Slush-Ease
TM
MAX
64 oz. Slushy
Maker
RJ62-20A-SERIES
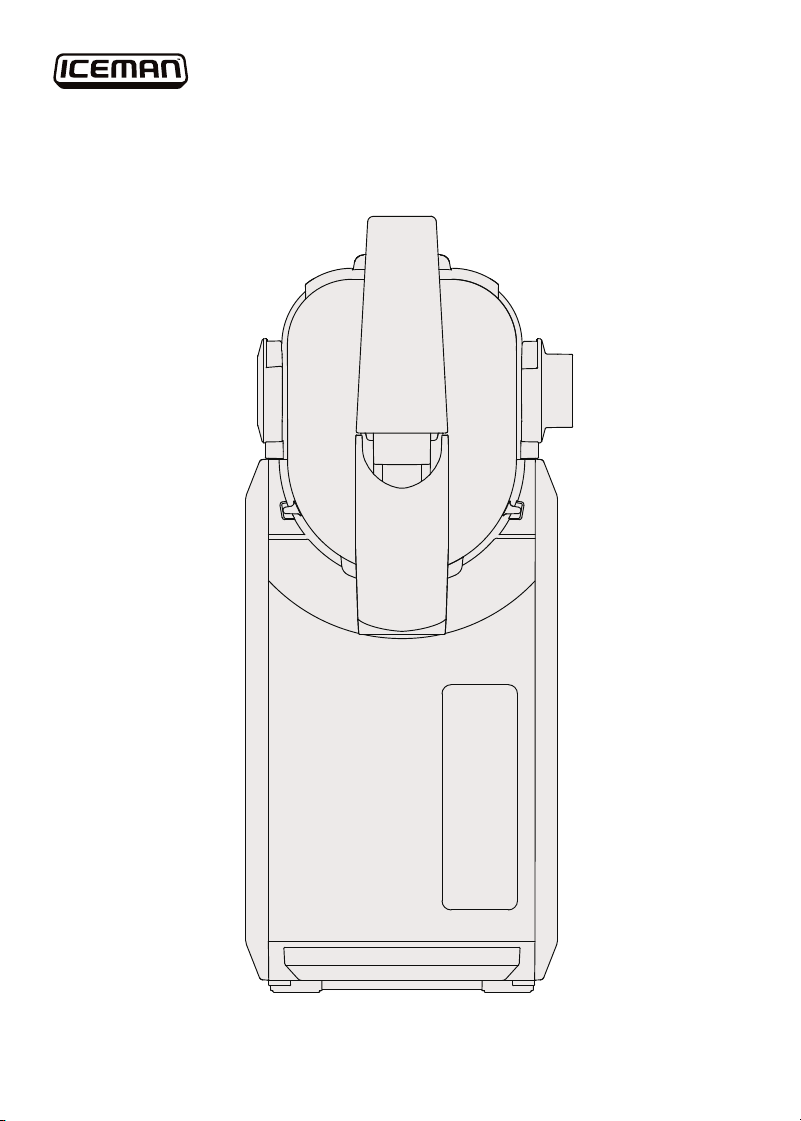
COVER DRAWING
2
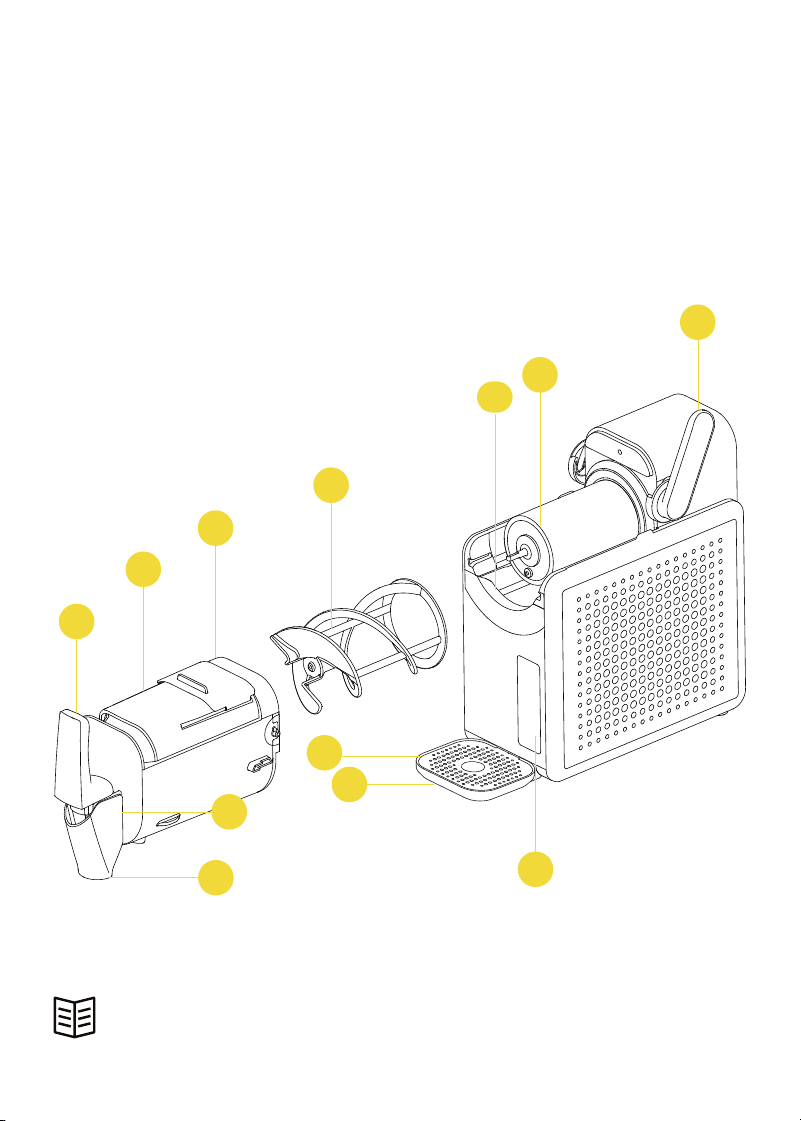
FEATURES DRAWING
Get to Know Your Slushy Maker
1. Dispenser handle
2. Tank with MIN (16 oz) and
MAX (64 oz) markings*
3. Fill hatch
4. Auger
5. Tank drip tray
6. Cooling cylinder
7. Tank locking lever
8. Control panel
9. Cup drip tray
10. Coaster
11. Dispenser nozzle
12. Removable nozzle cover
READ ALL INSTRUCTIONS BEFORE USE
For your safety and continued enjoyment of this product,
always read the instruction manual before using.
* The unit requires a minimum of 16 fl oz (2 cups) of slushy mixture
and a maximum of 64 fl oz (8 cups).
11
12
9
10
8
2
1
3
4
7
6
5
3
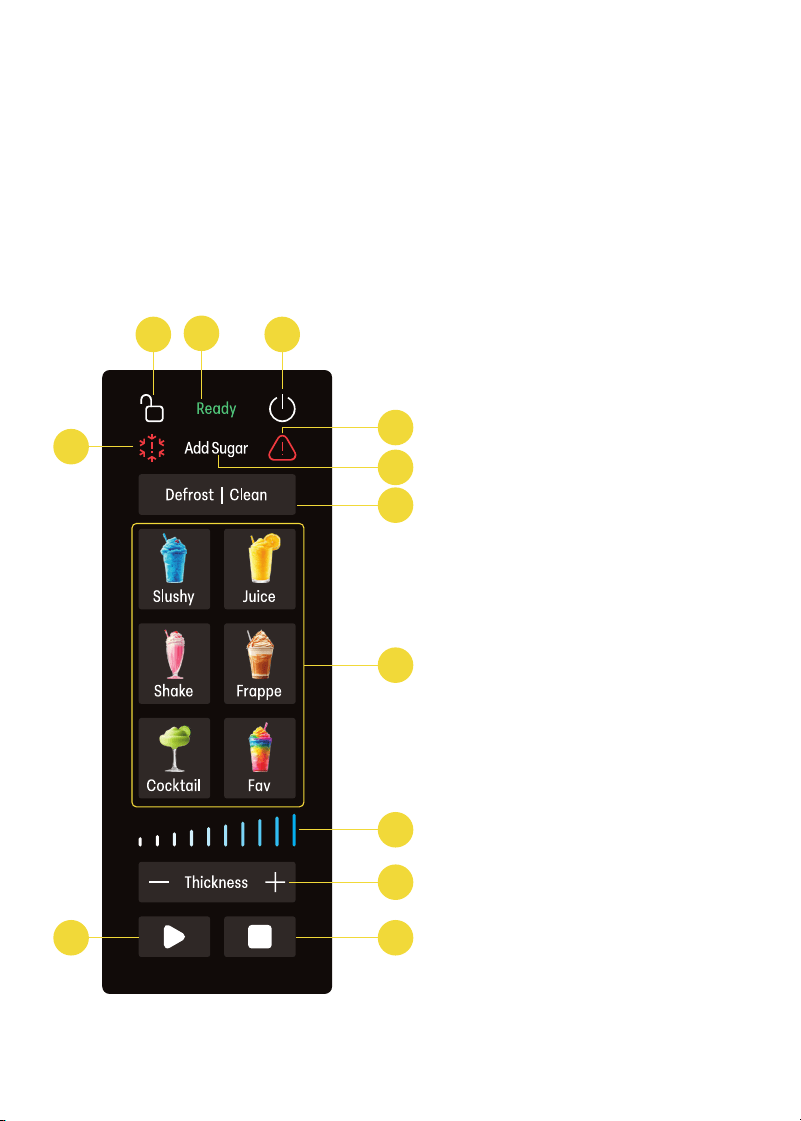
Control Panel
1. Unlocked tank warning light
2. Ready light
3. Power button
4. Overfreeze error light
5. Error light
6. Add Sugar warning light
7. Defrost | Clean button
8. Slushy preset buttons
9. Thickness indicator lights
10. Thickness control buttons *
11. Start button
12. Stop button
5
6
1211
10
9
8
4
7
1
2
3
* Press and hold both + and - for 3 seconds when in Standby mode to
mute the unit's beeps. Press and hold again to turn the sound back on.

44
SAFETY INSTRUCTIONS &
IMPORTANT SAFEGUARDS
When using electrical appliances, basic safety precautions should always
be followed, including:
1. Read all instructions.
2. Remove all bags and packaging from appliance before use.
3. Never leave appliance unattended when in use.
4. Make sure the appliance is cleaned thoroughly before using.
5. DO NOT use appliance for other than its intended use. For household
use only. Do not use outdoors.
6. To prevent electric shock, do not submerge the cord, plugs, motor unit,
or any electrical parts in water or other liquids.
7. DO NOT operate this appliance with a damaged cord, damaged plug,
after the appliance malfunctions, is dropped, or damaged in any
manner. Contact Customer Support for replacement, examination,
or repair.
8. DO NOT place appliance on or near a hot gas burner, hot electric burner,
or in a heated oven.
9. Refrain from using attachments that are not recommended by Iceman,
as this may result in fire, electric shock, or personal injury.
10. DO NOT let the cord touch hot surfaces, or hang over the edges of tables
or counters.
11. This appliance is not intended for use by persons (including children) with
reduced physical, sensory or mental capabilities, or lack of experience
and knowledge, unless they have been given supervision or instruction
concerning use of the appliance by a person responsible for their safety.
12. Children should be supervised to ensure that they do not play with
the appliance.
13. Avoid contact with moving parts.
14. Always be sure to unplug the appliance from the outlet prior to moving,
cleaning, storage, and when not in use.
15. Always place the unit on a firm and stable surface prior to use.

55
SAFETY INSTRUCTIONS &
IMPORTANT SAFEGUARDS
16. Improper use of the appliance can result in property damage or even
in personal injury.
17. Never use abrasive cleaning agents when cleaning this unit.
18. Unit should remain upright at all times. If unit is turned on its side or
upside down, you will need to put it in upright position and wait 2 hours
before using.
19. WARNING: Keep ventilation openings, in the appliance enclosure or in the
built-in structure, clear of obstruction. When using appliance, make sure
both sides and back of it are at least four inches away from walls.
20. WARNING: DO NOT use mechanical devices or other means to accelerate
the defrosting process, other than those recommended by the
manufacturer.
21. WARNING: DO NOT damage the refrigerant circuit. This warning is only
applicable to appliances with refrigerating circuits which are ACCESSIBLE
to the user.
22. When positioning the appliance, ensure the supply cord is not trapped
or damaged.
23. DO NOT locate multiple portable socket-outlets or portable power supplies
at the rear of the appliance.
24. DANGER: Risk of child entrapment. Before you throw away your old
refrigerator or freezer:
Take off the doors
Leave the shelves in place so that children may not easily climb inside.
SAVE THESE INSTRUCTIONS
FOR HOUSEHOLD USE ONLY

6
California Proposition 65:
(Applicable for California Residents only)
WARNING: Cancer and Reproductive Harm
www.P65Warnings.ca.gov
Do not place the appliance on a
stovetop or any other heatable surface,
even if stovetop is not on.
Doing so is a fire hazard.
SAFETY INSTRUCTIONS &
IMPORTANT SAFEGUARDS
WARNING: Improper use of the grounding plug can result in electric shock.
GROUNDING INSTRUCTIONS
This appliance must be grounded. In the event of an electrical short circuit,
grounding reduces the risk of electric shock by providing an escape wire for the
electric current. To protect against electrical shock, this appliance is equipped
with a cord having a 3-prong grounding-type plug for insertion into a proper
grounding-type electrical outlet.
DO NOT alter the plug for use in a 2-prong outlet. If the plug will not fit into an
outlet, have a proper outlet installed by a qualified electrician.
Short Cord Instructions
A short power-supply cord is provided to reduce the hazards of entanglement
or tripping over a longer cord. Longer detachable power-supply cords or
extension cords are available and may be used if care is exercised in their
use. If a longer detachable power-supply extension cord is used:
1. The marked electrical rating of the extension cord should be at least
as great as the electrical rating of the appliance;
2. If the appliance is of the grounded type, the extension cord should
be a grounding-type 3-wire cord; and
3. The longer cord should be arranged so that it will not drape over
the countertop or tabletop where it can be pulled on by children or
tripped over.

7
SAFETY INSTRUCTIONS &
IMPORTANT SAFEGUARDS
Power Cord Safety Tips
1. Never pull or yank on the cord or the appliance.
2. To insert the plug, grasp it firmly and guide it into the outlet.
3. To disconnect the appliance, grasp the plug and remove it from the outlet.
4. Never use the product if the power cord shows signs of abrasion or
excessive wear. Contact Customer Support for additional guidance
and support.
5. Never wrap the cord tightly around the appliance, as this could place
undue stress on the cord where it enters the appliance and cause it to
fray and break.
DO NOT OPERATE THE APPLIANCE IF THE POWER CORD SHOWS ANY DAMAGE
OR IF THE APPLIANCE WORKS INTERMITTENTLY OR STOPS WORKING ENTIRELY.
Warning: Risk of fire/
flammable materials

8
Before First Use
1. Remove all packaging materials and check to ensure that all parts and
accessories are accounted for. Read and remove all stickers, except for
the rating label, which should remain on the unit.
2. Set unit upright on a flat surface. Let it stand for at least 2 hours before
using, to allow the refrigerant to settle.
3. Remove and hand wash the tank, auger, tank drip tray, cup drip tray and
coaster. Holding the dispenser nozzle cover at the bottom, pull it out and
away from the unit and hand wash it.
4. Wipe down the unit housing with a soft, damp cloth. Do not immerse the
unit in water or other liquids. Never use abrasive cleaning agents, which
can damage the finish.
9
Quick Start: How to Make a Slushy
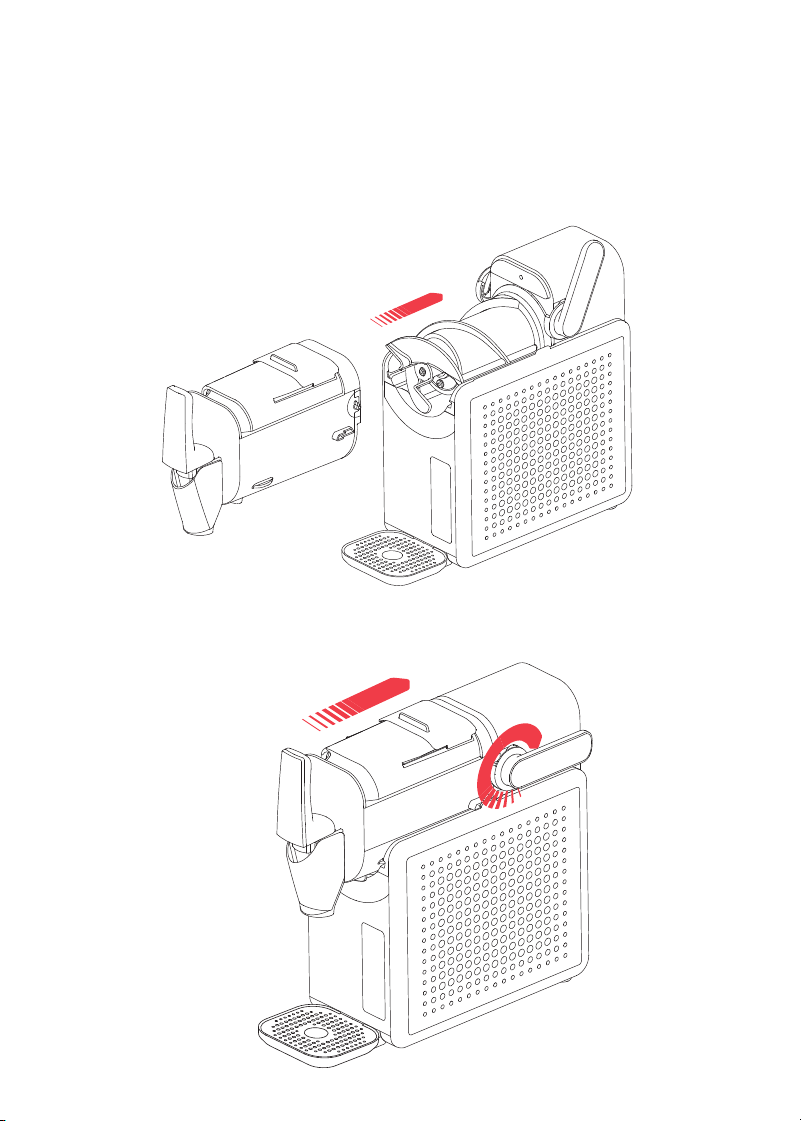
1. Keep the unit in an upright position for at least 2 hours before starting.
Ensure the tank drip tray is pushed all the way in. Slide the auger onto the
cooling cylinder, rotating the auger until it fully seats itself on the pin of the
cooling cylinder (the metal point of the cylinder will be flush with the front
of the auger).
CONTROL PANEL
STEP 1
2. Slide the tank on over the auger, pushing it all the way in. Lock it in place
with the tank locking lever.
10
Quick Start: How to Make a Slushy
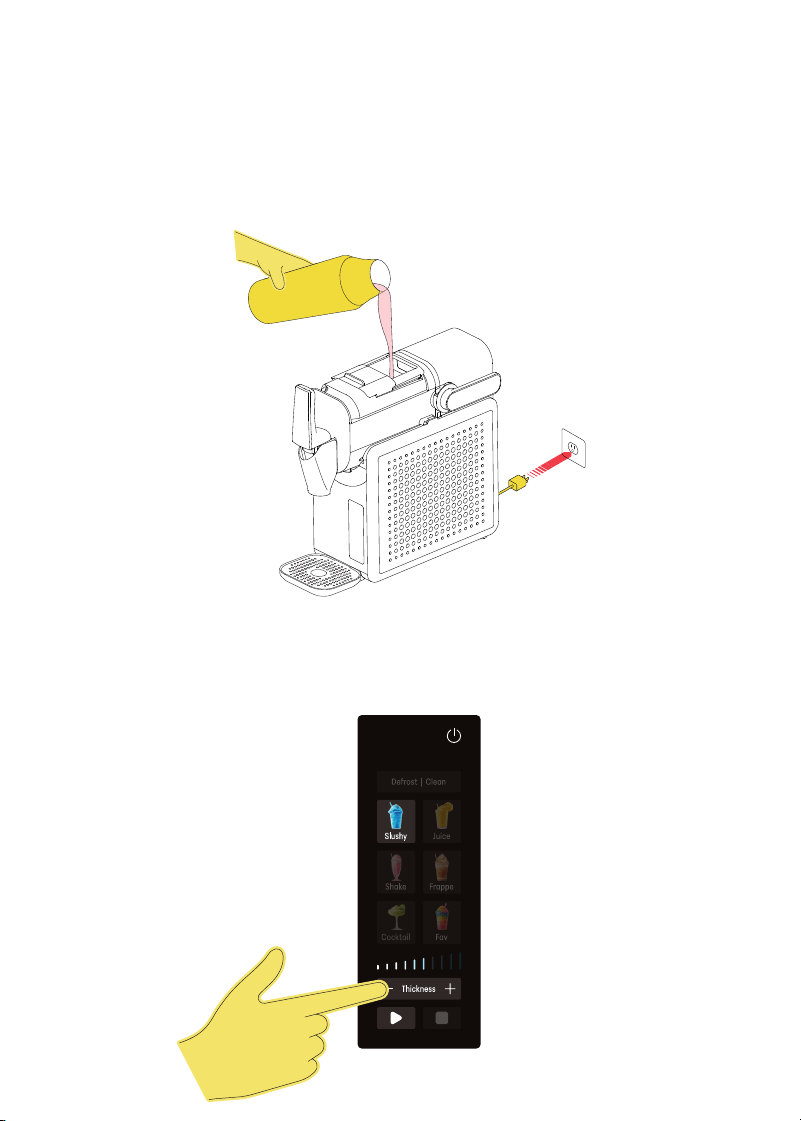
3. Plug in the unit and press the Power button. NOTE: the unlocked tank icon
will display and the unit will beep if the tank is not locked into place. Open
the tank fill hatch and pour your slushy mixture into the tank. Make sure
the mixture is between the MIN and MAX markings on the tank. Be sure
slushy mixture is cool or room temperature. For the fastest processing,
prechill the ingredients. CAUTION: Do NOT fill the tank with only water,
which can damage the machine.
STEP 3
4. Use the preset selection buttons to choose your slushy type. The preset
will automatically choose the typical thickness, although you can
modify it with the Thickness +/- buttons. (See chart on p. 12 for our
recommendations of the best thicknesses for popular drinks).
11
Quick Start: How to Make a Slushy
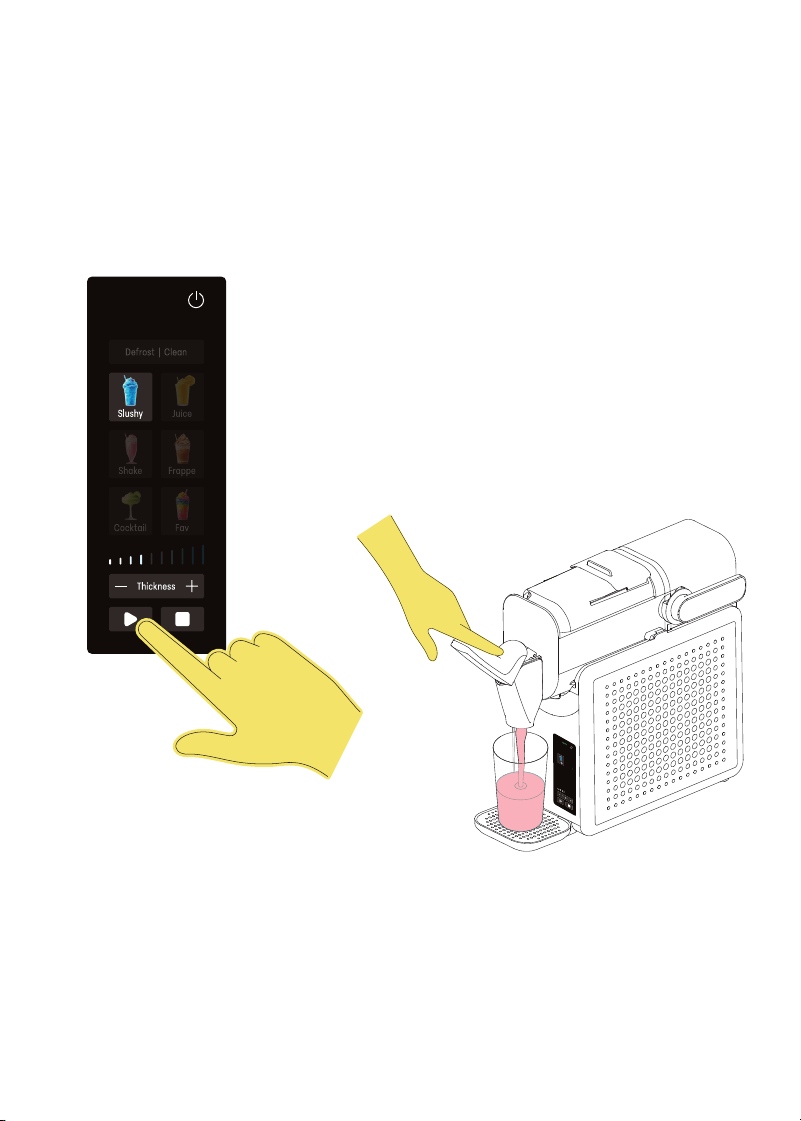
5. Press Start. The unit will begin
chilling and mixing the slushy
mixture. The chilling time
depends on your chosen preset,
as well as the volume and
temperature of your ingredients,
but usually ranges between 30
and 40 minutes.
6. When the slushy is ready, the
unit will beep, and the Ready
light will illuminate. Place a cup
under the nozzle and gently pull
down the dispenser to serve
the slushy. The unit will hold the
slushy at the final temperature
for up to 12 hours, while the auger
rotates to keep it well mixed.
You can continue to dispense
slushies throughout this holding
period, but if you use the Shake
or Frappe preset, it's best to
dispense right away because the
mixture will get foamy if it holds
too long in the tank. DO NOT turn
off the unit until all of the slushy is
dispensed.
STEP 4
NOTE: The slushy will be at its thickest immediately after it’s ready. If
the slushy is so thick that it won’t come out, you can simply wait a few
minutes, or for faster thinning, press the Defrost button and let it run for a
few minutes. When the slushy reaches your desired thickness, press the
original preset button and reduce thickness by one or two notches on the
display, then press Start.
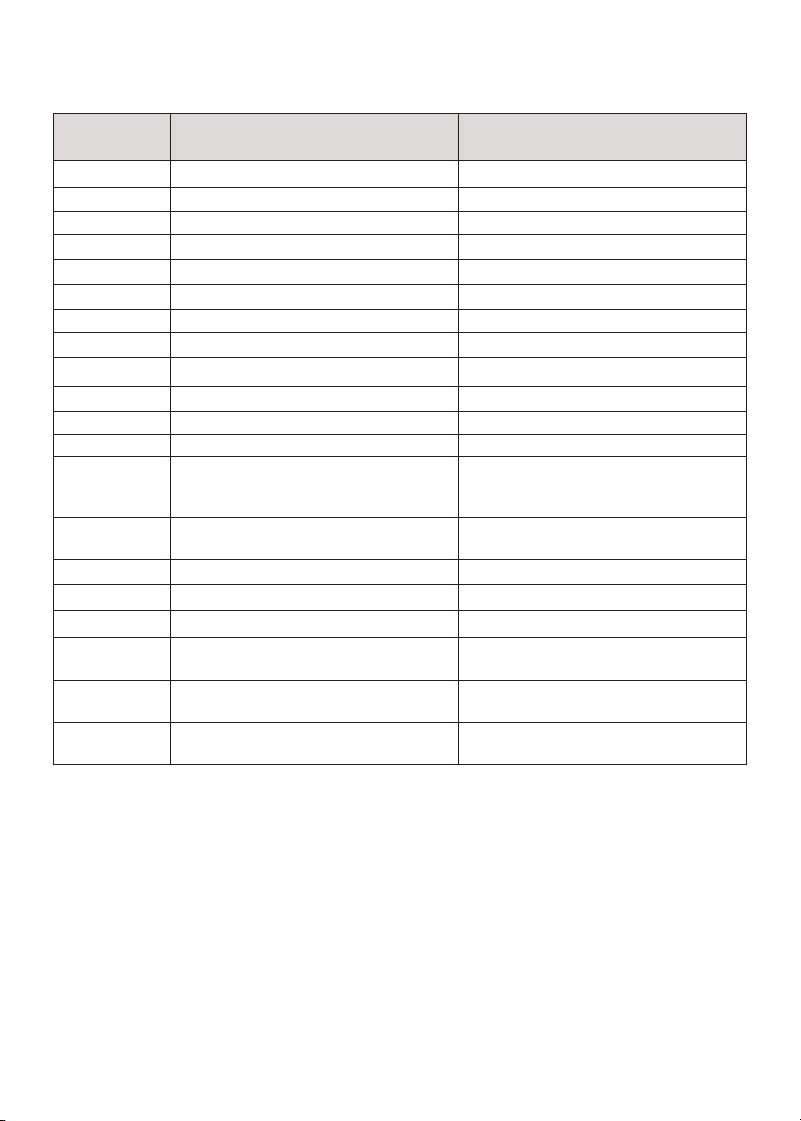
1212
Slushy Presets Guide
Preset Ingredients* Suggested Thickness
Slushy Soft drinks, such as Coke Adjust to 3 bars.
Slushy Limeade, Lemonade Adjust to 4 bars.
Slushy Sweetened iced tea Adjust to 2 bars.
Slushy Kombucha (non-alcoholic) Adjust to 1 bar.
Slushy Energy drink, such as Red Bull Adjust to 2 bars.
Juice Sports Drink, such as Gatorade Adjust to 1 bar.
Juice Orange juice Adjust to 4 bars.
Juice Apple cider or juice Adjust to 8 bars.
Juice Pineapple juice Adjust to 8 bars.
Juice Watermelon juice Adjust to 1 bar.
Juice Cranberry juice Adjust to 7 bars.
Shake Bottled smoothies Adjust thickness to 7 bars.
Shake Bottled protein shake
Adjust thickness to 5 bars. Note: If it is
artificially sweetened, add sugar or
allulose syrup (see p. 13).
Frappe Bottled coffee-and-milk drink, such as
Starbucks Latte.
Adjust to 5 bars.
Cocktail Hard seltzer Adjust to 1 bar.
Cocktail Beer (IPA - 7% alcohol)** Adjust to 2 bars.
Cocktail Wine (rose or white) Adjust to 6 bars.
Cocktail 32 oz Margarita mixer + 10 oz tequila +
18 oz water
Adjust to 5 bars.
Cocktail 24 oz Piña Colada mixer + 10 oz rum +
30 oz water
Adjust to 5 bars.
Cocktail 16 oz Strawberry Daiquiri mixer + 10 oz
rum + 30 oz water
Adjust to 5 bars.
* The unit requires a minimum of 16 fl oz (2 cups) of slushy mixture and a maximum of 64 fl oz
(8 cups).
** Thickness will vary by the beer's ABV; adjust the bars accordingly. Avoid beers with extremely
low ABV (below 2.8%) AND low sugar, which can cause overfreeze.
How to Save a Favorite
You can save a frequently-used setting in order to program your unit with one
touch. To program a favorite, set the unit to your favorite parameters (preset
plus specific thickness), then press and hold the Fav button for 3 seconds.
To use the favorite, simply press the Fav button, then Start. To replace the
favorite with a new one, set the unit with the new parameters, then press and
hold Fav again for 3 seconds; the new favorite will be saved over the old one.

13
Slushy Science:
Getting the Perfect Thickness
Three factors affect the thickness of your slushy: temperature, sugar content,
and alcohol content (for alcoholic slushies). Though presets have a set thickness,
you can manually adjust it, which lets you experiment with ingredients.
Temperature
The slushy maker's target temperature is represented on the control panel
by thickness bars. The more bars, the lower the temperature and the thicker
the slushy. Slushies are at their thickest immediately after the cycle ends, so
if a batch is too thick, let it run on Defrost for a few minutes, then return to the
preset but adjust the thickness down by a notch or two. If it’s too thin, increase
the thickness and run the cycle again. If these adjustments don’t give you the
thickness you want, the next step is to play with your ingredients...
Sugar Content
Sugar is essential for making your mixture freeze into a slushy rather than a
block of solid ice. Since freezing mutes flavors, sugar is is also a good way to
make the flavor pop, even if the thickness is fine. Your mixture must be at least
4% sugar to successfully slush. For bottled ingredients, the “Total Sugars” listed
on the nutrition label should be 1 g of sugar for every 1 oz of serving size. Allulose
syrup can also be used, but it is the ONLY sugar substitute that works. Diet sodas
and unsweetened drinks will ALWAYS need sugar or allulose added. Slushies with
allulose generally need a slightly lower thickness than those with sugar.
Add Sugar Warning: If the unit detects that the mixture is freezing too quickly, the
Add Sugar warning light will illuminate and the unit will beep every 10 seconds.
To correct it, dispense all of the mixture into a bowl, whisk in granulated sugar
(make sure it's fully dissolved), simple syrup, agave nectar, honey, maple syrup,
a sweetened beverage, or allulose syrup. Then return the mixture to the tank and
restart the unit on the chosen preset.
If the cycle continues running with no sugar added, the Overfreeze error light will
illuminate and the unit will automatically go into Defrost mode. After 10 minutes,
you'll be able to restart the freeze cycle with your original preset, but be sure to
add some form of sugar (see above) before restarting.

14
Slushy Science: Getting the Perfect Thickness
Sweetener Guidelines
Use this chart to determine how much sugar or allulose needs to be in your
slushy mixture per serving.
Serving Size Minimum Total Sugar
OR Minimum Added
Allulose Syrup
8 oz 8 g ½ Tbsp
12 oz 11 g 1 Tbsp
20 oz 18 g 1 ½ Tbsp
Alcohol Content
Alcohol inhibits freezing, which means if your mixture has too much alcohol—
more than 16%—the slushy will be too thin or won't freeze at all. Beers, hard
seltzers, most wines, and cocktails made following the instructions of bottled
mixes are all under this limit. Fortified wines (such as port) and very strong
cocktails are not. To adjust the alcohol content, dilute the mixture with any
non-alcoholic liquid: water, juice, cocktail mixer, soda, seltzer, etc.
Hard Alcohol/Spirit Guidelines
Use this chart to determine how much hard alcohol (rum, vodka, etc.) to add
for frozen cocktails. The rest of the recipe should be made up of non-alcoholic
liquids. Wine can be used in larger proportions, while beer and hard seltzer can
be used on their own (refer to page 12 for examples).
Total Recipe Volume Maximum Hard Alcohol Volume
3 cups ½ cup
4 ½ cups ¾ cup
6 cups 1 ¼ cups

15
Keep It Clean
The automatic cleaning cycle makes it easy to keep your unit in top condition.
Perform this cleaning cycle after each use of the slushy maker:
1. Dispense any remaining slushy from the tank.
2. Add a few drops of dishwashing liquid to the tank, then add water up to
the MAX fill line.
3. On the control panel, select Clean, then press START.
4. The auger will swish soapy water around the tank. When the cycle is
finished, the unit will beep and the Ready light will illuminate.
5. Dispense all of the soapy water into a 2-quart (or larger) container
and discard.
6. Unlock and remove the tank. Wipe down the cylinder with a warm
damp cloth.
7. Rinse the tank and auger thoroughly, then dry with a soft cloth.
8. To remove the dispensing nozzle cover, grasp it at the bottom and pull it
up and away from the nozzle.
9. Wash the tank drip tray, cup drip tray, dispensing nozzle cover, and
coaster with mild soap, then rinse and dry thoroughly.
10. While the dispensing nozzle's cover is still off, wipe down the nozzle with a
damp paper towel.
11. All removable parts are also top-rack dishwasher safe. If washing the tank
in the dishwasher, be sure to use a setting without a heated dry cycle.
12. Be sure the parts are completely dry before reassembling for storage.
16
Slushy Inspiration
As the presets suggest, you can make a fantastic slushy with just one ingredient:
beer, wine, soft drinks, fruit juice, etc. But you can have even more fun by creating
your own custom mixes to slush-ify. (Take a look at Slushy Science on p. 13
for tips on getting the right temperature and proportions, and advice about
what to adjust if it’s not quite perfect the first time.) Here are a few tasty ideas
to get you started:
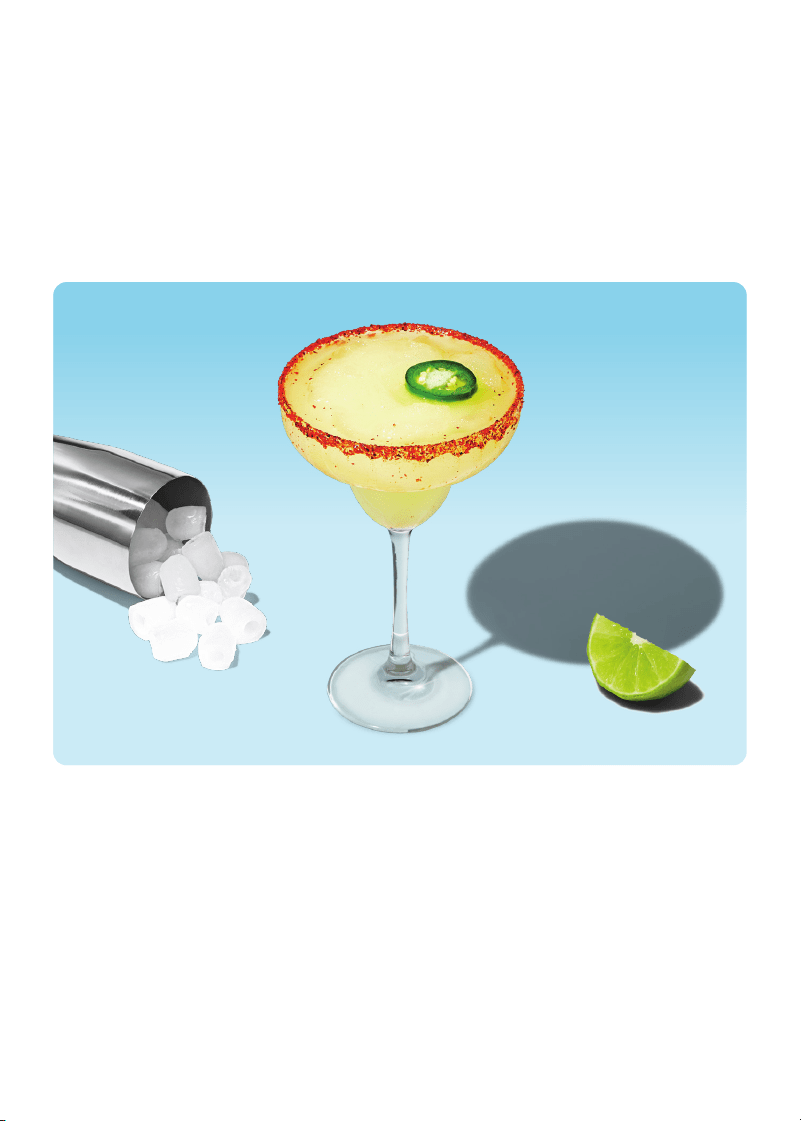
Margarita
In a large measuring cup or pitcher, combine 4 cups limeade, 1½ cups tequila,
1 cup water, 2/3 cup orange juice, 2/3 cup simple syrup, and ¼ cup fresh lime
juice. Add to the slushy maker tank. Process on the Cocktail setting, adjusting
the thickness to 5 bars. Dispense into a margarita glass with a salted rim, and
garnish with a slice of lime.
Variation: For a spicy margarita, use a jalapeno-infused simple syrup, serve
in a glass rimmed with tajin (chili-salt) and garnish with a slice of jalapeño.
17
Slushy Inspiration
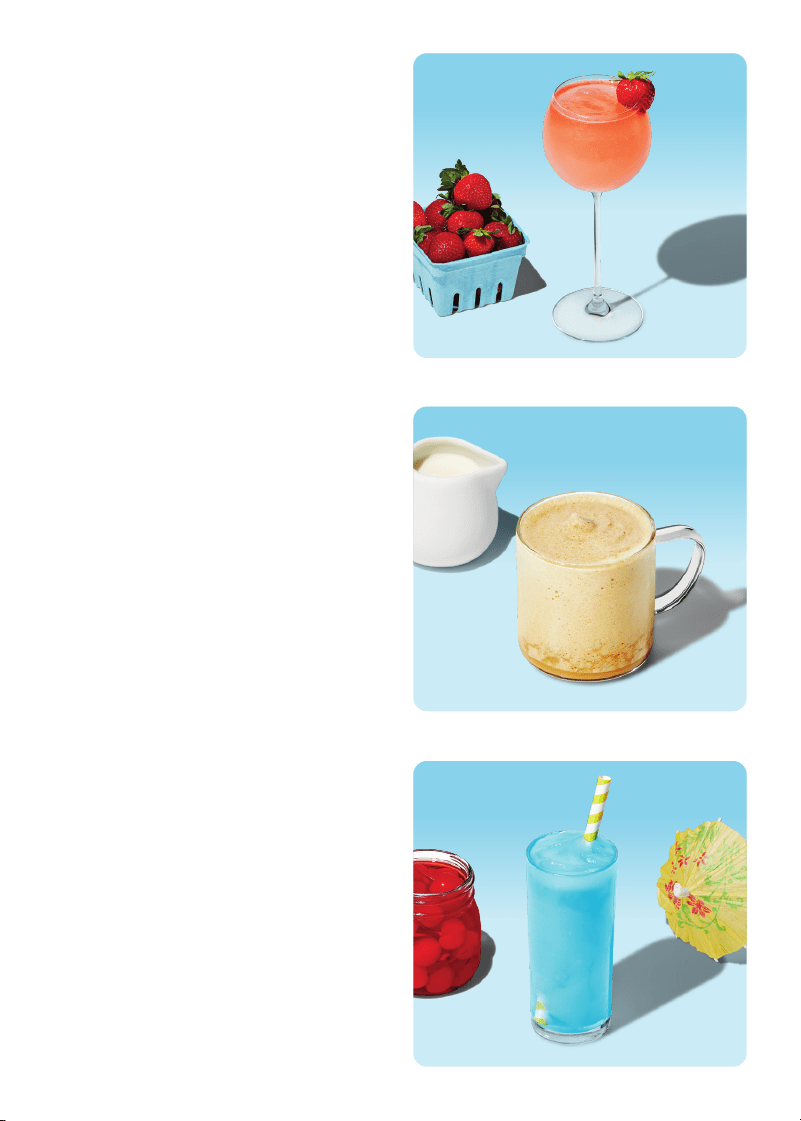
Strawberry Frosé
In a large measuring cup, combine
5 cups rosé wine, 1½ cups water, 1 cup
strawberry purée and the juice from
1 lime (about 2 Tbsp). Stir until well
mixed, then add to the slushy maker
tank. Process on the Cocktail preset
with thickness adjusted to 5 bars.
Serve in a wine glass, garnished with
a strawberry.
Frozen Latte
In a large measuring cup, combine
4 ½ cups cold-brew coffee, 2½ cups
whole milk, 1 cup heavy cream and
2/3 cup sugar. (For a stronger coffee
flavor, reduce the amount of cream
and add more cold brew). Stir until
well mixed, then add to the slushy
maker tank. Process on the Frappe
setting at 5 bars thickness. Dispense
into a glass and garnish with
whipped cream, if desired.
Blue Raspberry Lemonade Slushy
In a large measuring cup or pitcher,
combine 1 64-oz bottle of lemonade
and 1 packet unsweetened Kool-Aid
Blue Raspberry Lemonade. Stir until
well mixed, then add to the slushy
maker tank. Process on the Slushy
setting with thickness adjusted to
1 bar. Dispense into a tall glass and
garnish with a cherry.
18
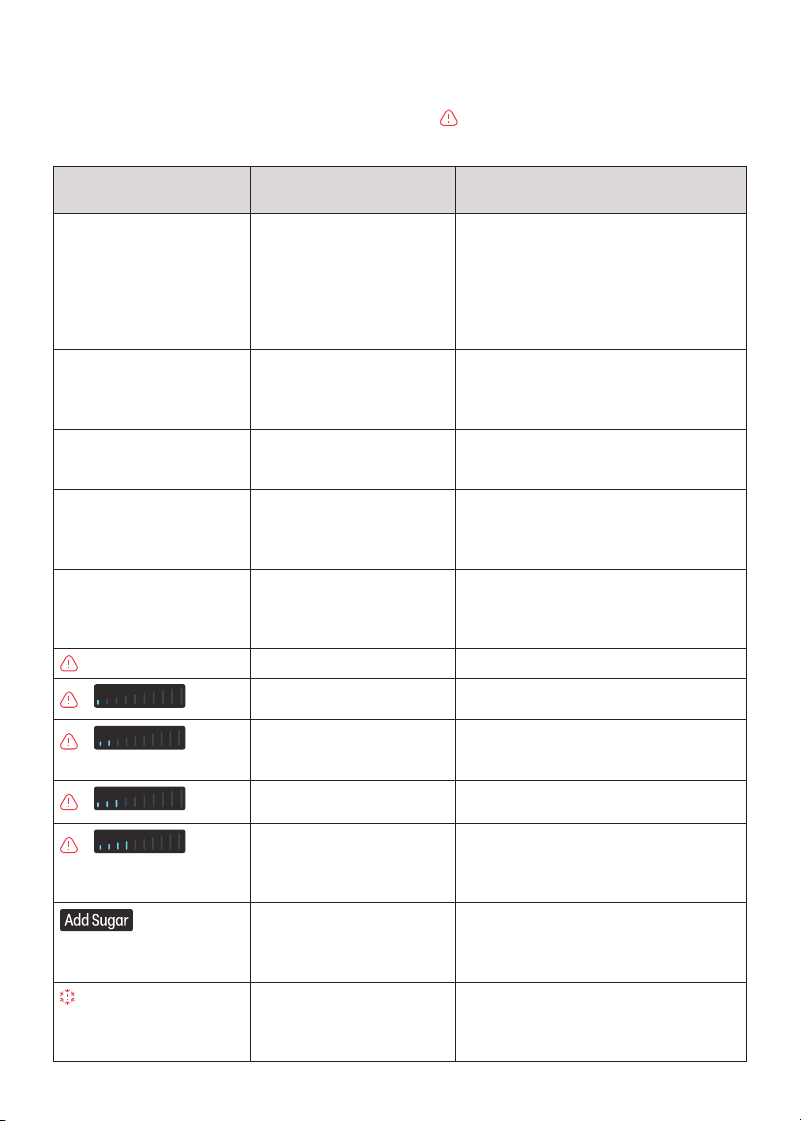
Having Trouble?
NOTE: Several problems are indicated by the Error light and a certain number
of thickness bars.
Problem Potential Cause Solution
Slushy is too thin. Slushy is too warm or
contains too much alcohol,
fat, or sugar.
Increase the thickness by one or two
notches and continue to run for 10 to
20 minutes. If the mixture contains
alcohol, it may need to be diluted with
nonalcoholic ingredients. If it does not
contain alcohol, add a little water or
another low-fat/low-sugar ingredient.
Slushy is too thick or not
dispensing well.
Slushy is too cold. Run the Defrost function for a few
minutes until slushy thins, then return to
the preset and lower the thickness by a
notch or two.
Slushy tank overflows
when using dairy
ingredients or beer.
These beverages produce
foam during mixing, which
can add to overall volume.
When using these ingredients, fill the
tank to no more than 48 oz. (6 cups) the
first time you try a recipe.
Unlocked tank warning
displays and unit is
beeping, even though the
tank is locked in place.
A damaged tank is
preventing the unit from
recognizing that the tank
is installed.
Contact Customer Support.
Auger scrapes the inside
of the tank or flings liquid
onto the sides.
Auger could need cleaning
or be deformed.
Remove, clean and re-install auger.
If the auger is dented, warped, or
chipped, contact Customer Support for
a replacement auger.
Temperature sensor error. Contact Customer Support.
+
Warm or hot liquid added
to the tank.
Empty tank. Be sure to only add cool or
room-temperature liquid to the tank.
+
Compressor is damaged
or other problem with
refrigeration.
Contact Customer Support.
+
Motor is damaged. Contact Customer Support.
+
1. Tank is empty or below
the minimum fill level.
2. Alcohol content is
too high.
1. Be sure the slushy mixture comes at
least to the MIN (16 oz) marking.
2. Be sure to use no more than 16%
alcohol in your slushy mixture.
The unit has detected low
sugar content, which can
cause overfreeze if not
corrected.
Add sugar to bring the ratio up to at
least 4% sugar. See p. 13 for more details.
(overfreeze warning)
Temperature has dropped
too low due to uncorrected
low sugar content.
Unit will automatically switch to defrost
mode. After 10 minutes you can restart
your original preset, but be sure to add
sugar to the mixture first (see p. 13).
19
Notes

20
Terms & Conditions
Limited Warranty
RJ Brands, LLC d/b/a Iceman
TM
offers a limited 1-year Warranty (the “Warranty”)
available on sales through authorized distributors and retailers only. Please
note that this Warranty becomes valid from the date of initial retail purchase
and that the Warranty is nontransferable and applies only to the
original purchaser.
This Warranty is void without proof of purchase within the United States and
Canada. Please be aware that this Warranty supersedes all other warranties
and constitutes the entire agreement between the consumer and Iceman
TM
.
Any changes to the Terms and Conditions of this Warranty must be in writing,
signed by a representative of Iceman
TM
. No other party has the right or ability to
alter or change the Terms and Conditions of this Warranty.
We may ask you to please submit, via email, photos and/or video of the issue
you are experiencing. This is to help us better assess the matter and possibly
offer a quick fix. Photos and/or video may also be required to determine
Warranty eligibility.
We encourage you to register your product. Registering can make the
Warranty process easier and can keep you informed of any updates or recalls
on your product. To register, follow the directions on the Iceman
TM
Warranty
Registration page in the Iceman
TM
User Guide. Please retain your proof of
purchase even after registering. In the event that you do not have proof of
your purchase date, we may declare your Warranty void or we may, at our
sole discretion, apply the date of manufacture as the purchase date for
purposes of this Warranty.

21
Terms & Conditions
What the Warranty Covers
• Manufacturer Defects
Iceman
TM
products are warranted against defects in material and
workmanship, under normal household use, for a period of 1 year from the
date of purchase when used in accordance with the directions listed in
the Iceman
TM
User Guide. If your product does not work as it should, please
contact Customer Support at Chillwithiceman.com so that we may
assist you.
This Warranty Does Not Cover
• Misuse
Damage that occurs from neglectful or improper use of products, including,
but not limited to, damage that occurs as a result of usage with incompatible
voltage, regardless of whether the product was used with a converter or
adapter. See Safety Instructions in the Iceman
TM
User Guide for information on
proper use of product;
• Poor Maintenance
General lack of proper care. We encourage you to take care of your Iceman
TM
products so that you may continue to enjoy them. Please see Keep It Clean
directions in this Iceman
TM
User Guide for information on proper maintenance;
• Commercial Use
Damage that occurs from commercial use;
• Normal Wear and Tear
Damage or degradation expected to occur due to normal use over time;
• Altered Products
Damage that occurs from alterations or modifications by any entity
other than Iceman
TM
such as the removal of the rating label affixed to
the product;
• Catastrophic Events
Damage that occurs from fire, floods, or natural disasters; or
• Loss of Interest
Claims of loss of interest or enjoyment.

22
Terms & Conditions
For product information, please visit us at Chillwithiceman.com.
EXCEPT WHERE SUCH LIABILITY IS REQUIRED BY LAW, THIS WARRANTY DOES NOT
COVER, AND ICEMAN
TM
SHALL NOT BE LIABLE FOR, INCIDENTAL, INDIRECT, SPECIAL,
OR CONSEQUENTIAL DAMAGES, INCLUDING WITHOUT LIMITATION, DAMAGE TO, OR
LOSS OF USE OF THE PRODUCT, OR LOST SALES OR PROFITS OR DELAY OR FAILURE TO
PERFORM THIS WARRANTY OBLIGATION. THE REMEDIES PROVIDED HEREIN ARE THE
EXCLUSIVE REMEDIES UNDER THIS WARRANTY, WHETHER BASED ON CONTRACT,
TORT OR OTHERWISE.
Date Code:
0000
Access Code:
Xxxxxxxx
XXXXX
23
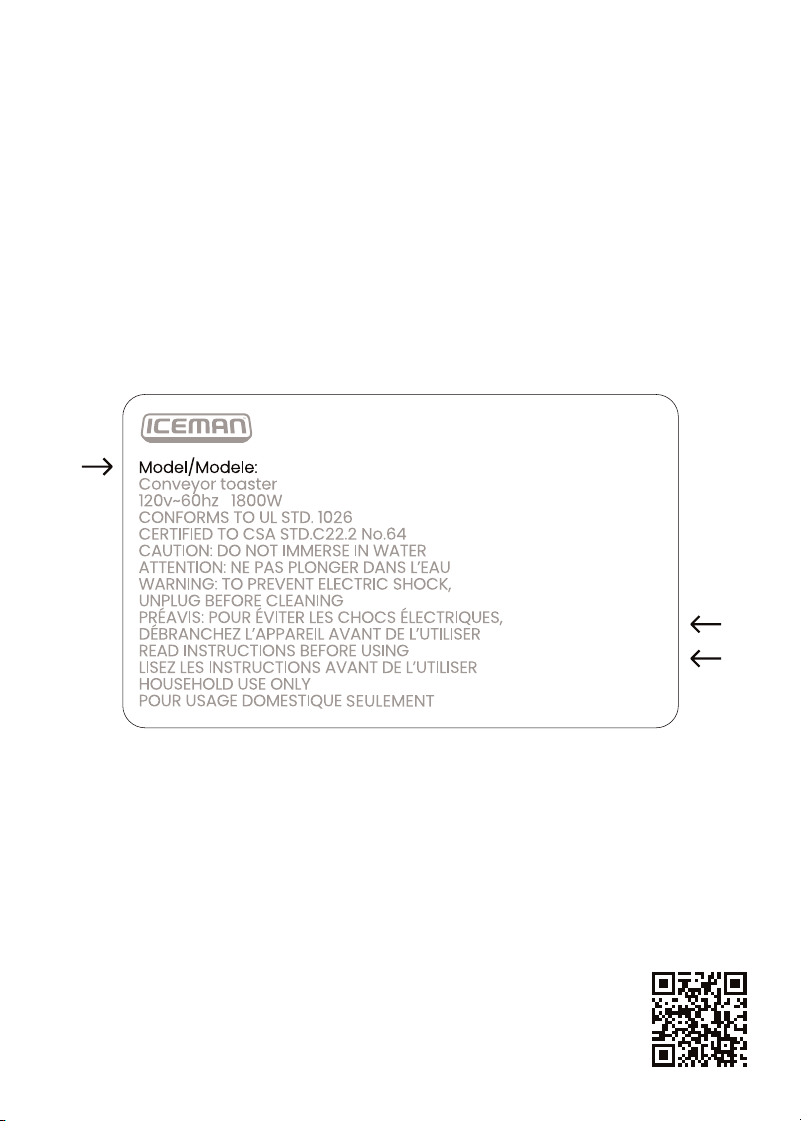
NOTE: Label depicted here is an example.
Please see label on your product for actual model/date code/access code.
NOTE: Label depicted here is an example.
Please see label on your product for actual model/date code/access code.
Warranty Registration
What do I need to register my product?
• Contact Information
• Model Number (see example below)
• Proof of Purchase (online confirmation, receipt, gift receipt)
• Date Code (see example below)
• Access Code (see example below)
How do I register my product?
All you need to do is fill out a simple Iceman
TM
registration form.
You can easily access the form in one of the two ways listed below:
• Visit Chillwithiceman.com.
• Scan the QR code to the right to access site.

RJ6220ASERIESUG061325
Slush-Ease
TM
MAX
64 oz. Slushy Maker
Iceman
TM
is a trademark of RJ Brands, LLC.
Slush-Ease
TM
is a trademark of RJ Brands, LLC.