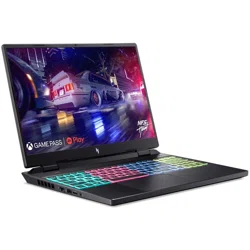
User Manual
Aspire 5 A514-54H


1
FCC Statement
This device complies with Part
15 of the FCC Rules. Operation
is subject to the following two
conditions:
1. This device may not cause
harmful interfer
ence.
2. This device must accept any
interference received, includ-
ing interference that may
cause undesired operation.
About this Concise User Guide
This quick guide is a brief introduction to getting your system started.
Some or all of the computer’s features may already have been setup. If they aren’t, or you are planning to re-configure
(or re-install) portions of the system, refer to the User’s Manual.
Trademarks
AMD is a trademark/registered trademark of AMD Corporation.
Windows is a registered trademark of Microsoft Corporation.
To Check the name of importer, registration certificate number and thickness of plastic
packaging under Plastic Waste Management Rules, 2016, scan the below QR Code:

2
Instructions for Care and Operation
The computer is quite rugged, but it can be damaged. To pre-
vent this, follow these suggestions:
• Don’t drop it, or expose it to shock. If the computer falls, the
case and the components could be damaged.
• Keep it dry, and don’t overheat it. Keep the computer and
power supply away from any kind of heating element. This is an
electrical appliance. If water or any other liquid gets into it, the
computer could be badly damaged.
• Avoid interferen
ce. Keep the computer away from high capacity
transformers, electric motors, and other strong magnetic fields.
These can hinder proper performance and damage your data.
• Follow the proper working procedures for the computer. Shut
the computer down properly and don’t forget to save your work.
Remember to periodically save your data as data may be lost.
Servicing
Do not attempt to service the computer yourself. Doing so may
violate your warranty and expose you and the computer to
electric shock. Refer all servicing to authorized service person-
nel. Unplug the computer from the power supply. Then refer
servicing to qualified service personnel under any of the fol-
lowing conditions:
• When the power cord or Tpec-C adapter is damaged or frayed.
• If the computer has been exposed to any liquids.
• If the computer does not work normally when you follow the
operating instructions.
• If the computer has been dropped or damaged (do not touch the
poisonous liquid if the panel breaks).
• If th
ere is an unusual odor, heat or smoke coming from your
com-puter.
Safety Information
• Only use an Type-C adapter approved for use with this computer.
• Use only the power cord and batteries indicated in this manual. Do not
dispose of batteries in a fire. They may explode. Check with local codes
for possible special disposal instructions.
• Do not continue to use a battery that has been dropped, or that appears
damaged (e.g. bent or twisted)
in any way. Even if the computer
continues to work with a da
maged battery in place, it may cause circuit
damage, which may possibly result in fire.
• Make sure that your computer is completely powered off before putting
it into a travel bag (or any such container).
• Before cleaning the computer, make sure it is disconnected from any
external power supplies, peripherals and cables.
• Use a soft clean cloth to clean the computer, but do not apply
cleaner directly to the computer. D
o not use volatile (petroleum
d
istillates) or abrasive cleaners on any part of the computer.
• Do not try to repair a battery pack. Refer any battery pack repair
or replacement to your service representative or qualified service
personnel.
• Avoid placing any other items in the carrying bag which may
rub against the top of the computer during transport. If any such
wear and tear develops contact your service center.
3
Polymer/Lithium-Ion Battery Precautions
Note the following information which is specific to Polymer/
Lithium-Ion batteries only, and where applicable, this over-
rides the general battery precaution information.
• Polymer/Lithium-Ion batteries may experience a slight expansion
or swelling, however this is part of the battery’s safety mechanism
and is not a cause for concern.
• Use proper handling procedures when using Polymer/Lithium-Ion
batteries. Do not use Polymer/Lithium-Ion batteries in high ambi-
ent temperature environments, and do not store unused batteries
for extended periods.
• If you are working in areas of low temperature use the AC/DC
adapter to power the computer.
Battery Disposal & Caution
The product that you have purchased contains a recharge-
able battery. The battery is recyclable. At the end of its use-
ful life, under various state and local laws, it may be illegal
to dispose of this battery into the municipal waste stream.
Check with your local solid waste officials for details in your
area for recycling options or proper disposal.
Danger of explosion if battery is incorrectly replaced. Re-
place only with the same or equivalent type recommended
by the manufacturer. Discard used battery according to the
manufacturer’s instructions.
RTC battery
Warning: "Do not ingest battery, Chemical Burn Hazard"
Keep new and used batteries away from children.
If the battery compartment does not close securely, stop
using the product and keep it away from children.
If you think batteries might have been swallowed or placed
inside any part of the body, seek immediate medical
attention.
To check the EPR Registration No. of Acer India Pvt.
Ltd. under Battery Waste Management Rules, 2022,
scan below:
4
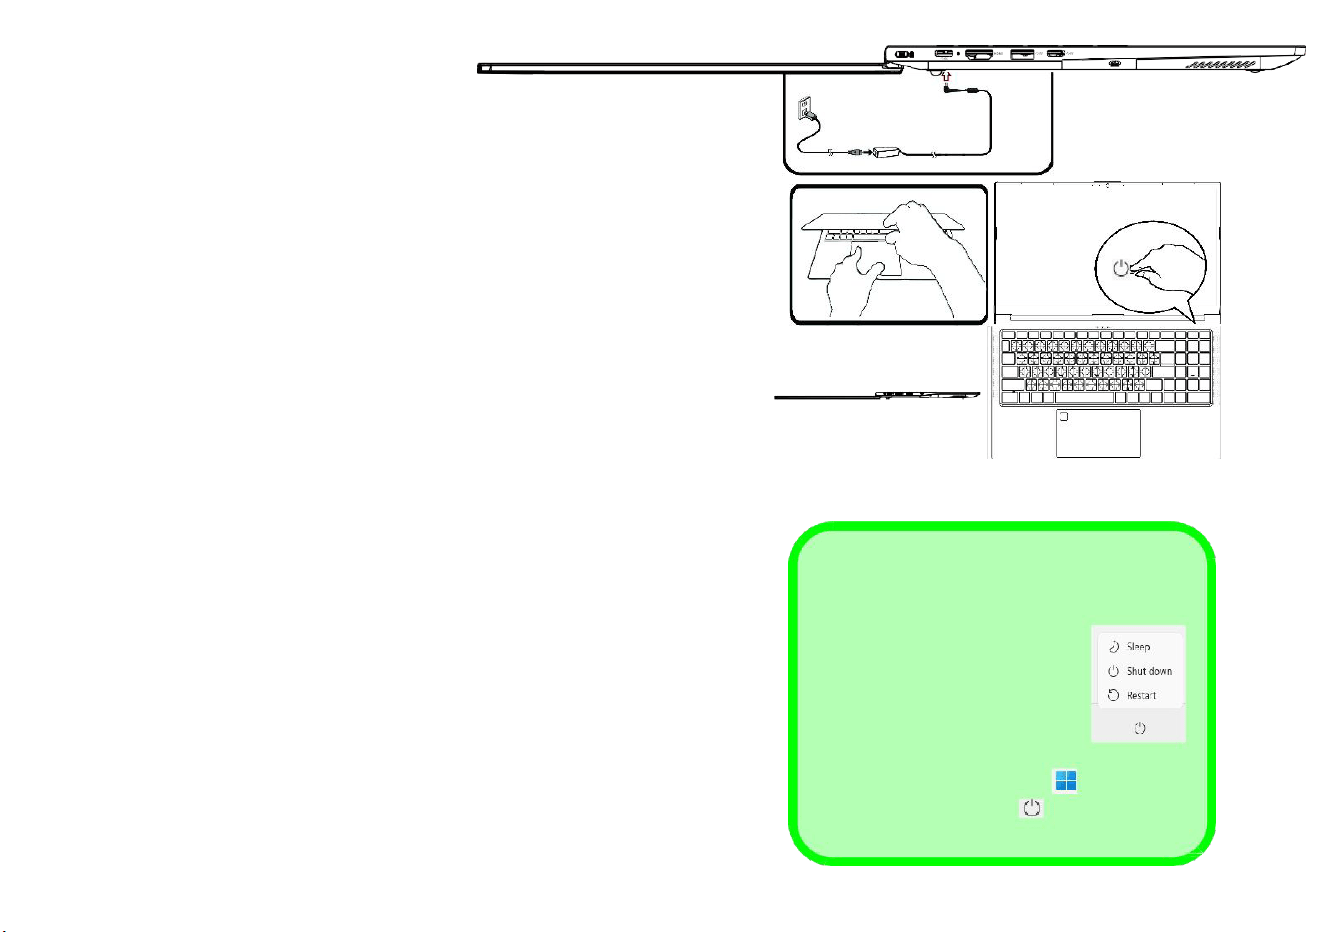
6\VWHP 6WDUWXS
5HPRYH DOO SDFNLQJ PDWHULDOV
3ODFH WKH FRPSXWHU RQ D VWDEOH VXUIDFH
6HFXUHO\ DWWDFK DQ\ SHULSKHUDOV \RX ZDQW WR XVH ZLWK WKH FRPSXWHU HJ
NH\ERDUG DQG PRXVH WR WKHLU SRUWV
:KHQ ILUVW VHWWLQJ XS WKH FRPSXWHU XVH WKH IROORZLQJ SURFHGXUH DV WR
VDIHJXDUG WKH FRPSXWHU GXULQJ VKLSSLQJ WKH EDWWHU\ ZLOO EH ORFNHG WR QRW SRZHU
WKH V\VWHP XQWLO ILUVW FRQQHFWHG WR WKH DGDSWHU DQG LQLWLDOO\ VHW XS DV EHORZ
$WWDFK WKH DGDSWHU FRUG WR WKH charging MDFN RQ WKH OHIW RI WKH FRPSXWHU
WKHQ SOXJ WKH $& SRZHU FRUG LQWR DQ RXWOHW DQG FRQQHFW WKH $& SRZHU
FRUG WR WKH DGDSWHU 7KH EDWWHU\ ZLOO QRZ EH XQORFNHG
8VH RQH KDQG WR UDLVH WKH OLG WR D FRPIRUWDEOH YLHZLQJ DQJOH XVH WKH RWKHU KDQG
DV LOOXVWUDWHG LQ )LJXUH WR VXSSRUW WKH EDVH RI WKH FRPSXWHU 1RWH 1HYHU OLIW
WKH FRPSXWHU E\ WKH OLG
3UHVV WKH SRZHU EXWWRQ WR WXUQ WKH FRPSXWHU ³RQ´
6\VWHP 6RIWZDUH
Your computer may already come with system software pre-installed.
Where this is not the case, or where you are re-configuring your com-
puter for a different system, you will find this manual refers to 0LFUR
VRIW :LQGRZV.
)LJXUH 2SHQLQJ WKH Notebook
ZLWK the $GDSWHU 3OXJJHG,Q
6KXW 'RZQ
1RWH WKDW \RX VKRXOG DOZD\V
VKXW \RXU FRPSXWHU GRZQ E\
FKRRVLQJ WKH 6KXW GRZQ FRP
PDQG LQ :LQGRZV VHH EHORZ
7KLV ZLOO KHOS SUHYHQW KDUG GLVN
RU V\VWHP SUREOHPV
&OLFN WKH 6WDUW 0HQX LFRQ
&OLFN WKH 3RZHU LWHP
&KRRVH 6KXW GRZQ IURP WKH PHQX
5
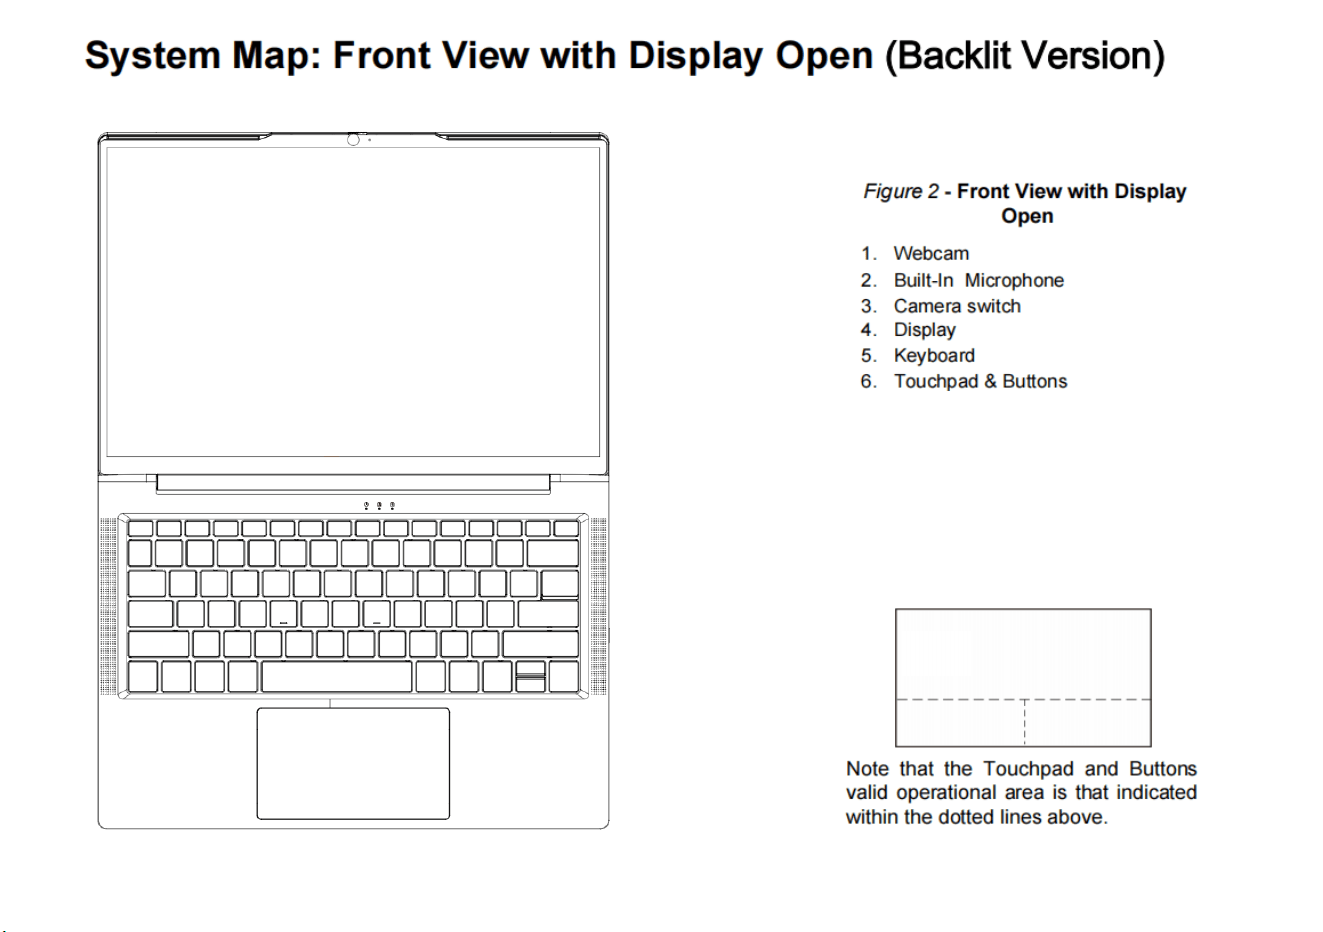
①②
③
④
⑤
14.1(35.6cm)
⑥
Keyboard
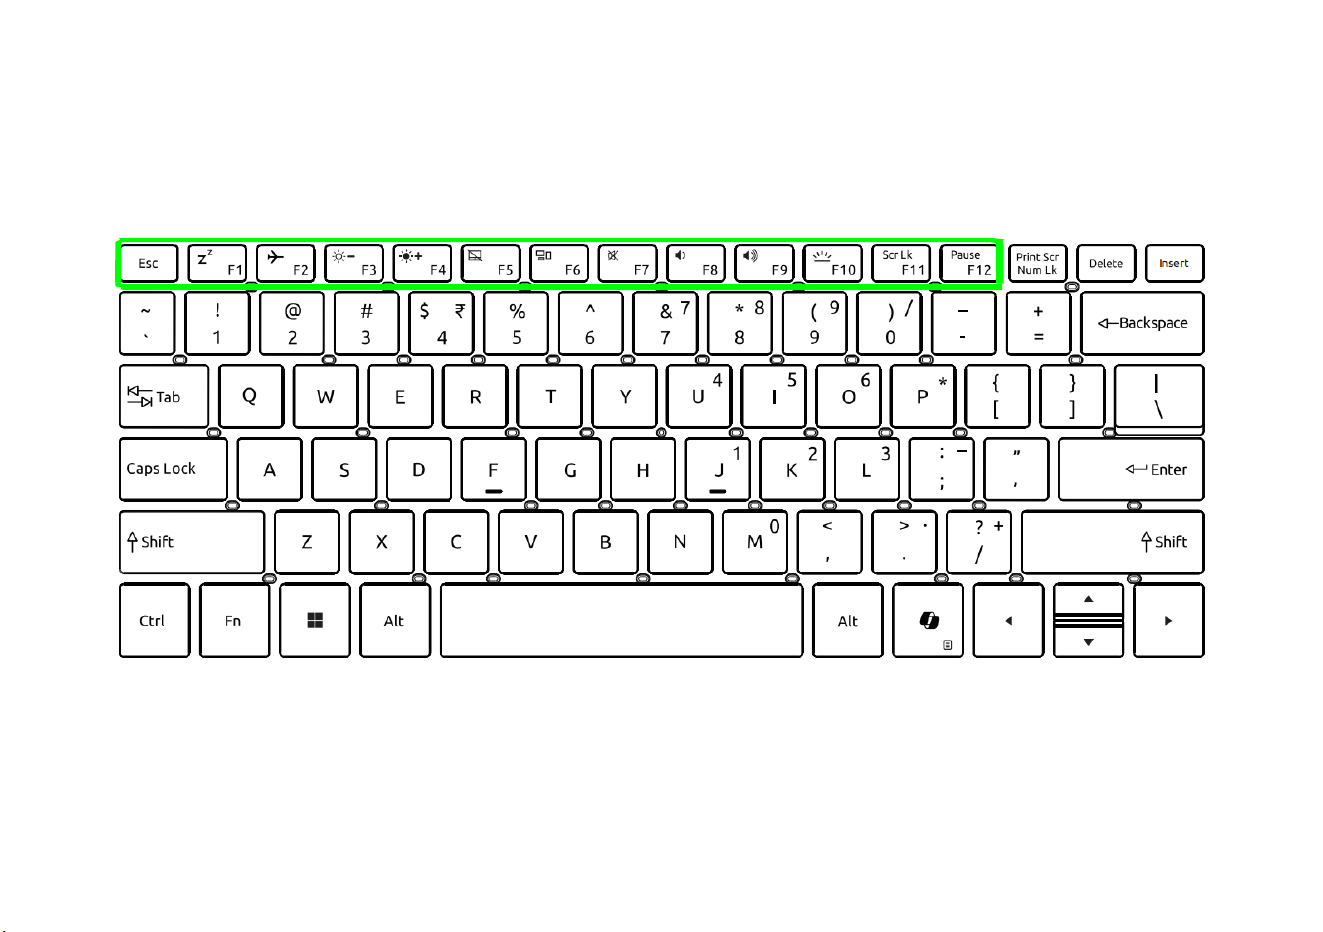
Your notebook comes with a keyboard. The keyboard has a numeric keypad for easy numeric data input.
6
Key Logo Key
Fn Windows
Menu/
Application
Key
Function Keys
Figure 5 - Keybo
ard
with
Backlit
Function Keys & Visual Indicators
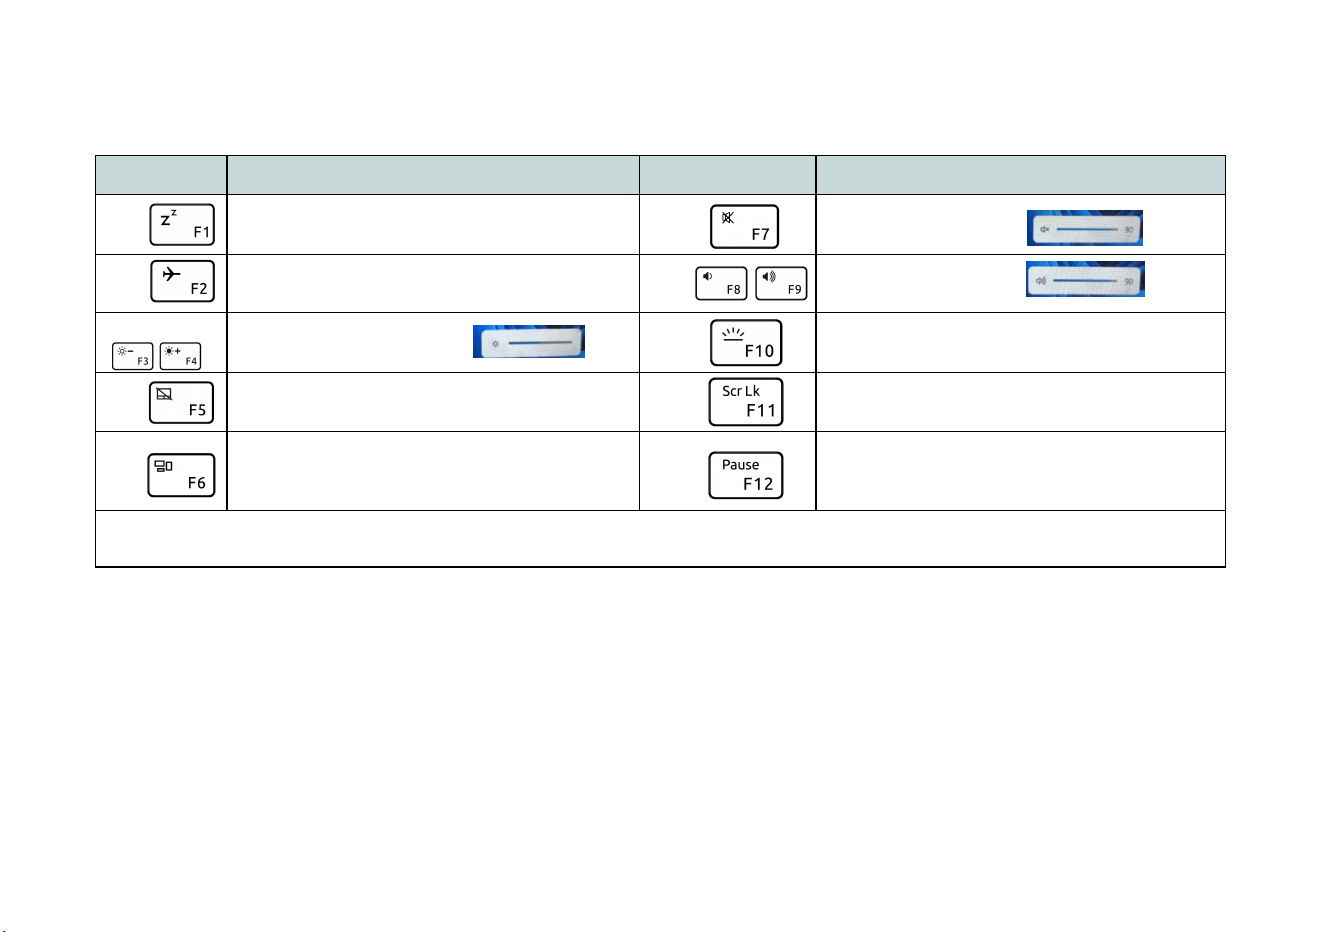
7KH IXQFWLRQ NH\V F1 F12 HWF ZLOO DFW DV KRW NH\V ZKHQ SUHVVHG ZKLOH WKH Fn NH\ LV KHOG GRZQ
Keys Function/Visual Indicators Keys Function/Visual Indicators
Fn +
Sleep Toggle
Fn +
Volume Decrease/
Increase
Fn +
Airplane Toggle
Fn +
Fn +
Display Brightness
Decrease/Increase
Fn +
Fn
Keyboard backlit Toggle (V
alid Only for
Backlit Version)
+
Change Screen mode
F
n +
Fn +
Mute Toggle
Table 2 - Function Keys & Visual Indicators
Pause Application
Touchpad Toggle
7
Scr Lock Toggle
Fn +
8
System Map: Left & Right Views
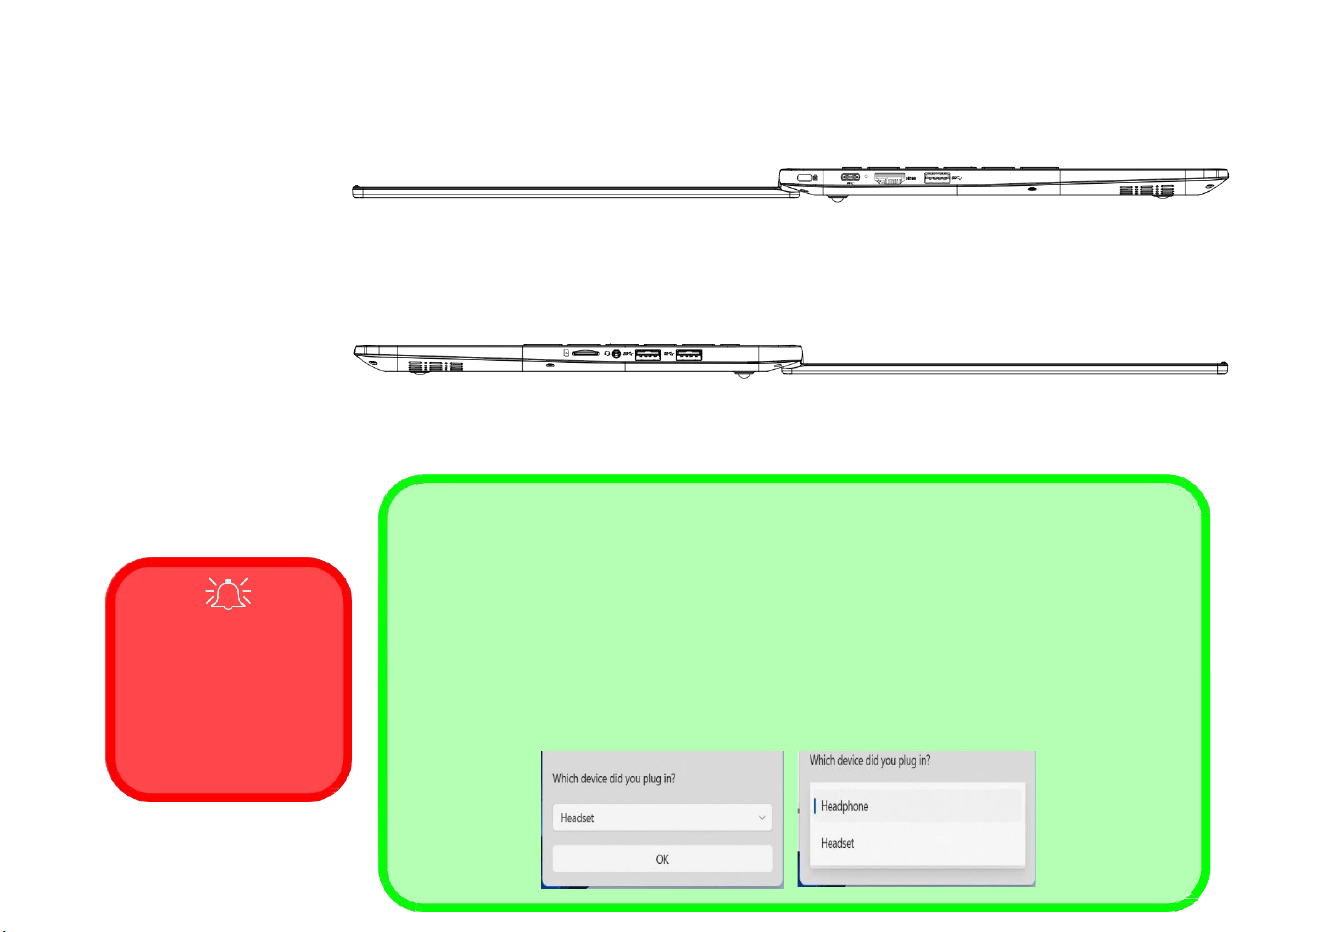
/HIW
)LJXUH
Left & Right
Views
86% 3RUW
+'0, 3RUW
7<3(& MDFN
4
.HQVLQJWRQ /RFN 6ORW
5
86% 3RUW
6
86% 3RUW
7
,Q $XGLR -DFN
+HDGSKRQH0LFURSKRQH
8
0LFUR6' &DUG 5HDGHU
5LJKW
Overheating
7R SUHYHQW \RXU FRP
SXWHU IURP RYHUKHDWLQJ
PDNH VXUH QRWKLQJ
EORFNV DQ\ YHQW ZKLOH
WKH FRPSXWHU LV LQ XVH
Combination Audio Jacks (2-In-1 Audio Jacks)
1RWH WKDW WKH FRPELQDWLRQ DXGLR MDFNV FDQ VXSSRUW KHDGSKRQHV RU KHDGVHWV LH D FRPELQDWLRQ
PLFURSKRQHKHDGSKRQH
:KHQ D GHYLFH LV SOXJJHG LQ WR WKH FRPELQDWLRQ DXGLR MDFN D GLDORJ ³:KLFK GHYLFH GLG \RX
SOXJ LQ"´ ER[ ZLOO SRSXS
0DNH VXUH \RX VHOHFW WKH FRUUHFW GHYLFH IURP WKH GURSGRZQ PHQX FRUUHVSRQGLQJ WR WKH
GHYLFH SOXJJHGLQ HJ FKRRVH ³+HDGVHW´ LI \RX KDYH SOXJJHGLQ D KHDGVHW DQG GR QRW
FKRRVH ³+HDGSKRQH´ L
Q WKLV FDVH DQG WKHQ FOLFN OK WR VDYH WKH VHWWLQJ
④
③ ② ①
⑧ ⑦ ⑥ ⑤
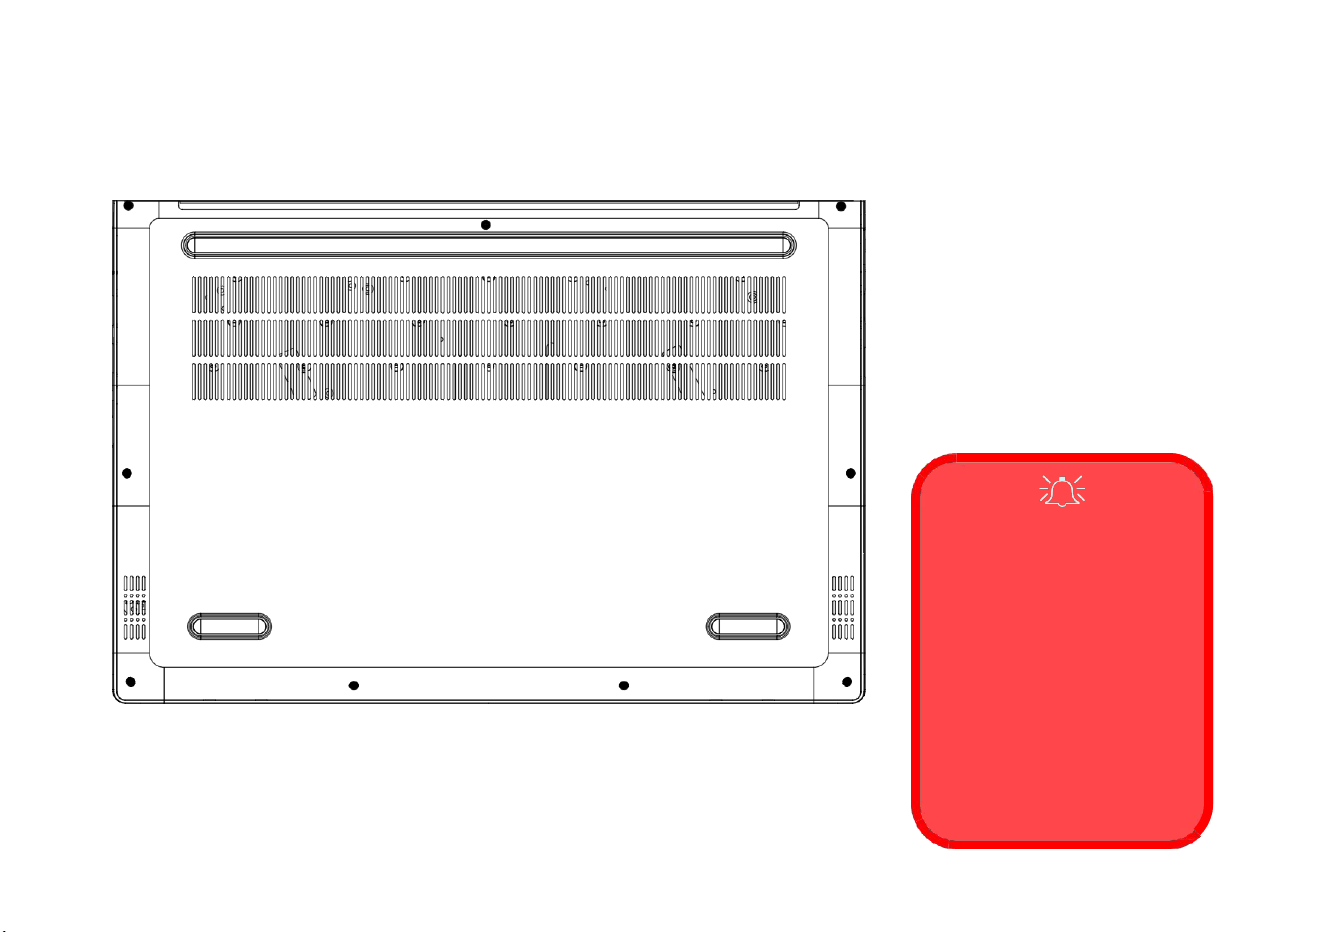
Bottom Cover Removal
Warning
Do not remove any cover(s)
and/or screw(s) for the purpos-
es of device upgrade as this
may violate the terms of your
warranty.
If you need to replace/remove
the SSD/RAM etc., for any
reason, please contact your
distributor/supplier for further
information.
System Map: Bottom Views
Bottom Views
1. Vent
2. Speaker
Figure 8
s
②
②
①
9
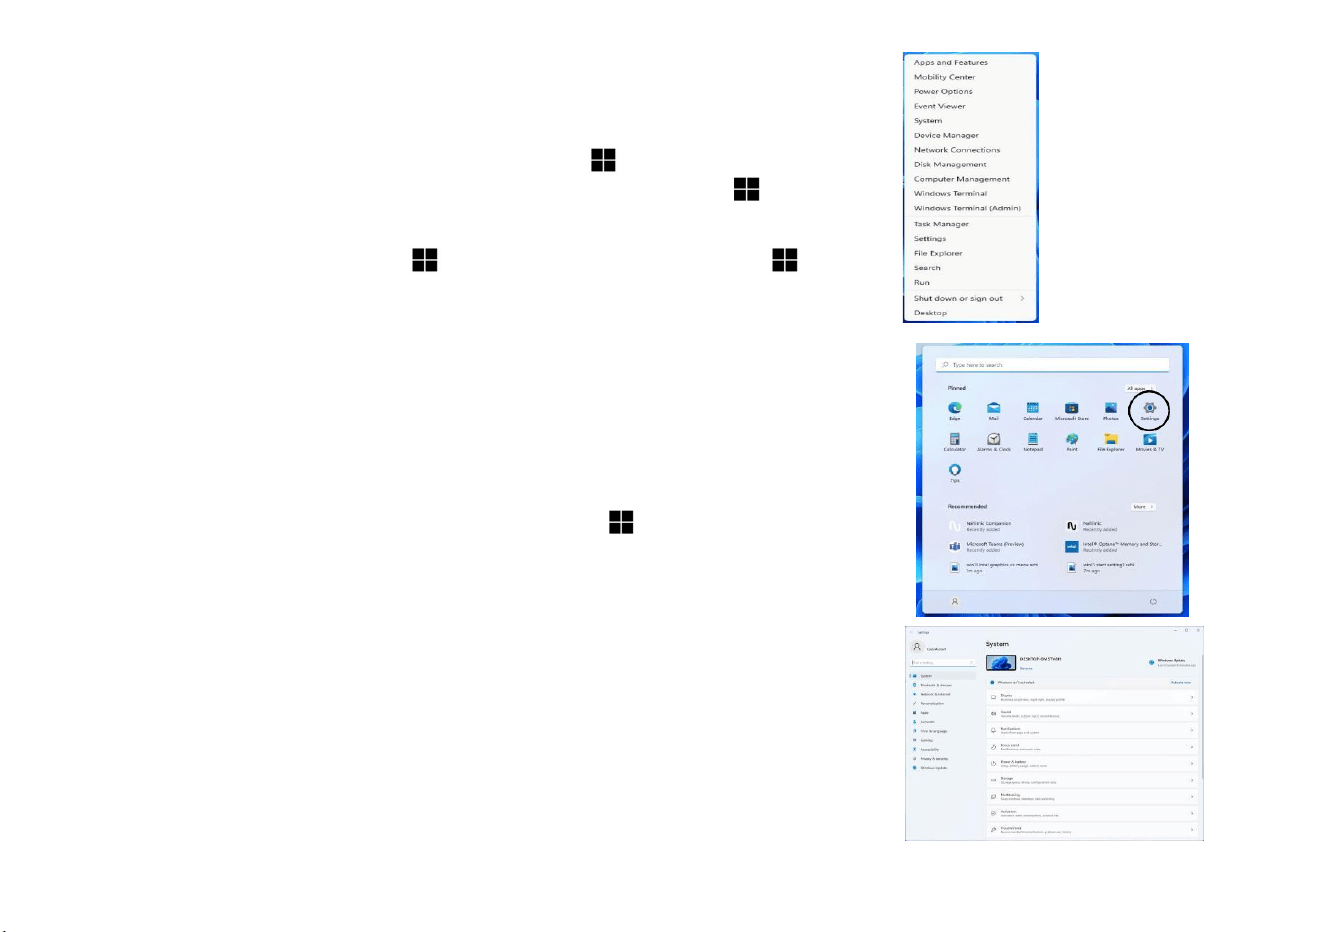
Windows 11 Start Menu, Context Menu,
Taskbar, Control Panel and Setting
10
s
Most of the apps, control panels, utilities and programs within Windows 11 can be
accessed from the Start Menu by clicking the icon
in the taskbar in the lower
left corner of the screen (or by pressing the Windows Logo Key
on the key-
board).
Right-click the Start Menu icon
(or use the Windows Logo Key + X key
combination) to bring up an advanced Context Menu of useful features such as
Apps and Features, Power Options, Task Manager, Search, File Explorer, Device
Manager, Computer Management and Network Connections etc.
The notification area of the taskbar is in the bottom right of the screen. Some of the
control panels and applications referred to throughout the course of this manual can
be accessed from here.
Throughout this manual you will see an instruction to open the Control Panel. To
access the Control Panel, use the Windows Logo Key + R key combination and
type “Control Panel”. You can pin the Control Panel tile to Start or taskbar.
The Settings item in the Start Menu (and also as an App) gives you quick access to
a number of system settings control panels allowing you to adjust settings for Sys-
tem, Bluetooth & devices, Network & internet, Personalization, Apps, Accounts,
Time & language, Gaming, Accessibility, Privacy & security and Windows Up-
date.
Figure 9
Start Menu,
Context Menu,
Taskbar, Con-
trol Panel and
Settings
11
Video Features
The system features an Intel’s Integrated GPU (for
power-saving) . You can switch display devices, and
configure display options as long as the video drivers are
installed.
Microsoft Hybrid Graphics
Microsoft Hybrid Graphics is a seamless technology
designed to get best performance from the graphics sys-
tem while allowing longer battery life, without having to
manually change settings. The computer’s operating sys-
tem (and some applications) will automatically switch
between the integrated GPU and the discrete GPU when
required by the applications in use.
To access the Display control panel in Windows:
1. Right-click the desktop and select Display settings from the
menu.
2. Choose the required display settings from the menus.
Display Devices
Note that you can use external displays connected to the
HDMI-Out port. See your dis-play device manual to see
which formats are supported.
Configuring the Displays in Windows
All external and internal displays (up to 3 active displays)
can be configured from Windows by using the Display or
System (in Settings) control panel or the Project menu.
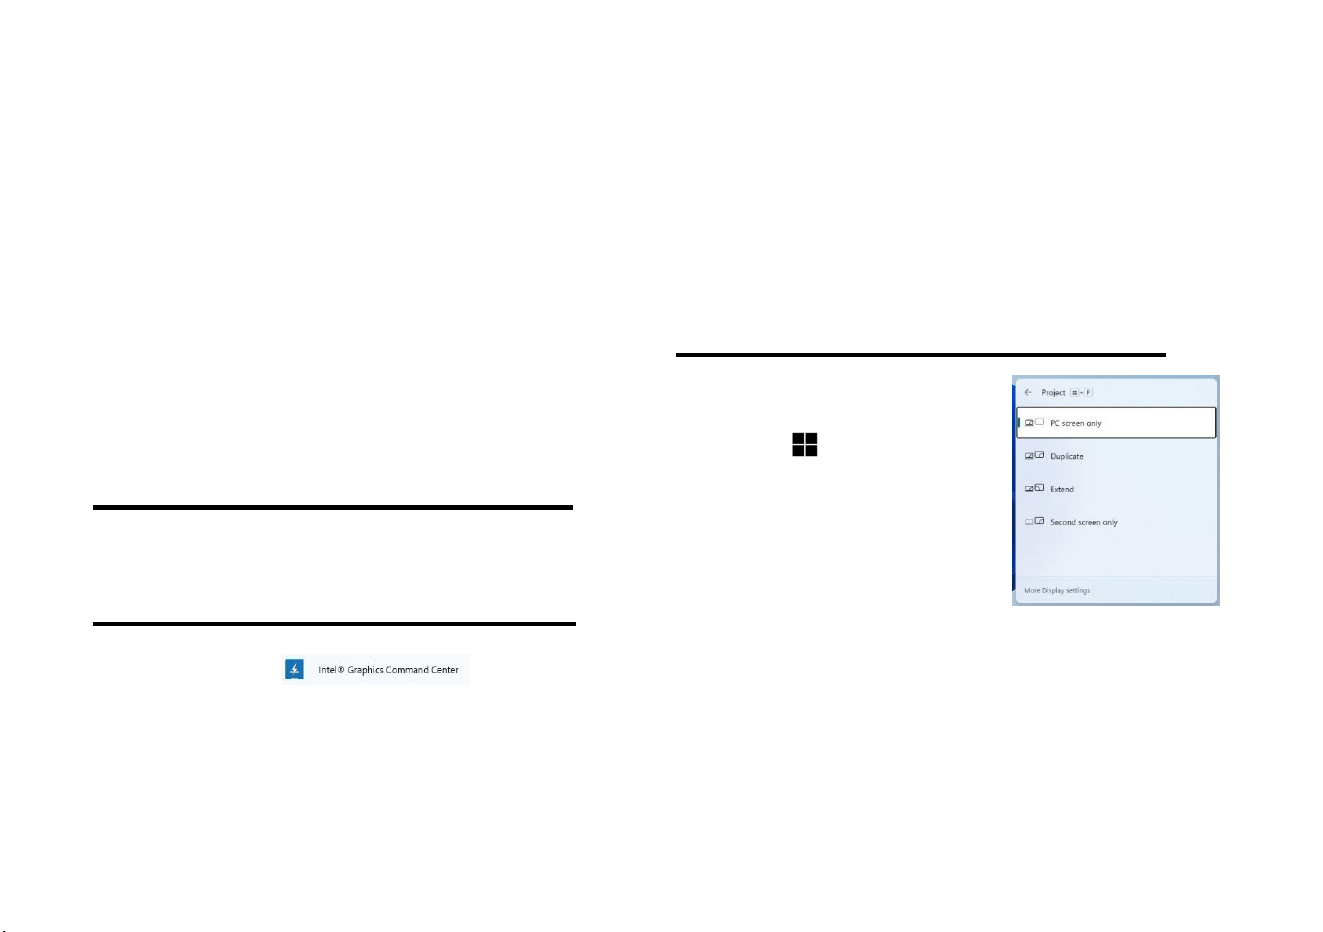
To configure the displays using the Project menu:
1. Attach your external display(s) to the
appropriate port, and turn it(them)
on.
2. Press the
+ P key combination.
3. Click on any one of the options from
the menu to select PC screen only,
Duplicate, Extend or Second
screen only.
4. You can also click Connect to a
wireless display at the bottom of
To access the Intel
®
Graphics Command Center:
1. Access the Intel® Graphics Command Center from the Start
menu in Windows .
the Project screen and follow the
steps to connect to any wireless
enabled display.
Figure 10
Project
12
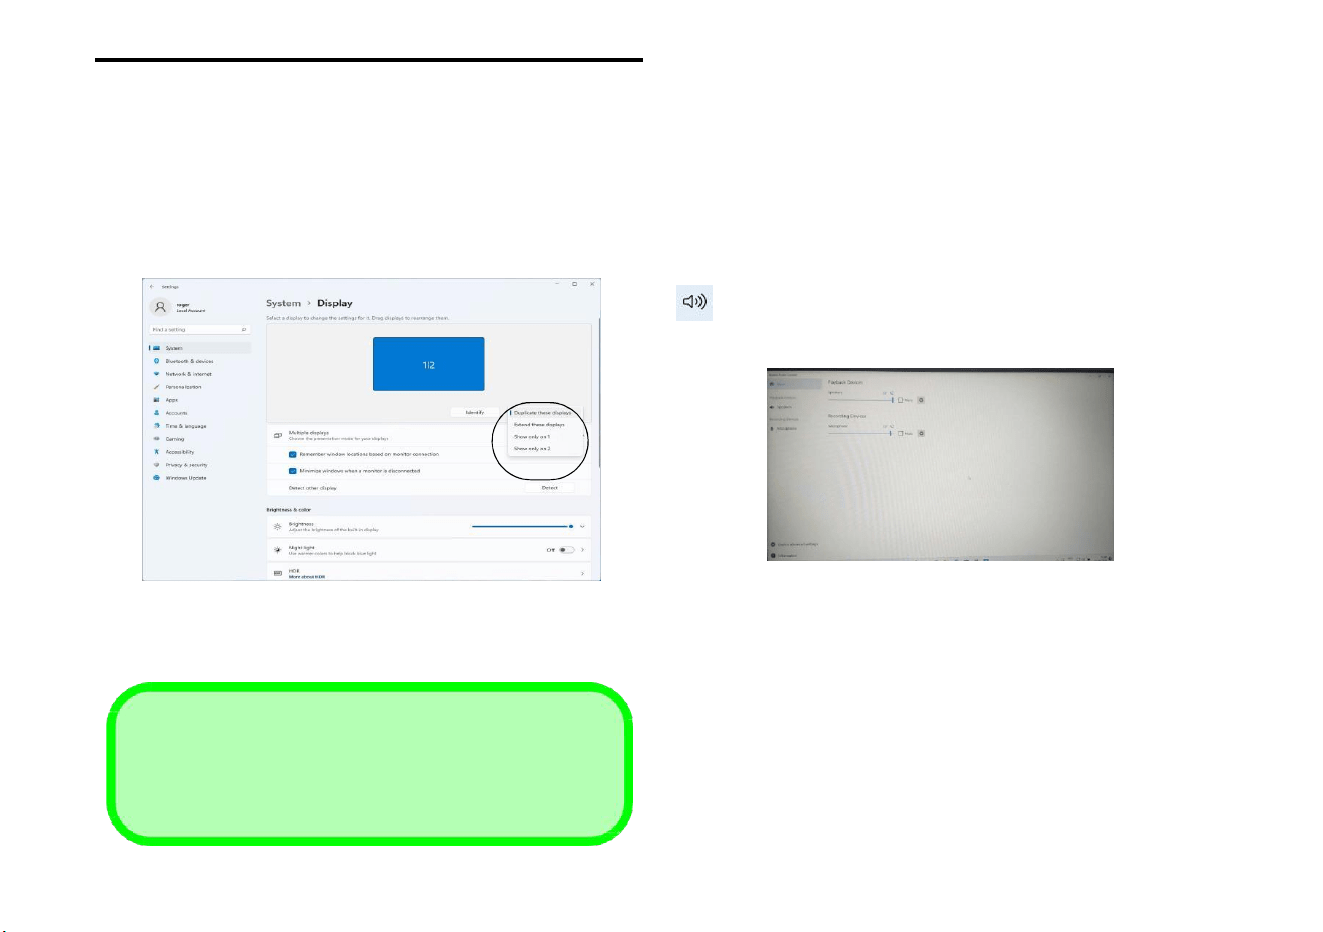
To configure the displays using the Display control panel:
1. Attach your external display(s) to the appropriate port, and turn
it(them) on.
2. Right-click the desktop and select Display settings from the
menu.
3. Click the Detect button.
4. The computer will then detect any attached displays.
5. You can configure up to 3 displays from the Multiple displays
menu.
Audio Feature
Figure 11- Display (Multiple displays)
s
You can configure the audio options on your computer
from the Sound control panel in Windows. Access the
Sound control panel via the Settings (System > Sound)
item in the Start menu.
The volume may be adjusted by means of the Fn + F8/F9
key combination. The sound volume level can also be set
using the volume control within Windows. Click the icon
in the taskbar to check the setting.
Figure 12 - Realtek Audio Console
Note that when 3 displays are connected, only 2 displays
may be configured in Duplicate mode
3 Connected Displays
.
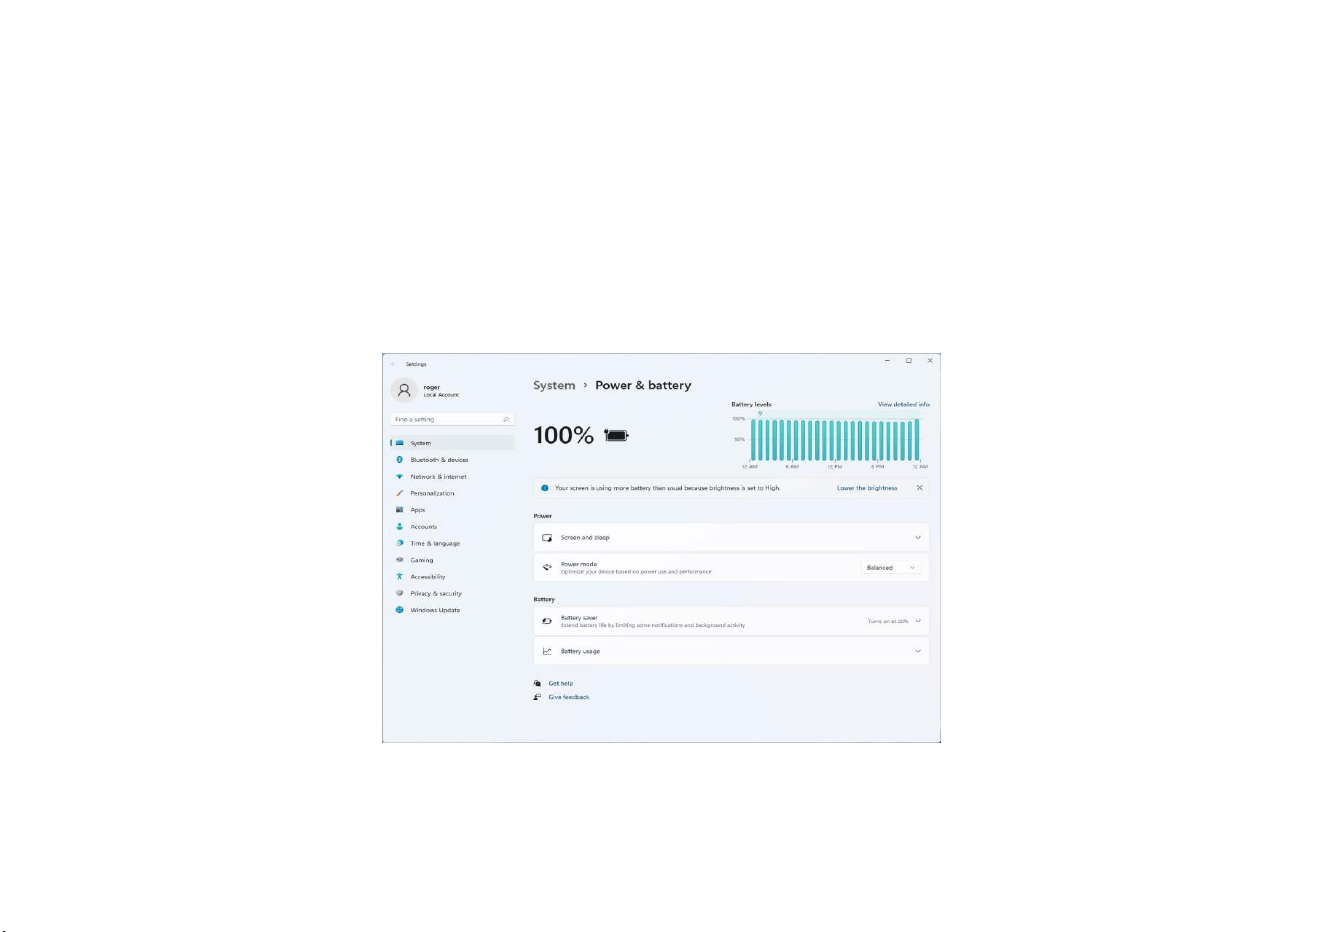
Power & batter
13
y
The Power & battery control panel allows you to quickly adjust power options for Screen and sleep, Power mode,
Battery saver and Battery usage etc. Access the Power & battery control panel via the Settings (System > Power &
battery) item in the Start menu.
The Power mode can be set to Balanced (default) which balances performance and battery life, Best power efficiency
for better battery life with reduced performance, and Best Performance for improved performance but with greater bat-
tery consumption. You can also customize the settings for how long your computer will remain inactive before it turns
off the screen or goes to sleep. Expand the “Screen and sleep” option, and select your preferred durations from each
drop-down menu.
Figure 13- Power & battery
14
Wireless LAN Module (Option)
Make sure the Wireless LAN module is turned on (and not
in Airplane Mode) before configuration begins.
WLAN Configuration in Windows
1. Click the icon in the notification area of the taskbar.
2. Click the icon .
3. A list of available access points will appear.
4. Double-click an access point to connect to it (or click it and click
Connect).
5. Enter a network security key (password) if required, and click
Next.
6. You can choose to find other devices
or not.
7. When you are connected to the network access point it will
display Connected.
8
. Select any connected network and click Disconnect to
disconnect from a connected access point.
9. You can click the Airplane Mode button to turn the mode On or
Off.
10. Alternatively you can click the Wi-Fi button to turn just the Wi-Fi
On or Off.
Bluetooth Module (Option)
Make sure the Bluetooth module is turned on (and not in
Airplane Mode) before configuration begins.
Bluetooth Configuration in Windows
1. Click the Settings item in the Start Menu.
2. Click Bluetooth & devices.
3. Click Add device > Bluetooth and a list of discovered devices
will appear.
4. Double-click the device you want to pair with the computer and
click Connect.
5. Select a device and click Remove Device > Yes to disconnect
from any device.
Connect Automatically
It is recommended that you check the box to Connect auto-
matically. This will cause the system to check for the access
point upon startup, and resuming from a power-saving state,
and will remove any necessity to keep connecting manually.

FCC Statement
Changes or modifications not expressly approved by the party responsible for compliance could void the user's authority to operate the equipment.
This equipment has been tested and found to comply with the limits for a Class B digital device, pursuant to Part 15 of the FCC Rules. These limits are
designed to provide reasonable protection against harmful interference in a residential installation. This equipment generates uses and can radiate radio
frequency energy and, if not installed and used in accordance with the instructions, may cause harmful interference to radio communications. However,
there is no guarantee that interference will not occur in a particular installation. If this equipment does cause harmful interference to radio or television
reception, which can be determined by turning the equipment off and on, the user is encouraged to try to correct the interference by one or more of the
following measures:
-- Reorient or relocate the receiving antenna.
-- Increase the separation between the equipment and receiver.
-- Connect the equipment into an outlet on a circuit different from that to which the receiver is connected.
-- Consult the dealer or an experienced radio/TV technician for help
This device complies with part 15 of the FCC rules. Operation is subject to the following two conditions (1)this device may not cause harmful interference,
and (2) this device must accept any interference received, including interference that may cause undesired operation.
This equipment complies with FCC radiation exposure limits set forth for an uncontrolled environment.
FCC/IC RF Radiation Exposure and SAR Statements
The
Laptop Aspire 5 A514-54H has been tested for body-worn Specific
Absorption Rate(SAR) compliance. The FCC/IC has established
detailed SAR requirements and has established that these
requirements. RF Exposure Information The radio module has been
evaluated under FCC Bulletin C95.1 and IEEE 1528 and found to be
compliant
to RF Exposure from radio frequency devices. This model meets the
applicable government requirements for exposure to radio frequency
waves. The highest reported SAR level for usage near the body
(0mm) is 0.302 W/kg.