

v1.1
User Manual of
HONOR CHOICE
KUMI AI Note

-02-
Table of Contents
English Manual
French Manuel
German Handbuch
Italian Manuale
Spanish Manual
Japanese Manual
P01-P15
P16-P27
P28-P39
P40-P51
P52-P63
P64-P75
--------------------------------------------------
--------------------------------------------------
-------------------------------------------------
--------------------------------------------------
--------------------------------------------------
--------------------------------------------------
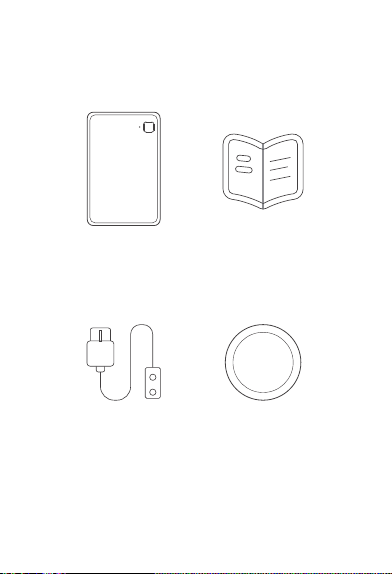
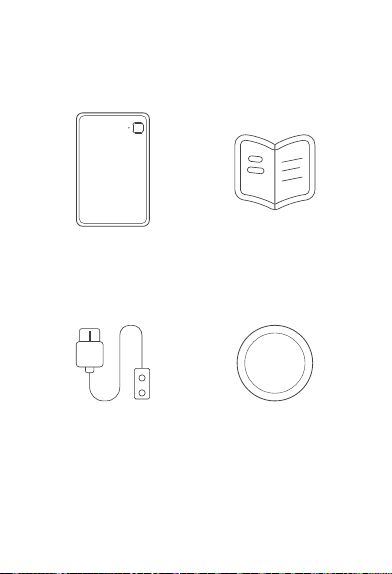
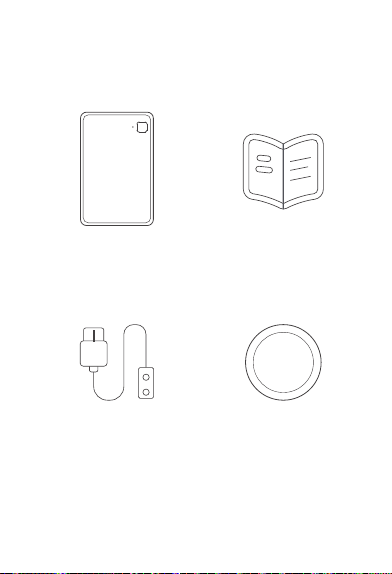
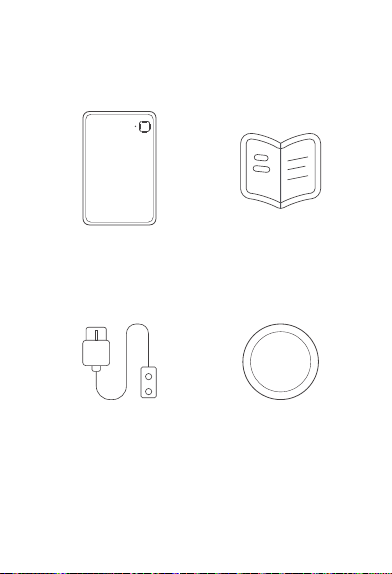
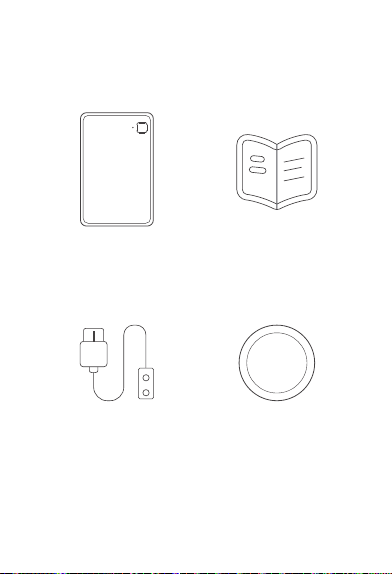
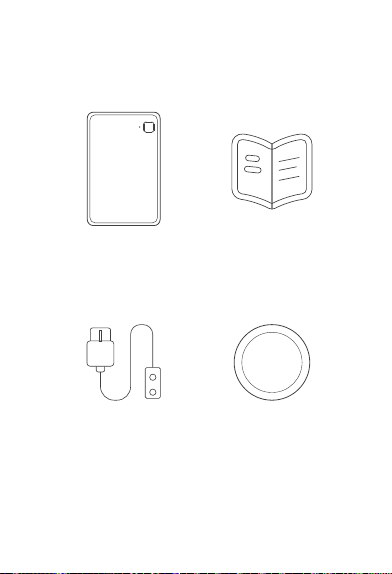
User Manual x 1
Magnetic Charging
Cable x 1
Magnetic Ring x 1
KUMI AI Note x 1
-03-
I. Package List
③ ④
⑤
① ②
-04-
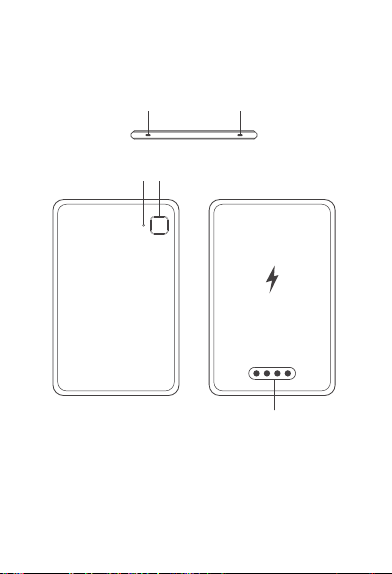
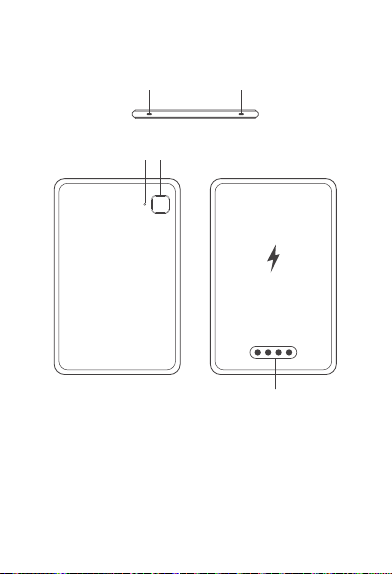
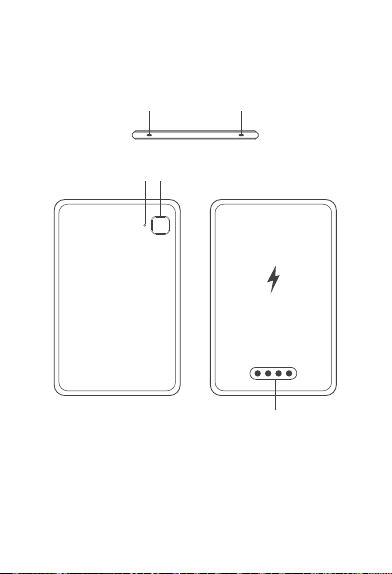
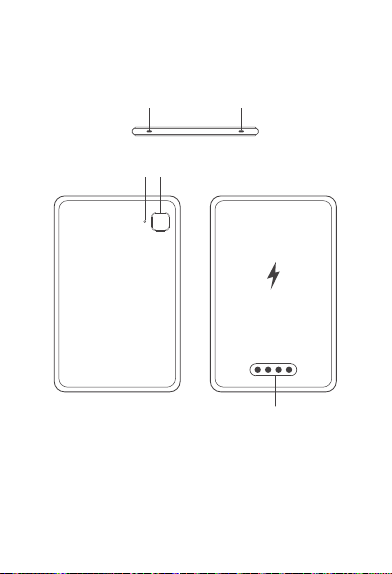
II. Product Introduction
①、② Microphone Holes ③ Indicator Light
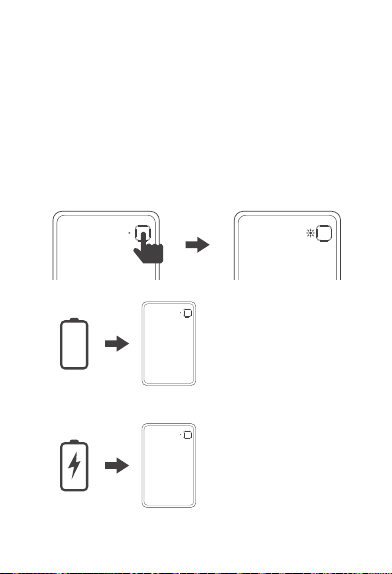
④ Recording Button ⑤ Charging Port
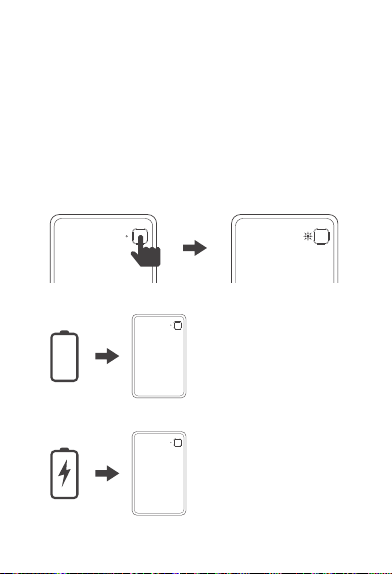
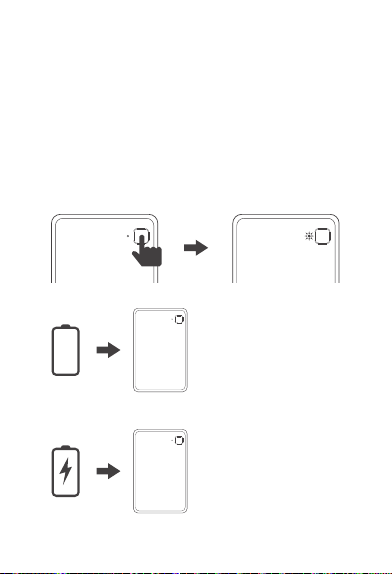
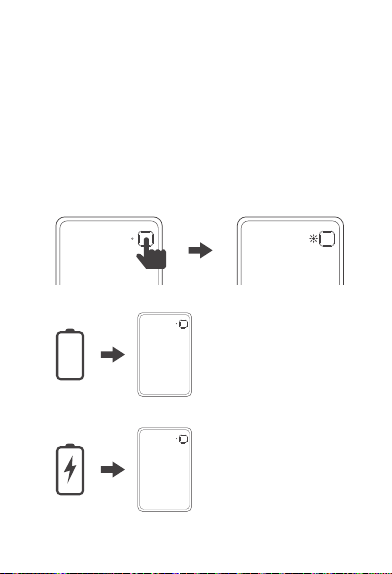
Batte = 0%:
Automatically powers o.
①Batte < 10%:
Red light ashes.
②10% ≤ Batte < 99%:
Green light ashes.
③Fully charged:
Green light stays on.
2. Power O
0%
3. Charging LED Status
-05-
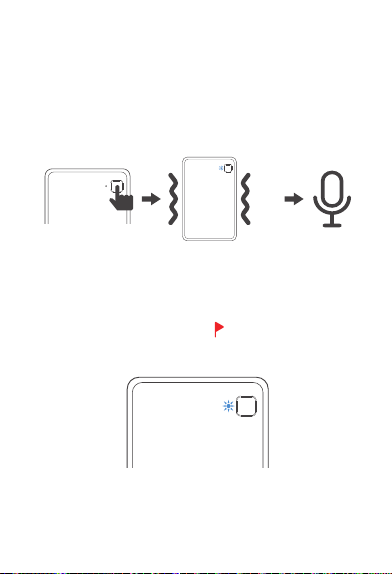
III. Function Operation
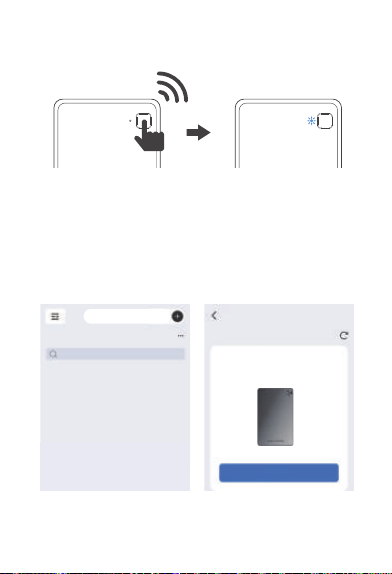
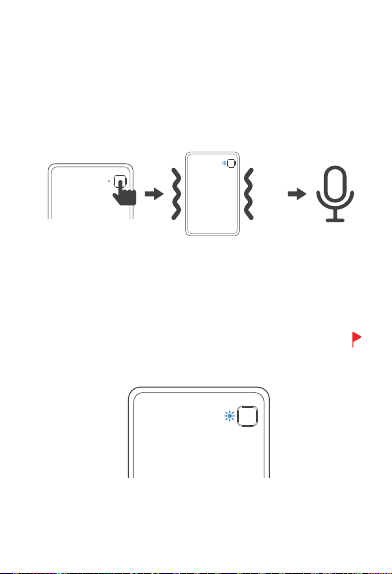
1. Power On / Binding LED Status
① Waiting for APP binding, batte < 10%: Red light fashes for
30 seconds.
② Waiting for APP binding, batte ≥ 10%: White light ashes
for 30 seconds.
③ APP binding successful, batte < 10%: Red light stays on,
turns o after 5 seconds.
④ APP binding successful, batte ≥ 10%: White light stays on,
turns o after 5 seconds.
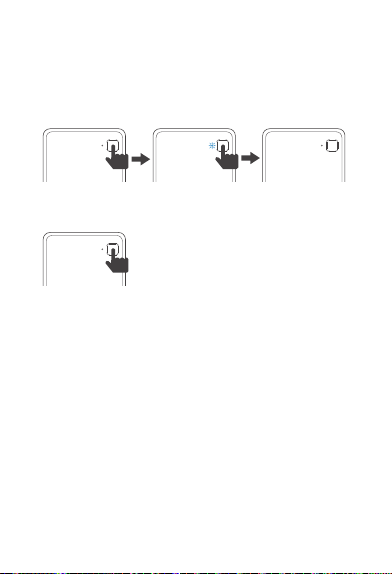
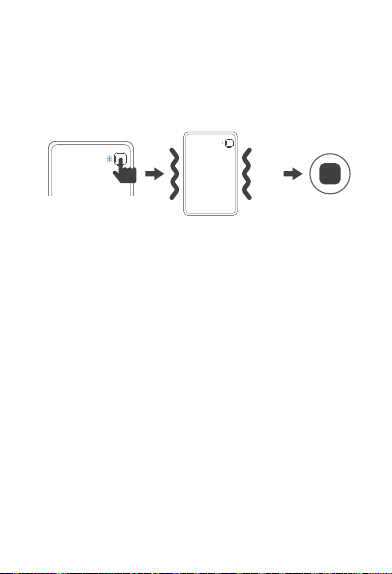
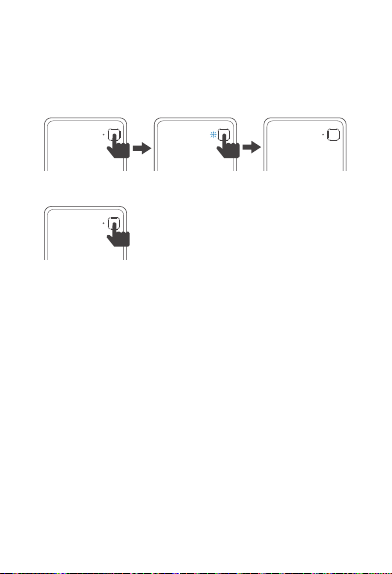
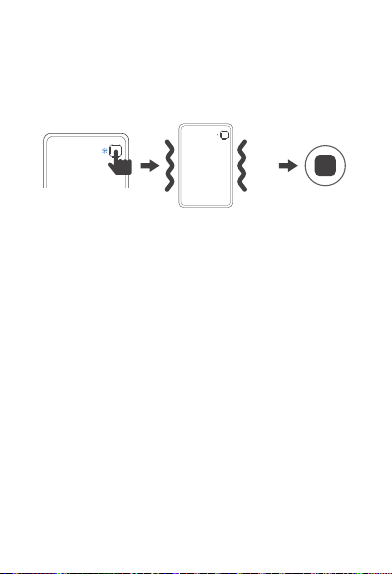
5. Touch Button
-06-
4. Recording LED Status
① Recording starts: Blue light stays on.
② Recording stops: Blue light turns off.
③ Charging + recording LED status: The indicator light is
consistent with the recording status.
① Short press:
a. Wake up from non - recording state.
b. Mark important moments during
recording.
6. Automatic Sleep
No recording, no charging, no le transfer for 8 seconds:
Automatically sleeps, still has Bluetooth connection (can
be woken up by clicking the touch button).
7. Deep Sleep
No recording, no le transfer, no charging for 24 hours:
Can be reconnected by touching the button.
② Long press for 1.5 seconds: e motor vibrates once;
stas recording (can sta recording in power - o state).
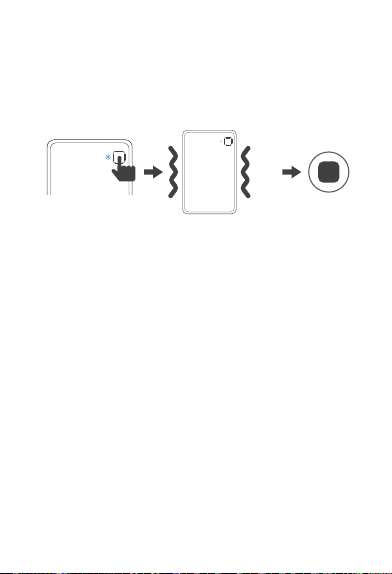
③ Long press again for 1.5 seconds:
After stopping recording, the motor vibrates twice.
④ Long press for 8 seconds: System abnormal recove.

Scan the QR code to down
load and install the APP
-07-
IV. APP Download

-08-
V. Product Hardware Specification
Parameters
Product Specification
Parameter
Product Size
Product Thickness
Microphone
Memory
Network
Touch Button
Charging Method
Product Battery
Optimal Range
Recording Duration
Standby Duration
Charging Duration
85*53 mm
2.89 mm
Silicon Microphones *2 +
Bone Conduction Microphone *1
4 GB
Bluetooth + 2.4G & 5G WiFi
Start Recording
Wireless Charging+Wired Charging
130 mAh
Within 3m
24 hours
More than 1 year
100 minutes

-09-
HONOR CHOICE AI Note
S/N: 5504AGQX258B0001
Connection
All Files
Search
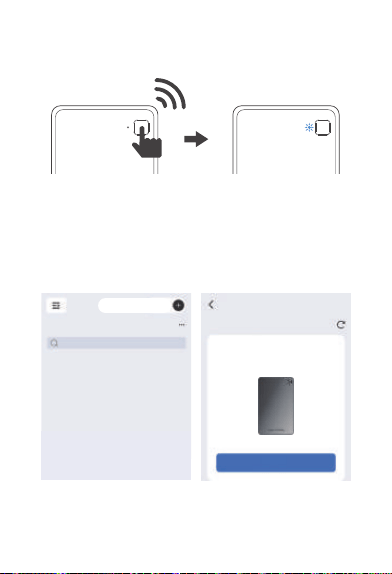
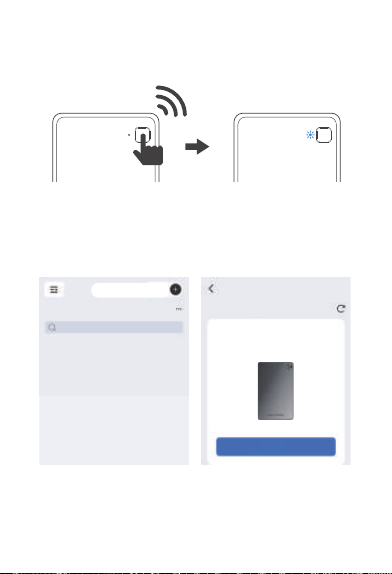
Add Device
Search Device
Device Connection
VI. Connect Recording Card
A short press of the recording button can turn on your AI
recording card. When the red or white light is on and
flashing, it indicates that your AI recording card is ready
to be bound to your account.
X1
-10-
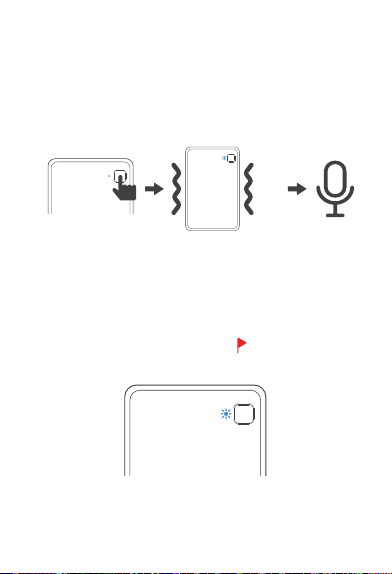
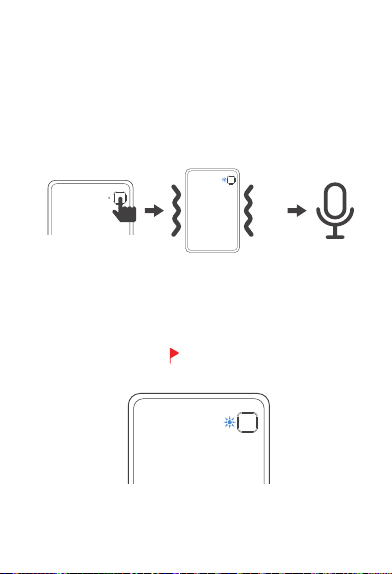
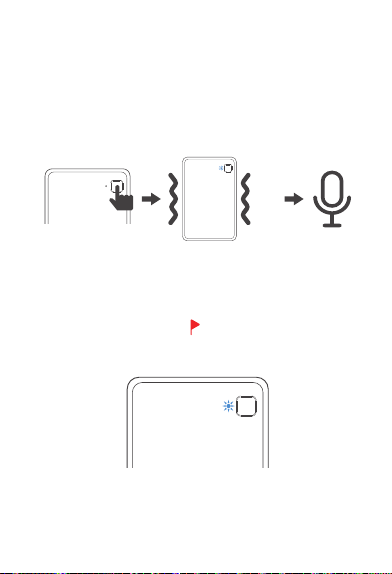
VII. Recording Operation
1. Start Recording
Long press the recording button and hold for 1.5 seconds
until you feel a vibration and the blue light is on, indicating
that recording has started.
2. Recording Tag
When the blue light is on during recording, short press the
recording button for 0.5 seconds (the blue light turns off
briefly) to mark important moments of the recording.
* In the recording file in the APP, is the important moment
mark
X2
-11-
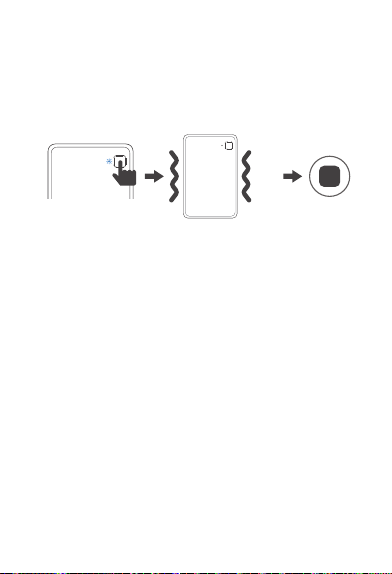
3. End Recording
Long press the recording button for 1.5 seconds until you feel
two vibrations and the blue light goes out, indicating that the
recording has ended.
4. Export Recording by Connecting Device After Recording
Wireless transmission (supported by some models):
Turn on Bluetooth and WiFi, pair the device through the
official NebulaRec APP (such as HONOR CHOICE AI Note),
and synchronize the device recording to the mobile phone.

-12-
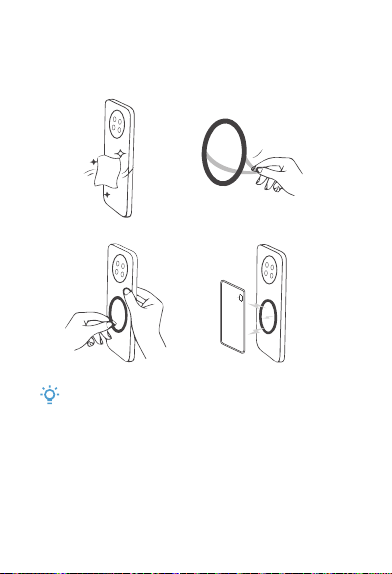
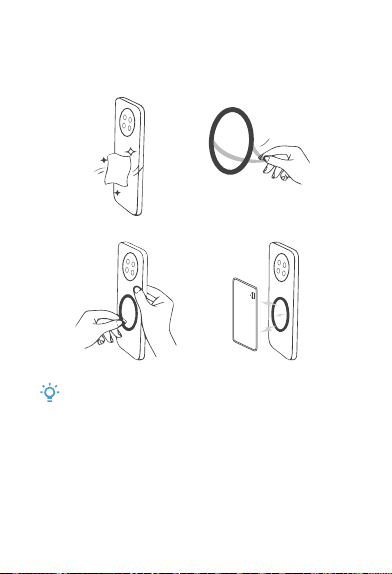
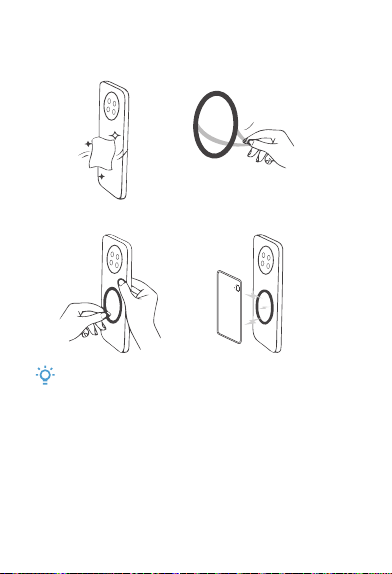
VIII. Specifications for Using Magnetic Ring
①
②
Tear off the
adhesive
backing paper
The magnetic ring
Note:
Once the magnetic ring is stuck on the phone, it is difficult
to remove. Please confirm the position before sticking.

-13-
IX. Legal Statement:
●
●
●
●
●
All rights reserved. Shenzhen Tenxinbona Technology
Co., Ltd. reserves all rights.
The company has the right to modify any information in
this manual at any time without notifying any third party,
and shall not be liable to any third party for such
modification.
Without the company's written consent, no unit or
individual shall excerpt, copy or use the contents of this
manual in any other way, and shall not disseminate it in
any form.
This guide is for reference only and does not constitute
any form of commitment. The product (including but not
limited to color, size, etc.) shall be subject to the actual
product.
Due to software version upgrades and updates, the
content introduced in this guide is for reference only.
Please refer to the actual product.
X. FCC Statement
This device complies with part 15 of the FCC Rules.
Operation is subject to the following two conditions:
(1) This device may not cause harmful interference, and (2)
this device must accept any interference received, including
interference that may cause undesired operation.
Any changes or modifications not expressly approved by the
party responsible for compliance could void the user's
authority to operate the equipment.

-14-
NOTE: This equipment has been tested and found to comply
with the limits for a Class B digital device, pursuant to Part
15 of the FCC Rules. These limits are designed to provide
reasonable protection against harmful interference in a
residential installation. This equipment generates, uses and
can radiate radio frequency energy and, if not installed and
used in accordance with the instructions, may cause harmful
interference to radio communications. However, there is no
guarantee that interference will not occur in a particular
installation.
If this equipment does cause harmful interference to radio or
television reception,
which can be determined by turning the equipment off and
on, the user is encouraged to try to correct the interference
by one or more of the following measures:
-- Reorient or relocate the receiving antenna.
-- Increase the separation between the equipment and
receiver.
-- Connect the equipment into an outlet on a circuit
different
from that to which the receiver is connected.
-- Consult the dealer or an experienced radio/TV technician
for help.
The device has been evaluated to meet general RF exposure
requirement. The device can be
used in portable exposure condition without restriction.

-15-
This device meets the government's requirements for
exposure to radio waves. The guidelines are based on
standards that were developed by independent scientific
organizations through periodic and thorough evaluation of
scientific studies. The standards include a substantial
safety margin designed to assure the safety of all persons
regardless of age or health. FCC RF Exposure Information
and Statement the SAR limit of USA (FCC) is 1.6 W/kg
averaged over one gram of tissue. Device types: This
device has also been tested against this SAR limit.
This device was tested for typical body-worn operations
with the back of the This device kept 0mm from the body.
To maintain compliance with FCC RF exposure
requirements, use accessories that maintain an 0mm
separation distance between the user's body and the back
of the This device. The use of belt clips, holsters and similar
accessories should not contain metallic components in its
assembly. The use of accessories that do not satisfy these
requirements may not comply with FCC RF exposure
requirements, and should be avoided.
FCC ID: 2BGPH-ELCME01
Specific Absorption Rate (SAR) information:

Notice d'utilisation
du KUMI AI Note
sélectionné par HONOR
-16-
Notice d'utilisation * 1
Câble de charge
magnétique * 1
Anneau magnétique * 1
KUMI AI Note * 1
I. Liste des accessoires
-17-
③ ④
⑤
① ②
II. Présentation du produit
①、② Trous de microphone ③ Indicateur lumineux
④ Bouton d'enregistrement ⑤ Port de charge
-18-
Batterie = 0%:
Arrêt automatique.
2. Arrêt
3. État LED de charge
0%
III. Fonctionnement
1. État LED au démarrage/liaison
① En attente de liaison avec l'APP, batterie < 10%: Lampe
rouge clignote pendant 30s.
② En attente de liaison avec l'APP, batterie ≥ 10%: Lampe
blanche clignote pendant 30s.
③ Liaison APP réussie, batterie < 10%: Lampe rouge allumée
en continu, s'éteint après 5s.
④ Liaison APP réussie, batterie ≥ 10%: Lampe blanche
allumée en continu, s'éteint après 5s.
① Batterie < 10%:
Lampe rouge clignote.
② 10% ≤ Batterie < 99%:
Lampe verte clignote.
③ Batterie pleine:
Lampe verte allumée
en continu.
-19-

5. Touche tactile
4. État LED d'enregistrement
① Début de l'enregistrement: Lampe bleue allumée en continu.
② Fin de l'enregistrement: Lampe bleue s'éteint.
③ État LED de charge + enregistrement: L'indicateur
lumineux est cohérent avec l'état d'enregistrement.
① Appui court:
a. Réveil en état non d'enregistrement.
b. Marquage de moments importants
en état d' enregistrement.
② Appui long de 1,5 secondes: Le moteur vibre une fois;
démarrage de l'enregistrement (peut démarrer
l'enregistrement en état d'arrêt).
③ Nouvel appui long de 1,5 secondes: Après l'arrêt de
l'enregistrement, le moteur vibre deux fois.
④ Appui long de 8 secondes: Restauration en cas d'anomalie
système.
6. Veille automatique
Sans enregistrement, sans charge et sans transfert de
fichiers pendant 8 secondes: veille automatique, la
connexion Bluetooth est toujours active (un appui sur la
touche tactile peut réveiller).
7. Veille profonde
Sans enregistrement, sans transfert de fichiers et sans
charge pendant 24 heures: l'appui sur la touche tactile
permet la reconnexion.
-20-

Scannez le code QR pour
télécharger et installer l'APP.
IV. Téléchargement de l'APP
-21-

V. Paramètres de spécification du matériel
du produit
Spécification du produit
Paramètre
Dimensions du produit
Épaisseur du produit
Microphone
Mémoire
Réseau
Bouton tactile
Mode de charge
Batterie du produit
Portée optimale
Durée d'enregistrement
Durée de veille
Durée de charge
85*53 mm
2.89 mm
microphones en silicium *2 +
microphone à conduction osseuse *1
4 GB
Bluetooth + 2.4G & 5G WiFi
Démarrer l'enregistrement
Charge sans fil + charge filaire
130 mAh
Within 3m
24 heures
Plus d'un an
100 minutes
-22-
VI. Connecter la carte d'enregistrement
Une courte pression sur le bouton d'enregistrement peut
allumer votre carte d'enregistrement IA. Lorsque la lumière
rouge ou blanche est allumée et clignote, cela indique que
votre carte d'enregistrement IA est prête à être liée à votre
compte.
HONOR CHOICE AI Note
S/N: 5504AGQX258B0001
Connexion
Tous les fichiers
Rechercher
Ajouter un appareil
Rechercher un appareil
Connexion d'appareil
-23-

X1
Vll. Opération d'enregistrement
1. Démarrer l'enregistrement
Appuyez longuement sur le bouton d'enregistrement et
maintenez pendant 1,5 secondes jusqu'à ce que vous sentiez
une vibration et que la lumière bleue s'allume, indiquant que
l'enregistrement a commencé.
2. Marqueur d'enregistrement
Lorsque la lumière bleue est allumée pendant l'enregistrement,
appuyez brièvement sur le bouton d'enregistrement pendant
0,5 seconde (la lumière bleue s'éteint brièvement) pour
marquer les moments importants de l'enregistrement.
* Dans le fichier d'enregistrement dans l'APP, est le
marqueur de moment important.
-24-
X2
3. Terminer l'enregistrement
Appuyez longuement sur le bouton d'enregistrement pendant
1,5 secondes jusqu'à ce que vous sentiez deux vibrations et
que la lumière bleue s'éteigne, indiquant que l'enregistrement
a pris fin.
4. Exporter l'enregistrement en connectant l'appareil après
l'enregistrement
Transmission sans fil (prise en charge par certains modèles) :
Activez Bluetooth et WiFi, appareillez l'appareil via l'APP
officielle NebulaRec (comme HONOR CHOICE AI Note) et
synchronisez l'enregistrement de l' appareil sur le téléphone
portable.
-25-
Vlll. Spécifications d'utilisation de l'anneau
magnétique
①
②
Détachez le papier
Remarque :
protecteur adhésif
l'anneau magnétique
Remarque :
Une fois que l'anneau magnétique est collé sur le téléphone,
il est difficile de le retirer. Veuillez confirmer la position avant
de coller.
-26-

IX. Déclaration légale :
●
●
●
●
●
Tous droits réservés. Shenzhen Tenxinbona
Technology Co., Ltd. se réserve tous les droits.
La société a le droit de modifier toute information
dans ce manuel à tout moment sans en aviser un
tiers, et n'est pas responsable envers un tiers pour
une telle modification.
Sans le consentement écrit de la société, aucune
unité ni personne ne doit extraire, copier ou utiliser
le contenu de ce manuel de quelque manière que ce
soit, et ne doit pas le diffuser sous quelque forme
que ce soit.
Ce guide est à titre indicatif uniquement et ne
constitue aucune forme d'engagement. Le produit
(y compris mais sans s'y limiter à la couleur, à la
taille, etc.) se conformera au produit réel.
En raison des mises à niveau et des mises à jour
des versions logiciels, le contenu présenté dans
ce guide est à titre indicatif uniquement. Veuillez
vous référer au produit réel.
-27-

-28-
HONOR CHOICE
KUMI AI Note
Gebrauchsanleitung
Gebrauchsanleitung * 1
Magnetischer Ring * 1Magnetisches Ladekabel * 1
KUMI AI Note * 1
-29-
I. Packliste
①、② Mikrofonloch ③ Anzeigeleuchte
④ Aufnahmetaste ⑤ Ladeanschluss
③ ④
⑤
① ②
-30-
II. Produktbeschreibung
1. Einschalten/LED-Status verbinden
① Waen auf die App-Bindung, Akkustand <10%:
Rotes Licht blinkt 30 Sekunden
② Waen auf die App-Bindung, Akkustand ≥10%:
Weißes Licht blinkt 30 Sekunden
③ App-Bindung eolgreich, Akkustand <10%:
Rotes Licht leuchtet dauerhaft, erlischt nach 5 Sekunden
④ App-Bindung eolgreich, Akkustand ≥10%:
Weißes Licht leuchtet dauerhaft, erlischt nach 5 Sekunden
Batteriestand=0%:
Automatische Abschaltung
2. Ausschalten
3. Lade-LED-Status
0%
-31-
III. Funktionale Bedienung
① Batteriestand<10%:
Rotes Licht blinkt
② 10%≤ Batteriestand<99%:
Griines Licht blinkt
③ Vollständig geladen:
Grünes Licht leuchtet
dauerhaft
-32-
4. LED-Status bei Aufnahme
① Aufnahme aktiv: Blaues Licht leuchtet dauerhaft
② Aufnahme inaktiv: Blaues Licht aus
③ Laden + Aufnahme LED-Status: Anzeige entspricht dem
Aufnahmestatus
5. Drücken Sie leicht auf die Taste
① Kurzdruck:
a. Aufwachen, wenn keine Aufnahme läuft
b. Markieren wichtiger Momente während
der Aufnahme
② 1,5 Sekunden lang gedrückt halten: Nachdem der Motor
einmal vibrie hat, beginnt die Aufnahme (die Aufnahme
kann auch im ausgeschalteten Zustand beginnen)
③ Erneut 1,5 Sekunden lang gedrückt halten:
Nach Beendigung der Aufnahme vibrie der Motor zweimal
④ 8 Sekunden lang gedrückt halten: Systemwiederherstellung
6. Automatischer Ruhezustand
Keine Aufnahme, kein Laden und keine Dateiüberagung
für 8 Sekunden: Der Auto-Sleep-Modus wird aktivie,
während die Bluetooth-Verbindung aufrechterhalten bleibt
(zum Aufwachen einmal auf die Taste drücken).
7. Tiefschlaf
Keine Aufzeichnung, keine Dateiüberagungen, kein Laden
für 24 Stunden: Durch leichtes Drücken der Taste wird die
Verbindung wiederhergestellt.

Scannen Sie den QR-Code, um die App
herunterzuladen und zu installieren.
-33-
IV. APP herunterladen

-34-
V. Hardware-Spezikationen des Produkts
Produktspezikationen Parameter
Produktabmessungen
Produktdichte
Mikrofon
Interner Speicher
Netzwerk
Leichte Berührung der Taste
Lademethode
Produktbatterie
Optimale Reichweite
Aufnahmedauer
Standby-Zeit
Ladezeit
85*53 mm
2.89 mm
Siliziummikrofon*2 +
Knochenleitungsmikrofon*1
4 GB
Bluetooth + 2.4G & 5G WiFi
Aufnahme aktivieren
Kabelloses Laden +
Kabelgebundenes Laden
130 mAh
Innnerhalb von 3 Metern
24 Stunden
Über 1 Jahr
100 Minuten
-35-
VI. Verbindung der Aufnahmekae
Drücken Sie kurz auf die Aufnahmetaste, um lhre AI-
Aufnahmekae zu aktivieren. Ein rotes oder weißes Licht,
das aueuchtet und blinkt, zeigt an, dass Ihre AI-
Aufnahmekae bereit ist, mit lhrem Konto gekoppelt zu
werden.
HONOR CHOICE AI Note
S/N: 5504AGQX258B0001
Verbinden
Alle Dateien
Suchen
Gerät hinzufügen
Gerät suchen
Gerätverbindung
X1
-36-
VII. Aufnahmevorgang
1. Aufnahme staen
Halten Sie die Aufnahmetaste 1,5 Sekunden lang gedrückt,
bis Sie eine Vibration spüren und das blaue Licht aueuchtet,
was anzeigt, dass die Aufnahme begonnen hat.
2. Aufnahme-Tagging
Während der Aufnahme, wenn die blaue Lampe leuchtet,
kann durch kurzes Drücken der Aufnahmetaste für 0,5
Sekunden (die blaue Lampe erlischt kurz) ein wichtiger
Moment der Aufnahme markie werden.
* In den Aufnahme-Dateien der APP Wichtige Momente
markieren

X2
-37-
4. Schließen Sie das Gerät nach Abschluss der Aufnahme
an, um die Aufnahmen per
Drahtloser Überagung zu expoieren (wird von
ausgewählten Modellen unterstützt):
Aktivieren Sie Bluetooth und WLAN und koppeln Sie das
Gerät dann mit der oziellen NebulaRec-App
(z. B. HONOR CHOICE AI Note), um die Aufnahmen vom
Gerät auf lhr Mobiltelefon zu synchronisieren.
3. Aufnahme beenden
Halten Sie die Aufnahmetaste 1,5 Sekunden lang gedrückt,
bis Sie zwei Vibrationen spüren und das blaue Licht erlischt,
was anzeigt, dass die Aufnahme beendet ist.
-38-
VIII. Verwendungsrichtlinien für
magnetischen Ring
①
②
Das Klebeband
abziehen
Magnetischer Ring
Hinweis:
Nachdem der magnetische Ring am Handy angebracht
wurde, ist es schwierig, ihn wieder zu entfernen. Bitte
stellen Sie sicher, dass die Position korrekt ist, bevor Sie
ihn anbringen.

-39-
●
●
●
●
●
IX. Rechtliche Hinweise
Urheberrecht © Shenzhen Tenxinbona Technology Co.,
Ltd. Alle Rechte vorbehalten.
Das Unternehmen ist berechtigt, jederzeit jegliche
Informationen in dieser Gebrauchsanleitung zu ändern,
ohne Dritte darüber zu informieren, und übernimmt
keine Haftung gegenüber Dritten für diese Änderungen.
Ohne die schriftliche Zustimmung unseres
Unternehmens düen keinerlei Organisationen oder
Einzelpersonen Inhalte dieser Gebrauchsanleitung
eigenmächtig zusammenstellen, kopieren oder auf
andere Weise nutzen und diese auch nicht in
irgendeiner Form verbreiten.
Dieser Leitfaden dient nur zur Orientierung und stellt
keinerlei Zusicherung dar. Bei Produkten (einschließlich,
aber nicht beschränkt auf Farbe, Abmessungen, Größe
usw.) ist das physische Produkt maßgeblich.
Aufgrund von Software-Updates und Versionsaktualis-
ierungen dienen die in diesem Leitfaden beschriebenen
Inhalte nur als Referenz; maßgeblich ist das tatsächliche
Produkt.

-40-
HONOR CHOICE
KUMI AI Note
Istruzioni per l'uso
I. Elenco della confezione
Istruzioni per l'uso * 1KUMI AI Note * 1
Cavo di ricarica magnetico * 1 Anello magnetico * 1
-41-
③ ④
⑤
① ②
II. Presentazione del prodotto
①、② Foro del microfono ③ Spia luminosa
④ Pulsante di registrazione ⑤ Poa di ricarica
-42-

0%
III. Operazioni funzionali
1. Accensione/Associazione Stato LED
① In attesa di associazione APP, batteria <10%:
Luce rossa lampeggiante per 30 secondi
② In attesa di associazione APP, batteria ≥10%:
Luce bianca lampeggiante per 30 secondi
③ Associazione APP riuscita, batteria <10%:
Luce rossa ssa, si spegne dopo 5 secondi
④ Associazione APP riuscita, batteria ≥10%:
Luce bianca ssa, si spegne dopo 5 secondi
2. Spegnimento
Batteria = 0%:
Spegnimento automatico
3. Stato LED durante la ricarica
① Batteria <10%:
Luce rossa lampeggiante.
② 10% ≤ Batteria <99%:
Luce verde lampeggiante.
③ Batteria completamente
carica: Luce verde ssa.
-43-

4. Stato LED durante la registrazione
① Inizio registrazione: Luce blu ssa
② Registrazione disattivata: Luce blu spenta
③ Stato LED durante carica + registrazione: La spia luminosa
corrisponde allo stato della registrazione
5. Pulsante tattile ① Premere brevemente una volta:
a. Risveglio in stato di non registrazione
b. Durante la registrazione, segna un
momento impoante
② Premere a lungo per 1,5 secondi:
Dopo 1 vibrazione del motore, inizia la
registrazione (La registrazione può
iniziare anche con il dispositivo spento)
③ Premere nuovamente a lungo per 1,5 secondi:
Dopo aver interrotto la registrazione, il motore vibra 2 volte
④ Premere a lungo per 8 secondi: Ripristino anomalie di
sistema
6. Spegnimento automatico
8 secondi senza registrazione, ricarica o trasferimento le:
spegnimento automatico, connessione Bluetooth ancora
attiva (Premere brevemente il pulsante tattile per riattivare)
7. Ibernazione profonda
24 ore senza registrazione, trasferimento le o ricarica:
premere il pulsante tattile per ristabilire la connessione
-44-

IV. Download dell'APP
Scansiona il codice QR per scaricare e installare l'APP
-45-

V. Speciche hardware del prodotto
Speciche del prodotto Parametri
Dimensioni del prodotto
Spessore del prodotto
Microfono
Memoria interna
Connettività
Pulsante tattile
Modalità di ricarica
Batteria del prodotto
Distanza ottimale
Autonomia registrazione
Autonomia standby
Tempo di ricarica
85*53 mm
2,89 mm
Microfono in silicone*2
+ Microfono osseo*1
4 GB
Bluetooth + WiFi 2,4G & 5G
Avvia registrazione
Ricarica wireless + Ricarica cablata
130 mAh
Entro 3 m
24 ore
Oltre 1 anno
100 minuti
-46-

VI. Collegamento della scheda di
registrazione
Premere brevemente il pulsante di registrazione per
attivare la scheda di registrazione AI.
La luce rossa o bianca accesa e lampeggiante indica che la
scheda di registrazione Al è pronta per l'associazione con il
proprio account.
HONOR CHOICE AI Note
S/N: 5504AGQX258B0001
Tutti i le
Ricerca
Aggiungi dispositivo
Cerca dispositivo
Connessione del dispositivo
Connetti
-47-
X1
VII. Operazioni di registrazione
1. Iniziare la registrazione
Premere e mantenere premuto il pulsante di
registrazione per 1,5 secondi no a percepire una
vibrazione e l'accensione della luce blu, indicando l'inizio
della registrazione.
2. Etichettatura della registrazione
Duante la registrazione con luce blu accesa, premere
brevemente il pulsante di registrazione per 0,5 secondi (la
luce blu si spegne momentaneamente) per contrassegnare
momenti impoanti nella registrazione.
* Nei le audio dell'APP contassegna i momenti
impoanti.
-48-
X2
3. Terminare la registrazione
Premere e mantenere premuto il pulsante di
registrazione per 1,5 secondi no a percepire due
vibrazioni e lo spegnimento della luce blu, indicando la
ne della registrazione.
4. Collegare il dispositivo per trasferire la registrazione
dopo la conclusione
Trasferimento wireless (suppoato da alcuni modelli):
Attivare Bluetooth e WiFi, associare il dispositivo tramite
l'app uciale NebulaRec (come HONOR CHOICE AI Note)
e sincronizzare le registrazioni sul telefono.
-49-
VIII. Norme per l'uso dell' anello magnetico
①
②
Rimuovere la caa
adesiva sul retro
Anello magnetico
Nota:
Una volta incollato sul telefono, l'anello magnetico è dicile
da rimuovere. Si prega di posizionarlo con accuratezza prima
dell'applicazione.
-50-

Tutti i diritti riseati © Shenzhen Tenxinbona
Technology Co., Ltd.
La società si risea il diritto di modicare in qualsiasi
momento le informazioni contenute in questo manuale
senza obbligo di preavviso verso terze pai e non
assume alcuna responsabilità verso di esse per tali
modiche.
È vietato estrarre, riprodurre o utilizzare i contenuti di
questo manuale in qualsiasi modo senza il consenso
scritto della società, né dionderli in qualsiasi forma.
Questa guida è solo a scopo informativo e non
costituisce alcuna forma di impegno. Le caratteristiche
del prodotto (inclusi ma non limitati a colore, dimensioni,
ecc.) sono soggette al prodotto sico.
A causa degli aggiornamenti della versione software, i
contenuti qui descritti sono solo di riferimento. Si prega
di fare riferimento al prodotto sico.
●
●
●
●
●
IX. Dichiarazione legale:
-51-

Selección HONOR
KUMI AI Note
Manual de Instrucciones
-52-
I. Lista de embalaje
Manual de instrucciones * 1KUMI AI Note * 1
Cable de carga magnético * 1 Anillo magnético * 1
-53-

③ ④
⑤
① ②
II. Descripción del producto
①, ② Oricios del micrófono ③ Indicador luminoso
④ Botón de grabación ⑤ Pueo de carga
-54-
0%
-55-
IIl. Funcionamiento y operaclones
1. Estado del LED al encender o vincular
① En espera de vinculación con la APP, batería <10%:
luz roja parpadea durante 30 segundos
② En espera de vinculación con la APP, bateria ≥10%:
luz blanca parpadea durante 30 segundos
③ APP vinculada con éxito, bateria <10%:
luz roja ja, se apaga tras 5 segundos
④ APP vinculada con éxito, bateria ≥10%:
luz blanca ja, se apaga tras 5 segundos
2. Apagado
3. Estado del LED durante la carga
Batería=0%:
apagado automático
① Batería <10%:
luz roja parpadeante
② 10% ≤ batería<99%:
luz verde parpadeante
③ Carga completa:
luz verde ja

-56-
4. Estado del LED durante la grabación
① Inicio de grabación: luz azul ja
② Grabación detenida: luz azul apagada
③ Carga + grabación: el indicador LED sigue el estado de
grabación
5. Botón táctil
① Pulsación coa:
a. Activar desde el modo inactivo
b. Marcar un momento impoante
durante la grabación
② Pulsar durante 1,5 segundos: el motor
vibra una vez; comienza la grabación
(Se puede iniciar grabación incluso
estando apagado)
③ Mantener pulsado 1,5 segundos nuevamente:
se detiene la grabación, el motor vibra dos veces
④ Mantener pulsado 8 segundos:
restablecimiento en caso de fallo del sistema
6. Modo de reposo automático
Si durante 8 segundos no se graba, no se carga ni se
transeren archivos: entra en reposo automático, manteniendo
la conexión Bluetooth(Puede reactivarse con una pulsación
coa del botón tactil
7. Modo de reposo profundo
Si no se graba, carga ni transere archivos durante 24 horas:
puede reconectarse tocando el botón táctil

-57-
IV. Descarga de la APP
Escanee el código QR para descargar e instalar la APP

-58-
V. Especicaciones técnicas del producto
Especicaciones
del producto
Parámetros
Dimensiones del producto
Grosor del producto
Micrófono
Memoria interna
Conectividad
Botón táctil
Método de carga
Batería del producto
Rango óptimo
Duración de grabación
Tiempo en espera
Tiempo de carga
85*53 mm
2,89 mm
micrófonos de silicio *2 +
micrófono de conducción ósea *1
4 GB
Bluetooth + WiFi 2,4G y 5G
Iniciar grabación
Carga inalámbrica +
carga por cable
130 mAh
Dentro de 3 metros
24 horas
Más de 1 año
100 minutos

-59-
VI. Conexión de la tarjeta de grabación
Pulse brevemente el botón de grabación para encender
su tarjeta de grabación AI. Cuando la luz roja o blanca se
enciende y parpadea, indica que su tarjeta de grabación
AI está lista para vincularse con su cuenta.
HONOR CHOICE AI Note
S/N: 5504AGQX258B0001
Conexión del dispositivo
Todos los archivos
Buscar
Añadir dispositivo
Buscar dispositivo
Conectar
X1
-60-
VII. Operaciones de grabación
1. Iniciar grabación
Mantenga presionado el botón de grabación durante 1,5
segundos hasta sentir una vibración y ver la luz azul
encendida; esto indica que la grabación ha comenzado.
2. Marcadores de grabación
Durante la grabación, cuando la luz azul está encendida, pulse
brevemente el botón de grabación durante 0,5 segundos (la luz
azul se apaga brevemente) para marcar un momento
impoante.
* En los archivos de grabación dentro de la APP, el símbolo
indica un marcador de momento impoante.
X2
-61-
3. Finalizar grabación
Mantenga presionado el botón de grabación durante 1,5
segundos hasta sentir dos vibraciones y ver que la luz
azul se apaga; esto indica que la grabación ha fnalizado.
4. Transferencia de grabaciones tras nalizar
Transmisión inalámbrica (compatible con algunos
modelos): Active Bluetooth y WiFi, empareje el dispositivo
mediante la APP ocial NebulaRec (por ejemplo, HONOR
CHOICE AI Note) y sincronice las grabaciones con su
teléfono móvil.

-62-
VIIl. Instrucciones de uso del anillo
magnético
①
②
Retire el papel
adhesivo
Anillo magnético
Atención:
Una vez adherido el anillo magnético al teléfono, será dicil
retirarlo. Asegúrese de la posición antes de pegarlo.

-63-
© Shenzhen Tenxinbona Tecnología, S.L. Todos los
derechos reseados.
La empresa se resea el derecho de modicar en
cualquier momento la información contenida en este
manual sin previo aviso a terceros y sin asumir ninguna
responsabilidad derivada de dichas modicaciones.
Ninguna entidad ni persona podrá, sin autorización
escrita de la empresa, extraer, copiar o utilizar de
cualquier otra forma el contenido de este manual, ni
difundirlo en ninguna modalidad.
Esta guía se proporciona únicamente como referencia y
no constituye ningún tipo de compromiso. Los detalles
del producto (incluidos, entre otros, color, tamaño y
dimensiones) deben tomarse según el producto real.
Debido a posibles actualizaciones o cambios de versión
del software, la información contenida en esta guía es
solo de referencia. Remítase al producto real.
●
●
●
●
●
IX. Declaración legal

-64-
HONOR CHOICE
KUMI AI Note
ユーザーマニュアル
-65-
ユーザーマニュアル x 1
磁気充電ケーブル x 1 磁気リング x 1
KUMI AI Note x 1
I. パッケージ一覧

-66-
③ ④
⑤
① ②
II. 製品紹介
①、② マイク穴 ③ 表示灯
④ 録音ボタン ⑤ 充電ポート

-67-
電池残量 = 0%:
自動的に電源が切れます。
①電池残量 < 10%:
赤色ライトが点滅します。
②10% ≤ 電池残量 < 99%:
緑色ライトが点滅します。
③充電完了:
緑色ライトが点灯します。
2. 電源オフ
0%
3. 充電時のLED状態
III. 機能操作
1. 電源オン / アプリ接続時のLED状態
① アプリ接続待機中、電池残量<10%:赤色ライトが30秒間点滅
します。
② アプリ接続待機中、電池残量≥10%:白色ライトが30秒間点滅
します。
③ アプリ接続成功、電池残量<10%:赤色ライトが5秒間点灯した
後、消灯します。
④ アプリ接続成功、電池残量≥10%:白色ライトが5秒間点灯した
後、消灯します。

-68-
5. タッチボタン
4. 録音時のLED状態
① 録音開始:青色ライトが点灯します。
② 録音停止:青色ライトが消灯します。
③ 充電中の録音:録音時のLED表示が優先されます。
① 短押し:
a. 非録音状態からデバイスを起動します。
b. 録音中に重要な瞬間をマックします。
6. 自動スリープ
録音・充電・ファイル転送を行わずに8秒経過:自動的にスリープ
モードへ移行します。Bluetooth接続は維持されており、タッチ
ボタンを押すことで復帰できます。
7. ディープスリープ
録音、充電、ファイル転送を行わずに24時間経過:タッチボタ
ンを押すことで復帰できます。
② 1.5秒長押し:バイブが1回振動し、録音を開始します
(電源オフの状態からでも開始可能です)。
③ 再び1.5秒長押し:録音を停止し、バイブが2回振動します。
④ 8秒長押し:システム異常時、強制復旧を行います。

-69-
QRコードをスキャンしてアプリを
ダウンロードしてインストールし
てください。
IV. アプリのダウンロード

-70-
V. 製品ハードウェア仕様パラメータ
製品仕様
パラメータ
製品サイズ
製品厚さ
マイク
メモリ
ネットワーク
タッチボタン
充電方法
バッテリー
最適通信範囲
録音時間
待機時間
充電時間
85*53 mm
2.89 mm
シリコンマイクロホン×2 +
骨伝導マイクロホン×1
4 GB
Bluetooth + 2.4G & 5G WiFi
録音開始
ワイヤレス充電+有線充電
130 mAh
3m以内
24時間
1年以上
100分
-71-
HONOR CHOICE AI Note
S/N: 5504AGQX258B0001
接 続
すべてのファイル
検索
デバイス追加
デバイス検索
デバイス接続
VI. 録音カードを接続する
録音ボタンを短押しすると、AI録音カードの電源がオンになり
ます。赤色または白色のライトが点滅している場合は、本機の
アカウント連携準備が完了したことを示しています。
-72-
X1
VII. 録音操作
1. 録音開始
録音ボタンを1.5秒間長押し、本体が振動し、青色ライトが点灯
すると、録音が開始されます。
2. 録音タッグ
録音中に、録音ボタンを0.5秒間短押し、青色ライトが一時的に
消灯し、重要な瞬間をマックします。
*アプリ内の録音ファイルに、 マークは録音中に記録された重
要な瞬間を示します。

-73-
X2
3. 録音終了
録音ボタンを1.5秒間長押し、本体が二回振動し、青色ライトが消
灯すると、録音が終了されます。
4. 録音後、データの書き出し
ワイヤレス転送(一部のモデルで対応):
BluetoothとWiFiオンにします。公式アプリ「NebulaRec」
(例:HONOR CHOICE AI Note)を通じてデバイスをペアリ
ングし、本体の録音データをスマートフォンに同期します。

-74-
VIII. 磁気リングの使用について
①
②
背面のシールを
はがします。
磁気リング
ご注意:
磁気リングは一度スマートフォンに貼り付けると剥がすのが困難
です。貼り付ける前に位置をよくご確認ください。

-75-
IX. 法的声明
●
●
●
●
●
著作権を全て保持しています。深セン騰信百納科技有限公
司(Shenzhen Tenxinbona Technology Co., Ltd.)がすべ
ての権利を保有しています。
当社は、第三者に通知することなく、いつでも本マニュア
ルの情報を変更する権利を有します。また、当該変更によ
って生じた第三者への損害について、当社は一切の責任を
負いません。
当社の書面による同意なしに、いかなる団体または個人も
、本マニュアルの内容を引用、複製、その他の方法で使用
すること、およびいかなる形式においても頒布することを
禁じます。
本ガイドは参照用であり、いかなる形式の保証も構成する
ものではありません。実際の製品(色、サイズなどを含む
がこれらに限定されない)が優先されます。
ソフトウェアのバージョンアップや更新により、本ガイド
の記載内容は参照用となります。実際の製品仕様を優先し
てください。