

Technical Support and E-Warranty Certificate
www.vevor.com/support
FABRIC ROOM DIVIDE
USER MANUAL
PFSSTBHS10
PFSSTBSH11
PFSSTBMS12
We continue to be committed to provide you tools with competitive price.
"Save Half", "Half Price" or any other similar expressions used by us only
represents an estimate of savings you might benefit from buying certain tools
with us compared to the major top brands and does not necessarily mean to cover
all categories of tools offered by us. You are kindly reminded to verify carefully
when you are placing an order with us if you are actually Saving
Half in comparison with the top major brands.

1
PFSSTBHS10 PFSSTBSH11 PFSSTBMS12
NEED HELP? CONTACT US!
Have product questions? Need technical support? Please feel free to
contact us:
Technical Support and E-Warranty Certificate
www.vevor.com/support
This is the original instruction, please read all manual instructions
carefully before operating. VEVOR reserves a clear interpretation of our
user manual. The appearance of the product shall be subject to the
product you received. Please forgive us that we won't inform you again if
there are any technology or software updates on our product.
FABRIC ROOM DIVIDE

2
SAFETY INSTRUCTIONS
WARNING:
Read this material before using this product. Failure to do so can
result in serious injury.
Assembly precautions
1. Assemble only according to these instructions. Improper assembly can
create hazards.
2. Wear ANSI-approved safety goggles and heavy-duty work gloves
during assembly.
3. Keep the assembly area clean and well-lit.
4. Keep bystanders out of the area during assembly.
5. Do not assemble if tired or when under the influence of alcohol, drugs
or medication.
6. The product capabilities apply to properly and completely assembled
products only.
7. Assemble on a flat, level, hard and smooth surface capable of safely
supporting the Fabric Room Divide.
8. For additional information regarding the parts listed in the following
pages, please refer to the Assembly Diagram of this manual. Unwrap
and separate all parts in a clean work area.
Use precautions
1. DO NOT SIT OR STAND ON THIS ITEM.
2. This product is not a toy. Do not allow children to play with or near this
item.
3. Do not exceed specified weight capacities.
4. Use only on a flat, level, hard, and smooth surface that can safely
support a fully loaded Fabric Room Divide.
5. Use as intended only.
6. Inspect before every use; do not use if parts are loose or damaged.
SAVE THIS MANUAL

3
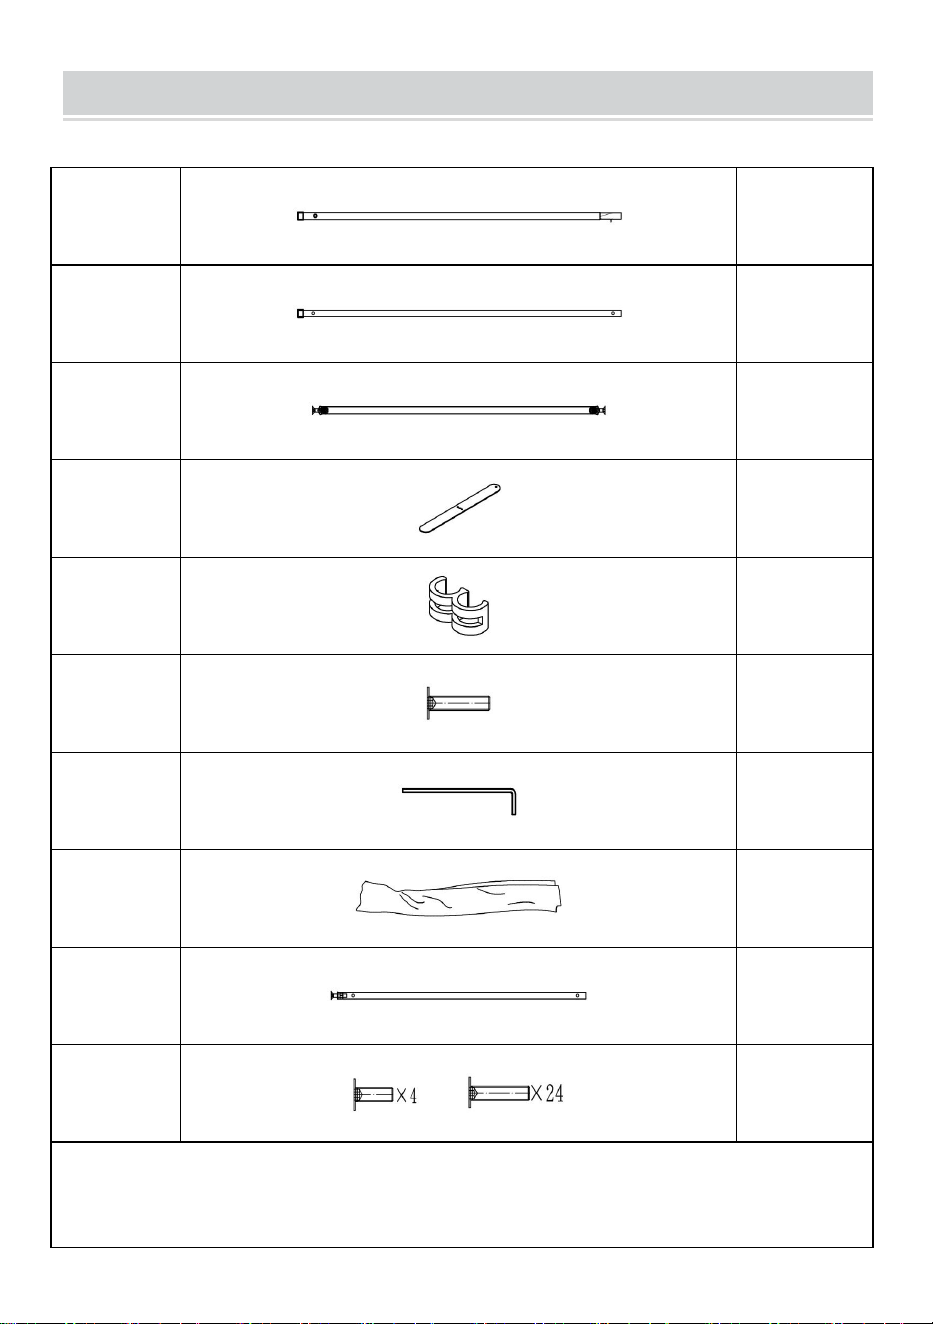
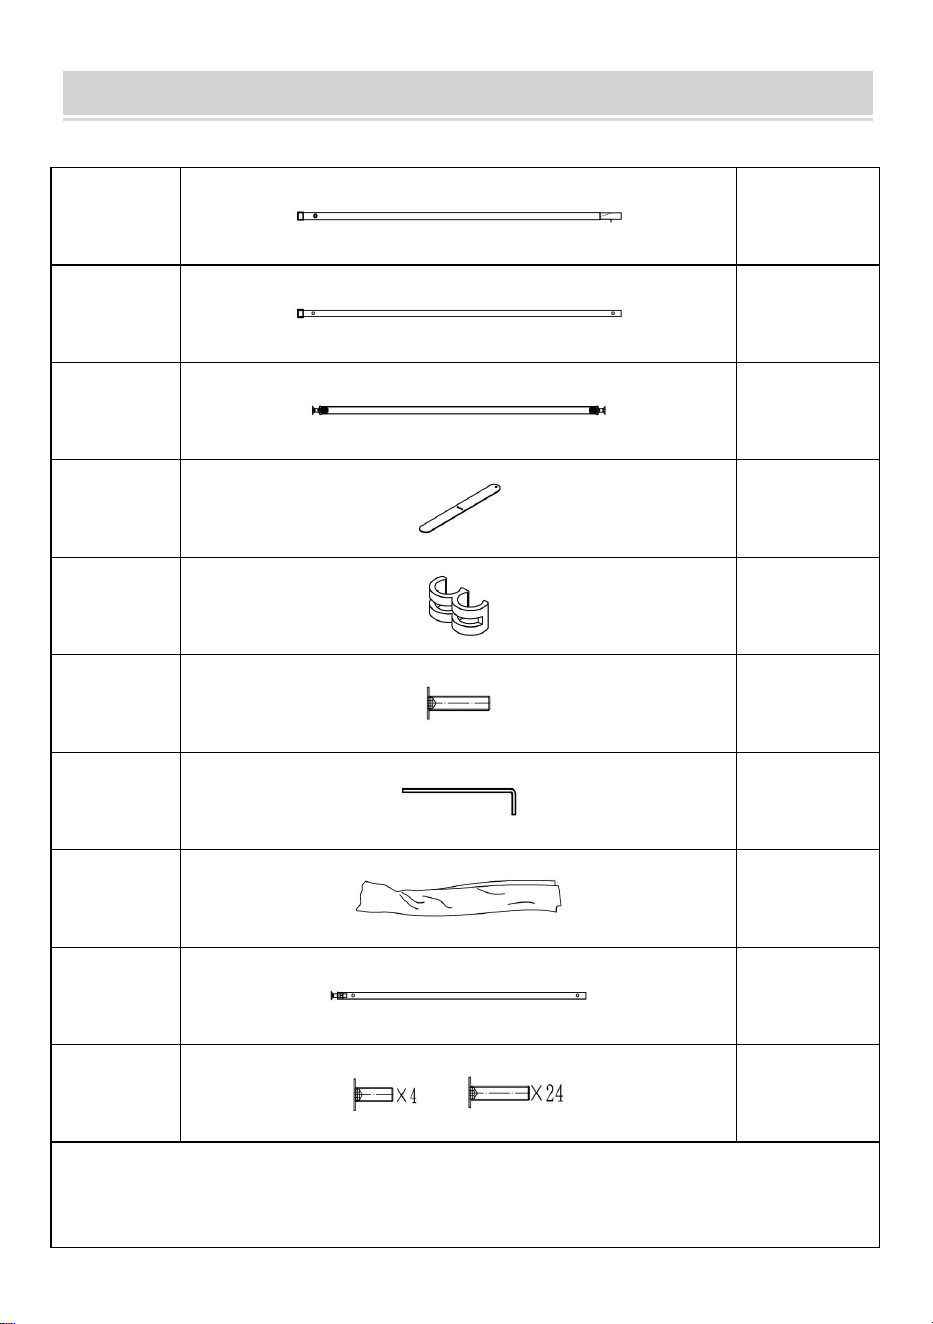
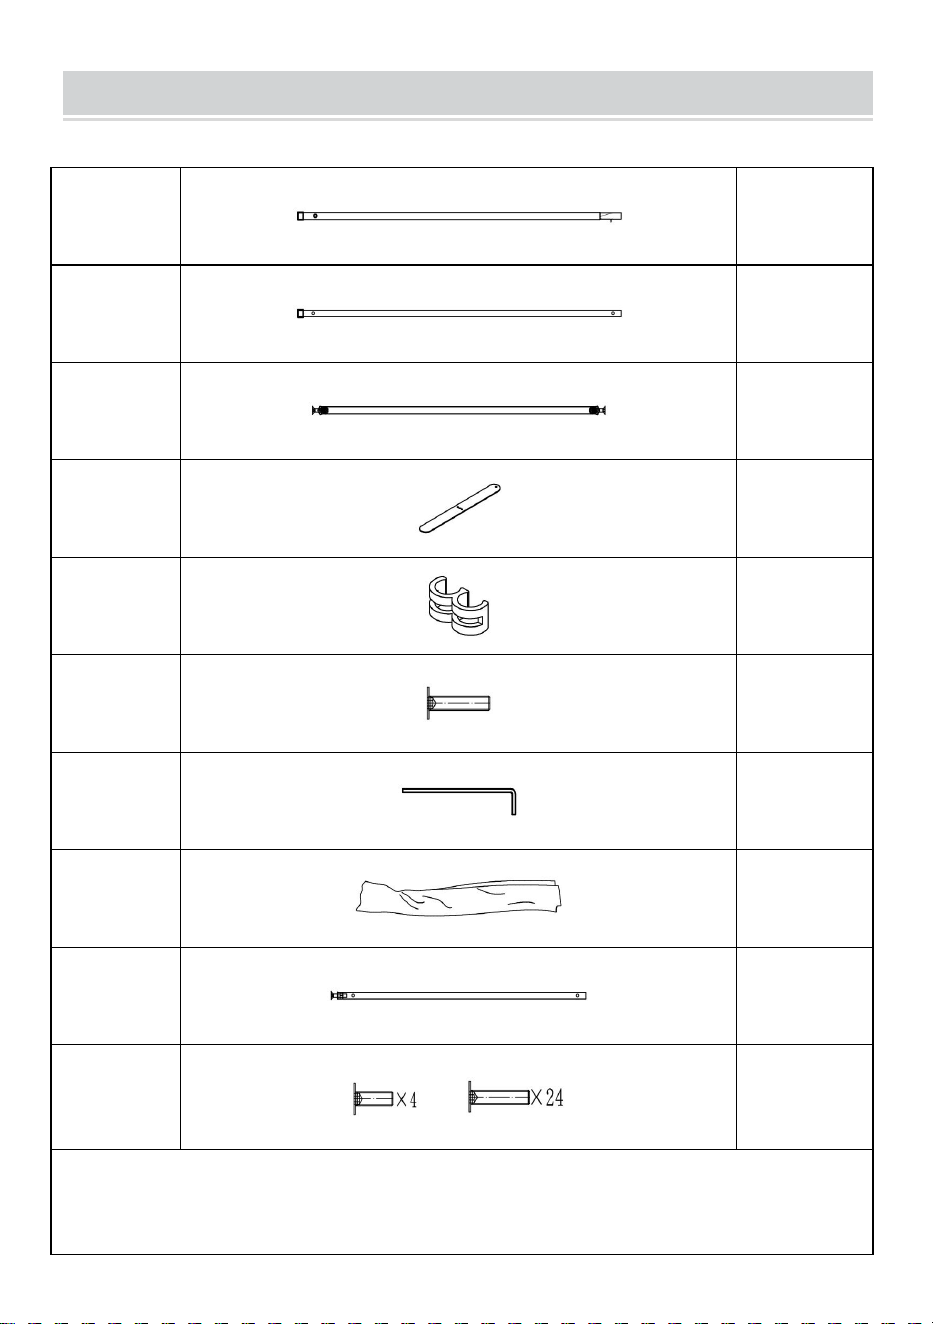
PARTS LIST
A
12
B
8
C
12
D
3
E
15
F
2
G
1
H
6
I
4
J
Preloaded
NOTE: F accessories are spare screws for gift; H is the fabric of the
screen, pay attention not to get dirty when installing.

4
ASSEMBLY STEP
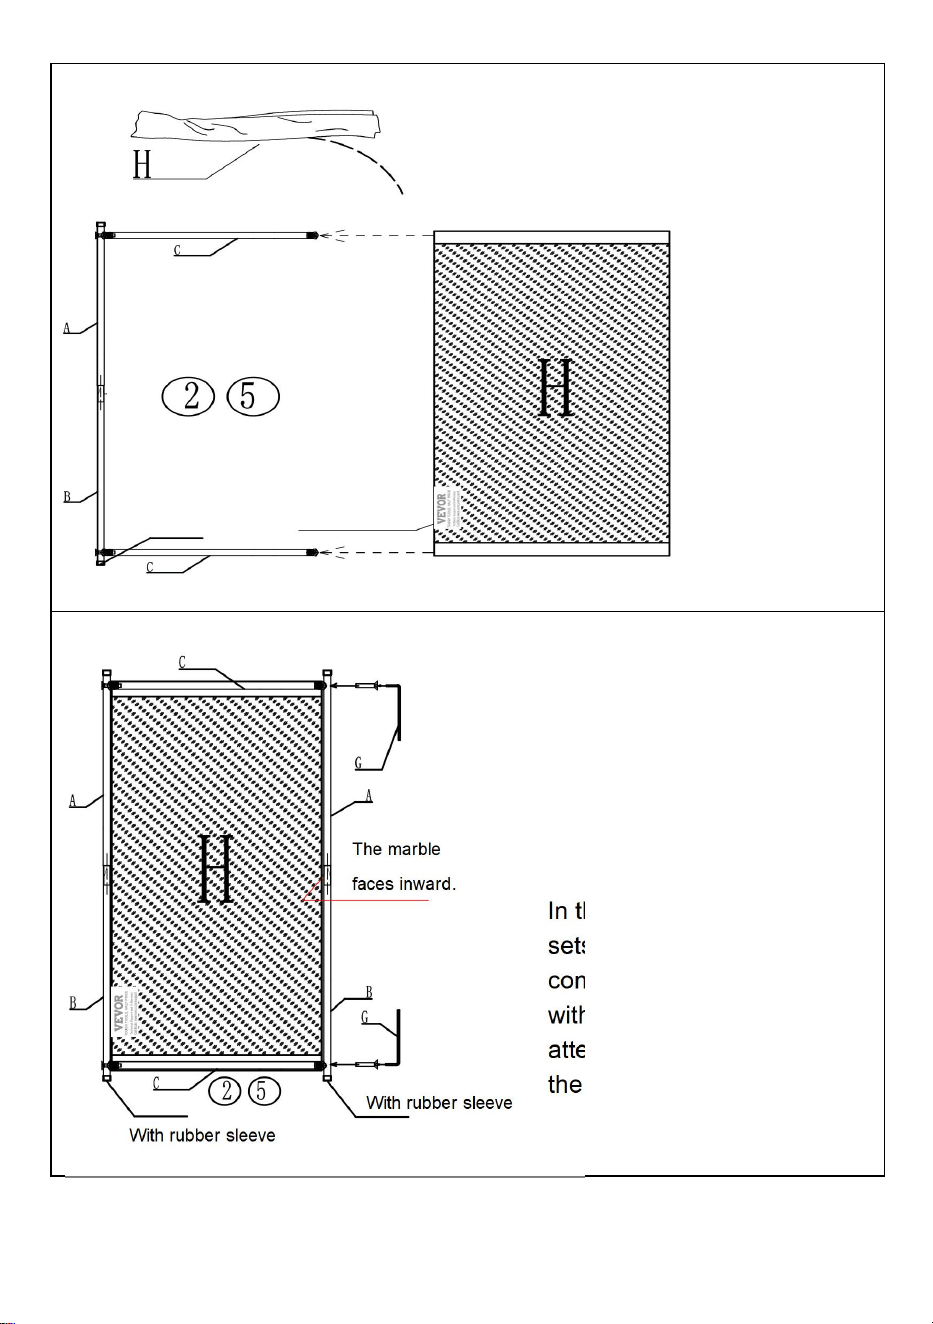
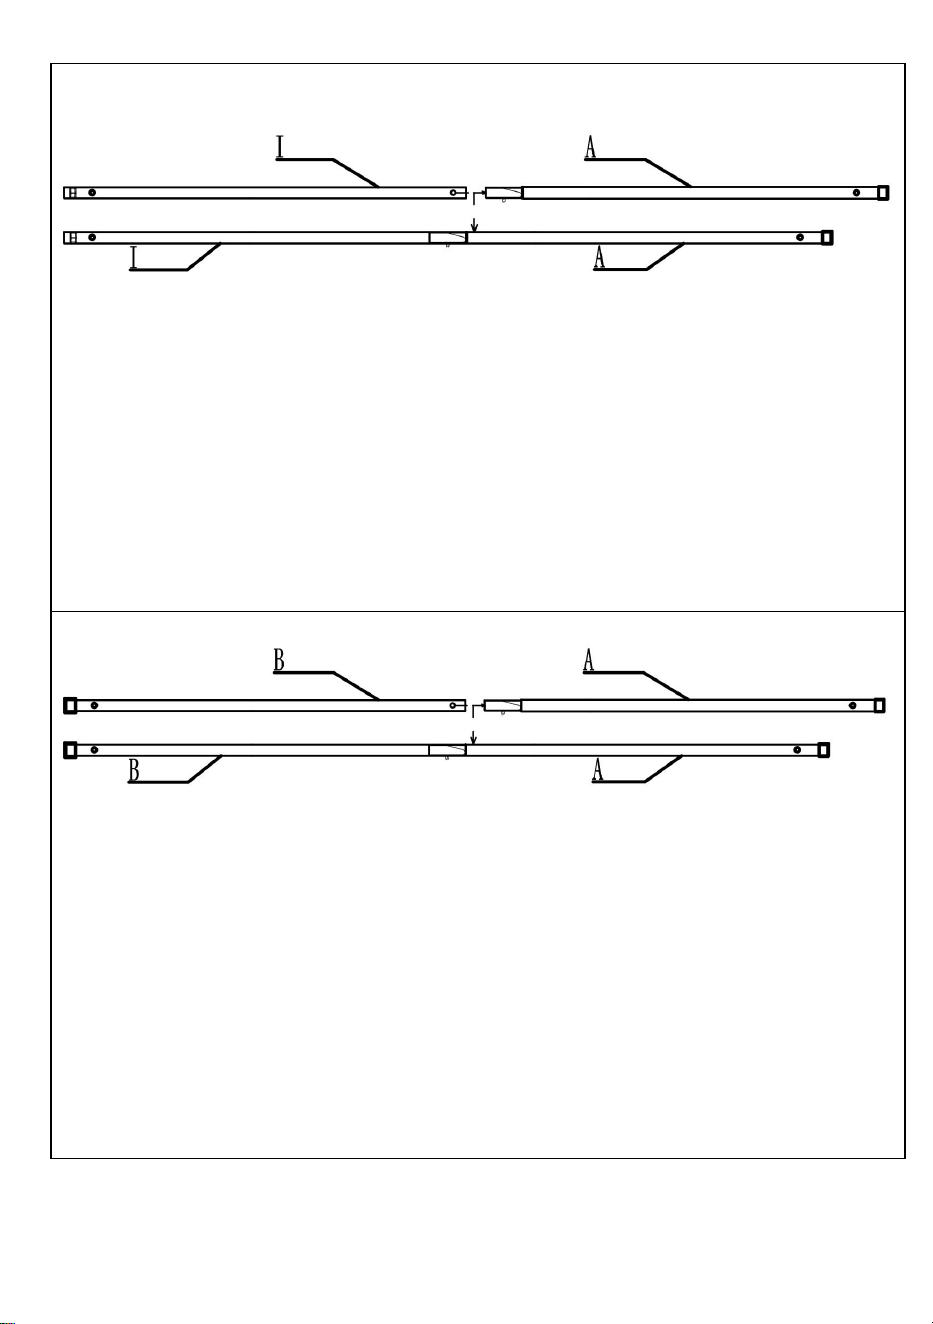
STEP 1
STEP 2
Unscrew from material I and set aside.
Unscrew from material C and set aside.
X4
X12

5
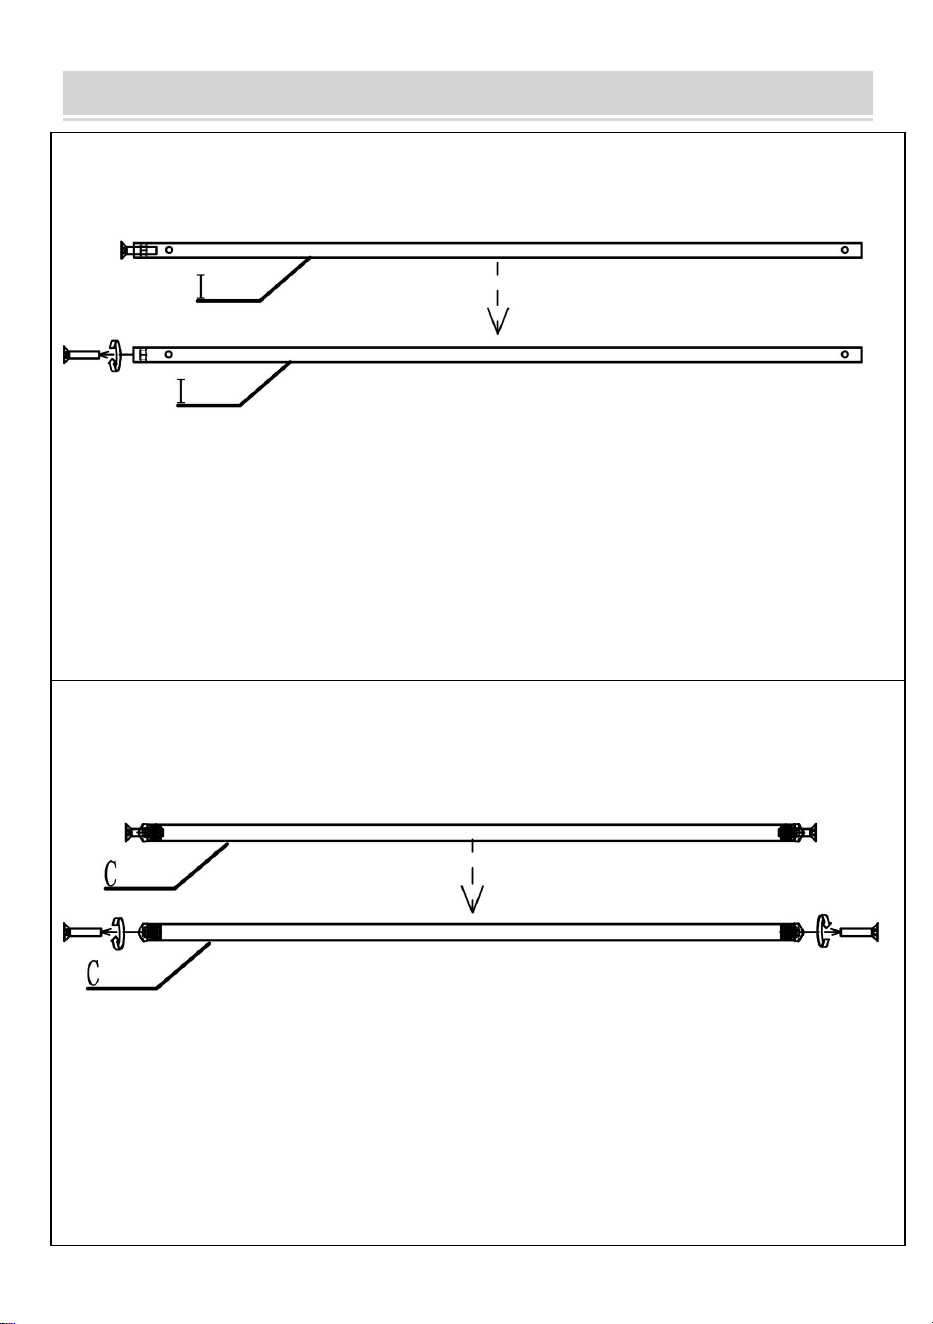
STEP 3
STEP 4
Connect material I and Material A (as shown in the figure) and put
them together.
Total 4 groups
Connect material B and Material A (as shown in the figure) and put
them together.
Total 8 groups

6
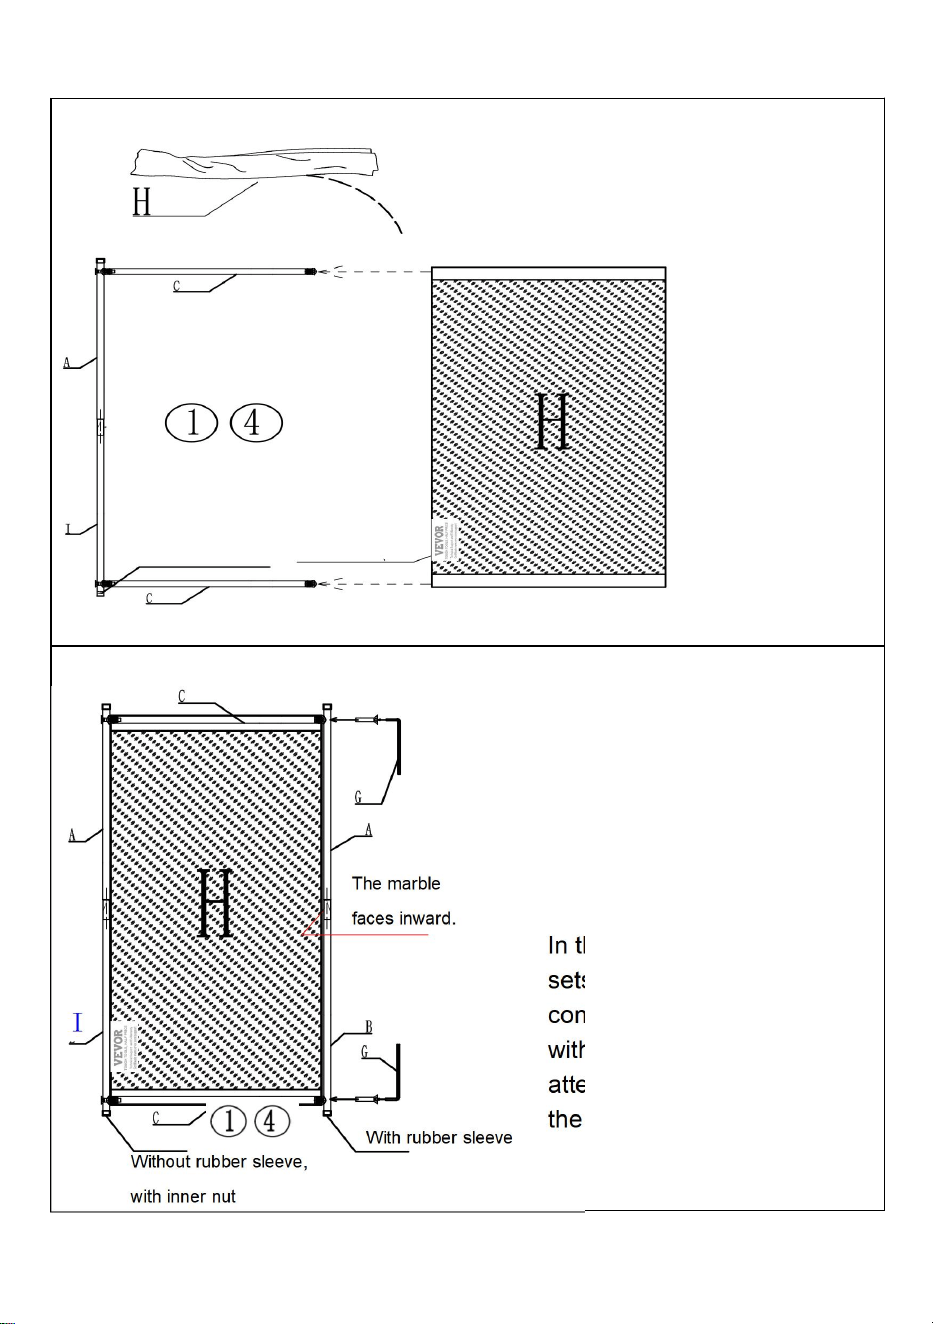
STEP 5
Take the two poles from Step 2 and assemble them on one pole from
Step 3. First unscrew the screw, and then connect through the screw (as
shown in the figure), pay attention to the position of the marble when
combining (as shown in the figure), and then tighten with G tool.This
group is No.①;
Follow the same steps to assemble another group, this group is No.④.
The remaining two sets of tubes go to the side.
The marble faces inward.
The marble faces inward.
The remaining two groups

7
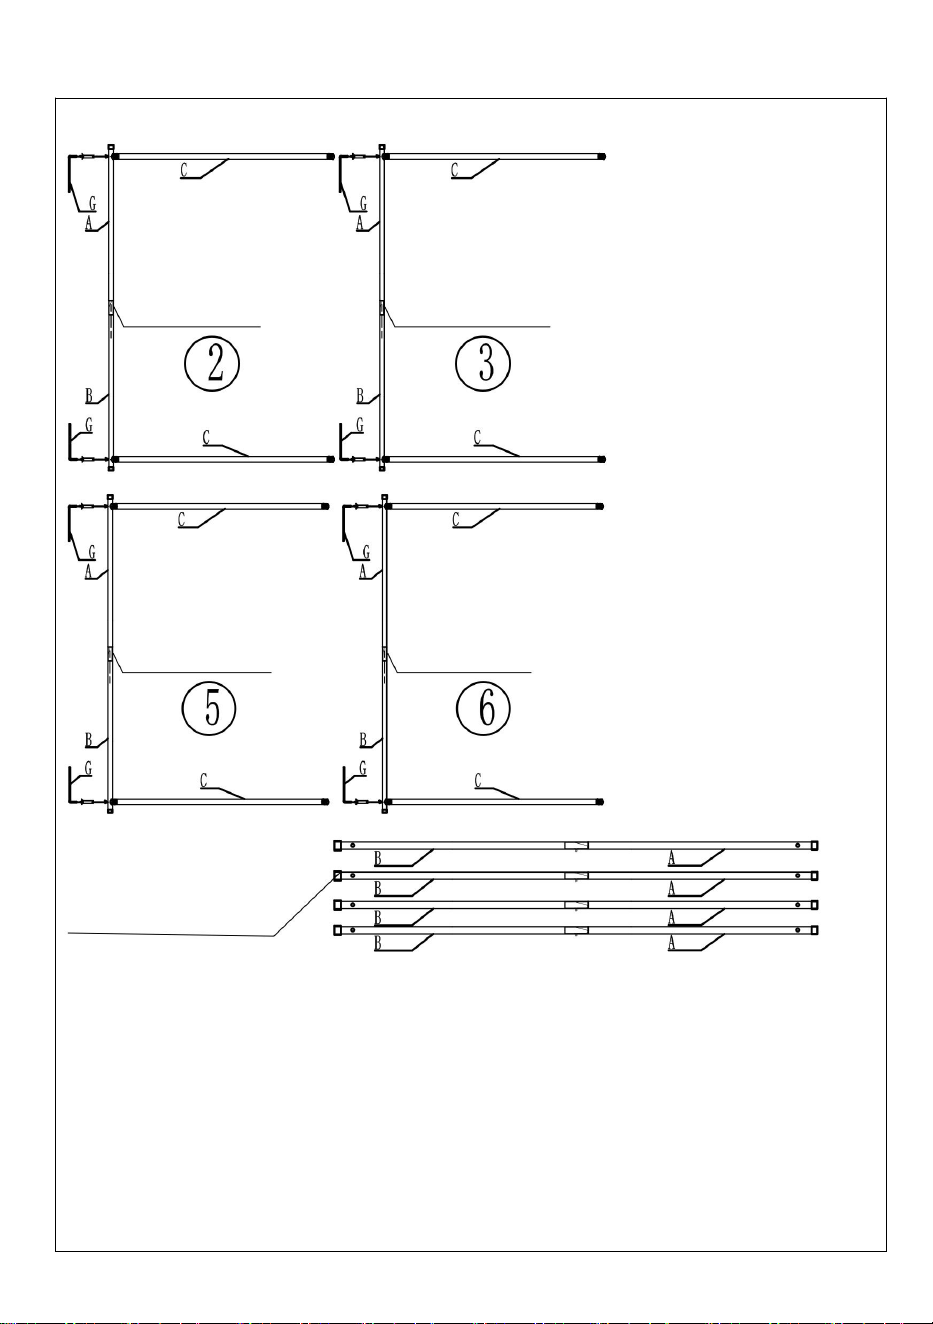
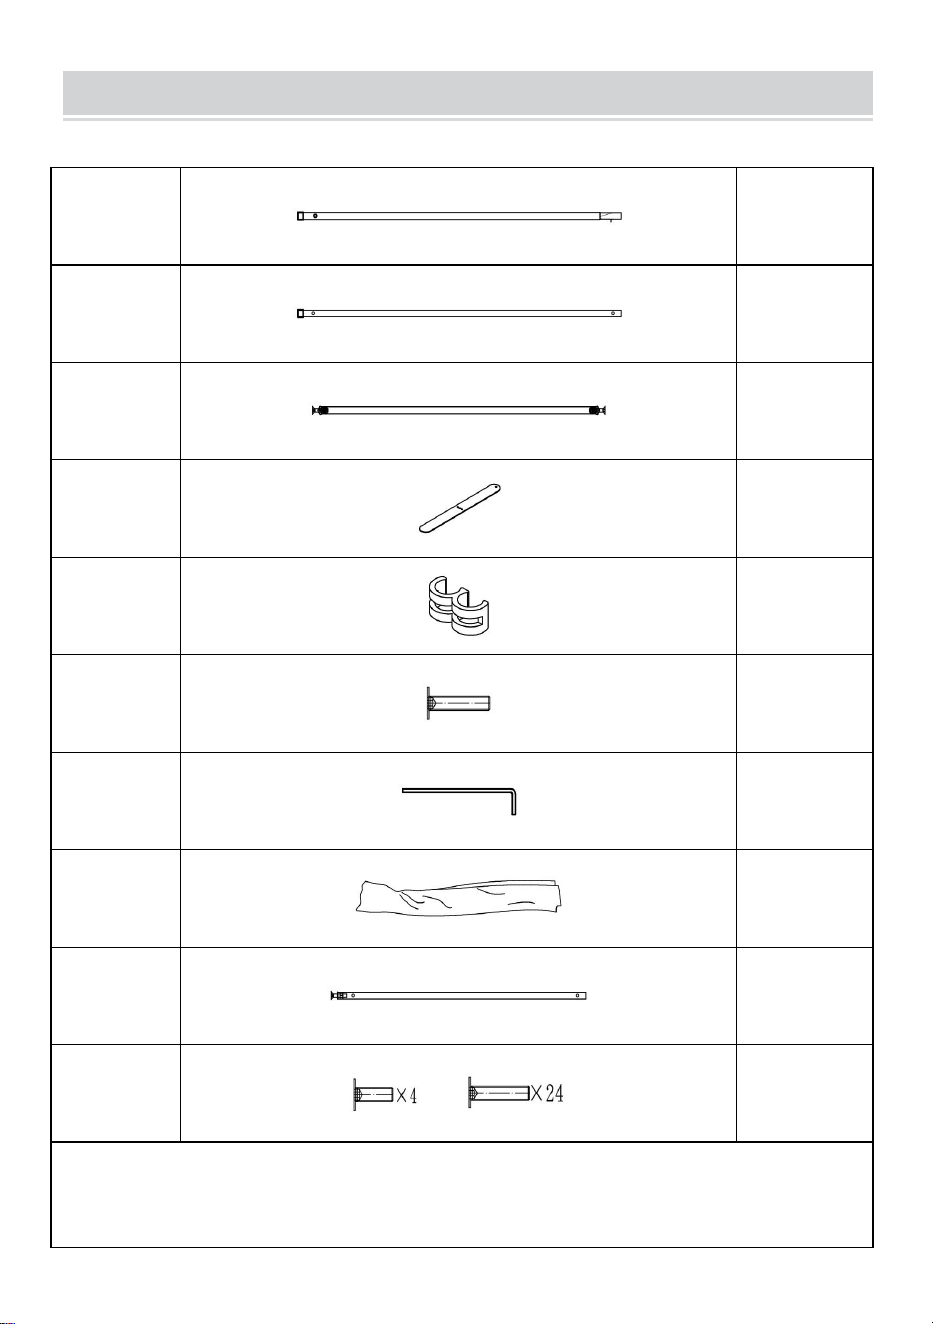
STEP 6
The marble faces inward.
The marble faces inward.
The marble faces inward.
The marble faces inward.
The remaining four groups
Take the two poles from Step 2 and assemble them on one pole from
Step 4. First unscrew the screw, and then connect through the screw (as
shown in the figure), pay attention to the position of the marble when
combining (as shown in the figure), and then tighten with G tool.This
group is No.②;
Follow the same steps to assemble 3 more groups, They're ③-⑤-⑥.
The remaining two sets of tubes go to the side.

8
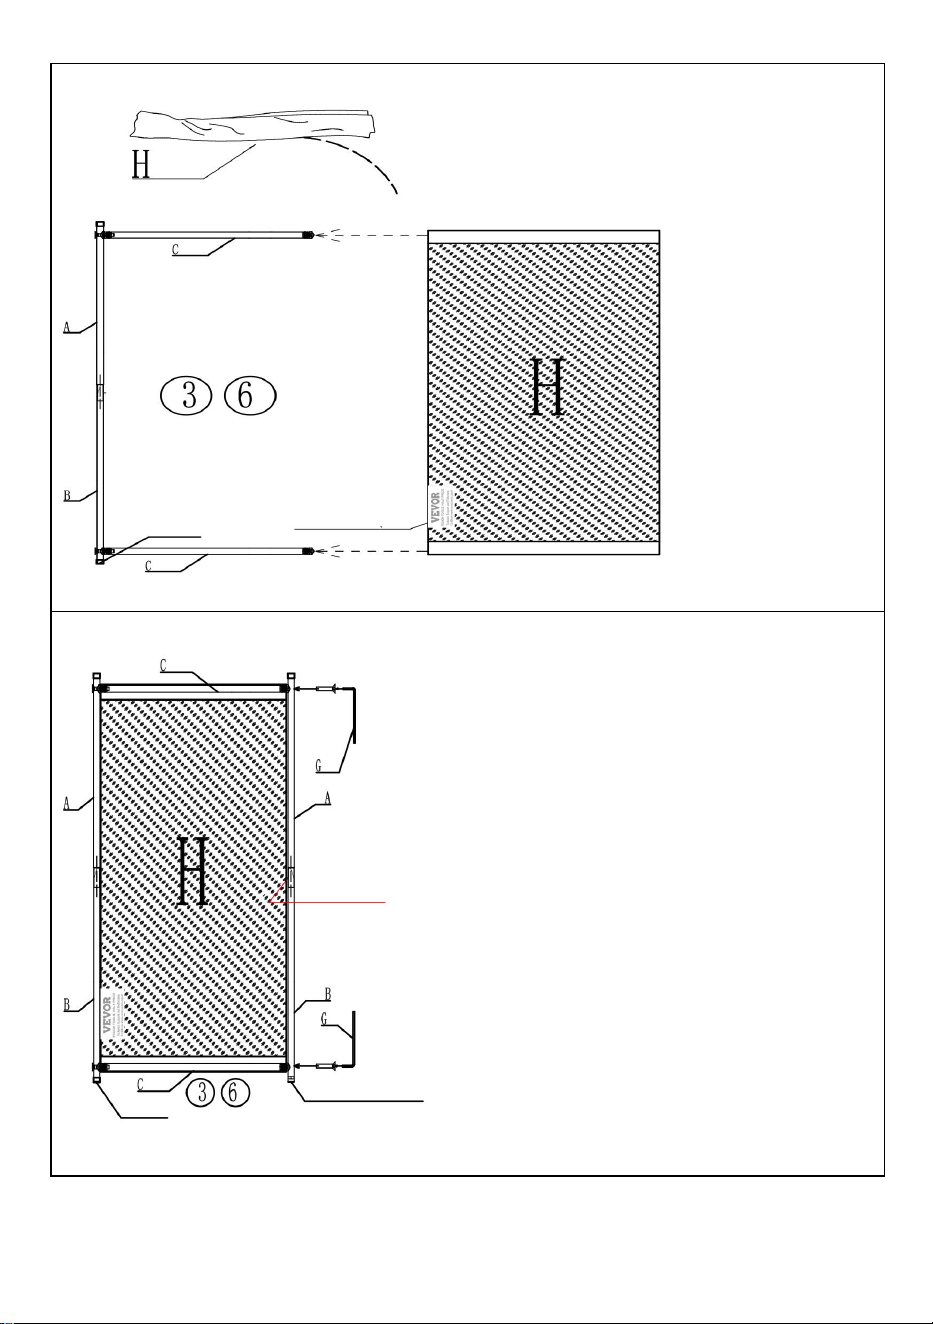
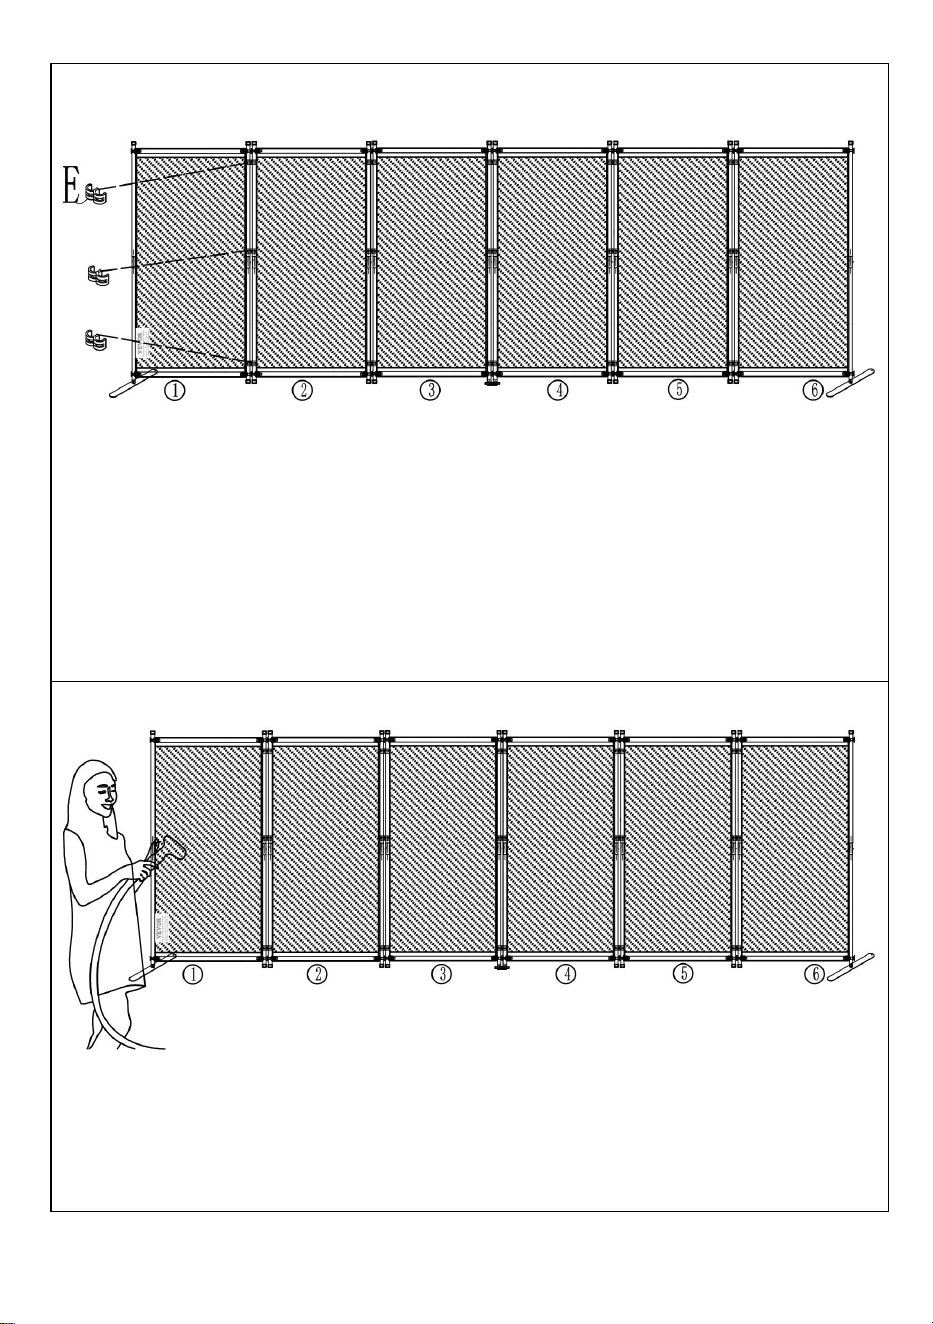
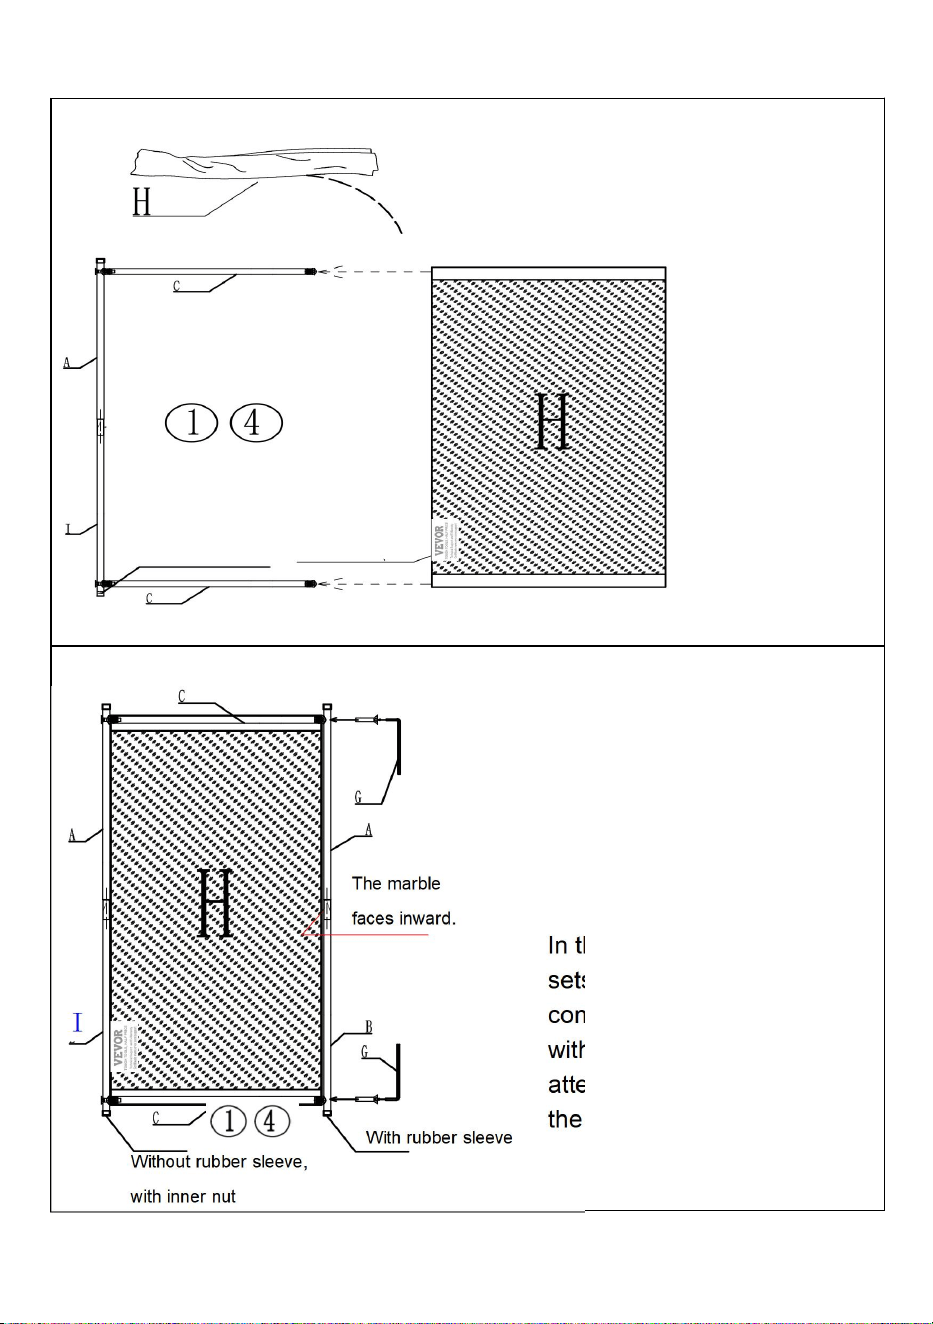
STEP 7
STEP 8
H Material is screen fabric, pay attention to
keep clean during installation
The label
should be at
the bottom
Insert the sleeve of material H into the upper and lower cross bars.
In the pipe of Step 4, take 2
sets, unscrew first, then
connect, and then tighten
with G tool, paying
attention to the position of
the marble.
Without
rubber sleeve,
with inner nut

9
STEP 9
STEP 10
H Material is screen fabric, pay attention to
keep clean during installation
The label
should be at
the bottom
Insert the sleeve of material H into the upper and lower cross bars.
In the pipe of Step 4, take 2
sets, unscrew first, then
connect, and then tighten
with G tool, paying
attention to the position of
the marble.
With rubber
sleeve
10
STEP 11
STEP 12
H Material is screen fabric, pay attention to
keep clean during installation
The label
should be at
the bottom
Insert the sleeve of material H into the upper and lower cross bars.
In the pipe of Step 3, take 2
sets, unscrew first, then
connect, and then tighten
with G tool, paying
attention to the position of
the marble.
With rubber
sleeve
The marble
faces inward.
Without rubber sleeve, with inner nut
With rubber sleeve
11
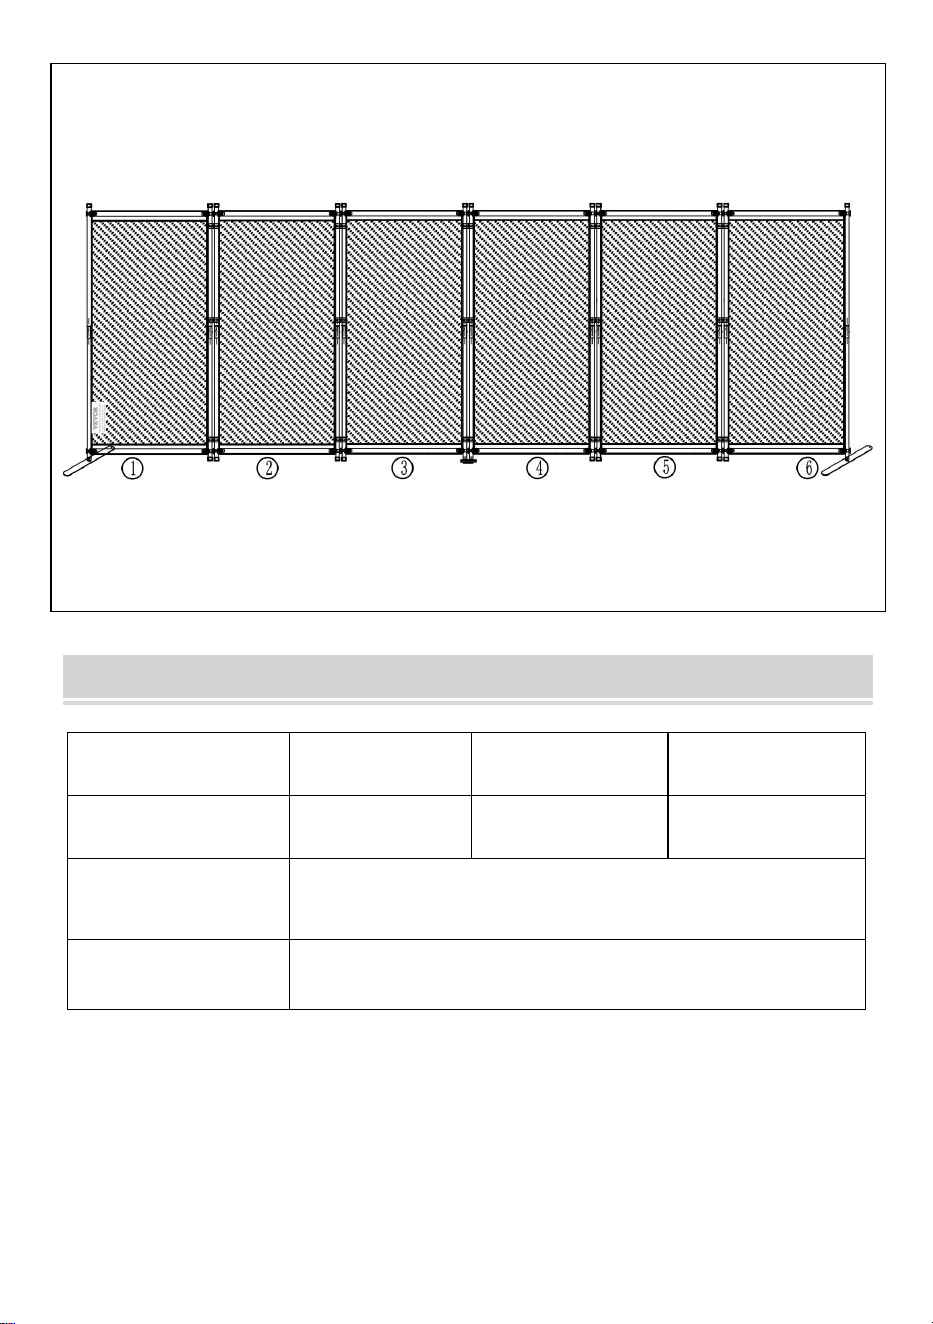
STEP 13
STEP 14
Take the combination of D material and the frame of step 11; First
unscrew the screw on the rod, then connect it, and then tighten it with
tool G.
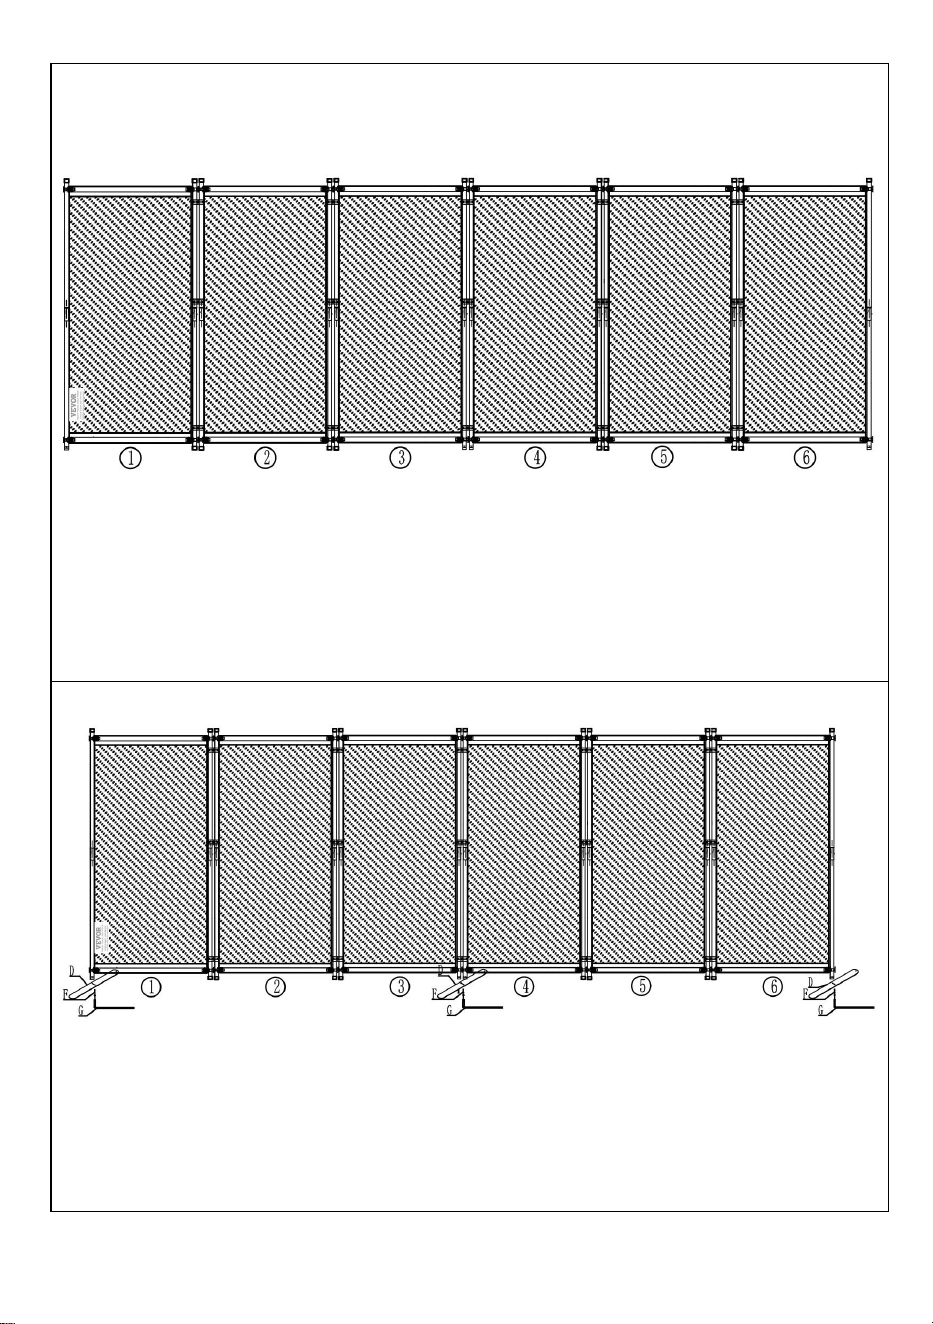
Arrange the assembled shelves in order.

12
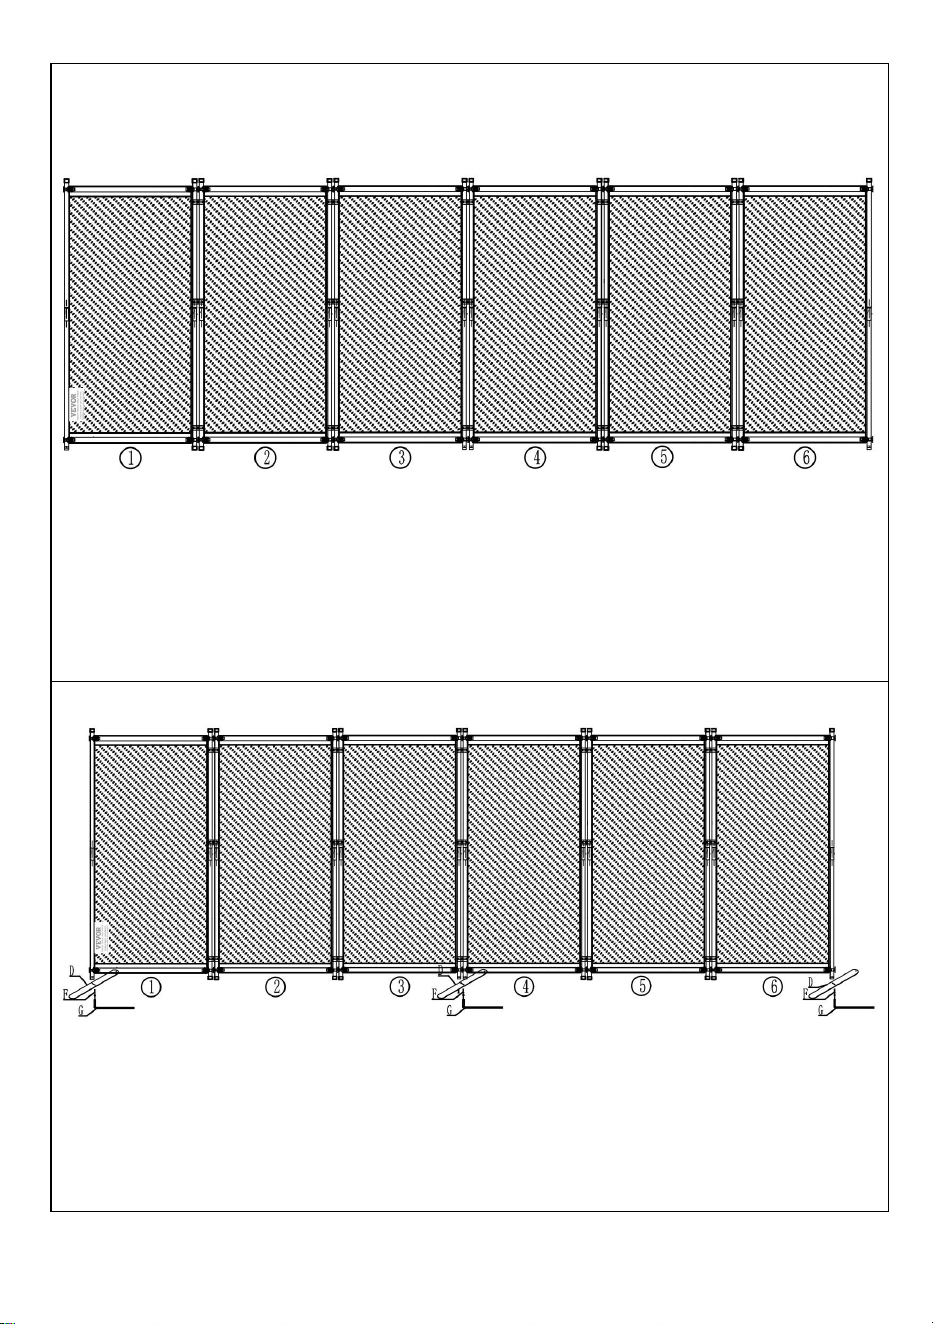
STEP 15
STEP 16
After the installation is completed, arrange the fabric to
ensure that the fabric is smooth. If the fabric has wrinkles,
you can use a household hanging press to iron it.
Put the 6 groups of shelves neatly and connect them by material B.


14
Manufacturer: Shanghaimuxinmuyeyouxiangongsi
Address: Shuangchenglu 803nong11hao1602A-1609shi, baoshanqu,
shanghai 200000 CN.
Imported to AUS: SIHAO PTY LTD. 1 ROKEVA STREETEASTWOOD
NSW 2122 Australia
Imported to USA: Sanven Technology Ltd. Suite 250, 9166 Anaheim
Place, Rancho Cucamonga, CA 91730
REP
UK
YH CONSULTING LIMITED. C/O YH Consulting
Limited Office 147, Centurion House, London
Road, Staines-upon-Thames, Surrey, TW18 4AX
REP
EC
E-CrossStu GmbH
Mainzer Landstr.69,
60329 Frankfurt am Main.


16
Technique Certificat d'assistance et de garantie électronique
www.vevor.com/support
CLOISON DE SÉPARATION EN TISSU
MANUEL D' utilisation
PFSSTBHS10
PFSSTBSH11
PFSSTBMS12
Nous continuons à nous engager à vous fournir des outils à des prix compétitifs.
« Économisez la moitié », « Moitié prix » ou toute autre expression similaire utilisée par
nous uniquement
représente une estimation des économies dont vous pourriez bénéficier en achetant
certains outils
avec nous par rapport aux grandes marques et ne signifie pas nécessairement couverture
toutes les catégories d'outils que nous proposons. Nous vous rappelons de bien vouloir
vérifier soigneusement
lorsque vous passez une commande chez nous si vous êtes réellement Économie
Moitié par rapport aux plus grandes marques.

1
PFSSTBHS10 PFSSTBSH11 PFSSTBMS12
BESOIN D'AIDE? CONTACTEZ-NOUS!
Vous avez des questions sur nos produits ? Vous avez besoin d'une
assistance technique ? N'hésitez pas à nous contacter :
Assistance technique et certificat de garantie électronique
www.vevor.com/support
Il s'agit de la notice d'utilisation d'origine. Veuillez lire attentivement toutes
les instructions du manuel avant de l'utiliser. VEVOR se réserve le droit
d'interpréter clairement notre manuel d'utilisation. L'apparence du produit
dépend du produit que vous avez reçu. Veuillez nous excuser, nous ne
vous informerons plus si des mises à jour technologiques ou logicielles
sont disponibles sur notre produit.
FABRIC ROOM DIVIDE

2
SAFETY INSTRUCTIONS
AVERTISSEMENT:
Lisez ce document avant d'utiliser ce produit. Le non-respect de ces
instructions peut entraîner des blessures graves.
Précautions de montage
9. Assembler uniquement selon ces instructions. Un assemblage
incorrect peut créer des dangers.
10. Portez des lunettes de sécurité approuvées ANSI et des gants de
travail robustes pendant l’assemblage.
11. Gardez la zone de montage propre et bien éclairée.
12. Gardez les spectateurs hors de la zone pendant le montage.
13. Ne pas monter si vous êtes fatigué ou sous l'influence de l'alcool, de
drogues ou de médicaments.
14. Les capacités du produit s'appliquent uniquement aux produits
correctement et entièrement assemblés.
15. Assemblez-le sur une surface plane, de niveau, dure et lisse capable
de supporter en toute sécurité le séparateur de pièce en tissu.
16. Pour plus d'informations sur les pièces répertoriées dans les pages
suivantes, reportez-vous au schéma d'assemblage de ce manuel.
Déballez et séparez toutes les pièces dans un espace de travail
propre.
Précautions d'emploi
7. NE PAS S'ASSEOIR OU SE TENIR DEBOUT SUR CET ARTICLE.
8. Ce produit n'est pas un jouet. Ne laissez pas les enfants jouer avec ou
à proximité de cet article.
9. Ne pas dépasser la quantité spécifiée capacités de poids.
10. Utiliser uniquement sur une surface plane, de niveau, dure et lisse
pouvant supporter en toute sécurité une cloison de séparation en tissu
entièrement chargée.
11. Utiliser uniquement comme prévu.

3
12. Inspectez avant chaque utilisation ; ne pas utiliser si des pièces sont
desserrées ou endommagées.
CONSERVER CE MANUEL
4
PARTS LIST
UN
12
B
8
C
12
D
3
E
15
F
2
G
1
H
6
je
4
J
P rechargé
REMARQUE : Les accessoires F sont des vis de rechange en
cadeau ; H est le tissu de l'écran, faites attention à ne pas vous salir
lors de l'installation.

5
ASSEMBLY STEP
ÉTAPE 1
ÉTAPE 2
Unscrew from material I and set aside.
Unscrew from material C and set aside.
X4
X12

6
ÉTAPE 3
ÉTAPE 4
Connect material I and Material A (as shown in the figure) and put
them together.
Total 4 groups
Connect material B and Material A (as shown in the figure) and put
them together.
Total 8 groups

7
ÉTAPE 5
Take the two poles from Step 2 and assemble them on one pole from
Step 3. First unscrew the screw, and then connect through the screw (as
shown in the figure), pay attention to the position of the marble when
combining (as shown in the figure), and then tighten with G tool.This
group is No.①;
Follow the same steps to assemble another group, this group is No.④.
The remaining two sets of tubes go to the side.
The marble faces inward.
The marble faces inward.
The remaining two groups

8
ÉTAPE 6
The marble faces inward.
The marble faces inward.
The marble faces inward.
The marble faces inward.
The remaining four groups
Take the two poles from Step 2 and assemble them on one pole from
Step 4. First unscrew the screw, and then connect through the screw (as
shown in the figure), pay attention to the position of the marble when
combining (as shown in the figure), and then tighten with G tool.This
group is No.②;
Follow the same steps to assemble 3 more groups, They're ③-⑤-⑥.
The remaining two sets of tubes go to the side.

9
ÉTAPE 7
ÉTAPE 8
H Material is screen fabric, pay attention to
keep clean during installation
The label
should be at
the bottom
Insert the sleeve of material H into the upper and lower cross bars.
In the pipe of Step 4, take 2
sets, unscrew first, then
connect, and then tighten
with G tool, paying
attention to the position of
the marble.
Without
rubber sleeve,
with inner nut

10
ÉTAPE 9
ÉTAPE 10
H Material is screen fabric, pay attention to
keep clean during installation
The label
should be at
the bottom
Insert the sleeve of material H into the upper and lower cross bars.
In the pipe of Step 4, take 2
sets, unscrew first, then
connect, and then tighten
with G tool, paying
attention to the position of
the marble.
With rubber
sleeve

11
ÉTAPE 11
ÉTAPE 12
H Material is screen fabric, pay attention to
keep clean during installation
The label
should be at
the bottom
Insert the sleeve of material H into the upper and lower cross bars.
In the pipe of Step 3, take 2
sets, unscrew first, then
connect, and then tighten
with G tool, paying
attention to the position of
the marble.
With rubber
sleeve
The marble
faces inward.
Without rubber sleeve, with inner nut
With rubber sleeve

12
ÉTAPE 13
ÉTAPE 14
Take the combination of D material and the frame of step 11; First
unscrew the screw on the rod, then connect it, and then tighten it with
tool G.
Arrange the assembled shelves in order.

13
ÉTAPE 15
ÉTAPE 16
After the installation is completed, arrange the fabric to
ensure that the fabric is smooth. If the fabric has wrinkles,
you can use a household hanging press to iron it.
Put the 6 groups of shelves neatly and connect them by material B.


15
Fabricant : Shanghaimuxinmuyeyouxiangongsi
Adresse : Shuangchenglu 803nong11hao1602A-1609shi, baoshanqu,
Shanghai 200 000 CN.
Importé en Australie : SIHAO PTY LTD. 1 ROKEVA
STREETEASTWOOD
NSW 2122 Australie
Importé aux États-Unis : Sanven Technology Ltd. Suite 250, 9166
Anaheim
Lieu, Rancho Cucamonga, CA 91730
REP
UK
YH CONSULTING LIMITED. C/O YH Consulting
Limited Office 147, Centurion House, London
Road, Staines-upon-Thames, Surrey, TW18 4AX
REP
EC
E-CrossStu GmbH
Mainzer Landstr.69,
60329 Frankfurt am Main.

16


18
Technisch Support und E-Garantie-Zertifikat
www.vevor.com/support
RAUMTEILER AUS STOFF
Benutzerhandbuch
PFSSTBHS10
PFSSTBSH11
PFSSTBMS12
Wir sind weiterhin bestrebt, Ihnen Werkzeuge zu wettbewerbsfähigen Preisen anzubieten.
"Sparen Sie die Hälfte", "Halber Preis" oder andere ähnliche Ausdrücke, die wir nur
verwenden
stellt eine Schätzung der Einsparungen dar, die Sie durch den Kauf bestimmter Werkzeuge
erzielen können
mit uns im Vergleich zu den großen Top-Marken und bedeutet nicht unbedingt, Abdeckung
alle von uns angebotenen Werkzeugkategorien. Wir möchten Sie bitten, zu überprüfen
sorgfältig
wenn Sie bei uns eine Bestellung aufgeben, wenn Sie tatsächlich Speichern
Hälfte im Vergleich mit den Top-Großmarken.

1
PFSSTBHS10 PFSSTBSH11 PFSSTBMS12
Brauchen Sie Hilfe? Kontaktieren Sie uns!
Sie haben Fragen zu unseren Produkten? Sie benötigen technischen
Support? Dann kontaktieren Sie uns gerne:
Technischer Support und E-Garantie-Zertifikat
www.vevor.com/support
Dies ist die Originalanleitung. Bitte lesen Sie alle Anweisungen sorgfältig
durch, bevor Sie das Gerät in Betrieb nehmen. VEVOR behält sich eine
klare Auslegung unserer Bedienungsanleitung vor. Das Erscheinungsbild
des Produkts richtet sich nach dem Produkt, das Sie erhalten haben. Bitte
verzeihen Sie uns, dass wir Sie nicht erneut informieren, wenn es
Technologie- oder Software-Updates für unser Produkt gibt .
FABRIC ROOM DIVIDE

2
SAFETY INSTRUCTIONS
WARNUNG:
Lesen Sie dieses Material, bevor Sie dieses Produkt verwenden.
Andernfalls kann es zu schweren Verletzungen kommen.
Vorsichtsmaßnahmen bei der Montage
17. Führen Sie die Montage nur gemäß dieser Anleitung durch. Eine
unsachgemäße Montage kann zu Gefahren führen.
18. Tragen Sie während der Montage eine ANSI-geprüfte Schutzbrille und
robuste Arbeitshandschuhe.
19. Halten Sie den Versammlungsbereich sauber und gut beleuchtet.
20. Halten Sie während der Montage unbeteiligte Zuschauer vom Bereich
fern.
21. Nicht zusammenbauen, wenn Sie müde sind oder unter Einfluss von
Alkohol, Drogen oder Medikamenten stehen.
22. Die Produktfunktionen gelten nur für ordnungsgemäß und vollständig
montierte Produkte.
23. Montieren Sie es auf einer flachen, ebenen, harten und glatten
Oberfläche, die die Stoff-Raumteiler sicher tragen kann.
24. Weitere Informationen zu den auf den folgenden Seiten aufgeführten
Teilen finden Sie im Montagediagramm dieses Handbuchs. Packen
Sie alle Teile in einem sauberen Arbeitsbereich aus und trennen Sie
sie.
Vorsichtsmaßnahmen treffen
13. SETZEN ODER STELLEN SIE SICH NICHT AUF DIESEN GEGENSTAND.
14. Dieses Produkt ist kein Spielzeug. Erlauben Sie Kindern nicht, mit
oder in der Nähe dieses Artikels zu spielen.
15. Überschreiten Sie nicht die angegebenen Gewichtskapazitäten.
16. Nur auf einer flachen, ebenen, harten und glatten Oberfläche
verwenden, die eine voll beladene Raumteiler aus Stoff sicher tragen
kann.
17. Nur bestimmungsgemäß verwenden.

3
18. Vor jedem Gebrauch prüfen; nicht verwenden, wenn Teile lose oder
beschädigt sind.
BEWAHREN SIE DIESES HANDBUCH AUF

4
PARTS LIST
A
12
B
8
C
12
D
3
E
15
F
2
G
1
H
6
ICH
4
J
Vorgeladen
HINWEIS : Bei Zubehör F handelt es sich um Ersatzschrauben als
Geschenk; H ist der Stoff des Bildschirms. Achten Sie darauf, dass er
bei der Installation nicht schmutzig wird.

5
ASSEMBLY STEP
SCHRITT 1
SCHRITT 2
Unscrew from material I and set aside.
Unscrew from material C and set aside.
X4
X12

6
SCHRITT 3
SCHRITT 4
Connect material I and Material A (as shown in the figure) and put
them together.
Total 4 groups
Connect material B and Material A (as shown in the figure) and put
them together.
Total 8 groups

7
SCHRITT 5
Take the two poles from Step 2 and assemble them on one pole from
Step 3. First unscrew the screw, and then connect through the screw (as
shown in the figure), pay attention to the position of the marble when
combining (as shown in the figure), and then tighten with G tool.This
group is No.①;
Follow the same steps to assemble another group, this group is No.④.
The remaining two sets of tubes go to the side.
The marble faces inward.
The marble faces inward.
The remaining two groups
8
SCHRITT 6
The marble faces inward.
The marble faces inward.
The marble faces inward.
The marble faces inward.
The remaining four groups
Take the two poles from Step 2 and assemble them on one pole from
Step 4. First unscrew the screw, and then connect through the screw (as
shown in the figure), pay attention to the position of the marble when
combining (as shown in the figure), and then tighten with G tool.This
group is No.②;
Follow the same steps to assemble 3 more groups, They're ③-⑤-⑥.
The remaining two sets of tubes go to the side.
9
SCHRITT 7
SCHRITT 8
H Material is screen fabric, pay attention to
keep clean during installation
The label
should be at
the bottom
Insert the sleeve of material H into the upper and lower cross bars.
In the pipe of Step 4, take 2
sets, unscrew first, then
connect, and then tighten
with G tool, paying
attention to the position of
the marble.
Without
rubber sleeve,
with inner nut

10
SCHRITT 9
SCHRITT 10
H Material is screen fabric, pay attention to
keep clean during installation
The label
should be at
the bottom
Insert the sleeve of material H into the upper and lower cross bars.
In the pipe of Step 4, take 2
sets, unscrew first, then
connect, and then tighten
with G tool, paying
attention to the position of
the marble.
With rubber
sleeve

11
SCHRITT 11
SCHRITT 12
H Material is screen fabric, pay attention to
keep clean during installation
The label
should be at
the bottom
Insert the sleeve of material H into the upper and lower cross bars.
In the pipe of Step 3, take 2
sets, unscrew first, then
connect, and then tighten
with G tool, paying
attention to the position of
the marble.
With rubber
sleeve
The marble
faces inward.
Without rubber sleeve, with inner nut
With rubber sleeve

12
SCHRITT 13
SCHRITT 14
Take the combination of D material and the frame of step 11; First
unscrew the screw on the rod, then connect it, and then tighten it with
tool G.
Arrange the assembled shelves in order.

13
SCHRITT 15
SCHRITT 16
After the installation is completed, arrange the fabric to
ensure that the fabric is smooth. If the fabric has wrinkles,
you can use a household hanging press to iron it.
Put the 6 groups of shelves neatly and connect them by material B.


15
Hersteller: Shanghaimuxinmuyeyouxiangongsi
Adresse: Shuangchenglu 803nong11hao1602A-1609shi, baoshanqu,
Shanghai, 200.000 CN.
Nach AUS importiert: SIHAO PTY LTD. 1 ROKEVA
STREETEASTWOOD
NSW 2122 Australien
Importiert in die USA: Sanven Technology Ltd. Suite 250, 9166 Anaheim
Ort, Rancho Cucamonga, CA 91730
REP
UK
YH CONSULTING LIMITED. C/O YH Consulting
Limited Office 147, Centurion House, London
Road, Staines-upon-Thames, Surrey, TW18 4AX
REP
EC
E-CrossStu GmbH
Mainzer Landstr.69,
60329 Frankfurt am Main.

16
Technisch Support und E-Garantie-Zertifikat


18
Tecnico Supporto e certificato di garanzia elettronica
www.vevor.com/support
DIVISORIO IN TESSUTO
MANUALE D' uso
PFSSTBHS10
PFSSTBSH11
PFSSTBMS12
Continuiamo a impegnarci per fornirvi strumenti a prezzi competitivi.
"Risparmia la metà", "Metà prezzo" o altre espressioni simili utilizzate solo da noi
rappresenta una stima dei risparmi che potresti ottenere acquistando determinati strumenti
con noi rispetto ai principali marchi top e non significa necessariamente copertina
tutte le categorie di strumenti da noi offerti. Ti ricordiamo cortesemente di verificare
accuratamente
quando effettui un ordine con noi se sei effettivamente Risparmio
Metà rispetto ai marchi più importanti.

1
PFSSTBHS10 PFSSTBSH11 PFSSTBMS12
HAI BISOGNO DI AIUTO? CONTATTACI!
Hai domande sui prodotti? Hai bisogno di supporto tecnico? Non
esitare a contattarci:
Supporto tecnico e certificato di garanzia elettronica
www.vevor.com/support
Questa è l'istruzione originale, si prega di leggere attentamente tutte le
istruzioni del manuale prima di utilizzare. VEVOR si riserva una chiara
interpretazione del nostro manuale utente. L'aspetto del prodotto sarà
soggetto al prodotto ricevuto. Vi preghiamo di perdonarci se non vi
informeremo di nuovo se ci sono aggiornamenti tecnologici o software sul
nostro prodotto.
FABRIC ROOM DIVIDE

2
SAFETY INSTRUCTIONS
AVVERTIMENTO:
Leggere questo materiale prima di utilizzare questo prodotto. La
mancata osservanza di questa precauzione può causare gravi lesioni.
Precauzioni di montaggio
25. Montare solo secondo queste istruzioni. Un montaggio improprio può
creare pericoli.
26. Durante il montaggio, indossare occhiali di sicurezza omologati ANSI e
guanti da lavoro resistenti.
27. Mantenere l'area di riunione pulita e ben illuminata.
28. Durante l'assemblea, tenere gli astanti lontani dall'area.
29. Non riunirsi se si è stanchi o sotto l'effetto di alcol, droghe o farmaci.
30. Le capacità del prodotto si applicano solo ai prodotti correttamente e
completamente assemblati.
31. Montare su una superficie piana, livellata, dura e liscia, in grado di
sostenere in modo sicuro il divisorio in tessuto.
32. Per ulteriori informazioni sulle parti elencate nelle pagine seguenti,
fare riferimento allo schema di montaggio di questo manuale.
Disimballare e separare tutte le parti in un'area di lavoro pulita.
Usare precauzioni
19. NON SEDERSI O STARE IN PIEDI SU QUESTO OGGETTO.
20. Questo prodotto non è un giocattolo. Non permettere ai bambini di
giocare con o vicino a questo articolo.
21. Non superare i limiti specificati capacità di peso.
22. Utilizzare solo su una superficie piana, livellata, dura e liscia in grado
di sostenere in modo sicuro un divisorio in tessuto completamente
carico.
23. Utilizzare solo come previsto.
24. Ispezionare prima di ogni utilizzo; non utilizzare se alcune parti
risultano allentate o danneggiate.

3
SALVA QUESTO MANUALE
4
PARTS LIST
UN
12
B
8
C
12
D
3
E
15
F
2
G
1
H
6
IO
4
J
Pre
ricaricato
NOTA : gli accessori F sono viti di ricambio in regalo; H è il tessuto
dello schermo, fare attenzione a non sporcarlo durante
l'installazione.

5
ASSEMBLY STEP
PASSO 1
PASSO 2
Unscrew from material I and set aside.
Unscrew from material C and set aside.
X4
X12

6
PASSO 3
PASSO 4
Connect material I and Material A (as shown in the figure) and put
them together.
Total 4 groups
Connect material B and Material A (as shown in the figure) and put
them together.
Total 8 groups

7
PASSO 5
Take the two poles from Step 2 and assemble them on one pole from
Step 3. First unscrew the screw, and then connect through the screw (as
shown in the figure), pay attention to the position of the marble when
combining (as shown in the figure), and then tighten with G tool.This
group is No.①;
Follow the same steps to assemble another group, this group is No.④.
The remaining two sets of tubes go to the side.
The marble faces inward.
The marble faces inward.
The remaining two groups

8
PASSO 6
The marble faces inward.
The marble faces inward.
The marble faces inward.
The marble faces inward.
The remaining four groups
Take the two poles from Step 2 and assemble them on one pole from
Step 4. First unscrew the screw, and then connect through the screw (as
shown in the figure), pay attention to the position of the marble when
combining (as shown in the figure), and then tighten with G tool.This
group is No.②;
Follow the same steps to assemble 3 more groups, They're ③-⑤-⑥.
The remaining two sets of tubes go to the side.

9
PASSO 7
PASSO 8
H Material is screen fabric, pay attention to
keep clean during installation
The label
should be at
the bottom
Insert the sleeve of material H into the upper and lower cross bars.
In the pipe of Step 4, take 2
sets, unscrew first, then
connect, and then tighten
with G tool, paying
attention to the position of
the marble.
Without
rubber sleeve,
with inner nut
10
PASSO 9
PASSO 10
H Material is screen fabric, pay attention to
keep clean during installation
The label
should be at
the bottom
Insert the sleeve of material H into the upper and lower cross bars.
In the pipe of Step 4, take 2
sets, unscrew first, then
connect, and then tighten
with G tool, paying
attention to the position of
the marble.
With rubber
sleeve

11
PASSO 11
PASSO 12
H Material is screen fabric, pay attention to
keep clean during installation
The label
should be at
the bottom
Insert the sleeve of material H into the upper and lower cross bars.
In the pipe of Step 3, take 2
sets, unscrew first, then
connect, and then tighten
with G tool, paying
attention to the position of
the marble.
With rubber
sleeve
The marble
faces inward.
Without rubber sleeve, with inner nut
With rubber sleeve

12
PASSO 13
PASSO 14
Take the combination of D material and the frame of step 11; First
unscrew the screw on the rod, then connect it, and then tighten it with
tool G.
Arrange the assembled shelves in order.

13
PASSO 15
PASSO 16
After the installation is completed, arrange the fabric to
ensure that the fabric is smooth. If the fabric has wrinkles,
you can use a household hanging press to iron it.
Put the 6 groups of shelves neatly and connect them by material B.


15
Produttore: Shanghaimuxinmuyeyouxiangongsi
Indirizzo: Shuangchenglu 803nong11hao1602A-1609shi, baoshanqu,
shanghai 200000 CN.
Importato in AUS: SIHAO PTY LTD. 1 ROKEVA STREETEASTWOOD
Nuovo Galles del Sud 2122 Australia
Importato negli USA: Sanven Technology Ltd. Suite 250, 9166 Anaheim
Luogo, Rancho Cucamonga, CA 91730
REP
UK
YH CONSULTING LIMITED. C/O YH Consulting
Limited Office 147, Centurion House, London
Road, Staines-upon-Thames, Surrey, TW18 4AX
REP
EC
E-CrossStu GmbH
Mainzer Landstr.69,
60329 Frankfurt am Main.


17
Técnico Certificado de soporte y garantía electrónica
www.vevor.com/support
DIVIDIR HABITACIÓN CON TELA
de USUARIO
PFSSTBHS10
PFSSTBSH11
PFSSTBMS12
Seguimos comprometidos a brindarle herramientas a precios competitivos.
"Ahorra la mitad", "mitad de precio" o cualquier otra expresión similar utilizada únicamente
por nosotros
Representa una estimación de los ahorros que podría obtener al comprar ciertas
herramientas.
con nosotros en comparación con las principales marcas líderes y no significa
necesariamente cubrir
Todas las categorías de herramientas que ofrecemos. Le recordamos que debe verificar
con cuidado
Cuando realiza un pedido con nosotros, si realmente está Ahorro
Medio en comparación con las principales marcas líderes.

1
PFSSTBHS10 PFSSTBSH11 PFSSTBMS12
¿NECESITAS AYUDA? ¡CONTÁCTANOS!
¿Tiene preguntas sobre el producto? ¿Necesita asistencia técnica? No
dude en ponerse en contacto con nosotros:
Soporte técnico y certificado de garantía electrónica
www.vevor.com/support
Estas son las instrucciones originales, lea atentamente todas las
instrucciones del manual antes de utilizar el producto. VEVOR se reserva
una interpretación clara de nuestro manual de usuario. La apariencia del
producto estará sujeta al producto que recibió. Perdónenos por no
informarle nuevamente si hay actualizaciones de tecnología o software
en nuestro producto.
FABRIC ROOM DIVIDE

2
SAFETY INSTRUCTIONS
ADVERTENCIA:
Lea este material antes de utilizar este producto. No hacerlo puede
provocar lesiones graves.
Precauciones de montaje
33. Realice el montaje únicamente de acuerdo con estas instrucciones.
Un montaje inadecuado puede generar peligros.
34. Use gafas de seguridad aprobadas por ANSI y guantes de trabajo
resistentes durante el montaje.
35. Mantenga el área de reunión limpia y bien iluminada.
36. Mantenga a los transeúntes fuera del área durante el montaje.
37. No se reúna si está cansado o bajo la influencia del alcohol, drogas o
medicamentos.
38. Las capacidades del producto se aplican únicamente a productos
ensamblados de forma correcta y completa.
39. Móntelo sobre una superficie plana, nivelada, dura y lisa capaz de
soportar de forma segura el divisor de ambientes de tela.
40. Para obtener información adicional sobre las piezas que se enumeran
en las páginas siguientes, consulte el diagrama de ensamblaje de
este manual. Desembale y separe todas las piezas en un área de
trabajo limpia.
Tome precauciones
25. NO SE SIENTA NI SE PARE SOBRE ESTE ARTÍCULO.
26. Este producto no es un juguete. No permita que los niños jueguen con
este artículo ni cerca de él.
27. No exceda lo especificado Capacidades de peso.
28. Úselo únicamente sobre una superficie plana, nivelada, dura y lisa
que pueda soportar de manera segura un divisor de ambientes de tela
completamente cargado.
29. Úselo únicamente según lo previsto.
30. Inspeccione antes de cada uso; no utilice si las piezas están sueltas o

3
dañadas.
GUARDE ESTE MANUAL

4
PARTS LIST
A
12
B
8
do
12
D
3
mi
15
F
2
GRAMO
1
yo
6
I
4
Yo
P
recargado
NOTA : Los accesorios F son tornillos de repuesto para regalo; H es
la tela de la pantalla, preste atención para no ensuciarse durante la
instalación.
5
ASSEMBLY STEP
PASO 1
PASO 2
Unscrew from material I and set aside.
Unscrew from material C and set aside.
X4
X12
6
PASO 3
PASO 4
Connect material I and Material A (as shown in the figure) and put
them together.
Total 4 groups
Connect material B and Material A (as shown in the figure) and put
them together.
Total 8 groups

7
PASO 5
Take the two poles from Step 2 and assemble them on one pole from
Step 3. First unscrew the screw, and then connect through the screw (as
shown in the figure), pay attention to the position of the marble when
combining (as shown in the figure), and then tighten with G tool.This
group is No.①;
Follow the same steps to assemble another group, this group is No.④.
The remaining two sets of tubes go to the side.
The marble faces inward.
The marble faces inward.
The remaining two groups

8
PASO 6
The marble faces inward.
The marble faces inward.
The marble faces inward.
The marble faces inward.
The remaining four groups
Take the two poles from Step 2 and assemble them on one pole from
Step 4. First unscrew the screw, and then connect through the screw (as
shown in the figure), pay attention to the position of the marble when
combining (as shown in the figure), and then tighten with G tool.This
group is No.②;
Follow the same steps to assemble 3 more groups, They're ③-⑤-⑥.
The remaining two sets of tubes go to the side.

9
PASO 7
PASO 8
H Material is screen fabric, pay attention to
keep clean during installation
The label
should be at
the bottom
Insert the sleeve of material H into the upper and lower cross bars.
In the pipe of Step 4, take 2
sets, unscrew first, then
connect, and then tighten
with G tool, paying
attention to the position of
the marble.
Without
rubber sleeve,
with inner nut

10
PASO 9
PASO 10
H Material is screen fabric, pay attention to
keep clean during installation
The label
should be at
the bottom
Insert the sleeve of material H into the upper and lower cross bars.
In the pipe of Step 4, take 2
sets, unscrew first, then
connect, and then tighten
with G tool, paying
attention to the position of
the marble.
With rubber
sleeve

11
PASO 11
PASO 12
H Material is screen fabric, pay attention to
keep clean during installation
The label
should be at
the bottom
Insert the sleeve of material H into the upper and lower cross bars.
In the pipe of Step 3, take 2
sets, unscrew first, then
connect, and then tighten
with G tool, paying
attention to the position of
the marble.
With rubber
sleeve
The marble
faces inward.
Without rubber sleeve, with inner nut
With rubber sleeve

12
PASO 13
PASO 14
Take the combination of D material and the frame of step 11; First
unscrew the screw on the rod, then connect it, and then tighten it with
tool G.
Arrange the assembled shelves in order.
13
PASO 15
PASO 16
After the installation is completed, arrange the fabric to
ensure that the fabric is smooth. If the fabric has wrinkles,
you can use a household hanging press to iron it.
Put the 6 groups of shelves neatly and connect them by material B.

15
Fabricante: Shanghaimuxinmuyeyouxiangongsi
Dirección: Shuangchenglu 803nong11hao1602A-1609shi, baoshanqu,
Shangai 200000 CN.
Importado a Australia: SIHAO PTY LTD. 1 ROKEVA
STREETEASTWOOD
Nueva Gales del Sur 2122 Australia
Importado a EE. UU.: Sanven Technology Ltd. Suite 250, 9166 Anaheim
Lugar, Rancho Cucamonga, CA 91730
REP
UK
YH CONSULTING LIMITED. C/O YH Consulting
Limited Office 147, Centurion House, London
Road, Staines-upon-Thames, Surrey, TW18 4AX
REP
EC
E-CrossStu GmbH
Mainzer Landstr.69,
60329 Frankfurt am Main.

16
Técnico Certificado de soporte y garantía electrónica


18
Techniczny Wsparcie i certyfikat e-gwarancji
www.vevor.com/support
PRZEGRODA POKOJU Z TKANINY
INSTRUKCJA obsługi
PFSSTBHS10
PFSTBSH11
PFSTBMS12
Nadal staramy się oferować Państwu narzędzia w konkurencyjnych cenach.
„Oszczędź połowę”, „Połowa ceny” lub jakiekolwiek inne podobne wyrażenia używane
wyłącznie przez nas
przedstawia szacunkowe oszczędności, jakie możesz uzyskać kupując określone
narzędzia
z nami w porównaniu do głównych, najlepszych marek i niekoniecznie oznacza to okładka
wszystkie kategorie narzędzi oferowanych przez nas. Przypominamy o sprawdzeniu
ostrożnie
gdy składasz u nas zamówienie, jeśli faktycznie Oszczędność
Połowa w porównaniu z wiodącymi markami.

1
PFSSTBHS10 PFSTBSH11 PFSTBMS12
POTRZEBUJESZ POMOCY? SKONTAKTUJ SIĘ Z NAMI!
Masz pytania dotyczące produktu? Potrzebujesz wsparcia
technicznego? Skontaktuj się z nami:
Wsparcie techniczne i certyfikat e-gwarancji
www.vevor.com/support
To jest oryginalna instrukcja, przed użyciem należy uważnie przeczytać
wszystkie instrukcje. VEVOR zastrzega sobie jasną interpretację naszej
instrukcji obsługi. Wygląd produktu będzie zależał od produktu, który
otrzymałeś. Prosimy o wybaczenie, że nie poinformujemy Cię ponownie,
jeśli w naszym produkcie pojawią się jakiekolwiek aktualizacje
technologiczne lub oprogramowania.
FABRIC ROOM DIVIDE

2
SAFETY INSTRUCTIONS
OSTRZEŻENIE:
Przeczytaj ten materiał przed użyciem tego produktu.
Nieprzestrzeganie tego może spowodować poważne obrażenia.
Środki ostrożności podczas montażu
41. Montaż należy wykonywać wyłącznie zgodnie z niniejszą instrukcją.
Nieprawidłowy montaż może stwarzać zagrożenia.
42. Podczas montażu należy nosić okulary ochronne z atestem ANSI oraz
wytrzymałe rękawice robocze.
43. Utrzymuj miejsce zgromadzenia w czystości i zapewnij dobre
oświetlenie.
44. Nie dopuszczać osób postronnych na teren montażu podczas jego
trwania.
45. Nie przychodź na spotkanie, jeśli jesteś zmęczony lub znajdujesz się
pod wpływem alkoholu, narkotyków lub leków.
46. Możliwości produktu odnoszą się wyłącznie do produktów prawidłowo i
kompletnie zmontowanych.
47. Zamontuj na płaskiej, równej, twardej i gładkiej powierzchni, która
będzie w stanie bezpiecznie utrzymać ściankę działową Fabric Room
Divide.
48. Aby uzyskać dodatkowe informacje dotyczące części wymienionych
na kolejnych stronach, zapoznaj się ze schematem montażu w tym
podręczniku. Rozpakuj i oddziel wszystkie części w czystym miejscu
pracy.
Stosuj środki ostrożności
31. NIE SIADAĆ ANI NIE STAWAĆ NA TYM PRZEDMIOCIE.
32. Ten produkt nie jest zabawką. Nie pozwalaj dzieciom bawić się tym
przedmiotem ani przebywać w jego pobliżu.
33. Nie przekraczać określonej nośność.
34. Stosować wyłącznie na płaskiej, równej, twardej i gładkiej powierzchni,
która może bezpiecznie utrzymać w pełni załadowaną ściankę

3
działową Fabric Room Divide.
35. Stosować wyłącznie zgodnie z przeznaczeniem.
36. Przed każdym użyciem należy przeprowadzić kontrolę. Nie należy
używać produktu, jeśli jakieś części są luźne lub uszkodzone.
ZAPISZ TĘ INSTRUKCJĘ
4
PARTS LIST
A
12
B
8
C
12
D
3
mi
15
F
2
G
1
H
6
I
4
J
Wstępnie
załadowane
UWAGA : Akcesoria F to zapasowe śrubki do kupienia w prezencie; H
to materiał ekranu, należy uważać, aby się nie zabrudził podczas
instalacji.

5
ASSEMBLY STEP
KROK 1
KROK 2
Unscrew from material I and set aside.
Unscrew from material C and set aside.
X4
X12

6
KROK 3
KROK 4
Connect material I and Material A (as shown in the figure) and put
them together.
Total 4 groups
Connect material B and Material A (as shown in the figure) and put
them together.
Total 8 groups

7
KROK 5
Take the two poles from Step 2 and assemble them on one pole from
Step 3. First unscrew the screw, and then connect through the screw (as
shown in the figure), pay attention to the position of the marble when
combining (as shown in the figure), and then tighten with G tool.This
group is No.①;
Follow the same steps to assemble another group, this group is No.④.
The remaining two sets of tubes go to the side.
The marble faces inward.
The marble faces inward.
The remaining two groups

8
KROK 6
The marble faces inward.
The marble faces inward.
The marble faces inward.
The marble faces inward.
The remaining four groups
Take the two poles from Step 2 and assemble them on one pole from
Step 4. First unscrew the screw, and then connect through the screw (as
shown in the figure), pay attention to the position of the marble when
combining (as shown in the figure), and then tighten with G tool.This
group is No.②;
Follow the same steps to assemble 3 more groups, They're ③-⑤-⑥.
The remaining two sets of tubes go to the side.

9
KROK 7
KROK 8
H Material is screen fabric, pay attention to
keep clean during installation
The label
should be at
the bottom
Insert the sleeve of material H into the upper and lower cross bars.
In the pipe of Step 4, take 2
sets, unscrew first, then
connect, and then tighten
with G tool, paying
attention to the position of
the marble.
Without
rubber sleeve,
with inner nut

10
KROK 9
KROK 10
H Material is screen fabric, pay attention to
keep clean during installation
The label
should be at
the bottom
Insert the sleeve of material H into the upper and lower cross bars.
In the pipe of Step 4, take 2
sets, unscrew first, then
connect, and then tighten
with G tool, paying
attention to the position of
the marble.
With rubber
sleeve

11
KROK 11
KROK 12
H Material is screen fabric, pay attention to
keep clean during installation
The label
should be at
the bottom
Insert the sleeve of material H into the upper and lower cross bars.
In the pipe of Step 3, take 2
sets, unscrew first, then
connect, and then tighten
with G tool, paying
attention to the position of
the marble.
With rubber
sleeve
The marble
faces inward.
Without rubber sleeve, with inner nut
With rubber sleeve
12
KROK 13
KROK 14
Take the combination of D material and the frame of step 11; First
unscrew the screw on the rod, then connect it, and then tighten it with
tool G.
Arrange the assembled shelves in order.

13
KROK 15
KROK 16
After the installation is completed, arrange the fabric to
ensure that the fabric is smooth. If the fabric has wrinkles,
you can use a household hanging press to iron it.
Put the 6 groups of shelves neatly and connect them by material B.


15
Producent: Shanghaimuxinmuyeyouxiangongsi
Adres: Shuangchenglu 803nong11hao1602A-1609shi, baoshanqu,
Szanghaj 200000 CN.
Importowane do AUS: SIHAO PTY LTD. 1 ROKEVA
STREETEASTWOOD
NSW 2122 Australia
Importowane do USA: Sanven Technology Ltd. Suite 250, 9166 Anaheim
Miejsce, Rancho Cucamonga, CA 91730
REP
UK
YH CONSULTING LIMITED. C/O YH Consulting
Limited Office 147, Centurion House, London
Road, Staines-upon-Thames, Surrey, TW18 4AX
REP
EC
E-CrossStu GmbH
Mainzer Landstr.69,
60329 Frankfurt am Main.

16
Techniczny Wsparcie i certyfikat e-gwarancji


18
Technisch Ondersteuning en E-garantiecertificaat
www.vevor.com/support
STOFFEN KAMERVERDELING
Gebruikershandleiding
PFSSTBHS10
PFSTBSH11
PFSSTBMS12
Wij streven er voortdurend naar om u gereedschappen tegen concurrerende prijzen te
leveren.
"Bespaar de helft", "halve prijs" of andere soortgelijke uitdrukkingen die alleen door ons
worden gebruikt
geeft een schatting van de besparingen die u kunt behalen door bepaalde gereedschappen
te kopen
bij ons vergeleken met de grote topmerken en betekent niet per se dat omslag
alle categorieën van tools die wij aanbieden. U wordt vriendelijk verzocht om te verifiëren
voorzichtig
wanneer u een bestelling bij ons plaatst, als u daadwerkelijk Besparing
Half in vergelijking met de grote topmerken.

1
PFSSTBHS10 PFSTBSH11 PFSSTBMS12
HULP NODIG? NEEM CONTACT MET ONS OP!
Heeft u vragen over het product? Heeft u technische ondersteuning
nodig? Neem dan gerust contact met ons op:
Technische ondersteuning en e-garantiecertificaat
www.vevor.com/support
Dit is de originele instructie, lees alle handleidingen zorgvuldig door
voordat u het product gebruikt. VEVOR behoudt zich een duidelijke
interpretatie van onze gebruikershandleiding voor. Het uiterlijk van het
product is afhankelijk van het product dat u hebt ontvangen. Vergeef ons
dat we u niet opnieuw zullen informeren als er technologie- of
software-updates voor ons product zijn .
FABRIC ROOM DIVIDE

2
SAFETY INSTRUCTIONS
WAARSCHUWING:
Lees dit materiaal voordat u dit product gebruikt. Als u dit niet doet,
kan dit leiden tot ernstig letsel.
Voorzorgsmaatregelen bij de montage
49. Monteer alleen volgens deze instructies. Onjuiste montage kan
gevaren opleveren.
50. Draag tijdens de montage een ANSI-goedgekeurde veiligheidsbril en
stevige werkhandschoenen.
51. Zorg ervoor dat de verzamelplaats schoon en goed verlicht is.
52. Houd omstanders uit de buurt tijdens de montage.
53. Kom niet bijeen als u moe bent of onder invloed van alcohol, drugs of
medicijnen.
54. De producteigenschappen gelden uitsluitend voor correct en volledig
gemonteerde producten.
55. Monteer de Fabric Room Divide op een vlak, egaal, hard en glad
oppervlak dat de Fabric Room Divide veilig kan dragen.
56. Voor aanvullende informatie over de onderdelen die op de volgende
pagina's worden vermeld, raadpleegt u het montageschema van deze
handleiding. Pak alle onderdelen uit en scheid ze in een schone
werkruimte.
Neem voorzorgsmaatregelen
37. NIET OP DIT ARTIKEL ZITTEN OF STAAN.
38. Dit product is geen speelgoed. Laat kinderen niet met of in de buurt
van dit item spelen.
39. Overschrijd de aangegeven waarden niet draagvermogen.
40. Gebruik het apparaat alleen op een vlak, egaal, hard en glad
oppervlak dat een volledig gevulde Fabric Room Divide veilig kan
dragen.
41. Alleen gebruiken zoals bedoeld.
42. Controleer het product voor elk gebruik. Gebruik het niet als er

3
onderdelen loszitten of beschadigd zijn.
BEWAAR DEZE HANDLEIDING
4
PARTS LIST
A
12
B
8
C
12
D
3
Ik
15
F
2
G
1
H
6
I
4
J
Vooraf
opnieuw
geladen
LET OP : De accessoires F zijn reserveschroeven voor cadeaus; H is
de stof van het scherm. Let op dat deze niet vies wordt tijdens de
installatie.

5
ASSEMBLY STEP
STAP 1
STAP 2
Unscrew from material I and set aside.
Unscrew from material C and set aside.
X4
X12

6
STAP 3
STAP 4
Connect material I and Material A (as shown in the figure) and put
them together.
Total 4 groups
Connect material B and Material A (as shown in the figure) and put
them together.
Total 8 groups

7
STAP 5
Take the two poles from Step 2 and assemble them on one pole from
Step 3. First unscrew the screw, and then connect through the screw (as
shown in the figure), pay attention to the position of the marble when
combining (as shown in the figure), and then tighten with G tool.This
group is No.①;
Follow the same steps to assemble another group, this group is No.④.
The remaining two sets of tubes go to the side.
The marble faces inward.
The marble faces inward.
The remaining two groups

8
STAP 6
The marble faces inward.
The marble faces inward.
The marble faces inward.
The marble faces inward.
The remaining four groups
Take the two poles from Step 2 and assemble them on one pole from
Step 4. First unscrew the screw, and then connect through the screw (as
shown in the figure), pay attention to the position of the marble when
combining (as shown in the figure), and then tighten with G tool.This
group is No.②;
Follow the same steps to assemble 3 more groups, They're ③-⑤-⑥.
The remaining two sets of tubes go to the side.
9
STAP 7
STAP 8
H Material is screen fabric, pay attention to
keep clean during installation
The label
should be at
the bottom
Insert the sleeve of material H into the upper and lower cross bars.
In the pipe of Step 4, take 2
sets, unscrew first, then
connect, and then tighten
with G tool, paying
attention to the position of
the marble.
Without
rubber sleeve,
with inner nut

10
STAP 9
STAP 10
H Material is screen fabric, pay attention to
keep clean during installation
The label
should be at
the bottom
Insert the sleeve of material H into the upper and lower cross bars.
In the pipe of Step 4, take 2
sets, unscrew first, then
connect, and then tighten
with G tool, paying
attention to the position of
the marble.
With rubber
sleeve

11
STAP 11
STAP 12
H Material is screen fabric, pay attention to
keep clean during installation
The label
should be at
the bottom
Insert the sleeve of material H into the upper and lower cross bars.
In the pipe of Step 3, take 2
sets, unscrew first, then
connect, and then tighten
with G tool, paying
attention to the position of
the marble.
With rubber
sleeve
The marble
faces inward.
Without rubber sleeve, with inner nut
With rubber sleeve

12
STAP 13
STAP 14
Take the combination of D material and the frame of step 11; First
unscrew the screw on the rod, then connect it, and then tighten it with
tool G.
Arrange the assembled shelves in order.

13
STAP 15
STAP 16
After the installation is completed, arrange the fabric to
ensure that the fabric is smooth. If the fabric has wrinkles,
you can use a household hanging press to iron it.
Put the 6 groups of shelves neatly and connect them by material B.


Fabrikant: Shanghaimuxinmuyeyouxiangongsi
Adres: Shuangchenglu 803nong11hao1602A-1609shi, baoshanqu,
Sjanghai 200000 CN.
Geïmporteerd naar AUS: SIHAO PTY LTD. 1 ROKEVA
STREETEASTWOOD
NSW 2122 Australië
Geïmporteerd naar de VS: Sanven Technology Ltd. Suite 250, 9166
Anaheim
Plaats, Rancho Cucamonga, CA 91730
REP
UK
YH CONSULTING LIMITED. C/O YH Consulting
Limited Office 147, Centurion House, London
Road, Staines-upon-Thames, Surrey, TW18 4AX
REP
EC
E-CrossStu GmbH
Mainzer Landstr.69,
60329 Frankfurt am Main.


