Remote Dog Training Collar
User Manual
TZ-935
Contents
Part 1: Important Safety Notice & Packaging
Please Read This Manual Carefully Before Use
21
Part 2: Product Introduction
43
Product Features
● 300m Remote Range: Reliable control up to 300 meters (985 ft)
in open areas, suitable for most training scenarios.
● Dual Correction System:
From Remote: Emits Ultrasound & Ultrasound+Strobe directly for
warning and deterrence.
From Collar: Delivers Sound, Vibration, and Static Stimulation upon
signal for close-contact guidance and correction.
● Clear LED Display: Bright screen shows active mode, intensity
level, and battery status for both remote and collar in real time.
● Dual Battery Indicators: Monitor remaining power for both the
remote and the connected collar simultaneously.
● 1-9 Level Adjustment: Precisely customize Sound, Vibration, and
Static Stimulation intensity levels for your dog's size and tempera-
ment.
● Controls 4 Collars: A single remote can pair with and manage up
to 4 receiver collars (DOG1-DOG4), perfect for multi-dog homes or
professional use.
● Auto Sleep Mode:
Remote: Enters sleep mode (screen o) after ~120 seconds of
inactivity. Press any key to wake.
Collar: Enters sleep mode after ~120 seconds of inactivity. Press its
power button or gently shake to wake.
● IPX6 Waterproof Collar: The receiver collar is rated IPX6, oering
protection against daily splashes and water (Remote is not waterproof).
● Key Lock Switch: Physical key lock on the remote prevents
accidental triggering during storage or transport.
Product Name: Remote Dog Training Collar
Materials: ABS, Silicone, Nylon, Electronic Components
Ultrasound Emission Range: 16.4~23 feet
Remote Control Range: Up to 300m (985 ft) in open areas
Remote Functions: Sound, Vibration, Static Stimulation, Ultrasound,
Ultrasound+Strobe, Key Lock, Multi-Dog Control (DOG 1-4), 1-9
Level Sensitivity Adjustment
Collar Functions: Receive Commands (Sound / Vibration / Static
Stimulation), Pairing
Remote Battery: Rechargeable 500mAh Li-Po Battery
Collar Battery: Rechargeable 300mAh Li-Po Battery
Remote Charging: Type-C Port, 5V/1A, ~2 hours for full charge
Collar Charging: Type-C Port, 5V/1A, ~1.5 hours for full charge
Remote Standby Time: Up to 60 days (On), 180 days (O )
Collar Standby Time: Up to 60 days (On), 180 days (O)
Remote Waterproof: Not waterproof
Collar Waterproof: IPX6
Operating Environment: Temperature -30℃ to +70℃, Humidity
20% - 90%
Product Specications
How It Works
This remote training system is a safe and eective tool for correcting
dog's behavior, suitable for most dogs weighing over 6.8 kg (15 lbs).
The system communicates via wireless signals, allowing you to
guide your dog from a distance.
The system works in two ways:
1. Direct Remote Action: Pressing the Ultrasound or
Ultrasound+Strobe button activates features directly from the
remote.
2. Collar Response: Pressing the Sound, Vibration, or Static
Stimulation button on the remote transmits a signal to the collar,
activating the chosen feedback mode.
These cues help interrupt unwanted behavior and guide your dog to
follow commands.
Important Note: The maximum eective remote range of 300
meters is achieved under optimal, unobstructed conditions.
Obstacles, weather, and interference can reduce this range. For best
results, hold the remote horizontally away from your body. On the
other hand, ultrasound travels up to 7 meters only.
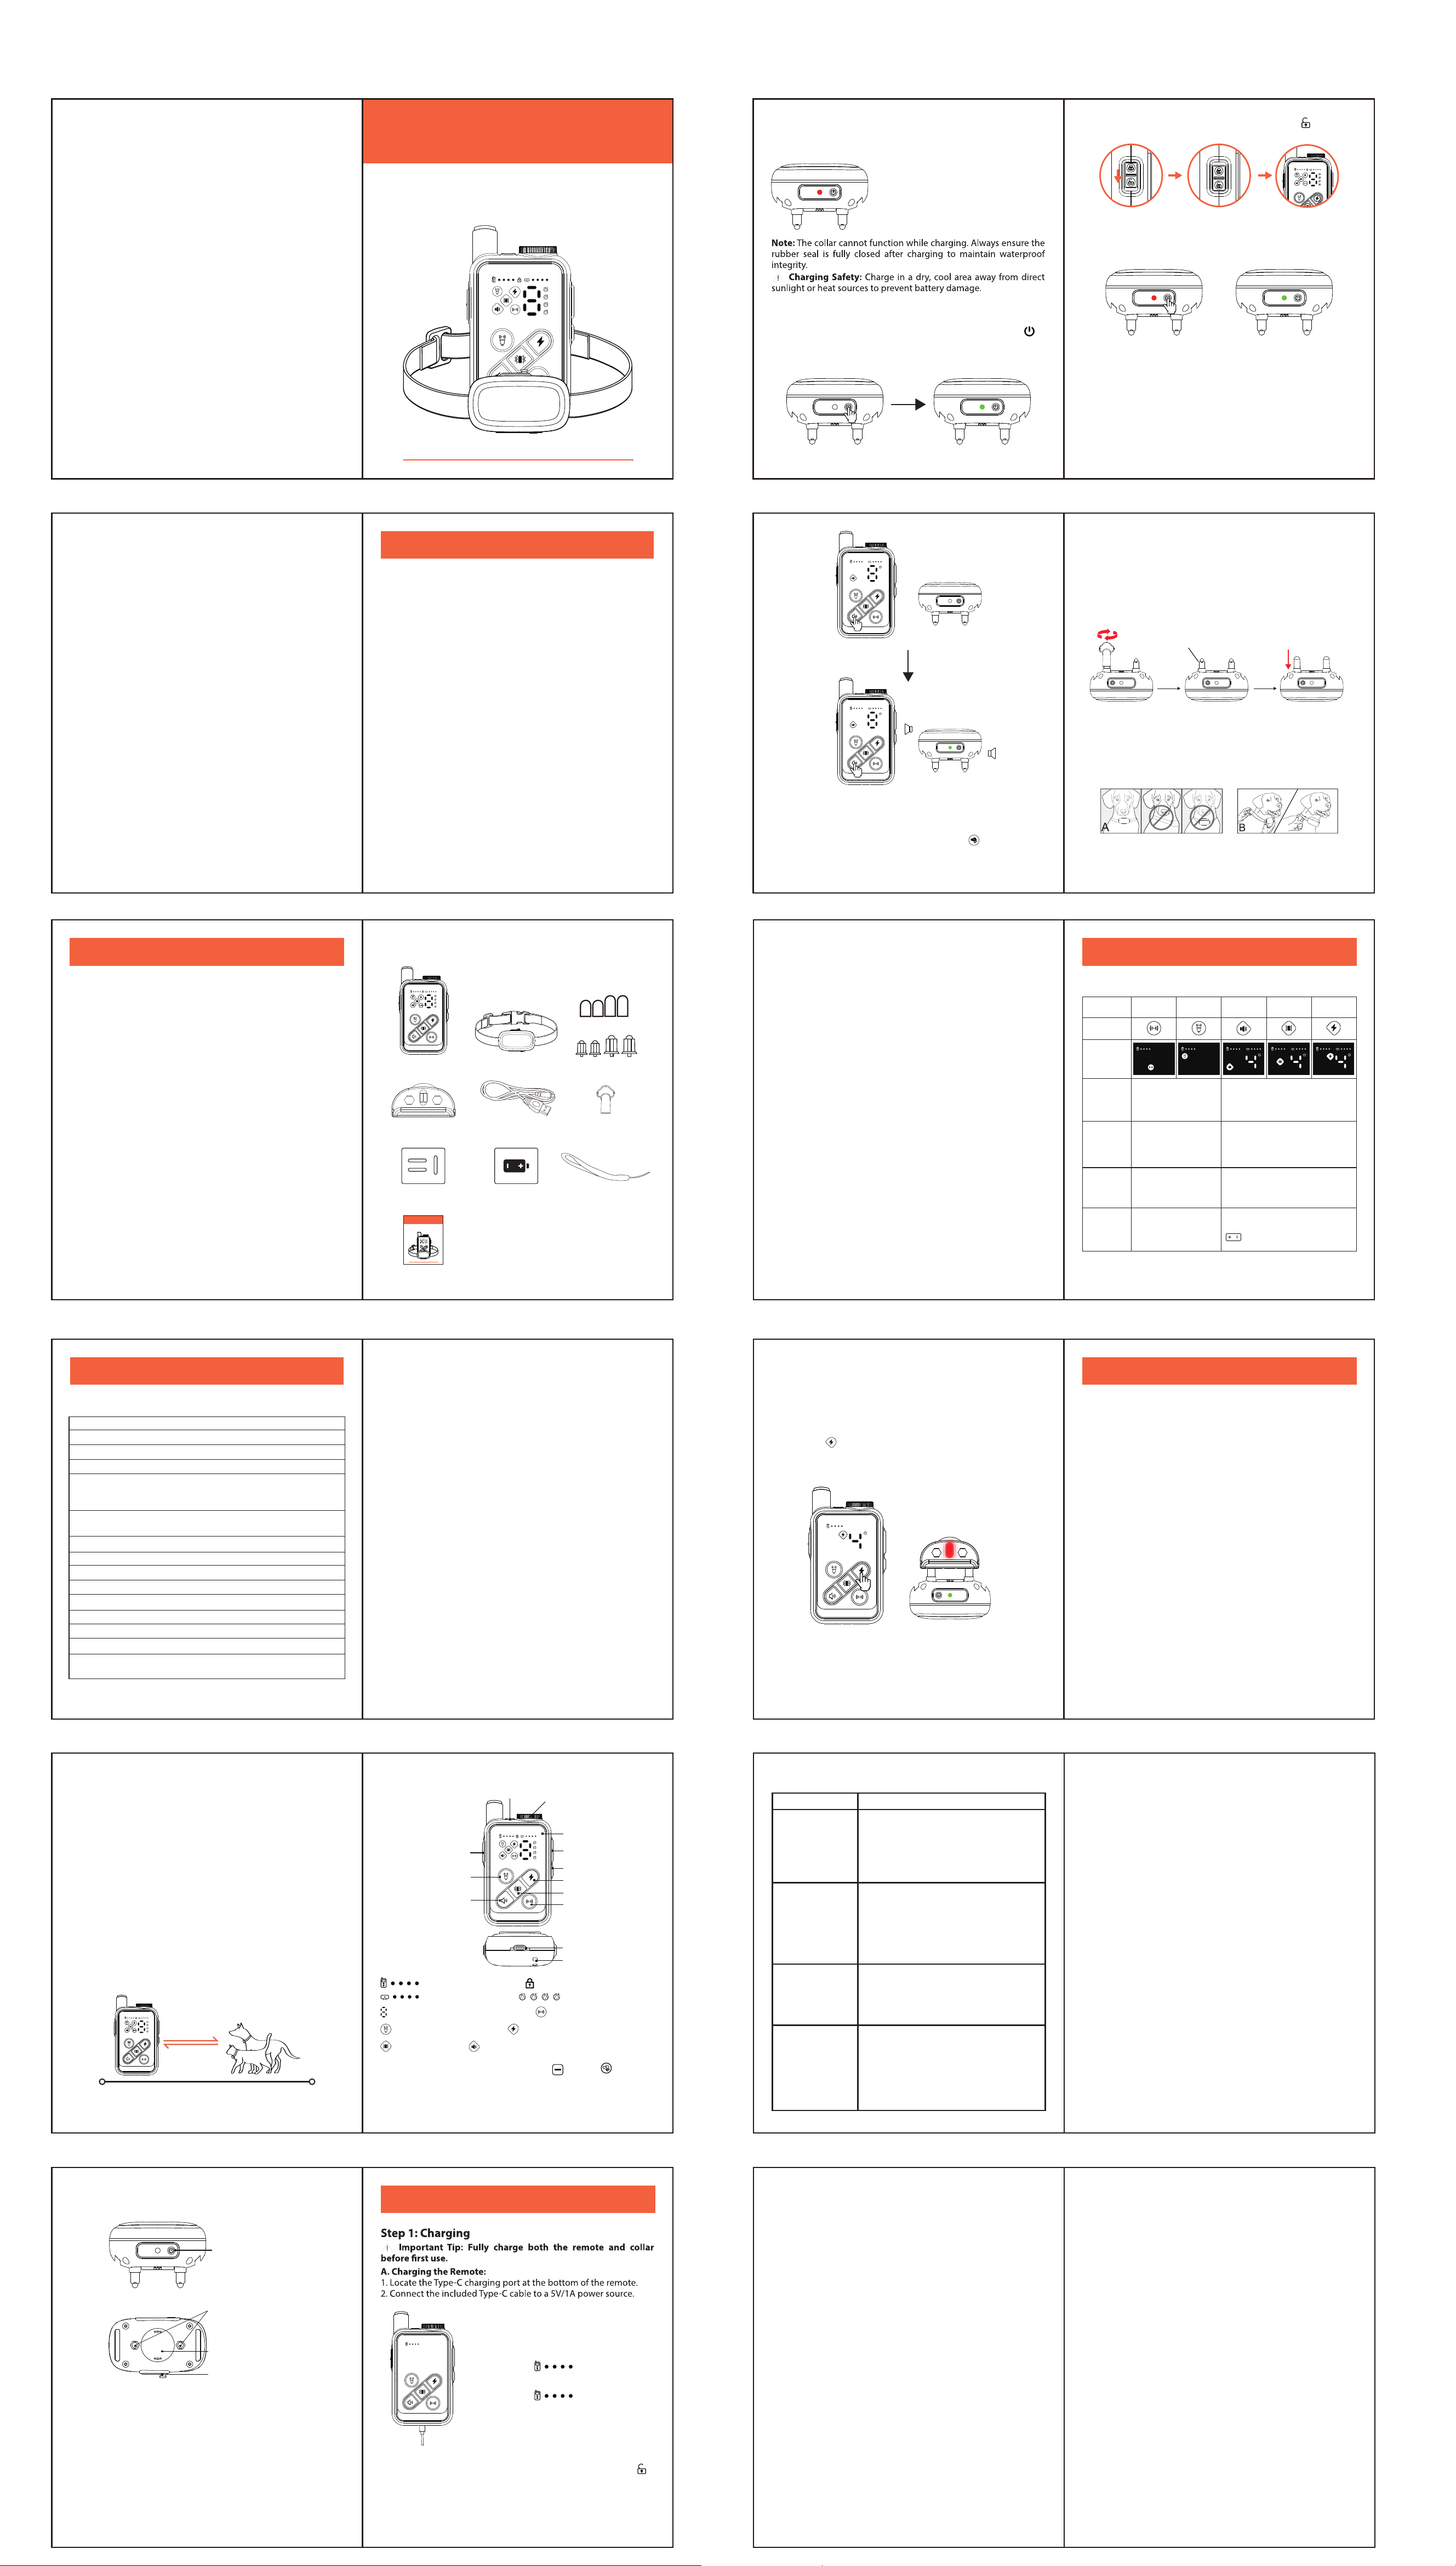
LED Flashlight
LED Screen
Ultrasound Emitter
Receiver Collar Introduction
Remote Control Introduction
Screen Test Mode: Press and hold the " " and " " buttons
simultaneously to enter screen test mode. All LED indicators will
light up, allowing you to check for issues like dead pixels or
ickering. Press any key to exit.
65
Part 3: Quick Start Guide
87
Note: All remote functions are disabled during charging.
After unplugging, slide the key lock switch to the unlocked " "
position to use.
Part 1: Important Safety Instructions & Packaging
Important Safety Instructions
Packaging List
Part 2: Product Introduction
Product Specications
Product Features
How It Works
Remote Control Introduction
Receiver Collar Introduction
Part 3: Quick Start Guide
Step 1: Charging
Step 2: Power On & Pairing
Step 3: Fitting the Collar
Step 4: Begin Training
Part 4: Function Operations
Functional Operations Overview
Testing the Static Stimulation Function
Part 5: Usage Guide & Maintenance
Training Guidelines
Daily Maintenance & Care
Troubleshooting
Frequently Asked Questions (FAQs)
109
2. Turn On the Remote: Slide the side switch to the " " position.
The screen will light up.
3. Enter Pairing Mode: Press and hold the collar’s power button for
about 1.5 seconds until the indicator alternates blinking red and
green.
4. Complete Pairing:
● To Pair: On the remote, briey press a button that controls the
collar (Sound, Vibration, or Static Stimulation). The collar’s indicator
will stop alternating and the remote will display the collar's battery
level.
● To Conrm: Press one of these buttons (Sound, Vibration, or Static
Stimulation) again. If the collar activates in response, pairing is
successful.
1211
1413
Important Safety Notice
This professional remote dog training tool must be used correctly to
ensure your dog's safety. Please read and follow all instructions.
● Do Not Use On: Puppies, sick, pregnant, elderly, frail, or heart-
condition dogs.
● Proper Use: This product is a professional behavior correction
tool. It is strictly prohibited to use it for revenge or abuse.
● Wearing Time: Limit use to 12 hours per day. Adjust the collar
position every 1-2 hours to prevent skin irritation.
● Static Stimulation Warning: Always start at the lowest level (1)
and only use the minimum level needed for response.
● Leash Warning: Never attach a leash to this collar. Use a separate
harness or collar for walking.
● Skin Check: Check your dog's neck daily for redness or sores. Stop
use if any are found and consult a vet if needed.
● Environment: Keep away from heat, ames, moisture, and
corrosive chemicals to avoid damage.
Packaging List:
Please conrm that your package contains the following items:
16
15
17
19 19
Troubleshooting
Q6: What is the lifespan of the batteries?
A: Under normal use, the lithium batteries support about 400 full
charge cycles. Actual lifespan depends on usage and charging
habits.
Q7: How long should a training session last?
A: We recommend short sessions of 10-15 minutes, 1-2 times per
day, combined with positive rewards for the best results.
Q8: Can I use a fast charger (9V/12V) to charge the devices?
A: No. Use only a standard 5V/1A (or 5V/0.5A) USB charger.
High-voltage chargers can damage the batteries and circuitry.
FCC Warning
This device complies with Part 15 of the FCC Rules. Operation is
subject to the following two conditions:
(1) This device may not cause harmful interference, and (2) this
device must accept any interference received, including interfer-
ence that may cause undesired operation.
NOTE 1: This equipment has been tested and found to comply with
the limits for a Class B digital device, pursuant to part 15 of the FCC
Rules. These limits are designed to provide reasonable protection
against harmful interference in a residential installation. This
equipment generates, uses and can radiate radio frequency energy
and, if not installed and used in accordance with the instructions,
may cause harmful interference to radio communications. However,
there is no guarantee that interference will not occur in a particular
installation. If this equipment does cause harmful interference to
radio or television reception, which can be determined by turning
the equipment o and on, the user is encouraged to try to correct
the interference by one or more of the following measures:
-Reorient or relocate the receiving antenna.
-Increase the separation between the equipment and receiver.
-Connect the equipment into an outlet on a circuit dierent from
that to which the receiver is connected.
-Consult the dealer or an experienced radio/TV technician for help.
NOTE 2: Any changes or modications to this unit not expressly
approved by the party responsible for compliance could void the
user's authority to operate the equipment.
The device has been evaluated to meet general RF exposure require-
ment. The device can be used in portable exposure condition
without restriction.
Frequently Asked Questions
Q1: Why did my remote and collar stop working suddenly?
A: First, check if both devices are powered on and not in sleep mode.
Second, check the battery levels and charge if low. If the issue
continues, re-pair the collar to the remote.
Q2: Will using the ultrasonic function of the remote aect other
animals?
A: Yes, it might aect other animals. While the ultrasonic mode
(emitting sound at 25 kHz) is designed for dogs, it may impact other
species (e.g. cats, rodents) within this frequency range.
Q3: Why is the ultrasonic function of the remote only suitable
for dogs aged 6 months to 8 years?
A: ● Puppies (<6 months): Auditory systems are underdeveloped;
ultrasonic exposure risks harm.
● Senior Dogs (>8 years): Age-related hearing loss may reduce
eectiveness.
● Eectiveness: Studies show success in 85–90% of dogs within the
recommended age range.
Q4: Does my dog need to wear the collar all the time after
training?
A: No. Once your dog learns the desired behavior, occasional use is
sucient to reinforce training. Continuous wear is not recommended.
Q5: Is the collar waterproof? Can my dog swim with it?
A: The collar is IPX6 waterproof, meaning it can withstand daily
splashing and spraying. However, it is not designed for submersion.
Do not allow your dog to swim or bathe while wearing the collar.
Training Guidelines
● Timing is Key: Correct your dog as they misbehaves, not after.
● Be Consistent: All family members should use the same
commands and correction methods to avoid confusing the dog.
● Gradual progression: Always begin with the lowest intensity
level and only increase if necessary.
● Mode selection: Prioritize Ultrasound or Sound modes rst. If
ineective, consider Vibration mode. Use static only as a last resort.
● Reward reinforcement: Immediately reward your dog with treats
or positive interaction (e.g. petting, praise) when it stops unwanted
behavior and responds correctly.
● Training duration: Limit focused training sessions to 10-15 minutes
at a time.
Daily Maintenance & Care
● Cleaning: Wipe the remote and collar with a soft, slightly damp
cloth. Ensure the collar's charging port seal is closed tightly.
● Battery care: If not used for a long time, recharge both devices
fully at least every 60 days to maintain battery health.
● Storage: Store in a cool, dry place away from direct sunlight and
extreme temperatures.
Part 5: Usage Guide & Maintenance
18
Type-C Charging CableTest Light Mini Spanner
Part 4: Function Operations
Functional Operations Overview
User Manual
Mini Remote Ultrasonic Dog Trainer
User Manual
TZ-935
Please Read This Manual Carefully Before Use
Silicone Caps
Contact PointsRemote Collar
Prong Installation
Card
LanyardCharging Notice
Card
Maximum Eective Control Distance Up to 985 Feet
Intensity Level Button
Channel Button
Static Stimulation (Shock)
Button
Vibration Button
Ultrasound Button
Wrist Strap Eyelet
Type-C Charging Port
Sound Button
Remote Battery Level Lock Key Icon
Channel Display (1-4)
Ultrasound Mode
Collar Battery Level
Ultrasound+Strobe Button
Lock Switch
Digital Display for Intensity Level
Ultrasound+Strobe Mode
Vibration Mode Sound Mode
Static Stimulation Mode
Power Button:
Short press for ON/OFF
Long press for Pairing
Metal Contact Points
Charging:
The battery icon " " ashes.
Fully Charged:
The battery icon " " stays solid
(full charge takes ~2 hours).
Charging:
indicator shows a solid red light.
Fully Charged:
Indicator turns solid green
(full charge takes ~1.5 hours).
Speaker
Type-C Charging Port
B.Charging the Collar:
1. Open the waterproof rubber seal on the side of the collar.
2. Connect the included Type-C cable to a 5V/1A power source.
Step 2: Power On & Pairing
1. Turn On the Collar: Briey press the collar’s power button " ".
The indicator will glow solid green for 2 seconds, then blink
intermittently, indicating it is on.
Notes:
1. Once paired, the devices will automatically reconnect when
turned on.
2. If pairing fails (timeout after 10 minutes), repeat Step 3-4.
3. For Multiple Dogs: Use the Channel button " " on the remote
to select an unused channel (DOG2, DOG3, or DOG4). Then repeat
the pairing steps for each additional collar.
Step 3: Fitting the Collar
1. Select and Install Contact Points:
The package includes long and short contact points.
● Long-haired dogs: Use long contact points.
● Short-haired dogs: Use short contact points.
Note: For very dense fur or to reduce friction, attach the included
silicone caps over the metal contact points.
Step 4: Begin Training
1. Basic Operation: Correct your dog at the exact moment of
misbehavior (e.g. barking, jumping) by pressing the appropriate
function button.
2. Recommended Usage Priority:
● Ultrasound: First choice for daily training. A high-frequency sound
(inaudible to humans) that interrupts behavior without physical
contact.
● Sound/Vibration: Use if ultrasound is ineective. Provides a
clearer, gentle reminder.
● Static Stimulation (Shock): Use only for emergency situations or
dangerous behaviors (e.g. chasing cars) when other modes fail.
ALWAYS start at the lowest level 1.
● Ultrasound+Strobe: Designed to deter external threats
(e.g. o-leash dogs approaching). Use to warn and distract.
3. Positive Reinforcement: Immediately after correction, reward
your dog with a treat or verbal praise (e.g. "Good dog!" with gentle
petting). This creates a positive association and improves training
eectiveness.
Testing the Static Stimulation Function
Use the included test light to ensure the function is working correctly
without testing on your dog.
1. Screw the contact points rmly onto the collar.
2. Press both metal probes of the test light against the two contact
points simultaneously.
3. Press the " " button on the remote. If the test light illuminates,
the function is working.
2. Adjust and Secure the Collar:
● Adjust the collar strap to t snugly around your dog's neck.
● After fastening, you should be able to t one nger comfortably
between the collar and your dog's neck (A).
● Position the contact points so they touch the skin on the underside
of the neck (B).
3. Check Comfort: Observe your dog for the rst 5-10 minutes. If
they scratch or paw at the collar excessively, readjust the tightness or
try dierent contact points.
Long Contact Points
Ultrasound
Button
Sound Vibration
Static
Stimulation
Ultrasound
+Strobe
Unscrew
Install the silicone caps
Remote
Display
Single
Press
The icon blinks once and the
remote performs its
corresponding function once.
The icon blinks once and the collar performs
its corresponding function once.
Continuous
Press
Protection
Mechanism
Intensity
Adjustment
The icon blinks continuously
and the remote repeatedly
performs its corresponding
function.
Issue
1. Remote/Collar
Won't Turn On
Dead Battery: Charge for at least 30
minutes.
Faulty Charger/Cable: Use a known-good
5V/1A charger and the included cable.
Sleep Mode: Press any button (remote) or the
power button (collar) to wake.
2. Won't Connect
/ No Response
3. Collar No
Response
4. Short
Battery Life
Possible Causes & Solutions
The icon blinks continuously and the collar
repeatedly performs its corresponding
function.
Pauses after 8s.
Release and press again to
resume.
Pauses after 8s (icon blinks slowly). Buttons
unresponsive for 30s.
Fixed; not adjustable.
Adjustable (1-9):
Press the function button, then use the
" " buttons to set level.
Not Paired: Repeat pairing process.
Wrong Channel: Ensure the remote is on
the correct DOG channel.
Out of Range: Move closer (within 300m for
pairing).
Collar Asleep: Press collar button or shake to
wake.
Poor Contact: Clean the contact points and
dog's neck fur. Ensure snug t.
Low Battery: Recharge the collar.
Test: Use the test light to check Static
Stimulation function.
Aging Battery: Batteries degrade over time
(~400 cycles).
Deep Discharge: Avoid fully draining the
battery.
High Usage: Frequent use of high-power
functions (Ultrasound, Strobe) drains battery
faster.