INS707
®
HANDLE CONNECTOR SERVICE KIT #101099
JUEGO DE SERVICIO DEL CONECTOR DEL MONOMANDO #101099
TROUSSE DE RÉPARATION POUR RACCORD DE POIGNÉE NO 101099
A
B
C
D
E
F
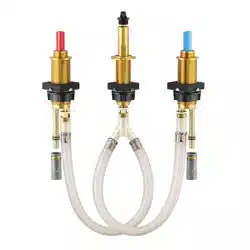
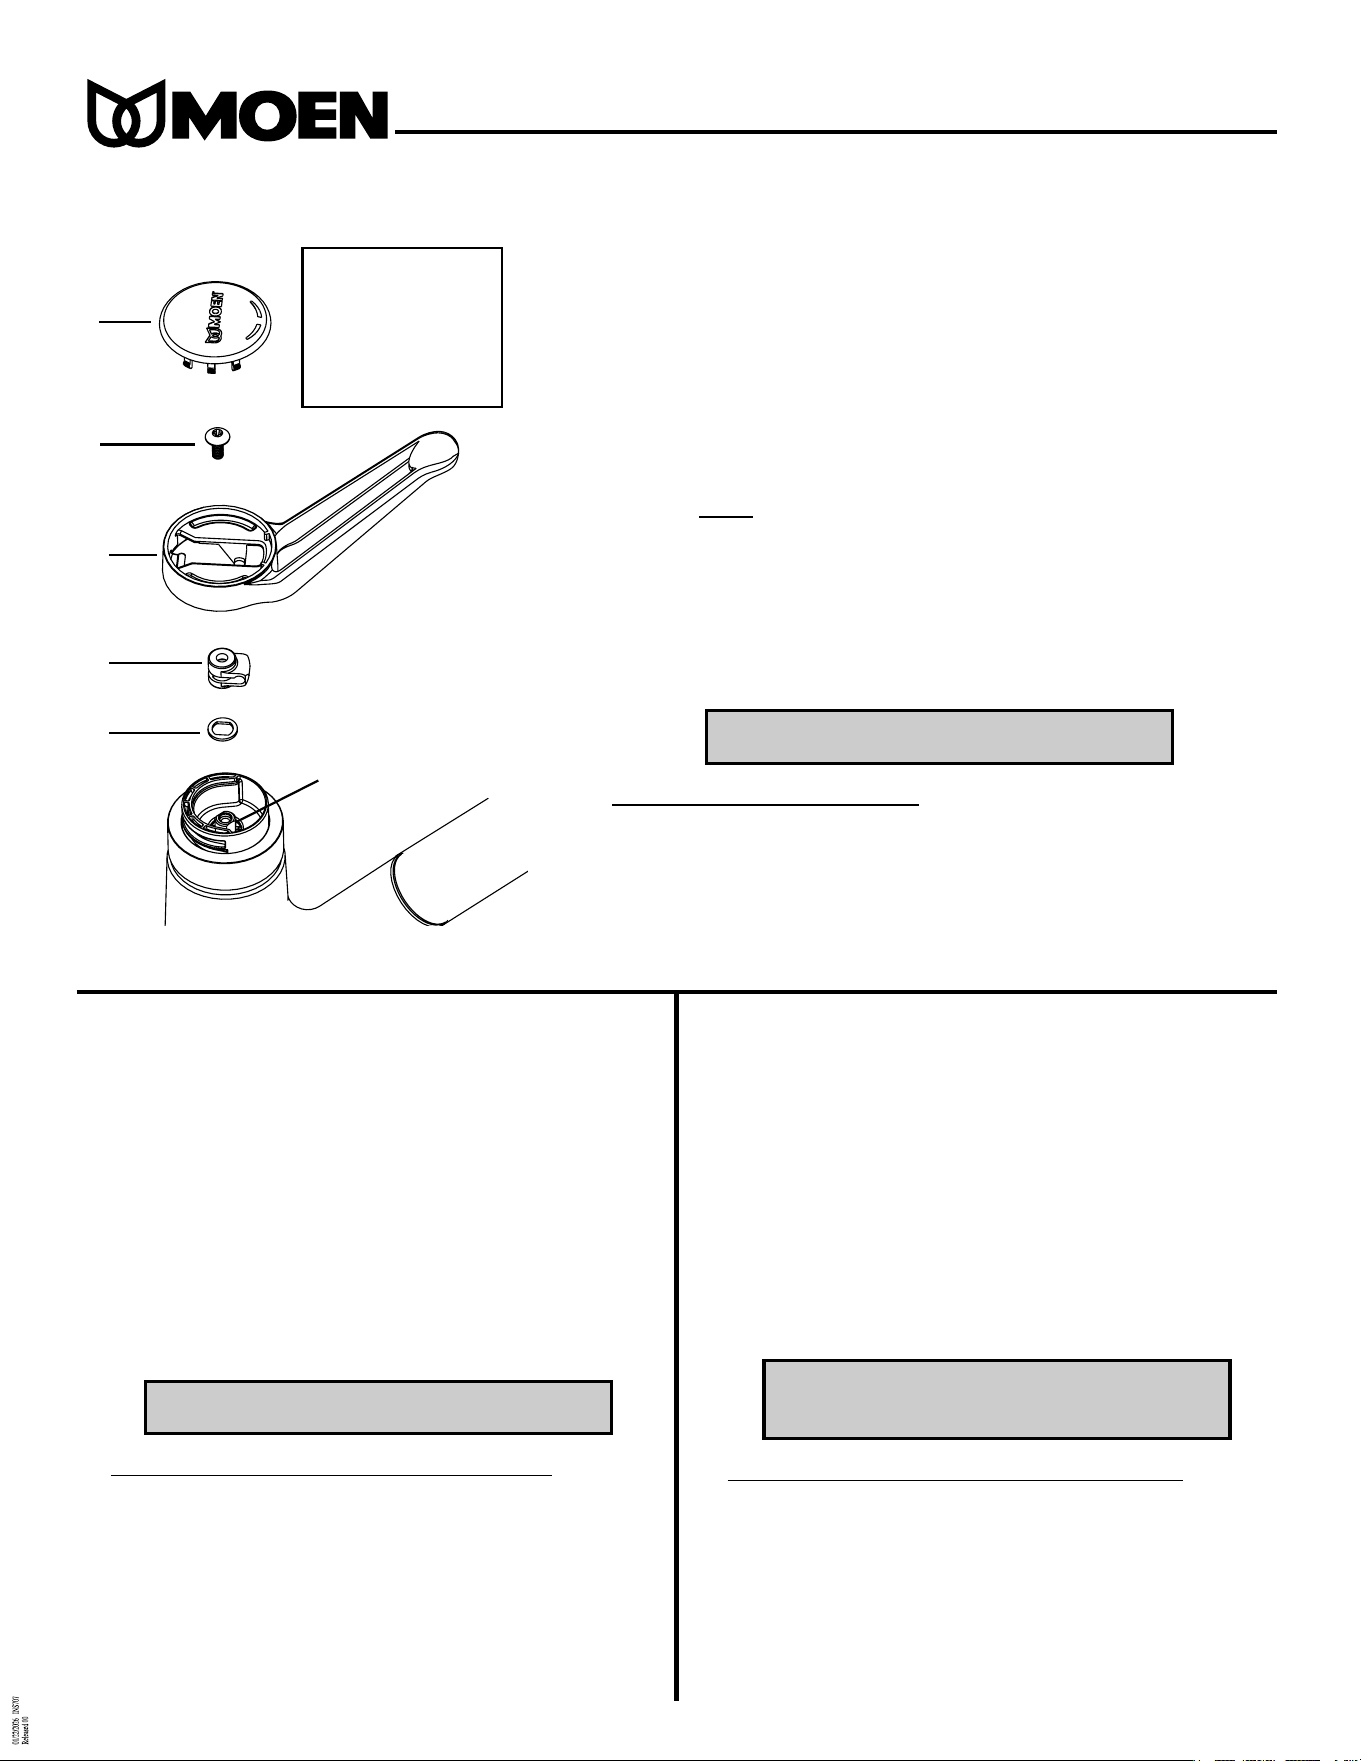
TO REMOVE OLD HANDLE CONNECTOR (figure 1)
NOTE: It is not necessary to shut off your water supply while making
this change.
1. Carefully pry off handle cap (A) with a flat bladed screwdriver and remove han-
dle screw (B). Tilt handle (C) and lift off.
2. Grasp cartridge stem (F) with a pair of pliers and pull cartridge stem up to full
open position.
3. Remove any washers and spacers (E) from cartridge stem.
IMPORTANT : ALL WASHERS AND SPACERS
MUST BE REMOVED FROM CARTRIDGE STEM
4. Note orientation of handle connector
(D) which is clipped on to handle (C). Flex
connector ends and remove connector from handle.
5. Discard all old washers, spacers and handle connector.
6. Push new connector onto the handle in the same orientation as the old con-
nector with small round hole facing top of handle.
PARA RETIRAR EL CONECTOR DEL
MONOMANDO ANTIGUO (figura 1)
NOTA: No es necesario cortar el suministro de agua para
hacer este cambio.
1. Levante cuidadosamente la tapa del monomando (A) haciendo
palanca con un destornillador de punta chata y retire el tornillo
del monomando (B). Incline el monomando (C) y sáquelo hacia
arriba.
2. Tome el vástago del cartucho (F) con unas pinzas y tire del
vástago del cartucho hacia arriba hasta la posición totalmente
abierto.
3. Retire todas las arandelas y bujes (E) del vástago del cartucho.
IMPORTANTE : TODAS LAS ARANDELAS Y BUJES DEBEN
SER RETIRADOS DEL VÁSTAGO DEL CARTUCHO
4. Note la orientación del conector del monomando (D) que va
sujeto al monomando (C). Flexione los extremos del conector
y retírelo del monomando.
5. Deseche todas las arandelas, bujes y el conector del monomando
viejos.
6. Empuje el conector nuevo sobre el monomando con la misma
orientación que presentaba el viejo, con el pequeño orificio
redondo mirando hacia la parte superior del monomando.
POUR ENLEVER L’ANCIEN RACCORD DE
POIGNÉE (illustr. 1)
NOTE : Il n’est pas nécessaire de couper l’alimentation en
eau durant la réparation.
1. 1. Soulever soigneusement l’enjoliveur de poignée (A) pour l’en-
lever à l’aide d’un tournevis à tête plate et enlever la vis de
poignée (B). Incliner la poignée (C) et l’enlever.
2. Saisir la tige de cartouche (F) à l’aide d’une paire de pinces et
tirer sur la tige de cartouche pour la placer à la position ouverte.
3. Enlever les rondelles et les entretoises (E) de la tige de
cartouche.
IMPORTANT : TOUTES LES RONDELLES ET LES
ENTRETOI ES DOIVENT ÊTRE ENLEVÉES DE LA
TIGE DE CARTOUCHE.
4. Prendre note de l’orientation du raccord de poignée
(D) qui est
accroché à la poignée (C). Plier les extrémités du raccord et
enlever le raccord de la poignée.
5.
Jeter les anciennes rondelles, entretoises et l’ancien raccord de poignée.
6. Insérer le nouveau raccord dans la poignée dans la même direc-
tion que l’ancien raccord en s’assurant que le petit trou est dirigé
vers le haut de la poignée.
FIGURE 1
(Old Configuration)
FIGURA 1
(Vieja Configuración)
ILLUSTRATION 1
(Ancienne configuration)
El juego contiene:
1 Tornillo
1 Conector
1 arandela de plástico azul
1 arandela metálica
Kit Contains:
1 Screw
1 Connector
1 blue plastic washer
1 metal washer
La trousse comprend :
1 Vis
1 Raccord
1 Rondelle en plastique bleu
1 Rondelle métallique
suite
continúa
continued
LÍNEAS TELEFÓNICAS
DE SERVICIO
Para aclarar sus dudas relacionadas con la instalación,
refacciones, repuestos y/o garantía de nuestros produc-
tos, llámenos por cobrar a los siguientes teléfonos:
(84) 88-08-26, 88-08-27, o 91-800-84-345.
FAX (84) 88-08-04.
En los Estados Unidos: 1-800-289-6636
Pregunte por el personal de servicio a clientes.
Horario: 9:00 A.M. - 1:00 P.M. - de lunes a viernes.
MOEN INCORPORATED
25300 Al Moen Drive
North Olmsted, OH 44070-8022
INS707
© Moen Incorporated, 2001
Printed in U.S.A
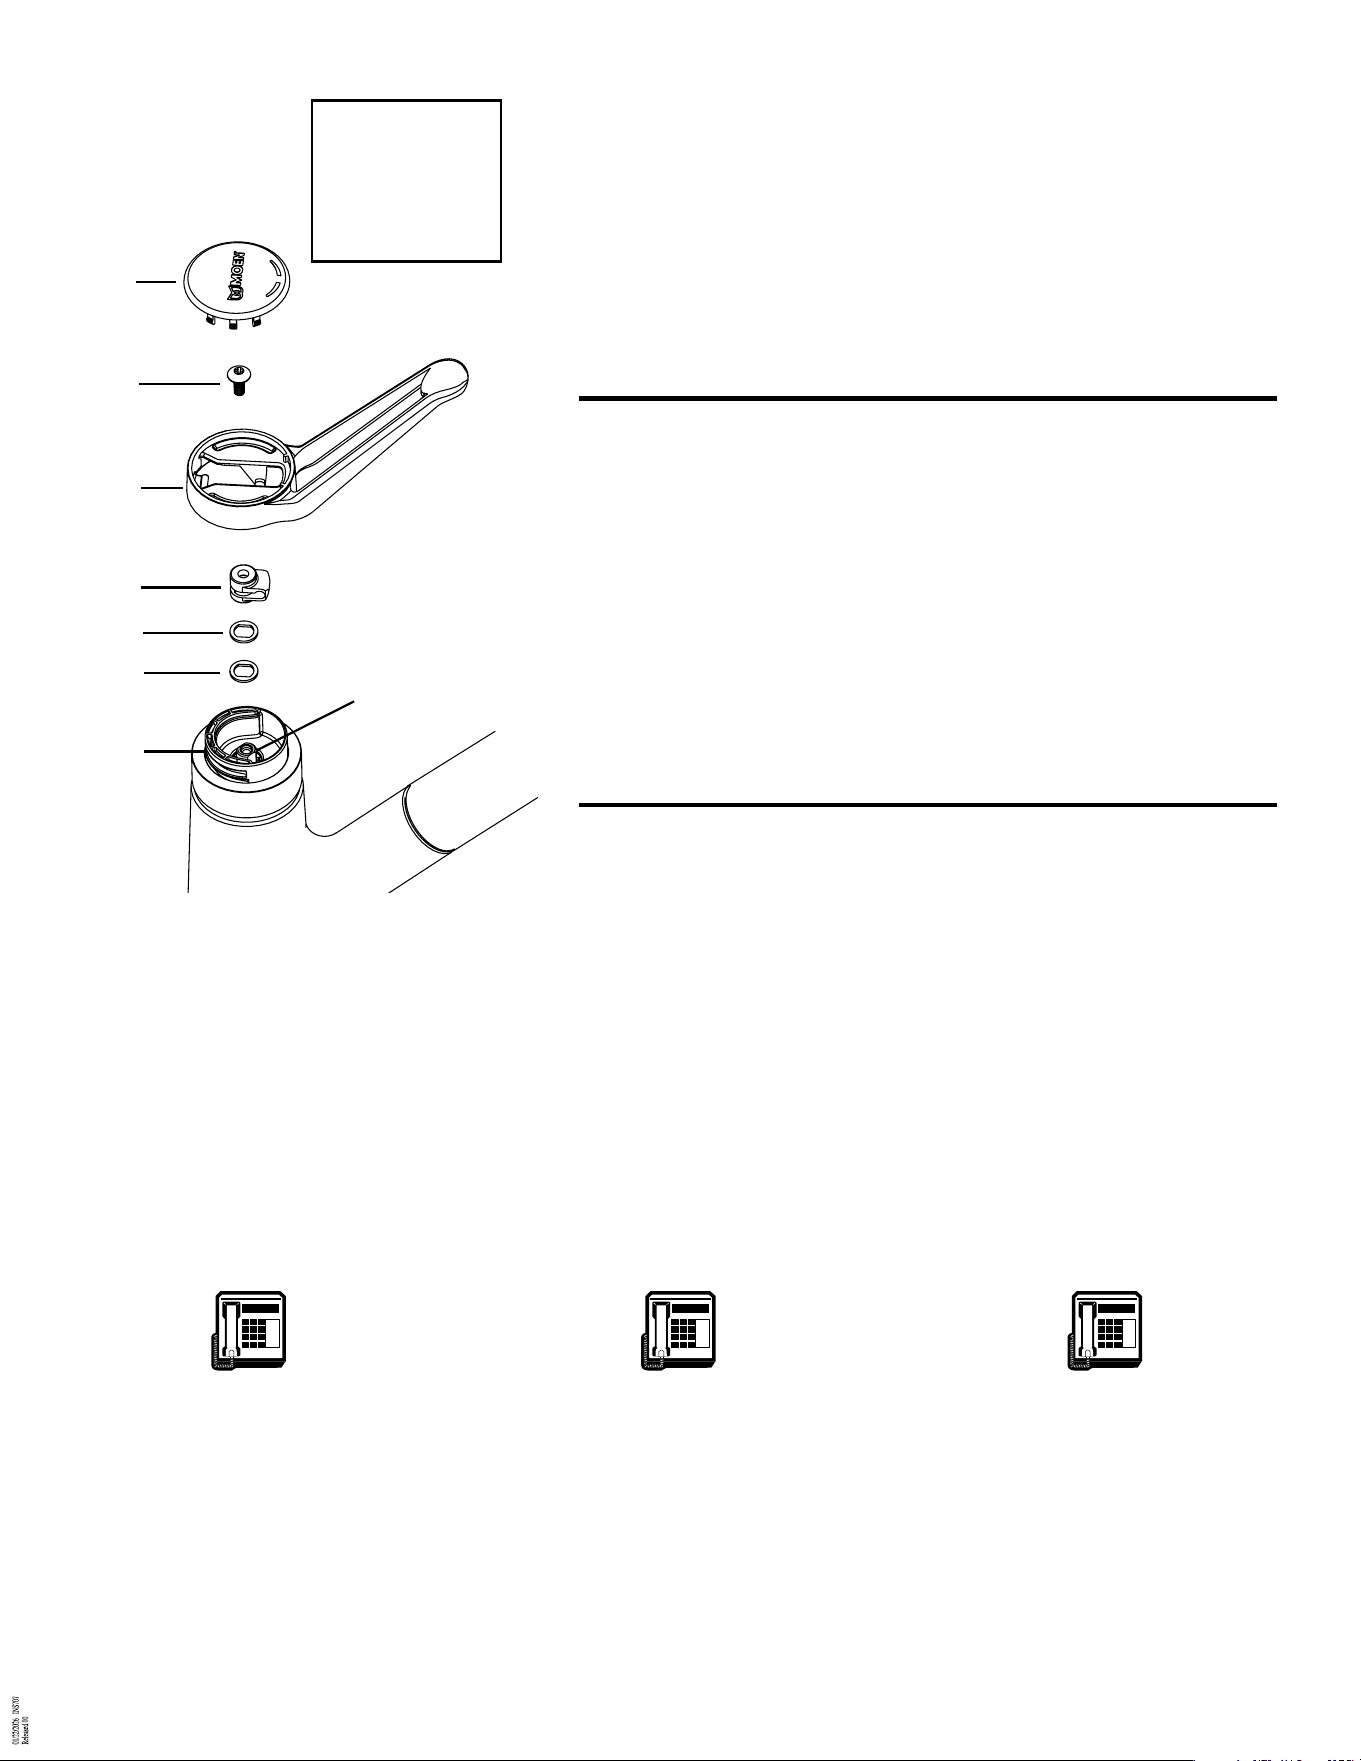
A
B
D
C
E
G
F
H
FIGURE 2
(New Configuration)
FIGURA 2
(Nueva Configuración)
ILLUSTRATION 2
(Nouvelle configuration)
TO INSTALL NEW HANDLE CONNECTOR (figure 2)
7. Place one metal washer (F) on to cartridge stem (G).
8. Place blue plastic washer (E) on top of metal washer (F) on cartridge stem.
9. Push cartridge stem down to fully closed position.
10. Hook notch on back of handle housing (C) into the top groove on the retainer
pivot nut (H) by tilting the handle to the back while installing. Rotate han-
dle until handle connector (D) seats on to cartridge stem. Handle must be
properly installed or shut-off leak may occur.
11. Insert new handle screw (B) and tighten securely.
12. Reinstall cap (A).
INSTALACIÓN DEL NUEVO CONECTOR DEL MONOMANDO
(figura 2)
7. Coloque una arandela metálica (F) sobre el vástago del cartucho (G).
8. Coloque la arandela de plástico azul (E) sobre la arandela metálica (F)
sobre el vástago del cartucho.
9. Empuje el vástago del cartucho hacia abajo hasta la posición totalmente cerrado.
10. Enganche la muesca en la parte posterior del bastidor del monomando (C)
en la ranura superior de la tuerca retenedora de pivote (H) inclinando el
monomando hacia atrás mientras lo instala. Haga girar el monomando hasta
que el conector del mismo (D) asiente en el vástago del cartucho. El mono-
mando debe estar correctamente instalado o de lo contrario pueden
producirse pérdidas al cerrarlo.
11. Inserte el nuevo tornillo del monomando (B) y apriételo con firmeza.
12. Vuelva a instalar la tapa (A).
POUR INSTALLER L’ANCIEN RACCORD DE POIGNÉE
(illustr. 2)
7. Placer une rondelle métallique (F) sur la tige de cartouche (G).
8. Placer une rondelle bleue en plastique (E) sur le dessus de la rondelle
métallique (F) sur la tige de cartouche.
9. Insérer la tige de cartouche vers le bas jusqu’à une position complètement
fermée.
10. Accrocher l’encoche au dos du boîtier de la poignée (C) dans la rainure
supérieure de l’écrou de pivot de retenue (H) en inclinant la poignée vers
l’arrière lors de l’installation. Faire pivoter la poignée jusqu’à ce que le rac-
cord de poignée (D) repose correctement sur la tige de cartouche. La
poignée doit être installée correctement ou il pourrait y avoir des fuites
lorsque vous fermez la poignée.
11. Insérer la nouvelle vis de poignée (B) et bien serrer.
12. Réinstaller l’enjoliveur de poignée (A).
SERVICE
À LA CLIENTÈLE
Appelez notre Service à la clientèle sans frais :
Région de Toronto :
(905) 829-3400
Du lundi au vendredi, de 7 h 30 à 17 h HNE
Ailleurs au Canada :
1 800 465-6130
Du lundi au vendredi, de 7 h 30 à 17 h HNE.
HELPLINE
Call our toll free helpline number:
1 (800) 289-6636
1 (800) BUY-MOEN
For answers to any product, installation
replacement parts, or warranty questions.
Hours of operation are:
8:00 A.M. - 8 P.M. EST. Monday - Friday
8: A.M. - 6:30 P.M. EST. Saturday