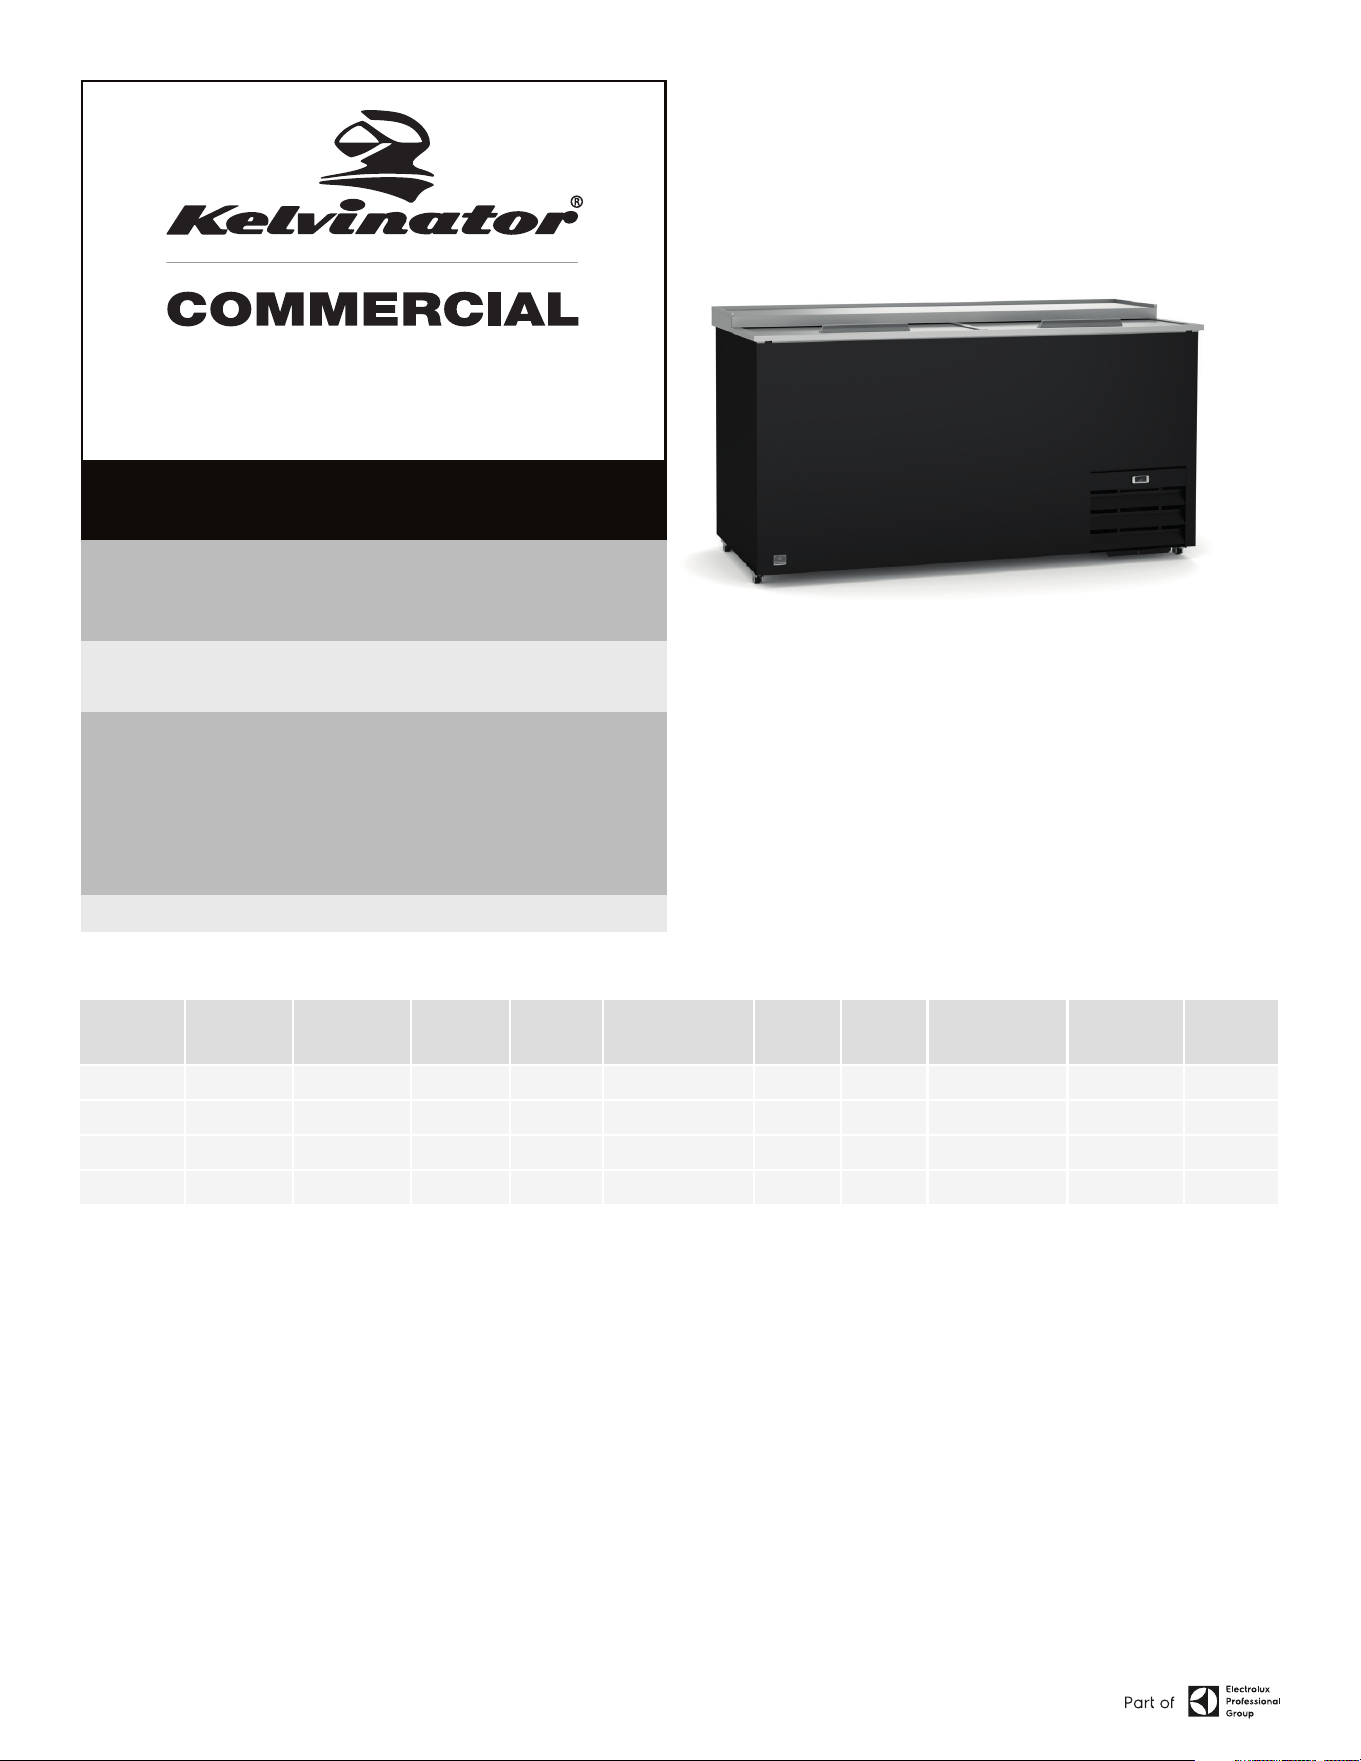
SERVICE/INSTALL MANUAL
IMPORTANT INFORMATION,
KEEP FOR OPERATOR
PART NUMBER HB_738371_9F73837100, REV. A (03/23)
This manual provides information for:
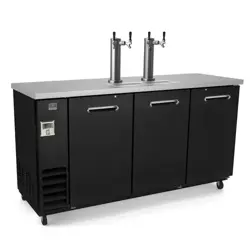
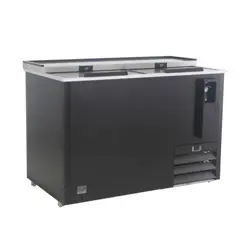
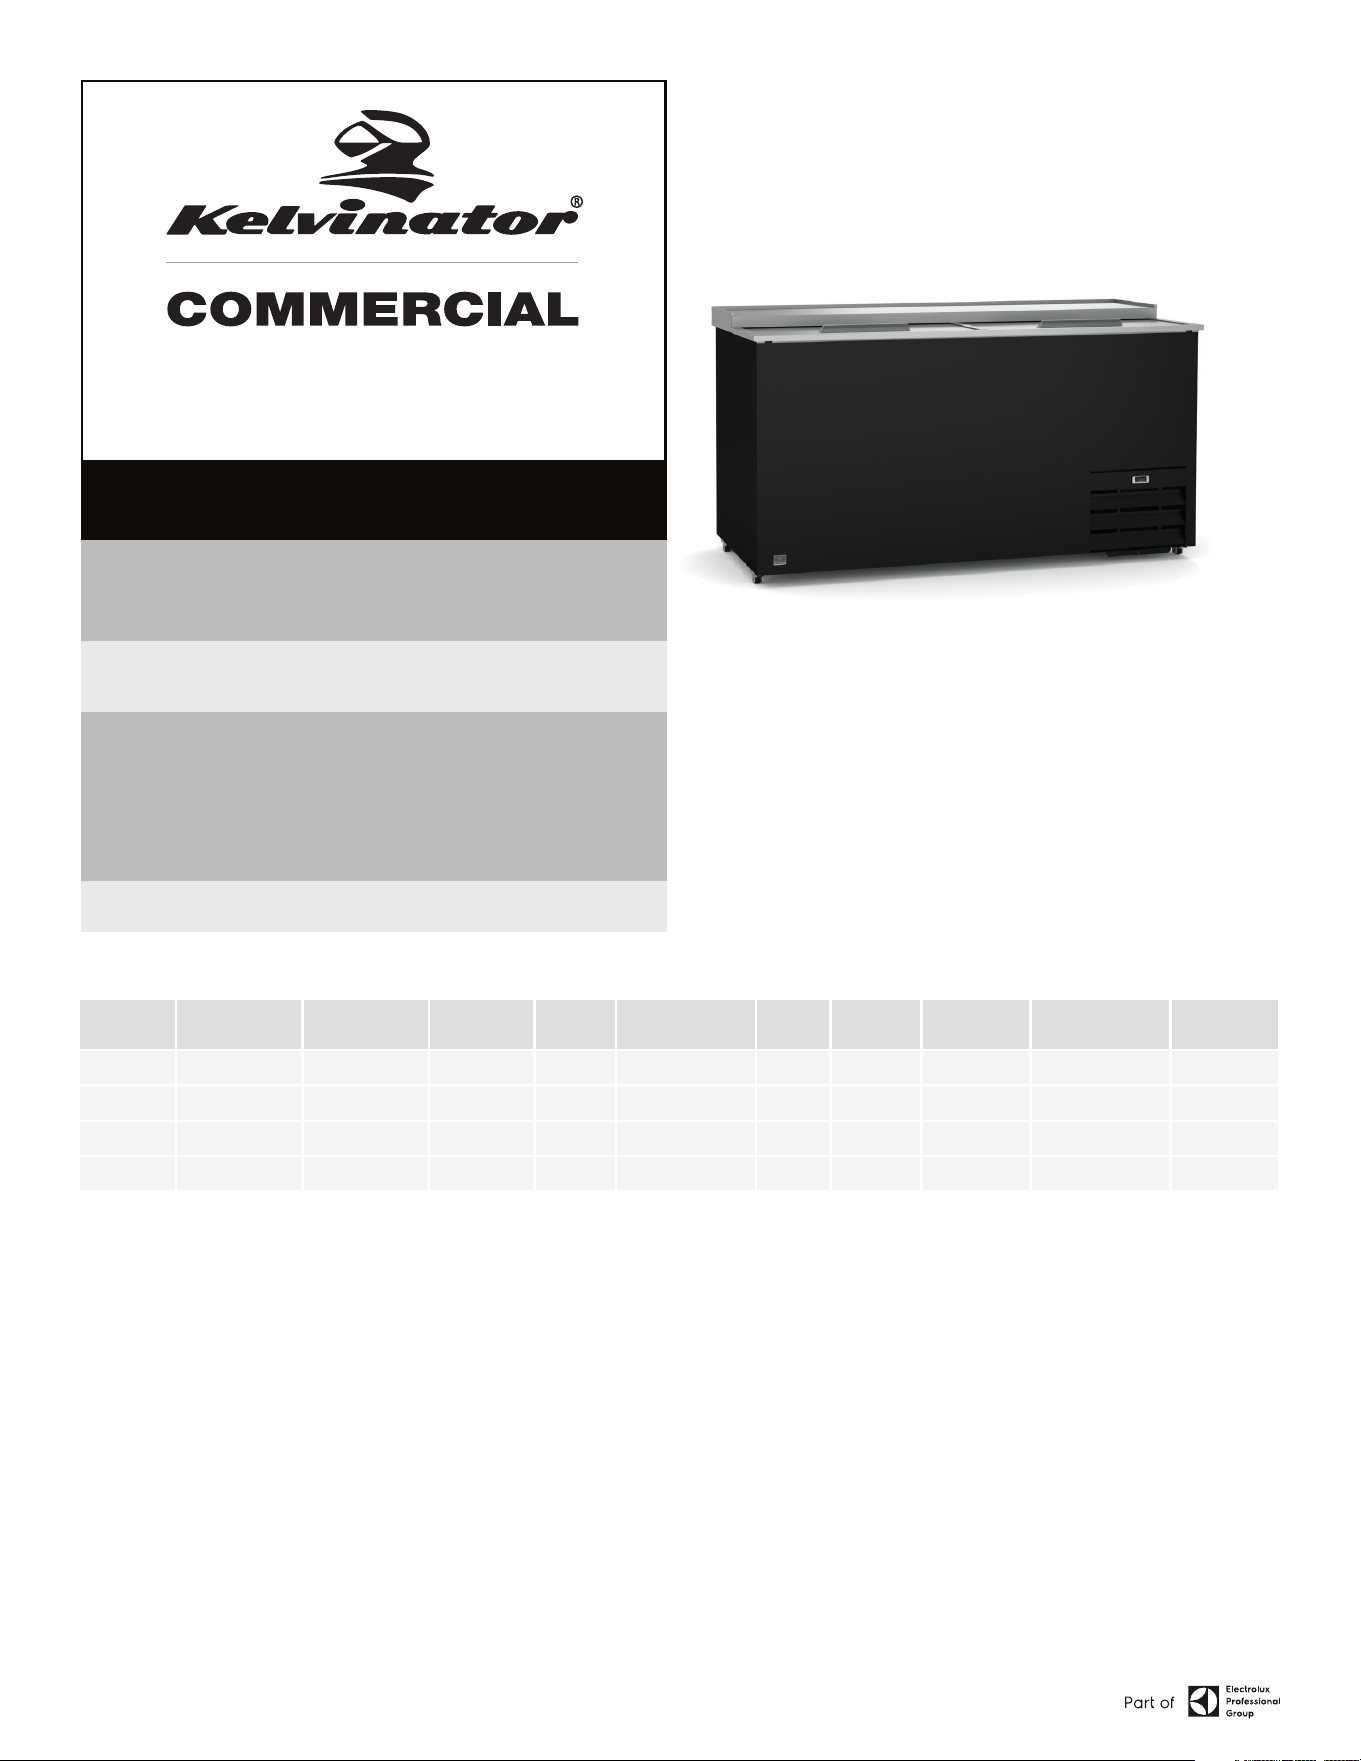
BOTTLE COOLER
THIS MANUAL MUST BE RETAINED FOR FUTURE REFERENCE. READ,
UNDERSTAND AND FOLLOW THE INSTRUCTIONS AND WARNINGS
CONTAINED IN THIS MANUAL.
FOR YOUR SAFETY Do not store or use gasoline or other flammable vapors
and liquids in the vicinity of this or any other appliance.
NOTIFY CARRIER OF DAMAGE AT ONCE It is the responsibility of the consignee
to inspect the container upon receipt of same and to determine the possibility
of any damage, including concealed damage. Electrolux Professional, Inc.
suggests that if you are suspicious of damage to make a notation on the
delivery receipt. It will be the responsibility of the consignee to file a claim with
the carrier. We recommend that you do so at once.
Manufacture Service/Questions 866-339-8515.
RETAIN THIS MANUAL FOR FUTURE REFERENCE
Note these instructions apply to all coolers. Installations of equipment may not
exactly correspond to your model.
NOTICE: Due to a continuous program of product improvement, Electrolux
Professional, Inc. reserves the right to make changes in design and specifications
without prior notice.
NOTICE: Please read the entire manual carefully before
installation. If certain recommended procedures are not followed, warranty claims
will be denied.
USA & Canada, 866-339-8515
4003 Collins Lane, Louisville, KY 40245
www.kelvinatorcommercial.com
Kelvinator Commercial is a pending or registered trademark of Electrolux Consumer Products, Inc., and is used under a license from Electrolux Consumer Products, Inc. Information contained in
this document is known to be current and accurate at the time of printing/creation. Reference our product line website for the most updated product information and specifications.
© 2024 Electrolux Professional, Inc. All Rights Reserved.
EQUIPMENT DESCRIPTION
MODEL NO.
REFRIGERANT
TYPE
REFRIGERANT
WEIGHT, G
V/HZ/PH AMPS
CAPACITY
STORAGE (CU FT)
HP BTU CHARGE OZ SHIP WEIGHT LBS NEMA PLUG
KCHBC36 R600a 60 115/60/1 1.8 9.3 1/10 2000 2.12 187 5-15P
KCHBC50 R600a 70 115/60/1 3 13.7 1/8 3200 2.47 234 5-15P
KCHBC65 R600a 70 115/60/1 3 19 1/8 5400 2.47 276 5-15P
KCHBC95 R290 100 115/60/1 3 29.1 1/5 7600 3.53 381 5-15P
REV. D (09/24)
INSTALLATION
Make sure that the cooler is not damaged on arrival. Your supplier must be notified
of any transport damage, within 24 hours of delivery.
The cooler should be placed in a warm, dry room, with suitable ventilation.
Place the cooler in such a way, as to allow the free circulation of air around it. That
is, with at least 100mm space all around it.
Never place the cooler in strong sunlight. The cooler be placed on a level surface.
Make sure that it does not rock.
If the cooler has been stored or transported cold, it must not be started before
the compressor is judged to have reached a temperature at least 41°F. It is
recommended to clean up the cooler before starting it.
ELECTRICAL CONNECTION
The cooler must be connected to a socket with the correct voltage/frequency, as
show on the nameplate. The standard for u.s is 115V/50HZ. Voltage variations
of ±10% are acceptable. Greater variations can damage the cooler, and in such
cases the factory warranty is not valid. In the case of extreme voltage variation,
above or below the standard, your local supplier will be able to advise you, what
to do.
The cooler requires extra protection according to the Danish Heavy Current
Regulations.
This also applies, if a new cooler is replaced, which did not have such protection.
The purpose of extra protection, is to protect the user from dangerous electric
shocks, in the case of defect.
2 BOTTLE COOLER
OPERATION INSTRUCTIONS
The temperature in the cooler is automatically regulated by a pre adjusted
thermostat.
The position of the cooler, the ambient temperature, the number of times the
lid is opened and for how long the lid is opened, all these factors affect the
temperature in the cooler, which should therefore not be placed in sunlight or
closed to a heat-radiating surface.
If your cooler is fitted with a lock, the key should be kept out of the reach of
children. If your new cooler is to replace an older one, which is not in use any
more, you should remove the lock mechanism, on the old one, before disposing it.
STORAGE OFF FOOD STUFFS
The cooler is only designed as a conserver, and is the not suited to cold freeze
foodstuffs. In other words, only refrozen food must be placed in the cooler. Next to
that the cooler must not be filled beyond the height limit of the contents line, or in
cases where there is no such line, to within 100mm below the lid. This is to ensure
the product temperature less than 36°F.
IMPORTANT - READ FIRST - IMPORTANT
YOUR SAFETY AND THE SAFETY OF OTHERS ARE VERY IMPORTANT.
WE HAVE PROVIDED MANY IMPORTANT SAFETY MESSAGES IN THIS MANUAL AND ON YOUR
APPLIANCE. ALWAYS READ AND OBEY ALL SAFETY MESSAGES.
OUR PRODUCT INSTRUCTIONS WILL BE UPLOADED ON OUR COMPANY OFFICIAL WEBSITE.
THIS IS THE SAFETY ALERT SYMBOL. THIS SYMBOL ALERTS YOU TO POTENTIAL
HAZARDS THAT CAN KILL OR INJURE YOU AND OTHERS. ALL SAFETY MESSAGES
WILL FOLLOW THE SAFETY ALERT SYMBOL AND EITHER THE WORDS” DANGER”,
“WARNING” OR “CAUTION”.
DANGER MEANS THAT FAILURE TO HEED THIS SAFETY STATEMENT MAY RESULT
IN SEVERE PERSONAL INJURY OR DEATH.
WARNING MEANS THAT FAILURE TO HEED THIS SAFETY STATEMENT MAY
RESULT IN EXTENSIVE PRODUCT DAMAGE, SERIOUS PERSONAL INJURY, OR
DEATH.
CAUTION MEANS THAT FAILURE TO HEED THIS SAFETY STATEMENT MAY RESULT
IN MINOR OR MODERATE PERSONAL INJURY, OR PROPERTY OR EQUIPMENT
DAMAGE.
ALL SAFETY MESSAGES WILL ALERT YOU TO WHAT THE POTENTIAL HAZARD IS, TELL YOU
HOW TO REDUCE THE CHANCE OF INJURY, AND LET YOU KNOW WHAT CAN HAPPEN IF THE
INSTRUCTIONS ARE NOT FOLLOWED.
FOLLOW BASIC PRECAUTIONS, INCLUDING THE FOLLOWING:
NOTE: IF THE SUPPLY CORD IS DAMAGED, IT MUST BE REPLACED BY THE
MANUFACTURER, ITS SERVICE AGENT OR SIMILARLY QUALIFIED PERSONS IN
ORDER TO AVOID A HAZARD.
NOTE: THIS APPLIANCE IS NOT INTENDED FOR USE BY PERSONS (INCLUDING
CHILDREN) WITH REDUCED PHYSICAL, SENSORY OR MENTAL CAPABILITIES,
OR LACK OF EXPERIENCE AND KNOWLEDGE, UNLESS THEY HAVE BEEN GIVEN
SUPERVISION OR INSTRUCTION CONCERNING USE OF THE APPLIANCE BY A
PERSON RESPONSIBLE FOR THEIR SAFETY.
NOTE: CHILDREN SHOULD BE SUPERVISED TO ENSURE THAT THEY DO NOT PLAY WITH
THE APPLIANCE.
NOTE: THIS APPLIANCE CAN BE USED BY CHILDREN AGED FROM 8 YEARS AND ABOVE
AND PERSONS WITH REDUCED PHYSICAL SENSORY OR MENTAL CAPABILITIES
OR LACK OF EXPERIENCE AND KNOWLEDGE IF THEY HAVE BEEN GIVEN
SUPERVISION OR INSTRUCTION CONCERNING USE OF THE APPLIANCE IN A SAFE
WAY AND UNDERSTAND THE HAZARDS INVOLVED. CHILDREN SHALL NOT PLAY
WITH THE APPLIANCE. CLEANING AND USER MAINTENANCE SHALL NOT BE
MADE BY CHILDREN WITHOUT SUPERVISION.
NOTE: KEEP THE APPLIANCE AND ITS CORD OUT OF REACH OF CHILDREN LESS THAN 8
YEARS.
NOTE: DO NOT STORE EXPLOSIVE SUBSTANCES SUCH AS AEROSOL CANS WITH A
FLAMMABLE PROPELLANT IN THIS APPLIANCE.
NOTE: THE APPLIANCE USE FLAMMABLE INSULATION BLOWING GAS C5H10, DISPOSAL
OF THE APPLIANCE SHALL IN ACCORDANCE WITH THE REGULATIONS OF LOCAL
AUTHORITIES.
NOTE: THE KEY FOR APPLIANCE ELECTRIC BOX SHOULD BE SAFE KEPT BY QUALIFIED
PERSONS IN ORDER TO AVOID A HAZARD
WARNING: KEEP VENTILATION OPENINGS, IN THE APPLIANCE ENCLOSURE OR IN THE BUILT-IN
STRUCTURE, CLEAR OF OBSTRUCTION.
WARNING: DO NOT USE MECHANICAL DEVICES OR OTHER MEANS TO ACCELERATE
THE DEFROSTING PROCESS, OTHER THAN THOSE RECOMMENDED BY THE
MANUFACTURER.
WARNING: DO NOT DAMAGE THE REFRIGERANT CIRCUIT.
WARNING: DO NOT USE ELECTRICAL APPLIANCES INSIDE THE FOOD STORAGE COMPARTMENTS
OF THE APPLIANCE, UNLESS THEY ARE OF THE TYPE RECOMMENDED BY THE
MANUFACTURER. HANDLING, MOVING, AND USE OF THE REFRIGERATOR OR
FREEZER TO AVOID EITHER DAMAGING THE REFRIGERANT TUBING, OR INCREASING
THE RISK OF A LEAK.
CAUTION: RISK OF FIRE OR EXPLOSION DUE TO FLAMMABLE REFRIGERANT USED. FOLLOW
HANDLING INSTRUCTIONS CAREFULLY IN COMPLIANCE WITH U.S. GOVERNMENT
REGULATIONS. COMPONENT PARTS SHALL BE REPLACED WITH LIKE COMPONENTS
AND THAT SERVICING SHALL BE DONE BY FACTORY AUTHORIZED SERVICE
PERSONNEL, SO AS TO MINIMIZE THE RISK OF POSSIBLE IGNITION DUE TO
INCORRECT PARTS OR IMPROPER SERVICE.
CAUTION: RISK OF FIRE OR EXPLOSION DUE TO PUNCTURE OF REFRIGERANT TUBING; FOLLOW
HANDLING INSTRUCTIONS CAREFULLY. FLAMMABLE REFRIGERANT USED
DANGER: RISK OF CHILD ENTRAPMENT. BEFORE YOU THROW AWAY YOUR OLD REFRIGERATOR
OR FREEZER: TAKE OFF THE DOORS, LEAVE THE SHELVES IN PLACE SO THAT
CHILDREN MAY NOT EASILY CLIMB INSIDE.
DEFROSTING THE CABINET
In the course of time, a frost layer will be naturally formed within the cooler. When
this layer is 5-8mm thick, the cabinet should be defrosted the following way:
• remove the plug from the socket;
• open the lid and leave it open;
• loosen the frost layer using a plastic or wooden scraper.
The defrosting process can be speeded up by using bowls of hot water.
Never use sharp or pointed instruments.
After final defrosting, the cabinet should be cleaned as described in section:
Maintenance. The cabinet should be thoroughly dried after cleaning.
3 BOTTLE COOLER
OPERATION
CAUTION: DO NOT THROW ITEMS INTO THE STORAGE AREA. FAILURE TO HEED THESE
RECOMMENDATIONS COULD RESULT IN DAMAGE TO THE INTERIOR OF THE
CABINET.
REFRIGERATED CYCLE
During the refrigeration cycle, the evaporator fans wilt run continuously even when
one or more doors are open. The door switch will activate the lights when opened.
1. Every 6 hours, the unit will turn off and to allow the evaporator coil to defrost. The
controller now displays the defrost symbol. When the coil temperature reaches
41°F or after 20 minutes of defrost, the unit will turn on again.
2. Anti-condensation heaters on door frames work in conjunction with the
compressor.
3. The factory setting for the temperature range is 34°F to 38° F.
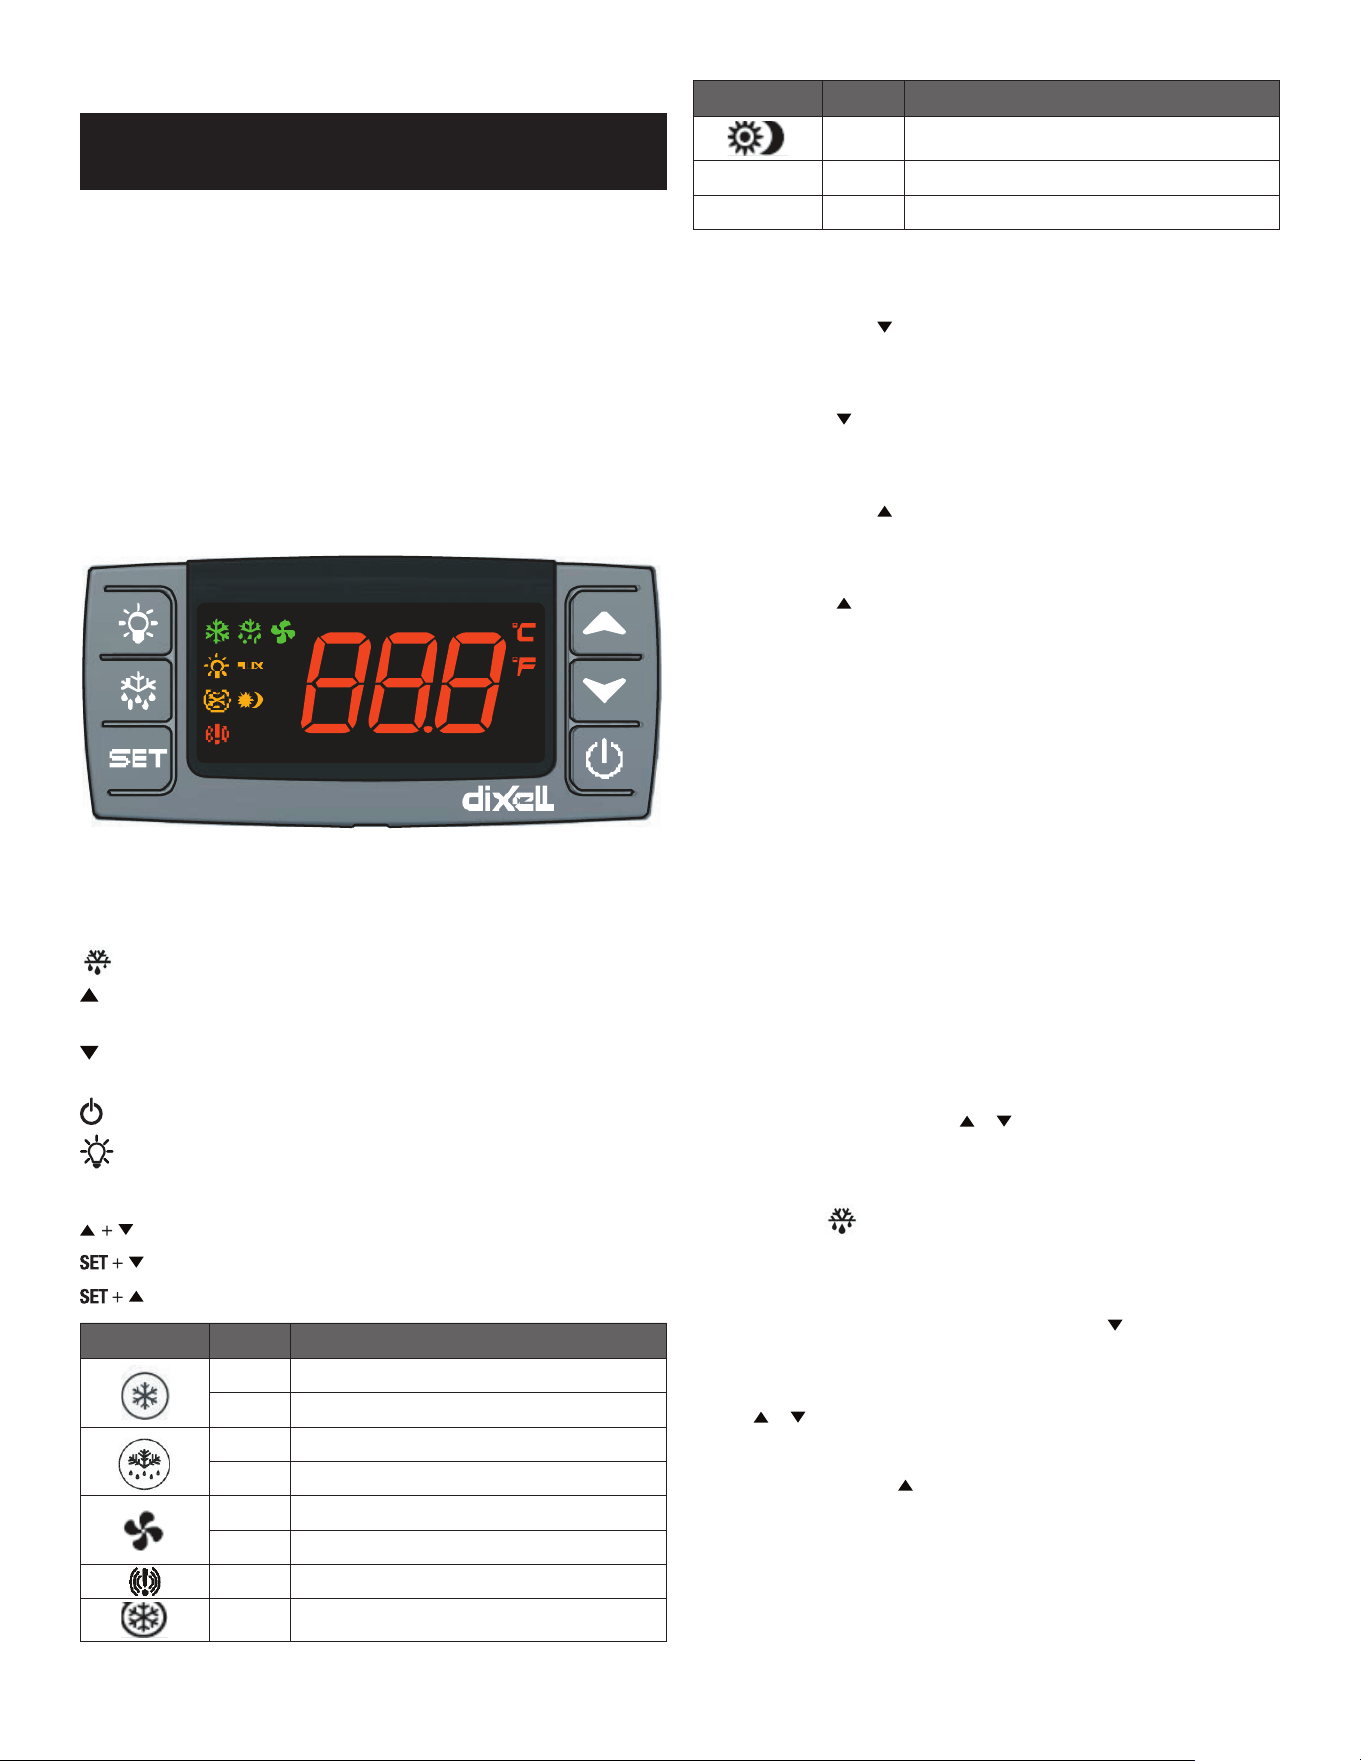
CONTROL PANEL SOLID-STATE THERMOSTAT
FRONT PANEL COMMANDS
SET SET: To display target set point; in programming mode it selects a
parameter or confirms an operation.
DEF: To start a manual defrost
UP: To see the max. stored temperature; in programming mode it browses
the parameter codes or increases the display valve
DOWN: To see the min. stored temperature; in programming mode it
browses the parameter codes or decreases the display value
To switch the instrument off, if onF = oFF.
Not enabled
Key combination:
To lock and unlock the keyboard
To enter in programming mode
To return to the room temperature display
LED MODE FUNCTION
On Compressor enabled
Flashing Anti-short cycle delay enabled
On Defrost enabled
Flashing Drip time in progress
On Fans enabled
Flashing Fans delay after defrost in progress
On An alarm is occurring
On Continuous cycle is running
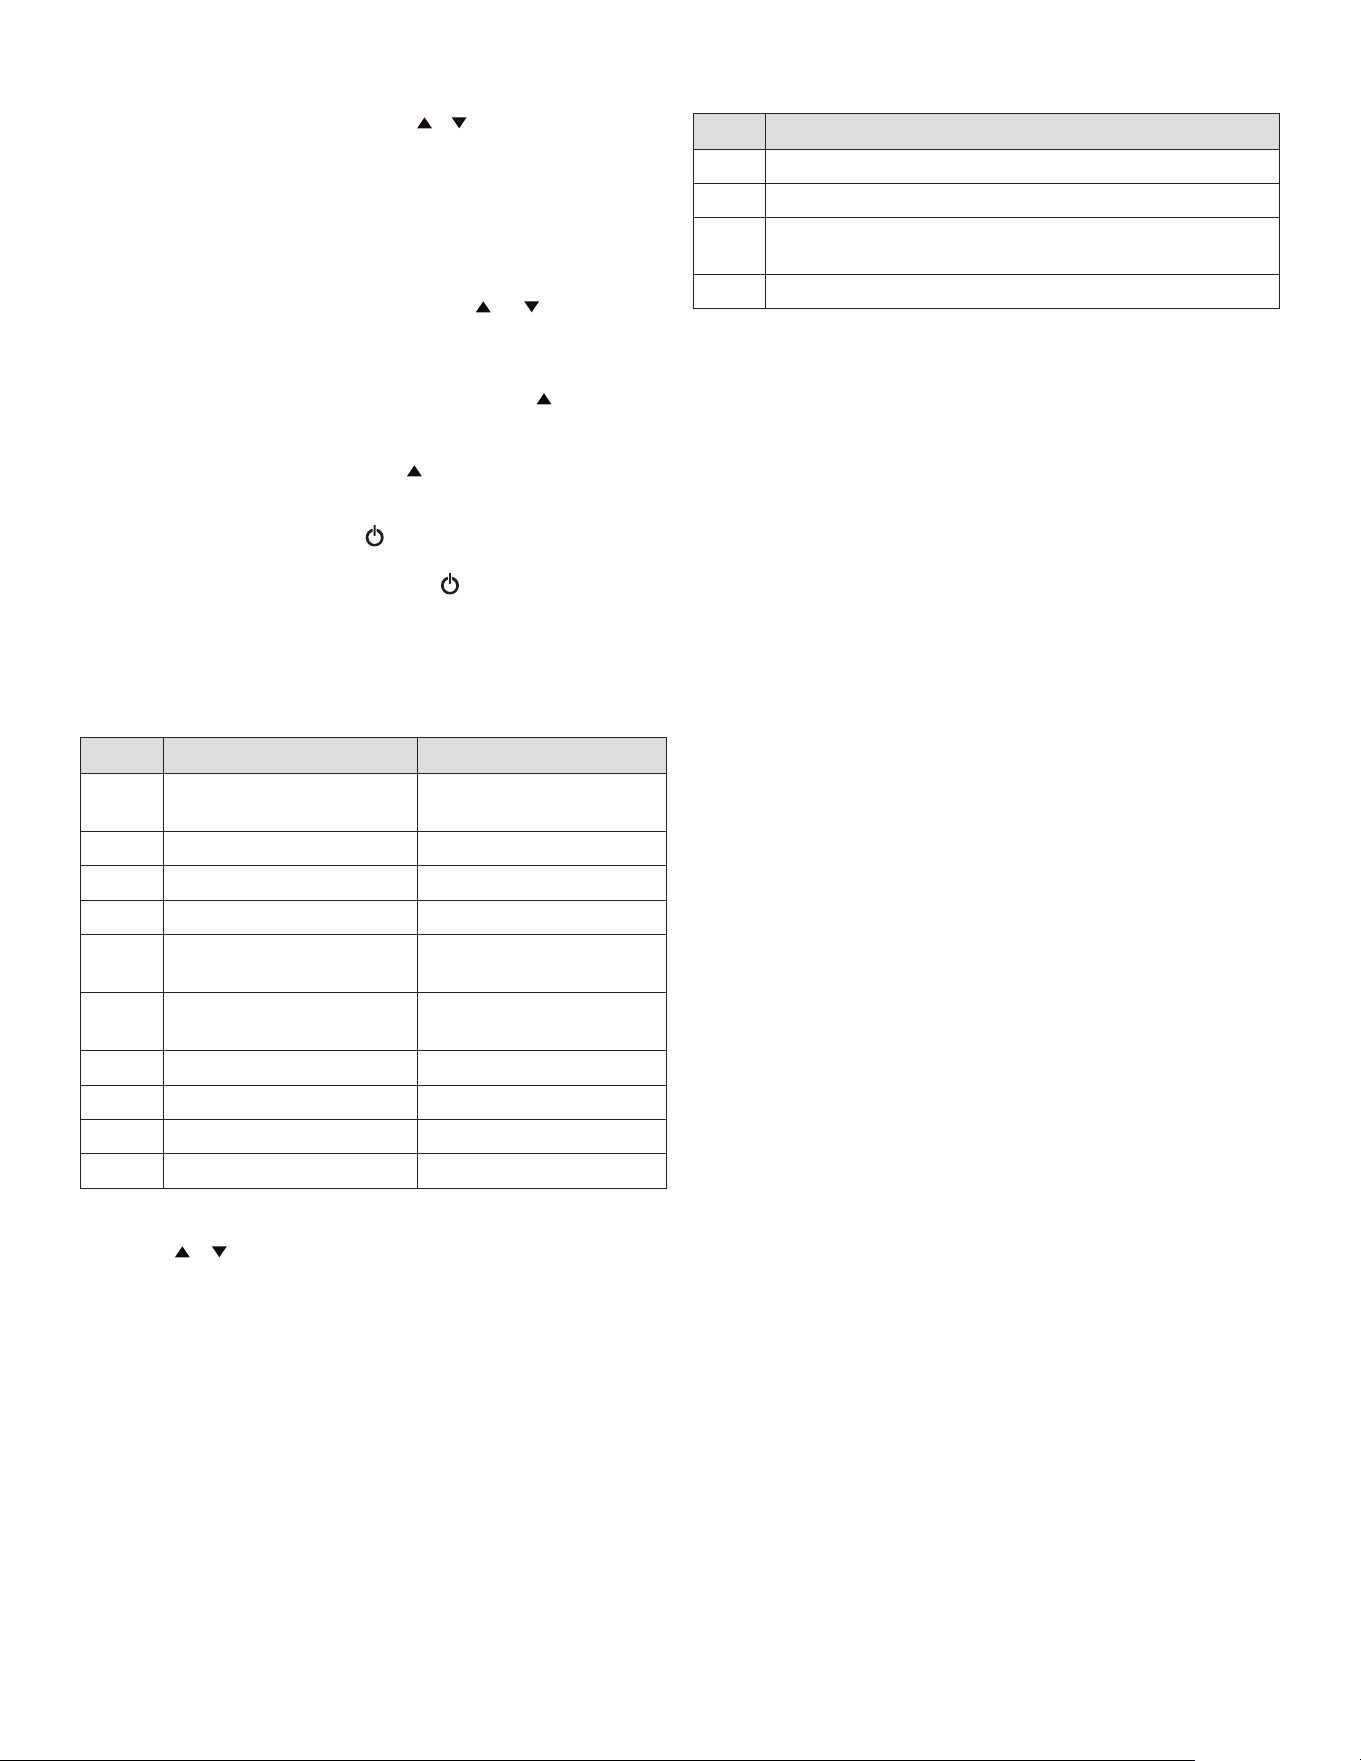
LED MODE FUNCTION
On Energy saving enabled
ºC/ºF
On Measurement unit
ºC/ºF
Flashing Programming phase
MAX & MIN TEMPERATURE MEMORIZATION
How to see the MIN temperature:
1. Press and release the key.
2. The “Lo” message will be displayed followed by the minimum temperature
recorded.
3. By pressing the key again or by waiting 5 seconds the normal display will be
restored.
How to see the MAX temperature:
1. Press and release the key.
2. The “Hi” message will be displayed followed by the maximum temperature
recorded.
3. By pressing the key again or by waiting 5 seconds the normal display will be
restored.
How to reset the MAX and MIN temperature recorded:
1. Hold press the SET key for more than 3 seconds, while the max and min
temperature is displayed. (rST message will be displayed)
2. To confirm the operation the “rST” message starts blinking and the normal
temperature will be displayed.
MAIN FUNCTIONS
How to see the setpoint:
1. Push and immediately release the SET key: the display will show the set point
value.
2. Push and immediately release the SET key or wait for 5 seconds to display the
probe value again.
How to change the setpoint:
1. Press the SET key for more than 2 seconds to change the set point value.
2. The value of the set point will be displayed and the “
ºC” or “ºF”
LED starts
blinking.
3. To change the set value, push the
or key within 10 seconds.
4. To memorize the new set point value, push the SET key again or wait 10 seconds.
How to start a manual defrost:
1. Push the DEF ( )
key for more than 2 seconds and a manual defrost will start.
How to change a parameter value:
To change the parameter’s value operate as follows:
1. Enter the programming mode by pressing the SET + keys for more than 3
seconds (the “
ºC” or “ºF”
LED starts blinking).
2. Select the required parameter. Press the SET key to display its value.
3. Use
or to change its value.
4. Press SET to store the new value and move to the following parameter.
To Exit: Press the SET + or wait 15 seconds without pressing a key.
Note: The set value is stored even when the procedure is exited by waiting the
time-out to expire.
4 BOTTLE COOLER
How to lock the keyboard:
1. Press and hold for more than 3 seconds the + keys.
2. The “POF” message will be displayed and the keyboard will be locked. At this
point it will be possibly only to see the set point or the MAX or MIN temperature
stored.
3. If a key is pressed for more than 3 seconds the “POF” message will be displayed.
How to unlock the keyboard:
1. Press and hold together for more than 3 seconds the and keys, til the “Pon”
message is displayed.
The continuous cycle:
When defrost is not progress, it can be activated by holding the key pressed for
about 3
seconds
. The compressor operates to maintain the “ccS” set point for the
time set through the “CCt” parameter. The cycle can be terminated before the end
of the set time using the same activation key for 3
seconds
.
The ON/OFF functions:
With “onF = oFF”, pushing the ON/OFF key, the instrument is switched off. The
“OFF” message is displayed. In this configuration, the regulation is disabled. To
switch the instrument on, push again the ON/OFF key.
WARNING: Loads connected to the normally closed contacts of the relays
are always supplied and under voltage, even if the instrument is in stand
by mode.
ALARM SIGNALS
MESSAGE CAUSE OUTPUTS
“P1” Room probe failure
Compressor output acc. to par.
“Con” and “COF”
“P2” Evaporator probe failure Defrost end is timed
“HA” Maximum temperature alarm Outputs unchanged
“LA” Minimum temperature alarm Outputs unchanged
“HA2” Condenser high temperature
It depends on the “Ac2”
parameter
“LA2” Condenser low temperature
It depends on the “bLL”
parameter
“dA” Door open Compressor and fans restarts
“EA” External alarm Output unchanged
“CA” Serious external alarm (i1F=bAL) All outputs OFF
“CA” Pressure switch alarm (i1F=PAL) All outputs OFF
How to see the alarm and reset the recorded alarm:
1. Push the or key to display the alarm signals.
2. When the signal is displayed, hold the SET key until the “rst” message is
displayed. Push the SET key again. The “rst” message starts blinking and the
normal temperature will be displayed again.
Alarm recovery:
Probe alarms “P1”, “P2” start some seconds after the fault in the related probe; they
automatically stop some seconds after the probe restarts normal operation. Check
connections before replacing the probe.
Temperature alarms “HA”, “LA”, “HA2” and “LA2” automatically stop as soon as the
temperature returns to normal values.
Alarms “EA” and “CA” (with i1F=bAL) recover as soon as the digital input is disabled.
Alarm “CA” (with i1F=PAL) recovers only by switching off and on the instrument.
Other messages:
CODE DESCRIPTION
Pon Keyboard Unlocked
PoF Keyboard locked
noP
In programming mode: none parameter is present in Pr1
On the display or in dP2, dP3, dP4: the selected probe is not enabled
noA None alarm is recorded
MAINTENANCE
This cooler can be cleaned using warm water and a mild detergent. Rinse with
clean water to finish off.
Never use detergents that contain chlorine.
The lid may be cleaned in the same way as the cooler.
If a condenser and associated fan are fitted at the back bottom of the cooler,
they can gather dust and dirt. If cleaning is necessary, they should be vacuumed
with a soft brush.
Please note that the parts behind the protective grille can be hot and rotating.
TROUBLE SHOOTING
If you are having problems with your cooler, please check the following point
before calling service personnel:
• Is the cooler connected to the power supply?
• Is the socket switch on?
• Is the fuse in the switch cabinet intact?
• Has the earth leak circuit breaker (if there is one) cut out?
• Has there been power cut?
If the cooler is in a place that is very hot or with bad ventilation, make sure to
provide adequate ventilation. If the condenser mentioned in Section Maintenance
is not clean, make sure to vacuum it.
If the above points have been checked and the cooler is still not working, please
call service personnel. Inform them the nature of the problem, the type of cooler,
serial number and item number (provided on the nameplate at the back of the
cabinet).
Do not open the cabinet, as every opening hastens the thawing point. As s rule,
the goods will not suffer damage at the first 12 hours. If more time passes, the
goods must be moved to another cooler.
DISPOSAL
When a worn-out cooler is to be disposed off, this must be done in a correct
manner, with respect to the environment. Please be aware of the rules covering
the disposal of such terms; there may be special requirements or conditions to
be observed.
Information about disposal may be obtained from:
• your supplier;
• the relevant authorities (the Local Authority, environmental agencies, etc.).

5 BOTTLE COOLER
SPECIAL POINTS TO NOTE
The information contained in these instruction for use, was correct at the term
of printing. On account of our constant produce development, however, we
reserve the right to make changes in the cooler described here. Naturally, we
will attempt to keep instructions for use up to date.
If you are in doubt as to the correct use of the cooler, please contact your
supplier, who will be able to advise you.
The producer is not responsible for accident or problems, occurred as a result of
wrong connection of the cooler.
6 BOTTLE COOLER
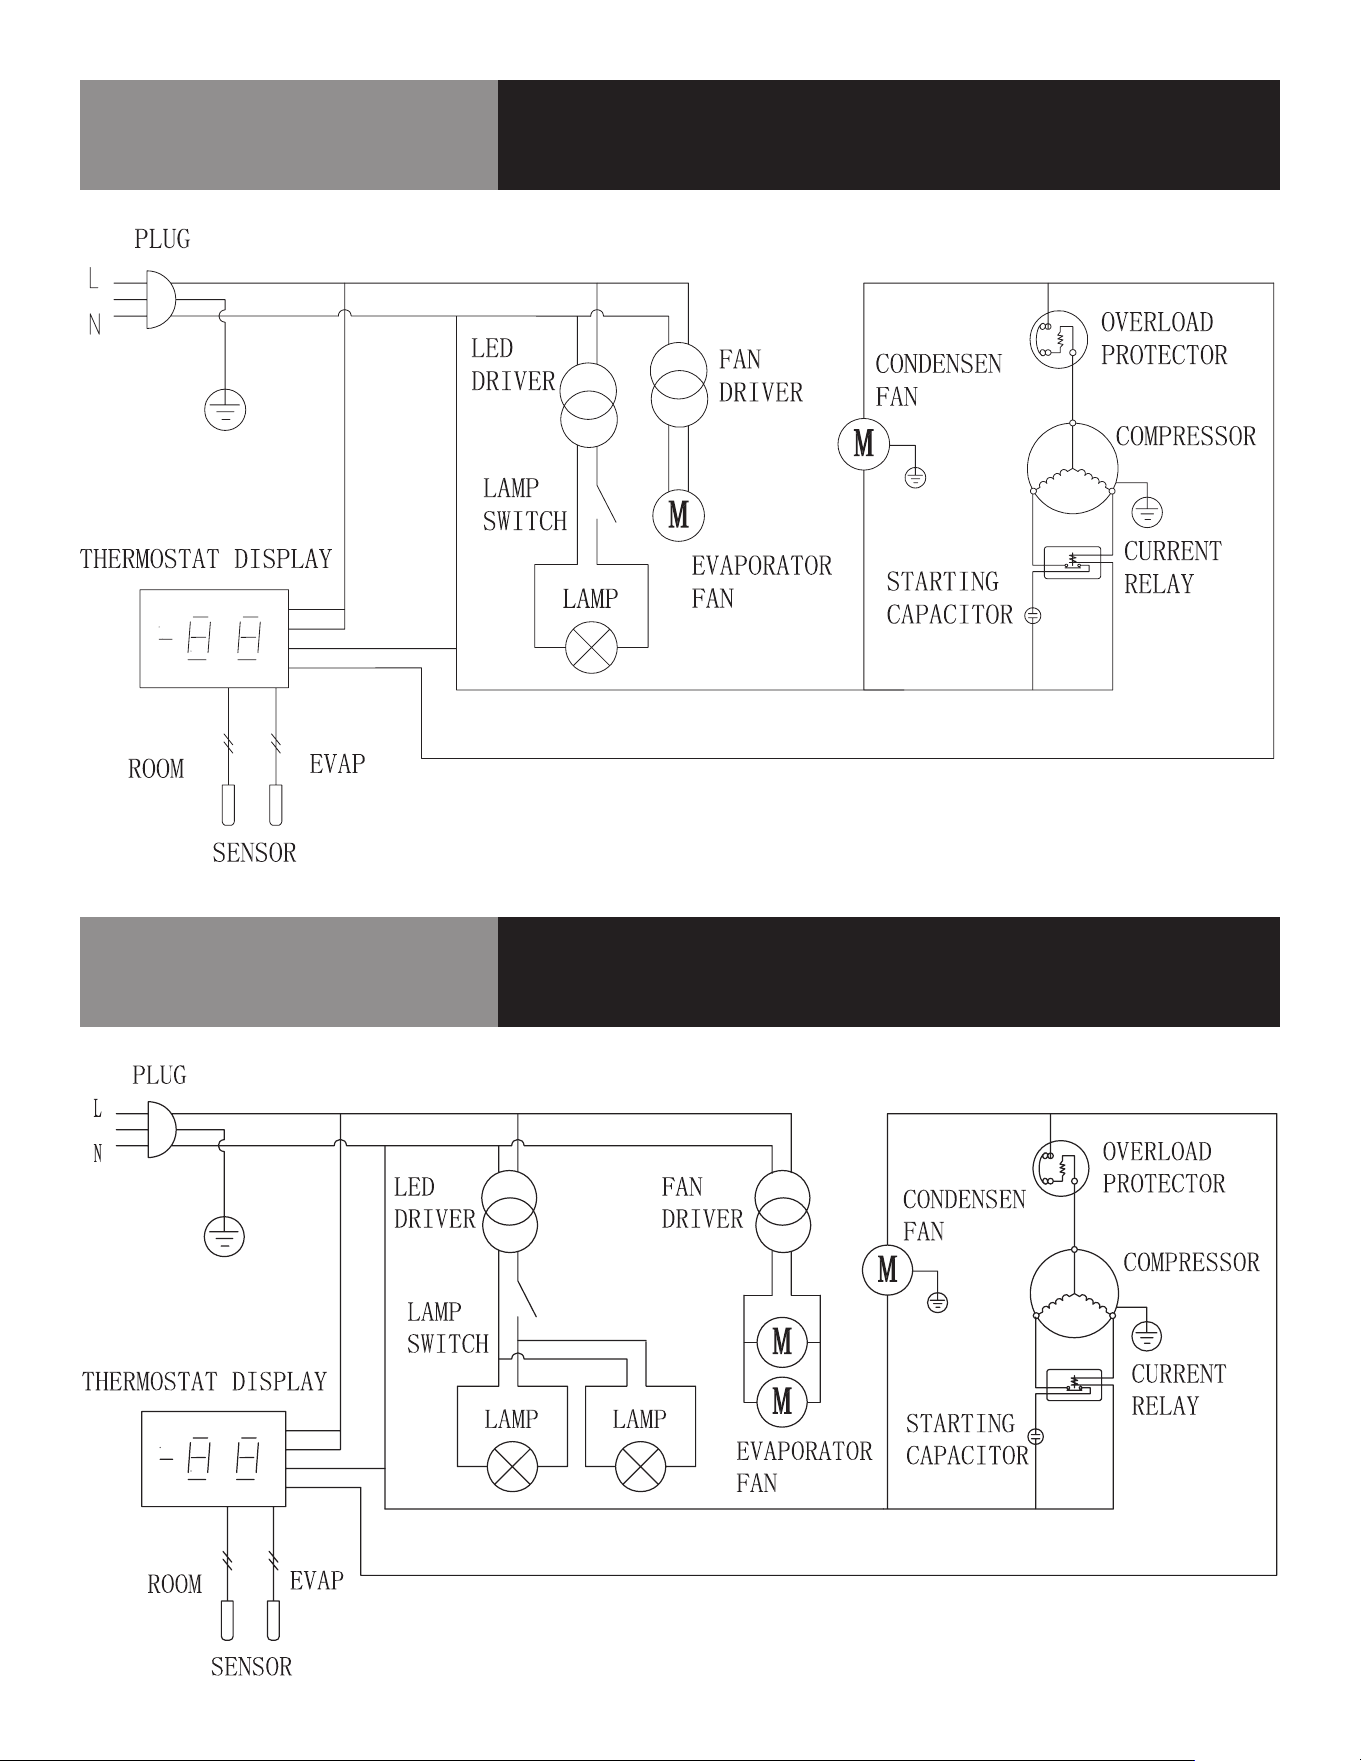
Wiring Diagram
KCHBC36 / KCHBC50 / KCHBC65
CALL FACTORY FOR REPLACEMENT PARTS:
866-339-8515
Wiring Diagram
KCHBC95
CALL FACTORY FOR REPLACEMENT PARTS:
866-339-8515
7 BOTTLE COOLER
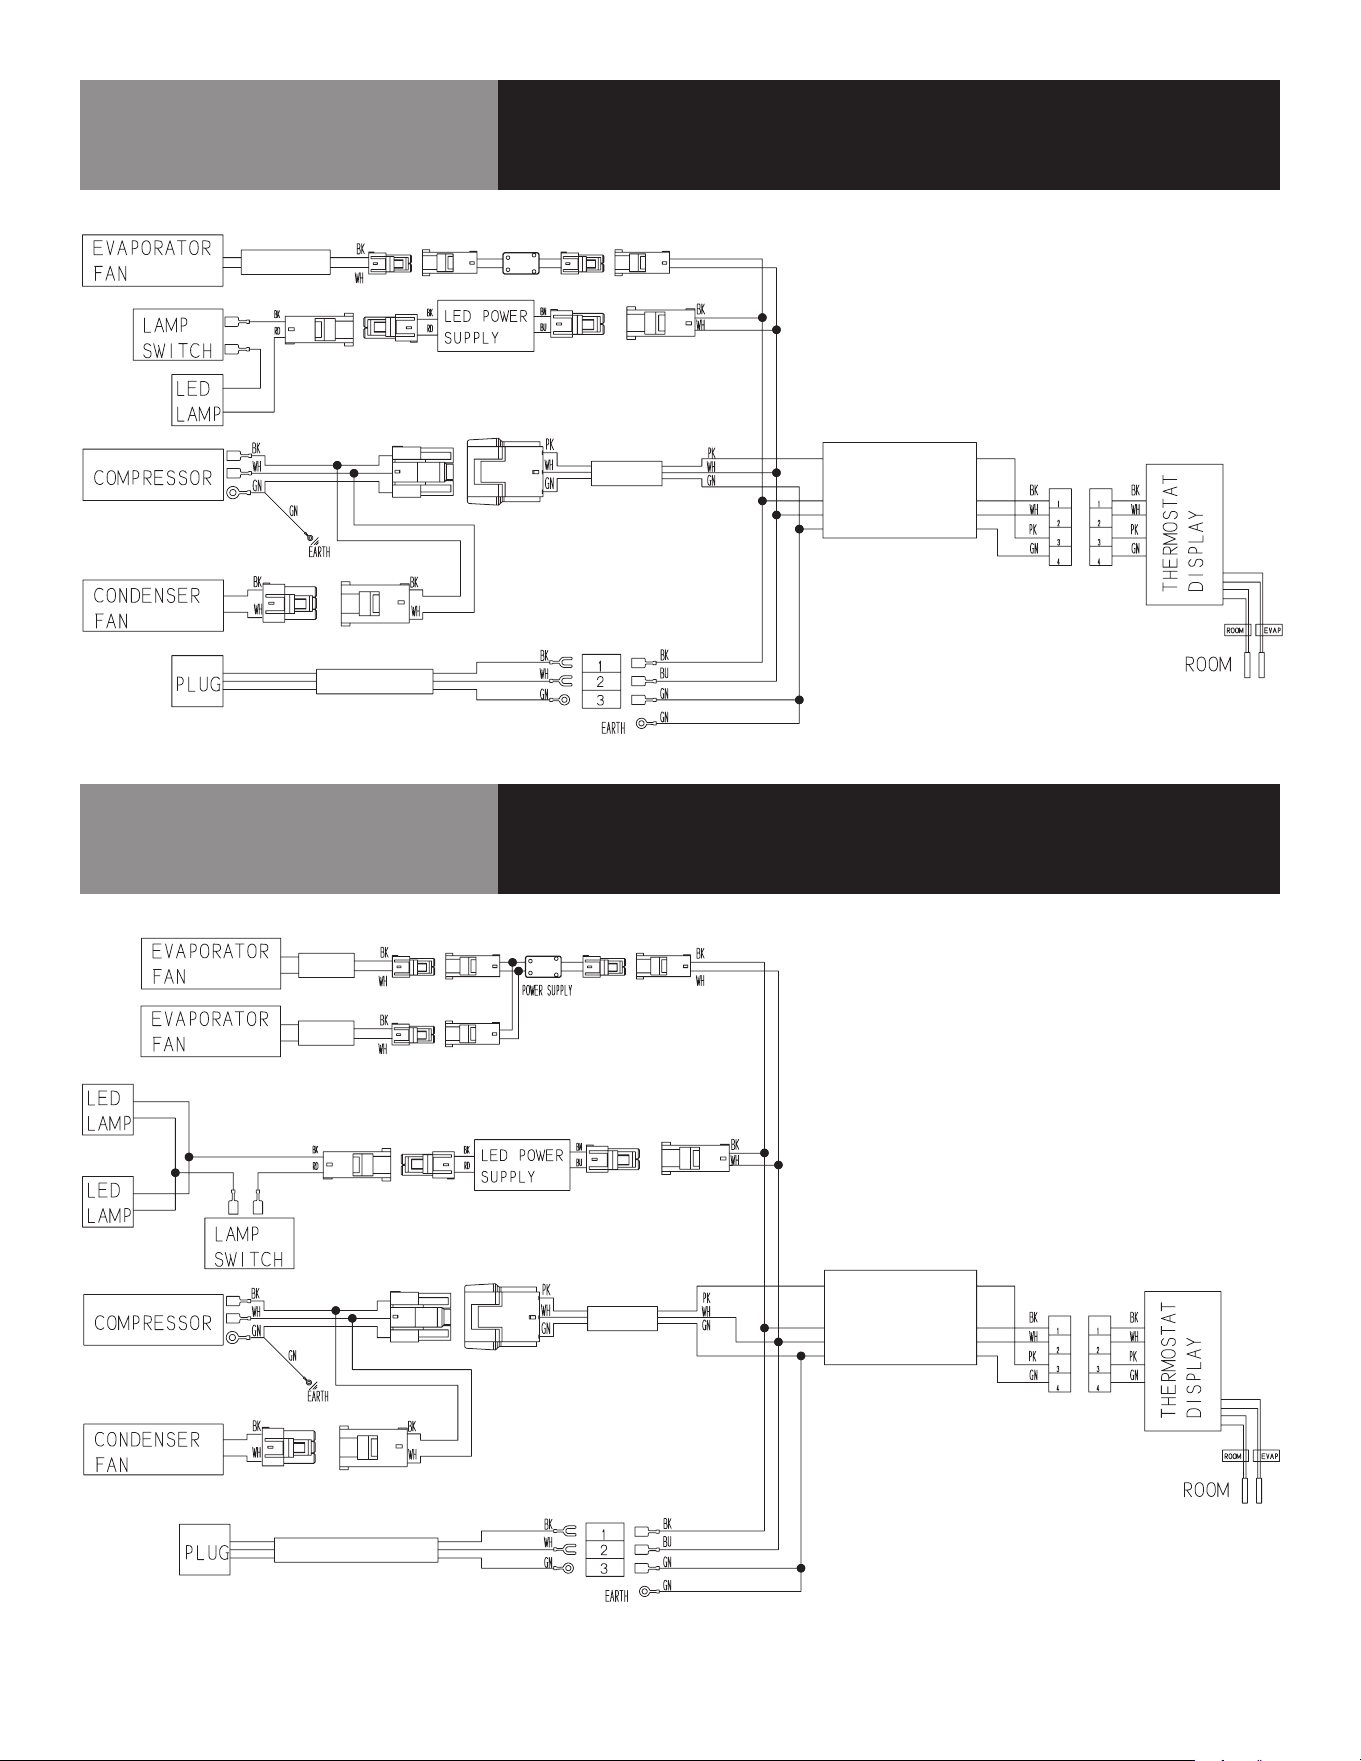
Wiring Diagram
KCHBC36 / KCHBC50 / KCHBC65
CALL FACTORY FOR REPLACEMENT PARTS:
866-339-8515
Wiring Diagram
KCHBC95
CALL FACTORY FOR REPLACEMENT PARTS:
866-339-8515
POWER SUPPLYPOWER SUPPLY
LL
NN
11
22
L
N
1
2

8 BOTTLE COOLER
WARRANTY
Your appliance is covered by a three (3) year limited warranty. For three (3) years
from your original date of purchase, Electrolux Professional, Inc. will pay all costs, except
as set forth below, for repairing or replacing any parts of this appliance that prove
to be defective in materials or workmanship when such appliance is installed, used,
and maintained in accordance with the provided instructions. For appliances that are
manufactured with a compressor, an additional two (2) year part warranty is provided
for the compressor only.
EXCLUSIONS
THIS WARRANTY DOES NOT COVER THE FOLLOWING:
1. Products where the original serial number has been removed, altered or cannot be
readily determined.
2. Normal wear and tear and gradual deterioration.
3. Product that has been transferred from its original owner to another party or
moved outside the USA or Canada.
4. Rust on the interior or exterior of the unit.
5. Products purchased “as-is”.
6. Food loss due to any refrigerator or freezer failures.
7. Damage caused at any time during shipment.
8. Service calls which do not involve malfunction or defects in materials or
workmanship, or for appliances used other than in accordance with the provided
instructions.
9. Service calls to correct the installation of your appliance or to instruct you how to
use your appliance.
10. Expenses for making the appliance accessible for servicing, such as removal of
trim, cupboards, shelves, etc., which are not a part of the appliance when it is
shipped from the factory.
11. Service calls to replace appliance light bulbs, air filters, water filters, and other
consumables, or knobs, handles, and other cosmetic parts.
12. Surcharges including, but not limited to, any after hours, weekend, or holiday
service calls, tolls, ferry trip charges, or mileage expense for service calls to
remote areas, including the state of Alaska.
13. Damages to the finish of the appliance and/or the appliance location that are
incurred during installation, including but not limited to floors, cabinets, walls, etc.
14. Damages caused by: services performed by unauthorized service companies; use
of parts other than genuine Electrolux Professional, Inc. parts or parts obtained
from persons other than authorized service companies; or external causes such
as abuse, misuse, inadequate power supply, accidents, fires, or acts of God.
15. For appliances operated by a concessionaire or vendor in a trailer or other
motorized vehicle, or at varying locations, your appliance is covered by a one
(1) year, limited parts and labor warranty. For appliances that are manufactured
with a compressor, an additional four (4) year part warranty is provided for the
compressor only.
DISCLAIMER OF IMPLIED WARRANTIES; LIMITATION OF REMEDIES
CUSTOMER’S SOLE AND EXCLUSIVE REMEDY UNDER THIS LIMITED WARRANTY
SHALL BE PRODUCT REPAIR OR REPLACEMENT AS PROVIDED HEREIN. CLAIMS
BASED ON IMPLIED WARRANTIES, INCLUDING WARRANTIES OF MERCHANTABILITY
OR FITNESS FOR A PARTICULAR PURPOSE, ARE LIMITED TO ONE (1) YEAR OR
THE SHORTEST PERIOD ALLOWED BY LAW, BUT NOT LESS THAN ONE (1) YEAR.
ELECTROLUX PROFESSIONAL, INC. SHALL NOT BE LIABLE FOR CONSEQUENTIAL OR
INCIDENTAL DAMAGES SUCH AS PROPERTY DAMAGE AND INCIDENTAL EXPENSES
RESULTING FROM ANY BREACH OF THIS WRITTEN LIMITED WARRANTY OR ANY
IMPLIED WARRANTY. SOME STATES AND PROVINCES DO NOT ALLOW THE EXCLUSION
OR LIMITATION OF INCIDENTAL OR CONSEQUENTIAL DAMAGES, OR LIMITATIONS ON
THE DURATION OF IMPLIED WARRANTIES, SO THESE LIMITATIONS OR EXCLUSIONS
MAY NOT APPLY TO YOU. THIS WRITTEN WARRANTY GIVES YOU SPECIFIC LEGAL
RIGHTS. YOU MAY ALSO HAVE OTHER RIGHTS THAT VARY FROM STATE TO STATE.
If You Need Service
In order to obtain service the unit must first be registered at KelvinatorCommercial.
com. Once registered please call 866-339-8515 for assistance.
This warranty only applies in the USA and Canada and is warranted by Electrolux
Professional, Inc. For installations outside the US and Canada, please contact your
local equipment provider for warranty specifics.
Electrolux Professional, Inc. authorizes no person to change or add to any obligations
under this warranty. Obligations for service and parts under this warranty must be
performed by Electrolux Professional, Inc. or an authorized service company. Product
features or specifications as described or illustrated are subject to change without
notice.
(November 2023)
866-339-8515
Electrolux Professional, Inc.
9 BOTTLE COOLER
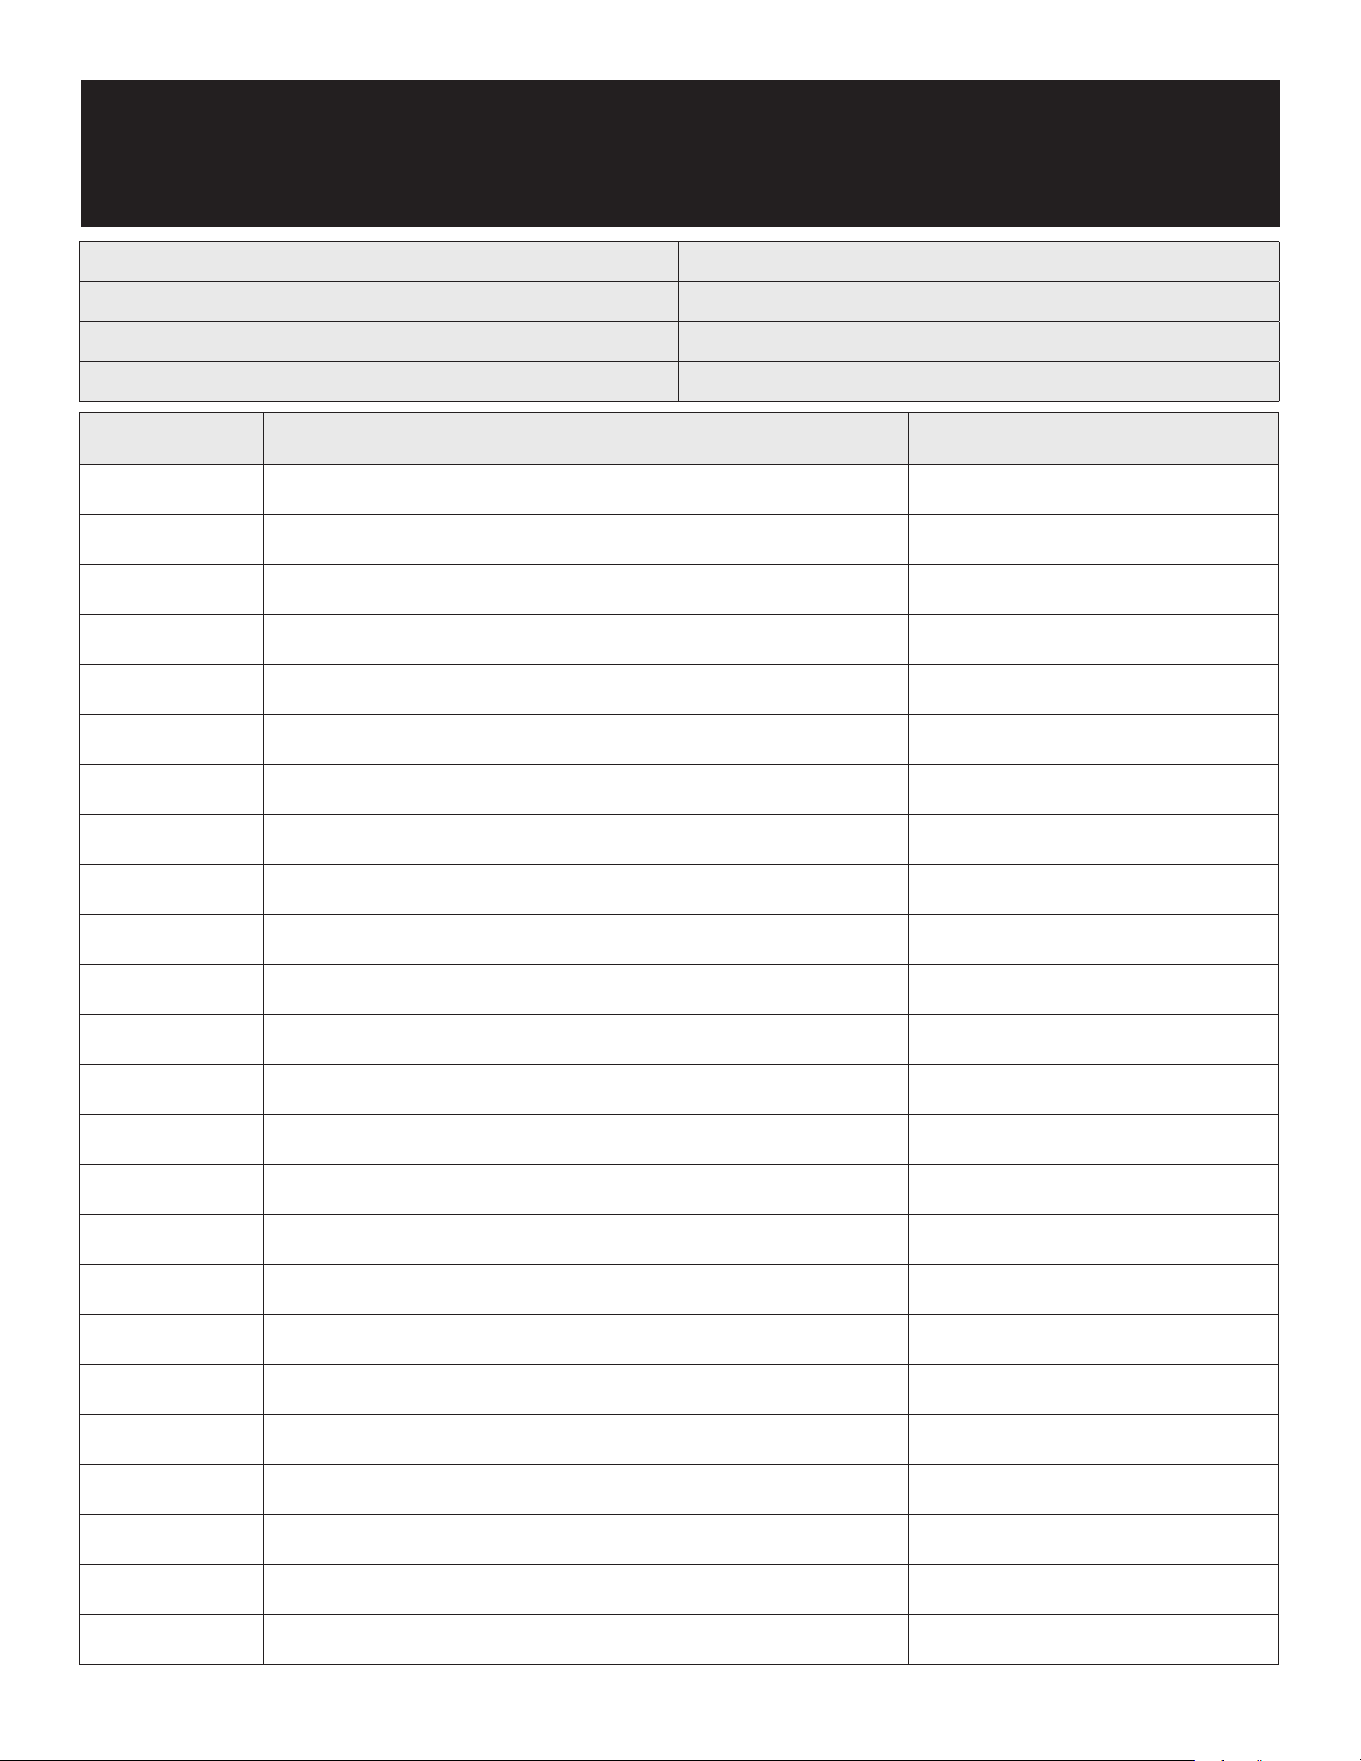
Service Log
Model No: Purchased From:
Serial No: Location:
Date Purchased: Date Installed:
Purchase Order No: For Service Call:
Date Maintenance Performed Performed By
MANUAL DE SERVICIO/INSTALACIÓN
INFORMACIÓN IMPORTANTE,
CONSÉRVESE PARA EL USUARIO
REFERENCIA DE PIEZA HB_738371_9F73837100, REV. A (03/23)
Este manual contiene información sobre:
ENFRIADOR DE BOTELLAS
ESTE MANUAL DEBE CONSERVARSE PARA CONSULTAS FUTURAS.
ASEGÚRESE DE LEER, COMPRENDER Y CUMPLIR LAS INSTRUCCIONES Y
ADVERTENCIAS QUE CONTIENE ESTE MANUAL.
PARA SU SEGURIDAD No guarde ni utilice gasolina ni otros líquidos o
vapores inflamables cerca de este equipo ni de ningún otro.
NOTIFIQUE LOS DAÑOS AL TRANSPORTISTA DE MANERA INMEDIATA
Es responsabilidad del destinatario inspeccionar el contenedor al recibirlo
y determinar la posibilidad de cualquier daño, incluidos los daños ocultos.
Electrolux Professional Inc. recomienda que, si sospecha que se han
producido daños, anote un comentario en el recibo del material. Será
responsabilidad del destinatario presentar una reclamación al transportista.
Es conveniente que lo haga de inmediato.
Servicio de fabricación/consultas 866-339-8515.
CONSERVE ESTE MANUAL PARA CONSULTAS FUTURAS
Tenga en cuenta que estas instrucciones son válidas para todos los enfriadores.
Es posible que las instalaciones de los equipos no correspondan exactamente a
su modelo.
AVISO: Debido a un programa continuo de mejora del producto, Electrolux
Professional Inc. se reserva el derecho de realizar cambios en el diseño y las
especificaciones sin previo aviso.
AVISO: Lea detenidamente todo el manual
antes de la instalación. Si no se siguen ciertos procedimientos recomendados,
se rechazarán las reclamaciones de garantía.
Estados Unidos y Canadá, 866-339-8515
4003 Collins Lane, Louisville, KY 40245
www.kelvinatorcommercial.com
Kelvinator Commercial es una marca comercial pendiente o registrada de Electrolux Consumer Products, Inc., y se utiliza bajo una licencia de Electrolux Consumer Products, Inc. La
información que contiene este documento se considera actual y exacta en el momento de su impresión/creación. Consulte el sitio web de nuestra línea de productos para obtener la
información y las especificaciones más actualizadas. © 2024 Electrolux Professional, Inc. Todos los derechos reservados.
DESCRIPCIÓN DEL EQUIPO
N.º DE
MODELO
TIPO DE
REFRIGERANTE
PESO DEL
REFRIGERANTE, G
V/HZ/PH AMPERIOS
CAPACIDAD
ALMACENAMIENTO
(PIES
3
/M
3
)
HP BTU ONZAS DE CARGA
PESO DE ENVÍO
LB/KG
ENCHUFE
NEMA
KCHBC36 R600a 60 115/60/1 1,8 9,3/0,26 1/10 2000 2,12 187/85 5-15P
KCHBC50 R600a 70 115/60/1 3,0 13,7/0,39 1/8 3200 2,47 234/106 5-15P
KCHBC65 R600a 70 115/60/1 3,0 19/0,54 1/8 5400 2,47 276/125 5-15P
KCHBC95 R290 100 115/60/1 3,0 29,1/0,82 1/5 7600 3,53 381/173 5-15P
REV. D (09/24)
INSTALACIÓN
Al recibir el enfriador, compruebe que no haya sufrido daños. Deberá notificar a
su proveedor cualquier daño ocasionado durante el transporte en un plazo de 24
horas a partir de la entrega.
El enfriador debe colocarse en una habitación cálida y seca, con ventilación
adecuada.
Coloque el enfriador de forma que el aire circule libremente a su alrededor. Es
decir, con al menos 100 mm de espacio a su alrededor.
No coloque nunca el enfriador a pleno sol. El enfriador debe situarse sobre una
superficie nivelada. No debe balancearse.
Si el enfriador ha estado guardado o se ha transportado frío, no debe ponerse
en marcha antes de que el compresor haya alcanzado una temperatura mínima
de 41 °F (5 °C). Se recomienda limpiar el enfriador antes de ponerlo en marcha.
CONEXIÓN ELÉCTRICA
El enfriador debe conectarse a una toma de corriente con el voltaje y la frecuencia
correctos, tal como se indica en la placa de características. El estándar en EE.UU.
es de 115 V/50 HZ. Son admisibles las variaciones de voltaje de ±10%. Unas
variaciones mayores pueden dañar el enfriador y anular la validez de la garantía
de fábrica. En caso de variación de voltaje extrema, por encima o por debajo de
la norma, su proveedor local podrá aconsejarle sobre lo que debe hacer.
El enfriador requiere una protección adicional de acuerdo con la normativa
danesa sobre corriente de alto voltaje (Danish Heavy Current Regulations).
Esto también se aplica si se sustituye un enfriador nuevo que no disponía de
dicha protección. El propósito de la protección adicional es evitar que el usuario
sufra descargas eléctricas peligrosas en caso de algún defecto.
2 ENFRIADOR DE BOTELLAS
INSTRUCCIONES DE MANEJO
La temperatura del enfriador se regula automáticamente mediante un termostato
preajustado.
La posición del enfriador, la temperatura ambiente, el número de veces que
se abre la tapa y durante cuánto tiempo, todos esos factores afectan a la
temperatura del enfriador, que por lo tanto no debe colocarse bajo el sol ni cerca
de una superficie que irradie calor.
Si el enfriador tiene cerradura, la llave debe mantenerse fuera del alcance de
los niños. Si su nuevo enfriador va a sustituir a otro antiguo que ya no se utiliza,
deberá retirar el mecanismo de cierre del antiguo antes de desecharlo.
ALMACENAMIENTO DE PRODUCTOS ALIMENTICIOS
El enfriador está diseñada sólo como conservador y no es adecuado para
congelar alimentos. En otras palabras, sólo deben introducirse en el enfriador
alimentos precongelados. Además, el enfriador no debe llenarse más allá del
límite de altura de la línea de contenido o, en caso de que no exista dicha línea,
hasta 100 mm por debajo de la tapa. Esto es para asegurar que la temperatura
del producto sea inferior a 36 °F (2 °C).
IMPORTANTE - LÉASE PRIMERO - IMPORTANTE
SU SEGURIDAD Y LA DE LOS DEMÁS SON MUY IMPORTANTES.
EN ESTE MANUAL Y EN EL EQUIPO ENCONTRARÁ NUMEROSOS MENSAJES DE SEGURIDAD
IMPORTANTES. LEA Y CUMPLA SIEMPRE TODOS LOS MENSAJES DE SEGURIDAD.
LAS INSTRUCCIONES SOBRE NUESTROS PRODUCTOS SE CARGARÁN EN EL SITIO WEB
OFICIAL DE NUESTRA EMPRESA.
ESTE ES EL SÍMBOLO DE ALERTA SOBRE SEGURIDAD. ESTE SÍMBOLO ALERTA
DE RIESGOS POTENCIALES QUE PUEDEN PROVOCAR HERIDAS O MUERTE AL
USUARIO O A OTRAS PERSONAS. TODOS LOS MENSAJES DE SEGURIDAD
IRÁN SEGUIDOS DE LOS SÍMBOLOS DE ALERTA DE SEGURIDAD Y DE LAS
PALABRAS "PELIGRO", "ADVERTENCIA" O "PRECAUCIÓN".
PELIGRO SIGNIFICA QUE EL INCUMPLIMIENTO DE ESTA INDICACIÓN DE
SEGURIDAD PUEDE PROVOCAR LESIONES GRAVES O MUERTE.
ADVERTENCIA SIGNIFICA QUE SI NO SE TIENE EN CUENTA ESTE AVISO DE
SEGURIDAD SE PUEDEN PRODUCIR DAÑOS IMPORTANTES EN EL PRODUCTO,
LESIONES PERSONALES GRAVES O MUERTE.
PRECAUCIÓN SIGNIFICA QUE EL INCUMPLIMIENTO DE ESTA INDICACIÓN
DE SEGURIDAD PUEDE PROVOCAR LESIONES PERSONALES LEVES O
MODERADAS, O DAÑOS MATERIALES O EN EL EQUIPO.
TODOS LOS MENSAJES DE SEGURIDAD ALERTAN SOBRE CUÁL ES EL PELIGRO POTENCIAL,
INDICAN CÓMO REDUCIR EL RIESGO DE LESIONES E INFORMAN DE LO QUE PUEDE
OCURRIR SI NO SE SIGUEN LAS INSTRUCCIONES.
ADOPTE MEDIDAS DE PRECAUCIÓN BÁSICAS, INCLUIDAS LAS SIGUIENTES:
NOTA: SI EL CABLE ELÉCTRICO SUFRE ALGÚN DAÑO, EL FABRICANTE, SU
SERVICIO TÉCNICO O UN PROFESIONAL TENDRÁN QUE CAMBIARLO PARA
EVITAR RIESGOS.
NOTA: ESTE EQUIPO NO ESTÁ DISEÑADO PARA QUE LO USEN PERSONAS
(INCLUIDOS NIÑOS) CON DISCAPACIDAD FÍSICA, SENSORIAL O MENTAL, O
CON EXPERIENCIA Y CONOCIMIENTO INSUFICIENTES, A MENOS QUE UNA
PERSONA RESPONSABLE DE SU SEGURIDAD LAS SUPERVISE O INSTRUYA
EN EL USO DEL EQUIPO.
NOTA: SE DEBE VIGILAR A LOS NIÑOS PARA IMPEDIR QUE JUEGUEN CON EL
EQUIPO.
NOTA: ESTE EQUIPO PUEDEN UTILIZARLO NIÑOS DE MÁS DE 8 AÑOS Y
PERSONAS CON CAPACIDADES FÍSICAS, SENSORIALES O MENTALES
REDUCIDAS O QUE CAREZCAN DE EXPERIENCIA Y CONOCIMIENTOS SI
SE LES SUPERVISA O SE LES INSTRUYE EN EL USO SEGURO DEL EQUIPO
Y SI COMPRENDEN LOS RIESGOS QUE COMPORTA. LOS NIÑOS NO
DEBEN JUGAR CON EL EQUIPO. LOS NIÑOS SIN SUPERVISIÓN NO DEBEN
REALIZAR TAREAS DE LIMPIEZA Y MANTENIMIENTO.
NOTA: MANTENGA EL EQUIPO Y EL CABLE FUERA DEL ALCANCE DE NIÑOS MENORES
DE 8 AÑOS.
NOTA: NO GUARDE EN EL EQUIPO SUSTANCIAS EXPLOSIVAS COMO AEROSOLES CON
PROPELENTE INFLAMABLE.
NOTA: EL EQUIPO UTILIZA GAS INFLAMABLE DE AISLAMIENTO C5H10; LA
ELIMINACIÓN DEL EQUIPO DEBE HACERSE DE ACUERDO CON LAS NORMAS
DE LAS AUTORIDADES LOCALES.
NOTA: LA LLAVE DE LA CAJA ELÉCTRICA DEL EQUIPO DEBE GUARDARLA PERSONAL
PROFESIONAL PARA EVITAR RIESGOS.
ADVERTENCIA: MANTENGA LIBRES DE OBSTRUCCIONES LAS ABERTURAS DE VENTILACIÓN
DEL ALOJAMIENTO DEL EQUIPO O DE LA ESTRUCTURA EMPOTRADA.
ADVERTENCIA: NO UTILICE DISPOSITIVOS MECÁNICOS NI OTROS MEDIOS PARA ACELERAR
EL PROCESO DE DESCONGELACIÓN, EXCEPTO LOS RECOMENDADOS POR EL
FABRICANTE.
ADVERTENCIA: NO DAÑE EL CIRCUITO REFRIGERANTE.
ADVERTENCIA: NO UTILICE DISPOSITIVOS ELÉCTRICOS DENTRO DE LOS COMPARTIMIENTOS
PARA ALIMENTOS DEL EQUIPO, SALVO SI SON DEL TIPO RECOMENDADO
POR EL FABRICANTE. MANIPULACIÓN, TRASLADO Y USO DE LA NEVERA
O CONGELADOR PARA EVITAR DAÑAR LOS TUBOS DE REFRIGERANTE O
AUMENTAR EL RIESGO DE FUGAS.
PRECAUCIÓN: RIESGO DE INCENDIO O EXPLOSIÓN DEBIDO AL REFRIGERANTE INFLAMABLE
UTILIZADO. SIGA ATENTAMENTE LAS INSTRUCCIONES DE MANIPULACIÓN
DE CONFORMIDAD CON LA NORMATIVA DEL GOBIERNO DE EE.UU.
LOS COMPONENTES DEBERÁN SUSTITUIRSE POR OTROS SIMILARES
Y EL MANTENIMIENTO DEBERÁ REALIZARLO PERSONAL DE SERVICIO
AUTORIZADO POR LA FÁBRICA, CON EL FIN DE MINIMIZAR EL RIESGO DE
UNA POSIBLE IGNICIÓN DEBIDA A PIEZAS INCORRECTAS O A UN SERVICIO
INADECUADO.
PRECAUCIÓN: RIESGO DE INCENDIO O EXPLOSIÓN DEBIDO A LA PERFORACIÓN DEL
TUBO DE REFRIGERANTE; SIGA ATENTAMENTE LAS INSTRUCCIONES DE
MANIPULACIÓN. SE UTILIZA REFRIGERANTE INFLAMABLE.
PELIGRO: RIESGO DE QUE NIÑOS QUEDEN ATRAPADOS. ANTES DE DESECHAR LA
NEVERA O EL CONGELADOR ANTIGUO: EXTRAIGA LAS PUERTAS Y DEJE LOS
ESTANTES EN SU SITIO PARA QUE LOS NIÑOS NO PUEDAN INTRODUCIRSE
CON FACILIDAD.
DESCONGELACIÓN DEL ARMARIO
Con el tiempo, se formará de manera natural una capa de escarcha en el interior
del enfriador. Cuando esa capa tenga un grosor de 5 a 8 mm, el armario debe
descongelarse de la manera siguiente:
• desconecte el enchufe de la toma;
• abra la tapa y déjela abierta;
• afloje la capa de escarcha con un rascador de plástico o madera.
El proceso de descongelación puede acelerarse utilizando cuencos con agua
caliente.
No utilice nunca instrumentos afilados o puntiagudos.
Después de la descongelación final, el armario debe limpiarse como se describe
en el apartado Mantenimiento. El armario debe secarse bien después de
limpiarlo.
3 ENFRIADOR DE BOTELLAS
FUNCIONAMIENTO
PRECAUCIÓN: NO ARROJE OBJETOS A LA ZONA DE ALMACENAMIENTO. EL
INCUMPLIMIENTO DE ESTAS RECOMENDACIONES PUEDE DAR COMO
RESULTADO DAÑOS EN EL INTERIOR DEL ARMARIO.
CICLO REFRIGERADO
Durante el ciclo de refrigeración, los ventiladores del evaporador funcionan
continuamente incluso con una o más puertas abiertas. El interruptor de la puerta
activa las luces al abrirla.
1. La unidad se apaga cada 6 horas para que el serpentín de evaporación se
descongele. El controlador mostrará el símbolo de descongelación. Cuando
el serpentín alcanza 41 °F (5 °C) o al cabo de 20 minutos de descongelación,
la unidad se enciende de nuevo.
2. Los calefactores anticondensación de los marcos de las puertas funcionan
conjuntamente con el compresor.
3. El ajuste de fábrica de la escala de temperatura es de 34 °F (1 °C) a 38 °F (3 °C).
TERMOSTATO DE ESTADO SÓLIDO DEL PANEL DE CONTROL
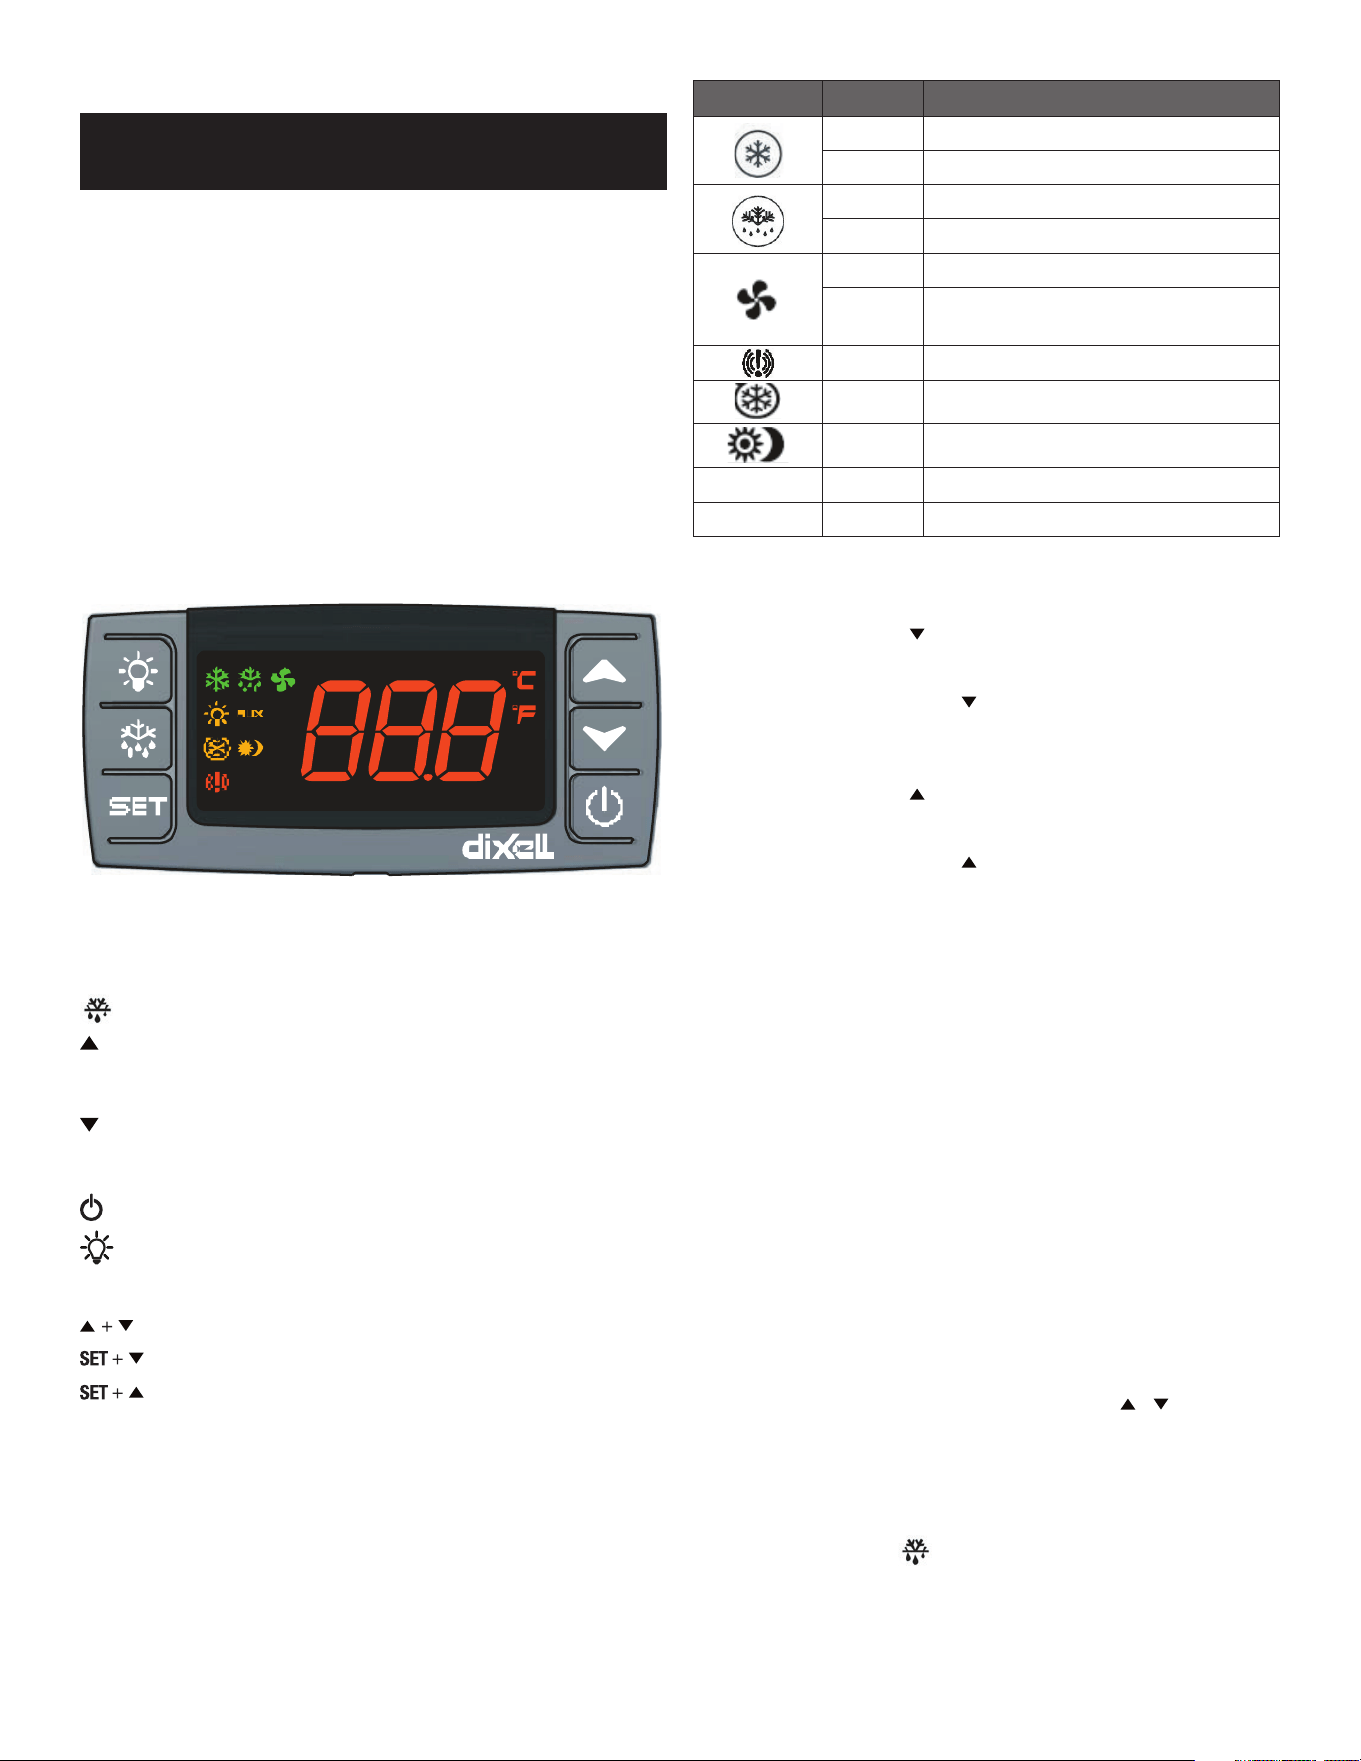
INSTRUCCIONES DEL PANEL FRONTAL
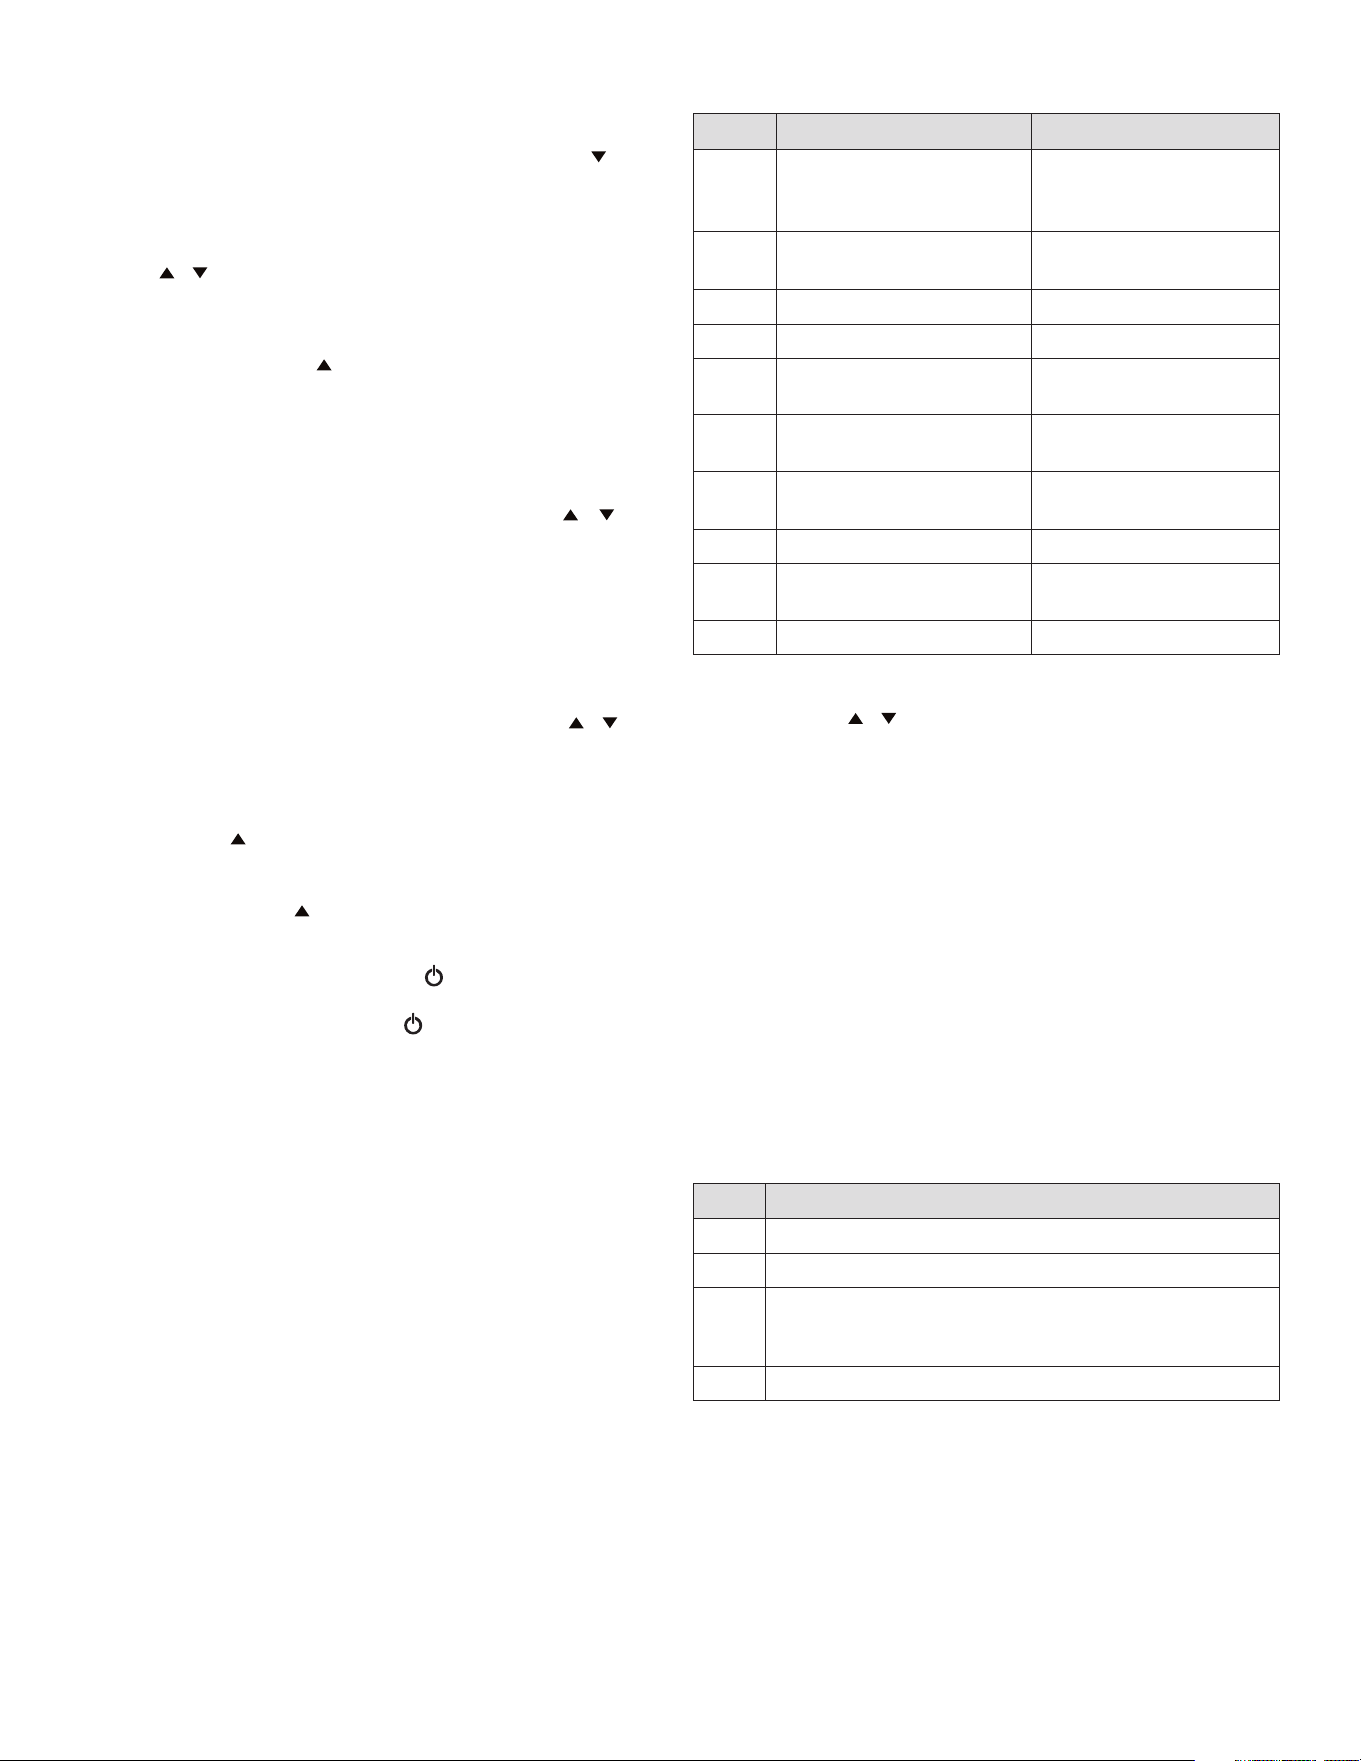
SET SET (ajuste): Para ver el ajuste de referencia objetivo; en el modo de
programación permite elegir un parámetro o confirmar una operación.
DEF (descongelación): Para iniciar la descongelación manual
ARRIBA: Para ver la temperatura máxima de almacenamiento; en el
modo de programación, permite examinar los códigos de parámetros
o aumentar el valor en pantalla.
ABAJO: Para ver la temperatura mínima de almacenamiento; en el
modo de programación, permite examinar los códigos de parámetros
o reducir el valor en pantalla.
Para apagar el equipo, si onF = oFF.
No activado
Combinaciones de teclas:
Permite bloquear y desbloquear el teclado
Permite acceder al modo de programación
Permite volver a la pantalla de temperatura ambiente
LED MODO FUNCIÓN
Encendido Compresor activado
Parpadeo Retardo de ciclo anticortocircuito activado
Encendido Descongelación activada
Parpadeo Tiempo de goteo en curso
Encendido Ventiladores activados
Parpadeo
Retardo de ventiladores tras la
descongelación en curso
Encendido Hay una alarma en curso
Encendido Ciclo continuo en marcha
Encendido Ahorro de energía activado
ºC/ºF
Encendido Unidad de medida
ºC/ºF
Parpadeo Fase de programación
GRABACION EN MEMORIA DE LAS TEMPERATURAS MÁXIMA Y MÍNIMA
Para ver la temperatura MÍNIMA:
1. Presione y suelte la tecla .
2. Aparece el mensaje “Lo” seguido de la temperatura mínima registrada.
3. Al presionar de nuevo la tecla o esperar 5 segundos se restablece la
visualización normal.
Para ver la temperatura MÁXIMA:
1. Presione y suelte la tecla .
2. Aparece el mensaje “Hi” seguido de la temperatura máxima registrada.
3. Al presionar de nuevo la tecla o esperar 5 segundos se restablece la
visualización normal.
Para restablecer las temperaturas MÁXIMA y MÍNIMA registradas:
1. Mantenga presionada la tecla SET durante más de 3 segundos, mientras se
muestran las temperaturas máxima y mínima (se muestra el mensaje rST)
2. Para confirmar la operación, el mensaje “rST” empieza a parpadear y se
muestra la temperatura normal.
PRINCIPALES FUNCIONES
Para ver el ajuste de referencia:
1. Presione y suelte de inmediato la tecla SET (ajuste); la pantalla muestra el
ajuste de referencia.
2. Presione y suelte de inmediato la tecla SET o espere 5 segundos para que se
vuelva a mostrar el valor de la sonda.
Para cambiar el ajuste de referencia:
1. Presione la tecla SET durante más de 2 segundos para cambiar el valor del
ajuste de referencia
2. Se muestra el valor del ajuste de referencia y el LED “
ºC” o “ºF”
empieza a
parpadear.
3. Para cambiar el ajuste de referencia, presione la tecla
o en un plazo de
10 segundos.
4. Para guardar en memoria el nuevo ajuste de referencia, vuelva a presionar la
tecla SET o espere 10 segundos.
Para iniciar una descongelación manual:
1. Presione la tecla DEF ( )
durante más de 2 segundos y se iniciará la
descongelación manual.
4 ENFRIADOR DE BOTELLAS
Para cambiar un valor de parámetro:
Si desea cambiar el valor del parámetro realice lo siguiente:
1. Para acceder al modo de programación presione las teclas SET + durante
más de 3 segundos (el LED “
ºC” o “ºF”
empieza a parpadear).
2. Seleccione el parámetro que desee. Pulse la tecla SET para seleccionar su
valor.
3. Utilice
o para cambiar su valor.
4. Presione la tecla SET para almacenar el nuevo valor y pasar al siguiente
parámetro.
Para salir: Presione SET + o espere 15 segundos sin presionar ninguna
tecla.
Nota: El valor fijado se almacena incluso cuando se sale del procedimiento,
esperando a que transcurra el tiempo de espera.
Para bloquear el teclado:
1. Mantenga presionadas durante más de 3 segundos las teclas + .
2. Aparece el mensaje “POF” y se bloquea el teclado. En ese momento solo
es posible ver el ajuste de referencia o la temperatura MÁXIMA o MÍNIMA
almacenada.
3. Si se presiona una tecla durante más de 3 segundos, se muestra el mensaje
“POF”.
Para desbloquear el teclado:
1. Mantenga presionadas durante más de 3 segundos las teclas y , hasta
que se muestre el mensaje “Pon”.
El ciclo continuo:
Cuando la descongelación no está en curso, puede activarse manteniendo
presionada la tecla durante unos 3
segundos
. El compresor funciona para
mantener el ajuste de referencia “ccS” durante el tiempo fijado con el parámetro
“CCt”. El ciclo puede finalizarse antes de que acabe el tiempo fijado utilizando
la misma tecla de activación durante 3
segundos
.
Las funciones de encendido/apagado:
Con “onF = oFF”, al pulsar la tecla ON/OFF se apaga el equipo. Aparece
el mensaje “OFF”. En esta configuración, la regulación está desactivada. Para
encender el equipo, pulse de nuevo la tecla ON/OFF.
ADVERTENCIA: Las cargas conectadas a los contactos normalmente
cerrados de los relés están siempre alimentadas y bajo tensión, aunque el
equipo esté en modo de espera.
SEÑALES DE ALARMA
MENSAJE CAUSA SALIDAS
“P1” Sonda ambiente defectuosa
Salida de compresor de
acuerdo con los parámetros
"Con" y "COF”
“P2” Fallo de sonda del evaporador
Final de descongelación
temporizado
“HA” Alarma de temperatura máxima Salidas sin cambios
“LA” Alarma de temperatura mínima Salidas sin cambios
“HA2”
Alta temperatura del
condensador
Depende del parámetro “Ac2”
“LA2”
Baja temperatura del
condensador
Depende del parámetro “bLL”
“dA” Puerta abierta
Reinicio de compresor y
ventiladores
“EA” Alarma externa Salida sin cambios
“CA”
Alarma externa grave
(i1F=bAL)
Todas las salidas desactivadas
“CA” Alarma de presostato (i1F=PAL) Todas las salidas desactivadas
Para ver la alarma y restablecer la alarma registrada:
1. Presione la tecla o para mostrar las señales de alarma.
2. Cuando se muestre la señal, mantenga la tecla SET pulsada hasta que
aparezca el mensaje “rst”. Vuelva a pulsar la tecla SET. El mensaje “rst”
empieza a parpadear y se muestra otra vez la temperatura normal.
Recuperación de alarmas:
Las alarmas de sonda “P1” y “P2” comienzan unos segundos después de la falla
de la sonda relacionada; se detienen automáticamente unos segundos después
de que la sonda reinicie su funcionamiento normal. Compruebe las conexiones
antes de sustituir la sonda.
Las alarmas de temperatura “HA”, “LA”, “HA2” y “LA2” se detienen
automáticamente en cuanto la temperatura vuelve a los valores normales.
Las alarmas “EA” y “CA” (con i1F=bAL) se recuperan en cuanto se desactiva la
entrada digital.
La alarma “CA” (con i1F=PAL) solo se recupera tras apagar y encender el
equipo.
Otros mensajes:
CÓDIGO DESCRIPCIÓN
Pon Teclado desbloqueado
PoF Teclado bloqueado
noP
En modo programación: no hay parámetros presentes en Pr1
En la pantalla o en dP2, dP3, dP4: la sonda seleccionada no está
activada
noA No se registran alarmas

5 ENFRIADOR DE BOTELLAS
MANTENIMIENTO
El enfriador puede limpiarse con agua templada y un detergente suave. Aclare
con agua limpia para terminar.
No utilice detergentes que contengan cloro.
La tapa puede limpiarse del mismo modo que el enfriador.
Si el condensador y el ventilador correspondiente están instalados en la parte
inferior trasera del enfriador, pueden acumular polvo y suciedad. Si es necesario
limpiarlos, debe hacerse con un cepillo suave.
Tenga en cuenta que las piezas situadas detrás de la rejilla de protección pueden
estar calientes y girar.
SOLUCIÓN DE PROBLEMAS
Si tiene problemas con el enfriador, compruebe los puntos siguientes antes de
llamar al personal de servicio:
• ¿El enfriador está conectado al suministro eléctrico?
• ¿Está encendido el interruptor de la toma?
• ¿Está intacto el fusible del armario de distribución?
• ¿Se ha desconectado el interruptor diferencial (si existe)?
• ¿Ha habido cortes de electricidad?
Si el enfriador está en un lugar muy caluroso o con mala ventilación, debe
proporcionar una ventilación adecuada. Si el condensador mencionado en el
apartado Mantenimiento no está limpio, debe aspirarlo.
Si se han comprobado los puntos anteriores y el enfriador sigue sin funcionar,
llame al servicio técnico. Infórmeles de la naturaleza del problema, el tipo de
enfriador, el número de serie y el número del equipo (que figura en la placa de
características de la parte posterior del armario).
No abra el armario, ya que cada apertura acelera el punto de descongelación.
Por regla general, la mercancía no sufrirá daños durante las primeras 12 horas.
Si pasa más tiempo, la mercancía debe trasladarse a otra nevera.
ELIMINACIÓN
Cuando se deseche un enfriador antiguo, debe hacerse de forma correcta,
respetando el medio ambiente. Tenga en cuenta las normas que rigen la
eliminación de esos elementos; puede haber requisitos o condiciones especiales
que deban cumplirse.
Puede solicitar información sobre la eliminación a:
• su proveedor;
• las autoridades competentes (autoridades locales, organismos
medioambientales, etc.).
PUNTOS ESPECIALES QUE DEBEN TENERSE EN CUENTA
La información que contienen estas instrucciones de uso era correcta en
el momento de su impresión. No obstante, debido al desarrollo constante de
nuestros productos, nos reservamos el derecho de introducir modificaciones en
el enfriador aquí descrito. Naturalmente, intentaremos mantener actualizadas
las instrucciones de uso.
Si tiene dudas sobre el uso correcto del enfriador, póngase en contacto con su
proveedor, que podrá asesorarle.
El fabricante no se hace responsable de los accidentes o problemas derivados
de una conexión incorrecta del enfriador.
6 ENFRIADOR DE BOTELLAS
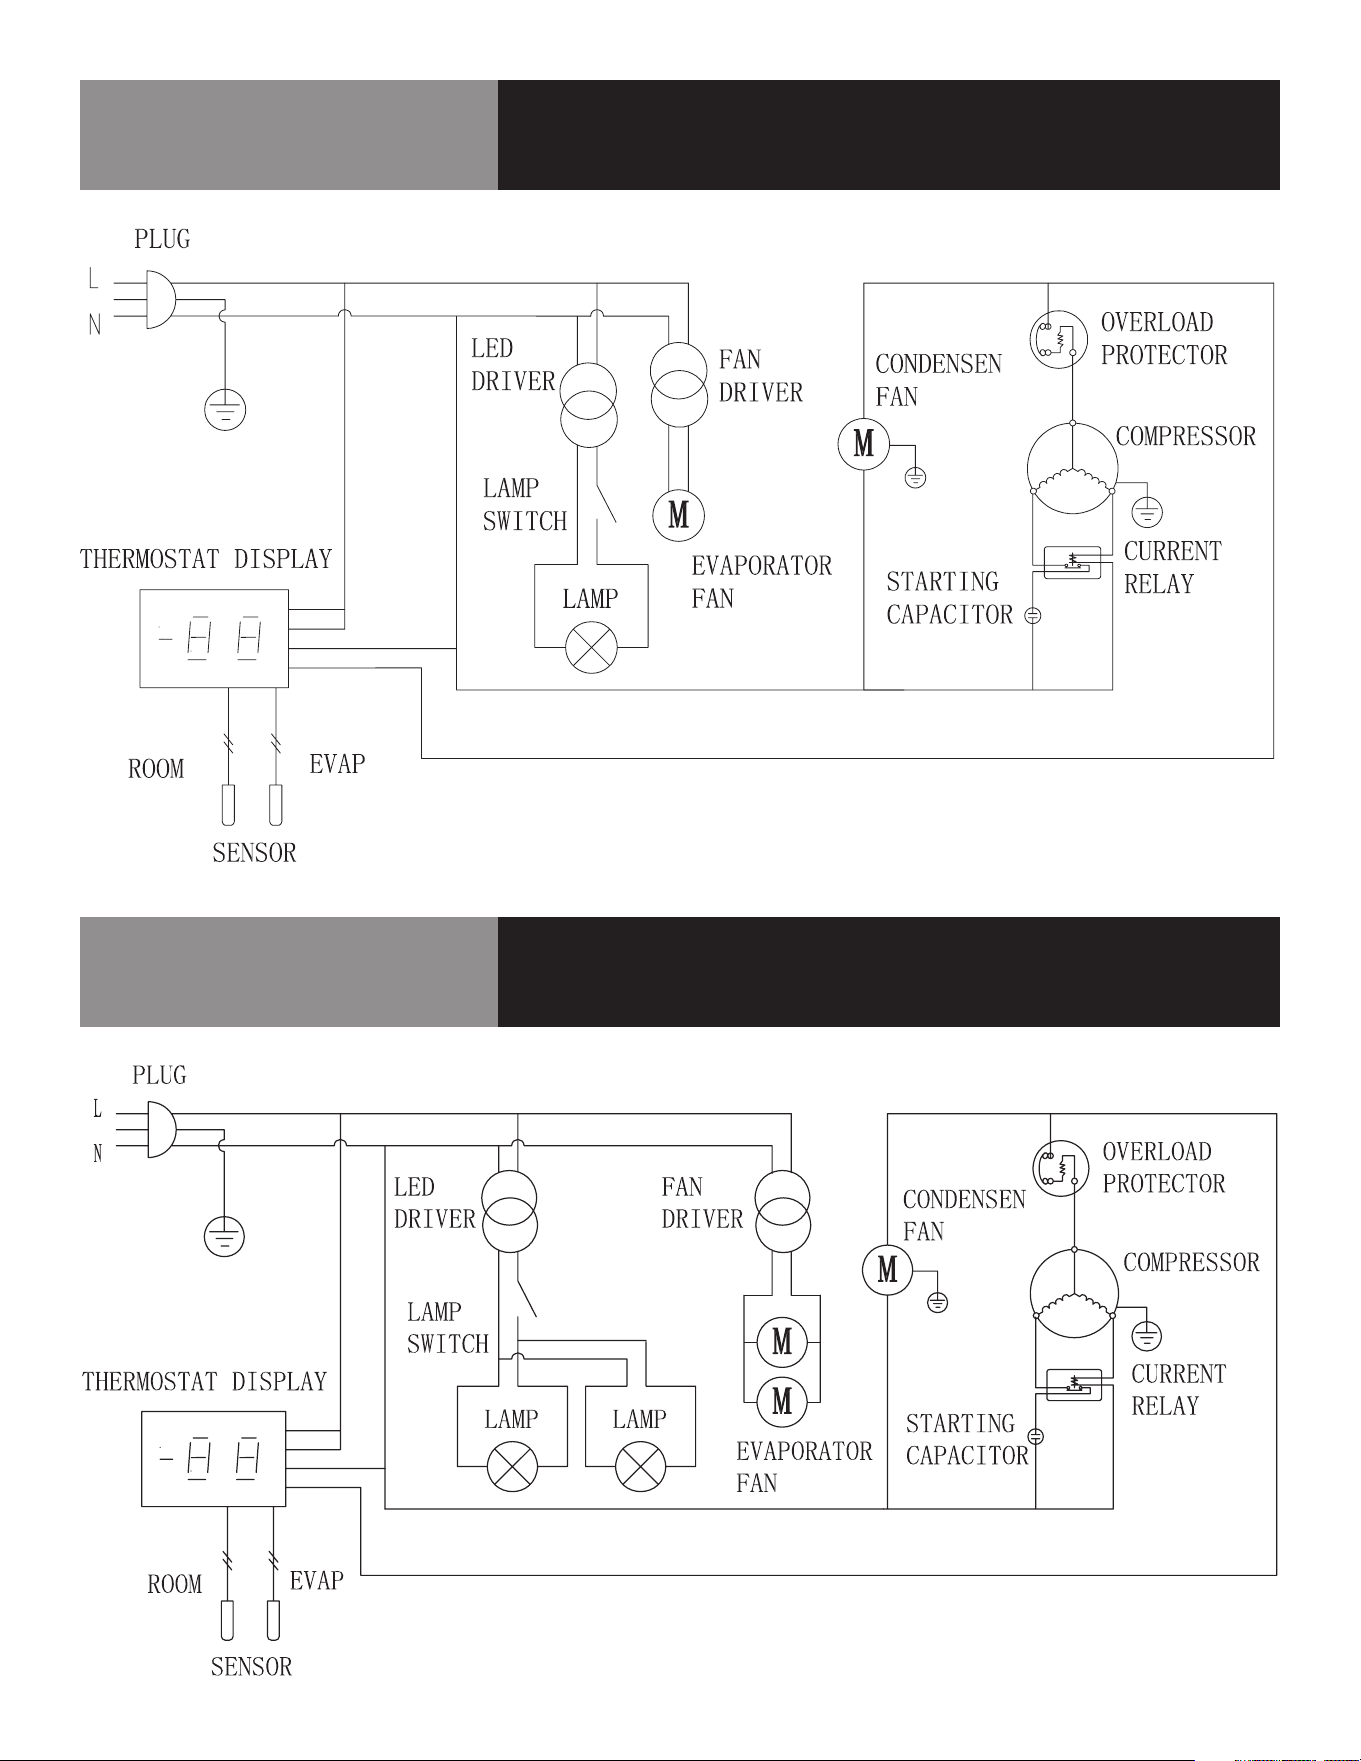
Diagrama de cableado
KCHBC36 / KCHBC50 / KCHBC65
LLAME A LA FÁBRICA SI NECESITA REPUESTOS:
866-339-8515
Diagrama de cableado
KCHBC95
LLAME A LA FÁBRICA SI NECESITA REPUESTOS:
866-339-8515
7 ENFRIADOR DE BOTELLAS
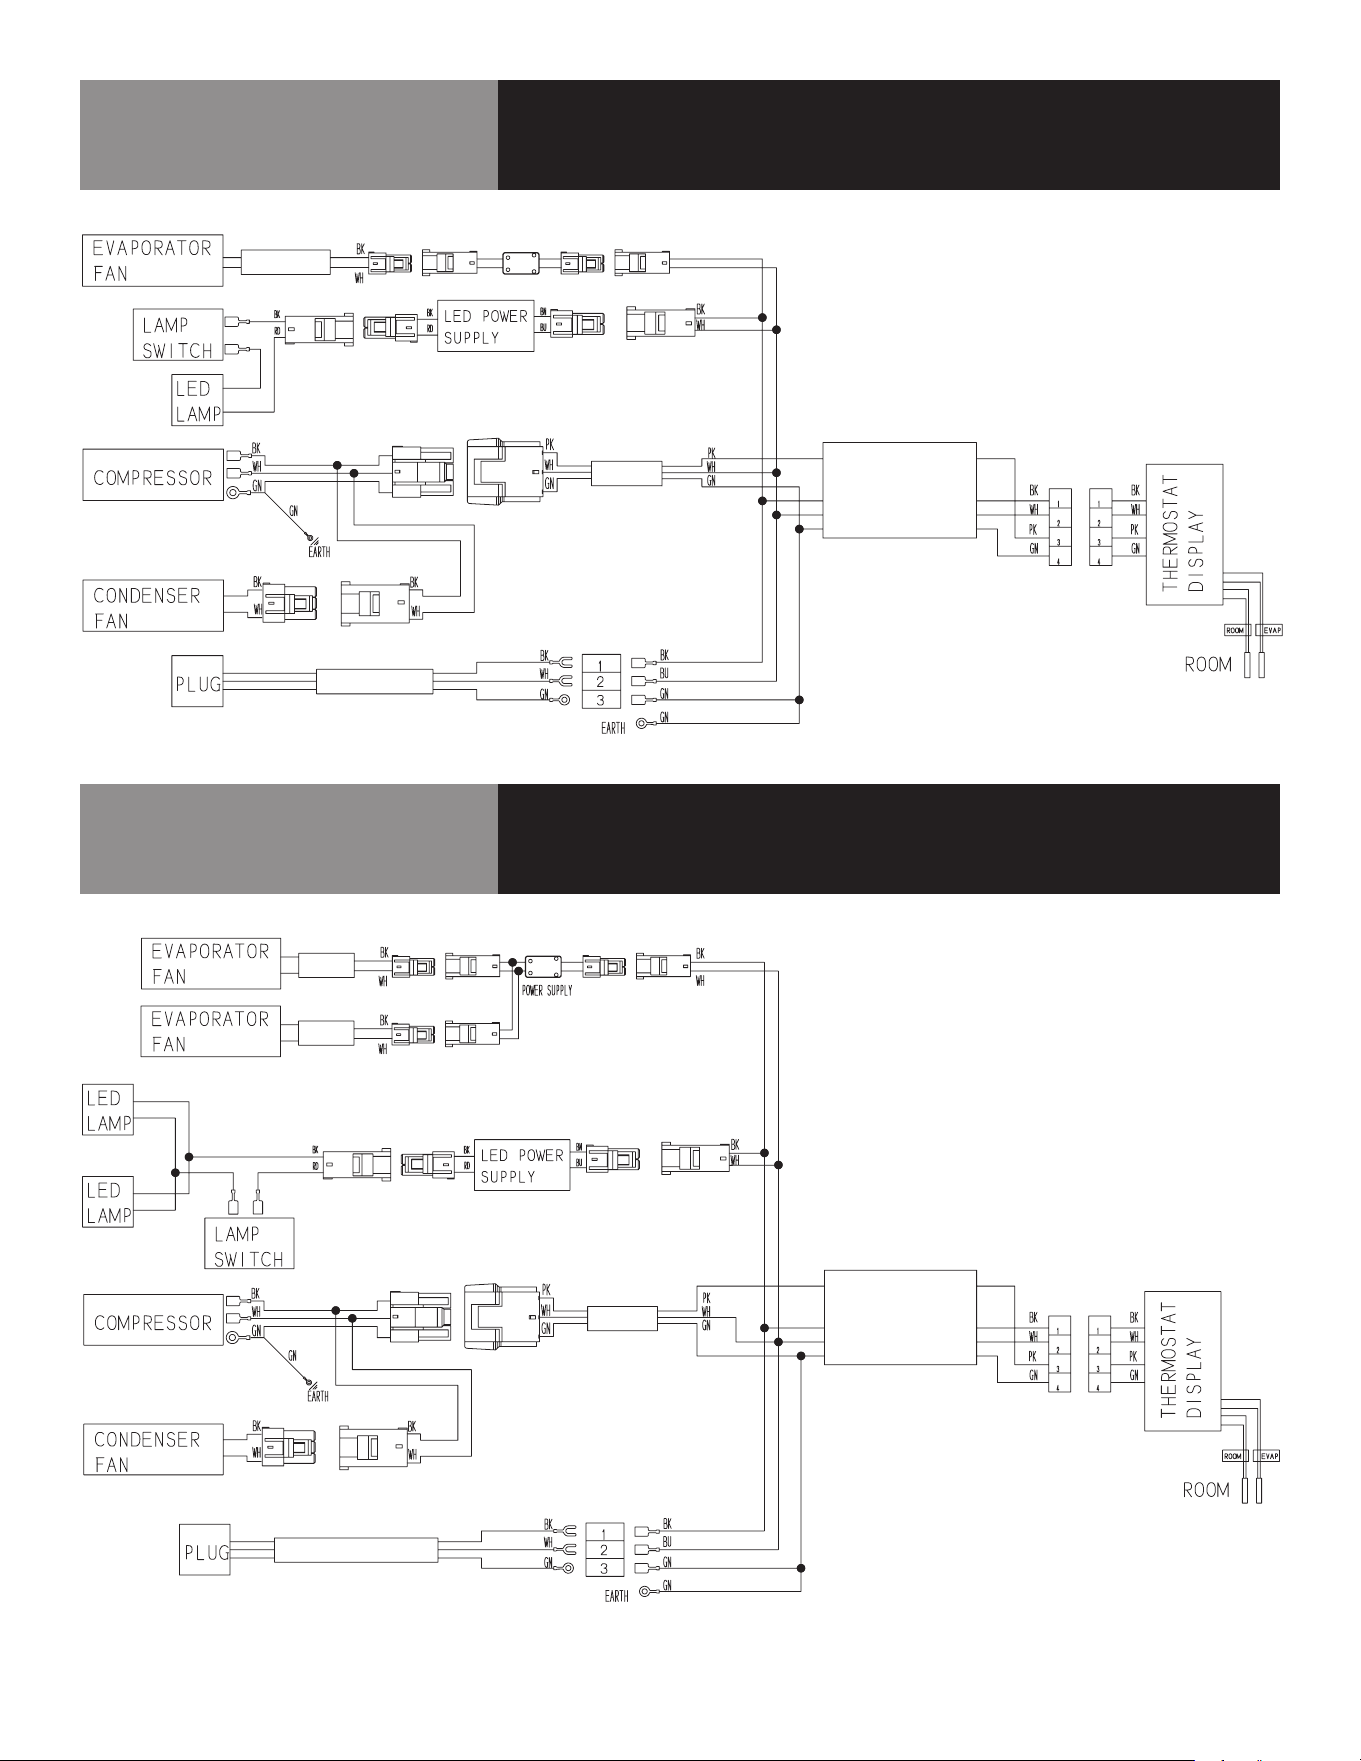
Diagrama de cableado
KCHBC36 / KCHBC50 / KCHBC65
LLAME A LA FÁBRICA SI NECESITA REPUESTOS:
866-339-8515
Diagrama de cableado
KCHBC95
LLAME A LA FÁBRICA SI NECESITA REPUESTOS:
866-339-8515
POWER SUPPLYPOWER SUPPLY
LL
NN
11
22
L
N
1
2

8 ENFRIADOR DE BOTELLAS
GARANTÍA
El equipo cuenta con
garantía limitada de tres (3) años. Desde la fecha original de
compra y durante un periodo de tres (3) años, Electrolux Professional, Inc. correrá con
todos los gastos, excepto los indicados más abajo, de reparación o sustitución de las
piezas de este equipo que muestren desperfectos de materiales o mano de obra en
el momento de la instalación, uso o mantenimiento, de acuerdo con las instrucciones
suministradas. Los equipos fabricados con compresor tienen una garantía adicional
de dos (2) años que solo se aplica al compresor.
EXCLUSIONES
ESTA GARANTÍA NO CUBRE LO SIGUIENTE:
1. Productos en los que el número de serie original se ha eliminado, alterado o no
pueda observarse con facilidad.
2. Desgaste normal y deterioro gradual.
3. Producto que ha sido transferido de su propietario original a otra parte o
trasladado fuera de EE.UU. o Canadá.
4. Óxido en el interior o el exterior de la unidad.
5. Productos adquiridos “tal cual”.
6. Pérdidas de alimentos debidas a desperfectos de nevera o congelador.
7. Daños sufridos en cualquier momento del transporte.
8. Llamadas al servicio técnico que no se refieran a desperfectos o defectos de
material o elaboración, o respecto a equipos utilizados de un modo distinto al
indicado en las instrucciones suministradas.
9. Llamadas al servicio técnico para corregir la instalación del equipo o para
solicitar instrucciones de uso.
10. Gastos para hacer accesible el equipo para su mantenimiento, como la retirada
de molduras, armarios, estantes, etc., que no formen parte del equipo cuando
se envía de fábrica.
11. Llamadas al servicio técnico para sustituir lámparas, filtros de aire, filtros de
agua y otros consumibles, o perillas, asas u otras piezas ornamentales.
12. Recargos derivados, entre otras cosas, de trabajo en horas extra, fin de semana
o festivos, peajes, trasbordos o kilometraje por llamadas al servicio técnico
desde zonas alejadas, incluido el Estado de Alaska.
13. Daños ocasionados al acabado del equipo o a su ubicación producidos durante
la instalación, entre otros, a pisos, armarios, paredes, etc.
14. Daños provocados por: servicios realizados por empresas de servicios no
autorizadas; uso de repuestos que no sean originales de Electrolux Professional,
Inc. o repuestos obtenidos de personas que no sean empresas de servicios
autorizadas; o causas externas como uso incorrecto o indebido, alimentación
eléctrica inadecuada, accidentes, incendios o desastres naturales.
15. Los equipos utilizados por concesionarios o distribuidores en un remolque u otro
vehículo motorizado, o en distintas ubicaciones, tienen garantía de un (1) año
con limitación de piezas y mano de obra. Los equipos fabricados con compresor
tienen una garantía adicional de cuatro (4) años que solo se aplica al compresor.
EXCLUSIÓN DE GARANTÍAS IMPLÍCITAS; LIMITACIÓN DE RECURSOS
EL ÚNICO Y EXCLUSIVO RECURSO DEL CLIENTE SEGÚN LOS TÉRMINOS DE ESTA
GARANTÍA LIMITADA SERÁ LA REPARACIÓN O SUSTITUCIÓN DEL PRODUCTO SEGÚN
SE ESTIPULA EN EL PRESENTE DOCUMENTO. LAS RECLAMACIONES BASADAS
EN GARANTÍAS IMPLÍCITAS, INCLUIDAS LAS GARANTÍAS DE COMERCIABILIDAD
O DE IDONEIDAD PARA UN FIN DETERMINADO, ESTÁN LIMITADAS A UN (1) AÑO
O AL PERÍODO MÁS CORTO PERMITIDO POR LEY, AUNQUE NO INFERIOR A UN
(1) AÑO. ELECTROLUX PROFESSIONAL, INC. NO SERÁ RESPONSABLE DE DAÑOS
CONSECUENTES O FORTUITOS COMO DAÑOS A LA PROPIEDAD Y GASTOS
OCASIONALES DERIVADOS DE CUALQUIER INCUMPLIMIENTO DE ESTA GARANTÍA
LIMITADA ESCRITA O DE CUALQUIER GARANTÍA IMPLÍCITA. ALGUNOS ESTADOS Y
PROVINCIAS NO PERMITEN LA EXCLUSIÓN O LIMITACIÓN DE DAÑOS ACCIDENTALES
O DERIVADOS NI LIMITACIONES ACERCA DE LA DURACIÓN DE LA GARANTÍA
IMPLÍCITA, DE MODO QUE ES POSIBLE QUE LAS LIMITACIONES O EXCLUSIONES
ARRIBA MENCIONADAS NO SE APLIQUEN A SU CASO. ESTA GARANTÍA ESCRITA LE
OTORGA DERECHOS LEGALES ESPECÍFICOS. ES POSIBLE QUE TAMBIÉN DISFRUTE
DE OTROS DERECHOS QUE VARÍEN DE UNA JURISDICCIÓN A OTRA.
Si necesita servicio
Para obtener servicio, la unidad debe registrarse primero en KelvinatorCommercial.
com. Una vez registrada, llame al 866-339-8515 para solicitar asistencia.
Esta garantía sólo se aplica en EE.UU. y Canadá y está garantizada por Electrolux
Professional, Inc. Para instalaciones fuera de EE. UU. y Canadá, comuníquese con
su proveedor de equipos local para conocer los detalles de la garantía.
Electrolux Professional, Inc. no autoriza a persona alguna a cambiar o añadir
obligaciones a esta garantía. Las obligaciones de servicio y repuestos impuestas
por esta garantía debe satisfacerlas Electrolux Professional, Inc. o una empresa
de servicios autorizada. Las características o especificaciones que se describen o
ilustran están sujetas a cambios sin previo aviso.
(Noviembre de 2023)
866-339-8515
Electrolux Professional, Inc.
9 ENFRIADOR DE BOTELLAS
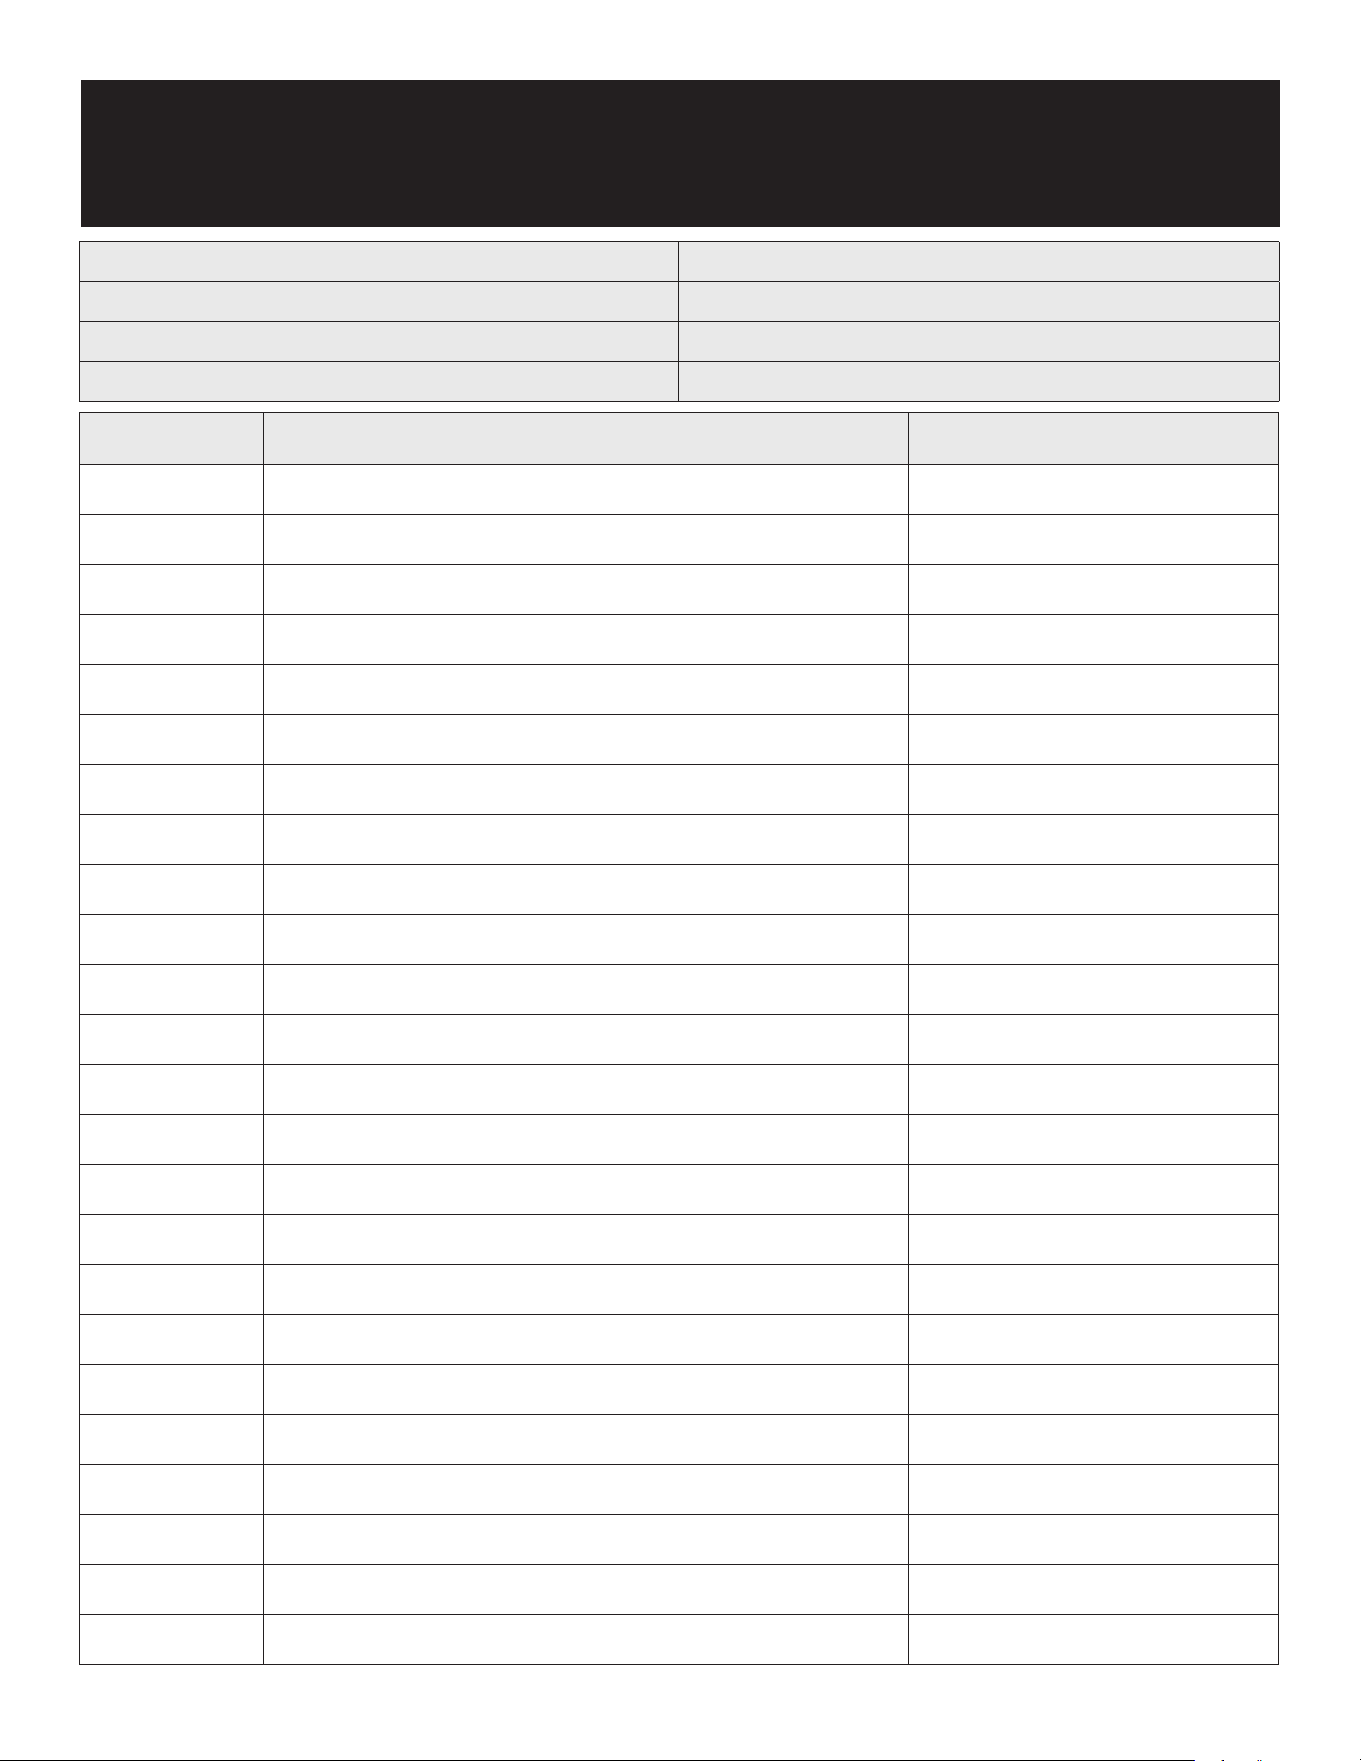
Registro de servicio
N.º de modelo: Adquirido a:
Nº de serie: Ubicación:
Fecha de compra: Fecha de instalación:
N.º de orden de compra: Para llamadas al servicio técnico:
Fecha Mantenimiento realizado Realizado por