Use and Care Manual
features and sizes may vary. please read this manual carefully before installing and operating.
save these instructions.
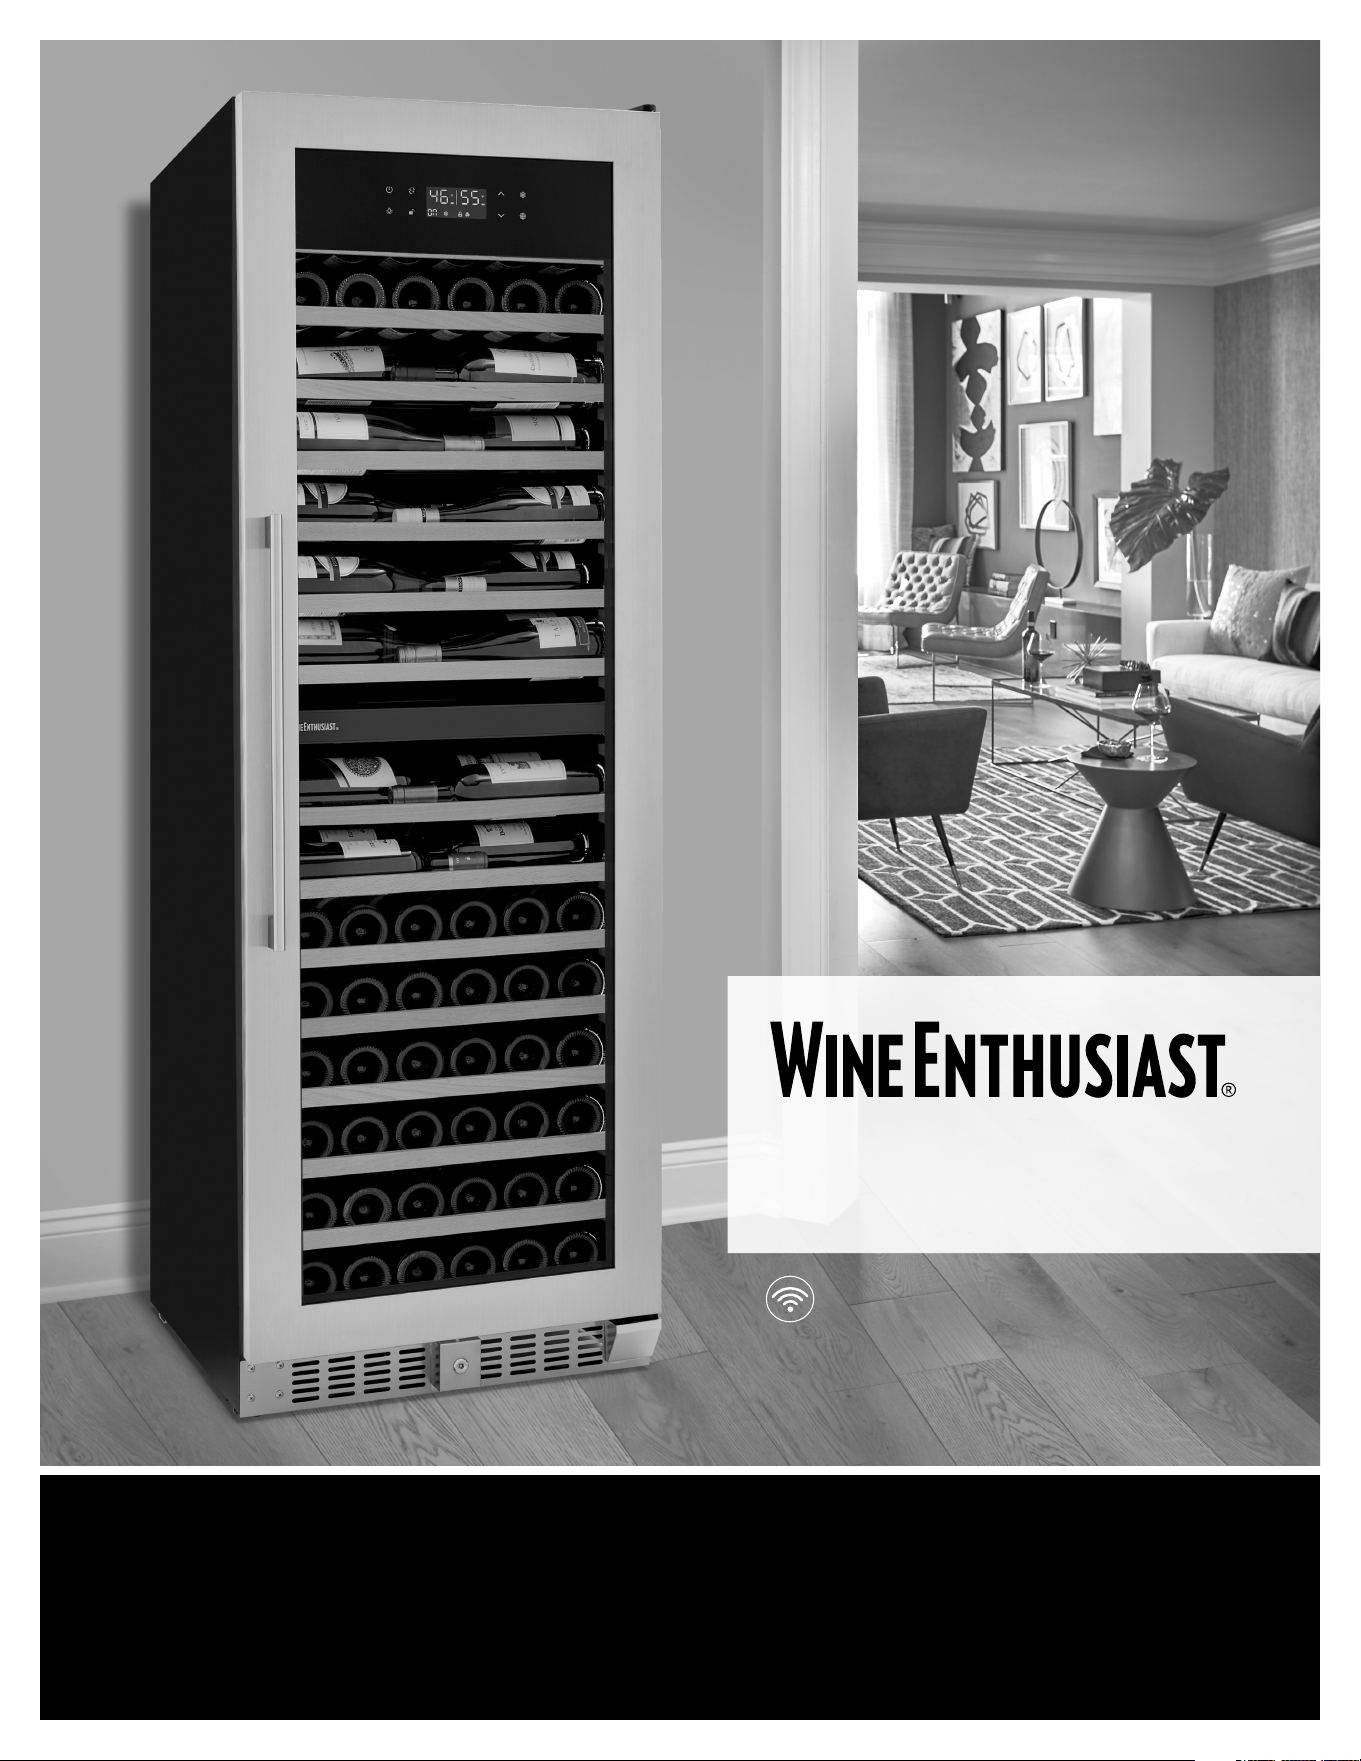
Wi-Fi Enabled
SommSeries L 150
Smart Wi-Fi Dual Zone Wine Cellar
A Message from Wine Enthusiast:
Thank you for purchasing your wine cellar from Wine Enthusiast. We have been dedicated to developing and oering
the best selection of wine products for more than 40 years. Our devoted team of wine experts apply their knowledge
and passion to develop high-quality, innovative cellars to protect and showcase wines for every wine drinker.
Thoughtfully designed for style, function and performance, your wine cellar will be a welcome part of your home
you’ll enjoy for years.
We appreciate you choosing Wine Enthusiast for your wine storage needs and look forward to delivering the best
products and service to you.
Welcome to the Wine Enthusiast!
QUESTIONS?
For toll-free telephone
support in the U.S. and
Canada, call 800.648.6058
For online support and
internet product information:
WineEnthusiast.com
Keep for Your Records
Staple your receipt to your manual. You will need the receipt to obtain warranty service.
____________________________________________________
Model Number
____________________________________________________
Serial Number
____________________________________________________
Date of Purchase
This easy-to-use manual will guide you in getting the best use of your
wine cellar. Please remember to record the model and serial number. They
are located inside the cabinet on a label on the bottom right side. The
following model numbers are referenced in this Use and Care Manual.
236 01 66 03
Model:
800.648.6058 | 1 | WineEnthusiast.com
Table of Contents
Important Safeguards .................................................................................................................................................................................... 3
Safety Precautions ........................................................................................................................................................................................... 4
Wine Cellar Features and Use .................................................................................................................................................................. 5
Initial Setup .............................................................................................................................................................................................5
Temperature Adjustment ................................................................................................................................................................5
Shelving (type and number of shelves will vary per model) .....................................................................................6
Removing the Rolling Shelf ........................................................................................................................................................... 6
Charcoal Filter ....................................................................................................................................................................................... 6
Replacing the Charcoal Filter ......................................................................................................................................................6
Installation as a Built-In Wine Cellar ....................................................................................................................................................7
Installing the Handle .......................................................................................................................................................................................7
Operating Your Wine Cellar .......................................................................................................................................................................8
Display and Icon Glossary .............................................................................................................................................................8
Programming Your Lighting ..........................................................................................................................................................9
Setting the Temperature Range ..................................................................................................................................................9
Before You Start ................................................................................................................................................................................. 10
Setting the Temperature Control ..............................................................................................................................................10
Lock or Unlock the Control Panel ...........................................................................................................................................10
Interior Light .........................................................................................................................................................................................10
Adjusting the Light Intensity .......................................................................................................................................................11
Door Lock ...............................................................................................................................................................................................11
Normal Operating Sounds You May Hear ...........................................................................................................................11
Wi-Fi Pairing ..........................................................................................................................................................................................11
Installing the App ............................................................................................................................................................................................12
How to Connect Your Wine Cellars.....................................................................................................................................................13
Technical Data ..................................................................................................................................................................................................15
Proper Wine Cellar Care, Cleaning and Maintenance ............................................................................................................16
Troubleshooting Guide ................................................................................................................................................................................ 17
Limited Warranty ............................................................................................................................................................................................18
800.648.6058 | 2 | WineEnthusiast.com
Important Safeguards
When using this appliance, always exercise basic safety precautions, including the following:
1. Read all of the instructions before using this appliance.
2. This appliance is not intended for use by persons (including children) with reduced physical,
sensory or mental capabilities, or lack of experience and knowledge, unless they have been
given supervision or instruction concerning use of the appliance by a person responsible
for their safety.
3. Children should be supervised to ensure that they do not play with the appliance.
4. Use this appliance only for its intended purpose as described in this use and care guide.
5. This wine cellar must be properly installed in accordance with the installation instructions
before it is used. See grounding instructions in the installation section.
6. Never unplug your wine cellar by pulling on the power cord. Always grasp the plug firmly
and pull straight out from the outlet.
7. Unplug your wine cellar before cleaning or before making any repairs. Note: If for any reason
this product requires service, we strongly recommend that a certified technician performs
the service.
8. The SUPPLY CORD cannot be replaced. If the cord is damaged the appliance should
be scrapped.
9. This appliance is designed for freestanding installation or can be recessed into cabinetry.
10. DANGER: Risk of Child Entrapment! Before you throw away your old wine cellar, take o
the doors. Leave the shelves in place so that children may not easily climb inside.
11. Do not operate your wine cellar in the presence of explosive fumes.
12. Do not store foods in wine cellar as interior temperature may not be cool enough to prevent
spoilage or may cause bacteria growth.
DANGER
Risk of child entrapment! Before you throw away your old wine cellar,
take o the doors. Leave the shelves in place so that children may not
easily climb inside.
800.648.6058 | 3 | WineEnthusiast.com
Electrical Requirement
• Make sure there is a suitable power outlet with
proper grounding to power the wine cellar.
• Avoid the use of three plug adapters or cutting o the
third grounding in order to accommodate a two plug
outlet. This is a dangerous practice since it provides
no eective grounding for the wine cellar and may
result in shock hazard.
Install Limitations
• Do not install your wine cellar in any location
not properly insulated or heated e.g. garage etc.
Your wine cellar was not designed to operate in
temperature settings below 60° Fahrenheit.
• Select a suitable location for the wine cellar on a hard
even surface away from direct sunlight or heat source
e.g. radiators, baseboard heaters, cooking appliances
etc. Any floor unevenness should be corrected with
the leveling legs located on the front and rear bottom
corners of the wine cellar.
• This appliance is designed for freestanding
installation or can be recessed into cabinetry.
Use of Extension Cords
• Avoid the use of an extension cord because of
potential safety hazards under certain conditions. If
it is necessary to use an extension cord, use only a
3-wire extension cord that has a 3-blade grounding
plug and a 3-slot outlet that will accept the plug. The
marked rating of the extension cord must be equal to
or greater than the electrical rating of the appliance.
Safety Precautions
WARNING!
Keep packaging materials away
from children. Polythene sheets
and bags can cause suocation!
If possible, please recycle packaging
material at a recycling facility.
WARNING!
The refrigerant R600a contained
within the appliance is environmentally
friendly, but flammable. Leaking
refrigerant can ignite.
CAUTION!
To avoid risk of personal injury or
property damage when setting up,
have two people unpack and move
this appliance into place.
800.648.6058 | 4 | WineEnthusiast.com
Wine Cellar Features and Use
Initial Setup
• Before connecting the wine cellar to the power source, let it stand upright for approximately
24 hours. This will reduce the possibility of a malfunction in the cooling system from handling
during transportation.
• Once you have plugged the unit into an electrical outlet, let the unit run for at least 30 minutes to
acclimate before making any adjustments.
Temperature Adjustment
• The wine cellar can be set to accommodate your wine storage requirements. To set the temperature,
press the up or down arrow button to increase or decrease the temperature setting until the desired
temperature is attained. It may take some time to reach the set temperature.
• The temperature will fluctuate more so when the wine cellar is empty.
800.648.6058 | 5 | WineEnthusiast.com
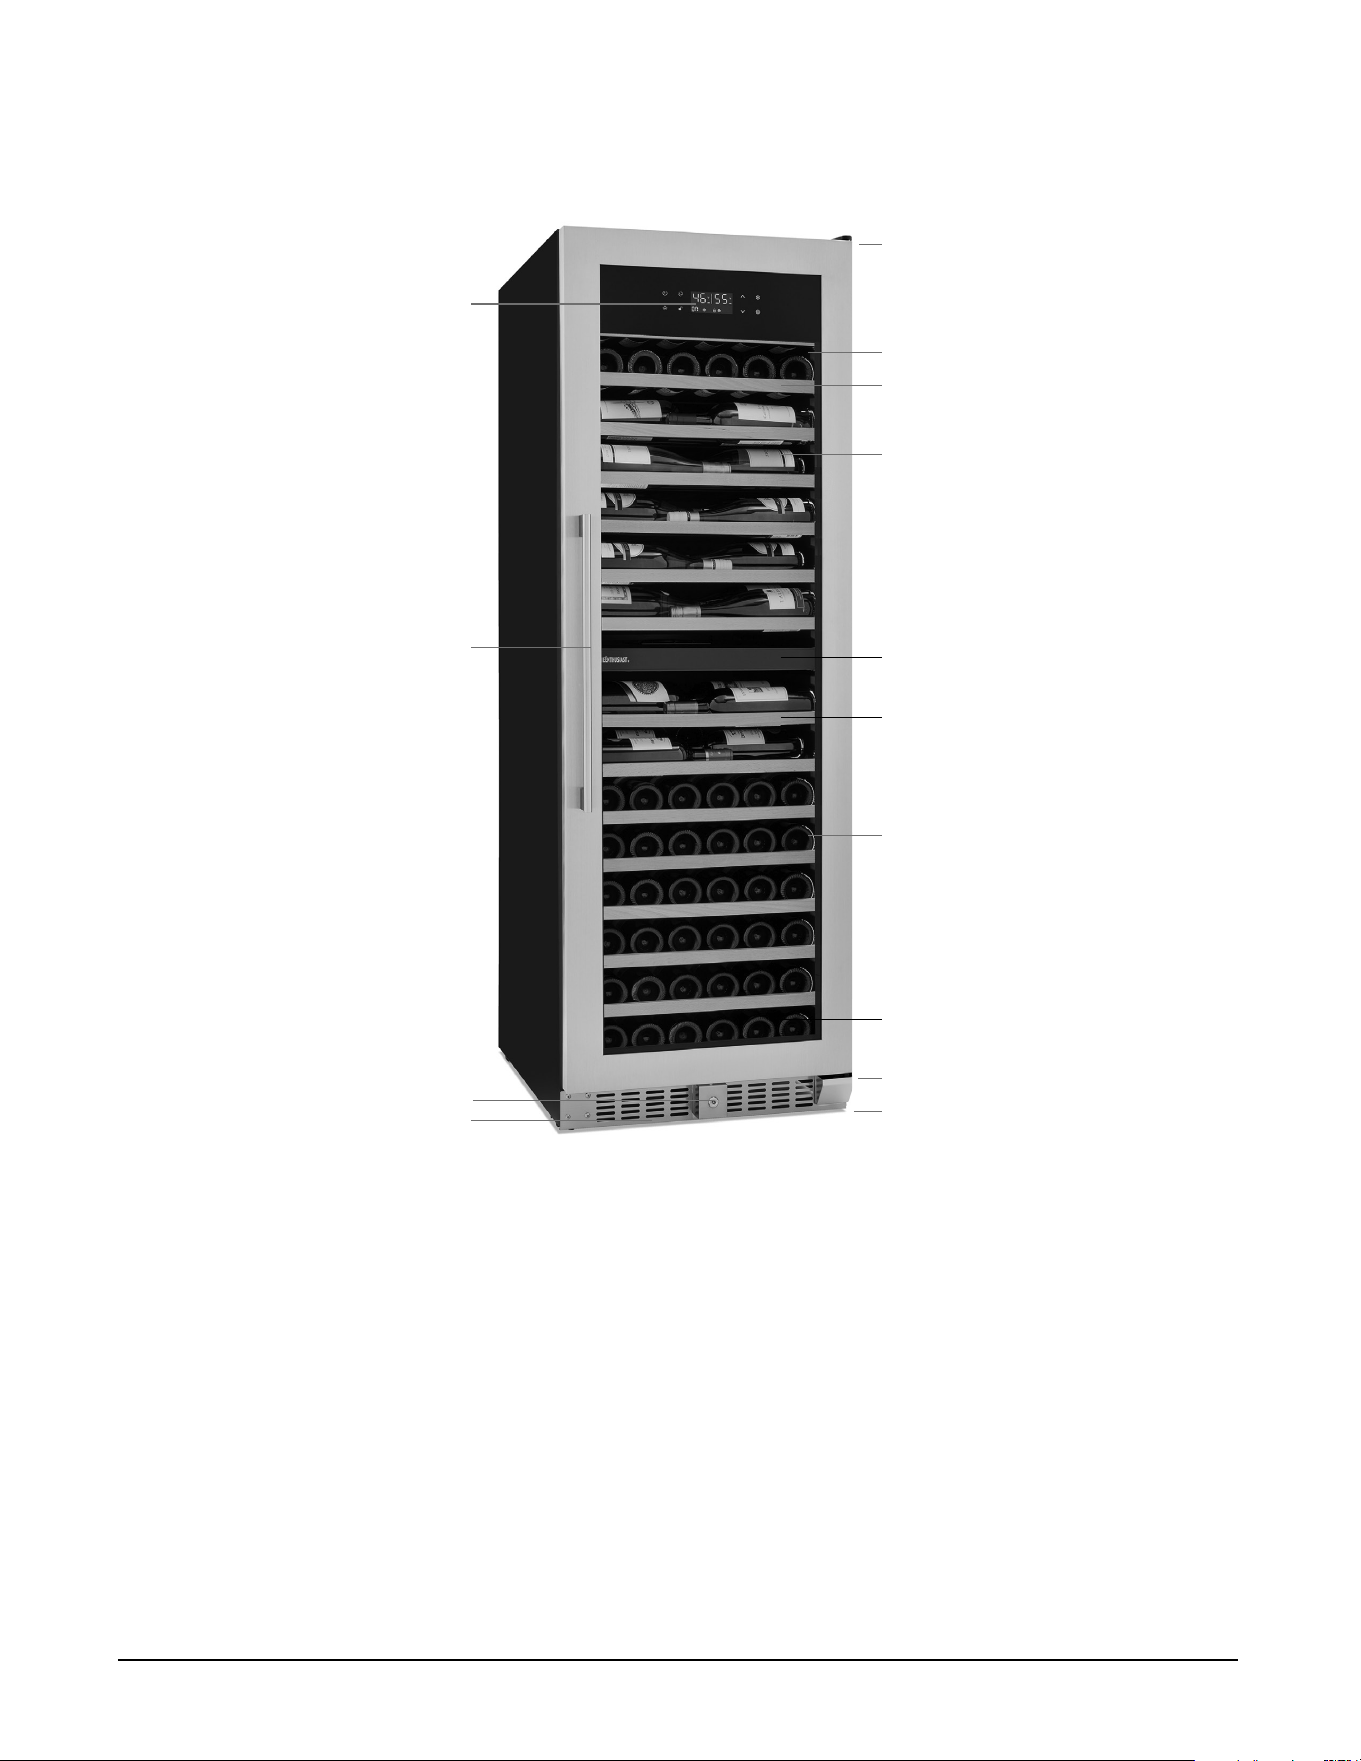
Handle
Control Panel
Upper Hinge
LED Lights (Both Sides)
Upper Zone
Lower Zone
Lower Hinge
Front Venting Grill
Leveling Legs (4)
Lock
Regular Shelf
Zone Separator
Showcase Shelf
Shallow Shelf
Shelving
(Type and number of shelves will vary per model)
Your cabinet was designed to store a maximum number of bottles securely. We recommend that you
observe the tips below to optimize loading:
• Remove all packing materials from shelves once unit is stable and ready for bottle storage.
• Disperse the bottles evenly to avoid concentrating weight in one place. Bottles must not touch
either the back of the cabinet or the step at the bottom. While your wine cellar was designed to
hold large format bottles, such as Pinot Noir, larger bottles could reduce the number of bottles you
can fit on a shelf.
• Make sure that the bottles are not all grouped together either at the top or bottom of the cabinet.
• Only pull out one shelf at a time, never attempt to pull out more than one.
• Maximum weight capacity per shelf is 55 lbs.
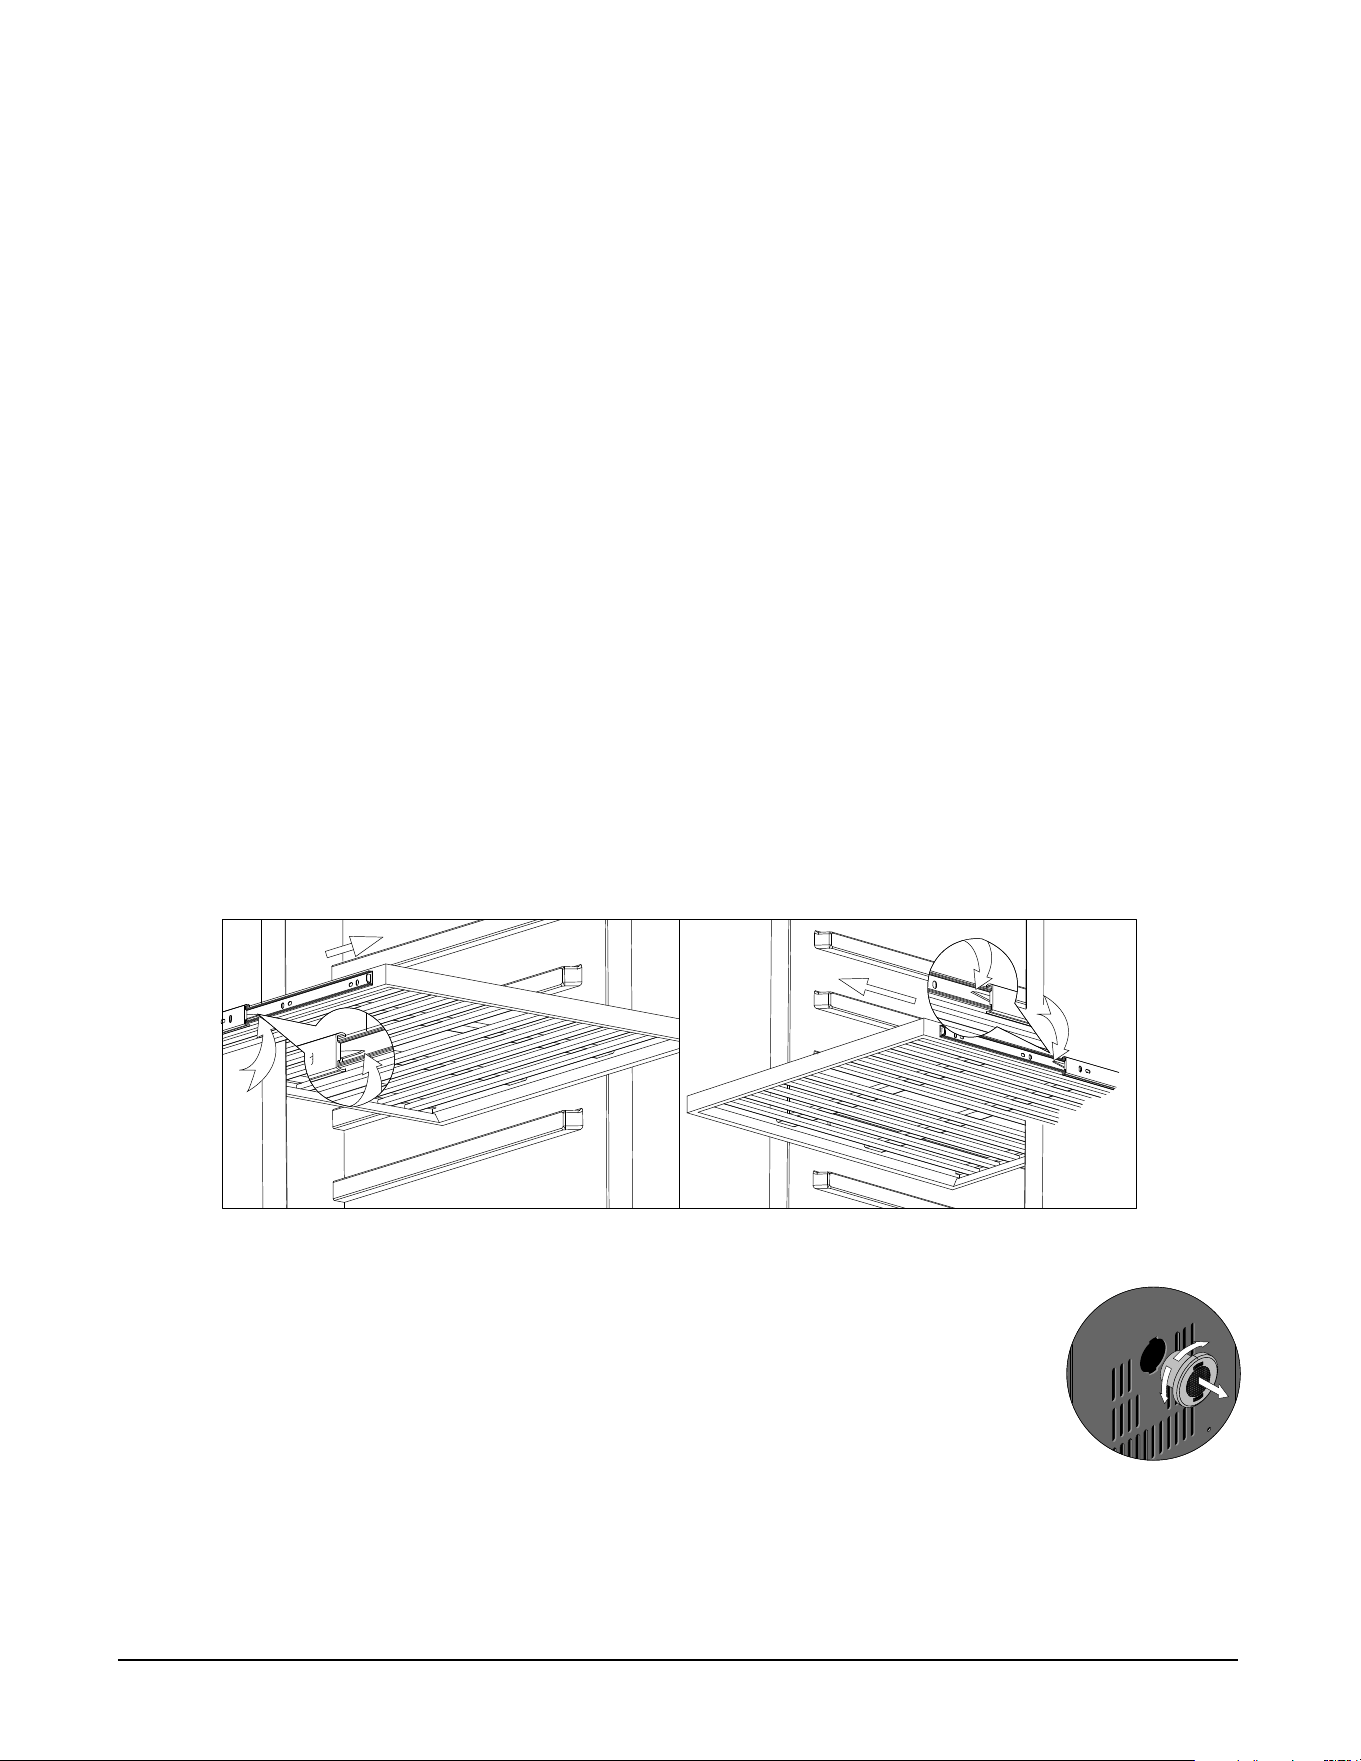
Removing the Rolling Shelf
1. Remove all bottles.
2. Pull the shelf out as far as it will go.
3. Push the left side lever upward while pushing the right side lever downward (as illustrated).
4. Pull the shelf towards you to completely to remove from the wine cellar.
Charcoal Filter
Charcoal air filters ensure the natural ventilation and humidity control that encourages
wine to mature properly free from damaging odors. We recommend you replace your
filter every year, order part number 268 03 98 99 at WineEnthusiast.com.
Replacing the Charcoal Filter
Located on the back wall of your wine cellar, Turn counterclockwise to unlock,
then remove. Replace with a new filter and turn clockwise to lock in place.
800.648.6058 | 6 | WineEnthusiast.com
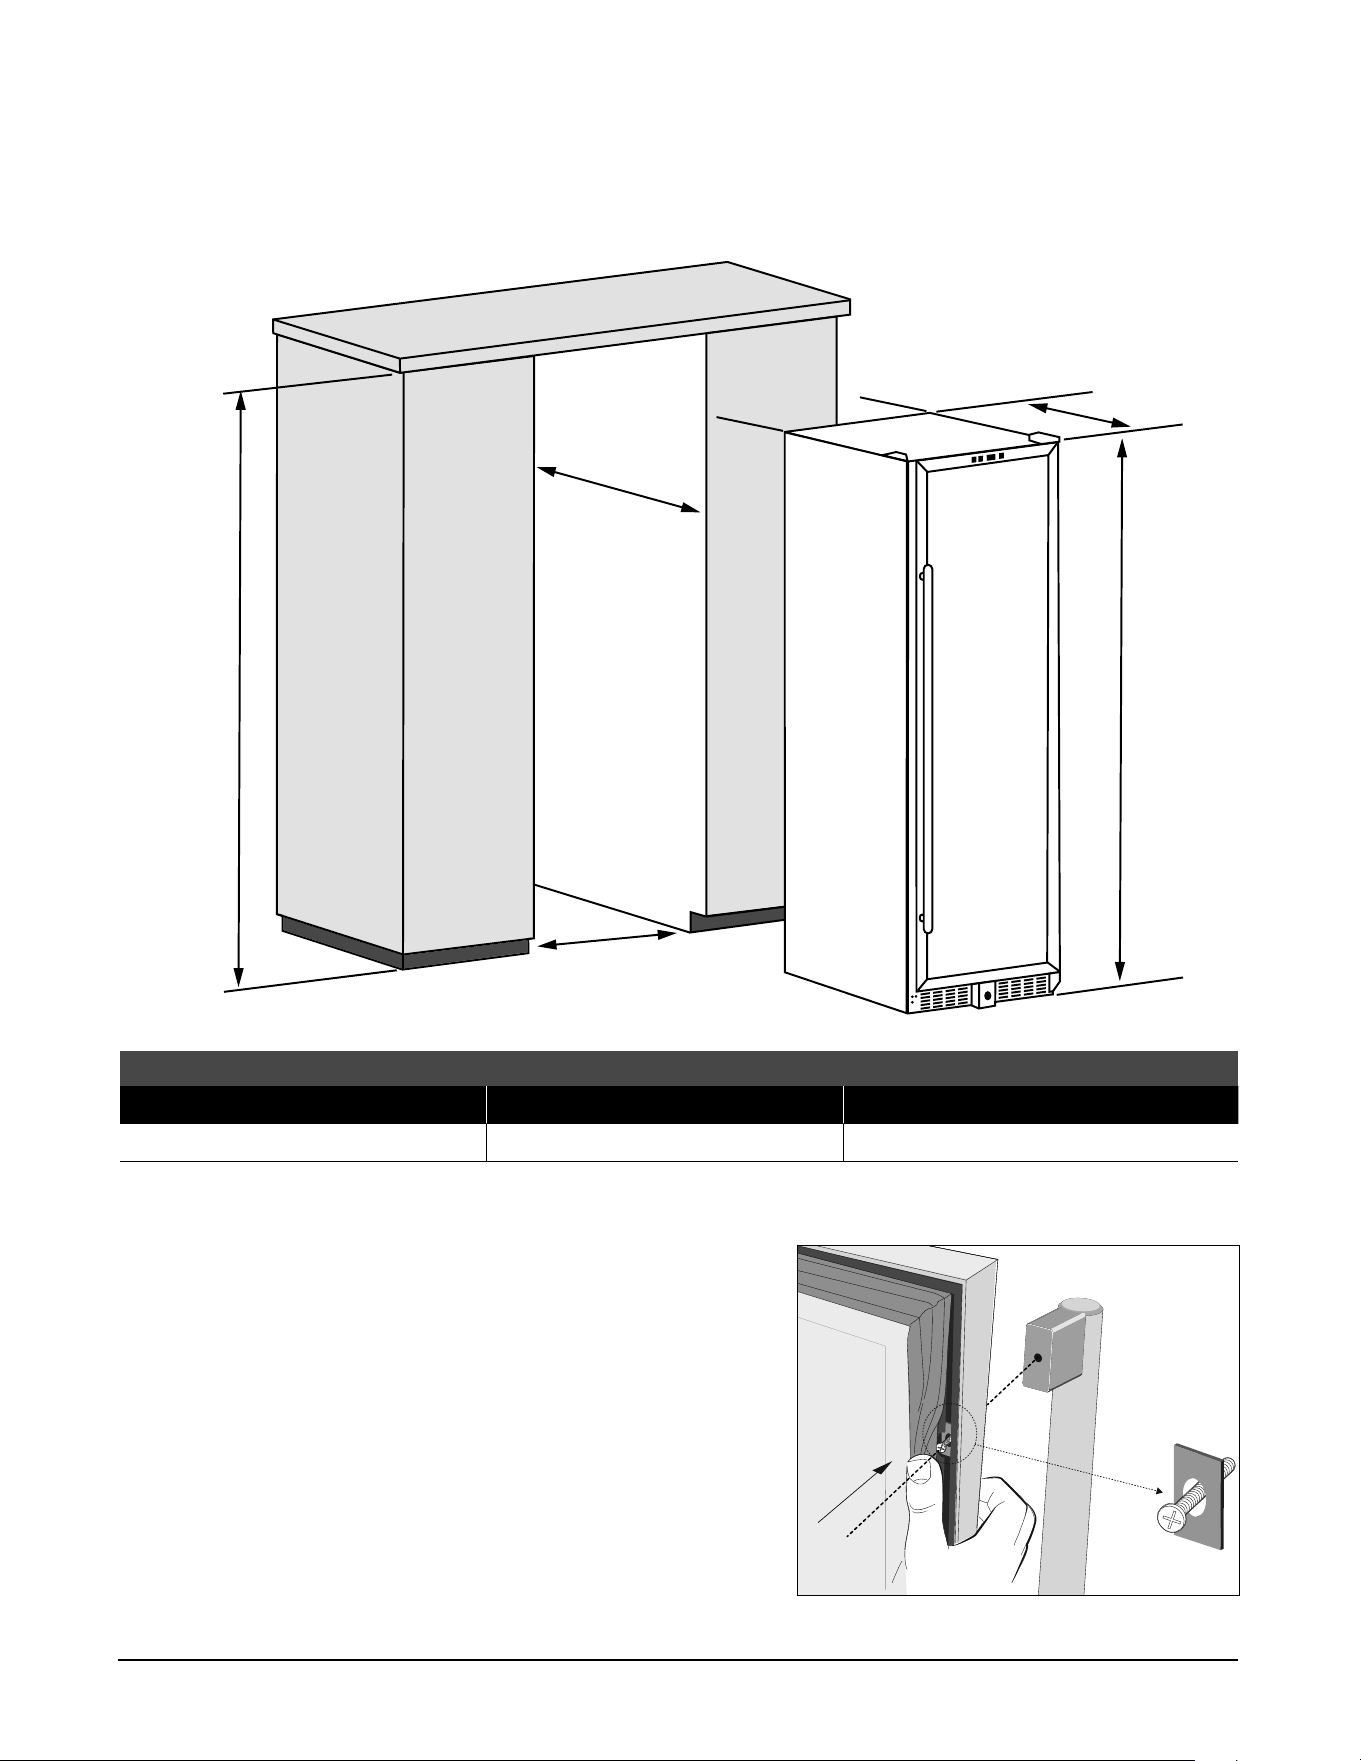
Installation as a Built-In Cellar
These cut out dimensions show the minimum space required for your wine cellar to perform as designed,
SOMMSERIES L 150 WINE CELLAR
MODEL CELLAR DIMENSIONS DIMENSIONS OF BUILT-IN AREA
SINGLE UNIT 69¾"H x 23¾"W x 27¼"D* 70¼"H x 24¾"W x 29¼"D
* Handle adds 2" to depth.
800.648.6058 | 7 | WineEnthusiast.com
29¼"
70¼"
27 ¼"
69¾"
24¾"
23¾"
Installing the Handle
1. Pull back the door seal/gasket behind handle location.
2. Insert screws into pre-drilled screw holes.
3. Attach handle and tighten screws.
4. Press door seal back into place.
1.
2.
3.
2.
800.648.6058 | 8 | WineEnthusiast.com
Operating Your Wine Cellar
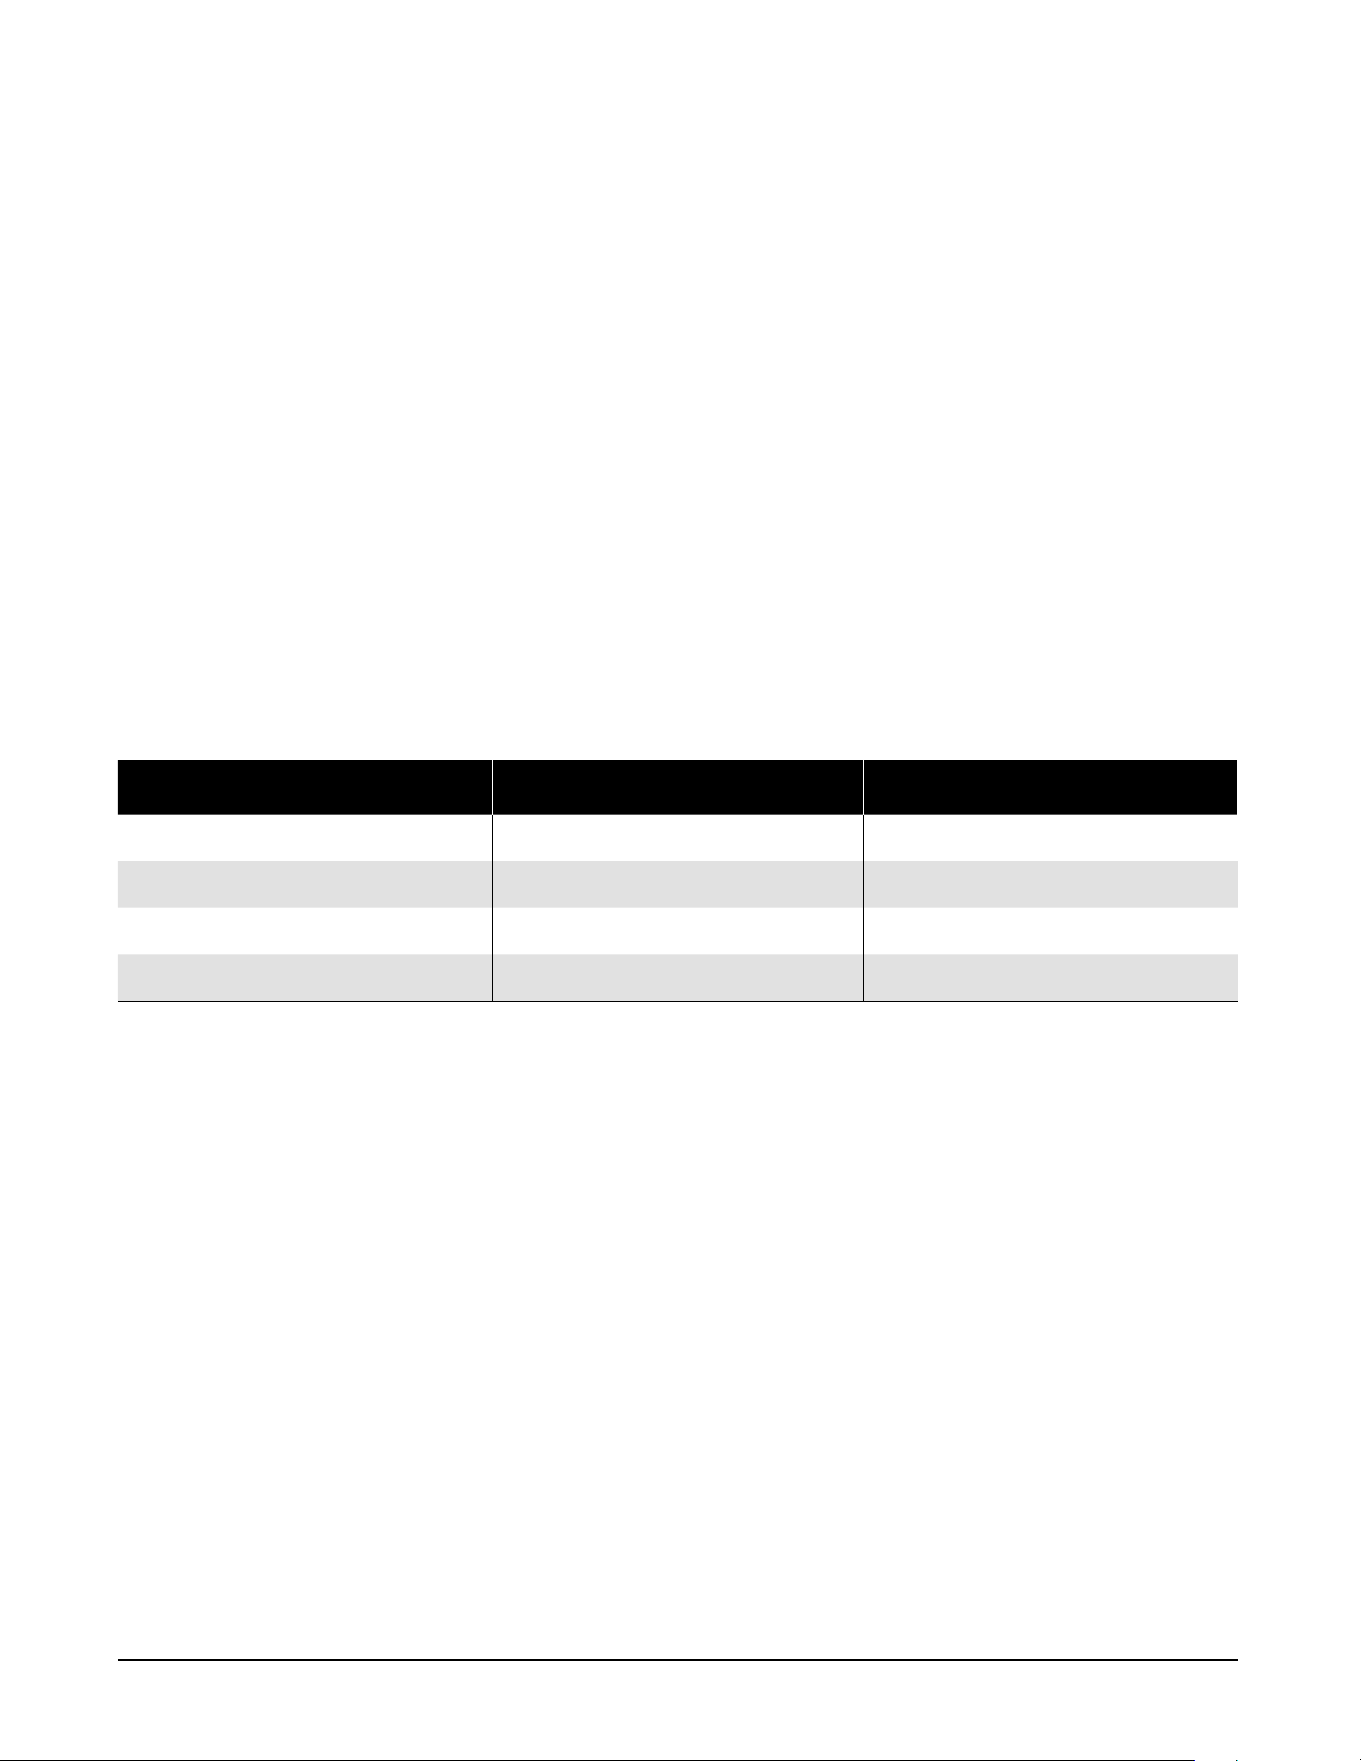
Each wine cellar includes an operating panel on the front of the unit. This operating panel includes several
features to operate and control the temperature.
Power: Press for 10 seconds to turn the wine cellar ON or OFF.
Light: Turns the interior wine cellar lights on or o.
Unlock: Press for 3 seconds to unlock the control panel.
C°/F°: Alters the temperature display to Fahrenheit or Celsius.
Temperature Set: Press to select Upper/Lower zone for setting temperature.
Temperature Up: Increases temperature by 1°.
Temperature Down: Decreases temperature by 1°.
Range: Press to change the temperature set-range.
Note: The control panel will lock automatically when left untouched for 10 seconds.
Make sure to unlock the control panel before setting. With the exception of the power button, all other
buttons back light will turn o when the control panel is left untouched for 15 seconds.
LIGHT UNLOCK
DISPLAY
ON/OFF
TEMP.
DOWN
RANGE
C0 / F0
UPPER
ZONE
LOWER
ZONE
TEMP
UP
TEMP
SET
POWER
Display and
Icon Glossary
WI-FI
UPPER
ZONE
LOWER
ZONE
DISPLAY
ON/OFF
ACTIVE
COOLING
ACTIVE
HEATER
CONTROL
PANEL
LOCK
WI-FI
800.648.6058 | 9 | WineEnthusiast.com
Programming Your Lighting
Your wine cellar comes equipped with 2 dierent lighting options: Amber or White.
• Unlock the control panel if it is locked.
• Repeatedly press the "Light" button to cycle through the intensity settings:
100% - 75% - 50% - 25% - OFF.
• To change the color of the LED lighting, (White or Amber), press and hold the LIGHT button
for 5 seconds. Tap the LIGHT button to change the color of the LED lighting.
• You will exit "light set mode" automatically after 5 seconds of inactivity.
Seing the Temperature Range
Your wine cellar is originally set as “H”, the ideal temperature for the storage of wine.
You can alter the temperature series by pressing RANGE until the display shows the appropriate letter.
DISPLAY UPPER ZONE SET RANGE LOWER ZONE SET RANGE
E 41°F - 54°F (5°C - 12°C) 54°F - 72°F (12°C - 22°C)
F 36°F - 54°F (2°C - 12°C) 54°F - 68°F (12°C - 20°C)
H 41°F - 54°F (5°C - 12°C) 46°F - 66°F ( 8°C - 19°C)
L 36°F - 50°F (2°C -1 0°C) 54°F - 72°F (12°C - 22°C)
Before You Start
The wine cellar should be placed in a location where the ambient temperature is between 60-80°
Fahrenheit. If the ambient temperature is above or below this range, the performance of the unit
may be aected. For example, placing your unit in extreme cold or hot conditions may cause interior
temperatures to uctuate.
Setting the Temperature Control
NOTE: The temperature readout shows the actual cellar temperature, it will temporarily show the set
temperature while making adjustments, then reverts back after 5 seconds.
1. Make sure power cord is connected to a properly grounded outlet.
2. Turn power ON.
3. Use the Zone Select button to select the Upper or Lower zone. Upper zone must be set 4°F colder
than lower zone.
4. Set the desired temperature by pushing the Temp UP or DOWN button.
5. Temperatures increase or decrease 1°F with each push of the UP or DOWN button.
NOTE: Temperatures may fluctuate depending on whether the interior light is ON or OFF and depending
on the position of the bottles.
Lock or Unlock the Control Panel
To LOCK the control panel:
1. Press and hold the LOCK button for 3 seconds.
2. The control panel will beep and the LOCK icon will illuminate.
To UNLOCK the control panel:
1. Touch the control panel to wake it up from sleep mode
2. Press and hold the LOCK button for 3 seconds.
3. The control panel will beep and the LOCK icon will darken.
Interior Light
To complement the look of your wine collection, LED lighting has been built into the wine cellar.
Simply press lightly the “Light” button and the light comes on, push again for o. For maximum energy
eiciency, leave light o when not viewing your collection.
800.648.6058 | 10 | WineEnthusiast.com
Adjusting the Light Intensity
You can adjust the intensity of the LED lighting from 100% down to 25%
• Unlock the control panel if it is locked.
• Simply push the "Light" button 1X for 100%, 2X for 75%, 3X for 50% or 4X for 25%.
• To change the color of the LED lighting from White to Amber, Press and Hold the LIGHT button
for 5 seconds. Press the LIGHT button to change the color of the LED lighting.
• You will exit ‘light set mode’ automatically after 5 seconds of inactivity.
Door Lock
• This unit comes with key lock.
• The keys are located inside the plastic bag along with the user manual. To unlock the door, insert the
key into the lock and turn counter clockwise.
• To lock the door, simply reverse the operation making sure the metal pin is engaged completely.
• Then remove the key and place it in a secure place for safekeeping.
Normal Operating Sounds You May Hear
• Boiling water, gurgling sounds or slight vibrations that are the result of the refrigerant circulating
through the cooling coils.
• The thermostat control will click when it cycles on and o.
Wi-Fi Pairing
• When connecting your Wine Enthusiast Somm Series wine cellar to the Wine Enthusiast App you
might need to activate the pairing mode to make a connection.
• Press and hold the LOCK and the TEMP UP (+) button simultaneously for 3 seconds,
the Wi-Fi icon will begin flashing.
800.648.6058 | 11 | WineEnthusiast.com
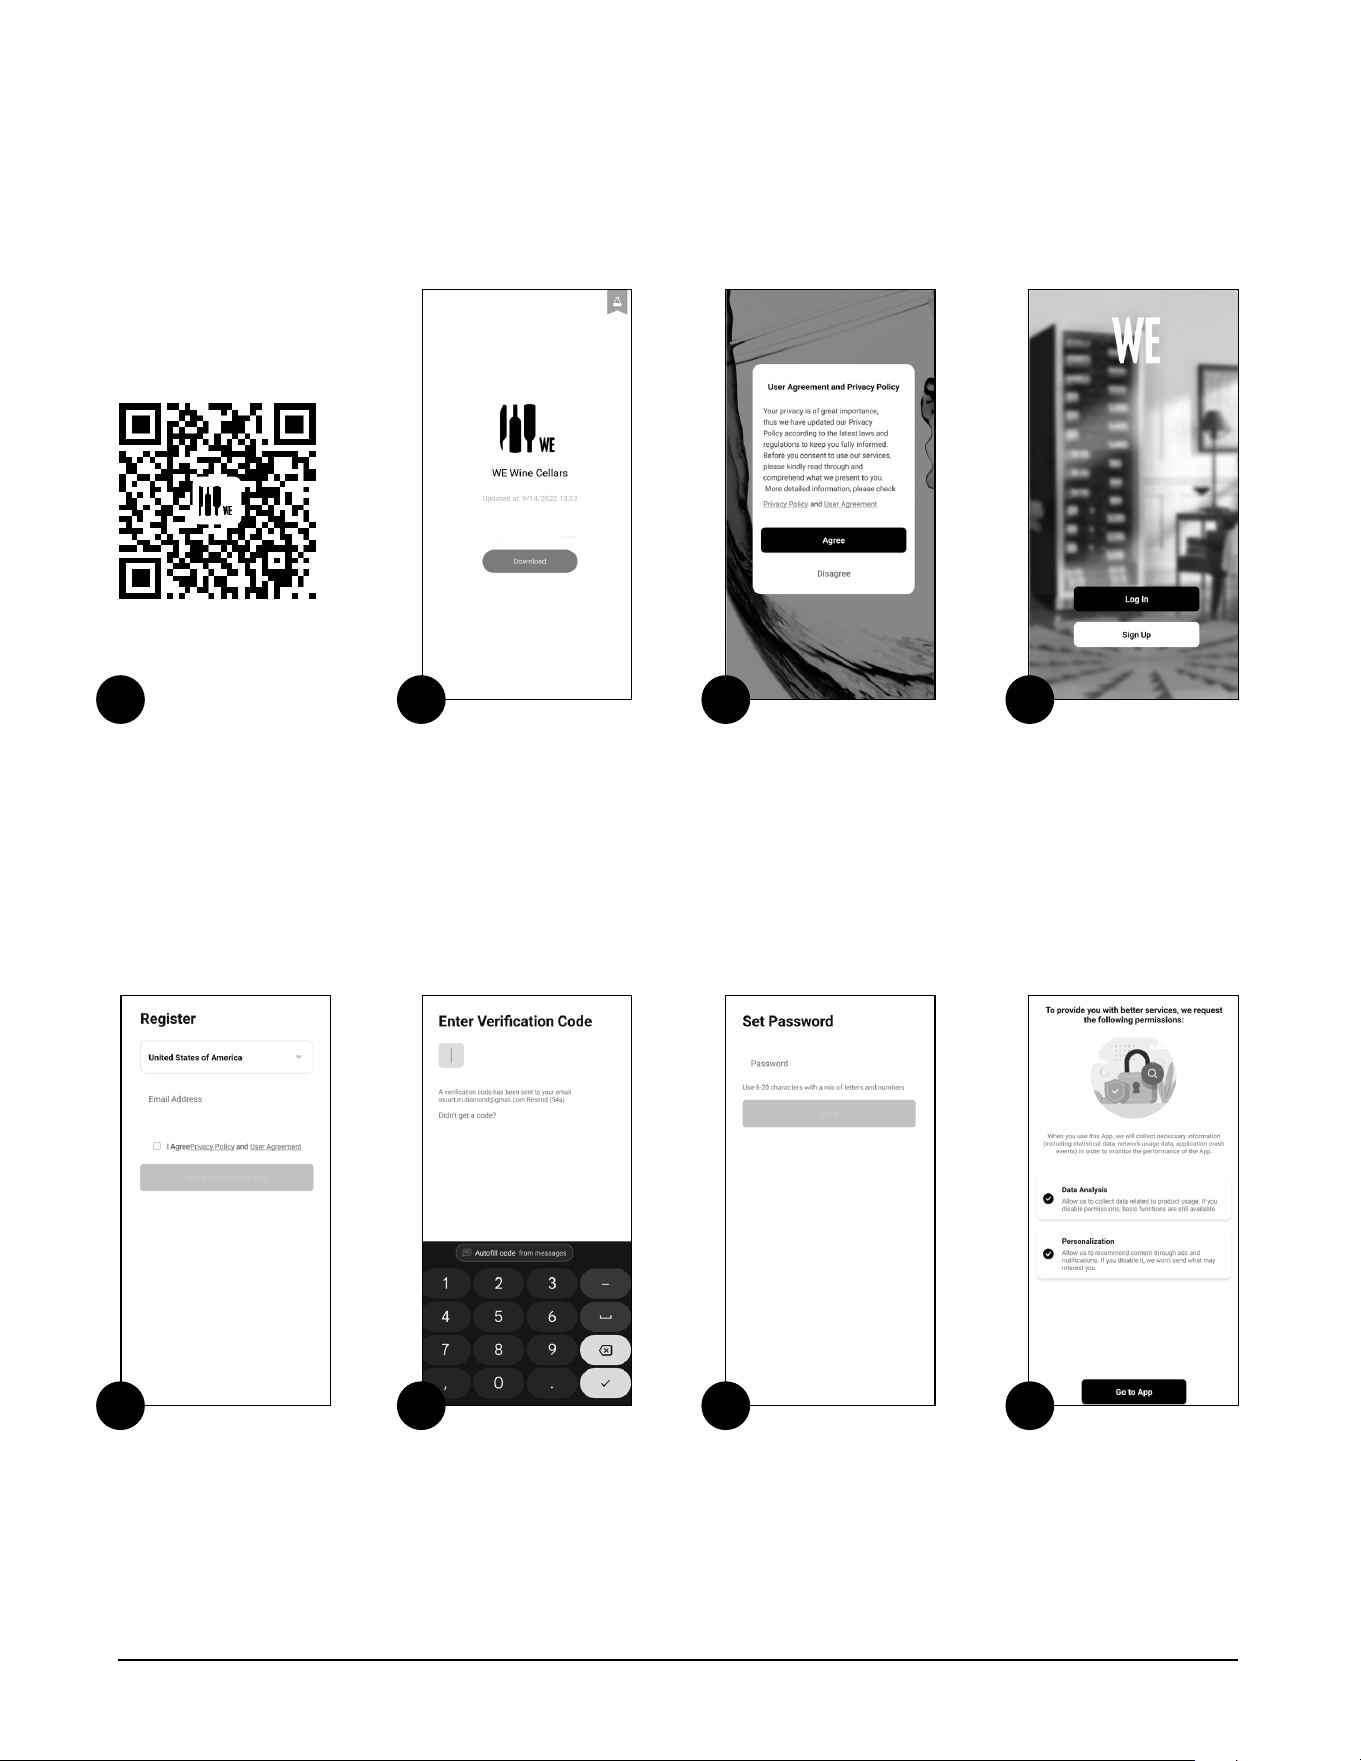
Installing the App
800.648.6058 | 12 | WineEnthusiast.com
Press ‘Download’. Read and press ‘Agree’.
to the User Agreement
and Privacy Policy.
Press ‘Sign Up’ to
create an account.
Enter your email address, and
check ‘I Agree to the Privacy
Policy and User Agreement’.
a. You can review each
document by pressing
on the highlighted text
b. Then press the ‘Get Verification
Code‘ button.
Check your email for the
verification code, enter
the code.
Set your password.
Use 6 to 20 characters
with a mix of letters
and numbers. Be sure
to write this down and
keep it in a secure place.
2. 4.
5.
Review the Data
Analysis and
Personalization
permission, leave
checked or unchecked,
then press ‘Go to App’.
3.
6. 7. 8.
Scan this QR Code to
download the free
Wine Enthusiast Cellars
Smart Remote App.
1.
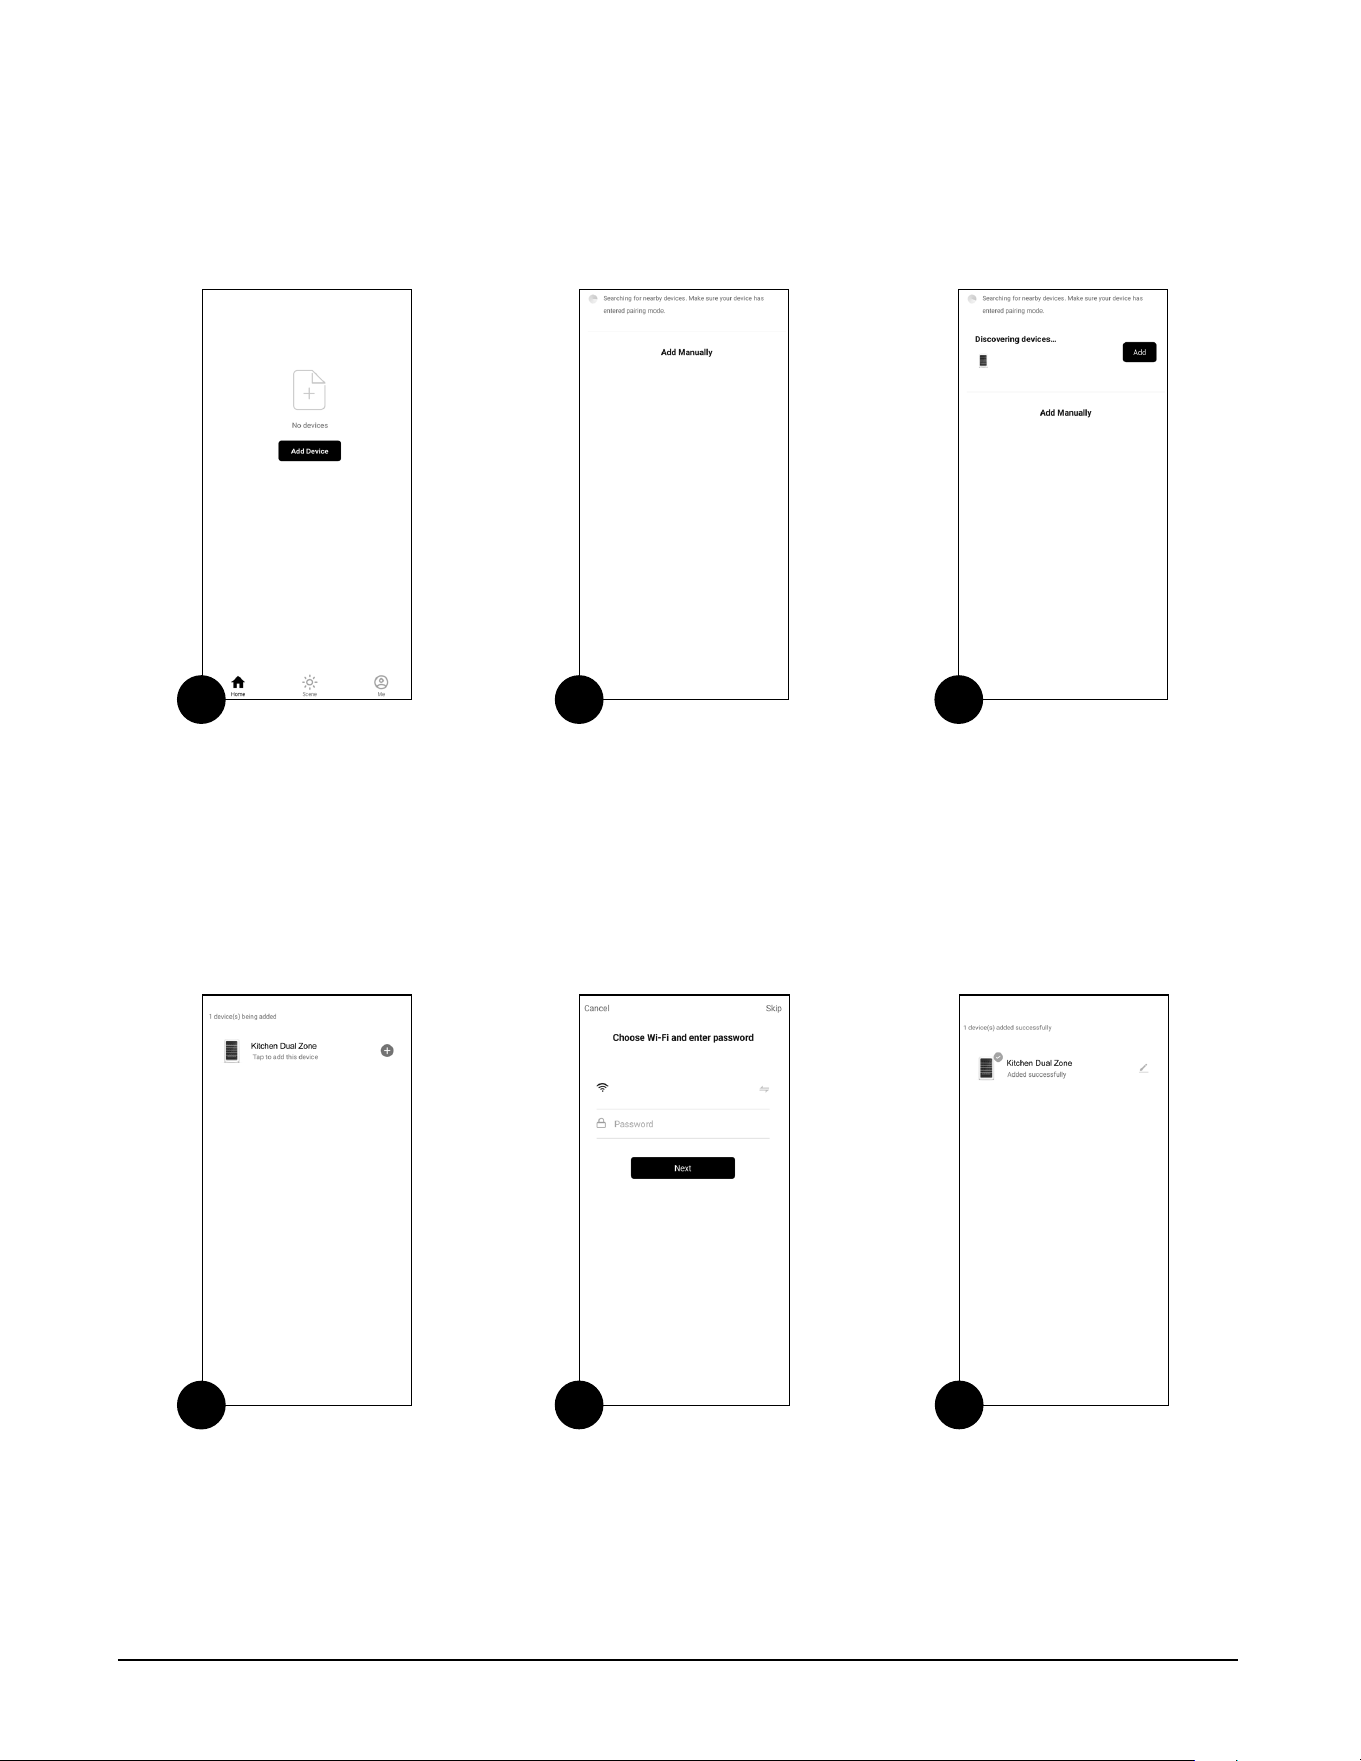
How to Connect to Your Wine Cellars
1. 3.2.
5. 6.
800.648.6058 | 13 | WineEnthusiast.com
4.
The App will automatically search
for an available wine cellar.
a. Be sure the App permissions is
set to ALLOW Nearby Devices.
b. Your wine cellar is in pairing
mode (Wi-Fi icon is flashing on
the temperature display).
The App should list
Discovering Devices.
Press ‘Add’ on the wine
cellar you want to add.
Your wine cellar will now
connect to the Wi-Fi
router, this may take a few
minutes, please be patient.
- Press the wine cellar icon
to go to the control panel.
Press the ‘Add Device’
icon on the screen to
add a new wine cellar.
Ensure that Wi-Fi and
Bluetooth are both ON.
Select your Wi-Fi from the list
and then enter the password.
- The Wi-Fi module
will connect with 2.4
or 5 GHz routers.
- Press ‘Next’.
The App will list the wine
cellar (again).
Press the + icon next
to the listed cellar.
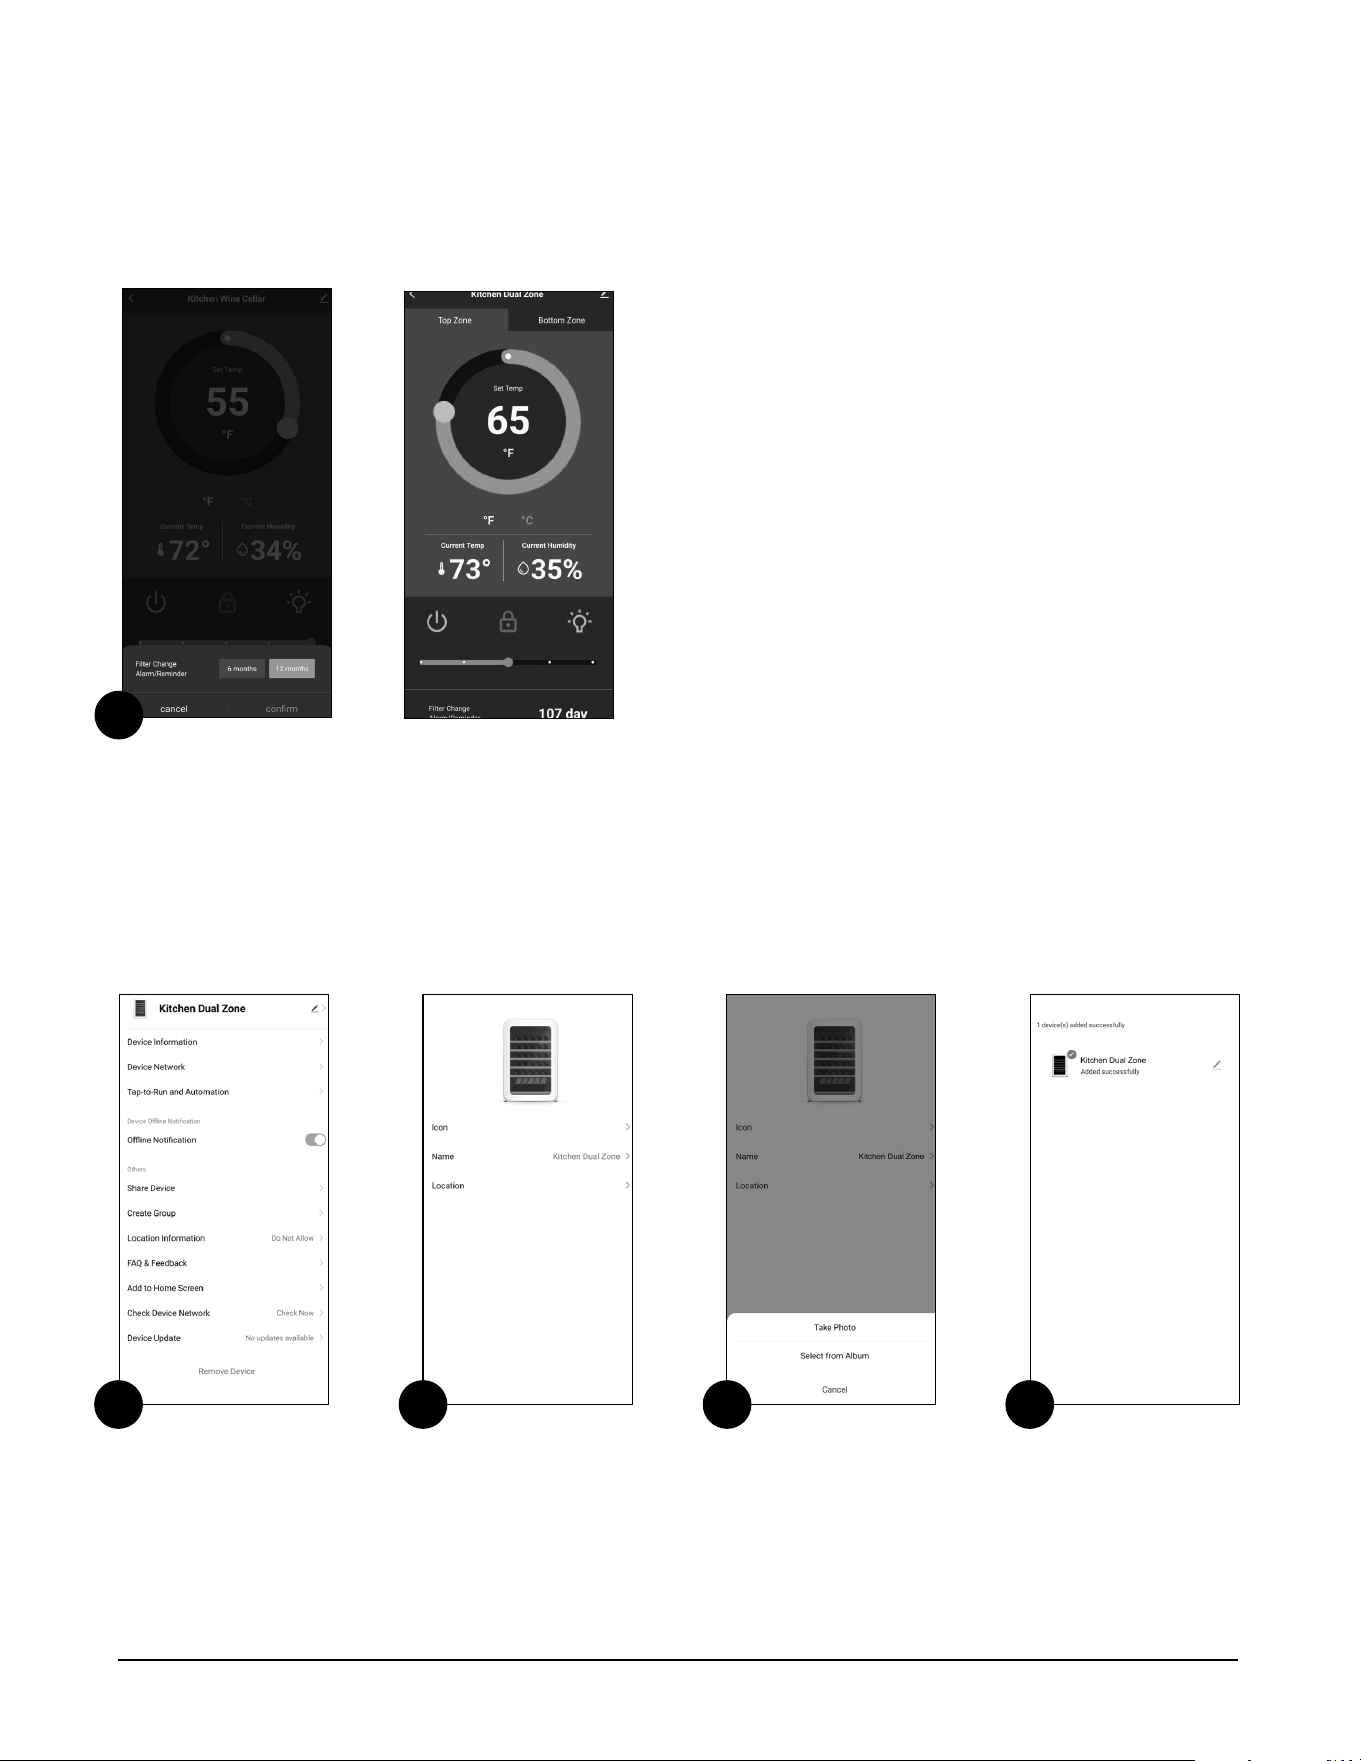
How to Connect to Your Wine Cellars
(continued)
1. 3. 4.2.
You can view and adjust the temperature by sliding your
finger over the wheel.
a. Change the temperature display from Fahrenheit to
Celsius by pressing the F or C.
b. Lock/Unlock the temperature controls by pressing
the LOCK icon.
c. Change the color of the LED lighting by repeatedly
pressing the light icon, rotating between white
and amber.
d. Change the intensity of the LED lighting by
sliding the light adjustment bar left to right
(0% - 25% - 50% - 75% - 100%).
e. Turn the Lights ON and OFF by pressing the
LIGHT icon for 3 seconds.
f. To customize the display, press the pencil icon on
the top right corner.
Please note: the Current Humidity is not adjustable.
7.
FILTER CHANGE
Customizing Seings
800.648.6058 | 14 | WineEnthusiast.com
Press the pencil icon
on the top right corner
of this screen.
To change the name of the
wine cellar press the arrow
on the right of the name.
To change the image,
press the arrow to the
right of the word ICON,
you can upload a photo
or use your camera to
take a picture of the
cellar you want to add.
You can control multiple
units from this one App,
press ‘Home’ to see a list
of all connected units.
800.648.6058 | 15 | WineEnthusiast.com
Technical Data
SOMMSERIES L 150 DUAL ZONE (each unit)
INSTALLATION TYPE Freestanding or Built-In
ELECTRICAL REQUIREMENTS 115 ~ 60Hz
PROTECTION CLASS I
CLIMATE CLASS N
AMBIENT TEMPERATURE 60°F – 80°F
TEMPERATURE CONTROL RANGE Upper Zone: 41°F – 54°F • Lower Zone: 46°F – 66°F
TOTAL VOLUME 15.11 Cu. Ft.
RATED CURRENT 2.3 Amps
START-UP AMPS 6.9 Amps
RUNNING AMPS 2.3 Amps
REFRIGERANT R600a – 1.8 oz.
ENERGY CONSUMPTION 217 kWh/year
PLUG TYPE Right Angle NEMA 5-15P Plug with SJT 3X18AWG Cord
BREAKER SIZE 15 Amp Line*
DECIBEL RATING 39 dB(A)
APPROXIMATE NET WEIGHT 225 lbs
DIMENSIONS 69¾"H x 23¾"W x 27¼"D*
* Multiple Unit Note: If there is more than one cellar on a line, a 20 Amp circuit is required for every 2 units.
Proper Wine Cellar Care, Cleaning
& Maintenance
General
• Prepare a cleaning solution of 3-4 tablespoons of baking soda mixed with 2 cups of warm water
or use one part Borax for ten parts water (about one cup per gallon). Use sponge or soft cloth,
dampened with the cleaning solution, to wipe down your wine cellar.
• Rinse with clean warm water and dry with a soft cloth.
• Do not use harsh chemicals, abrasives, ammonia, chlorine bleach, concentrated detergents, solvents or
metal scouring pads. Some of these chemicals may dissolve, damage and/or discolor your wine cellar.
Mold on the Interior
Microscopic mold spores are naturally occurring and present in the ambient air. When mold gets in your
wine cellar it may grow within the humid environment. Removal can be completed with mild solutions of
commonly available products such as Borax, vinegar, or baking soda.
Door Gaskets
• Clean door gaskets every three months according to general instructions. Gaskets must be kept clean
and pliable to assure a proper seal.
• Petroleum jelly applied lightly on the hinge side of gaskets will keep the gasket pliable and assure
a good seal.
Power Interruptions
Occasionally there may be power interruptions due to thunderstorms or other causes. Remove the power
cord from AC outlet when a power outage occurs. When power has been restored, wait 3 to 5 minutes
then re-plug the power cord to AC outlet.
Vacation and Moving Care
• For long vacations or absences, unplug the wine cellar and clean the wine cellar and door gaskets
according to "General Cleaning" section. Leave doors open, so air can circulate inside.
• Always move the wine cellar vertically. Do not move with the unit lying down, as possible damage to
the sealed system could occur.
Note: After moving, wait for 24 hours before plugging in the wine cellar.
CAUTION!
Before using cleaning products, always read and
follow manufacturer's instructions and warnings
to avoid personal injury or product damage.
WARNING!
To avoid electric shock always unplug your
cellar before cleaning. Ignoring this warning
may result in death or injury.
800.648.6058 | 16 | WineEnthusiast.com
Troubleshooting Guide
Many common issues with your wine cellar can be easily solved. Try the troubleshooting tips below if you
experience any problems.
Wine Cellar Does Not Operate:
• Check if wine cellar is plugged in.
• Check if there is power in the AC outlet, by checking the circuit breaker.
Wine Appears Too Warm:
• Door may have been opened too frequently or for an extended period of time.
• Allow time for recently added wine to reach desired temperature.
• Check door gasket for proper seal.
• Clean condenser coils.
• Adjust temperature control to colder setting.
Wine Appears Too Cold:
• If temperature control setting is too cold, adjust to a warmer setting.
Wine Cellar Runs Too Frequently:
• This may be normal to maintain constant temperature during high temperature and humid days.
• Doors may have been opened frequently or for an extended period of time.
• Clean condenser coils.
• Check door gasket for proper seal.
• Check to see if doors are completely closed.
Moisture Build-Up on Interior or Exterior of the Wine Cellar:
• This is normal during high humidity periods.
• Prolonged or frequent door openings.
• Check door gasket for proper seal.
Wine Cellar Door Does not Shut Properly:
• Level the wine cellar.
• Check for blockages e.g. wine bottles, shelves.
800.648.6058 | 17 | WineEnthusiast.com
Limited Warranty
This Warranty Covers Appliances within the Continental United States Only.
How to Get Warranty Service:
In the event your wine cellar is not operating within the manufacturer’s specifications, during the Warranty Period, contact
Customer Care at http://help.wineenthusiast.com or by phone 800.648.6058.
Length of Warranty:
This Limited Warranty lasts for two (2) years from date of receipt of purchase of the wine cellar (“Limited Warranty
Period”) and the sealed system (compressor, condenser, evaporator) will be covered for three (3) years. Extended warranties
may be available for an additional cost at the time of purchase or up to 30 days from date of purchase. These extended
warranties would extend this one (1) year limited warranty to two (2), three (3), or five (5) years. Details about our extended
protection plans can be found at wineenthusiast.com.
Who is Protected:
This Limited Warranty protects the original purchaser during the Limited Warranty Period, provided that such purchaser can
present appropriate proof of original purchase.
What is Covered:
This Limited Warranty covers any defects in workmanship or materials in your new wine cellar under normal use.
What is Not Covered:
The following are not covered by this Limited Warranty: damage due to such things as accident, misuse, abuse, mishandling,
neglect, unauthorized repair, failure to properly maintain, acts of God or any other cause beyond the reasonable control of the
Wine Enthusiast whether similar or dissimilar to the foregoing.
Commercial use or use other than normal household or small oice.
Purchaser understands and acknowledges that the wine cellar is a wine refrigerator, which houses wine. Purchaser assumes all
the risk of using these units, including risk of spoilage, humidity variations, temperature variations, leaks, fires, water damage, mold,
mildew, dryness and similar perils that may occur.
What We Will Do:
During the Limited Warranty Period, Wine Enthusiast and/or the manufacturer will, at its sole discretion, repair or replace any
wine cellar not operating within the manufacturer’s specifications. All costs for labor and materials thereto shall be covered
during the Limited Warranty Period. If Wine Enthusiast deems the wine cellar is not repairable, Wine Enthusiast will use the
value of your original order toward a replacement; provided, however, that the purchaser will be responsible for all shipping and
handling costs with respect to the replacement after the initial ninety (90) days after the date of receipt of original purchase.
After the initial ninety (90) day period after the date of receipt of purchase, purchaser must pay any shipping and handling
charges that are incurred in shipping or transporting the wine cellar for service under this Limited Warranty. Wine
Enthusiast reserves the right to substitute materials of substantially similar quality in the event that identical materials are not
available at the time the Limited Warranty services are performed. Wine Enthusiast reserves the right to request that purchaser
contact a local refrigeration company to service the wine cellar.
How to Get Warranty Service:
In the event your wine cellar is not operating within the manufacturer’s specifications, during the Warranty Period, contact
Customer Care at http://help.wineenthusiast.com or by phone 800.648.6058.
Limitation of Implied Warranties:
All implied warranties, including warranties of merchantability and fitness for a particular purpose, are limited in duration to the
length of this Limited Warranty.
Exclusion of Certain Damages:
Wine Enthusiast’s liability is limited to replacement or repair of the defective wine cellar. Wine Enthusiast shall not be liable for
any damages, whether incidental, consequential or otherwise, because of any defective wine cellar.
How State Law Applies:
Some states do not allow limitations on how long an implied warranty lasts and/or do not allow the exclusion of incidental or
consequential damages, so the above limitations and exclusions may not apply to you. The Limited Warranty gives you specific
legal rights, and you may also have other rights which vary from state to state.
800.648.6058 | 18 | WineEnthusiast.com
800.648.6058
•
Valhalla, New York 10595
Your Cheat Sheet to Wine Serving Temperatures
Too many people pour wine at the wrong temperature destroying its decadent avors and aromas.
Serve your bolings at perfect temperatures. Here’s everything you need to know.
STYLE OF WINE EXAMPLE
RECOMMENDED
SERVING TEMPERATURE
Sweet Wines Sauternes
Well Chilled
43°F–48°F (6°C– 9°C)
Sparkling Wines Champagne
Chilled
45°F–49°F (7°C– 9°C)
Light-, Medium-
Bodied White Wines
Chenin Blanc
Chilled
45°F–49°F (7°C– 9°C)
Full-Bodied
White Wines
Oaked Chardonnay
Lightly Chilled
48°F–55°F (9°C– 13°C)
Light-Bodied
Red Wines
Beaujolais
Room Temperature or Lightly Chilled
53°F–55°F (11°C– 13°C)
Medium-, Full-Bodied
Red Wines
Tempranillo
Room Temperature
60°F–65°F (15°C– 18°C)



