sharkninja.com
SLUSHi™ TWIST SMART FROZEN DRINK MAKER
WITH SLUSHASSIST™ TECHNOLOGY
FS701 Series | Owner’s Guide
1 Read all instructions prior to using the appliance and its accessories.
2 Carefully observe and follow all warnings and instructions. This unit contains electrical connections
and moving parts that potentially present risk to the user.
3 Take inventory of all contents to ensure you have all parts needed to properly and safely operate
your appliance.
4 Turn the appliance OFF, then unplug the appliance from the outlet when not in use, before
assembling or disassembling parts, and before cleaning. To unplug, grasp the plug by the body
and pull from the outlet. NEVER unplug by grasping and pulling the flexible cord.
5 Before use, wash all parts that may contact food. Follow washing instructions covered in this
instruction manual.
6 DO NOT operate any appliance with a damaged cord or plug, or after the appliance malfunctions
or is dropped or damage in any manner. This appliance has no user-serviceable parts. If damaged,
contact SharkNinja for servicing.
7 This appliance has important markings on the plug. The entire supply cord is not suitable for
replacement. If damaged, please contact SharkNinja for service.
8 Extension cords should NOT be used with this appliance.
9 To protect against the risk of electric shock, DO NOT submerge the appliance or allow the power
cord to contact any form of liquid.
10 DO NOT allow the cord to hand over the edges of tables or counters. The cord may become snagged
and pull the appliance o the work surface.
11 DO NOT allow the unit or the cord to contact hot surfaces, including stoves and other heating appliances.
12 ALWAYS use the appliance on a dry and level surface.
13 DO NOT allow children to operate this appliance or use as a toy. Close supervision is necessary when
any appliance is used near children.
IMPORTANT SAFETY INSTRUCTIONS
PLEASE READ ALL INSTRUCTIONS BEFORE USE • FOR HOUSEHOLD USE ONLY
Read and review instructions for operation and use.
Indicates the presence of a hazard that can cause personal injury, death, or substantial property damage if
the warning included with this symbol is ignored.
Combustible material. May burst if heated. (Indicated by a fl ame symbol with white background, surrounded
by a red diamond.)
Flammable material. (Indicated by a fl ame symbol with yellow background, surrounded by a black triangle.)
For indoor and household use only.
When using electrical appliances, basic safety precautions should always be followed, including the following:
DANGER: Risk of fire or explosion. Flammable refrigerant used. DO NOT puncture refrigerant
tubing. Dispose of product properly in accordance with the applicable federal or local regulations
pertaining to flammable refrigerants.
WARNING: To reduce the risk of injury, fire, electrical shock, or property damage, basic safety
precautions must always be followed, including the following numbered warnings and subsequent
instructions. DO NOT use appliance for other than intended use.

sharkninja.com
14 This appliance is NOT intended for use by persons (including children) with reduced physical,
sensory, or mental capabilities or lack of experience and knowledge, unless they have been given
supervision or instruction concerning use of the appliance by a person responsible for their safety.
Children should be supervised to ensure that they do not play with the appliance.
15 Use ONLY attachments and accessories that are provided with the product or are recommended by
SharkNinja. The use of attachments not recommended or sold by SharkNinja may cause fire, electric
shock, or injury.
16 Keep hands, hair, and clothing out of the container when loading and operating.
17 During operation and handling of the appliance, avoid contact with moving parts.
18 DO NOT microwave the containers or accessories provided with the appliance.
19 DO NOT use mechanical devices or other means to accelerate the defrosting process, other than
those recommended by the manufacturer.
20 DO NOT damage the refrigerant circuit. This warning is only applicable for appliances with
refrigerating circuits that are accessible by the user.
21 DO NOT use electrical appliances inside the food storage compartments of the appliance, unless they
are of the type recommended by the manufacturer.
22 DO NOT add frozen fruit, frozen vegetables, or ice to the unit.
23 DO NOT add hot ingredients to the unit.
24 DO NOT submerge the motor base or control panel in water or other liquids.
25 DO NOT fill vessel past the MAX FILL unless rinsing the unit.
26 NEVER leave the appliance unattended while in use.
27 Before operation, ensure all utensils are removed from containers. Failure to remove utensils can
cause containers to shatter and potentially result in personal injury and property damage.
28 DO NOT carry the unit by the bail handle. Hold the unit by grasping both sides of the unit under the
motor base.
29 DO NOT process hard, loose ingredients, or ice. This appliance is not intended to process loose frozen
fruit, a block of solid ice, or ice cubes.
30 ALWAYS keep the unit upright.
31 After unboxing the unit for the first time, ensure the unit is upright for at least 2 hours before
operating to let the refrigerant oils settle in the air conditioning system for best performance.
32 The supply cord cannot be replaced. If the cord is damaged, the appliance should be discarded safely.
33 Keep rear and sides of the unit open so the compressor can operate properly and not overheat.
34 Keep ventilation openings in the appliance enclosure and built-in structure clear of obstruction.
35 DO NOT damage the refrigerant circuit. This warning is applicable only for appliances with refrigerating
circuits that are accessible by the user.
36 When using appliance, make sure both sides and back of it are at least 4 (four) inches away from walls.
37 When positioning the appliance, ensure the supply cord is not trapped or damaged.
38 DO NOT place multiple portable socket-outlets or portable power supplies at the rear of the appliance.
39 DO NOT touch the evaporator while operating the machine. Turn o the unit before cleaning
the evaporator.
IMPORTANT SAFETY INSTRUCTIONS
PLEASE READ ALL INSTRUCTIONS BEFORE USE • FOR HOUSEHOLD USE ONLY
SAVE THESE INSTRUCTIONS
sharkninja.com
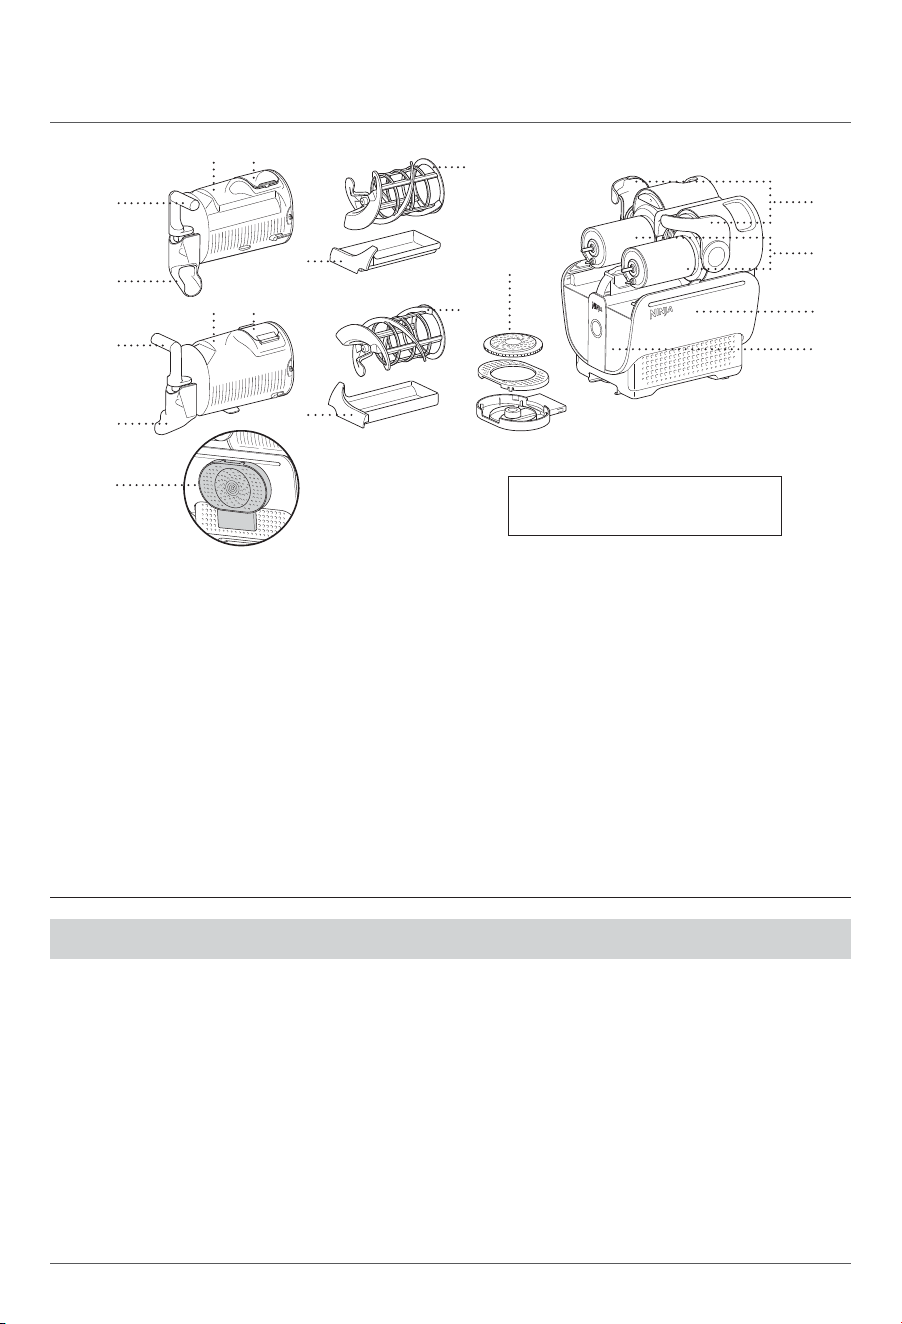
PARTS
A Easy-Fill Port and Cover
B Vessels*
C Comfort Handle
D Pour Spout with Removable Shroud
E Condensation Catch
F 3-Part Drip Tray
G Bail Handle
H Evaporator (Attached to Motor Base)
I Auger
J Motor Base
K Control Panel
L Drip Tray Storage (Left Side of Motor Base)
To find great recipes, visit sharkninja.com.
A
A
B
B
E
E
C
C
1 Remove all packaging materials from the unit.
2 Wash all removable parts in warm, soapy water.
3 Thoroughly rinse and air-dry all parts.
4 Wipe control panel, motor base, and evaporator with a soft, damp cloth. Allow to dry completely
before using.
5 If unit was not in the upright position before use, place it upright on a countertop for at least 2 hours
before operating. This allows the refrigerant to settle in the condenser for optimal and safe use.
BEFORE FIRST USE
I
I
G
H
F
J
K
D
D
* 16-oz minimum liquid capacity per vessel. 48-oz maximum liquid capacity per vessel.
L
NOTE: Colors, components, and
functions may vary by model.
IMPORTANT: Review all warnings at the beginning of this Owner’s Guide before proceeding.
sharkninja.com
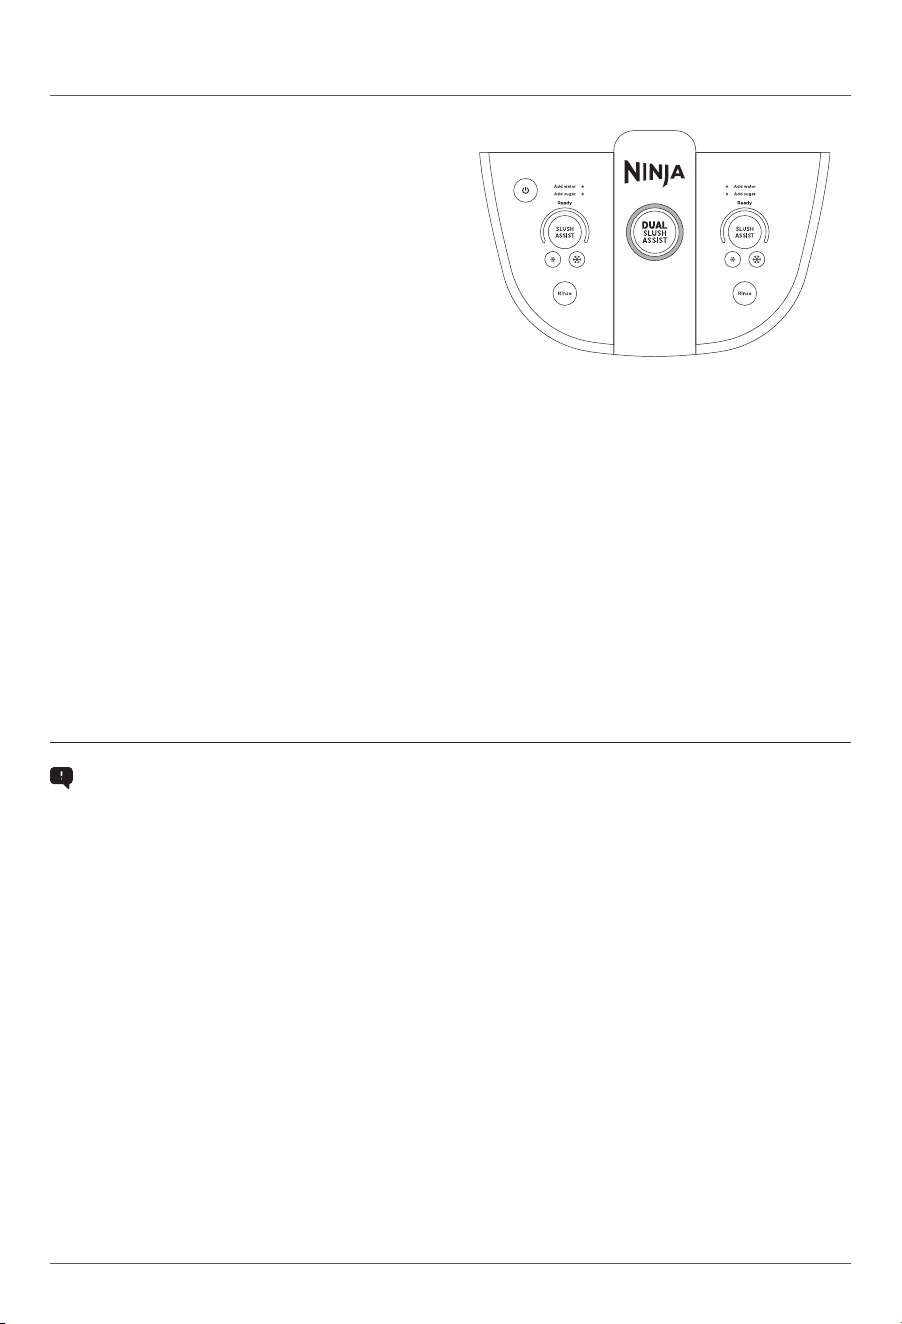
USING THE CONTROL PANEL
POWER
• Press to power the unit on and o.
RINSE CYCLE
• This cycle agitates, without cooling, to rinse the unit.
Select the RINSE button to start the rinse cycle on
the corresponding side of the unit.
SLUSHASSIST™ PROGRAM
• Unique program that senses combinations of
ingredients, auto-adjusts settings, and delivers
the optimal slush output every time. Perfect for
at-home creations.
• When SLUSHASSIST is selected, the associated
LEDs illuminate in blue. The temperature control
LEDs rotate clockwise for 10–15 minutes while the optimal slush texture is being calculated.
• When “SENSING” has completed, the LEDs around the SLUSHASSIST buttons will display the set
temperature and slushing will continue. If desired, adjust the texture using dial after “SENSING” stage
is complete using temperature control buttons.
DUAL SLUSHASSIST PROGRAM
• Central program the begins SLUSHASSIST on both sides of the unit at once with one touch of a button.
TEMPERATURE CONTROL SETTING
• The temperature control displays temperatures from cold (left) to coldest (right). After sensing has
completed, the target temperature will be solid and the left range of LEDs will blink. When each
temperature is reached, the LED will become solid and the “Ready” indicator will illuminate. Your slush
is complete when all LEDs in the range are solid and full BLUE.
• Adjust the temperature using the temperature control settings on the respective control panel sides
for your perfect frozen drink texture.
• For thinner, more sippable frozen drinks, adjust the temperature by pressing the left button
(small snowflake) under the SLUSHASSIST button on the associated control panel side.
• For thicker, colder frozen drinks, adjust the temperature by pressing the right button (large snowflake)
under the SLUSHASSIST button on the associated control panel side.
TROUBLESHOOTING TIPS
• RECIPE NOT SLUSHING? If your recipe has not reached the desired texture after 60 minutes, press
the colder temperature button (larger snowflake) once and wait 5-10 minutes to see the texture
thicken. Repeat until desired texture is achieved.
• SLUSH NOT DISPENSING? For the best dispensing experience, fill the unit to the max fill line and
ensure the unit is running. For a smoother dispense experience, press the warmer temperature button
(smaller snowflake) once and wait 5–10 minutes to see the texture become thinner. More sippable
frozen drinks will dispense more smoothly.
sharkninja.com
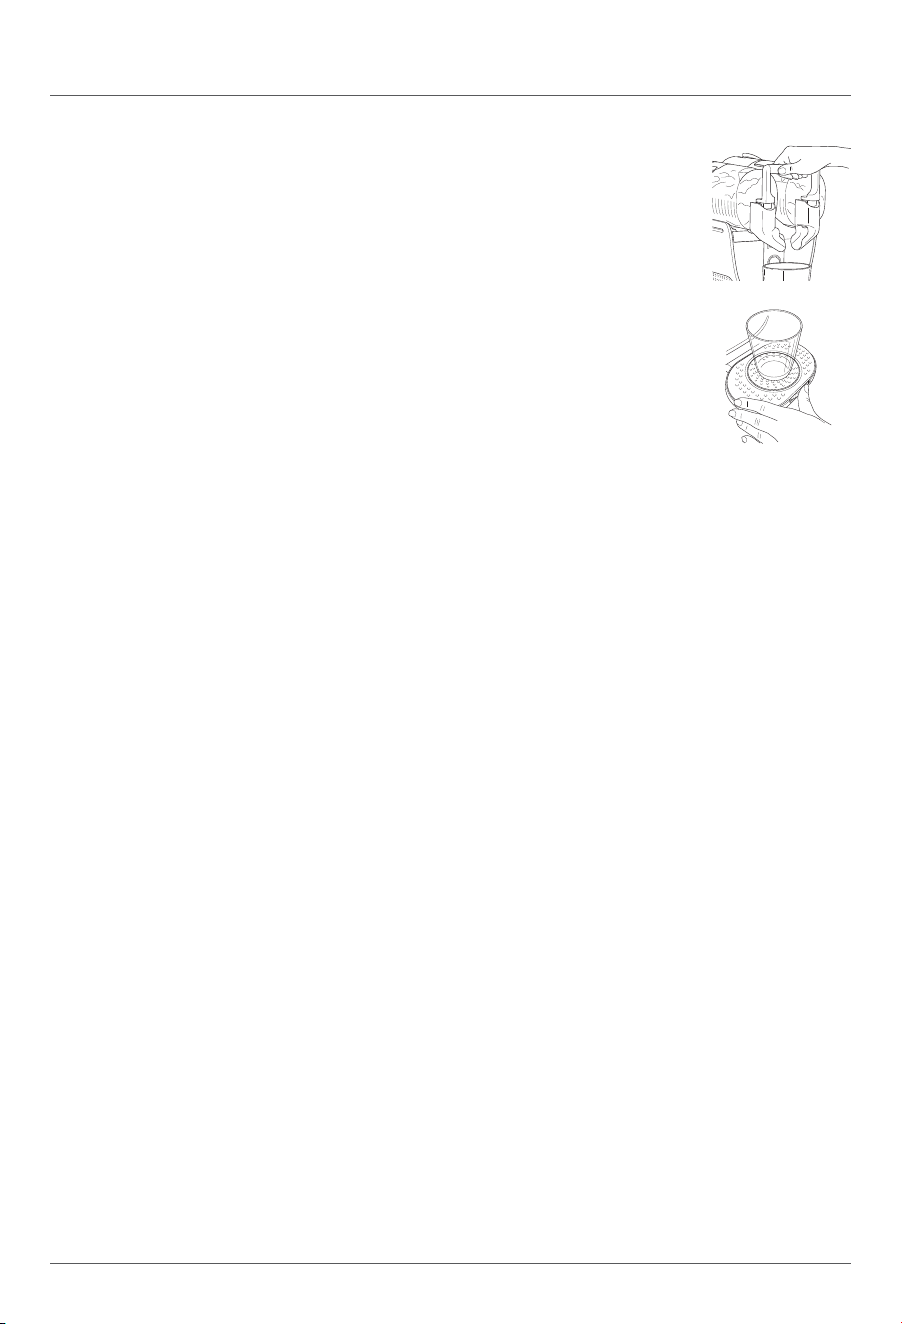
When the vessels have reached their determined temperature, you are ready to dispense.
Place a cup on the center of the rotating drip tray.
USING THE DISPENSE HANDLES:
To dispense a combined output, slowly pull the middle of the two handles to
dispense both slush outputs at the same time. For more control, use two hands to
control the flow for dierent dispense rates. Stop pulling when the cup is
3
/4 filled.
To dispense single outputs, pull each handle separately. Pull the respective handle
(right or left) slowly until the cup is about
3
/4 full.
USING THE SPINNING DRIP TRAY:
For combined twisted outputs, slowly spin the drip tray with one hand using the
front wheel. One gentle spin will be enough to twist your flavors consistently while
dispensing. Test the force of your spin before dispensing so the cup does not shift.
For non-twisted outputs, keep cup placed in center without spinning and dispense
pulling either one or both of the handles.
USING THE DISPENSE HANDLES AND SPINNING DRIP TRAY
sharkninja.com
REQUIRED SUGAR CONTENT
Too little sugar or too much alcohol will prevent proper freezing of a slush output. Follow guidelines
below for a perfect slush every time.
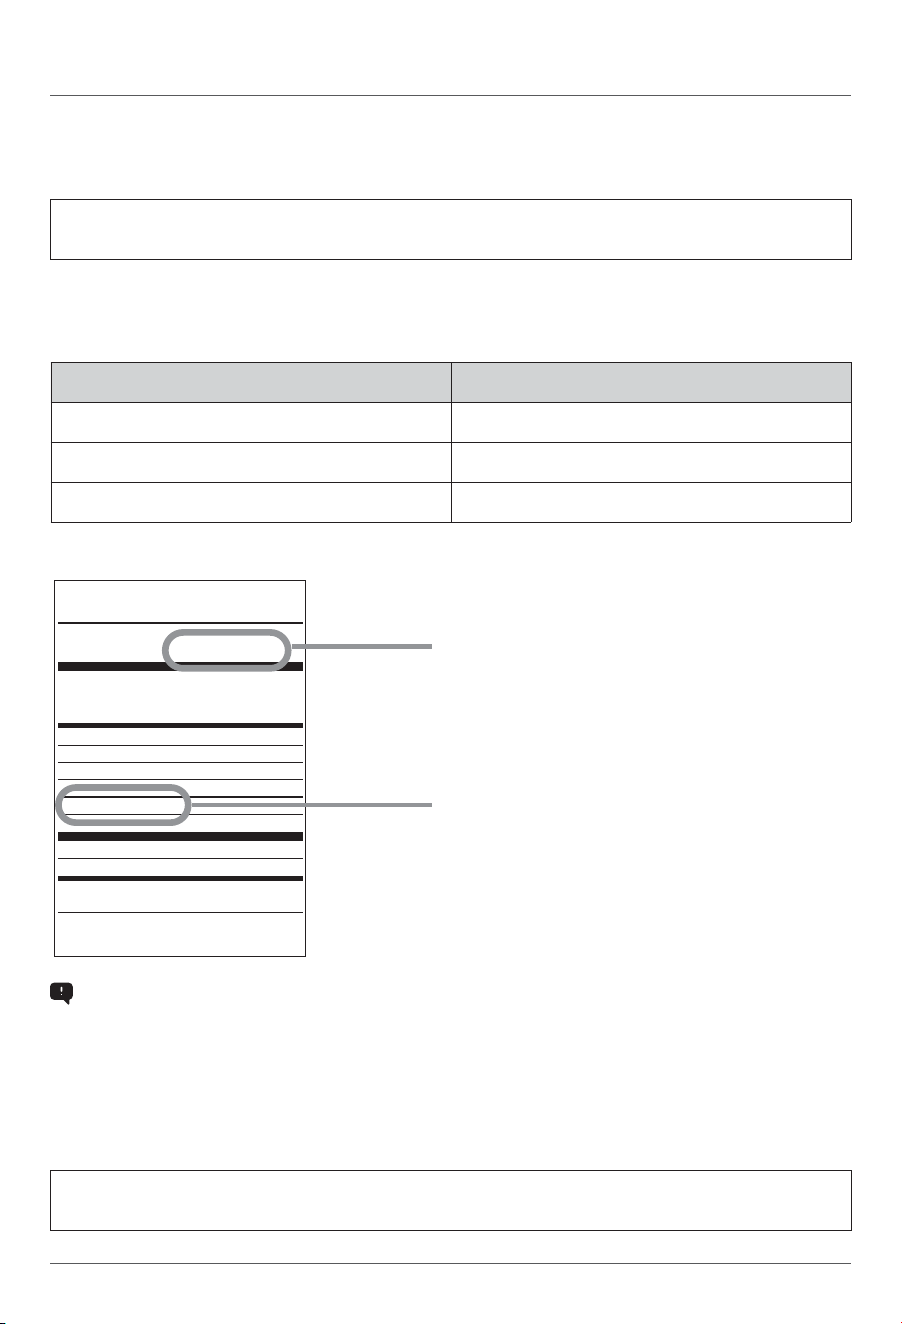
All inputs must contain at least 4.5% sugar.
SUGAR GUIDELINES
Refer to drink/liquid nutrition label to ensure sugar content meets the recommended minimums below:
Nutrition Facts
8 Servings per container
Serving size 8 fl oz (240 ml)
Amount per serving
Calories
120
% Daily Value*
Total Fat 0g 0%
Sodium 25mg 1%
Total Carbohydrate 31g 11%
Total Sugars 26g
Protein 0g
Potassium 251mg 6%
Vitamin C 108mg 120%
Not a signicant source of saturated fat, trans fat, cholesterol,
dietary ber, added sugars, vitamin D, calcium and iron.
* The % Daily Value (DV) tells you how much a nutrient in a
serving of food contributes to a daily diet. 2,000 calories a day
is used for general nutrition advice.
Serving Size
Total Sugars
(26 g meets the minimum requirements)
EXAMPLE: Apple juice
SERVING SIZE Minimum Total Sugar Amount
8 oz (240 ml) 11 g
12 oz (355 ml) 16 g
20 oz (591 ml) 26 g
TROUBLESHOOTING TIPS
Low-sugar alert: “ADD SUGAR” LED will illuminate on the respective vessel side when sugar content
is too low. Unit will continue to beep when error occurs for 15 minutes until the error is resolved.
To fix low sugar: Add 2 tablespoons simple syrup, flavored syrup, allulose syrup (diet/low sugar drinks),
honey, agave nectar, maple syrup, or grenadine per 8 oz liquid. Or if using granulated sugar, coconut
sugar, or date sugar, dispense 8 oz liquid into separate container and mix to dissolve before retuning
liquid to vessel. If at MAX FILL, dispense and extra 8 oz liquid to account for the addition and set aside.
Press the SLUSHASSIST™ button to clear error and continue slushing.
NOTE: Pre-frozen ingredients taste sweeter. Worried your drink might be too sweet? Don’t worry, it
won’t taste as sweet after you freeze and slush it into a frozen drink.
NOTE: Sugar-free substitutes or artificial sweeteners will not aid in meeting total minimum or
maximum sugar requirements.
sharkninja.com
NOTE: Use this hack when using sugar-free substitutes in the recipes listed in the online
Inspiration Guide.
ALCOHOL GUIDELINES
DIET/LOW-SUGAR TIP
Ninja™ SLUSHi™ TWIST unlocks colder temperatures, which enable drinks with higher alcohol contents
to slush. Use SLUSHASSIST for your favorite frozen cocktails at home. Inputs can contain up to
20% alcohol.
HARD ALCOHOL/SPIRIT GUIDELINES
To create frozen cocktails, see chart below for the maximum hard alcohol/spirit (vodka, tequila, etc.)
content per total recipe size.
If you’re using a diet or low-sugar beverage in your slush recipe, try this helpful tip:
DIRECTIONS: Add 2
1
/2 tsp liquid allulose + 1
1
/2 tsp lemon juice (for balanced flavor) per 8 oz diet
or low-sugar beverage, then select SLUSHASSIST™.
Allulose is a sugar substitute found in the baking aisle at most grocery stores and online from
various retailers.
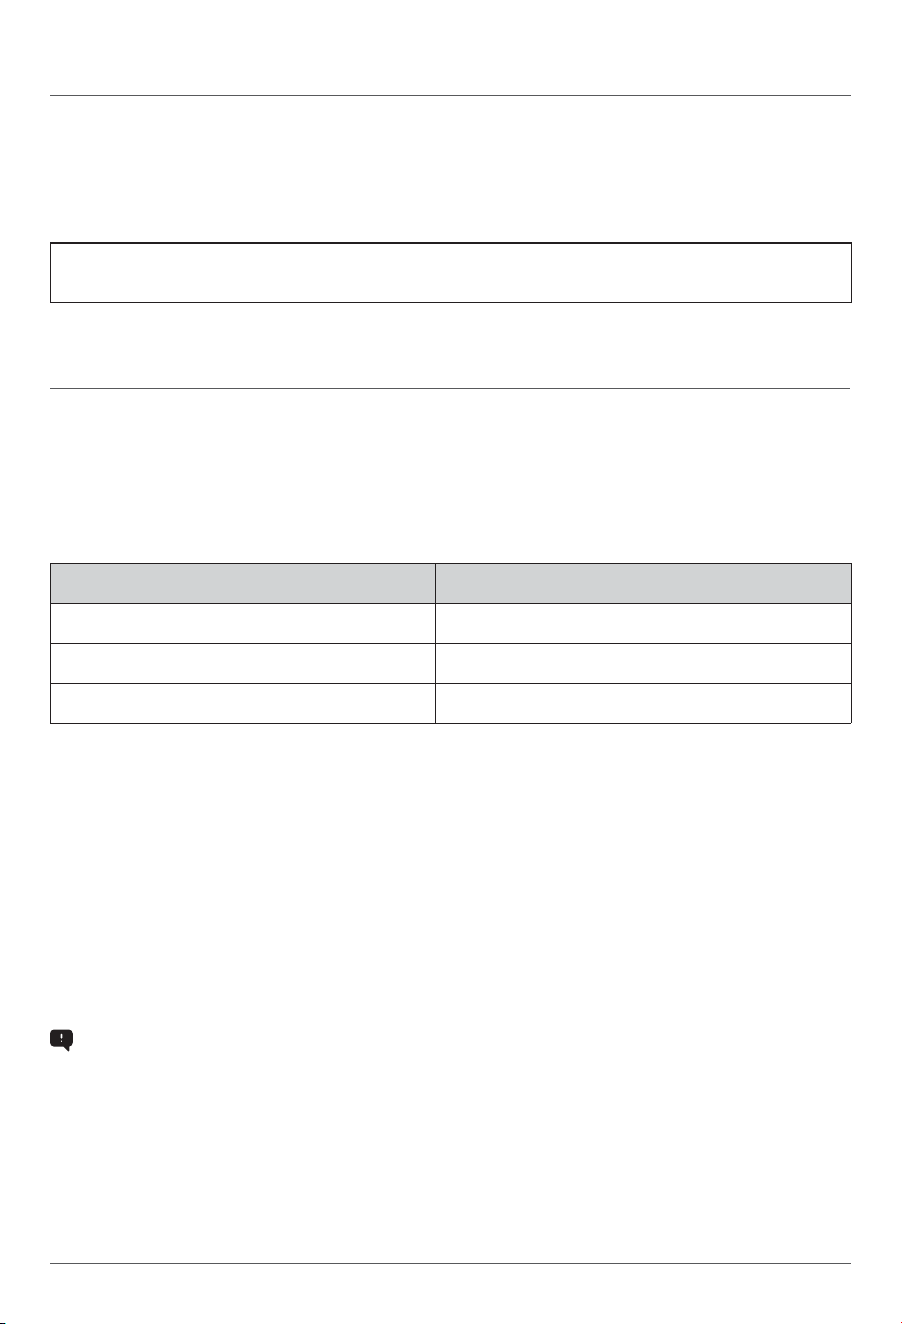
Total Recipe Size Maximum Alcohol Amount
3 cups (24 oz)
3
/4 cup (6 oz)
4
1
/2 cups (36 oz) 1
1
/2 cups (7 oz)
6 cups (48 oz) 2 cups + 4 tablespoons (10 oz)
Chart above is a guide for incorporating hard alcohol/spirits (35% +) ONLY. When using other alcohols
such as wine, beer, seltzer, or premade cocktails, refer to the Inspiration Guide.
TROUBLESHOOTING TIPS
High-alcohol/high-sugar alert: If the alcohol and sugar content of the input is too high, the unit will detect
it and provide an alert. “ADD WATER” LED will illuminate on the respective vessel side.
To fix high alcohol: Add 3 tablespoons water per 8 oz to the vessel. After you have added water, press
the SLUSHASSIST button again to clear error and continue slushing.
TIPS
• When using light or lower-sugar drink mixes, omit water from the recipe and replace with additional
light drink mix in the equal amount.
• When using premade mixes containing alcohol, omit addition of alcohol from chart instructions and
replace with additional drink mix in equal amount.
• When using full-sugar premade mixes with blender instructions, use
1
/2 the amount of ice
recommended on package instructions in the form of water (e.g., 1 cup ice =
1
/2 cup water).
• When using light-sugar premade mixes with blender instructions, use
1
/4 the amount of ice
recommended on package instructions in the form of water (e.g., 1 cup ice =
1
/4 cup water).
sharkninja.com
TIPS & TRICKS
• Keep unit upright for at least 2 hours before first use.
• DO NOT add hot ingredients.
• DO NOT add ice or solid ingredients like fruit, ice cream, or frozen fruit.
• Pre-frozen ingredients taste sweeter. Worried your drink might be too sweet? Don’t worry, it won’t
taste as sweet after you freeze and slush it into a frozen drink.
• All inputs must include at least 4.5% sugar.
• All inputs for alcoholic slushes must contain between 2.8% and 20% alcohol.
• For best results, chill liquid(s) or blended ingredients before adding to the unit.
• For the frostiest results, chill serving glasses before dispensing your frozen drink.
• For your ideal frozen drink texture, use the temperature control dial to adjust.
• When preparing recipes containing dairy, dispense contents within 30 minutes of “Ready” illuminating
to avoid a foamy output.
• For the best dispensing experience, fill the unit to the max-fill line (48 oz) and ensure the dispense
handle is fully extended for maximum liquid dispensing.
• You can run the unit up to 12 hours.
• When dispensing liquid from the RINSE feature, gradually pull the dispense handle for the liquid
dispense flow. Do not open the dispense nozzle fully unless you are pouring into a large, open
container to avoid overspill.
Minimum input = 2 cups (16oz) Maximum input = 6 cups (48 oz)
This is NOT a blender.
DO NOT process a solid block of ice or ice cubes.
DO NOT make a smoothie or process hard, loose ingredients.
DO NOT attempt to blend or macerate non-liquid ingredients.
sharkninja.com
USING THE NINJA™ SLUSHI™ TWIST
FROZEN DRINK MAKER
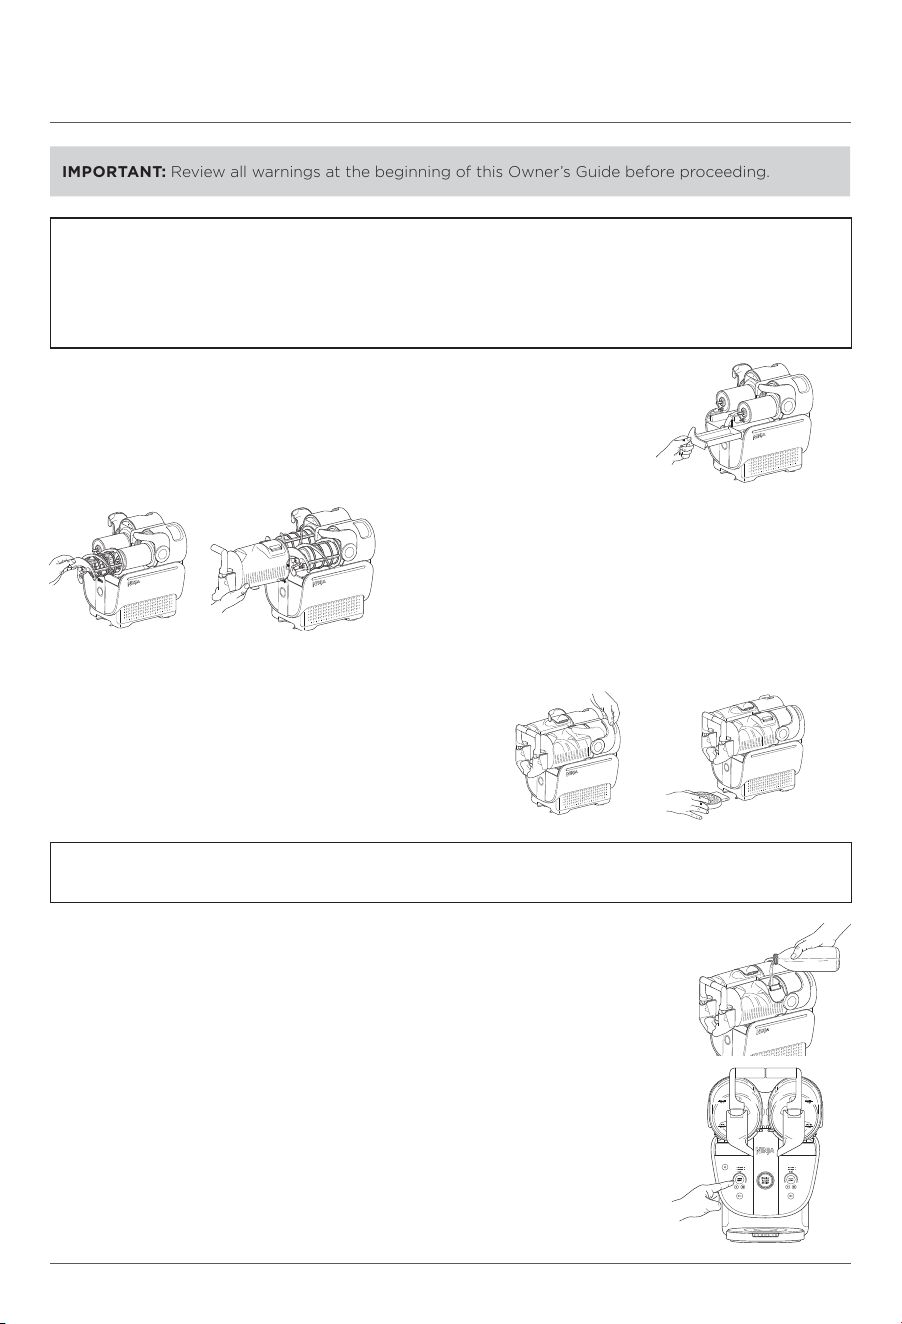
1 Ensure all parts are fully cleaned and the motor base is level on a flat,
solid surface.
2 Install each condensation catch under the evaporators by sliding
them into the rail grooves.
IMPORTANT: Review all warnings at the beginning of this Owner’s Guide before proceeding.
3 Install each auger, sliding the (L) auger over the left
evaporator, and sliding the (R) auger over the right
evaporator. Rotate the augers they sit in place on
the pins.
4 With the bail handle up, slide the associated left and
right vessel over the installed augers. Each vessel is
designed to fit only on either the right or left side.
Do not force vessels onto the unit.
5 Lock the vessels in place by pushing the bail handle
back to seal the vessels.
6 Insert the drip tray in front of the motor base until it
clicks in place.
7 Plug in the unit.
8 Add liquid(s) through the easy-fill ports located at the top of the vessels.
9 Press the power button to turn on.
10a When using both vessels at once, press the DUAL SLUSHASSIST™ button
in the center of the control panel to activate SLUSHASSIST on both vessels.
Slushing will begin.
10b When using individual (right or left) vessels, press the SLUSHASSIST button
on the associated control panel side. Slushing will begin.
11. When the frozen drink(s) reaches determined temperature, the unit will beep,
LEDs will all turn BLUE, and “Ready” indicator will illuminate. Vessels may be
“Ready” at dierent times.
NOTE: Make sure the unit has been sitting upright on the countertop for at least 2 hours before first use,
so the refrigerant can settle in the condensers for optimal and safe use.
NOTE:
• Minimum 2 cups (16 oz) input required for using the unit.
• Maximum 48 oz liquid capacity.
• DO NOT add ice or solid ingredients like fruit, ice cream, or frozen fruit.
• DO NOT add hot ingredients.
sharkninja.com
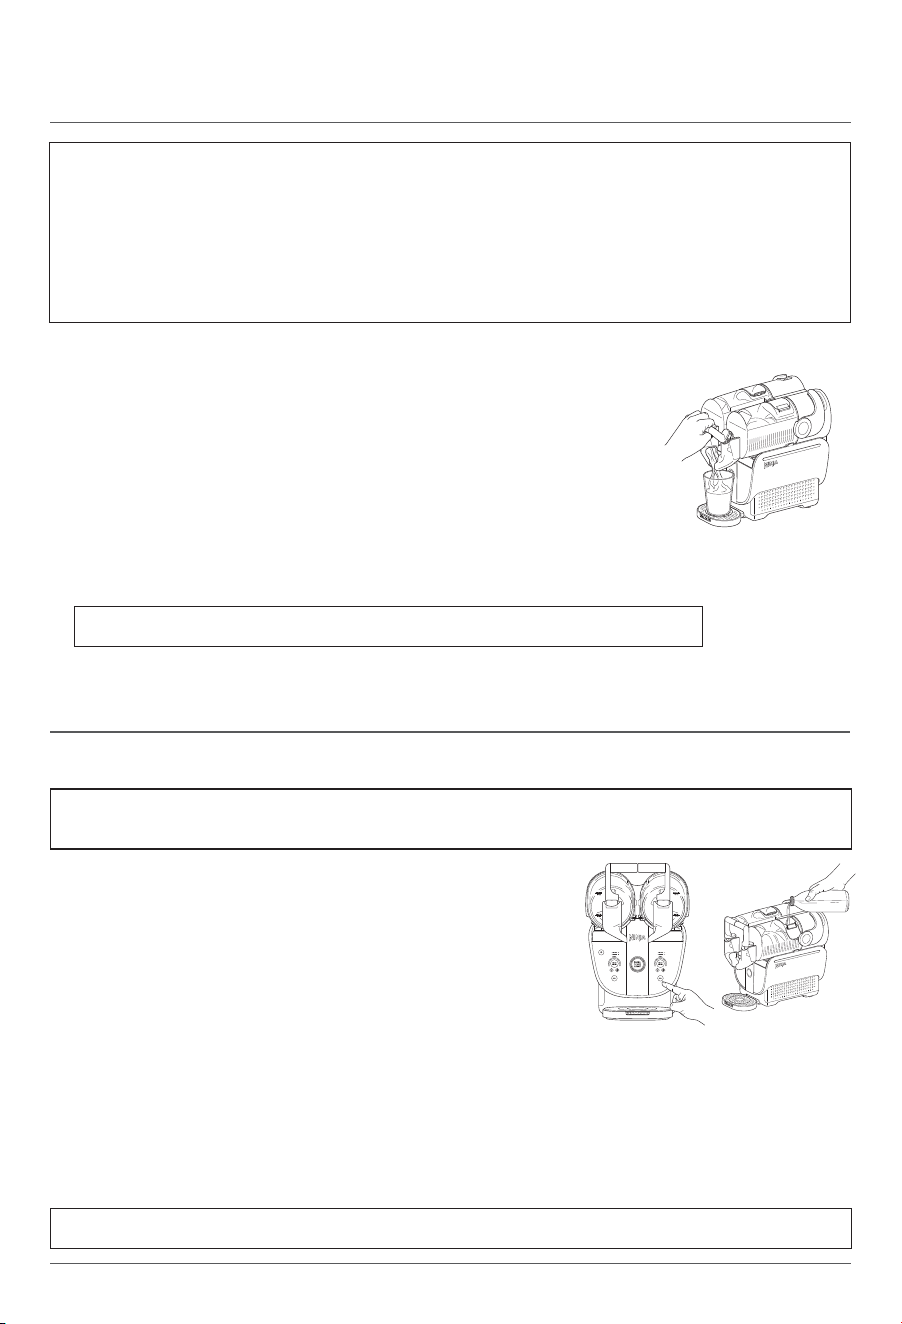
12 Place a cup on the center of the rotating drip tray.
For a twisted output from a single vessel, spin the drip tray with your
hand using the wheel. Spin quickly but in control so the cup does not shift.
For a non-twisted output from a single vessel, keep cup placed in center
without spinning.
For a combined output from both vessels, pull both handles to dispense
both slushes at the same time. For more control, use two hands to control
the flow for dierent dispense rates. Combine the two vessels’ outputs
with the spinning drip tray for a twisted output.
For a single output from each vessel, pull each handle separately.
13 Enjoy!
NOTE:
• Temperature Control Setting LEDs will pulse while frozen drink is freezing to the set temperature level.
Once frozen drink reaches the desired temperature, the unit will beep, and LEDs will remain solid. Unit
will continue running to keep your frozen drink at the ideal temperature and be ready to dispense.
• Creating drinks can take up to 15–60 minutes depending on ingredients, volume, and starting
temperature.
• Pre-frozen ingredients taste sweeter. Worried your drink might be too sweet? Don’t worry, it won’t
taste as sweet after you freeze and slush it into a frozen drink.
NOTE: DO NOT turn o SLUSHASSIST™ until all frozen drink has been dispensed.
USING THE NINJA™ SLUSHI™ TWIST
FROZEN DRINK MAKER – CONT.
This cycle agitates, without cooling, to rinse the unit. After using
the RINSE cycle, wash all parts by hand to fully clean the unit
after each use.
1 Dispense any remaining frozen drink.
2 Stop the unit by pressing SLUSHASSIST.
3 Place a large bowl under the shrouds or move unit to the edge
of a sink.
4 Add warm water up to the top of the vessel (water can exceed
MAX FILL line).
5 Press the Rinse button. Let the Rinse cycle run for 1–2 minutes.
6 Slowly dispense the water from each vessel. The harder you pull the handle, the faster
the water will dispense.
7 Repeat as needed with clean water until water runs clear.
8 Stop Rinse cycle by pressing the Rinse button again.
9 Press the power button to turn o the unit.
10 Refer to the Owner’s Guide for more details on cleaning parts after using the Rinse cycle.
USING THE RINSE CYCLE
NOTE: Liquids from rinsing will dispense quickly from vessel pour spout. Ensure you use a large
cup or bowl to capture this liquid.
NOTE: If needed, repeat until all remaining frozen drink is rinsed o the evaporator.
CARE & MAINTENANCE
sharkninja.com
7 Hand-wash all parts in warm, soapy water. If needed, repeat until all parts are
fully clean.
8 Wipe down the motor base with a sanitized or warm, damp cloth.
9 Allow all parts to dry thoroughly before reassembling and/or storing the unit.
For best results, use the Rinse cycle before disassembling and cleaning all parts.
DISSASSEMBLY & CLEANING
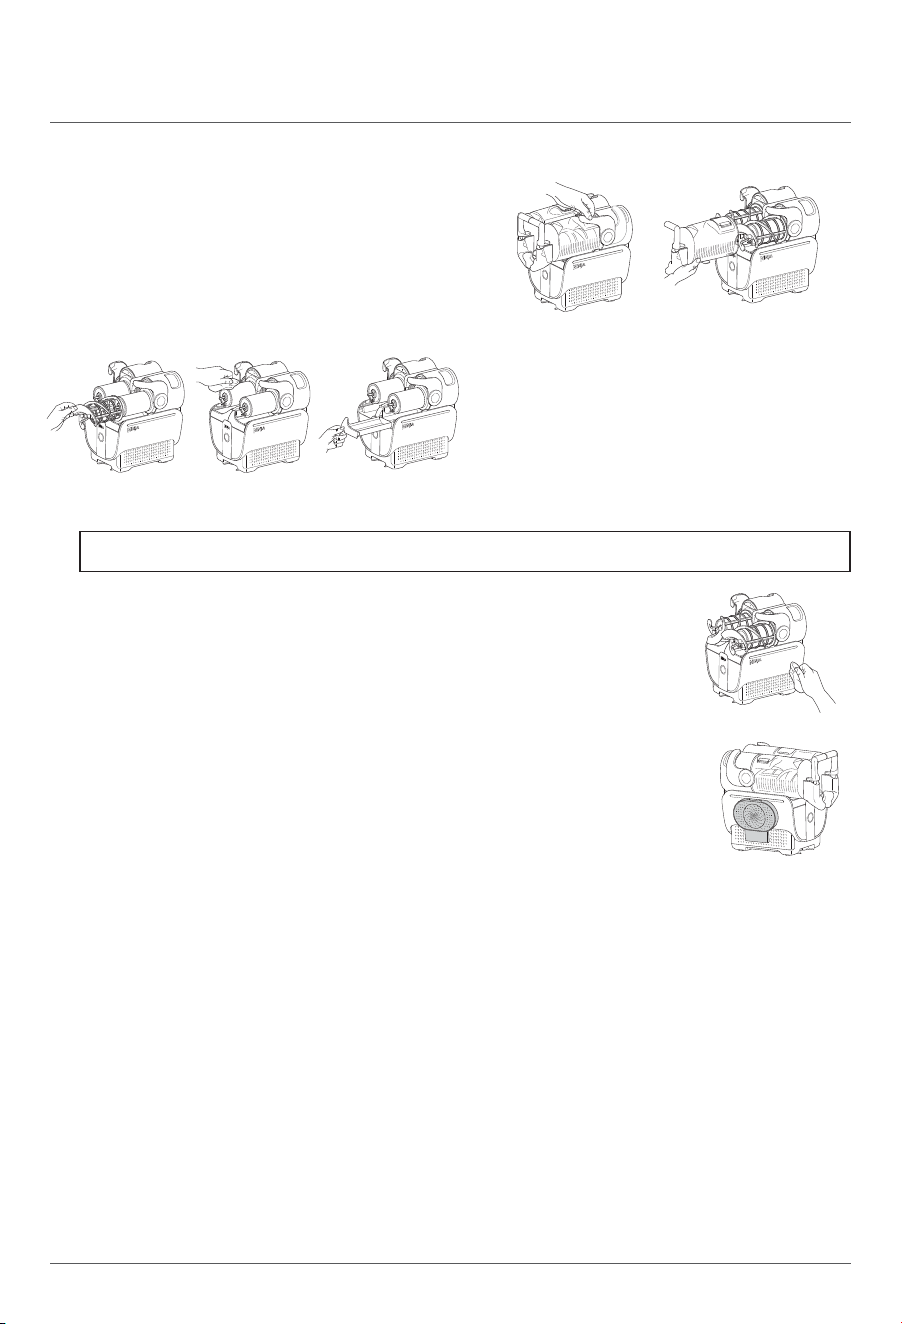
1 Unlock the bail handles by pulling them forward, and
remove the vessels by gently pulling them o the
unit. Ensure the vessel is tipped downward to prevent
remaining liquid from spilling out the back of the vessel.
Set aside.
2 Slide the augers o the evaporator. Set aside.
3 Wipe down the evaporator with a sanitized
or warm, damp cloth.
4 Gently slide the condensation catches out of
the unit, since there may be residual liquid in
the condensation catch. Set aside.
5 Wipe down unit underneath the evaporator
with a sanitized or warm, damp cloth.
6 If needed, remove the drip tray and/or
spout shroud.
STORING
For cord storage, wrap cord with the hook-and-loop fastener near the back of the
motor base. DO NOT wrap the cord around the bottom of the base. Store the unit
upright and store all parts assembled. Store the drip tray on the left side of the unit
by hanging it in place. When moving the unit, lift from the bottom of the motor base.
DO NOT store ingredients inside the vessel.
RESETTING THE MOTOR
This unit features a unique safety system that prevents damage to the motor and drive system should
you inadvertently overload it. If the unit is overloaded, the motor will be temporarily disabled. Should
this occur, follow the reset procedure below.
1 Unplug the unit from the electrical outlet.
2 Allow the unit to cool for approximately 15 minutes.
3 Remove all parts and accessories. Ensure no ingredients are jamming the auger.
IMPORTANT: Ensure that maximum capacity is not exceeded. This is the most typical cause of appliance
overload.
DO NOT process a solid block of ice or ice cubes. DO NOT make a smoothie or process hard, loose ingredients.
If your unit needs servicing, please call Customer Service at 1-877-646-5288. So we may better assist you,
please register your product online at sharkninja.com and have the product on hand when you call.
NOTE: Drip tray cover can be removed for easy cleaning.
sharkninja.com
PRODUCT REGISTRATION
Please visit sharkninja.com to register your new Ninja product within ten (10) days of purchase. You will
be asked to provide the store name, date of purchase, and model number along with your name and
address.
The registration will enable us to contact you in the unlikely event of a product safety notification. By
registering, you acknowledge you have read and understood the instructions for use and warnings set
forth in the accompanying instructions.
To order additional parts and attachments, visit sharkninja.com.
ORDERING REPLACEMENT PARTS
sharkninja.com
TROUBLESHOOTING GUIDE
Unit is dicult to remove from counter for storage.
• Place your hands underneath both sides of the motor base and gently pull the unit up and toward you.
Can I add frozen fruit or ice?
• No. DO NOT add frozen ingredients or ice when using this unit.
Vessel not installed alert: If the vessel is not installed correctly, the unit will detect it and provide an
alert. All SLUSHASSIST™ LEDs will flash.
• To prevent leaking and spills, ensure the vessel is empty before assembling or disassembling onto the
motor base. With the bail handle up, slide the vessel over the installed auger and evaporator.
• Lock the vessel in place by pushing the bail handle back to seal the vessel.
• Press the Power button to turn unit on, and SLUSHASSIST LEDs will illuminate, indicating the unit is
ready for use.
Low-sugar alert: If the sugar content of the input is too low, the unit will detect it and provide an
alert. “ADD SUGAR” LED will illuminate the respective vessel side. The unit will beep every minute
for 15 minutes.
• Check the sugar content in your recipe to ensure it contains at least 4.5% sugar.
• If using a premade beverage, check the ingredient list to ensure the sugar content is at least 4.5%
and ensure the beverage doesn’t include artificial sweeteners. Refer to the Required Sugar Content
section for more details.
• If a drink does not meet minimum requirements of total sugar, add 2 tablespoons flavored syrup,
sugar, date sugar, coconut sugar, maple syrup, agave, simple syrup, or honey per serving (8 oz).
• Restart the unit by pressing SLUSHASSIST again.
High-alcohol alert: If the alcohol and sugar content of the input is too high, the unit will detect it and
provide an alert. “ADD WATER” LED will illuminate the respective vessel side. The unit will beep every
minute for 15 minutes.
• Check the alcohol content in your recipe to ensure it contains between 2.8% and 20% alcohol.
• If using hard alcohol/spirits (35%+), use 4 oz for every 24 oz of total recipe size. Refer to the Alcohol
Guidelines section for more details.
• If a drink exceeds the maximum alcohol amount, add 3 tablespoons water per serving (8 oz) to dilute
the input.
• Reset the unit by pressing SLUSHASSIST.
Motor stall alert: If the motor stalls while running, the unit will detect it and provide an alert. Every
Temperature Control LED will flash, and the unit will beep every minute for 15 minutes.
• This unit features a unique safety system that prevents damage to the motor and drive system
should you inadvertently overload it. If the unit is overloaded, the motor will be temporarily disabled.
• Unplug the unit from the electrical outlet.
• Allow the unit to cool for approximately 15 minutes.
• Remove all parts and accessories. Ensure no ingredients are jamming the auger.
• Plug in the unit again and reassemble all parts to resume unit use.
If the auger stops and the target temperature BLUE LED pulses, allow the unit to complete its
process and do not intervene. The unit will correct itself after this behavior.
Unit failure alert: If the unit fails, the unit will detect it and provide an alert. Every other Temperature
Control LED will flash alternately, and the unit will beep every minute for 15 minutes.
• If the unit fails, please call Customer Service at 1-877-646-5288.
Unit sideways alert: If the unit is on its side during use, the unit will detect it and provide an alert.
The top 5 and bottom 5 Temperature Control LEDs will flash alternately, and the unit will beep every
minute for 15 minutes.
• Place the unit upright and let it stand for at least 2 hours before using.
WARNING: To reduce the risk of shock and unintended operation, turn power o
and unplug unit before troubleshooting.
sharkninja.com
The One (1) Year Limited Warranty applies to purchases made from authorized retailers of
SharkNinja Operating LLC. Warranty coverage applies to the original owner and to the original product
only and is not transferable.
SharkNinja warrants that the unit shall be free from defects in material and workmanship for a period
of one (1) year. One (1) Year Limited Warranty period begins on the original date of delivery or pickup
when it is used under normal household conditions and maintained according to the requirements
outlined in the Owner’s Guide, subject to the following conditions and exclusions:
California Residents Only: The One (1) Year Limited Warranty period begins on the original date of
delivery or pickup.
What is covered by this warranty?
1. The original unit and/or non-wearable parts deemed defective, in SharkNinja’s sole discretion,
will be repaired or replaced up to one (1) year from the original date of delivery or pickup.
2. In the event a replacement unit is issued, the warranty coverage ends six (6) months following the
receipt date of the replacement unit or the remainder of the existing warranty, whichever is later.
SharkNinja reserves the right to replace the unit with one of equal or greater value.
What is not covered by this warranty?
1. Normal wear and tear of wearable parts (such as blending vessels, lids, cups, blades, blender
bases, removable pots, racks, pans, etc.), which require regular maintenance and/or replacement
to ensure the proper functioning of your unit, are not covered by this warranty. Replacement parts
are available for purchase at sharkninja.com.
2. Any unit that has been tampered with or used for commercial purposes.
3. Damage caused by misuse, abuse, negligent handling, failure to perform required maintenance
(e.g., failure to keep the well of the motor base clear of food spills and other debris), or damage
due to mishandling in transit.
4. Consequential and incidental damages.
5. Defects caused by repair persons not authorized by SharkNinja. These defects include damages
caused in the process of shipping, altering, or repairing the SharkNinja product (or any of its parts)
when the repair is performed by a repair person not authorized by SharkNinja.
6. Products purchased, used, or operated outside North America.
How to get service
If your appliance fails to operate properly while in use under normal household conditions within
the warranty period, visit sharkninja.com for product care and maintenance self-help. Our Customer
Service Specialists are also available at 1-877-646-5288 to assist with product support and warranty
service options, including the possibility of upgrading to our VIP warranty service options for select
product categories. So we may better assist you, please register your product online at sharkninja.com
and have the product on hand when you call.
SharkNinja will cover the cost for the customer to send in the unit to us for repair or replacement. A fee
of $20.95 (subject to change) will be charged when SharkNinja ships the repaired or replacement unit.
How to initiate a warranty claim
You must call 1-877-646-5288 to initiate a warranty claim. You will need the receipt as proof of purchase.
We also ask that you register your product online at sharkninja.com and have the product on hand
when you call, so we may better assist you. A Customer Service Specialist will provide you with return
and packing instruction information.
How state law applies
This warranty gives you specifi c legal rights, and you also may have other rights that vary from state
to state. Some states do not permit the exclusion or limitation of incidental or consequential damages,
so the above may not apply to you.
ONE (1) YEAR LIMITED WARRANTY
NJA_1_YR_IB_LMTD_WRNTY_US_ENG
NOTES
sharkninja.com
SharkNinja Operating LLC
US: Needham, MA 02494
CAN: Ville St-Laurent, QC H4S 1A7
1-877-646-5288
sharkninja.com
Illustrations may dier from actual product. We are constantly striving to improve our products,
therefore the specifications contained herein are subject to change withoutnotice.
NINJA, SLUSHASSIST, and SLUSHI are trademarks of SharkNinja Operating LLC.
This product may be covered by one or more U.S. patents.
See sharkninja.com/patents for more information.
© 2026 SharkNinja Operating LLC
FS701Series_IB_MP_Mv10_260330
TECHNICAL SPECIFICATIONS
Voltage: 120V~, 60Hz
Power: 500 Watts
RECORD THIS INFORMATION
Model Number: ____________________
Serial Number: _____________________
Date of Purchase: ___________________
(Keep receipt)
Store of Purchase: __________________
REGISTER YOUR PURCHASE
registeryourninja.com
Scan QR code using mobile device
@ninjakitchen

