Service and Troubleshooting
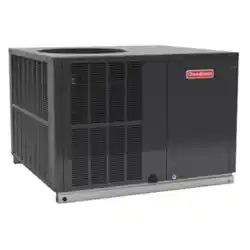
GPCM3 Cooling/*PHM3 Heat Pump & *PHM5 15.2 SEER(2) Heat
Pump Multi Position Package Unit with R-410A
RS6300013r6
February 2023
Pride and workmanship go into every product to provide
our customers with quality products. It is possible, however,
that during its lifetime a product may require service.
Products should be serviced only by a qualied service
technician who is familiar with the safety procedures
required in the repair and who is equipped with the proper
tools, parts, testing instruments and the appropriate service
manual. REVIEW ALL SERVICE INFORMATION IN THE
APPROPRIATE SERVICE MANUAL BEFORE
BEGINNING REPAIRS.
TABLE OF CONTENTS
IMPORTANT INFORMATION ............................................ 2
PRODUCT IDENTIFICATION ........................................... 3
SYSTEM OPERATION ...................................................... 7
SCHEDULED MAINTENANCE ....................................... 10
SERVICING ..................................................................... 11
CHECKING VOLTAGE ............................................... 11
CHECKING WIRING ................................................... 11
CHECKING THERMOSTAT AND WIRING ................. 11
CHECKING TRANSFORMER AND
CONTROL CIRCUIT .................................................... 12
CHECKING CONTACTOR AND/OR RELAYS ............ 13
CHECKING CONTACTOR CONTACTS ...................... 13
CHECKING LOW PRESSURE CONTROL ................. 13
CHECKING HIGH PRESSURE CONTROL ................ 13
CHECKING INTERNAL OVERLOAD ......................... 14
CHECKING CAPACITOR ............................................ 14
TESTING START REPLAY KITS ................................. 14
TESTING CONTACTS RESISTANCE ......................... 15
TESTING CONTACTS VOLTAGE ............................... 15
CAPACITANCE CHECK (MFD) ................................... 15
CHECKING FAN AND BLOWER MOTOR WINDINGS
(PSC MOTORS) .......................................................... 15
CHECKING EEM MOTORS ....................................... 16
CHECKING ECM MOTORS ........................................ 16
CHECKING ECM MOTOR WINDINGS ....................... 17
CHECKING COMPRESSOR ....................................... 17
RESISTANCE TEST .................................................... 17
GROUND TEST .......................................................... 18
UNLOADER TEST PROCEDURE ............................. 19
OPERATION TEST...................................................... 19
LOCKED ROTOR TEST ............................................. 19
TESTING CRANKCASE HEATER .............................. 20
CHECKING CRANKCASE HEATER THERMOSTAT .. 20
CHECKING REVERSING VALVE AND SOLENOID ... 20
TESTING DEFROST CONTROL ................................ 21
TESTING DEFROST THERMOSTAT .......................... 21
©2020-2021, 2023 Daikin Comfort Technologies Manufacturing, L.P.
Brand
®
is a registered trademark of Maytag Corporation or its related companies and is used under license. All rights reserved.
ONLY PERSONNEL THAT HAVE BEEN TRAINED TO INSTALL,
ADJUST, SERVICE, MAINTENANCE OR REPAIR
(HEREINAFTER, “SERVICE”) THE EQUIPMENT SPECIFIED
IN THIS MANUAL SHOULD SERVICE THE EQUIPMENT. THE
MANUFACTURER WILL NOT BE RESPONSIBLE FOR ANY
INJURY OR PROPERTY DAMAGE ARISING FROM IMPROPER
SERVICE OR SERVICE PROCEDURES. IF YOU SERVICE
THIS UNIT, YOU ASSUME RESPONSIBILITY FOR ANY INJURY
OR PROPERTY DAMAGE WHICH MAY RESULT. IN ADDITION,
IN JURISDICTIONS THAT REQUIRE ONE OR MORE
LICENSES TO SERVICE THE EQUIPMENT SPECIFIED IN THIS
MANUAL, ONLY LICENSED PERSONNEL SHOULD SERVICE
THE EQUIPMENT. IMPROPER INSTALLATION, ADJUSTMENT,
SERVICING, MAINTENANCE OR REPAIR OF THE EQUIPMENT
SPECIFIED IN THIS MANUAL, OR ATTEMPTING TO INSTALL,
ADJUST, SERVICE OR REPAIR THE EQUIPMENT SPECIFIED
IN THIS MANUAL WITHOUT PROPER TRAINING MAY RESULT
IN PRODUCT DAMAGE, PROPERTY DAMAGE, PERSONAL
INJURY OR DEATH.
WARNING
WARNING
DO NOT BYPASS SAFETY DEVICES
IMPORTANT INFORMATION
2
IMPORTANT NOTICES
RECOGNIZE SAFETY SYMBOLS, WORDS AND
LABELS
WARNING
THIS UNIT SHOULD NOT BE CONNECTED TO, OR USED IN
CONJUNCTION WITH, ANY DEVICES THAT ARE NOT DESIGN
CERTIFIED FOR USE WITH THIS UNIT OR HAVE NOT BEEN
TESTED AND APPROVED BY THE MANUFACTURER. SERIOUS
PROPERTY DAMAGE OR PERSONAL INJURY, REDUCED UNIT
PERFORMANCE AND/OR HAZARDOUS CONDITIONS MAY RESULT
FROM THE USE OF DEVICES THAT HAVE NOT BEEN APPROVED
OR CERTIFIED BY THE MANUFACTURER.
WARNING
TO PREVENT THE RISK OF PROPERTY DAMAGE, PERSONAL
INJURY, OR DEATH, DO NOT STORE COMBUSTIBLE MATERIALS
OR USE GASOLINE OR OTHER FLAMMABLE LIQUIDS OR
VAPORS IN THE VICINITY OF THIS APPLIANCE.
WARNING
HIGH VOLTAGE
DISCONNECT ALL POWER BEFORE SERVICING
OR INSTALLING THIS UNIT. MULTIPLE POWER
SOURCES MAY BE PRESENT. FAILURE TO DO SO
MAY CAUSE PROPERTY DAMAGE, PERSONAL
INJURY OR DEATH.
OUTSIDE THE U.S., call 1-713-861-2500.
(Not a technical assistance line for dealers.) Your telephone company will bill you for the call.
SAFE REFRIGERANT HANDLING
While these items will not cover every conceivable
situation, they should serve as a useful guide.
WARNING
Refrigerants are heavier than air. They can “push out” the
oxygen in your lungs or in any enclosed space. To avoid
possible difficulty in breathing or death:
• Never purge refrigerant into an enclosed room or
space. By law, all refrigerant must be reclaimed.
• If an indoor leak is suspected, thoroughly ventilate the
area before beginning work.
• Liquid refrigerant can be very cold. To avoid possible
frostbite or blindness, avoid contact with refrigerant
and wear gloves and goggles. If liquid refrigerant
does contact your skin or eyes, seek medical help
immediately.
• Always follow EPA regulations. Never burn refrigerant,
as poisonous gas will be produced.
WARNING
To avoid possible injury, explosion or death, practice safe
handling of refrigerants.
WARNING
The compressor POE oil for R-410A units is extremely
susceptible to moisture absorption and could cause
compressor failure. Do not leave system open to atmosphere
any longer than necessary for installation.
WARNING
To avoid possible explosion:
• Never apply flame or steam to a refrigerant cylinder. If
you must heat a cylinder for faster charging, partially
immerse it in warm water.
• Never fill a cylinder more than 80% full of liquid
refrigerant.
• Never add anything other than R-22 to an R-22 cylinder
or R-410A to an R-410A cylinder. The service equipment
used must be listed or certified for the type of
refrigerant used.
• Store cylinders in a cool, dry place. Never use a
cylinder as a platform or a roller.
WARNING
To avoid possible explosion, use only returnable (not
disposable) service cylinders when removing refrigerant
from a system.
• Ensure the cylinder is free of damage which could lead
to a leak or explosion.
• Ensure the hydrostatic test date does not exceed 5
years.
• Ensure the pressure rating meets or exceeds 400
lbs.
When in doubt, do not use cylinder.
CHECKING HEATER LIMIT CONTROL(S) ................. 21
CHECKING HEATER ELEMENTS .............................. 21
REFRIGERATION REPAIR PRACTICE ...................... 22
STANDING PRESSURE TEST (RECOMMENDED
BEFORE SYSTEM EVACUATION) ............................. 22
LEAK TESTING
(NITROGEN OR NITROGEN-TRACED) ..................... 22
SYSTEM EVACUATION .............................................. 23
CHARGING ................................................................. 23
CHECKING COMPRESSOR EFFICIENCY ................ 24
THERMOSTATIC EXPANSION VALVE ....................... 24
OVERFEEDING .......................................................... 27
UNDERFEEDING ........................................................ 27
REFRIGERANT CHARGE CHECK ............................. 27
CHECKING SUPERHEAT ........................................... 27
CHECKING SUBCOOLING ......................................... 27
HEAT PUMO - HEATING CYCLE ................................ 28
CHECKING EXPANSION VALVE OPERATION .......... 28
FIXED ORIFICE RESTRICTION DEVICES ................ 28
CHECKING RESTRICTED LIQUID LINE .................... 29
REFRIGERANT OVERCHARGE ............................... 29
NON-CONDENSABLES .............................................. 29
COMPRESSOR BURNOUT ........................................ 29
REVERSING VALVE REPLACEMENT ....................... 30
CHECKING EXTERNAL STATIC PRESSURE ............ 30
TROUBLESHOOTING .................................................... 43
WIRING DIAGRAMS ....................................................... 43
PRODUCT IDENTIFICATION
3
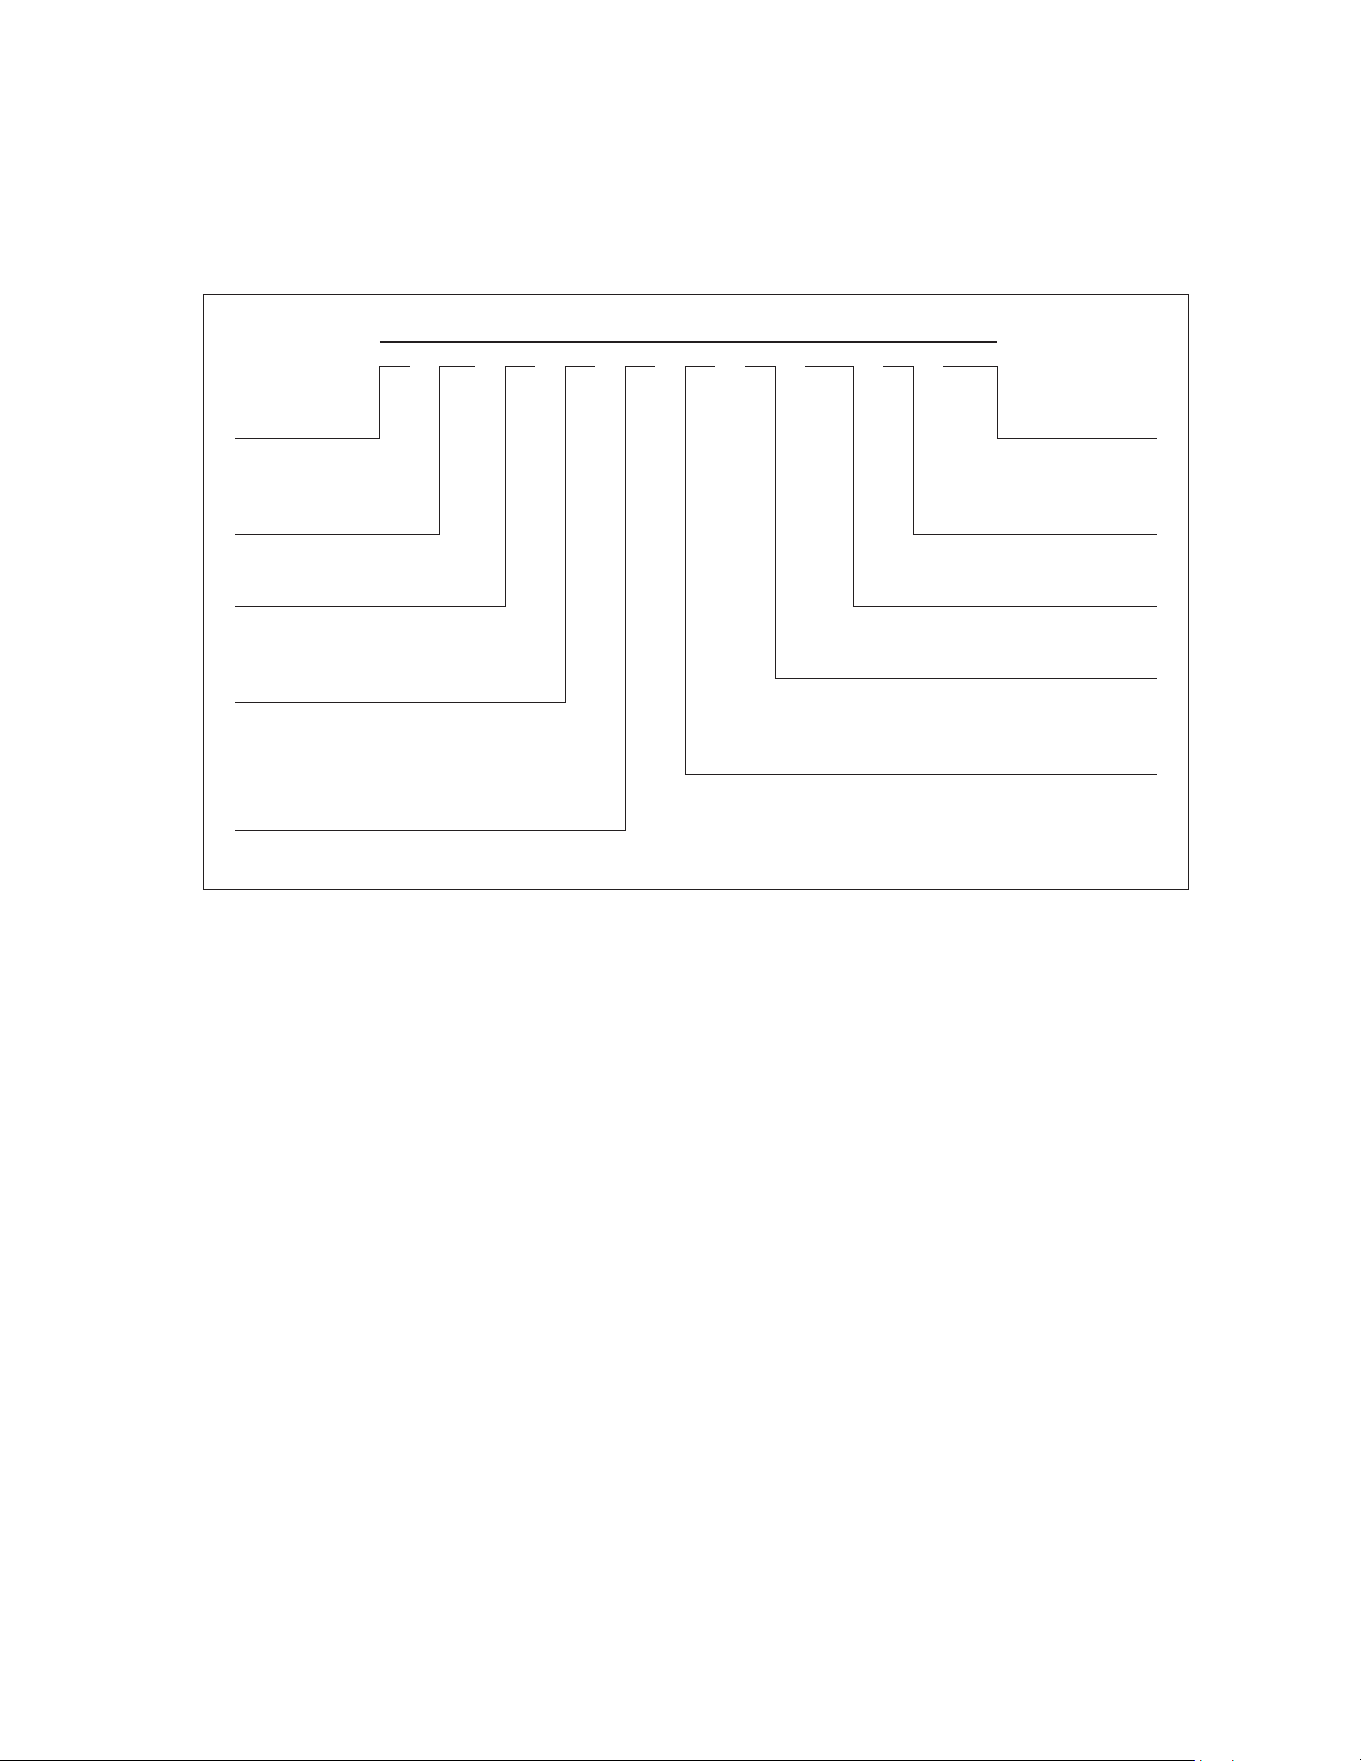
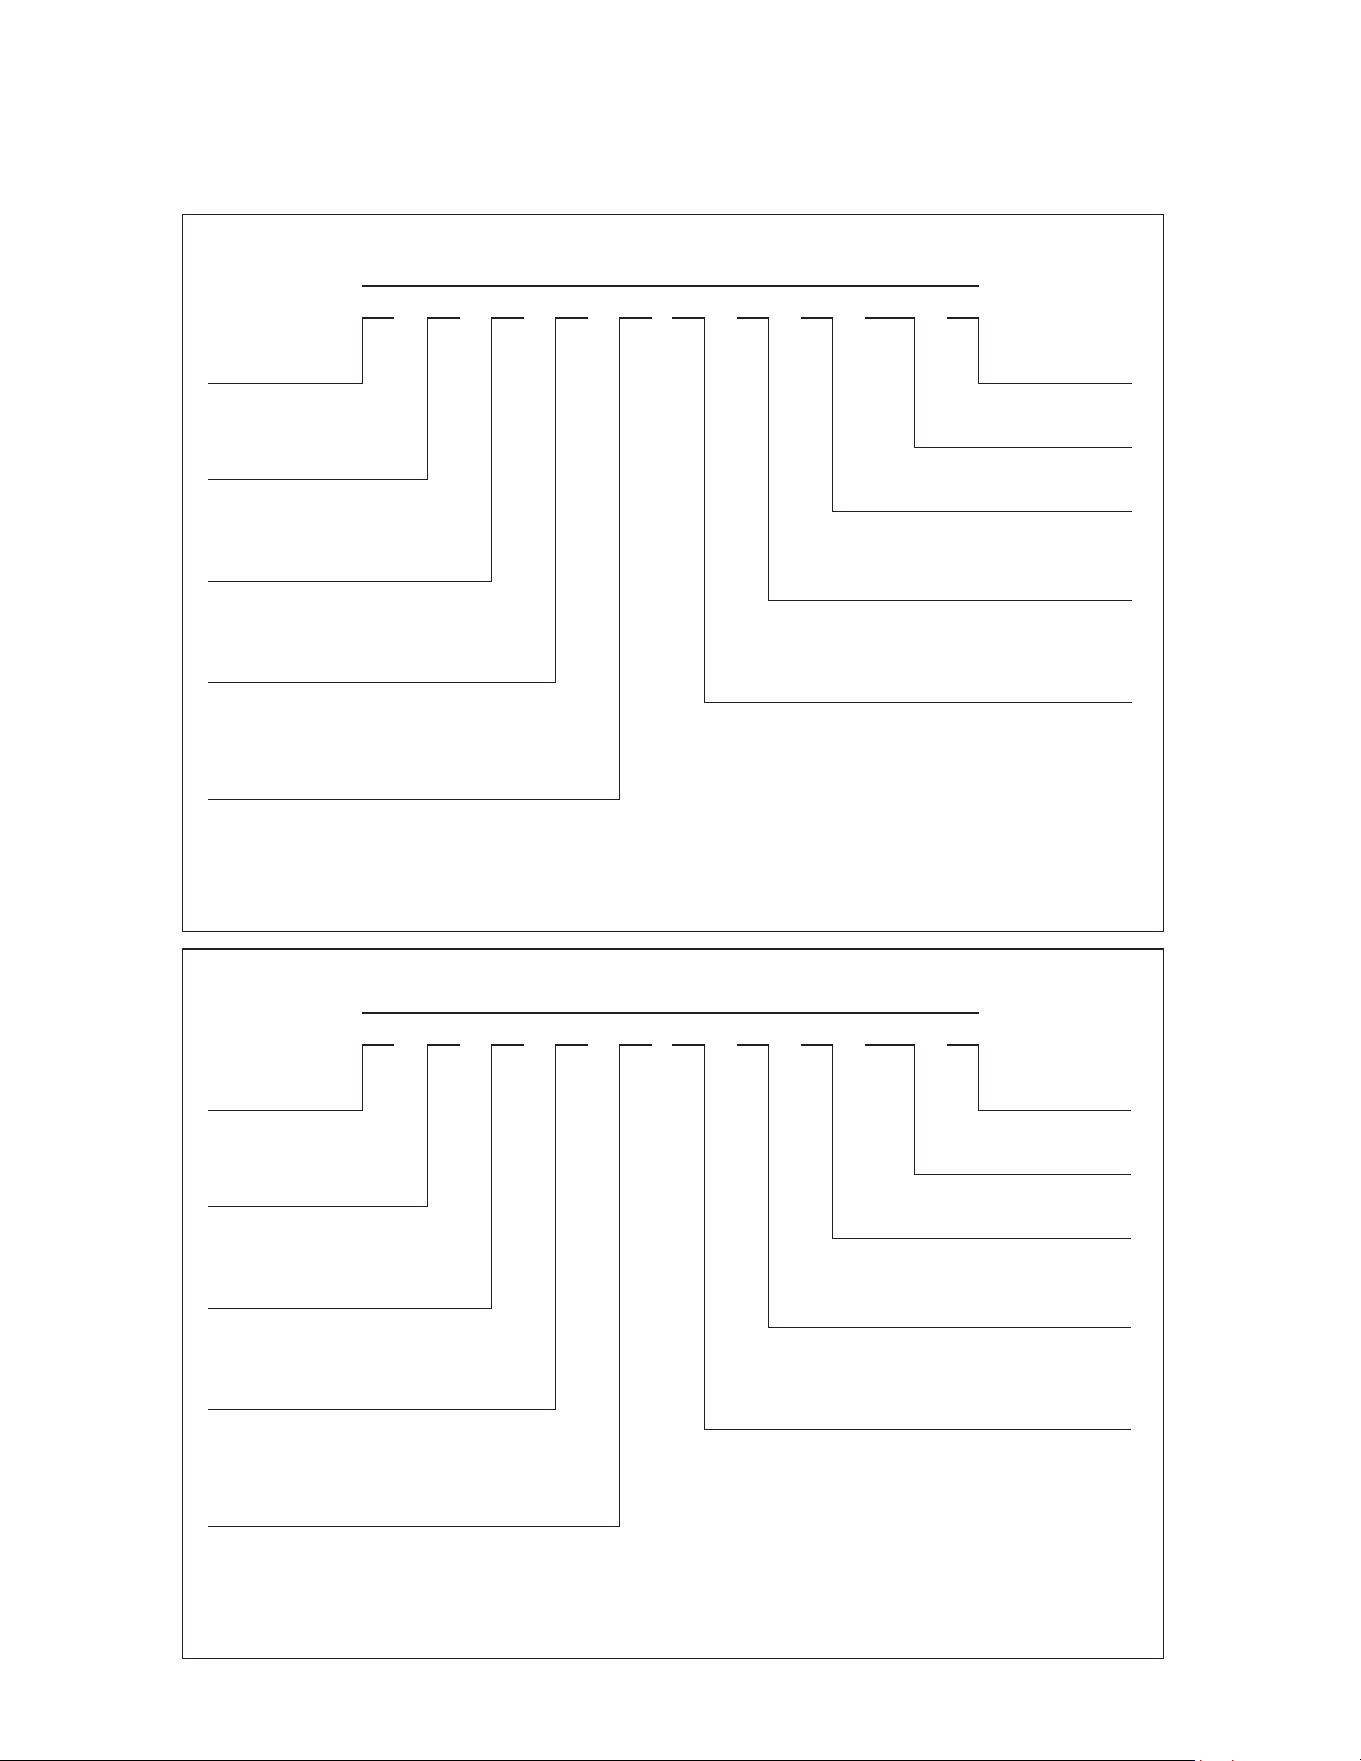
NOMENCLATURE
The model number is used for positive identication of component parts used in manufacturing. Please use this number
when requesting service or parts information.
2 www.goodmanmfg.com SS-GPCM3
SS-GPCM3 www.goodmanmfg.com 3
Nomenclature
G P C M 3 24 4 1 A A
1 2 3 4 5 6,7 8 9 10 11
Brand Minor Revision
G Goodman® brand A
Product Category Major Revision
P Packaged Unit A
Unit Type Electrical
C Air Condioner 1 208/230 V, 1 Phase, 60 Hz
H Heat Pump
Refrigerant
Airow
4 R-410A
H Horizontal
M Mul-Posion
Nominal Capacity
Eciency
24 2 Tons
30 2½ Tons
36 3 Tons
42 3½ Tons
48 4 Tons
60 5 Tons
3 13.4 SEER2
PRODUCT IDENTIFICATION
4
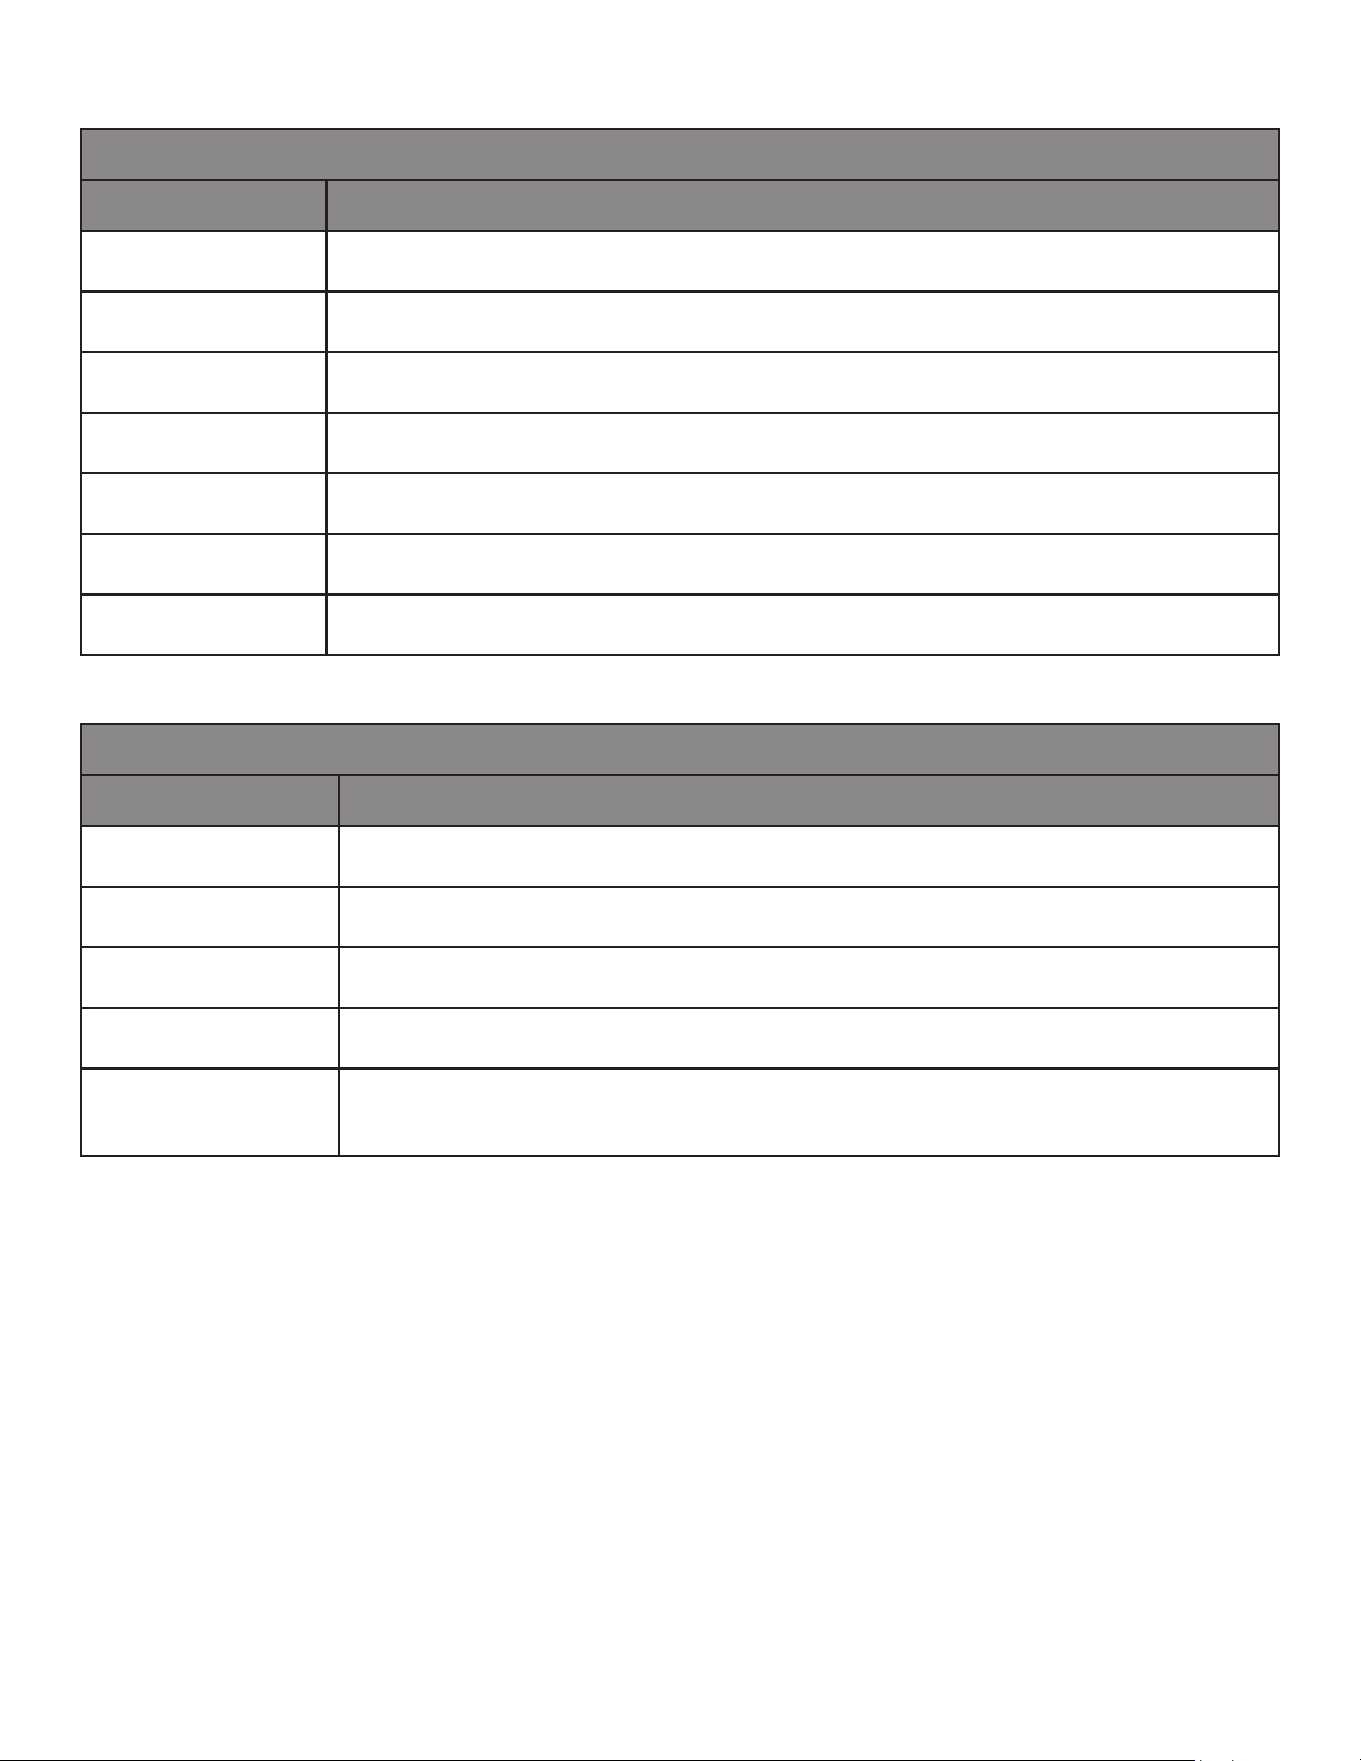
NOMENCLATURE
The model number is used for positive identication of component parts used in manufacturing. Please use this number
when requesting service or parts information.
2 www.amana-hac.com SS-APHM3
SS-APHM3 www.amana-hac.com 3
Nomenclature
A P H M 3 24 4 1 A A
1 2 3 4 5 6,7 8 9 10 11
Brand Minor Revision
A - Amana® Brand A
Major Revision
Product Category
A
P - Packaged Unit
Electrical
1 - 208/230V 1 phase, 60 Hz
Unit Type
C Air Condioner
Refrigerant
H Heat Pump
4 - R-410A
Airow
H Horizontal
Nominal Capacity
M Mul-Posion
24 - 2.0 tons 36 - 3.0 tons 48 - 4.0 tons
30 - 2.5 tons 42 - 3.5 tons 60 - 5.0 tons
Eciency
3 13.4 SEER2
5 15.2 SEER2
2 www.goodmanmfg.com SS-GPHM3
SS-GPHM3 www.goodmanmfg.com 3
Nomenclature
G P H M 3 36 4 1 A A
1 2 3 4 5 6,7 8 9 10 11
Brand Minor Revision
G - Goodman® Brand A
Major Revision
Product Category
A
P - Packaged Unit
Electrical
1 - 208/230V single-phase, 60 Hz
Unit Type
C - Air Condioner
Refrigerant
H - Heat Pump
4 - R-410A
Airow
H - Horizontal
Nominal Capacity
M - Mul-Posion
24 - 2 tons 42 - 3½ tons
30 - 2½ tons 48 - 4 tons
Eciency
36 - 3 tons 60 - 5 tons
3 - 13.4 SEER2
5 - 15.2 SEER2
PRODUCT IDENTIFICATION
5
Single Phase Multiposition Heat Pump
Model # Description
APH14[24-60]M41AA
Amana® Brand Package Heat Pump 14 SEER R410A Multiposition heating/cooling
units. Initial release of single phase models.
GPH14[24-60]M41AA
Goodman® Brand Package Heat Pump 14 SEER R410A Multiposition heating/cooling
units. Initial release of sinlge phase models.
APH14[24-60]M41AB
Amana® Brand Package Heat Pump 14 SEER R410A Multiposition heating/cooling
units. Release of models with access box removed.
GPH14[24-60]M41AB
Goodman® Brand Package Heat Pump 14 SEER R410A Multiposition heating/cooling
units. Release of models with access box removed.
A/GPHM3[24-60]41AA
Amana® Brand/Godman® Brand Package Heat Pump up to 13.4 SEER(2) R410A
Multiposition heating/cooling units. Initial release of models meeting DOE 2023
Regulatory Requirements
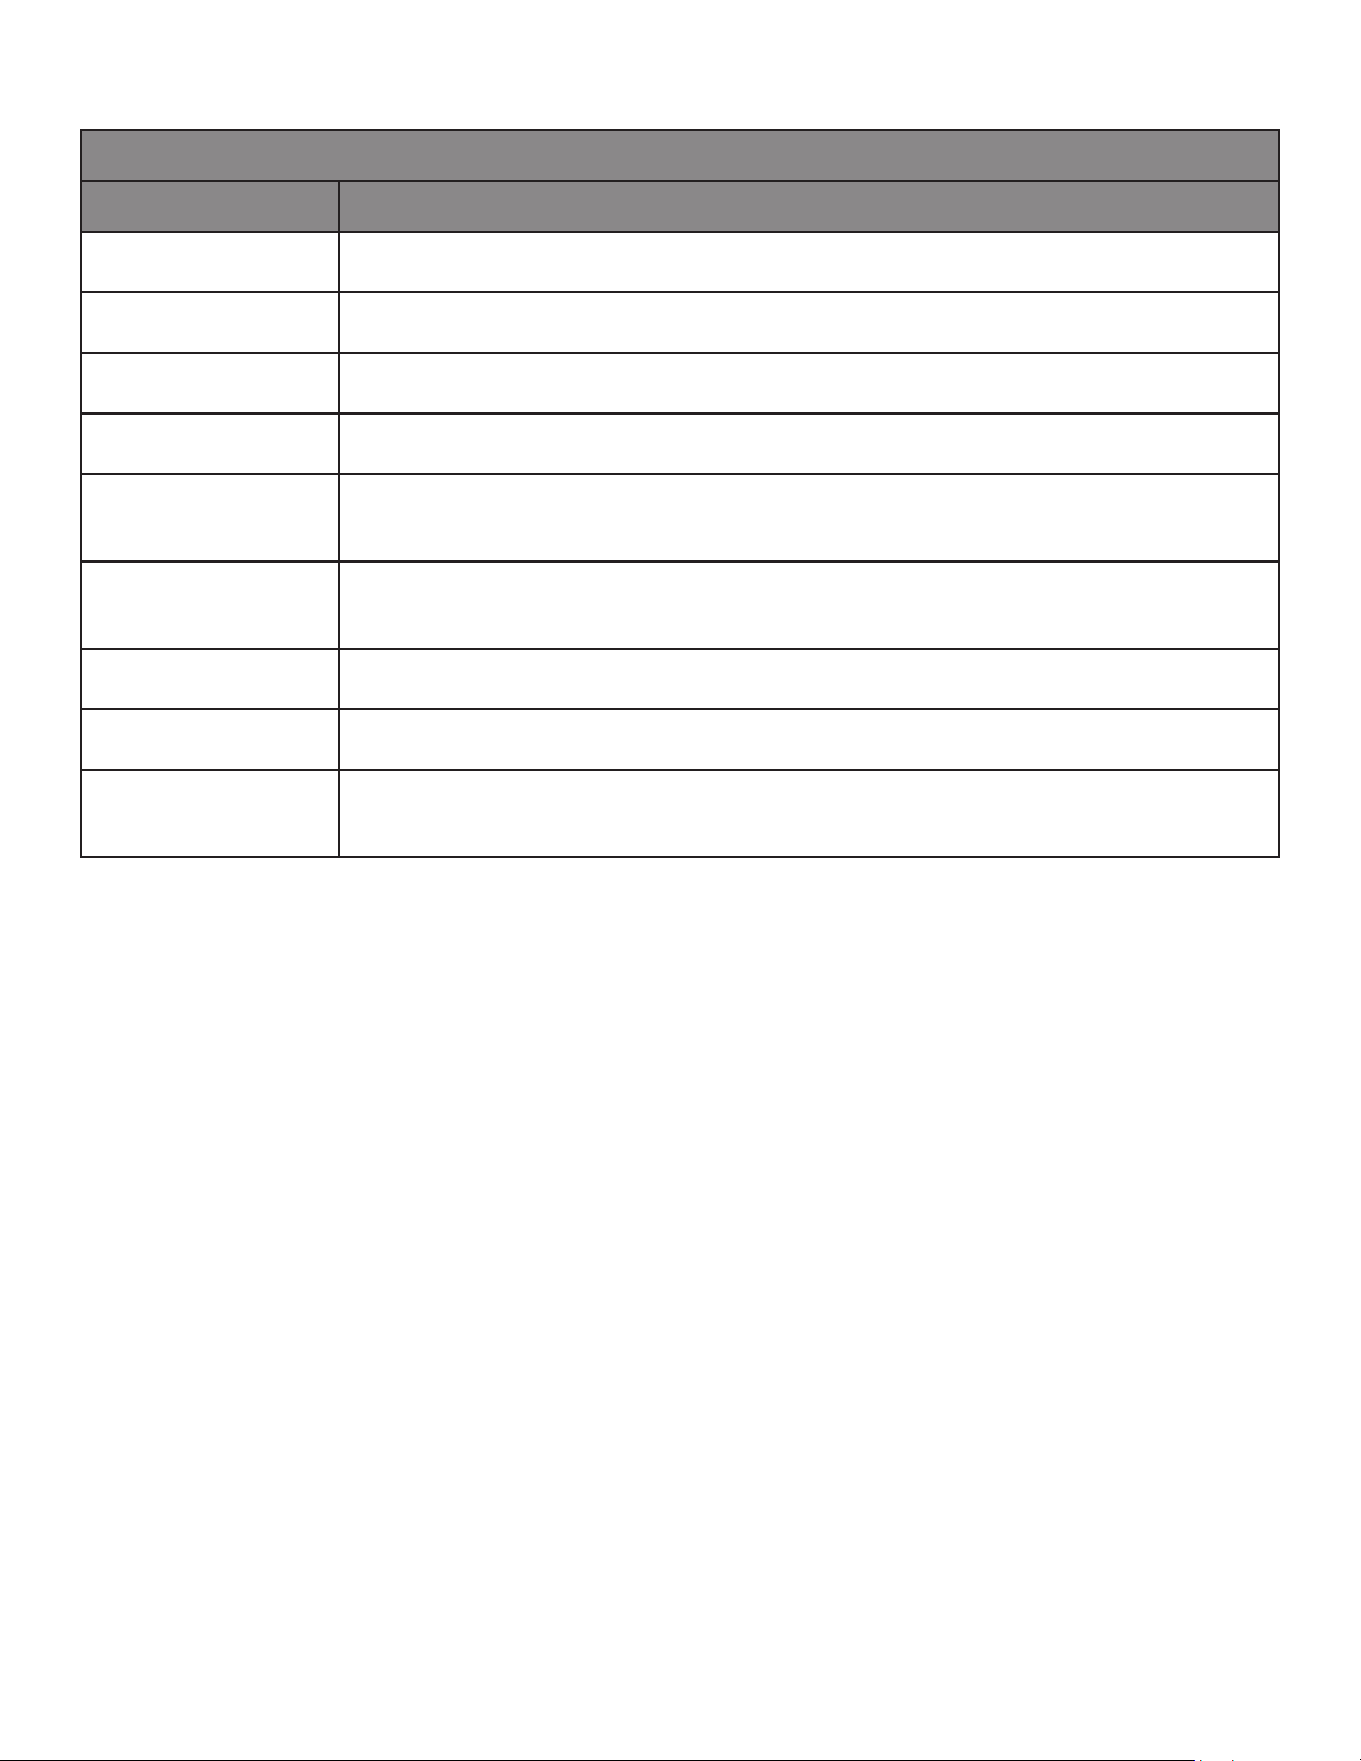
Single Phase Multiposition Cooling
Model # Description
APC14[24-60]M41AA
Amana® Brand Package Cooling 14 SEER R410A Multiposition cooling units. Initial
release of single phase models.
GPC14[24-60]M41AA
Goodman® Brand Package Cooling 14 SEER R410A Multiposition cooling units. Initial
release of sinlge phase models.
APC14[24-60]M41AB
Amana® Brand Package Cooling 14 SEER R410A Multiposition cooling units. Release of
models with access box removed.
GPC14[24-60]M41AB
Goodman® Brand Package Cooling 14 SEER R410A Multiposition cooling units. Release
of models with access box removed.
GPC1430M41BA
Goodman® Brand Package Cooling 14 SEER R410A Multiposition cooling units. Release
of models with Rechi compressor.
GPC1436M41BA
Goodman® Brand Package Cooling 14 SEER R410A Multiposition cooling units. Release
of models with Rechi compressor.
GPCM3[24-60]41AA
Goodman® Brand Package Cooling 13.4 SEER(2) R410A Multiposition cooling units.
Initial release of models meeting DOE 2023 Regulatory Requirements.
PRODUCT IDENTIFICATION
6
Single Phase Multiposition Heat Pump
Model # Description
APH16[24-48]M41AA
Amana® Brand Package Heat Pump up to 16 SEER R410A Multiposition heating/
cooling units. Initial release of single phase models.
GPH16[24-48]M41AA
Goodman® Brand Package Heat Pump up to 16 SEER R410A Multiposition heating/
cooling units. Initial release of single phase models.
APH16[24-48]M41AB
Amana® Brand Package Heat Pump up to 16 SEER R410A Multiposition heating/
cooling units. Release of models with access box removed.
GPH16[24-48]M41AB
Goodman® Brand Package Heat Pump up to 16 SEER R410A Multiposition heating/
cooling units. Release of models with access box removed.
APH1660M41AA
Amana® Brand Package Heat Pump up to 16 SEER R410A Multiposition heating/
cooling units. Converting light commercial 6 ton unit to 5 ton residential gas pack and
heat pump units.
GPH1660M41AA
Goodman® Brand Package Heat Pump up to 16 SEER R410A Multiposition heating/
cooling units. Converting light commercial 6 ton unit to 5 ton residential gas pack and
heat pump units.
APH1660M41BA
Amana® Brand Package Heat Pump up to 16 SEER R410A Multiposition heating/
cooling units. Release of 5 Ton single phase models with new chassis design.
GPH1660M41BA
Goodman® Brand Package Heat Pump up to 16 SEER R410A Multiposition heating/
cooling units. Release of 5 Ton single phase models with new chassis design.
A/GPHM5[24-60]41AA
Amana® Brand/Godman® Brand Package Heat Pump up to 15.2 SEER(2) R410A
Multiposition units. Initial release of models meeting DOE 2023 Regulatory
Requirements

SYSTEM OPERATION
7
Cooling
The refrigerant used in the system is R-410A. It is a clear,
colorless, non-toxic and non-irritating liquid. R-410A is a
50:50 blend of R-32 and R-125. The boiling point at atmo-
spheric pressure is -62.9°F.
A few of the important principles that make the refrigeration
cycle possible are: heat always ows from a warmer to a
cooler body. Under lower pressure, a refrigerant will absorb
heat and vaporize at a low temperature. The vapors may
be drawn o and condensed at a higher pressure and
temperature to be used again.
The indoor evaporator coil functions to cool and dehumidify
the air conditioned spaces through the evaporative process
taking place within the coil tubes.
NOTE: The pressures and temperatures shown in
the refrigerant cycle illustrations on the following
pages are for demonstration purposes only. Actual
temperatures and pressures are to be obtained from
the "Expanded Performance Chart".
Liquid refrigerant at condensing pressure and
temperatures, (270 psig and 122°F), leaves the outdoor
condensing coil through the drier and is metered into the
indoor coil through the metering device. As the cool, low
pressure, saturated refrigerant enters the tubes of the
indoor coil, a portion of the liquid immediately vaporizes.
It continues to soak up heat and vaporizes as it proceeds
through the coil, cooling the indoor coil down to about 48°F.
Heat is continually being transferred to the cool ns and
tubes of the indoor evaporator coil by the warm system air.
This warming process causes the refrigerant to boil. The
heat removed from the air is carried o by the vapor.
As the vapor passes through the last tubes of the coil, it
becomes superheated. That is, it absorbs more heat than
is necessary to vaporize it. This is assurance that only
dry gas will reach the compressor. Liquid reaching the
compressor can weaken or break compressor valves.
The compressor increases the pressure of the gas, thus
adding more heat, and discharges hot, high pressure
super-heated gas into the outdoor condenser coil.
In the condenser coil, the hot refrigerant gas, being
warmer than the outdoor air, rst loses its superheat by
heat transferred from the gas through the tubes and ns
of the coil. The refrigerant now becomes saturated, part
liquid, part vapor and then continues to give up heat until
it condenses to a liquid alone. Once the vapor is fully
liqueed, it continues to give up heat which subcools the
liquid, and it is ready to repeat the cycle.
Cooling Cycle
Cooling Only Models
When the contacts of the room thermostat close, making
terminals R to Y and R to G, the low voltage circuit to the
contactor is completed starting the compressor and outdoor
fan motor. The EEM indoor blower motor is energized at
the cool speed when the compressor contactor energizes.
When the thermostat is satised, breaking the circuit
between R to Y and R to G, the compressor and outdoor
fan motor will stop. The indoor blower will stop after the fan
o delay.
If the room thermostat fan selector switch should be set
to the “on” position then the indoor blower would run
continuous rather than cycling with the compressor.
Heat Pump Models
Any time the room thermostat is switched to cool, the O
terminal is energized. This energizes the 24 volt coil on the
reversing valve and switches it to the cooling position.
When the contacts of the room thermostat close, this
closes the circuit from R to Y and R to G in the unit.
This energizes the compressor contactor and will energize
the indoor blower on models equipped with the EEM motor.
When the thermostat is satised, it opens its contacts
breaking the low voltage circuit causing the compressor
contactor to open and indoor fan to stop after the
programmed 60 second o delay on units with the EEM
motor.
If the room thermostat fan selector switch should be set
to the “on” position then the indoor blower would run
continuous rather than cycling with the compressor.
Heating Cycle
Cooling Only Units
NOTE: The following only applies if the cooling only
unit has an approved electric heat kit installed for
heating. If auxiliary electric heaters should be used,
they may be controlled by outdoor thermostats (OT18-
60A or OT/EHR18-60A).
GPCM3 EEM Equipped Model Units
With the thermostat set to the heat position and a call
for heat, R to W will be energized. This will energize the
electric heat contactor(s)/sequencer(s) and the EEM indoor
blower motor. When the normally open contacts of the
heat contactor(s)/sequencer(s) close, this will energize the
electric resistance heat.
SYSTEM OPERATION
8
Single-Stage Heat Pump Units
On a call for rst stage heat, the contacts of the room
thermostat close. This energizes terminals R to Y and R
to G, the low voltage circuit to the contactor is completed
starting the compressor and outdoor fan motor. This also
energizes the indoor blower on models equipped with the
EEM motor.
When the thermostat is satised, breaking the circuit
between R to Y and R to G, the compressor and outdoor
fan motor will stop. The indoor blower will stop after the
programmed 60 second o delay on models equipped with
the EEM motor.
Two-Stage Heat Pump Units
On a call for rst stage heat, the contacts of the room
thermostat close. This energizes terminals R to Y1 and R
to G, the low voltage circuit to the contactor is completed
starting the compressor and outdoor fan motor. This also
energizes the indoor blower motor.
When the thermostat is satised, breaking the circuit
between R to Y1 and R to G, the compressor and outdoor
fan motor will stop. The indoor blower will stop after the
programmed o delay.
During rst stage operation the stat calls for second stage
heat. This energizes terminals R to Y2. This powers voltage
to the compressor solenoid allowing the compressor to
shift to full capacity. When the thermostat is satised,
breaking the circuit between R to Y1, R to Y2 and R to G,
the compressor and outdoor fan motor will stop. The indoor
blower will stop after the programmed o delay on the
motor.
When auxiliary electric heaters are used the Aux stage
heating contacts in the room thermostat close, which
would be wired to W1 at the unit low voltage connections,
this would energize the coil(s) of the electric heat
contactor(s)/sequencer(s). Contacts within the contactor(s)/
Sequencer(s) will close, bringing on the electric resistance
heaters. If auxilary electric heaters should be used, the
may be controlled by outdoor thermostats (OT18-60A or
OT/EHR18-60A).
Emergency Heat Mode (Heat Pumps)
NOTE: The following only applies if the unit has
an approved electric heat kit installed for auxiliary
heating.
A/GPHM3 EEM Equipped Models Only:
With the thermostat set to the emergency heat position and
a call for 2nd stage heat, R to W1 will be energized. This
will energize the electric heat contactor(s)/sequencer(s)
and the EEM motor. The electric heat will be energized
through the normally open contacts of the electric heat
contactor(s)/sequencer(s). The indoor blower will be
energized through W from the thermostat.
DEFROST CYCLE
Package Heat Pumps
The defrosting of the outdoor coil is jointly controlled by the
defrost control board and the defrost thermostat.
Solid State Defrost Control
During operation the power to the circuit board is controlled
by a temperature sensor, which is clamped to a feeder tube
entering the outdoor coil. Defrost timing periods of 30, 60,
or 90 minutes may be selected by setting the circuit board
jumper to 30, 60, or 90 respectively. Accumulation of time
for the timing period selected starts when the sensor closes
(approximately 30° F), and when the room thermostat
calls for heat. At the end of the timing period, the unit’s
defrost cycle will be initiated provided the sensor remains
closed. When the sensor opens (approximately 60° F), the
defrost cycle is terminated and the timing period is reset.
If the defrost cycle is not terminated due to the sensor
temperature, a twelve minute override interrupts the unit’s
defrost period.
FAN OPERATION
Continuous Fan Mode
GPCM3 & A/GPHM3 EEM Equipped Models Only:
If the thermostat calls for continuous fan, the indoor blower
will be energized from the G terminal of the thermostat to
the EEM blower motor.
If a call for heat or cool occurs during a continuous fan call,
the EEM motor will always recognize the call for the highest
speed and ignore the lower speed call.
If the thermostat is not calling for heat or cool, and the
fan switch on the thermostat is returned to the automatic
position, the fan will stop after the programmed 60 second
o delay on units with the EEM motor.
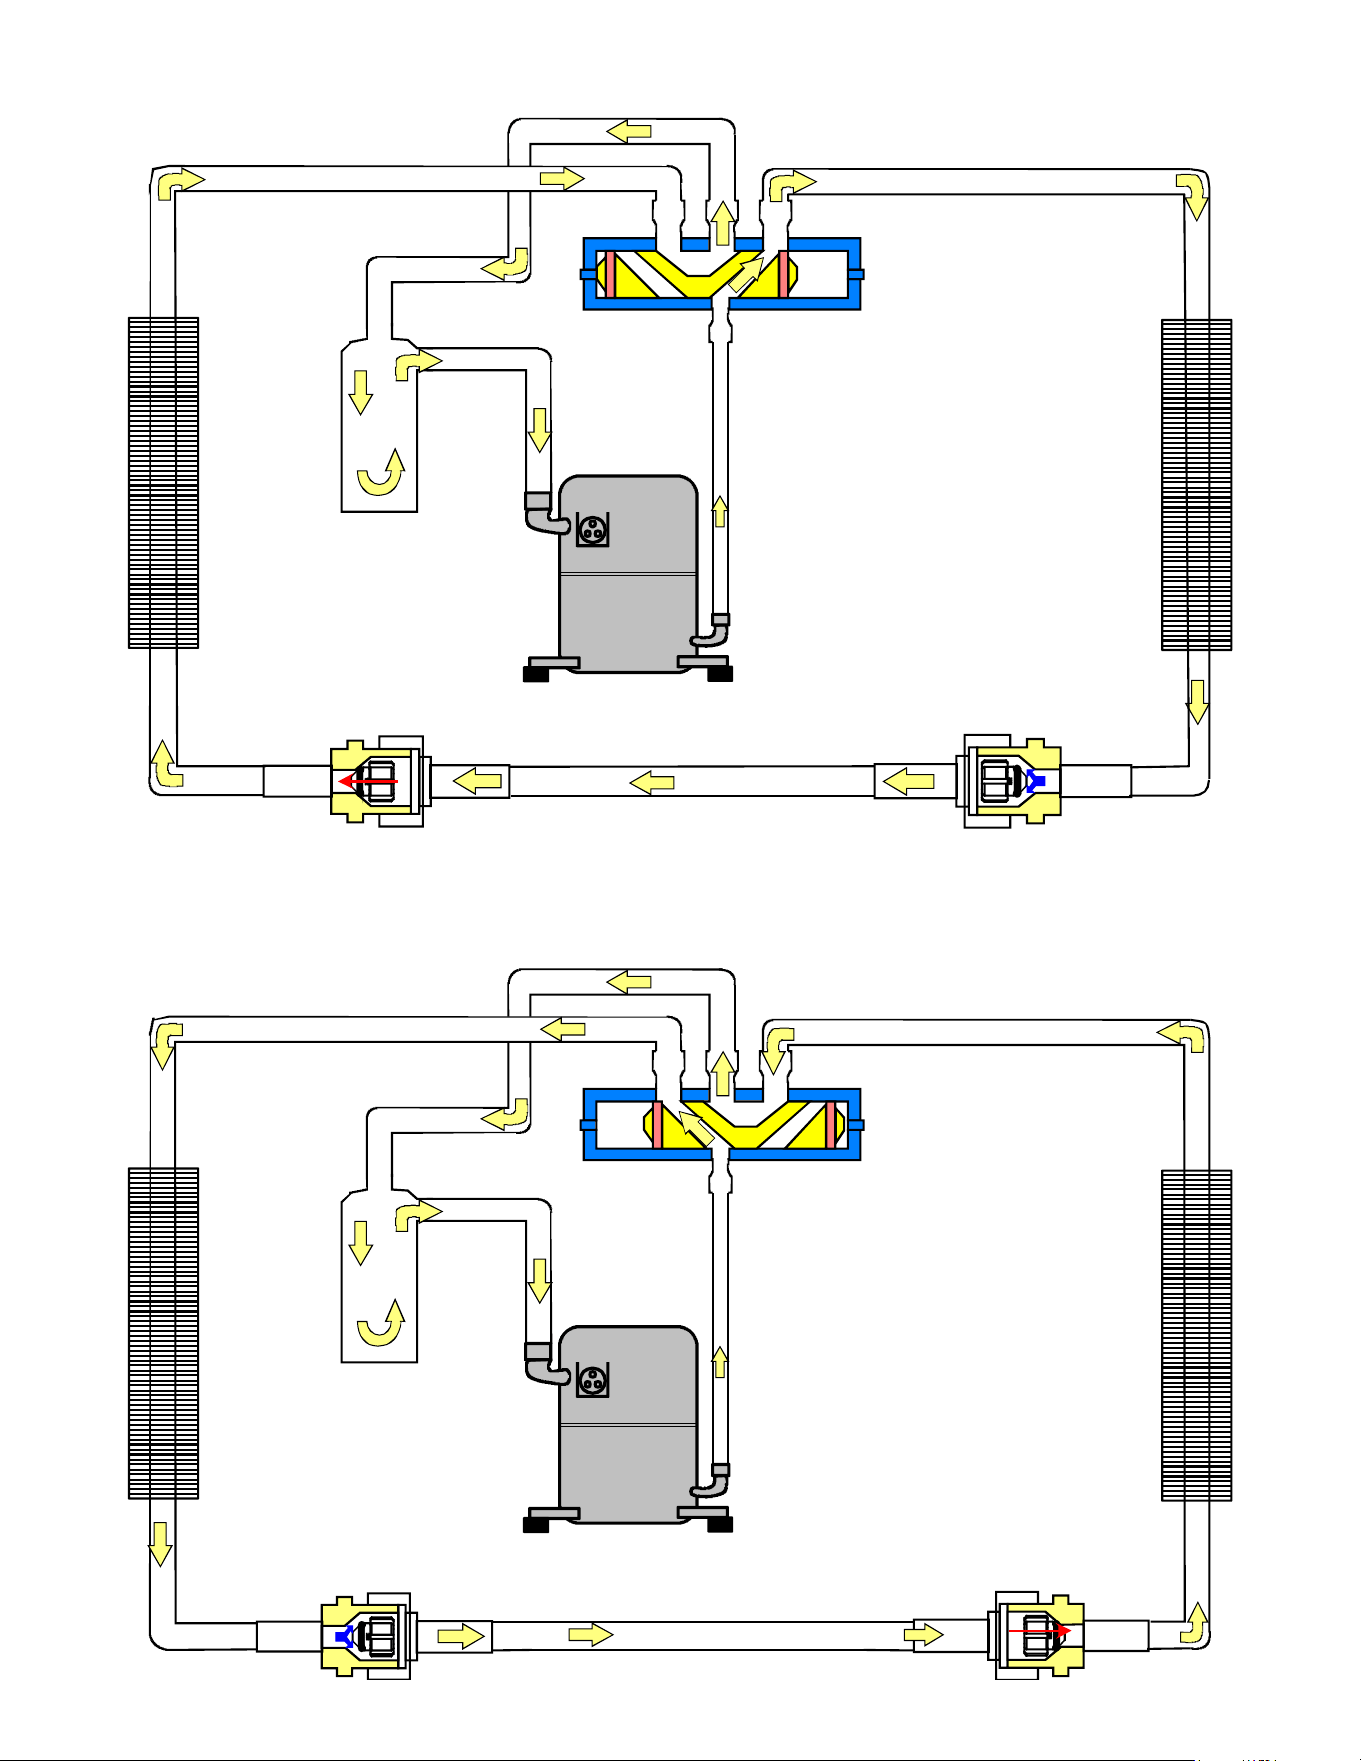
SYSTEM OPERATION
9
Indoor
Coil
Accumulator
Outdoor
Coil
Reversing Valve
(Energized)
Indoor
Coil
Accumulator
Outdoor
Coil
Reversing Valve
(De-Energized)
Typical Heat Pump System in Cooling
Typical Heat Pump System in Heating
SCHEDULED MAINTENANCE
10
Package gas units require regularly scheduled
maintenance to preserve high performance standards,
prolong the service life of the equipment, and lessen the
chances of costly failure.
In many instances the owner may be able to perform some
of the maintenance; however, the advantage of a service
contract, which places all maintenance in the hands of a
trained serviceman, should be pointed out to the owner.
WARNING
High Voltage!
Disconnect all power before servicing or
installing. Multiple power sources may be present.
Failure to do so may cause property damage,
personal injury or death.
ONCE A MONTH
1. Inspect the return lters of the evaporator unit and
clean or change if necessary. NOTE: Depending on
operation conditions, it may be necessary to clean
or replace the lters more often. If permanent type
lters are used, they should be washed with warm
water and dried.
2. When operating on the cooling cycle, inspect the
condensate line piping from the evaporator coil.
Make sure the piping is clear for proper condensate
ow.
ONCE A YEAR
Qualified Service Personnel Only
1. Clean the indoor and outdoor coils.
2. Clean the cabinet inside and out.
3. Motors are permanently lubricated and do not require
oiling. TO AVOID PREMATURE MOTOR FAILURE,
DO NOT OIL.
4. Manually rotate the outdoor fan and indoor blower to
be sure they run freely.
5. Inspect the control panel wiring, compressor
connections, and all other component wiring to be
sure all connections are tight. Inspect wire insulation
to be certain that it is good.
6. Check the contacts of the compressor contactor. If
they are burned or pitted, replace the contactor.
7. Using a halide or electronic leak detector, check all
piping and etc. for refrigerant leaks.
TEST EQUIPMENT
Proper test equipment for accurate diagnosis is as
essential as regular hand tools.
The following is a must for every service technician and
service shop:
1. Thermocouple type temperature meter - measure dry
bulb temperature.
2. Sling psychrometer - measure relative humidity and
wet bulb temperature.
3. Volt-Ohm Meter - testing continuity, capacitors, motor
windings and voltage.
4. Accurate Leak Detector - testing for refrigerant leaks.
5. High Vacuum Pump - evacuation.
6. Electric Vacuum Gauge, Manifold Gauges and
high vacuum hoses - to measure and obtain proper
vacuum.
7. Accurate Charging Cylinder or Electronic Scale -
measure proper refrigerant charge.
8. Inclined Manometer - measure static pressure and
pressure drop across coils.
Other recording type instruments can be essential in
solving abnormal problems, however, in many instances
they may be rented from local sources.
Proper equipment promotes faster, more ecient service,
and accurate repairs with less call backs.
SERVICING
11
Checking Voltage
WARNING
High Voltage!
Disconnect all power before servicing or
installing. Multiple power sources may be present.
Failure to do so may cause property damage,
personal injury or death.
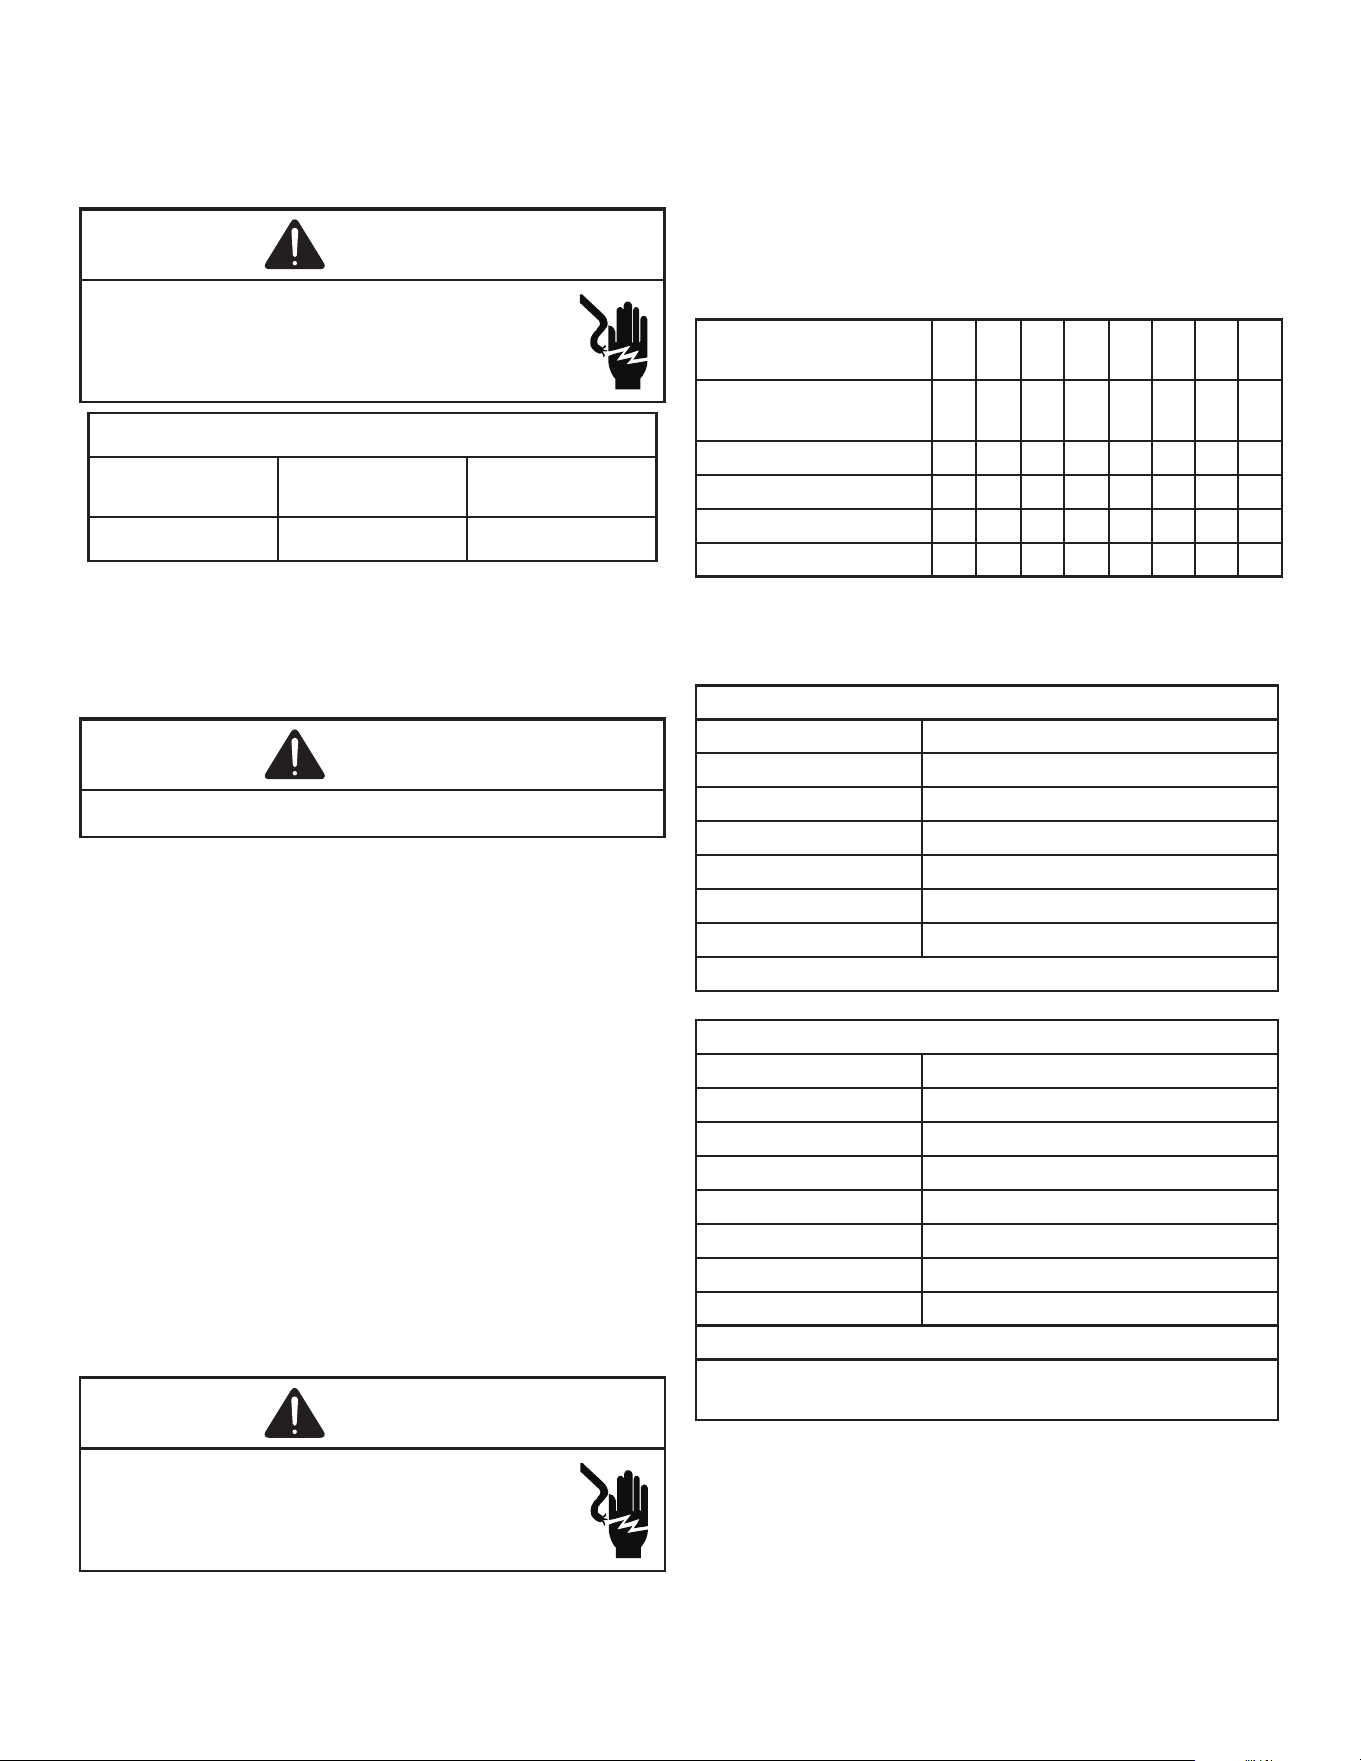
Unit Voltage
Rated Voltage Min. Supply
Voltage
Max. Supply
Voltage
208/230V 197 253
1. Remove doors, control panel cover, etc. from unit
being tested.
With power ON:
WARNING
Line voltage now present.
2. Using a voltmeter, measure the voltage across
terminals L1 and L2 of the contactor.
3. No reading - indicates open wiring, open fuse(s) no
power or etc. from unit to fused disconnect service.
Repair as needed.
4. If incoming voltage is within the range listed in the
chart below, energize the unit.
5. Using a voltmeter, measure the voltage with the unit
starting and operating to determine if voltage is within
the range listed in the chart below.
6. If the voltage falls below the minimum voltage, check
the line wire size. Long runs of undersized wire can
cause low voltage. If the wire size is adequate, notify
the local power company regarding either low or high
voltage.
Checking Wiring
WARNING
High Voltage!
Disconnect all power before servicing or
installing. Multiple power sources may be present.
Failure to do so may cause property damage,
personal injury or death.
1. Check wiring visually for signs of overheating,
damaged insulation and loose connections.
2. Use an ohmmeter to check continuity of any
suspected open wires.
3. If any wires must be replaced, replace with
comparable gauge and insulation thickness.
Checking Thermostat and Wiring
Branch Circuit Am-
pacity
15 20 25 30 35 40 45 50
SUPPLY WIRE
LENGTH - FEET
200 6 4 4 4 3 3 2 2
150 8 6 6 4 4 4 3 3
100 10 8 8 6 6 6 4 4
50 14 12 10 10 8 8 6 6
Wiring Table
Thermostat Wiring: The maximum wire length for 18 AWG
thermostat wire is 100 feet.
GPCM3 Thermostat Wiring
Terminal Thermostat
Red R (24V)
Green G (fan)
Yellow Y (Cool)
White W1 (Heat, Aux Heat Stage 1)*
Brown W2 (Heat, Aux Heat Stage 2)*
Blue C (Common)
*Optional eld installed heat connections
*PHM3 Thermostat Wiring
Terminal Thermostat
Red R (24V)
Green G (fan)
Orange O (Rev. Valve)
White W1 (Heat, Aux Heat Stage 1)*
Brown W2 (Heat, Aux Heat Stage 2)*
Yellow Y (Compressor)
Blue C (24V Common)
*Optional eld installed heat connections
Thermostats must be set to energize “G” during cooling.
This is default on most thermostats.
SERVICING
12
*PHM5[24-48]41 Thermostat Wiring
Terminal Thermostat
Red R (24V)
Green G (fan)
Orange O (Rev. Valve)
White W1 (Heat, Aux Heat Stage 1)*
Brown W2 (Heat, Aux Heat Stage 2)*
Purple Y1 (Compressor Stage 1)
Yellow Y2 (Compressor Stage 2)
Blue C (24V Common)
*Optional eld installed heat connections
Thermostats must be set to energize “G” during cooling.
This is default on most thermostats.
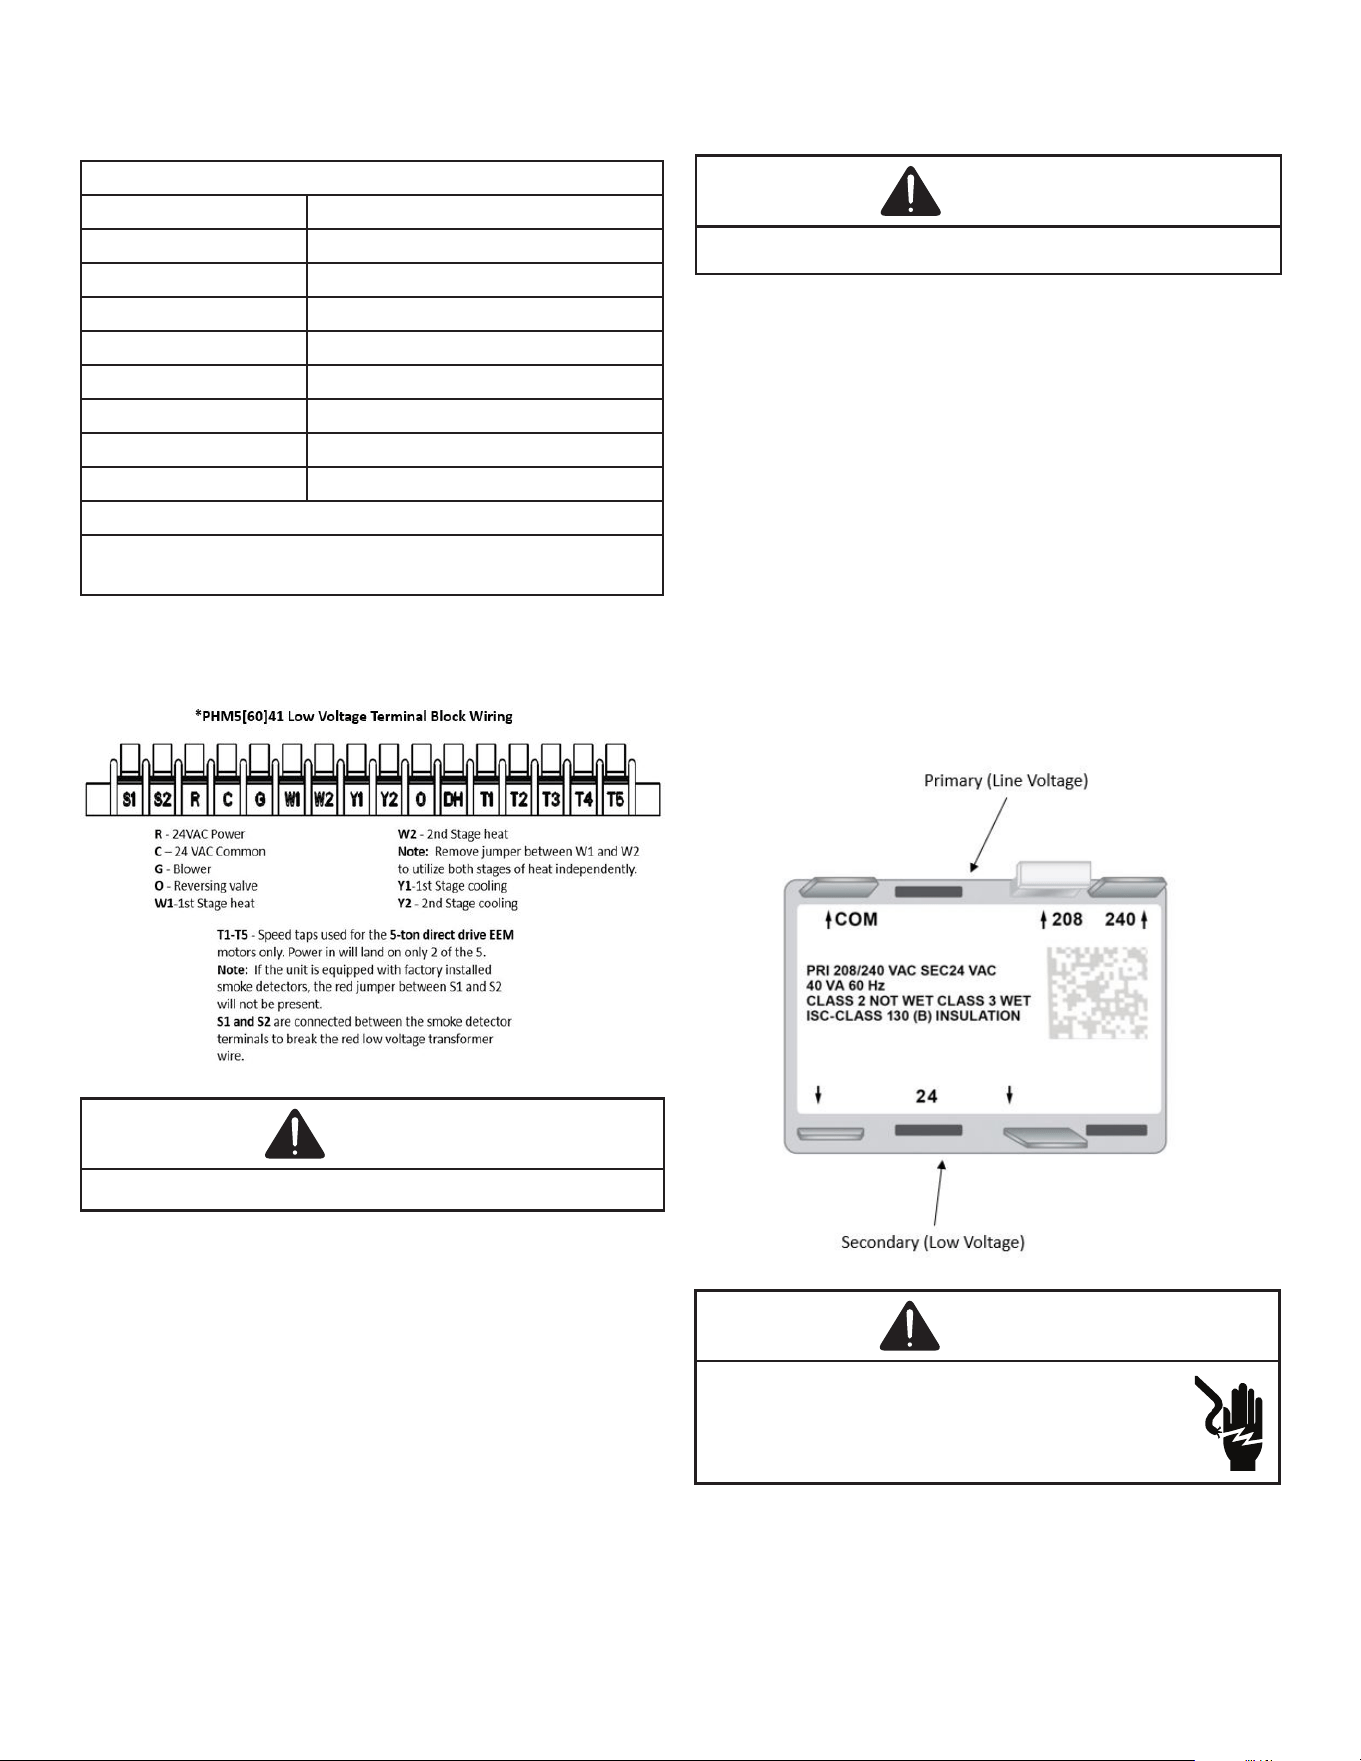
NOTE: &PHM5[60]41 models have a low voltage terminal
block for thermostat connections.
WARNING
Line voltage now present.
With power ON, thermostat calling for cooling:
1. Use a voltmeter to verify 24 volts present at
thermostat wires C and R.
2. If no voltage present, check transformer and
transformer wiring. If 24 volts present, proceed to
step 3.
3. Use a voltmeter to check for 24 volts at thermostat
wires C and Y.
4. No voltage indicates trouble in the thermostat, wiring
or external transformer source.
5. Check the continuity of the thermostat and wiring.
Repair or replace as necessary.
Indoor Blower Motor
With power ON:
WARNING
Line voltage now present.
1. Use a voltmeter to verify 24 volts present at
thermostat wires C and R.
2. If no voltage present, check transformer and
transformer wiring. If 24 volts present, proceed to
step 3.
3. Set fan selector switch at thermostat to “ON”
position.
4. With voltmeter, check for 24 volts at wires C and G.
5. No voltage, indicates the trouble is in the thermostat
or wiring.
6. Check the continuity of the thermostat and wiring.
Repair or replace as necessary.
Checking Transformer and Control Circuit
A step-down transformer (208/240 volt primary to 24 volt
secondary) is provided with each package unit. This allows
ample capacity for use with resistance heaters.
WARNING
High Voltage!
Disconnect all power before servicing or
installing. Multiple power sources may be present.
Failure to do so may cause property damage,
personal injury or death.
1. Remove control panel cover, or etc., to gain access
to transformer.
With power ON:
SERVICING
13
WARNING
Line voltage now present.
2. Using a voltmeter, check voltage across secondary
voltage side of transformer (R to C).
3. No voltage indicates faulty transformer, bad wiring, or
bad splices.
4. Check transformer primary voltage at incoming line
voltage connections and/or splices.
5. If line voltage is present at the primary voltage side
of the transformer and 24 volts is not present on the
secondary side, then the transformer is inoperative.
Replace.
Checking Contactor and/or Relays
The compressor contactor and other relay holding coils are
wired into the low or line voltage circuits. When the control
circuit is energized, the coil pulls in the normally open
contacts or opens the normally closed contacts. When the
coil is de-energized, springs return the contacts to their
normal position.
WARNING
High Voltage!
Disconnect all power before servicing or
installing. Multiple power sources may be present.
Failure to do so may cause property damage,
personal injury or death.
1. Remove the leads from the holding coil.
2. Using an ohmmeter, test across the coil terminals.
If the coil does not test continuous, replace the relay or
contactor.
Checking Contactor Contacts
WARNING
High Voltage!
Disconnect all power before servicing or
installing. Multiple power sources may be present.
Failure to do so may cause property damage,
personal injury or death.
Single Phase
1. Disconnect the wire leads from the terminal (T) side
of the contactor.
2. With power ON, energize the contactor.
WARNING
Line voltage now present.
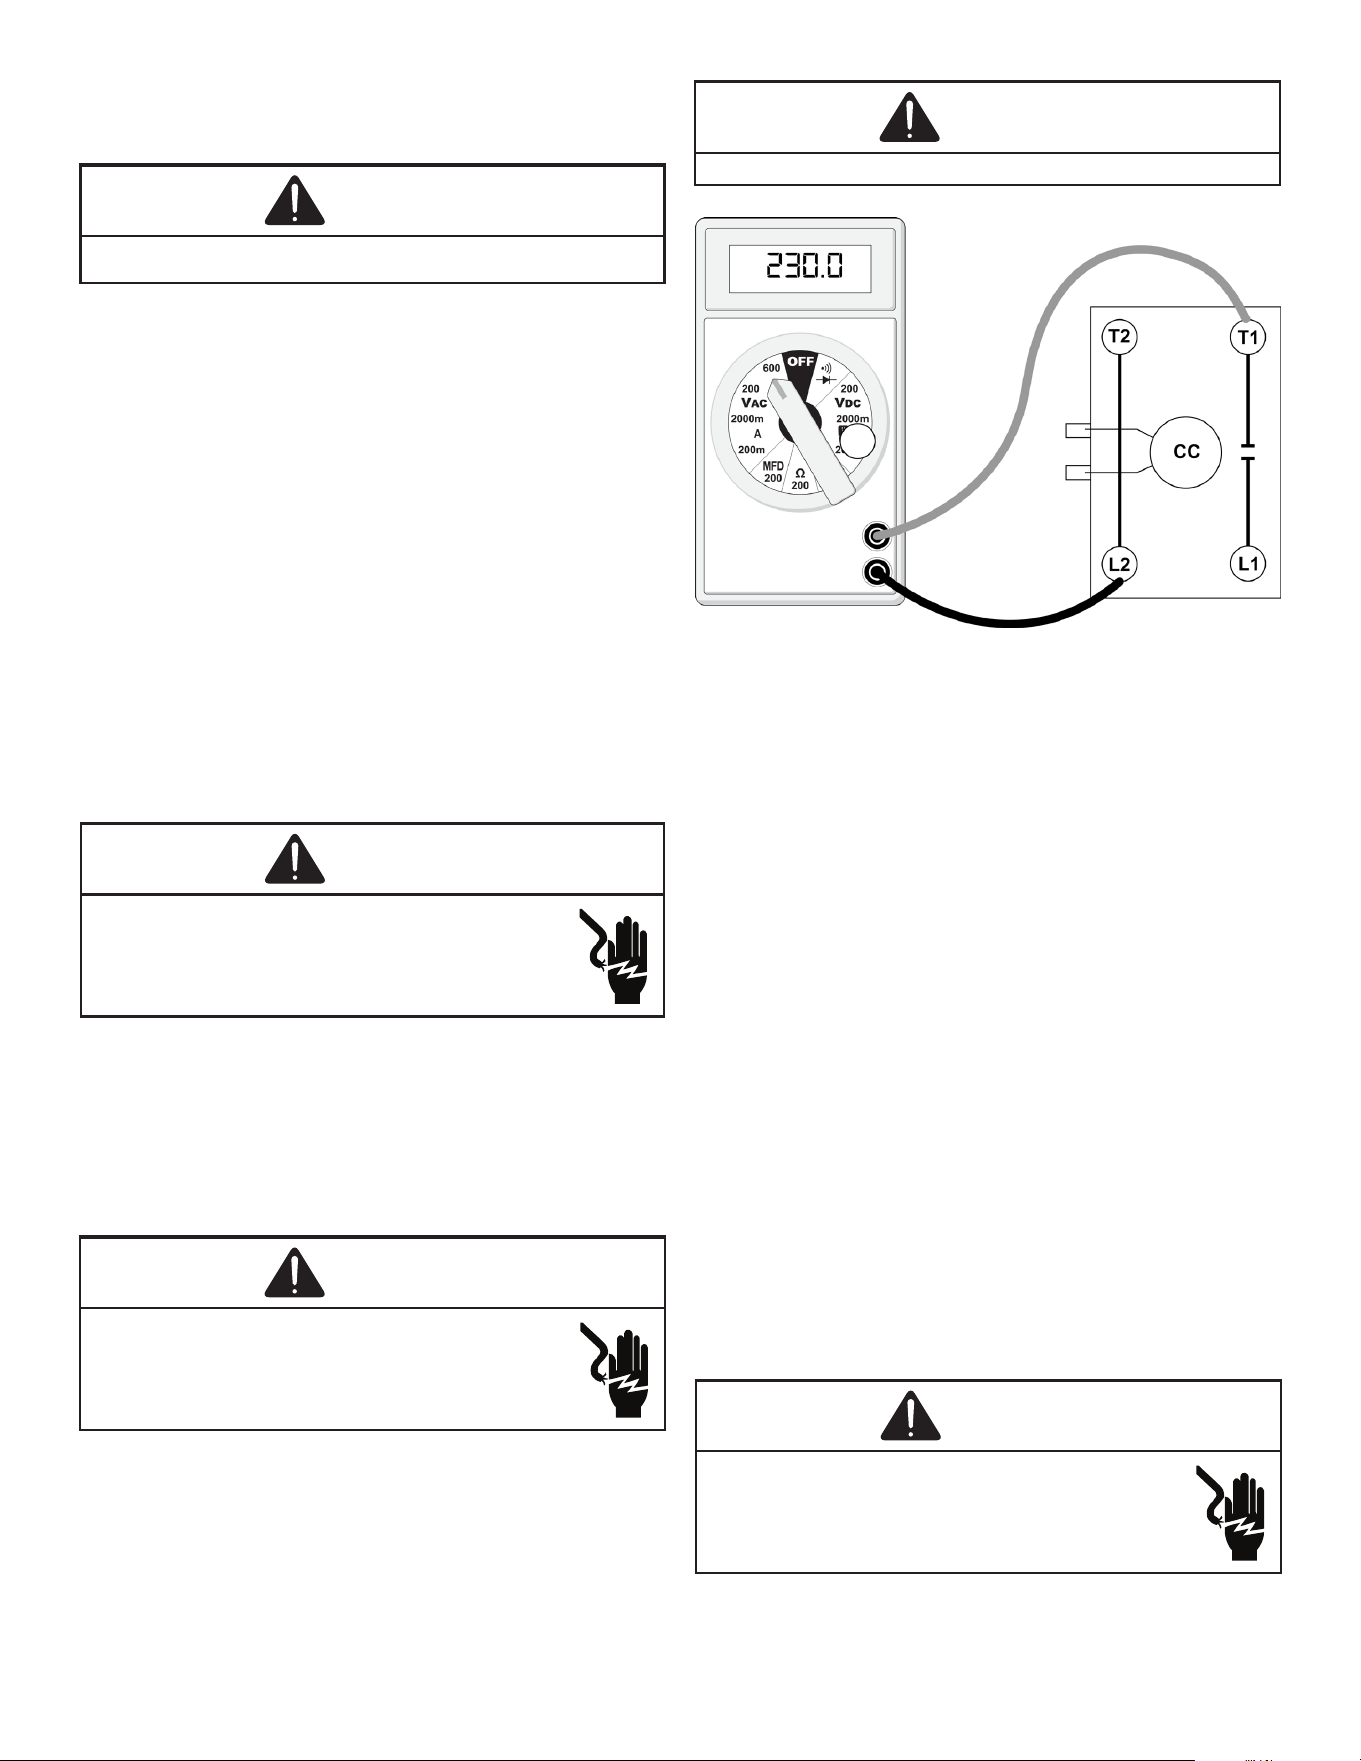
Testing Compressor Contactor
(Single Phase)
3. Using a voltmeter, test across terminals.
A. L1 - L2 - No voltage. Check breaker or fuses on
main power supply. If voltage present, proceed to
step B.
B. T1 to T2 - Meter should read the same as L1 to
L2 in step A. If voltage readings are not the same
as step A, replace contactor.
Checking Low Pressure Control
(Heat Pump Models)
The low pressure control senses the pressure in the
suction line and will open its contacts on a drop in
pressure. The low pressure control will automatically reset
itself with a rise in pressure.
The low pressure control is designed to cut-out (open) at
approximately 22 PSIG. It will automatically cut-in (close) at
approximately 50 PSIG.
Test for continuity using a VOM and if not as above,
replace the control.
Checking High Pressure Control
WARNING
High Voltage!
Disconnect all power before servicing or
installing. Multiple power sources may be present.
Failure to do so may cause property damage,
personal injury or death.
The high pressure control capillary senses the pressure in
the liquid or discharge line. If abnormally high condensing
SERVICING
14
pressures develop, the contacts of the control open,
breaking the control circuit before the compressor motor
overloads. This control is automatically reset.
1. Using an ohmmeter, check across terminals of
high pressure control, with wire removed. If not
continuous, the contacts are open.
2. Attach a gauge to the dill valve port on the base
valve.
With power ON:
WARNING
Line voltage now present.
3. Start the system and place a piece of cardboard in
front of the condenser coil, raising the condensing
pressure.
4. Check pressure at which the high pressure control
cuts-out.
If it cuts-out at 660 PSIG ± 10 PSIG, it is operating normally
(See causes for high head pressure in Service Problem
Analysis Guide). If it cuts out below this pressure range,
replace the control. The control should reset at 420 PSIG +
25 PSIG.
Checking Internal Overload
The Internal Overload prevents the compressor windings
from overheating. Reacts to both current and temperature
Cuts out 302°F. Cuts in between 146 and 176°F
1. Using an ohmmeter, test continuity between
terminals, If either winding test continuous, Internal
overload open.
2. Allow time for the compressor to cool, and overload
to close and retest.
Checking Capacitor
Capacitor, Run
A run capacitor is wired across the auxiliary and main
windings of a single phase permanent split capacitor
motor. The capacitors primary function is to reduce the line
current while greatly improving the torque characteristics
of a motor. This is accomplished by using the 90° phase
relationship between the capacitor current and voltage
in conjunction with the motor windings so that the motor
will give two phase operation when connected to a single
phase circuit. The capacitor also reduces the line current to
the motor by improving the power factor.
Capacitor, Start
Scroll Compressor Models
Hard start components are not required on Scroll
compressor equipped units due to a non-replaceable check
valve located in the discharge line of the compressor.
However hard start kits are available and may improve low
voltage starting characteristics.
This check valve closes o high side pressure to the
compressor after shut down allowing equalization through
the scroll anks. Equalization requires only about one or
two seconds during which time the compressor may turn
backwards.
Your unit comes with a 180-second anti-short cycle
to prevent the compressor from starting and running
backwards.
Models Equipped With A Hard Start Device
A start capacitor is wired in parallel with the run capacitor
to increase the starting torque. The start capacitor is of the
electrolytic type, rather than metallized polypropylene as
used in the run capacitor.
A switching device must be wired in series with the
capacitor to remove it from the electrical circuit after the
compressor starts to run. Not removing the start capacitor
will overheat the capacitor and burn out the compressor
windings.
These capacitors have a 15,000 ohm, 2 watt resistor
wired across its terminals. The object of the resistor
is to discharge the capacitor under certain operating
conditions, rather than having it discharge across the
closing of the contacts within the switching device such as
the Start Relay, and to reduce the chance of shock to the
servicer. See the Servicing Section for specic information
concerning capacitors.
Relay, Start
A potential or voltage type relay is used to take the start
capacitor out of the circuit once the motor comes up to
speed. This type of relay is position sensitive. The normally
closed contacts are wired in series with the start capacitor
and the relay holding coil is wired parallel with the start
winding. As the motor starts and comes up to speed, the
increase in voltage across the start winding will energize
the start relay holding coil and open the contacts to the
start capacitor.
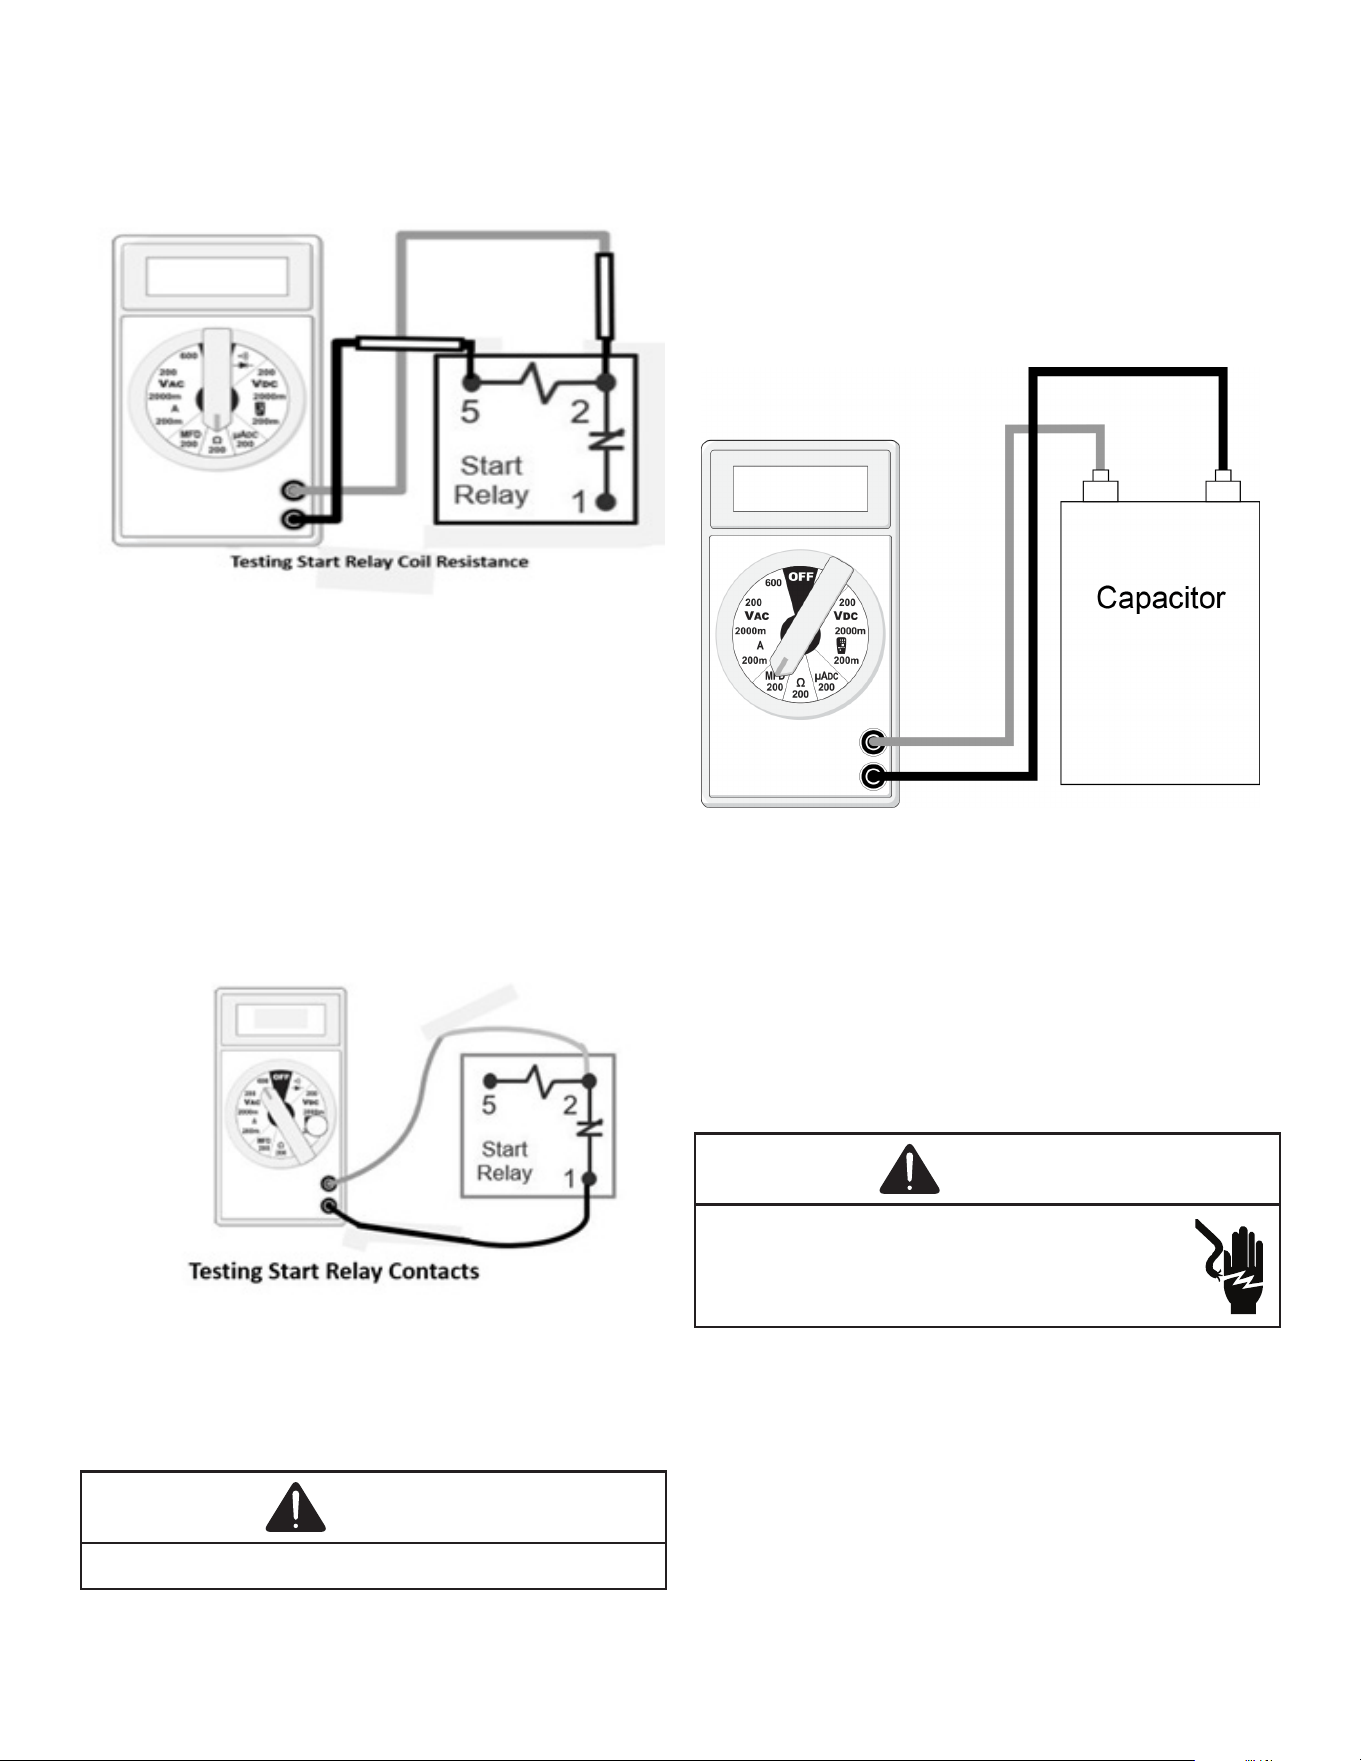
Testing Start Relay Kits
Testing Coil Relay
1. Disconnect power to unit
2. Disconnect all wiring
3. Measure the resistance of the coil between terminals
2 & 5
4. If the coil reads open or shorted, replace the relay
SERVICING
15
Testing Contacts Resistance
1. Disconnect power to unit
2. Disconnect all wiring to the start relay
3. Measure the resistance of the contacts between
terminals 1 & 2
4. If the contacts read open, replace the relay
Testing Contacts Voltage
1. With power on, provide a call for cool to energize the
compressor
2. With the compressor running, use a voltmeter to
measure the voltage between terminals 1 & 2
3. voltage reading of zero indicates that the relay’s
contacts are stuck, replace the relay
Two quick ways to test a capacitor are a resistance and a
capacitance check.
Capacitance Check (MFD)
WARNING
Discharge capacitor through a 20 to 30 OHM resistor before
handling.
1. Turn Power o to Unit
2. Discharge capacitor through a 20Ω - 30Ω resistor
3. Remove wires from capacitor
4. Use multi-meter check micro-farads (MFD) of the
capacitor.
5. Place leads from C – HERM
6. Place leads from C – FAN
7. Compare to capacitor rating label.
If the reading is within the tolerance listed on rating label
the capacitor is good.
If the reading is lower, the capacitor is bad and must be
replaced.
.
Testing Capacitance
Checking Fan And Blower Motor Windings
(PSC Motors)
The auto reset fan motor overload is designed to protect
the motor against high temperature and high amperage
conditions by breaking the common circuit within the motor,
similar to the compressor internal overload. However, heat
generated within the motor is faster to dissipate than the
compressor, allow at least 45 minutes for the overload to
reset, then retest.
WARNING
High Voltage!
Disconnect all power before servicing or
installing. Multiple power sources may be present.
Failure to do so may cause property damage,
personal injury or death.
1. Remove the motor leads from its respective
connection points and capacitor (if applicable).
2. Check the continuity between each of the motor
leads.
3. Touch one probe of the ohmmeter to the motor frame
(ground) and the other probe in turn to each lead.
If the windings do not test continuous or a reading is
obtained from lead to ground, replace the motor.
SERVICING
16
Checking EEM Motors
The EEM Motor is a one piece, fully encapsulated, 3 phase
brushless DC (single phase AC input) motor with ball
bearing construction. The EEM features an integral control
module.
NOTE: The GE TECMate will not operate the currently
used EEM motor.
1. Using a voltmeter, check for 230 volts to the motor
connections L and N. If 230 volts is present, proceed
to step 2. If 230 volts is not present, check the line
voltage circuit to the motor.
2. Using a voltmeter, check for 24 volts from terminal C
to either terminal 1, 2, 3, 4 or 5, depending on which
tap is being used, at the motor. If voltage is present,
proceed to step 3. If no voltage, check 24 volt circuit
to motor.
3. If voltage was present in steps 1 and 2, the motor
has failed and will need to be replaced.
NOTE: When replacing motor, ensure the belly band is
between the vents on the motor and the wiring has the
proper drip loop to prevent condensate from entering
the motor.
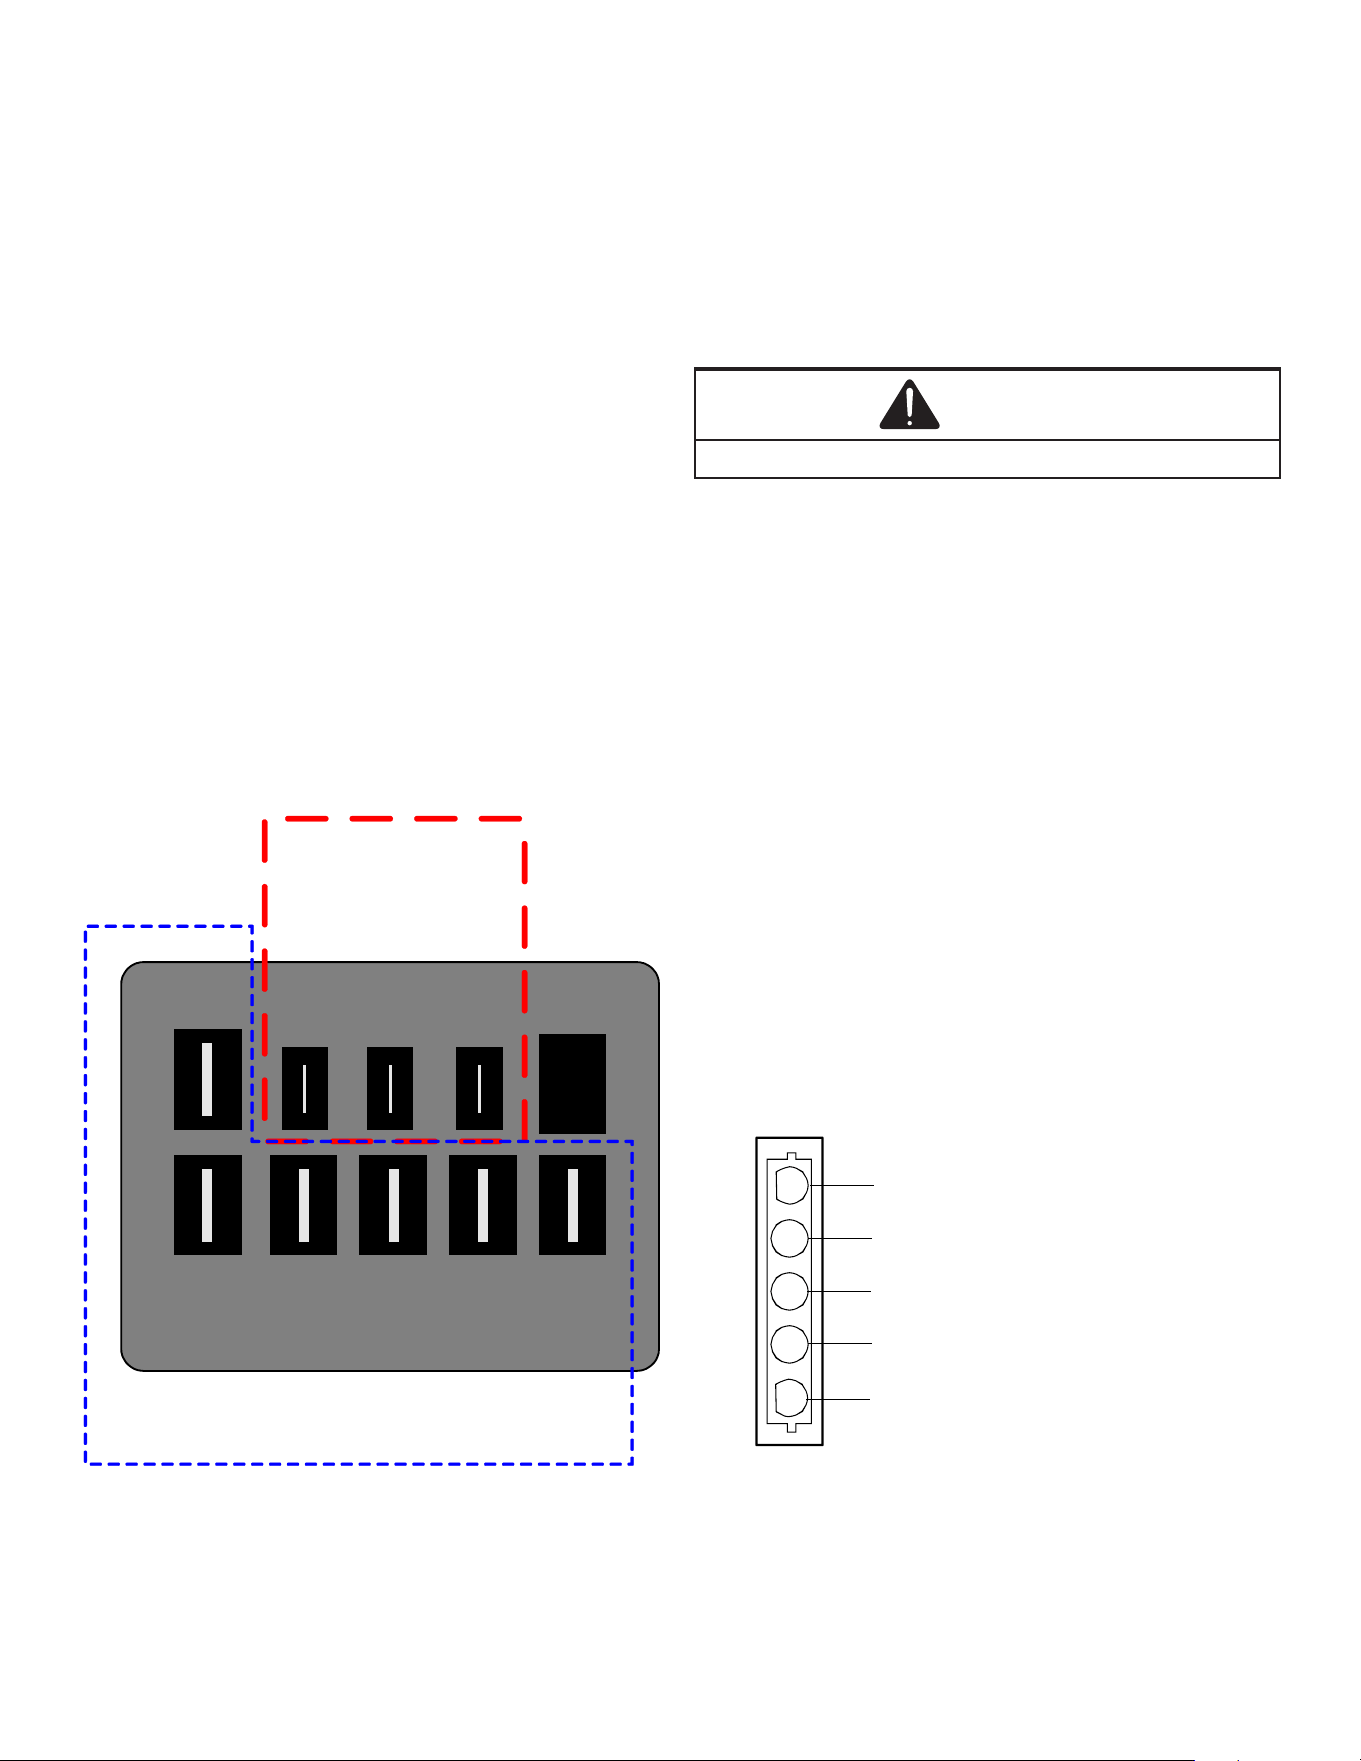
C
L G N
1 2
3
4
5
High Voltage
Connections
3/16"
Low Voltage Connections
1/4”
EEM Motor Connections
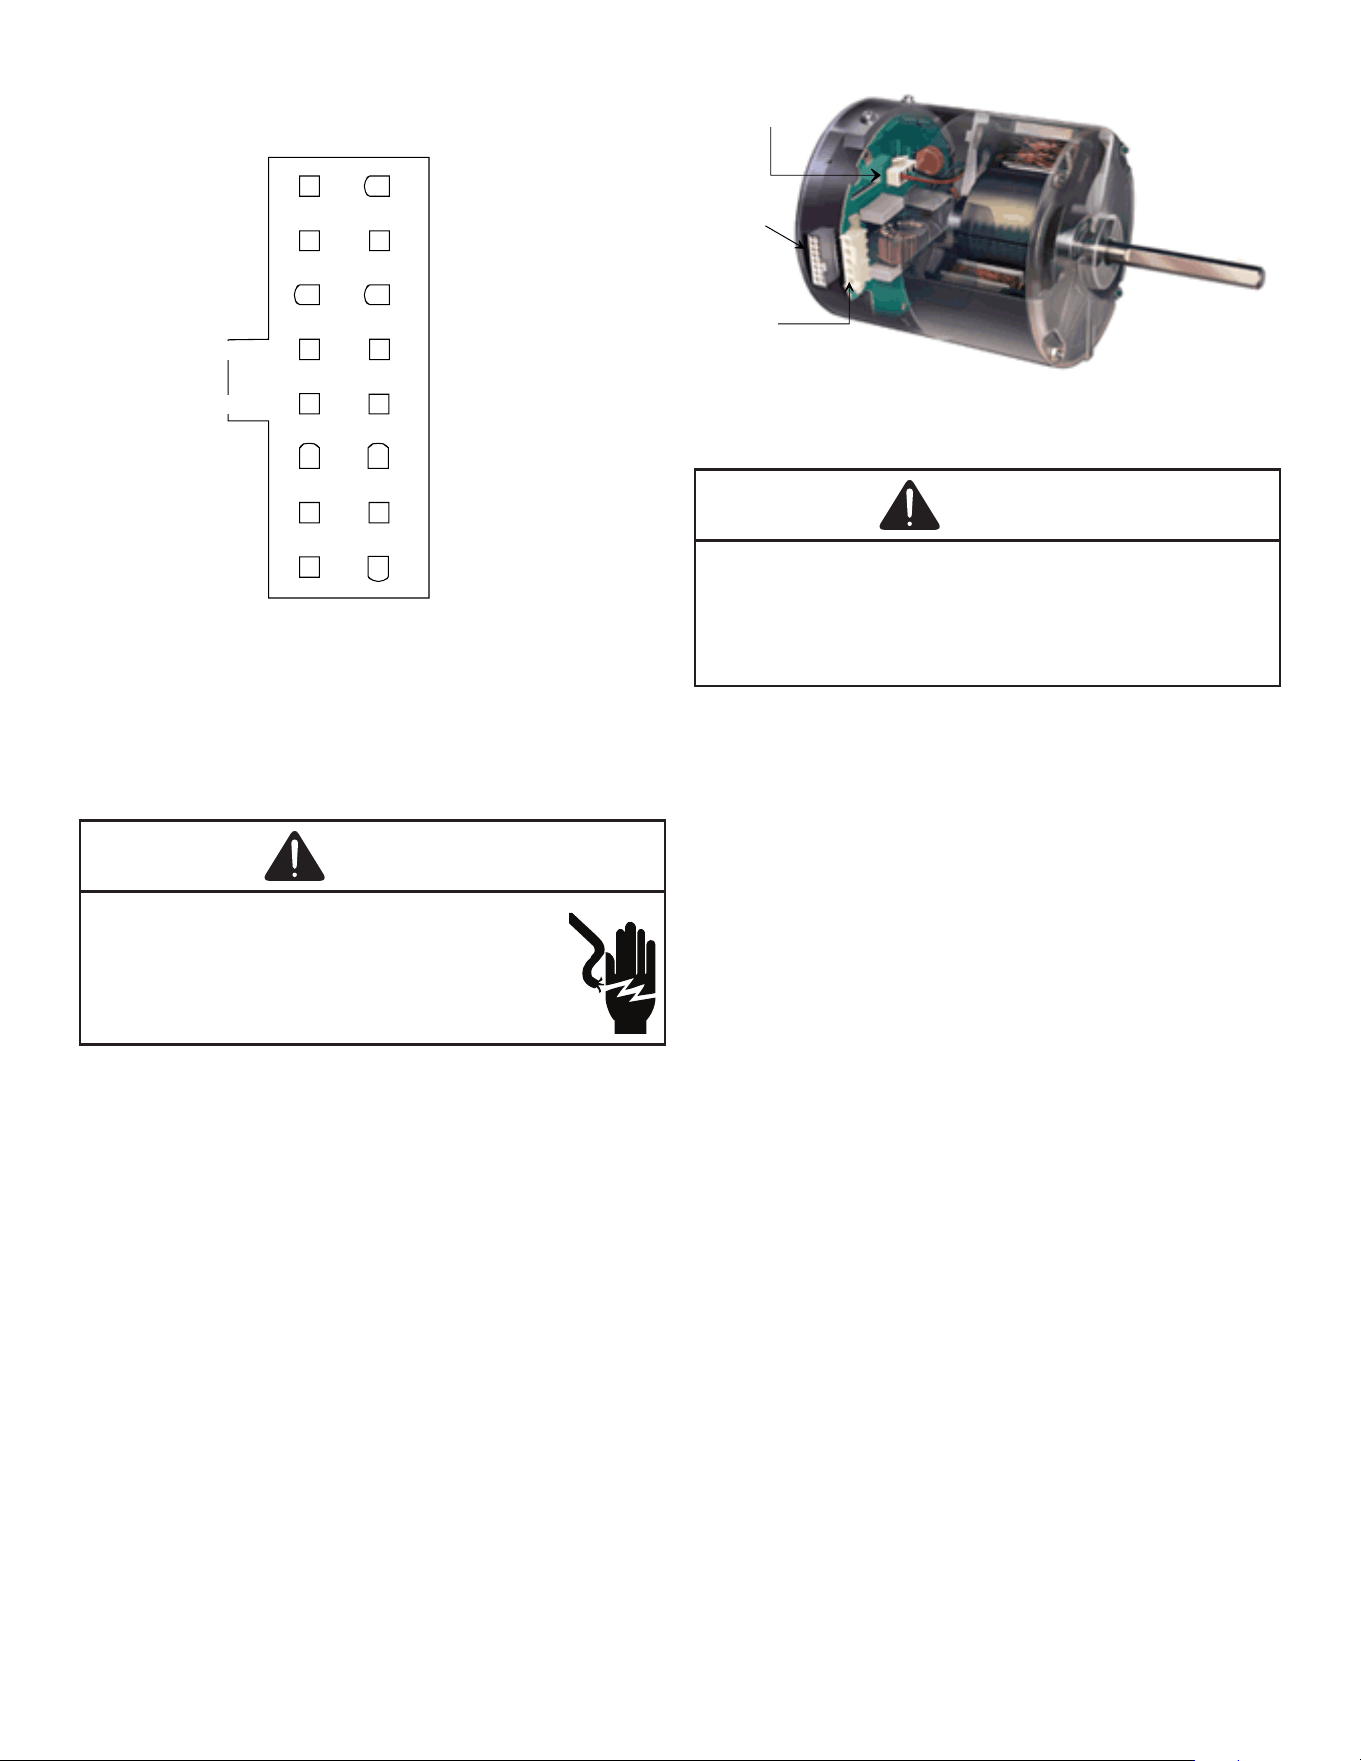
Checking ECM Motors
An ECM is an Electronically Commutated Motor which
oers many signicant advantages over PSC motors.
The ECM has near zero rotor loss, synchronous machine
operation, variable speed, low noise, and programmable
air ow. Because of the sophisticated electronics within
the ECM motor, some technicians are intimated by the
ECM motor; however, these fears are unfounded. GE/
Regal Beloit oers two ECM motor testers, and with a VOM
meter, one can easily perform basic troubleshooting on
ECM motors. An ECM motor requires power (line voltage)
and a signal (24 volts) to operate. The ECM motor stator
contains permanent magnet. As a result, the shaft feels
“rough” when turned by hand. This is a characteristic of the
motor, not an indication of defective bearings.
WARNING
Line voltage now present.
1. Disconnect the 5-pin connector from the motor.
2. Using a volt meter, check for line voltage at terminals
#4 & #5 at the power connector. If no voltage is
present:
3. Check the unit for incoming power.
4. Check the control board.
5. If line voltage is present, reinsert the 5-pin connector
and remove the 16-pin connector.
6. Check for signal (24 volts) at the transformer.
7. Check for signal (24 volts) from the thermostat to the
“G” terminal at the 16-pin connector.
8. Using an ohmmeter, check for continuity from the #1
& #3 (common pins) to the transformer neutral or “C”
thermostat terminal. If you do not have continuity, the
motor may function erratically. Trace the common
circuits, locate and repair the open neutral.
9. Set the thermostat to “Fan-On”. Using a voltmeter,
check for 24 volts between pin # 15 (G) and common.
10. Disconnect power to compressor. Set thermostat to
call for cooling. Using a voltmeter, check for 24 volts
at pin # 6 and or #14.
11. Set the thermostat to a call for heating. Using a
voltmeter, check for 24 volts at pin #2 and/or #11.
1
2
3
4
5
Lines 1 and 2 will be connected
for 12OVAC Power Connector
applications only
Gnd
AC Line Connection
AC Line Connection
}
SERVICING
17
11
1 9
2
3
4
5
6
7
8 16
15
14
13
12
10
OUT - OUT +
ADJUST +/-
G (FAN)
Y1 Y/Y2
COOL
EM Ht/W2
DELAY
24 Vac (R)
COMMON2
HEAT
W/W1
BK/PWM (SPEED)
COMMON1 O (REV VALVE)
16-PIN ECM HARNESS CONNECTOR
If you do not read voltage and continuity as described, the
problem is in the control or interface board, but not the
motor. If you register voltage as described, the ECM power
head is defective and must be replaced.
Checking ECM Motor Windings
WARNING
High Voltage!
Disconnect all power before servicing
or installing. Multiple power sources
may be present. Failure to do so may
cause property damage, personal injury
or death.
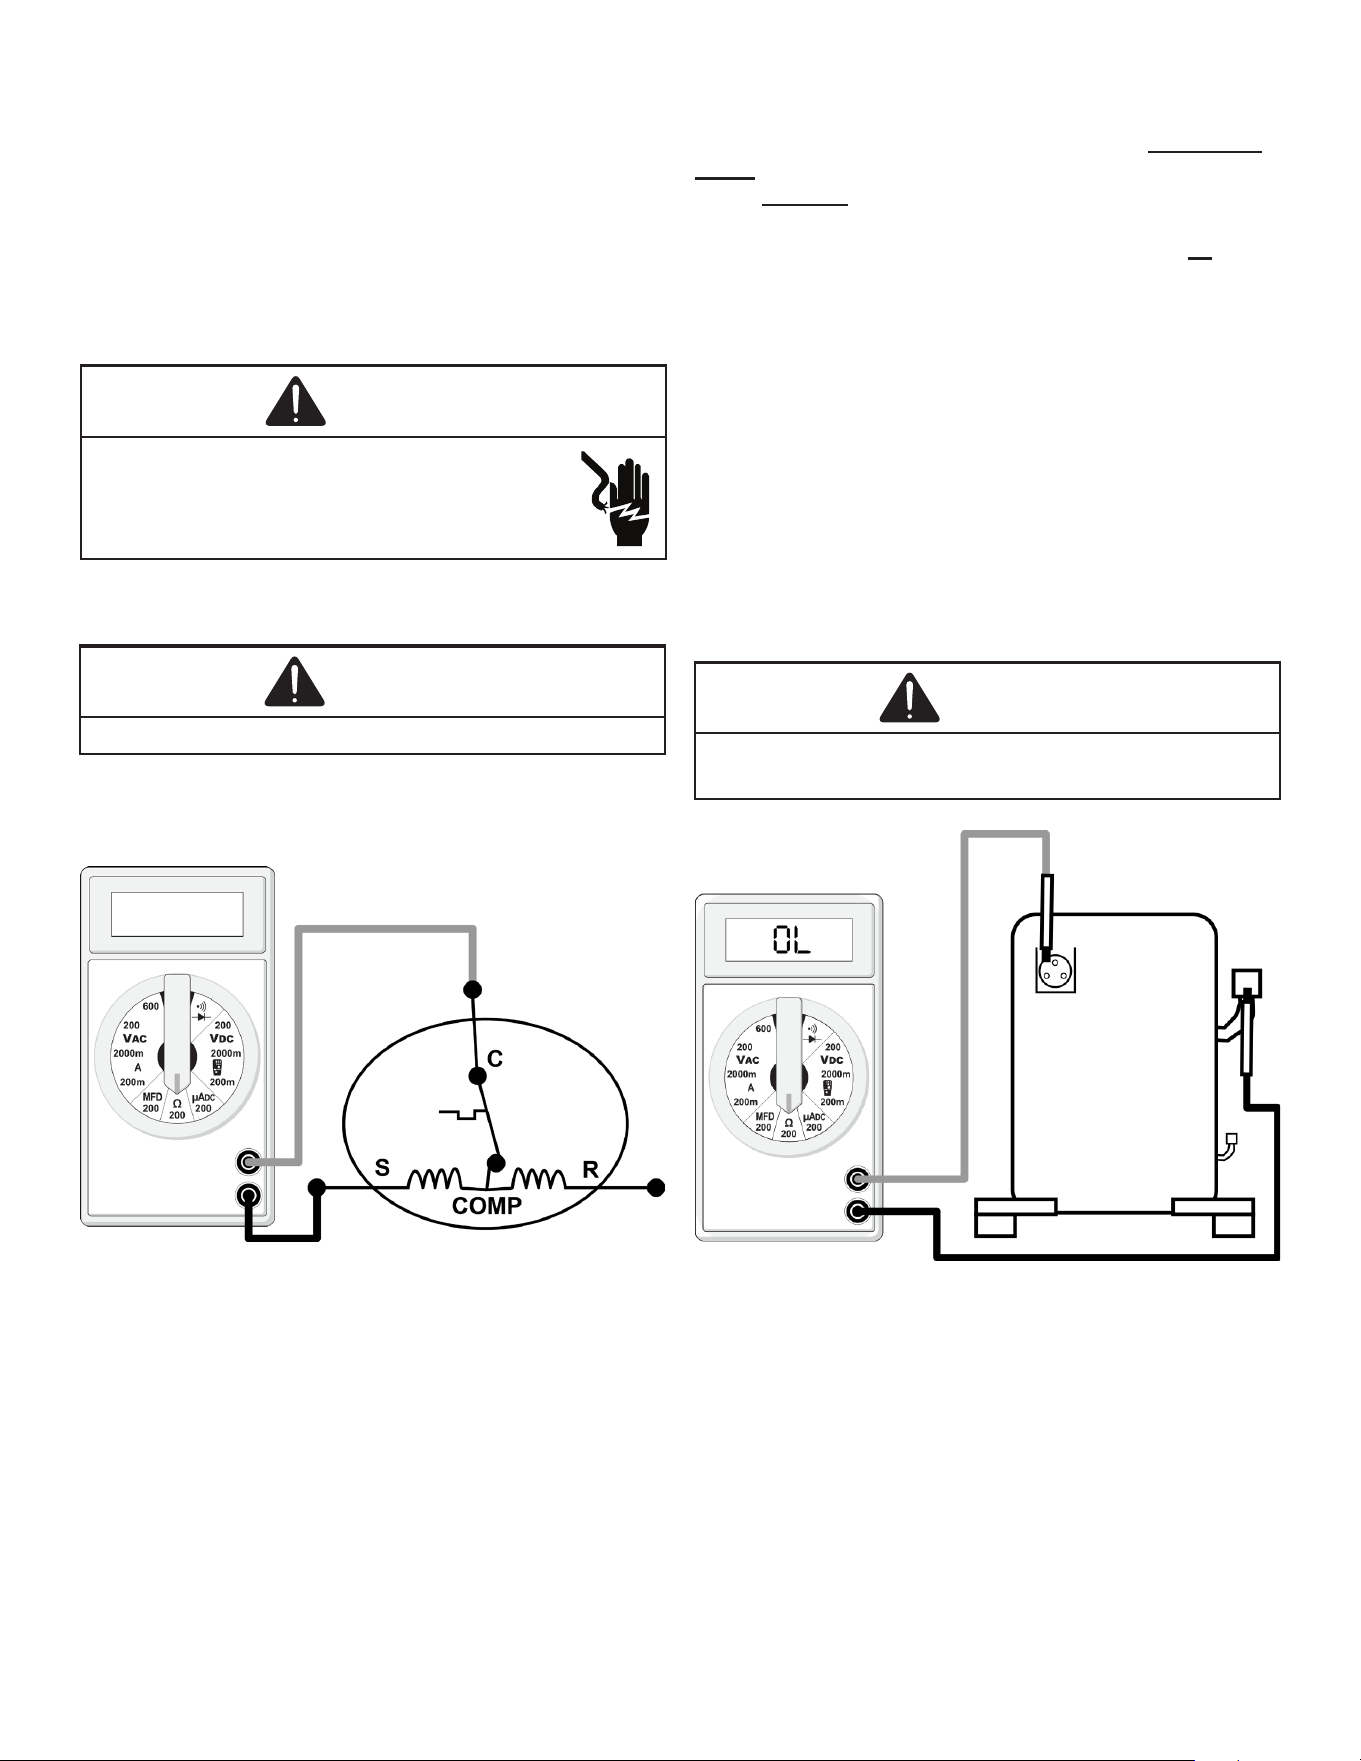
1. Disconnect the 5-pin and the 16-pin connectors from
the ECM power head.
2. Remove the 2 screws securing the ECM power head
and separate it from the motor.
3. Disconnect the 3-pin motor connector from the power
head and lay it aside.
4. Using an ohmmeter, check the motor windings for
continuity to ground (pins to motor shell). If the
ohmmeter indicates continuity to ground, the motor is
defective and must be replaced.
5. Using an ohmmeter, check the windings for continuity
(pin to pin). If no continuity is indicated, the thermal
limit (over load) device may be open. Allow motor to
cool and retest.
16-pin
connector
5-pin
connector
3-pin motor
connector
Checking Compressor
WARNING
Hermetic compressor electrical terminal venting can
be dangerous. When insulating material which supports
a hermetic compressor or electrical terminal suddenly
disintegrates due to physical abuse or as a result of an
electrical short between the terminal and the compressor
housing, the terminal may be expelled, venting the vapor and
liquid contents of the compressor housing and system.
If the compressor terminal PROTECTIVE COVER and
gasket (if required) are not properly in place and secured,
there is a remote possibility if a terminal vents, that the
vaporous and liquid discharge can be ignited, spouting
ames several feet, causing potentially severe or fatal
injury to anyone in its path.
This discharge can be ignited external to the compressor
if the terminal cover is not properly in place and if the
discharge impinges on a sucient heat source.
Ignition of the discharge can also occur at the venting
terminal or inside the compressor, if there is sucient
contaminant air present in the system and an electrical arc
occurs as the terminal vents.
Ignition cannot occur at the venting terminal without the
presence of contaminant air, and cannot occur externally
from the venting terminal without the presence of an
external ignition source.
Therefore, proper evacuation of a hermetic system is
essential at the time of manufacture and during servicing.
To reduce the possibility of external ignition, all open
ame, electrical power, and other heat sources should be
extinguished or turned o prior to servicing a system.
If the following test indicates shorted, grounded or open
windings, see procedure for the next steps to be taken.
Resistance Test
Each compressor is equipped with an internal overload.
The line break internal overload senses both motor
amperage and winding temperature. High motor
temperature or amperage heats the disc causing it to open,
SERVICING
18
breaking the common circuit within the compressor on
single phase units.
Heat generated within the compressor shell, usually due to
recycling of the motor, high amperage or insucient gas to
cool the motor, is slow to dissipate. Allow at least three to
four hours for it to cool and reset, then retest.
WARNING
High Voltage!
Disconnect all power before servicing or
installing. Multiple power sources may be present.
Failure to do so may cause property damage,
personal injury or death.
1. Remove the leads from the compressor terminals.
WARNING
See warnings before removing compressor terminal cover.
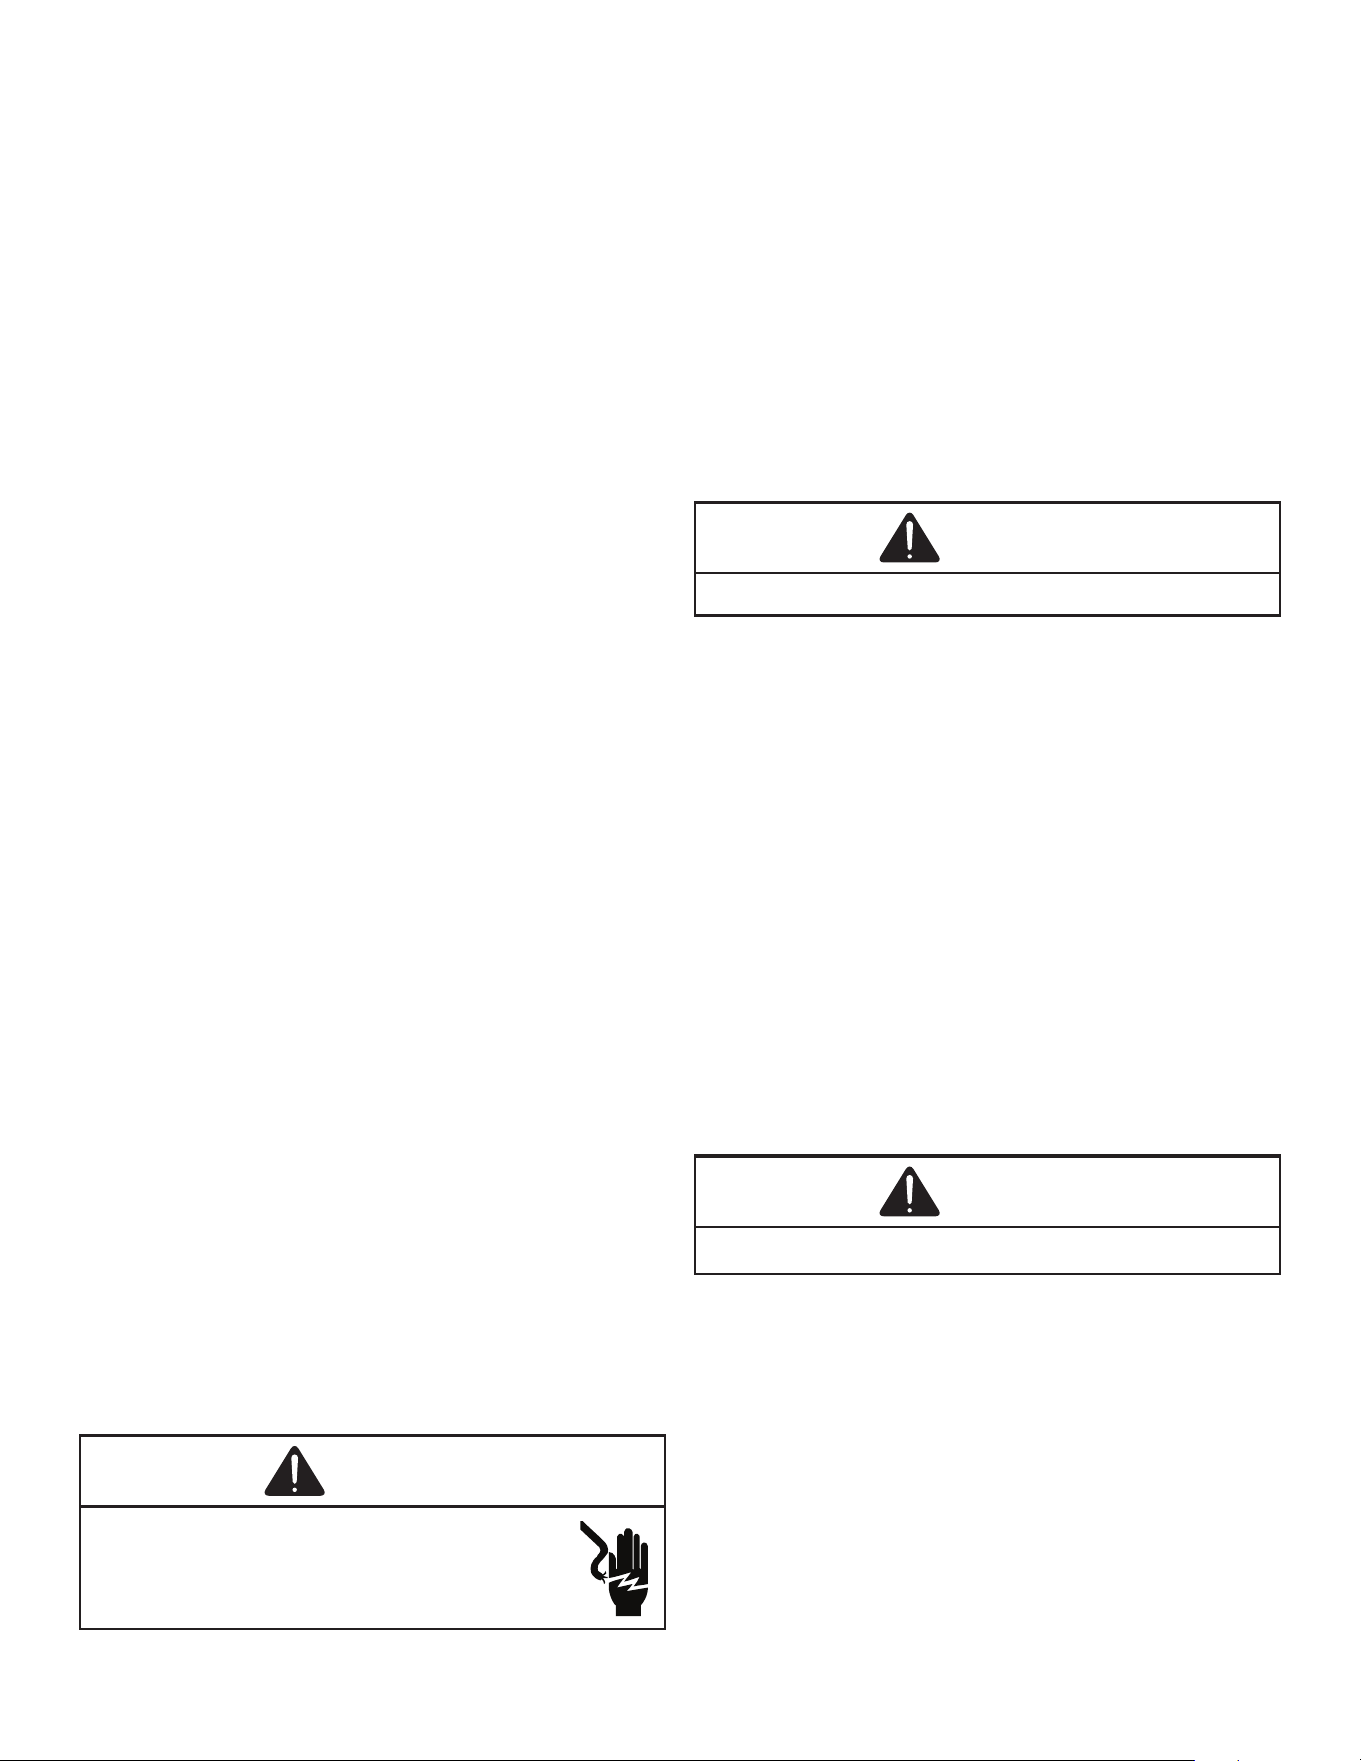
2. Using an ohmmeter, test continuity between
terminals S-R, C-R, and C-S.
Testing Compressor Windings
If either winding does not test continuous, replace the
compressor.
NOTE: If an open compressor is indicated, allow
ample time for the internal overload to reset before
replacing compressor.
Ground Test
If fuse, circuit breaker, ground fault protective device, etc.
has tripped, this is a strong indication that an electrical
problem exists and must be found and corrected. The
circuit protective device rating must be checked and its
maximum rating should coincide with that marked on the
equipment nameplate.
With the terminal protective cover in place, it is acceptable
to replace the fuse or reset the circuit breaker ONE TIME
ONLY to see if it was just a nuisance opening. If it opens
again, DO NOT continue to reset.
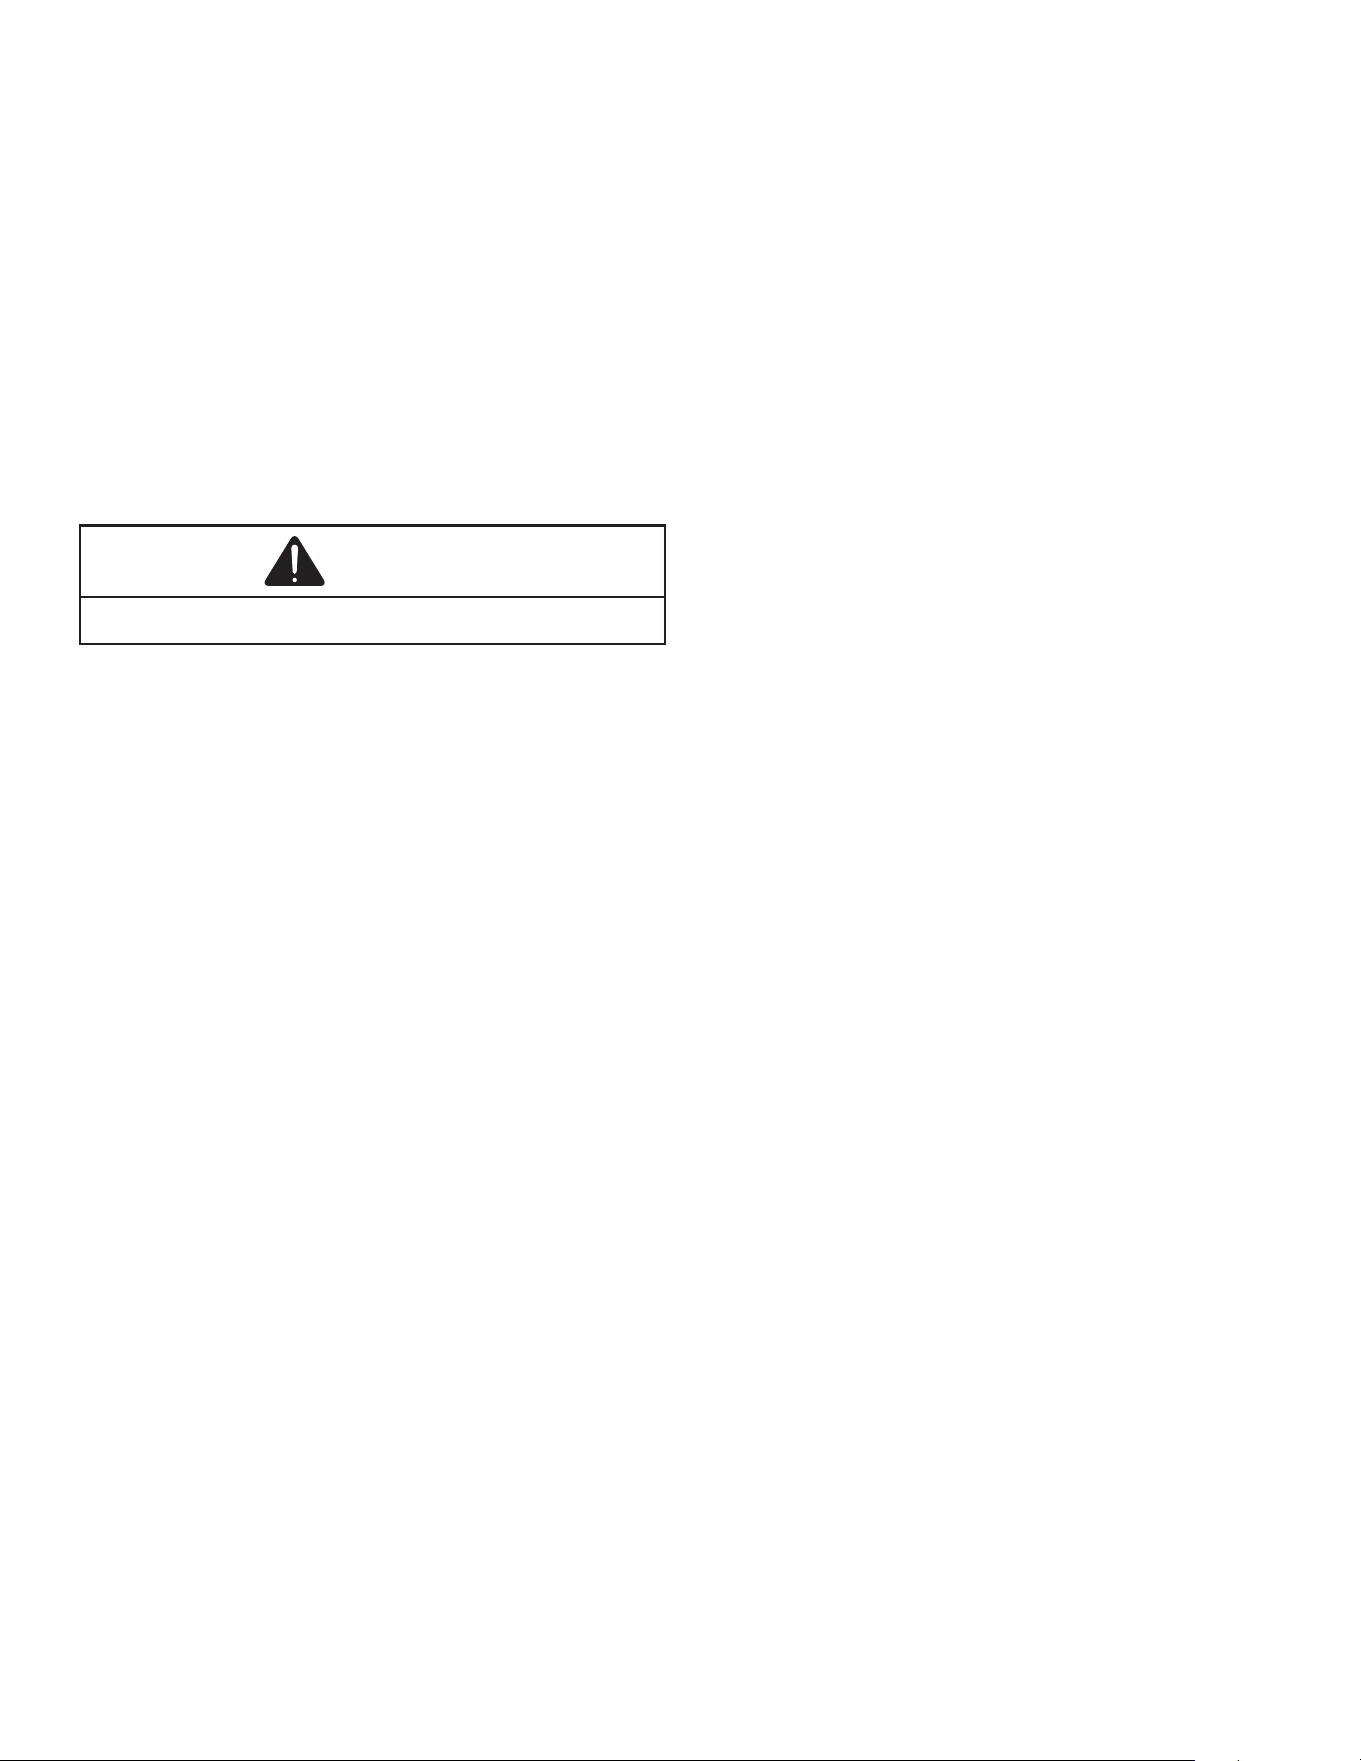
Disconnect all power to unit, making sure that all
power legs are open.
1. Carefully remove the compressor terminal protective
cover and inspect for loose leads or insulation breaks
in the lead wires.
2. Disconnect the three leads going to the compressor
terminals at the compressor or nearest point to the
compressor.
3. Check for a ground separately between each of the
three terminals and ground (such as an unpainted
tube on the compressor). If there is any reading of
continuity to ground on the meter, the compressor
should be considered defective.
4. If ground is indicated, replace the compressor.
WARNING
Damage can occur to the glass embedded terminals if the
leads are not properly removed. This can result in terminal
and hot oil discharging.
Compressor Ground Test
Unloader Test Procedure
(2 Stage Compressors Only)
A nominal 24-volt direct current coil activates the
compressor internal unloader solenoid. The input control
circuit voltage must be 18 to 28 volt ac. (remove) The
coil power requirement is 5 VA. The external electrical
connection is made with a molded plug assembly. This plug
contains a full wave rectier to supply direct current to the
unloader coil. The measured DC voltage at the connectors
in the plug should be 15 to 27 volt dc.
SERVICING
19
Unloader Test Procedure
If it is suspected that the unloader is not working, the
following methods may be used to verify operation.
1. Operate the system and measure compressor
amperage. Cycle the unloader ON and OFF at 10
second intervals. The compressor amperage should
increase when switching from part-load to full-load
and decrease when switching from full-load to part-
load. The percent change depends on the operating
conditions and voltage, but should be at least 25
percent.
2. If step one does not give the expected results, shut
unit o. Apply 18 to 28 volt ac to the unloader molded
plug leads and listen for a click as the solenoid pulls
in. Remove power and listen for another click as the
unloader returns to its original position.
3. If clicks can’t be heard, shut o power to the unit
and remove the control circuit molded plug from
the compressor and measure the unloader coil
resistance (connections on the compressor).
The solenoid coil should have continuity and not
be grounded or have innite resistance. If the
coil resistance is innite, zero, or grounded, the
compressor must be replaced.
4. Next check the molded plug.
A. Voltage check: Apply control voltage to the
plug wires (18 to 28 volt ac). The measured dc
voltage at the female connectors in the plug
should be around 15 to 27 vdc.
B. Resistance check: Measure the resistance from
the end of one molded plug lead to either of the
two female connectors in the plug. One of the
connectors should read close to zero ohms while
the other should read innity. Repeat with other
wire. The same female connector as before
should read zero while the other connector again
reads innity. Reverse polarity on the ohmmeter
leads and repeat. The female connector that
read innity previously should now read close to
zero ohms.
C. Replace plug if either of these test methods
doesn’t show the desired results.
Operation Test
If the voltage, capacitor, overload and motor winding test
fail to show the cause for failure:
WARNING
High Voltage!
Disconnect all power before servicing or
installing. Multiple power sources may be present.
Failure to do so may cause property damage,
personal injury or death.
1. Remove unit wiring from disconnect switch and wire
a test cord to the disconnect switch.
NOTE: The wire size of the test cord must equal the
line wire size and the fuse must be of the proper size
and type.
2. With the protective terminal cover in place, use the
three leads to the compressor terminals that were
disconnected at the nearest point to the compressor
and connect the common, start and run clips to the
respective leads.
3. Connect good capacitors of the right MFD and
voltage rating into the circuit as shown.
4. With power ON, close the switch.
WARNING
Line voltage now present.
A. If the compressor starts and continues to run,
the cause for failure is somewhere else in the
system.
B. If the compressor fails to start - replace.
Locked Rotor Test
If fuse, circuit breaker, ground fault protective device, etc.
has tripped, this is a strong indication that an electrical
problem exists and must be found and corrected. The
circuit protective device rating must be checked and its
maximum rating should coincide with that marked on the
equipment nameplate.
Before checking for locked rotor, the compressor terminals
should be checked for open windings (see Resistance Test)
and the run capacitor and start capacitor (if used) should
be checked thoroughly (see Checking Capacitor).
With power ON:
WARNING
Line voltage now present.
1. Check the serial data plate for the compressor locked
rotor amps (LRA) rating.
2. Using an ampmeter, measure the amperage reading
for the run and common wires to the compressor.
Since the compressor motor overload will likely
trip soon after drawing locked rotor amps, this
measurement should be taken as soon as the
compressor starts.
3. If the amperage reading roughly equals the
compressor LRA rating and all other checks have
been completed, locked rotor amps has been
veried.
SERVICING
20
Testing crankcase heater
NOTE: Not all compressors use crankcase heaters.
The crankcase heater must be energized a minimum of
four (4) hours before the condensing unit is operated.
Crankcase heaters are used to prevent migration or
accumulation of refrigerant in the compressor crankcase
during the o cycles and prevents liquid slugging or oil
pumping on start up.
A crankcase heater will not prevent compressor damage
due to a oodback or over charge condition.
WARNING
Disconnect ALL power before servicing.
1. Disconnect the heater lead in wires.
2. Using an ohmmeter, check heater continuity - should
test continuous. If not, replace.
Checking Crankcase Heater Thermostat
NOTE: Not all models with crankcase heaters will have
a crankcase heater thermostat.
1. Install a thermocouple type temperature test lead on
the discharge line adjacent to the crankcase heater
thermostat.
2. Check the temperature at which the control closes its
contacts by lowering the temperature of the control.
The crankcase heater thermostat should close at
67°F ± 5°F.
3. Check the temperature at which the control opens
its contacts by raising the temperature of the control.
The crankcase heater thermostat should open at
85°F ± 5°F.
4. If not as above, replace control.
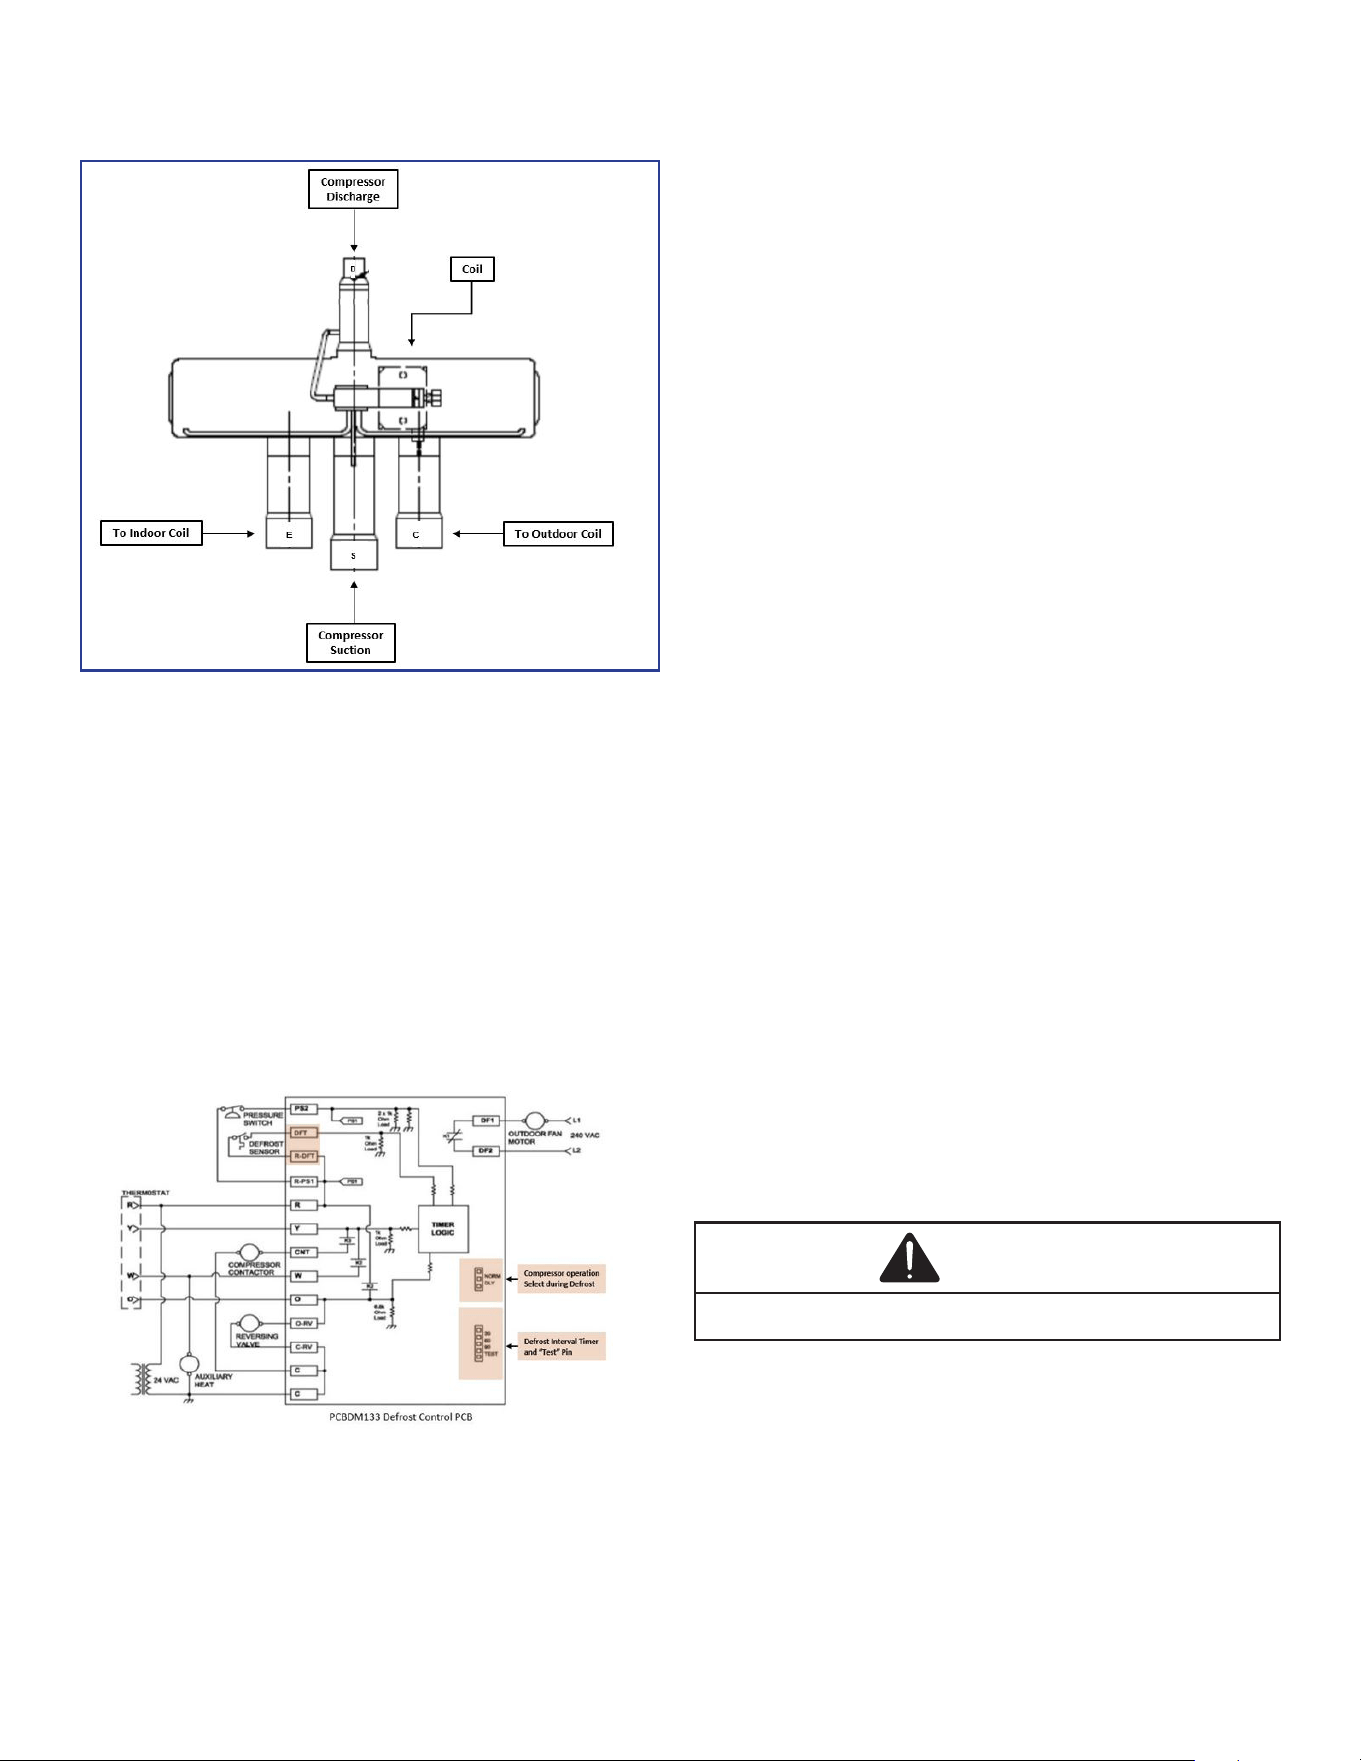
Checking Reversing Valve And Solenoid
Reversing valve used in heat pumps could potentially leak
internally. Discharge gases can leak into the suction inside
the valve. Compound gages will give the same symptoms
as bad compressor valves or broken scroll anks. The
temperature between true suction and the suction line after
the valve should not be greater than 4 degrees. Note: The
center tube is always the suction line and should be cold.
Troubleshooting the Reversing Valve for Electri-
cal Failure
1. Place unit into the cooling mode. Test for 24 volts at
the solenoid. If there is no voltage present at coil,
check the control voltage.
2. If voltage is present, loosen the nut on the top of
the coil. Remove the coil, there should be slight
resistance.
3. If the slight resistance is felt, remove the coil. As you
remove the coil listen carefully, an audible click should
be detected. The clicking is due to the movement
of the pilot valve plunger. The absence of a clicking
sound indicates the plunger is stuck.
Troubleshooting Mechanical Failures on a Revers-
ing Valve by Pressure
1. Troubleshooting the reversing valve can be done by
pressure and touch.
2. Raise the head pressure. In the cooling mode block
the fan exhaust. Once head pressure has been
raised, cycle between cooling and heating and see if
the piston can be freed.
Troubleshooting Mechanical Failures on a Revers-
ing Valve byTemperature
1. When operating properly the valve contains refrigerant
gases at certain temperatures.
2. The discharge line should be the same temperature
after the valves discharge line.
3. The true suction should be the same as the suction
line after the valve. If there is a 4-degree dierence,
valve is leaking
When stuck in the mid-position, part of the discharge gas
from the compressor is directed back to the suction side,
resulting in excessively high suction pressure. An increase
in the suction line temperature through the reversing
valve can also be measured. Check operation of the valve
by starting the system and switching the operation from
COOLING to HEATING cycle.
If the valve fails to change its position, test the voltage
(24V) at the valve coil terminals, while the system is on the
COOLING cycle.
If voltage is registered at the coil, tap the valve body lightly
while switching the system from HEATING to COOLING,
etc. If this fails to cause the valve to switch positions,
remove the coil connector cap and test the continuity of
the reversing valve solenoid coil. If the coil does not test
continuous - replace it. If the coil test continuous and 24
volts is present at the coil terminals, the valve is inoperative
- replace it.
SERVICING
21
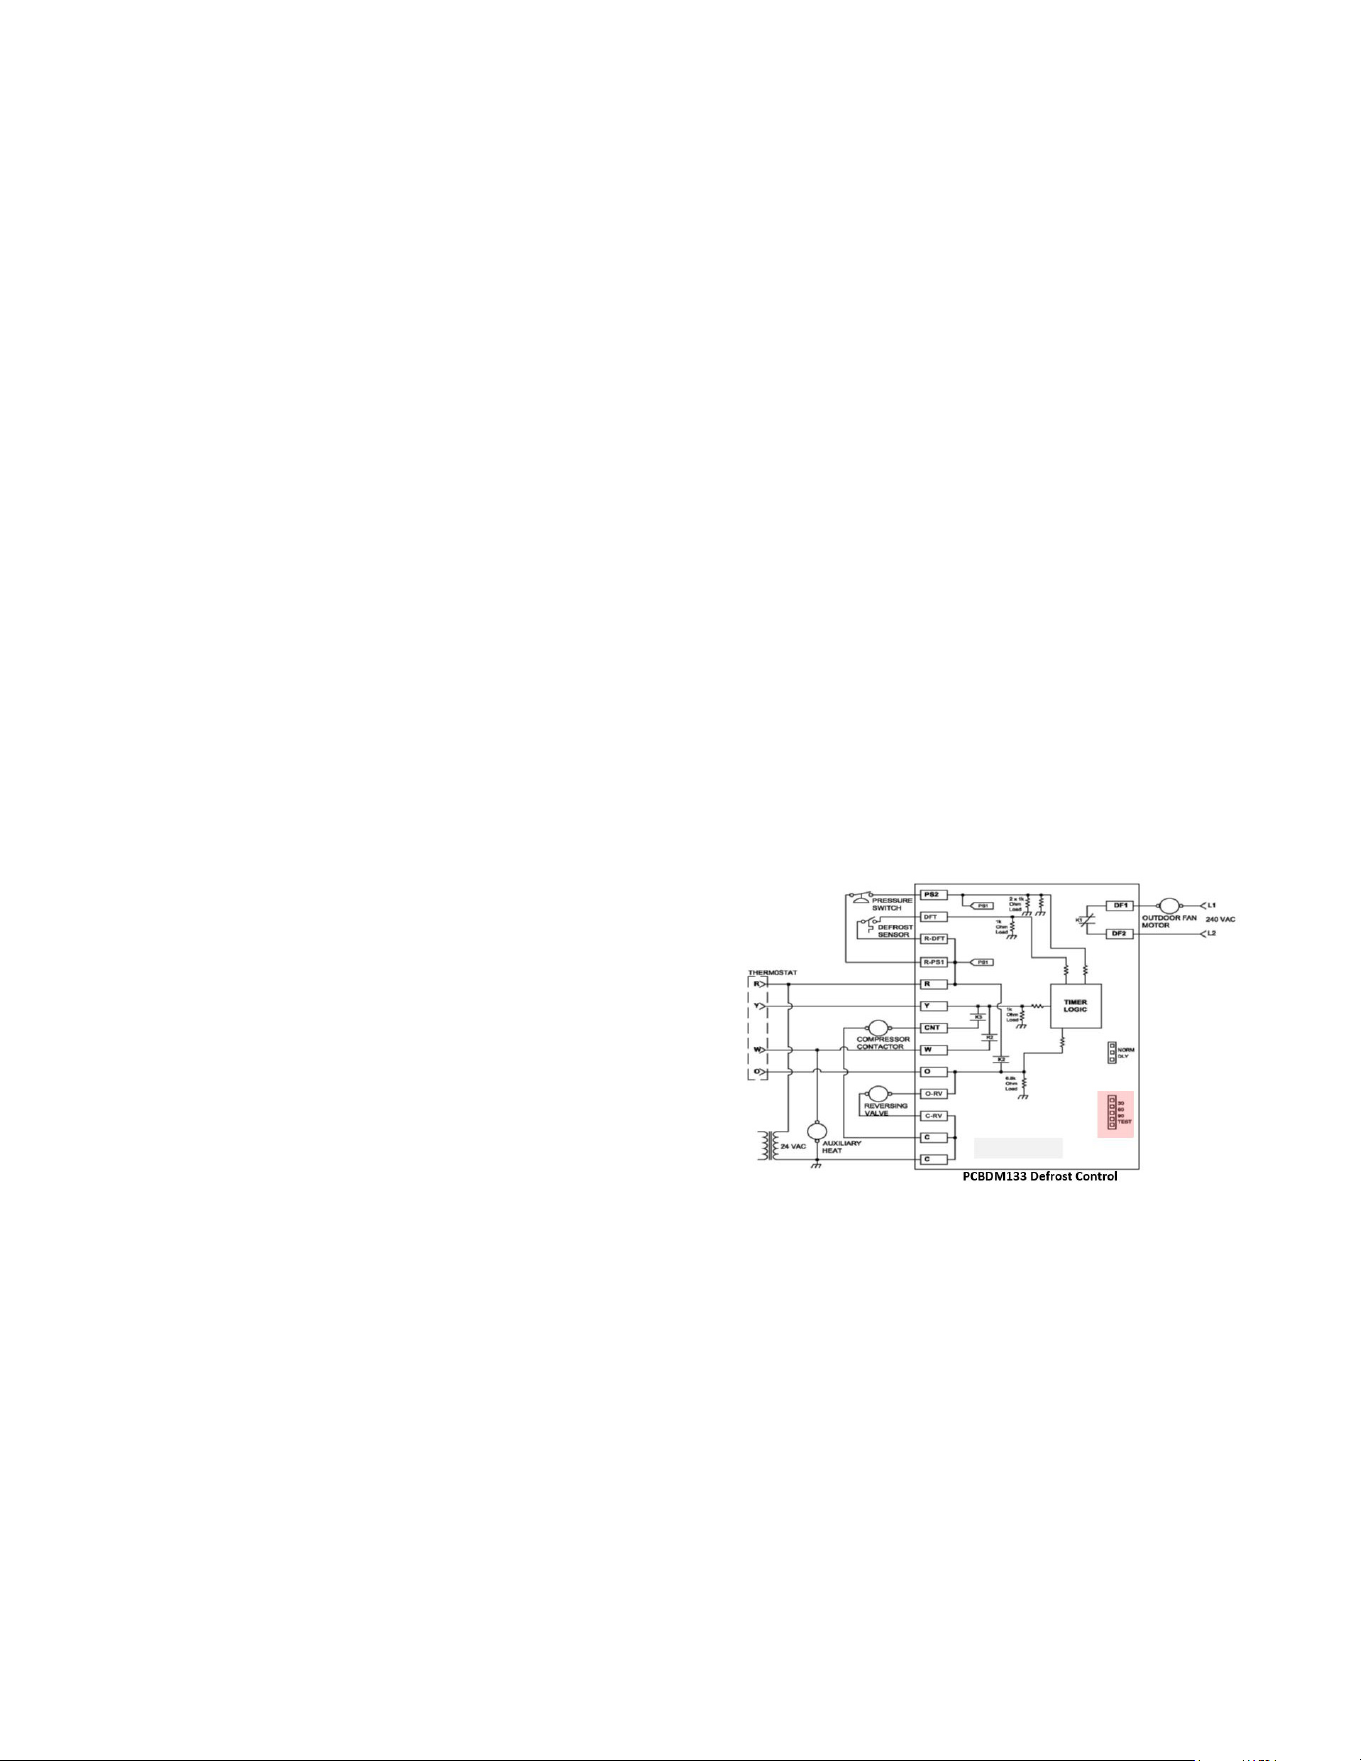
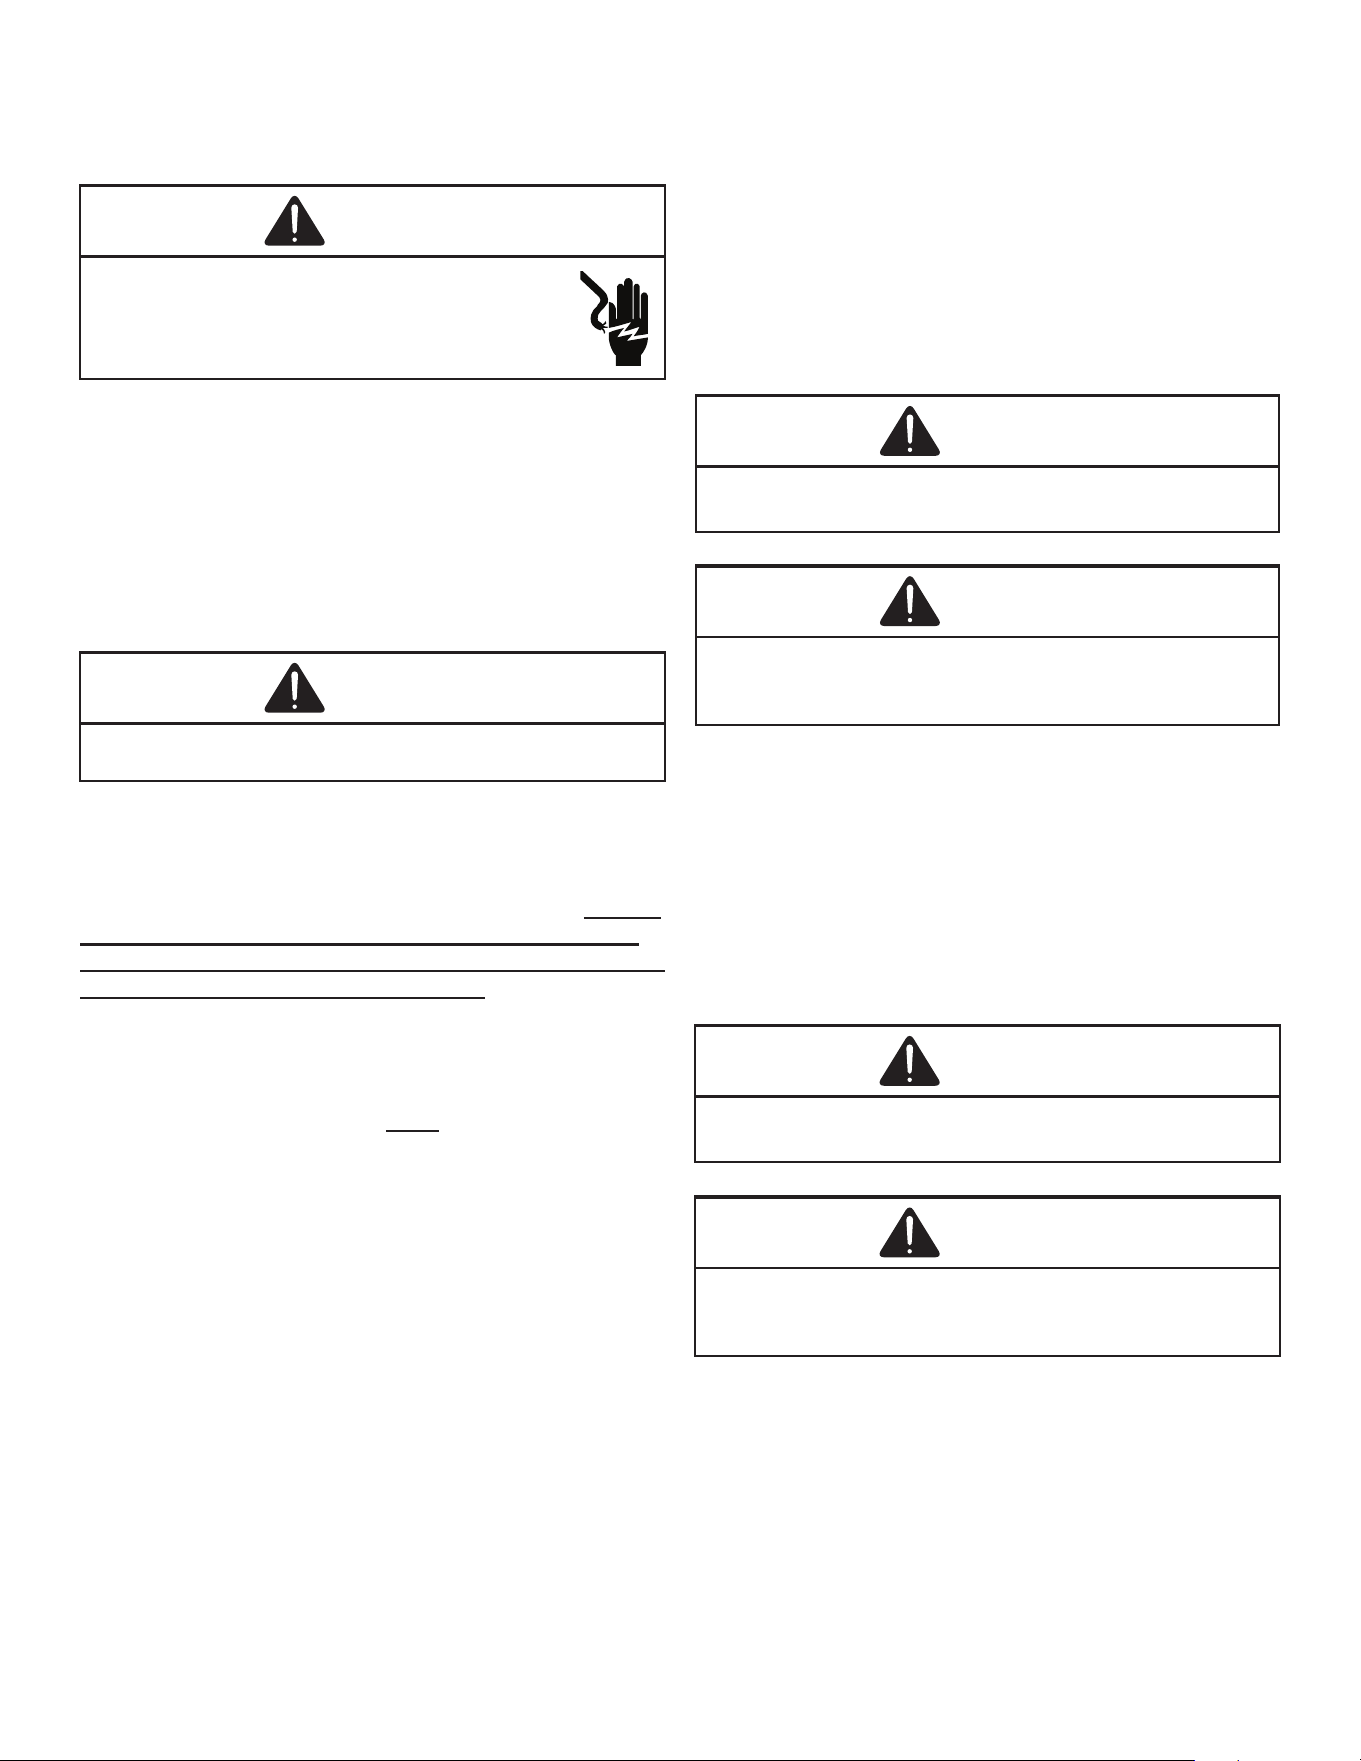
Testing Defrost Control
NOTE: PCBDM133 defrost control has a three (3)
minute compressor o cycle delay.
NOTE: The PCBDM133 defrost control is shipped from
the factory with the compressor delay option selected.
This will de-energize the compressor contactor for 30
seconds on defrost initiation and defrost termination.
If the jumper is set to Normal, the compressor will
continue to run during defrost initiation and defrost
termination. The control will also ignore the low
pressure switch connected to R-PS1 and PS2 for 5
minutes upon defrost initiation and 5 minutes after
defrost termination.
To check the defrost control for proper sequencing,
proceed as follows: With power ON; unit not running.
1. Jumper defrost thermostat by placing a jumper wire
across the terminals “DFT” and “R”/” R-DFT” at
defrost control board.
2. Remove jumper from timer pins and jump across test
pins on defrost control board. NOTE: Do not use
screwdriver or eld supplied jumper to test the
control.
3. Set thermostat to call for heating. System should go
into defrost within 21 seconds.
4. Immediately remove jumper from test pins.
5. Using VOM check for voltage across terminals “C &
O”. Meter should read 24 volts.
6. Using VOM check for voltage across fan terminals
DF1 and DF2 on the board. You should read line
voltage (208-230 VAC) indicating the relay is open in
the defrost mode.
7. Using VOM check for voltage across “W”/”W2” & “C”
terminals on the board. You should read 24 volts.
8. If not as above, replace control board.
9. Set thermostat to o position and disconnect power.
Remove jumper from defrost thermostat and replace
timer jumper to the desired defrost time.
NOTE: Remove jumper across defrost thermostat
before returning system to service.
Testing Defrost Thermostat
1. Install a thermocouple type temperature test lead on
the tube adjacent to the defrost control. Insulate the
lead point of contact.
2. Check the temperature at which the control closes its
contacts by lowering the temperature of the control.
The defrost control should close at approximately
30°F.
3. Check the temperature at which the control opens
its contacts by raising the temperature of the control.
The defrost control should open at approximately
60°F.
4. If not as above, replace control.
Checking Heater Limit Control(s)
(Optional Electric Heaters)
Each individual heater element is protected with an
automatic rest limit control connected in series with each
element to prevent overheating of components in case
of low airow. This limit control will open its circuit at
approximately 150°F. to 160°F and close at approximately
110°F.
WARNING
Disconnect ALL power before servicing.
1. Remove the wiring from the control terminals.
2. Using an ohmmeter test for continuity across the
normally closed contacts. No reading indicates the
control is open - replace if necessary. Make sure the
limits are cool before testing.
IF FOUND OPEN - REPLACE - DO NOT WIRE AROUND.
Checking Heater Elements
Optional electric heaters may be added, in the quantities
shown in the spec sheet for each model unit, to provide
electric resistance heating. Under no condition shall more
heaters than the quantity shown be installed.
SERVICING
22
WARNING
High Voltage!
Disconnect all power before servicing or
installing. Multiple power sources may be present.
Failure to do so may cause property damage,
personal injury or death.
1. Disassemble and remove the heating element(s).
2. Visually inspect the heater assembly for any breaks
in the wire or broken insulators.
3. Using an ohmmeter, test the element for continuity -
no reading indicates the element is open. Replace as
necessary.
Refrigeration Repair Practice
DANGER
Always remove the refrigerant charge in a proper manner
before applying heat to the system.
These models use the FasTest Access Fitting System,
with a saddle that is either soldered to the suction and
liquid lines or is fastened with a locking nut to the access
tting box (core) and then screwed into the saddle. Do not
remove the core from the saddle until the refrigerant
charge has been removed. Failure to do so could result
in property damage or personal injury.
When installing a new core or reinstalling the core after
removal, it is very important to note that before inserting
the core into the saddle, the core and saddle must be
free of debris and the “O” Ring must have a thin coating
of refrigerant oil applied to it. The oil is to prevent the “O”
Ring from being deformed when the core is tightened
completely. The core should be torqued to 8 ft. lb.
When repairing the refrigeration system:
1. Never open a system that is under vacuum. Air and
moisture will be drawn in.
2. Plug or cap all openings.
3. Remove all burrs and clean the brazing surfaces of
the tubing with sand cloth or paper. Brazing materials
do not ow well on oxidized or oily surfaces.
4. Clean the inside of all new tubing to remove oils and
pipe chips.
5. When brazing, sweep the tubing with dry nitrogen
to prevent the formation of oxides on the inside
surfaces.
6. Complete any repair by replacing the liquid line drier
in the system, evacuate and charge.
At any time the system has been open for repair, the
factory installed liquid line lter drier must be replaced.
Brazing Materials
Copper to Copper Joints - Sil-Fos used without ux
(alloy of 15% silver, 80% copper, and 5% phosphorous).
Recommended heat 1400°F.
Copper to Steel Joints - Silver Solder used without
a ux (alloy of 30% silver, 38% copper, 32% zinc).
Recommended heat - 1200°F.
Standing Pressure Test (Recommended Before
System Evacuation)
WARNING
To avoid the risk of fire or explosion, never use oxygen,
high pressure air or flammable gases for leak testing of a
refrigeration system.
WARNING
To avoid possible explosion, the line from the nitrogen
cylinder must include a pressure regulator and a pressure
relief valve. The pressure relief valve must be set to open at
no more than 450 PSIG.
Using dry nitrogen, pressurize the system to 450 PSIG.
Allow the pressure to stabilize and hold for 15 minutes
(minimum). If the pressure does not drop below 450 PSIG,
the system is considered leak free. Proceed to system
evacuation using the Deep Vacuum Method. If after 15
minutes the pressure drops below 450 PSIG, follow the
procedure outlined below to identify system leaks. Repeat
the Standing Pressure Test.
Leak Testing (nitrogen or nitrogen-traced)
WARNING
To avoid the risk of fire or explosion, never use oxygen,
high pressure air or flammable gases for leak testing of a
refrigeration system.
WARNING
To avoid possible explosion, the line from the nitrogen
cylinder must include a pressure regulator and a pressure
relief valve. The pressure relief valve must be set to open at
no more than 450 PSIG.
Leak test the system using dry nitrogen and soapy
water to identify leaks. If you prefer to use an electronic
leak detector, charge the system to 10 PSIG with the
appropriate system refrigerant (See Serial Data Plate
for refrigerant identication). Using dry nitrogen, nish
charging the system to 450 PSIG. Apply the leak detector
to all suspect areas. When leaks are discovered, repair
the leaks, and repeat the pressure test. If leaks have been
eliminated proceed to system evacuation.
SERVICING
23
System Evacuation
Condensing unit liquid and suction valves are closed to
contain the charge within the unit. The unit is shipped with
the valve stems closed and caps installed. Do not open
valves until the system is evacuated.
WARNING
REFRIGERANT UNDER PRESSURE!
Failure to follow proper procedures may cause property
damage, personal injury or death.
NOTE: Scroll compressors should never be used
to evacuate or pump down a heat pump or air
conditioning system.
CAUTION
Prolonged operation at suction pressures less than 20
PSIG for more than 5 seconds will result in overheating of
the scrolls and permanent damage to the scroll tips, drive
bearings and internal seal.
LOW SIDE
GAUGE
AND VALVE
HIGH SIDE
GAUGE
AND VALVE
Evacuation
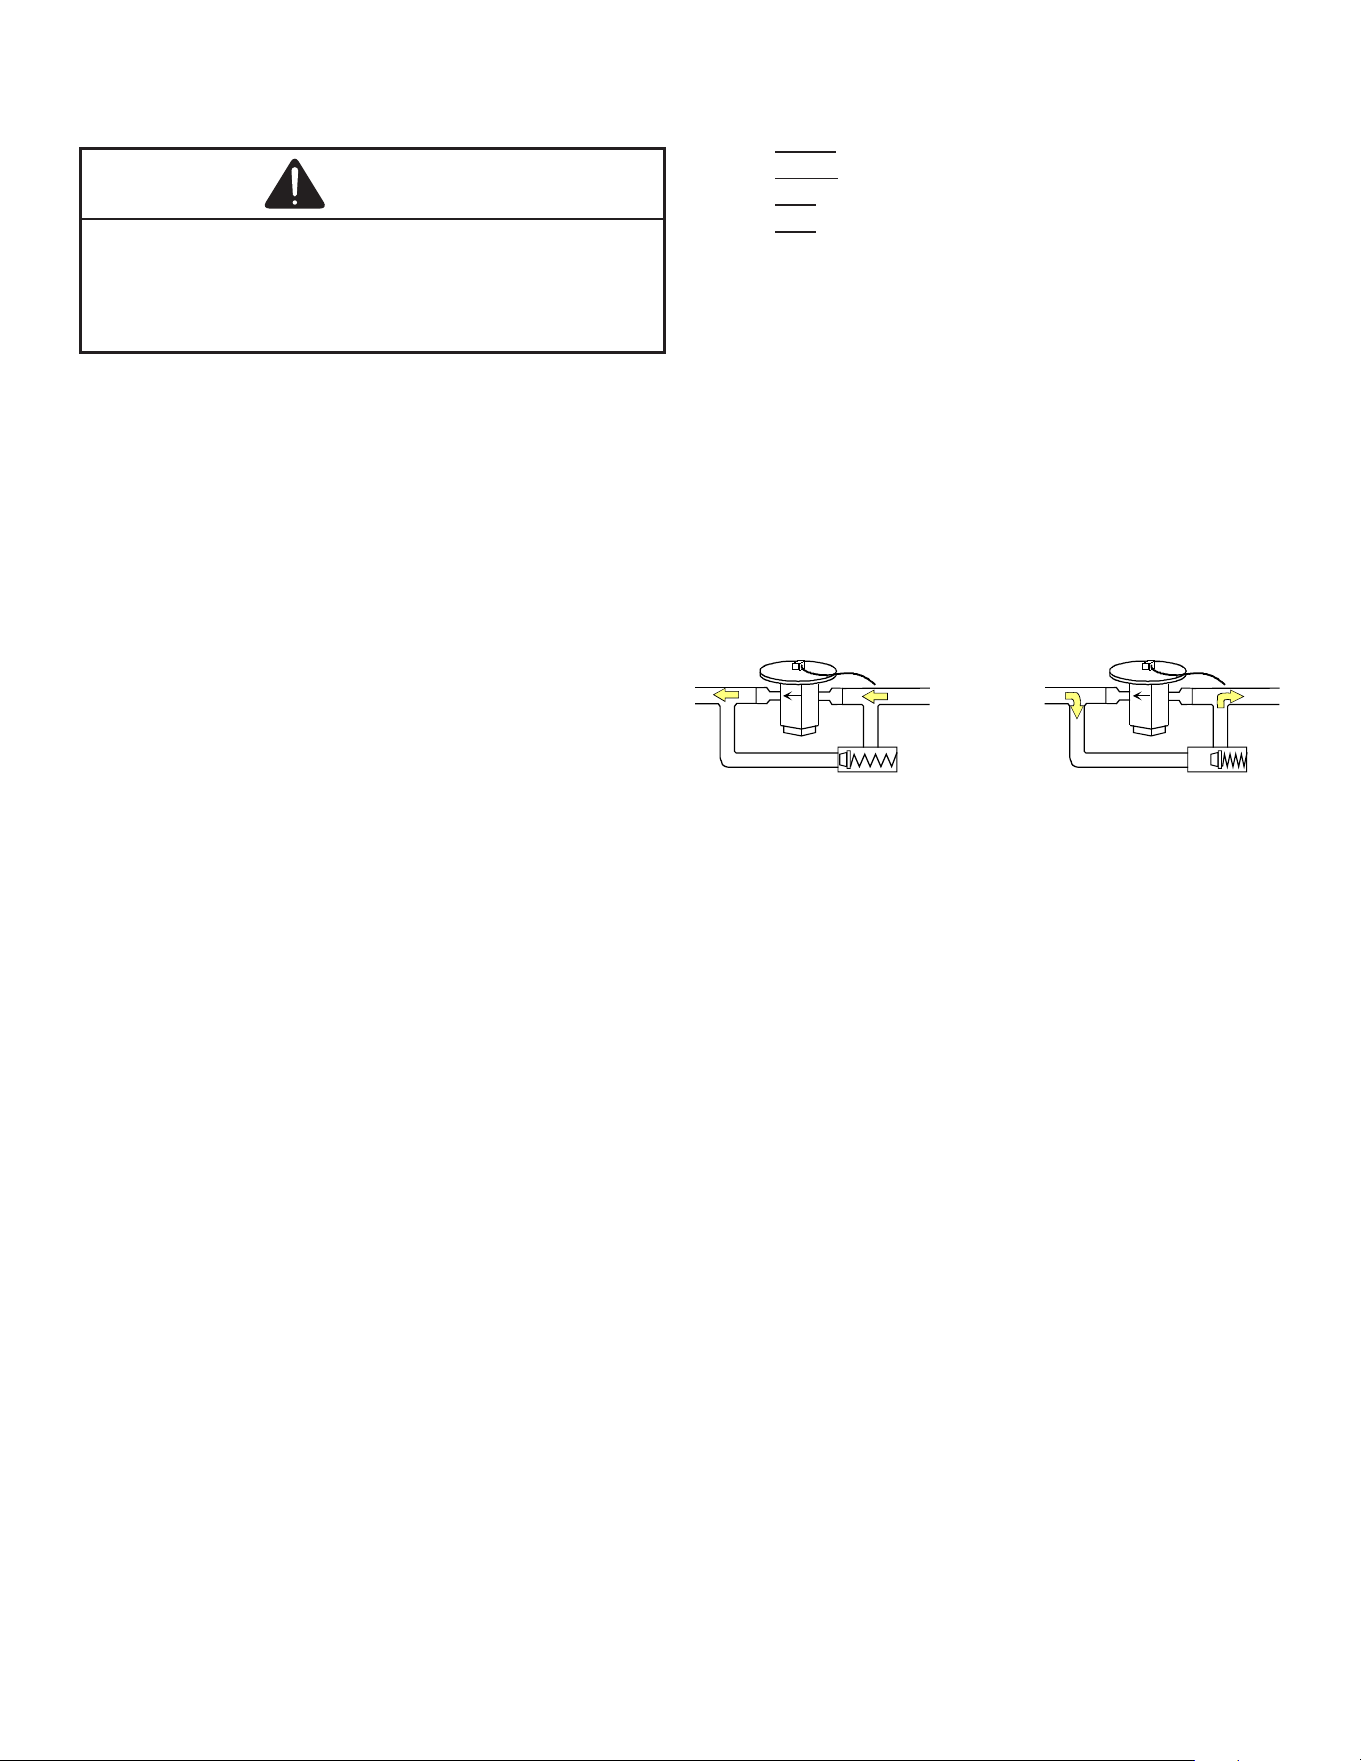
Deep Vacuum Method (Recommended)
The Deep Vacuum Method requires a vacuum pump
rated for 500 microns or less. This method is an eective
and ecient way of assuring the system is free of non-
condensable air and moisture. As an alternative, the Triple
Evacuation Method is detailed in the Service Manual for
this product model.
It is recommended to remove the Schrader Cores from the
service valves using a core-removal tool to expedite the
evacuation procedure.
1. Connect the vacuum pump, micron gauge, and
vacuum rated hoses to both service valves.
Evacuation must use both service valves to eliminate
system mechanical seals.
2. Evacuate the system to less than 500 microns.
3. Isolate the pump from the system and hold vacuum
for 10 minutes (minimum). Typically, pressure will rise
slowly during this period. If the pressure rises to less
than 1000 microns and remains steady, the system
is considered leak-free; proceed to system charging
and startup.
4. If pressure rises above 1000 microns but holds
steady below 2000 microns, non-condensable air or
moisture may remain or small leak is present. Return
to step 2: If the same result is achieved, check for
leaks and repair. Repeat the evacuation procedure.
5. If pressure rises above 2000 microns, a leak is
present. Check for leaks and repair. Repeat the
evacuation procedure.
5000
4500
4000
3500
3000
2500
2000
1500
1000
500
0 1 2 3 4 5 6 7 8 9
10
LEAK(S)
PRESENT
MINUTES
V
ACUUM
IN
MICRONS
CONDENSIBLES OR SMALL
LEAK PRESENT
NO LEAKS
NO CONDENSIBLES
Triple Evacuation Method (Alternate)
1. Evacuate the system to 4000 microns and hold for 15
minutes. Break the vacuum with dry nitrogen, bring
the system pressure to 2-3 PSIG, and hold for 20
minutes. Release the nitrogen,
2. Evacuate to 1500 microns and hold for 20 minutes.
Break the vacuum with dry nitrogen again, bring the
system pressure back to 2-3 PSIG, and hold for 20
minutes.
3. Evacuate the system to 500 microns and hold for 60
minutes.
4. If the pressure rises to 1000 microns or less and
remains steady the system is considered leak free;
proceed to start-up.
Charging
WARNING
REFRIGERANT UNDER PRESSURE!
• Do not overcharge system with refrigerant.
• Do not operate unit in a vacuum or at negative
pressure.
Failure to follow proper procedures may cause property
damage, personal injury or death.
SERVICING
24
CAUTION
Only use refrigerant certified to AHRI standards. Used
refrigerant may cause compressor damage. Goodman is not
responsible for damage or the need for repairs resulting
from the use of unapproved refrigerant types or used or
recycled refrigerant. Most portable machines cannot clean
used refrigerant to meet AHRI standards.
Charge the system with the exact amount of refrigerant.
See unit nameplate for the correct refrigerant charge
amount.
NOTE: An inaccurately charged system will cause
future problems.
1. Using a charging scale, weigh in the refrigerant
charge amount listed on unit nameplate.
2. After the system will take all it will take, close the
valve on the high side of the charging manifold.
3. Start the system and charge the balance of the
refrigerant through the low side.
NOTE: R410A should be drawn out of the storage
container or drum in liquid form due to its fractionation
properties, but should be “Flashed” to its gas state
before entering the system. There are commercially
available restriction devices that t into the system
charging hose set to accomplish this. DO NOT charge
liquid R410A into the compressor.
4. With the system still running, close the valve on the
charging cylinder. At this time, you may still have
some liquid refrigerant in the charging cylinder hose
and will denitely have liquid in the liquid hose.
Reseat the liquid line core. Slowly open the high side
manifold valve and transfer the liquid refrigerant from
the liquid line hose and charging cylinder hose into
the suction service valve port. CAREFUL: Watch so
that liquid refrigerant does not enter the compressor.
NOTE: Even though the compressor section of a
Scroll compressor is more tolerant of liquid refrigerant,
continued oodback or ooded start conditions may
wash oil from the bearing surfaces causing premature
bearing failure.
Checking Compressor Efficiency
The reason for compressor ineciency is broken or
damaged scroll anks on Scroll compressors, reducing the
ability of the compressor to pump refrigerant vapor.
The condition of the scroll anks is checked in the following
manner.
1. Attach gauges to the high and low side of the
system.
2. Start the system and run a “Cooling Performance
Test.
If the test shows:
A. Below normal high side pressure.
B. Above normal low side pressure.
C. Low temperature dierence across coil.
D. Low amp draw at compressor.
And the charge is correct. The compressor is faulty -
replace the compressor.
Thermostatic Expansion Valve
The expansion valve is designed to control the rate of liquid
refrigerant ow into an evaporator coil in exact proportion
to the rate of evaporation of the refrigerant in the coil. The
amount of refrigerant entering the coil is regulated since
the valve responds to temperature of the refrigerant gas
leaving the coil (feeler bulb contact) and the pressure of the
refrigerant in the coil. This regulation of the ow prevents
the return of liquid refrigerant to the compressor.
The illustration below shows typical heatpump TXV/check
valve operation in the heating and cooling modes.
COOLING HEATING
TXV Valves
Some TXV valves contain an internal check valve thus
eliminating the need for an external check valve and
bypass loop. The three forces which govern the operation
of the valve are: (1) the pressure created in the power
assembly by the feeler bulb, (2) evaporator pressure, and
(3) the equivalent pressure of the superheat spring in the
valve.
0% bleed type expansion valves are used on indoor and
outdoor coils. The 0% bleed valve will not allow the system
pressures (High and Low side) to equalize during the
shut down period. The valve will shut o completely at
approximately 100 PSIG.
30% bleed valves used on some other models will continue
to allow some equalization even though the valve has shut-
o completely because of the bleed holes within the valve.
This type of valve should not be used as a replacement for
a 0% bleed valve, due to the resulting drop in performance.
The bulb must be securely fastened with two straps to a
clean straight section of the suction line. Application of
the bulb to a horizontal run of line is preferred. If a vertical
installation cannot be avoided, the bulb must be mounted
so that the capillary tubing comes out at the top.
THE VALVES PROVIDED ARE DESIGNED TO MEET
THE SPECIFICATION REQUIREMENTS FOR OPTIMUM
PRODUCT OPERATION. NO ADJUSTMENTS NEEDED.
NOTE: DO NOT USE SUBSTITUTES.
SERVICING
25
PSIG
°F
PSIG
°F
PSIG
°F
PSIG
°F
PSIG
°F
PSIG
°F
12
-37.7
114.0
37.8
216.0
74.3
318.0
100.2
420.0
120.7
522.0
137.6
14
-34.7
116.0
38.7
218.0
74.9
320.0
100.7
422.0
121.0
524.0
137.9
16
-32.0
118.0
39.5
220.0
75.5
322.0
101.1
424.0
121.4
526.0
138.3
18
-29.4
120.0
40.5
222.0
76.1
324.0
101.6
426.0
121.7
528.0
138.6
20
-36.9
122.0
41.3
224.0
76.7
326.0
102.0
428.0
122.1
530.0
138.9
22
-24.5
124.0
42.2
226.0
77.2
328.0
102.4
430.0
122.5
532.0
139.2
24
-22.2
126.0
43.0
228.0
77.8
330.0
102.9
432.0
122.8
534.0
139.5
26
-20.0
128.0
43.8
230.0
78.4
332.0
103.3
434.0
123.2
536.0
139.8
28
-17.9
130.0
44.7
232.0
78.9
334.0
103.7
436.0
123.5
538.0
140.1
30
-15.8
132.0
45.5
234.0
79.5
336.0
104.2
438.0
123.9
540.0
140.4
32
-13.8
134.0
46.3
236.0
80.0
338.0
104.6
440.0
124.2
544.0
141.0
34
-11.9
136.0
47.1
238.0
80.6
340.0
105.1
442.0
124.6
548.0
141.6
36
-10.1
138.0
47.9
240.0
81.1
342.0
105.4
444.0
124.9
552.0
142.1
38
-8.3
140.0
48.7
242.0
81.6
344.0
105.8
446.0
125.3
556.0
142.7
40
-6.5
142.0
49.5
244.0
82.2
346.0
106.3
448.0
125.6
560.0
143.3
42
-4.5
144.0
50.3
246.0
82.7
348.0
106.6
450.0
126.0
564.0
143.9
44
-3.2
146.0
51.1
248.0
83.3
350.0
107.1
452.0
126.3
568.0
144.5
46
-1.6
148.0
51.8
250.0
83.8
352.0
107.5
454.0
126.6
572.0
145.0
48
0.0
150.0
52.5
252.0
84.3
354.0
107.9
456.0
127.0
576.0
145.6
50
1.5
152.0
53.3
254.0
84.8
356.0
108.3
458.0
127.3
580.0
146.2
52
3.0
154.0
54.0
256.0
85.4
358.0
108.8
460.0
127.7
584.0
146.7
54
4.5
156.0
54.8
258.0
85.9
360.0
109.2
462.0
128.0
588.0
147.3
56
5.9
158.0
55.5
260.0
86.4
362.0
109.6
464.0
128.3
592.0
147.9
58
7.3
160.0
56.2
262.0
86.9
364.0
110.0
466.0
128.7
596.0
148.4
60
8.6
162.0
57.0
264.0
87.4
366.0
110.4
468.0
129.0
600.0
149.0
62
10.0
164.0
57.7
266.0
87.9
368.0
110.8
470.0
129.3
604.0
149.5
64
11.3
166.0
58.4
268.0
88.4
370.0
111.2
472.0
129.7
608.0
150.1
66
12.6
168.0
59.0
270.0
88.9
372.0
111.6
474.0
130.0
612.0
150.6
68
13.8
170.0
59.8
272.0
89.4
374.0
112.0
476.0
130.3
616.0
151.2
70
15.1
172.0
60.5
274.0
89.9
376.0
112.4
478.0
130.7
620.0
151.7
72
16.3
174.0
61.1
276.0
90.4
378.0
112.6
480.0
131.0
624.0
152.3
74
17.5
176.0
61.8
278.0
90.9
380.0
113.1
482.0
131.3
628.0
152.8
76
18.7
178.0
62.5
280.0
91.4
382.0
113.5
484.0
131.6
632.0
153.4
78
19.8
180.0
63.1
282.0
91.9
384.0
113.9
486.0
132.0
636.0
153.9
80
21.0
182.0
63.8
284.0
92.4
386.0
114.3
488.0
132.3
640.0
154.5
82
22.1
184.0
64.5
286.0
92.8
388.0
114.7
490.0
132.6
644.0
155.0
84
23.2
186.0
65.1
288.0
93.3
390.0
115.0
492.0
132.9
648.0
155.5
86
24.3
188.0
65.8
290.0
93.8
392.0
115.5
494.0
133.3
652.0
156.1
88
25.4
190.0
66.4
292.0
94.3
394.0
115.8
496.0
133.6
656.0
156.6
90
26.4
192.0
67.0
294.0
94.8
396.0
116.2
498.0
133.9
660.0
157.1
92
27.4
194.0
67.7
296.0
95.2
398.0
116.6
500.0
134.0
664.0
157.7
94
28.5
196.0
68.3
298.0
95.7
400.0
117.0
502.0
134.5
668.0
158.2
96
29.5
198.0
68.9
300.0
96.2
402.0
117.3
504.0
134.8
672.0
158.7
98
30.5
200.0
69.5
302.0
96.6
404.0
117.7
506.0
135.2
676.0
159.2
100
31.2
202.0
70.1
304.0
97.1
406.0
118.1
508.0
135.5
680.0
159.8
102
32.2
204.0
70.7
306.0
97.5
408.0
118.5
510.0
135.8
684.0
160.3
104
33.2
206.0
71.4
308.0
98.0
410.0
118.8
512.0
136.1
688.0
160.8
106
34.1
208.0
72.0
310.0
98.4
412.0
119.2
514.0
136.4
692.0
161.3
108
35.1
210.0
72.6
312.0
98.9
414.0
119.6
516.0
136.7
696.0
161.8
110
35.5
212.0
73.2
314.0
99.3
416.0
119.9
518.0
137.0
112
36.9
214.0
73.8
316.0
99.7
418.0
120.3
520.0
137.3
*Based on ALLIED SIGNAL Data
Pressure vs. Temperature Chart
R-410A
SERVICING
26
LIQUID PRESSURE
AT SERVICE VALVE (PSIG) 8 10 12 14 16 18
189 58 56 54 52 50 48
195 60 58 56 54 52 50
202 62 60 58 56 54 52
208 64 62 60 58 56 54
215 66 64 62 60 58 56
222 68 66 64 62 60 58
229 70 68 66 64 62 60
236 72 70 68 66 64 62
243 74 72 70 68 66 64
251 76 74 72 70 68 66
259 78 76 74 72 70 68
266 80 78 76 74 72 70
274 82 80 78 76 74 72
283 84 82 80 78 76 74
291 86 84 82 80 78 76
299 88 86 84 82 80 78
308 90 88 86 84 82 80
317 92 90 88 86 84 82
326 94 92 90 88 86 84
335 96 94 92 90 88 86
345 98 96 94 92 90 88
354 100 98 96 94 92 90
364 102 100 98 96 94 92
374 104 102 100 98 96 94
384 106 104 102 100 98 96
395 108 106 104 102 100 98
406 110 108 106 104 102 100
416 112 110 108 106 104 102
427 114 112 110 108 106 104
439 116 114 112 110 108 106
450 118 116 114 112 110 108
462 120 118 116 114 112 110
474 122 120 118 116 114 112
486 124 122 120 118 116 114
499 126 124 122 120 118 116
511 128 126 124 122 120 118
REQUIRED SUBCOOLING TEMPERATURE (°F)
REQUIRED LIQUID LINE TEMPERATURE
SERVICING
27
Overfeeding
Overfeeding by the expansion valve results in high suction
pressure, cold suction line, and possible liquid slugging of
the compressor.
If these symptoms are observed:
1. Check for an overcharged unit by referring to the
cooling performance charts in the servicing section.
2. Check the operation of the power element in the
valve as explained in Checking Expansion Valve
Operation.
3. Check for restricted or plugged equalizer tube.
Underfeeding
Underfeeding by the expansion valve results in low system
capacity and low suction pressures.
If these symptoms are observed:
1. Check for a restricted liquid line or drier. A restriction
will be indicated by a temperature drop across the
drier.
2. Check the operation of the power element of the
valve as described in Checking Expansion Valve
Operation.
Refrigerant Charge Check
Units with Fixed Orice Devices
After completing airow measurements and adjustments
the unit’s refrigerant charge must be checked. All package
units with xed orice devices are charged using the super
heat method at the compressor suction line.
After superheat is veried, it is recommended to check unit
sub-cooling at the condenser coil liquid line out.
Superheat
Before checking the superheat or replacing the valve,
perform all the procedures outlined under Air Flow,
Refrigerant Charge, Expansion Valve - Overfeeding,
Underfeeding. These are the most common causes for
evaporator malfunction.
Checking Superheat
Refrigerant gas is considered superheated when its
temperature is higher than the saturation temperature
corresponding to its pressure. The degree of superheat
equals the degrees of temperature increase above the
saturation temperature at existing pressure.
Procedure:
CAUTION
To prevent personal injury, carefully connect and
disconnect manifold gauge hoses. Escaping liquid
refrigerant can cause burns. Do not vent refrigerant to
atmosphere. Recover during system repair or final unit
disposal.
1. Run system at least 15 -20 minutes to allow pressure
to stabilize.
2. Install a low side pressure gauge on the suction line
access tting.
3. Temporarily install thermometer on suction (large)
line near compressor with adequate contact and
insulate for best possible reading.
4. Record the gauge pressure corresponding
temperature and the temperature of the suction line.
5. Refer to the superheat table for proper system
superheat. Add charge to lower superheat recover
charge to raise superheat.
100
-
- - 10 10
95
- - 10 10 10
90
- - 12 15 18
85
- 10 13 17 20
80
- 10 15 21 26
75 10 13 17 25 29
70 10 17 20 28 32
65 13 19 26 32 35
60 17 25 30 33 37
Ambient Condenser
Inlet Temp (°F
Drybulb)
65
70
75
Return Air Temp. (°F Drybulb)
80
85
EXAMPLE:
A. Suction Pressure = 143
B. Corresponding Temp. °F. = 50
C. Thermometer on Suction Line = 61°F.
To obtain the degrees temperature of superheat, subtract
50.0 from 61.0°F.
The dierence is 11° Superheat. The 11° Superheat would
fall in the ± range of allowable superheat.
Superheat Formula = Suct. Line Temp. - Sat. Suct.
Temp.
Units with TXV Devices
All package units with TXV devices are charged using the
SUBCOOLING method at the liquid line. After subcooling is
checked it is recommended to check unit superheat at the
evaporator coil suction line.
Checking Subcooling
Refrigerant liquid is considered subcooled when its
temperature is lower than the saturation temperature
corresponding to its pressure. The degree of subcooling
equals the degrees of temperature decrease below the
saturation temperature at the existing pressure.
Procedure:
1. Attach an accurate thermometer or preferably a
thermocouple type temperature tester to the liquid
line close to the pressure switch.
2. Install a high side pressure gauge on the liquid
access tting.
3. Record the gauge pressure and the temperature of
the line.
SERVICING
28
4. The dierence between the thermometer reading and
pressure to temperature conversion is the amount of
subcooling.
Subcooling Formula = Sat. Liquid Temp. - Liquid Line
Temp.
EXAMPLE:
A. Liquid Line Pressure = 417
B. Corresponding Temp. °F. = 120°
C. Thermometer on Liquid line = 109°F.
To obtain the amount of subcooling subtract 109°F from
120°F.
The dierence is 11° subcooling. See the specication
sheet or technical information manual for the design
subcooling range for your unit.
See R410A Pressure vs. Temperature Chart
Expansion Valve (TXV) System Two Speed Application
Run the unit on high stage cooling for 15-20 minutes until
refrigerant pressures stabilize. Check charge with unit on
high stage.
Follow Checking Subcooling Instructions.
NOTE: THE TXV PROVIDED IS DESIGNED TO MEET
THE SPECIFICATION REQUIREMENTS FOR OPTIMUM
PRODUCT OPERATION. “NO ADJUSTMENTS NEEDED
TO TXV”
Liquid
Pressure
Saturated Liquid
Temperature °F
PSIG R-410A
200 70
210 73
220 76
225 78
235 80
245 83
255 85
265 88
275 90
285 92
295 95
305 97
325 101
355 108
375 112
405 118
SATURATED LIQUID PRESSURE
TEMPERATURE CHART
Heat Pump - Heating Cycle
The proper method of charging a heat pump in the heat
mode is by weighing the charge according to the total
charge listed on the rating plate.
Checking expansion valve operation
1. Remove the remote bulb of the expansion valve from
the suction line.
2. Start the system and cool the bulb in a container of
ice water, closing the valve. As you cool the bulb,
the suction pressure should fall and the suction
temperature will rise.
3. Next warm the bulb in your hand. As you warm the
bulb, the suction pressure should rise and the suction
temperature will fall.
4. If a temperature or pressure change is noticed, the
expansion valve is operating. If no change is noticed,
the valve is restricted, the power element is faulty, or
the equalizer tube is plugged.
5. Capture the charge, replace the valve and drier and
evacuate.
Fixed Orifice Restriction Devices
The xed orice restriction device (owrator) used in
conjunction with the indoor coil is a predetermined bore
(I.D.).
It is designed to control the rate of liquid refrigerant ow
into an evaporator coil.
The amount of refrigerant that ows through the xed
orice restriction device is regulated by the pressure
dierence between the high and low sides of the system.
In the cooling cycle when the outdoor air temperature rises,
the high side condensing pressure rises. At the same time,
the cooling load on the indoor coil increases, causing the
low side pressure to rise, but at a slower rate.
Since the high side pressure rises faster when the
temperature increases, more refrigerant ows to the
evaporator, increasing the cooling capacity of the system.
When the outdoor temperature falls, the reverse takes
place. The condensing pressure falls, and the cooling loads
on the indoor coil decreases, causing less refrigerant ow.
If a restriction should become evident, proceed as follows:
1. Recover refrigerant charge.
2. Remove the orice assembly and clean or replace.
3. Replace liquid line drier, evacuate and recharge.
Checking Equalization Time
During the “OFF” cycle, the high side pressure bleeds to
the low side through the xed orice restriction device.
Check equalization time as follows:
1. Attach a gauge manifold to the suction and liquid line
access ttings.
2. Start the system and allow the pressures to stabilize.
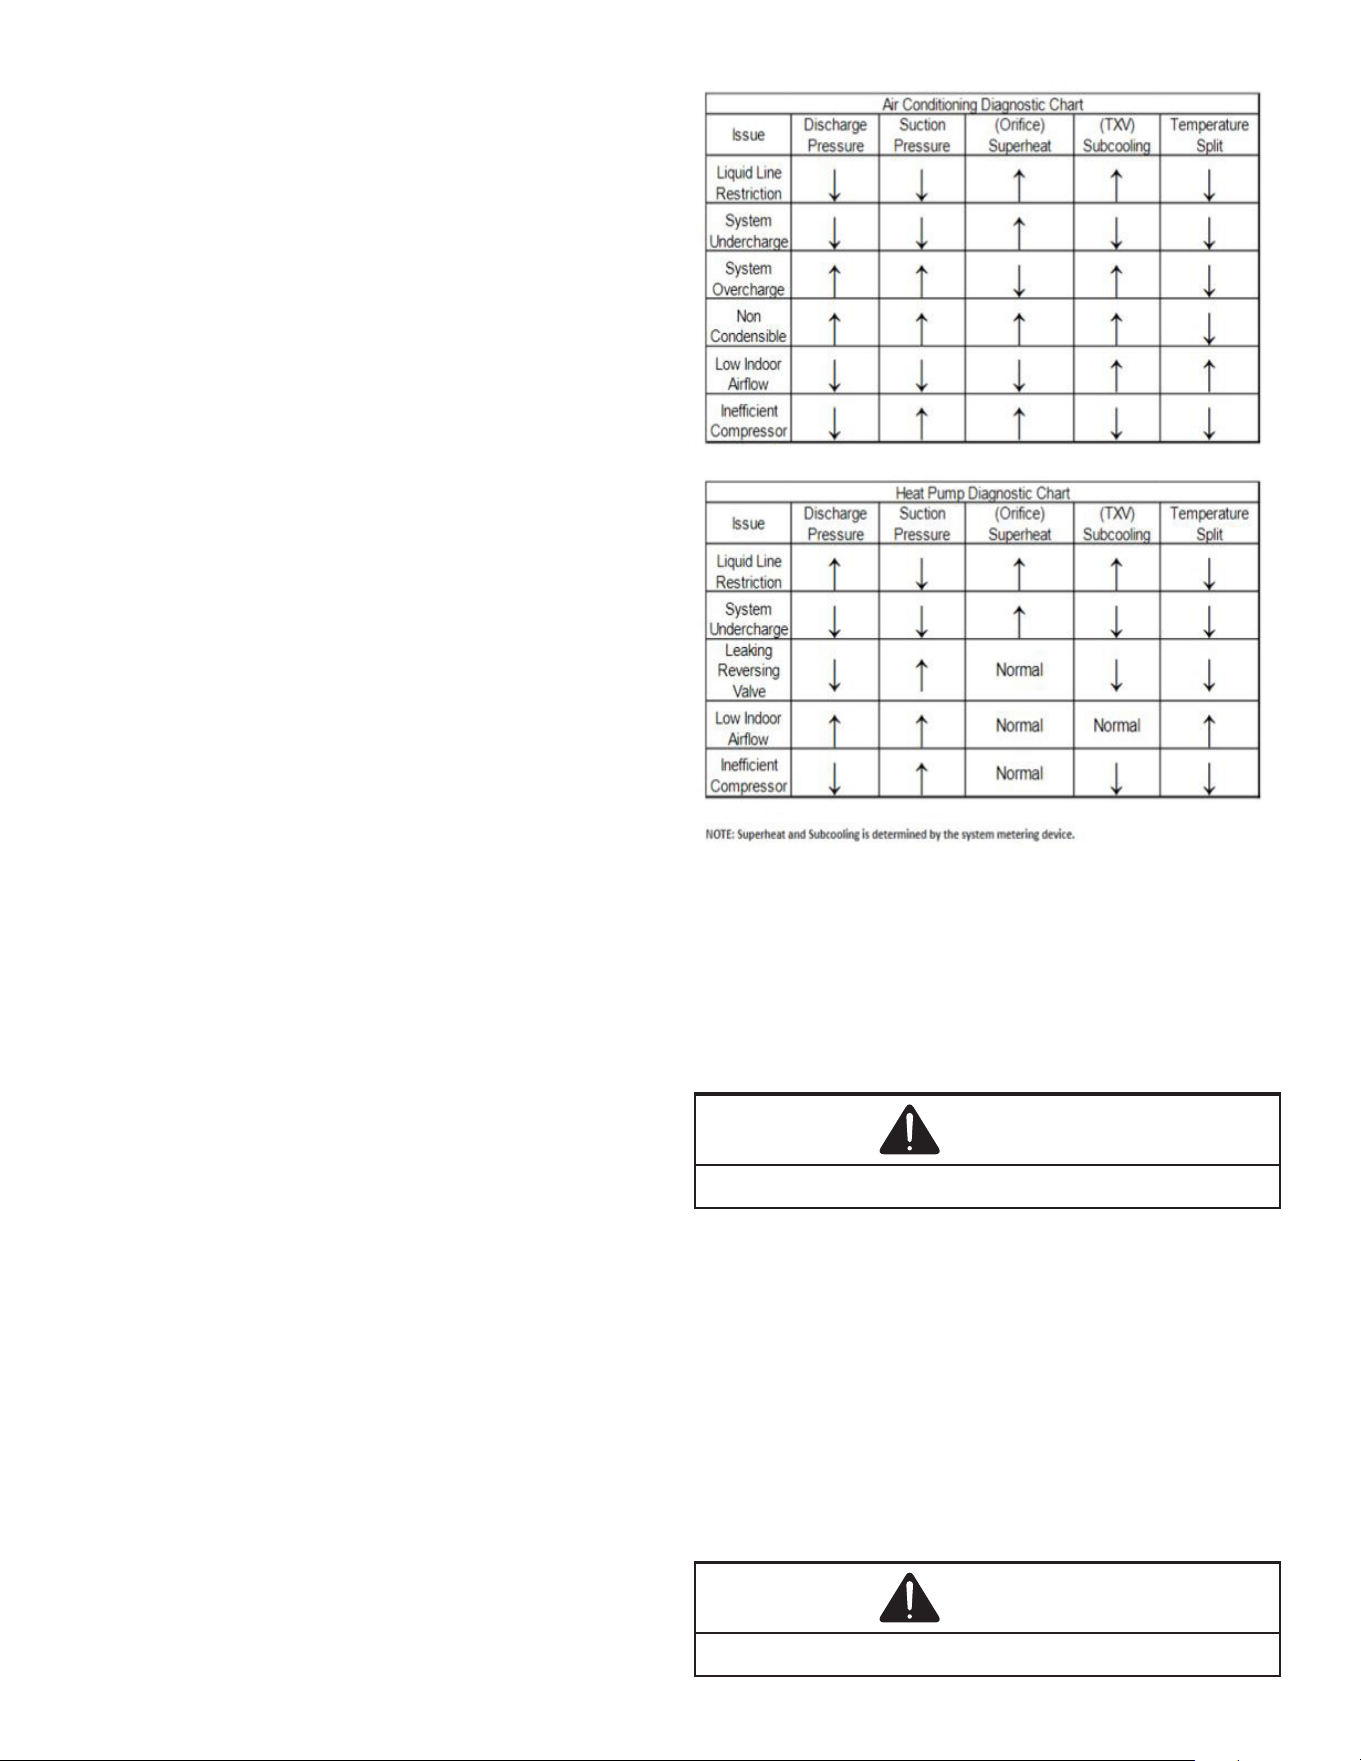
SERVICING
29
3. Stop the system and check the time it takes for the
high and low pressure gauge readings to equalize.
If it takes more than seven (7) minutes to equalize, the
restriction device is inoperative. Replace, install a liquid line
drier, evacuate and recharge.
Checking Restricted Liquid Line
When the system is operating, the liquid line is warm to the
touch. If the liquid line is restricted, a denite temperature
drop will be noticed at the point of restriction. In severe
cases, frost will form at the restriction and extend down the
line in the direction of the ow.
Discharge and suction pressures will be low, giving the
appearance of an undercharged unit. However, the unit will
have normal to high subcooling.
Locate the restriction, replace the restricted part, replace
drier, evacuate and recharge.
Refrigerant Overcharge
An overcharge of refrigerant is normally indicated by
excessively high head pressure and/or liquid return to the
compressor.
If high head pressure is not indicated, an overcharge or a
system containing non-condensables could be the problem.
If overcharging is indicated:
1. Start the system.
2. Remove small quantities of gas from the suction
line dill valve until the head pressure is reduced to
normal.
3. Observe the system while running a cooling
performance test, if a shortage of refrigerant
is indicated, then the system contains non-
condensables.
Non-Condensables
Check for non-condensables:
1. Shut down the system and allow the pressures to
equalize for a minimum of 15 minutes.
2. Take a pressure reading.
3. Compare this pressure to the temperature of the
coldest coil since this is where most of the refrigerant
will be. If the pressure indicates a higher temperature
than that of the coil temperature, non-condensables
are present.
To remove the non-condensables:
1. Remove the refrigerant charge.
2. Replace and/or install liquid line drier.
3. Evacuate and recharge.
Compressor Burnout
When a compressor burns out, high temperature develops
causing the refrigerant, oil and motor insulation to
decompose forming acids and sludge.
If a compressor is suspected of being burned-out, attach
a refrigerant hose to the liquid line dill valve and properly
remove and dispose of the refrigerant.
NOTICE
Violation of EPA regulations may result in fines or other
penalties.
Now determine if a burn out has actually occurred. Conrm
by analyzing an oil sample using a Sporlan Acid Test Kit,
AK-3 or its equivalent.
Remove the compressor and obtain an oil sample from the
suction stub. If the oil is not acidic, either a burnout has not
occurred or the burnout is so mild that a complete clean-up
is not necessary.
If acid level is unacceptable, the system must be cleaned
by using the clean-up drier method.
CAUTION
Do not allow the sludge or oil to contact the skin. Severe
burns may result.
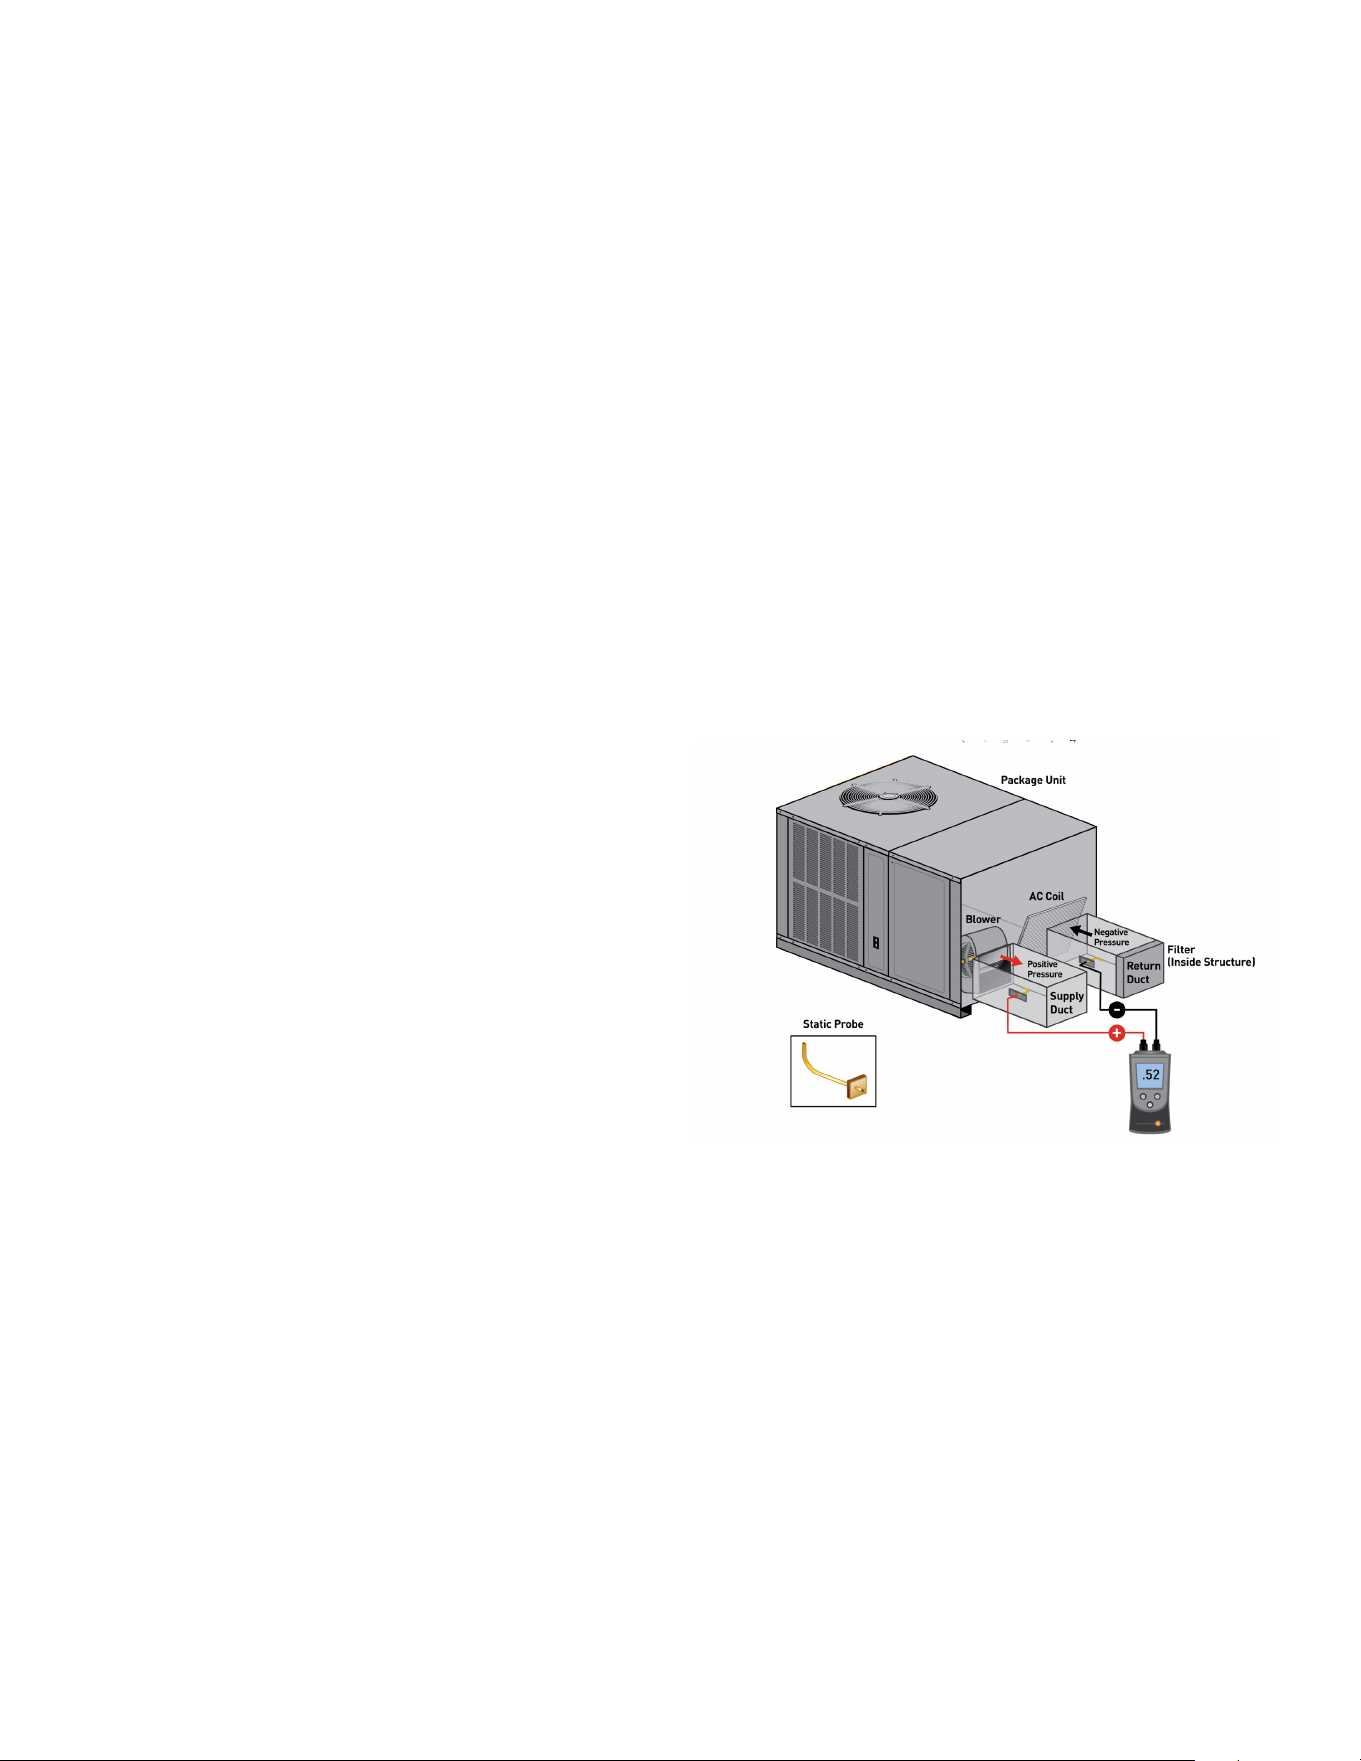
SERVICING
30
NOTE: The Flushing Method using R-11 refrigerant
is no longer approved by Goodman® Manufacturing
Company, L.P.
Suction Line Drier Clean-Up Method
The POE oils used with R410A refrigerant is an excellent
solvent. In the case of a burnout, the POE oils will remove
any burnout residue left in the system. If not captured by
the refrigerant lter, they will collect in the compressor
or other system components, causing a failure of the
replacement compressor and/or spread contaminants
throughout the system, damaging additional components.
The suction line lter drier should be installed as close to
the compressor suction tting as possible. The lter must
be accessible and be rechecked for a pressure drop after
the system has operated for a time. It may be necessary to
use new tubing and form as required.
NOTE: At least twelve (12) inches of the suction line
immediately out of the compressor stub must be
discarded due to burned residue and contaminates.
1. Remove compressor discharge line strainer.
2. Remove the liquid line drier and expansion valve.
3. Purge all remaining components with dry nitrogen or
carbon dioxide until clean.
4. Install new components including liquid line drier.
5. Braze all joints, leak test, evacuate, and recharge
system.
6. Start up the unit and record the pressure drop across
the drier.
7. Continue to run the system for a minimum of twelve
(12) hours and recheck the pressure drop across the
drier. Pressure drop should not exceed 6 PSIG.
8. Continue to run the system for several days,
repeatedly checking pressure drop across the
suction line drier. If the pressure drop never exceeds
the 6 PSIG, the drier has trapped the contaminants.
Remove the suction line drier from the system.
9. If the pressure drop becomes greater, then it must be
replaced and steps 5 through 9 repeated until it does
not exceed 6 PSIG.
NOTICE: Regardless, the cause for burnout must be
determined and corrected before the new compressor
is started.
Reversing Valve Replacement
Remove the refrigerant charge from the system.
When brazing a reversing valve into the system, it is of
extreme importance that the temperature of the valve does
not exceed 250°F at any time.
Wrap the reversing valve with a large rag saturated with
water. “Re-wet” the rag and thoroughly cool the valve after
each brazing operation of the four joints involved. The wet
rag around the reversing valve will eliminate conduction of
heat to the valve body when brazing the line connection.
The use of a wet rag sometimes can be a nuisance. There
are commercial grades of heat absorbing paste that may
be substituted.
After the valve has been installed, leak test, evacuate and
recharge.
Checking External Static Pressure
The minimum and maximum allowable duct static pressure
is found in the Technical Information Manual.
Too great of an external static pressure will result in
insucient air that can cause icing of the coil, whereas too
much air can cause poor humidity control, and condensate
to be pulled o the evaporator coil causing condensate
leakage. Too much air can cause motor overloading and in
many cases this constitutes a poorly designed system. To
determine proper air movement, proceed as follows:
1. Using a manometer measure the static pressure
of the return duct at the inlet of the unit, (Negative
Pressure).
Total External Static
2. Measure the static pressure of the supply duct,
(Positive Pressure).
3. Add the two readings together.
NOTE: Both readings may be taken simultaneously
and read directly on the manometer as shown in the
illustration above, if so desired.
4. Consult proper table for quantity of air.
If the external static pressure exceeds the minimum or
maximum allowable statics, check for closed dampers, dirty
lters, undersized or poorly laid out ductwork.
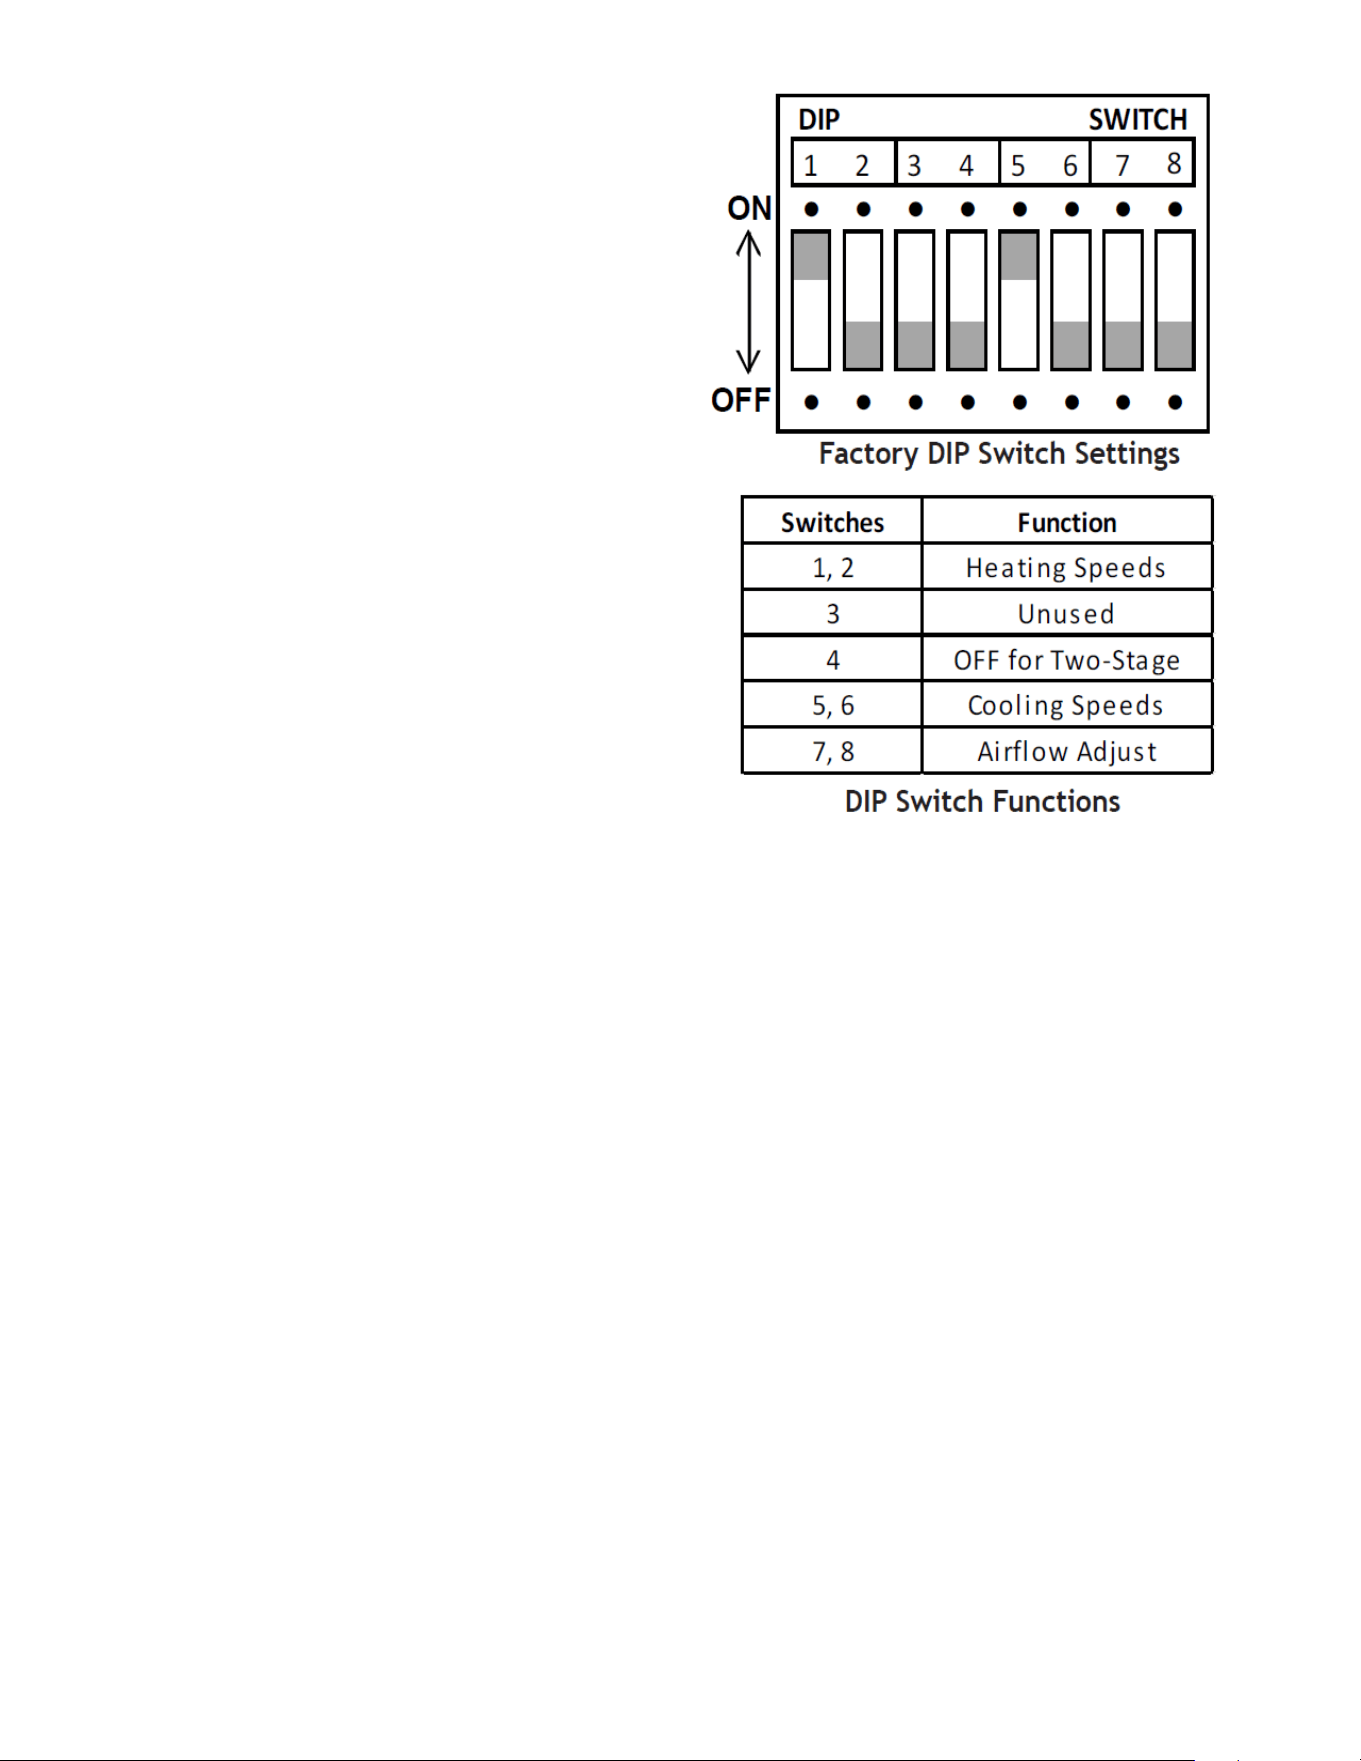
SERVICING
31
Adjusting Airflow
EEM Motor
The blower motor speed for the EEM motor is controlled by
three 24V low voltage leads: green, yellow, and white. The
green lead sets the speed for fan-only mode. The yellow
lead sets the speed for cooling and heat pump heating
mode (if applicable).
EEM Motor Speed Adjustment
The white lead sets the speed for electric heat mode
(emergency heat and second stage heat, if applicable).
The leads are factory connected as follows: Green to T1,
Yellow to T2, and White to T3. T1 is the low speed setting
and is dedicated to fan-only mode. T2 is medium
speed cooling and T3 is medium speed heating. T4 is high
speed cooling and T5 is high speed heating. To adjust the
blower speed, move the yellow and/or white wires to T4
and T5.
NOTE: If more than one lead is energized at the
same time, the motor will use the higher speed
setting.
ECM Motor Speed Adjustment
Each ECM blower motor has been preprogrammed for
operation at 4 distinct air ow levels when operating in
Cooling/Heat Pump mode or Electric Heat mode. These 4
distinct levels may also be adjusted slightly lower or higher
if desired. The adjustment between levels and the trim
adjustments are made by changing the dip switch(s) either
to an “OFF” or “ON” position. See Blower Performance
Data tables in installation manual.
DIP Switch Functions
The ECM motor has an electronic control that contains
eight (8) 2-position dip switches. The function of these dip
switches is shown in Table below.
For APHH5[24-36]41 models, dip switch 4 must be set
to ON. Dip switch 4 must be set to OFF for the two-stage
compressor models APHH5[42-60]41. Dip switch 4 ON
energizes Y1 signal to the ECM motor anytime Y/Y2 is
energized. The indoor motor will not operate properly if
switch is not set correctly for the correct model.
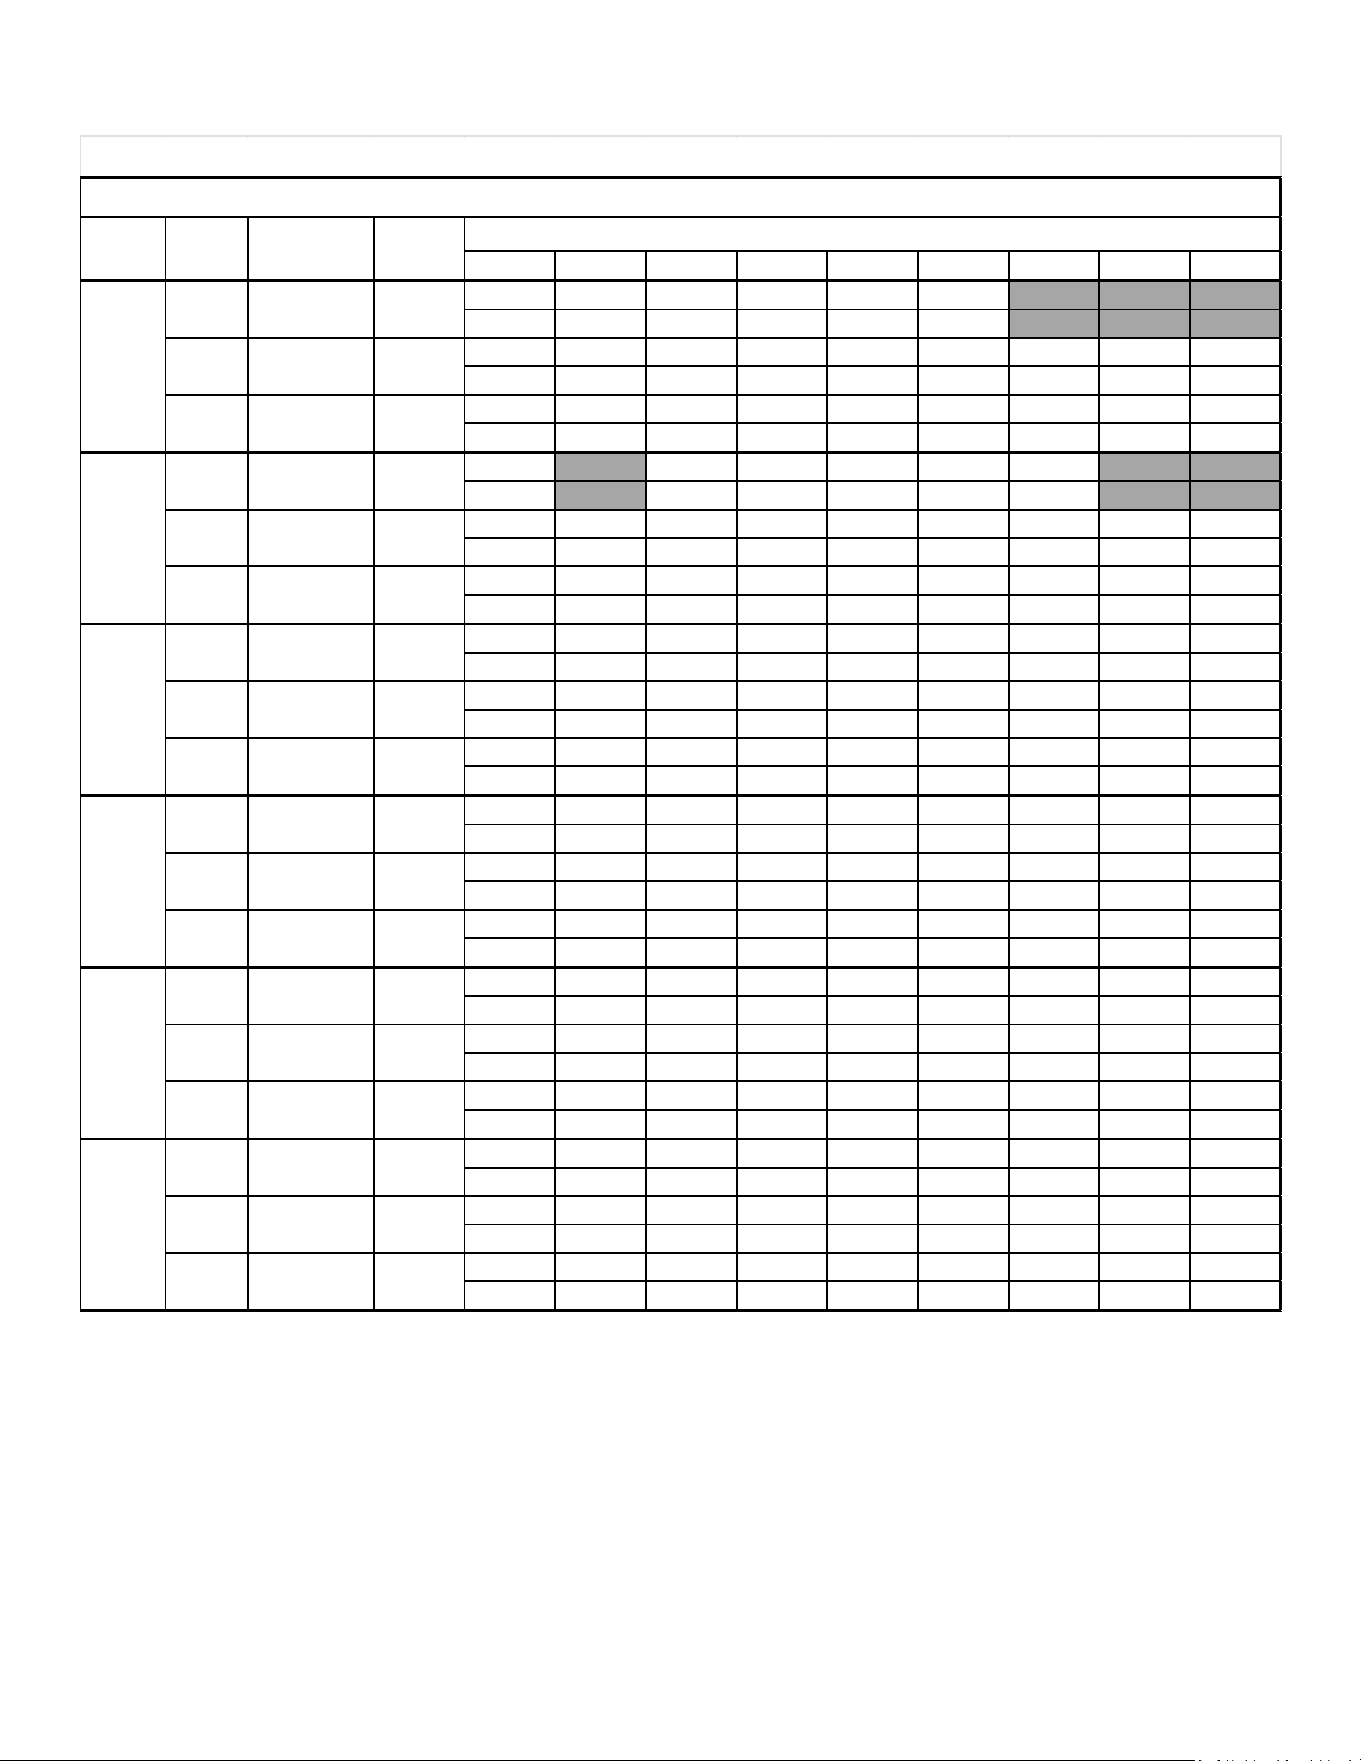
SERVICING
32
0.1 0.2 0.3 0.4 0.5 0.6 0.7 0.8
CFM 580 505 445 390 320 - - -
Watts 36 46 54 60 65 - - -
CFM 1133 1081 1026 970 911 839 748 679
Watts 146 154 161 168 176 185 192 197
CFM 1230 1190 1140 1095 1040 990 920 850
Watts 202 212 220 233 235 243 249 262
CFM - 550 475 415 340 270 - -
Watts - 50 59 66 74 77 - -
CFM 1271 1222 1176 1129 1081 1026 962 889
Watts 202 210 219 227 234 242 250 257
CFM 1345 1305 1260 1220 1180 1125 1080 975
Watts 258 273 272 283 292 298 306 310
CFM 1070 1030 980 935 870 775 720 665
Watts 145 161 165 173 181 190 198 202
CFM 1468 1427 1385 1337 1293 1243 1189 1137
Watts 288 296 304 310 318 325 333 340
CFM 1505 1465 1420 1385 1335 1300 1250 1205
Watts 359 371 384 383 393 398 406 416
CFM 1035 995 945 895 845 790 695 630
Watts 132 144 152 157 168 176 183 189
CFM 1575 1526 1481 1438 1393 1352 1306 1253
Watts 301 310 321 332 342 350 361 369
CFM 1698 1654 1604 1558 1513 1467 1421 1370
Watts 370 381 386 396 405 413 421 429
CFM 1355 1300 1250 1210 1155 1110 1045 965
Watts 212 228 230 246 248 261 273 282
CFM 1844 1803 1763 1725 1682 1639 1593 1546
Watts 438 447 457 468 477 484 491 498
CFM 1895 1855 1805 1770 1730 1685 1640 1600
Watts 558 558 578 584 590 594 602 612
CFM 1360 1300 1260 1215 1175 1125 1085 1030
Watts 213 221 233 244 255 264 273 293
CFM 1959 1920 1884 1847 1806 1768 1724 1680
Watts 515 526 541 554 564 572 581 589
CFM 2000 1960 1925 1875 1835 1800 1760 1725
Watts 642 651 660 651 672 683 691 699
Model
Motor
Tap
Compressor
stage
Volts
E.S.P. (In. of H
2
O)
T2/T3
Single stage
230
T1
Single stage
230
T4/T5
Single stage
230
T2/T3
Single stage
230
T4/T5
Single stage
230
T4/T5
Single stage
230
T2/T3
GPCM34841**
T1
Single stage
230
T2/T3
Single stage
230
T4/T5
Single stage
230
GPCM34241**
T1
Single stage
230
Single stage
230
T2/T3
Single stage
230
GPCM36041**
T1
Single stage
230
T4/T5
Single stage
230
GPCM3[24-60]41** BLOWER PERFORMANCE
GPCM33641**
T1
Single stage
230
Single stage
230
Horizontal Flow
GPCM33041**
T4/T5
Single stage
230
GPCM32441**
T1
Single stage
230
T2/T3
SERVICING
33
0.1 0.2 0.3 0.4 0.5 0.6 0.7 0.8
CFM 545 475 418 367 301 - - -
Watts 37 47 55 62 67 - - -
CFM 1065 1016 964 912 856 788 703 638
Watts 150 158 165 172 181 189 197 202
CFM 1156 1119 1072 1029 978 931 865 799
Watts 207 217 226 239 241 249 255 269
CFM - 517 447 390 320 254 - -
Watts - 51 60 68 76 79 - -
CFM 1195 1148 1106 1061 1016 964 905 836
Watts 207 215 224 233 240 248 256 264
CFM 1264 1227 1184 1147 1109 1058 1015 917
Watts 264 280 279 290 299 305 314 318
CFM 1006 968 921 879 818 729 677 625
Watts 149 165 169 177 186 195 203 207
CFM 1380 1342 1302 1257 1215 1168 1118 1068
Watts 295 304 312 318 326 333 341 348
CFM 1415 1377 1335 1302 1255 1222 1175 1133
Watts 368 380 394 393 403 408 416 426
CFM 973 935 888 841 794 743 653 592
Watts 135 148 156 161 172 180 188 194
CFM 1480 1434 1392 1351 1310 1271 1228 1178
Watts 309 318 329 340 350 359 370 378
CFM 1596 1554 1508 1465 1423 1379 1336 1288
Watts 379 390 395 406 415 424 432 439
CFM 1274 1222 1175 1137 1086 1043 982 907
Watts 217 234 236 252 254 268 280 289
CFM 1733 1695 1658 1622 1581 1541 1497 1453
Watts 449 459 469 480 489 497 504 510
CFM 1781 1744 1697 1664 1626 1584 1542 1504
Watts 572 572 592 599 605 609 617 627
CFM 1278 1222 1184 1142 1105 1058 1020 968
Watts 218 227 239 250 261 271 280 300
CFM 1841 1805 1771 1736 1698 1661 1620 1579
Watts 528 539 554 568 578 587 596 603
CFM 1880 1842 1810 1763 1725 1692 1654 1622
Watts 658 667 677 667 689 700 708 716
GPCM3[24-60]41** BLOWER PERFORMANCE
230
Compressor
stage
Single stage
Single stage
Motor
Tap
230
T2/T3
230
GPCM33041**
230
T2/T3
230
T2/T3
230
T4/T5
230
230
GPCM34841**
T1
230
T2/T3
230
T4/T5
GPCM34241**
T1
230
T4/T5
230
T2/T3
230
GPCM36041**
Model
GPCM33641**
Single stage
Single stage
T4/T5
T4/T5
GPCM32441**
T1
T1
T1
T2/T3
Single stage
Down flow
Single stage
Single stage
Single stage
Single stage
Single stage
T4/T5
230
Single stage
Single stage
Single stage
Single stage
Single stage
T1
230
230
230
Volts
E.S.P. (In. of H
2
O)
230
Single stage
Single stage
Single stage
SERVICING
34
0.1 0.2
0.3 0.4 0.5 0.6 0.7 0.8
CFM
847
792
728 638 - - - -
Watts 76 84 94 102 - - - -
CFM 1114 1068 1017 964 901 829 751 667
Watts 138 147 155 164 173 181 188 194
CFM 1371 1316 1281 1240 1186 1133 1072 1000
Watts 235 243 252 261 266 275 284 293
CFM 877 821 758 674 596 531 481 -
Watts 84 92 99 110 118 125 130 -
CFM 1347 1295 1243 1190 1134 1079 1010 938
Watts 228 236 245 252 259 266 275 283
CFM 1463 1419 1376 1329 1282 1235 1183 1126
Watts 284 294 302 309 317 325 333 340
CFM 850 795 726 640 559 - - -
Watts 76 85 93 103 110 - - -
CFM 1438 1393 1354 1304 1258 1209 1154 1089
Watts 271 280 291 296 305 312 320 329
CFM 1604 1560 1507 1468 1415 1364 1321 1276
Watts 396 402 408 424 426 433 444 454
CFM 1003 937 887 837 773 699 631 574
Watts 100 106 116 129 142 154 162 171
CFM 1534 1492 1453 1410 1372 1330 1287 1236
Watts 257 269 279 290 301 311 322 334
CFM 1799 1754 1712 1672 1630 1582 1534 1482
Watts 419 430 442 453 462 469 475 481
CFM 1177 1123 1077 1031 972 - - -
Watts 142 151 162 173 185 - - -
CFM 1825 1785 1748 1713 1674 1610 1609 1544
Watts 439 448 460 470 480 488 489 498
CFM 1984 1947 1975 1864 1823 1781 1741 1694
Watts 567 578 590 596 603 610 618 623
CFM 1488 1448 1410 1371 1336 1293 1254 1204
Watts 270 279 290 305 318 330 343 356
CFM 2029 1991 1956 1920 1876 1829 1801 1766
Watts 616 622 631 638 648 656 671 682
CFM 2199 2161 2126 2090 2056 2018 1982 1949
Watts 801 809 817 828 838 851 858 873
Horizontal Flow
Model
Motor
Tap
Compressor
stage
Volts
E.S.P. (In. of H
2
O)
*PHM32441**
T4/T5
Single stage
230
T2/T3
Single stage
230
T1
Single stage
230
T4/T5
Single stage
230
Single stage
230
T4/T5
Single stage
230
*PHM34241**
T1
Single stage
230
T2/T3
Single stage
230
T4/T5
*PHM33641**
T1
Single stage
230
T2/T3
T2/T3
High stage
230
T1
Low stage
230
T4/T5
High stage
230
T4/T5
Single stage
230
Single stage
230
*PHM3[24-60]41** BLOWER PERFORMANCE
*PHM33041**
T1
Single stage
230
T2/T3
Single stage
230
*PHM36041**
Single stage
230
*PHM34841**
T1
Single stage
230
T2/T3
SERVICING
35
0.1 0.2 0.3 0.4 0.5 0.6 0.7 0.8
CFM 828 767 680 574 - - - -
Watts 75 85 95 104 - - - -
CFM 1085 1019 960 888 813 713 657 601
Watts 136 144 152 162 173 180 185 191
CFM 1355 1300 1254 1201 1147 1084 1007 899
Watts 244 253 260 268 276 285 294 303
CFM 859 797 719 619 552 497 437 -
Watts 83 92 101 111 118 122 127 -
CFM 1302 1257 1198 1148 1089 1023 936 844
Watts 220 228 238 246 254 263 273 282
CFM 1439 1396 1341 1294 1246 1185 1119 1047
Watts 288 297 305 313 322 330 339 347
CFM 825 762 686 577 523 - - -
Watts 77 87 97 105 111 - - -
CFM 1436 1389 1338 1289 1241 1186 1122 1053
Watts 281 290 298 307 315 325 334 343
CFM 1595 1555 1506 1462 1415 1370 1319 1260
Watts 382 391 399 408 418 426 435 444
CFM 981 918 850 761 687 613 553 488
Watts 100 113 126 138 153 161 171 179
CFM 1490 1433 1371 1318 1260 1197 1121 1023
Watts 258 273 285 297 309 323 335 347
CFM 1786 1728 1678 1629 1577 1517 1453 1385
Watts 419 432 445 457 468 474 482 490
CFM 1168 1101 1045 979 913 - - -
Watts 144 155 168 182 197 - - -
CFM 1829 1771 1720 1670 1613 1556 1493 1426
Watts 440 452 465 478 486 494 501 510
CFM 2004 1949 1892 1837 1782 1728 1674 1616
Watts 564 577 587 594 603 612 620 628
CFM 1399 1361 1326 1289 1256 1215 1179 1132
Watts 277 286 298 312 326 338 351 365
CFM 1907 1872 1839 1804 1763 1719 1692 1660
Watts 632 638 646 654 664 672 688 699
CFM 2067 2031 1999 1964 1932 1897 1863 1832
Watts 821 829 838 849 859 872 880 895
Down flow
Model
Motor
Tap
Volts
E.S.P. (In. of H
2
O)
230
T2/T3
230
*PHM32441**
T1
T4/T5
T2/T3
230
Single stage
Single stage
Single stage
T4/T5
230
*PHM34241**
T1
230
T2/T3
230
*PHM33641**
T1
230
Single stage
Single stage
T1
230
T2/T3
230
High stage
*PHM36041**
T4/T5
High stage
*PHM3[24-60]41** BLOWER PERFORMANCE
Compressor
stage
Single stage
Single stage
Single stage
Single stage
Single stage
Single stage
T4/T5
230
230
*PHM33041**
T1
230
T2/T3
230
Single stage
Single stage
Single stage
Single stage
Low stage
T4/T5
230
230
T4/T5
230
*PHM34841**
T1
230
T2/T3
230
SERVICING
36
Cooling /
HP Speed
Adjust
Tap
CFM *
Electric
Heat
Adjust
Tap
CFM *
Cooling /
HP Speed
Adjust
Tap
CFM *
Electric
Heat
Adjust
Tap
CFM *
Minus 630 Minus 630 Minus 720 Minus 720
Normal 700 Normal 700 Normal 800 Normal 800
Plus 770 Plus 770 Plus 880 Plus 880
Minus 743 Minus 743 Minus 900 Minus 900
Normal 825 Normal 825 Normal 1,000 Normal 1,000
Plus 908 Plus 908 Plus 1,100 Plus 1,100
Minus** 855 Minus** 855 Minus 990 Minus 990
Normal 950 Normal 950 Normal** 1,100 Normal** 1,100
Plus 1,045 Plus 1,045 Plus 1,210 Plus 1,210
Minus 945 Minus 945 Minus 1,125 Minus 1,125
Normal 1,050 Normal 1,050 Normal 1,250 Normal 1,250
Plus 1,155 Plus 1,155 Plus 1,375 Plus 1,375
Cooling /
HP Speed
Adjust
Tap
CFM *
Electric
Heat
Adjust
Tap
CFM *
Cooling /
HP Speed
Adjust
Tap
CFM *
Electric
Heat
Adjust
Tap
CFM *
Minus 720 Minus 720 Minus 1,103 Minus 1,103
Normal 800 Normal 800 Normal 1,225 Normal 1,225
Plus 880 Plus 880 Plus** 1,348 Plus** 1,348
Minus 900 Minus 900 Minus** 1,260 Minus** 1,260
Normal 1,000 Normal 1,000 Normal 1,400 Normal 1,400
Plus 1,100 Plus 1,100 Plus 1,540 Plus 1,540
Minus 990 Minus 990 Minus 1,530 Minus 1,530
Normal** 1,100 Normal** 1,100 Normal 1,700 Normal 1,700
Plus** 1,210 Plus** 1,210 Plus 1,870 Plus 1,870
Minus 1,125 Minus 1,125 Minus 1,620 Minus 1,620
Normal 1,250 Normal 1,250 Normal 1,800 Normal 1,800
Plus 1,375 Plus 1,375 Plus 1,980 Plus 1,980
Cooling /
HP Speed
Adjust
Tap
CFM *
Electric
Heat
Adjust
Tap
CFM *
Minus 1,103 Minus 1,103
Normal 1,225 Normal 1,225
Plus 1,348 Plus 1,348
Minus 1,260 Minus 1,260
Normal 1,400 Normal 1,400
Plus 1,540 Plus 1,540
Minus 1,530 Minus 1,530
Normal 1,700 Normal 1,700
Plus 1,870 Plus 1,870
Minus** 1,620 Minus** 1,620
Normal 1,800 Normal 1,800
Plus 1,980 Plus 1,980
APHM5 Blower Performance Data
APHM52441
APHM53041
D
D
D
D
C
C
C
C
B
B
B
B
A
A
A
A
* - @ 0.1 - 0.8 ESP
* - @ 0.1 - 0.8 ESP
** - Factory Default
** - Factory Default
APHM53641
APHM54241
D
D
D
D
C
C
C
C
B
B
B
B
A
A
A
A
* - @ 0.1 - 0.8 ESP
* - @ 0.1 - 0.8 ESP
** - Factory Default
** - Factory Default
** - Factory Default
APHM54841
D
D
C
C
B
B
A
A
* - @ 0.1 - 0.8 ESP
SERVICING
37
0.1 0.2 0.3 0.4 0.5 0.6 0.7 0.8
CFM
726 662 576 486 415 346 284 248
Watts 56 64 73 79 84
89 93
97
CFM
1151
1099
1047
993 936
865
775 704
Watts 157 164 173 180 188 196 204 209
CFM 1347 1315 1256 1194 1152 1096 1051 972
Watts 239 256 265 271 282 286 293 297
CFM
866 805 743 666 578 508 435 359
Watts 83 91 98 106 112 119 124 128
CFM
1321
1276
1232 1170
1116
1065 1007
948
Watts
232
240
249
255 262
269 276
283
CFM 1440
1418 1364 1307 1265 1219 1168 1094
Watts 290 306 312 321 326 332 348 353
CFM 981 929 866 791 717 642 566 492
Watts
89 97 105 113 121 128 134 140
CFM
1507 1465
1425
1377 1329
1275 1216
1154
Watts 260
271 281
289
295 303 310 317
CFM 1604
1560
1507 1468 1415 1364 1321 1276
Watts 396
402
408 424 426 423 444 454
CFM 1215 1162 1114 1073 1027 976
910 822
Watts 153 162 173 184
196 210 224 236
CFM
1563
1521 1479 1435 1387 1346 1305 1247
Watts 286 297 307 317 328 339 350
359
CFM 1775 1718 1673 1643 1588 1532 1482
1431
Watts
416 424 430 454 458 466 478 488
CFM
1271 1231 1186 1140 1094 1041 986 915
Watts
169
181 190
201 211 223 234
249
CFM
1863
1819 1780 1740 1697 1655 1606 1562
Watts
456 466
476 487
496 504
510 516
CFM 2012 1965 1912 1871
1809 1770
1741 1691
Watts 578 593 599 606 610
627 626 634
Horizontal Flow
GPHM52441**
T1
Low stage
230
Model
Motor
Tap
Compressor
stage
Volts
E.S.P. (In. of H
2
O)
GPHM53041**
T1
Low stage
230
T4/T5
High stage
230
T2/T3
High stage
230
T2/T3
High stage
230
T4/T5
High stage
230
T1
Low stage
230
T4/T5
High stage
230
GPHM54241**
T1
Low stage
230
T4/T5
High stage
230
GPHM53641**
T2/T3
High stage
230
GPHM54841**
T1
Low stage
230
T4/T5
High stage
230
T2/T3
High stage
230
T2/T3
High stage
230
GPHM5[24-48]41** BLOWER PERFORMANCE
SERVICING
38
0.1 0.2 0.3 0.4 0.5 0.6 0.7 0.8
CFM 683 622 542 457 390 326 267 233
Watts 58 66 75 81 86 91 96 100
CFM 1082 1033 984 933 880 813 729 662
Watts 160 168 177 185 193 201 209 214
CFM 1266 1236 1181 1122 1083 1030 988 914
Watts 245 262 272 278 289 293 300 304
CFM 814 757 699 626 543 478 408 338
Watts 85 93 101 108 115 122 128 132
CFM 1242 1200 1158 1100 1049 1001 946 891
Watts 238 246 255 261 268 276 283 290
CFM 1354 1333 1282 1229 1189 1146 1098 1028
Watts 297 314 320 329 334 340 357 362
CFM 922 873 814 743 674 604 532 462
Watts 91 100 108 116 124 131 138 143
CFM 1416 1377 1339 1294 1249 1198 1143 1085
Watts 267 277 288 296 302 311 318 325
CFM 1508 1466 1417 1380 1330 1282 1242 1199
Watts 406 412 418 435 437 434 455 465
CFM 1142 1092 1047 1009 965 917 856 773
Watts 157 166 177 189 201 215 229 242
CFM 1469 1430 1390 1349 1303 1266 1227 1172
Watts 293 305 315 325 336 347 359 368
CFM 1669 1615 1573 1544 1493 1440 1393 1345
Watts 426 435 441 465 469 478 490 500
CFM 1195 1157 1114 1072 1028 979 927 860
Watts 173 186 195 206 216 228 240 255
CFM 1751 1710 1673 1635 1595 1556 1509 1468
Watts 467 477 488 499 508 516 523 529
CFM 1891 1847 1797 1759 1700 1664 1637 1590
Watts 592 608 614 621 625 643 642 650
Down flow
T2/T3
230
Model
Motor
Tap
Volts
E.S.P. (In. of H
2
O)
GPHM52441**
T1
230
Compresso
r stage
GPHM53041**
T1
230
T2/T3
230
High stage
T4/T5
230
High stage
Low stage
High stage
GPHM53641**
230
High stage
Low stage
High stage
GPHM54241**
230
T2/T3
230
T1
GPHM54841**
T2/T3
GPHM5[24-48]41** BLOWER PERFORMANCE
Low stage
High stage
High stage
Low stage
T2/T3
230
T4/T5
230
T4/T5
230
T1
230
High stage
Low stage
High stage
High stage
T4/T5
230
T1
230
T4/T5
230
SERVICING
39
Speed
Tap
External
Static
Pressure
(ESP), in
w.c.
SCFM
RPM
BHP
Speed
Tap
External
Static
Pressure
(ESP), in w.c.
SCFM RPM BHP
0.2
1372
665
0.20 0.2 1372 665 0.20
0.4 1259 734 0.23 0.4 1259 734 0.23
0.6 1133 813 0.25 0.6 1133 813 0.25
0.8 1016 888 0.27 0.8 1016 888 0.27
0.2 2176 878 0.69 0.2 2176 878 0.69
0.4 2080 939 0.74 0.4 2080 939 0.74
0.6 1973 1000 0.79 0.6 1973 1000 0.79
0.8 1887 1048 0.83 0.8 1887 1048 0.83
0.2 2176 878 0.69 0.2 2176 878 0.69
0.4 2080 939 0.74 0.4 2080 939 0.74
0.6 1973 1000 0.79 0.6 1973 1000 0.79
0.8 1887 1048 0.83 0.8 1887 1048 0.83
0.2 2234 960 0.86 0.2 2234 960 0.86
0.4 2162 1003 0.9 0.4 2162 1003 0.9
0.6 2101 1042 0.83 0.6 2101 1042 0.83
0.8 2053 1073 0.96 0.8 2053 1073 0.96
0.2 2300 982 0.93 0.2 2300 982 0.93
0.4 2222 1025 0.98 0.4 2222 1025 0.98
0.6 2170 1061 1.01 0.6 2170 1061 1.01
0.8 2120 1095 1.04 0.8 2120 1095 1.04
APHM56041
Horizontal Flow
T1
T5
T4
T5
Downflow
APHM56041
T1
T2
T3
T4
T2
T3
SERVICING
40
5 Ton Heat Pump
Standard Static Drive
Model: APHM56041
Speed
Tap
External
Static
Pressure
(ESP), in w.c.
SCFM RPM BHP
0.2
1380 664 0.20
0.4
1262 735 0.23
0.6
1132 811 0.25
0.8
1006 884 0.27
0.2
2145 902 0.71
0.4
2056 952 0.75
0.6
1967 1003 0.79
0.8
1890 1051 0.83
0.2
2145 902 0.71
0.4
2056 952 0.75
0.6
1976 1003 0.79
0.8
1890 1051 0.83
0.2
2293 950 0.85
0.4
2195 995 0.89
0.6
2112 1042 0.93
0.8
2034 1088 0.97
0.2
2364 971 0.92
0.4
2274 1019 0.97
0.6
2190 1063 1.01
0.8
2113 1110 1.06
T5
Downflow
T1
T2
T3
T4
Speed
Tap
External
Static
Pressure
(ESP), in w.c.
SCFM RPM BHP
0.2
1372 665 0.20
0.4
1259 734 0.23
0.6
1133 813 0.25
0.8
1016 888 0.27
0.2
2176 878 0.69
0.4
2080 939 0.74
0.6
1973 1000 0.79
0.8
1887 1048 0.83
0.2
2176 878 0.69
0.4
2080 939 0.74
0.6
1973 1000 0.79
0.8
1887 1048 0.83
0.2
2234 960 0.86
0.4
2162 1003 0.9
0.6
2101 1042 0.83
0.8
2053 1073 0.96
0.2
2300 982 0.93
0.4
2222 1025 0.98
0.6
2170 1061 1.01
0.8
2120 1095 1.04
Horizontal Flow
T1
T4
T5
T2
T3
Shaded area indicates air ow below 1500 SCFM (300 SCFM/ton) that is not recommended
for High Stage cooling or heating.
SERVICING
41
APPENDIX A BLOWER PERFORMANCE TABLES – HEAT PUMP
5 TON HEAT PUMP
Standard Static Drive
Model: GPHM56041
Horizontal Flow
Down Flow
Speed
Tap
External
Static
Pressure
(ESP), in w.c.
SCFM RPM BHP
Speed
Tap
External
Static
Pressure
(ESP), in w.c.
SCFM RPM BHP
T1
0.2 1372 665 0.20
T1
0.2 1380 664 0.20
0.4 1259 734 0.23 0.4 1262 735 0.23
0.6 1133 813 0.25 0.6 1132 811 0.25
0.8 1016 888 0.27 0.8 1006 884 0.27
T2
0.2 2176 878 0.69
T2
0.2 2145 902 0.71
0.4 2080 939 0.74 0.4 2056 952 0.75
0.6 1973 1000 0.79 0.6 1967 1003 0.79
0.8 1887 1048 0.83 0.8 1890 1051 0.83
T3
0.2 2176 878 0.69
T3
0.2 2145 902 0.71
0.4 2080 939 0.74 0.4 2056 952 0.75
0.6 1973 1000 0.79 0.6 1967 1003 0.79
0.8 1887 1048 0.83 0.8 1890 1051 0.83
T4
0.2 2234 960 0.86
T4
0.2 2293 950 0.85
0.4 2162 1003 0.9 0.4 2195 995 0.89
0.6 2101 1042 0.83 0.6 2112 1042 0.93
0.8 2053 1073 0.96 0.8 2034 1088 0.97
T5
0.2 2300 982 0.93
T5
0.2 2364 971 0.92
0.4 2222 1025 0.98 0.4 2274 1019 0.97
0.6 2170 1061 1.01 0.6 2190 1063 1.01
0.8 2120 1095 1.04 0.8 2113 1110 1.06
Shaded area indicates air flow below 1500 SCFM (300 SCFM/ton) that
is not recommended for High Stage cooling or heating
42
TROUBLESHOOTING
SYMPTOM
High head - low suction
a.
Restriction in liquid line or
TXV not functioning
a.
Remove or replace with proper size TXV.
High head - high or normal suction
a.
In Cooling: Dirty condenser coil
a.
Clean coil
In Heating: Dirty filter, Dirty indoor coil
b.
Overcharged
b.
Correct System charge
c.
In Cooling: Condenser fan not running
c.
In Heating: Indoor blower not running
c.
Repair or Replace
a.
Incorrect TXV.
a.
Replace with correct TXV
b.
Defective compressor valves
b.
Replace compressor
c.
TXV not functioning properly
c.
Check for debris in TXV or deformed TXV.
Remove debris or replace TXV.
d.
Incorrect TXV setting d.
Check Super Heat
a.
Power off or loose electrical connection
a. Check for unit voltage at contactor in unit
b.
Thermostat out of calibration set too high
b.
Reset
c.
Defective contactor
c.
Check for 24 volts at contactor coil replace if
contacts are open
d.
Blown fuses or tripped breaker
d.
Replace fuse or reset breaker
e.
Transformer defective
e.
Check wiring - replace transformer
f.
High or low pressure control open
(Optional)
f.
Check high pressure control or check unit
charge
High pressure control opens at 610 psig
Low pressure control opens at 22 psig
g.
Compressor overload contacts open
g.
Replace compressor
NOTE: Wait at least 2 hours for overload to reset
Condenser fan runs,
compressor doesn't
a.
Loose connection
a.
Check for unit voltage at compressor check &
tighten all connections
b.
Compressor stuck, grounded or open
winding
open internal overload
b.
Wait at least 2 hours for overload to reset If still
open, replace the compressor.
c.
Low voltage connection
c.
At compressor terminals, voltage must be within
10 % of nameplate volts when unit is operating
d.
Capacitor weak, open, or shorted
d.
Check capacitor. If defective, replace.
Low suction - cool compressor
a.
In Cooling: Low indoor airflow
a.
Iced evaporator coil
In Heating: Dirty outdoor coil, defective
defrost thermostat, defective defrost
control board, outdoor fan not running, low
refrigerant charge.
b.
Low airflow
b.
Check - should be approximately 400 CFM per
ton, dirty air filters, all duct outlets open
c.
Low refrigerant charge
c.
Properly charge unit
d.
Operating unit in cooling mode below 65°F
outdoor temperature
d.
Install or check low ambient control, should be
open below 65°F outdoor temperature
a.
Defective overload protector
a.
Replace - check for correct voltage
b.
Unit cycling on low pressure control
b.
Check refrigerant charge and / or airflow
c.
High pressure switch cuts out c.
Check airflow (indoor & outdoor),
check expansion device
a.
a.
Increase speed of blower or reduce restriction
replace air filters
a.
Excessive load
a.
Recheck load calculation
b.
Defective compressor
b.
Replace
c.
Reversing valve not seating properly.
c.
Replace
a.
Improperly sized unit
a.
Recalculate load
b.
Improper airflow
b.
Check - should be approximately 400 CFM per ton
c.
Incorrect refrigerant charge.
c.
Charge per procedure attached to unit service
panel
d. Incorrect voltage
d.
At compressor terminals, voltage must be within
10% of nameplate volts when unit is operating
Increase speed of blower or reduce restriction -
replace air filters
Insufficient cooling
High suction pressure
REMEDY
POSSIBLE CAUSE
Compressor short cycles
Registers sweat
Low airflow
Low head - high suction
Unit will not run
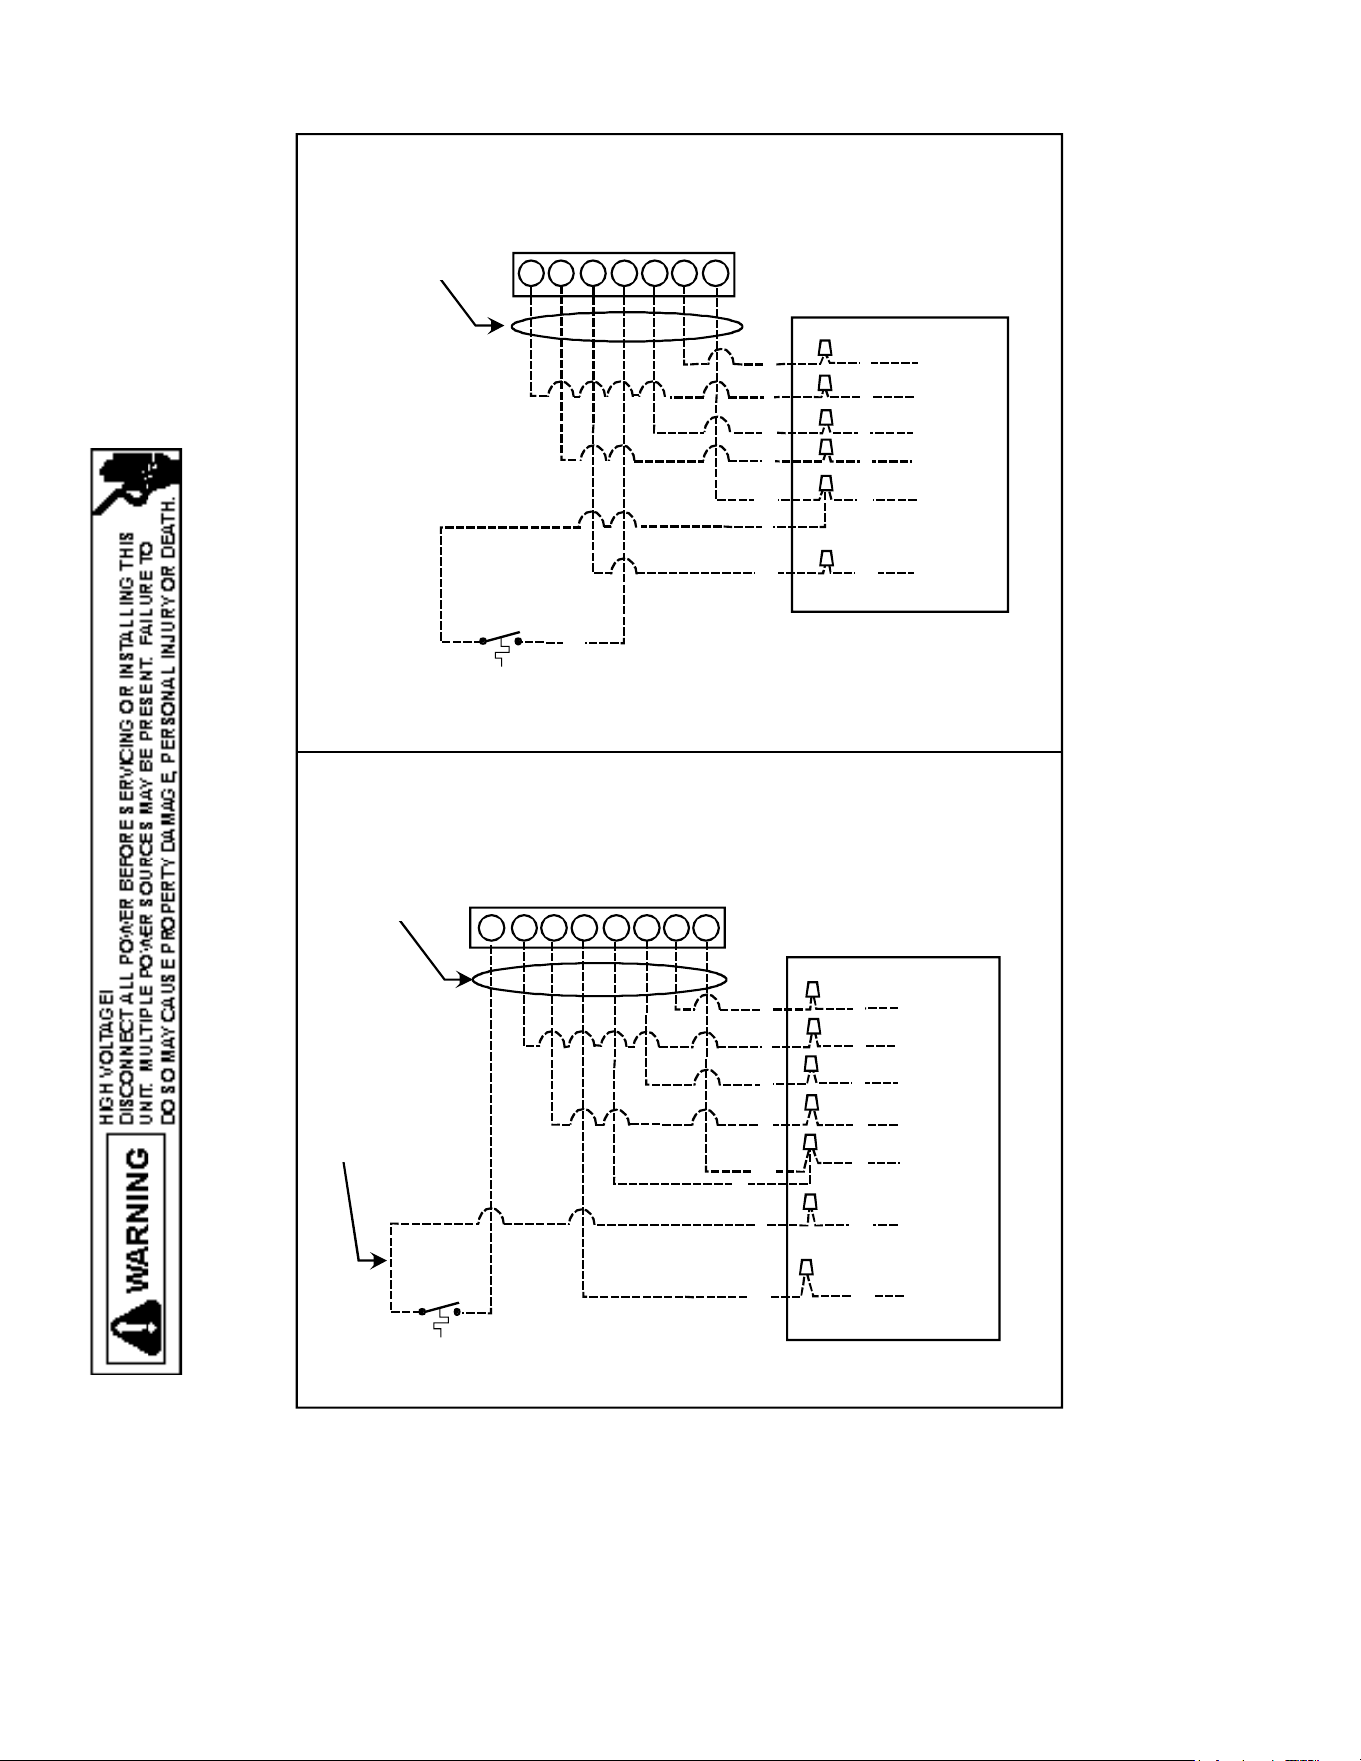
WIRING DIAGRAMS
Wiring is subject to change. Always refer to the wiring diagram on the unit for the most up-to-date wiring.
43
BLUE
WHITE
ORANGE
GREEN
YELLOW
RED
SEE NOTE 1
#18 GAUGE 7 WIRE
REQUIRED FOR
HEAT PUMPS
PACKAGE SYSTEM WIRING DIAGRAM - 1 STAGE ELECTRIC HEAT
TYPICAL HP
ROOM THERMOSTAT
OUTDOOR THERMOSTAT
CLOSE ON TEMPERATURE FALL
12
Y O
C W1 G
R
E
R
Y
Y
R
G
O
O
G
W
BR
BL
BL
R
PACKAGE UNIT
LOW VOLTAGE
JUNCTION BOX
BL
W2 C RY O W1 G E
TYPICAL HP
ROOM THERMOSTAT
12
OUTDOOR THERMOSTAT
CLOSE ON TEMPERATURE FALL
PACKAGE UNIT
LOW VOLTAGE
JUNCTION BOX
BLUE
BROWN
WHITE
ORANGE
GREEN
YELLOW
RED
SEE NOTE 1
#18 GAUGE 8 WIRE
FOR HEAT PUMPS
PACKAGE SYSTEM WIRING DIAGRAM - 2 STAGE ELECTRIC HEAT
ABOVE 10 KW
SEE NOTE 2
R
Y
G
O
O
Y
G
R
BL
BL
BR
R
W
BR
W
NOTES:
1) "O" and "E" used on heat pumps only.
2) Connect wire from terminal #1 on outdoor thermostat to the white
wire on package units if single stage indoor thermostat is used.
Color Codes
R - Red
Y - Yellow
BL - Blue
BR - Brown
O - Orange
W - White
G - Green
OT18-60A Outdoor Thermostat
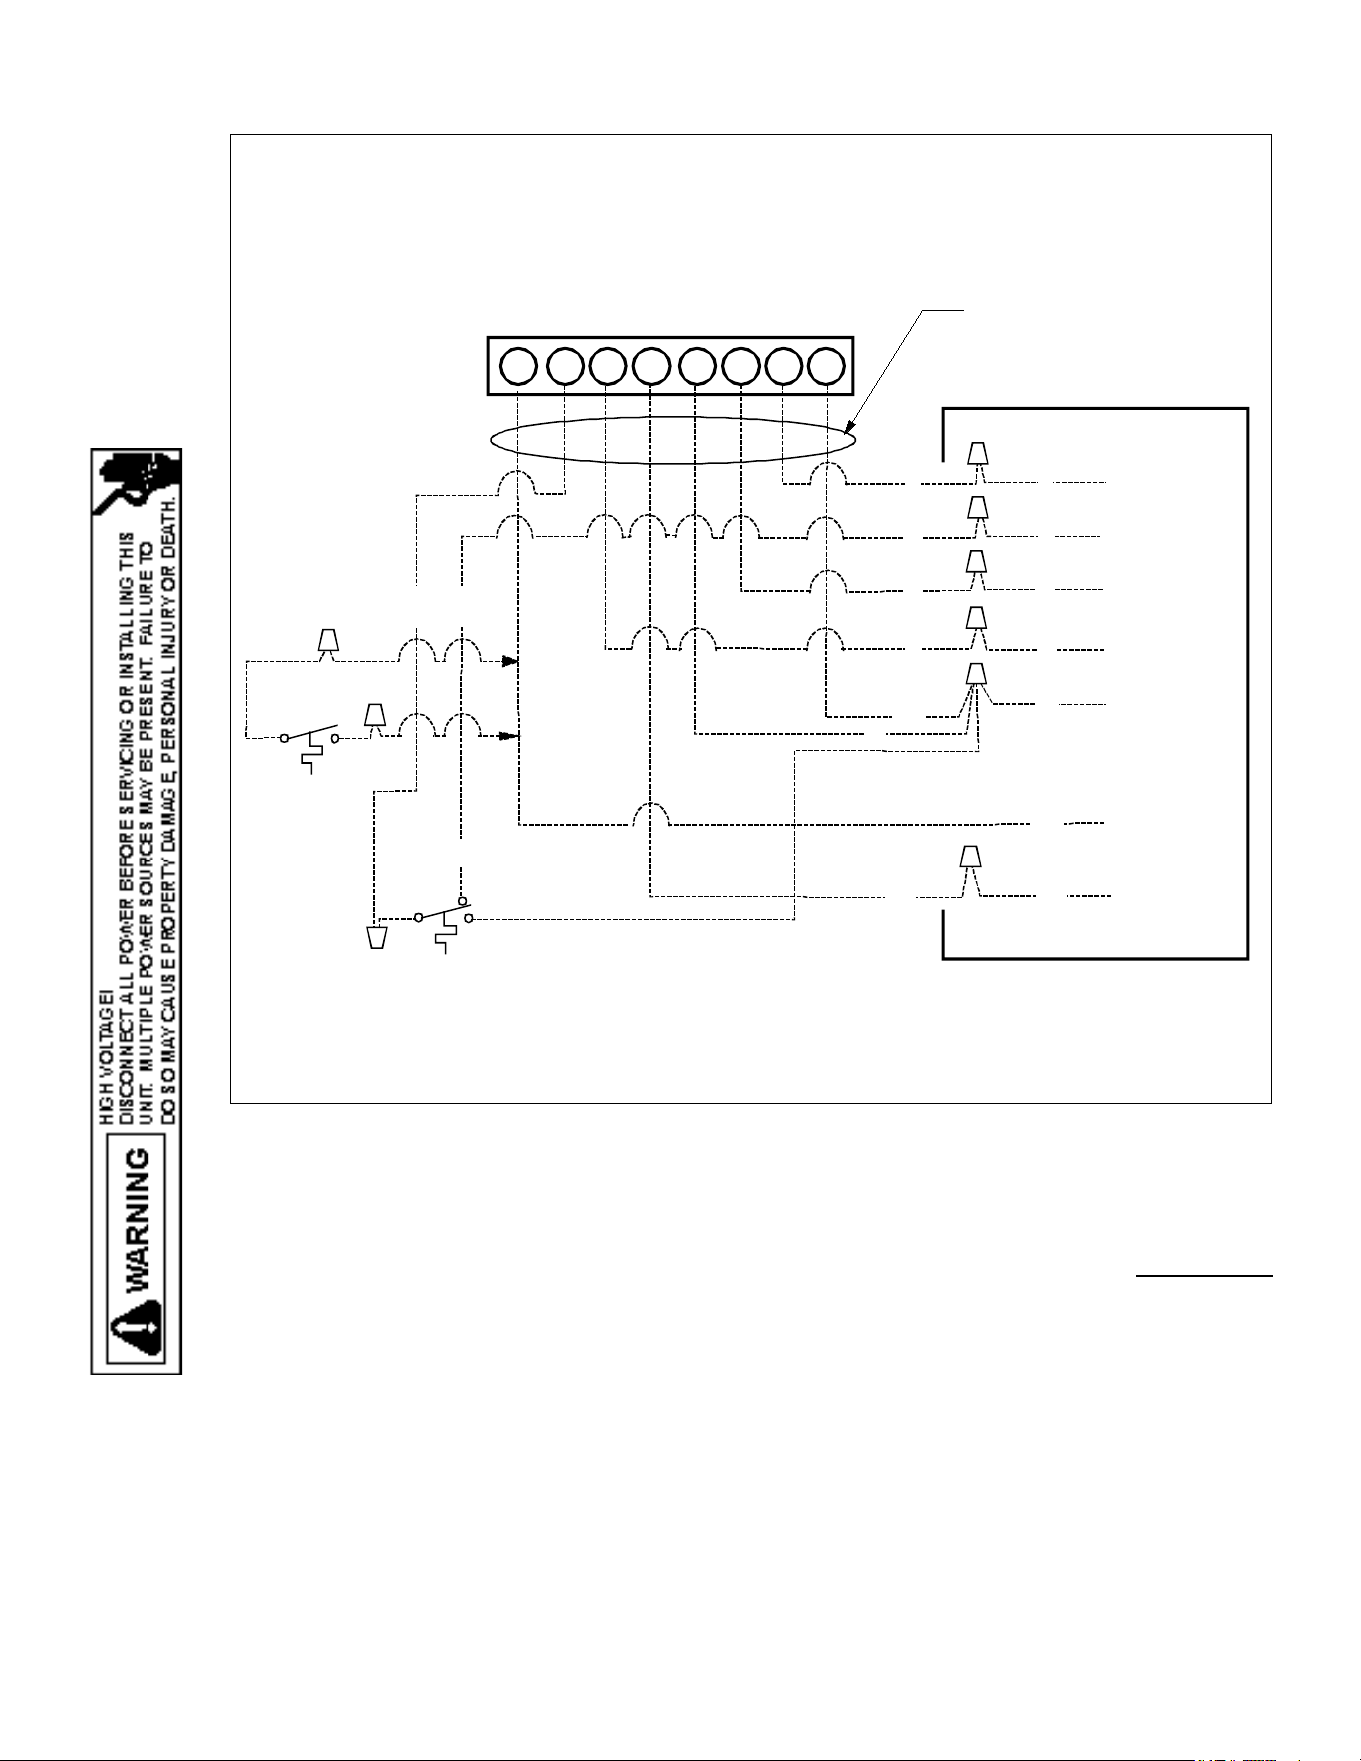
WIRING DIAGRAMS
Wiring is subject to change. Always refer to the wiring diagram on the unit for the most up-to-date wiring.
44
R
W2 C
RY
O W1 G
E
TYPICAL H/P
ROOM THERMOSTAT
1
2
PACKAGE HEAT PUMP
LOW VOLTAGE
JUNCTION BOX
BLUE
BROWN
WHITE
ORANGE
GREEN
YELLOW
RED
#18 GAUGE 8 WIRE
R
Y
G
O
O
Y
G
R
BL
BL
BR
W
BR
W
3
BL
Y
PACKAGE SYSTEM WIRING DIAGRAM - HEAT PUMPS ONLY!
TWO-STAGE ELECTRIC HEAT ABOVE 10 kW
For outdoor temperatures below 0° F with 50% or higher relative humidity,
set outdoor thermostat at 0° F
NOTE 1: OT18 #2 CAN BE CONNECTED BETWEEN W2 OF THERMOSTAT AND BROWN WIRE IF DESIRED.
COLOR CODES
R --RED
Y --YELLOW
BR-BROWN
O --ORANGE
W -WHITE
G --GREEN
BL-BLUE
OUTDOOR THERMOSTAT #1
CLOSE ON TEMPERATURE FALL
BL
1
2
OUTDOOR THERMOSTAT #2
(IF USED, SEE NOTE 1)
OT18-60A Outdoor Thermostat
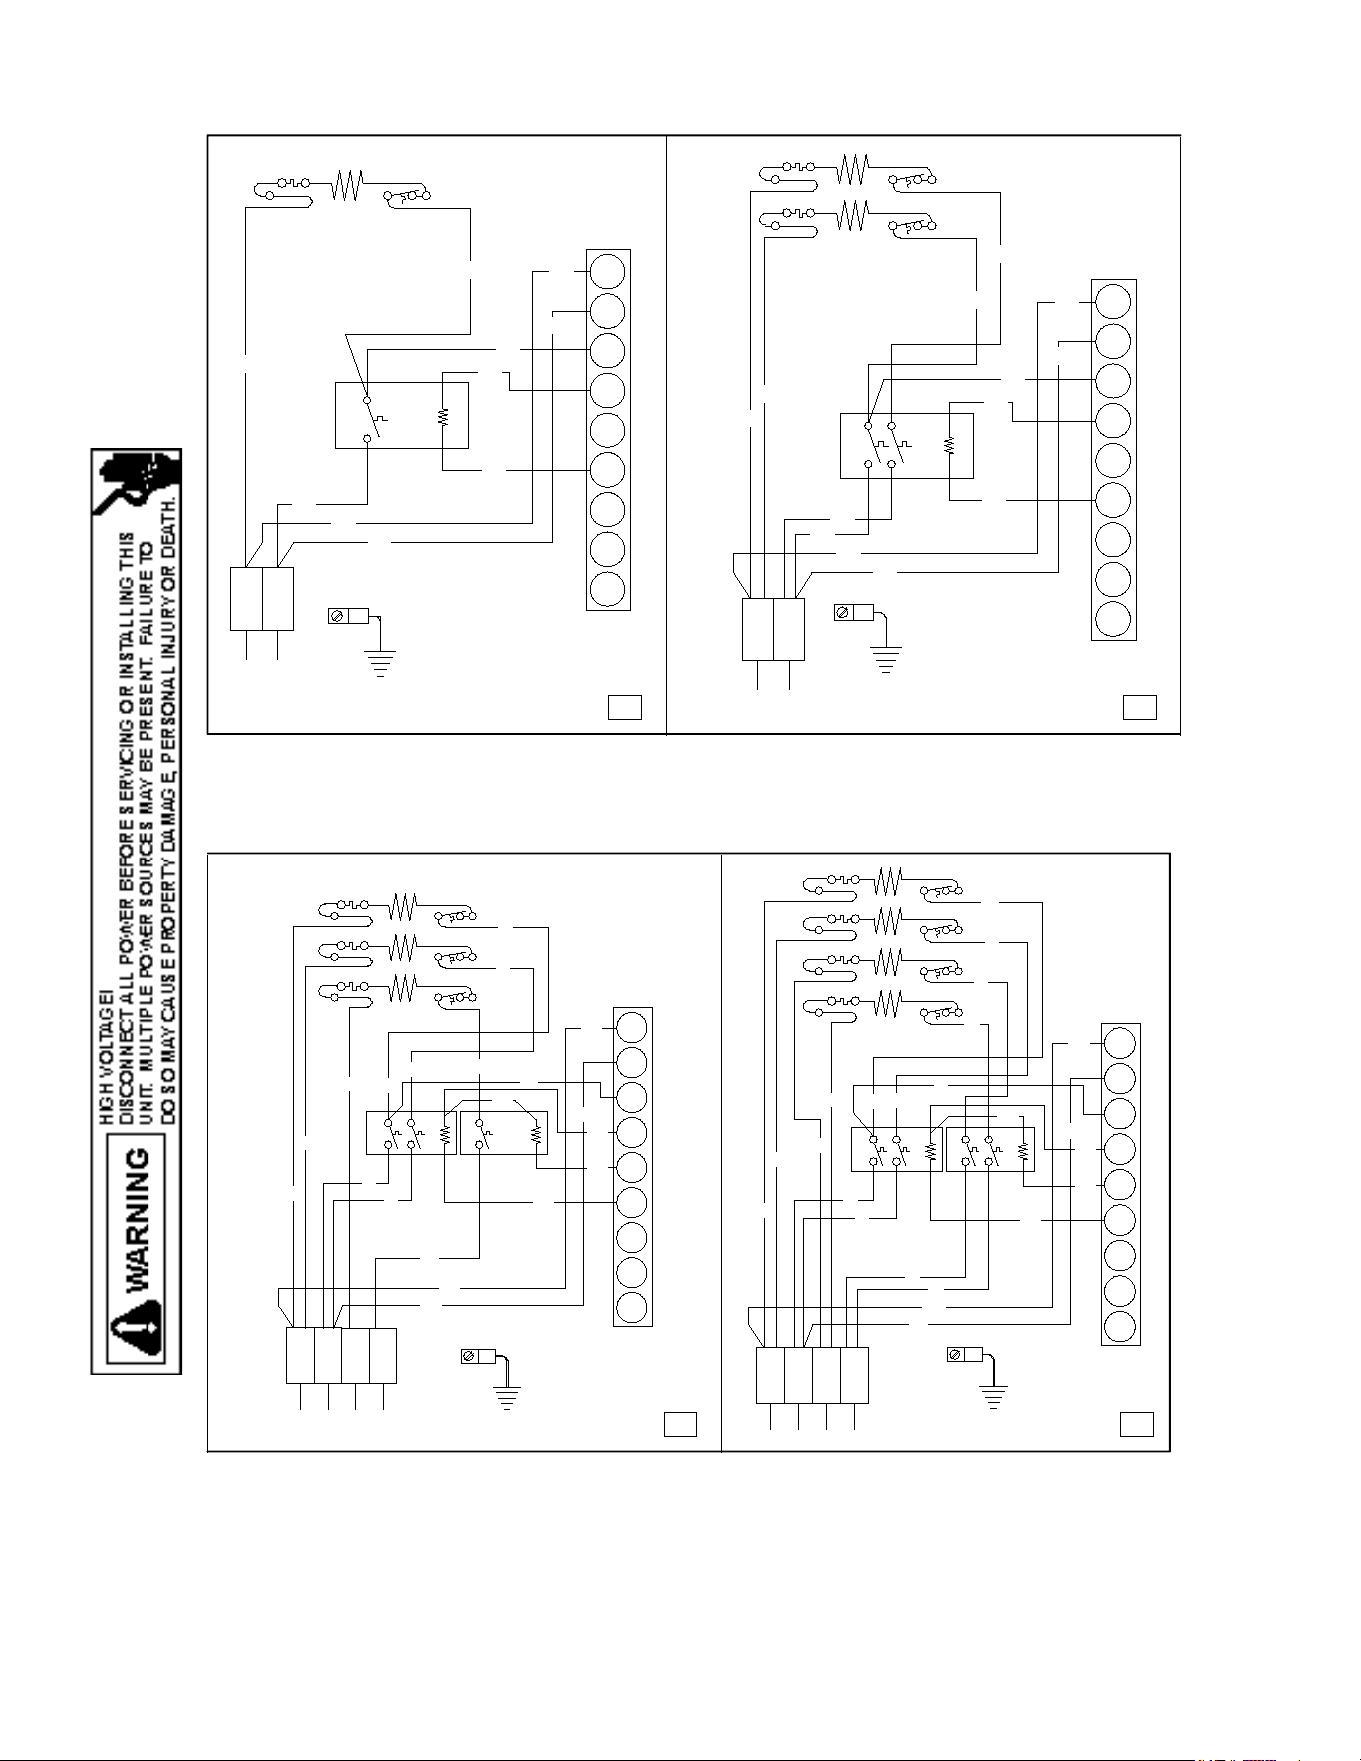
WIRING DIAGRAMS
Wiring is subject to change. Always refer to the wiring diagram on the unit for the most up-to-date wiring.
45
BK
BL
BK
L1
L2
BK
BK
HTR1
TL
HTR2
R
9
8
7
R
W
BL
PU
TL
BK
5
6
3
4
PLM
BK
R
1
2
W
BK
L2
L1
BK
R
R
R
BK
R
HTR1
TL
6
8
9
7
2
R
PU
4
5
3
BK
R
1
PLM
ONE (1) ELEMENT ROWS
TWO (2) ELEMENT ROWS
FL
M1
M2
FL
FL
M1
M2
M3
M4
5 KW
10 KW
L1
BK
BK
L2 L1
L2
R
Y
M1
M2
BK
R
Y
R
R1
M4
R
BK
M3
HTR3
TL
HTR2
HTR1
TL
TL
PU
M2
R2
Y
M1
BL
W
BR
BL
R
BK
R
BK
TL
HTR1
BK
HTR4
HTR3
HTR2
BK
R
9
7
8
L2
L1
L1
L2
2
5
6
3
4
PLM
1
R
M1
Y
BK
M2
BL
W
6
BL
R
BK
Y
8
9
7
M6
M5
M3
R1
M4
R
PU
M7
R2
M8
BL
TL
TL
TL
Y
BL
R
BK
R
BL
BR
4
5
3
2
BK
PLM
1
THREE (3) ELEMENT ROWS
FOUR (4) ELEMENT ROWS
FL
FL
FL
FL
FL
FL
FL
15 KW
20 KW
Single Phase HKP** / HKR** Heat Kit
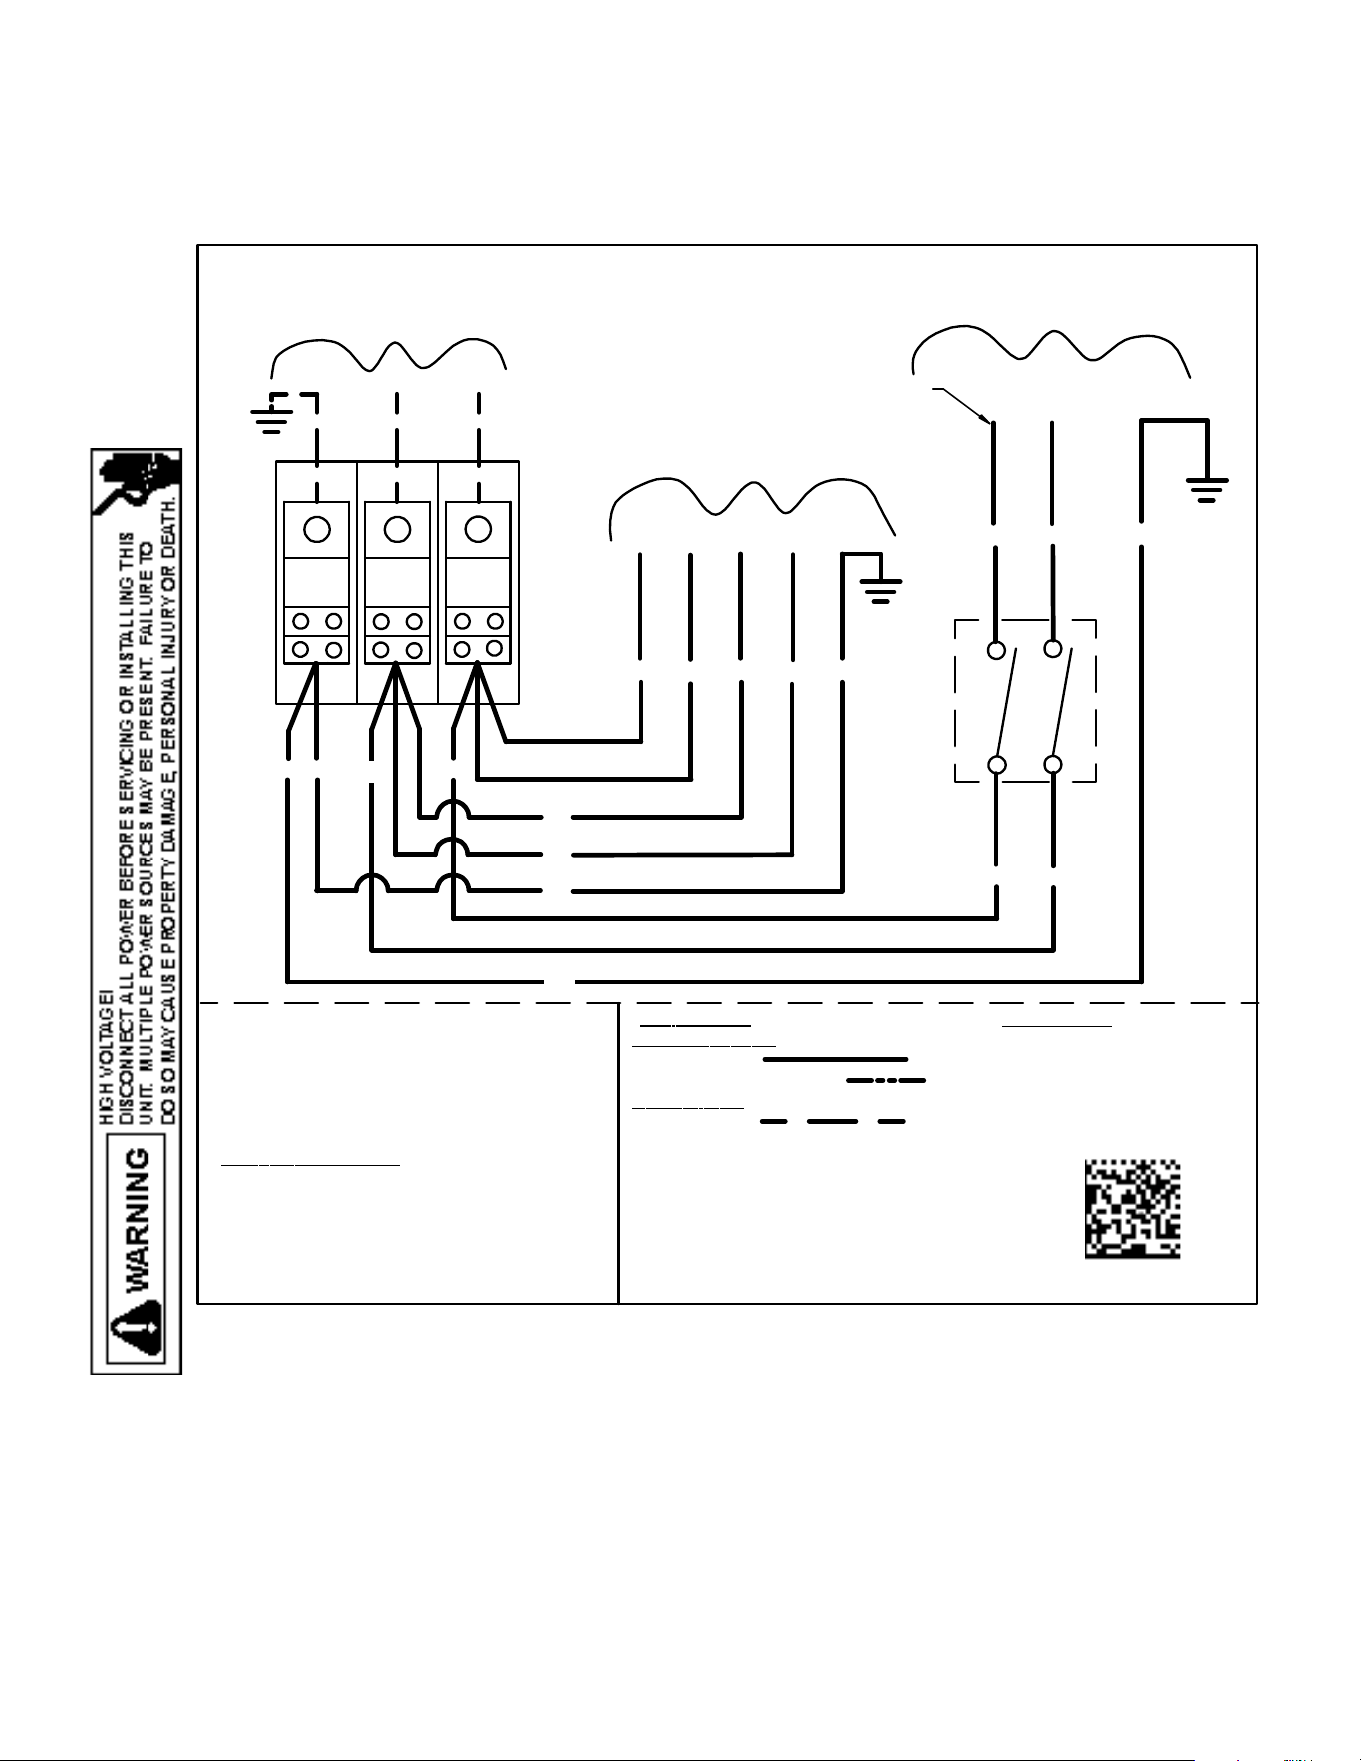
WIRING DIAGRAMS
Wiring is subject to change. Always refer to the wiring diagram on the unit for the most up-to-date wiring.
46
208 / 240 / 1 / 60
A
A
B
B
TO ELECTRIC HEAT
A
B
B
A
NOTES:
1. FOR APC & GPC UNITS: A = L1 / B = L2
FOR APH & GPH UNITS: A = L2 / B = L1
2. 45, 40, 35, & 30 AMP BREAKERS WILL
HAVE A PURPLE WIRE. 50 AND 60
AMP BREAKERS WILL HAVE BLACK
WIRE LABELED WITH A #3
CO
MPONENT LEGEND
CCB - COMPRESSOR
CIRCUIT BREAKER
SPB - SINGLE POINT BLOCK
GR
PU/BK-3
GR
BK
BK
BK-3
BK
BK
BK
BK
SPB
CCB
0140G02544-B
TO CONTROL BOX
SEE NOTES 1 & 2
BK
GR
COLOR CODE
BK --------------- BLACK
GR---------------- GREEN
BR --------------- BROWN
PU --------------- PURPLE
WH -------------- WHITE
YL --------------- YELLOW
WIR
ING CODE
FACTORY WIRING
HIGH VOLTAGE
OPTIONAL HIGH VOLTAGE
F
IELD WIRING
HIGH VOLTAGE
GR
GR
GR
BK
BK-3
BK
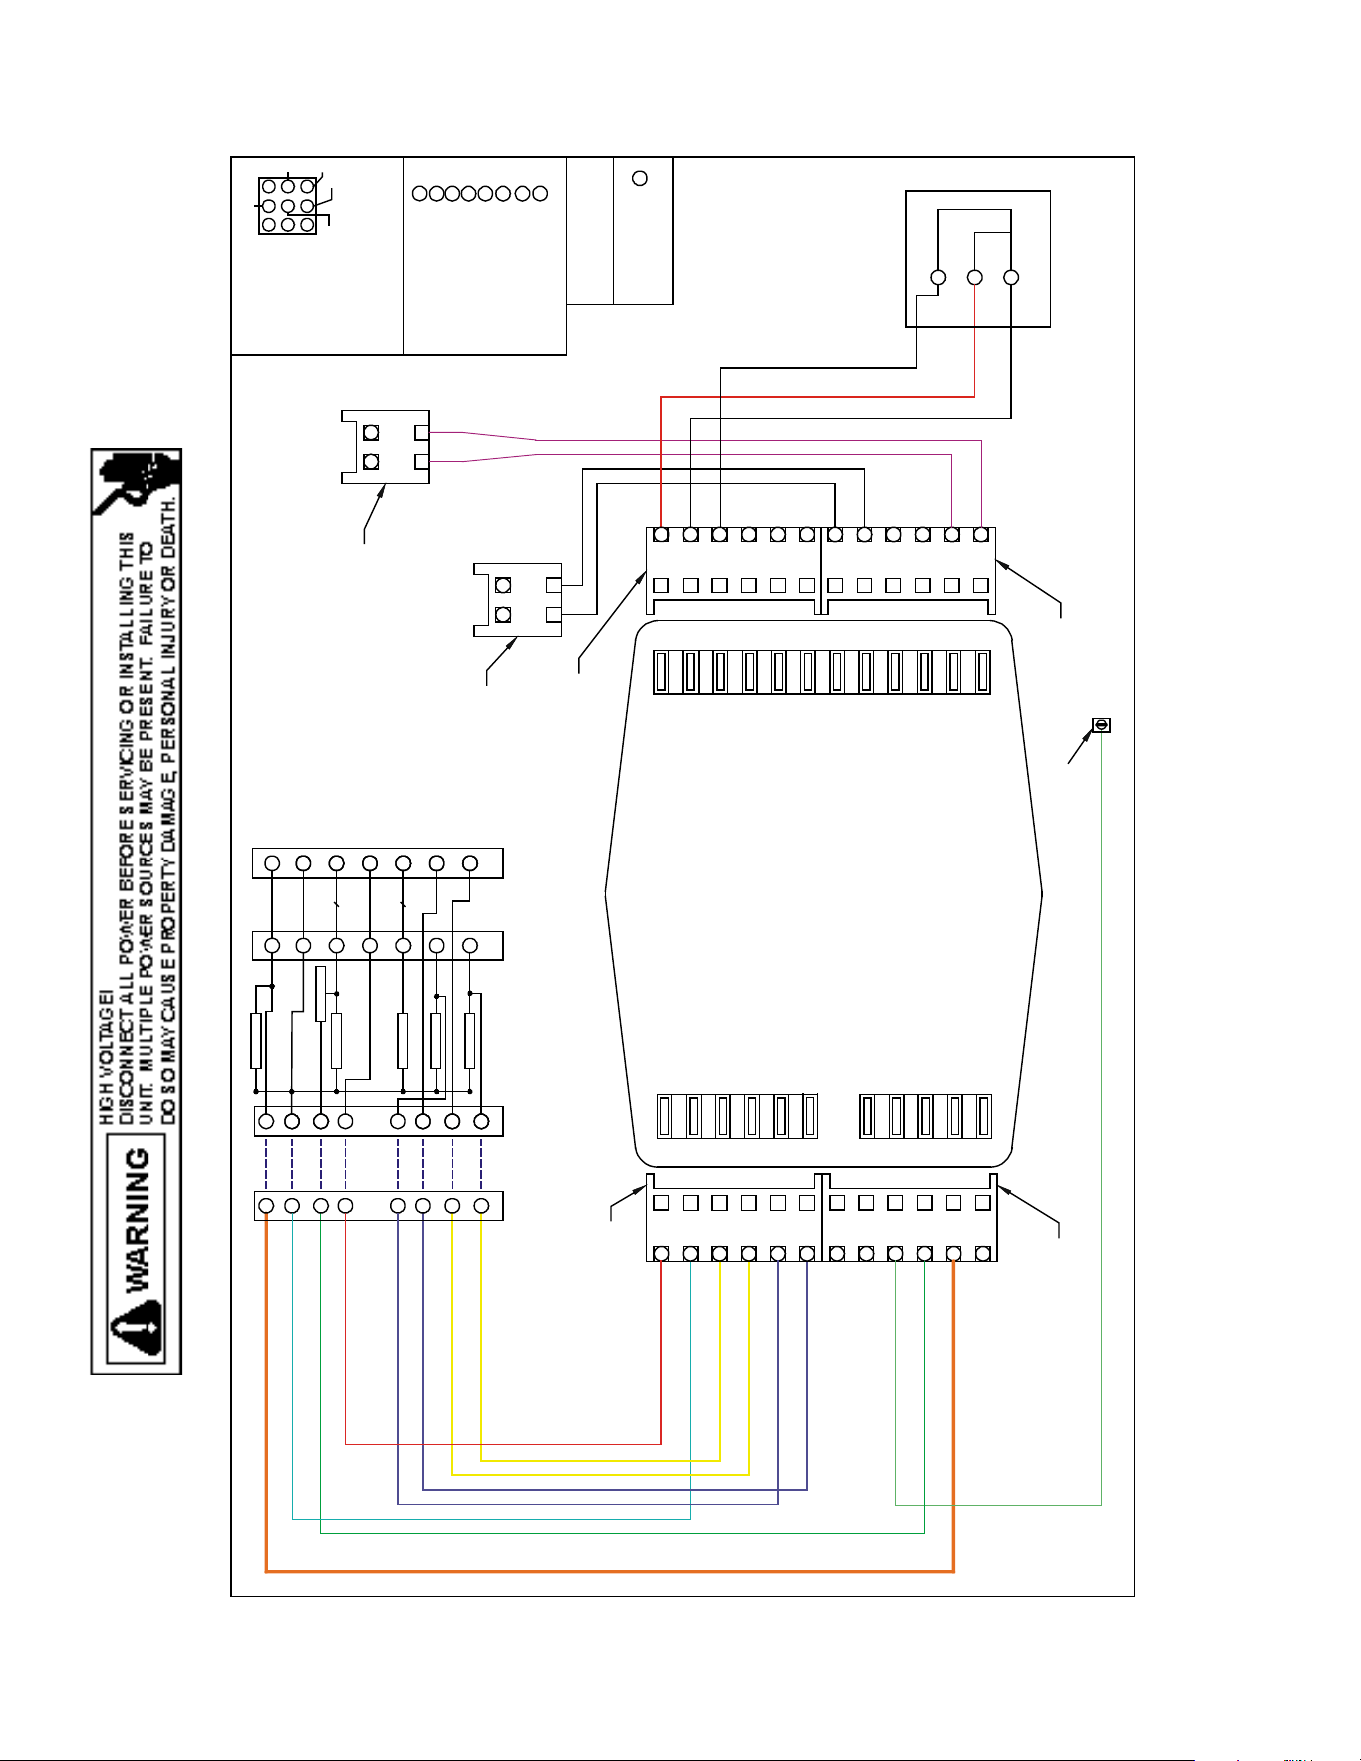
WIRING DIAGRAMS
Wiring is subject to change. Always refer to the wiring diagram on the unit for the most up-to-date wiring.
47
36240 ECONOMIZER
WIRE DIAGRAM
2
3
5
6
8
(Y) YELLOW
(BL) BLUE
(P) PURPLE
COLOR CODES FOR PLUG 2
4
(G) GREEN
(BL)
(R)
(Y)
(P)
WIRE LENGTHS FOR PLUG 2
(O) ORANGE
PURPLE = 2 X 77"
YELLOW = 2 X 77"
BLUE = 1 X 77"
GREEN = 1 X 77"
HONEYWELL
W7220
(G)
(BL)
(P)
(Y)
(O)
(O)
GROUND(G)
GROUND(G)
MAT
MAT
OAT
OAT
S-BUS
S-BUS
IAQ 2-10
IAQ COM
IAQ 24V+
ACT 2-10
ACT COM
ACT 24V+
AUX2-1
OCC
E-GND
EXH1
AUX1-0
Y2-I
Y2-O
Y1-I
Y1-O
C
R
GROUND LUG
MOLEX 3597706**
50048926-002
MOLEX 3597706**
500-48926-002
ORANGE = 1 X 78"
GROUND = 1 X 50"
COLOR CODES FOR PLUG 1
8 (O) ORANGE
GROUND (G)GREEN
WIRE LENGTHS FOR PLUG 1
9
8
7
3
2
1
G
Y2 TSTAT
Y1 (CONTACTOR)
COMMON
Y1 TSTAT
O
6
5
4
(CC1)
Y/Y2 (CONTACTOR)(CC2)
1
(P) PURPLE
(Y) YELLOW
4
1
2
6
5
4
1
2
6
5
Y1
Y2
W2
R
G
C
Y1
Y2
W2
R
G
C
COOL 1
HEAT
FAN
ECON.
PLUG
PLUG
ECON
GMC
TERMINAL BLOCK
ROOM THERMOSTAT
88
OO
RV
RV - REVERSING VALVE
(ENERGIZED IN COOLING MODE)
33
COOL 2
(P)
(Y)
(P)
(Y)
99
(R)
9
(R) RED
R
(P)
(P)
(W)
(W)
MOLEX 3597706**
50048926-002
MOLEX 3597702**
50048926-001
MOLEX 3597702**
50048926-001
MS7105K2046/B
HONEYWELL ACTUATOR
1
2
3
COM
+
RED
WHITE
24VAC/DC
CONNECT TO
C7250A1001
MIXED AIR SENSOR
CONNECT TO
C7400S1000
ENTHALPY CONTROL
BLACK
WHITE
BLACK
RED
MOLEX 3597706**
50048926-002
2
.
.
.
1
0
V
D
C
Economizer
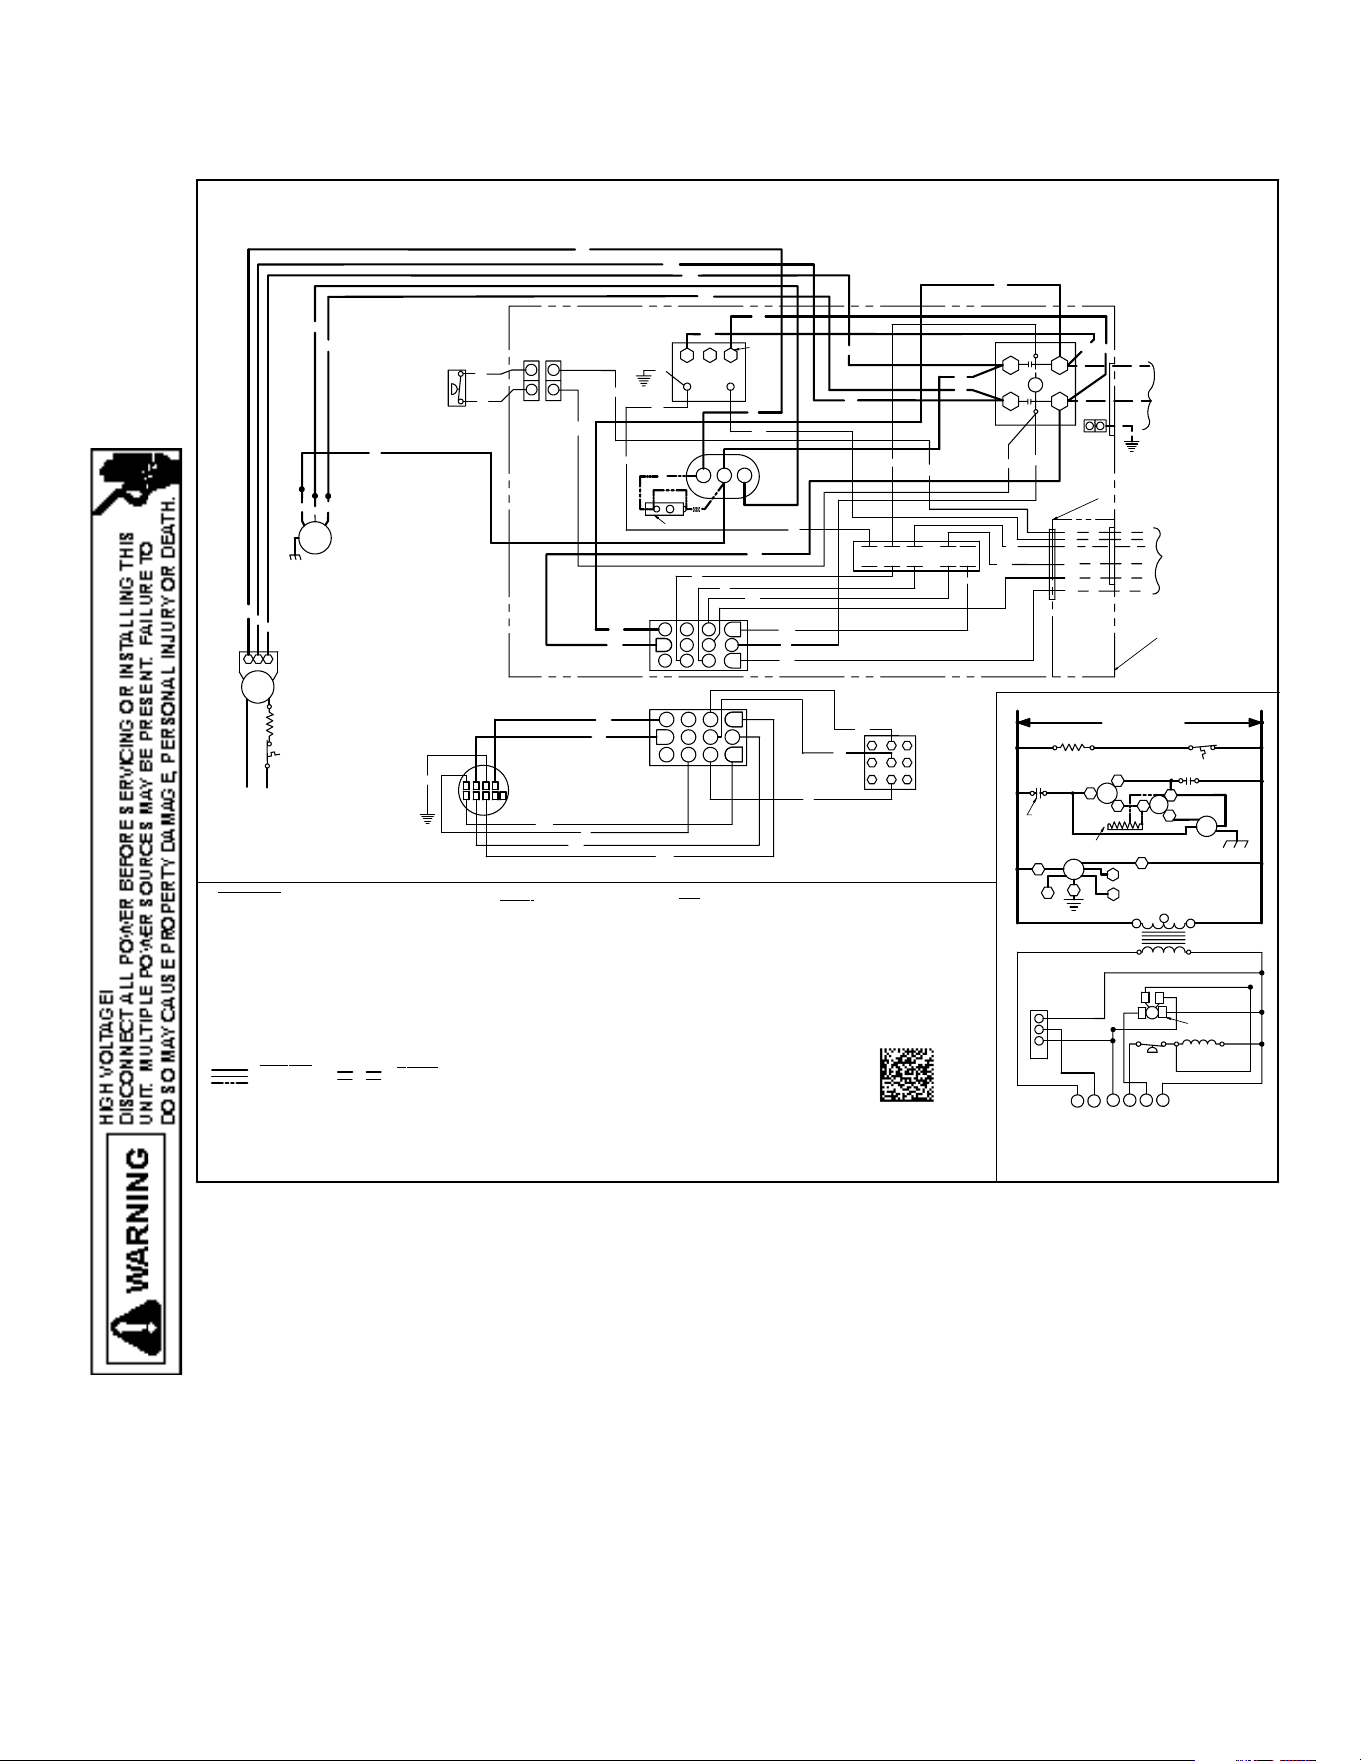
WIRING DIAGRAMS
Wiring is subject to change. Always refer to the wiring diagram on the unit for the most up-to-date wiring.
48
GPCM3[24-60]M41A*
3
CONTROL
BOX
240
2
24V
BL
208
TR
C
1
RD
BL
GR
WH
BR
R
C
W2
W1
G
Y
T2
T1
SEE
NOTE 3
PU
L1
GND
C
L2
BK
RD
BK
BK
SEE
NOTE 5
LVJB
RCCF
SA
H
C
F
PU
BK
YL
YL
YL
4
1
PLF-H
5
6
2
3
7
8
9
BL
BR
WH
YL
BK
RD
YL
YL
YL
YL
BK
GR
PU
WH
WH
WH
BL
BL
BL
BL
GR
LVTB
COM
PONENT
L
EGEND
WIRE COD
E
BK
BL
BR
GR
OR
PU
RD
WH
YL
BL/PNK
FACTOR
Y
WIRING
LINE VOLT AGE
LOW VOLTAGE
OPTIONAL HIGH
VOLTAGE
FI
E
LD
WIRING
HIGH VOLT AGE
LOW VOLTAGE
BL
123
6
5
4
98
7
12 11
10
YL
C L
G
N
1
2
3
EM
4
5
GR
BK
123
12
11
10
98
7
6
54
YL
BL
YL
BK
COMP
S
CR
CM
BR
PU
BK
BR
PU
HPS
1
2
1
2
208-230/1/60 0140G03217-C
SEE UNIT RATING PLATE FOR TYPE AND SIZE
OF OVER CURRENT PROTECTION
NOTES
:
1. REPLACEMENT WIRE MUST BE SAME SI ZE AND TYPE IN SULATION
AS ORIG INAL (AT LEAST 105˚C) USE COPPER COND UCTOR ONLY.
2. TO CHANGE EVAPORATOR MOTOR SPEED MOVE YELLOW AND
WHITE LEADS FROM EM"2" AND "3" TO "4" AND "5". IF BOTH LEADS
ARE ENERGIZED, THE HIGHER SPEED SETTING IS USED.
3. FOR 208 VOLT TRANSFOR MER OPERATION MOVE BLACK WIRE
FROM TERMINAL 3 TO TERMINAL 2 ON TRANSFORMER.
4. START ASSI ST FACTOR EQUIPPED WHEN REQUIRED
5. USE COPPER CONDUCTORS ONLY
USE N.E.C. CLASS 2 WIRE
6. CRANKCASE HEAT ER (OPTIONAL)
7. DOUBLE POLE CONTACTOR SHOW N. SINGLE POLE CONT ACTOR
COULD BE FACTORY EQUIPPED AS AN ALTERNATE CONFIGURATION.
SEE NOTE 2
PLF-C
PLM-B
PLF-P
PLM-P
C
CH
CHS
CM
COMP
EM
GND
HPS
LVJB
LVTB
PLF-C
PLF-H
PLF-P
PLM-B
PLM-P
RCCF
SA
TR
CONTACTOR
CRANKCASE H EATER
CRANKCASE H EATER SWITCH
CONDENSER MOTOR
COMPRESSOR
EVAPORATOR MOTOR
EQUIPMENT GROUND
HIGH PRESSURE SWITCH
LOW VOLTAGE JUNCTION BOX
LOW VOLTAGE TERMINAL BLOCK
FEMALE PLUG / CONNECTOR-CONTROL
FEMALE PLUG/CONNECTOR-HEAT KIT
FEMALE PLUG/ CONNECTOR- PRESSURE SW ITCH
MALE PLUG/ CONNECTION BLOWER
MALE PLUG/ CONNECTOR- PRESSURE SWITCH
RUN CAPACITOR FOR
COMPRESSOR AND FAN
START ASSI ST
TRANSFORMER
PU
WH
RD
BL
YL
BK
PU
GR
HPS
C
3
2
G
N
THERMOSTAT
SEE NOTE 5
IF USED
SEE NOTE #2
C
1
EM
PLF
6
5
4
C
G
Y
W1
W2
R
2
13
L
1
L2
C
T2
CM
RCCF
F
H
SEE NOTE #4
C
L1
R
T1
S
S.A.
C
COMP
C
SUPPLY VOLTAGE
208-230/1/60
SEE NOTE 1
208-230
24V
TR
EM
NOTE #3
NOTE #2
3
2
YL
BK
RD
SEE NOTE 4
WH
208-230/1/60
THERMOSTAT
BK
BK
CH & CHS OPTIONAL
@ L1,L2, SEE NOTE 6
0140G03217-C
CH
CHS
SEE NOTE 6
RD
BK
YL
SEE NOTE 7
SEE NOTE 1
SEE
NOTE #7
BLACK
BLUE
BROWN
GREEN
ORANGE
PURPLE
RED
WHITE
YELLOW
BLUE/PINK STRIPE
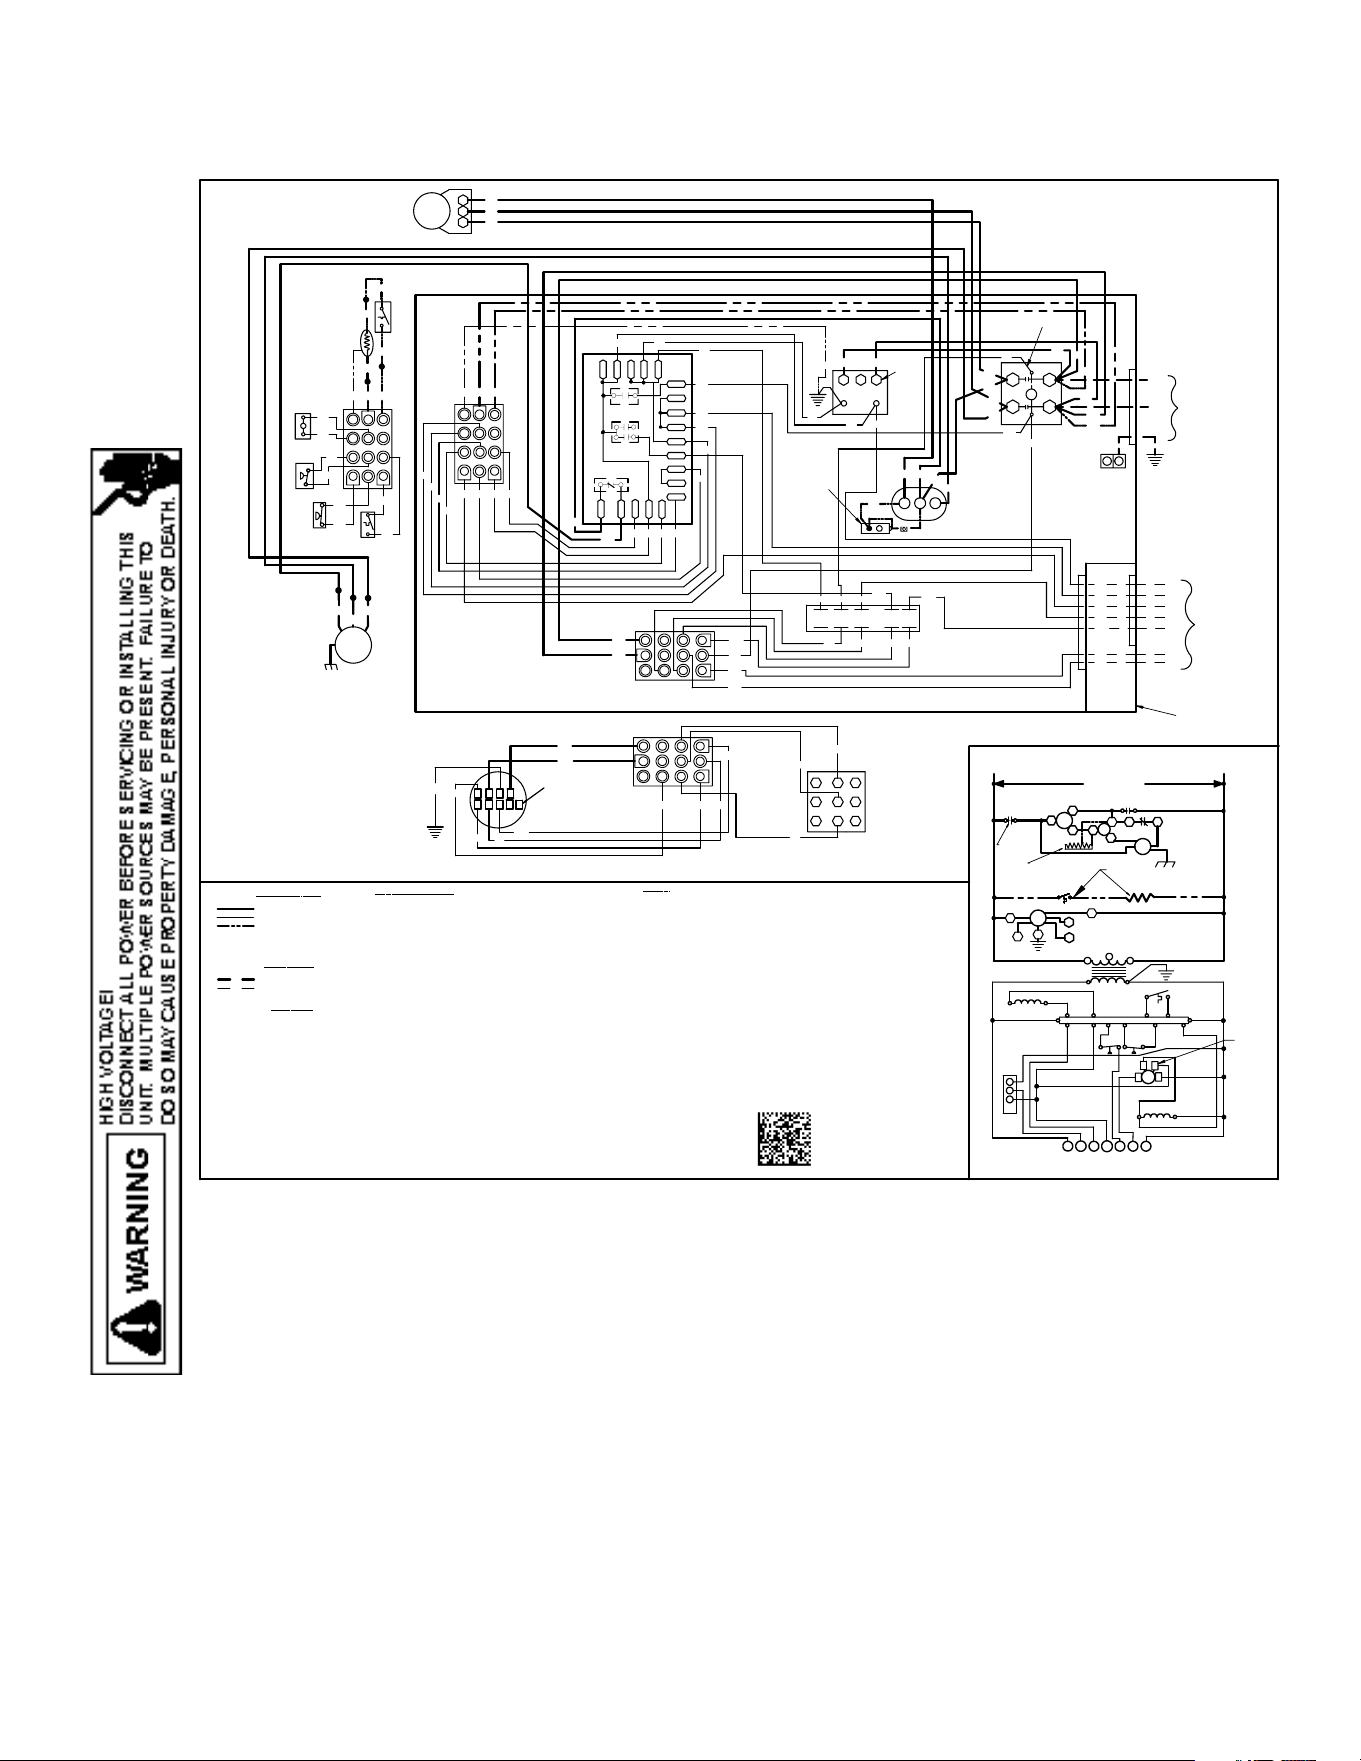
WIRING DIAGRAMS
Wiring is subject to change. Always refer to the wiring diagram on the unit for the most up-to-date wiring.
49
A/GPHM3[24-48]M41A*
F A
CTOR
Y
W
I
R
I
NG
LINE VOLTAGE
LOW VOLTAGE
OPTIONAL HIGH
VOLTAGE
F I
E
LD
W
I
R
I
NG
HIGH VOLTAGE
LOW VOLTAGE
3
CONTROL
BOX
240
2
24V
208
TR
C
1
PU
WH
BR
BL
R
O
W2
W1
C
Y
T2
T1
L1
GND
C
L2
BK
RD
RD
BK
BK
LVJB
RCCF
SA
H
C
F
PU
YL
BK
BK
RVC
BK
COMP
S
C
R
CM
BR
PU BK
YL
LPS
DFT
RD
YL
BK
YL
BL
HPS
BR
PU
G
BL
LVTB
OR
WH
WH
BL
PK
YL
BK
GR
BK
PU
10
11
12
7
8
9
4
5
6
3
2
1
BR
GR
GR
1
23
65
4
98
7
1211
10
PU
PU
BR
BR
YL
PLM-P
GR
PU
BK
1
23
65
4
98
7
1211
10
BR
BR
BR
YL
YL
BK
BK
PU
PU
PU
BK
PU
RD
RD
RD
BR
YL
BL
PU
BL
BL
RD
BL
BL
WH
WH
WH
PLF-C
PU
PU
PK
BL
BK
PS2
C
C
R
C
Y
Y
R-PS1
R-DFT
DFT
0
CNT
CCR
HVDR
LVDR
W
C-RV
0-RV
0
DF2
DF1
R
DC
PU
BK
OR
RD
SEE NOTE 1
YL
YL
SE E NOTE 4
SEE
NOTE 3
SEE
NOTES
7 AND 8
4
1
PLF-H
5
6
2
3
7
8
9
BL
BR
WH
GR
BK
PU
YL
BL
WH
C
L
G
N
1
2
3
EM
4
5
GR
10
11
12
7
8
9
4
5
63
2
1
PLM-B
SEE NOTE 2
BL
GR YL
WH
2
3
SEE NOTE 2
SEE NOTE 3
EM
TR
208-230
208-230/1/60
SEE NOTE 1
SUPPLY VOLTAGE
C
COMP
C
S.A.
S
T1
R
L1
DF1
C
SEE NOTE 4
H
F
RCCF
CM
HVDR
T2
C
DF2
1
N
3
1
2
L
G
CH
CHS
R
W2
O
W1
Y
G
C
4
5
6
PLF
EM1
C
HPS
C
THERMOSTAT
SEE NOTE 5
2
3
24V
DC
DFT
Y
C
R
RVC
LPS
CNT
R-PS1 PS2
R
WO
R-DFT
DFT
O-RV C-RV
2 POLE ONLY
SEE NOTE 7
SEE NOTE 6
SEE NOTE
2
L2
NOT
E
S
:
1. REPLACEMENT WIRE MUST BE SAME SIZE AND TYPE INSULATION AS
ORIGINAL (AT LEAST 105˚C) USE COPPER CONDUCTOR ONLY.
2. TO CHANGE EVAPORATOR MOTOR SPEED MOVE YELLOW AN D WHITE
LEADS FROM EM"2" AND "3" TO "4" AND "5". IF BO TH LEADS ARE
ENERGIZED, THE HIGHER SPEED SETTING IS USED.
3 FOR 208 VOLT TRANSFORMER OPERATION MOVE BLACK WIRE
FROM TERMINAL 3 TO TERMINAL 2 ON TRANSFORMER.
4. START ASSIST FACTORY EQUIPPED WHEN REQUIRED.
5. USE COPPER CONDUCTORS ONLY
USE N.E.C. CLASS 2 WIRE.
6. CRANKCASE HEATER AND CRANKCASE HEATER SWITCH FA CTORY
EQUIPPED WHEN REQUIRED.
7. DOUBLE POLE CONTACTOR SHOWN. SINGLE POLE CONTACTOR
COULD BE FACTORY EQUIPPED AS AN ALTERNATE CONF IGURATION.
8. COMMON SIDE OF CONT ACTOR CAN NOT BE GROUNDED OR
CONNECTED TO ANY OTHER COMMON (24V).
SEE UNIT RATING PLATE FOR TYPE AND SIZE
OF OVER CURRENT PROT ECTION
CH
RD
CHS
GR BK
PU
RD
BK
PLF-P
BK
SEE NOTE 6
208/230/1/60
THERMOSTAT
SEE NOTE 5
BLUE
BLACK
BROWN
GREEN
ORANGE
PURPLE
RED
WHITE
YELLOW
BL
BK
BR
GR
OR
PU
RD
WH
YL
W
I
R
E
C OD
E
C
CCR
CH
CHS
CM
COMP
DC
DFT
EM
GND
HPS
HVDR
LPS
LVDR
LVJB
LVTB
PLF-C
PLF-H
PLF-P
PLM-B
PLM-P
RVC
RCCF
SA
TR
CONTACTOR
COMPRESSOR CONTACTOR RELAY
CRANKCASE HEATER
CRANKCASE HEATER SWITCH
CONDENSER MOTOR
COMPRESSOR
DEFROST CONTROL
DEFROST THERMOSTAT
EVAPORATOR MOTOR
EQUIPMENT GROUND
HIGH PRESSURE SWITCH
HIGH VOLTAGE DEFROST RELAY
LOW PRESSURE SWITCH
LOW VOLTAGE DEFROST RELAY
LOW VOLTAGE JUNCTION BOX
LOW VOLTAGE TERMINAL BLOCK
FEMALE PLUG/CONNECTOR - CONTROL
FEMALE PLUG/CONNECTOR - HEAT KIT
FEMALE PLUG/CONNECTOR - PESSURE SWITCH
MALE PLUG/CONNECTOR - BLOWER
MALE PLUG/CONNECTOR - PRESSURE SW ITCH
REVERSING VALVE COIL
RUN CAPACITOR FOR COMPRESSOR AND FAN
START ASSIST
TRANSFORMER
CO
MP
ON
E
NT
L
E
G E
ND
208-230/1/60 0140G03220-C
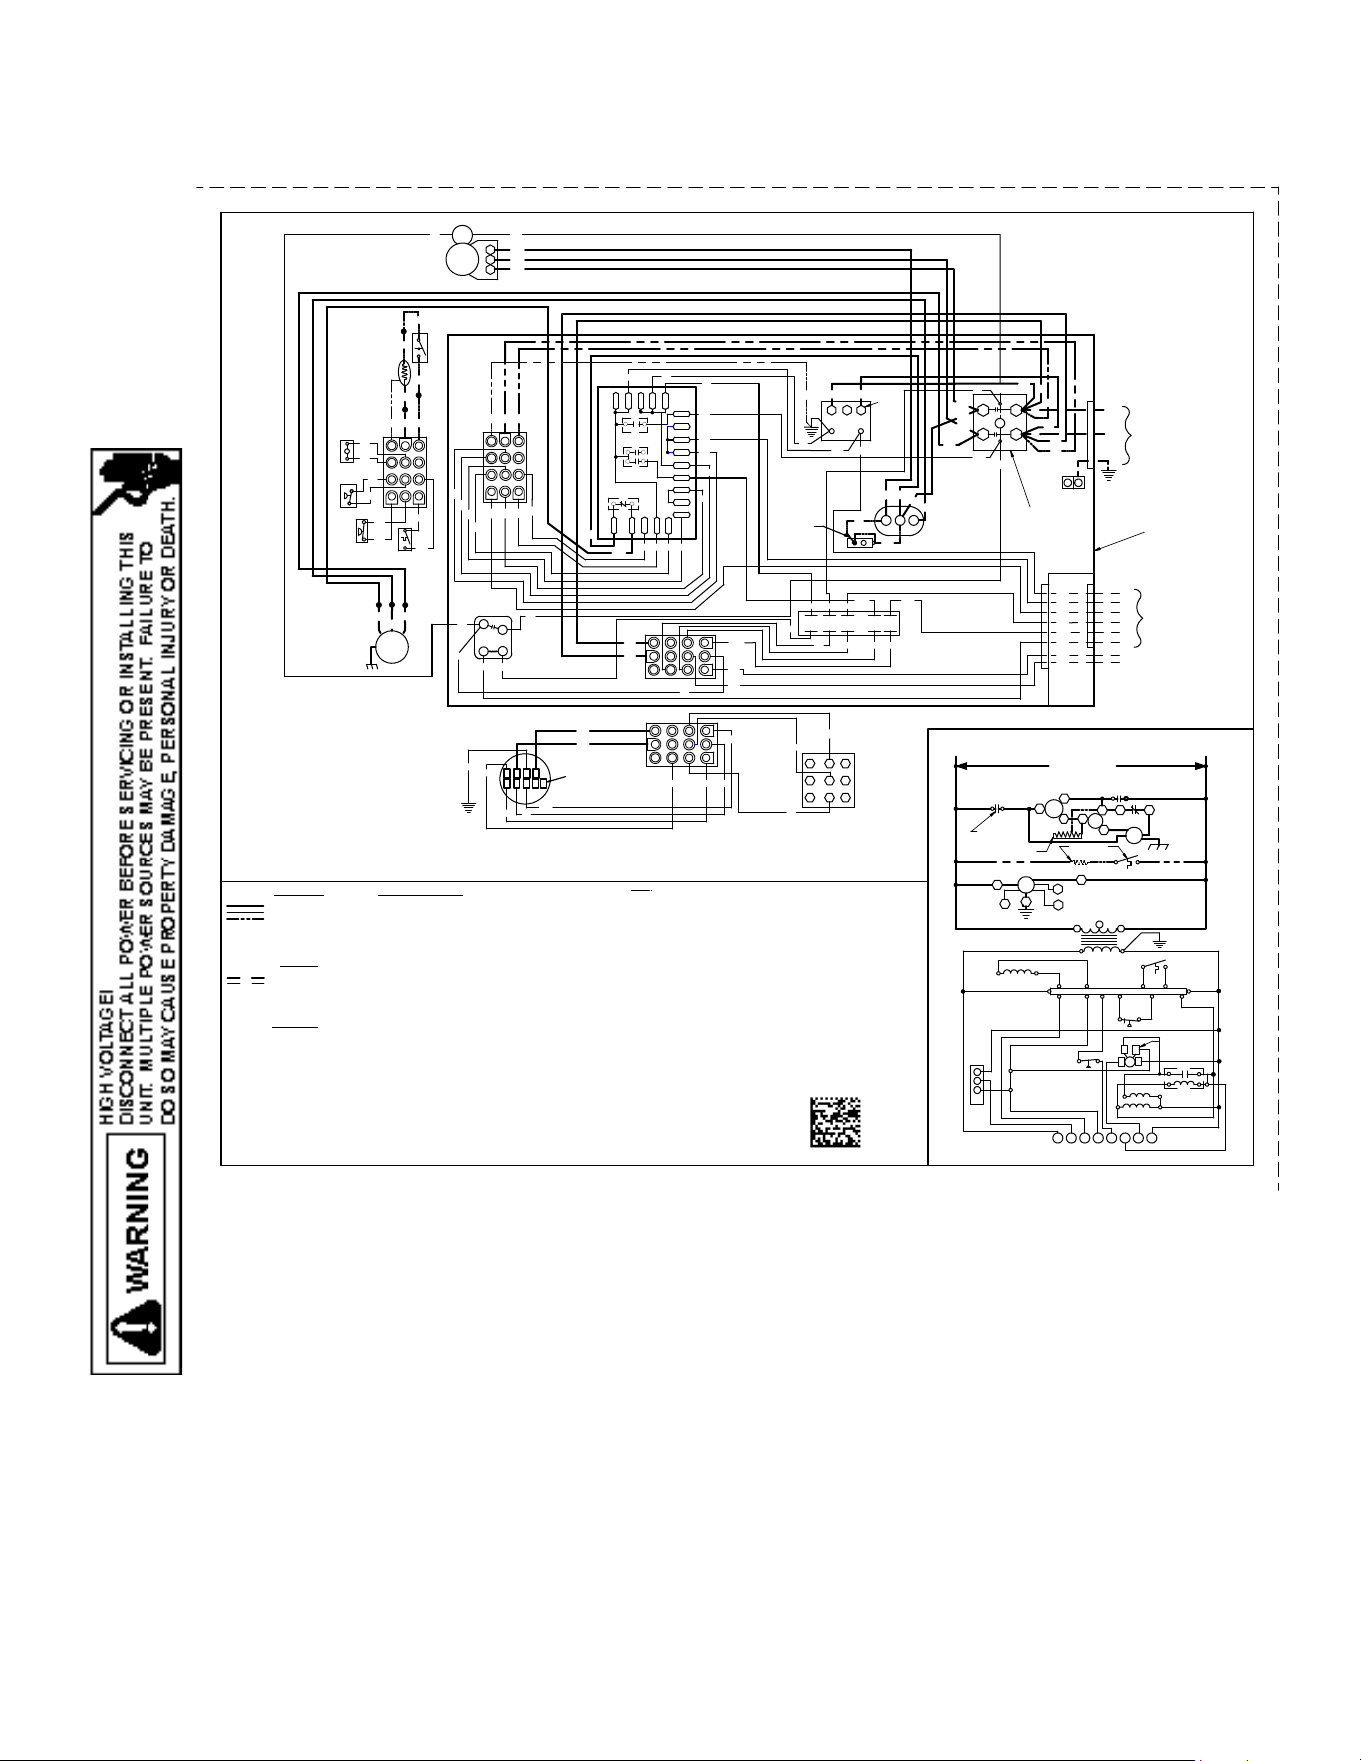
WIRING DIAGRAMS
Wiring is subject to change. Always refer to the wiring diagram on the unit for the most up-to-date wiring.
50
A/GPHM3[60]M41A*
2
3
SEE NOTE 2
SEE NOTE 3
EM
TR
208-230
208-230/1/60
SUPPLY VOLTAGE
C
COMP
C
S.A
S
T1
R
L1
DF1
C
H
F
RCCF
CM
HVDR
T2
C
DF2
L2
1
L
3
1
2
R W2 O
W1 Y1
G C
EM
1
C
CSR
SEE NOTE 6
THERMOSTAT
N
G
2
3
CHS
CH
Y2
C
SOL
HP
S
24V
DC
DFT
Y
C
R
RVC
LPS
CNT
R-PS1 PS2
R
W
O
R-DFT
O-RV
C-RV
DFT
2 POLE ONLY
SEE NOTE 7
SEE NOTE 4
4
5
6
PLF
SEE NOTE 2
3
CONTROL
BOX
240
2
24V
208
TR
C
1
PU
WH
BR
BL
R
O
Y2
W2
W1
C
Y1
T2
T1
L1
GND
C
L2
BK
RD
RD
BK
BK
LVJB
RCCF
RD
SA
H
C
F
PU
YL
BK
BK
RVC
BKCOMP
S
C
R
CM
BR
PU BK
YL
LPS
DFT
RD
YL
BK
YL
BL
HPS BR
PU
BL
G
YL
BL
SOLYL
BL
CSR
2
LVTB
OR
WH
WH
BL
PK
3
4
1
YL
YL
YL
YL
BK
GR
BK
PU
10
11
12
7
8
9
4
5
63
2
1
BR
GR
GR
1
23
65
4
98
7
1211
10
PU
PU
BR
BR
YL
PLM- P
GR
PU
BK
1
23
6 54
98
7
12
11
10
BR
BR
BR
YL
YL
BK
BK
PU
PU
PU
BK
PU
RD
RD
RD
BR
YL
BL
PU
BL
BL
RD
BL
BL
BL
BL
WH
WH
WH
PLF-C
PU
PU
PK
BL
BK
YL
PS2
C
C
R
C
Y
Y
R-PS1
R-DFT
DFT
0
CNT
CCR
HVDR
LVDR
W
C-RV
0-RV
0
DF2
DF1
R
DC
PU
BK
OR
RD
SEE NOTE 1
YL
SEE NOTE 7
SEE
NOTE 3
41
PLF-H
5
6
2
3
7
8
9
BL
BR
WH
GR
BK
PU
YL
BL
WH
C L G N
1
2 3
EM
4 5
GR
10
11
12
7
8
9
4
5
6
3
2
1
PLM- B
SEE NOTE 2
BL
GR YL
WH
NOTES:
1. REPLACEMENT W IRE MUST BE SAME SIZE AND TYPE INSULATION AS
ORIGINAL (AT LEAST 105°C) USE COPPER CONDUCTOR ONLY.
2. TO CH ANGE EVAPORATOR MOTOR SPEED MOVE YELLOW AND W HITE
LEADS FROM EM"2" AND "3" TO "4" AND "5". IF BOT H LEADS ARE
ENERGIZED, THE HIGHER S PEED SETTING IS U SED.
3 FOR 208 VOLT TRANSFORMER OPERATION MOVE BLACK W IRE
FROM TERMINAL 3 TO TERMINAL 2 ON TRANSFORMER.
4. START ASSIST FACTORY EQUIPPED WHEN REQUIRED
5. USE COPPER CONDUCTORS ONLY
USE N .E.C. CLASS 2 W IRE
6. CRANKCASE HEATER AND CRANKCASE HEATER SWITCH FACTORY
EQUIPPED WHEN REQUIRED.
7. DOUBLE POLE CONTACTOR SHOWN. SINGLE POLE CONTACTOR
COULD BE FACTORY EQUIPPED AS AN ALT ERNATE CON FIGURATION.
SE E UNIT RATING PLATE FOR TYPE AND SIZE
OF O VER CURRENT PROTECTION
FACTOR
Y WIRING
LINE VOLTAGE
LOW VOLTAGE
OPTIONAL HIGH
VOLTAGE
FIELD WIRING
HIGH VOLTAGE
LOW VOLTAGE
208/230/1/60
THERMOSTAT
SEE NOTE 5
SEE
NOTE 4
CH
RD
CHS
GR BK PU
RD
BK
PLF-P
BK
SEE NOTE 6
BK
BL
BR
GR
OR
PU
RD
WH
YL
BLACK
BLUE
BROW N
GREEN
ORANGE
PURPLE
RED
WHI TE
YELLOW
WIRE CODE
CONTACTOR
COMPRESSOR CONT ACTOR REL AY
CRANKCASE HEATER
CRANKCASE HEATER SWITCH
CONDENSER MO TOR
COMPRESSOR
COMPRESSOR SOLENOID RELAY
DEFROST CONT ROL
DEFROST THERMOSTAT
EVAPORATOR MOTOR
EQUIPMENT G ROUND
HIGH PRESSURE SWITCH
HIGH VOLTAGE DEFROST RELAY
LOW PRESSURE SWITCH
LOW VO LTAG E DEFROST RELAY
LOW VO LTAG E JUNCTION BOX
LOW VO LTAG E TERMINAL BLO CK
FEMAL E PLUG/CONNECTOR - CONTRO L
FEMAL E PLUG/CONNECTOR - HEAT KIT
FEMALE PLUG/CONNECTOR - PESSURE SWITCH
MALE PLUG/CONNECTOR - BLOW ER
MALE PLUG/CONNECTOR - PRESSURE SWITCH
REVERSING VALVE COIL
RUN CAPACITOR FOR COMPRESSOR AND FAN
START ASSIST
TRANSFORMER
C
CCR
CH
CHS
CM
COMP
CSR
DC
DFT
EM
GND
HPS
HVDR
LPS
LVDR
LVJB
LVTB
PLF-C
PLF-H
PLF-P
PLM-B
PLM-P
RVC
RCCF
SA
TR
COMPONENT LEGEND
208-230/1/60
0140G046 28-A
SEE NOTE 5
SEE NOTE 1
YL
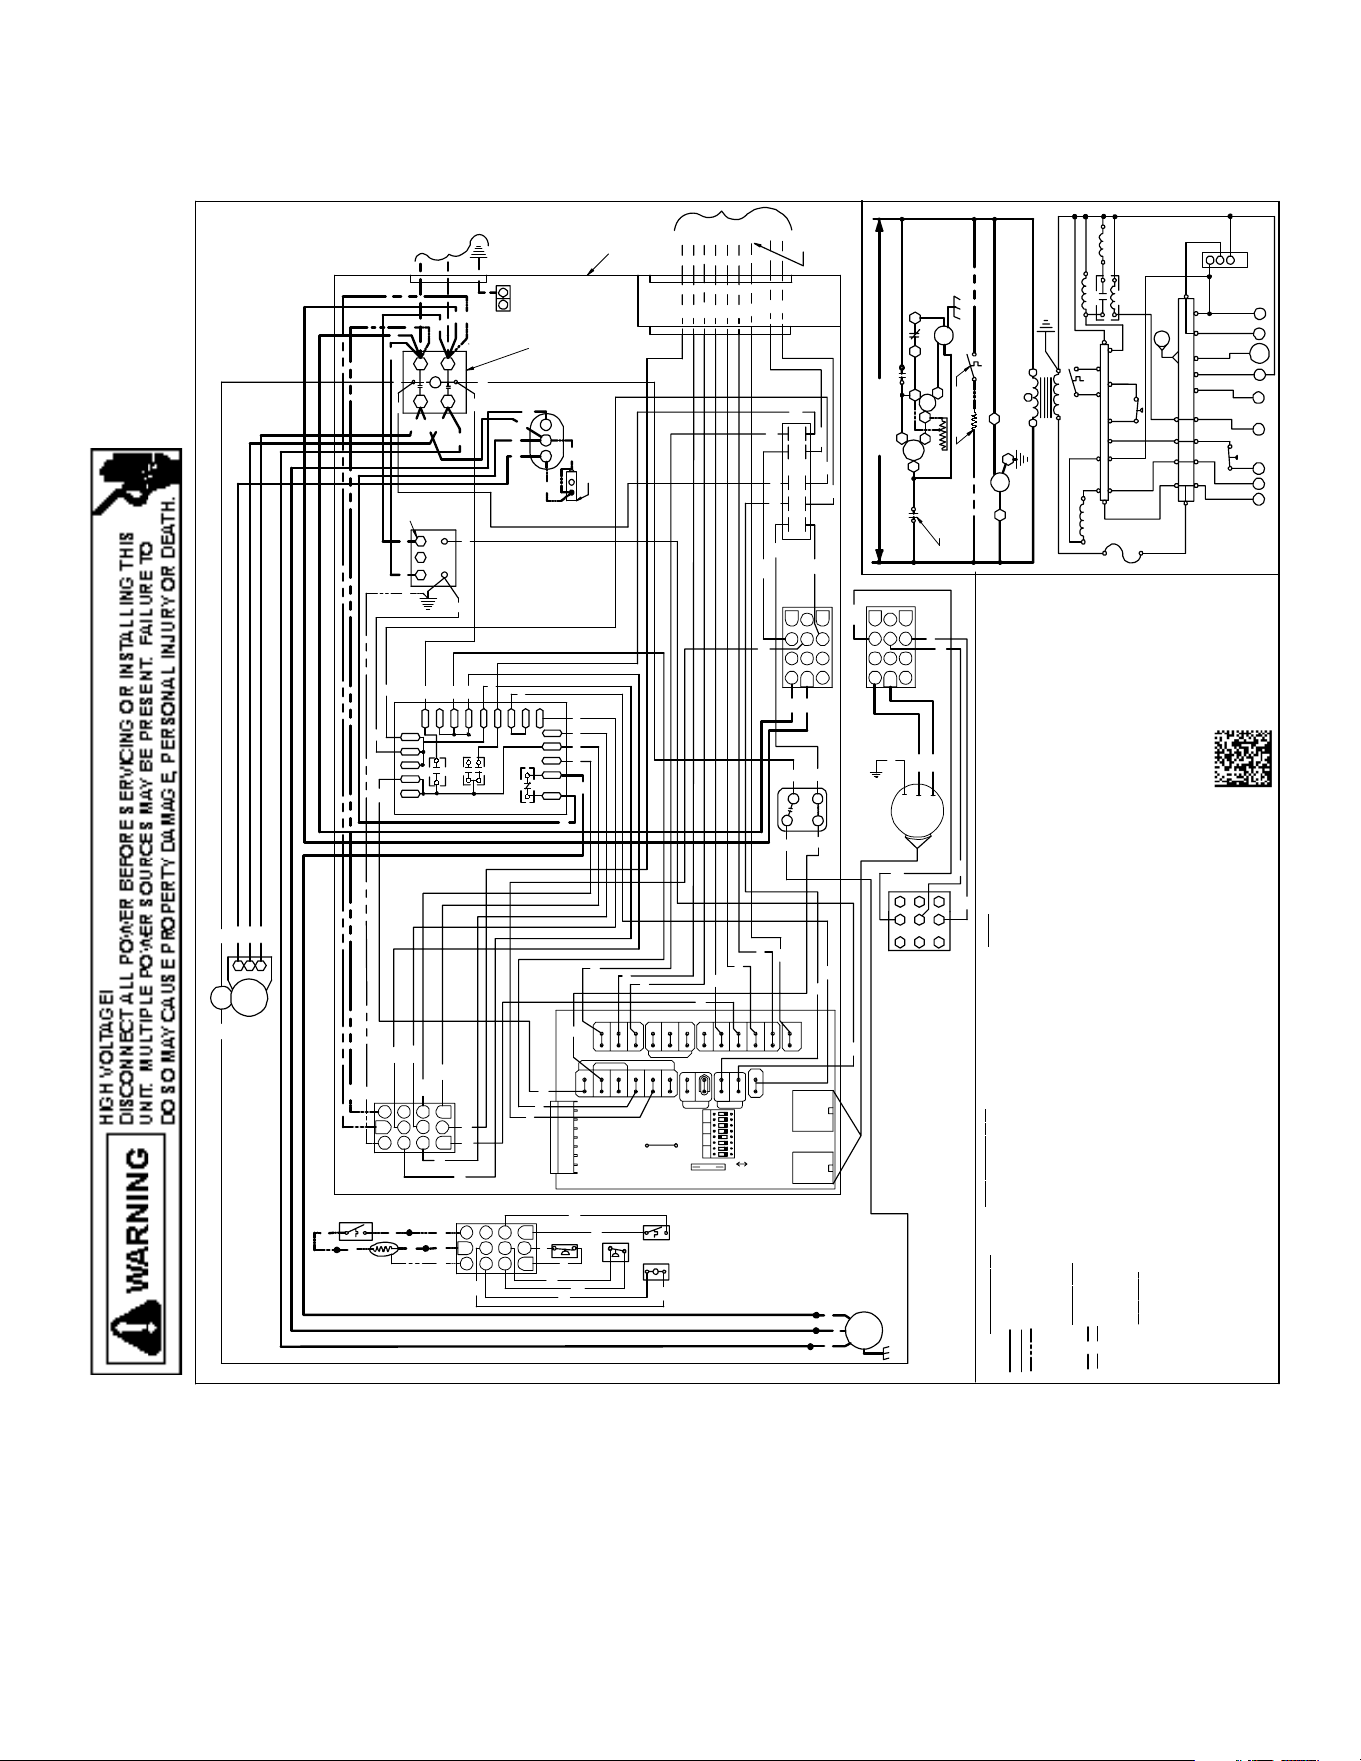
WIRING DIAGRAMS
Wiring is subject to change. Always refer to the wiring diagram on the unit for the most up-to-date wiring.
51
APHM5[24-48]M41A*
SEENOTE 2
EM
TR
208-230
208-230/1/60
SUPPLYVOL TAGE
C
COMP
C
S.A
S
T1
R
L1
DF1
C
H
F
RCCF
CM
HVDR
T2
C
DF2
L2
N
3 1
2
R
W2O
W1
Y1 G
C
EM
CSR
SEENOTE5
THER MOSTAT
L
G
CHS
CH
Y2
C
SOL
HPS
24V
DC
DFT
Y
C
R
RVC
LPS
CNT
R-PS1 PS2
R
WO
R-DFT
O-RV C-RV
DFT
2POLEONLY
SEENOTE6
3
CONTRO L
BOX
24 0
2
24V
208
TR
C
1
PU
WH
BR
BL
O
Y2
W2
W1
C
Y1
T2
T1
L1
GND
C
L2
BK
RD
RD
BK
BK
LVJB
RCCF
RD
SA
H
C
F
PU
YL
BK
BK
RVC
BK
COMP
S
C
R
CM
BR
PU
BK
YL
LPS
DF T
RD
YL
BK
YL
BL
HPS
BR
PU
HUM
YL
BL
SOLYL
BL
CSR
4
LVTB
OR
WH
WH
BL
PK
3
2
1
YL
YL
YL
BK
GR
BK
PU
GY
BK
BR
YL
PLM-P
GR
PU
BK
123
65
4
987
1211
10
BR
BR
BR
YL
YL
BK
BK
PU
PU
PU
BK
PU
RD
RD
RD
BR
YL
BL
PU
BL
BL
RD
BL
BL
BL
WH
WH
PL F-C
PU
PU
BL
BK
YL
PS2
C
C
R
C
Y
Y
R-PS1
R-DFT
DF T
0
CNT
CCR
HVDR
LVDR
W
C-RV
0-RV
0
DF 2
DF 1
R
DC
PU
BK
SEENOTE 4
SEENOT E 6
SEE
NOTE
2
41
PL F-H
5
6
2
3
7
8
9
BL
BR
PLM-B
NO
T
E
S
:
1. REPLACEMENTWIREMUSTBESAMESIZEAND TYPE INSULATION AS
ORIGINAL (ATLEAST 105˚C) USECOPPER CONDUCTORONLY.
2. FOR208 VOLT TRANSFORMEROPERA TION MOVE BLACKWIRE
FROM TERMINAL 3TOTERMINAL 2ONTRANSFORMER.
3. STARTASSISTFACTORY EQUI PP ED WHEN REQUIRED
4. USECOPPERCONDUCT ORSONLY
++ USEN.E.C.CLASS 2WIRE
5. CRANKCASEHEATERAND CRANKCASE HEATERSWITCHFACTORY
EQUIPPED WHEN REQUIRED.
6. DOUBLE POLE CONTACTOR SHOWN. SING LE POLE CONTACTOR
COULD BE FACT ORY EQUIPPEDASANALTERNATE CONFI GURATION.
7. FORDEHUMIDIFICATION, CONNECTA24VACDEHUMIDISTATTHAT
OPEN SONHUMIDITYRISETOGRAYWIREFROMVSTBAND TO
THERMOSTAT R. SEE INSTALLATIONINSTRUCTIONSFOR DETAILS.
CUT"HUM" JUMPER ON VSTB.
SEEUNITRAT INGPLATE FORTYPEAND SIZE
OF OVER CURRENTPROTECTION
208-230/1/600140G03222-A
COM
P
ON
E
N
T
L
E
G
E
ND
C CONTACTOR
CCRCOMPRESSORCONTACTOR RELAY
CH CRANKCASE HEATER
CHS CRANKCASE HEATERSWITCH
CM CONDENSER MOTOR
COMP COMPRESSOR
CSRCOMPRESSOR SOLENOID RELAY
DC DEFROST CONTROL
DFTDEFROST THERMOSTAT
EM EVAPORATOR MO TOR
FFUSE
GNDEQUIPMENT GROUND
HPSHIG H PRESSURESWITCH
HVDR HIGH VOLTAGE DEFROST RELAY
LPSLOW PRESSURE SWITCH
LVDR LOWVOLTAGE DEFROSTRELAY
LVJB LOWVOLTAGE JUNCTION BO X
LVTB LOWVOLTAGE TERMINAL BLOCK
PLF-CFEMALEPLUG/CONNECTOR-CONTROL
PLF-HFEMALEPLUG/CONNECTOR-HEAT KIT
PLF-PFEMALEPLUG/CONNECTOR-PESS URESWITCH
PLM-BMALEPLUG/CONNECTOR-BLOWER
PLM-PMALEPLUG/CONNECTOR - PRESSURESWITCH
RVCREVERSINGVALVE COIL
RCCF RUN CAPACITOR FORCOM PRESSORAND FAN
SA STARTASSIST
TR TRANSFORMER
VSTB VARIABLE SPEED TERMINALBOARD
W
I
R
E
COD
E
BK BLACK
BL BLUE
BR BROWN
GR GREEN
GY GRAY
OR ORANGE
PK PINK
PU PURPLE
RD RED
WH WHITE
YL YE LLOW
FA
C
T
OR
Y
W
I
R
I
NG
LINE VOLTAGE
LOWVOLTAGE
OPTIONAL HIGH
VOLTAGE
F
I
E
LD
W
I
R
I
NG
HIGH VOLTAGE
LOWVOLTAGE
208/230/1/ 60
THERMOSTAT ++
CH
RD
CHS
GR
BK
PU
RD
BK
PLF-P
BK
SEENOTE 5
Y1
GR
EM
BK
PU
L1
G
L2
BL
BR
SW IT CH
87 65 43 21
HE ATER
W1 W2 CR
24 VAC
DS1
OFF
ON
DIP
E
F3A
(CFM)
CONFIGURATION.
DIPSWITCH
FORPROPER
TO MANUAL
PLEASEREFER
MOCO2WDERNOCY
HEATPUMP
CONDENSER
OU TDOOR
THERMOSTAT S
HUMIDI STAT
HUM2TOCR1YG 2Y/YOT12W/WO CTOE\W1
J1
OR
R
RD
G
GR
R
R
O
O
Y1
Y1
YCON
Y/Y2
GC
HUM
W2 E/W1
R
W2
4
5
6
PLF
HUM
F
BR
PK
YL
WH
BR
OR
OR
BR
RD
PU
GR
YL
GY
PU
RD
BL
WH
SEE
NOTE
7
BL
SEE
NOTE 3
10
11
12
7
8
9
4
5
63
2
1
10
11
12
7
8
9
4
5
63
2
1
123
654
987
1121
10
WH
YL
BL
BR
HUM
VSTB
PU
PU
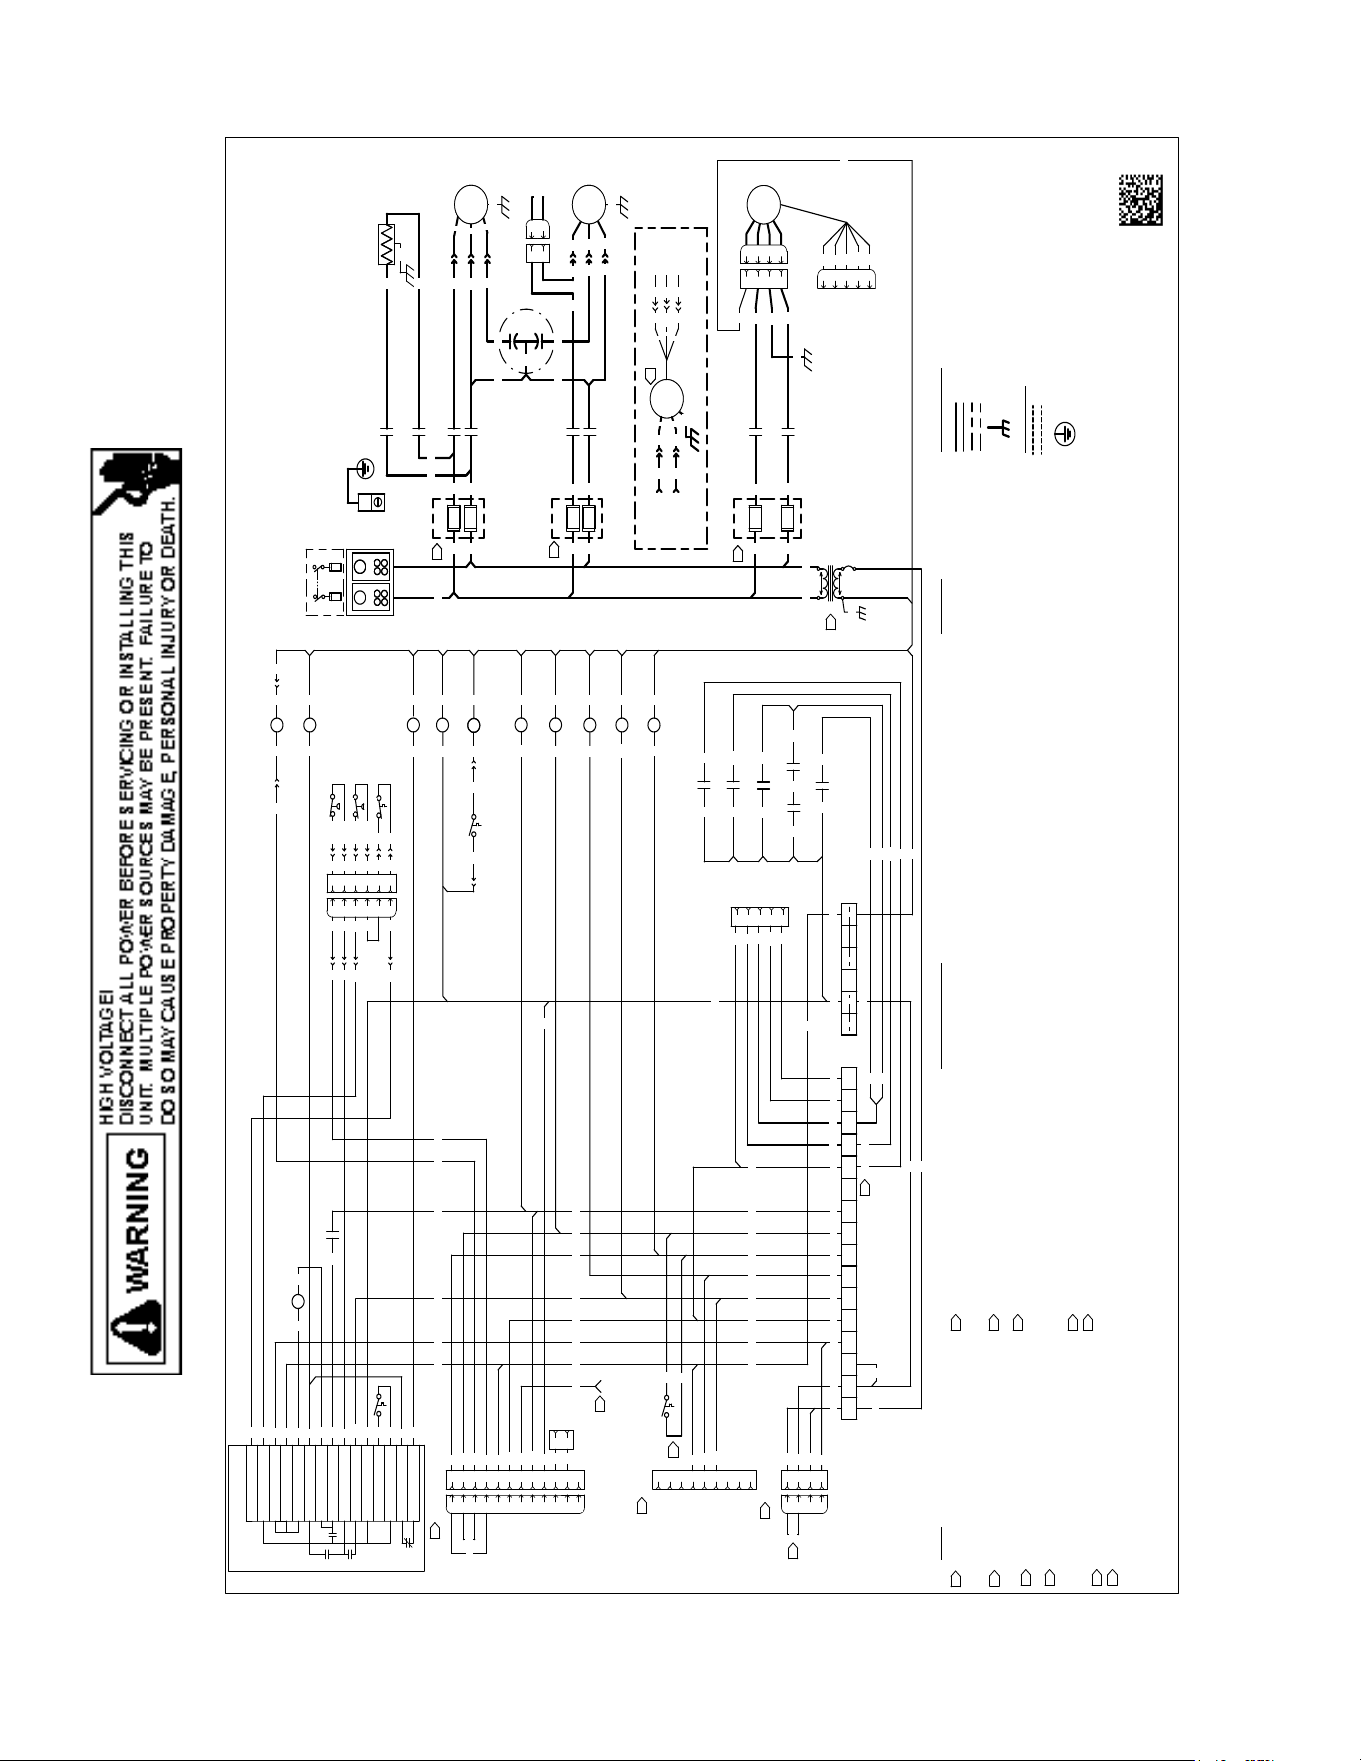
WIRING DIAGRAMS
Wiring is subject to change. Always refer to the wiring diagram on the unit for the most up-to-date wiring.
52
BC BLOWER CONTACTOR
BM BLOWER MOTOR
BR BLOWER RELAY
CB CIRCUIT BREAKER
CC COMPRESSOR CONTACTOR
CCH CRANKCASE HEATER
CCP COMPRESSOR/COIL PROTECTION
CHR CRANKCASE HEATER RELAY
CHS CRANKCASE HEATER SWITCH
CM CONDENSER MOTOR
CMC CONDENSER MOTOR CONTACTOR
COMP COMPRESSOR
CS COMPRESSOR SOLENOID (STAGE 2)
DFT DEFROST TEMPERATURE SWITCH
DR DEFROST RELAY
ECON ECONOMIZER
EHK ELECTRIC HEATER KIT
ES EMERGENCY SHUTDOWN
FB FUSE BLOCK
FPS FREEZE PROTECTION SWITCH
GND EQUIPMENT GROUND
HPS HIGH PRESSURE SWITCH
LPS LOW PRESSURE SWITCH
MAT MIXED AIR TEMPERATURE SENSOR
ODT OUTDOOR TEMPERATURE SENSOR
PB POWER DISTRIBUTION BLOCK
PLF FEMALE PLUG/CONNECTOR
PLM MALE PLUG/CONNECTOR
RC RUN CAPACITOR
RVC REVERSING VALVE COIL
TB TERMINAL BLOCK
TR TRANSFORMER
WIRE CODE
REPLACEMENT WIRE MUST BE SAME SIZE AND TYPE
OF INSULATION AS ORIGINAL (AT LEAST 105° C). USE
COPPER CONDUCTORS ONLY. USE N.E.C. CLASS 2
WIRE FOR ALL LOW VOLTAGE FIELD CONNECTIONS.
IF OPTIONAL ECONOMIZER IS INSTALLED REMOVE
ECON PLM JUMPER AND PLUG IN NEW HARNESS
FROM ECONOMIZER KIT
IF OPTIONAL ELECTRIC HEAT IS INSTALLED, PLUG IN
NEW HARNESS FROM ELECTRIC HEATER KIT.
TR1 PRIMARY (HIGH VOLTAGE) CONNECTIONS:
ORANGE WIRE CONNECTED TO 240V TAP AT THE
FACTORY AND BLACK WIRE TO COM TERMINAL. FOR
208V SUPPLY POWER, MOVE ORANGE WIRE FROM
240V TAP TO THE 208V TAP.
FUSE BLOCKS 1, 2, & 3 ARE OPTIONAL
IF OPTIONAL SAFETY EQUIPMENT SUCH AS A PHASE
MONITOR, FLOAT SWITCH OR SMOKE DETECTOR IS
INSTALLED, UNPLUG JUMPER PLUG AND PLUG IN
SAFETY DEVICE. IF MULTIPLE SAFETIES ARE
INSTALLED, PLUG IN THE ADDITIONAL DEVICES IN
SERIES. PLUG IN JUMPER PLUG AT THE LAST SAFETY
DEVICE INSTALLED.
NOTES
4
3
2
1
5
6A
BLACK
BLUE
BLUE WITH PINK STRIPE
BROWN
GREEN
GRAY
ORANGE
PINK
PURPLE
RED
TAN
WHITE
YELLOW
YELLOW WITH PINK STRIPE
BK
BL
BL/PK
BR
GR
GY
OR
PK
PU
RD
TN
WH
YL
YL/PK
HIGH VOLTAGE
LOW VOLTAGE
OPTIONAL HIGH VOLTAGE
OPTIONAL LOW VOLTAGE
CHASSIS GROUND
FIELD WIRING
FACTORY WIRING
HIGH VOLTAGE
LOW VOLTAGE
EARTH GROUND
COMPONENT LEGEND
PB
L1
GND
L2
LINE
VOLTAGE
FB1
F1
F1
BK
RD
208-230V/1PH/60Hz
L1
L2
T1
T2
C
S
CMBR
RD
GR
BK
GR
RD
FB3
F3
F3
5
BK
RD
RD
YL
BR
BK
PU
BK
RD
PU
BK
5
L1
L2
T1
T2
BK
BC
COMP
RC
COM
H
F
PU
PU
CMC
L1
L2
T1
T2
FB2
F2
F2
BK
RD
BK
RD
BK
PU
BR
5
R
BK
BK
OR
BL
PU
YL
GR
WH
BR
PLM2PLF2
BM
PLM1
BM
BM
BL
N
G
L
C
N
G
L
C
4
3
2
1
5
GR
GR
M
1~
M
1~
M
1~
CCH
BK
GR
RD BK
BK
BK
CC
BK
PLF
CM
PLM
2
1
2
1
YL
IF A THIRD PARTY SAFETY DEVICE IS FIELD INSTALLED,
CUT THE RED WIRE ON THE JUMPER PLUG AND WIRE A
NORMALLY CLOSED DRY CONTACT IN SERIES WITH
THE CUT WIRE.
24 VAC ALARM OUTPUT FROM OPTIONAL
ECONOMIZER CONTROL MODULE.
Y1 (YELLOW) AND Y2 (PURPLE) ARE FACTORY WIRED
TO BLOWER SPEED SPEED TAPS T1 AND T3
RESPECTIVELY. W1 (WHITE) AND W2 (BROWN) ARE
FACTORY WIRED TO T2 AND T3 RESPECTIVELY. IF
DIFFERENT SPEEDS ARE NEEDED, SEE IO MANUAL
FOR FURTHER DETAIL ON BLOWER SPEED TAPS.
ALTERNATE 2 SPEED ECM CONDENSER FAN MOTOR.
OUTDOOR TEMPERATURE SENSOR USED ON 5 TON
HP UNIT.
9
8
7
10
CHR
CHR
2 4
6 8
6B
0140L07334-A
DFT
4
V1
V2
PLM
PLF
PU
YL
TB1
PLM
PLF
RD
RD
PK
GRRD
PK
CS
YL
PU
BL
GR
WH
PK
2
BL
6A
TB1
W2
Y1
O
Y2
S2
R W1
C
S1
G DH T1 T2 T3 T4 T5
GY
YLWH PU
PU
WH BR
TB2
BA C D
BL
BL
CMC
A2
BL
CC
A1
A2
BL
12
11
10
9
8
7
6
5
4
3
2
1
12
11
10
9
8
7
6
5
4
3
2
1
RD
4
3
2
1
4
3
2
1
RD
BC
A1
A2
BL
GR YLWH PUBL
YL
BL
YL
O-RV
R-PS1
R-DFT
PS2
R
O
C-RV
C
C
DFT
DF1
DF2
PCBDM133
W
CNT
Y
EHK
PLF
9
8
7
6
5
4
3
2
1
RVC
V2 V1
BL
DR
1 3
BL
PK
YL
DR
2
4
PU
PU
PU
BL
BRBR
WH
YL
WH
PK
GY
BK
RD
RD
BL
BL
BL
BR
WHBL
BR
BK
GY
3
YL
A1
PK
PK
1
0
BR2
1 0
BR3
1 0
BR
WH
BL
BL
BL
BR4
PK
BR3
2
4
RD
PK
PK
ODT
PU
YL
2 1
10
BL
BL
YL
PU
YL
HPS
LPS
PLFPLM
BL
BL
YL
YL
BL/PK
YL/PK
YL/PK
BL/PK
PU
FPS
BK
BK
BK
BK
6
5
4
3
2
1
6
5
4
3
2
1
YL
PU
PU
YL
YL
PU
PU
7
PU YL
BR1
1
3
OR
BL
OR
PK
PK
YL BL
OR
CHR
1
0
CHS
PKRD RD
BL
BL OR
BR4
2
4
PU
PK
YL
GR
GR
BL
YL
WH
PU
8
8
6
BR1
BR3
6
PK
YL
BR
BK
WH
BR
PU
BR2
2
4
BR
PK
PK
WH
BR1
2
4
PK YL
MAT
PLF
2
1
BK
BK
8
5
4
3
2
1
GR
YL
PU
BR
BM
PLF1
WH
BR
PU
PK
GR WHBLBL YL PU OR
GY
ECON
ES
CCP
6B
CB
COM
TR1
GR
GR
M
1~
BK
BR
9
2-SPEED ECM CONDENSER MOTOR
1
2
3
COM
HIGH
LOW
CC - A1
TB1 - Y2
3
2
YL
WH
TB2 - C,D
BL
1
YL
PU
BL
CM PLF-2
CMC - T2
BK
BR
L
N
A/GPHM5[60]M41
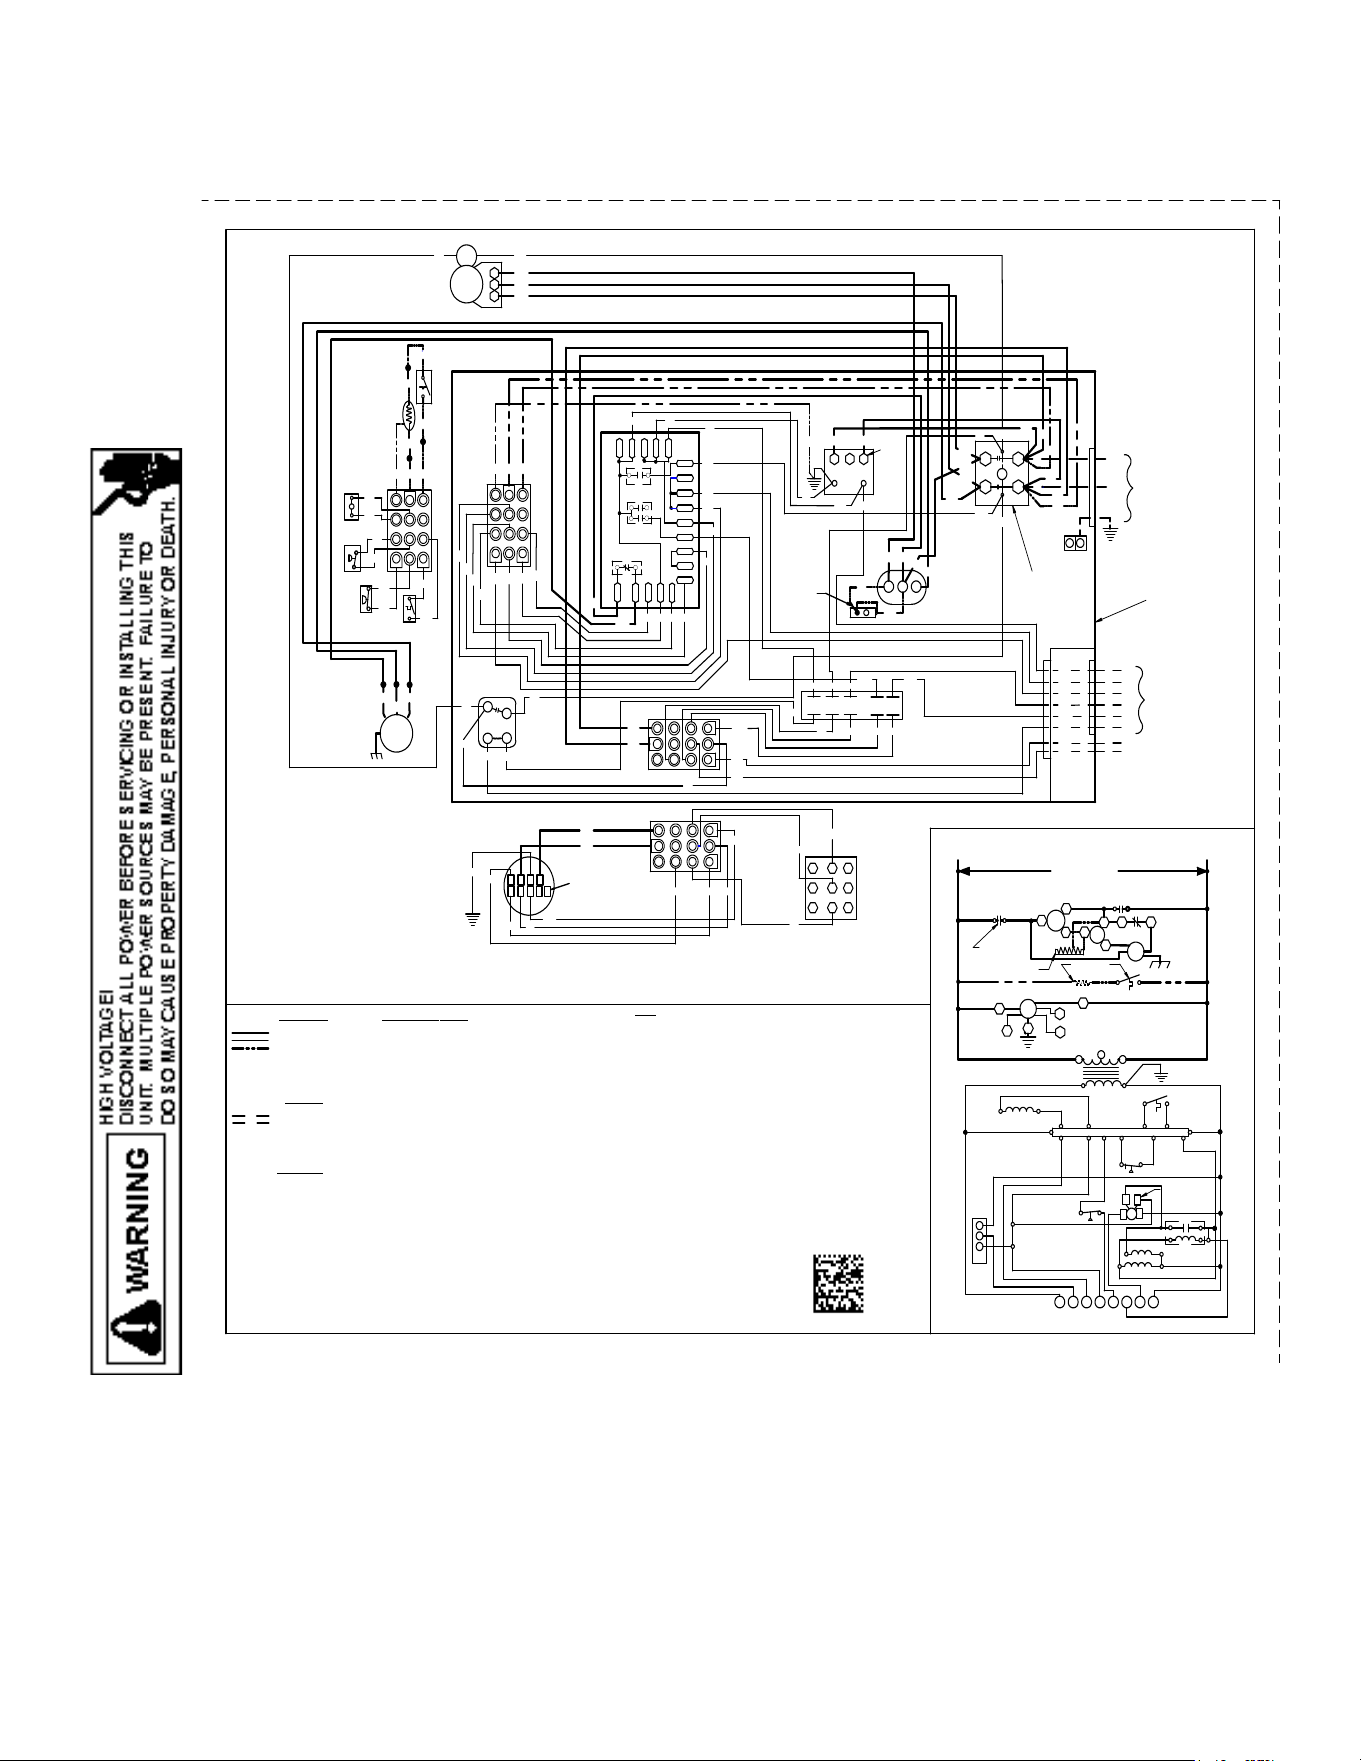
WIRING DIAGRAMS
Wiring is subject to change. Always refer to the wiring diagram on the unit for the most up-to-date wiring.
53
GPHM5[24-48]M41A*
2
3
SEE NOTE 2
SEE NOTE 3
EM
TR
208-230
208-230/1/60
SUPPLY VOLTAGE
C
COMP
C
S.A
S
T1
R
L1
DF1
C
H
F
RCCF
CM
HVDR
T2
C
DF2
L2
1
L
3
1
2
R W2 O
W1 Y1
G C
EM
1
C
CSR
SEE NOTE 6
THERMOSTAT
N
G
2
3
CHS
CH
Y2
C
SOL
HP
S
24V
DC
DFT
Y
C
R
RVC
LPS
CNT
R-PS1 PS2
R
W
O
R-DFT
O-RV
C-RV
DFT
2 POLE ONLY
SEE NOTE 7
SEE NOTE 4
4
5
6
PLF
SEE NOTE 2
3
CONTROL
BOX
240
2
24V
208
TR
C
1
PU
WH
BR
BL
R
O
Y2
W2
W1
C
Y1
T2
T1
L1
GND
C
L2
BK
RD
RD
BK
BK
LVJB
RCCF
RD
SA
H
C
F
PU
YL
BK
BK
RVC
BKCOMP
S
C
R
CM
BR
PU BK
YL
LPS
DFT
RD
YL
BK
YL
BL
HPS BR
PU
BL
G
YL
BL
SOLYL
BL
CSR
2
LVTB
OR
WH
WH
BL
PK
3
4
1
YL
YL
YL
YL
BK
GR
BK
PU
10
11
12
7
8
9
4
5
63
2
1
BR
GR
GR
1
23
65
4
98
7
1211
10
PU
PU
BR
BR
YL
PLM- P
GR
PU
BK
1
23
6 54
98
7
12
11
10
BR
BR
BR
YL
YL
BK
BK
PU
PU
PU
BK
PU
RD
RD
RD
BR
YL
BL
PU
BL
BL
RD
BL
BL
BL
BL
WH
WH
WH
PLF-C
PU
PU
PK
BL
BK
YL
PS2
C
C
R
C
Y
Y
R-PS1
R-DFT
DFT
0
CNT
CCR
HVDR
LVDR
W
C-RV
0-RV
0
DF2
DF1
R
DC
PU
BK
OR
RD
SEE NOTE 1
YL
SEE NOTE 7
SEE
NOTE 3
41
PLF-H
5
6
2
3
7
8
9
BL
BR
WH
GR
BK
PU
YL
BL
WH
C L G N
1
2 3
EM
4 5
GR
10
11
12
7
8
9
4
5
6
3
2
1
PLM- B
SEE NOTE 2
BL
GR YL
WH
NOTES:
1. REPLACEMENT W IRE MUST BE SAME SIZE AND TYPE INSULATION AS
ORIGINAL (AT LEAST 105°C) USE COPPER CONDUCTOR ONLY.
2. TO CHANGE EVAPORATOR MOTOR SPEED MOVE YELLOW AND W HITE
LEADS FROM EM"2" AND "3" TO "4" AND "5". IF BOTH LEADS ARE
ENERGIZED, THE HIGHER SPEED SETTING IS USED.
3 FOR 208 VOLT TRANSFORMER OPERATION MOVE BLACK WIRE
FROM TERMINAL 3 TO TERMINAL 2 ON TRANSFORMER.
4. START ASSIST FACTORY EQUIPPED W HEN REQUIRED
5. USE COPPER CONDUCTORS ONLY
USE N.E.C. CLASS 2 WIRE
6. CRANKCASE HEATER AND CRANKCASE HEATER SWITCH FACTORY
EQUIPPED W HEN REQUIRED.
7. DOUBLE POLE CONTACTOR SHOWN. SINGLE POLE CONTACTOR
COULD BE FACTORY EQUIPPED AS AN ALTERNATE CONFIGURATION.
SEE UNIT RATING PLATE FOR TYPE AND SIZE
OF OVER CURRENT PROT ECTION
FACTOR
Y WIRING
LINE VOLTAGE
LOW VOLTAGE
OPTIONAL HIGH
VOLTAGE
FIELD WIRING
HIGH VOLTAGE
LOW VOLTAGE
208/230/1/60
THERMOSTAT
SEE NOTE 5
SEE
NOTE 4
CH
RD
CHS
GR BK PU
RD
BK
PLF-P
BK
SEE NOTE 6
BK
BL
BR
GR
OR
PU
RD
WH
YL
BLACK
BLUE
BROW N
GREEN
ORANGE
PURPLE
RED
WHI TE
YELLOW
WIRE CODE
CONTACTO R
COMPRESSOR CONTACTOR RELAY
CRANKCASE HEATER
CRANKCASE HEATER SWITCH
CONDENSER MOTOR
COMPRESSOR
COMPRESSOR SOLENOID RELAY
DEFROST CONTROL
DEFROST THERMOSTAT
EVAPORATOR MOTOR
EQUIPMENT GROUND
HIGH PRESSURE SWITCH
HIGH VOLTAGE DEFROST RELAY
LOW PRESSURE SWITCH
LOW VOLTAGE DEFROST RELAY
LOW VOLTAGE JUNCTION BOX
LOW VOLTAGE TERMINAL BLOCK
FEMALE PLUG/CONNECTOR - CONTROL
FEMALE PLUG/CONNECTOR - HEAT KIT
FEMALE PLUG/CONNECTOR - PESSURE SWITCH
MALE PLUG/CONNECTOR - BLOW ER
MALE PLUG/CONNECTOR - PRESSURE SWITCH
REVERSING VALVE COIL
RUN CAPACITOR FOR COMPRESSOR AND FAN
START ASSIST
TRANSFORMER
C
CCR
CH
CHS
CM
COMP
CSR
DC
DFT
EM
GND
HPS
HVDR
LPS
LVDR
LVJB
LVTB
PLF-C
PLF-H
PLF-P
PLM-B
PLM-P
RVC
RCCF
SA
TR
COMPONENT LEGEND
208-230/1/60
0140G04628-A
SEE NOTE 5
SEE NOTE 1
YL
CUSTOMER FEEDBACK
We are very interested in all product comments.
Please ll out the feedback form on one of the following links:
Goodman
®
Brand Products: (http://www.goodmanmfg.com/about/contact-us).
Amana
®
Brand Products: (http://www.amana-hac.com/about-us/contact-us).
You can also scan the QR code on the right for the product brand
you purchased to be directed to the feedback page.
GOODMAN
®
BRAND
AMANA
®
BRAND
©2020-2021, 2023 Daikin Comfort Technologies Manufacturing, L.P.
Brand
®
is a registered trademark of Maytag Corporation or its related companies and is used under license. All rights reserved.



