Owner’s Manual & Safety Instructions
Save This Manual Keep this manual for the safety warnings and precautions, assembly,
operating, inspection, maintenance and cleaning procedures. Write the product’s date code in the back of
the manual (or month and year of purchase if product has no number). Keep this manual and the receipt in
a safe and dry place for future reference. 26i
When unpacking, make sure that the product is intact and
undamaged. If any parts are missing or broken, please
visit harborfreight.com/customer-support/contact-us
as soon as possible.
Copyright
©
2026 by Harbor Freight Tools
®
. All rights reserved.
No portion of this manual or any artwork contained herein may be reproduced in
any shape or form without the express written consent of Harbor Freight Tools.
Diagrams within this manual may not be drawn proportionally. Due to continuing
improvements, actual product may differ slightly from the product described herein.
Tools required for assembly and service may not be included.
Read this material before using this product.
Failure to do so can result in serious injury.
SAVE THIS MANUAL.
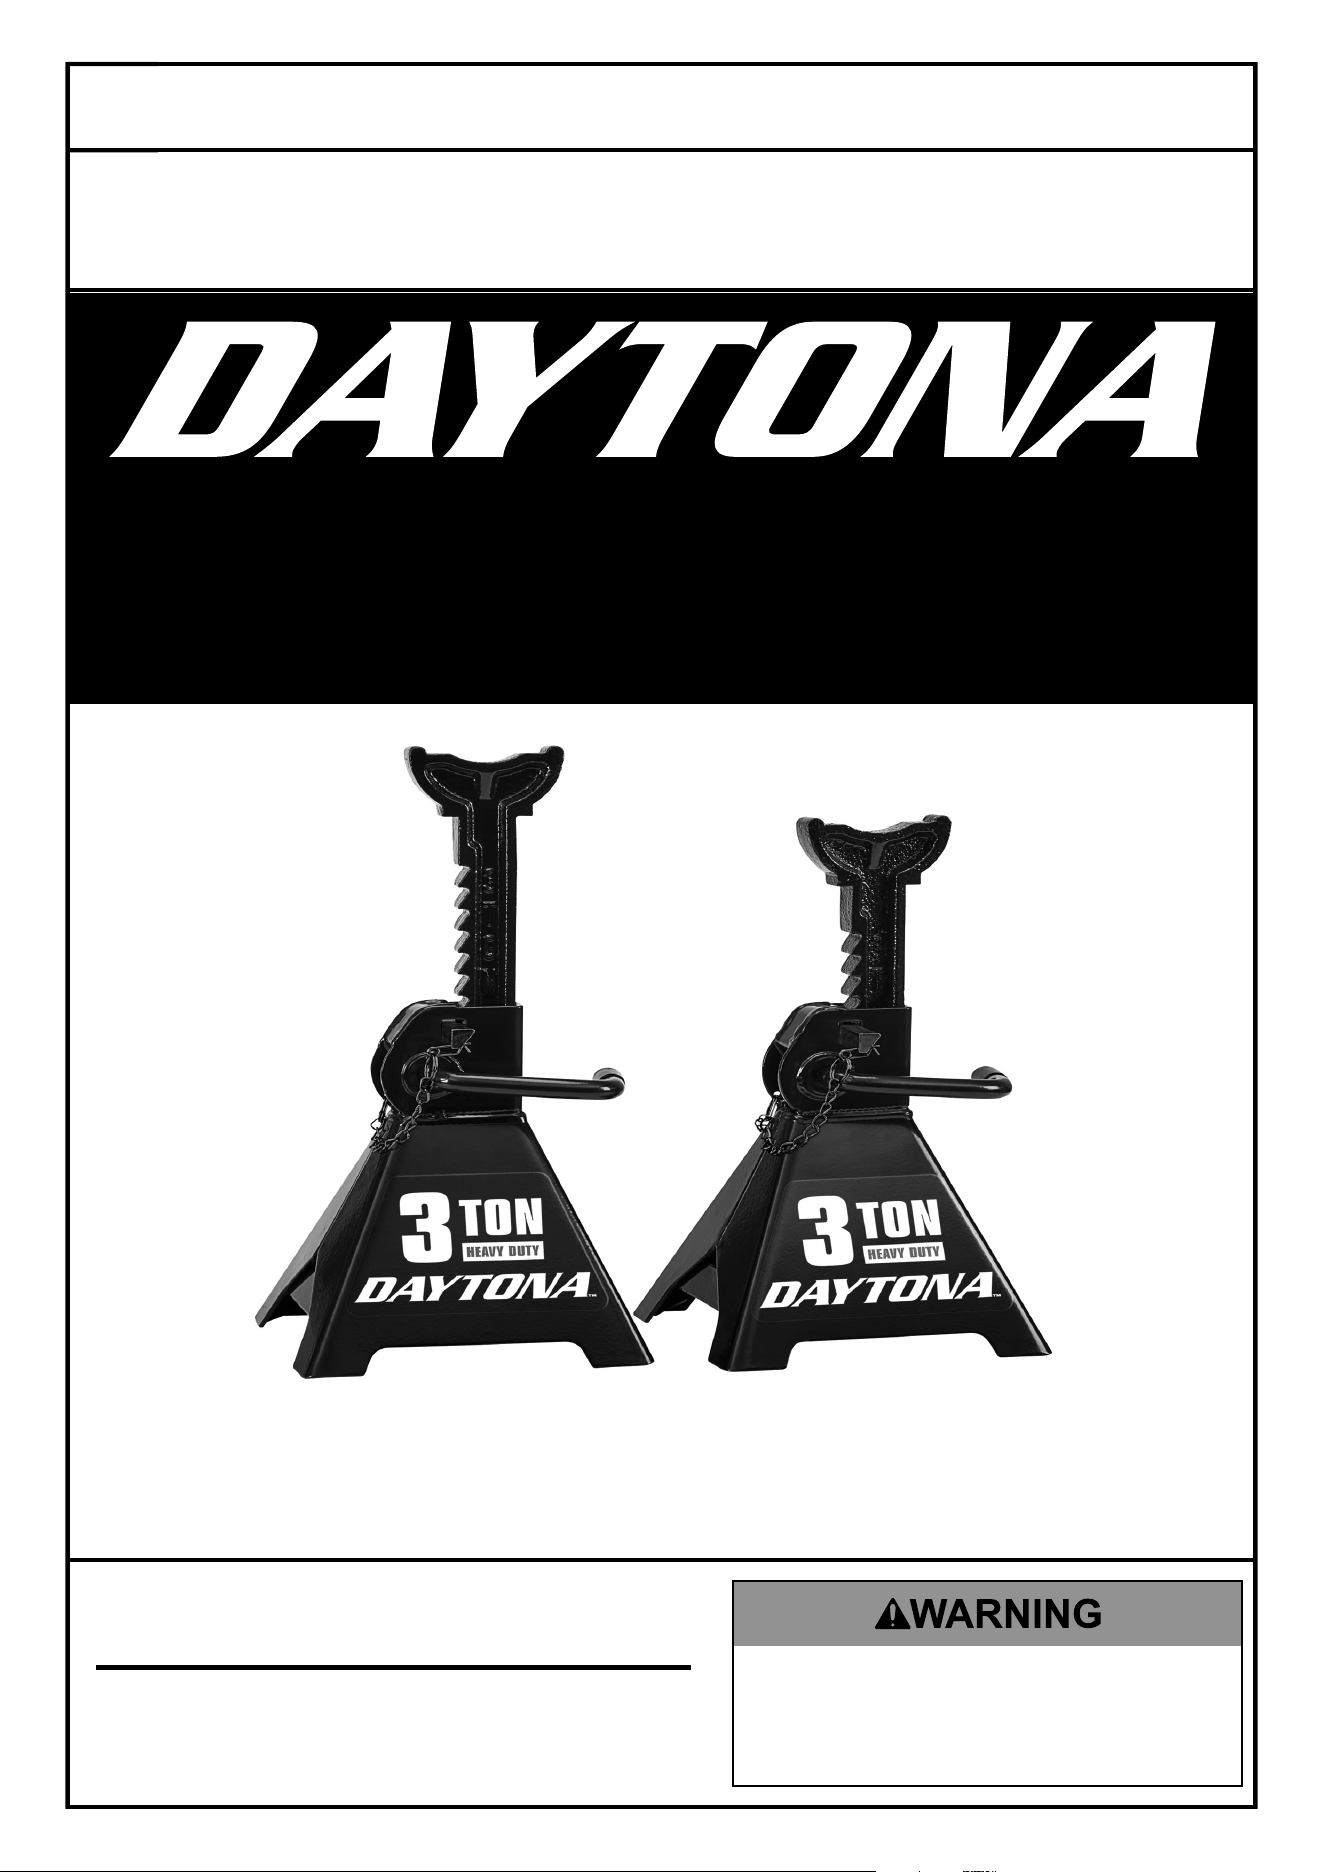
DJS3TBK Shown
3-Ton:
DJS3TBK
DJS3TBL
DJS3TY
DJS3TOR
DJS3TGR
DJS3TGRY
DJS3TMR
DJS3TMP
DJS3TMO
DJS3TMG
6-Ton:
DJS6TBK
DJS6TBL
DJS6TY
DJS6TOR
DJS6TGR
DJS6TGRY
12-Ton:
DJS12TBK
Visit our website at: https://www.harborfreight.com
For product assistance, visit harborfreight.com/customer-support/contact-us
RATCHETING JACK STANDS
WITH MOBILITY PIN
TM
Page 2
For product assistance, please visit harborfreight.com/customer-support/contact-us
Jack Stand
Specifications
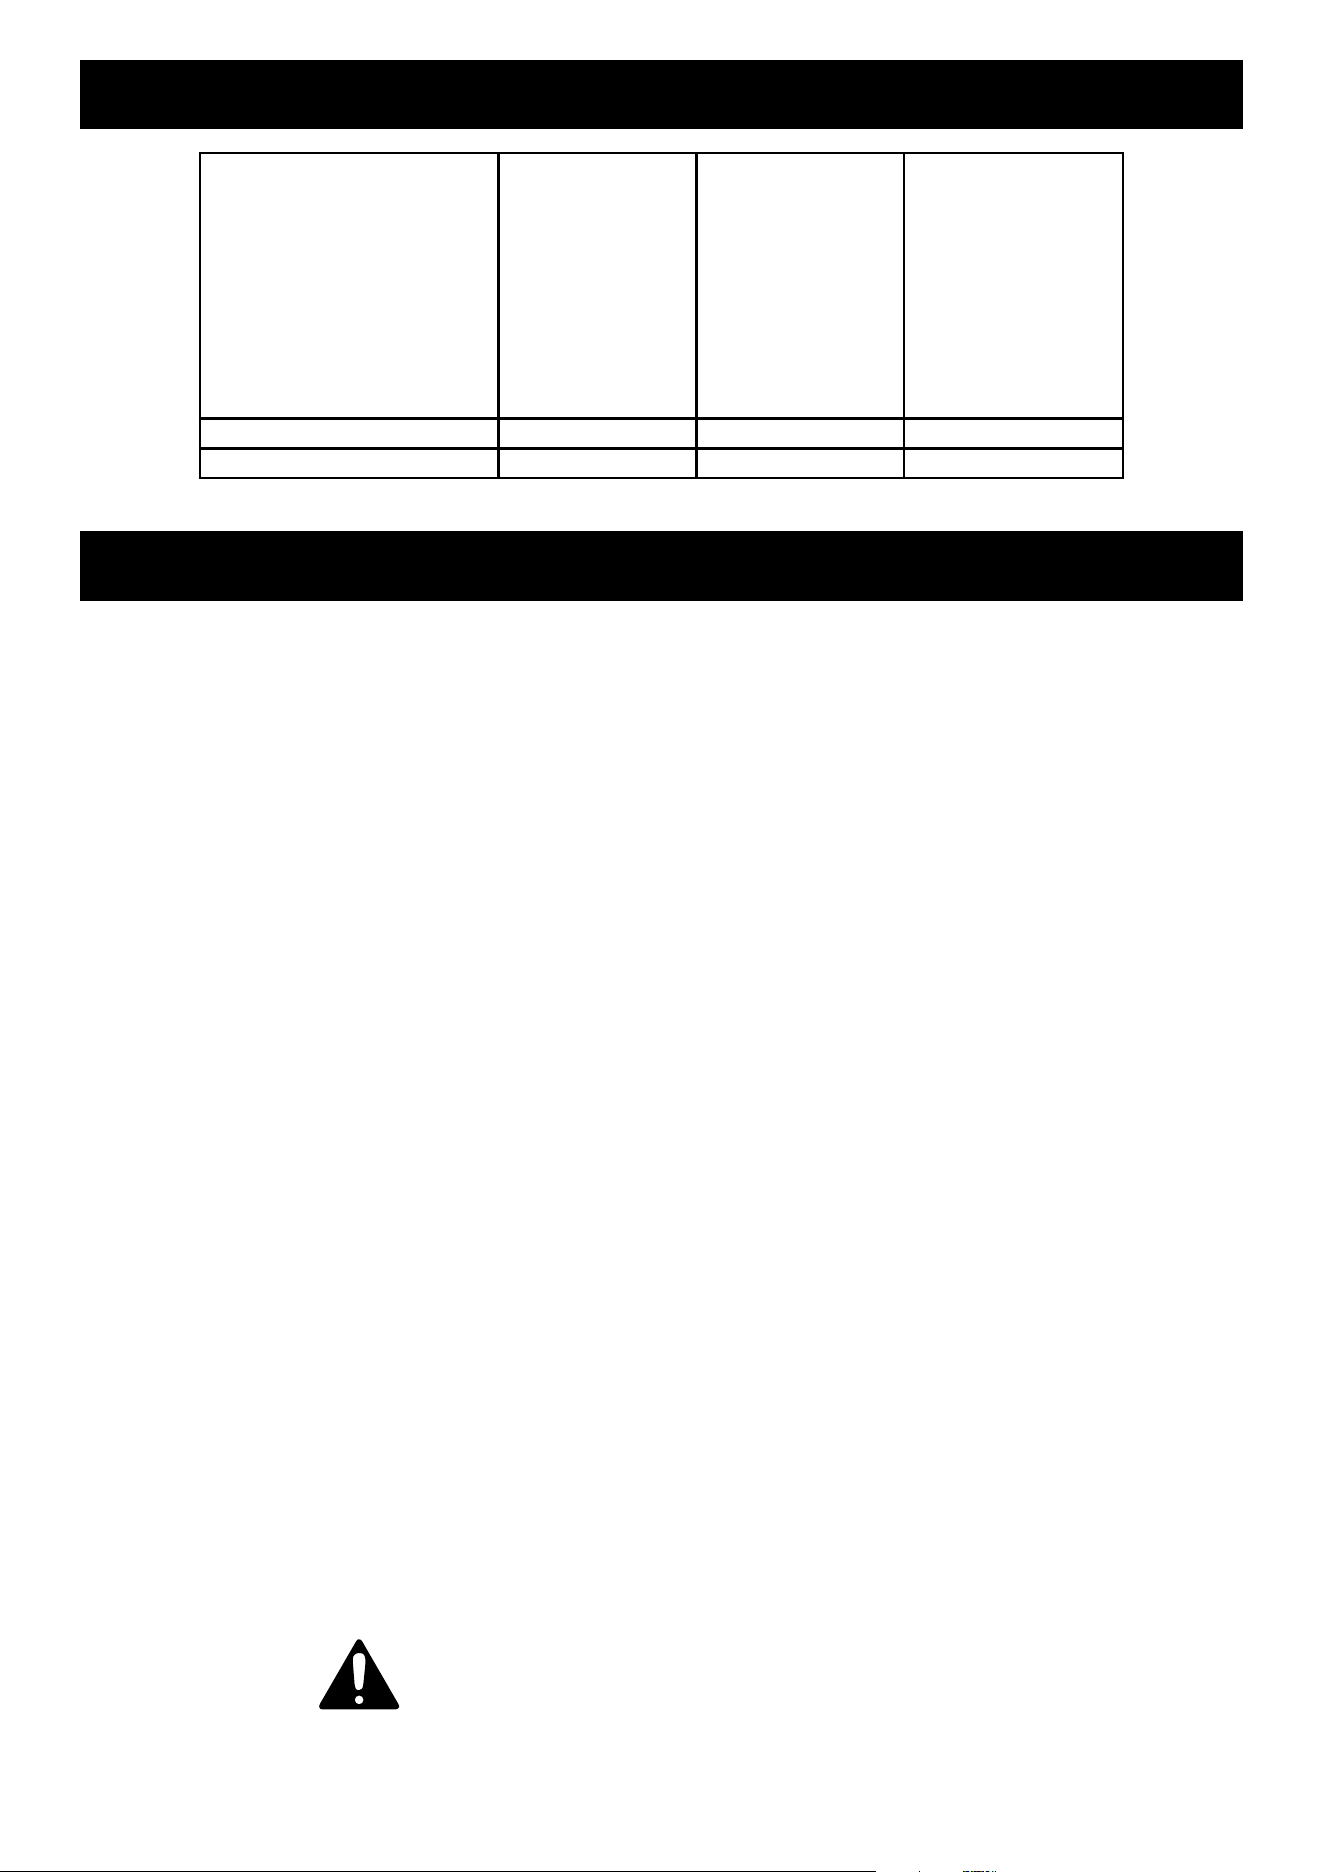
Model
DJS3TBK
DJS3TBL
DJS3TY
DJS3TOR
DJS3TGR
DJS3TGRY
DJS3TMR
DJS3TMP
DJS3TMO
DJS3TMG
DJS6TBK
DJS6TBL
DJS6TY
DJS6TOR
DJS6TGR
DJS6TGRY
DJS12TBK
Capacity 3 Tons (6,000 lb.)* 6 Tons (12,000 lb.)* 12 Tons (24,000 lb.)*
Height Range (Approximate) 11-3/8" – 16-7/8" 15-1/4" – 24" 19-5/8" – 30"
*Evenly distributed across two Jack Stands.
IMPORTANT SAFETY INFORMATION
1. Study, understand, and follow all instructions
before operating this device.
2. Use only as an identical pair.
3. Maximum load capacity per identical pair shall not
exceed the rated capacity of the individual stand.
4. Use stands to support one end of a vehicle only.
5. Use only on a hard, level surface
capable of supporting the load.
6. Center load on saddle.
7. Locate saddles at vehicle manufacturer’s
designated support points.
8. Ensure the locking device is fully engaged with the
column before lowering vehicle onto stands.
9. Carefully lower vehicle onto both stands simultaneously.
10. Failure to heed these markings may result in
personal injury, property damage, or both.
11. Only attachments and adapters supplied by or
approved by the manufacturer shall be used.
12. No alterations shall be made to this product.
13. Stands are not to be used to simultaneously
support both ends of a vehicle.
14. Wear ANSI-approved safety goggles and
heavy-duty work gloves during use.
15. Do not use for aircraft purposes.
16. Inspect before every use; do not use
if parts loose or damaged.
17. Examine Jack Stands for cracks or damage
before each use. Do not use if even a minor crack,
bend or other damage/deformation appears.
Discard Jack Stand if damaged or deformed.
18. Keep work area clean. Cluttered areas invite injuries.
19. Observe work area conditions. Keep
work area well lighted.
20. Keep children away. Children must never
be allowed in the work area.
21. Store idle equipment. When not in use, tools must be
stored in a dry location to inhibit corrosion. Always
lock up tools and keep out of reach of children.
22. There are certain applications for which this tool was
designed. Do not modify this tool and do not use this
tool for a purpose for which it was not intended.
23. Dress properly. Do not wear loose clothing or jewelry
as they can be caught in moving parts. Protective,
electrically non-conductive clothes and non-skid
footwear are recommended when working. Wear
restrictive hair covering to contain long hair.
24. Maintain tools with care. Keep tools clean for
better and safer performance. Follow instructions
for lubricating and changing accessories.
25. Stay alert. Watch what you are doing, use common
sense. Do not operate any tool when you are tired.
26. Do not operate tool if under the influence of alcohol or
drugs. Read warning labels on prescriptions to determine
if your judgment or reflexes are impaired while taking
drugs. If there is any doubt, do not operate the tool.
27. Only use on proper surface. Only use the Jack Stands on
a dry, level, flat surface, which is free of grease or debris.
The surface to be used must be capable of supporting
the combined weight of the vehicle and the Jack Stands.
28. The warnings, precautions, and instructions discussed
in this manual cannot cover all possible conditions
and situations that may occur. The operator must
understand that common sense and caution are
factors, which cannot be built into this product,
but must be supplied by the operator
.
SAVE THESE INSTRUCTIONS.
Page 3
For product assistance, please visit harborfreight.com/customer-support/contact-us
Jack Stand
Assembly
Read the ENTIRE IMPORTANT SAFETY INFORMATION section at the beginning of this
manual including all text under subheadings therein before set up or use of this product.
Note: For additional information regarding the parts listed in the following pages,
refer to the Assembly Diagram near the end of this manual.
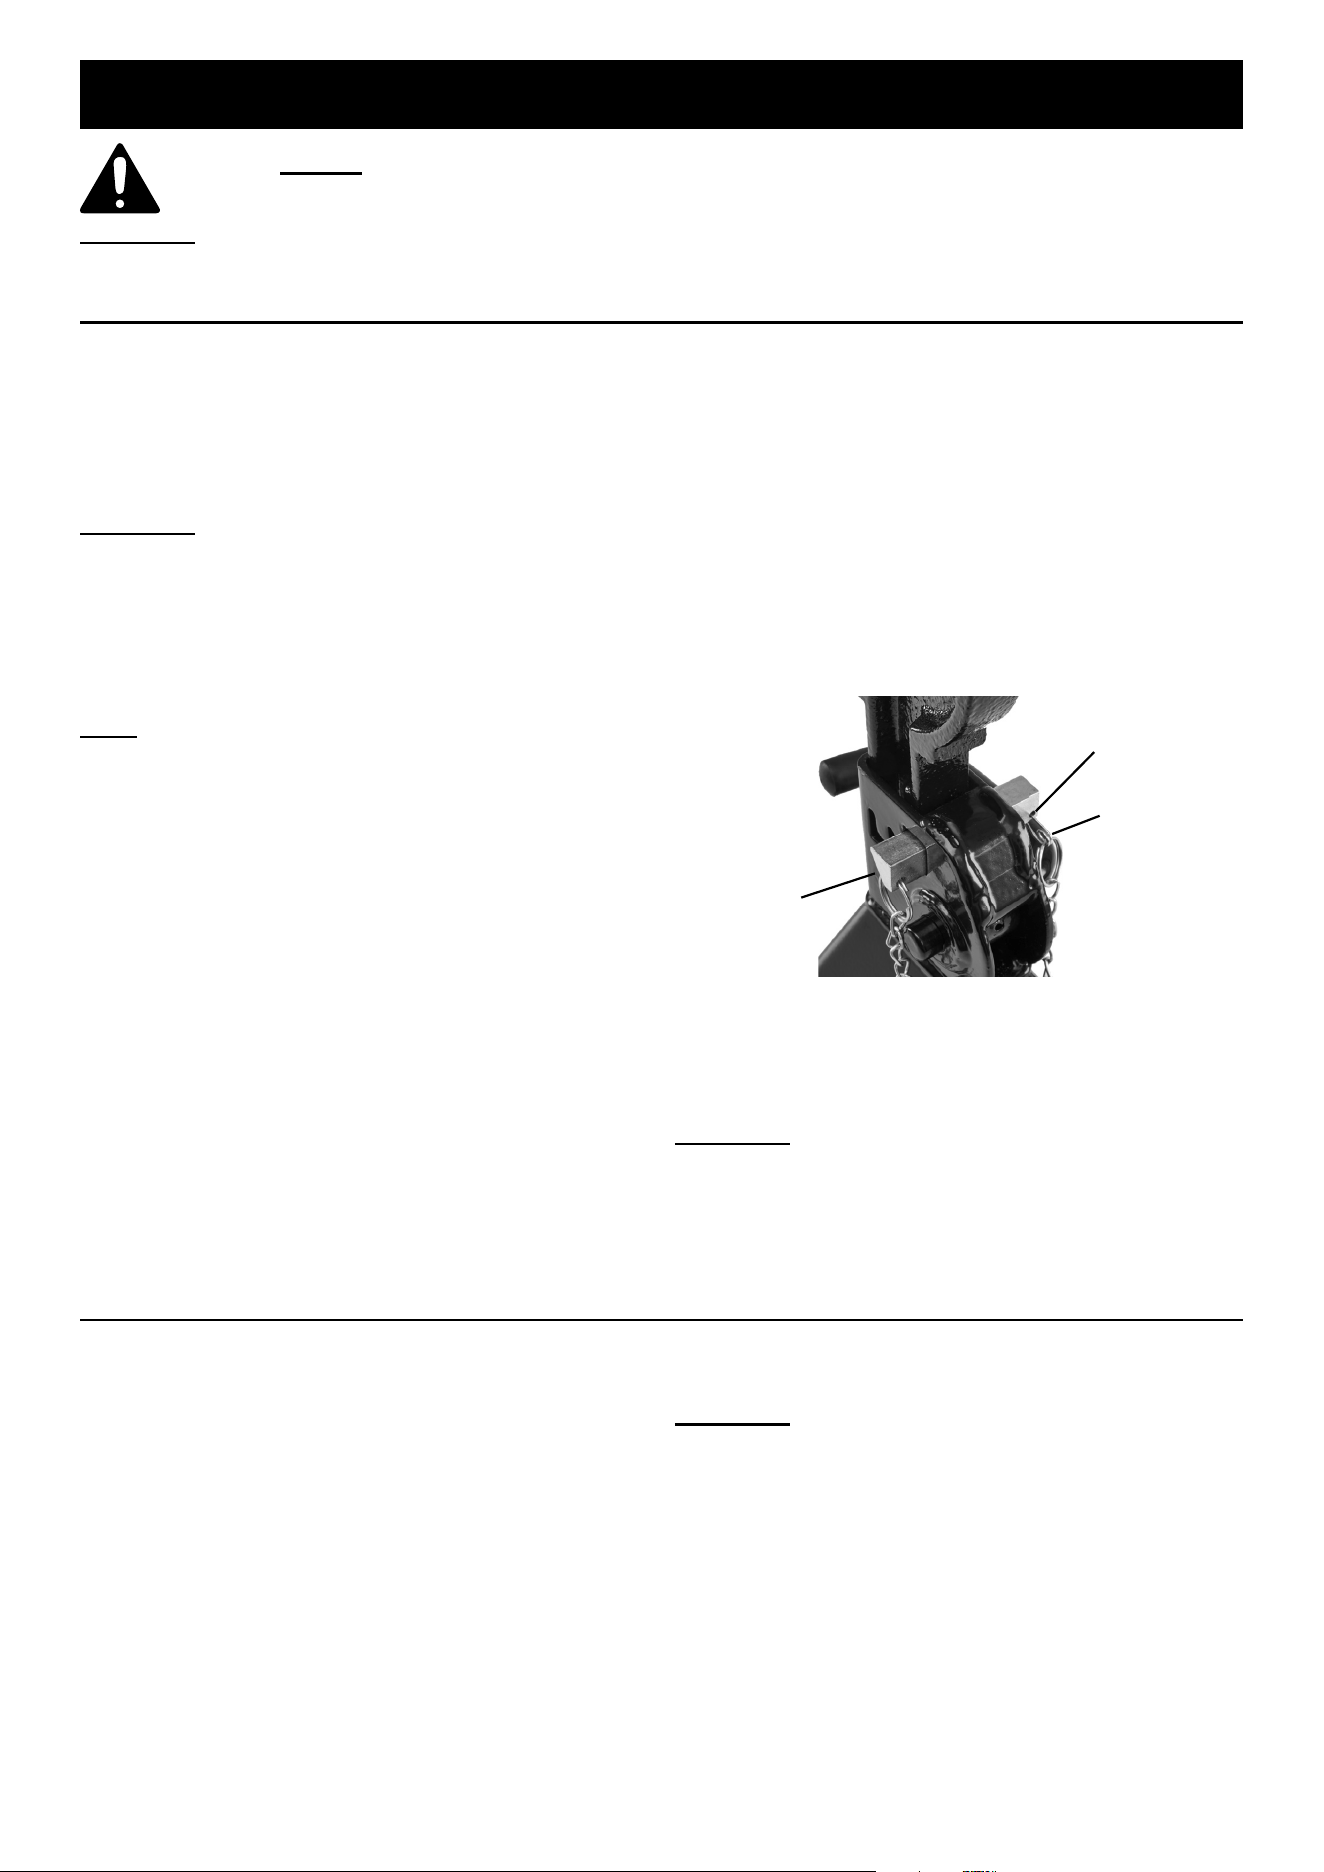
1. Secure the chain to the jack stand by attaching the
split ring to the Hole near the Pawl. See Figure A.
2. Turn Post so that the teeth on its side face
the Pawl. Insert Post into the Base.
3. Bend Stop Tab in to secure the Post
into the Base. See Figure A.
CAUTION! Be alert to pinching hazard
when lowering the Post.
CAUTION! TO PREVENT INJURY: Before
using the Jack Stands, make sure the Post
cannot be pulled up and out of the Base.
4. Repeat Steps 1 through 3 with the other Jack Stand.
Stop Tab
Figure A
Split Ring
Split Ring Hole
Pawl
TM
Page 4
For product assistance, please visit harborfreight.com/customer-support/contact-us
Jack Stand
Operating Instructions
Read the ENTIRE IMPORTANT SAFETY INFORMATION section at the beginning of this
manual including all text under subheadings therein before set up or use of this product.
WARNING! TO PREVENT SERIOUS INJURY: Use as matched pair to support one end of a vehicle only.
Supporting a Vehicle
1. Make sure the vehicle does not exceed the capacity
of the Jack Stands. Note: Check that the weight
is evenly distributed between the Jack Stands.
You must evenly distribute the weight or the
Jack Stands may fail, causing severe injury
or death. Only apply the load vertically.
WARNING! TO PREVENT SERIOUS INJURY: If a
vehicle drops on the Jack Stands (even if it is under
the weight capacity limit), the principle of “dynamic
loading” takes affect. The force of the weight
falling may cause the Jack Stands to fail. A vehicle
weighing much less than the Jack capacity may
cause the Jack Stands to fail if dropped on them.
Note: Do not move the Handle when the Jack
Stands are supporting a vehicle. The shear pin is
designed to shear in the event the user attempts to
move the Handle while supporting weight. If the pin
shears, do not use the Jack Stands again until the
shear pin is replaced by a qualified technician.
2. Examine Jack Stands for cracks or damage before
each use. Do not use if even a minor crack,
bend, or other damage/deformation appears.
Discard Jack Stand if damaged or deformed.
3. Raise the Handle on each Jack Stand
to completely lower the Post.
4. If your are raising only one end of the vehicle,
block the tires that remain on the ground.
5. Following the instructions in your floor jack
manual, raise your vehicle to just above the
minimum height of your Jack Stands.
6. Slide your Jack Stands to the proper position points
referred to in the vehicle owner’s manual. Make
sure the Jack Stands are on the same point on
each side of the vehicle. Move the Handle up,
and raise the Jack Stands until they are just below
the jack contact point on the vehicle. Center
the load on the Saddle of the Post. Release the
Handle so that ratchet catches on the Pawl.
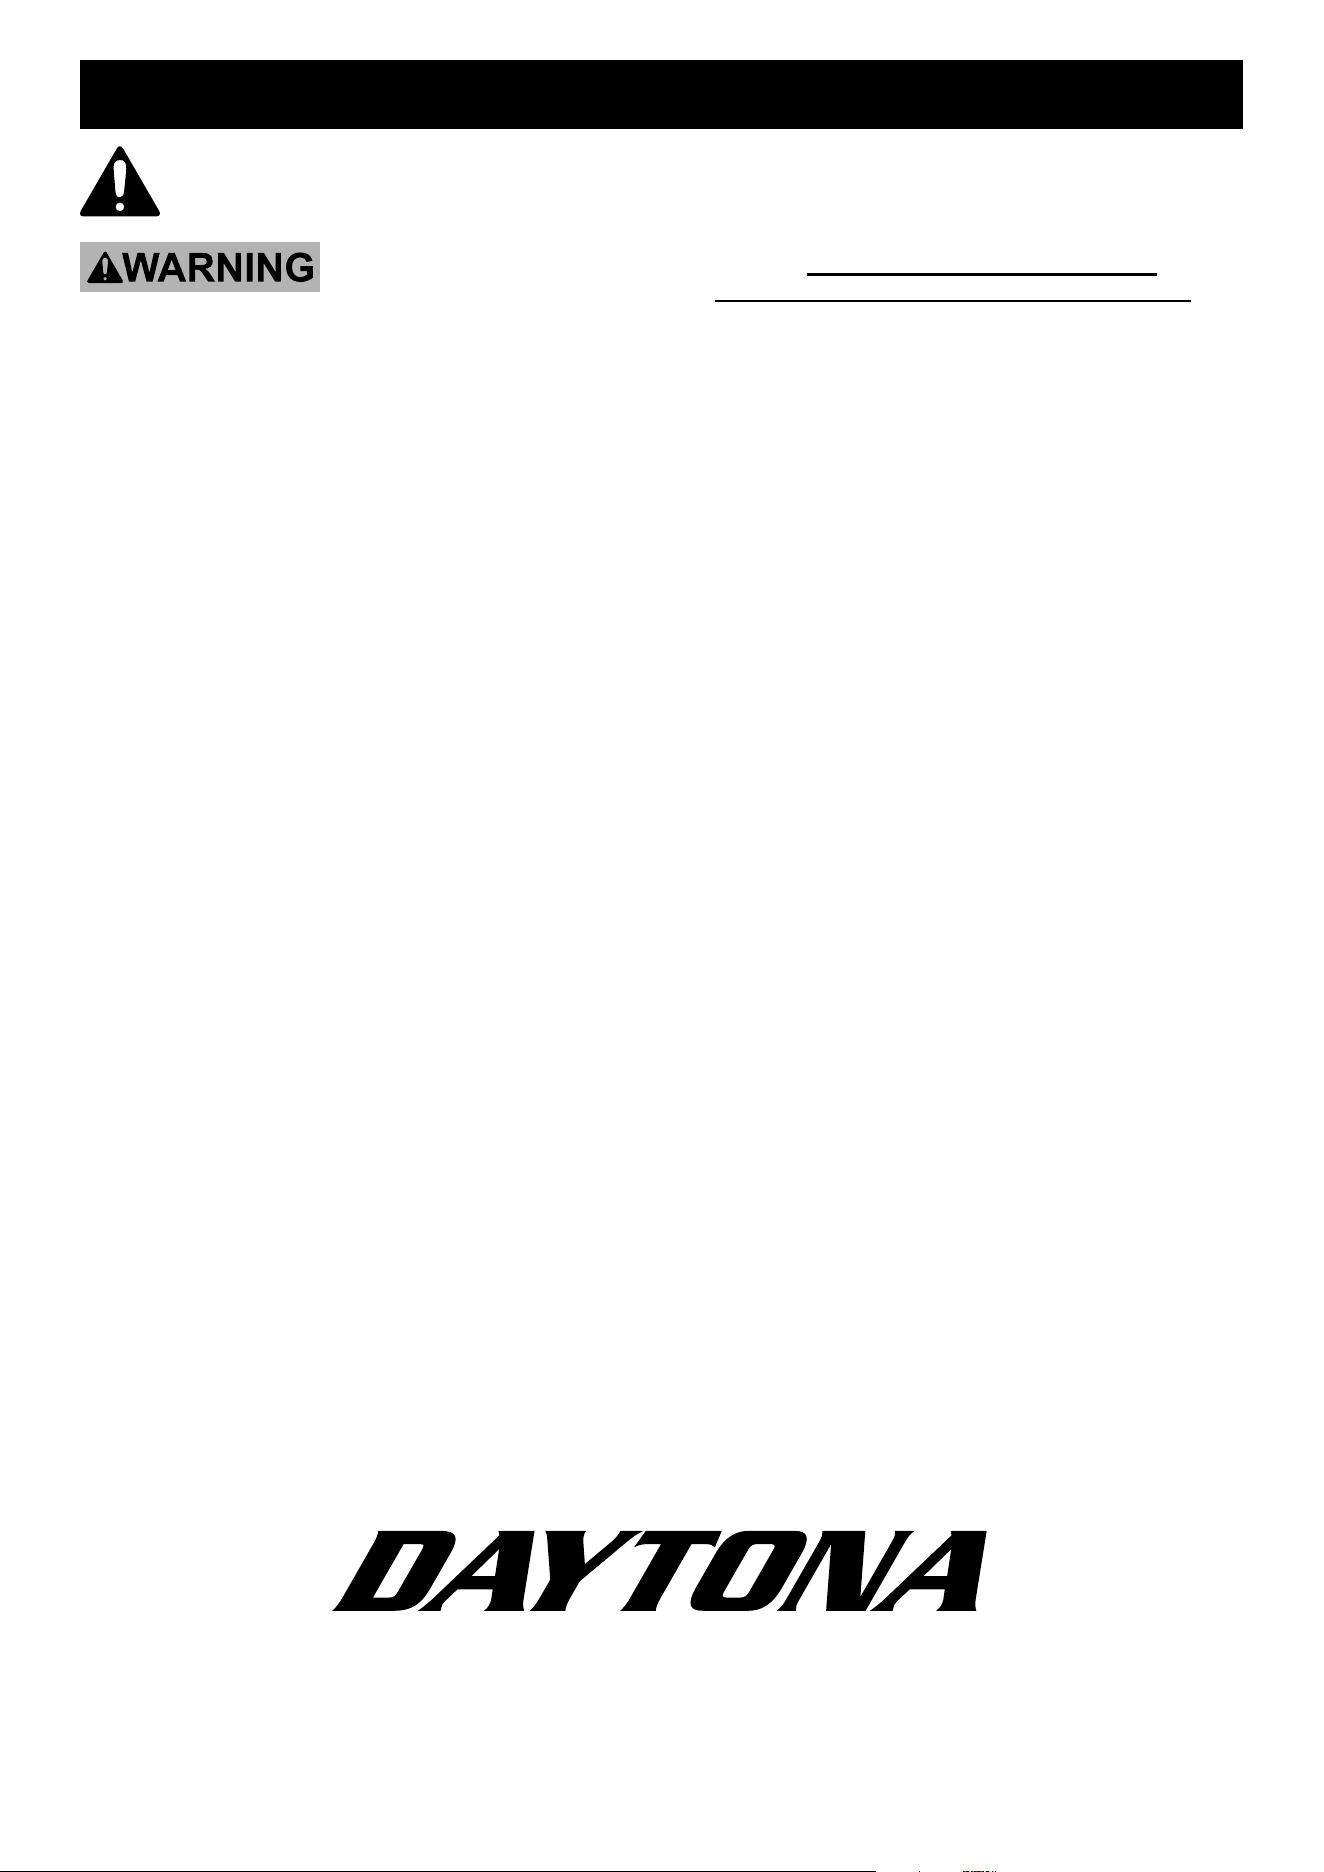
7. Insert Mobility Pin into the opening located next
to the Stop Tab. Secure the Mobility Pin in place
by inserting the Safety Pin into the small hole
on the end of the Mobility Pin. See Figure B.
Figure B
8. Gently lower the vehicle with the floor jack. It may
drop down a very small amount until the ratchet
catches on the Pawl. Repeat on other side.
WARNING! TO PREVENT SERIOUS INJURY:
Set both Jack Stands to the same height.
9. Determine if the vehicle is stable. If not, raise
the vehicle and reposition the Jack Stands.
Removing the Jack Stands
1. Raise the vehicle with a floor jack to take
the load off of the Jack Stands.
2. Remove Safety Pin from the Mobility Pin.
Remove the Mobility Pin from the Base.
3. Raise the Handle on the Jack
Stands and lower the Posts.
4. Remove the Jack Stands. Use the floor jack
to safely lower the vehicle to the ground.
WARNING! TO PREVENT SERIOUS INJURY:
Do not use Jack Stands as a permanent stand for
the vehicle. Use them only while making repairs,
then immediately lower vehicle to the ground.
Mobility
Pin
Safety Pin
Safety Pin
Hole
Page 5
For product assistance, please visit harborfreight.com/customer-support/contact-us
Jack Stand
Maintenance and Servicing
Procedures not specifically
explained in this manual must be
performed only by a qualified technician.
TO PREVENT SERIOUS INJURY FROM TOOL
FAILURE:
Do not use damaged equipment.
If abnormal noise or vibration occurs, have
the problem corrected before further use.
1. Periodically clean the bottom of the Bases and
top of Posts of any dirt, grease, or debris.
2. Before each use, inspect the general condition
of the Jack. Check for broken, cracked, or bent
parts, loose or missing parts, and any condition
that may affect the proper operation of the
product. Do not use damaged equipment.
Discard Jack Stand if damaged or deformed.
3. Periodically lubricate release handle pivot points.
TM
Page 6
For product assistance, please visit harborfreight.com/customer-support/contact-us
Jack Stand
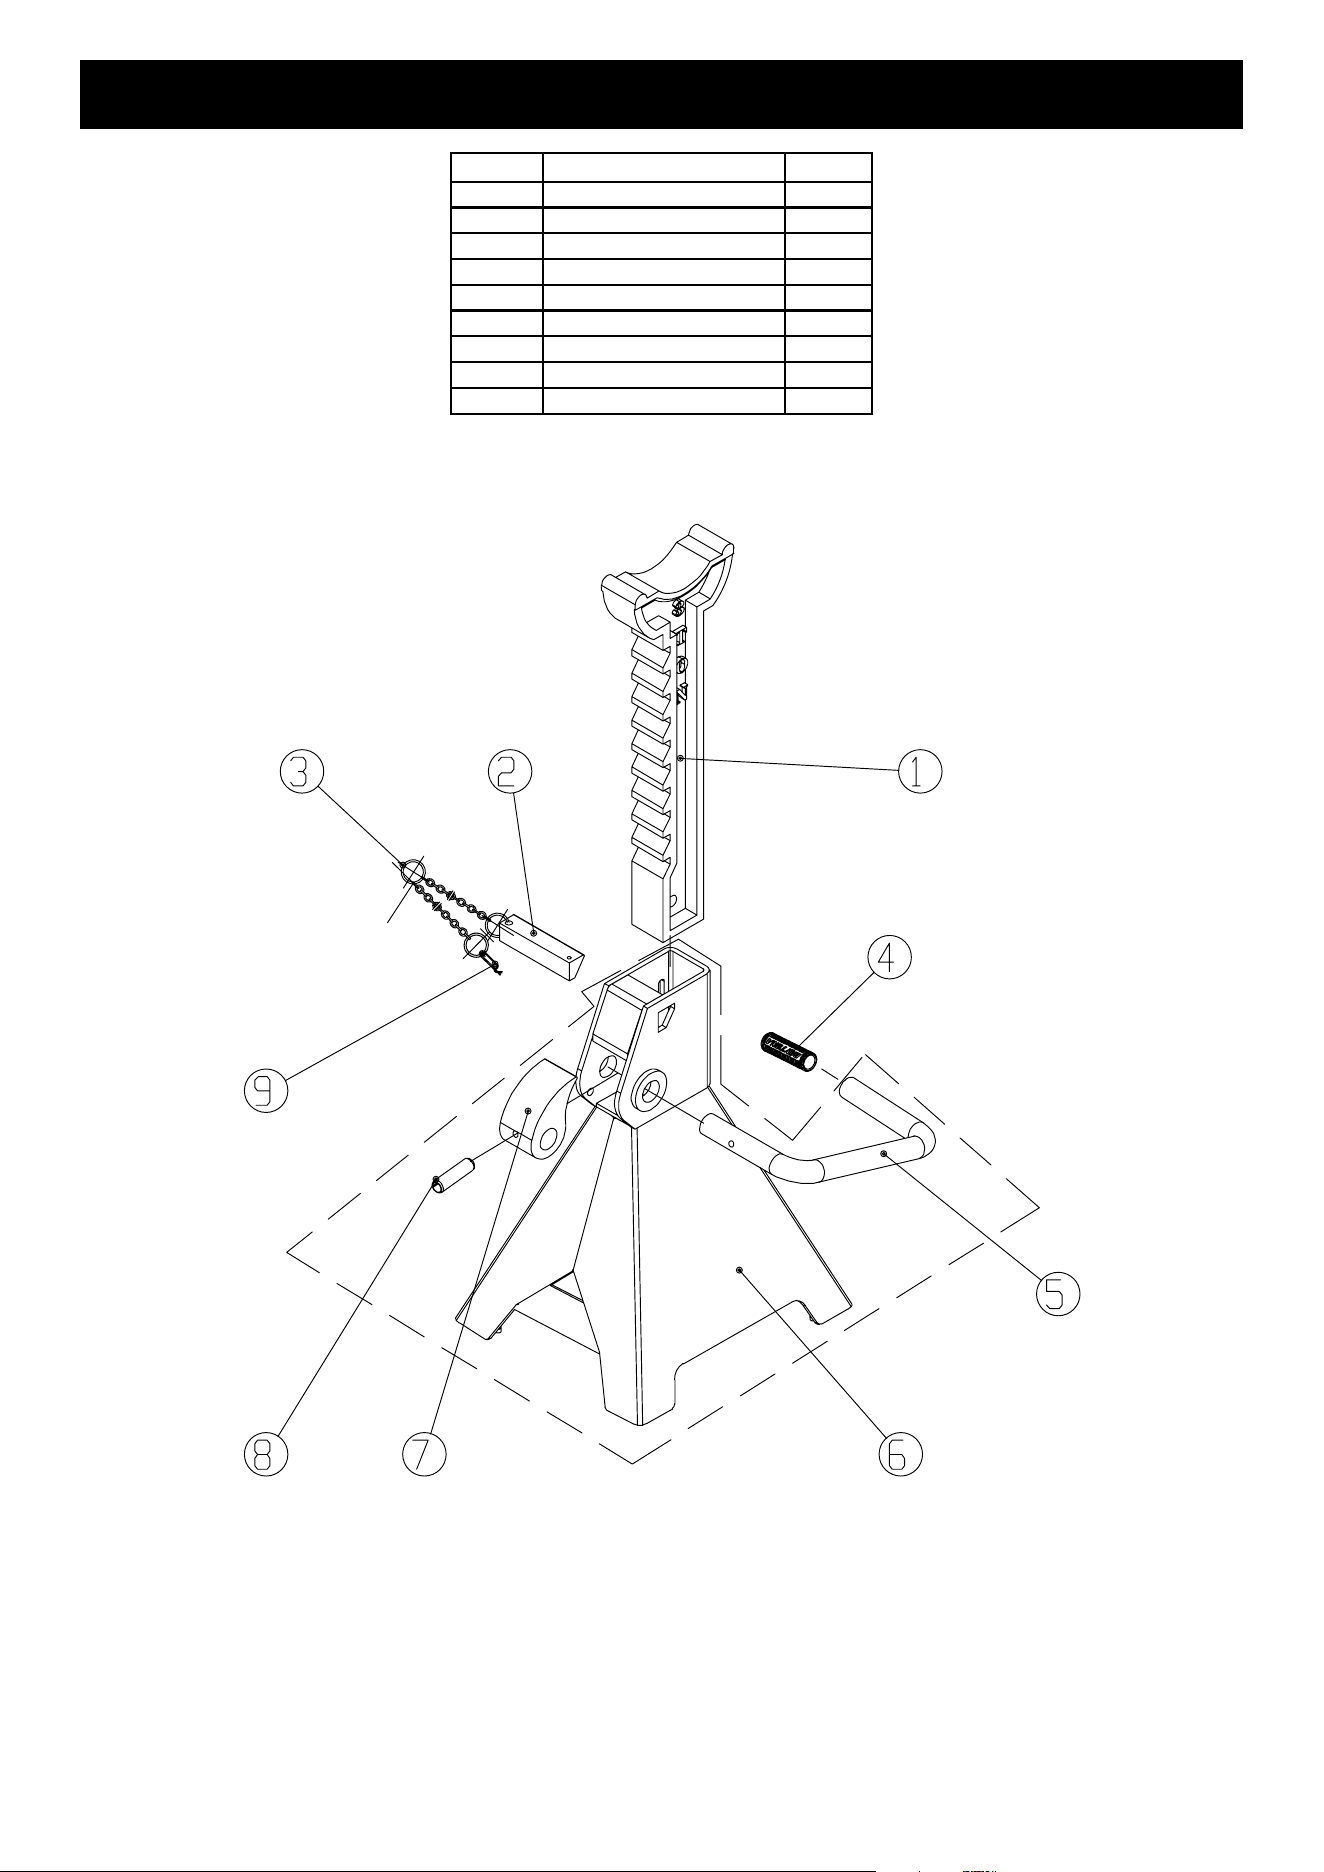
Component List and Assembly Diagram
Part Description Qty
1 Post 1
2 Mobility Pin 1
3 Chain 1
4 Handle Grip 1
5 Handle 1
6 Base 1
7 Pawl 1
8 Pin 1
9 Safety Pin 1
The component list and assembly diagram are shown for reference only.
To view all currently available replacement parts, please visit harborfreight.com/parts

Page 7
For product assistance, please visit harborfreight.com/customer-support/contact-us
Jack Stand
Record Product’s Date Code Here:
Note: If product has no date code, record month and year of purchase instead.
Note: Some parts are listed and shown for illustration purposes only, and are not available
individually as replacement parts. Parts may not be interchangeable.
Specify UPC number when ordering:
3-Ton Black (DJS3TBK):58343; UPC 193175554222
3-Ton Blue (DJS3TBL): 58344; UPC 193175554239
3-Ton Yellow (DJS3TY): 58345; UPC 193175554284
3-Ton Orange (DJS3TOR): 58346; UPC 193175554253
3-Ton Green (DJS3TGR): 58347; UPC 193175554246
3-Ton Gray (DJS3TGRY): 70593; UPC 193175554260
3-Ton Metallic Red (DJS3TMR): 71423; UPC 193175570420
3-Ton Metallic Purple (DJS3TMP): 71189; UPC 193175570437
3-Ton Metallic Orange (DJS3TMO): 71422; UPC 193175570284
3-Ton Metallic Green (DJS3TMG): 73332; UPC 193175575968
6-Ton Black (DJS6TBK): 58342; UPC 193175554291
6-Ton Gray (DJS6TGRY): 70594; UPC 193175554024
6-Ton Green (DJS6TGR): 58351; UPC 193175554000
6-Ton Orange (DJS6TOR): 58350; UPC 193175554017
6-Ton Blue (DJSTBL): 58348; UPC 193175554499
6-Ton Yellow (DJS6TY): 58349; UPC 193175554031
12-Ton Black (DJS12TBK): 58341; UPC 193175589590
PLEASE READ THE FOLLOWING CAREFULLY
THE MANUFACTURER AND/OR DISTRIBUTOR HAS PROVIDED THE PARTS DIAGRAM IN THIS MANUAL AS A REFERENCE
TOOL ONLY. NEITHER THE MANUFACTURER NOR DISTRIBUTOR MAKES ANY REPRESENTATION OR WARRANTY OF
ANY KIND TO THE BUYER THAT HE OR SHE IS QUALIFIED TO MAKE ANY REPAIRS TO THE PRODUCT OR THAT HE OR
SHE IS QUALIFIED TO REPLACE ANY PARTS OF THE PRODUCT. IN FACT, THE MANUFACTURER AND/OR DISTRIBUTOR
EXPRESSLY STATES THAT ALL REPAIRS AND PARTS REPLACEMENTS SHOULD BE UNDERTAKEN BY CERTIFIED AND
LICENSED TECHNICIANS AND NOT BY THE BUYER. THE BUYER ASSUMES ALL RISK AND LIABILITY ARISING OUT OF HIS
OR HER REPAIRS TO THE ORIGINAL PRODUCT OR REPLACEMENT PARTS THERETO, OR ARISING OUT OF HIS OR HER
INSTALLATION OF REPLACEMENT PARTS THERETO.

For product assistance, visit harborfreight.com/customer-support/contact-us
TM
Limited 90 Day Warranty
Harbor Freight Tools Co. makes every effort to assure that its products meet high quality and durability standards,
and warrants to the original purchaser that this product is free from defects in materials and workmanship
for the period of 90 days from the date of purchase. This warranty does not apply to damage due directly
or indirectly, to misuse, abuse, negligence or accidents, repairs or alterations outside our facilities, criminal
activity, improper installation, normal wear and tear, or to lack of maintenance. We shall in no event be liable
for death, injuries to persons or property, or for incidental, contingent, special or consequential damages
arising from the use of our product. Some states do not allow the exclusion or limitation of incidental or
consequential damages, so the above limitation of exclusion may not apply to you. This warranty is expressly
in lieu of all other warranties, express or implied, including the warranties of merchantability and fitness.
To take advantage of this warranty, the product or part must be returned to us with transportation charges prepaid. Proof
of purchase date and an explanation of the complaint must accompany the merchandise. If our inspection verifies the
defect, we will either repair or replace the product at our election or we may elect to refund the purchase price if we
cannot readily and quickly provide you with a replacement. We will return repaired products at our expense, but if we
determine there is no defect, or that the defect resulted from causes not within the scope of our warranty, then you must
bear the cost of returning the product.
This warranty gives you specific legal rights and you may also have other rights which vary from state to state.