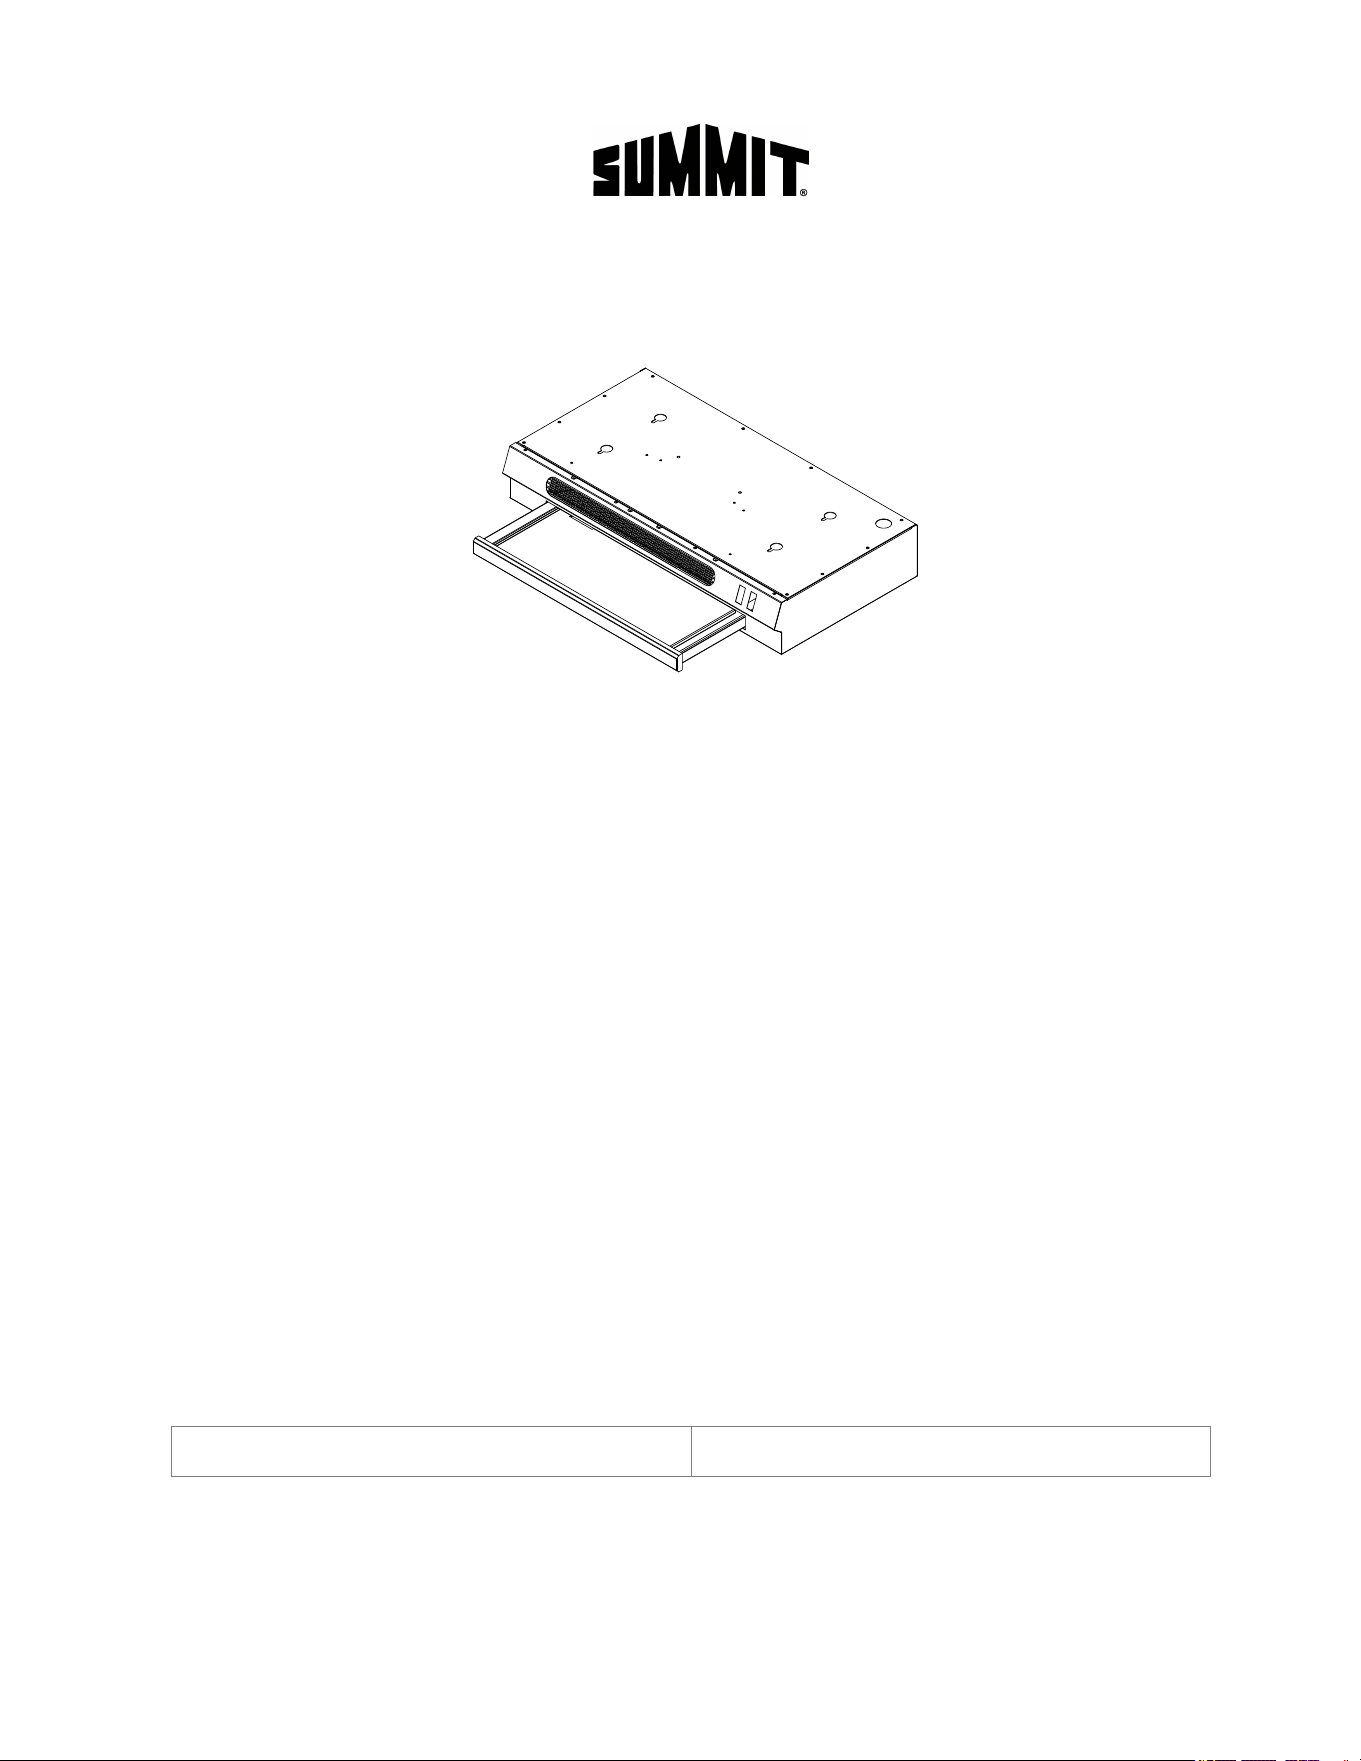
RETR
ACTABLE RANGE HOOD
User Manual
Model numbers with the PTC suffix indicate a hardwired power cord for the U.S. market, while
those with the PTC2 suffix indicate a hardwired power cord for the Canadian market. **
BEFORE USE, PLEASE READ AND FOLLOW ALL SAFETY RULES AND OPERATING INSTRUCTIONS
Felix Storch, Inc.
An ISO 9001:2015 registered company
770 Garrison Avenue
Bronx, New York 10474
www.summitappliance.com
HRTX18B ADAHRTX18B L18BHRT LADA18BHRT
HRTX18W ADAHRTX18W L18WHRT LADA18WHRT
HRTX18SS ADAHRTX18SS L18SSHRT LADA18SSHRT
HRTX20B ADAHRTX20B L20BHRT LADA20BHRT
HRTX20W ADAHRTX20W
L20WHRT LADA20WHRT
HRTX20SS ADAHRTX20SS
L20SSHRT LADA20SSHRT
HRTX24B ADAHRTX24B
L24BHRT LADA24BHRT
HRTX24W ADAHRTX24W L24WHRT LADA24WHRT
HRTX24SS ADAHRTX24SS
L24SSHRT LADA24SSHRT
HRTX30B ADAHRTX30B L30BHRT LADA30BHRT
HRTX30W ADAHRTX30W L30WHRT LADA30WHRT
HRTX30SS ADAHRTX30SS L30SSHRT LADA30SSHRT
Models: Serial Number:
Models:

TABLE OF CONTENTS
IMPORTANT SAFETY INSTRUCTIONS ..................................................................................... 1
EQUIPMENT SAFETY .......................................................................................................... 2 - 4
INSTALLATION INSTRUCTIONS ......................................................................................... 5 - 6
OPERATING YOUR RANGE HOOD .......................................................................................... 7
REMOTE SWITCH INSTALLATION ........................................................................................... 8
CLEANING AND CARE ...................................................................................................... 9 - 10
TROUBLESHOOTING ..............................................................................................................10
LIMITED WARRANTY..............................................................................................................12
IMPORTANT SAFETY INSTRUCTIONS
APPROVED FOR
RESIDENTIAL APPLIANCES FOR RESIDENTIAL USE ONLY
READ AND SAVE THESE INSTRUCTIONS
INSTALLATION MUST COMPLY WITH ALL LOCAL CODES.
IMPORTANT: Save these Instructions for the Local Electrical Inspector’s use.
INSTALLER: Please leave these Instructions with this unit for the owner.
OWNER: Please retain these instructions for future reference.
SYMBOLS USED IN THIS MANUAL
WARNING
Hazards or unsafe practices that may result in severe personal injury or death.
CAUTION
Hazards or unsafe practices that may result in electric shock, personal injury,
or property damage.
NOTE
Useful tips and instructions. These warning icons and symbols are here to
prevent injury to you and others. Please follow them explicitly. After reading
this section, keep it in a safe place for future reference.
For an electronic copy of the user manual, please visit our website: www.summitappliance.com
For Technical Support, contact: techsupport@summitappliance.com or 1-800-932-4267 (Ext. 513)
Read and save these instructions.
EN - 1
EQUIPMENT SAFETY
•
READ AND SAVE THESE INSTRUCTIONS.
•
READ ALL
INSTRUCTIONS BEFORE USING THE APPLIANCE.
•
Use this unit only in the manner intended by the manufacturer. If you have questions, contact the manufacturer.
WARNING!
TO REDUCE THE RISK OF FIRE, ELECTRIC SHOCK, OR INJURY TO PERSONS, OBSERVE THE
FOLLOWING:
•
Installation work and electrical wiring must be done by qualified person(s) in accordance with all
applicable codes and standards,
including fire-rated construction.
•
Sufficient air is needed for proper combustion and exhausting of gases through the flue (chimney) of fuel
burning equipment to prevent back drafting. Follow the heating equipment manufacturer's guideline and
safety standards such as those published by the National Fire Protection Association (NFPA), and the
American Society for Heating, Refrigeration and Air Conditioning Engineers (ASHRAE), and the local
code authorities.
•
When cutting or drilling into wall or ceiling, do not damage electrical wiring and other hidden utilities.
•
Before servicing or cleaning unit, switch power off at service panel and lock the service disconnecting
means to prevent power from being switched on accidentally. When the service disconnecting means
cannot be locked, securely fasten a prominent warning device, such as a tag to the service panel.
•
Stay clear of the rotating dan when the motor is running.
•
Do not use any accessories not recommended by the manufacturer.
•
Do not use this appliance for commercial uses.
•
Do not use this unit with any solid-state speed control device.
•
Do not repair or replace any part of the appliance or attempt any servicing.
NOTE: If
for any reason this product requires service, we strongly recommend that a certified technician
perform the service.
WARNING!
TO REDUCE THE RISK OF A RANGE TOP GREASE FIRE:
• Never leave surface units unattended at high settings. Boilovers cause smoking and greasy spillovers
that may ignite. Heat oils slowly on low or medium settings.
• Always turn hood ON when cooking at high heat or when flambéing food (i.e. Crepes Suzette, Cherries
Jubilee, Peppercorn Beef Flambe').
• Clean ventilating fans frequently. Grease should not be allowed to accumulate on fan or filter.
• Use proper pan size. Always use cookware appropriate for the size of the surface element.
CAUTION
• For general ventilating use only. Do not use to exhaust hazardous or explosive materials and vapors.
• Your hood motor has a thermal overload which will automatically shut off the motor if it becomes
overheated. The motor will restart when it cools down. If the motor continues to shut off and restart,
have the hood serviced.
EN - 2
Read and save these instructions.
COOKING SAFETY INFORMATION:
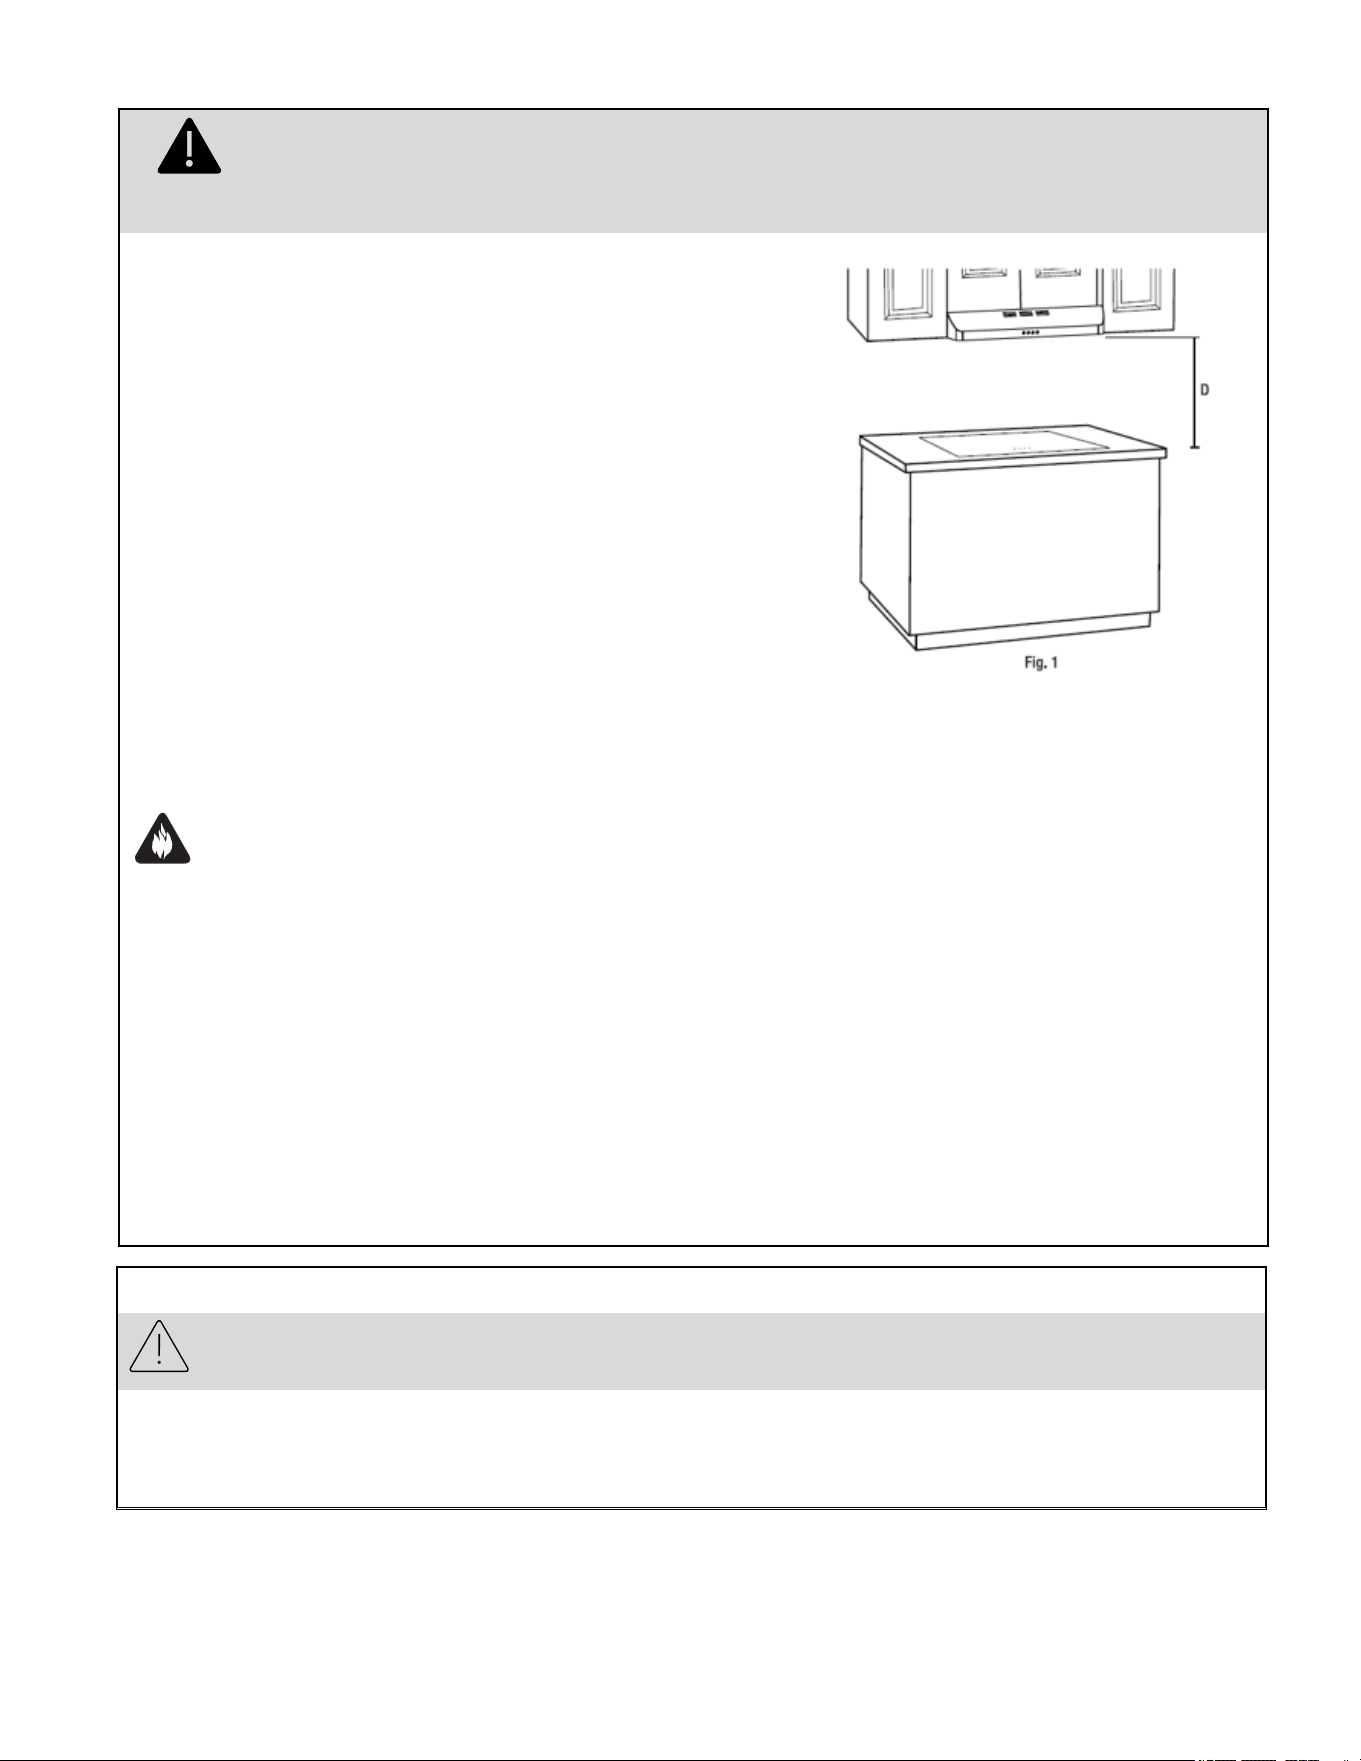
• Never leave the range hood unattended when in use. Never
cook over open flames under the range hood.
• Always turn the range hood on when cooking at high heat
or when cooking flaming foods.
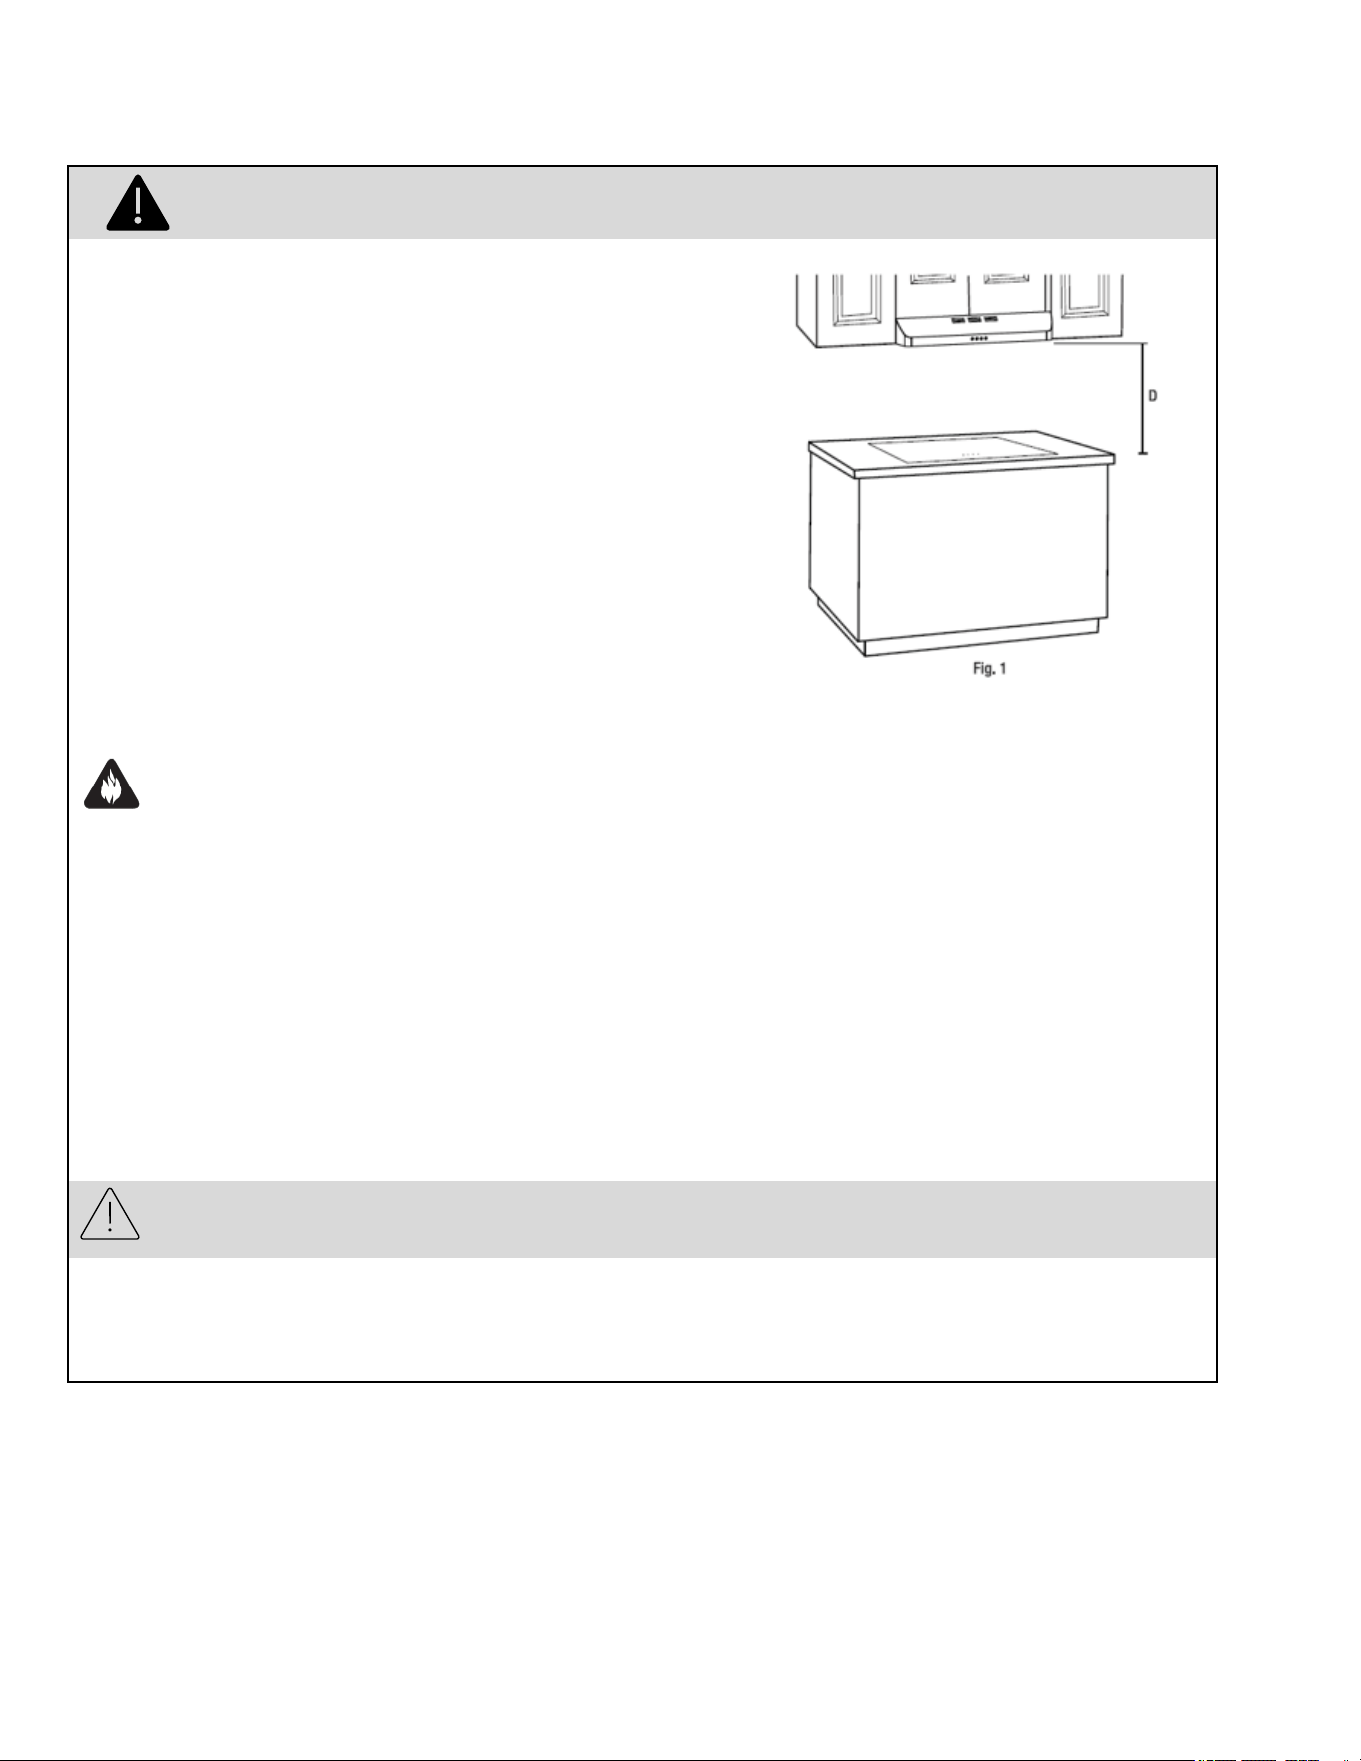
• The installation distance above the range (D) is 30 in. (762
mm). Use extra caution as the surface of the range hood
may become extremely hot to the touch if the range is
operated on high power for an extended amount of time.
• Use caution when cooking with oil or with deep fryers.
Overheating may cause oil to reach its flash point and
ignite. Used oil will ignite at lower temperatures than fresh
oil. Heat oils slowly on low to medium setting.
• Avoid boil overs, as they may cause smoking and greasy
spillovers that could ignite.
• To prevent burns or fires, always use cookware appropriate
to the size of the heating element that you are using.
WARNING- TO REDUCE THE RISK OF INJURY TO PERSONS IN THE EVENT OF A RANGE TOP
GREASE FIRE. OBSERVE THE FOLLOWING*:
1.
SMOTHER FLAMES with a close-fitting lid, cookie sheet, or metal tray, then turn off the burner. BE
CAREFUL TO PREVENT BURNS. If the flames do not go out immediately. EVACUATE AND CALL THE
FIRE DEPARTMENT.
2.
NEVER PICK UP A FLAMING PAN — You may be burned.
3.
DO NOT USE WATER, including wet dishcloths or towels – a violent steam explosion will result.
4.
Use an extinguisher ONLY if:
a.
You know you have a Class ABC extinguisher, and you already know how to operate it.
b.
The fire is small and contained in the area where it started.
c.
The fire department is being called.
d.
You can fight the fire with your back to an exit.
*Based on “Kitchen Fire Safety Tips” published by NFPA.
CLEANING SAFETY INFORMATION
• The fan and filter must be cleaned periodically and kept free from the accumulation of cooking. Old, worn,
or broken filters must be replaced immediately.
• Never disassemble parts to clean. Parts should be disassembled by qualified persons only.
EN - 3
Read and save these instructions.
WARNING!
IMPORTANT — OBSERVE ALL GOVERNING CODES AND ORDINANCES.
1. For general ventilation use only. Do not use this appliance to exhaust hazardous or explosive materials and vapors.
2. To reduce the risk of fire, use only metal ductwork.
3. To avoid damage to the motor or other components, keep drywall spray, construction dust, etc. off the power unit.
4. Please read the specification label on the product for further information and requirements.
CAUTION!
GROUNDING INSTRUCTIONS
This appliance must be grounded. In the event of an electrical short circuit,
grounding reduces the risk of electric shock by providing an escape wire
for the electric current. This appliance is equipped with a cord having a
grounding wire with a grounding plug. The plug must be plugged into an
outlet that is properly controlled and grounded.
WARNING!
• Im
proper grounding can result in a risk of electric shock.
• Consult a qualified electrician if the grounding instructions are not completely
understood, or if doubt exists as to whether the appliance is properly
grounded.
• Do not use an extension cord. If the power supply cord is too short, have a
qualified install an outlet near the appliance.
CAUTION!
• Do not operate
any fan with a damaged cord
or plug. Discard fan or return
to an authorized service facility for examination and/or repair.
• Do not run cord under carpeting.
Do not cover the cord with throw rugs,
runners, or similar coverings. Do not route cord under furniture or
appliances. Arrange cord away from traffic
area and where it will not be
tripped over.
• At least two people are needed to move and safely install the appliance.
Failure to properly lift the range hood could result in product damage and
personal injury.
• Never dispose cigarett
e ashes, ignitable substances, or any foreign objects
in the fans.
All electrical wiring
must be properly installed,
insulated, and
grounded.
Improper insulation and
grounding will result in
deadly electrical shock.
EN - 4
INSTALLATION INSTRUCTIONS
CAUTION: B
efore beginning the installation, switch the power off at the circuit breaker and lock the
service, disconnecting means to prevent power from being switched on accidentally.
When the service disconnecting means cannot be locked, securely fasten a prominent
warning device, such as a tag, to the breaker.
DAMAGE
•
If the unit is damaged in shipment, return the unit to the store in which it was bought for repair or replacement.
•
If the unit is damaged by the customer, repair or replacement is the responsibility of the customer.
•
If the unit is damaged by the installer (if other than the customer), repair or replacement must be made by
arrangement between the customer and installer.
WIRING CONNECTION
Installation work and electrical wiring must be done by a qualified person(s
) in accordance with all
applicable codes and standards, including fire-rated construction.
•
Electrical grounding is required for this range hood. Check with a qualified electrician if you ar
e not
sure whether the range hood is properly grounded. A fuse in the neutral or grounding circuit could
result in electrical shock.
•
Failure to follow electrical requirements may result in a fire.
•
If the hot/cold water pipe is interrupted by plastic nonmetallic gaskets or other materials, DO NOT use
them for grounding.
•
DO NOT GROUND TO A GAS PIPE.
NOTE: It is the customer's responsibility to contact a qualified electrical installer and assure that the
electrical installation is adequate and complies with the National Electrical Code, or CSA standards, as well
as all local codes and ordinances.
•
Save installation instructions for electrical inspector's use.
•
If codes permit and a separate ground wire is used, it is recommended that a qualified electrician
determine if the ground path is adequate.
•
DO NOT use an extension cord or adapter plug with this appliance.
•
The range hood must be connected with copper wire only.
•
The range hood should be connected directly to the junction (or circuit breaker) box through flexible,
armored, or nonmetallic sheathed copper cable. Allow some slack in the cable so the appliance can
be moved if servicing is ever necessary.
•
A UL listed or CSA approved conduit connector must be provided at each end of the power
supply cable (at the range hood and at the junction box).
•
When making the electrical connection, cut a 3.2 cm (1-1/4” hole in the wall. A hole cut through wood
must be sanded until smooth. A hole through metal must have a grommet.
•
When cutting or drilling into the wall or ceiling, do not damage electrical wiring and other hidden
utilities.
NOTE: Temporarily wire the range hood to test it
for proper operation. If the range hood
does not operate correctly, do not
proceed with the installation.
DANGER: Risk of electrical shock. This range
hood must be properly grounded.
EN - 5
For Wired Models:
1. Use the power supply cable to connect the range hood directly to the
junction box or circuit breaker box. Use a flexible, armored, or
nonmetallic sheathed copper cable only. Never use an extension cord
or adapter plug.
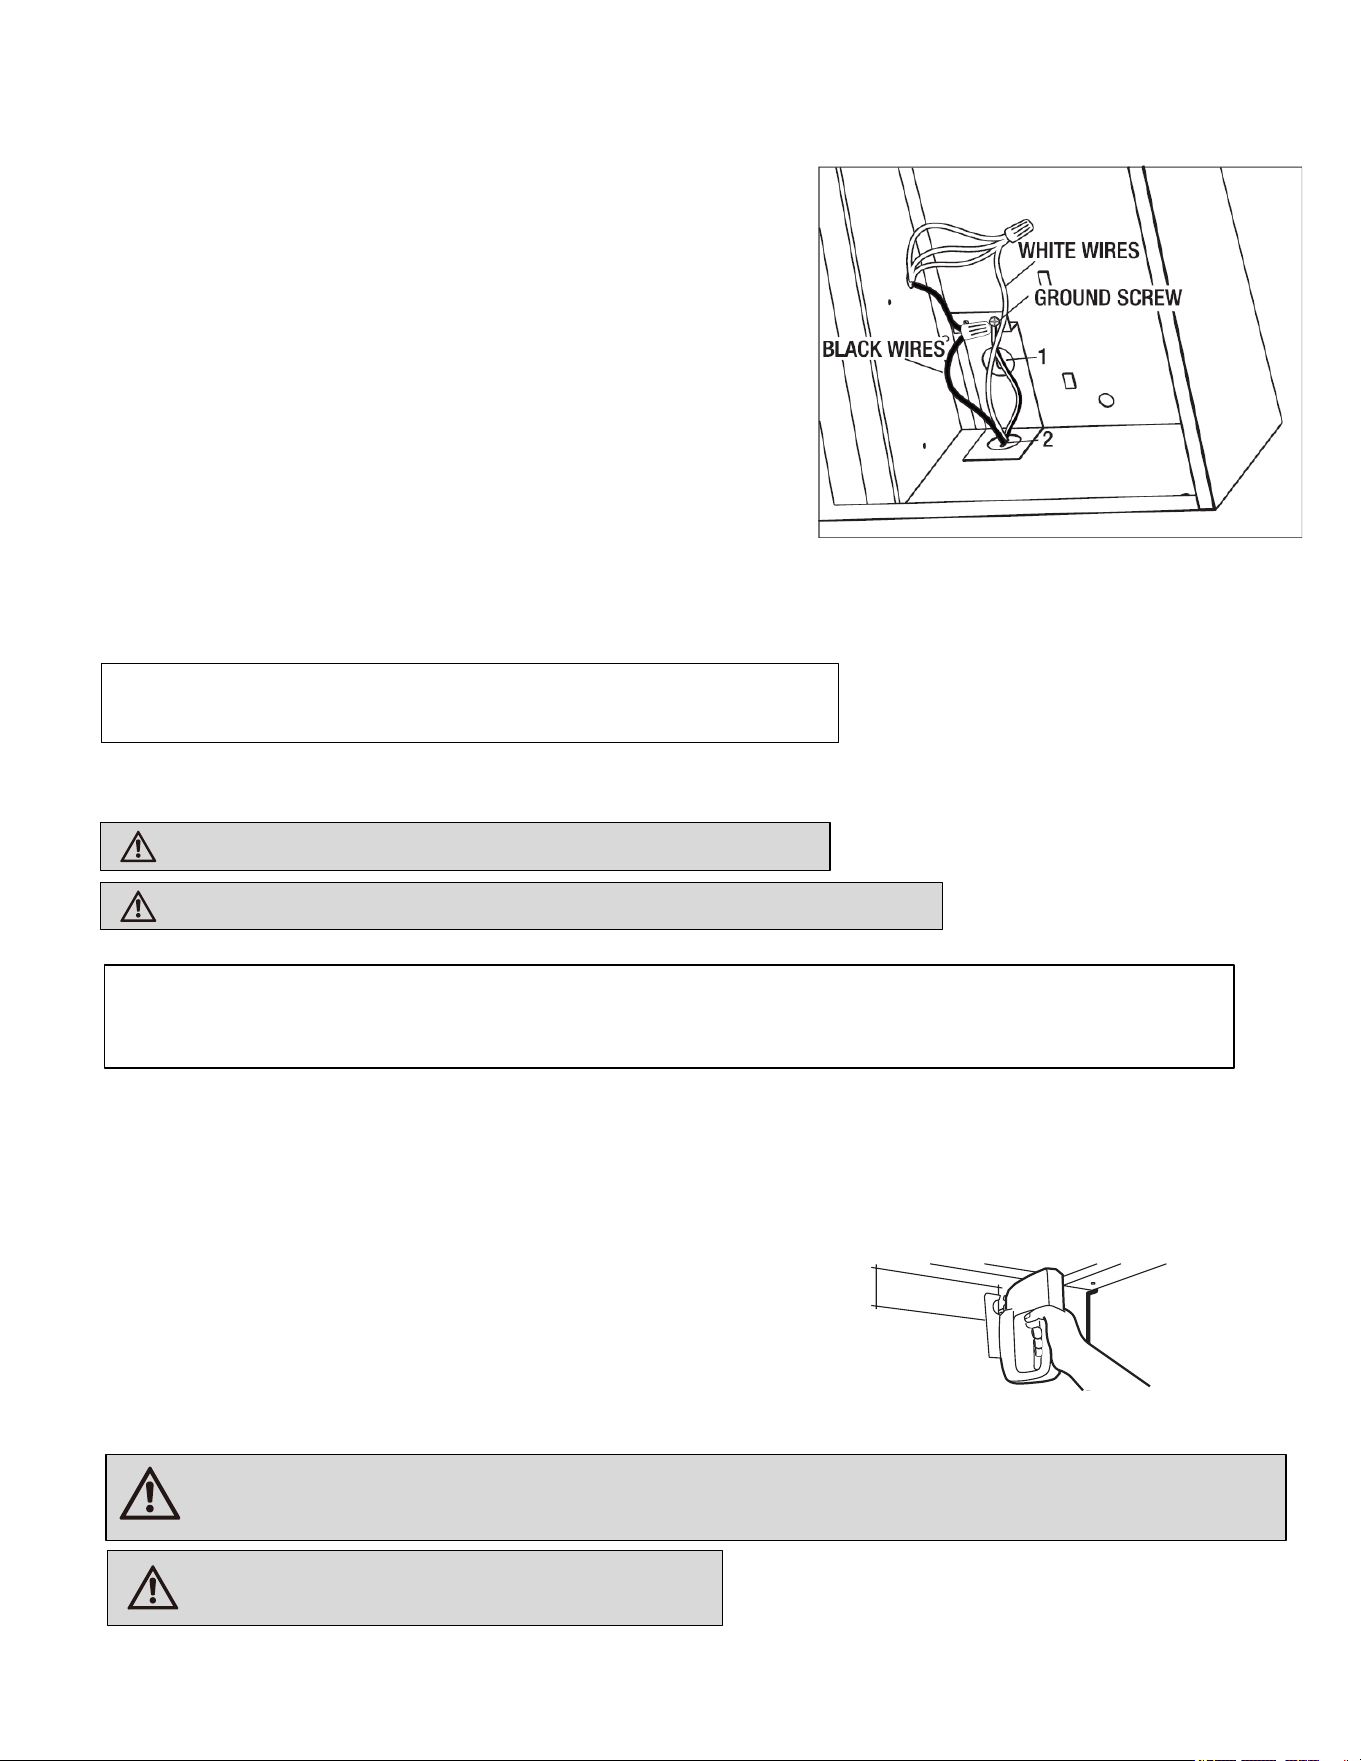
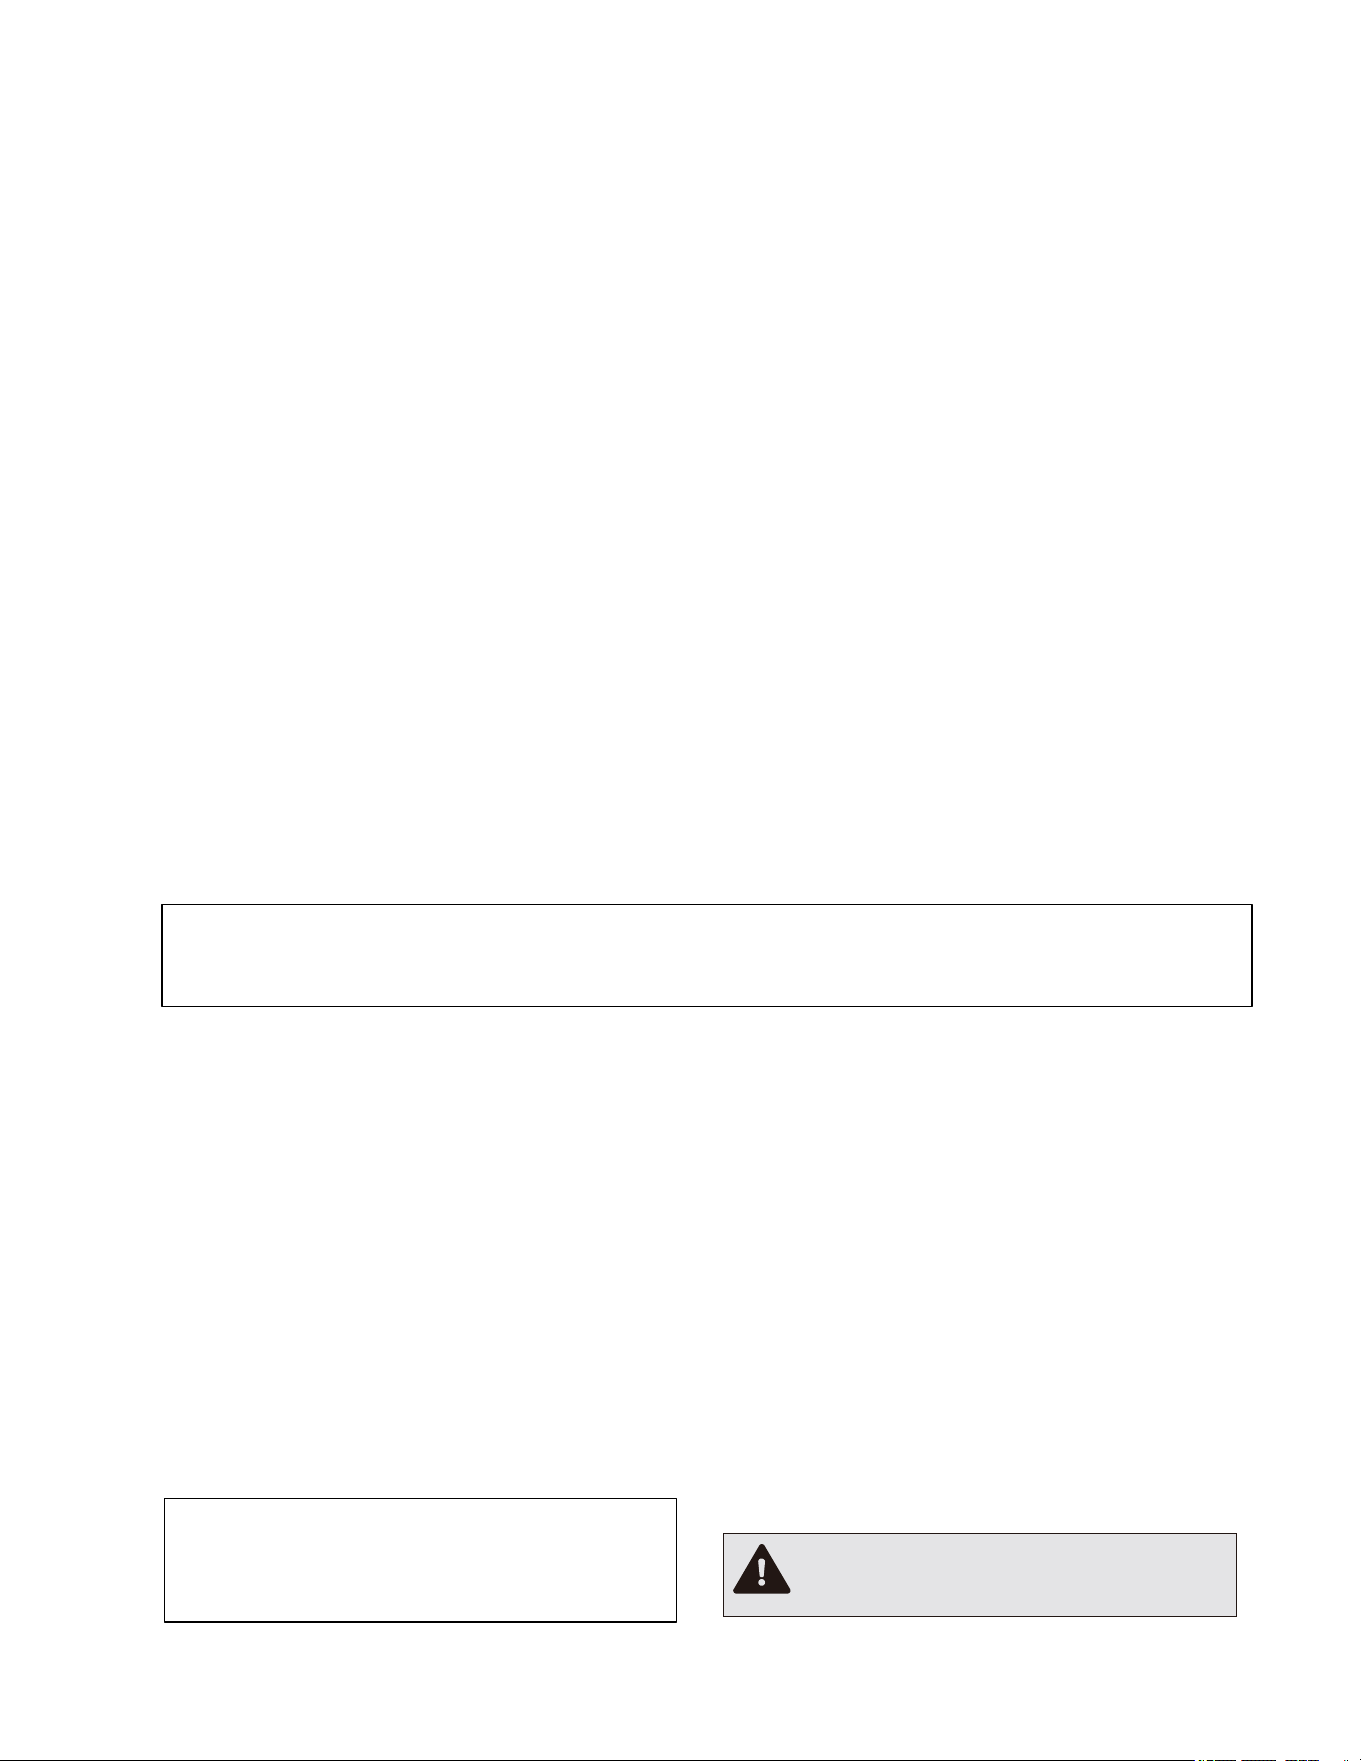
2. Connect a UL-listed or CSA-approved conduit connector to
each end of the power supply cable (at the range hood and at the
junction box).
Connect the 2 colored wires from the range hood to the corresponding
wires from the electrical source: black to black
(live), white to white (neutral), and the house grounding wire to the
ground screw. Use either the top hole (1) or the back hole (2) of the
range hood depending on your installation type.
3. Turn the power on and ensure that the lights and the fan are operating
correctly.
4. Once you have tested the electrical connection, disconnect the
power supply cable and wires from the electrical source before
proceeding with the rest of the installation.
S
ince this
ho
od is
t
o b
e install
ed i
n a recirculating,
non
-vented,
ductless
manner,
d
o not knock out any vent openings in the hood.
WARNING: Always wear safety goggles and gloves during installation.
For Power Cord Models (Models with PTC and PTC2 suffix):
Plug the power cord into a
designated functioning and properly grounded outlet.
Mark Holes
•
Use the hood as a template and mark the locations on the cabinet for keyhole screw slots.
•
Since the hood is to be recirculated (not to be vented outside), do not cut out any vent openings in the wall or
cabinet bottom.
Cut Holes
•
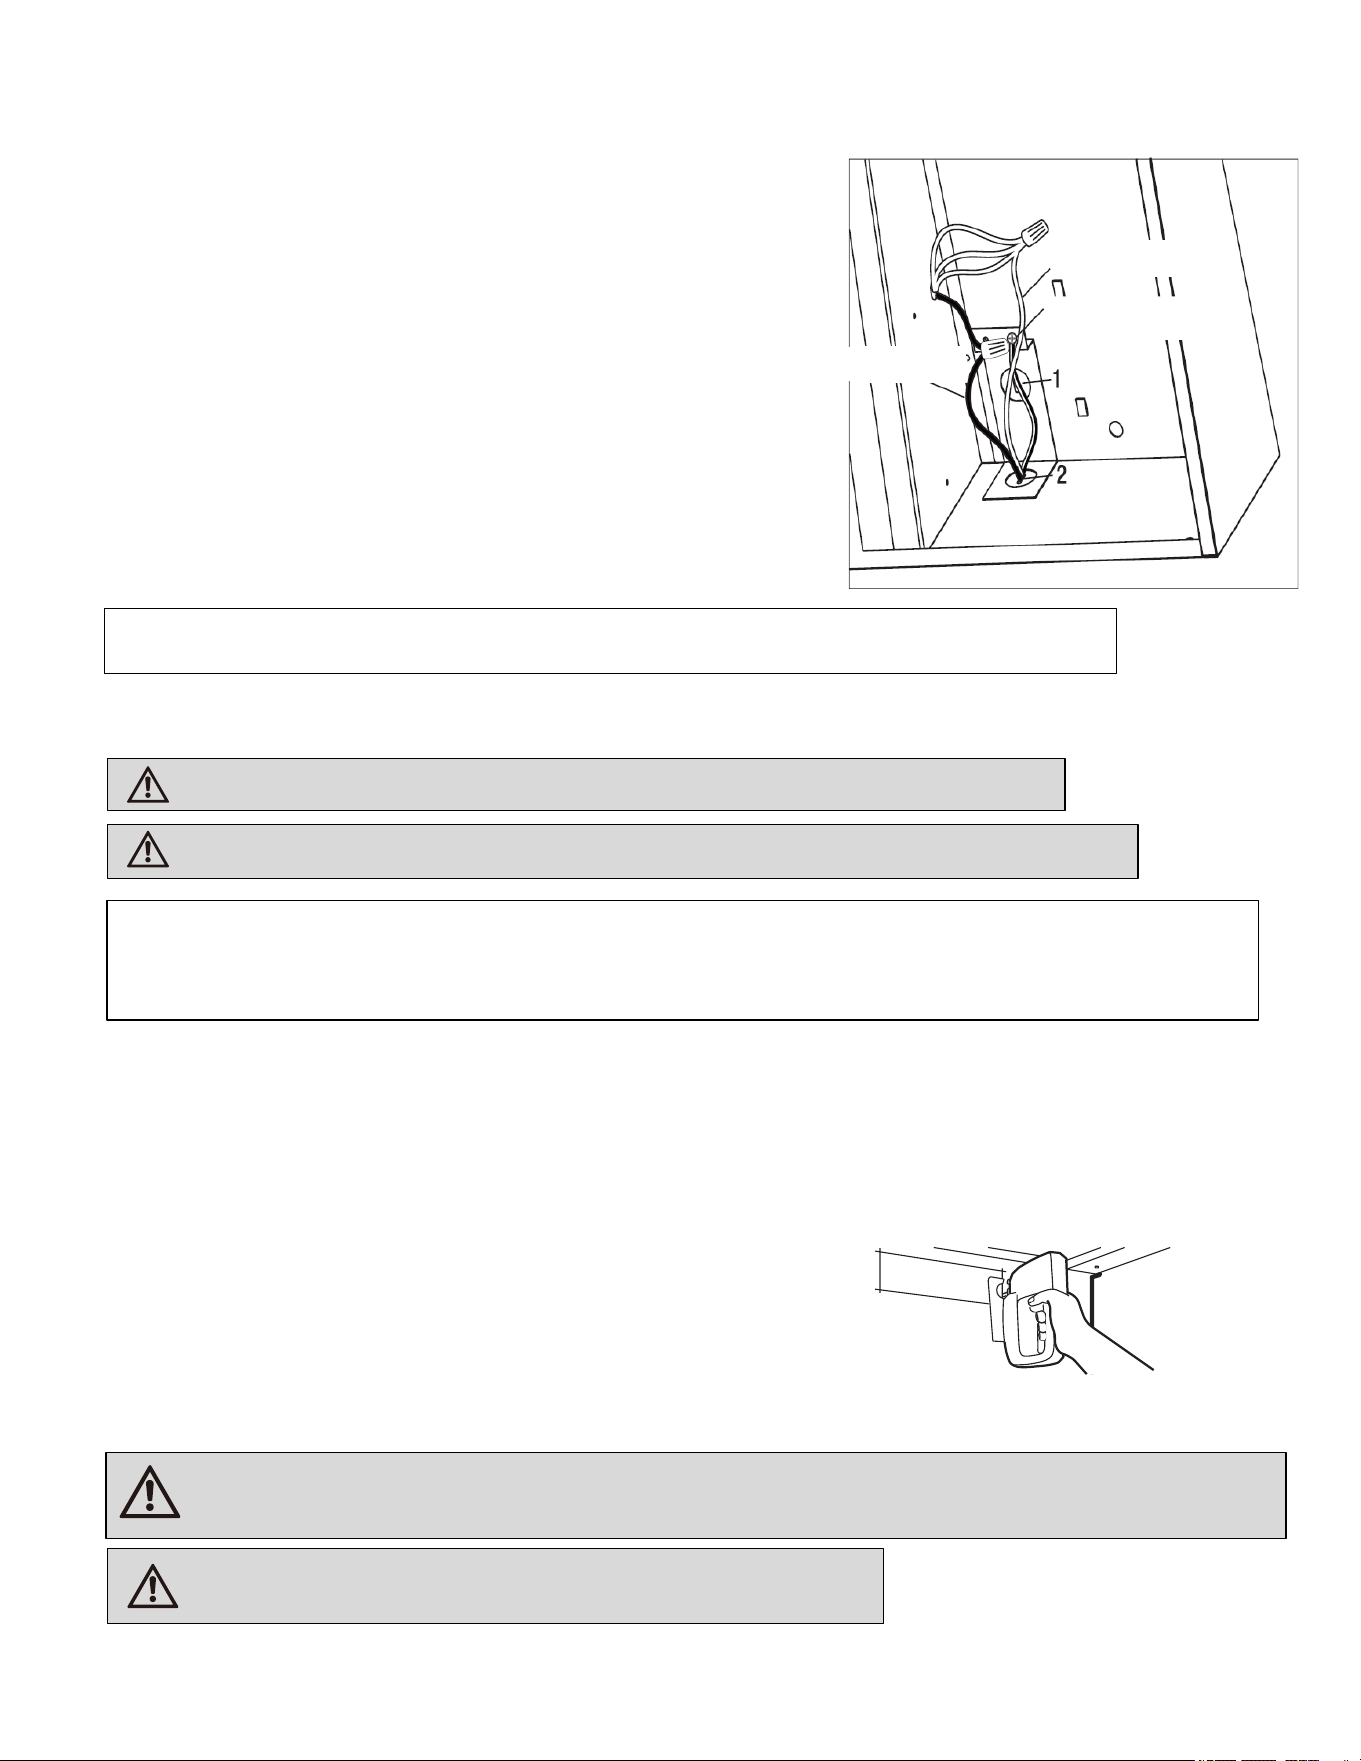
Drive a mounting screw (from the hardware packet) partway into each
center of the narrow neck of the keyhole slots marked on the cabinet
bottom.
The installation is complete. Turn on the power at the breaker box and test the hood for proper operation.
WARNING: Light bulbs can become hot when turned on. Do not touch bulbs until they are switched off and cooled.
Touching hot bulbs could cause serious burns.
WARNING: Charcoal filters are NOT dishwasher safe.
EN - 6
WARNING: Failure to replace worn out or damaged filters will increase the risk of fire.
NOTE: Mount the hood body flush with the front face of the cabinet door to ensure airflow is not obstructed. If your cabinet
box is exactly 12 inches deep with a 3/4-inch door thickness, the hood should be positioned 3/4 inch away from the back wall.
However, cabinet dimensions vary, so measure carefully before drilling the installation holes.
OPERATING YOUR RANGE HOOD
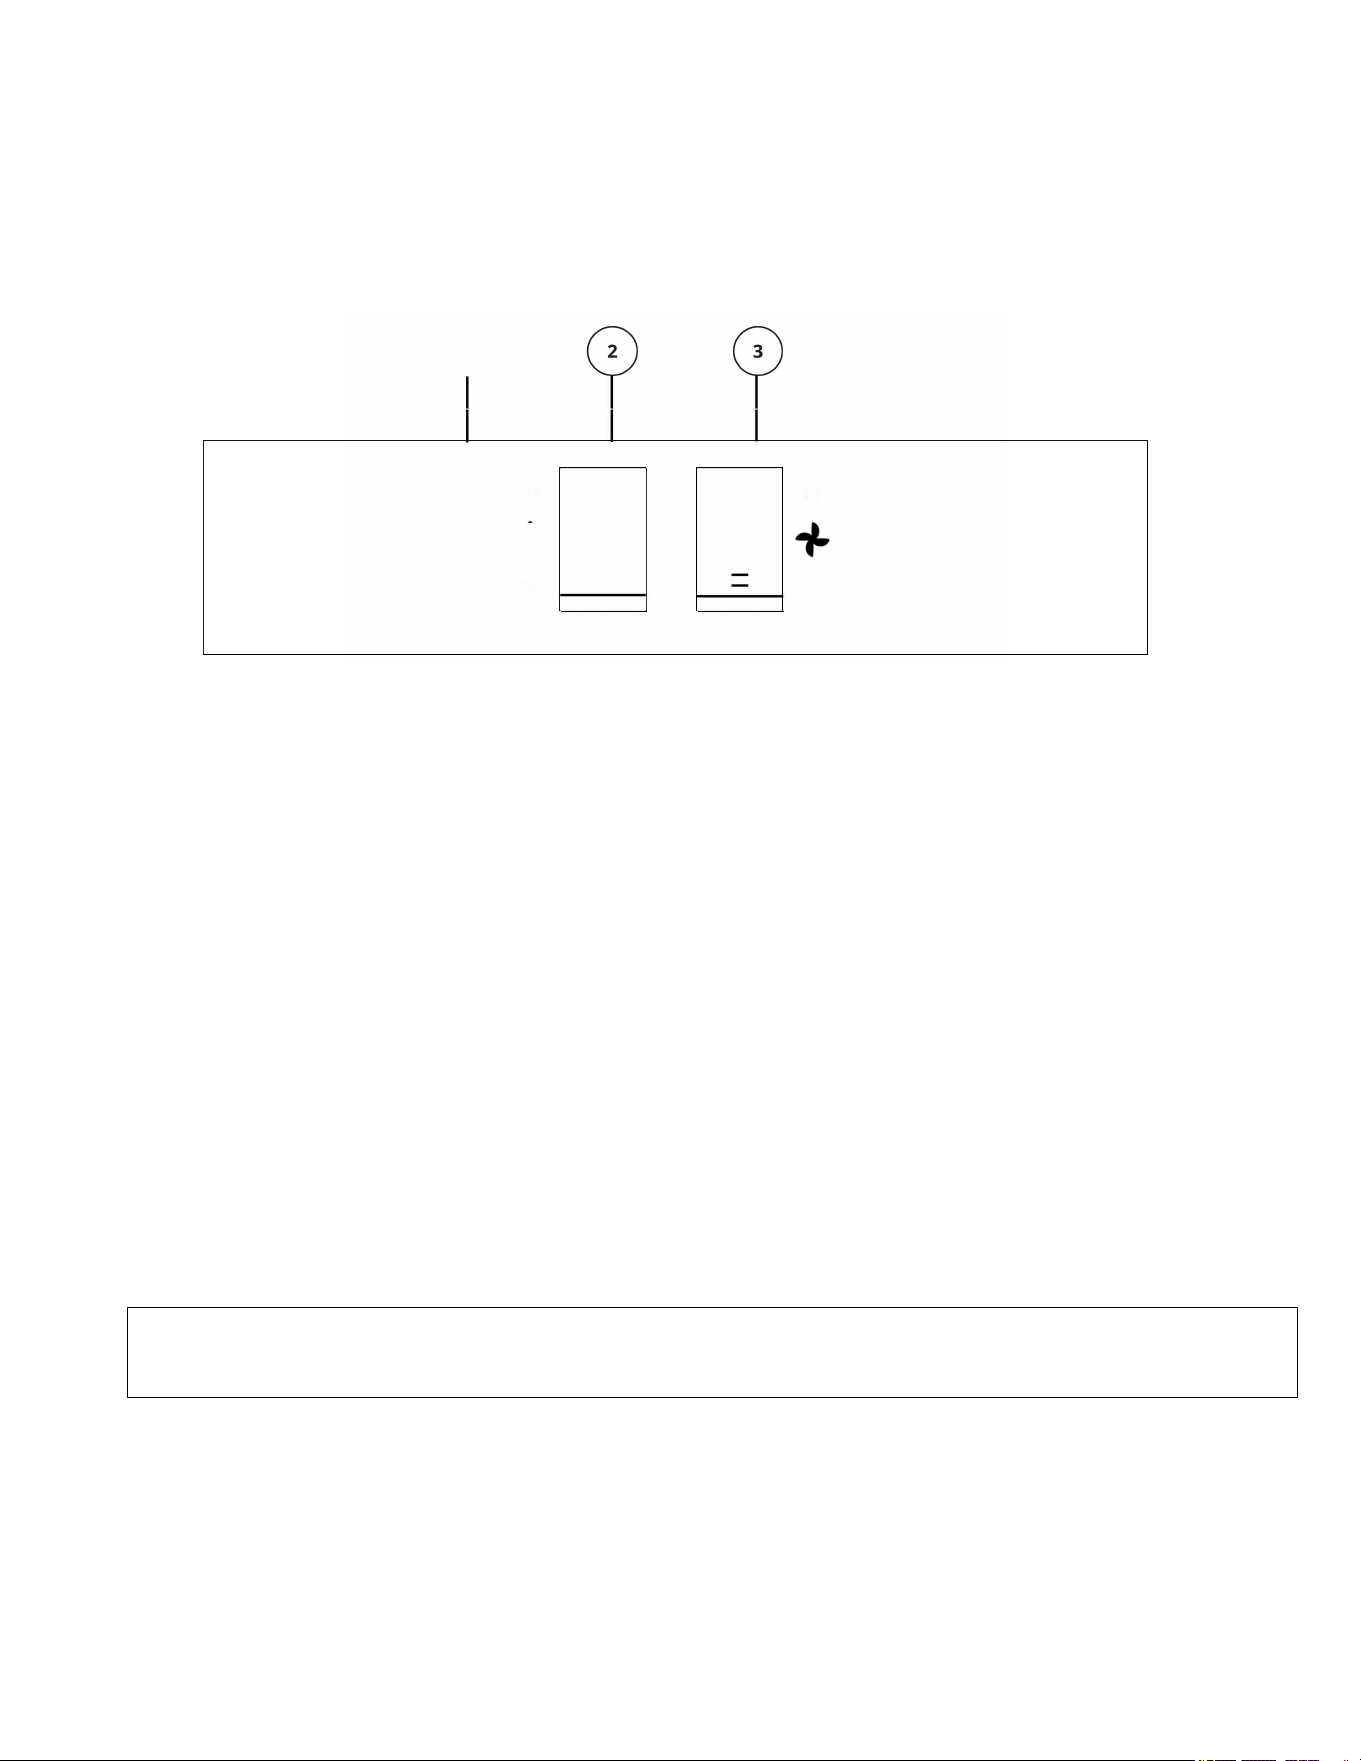
Controls
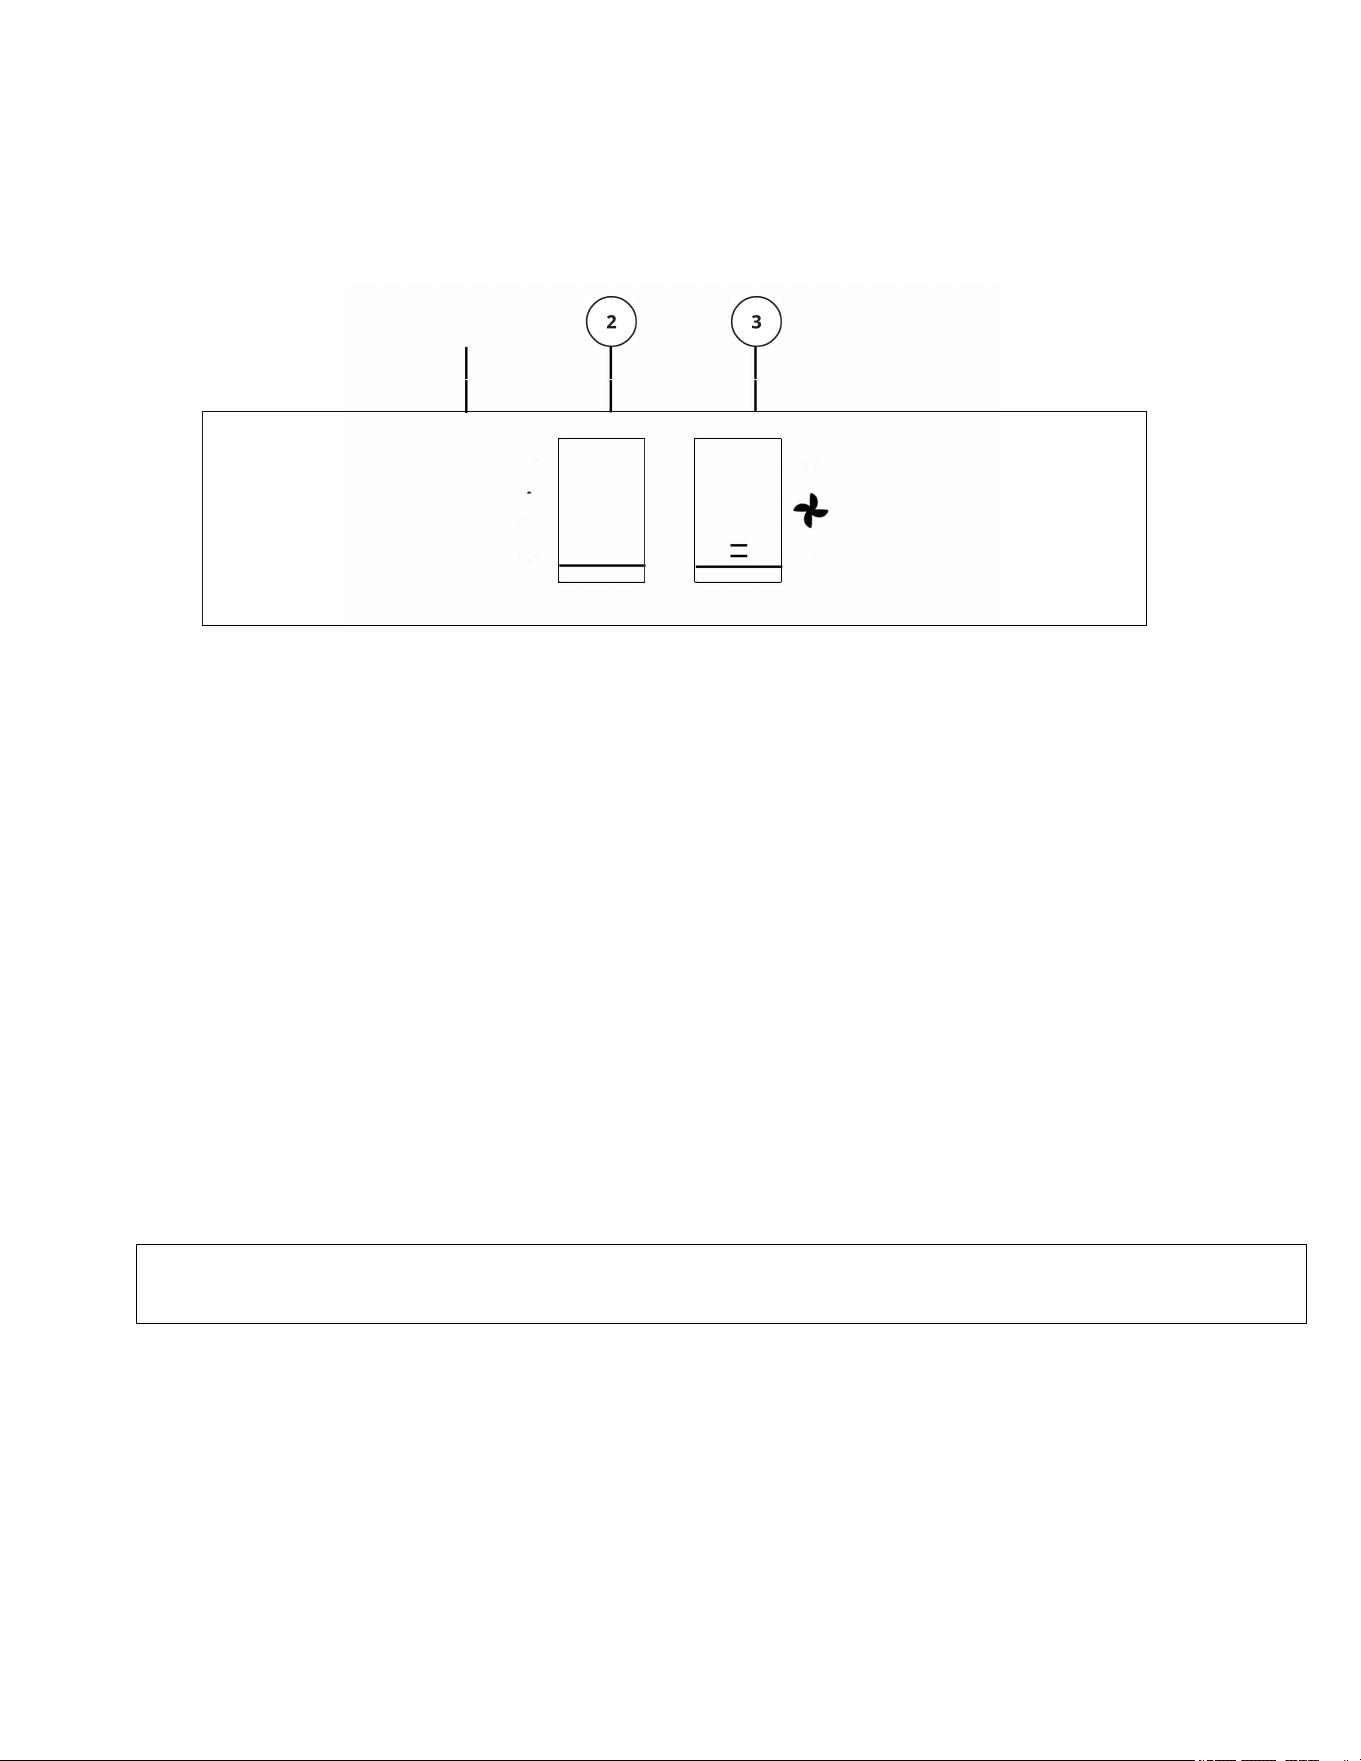
1. Range Hood Control Panel
The control panel is located on the front of the canopy.
2. Light Switch
The light switch toggles between ON and OFF.
3. Fan Power Supp
ly
The power switch toggles between the fan settings LO, HI, and OFF.
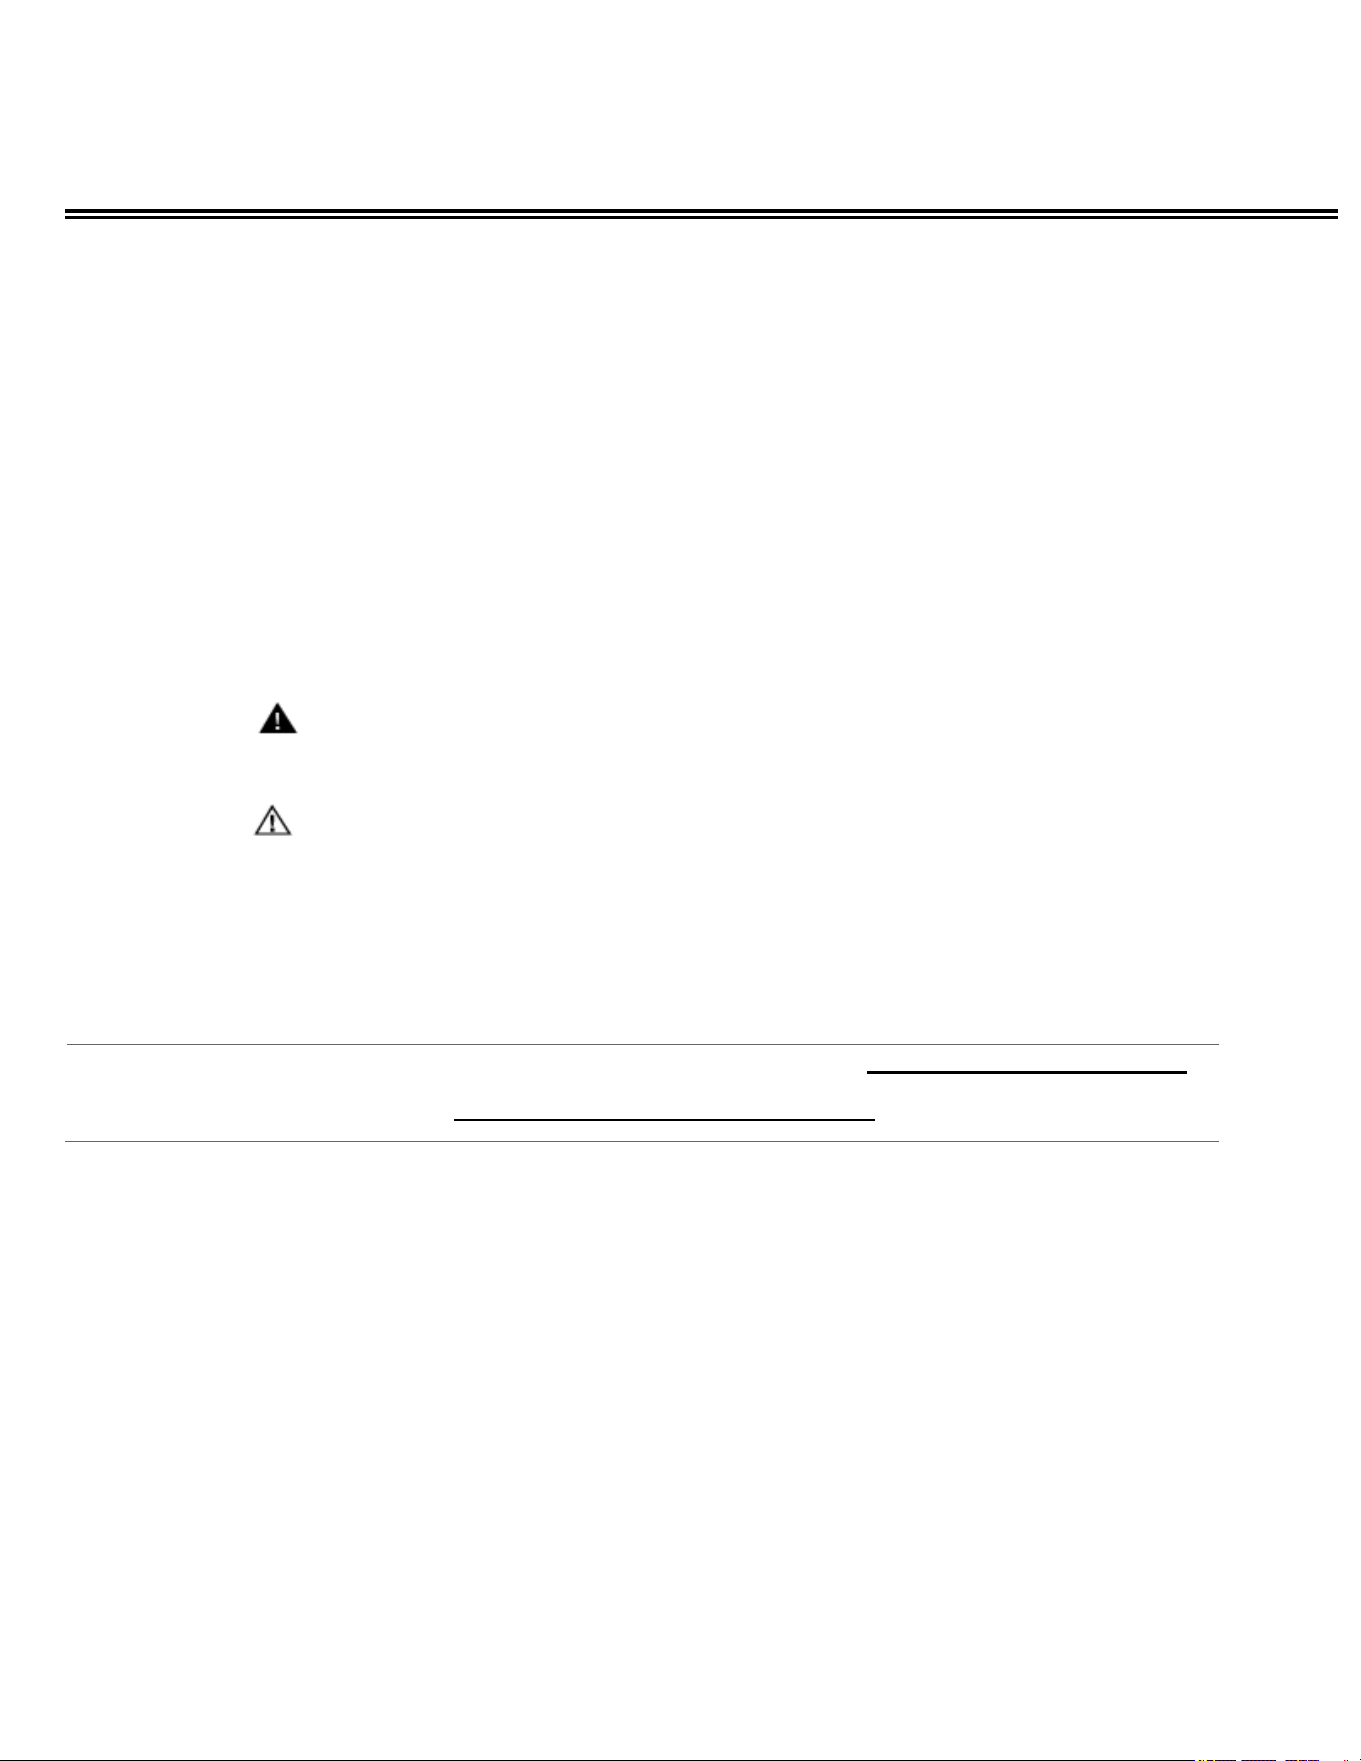
Retractable Range Hood Tray
Your model is equipped
with two (2) aluminum mesh & charcoal combination filters. One is fixed to the range
hood. The other is attached to the retractable tray. The combination filters help to filter oils, smoke, and smells
while you are cooking.
To use the retracta
ble filter, extend the tray to the out position and select the desired fan speed.
N
OTE: We recommend that the retractable tray for ADA models always remain in the out position to comply with
ADA guidelines. For instructions on how to install a remot
e switch to make this unit ADA-compliant (see page 8).
EN - 7
0
ON
-
-
HI
'
,
0
- -
, I '
OFF
0
LO

REMOTE SWITCH INSTALLATION
(for models with ADA prefix)
EN - 8
To comply with ADA standards, models with ADA as the
prefix, install a remote switch separate from the
control panel to operate the fan and light functions of the range hood.
NOTE: Installation and service must be performed by a qualified installer/electrician.
WARNING: To avoid fire or electrical shock, turn off the power at the circuit breaker or fuse. Test to
ensure that the power is off before wiring.
TRANSFERRING THE LEADS
1. Unscrew the top panel to access the switch leads
2. Disconnect the leads from the switches
3. Transfer
the leads to where the wall knock out is
4. Mount the single gang - recessed switch box
WIRING
Switch
Configuration: The fan switch has three (3) terminals. The light switch has two (2) terminals.
1. Connecting the Fan Switch
Connect the fan switch lead to the corresponding terminals on the wall plate.
(i.e. LEAD #1 in the fan terminal will connect to TERMINAL #1 on the wall plate)
2. Connecting the Light Switch
Connect the light switch lead to the corresponding terminals on the wall plate.
ATTACHING THE WALL PLATE
1. Once the switches
are wired, align the wall plate wit
h the switch box.
2. Secure the wall plate to the switch box using the provided screws.
For a clean appearance, the switches on the range hood should remain in place.
NOTE: To install this
switch in accordance with ADA guidelines, the height of the light switch must be
no lower than
15” from the floor and no higher than 48” from the floor. Additional regulations apply if
there are any obstructions in front of the switch. For more information, refer to Section 308 of the
most recent ADA Standards for Accessible Design at ada.gov.
CLEANING AND CARE
Combination Filters (Aluminum Mesh & Charcoal)
•
The aluminum mesh cassette holds oils and dust from the air while the charcoal filter layer helps remove
smoke and odors.
•
The filters cannot be cleaned and must be replaced.
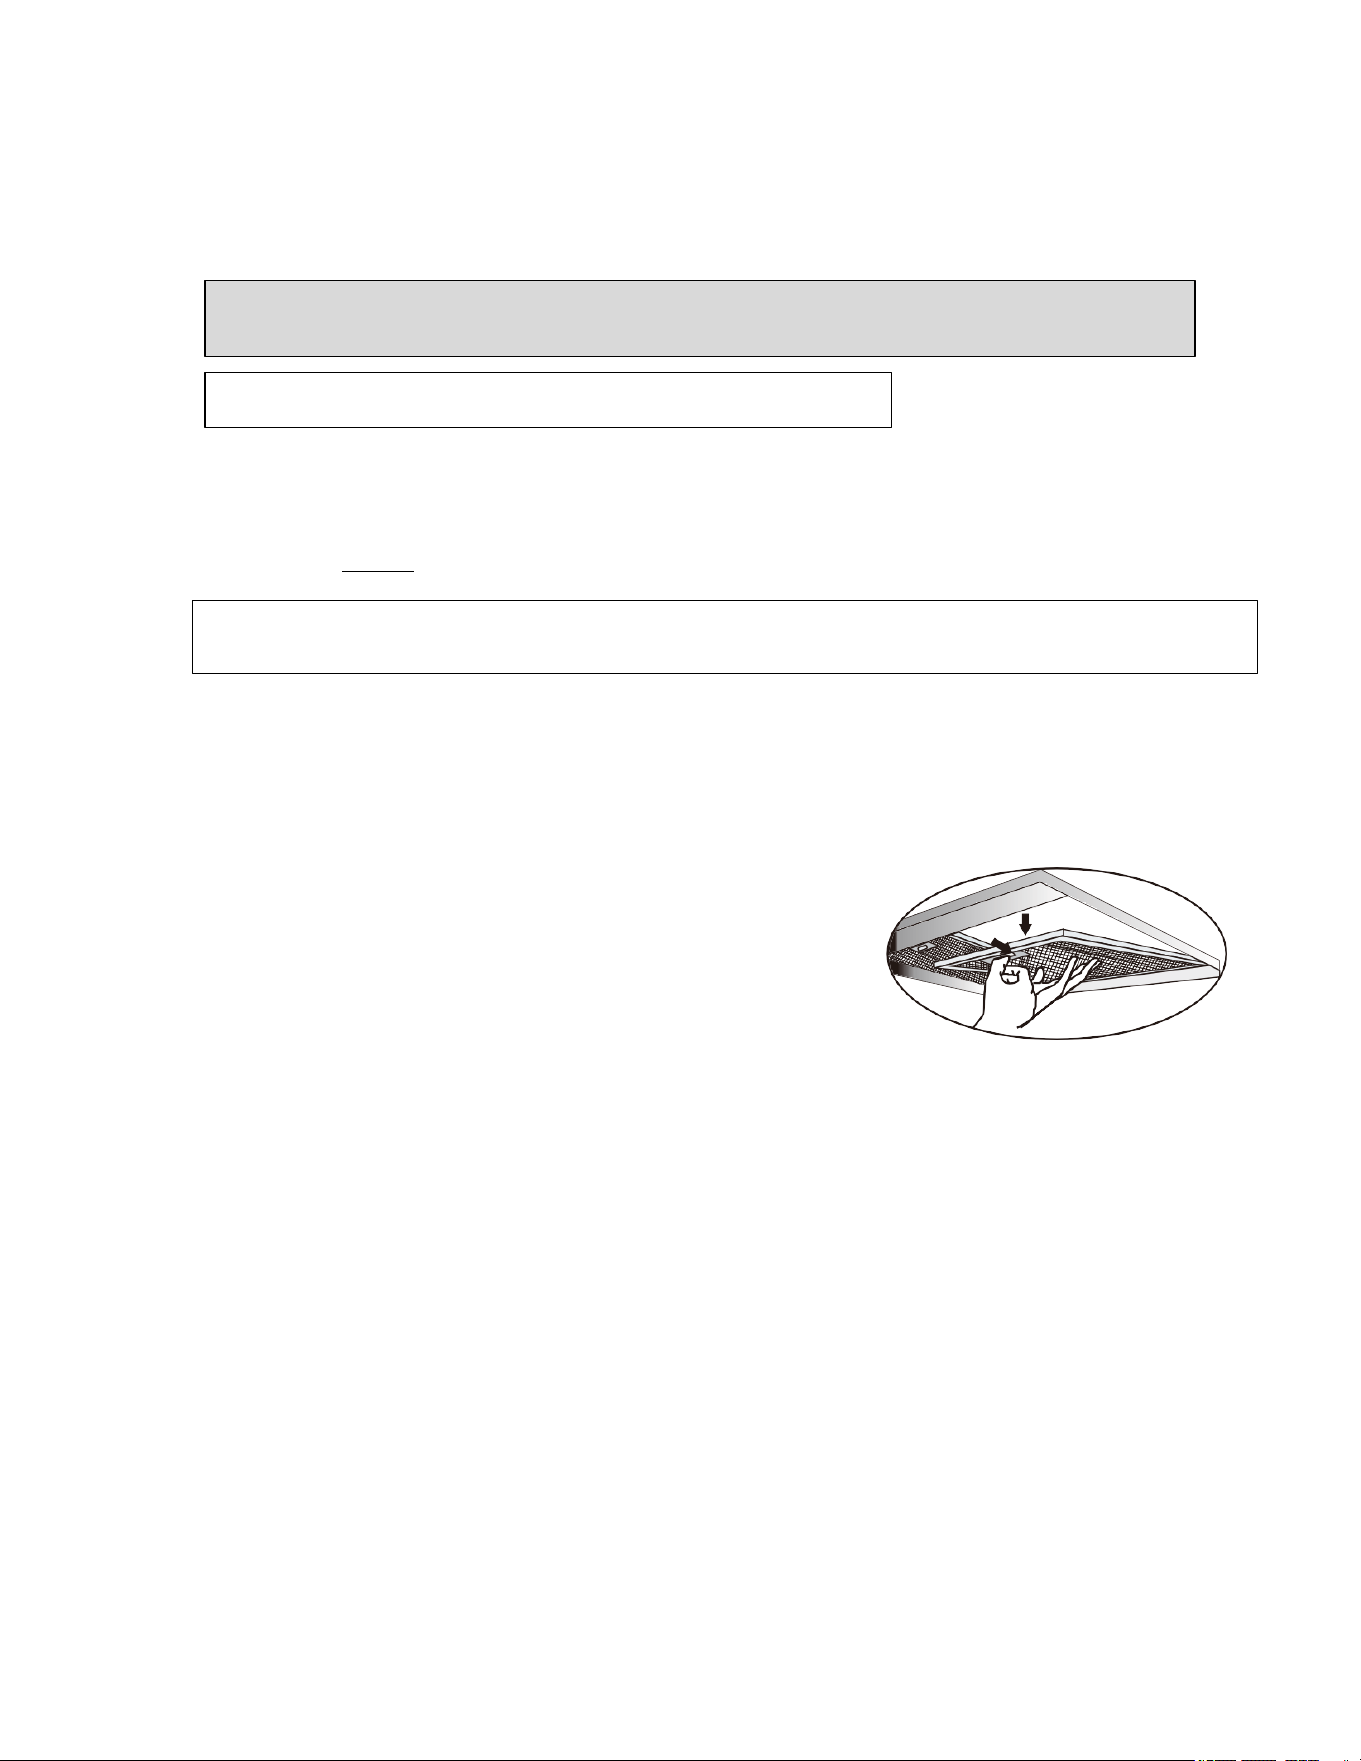
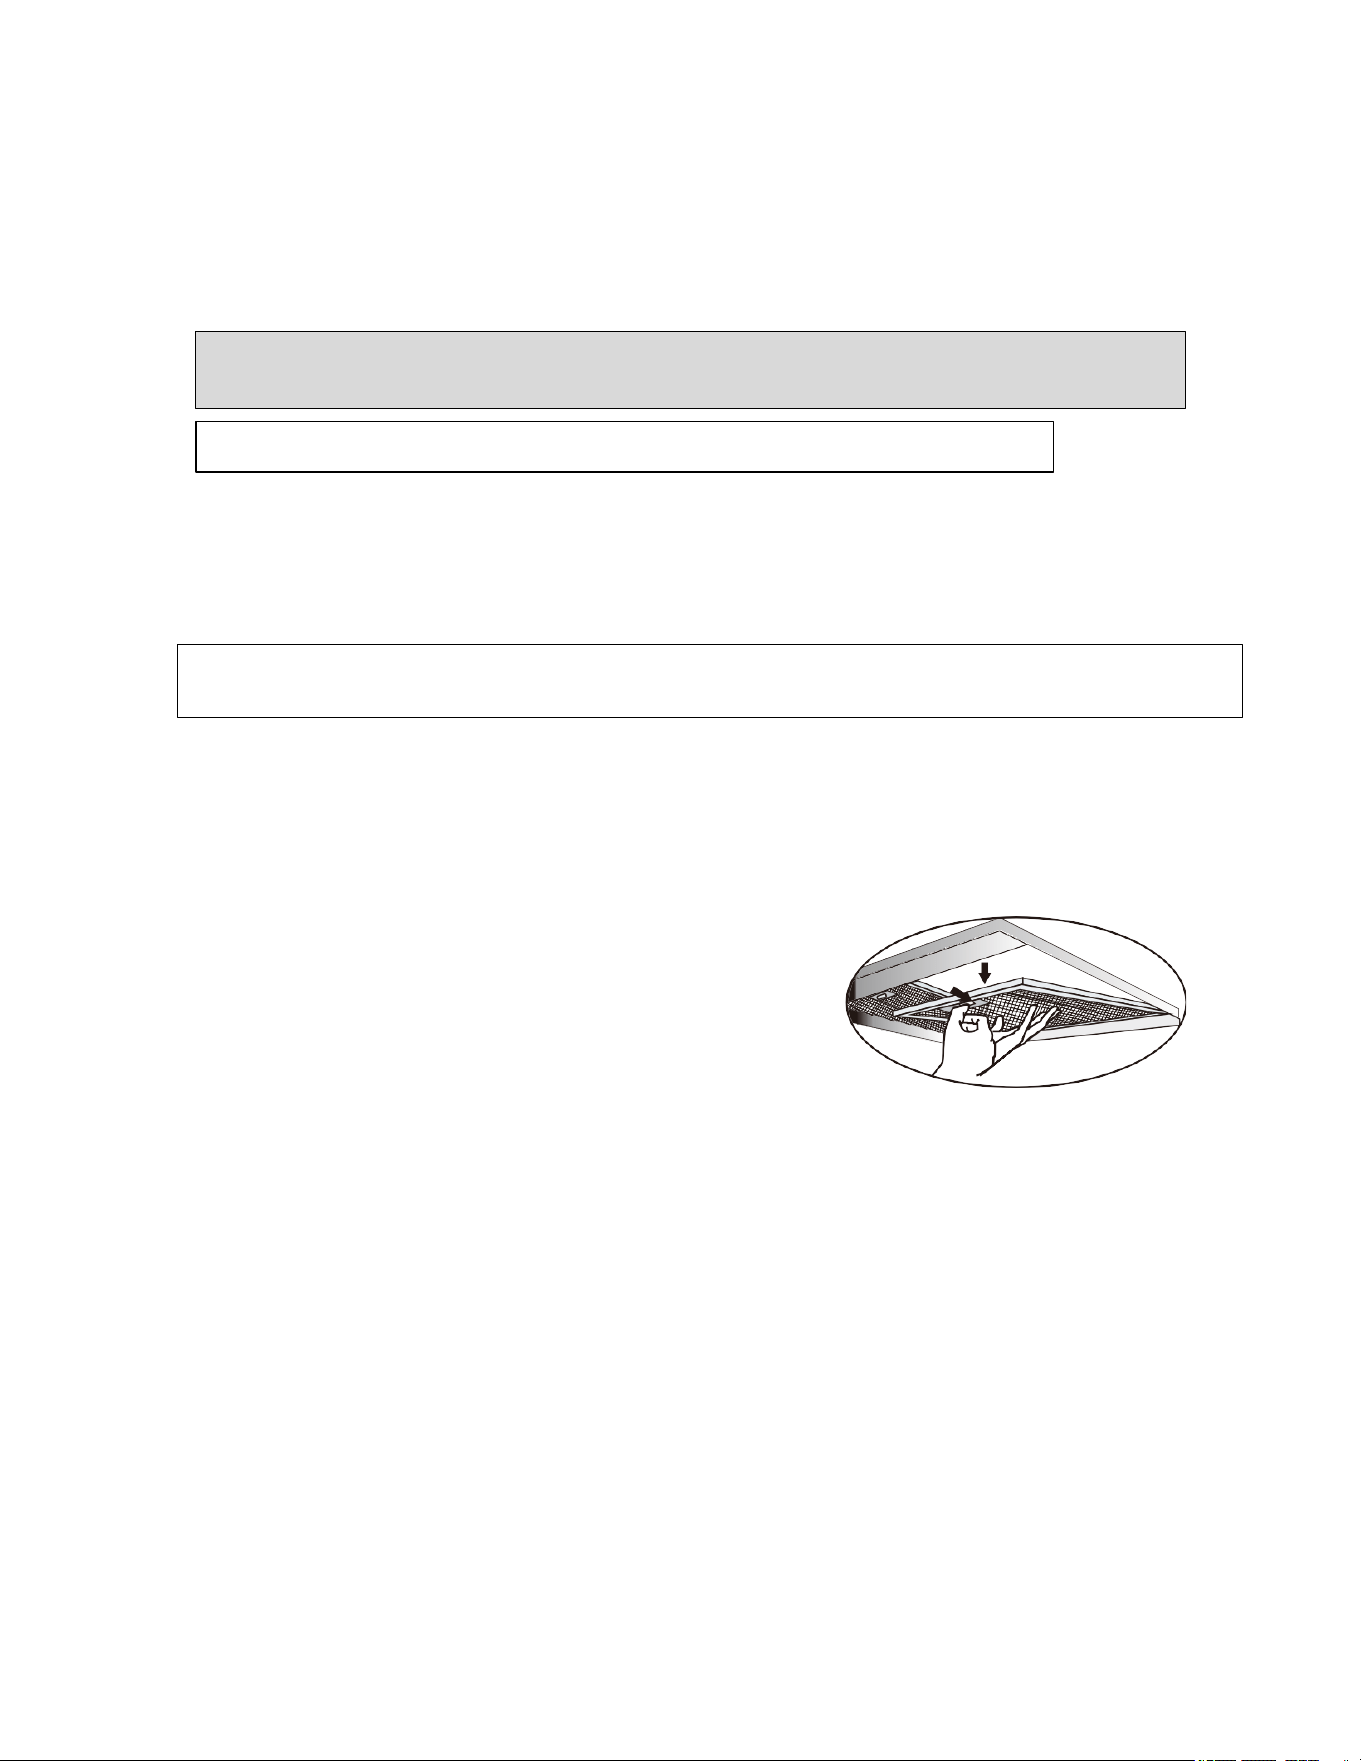
Replace the Filters
Your range hood is equipped with two filters. One is fixed to the range hood. The other is in the retractable tray.
The filters are NOT dishwasher safe and must be replaced every 6-12 moths depending on usage.
1. Ensure the range hood is disconnected and all surfaces are cool.
2. Remove the screws that hold the fixed filter in place.
3. Click the spring clamps then gently pull it out of the frame.
4. Pull out the retractable tray to remove the retractable filter.
5. Insert new filters in place.
Replace Light Bulb
1. Remove the filter and turn off the power at the breaker
2. Turn it counterclockwise and remove from the socket.
3. Insert the replacement bulb and turn clockwise.
4. For optimal performance, replacement bulb should be a 5W GU10 LED bulb
NOTE: Aluminum filters may change color after several washings in the dishwasher. Discoloration of the
NOTE: DO NOT rinse or place filters in an automatic dishwasher.
CAUTION: Ensure the range hood is
disconnect
ed fro
m the power supply and all surfaces are
cool before cleaning any part of the vent hood.
NOTE: To purchase replacement filters please call us at (718) 893-3900 or order directly on our website:
https://summitapplianceparts.com/HRTXFILTERSET/
EN - 9
TROUBLESHOOTING
You can solve many common problems easily, possibly saving you the cost of a service call. Try
the suggestions below to see if you can solve the problem before calling the servicer.
The fan does not work but the
lights do.
Loose, disconnected, or
damaged wiring.
Turn off the power at the service panel and
lock the service disconnect to prevent
accidental power restoration. If the service
disconnect cannot be locked, securely
attach a clearly visible warning device,
such as a tag, to the service panel to alert
others.
Check the wiring connections. See the
CONNECT WIRING section in this user
manual.
If you have checked the table above and find that you still need help with your appliance, call our
If you have checked the table above and find that you still need help with your appliance, call our
Customer Service facility at
800-932-4267 (Ext. 513) between 9:00 AM and 5:00 PM ET or visit
www.summitappliance.com/support. We will do our best to answer your questions.
EN - 10
Problem Possible Cause Possible Solution
•
Stainless Steel Surfaces (on some models) Do not use a steel-wool pad; it will scratch
the surface.
•
To clean the stainless steel surface, use warm sudsy water or a stainless steel cleaner or polish. Always
wipe the surface in the direction of the grain. Follow the cleaner instructions for cleaning the stainless
steel surface.
CAUTION: When cleaning the hood surfaces, be certain that you do not touch the light bulb with moist
hands or cloth. A warm or hot light bulb may break if touched with a moist surface. Always let the light
bulb cool completely before cleaning around it.
Surface
NOTE: To purchase replacement filters please call
us at (718) 893-3900 or
order directly o
n our website:
https://summitapplianceparts.com/HRTXFILTERSET/
•
Do not use steel-wool pads or other abrasive cleaners on painted surfaces. They will scratch the
surface.
•
Clean grease-laden surfaces of the hood frequently. To clean the hood surface, use a hot, damp cloth
with a mild detergent suitable for painted surfaces. About one tablespoon of ammonia may be added to
the water.

NOTES
EN - 11
LIMITED WARRANTY
ONE YEAR LIMITED WARRANTY
Within the 48 contiguous United States, for one year from the date of purchase, when this appliance is operated
and maintained according to instructions attached to or furnished with the product, the warrantor will pay for factory-
specified parts and repair labor to correct defects in materials or workmanship. Service must be provided by a
designated service company. Outside the 48 states, all parts are warranted for one year from manufacturing
defects. Plastic parts, shelves, and cabinets are warranted to be manufactured to commercially acceptable
standards and are not covered from damage during handling or breakage
.
ITEMS
WARRANTOR WILL NOT PAY FOR:
1. Service calls to correct the installation of your appliance, to instruct you how to use your appliance, to replace
or repair fuses, or to correct wiring or plumbing.
2. Service calls to repair or replace appliance light bulbs or broken glass shelves. Consumable parts (such
as filters) are excluded from warranty coverage.
3. Damage resulting from accident, alteration, misuse, abuse, fire, flood, acts of God, improper installation,
installation not in accordance with electrical or plumbing codes, or use of products not approved by the
warrantor.
4. Replacement parts or repair labor costs for units operated outside the United States.
5. Repairs to parts or systems resulting from unauthorized modifications made to the appliance.
6. The removal and reinstallation of your appliance if it is installed in an inaccessible location or is not installed
in accordance with published installation instructions.
DISCLAIMER OF IMPLIED WARRANTIES; LIMITATION OF REMEDIES
THE CUSTOMER’S SOLE AND EXCLUSIVE REMEDY UNDER THIS LIMITED WARRANTY SHALL
BE PRODUCT REPAIR AS PROVIDED HEREIN. IMPLIED WARRANTIES, INCLUDING
WARRANTIES OF MERCHANTABILITY OR FITNESS FOR A PARTICULAR PURPOSE, ARE
LIMITED TO ONE YEAR. WARRANTOR SHALL NOT BE LIABLE FOR INCIDENTAL OR
CONSEQUENTIAL DAMAGES. SOME STATES DO NOT ALLOW THE EXCLUSION OR LIMITATION
OF INCIDENTAL OR CONSEQUENTIAL DAMAGES, OR LIMITATIONS ON THE DURATION OF
IMPLIED WARRANTIES OF MERCHANTABILITY OR FITNESS, SO THESE EXCLUSIONS OR
LIMITATIONS MAY NOT APPLY TO YOU. THIS WARRANTY GIVES YOU SPECIFIC LEGAL RIGHTS
AND YOU MAY ALSO HAVE OTHER RIGHTS, WHICH VARY FROM STATE TO STATE.
Felix Storch, Inc.
An ISO 9001:2015 registered company
770 Garrison Ave
Bronx, New York 10474
www.summitappliance.com
For parts and accessory ordering,
troubleshooting and helpful hints, visit:
www.summitappliance.com/support
EN - 12
HOTTE DE CUISINE RÉTRACTABLE
Manuel de l'Utilisateur
Les numéros de modèle avec le suffixe PTC indiquent un cordon d'alimentation câblé pour le marché
américain, tandis que ceux avec le suffixe PTC2 indiquent un cordon d'alimentation câblé pour le
marché canadien. **
AVANT UTILISATION, VEUILLEZ LIRE ET SUIVRE TOUTES LES RÈGLES DE SÉCURITÉ ET LES
INSTRUCTIONS D'UTILISATION
Felix Storch, Inc.
Une entreprise certifiée ISO 9001:2015
770 Garrison
Avenue
Bronx, New York 10474
www.summitappliance.com
HRTX18B ADAHRTX18B L18BHRT LADA18BHRT
HRTX18W ADAHRTX18W L18WHRT LADA18WHRT
HRTX18SS ADAHRTX18SS L18SSHRT LADA18SSHRT
HRTX20B ADAHRTX20B L20BHRT LADA20BHRT
HRTX20W ADAHRTX20W
L20WHRT LADA20WHRT
HRTX20SS ADAHRTX20SS
L20SSHRT LADA20SSHRT
HRTX24B ADAHRTX24B
L24BHRT LADA24BHRT
HRTX24W ADAHRTX24W L24WHRT LADA24WHRT
HRTX24SS ADAHRTX24SS
L24SSHRT LADA24SSHRT
HRTX30B ADAHRTX30B L30BHRT LADA30BHRT
HRTX30W ADAHRTX30W L30WHRT LADA30WHRT
HRTX30SS ADAHRTX30SS L30SSHRT LADA30SSHRT
Modèle: Numéro de série:
Modèles:

TABLE DES MATIÈRES
CONSIGNES DE SÉCURITÉ IMPORTANTES ........................................................................... 1
SÉCURITÉ DES ÉQUIPEMENTS .......................................................................................... 2 - 4
INSTRUCTIONS D'INSTALLATION ...................................................................................... 5 - 6
FONCTIONNEMENT DE VOTRE HOTTE DE CUISINE ........................................................... 7
INSTALLATION D'UN INTERRUPTEUR À DISTANCE ............................................................ 8
NETTOYAGE ET ENTRETIEN ........................................................................................... 9 - 10
DÉPANNAGE ........................................................................................................................... 10
GARANTIE LIMITÉE .................................................................................................................12
CONSIGNES DE SÉCURITÉ IMPORTANTES
APPROUVÉ POUR
LES APPAREILS RÉSIDENTIELS À USAGE RÉSIDENTIEL UNIQUEMENT
LISEZ ET CONSERVEZ CES INSTRUCTIONS
L'INSTALLATION DOIT SE CONFORMER À TOUS LES CODES LOCAUX.
IMPORTANT : Conservez ces instructions pour l’utilisation de l’inspecteur électrique local.
INSTALLATEUR : Veuillez laisser ces instructions avec cet appareil pour le propriétaire.
PROPRIÉTAIRE : Veuillez conserver ces instructions pour référence future.
SYMBOLES UTILISÉS DANS CE MANUEL
AVERTISSEMENT
Dangers ou pratiques dangereuses pouvant entraîner des blessures graves,
voire la mort.
MISE EN GARDE
Dangers ou pratiques dangereuses pouvant entraîner un choc électrique, des
blessures corporelles ou des dommages matériels.
NOTEZ
Conseils et instructions utiles. Ces icônes et symboles d'avertissement sont là
pour éviter des blessures à vous-même et à autrui. Veuillez les suivre
explicitement. Après avoir lu cette section, conservez-la dans un endroit sûr
pour référence future.
Pour une copie électronique du manuel d'utilisation, veuillez visiter notre site Web: www.summitappliance.com
Lisez et conservez ces instructions.
FR - 1
SÉCURITÉ DE L'ÉQUIPEMENT
•
LISEZ ET CONSERVEZ CES INSTRUCTIONS.
•
Lisez toutes les instructions avant d'utiliser l'appareil.
•
Utilisez cet appareil uniquement de la manière prévue par le fabricant.
Si vous avez des questions, contactez le fabricant.
AVERTISSEMENT !
POUR RÉDUIRE LES RISQUES D'INCENDIE, DE CHOC ÉLECTRIQUE OU DE BLESSURES
CORPORELLES, OBSERVEZ CE QUI SUIT :
•
Les travaux d'installation et le câblage électrique doivent être effectués par une ou plusieurs personnes
qualifiées conformément à tous les codes et normes applicables, y compris la construction coupe-feu.
•
Suffisamment d'air est nécessaire pour une combustion adéquate et pour l'évacuation des gaz par le
conduit de fumée (cheminée) de l'équipement à combustion afin d'éviter le refoulement. Suivez les
directives et les normes de sécurité du fabricant de l'équipement de chauffage telles que celles publiées
par la National Fire Protection Association (NFPA) et l'American Society for Heating, Refrigeration and
Air Conditioning Engineers (ASHRAE) et les autorités locales.
•
Lorsque vous coupez ou percez un mur ou un plafond, n'endommagez pas le câblage électrique et
autres services publics cachés.
•
Avant d'entretenir ou de nettoyer l'unité, coupez l'alimentation au niveau du panneau de service et
verrouillez les moyens de déconnexion de service pour éviter toute remise sous tension accidentelle.
Lorsque les moyens de déconnexion de service ne peuvent pas être verrouillés, fixez solidement un
dispositif d'avertissement bien visible, tel qu'une étiquette, sur le panneau de service.
•
Restez à l'écart du papillon en rotation lorsque le moteur tourne.
•
N'utilisez aucun accessoire non recommandé par le fabricant.
•
N'utilisez pas cet appareil à des fins commerciales.
•
N'utilisez pas cet appareil avec un dispositif de contrôle de vitesse à semi-conducteurs.
•
Ne réparez ou ne remplacez aucune pièce de l'appareil et ne tentez aucun entretien.
REMARQUE : Si, pour une raison quelconque, ce produit nécessite un entretien, nous vous
recommandons fortement de faire appel à un technicien certifié pour effectuer l'entretien.
AVERTISSEMENT !
POUR RÉDUIRE LE RISQUE D'UN FEU DE GRAISSE SUR LE HAUT DE CUISINIÈRE :
• Ne laissez jamais les unités de surface sans surveillance à des réglages élevés. Les débordements
provoquent de la fumée et des déversements graisseux qui peuvent s'enflammer. Chauffer les huiles
lentement à feu doux ou moyen.
• Allumez toujours la hotte lorsque vous cuisinez à feu vif ou lorsque vous flambez des aliments (par
exemple, crêpes Suzette, cerises jubilées, flambée de bœuf au poivre).
• Nettoyez fréquemment les ventilateurs. La graisse ne doit pas s’accumuler sur le ventilateur ou le filtre.
• Utilisez un moule de taille appropriée. Utilisez toujours des ustensiles de cuisine adaptés à la taille de
l'élément de surface.
MISES EN GARDE
• Pour usage général de ventilation uniquement. Ne pas utiliser pour évacuer des matières et des vapeurs
dangereuses ou explosives.
• Le moteur de votre hotte présente une surcharge thermique qui arrête automatiquement le moteur en cas
de surchauffe. Le moteur redémarrera lorsqu'il aura refroidi. Si le moteur continue de s'arrêter et de
redémarrer, faites réparer la hotte.
FR - 2
• Ne laissez jamais la hotte sans surveillance lorsqu'elle est
utilisée. Ne cuisinez jamais sur des flammes nues sous la
hotte.
• Allumez toujours la hotte lorsque vous cuisinez à feu vif ou
lorsque vous cuisinez des aliments flambés.
• La distance d'installation au-dessus de la cuisinière (D) est
de 30 po (762 mm). Soyez extrêmement prudent car la
surface de la hotte peut devenir extrêmement chaude au
toucher si la cuisinière fonctionne à puissance élevée
pendant une période prolongée.
• Soyez prudent lorsque vous cuisinez avec de l'huile ou
avec des friteuses. Une surchauffe peut amener l'huile à
atteindre son point d'éclair et à s'enflammer. L’huile usagée
s’enflamme à des températures plus basses que l’huile
neuve. Chauffer les huiles lentement à feu doux à moyen.
• Évitez les débordements, car ils pourraient provoquer de la
fumée et des déversements graisseux qui pourraient
s'enflammer.
• Pour éviter les brûlures ou les incendies, utilisez toujours
des ustensiles de cuisine adaptés à la taille de l'élément
chauffant que vous utilisez.
D'INCENDIE DE GRAISSE SUR LA CUISINIÈRE. RESPECTEZ CE QUI SUIT*:
1. ÉTOUFFEZ LES FLAMMES avec un couvercle bien ajusté, une plaque à biscuits ou un plateau en métal,
puis éteignez le brûleur. ATTENTION À ÉVITER LES BRÛLURES. Si les flammes ne s'éteignent pas
immédiatement. ÉVACUEZ ET APPELEZ LES POMPIERS.
2. NE JAMAIS RAMASSER UNE POÊLE ENFLAMMÉE – Vous pourriez vous brûler.
3. N'UTILISEZ PAS D'EAU, y compris des torchons ou des serviettes mouillés – une violente explosion de
vapeur en résulterait.
4. Utilisez un extincteur UNIQUEMENT si:
a.
Vous savez que vous possédez un extincteur de classe ABC et vous savez déjà comment le faire
fonctionner.
b.
L'incendie est petit et circonscrit à la zone où il s'est déclaré.
c.
Les pompiers sont appelés.
d.
Vous pouvez combattre l’incendie dos à la sortie.
Basé sur "Kitchen Fire Safety Tips" publié par la NFPA.
INFORMATIONS DE SÉCURITÉ POUR
LA CUISSON :
AVERTISSEMENT - POUR RÉDUIRE LE RISQUE DE BLESSURES AUX PERSONNES EN CAS
INFORMATIONS DE SÉCURITÉ POUR LE NETTOYAGE
• Le ventilateur et le filtre doivent être nettoyés périodiquement et maintenus exempts de toute accumulation de
cuisson. Les filtres vieux, usés ou cassés doivent
être remplacés immédiatement.
• Ne démontez jamais les pièces pour les nettoyer. Les pièces doivent être démontées uniquement par des
personnes qualifiées.
Lisez et conservez ces instructions.
FR - 3
Lisez et conservez ces instructions.
AVERTISSEMENT!
IMPORTANT — RESPECTEZ TOUS LES CODES ET ORDONNANCES GOUVERNEMENTALES.
1. Pour usage de ventilation générale uniquement. N'utilisez pas cet appareil pour évacuer des matières et des
vapeurs dangereuses ou explosives.
2. Pour réduire le risque d'incendie, utilisez uniquement des conduits métalliques.
3. Pour éviter d'endommager le moteur ou d'autres composants, gardez le spray pour cloisons sèches, la poussière
de construction, etc. hors de l'unité motrice.
4. Veuillez lire l'étiquette de spécifications sur le produit pour plus d'informations et d'exigences.
MISES EN GARDE!
INSTRUCTIONS DE MISE À LA TERRE
Cet appareil doit être mis à la terre. En cas de court-circuit électrique, la
mise à la terre réduit le risque de choc électrique en fournissant un fil de
fuite pour le courant électrique. Cet appareil est équipé d'un cordon doté
d'un fil de terre avec une fiche de mise à la terre. La fiche doit être
branchée dans une prise correctement contrôlée et mise à la terre.
AVERTISSEMENT !
• Une mise à la terre incorrecte peut entraîner un risque de choc électrique.
• Consultez un électricien qualifié si les instructions de mise à la terre ne sont
pas entièrement comprises ou s'il existe des doutes quant à savoir si
l'appareil est correctement mis à la terre.
• N'utilisez pas de rallonge. Si le cordon d'alimentation est trop court,
demandez à un technicien qualifié d'installer une prise à proximité de
l'appareil.
MISES EN GARDE!
• Ne faites pas fonctionner un ventilateur dont le cordon ou la fiche est
endommagé. Jetez le ventilateur ou retournez-le à un centre de service
agréé pour examen et/ou réparation.
• Ne faites pas passer le cordon sous la moquette. Ne couvrez pas le
cordon avec des tapis, des tapis ou des revêtements similaires. Ne faites
pas passer le cordon sous les meubles ou les appareils électroménagers.
Disposez le cordon loin de la zone de circulation et là où il ne risque pas
de trébucher.
• Au moins deux personnes sont nécessaires pour déplacer et installer
l'appareil en toute sécurité. Ne pas soulever correctement la hotte de
cuisine pourrait entraîner des dommages au produit et des blessures.
• Ne jetez jamais de cendres de cigarettes, de substances inflammables ou
tout autre corps étranger dans les ventilateurs.
Tout le câblage
électrique doit être
correctement installé, isolé
et mis à la terre. Une
mauvaise isolation et une
mauvaise mise à la terre
entraîneront un choc
électrique mortel.
FR - 4
INSTRUCTIONS D’INSTALLATION
MIS EN GARDE: Avant de commencer l'installation, coupez l'alimentation au disjoncteur et verrouillez
le service, en déconnectant les moyens pour empêcher toute mise sous tension
accidentelle. Lorsque les moyens de déconnexion de service ne peuvent pas être
verrouillés, fixez solidement un dispositif d'avertissement bien visible, comme une étiquette,
au disjoncteur.
Dommage
•
Si l'appareil est endommagé pendant le transport, renvoyez-le au magasin où vous l'avez acheté pour réparation
ou remplacement.
•
Si l'appareil est endommagé par le client, la réparation ou le remplacement est à la charge du client.
•
Si l'unité est endommagée par l'installateur (si autre que le client), la réparation ou le remplacement doit être
effectué par arrangement entre le client et l'installateur.
Connexion du Câblage
Les travaux d'installation et le câblage électrique doivent être effectués par une ou des personnes qualifiées
conformément à tous les codes et normes applicables, y compris la construction coupe-feu.
•
Une mise à la terre électrique est requise pour cette hotte. Vérifiez auprès d'un électricien qualifié si vous n'êtes
pas certain que la hotte soit correctement mise à la terre. Un fusible dans le circuit neutre ou de mise à la terre peut
entraîner un choc électrique.
•
Le non-respect des exigences électriques peut provoquer un incendie.
•
Si le tuyau d'eau chaude/froide est interrompu par des joints en plastique non métalliques ou d'autres matériaux,
NE PAS les utiliser pour la mise à la terre.
•
NE PAS METTRE À LA TERRE À UN TUYAU DE GAZ.
•
Conservez les instructions d'installation à l'usage de l'inspecteur électrique.
•
Si les c
odes le permettent et qu'un fil de terre séparé est utilisé, il est recommandé qu'un électricien qualifié
détermine si le chemin de terre est adéquat.
•
N'UTILISEZ PAS de rallonge ou d'adaptateur avec cet appareil.
•
La hotte de cuisine doit être connectée uniquement avec du fil de cuivre.
•
La hotte doit être connectée directement à la boîte de jonction (ou disjoncteur) par un câble en cuivre flexible, armé
ou gainé non métallique. Laisser un peu de mou dans le câble afin que l'appareil puisse être déplacé si un entretien
est nécessaire.
•
Un connecteur de conduit répertorié UL ou approuvé CSA doit être fourni à chaque extrémité du câble d'alimentation
(à la hotte de cuisinière et à la boîte de jonction).
•
Lors de la connexion électrique, percez un trou de 3,2 cm (1-1/4 po) dans le mur. Un trou percé dans le bois doit être
poncé jusqu'à ce qu'il soit lisse. Un trou dans le métal doit avoir un œillet.
•
Lorsque vous coupez ou percez dans le mur ou le plafond, n'endommagez pas le câblage électrique et les autres
utilités cachées.
NOTEZ: Câblez temporairement la hotte pour
tester son bon fonctionnement. Si la
hotte ne fonctionne pas correctement,
ne procédez pas à l'installation.
DANGER: Risque de choc électrique. Cette
hotte doit être correctement mise à la terre
REMARQUE: Il est de la responsabilité du client de contacter un installateur électricien qualifié et de
s'assurer que l'installation électrique est adéquate et conforme au Code national de l'électricité ou aux
normes CSA, ainsi qu'à tous les codes et ordonnances locaux.
FR - 5
Pour les Modèles Filaires:
1. Utilisez le câble d'alimentation pour connecter directement la hotte à la
boîte de jonction ou au boîtier de disjoncteurs. Utilisez uniquement un
câble en cuivre flexible, blindé ou non métallique. N'utilisez jamais de
rallonge ou de prise d'adaptateur.
2. Connectez un connecteur de conduit homologué UL ou CSA à chaque
extrémité du câble d'alimentation
(au niveau de la hotte et de la boîte de jonction). Connectez les 2 fils de
couleur de la hotte aux fils correspondants de la source électrique : noir
au noir (sous tension), blanc au blanc (neutre) et le fil de terre de la
maison à la vis de terre. Utilisez soit le trou supérieur (1) soit le trou
arrière (2) de la hotte selon votre type d'installation.
3. Mettez l'appareil sous tension et assurez-vous que les lumières et le
ventilateur fonctionnent correctement.
4. Une fois que vous avez testé la connexion électrique, débranchez le
câble d'alimentation et les fils de la source électrique avant de procéder
au reste de l'installation.
Marquer les Trous
•
Utilisez la hotte comme gabarit et marquez les emplacements sur l'armoire pour les fentes de vis en trou de serrure.
•
Étant donné que la hotte doit être recirculée (et non ventilée à l'extérieur), ne découpez aucune ouverture d'aération
dans le mur ou dans le fond de l'armoire.
Percer des Trous
•
Enfoncez une vis de montage (provenant du paquet de matériel) à mi-
chemin dans chaque centre du col étroit des fentes en trou de serrure
marquées sur le bas de l'armoire.
Enfoncez une vis de montage (provenant du paquet de matériel) à mi-chemin dans chaque centre du col étroit des fentes
en trou de serrure marquées sur le bas de l'armoire.
AVERTISSEMENT: Les ampoules peuvent devenir chaudes lorsqu'elles sont allumées. Ne touchez pas les ampoules
tant qu'elles
ne sont pas éteintes et refroidies. Le contact avec des ampoules chaudes peut provoquer de graves brûlures.
AVERTISSEMENT: Les filtres à charbon ne vont PAS au lave-vaisselle.
FILS BLANCS
VIS DE TERRE
FILS NOIRS
Étant donné que cette hotte doit être installée de manière à ce qu'elle soit à recirculation, sans ventilation et sans conduit,
ne
percez aucune ouverture de ventilation dans la hotte.
Pour les modèles de cordon d'alimentation (modèles avec suffixe PTC et PTC2):
Branchez le cordon d’alimentation dans une prise de courant fonctionnelle et correctement reliée à la
terre.
AVERTISSEMENT: Portez toujours des lunettes de sécurité et des gants pendant l'installation.
FR - 6
AVERTISSEMENT: Le non-remplacement des filtres usés ou endommagés augmente le risque d’incendie.
Remarque: Montez le corps de la hotte à fleur avec la façade avant de la porte d’armoire afin de garantir que le débit d’air
n’est pas obstrué. Si votre caisson d’armoire a une profondeur exacte de 12 po et une porte de 3/4 po d’épaisseur, la hotte
devra être positionnée à 3/4 po du mur arrière. Toutefois, les dimensions des armoires peuvent varier; mesurez donc
soigneusement avant de percer les trous d’installation.
FONCTIONNEMENT DE VOTRE HOTTE DE CUISINE
Contrôles
1. Panneau de Commande de la Hotte
Le panneau de commande est situé à l'avant de la canopée.
2. Interrupteur d'Éclairage
L'interrupteur d'éclairage bascule entre ON et OFF.
3. Alimentation du Ventilateur
L'interrupteur d'alimentation bascule entre les réglages du ventilateur LO,
HI et OFF.
Plateau Rétractable pour Hotte de Cuisinière
Votre modèle est équipé de deux (2) filtres combinés en maille d'aluminium et en charbon de bois. L'un est
fixé à la hotte de cuisinière. L'autre est fixé au plateau rétractable. Les filtres combinés aident à filtrer les
huiles, la fumée et les odeurs pendant que vous cuisinez.
Pour utiliser le filtre rétractable, déployez le plateau jusqu'à la position extérieure et sélectionnez la vitesse de
ventilation souhaitée.
REMARQUE: Nous recommandons que le plateau rétractable des modèles ADA reste toujours en position sortie
pour se conformer aux directives ADA. Pour obtenir des instructions sur la façon d'installer un interrupteur à
distance pour rendre cet appareil conforme à l'ADA (voir page 8).
FR - 7
0
ON
-
-
HI
'
,
0
- -
, I '
OFF
0
LO

FR - 8
INSTALLATION D'UN INTERRUPTEUR À DISTANCE
(for models with ADA prefix)
Pour se conformer aux normes ADA, les modèles avec ADA comme préfixe doivent installer un interrupteur à
distance séparé du panneau de commande pour faire fonctionner l
es fonctions de ventilateur et d'éclairage de la
hotte.
REMARQUE: L’installation et l’entretien doivent être effectués par un installateur/électricien qualifié.
AVERTISSEMENT: pour éviter tout risque d'incendie ou d'électrocution, coupez l'alimentation au niveau du
disjoncteur ou du fusible. Vérifiez que l'alimentation est coupée avant de procéder au câblage.
TRANSFERT DES LEADS
1. Dévissez le panneau supérieur pour accéder aux fils de l'interrupteur
2. Débranchez les fils des interrupteurs
3. Transférez les fils à l'endroit où se trouve l'entrée défonçable murale
4. Montez le boîtier d'interrupteur encas
tré à un seul groupe
CÂBLAGE
Configuration du commutateur: Le commutateur du ventilateur possède trois (3) bornes. L'interrupteur d'éclairage
possède deux (2) bornes.
1. Connexion de l'Interrupteur du Ventilateur
Connectez le fil de l'interrupteur du ventilateur aux bornes correspondantes de la plaque murale (c'est-
à-dire que le fil n°1 de la borne du ventilateur se connectera
à la borne n°1 de la plaque murale)
2. Connexion de l'interrupteur d'éclairage
Connect the light switch lead to the corresponding terminals on the wall plate.
FIXATION DE LA PLAQUE MURALE
1. Une fois les interrupteurs câblés, alignez la plaque murale avec le boîtier de commutation.
2. Fixez la plaque murale au boîtier de commutation à l'aide des vis fournies.
Pour une apparence propre, les interrupteurs de la hotte doivent rester en place.
REMARQUE: Pour installer cet interrupteur conformément aux directives de l'ADA, la hauteur de
l'interrupteur ne doit pas être inférieure à 15 po du sol ni supérieure à 48 po du sol. Des
réglementations
supplémentaires s'appliquent s'il y a des obstacles devant l'interrupteur. Pour plus
d'informations, reportez-vous à la section 308 des normes ADA les plus récentes pour la conception
accessible sur ada.gov.
NETTOYAGE ET ENTRETIEN
Filtres Combinés (Maille en Aluminium et Charbon)
Remplacer les Filtres
Votre hotte est équipée de deux filtres. L'un est fixé à la hotte. L'autre se trouve dans le bac rétractable. Les
filtres ne passent PAS au lave-vaisselle et doivent être remplacés tous les 6 à 12 mois selon l'utilisation.
ATTENTION: Assurez-vous que la hotte est débranchée de l’alimentation électrique et que
toutes les surfaces sont froides avant de nettoyer une partie de la hotte.
REMARQUE: Pour acheter des filtres de remplacement, veuillez nous appeler au (718) 893-3900 ou
commander directement sur notre site Web : https://summitapplianceparts.com/HRTXFILTERSET/
REMARQUE: NE PAS rincer ni placer les filtres dans un lave-vaisselle automatique.
FR - 9
•
La cassette en maille d'aluminium retient les huiles et la poussière de l'air tandis que la couche filtrante
au charbon aide à éliminer la fumée et les odeurs.
•
Les filtres ne peuvent pas être nettoyés et doivent être remplacés.
1. Assurez-vous que la hotte est débranchée et que toutes les
surfaces sont froides.
2. Retirez les vis qui maintiennent le filtre fixe en place.
3. Cliquez sur les pinces à ressort, puis retirez-les délicatement du
cadre.
4. Retirez le plateau rétractable pour retirer le filtre rétractable.
5. Insérez les nouveaux filtres en place.
Remplacer l'Ampoule
Pour remplacer l'ampoule, tournez-la dans le sens inverse des aiguilles d'une montre et retirez-la de la
douille. Insérez l'ampoule de rechange et tournez-la dans le sens des aiguilles d'une montre.
L'ampoule de rechange doit être une ampoule LED GU10 de 5 W pour des performances optimales.

DÉPANNAGE
Vous pouvez résoudre facilement de nombreux problèmes courants, ce qui vous permettra peut-être
d'économiser le coût d'une intervention de service. Essayez
les suggestions ci-dessous pour voir si vous
pouvez résoudre le problème avant d'appeler le réparateur.
Problème Cause Possible Solution Possible
Le ventilateur ne fonctionne
pas mais les lumières
fonctionnent.
Câblage desserré,
déconnecté ou
endommagé.
Coupez l'alimentation au niveau du
panneau de
service et verrouillez le
sectionneur de service pour éviter tout
rétablissement accidentel de
l'alimentation. Si le sectionneur de
service ne peut pas être verrouillé, fixez
solidement un dispositif d'avertissement
clairement visible, tel qu'une étiquette,
au panneau de service pour alerter les
autres.
Vérifiez les connexions de câblage.
Consultez la section CONNEXION DU
CÂBLAGE dans ce manuel d'utilisation.
Si vous avez consulté le tableau ci-dessus et que vous avez encore besoin d'aide avec votre appareil,
appelez notre service clientèle au 800-932-4267 (poste 513) entre 9 h et 17 h HE ou visitez le site
www.summitappliance.com/support. Nous ferons de notre mieux pour répondre à vos questions.
FR - 10
•
Surfaces en acier inoxydable (sur certains modèles) N'utilisez pas de tampon en laine d'acier, car cela
rayerait la surface.
•
Pour nettoyer la surface en acier inoxydable, utilisez de l'eau chaude savonneuse ou un nettoyant ou un
produit de polissage pour acier inoxydable. Essuyez toujours la surface dans le sens du grain. Suivez
les instructions du nettoyant pour nettoyer la surface en acier inoxydable.
ATTENTION : Lors du nettoyage des surfaces de la hotte, veillez à ne pas toucher l'ampoule avec les
mains ou un chiffon humides. Une ampoule chaude ou tiède peut se briser si elle est touchée par une
surface humide. Laissez toujours l'ampoule refroidir complètement avant de nettoyer autour d'elle.
Surface
REMARQUE: Pour acheter des filtres de remplacement, veuillez nous appeler au (718) 893-3900 ou
commander directement sur notre site Web: https://summitapplianceparts.com/HRTXFILTERSET/
•
N'utilisez pas de tampons en laine d'acier ou d'autres nettoyants abrasifs sur les surfaces peintes. Ils
rayeraient la surface.
•
Nettoyez fréquemment les surfaces chargées de graisse de la hotte. Pour nettoyer la surface de la
hotte, utilisez un chiffon chaud et humide avec un détergent doux adapté aux surfaces peintes. Environ
une cuillère à soupe d'ammoniaque peut être ajoutée à l'eau.

Remarques
FR - 11
GARANTIE LIMITÉE
Dans les 48 États américains contigus, pendant un an à compter de la date d'achat, lorsque cet appareil est utilisé
et entretenu conformément aux instructions jointes ou fournies avec le produit, le garant paiera les pièces
spécifiées par l'usine et la main-d'œuvre pour corriger les défauts de matériaux ou fabrication. Le service doit être
fourni par une société de service désignée. En dehors des 48 États, toutes les pièces sont garanties pendant un
an contre les défauts de fabrication. Les pièces en plastique, les étagères et les armoires sont garanties être
fabriquées selon des normes commercialement acceptables et ne sont pas couvertes contre les dommages lors
de la manipulation ou de la rupture
.
ARTICLES L
E GARANT NE PAYERA PAS POUR :
1. Appels de service pour corriger l'installation de votre appareil, pour vous apprendre à utiliser votre appareil,
pour remplacer ou réparer les fusibles, ou pour corriger le câblage ou la plomberie.
2. Appels de service pour réparer ou remplacer les ampoules d'appareils électroménagers ou les tablettes de
verre brisées. Les pièces consommables (telles que les filtres) sont exclues de la couverture de la garantie.
3. Les dommages résultant d'un accident, d'une modification, d'une mauvaise utilisation, d'un abus, d'un
incendie, d'une inondation, d'actes de Dieu, d'une installation incorrecte, d'une installation non conforme aux
codes électriques ou de plomberie ou de l'utilisation de produits non approuvés par le garant.
4. Les pièces de rechange ou les frais de main-d'œuvre pour les unités utilisées en dehors des États-Unis.
5. Les réparations de pièces ou de systèmes résultant de modifications non autorisées apportées à l'appareil.
6. Le retrait et la réinstallation de votre appareil s'il est installé dans un endroit inaccessible ou s'il n'est pas
installé conformément aux instructions d'installation publiées.
EXCLUSION DE GARANTIES IMPLICITES ; LIMITATION DES RECOURS
LE SEUL ET UNIQUE RECOURS DU CLIENT DANS LE CADRE DE CETTE GARANTIE LIMITÉE
SERA LA RÉPARATION DU PRODUIT COMME INDIQUÉ AUX PRÉSENTES. LES GARANTIES
IMPLICITES, Y COMPRIS LES GARANTIES DE QUALITÉ MARCHANDE OU D'ADÉQUATION À UN
USAGE PARTICULIER, SONT LIMITÉES À UN AN. LE GARANT NE SERA PAS RESPONSABLE
DES DOMMAGES ACCESSOIRES OU INDIRECTS. CERTAINS ÉTATS N'AUTORISENT PAS
L'EXCLUSION OU LA LIMITATION DES DOMMAGES ACCESSOIRES OU CONSÉCUTIFS, OU LES
LIMITATIONS SUR LA DURÉE DES GARANTIES IMPLICITES DE QUALITÉ MARCHANDE OU
D'ADÉQUATION, CES EXCLUSIONS OU LIMITATIONS PEUVENT NE PAS S'APPLIQUER À VOUS.
CETTE GARANTIE VOUS DONNE DES DROITS LÉGAUX SPÉCIFIQUES ET VOUS POUVEZ AUSSI
AVOIR D'AUTRES DROITS, QUI VARIENT D'UN ÉTAT À L'AUTRE.
Felix St
orch, Inc.
An ISO 9001:2015 registered company
770 Garrison Ave
Bronx, New York 10474
www.summitappliance.com
Pour la commande de pièces et d'accessoires,
le dépannage et des conseils utiles, visitez :
www.summitappliance.com/support
AVERTISSEMENT : ce produit peut vous exposer à des produits chimiques, y
compris le nickel (métallique) qui est connu dans l’État de Californie pour provoquer
le cancer.
Pour plus d’informations, rendez-vous sur www.65Warnings.ca.gov
Remarque : le nickel est un composant de tout l’acier inoxydable et de certaines autres
compositions métalliques
FR - 12