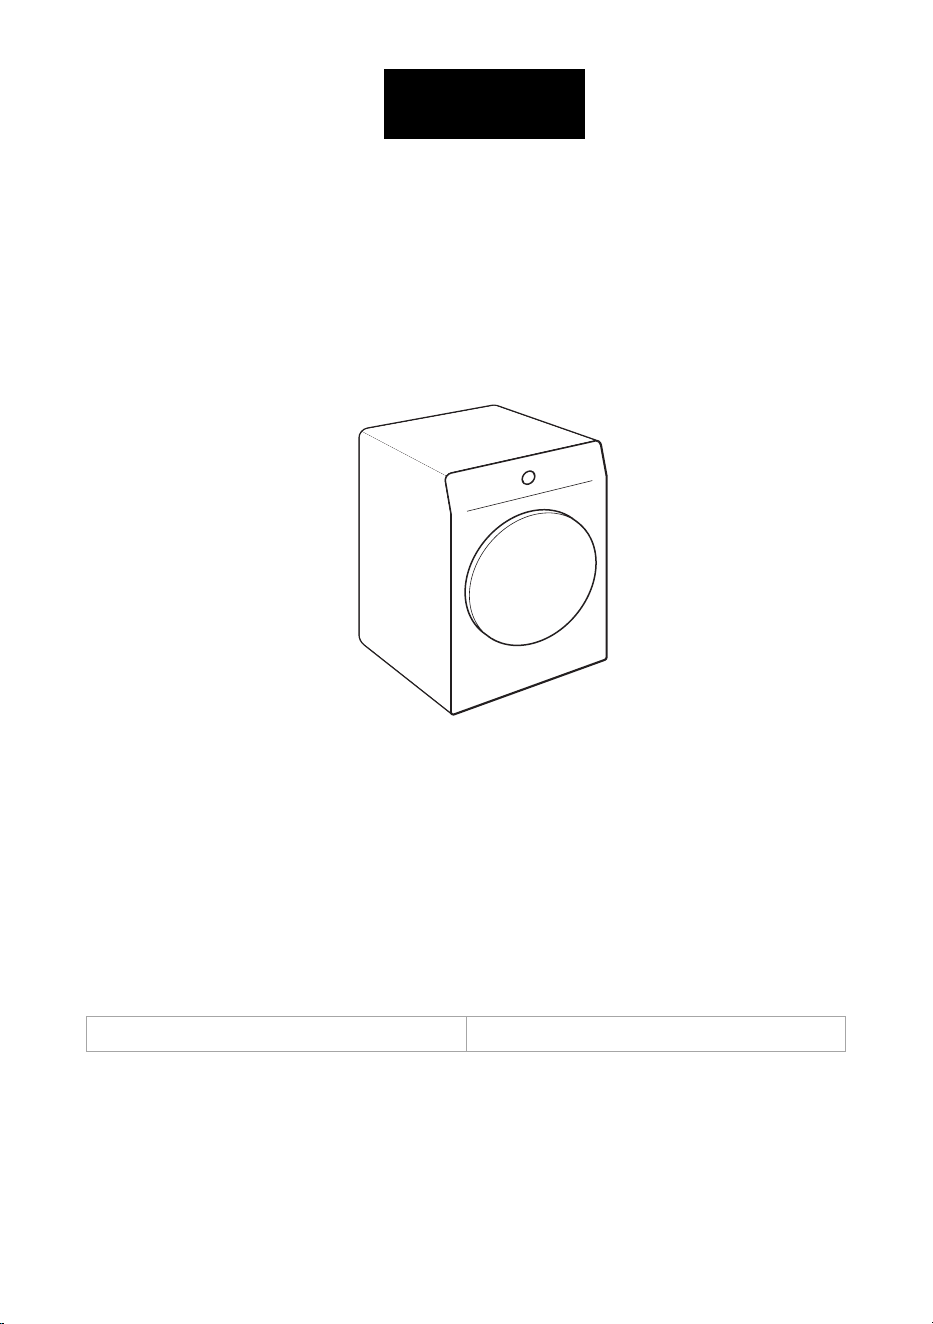
VENTED DRYER
User Manual
Models:
SLDV342 | LBDV242
BEFORE USE, PLEASE READ AND FOLLOW ALL SAFETY RULES AND OPERATING INSTRUCTIONS
Model Number: Serial Number:
Felix Storch, Inc.
ISO 9001:2015 registered company
770 Garrison Avenue
Bronx, NY 10474
www.summitappliance.com
This dryer is intended solely for household use.
Do not use it to dry clothes that are not suitable for machine drying.
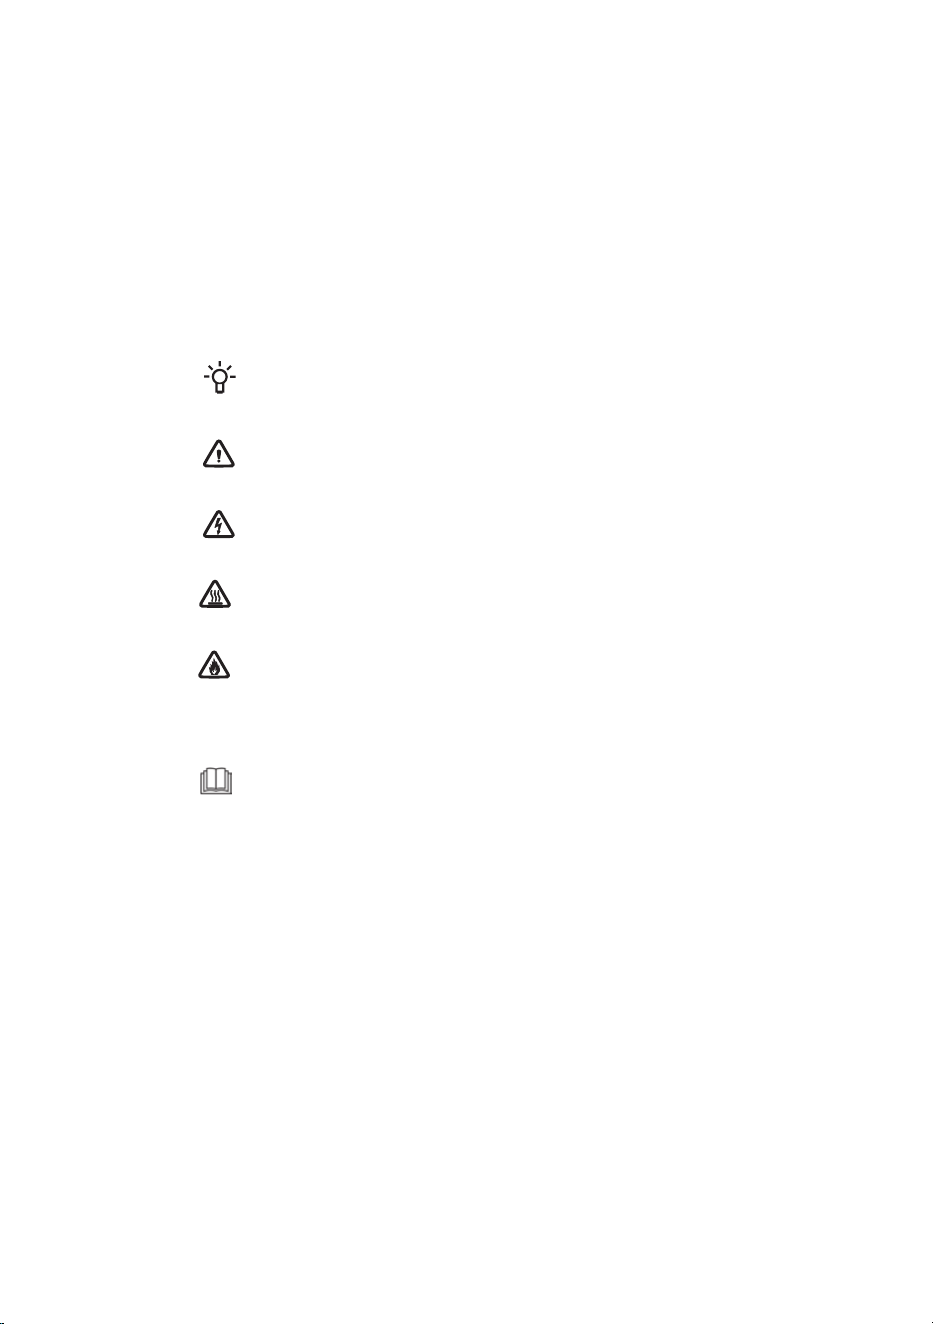
The following symbols are used throughout the manual:
INFORMATION!
Information, advice, tip, or recommendation
WARNING!
Warning – general danger
ELECTRIC
SHOCK!
Warning – danger of electric shock
HOT SURFACE!
Warning – danger
of hot surface
DANGER OF FIRE!
Warning – danger of fire
It is important to read the instructions carefully.
EN - 2

Contents
4IMPORTANT SAFETY INSTRUCTIONS .................................................................................
6DANGER OF HOT SURFACE ...................................................................................................
6SAFETY .....................................................................................................................................
7DESCRIPTION OF THE DRYER ..............................................................................................
7Technical information ................................................................................................................
8Touch control .............................................................................................................................
9INSTALLATION AND CONNECTION ......................................................................................
10Selecting the room ....................................................................................................................
11Dryer placement ........................................................................................................................
12Closet Install- Ventilation Requirements ...................................................................................
13Adjusting the dryer feet .............................................................................................................
14Evacuation of humid air ............................................................................................................
15Connecting to the power mains ................................................................................................
15Electrical installation .................................................................................................................
16Electrical Connections ..............................................................................................................
16Moving and transport after installation .....................................................................................
17BEFORE USING THE APPLIANCE FOR THE FIRST TIME ...................................................
18DRYING PROCESS, STEP BY STEP (1 - 6) ...........................................................................
18Step 1: Heed the labels on the laundry ....................................................................................
19Step 2: Preparing for the laundry drying process ....................................................................
19Switching on the dryer ..............................................................................................................
20Loading the dryer ......................................................................................................................
21Step 3: Choosing the drying program ......................................................................................
22Program table ...........................................................................................................................
24Step 4: Selecting extra functions ..............................................................................................
28Step 5: Starting the drying program .........................................................................................
28Step 6: End of the drying program ...........................................................................................
29INTERRUPTIONS AND CHANGING THE PROGRAM ...........................................................
29Interruptions ..............................................................................................................................
29Changing the program/functions ..............................................................................................
29Adding laundry after the start of the program ..........................................................................
29Saving personal settings ...........................................................................................................
30AdaptTech ................................................................................................................................
30Personal settings menu ............................................................................................................
30Overview of the number of drying cycles performed ................................................................
31CLEANING AND MAINTENANCE ...........................................................................................
32Cleaning the net filter in the door ..............................................................................................
33Cleaning the exhaust duct ........................................................................................................
33Cleaning the dryer .....................................................................................................................
35TROUBLESHOOTING ..............................................................................................................
34TIPS FOR DRYING AND ECONOMIC USE YOUR DRYER ...................................................
34Low standby mode ...................................................................................................................
38DISPOSAL ................................................................................................................................
39
LIMITED WARRANTY ...............................................................................................................
EN - 3
1. Read all instructions before using the appliance.
2. Do not dry articles that have been previously
cleaned, washed, soaked, or spotted with
gasoline, dry-cleaning solvents, or other
flammable or explosive substances, as they give
off vapors that could ignite or explode.
3. Risk of Suffocation and Injury from
Entrapment: Do not allow children to play on or in
the appliance. Close supervision is required when
the appliance is used near children.
4. Before the appliance is removed from service or
discarded, remove the door to the drying
compartment.
5. Do not reach into the appliance if the drum is
moving.
6. Do not install or store this appliance outdoors or in
locations exposed to weather.
7. Do not tamper with controls.
8. Do not repair or replace any part of the appliance
or attempt any service unless specifically
recommended in the user-maintenance
instructions or in published user-repair instructions
that you understand and have the skills to carry
out.
9. Do not use spare parts that have not been
recommended by the manufacturer (e.g. parts
made at home using a 3D printer).
10. Do not use fabric softeners or products to
eliminate static unless recommended by the
manufacturer of the fabric softener or product.
11. Do not use heat to dry articles containing foam
rubber or similarly textured rubber-like materials.
12. Clean lint screen before or after each load.
13. Keep area around the exhaust opening and
adjacent surrounding areas free from the
accumulation of lint, dust, and dirt.
14. The interior of the appliance and exhaust duct
should be cleaned periodically by qualified service
personnel.
15. Do not place items exposed to cooking oils in your
dryer. Items contaminated with cooking oils may
contribute to a chemical reaction that could cause
a load to catch fire. To reduce the risk of fire due
to contaminated loads, the final part of a tumble
dryer cycle occurs without heat (cool down
period). Avoid stopping a tumble dryer before the
end of the drying cycle unless all items are quickly
removed and spread out so that the heat is
dissipated.
16. WARNING: Improper connection of the
equipment-grounding conductor can result in a
risk of electric shock. Check with a qualified
electrician or service representative or personnel
if you are in doubt as to whether the appliance is
properly grounded.
17. WARNING: Keep the ventilation slits on the
housing unobstructed.
Carefully read the instructions for use before using
the dryer.
Do not use the dryer without reading and
understanding these instructions for use first.
This appliance is not intended for use by people
(including children) with reduced physical, sensory, or
cognitive abilities, or by people lacking experience and
knowledge, unless they have been given supervision
or instruction concerning the use of the appliance by a
person responsible for their safety.
These instructions for use of a dryer are supplied
with different types or models of dryers. Therefore,
they may include descriptions of settings or
equipment that are not available in your dryer.
Failure to observe the instructions for use or
inappropriate use of the dryer may result in damage
to the laundry or the appliance, or injury to the user.
Keep the instruction manual handy, near the dryer.
Your dryer is intended solely for household use. If
the dryer is used for professional, for-profit purpose or
purpose exceeding normal use in a household, or if the
dryer is used by a person who is not a consumer, the
warranty period shall be equal to the shortest warranty
period required by relevant legislation.
Follow the instructions for correct installation of the
dryer and connection to the power mains (see
INSTALLATION AND CONNECTION).
All and any repairs or maintenance tasks on the dryer
should only be done by trained experts. Unprofessional
repair may result in an accident or major malfunction.
To avoid danger, a damaged power cord may only be
replaced by the manufacturer, a service technician, or
an authorized person.
After installation, the dryer should stand still for
two hours before it is connected to the power
mains.
At least two people are required to install the tumble
dryer on top of a washing machine.
WARNING!
The dryer may not be connected to the power mains
using an extension cord.
Do not connect the dryer to power mains using an
external switching device such as a program timer or
connect it to power mains that is regularly switched on
and off by the power supply provider.
WARNING!
In case of a defect, only use approved spare parts by
authorized manufacturers.
IMPORTANT SAFETY INSTRUCTIONS
SAVE THESE INSTRUCTIONS FOR FUTURE REFERENCE!
WARNING!
To reduce the risk of fire, electric shock, or injury to persons when using your appliance,
follow basic precautions, including the following:
EN - 4
WARNING!
In case of incorrect dryer connection, incorrect use, or
servicing by an unauthorized person, the user shall
bear the cost of any damage as such damage shall not
be covered by warranty.
Always use the ducts or hoses supplied with the dryer.
WARNING!
As this is an evacuation dryer, it does not have a
condensate tank. The handle has solely a decorative
purpose and it is fixed; it is not intended for opening. If
excessive force is applied, the handle may break.
Install the dryer in a room with adequate ventilation and
a temperature between 50°F (10°C) and 77°F (25°C).
Place the dryer on a level and stable solid (concrete)
base.
WARNING!
Do not place the dryer behind lockable or sliding door,
or door with a hinge on the opposite side of the dryer
door hinge. Install the dryer in such way that the door
can always be freely opened.
Never block the air exhaust (evacuation opening).
WARNING!
Do not place the dryer on a carpet with long fibers as
this may impede air circulation.
Do not connect the dryer to a chimney or a duct that is
also used to extract products of combustion of natural
gas or other fuels from other appliances.
Air in the dryer environment should not contain
dust particles. The air where the dryer is installed
should be thoroughly ventilated to prevent reverse
flow of gases released from the gas appliances with
open fire (e.g. a fireplace).
Ensure the fibers do not accumulate around the dryer.
Do not evacuate the air from the dryer through
channels or ducts used for appliances or devices that
use natural gas or other fuels for their operation.
The appliance may not be in contact with a wall or
adjacent furniture.
Do not use the dryer to dry any laundry that has not
been washed.
Laundry stained with oil, acetone, alcohol, oil
derivatives, stain removers, turpentine, wax, and wax
removers should be washed in a washing machine with
hot water and detergent before it is dried in the dryer.
Clothing that includes latex, rubber parts, shower and
bathing caps, and laundry or covers with rubber foam
may not be dried in the dryer.
Use laundry conditioners or similar products
in compliance with manufacturer's instructions.
DANGER OF FIRE!
Remove all objects
such as lighters and matches from
the pockets.
If the dryer is connected to an air exhaust system
already used for another appliance, a non-return valve
must be installed.
Return flow into the dryer could damage the appliance
and the non-return valve prevents such flow.
Clean the dryer filter after each drying cycle. If you
have removed the filter, replace it before the next
drying cycle.
WARNING!
Do not use any solvents or cleaning agents that
could damage the dryer (follow the recommendations
and warnings provided by the manufacturers of the
cleaning agents).
After the drying process, unplug the dryer power
cord from the power outlet.
The warranty does not cover consumables, minor
deviations in color, increased noise that results from
appliance age and which does not affect the
functionality of the dryer, and aesthetic defects on
components, which do not affect the dryer's
functionality and safety.
WARNING!
Do not allow children to play with the dryer.
Prevent your children and pets from entering the dryer
drum.
Before closing the dryer door and running the program,
make sure there is nothing except laundry in the drum
(e.g. if a child climbed into the dryer drum and closed
the door from the inside).
Activate the Child lock. See STEP 4: SETTING THE
EXTRA FUNCTIONS/Child lock.
Do not let children younger than three years near
the tumble dryer, unless they are under constant
supervision.
The dryer is made in compliance with all relevant
safety standards.
This dryer may be used by children aged 8 years and
above and by people with reduced physical, sensory or
cognitive capabilities or lack of experience and
knowledge, but only if they are supervised during the
use of the appliance, if they have been provided
relevant instructions regarding safe use of the dryer,
and if they understand the hazards of inappropriate
use.
EN - 5

Make sure children do not play with the dryer.
Children may not clean the dryer or perform any
maintenance tasks without supervision.
DANGER OF HOT SURFACE
The back of the dryer may get very hot during
operation. Wait for the dryer to cool down
completely before touching its back side.
If you open the dryer door during the drying process,
the clothes may be very hot and there is a risk of
burning.
Never stop the drying process before it is completed; if
you do interrupt the cycle for any reason, use caution
when removing the laundry from the drum as it is very
hot. Quickly remove the laundry from the drum and
spread it to cool down as quickly as possible.
SAFETY
The dryer is protected by an overheating safety cut-off.
This feature switches off the dryer if the temperature
becomes too high.
If the lint filter becomes clogged, the dryer may
automatically switch off due to overheating. Clean the
filter, wait for the dryer to cool down, and then try to
restart it. If it still does not start, contact technical
service.
HOT SURFACE!
At higher drying temperatures, the door glass
will heat up. Use caution to avoid burns. Make
sure children do not play near the glass door.
DANGER OF FIRE!
If you have cleaned your clothes with
industrial cleaners or chemical substances, do
not dry them in the dryer.
EN - 6
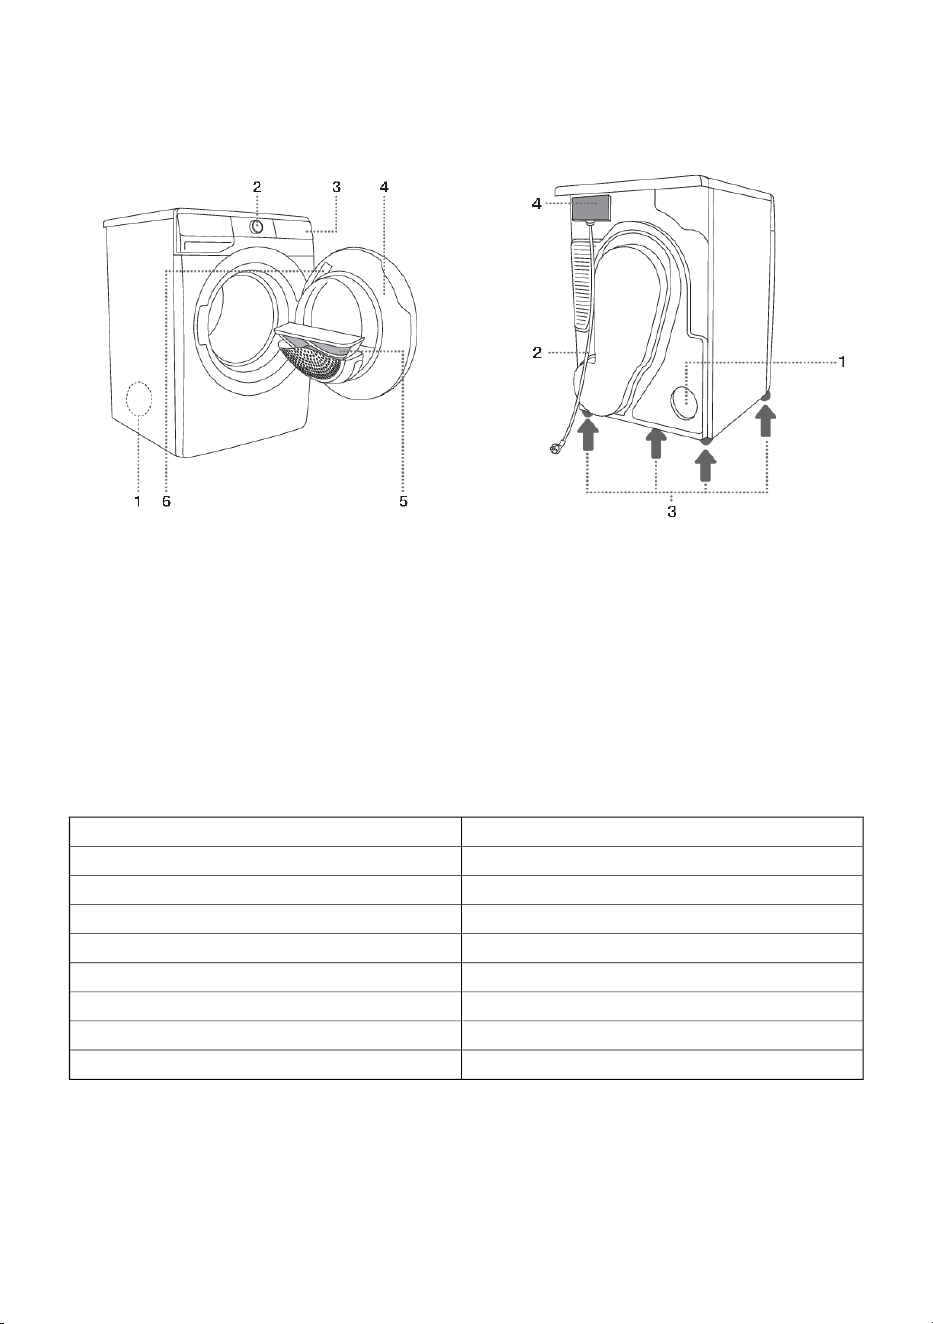
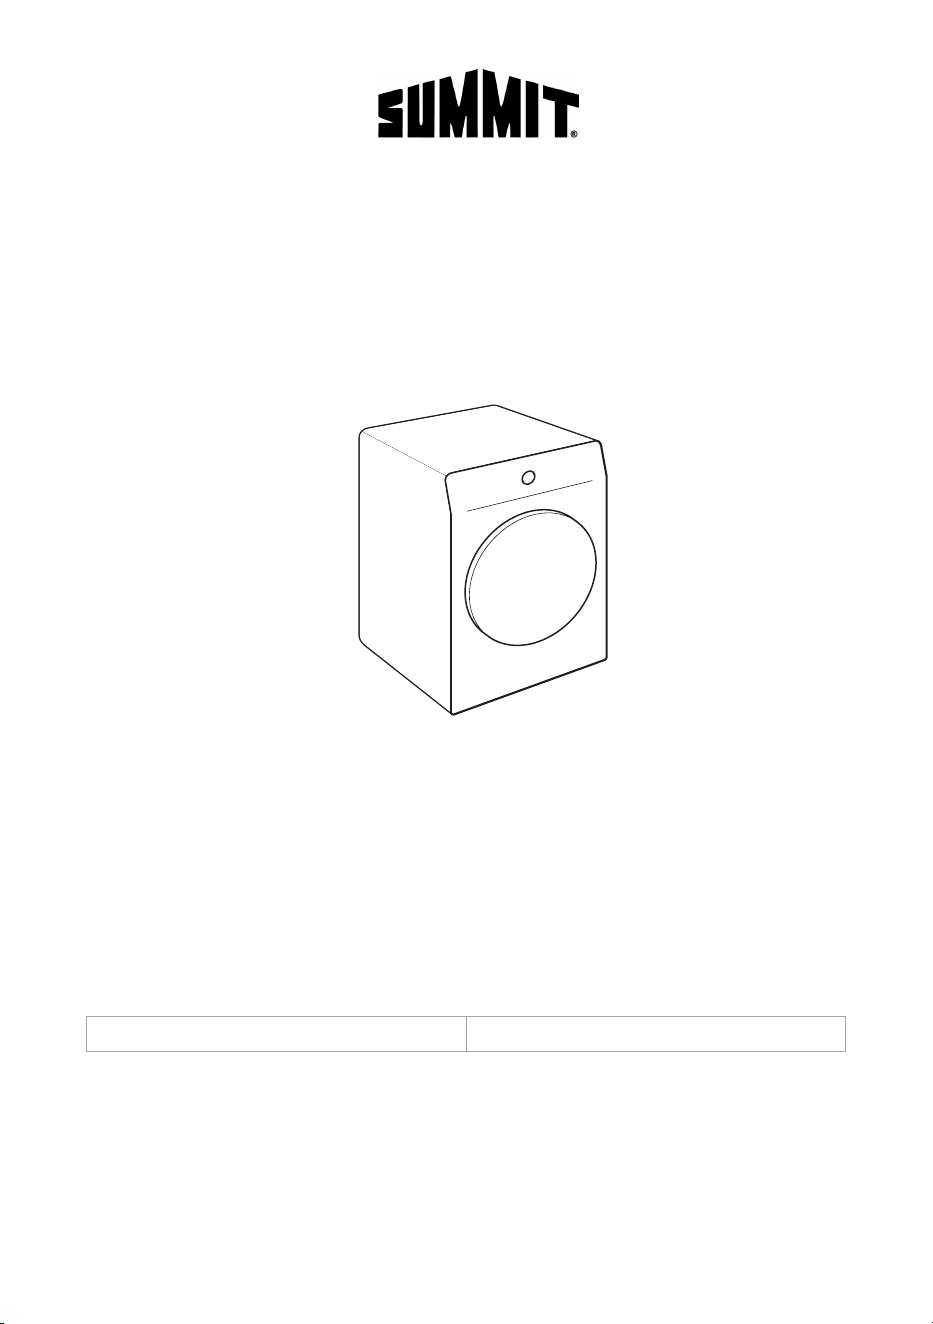
DESCRIPTION OF THE DRYER
FRONT
1. Air exhaust opening on the back side
2. Dryer ON/OFF & program selector knob
3. Touch control
4. Door
5. Net filter
6. Rating plate
BACK
1. Air exhaust opening
2. Power cord
3. Adjustable feet
4. Junction box
Technical information
Rating plate with basic information about the dryer is located on the inner side of the dryer door.
23½" (600 mm)Width
33½" (850 mm)Height
24½" (625 mm)Dryer depth (a)
25½" (653 mm)Depth with door closed
44½" (1134 mm)Depth with door open (b)
See rating plateRated voltage
See rating plateFuse
See rating plateNominal power
See rating plateMaximum load
EN - 7
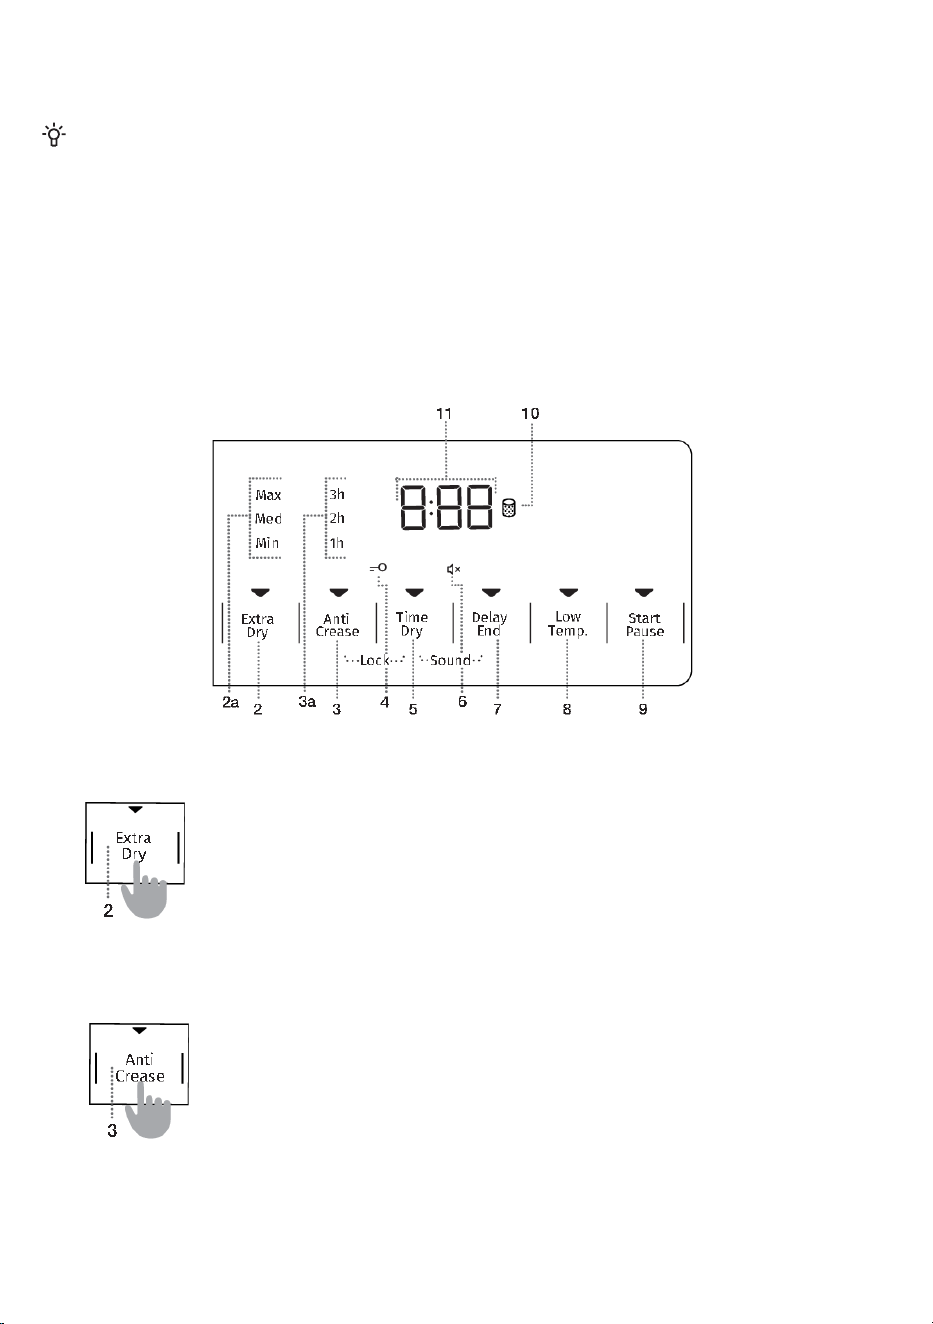
Touch Control
1
Dryer ON/OFF and PROGRAM SELECTOR KNOB.
To TURN ON the dryer, rotate the program selector knob in either direction.
To TURN OFF the dryer, rotate the
program selector knob to the OFF position .
To SELECT a drying program, rotate the knob in either direction.
The indicator light next to the selected program lights up.
EXTRA DRY (DRYNESS LEVEL)
The symbol will light up when the function is selected.
Extra functions: To select dryness level MAX, MED, MIN (2a) and extend the drying
time.
2
ANTI CREASE (CREASE PREVENTION)
The selected operating time of the function will light up.1h, 2h, 3h (3a)
3
Child Lock ON/OFF (lock)
Press and hold ANTI CREASE and TIME DRY (3 and 5) for 3 seconds.
3+5
CHILD LOCK symbol
4
TIME DRY (TIMED DRYING)
Option to set the drying time.
5
SOUND OFF symbol (light)
6
DELAY END (DELAYING THE END OF THE DRYING PROGRAM)
Option to set the time when the drying will end.
7
Sound ON/OFF (Sound)
Press and hold TIME DRY and DELAY END (5 and 7) for 3 seconds.
5+7
8
LOW TEMP. (LOWER TEMPERATURE)
Option to dry at a lower temperature.
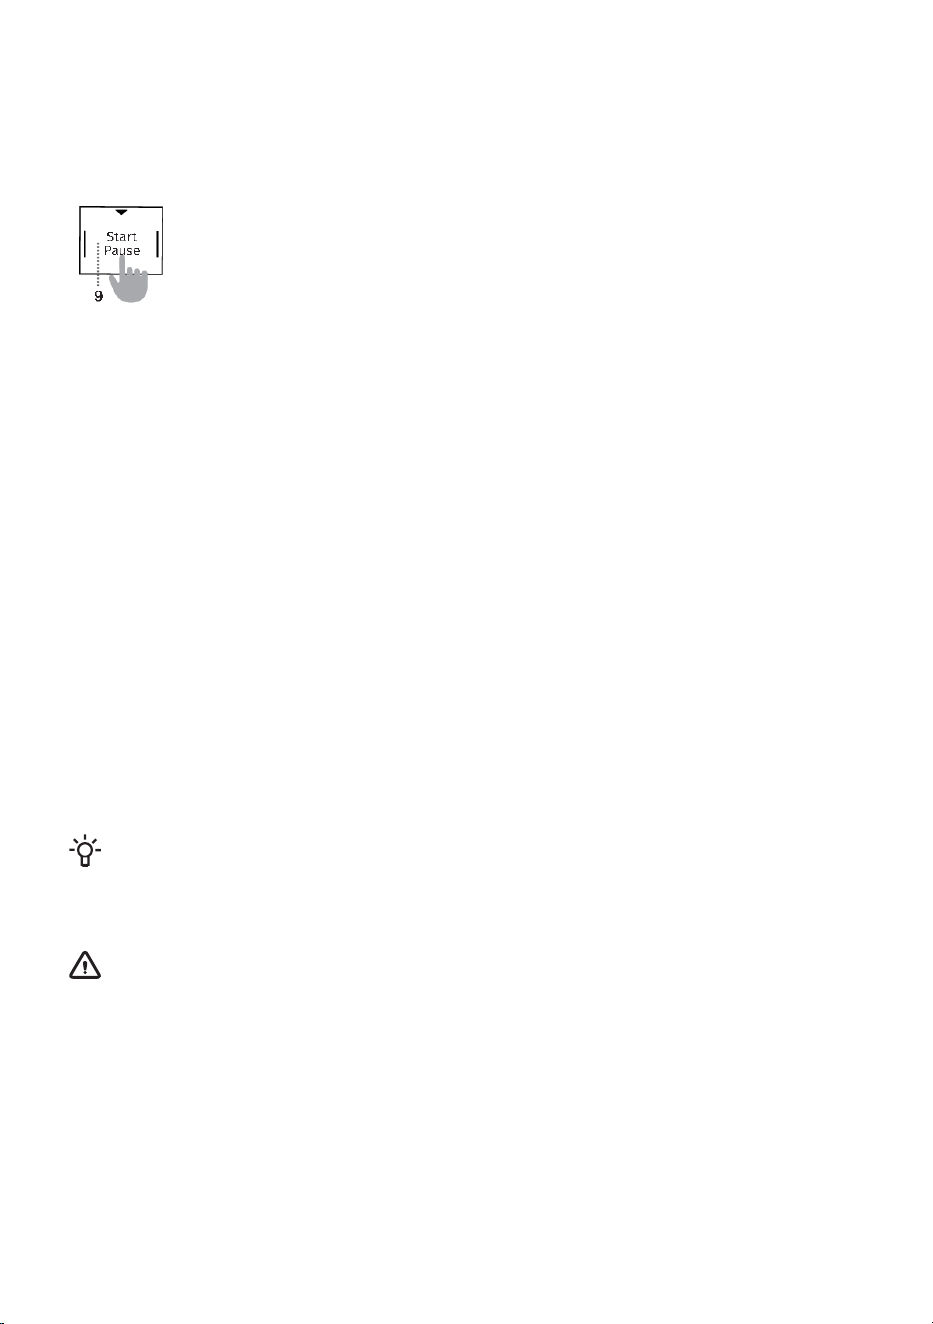
START/PAUSE button
The button has 3 functions:
• START – starting the drying program (press once to start the program)
• PAUSE – pause the drying program (press twice to pause the operation)
• SAVING PERSONAL SETTINGS (hold for 5 seconds).
When the appliance is turned on, the indicator on the button lights up.
9
CLEAN THE
FILTER symbol (light)
10
The following is displayed on the DISPLAY UNIT:
• Available functions
• Time remaining to program completion
• Information
for the user.
11
EN - 8
INSTALLATION AND CONNECTION
INFORMATION!
Remove all packaging. Use cation when removing the packaging with sharp objects so not to
damage the dryer.
WARNING:
• Install the clothes dryer according to the manufacturer ’s instructions and local codes.
• Clothes dryer installation must be performed by a qualified installer.
• To reduce the risk of severe injury or death, follow all installation instructions.
• Do not install a clothes dryer with flexible plastic venting materials. If flexible metal (foil
type) duct is installed, it must be of a specific type identified by the appliance
manufacturer as suitable for use with clothes dryers. Flexible venting materials are
known to collapse, be easily crushed, and trap lint. These conditions will obstruct
clothes dryer airflow and increase the risk of fire.
• The appliance must not be exhausted into a chimney, wall, ceiling, attic, crawl space,
or concealed space of a building.
Only use rigid or flexible metal duct for exhausting.
Maximum duct length should be 8 ft. (2.4 m) and maximum of 4 bends .
The total length of flexible metal duct should not exceed 8 ft. (2.4 m).
The duct should not be assembled with screws or other fastening means that extend
into the duct and catch lint.
• Save these instructions.
EN - 9
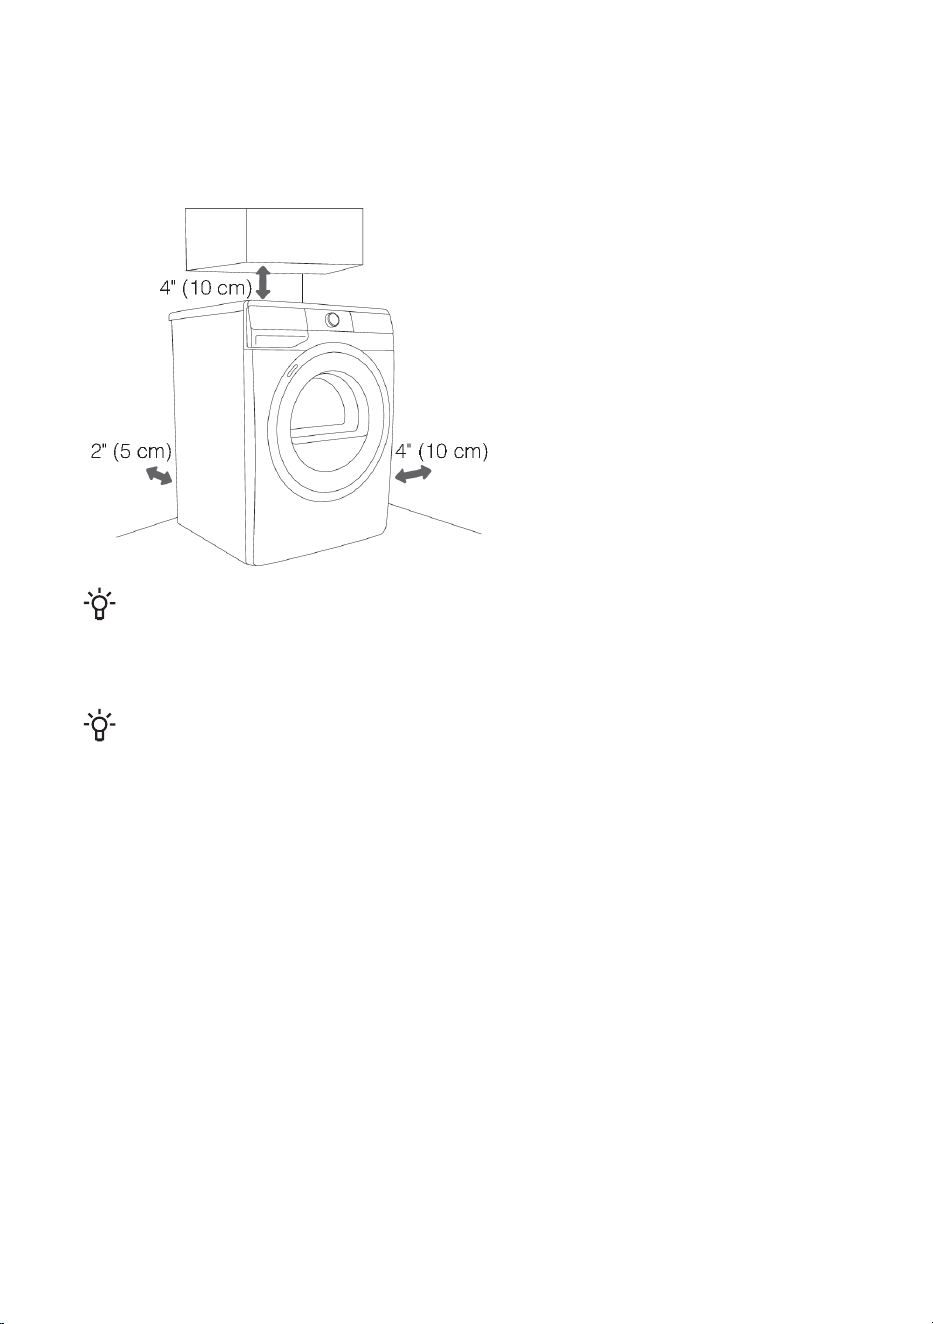
Selecting the room
INFORMATION!
The dryer may not be in contact with a wall or adjacent furniture. For optimum dryer
operation, we recommend observing the clearance from the walls as indicated in the figure.
In case of failure to heed the required minimum clearance, the dryer may overheat.
INFORMATION!
Do not obstruct the vents and humid air exhaust opening on the back or sides of the dryer.
Place the appliance in a ventilated room with a window or ventilation fan.
Connect the exhaust duct to the air exhaust opening. Do not connect the exhaust to a duct
that is also used for evacuation of combustion gases from other appliances or gases from
appliances that use other combustible substances for their operation.
The dryer emits heat. Avoid placing the dryer in a small room as the drying process may take
longer due to limited air circulation.
Ensure the room is well-lit so the display and control panel can be easily read.
EN - 10
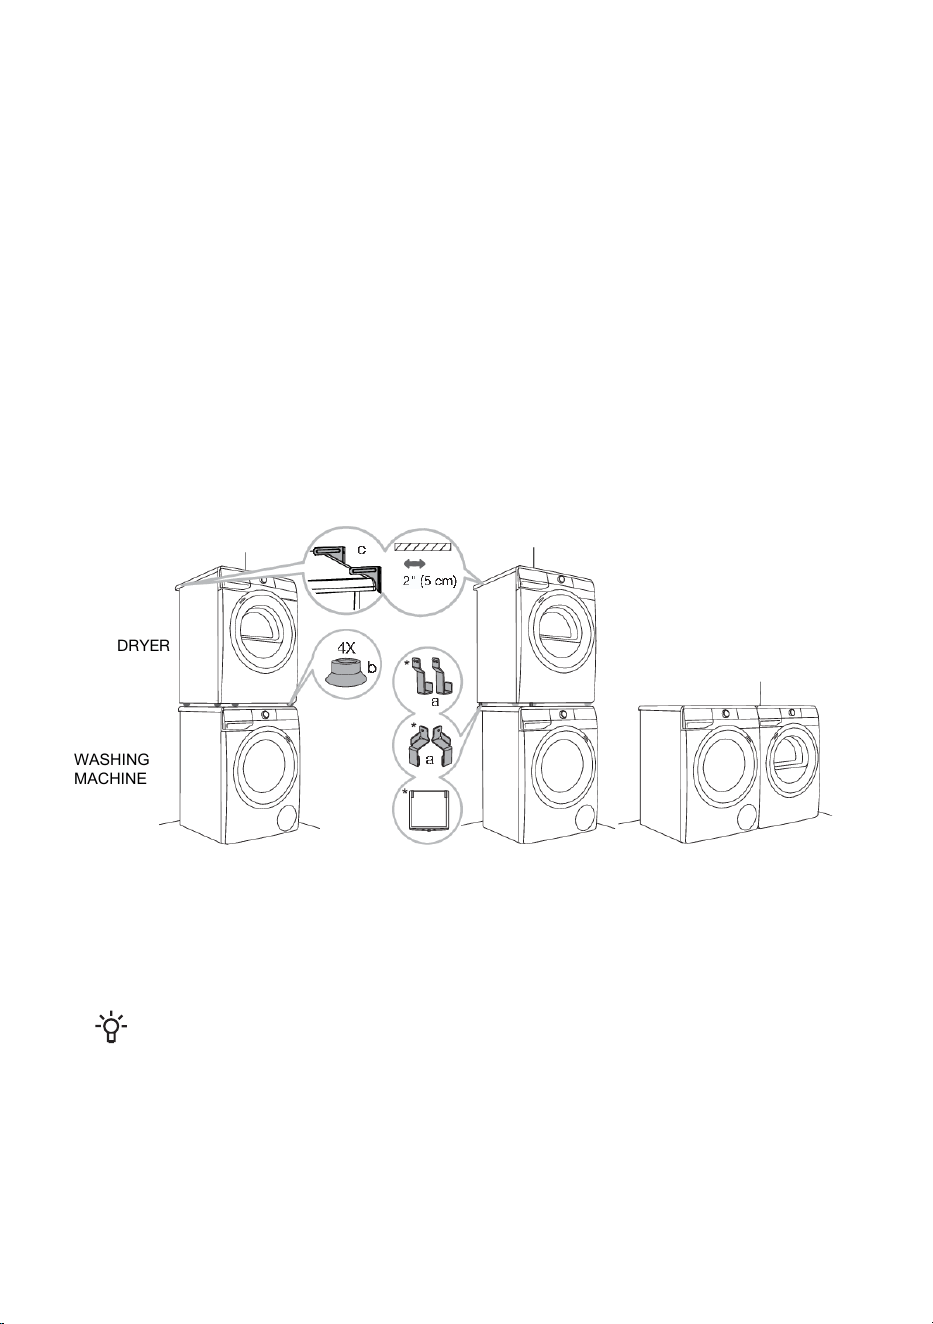
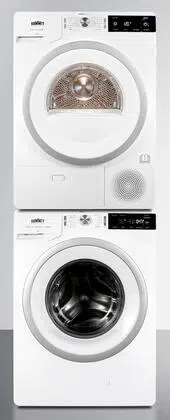
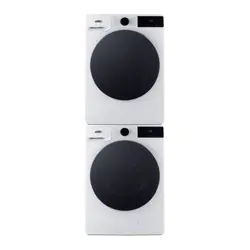
Dryer placement
If you also have a dryer of corresponding (same) dimensions, it can be placed on top of the washing
machine. The vacuum feet must be used when installing a dryer over the washing machine.
Alternatively, the dryer can be placed next to the washing machine (figures 1 and 3).
If your washing machine is smaller (minimum depth 21½" / 545 mm) than your dryer, then the dryer
support has to be purchased separately (figure 2). The supplied vacuum feet must be used; they are
designed to prevent the dryer from slipping. It is essential to use the vacuum feet!
Additional accessories: dryer support (a), vacuum feet (b), and wall fixing bracket (c).
To order replacement parts, visit our website: summitapplianceparts.com
The surface on which the appliance is placed should be clean and level.
The washing machine must be able to hold the weight of the dryer (see DESCRIPTION OF THE
DRYER/Technical information).
DRYER
WASHING
MACHINE
321
* depending on the model
INFORMATION!
At least two people are required to install the tumble dryer on top of a washing machine.
EN - 11
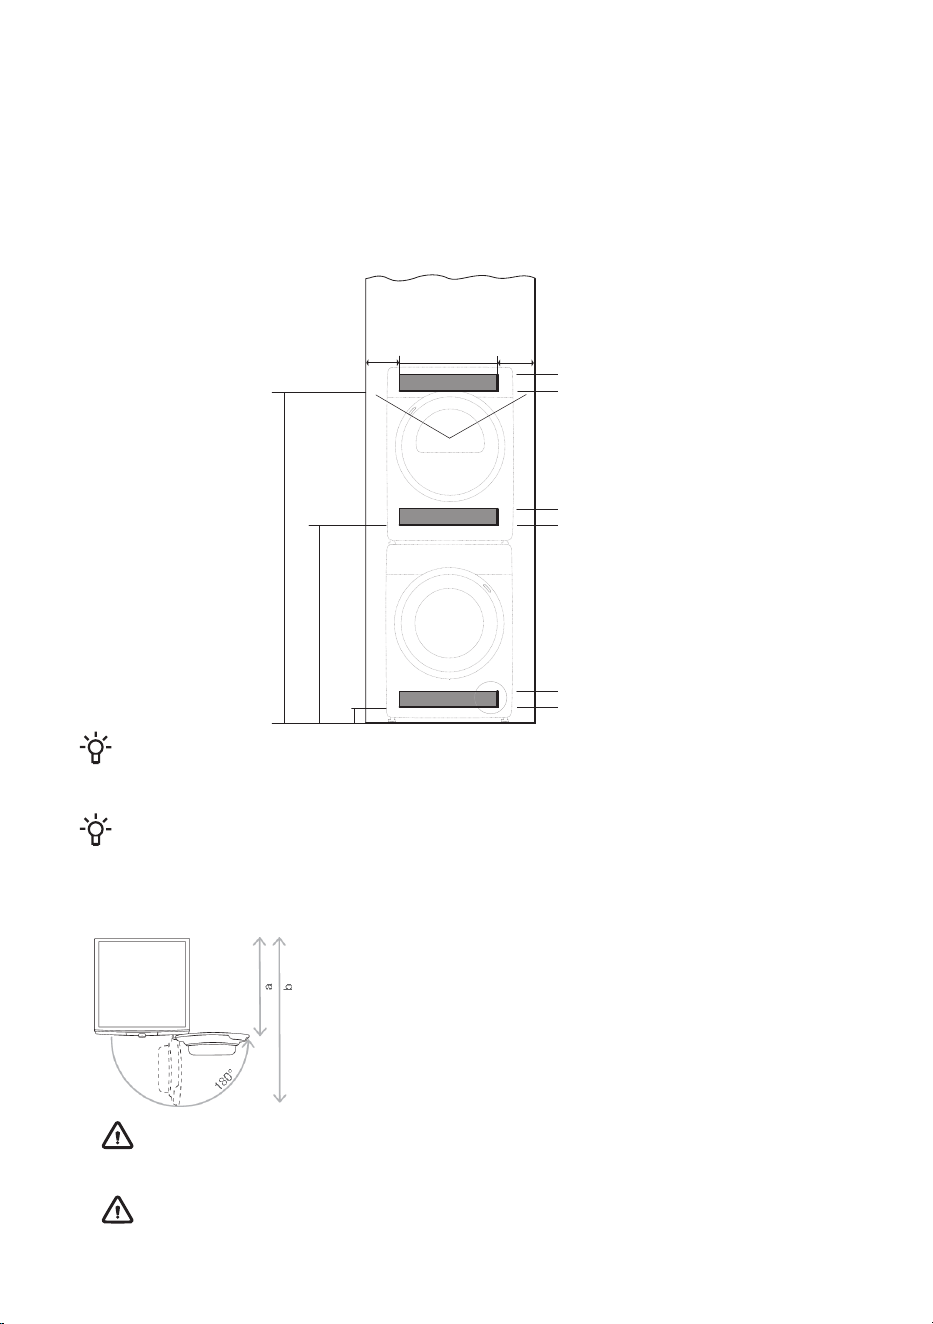
Closet Install- Ventilation Requirements
The front panel controls make it possible to install the washers and dryers in a closet.
Allow a 1" (25 mm) minimum clearance between units and cabinet or wall and a 1" (25 mm)
minimum clearance between the rear edge of the machine top panel and the cabinet or wall.
To ensure proper ventilation, we recommend louvered doors. Otherwise there must be ventilation
openings in the door.
See illustration for minimum ventilation openings below (gray boxes):
INFORMATION!
Ensure that the washing machine door can be opened fully and without obstruction after
installation.
INFORMATION!
The cool air intake panel at the front of the washing machine must not be blocked or
covered. Obstructing the airflow may cause the unit to display an error or malfunction.
Opening the dryer door (overhead view)
See DESCRIPTION OF THE DRYER/Technical information.
a = 24½" (625 mm)
b = 44½" (1134 mm)
WARNING!
Do not install the dryer behind a lockable door, a sliding door, or a door with a hinge on
the opposite side of the dryer door hinge. Install the dryer so that the door can always be
opened freely.
WARNING!
Do not place the dryer on a carpet with long fibers as this may impede air circulation.
3" (76 mm)
36" (915 mm )
61¼" (1555 mm)
29⁄16" (65 mm )
185⁄16" (465 mm)
3" (76 mm)
3" (76 mm)
Minimum
1⅜" (35 mm)
EN - 12

Adjusting the dryer feet
Level the dryer both front-to-back and side-to-side by adjusting the feet, which allow for height
adjustment of ±½" (±1 cm).
Use a spirit level to check alignment and a spanner No. 22 to make the adjustments.
INFORMATION!
The dryer must be placed on a floor with a concrete base. It should be clean and dry;
otherwise, the dryer may slide. Ensure the bottom of adjustable feet are clean and dry.
INFORMATION!
The dryer must stand level and stable on a solid base.
INFORMATION!
Incorrect leveling of the dryer with the adjustable legs may cause vibration, appliance
sliding across the room, and loud operation. Incorrect leveling of the dryer shall not be
subject to warranty.
INFORMATION!
Unusual or louder noises may occur during appliance operation. These sounds are
usually caused by improper installation.
EN - 13
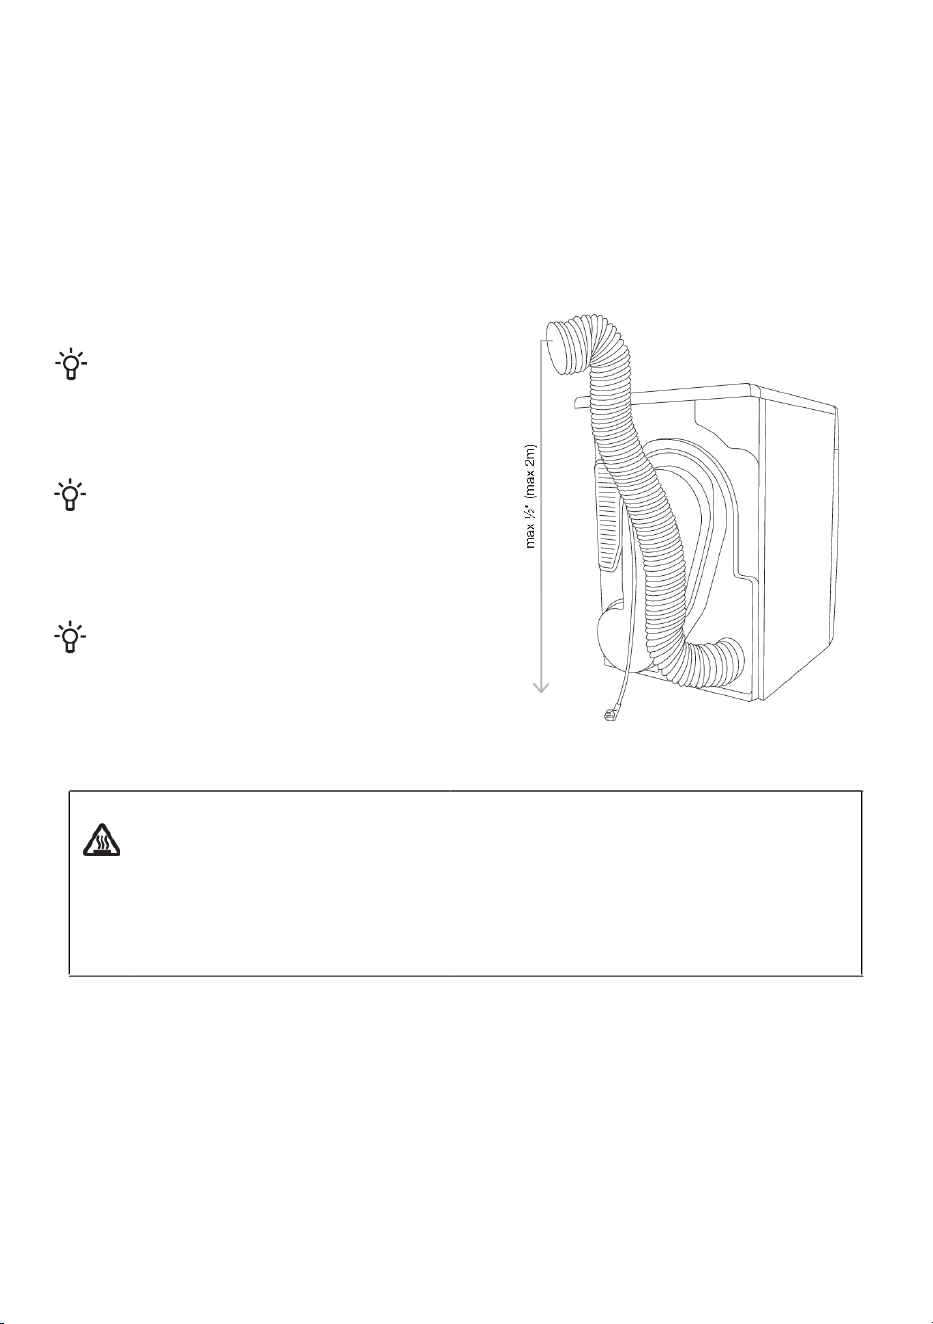
Evacuation of humid air
The dryer has h
umid air exhaust opening on the back side. Connect the air exhaust duct to the exhaust
opening.
Air exhaust duct is not supplied with the dryer!
INFORMATION!
Maximum duct
length
of
60 feet. A maximum of 4
elbows may be
used, but 4 feet of duct must
subtracted from the total vent length for every 90°
elbow used.
INFORMATION!
The distance between the dryer and the air
evacuation opening
(ventilation opening, window)
may not exceed ½" (2 meters). Otherwise,
moisture could accumulate in the air exhaust
duct.
INFORMATION!
Do not evacuate the air from the dryer through
channels used
for appliances or devices that use
natural gas or other fuels
for their operation.
WARNING:
Risk of fire.
Do
not install a booster fan in the exhaust duct.
Note: The booster fan warning does not apply to
clothes dryers intended to be installed in a multiple
clothes dryer system, with an engineered exhaust
duct system that is installed per the clothes dryer
manufacturer’s guidelines.
EN - 14
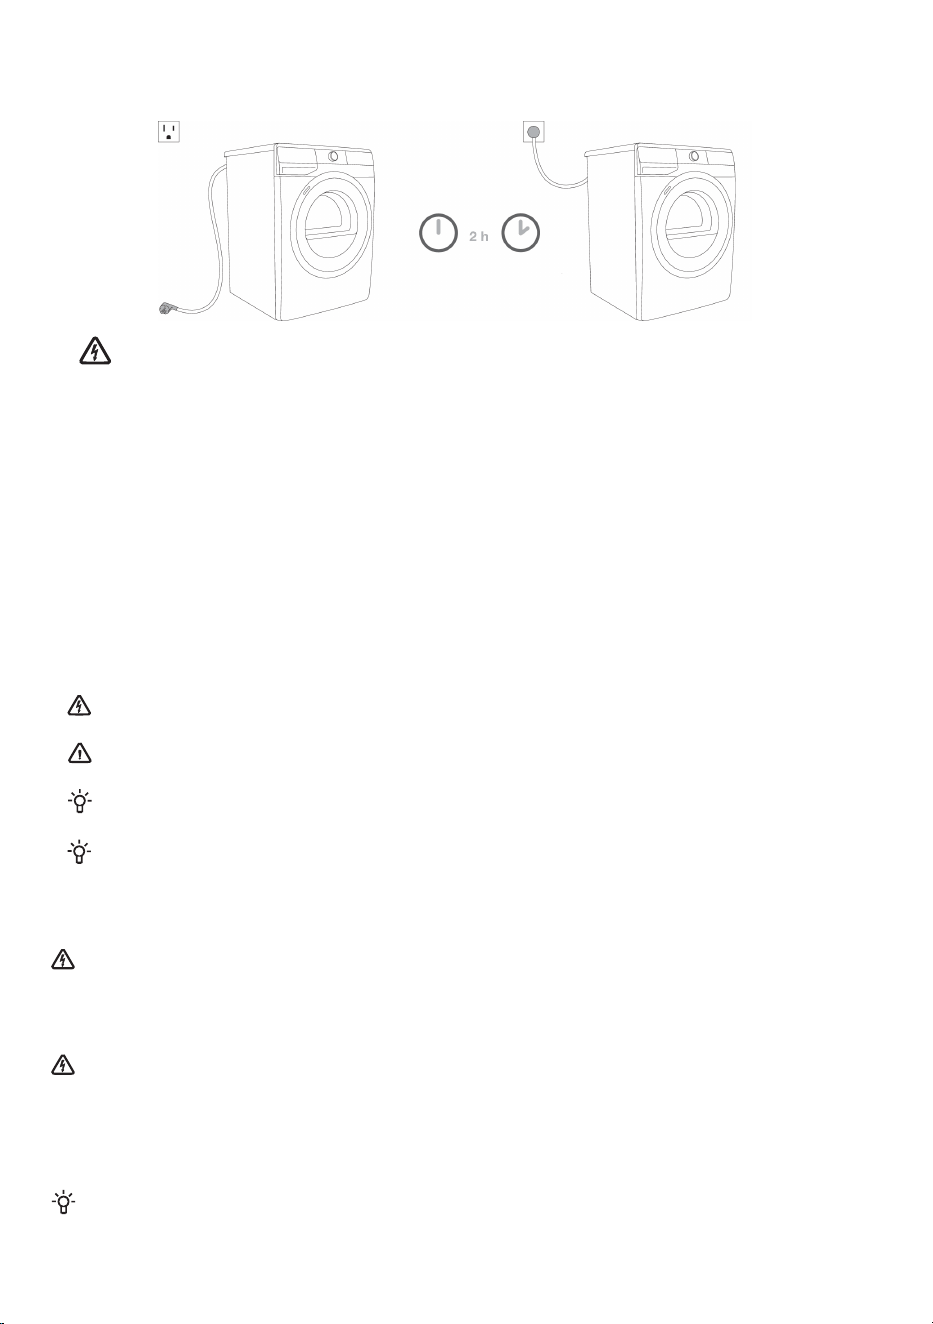
Connecting to the power mains
ELECTRIC
SHOCK!
After
installation,
the
dryer
should
stand still for two hours before it is connected
to the
power
mains; this allows the dryer to stabilize.
This appliance must be grounded. In the event of malfunction or breakdown, grounding will reduce
the risk of electric shock by providing a path of least resistance for electric current. This appliance is
equipped with a cord having an equipment grounding conductor and a grounding plug. The plug must
be plugged into an appropriate outlet that is properly installed and grounded in accordance with all
local codes and ordinances.
Do not modify the plug provided with the appliance if it does not fit the outlet, have a proper outlet
installed by a qualified electrician.
Connect the dryer to a grounded power outlet. After installation, the wall outlet should be freely
accessible. The outlet must be properly grounded in accordance with applicable electrical regulations.
Information on your dryer is indicated on the rating plate (see DESCRIPTION OF THE DRYER/
Technical information).
ELECTRIC SHOCK!
We recommend using over-voltage protection to protect the appliance in case of
a lightning strike.
WARNING!
The dryer should not be connected to the power mains using an extension cord.
INFORMATION!
Any repair and maintenance pertaining to safety or performance should be done by trained experts.
INFORMATION!
A damaged power cord should only be replaced by an authorized personnel.
Electrical installation
ELECTRIC SHOCK!
The receptacle on the rear of the machine is designed to accommodate washers rated 208–240 V. To use this
receptacle, you must use the ready-fitted plug supplied with the washing machine or an equivalent. Washers
rated 208–240 V have two internal fuses of
15 A each. The machine should only be connected to a grounded wall
socket.
ELECTRIC SHOCK!
This appliance must be properly grounded. Refer to the Important Safety Instructions for grounding instructions.
The power supply cord must be grounded. If the machine is to be used in a wet area, the supply must be protected
by a residual current device. Connection to a permanently wired supply point must be made only by a qualified
electrician.
As supplied: 208–240 V, 60 Hz, 2300 W heater rating 30 A circuit required.
INFORMATION!
Do not connect the machine to the mains electricity supply by an extension lead.
EN - 15

Electrical Connections
INFORMATION!
Read the Electrical requirements and grounding instructions before connecting the tumble dryer.
Electric models of the dryer are manufactured for a 3-wire connection system. The dryer frame
is grounded by a link to the neutral conductor on the dryer terminal block. If local codes do not
permit grounding through the neutral, the grounding link from the terminal block must be
removed and a separate ground wire must be used.
Only a 4-conductor cord shall be used when the appliance is installed in a location where
grounding through the neutral conductor is prohibited. Grounding through the neutral conductor
is prohibited for new branch-circuit installations, mobile homes, recreational vehicles, and areas
where local codes prohibit grounding through the neutral conductors. The grounding link on the
dryer must be removed for all 4-wire installations.
These Electrical Connection instructions provide for installing the dryer in the following
situations:
3-wire connections where local codes permit grounding through the neutral, 3-wire connections
with a separate grounding connector where local codes do not permit grounding through the
neutral, and 4-wire connections.
Each of the above connections can be made with an approved power supply cord or by direct
wiring. Each connection instruction identifies the appropriate Power Supply Cord and covers
requirements for direct wiring.
INFORMATION!
The dryer is equipped with a four-prong plug intended for connection to a single-phase supply.
Moving and transport after installation
After every drying cycle, a small amount of condensed water will remain in the dryer. Switch on the
dryer and choose one of the programs, then let the appliance operate for approximately half a
minute. This will pump out the remaining water and prevent damage to the dryer during transport.
ELECTRIC SHOCK!
After transport, the dryer should be left to stand still for at least two hours before it is
connected to the power mains. The appliance should be installed and connected by a
trained technician.
INFORMATION!
If the appliance was not transported in compliance with the instructions, the dryer should be
left to stand still at least 2 hours before it is reconnected to the power mains.
ELECTRIC SHOCK!
Carefully read the instructions for use before connecting the dryer. Repair or any
warranty claim resulting from incorrect connection or use of the dryer shall not be
covered by the warranty.
INFORMATION!
The belt may only be replaced by a service technician.
EN - 16

BEFORE USING THE APPLIANCE FOR THE
FIRST TIME
Make sure the dryer is disconnected from the power mains; then, open the door by pulling the left
side of the door towards you (figures 1 and 2).
Before using the dryer for the first time, clean the dryer drum using a soft damp cotton cloth and water
(figure 3).
21
3
WARNING!
Do not use any solvents or cleaning agents that could damage the dryer (follow the
recommendations and warnings provided by the of the cleaning agent manufacturer).
EN - 17
DRYING PROCESS, STEP BY STEP (1 - 6)
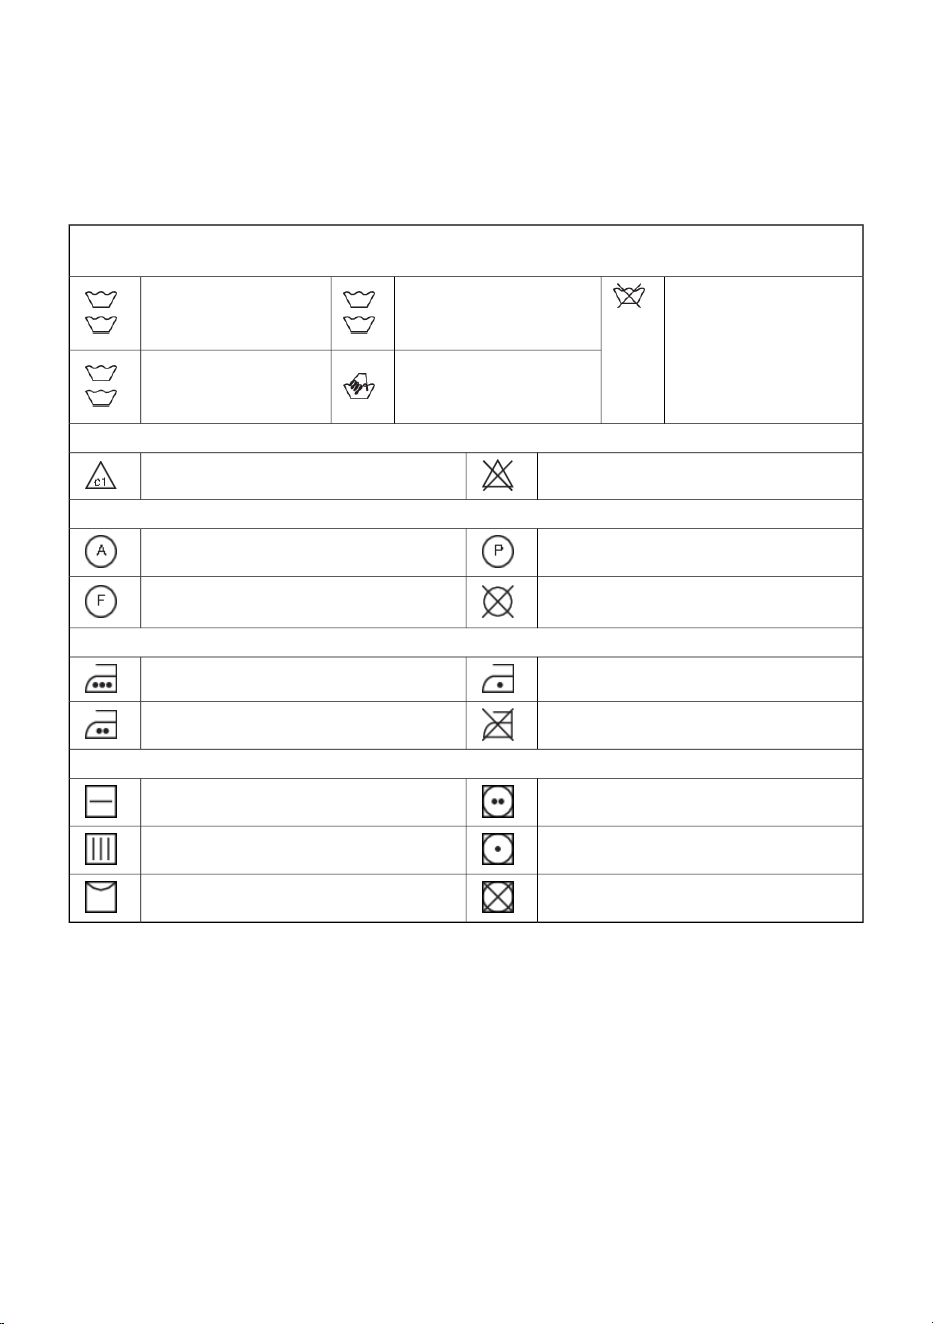
Step 1: Heed the labels on the laundry
Cotton Normal wash;
Sensitive laundry
Do not washMax. washing
temperature
Max. washing
temperature
HOT+ (EXTRA HOT) WARM
Hand wash only
Max. washing
temperature
HOT
Bleaching
Bleaching not allowedBleaching in cool water
Dry cleaning
Petroleum solvent R11, R113Dry cleaning with all agents
Dry cleaning not allowed
Dry cleaning in kerosene, pure alcohol,
and in R113
Ironing
Hot ironing, max. LOW temperatureHot ironing, max. HIGH temperature
Ironing not allowedHot ironing, max. MEDIUM temperature
Drying
High temperatureDry flat (place on a flat surface)
Low temperatureDrip dry
Do not tumble dryLine dry
EN - 18
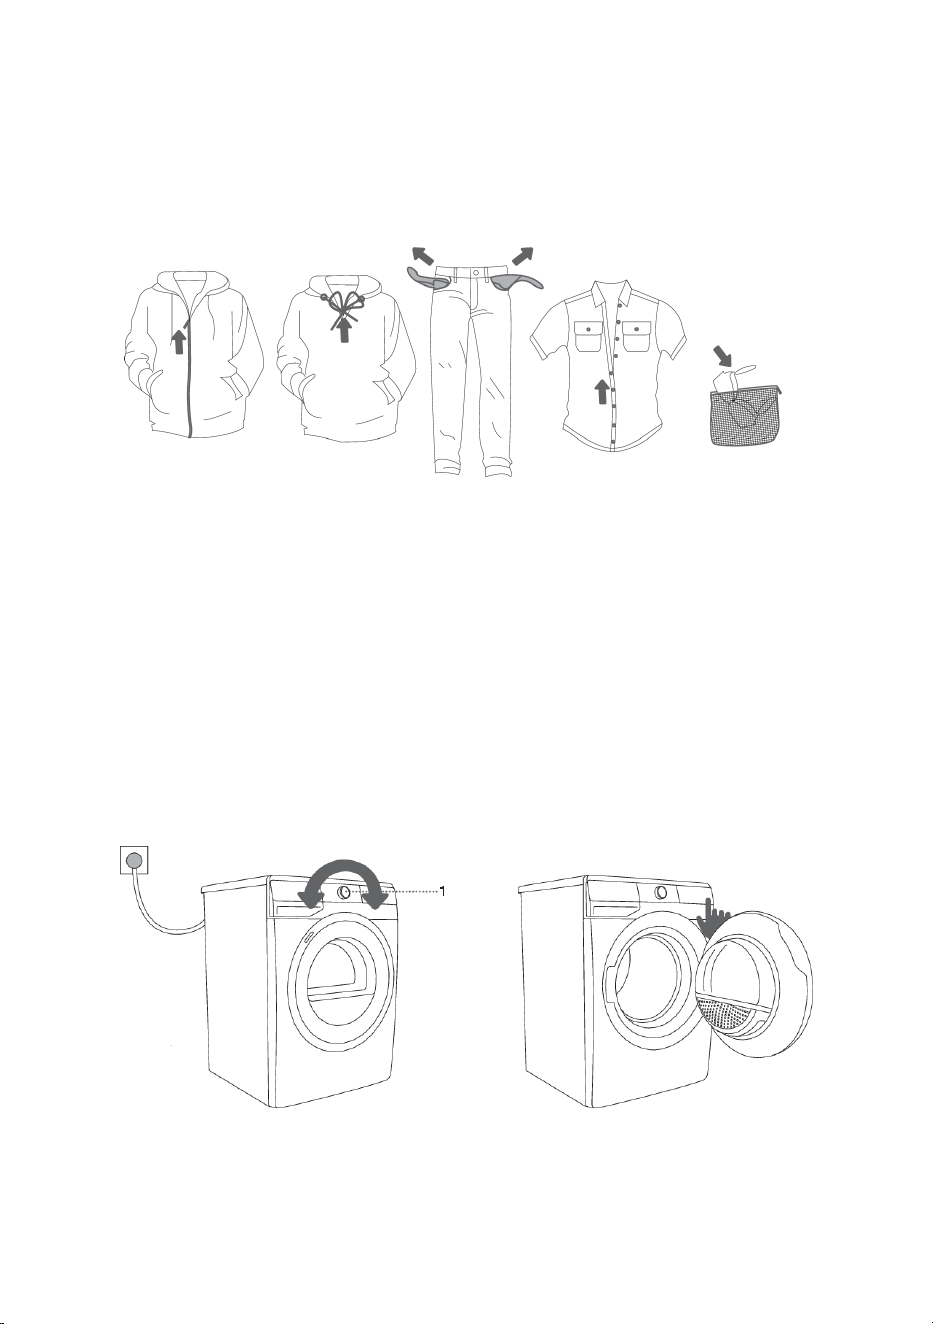
Step 2: Preparing for the laundry drying process
1. Sort the laundry by type and thickness of the fabric (see PROGRAM TABLE).
2. Close the buttons and zips, tie any ribbons, and turn the pockets inside out.
3. Place delicate clothes in a special-purpose laundry bag.
Drying laundry made of particularly delicate fabrics that
may be deformed is not
recommended. The following types of laundry may not be dried in the dryer as this
may cause your garments to deform:
• leather garments and other leather products
• garments that are waxed or treated in any other way
• garments with major wooden, plastic, or metal parts
• garments with spangles
• garments with metal parts subject to rusting
Switching on the dryer
Connect the dryer to the power mains by plugging in the power cord.
To turn on the dryer, rotate the program
selector knob to any position (figure 1).
2
1
EN - 19
Loading the dryer
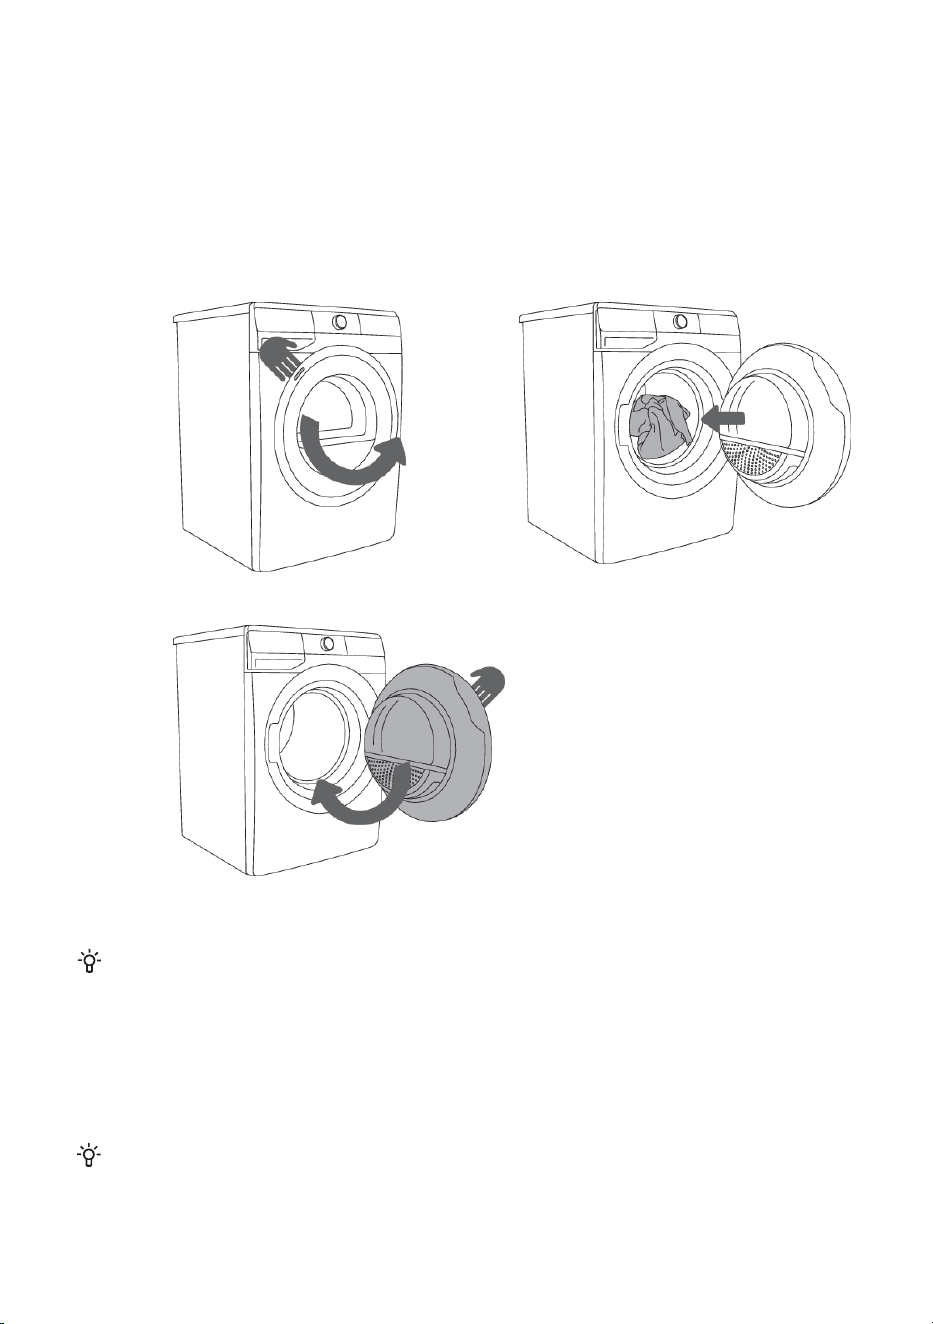
1. Open the dryer door by pulling the left side of the door towards you (figure 1).
2. Insert the laundry into the drum (after making sure the drum is empty) (figure 2).
3. Close the dryer door (figure 3).
21
3
INFORMATION!
Do not insert laundry into
the dryer if it has not been wrung or spun
(recommended minimum spinning cycle: 800 rpm).
INFORMATION!
When drying larger items (bedding, towels, tablecloths etc.), loosen them and then insert them
into the dryer drum.
Do not overload the drum. Refer to the PROGRAM TABLE and follow the nominal load
indicated on the rating plate.
Overloading the drum can cause excessive wrinkling and uneven drying.
EN - 20
Step
3:
Choosing
the drying program
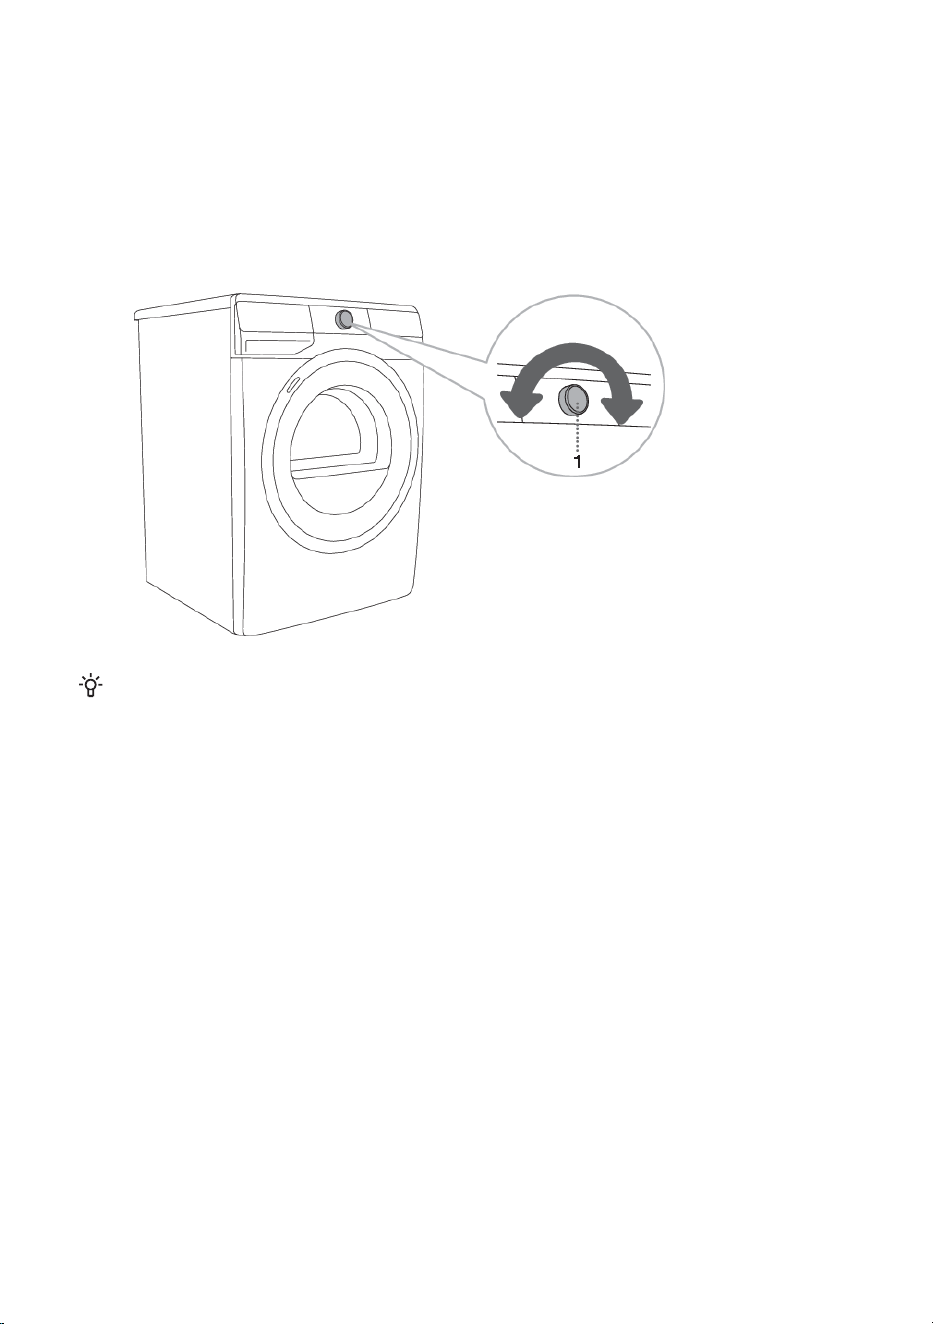
Choose the program by rotating the program selector knob to the left or to the right (depending on
the type of laundry and the desired level of dryness). See PROGRAM TABLE.
The signal light next to the selected program lights up.
INFORMATION!
The program selector
knob will not rotate automatically during
operation.
EN - 21

Program table
Program descriptionMax.
load
Program
Dryness levels
Use this program for thicker non-sensitive cotton laundry. After
drying, it will be dry and ready to be stored.
Full loadExtra Dry
Full loadNormal
Use this program for thicker non-sensitive cotton laundry of
approximately the same thickness.
The program is intended for drying wet cotton laundry. It is the
most energy-efficient program for drying cotton laundry. The
energy usage data is determined using the program cycle setting
and medium dryness setting per CAN/CSA-C361-16 Standard
and DOE test procedure methods specified at 10 CFR 430,
Subpart B, Appendix D2.
Use this program for non-sensitive cotton laundry. After drying,
it will be ready for ironing.
Full loadDamp Iron
(Moist for ironing)
Use this program for non-sensitive cotton laundry. After drying,
it will be ready for ironing.
1/2 loadMixed Fabrics
LOW. TEMP. drying at a lower temperature that is friendlier to
your laundry.
The program is used for drying delicate laundry made of
synthetics fibers.
1/2 loadMixed Damp Iron
This short program is intended for softening or fluffing of clothes
made of wool and silk, which have to be dried thoroughly
according to manufacturers instructions.
1/4 loadWool
Use this program to dry textiles stuffed or padded with down
(pillows, duvets, jackets etc.). Dry large items separately and
use the EXTRA DRY function if necessary.
1/4 loadDown Wear
This program is designed for non-sensitive laundry that is
slightly damp and requires thorough drying. The dryer does
not automatically detect remaining moisture in this mode, so if
the load is still damp after the cycle, it should be repeated.
Conversely, if the laundry becomes overly dry, wrinkled, or
stiff, the selected drying time was too long.
1/2 loadTime
(Timed drying
program)
1/2 loadBaby
(Baby clothes)
Use this program to dry baby clothes. Clothes dried with this
program dry normally.
LOW. TEMP. drying at a lower temperature that is friendlier to
your laundry.
Use this program to dry highly delicate laundry made of
synthetic fibres, which may be slightly moist after the drying
process. We recommend using a special-purpose laundry bag.
1/4 loadDelicates
LOW. TEMP. drying at a lower temperature that is friendlier to
your laundry.
Use this program to dry shirts and blouses. Adjusted drum
rotation prevents the laundry from creasing.
1/4 loadShirts - Perm. Press
LOW. TEMP. drying at a lower temperature that is friendlier to
your laundry.
EN - 22

Program descriptionMax.
load
Program
Dryness levels
Use this program for clothing with a membrane, for sportswear
made of mixed materials, and breathable fabrics.
1/4 loadActive Wear
(Sportswear)
LOW. TEMP. drying at a lower temperature that is friendlier to
your laundry.
The program is suitable for smaller amounts of laundry that you
wish to dry quickly and efficiently.
1/2 loadQuick Dry
Longer drying program duration and overheating of the fabric
results in higher drying temperature above 140°F ( 60°C),
which reduces the amount of microbes and allergens on the
garments. This drying program should not be used for delicate
items and items that are not suitable for machine drying.
1/2 loadAllergy Care
In this program, the heater is switched off. The program is
suitable for refreshing your laundry.
1/4 loadAir Refresh
If your laundry is not
dried to the desired dryness level, use extra functions or use a more
suitable program.
EN - 23
Step 4: Selecting extra functions
INFORMATION!
Activate/deactivate the function by pressing the desired position (before pressing START/PAUSE).
Adjust the settings by pressing the relevant function button (before pressing START/PAUSE).
Functions that can be changed or adjusted with the selected drying program are partly lit (dimmed).
Certain settings cannot be selected with some programs. Such settings will not be lit, and the
button will flash when pressed (see FUNCTION TABLE).
Description of lighting of functions for the selected drying program:
• Lit
(Basic/preset
setting)
• Dimmed
(Functions
that
can
be
adjusted)
• Unlit
(Functions
that
cannot
be
selected)
EXTRA DRY (DRYNESS LEVEL)
Press EXTRA DRY to increase the dryness level and drying time.
This can be adjusted before starting the drying cycle.
If the same program and settings are used three times in a row, the ADAPTTECH
function will automatically store them.
Three levels are available: MAX, MED, and MIN. The light for the selected level
will turn on.
ANTI CREASE (CREASE PREVENTION)
If you cannot remove the laundry immediately after the drying cycle ends, select
the ANTI CREASE function before starting the program.
Press ANTI CREASE to choose between 1h, 2h, or 3h, or to deactivate the
function.
The function turns off automatically when you open the dryer door or press
START/PAUSE after the program ends.
EN - 24
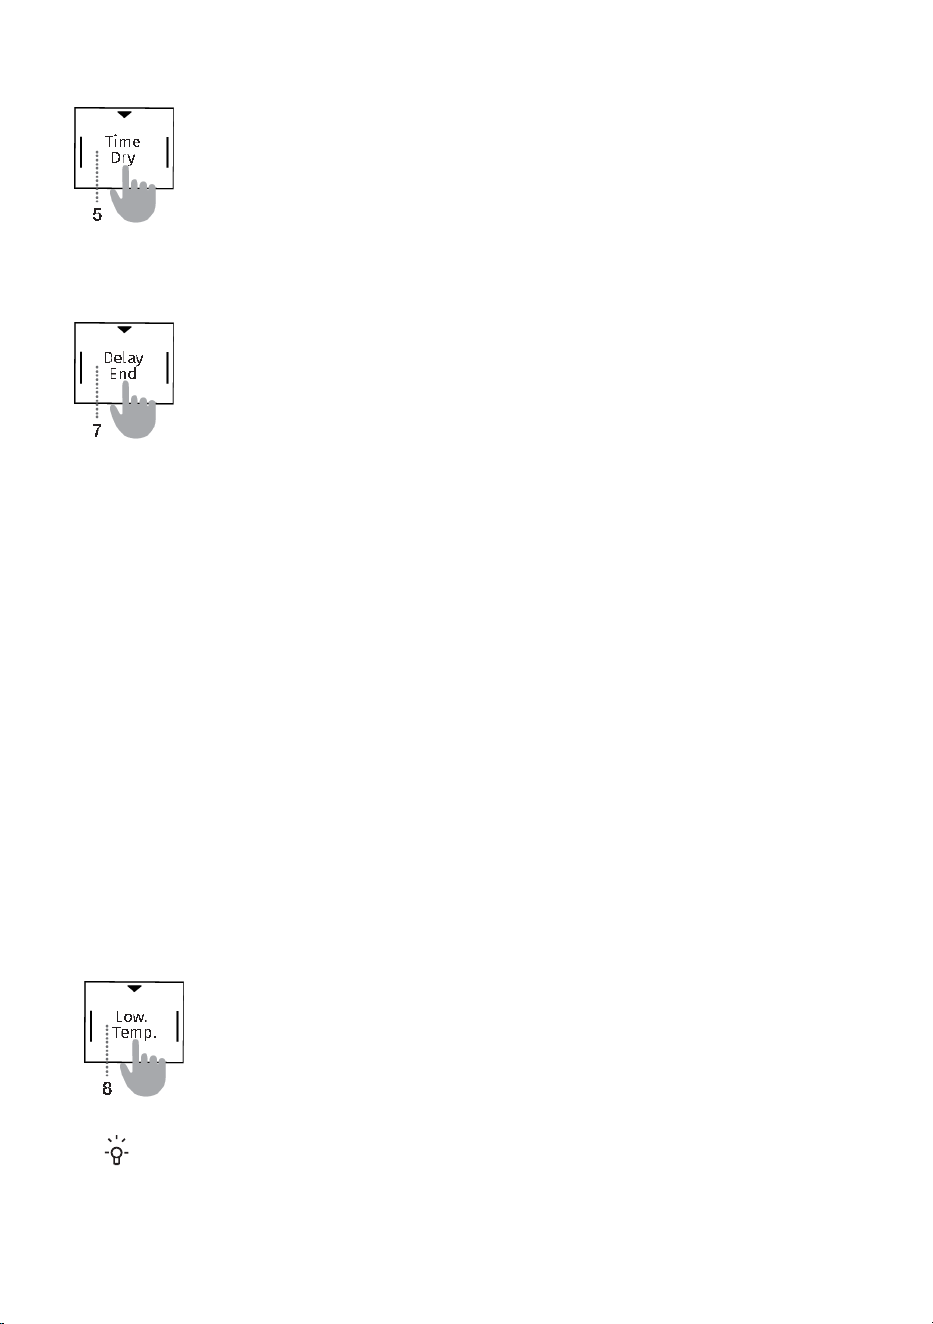
TIME DRY (TIMED DRYING)
In the Time program, press TIME DRY to set the desired drying time.
The selected function light will turn on.
The initial time is 0:30, and each press increases the drying time by 15 minutes, up to
a maximum of 4 hours.
To reset the drying time, press and hold TIME DRY for 3 seconds.
DELAY END (DELAYING THE END OF THE DRYING PROGRAM)
(depending on the model)
Press and hold DELAY END
to set the drying program to finish in up to 24 hours.
If you press any button (except DELAY END or START/PAUSE) while setting this
function, DELAY END will reset.
Set all other desired functions before activating DELAY END.
Settings procedure:
1. Select the desired program and extra functions.
2. Press or hold DELAY END to set the desired end delay:
• 30-minute increments up to 6 hours
• 1-hour increments from 6 to 24 hours
3. Press START/PAUSE to confirm.
After setting DELAY END, the dryer will count down the delay time. When the
countdown reaches the program start time (e.g. 2:30), the drying cycle will start
automatically.
To stop or change the delay, turn the program selector knob to OFF for at least 1
second.
The next time the dryer is used, you can set a new drying completion delay.
To cancel:
Press and hold DELAY END for 3 seconds to cancel the program completion delay. The
drying program will resume immediately.
Example:
If it is currently 9:00 PM and you want the drying program to finish by 6:00 AM, set
DELAY END to 9 hours.
LOW. TEMP. (LOWER TEMPERATURE)
Press LOW TEMP to dry laundry at a lower temperature, which is gentler on fabrics
and helps reduce shrinkage.
This function uses precise heat pump control and an additional temperature sensor to
lower the drying temperature. Garments may experience up to 50% less shrinkage
compared to normal drying, depending on fabric type.
Use this setting only for items that are suitable for tumble drying.
INFORMATION!
Some functions may not be available with certain programs.
If a function cannot be selected, an acoustic signal will sound and the corresponding
indicator light will flash. (See EXTRA FUNCTION TABLE for details.)
EN - 25
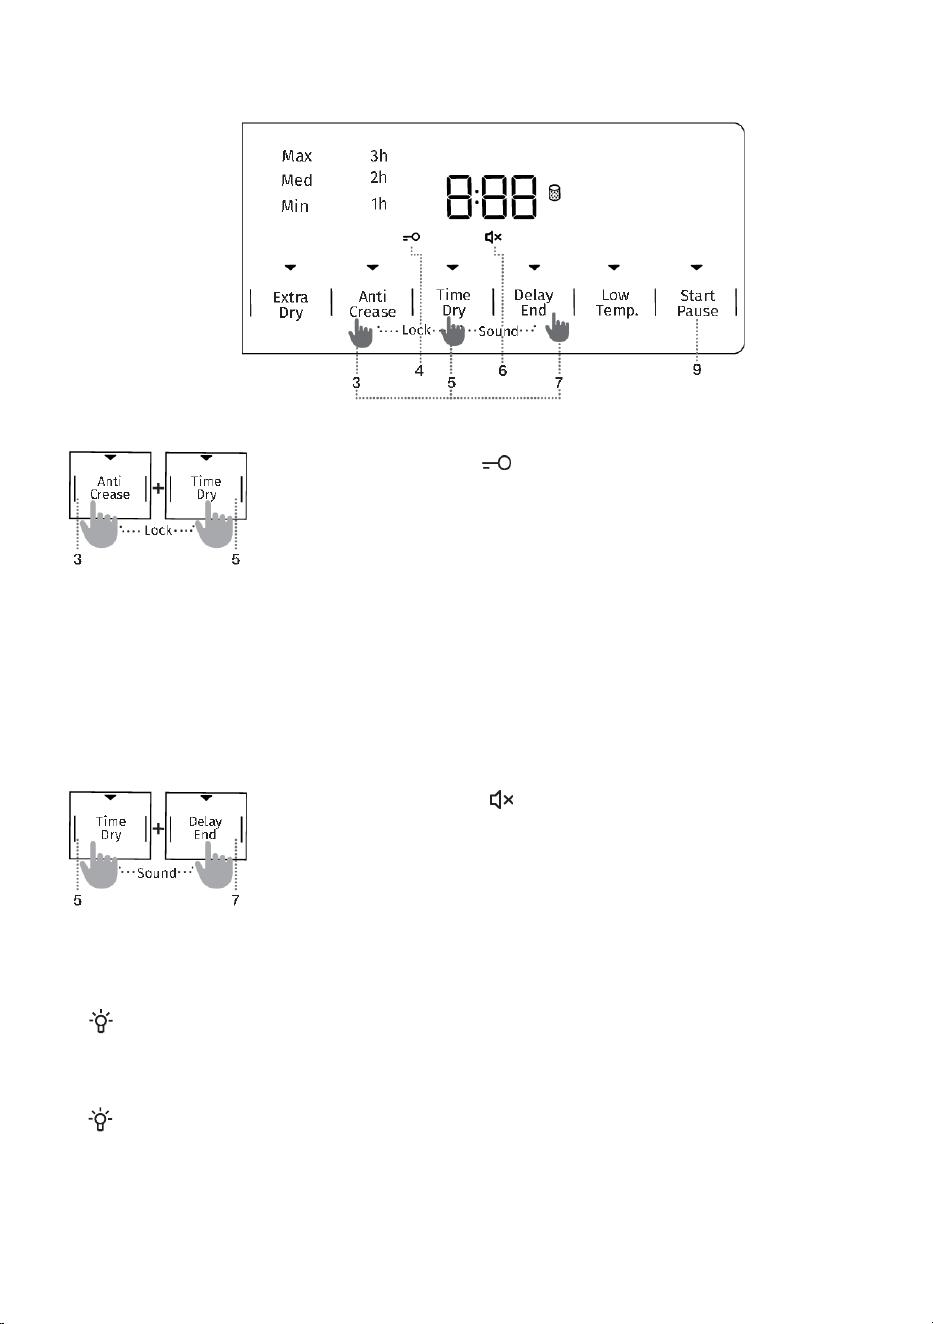
LOCK (CHILD LOCK)
The Child Lock is an additional safety feature that prevents accidental
changes to the program, settings, or additional functions.
To activate or deactivate the child lock:
1. Press and hold ANTI CREASE and TIME DRY for at least 3 seconds.
2. Follow the same procedure to deactivate.
• While the Child Lock is active, programs, settings, and additional
functions cannot be changed.
• The Child Lock remains active even after the dryer is switched off.
• To select a new program, the Child Lock must be deactivated first.
• It can be deactivated during the drying process.
SOUND (SOUND OFF)
This function allows you to mute all operation sounds.
1. Press and hold TIME DRY and DELAY END for at least 3 seconds.
2. To reactivate follow the same procedure.
Note: When the sound is turned off, there will be no audible signal at the
end of the drying program.
INFORMATION!
After disconnecting the dryer from the power mains, all settings will be reset to their default
factory values, except for the acoustic signal loudness, anti-crease, and child lock setting.
INFORMATION!
The LOCK (CHILD LOCK) and SOUND (SOUND OFF) functions cannot be activated or
deactivated 10 seconds after turning on.
Two button combination settings
EN - 26
Extra function table
LOW. TEMP.
(LOWER TEMPERATURE)
DELAY END
(DELAYING THE END OF
THE DRYING PROGRAM)
TIME DRY
(TIMED DRYING)
ANTI CREASE
(CREASE PREVENTION)
EXTRA DRY
(DRYNESS LEVEL)
Program
••••
Extra Dry
(Cupboard dry)
•••Normal
••••
Damp Iron
(Moist for ironing)
••••Mixed Fabrics
••••Mixed Damp Iron
Wool
••••Down Wear
•••
Time
(Timed drying program)
••••
Baby
(Baby clothes)
••••Delicates
••••Shirts - Perm. Press
••••
Active Wear
(Sportswear)
••Quick Dry
••Allergy Care
Air Refresh
• Extra functions can be used
If your laundry is not dried to the desired dryness level, use extra functions or use a more suitable
program.
EN - 27
Step 5: Starting the drying program
Press START/PAUSE.
The time remaining until program completion or DELAY END time (if set) will appear
on the display. Indicators for the selected functions will illuminate.
If the door is not closed properly, the time remaining will flash three times on the
display and there will be an audible signal.
To resume the drying program, close the door properly then press START/PAUSE.
INFORMATION!
Remove the laundry from the dryer to prevent it from creasing at the end of the drying
program.
WARNING!
The final drying cycle includes a cooling stage without heater operation. This ensures the
laundry reaches a safe temperature at the end of the program and can be removed from the
dryer without the risk of hot surfaces.
Step 6: End of the drying program
When the drying program is complete, [End] will appear on the display.
Two red indicator lights will illuminate, the START/PAUSE button light will flash, and
if the ANTI CREASE function was selected, its indicator light will also flash.
1. Open the dryer door.
2. Clean the filter (see CLEANING).
3. Remove the laundry from the drum.
4. Close the door.
5. Switch the dryer to the OFF position with the selector knob.
6. Unplug the power cord from the outlet.
EN - 28
INTERRUPTIONS AND CHANGING THE PROGRAM
Interruptions
Interrupting the program process
Press START/PAUSE to pause or resume a program.
To stop the drying program, press and hold START/PAUSE for 3 seconds. The selected
program will stop, and the
dryer will start to cool down. Cooling down time depends on the selected
program. After this process, a drying program can be selected again.
Open door
If the dryer door is opened during the drying process, the drying cycle will be interrupted.
When the door is closed and the START/PAUSE button is pressed, the drying will resume from the
point at which it was interrupted.
HOT SURFACE!
The dryer door will heat up during the drying process. Use caution when opening the
dryer door to avoid burns.
Power supply failure
After a power failure [PF] will appear on the display and the signal light on the START/PAUSE
button will flash.
Press START/PAUSE to resume the drying process.
Changingthe program/functions
Turn off the dryer by rotating the program selector knob to the OFF position. Turn it back on again by
rotating the program selector knob to any program.
Select another program/function and press START/PAUSE again.
Adding laundry after the start of the program
Open the dryer door and press START/PAUSE button. Insert the laundry and press START/PAUSE.
Drying time may be extended.
HOT SURFACE!
Be careful not to burn yourself when opening the dryer door to load or remove laundry.
Saving personal settings
Initial settings can be changed.
1. Select the desired program and additional functions.
2. Press and hold START/PAUSE for 9 seconds to save the combination.
• A light on the START/PAUSE button and an acoustic signal will confirm the selection and
[saved] will briefly appear on the display.
3. Press START/PAUSE to begin the drying process.
The saved combination will appear each time the dryer is switched on.
To change a previously saved combination, repeat the same procedure.
EN - 29

AdaptTech
When a drying program setting is used three times in a row, this setting is stored as default
and will always be suggested when you select that drying program – this is called the
ADAPTTECH function. If you manually store the settings of a drying program, the
ADAPTTECH function on this program is deactivated.
Personal settings menu
1. Turn on the dryer by rotating the program selector knob to any position.
2. Press and hold EXTRA DRY and TIME DRY for 3 seconds to open the Personal Settings Menu.
• ANTI CREASE and CLEAN THE FILTER indicators will light up.
• Number 1 will appear on the display, indicating the first settings function.
3. Rotate the program selector knob left or right to choose the function:
1 – Sound settings
2 – Reset personal program settings to factory defaults
4. Press ANTI CREASE to confirm the selected function and settings.
5. Press EXTRA DRY to go back one step.
Acoustic Signal Volume
Volume can be set at four levels:
• 0 – Sound off
• 1 – Button sound only
• 2 – Low volume
• 3 – High volume
Rotate the program selector knob to select the desired volume.
If no selection is made within 20 seconds, the menu will automatically return to the main
menu.
The number of drying
cycles performed will appear on the display for 3 seconds if you
unplug the power cord, wait 10 seconds and then plug the power cord back in. After 3
seconds, the appliance enters standby mode.
Overview of the
number
of
drying cycles performed
EN - 30
CLEANING AND MAINTENANCE
ELECTRIC SHOCK!
Before cleaning, make sure to switch off the
dryer and disconnect it from the power
mains (unplug the power cord from the outlet).
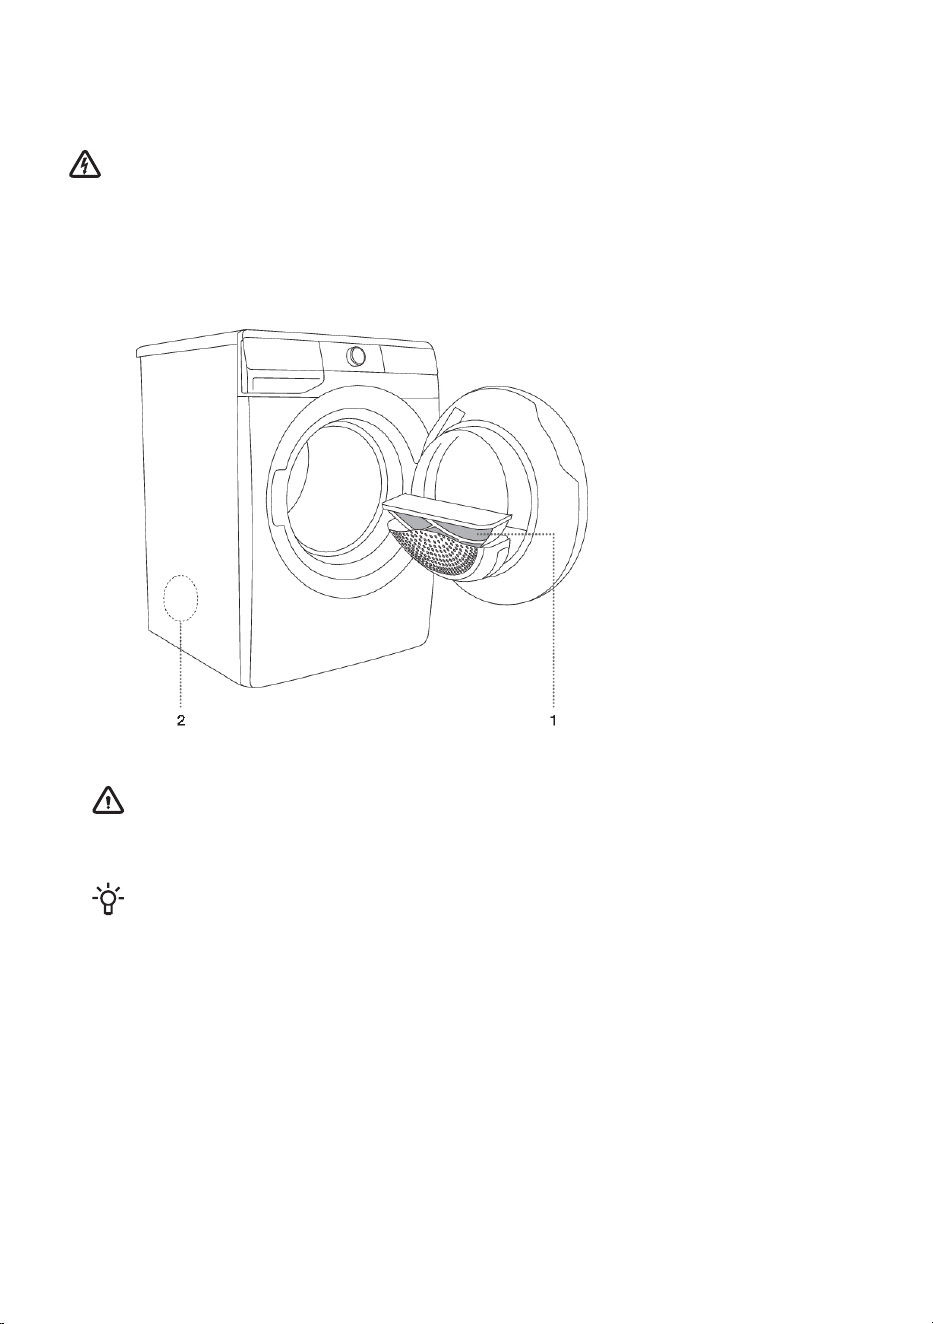
The dryer is fitted with a filtering system consisting of one filter.
1 Net filter
2 Air exhaust opening on
the back side
WARNING!
Never operate the dryer without the filter in place or with a damaged filter. Excess lint
buildup can cause the dryer to malfunction or fail.
INFORMATION!
The dryer may never be operated without the filter in place, or with damaged filter,
as excessive amount of accumulated fibers from the fabric could cause malfunction
or failure of the dryer.
EN - 31
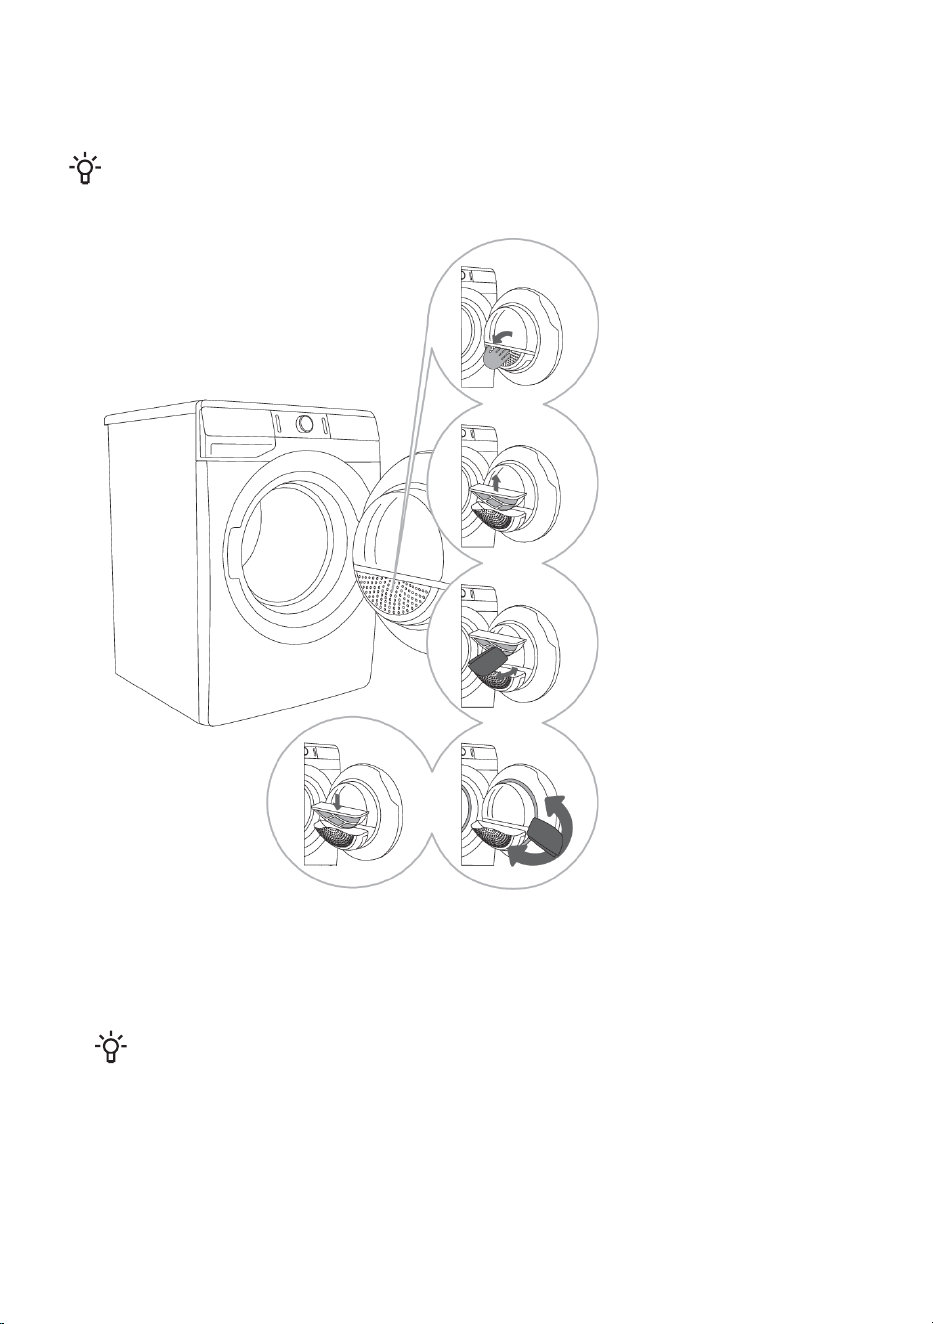
Cleaning the net filter
INFORMATION!
Clean the net filter after each drying cycle.
1 Open the filter housing.
2 Pull out the net filter.
3 Gently scrape the filter
to remove the lint, i.e. the
lining of fibers and threads,
with your hand or with a
cloth.
4 If necessary, clean the
filter housing and door
gasket as well.
5 Insert the net filter and
close the filter housing.
INFORMATION!
Use care when handling the filter cover to avoid pinching your fingers.
EN - 32

Cleaning the exhaust duct
Occasionally clean the interior of the air exhaust opening and the duct using a vacuum.
Cleaning the dryer
ELECTRIC SHOCK!
Always disconnect the dryer from the power mains before cleaning.
Clean the dryer exterior using a soft damp cotton cloth.
WARNING!
Do not use any solvents or cleaning agents that could damage the dryer (follow the
recommendations and warnings provided by the manufacturers of
the cleaning agents).
Wipe all
parts
of
the
dryer
with
a
soft
cloth
until
dry.
INFORMATION!
Do not clean the dryer with a water jet.
EN - 33
TIPS FOR DRYING AND ECONOMIC USE YOUR
DRYER
The most economical way of drying is to dry the recommended amount of laundry in each batch (see
PROGRAM TABLE).
Drying laundry made of particularly delicate fabrics that may be deformed is not recommended.
Use of conditioner in the washing cycle is not necessary as the laundry is soft and smooth after drying
in the dryer. Drying time will be shorter and power consumption will be lower if the garments are
thoroughly wrung or spun before drying. By selecting the appropriate drying program, you will avoid
over-drying your laundry and problems with ironing or shrinkage of fabric.
Regular cleaning of the filters will lead to optimum drying time and minimum power consumption.
When drying smaller amounts of laundry or individual garments, the sensor may not perceive the
actual level of moisture in the laundry. In such cases, it is recommended to dry smaller items or
amounts with programs for dryer laundry or with the timed program.
Low standby mode
If you do not run any program or choose any settings after switching on the dryer (program selector
knob), the display unit will be switched off after 5 minutes and switched to stand-by mode in order to
save energy.
The display unit can be reactivated by rotating the program selector knob. If you do not do anything
for 5 minutes after the end of a program, the display unit will be switched off to save power.
< 0,5P o = weighted power when off [W]
< 0,5P I = weighted power when in standby [W]
5,00T I = standby time [min]
INFORMATION!
Low mains voltage and different
drying loads may affect the drying time; the remaining
time displayed is adjusted accordingly during the drying process.
EN - 34

TROUBLESHOOTING
Disturbances from the environment (e.g. the power grid) may result in various error reports (see
TROUBLESHOOTING TABLE). In such case:
• Switch off the dryer and wait at least one minute.
• Switch on the dryer and repeat the drying program.
• Most errors during operation can be resolved by the user (see TROUBLESHOOTING TABLE).
• If the error persists, call an authorized service personnel.
• Repairs may only be carried out by an adequately trained person.
• Repair or any warranty claim resulting from incorrect connection or use of the dryer shall not be
covered by the warranty. In such cases, the costs of repair shall be charged to the user.
What to do?CauseProblem/Error
The machine
will not start.
• Check whether the main switch is on.
• The main switch is off.
• Check the fuse.• There is no voltage in the
power outlet. • Check if the power cord plug is correctly
inserted into the power outlet.
There is voltage
in the outlet,
but the drum
does not spin
and the
appliance does
not work.
•• Check if the door is closed properly.Open the door.
••
To deactivate the start delay option,
press and hold DELAY
END
for 3
seconds.
Perhaps the DELAY END
function was set.
• Program was not started in
accordance with the
instructions.
• Re-read the instructions for use again.
The appliance
stops heating
completely
during a
program.
• The net filter may be clogged.
As a result, the temperature in
the dryer rises, which in turn
causes overheating, and
therefore heating is switched
off.
• Clean the net filter (see
CLEANING
AND
MAINTENANCE/Cleaning
the
net
filter in
the door).
• Wait for the appliance
to cool down, and
try running
it again. If the dryer still fails
to start, call a service technician.
A slight hitting
noise appears.
•• The noise
will
subside
without
any
intervention.
If the dryer is out of use for a
long period of time, the
support elements are under
stress at the same point.
The door opens
during drying.
• Reduce the amount of laundry.
• Excessive load on the door
(too
much
laundry
in
the
drum).
EN - 35
What to do?CauseProblem/Error
Unevenly dried
laundry.
•• Make sure you have sorted the laundry
by type and thickness, whether you have
added a suitable amount of laundry to
the drum, and whether you have
selected a suitable program (see
PROGRAM TABLE).
Laundry of varying types and
thickness, or excessive
amount of laundry.
Laundry not
dried or drying
takes too long.
••
Clean the filter (see CLEANING AND
MAINTENANCE/Cleaning the net filter
in the door).
Filter is not cleaned.
• Make sure there is adequate supply of
fresh air to the dryer; for example, open
the door and/or window.
• Dryer is placed in a closed
room; room that is too cold; or
room that is too small and the
air overheats as a result. • Check if the temperature in the room
where the dryer is installed is too high
or too low.
•• If the laundry is still wet after the drying
cycle, repeat the drying and select an
appropriate drying program (after
cleaning the filter).
Laundry was not sufficiently
wrung or spun.
•• Use a suitable program or extra
functions.
Amount of laundry dried in the
appliance is too large or
insufficient.
• Close the buttons or zippers on the
laundry before drying.
• Laundry (such as bedding)
gets tangled into large balls.
• After the drying process, loosen the
laundry and select an additional drying
program (e.g. Time (Timed drying
program).
Errors indicated on the display unit may include the following:
What to do?Indication on the display unit
and description of error
Problem/Error
Call service center.
Control unit failure
Call service center.
Temperature sensor failure
Call service center.
Communication error
EN - 36
What to do?Indication on the display unit
and description of error
Problem/Error
Control unit failure
Disconnect the tumble dryer from the power
supply.
Call service center.
Warnings indicated on the display unit may include the following:
What to do?Indication on the display unit
and description of warning
Warning
Power supply failure warning
Drying interrupted due to power supply failure.
Press START/PAUSE to restart or resume
the drying program.
Clean the filter.At the end of the drying
program, (End) will appear
on the display unit.
The red symbol will light
up. This is not a fault; it is just
a warning that the filter need
to be cleaned after drying.
Sound
Rumbling or rattling noise: during drying when the laundry also includes hard parts (such as buttons,
zippers etc.)
WARNING!
In case of a failure, only use approved spare parts by authorized manufacturers.
WARNING!
Repair or any warranty claim resulting from incorrect connection or use of the dryer shall
not be covered by the warranty. In such cases, the costs of repair shall be charged to
the user.
INFORMATION!
The warranty does not cover the errors or failures resulting from disturbances from the
environment (lightning strike, power grid failures, natural disasters etc.)
If you have checked the table above and find that you still need help with your appliance, call our
Customer Service facility at 800-932-4267 (Ext. 513) between 9:00 AM and 5:00 PM ET or visit
www.summitappliance.com/support. We will do our best to answer your questions.
To order replacement parts, visit our website: summitapplianceparts.com
EN - 37

DISPOSAL
Packaging is made of environmentally friendly materials that can be
recycled, disposed of, or destroyed without any hazard to the environment.
To this end, packaging materials are labelled appropriately.
The symbol on the product or its packaging indicates that the product
should not be treated as normal household waste. Take the product to an
authorized collection centre for waste electric and electronic equipment
processing.
When disposing of the dryer at the end of its useful life, remove all power
cords, and destroy the door latch and switch to prevent the door from
locking or latching (child safety).
Correct disposal of the product will help prevent any negative effects on
the environment and health of people, which could occur in case of
incorrect product removal. For detailed information on removal and
processing of the product, please contact the relevant municipal body in
charge of waste management, your waste disposal service, or the store
where you bought the product.
EN - 38
LIMITED WARRANTY
ONE-YEAR LIMITED WARRANTY
Warranty coverage is available within the 48 contiguous United States, along with select areas
of
Alaska, Hawaii, and Canada. For locations not covered, consumers can either contact a local provider
or coordinate with Felix Storch, Inc. to find nearby service options, which may qualify for partial
reimbursement.
The warranty for this appliance is valid for one year from the date of purchase, provided the appliance
is operated and maintained according to the instructions included with the product. The warrantor
will cover the cost of factory-specified parts and repair labor needed to correct defects in materials
or workmanship. Service must be performed by a designated service company.
All parts, except the compressor, are warranted for one year against manufacturing defects. Plastic
parts, shelves, and cabinets are produced to commercially acceptable standards but are not
covered for damages incurred during handling or for breakage.
ITEMS WARRANTOR WILL NOT PAY FOR:
1. Service calls to correct the installation of your appliance, to instruct you how to use your
appliance, to replace or repair fuses or to correct wiring
or plumbing.
2. Service calls to repair or replace appliance light bulbs or broken shelves. Consumable parts
(such as filters) are excluded from warranty coverage.
3. Damage resulting from accident, alteration, misuse, abuse, fire, flood, acts of God, improper
installation, installation not in accordance with electrical or plumbing codes, or use of products
not approved by warrantor.
4. Replacement parts or repair labor costs for units operated outside the 48 contiguous United
States, along with select areas of Alaska, Hawaii, and Canada.
5. Repairs to parts or systems resulting from unauthorized modifications made to the appliance.
6. Expenses for travel and transportation for product service in remote locations.
7. The removal and reinstallation of your appliance if it is installed in an inaccessible location or is
not installed in accordance with published installation instructions.
DISCLAIMER OF IMPLIED WARRANTIES; LIMITATION OF REMEDIES
CUSTOMER'S SOLE AND EXCLUSIVE REMEDY UNDER THIS LIMITED WARRANTY SHALL BE PRODUCT
REPAIR
AS PROVIDED HEREIN. IMPLIED WARRANTIES, INCLUDING WARRANTIES OF MERCHANTABILITY OR FITNESS
FOR A PARTICULAR PURPOSE, ARE LIMITED TO ONE YEAR. WARRANTOR SHALL NOT BE LIABLE FOR
INCIDENTAL OR CONSEQUENTIAL DAMAGES. SOME STATES DO NOT ALLOW THE EXCLUSION OR LIMITATION
OF INCIDENTAL OR CONSEQUENTIAL DAMAGES, OR LIMITATIONS ON THE DURATION OF IMPLIED WARRANTIES
OF MERCHANTABILITY OR FITNESS, SO THESE EXCLUSIONS OR LIMITATIONS MAY NOT APPLY TO YOU. THIS
WARRANTY GIVES YOU SPECIFIC LEGAL RIGHTS AND YOU MAY ALSO HAVE OTHER RIGHTS, WHICH VARY FROM
STATE TO STATE.
WARNING: This product can expose you to chemicals including Nickel
(Metallic) which is known to the State of California to cause cancer.
For more information go to www.P65Warnings.ca.gov
Note: Nickel is a component in all stainless steel and some other metallic compositions.
EN - 39

F
elix
Storch,
I
nc.
An ISO 9001:2015 registered company
770 Garrison Ave
Bronx, New York 10474
www.summitappliance.com
Revised: 2026-04-08
SÈCHE-LINGE À
VENTILATION
Manuel d'Utilisation
Modèles:
SLDV342 | LBDV242
AVANT UTILISATION, VEUILLEZ LIRE ET SUIVRE TOUTES LES CONSIGNES DE
SÉCURITÉ ET LES INSTRUCTIONS D'UTILISATION
Numéro de Modèle: Numéro de Série:
Felix Storch, Inc.
Entreprise certifiée ISO 9001:2015
770 Garrison Avenue
Bronx, NY 10474
www.summitappliance.com
Ce sèche-linge est conçu exclusivement pour un usage domestique.
Ne l'utilisez pas pour sécher des vêtements qui ne peuvent pas être séchés en
machine.
Les symboles suivants sont utilisés dans ce manuel :
INFORMATION!
Information, conseil, astuce ou recommandation
AVERTISSEMENT!
Avertissement – danger général
CHOC ÉLECTRIQUE!
Avertissement –risque de choc électrique
SURFACE CHAUDE!
Avertissement –danger de surface chaude
DANGER D'INCENDIE!
Avertissement – risque d'incendie
Il est important de lire attentivement les instructions.
FR - 2

4
6
6
7
7
8
9
10
11
12
13
14
15
15
16
16
17
18
18
19
19
20
21
22
24
28
28
29
29
29
29
29
30
30
30
31
32
33
33
34
34
35
38
39
INSTRUCTIONS DE SÉCURITÉ IMPORTANTES ................................................................
DAN
GER DE SURFACE CHAUDE ........................................................................................
SÉCURITÉ .............................................................................................................................
DESCRIPTION DU SÈCHE-LINGE .......................................................................................
Informations techniques .........................................................................................................
Commande tactile ..................................................................................................................
INSTALLATION ET RACCORDEMENT ................................................................................
Choix de la pièce ...................................................................................................................
Emplacement du sèche-linge ................................................................................................
Installation dans un placard – Exigences de ventilation ........................................................
Réglage des pieds du sèche-linge .........................................................................................
Évacuation de l’air humide .....................................................................................................
Raccordement au réseau électrique ......................................................................................
Installation électrique .............................................................................................................
Connexions électriques ..........................................................................................................
Déplacement et transport après installation ...........................................................................
AVANT LA PREMIÈRE UTILISATION DE L’APPAREIL ........................................................
PROCESSUS DE SÉCHAGE, ÉTAPE PAR ÉTAPE (1 - 6) ...................................................
Étape 1 : Respecter les étiquettes du linge ............................................................................
Étape 2 : Préparation du linge pour le séchage ......................................................................
Mise en marche du sèche-linge ..............................................................................................
Chargement du sèche-linge ....................................................................................................
Étape 3 : Choix du programme de séchage ............................................................................
Tableau des programmes ........................................................................................................
Étape 4 : Sélection des fonctions supplémentaires .................................................................
Étape 5 : Démarrage du programme de séchage ...................................................................
Étape 6 : Fin du programme de séchage ................................................................................
INTERRUPTIONS ET MODIFICATION DU PROGRAMME ...................................................
Interruptions ............................................................................................................................
Modification du programme/des fonctions ..............................................................................
Ajout de linge après le démarrage du programme ..................................................................
Enregistrement des réglages personnels ................................................................................
AdaptTech ...............................................................................................................................
Menu des réglages personnels ...............................................................................................
Aperçu du nombre de cycles de séchage effectués ................................................................
NETTOYAGE ET ENTRETIEN ...............................................................................................
Nettoyage du filtre à peluches dans la porte ...........................................................................
Nettoyage du conduit d’évacuation .........................................................................................
Nettoyage du sèche-linge .......................................................................................................
CONSEILS POUR LE SÉCHAGE ET UNE UTILISATION ÉCONOMIQUE DU SÈCHE-LINGE ...
Mode veille à faible consommation .......................................................................................
DÉPANNAGE ........................................................................................................................
MISE AU REBUT ...................................................................................................................
GARANTIE LIMITÉE .............................................................................................................
FR - 3
Contenu

1. Lisez attentivement toutes les instructions avant
d'utiliser l'appareil.
2. Ne séchez pas d'articles ayant été préalablement
nettoyés, lavés, trempés ou tachés d'essence, de
solvants de nettoyage à sec ou d'autres
substances inflammables ou explosives, car ils
dégagent des vapeurs susceptibles de
s'enflammer ou d'exploser.
3. Risque d'étouffement et de blessure par
coincement: ne laissez pas les enfants jouer sur
ou dans l'appareil. Une surveillance étroite est
requise lorsque l'appareil est utilisé à proximité
d'enfants.
4. Avant de mettre l'appareil hors service ou de le
jeter, retirez la porte du compartiment de séchage.
5. N'introduisez pas les mains dans l'appareil si le
tambour est en mouvement.
6. N'installez pas et n'entreposez pas cet appareil à
l'extérieur ou dans un endroit exposé aux
intempéries.
7. Ne modifiez pas les commandes.
8. Ne réparez ni ne remplacez aucune pièce de
l'appareil et n'effectuez aucune réparation, sauf
indication contraire dans les instructions
d'entretien ou de réparation publiées que vous
comprenez et pour lesquelles vous possédez les
compétences nécessaires.
9. N’utilisez pas de pièces de rechange non
recommandées par le fabricant (par exemple, des
pièces fabriquées à domicile à l’aide d’une
imprimante 3D).
10. N’utilisez pas d’assouplissants ni de produits
antistatiques, sauf indication contraire du
fabricant.
11. N’utilisez pas de chaleur pour sécher les articles
contenant de la mousse de caoutchouc ou des
matériaux similaires.
12. Nettoyez le filtre à peluches avant ou après
chaque utilisation.
13.
14.
Veillez à ce que la zone autour de la sortie d’air et
les zones adjacentes soient exemptes de
peluches, de poussière et de saletés.
L’intérieur de l’appareil et le conduit d’évacuation
doivent être nettoyés périodiquement par un
technicien qualifié.
15.
16.
Ne placez pas dans votre sèche-linge des articles
ayant été en contact avec des huiles de cuisson.
Les articles contaminés par des huiles de cuisson
peuvent provoquer une réaction chimique
susceptible d’enflammer le linge. Pour réduire les
risques d’incendie liés à des charges
contaminées, la dernière phase du cycle de
séchage s’effectue sans chaleur (phase de
refroidissement). Évitez d'arrêter le sèche-linge
avant la fin du cycle de séchage, sauf si vous
retirez rapidement tout le linge et l'étalez pour
permettre à la chaleur de se dissiper.
AVERTISSEMENT: Un branchement incorrect du
conducteur de mise à la terre peut entraîner un
risque d'électrocution. En cas de doute sur la mise
à la terre de l'appareil, veuillez consulter un
électricien qualifié ou un technicien agréé.
17. AVERTISSEMENT : Veillez à ce que les fentes de
ventilation du boîtier ne soient pas obstruées.
Lisez attentivement le mode d'emploi avant
d'utiliser le sèche-linge.
N’utilisez pas le sèche-linge sans avoir lu et
compris au préalable ce mode d’emploi.
Cet appareil n’est pas destiné à être utilisé par des
personnes (y compris les enfants) dont les capacités
physiques, sensorielles ou cognitives sont réduites, ou
par des personnes manquant d’expérience et de
connaissances, à moins qu’elles ne soient sous la
surveillance d’un adulte responsable de leur sécurité
ou qu’elles n’aient reçu des instructions concernant
l’utilisation de l’appareil.
Ce mode d’emploi est fourni avec différents types
et modèles de sèche-linge. Il peut donc contenir
des descriptions de réglages ou d’équipements
non disponibles sur votre appareil.
Le non-respect du mode d’emploi ou une
utilisation inappropriée du sèche-linge peut
endommager le linge ou l’appareil, ou blesser
l’utilisateur. Conservez le mode d’emploi à portée de
main, près du sèche-linge.
Votre sèche-linge est destiné exclusivement à un
usage domestique. Si le sèche-linge est utilisé à des
fins professionnelles, lucratives ou pour un usage
dépassant le cadre d’une utilisation domestique
normale, ou s’il est utilisé par une personne qui n’est
pas un consommateur, la période de garantie sera
égale à la période de garantie la plus courte prévue par
la législation en vigueur.
Suivez les instructions pour l'installation correcte du
sèche-linge et son branchement au secteur (voir
INSTALLATION ET BRANCHEMENT).
Toute réparation ou opération d'entretien du sèche-
linge doit être effectuée exclusivement par des
techniciens qualifiés. Une réparation non
professionnelle peut entraîner un accident ou un
dysfonctionnement majeur.
Pour éviter tout danger, un cordon d'alimentation
endommagé ne peut être remplacé que par le
fabricant, un technicien agréé ou une personne
autorisée.
Après l'installation, laissez le sèche-linge reposer
pendant deux heures avant de le brancher au
secteur.
L'installation du sèche-linge sur un lave-linge nécessite
au moins deux personnes.
CONSIGNES DE SÉCURITÉ IMPORTANTES
CONSERVEZ CES INSTRUCTIONS POUR CONSULTATION ULTÉRIEURE!
AVERTISSEMENT!
Pour réduire les risques d’incendie, d’électrocution ou de blessures lors de l’utilisation de votre appareil,
veuillez suivre les précautions de base, notamment les suivantes:
FR - 4
AVERTISSEMENT!
Il est interdit de brancher le sèche-linge au secteur à
l'aide d'une rallonge.
Ne branchez pas le sèche-linge au secteur à l'aide d'un
dispositif de commutation externe, tel qu'une
minuterie, ni sur une prise de courant régulièrement
mise sous tension et hors tension par le fournisseur
d'électricité.
AVERTISSEMENT!
En cas de défaut, utilisez uniquement des pièces de
rechange homologuées par les fabricants agréés.
AVERTISSEMENT!
En cas de branchement incorrect, d'utilisation
incorrecte ou d'intervention d'une personne non
autorisée, les dommages seront à la charge de
l'utilisateur et ne seront pas couverts par la garantie.
Utilisez toujours les conduits ou tuyaux fournis avec le
sèche-linge.
AVERTISSEMENT!
Ce sèche-linge étant à évacuation, il ne possède pas
de réservoir de condensats. La poignée est purement
décorative et fixe ; elle ne doit pas être ouverte. Une
force excessive appliquée sur la poignée peut la
casser.
Installez le sèche-linge dans une pièce bien ventilée et
dont la température est comprise entre 10°C et 25°C
(50°F et 77°F).
Placez le sèche-linge sur une surface plane, stable et
solide (en béton).
AVERTISSEMENT!
Ne placez pas le sèche-linge derrière une porte
verrouillable ou coulissante, ni derrière une porte dont
la charnière est du côté opposé à celle du sèche-linge.
Installez le sèche-linge de manière à ce que la porte
puisse toujours s'ouvrir librement.
Ne jamais obstruer l'orifice d'évacuation d'air.
AVERTISSEMENT!
Ne pas placer le sèche-linge sur un tapis à poils longs,
car cela pourrait entraver la circulation de l'air.
Ne pas raccorder le sèche-linge à une cheminée ou à
un conduit servant également à l'évacuation des
produits de combustion de gaz naturel ou d'autres
combustibles provenant d'autres appareils.
L'air ambiant du sèche-linge ne doit pas contenir
de poussière. La pièce où est installé le sèche-
linge doit être bien ventilée afin d'éviter le
refoulement des gaz provenant des appareils à gaz à
flamme nue (par exemple, une cheminée).
S'assurer que les fibres ne s'accumulent pas autour du
sèche-linge.
Ne pas évacuer l'air du sèche-linge par les conduits ou
les gaines utilisés pour les appareils fonctionnant au
gaz naturel ou à d'autres combustibles.
L'appareil ne doit pas être en contact avec un mur ou
un meuble adjacent.
Ne pas utiliser le sèche-linge pour sécher du linge non
lavé.
Le linge taché d'huile, d'acétone, d'alcool, de dérivés
d'huile, de détachants, de térébenthine, de cire et de
dissolvants de cire doit être lavé en machine à l'eau
chaude avec de la lessive avant d'être séché au sèche-
linge.
Les vêtements contenant du latex, des pièces en
caoutchouc, les bonnets de douche et de bain, ainsi
que le linge ou les couvertures en mousse de
caoutchouc ne doivent pas être séchés au sèche-linge.
Utilisez un adoucissant ou un produit similaire en
suivant les instructions du fabricant.
DANGER D'INCENDIE!
Retirez tous les objets, tels que briquets et allumettes,
des poches.
Si le sèche-linge est raccordé à un système
d'évacuation d'air déjà utilisé par un autre appareil, un
clapet anti-retour doit être installé.
Un retour d'air dans le sèche-linge pourrait
endommager l'appareil ; le clapet anti-retour empêche
ce retour.
Nettoyez le filtre du sèche-linge après chaque cycle de
séchage. Si vous avez retiré le filtre, remettez-le en
place avant le cycle de séchage suivant.
AVERTISSEMENT!
N’utilisez aucun solvant ni produit nettoyant
susceptible d’endommager le sèche-linge (suivez les
recommandations et les avertissements des
fabricants).
Après le séchage, débranchez le sèche-linge.
La garantie ne couvre pas les consommables, les
légères variations de couleur, l’augmentation du bruit
due à l’âge de l’appareil et n’affectant pas son
fonctionnement, ni les défauts esthétiques des
composants qui n’affectent ni le fonctionnement ni la
sécurité du sèche-linge.
AVERTISSEMENT!
Ne laissez pas les enfants jouer avec le sèche-
linge.
FR - 5

Empêchez vos enfants et vos animaux domestiques
d'entrer dans le tambour du sèche-linge.
Avant de fermer la porte du sèche-linge et de lancer un
cycle, assurez-vous qu'il ne reste que du linge dans le
tambour (par exemple, si un enfant y est entré et a
fermé la porte de l'intérieur).
Activez la sécurité enfants. Voir l'ÉTAPE 4 :
RÉGLAGE DES FONCTIONS
SUPPLÉMENTAIRES/Sécurité enfants.
Ne laissez pas les enfants de moins de trois ans
s'approcher du sèche-linge, sauf s'ils sont sous
surveillance constante.
Ce sèche-linge est conforme à toutes les normes
de sécurité en vigueur.
Ce sèche-linge peut être utilisé par des enfants de
8 ans et plus, ainsi que par des personnes ayant des
capacités physiques, sensorielles ou cognitives
réduites, ou un manque d'expérience et de
connaissances, à condition qu'ils soient surveillés
pendant l'utilisation de l'appareil, qu'ils aient reçu les
instructions nécessaires concernant l'utilisation en
toute sécurité du sèche-linge et qu'ils comprennent les
risques liés à une utilisation inappropriée.
Veillez à ce que les enfants ne jouent pas avec le
sèche-linge.
Les enfants ne sont pas autorisés à nettoyer le sèche-
linge ni à effectuer des opérations d'entretien sans
surveillance.
DANGER DE SURFACE CHAUDE
L'arrière du sèche-linge peut devenir très chaud
pendant son fonctionnement. Attendez qu'il
refroidisse complètement avant de toucher son
arrière.
Si vous ouvrez la porte du sèche-linge pendant le
séchage, le linge peut être très chaud et vous risquez
de vous brûler.
N'interrompez jamais le séchage avant la fin du cycle.
Si vous devez l'interrompre, soyez très prudent lorsque
vous sortez le linge du tambour, car il est très chaud.
Retirez-le rapidement et étalez-le pour qu'il refroidisse
au plus vite.
SÉCURITÉ
Le sèche-linge est protégé par un dispositif de sécurité
anti-surchauffe. Ce dispositif arrête l'appareil si la
température devient trop élevée.
Si le filtre à peluches est obstrué, le sèche-linge peut
s'arrêter automatiquement en raison d'une surchauffe.
Nettoyez le filtre, attendez que le sèche-linge
refroidisse, puis essayez de le redémarrer. S'il ne
démarre toujours pas, contactez le service technique.
SURFACE CHAUDE!
À des températures de séchage plus élevées, la
vitre de la porte chauffera. Soyez prudent pour
éviter les brûlures. Assurez-vous que les enfants
ne jouent pas près de la porte vitrée.
DANGER D'INCENDIE!
Si vous avez nettoyé vos vêtements avec
des produits de nettoyage industriels
ou des substances chimiques, ne les
séchez pas au sèche-linge.
FR - 6

DESCRIPTION DU SÈCHE-LINGE
DEVANT
1. Orifice d'évacuation d'air à l'arrière
2. Bouton MARCHE/ARRET et sélecteur de
programme du sèche-linge
3. Unité de contrôle
4. Porte
5. Filtre à réseau
6. Plaque signalétique
ARRIÈRE
1. Orifice d'évacuation d'air
2. Cordon d'alimentation
3. Pieds réglables
4. Boîte de jonction
23½" (600 mm)
33½" (850 mm)
24½" (625 mm)
25½" (653 mm)
44½" (1134 mm)
Voir la plaque signalétique
Informations techniques
La plaque signalétique contenant les informations de base sur le sèche-linge se trouve à
l'intérieur de la porte du sèche-linge.
Largeur
Hauteur
Profondeur du séchoir (a)
Profondeur porte fermée
Profondeur avec porte ouverte (b)
Tension nominale
Fusible
Puissance nominale
Charge maximale
Voir la plaque signalétique
Voir la plaque signalétique
Voir la plaque signalétique
FR - 7
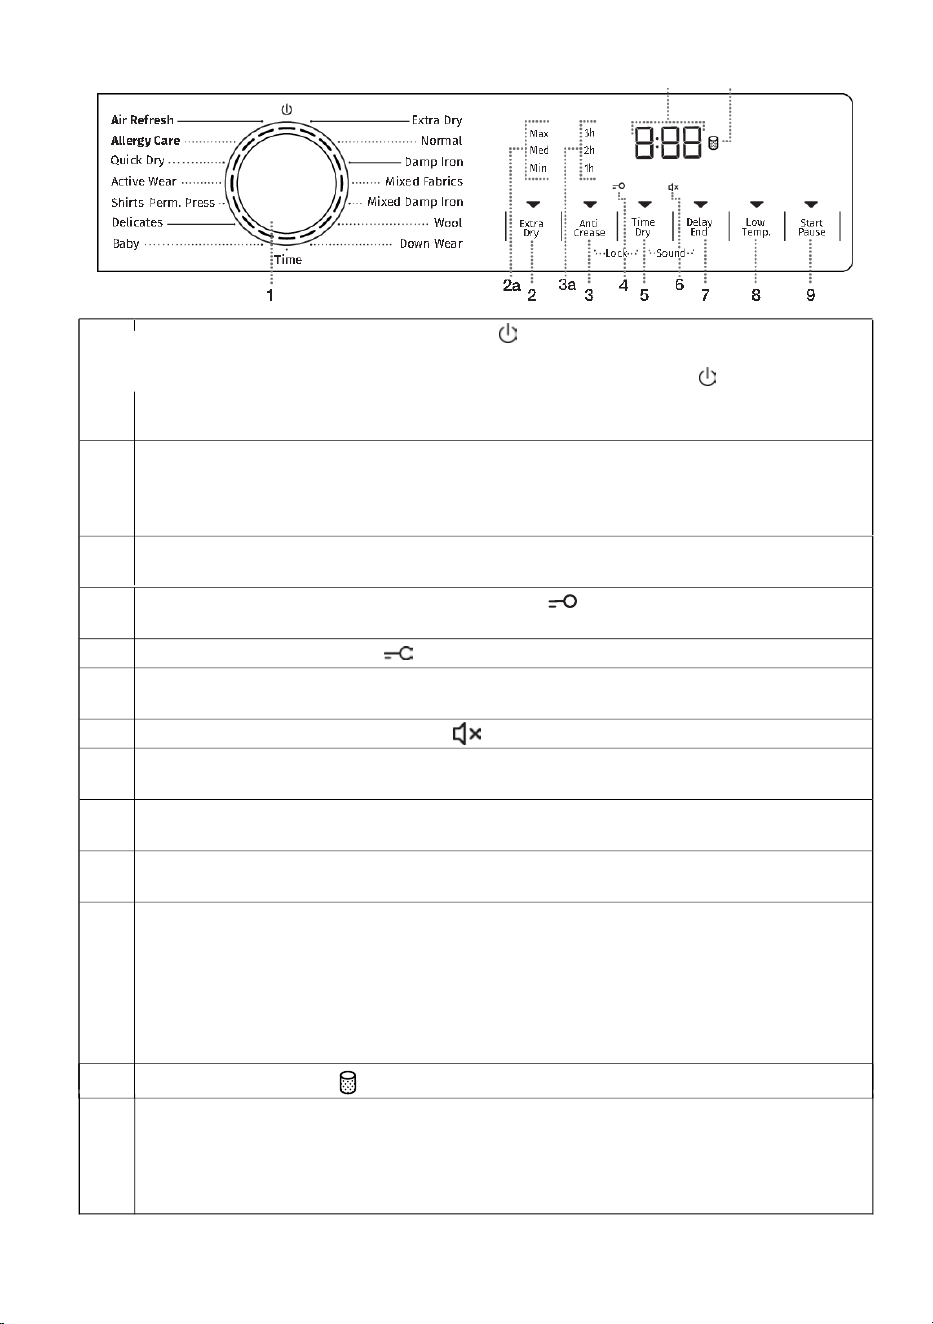
Unité de Contrôle
1
2
3
3+5
4
TIME DRY
(SÉCHAGE PROGRAMMÉ)
Possibilité de régler le temps de séchage.
5
Allumage du symbole SOUND OFF
6
DELAY END (RETARDER LA FIN DU PROGRAMME DE SÉCHAGE)
Possibilité de régler l'heure de fin du séchage.
7
5+7
8
LOW TEMP. (TEMPÉRATURE PLUS BASSEUSE)
Possibilité de séchage à basse température.
9
NETTOYER LE FILTRE
symbole (lumière)
10
EXTRA DRY
(NIVEAU DE SÉCHAGE)
Le symbole s’allume lorsque la fonction est activée
.
Fonctions supplémentaires: permet de sélectionner le niveau de séchage MAX, MED ou
MIN (2a) et de prolonger le temps de séchage
.
ANTI CREASE
(PRÉVENTION DES PLIS)
La durée de fonctionnement sélectionnée s'affichera. 1h, 2h, 3h (3a)
Verrouillage enfant MARCHE/ARRÊT (Verrouillage)
Appuyez et maintenez ANTI CREASE
et
TIME DRY (3 et 5) pendant 3 secondes.
Symbole de sécurité enfant
Bouton
ON/OFF
et sélecteur de programme.
Pour allumer le sèche-linge, tournez le bouton de sélection dans n’importe quel sens.
Pour éteindre le sèche-linge, tournez le bouton sur la position
ARRÊT
Pour choisir un programme, tournez simplement le bouton jusqu’au programme souhaité
Le voyant à côté du programme sélectionné s’allume
Activation/désactivation du son
(Son)
Appuyez et maintenez
TIME DRY
et
DELAY END
(5 et 7) pendant 3 secondes
• DÉMARRER – Appuyez une fois pour lancer le programme de séchage.
• PAUSE
– Appuyez deux fois pour mettre le programme en pause.
• SAUVEGARDE DES RÉGLAGES PERSONNELS
– Maintenez appuyé pendant 5 secondes.
Lorsque l'appareil est allumé, le voyant du bouton s'allume.
L'écran affiche les informations suivantes
11
• Fonctions disponibles
• Temps restant avant la fin du programme
• Informations destinées à l'utilisateur.
Bouton START/PAUSE
Ce bouton a 3 fonctions:
FR - 8
INSTALLATION ET RACCORDEMENT
INFORMATION!
Retirez tout l'emballage. Faites preuve de prudence lorsque vous retirez l'emballage à l'aide
d'objets pointus afin de ne pas endommager le sèche-linge.
AVERTISSEMENT:
•
Installez le sèche-linge conformément aux instructions du fabricant et aux
réglementations locales.
• L’installation d’un sèche-linge doit être effectuée par un installateur qualifié.
• To reduce the risk of severe injury or death, follow all installation instructions.
• Pour réduire les risques de blessures graves ou mortelles, suivez scrupuleusement
toutes les instructions d’installation. N’installez pas de sèche-linge avec des conduits
d’évacuation en plastique souple. Si un conduit métallique souple (de type aluminium)
est installé, il doit être d’un type spécifique identifié par le fabricant de l’appareil
comme étant compatible avec les sèche-linge. Les conduits d’évacuation souples
sont connus pour s’affaisser, se déformer facilement et retenir les peluches. Ces
conditions obstruent la circulation de l’air du sèche-linge et augmentent le risque
d’incendie.
• L'appareil ne doit pas évacuer les gaz d'échappement dans une cheminée, un mur,
un plafond, un grenier, un vide sanitaire, ou un espace dissimulé d'un bâtiment.
Utilisez uniquement des conduits métalliques rigides ou flexibles pour l'évacuation.
La longueur maximale du conduit doit être de 8 pieds (2,4 m) et le nombre maximal
de coudes de 4.
La longueur totale du conduit métallique flexible ne doit pas dépasser 8 pieds (2,4 m).
Le conduit ne doit pas être assemblé avec des vis ou d'autres moyens de fixation qui
pénètrent dans le conduit et retiennent les peluches.
• Conservez ces instructions.
FR - 9

Choisir la chambre
INFORMATION!
Le sèche-linge ne doit pas être en contact avec un mur ou un meuble adjacent. Pour un
fonctionnement optimal, nous recommandons de respecter la distance de sécurité
indiquée sur la figure.
En cas de non-respect de l'espace minimal requis, le séchoir risque de surchauffer.
INFORMATION!
Ne pas obstruer les orifices de ventilation et d'évacuation d'air humide situés à l'arrière ou
sur les côtés du sèche-linge.
Placez l'appareil dans une pièce aérée, munie d'une fenêtre ou d'un ventilateur.
Raccordez le conduit d'évacuation à l'orifice d'évacuation d'air. Ne raccordez pas l'évacuation
à un conduit servant également à l'évacuation des gaz de combustion d'autres appareils ou
des gaz provenant d'appareils utilisant d'autres substances combustibles.
Le sèche-linge dégage de la chaleur. Évitez de le placer dans une petite pièce, car le séchage
risque d'être plus long en raison d'une mauvaise circulation de l'air.
Veillez à ce que la pièce soit bien éclairée afin que l'écran et le panneau de commande soient
facilement lisibles.
FR - 10

Emplacement du sèche-linge
Si vous possédez également un sèche-linge de dimensions identiques, vous pouvez le placer
au-dessus du lave-linge. L'utilisation des pieds à ventouses est indispensable lors de
l'installation du sèche-linge.
Il est également possible de placer le sèche-linge à côté de la machine à laver (figures 1 et 3).
Si votre lave-linge est moins profond (545 mm minimum) que votre sèche-linge, le support pour
sèche-linge doit être acheté séparément (figure 2). L'utilisation des ventouses fournies est
obligatoire; elles sont conçues pour empêcher le sèche-linge de glisser. Leur utilisation est
essentielle!
Accessoires supplémentaires: support pour sèche-linge (a), pieds pour aspirateur (b) et support
de fixation murale (c).
Pour commander des pièces de rechange, rendez-vous sur notre site web:
summitapplianceparts.com
La surface sur laquelle l'appareil est placé doit être propre et plane.
La machine à laver doit pouvoir supporter le poids du sèche-linge (voir DESCRIPTION DU
SÈCHE-LINGE/Informations techniques).
21 3
* selon le modèle
INFORMATION!
Il faut au moins deux personnes pour installer le sèche-linge au-dessus d'une
machine à laver.
LAVAGE
MACHINE
SÉCHOIR
FR - 11

INFORMATION!
Après l'installation, assurez-vous que la porte de la machine à laver puisse s'ouvrir complètement et
sans obstruction.
INFORMATION!
La grille d'aération située à l'avant du lave-linge ne doit pas être obstruée ni recouverte. Un blocage
de la circulation d'air peut entraîner un message d'erreur ou un dysfonctionnement de l'appareil.
Ouverture de la porte du sèche-linge (vue de dessus)
Voir la DESCRIPTION DU SÈCHE-LINGE/Informations techniques.
a = 24½" (625 mm)
b = 44½" (1134 mm)
AVERTISSEMENT!
N’installez pas le sèche-linge derrière une porte verrouillable, une porte coulissante ou une porte
dont la charnière se trouve du côté opposé à celle du sèche-linge. Installez le sèche-linge de
manière à ce que la porte puisse toujours s’ouvrir librement.
AVERTISSEMENT!
Ne placez pas le sèche-linge sur un tapis à fibres longues, car cela pourrait entraver la circulation
de l'air.
3" (76 mm)
36" (915 mm )
61¼" (1555 mm)
29⁄16" (65 mm )
Installation de placard - Exigences de ventilation
Les commandes en façade permettent d'installer les lave-linge et les sèche-linge dans un placard.
Prévoir un dégagement minimal de 1" (25 mm) entre les unités et l'armoire ou le mur et un dégagement
minimal de 1" (25 mm) entre le bord arrière du panneau supérieur de la machine et l'armoire ou le mur.
Pour assurer une ventilation adéquate, nous recommandons les portes à persiennes. À défaut, la porte doit
comporter des ouvertures de ventilation.
Voir l'illustration ci-dessous (cases grises) pour les ouvertures de ventilation minimales:
3" (76 mm)
3" (76 mm)
Minimum
1⅜" (35 mm)
185⁄16" (465 mm)
FR - 12
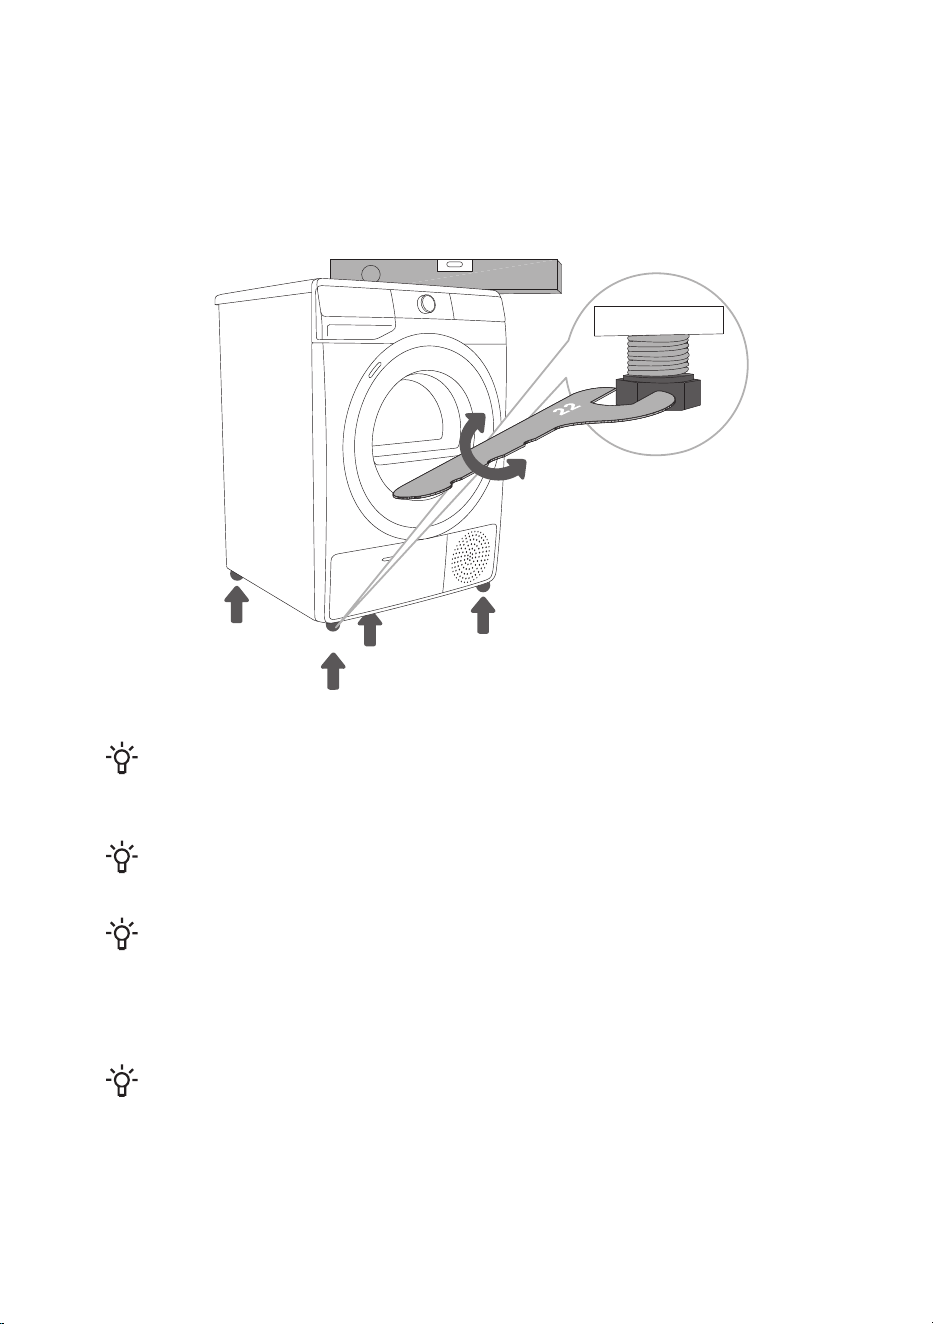
Réglage des pieds du sèche-linge
Nivelez le sèche-linge d'avant en arrière et de gauche à droite en ajustant les pieds, qui
permettent de régler la hauteur réglage de ±½" (±1 cm).
Utilisez un niveau à bulle pour vérifier l'alignement et une clé n° 22 pour effectuer les
réglages.
INFORMATION!
Le sèche-linge doit être placé sur un sol en béton propre et sec, sinon il risque de
glisser. Assurez-vous que la base des pieds réglables est propre et sèche.
INFORMATION!
Le sèche-linge doit être installé de niveau et stable sur une base solide.
INFORMATION!
Un mauvais nivellement du sèche-linge à l'aide des pieds réglables peut entraîner des
vibrations, un déplacement de l'appareil dans la pièce et un fonctionnement bruyant.
La garantie ne couvre pas les dommages causés par un mauvais nivellement du
sèche-linge.
INFORMATION!
Des bruits inhabituels ou plus forts peuvent se produire pendant le fonctionnement de
l'appareil. Ces bruits sont généralement dus à une installation incorrecte.
FR - 13
Évacuation de l'air humide
Le sèche-linge possède une ouverture d'évacuation d'air humide à l'arrière. Raccordez le conduit
d'évacuation d'air à cette ouverture.
Le conduit d'évacuation d'air n'est pas fourni avec le sèche-linge !
INFORMATION!
Longueur maximale du conduit : 60 pieds. Un
maximum de 4 coudes peut être utilisé, mais 4
pieds de conduit doivent être soustraits de la
longueur totale de ventilation pour chaque coude à
90° utilisé.
INFORMATION!
La distance entre le sèche-linge et l'orifice
d'évacuation d'air (ouverture de ventilation,
fenêtre) ne doit pas dépasser ½ pouce (2 mètres).
Sinon, de l'humidité pourrait s'accumuler dans les
gaz d'échappement canal.
INFORMATION!
Ne pas évacuer l'air du sèche-linge par les
conduits utilisés pour les appareils ou dispositifs
fonctionnant au gaz naturel ou à d'autres
combustibles.
AVERTISSEMENT:
Risque d'incendie.
N’installez pas de ventilateur d’appoint dans le conduit
d’évacuation.
Remarque: L'avertissement concernant le ventilateur
d'appoint ne s'applique pas aux sèche-linge destinés à
être installés dans un système à plusieurs sèche-linge,
avec un système de conduit d'évacuation conçu et installé
conformément aux directives du fabricant du sèche-linge.
FR - 14
Raccordement au réseau électrique
CHOC ÉLECTRIQUE !
Après l'installation, le sèche-linge doit rester immobile pendant deux heures avant d'être
branché sur le secteur; cela permet au sèche-linge de se stabiliser.
Cet appareil doit être mis à la terre. En cas de dysfonctionnement ou de panne, la mise à la terre
réduit le risque d'électrocution en offrant un chemin de moindre résistance au courant électrique. Cet
appareil est équipé d'un cordon d'alimentation muni d'un conducteur de mise à la terre et d'une fiche
de terre. La fiche doit être branchée dans une prise de courant appropriée, correctement installée et
mise à la terre conformément à la réglementation en vigueur.
Ne modifiez pas la fiche fournie avec l'appareil si elle ne correspond pas à la prise murale; faites
installer une prise appropriée par un électricien qualifié.
Branchez le sèche-linge à une prise de courant mise à la terre. Après l'installation, la prise murale
doit rester facilement accessible. La prise doit être correctement mise à la terre conformément aux
normes électriques en vigueur.
Les informations concernant votre sèche-linge sont indiquées sur la plaque signalétique (voir
DESCRIPTION DU SÈCHE-LINGE/Informations techniques).
CHOC ÉLECTRIQUE!
Nous recommandons l'utilisation d'une protection contre les surtensions pour protéger l'appareil
en cas de foudre.
AVERTISSEMENT!
Le sèche-linge ne doit pas être branché sur le secteur à l'aide d'une rallonge.
INFORMATION!
Toute réparation ou maintenance relative à la sécurité ou aux performances doit être effectuée par des
experts qualifiés.
INFORMATION!
Un cordon d'alimentation endommagé ne doit être remplacé que par un personnel autorisé.
Installation électrique
CHOC ÉLECTRIQUE !
La prise située à l'arrière de l'appareil est conçue pour les lave-linge fonctionnant sous une tension de 208 à 240 V.
Pour l'utiliser, vous devez employer la fiche fournie avec le lave-linge ou une fiche équivalente. Les lave-linge
fonctionnant sous une tension de 208 à 240 V sont équipés de deux fusibles internes de 15 A chacun. L'appareil
doit être branché uniquement sur une prise murale mise à la terre.
CHOC ÉLECTRIQUE !
Cet appareil doit être correctement mis à la terre. Consultez les consignes de sécurité importantes pour les
instructions de mise à la terre. Le cordon d'alimentation doit être mis à la terre. Si la machine est utilisée dans un
endroit humide, l'alimentation doit être protégée par un dispositif différentiel résiduel. Le raccordement à une prise
de courant fixe doit être effectué uniquement par un électricien qualifié. Caractéristiques fournies: 208–240 V, 60
Hz, puissance de chauffage de 2300 W, circuit de
30 A requis.
INFORMATION!
Ne branchez pas la machine au réseau électrique au moyen d'une rallonge.
FR - 15

Raccordements électriques
INFORMATION!
Lisez les instructions relatives aux exigences électriques et à la mise à la terre avant de brancher le
sèche-linge.
Les modèles électriques de sèche-linge sont conçus pour un système de raccordement à trois fils. La
mise à la terre du châssis est assurée par une liaison au conducteur neutre du bornier. Si la
réglementation locale interdit la mise à la terre par le neutre, cette liaison doit être retirée et
remplacée par un fil de terre séparé.
Seul un cordon à 4 conducteurs doit être utilisé lorsque l'appareil est installé dans un endroit où la
mise à la terre par le conducteur neutre est interdite. La mise à la terre par le conducteur neutre est
interdite pour les nouvelles installations de circuits dérivés, les maisons mobiles, les véhicules
récréatifs et les zones où les règlements locaux l'interdisent. Le dispositif de mise à la terre du
sèche-linge doit être retiré pour toutes les installations à 4 fils.
Ces instructions de raccordement électrique prévoient l'installation du sèche-linge dans les situations
suivantes:
Connexions à 3 fils lorsque les codes locaux autorisent la mise à la terre par le neutre, connexions à
3 fils avec un connecteur de mise à la terre séparé lorsque les codes locaux n'autorisent pas la mise
à la terre par l'intermédiaire du neutre et connexions à 4 fils.
Chacun des branchements ci-dessus peut être réalisé à l'aide d'un cordon d'alimentation homologué
ou par câblage direct. Chaque instruction de branchement précise le cordon d'alimentation approprié
et décrit les exigences relatives au câblage direct.
INFORMATION!
Le sèche-linge est équipé d'une prise à quatre broches destinée au raccordement à une alimentation
monophasée.
Déplacement et transport après installation
Après chaque cycle de séchage, il restera un peu d'eau condensée dans le sèche-linge. Mettez-le
en marche, sélectionnez un programme et laissez-le fonctionner pendant environ 30 secondes. Cela
permettra d'évacuer l'eau restante et d'éviter d'endommager le sèche-linge pendant le transport.
CHOC ÉLECTRIQUE !
Après le transport, le séchoir doit rester immobile pendant au moins deux heures
avant d'être utilisé raccordé au réseau électrique. L'appareil doit être installé et
raccordé par un technicien qualifié.
INFORMATION!
Si l'appareil n'a pas été transporté conformément aux instructions, le sèche-linge doit être
laissé immobile pendant au moins 2 heures avant d'être rebranché au secteur.
CHOC ÉLECTRIQUE !
Lisez attentivement le mode d'emploi avant de brancher le sèche-linge. Toute
réparation ou autre intervention sera refusée. Aucune réclamation au titre de la
garantie ne sera acceptée en cas de branchement ou d'utilisation incorrecte du sèche-
linge. couvert par la garantie.
INFORMATION!
Seul un technicien de maintenance peut remplacer la courroie.
FR - 16
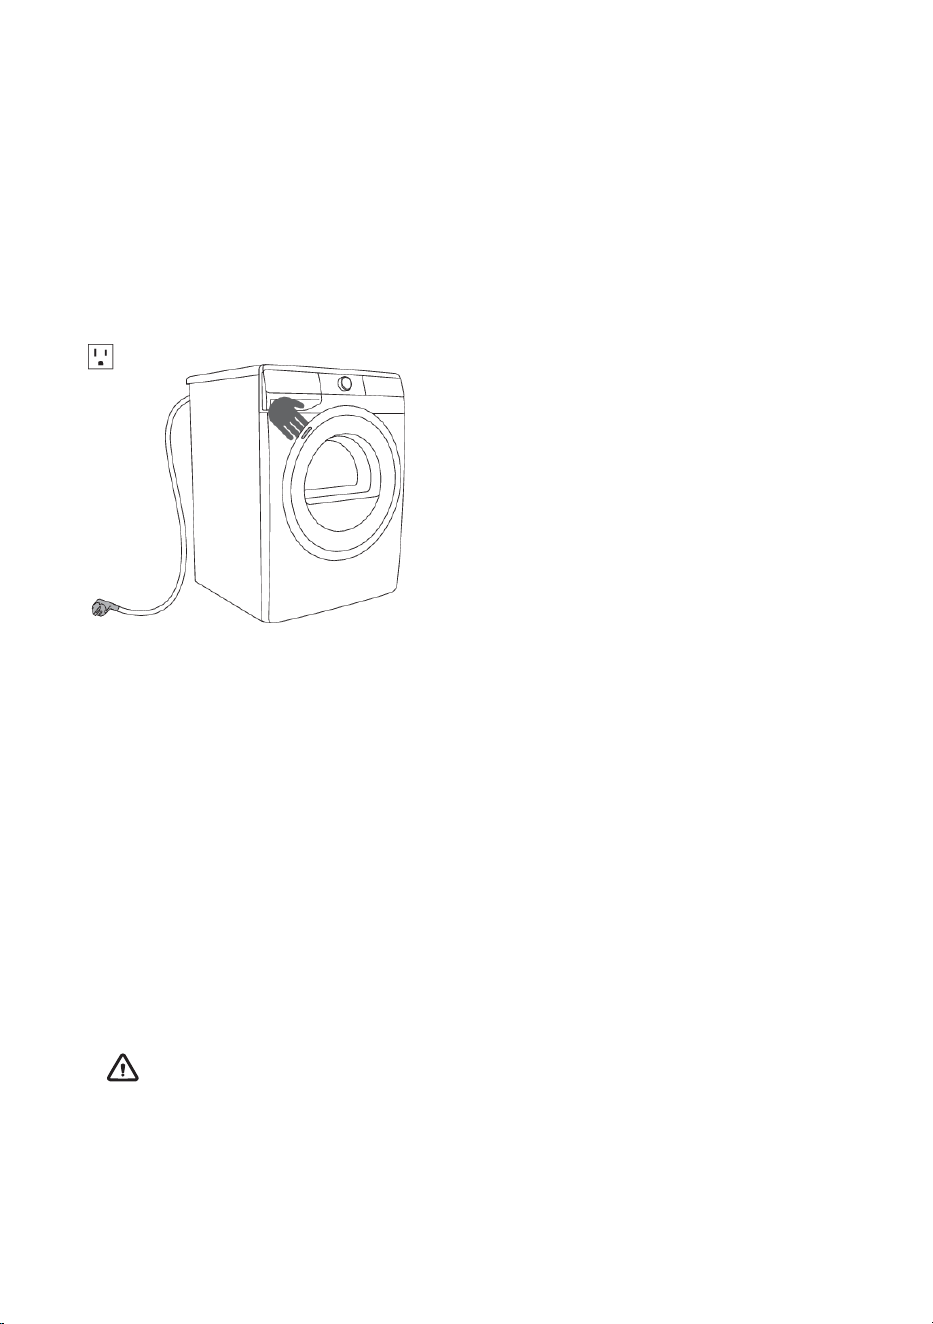
AVANT D'UTILISER L'APPAREIL POUR LE
PREMIÈRE FOIS
Assurez-vous que le sèche-linge est débranché du secteur; puis, ouvrez la porte en tirant le côté
gauche de la porte vers vous (figures 1 et 2).
Avant d’utiliser le sèche-linge pour la première fois, nettoyez le tambour du sèche-linge à l’aide d’un
chiffon doux en coton humide et d’eau (figure 3).
21
3
AVERTISSEMENT!
N’utilisez aucun solvant ni produit de nettoyage susceptible d’endommager le sèche-
linge (suivez les recommandations et les avertissements fournis par le fabricant du
produit de nettoyage).
FR - 17
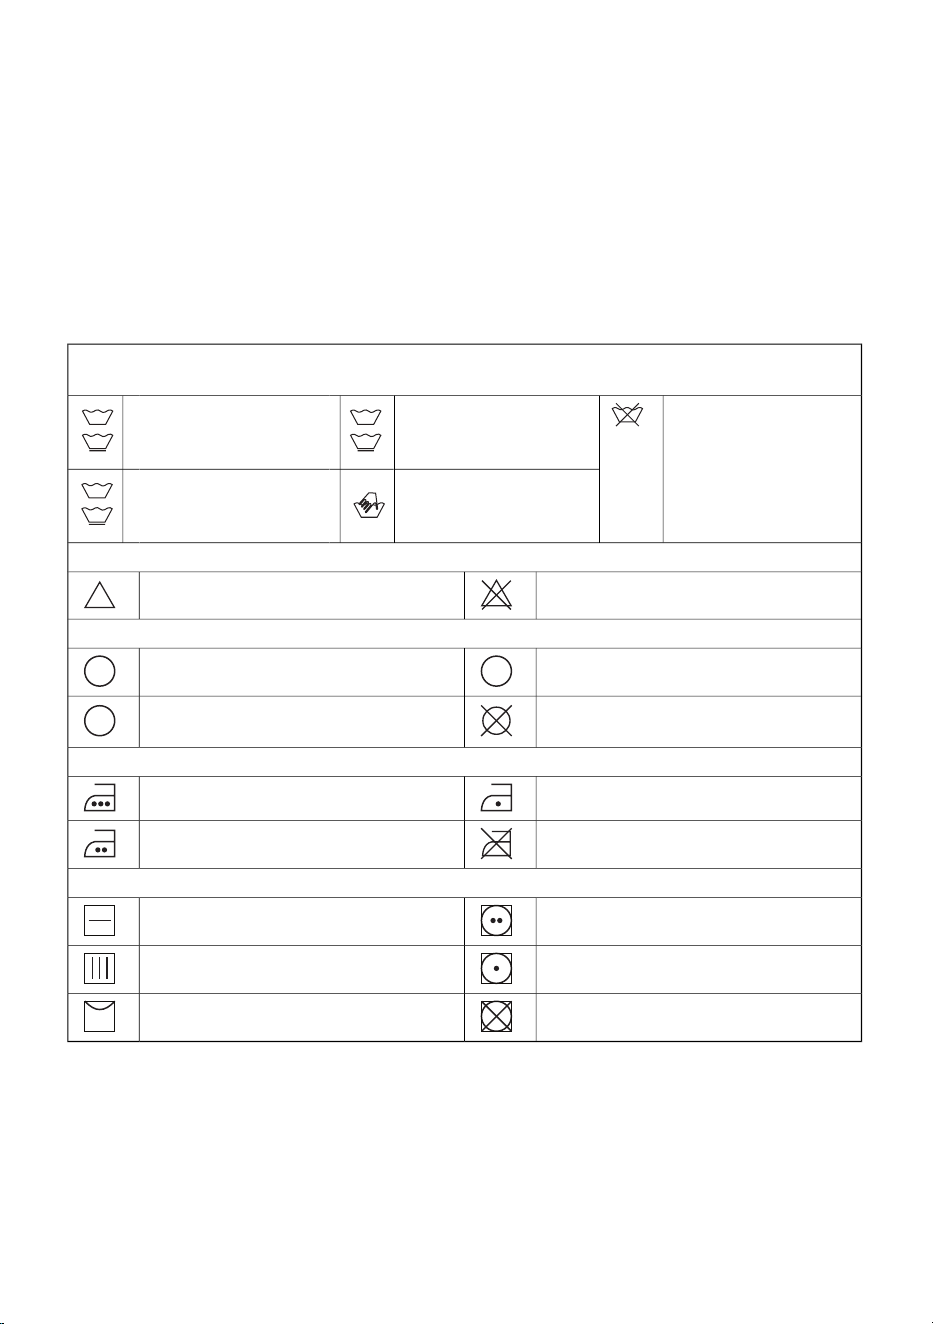
Coton, lavage normal
linge délicat
Ne pas laver
Lavage max.
température
tetempérature de
lavage maximale
CHAUD+ (TRÈS CHAUD)
CHAUD
Lavage à la main
seulement
Lavage max.
température
CHAUD
Blanchiment
Blanchiment interditBlanchiment à l'eau froide
c1
Nettoyage à sec
Solvant pétrolier R11, R113
P
Nettoyage à sec avec tous les agents
A
Nettoyage à sec non autorisé
Nettoyage à sec au kérosène, à
l'alcool pur et au R113
F
Repassage
Repassage à BASSE température
Repassage à HAUTE température
Repassage interdit
Repassage à température MOYENNE
Séchage
température élevée
Sécher à plat
(poser sur une surface plane)
basse températureSéchage à l'air libre
Ne pas sécher en machineSéchage à la corde
PROCESSUS DE SÉCHAGE
ÉTAPE PAR ÉTAPE (1 - 6)
Étape 1: Respectez les étiquettes sur le linge
FR - 18

Mise en marche du sèche-linge
Branchez le sèche-linge au secteur en branchant le cordon d'alimentation. Pour allumer le
sèche-linge, tournez le bouton de sélection du programme dans n'importe quelle position
(figure 1).
2
1
Étape 2: Préparation du processus de séchage du linge
1. Triez le linge par type et épaisseur du tissu (voir TABLEAU DES PROGRAMMES).
2. Fermez les boutons et les fermetures éclair, nouez les rubans et retournez les poches.
3. Placez les vêtements délicats dans un sac à linge spécialement conçu à cet effet.
• Vêtements et articles en cuir
• Vêtements cirés ou traités de toute autre manière
• Vêtements comportant des pièces importantes en bois, en plastique ou
en métal
• Vêtements ornés de paillettes
• Vêtements comportant des pièces métalliques susceptibles de rouiller
Le séchage en machine du linge confectionné dans des tissus particulièrement
délicats susceptibles de se déformer n'est pas recommandé. Les types de linge
suivants ne doivent pas être séchés au sèche-linge car cela pourrait déformer vos
vêtements:
FR - 19

Charger le sèche-linge
1. Ouvrez la porte du sèche-linge en tirant le côté gauche de la porte vers vous (figure 1).
2. Insérez le linge dans le tambour (après vous être assuré que le tambour est vide)
(figure 2).
3. Fermez la porte du sèche-linge (figure 3).
21
3
INFORMATION!
Ne mettez pas de linge dans le sèche-linge s'il n'a pas été essoré (cycle d'essorage minimum
recommandé: 800 tr/min).
Ne surchargez pas le tambour. Consultez le TABLEAU DES PROGRAMMES et
respectez la charge nominale indiquée sur la plaque signalétique.
Une surcharge du tambour peut provoquer un froissement excessif et un séchage
irrégulier.
INFORMATION!
Pour sécher les articles plus volumineux (draps, serviettes, nappes, etc.), détachez-les puis
insérez-les dans le tambour du sèche-linge.
FR - 20

Étape 3: Choisir le programme de séchage
Sélectionnez le programme en tournant le sélecteur de programme vers la gauche ou vers la droite
(selon le type de linge et le niveau de séchage souhaité). Voir le TABLEAU DES PROGRAMMES.
Le voyant situé à côté du programme sélectionné s'allume.
INFORMATION!
Le sélecteur de programme ne tournera pas automatiquement pendant le fonctionnement.
FR - 21

Table de programme
Description du programme
Charge
maximale
Programme Niveaux
de sécheresse
Utilisez ce programme pour le linge en coton épais et nonUt
délicat. Après séchage, il sera sec et prêt à être stocké.
Charge
complète
Extra sec
Charge
complète
Normale
Utilisez ce programme pour le linge en coton épais non délicat
d'épaisseur approximativement identique.
Ce programme est conçu pour sécher le linge en cotonCe
humide. Programme le plus économe en énergie pour lehu
séchage du linge en coton. Les données de consommation
d'énergie sont déterminées à l'aide du réglage du cycle
du programme et réglage de séchage moyen selon ladu
norme CAN/CSA-C361-16 et les méthodes de procédureno
d'essai du DOE spécifiées au 10 CFR 430, Sous-partie
B, Annexe D2.
Utilisez ce programme pour le linge en coton non délicat.Ut
Après séchage, il sera prêt à être repassé.
Charge
complète
Fer humide
(Humide pour
le repassage)
1/2 charge
Tissus mélangés
Utilisez ce programme pour le linge en coton non délicat.
Après séchage, il sera prêt à repasser.
Séchage LOW TEMP à basse température, plus respectueux
de votre linge.
Ce programme est utilisé pour sécher le linge délicat.
fabriqué à partir de fibres synthétiques.
1/2 charge
Fer à repasser
humide mixte
CeCe programme court est conçu pour adoucir ou assouplir les
vêtements en laine et en soie, qui doivent être séchés
complètement conformément aux instructions du fabricant.
1/4 charge
Laine
Utilisez ce programme pour sécher les textiles rembourrés
de duvet (oreillers, couettes, vestes, etc.). Séchez les
articles volumineux séparément et utilisez la
fonction LOW TEMP si nécessaire.
1/4 charge
Vêtements en duvet
Ce programme convient au linge non délicat, légèrement
humide, nécessitant un séchage complet. Le sèche-linge ne
détecte pas l’humidité restante dans ce mode ; si le linge
reste humide, relancez le cycle. Si le linge ressort trop sec,
froissé ou rigide, la durée choisie était trop longue.
1/2 charge
Temps
(Séchage programmé)
1/2 charge
Bébé
(Vêtements pour
bébés)
UtUtilisez ce programme pour sécher les vêtements de bébé.
Les vêtements séchés avec ce programme sèchent
normalement.
LOW TEMP, séchage à basse température plus respectueux
de l'environnement votre linge.
1/4 charge
Produits délicats
Utilisez ce programme pour le linge très délicat en fibres
synthétiques, qui peut rester légèrement humide après le
séchage. Il est recommandé d’utiliser un sac de lavage
spécial. LOW TEMP: séchage à basse température, plus
doux pour le linge.
1/4 charge
Chemises -
Programme
permanent
Utilisez ce programme pour sécher chemises et blouses. La
rotation adaptée du tambour limite le froissage du linge.
LOW TEMP: séchage à basse température, plus doux pour
le linge.
FR - 22

Ce programme est conçu pour les vêtements avec
membrane, les vêtements de sport en matériaux
mélangés et les tissus respirants. LOW TEMP: séchage à
basse température, plus doux pour le linge.
1/4 charge
Vêtements de sport
Description du programmeCharge
maximale
Programme Niveaux
de sécheresse
Ce programme convient aux petites quantités de linge
que vous souhaitez sécher rapidement et efficacement.
1/2 charge
Séchage rapide
La durée de séchage plus longue et la température élevée,
dépassant 60 °C (140 °F), réduisent la quantité de microbes
et d’allergènes sur les vêtements. Ce programme ne doit pas
être utilisé pour les articles délicats ou non adaptés au
séchage en machine.
1/2 charge
Soins des allergies
Ce programme désactive le chauffage. Il est idéal pour
rafraîchir votre linge.
1/4 charge
Rafraîchissement
de l'air
Si votre linge n'est pas séché au niveau de séchage souhaité, utilisez des fonctions
supplémentaires ou un programme plus adapté.
FR - 23
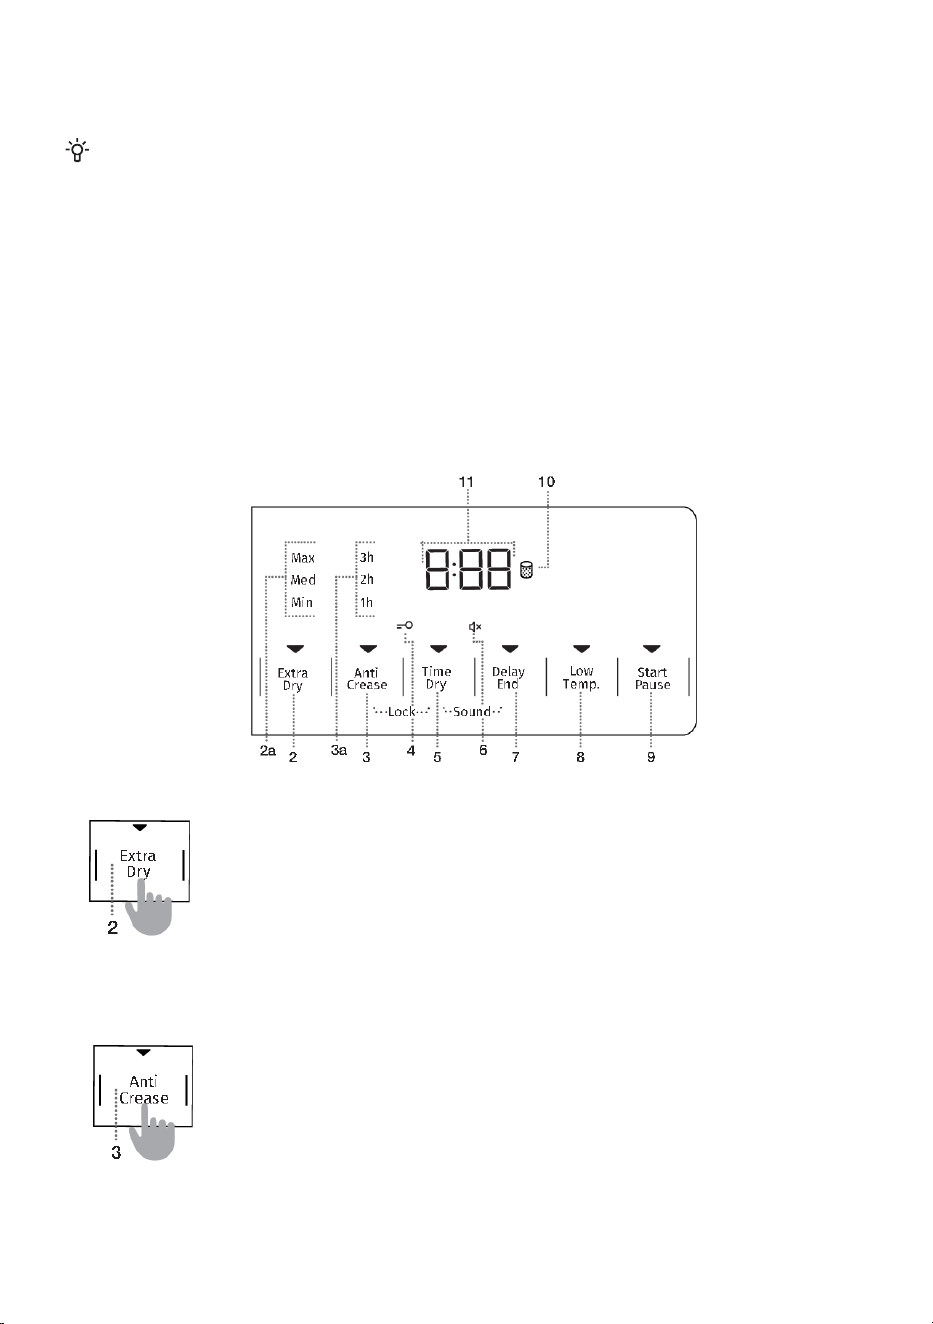
Step 4: Sélection des fonctions supplémentaires
INFORMATION!
Activez/désactivez la fonction en appuyant sur la position souhaitée (avant d'appuyer surAc
START/PAUSE).
Réglez les paramètres en appuyant sur la touche de fonction correspondante (avant d’appuyer sur
START/PAUSE).
Les fonctions pouvant être modifiées avec le programme sélectionné sont partiellement éclairées
(luminosité réduite).
Certaines fonctions ne sont pas disponibles avec certains programmes : elles ne s’allument pas et le
bouton clignote lorsqu’on appuie dessus (voir TABLEAU DES FONCTIONS).
Description de l’éclairage des fonctions pour le programme de séchage sélectionné :
• Allumé (Réglage de base/préréglé)
• Atténué (Fonctions réglables)
• Non éclairé (Fonctions non sélectionnables)
EXTRA SEC (NIVEAU DE SECEUR)
Appuyez sur EXTRA DRY pour augmenter le niveau de séchage et la
durée de séchage.Ce réglage peut être effectué avant de démarrer ledu
cycle de séchage.
Si le même programme et les mêmes paramètres sont utilisés trois fois deSi
suite, l' ADAPTTECH cette fonction les enregistrera automatiquement.
Trois niveaux sont disponibles : MAX, MED et MIN. Le voyant
correspondant au niveau sélectionné s’allumera.
ANTI-FROISSE (PRÉVENTION DU FROISSAGE)
Si vous ne pouvez pas retirer le linge immédiatement après la fin du cycle,
sélectionnez la fonction ANTI CREASE avant de lancer le programme.
Appuyez sur
ANTI CREASE pour choisir entre 1 h, 2 h ou 3 h, ou pour désactiver
la fonction.
La fonction se désactive automatiquement lorsque vous ouvrez la porte du
sèche-linge ou appuyez sur START/PAUSE après la fin du programme.
FR - 24
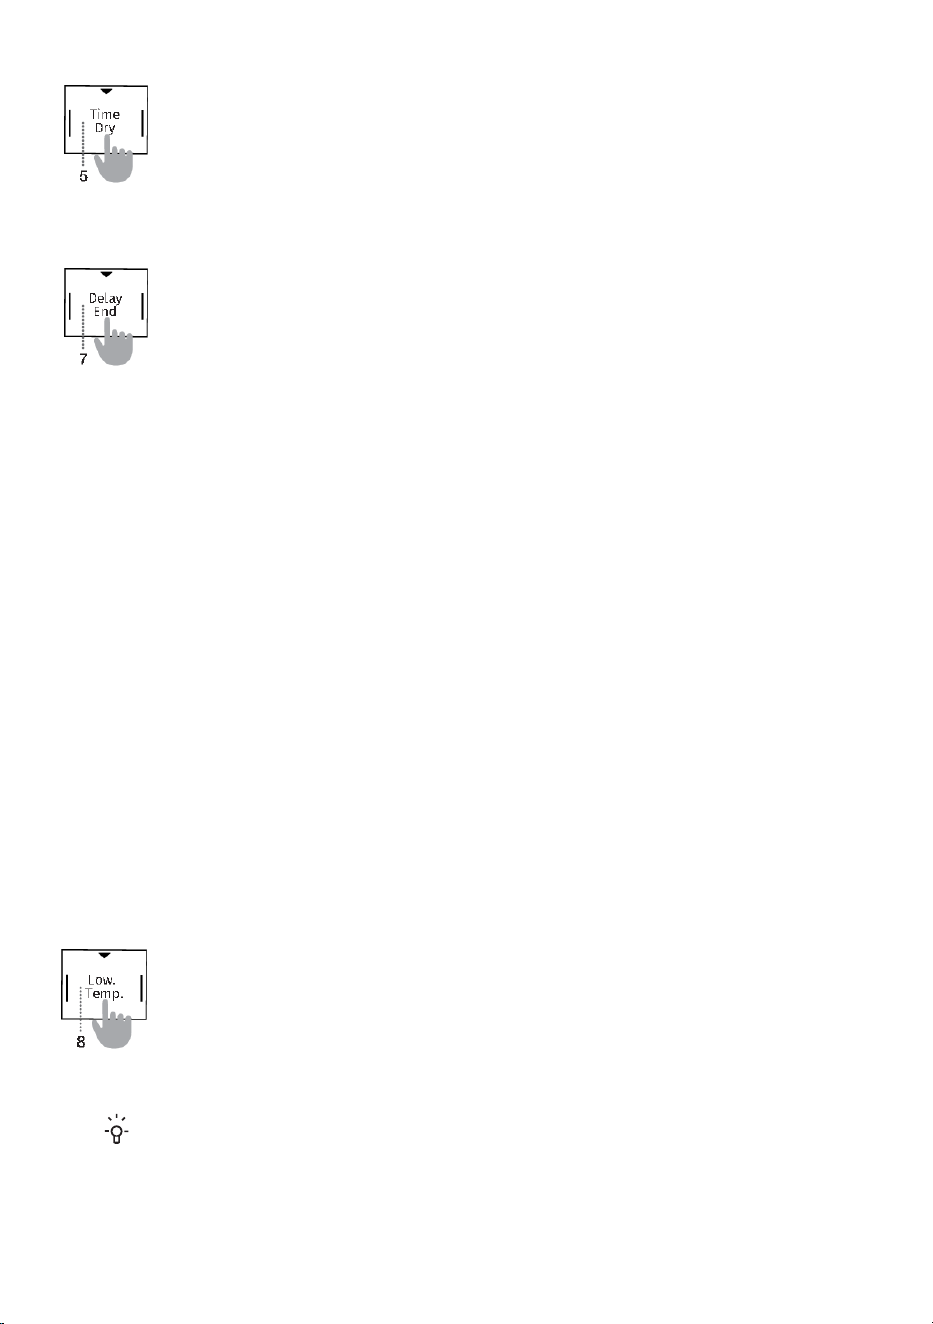
LOW. TEMP. (BAISSE TEMPÉRATURE)
Appuyez sur LOW TEMP pour sécher le linge à une température plus basse, ce qui
est plus doux pour les tissus et contribue à réduire le rétrécissement.
Cette fonction utilise une régulation précise de la pompe à chaleur et un capteur
de température supplémentaire pour abaisser la température de séchage. Les
vêtements peuvent rétrécir jusqu'à 50% en moins par rapport à un séchage
classique, selon le type de tissu.
Utilisez ce réglage uniquement pour les articles adaptés au séchage en machine
INFORMATION!
Certaines fonctionnalités peuvent ne pas être disponibles avec certains programmes. Si
une fonction ne peut être sélectionnée, un signal sonore retentit et le voyant
correspondant clignote.
(Voir le TABLEAU DES FONCTIONS SUPPLÉMENTAIRES pour plus de détails.)
1. Sélectionnez le programme souhaité et les fonctions supplémentaires.
2. Appuyez sur la touche DELAY END ou maintenez- la enfoncée pour régler le
délai de fin souhaité:
• Par incréments de 30 minutes jusqu’à 6 heures
• Par incréments d’une heure de 6 à 24 heures
3. Appuyez sur START/PAUSE pour confirmer.
Après avoir programmé la DELAY END, le sèche-linge effectuera un compte à rebours. Lorsque
ce compte à rebours atteint l'heure de début du programme (par exemple 2:30), le cycle de
séchage démarrera automatiquement.
Pour arrêter ou modifier le délai, tournez le sélecteur de programme sur OFF pendant au moins 1
seconde.
Lors de la prochaine utilisation du sèche-linge, vous pourrez définir un nouveau délai de fin de
séchage.
Pour annuler:
maintenez la touche DELAY END enfoncée pendant 3 secondes. Le programme de séchage
reprendra immédiatement.
Exemple:
S’il est actuellement 9:00 PM et que vous souhaitez que le programme de séchage se termine à
6:00 AM, réglez la DELAY END sur 9 heures.
SÉCHAGE TEMPORÉ (SÉCHAGE TEMPORÉ)
Dans le programme temps, appuyez sur TIME DRY pour régler la durée de séchagepo
souhaitée. Le voyant de la fonction sélectionnée s'allumera.
Le temps initial est de 0:30, et chaque pression augmente le temps de séchage de 15,
minutes, jusqu'à un maximum de 4 heures.
Pour réinitialiser le temps de séchage, maintenez la touche TIME DRY enfoncée pendant 3
secondes.
FIN DIFFÉRÉE (RETARDEMENT DE LA FIN DU PROGRAMME DE SÉCHAGE)
(selon le modèle)
Maintenez la touche DELAY END enfoncée pour régler le programme de séchage afin qu'il
se termine dans un délai maximum de 24 heures.
Si vous appuyez sur n'importe quel bouton (sauf DELAY END ou START/PAUSE) pendant
le réglage de cette fonction, DELAY END sera réinitialisé.
Configurez toutes les autres fonctions souhaitées avant d'activer DELAY END. Procédure
de paramétrage:
FR - 25
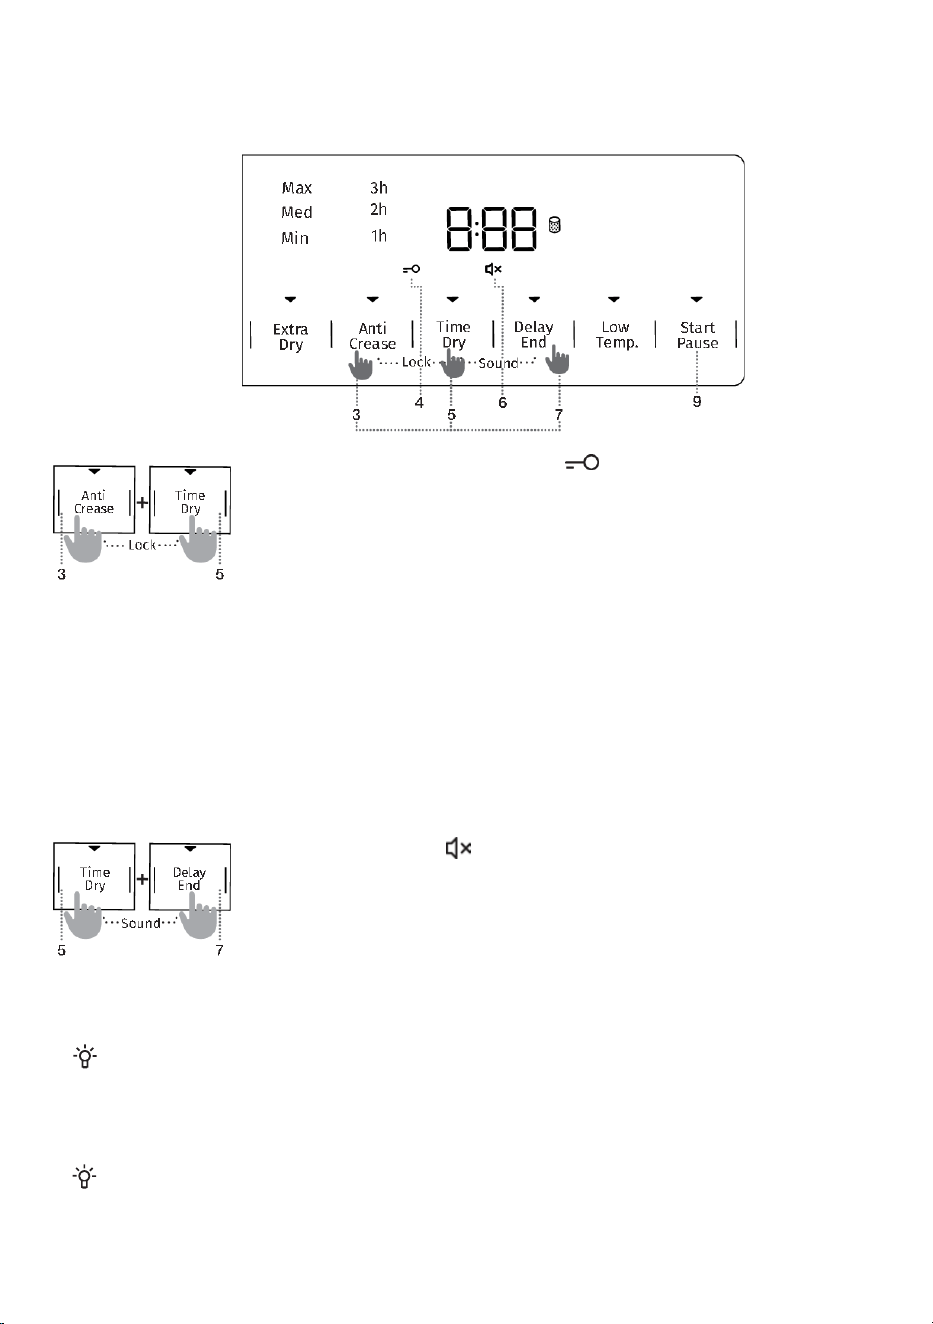
Réglages de combinaison de deux boutons
VERROUILLAGE (CHILD LOCK)
Le verrouillage enfant est une fonction de sécurité supplémentaire qui empêche
les ouvertures accidentelles modifications apportées au programme, aux
paramètres ou aux fonctions supplémentaires.
Pour activer ou désactiver le verrouillage enfant:
1. Appuyez et maintenez enfoncés les boutons ANTI CREASE et TIME DRY
pendant au moins 3 secondes.
2. Suivez la même procédure pour désactiver.
• Lorsque le verrouillage enfant est activé, les programmes, les paramètres
et les fonctionnalités supplémentaires sont inaccessibles. Les fonctions
ne peuvent pas être modifiées.
• Le verrouillage enfant reste actif même après l'arrêt du sèche-linge.
• Pour sélectionner un nouveau programme, le verrouillage enfant doit
d'abord être désactivé.
• Il peut être désactivé pendant le processus de séchage.
SON (SOUND OFF)
Cette fonction vous permet de désactiver tous les sons de fonctionnement.
1. Appuyez et maintenez enfoncés les boutons TIME DRY et DELAY END
pendant au moins 3 secondes.
2. Pour réactiver, suivez la même procédure.
Remarque: Lorsque le son est coupé, aucun signal sonore ne sera émis. Fin du
programme de séchage.
INFORMATION!
Après avoir débranché le sèche-linge du secteur, tous les réglages seront réinitialisés à leurs valeurs
d'usine par défaut, à l'exception du volume du signal sonore, de la fonction anti-froissage et du
verrouillage enfant.
INFORMATION!
Les fonctions VERROUILLAGE (CHILD LOCK) et SON (SOUND OFF) ne peuvent pas être activées
ou désactivées dans les 10 secondes suivant la mise sous tension.
FR - 26
Table des fonctions supplémentaires
BASSE TEMPÉRATURE
(TEMPERATURE PLUS
BASSE)
FIN DIFFÉRÉE
(DIFFÉRER LA FIN DU
PROGRAMME DE
SÉCHAGE)
SÉCHAGE PROGRAMMÉ
(SECHAGE A DUREE
DETERMINEE)
ANTI-PLIS
(PRÉVENTION DES
PLIS)
EXTRA SEC
(NIVEAU DE
SÉCHERESSE)
Programme
•••
Extra sec
(Placard sec)
•••
Normale
•••
FER A REPASSER HUMIDE
(humide pour le repassage)
••••
Tissus Mélangés
•••
Fer Humide Mélangé
Laine
•••
Vêtements en Duvet
••
Durée
(Programme de séchage chronométré)
••••
Bébé
(Vêtements pour bébés)
••••
Articles délicats
••••
Chemises - Infroissables
••••
Vêtements de sport
••
Séchage rapide
••
Soins des allergies
Rafraîchissement de l'air
• Des fonctions supplémentaires peuvent être utilisées.
Si votre linge n'est pas séché au niveau de séchage souhaité, utilisez des fonctions supplémentaires
ou sélectionnez un programme plus adapté.
•
•
•
•
•
FR - 27

Étape 5: Démarrage du programme de séchage
Appuyez sur START/PAUSE.
Le temps restant jusqu’à la fin du programme ou l’heure DELAY END (si réglée) s’affiche
à l’écran. Les voyants des fonctions sélectionnées s’allument.
Si la porte n’est pas correctement fermée, le temps restant clignote trois fois à l’écran et
un signal sonore retentit.
Pour reprendre le programme de séchage, fermez correctement la porte, puis appuyez
sur START/PAUSE.
INFORMATION!
Retirez le linge du sèche-linge pour éviter qu'il ne se froisse à la fin du programme de séchage.
AVERTISSEMENT!
Le cycle de séchage final comprend une étape de refroidissement sans chauffage. Cela permet de
s'assurer que le linge atteint une température sûre en fin de programme et peut être retiré du
sèche-linge sans risque de brûlure.
Étape 6: Fin du programme de séchage
Lorsque le programme de séchage est terminé, [End] apparaîtra sur l'écran.
Deux voyants rouges s'allumeront, le voyant du bouton START/PAUSE clignotera et, si la fonction
ANTI CREASE a été sélectionnée, son voyant clignotera également.
1. Ouvrez la porte du sèche-linge.
2. Nettoyez le filtre (voir CLEAN).
3. Retirez le linge du tambour.
4. Fermez la porte.
5. Mettez le sèche-linge en position OFF à l'aide du bouton sélecteur.
6. Débranchez le cordon d'alimentation de la prise.
FR - 28

INTERRUPTIONS ET MODIFICATIONS DU PROGRAMME
Interruptions
Pour interrompre le déroulement du programme
Appuyez sur START/PAUSE pour mettre en pause ou reprendre un programme.
Pour interrompre le programme de séchage, maintenez le bouton START/PAUSE enfoncé pendant 3
secondes. Le programme sélectionné s'arrêtera et le sèche-linge commencera à refroidir. La durée du
refroidissement dépend du programme sélectionné. Une fois cette opération terminée, vous pourrez
sélectionner un nouveau programme de séchage.
Ouvrir la porte
Si la porte du sèche-linge est ouverte pendant le processus de séchage, le cycle de séchage sera interrompu.
Lorsque la porte est fermée et que le bouton START/PAUSE est enfoncé, le séchage reprendra là où il s'était
arrêté.
SURFACE CHAUDE !
La porte du sèche-linge chauffera pendant le séchage. Soyez prudent lorsque vous l'ouvrez afin
d'éviter les brûlures.
Panne d'alimentation électrique
En cas de panne d'alimentation, [PF] apparaîtra sur l'écran et le voyant du bouton START/PAUSE clignotera.
Appuyez sur START/PAUSE pour reprendre le processus de séchage.
Changement de programme/fonctions
Éteignez le sèche-linge en tournant le sélecteur de programme sur la position OFF. Rallumez-le en tournant le
sélecteur de programme sur n’importe quel programme.
Sélectionnez un autre programme/fonction et appuyez à nouveau sur START/PAUSE.
Ajouter du linge après le début du programme
Ouvrez la porte du sèche-linge et appuyez sur le bouton START/PAUSE. Insérez le linge et appuyez de
nouveau sur START/PAUSE. Le temps de séchage peut être prolongé.
SURFACE CHAUDE!
Faites attention à ne pas vous brûler en ouvrant la porte du sèche-linge pour charger ou retirer
le linge.
Enregistrement des paramètres personnels
Les paramètres initiaux peuvent être modifiés.
La combinaison enregistrée s'affichera à chaque fois que le sèche-linge sera allumé. Pour modifier une
combinaison précédemment enregistrée, répétez la même procédure.
1. Sélectionnez le programme souhaité et les fonctions supplémentaires.
2. Appuyez sur START/PAUSE et maintenez-le enfoncé pendant 9 secondes pour enregistrer la combinaison.
• Un voyant sur le bouton START/PAUSE et un signal sonore confirmeront la sélection et [saved]
apparaîtra brièvement sur l'écran.
3. Appuyez sur START/PAUSE pour démarrer le processus de séchage.
FR - 29

AdaptTech
Lorsqu'un réglage de programme de séchage est utilisé trois fois de suite, ce réglage est enregistré
comme réglage par défaut et sera toujours proposé lorsque vous sélectionnerez ce programme de
séchage – c'est ce qu'on appelle la fonction ADAPTTECH.
Si vous enregistrez manuellement les paramètres d'un programme de séchage, la fonction
ADAPTTECH de ce programme est désactivée.
menu des paramètres personnels
1. Mettez le sèche-linge en marche en tournant le bouton de sélection du programme sur n'importe
quelle position.
2. Appuyez et maintenez enfoncés les boutons EXTRA DRY et TIME DRY pendant 3 secondes pour
ouvrir le menu Paramètres personnels.
• Les témoins ANTI CREASE et CLEAN THE FILTER s'allument.
• Le chiffre 1 s'affiche, indiquant la première fonction de réglage.
3. Tournez le sélecteur de programme vers la gauche ou la droite pour choisir la fonction:
1 – Réglages sonores
2 – Réinitialiser les paramètres personnels du programme aux valeurs d’usine
4. Appuyez sur ANTI CREASE pour confirmer la fonction et les paramètres sélectionnés.
5. Appuyez sur EXTRA DRY pour revenir à l'étape précédente.
Volume du signal acoustique
Le volume peut être réglé sur quatre niveaux:
• 0 – Son désactivé
• 1 –Son des boutons uniquement
• 2 – Volume faible
• 3 – Volume élevé
Tournez le bouton de sélection du programme pour choisir le volume souhaité.
Si aucune sélection n'est effectuée dans les 20 secondes, le menu reviendra automatiquement au
menu principal.
Aperçu du nombre de cycles de séchage effectués
Le nombre de cycles de séchage effectués s'affiche pendant 3 secondes si vous débranchez le
cordon d'alimentation, attendez 10 secondes, puis rebranchez-le. Après 3 secondes, l'appareil
passe en mode veille.
FR - 30
Le sèche-linge est équipé d'un système de filtration composé d'un seul filtre.
1
Filtre net
2
Ouverture d'échappement
d'air sur le verso
AVERTISSEMENT!
N’utilisez jamais le sèche-linge sans le filtre ou avec un filtre endommagé. Une
accumulation excessive de peluches peut entraîner un dysfonctionnement ou une
panne de l’appareil.
INFORMATION!
Le sèche-linge ne doit jamais être utilisé sans le filtre en place, ou avec un filtre
endommagé, car une quantité excessive de fibres accumulées provenant du tissu
pourrait provoquer un dysfonctionnement ou une panne du sèche-linge.
NETTOYAGE ET ENTRETIEN
CHOC ÉLECTRIQUE!
Avant de procéder au nettoyage, assurez-vous d'éteindre le sèche-linge et de le
débrancher secteur (débranchez le cordon d'alimentation de la prise).
FR - 31

Nettoyage du filtre
INFORMATION!
Nettoyez le filtre après chaque cycle de séchage.
1 Ouvrez le boîtier du filtre.
2 Retirez le filtre à filet.
3
Grattez délicatement le filtre
pour enlever les peluches,
c'est-à-dire la couche de
fibres et de fils, à la main ou
avec un chiffon
4
Si nécessaire, nettoyez le
joint du boîtier de filtre et
celui de la porte également.
5
Insérez le filtre net et fermez
le boîtier du filtre.
INFORMATION!
Manipulez le couvercle du filtre avec précaution pour éviter de vous pincer les doigts.
FR - 32
Nettoyage du conduit d'évacuation
Nettoyez occasionnellement l'intérieur de l'ouverture d'évacuation d'air et le conduit à l'aide
d'un aspirateur.
Nettoyage du sèche-linge
CHOC ÉLECTRIQUE !
Débranchez toujours le sèche-linge du secteur avant de le nettoyer.
Nettoyez l'extérieur du sèche-linge à l'aide d'un chiffon doux en coton humide.
AVERTISSEMENT!
N’utilisez aucun solvant ni produit de nettoyage susceptible d’endommager le sèche-linge
(suivez les recommandations et les avertissements fournis par les fabricants des produits
de nettoyage).
Essuyez toutes les parties du sèche-linge avec un chiffon doux jusqu'à ce qu'elles soient sèches.
INFORMATION!
Ne nettoyez pas le sèche-linge avec un jet d'eau !
FR - 33
CONSEILS POUR UN SÉCHAGE ET UNE
UTILISATION ÉCONOMIQUE DE VOTRE SÉCHOIR
La méthode de séchage la plus économique consiste à sécher la quantité de linge recommandée à
chaque fois (voir TABLEAU DES PROGRAMMES).
Le séchage en machine du linge confectionné dans des tissus particulièrement délicats susceptibles de
se déformer n'est pas recommandé.
L'utilisation d'adoucissant n'est pas nécessaire au lavage, car le linge est doux et souple après
séchage. Le temps de séchage sera plus court et la consommation d'énergie moindre si les vêtements
sont bien essorés avant le séchage. En choisissant le programme de séchage approprié, vous éviterez
de trop sécher votre linge et les problèmes de repassage ou de rétrécissement des tissus.
Un nettoyage régulier des filtres permettra d'optimiser le temps de séchage et de minimiser la
consommation d'énergie.
Lors du séchage de petites quantités de linge ou de vêtements individuels, le capteur peut ne pas
détecter le taux d'humidité réel. Dans ce cas, il est recommandé d'utiliser les programmes de séchage
en machine ou le programme de séchage programmé pour les petites quantités de linge.
Mode veille faible
Si vous ne lancez aucun programme ou ne choisissez aucun réglage après avoir allumé le sèche-linge
(bouton de sélection de programme), l'unité d'affichage s'éteindra au bout de 5 minutes et passera en
mode veille afin d'économiser de l'énergie.
L'écran peut être réactivé en tournant le sélecteur de programme. Si vous ne faites rien pendant 5
minutes après la fin d'un programme, l'écran s'éteindra pour économiser l'énergie.
< 0,5
P
o
= puissance
pondérée
à
l'arrêt
[W]
< 0,5
P
I
= puissance
pondérée
en
veille [W]
5,00
T
I
= temps
de veille [min]
INFORMATION!
Une tension secteur faible et des charges de séchage différentes peuvent affecter le temps de
séchage; le reste Le temps affiché est ajusté en conséquence pendant le processus de
séchage.
FR - 34

Ce qu'il faut faire?Cause
Problème/Erreur
La machine ne
démarre pas.
• Vérifiez si l'interrupteur principal est
sur.
• L'interrupteur principal est non
allumé.
• Il n'y a pas de tension dans la
prise de courant
• Vérifiez le fusible.
• Vérifiez si la prise du cordon
d'alimentation est correctement inséré
dans la prise de courant
Il y a bien du
courant dans
la prise, mais
le tambour ne
tourne pas et
l'appareil ne
fonctionne
pas.
• Vérifiez que la porte est bien fermée.
• Ouvrez la porte.
• Il est possible que la fonction
DELAY END ait été activée.
• Le programme n'a pas été
lancé conformément aux
instructions.
• Pour désactiver l'option de délai de
démarrage, maintenez la touche
DELAY
END enfoncée pendant 3 secondes.
• Relisez attentivement le mode d'emploi.
L'appareil
cesse
complètement
de chauffer
pendant un
programme.
• Le filtre net peut être. Le
conduit est obstrué. Par
conséquent, la température à
l'intérieur du sèche-linge
augmente, ce qui provoque
une surchauffe et donc l'arrêt
du chauffage.
• Nettoyez le filtre (voir NETTOYAGE) ET
ENTRETIEN/Nettoyage du filtre de la
porte).
• Attendez que l'appareil refroidisse,
essayez de le faire fonctionner à
nouveau. Si le sèche-linge ne démarre
toujours pas, appelez un technicien.
DÉPANNAGE
Des perturbations environnementales (par exemple, du réseau électrique) peuvent entraîner divers
rapports d'erreur (voir le TABLEAU DE DÉPANNAGE). Dans ce cas:
• Éteignez le sèche-linge et attendez au moins une minute.
• Rallumez le sèche-linge et relancez le programme de séchage.
• La plupart des erreurs de fonctionnement peuvent être résolues par l'utilisateur (voir le TABLEAU
DE DÉPANNAGE).
• Si l'erreur persiste, contactez un technicien agréé.
• Les réparations doivent être effectuées uniquement par un technicien qualifié.
• La garantie ne couvre pas les réparations ni les demandes de prise en charge au titre de la
garantie résultant d'un branchement ou d'une utilisation incorrects du sèche-linge. Dans ce cas, les
frais de réparation sont à la charge de l'utilisateur.
Un léger bruit
de choc se fait
entendre.
••
Le bruit va diminuer sans aucune
intervention.
Si le sèche-linge reste inutilisé
pendant une longue période,
les éléments de support sont
soumis à des contraintes au
même point.
La porte
s'ouvre
pendant le
séchage.
• Réduisez la quantité de lessive
• Surcharge excessive sur le
porte (trop de linge dans le
tambour).
FR - 35

Les erreurs affichées sur l'écran peuvent inclure les éléments suivants:
Ce qu'il faut faire?Indication sur l'écran et
description de l'erreur
Problem/Error
Centre de service d'appel
défaillance de l'unité de
contrôle
Centre de service d'appel
défaillance du capteur de
temperature
Centre de service d'appel
Erreur de communication
Ce qu'il faut faire?
Cause
S
échage
irrégulier
lessive
••
Assurez-vous d'avoir trié le linge par
type et par épaisseur, d'avoir mis une
quantité de linge appropriée dans le
tambour et d'avoir sélectionné un
programme adapté (voir le tableau des
programmes).
Du linge de types et
d'épaisseurs variés, ou une
quantité excessive de linge.
Lavage non
séché ou
séchage ça
prend trop de
temps.
••
Nettoyez les filtres (voir la section
NETTOYAGE ET ENTRETIEN/
Nettoyage du filtre de la porte ).
Les filtres ne sont pas propres.
• Le sèche-linge est placé dans
un espace fermé chambre ;
chambre trop froide ; ou une
pièce trop petite et l'air
surchauffe comme un résultat.
• Assurez-vous que le sèche-linge
bénéficie d'une aération suffisante ; par
exemple, ouvrez la porte et/ou la fenêtre.
• Vérifiez si la température de la pièce où
est installé le sèche-linge est trop élevée
ou trop basse.
••
Si le linge est encore humide après le
cycle de séchage, répétez l'opération et
sélectionnez un programme de séchage
approprié (après avoir nettoyé les
filtres).
Le linge n'avait pas été
suffisamment essoré.
••
Utilisez un programme approprié ou
des fonctions supplémentaires.
La quantité de linge séché
dans l'appareil est trop
importante ou insuffisante.
• Le linge (comme les draps)
s'emmêle et forme de
grosses boules.
• Fermez les boutons ou les fermetures
éclair du linge avant le séchage.
• Après le séchage, défroissez le linge et
sélectionnez un programme de séchage
supplémentaire (par exemple, Séchage
minuté).
Problème/Erreur
FR - 36
Ce qu'il faut faire?Indication sur l'écran et
description de l'erreur
Problem/Error
Défaillance de l'unité de
commande
Débranchez le sèche-linge de l'alimentation
électrique.
Appelez le service après-vente.
Les avertissements affichés sur l'écran peuvent inclure les éléments suivants:
Ce qu'il faut faire?
Indication sur l'écran et
description de l'avertissement
Avertissement
Avertissement de panne
d'alimentation électrique
Le séchage a été interrompu en raison d'une
panne de courant. Appuyez sur START/
PAUSE pour redémarrer ou reprendre le
programme de séchage.
Nettoyez le filtre.
À la fin du programme de
séchage, la mention
(Fin) s'affichera sur l'écran.
Le voyant rouge s'allume.
Il ne s'agit pas d'un
dysfonctionnement, mais
simplement d'un avertissement
indiquant que le filtre doit être
nettoyé après le séchage.
Bruit
Bruit de grondement ou de cliquetis: pendant le séchage, lorsque le linge contient des éléments
rigides (tels que des boutons, des fermetures éclair, etc.).
AVERTISSEMENT!
En cas de panne, utilisez uniquement des pièces de rechange agréées par les
fabricants autorisés.
AVERTISSEMENT!
Les réparations ou toute réclamation au titre de la garantie résultant d'un branchement
ou d'une utilisation incorrecte du sèche-linge ne sont pas couvertes par la garantie.
Dans ce cas, les frais de réparation seront à la charge de l'utilisateur.
INFORMATION!
La garantie ne couvre pas les erreurs ou les pannes résultant de perturbations
environnementales (foudre, pannes du réseau électrique, catastrophes naturelles, etc.)
Si après avoir consulté le tableau ci-dessus, vous avez encore besoin d'aide concernant votre
appareil, veuillez contacter notre service client au 800-932-4267 (poste 513) entre 9:00 AM et
5:00 PM (heure de l'Est) ou consultez le site www.summitappliance.com/support.
Nous ferons de notre mieux pour répondre à vos questions.
Pour commander des pièces de rechange, veuillez consulter notre site web: summitapplianceparts.com
FR - 37

ÉLIMINATION
L'emballage est fabriqué à partir de matériaux respectueux de l'environnement qui
peuvent être les emballages sont recyclés, éliminés ou détruits sans
aucun risque pour l'environnement. À cette fin, ils sont étiquetés en conséquence.
Le symbole apposé sur le produit ou son emballage indique que le produit ne doit
pas être traité comme un déchet ménager ordinaire. Apportez le produit à un
centre de collecte agréé pour les déchets d'équipements électriques et
électroniques traitement.
Lors de la mise au rebut du sèche-linge en fin de vie, retirez toute source
d'alimentation les cordons, et détruire le loquet et l'interrupteur de la porte
pour empêcher la porte de verrouillage ou loquet (sécurité enfant).
L'élimination correcte du produit contribuera à prévenir tout effet négatif sur
l'environnement et la santé des personnes pourraient être affectés en cas de
retrait incorrect du produit. Pour des informations détaillées sur le retrait et le
traitement du si vous avez des questions concernant ce produit, veuillez contacter
le service municipal compétent en matière de gestion des déchets, votre
service de collecte des déchets ou le magasin où vous l'avez acheté produit.
FR - 38
FR - 39
GARANTIE LIMITÉE
GARANTIE LIMITÉE D’UN AN
La couverture de garantie est disponible dans les 48 États continentaux des États-Unis, ainsi que dans certaines régions
de l’Alaska, d’Hawaï et du Canada. Pour les endroits non couverts, les consommateurs peuvent soit contacter un
fournisseur local, soit coordonner avec Felix Storch, Inc. afin de trouver des options de service à proximité, lesquelles
peuvent donner droit à un remboursement partiel.
La garantie de cet appareil est valable pendant un an à compter de la date d’achat, à condition que l’appareil soit utilisé
et entretenu conformément aux instructions fournies avec le produit. Le garant prendra en charge le coût des pièces
d’origine spécifiées par l’usine et de la main-d’œuvre nécessaire pour corriger les défauts de matériaux ou de fabrication.
Le service doit être effectué par une entreprise de service désignée.
Toutes les pièces, sauf le compresseur, sont garanties pendant un an contre les défauts de fabrication. Les pièces en
plastique, les étagères et les armoires sont fabriquées selon des normes commerciales acceptables, mais ne sont pas
couvertes en cas de dommages subis lors de la manipulation ou de bris.
ÉLÉMENTS NON COUVERTS PAR LE GARANT:
1. Les appels de service visant à corriger l’installation de votre appareil, à vous expliquer son utilisation, à
remplacer ou réparer des fusibles ou à corriger le câblage ou la
plomberie.
2. Les appels de service pour réparer ou remplacer les ampoules de l’appareil ou les étagères cassées. Les pièces
consommables (comme les filtres) sont exclues de la couverture de garantie.
3. Les dommages résultant d’un accident, d’une modification, d’une mauvaise utilisation, d’un abus, d’un
incendie, d’une inondation, de catastrophes naturelles, d’une installation incorrecte, d’une installation non
conforme aux codes électriques ou de plomberie, ou de l’utilisation de produits non approuvés par le garant.
4. Les pièces de rechange ou les coûts de main-d’œuvre pour des appareils utilisés en dehors des 48 États
continentaux des États-Unis, ainsi que dans certaines régions de l’Alaska, d’Hawaï et du Canada.
5. Les réparations de pièces ou de systèmes résultant de modifications non autorisées apportées à l’appareil.
6. Les frais de déplacement et de transport pour le service du produit dans des endroits éloignés.
7. Le retrait et la réinstallation de votre appareil s’il est installé dans un endroit inaccessible ou non installé
conformément aux instructions d’installation publiées.
EXONÉRATION DE GARANTIES IMPLICITES ; LIMITATION DES RECOURS
LE SEUL ET UNIQUE RECOURS DU CLIENT EN VERTU DE LA PRÉSENTE GARANTIE LIMITÉE CONSISTE EN LA RÉPARATION
DU PRODUIT TELLE QUE PRÉVUE CI-DESSUS. LES GARANTIES IMPLICITES, Y COMPRIS LES GARANTIES DE QUALITÉ
MARCHANDE OU D’APTITUDE À UN USAGE PARTICULIER, SONT LIMITÉES À UNE DURÉE D’UN AN. LE GARANT NE SERA
PAS RESPONSABLE DES DOMMAGES INDIRECTS OU CONSÉCUTIFS. CERTAINS ÉTATS N’AUTORISENT PAS L’EXCLUSION
OU LA LIMITATION DES DOMMAGES INDIRECTS OU CONSÉCUTIFS, NI LES LIMITATIONS DE DURÉE DES GARANTIES
IMPLICITES DE QUALITÉ MARCHANDE OU D’APTITUDE, DE SORTE QUE CES EXCLUSIONS OU LIMITATIONS PEUVENT
NE PAS S’APPLIQUER À VOUS. CETTE GARANTIE VOUS CONFÈRE DES DROITS LÉGAUX SPÉCIFIQUES, ET VOUS POUVEZ
ÉGALEMENT BÉNÉFICIER D’AUTRES DROITS QUI VARIENT SELON L’ÉTAT.
AVERTISSEMENT : Ce produit peut vous exposer à des produits chimiques, y compris
le Nickel (Métallique) qui est connu dans l’État de Californie pour provoquer le cancer.
Pour plus d’informations, rendez-vous sur www.P65Warnings.ca.gov
Remarque: Le Nickel est un composant de tout l’acier inoxydable et de certaines autres compositions
MétalliquesMé

F
elix
Storch,
I
nc.
An ISO 9001:2015 registered company
770 Garrison Ave
Bronx, New York 10474
www.summitappliance.com
Revised: 2026-04-08