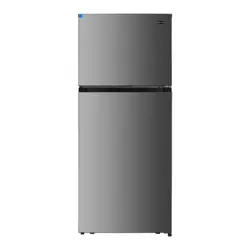
Please read the Operating Instructions carefully before operating the refrigerator
and keep it properly
VEFTF3021RBK
VEFTF3021RWH
VEFTF3021RSL
VEFTF3324RBK
VEFTF3324RWH
VEFTF3324RSL
VEFTF3021RBK VEFTF3021RWH VEFTF3021RSL
VEFTF3324RBK
VEFTF3324RWH VEFTF3324RSL
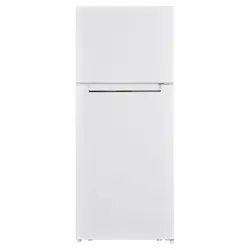
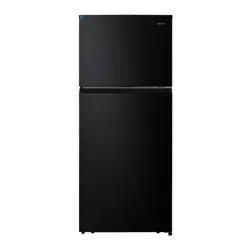
Top Mounted Freezer Refrigerator
Contents
1
2
3-6
7-8
9-19
Component Names and Characteristics of Refrigerators
Temperature and Humidity Adjustment Operation
Troubleshooting
Proper Use of Refrigerator
25
26
Defrosting Interval Declaration
Safety Precautions
25
Maintenance of Refrigerator
27
Product Information
Important Note
27
19-22
Ice Maker Installation
23-24
Connecting Water Supply System
2
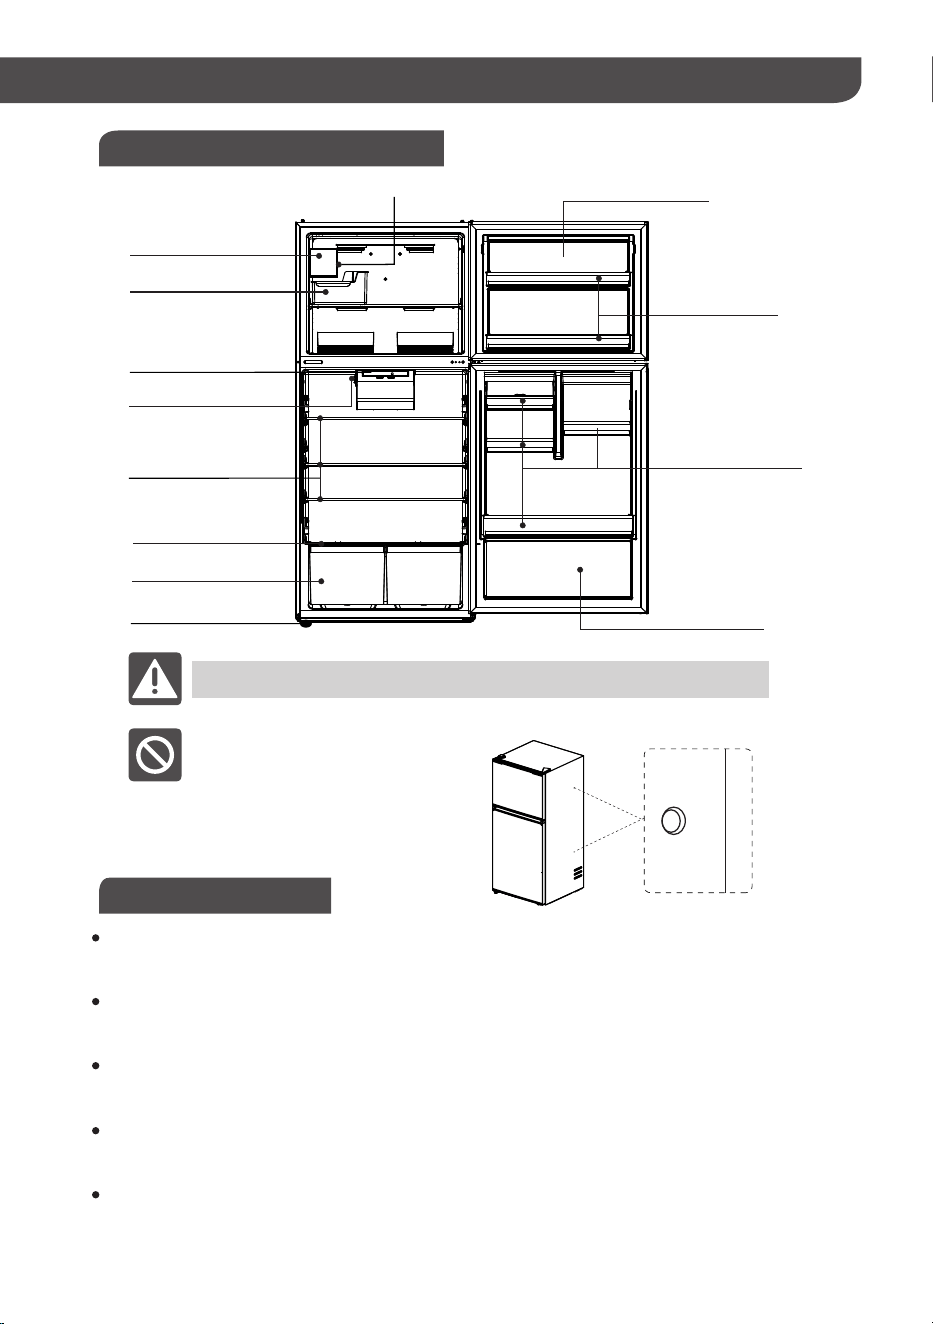
Component Names and Characteristics of Refrigerators
Name of Each Component
Some features and accessories of the refrigerator you purchased may not be completely
consistent with this legend, please refer to the packing list.
Product Features
Leveling Foot
Ice Storage Bin (with
Built-in Ice Maker Model)
Fruit and Vegetable
Compartment
Glass Shelf
Ice Maker (with Built-in Ice
Maker Model)
Ice Probe (with Built-in Ice Maker Model)
Temperature Control Panel
Temperature Control Device
Refrigerator Bottle Rack
Refrigerator Door
Freezer Bottle Rack
Freezer Door
Fruit and Vegetable
Compartment Glass Shelf
Intelligent frost-free energy-efficient refrigerator
The High-Efficiency Compressor and VIP (Vacuum Insulation Panel) Insulation Material and latest frost-free
technology are adopted to achieve energy conservation, efficiency and superior performance.
Temperature control is intelligent and accurate to keep fresh for a longer time
The microcomputer control system is used to makes the temperature adjustment more accurate and keeps
fresh for a longer time.
LED display icons
LED display icons are employed to present the setting levels and functional status of the refrigerating
chamber, allowing for an intuitive and efficient operation.
Quick refrigerating function
Quick refrigerating function drops the temperature of the Refrigerating Chamber to 2°C (35.6 °F) quickly,
which makes the fresh-keeping effect better and makes it easier to have iced drinks;
Sabbath mode
Sabbath mode, quickly turns off the lights of the freezer door and the refrigerator door.
This is a process air vent, please don’t block it
during use.
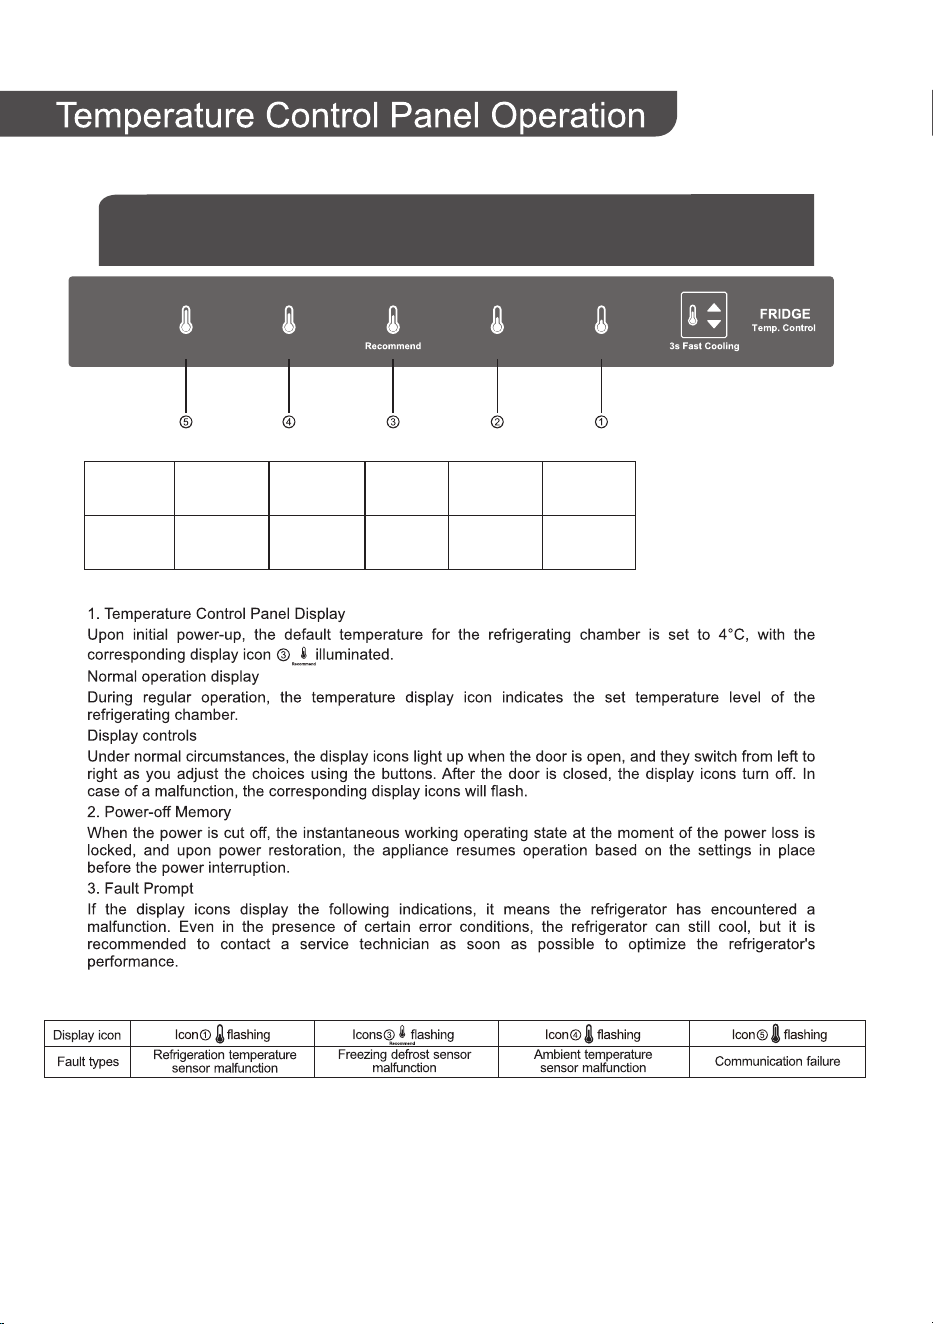
1℃-5℃1℃-4℃0.5℃-4℃
Temperature Range
32.9℉-39.2℉ 33.8℉-39.2℉ 33.8℉-41℉
Number ① ② ③ ④ ⑤
1.5℃-6℃
34.7℉-42.8℉
2℃-8℃
35.6℉-46.4℉
Range
Temperature and Humidity Adjustment Operation
(VEFTF3021R)
3
④
Temperature and Humidity Adjustment Operation
(VEFTF3324R)
Recommend
FRIDGE
Temp. Control
3s Fast Cooling
Display icon
Fault types
Refrigeration sensor
malfunction
Defrost sensor malfunction
Ambient temperature
sensor malfunction
Lowest temperature choice
icon flashing
Recommended choice
icon flashing
Low temperature choice
icon flashing
1. Temperature Control Panel Display
Each time the power is turned on, all icons are displayed for 3 seconds, followed by normal operational display (Upon
initial power-up, the displayed icon is the recommended choice ).
Normal operation display
During regular operation, the temperature display icon indicates the set temperature level of the refrigerating
chamber.
Display controls
Under normal circumstances, the display icons light up when the door is open, and they switch from left to right as
you adjust the choices using the buttons. After the door is closed, the display icons turn off. In case of a malfunction,
the corresponding display icons will flash.
2. Power-off Memory
When the power is cut off, the instantaneous working operating state at the moment of the power loss is locked, and
upon power restoration, the appliance resumes operation based on the settings in place before the power
interruption.
3. Fault Prompt
If the display icons display the following indications, it means the refrigerator has encountered a malfunction. Even in
the presence of certain error conditions, the refrigerator can still cool, but it is recommended to contact a service
technician as soon as possible to optimize the refrigerator's performance.
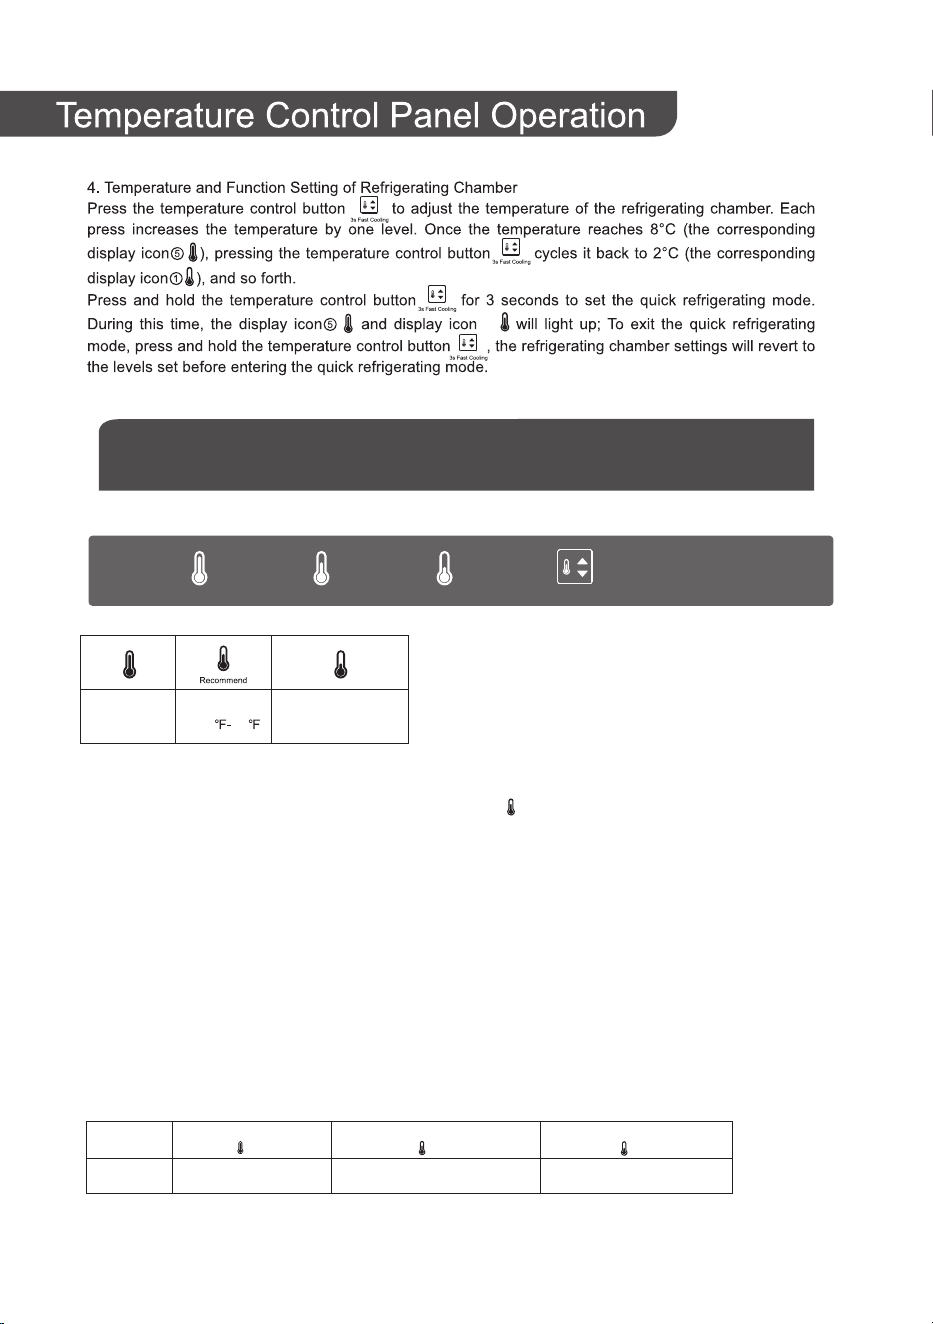
Recommend
0.5℃-4℃1℃-5℃2℃-8℃
Temperature Range
35.6℉-46.4℉ 32.9℉-39.2℉
4
33.8
41
Temperature and Humidity Adjustment Operation
5
4. Temperature and Function Setting of Refrigerating Chamber
Press the temperature control button to adjust the refrigerating chamber temperature. With each press, the
temperature decreases by one level. Once the temperature reaches the lowest temperature choice , pressing the
temperature control button again will cycle the temperature back to the low temperature choice , and so forth.
Press and hold the temperature control button for 3 seconds to set the quick refrigerating mode. During this
time, all levels will display illuminated icons. To exit the quick refrigerating mode, press the temperature control button
.The refrigerating chamber settings will revert to the levels set before entering the quick refrigerating mode.
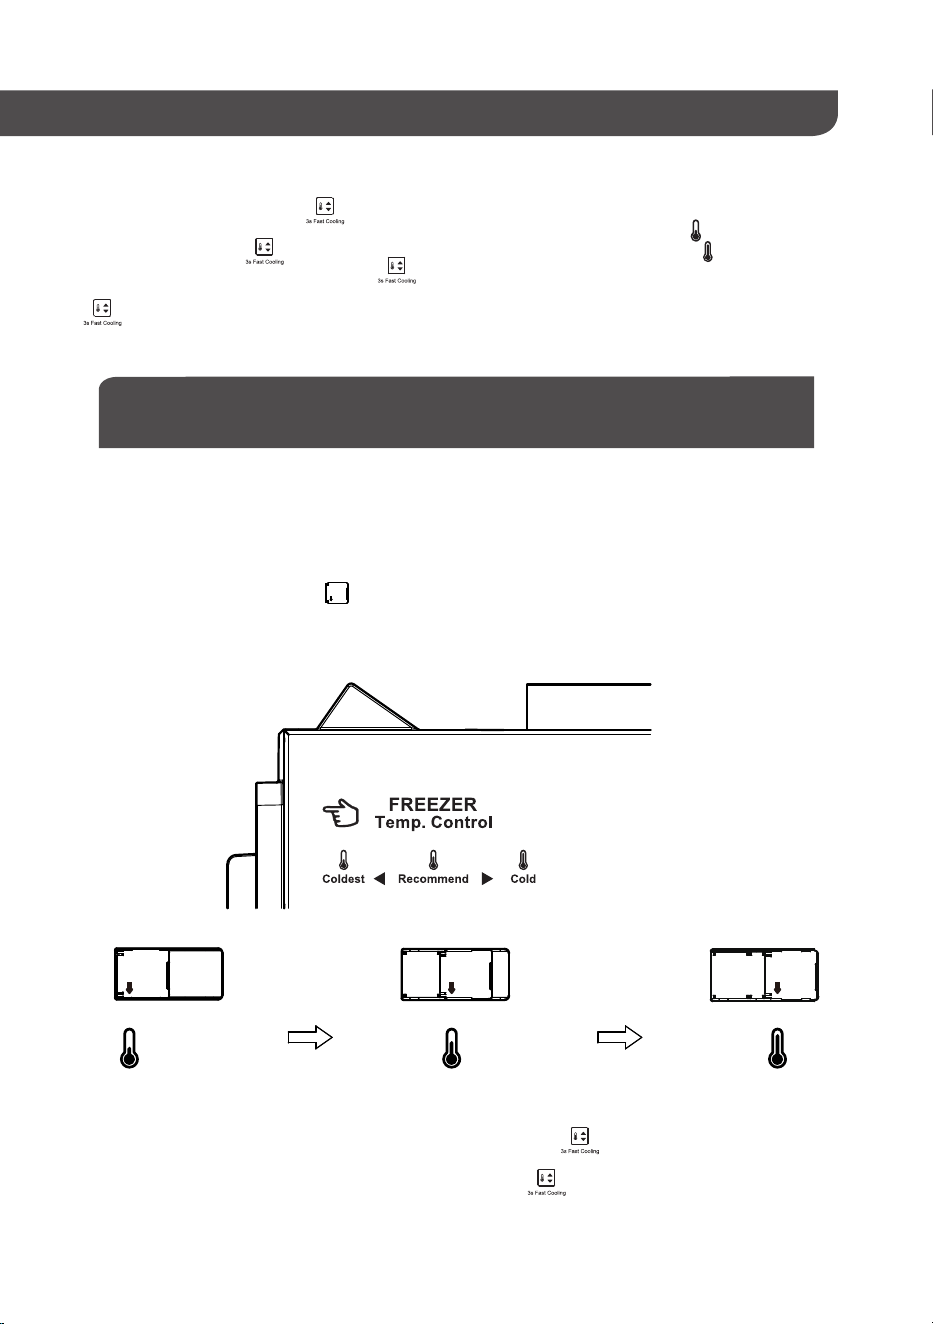
Temperature and Humidity Adjustment Operation
(all models)
coldest
Recommend
cold
3. Sabbath Mode
When the refrigerator door is open, press the temperature control button 12 times consecutively to activate
the Sabbath mode. In this mode, the lights in the refrigerator and freezer will turn off. To exit the Sabbath mode,
open the refrigerator door and press the temperature control button 12 times consecutively. The lights in the
refrigerator and freezer will then resume normal operation.
2. Temperature Setting of Freezing
Turn the air volume adjustment dial so that the arrow on top points to the coldest position and the freezing
chamber temperature will reach its lowest. Point it to the Recommended position, the freezing chamber temperature
will reach the recommended temperature. Point it to the cold position, the freezing chamber temperature will reach
its highest.
1. Power-off Memory
When the power is cut off, the instantaneous working operating state at the moment of the power loss is locked, and
upon power restoration, the appliance resumes operation based on the settings in place before the power
interruption.
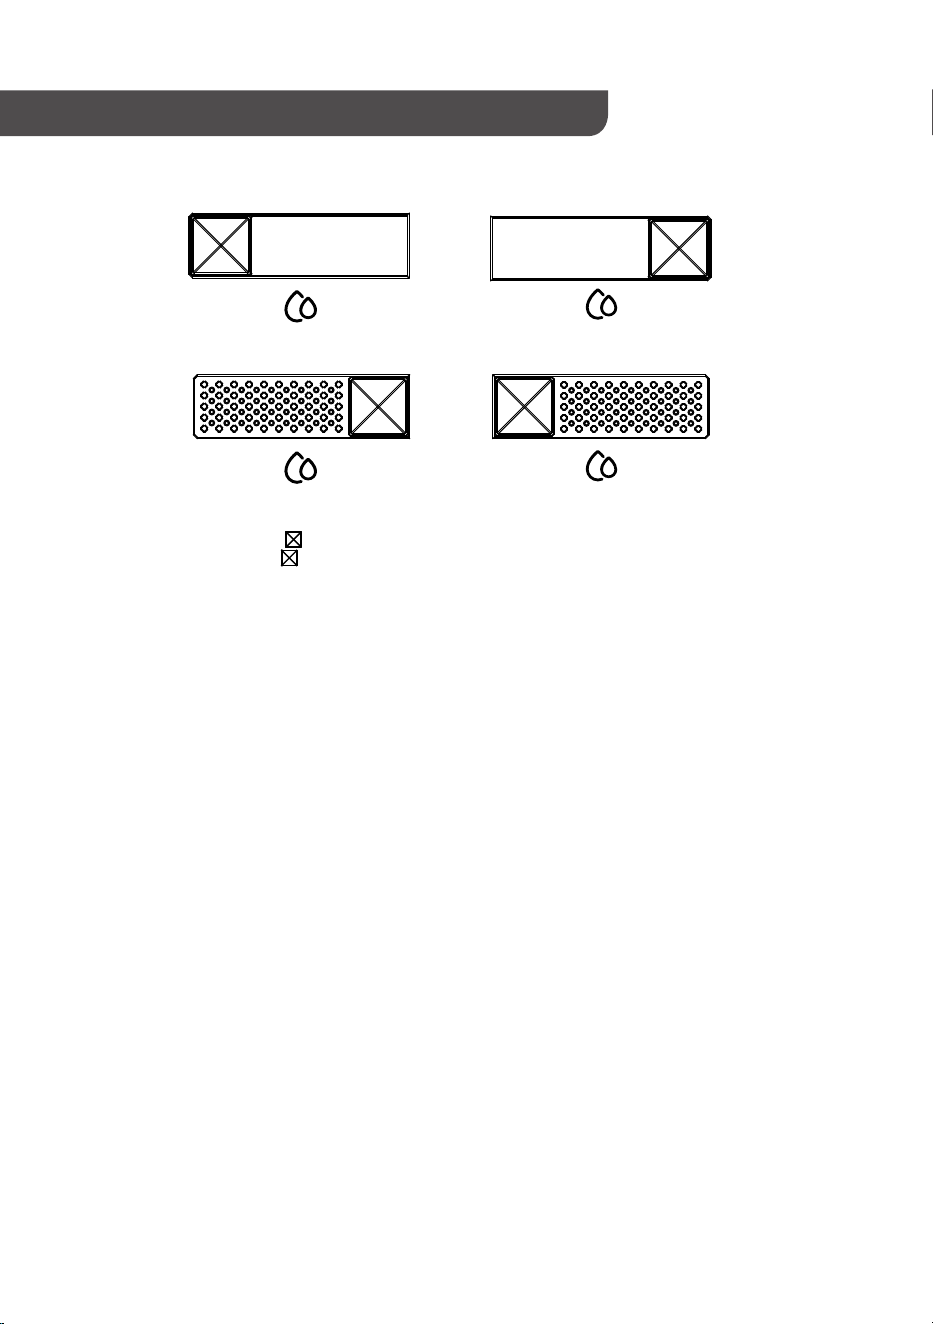
Humidity Adjustment Operation
6
High
Low
Low High
High
Low
Low High
1. Fruit and Vegetable Compartment Glass Shelf with Humidity Control Function (Optional Component)
Adjust the humidity control dial to the "low" position to minimize humidity in the fruit and vegetable compartment,
adjust the humidity control dial to the "high" position to maximize humidity in the fruit and vegetable compartment.
7
用
For the following simple problems, you can try to solve them by yourself. If there is no improvement, please
call the after-sales service department.
Problem Point
Possible Causes
The refrigerator
doesn't work
The refrigerator has an
unpleasant odor
The compressor works
for a long time
The refrigerator light is
not on
The refrigerator door
cannot be closed
Noise
The door seal has seams
Water pan overflows
the water
Refrigerator shell heating
Exterior condensation
There is an abnormal
sound in the refrigerator
Troubleshooting
Whether the power supply is connected and the plug is firmly plugged in
Is the voltage too low
Smelly food should be tightly wrapped
Check for food decay
The inside of the refrigerator needs to be cleaned
It is a normal phenomenon that the refrigerator works for a long time in summer
because the ambient temperature is high
Too much food is put in at one time
Do not place food in the refrigerator until it has cooled
Open the refrigerator door too frequently
Is the refrigerator powered on or the lighting lamp damaged
The door is jammed with food packages so that it can not be closed
Too much food is put in
Skewed refrigerator
Whether the ground is flat and the refrigerator is placed steadily
Are refrigerator accessories in normal position
Remove foreign matter from door seal
Heat the door seal and restore it after air cooling (with a hair dryer or a hot
towel)
Too much food storage or too much moisture in the refrigerator leads to a large
amount of water during defrosting
Improperly closed door and other reasons make the air enter and start frosting,
and the water produced by defrosting increases
It is normal for the built-in condenser to dissipate heat inside through the shell
The ambient temperature is too high, and there are too many foods or short
downtime of compressor
Causing the shell to heat up. Pay attention to ventilation and heat dissipation
When the ambient temperature is too high, there will be condensation
phenomenon on the outer surface of the refrigerator and the surface of the door
seal
It is a normal phenomenon and can be wiped with a clean towel
Buzz: When the compressor works, it will produce buzzing sound, and the
sound is loud when starting or stopping, which is a normal phenomenon
Squeak: It is a normal phenomenon that the refrigerant in electrical appliances
will make a squeak when flowing
8
Problem Point
Possible Causes
用
Troubleshooting
Hearing one or more of the
following sounds: humming/
dripping/ popping (ice
collision sound)
Water inlet valve is functioning/water is entering the ice maker funnel/ice is
being dispensed into the ice storage bin.
Ice tastes stale Ice has been stored for too long; please make fresh ice and use it promptly.
Water overflows from the
ice maker
Refrigerator or ice maker is not level.
If water still overflows after leveling the ice maker, close the water inlet valve
for the ice maker, adjust the ice probe to the "closed" position, and then
contact customer service.
Insufficient ice production
It takes 72 hours to fill the ice storage bin; ice is produced every 2 to 3 hours
during this period.
If you need more ice, lower the freezing chamber temperature.
Ice maker stops working
The ice storage bin is full, and the ice probe is in the closed position;
Water inlet valve is not open;
Water inlet valve or water valve filter is clogged (please contact customer
service).
9
Placing
Start
Proper Use of Refrigerator
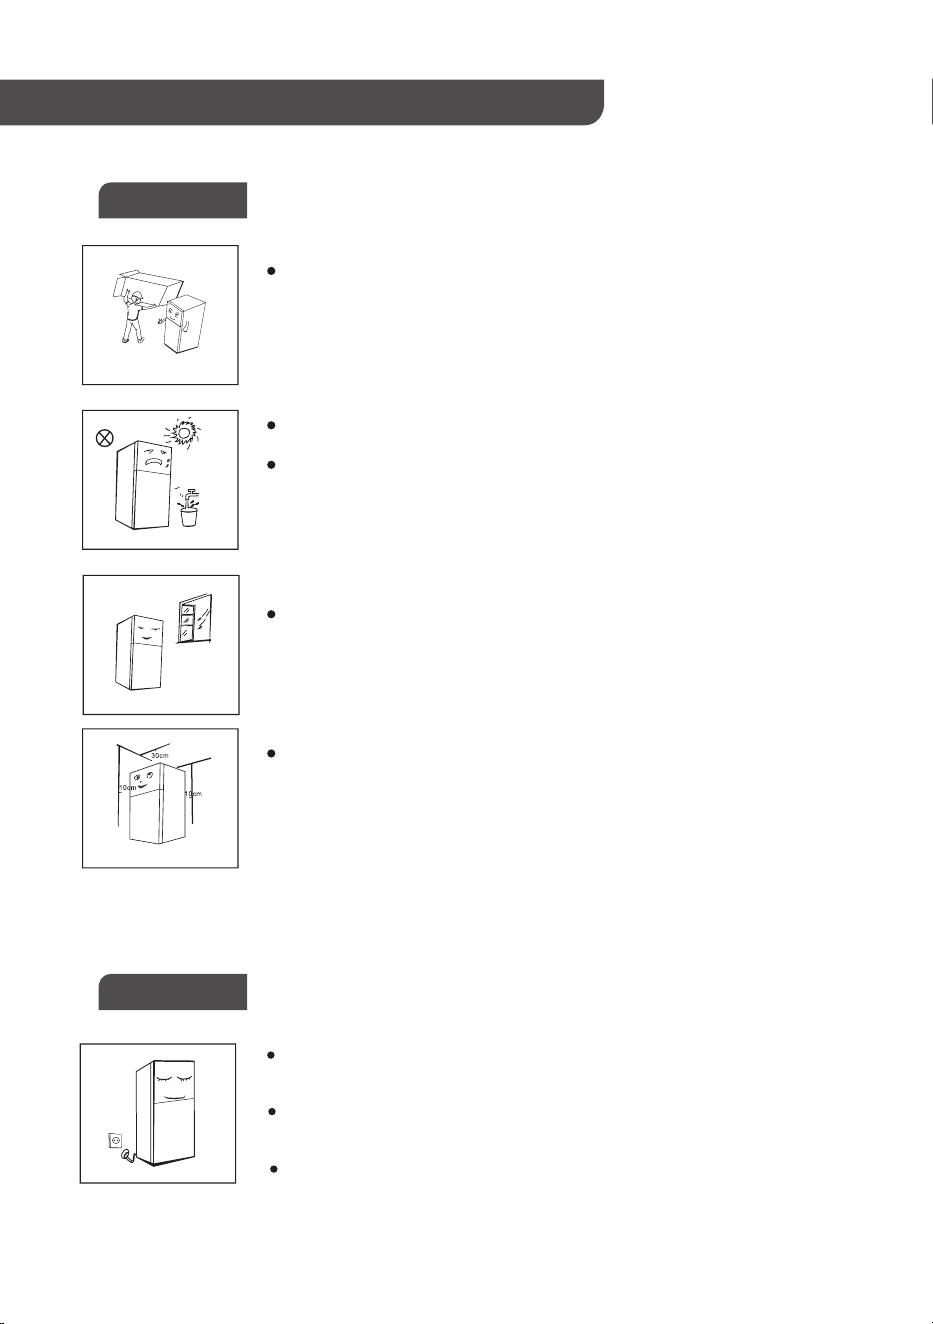
Before using the refrigerator, remove all packaging materials, including the
base cushion, foam cushion inside the refrigerator, adhesive tape, etc., and
tear off the protective film on the door body and refrigerator.
Keep away from heat sources and avoid direct sunlight. Do not place in
damp or watery places to prevent rust or weaken insulation effect.
Do not spray or wash the refrigerator with water, and do not place it in a
place where it is damp and easy to splash water, so as not to affect the
electrical insulation performance of refrigerator products.
Place the refrigerator in a well-ventilated place indoors, and the ground is flat
and firm (if there is any instability, you can rotate the leveling foot to the left
or right for leveling).
This refrigerator is installed independently and cannot be used as an
embedded device, otherwise it will lead to problems such as unable to fit into
cabinets, reduced product performance and life, and unable to obtain the
basic product warranty provided by the manufacturer.
For the transported products, please place them for more than 2 hours
before turning on the power, otherwise it will lead to product performance
degradation or damage.
Before putting fresh or frozen food, let the refrigerator run for 2~3 hours; the
ambient temperature is high in summer, thus the refrigerator should be fully
operated for more than 4 hours first.
In case of power cut or cleaning, the power plug should be unplugged and
kept at least five minutes at intervals before the power supply can be turned
on again, so as to prevent the compressor from being damaged due to
continuous start-up.
10
Proper Use of Refrigerator
Notice for Use
Matters Related to Placing Articles
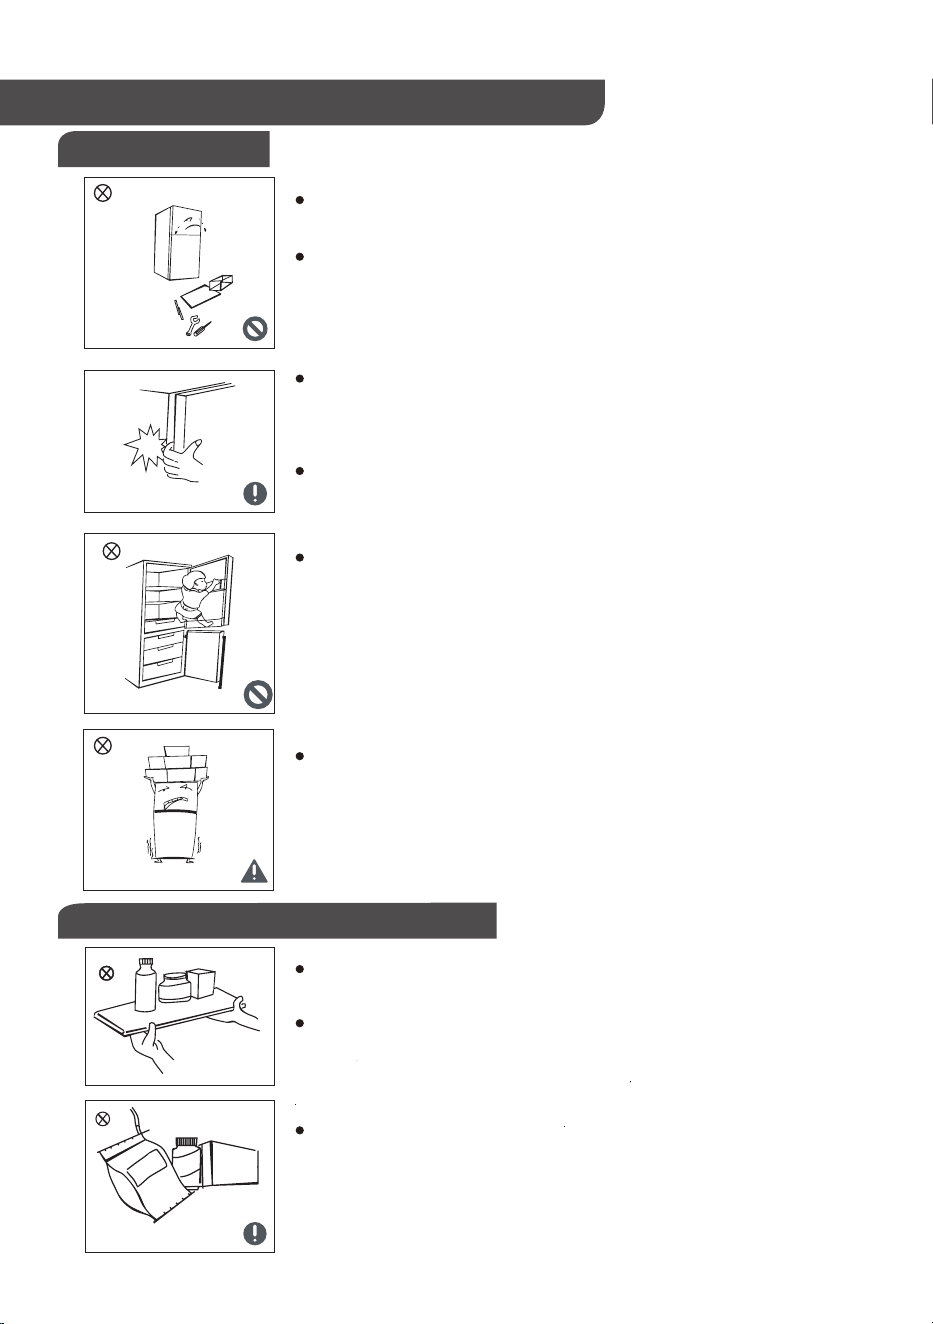
It is strictly prohibited to dismantle or transform the refrigerator without
permission, and it is prohibited to damage the refrigeration pipeline. The
maintenance of the refrigerator must be carried out by professionals.
If the power cord is damaged, it must be replaced by the relevant
professionals of the seller or its maintenance department in order to avoid
danger.
There is a small gap between the freezer door and the refrigerator door,
as well as between each door and the refrigerator body. Be careful not to
reach into these areas to avoid crushing your fingers. When opening and
closing the refrigerator door, don't use too much force to avoid items
falling.
After the refrigerator starts to run, don't use wet hands to take food or
containers in the Freezing Chamber, especially metal containers, so as to
avoid frostbite.
Do not allow children to enter or climb the refrigerator, so as to avoid
being sealed in the refrigerator products, which may lead to suffocation, or
falling electrical products to hurt children.
Please do not place heavy objects on the top of the refrigerator. When
closing the door, they are easy to fall and cause accidental damage.
Please do not put flammable, explosive, volatile and strong corrosive
articles into electrical appliances, so as not to cause product damage or
fire accidents.
Please do not place or use combustible articles near the refrigerator to
avoid fire.
This refrigerator is a household refrigerator, which is only suitable for
storing food, and cannot be used for other purposes, such as storing
blood, medicines and biological products.
Explosive
Strong
Corrosive
Flammable
Blood
Medicines
Biological
Products
11
Proper Use of Refrigerator
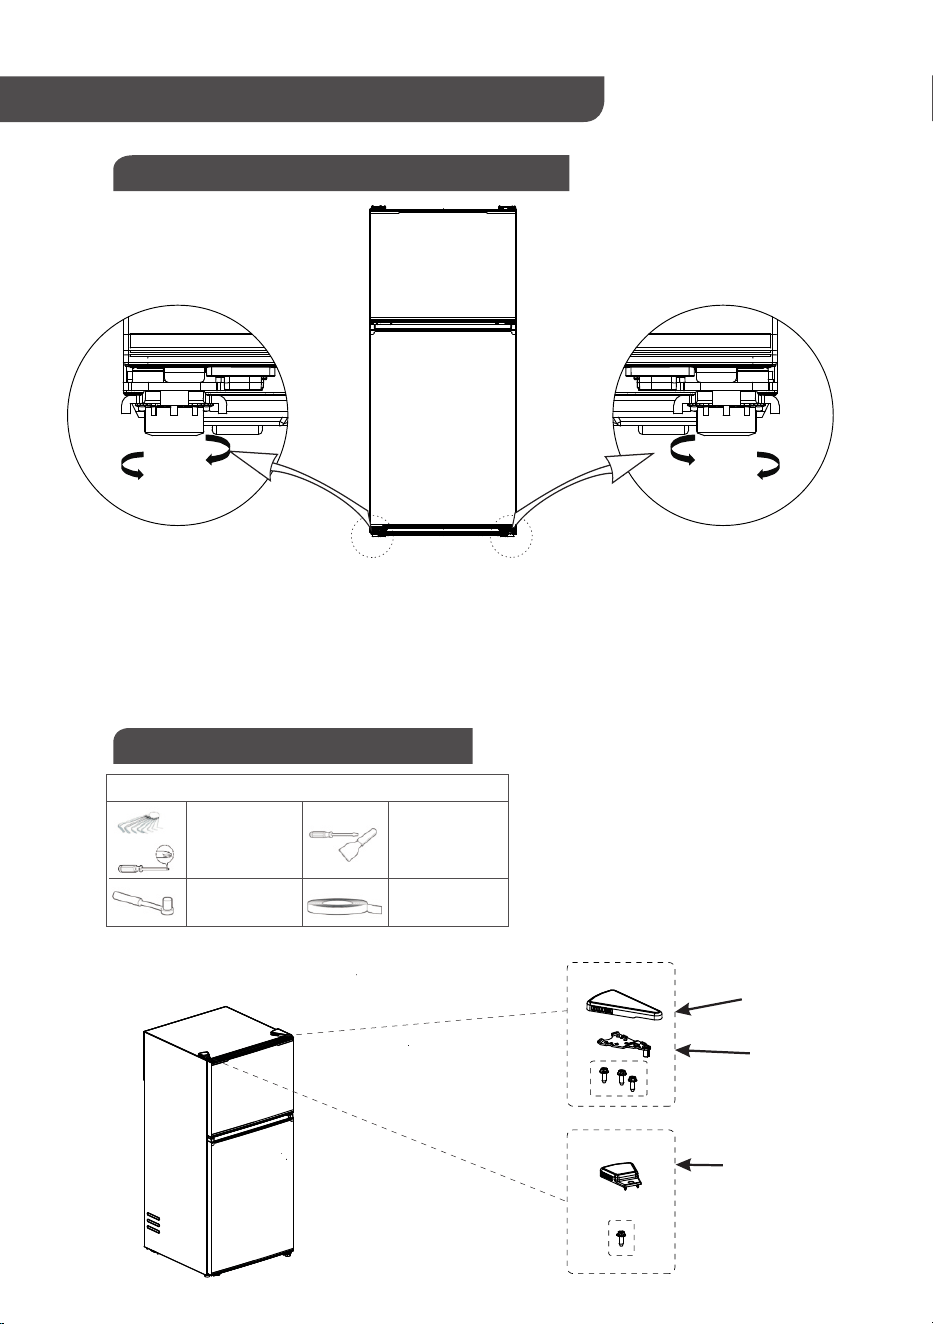
Schematic Diagram of Leveling Foot
Left and Right Door Change
(The above pictures are for reference only, and the actual configuration is subject to the purchased
physical objects or the seller's statement)
Cross
screwdriver
5/16" Socket
spanner
List of tools to be provided by users
Clockwise
Anticlockwise
Clockwise
Anticlockwise
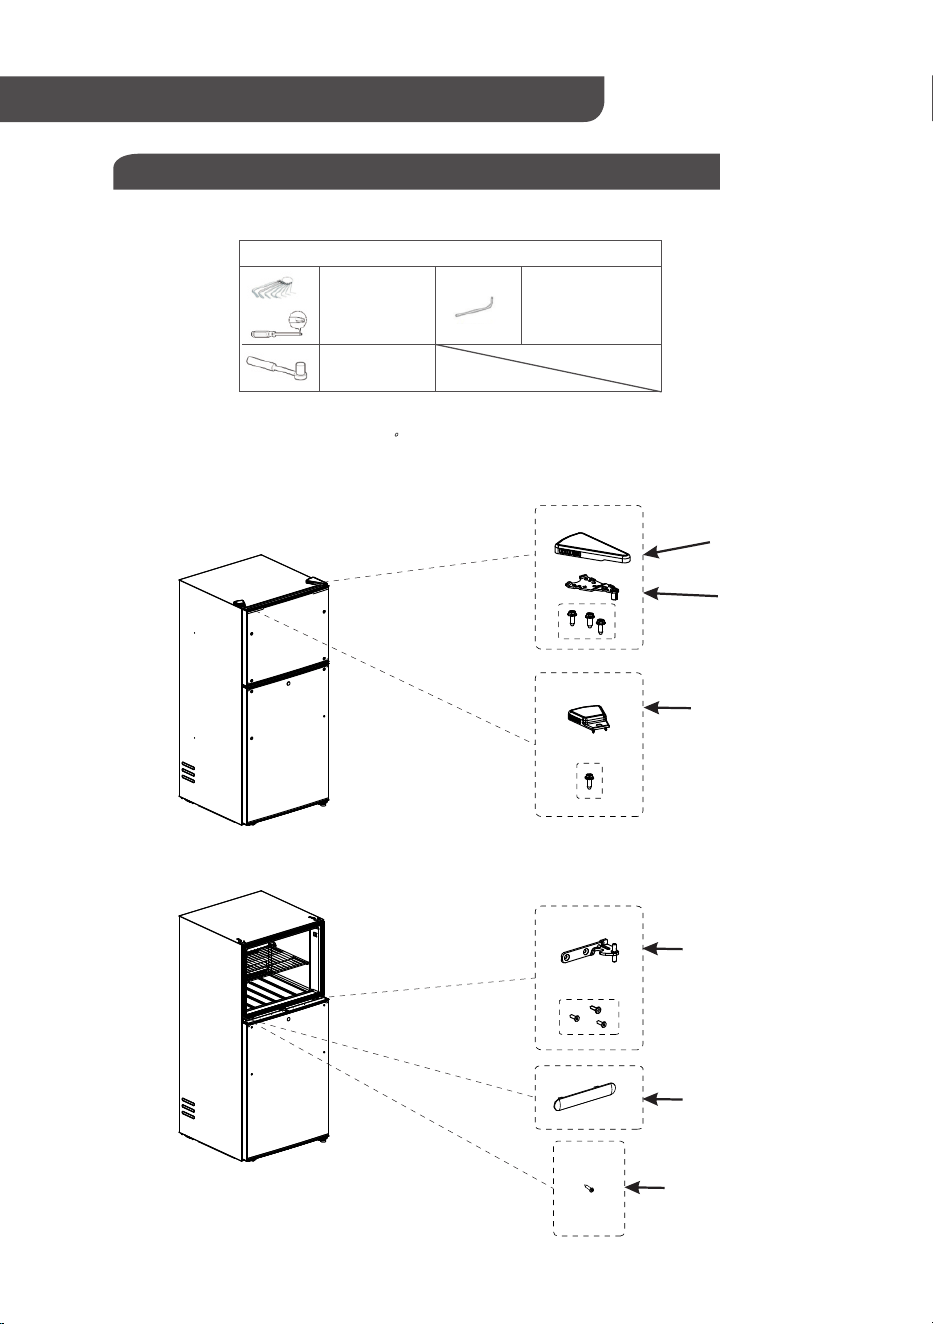
Top hinge cover
Top hinge
Left top hinge cover
Refrigerator body
Adjustment steps:
a. Rotate the bottom leveling foot clockwise to raise the refrigerator;
b. Rotate the bottom leveling foot anticlockwise to lower the refrigerator;
c. According to the above steps, level the refrigerator by rotating the leveling feet on the left and right until
the refrigerator is at a horizontal height.
Putty knife
Straight
screwdriver
Masking paper
tape
1) Remove articles from the door body.
2) Remove the top hinge cover, left top hinge cover, and the top hinge.
12
Proper Use of Refrigerator
Left and Right Door Change
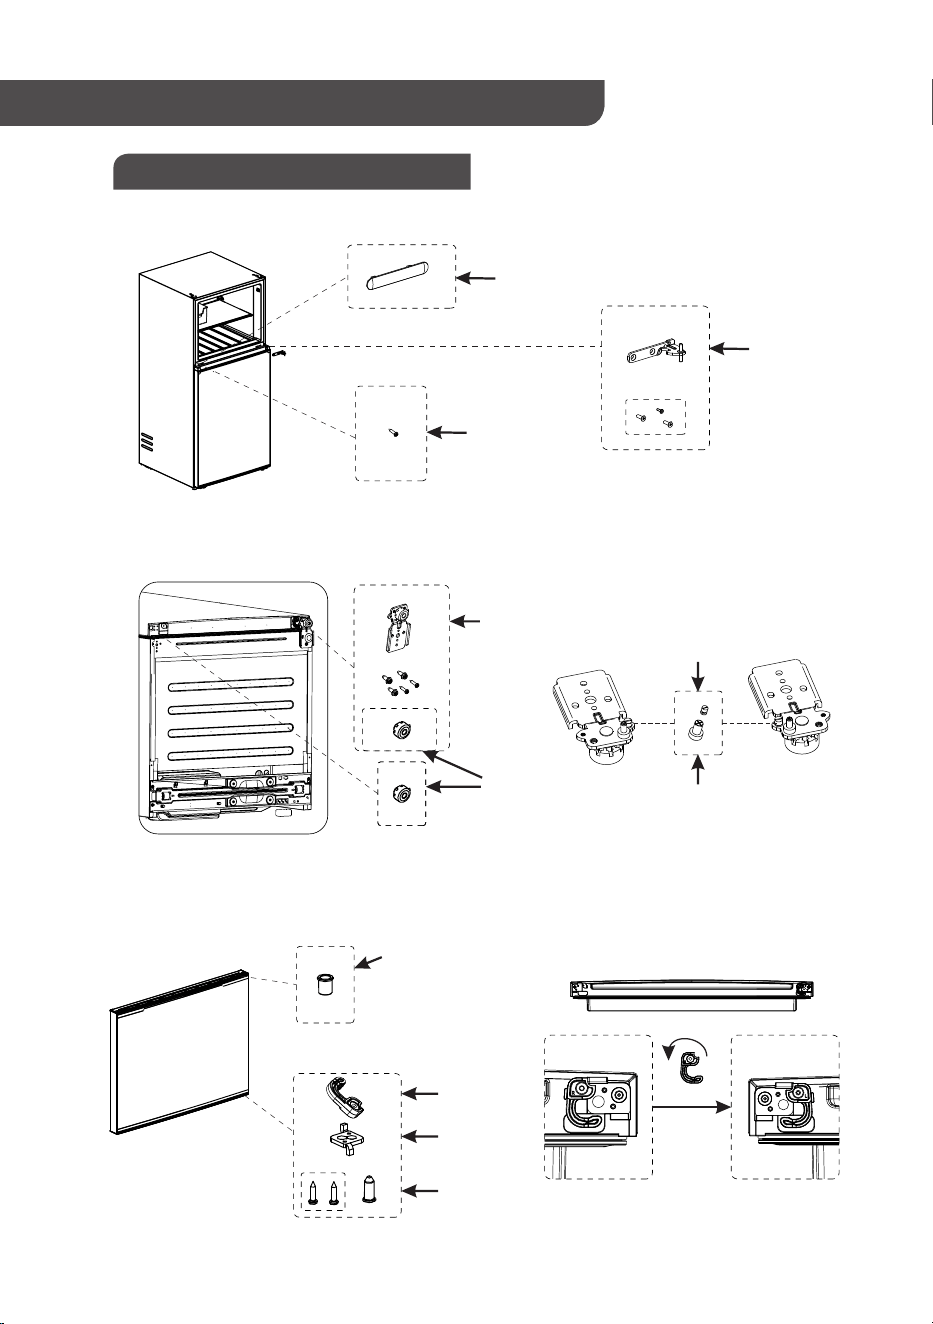
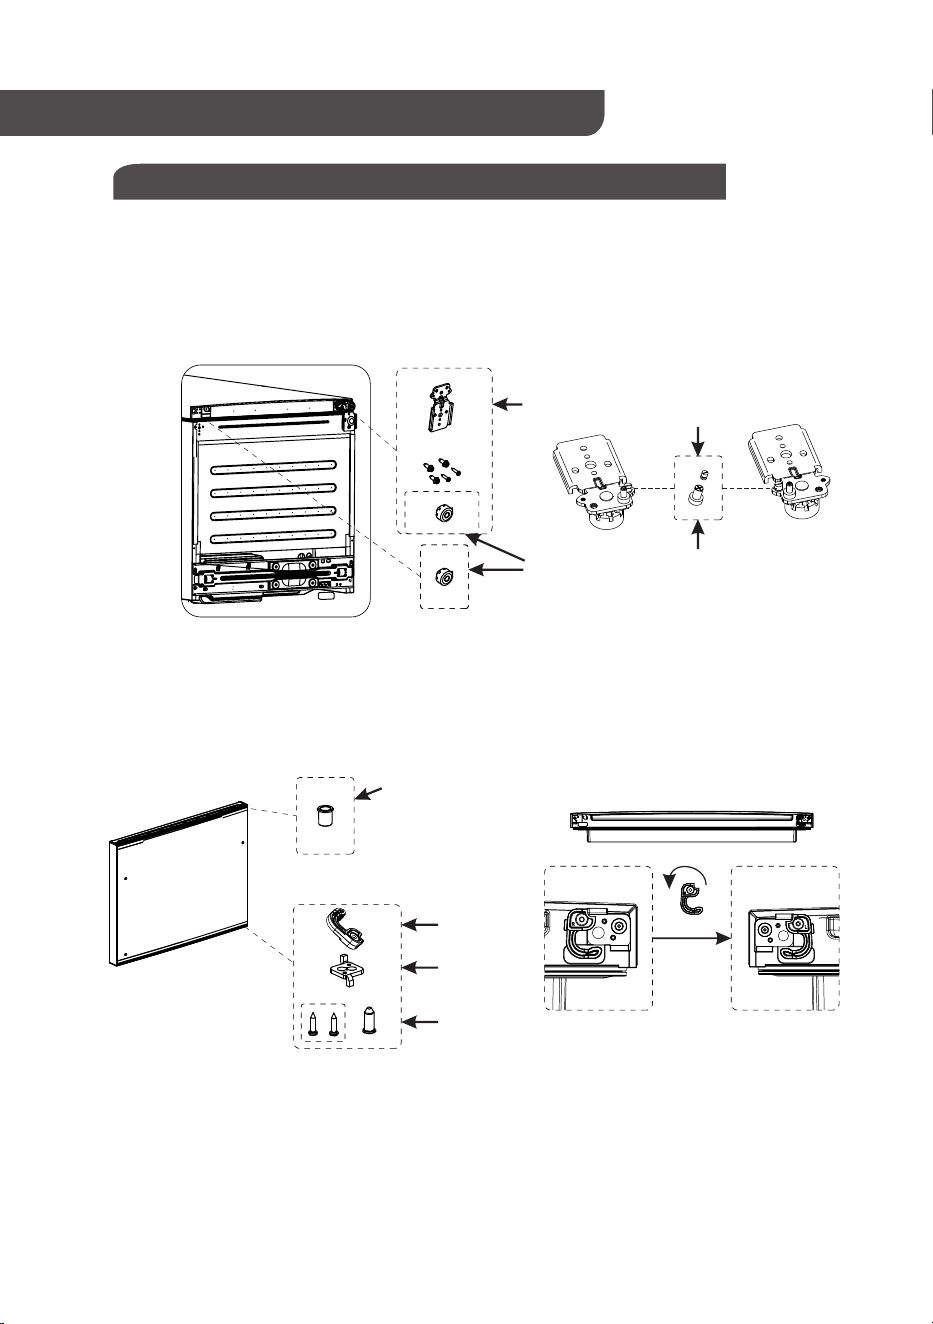
Sleeve
Self-lock
Stopper
Sleeve
Bottom hinge
Leveling Foot
Middle hinge
Crossbeam hole cover
U-shell screws
Refrigerator body
Refrigerator body
Freezer door
3) Take off the freezer door carefully (ensure not to lose small parts on the door). Carefully unscrew the U-shell screws
and pry open the crossbeam hole cover, remove the middle hinge.
4) Take off the refrigerator door carefully (ensure not to lose small parts like sleeve and stopper on the door);
Remove the bottom hinge and leveling foot. Remove the bottom hinge stop and the hinge shaft and install them on the
other side of the hinge, and install the modified bottom hinge on the other side of the refrigerator; the leveling foot is
installed on the original bottom hinge side.
5) Freezer door replacement:
① Install the sleeve on the other side;
② Remove the self-lock, stopper, and sleeve from the freezer door, flip and install the self-lock on the left side of the
bottom end cover of the freezer door, and move the stopper and sleeve to the left side of the freezer door.
bottom hinge stop
hinge shaft
Right side Left side
the bottom end cover of the freezer door
13
Left and Right Door Change
Proper Use of Refrigerator
,
(The above pictures are for reference only, and the actual configuration is subject to the purchased
physical objects or the seller's statement)
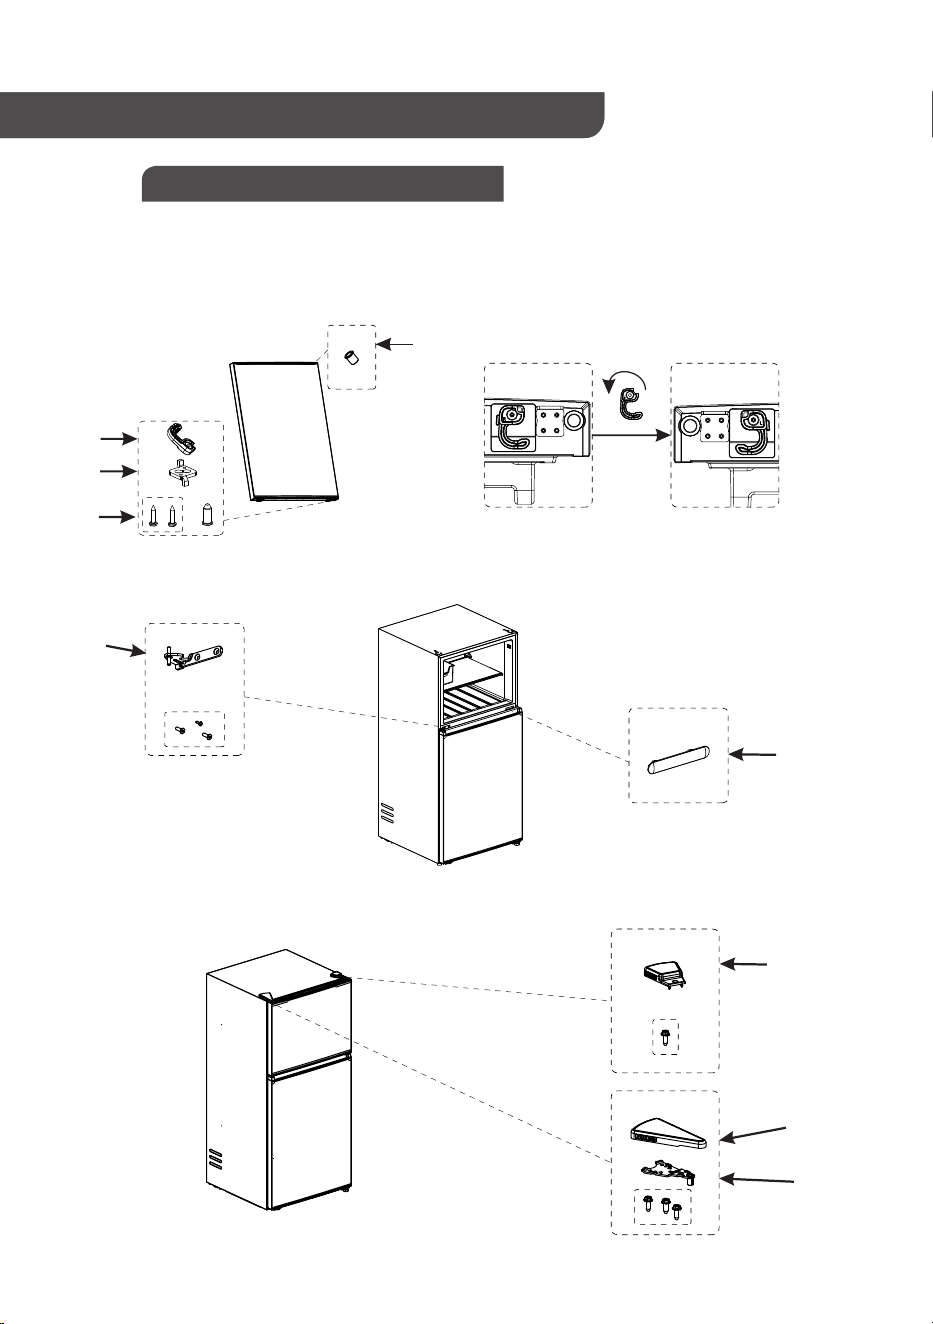
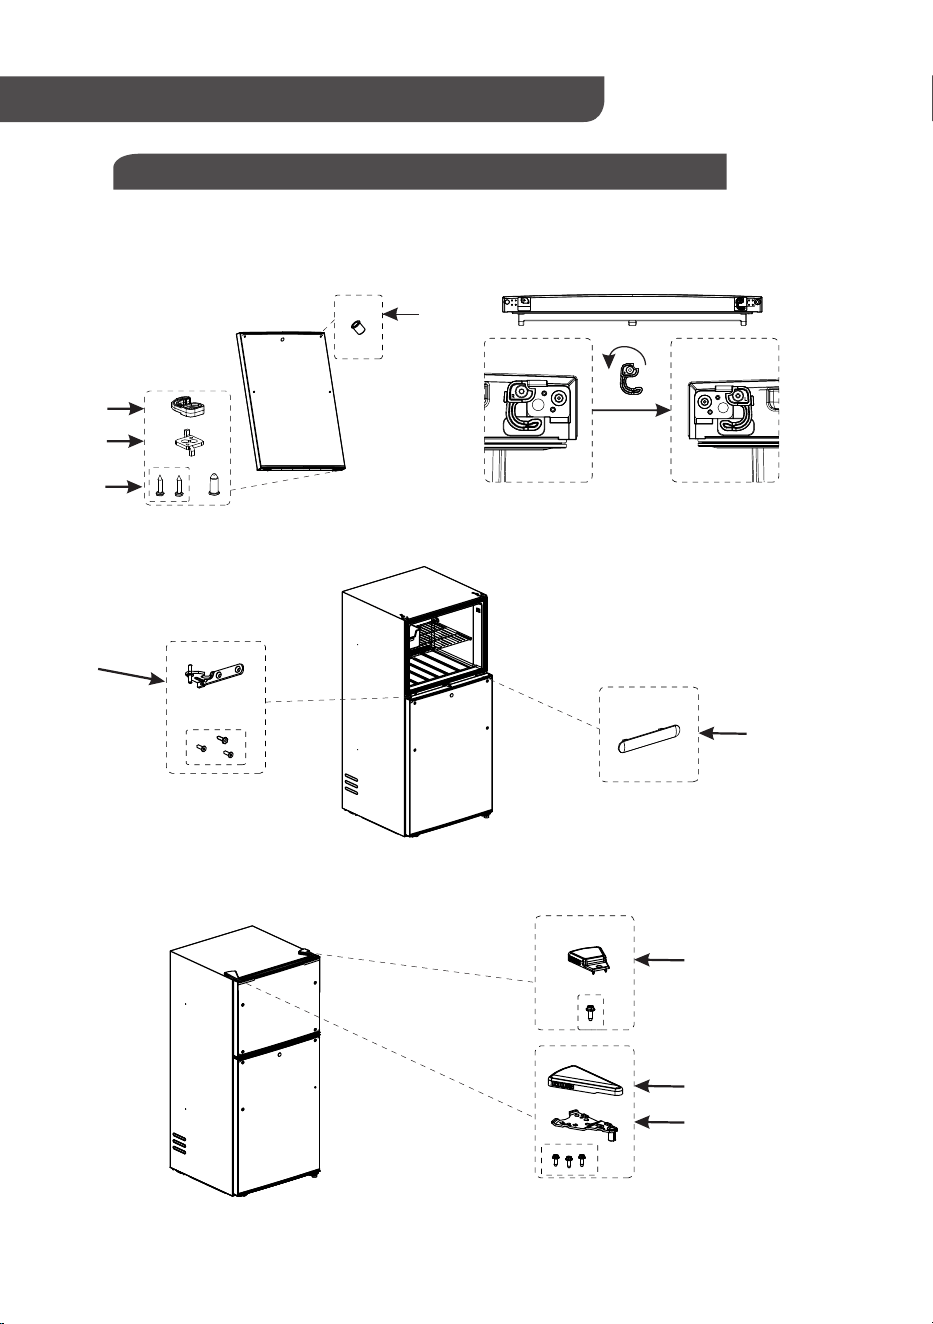
Self-lock
Stopper
Sleeve
Sleeve
Middle hinge
Crossbeam
hole cover
Top hinge cover
Top hinge
Left top hinge cover
Refrigerator door
Refrigerator body
6) Refrigerator door replacement:
① Remove the sleeve of the refrigerator door, install it at the left side.
② Remove the self-lock, stopper, and sleeve from the refrigerator door, flip and install the self-lock on the
left side of the bottom end cover of the refrigerator door, and move the stopper and sleeve to the left side of
the refrigerator door.
7) Install the replaced refrigerated door on the bottom hinge, then install the middle hinge and cover with the
crossbeam hole cover.
8) Place the freezer door on the middle hinge and install the top hinge; install the left top hinge cover on the
right top side; install the top hinge cover on the left top side.
Right side Left side
Bottom end cover of the refrigerator door
14
Proper Use of Refrigerator
Left and Right Door Change (With Handle Model)
Middle hinge
Crossbeam hole cover
Top hinge cover
Top hinge
Left top hinge cover
U-shell screws
Refrigerator body
Refrigerator body
Cross
screwdriver
5/16"Sleeve
wrench
List of accessories for packaging bags
5/32'' Allen key
1) Remove items from the door, and unlock the child lock if applicable. (For models with a child lock mechanism.
For models with optional handles already installed, you need to disassemble the handle first. Specific steps for
disassembly are provided after the instructions of the left and right door change.)
2) Remove the top hinge cover, left top hinge cover, and top hinge.
3) Take off the freezer door carefully (ensure not to lose small parts like sleeve and stopper on the door).
Carefully pry open the U-shell screws and crossbeam hole cover, and remove the middle hinge.
15
Proper Use of Refrigerator
Left and Right Door Change (With Handle Model)
Bottom hinge
Leveling foot
Refrigerator body
4) Take off the refrigerator door carefully (ensure not to lose small parts like sleeve and stopper on the door);
Remove the bottom hinge and leveling foot. Remove the bottom hinge stop and the hinge shaft and install them on the
other side of the hinge, and install the modified bottom hinge on the other side of the refrigerator; the leveling foot is
installed on the original bottom hinge side.
bottom hinge stop
hinge shaft
Sleeve
Self-lock
Stopper
Sleeve
Freezer door
5) Freezer door replacement:
① Install the sleeve on the other side;
② Remove the self-lock, stopper, and sleeve from the freezer door, flip and install the self-lock on the left side of the
bottom end cover of the freezer door, and move the stopper and sleeve to the left side of the freezer door.
Right side Left side
the bottom end cover of the freezer door
16
Proper Use of Refrigerator
Left and Right Door Change (With Handle Model)
,
(The above pictures are for reference only, and the actual configuration is subject to the purchased
physical objects or the seller's statement)
Top hinge cover
Top hinge
Left top hinge cover
Self-lock
Stopper
Sleeve
Sleeve
Middle hinge
Crossbeam
hole cover
Refrigerator door
Refrigerator body
Refrigerator body
7) Install the replaced refrigerated door on the bottom hinge, then install the middle hinge and crossbeam
hole cover.
8) Place the freezer door on the middle hinge and install the top hinge; install the left top hinge cover on the
right top side; install the top hinge cover on the left top side.
Self-lock
Stopper
Sleeve
Sleeve
Refrigerator door
6) Refrigerator door replacement:
① Remove the sleeve of the refrigerator door, install it at the left side.
② Remove the self-lock, stopper, and sleeve from the refrigerator door, flip and install the self-lock on the
left side of the bottom end cover of the refrigerator door, and move the stopper and sleeve to the left side of
the refrigerator door.
Right side Left side
Bottom end cover of the refrigerator door
17
Proper Use of Refrigerator
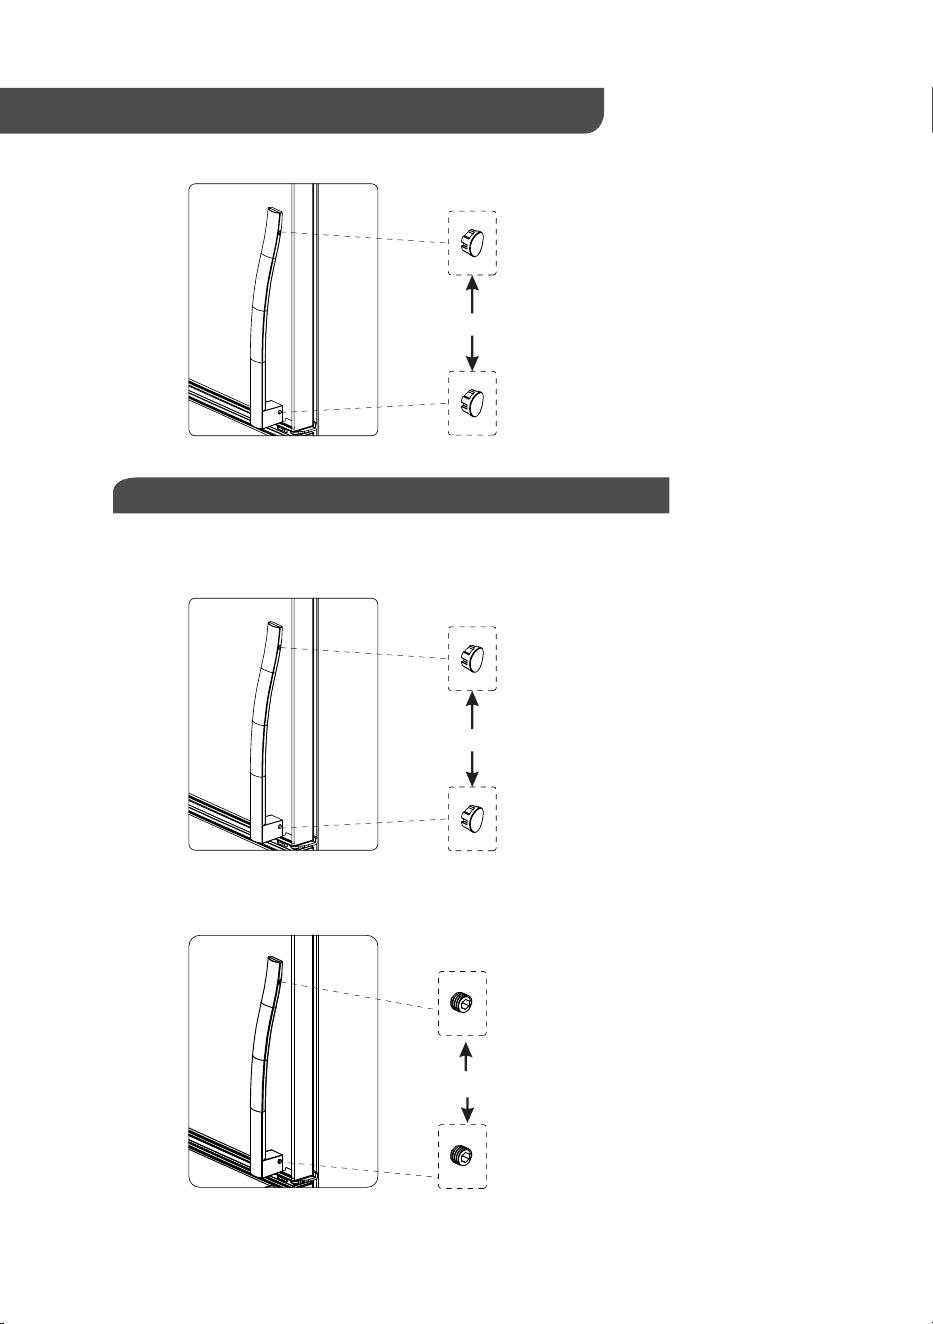
Handle Installation (Optional Handle Model)
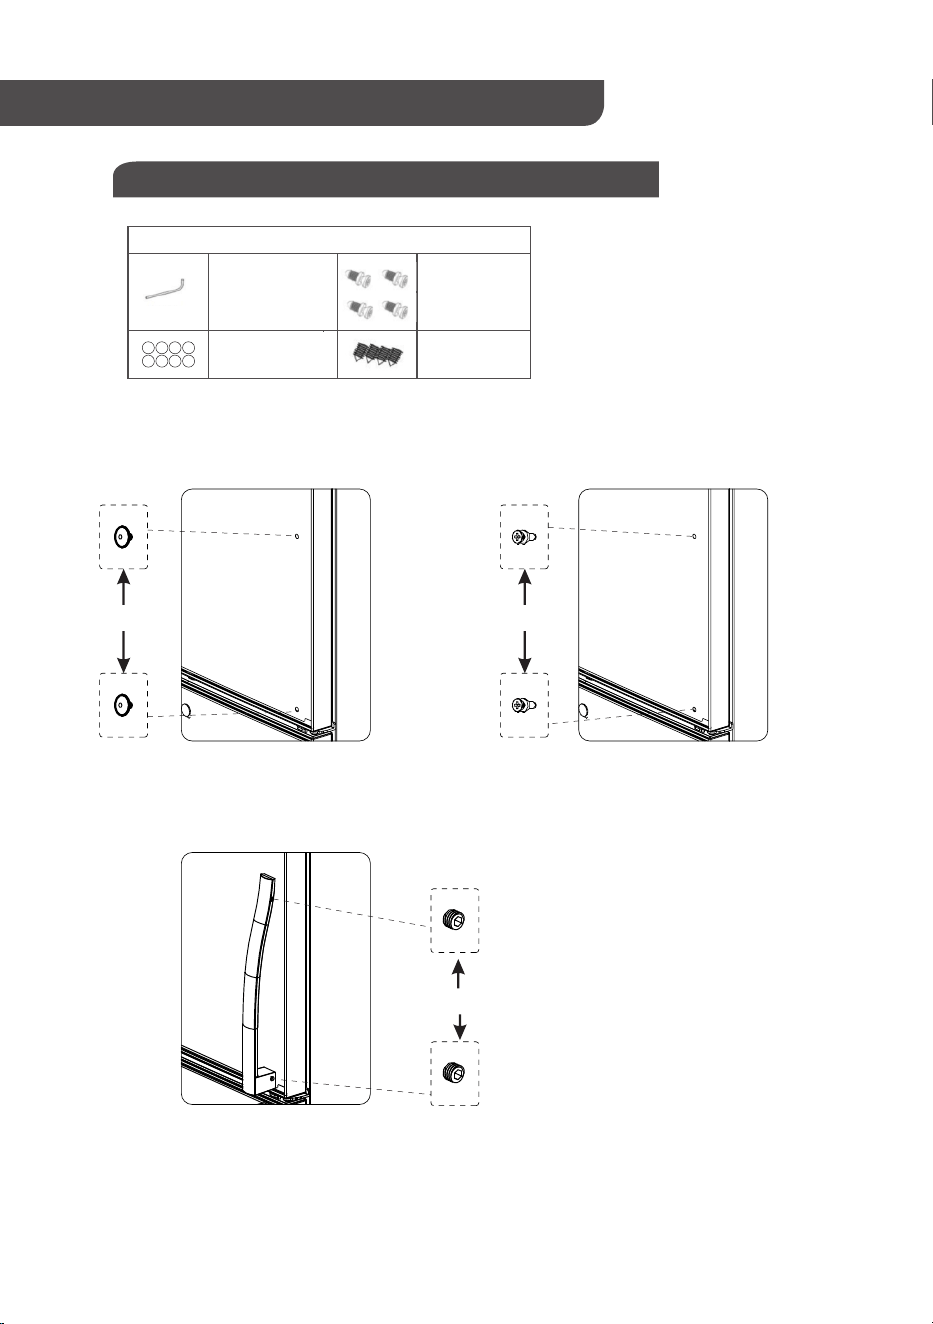
3/25'' Allen key
Handle bolt
Plug
List of accessories for packaging bags
Socket head
cap screw
Handle bolt
Socket head cap screw
Freezer door
Handle cap
Freezer door Freezer door
1) Taking the freezer door and cigar-shaped handle as an example (the refrigerated door and arc-shaped
handle are similar), choose one side in the direction you like, find the reserved hole on the door, pry open
the handle cap, insert the two handle bolts into the reserved hole, and tighten them.
2) Align the holes on the door handle with the handle bolts and insert them. Insert a socket head cap screw
into the outer threaded hole of the handle and tighten it with an Allen key. Repeat this step and secure the
lower end of the handle tightly.
3) Install the plug on the outer side of the upper and lower ends of the outer handle Tobacco-pipe-shaped
handle on both sides), completing the installation.
18
Proper Use of Refrigerator
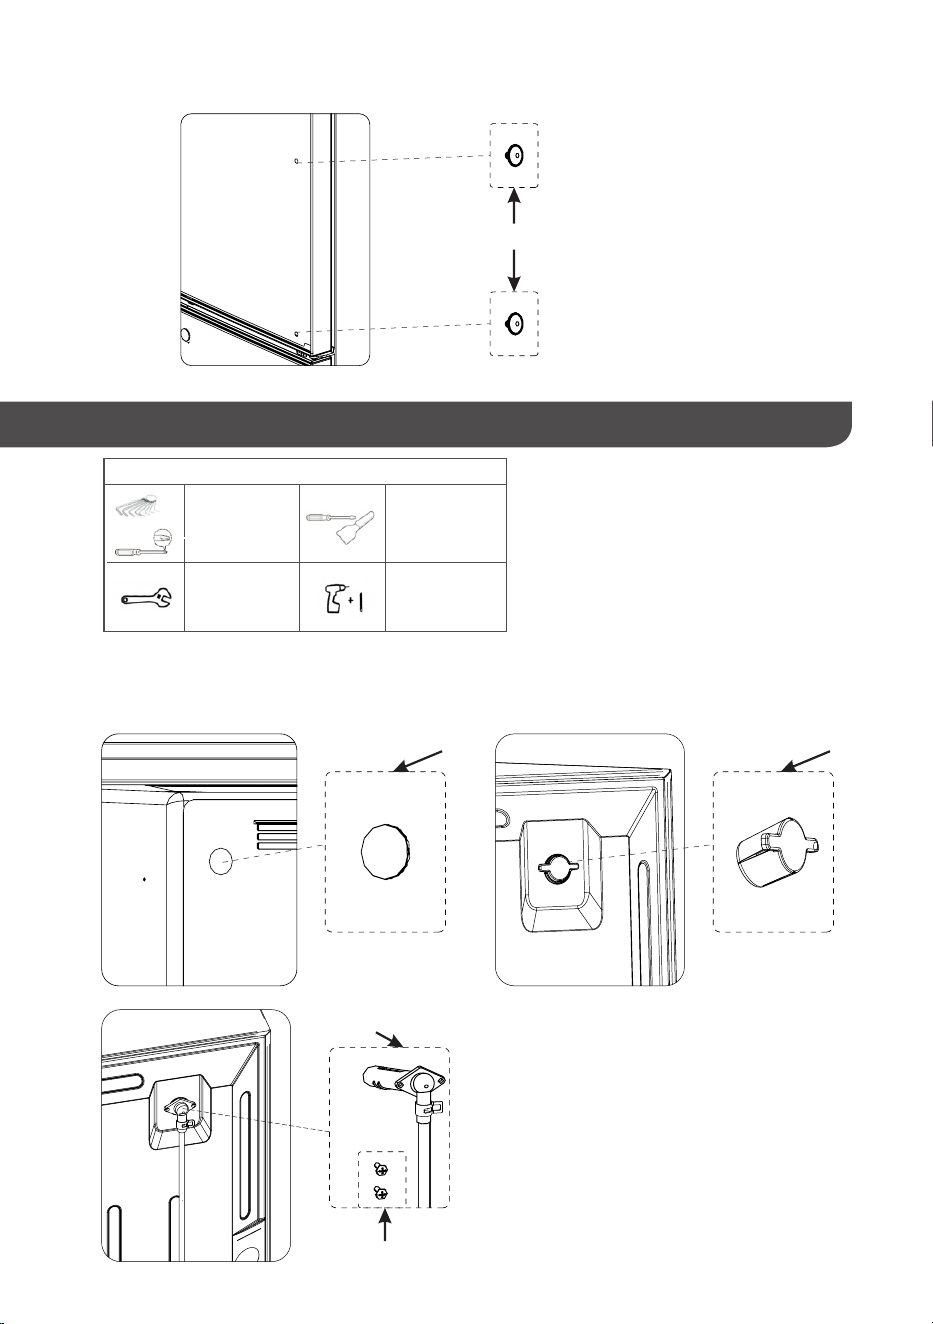
Remove the Handle (Optional Handle Model)
Plug
Plug
Socket head cap screw
Freezer door
Freezer door
Freezer door
1) Taking the freezer door and cigar-shaped handle as an example (the refrigerated door and arc-shaped
handle are similar), remove the two plugs on the outer sides of the upper and lower ends of the handle.
2) Use an allen key to remove the socket head cap screws on the outer sides of the upper and lower ends,
and remove the handle.
Ice Maker Installation (Optional Ice Maker Model)
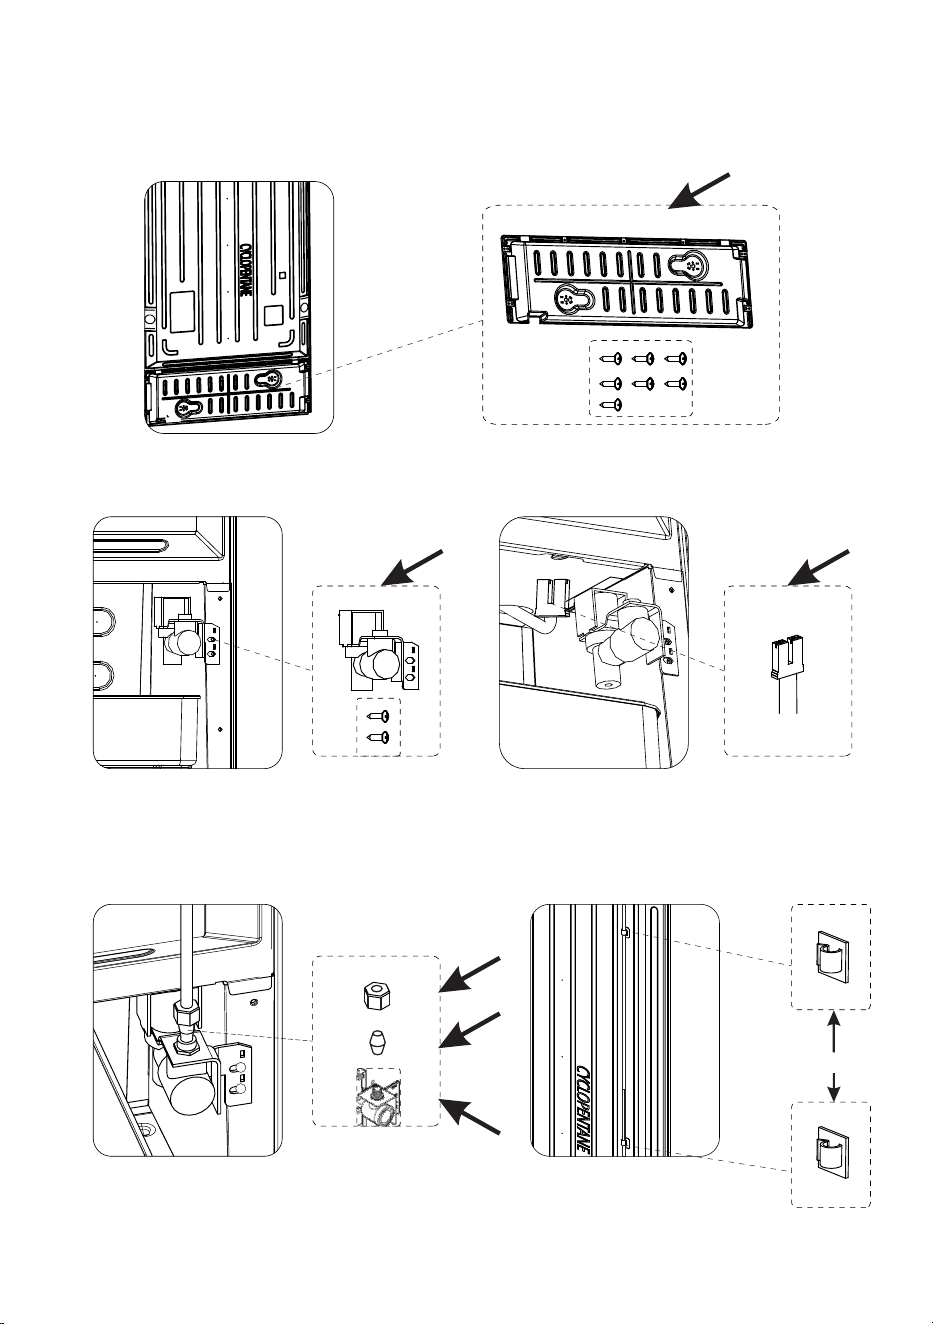
Decorative cover
Cross
screwdriver
List of tools to be provided by users
Handle cap
Freezer door
19
3) Place the handle cap into the reserved hole on this side to complete the disassembly.
1/2" Adjustable
wrench
Putty knife
Straight
screwdriver
Electric
screwdriver
1/4" Drill bit
1) First, use a straight screwdriver to pry open the decorative cover inside the freezing chamber.
Then,Remove the drain plug from the back of the refrigerator, locate the groove at the top of the back of the
refrigerator, insert the joint of the water supply tube into the guide, and secure the joint of the water supply
tube with two screws.
Joint of the water
supply tube
Screws
Drain plug
20
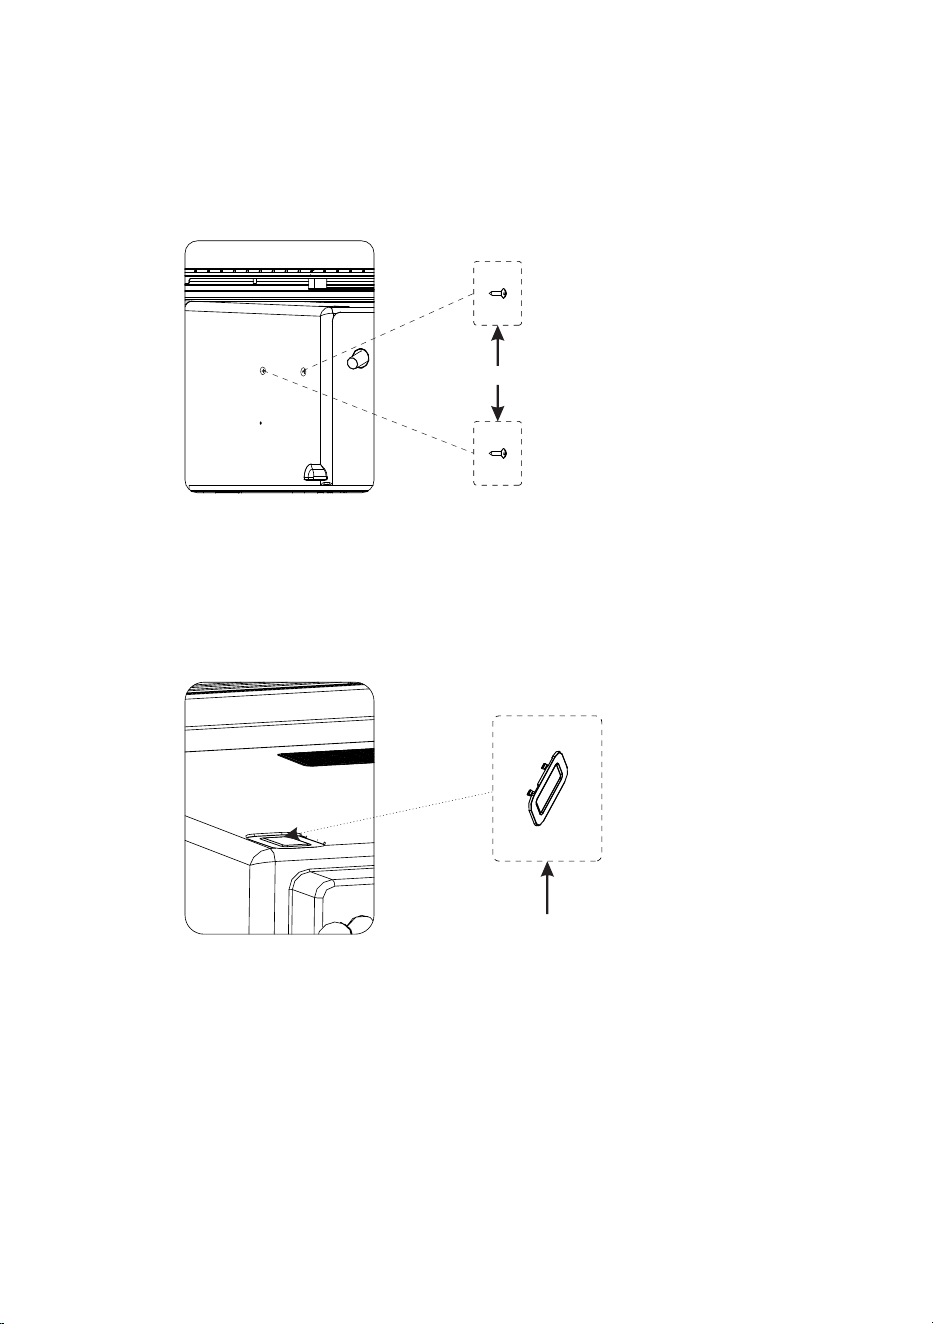
Compressor rear cover
Tube clip
Wire harness terminal
Water inlet valve
3) Align the water inlet valve with the hole at the lower right side of the back, tighten it with two screws, cut off the zip
ties on the wire harness terminal on the body,and insert the wire harness terminal on the body into the terminal of the
water inlet valve.
4) ①Thread the brass compression nut and ferrule into the long water pipe in sequence, and insert them into the
copper water line.Finally, rotate and tighten the brass compression nut onto the copper water line.
②Thread the long water tube on the water inlet valve into the tube clamp at the upper groove on the back of the
refrigerator and the short water tube into the tube strap at the lower groove.
Brass compression
nut
Ferrule
Copper water line
2) Remove all the screws securing the compressor rear cover (located at the bottom back of the refrigerator)
and remove the compressor rear cover.
21
Pre-embedded cover of the
ice maker terminal box
Screws
5) Align the two ice maker installation screws with the two small holes above the freezer wall, screw
them in halfway clockwise, making sure not to fully tighten.
6) Using a straight screwdriver, remove the pre-embedded cover of the ice maker terminal box located
at the top of the freezing chamber. Please save the cover pre-embedded cover of the ice maker terminal
box for future use. (Only applicable to models with an ice maker installation interface.)
7) With one hand holding the ice maker, use the other hand to connect the terminal connection of wiring
harness to the ice maker terminal box located at the top of the freezing chamber. Check the connection
for tightness and ensure the wiring harness is secured on the hooks at the back of the ice maker.
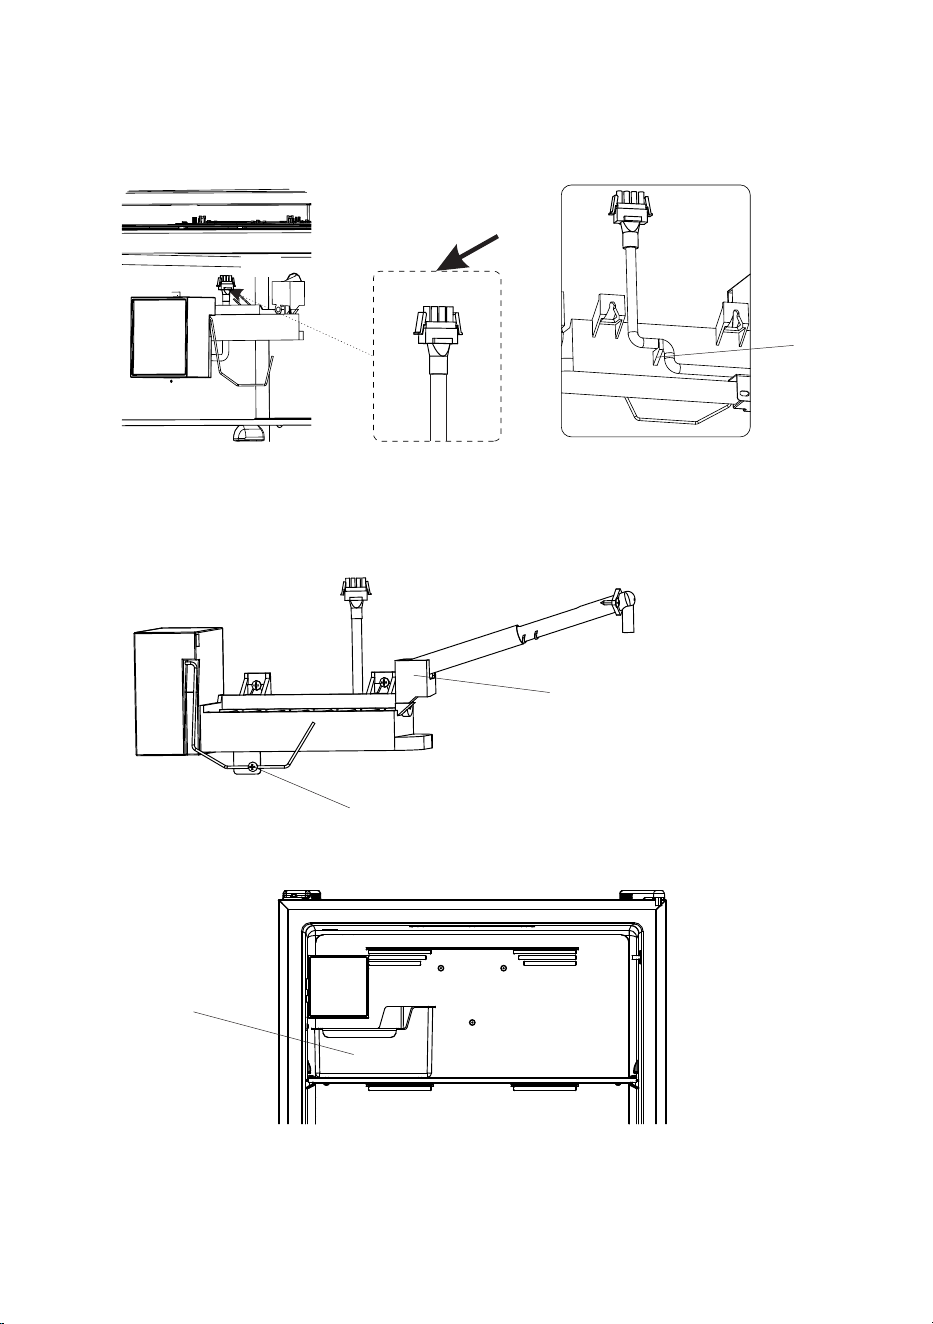
22
Ice maker funnel
Third screw
Ice storage bin
Hooks at the
back of the ice
maker
Wiring harness terminal
8) Hang the ice maker on the two previously partially screwed screws, align the water outlet of the water
supply tube with the ice maker funnel, then insert the third screw, and finally tighten all the screws. The ice
maker is now securely fixed.
9) Place the ice storage bin on the corresponding position of the freezer glass shelf to complete the installation.
23
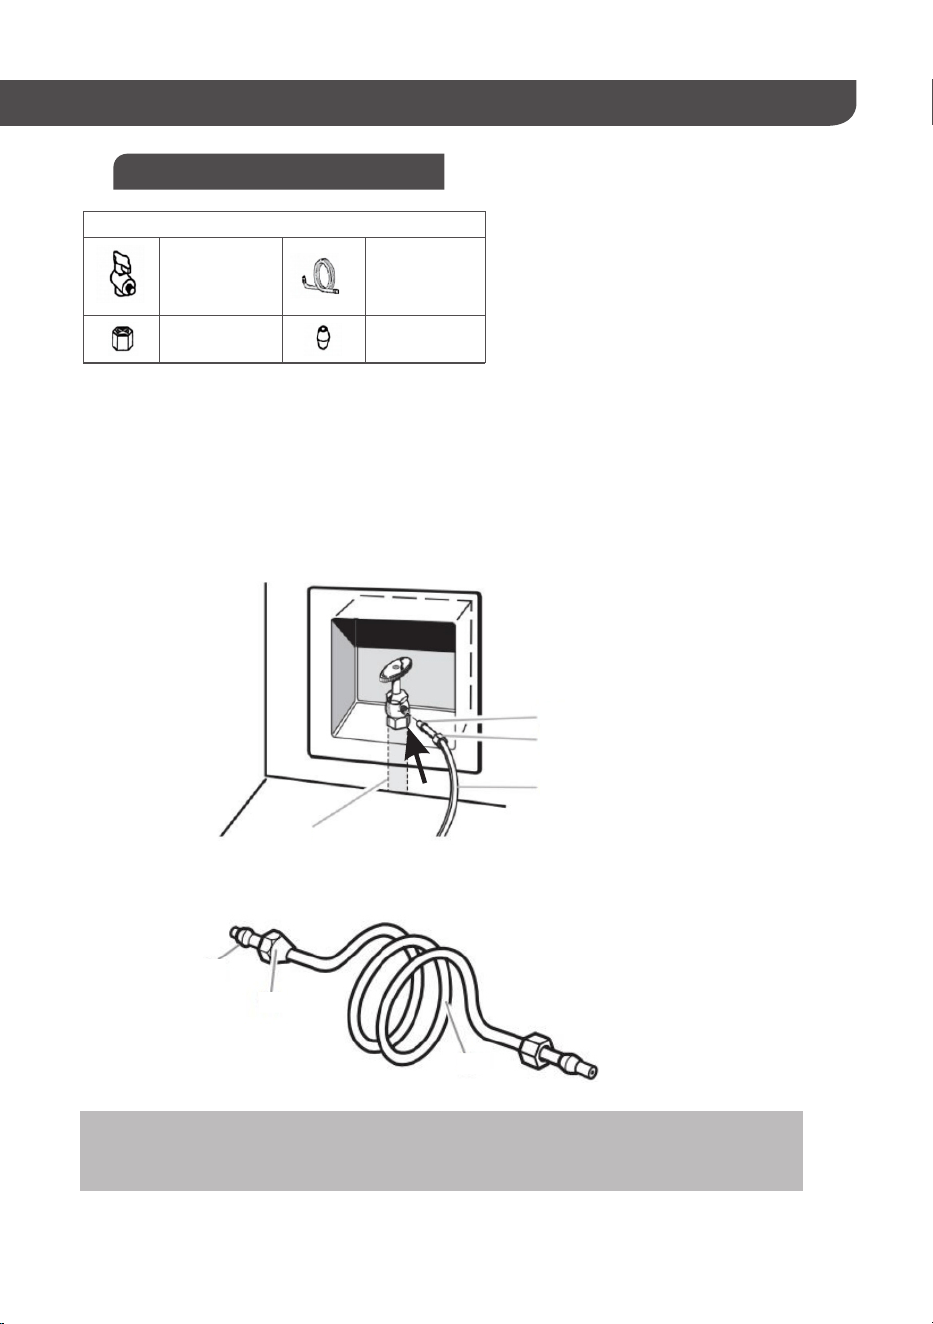
Connecting Water Supply System (with Built-in Ice Maker Model)
Connecting Water Supply
Sleeve
1/4'' Compression nut
Water supply tube
Household water tube (at least 1/2")
Sleeve
Faucet
1/4" Water
supply tube
1/4" Compression
nut
List of tools to be provided by users
Sleeve
1/4'' Compression nut
Water supply tube
1) Unplug the refrigerator or disconnect the power;
2) Shut off the main water supply system. Choose the faucet closest to the refrigerator;
3) Use the faucet or a similar valve in the household. (Note: To ensure sufficient water flow to the refrigerator,
it is recommended to use at least a 1/2" household water tube);
4) Now, you can connect the water supply tube to the faucet. (Note: Use a 1/4" water supply tube for the
connection);
5) Ensure the length of your water supply tube is appropriate, and make sure both ends of the water supply
tube are cut flat.
6) Sleeve the compression sleeve and compression nut onto the water supply tube. Insert one end of the
water supply tube into the faucet's water outlet, and use a wrench to tighten the compression nut onto the
water outlet, being careful not to overtighten;
7) Place the other end of the water supply tube into an empty container or sink, and open the main water
supply system to flush the water supply line until the water runs clear. Close the faucet (Note: Before
connecting to the faucet interface, ensure the water supply line is purged.)
The maximum inlet water pressure is 1.5×10^5, in pascals;
The minimum inlet water pressure is 6×10^5, in pascals, if this is necessary for the correct operation
of the appliance.
24
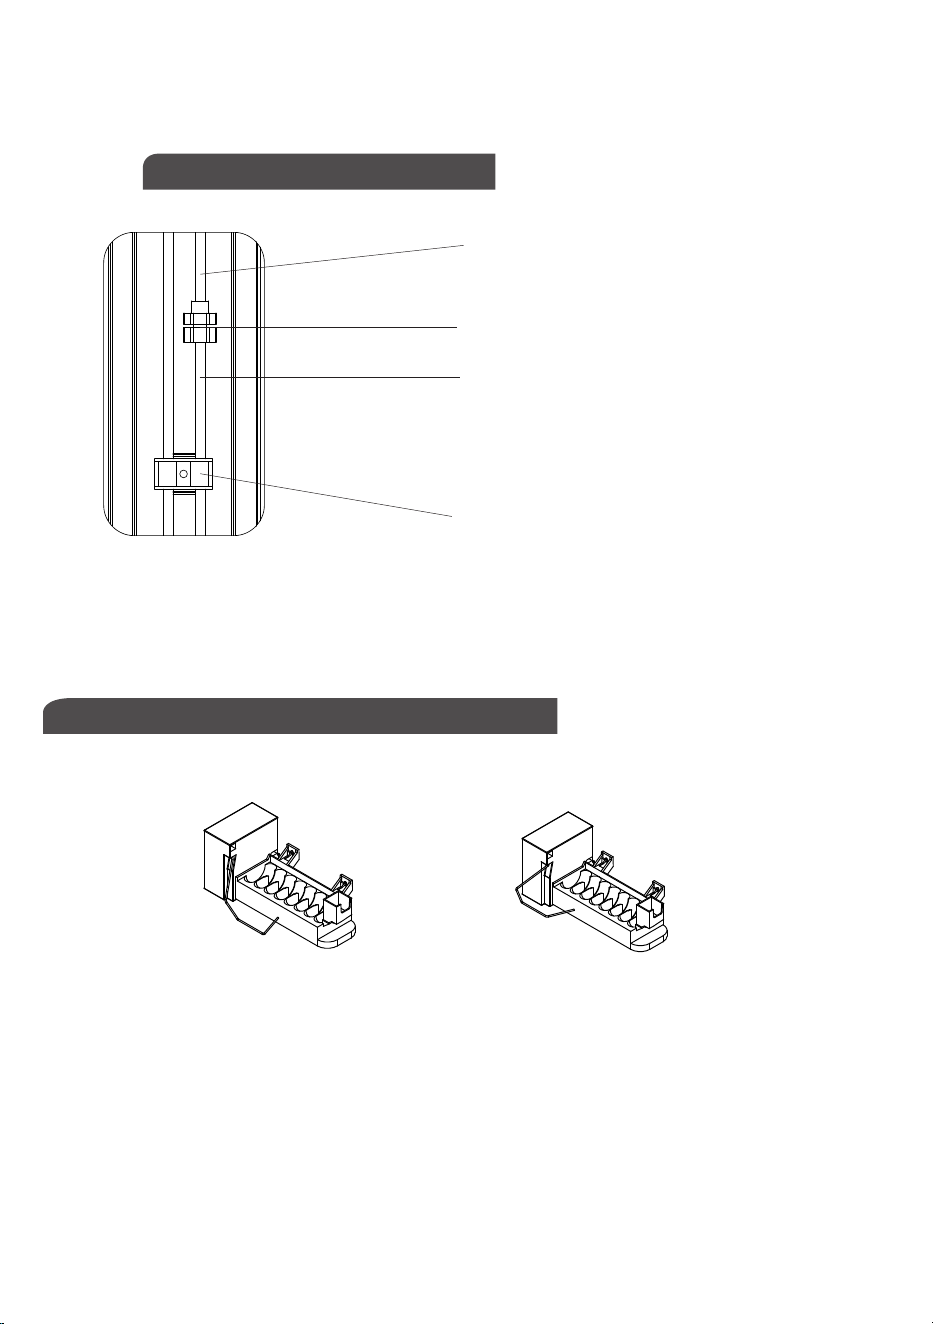
Water supply tube
1/4'' Compression nut
Short tube
Tube clip
Ice Making Function Enabled
Ice Making Function Disabled
Ice Maker Control (Optional Component)
Connecting the Refrigerator
1) Disconnect the refrigerator from the power source and turn off the water supply.
2) As shown in the diagram, use the compression nut to connect the water supply tube to the short tube of
the inlet valve (at this point, the short tube should already be secured on the tube clip as per the fifth step of
the ice maker installation). Tighten the compression nut. Be careful not to overtighten. Pull the water supply
tube to ensure a secure connection.
3) Turn on the water supply system and check for any leaks.
Ice Making Function Enabled: Lower the ice probe vertically, approaching approximately 90° to the
horizontal plane;
Ice Making Function Disabled: Rotate the ice probe outward 70-85°, aligning approximately parallel to the
horizontal plane.
25
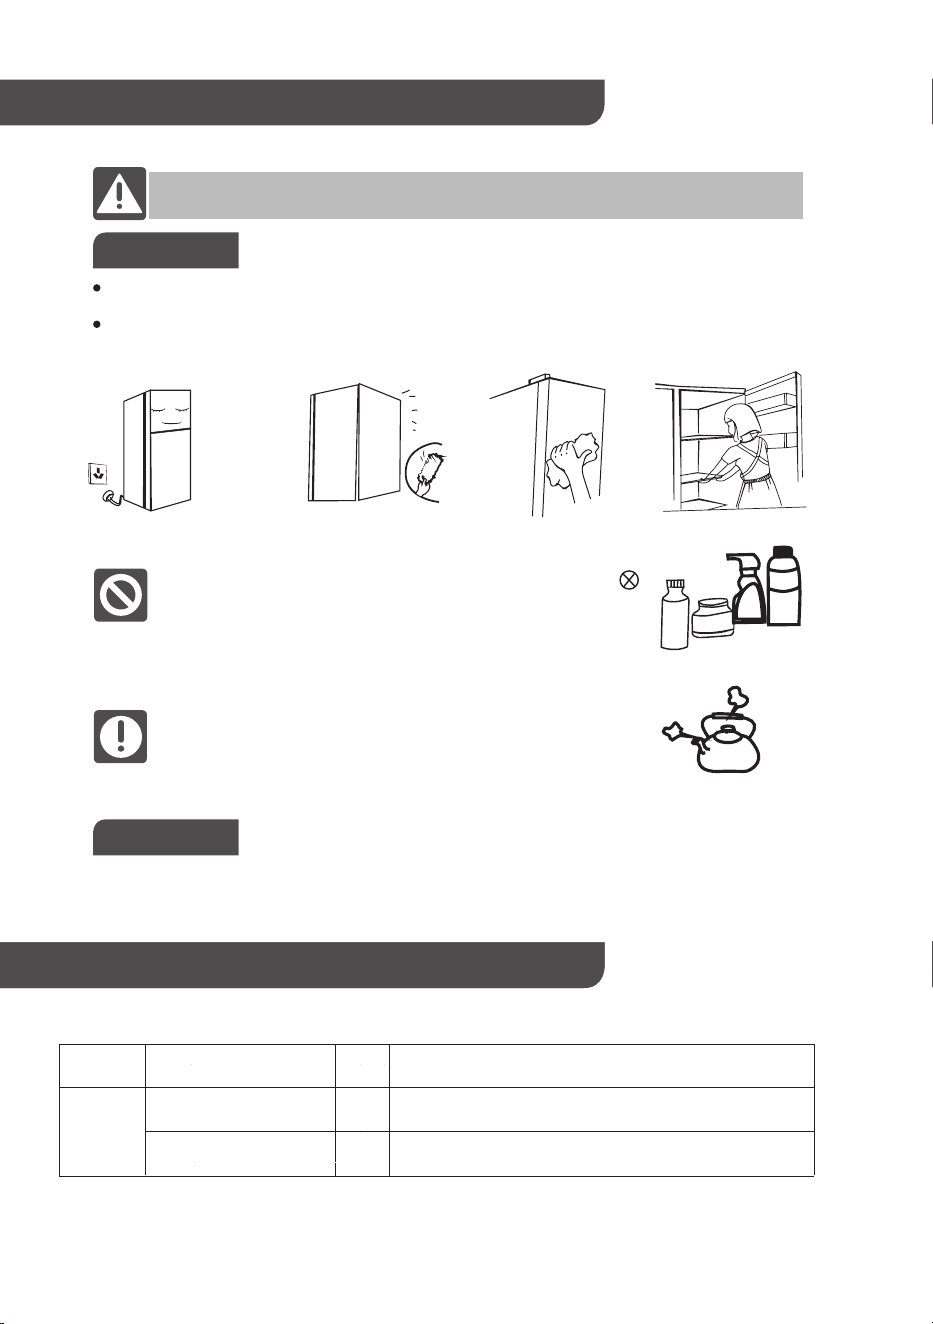
Maintenance of Refrigerator
When cleaning and defrosting the refrigerator, please unplug the power
plug first.
Cleaning
Ambient
temperature
Defrosting interval
Time
Minimum defrosting interval
( Δ t )
d-min
8h
Frequently used, the Freezing Chamber can not reach the
set temperature
48h
No door opening and closing action, and no special mode
setting
32 °C
霜间
Defrosting
This refrigerator is a full air-cooled with automatic defrosting function without manual operation.
Defrosting Interval Declaration
Please clean up the dust behind the refrigerator and on the ground on time to improve the heat dissipation
effect and save energy.
The inside of the refrigerator should be cleaned frequently to avoid an unpleasant odor. When cleaning,
please use a soft towel or sponge, and dip it in clear water or non-corrosive neutral detergent, and finally
wipe it with clear water and dry it with a dry rag. Open the door and dry it naturally before turning on the
power supply.
When cleaning, do not use hard brushes, steel wire balls, steel wire
brushes, abrasives (such as toothpaste), organic solvents (such as
alcohol, acetone, lacquer thinner, etc.), boiled water, acid and alkaline
articles to clean the refrigerator. This may damage the surface and
liner of refrigerator.
Do not wash with water when cleaning, so as not to affect the
electrical insulation performance. Please use a dry rag when cleaning
electrical components such as lighting lamps.
Gasoline
Alcohol
Detergent
Cleanser
Essence
Maximize defrosting interval
( Δ t )
d-max
Specific conditions
26
Safety Precautions
When children are present, they should be supervised to ensure that they do not play with this refrigerator.
If the power cord is damaged or the socket hole is loose, it must be replaced by the manufacturer, its service agent or
similar institutions to avoid danger. Do not store explosive substances (such as aerosol tanks with flammable
propellants) in the refrigerator.
The power plug of the equipment must be unplugged after use and before self cleaning of equipment.
LED lamp were used, it can only bereplaced by the manufacturer or its service agent, together with a part of the
appliance
– WARNING: Ensure there are no obstacles in the ventilation holes in the equipment shell or built-in structure.
– WARNING: Do not use mechanical devices or other means to speed up defrosting except the process
recommended by the manufacturer.
– WARNING: Do not damage the pipes of the refrigerant circuit.
– WARNING: Do not connect the plug adapter or other accessories to the power plug.
– WARNING: Please dispose the refrigerator according to local regulations, because it uses flammable cyclopentane
and refrigerant.
– WARNING: When positioning the equipment, make sure that the power cord is not clamped or damaged.
– WARNING: Do not locate multiple portable socket-outlets or portable power supplies at therear of the appliance.
– WARNING: Do not modify or extend the power cord.
– WARNING: The risk of trapping the children.
– WARNING: It is strictly prohibited to disassemble or modify the ice maker and its related components without
authorization. To avoid danger, replacement must be carried out by the manufacturer, its service department, or
qualified professionals.
– WARNING: Keep ventilation openings, in the appliance enclosure or in the built-instructure, clear of obstruction.
– WARNING: Do not use mechanical devices or other means to accelerate the defrostingprocess, other than those
recommended by the manufacturer.
– WARNING: Do not use electrical appliances inside the food storage compartments of theappliance, unless they are
of the type recommended by the manufacturer.
– WARNING: Connect to potable water supply only.
Before disposing the old refrigerator:
- Remove the refrigerator doors.
- Put the bottle racks and doors in a proper place to prevent children from entering and playing to cause accidents.
To avoid food contamination, please abide by the following instructions:
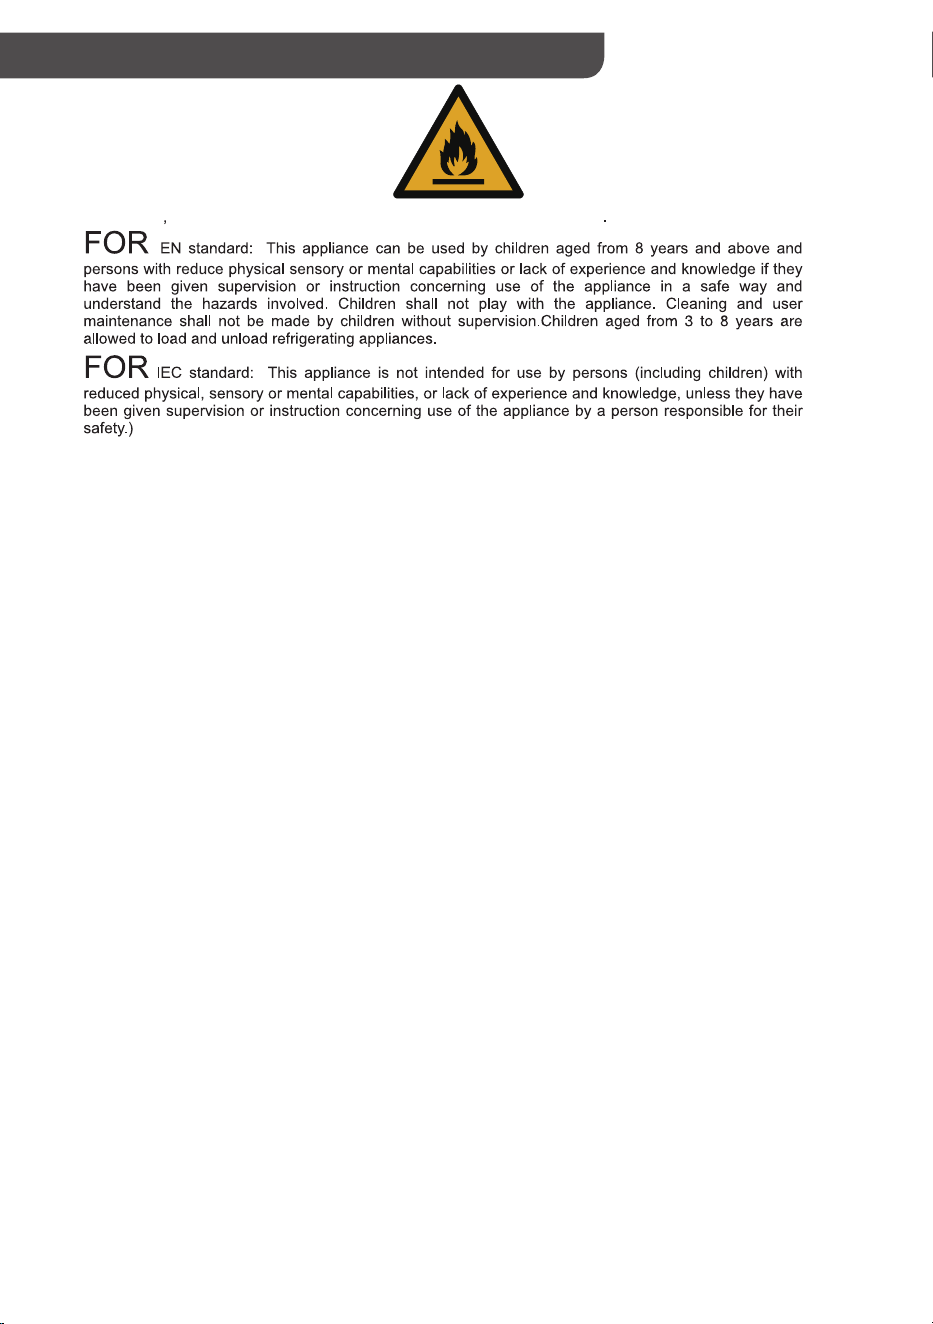
Warning: Risk of fire / Flammable materials
- Please do not open the door for a long time, otherwise it will lead to leakage of cold air, causing the internal
temperature of the refrigerator to rise and food to easily deteriorate.
- Store raw meat and fish in proper containers in the refrigerator so that they do not touch on other foods.
- If the refrigeration equipment is idle for a long time, please thaw, clean and dry the equipment before leaving, close
the door and cut off the power to prevent mold in the container.
- For freestanding devices: The refrigeration equipment is not intended to be used as a built-in equipment appliance.
Voltage
Rated Current (A)
Frequency
Refrigerant Type
Factory Model
Product Information
The refrigerant and cyclopentane foam materials used in this equipment are flammable. Therefore, when equipment
is abandoned, it should be kept away from any fire source and treated by a qualified special recycling company
instead of combustion treatment to prevent damage to the environment or any other harm.w, clean and dry the
equipment before leaving, close the door and cut off the power to prevent mold in the container.
Important Note
27
VEFTF3021RBK
115V
2.2A
60Hz
R600a,58g(2.04oz)
VEFTF3021RWH
115V
2.2A
60Hz
R600a,58g(2.04oz)
VEFTF3021RSL
115V
2.2A
60Hz
R600a,58g(2.04oz)
Voltage
Rated Current (A)
Frequency
Refrigerant Type
Factory Model VEFTF3324RBK
115V
1.45A
60Hz
R600a,60g(2.12oz)
VEFTF3324RWH
115V
1.45A
60Hz
R600a,60g(2.12oz)
VEFTF3324RSL
115V
1.45A
60Hz
R600a,60g(2.12oz)