PROPER USE
Precautions & Care
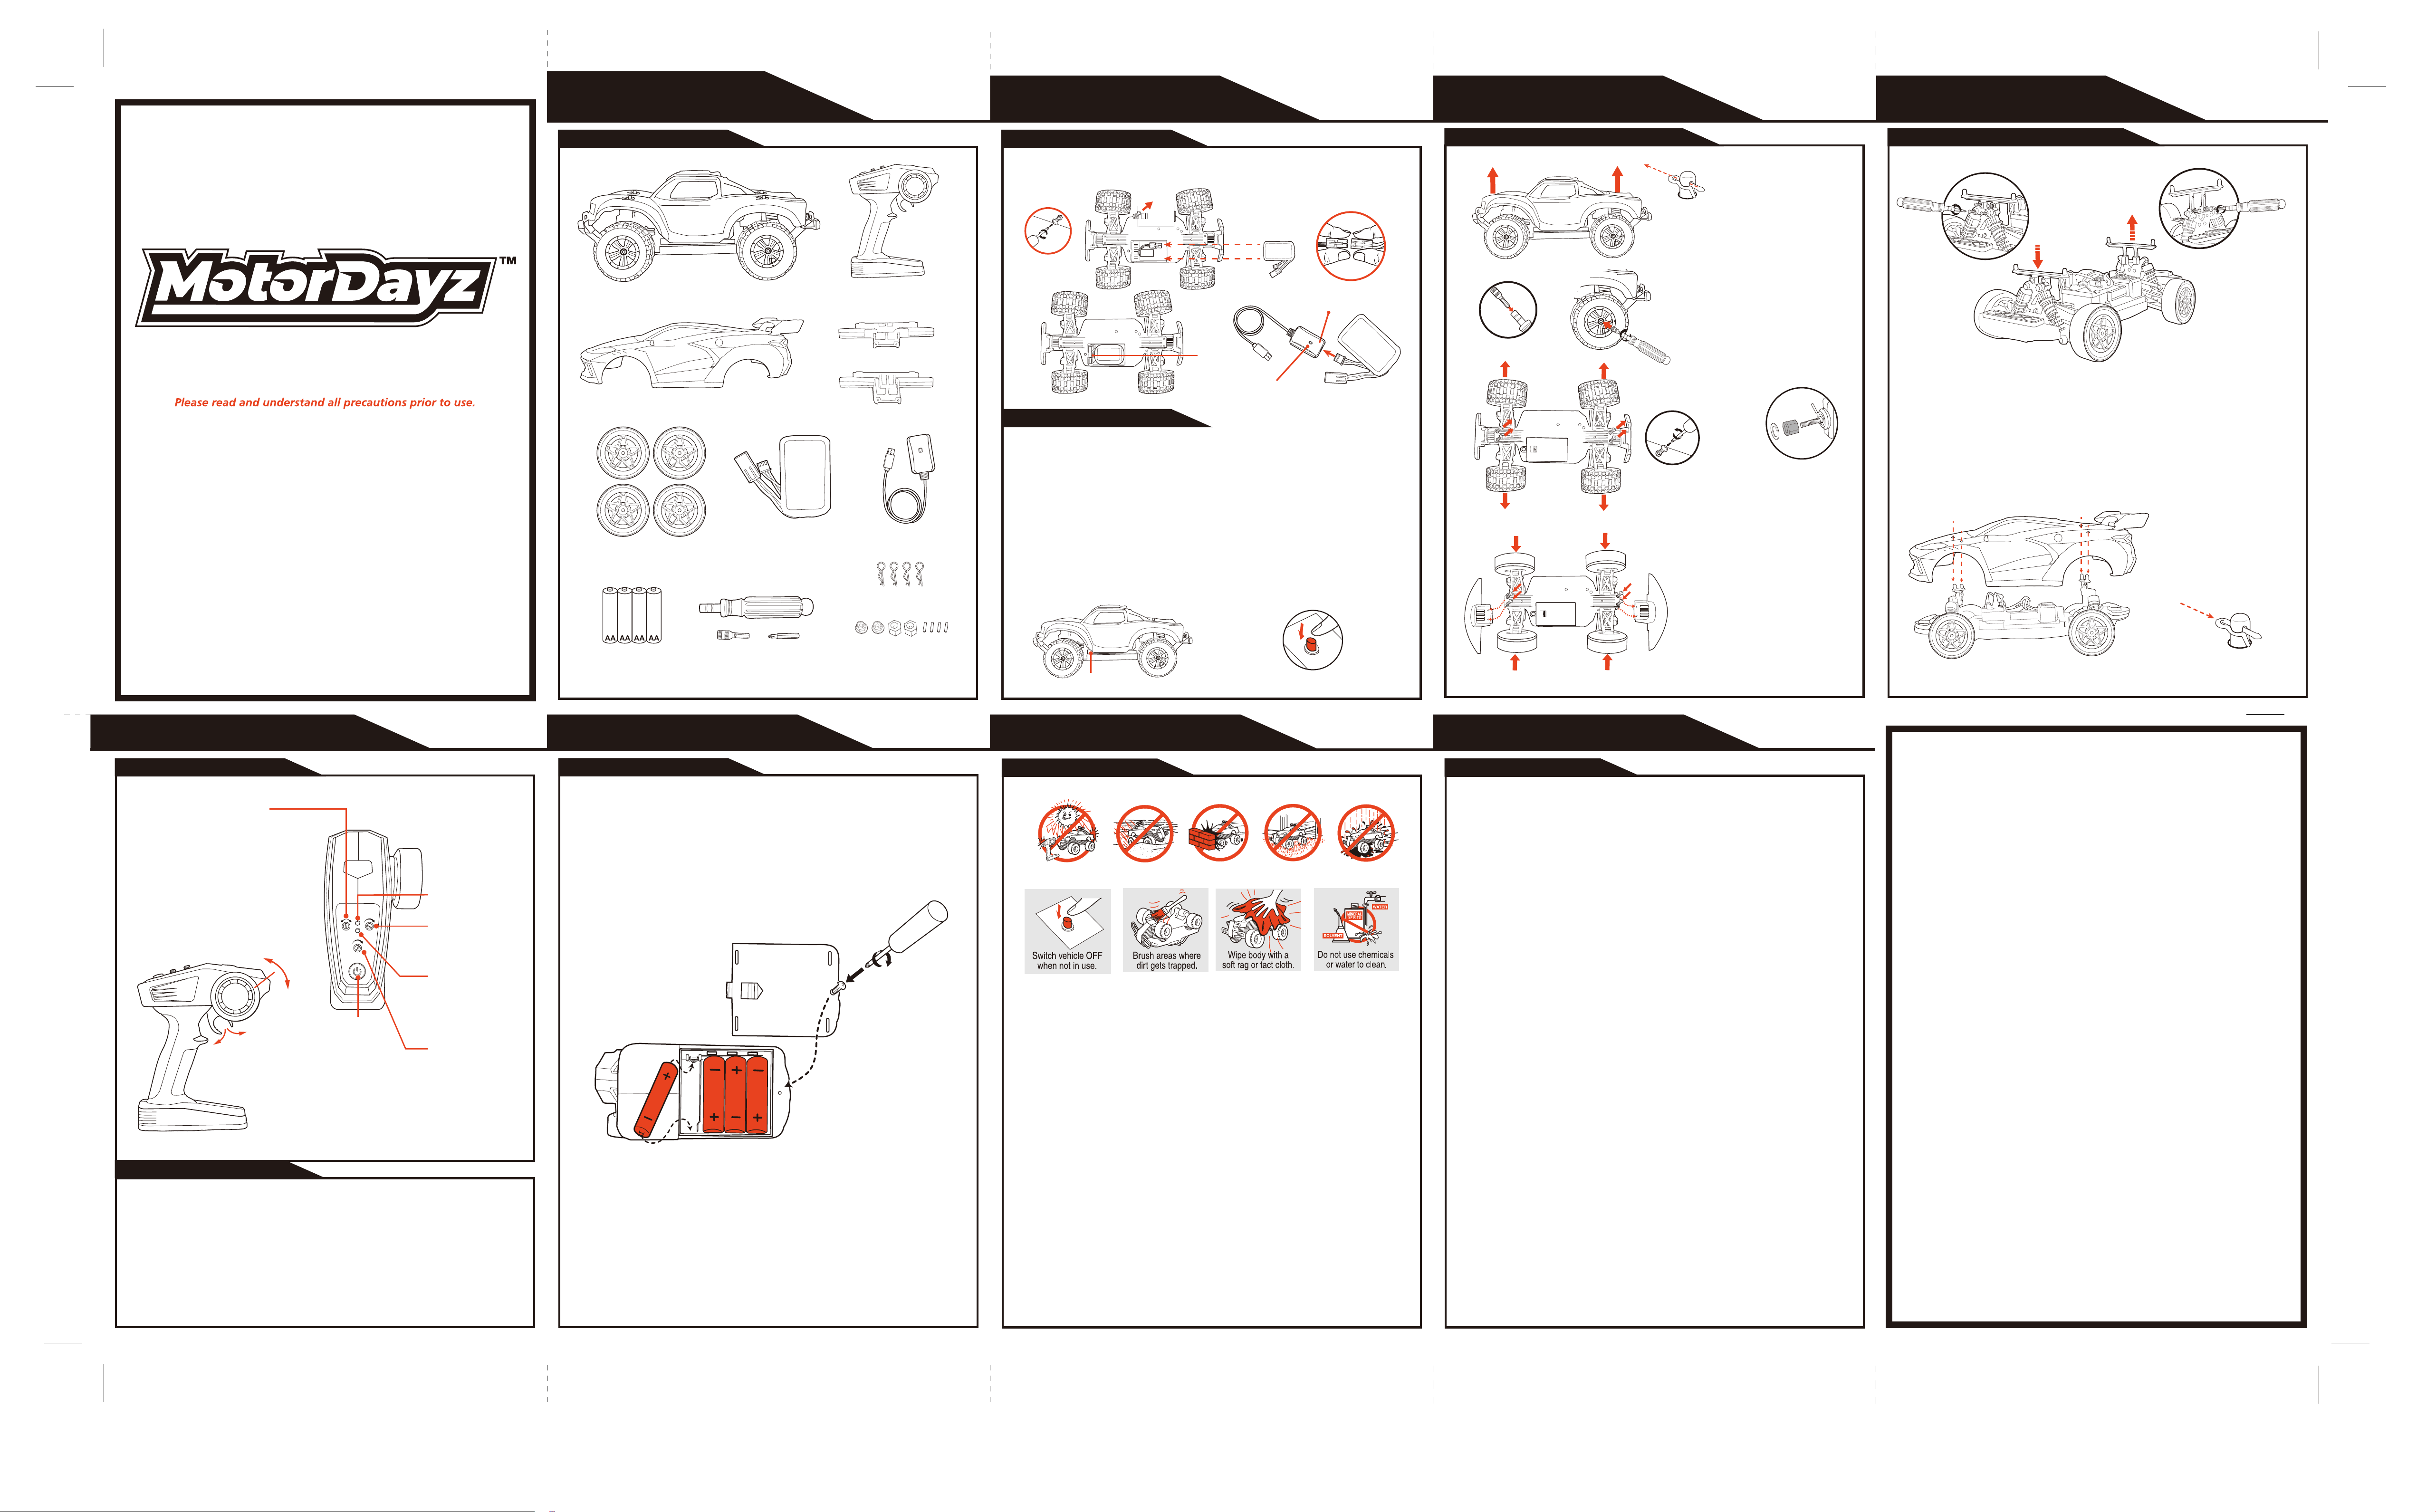
Component Checklist
WHAT’S INCLUDED
JN082-26
OWNER’S MANUAL
VEHICLE VEHICLE VEHICLE
R8-16CTRKIT1
Features & Functions
TRANSMITTER
Battery Installation
TRANSMITTER
Note:
When replacing Transmitter batteries:
Do not mix old and new batteries.
Do not mix alkaline, standard or rechargeable batteries.
Use alkaline batteries only.
This transmitter is equipped with 2.4GHz technology which allows up to 6 vehicles to be raced at the
same time.
Before first use and after any time the batteries are replaced, the transmitter must be paired to the
vehicle.
To sync transmitter and vehicle, follow the steps below:
1. Correctly install batteries in the transmitter, then press the power switch on the remote control to turn
it on.
2. Open the body shell and long press to power on, The Vehicle is only in sync mode for 30 seconds.
3. Immediately pull and hold the Forward/Reverse trigger on the transmitter. The lights stop flashing and
pairing is complete. Keep holding until wheels move (up to 30 sec).
Syncing
1. Remove the screw to open the Battery Compartment Cover.
2. Insert 4 "AA" size batteries. Make sure the positive (+) and negative (-) markings
on the batteries match up to the ones inside the Battery Compartment.
3. Replace the Battery Compartment Cover and replace the screw.
Charging the Battery
This vehicle is equipped with a removable Lithium-lon battery soft pack that is recharged via USB.
1. Locate the battery compartment cover screw on the chassis of the vehicle.
2. Remove screw and slide open compartment cover.
3. Locate the Battery and Vehicle Connectors, show above. Grab hold of the plastic
connector. Using a fingernail, lift the locking tab and pull to separate the connectors. Do not grab and
pull by the wires. Remove the Battery Pack.
4. Connect the supplied USB Charging Cord (shown above) by pressing the Battery and USB connectors
together until the locking tab clicks in place.
5. Plug USB into any powered 5V DC USB port. Charging is completed in approximately 3 hours (when
charging from a computer). While charging, the indicator light will glow red. Once fully charged the
indicator light will turn glow green.
6. After charging is complete, reconnect the Battery and Vehicle and store the USB cord in a safe place.
Replace compartment cover and secure with screw.
Installing Vehicle Battery
The included Lithium lon battery pack is only PARTIALLY CHARGED prior to shipment and it is
recommended the battery be fully charged before first use.
Motor Dayz Customer Service
3000 N. Pontiac Trail
Commerce Township, MI 48390
http://www.motordayz.com/
USA & Canada
90-Day Limited Warranty
Motor Dayz warrants to the original purchaser that this product will be free of defects in materials and
workmanship for ninety (90) days from the date of purchase. If a defect arises within the warranty
period, Motor Dayz will, at its sole discretion, provide replacement parts, replace the product, or offer
a coupon for our website for a new product of at least equal value. This Warranty does not cover
damage resulting from unauthorized modifications, accidents, misuse, or abuse. A dated sales
receipt is required for coverage under this Warranty. Purchases from unauthorized retailers,
resellers, or distributors are not covered under this Warranty.
Should your item have a defect covered under this Warranty, either call the Consumer Service team
by phone or email using the contact details listed below. Most issues can be resolved through
troubleshooting in this manner. If necessary, you will be issued a Case Number and be provided
instructions on how to obtain replacement parts, a replacement product, or a coupon.
Please allow 2 to 4 weeks for processing and delivery, depending on your location. Motor Dayz
covers the cost of shipping for valid claims within the USA and Canada. DO NOT send any product
to Motor Dayz. Any unsolicited product returns will be refused delivery and returned at the sender’s
expense.
Motor Dayz’s liability for defects in materials and workmanship under this warranty is limited to
providing replacement parts, a replacement product, or a coupon at Motor Dayz’s sole discretion. In
no event shall Motor Dayz be responsible for any incidental, consequential or contingent damages.
Valid only in the USA & Canada.
For full Warranty details, visit,
USA: https://www.motordayz.com/customer-support/warranty/
Canada: https://www.motordayz.ca/customer-support/warranty/
For more information regarding our product line, please visit,
USA: www.motordayz.com. For Canada, please visit: www.motordayz.ca
For Service in the USA
Email: [email protected]
Call: 248-863-3110
Monday- Friday,
8:30am- 7:00pm Eastern Time
For Service in Canada
Email: [email protected]
Call: 888-225-7378
Monday- Friday,
8:30am- 5:00pm Eastern Time
Problem - Vehicle does not move or moves slowly.
- Make certain there are fresh alkaline batteries in the transmitter and that they have been installed in
the correct position. You may need to re-sync the transmitter and vehicle. Refer to sync instructions.
- Are the (+) and (-) markings on the alkaline batteries in the same position as the (+) and (-) markings
in the Transmitter Battery Compartment?
- Are the metal contact tabs touching, rusty or dirty in the transmitter?
- When the remote control or vehicle has low power, the remote control distance will be affected. In the
meanwhile, there will be too low speed or climbing difficulty.
- Has the battery soft pack been installed in the vehicle?
- Make certain that the vehicle ON/OFF switch is in the "ON" position.
Problem - Vehicle moves by itself or exhibits reduced range from the transmitter.
Make certain there are no outside radio interference in your area. The best way to test this is to take
the vehicle as far away from radio towers, electrical lines or tall buildings as possible to ensure no
further radio interference will occur.
- Do not recharge Battery Pack if it is hot or warm to the touch. Allow Battery to cool before recharging.
Recharging a hot or warm Battery will shorten the life of the unit.
- Do not recharge the Battery if it appears to be damaged or leaking.
- Do not use included Battery charging cord for anything other than the intended purpose.
- Do not dispose batteries in fire. Leakage, explosion and personal injury may occur.
- Do not attempt to disassemble Battery soft pack or Battery Charging Cord.
- Always remove Batteries from transmitter when not in use.
- Only an adult should charge Batteries.
- Always remove Battery Pack form Battery Compartment when not in use.
- Dispose of Lithium-lon Battery Pack properly.
- When the car moves, please don't touch the four wheels of the remote control vehicle, so as to avoid
twist wound or incised wound.
- The remote control vehicle can not fall from altitude or have serious collision, because it might
damage the remote controller or shorten the service life of the vehicle.
- Please do not play the vehicle near the roadside, puddle, earth or other dangerous places, so as to
avoid danger.
SUPPORT
F.C.C. CAUTION:
Changes or modifications not expressly approved by the party responsible for compliance could void the
user’s authority to operate the equipment.
This device complies with Part 15 of the FCC Rules. Operation is subject to the following two conditions:
(1) this device may not cause harmful interference, and (2) this device must accept any interference
received, including interference that may cause undesired operation.
NOTE:
This equipment has been tested and found to comply with the limits for a Class B digital device, pursuant to Part 15 of the FCC Rules.
These limits are designed to provide reasonable protection against harmful interference in a residential installation. This equipment
generates, uses and can radiate radio frequency energy and, if not installed and used in accordance with the instructions, may cause
harmful interference to radio communications. However, there is no guarantee that interference will not occur in a particular installation. If
this equipment does cause harmful interference to radio or television reception, which can be determined by turning the equipment off and
on, the user is encouraged to try to correct the interference by one or more of the following measures:
- Reorient or relocate the receiving antenna.
- Increase the separation between the equipment and receiver.
- Connect the equipment into an outlet on a circuit different from that to which the receiver is connected.
- Consult the dealer or an experienced radio/TV technician for help.
Troubleshooting & Support
When replacing the tire, do not
lose the small iron axle, the small
iron piece and the hexagonal
sleeve, otherwise the tire will not
rotate properly.
Filename: R8-16CTRKIT1 Eng(082-26).ai
Software: Adobe Illustrator CS
Color: 100K+1788c
By: Tracy
Date: 2026 04 16
ON/OFF Switch
ASSEMBLY TOOLS
SPARE PARTS
(Wheel Assembly)
1 7.4V LITHIUM
BATTERY PACK
1 USB CHARGER
If the vehicle pulls to the
left or right during forward
driving, Use the Wheel
Alignment knob on the
remote control to fine-tune
the steering until the
vehicle drives straight on
its own.
Avoid collisions. Avoid high-pile carpet. Avoid water.
Avoid sand.Avoid prolonged sun exposure.
OFF/ON
OFF/ON
- The product is not suitable for use by children under 8 years of age.
- This product features high-speed rotating components and poses potential risks during
operation. Do not approach or touch the product while it is in use.
- When using the product, keep it away from railways, highways, and other hazardous environ-
ments.
- When using the product, keep it away from cell phone towers, high-power transmitting
equipment, and other areas with strong electromagnetic interference.
- When using the product, keep it away from bicycles, cars, and other vehicles.
- Do not use the product in rain, thunderstorms, sandstorms, fog, snow, strong winds, low
temperatures, or other severe weather conditions.
- The product has a waterproof design. Do not operate it near bodies of water.
- Always keep the product within the operator’s line of sight.
- Do not operate the product near areas where children are playing.
- Do not use the product to chase any vehicles or interfere with their normal operation.
- Do not use the product if you have been drinking alcohol, are tired, taking medication, or are in
poor physical condition.
- Inspect the product before each use, including but not limited to: component tightness, cracks or
wear on the body and tires, battery level, indicator light functionality, etc. If any abnormality is
found, stop use immediately and replace the corresponding parts.
- A remote-controlled vehicle with abnormal performance may cause accidents. Do not attempt to
force it to operate.
- Do not obstruct any moving parts.
- Do not modify the product or use it for any purpose other than its intended design.
- Operate the product in accordance with the instruction manual.
- Use only original manufacturer components for maintenance and replacement.
- Do not mix batteries of different types.
- Do not use swollen, leaking, or damaged batteries.
- When charging the battery, keep it away from flammable materials (such as blankets, wooden
furniture, wooden boards, etc.).
- Use only the original manufacturer’s charging cable. Do not use third-party or damaged cables.
- Do not place the model near your ear, as improper operation may cause hearing damage.
- Do not squeeze the battery or cause a short circuit, to avoid the risk of explosion.
- The motor gets hot during use. Do not touch it to avoid burns.
Battery Connectors
Charging Status Light
Battery
Connectors
OPEN
OPEN
Locate the body pins on top of
vehicle body. Pull pins as shown
and set aside. Lift and remove
the Truck body shell.
Use a screwdriver to remove the
wheel hub screws and set them
aside. Take off the off-road tires,
install the drift tires, then secure
with the screws.
Use a screwdriver to remove the
front and rear bumper screws
under the vehicle, set them aside,
take off the truck bumpers, install
the car bumpers, then secure with
the screws.
1 CAR BODY SHELL
1 TRANSMITTER1 R/C TRUCK
1 FRONT CAR BUMPER
1 REAR CAR BUMPER
4 AA BATTERIES
4 BODY CLIPS
4 DRIFT TIRES
OPEN
OPEN
Body Components Disassembly & AssemblyBody Components Disassembly & Assembly
Before replacing the car body shell, use a screwdriver to remove the screws on the front and rear
chassis.
Then lower the front chassis to the lowest position and raise the rear chassis to the highest
position. Finally, secure it with screws.
Align the body holes with the
chassis pillars, and secure the
body with body pins.
The status light stays
on when pairing
is complete.
Status
Indicating Light
Power
Indicating Light
Adjust steering angle
to change turning
radius.
Steering Angle
Power
Switch
Wheel Alignment
Speed Regulation
Adjust the Speed
regulation to set the
maximum speed of the
vehicle.
Open the body
shell and
long press to
power on
Left Turning
Right
Turning
Reverse
Driving
Forward
Driving