
R290/40g
110V/60Hz
MECR-31D MECR-32D
SERVICE, INSTALLATION
& INSTRUCTION MANUAL
Note: The design and components used for this appliance are subject to change
without advance knowldege. If in doubt always refer to the attached name plate for
techincal data and parameters like the refrigerant and charge size.
ANSI SAFETY
STANDARD 471
ANSI NSF STANDARD 7
This unit complies with
the 2017 DOE
electrical energy
requirements.
Please Read These Instructions Carefully Before Use
American English
V3_041517
Thank you for choosing and purchasing our product. Please carefully read the operation instructions
before use and familiarize yourself with your new product. This will help avoid accidents that could
damage individuals, the building, product and/or the merchandiser.
Contents
General
Structure and Parts
Handling and Installation
Precautions and Use
Digital Temperature Controller
Features and Functions
Front Panel Operation
Controller Programming
Principles of Refrigeration System
Circuit Diagram
Major Parameters
Product Dimensions
Product Specications
Maintenance
Troubleshooting
P
age
#
2
2
3-4
5
5
5
5
6
7
8
8
9
9
10
11
Version Release Date Commments
A 03/2017 Initial Release
The serial number of all self-contained refrigerators and freezers is located inside the unit on the left
hand side near the top on the wall.
Always have the serial number of your unit available when calling for parts or service.
Serial #: _____________________________________________ Date: _______________
Model #: __________________________ Sent in Warranty Card Date: ____________
This manual covers standard units only. If you have a custom unit, consult the customer service department at the number
listed in the back cover. Keep your proof of purchase invoice or bill (dated with model number) to establish your warranty
period. The warranty card should be lled out and sent in within 2 weeks after startup to put the warranty coverage in place.
Failure to provide this information can void the unit warranty coverage.
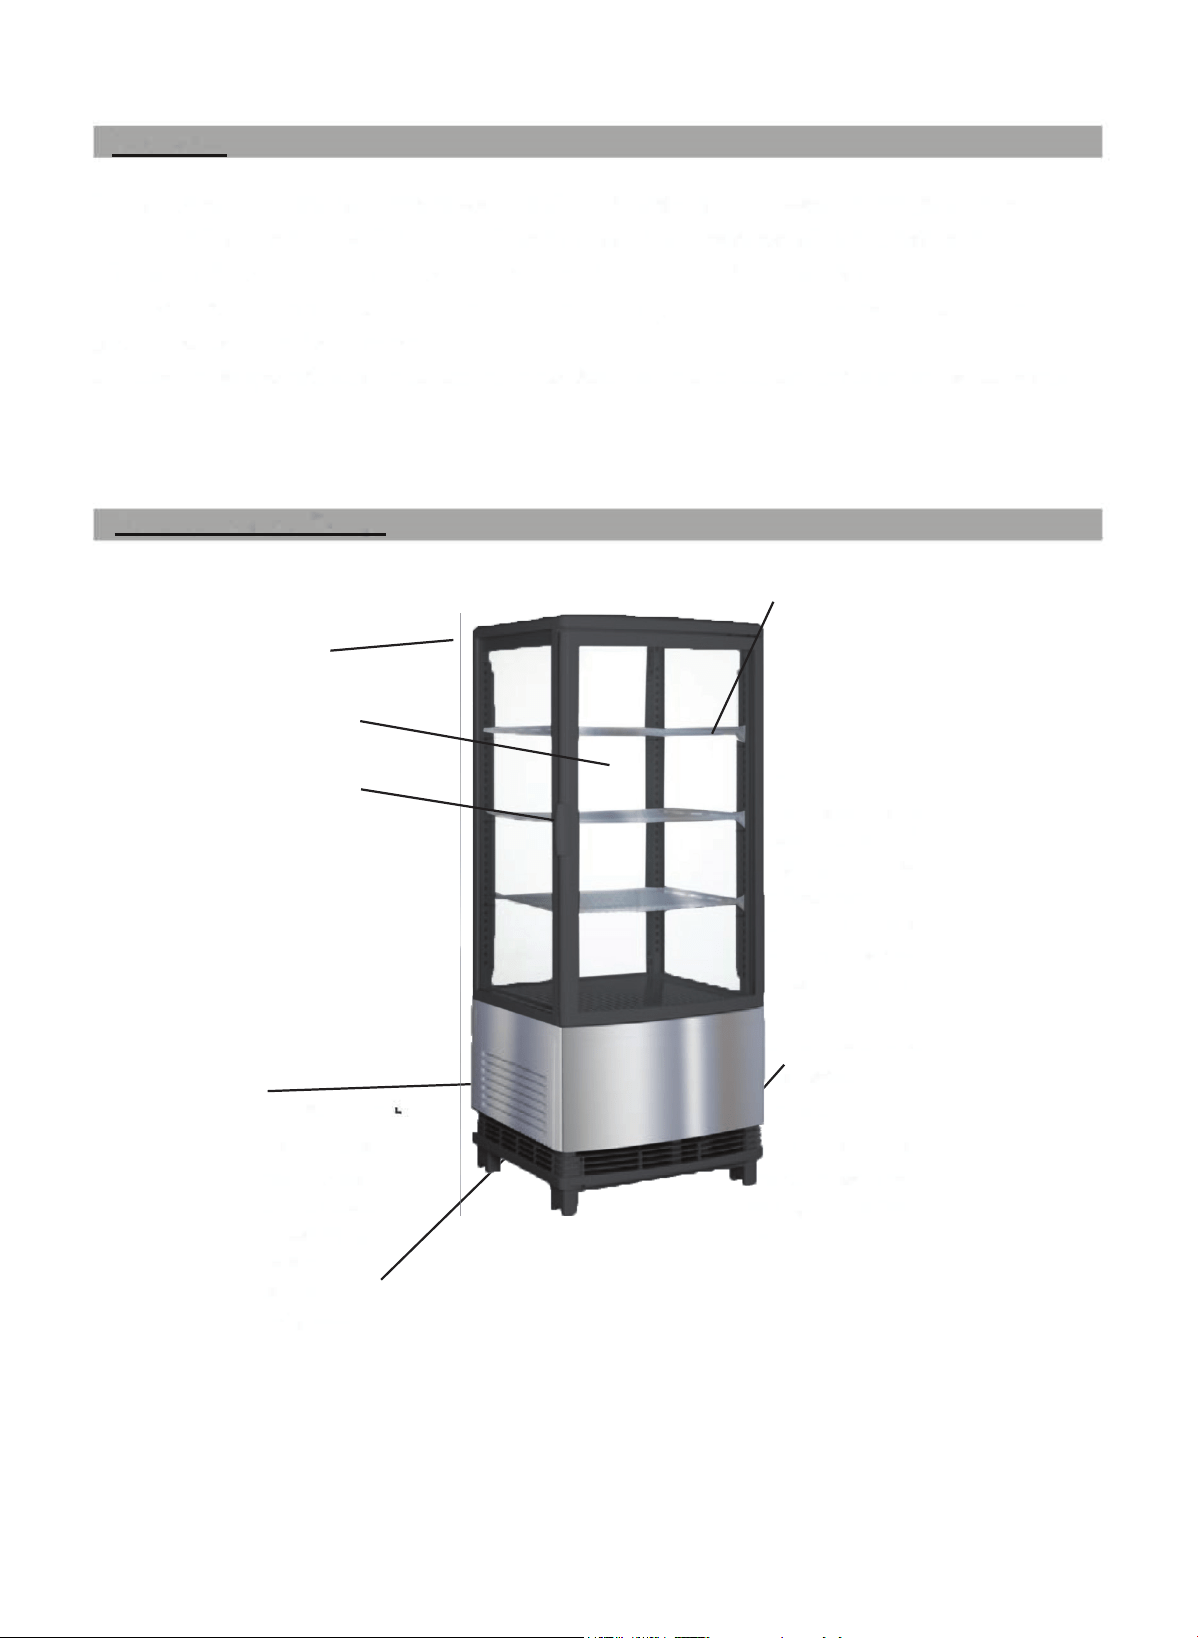
Air Intake Louvre
For the condensing unit utility
compartment.
Air Outlet
Never block the air outlet. Let
inside cir culating cold air ow
out of the unit as it is replaced
with fresh air.
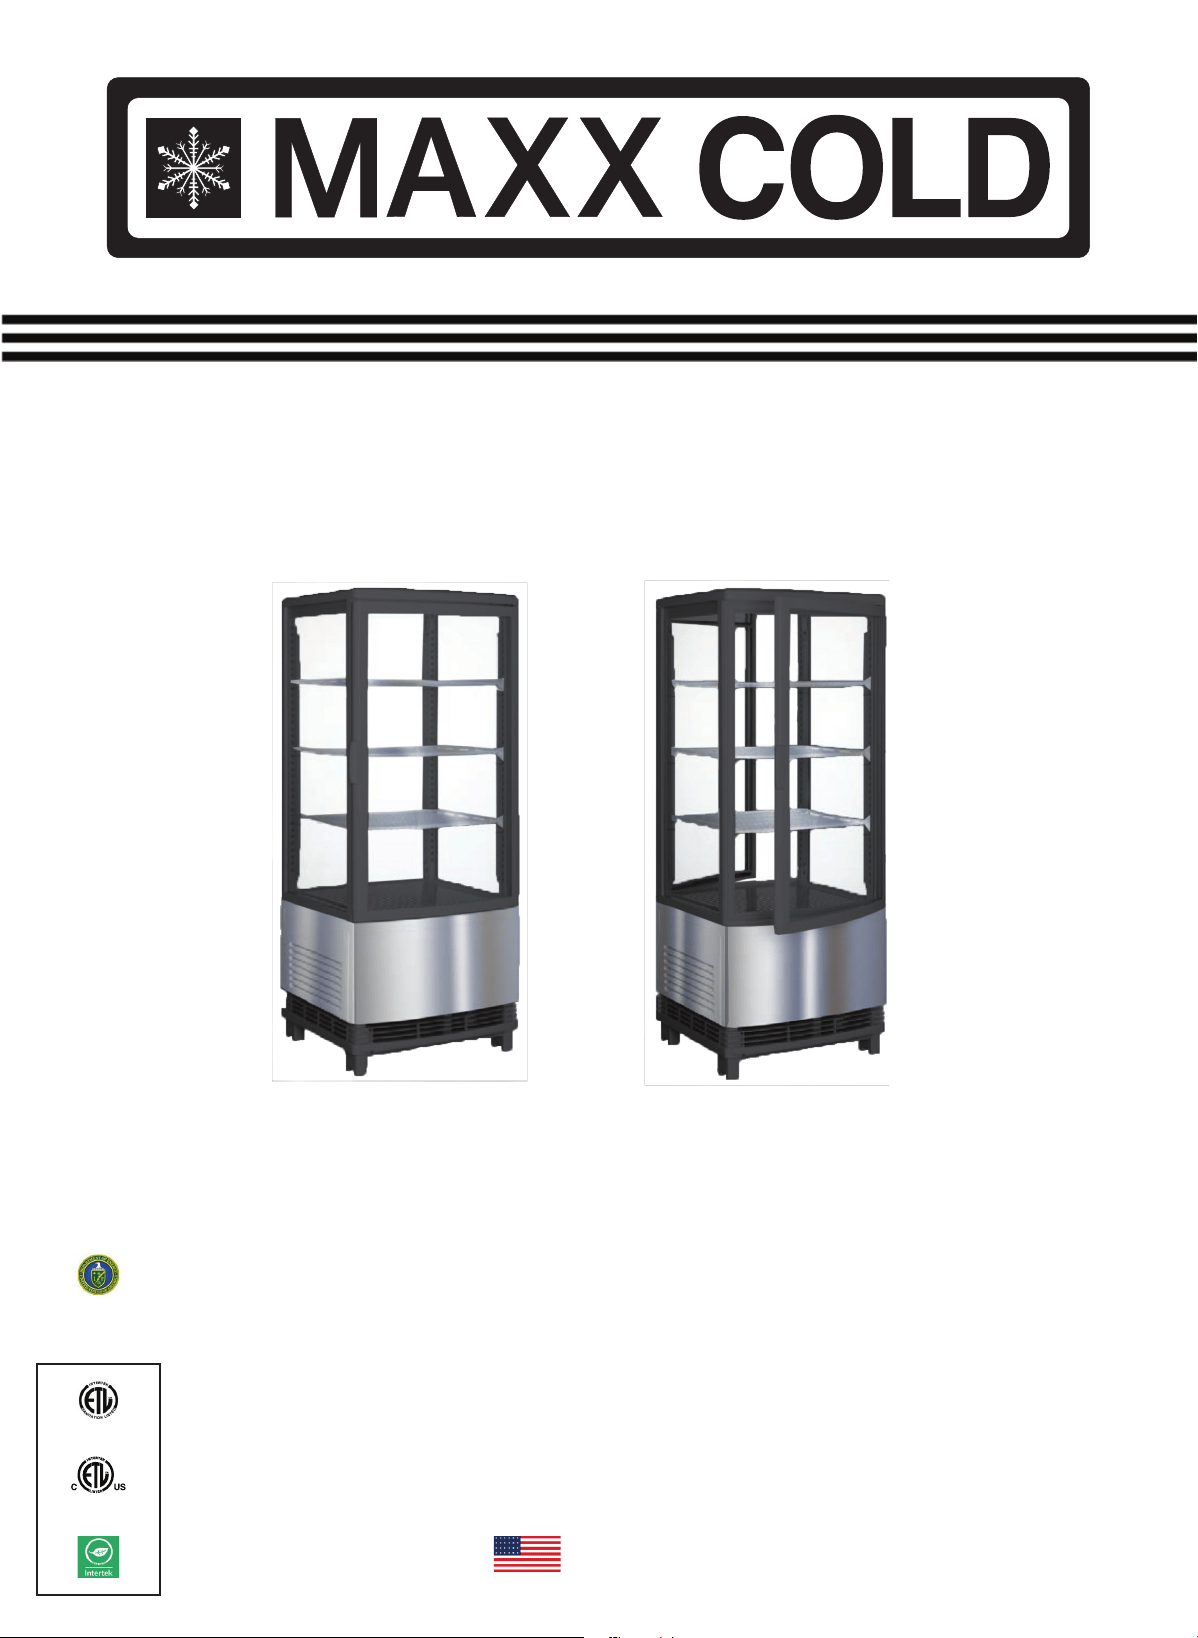
General
1. The self contained countertop (or oor model) refrigerated merchandiser uses R290 refrigerant (an
environmentally friendly agent) as well as state-of-the-art energy efcient condensing units. These
elements working together ensure that an even temperature is held throughout the unit.
2. Double layer, hollow transparent glass panes are used for both the door and body. It features an
artistic and elegant appearance, excellent viewing and easy access. (single and double access-door
options are available)
3. This merchandiser has been shown to be successful and appropriate for a wide range of commer-
cial, retail, institutional, food service and private or residential applications.
Structure and Parts
Air Suction
Never block the suction. Air is
sucked in and cold air is
circulated throughout the
refrigerator.
2
Coping
Glass Door
Door Handle
**Model # MECR-31D (single door) shown here
Adjustable Rack
Toe height of rack is adjustable
to optimize the product display
& storage.
For adjustment:
1. Take out the wire rack.
2. Move the rack supports
to the desired height.
3. Replace the rack on the
supports.
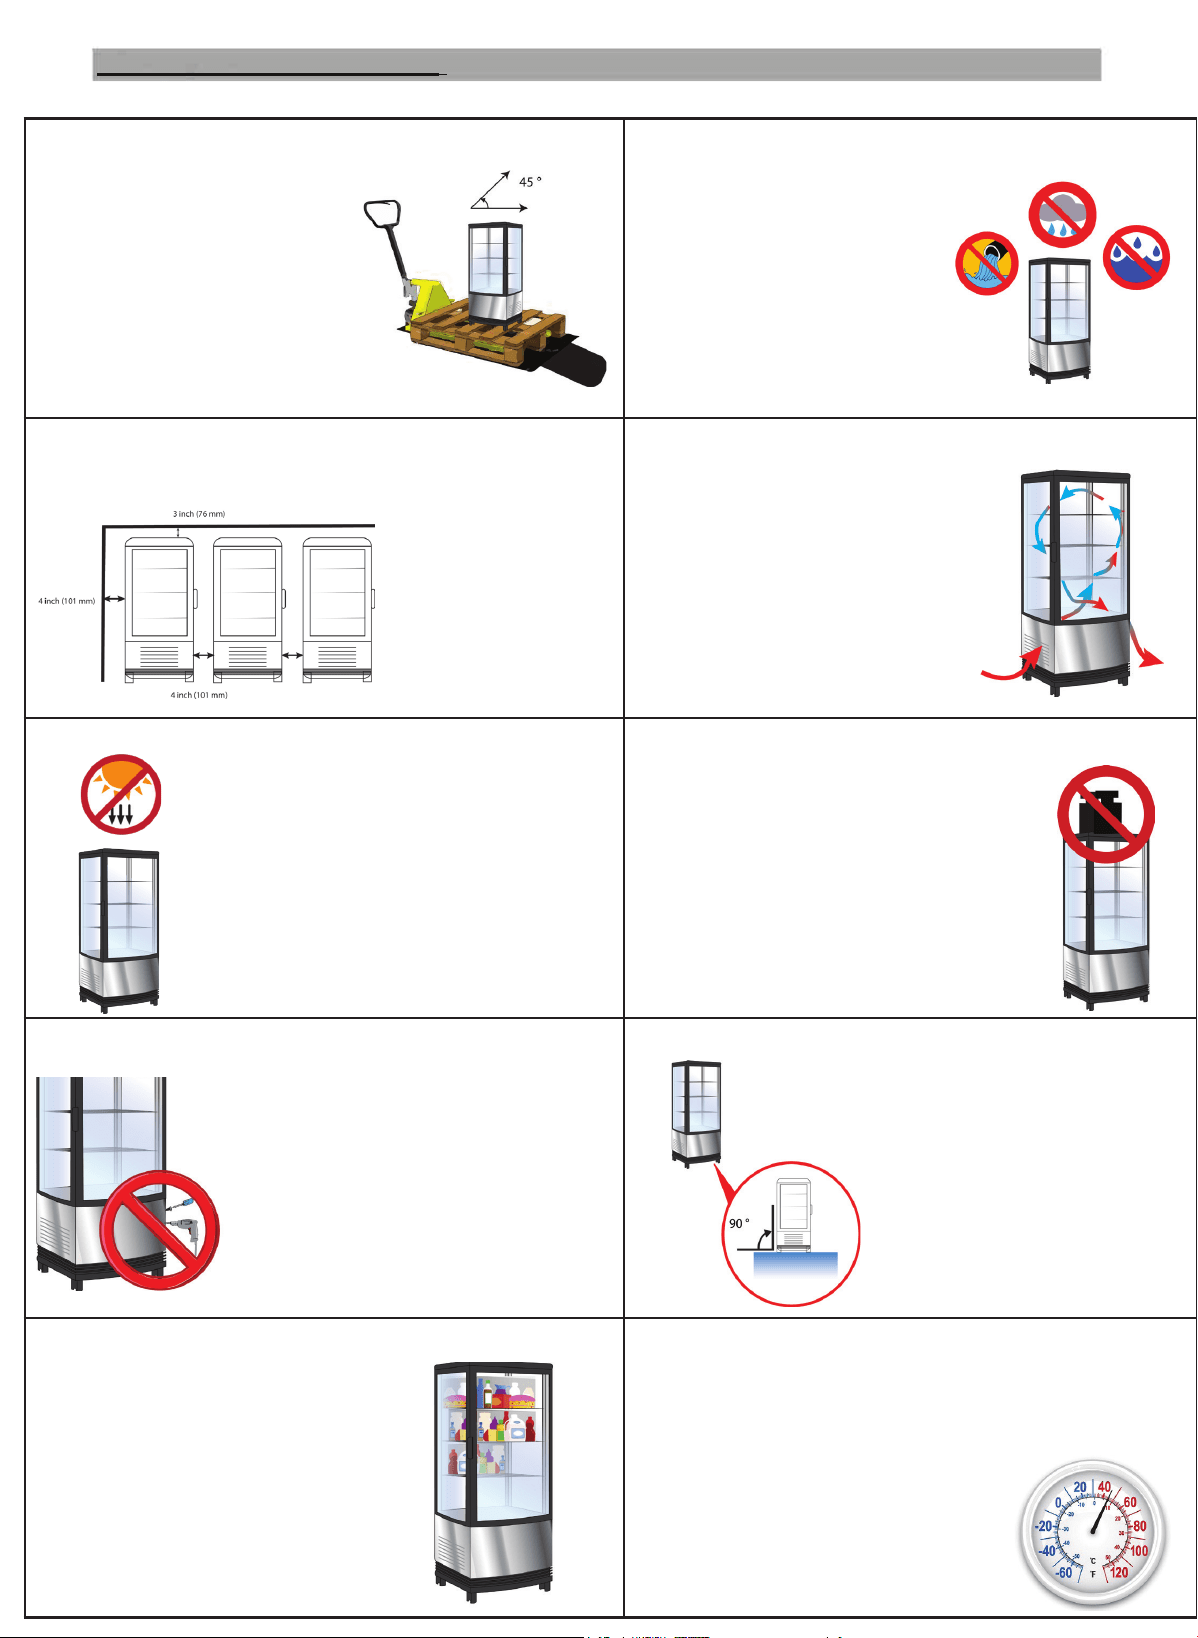
HANDLE WITH CARE
Use caution when unpacking.
Never tilt the appliance past
a 45° angle while handling.
If tilting occurs, or the
appliance is laid on it's side,
let the unit stand upright
for at least 24 hours before
turning the unit on.
INDOOR DRY LOCATION
Always locate the refrigerator in
a dry location. Higher Humidity
will increase condensate on the
outside of glass.
SUFFICIENT SPACE
The distance from both sides and back of the
refrigerator to the
wall or other
barriers must be no
less than
4 inches (100mm).
FACILITATE VENTILATION
Always pre-chill items before
loading them into the refrigerator.
Allow it to reach peak cold
temperature before using
(wait at least 4 hours). Do not
overload shelf - air circulation
and appearance are important.
AVOID HEAT AND SUNLIGHT
Never place the refrigerator in
direct sunlight. Avoid placing it
near heat sources to prevent
reducing the refrigeration system
cooling capability.
NOTHING HEAVY
Never place anything heavy on top
of the refrigerator.
Do not stack heavy products on top,
or allow the product to be climbed upon.
the at top of the merchandiser can,
however, be used to support light
weight POP materials or signage.
NO HOLES!
Never make holes on or inside the
appliance. Never attempt to
install shelving or other elements
onto the refrigerator, this will
void your warranty and possibly
damage the merchandiser.
STABLE LOCATION
Unpack and install the
refrigerator on a at
level surface that is stable,
and suitable for installation.
KEEP IT COLD
To ensure products freshness,
avoid over-crowding products/items
within the merchanidiser.
KEEP IT COLD part 2
If the appliance is not maintaining the temperature
required, check the appliance's internal storage temperature
at least 2 (two) times daily. It is very likely the set point
has been changed, the condensing
unit ambient temperature is too high
or the air circulation has been blocked.
Handling and Installation
3
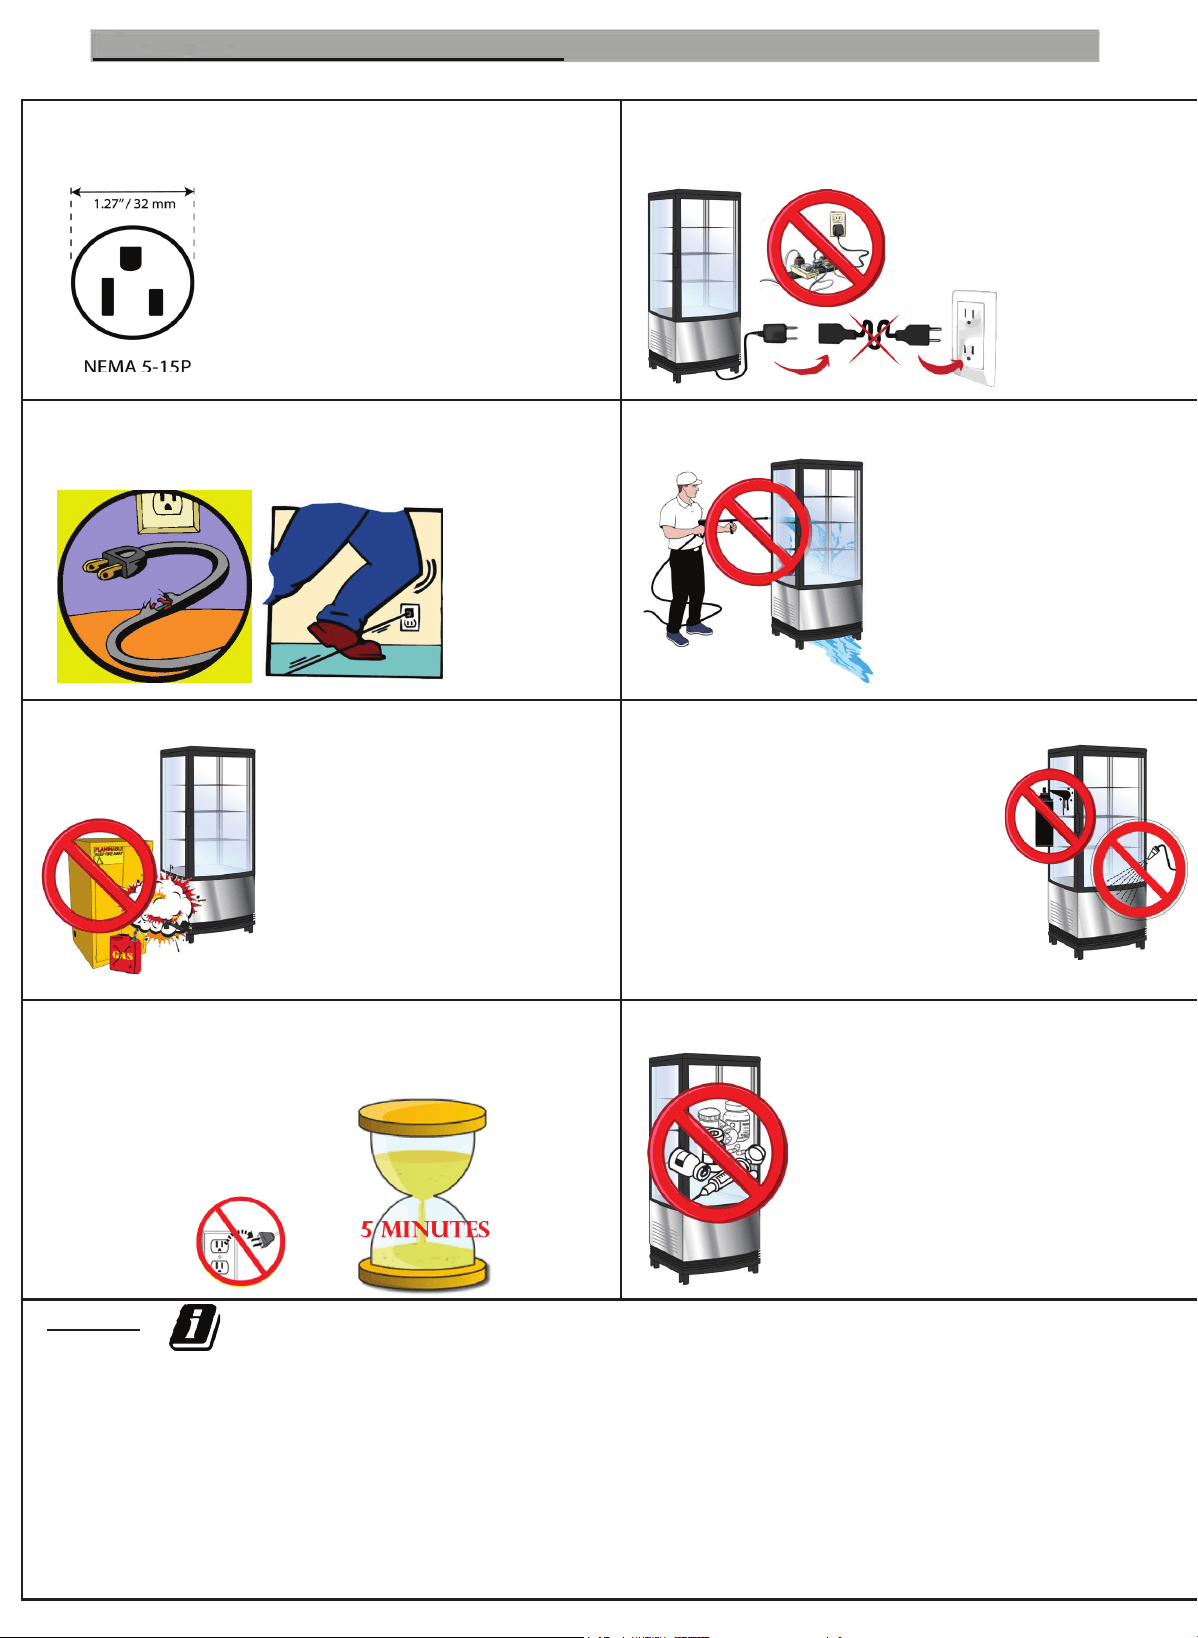
EXCLUSIVE POWER SOCKET
Always use a NEMA 5-15 110-120V, 60Hz
single phase power supply with
an exclusive single phase
three pin receptacle. the outlet
must be grounded.
DO NOT USE OUTLET POWER BARS,
ADAPTERS, OR EXTENSION CORDS
Never share the common
socket with other appliances.
If a duplex outlet is used,
do not install more than
1 other appliance.
(amp draw ≤ 7 amps)
PROTECT CABLES
DO NOT break or damage power cords. Current
leakage and
re may
occur
as a result.
NO WATER FLUSHING/POWER WASHING
Never ush or spray water
on or near this appliance.
Current leakage may occur
as a result, causing
potential damage or
safety hazards.
AVOID FLAMMABLES AND EXPLOSIVES
Never store dangerous products
(such as ether, gasoline, or
alcohol) near the refrigerator.
Never put anything ammable
or explosive inside the
refrigerator.
NO SPRAYING
DO NOT spray ammables such as
paint or similar protective coatings
near or onto the refrigerator.
Fire may occur as a result.
AFTER POWER BREAK
After a power outage or unplugging of the appliance, Always
wait at least
5 minutes, and then plug
the refrigerator back in
to start it again.
NO MEDICINE/MEDICAL STORAGE
this appliance is not rated for
medicine/scientic/medical
sample storage. Do not attempt to
store these types of items inside the
appliance. this is not covered under
warranty.
NOTES:
• Always pre-chill items before loading them into the
refrigerator.
• It is permissable to add decorative POP or similar promo-
tional material to the opaque portion of the merchandiser,
as long as it does not block air circulation.
• If this unit is promoting impulse sales, keep it clean
with the products being neatly displayed. Ensure it is
restocked several times a day.
• If fresh products/produce is displayed in the unit,
develop a rotation system so that the customer does not
pull the most fresh items from the front. (This is less
important with pre-packaged products)
Handling and Installation (con’td)
4
Cautions:
• Maintain a cold temperature inside the refrigerator and conserve energy by reducing the frequency you
open the unit, and shortening the time the door is open during each occurrence.
• Never block the air suction or outlet. Maintain air circulation and the unit’s refrigeration capability.
• Do not overload the storage compartment or have product touching, inside the refrigerator, as it will
negatively inuence the cooling effect. Adjust the rack height for proper food storage (with adequate air
ow around each item including above and below all stored product).
cold-compartment temperature.
ing of the merchandiser.
stop a defrost cycle.
cold-compartment temperature will be displayed.
Precautions and Use
1. Before use:
Plug the refrigerator into a (NEMA 5-15) 110-120V exclusive-use socket. After the refrigerator has
run for a minimum of 4 hours, ensure it is su
ff
iciently cold and at a desired target temperature be
f
ore
placing pre-chilled
f
ood or product inside.
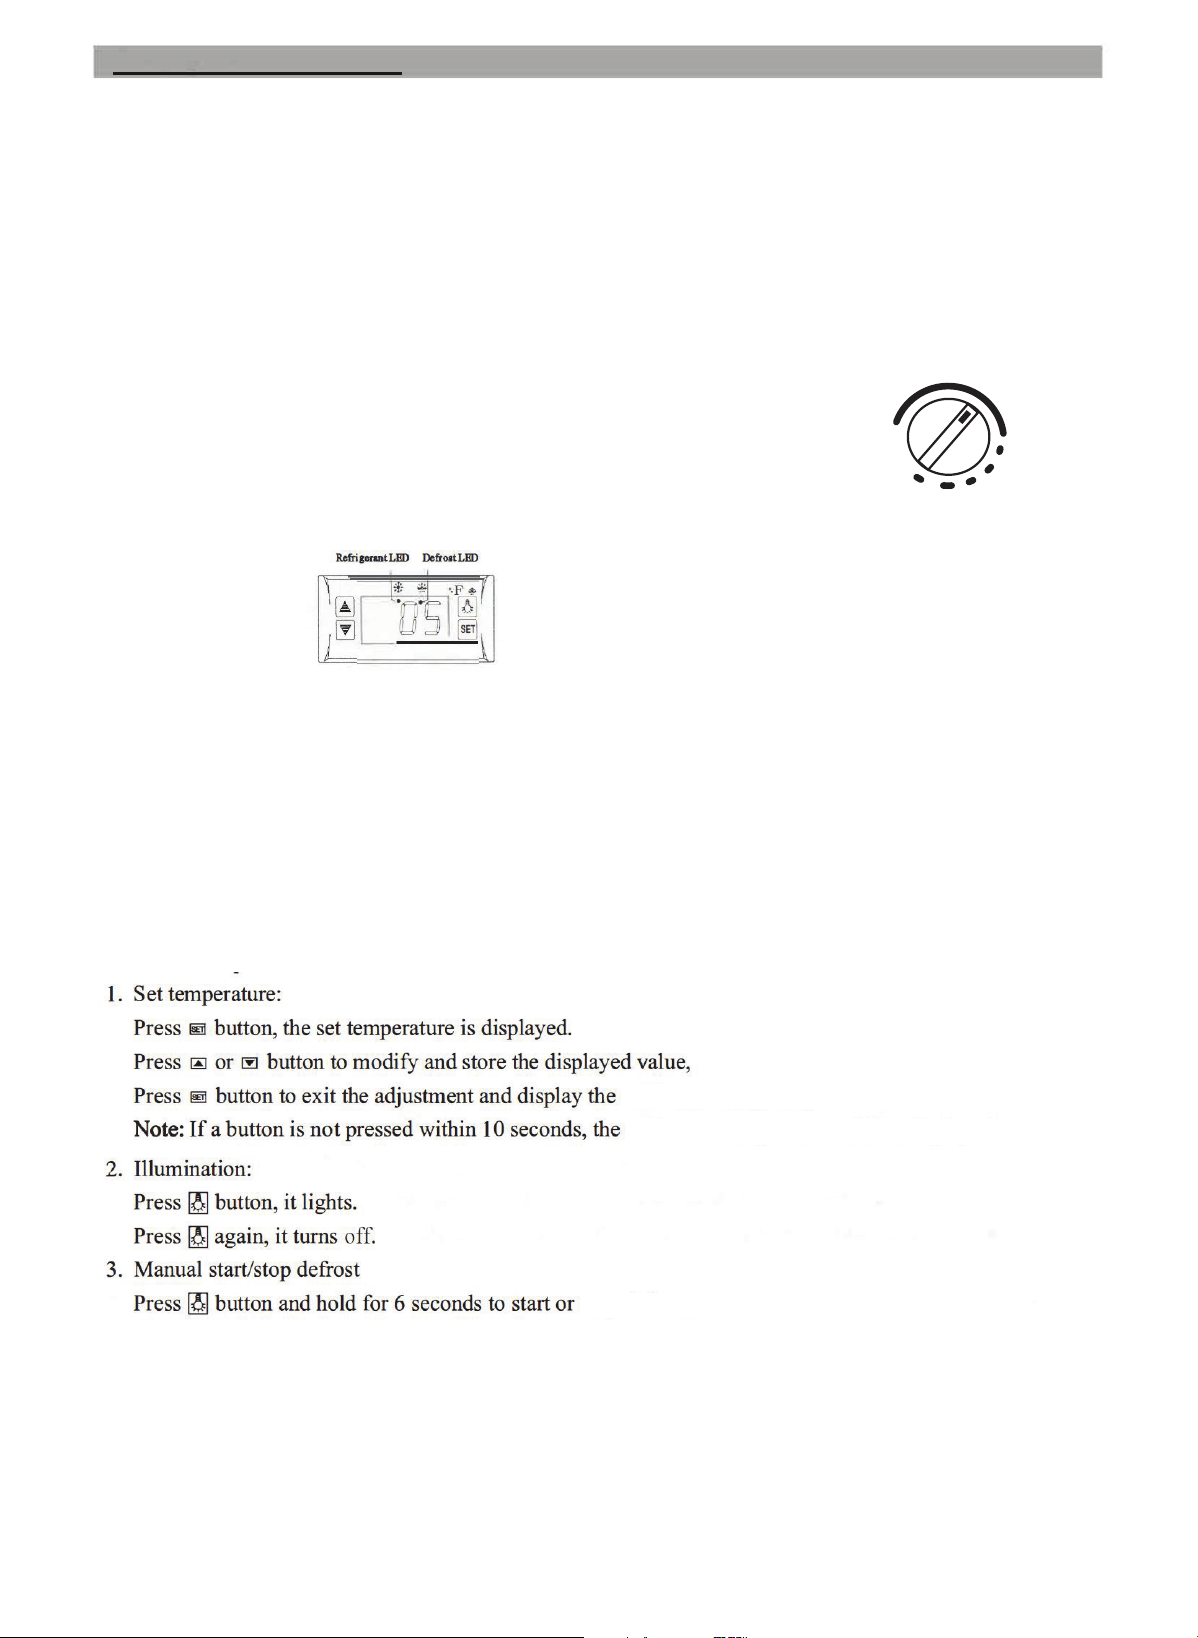
2. Mechanical Temperature controller:
For nominal use, set the controller on the “MID-HIGH” setting.
If the controller is set to “FREEZE” the evaporator may frost and the refrigeration capability could
be decreased.
The range of the controller is divided into settings of ”LOW, MID, HIGH
and FREEZE”, as shown. The temperature inside the refrigerator goes down
if you turn the knob clockwise, while the temperature goes up if you turn it
counter-clockwise.
LOW
FREEZE
HIGH
Features
and Functions
It is a mini-sized and integrated intelligent controller that regulates the compartment temperature as well as
the condensing unit performance.
MID
Digital Temperature Controller:
Front Panel Operation
The main functions are:
• Temperature Display
• Temperature Control
• Value Storing
• Illumination Control
• Self Testing
• Parameter Locking
• Manual defrost cycling
• Programmed automatic defront for reliable
operation without manned intervention
5
Refrigerant LED:
LED is ON - Refrigeration cycle is on.
LED is OFF - Cold room temperature is contstant
LED is blinking - Unit is experiencing a delayed start
Defrost LED:
LED is ON - Defrost cycle is on
LED is OFF - Defrost cycle nished
LED is blinking - Unit is experiencing a delayed defrost
Mode function
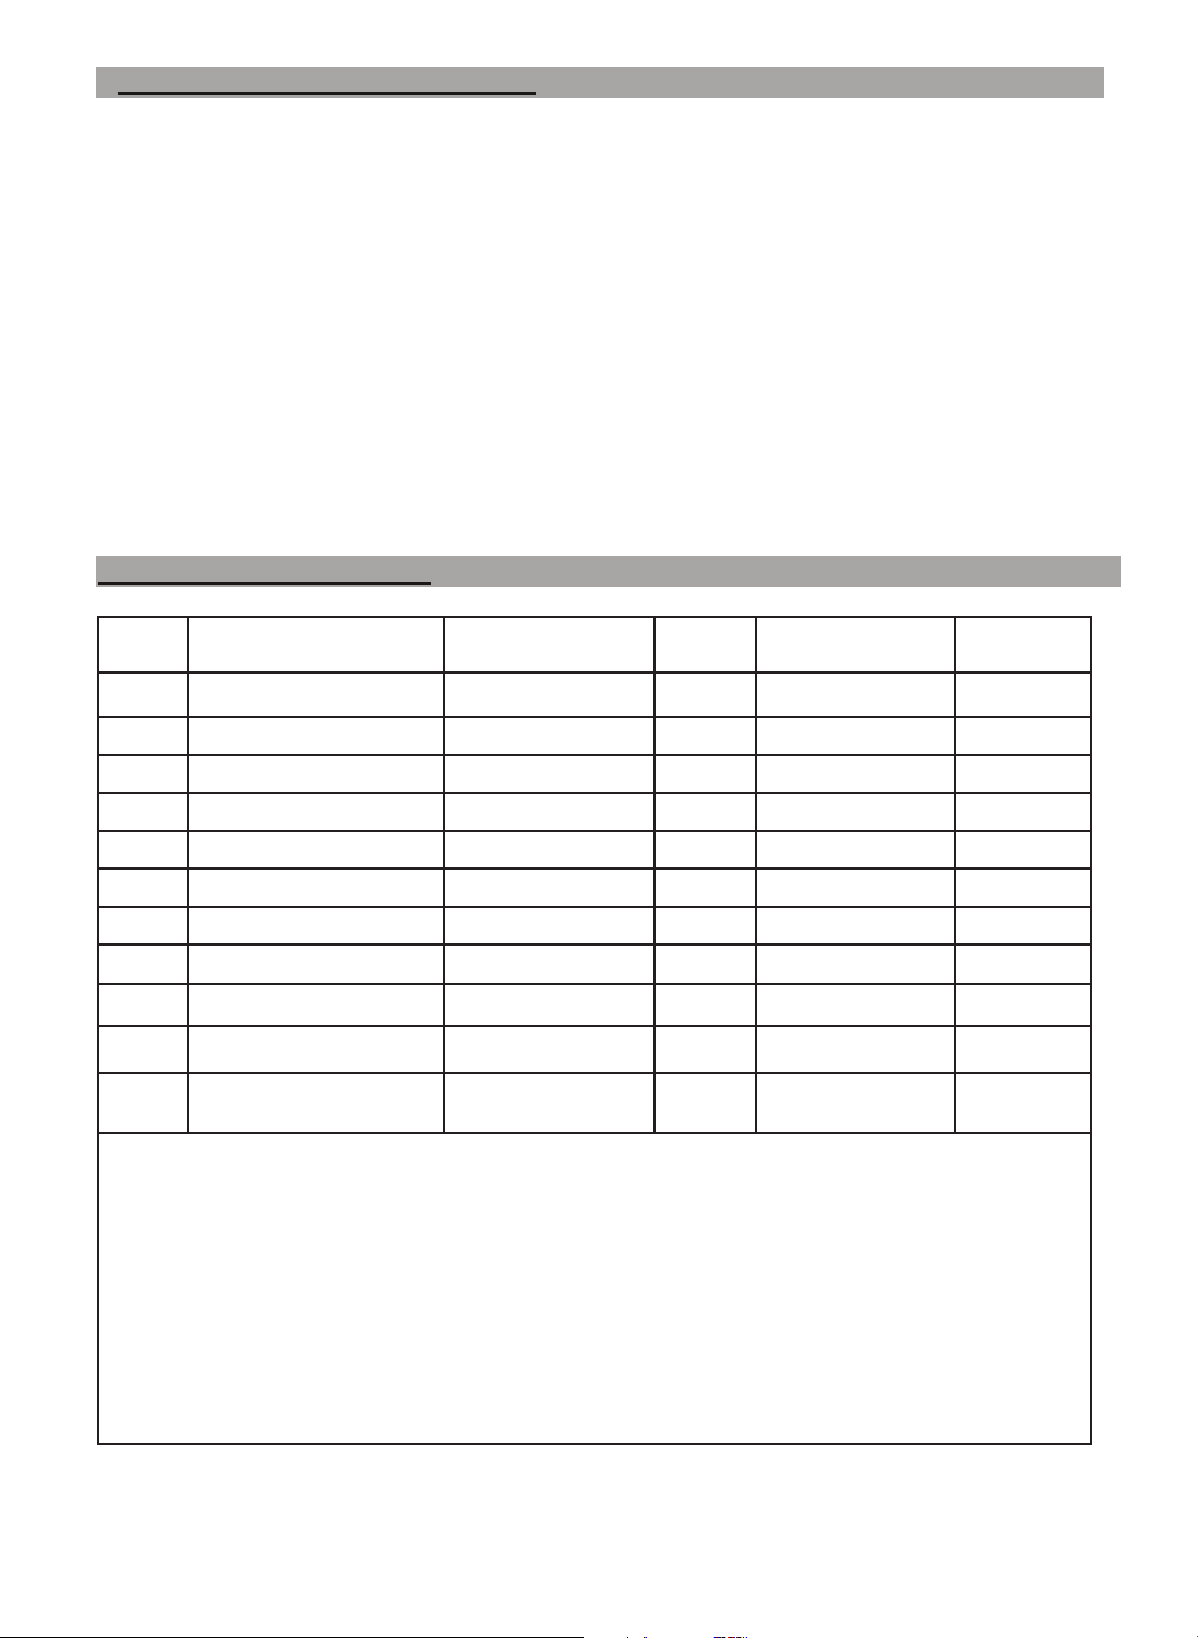
set range °C
Factory
setting
set range °F
Factory
Setting
E1
Lower set point limit
-20°C 2°C -4°F 36°F
E2
Upper set point limit
45°C 7°C 113°F 45°F
E3
Temperature Differential
1 to 10°C 2°C 1 to 18°F 3°F
E4
Comp. start delay
0 to 10 minutes 1 minute 0 to 10 minutes 1 minute
E5
offset- room temp
-5 to 5°C -2°C 23 to 41°F 28°F
E6
offset - evaporator temp
-5 to 5°C 0°C 23 to 41°F 32°F
F1
Max defrost duration
1 to 60 minutes
8 minutes
1 to 60 minutes 8 minutes
F2
Defrost frequency
0 to 24 hours 6 hours 0 to 24 hours 6 hours
F3
Defrost termination temp
0 to 20°C 5°C 32 to 68°F 41°F
F4
display during defrost
0 - Normal
1 - last value before defrost
0 0 - cabinet temp 0
C1
Temperature Units
0 for C
1 for F
1
0 for C
1 for F
1
NOTES:
*These settings have been selected to make the unit operate as a “plug and play” appliance for most applications. Your specic needs
and storage conditions may require several settings to be changed/modied. If that is the case, be sure to mark down the desired settings
and impact on the appliance performance for future reference.
Precaution and Use (continued)
Cautions (continued):
• Improper loading of the unit will void its warranty, as well as the quality, avor and shelf-life of the
products stored.
• Cool hot food down to room temperature before you put it into the merchandiser.
• Keep the refrigerator cold when the power is cut off. Try to reduce the frequency and duration when
the door is opened to access product in this merchandiser.
• Only skilled service technicians should repair damaged power cables or service this refrigerator.
• DO NOT touch the compressor, it may cause burns as this component gets hot when it is running and
takes over an hour to cool down to below 150°F.
• This appliance is not intended for use by persons (including children) with reduced physical, sensory
or mental capabilities, or lack of experience and knowledge, unless they have been given supervision
or instruction concerning the use of the appliance by a person responsible for their safety. Children
should be supervised to ensure that they do not play with the appliance.
• Refer to this operations manual for all safety, operational, loading or installation information.
6
Controller Programming
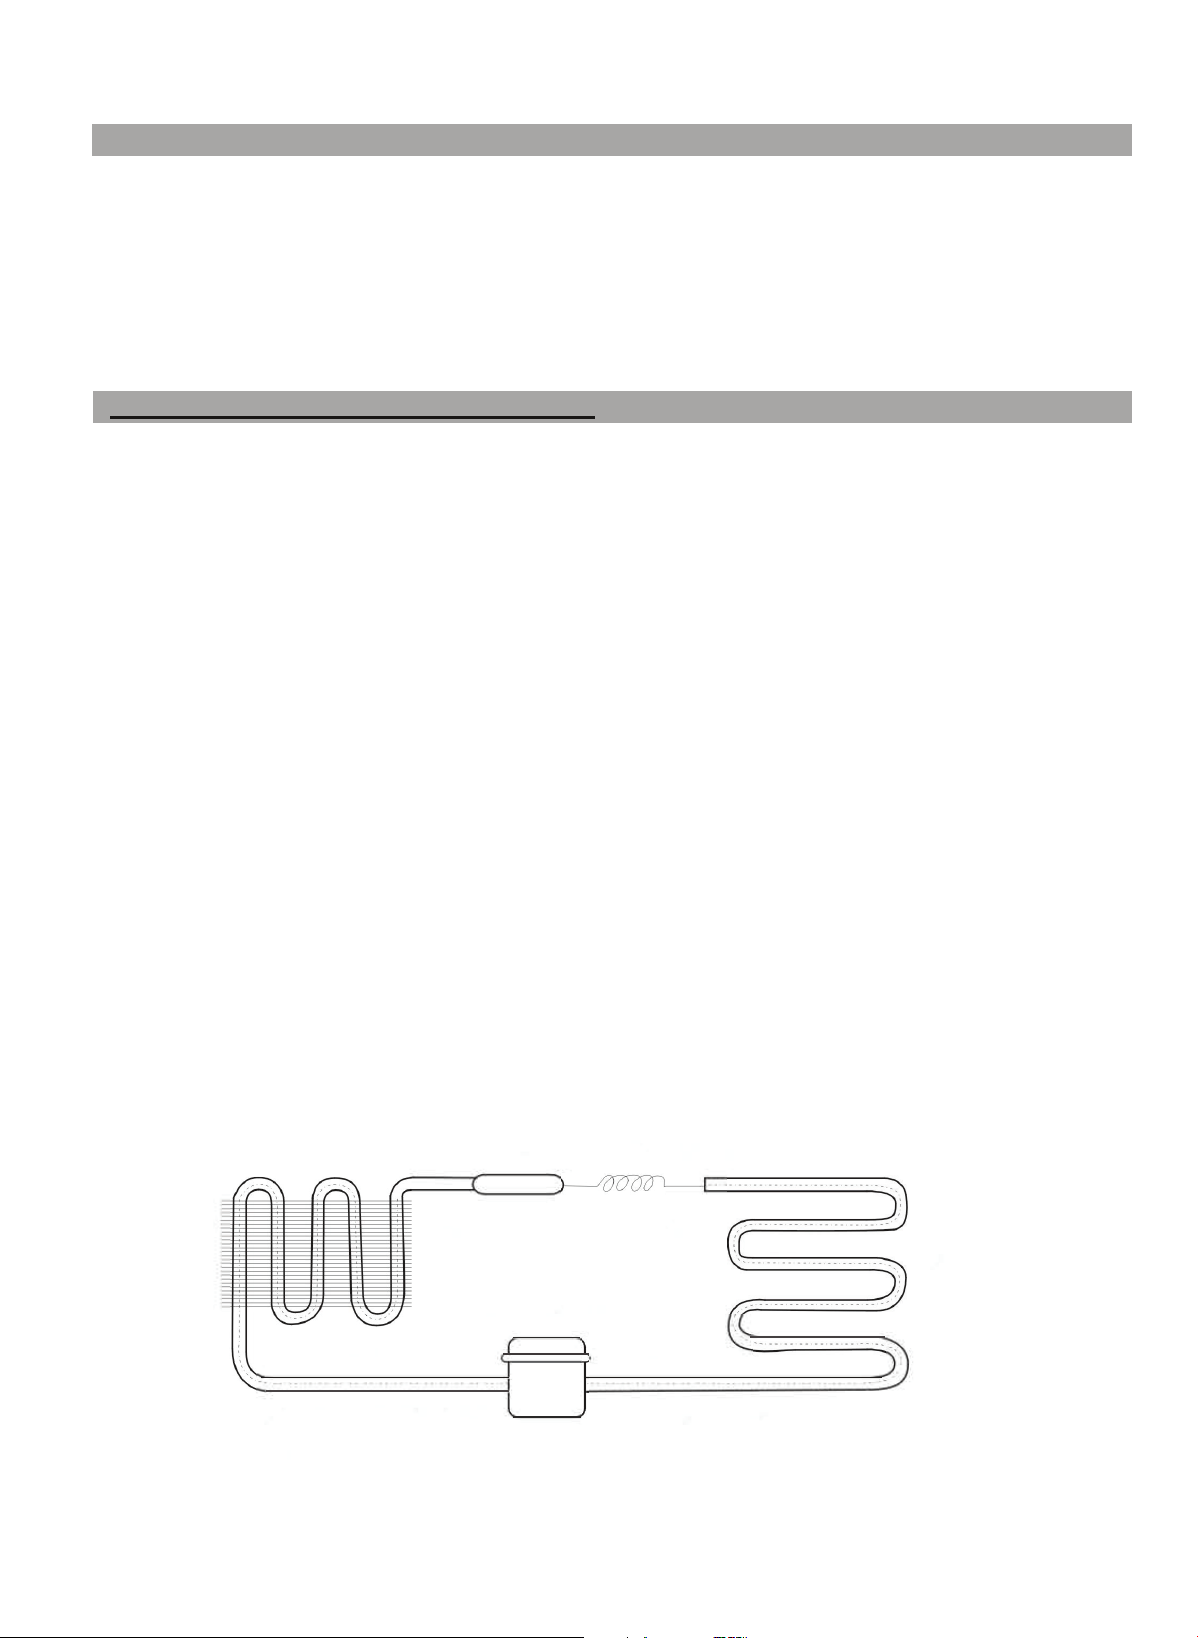
condenser
evaporator
liquid gas
----> ---->
capillary or metering device
Note !
The following phenomena are not malfunctions and should not be a source of concern:
• The murmur of water is heard when the refrigerator is working/running. This is a normal event, as the
coolant (in either a gas or liquid form) is circulating through the system.
• If the ambient temperature has a high relative humidity levels, condensation might be found on the outside
of the refrigerator. This is a normal occurrence, which is caused by the high humidity. Simply use a soft
dry cloth to wipe it. An ambient room relative humidity of ≤ 50% is desirable for this merchandiser to
prevent surface sweating.
<---
drying lter
compressor
high pressure and high
temperature gas
<---
low pressure gas
7
Principles of Refrigeration Systems
The principle of compression refrigeration consists of “compression”, “condensation”, “throttling (metering)”
and ”vaporization”. The compression stage is regulated by the compressor, the condensation is handled by the
condenser, the throttling/metering is executed by the unit’s capillary tube and the vaporization stage occurs
in the evaporator. When the coolant is circulating through this closed refrigeration system, coolant enters the
metering device capillary device and absorbs heat as it travels through the evaporator, as it transforms into a
low pressure and low temperature gas. In the condenser, the refrigerant dissipates heat into the air, while the
coolant is re-liqueed and throttled (monitored) by the capillary tube when it then enters the evaporator, where
it then cools to a desired low pressure. The liqueed coolant quickly boils and vaporizes into gas with a rapid
drop in temperature/pressure. Meanwhile, as the evaporator absorbs heat inside the refrigerator, which lowers
the storage compartment temperature. This heat load is transfered to the refrigerant. Finally, the low pressure
and low temperature gaseous coolant enters the compressor. This device turns the refrigerant into a hot, high
pressure regulated state that is sent to the condenser to give off its heat to the room and convert the refrigerant
back into a liquid state. It passes through a lter and drier to remove moisture and impurities from the refrig-
erant as it ows through this appliances gas. This process repeats itself continually within the unit to maintain
the desired internal temperature, with the thermal control circuit regulating the entire process within the estab-
lished temperature range for the unit. (36 to 48 °F is recommended)
Coolant and injection quantity(g)
General Rated input power(W)
Max ambient temperature (
°
F/
°
C)
Regulated temperature range (
°
F/
°
C)
Use grounded circuit
Rated Current (A):
Lamp power (W):
Total effective volume (l)
Net weight
Rated voltage (V)
Rated Frequency (Hz)
Overall dimension of closed unit
(LxWxH)
Parameter
Model
34-39
°
F (1-4
°
C)
16.7 x 15.9 x 38.5
(mm)
(in )
16.7 x 16.8 x 38.5
(mm)
(in )
425x428x980
Nominal temperature set point
Leg height countertop/oor
2 INCH 2 INCH
37
°
F (3
°
C) 37
°
F (3
°
C)
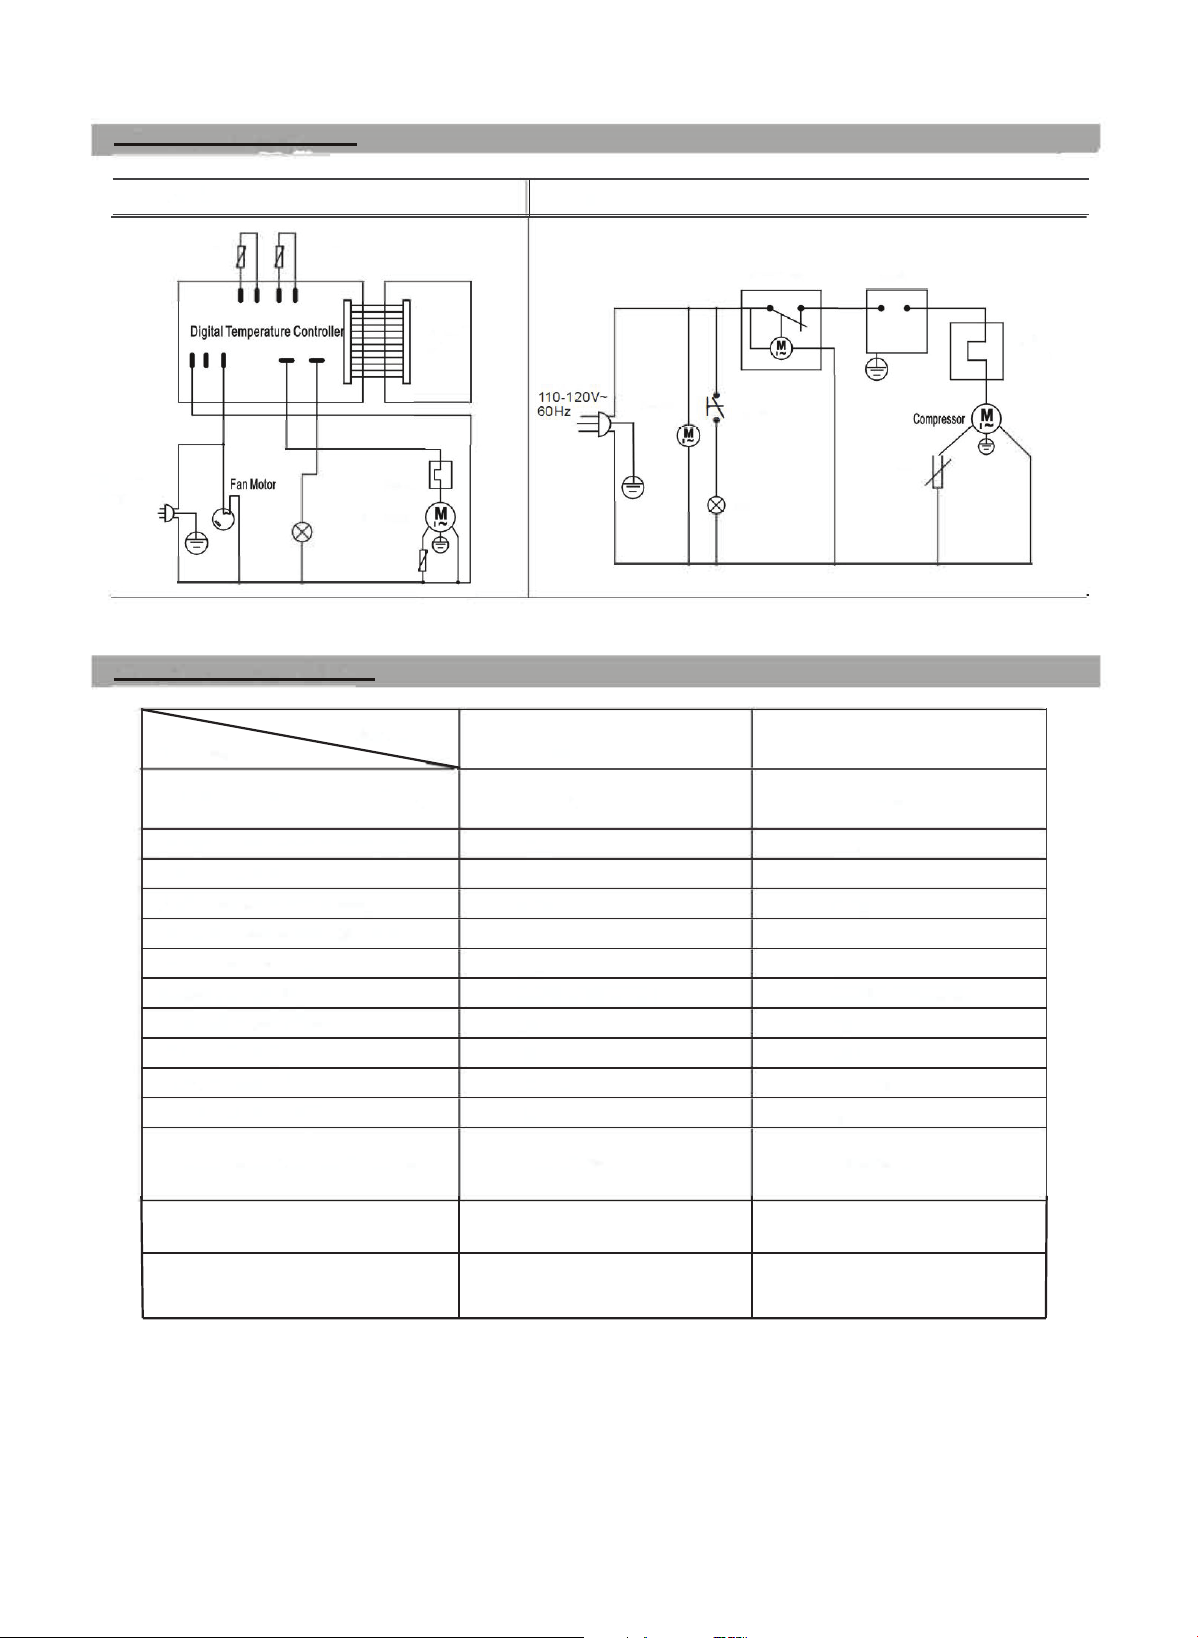
Circuit Diagram
Digital
110-120V-
60Hz
Defrost
probe
Thermostat
probe
Lamp
Display
panel
Overload
Protector
Compressor
PTC
Major Parameters
Mechanical
MECR-31D
R290 & 40 g / 1.4 oz
200
80
°
F (26
°
C)
34-39
°
F (1-4
°
C)
yes
2
Fan Motor
ll(T4),l.44/PC(LED)
82 l (2.9 cu ft)
36kg / 81.5 lbs
110-120V uses NEMA 5-15
60
425x404x980
8
Defrost Timer
Lamp
ON/OFF
Lamp
Controller
PTC
MECR-32D
R290 & 40 g / 1.4 oz
200
80
°
F (26
°
C)
yes
2
ll(T4),l.44/PC(LED)
85 l (3.0 cu ft)
110-120V uses NEMA 5-15
60
Overload
Protector
36.5kg / 82.5 lbs
FRONT VIEW
SIDE VIEW
PLAN VIEW -
MECR-31D
(Single door)
PLAN VIEW -
MECR-32D
(Double door)
38.5 IN
980 mm
38.5 IN
980 mm
16 IN
406 mm
6.8 IN
170 mm
14.4 IN
366 mm
16.7 IN
425 mm
12.8 IN
324 mm
16.7 IN
425 mm
16.8 IN
427 mm
13.8 IN
324 mm
33.5 IN
850 mm
14.4 IN
366 mm
33.5 IN
850 mm
16 IN
402 mm
31.7 IN
805 mm
25 IN
635 mm
2.4 IN
60 mm
2 IN
50 mm
Model
MECR-31D MECR-32D
Electrical Data
Plug Type
Voltage
Full Load Amperes
Compressor HP
Power Rating
Cord Length (ft)
Dimensional Data
Net Capacity (cu. ft)
Ext. Length Overall
Ext. Depth Overall
Ext. Height Overall
Int. Length Overall
Int. Depth Overall
Int. Height Overall
Net Weight (lbs.)
Gross Weight (lbs.)
Shelf Size (in.)
# of shelves 3 3
**Design and specications subject to change without notice.
115/60/1
NEMA 5-15P
2.6
2/9
225 Watts
6.5
3
16.7in (425mm)
16in (406mm)
38.5in (978mm)
14.4in (366mm)
12.75in (324mm)
25in (635mm)
89
81.5
14.4 x 12.75
115/60/1
NEMA 5-15P
2.6
2/9
6.5
3
16.7in (425mm)
16.8in (427mm)
38.5in (978mm)
14.4in (366mm)
13.2in (335mm)
25in (635mm)
90
82.5
14.4 x 12.75
240 Watts
*Doors depicted open
9
Product Specications
Product Dimensions

10
Maintenance
Notice:
• Keep the refrigerator tidy, clean the inside /outside often and perform periodical maintenance as
necessary. Never spray wash or ush the refrigerator with water.
• Never use an alkali detergent, soap, gasoline, acetone or brush on the surfaces for cleaning.
• Always unplug the appliance before executing any maintenance or cleansing operations.
• To prevent from electrical shock or a short circuit, NEVER use a damaged plug, frayed electrical
cord, ungrounded circuit or loose socket.
1. Plan to Shut down refrigerator for an extended period of time:
• Take all food out and unplug the wall socket.
• Clean both inside and outside of the refrigerator thoroughly and leave the door open until it is
sufciently dry as instructed below.
A. Clean outside:
• Dip a soft cloth into a neutral based detergent (tableware detergent) to clean the outside of the
refrigerator and then wipe it with a dry soft cloth.
B. Clean inside:
• Take rack out for cleaning with water after applying a mild chlorine or quat sanitizing solution.
• Clean the condensate tray and wipe it dry.
• Insert an open box of baking soda to absorb any odors that may develop.
*Note: The glass breaks easily. Keep children away from the glass.
Tips for Longterm Storage:
If the unit is to be taken out of service TEMPORARILY;
1. Sanitize, clean and dry the unit thoroughly.
2. Place a box of baking soda and at least 2 ounces of silica gel dessicant in the sotrage
compartment.
3. Close and secure the doors until unit is returned to service.
If the unit is to be taken out of service PERMANENTLY;
1. Employ a refrigeration technician to reclaim the refrigerant.
2. Remove the doors.
3. Discard all shelving and products inside the unit per the prevailing local codes and requirements.
Tips for loading the unit for display:
1. Do not crowd the items placed on any shelf.
2. Ensure the product storage is neat and organized in appearance through each of the 4 glass sides.
3. Ensure that the product identity is discernable (impulse purchases involve knowing and wanting a
specic product).
4. Periodically check the display during the day to keep it stocked, organized and attractive.
ANSI SAFETY
STANDARD 471
ANSI NSF
STANDARD 7
Environmentally
friendly refrigerant
and insulation
Notes
• The electric circuit diagram and parameters as they appear on the product name plate reect the as-built
electrical design.
• The design and/or manual may be improved/revised without notice. Keep this user manual for future
reference. Visit www.maxximumfoodservice.com for the most up to date version of this manual.
• Read this entire manual to ensure proper usage.
• Follow all safety precautions as described.
• Disconnect the power cord before attempting to work on or clean equipment. Disconnect power if the
appliance will be idle for a long period of time.
• Do not attempt to remove any covers or parts yourself, as this can expose dangerous, high voltage wiring.
Service should only be performed by an authorized or qualied technician.
• Always route power cords away from areas where they can be walked on or damaged.
• Never use extension cords, or plug more than one than one appliance into the same circuit. This can over-
load the power supply, which can result in electrical shock or re.
• Your appliance is equipped with a polarized, grounded power plug. Never attempt to remove the ground
post or use a non-polarized adapter, without properly grounding the equipment.
• If a replacement part is required at any point during the lifetime of this appliance, always insist on factory
authorized components.
• If the supply cord is damaged, it must be replaced by the manufacturer, the distributors’ service agent, or
similarly qualied persons in order to avoid a re hazard.
• Keep this manual handy for reference when training a new employee on its use or for the technician to
help describe how this unit is intended to operate.
• Maintain a proof of purchase date for your appliance and return the warranty card immediately after
purchase. This establishes when your warranty coverage began. If this hasn’t been completed prior to a
service request, the assistance may be excluded from your warranty coverage.
This unit complies with the 2017 DOE
electrical energy requirements.
Trouble Possible Cause / Remedy
No refrigeration
Still having problems? Contact our technical support team! Phone: (877)368-2797
Is it in direct sunlight? Is there a heat source nearby?
Is the surrounding ventilation bad?
Does the door close well? Has the door been open for a long time?
Is the door seal strip deformed or damaged? Is food congested or
too excessive? Is the utility compartment temperature below 80°F
Does food block the air suction or outlet?
Is the temperature controller set and operating properly?
Unsatisfactory refrigeration
Too much noise
Is the plug snuggly plugged into the wall outlet?
Is the fuse blown/cicruit breaker tripped?
Is there power to the circuit?
The refrigerator is not level.
The refrigerator is in contact with a wall or other obstacle.
There is a loose part in the refrigerator.
Troubleshooting Tips (use these tips to help resolve the problem before calling for technical support for assistance)
www.maxximumfoodservice.com
3355 Enterprise Avenue, Suite 160
Fort Lauderdale, FL 33331
Phone: (877) 368-2797 | Fax: (954) 202-7337
