ZŪMO
®
XT3
Motorcycle Navigator
Owner's
Manual

Table of Contents
Getting Started................................. 6
zūmo
®
XT3 - 6 in. Device Overview....... 6
zūmo
®
XT3 - 4.7 in. Device Overview.....6
Turning the Device On or Off.............. 7
Locking and Unlocking the
Touchscreen...................................7
Acquiring GPS Signals...................... 7
Status Bar Icons.............................. 7
Using the On-Screen Buttons.............. 7
Adjusting the Volume....................... 8
Using the Audio Mixer....................8
Adjusting the Screen Brightness..........8
Installation....................................... 9
Mounting Your Device in a
Motorcycle..................................... 9
Powered Motorcycle Mount............ 9
Installing the Handlebar Base........ 10
Installing the Post Mount.............. 11
Installing Your Device in the Motorcycle
Mount..........................................12
Removing Your Device from the
Motorcycle Mount.......................... 12
Mounting Your Device in an
Automobile................................... 12
Rider Awareness Features and
Alerts............................................. 14
Enabling or Disabling Rider Alerts...... 14
Red Light and Speed Cameras.......... 14
Incident Detection and Notifications...14
Setting Up an Emergency Contact...15
Cancelling an Incident
Notification................................15
Disabling Incident Notifications......15
inReach
®
Remote............................15
Connecting an inReach
®
Device...... 15
SOS..........................................15
Garmin Messenger
™
App..................16
Using the Garmin Messenger App...17
Creating a Post in the Garmin
Messenger App.......................... 17
Deleting Messages in the Garmin
Messenger App.......................... 17
Viewing Helmet Law Notifications..... 18
Searching for Helmet Laws.............. 18
Navigating to Your Destination....... 19
Routes......................................... 19
Starting a Route............................. 19
Taking a Route Using Garmin
Adventurous Routing
™
.................. 19
Starting a Route to a Point on the
Map......................................... 19
Going Home...............................20
Planning a Route............................20
Your Route on the Map.................... 20
Active Lane Guidance...................21
Viewing Turns and Directions........ 21
Viewing the Entire Route on the
Map......................................... 21
Arriving at Your Destination.............. 21
Parking Near Your Destination....... 22
Ride Summary............................ 22
Changing Your Active Route............. 22
Adding a Location to Your Route.... 22
Shaping Your Route..................... 22
Taking a Detour.......................... 23
Stopping the Route......................... 23
Avoiding Delays, Tolls, and Areas...... 23
Avoiding Traffic Delays on Your
Route........................................23
Avoiding Road Features................23
Avoiding Toll Roads..................... 23
Custom Avoidances.....................23
Fuel Tracking................................ 24
Enabling Fuel Tracking................. 24
Setting a Low Fuel Warning........... 24
Resetting the Fuel Tank Mileage.....24
Enabling Dynamic Fuel Stops.........24
Using the Map................................ 25
Map Tools.................................... 25
Viewing a Map Tool..................... 25
Up Ahead..................................... 25
Viewing Upcoming Locations.........26
Customizing the Up Ahead
Categories................................. 26
Cities Ahead..................................26
Viewing Upcoming Cities and Exit
Services.................................... 26

Trip Information.............................26
Viewing Trip Data from the Map..... 26
Viewing Trip Data........................ 26
Resetting Trip Information............ 26
Viewing Traffic Information.............. 27
Customizing the Map...................... 27
Customizing the Map Layers......... 27
Changing the Map Data Field......... 28
Changing the Map Shortcuts......... 28
Changing the Map Perspective.......28
Changing the Map Region............. 28
Finding and Saving Locations......... 29
Points of Interest........................... 29
Finding a Location Using the Search
Bar.............................................. 29
Finding a Location by Category......... 29
Navigating to Points of Interest Within
a Venue.....................................30
Location Search Results.................. 30
Changing the Search Area................30
Parking........................................ 31
Finding Parking Near Your Current
Location....................................31
Finding Parking Near a Specified
Location....................................31
Search Tools................................. 31
Finding an Address......................31
Finding an Intersection................. 31
Finding a Location Using
Coordinates............................... 31
Finding National Parks.................... 32
Finding Ultimate Campgrounds Points
of Interest.....................................32
Tripadvisor
®
.................................. 32
Finding Tripadvisor
®
Points of
Interest..................................... 32
Trendy Places............................... 32
Viewing Recently Found Locations.....33
Clearing the List of Recently Found
Locations.................................. 33
Viewing Current Location
Information...................................33
Finding Emergency Services and
Fuel..........................................33
Getting Directions to Your Current
Location....................................33
Adding a Shortcut.......................... 33
Removing a Shortcut....................33
Saving Locations............................33
Saving a Location........................33
Saving Your Current Location.........34
Editing a Saved Location...............34
Viewing Your Saved Items................34
Sharing a Saved Item................... 34
Synchronizing Garmin
®
Account
Data......................................... 35
Vehicle Profiles.............................. 36
Switching the Vehicle Profile............ 36
Adding a Vehicle Profile...................36
Editing a Vehicle Profile...................36
Live Services, Traffic, and
Smartphone Features..................... 37
Pairing with Your Smartphone...........37
Pairing a Wireless Headset...............37
Smart Notifications........................ 37
Receiving Notifications.................37
Viewing the List of Notifications.....38
Hands-Free Calling......................... 38
Placing a Call............................. 38
Using In-Call Options....................39
Disconnecting a Bluetooth
®
Device.....39
Deleting a Paired Phone...................39
Using the Apps............................... 40
Garmin Performance App................ 40
Subscribing to a GarminPerformance
Package
™
.................................. 40
Starting a Track Session............... 41
Starting a Drag Race Session.........42
Lean Angles.................................. 43
Garmin PowerSwitch
™
App............... 43
Activating a Power Switch.............43
Turning Off All Switches............... 43
Customizing a Button...................44
Assigning a Switch to a Control
Input.........................................44
Adding a Custom Layout...............44
Routines....................................45
Radio...........................................45
Selecting a Preset....................... 45
Selecting a Radio Channel.............46
Adjusting the Squelch.................. 46

Adding a Custom Radio Preset.......46
Selecting a Roger Tone.................46
Turning the Radio Off................... 46
Enabling Push-to-Talk with a
Headset.................................... 46
Transmitting Your Voice............... 46
Adjusting the Radio Volume.......... 46
Radio Settings............................ 47
Group Ride....................................47
Starting a Mobile Group Ride......... 47
Starting a Radio Group Ride...........47
Joining a Group Ride....................47
Rejoining a Recent Group Ride....... 47
Adding Riders to a Radio Group
Ride......................................... 47
Broadcasting a Message.............. 48
Broadcasting a Location............... 48
Viewing a Group Ride Notification...48
Exiting a Group Ride.....................48
Group Ride Settings..................... 48
Handlebar Controller.......................48
Configuring the Buttons................49
Wireless Cameras.......................... 49
Pairing the Device with a Wireless
Camera..................................... 49
Viewing the Wireless Camera........ 49
Great Rides................................... 50
Bookmarking a Ride.....................50
Synchronizing Great Rides............ 50
Navigating a Bookmarked Ride...... 50
Music Player................................. 51
Adding the Music Player Tool to the
Map......................................... 51
Changing the Media Source...........51
Tracks......................................... 51
Recording Tracks........................ 51
TracBack
®
.....................................52
Following Your Recent Track......... 52
Saving Your Recent Track as a
Route........................................52
Viewing Traffic on the Map.............. 52
Searching for Traffic Incidents....... 52
Viewing the Weather Forecast...........52
Viewing the Weather Radar........... 52
Viewing Previous Routes and
Destinations..................................52
Settings..........................................53
Phone and Headset Settings.............53
Phone Settings........................... 53
Headset Settings........................ 53
Wi‑Fi
®
Settings............................... 53
Map Settings.................................53
Navigation Settings........................ 53
Traffic Settings........................... 54
Setting a Simulated Location......... 54
Driver Assistance Settings............... 54
Display Settings............................. 54
System Settings.............................54
Position Format Settings.............. 55
Setting the Time..........................55
Device and Privacy Settings..............55
Enabling the Screen Lock..............55
Restoring Settings.......................... 55
Data Management.......................... 56
About Memory Cards...................... 56
Installing a Memory Card for Maps and
Data............................................ 56
Connecting the Device to Your
Computer..................................... 56
Transferring GPX Files From Your
Computer..................................... 56
Transferring Data From Your
Computer..................................... 56
Disconnecting the USB Cable............56
Device Information......................... 58
Viewing E-label Regulatory and
Compliance Information.................. 58
Specifications............................... 58
Charging Requirements................ 58
Informações de
Radiocomunicação.................... 0
Charging the Device........................58
Device Maintenance....................... 59
Garmin
®
Support Center................... 59
Map and Software Updates.............. 59
Updating Maps and Software Using a
Wi‑Fi
®
Network............................ 59
Updating Maps and Software with
Garmin Express
™
......................... 60
Device Care...................................61

Cleaning the Outer Casing.............61
Cleaning the Touchscreen.............61
Restarting the Device...................... 61
Troubleshooting............................. 62
My device is not acquiring satellite
signals.........................................62
My device does not connect to my
phone.......................................... 62
My device is not contacting my
emergency contact.........................62
My battery does not stay charged for
very long...................................... 62
The suction cup will not stay on my
windshield.................................... 62
My device does not appear as either a
portable device or a removable drive or
volume on my computer.................. 62
Getting Started
WARNING
See the Important Safety and Product Information guide in the product box for product warnings and other
important information.
1 Connect to a Wi‑Fi
®
network (Connecting to a Wi‑Fi
®
Network, page59)(optional).
2 Pair your Bluetooth
®
phone and headset (Pairing with Your Smartphone, page37) (optional).
3 Update the maps and software on your device (Map and Software Updates, page59).
4 Acquire GPS signals (Acquiring GPS Signals, page7).
5 Mount the device and connect it to power (Installation, page9).
6 Adjust the screen brightness (Adjusting the Screen Brightness, page8).
7 Navigate to your destination (Starting a Route, page19).
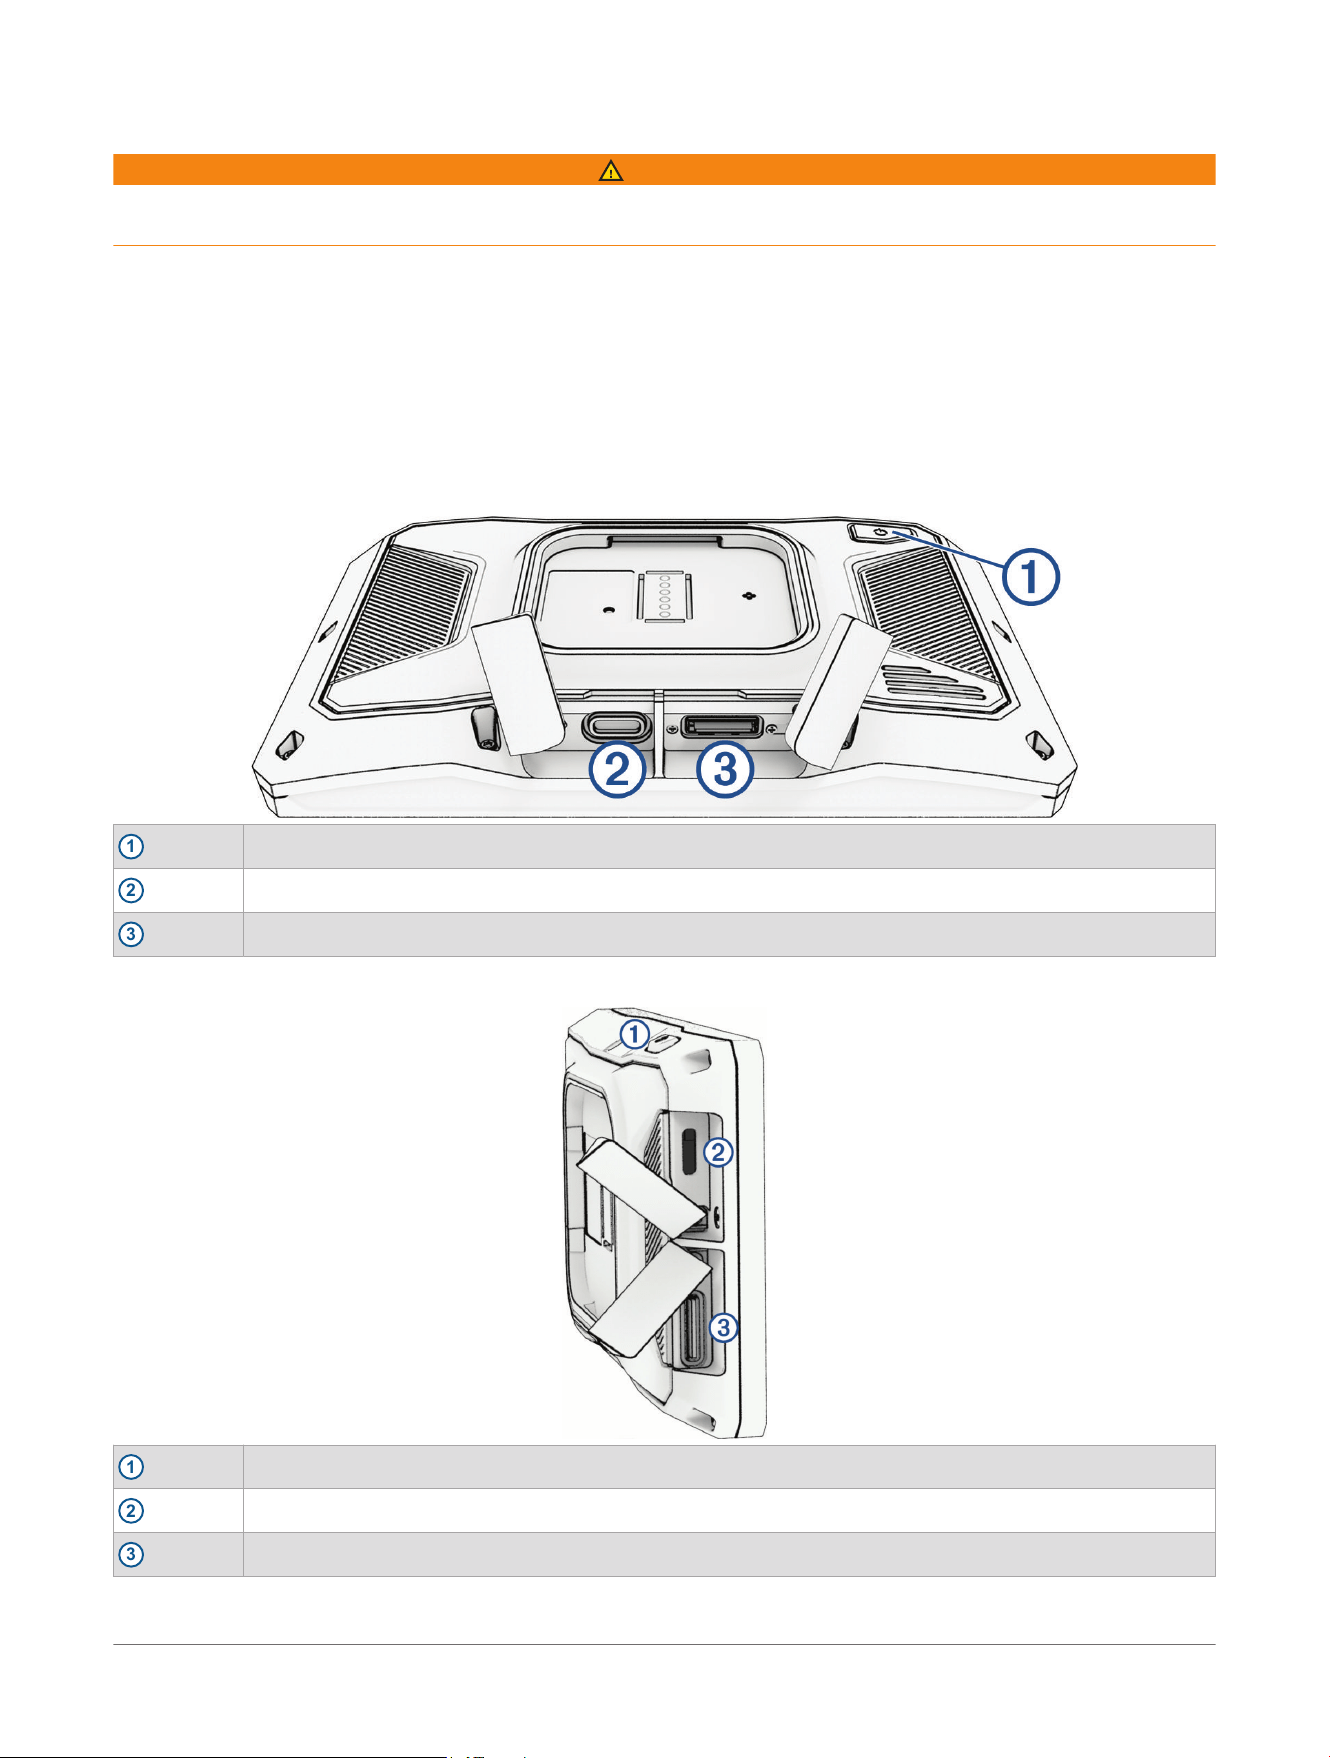
zūmo
®
XT3 - 6 in. Device Overview
1
Power button
2
USB-C
®
power and data port
3
microSD
®
memory card slot
zūmo
®
XT3 - 4.7 in. Device Overview
1
Power button
2
USB-C
®
power and data port
3
microSD
®
memory card slot
6 zūmo® XT3 Motorcycle Navigator
Owner's Manual
Getting Started
Turning the Device On or Off
● To turn the device on, press the power button, or connect the device to power.
● To put the device in power saving mode, press the power button while the device is on.
While in power saving mode, the screen is off and the device uses very little power, but it can wake instantly
for use.
TIP: You can charge your device faster by putting it in power saving mode while charging the battery.
● To turn off the device completely, hold the power button until a prompt appears on the screen, and select
Power Off.
The prompt appears after five seconds. If you release the power button before the prompt appears, the
device enters power saving mode.
Locking and Unlocking the Touchscreen
You can lock the touchscreen to prevent unwanted interaction during your ride. This can be useful during rain
and other environmental situations that may affect the touchscreen.
● To lock the touchscreen, hold the power button until a prompt appears on the screen, and select Lock
Screen.
The prompt appears after five seconds. If you release the power button before the prompt appears, the
device enters power saving mode.
● To unlock the touchscreen, press the power button.
Acquiring GPS Signals
When you turn on your navigation device, the GPS receiver must collect satellite data and establish the current
location. The time required to acquire satellite signals varies based on several factors, including how far you are
from the location where you last used your navigation device, whether you have a clear view of the sky, and how
long it has been since you last used your navigation device. The first time you turn on your navigation device, it
may take several minutes to acquire satellite signals.
1 Turn on the device.
2 Wait while the device locates satellites.
3 If necessary, go to an open area, away from tall buildings and trees.
in the status bar indicates the satellite signal strength. When at least half the bars are filled, the device is
ready for navigation. You can touch the icon to view more details about your satellite signal, such as your
current location accuracy.
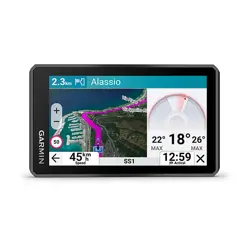
Status Bar Icons
The status bar is located at the top of the main menu. The status bar icons display information about features
on the device. You can select some icons to change settings or view additional information.
GPS signal status. Select to view GPS accuracy and acquired satellite information .
Bluetooth
®
technology status. Select to view the Bluetooth settings (Phone and Headset Settings, page53).
Wi‑Fi
®
signal strength. Select to change the Wi‑Fi settings (Wi‑Fi
®
Settings, page53).
Connected to hands-free calling. Select to place a phone call (Hands-Free Calling, page38).
Active vehicle profile. Select to view the vehicle profile settings.
Current time. Select to set the time (Setting the Time, page55).
Battery charge level.
Tread
®
app connection status (Pairing with Your Smartphone, page37).
Temperature. Select to view the weather forecast (Viewing the Weather Forecast, page52).
Fuel status. Select to view fuel tracking information (Fuel Tracking, page24).
Using the On-Screen Buttons
On-screen buttons allow you to navigate the pages, menus, and menu options on your device.
● Select to return to the previous menu screen.
● Hold to quickly return to the main menu.
● Select or to scroll through lists or menus.
Getting Started
zūmo® XT3 Motorcycle Navigator
Owner's Manual
7

● Hold or to scroll faster.
● Select to see a context-based menu of options for the current screen.
Adjusting the Volume
1 Select .
2 Select an option:
● Use the slider bar to adjust the volume.
● Select to mute the device.
● Select a check box to enable or disable additional sound options.
Using the Audio Mixer
You can use the audio mixer to set the volume levels for different audio types, such as navigation prompts or
phone calls. The level for each audio type is a percentage of the master volume.
1 Select .
2 Select Mixer.
3 Use the sliders to adjust the volume for each audio type.
Adjusting the Screen Brightness
1 Select > Display.
2 Use the slider bar to adjust the brightness.
8 zūmo® XT3 Motorcycle Navigator
Owner's Manual
Getting Started
Installation
Mounting Your Device in a Motorcycle
Powered Motorcycle Mount
WARNING
See the Important Safety and Product Information guide in the product box for product warnings and other
important information.
Garmin
®
strongly recommends having an experienced installer with the proper knowledge of electrical systems
install the device. Incorrectly wiring the power cable can result in damage to the vehicle, the battery, or the
device and can cause bodily injury.
NOTICE
Do not disassemble the device or motorcycle mount, because doing so could damage the device or mount.
The device must be mounted in a suitable and secure location on your motorcycle, based on available power
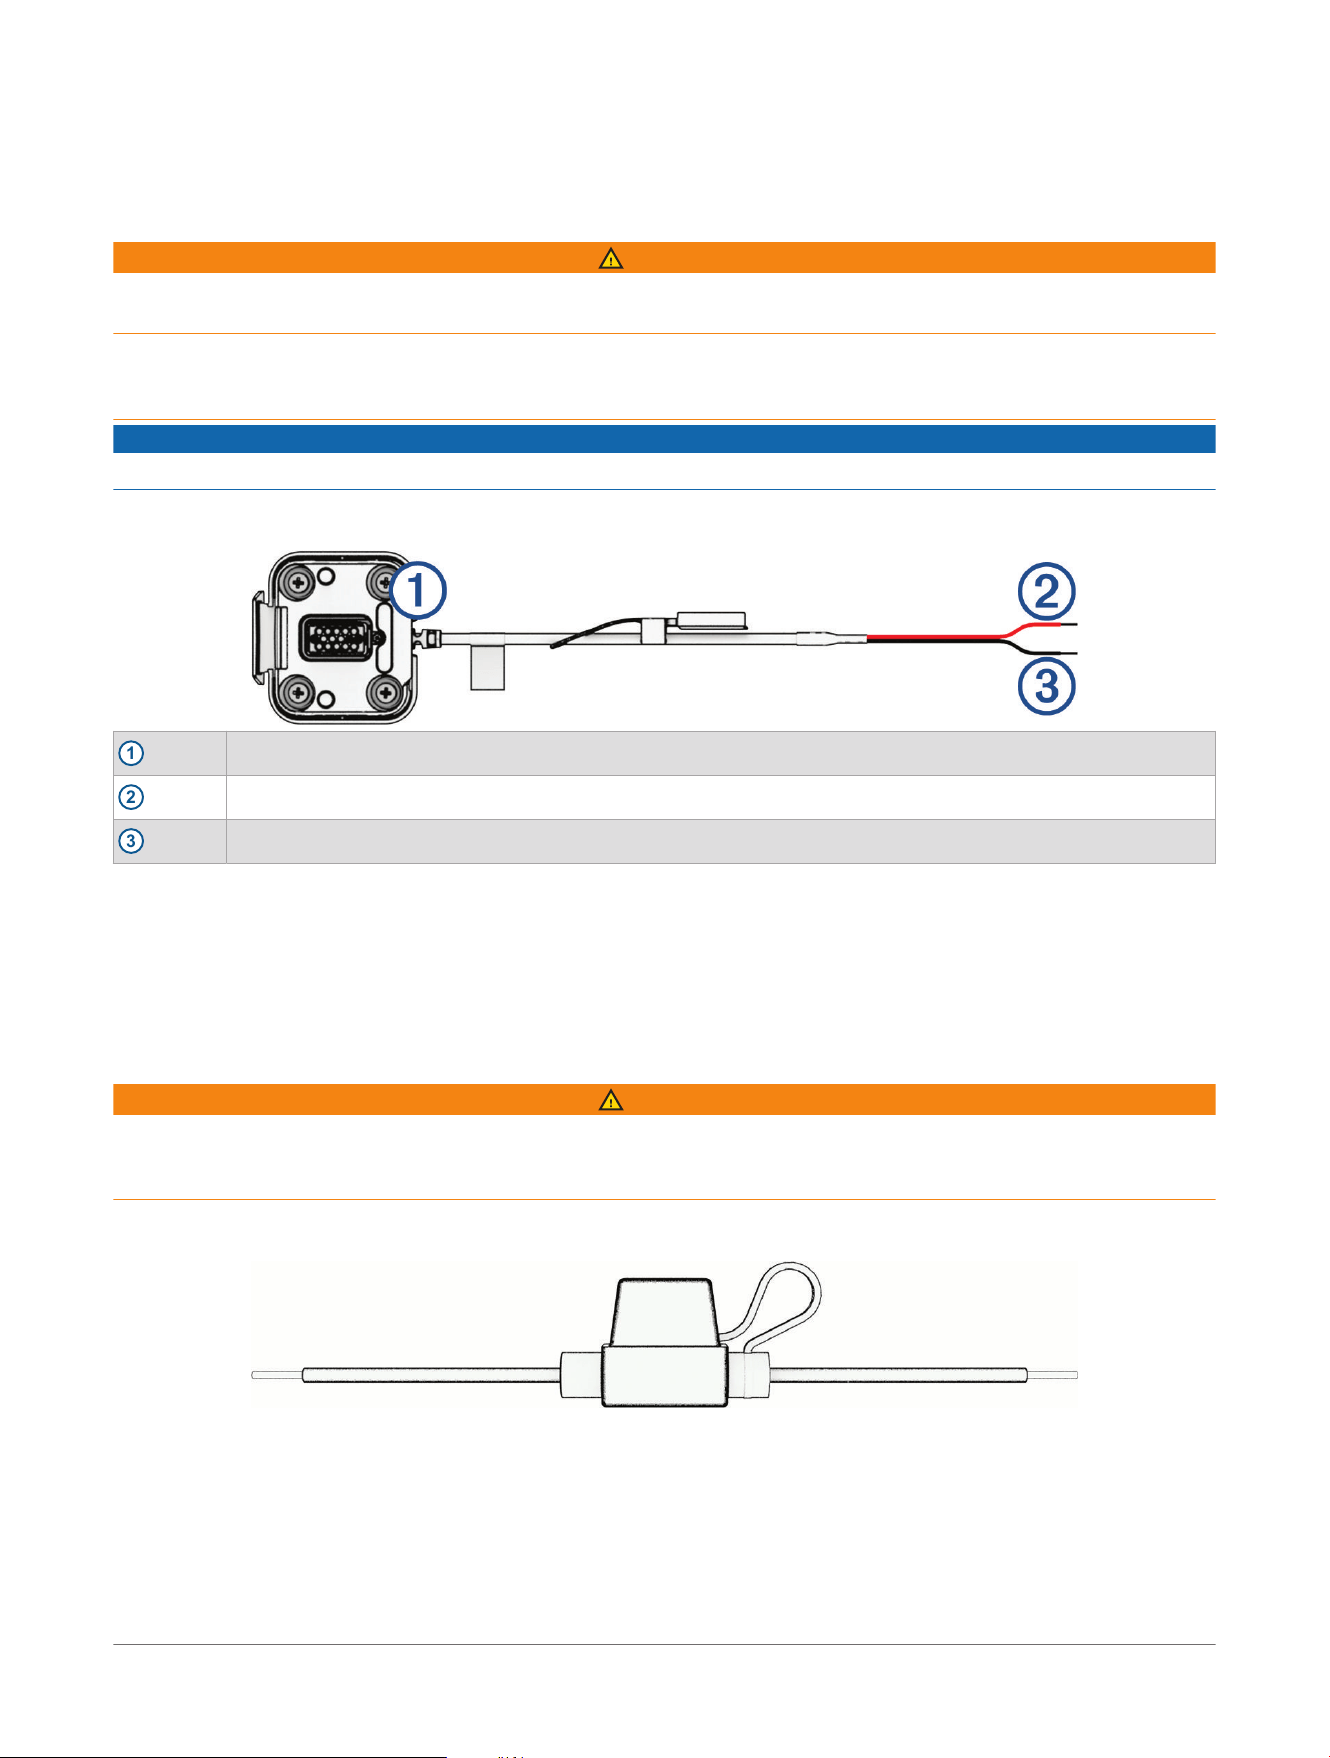
sources and safe cable routing.
1
Motorcycle mount connector
2
10to30 Vdc system power (red)
3
System ground (black)
NOTE: Additional parts are included with the device to provide more installation and wiring options. Contact an
experienced installer for more information about using these parts with your motorcycle.
Crimp Style Ring Terminal: Connects the wiring harness directly to the battery terminal.
Cable Tie: Secures cables to the motorcycle frame.
In-line Fuse Cable: Protects the navigation device from excessive electrical current (In-line Fuse Cable,
page9).
In-line Fuse Cable
WARNING
Garmin
®
strongly recommends having an experienced installer with the proper knowledge of electrical systems
install the in-line fuse cable. Incorrectly wiring the power cable or the in-line fuse cable can result in damage to
the vehicle or the battery and can cause bodily injury.
In many cases, you must install the included in-line fuse cable on the device power cable to protect the device
from excessive electrical current.
● You must install the included in-line fuse cable if you are connecting the power cable directly to the vehicle
battery.
● If you are connecting the power cable to an accessory power source or bus bar that already has a suitable
fuse or a protective circuit, installing the included in-line fuse is not necessary.
● When installing the in-line fuse cable, you should connect it to the red system power wire using the included
splice connector.
Installation
zūmo® XT3 Motorcycle Navigator
Owner's Manual
9
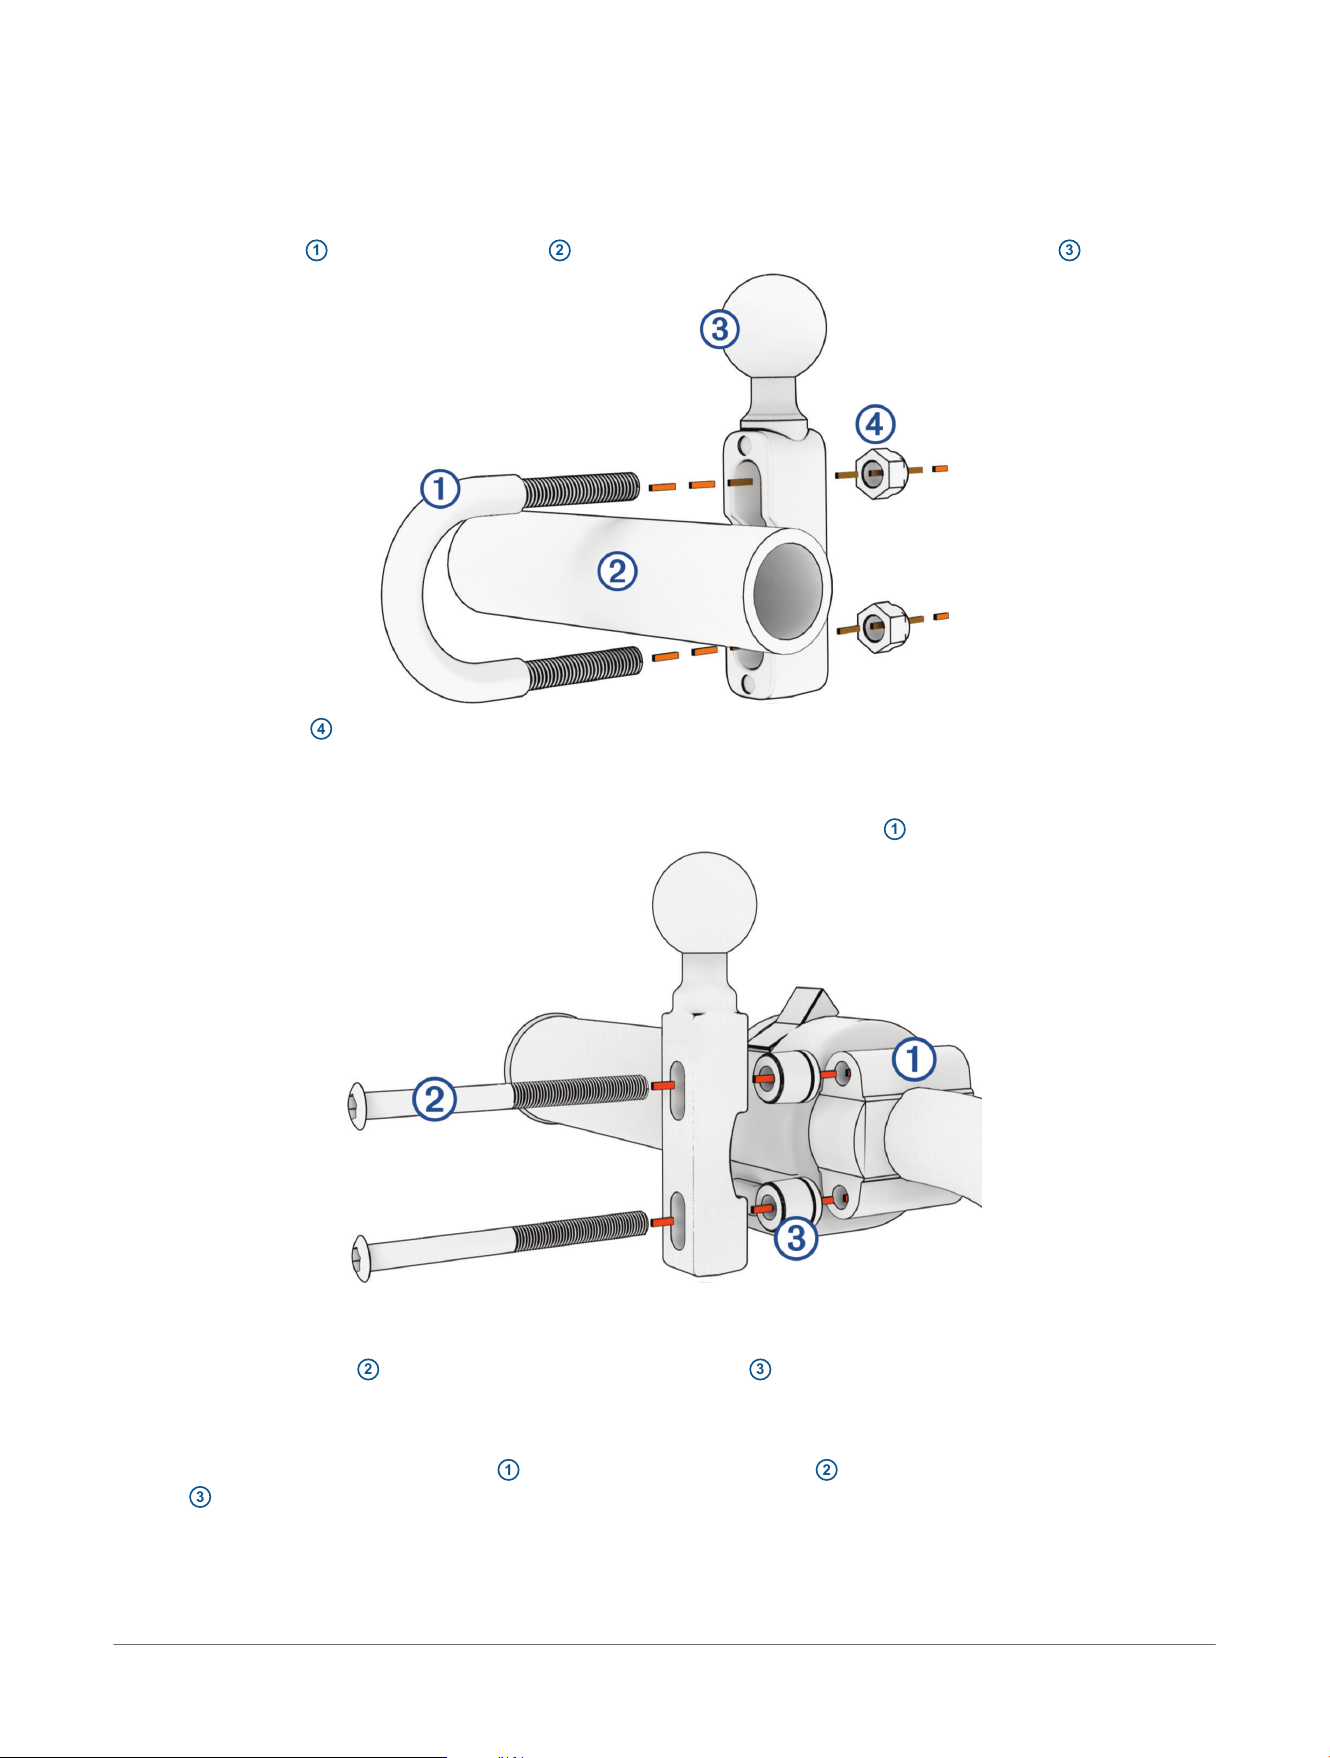
Installing the Handlebar Base
The zūmo
®
XT3 - 6 in. device includes parts for two handlebar installation solutions. Custom mounts may
require additional hardware.
Installing the U-bolt and Handlebar Base
1 Place the U-bolt
1
around the handlebar
2
, and thread the ends through the handlebar base
3
.
2 Tighten the nuts
4
to secure the base.
The recommended torque is 50lbf-in (5.65N-m). Do not exceed a torque of 80lbf-in (9.04N-m).
Installing the Handlebar Base to the Clutch-Clamp or Brake-Clamp Brackets
1 Remove the two factory bolts on your clutch-clamp or brake-clamp bracket
1
.
NOTE: Both
1
/
4
in. standard and M6 bolts are included. Match the size of the factory bolts on your clutch-
clamp or brake-clamp bracket.
2 Thread the new bolts
2
through the handlebar base, spacers
3
, and clutch-clamp or brake-clamp bracket.
3 Tighten the bolts to secure the handlebar base.
Attaching the Base Plate to the Handlebar Base
1 Align the ball of the handlebar base
1
and the ball of the base plate
2
with each end of the double-socket
arm
3
.
10
zūmo® XT3 Motorcycle Navigator
Owner's Manual
Installation
2 Insert the ball of the handlebar base
1
and the ball of the base plate
2
into the double-socket arm
3
.
3 Tighten the knob slightly.
4 Adjust for optimal viewing and operation.
5 Tighten the knob to secure the mount.
Installing the Post Mount
The zūmo
®
XT3 - 4.7 in. device includes parts for a post mount installation. Custom mounts may require
additional hardware.
1 Remove a factory bolt on your handlebar
1
.
2 Insert the post mount
2
into the handlebar, and insert the new bolt
3
through the post mount.
NOTE: M8 bolts are included in 50mm, 55mm, and 60mm lengths. Match the size of the factory bolt on your
handlebar.
3 Tighten the bolt to secure the post mount.
Attaching the Base Plate to the Post Mount
1 Insert the ball of the post mount
1
and the ball of the base plate
2
into the double-socket arm
3
.
Installation
zūmo® XT3 Motorcycle Navigator
Owner's Manual
11
2 Tighten the knob slightly.
3 Adjust for optimal viewing and operation.
4 Tighten the knob to secure the mount.
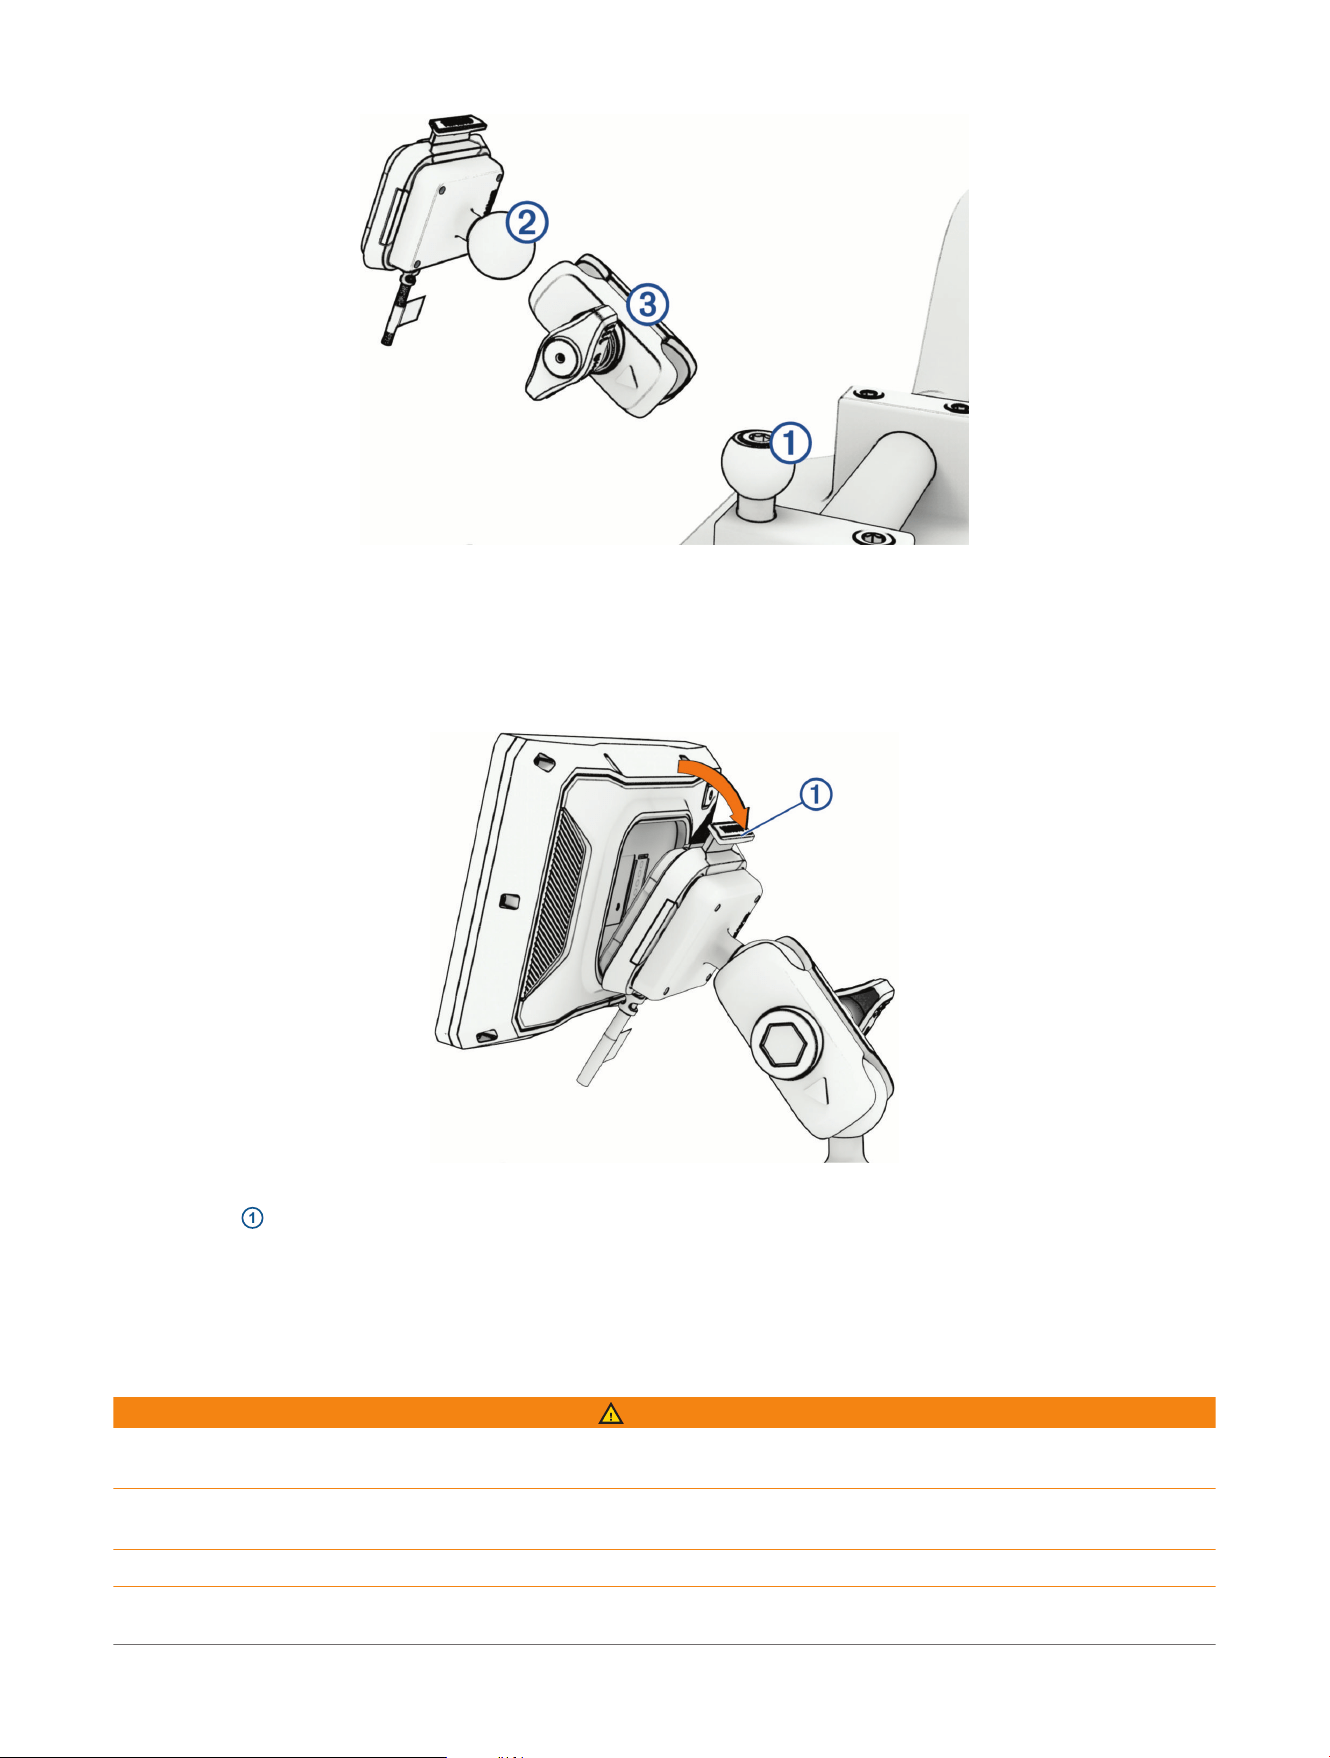
Installing Your Device in the Motorcycle Mount
1 Fit the bottom of your device into the cradle.
2 Push the top of the device forward until it snaps into place.
The latch
1
on the mount stays up after you insert the device.
Removing Your Device from the Motorcycle Mount
1 Press the latch on the top of the mount.
2 Lift out the device.
Mounting Your Device in an Automobile
WARNING
See the Important Safety and Product Information guide in the product box for product warnings and other
important information.
This product contains a lithium-ion battery. To prevent the possibility of personal injury, product damage, or
other property damage caused by battery exposure to extreme heat, store the device out of direct sunlight.
Do not use the suction cup mount on a motorcycle.
12
zūmo® XT3 Motorcycle Navigator
Owner's Manual
Installation
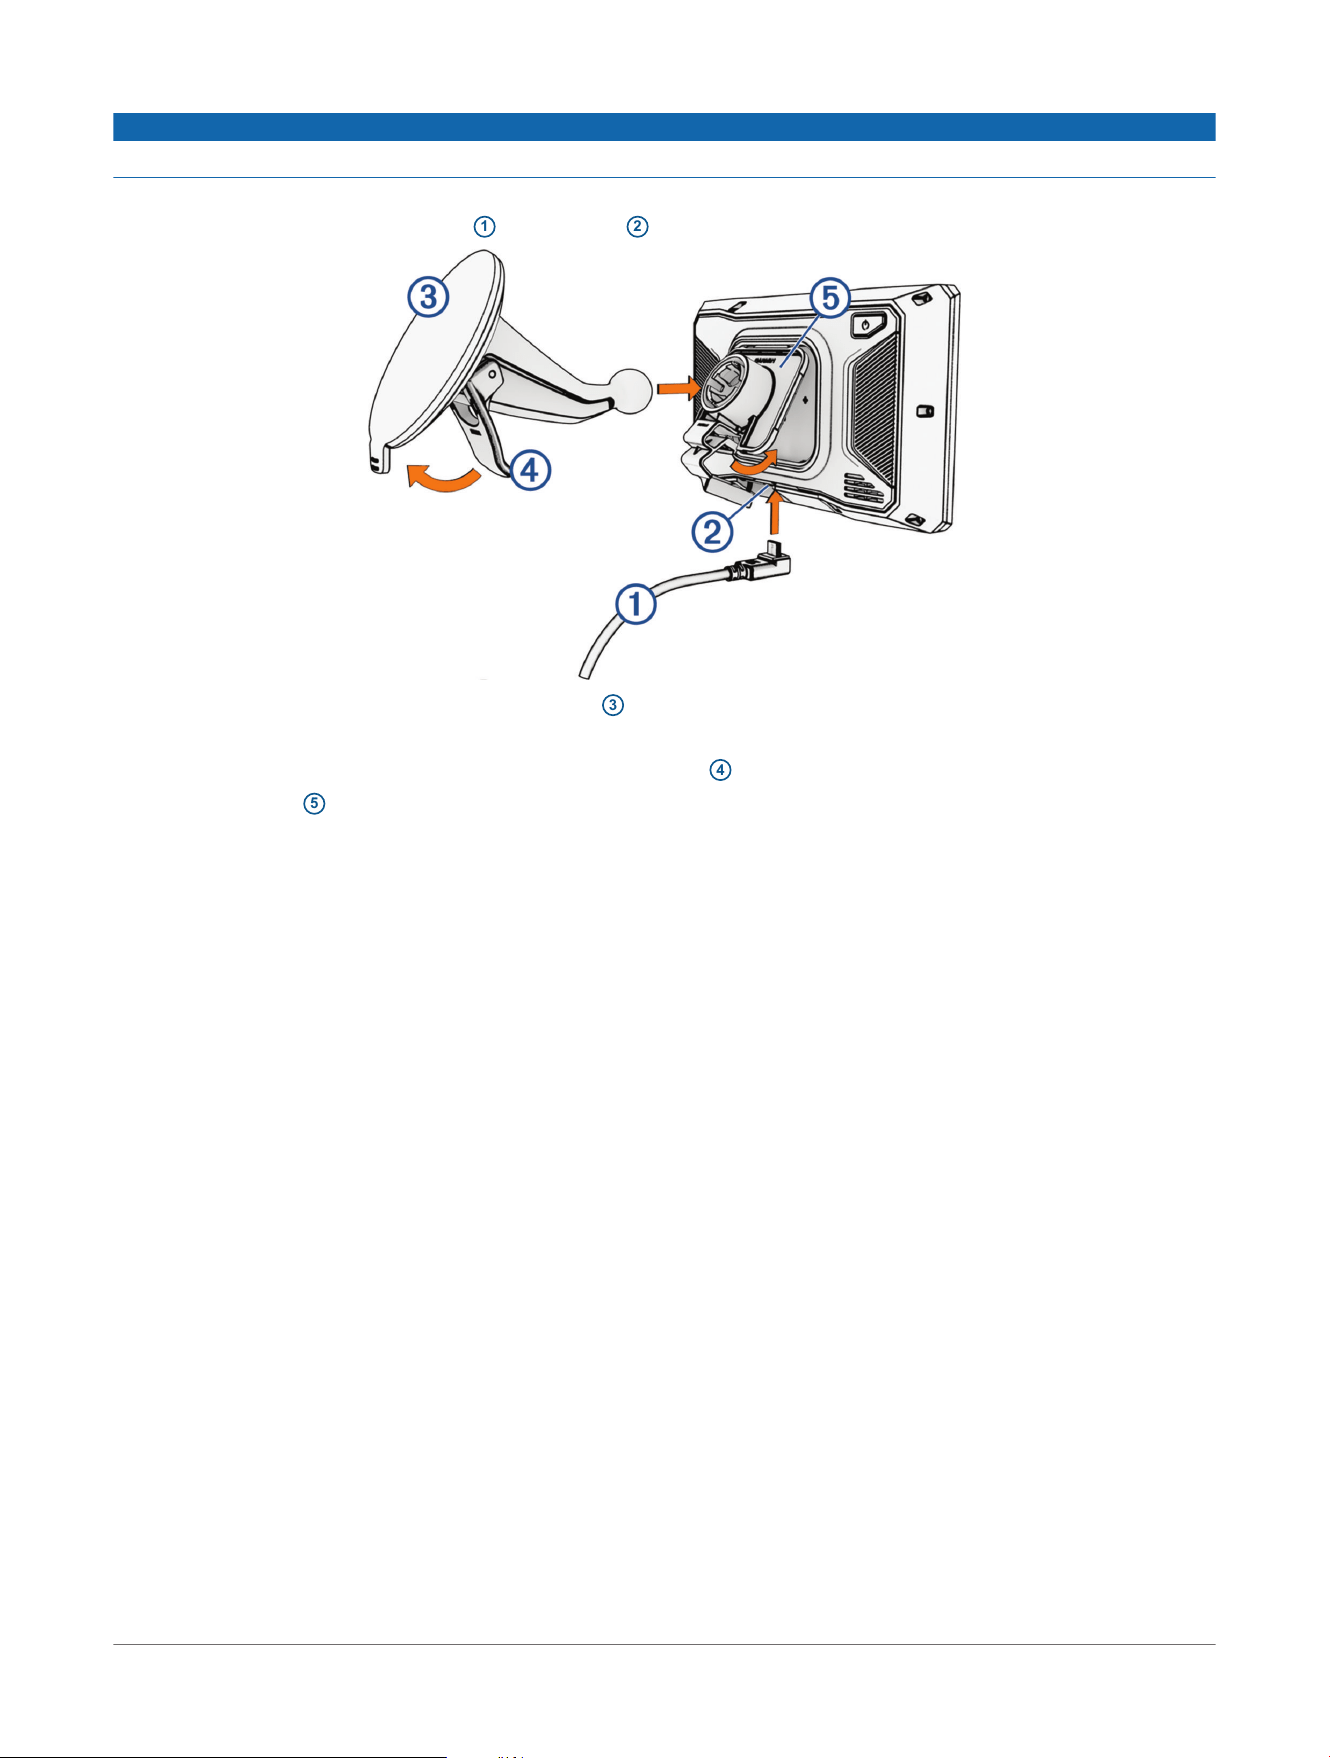
NOTICE
Before mounting the device, check the local laws pertaining to windshield mounting.
NOTE: The automobile mount is an optional accessory. Go to garmin.com to purchase optional accessories.
1 Plug the automotive power cable
1
into the port
2
on the device.
2 Remove the clear plastic from the suction cup
3
.
3 Clean and dry your windshield and the suction cup with a lint-free cloth.
4 Press the suction cup to the windshield, and flip the lever
4
back toward the windshield.
5 Snap the cradle
5
onto the suction cup arm.
6 Fit the top of your device into the cradle.
7 Press the device into the cradle until it snaps into place.
8 Plug the other end of the automotive power cable into a power outlet.
Installation
zūmo® XT3 Motorcycle Navigator
Owner's Manual
13
Rider Awareness Features and Alerts
CAUTION
The rider alerts and speed limit features are for information only and do not replace your responsibility to abide
by all posted speed limit signs and to use safe driving judgment at all times. Garmin
®
is not responsible for any
traffic fines or citations you receive for failing to follow all applicable traffic laws and signs.
Your device provides features that can help encourage safer riding, even when you are riding in a familiar area.
The device plays an audible tone or message and displays information for each alert. You can enable or disable
the audible tone or message for each type of alert. Not all alerts are available in all areas.
School zone or nearby school: The device plays a tone and displays the distance to and speed limit (if available)
for an upcoming school or school zone.
Speed limit reduction: The device plays a tone and displays the upcoming reduced speed limit so you can be
prepared to reduce your speed.
Speeding alert: The device displays a red border on the speed limit icon when you exceed the posted speed limit
for the current road.
Railroad crossing: The device plays a tone and displays the distance to an upcoming railroad crossing.
Animal crossing: The device plays a tone and displays the distance to an upcoming animal crossing area.
Curve: The device plays a tone and displays the distance to a curve in the road.
Slower traffic: The device plays a tone and displays the distance to slower traffic when you approach slower
traffic at a higher speed. Your device must be receiving traffic information to use this feature.
Break planning: The device plays a tone and suggests upcoming rest stops after you have been driving for more
than two hours without stopping.
Enabling or Disabling Rider Alerts
You can turn off individual audible rider alerts. Visual alerts appear even when the audible alert is disabled.
1 Select > Driver Assistance> Rider Alerts.
2 Select or clear the check box next to each alert.
Red Light and Speed Cameras
NOTICE
Garmin
®
is not responsible for the accuracy of or the consequences of using a red light or speed camera
database.
NOTE: This feature is not available for all regions or product models.
Information about red light and speed camera locations is available in some areas and for some product
models with a paid subscription. The device alerts you when you approach a reported speed or red light camera.
● In some areas, your device can receive red light and speed camera data while connected to a smartphone
running the Tread
®
app.
●
You can use the Garmin Express
™
software (garmin.com/express) or the Tread app to update the camera
database stored on your device. You should update your device frequently to receive the most up-to-date
camera information.
Incident Detection and Notifications
WARNING
The device allows you to send your location to an emergency contact. This is a supplemental feature and
should not be relied upon as a primary method to obtain emergency assistance. The Tread
®
app does not
contact emergency services on your behalf.
NOTICE
To use this feature, your device must be connected to the Tread app using Bluetooth
®
technology. You can set
emergency contacts using the Tread app.
To use this feature, your device must be connected to a compatible external power source using the included
mount or a USB cable.
Your zūmo
®
device uses built-in sensors to detect a possible vehicle incident.
● If you set up an emergency contact, the device can send an automated text message to that contact when it
detects an incident and your vehicle stops moving. This can help alert the contact to your situation if you are
14
zūmo® XT3 Motorcycle Navigator
Owner's Manual
Rider Awareness Features and
Alerts

not able to call or send a message. This feature requires your device to be connected to the Tread app using
Bluetooth technology and your phone to have an active mobile data connection to send a message.
● If you have not set up an emergency contact, the device automatically displays the nearest address or
geographic coordinates, if available, when it detects an incident. This feature is helpful if you need to tell
emergency personnel your location.
● If you have an inReach
®
satellite communicator connected to your zūmo device, you can manually send an
SOS when your zūmo device detects an incident.
Setting Up an Emergency Contact
Before you can set up an emergency contact, you must connect your navigation device to the Tread
®
app
(Pairing with Your Smartphone, page37).
The device must have access to the Tread app and to your smartphone phone book during the emergency
contact setup. An emergency contact must be an existing contact on the smartphone paired with your zūmo
®
device.
1 From the Tread app on your smartphone, select > Settings> Emergency Assistance> Continue.
2 Read and accept the terms of use.
NOTE: You must accept the terms of use to use this feature.
3 Select Add Emergency Contact.
A list of your smartphone contacts appears.
4 Select a contact.
5 Select Import> Save.
6 Follow the on-screen instructions to inform your contact that you have added them as an emergency
contact.
NOTE: The incident notification message includes the name or nickname you entered, but it is not sent from
your phone number. The message is sent using a third-party service, and you should inform your emergency
contact that the incident message will come from an unknown number.
Cancelling an Incident Notification
When the device detects an incident, a message and a voice prompt inform you that a notification will be sent
to your emergency contact. A 60-second countdown timer starts when the incident is detected, and the device
sends the notification automatically when the timer expires. If you do not want to send the notification, you can
cancel it.
Before the timer expires, select Cancel.
Disabling Incident Notifications
While incident notifications are disabled, the device does not send an SMS notification when it detects an
incident.
1 Select > Driver Assistance.
2 Clear the Automatic Incident Detection check box.
inReach
®
Remote
The inReach remote function allows you to control your inReach satellite communication device (sold
separately) using your zūmo
®
device. You can send messages, view weather reports, trigger an SOS alert, and
more. Go to buy.garmin.com to purchase an inReach device.
Connecting an inReach
®
Device
1 Bring the inReach device within 3m(10ft.) of your zūmo
®
device.
2 On your zūmo device, select > inReach.
3 Follow the on-screen instructions on your zūmo device to complete the pairing process.
After the pairing process is complete, the inReach and zūmo devices connect automatically when they are
within range.
SOS
WARNING
Before you can use the SOS function, you must have an active satellite subscription. Always test your device
before you use it outdoors.
Rider Awareness Features and
Alerts
zūmo® XT3 Motorcycle Navigator
Owner's Manual
15
Ensure you have a clear view of the sky when using the SOS function, because this feature requires satellite
access to operate properly.
NOTICE
Some jurisdictions regulate or prohibit the use of satellite communications devices. It is the responsibility of the
user to know and follow all applicable laws in the jurisdictions where the device is intended to be used.
During an emergency, you can use your paired inReach
®
satellite communicator to contact the Garmin
Response
SM
center to request help. The SOS feature sends a message to the Garmin Response team, and
they notify the appropriate emergency responders of your situation. You can communicate with the Garmin
Response team during your emergency while you wait for help to arrive. You should only use the SOS function in
a real emergency situation.
Initiating an SOS Rescue
WARNING
Before you can initiate an SOS rescue using your zūmo
®
navigator, you must pair it with a compatible inReach
®
satellite communicator (Connecting an inReach
®
Device, page15).
CAUTION
While the device is in SOS mode, do not turn off or attempt to turn off the inReach satellite communicator. Doing
so could prevent this feature from operating properly and could delay receipt of assistance in the event of an
emergency.
1 Select > inReach.
2 Select .
3 Wait for the SOS countdown.
The device sends a default message to the emergency response service with details about your location.
4 Reply to the confirmation message from the emergency response service.
Your reply lets the emergency response service know that you are capable of interacting with them during
the rescue.
For the first 10 minutes of your rescue, an updated location is sent to the emergency response service every
minute. To conserve battery power after the first 10 minutes, an updated location is sent every 10 minutes
when moving, and every 30 minutes when stationary.
Canceling an SOS Rescue
If you no longer need assistance, you can cancel an SOS rescue after it is sent to the emergency response
service.
Select Cancel SOS.
Your device transmits the cancellation request. When you receive a confirmation message from the emergency
response service, the device returns to normal operation.
Garmin Messenger
™
App
WARNING
The inReach
®
features of the Garmin Messenger app on your phone, including SOS, tracking, and inReach
Weather, are not available without a connected inReach device and an active inReach service plan. Always test
the app outdoors before using it on a trip.
CAUTION
The non-satellite messaging features of the Garmin Messenger app on your phone should not be solely relied
upon as a primary method to obtain emergency assistance.
NOTICE
The app works over both the internet (using a wireless connection or cellular data on your phone) and the
satellite network (using an inReach device). If you are using cellular data, your paired phone must be equipped
with a data plan and be in an area of network coverage where data is available. If you are in an area without
network coverage, you must have an active inReach service plan for your device to use the satellite network.
You can use the app to message other Garmin Messenger app users, including friends and family without
Garmin
®
devices. Anyone can download the app and connect their phone, allowing them to communicate with
other app users over the internet (no login is required). App users can also create group messaging threads
16
zūmo® XT3 Motorcycle Navigator
Owner's Manual
Rider Awareness Features and
Alerts
with other SMS phone numbers. New members added to the group message can download the app to see what
others are saying.
Messages sent using a wireless connection or cellular data on your phone do not incur data charges or
additional charges on your inReach service plan. Messages received may incur charges if message delivery is
attempted over both the satellite network and the internet. Standard text messaging rates for your cellular data
plan apply.
You can download the Garmin Messenger app from the app store on your phone (garmin.com/messengerapp).
Using the Garmin Messenger App
CAUTION
The non-satellite messaging features of the Garmin Messenger
™
app alone should not be relied on as a primary
method to obtain emergency assistance.
NOTICE
To use the Garmin Messenger app on your zūmo
®
navigator, it must be connected to the zūmo app and
the Garmin Messenger app on your compatible phone using Bluetooth
®
technology (Garmin Messenger
™
App,
page16).
The Garmin Messenger app on your navigator allows you to view, compose, and reply to messages from the
Garmin Messenger app on your phone.
1 From the home screen, select > Garmin Messenger.
2 If this is your first time using the Garmin Messenger feature, scan the QR code with your phone, and follow
the on-screen instructions to complete the pairing and setup process.
3 On your navigator, select an option:
● To compose a new message, select New Message, select one or more recipients, select Next, and
compose a message.
● To view a conversation, scroll down, and select a conversation.
● To reply to a message, select a conversation, select Reply, and compose a message.
TIP: You can select to send a message with your current location.
● To share a location, select > Location, search for a location, and select Select to add it to the message.
● To send an automated message with your arrival time while navigating to a destination, select > Arrival
Time.
Creating a Post in the Garmin Messenger App
CAUTION
The non-satellite messaging features of the Garmin Messenger
™
app alone should not be relied on as a primary
method to obtain emergency assistance.
You can send a post message to multiple recipients at once, where each recipient receives the message
individually without seeing replies from others. Messages sent to more than five contacts, or to email addresses
and zūmo
®
addresses, are sent as post messages.
1 From the home screen, select > Garmin Messenger.
2 Select > Create a New Post.
3 Select one or more recipients.
4 Select Next.
5 Compose a message.
TIP: You can select to send a message with your current location. You can select to share a location or
send an automated message with your arrival time while navigating.
Deleting Messages in the Garmin Messenger App
1 From the home screen, select > Garmin Messenger.
2 Select an option:
● To delete an individual message, select a conversation, select a message, and select Delete.
● To delete an entire message thread, select > Delete Messages, select a message thread, and select
Delete.
Rider Awareness Features and
Alerts
zūmo® XT3 Motorcycle Navigator
Owner's Manual
17

Viewing Helmet Law Notifications
While you are using a motorcycle vehicle profile, helmet law and eye protection notifications may appear on
your zūmo
®
device. Notifications appear the first time your device acquires satellites and when your device
approaches a location with motorcycle safety rules.
NOTICE
Garmin
®
recommends that all riders wear helmets for safety. Helmet law notifications are for reference only, are
subject to change, and are not intended to be considered legal advice. Helmet law notifications are available in
the U.S. and Canada only.
Select the notification to view more details.
Searching for Helmet Laws
You can search for helmet laws by state or province.
1 Select > Helmet Guide.
2 Select a state or province.
18 zūmo® XT3 Motorcycle Navigator
Owner's Manual
Rider Awareness Features and
Alerts

Navigating to Your Destination
Routes
A route is a path from your current location to one or more destinations.
● The device calculates a recommended route to your destination based on the preferences you set, including
the route calculation mode and avoidances (Avoiding Delays, Tolls, and Areas, page23).
● You can start navigating to your destination quickly using the recommended route, or you can select an
alternate route (Starting a Route, page19).
● If there are specific roads you need to use or avoid, you can customize the route.
● You can add multiple destinations to a route (Adding a Location to Your Route, page22).
Starting a Route
You can start a route by searching for a location.
1 Select Where To?, and search for a location.
2 Select a location.
3 Select an option:
● To navigate using the default route calculation method for the current vehicle profile, select Go!.
● To navigate to the location using adventurous routing (Taking a Route Using Garmin Adventurous
Routing
™
, page19), select .
The device calculates a route to the location and guides you using voice prompts and information on the map
(Your Route on the Map, page20). A preview of the major roads in your route appears at the edge of the map
for several seconds.
If you need to stop at additional destinations, you can add the locations to your route (Adding a Location to Your
Route, page22).
Taking a Route Using Garmin Adventurous Routing
™
Your device can calculate adventurous routes that prefer curvy roads, hills, and fewer highways. This feature
can provide a more enjoyable ride, but it may increase the time or distance to your destination.
1 Select Where To?, and search for a location.
2 Select a location.
3 Select .
4 Use the slider to increase or decrease the level of adventure of your route.
5 Select Go!.
Changing Adventurous Route Settings
You can add and remove some types of paths, roads, and environmental features from adventurous routes.
1 Select Where To?, and search for a location.
2 Select a location.
3 Select > .
4 Select or remove one or more route features, and select .
The navigator recalculates the route with the selected route features.
Changing the Level of Adventurous Routing
You can change the level of adventurous routing without starting a new route.
1 From the map, select > Edit Route> Garmin Adventurous Routing™.
2 Use the slider to increase or decrease the level of adventure for your route.
3 Select Go!.
Starting a Route to a Point on the Map
You can start a route by selecting a location from the map.
1 Select View Map.
2 Drag and zoom the map to display the area.
3 Select a point on the map.
4 Select Go!.
Navigating to Your Destination
zūmo® XT3 Motorcycle Navigator
Owner's Manual
19
The device calculates a route using the default calculation method for your vehicle profile.
Going Home
The first time you start a route home, the device prompts you to enter your home location.
1 Select Where To?> Go Home.
2 If necessary, enter your home location.
Editing Your Home Location
1 Select Where To?> > Set Home Location.
2 Enter your home location.
Planning a Route
A route can include many stops and shaping points, and it must include at least a starting location and one
destination.
1 Select > Route Planner.
2 Search for or select a location on the map to be the starting point for this route.
3 If necessary, select a route calculation mode for the route segment.
TIP: You can select to let the device automatically calculate the most adventurous route to your next
destination
(Taking a Route Using Garmin Adventurous Routing
™
, page19).
4 Select an option:
● If the next point along your route is a stop, select Add a Stop.
● If the next point in your route is a shaping point, select Add Shaping Point.
5 If necessary, add additional stops or shaping points.
The last stop you add is the route destination.
6 If necessary, select to rearrange the order of stops and shaping points along the route.
7 After you have finished planning the route, select .
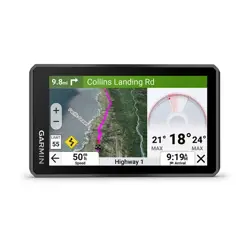
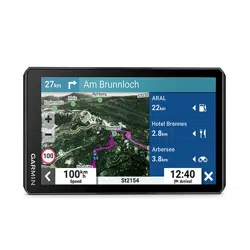
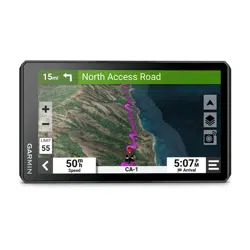
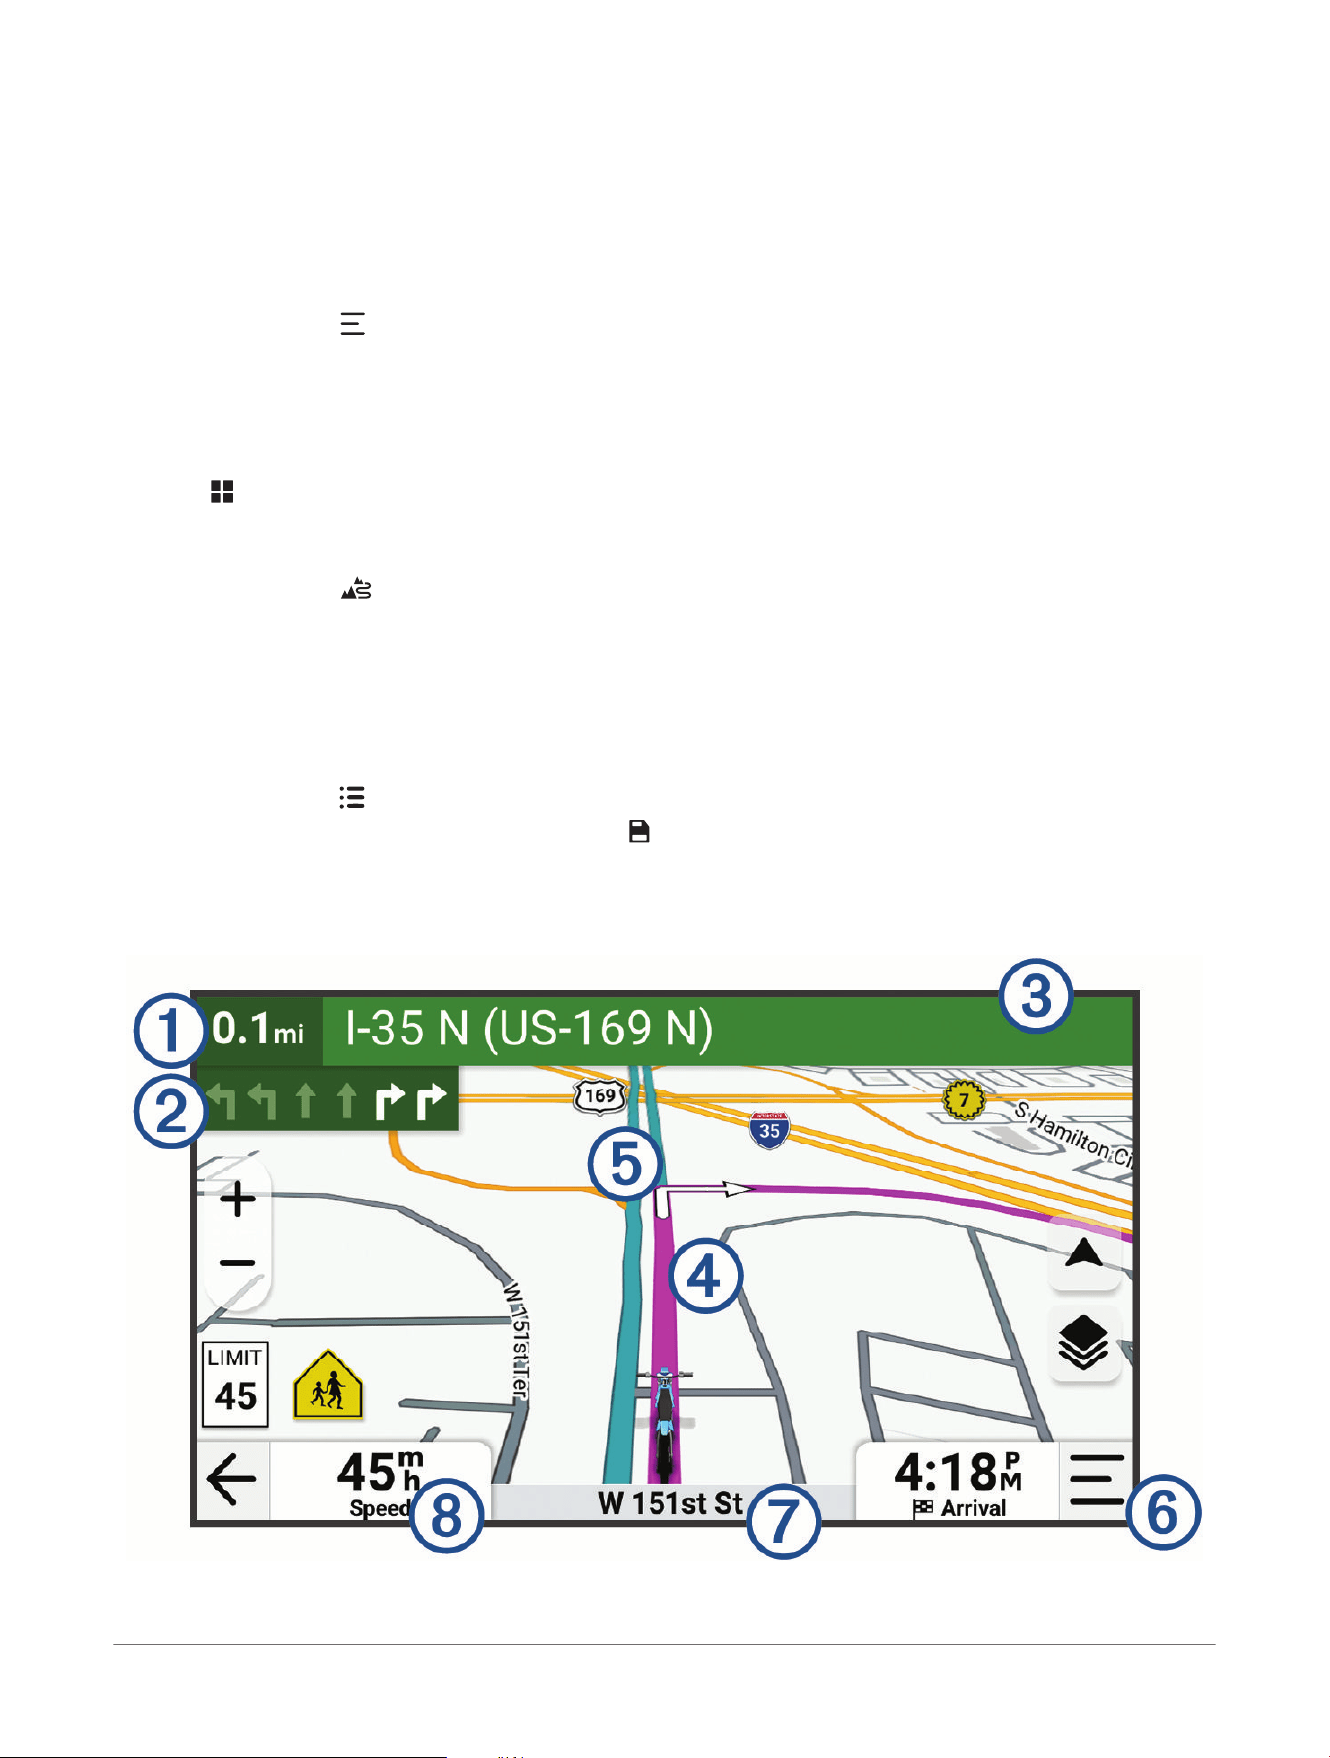
Your Route on the Map
As you travel, the device guides you to your destination using voice prompts and information on the map.
Instructions for your next turn or exit, or other actions appear across the top of the map.
20
zūmo® XT3 Motorcycle Navigator
Owner's Manual
Navigating to Your Destination
1
Distance to the next action.
2
Next action in the route. Indicates the next turn, exit, or other action and the lane in which you should travel, if
available.
3
Name of the street or exit associated with the next action.
4
Route highlighted on the map.
5
Next action in the route. Arrows on the map indicate the location of upcoming actions.
6
Map tools. Provides tools to show you more information about your route and surroundings.
7
Name of the road on which you are traveling.
8
Vehicle speed.
Active Lane Guidance
As you approach some turns, exits, or interchanges in your route, a detailed simulation of the road appears
beside the map, if available. A colored line
1
indicates the proper lane for the turn.
Viewing Turns and Directions
While navigating a route, you can view upcoming turns, lane changes, or other directions for your route.
1 From the map, select an option:
● To view upcoming turns and directions as you navigate, select > Turns.
The map tool displays the next several turns or directions beside the map. The list updates automatically
as you navigate the route.
● To view the complete list of turns and directions for the entire route, select the text bar at the top of the
map.
2 Select a turn or direction (optional).
Detailed information appears. An image of the junction may appear for junctions on major roadways, if
available.
Viewing the Entire Route on the Map
1 While navigating a route, select anywhere on the map.
2 Select .
Arriving at Your Destination
When you approach your destination, the device provides information to help you complete your route.
● indicates the location of your destination on the map, and a voice prompt announces you are approaching
your destination.
● When you approach some destinations, the device automatically prompts you to search for parking. You can
select Yes to find nearby parking areas (Parking Near Your Destination, page22).
Navigating to Your Destination
zūmo® XT3 Motorcycle Navigator
Owner's Manual
21

● When you stop at your destination, the device automatically ends the route. If the device does not detect
your arrival automatically, you can select Stop to end your route.
Parking Near Your Destination
NOTICE
This feature is for informational purposes only. You are responsible for ensuring that you are parking in
accordance with posted signage and any applicable laws, regulations, or rules that may apply to your desired
parking location.
Your device can help you find a parking spot near your destination. When you approach some destinations, the
device automatically suggests parking areas.
1 Select an option:
● When the device suggests parking, select More to see all of the suggested parking areas.
When you select a suggested parking area, the device automatically updates your route.
● If the device does not suggest parking locations, select Where To?> Categories> Parking, and select
Near Destination for the search area.
2 Select a parking location, and select Go!.
The device guides you to the parking area.
Ride Summary
When you arrive at your destination, the device displays a summary of your ride statistics. You can select Save
to save the ride as a track.
NOTE: You can disable the ride summary in the settings menu (Driver Assistance Settings, page54).
Changing Your Active Route
Adding a Location to Your Route
Before you can add a location to your route, you must be navigating a route (Starting a Route, page19).
You can add locations to the middle or end of your route. For example, you can add a fuel station as the next
destination in your route.
TIP: To create complex routes with multiple destinations or scheduled stops, you can use the route planner to
plan, schedule, and save a route (Planning a Route, page20).
1 From the map, select > Where To?.
2 Search for a location.
3 Select a location.
4 Select Go!.
5 Select an option:
● To add the location as the next destination in your route, select Add as Next Stop.
● To add the location to the end of your route, select Add as Last Stop.
● To add the location and edit the order of destinations in your route, select Add to Active Route.
The device re-calculates the route to include the added location and guides you to the destinations in order.
Shaping Your Route
Before you can shape your route, you must start a route (Starting a Route, page19).
You can manually shape your route to change its course. This allows you to direct the route to use a certain
road or go through a certain area without adding a destination to the route.
1 From the map, select > Edit Route> Shape Route.
The device enters route shaping mode.
2 Select a map location to create a shaping point.
TIP: You can select to zoom in on the map and select a more precise location.
3 If necessary, select an option:
● To add more shaping points to the route, select additional locations on the map.
● To remove a shaping point, select the shaping point and select .
4 Select .
22
zūmo® XT3 Motorcycle Navigator
Owner's Manual
Navigating to Your Destination

Taking a Detour
You can take a detour for a specified distance along your route or detour around specific roads. This is useful if
you encounter construction zones, closed roads, or poor road conditions.
1 From the map, select > Edit Route.
2 Select an option:
● To detour your route for a specific distance, select Detour by Distance.
● To detour around a specific road on the route, select Detour by Road.
Stopping the Route
From the map, select > Stop.
Avoiding Delays, Tolls, and Areas
Avoiding Traffic Delays on Your Route
Before you can avoid traffic delays, you must be receiving traffic information.
By default, the device optimizes your route to avoid traffic delays automatically. If you have disabled this option
in the traffic settings (Traffic Settings, page54), you can view and avoid traffic delays manually.
1 While navigating a route, select > Traffic.
2 Select Alternate Route, if available.
3 Select Go!.
Avoiding Road Features
1 Select > Navigation.
2 Select the vehicle profile.
3 Select Avoidances.
4 Select the road features to avoid on your routes, and select Save.
Avoiding Toll Roads
Your device can avoid routing you through areas that require tolls, such as toll roads, toll bridges, or congestion
areas. The device may still include a toll area in your route if no other reasonable routes are available.
1 Select > Navigation.
2 Select the vehicle profile.
3 Select Avoidances> Tolls and Fees.
4 Select Save.
Custom Avoidances
Custom avoidances allow you to select specific areas or sections of road to avoid. When the device calculates a
route, it avoids these areas and roads unless no other reasonable route is available.
Avoiding an Area
1 Select > Navigation> Custom Avoidances.
2 If necessary, select Add Avoidance.
3 Select Add Avoid Area.
4 Select the upper-left corner of the area to avoid, and select Next.
5 Select the lower-right corner of the area to avoid, and select Next.
The selected area is shaded on the map.
6 Select Done.
Avoiding a Road
1 Select > Navigation> Custom Avoidances.
2 If necessary, select Add Avoidance.
3 Select Add Avoid Road.
4 Select the starting point of the section of road to avoid, and select Next.
5 Select the ending point of the road section, and select Next.
6 Select Done.
Navigating to Your Destination
zūmo® XT3 Motorcycle Navigator
Owner's Manual
23

Disabling a Custom Avoidance
You can disable a custom avoidance without deleting it.
1 Select > Navigation> Custom Avoidances.
2 Select an avoidance.
3 Select > Disable.
Deleting Custom Avoidances
1 Select > Navigation> Custom Avoidances> .
2 Select an option:
● To delete all custom avoidances, select Select All> Delete.
● To delete one custom avoidance, select the avoidance, and select Delete.
Fuel Tracking
You can set your device to estimate your fuel usage, warn you when you approach the maximum estimated fuel
distance, and suggest fuel stops based on your estimated fuel range. When fuel tracking is enabled, indicates
the current fuel status.
White: Fuel tracking is disabled, or the device is not connected to the motorcycle mount.
Green: The estimated fuel range is above the fuel tank warning level.
Yellow: The estimated fuel range is below the fuel tank warning level.
Red: The estimated distance remaining on the tank is 0.
Enabling Fuel Tracking
Before you can enable fuel tracking, the device must be placed in the motorcycle mount.
When you enable fuel tracking, a fuel gauge appears on the trip computer (Viewing Trip Data, page26).
1 Fill your fuel tank.
2 Select > Fuel Settings> Fuel Tracking.
3 Select Distance Per Tank.
4 Enter the distance the vehicle travels on a tank of gas and select Done.
Setting a Low Fuel Warning
You can set the device to warn you when the tank is low on fuel.
The device must be connected to the motorcycle mount to give low fuel warnings.
1 Enable fuel tracking (Enabling Fuel Tracking, page24).
2 Select Remaining Fuel Warning.
3 Enter a distance, and select Done.
When you have only enough fuel left to travel the distance you entered, a low fuel warning appears on the map
page.
Resetting the Fuel Tank Mileage
When you refill your fuel tank, you should reset the fuel tank mileage on your device to more accurately track
your remaining fuel.
Select > Fuel Settings> Reset Fuel Tank.
Enabling Dynamic Fuel Stops
Before you can enable dynamic fuel stops, the device must be in motorcycle mode, placed in the motorcycle
mount, and fuel tracking must be enabled.
You can set the device to suggest fuel stops based on your estimated fuel range.
Select > Fuel Settings> Dynamic Fuel Stops.
24
zūmo® XT3 Motorcycle Navigator
Owner's Manual
Navigating to Your Destination

Using the Map
You can use the map to navigate a route (Your Route on the Map, page20) or to view a map of your
surroundings when no route is active.
1 Select View Map.
2 Touch anywhere on the map.
3 Select an option:
● Drag the map to pan left, right, up, or down.
● To add or remove map layers, select .
● To zoom in or out, select or .
● To switch between North Up, 2D, and 3D views, select .
● To plan a route, drag the map to reveal the icon, and select (Planning a Route, page20).
● To start a route, select a location on the map, and select Go! (Starting a Route to a Point on the Map,
page19).
Map Tools
Map tools provide quick access to information and device functions while you view the map. When you activate
a map tool, it appears in a panel at the edge of the map.
Stop: Stops navigation of the active route.
Edit Route: Allows you to take a detour or skip locations in your route (Changing Your Active Route, page22).
Mute Navigation: Mutes the device audio.
Cities Ahead: Displays upcoming cities and services along your active route or along a highway.
Up Ahead: Displays upcoming locations along the route or the road on which you are traveling (Up Ahead,
page25).
Elevation: Displays upcoming elevation changes.
Traffic: Displays traffic conditions along your route or in your area. This feature is not available in all areas or for
all device models.
Trip Data: Displays customizable trip data, such as speed or mileage (Viewing Trip Data from the Map,
page26).
Track Recorder: Displays the track data for your active track.
Turns: Displays a list of upcoming turns in your route (Viewing Turns and Directions, page21).
Phone: Displays a list of recent phone calls from your connected phone, and displays in-call options while a
phone call is active.
Weather: Displays weather conditions for your area (Viewing the Weather Forecast, page52).
Music Player: Displays media controls and media information.
Smart Notifications: Displays recent smart notifications from your connected phone.
Group Ride: Displays the distance and direction of the members in your group ride (Group Ride, page47).
Free Ride: Displays the compass.
Garmin Messenger: Displays your Garmin Messenger messages.
Lean Angles: Displays the current lean angle of your motorcycle (Lean Angles, page43).
zūmo
™
R1 Radar: Displays information from your connected motorcycle radar device.
Radio: Allows you to use the push-to-talk feature with a compatible Bluetooth
®
headset (Enabling Push-to-Talk
with a Headset, page46).
Viewing a Map Tool
1 From the map, select .
2 Select a map tool to open it.
TIP: With some map tools, you can touch the map tools to expand it or show more detailed information.
3 When you are done using the map tool, select .
Up Ahead
The Up Ahead tool provides information about upcoming locations along your route or the road on which you
are traveling. You can view upcoming points of interest by category, such as restaurants, fuel stations, or rest
areas.
Using the Map
zūmo® XT3 Motorcycle Navigator
Owner's Manual
25

You can customize the categories that show in the Up Ahead tool.
Viewing Upcoming Locations
1 From the map, select > Up Ahead.
While you are traveling, the map tool shows the next location along your road or route.
2 Select an option:
● If the map tool shows categories, select a category to view a list of nearby locations in that category.
● If the map tool shows upcoming locations, select a location to view location details or start a route to the
location.
Customizing the Up Ahead Categories
You can change the location categories that appear in the Up Ahead tool.
1 From the map, select > Up Ahead.
2 Select a category.
3 Select .
4 Select an option:
● To move a category up or down in the list, select and drag the arrow next to the category name.
● To change a category, select the category.
● To create a custom category, select a category, select Custom Search, and enter the name of a business
or category.
5 Select Save.
Cities Ahead
While you are traveling on a highway or navigating a route that includes a highway, the Cities Ahead tool
provides information about upcoming cities along the highway. For each city, the map tool shows the distance
to the highway exit and the services available, similar to the information on highway road signs.
Viewing Upcoming Cities and Exit Services
1 From the map, select > Cities Ahead.
While you are traveling along a highway or an active route, the map tool shows information about upcoming
cities and exits.
2 Select a city.
The device shows a list of points of interest located at the selected city exit, such as fuel stations, lodging, or
restaurants.
3 Select a location, and select Go! to start navigating.
Trip Information
Viewing Trip Data from the Map
From the map, select > Trip Data.
Customizing the Trip Data Fields
1 From the map, select > Trip Data.
2 Select a trip data field.
3 Select an option.
The new trip data field appears in the trip data map tool.
Viewing Trip Data
The trip data tool displays your speed and provides statistics about your trip.
From the map, select Speed.
Resetting Trip Information
1 From the map, select Speed.
2 Select > Reset Field(s).
3 Select an option:
● When not navigating a route, select Select All to reset every data field except the speedometer, on the
first page.
26
zūmo® XT3 Motorcycle Navigator
Owner's Manual
Using the Map

● Select Reset Overall Data to reset the information on the trip computer.
● Select Reset Max. Speed to reset the maximum speed.
● Select Reset Trip B to reset the odometer.
Viewing Traffic Information
Before you can view up-to-date traffic information, you must pair and connect your device to the Tread
®
app on
your phone (Pairing with Your Smartphone, page37).
NOTICE
Garmin
®
is not responsible for the accuracy or timeliness of the traffic information.
1 From the map, select > Traffic.
2 Touch the Traffic panel to view the traffic incidents on the map.
Customizing the Map
Customizing the Map Layers
1 From the map, select > Layers.
2 Under Map Type, select a map type.
With some map types, you can select > Hybrid Map to combine two map types.
The Satellite Imagery map shows satellite images only for areas where you have downloaded satellite
imagery (Downloading Outdoor Maps+ Content, page27).
3 Under Map Details, select the types of information to display over the map.
NOTE: Some layers are incompatible with each other and cannot be enabled at the same time. Enabling a
layer automatically disables any incompatible layers.
NOTE: Some map layers require an Outdoor Maps+ subscription.
Viewing Popular Motorcycle Paths on the Map
You can enable the device to highlight popular motorcycle paths on the map. This can help you choose roads
that provide a more enjoyable ride.
From the map, select > Popular Paths (Moto).
Downloading Outdoor Maps+ Content
Before you can download Outdoor Maps+ content, you must purchase an Outdoor Maps+ subscription. Go to
garmin.com/outdoormaps for more information.
You must connect your device to Wi‑Fi
®
before you can download Outdoor Maps+ content (Connecting to a
Wi‑Fi
®
Network, page59).
To see Outdoor Maps+ content on the map, you must download the content for a specific area.
NOTE: Some Outdoor Maps+ layers are available only in certain areas.
1 Select > Map> Map Manager> Outdoor Maps+> Download Maps.
2 Select .
3 Select each map layer you want to download.
TIP: You can touch to see information about each map layer.
The selected map layers are marked with a checkmark.
4 Select .
5 Drag the map and pinch to zoom in and out on the map until the highlighted rectangle covers the area for
which you want to download map data.
TIP: As you change the size of the area, the total download size and your current disk usage appear at the
top of the screen.
6 Select to start downloading.
You can continue using your device while it downloads Outdoor Maps+ content.
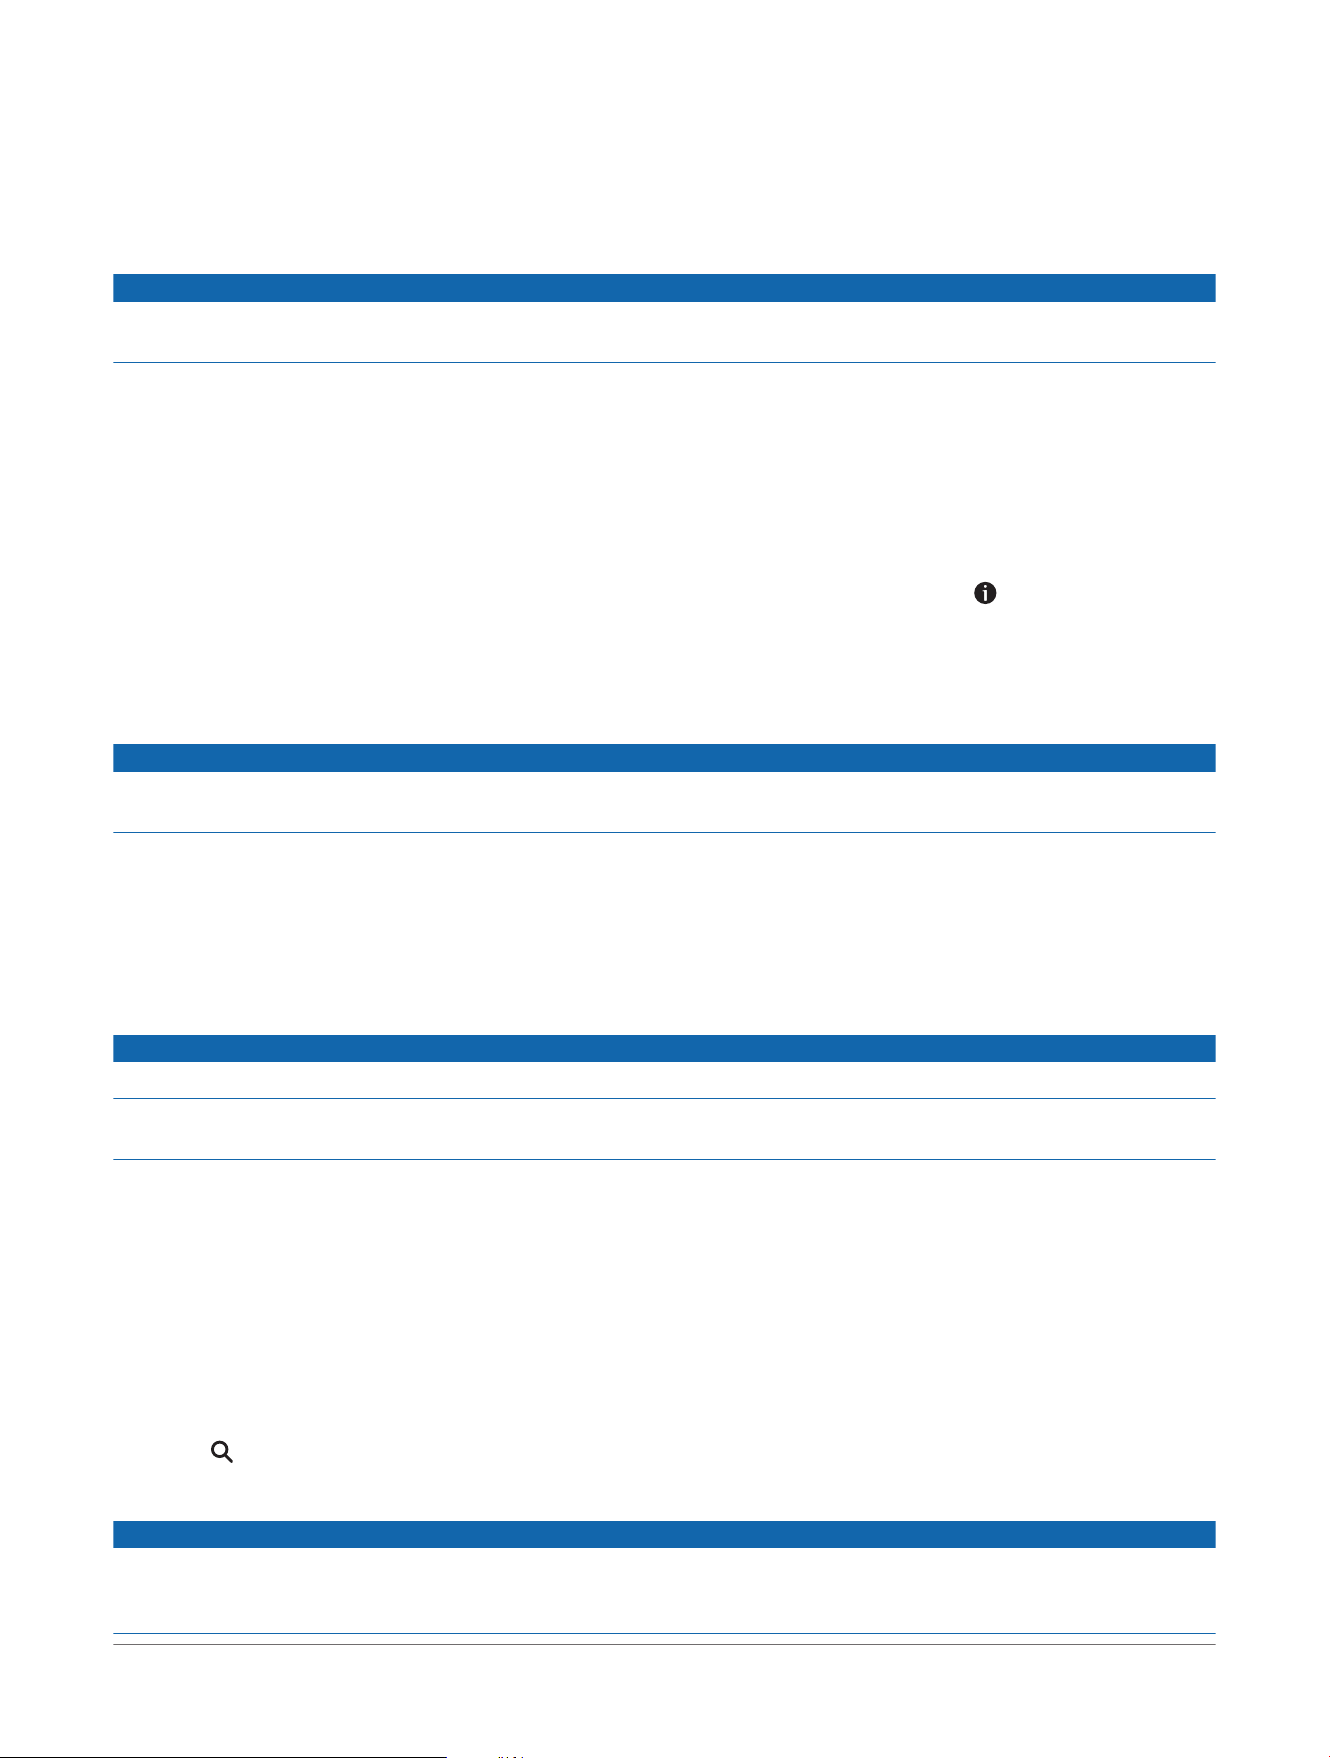
Viewing Your Collections on the Map
Before you can view the Collections map layer, you must pair your device with the Tread
®
app to sync your
device with your Garmin
®
account.
You can view the items from your Garmin account directly on the map.
Using the Map
zūmo® XT3 Motorcycle Navigator
Owner's Manual
27

NOTE: Items from your Garmin account that were not added to any collection appear in the Unorganized
collection on your zūmo
®
device.
1 From the map, select > Collections.
2 Select one or more collection categories from the list.
The tracks and waypoints from the selected collections appear as icons on the map.
Changing the Map Data Field
1 From the map, select a data field.
NOTE: You cannot customize Speed.
2 Select a type of data to display.
Changing the Map Shortcuts
You can change the shortcut buttons that appear on the edge of the map.
1 From the map, select > .
2 Select an option:
● To remove a shortcut button, select .
● To replace a shortcut button, select , and select a shortcut button to display.
3 Select Save.
Changing the Map Perspective
1
Select > Map> Driving Map View.
2 Select an option:
● Select Track Up to display the map in two dimensions (2-D), with your direction of travel at the top.
● Select North Up to display the map in 2-D with north at the top.
● Select 3-D to display the map in three dimensions.
● Select Auto Zoom to Group to automatically adjust the zoom level so all riders in a group ride are visible
on the map.
3 Select Save.
Changing the Map Region
When the device is connected to a Wi‑Fi
®
network, you can download new map regions directly onto the device.
1 Select > Map Manager> Manage Device Maps.
2 Select an option:
● To remove a map region, select the region, and select Remove.
● To install a new map region to the device's internal memory, select the region, and select Install to
Device.
● To install a new map region to a memory card (Installing a Memory Card for Maps and Data, page56),
select the region, and select Install to the Memory Card.
As you add or remove new regions, a bar at the top of the page displays the available storage space on the
device.
3 After you have finished adding and removing map regions, select Apply.
28
zūmo® XT3 Motorcycle Navigator
Owner's Manual
Using the Map

Finding and Saving Locations
The maps loaded in your device contain locations, such as restaurants, hotels, auto services, and detailed street
information. The Where To? menu helps you find your destination by providing several methods to browse,
search, and save this information.
From the main menu, select Where To?.
● To quickly search all locations on your device, select Search (Finding a Location Using the Search Bar,
page29).
● To find an address, select Address (Finding an Address, page31).
● To browse or search pre-loaded points of interest by category, select Categories (Finding a Location by
Category, page29).
● To search near a different city or area, select the current search area, and select a new search area
(Changing the Search Area, page30).
● To view and edit your saved locations, select Waypoints (Saving Locations, page33).
● To view locations you have recently selected from the search results, select Recent (Viewing Recently Found
Locations, page33).
● To search for RV parks and campgrounds, select Ultimate Public Campgrounds (Finding Ultimate
Campgrounds Points of Interest, page32).
● To search for locations that are part of your Outdoor Maps+ subscription, select Outdoor Maps+.
● To browse and search Tripadvisor
®
traveler ratings, select Tripadvisor (Finding Tripadvisor
®
Points of Interest,
page32).
● To find national parks and explore park maps, select National Parks (Finding National Parks, page32).
● To navigate to specific geographic coordinates, select Coordinates (Finding a Location Using Coordinates,
page31).
Points of Interest
NOTICE
You are responsible for understanding and complying with any applicable rules, laws, or regulations associated
with points of interest.
A point of interest is a place that you may find useful or interesting. Points of interest are organized by category
and can include popular travel destinations such as gas stations, restaurants, hotels, and entertainment venues.
Finding a Location Using the Search Bar
You can use the search bar to search for locations by entering a category, brand name, address, or city name.
1 Select Where To?.
2 Select Search in the search bar.
3 Enter all or part of the search term.
Suggested search terms appear below the search bar.
4 Select an option:
● To search for a type of business, enter a category name (for example, "movie theaters").
● To search for a business name, enter all or part of the name.
● To search for an address near you, enter the house number and street name.
● To search for an address in another city, enter the house number, street name, city, and state.
● To search for a city, enter the city and state.
● To search for coordinates, enter latitude and longitude coordinates.
5 Select an option:
● To search using a suggested search term, select the term.
● To search using the text you entered, select .
6 If necessary, select a location.
Finding a Location by Category
1 Select Where To?.
2 Select a category, or select Categories.
3 If necessary, select a subcategory.
4 Select a location.
Finding and Saving Locations
zūmo® XT3 Motorcycle Navigator
Owner's Manual
29
Navigating to Points of Interest Within a Venue
NOTE: This feature is not available for all locations.
You can create a route to a point within a larger venue, such as a specific store in a shopping mall, a terminal at
an airport, or nearby parking areas.
1 Select Where To?> Search.
2 Enter the name of the venue, and select .
3 Select the venue.
A list of categories for points of interest within the venue appears.
4 Select a category, select a location, and select Go!.
The device creates a route to the parking area or venue entrance closest to the selected point.
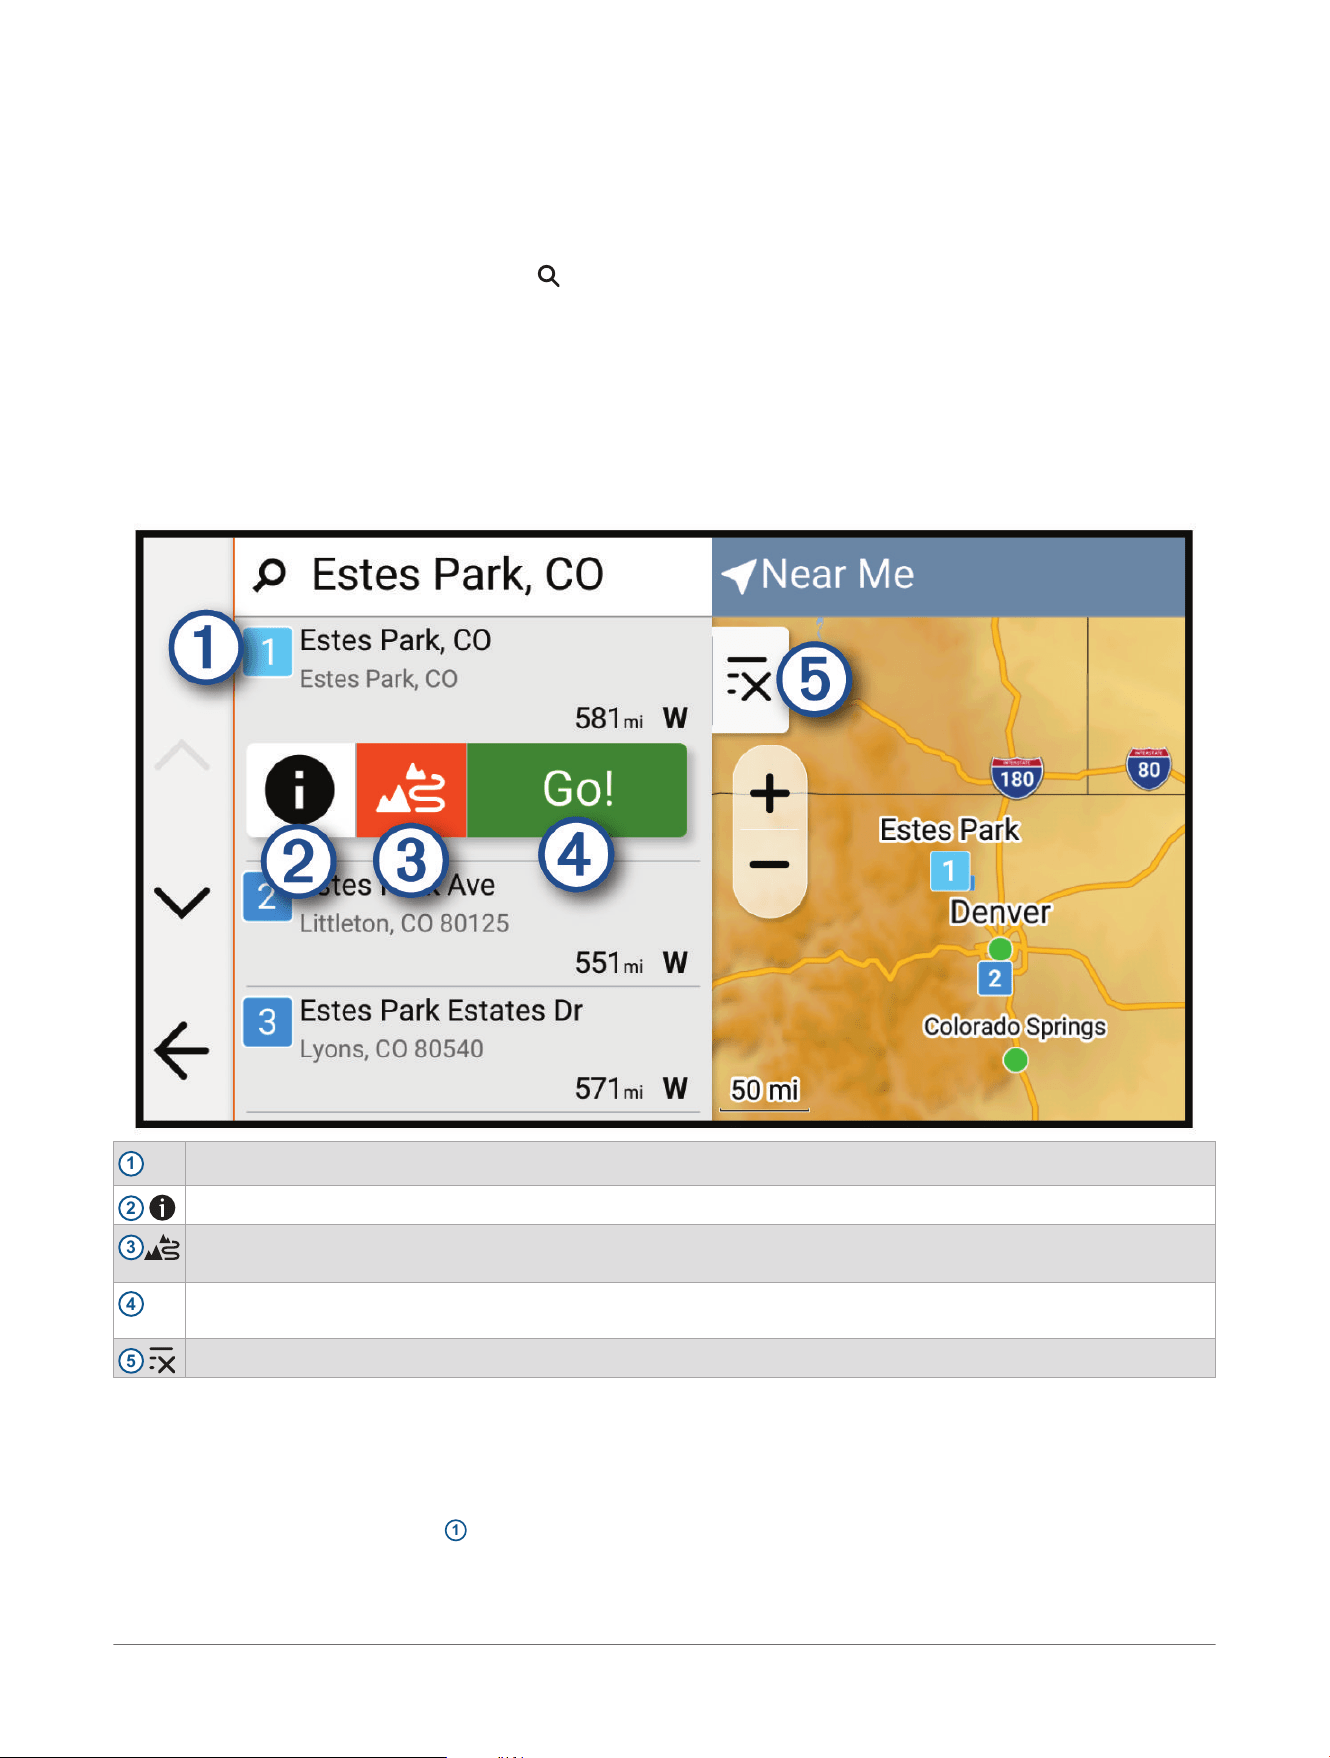
Location Search Results
The location search results appear in a list, with the nearest location at the top. Each numbered location also
appears on the map. You can scroll down to view more results.
1
Select a location to view the option menu.
2
Select to view detailed information about the location.
3
Select to start navigating using adventurous routing (Taking a Route Using Garmin Adventurous Routing
™
,
page19).
4
Go!
Select to start navigating to the location using the default route calculation mode for the current vehicle
profile.
5
Select to view the search results on the map in full screen.
Changing the Search Area
By default, the device searches for locations near your current location. You can also search other areas, such
as near your destination, near another city, or along your active route.
1 Select Where To?.
2 Select the current search area
1
.
30
zūmo® XT3 Motorcycle Navigator
Owner's Manual
Finding and Saving Locations
3 Select a search area.
4 If necessary, follow the on-screen instructions to select a specific location.
The selected search area appears at the top of the screen. When you search for a location using any of the
options in the Where To? menu, the device suggests locations near this area first.
Parking
Finding Parking Near Your Current Location
1 Select Where To?> Categories> Parking.
2 Select a parking location.
3 Select Go!.
Finding Parking Near a Specified Location
1 Select Where To?.
2 Search for a location.
3 From the location search results, select a location.
4 Select > Parking.
A list of parking areas near the selected location appears.
5 Select a parking location.
6 Select Go!.
Search Tools
Search tools allow you to search for specific types of locations by responding to on-screen prompts.
Finding an Address
NOTE: The order of the steps may change depending on the map data loaded on your device.
1 Select Where To?.
2 If necessary, select the current search area to search near a different city or area.
3 Select Address.
4 Follow the on-screen instructions to enter address information.
5 Select the address.
Finding an Intersection
You can search for an intersection or junction between two streets, highways, or other roads.
1 Select Where To?> Intersections.
2 Follow the on-screen instructions to enter street information.
3 Select the intersection.
Finding a Location Using Coordinates
You can find a location using latitude and longitude coordinates.
1 Select Where To?> Coordinates.
2 If necessary, select , and change the coordinate format or datum.
3 Select Coordinates.
4 Enter the latitude and longitude coordinates, and select Done.
5 Select an option:
Finding and Saving Locations
zūmo® XT3 Motorcycle Navigator
Owner's Manual
31
● To save the coordinates as a location, select Save.
● To start a route to the coordinates, select Go!.
Finding National Parks
Device models that include maps for North America or the United States also include detailed information for
national parks in the United States. You can navigate to a national park or to a location within a national park.
NOTICE
You are responsible for understanding and complying with any applicable rules, laws, or regulations associated
with national parks.
1 Select Where To?> National Parks.
A list of national parks appears, with the nearest park at the top.
2 Select Search, and enter all or part of the park name to narrow the results (optional).
3 Select a national park.
A list of categories for locations of features and amenities within the park appears below the park name.
4 Select an option:
● To start navigating to the park, select Go!.
● To view more park information or explore the park features and amenities, select .
● To quickly find a location within the park, select a category from the list below the park name, and select
a location.
Finding Ultimate Campgrounds Points of Interest
NOTE: This feature is not available in all areas.
NOTICE
You are responsible for understanding and complying with any applicable rules, laws, or regulations associated
with campsites and points of interest.
Your device includes Ultimate Campgrounds points of interest, which allow you to find public campgrounds near
your location.
1 Select Where To?> Ultimate Public Campgrounds.
2 If necessary, select Search Filters, select one or more search filters, and select Search.
3 Select a location.
Tripadvisor
®
NOTICE
Garmin
®
is not responsible for the accuracy or timeliness of the Tripadvisor information.
You are responsible for understanding and complying with any applicable rules, laws, or regulations associated
with points of interest.
Your device includes Tripadvisor traveler ratings. Tripadvisor ratings appear automatically in the search results
list for restaurants, hotels, and attractions. You can also search for nearby Tripadvisor points of interest and
sort by distance or popularity.
Finding Tripadvisor
®
Points of Interest
1 Select Where To?> Tripadvisor.
2 Select a category.
3 If necessary, select a subcategory.
A list of nearby Tripadvisor points of interest for the category appears.
4 Select Sort Results to filter the displayed points of interest by distance or popularity (optional).
5 Select , and enter a search term (optional).
Trendy Places
NOTICE
Garmin
®
is not responsible for the accuracy or timeliness of the Tripadvisor
®
information. You are responsible
for understanding and complying with any applicable rules, laws, or regulations associated with points of
interest.
32
zūmo® XT3 Motorcycle Navigator
Owner's Manual
Finding and Saving Locations

The Trendy Places search feature includes Tripadvisor points of interest and ratings, providing a comprehensive
list of attractions. You can filter the search results by categories, ratings, and distance from the route.
NOTE: Tripadvisor points of interest are not available in all areas.
Viewing Recently Found Locations
Your device stores a history of the last 50 locations you have found.
Select Where To?> Recent.
Clearing the List of Recently Found Locations
Select Where To?> Recent> > Clear> Yes.
Viewing Current Location Information
You can use the Where Am I? page to view information about your current location. This feature is helpful if you
need to tell emergency personnel your location.
From the map, select the vehicle.
Finding Emergency Services and Fuel
You can use the Where Am I? page to find the nearest hospitals, police stations, and fuel stations.
1 From the map, select the vehicle.
2 Select Hospitals, Police Stations, or Fuel.
NOTE: Some service categories are not available in all areas.
A list of locations for the selected service appears, with the nearest locations at the top.
3 Select a location.
4 Select an option:
● To navigate to the location, select Go!.
● To view the phone number and other location details, select .
Getting Directions to Your Current Location
If you need to tell another person how to get to your current location, your device can give you a list of
directions.
1 From the map, select the vehicle.
2 Select > Directions to Me.
3 Select a starting location.
4 Select Select.
Adding a Shortcut
You can add shortcuts to the Where To? menu. A shortcut can point to a location, a category, or a search tool.
The Where To? menu can contain up to 36 shortcut icons.
1 Select Where To?> Add Shortcut.
2 Select an item.
Removing a Shortcut
1 Select Where To?> > Remove Shortcut(s).
2 Select a shortcut to remove.
3 Select the shortcut again to confirm.
4 Select Done.
Saving Locations
Saving a Location
1 Search for a location (Finding and Saving Locations, page29).
2 Select a location from the list of search results.
3 Select > Save.
4 If necessary, select Name to edit the name of the location.
5 Select Save.
Finding and Saving Locations
zūmo® XT3 Motorcycle Navigator
Owner's Manual
33
Saving Your Current Location
1 From the map, select the vehicle icon.
2 Select Save.
3 If necessary, select Name to edit the name of the location.
4 Select Save.
Editing a Saved Location
1 Select Where To?> Waypoints.
2 If necessary, select a category.
3 Select a location.
4 Select Edit.
5 Select an option:
● Select Name.
● Select Map Symbol to change the symbol used to mark the saved location on a map.
● Select Collections to add or remove the location from your saved collection categories.
● Select Coordinates to edit the GPS coordinates for the location.
6 Edit the information.
7 Select Done.
Viewing Your Saved Items
You can use the Saved app to view your saved items, such as waypoints, routes, and tracks. When paired with
the Tread
®
app, your saved items periodically sync with your Garmin
®
account.
1 Select > Saved.
2 If necessary, select the category filter
1
to browse different collections and filter by item type.
Sharing a Saved Item
You can share items using a connected smartphone with the Tread
®
app, or you can save them to a memory
card.
1 From the Saved app, select the item you want to share.
2 Select an option:
● To share a route or track, select > Share.
● To share a waypoint, select Share.
3 Select an option:
● To send the item to the Tread app on your phone, select Garmin Tread.
● To save the item to a memory card, select Memory Card.
4 If necessary, edit the name for the .gpx file.
Sharing Multiple Saved Items
You can share multiple items in a single .gpx file.
34
zūmo® XT3 Motorcycle Navigator
Owner's Manual
Finding and Saving Locations

1 From the Saved app, select a category or collection filter including all the items you want to share.
2 Select > Share.
3 Select the items to share.
4 Select .
5 Select an option:
● To send the items to the Tread
®
app on your phone, select Garmin Tread.
● To save the items to a memory card, select Memory Card.
6 If necessary, edit the name for the .gpx file.
Synchronizing Garmin
®
Account Data
Before you can synchronize account data, you must pair your device with the Tread
®
app (Pairing with Your
Smartphone, page37).
You can synchronize data, such as tracks, with your Garmin account. Your device periodically synchronizes data
with your account automatically. You can also synchronize data manually at any time.
1 Select > Saved.
2 Select .
Finding and Saving Locations
zūmo® XT3 Motorcycle Navigator
Owner's Manual
35
Vehicle Profiles
WARNING
Entering your vehicle profile characteristics does not guarantee that your vehicle's characteristics will be
accounted for in all route suggestions or that you will receive the warning icons in all cases. Limitations may
exist in the map data such that your device cannot account for these restrictions or road conditions in all cases.
Always defer to all posted road signs and road conditions when making driving decisions.
By using different vehicle profiles, you can quickly change several device settings, such as which map layers are
enabled and which route calculation mode is used by default.
Routing and navigation are calculated differently based on your vehicle profile. The device avoids including
restricted or impassable areas in routes based on the dimensions, weight, and other characteristics you entered
for your vehicle.
The current active vehicle profile is indicated by an icon in the status bar. The navigation and map settings on
your device can be customized separately for each vehicle type.
Switching the Vehicle Profile
1 From the status bar, select the vehicle profile icon, such as or .
2 Select a vehicle profile.
The vehicle profile information appears, including measurements and weight.
3 Select Select.
Adding a Vehicle Profile
You can add a vehicle profile for each vehicle to be used with your device.
1 Touch the current vehicle profile icon in the status bar.
2 Select .
3 Select your current vehicle type.
4 Enter the vehicle characteristics such as size and traction method.
5 Select the default route calculation method.
Editing a Vehicle Profile
You can change basic vehicle profile information or add detailed information to a vehicle profile, such as
maximum speed.
1 Select > Vehicle Profile.
2 Select a vehicle profile to edit.
3 Select an option:
● To edit the vehicle profile information, select , and select a field to edit.
● To rename the vehicle profile, select > > Rename Profile.
● To delete the vehicle profile, select > > Delete.
36
zūmo® XT3 Motorcycle Navigator
Owner's Manual
Vehicle Profiles

Live Services, Traffic, and Smartphone Features
WARNING
Do not read or interact with notifications while driving, because doing so can cause distraction which could lead
to an accident resulting in serious personal injury or death.
NOTICE
Garmin
®
is not responsible for the accuracy or timeliness of the traffic information.
The Tread
®
app allows your device to receive smart notifications and live information, such as live traffic data
and weather information.
Live traffic data: Sends live traffic data to your device, such as traffic incidents and delays, construction zones,
and road closings.
Weather information: Sends real-time weather forecasts, road conditions, and weather radar to your device
(Viewing the Weather Forecast, page52).
Smart Notifications: Displays phone notifications and messages on your device. This feature is not available for
all languages.
Hands-Free calling: Allows you to place and receive phone calls through the device using your connected
Bluetooth
®
headset.
Send locations to device: Allows you to send locations from your smartphone to your navigation device.
Pairing with Your Smartphone
You can pair your zūmo
®
navigator with your smartphone and the Tread
®
app to enable additional features and
access live information (Live Services, Traffic, and Smartphone Features, page37).
1 Turn on your zūmo navigator, and place the navigator and your smartphone within 3m (10ft.) of each other.
2 From your zūmo navigator, select > Phone> Add a Phone.
3 Using your phone, scan the QR code to download and install the Tread app.
TIP: You can use the camera app on most phones to scan the QR code.
4 Follow the on-screen instructions to sign in to a Garmin
®
account and complete the pairing and setup
process.
The main app dashboard appears. After the devices are paired, you can enable or disable smartphone features
on your navigator (Phone Settings, page53). The devices connect automatically when they are turned on and
within range.
Pairing a Wireless Headset
NOTE: When your zūmo
®
device is paired to the Tread
®
app on your phone, you can pair your headset directly to
your phone using Bluetooth
®
technology instead of your zūmo device. Only one headset can receive navigation
prompts and phone calls at a time. Up to two headsets can be used for multimedia audio.
1 Place your headset and your navigation device within 33ft. (10m) of each other.
2 On your navigation device, select > Headset> Add Headset.
3 On your headset, enable Bluetooth technology and make it visible to other Bluetooth devices.
4 Follow the on-screen instructions on your navigation device to complete the pairing process.
After the pairing process is complete, you can enable or disable features for your paired wireless headset
(Headset Settings, page53).
Smart Notifications
While your device is connected to the Tread
®
app, you can view notifications from your smartphone on your
zūmo
®
device, such as text messages, incoming calls, and calendar appointments.
Receiving Notifications
WARNING
Do not read or interact with notifications while driving, because doing so can cause distraction that could lead
to an accident resulting in serious personal injury or death.
Before you can use this feature, your device must be connected to a supported phone running the Tread
®
app
(Pairing with Your Smartphone, page37).
From most pages, a popup appears when the device receives a notification from your smartphone. If the device
is moving, you must verify you are a passenger and not the driver before you can view notifications.
Live Services, Traffic, and
Smartphone Features
zūmo® XT3 Motorcycle Navigator
Owner's Manual
37

NOTE: If you are viewing the map, notifications appear in a map tool.
● To ignore a notification, select OK.
The popup closes, but the notification remains active on your phone.
● To view a notification, select View.
● To listen to the notification, select View> .
The device reads the notification using text-to-speech technology. This feature is not available for all
languages.
● To perform additional actions, such as dismissing the notification from your phone, select View, and select
an option.
NOTE: Additional actions are available for only some notification types and must be supported by the app
generating the notification.
Receiving Notifications while Viewing the Map
WARNING
Do not read or interact with notifications while driving, because doing so can cause distraction that could lead
to an accident resulting in serious personal injury or death.
Before you can use this feature, your device must be connected to a supported phone running the Tread
®
app
(Pairing with Your Smartphone, page37).
When you are viewing the map, new notifications appear in a map tool at the edge of the screen. If the device is
moving, you must verify you are a passenger and not the driver before you can view notifications.
● To ignore a notification, select , or wait for popup to expire.
The popup closes, but the notification remains active on your phone.
● To view a notification, select the notification text.
● To listen to the notification, select Play Message.
The device reads the notification using text-to-speech technology. This feature is not available for all
languages.
Viewing the List of Notifications
You can view a list of all active notifications.
1 Select > Smart Notifications.
The list of notifications appears. Unread notifications appear black, and previously read notifications appear
gray.
2 Select an option:
● To view a notification, select the notification description.
● To listen to a notification, select .
The device reads the notification using text-to-speech technology. This feature is not available for all
languages.
Hands-Free Calling
NOTE: While most phones and headsets are supported and can be used, a particular phone or headset cannot
be guaranteed to be compatible. All features may not be available for your phone.
Using Bluetooth
®
technology, your device can connect to your compatible mobile phone and wireless headset or
helmet to become a hands-free device. To check compatibility, go to www.garmin.com/bluetooth.
Placing a Call
1 Select > Phone.
2 Select an option:
● To dial a number, select Dial, enter the phone number, and select Dial.
● To view numbers of recent, missed, or recently dialed or received calls, select Recents, select a log, select
a number, and select Call to dial it.
● To call a contact from your phone book, select Contacts, select a contact, and select Call.
● To call a point of interest location such as a restaurant or attraction, select Browse Categories, select a
category, select a location, and select Call.
Calling Home
Select > Phone> Call Home.
38
zūmo® XT3 Motorcycle Navigator
Owner's Manual
Live Services, Traffic, and
Smartphone Features

When using this feature for the first time, you are prompted to dial the home phone number.
TIP: You can reset the home phone number by selecting > Set Home Number.
Using In-Call Options
In-call options are available when you answer a call. Some options may not be compatible with your phone.
TIP: If you close the in-call options page, you can open it again by selecting from any screen. You can also
select the caller from the map.
● To set up a conference call, select Add Call.
● To transfer audio to your phone, select Call in Progress on Navigator.
TIP: You can use this feature if you want to disconnect the Bluetooth
®
connection and remain on the call, or if
you need privacy.
● To use the dial pad, select Keypad.
TIP: You can use this feature to use automated systems, such as voice mail.
● To mute the microphone, select Mute.
● To hang up, select End Call.
Disconnecting a Bluetooth
®
Device
You can temporarily disconnect a Bluetooth device without deleting it from the paired devices list. The
Bluetooth device can connect to your zūmo
®
navigator automatically in the future.
1 Select an option:
● To disconnect a phone, select > Phone.
● To disconnect a headset, select > Headset.
2 Select the device to disconnect.
3 Select Disconnect.
Deleting a Paired Phone
You can delete a paired phone to prevent it from automatically connecting to your device in the future.
1 Select > Phone.
2 Select the phone, and select Forget Device.
Live Services, Traffic, and
Smartphone Features
zūmo® XT3 Motorcycle Navigator
Owner's Manual
39
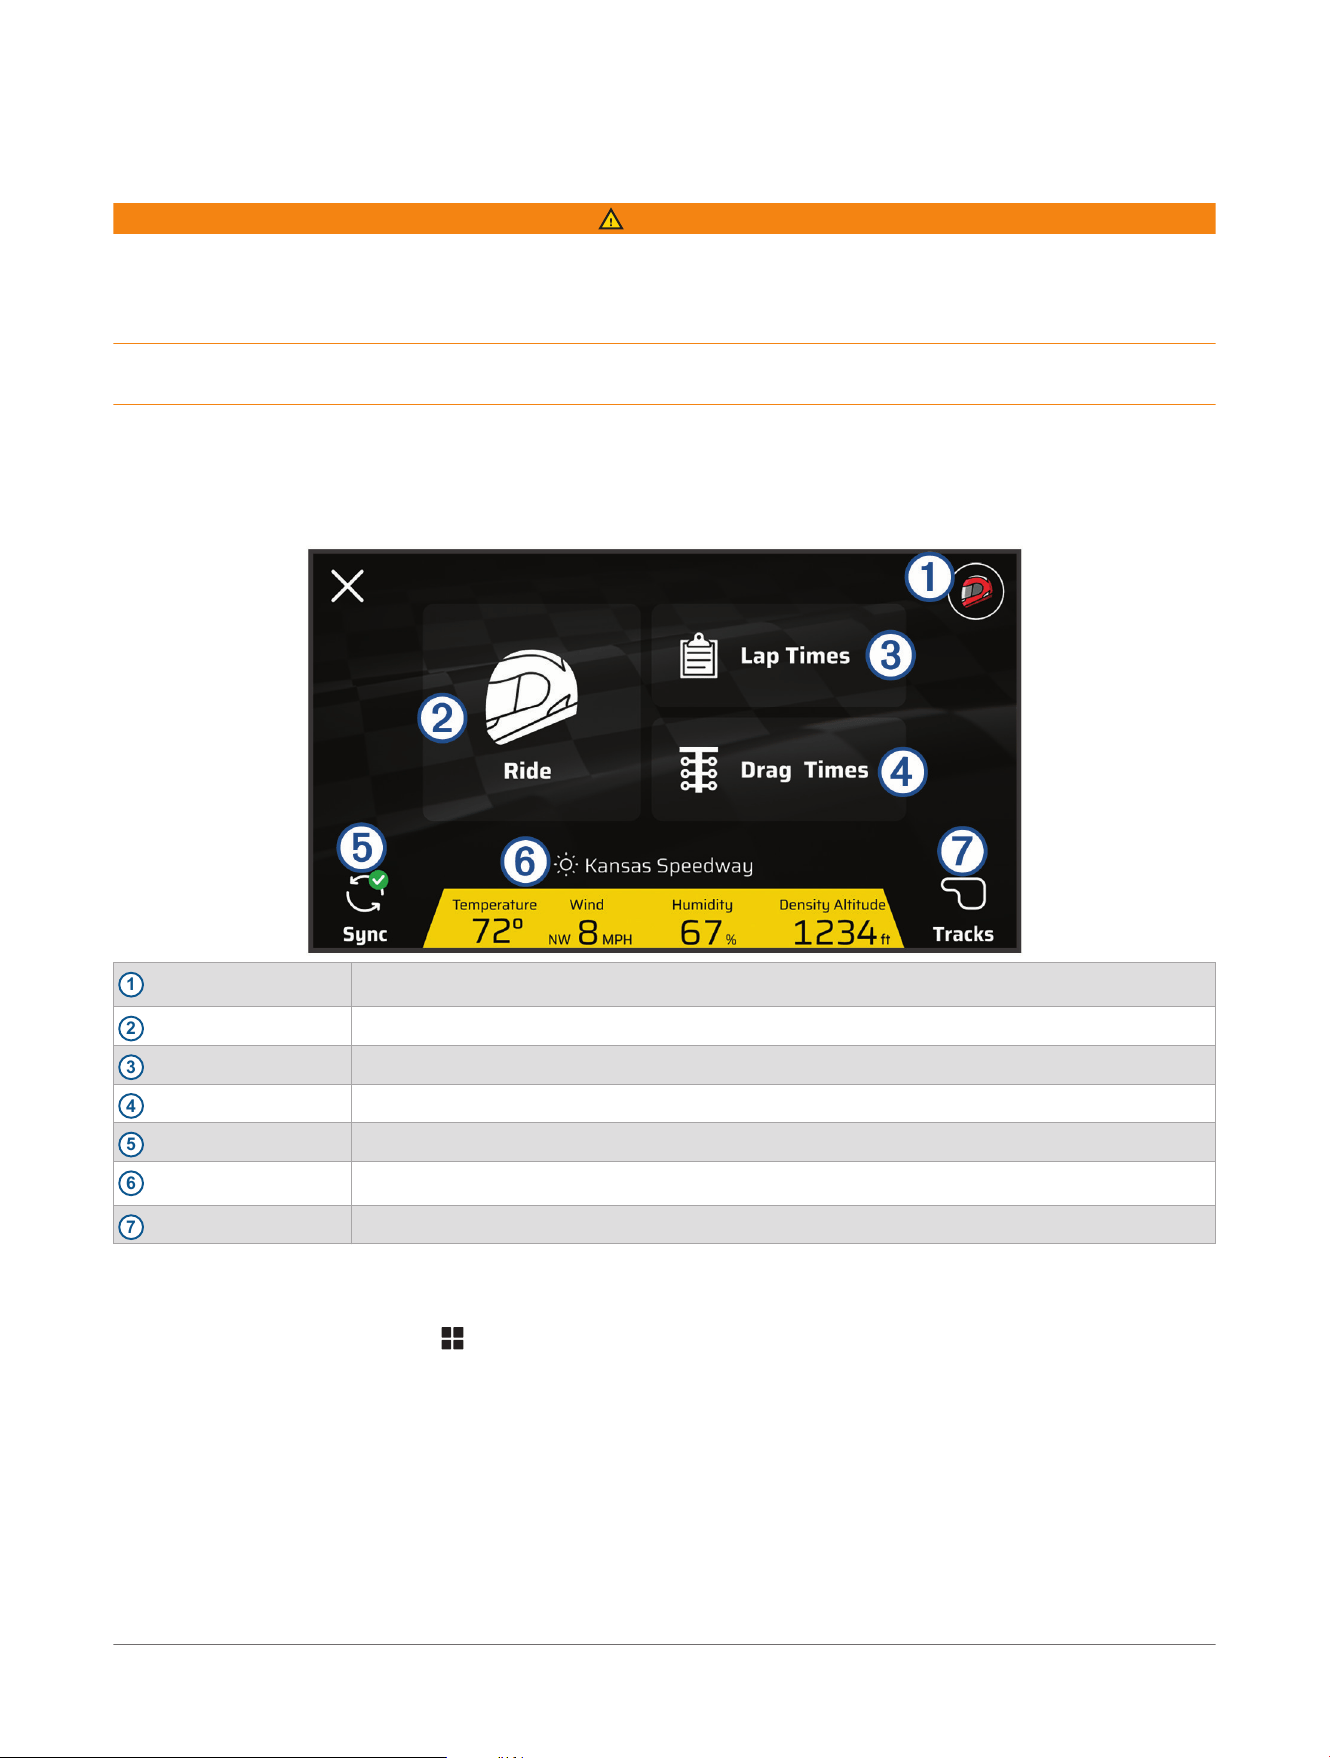
Using the Apps
Garmin Performance App
WARNING
Use of this device in a track session, drag race session, or any other kind of racing session is intended only for
recreational use on a racetrack. Never use this device on public roadways. Failure to follow this warning may
result in an accident causing property damage, serious personal injury, or death. You are responsible for using
this device in a safe and prudent manner.
Do not review any track sessions or drag race sessions while riding. Failure to pay attention to your
surroundings and road conditions can result in serious personal injury or death.
NOTE: Before you can use the Garmin Performance app on your device, you must have a GarminPerformance
Package
™
subscription (Subscribing to a GarminPerformance Package
™
, page40).
The Garmin Performance app allows you to start a track session or drag race session from your zūmo
®
device,
and view performance data from your sessions, such as lap times and race summaries. You can also view
current weather conditions before a race and past weather conditions for every session.
1
Select to view your race profile
2
Ride
Select to start a track or drag race session
3
Lap Times
Select to view a summary of previous track sessions
4
Drag Times
Select to view a summary of previous drag race sessions
5
Sync
Select to sync your ride sessions
6
Displays environmental conditions
7
Tracks
Select to view the track database
Subscribing to a GarminPerformance Package
™
You can purchase a GarminPerformance Package subscription to access racing features on your zūmo
®
device.
1 From the home screen, select > Garmin Performance.
2 Scan the QR code, and follow the on-screen instructions to complete the subscription process.
GarminCatalyst
™
App
The GarminCatalyst app allows you to view race performance data from your zūmo
®
device, such as lap times,
drag times, and session summaries. You can also view weather conditions for every session. The app provides
customizable icons for your rider and vehicle profiles. You can download the GarminCatalyst app from the app
store on your mobile device.
NOTE: The icons for your driver profiles do not synchronize with your zūmo device.
40
zūmo® XT3 Motorcycle Navigator
Owner's Manual
Using the Apps
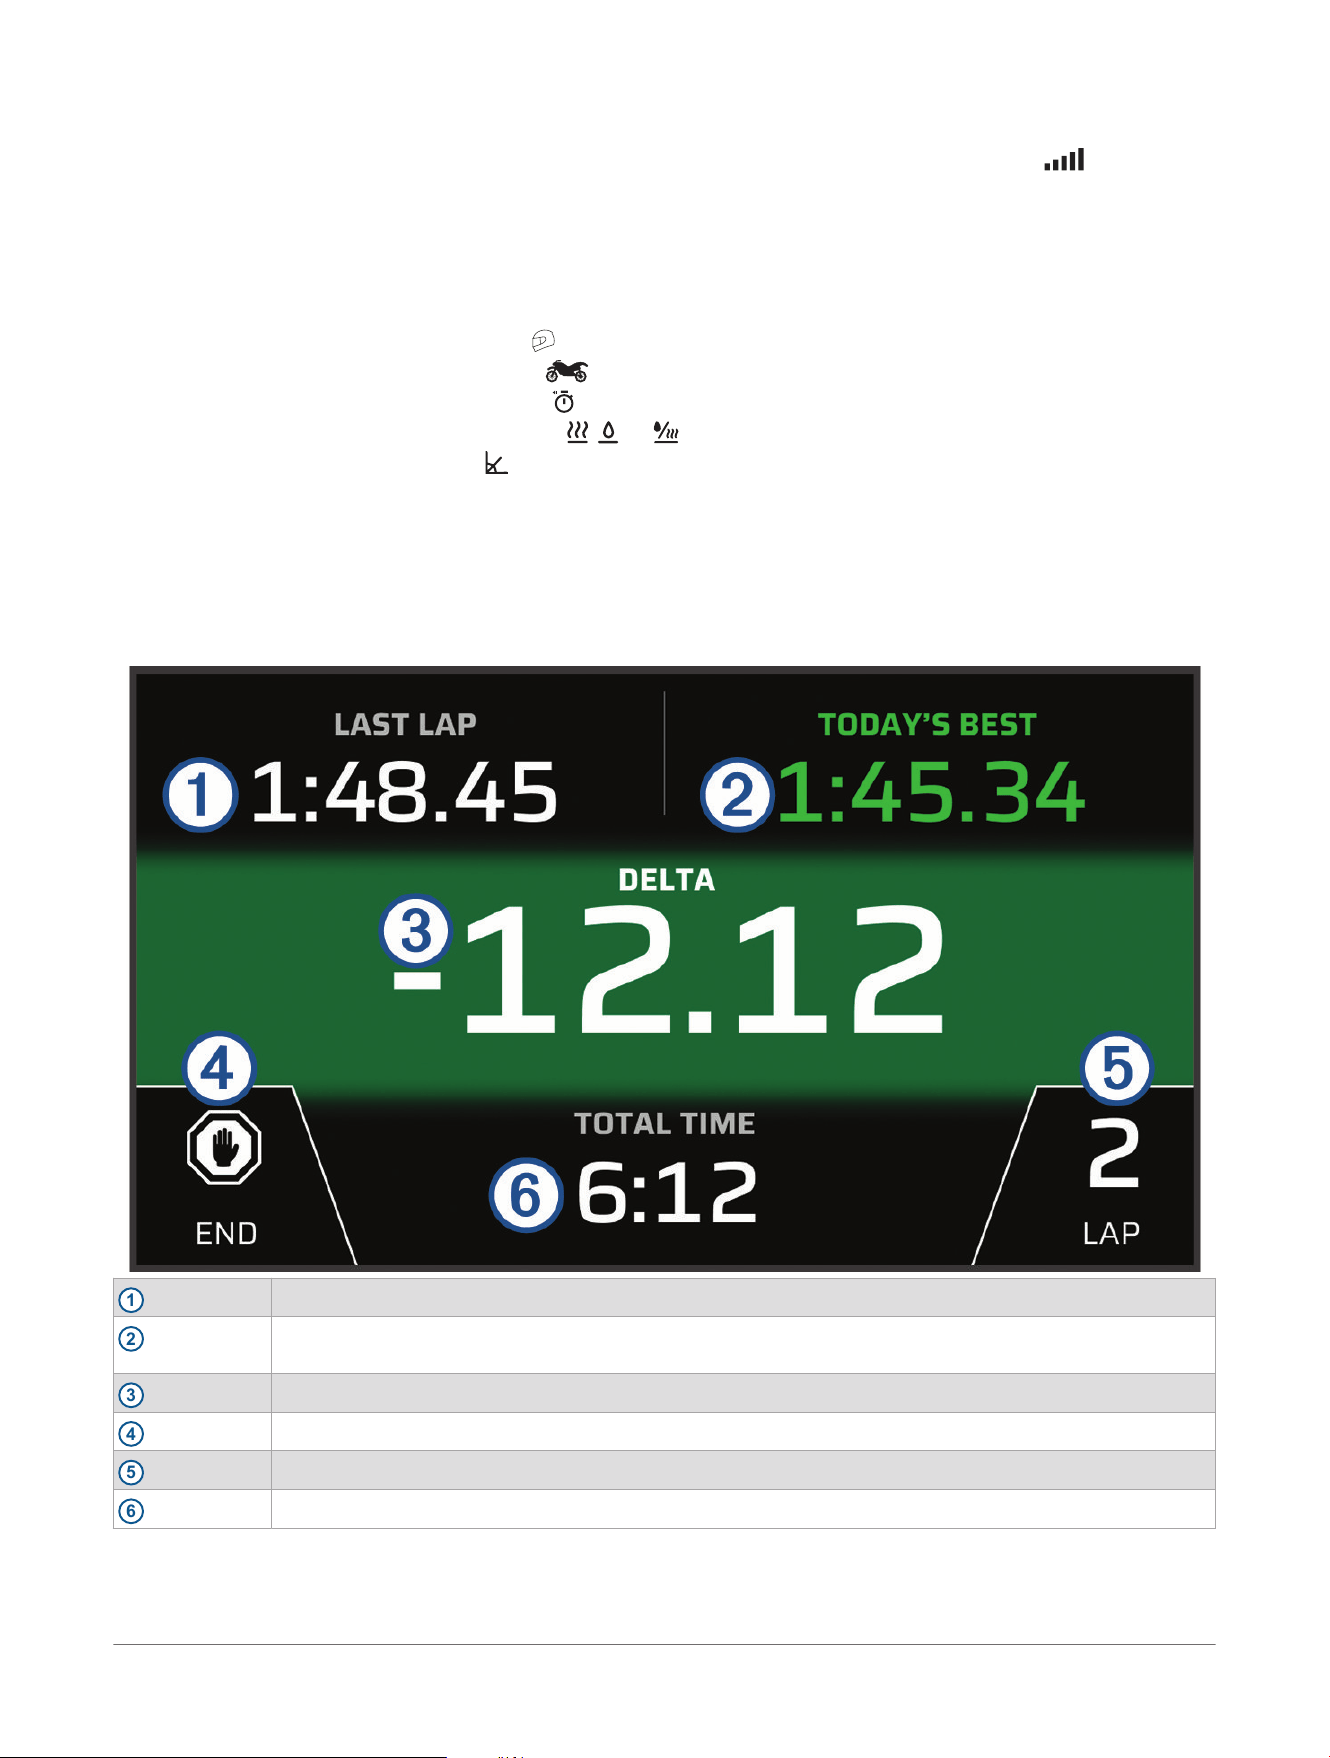
Starting a Track Session
Before you can start a track session, your device must acquire satellite signals. You can select in the status
bar to check the current signal strength and accuracy.
1 From the Garmin Performance app, select Ride> Track.
2 Select a track.
3 If necessary, select a track configuration.
4 Select an option:
● To change your driver profile, select and select a different profile.
● To change your vehicle profile, select and select a different profile.
● To configure lap timer settings, select , and select Delta Timer or Lap Timer Display.
● To change your track conditions, select , , or .
● To calibrate lean angles, select , and follow the on-screen instructions.
5 Select Start.
6 Start riding.
The timer starts automatically when you cross the starting line.
Track Session Timer
As you ride, the device keeps track of your progress. The session timer keeps track of your lap number and
shows your best lap times.
1
LAST LAP
Displays the last lap time during the current session.
2
BEST LAP
Displays the best lap time for the current session. This timer is customizable when starting a ride
(Starting a Track Session, page41).
3
DELTA
Displays the time difference between the current lap and the best lap during the current session.
4
END
Select to pause the timer or end the current session.
5
LAP
Displays the current lap number.
6
TOTAL TIME
Displays the total lap time.
Adding a Track in the Garmin Performance App
You can add a track that is not already loaded on your device. The device uses your GPS location and your
vehicle's movements to create a map of the track.
Using the Apps
zūmo® XT3 Motorcycle Navigator
Owner's Manual
41
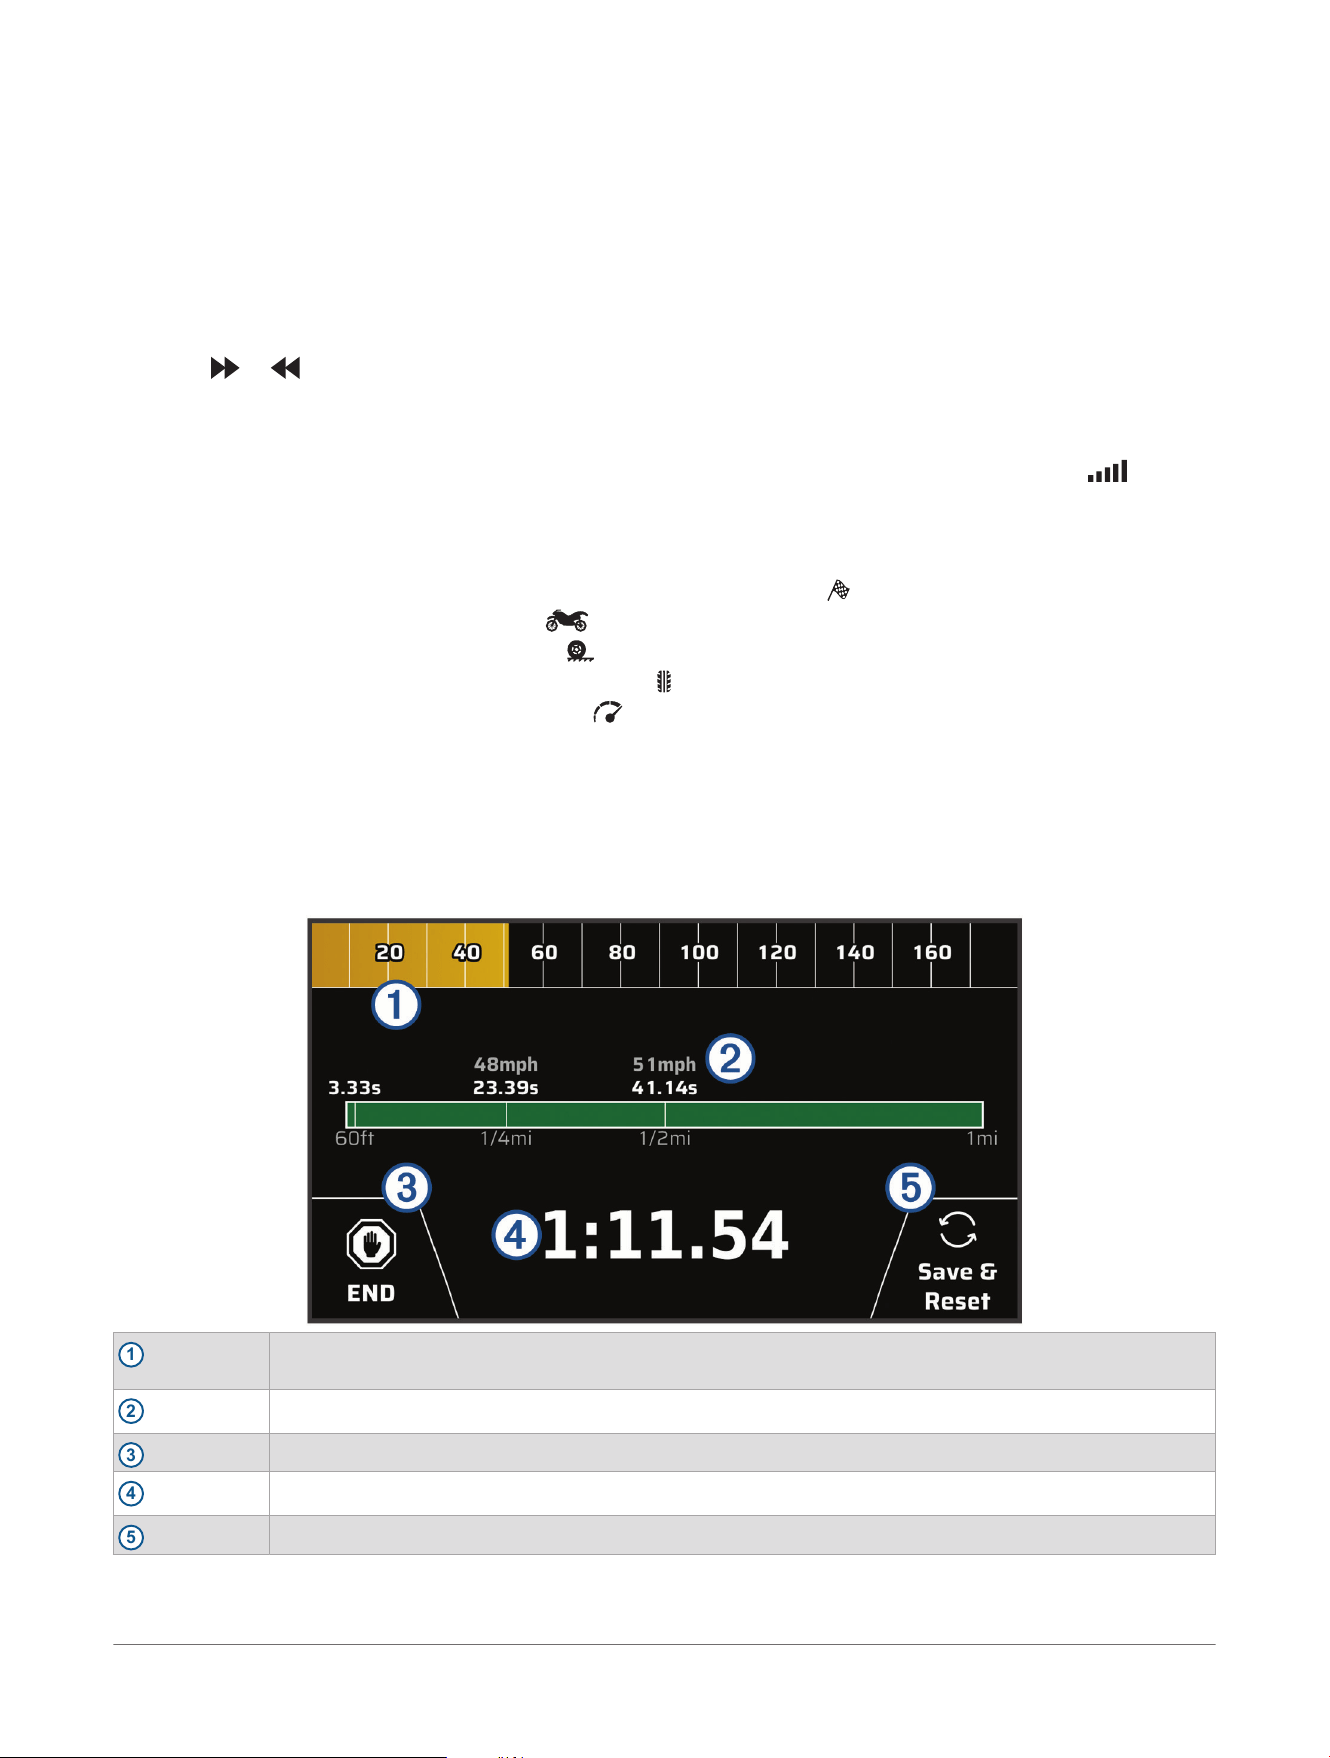
1 From the Garmin Performance app, select Ride> Track> Add a Track.
2 Enter a track name.
3 If necessary, adjust your rider profile and session settings (Starting a Track Session, page41).
4 Select Start.
5 Start driving.
After you exit the pit area and enter the track, you must drive in a straight line for at least 0.5 seconds at a
minimum of 55 mph (90 km/h), and complete one full lap.
6 Select END after you have completed the drive session.
7 Select or to position the starting line on the map.
8 Select SAVE.
Starting a Drag Race Session
Before you can start a drag race session, your device must acquire satellite signals. You can select in the
status bar to check the current signal strength and accuracy.
1 From the Garmin Performance app, select Ride> Drag Race.
2 Select an option:
● To change the distance or speed of your drag race session, select .
● To change your vehicle profile, select and select a different profile.
● To change your track conditions, select .
● To add front and rear tire pressure values, select .
● To add a launch control RPM value, select .
3 Select Start.
4 Start racing.
The timer starts automatically.
Drag Race Session Timer
During your drag race session, the device keeps track of your speed and progress. The session timer keeps
track of your total time and shows your time splits.
1
Displays your riding speed during your session. When stopped, displays your maximum speed during
the session.
2
Displays the time splits for the current session.
3
END
Select to end the current session.
4
Displays the total time of the current session.
5
Save & Reset
Select to save the current session and reset the session timer.
42 zūmo® XT3 Motorcycle Navigator
Owner's Manual
Using the Apps
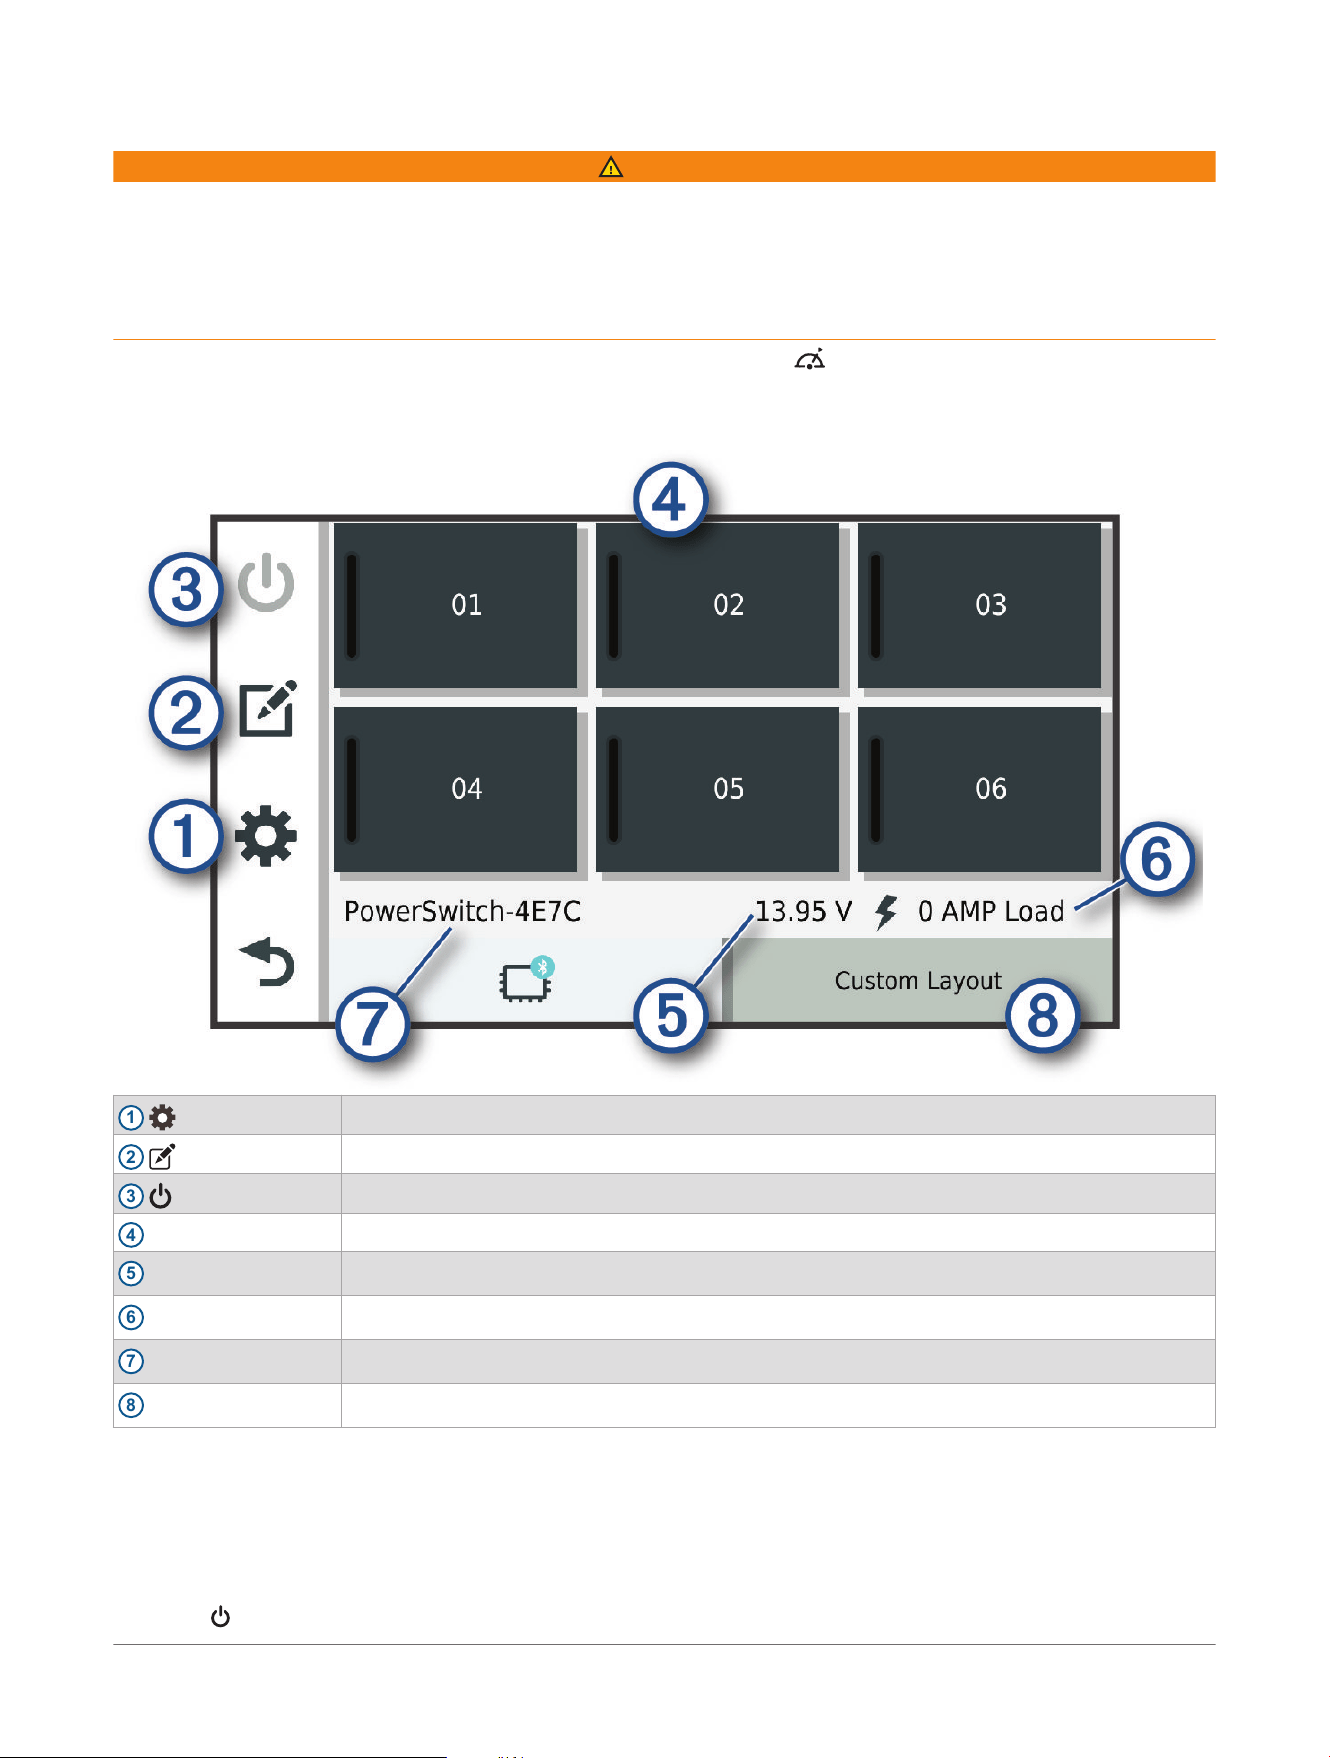
Lean Angles
WARNING
The Lean Angle application is intended to show motorcycle angles based on calibrated measurements only.
You are responsible for calibrating the device. Changes to the position of the device after calibration may affect
the accuracy of its measurements. Measured values are suggestions only based on your input into the device.
Take readings often and carefully, and allow the readings to stabilize after significant changes in environmental
conditions. Always allow a margin of safety for changing conditions and reading errors. Failure to account for
your vehicle and your environment could cause an incident resulting in death or serious injury.
The device displays the current lean angle of your motorcycle. Select , and follow the on-screen instructions
to calibrate the device every time the mounting changes.
Garmin PowerSwitch
™
App
1
Opens the app settings menu
2
Enters editing mode to customize the app layout and functions
3
Turns off all outputs
4
Power buttons
Activates each connected output
5
Displays input voltage
6
Displays the total amperage of the selected Garmin PowerSwitch device
7
Displays the device name
8
Displays Garmin PowerSwitch device tabs and custom layout tabs
Activating a Power Switch
Before you can use the Garmin PowerSwitch
™
app to activate a switch, you must install your Garmin
PowerSwitch device in your vehicle and pair it with the Garmin PowerSwitch app.
From the Garmin PowerSwitch app, select a power button to turn a switch on or off.
Turning Off All Switches
Select .
Using the Apps
zūmo® XT3 Motorcycle Navigator
Owner's Manual
43

Customizing a Button
1 From the Garmin PowerSwitch
™
app screen, select .
The app enters editing mode.
2 Select on the button you want to customize.
3 When you have finished customizing the button, select .
4 Select Done.
Assigning a Switch to a Control Input
Before you can use control input functions, you must connect a control input to your Garmin PowerSwitch
™
device.
You can assign one or more switches to turn on when the Garmin PowerSwitch device receives a signal from a
control input.
1 Select .
2 Select your Garmin PowerSwitch device.
3 Select a control input.
4 Select one or more switches.
Adding a Custom Layout
You can add a custom layout tab to the Garmin PowerSwitch
™
app. Buttons added to a custom layout can
control multiple switches at the same time.
1 From the Garmin PowerSwitch app, select .
The device enters editing mode.
2 Select .
Adding a Button to a Custom Layout
1
From the Garmin PowerSwitch
™
app, select a custom layout tab.
2 Select .
The app enters editing mode.
3 Select Add Button.
4 On the new button, select .
5 Select an option:
● To change the name of the button, select the Button Label field, and enter a name.
● To add an icon to the button, select the Icon field, and select an icon.
● To change the button color, select a color.
6 Select Add Action.
7 If necessary, select a Garmin PowerSwitch device and a switch.
8 Select an action:
● To set the button to turn the switch on or off with each press, select Toggle.
● To set the button to turn on the switch, select Turn On.
● To set the button to turn off the switch, select Turn Off.
9 Select a button mode:
● To set the button to activate with one touch, select Normal.
● To set the button to activate only while touching the button, select Momentary.
● To set the button to turn on and off repeatedly, select Strobe, and select time intervals.
10 If applicable, use the slider to set the brightness of lights.
11 Select .
12 If necessary, select Add Action to add additional actions for the button.
You can add one action for every switch on the Garmin PowerSwitch device.
Arranging Buttons In a Custom Layout
1
From the Garmin PowerSwitch
™
app, select a custom layout tab.
2 Select .
The app enters editing mode.
44
zūmo® XT3 Motorcycle Navigator
Owner's Manual
Using the Apps

3 On the button you want to move, hold , and drag the button to a new location.
Deleting a Custom Layout or Button
1
From the Garmin PowerSwitch
™
app, select a custom layout tab.
2 Select .
The app enters editing mode.
3 Select an option:
● To delete a button, select on the button you want to delete.
● To delete a layout tab, select on the layout tab.
Routines
Routines automate your Garmin PowerSwitch
™
device. When you define a routine on your compatible Garmin
®
navigation device, it turns switches on or off automatically when the conditions of the routine are met. For
example, you can set a routine to turn on a switch at specific time each day or when your vehicle reaches a
specific speed. Routines are available only when using a compatible Garmin navigation device.
Adding a Routine
1 From the Garmin PowerSwitch
™
app, select > Routines.
2 If necessary, select Add Routine.
3 Select When.
4 Select a trigger:
● To set a switch to trigger when your vehicle reaches a specific speed, select Speed> Next, and follow the
on-screen instructions to enter speed thresholds.
● To set a switch to trigger at a specific time each day, select Time> Next, and enter a time.
● To set a switch to trigger at sunrise, select Sunrise.
● To set a switch to trigger at sunset, select Sunset.
5 Select Add Action.
6 Select a device, a switch, an action, and a button mode.
7 If necessary, use the slider to adjust the dimmer.
8 Select Save.
Editing a Routine
1 From the Garmin PowerSwitch
™
app, select > Routines.
2 Select on the routine you want to edit.
3 Select an option:
● To change the trigger for the routine, select When, and select a trigger.
● To change an action, select on the action you want to change, and update the action.
● To add an action to the routine, select Add Action, and enter information about the action.
4 Select Save.
Deleting a Routine
1 From the Garmin PowerSwitch
™
app, select > Routines.
2 Select on the routine you want to delete.
Radio
NOTE: Before you can use the Radio app, you must install a Group Ride accessory. Go to garmin.com to
purchase a Group Ride accessory.
TIP: The Radio app is not available in all regions.
You can use the Radio app to create radio presets, select a radio channel, and select squelch codes. To use this
feature, you must connect the device and the antenna to the Group Ride mount. The zūmo
®
device configures
radio settings automatically when you join or create a group ride.
Selecting a Preset
For some product models, the Radio app is located in the apps menu.
1 From the main menu, select > Radio.
2 Select an option:
Using the Apps
zūmo® XT3 Motorcycle Navigator
Owner's Manual
45

● To move through the available presets, select or .
● To select a preset from the menu, select Preset.
Selecting a Radio Channel
1 From the main menu, select > Radio.
2 Select an option:
● To move to a different channel, select or .
● To select a MURS channel from the menu, select Channel.
Adjusting the Squelch
You can adjust the squelch and change between CTCSS, DCS, and Open squelch modes to improve audio
quality and avoid radio interference in your area.
1 From the main menu, select > Radio.
2 Select an option:
● To choose a squelch code within the current mode, select or .
● To adjust the squelch mode, select Open.
Adding a Custom Radio Preset
1 Select > Radio> Preset> .
2 Select or to select a channel and squelch code.
3 Select Save.
Selecting a Roger Tone
You can select the tone other devices play when you operate your radio.
1 Select > Radio> > Roger Tone.
2 Select a roger tone.
The device plays the selected tone.
3 Select Save.
Turning the Radio Off
Select > Radio> > Yes.
Enabling Push-to-Talk with a Headset
You can enable push-to-talk controls for use with a compatible Bluetooth
®
headset. This allows you to transmit
your voice using the voice dial feature on your headset.
1 Select > Radio> > Push to Talk with Headset.
2 If necessary, follow the on-screen instructions to pair your headset with the device.
3 Select Push to Talk with Headset.
4 Select .
Transmitting Your Voice
Before you can transmit your voice, you must pair your zūmo
®
device with a compatible Bluetooth
®
headset or
connect the fist microphone.
You can transmit your voice over the radio using the connected fist microphone or a compatible Bluetooth
headset.
Select an option:
● Hold the push-to-talk button on the side of the connected fist microphone.
● From the main menu, select > Radio> Push to Talk Over Headset.
● Use the voice dial feature on your connected Bluetooth headset (Enabling Push-to-Talk with a Headset,
page46).
TIP: You can press the pause or stop button to manually close the radio.
You must enable the Push to Talk with Headset setting to use this feature (Radio Settings, page47).
Adjusting the Radio Volume
1 Select > Radio> .
2 Use the slider bars to adjust the volume.
46
zūmo® XT3 Motorcycle Navigator
Owner's Manual
Using the Apps

Radio Settings
From the main menu, select > Radio> .
Push to Talk with Headset: Enables you to transmit your voice using the push-to-talk button on your compatible
headset.
Roger Tone: Sets the roger tone the device plays when you operate your radio.
Reset Default Settings: Resets all radio settings and presets to factory default values.
Group Ride
The Group Ride app allows you to coordinate rides and communicate with nearby riders using preset text
messages, live map locations, and voice communications. You can pair your zūmo
®
device with the Tread
®
app
on your smartphone to enable Group Ride tracking features.
Voice communication and preset messaging require a Group Ride accessory, which is not included with all
product models. The voice communication feature is not available in all areas. Go to garmin.com for more
information, or to purchase a Group Ride accessory.
Starting a Mobile Group Ride
Before you can start or join a mobile group ride, you must pair your zūmo
®
device with the Tread
®
app on your
phone, and your phone must have an active internet connection.
1 From the main menu, select Group Ride.
2 If necessary, enter your name, and select Done.
3 Select Start a Group Ride> Create a Mobile Group Ride.
The ride ID and QR code appear.
4 Share the ride ID with other riders.
TIP: Riders can use the Tread app to join your group ride by scanning the QR code.
5 Select Start.
Starting a Radio Group Ride
Before you can start or join a radio group ride, you must purchase and install a Group Ride accessory. You can
go to buy.garmin.com to purchase a Group Ride accessory.
NOTE: Voice communication during radio group rides is not available in certain regions.
1 From the main menu, select Group Ride.
2 If necessary, enter your name, and select Done.
3 Select Start a Group Ride> Create a Radio Group Ride.
4 Select an option:
● Select a radio preset.
● Select a radio channel and squelch mode.
5 Select Next.
6 Enter the ride name, and select Done.
As riders join your group ride, their names appear on the list.
7 After other riders have joined your group ride on their devices, select Start.
Joining a Group Ride
You can join a nearby group ride that was created by another rider.
1 From the main menu, select Group Ride> Join a Group Ride.
2 Enter the Ride ID, and select Done.
Rejoining a Recent Group Ride
You can rejoin any of your ten most-recent group rides.
1 From the main menu, select Group Ride> Recent Group Rides.
2 Select a recent group ride, and select Join.
Adding Riders to a Radio Group Ride
You can add riders to a radio group ride that is already in progress.
1 From the main menu, select > Group Ride.
2 If necessary, select .
Using the Apps
zūmo® XT3 Motorcycle Navigator
Owner's Manual
47
3 Select Add.
As new riders join the group ride, they appear on the list.
4 Select Continue.
Broadcasting a Message
WARNING
Do not read, send, or reply to any messages while driving. If you do so, you could become distracted by the
display, which could lead to an accident causing personal injury or death.
You can broadcast a preset message to the members in your active group ride that are in range of the VHF
radio.
1 From the main menu, select Group Ride.
2 If necessary, select .
3 Select Broadcast to Group.
4 Select a preset message, and select Send.
Broadcasting a Location
WARNING
While driving, do not interact with the display to broadcast your location. If you do so, you could become
distracted by the display, which could lead to an accident causing serious personal injury or death.
You can broadcast a location to the members in your active group ride that are in range of the VHF radio.
1 From the main menu, select Group Ride.
2 If necessary, select .
3 Select Broadcast to Group> Broadcast a Location, and select a location.
4 Select Share.
Viewing a Group Ride Notification
WARNING
Do not read or reply to any notifications while driving. If you do so, you could become distracted by the display,
which could lead to an accident causing serious personal injury or death.
From most pages, a notification appears when the device receives a broadcasted group ride location or
message. You can also view group ride notifications in the Group Ride app.
When you are viewing the map, new notifications appear in a map tool at the edge of the screen..
1 From the main menu, select Group Ride> , and select a notification.
2 Select Go! to navigate to a shared location.
Exiting a Group Ride
1 From the main menu, select Group Ride.
2 If necessary, select .
3 Select Exit> Yes.
Group Ride Settings
From the main menu, select Group Ride> .
Edit Rider Name: Allows you to set your name that displays during a group ride. This setting is not available
during an active group ride.
Rider Map Labels: Sets the label displayed for each active rider on the map.
Show Tracks on Map: Shows the track that each group ride member takes on the map.
Reset Default Settings: Allows you to reset all group ride settings to default values. This setting is not available
during an active group ride.
Handlebar Controller
The Handlebar Controller app allows you to view and configure the actions triggered by each button on the
Handlebar Controller accessory.
By default, the handlebar controller buttons trigger the following actions.
48
zūmo® XT3 Motorcycle Navigator
Owner's Manual
Using the Apps
Short press to save the current location.
Long press to skip the next destination on your route.
Press to zoom in on the map.
Press to zoom out on the map.
Short press to change the map type.
Long press to lock or unlock the screen.
In addition to the user-configurable actions, you can press the and buttons to interact with on-screen
dialogs.
Configuring the Buttons
You can configure each button on the handlebar controller to trigger different actions.
1 Select > Handlebar Controller.
A diagram of the handlebar controller appears. Each button is linked to a short press action and a long press
action.
2 Select Short Press to choose the action to trigger with a short press of the linked button.
Some actions, such as zooming in or out on the map, must trigger with both a short press or a long press
and will automatically be set for both modes.
3 Select an action.
4 Select .
5 Select Long Press to choose the action to trigger with a long press of the linked button.
6 Select .
7 Repeat steps 2 through 6 for each of the buttons.
You can select > Restore to set all the handlebar controller buttons back to their default configuration.
Wireless Cameras
Your device can display the video feed from one or more connected wireless cameras (sold separately).
Pairing the Device with a Wireless Camera
You can pair a wireless camera with your zūmo
®
device.
1 Update your zūmo device to the latest software version (Map and Software Updates, page59).
Your device may not support the wireless camera without the latest software.
2 Select > Cameras> Add New Camera.
3 Follow the on-screen instructions to finish pairing and setting up the camera.
After you complete the pairing process with a camera for the first time, it connects automatically to the Garmin
®
navigation device when power is applied.
Viewing the Wireless Camera
WARNING
This device is intended to enhance situational awareness when used properly. If used improperly, you could
become distracted by the display, which could lead to an accident causing serious personal injury or death.
Always view the display at a glance when the vehicle is in motion to avoid becoming distracted.
Select > Cameras.
Aligning the Guidance Lines
For the best reference points, the guidance lines should be aligned to reflect the outside edges of the vehicle.
You should align the guidance lines separately for each backup camera. On some models, adjustment is
automatically available after pairing a camera.
WARNING
You must ensure that the guidance lines are properly aligned before using the device and after making any
camera angle adjustments. Failure to properly align the guidance lines could result in an accident or collision,
resulting in death, serious injury, or property damage.
1 Position the vehicle with one side closely aligned to a curb, driveway, or parking stall lines.
Using the Apps
zūmo® XT3 Motorcycle Navigator
Owner's Manual
49
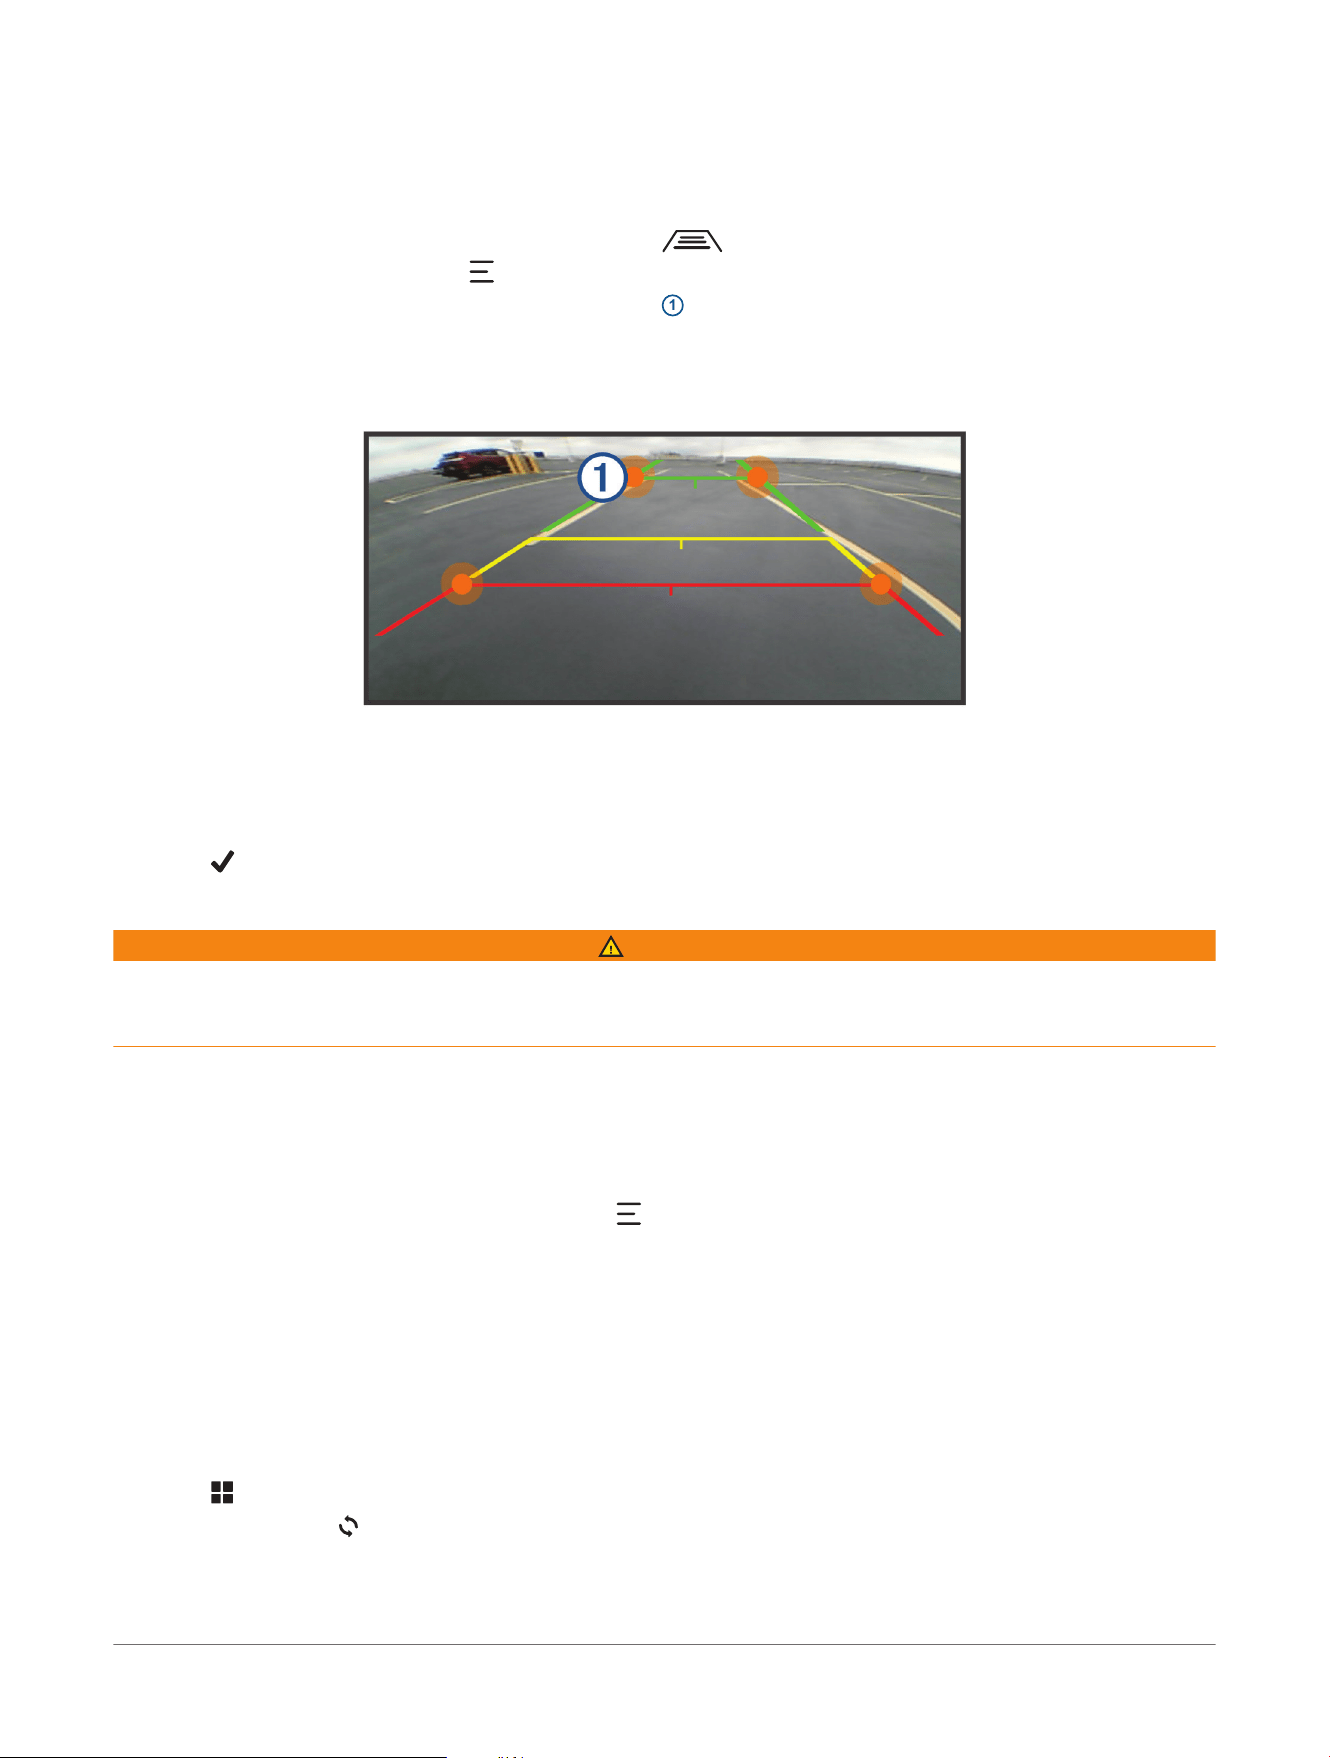
You may want to position the vehicle in the center of a parking stall, and then pull forward into the next stall.
This allows you to use the parking stall lines in the rear of the vehicle as reference points for alignment.
The curb, driveway, or parking stall lines should be clearly visible on the device.
2 Select an option:
● From the camera view, tap the screen, and select .
● From the camera view, select > Adjust Video.
3 Drag the circles on the corners of the guidance lines
1
, or tap the arrows until they match the angle and
position of the curb, driveway, or parking stall lines.
The guidance lines should appear directly on top of your reference points.
The red or orange section of the guidance lines should align with the rear of your vehicle.
4 If necessary, reposition the vehicle with the other side closely aligned to a curb, driveway, or parking stall
lines, and repeat the alignment process.
You should attempt to keep the guidance lines symmetrical, even if your vehicle is not in perfect alignment
with the curb, driveway, or parking stall lines.
5 Select after alignment is complete.
Great Rides
WARNING
This feature allows you to follow rides and routes generated by third parties. Garmin
®
makes no representations
about the accuracy, reliability, completeness or timeliness of routes generated by third parties. Any use or
reliance on such routes is at your own risk.
You can use the Great Rides feature to bookmark and navigate popular rides. You can rate rides and share
photos using the Tread
®
app on your smartphone.
Bookmarking a Ride
You can view and bookmark rides using the Tread
®
app on your smartphone. Bookmarked rides automatically
sync with your zūmo
®
navigator while it is connected to the Tread app.
1 From the Tread app on your smartphone, select > Great Rides.
2 Select an option:
● To view a list of popular rides in your region, select Top Rides.
● To view a list of nearby rides, select Nearby.
3 Select a ride.
4 Select Add Bookmark.
Synchronizing Great Rides
Bookmarked rides synchronize automatically when you open the Great Rides app on your zūmo
®
navigator while
you are connected to the Tread
®
app on your smartphone. You can also synchronize data manually at any time.
1 Select > Great Rides.
2 If necessary, select .
Navigating a Bookmarked Ride
Before you can navigate to a bookmarked ride, you must synchronize the Great Rides app on your zūmo
®
navigator with the Tread
®
app on your smartphone (Synchronizing Great Rides, page50).
50
zūmo® XT3 Motorcycle Navigator
Owner's Manual
Using the Apps
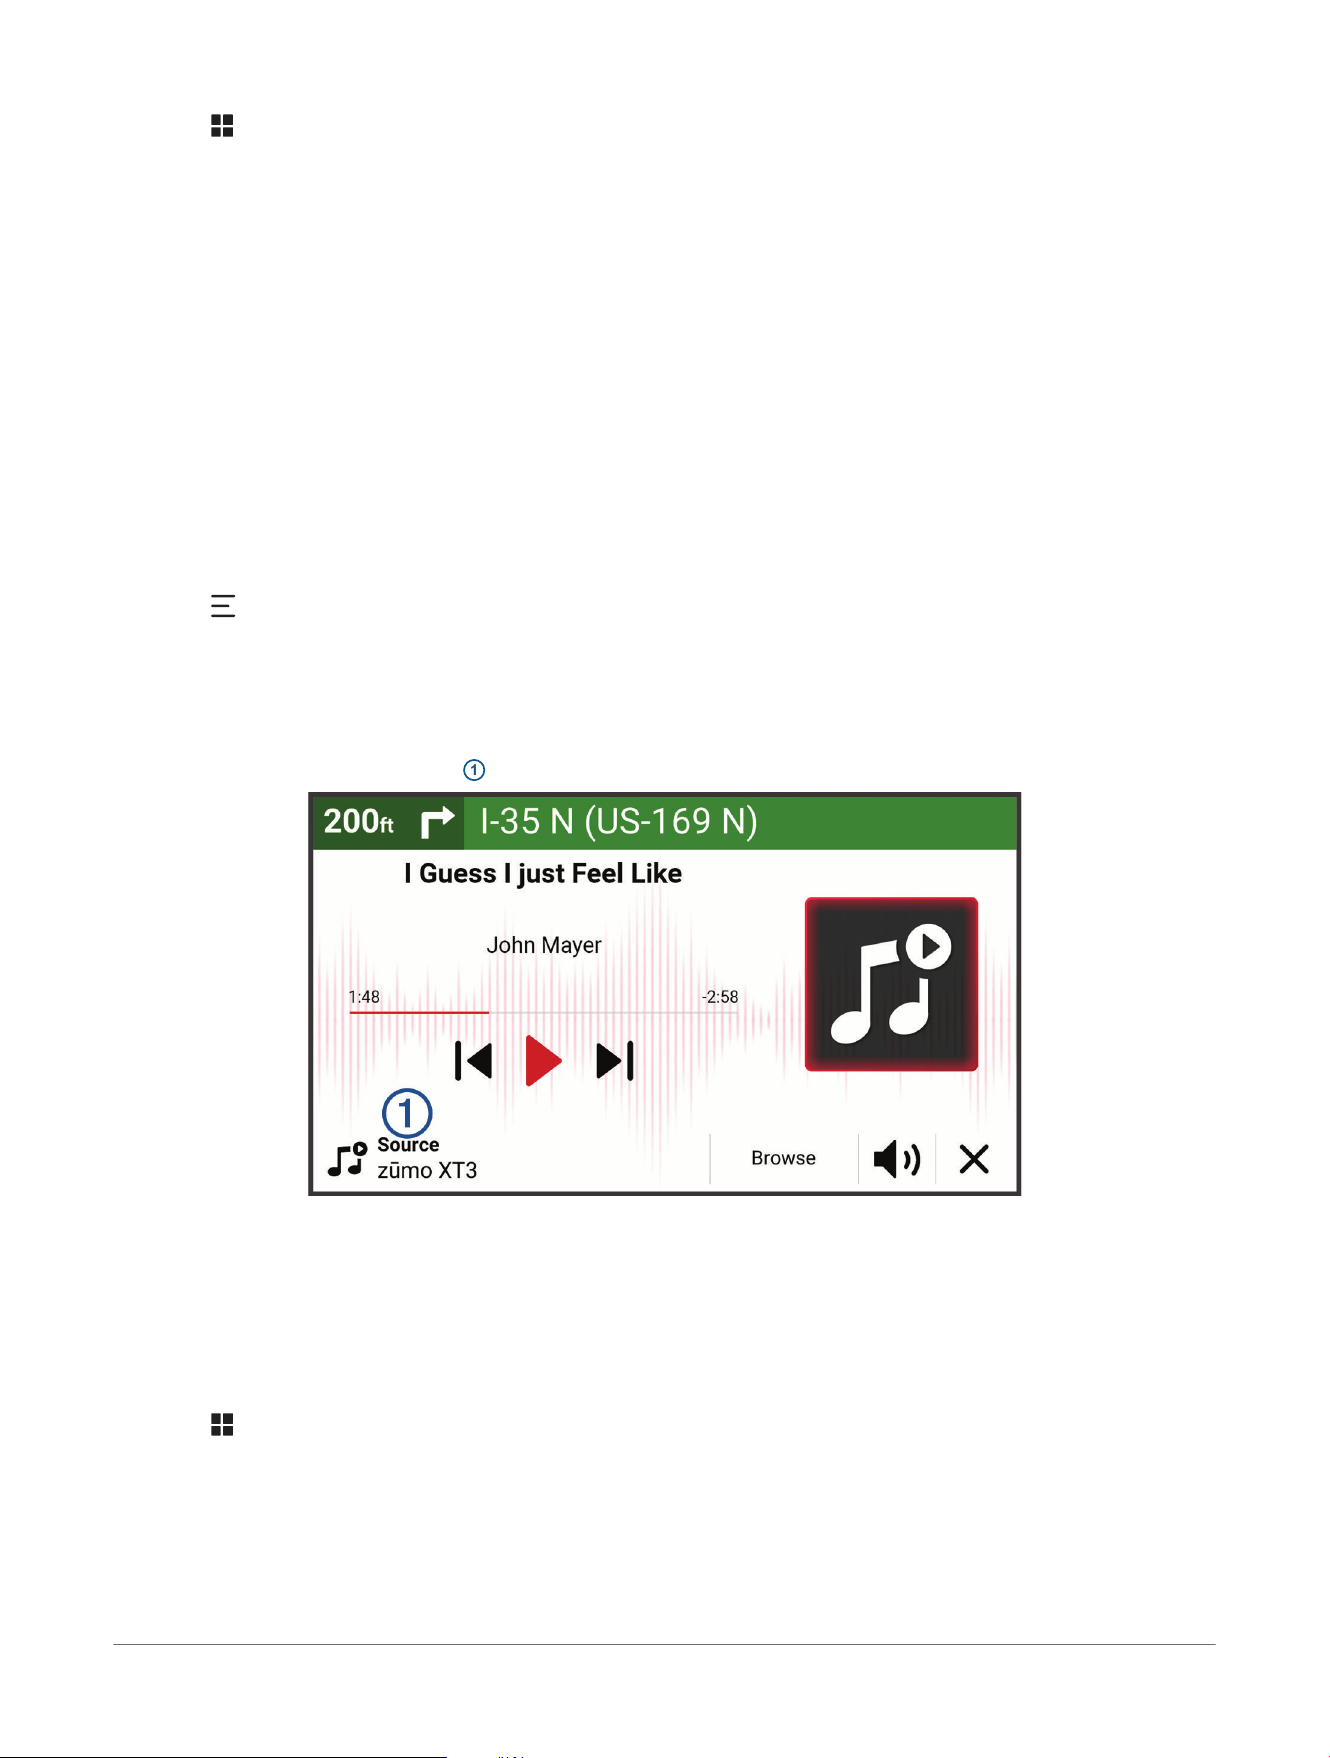
1 Select > Great Rides.
2 Select a ride.
3 Select the starting point for your ride, and select Go!.
4 Select the next destination, and select OK.
The device calculates a route to the starting point you selected.
5 Select Start.
After you navigate a bookmarked ride, you can rate the ride and share photos using the Tread app on your
smartphone.
Music Player
The music player can play music or audio from these sources.
● Music files stored on your zūmo
®
device.
● Bluetooth
®
audio from a paired phone.
Adding the Music Player Tool to the Map
The music player map tool enables you to control the music player from your map.
1 Open the map.
2 Select > Music Player.
The music player controls appear on the map.
Changing the Media Source
You can change the source from which media is played on your device.
1 Select Music.
2 Select the current media source
1
.
3 Select an available media source from the list.
Tracks
A track is a recording of your path. The track log contains information about the recorded path, including time,
location, and elevation information.
Recording Tracks
Tracking records your path. When you start tracking, your device logs your location and updates the track line.
1 Select > Track Recorder.
2 Select Start.
If your device is paired with the Tread
®
app, recorded tracks are periodically synchronized to your Garmin
®
account.
You can retrace your recorded track by navigating it as a new route.
Using the Apps
zūmo® XT3 Motorcycle Navigator
Owner's Manual
51
TracBack
®
Following Your Recent Track
The TracBack
®
feature records the most recent segment of your movement. You can retrace your recent track
back to a previous location.
1 Select > TracBack.
Your recent track appears on the map.
2 Select Go!.
Saving Your Recent Track as a Route
You can save your recent track as a route, which you can navigate later using the route planner.
1 Select > TracBack.
Your recent track appears on the map.
2 Select > Save as Route.
3 Enter a name for the route, and select Done.
Viewing Traffic on the Map
The traffic map shows color-coded traffic flow and delays on nearby roads.
1 From the main menu, select > Traffic.
2 If necessary, select > Legend to view the legend for the traffic map.
Searching for Traffic Incidents
1 From the main menu, select > Traffic.
2 Select > Incidents.
3 Select an item in the list.
4 If there is more than one incident, use the arrows to view additional incidents.
Viewing the Weather Forecast
NOTICE
Garmin
®
is not responsible for the accuracy or timeliness of the weather data.
Before you can use this feature, your device must be receiving weather data. You can connect your device to the
Tread
®
app to receive weather data (Pairing with Your Smartphone, page37).
NOTE: Weather forecasts are not available in all areas.
1 Select > Weather.
The device shows the current weather conditions and a forecast for the next several days.
2 Select a day.
The detailed forecast for that day appears.
Viewing the Weather Radar
Before you can use this feature, your device must be connected to a supported phone running the Tread
®
app
(Pairing with Your Smartphone, page37).
1 Select > Weather Radar.
2 Select to animate the radar map.
Viewing Previous Routes and Destinations
Before you can use this feature, you must enable the travel history feature (Device and Privacy Settings,
page55).
You can view your previous routes and places you have stopped on the map.
Select > Where I've Been.
52
zūmo® XT3 Motorcycle Navigator
Owner's Manual
Using the Apps

Settings
Phone and Headset Settings
Phone Settings
Select > Phone, and select your phone.
Disconnect: Disconnects the paired phone.
Phone Name: Displays the name of the paired phone. You can select the name to change how it displays on
your navigation device.
Phone Call Controls: Enables phone controls when receiving a phone call.
Media Audio: Enables the navigation device to play media audio from your paired phone.
Garmin Tread: Displays the connection status to the Tread
®
app on your phone.
Forget Device: Removes the connected device from the list of paired devices. This option is available only after
a device is paired.
Headset Settings
Select > Headset, and select your headset.
Disconnect: Disconnects the paired headset.
Headset Name: Displays the name of the paired headset. You can select the name to change how it appears on
your navigation device.
Navigation Audio Quality: Sets the audio quality for navigation prompts.
Headset: Enables or disables headset features.
Media Audio: Enables or disables media audio through the headset.
Forget Device: Removes the headset from the list of paired devices.
Wi‑Fi
®
Settings
The wireless network settings allow you to manage Wi‑Fi networks.
Select > Wi-Fi.
Wi-Fi: Enables the Wi‑Fi radio.
Saved Networks: Allows you to edit or remove saved networks.
Search for Networks: Searches for nearby Wi‑Fi networks (Connecting to a Wi‑Fi
®
Network, page59).
Map Settings
Select > Map.
Map Vehicle Icon: Sets the vehicle icon that represents your position on the map.
Driving Map View: Sets the navigational perspective on the map.
Map Detail: Sets the level of detail on the map. More detail may cause the map to draw slower.
Waypoint Labels: Sets the size of waypoint labels on the map.
Waypoint Decluttering: Hides waypoints at high map zoom levels.
Large Navigation Text: Enables enlarged navigation text.
Auto Zoom: Automatically selects the zoom level for optimal use of your map. When disabled, you must zoom
in or out manually.
Skip Next Stop Confirmation: Sets a confirmation message to appear when skipping a location on your route.
Map Manager: Manages maps installed on the device (Downloading Outdoor Maps+ Content, page27).
Navigation Settings
Select > Navigation.
Vehicle Settings: Sets routing options and other options for your current vehicle profile.
Off-Route Recalculation: Sets recalculation preferences when navigating away from an active route.
Custom Avoidances: Allows you to avoid specific roads or areas.
Traffic: Sets options for traffic features (Traffic Settings, page54).
Restricted Mode: Disables all functions that require significant operator attention.
GPS Simulator: Stops the device from receiving a GPS signal, and saves battery power.
Settings
zūmo® XT3 Motorcycle Navigator
Owner's Manual
53

Traffic Settings
From the main menu, select > Navigation> Traffic.
Traffic: Enables traffic.
Optimize Route: Enables the device to use optimized alternate routes automatically or upon request (Avoiding
Traffic Delays on Your Route, page23).
Setting a Simulated Location
If you are indoors or not receiving satellite signals, you can use the GPS simulator to plan routes from a
simulated location.
1 Select > Navigation> GPS Simulator.
2 From the main menu, select View Map.
3 Tap the map twice to select an area.
The address of the location appears at the bottom of the screen.
4 Select the location description.
5 Select Set Location.
Driver Assistance Settings
Select > Driver Assistance.
Rider Alerts: Allows you to enable or disable alerts for upcoming zones or road conditions (Rider Awareness
Features and Alerts, page14).
Speeding Alert: Alerts you when you are exceeding the speed limit.
Reduced Speed Tone: Alerts you when the speed limit decreases.
Ride Summary: Displays a summary of your ride at the end of a route.
Local Spots: Displays attractions near the destination.
Helmet Guide: Displays changes for helmet requirements when crossing borders.
Country Border Alert: Displays a notification when crossing international borders.
Route Preview: Displays a preview of the major roads in your route when you start navigation.
Break Planning: Reminds you to take a break, and displays upcoming services after you drive for an extended
time. You can enable or disable break reminders and upcoming service suggestions.
Automatic Incident Detection: Enables the navigator to detect incidents and to notify emergency contacts when
the navigator detects an incident (Incident Detection and Notifications, page14).
Incident Messaging: Alerts your emergency contacts if an incident is detected (Incident Detection and
Notifications, page14).
Display Settings
Select > Display.
Brightness Slider: You can move the slider to adjust the display brightness.
Orientation: Allows you to set the display to portrait (vertical) or landscape (horizontal). If you select the Auto
option, the display automatically switches orientation based on the physical orientation of the device.
Color Mode: Allows you to select day or night color mode. If you select the Auto option, the device automatically
switches to day or night colors based on the time of day.
Display Timeout: Allows you to set the amount of idle time before your device enters sleep mode while using
battery power.
Screenshot: Allows you to take a picture of the device screen. Screenshots are saved in the Screenshot folder of
the device storage.
System Settings
Select > System.
Voice Language: Sets the language for voice prompts.
Text Language: Sets all on-screen text to the selected language.
NOTE: Changing the text language does not change the language of user-entered data or map data, such as
street names.
Keyboard Language: Enables keyboard languages.
Units: Sets the unit of measure used for distances.
54
zūmo® XT3 Motorcycle Navigator
Owner's Manual
Settings
Current Time: Sets the device time.
Time Format: Allows you to select a 12-hour, 24-hour, or UTC display time.
Position Format: Sets the coordinate format and datum used for geographical coordinates.
Position Format Settings
NOTE: Do not change the position format or the map datum coordinate system unless you are using a map or
chart that specifies a different position format.
Select > System> Position Format.
Coordinate Format: Sets the position format for the location information.
Display Format: Sets the format in which coordinates will appear on the device.
Datum: Sets the coordinate system on which the map is structured.
Map Spheroid: Shows the coordinate system the device is using. The default coordinate system is WGS 84.
Setting the Time
1 From the main menu, select the time.
2 Select an option:
● To set the time automatically using GPS information, select Automatic.
● To set the time manually, drag the numbers up or down.
Device and Privacy Settings
Select > Device.
About: Displays the software version number, the unit ID number, and information on several other software
features.
Screen Lock: Sets options to require a Personal Identification Number (PIN) each time you turn on the navigator
(Enabling the Screen Lock, page55).
Regulatory: Displays regulatory markings and information.
EULAs: Displays the end-user license agreements.
NOTE: You need this information when you update the system software or purchase additional map data.
Software Licenses: Displays software licensing information.
Device Data Reporting: Shares anonymous data to improve the device.
Travel History: Allows the device to store a record of the places you go. This allows you to view the trip log, use
the Trip History feature, and use myTrends
™
suggested routes.
Reset: Allows you to clear your travel history, reset settings, or delete all user data.
Enabling the Screen Lock
To prevent unauthorized use of your device, you can enable the Screen Lock feature, which requires a Personal
Identification Number (PIN). When enabled, you must enter the PIN to unlock the screen each time you turn on
the device.
NOTICE
If you enable the Screen Lock feature, Garmin
®
Support cannot retrieve the PIN or access your device. It is your
responsibility to provide the PIN to anyone authorized to use the navigator.
1 Select > Device> Screen Lock.
2 Select an option:
● To enable the screen lock and set a new PIN, select Require PIN, and enter a PIN number.
● To change your PIN number, select Change PIN, and enter a PIN number.
● To disable the screen lock, clear the Require PIN check box.
Restoring Settings
You can restore a category of settings or all settings to the factory default values.
1 Select .
2 If necessary, select a settings category.
3 Select > Restore.
Settings
zūmo® XT3 Motorcycle Navigator
Owner's Manual
55

Data Management
The device has a memory card slot for additional data storage.
NOTE: The device is compatible with Windows
®
7 and newer, and Mac
®
OS 10.7 and newer.
About Memory Cards
You can purchase memory cards from an electronics supplier, or purchase pre-loaded Garmin mapping
software (www.garmin.com). Memory cards can be used to store files such as maps and POIs.
Installing a Memory Card for Maps and Data
You can install a memory card to increase the storage space for maps and other data on your device. You can
purchase memory cards from an electronics supplier. Memory cards must use the exFAT file system format.
1 Locate the map and data memory card slot on your device (zūmo
®
XT3 - 6 in. Device Overview, page6).
2 Insert a memory card into the slot.
3 Press it in until it clicks.
Connecting the Device to Your Computer
You can connect the device to your computer using a USB cable.
1 Plug the small end of the USB cable into the port on the device.
2 Plug the larger end of the USB cable into a port on your computer.
3 From your zūmo
®
device, select Tap to Connect to Computer.
A picture of your device connected to a computer appears on the device screen.
Depending on your computer operating system, the device appears as either a portable device, a removable
drive, or a removable volume.
Transferring GPX Files From Your Computer
Apple
®
computers may require additional third-party software, such as Android File Transfer, to read and write
files on this device.
If you have already created routes that you want to use on your device, you can transfer GPX files directly from
your computer.
1 Connect the device to your computer (Connecting the Device to Your Computer, page56).
The device appears as a portable device.
2 On your computer, open the file browser.
3 Select a GPXfile.
4 Select Edit> Copy.
5 Browse to the GPX folder on the device.
6 Select Edit> Paste.
Transferring Data From Your Computer
1 Connect the device to your computer (Connecting the Device to Your Computer, page56).
Depending on your computer operating system, the device appears as either a portable device, a removable
drive, or a removable volume.
2 On your computer, open the file browser.
3 Select a file.
4 Select Edit> Copy.
5 Browse to a folder on the device.
NOTE: For a removable drive or volume, you should not place files in the Garmin folder.
6 Select Edit> Paste.
Disconnecting the USB Cable
If your device is connected to your computer as a removable drive or volume, you must safely disconnect your
device from your computer to avoid data loss. If your device is connected to your Windows
®
computer as a
portable device, it is not necessary to safely disconnect the device.
1 Complete an action:
56
zūmo® XT3 Motorcycle Navigator
Owner's Manual
Data Management

● For Windows computers, select the Safely Remove Hardware icon in the system tray, and select your
device.
● For Apple
®
computers, select the device, and select File> Eject.
2 Disconnect the cable from your computer.
Data Management zūmo® XT3 Motorcycle Navigator
Owner's Manual
57
Device Information
Viewing E-label Regulatory and Compliance Information
1 From the settings menu, swipe to the bottom of the menu.
2 Select Device> Regulatory.
Specifications
Water resistance
IEC 60529 IPX7
1
Operating temperature range From-15° to 55°C (from5° to 131°F)
Charging temperature range From0° to 45°C (from32° to 113°F)
Power input (vehicle power cable, motorcycle, or external power) From 12 to 18Vdc
Battery type Lithium-ion battery
Battery voltage range From3.5to4.2V
EU wireless frequencies and transmit power 2400 - 2483,5 MHz: < 20dBm
5150 - 5250 MHz: < 23dBm
5250 - 5350 MHz: < 23dBm
5470 - 5725 MHz: < 23dBm
5725 - 5850 MHz: < 23dBm
EU SAR A05115: < 0,411 W/kg limb, < 0,411 W/kg torso
A05116: < 0,429 W/kg limb, < 0,429 W/kg torso
Charging Requirements
The power delivered by the charger must be between min 4.5 Watts required by the radio equipment, and
max 12 Watts in order to achieve the maximum charging speed.
Charging the Device
NOTE: This Class III product shall be powered by an LPS power supply.
You can charge the battery in the device using any of these methods.
● Install the device in the mount, and connect the mount to vehicle power.
NOTICE
Do not connect the device directly to the vehicle power cable.
● Connect the device to an optional power adapter accessory, such as a wall power adapter.
You can purchase an approved Garmin
®
AC-DC adapter suitable for home or office use from a Garmin dealer
or www.garmin.com. The device may charge slowly when connected to a third-party adapter.
4,5 - 12
W
1
*The device withstands incidental exposure to water of up to 1m for up to 30min. For more information, go to www.garmin.com/waterrating.
58 zūmo® XT3 Motorcycle Navigator
Owner's Manual
Device Information
Device Maintenance
Garmin
®
Support Center
Go to support.garmin.com for help and information, such as product manuals, frequently asked questions,
videos, and customer support.
Map and Software Updates
For the best navigation experience, you should keep the maps and software on your device up to date.
Map updates provide the newest available changes to roads and locations in the maps used by your device.
Keeping maps up to date helps your device find recently added locations and calculate more accurate routes.
Map updates are large and may take several hours to complete.
Software updates provide changes and improvements to the device features and operation.
You can update your device using two methods.
● You can connect the device to a Wi‑Fi
®
network to update directly on the device (recommended). This option
allows you to update your device conveniently without connecting it to a computer.
●
You can connect the device to a computer and update it using the Garmin Express
™
application
(garmin.com/express).
Updating Maps and Software Using a Wi‑Fi
®
Network
NOTICE
Map and software updates may require the device to download large files. Regular data limits or charges from
your internet service provider apply. Contact your internet service provider for more information about data
limits or charges.
You can update the maps and software by connecting your device to a Wi‑Fi network that provides access to the
internet. This allows you to keep your device up to date without connecting it to a computer.
1 Connect the device to a Wi‑Fi network (Connecting to a Wi‑Fi
®
Network, page59).
While connected to a Wi‑Fi network, the device checks for available updates. When an update is available,
appears on the icon in the main menu.
2 Select > Updates.
The device checks for available updates. When an update is available, Update Available appears below Map
or Software.
3 Select an option:
● To install all available updates, select Install All.
● To install only map updates, select Map> Install All.
● To install only software updates, select Software> Install All.
4 Read the license agreements, and select Accept All to accept the agreements.
NOTE: If you do not agree with the license terms, you can select Reject. This stops the update process. You
cannot install updates until you accept the license agreements.
5 Using the included USBcable, connect the device to external power, and select Continue (Charging the
Device, page58).
For the best results, a USBwall charger that provides at least 2A power output is recommended. Many
USBpower adapters for smartphones, tablets, or portable media devices may be compatible.
6 Keep the device connected to external power and within range of the Wi‑Fi network until the update process
is complete.
TIP: If a map update is interrupted or canceled before it completes, your device may be missing map data. To
repair missing map data, you must update the maps again using either
Wi‑Fi or Garmin Express
™
.
Connecting to a Wi‑Fi
®
Network
The first time you turn on the device, it prompts you to connect to a Wi‑Fi network. You can also connect to a
Wi‑Fi network using the settings menu.
1 Select > Wi-Fi.
2 If necessary, select Wi-Fi to enable Wi‑Fi technology.
3 Select Search for Networks.
The device displays a list of nearby Wi‑Fi networks.
4 Select a network.
Device Maintenance
zūmo® XT3 Motorcycle Navigator
Owner's Manual
59
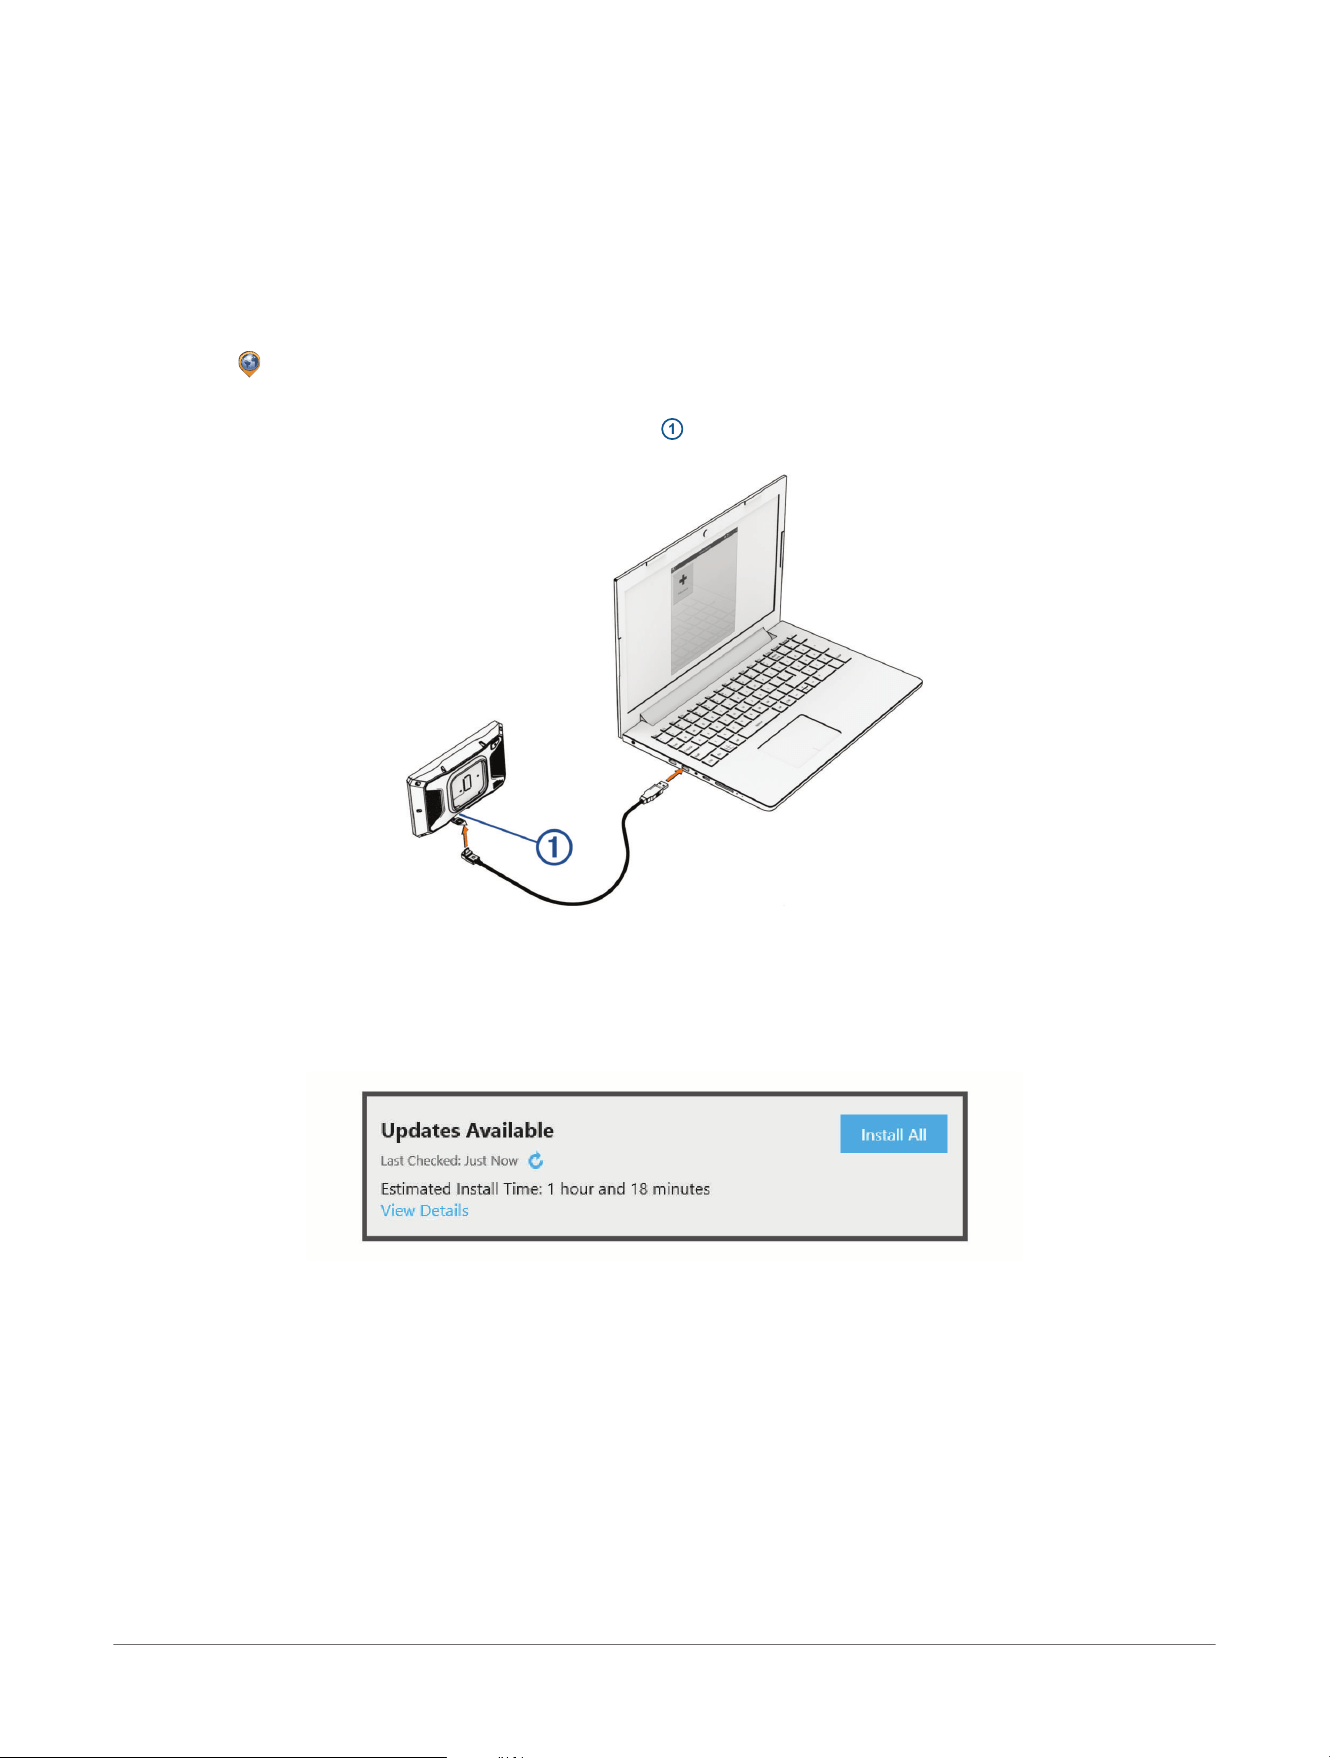
5 If necessary, enter the password for the network, and select Done.
The device connects to the network, and the network is added to the list of saved networks. The device
reconnects to this network automatically when it is within range.
Updating Maps and Software with Garmin Express
™
You can use the Garmin Express application to download and install the latest map and software updates for
your device.
1 If you do not have the Garmin Express application installed on your computer, go to garmin.com/express
and follow the on-screen instructions to install it.
2 Open the Garmin Express application.
3 Connect your device to your computer using a USBcable.
The small end of the cable connects to the USB port
1
on your zūmo
®
device, and the large end connects to
an available USBport on your computer.
4 From your zūmo device, select Tap to Connect to Computer.
5 In the Garmin Express application, click Add a Device.
The Garmin Express application searches for your device and displays the device name and serial number.
6 Click Add Device, and follow the on-screen instructions to add your device to the Garmin Express application.
When setup is complete, the Garmin Express application displays the updates available for your device.
7 Select an option:
● To install all available updates, click Install All.
● To install a specific update, click View Details, and click Install next to the update you want.
The Garmin Express application downloads and installs the updates onto your device. Map updates are very
large, and this process may take a long time on slower internet connections.
NOTE: If a map update is too large for the internal storage of the device, the software may prompt you to
install a microSD
®
card in your device to add storage space (Installing a Memory Card for Maps and Data,
page56).
8 Follow the on-screen instructions during the update process to finish installing updates.
For example, during the update process, the Garmin Express application may instruct you to disconnect and
reconnect your device.
60
zūmo® XT3 Motorcycle Navigator
Owner's Manual
Device Maintenance

Device Care
NOTICE
Avoid dropping your device.
Do not store the device where prolonged exposure to extreme temperatures can occur, because it can cause
permanent damage.
Never use a hard or sharp object to operate the touchscreen, or damage may result.
Cleaning the Outer Casing
NOTICE
Avoid chemical cleaners and solvents that can damage plastic components.
1 Clean the outer casing of the device (not the touchscreen) using a cloth dampened with a mild detergent
solution.
2 Wipe the device dry.
Cleaning the Touchscreen
1 Use a soft, clean, lint-free cloth.
2 If necessary, lightly dampen the cloth with water.
3 If using a dampened cloth, turn off the device and disconnect the device from power.
4 Gently wipe the screen with the cloth.
Restarting the Device
You can restart your device if it stops functioning.
Hold the power button for 12 seconds.
Device Maintenance
zūmo® XT3 Motorcycle Navigator
Owner's Manual
61

Troubleshooting
My device is not acquiring satellite signals
● Verify the GPS simulator is turned off (Navigation Settings, page53).
● Take your device out of parking garages and away from tall buildings and trees.
● Remain stationary for several minutes.
My device does not connect to my phone
● Select > Phone, and verify that your phone is paired with the navigator.
● Enable Bluetooth
®
wireless technology on your phone, and bring your phone within 10m (33ft.) of the device.
● Verify your phone is compatible.
Go to www.garmin.com/bluetooth for more information.
● Complete the pairing process again.
To repeat the pairing process, you must unpair your phone and device (Disconnecting a Bluetooth
®
Device,
page39), and complete the pairing process (Pairing with Your Smartphone, page37).
My device is not contacting my emergency contact
WARNING
The device allows you to send your location to an emergency contact. This is a supplemental feature and
should not be relied upon as a primary method to obtain emergency assistance. The Tread
®
app does not
contact emergency services on your behalf.
If your device is not contacting your emergency contact, you can try these options.
● Verify the zūmo
®
navigator is connected to a compatible external power source, such as the included mount
or using a USB cable (Installation, page9).
● Verify the zūmo navigator is connected to the Tread app on your smartphone using Bluetooth
®
wireless
technology (Pairing with Your Smartphone, page37).
● Verify your smartphone is in an area of network coverage where data connectivity is available.
● Verify that the Automatic Incident Detection feature and the Incident Messaging feature are enabled on your
zūmo navigator (Driver Assistance Settings, page54).
● Verify that you have set up an emergency contact using the Tread app on your smartphone (Setting Up an
Emergency Contact, page15).
● Verify the incident contact's phone is capable of receiving text messages or email.
My battery does not stay charged for very long
● Decrease the screen brightness (Display Settings, page54).
● Shorten the display timeout (Display Settings, page54).
● Decrease the volume (Adjusting the Volume, page8).
● Turn off the wi-fi radio when it is not in use (Wi‑Fi
®
Settings, page53).
● Put the device in power saving mode when not in use (Turning the Device On or Off, page7).
● Keep your device away from extreme temperatures.
● Do not leave your device in direct sunlight.
The suction cup will not stay on my windshield
1 Clean the suction cup and windshield with rubbing alcohol.
2 Dry with a clean, dry cloth.
3 Mount the suction cup (Mounting Your Device in an Automobile, page12).
My device does not appear as either a portable device or a removable drive or
volume on my computer
1 Disconnect the USB cable from your computer.
2 Turn off the device.
3 Connect the USB cable to your device and to a USB port on your computer.
TIP: The USB cable must connect to a USB port on your computer, not to a USB hub.
62
zūmo® XT3 Motorcycle Navigator
Owner's Manual
Troubleshooting

The device turns on automatically and goes into MTP mode or USB mass storage mode. A picture of the device
connected to a computer appears on the device screen.
If you have several network drives mapped on your computer, Windows
®
may have trouble assigning drive
letters to your Garmin
®
drives. For information about assigning drive letters, see the help file for your operating
system.
Troubleshooting zūmo® XT3 Motorcycle Navigator
Owner's Manual
63

support.garmin.com
© 2026 Garmin Ltd. or its subsidiaries
Garmin
®
, the Garmin logo, zūmo
®
, inReach
®
, TracBack
®
, and Tread
®
are trademarks of Garmin Ltd. or its subsidiaries, registered in the USA and other
countries. Garmin Adventurous Routing
™
, GarminCatalyst
™
, Garmin Express
™
, Garmin Messenger
™
, GarminPerformance Package
™
, Garmin PowerSwitch
™
, and
myTrends
™
are trademarks of Garmin Ltd. or its subsidiaries. These trademarks may not be used without the express permission of Garmin.
Apple
®
and Mac
®
are trademarks of Apple Inc., registered in the U.S. and other countries and regions. The Bluetooth
®
word mark and logos are owned by
the Bluetooth SIG, Inc., and any use of such name by Garmin is under license. microSD
®
and the microSD logo are trademarks of SD-3C, LLC. Tripadvisor
®
is
a registered trademark of TripAdvisor LLC. USB-C
®
is a registered trademark of USB Implementers Forum. Windows
®
is a registered trademark of Microsoft
Corporation in the United States and other countries. Wi‑Fi
®
is a registered trademark of Wi-Fi Alliance. Other trademarks and trade names are those of their
respective owners.
February 2026 GUID-4BE99090-811B-47FE-896B-D04EF0B4ED72 v1