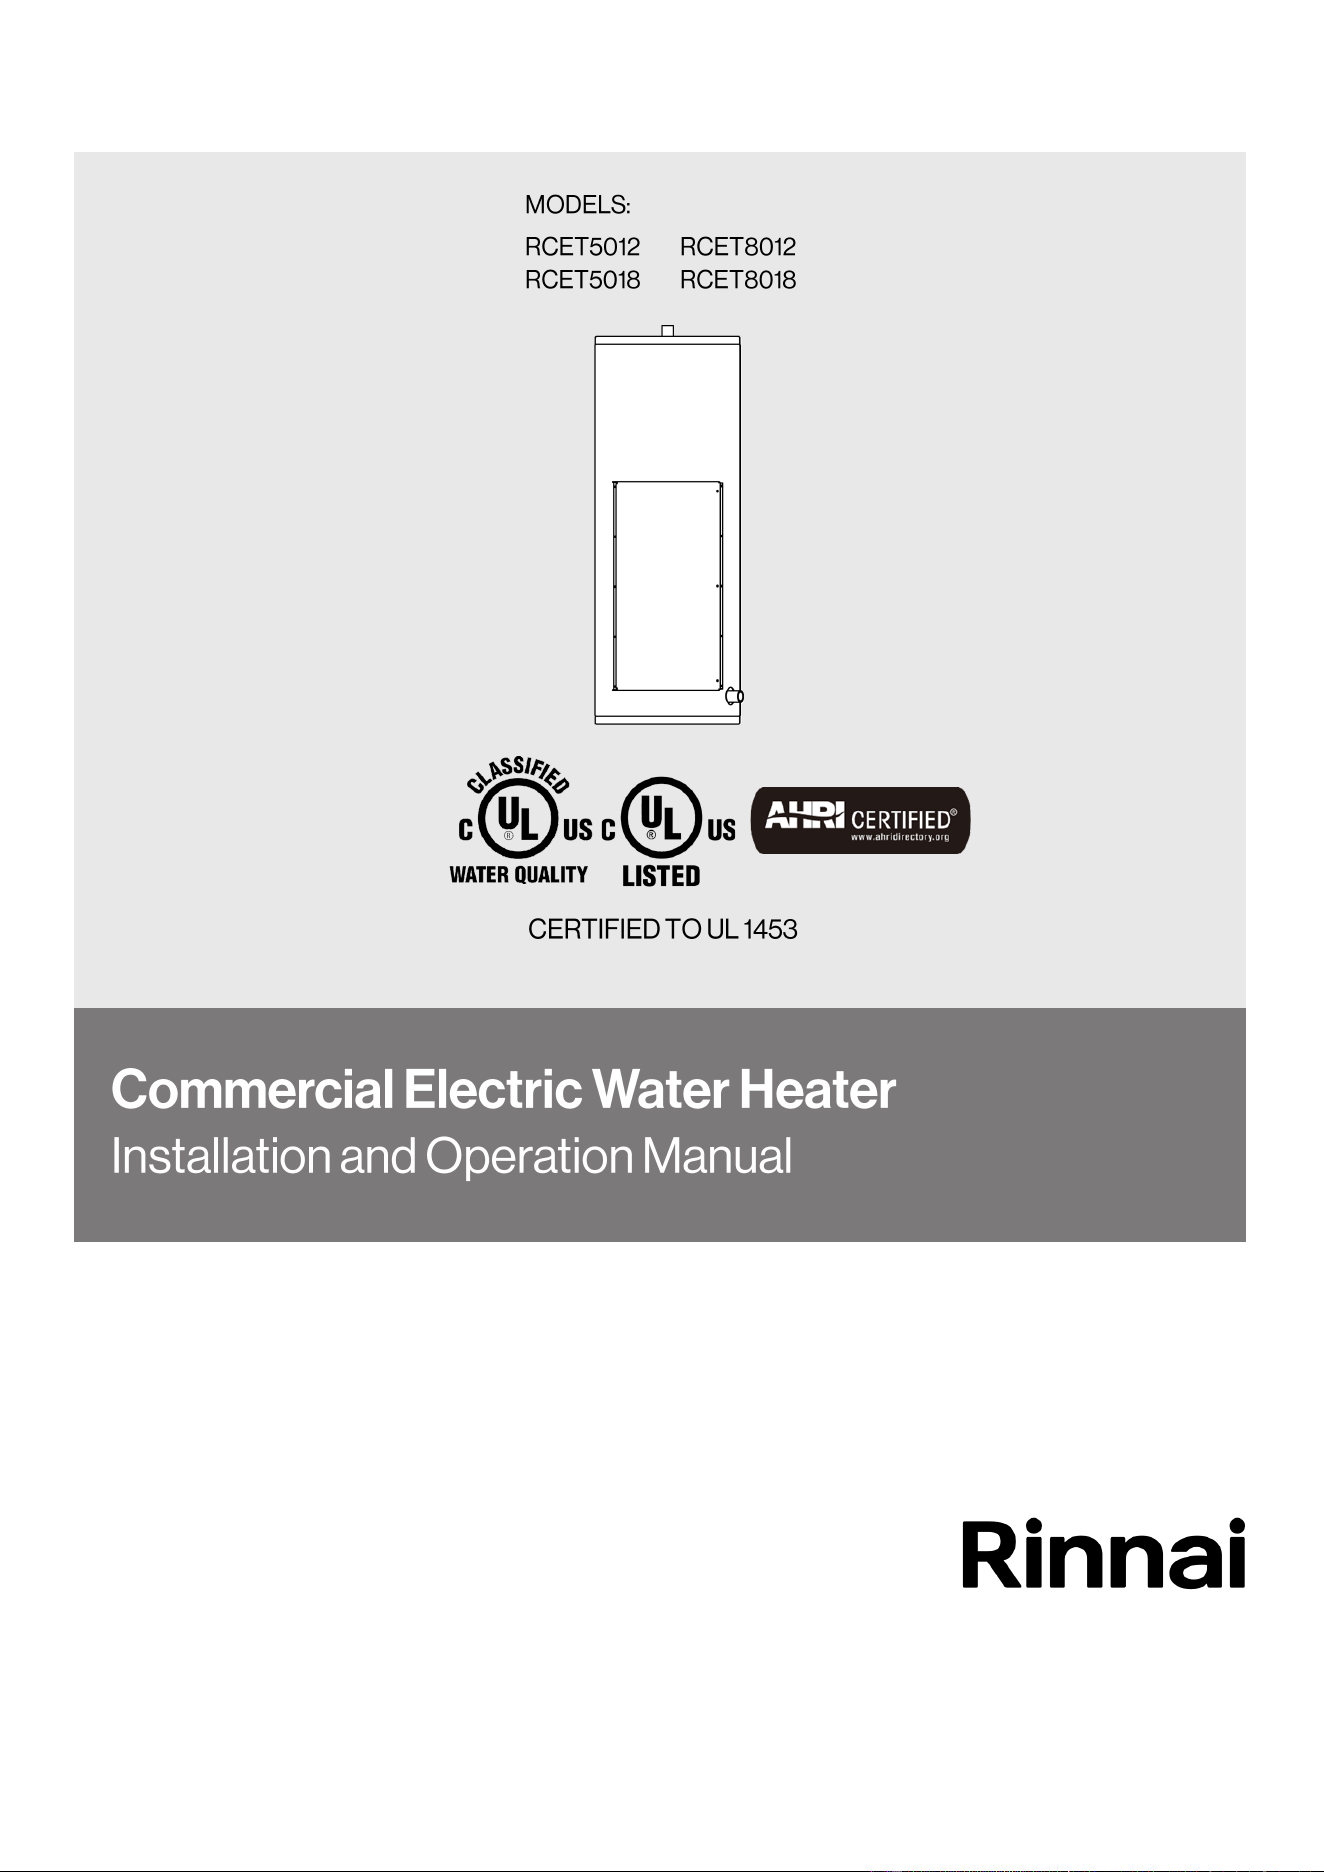
NSF/ANSI 372
2 Rinnai Commercial Electric Water Heater Installaon and Operaon Manual
• Installation and service should be performed by a trained and qualified
professional or service agency.
• If the water heater becomes submerged in water up to the level of the
electrical elements, the heater should be examined by a qualified service
agency before it is placed in operation.
WARNING
If the information in these instructions is not followed exactly, a fire or
explosion may result causing property damage, personal injury, or
death.

Rinnai Commercial Electric Water Heater Installaon and Operaon Manual 3
1. Welcome ................................................................................................................................. 4
1.1 To The Installer ............................................................................................................... 4
1.2 To The Consumer ........................................................................................................... 4
1.3 Acronyms and Abbreviations .......................................................................................... 4
2. Safety ..................................................................................................................................... 5
2.1 Safety Symbols ............................................................................................................... 5
2.2 Safety Precautions ......................................................................................................... 5
3. About the Water Heater ......................................................................................................... 6
3.1 Front and Top Views ...................................................................................................... 6
3.2 Components ................................................................................................................... 7
3.3 Specifications ................................................................................................................. 8
3.4 Dimensions .................................................................................................................... 9
4. Install the Water Heater ....................................................................................................... 10
4.1 Installation Guidelines .................................................................................................. 10
4.2 What You Will Need ..................................................................................................... 11
4.3 Choose an Installation Location ................................................................................... 12
4.4 Connect the Water Supply ........................................................................................... 14
4.5 Install the Pressure Relief Valve .................................................................................. 15
4.6 Connect the Power Supply ........................................................................................... 16
4.7 Post-Water Heater Installation Checklist ...................................................................... 20
5. Operation .............................................................................................................................. 21
5.1 Safety Precautions ....................................................................................................... 21
5.2 Filling the Water Heater ............................................................................................... 21
5.3 Setting the Temperature .............................................................................................. 22
5.4 Resetting High Temperature Control ............................................................................ 23
5.5 Troubleshooting ............................................................................................................ 23
6. Maintenance ......................................................................................................................... 24
6.1 Maintenance ................................................................................................................ 24
6.2 Flushing the Water Heater ........................................................................................... 26
6.3 Draining the Water Heater ........................................................................................... 26
7. Plumbing Diagrams.............................................................................................................. 27
8. Warranty .................. ………………………………………………………………………………...30
4 Rinnai Commercial Electric Water Heater Installaon and Operaon Manual
Thank you for purchasing a Rinnai commercial
electric water heater. Before installing and
operating this water heater, be sure to read
these instructions completely and carefully to
familiarize yourself with the water heater’s
features and functionality.
ANSI American National Standards Institute
Btu British Thermal Unit
DHW Domestic Hot Water
GPM Gallons per minute
kW Kilowatt
NEC National Electrical Code
NFPA National Fire Protection Association
UL Underwriters Laboratory
T&P
Temperature and Pressure Relief
Valve
PSI Pounds per Square Inch
•
You must read the entire manual to
properly operate the water heater and to
have regular maintenance performed.
•
Keep this manual for future reference.
•
As when using any appliance generating
heat, there are certain safety precautions
you should follow. See section “2.2 Safety
Precautions” for detailed safety
precautions.
•
Be sure your water heater is installed by a
trained and qualified professional.
Table 1 provides a list of common acronyms
and abbreviations used in this manual:
• It is recommended that a trained and
qualified professional who has attended
a Rinnai training class complete the
installation. The warranty may be voided
due to any improper installation. Training
on Rinnai products is accessible at
rinnaipro.myabsorb.com.
• A trained and qualified professional
should have skills such as:
− Connecting water lines, valves, and
electricity
− Knowledge of applicable national,
state, and local codes
• Read all instructions in this manual
before installing the water heater. The
water heater must be installed according
to the exact instructions in this manual.
• Proper installation is the responsibility of
the trained and qualified professional.
• When installation is complete, leave this
manual with the water heater (for
internal/indoor units) or give the manual
directly to the consumer.
• Massachusetts Code requires this water
heater to be installed in accordance with
Massachusetts 248-CMR 2.00: State
Plumbing Code and 248-CMR 5.00
• For installation in California, this water
heater must be braced or anchored to
avoid falling or moving during an
earthquake.
Table 1. Acronyms and Abbreviations
Rinnai Commercial Electric Water Heater Installaon and Operaon Manual 5
Indicates an imminently hazardous
situation which, if not avoided, will result
in personal injury or death.
CAUTION
WARNING
This manual contains the following important
safety symbols. Always read and obey all safety
messages.
•
Do not use this water heater if any part has
been exposed to flooding or water
damage. Immediately call a qualified
service technician to inspect the water
heater and to replace any part of the
control system which has been under
water.
•
If the unit is exposed to the following, do
not operate the water heater until all
corrective steps have been made by a
qualified service technician.
1. External Fire
2. Damage
3. Dry firing
•
Keep the area around the appliance clear
and free from combustible materials,
gasoline, and other flammable vapors and
liquids.
•
Always check the water temperature
before entering a shower or bath.
•
To protect yourself from harm, before
performing maintenance:
−
Turn off the electrical power supply by
turning off the disconnect switch or by
turning off the electricity at the circuit
breaker. (The temperature controller
does not control the electrical power.)
−
This water heater must be grounded in
accordance with the NEC and/or local
codes in all installations. Failure to
ground the water heater properly may
also cause control system issues.
•
DO NOT use substitute materials. Use
only parts certified for the appliance.
•
Should overheating occur or the electrical
supply fails to shut off, turn off the main
breaker to the appliance.
DANGER
indicates an imminently hazardous
situation which, if not avoided, will result in
personal injury or death.
Indicates a potentially hazardous situation
which, if not avoided, could result in minor
or moderate injury. It may also be used to
alert against unsafe practices.
Alerts you to potential hazards
that can kill or hurt you and
others.
Indicates an imminently hazardous
situation which, if not avoided, will result
in personal injury or death.
WARNING
The following precautions apply to the
installer and consumer. Read and follow all
instructions in this section.
•
Do not store or use gasoline or other
flammable vapors and liquids in the
vicinity of this or any other appliance.
•
Installation and service should be
performed by a trained and qualified
professional or service agency.
•
The warning signs in this manual are
here to prevent injury to you and others.
Follow them explicitly.
WARNING
If the information in these instructions is
not followed exactly, a fire or explosion
may result causing property damage,
personal injury, or death.
6 Rinnai Commercial Electric Water Heater Installaon and Operaon Manual
•
Only trained and qualified professionals are permitted to adjust parameter settings.
•
DO NOT use an extension cord or adapter plug with this appliance.
•
Any alteration to the appliance or its controls can be dangerous and will void the warranty.
•
EXPLOSION HAZARD. In hot water systems where the hot water has not been used for a long
period of time, hydrogen gas can be produced. Hydrogen gas is highly flammable. To reduce the
risk of explosion or injury, open a hot water faucet for several minutes before using any electrical
appliances. There should also not be any smoking or open flames near the faucet when it is
opened.
•
DO NOT operate the water heater without the front panel installed. The front panel should only
be removed for service/maintenance or replacing internal components. Before removing any
access panels or servicing the heater, the electrical supply to the water heater must be turned
off. Failure to do so could result in death, serious injury, or property damage.
•
BURN HAZARD. Hot water outlet pipes leaving the water heater can be hot to touch.
•
DO NOT store or use gasoline or other flammable vapors and liquids in the vicinity of this or any
other appliance.
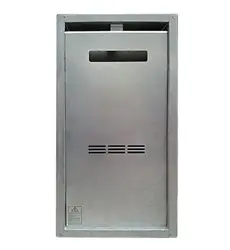
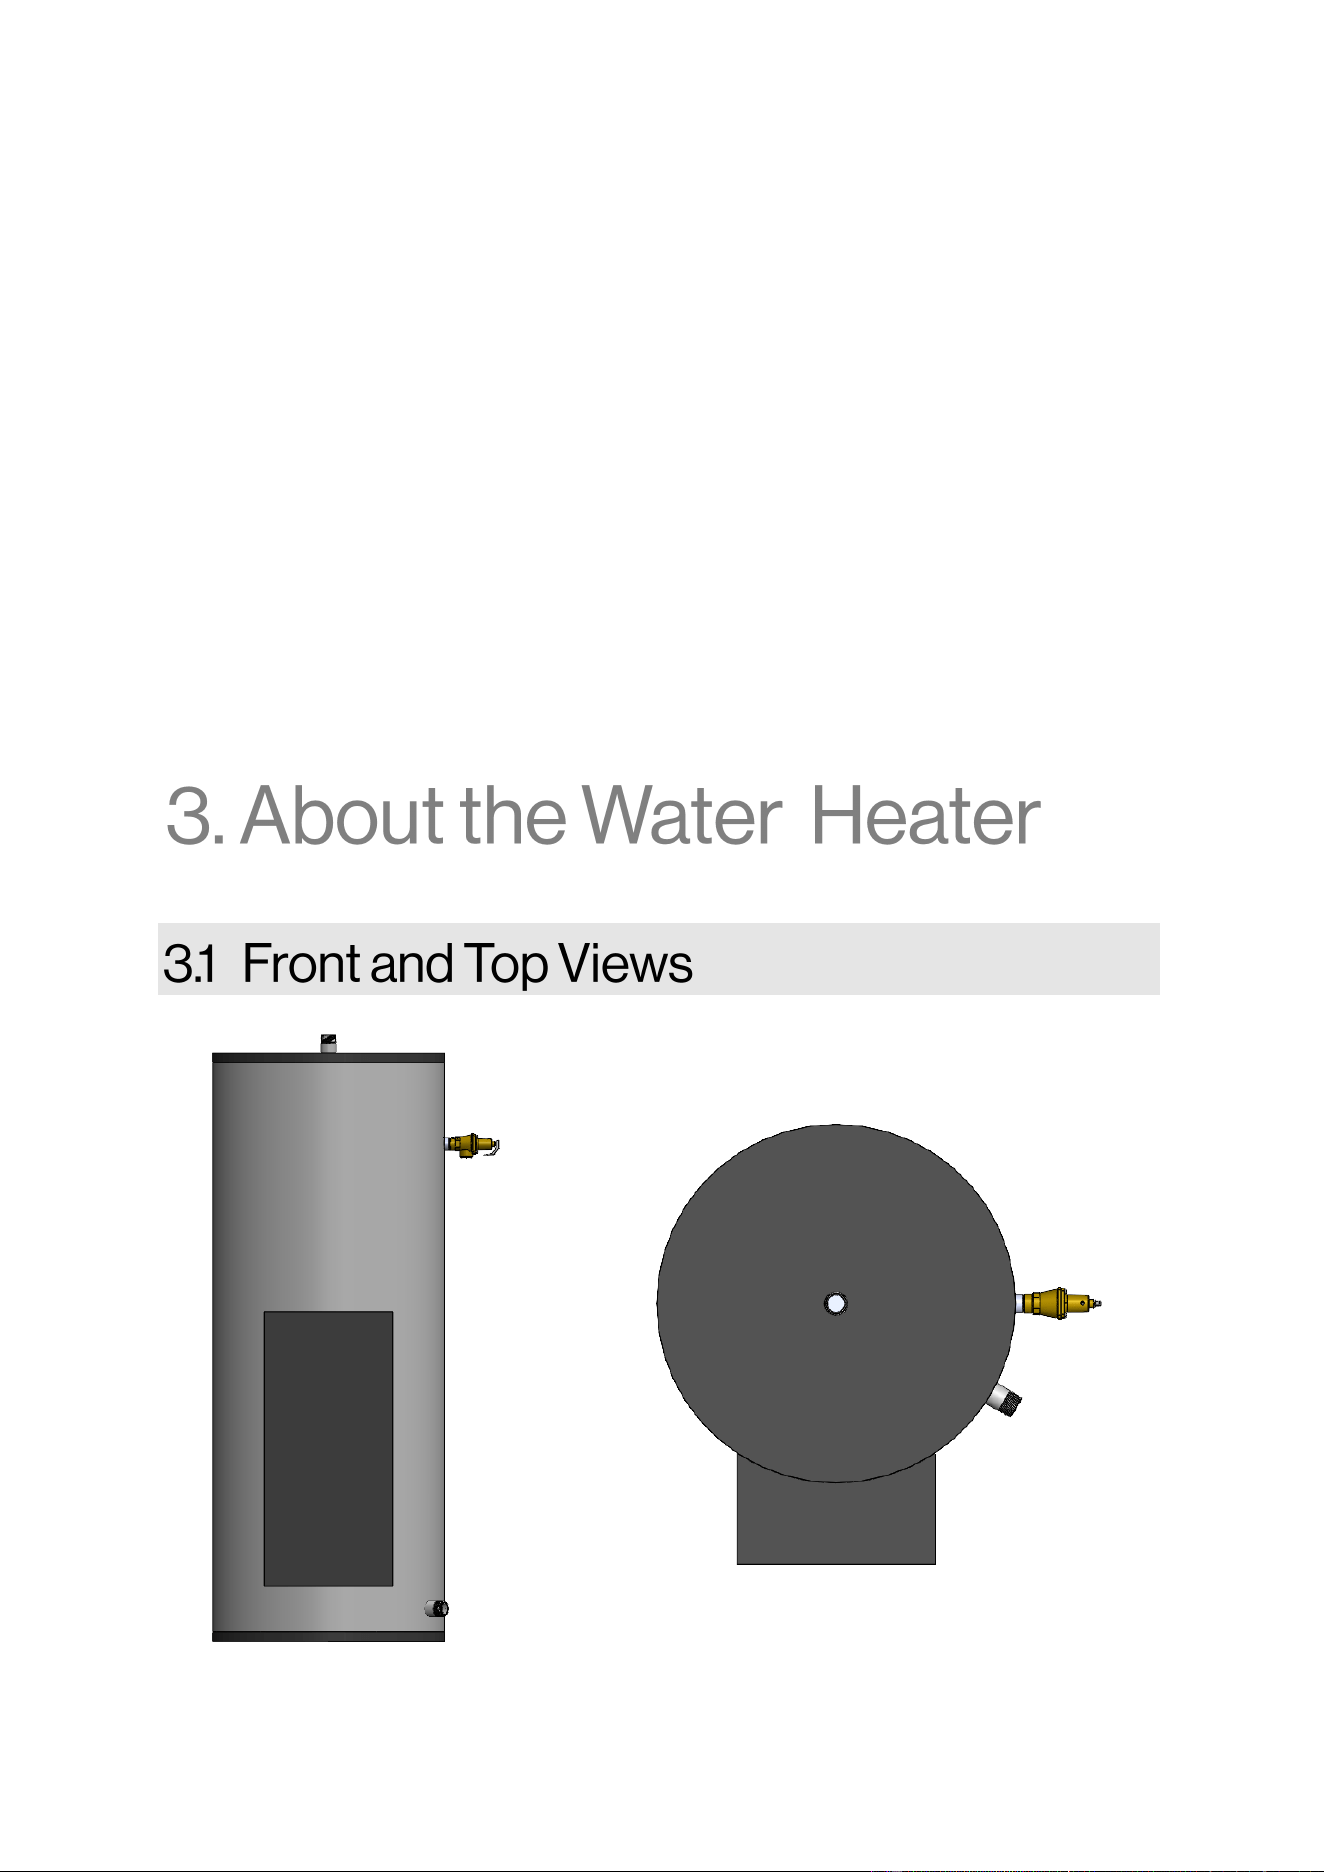
Figure 2: Top View
Figure 1: Front View
Rinnai Commercial Electric Water Heater Installaon and Operaon Manual 7
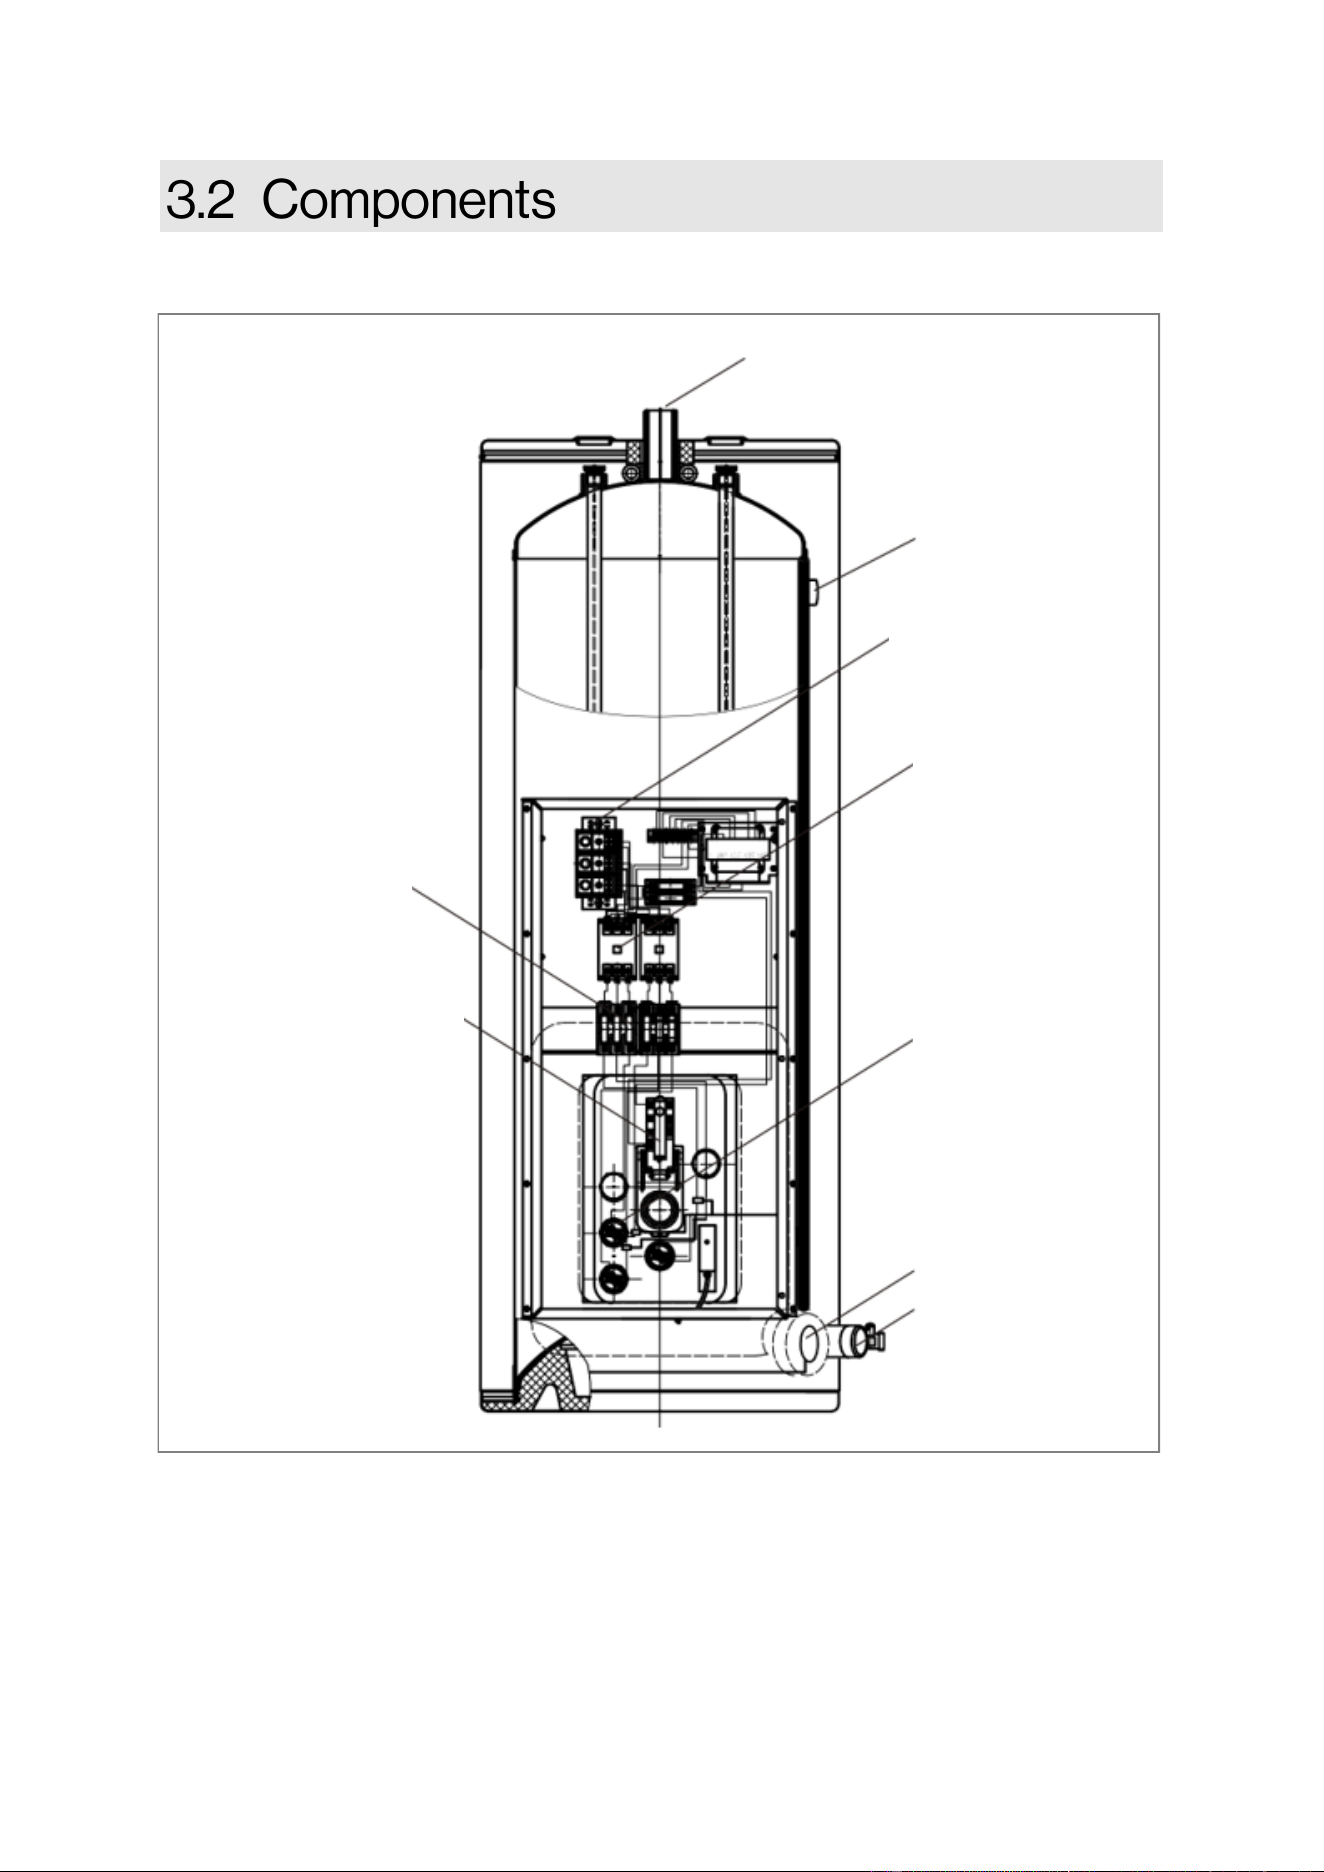
Figure 3: Components
T&P VALVE
WATER OUTLET
POWER CIRCUIT
FUSE/BLOCK
HEATING
ELEMENTS/PLUG
CONTACTOR
POWER DISTRIBUTION
BLOCK
WATER INLET
DRAIN
THERMOSTATE/ECO
COMBINATION CONTROLS
8 Rinnai Commercial Electric Water Heater Installaon and Operaon Manual
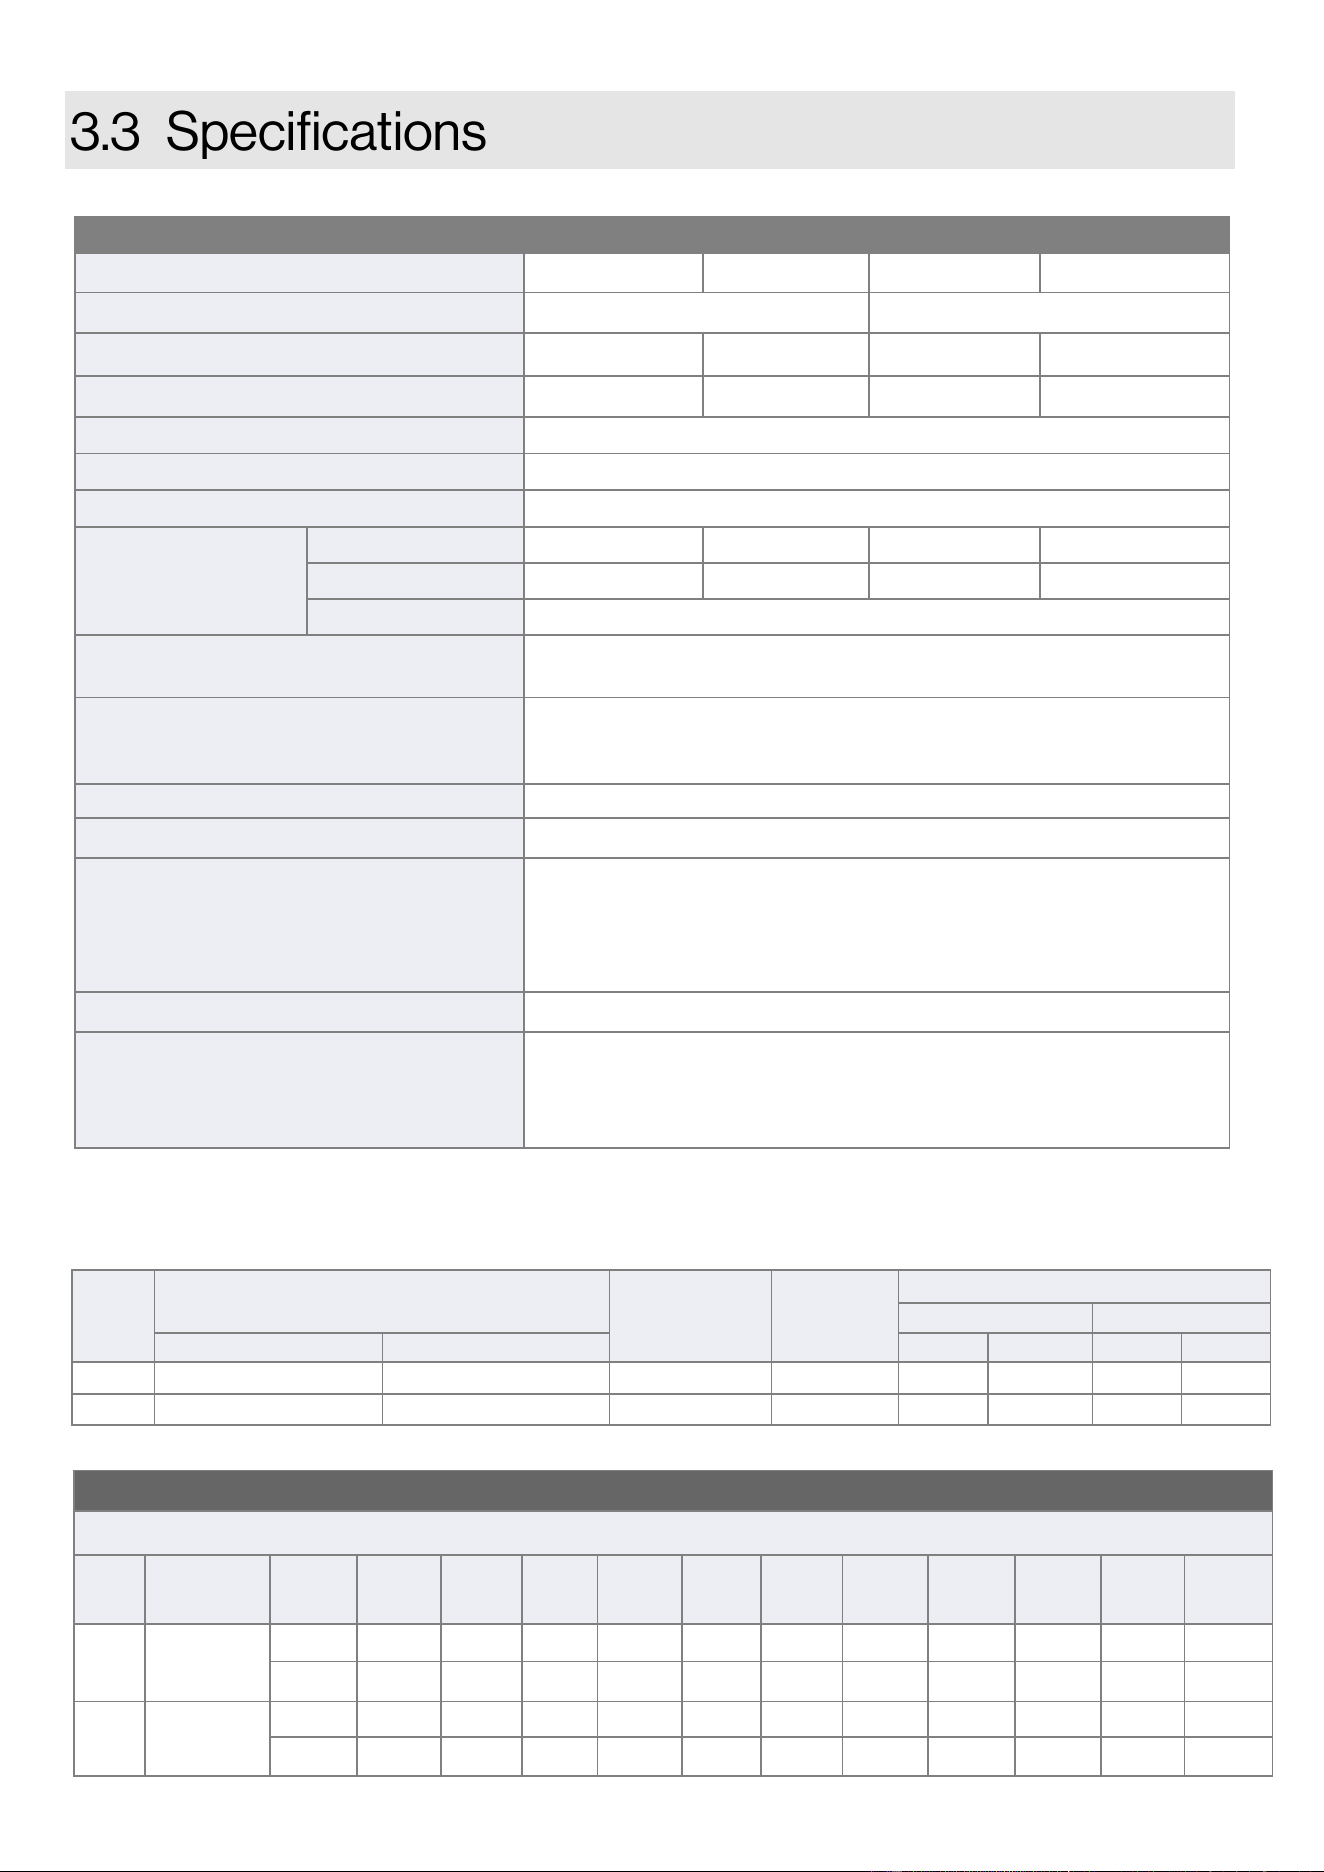
Table 2A: Technical Specifications
Table 3: Recovery Capacities
Model RCET5012 RCET5018 RCET8012 RCET8018
Maximum Electrical Consumption kW/hr 12.3 18 12.3 18
Tank Volume 50 Gallons (189 Liters) 80 Gallons (303 Liters)
First Hour Delivery at 100°F Rise
1
85 109 106 130
Product Weight 197 lb (89 kg) 203 lb (92 kg) 246 lb (112 kg) 252 lb (114 kg)
Installation Type Internal (Indoor) Commercial Applications
Water Supply Pressure 150 PSI (Maximum)
Temperature Setting 100°F (38°C) to 170°F (77°C)
Electrical Data
Normal 12.3 kW 18 kW 12.3 kW 18 kW
Max Current 51.25 A 75 A 51.25 A 75 A
Fuse Element Leg Fuse: 30 Amps (Per Leg)
Connections
Hot Water Outlet: 1-1/2 in. MNPT
Cold Water Inlet: 1-1/2 in. MNPT
Electric Connections
Appliance: AC 208/240 Volts, 60Hz, Single Phase.
Can be converted to 3-phase.
Integrated Temperature Controller: AC 240 Volts (Analog)
Water Temperature Control Surface Mounted Thermostat
ENERGY STAR® Certified Yes
Efficiency
Water heater models listed above meet or surpass thermal efficiency
and standby loss requirements set by the American Society of Heating,
Refrigerating and Air-Conditioning Engineers (ASHRAE ) standards, as
part of the Energy Policy Act (Epact), a federal law that mandates
energy efficiency for various appliances.
Certifications UL 1453
Safety Devices
• Hi-Limit Reset Therm-O-Disc 66T 4401 301202
• T&P Relief Valve: ANSI Z21.22 and ASME approved, 105,000
BTU/HR, 150 PSI, 210°F (99°C).
1
First Hour Delivery Rating is a theoretical calculation based on 70% usable tank capacity (Tank Capacity x 0.70 +
(recovery) = First Hour Delivery Rating)
RECOVERY CAPACITIES
U.S. Gallons/Hour Liters/Hour at Temperature Rise Indicated
Input
(kW)
Equivalent
BTU/HR
Units
40°F
(22°C)
50°F
(28°C)
60°F
(33°C)
70°F
(39°C)
80°F
(45°C)
90°F
(50°C)
100°F
(56°C)
110°F
(61°C)
120°F
(67°C)
130°F
(72°C)
140°F
(78°C)
12.3 40,946
GPH 124 99 83 71 62 55 50 45 41 38 35
LPH 470 376 313 268 235 209 188 171 157 145 134
18 61,420
GPH 186 149 124 106 93 83 74 68 62 57 53
LPH 705 564 470 403 352 313 282 256 235 217 201
kW
Input
Model Numbers Tank Capacity in Gallons
Number of
Elements
Element
Wattage
Full Load Current in Amperes
Single Phase Three Phase
50
80 208V 240V 208V 240V
12.3 RCET5012 RCET8012 3 4,100 59 51 34 30
18 RCET5018 RCET8018 6 3,000 86.5 75 50 43.3
Table 2B: Electrical Consumption and Tank Capacity
Rinnai Commercial Electric Water Heater Installaon and Operaon Manual 9
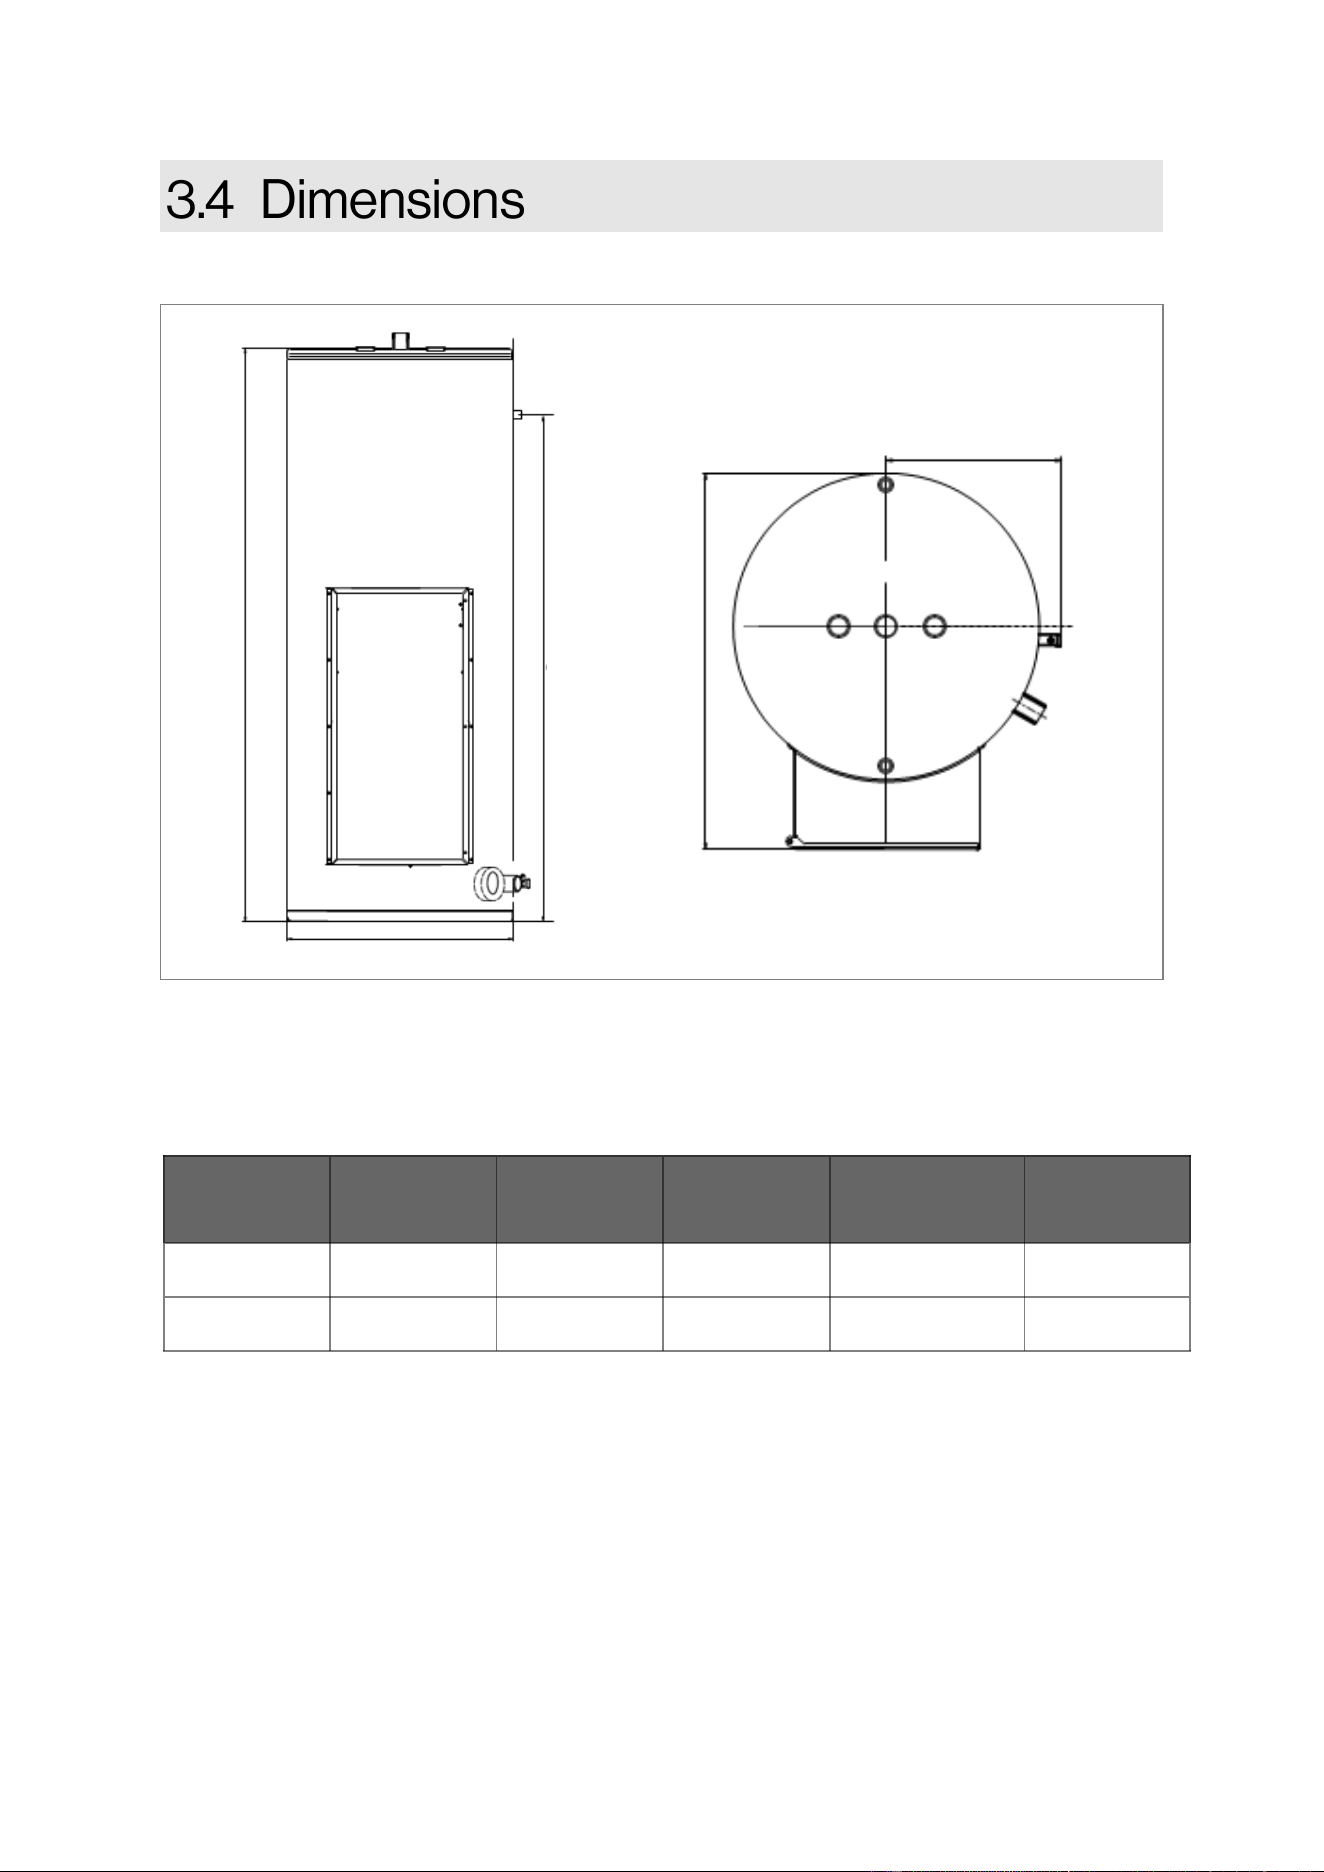
Measurements: in. (mm)
Figure 4: Dimensions
Model A
Tank Height
B
Tank Diameter
C
PRV Height
D
Maximum Depth
E
CET5012/5018 58.1 (1476) 21.5 (546) 49 (1245) 27.25 (692) 16.5 (419)
CET8012/8018 64.25 (1632) 25.28 (642) 53.07 (1348) 31.02 (788) 18.4 (467)
Table 4: Dimensions
D
A
C
B
E
10 Rinnai Commercial Electric Water Heater Installaon and Operaon Manual
When installing the water heater, follow
these guidelines:
• This water heater is certified for
installation in commercial applications.
• This water heater is suitable for
combination water heating and space
heating and not suitable for space
heating applications only.
• The installation must conform with local
codes, or in the absence of local codes,
with the National Electrical Code, NFPA
70 or the Canadian Electrical Code
CSA C22.1. To comply with NSF
Standard 5, the bottom of the water
heater must be sealed to the floor with
silicone-based sealant or elevated 6 in.
(152 mm) above the floor.
THIS SECTION IS INTENDED FOR THE
INSTALLER
• It is recommended that a trained and
qualified professional who has attended a
Rinnai training class complete the
installation. The warranty may be voided
due to any improper installation. Training
on Rinnai products is accessible at
rinnaipro.myabsorb.com.
• A trained and qualified professional
should have skills such as:
− Connecting water lines, valves, and
electricity
− Knowledge of applicable national,
state, and local codes
• The appliance, when installed, must be
electrically grounded in accordance with
local codes or, in the absence of local
codes, with the National Electrical Code,
ANSI/NFPA 70, and/or the CSA C22.1,
Canadian Electrical Code, Part 1.
• If a water heater is installed in a closed
water supply system, such as one having a
backflow preventer in the cold water supply
line, means shall be provided to control
thermal expansion. Contact the water
supplier or local plumbing inspector on how
to control thermal expansion.
• This water heater should not be connected
to any heating system(s) or component(s)
used with non-potable water heating
appliance. Toxic chemicals, such as those
used for boiler treatment should not be
introduced into this system.
• Field installed circulating pumps should be
of all bronze construction.
• Insulation blankets are available to the
general public for external use on the
electric water heaters, but they are not
required. The purpose of the insulation
would be to decrease the amount of
standby loss. This water heater meets or
exceeds ASHRAE standards with respect to
standby loss. Should an insulation blanket
be installed with this water heater, do not
cover the temperature and pressure relief
valve. Do not cover the instruction manual.
Do install replacement labels on the outside
of the blanket where they can be accessed.
• Temperature-Pressure (T&P) relief
valve must comply with ANSI Z21.22
and ASME code.
• Properly sized T&P valve must be
installed in opening provided.
• Failure to install T&P valve can result in
overheating and over pressurization of
the tank.
• Failure to follow these instructions can
result in serious injury or death.
WARNING
Rinnai Commercial Electric Water Heater Installaon and Operaon Manual 11
• Pipe Wrenches (x2)
• Phillips Head Screwdriver
• Wire Cutters
• Gloves
• Safety Glasses
• Level
• Teflon Tape (recommended) or Pipe
Compound
• Pipe Insulation
• Torch Set
• Copper Tubing Cutter
• Steel Pipe Cutter
• Heat Tape
• Electrical Wire
• Isolation Valves
• Unions and Drain Valves
Unpack the Rinnai water heater package and
verify the following contents are included. If any
items are missing, contact your local dealer/
distributor or call Rinnai Customer Care at 1-800
-621-9419.
• Rinnai commercial electric water heater
• Literature Bag
− Commercial Electric Water Heater
Installation and Operation Manual (this
manual)
− Model/Serial Number Labels (with
printed QR code)
DO NOT
• DO NOT install the water heater in an area
where water leakage of the unit or
connections will result in damage to the
area adjacent to the appliance or to lower
floors of the structure. When such locations
cannot be avoided, it is recommended that
a suitable drain pan, adequately drained, be
installed under the water heater.
• DO NOT use chemically treated water (i.e.
chlorinated water or salt water for pools or
spas) in the appliance.
• DO NOT use substitute parts that are not
authorized for this appliance.
12 Rinnai Commercial Electric Water Heater Installaon and Operaon Manual
*Source: Part 143 National Secondary Drinking Water Regulation
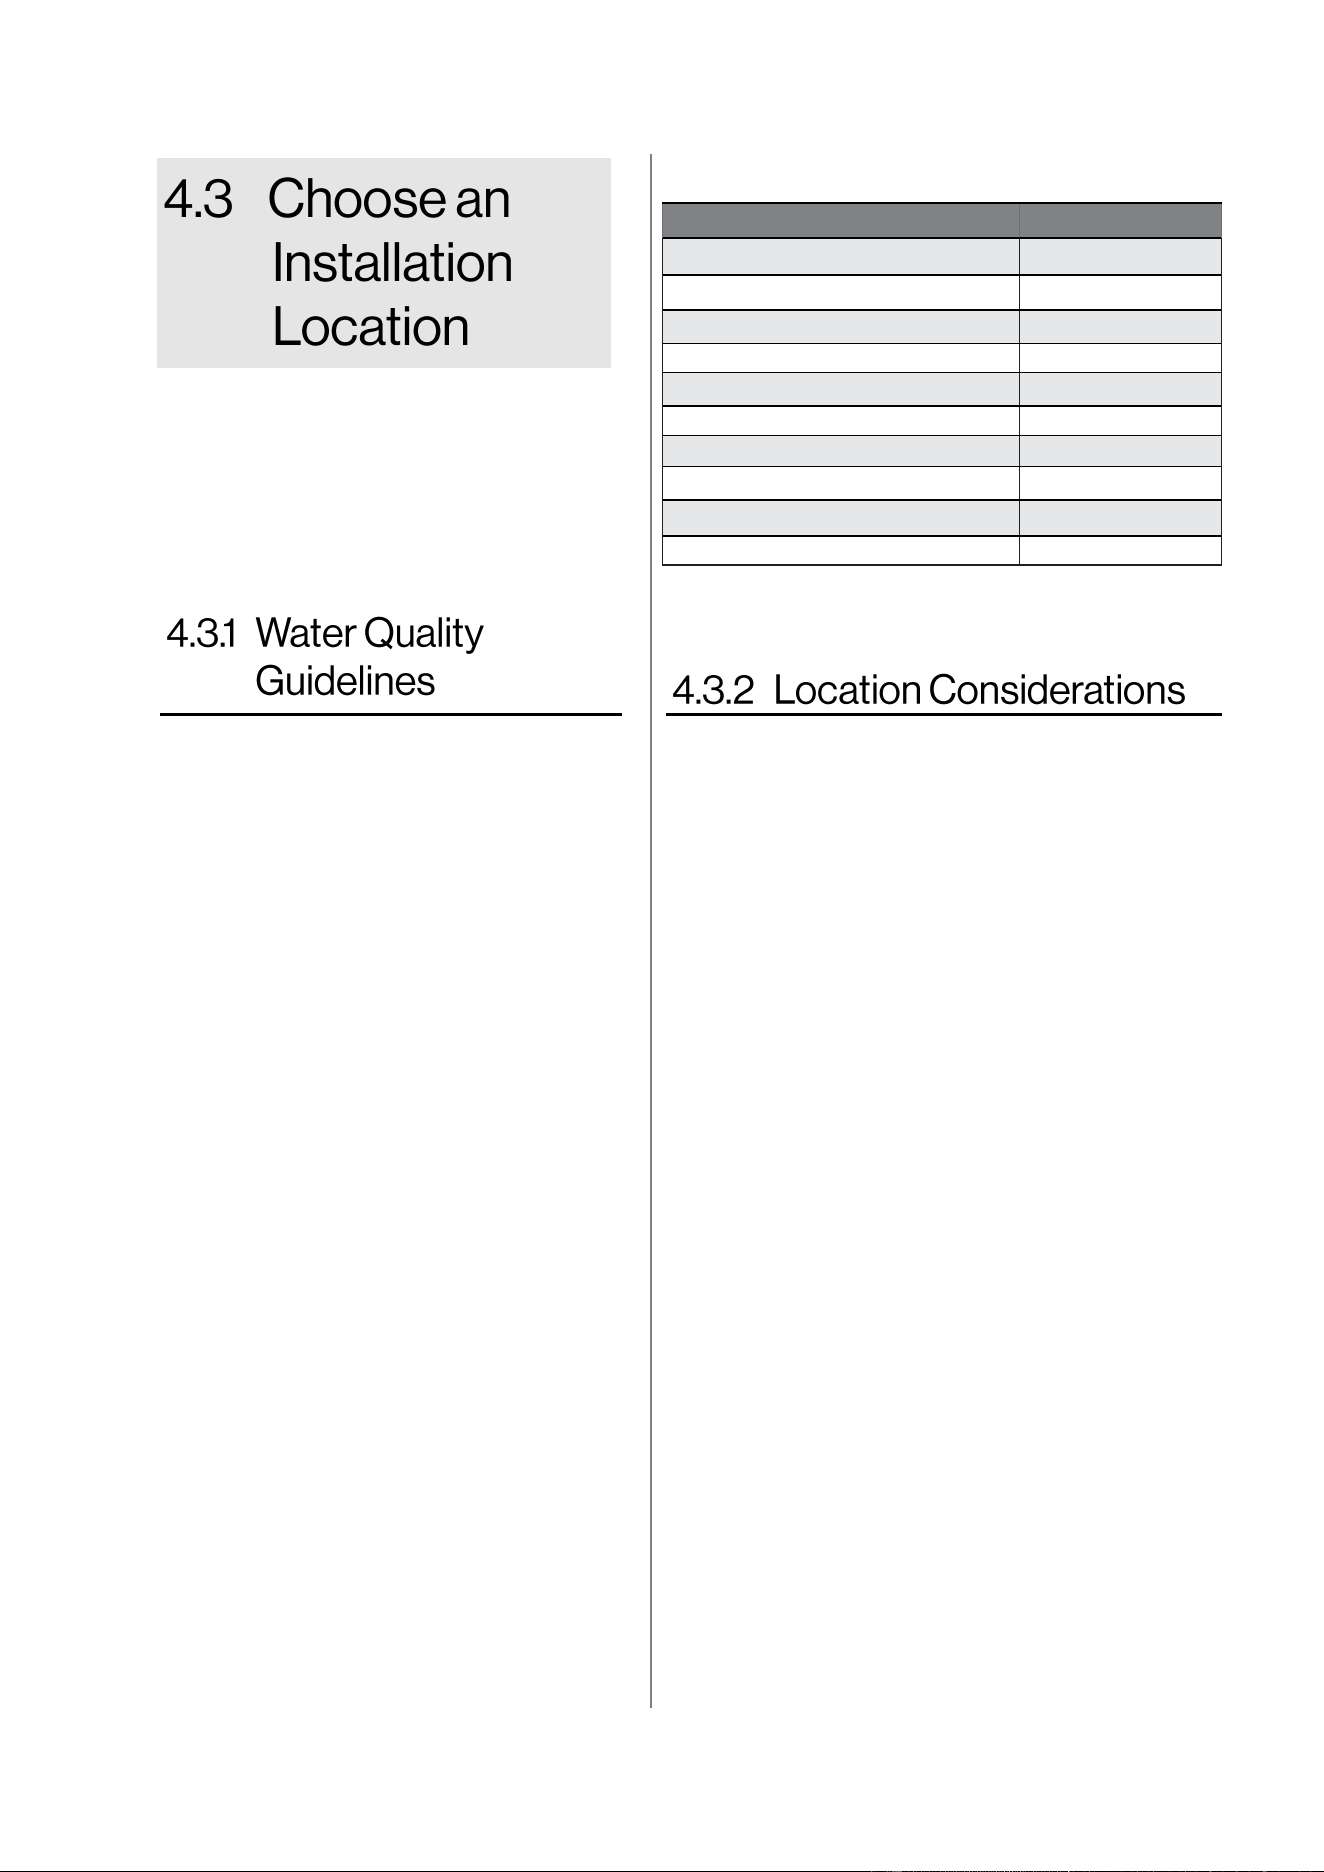
Table 5: Water Quality Guidelines
This section provides information on the
importance of water quality to the water
heater. The information is intended to serve
as a general guide only and is not a
complete list of water quality guidelines.
Consideration of care for your water heater
should include evaluation of water quality.
The water must be potable, free of corrosive
chemicals, sand, dirt, or other contaminants.
It is up to the trained and qualified
professional to ensure the water does not
contain corrosive chemicals or elements that
can affect or damage the water heater.
Water that contains chemicals exceeding the
levels listed below can damage the water
heater. Replacement of components due to
water quality damage is not covered by the
warranty.
If you install this water heater in an area that
is known to have hard water or that causes
scale build-up, the water must be treated
and may require a more frequent flushing
schedule.
When selecting an installation location, you
must ensure that all water heater clearances
will be met. Consider the installation
environment and water quality. Requirements
for the water lines and electrical connections
can be found in their respective installation
sections in this manual.
• Install on a level surface. Shim the base
as necessary if leveling is required.
• Install near a floor drain. The heater
should be located in an area where
leakage of the tank or connections will
not result in damage to the area adjacent
to the heater or to the lower floors of the
structure.
• Install as closely as possible to the major
points of hot water usage.
• Hot water piping should be as short as
possible and it should be insulated to
prevent heat loss.
• The ambient temperature where the
water heater is installed must be
between 32°-122°F (0-50°C).
• In coastal regions, the water heater
should be installed so that it is sheltered/
protected from exposure to sea breeze.
Exposure to salty spray or breeze can
cause corrosion of the water heater.
• Damage and repair due to corrosive
compounds in the air is not covered by
warranty.
Contaminant Maximum Level
Total Hardness Up to 200 mg/L
Aluminum * Up to 0.2 mg/L
Chlorides * Up to 250 mg/L
Copper * Up to 1.0 mg/L
Dissolved Carbon Dioxide (CO2) Up to 15.0 mg/L
Iron * Up to 0.3 mg/L
Manganese * Up to 0.05 mg/L
pH * 6.5 to 8.5
TDS (Total Dissolved Solids) * Up to 500 mg/L
Zinc * Up to 5 mg/L
Rinnai Commercial Electric Water Heater Installaon and Operaon Manual 13
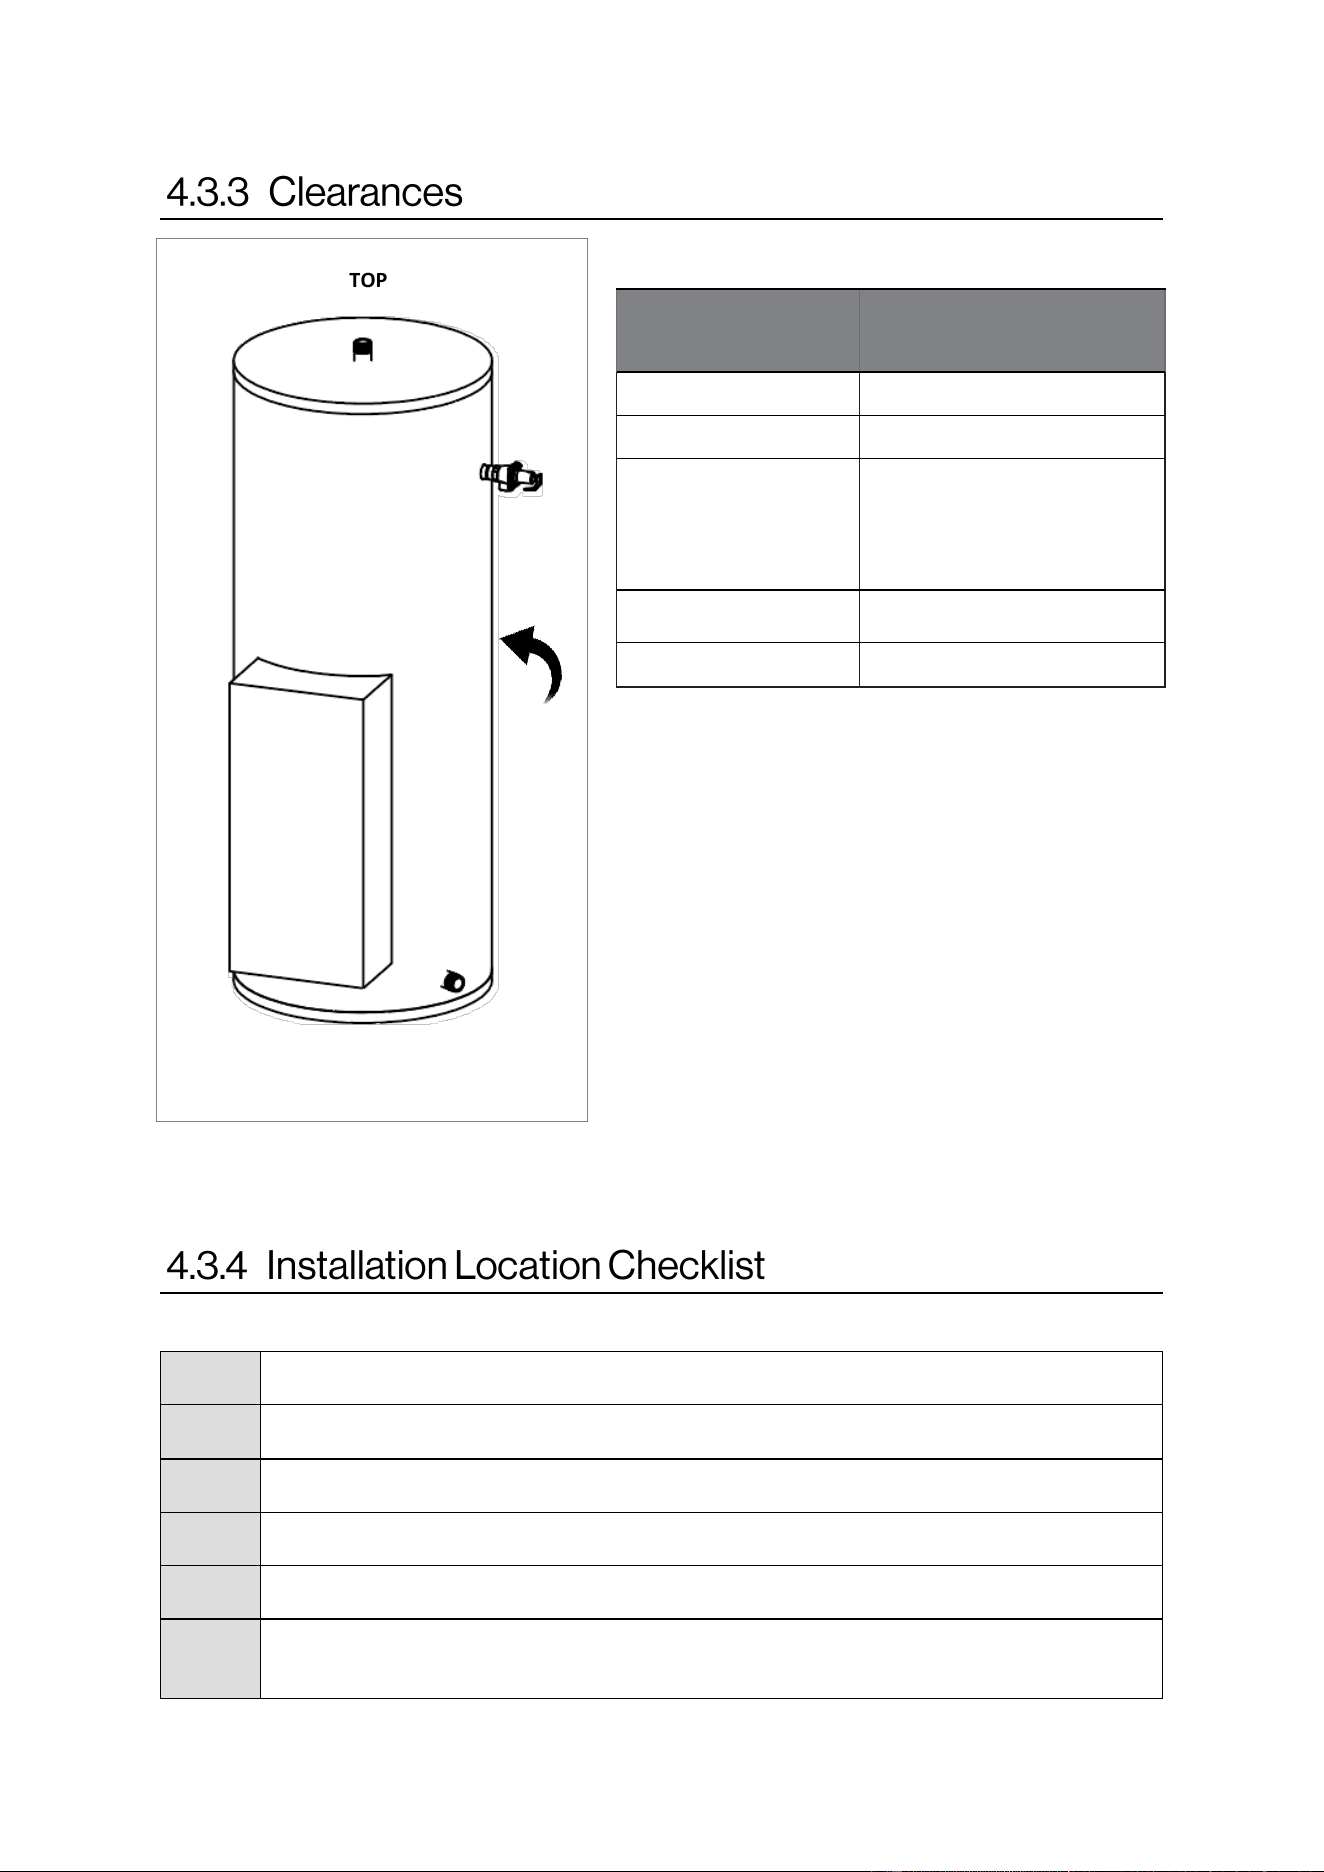
Figure 5: Clearances
The water heater is installed on a flat surface.
The water heater location complies with the required clearances.
The water heater is installed near a floor drain or has a method of draining.
The ambient room temperature is between 32°-122° F (0-50 C°).
A standard 240 VAC, 60 Hz properly grounded electrical source is available.
The installation must conform with local codes or, in the absence of local codes, with the
National Electrical Code, NFPA 70 or the Canadian Electrical Code.
Use this checklist to ensure you have selected the correct location for the water heater.
Location Clearance to Combusti-
bles and Non-
Combustibles
Top 12 in. (305 mm)
Bottom/Ground 0 in.
Front 0 in.
Clearance for servicing is 24
in. (610 mm) in front of water
heater.
Back 0 in.
Sides (Left and Right) 0 in.
TOP
FRONT
BOTTOM/GROUND
SIDE
BACK
Table 6: Clearances

14 Rinnai Commercial Electric Water Heater Installaon and Operaon Manual
• The piping (including soldering materials) and components connected to this appliance must be
approved for use in potable water systems.
• Purge the water line to remove all debris and air. Debris will damage the water heater.
• The appliance must not be connected to a system that was previously used with a non-potable
water heating appliance.
• DO NOT introduce toxic chemicals such as those used for boiler water treatment to the potable
water used for space heating.
To connect the water supply, follow the instructions below.
Water connections to the water heater should follow all state and local plumbing codes. If this is a
standard installation, refer to the “Piping Diagram for Basic Installation” below.
1. Plumb the cold water supply line to the water heater on the 1-1/4 in. MNPT connection at the
bottom of the water heater.
2. Plumb the hot water supply line to the 1-1/4 in. MNPT connection.
3. Install a thermal expansion tank on the cold supply to control expansion as water is heated in a
closed system.
PIPING DIAGRAM FOR BASIC INSTALLATION
KEY
This is not an engineered drawing. It is intended only as
a guide and not as a replacement for professionally
engineered project drawings. This drawing is not
intended to describe a complete system. It is up to the
contractor/engineer to determine the necessary
components and configuration of the particular system
being installed. This drawing does not imply compliance
with local building code requirements. It is the
responsibility of the contractor/engineer to ensure
installation is in accordance with all local building codes.
Confer with local building officials before installation.
Ball Valve
T&P Valve
Check Valve
Drain Valve
Expansion Tank
Circulating Pump
IMPORTANT
Cold supply
Hot supply
Figure 6: Piping Diagram
Rinnai Commercial Electric Water Heater Installaon and Operaon Manual 15
Water discharged from
the pressure relief
valve could cause severe burns instantly or
death from scalds.
• This water heater is provided with
a properly rated/sized and
certified combination temperature
- pressure relief valve by the
manufacturer. The valve is
certified by a nationally
recognized testing laboratory that
maintains periodic inspection of
production of listed equipment of
materials as meeting the
requirements for Relief Valves for
Hot Water Supply Systems, ANSI
Z21.22, CSA 4.4, and the code
requirements of ASME.
• If replaced, the new valve must meet
the requirements of local codes, but
not less than a combination
temperature and pressure relief valve
rated/sized and certified as indicated in
the above paragraph. The new valve
must be marked with a maximum set
pressure not to exceed the marked
hydrostatic working pressure of the
water heater (150 psi = 1,035 kPa) and
a discharge capacity not less than the
water heater Btu/hr or kW input rate as
shown on the water heater’s model
rating plate.
• The pressure relief valve must be
manually operated once a year to
check for correct operation.
• The discharge line from the
temperature and pressure relief valve
should pitch downward and terminate
6 in. (152 mm) above drains where
discharge will be clearly visible.
WARNING
• The discharge end of the line shall be
plain (unthreaded) and a minimum of 3/4
in. nominal pipe diameter. The discharge
line material must be suitable for water at
least 180°F (82°C).
• The pressure relief valve must be
installed near the hot water outlet.
• DO NOT place any other valve or shut off
device between the pressure relief valve
and the water heater.
• If a pressure relief valve discharges
periodically, this may be due to thermal
expansion in a closed water supply
system. Contact the water supplier or
local plumbing inspector on how to
correct this situation. Do not plug the
pressure relief valve.
• Protect the temperature and pressure
relief valve and relief valve discharge line
from freezing. Do not plug or restrict flow
of the pressure relief valve.
• DO NOT plumb the pressure relief valve
with any other drain; it must be plumbed
independently to drain.
• DO NOT plug the pressure relief valve
and do not install any reducing fittings or
other restrictions in the relief line. The
pressure relief line should allow for
complete drainage of the valve and the
line.
Pressure Relief Valve Maintenance:
For proper care of this approved temperature
and pressure relief valve, it is recommended
that the valve is manually operated once a
year. In doing so, it will be necessary to take
precautions with regard to the discharge of
potentially scalding hot water under pressure.
Ensure discharge water has a safe place to
flow. Contact with your body or other
property may cause damage or harm.
16 Rinnai Commercial Electric Water Heater Installaon and Operaon Manual
WARNING
• Before removing any access panels or servicing the water heaters make sure the electrical
supply to the water heater is turned off. Failure to do so could result in death or serious bodily
injury.
• The installation must conform to local code authority, and in the absence of local codes, the
installation must comply with NEC, NFPA 70 or the Canadian Electrical Code.
• The water heater must be electrically grounded in accordance with local codes and ordinances
or, in the absence of local codes, in accordance with the National Electrical Code, ANSI/ NFPA
No. 70.
• Voltage applied to the heater should not vary more than 5% to –10% of the model and rating
plate marking for operation.
• DO NOT turn on electrical supply before filling the water heater with water.
Tables 7 and 8 below provide the total connected heating element load in amperes for branch
circuit conductor and over-current protection sizing. Single-phase heaters are two wire circuits.
Three-phase heaters are three wire circuits. In addition to the foregoing, a grounded conductor is
required.
The rating of the over-current protection must be computed on the basis of 125% of the total
connected load amperage. Where the standard ratings and settings do not correspond with this
computation, the next higher standard rating or setting should be selected.
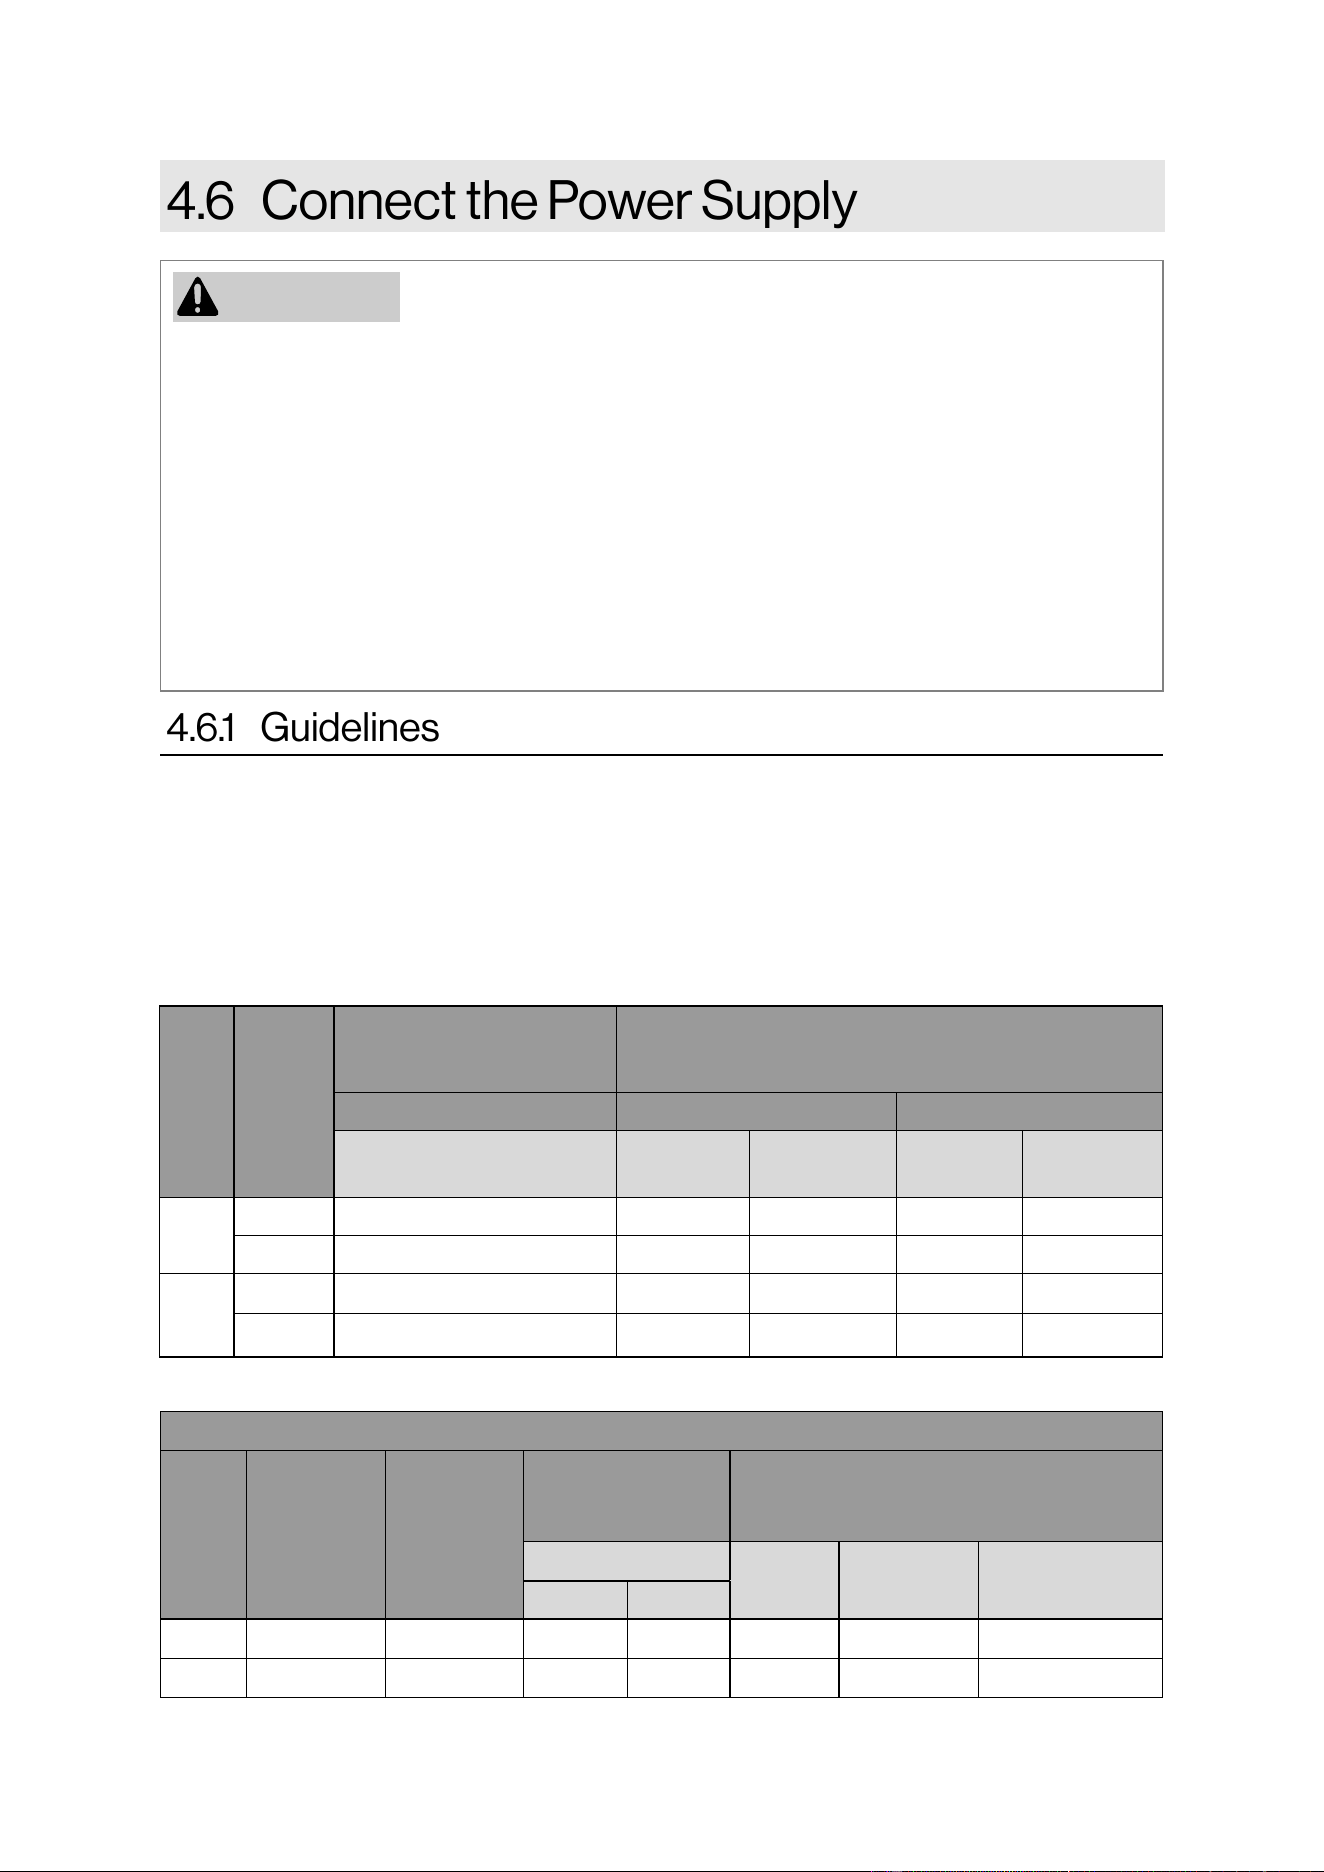
Table 7: Overcurrent Protection
Table 8: Total Connected Heating Element Load
kW
RECOMMENDED OVER
CURRENT PROTECTION
RATING
240
PHASE
VOLTAGE COPPER ALUMINUM
240
WIRE
GAUGE
EMT
CONDUIT
WIRE
GAUGE
EMT
CONDUIT
12.3
1 65 6 3/4 4 1
3 40 8 3/4 8 3/4
18
1 95 3 1 1 1 1/4
3 55 6 1 4 1 1/4
ELECTRICAL CHARACTERISTICS
INPUT
kW
NO.OF
ELEMENTS
ELEMENTS
WATTAGE
FULL LOAD
CURRENT IN
AMPERES
SURFACE MOUNTED
240V PHASE
NO.OF
T’STATS
NUMBER
OF FUSES
NUMBER OF
CONTACTORS
1 3
12.3 3 4,100 50 29 1 6 2
18 6 3,000 75 43.3 1 12 4
Rinnai Commercial Electric Water Heater Installaon and Operaon Manual 17
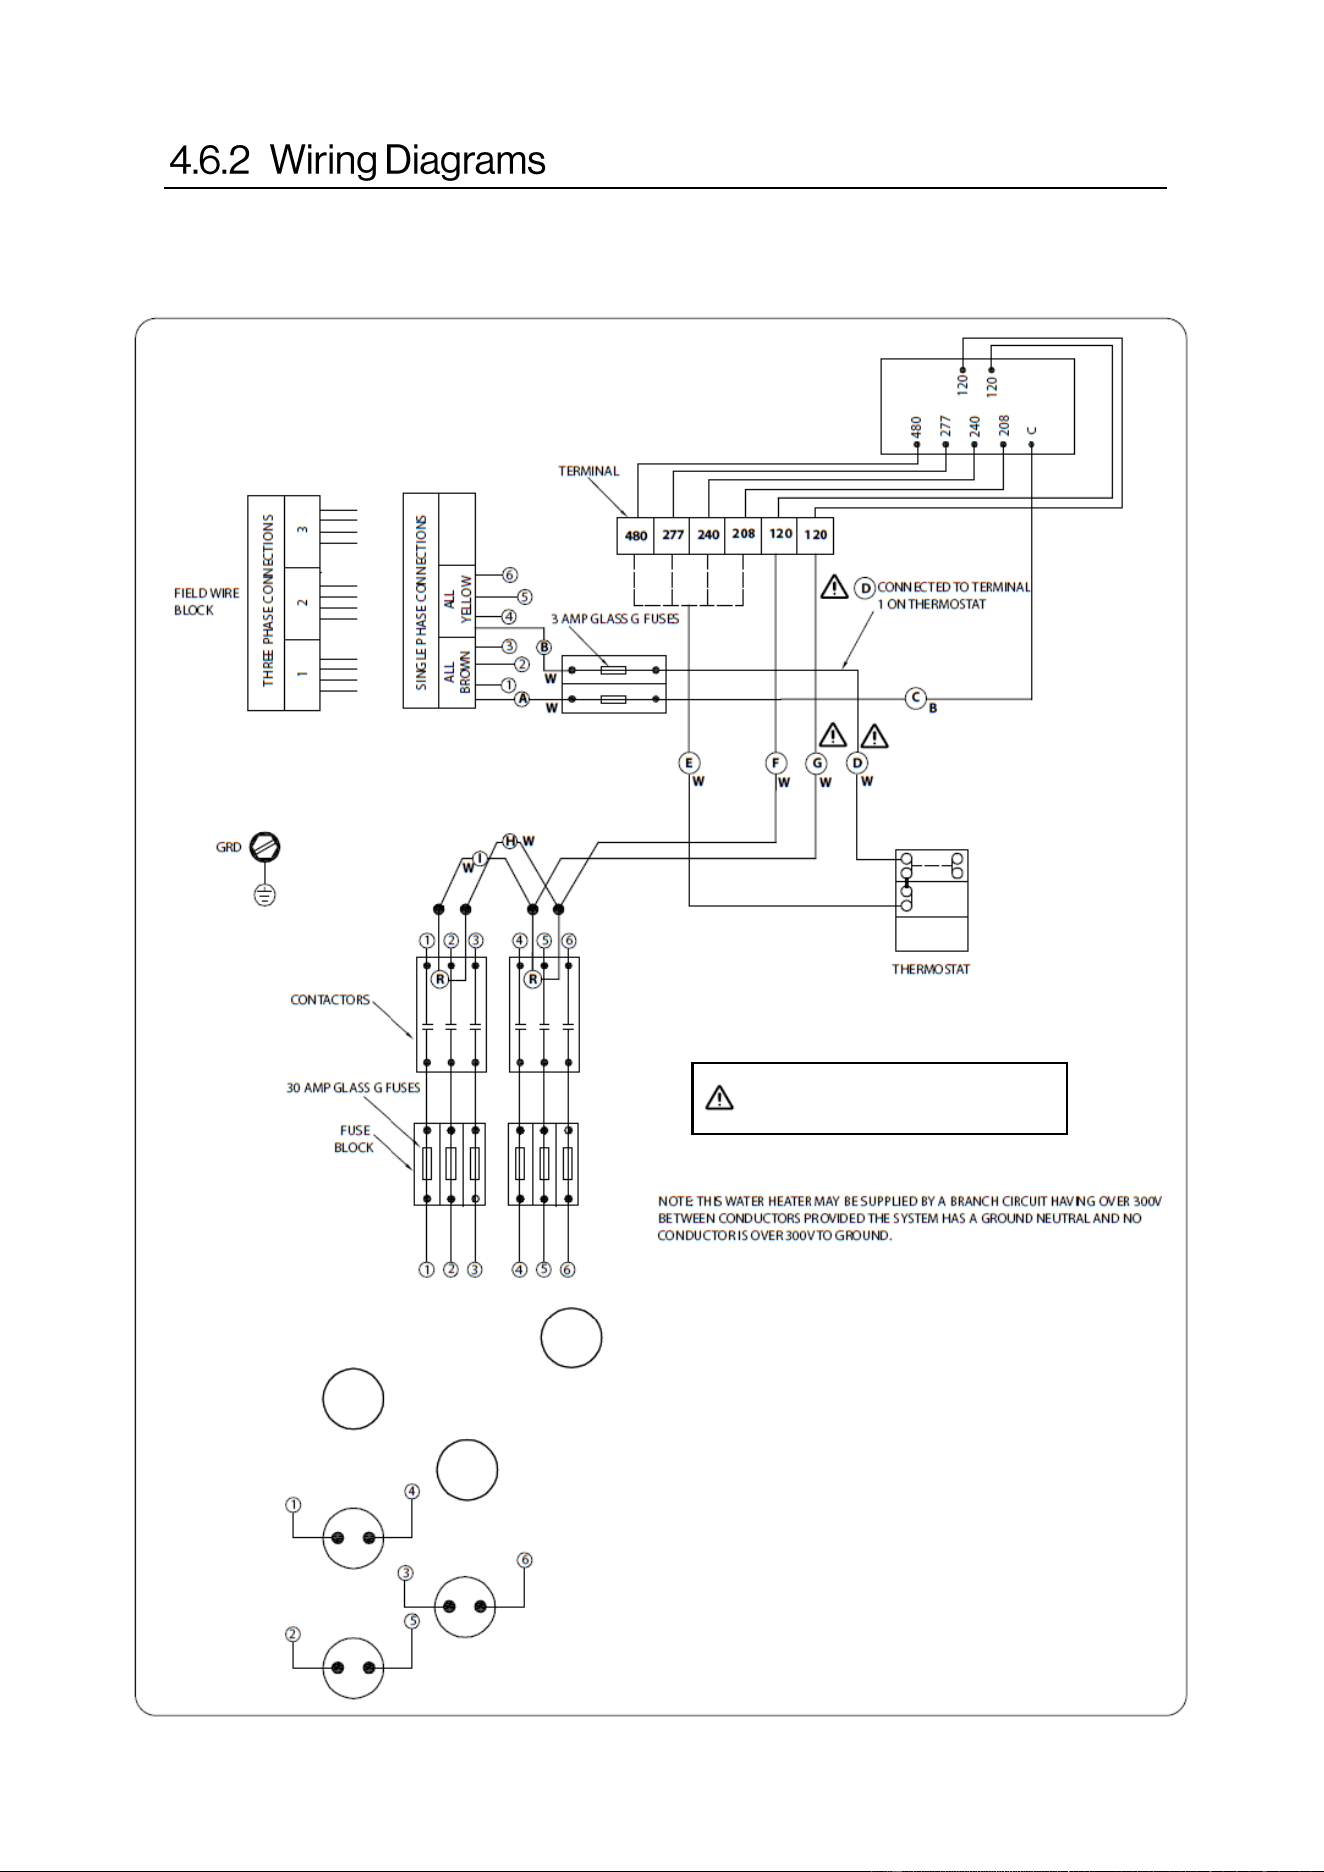
The following describes the heater circuits and includes wiring diagrams. All heater circuits are
designed for 60/50 hertz alternating current. The water heater circuit wiring is 12 AWG, AWM, or
TEW type, rated 240 volts, 220˚F. Fusing consists of two 30 amp fuses for each element. Fusing
is an optional feature for Canadian models.
Figure 7: Three Element Single and Three Phase Power Circuits
THERMOSTAT AND HIGH LIMIT CONTROLS
OPERATE AT INCOMING LINE VOLTAGE.
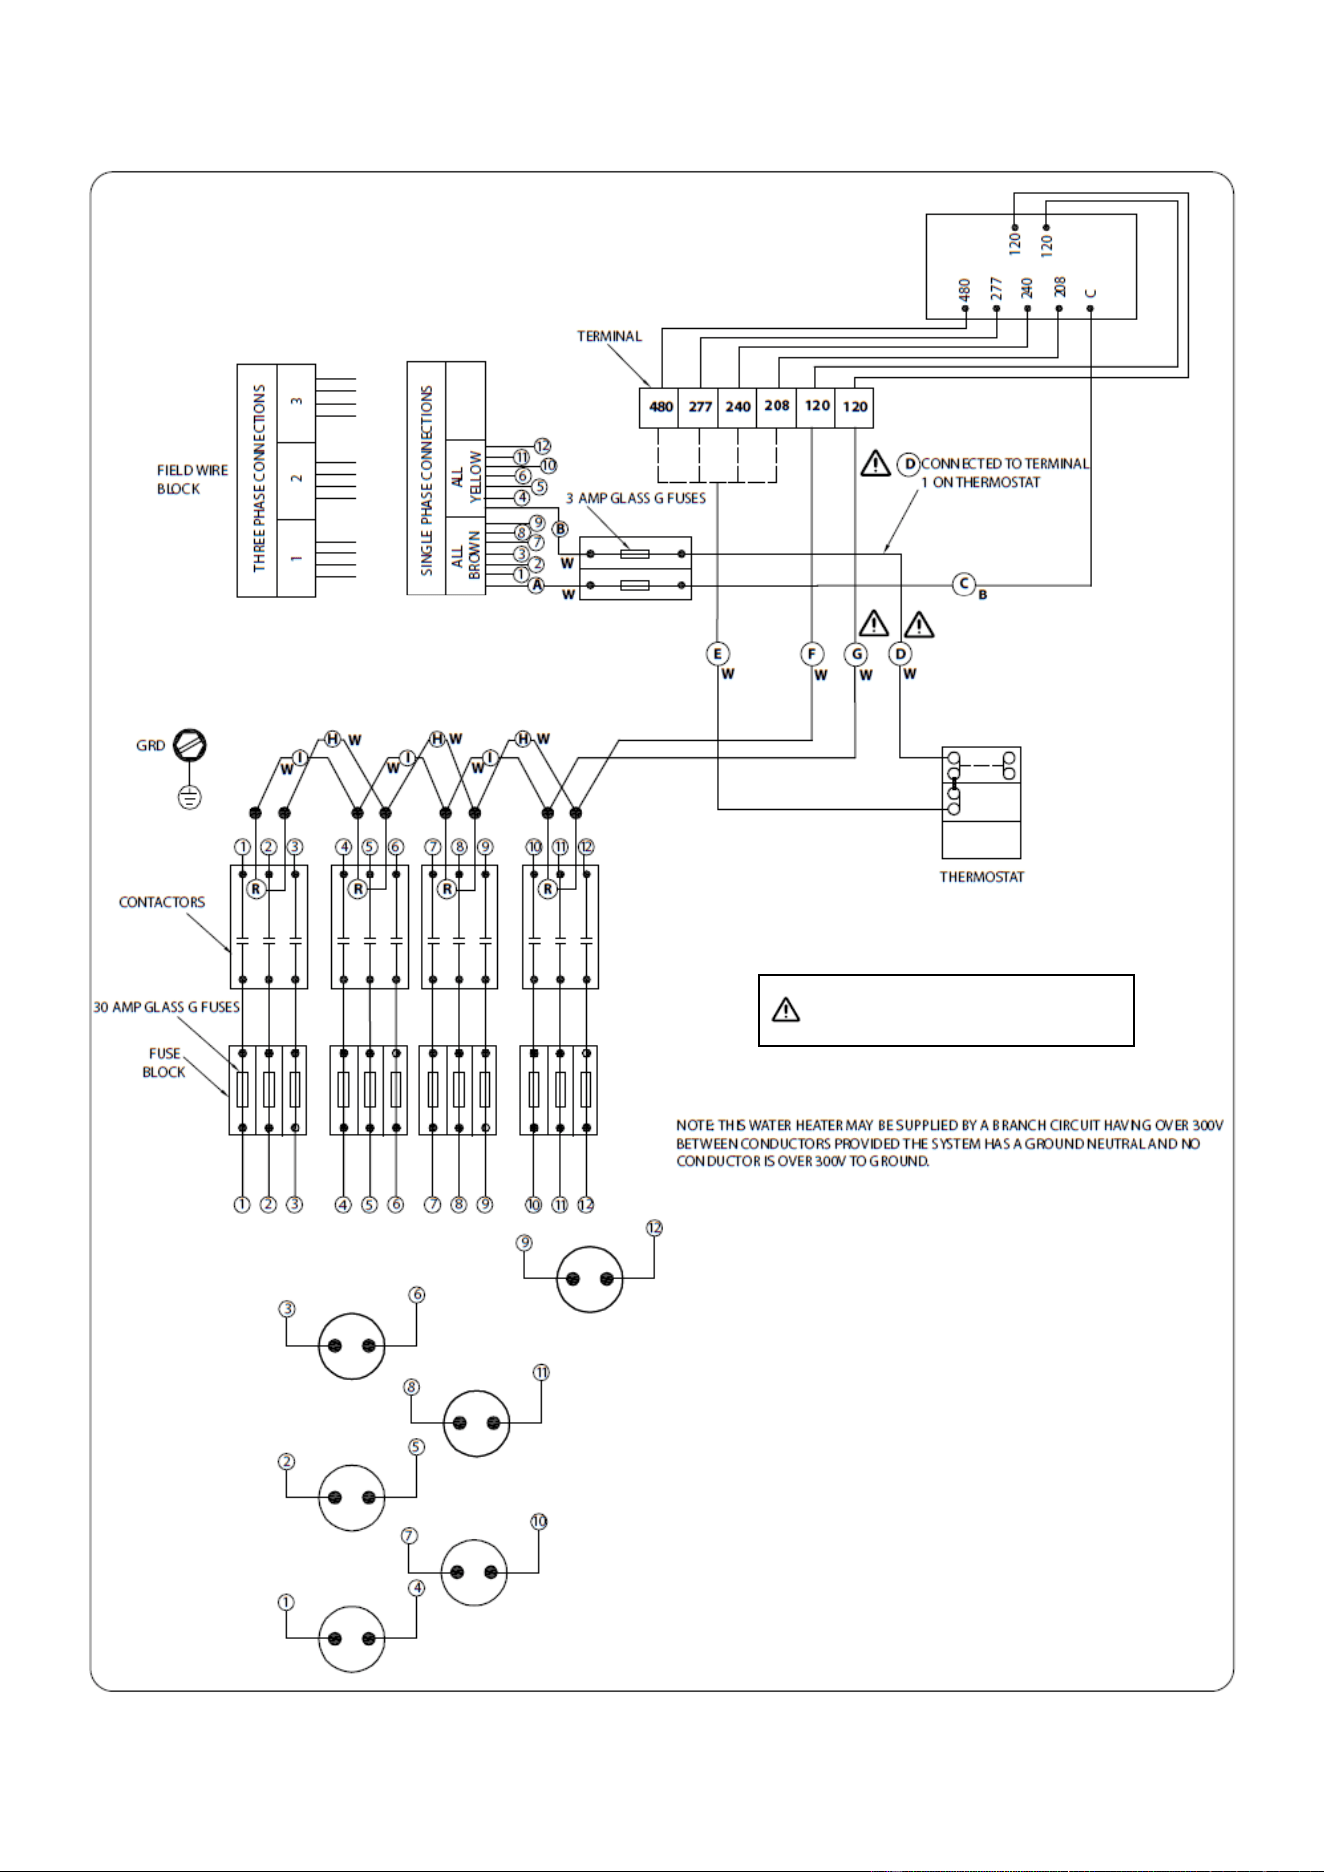
18 Rinnai Commercial Electric Water Heater Installaon and Operaon Manual
Figure 8: Six Element Single and Three Phase Power Circuits
THERMOSTAT AND HIGH LIMIT CONTROLS
OPERATE AT INCOMING LINE VOLTAGE.
Rinnai Commercial Electric Water Heater Installaon and Operaon Manual 19
• Check the rating plate of the water heater against the electrical supply for correct voltage.
• The water heater is internally wired from the factory to the field connection terminal block for a
single phase connection. For three phase connections refer to the wiring diagrams in this
manual and:
1. Disconnect the yellow and brown wires from the field terminal block legs 1 and 2.
2. Reconnect yellow and brown wires to legs 1, 2 and 3 of the field terminal block.
3. Ensure that the yellow and brown wires from each element are not on the same leg of the
terminal block. If both yellow and brown wires from the same element(s) are on the same
leg, this will not supply the correct power and the element(s) will not work correctly.
4. Connect incoming power to field terminal block legs 1, 2 and 3.
• Provide a separate branch circuit with overcurrent protective device and suitable disconnection
means for each water heater. Refer to Table 7 for minimum branch circuit sizing.
• Non-metallic plumbing, dielectric unions, and other materials can cause the water heater to be
electrically isolated, and the branch circuit should include one of the following means for
grounding.
• Metallic conduit or metallic sheathed cable approved for use as a grounding conductor and
installed with fittings approved for the purpose.
• Non-metallic sheathed cable, or metallic conductor or metallic sheathed cable not approved for
use as a grounding conduction, shall include a separate conductor for grounding. It shall be
connected to the grounding means of the water heater (1/4in green screw) and that of the
electrical distribution box. Terminate stranded grounding conductions with suitable pressure
connectors.
20 Rinnai Commercial Electric Water Heater Installaon and Operaon Manual
Complete the following checklist when water heater installation is complete. You should be able to
answer YES to each question. If you answer NO to any question, installation is not complete. Refer
to the applicable section in the Rinnai Water Heater Installation and Operation Manual for additional
information.
INSTALLATION LOCATION
YES NO
Is the water heater on a flat surface?
□ □
Does the water heater comply with required clearances?
□ □
Does the water have means for draining?
□ □
Is the ambient temperature between 32˚F and 122˚F?
□ □
PLUMBING
YES NO
Have the water lines been purged of all debris? □ □
Have you verified the hot and cold water lines to the water heater are not
interchanged?
□ □
Does the water supply to the heater have adequate pressure? Is it free of chemi-
cals? Did you verify it does not exceed total hardness that will damage the heat
exchanger?
□ □
Have you verified that no toxic chemicals were introduced to the potable water?
□ □
Have water quality issues (if any) been addressed? □ □
Have you performed the leak and pressure test for the water heater and plumbing
system?
□ □
TEMPERATURE AND PRESSURE RELIEF VALVE (T&P)
YES NO
Does the T&P valve comply with the standard for Relief Valves for Hot Water Supply
Systems, ANSI Z21.22, CSA 4.4, and the code requirements of ASME?
□ □
Did you verify the T&P is rated up to 150 psi and (at least) the maximum input of the
water heater?
□ □
Is the discharge from the T&P piped to the ground or into a drain system as per local
codes?
□ □
Is the discharge line from the T&P pitched downward and does it terminate 6 in. (152
mm) above the drains?
□ □
Is the discharge end of the line plain (unthreaded) and a minimum of 3/4 in. diameter?
□ □
Is the discharge line material suitable for at least 180°F (82°C) water?
□ □
Did you take measures to protect the T&P and T&P discharge line from freezing?
□ □
Have you verified the T&P is not plumbed with any other drain lines?
□ □
Have you verified the T&P is not plugged and that reducing fittings, valves, or other
restrictions are not installed in the relief line?
□ □
ELECTRICAL SUPPLY
YES NO
Confirm the electricity is supplied from a 240VAC or 208VAC, 60Hz power source.
□ □
Confirm the installation conforms to local code authority, and in the absence of local
codes, the NEC, NFPA 70, or the Canadian Electrical Code.
□ □
Have you checked to make sure that the voltage is not varying more than 5% to –10%
of the model and rating plate?
□ □
Have you properly grounded the circuit?
□ □
Is the gauge wire and conduit sized properly for the number per table 7?
□ □
If the electrical supply is single-phase, did you follow the wiring steps in the manual?
□ □
Rinnai Commercial Electric Water Heater Installaon and Operaon Manual 21
•
Do not use this appliance if any part has
been under water. Immediately call a
trained and qualified professional to
inspect the appliance and to replace any
part of the system which has been under
water.
•
DO NOT use an extension cord or an
adapter plug with this appliance.
•
DO NOT turn on water heater unless it is
filled with water.
•
DO NOT turn on water heater if cold
water supply shut-off valve is closed.
•
Hydrogen gas can be produced in a hot
water system served by this water heater
that has not been used for a long period
of time.
DANGER
Full power is present whenever the
cabinet door is opened, even with the pilot
switch turned off.
CAUTION
Fill tank with water before operating or
supplying power in order to prevent
property damage.
Never turn on power to the water heater
without being certain the water heater is filled
with water and a temperature and pressure
relief valve is installed in the relief valve
opening.
Before removing any access panels or
servicing the water heater, make sure the
electrical supply to the water heater is
turned “OFF.”
Failure to do so could result in death,
serious injury, or property damage.
WARNING
CAUTION
Hydrogen gas is extremely flammable. To
reduce risk of injury, hot water fixtures must
be opened for several minutes before using
any electrical appliance connected to the
hot water supply. Do not smoke or present
an open flame near the faucet at the time of
opening.
1. The electrical disconnect switch should
be off, or the building electrical supply
should be turned off.
2. Close the water heater drain valve.
3. Open a nearby hot water fixture to allow
for the water pressure to purge air from
the system.
4. Open the cold water inlet shut-off valve
to allow water to fill the water heater and
plumbing.
5. Close the hot water fixture from step 3
once water is flowing freely without any
air purging.
6. The heater is now full of water.
•
Any alteration to the appliance or its controls
can be dangerous and will void the warranty.
•
If you install this water heater in an area that
is known to have hard water or that causes
scale build-up the water must be treated and/
or the heat exchanger flushed regularly.
Rinnai provides a “Scale Control System” that
offers superior lime scale prevention and
corrosion control by feeding a blend of control
compounds into the water supply. Damage
and repair due to corrosive compounds in the
air is not covered by warranty.
•
Always check the water temperature before
entering a shower or bath.
22 Rinnai Commercial Electric Water Heater Installaon and Operaon Manual
Make sure the tank is filled with water before
placing the water heater in operation. To
comply with safety regulations and reduce
the risk of injury, the thermostat of the water
heater has been set to a factory setting of
120˚F. This is the preferred starting point for
setting the control for general purpose hot
water. To meet commercial water needs,
the thermostat is adjustable to 170˚F.
Water temperatures over 125°F (52°C) can
cause severe burns or scalding resulting in
death.
Hot water can cause first degree burns with
exposure for as little as:
•
3 seconds at 140°F (60°C)
•
20 seconds at 130°F (54°C)
•
8 minutes at 120°F (49°C)
Children, disabled, or elderly are at highest
risk of being scalded.
Feel water before bathing or showering.
DANGER
IMPORTANT
Check local codes for the maximum water
temperature setting allowed when used in
nursing homes, schools, day care centers,
and all other public applications.
The power to the
heater must be
disconnected before adjusting the
temperature setting of the thermostat.
DANGER
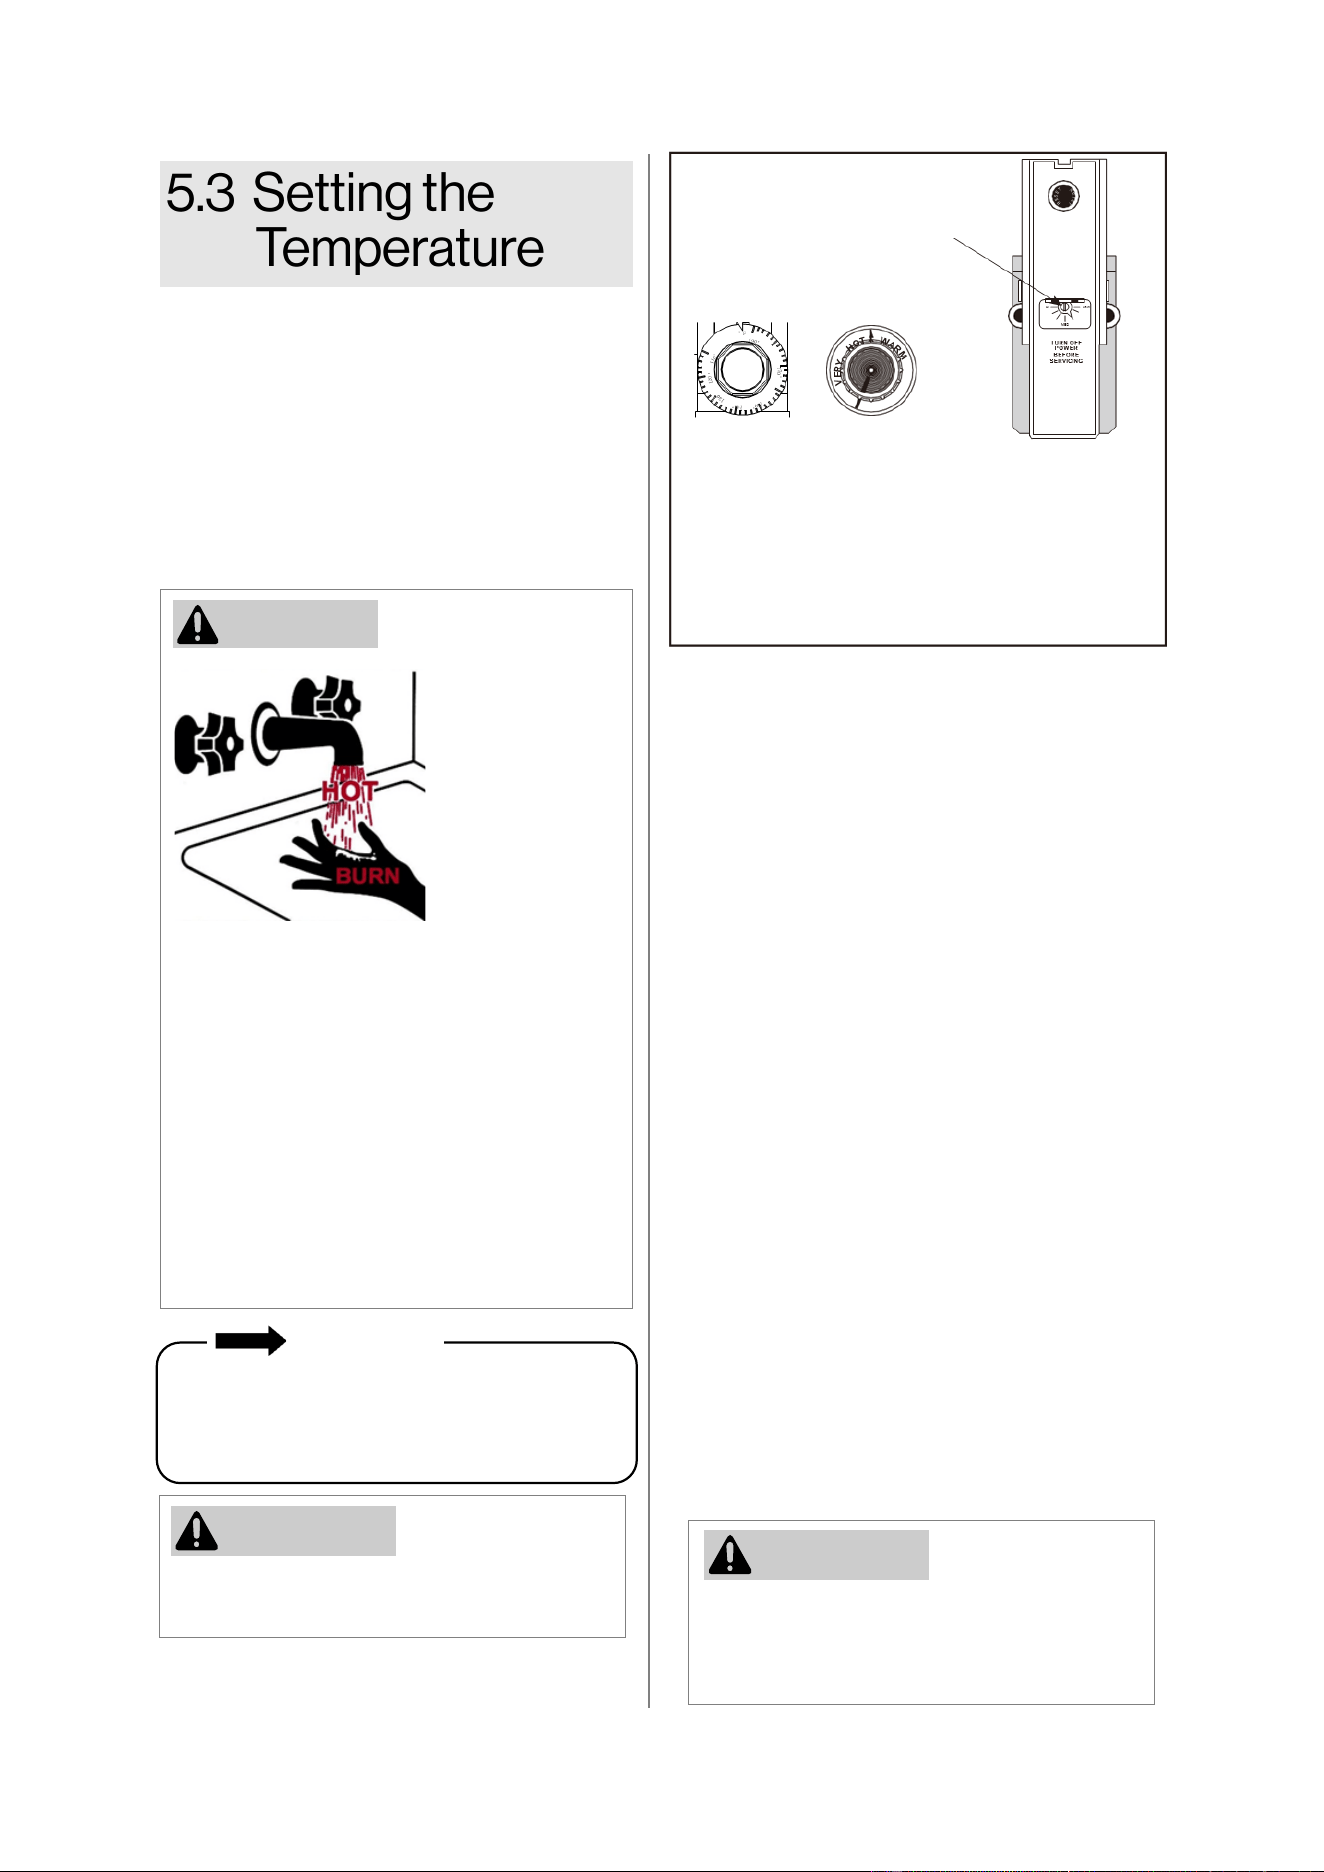
Figure 9
The cause of a high
limit temperature
condition must be investigated by a
qualified service personnel and corrective
action taken before placing the water
heater in service again.
CAUTION
• There is one thermostat that controls all
heating elements. It is located behind the
removable pad of glass fiber insulation in the
control compartment.
• Adjust thermostat dial pointer with a small
screwdriver to the desired water temperature
setting (Figure 9). THERMOSTAT
PROTECTIVE COVER SHOULD NOT BE
REMOVED. The thermostat is adjustable
from a “LOW” to “HI” setting. An approximate
water temperature of 150°F (66°C) is
accomplished when the temperature dial
pointer is in the “MED” position. Each mark
above and below the “MED” position
indicates an approximate 10°F (6°C) change
in water temperature. Replace insulation,
close access door and turn power ”ON”, and
the water heater is operational.
• NOTE: A thermometer installed at or near
the outlet of the water heater and/or storage
tank will result in the most accurate outlet
water temperature settings.
• HIGH TEMPERATURE LIMIT CONTROL —
The water heater is equipped with a manual
reset high temperature limiting control(s). If
for any reason the water temperature
becomes excessively high, The High
Temperature Limit Control breaks the power
to the heating elements. Once this control
opens, it must be manually reset.
To adjust the water
temperature on Surface
Mounted Thermostat models,
insert a small straight
screwdriver into slotted screw
of indicator and move indicator
to desired setting.
Surface Mounted
Thermostat
E-10 Model Only
CAUTION!!
Hotter water
increases the
risk of
SCALDING!
To adjust the water temperature
on Immersion Thermostat
models, turn thermostat dial to
align desired mark with index
line above thermostat. See
“Operation” section of this
manual for details.
Immersion Thermostat
Rinnai Commercial Electric Water Heater Installaon and Operaon Manual 23
The power must be
disconnected to the
water heater before attempting to reset the
limit control.
WARNING
• Allow the water in the tank to cool before
attempting to reset the high temperature
limit control.
• Press the red “RESET” button located
above the thermostat. The thermostat
protective cover SHOULD NOT be
removed.
Before removing any
access panels or
servicing the water heater, make sure the
electrical supply to the water heater is turned
“OFF.” Failure to do so could result in death,
serious injury, or property damage.
WARNING
Not Enough or No Hot Water
• Be certain the electrical disconnect
switch serving the water heater is in the
on position.
• Check the fuses in the electrical
disconnect switch and on the heater.
• If the water was too hot, and now it is
cold, the high limit switch may have been
activated. See the temperature section of
this manual for how to reset the high limit
controls.
• There may have been too large of a
demand for the tank recovery to keep up.
• Cooler incoming water temperature will
lengthen the time required to heat water
to the desired temperature.
• Look for a hot water leak.
• Scale or sediment build up may be
affecting the function of the water heater.
Abnormal Sounds
• Sediment or lime scale build up on the
elements causes sizzling and hissing
noises when the heater is in operation.
The tank and element should be cleaned.
See the maintenance portion of the
installation and operation manual.
• Contactors or switches may make
clicking noises during normal operation
which is normal. Transformers may also
produce a normal humming noise.
Water Leak
• Ensure the water heater drain valve is
closed completely.
• If the T&P valve is leaking there could be
excessive water temperature, excessive
water pressure, or a faulty relief valve.
• Excessive water pressure is the most
common cause of a T&P valve leak.
Check the expansion tank to ensure that
it is pressurized and working properly.
24 Rinnai Commercial Electric Water Heater Installaon and Operaon Manual
This water heater must be inspected
annually by a trained and qualified
professional. Repairs and maintenance
shall be performed by a trained and
qualified professional. The trained and
qualified professional must verify proper
operation after servicing.
To protect yourself from harm, before
performing maintenance:
•
Before removing any access panels or
servicing the water heater, make sure
the electrical supply to the water heater
is turned “OFF”
•
Turn off the incoming water supply. This
can be done at the isolation valve on the
cold water supply of the water heater or
by turning off the water supply to the
building.
WARNING
The following maintenance items are required for
the proper operation of your water heater.
ANODE ROD
Each water heater contains at least one anode
rod, which will slowly deteriorate due to
electrolysis. The anode rod is a sacrificial
component which prolongs the life of the water
heater by protecting the glass lined tank from
corrosion. Higher setpoint temperatures and
water softening methods can increase the rate of
the anode rod deterioration. The anode rod
should be inspected once every 3 years, and
replaced when needed by following the below
steps.
1. Turn off electric supply to the water heater.
2. Shut off the water supply and open a nearby
hot water fixture in order to depressurize the
tank.
3. Drain 5 gallons of water by using the drain
valve on the bottom of the tank, then close
the drain valve.
4. Remove the anode rod.
5. Inspect the anode rod. If a majority of the
rods diameter is less than 3/8in diameter, or
if the support wire is visible for a major length
of the rod, then it will need to be replaced.
6. Use Teflon tape or pipe sealant on the
threads and install a new anode rod.
7. Turn on the cold water supply and open a
nearby hot water fixture in order to purge air
from the water system. Check for any leaks
around the newly installed anode rod.
8. Turn on the power supply to the water
heater.

Rinnai Commercial Electric Water Heater Installaon and Operaon Manual 25
TEMPERATURE & PRESSURE RELIEF
VALVE
Operate the pressure relief valve manually
once a year. In doing so, it will be necessary
to take precautions with regard to the
discharge of potentially scalding hot water
under pressure. Ensure discharge has a
safe place to flow. Contact with your body or
other property may cause damage or harm.
Testing the pressure relief valve should
only be performed by a trained and
qualified professional. Water discharged
from the pressure relief valve could cause
severe burns instantly or death from scalds.
WARNING
LIME/SCALE BUILD-UP
Scale build-up is caused by hard water and
can be accelerated if the water heater is set at
a high temperature. Refer to section “6.2
Flushing the Water Heater” for more
information. Refer to section “4.3.1 Water
Quality Guidelines” to determine if your water
needs to be treated or conditioned.
The water must be potable, free of corrosive
chemicals, sand, dirt, or other contaminates. It
is up to the installer to ensure the water does
not contain corrosive chemicals or elements
that can affect or damage the elements or
water heater.
Water that contains chemicals exceeding
acceptable levels, may damage the water
heater. Replacement of the water heater or
components due to water quality damage is
not covered by the warranty.
Lime scale accumulation may cause noise to
occur during operation. It is recommended that
the heating elements be removed periodically
for examination. If it is scaled, all of the
elements should be removed and cleaned. If
the tank bottom has an accumulation of
sediment, it should be cleaned and flushed.
To remove lime scale, follow the below steps:
1. Turn off electrical disconnect switch or
building power supply.
2. Drain the water heater following the
draining instructions.
3. Open the front panel.
4. Disconnect the element wiring.
5. Unscrew each element and remove the
elements and gaskets from the openings.
6. Place the limed ends of the heating
elements into a delimer and allow scale to
dissolve. Do not permit delimer or water
to contact the electrical terminals.
7. Once the scale is removed, flush the
cleaned elements with water.
8. Remove sediment and scale from the tank
bottom through the element openings and
drain valve opening.
9. Put new gaskets on each element and
install into tank openings.
10. Attach element wires to connection points
from which they were removed.
11. Fill the water heater and check for leaks.
12. Close the front panel.
13. Restore power.
26 Rinnai Commercial Electric Water Heater Installaon and Operaon Manual
1. Turn off the electrical supply to the water
heater at the breaker or at the
disconnect switch.
2. Ensure the cold water supply valve is
open.
3. Open a hot water fixture or fixtures to let
the water run until it is no longer hot,
then close the hot water fixtures.
4. Connect a hose to the drain valve at the
bottom of the water heater, and
terminate it outside or into an adequate
drain. Make sure the hose is tightened
and secured to the drain valve.
5. Open the drain valve to flush the storage
tank and remove sediment.
6. Once the water runs clean, close the
drain valve, and remove the drain hose.
7. Fill the water heater by opening a hot
water fixture to purge the air from the
system. Once the water is flowing
without air, turn off the hot water fixture.
8. Turn on the electrical supply to the water
heater.
1. Turn off the electrical supply to the water
heater at the breaker or at the disconnect
switch.
2. Open and continue running a hot water
fixture until the tank temperature drops to
a safe temperature.
3. With the hot fixture open and electric
supply off, close the cold water supply.
4. Attach a hose to the drain valve at the
bottom of the heater.
5. Run the drain hose outside or to an
adequate drain.
6. Open the drain valve and allow the water
to drain until it is no longer flowing out of
the tank.
CAUTION
The power to the water heater must be
disconnected before draining the water
heater.
Water discharged from draining the tank
could cause severe burns instantly or death
from scalds.
WARNING
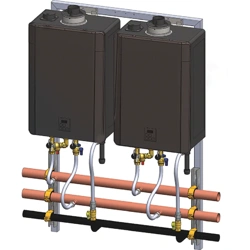
Rinnai Commercial Electric Water Heater Installaon and Operaon Manual 27
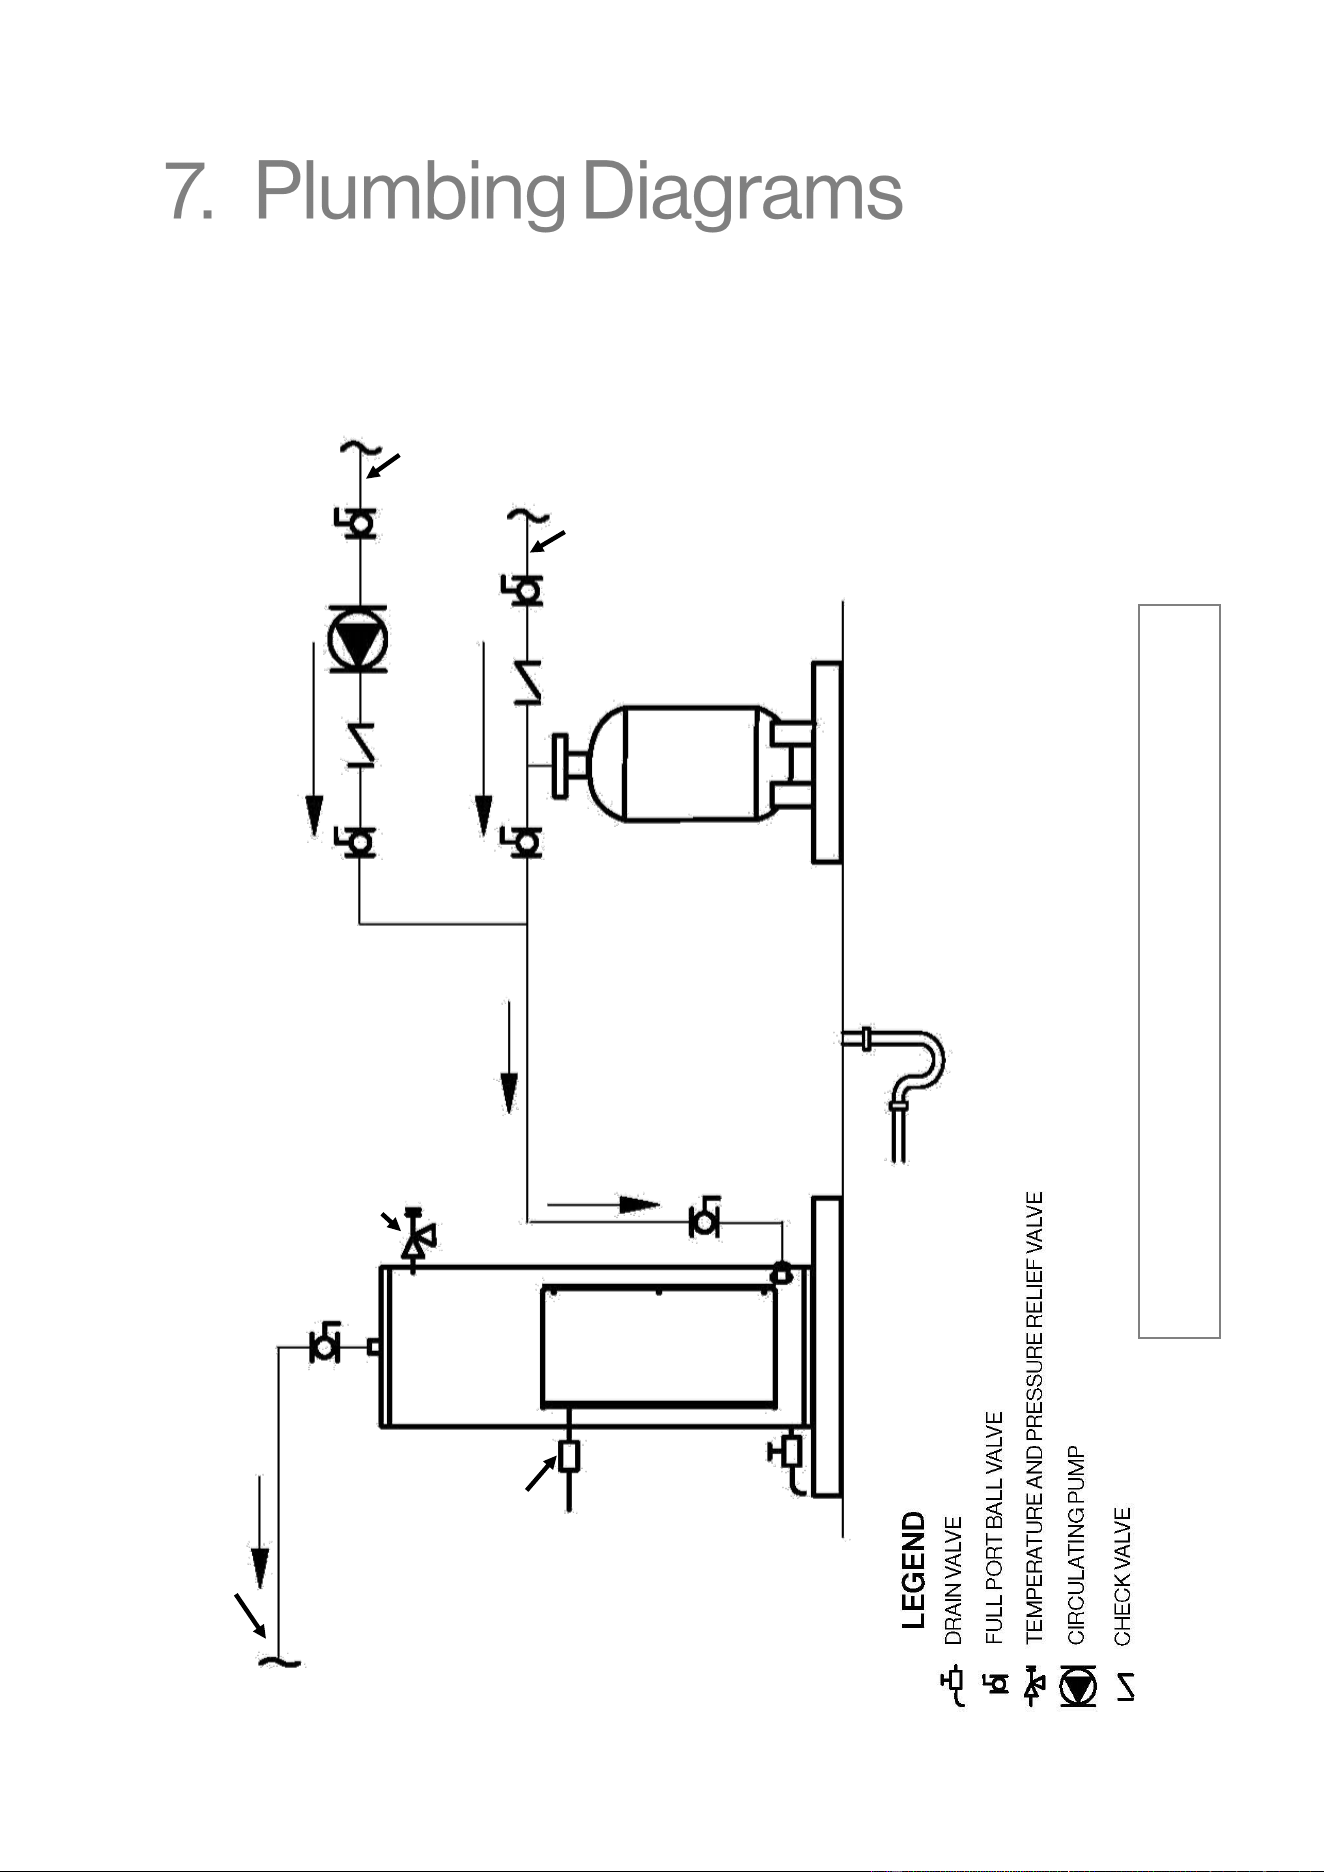
Figure 10
Commercial Electric Water Heater: 1 Unit
WARNING:
This drawing shows suggested piping conguraon and other de-
vices. Check with local codes and ordinances for addional requirements.
Hot Water To
Fixtures
Cold Water
Supply
Pipe T&P To
Open Drain
Expansion
Tank
Finished
Floor
Hot Water
Return
Fused
Disconnect
Switch
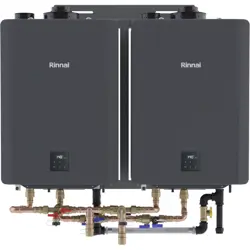
28 Rinnai Commercial Electric Water Heater Installaon and Operaon Manual
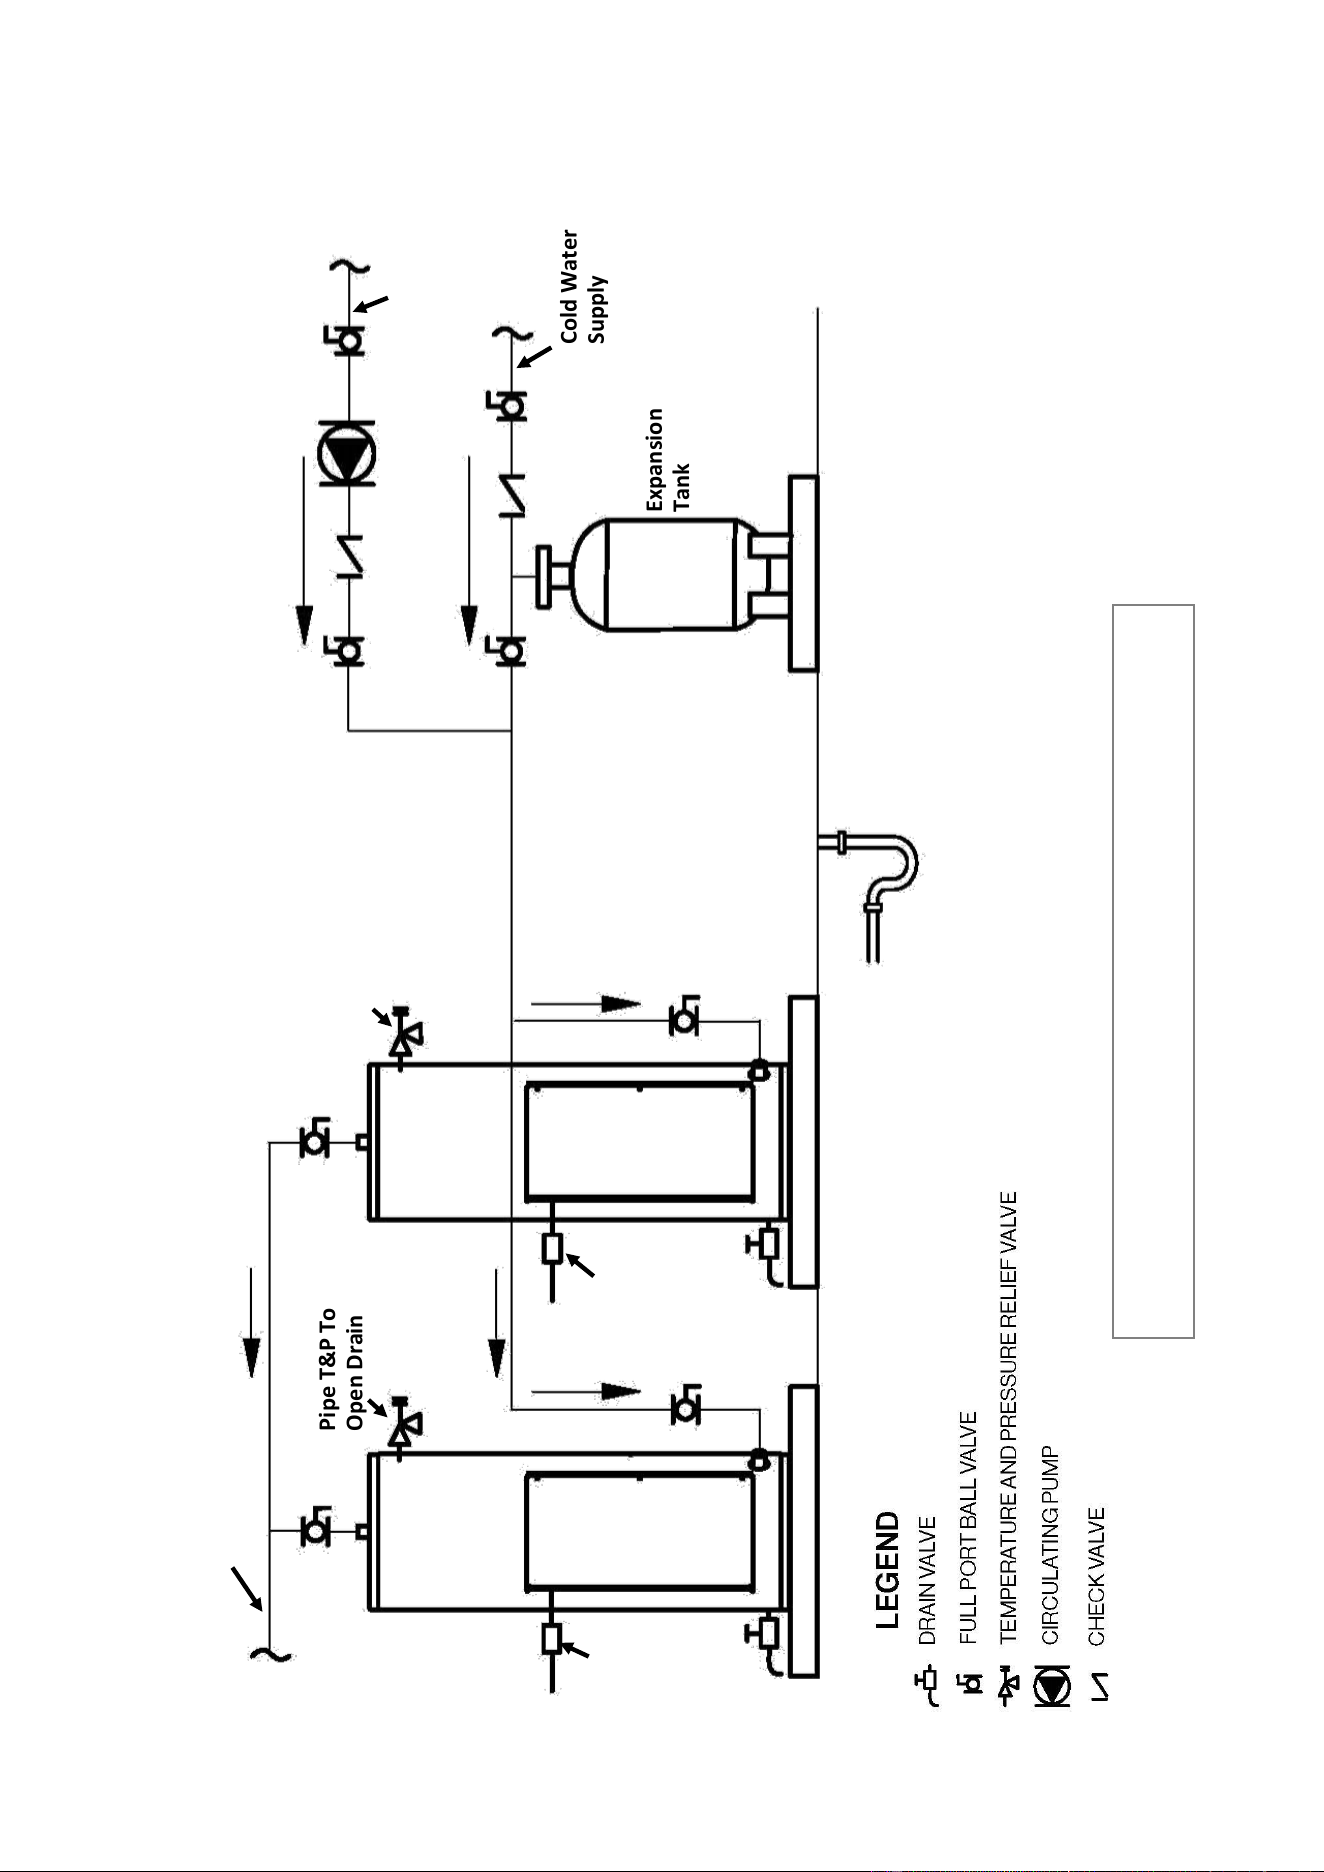
Commercial Electric Water Heater: 2 Units
Figure 11
WARNING:
This drawing shows suggested piping conguraon and other de-
vices. Check with local codes and ordinances for addional requirements.
Cold Water
Supply
Pipe T&P To
Open Drain
Expansion
Tank
Hot Water
Return
Fused
Disconnect
Switch
Hot Water To
Fixtures
Fused
Disconnect
Switch
Pipe T&P To
Open Drain
Rinnai Commercial Electric Water Heater Installaon and Operaon Manual 29
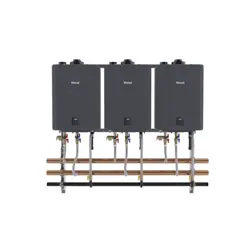
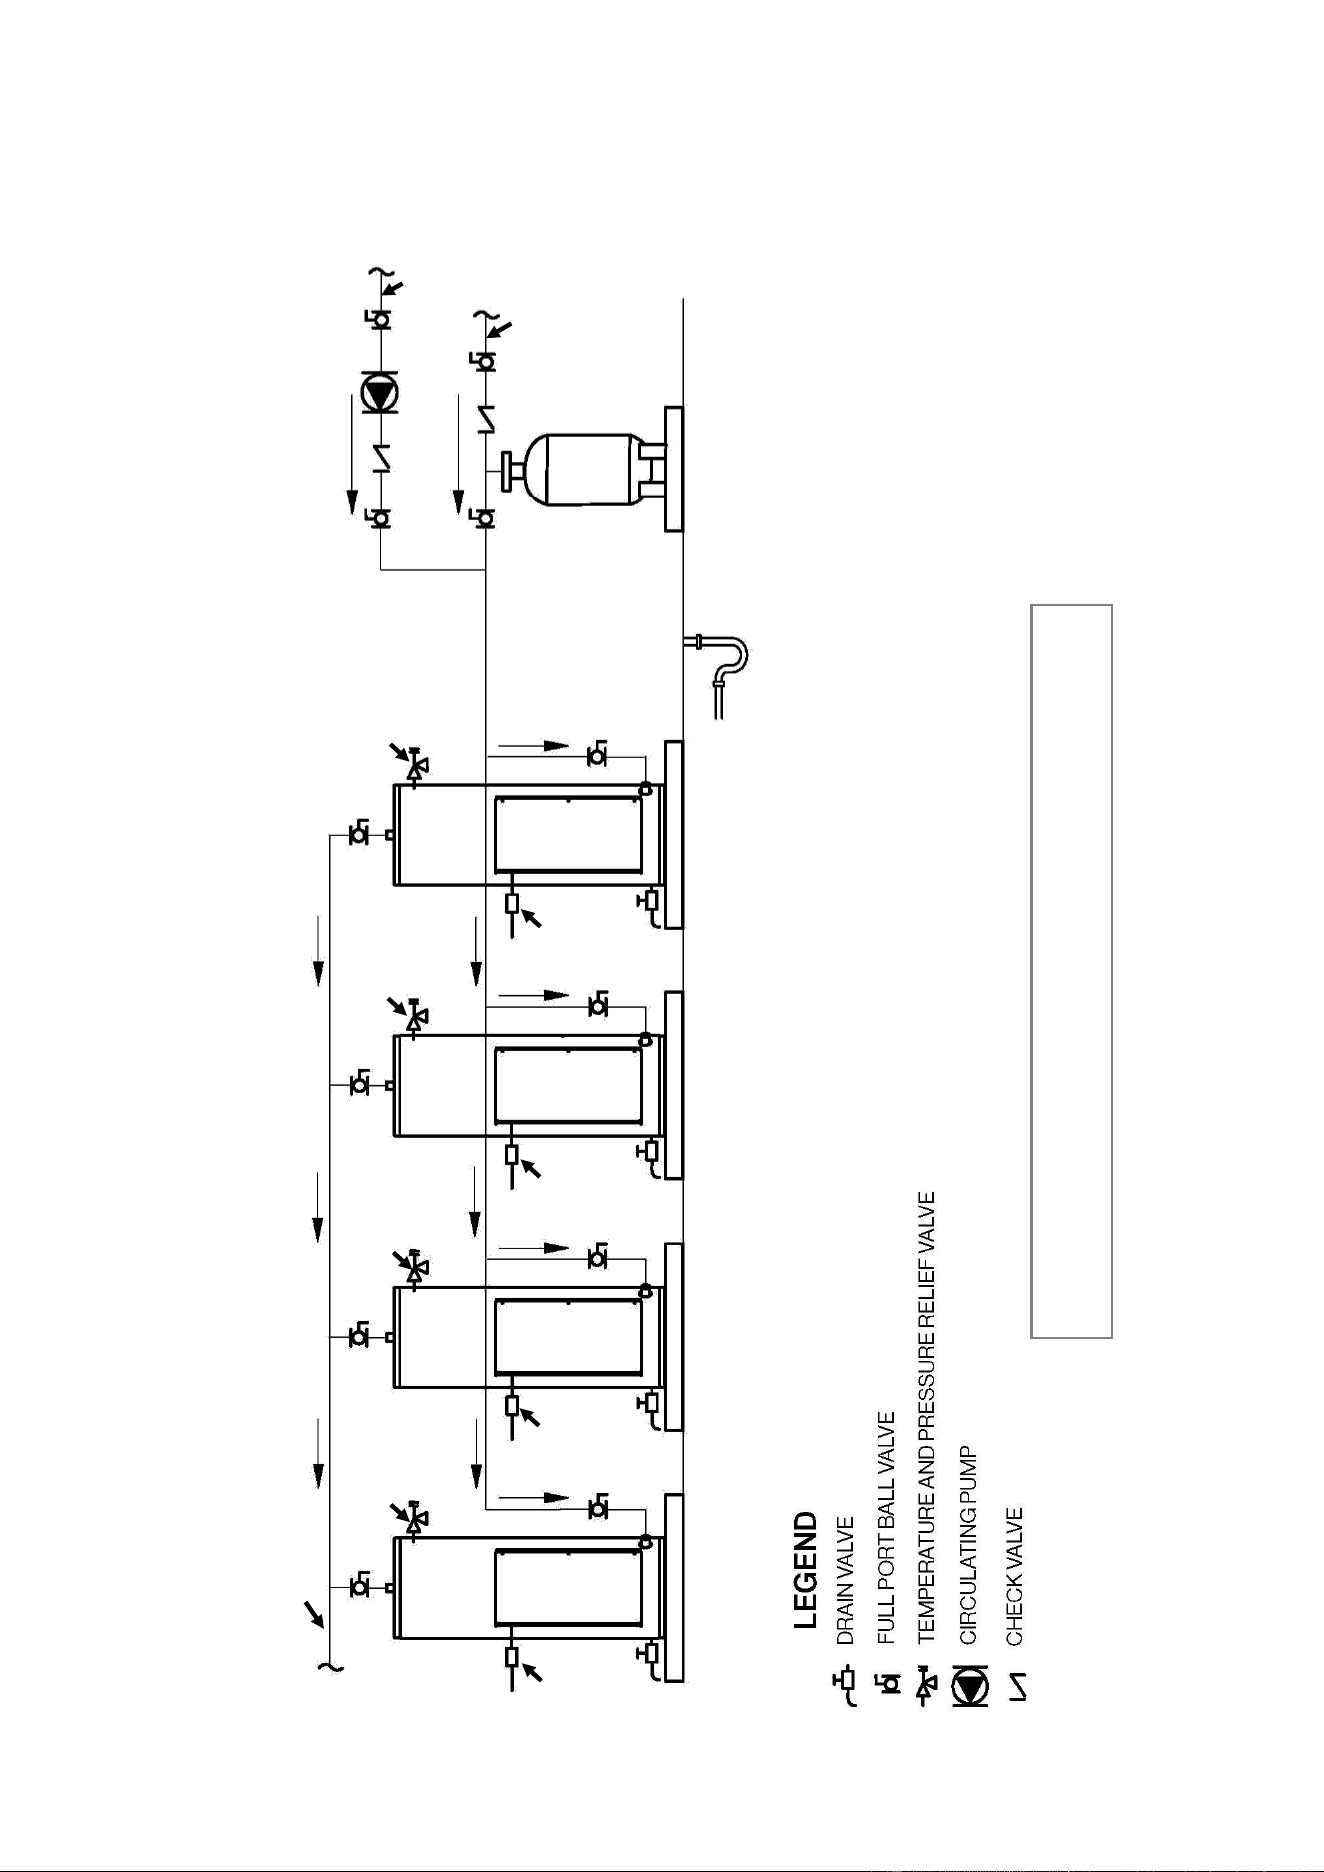
Commercial Electric Water Heater: 4 Units
Figure 12
WARNING:
This drawing shows suggested piping conguraon and other de-
vices. Check with local codes and ordinances for addional requirements.
Cold Water
Supply
Pipe T&P To
Open Drain
Expansion
Tank
Hot Water
Return
Fused
Disconnect
Switch
Hot Water To
Fixtures
Pipe T&P To
Open Drain
Pipe T&P To
Open Drain
Pipe T&P To
Open Drain
Fused
Disconnect
Switch
Fused
Disconnect
Switch
Fused
Disconnect
Switch
30 Rinnai Commercial Electric Water Heater Installaon and Operaon Manual
Rinnai Commercial Electric Water Heater Models: RCET5012, RCET5018, RCET8012, RCET8018
What is Covered?
The Rinnai Standard Limited Warranty covers any defects in materials or workmanship when the product
is installed and operated according to Rinnai written installation instructions, subject to the terms within
this Limited Warranty document. This Limited Warranty applies only to products that are installed
correctly in the United States and Canada. Improper installation may void this Limited Warranty. It is
recommended that a trained and qualified professional who has attended a Rinnai installation training
class complete your installation. This Limited Warranty coverage, as set out in the table below, extends
to the original purchaser and subsequent owners, but only while the product remains at the site of the
original installation, and terminates if the product is moved or reinstalled at a new location.
What Will Rinnai Do?
Rinnai will repair or replace the covered product or any part or component that is defective in
materials or workmanship as set forth in the above table. Rinnai will pay reasonable labor charges
associated with the repair or replacement of any such part or component during the term of the labor
warranty period. All repair parts must be genuine Rinnai parts. All repairs or replacements must be
performed by a qualified professional who is properly trained to do the type of repair.
Replacement of the product may only be authorized by Rinnai at its sole discretion. Rinnai does not
authorize any person or company to assume for it any obligation or liability in connection with the
replacement of the product. If Rinnai determines that repair of a product is not possible, Rinnai may
replace the product with a comparable product at Rinnai’s sole discretion. The warranty claim for
product parts and labor may be denied if a component or product returned to Rinnai is found to be
free of defects in material or workmanship; damaged by improper installation, use or operation; or
damaged during return shipping.
How To Obtain Service
For the name of a trained and qualified professional, please contact your place of purchase, visit the
Rinnai website (www.rinnai.us or www.rinnai.ca), call Rinnai at 1-800-621-9419 or write to Rinnai at
103 International Drive, Peachtree City, Georgia 30269.
To obtain warranty you are required to show proof of purchase with a dated sales receipt, or by
registering within 30 days of purchasing the product. To register your Rinnai Electric Water Heater,
please visit www.rinnai.us or www.rinnai.ca. For those without internet access, please call 1-800-
621- 9419. Receipt of registration by Rinnai will constitute proof-of-purchase for this product.
Registration of product installed in new home construction may be verified with a copy of the closing
papers provided by the initial home buyer. However, registration is not necessary in order to validate
this Limited Warranty.
Item
Period of Coverage (From Date of Purchase)
Electric Water Heater Tank
3 Years
All Other Parts and Components
1 Year
Reasonable Labor
1 Year

Rinnai Commercial Electric Water Heater Installaon and Operaon Manual 31
What Is Not Covered?
This Limited Warranty does not cover any failures or operating difficulties due to the following:
•
Accident, abuse, or misuse
•
Alteration of the product or any component part
•
Misapplication of this product
•
Improper installation (such as but not limited to):
•
Product being installed in a corrosive environment
•
Incorrect water pressure
•
Absence of a drain pan under the appliance
•
Improper maintenance (such as but not limited to scale build-up or freeze damage)
•
Incorrect sizing
•
Any other cause not due to defects in materials or workmanship
•
Problems or damage due to fires, flooding, electrical surges, freezing or any acts of God
•
Any damage caused by poor water quality
•
Operating the water heater with anything other than potable water at all times
•
Force majeure
There is no warranty coverage on product installed in a closed loop application, commonly
associated with space heating only applications.
This Limited Warranty does not apply to any product whose serial number or manufacture date has
been defaced.
This Limited Warranty does not cover any product used in an application that uses chemically
treated water such as a pool or spa heater.
Limitation on Warranties
No one is authorized to make any other warranties on behalf of Rinnai America Corporation. Except
as expressly provided herein, there are no other warranties, expressed or implied, including, but not
limited to warranties of merchantability or fitness for a particular purpose, which extend beyond the
description of the warranty herein.
Any implied warranties of merchantability and fitness arising under state law are limited in duration to
the period of coverage provided by this Limited Warranty, unless the period provided by state law is
less. Some states do not allow limitations on how long an implied Limited Warranty lasts, so the
above limitation may not apply to you.
Rinnai shall not be liable for indirect, incidental, special, consequential or other similar damages that
may arise, including lost profits, damage to person or property, loss of use, inconvenience, or liability
arising from improper installation, service or use. Some states do not allow the exclusion or limitation
of incidental or consequential damages, so the above limitation may not apply to you.
This Limited Warranty gives you specific legal rights, and you may also have other rights which vary
from state to state.