EG10066 Revised 02/23
INSTALLATION / OPERATING INSTRUCTIONS
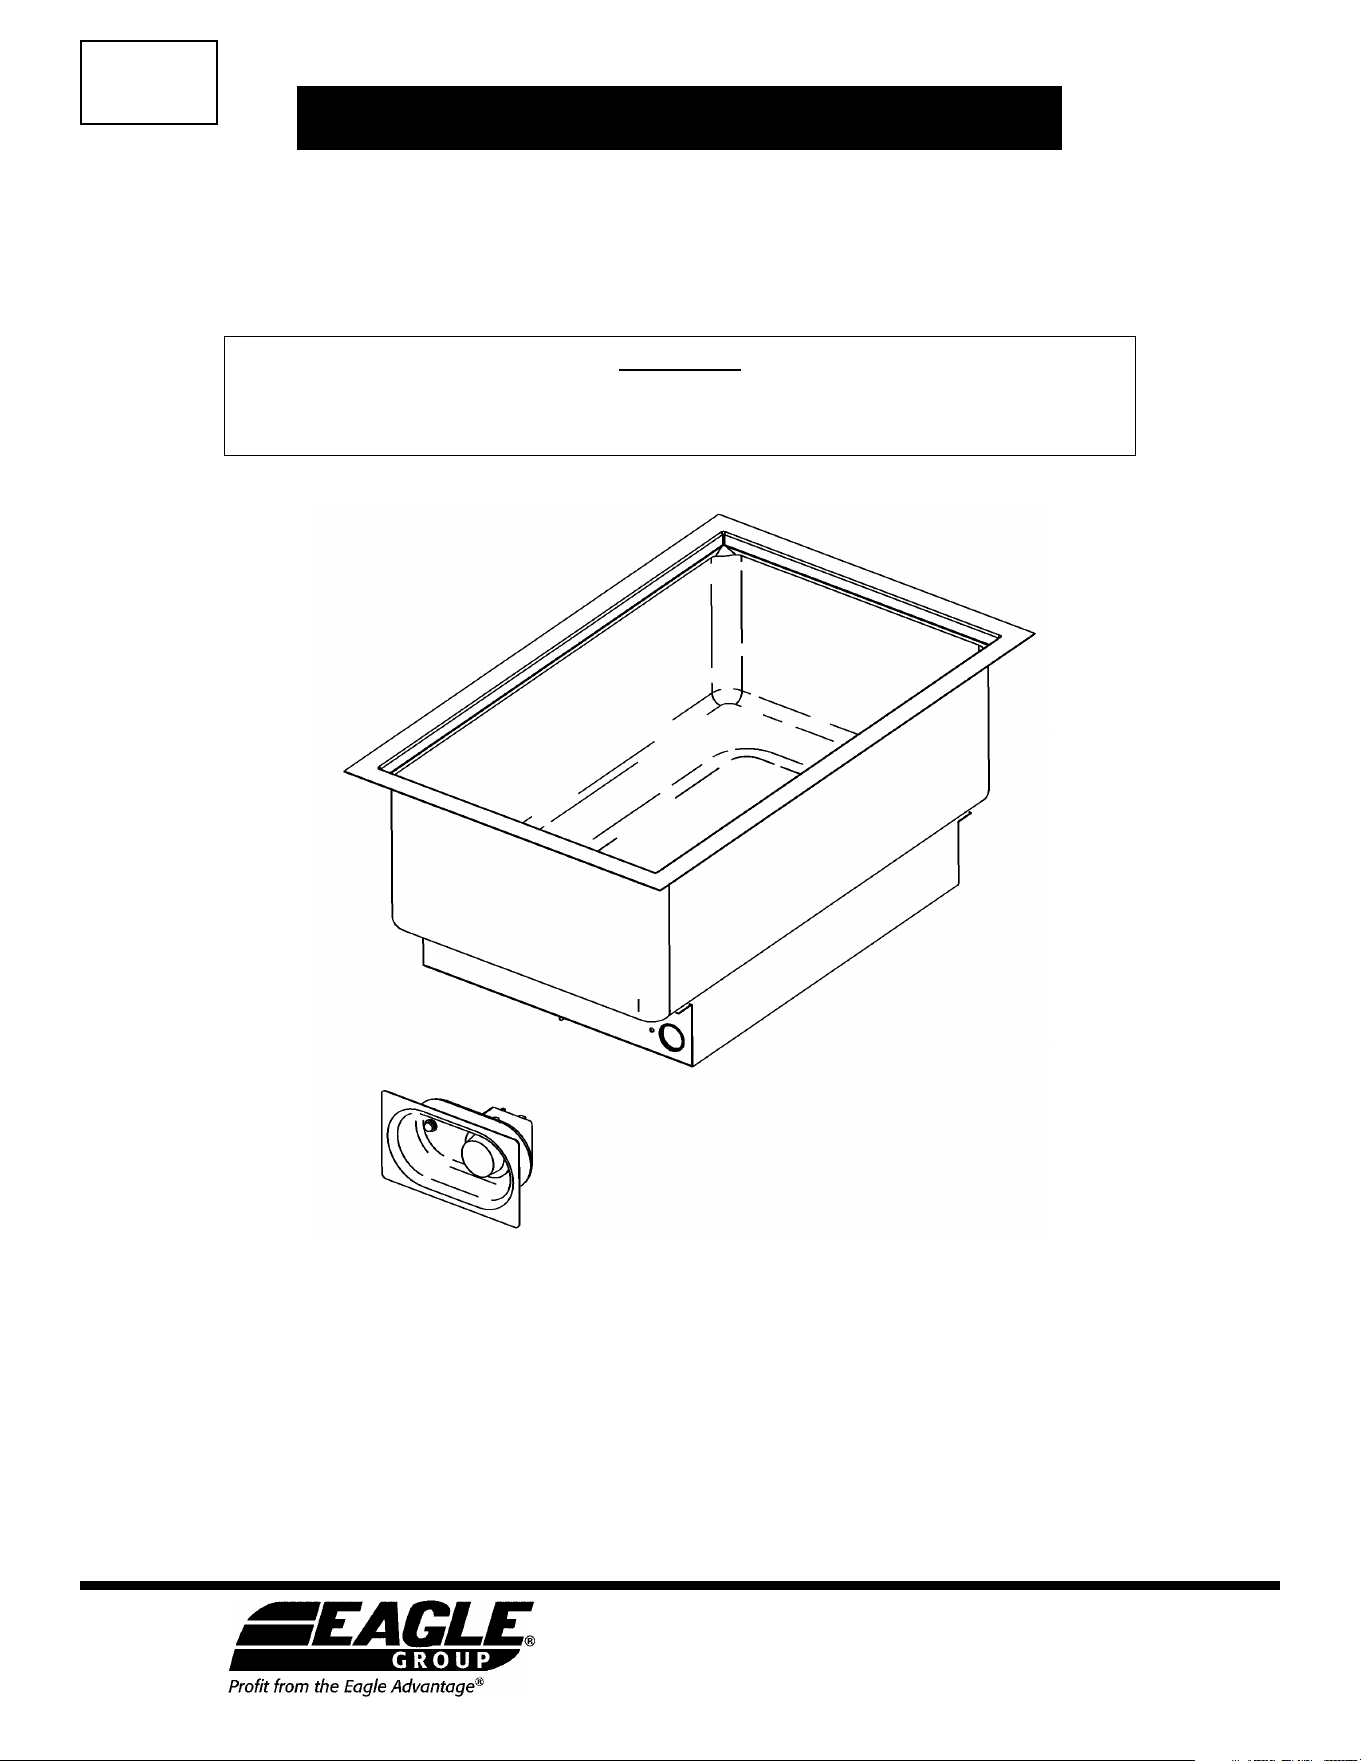
Bottom Mount Food Warmers
Models #BM1220FW-120 / -120T / -120-D / -120T-D
This food warmer will work most efficiently when used with water in the pan liner. The hot water will give a better distribution of heat
and help keep food from drying out. It is not designed for cooking foods but merely to keep hot foods at desired temperatures for
serving.
During initial operation, a little smoke or odor may be detected. This will occur when the coating on the heating element
burns off. This should stop after 1/2 hour of operation.
This warmer is equipped with a variable control for different heat selections.
Suffix “-120” may be replaced with suffix “-208” for 208 volt models or suffix “-240” for 240 volt models.
Suffix “T” indicates thermostatic control.
Suffix “-D” indicates unit with drain.
CAUTION
INSPECT CONTENTS IMMEDIATELY AND FILE CLAIM WITH DELIVERING
CARRIER FOR ANY DAMAGE. SAVE YOUR BOX AND ALL PACKING MATERIALS.
YOU ARE RESPONSIBLE FOR DAMAGE TO YOUR UNIT IF RETURNED IMPROPERLY PACKED.
Eagle Foodservice Equipment, Eagle MHC, and SpecFAB
®
are divisions of Eagle Group. ©2023 by the Eagle Group
• 100 Industrial Boulevard, Clayton, Delaware 19938-8903 U.S.A.
• Phone: 302/653-3000 • 800/441-8440 • Fax: 302/653-2065
• www.eaglegrp.com • www.eaglegrpnews.com • www.eaglemhc.com
INSTRUCTION
SHEET
#361591
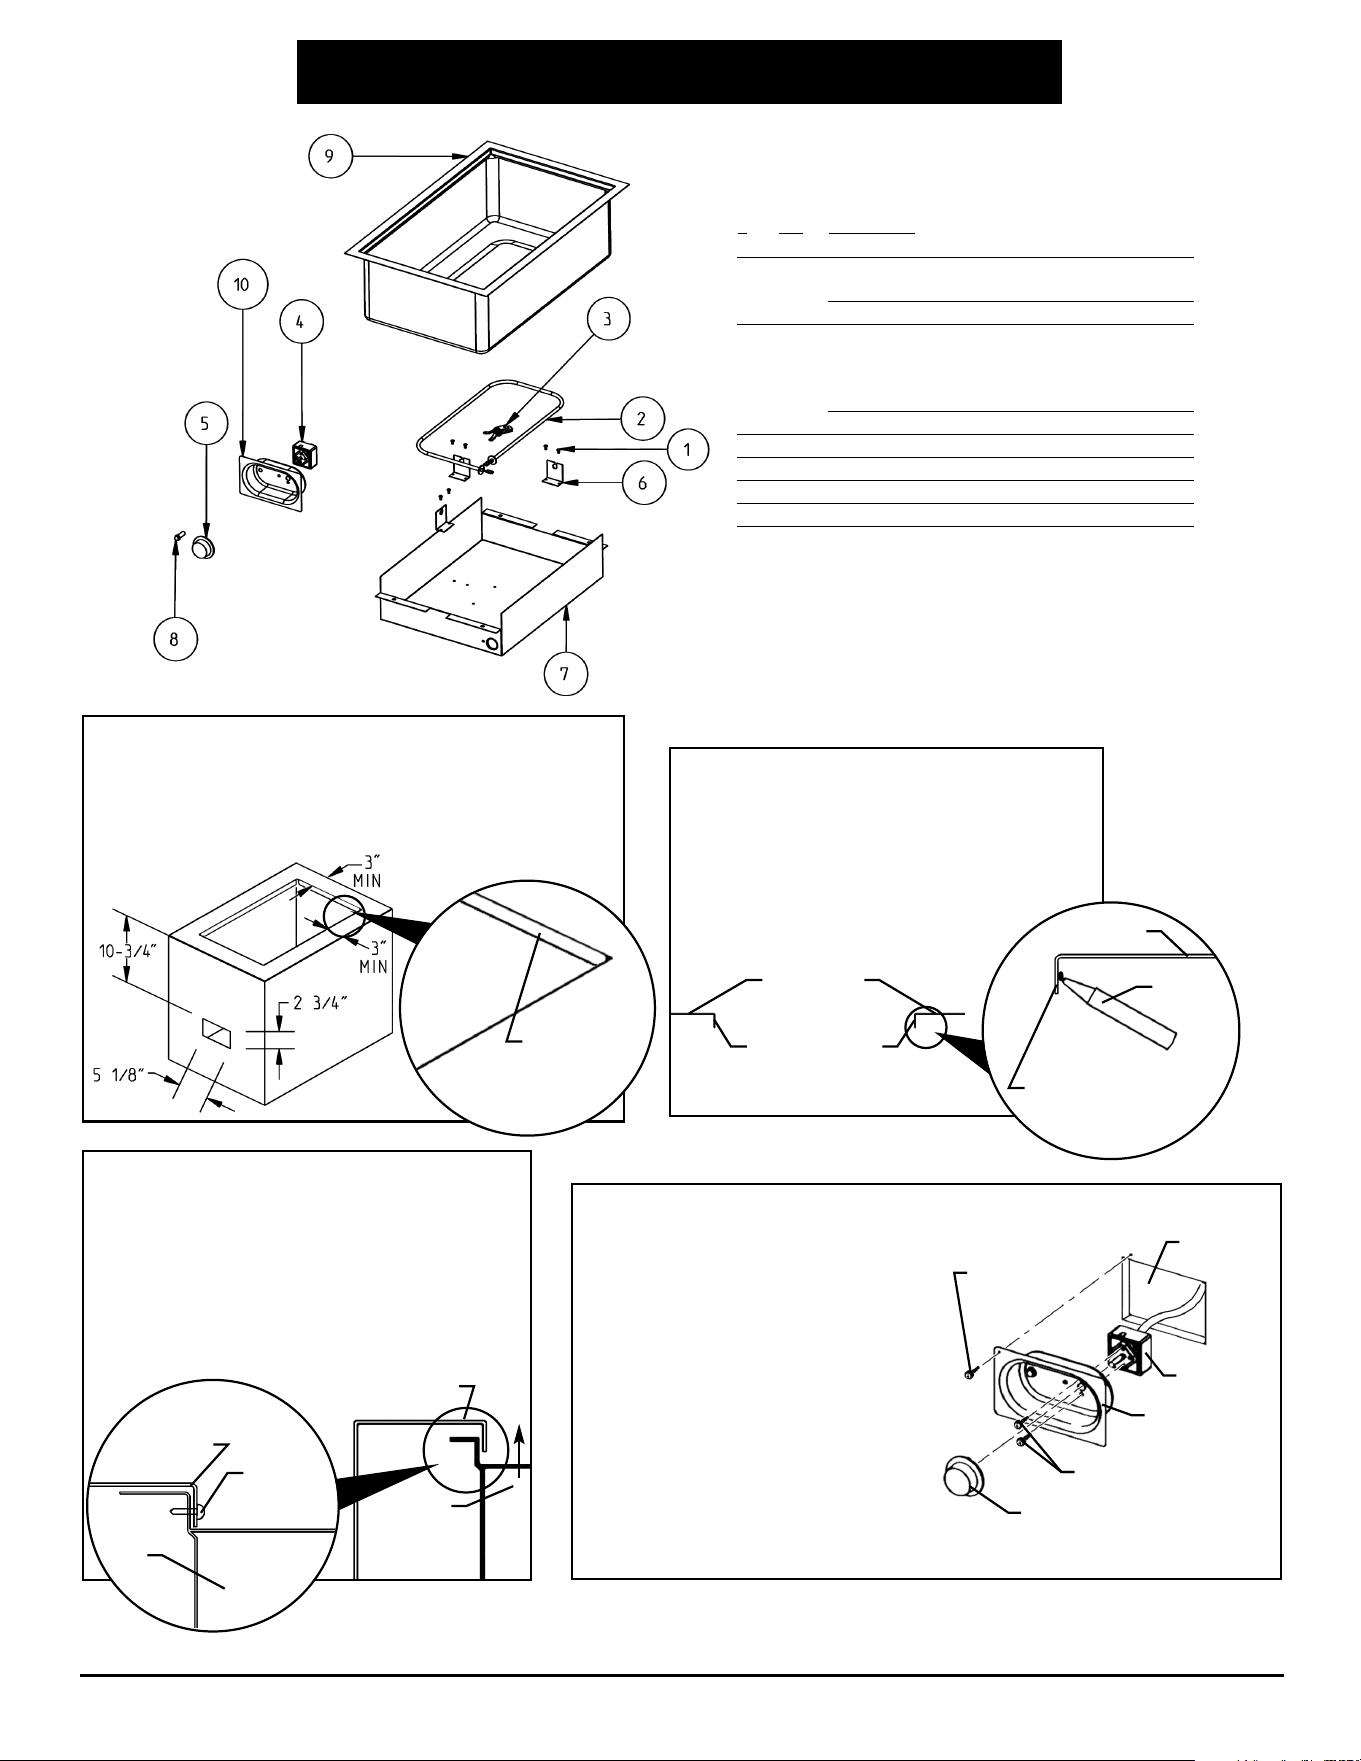
Step 1 - Cut out holes.
• Cut out and form flanged openings in countertop to fit
inside of warmer. Also, cut hole for the control panel.
• Be sure to hold to all minimum dimensions shown.
flanges
formed in
opening
Step 3 - Install unit.
• Install from underside of countertop with
control toward front.
• Attach unit to countertop with screws or rivets
(not supplied).
• Wipe off excess silicone with clean cloth
before it cures.
countertop
countertop
screw or
rivet (not
included)
unit
unit
(end view)
INSTALLATION INSTRUCTIONS
2
Step 2 - Apply silicone rubber.
Apply bead of silicone rubber to underside of
flanges formed in opening.
(Note: Silicone can be purchased at a local
hardware store.)
flanges formed
in opening
flange formed
in opening
silicone
countertop
countertop
2
3
⁄4˝ x 5
1
⁄8˝
cutout
control
knob
mounting
screws (2)
screws or
rivets not
included
(4)
recessed
control panel
Step 4 - Attach controls.
• Remove control from recessed
control panel by removing knob
and two mounting screws.
• With indicator light still attached to
panel, insert recessed control
panel through 2
3
⁄4˝ x 5
1
⁄8˝ cutout
from rear of enclosure.
• Remount control to recessed
control panel and attach knob.
• Recessed control panel should be
mounted to enclosure using
screws or rivets (not supplied).
(For wiring instructions, see page 3.)
Parts List
Replacement parts may be purchased through our
local Authorized Parts & Service Center.
# qty description
#1 6 pop rivet
#2 1 heater (1200W 120V; 1200W 240V;
1600W 240V; or 1600W 277V)
#3 1 hi limit (for infinite control units)
#4 1 120V or 240V infinite control
(for infinite control units),
or thermostatic control
(for thermostatic control units)
#5 1 knob
#6 3 heat element support bracket
#7 1 heat cover assembly
#8 1 indicator light
#9 1 bowl
#10 1 recessed control panel
WIRING INSTRUCTIONS
CONDITION OF ACCEPTANCY
1) This equipment must be installed in an all-metal fixture of steel or stainless steel construction, 0.050˝ minimum
thickness for the top and supporting frame. Side enclosures to be at least 22 gauge minimum thickness.
2) A removable bottom enclosure must be provided under each drop-in unit, and must be of all-metal construction
of at least 22 gauge minimum. If ventilating openings are provided, they must not allow the entrance of a 3/4˝-
diameter rod; must not be located directly below uninsulated live terminals, wiring, or electrical components;
and must be located at least 1˝ away from any insulated live terminals.
3) Minimum spacing between drop-ins or edges shown in Step 1 (page 2).
4) Controls shall be mounted on the front vertical surface of the fixture.
5) Cabinet supply wires shall have minimum temperature rating of 220˚F (105˚C).
CAUTION:
Temperature in control area must not exceed 220˚F (105˚C).
3
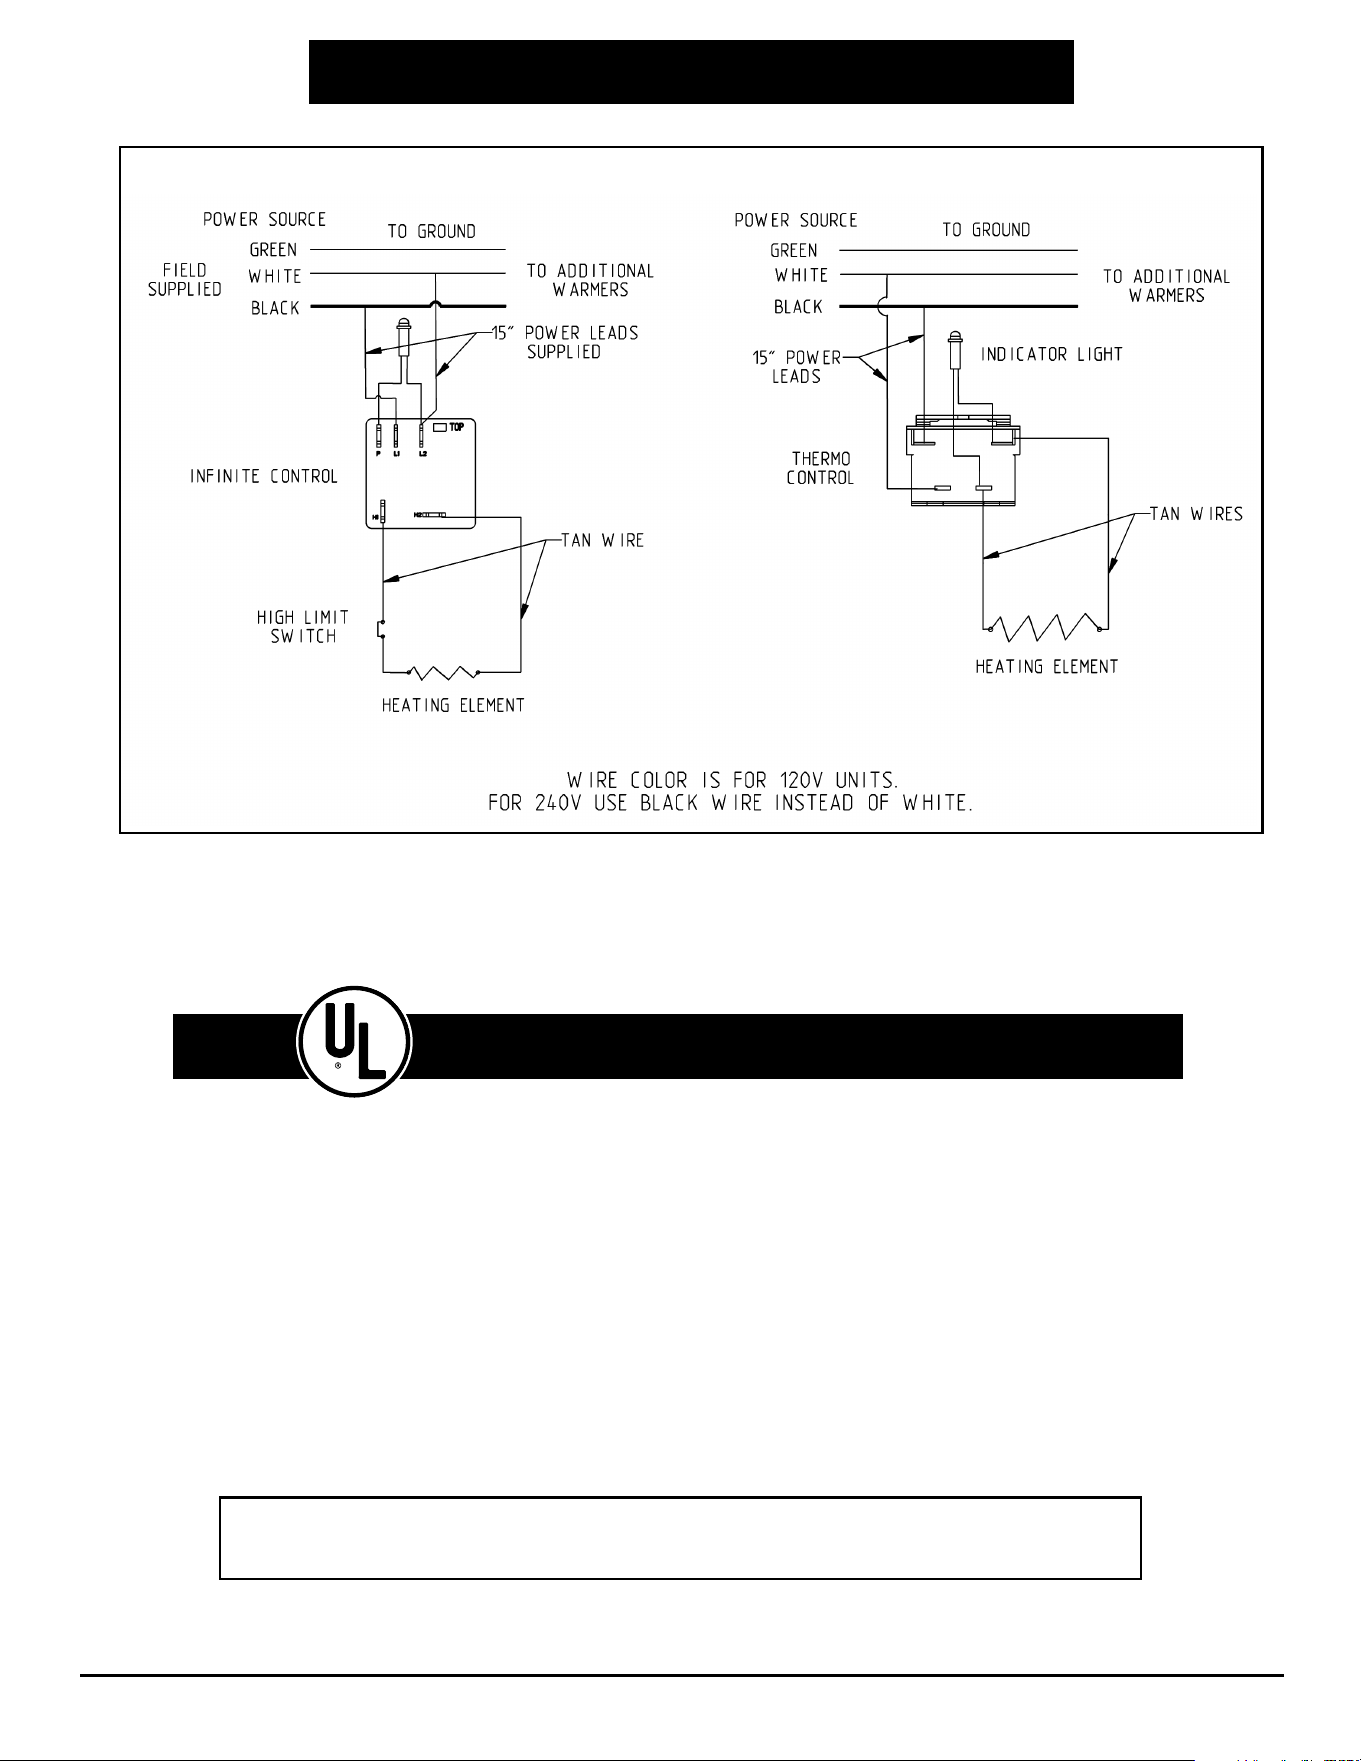
Wiring diagram - Infinite control Wiring diagram - Thermostatic control
Please note:
• Connect power supply to 15˝ power leads.
• Be sure to connect ground to green wire.
OPERATING INSTRUCTIONS
WET OPERATION WITH COVER
1) Fill bottom well with minimum of 190°F hot water so that water touches the bottom of the food pan.
2) Set dial to highest position for 45 minutes with well covered. Note: the indicator light is the set point for the control knob.
To preheat unit, place precooked food (minimum 160°F) in food pans and place in well. Cover food pans with lids.
3) Adjust to desired setting for proper food temperature. This will vary with the type of food, type of pans and individual serving
temperature. NSF requires a minimum temperature of 150°F in food product.
4) To increase temperature turn knob toward highest setting. To decrease turn knob toward lowest setting. In some cases it will be
necessary to position the knob between the lowest setting and off to achieve a lower temperature.
5) Change water, clean liner and wipe dry after every 24 hours of operation. Water may have to be added to pan during operation
depending on operating time and temperature setting.
6) When food is not being served, food pans should be covered to maintain temperature and to prevent food from drying out.
The above instructions are starting suggestions only and may be changed to suit your individual needs. With so many different
applications for this item, it is impossible to have standard settings to suit all.
NOTE: If unit is used dry, the bottom of receptacle will take on a brown colored appearance where heater is located.
This discoloration is permanent and cannot be removed. This in no way will affect the operation of the unit.
CAUTION:
(1) Do not immerse the food warmer in water.
(2) All repairs should be done by an authorized service agency.
(3) Unit should be turned off when not in use. It is recommended that unit be disconnected from power supply by
removing plug from receptacle or shutting off power disconnect switch.
(4) Unit should be operated with feet provided to prevent overheating and damage to countertop or cord. Check
feet every 30 days to assure they are tight.
(5) Check cord and plug appearance for damage, cracking or deterioration. If visible, have both replaced by an
authorized service agency.
This equipment is designed and sold for commercial use only, by personnel trained and experienced in its
operation. It is not sold for consumer use in and around the home, nor for use directly by the general public in
foodservice locations.
Eagle Foodservice Equipment, Eagle MHC, and SpecFAB
®
are divisions of Eagle Group. ©2023 by the Eagle Group
• 100 Industrial Boulevard, Clayton, Delaware 19938-8903 U.S.A.
• Phone: 302/653-3000 • 800/441-8440 • Fax: 302/653-2065
• www.eaglegrp.com • www.eaglegrpnews.com • www.eaglemhc.com
WARRANTY INFORMATION
Eagle Hot Food Tables, Cold Pan Units, Portable Warming Equipment, Heated Drawers, and Transport Holding Cabinets
Eagle will warrant for 12 months from the date of shipment from the factory or 6 months from the date first placed into service (whichever comes
first). Eagle will replace any defective part or component material upon demonstration to its satisfaction that a breach of warranty did not exist. This
warranty does not cover any cost associated with maintenance, misuse, abuse, improper installation, pilot light adjustments, pilot outage, improper
ventilation, adjustments, alteration, calibration, wrong voltage, wrong gas, voltage or gas conversions, resetting of circuit breakers, or safety controls,
overtime charges, mileage in excess of 100 miles, operation contrary to the installation and operating instructions, damage caused by flood, fire or
acts of God. The warranty shall not apply if the nameplate has been removed or altered.
Eagle Cooking Equipment—including but not limited to all Gas and Electric Griddles, Charbroilers, Hot Plates and Fryers
Eagle will warrant for 12 months from the date of shipment from the factory or 6 months from the date first placed into service (whichever comes
first). Units intended for other than household use. These commercial appliances must be installed within surroundings and ventilation requirements
as dictated by National and/or local code. This warranty does not cover any cost associated with maintenance, misuse, abuse, improper installation,
pilot light adjustments, pilot outage, improper ventilation, adjustments, alteration, calibration, wrong voltage, wrong gas, voltage or gas conversions,
resetting of circuit breakers, or safety controls, overtime charges, mileage in excess of 100 miles, operation contrary to the installation and operating
instructions, damage caused by flood, fire or acts of God. The warranty shall not apply if the nameplate has been removed or altered.
CLICK HERE to review
full warranty information