
1
User Manual
All-Terrain Electric Skateboard G4X Ultra
Version:2025.04

2
Important Notice
Electric skateboarding is an extreme sport with inherent risks. Electric
skateboards are not designed with protective structures, and users
are highly likely to encounter safety accidents during use. Therefore,
before using the product, you must carefully read this user manual
and keep it in a safe place for future reference.
Our company only provides the skateboard product. You must
ensure that you use this product safely, reasonably, and in
compliance with applicable laws, and you assume full responsibility
for your own manner of use.

3
Table of Contents
User Instructions ---------------------------------------------------------4
Pre-Ride Checklist ------------------------------------------------------10
Main Body Functions of the Skateboard ----------------------------- 11
Main Body Functions of the Remote Controller --------------------- 14
Vehicle Maintenance & Parts Replacement -------------------------- 23
Warranty ---------------------------------------------------------------- 28
Packing List ------------------------------------------------------------- 30
Common Troubleshooting -------------------------------------------- 31
Brand Story ------------------------------------------------------------- 32
After-Sales Support for Skateboard ---------------------------------- 33

4
Risks
Electric skateboarding has inherent risks. The skateboard provides no
protective structure. We cannot predict or control how you use it or
prevent accidents. Any accident may cause injury or death.
These risks cannot be avoided, but you can reduce them:
• Stay away from crowds, vehicles, uneven terrain, and obstacles
when practicing.
• Build your skills step by step.
• Learn how the skateboard works and its limits.
• Ride within your ability.
• Do not let others pressure you into uncomfortable riding.
• Consider time, location, weather, and terrain.
• Wear proper protective gear.
• Do not ride if the skateboard is damaged (or you suspect it is).
• Read, understand, remember, and think about all information
in this manual.
This skateboard is different from other electric and non-electric ones.
Even experienced riders should be as cautious as beginners on first
use. Take time to learn how to use it properly.
Legality
You are responsible for knowing and following local laws on
skateboard use. Any illegal use and resulting incidents are solely your
responsibility, not ours.
Protective Gear
Choose gear based on your riding style and purpose.
• Street cruising:
At least helmet, gloves, elbow pads, knee pads, and closed-toe
User Instructions

5
shoes. Available at skate shops.
• Off-road, extreme, freestyle, or jumping:
At least full-face helmet, goggles, full-finger gloves, neck brace,
full body armor with back support, leg protection, and
supportive boots with ankle support. Available at motorcycle or
mountain bike shops.
In both cases, your gear should meet current safety standards
(especially your helmet), fit properly, be undamaged, and be worn
correctly while riding.
Road Riding Safety
Note:
In many countries/regions, riding electric skateboards on public
roads or sidewalks is illegal. You are responsible for checking and
following local laws.
If riding is allowed in public areas:
• Obey traffic laws and road signs.
• Wear proper protective gear.
• At intersections, stop and check both ways before crossing.
• Stay alert and defensive-assume others don't see you.
• Use hand signals when turning (like on a bike).
• Keep distance from parked cars to avoid suddenly opened
doors.
• Do not ride after drinking or taking drugs.
Note:
We cannot force you to wear protective gear or predict how
you ride.
Ensuring you wear proper gear is entirely your personal
responsibility.
Failure to wear suitable gear may result in injury, paralysis, or
death.

6
• Do not ride in wet conditions or low visibility (dawn, dusk,
night, fog, or when tired).
• Do not carry passengers.
• Do not carry anything that blocks your view, limits control, or
could get caught in wheels.
• Do not wear headphones. Stay aware of your surroundings.
• Avoid crowded traffic or pedestrian areas.
• Do not hold onto moving vehicles.
• Yield to other vehicles even if you have the right of way. In a
crash with a vehicle, you will be hurt.
• Do not attempt jumps or stunts unless you accept the risks
and have read pages 4–9.
Off-Road Riding Safety
Off-road riding is more unpredictable and risky than street riding.
Start on flat, open ground and build skills gradually.
• Wear proper protective gear.
• Do not ride alone in remote areas. If you go alone, tell
someone your destination and return time.
• Carry ID in case of accident.
• Bring water and some emergency cash.
• Yield to animals and keep a safe distance in case they act
suddenly.
• Do not attempt stunts or jumps until fully skilled. If you must,
first survey the terrain: ground conditions, traction, slopes,
obstacles, and holes.
Note:
Protect the environment and follow local rules. Do not
over-ride and cause soil erosion. Do not cut through
vegetation. Take all your belongings when leaving. Share trails
with hikers and cyclists — respect their rights.

7
Riding Environment
01 Riding in Wet Conditions
The skateboard is water-resistant, not waterproof. It can handle
splashes or damp surfaces, but not submersion, mud, or rain. Do not
let water pool on the deck. We strongly advise against riding in rain.
To slow down and stop safely in wet conditions: ride slowly, and
brake earlier and more gently than on dry ground.
02 Riding in Low Visibility
Low visibility (night, dawn, dusk, fog) is much more dangerous than
clear conditions.
If you accept the added risk:
• Follow local laws on low-visibility riding.
• In addition to the board’s light, use a battery-powered light
(helmet/body, or a flashing light).
• Wear light-colored or reflective clothing (e.g., high-vis vest).
• Ride slower than in clear conditions. Pick familiar routes if
possible.
• Do not ride in congested areas.
• Do not ride in dark places without other light sources
(moonlight doesn’t count).
03 Jumping, Stunts & Freeriding
We strongly advise against jumps, extreme riding, or freeriding.
These are very dangerous and likely to cause injury.
Warning:
On wet surfaces, tire grip decreases for both your skateboard
and nearby vehicles. This greatly increases the risk of wheel
slip during braking and makes the skateboard harder to
control.

8
If you choose to do them, you accept the risks of injury, paralysis, or
death, and assume all responsibility.
We do not recommend this. But if you insist, at least:
• Learn slowly, practice repeatedly, and build skills step by step.
• Only jump or do stunts in designated areas.
• Ride slowly on familiar routes (walk them first if needed).
• Wear proper gear: full-face helmet, full-finger gloves, armor
with neck and back support.
• Know that this riding stresses the board beyond its design
limits, voiding the warranty.
• Check the board thoroughly before each ride. If damaged, do
not use it.
Finally, we cannot control how you ride. You are responsible for all
precautions. Remember: jumps, stunts, or freeriding can injure you.
Cleaning
Off-road riding demands a lot from the skateboard. Clean it after
each ride and do a pre-ride check before each ride.
You don’t have to clean every spot, but you must remove dirt/debris
from all pivots/joints and rotating parts (drive pulley, drive shaft).
Failing to keep the skateboard reasonably clean increases the risk of
accidents and injury.
Repair & Modification
Some may want to repair or modify the skateboard. We cannot
predict all possible failures. Incorrect repairs/modifications may hide
or cause structural damage, leading to serious accidents.
We strongly advise against any repair or modification.
Warning:
Although the skateboard is designed for high-speed riding, we
cannot predict every situation. Jumps and freeriding may
exceed its design limits and risk injury.

9
If you do so:
1.You understand and agree that all warranties are void.
2.We take no responsibility for any resulting accidents.
Product Limits
Ignoring rider error, any extreme riding puts high stress on your gear.
The board is designed for harsh conditions, but we cannot guarantee
it survives multiple six-foot drops. Jumps have no industry standard
— many factors (takeoff, landing, speed, technique, rotation) are
unique. Rider judgment (or lack of it) is also unpredictable. So we
cannot guarantee any board will withstand this type of riding.
Keeping the board and all parts in good working condition is critical.
Clean, inspect, and maintain it yourself. No part lasts forever —
especially lightweight components that are often abused.

10
a
Before each ride, we recommend:
• Visually check for bent or broken parts.
• Tire pressure ≥ 30 psi.
• Wheels are secure / axle nuts tight.
• Shock springs firmly attached.
• Belt not loose or damaged.
• Skateboard and remote have enough battery.
• No unusual squeaks when moving the board.
• Rubber boots/covers on CV joints not damaged or missing. If
missing, replace before riding.
If you find any issues, fix them before riding. If unsure how, contact
us for instructions.
Pre-Ride Checklist
11
Main Body Functions of the Skateboard
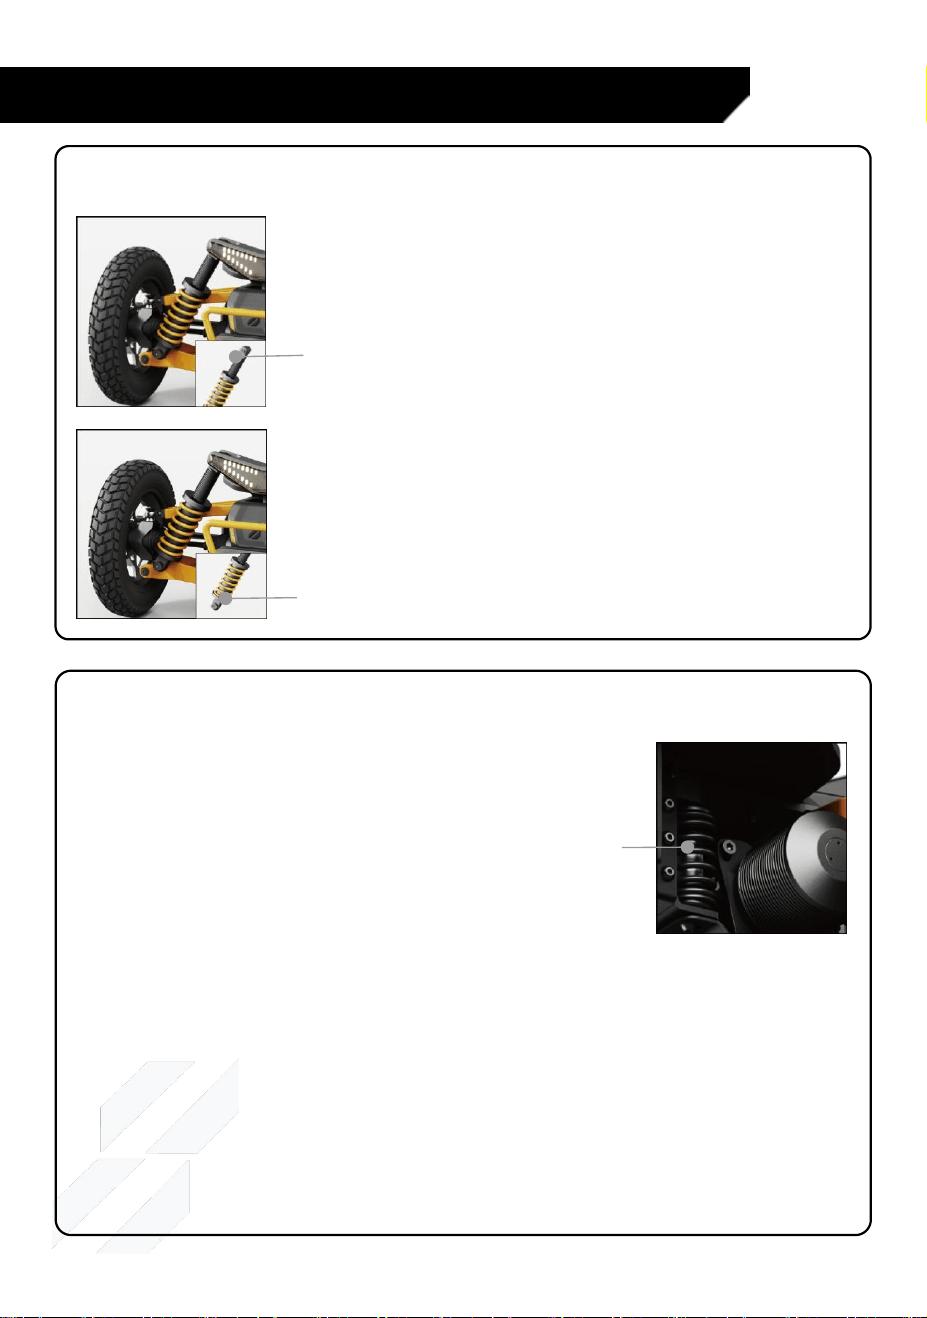
Shock Absorber
Use the spring collar to adjust preload.
Clockwise increases preload, counterclockwise
decreases it. More preload makes the
suspension feel stiffer.
Do not exceed the spring ’ s free length,
otherwise the spring becomes unsafe.
Turn the red knob to adjust rebound.
Clockwise = slower rebound, counterclockwise
= faster. Slower rebound makes the suspension
stiffer. Faster rebound may cause wobbling.
Steering Spring
Steering spring locking screw:
Turn counterclockwise to loosen the steering
spring. This makes steering more responsive and
agile, but increases the chance of wobbling.
Turn clockwise to tighten the steering spring.
Steering Note:
Steering is affected by both the steering damper and the shock
absorber springs.
Like a traditional skateboard, you steer by leaning. However, because
this board has suspension, chassis roll also turns the wheels. Imagine
the steering damper fully locked — the board can’t pivot.
This slows steering response but provides better stability at high
speeds.
12
When you lean, one shock compresses more than the other, and that
still turns the wheels.
So when adjusting steering, remember you ’ re not just tuning the
damper. You also need to experiment with shock preload.
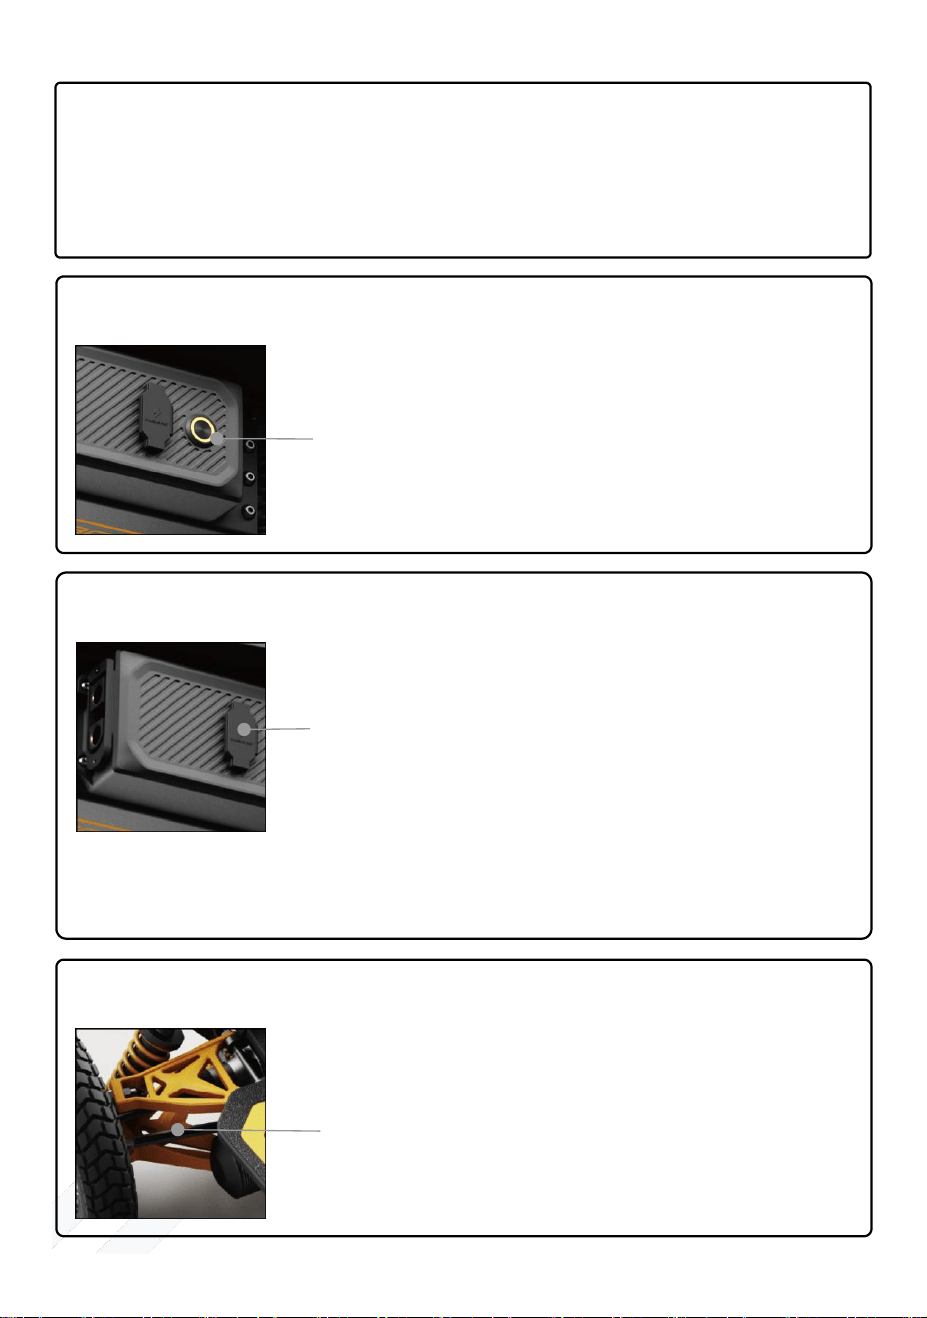
Power On/Of
Press the power button once to turn the
skateboard on. The power icon on the button
will light up. Press again to turn off; the light
goes out.
Charging Port
Plug the charger into this port to charge.
The charger has 2 LEDs. If both are red and the
fan is running, the board is charging.
When one LED turns green and the fan stops,
it's fully charged.
Unplug the charger once fully charged.
Keep the cap closed while riding to keep dust out.
Steering Link Rod
The steering link rod adjusts the wheel angle.
Adjust it so that the wheels stay parallel to the
board under the rider’s weight.
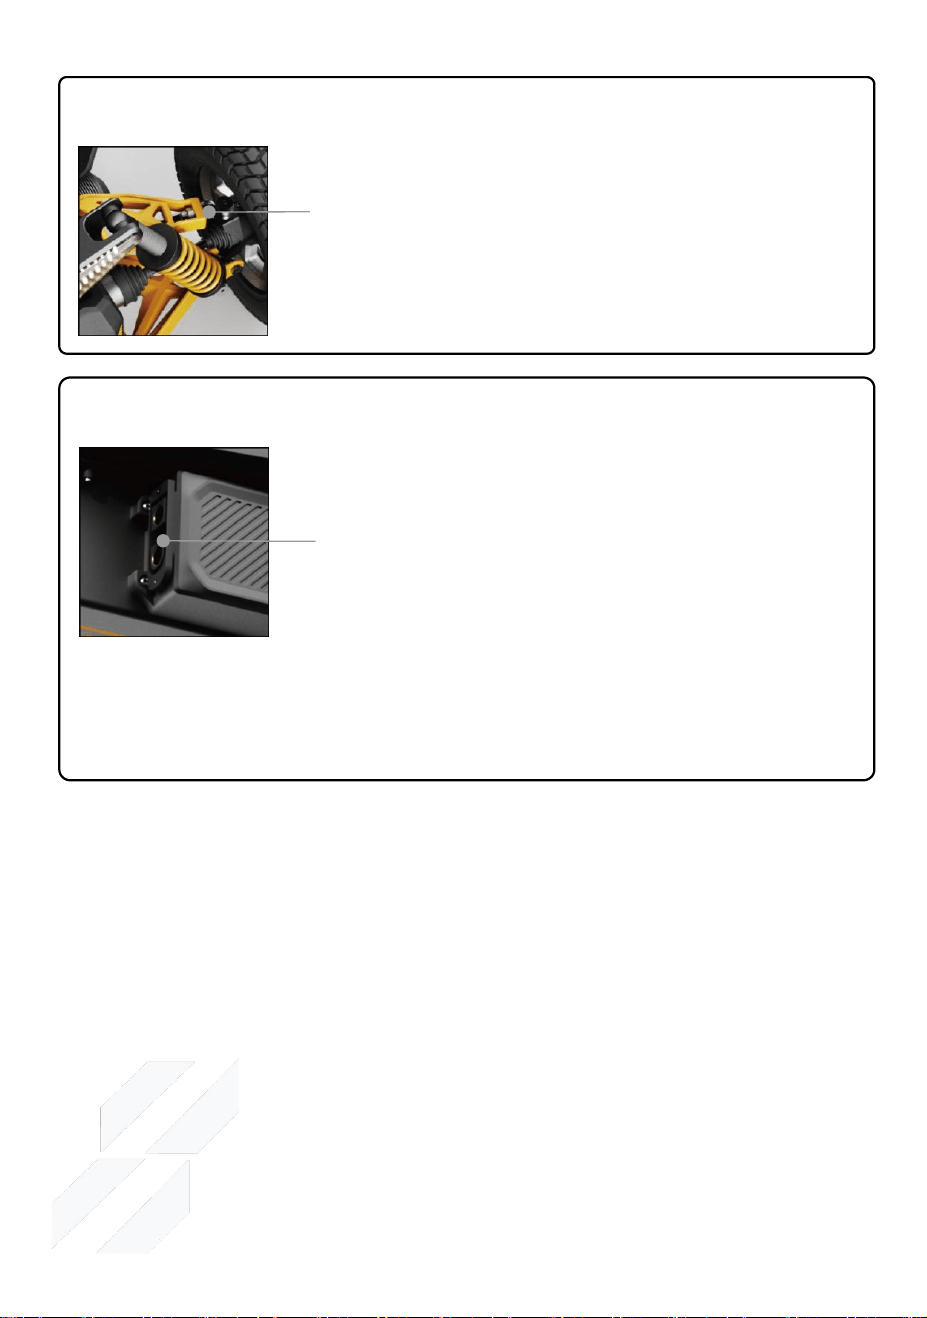
13
Arm Screw
Adjust the length of this screw so that the
wheels stay perpendicular to the ground.
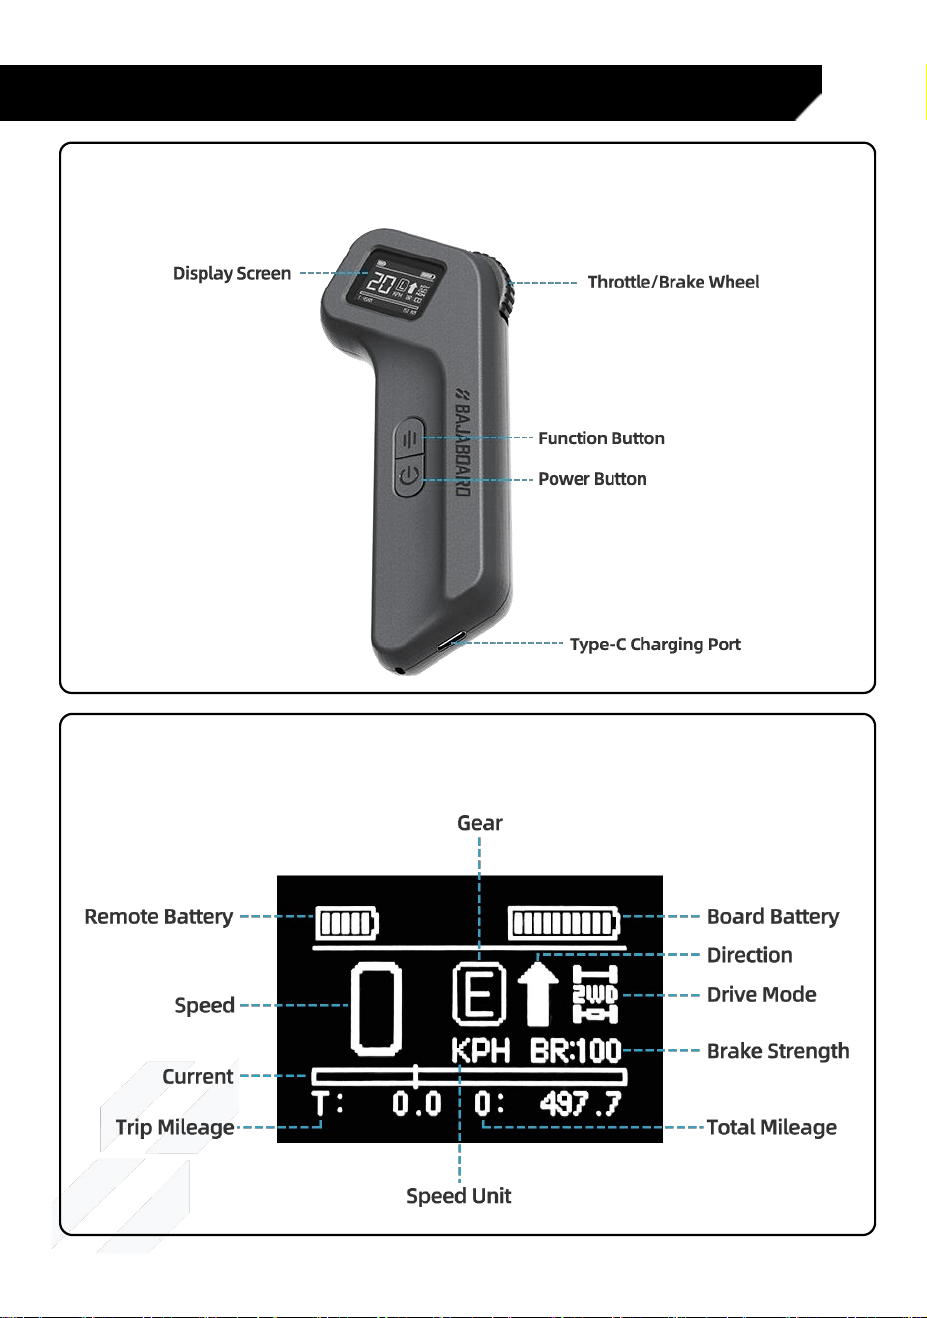
External Battery Parallel Port
This port supports up to 200A overcurrent. An
external battery can be connected in parallel
via this port.
Both internal and external batteries must be
genuine Bajaboard batteries. When charging,
disconnect the external battery. Only separate charging is supported.
Note: Genuine Bajaboard batteries currently cannot be used in
parallel with other brands.
14
Main Body Functions of the Remote Controller
Function Panel
Interface Icon Function Indicators

15
Functions and Operating Instructions
1. Power On
When the remote is off, press and hold the power button for 1
second. The remote vibrates once, enters connection mode, and
shows the main screen or“disconnected”prompt. Then briefly press
the board’s power button to turn it on and enter connection mode.
Note: When connected, the remote shows the main screen and the
board’s power indicator stays solid.
2. Power Off
Manual shutdown:
When powered on, press and hold the power button for 2 seconds to
turn off. (If the remote is connected and the board is moving, the
remote cannot be turned off. The board can be turned off anytime by
holding its power button for 2 seconds.)
Note: If the board is off but the remote remains on and connected,
the remote shows “disconnected” and gives a short vibration. When
connected and the board is stationary, turning off the remote makes
the board enter standby mode (standby time ~ 24 hours).
Auto shutdown:
When connected and stationary with no operation for 5 minutes, the
remote turns off automatically and the board enters standby. When
not connected and stationary with no operation for 5 minutes, both
the remote and the board turn off automatically. Next use requires
manual power-on.
3. Pairing
With both the remote and board off, press and hold the board ’ s
power button for 5 seconds. The board’s power LED flashes quickly
to indicate pairing mode. Then press and hold the remote’s power

16
button for 5 seconds. The remote shows a pairing prompt. Once
paired, the remote gives two short vibrations and one long vibration.
After pairing, set the board’s 2WD/4WD, speed unit, gear ratio, wheel
diameter, motor KV, and motor pole pairs (factory settings are
correct, no need to change). The board’s indicator turns solid red.
Pairing is complete and ready to use.
Note: Use the scroll wheel to switch options. Press the power button
to save settings. After setup, the remote enters the main function
screen.
4. Battery Indicator
Remote battery indicator:
The remote has 5 bars, each ≈ 20%.
After power-on, if battery is below 10% (about 30 min left), the
remote shows“battery < 10%”and gives two long vibrations once.
When battery drops to about 5% (about 15 min left), the remote
shows“battery < 5%”and gives two long vibrations once.
When battery is below safe voltage (3.4V) and connected to the
board with the board stopped, the remote vibrates once briefly and
turns off.
Board battery indicator:
The board has 10 bars, each ≈ 10%.
When board battery is below 25%, the remote shows“board battery
<25%”and gives two long vibrations once (motor output decreases
proportionally as battery drops).
When board battery is below 10%, the remote shows“board battery
<10%”and gives two long vibrations once.
When battery reaches 0%, power output is cut off and only braking
responds.

17
The user is advised to stop riding. The board only responds to
braking.
In extreme braking, power is consumed; under normal braking,
energy is recovered.
Under heavy and repeated emergency braking at this point, battery
drain increases, which may damage the battery and cause safety
incidents.
5. Throttle / Brake Control
Push the throttle wheel forward to accelerate. Pull it backward to
brake.
When powering on, make sure the throttle wheel is at the natural
center position, otherwise throttle feel may be affected. If the throttle
deviates too far from center at startup, the screen prompts a wheel
return operation.
6. Skateboard Direction Switching
In forward state, double-click the function button. The remote
vibrates briefly, and the direction icon on the screen changes to a
"backward arrow".
In backward state, double-click the function button. The remote
vibrates briefly, and the direction icon changes to a "forward arrow".
Note: This operation is only valid when the throttle wheel is at the
center position (zero throttle) and the speed is less than 3 km/h.
7. Gear Switching
Press the function button once briefly. The remote switches to the
next gear, gives one short vibration, and the gear icon on the screen
changes accordingly.
Note: This operation is only valid when the throttle wheel is at the
center position (zero throttle).

18
8. Data Viewing
At any time on the main screen, click the function button once to
cycle through real-time data (total mileage, trip mileage; real-time
voltage and current; real-time board motor temperature; real-time
motor RPM; drive mode, gear ratio, wheel diameter, motor pole
pairs).
9. Cruise Control
After power-on, with a certain amount of throttle applied, click the
power button once to enter cruise control. You can then release the
throttle wheel, and the skateboard will maintain the current speed.
Any further throttle, braking, or button press will immediately exit
cruise control.
10. Advanced Function Parameter Settings
1)Under normal connection, press the function button 5 times
quickly to enter level 1 parameter settings (2WD/4WD, speed unit
switching, brake strength).
Use the throttle wheel to scroll through options. Click the power
button once to save and automatically move to the next item. After
completing all, it jumps to the speed display screen.
2)Under normal connection, press the function button 8 times
quickly to enter level 2 parameter settings.
Use the throttle wheel to scroll through options. Click the power
button once to enter a setting item; click the power button again to
go back to the previous level. Click the function button once to save
settings and exit parameter settings.
Note: Each time you enter settings, you can adjust all items at once.
After selecting the desired parameters, click the function button once
to save all settings and automatically exit the parameter settings
interface.

19
11. Tank Mode
In 4WD mode, press the power button three times quickly. The
remote vibrates to indicate tank mode is enabled, and the screen
shows a double arrow. Double-click the gear switch button to change
the turning direction. When speed is below 3 km/h, click the power
button once to exit tank mode.
12. Charging
Remote charging:
After the remote is plugged in for charging, it vibrates once briefly,
and the screen shows real-time charging progress.
While charging, no other operations are possible. After unplugging
the charging cable, the remote vibrates once briefly and turns off
automatically.
Note: Only use a charger with 5V output. Do not use chargers marked
with 5V/6V/9V/12V output, as such chargers may deliver voltages
exceeding 5V and damage the remote.
13. Auto-Match Motor Parameters
The board can learn motor parameters. When replacing with a
different motor, connect the controller to the new motor ’s phase
wires and Hall sensor wires. The motor must be unloaded (wheels off
the ground). Press and hold the power button for 1 second to turn on,
then release. Within 5 seconds, briefly press the power button 3 times
in a row. The motor will beep, vibrate, and rotate. This process takes
about 50 seconds.
Do not perform any operation during the learning process. If power is
cut or the motor stops spinning, repeat the above steps to re-enter
learning mode. After successful matching, the motor stops spinning

20
and no longer beeps. Wait 5 seconds, then the remote can be used
normally.
Note: If during learning the motor stalls (does not spin) or spins then
stops while continuing to beep, immediately press and hold the
power button to turn off the controller. Check whether all connectors
are properly plugged in, whether foreign objects are blocking the
motor, or whether the motor has excessive no-load resistance.
When replacing with a new motor, you must perform the above
auto-match procedure. Forcing the motor to run using the throttle
without matching may damage the motor and controller.
14. Fault Alarm Description
1)Battery Overvoltage Alarm
When the battery is overcharged or riding downhill on a fully charged
battery causes the voltage to exceed normal limits, the battery
overvoltage alarm will trigger.
In principle, we prohibit riding downhill with a fully charged
skateboard. Braking while going downhill will charge the battery, so
riding downhill on a full battery can reduce battery life or even cause
explosions or fire accidents.
Users must first consume some battery power on flat ground or uphill
before going downhill!
When a fully charged skateboard is improperly used downhill and the
ESC detects battery overvoltage, the remote will vibrate and show a
warning. If the user continues descending, the skateboard will actively
brake to stop the user. This method only provides limited protection
and cannot guarantee that the battery will be 100% free from
damage.

21
2)Signal Loss Alarm
When the signal is suddenly lost, the remote screen shows
“Disconnected” and gives one short vibration. If the skateboard is
accelerating, power output is immediately cut off and the board
freewheels; if not accelerating, power output is also cut off with no
braking. After signal loss, the remote enters searching mode. When it
finds and reconnects successfully, the remote gives one short
vibration. The throttle must be returned to zero, then normal throttle
operation resumes immediately.
3)Stall Alarm
When the motor stalls or is completely locked, the remote vibrates
intermittently with short vibrations, and the screen shows a motor
stall warning. When this occurs, the user should stop applying
throttle, check whether foreign objects are jamming the motor, and
clear them before operating the skateboard again.
Note: The user should monitor motor temperature. If the motor
becomes too hot, stop using it and wait for it to cool down before
resuming.
4)Overcurrent Alarm
When the motor operating current exceeds the allowable value, the
remote screen shows “Overcurrent” and the motor stops working.
Note: After an overcurrent warning, power output resumes when
speed drops below 3 km/h. If overcurrent warnings occur frequently,
stop using immediately; the power system has a fault. Fix the fault
before using again.
5)Overheat Alarm
When the controller operating temperature exceeds 105°C, the
remote vibrates once, the screen shows “Overheat”, the controller
cuts off power output and stops working.

22
The user should monitor controller temperature. If the controller
becomes too hot, stop using it and wait for it to cool down before
resuming.
When the motor operating temperature exceeds 125°C, the remote
vibrates once, the screen shows “Overheat”, and the motor stops
working.

23
Battery Maintenance
Storage
• The battery should not be stored fully charged for long periods.
For long-term storage, discharge the battery to 40-60%.
Long-term means more than 3 months.
• If the battery will not be used for an extended time, you must
cycle (discharge then charge) the battery at least once every 2 to 3
months, then discharge it to 40‑ 60% to maintain battery health.
• Each cell in the battery pack has its own discharge rate. After
long-term non-use, the cells may not hold the same charge, so the
total capacity may appear reduced. In this case, cycle the battery
pack several times so the Battery Management System (BMS) can
rebalance the cells and recover the “lost capacity”.
Operation
• When the battery pack is fully discharged and the skateboard is
off, do not use it again before recharging. Over-discharging the
battery pack will shorten battery life or cause permanent damage.
• When the battery pack is fully discharged and the skateboard is
off, you must charge the battery pack within 12 hours to prevent
damage.
• Only use the charger provided with the skateboard to charge the
battery pack. Using any other charger will void the battery
warranty.
• The battery pack can be discharged at -15°C to 40°C [5°F to 104°
F], and charged at 0°C to 40°C [32°F to 104°F]. The optimal
operating temperature is 15°C to 30°C [59°F to 86°F]. Do not use
the skateboard outside the range of -15°C to 40°C [5°F to 104°F].
Vehicle Maintenance & Parts Replacement
24
Note that while air temperature may be 40°C [104°F], ground
temperature and internal temperature may be higher. Consider
temperature conditions before riding.
• Do not expose the skateboard to temperatures above 70°C [158°
F] under any circumstances. This can severely damage the battery
and may cause fire. Do not store in a car during hot weather.
• In case of fire, use a fire extinguisher / sand / soil to put it out.
• Handle the product with care. Avoid dropping the skateboard
when removing it.
Drive Shaft Joint Maintenance
You must ensure the drive shaft rubber boots are installed before
riding. If a drive shaft rubber boot is torn or missing, it must be
replaced before riding.
Operating the skateboard without the drive shaft boots in place
allows dust and other debris to accumulate inside the drive shaft
joints, causing damage.
Tire Maintenance and Replacement
Tire wear reduces tire life, increases power consumption, and also
increases the risk of a blowout. You should check tire pressure at
least once a month. Tire pressure should be no lower than 30 psi.
The tire wear indicator is located in the tread grooves. When the tire
wear reaches the level of the wear indicator, the tire must be
replaced.
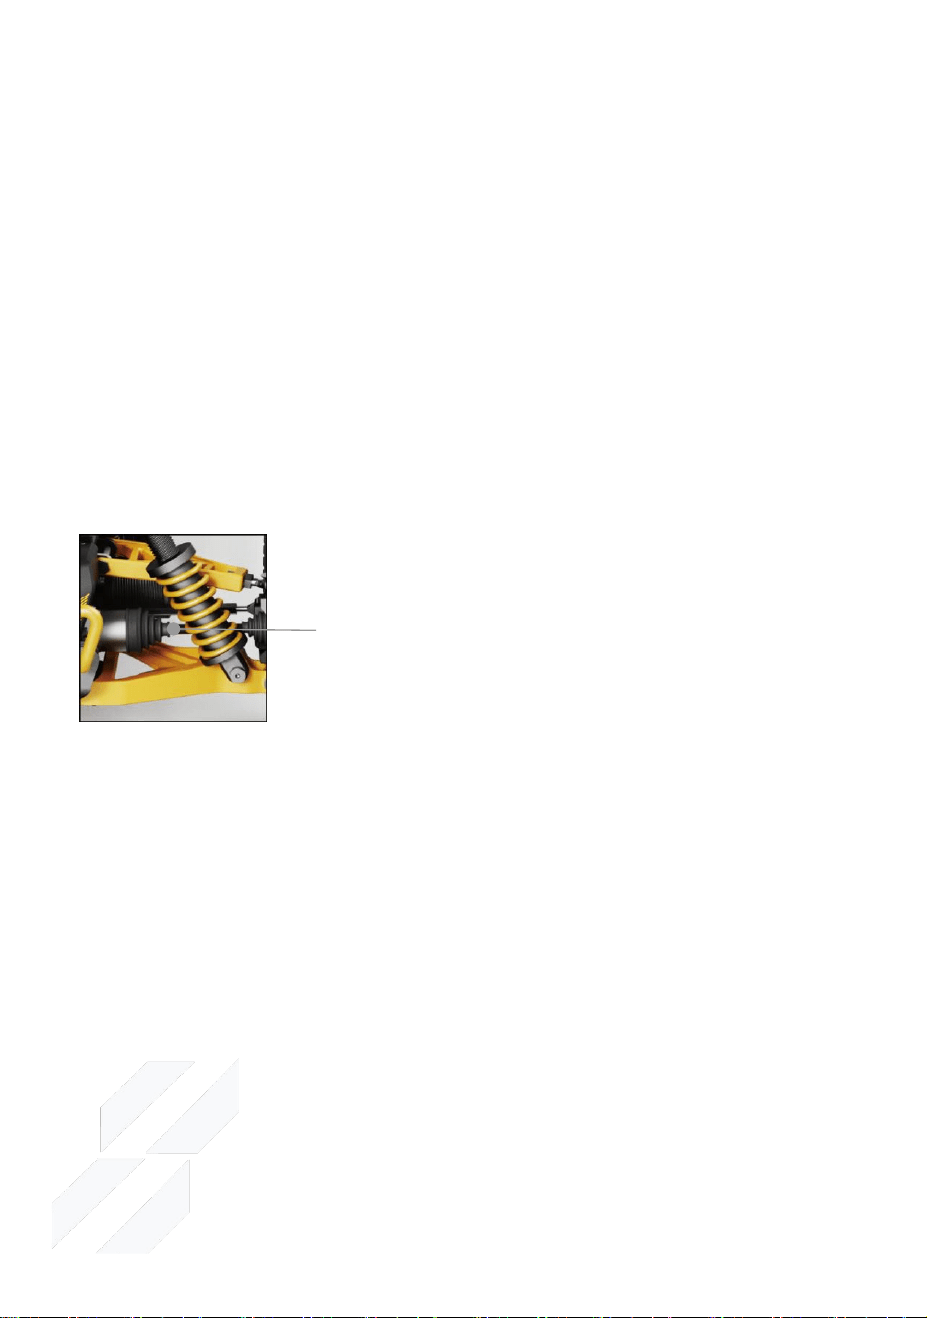
The drive shaft joints on the skateboard must be
kept in good working condition. The drive shaft
joints require lubricating oil to run smoothly.
You must apply lubricating oil to the joints every
2 months.
25
The rider should promptly inspect the tires for bulges, cracks, cuts,
punctures, and abnormal wear. If any of these are found, repair or
replace the tire in a timely manner.
Tire Replacement:
Scan QR
Belt Maintenance and Replacement
The rider should promptly inspect the belt for cracks, cuts, looseness,
and misalignment. If any of these are found, repair or replace the belt
in a timely manner.
Belt Replacement:
Scan QR
Step 3: Remove the motor. Remove the two screws near the front of
the board that secure the motor, and loosen the third screw until the
belt can be removed. After replacing the belt, reinstall the suspension
support and tire in order.
Note: When replacing a broken belt, the above steps must still be
completed to replace the belt. After the belt is installed, do not
First, lift the tire off the ground. Use a tool to
remove the M10 flange lock nut with teeth
from the center of the tire, then pull the tire
out. If the tire is too tight, lightly tap the
connecting shaft with a rubber hammer while
shaking the tire. Do not use excessive force or
violent removal, as this may damage the drive
shaft.
Step 1: Remove the tire (refer to tire replacement
steps).
Step 2: Remove the suspension support. The nuts
on the upper and lower control arms and the
steering link rod have low-strength threadlocker
applied. When reinstalling, low-strength
threadlocker must be applied.
26
tighten the motor mounting screws. Hold the motor at the
special-shaped screw hole on the motor mounting plate, lift the
motor upward until the belt is tensioned (not too tight or too loose),
and simultaneously tighten the fixing screws.
Motor Maintenance and Replacement
The motor should operate in a dry environment. The motor surface
should be kept clean. Excessive dust on the surface will reduce heat
dissipation. Obstruction by foreign objects will increase energy
consumption and should be cleaned promptly. Forced operation will
cause motor damage. Excessive temperature, abnormal noise, and
vibration are all important factors for determining whether the motor
is working properly.
Motor Replacement:
Scan QR
Step 5: Connect the new motor to the frame. First, properly engage
the belt pulley with the belt, then use screws to secure the new motor
to the frame.
At this point, do not tighten the motor fixing screws. Adjust the belt
tension. Hold the motor at the special-shaped screw hole on the
motor mounting plate, lift the motor upward until the belt is
tensioned (not too tight or too loose), and simultaneously tighten
the fixing screws. Motor replacement is now complete.
Step 1: Remove the motor fixing screws.
Step 2: Remove the motor and the belt pulley.
Step 3: Remove the motor mounting plate from
the frame.
Step 4: Assemble the new motor with the frame
mounting plate and the belt pulley.
27
Fender Maintenance and Installation
Before riding, check whether the fender is damaged and whether the
screws are loose. After riding, keep the board surface clean and
ensure no foreign objects are embedded in the gap between the
fender and the body, so that the fender functions properly.
Fender Installation and Replacement:
Scan QR
Step 3: Connect the fender to the mounting plate using bolts, with a
plastic spring spacer between them.
Step 4: Secure the other end of the fender with the bottom
connecting screws. Fender installation is now complete.
Frame Maintenance
After using the skateboard, the rider should perform a visual
inspection to ensure the board is clean, no foreign objects
embedded, no bent or damaged parts, no loose or missing screws,
no unusual noises when moving the board (e.g., squeaking), and no
damaged or missing rubber boots/covers, etc.
Step 1: Remove the connecting screws on the
bottom of the skateboard and set aside.
Step 2: Remove the shoulder screw at the front of
the board, then secure the fender mounting plate
to the frame using the shoulder screw, with a
spacer between the plate and the frame.
The fender is not standard equipment for the
skateboard and must be purchased separately.
The function of the fender is to reduce damage
to the front and rear of the skateboard body in
the event of a severe collision.

28
Your skateboard’s main components enjoy a conditional one-year
warranty. Non-wearable parts are warranted for three months.
Wearable parts are not covered. The warranty period begins on the
delivery date of the skateboard, as indicated by the relevant carrier
tracking information.
Main components include:battery, motor, controller.
Wearable parts include:wheels and tires, CV (drive shaft) pin caps,
drive shaft joint rubber boots, timing belt.
The following are warranty conditions and disclaimers. If any of the
following applies, the skateboard will not be covered by the warranty,
or the warranty will become void.
• Damage caused by water ingress.
• Removal or tampering with warranty stickers, or water-damaged
stickers.
• Damage caused by collision.
• Unauthorized modification of the product.
• Using the product beyond its specified limits.
• Normal wear and tear, such as scratches and dents from road
debris.
• Unauthorized disassembly, modification, or replacement of the
battery pack.
• Minor tears or scratches on the BMS or outer layer of the battery
pack.
• Using a charger not approved by the skateboard manufacturer.
• Not using the battery according to the storage and operating
instructions below.
Cooperation
If requested, you must provide photos and videos to Bajaboard for
evaluating all warranty claims.
Warranty

29
If needed, you must cooperate with Bajaboard and may first attempt
to answer questions via email, phone, or video conference. If the
issue is resolved this way, the warranty claim will be considered
settled. Unless you have cooperated as described above, Bajaboard
has no obligation to verify any warranty claim or provide
replacement parts.
Return of Damaged Parts
For any replacement part claimed under warranty, the original part
must be returned to Bajaboard. The board may decline to replace
your part before receiving evaluation information of the original part.
Both parties will bear their own shipping costs.
30
Dear customer:
When you open the package, please carefully check that the contents
match the list. If there are any issues, contact us promptly for
assistance.
No.
Description
Qty
Unit
Remark
1
G4X Ultra Complete
Skateboard
1
unit
Standard
2
Skateboard Charger
1
unit
3
User Manual
1
copy
4
Remote Controller
1
set
5
Fender
set
Optional
Packing List

31
If the skateboard behaves abnormally, refer to the table below and
take corresponding actions.
If the problem persists or other issues arise, contact Bajaboard
customer service.
Common Issue
Possible Solution
Battery level
display delay
It is recommended to run the battery all the
way down (through a test ride), then fully
charge it, and then test the battery by riding a
60 km range. The solution is: after riding for a
while, wait about 3 minutes for calibration.
Loose belt
The motor shifts, causing the distance to the
timing pulley concentric shaft to shorten,
resulting in a loose belt. Check and adjust the
motor position.
The belt has aged to its original color and lacks
strength; replace the belt.
The suspension is deformed; replace the
suspension or correct it.
Mud stuck to the gear causes the belt to jump
during operation; remove debris and replace
the belt.
Remote won’t
connect on
power-on
Check if the remote system matches the
skateboard model.
Mainboard or remote RF chip faulty. Contact
after-sales.
Signal interference. Reconnect the skateboard.
Common Troubleshooting

32
Origin of Bajaboard
The designer of Bajaboard was once a snowboarder, mountain biker,
and off-road enthusiast.Passionate about thrilling extreme sports.
Eventually, he designed the world ’ s first all-terrain electric
skateboard that combines all three sports.
He named it after the Baja 1000 off-road race, a symbol of passion
and excitement.
Our Honors
Once launched, the skateboard was highly praised by enthusiasts for
its high speed, high power, strong off-road capability, unique frame
and suspension design, and convenient, efficient control interface.
It has also won many design awards:
⚠Statement
All content in this document has been carefully verified. If there are
any printing errors or misunderstandings, please contact our
company.If technical improvements are made to the product, they
will be included in a new edition of the manual without prior
notice.Product appearance and color are subject to change. The
actual product shall prevail.
Brand Story
33
After-Sales Support for Skateboard
TEL 028 - 63025656
Bajaboard Technology (Chengdu) Co., Ltd.
Email:[email protected]
Website:http://www.bajaboardasia.com

FCC Warnning:
This equipment has been tested and found to comply with the limits for a Class B digital device,
pursuant to part 15 of the FCC Rules. These limits are designed to provide
reasonable
protection against harmful interference in a residential installation. This equipment generates,
uses and can radiate radio
frequency
energy
and,
if
not
installed
and
used
in
accordance
with
the
instructions,
may cause
harmful
interference
to
radio
communications.
However,
there
is
no
guarantee
that interference
will
not
occur
in
a
particular
installation.
If
this
equipment
does
cause
harmful interference to radio or television reception, which can be
determined by turning the equipment off
and
on,
the
user
is
encouraged
to
try
to
correct
the interference
by
one
or
more
of
the following measures:
•
Reorient or relocate the receiving antenna.
•
Increase the separation between the equipment and receiver.
•
Connect the equipment into an outlet on a circuit different from that to which the receiver is
connected.
• Consult the dealer or an experienced radio/TV technician for help.
Caution:
Any
changes
or
modifications
to
this
device
not
explicitly
approved
by
manufacturer
could void your authority to operate this equipment.
This
device
complies
with
part
15
of
the
FCC
Rules.
Operation
is
subject
to
the
following
two
conditions:
(1)This
device
may
not
cause
harmful
interference,
and
(2)
this
device
must
accept
any
interference received, including interference that may cause undesired operation.
This
equipment
complies
with
FCC
radiation
exposure
limits
set
forth
for
an
uncontrolled
environment.
This
equipment
should
be
installed
and
operated
with
minimum
distance
0cm
between the radiator and your body.