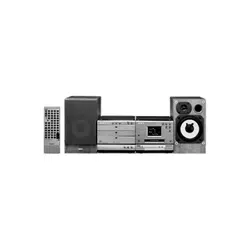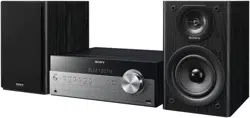
Mini Hi-Fi
Component
System
Operating Instructions
4-233-738-13(2)
MHC-S3
© 2001 Sony Corporation
2
WARNING
To prevent fire or shock hazard, do not
expose the unit to rain or moisture.
To avoid electrical shock, do not open the cabinet.
Refer servicing to qualified personnel only.
Do not install the appliance in a confined space,
such as a bookcase or built-in cabinet.
This appliance is classified
as a CLASS 1 LASER
product. The CLASS 1
LASER PRODUCT
MARKING is located on
the rear exterior.
The following caution label is located inside the
apparatus.
To prevent fire, do not Cover the ventilation of the
apparatus with news papers, table-cloths, curtains,
etc. And don’t place lighted candles on the apparatus.
To prevent fire or shock hazard, do not place objects
filled with liquids, such as vases, on the apparatus.
Don’t throw a battery, dispose it as
the injurious wastes.
This system incorporates Dolby* Digital and DTS**
System.
* Manufactured under license from Dolby
Laboratories.
“Dolby” and the double-D symbol are trademarks
of Dolby Laboratories.
Confidential unpublished works. © 1992-1997
Dolby Laboratories. All rights reserved.
**Manufactured under license from Digital Theater
Systems, Inc. US Pat. No. 5,451,942, 5,956,674,
5,974,380, 5,978,762 and other world-wide patents
issued and pending. “DTS” is a registered
trademarks of Digital Theater Systems, Inc.
© 1996, 2000 Digital Theater Systems, Inc. All
rights reserved.
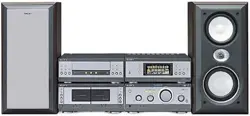
The MHC-S3 consists of the following
components:
– A/V amplifier TA-S3
– Tuner ST-S3
– CD player CDP-S3
– Cassette deck TC-S3
– Speaker system SS-S3
3
Table of Contents
Parts Identification
Main unit ............................................... 4
Remote Control ..................................... 6
Getting Started
Hooking up the system .......................... 7
Inserting two size AA (R6) batteries
into the remote ................................ 9
Setting the time...................................... 9
Saving the power in standby mode...... 10
CD
Loading a CD ...................................... 11
Playing a CD
— Normal Play/Repeat Play/
Shuffle Play ................................... 11
Programming the CD tracks
— Program Play ............................ 12
Using the CD display .......................... 13
Tuner
Presetting radio stations....................... 14
Listening to the radio
— Preset Tuning ........................... 14
Using the Radio Data System (RDS)* 15
Tape
Loading a tape ..................................... 16
Playing a tape ...................................... 16
Recording to a tape
— CD Synchro Recording/
High-Speed Dubbing/Recording
Manually/Program Edit ................. 17
Timer-recording radio programs ......... 18
Sound Adjustment
Adjusting the sound ............................. 20
Selecting a sound field ........................ 20
Understanding the multi channel
surround displays .......................... 22
Customizing sound fields .................... 22
Other Features
Changing the spectrum analyzer
display ........................................... 26
To adjust the brightness of
the display ..................................... 26
Falling asleep to music
— Sleep Timer .............................. 26
Waking up to music
— Daily Timer .............................. 26
Hooking Up the Optional
Components
Connecting audio components ............ 28
Additional Information
Precautions .......................................... 29
Troubleshooting................................... 30
Specifications ...................................... 32
Table for the settings using SUR, EQ,
and SET UP buttons ...................... 34
Adjustable parameters for each sound
field ............................................... 35
* European model only.
4
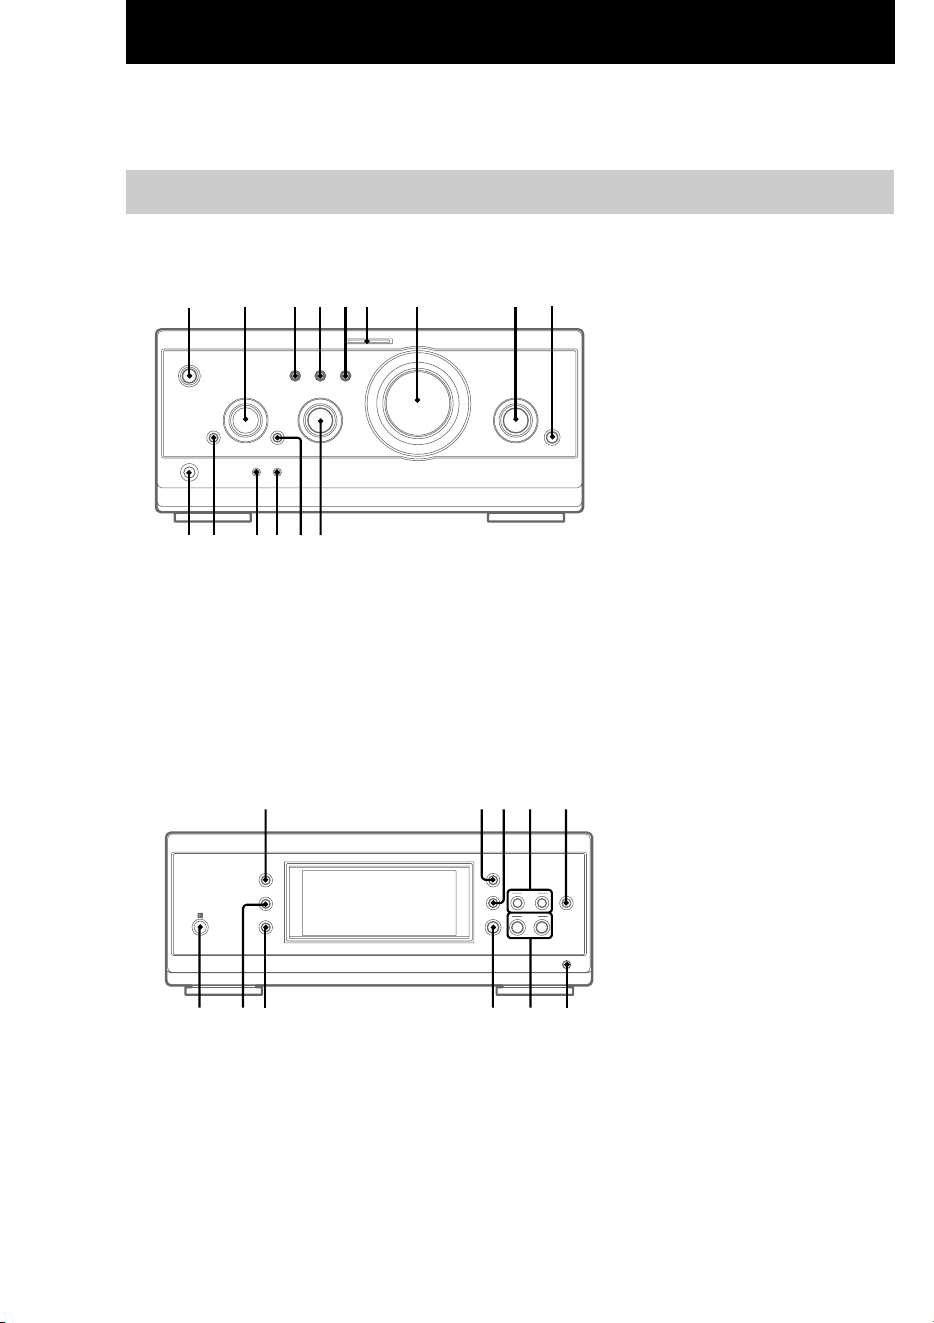
–
–
+
+
qh qjqk ql w;
wawswdwfwgwh
P
o
O
p
63 4 5 7 82
9
q;qaqsqdqfqg
1
DIGITAL 9 (28, 32)
ENTER/O/o/P/p 2 (9, 12, 18,
19, 22–27)
EQ qa (24)
EQ ON/OFF qs (9, 24)
FILE SELECT q; (20, 24)
FUNCTION 8 (9, 11, 12, 17, 18,
28)
GROOVE 5 (20)
MOVIE MODE 4 (20, 21)
MULTI CHANNEL DECODING
indicator 6 (22)
MUSIC MODE 3 (20, 21)
PHONES jack qg
SET UP qd (23–26)
SUR qf (22)
VOLUME 7
@/1 (power) 1 (8, 9, 32)
Parts Identification
Main unit
The items are arranged in alphabetical order.
Refer to the pages indicated in parentheses ( ) for details.
A/V amplifier
Tuner
CLOCK/TIMER wg (9, 18, 26)
DISPLAY qh (10, 13, 15, 26, 32)
ENTER w; (14, 15)
IR receptor wh
PRESET +/– ws (14, 15)
PTY wa (15)
STEREO/MONO qj (14)
TIMER SELECT wf (19, 27)
TUNER/BAND wd (14)
TUNER MEMORY qk (14)
TUNING +/– ql (14)
Parts Identification
5
hH
AUTO REVERSE
hH
AUTO REVERSE
M>
m
H
.
h
x
M >
m
H
.
h
x
A A
th
tg
tf
td
ts
ta
el
r;
ra
rs
rd
rf
rgrhrjrkrlt;
mM
.
HS x
>
1 2 3
wj wkwl e;
ea
es
ed
efegehej
ek
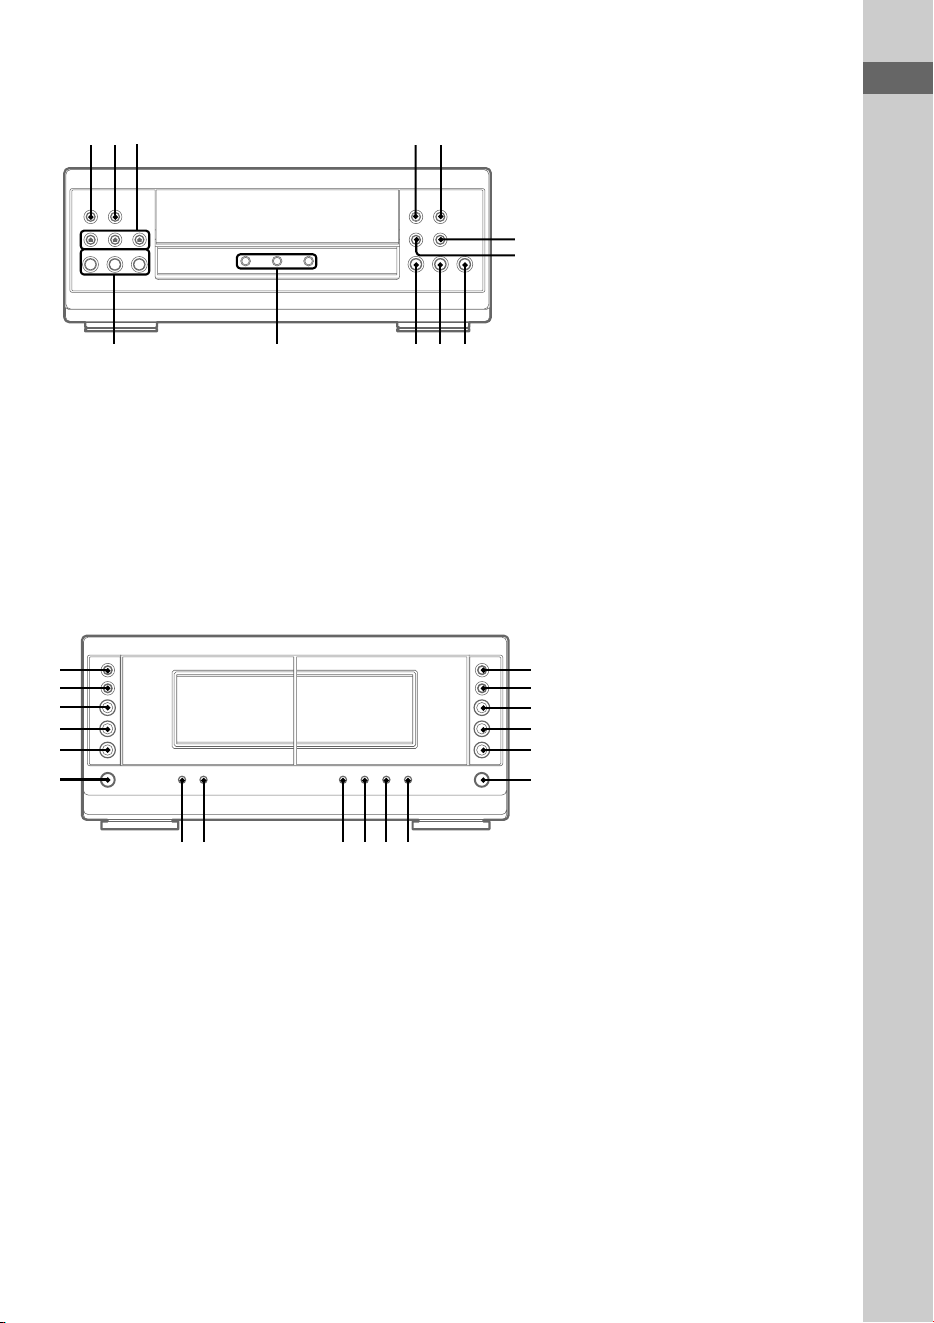
DISC 1–3 ek (11, 12, 18)
DISC 1–3 indicators ej
DISC 1–3 Z (eject) wl (11)
PLAY MODE wj (11, 12, 18)
REPEAT wk (11)
N (play) eh (11, 12)
X (pause) eg (11)
x (stop) ef (11, 17)
. (go back) ed (11, 12, 18)
> (go forward) es (11, 12, 18)
m (rewind) e; (11)
M (fast forward) ea (11)
CD player
Cassette deck
CD SYNC rh (17, 18)
DIRECTION t; (16–18)
DOLBY NR rl (16–18)
EDIT rk (18)
HI-DUB rj (17)
REC PAUSE/START rg (17, 18)
– Deck A –
N (forward play) tf (16)
n (reverse play) td (16)
x (stop) ts (16)
M/> (fast forward/go
forward) th (16)
m/. (rewind/go back) tg
(16)
Z (eject) ta (16)
– Deck B –
N (forward play) ra (16, 17)
n (reverse play) rs (16, 17)
x (stop) rd (16, 17)
M/> (fast forward/go
forward) el (16)
m/. (rewind/go back) r;
(16)
Z (eject) rf (16)
6
x
hH
H
hH
O
o
Pp
Mm
X
>
.
1
wa
qf
9
wf
wd
ws
qj
2
3
4
5
0
qs
qa
qd
6
7
8
qh
qg
ql
qk
w;
wk
wj
wh
wg
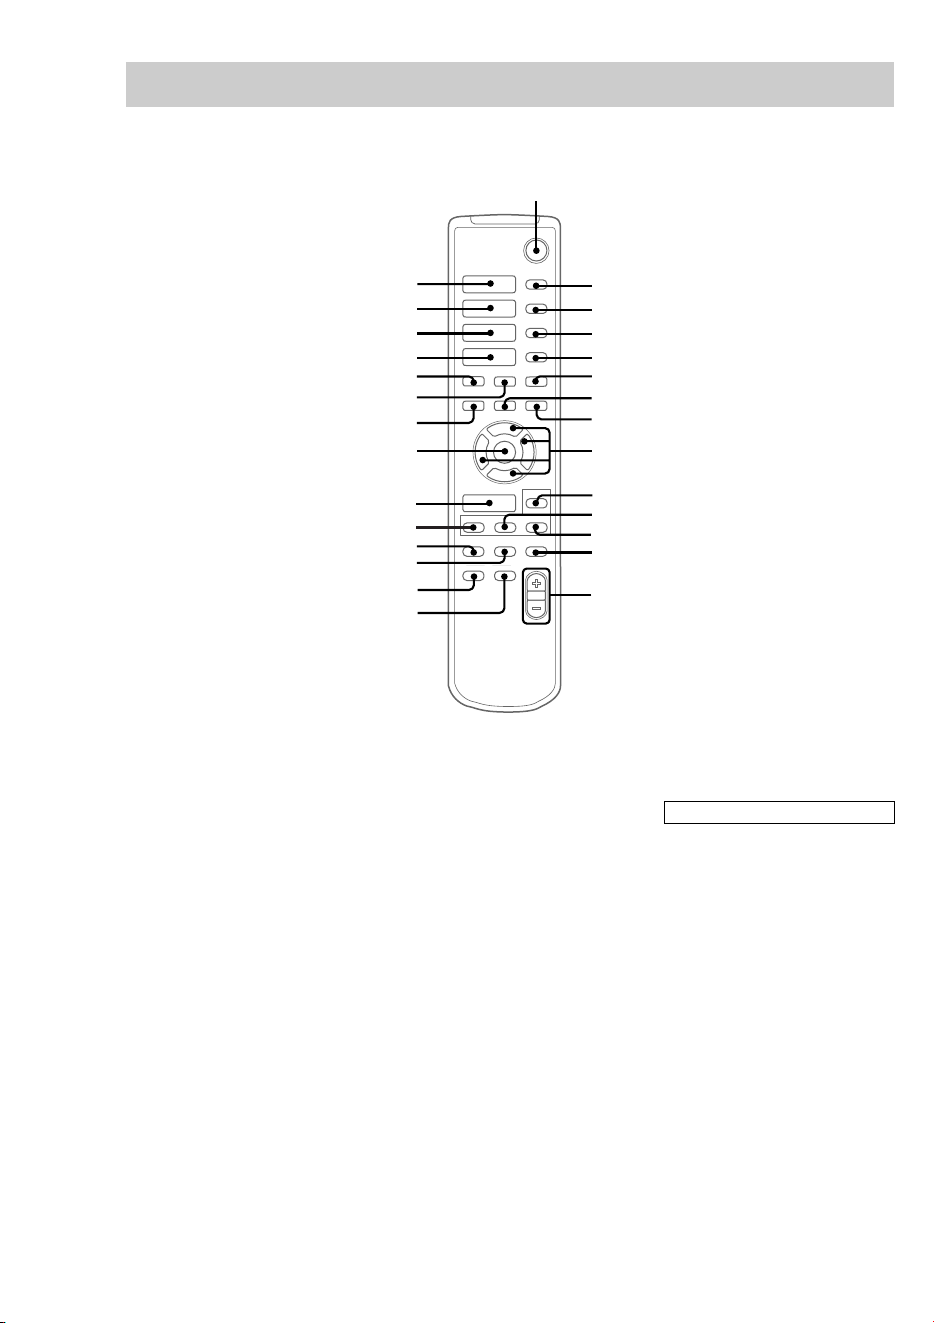
Remote Control
CD H wk (11, 12)
CHECK 3 (12)
CLEAR 4 (12)
CLOCK/TIMER SELECT qg
(19, 27)
CLOCK/TIMER SET qh (9, 18,
26)
DBFB qd (20)
DISPLAY qk (10, 13, 15, 26, 32)
D.SKIP 2 (11)
ENTER wa (9, 12, 14, 15, 18, 19,
22–27)
EQ qa (24)
EQ ON/OFF qs (9, 24)
FUNCTION w; (9, 11, 12, 17, 18,
28)
GROOVE qj (20)
SET UP q; (23–26)
SLEEP 5 (26)
SUR ql (22)
TAPE A hH wj (16)
TAPE B hH wh (16, 17)
TUNER/BAND wg (14)
TUNING + 7 (14)
TUNING – ws (14)
VOL +/– qf
BUTTON DESCRIPTIONS
@/1 (power) 1
X (pause) 8
x (stop) 6
. (go back) wf
> (go forward) wd
m (rewind) ws
M (fast forward) 7
O/o/P/p 9
7
Getting Started
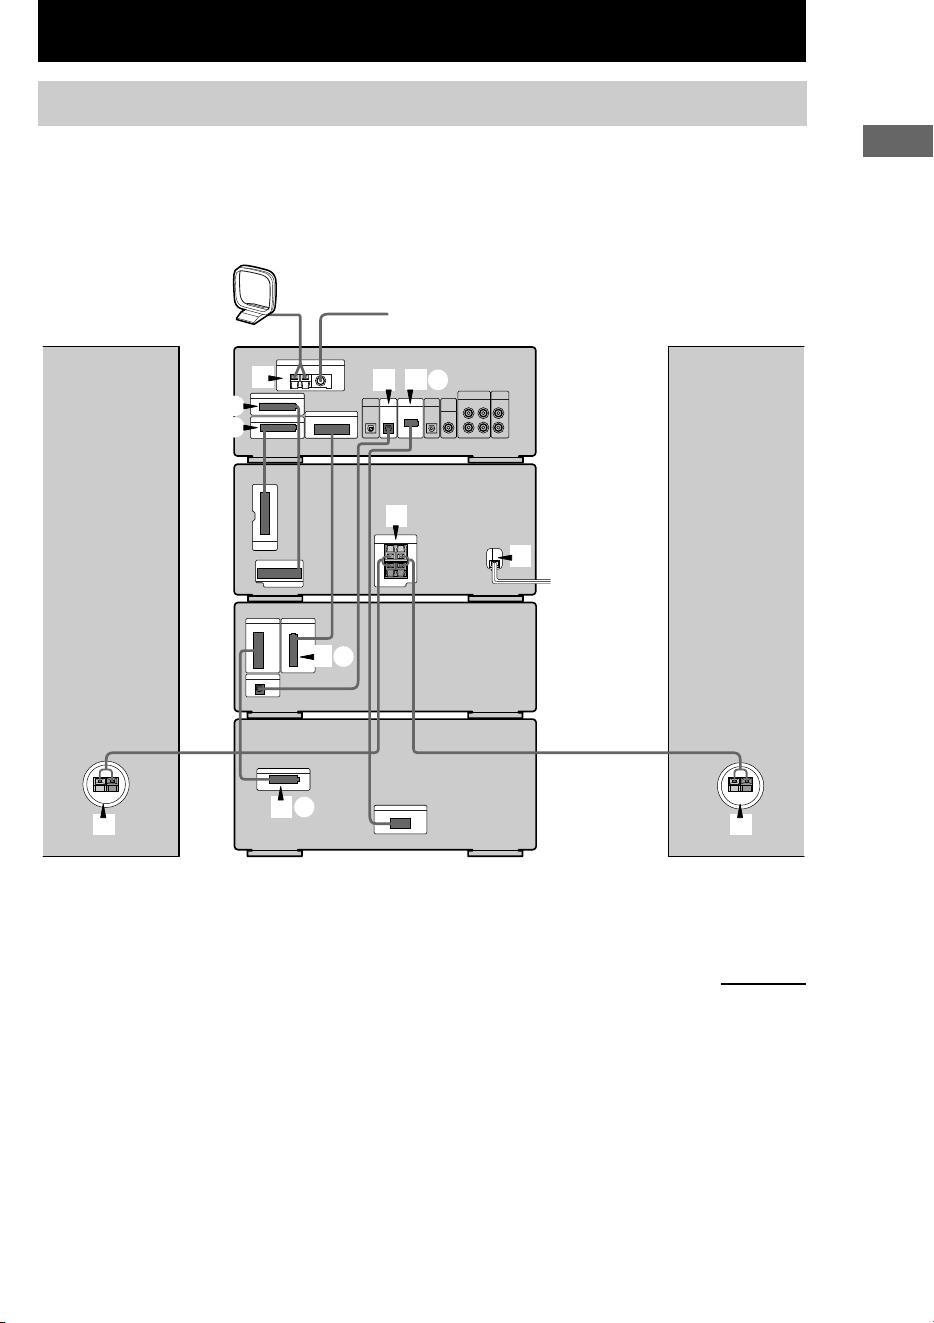
AM loop antenna
Front speaker
(Left)
Front speaker
(Right)
FM antenna
Cassette deck
Tuner
CD player
Getting Started
Hooking up the system
Do the following procedure 1 to 5 to hook up your system using the supplied cords and
accessories.
Before connecting, place the system as described below.
A/V amplifier
continued
2A
2B
2C
2D
1
4
5
3
3 3
2
E
8
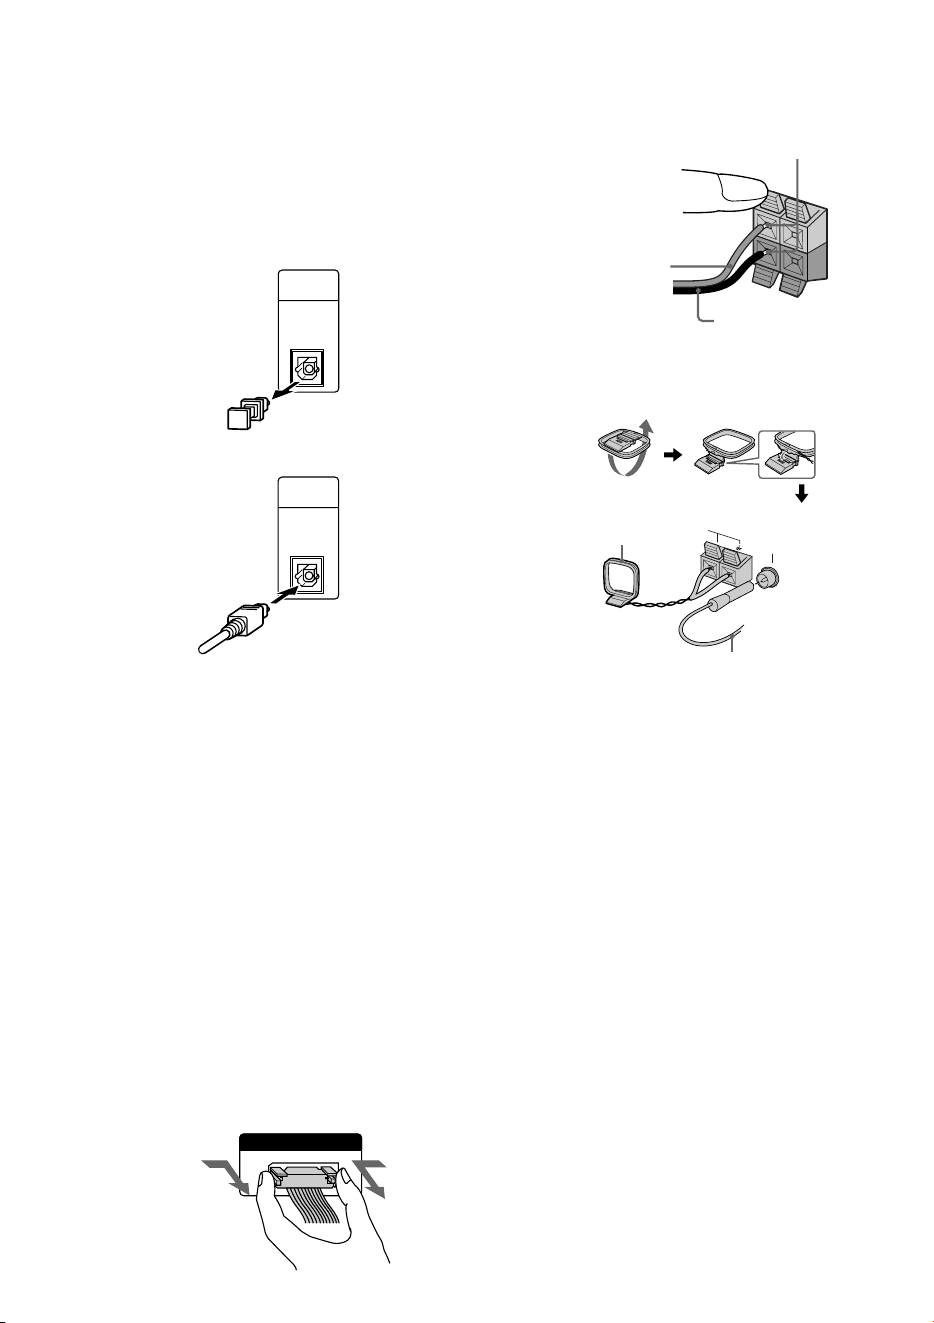
3 Connect the front speakers.
Connect the speaker cords to the FRONT
SPEAKER jacks.
4 Connect the FM/AM antennas.
Set up the AM loop antenna, then connect
it.
5 Connect the power cord to a wall outlet.
The demonstration appears in the display.
When you press ?/1, the system turns on
and the demonstration automatically ends.
If the supplied adaptor on the plug does not
fit your wall outlet, detach it from the plug
(only for models equipped with an adaptor).
FM75Ω/COAXIAL
AM
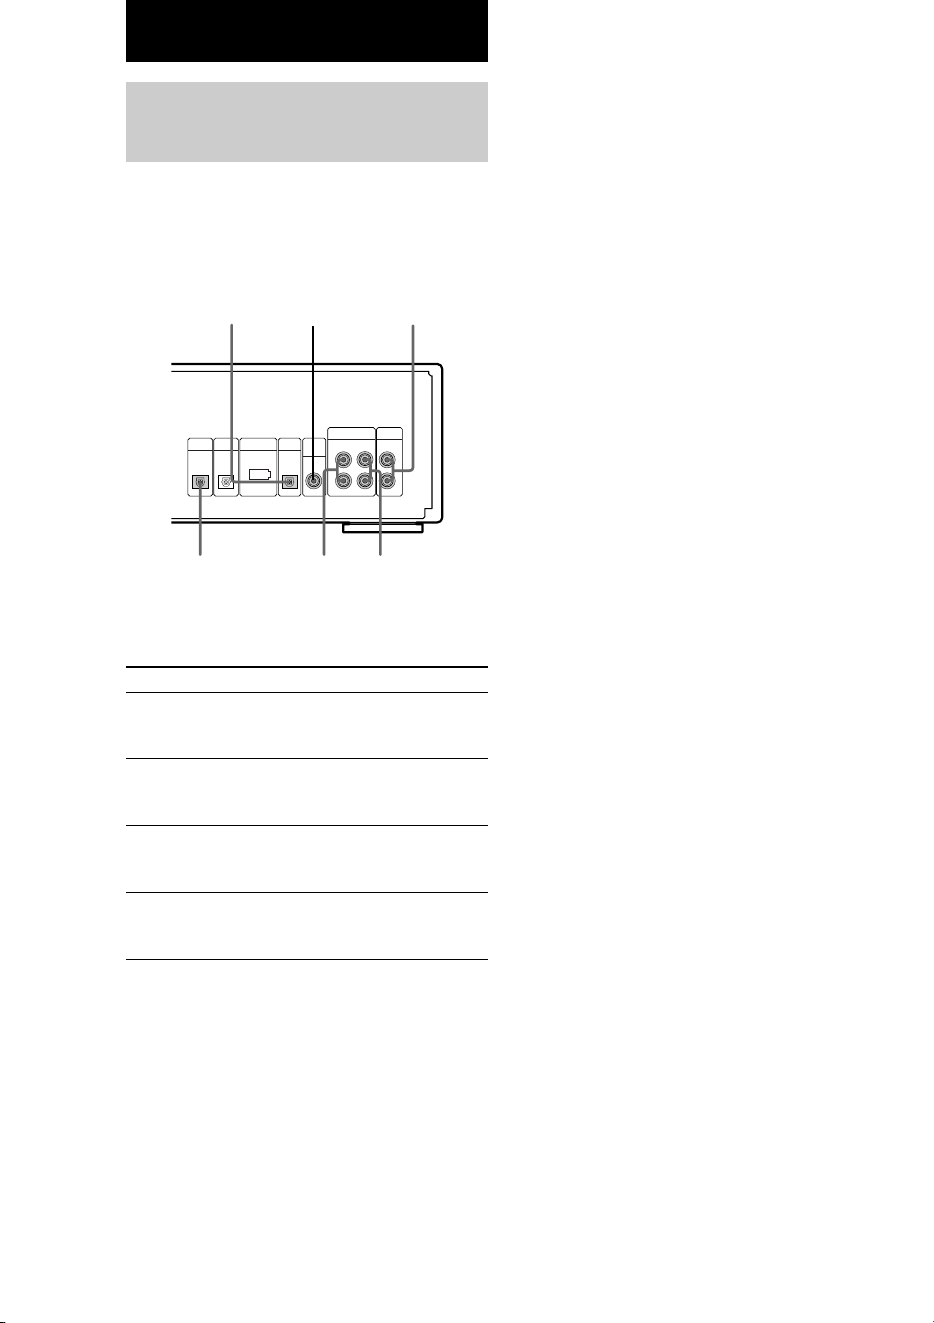
1 Connect the CD player and the tuner
with the optical cable.
Connect from the OPTICAL OUT jack on
the CD player to the OPTICAL IN jack on
the tuner.
1 Remove the cover of the jack.
2 Connect the optical cable.
2 Connect the flat system control cables
to the SYSTEM CONTROL connectors
until it clicks.
Connect to the same colored jack in the
order indicated on the rear panel.
A SYSTEM CONTROL 1 (Red)
Connect from the tuner to the A/V
amplifier.
B SYSTEM CONTROL 2 (Blue)
Connect from the tuner to the A/V
amplifier.
C SYSTEM CONTROL 3 (Black)
Connect from the CD player to the tuner.
D SYSTEM CONTROL 4 (Black)
Connect from the tuner to the cassette deck.
E SYSTEM CONTROL 5 (White)
Connect from the cassette deck to the CD
player.
Extend the FM lead
antenna horizontally.
AM loop antenna
SYSTEM CONTROL 3
FROM CDP-S3
To disconnect
Insert only the stripped portion.
–
R
L
+
OPTICAL
IN
FROM
CDP-S3
OPTICAL
IN
FROM
CDP-S3
Black/Stripe (#)
Red/Solid (3)
Hooking up the system (continued)
9
Getting Started
Setting the time
1 Turn on the system.
2 Press CLOCK/TIMER (or CLOCK/TIMER
SET on the remote).
When you set the time for the first time,
proceed to step 5.
3 Press O or o repeatedly to select
“CLOCK SET”.
4 Press ENTER (A/V amplifier or remote).
5 Press O or o repeatedly to set the hour.
6 Press ENTER (A/V amplifier or remote).
7 Press O or o repeatedly to set the
minutes.
8 Press ENTER (A/V amplifier or remote).
Tip
If you have made a mistake or want to change the
time, start over from step 2.
Note
The clock settings are canceled when you disconnect
the power cord or if a power failure occurs.
Tip
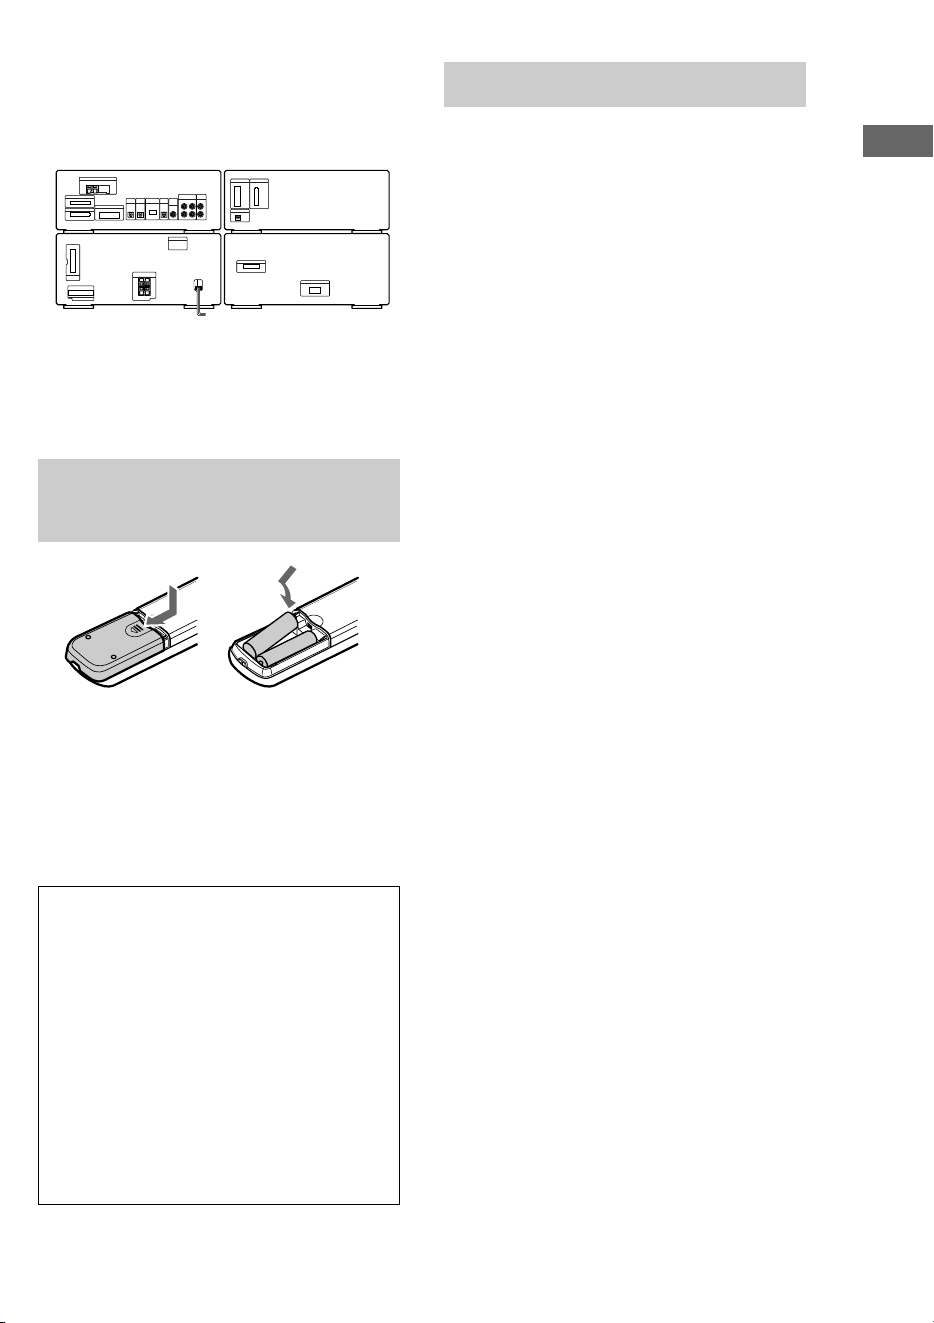
You can place the components as described below. In
this case, place the components first, then connect the
components.
Note
Keep the speaker cords away from the antennas to
prevent noise.
Inserting two size AA (R6)
batteries into the remote
Tip
When the remote no longer operates the system,
replace both batteries with new ones.
Note
If you do not use the remote for a long period of time,
remove the batteries to avoid possible damage from
battery leakage.
Notice for carrying this system
Do the following to protect the CD
mechanism.
1 Turn on the system, then turn
FUNCTION to select “CD”.
Make sure that all discs are removed
from the unit.
2 While holding down EQ ON/OFF, press
?/1 until “LOCK” appears.
3 Release ?/1 first, then release EQ ON/
OFF.
4 Unplug the AC power cord.
]
}
]
}
A/V amplifier
Cassette deck
Tuner CD player

10
Saving the power in
standby mode
Press DISPLAY repeatedly when the
power is off.
Each time you press the button, the system
switches cyclically as follows:
Demonstration t Clock t Power Saving
Mode
To cancel the Power Saving Mode
Press DISPLAY once to show the
demonstration, twice to show the clock display.
Tips
• ?/1 indicator lights up even in the Power Saving
Mode.
• The timer functions during the Power Saving Mode.
Note
During the Power Saving Mode, the following
functions do not work:
– Setting the time.
– One Touch Play function.
11
CD
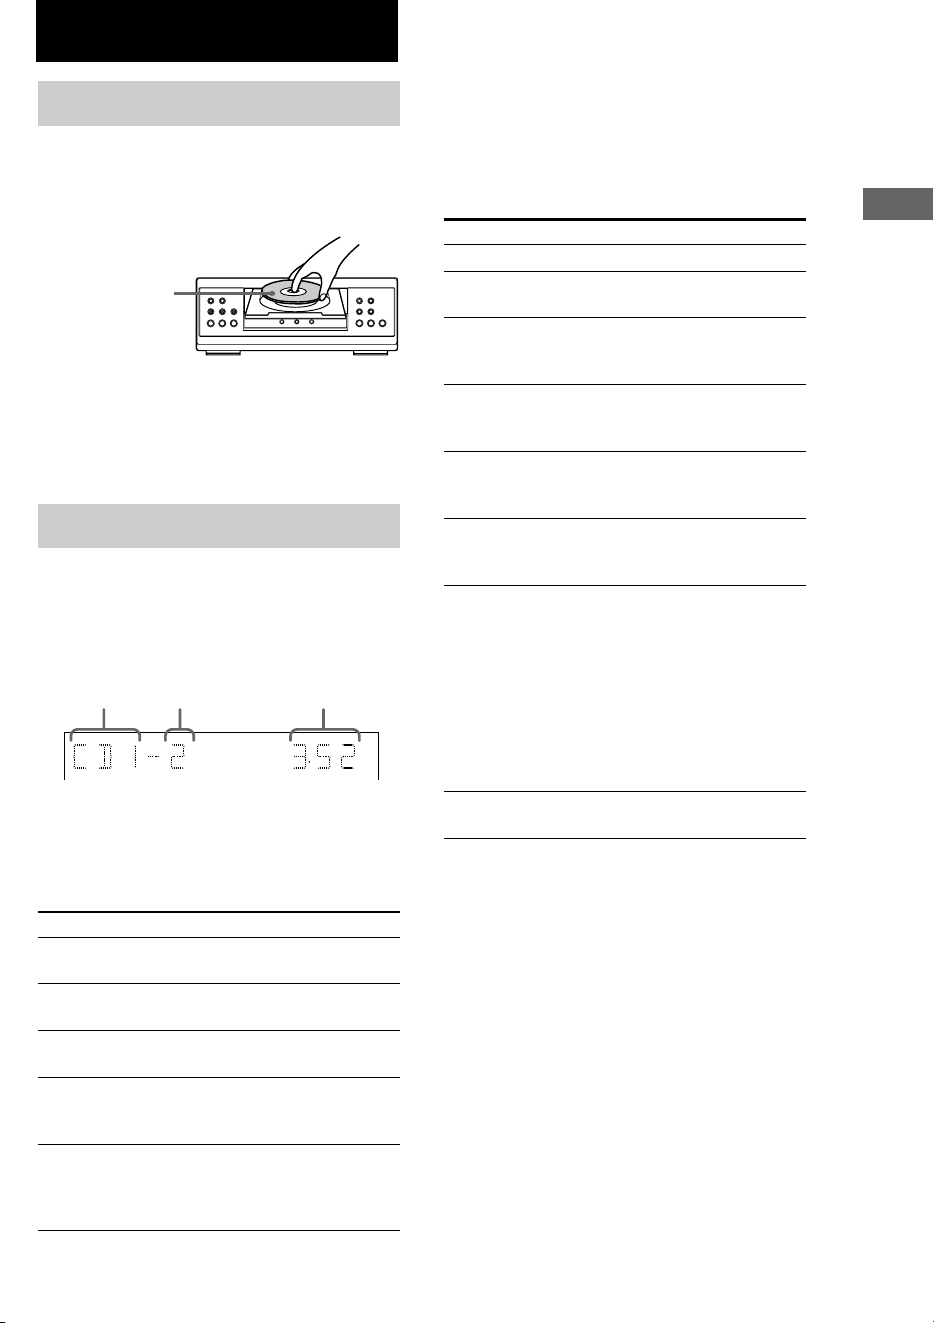
Loading a CD
1 Press one of the DISC 1–3 Z buttons.
The disc tray slides out.
2 Place a CD with the label side up on the
disc tray.
To insert additional discs, press Z of the
other numbers to open the disc tray.
3 Press the same button to close the disc
tray.
Playing a CD
— Normal Play/Repeat Play/Shuffle
Play
This unit lets you play the CD in different play
modes.
1 Turn FUNCTION to select “CD”.
2 When playback is stopped, press PLAY
MODE repeatedly until the mode you
want appears in the display.
Select
ALL DISCS
1 DISC
ALL DISCS
SHUFFLE
1 DISC
SHUFFLE
PROGRAM
mM
.
HS x
>
1 2 3
CD
When you play a
CD single, place it
on the inner circle
of the tray.
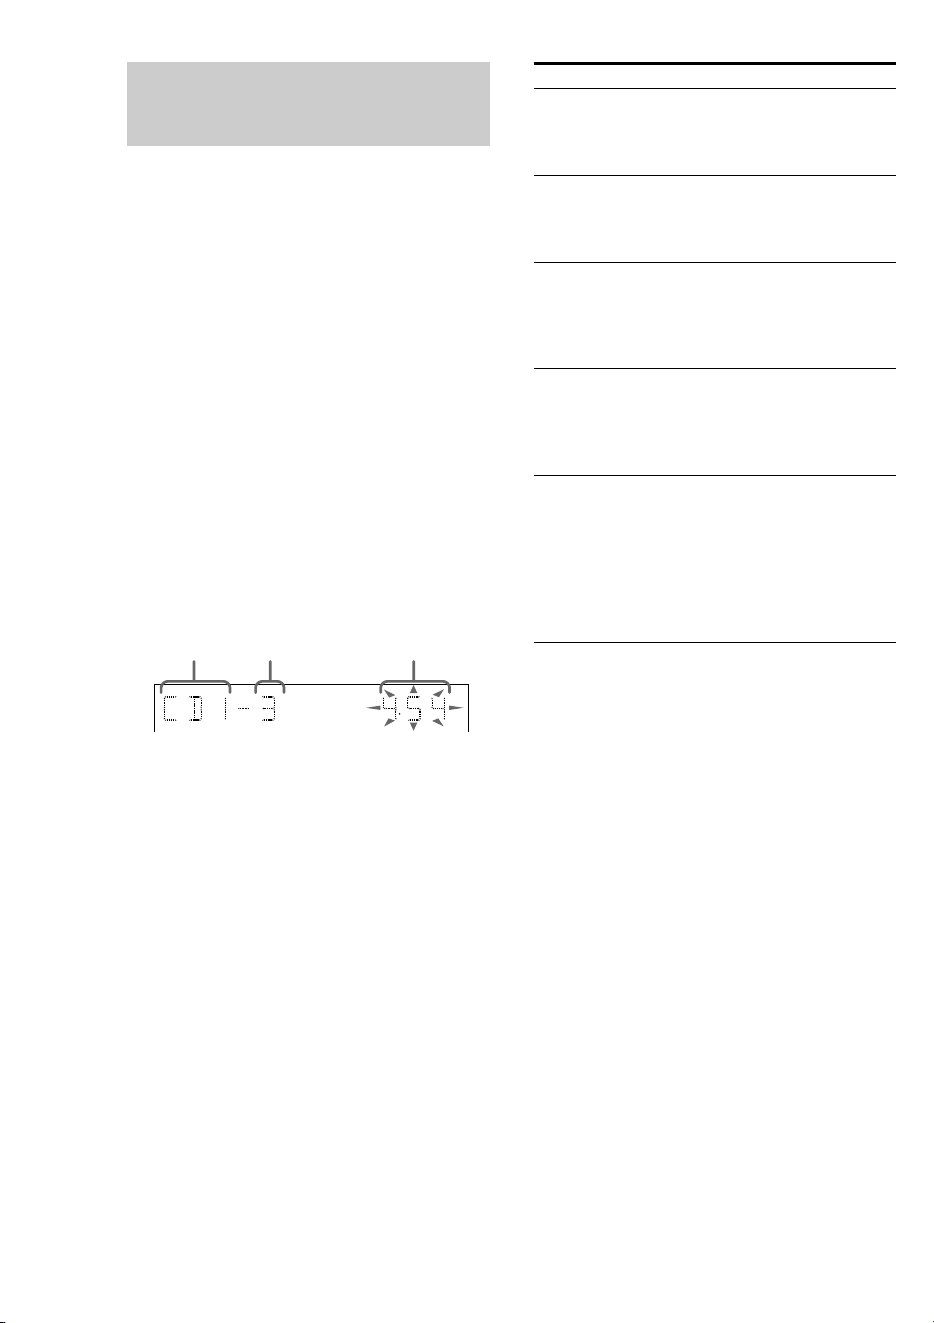
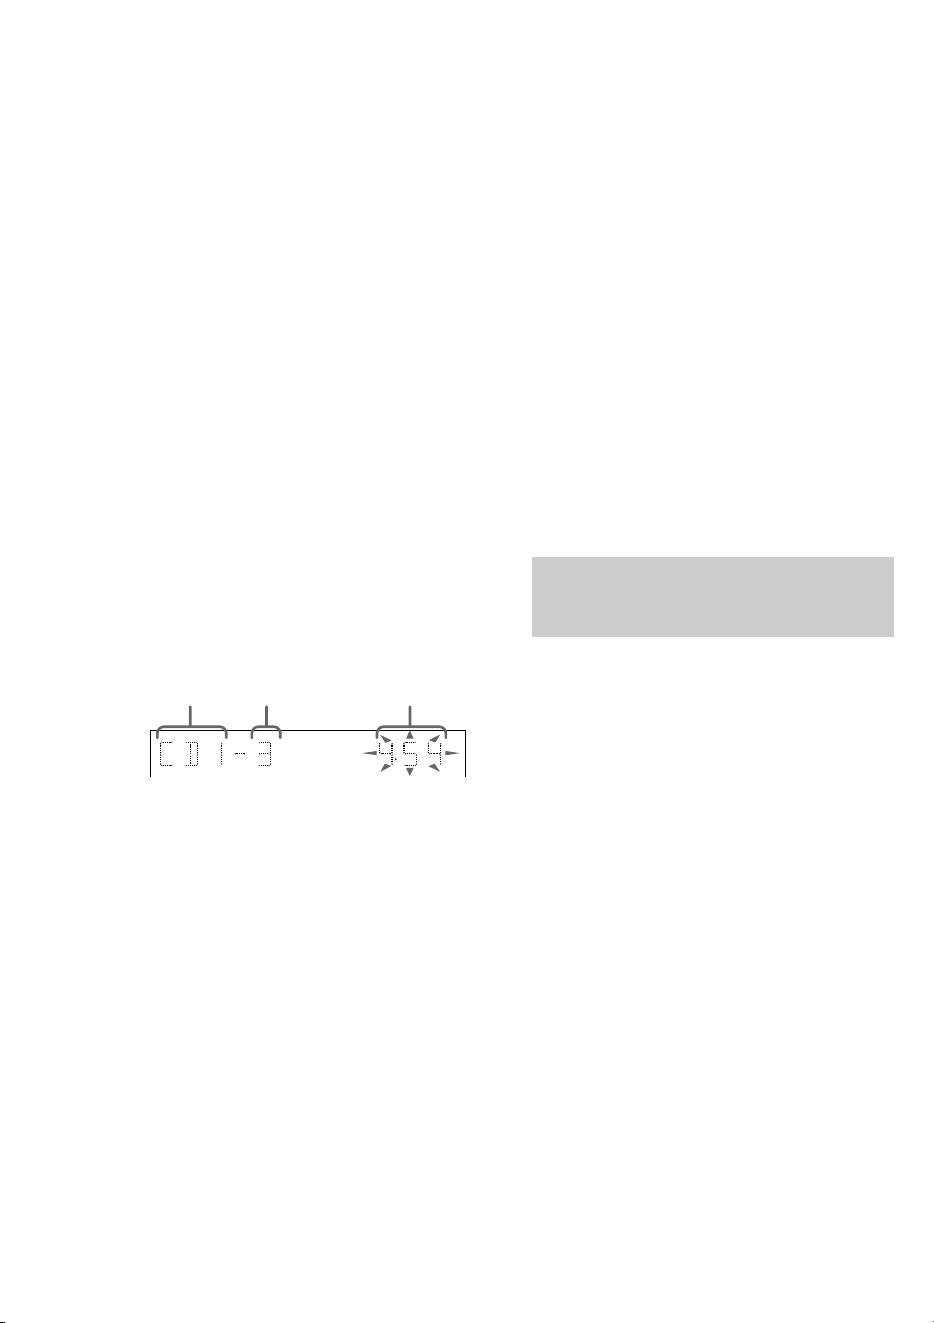
Track number Playing timeDisc tray number
3 Press N (CD) (or CD H on the
remote).
Tip
You cannot change the play mode during playback.
Other operations
To
Stop playback
Pause playback
Select a track
Find a point in a
track
Select a CD
Switch to CD
function from
another source
Play repeatedly
(Repeat Play)
Remove the CD
*You cannot use this function during ALL DISCS
SHUFFLE.
Note
Do not use force to close the disc tray, as this may
cause the CD player trouble. Always close the disc
tray by pressing one of the DISC 1–3 Z buttons.
To play
All CDs in the disc tray
continuously.
The CD you have selected in the
original order.
The tracks on all CDs in random
order.
The tracks on the CD you have
selected in random
order.
The tracks on all CDs in the
order you want them to be played
(see “Programming the CD
tracks” on page 12).
Do this
Press x (CD).
Press X.
Press again to resume playback.
During playback or pause, press
> (CD) (to go forward) or
. (CD) (to go back).
Press and hold M or m
(CD) during playback and
release it at the desired point.
Press one of the DISC 1–3
buttons (or D.SKIP on the
remote).
Press one of the DISC 1–3
buttons (Automatic Source
Selection).
Press REPEAT during playback
until “REPEAT” or “REPEAT
1” appears.
REPEAT*: For all the tracks on
the CD up to 5 times.
REPEAT 1: For a single track
only.
To cancel Repeat Play, press
REPEAT until “REPEAT” and
“REPEAT 1” disappears.
Press one of the DISC 1–3 Z
buttons.
12
Programming the CD
tracks
— Program Play
You can make a program of up to 25 tracks
from all the CDs in the order you want them to
be played.
1 Turn FUNCTION to select “CD”, then
place a CD.
2 Press PLAY MODE repeatedly when the
playback is stopped until “PROGRAM”
appears in the display.
3 Press one of the DISC 1–3 buttons to
select a CD.
To program all the tracks on a CD at once,
proceed to step 5 while “AL” appears in the
display.
4 Press . or > (CD) repeatedly until
the track you want appears in the
display.
5 Press ENTER (A/V amplifier or remote).
The track(s) is (are) programmed. The
program step number appears, followed by
the total playing time.
6 To program additional tracks, repeat
steps 3 to 5.
Skip step 3 to select tracks from the same
disc.
7 Press N (CD) (or CD H on the
remote).
To
Cancel Program Play
Check the program
Clear a track
Clear a specific track
Add a track to the
program when
playback is stopped
Tips
• The program you made remains in the system’s
memory even after it has been played back. Press
N (CD) to play the same program again.
• If “--.--” appears instead of the total playing time
during programming, this means:
– you have programmed a track number
which exceeds 20.
– the total playing time has exceeded 100 minutes.
Track
number
Disc tray
number
Total playing time
(including selected track)
Press
PLAY MODE repeatedly
when the playback is stopped
until “1 DISC” or “ALL
DISCS” appears in the display.
CHECK on the remote
repeatedly. After the last track,
“CHECK END” appears in the
display.
CLEAR on the remote when
the playback is stopped. Each
time you press the button, a
track is cleared from the end of
the program.
CHECK on the remote
repeatedly until the track
number you want to clear
appears, then press CLEAR on
the remote.
1 Press one of the DISC 1–3
buttons to select a CD.
2 Press . or > (CD)
repeatedly to select the
track.
3 Press ENTER (A/V
amplifier or remote).

13
CD
Using the CD display
You can check the remaining time of the
current track or that of the CD.
When a CD TEXT disc is loaded, you can
check the information stored on the disc. When
the unit detects CD TEXT discs, the “CD
TEXT” indication appears in the display.
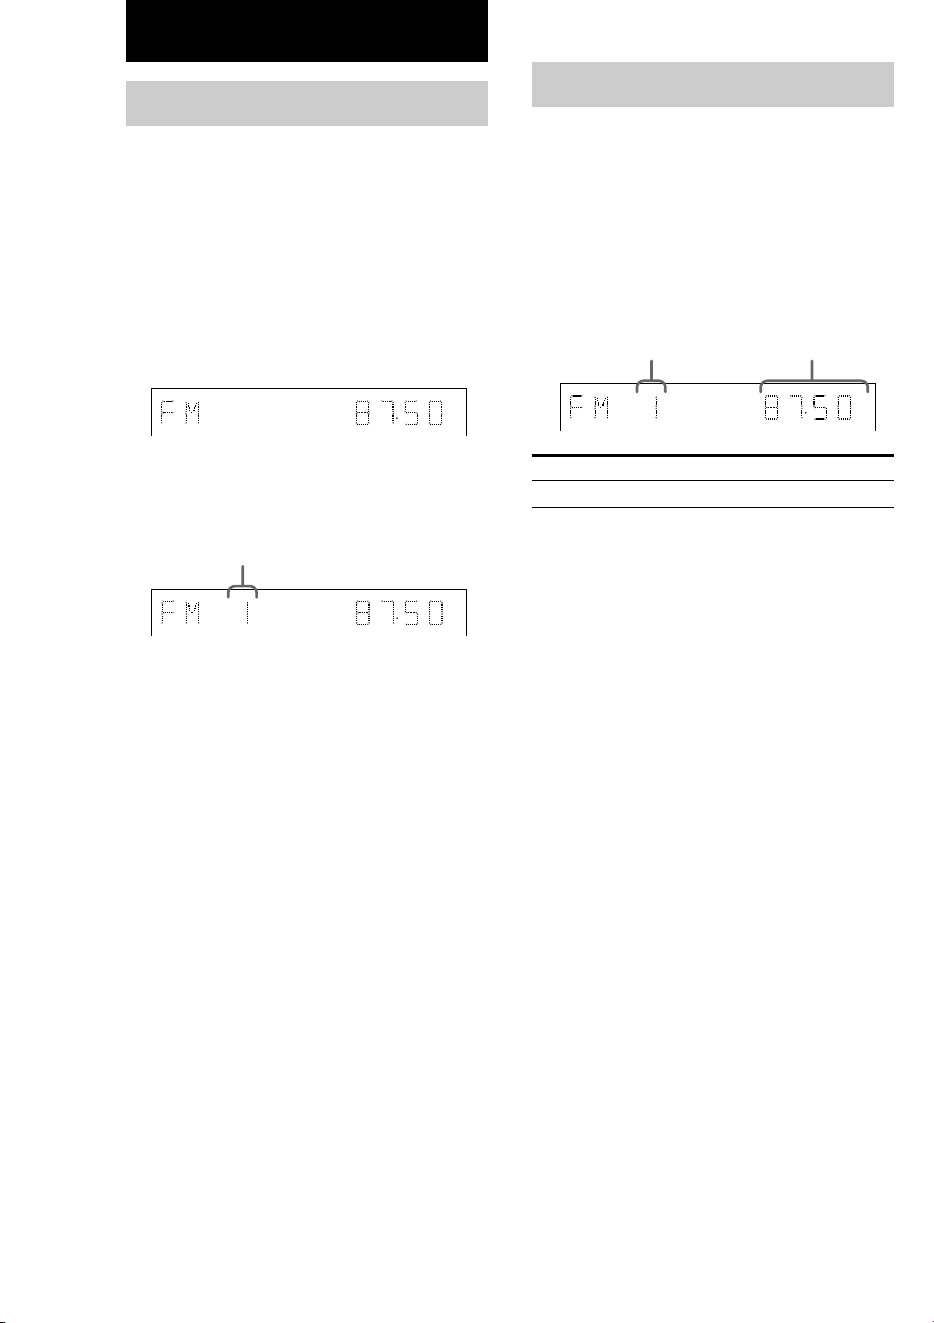
Press DISPLAY.
Each time you press the button, the display
changes cyclically as follows:
During normal playback
Playing time on the current track t
Remaining time on the current track t
Remaining time on the current CD (“1 DISC”
mode) or “--.--” display (“ALL DISCS” mode)
t Title name of the current track* t Clock
display (for 8 seconds) t Effect status (for
8 seconds)
When playback is stopped
Total number of tracks and the total playing
time** t Title name of the CD* t Clock
display (for 8 seconds) t Effect status (for
8 seconds)
* With CD TEXT discs only (certain characters
cannot be displayed). Depending on the disc, some
CD TEXT information may not appear. When the
disc contains more than 20 tracks, CD TEXT
information is not displayed from track 21 on.
**When the program mode is selected and there is a
program, the last track number, the total playing
time, and the total number of the programmed
tracks are displayed.
14
Presetting radio stations
You can preset 20 stations for FM and
10 stations for AM.
1 Press TUNER/BAND repeatedly to
select FM or AM.
2 Press and hold TUNING + or – until
“AUTO” appears in the display.
Scanning stops when the system tunes in a
station. “TUNED” and “STEREO” (for a
stereo program) appear.
3 Press TUNER MEMORY.
A preset number appears in the display. The
stations are stored from preset number 1.
4 Press ENTER (Tuner or remote).
The station is stored.
5 Repeat steps 1 to 4 to store other
stations.
To tune in a station with a weak
signal
Press TUNING + or – repeatedly to tune in the
station manually.
To set another station to an existing
preset number
Start over from step 1. After step 3, press
PRESET + or – repeatedly to select the preset
number where you want to store a new station,
then proceed to step 4.
Tip
The preset stations are retained for half a day even if
you unplug the power cord or if a power failure
occurs.
MHz
MHz
Listening to the radio
— Preset Tuning
Preset radio stations in the tuner’s memory first
(see “Presetting radio stations”).
1 Press TUNER/BAND repeatedly to
select the band you want.
2 Press PRESET + or – repeatedly to tune
in the preset station you want.
To Do this
Turn off the radio Press ?/1.
To listen to non-preset radio stations
In step 2, press TUNING + or – repeatedly
(Manual Tuning) or press and hold TUNING +
or – (Automatic Tuning).
Tips
• When an FM program is noisy, press STEREO/
MONO so that “MONO” appears in the display.
There will be no stereo effect, but the reception will
improve.
• To improve broadcast reception, reorient the
antennas.
Tuner
Preset number
MHz
Preset number Frequency

15
Tuner
Using the Radio Data
System (RDS)
(European model only)
What is the Radio Data
System?
Radio Data System (RDS) is a broadcasting
service that allows radio stations to send
additional information along with the regular
program signal. This tuner offers convenient
RDS features like station name display and
location of stations by program type. RDS is
available only for FM stations.
Note
RDS may not work properly if the station you are
tuned to is not transmitting the RDS signal properly
or if the signal is weak.
Receiving RDS broadcasts
Simply select a station from the FM band.
When you tune in a station that provides RDS
services, the station name appears in the
display.
To check the RDS information
Press DISPLAY.
Each time you press the button, the display
changes cyclically as follows:
Station name* t Frequency t Program
type* t Clock display t Effect status
* If the RDS broadcast is not received, the station
name and program type may not appear in the
display.
Locating a station by
program type (PTY)
You can locate a station you want by selecting
a program type. The tuner tunes in the type of
programs currently being broadcast from the
RDS stations stored in the tuner’s preset
memory.
The types of programs include NEWS,
AFFAIRS (current news), INFORMATION,
SPORT, EDUCATION (education programs),
DRAMA, CULTURE, SCIENCE, VARIED
(interviews, games and comedy), POP, ROCK,
EASY MUSIC, L.CLASSICAL,
S.CLASSICAL, OTHER MUSIC, WEATHER,
FINANCE, CHILDREN, SOCIAL,
RELIGION, PHONE IN, TRAVEL, LEISURE,
JAZZ, COUNTRY (country music), NATION
(nation’s popular music), OLDIES, FOLK,
DOCUMENTARY (investigative features),
ALARM TEST (test signal for emergency
broadcast), ALARM-ALARM (emergency
broadcast) and NONE (any programs not
defined above).
1 Press PTY while listening to the radio.
2 Press PRESET + or – repeatedly to
select the program type you want.
3 Press ENTER (Tuner or remote).
“SEARCH” and the selected program type
appear alternately in the display.
When the tuner receives a program, the
preset station name flashes.
4 Press PRESET + or – repeatedly to
continue searching for the station
name you want.
5 Press ENTER (Tuner or remote) while
the preset station name you want is
flashing.
To cancel the PTY search
Press PTY again.
Note
“NO PTY” appears when the program type you
selected is not currently being broadcast.
16
Tip
When you want to reduce the hiss noise in low-level
high-frequency signals, press DOLBY NR so that
“DOLBY NR” appears in the display.
Searching for the beginning of a
track (AMS*)
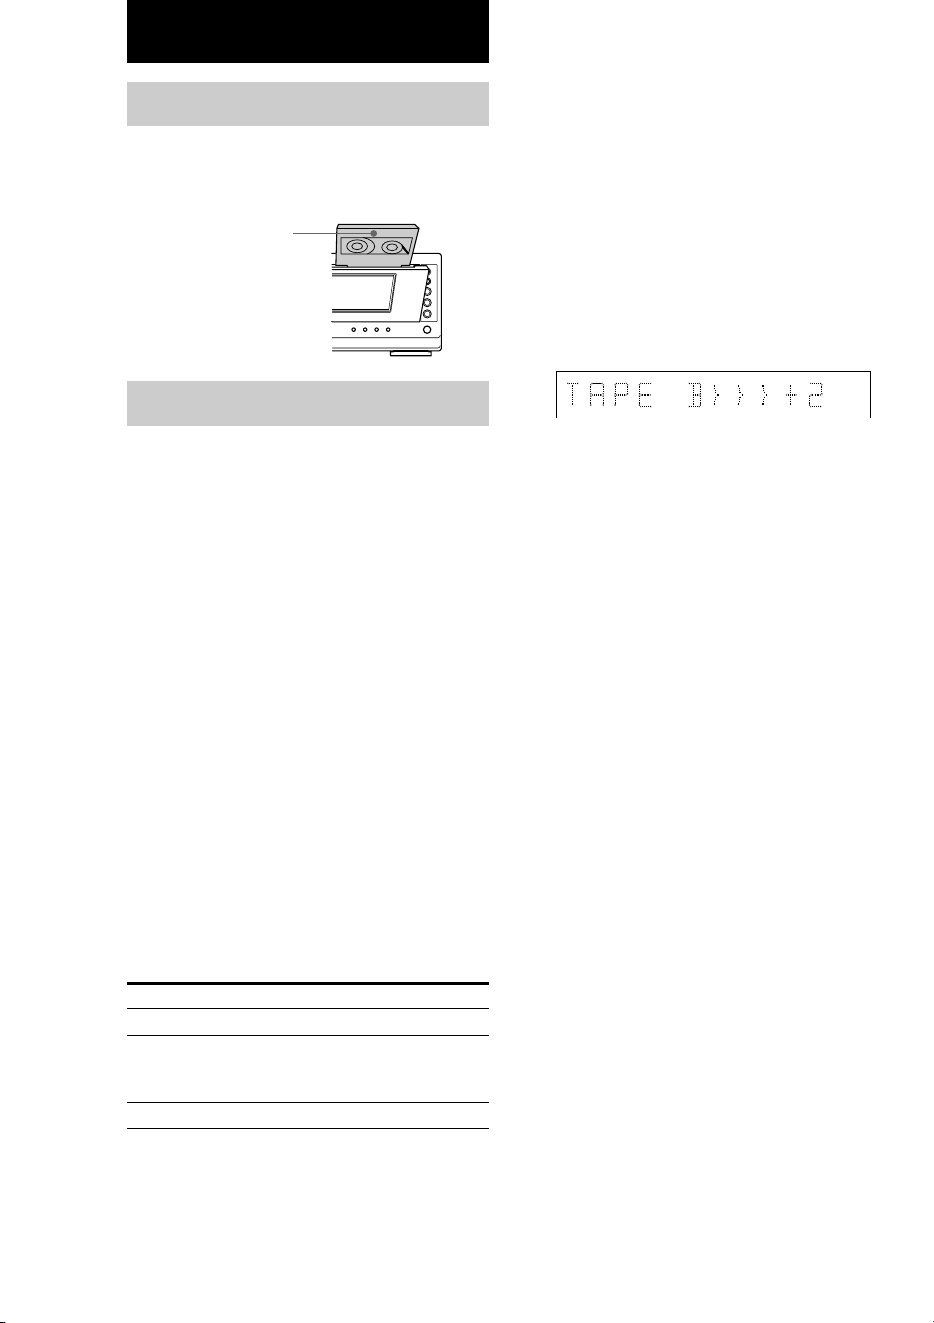
During playback, press . or > (Deck A
or B) repeatedly for the number of songs you
want to skip forward (or backward).
The search direction, + (forward) or – (back),
and number of songs being skipped (1–9)
appear in the display.
* Automatic Music Sensor
Note
The AMS function may not operate correctly under
the following circumstances:
– When the unrecorded space between songs is less
than 4 seconds long.
– When the unit is placed near a television.
Loading a tape
1 Press Z (Deck A or B).
2 Insert a tape in deck A or B.
Playing a tape
You can use TYPE I (normal), TYPE II (CrO2),
or TYPE IV (metal)
tapes. The deck
automatically detects the tape type.
1 Load a tape.
2 Press DIRECTION repeatedly to select
g to play one side, j to play both
sides, or RELAY* (Relay Play) to play
both decks in succession.
3 Press N (Deck A or B) (or, TAPE A
hH or TAPE B hH on the remote).
The tape starts playing.
Press n (Deck A or B) to play the reverse
side. When using the remote, press TAPE A
hH or TAPE B hH again.
When you select j or RELAY, the deck
stops automatically after repeating the
sequence 5 times.
* Relay Play always follow this cyclic sequence:
Deck A (front side) t Deck A (reverse side) t
Deck B (front side) t Deck B (reverse side)
To
Stop playback
Fast-forward or rewind
Remove the cassette
M
>
m
H
.
h
x
A
h
H
AUTO REVERSE
Insert with the
side you want
to play/record
facing forward.
Example: searching forward 2 songs
Do this
Press x (Deck A or B).
Press m or M (Deck A
or B) when the playback is
stopped.
Press Z (Deck A or B).
Tape
17
Tape
Turn FUNCTION to
select the recording
source.
Recording from a tape
(High-Speed Dubbing)
Recording from a CD
(CD Synchro Recording)
Recording manually
Insert a recordable tape into deck B.
Turn FUNCTION to select
“TAPE A”.
Turn FUNCTION to select
“CD”.
Insert the tape you want to
record into deck A.
Insert the CD you want to
record.
Prepare the recording
source.
Press CD SYNC.
Press REC PAUSE/
START.
Deck B stands by for recording.
“REC” indicator flashes in the display.
To reduce the hiss noise in low-level high-frequency signals, press DOLBY NR so that
“DOLBY NR” appears in the display (except when recording from a tape).
Press DIRECTION repeatedly to select g to record on one side.
Select j (or RELAY) to record on both sides.
Press REC PAUSE/START.
Recording starts.
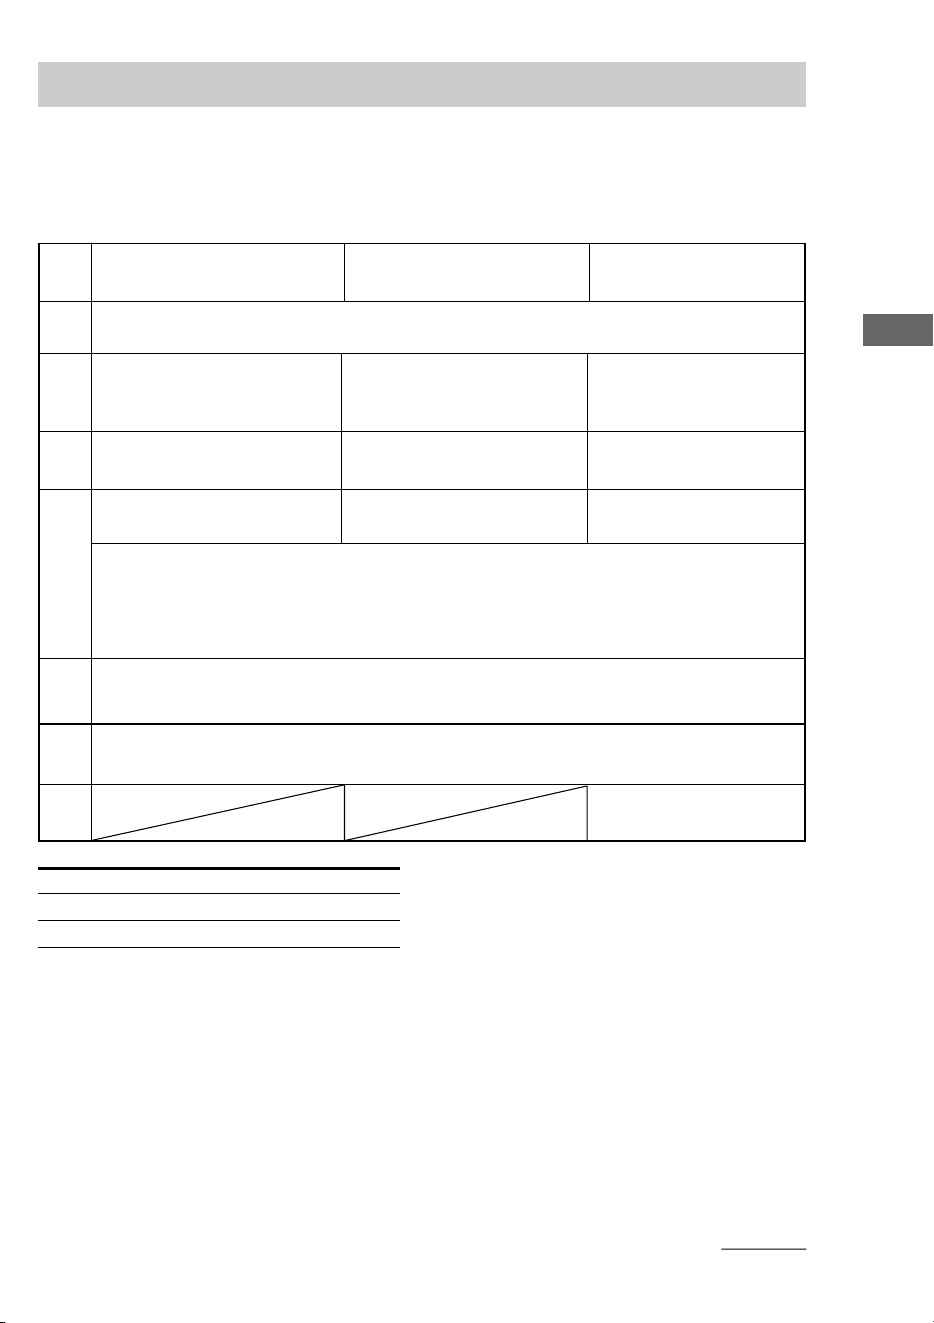
Steps
1
2
3
4
5
6
Recording to a tape
— CD Synchro Recording/High-Speed Dubbing/Recording Manually/Program
Edit
You can record from a CD, tape, radio or other connected component. You can use TYPE I (normal)
or TYPE II (CrO2) tapes. The recording level is adjusted automatically.
To Press
Stop recording x (CD or Deck B).
Pause recording* REC PAUSE/START.
* Only when recording manually.
Tips
• If you want to record from the reverse side, press
n or N (Deck B) (or TAPE B hH on the
remote) which does not light up after step 4 (when
the deck B is in recording pause).
• When you record on both sides, be sure to start
from the front side. If you start from the reverse
side, recording stops at the end of the reverse side.
• (High-Speed Dubbing only)
If you set direction to j when the tapes have
different lengths, the tapes in each deck reverses
independently. If you select RELAY, the tapes in
both decks reverse together.
Note
The sound field automatically switches to 2CH
STEREO when you start recording.
Press HI-DUB.
Start playing the
recording source.
7
continued
18
Recording to a tape (continued)
Recording a CD by specifying
track order
— Program Edit
When programming, make sure the playing
times for each side do not exceed the length of
one side of the tape.
1 Insert a CD and a recordable tape into
deck B, then turn FUNCTION to select
“CD”.
2 Press PLAY MODE repeatedly when the
playback is stopped until “PROGRAM”
appears in the display.
3 Press one of the DISC 1–3 buttons to
select a CD.
To program all the tracks on a CD at once,
proceed to step 5 while “AL” appears in the
display.
4 Press . or > (CD) repeatedly until
the track you want appears in the
display.
5 Press ENTER (A/V amplifier or remote).
The track(s) is (are) programmed. The
program step number appears, followed by
the total playing time.
6 To program additional tracks, repeat
steps 3 to 5.
Skip step 3 to select tracks from the same
disc.
7 Press CD SYNC.
Deck B stands by for recording. To reduce
the hiss noise in low-level high-frequency
signals, press DOLBY NR so that “DOLBY
NR” appears in the display. “REC”
indicator in the display flashes.
8 Press DIRECTION repeatedly to select
g to record on one side.
Select j (or RELAY) to record on
both sides.
9 Press REC PAUSE/START.
Recording starts.
To cancel Program Edit
Press PLAY MODE repeatedly when the
playback is stopped until “1 DISC” or “ALL
DISCS” appears in the display.
Tip
To check the required tape length for recording a CD,
press EDIT after you have inserted a CD and selected
CD function. The required tape length for the
currently selected CD appears, followed by the total
playing time for side A and side B (Tape Select Edit).
Note
You cannot use Tape Select Edit Function for discs
containing over 21 tracks. “CANNOT EDIT” appears
in the display.
Timer-recording radio
programs
To timer-record, you must set the clock (see
“Setting the time” on page 9) and preset the
radio stations (see “Presetting radio stations”
on page 14) beforehand.
1 Tune in the preset radio station (see
“Listening to the radio” on page 14).
2 Press CLOCK/TIMER (or CLOCK/TIMER
SET on the remote).
“DAILY1 SET” flashes.
3 Press O or o repeatedly to select “REC
SET”, then press ENTER.
“ON” appears and the hour indication
flashes.
4 Set the time to start recording.
Press O or o repeatedly to set the hour, then
press ENTER (A/V amplifier or remote).
The minute indication flashes.
Press O or o repeatedly to set the minutes,
then press ENTER (A/V amplifier or
remote).
The hour indication flashes again.
Track
number
Disc tray
number
Total playing time
(including selected track)
19
Tape
5 Set the time to stop recording following
step 4.
The start time appears, followed by the stop
time, the preset radio station to be recorded
(e.g., “TUNER FM 5”), then the original
display appears.
6 Insert a recordable tape into deck B.
7 Turn off the power.
When the recording starts, the volume level
is set to the minimum.
To
Check the setting
Change the setting
Cancel the
Timer-recording
Notes
• If the power is on at the preset time, the Timer-
recording does not work.
• When you use the Sleep Timer, the Timer-recording
will not turn on the system until the Sleep Timer
turns it off.
• The power turns on 15 seconds before the preset
time.
Do this
Press TIMER SELECT (or
CLOCK/TIMER SELECT on
the remote) and press O or o
repeatedly to select “REC
SELECT”, then press ENTER
(A/V amplifier or remote).
Start over from step 1.
Press TIMER SELECT (or
CLOCK/TIMER SELECT on
the remote) and press O or o
repeatedly to select “TIMER
OFF”, then press ENTER
(A/V amplifier or remote).
20
Adjusting the sound
To reinforce bass (DBFB*)
Press DBFB on the remote.
Each time you press the button, the display
changes as follows:
DBFB ON y DBFB OFF
* Dynamic Bass Feedback
For a powerful sound
Press GROOVE.
Each time you press the button, the display
changes cyclically as follows:
GROOVE t V-GROOVE t GROOVE OFF
GROOVE: The GROOVE button lights up.
The volume switches to power mode and the
equalizer curve changes. DBFB is
automatically set to full strength.
V-GROOVE: The GROOVE button lights up.
The volume switches to power mode, the lower
bass frequencies of the sound you are listening
to is powerfully reinforced, and the equalizer
curve changes. DBFB is automatically set to
full strength.
Selecting a sound field
Press MUSIC MODE or MOVIE MODE, then
turn FILE SELECT to select the sound field
you want.
The display changes as follows:
After pressing MUSIC MODE*:
2CH STEREO y SMALL HALL y
LARGE HALL y OPERA HOUSE y
JAZZ CLUB y DISCO/CLUB y
CHURCH y LIVE HOUSE y
ARENA y STADIUM y GAME y
2CH STEREO...
* The MUSIC MODE button lights up.
After pressing MOVIE MODE*:
SEMI C.EX A y SEMI C.EX B y
SEMI C.EX C y V.SEMI M.D. y
V.ENHANCE.A y V.ENHANCE.B y
SEMI C.EX A...
* The MOVIE MODE button lights up.
See below for the information of each sound
field.
Tips
• You can also select a sound field by pressing
MUSIC MODE or MOVIE MODE repeatedly.
Each time you press the button, the display changes
cyclically as described above.
• You can also select a sound field by pressing P or p
while indicators on the SUR and EQ buttons are
turned on or off.
• You can identify the encoding format of program
software by looking at its packaging.
Dolby Digital discs are labeled with the
logo.
• In the sound field selecting mode, you can switch to
MOVIE MODE by pressing o and MUSIC MODE
by pressing O.
<MUSIC MODE>
x 2 Channel Stereo (2CH STEREO)
Outputs the sound from the front left and right
speakers and a subwoofer. Standard two
channel (stereo) sources completely bypass the
sound field processing. Multi channel surround
formats are downmixed to two channels.
x SMALL HALL
Reproduces the acoustics of a small rectangular
concert hall.
x LARGE HALL
Reproduces the acoustics of a large rectangular
concert hall.
x OPERA HOUSE
Reproduces the acoustics of an opera house.
x JAZZ CLUB
Reproduces the acoustics of a jazz club.
Sound Adjustment

21
Sound Adjustment
x DISCO/CLUB
Reproduces the acoustics of a discotheque/
dance club.
x CHURCH
Reproduces the acoustics of a stone church.
x LIVE HOUSE
Reproduces the acoustics of a 300-seat live
house.
x ARENA
Reproduces the acoustics of a 1000-seat
concert hall.
x STADIUM
Reproduces the feeling of a large open-air
stadium.
x GAME
Obtains maximum audio impact from video
game software.
<MOVIE MODE>
x Semi Cinema Studio EX. A
(SEMI C.EX A)*
Reproduces the sound characteristics of Sony
Pictures Entertainment’s classic editing studio
using the 3D sound imaging of V.SEMI M.D.
to create 5 sets of virtual speakers surrounding
the listener from the sound of the front
speakers.
x Semi Cinema Studio EX. B
(SEMI C.EX B)*
Reproduces the sound characteristics of Sony
Pictures Entertainment’s mixing studio which
is one of the most up-to-date facilities in
Hollywood. The 3D sound imaging of V.SEMI
M.D. is used to create 5 sets of virtual speakers
surrounding the listener from the sound of the
front speakers.
x Semi Cinema Studio EX. C
(SEMI C.EX C)*
Reproduces the sound characteristics of Sony
Pictures Entertainment’s BGM recording studio
using the 3D sound imaging of V.SEMI M.D.
to create 5 sets of virtual speakers surrounding
the listener from the sound of the front
speakers.
x Virtual Semi Multi Dimension
(V.SEMI M.D.)*
Uses 3D sound imaging to create virtual rear
speakers from the sound of the front speakers.
This mode creates 5 sets of virtual speakers
surrounding the listener at a 30° angle of
elevation.
x Virtual Enhanced Surround A
(V.ENHANCE.A)*
Uses 3D sound imaging to create 3 sets of
virtual rear speakers from the sound of the front
speakers.
x Virtual Enhanced Surround B
(V.ENHANCE.B)*
Uses 3D sound imaging to create 1 set of
virtual rear speakers from the sound of the front
speakers.
* “VIRTUAL” sound field: Sound field with virtual
speakers. However, for “SEMI C.EX A–C”, the
sound characteristics of each cinema production
studio is reproduced without virtual speakers when
“VIR.SP.” in the SUR menu is set to “OFF”.
Notes
• The sound field you can select depends on the mode
currently selected (MUSIC MODE or MOVIE
MODE). If the button (MUSIC MODE or MOVIE
MODE) for the sound field you want does not light
up, you cannot select the sound field by turning
FILE SELECT. Press MUSIC MODE or MOVIE
MODE first to light the indicator.
• The effects provided by the virtual speakers may
cause increased noise in the playback signal.
• If you change the settings of sound, such as
changing the sound field menu, while recording, the
recording sound is interrupted at the point.
22
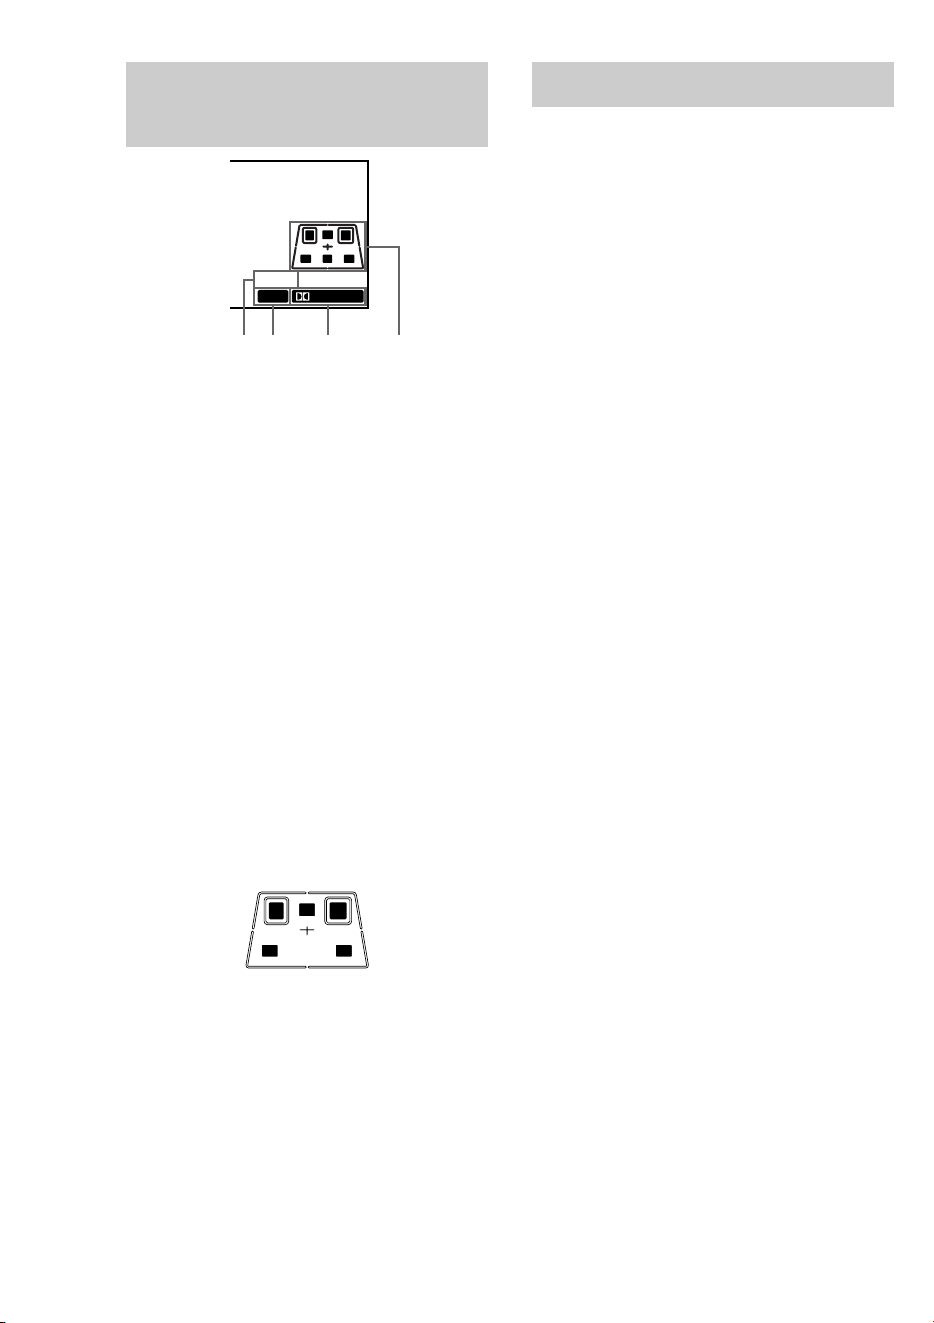
Understanding the multi
channel surround displays
1 VIRTUAL: Lights up when the sound field
with virtual speakers is selected.
2 dts: Lights up when DTS signals are input.
3 ; DIGITAL: Lights up when the unit is
decoding signals recorded in the Dolby
Digital format.
4 Playback channel indicators: The letters
(L, C, R, etc.) indicate the channels being
played back. The boxes around the letters “L”
and “R” show that the unit downmixes the
source sound into the “L” and “R” channels.
When using sound fields like “LARGE
HALL” or “SMALL HALL”, the unit adds
reverberation based on the source sound.
L (Front Left), R (Front Right), C (Center
(monaural)), SL (Rear Left), SR (Rear Right),
S (Rear (monaural))
Example:
Recording format (Front /Rear): 3/2
Output channel: Front left and right
Sound Field: GAME
Customizing sound fields
By adjusting the surround parameters and the
equalization of the front speakers, you can
customize the sound fields to suit your
particular listening situation.
Once you customize a sound field, the changes
are stored in the memory indefinitely (unless
the unit is unplugged for half a day). You can
change a customized sound field any time by
making new adjustments to the parameters.
See the table on page 34 for the parameters
available in each sound field.
Adjusting the surround
parameters
The SUR menu contains parameters that let
you customize various aspects of the current
sound field. The settings available in this menu
are stored individually for each sound field.
1 Start playing a program source
encoded with multi channel surround
sound, then select a sound field.
MULTI CHANNEL DECODING indicator
lights up when the tuner is decoding signals
recorded in a multi channel format.
When the selected sound field contains
adjustable surround parameters, the SUR
button lights up.
2 When the SUR button lights up, press
SUR.
The button starts blinking and the first
parameter is displayed.
3 Press P or p repeatedly to select the
parameter you want to adjust.
4 Press O or o repeatedly to select the
setting you want.
The setting is stored.
5 Press ENTER (A/V amplifier or remote).
The SUR button lights up. See the table on
page 34 for the surround parameters.
VIRTUAL
dts
DIGITAL
L
SL S SR
C
R
21 43
L
S
C
R
SL
SR
23
Sound Adjustment
x Effect level (EFFECT)
Lets you adjust the “presence” of the current
surround effect.
x Wall type (WALL)
Lets you control the level of the high
frequencies to alter the sonic character of your
listening environment by simulating a softer (S)
or harder (H) wall. The midpoint designates a
neutral wall (made of wood).
x Reverberation (REVERB)
Lets you control the spacing of the early
reflections to simulate a sonically longer (L) or
shorter (S) room. The midpoint (0) designates a
standard room with no adjustment.
x Screen depth (S.DEPTH)
Lets you create the same sensation in your
listening room by shifting the sound of the
front speakers “into” the screen. This parameter
can be set to “OFF”, “M” (MID), or “D”
(DEEP). “D” provides the greatest amount of
screen depth.
x Virtual speaker (VIR.SP.)
Lets you turn the virtual speakers created by
the SEMI C.EX A, B, C sound fields off or on.
Adjusting the level
parameters
The SP. LEVEL menu contains parameters that
let you adjust the balance of front speakers and
speaker volume of the subwoofer. The settings
available in this menu are applied to all sound
fields.
1 Press SET UP.
2 Press P or p repeatedly to select “SP.
LEVEL”.
3 Press ENTER (A/V amplifier or remote).
4 Press P or p repeatedly to select the
parameter you want to adjust.
5 Press O or o repeatedly to select the
setting you want.
The setting is stored.
6 Press ENTER (A/V amplifier or remote).
See the table on page 34 for the speaker
level parameters.
x Front balance (FRONT)
Lets you adjust the balance between the front
left and right speakers.
x Subwoofer level (SUB W.)
Lets you adjust the level of the subwoofer.
x LFE (Low Frequency Effect) mix level
(LFE)
Lets you attenuate the level of the LFE (Low
Frequency Effect) channel output from the sub
woofer without effecting the level of the bass
frequencies sent to the subwoofer from the
front channels via the Dolby Digital bass
redirection circuitry.
• “0 dB” outputs the full LFE signal at the mix
level determined by the recording engineer.
• “MUTING” mutes the sound of the LFE
channel from the sub woofer. However, the low
frequency sounds of the front speakers are
output from the subwoofer.
x Dynamic range compressor (D.COMP.)
Lets you compress the dynamic range of the
sound track. This may be useful when you want
to watch movies at low volumes late at night.
• “OFF” reproduces the sound track with no
compression.
• “STD” reproduces the sound track with the
dynamic range intended by the recording
engineer.
• “0.1” – “0.9” allow you to compress the
dynamic range in small steps to achieve the
sound you desire.
• “MAX” provides a dramatic compression of the
dynamic range.
Note
Dynamic range compression is possible with Dolby
Digital sources only.
continued
24
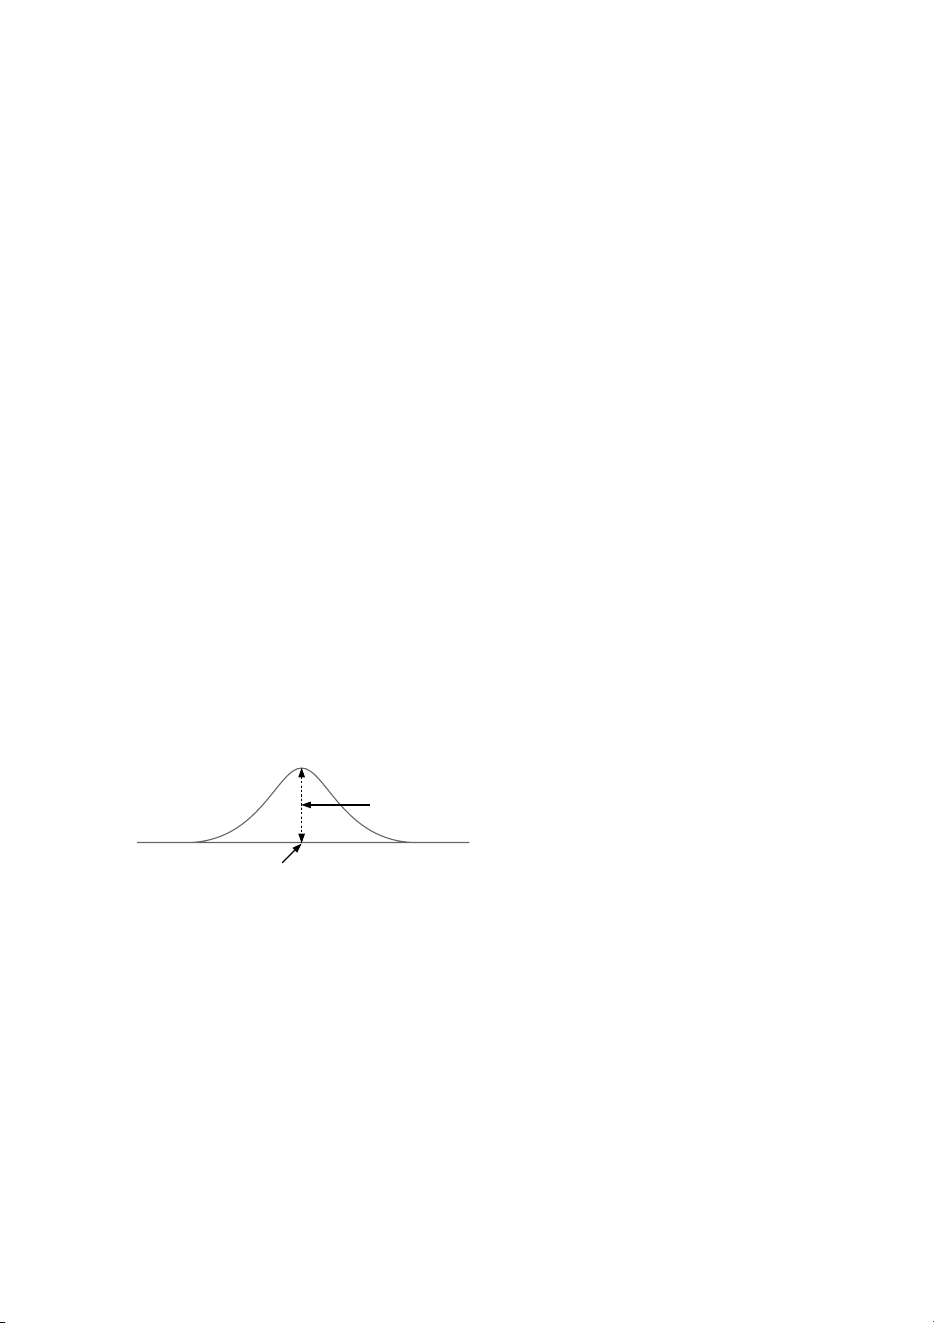
Adjusting the equalizer
The EQ menu lets you adjust the equalization
(low, mid, and high frequencies) of the front
speakers. The equalizer settings are stored
individually for each sound field.
1 Start playing a program source
encoded with multi channel surround
sound, then select a sound field.
When the selected sound field contains
adjustable equalizer parameters, the EQ
button lights up.
2 When the EQ button lights up, press
EQ.
The button starts blinking and the first
parameter is displayed.
3 Press P or p repeatedly to select the
parameter (gain (dB) or frequency (Hz))
you want to adjust.
4 Press O or o repeatedly to select the
setting you want.
The setting is stored.
5 Press ENTER (A/V amplifier or remote).
The EQ button lights up. See the table on
page 34 for the equalizer parameters.
To turn on/off the equalizer
Press EQ ON/OFF. The EQ indicator in the
display lights up when the equalizer is turned
on. When you adjust the equalizer using the EQ
parameters, the settings are stored separately
for each sound field and can be reproduced
whenever you turn on the equalizer.
x Front speaker bass (BASS)
(Gain/Frequency)
Lets you adjust the gain and frequency of bass.
x Front speaker midrange (MID)
(Gain/Frequency)
Lets you adjust the gain and frequency of
midrange.
x Front speaker treble (TREB)
(Gain/Frequency)
Lets you adjust the gain and frequency of
treble.
Resetting customized sound
fields to the factory settings
To reset the settings of a
customized sound field
1 Turn FILE SELECT to select the sound
field you want to reset the settings.
2 Press SET UP.
3 Press P or p repeatedly to select
“RESET MENU”.
4 Press ENTER (A/V amplifier or remote).
5 Press P or p repeatedly to select “CUR.
F. RESET”.
6 Press ENTER (A/V amplifier or remote)
again.
All the surround, equalizer, and speaker
level parameters of the selected sound field
are reset to the factory settings.
To cancel
Press SET UP.
Customizing sound fields (continued)
Level (dB)
Frequency (Hz)

25
Sound Adjustment
To reset the settings of all the
customized sound fields
1 Press SET UP.
2 Press P or p repeatedly to select
“RESET MENU”.
3 Press ENTER (A/V amplifier or remote).
4 Press P or p repeatedly to select “ALL
F. RESET”.
5 Press ENTER (A/V amplifier or remote)
again.
All the surround, equalizer, and speaker
level parameters are reset to the factory
settings.
To cancel
Press SET UP.
26
Press
SLEEP once.
SLEEP repeatedly to select
the time you want.
SLEEP repeatedly until
“SLEEP OFF” appears.
Other Features
Changing the spectrum
analyzer display
Press and hold DISPLAY for more than 2
seconds.
Each time you press the button, the display
changes as follows:
SPECTRUM ON y SPECTRUM OFF
To adjust the brightness
of the display
1 Press SET UP.
2 Press P or p repeatedly to select
“DIMMER”.
3 Press ENTER (A/V amplifier or remote).
4 Press O or o repeatedly to select the
setting you want.
The setting is stored.
5 Press ENTER (A/V amplifier or remote).
Falling asleep to music
— Sleep Timer
You can set the system to turn off at a preset
time, so you can fall asleep to music.
Press SLEEP on the remote.
Each time you press the button, the minute
display (the turn-off time) changes as follows:
OFF t AUTO* t 90min t 80min t
70min t … t 10min
* The power turns off when the current CD or tape
finishes playback (for up to 100 minutes).
To
Check the remaining
time
Change the time to
turn off
Cancel the Sleep
Timer
Waking up to music
— Daily Timer
You can wake up to music at a preset time
every day. Make sure you have set the clock
(see “Setting the time” on page 9).
1 Prepare the music source you want to
play.
• CD: Load a CD. To start from a specific
track, make a program (see
“Programming the CD tracks” on page
12).
• Tape: Load a tape with the side you
want to play facing forward.
• Radio: Tune in the preset station you
want (see “Listening to the radio” on
page 14).
2 Adjust the volume.
3 Press CLOCK/TIMER (or CLOCK/TIMER
SET on the remote).
“DAILY1 SET” appears.
4 Press O or o repeatedly to select
“DAILY 1 (or 2)”, then press ENTER
(A/V amplifier or remote).
“ON” appears and the hour indication
flashes.
27
Other Features
Do this
Press TIMER SELECT (or
CLOCK/TIMER SELECT on
the remote) and press O or o
repeatedly to select the
respective mode (“DAILY 1”
or “DAILY 2”), then press
ENTER (A/V amplifier or
remote).
Start over from step 1.
Press TIMER SELECT (or
CLOCK/TIMER SELECT on
the remote) and press O or o
repeatedly to select “TIMER
OFF”, then press ENTER (A/V
amplifier or remote).
Notes
• If the power is on at the preset time, the Daily
Timer does not work.
• When you use the Sleep Timer, the Daily Timer
will not turn on the system until the Sleep Timer
turns it off.
• The power turns on 15 seconds before the preset
time.
5 Set the time to start playback.
Press O or o repeatedly to set the hour, then
press ENTER (A/V amplifier or remote).
The minute indication flashes.
Press O or o repeatedly to set the minutes,
then press ENTER (A/V amplifier or
remote).
The hour indication flashes again.
6 Set the time to stop playback following
step 5.
7 Press O or o repeatedly until the music
source you want appears.
The indications change as follows:
t TUNER y CD PLAY T
t TAPE PLAY T
8 Press ENTER (A/V amplifier or remote).
The type of timer (“DAILY 1” or “DAILY
2”), followed by the start time, stop time
and the music source, appears, then the
original display appears.
9 Turn off the power.
To
Check the setting
Change the setting
Cancel the Daily
Timer
28
Connecting audio
components
To connect audio components, connect to the
jacks on the rear panel of the tuner.
To
Make a digital
recording from CD
to MD
Listen to the digital
sound of a connected
MD deck
Listen to the analog
sound of a connected
MD deck
Listen to the analog
sound of a connected
VCR
Tip
When you remove the optical cover, keep it for future
use.
Hooking Up the Optional Components
To the analog
output jacks of
a VCRTo subwoofer
To the digital
input jack of
an MD deck
or DVD player
To the analog
output jacks of
an MD deck
To the analog
input jacks of
an MD deck
To the digital
output jack of an
MD deck or DVD
player
Do This
Connect an optional optical
cable.
Press DIGITAL.
Turn FUNCTION to select
“MD”.
Turn FUNCTION to select
“VIDEO”.
Notes
• Make sure to match the color of the plugs and the
connectors.
• When you connect a VIDEO CD player, connect
the audio output jacks of the VIDEO CD player to
the MD IN jacks of this unit.
• Digital signals are output from DIGITAL OUT jack
during CD or DIGITAL function only. Besides, the
sound output from the DIGITAL OUT jack is not
affected by the sound adjustment.
• This unit is not compatible with 96 kHz sampling
frequencies and SACD format.
29
Hooking up the Optional Components/Additional Information
Additional Information
Precautions
On operating voltage
Before operating the unit, check that the operating
voltage of your unit is identical with the voltage of
your local power supply.
On safety
• The unit is not disconnected from the AC power
source (mains) as long as it is connected to the wall
outlet, even if the unit itself has been turned off.
• Unplug the unit from the wall outlet (mains) if it is
not to be used for an extended period of time. To
disconnect the cord (mains lead), pull it out by the
plug. Never pull the cord itself.
• Should any solid object or liquid fall into the
component, unplug the unit and have the
component checked by qualified personnel before
operating it any further.
• The AC power cord must be changed only at a
qualified service shop.
On placement
• Do not place the unit in an inclined position.
• Do not place the unit in locations where it is:
— extremely hot or cold.
— dusty or dirty.
— very humid.
— vibrating.
— subject to direct sunlight.
On heat buildup
• Although the unit heats up during operation, this is
not a malfunction.
• Place the unit in a location with adequate
ventilation to prevent heat build-up in the unit.
If you continuously use this unit at a large volume,
the cabinet temperature of the top, side and bottom
rises considerably. To avoid burning yourself, do not
touch the cabinet.
To prevent a malfunction, do not cover the ventilation
hole for the cooling fan.
On operation
• If the unit is brought directly from a cold to a warm
location, or is placed in a very damp room, moisture
may condense on the lens inside the CD player.
Should this occur, the unit will not operate properly.
Remove the CD and leave the unit turned on for
about an hour until the moisture evaporates.
• When you move the unit, take out any discs.
If you have any questions or problems concerning the
unit, please consult your nearest Sony dealer.
Notes on CDs
• Before playing, clean the CD with a cleaning cloth.
Wipe the CD from the center out.
• Do not use solvents.
• Do not expose the CD to direct sunlight or heat
sources.
• Discs with non-standard shapes (e.g., heart, square,
star) cannot be played on this unit. Attempting to do
so may damage the unit. Do not use such discs.
Note on CD-R/CD-RW playback
Discs recorded on CD-R/CD-RW drives may not be
played back because of scratches, dirt, recording
condition or the drive's characteristics. Besides, the
discs, which are not yet finalized at the end of
recording, cannot be played back.
Cleaning the cabinet
Use a soft cloth slightly moistened with mild
detergent solution.
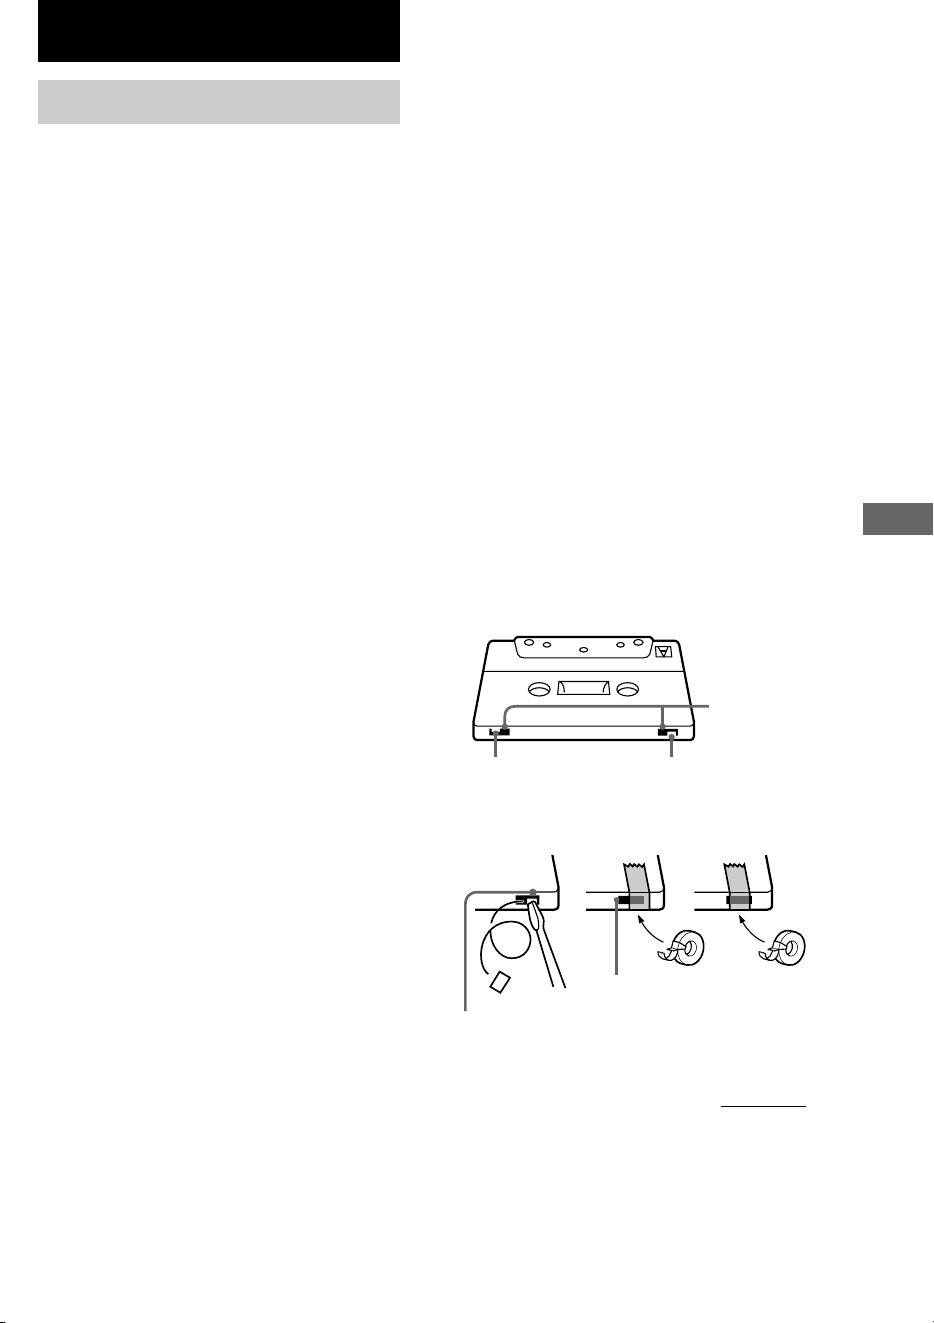
To save a tape permanently
To prevent a tape from being accidentally recorded
over, break off the cassette tab from side A or B as
illustrated.
If you later want to reuse the tape for recording, cover
the broken tab with adhesive tape. However, be
careful not to cover the detector slots which allow the
tape player to automatically detect the type of tape.
Tab of side B Tab of side A
Detector slots
Detector slots
Tape type:
CrO
2
/METAL
Tape type:
Normal
Break off the
cassette tab of
side A
continued
30
Before placing a cassette in the tape
deck
Take up any slack in the tape. Otherwise the tape may
get entangled in the parts of the tape deck and become
damaged.
When using a tape longer than
90 minutes
The tape is very elastic. Do not change the tape
operations such as play, stop, and fast-winding etc.
frequently. The tape may get entangled in the tape
deck.
Cleaning the tape heads
Clean the tape heads after every 10 hours of use.
Make sure to clean the tape heads before you start an
important recording or after playing an old tape. Use
a separately sold dry-type or wet-type cleaning
cassette. For details, refer to the instructions of the
cleaning cassette.
Demagnetizing the tape heads
Demagnetize the tape heads and the metal parts that
have contact with the tape every 20 to 30 hours of use
with a separately sold demagnetizing cassette. For
details, refer to the instructions of the demagnetizing
cassette.
Troubleshooting
If you run into any problem using this unit, use
the following check list.
First, check that the power cord is connected
firmly and the speakers are connected correctly
and firmly.
Should any problem persist, consult your
nearest Sony dealer. When bringing the system
in for repairs, be sure to bring in the entire
system. This product is a system product, and
the entire system is necessary to determine the
location requiring to repair.
General
The display starts flashing as soon as you plug
in the power cord even though you haven’t
turned on the power.
• The demonstration mode started. Press ?/1 (see
step 5 on page 8).
The clock setting/timer is canceled.
• The power cord is disconnected or a power
failure occurs. Redo “Setting the time” (page 9).
If you have set the timer, redo “Waking up to
music” (page 26) and/or “Timer-recording radio
programs” (page 18).
The radio presetting is canceled.
• The power cord is disconnected or a power
failure occurs for longer than half a day. Redo
“Presetting radio stations” (page 14).
There is no sound.
• Turn VOLUME clockwise.
• The headphones are connected.
• Insert only the stripped portion of the speaker
cord into the SPEAKER jack. Inserting the vinyl
portion of the speaker cord will obstruct the
speaker connections.
• The protective device on the amplifier has been
activated because of a short circuit.
(“PROTECT” and “PUSH POWER” flash
alternately.) Turn off the power, eliminate the
short-circuit problem and turn on the power
again.
• There is no audio output during Timer-recording.
There is severe hum or noise.
• A TV or VCR is placed too close to the unit.
Move the unit away from the TV or VCR.
“--:--” lights up in the display.
• A power interruption occurred. Set the clock and
timer settings again.
The timer does not function.
• Set the clock correctly.
• You cannot activate the Daily timer and the
Timer-recording simultaneously.
Precautions (continued)
31
Additional Information
“DAILY 1”, “DAILY 2”, or “REC SELECT” does
not appear when you press TIMER SELECT (or
CLOCK/TIMER SELECT on the remote).
• Set the timer correctly.
• Set the clock.
The remote does not function.
• There is an obstacle between the remote and the
unit.
• The remote is not pointing in the direction of the
unit’s sensor.
• The batteries have run down. Replace the
batteries.
There is acoustic feedback.
• Decrease the volume level.
• Move the microphone away from the speakers or
change the direction of the microphone.
The color irregularity on a TV screen persists.
• Turn off the TV set once, then turn it on after
15 to 30 minutes. If the color irregularity still
persists, place the speakers farther away from the
TV set.
“PROTECT” and “PUSH POWER” appear
alternately.
• A strong signal is input. Turn off the power,
leave the system turned off for a while, then turn
on the power again. If “PROTECT” and “PUSH
POWER” still appear alternately, check the
speaker cords.
Speakers
Sound comes from only one channel or
unbalanced left and right volume.
• Check the speaker connection and speaker
placement.
• The source being played back is monaural.
• Adjust the balance parameters (page 23).
Sound lacks bass.
• Check that the speaker’s + and – terminals are
connected correctly.
CD Player
The CD tray does not close.
• The CD is not placed properly.
The CD will not play.
• The CD is not lying flat in the disc tray.
• The CD is dirty (see page 29).
• The CD is inserted label side down.
• Moisture condensation has built up.
Playback does not start from the first track.
• The player is in Program Play or Shuffle Play
mode. Press PLAY MODE repeatedly until
“1 DISC” or “ALL DISCS” appears.
“OVER” is displayed.
• You have reached the end of the CD or tape by
pressing M to fast forward.
Tape Deck
The tape does not record.
• The tab has been removed from the cassette (see
“To save a tape permanently” on page 29).
• The tape has reeled to the end.
The tape does not record nor play, or there is a
decrease in sound level.
• The heads are dirty (see “Cleaning the tape
heads” on page 30).
• The record/playback heads are magnetized (see
“Demagnetizing the tape heads” on page 30).
The tape does not erase completely.
• The record/playback heads are magnetized (see
“Demagnetizing the tape heads” on page 30).
There is excessive wow or flutter, or the sound
drops out.
• The capstans or pinch rollers are dirty (see
“Cleaning the tape heads” on page 30).
Noise increases, or the high frequencies are
erased.
• The record/playback heads are magnetized (see
“Demagnetizing the tape heads” on page 30).
After pressing N (n) or Z, there is a
mechanical noise, “EJECT” appears in the
display, and the unit enters standby mode
automatically.
• The cassette tape has not inserted correctly.
continued

32
Tuner
There is severe hum or noise (“TUNED” or
“STEREO” flashes in the display).
• Adjust the antenna.
• The signal is too weak. Connect an external
antenna.
A stereo FM program cannot be received in
stereo.
• Press STEREO/MONO so that “MONO”
disappears.
If other troubles not described above
occur, reset the system as follows:
1 While holding down DIGITAL, press
DISPLAY.
2 Press ?/1 to turn on the power.
The unit is reset to factory settings. All the
settings are cleared.
Specifications
Amplifier section
DIN power output (rated) 60 + 60 watts
(6 ohms at 1 kHz, DIN)
Continuous RMS power output (reference)
80 + 80 watts
(6 ohms at 1 kHz, 10%
THD)
Music power output (reference)
150 + 150 watts
(6 ohms at 1 kHz, 10%
THD)
Inputs
VIDEO (AUDIO) IN: voltage 250 mV,
(phono jacks) impedance 47 kilohms
MD IN: voltage 450 mV,
(phono jacks) impedance 47 kilohms
OPTICAL IN:
(Square optical connector jacks, rear panel)
wavelength 700 nm
Outputs
MD OUT: voltage 250 mV
(phono jacks) impedance 1 kilohms
PHONES: accepts headphones of
(stereo mini jack) 8 ohms or more
FRONT SPEAKER: accepts impedance of 6 to
16 ohms
SUB WOOFER OUT: Voltage 1 V,
impedance 1 kilohms
CD player section
System Compact disc and digital
audio system
Laser Semiconductor laser
(λ=795 nm)
Emission duration:
continuous
Frequency response 2 Hz – 20 kHz (±0.5 dB)
Signal-to-noise ratio More than 90 dB
Dynamic range More than 90 dB
OPTICAL OUT
(Square optical connector jack, rear panel)
Tape player section
Recording system 4-track 2-channel stereo
Frequency response 60 – 13,000 Hz (±3 dB),
(DOLBY NR OFF) using Sony TYPE I
cassette,
60 – 14,000 Hz (±3 dB),
using Sony TYPE II
cassette
Wow and flutter ±0.15% W.Peak (IEC)
0.1% W.RMS (NAB)
±0.2% W.Peak (DIN)
Troubleshooting (continued)
33
Additional Information
Tuner section
FM stereo, FM/AM superheterodyne tuner
FM tuner section
Tuning range 87.5 – 108.0 MHz
Antenna FM lead antenna
Antenna terminals 75 ohm unbalanced
Intermediate frequency 10.7 MHz
AM tuner section
Tuning range 531 – 1,602 kHz
(with the interval set at
9 kHz)
Antenna AM loop antenna
Antenna terminals External antenna terminal
Intermediate frequency 450 kHz
Speaker SS-S3
Speaker system 3-way, 3-unit,
bass-reflex type,
magnetically shielded type
Speaker units
Woofer: 15 cm, cone type
Subwoofer: 15 cm, cone type
Tweeter: 2.8 cm, dome type
Nominal impedance 6 ohms
Dimensions (w/h/d)
Approx. 235 x 470 x 265 mm
Mass Approx. 7.3 kg net per
speaker
General
Power requirements 230 V AC, 50/60 Hz
Power consumption 180 watts
0.6 watts (during Power
Saving Mode)
Dimensions (w/h/d)
TA-S3:
Approx. 280 x 128 x 350 mm
ST-S3:
Approx. 280 x 108 x 340 mm
CDP-S3:
Approx. 280 x 108 x 330 mm
TC-S3:
Approx. 280 x 128 x 330 mm
Mass
TA-S3: Approx. 6.2 kg
ST-S3: Approx. 2.1 kg
CDP-S3: Approx. 2.7 kg
TC-S3: Approx. 2.4 kg
Supplied accessories: AM loop antenna (1)
FM lead antenna (1)
Remote commander (1)
Batteries (2)
Speaker cords (2)
Optical cable (1)
Design and specifications are subject to change
without notice.
34
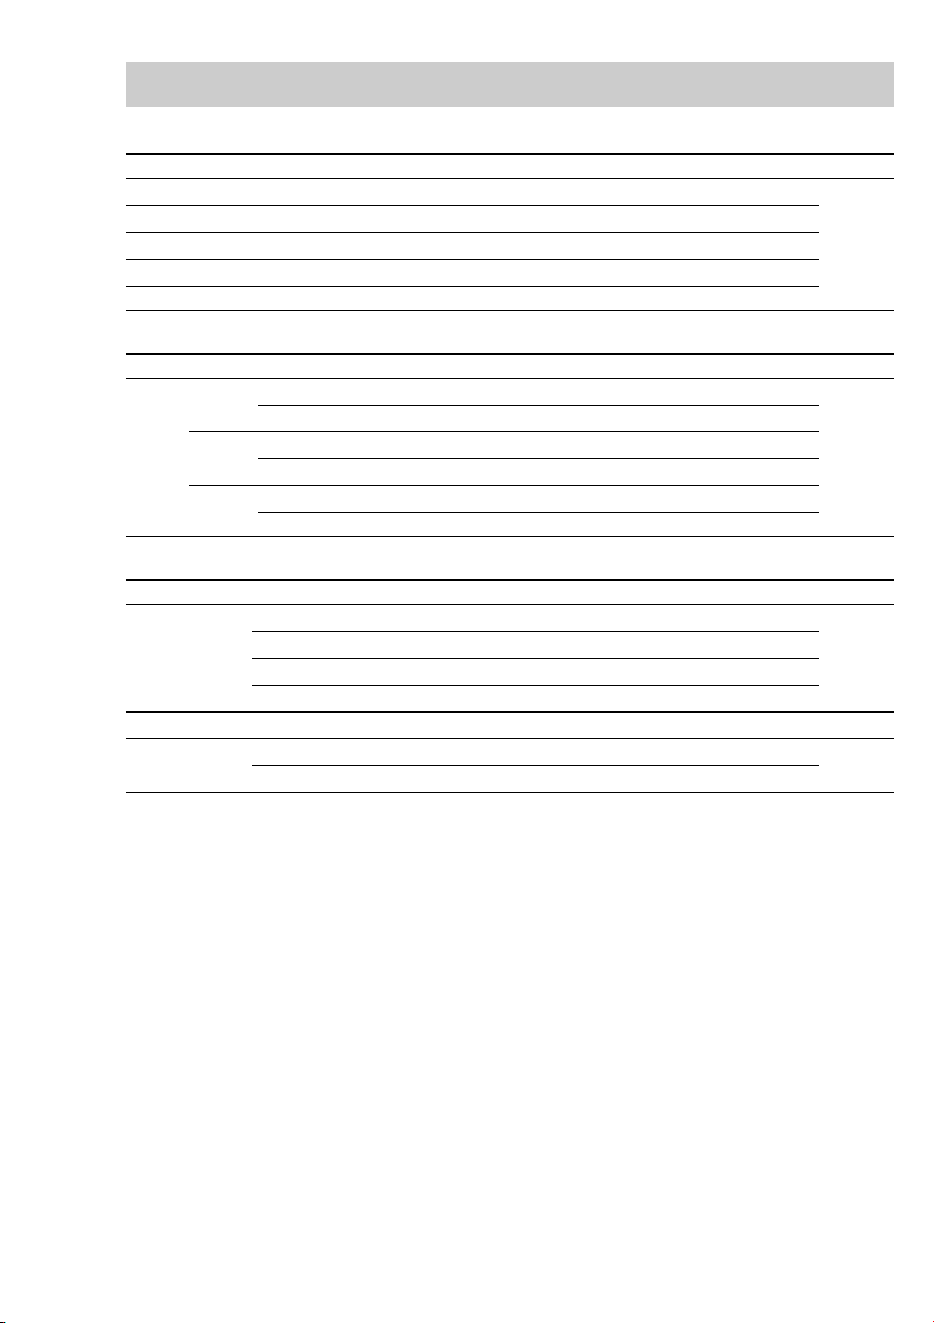
Table for the settings using SUR, EQ, and SET UP buttons
SUR parameters (Press SUR)
Press P or p Press O or o Initial setting Page
EFFECT [XX] depends on sound field depends on sound field 22
WALL S/H [X] S (–8) to H (+8) midpoint
REVERB S/L [X] S (–8) to L (+8) midpoint
S.DEPTH [XXX] OFF, M, D M
VIR.SP. [XXX] ON, OFF ON
EQ parameters (Press EQ)
Press P or p Press O or o Page
FRONT BASS GAIN BASS [XXX] dB
–8 dB to +8 dB
24
FREQUENCY BASS [XXX] kHz 99 Hz to 1.0 kHz
MID GAIN MID [XXX] dB –8 dB to +8 dB
FREQUENCY MID [XXX] kHz 500 Hz to 5 kHz
TREBLE GAIN TREB [XXX] dB –8 dB to +8 dB
FREQUENCY TREB [XXX] kHz 1.0 kHz to 10 kHz
SET UP parameters (Press SET UP)
Press P or p Press P or p Press O or o Initial setting Page
SP. LEVEL FRONT L/R [X] –6 to +6 center 23
SUB W. [XX] dB –10 dB to +10 dB +10 dB
LFE XXXXX MUTING, –20 dB to 0 dB 0 dB
D.COMP. OFF, 0.1 to 0.9, STD, MAX OFF
DIMMER DIMMER [XXX] OFF, 1, 2 OFF 26
RESET MENU CUR. F. RESET — 24
ALL F. RESET —
35
Additional Information
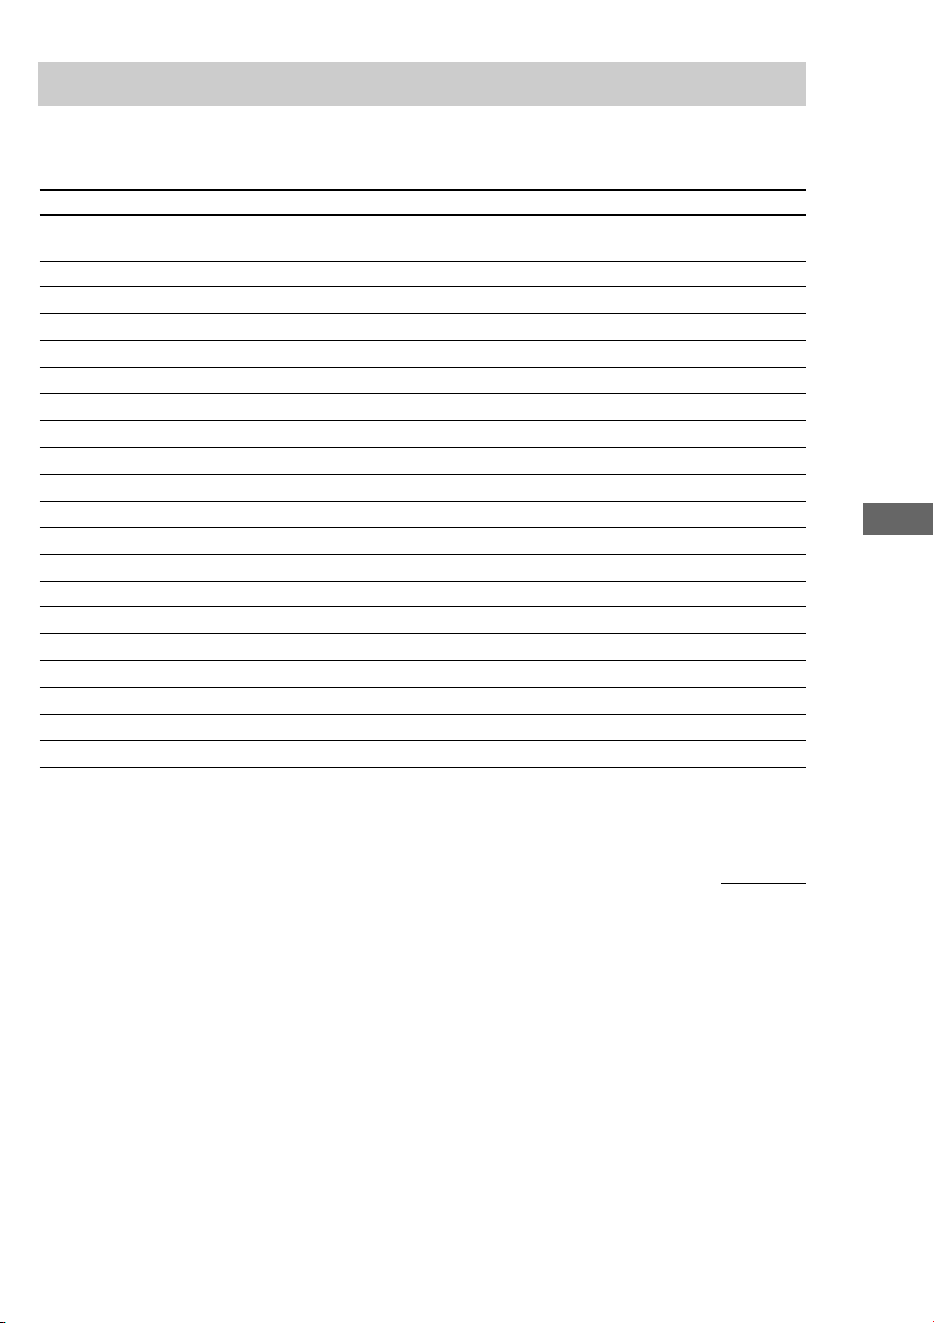
Adjustable parameters for each sound field
The adjusted SUR and EQ parameters are stored in each sound field.
The adjusted SP. LEVEL parameters are applied to all of the sound fields.
continued
< SUR >< SP. LEVEL >
EFFECT WALL REVERB SCREEN VIRTUAL
FRONT SUB WOOFER
LFE* D.COMP.*
LEVEL TYPE DEPTH SPEAKER
BALANCE LEVEL
MUSIC MODE
2CH STEREO zzzz
SMALL HALL zzz zzzz
LARGE HALL zzz zzzz
OPERA HOUSE zzz zzzz
JAZZ CLUB zzz zzzz
DISCO/CLUB zzz zzzz
CHURCH zzz zzzz
LIVE HOUSE zzz zzzz
ARENA zzz zzzz
STADIUM zzz zzzz
GAME zzz zzzz
MOVIE MODE
SEMI C.EX A z zzzzzz
SEMI C.EX B z zzzzzz
SEMI C.EX C z zzzzzz
V.SEMI M.D. zzzz
V.ENHANCE.A zzzz
V.ENHANCE.B zzzz
* These parameters may not operate depending on the source or may not operate as adjusted. For details, see each
item in “Adjusting the level parameters”.

36
<EQ>
FRONT FRONT FRONT FRONT FRONT FRONT
BASS (dB) BASS (Hz) MID (dB) MID (Hz) TREB (dB) TREB (Hz)
MUSIC MODE
2CH STEREO zzzzzz
SMALL HALL zzzzzz
LARGE HALL zzzzzz
OPERA HOUSE zzzzzz
JAZZ CLUB zzzzzz
DISCO/CLUB zzzzzz
CHURCH zzzzzz
LIVE HOUSE zzzzzz
ARENA zzzzzz
STADIUM zzzzzz
GAME zzzzzz
MOVIE MODE
SEMI C.EX A zzzzzz
SEMI C.EX B zzzzzz
SEMI C.EX C zzzzzz
V.SEMI M.D. zzzzzz
V.ENHANCE.A zzzzzz
V.ENHANCE.B zzzzzz
Adjustable parameters for each
sound field (continued)
Sony Corporation Printed in Malaysia