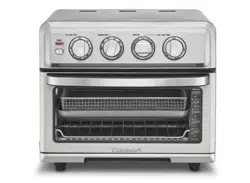
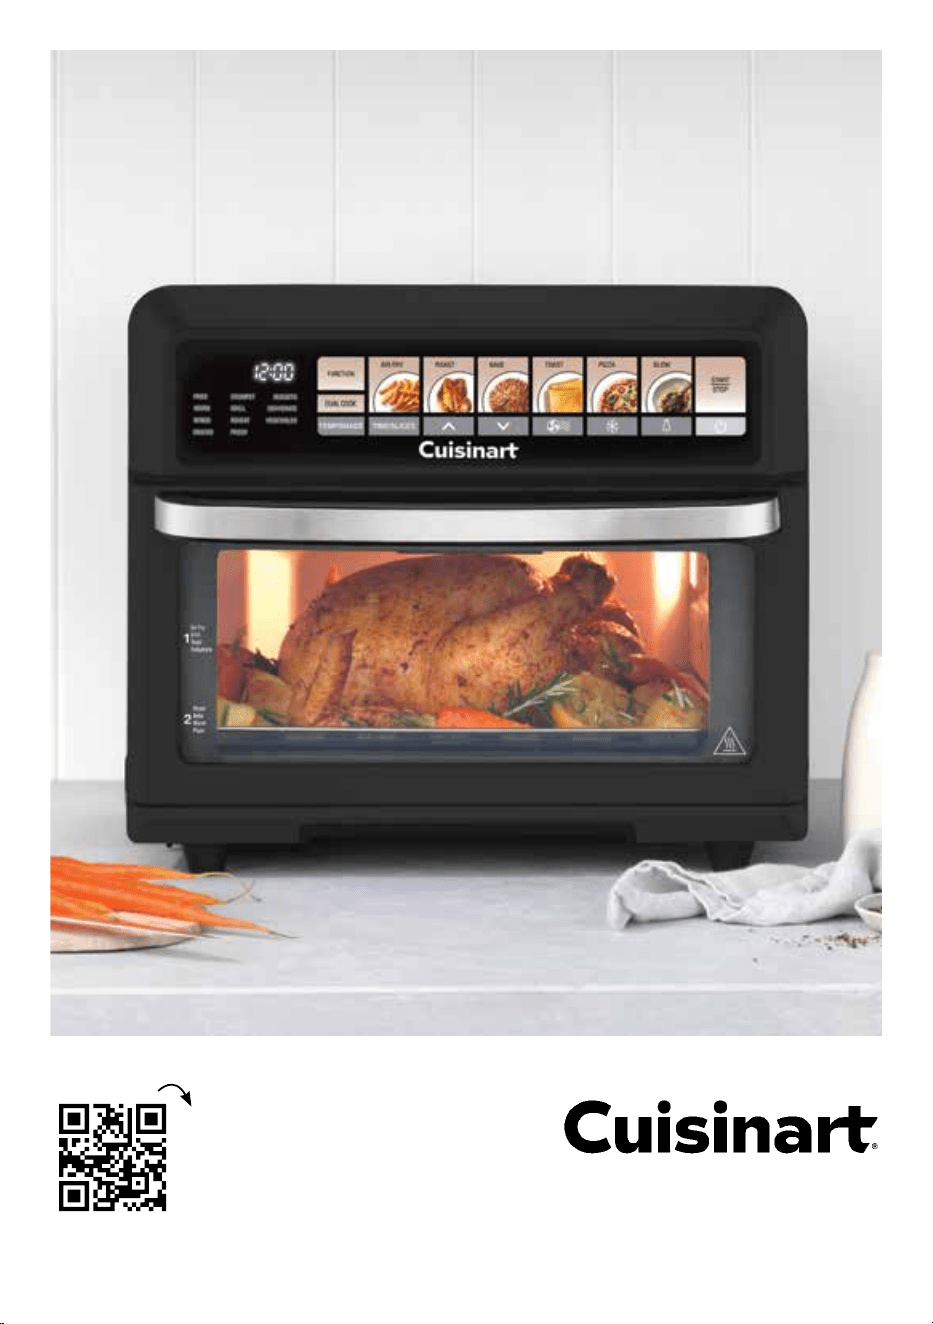
Air Crisp Pro
Combi Oven
Scan to access
delicious recipes
to use with your
Air Crisp Pro

CONTENTS
Important Safeguards...........................................3
Special Cordset Instructions......................................4
Before the First Use ............................................4
Parts & Features ...............................................5
Getting to Know Your Control Panel ...............................6
Smart Digital Thermo Sensor. ....................................8
Oven Rack & Positions ..........................................9
Operating Instructions .........................................9
Cooking Functions ............................................10
Extra Guides For The Air Crisp Pro ...............................15
Cleaning & Maintenance .......................................18
Trouble Shooting .............................................19

3
IMPORTANT SAFEGUARDS
READ ALL INSTRUCTIONS BEFORE USING
When using any electrical appliance, especially when children are present, basic safety precautions
should always be taken to reduce the risk of fire, electric shock and/or injury, including the
following:
• Never leave unattended while cooking to avoid possibility of fire.
• This appliance is intended for HOUSEHOLD USE ONLY and similar applications such as:
- staff kitchen areas in shops, offices & other working environments;
- farmhouses;
- clients in hotels, motels and other residential type environments;
- bed and breakfast settings
• This appliance is not intended for use by persons (including children) with reduced physical,
sensory, or mental capabilities, or lack experience and knowledge unless, they have been given
instruction concerning use of the appliance by a person responsible for their safety.
• Use only on an appropriate benchtop & indoors only, sitting away from flammable materials such
as curtains, draperies and walls of similar nature as a fire may occur if comes in contact or
becomes covered during operation.
• Do not place on or near a hot gas, electric burner, or in a heated oven.
• Do not use appliance for other than its intended use.
• This appliance is under 220V~240V use only. Check voltage to be sure the voltage indicated on
the nameplate agrees with your voltage.
• Always attach plug to unit first, then plug cord to wall outlet. To safely disconnect, press the power
button
to stop cooking cycle and remove plug from electrical outlet.
• To avoid the possibility of the unit being accidentally pulled off the working area, which could result
in damage to the unit or personal injury, do not let the cord hang over the edge of a table or
benchtop.
• To avoid damage to the cord and possible fire or electrocution hazard, do not let cord come into
contact with any hot surfaces including a stovetop.
• Do not operate this appliance if it has been dropped or damaged (including the cord) in any
manner or is not operating correctly.
• Do not operate this appliance in an appliance cabinet or under a wall cabinet. When storing in an
appliance cabinet, always unplug the unit from the electrical outlet. Not doing so could create a
risk of fire, especially if the unit is in contact with the walls of any cabinetry or on closing the
cabinet door and touching the unit.
• Keep hands, hair and clothing away during operation to reduce the risk of injury.
• Always unplug from the electrical outlet when not in use before putting on or taking off parts and
before cleaning.
• The use of attachments not recommended by Cuisinart may be hazardous.
• At no time, before or during cooking and cleaning immerse unit, plug or cord in water, or any
other liquids similarly under running water too – this is to protect against the starting of a fire and
electric shock that could induce injury to persons. If the unit, plug or cord should fall into water or
other liquids, unplug the cord from the electrical output immediately. DO NOT reach into the
water.
• Do not cover crumb tray or any part of the oven except the baking pan with metal foil – this will
cause overheating of the oven.

4
• The top of the oven, steam vents and any other opening should always be clear 15cms of any
other object while in use.
• The temperature of accessible surfaces may be high when the appliance is operating.
Surfaces marked with this symbol will be very hot to touch during use – only use handles
and/or knobs. DO NOT TOUCH the unit until it has cooled down.
• Oversized foods, metal food packages and utensils must not be inserted in the oven as this can
create a risk of fire or electric shock.
• No object should ever be rested on the glass door. This includes cooking utensils and baking
dishes.
• Do not place sealed or airtight containers in the oven.
• Do not place paper, cardboard, plastic or similar products in the oven.
•
Extreme caution should be exercised when using containers constructed of materials other than
metal, glass or ceramic in the oven.
• Use extreme caution when removing trays, pans, racks or disposing of grease and oils or when
moving the unit itself that may contain hot oils or grease to avoid burns.
• Do not clean with metal scouring pads. Pieces can break off the pad and touch electrical parts,
involving a risk of electric shock.
• If the supply cord is damaged, it must be replaced by the manufacturer, its service agent or
similarly qualified persons in order to avoid a hazard.
• The appliances are not intended to be operated by means of an external timer or separate
remote-control system.
• Children should be supervised to ensure that they do not play with the appliance.
• This appliance incorporates an earth connection for functional purposes only.
SPECIAL CORDSET INSTRUCTIONS
A short power supply cord is provided to reduce the risks resulting from becoming entangled in or trip-
ping over a longer cord.
Extension cords may be used if care is exercised in their use. If an extension cord is used, the marked
electrical rating of the extension cord must be at least as great as the electrical rating of the appliance,
and the longer cord should be arranged so that it will not drape over the countertop or tabletop where it
can be tripped over unintentionally or pulled on by children.
SAVE THESE INSTRUCTIONS
BEFORE THE FIRST USE
1. Place the Air Crisp Pro on a large, sturdy, flat non-heat sensitive surface.
2. Ensure there is minimum distance of 15cm of space from the wall, sides and above. Do not use on heat
sensitive surfaces.
3. Remove any dust from shipping by wiping the unit and controls with a damp cloth. Thoroughly clean the
internal part of the oven with hot sudsy water (see Cleaning & Maintenance instructions on page 18).
NOTE: Objects should not be stored on top of the oven. If they are, remove all objects before you turn on
your oven. The exterior walls can get very hot when in use.
4. Check that the Crumb Tray is in place and that there is nothing in the oven.
5. Plug power cord into a suitable 230/240v power outlet.
5
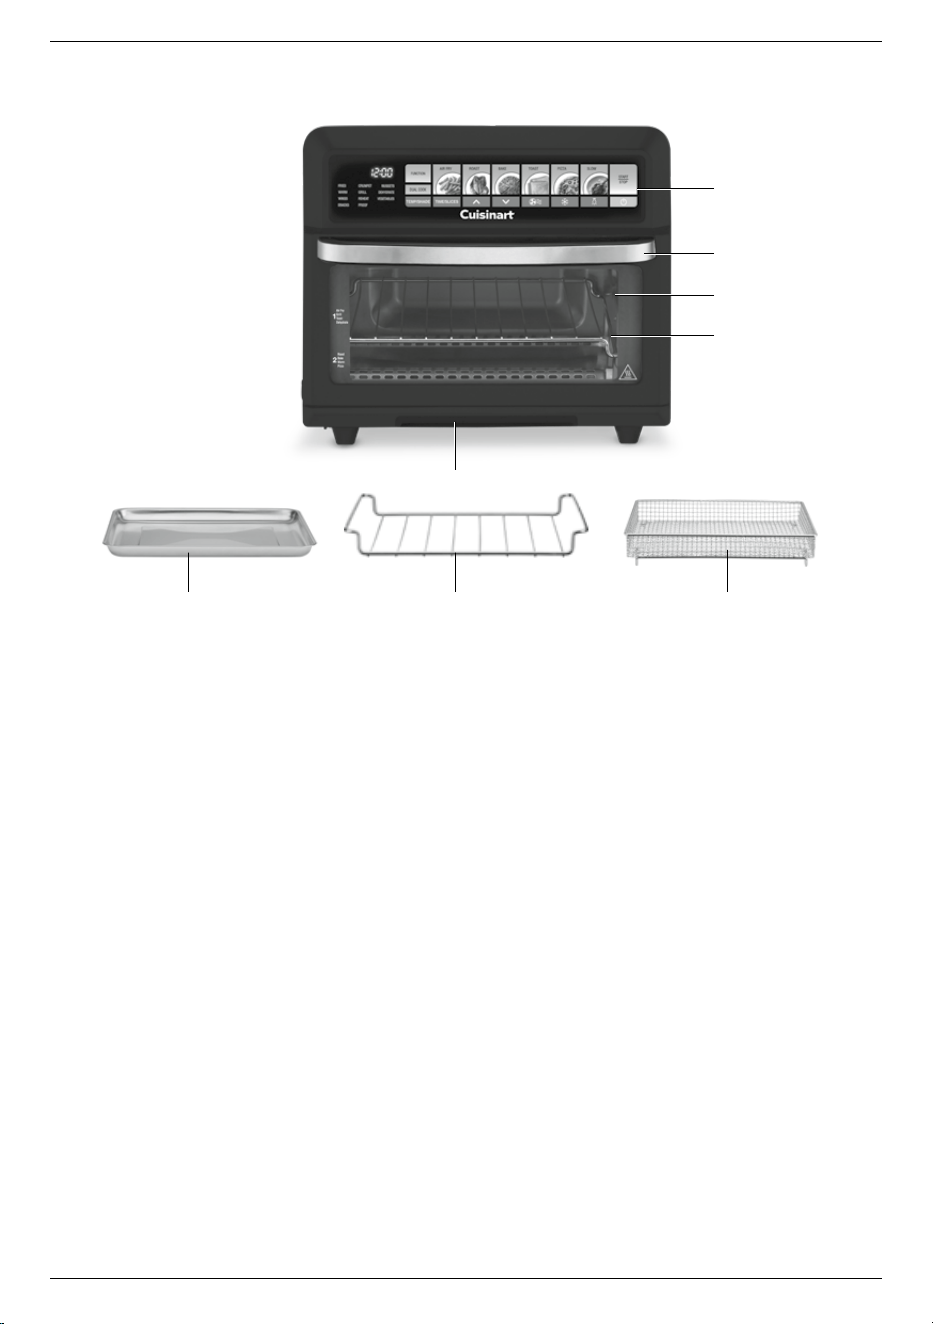
PARTS & FEATURES
A. Touch Screen Control Panel
Easy to use touch LED menu (refer to page 6 - Getting to know your touch control panel)
B. Cool-Touch Handle
Designed to stay cool during cooking
C. Glass Viewing Window
D. Rack Positions
Refer to page 9
E. Stainless Steel Air Fry / Cooking basket
Use for air-frying, grilling or dehydrating
F. Stainless Steel Wire Rack
Can be inverted to create extra height. E.g. for grilling
G. Stainless Steel Baking Tray / Drip Tray
Use for baking or roasting. When using the Air-Fryer Basket use underneath as a drip tray
H. Pull-Out Crumb Tray
Slides in & out
G F
H
E
A
B
C
D
6
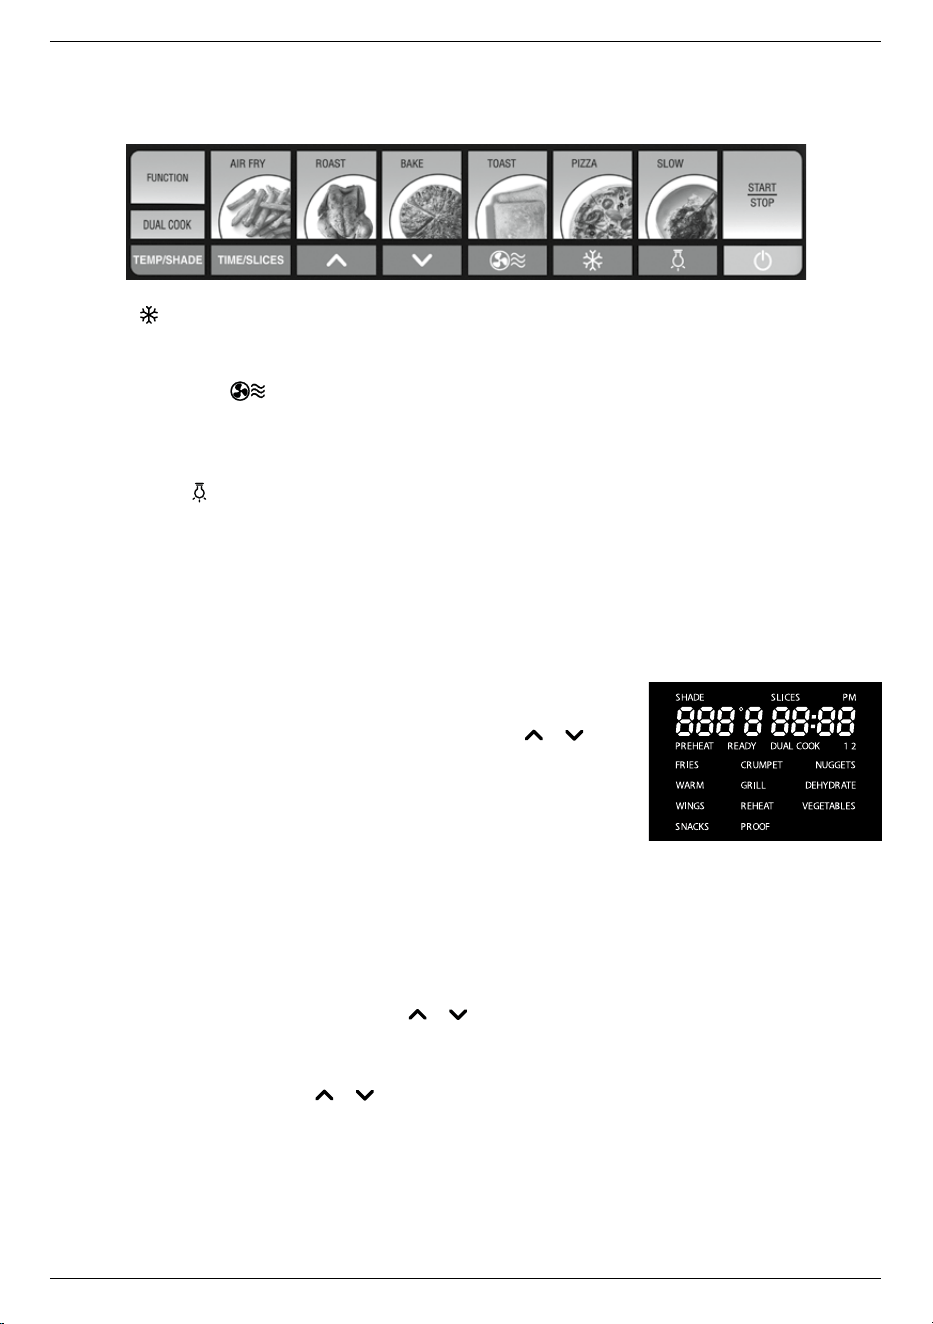
GETTING TO KNOW YOUR TOUCH CONTROL PANEL
Touch to select function depending on your cooking preference. You will then have the option to adjust
the temperature or time.
A. Frozen
Select when cooking/reheating from frozen using the Toast, Crumpets, Pizza & certain Air Fry preset functions.
The frozen icon will display on the LED screen.
B. Super Convection
Fan speed is increased & can be set in Bake, Grill, Roast, Proof, Slow or Reheat settings. The Pizza setting is
already preset with this as well as Dehydrate & all Air Fry functions. When the icon is NOT showing, normal
convection fan speed is set.
C. Interior Light
Press the light button to have a clear view of cooking progress - light will turn off automatically after 20
secs.
D. Dual Cook
Use to program two-stage cooking operation automatically.
E. START / STOP
Use to start & stop cooking. Indicator will illuminate when cooking.
F. FUNCTION
Press FUNCTION to access the pre-programmed preset menu on the
left hand side of the panel. Use the Up or down arrows ("
"/" ") to
toggle between each function.
G. TEMP / SHADE
Select to adjust the cooking temperature or toast shade.
H. TIME / SLICES
Select to adjust the cooking time / number of toast slices to be cooked.
TO CHANGE TIME, TEMPERATURE OR FUNCTION DURING
COOKING CYCLE
To change the temperature during the cooking cycle, press TEMP / SHADE. Adjust the temperature up
or down by pressing the up or down arrows (" "/" ") and press TEMP / SHADE again to confirm the
selection.
To change the time during the cooking cycle, press TIME / SLICES. Adjust the time up or down by
pressing the up or down arrows ("
"/" ") and press TIME / SLICES again to confirm the selection.
To change function: You must press Start/Stop to stop the current program. The current program will
begin to flash on the screen. To exit the program press START / STOP for 3-5 seconds. The full control
panel should now be displayed and you can select an new program.
NOTE: When the Air Crisp Pro is in use, opening
the door will suspend the heaters and countdown timer and
discontinue working. When the door closes the heaters and countdown timer will resume.
7
SETTING THE CLOCK
The clock can only be set when the oven is not cooking i.e. when the clock is displayed on the screen.
When the appliance starts for the first time, it will display and the clock the default time 12:00 will be flashing.
You can also change the clock at any time while the oven is not cooking. Just hold the "TIME/SLICES" button
for 3-5 seconds, the time will be flashing.
To change the time:
1. Press the up or down arrows ("
"/" ") to set the hour, then press "TIME/SLICES" to confirm.
2. The minutes of the clock will now be flashing. Press the up or down arrows ("
"/" ") to set the
minutes and press "TIME/SLICES".
3. Press the up or down arrows ("
"/" ") to toggle between showing PM and not showing anything
(indicating AM) and press "TIME/SLICES".
NOTE: If nothing is pressed, the clock will continue to run from 12:00 from the time the power is
connected.
SETTING THE VOLUME OF THE TONE
The tone volume can only be adjusted when the time is displayed on the screen.
1. Press and hold FUNCTION and DUAL COOK buttons simultaneously for 4 seconds.
2. The number 1 (default setting) or currently selected volume level (0 ,1 or 2) will display.
3. Press the up or down arrows ("
"/" ") to set preferred tone level: 0 (off/ tones deactivated), 1 (low), or
2 (high).
4. Once your selection is displayed, press FUNCTION to confirm.
USING THE OVEN LIGHT
Touch the " " function on the control touch panel to turn the oven light on.
Touch the "
" function again to turn off the oven light.
NOTE: When the light is on it will automatically switch off after a period of 20 seconds. When opening the
oven door, the light automatically switches on.
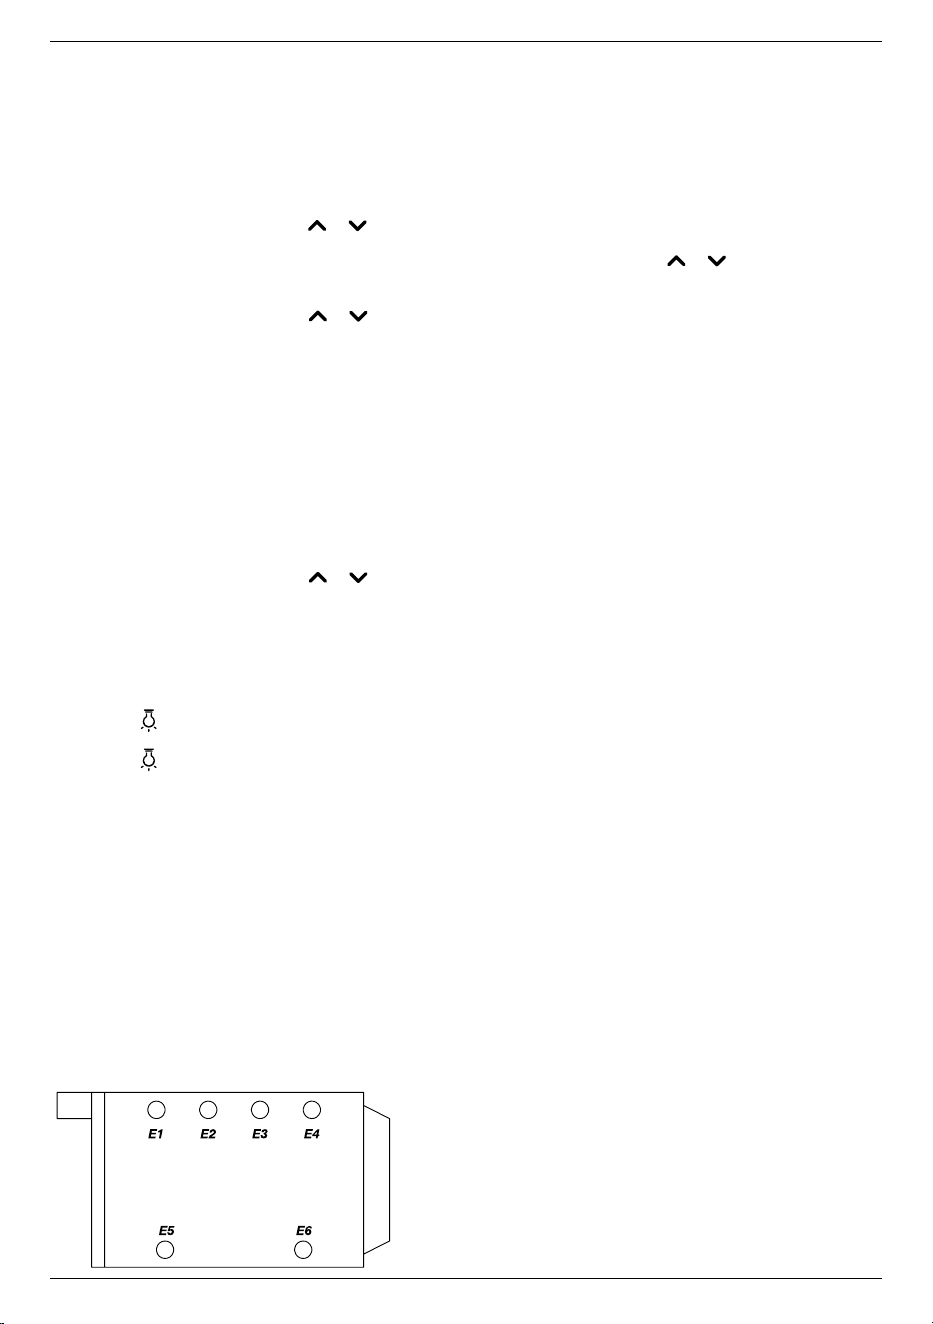
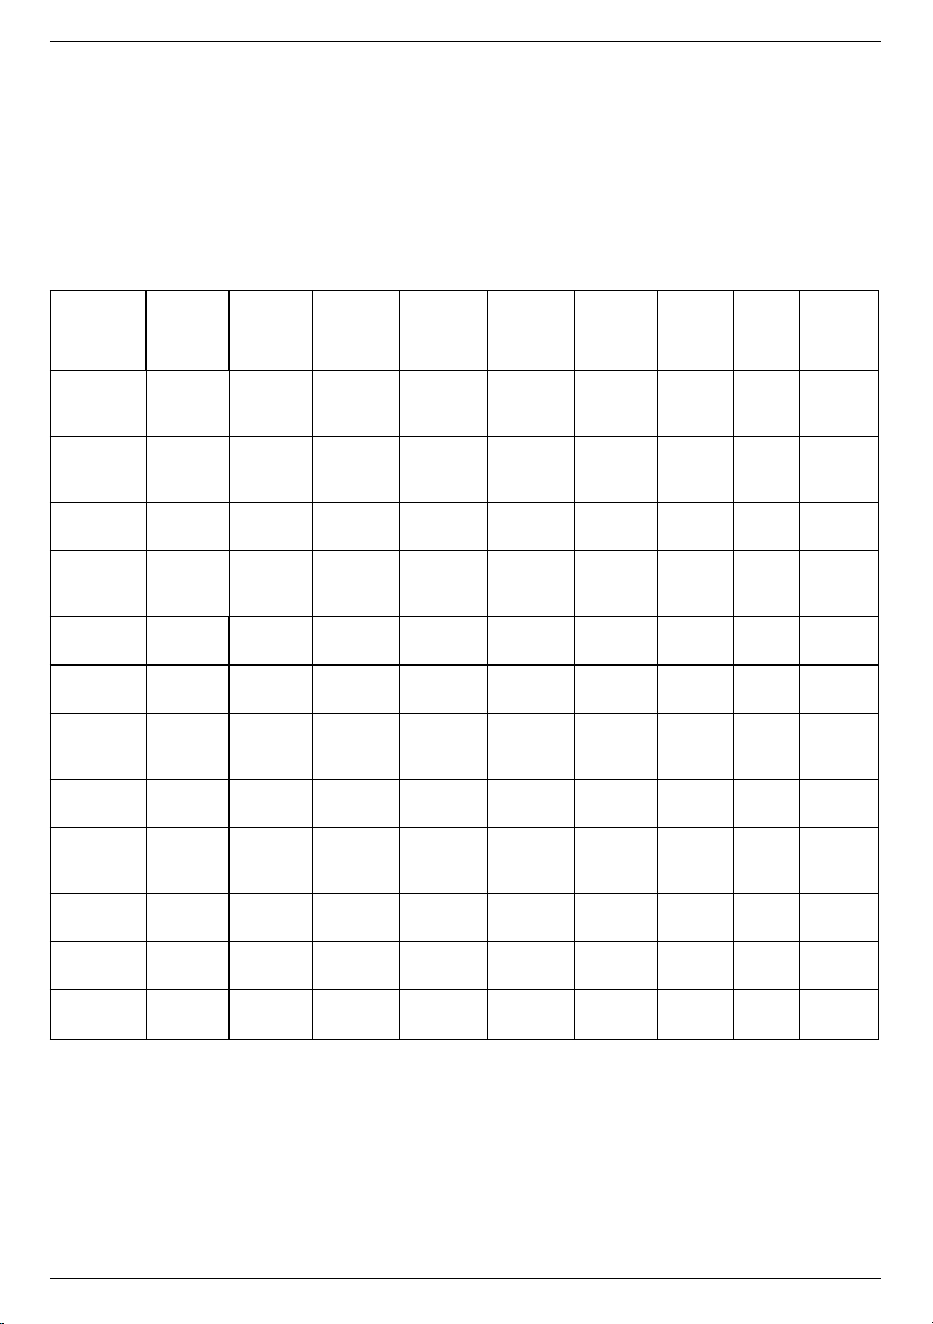
INTUITIVE ELEMENT TECHNOLOGY
The Air Crisp Pro features 6 individual elements that have been programmed to direct the heat exactly
where it is needed most for each function and cooking style.
Each of the oven's functions are preset with specific combinations and temperatures, however these can
be adjusted to suit your own cooking needs.
Note that elements may operate on differ
ent power levels depending on the function selected so they may
not all be functioning at full power at the same time. This means that depending on the selected function, not all
elements will be glowing.
8
Function
E1
(440W)
E2
(310W)
E3
(310W)
E4
(440W)
E5
(310W)
E6
(310W)
Fan
speed
Temp
range
Timer
range
Toast On Off Off On On On
Always
Low
Fixed
on
max.
Default
Crumpet On Off Off On
On at
half
power
On at
half
power
Always
Low
Fixed
on
max.
Default
Bake On Off Off On On On
High
Low
90-
230°C
1 min -
2 hours
Grill On Off Off On Off Off
High
Low
Fixed
on
max.
1 min -
2 hours
Pizza On Off Off On On On
High
Low
170-
230°C
1 min -
2 hours
Roast On Off Off On On On
High
Low
90-
230°C
1 min -
2 hours
Dehydrate On Off Off On On On
High
Low
40-
95°C
1 min
- 72
hours
Proof On Off Off On On On
High
Low
25-
40°C
1 min -
2 hours
Slow On Off Off On On On
High
Low
40-
150°C
1 min
- 12
hours
Reheat On Off Off On On On
High
Low
90-
230°C
1 min -
2 hours
Warm Off Off Off Off On On
Always
Low
60-
150°C
1 min -
2 hours
Air Fry On On On On Off Off
Always
High
90-
230°C
1 min -
1 hours
SMART DIGITAL THERMO SENSOR
Your Air Crisp Pro has a smart digital thermo sensor that adjusts and uses the correct combination of elements
and power according to the function selected. This means that some elements may be off or using low power
while others may run at a higher power level to balance the right amount of heat for the program selected.
This is a normal function of the oven.
NOTE: The elements may be heating even if they are not lighting up.
CAUTION: DO NOT touch elements to see if they are working. Elements are programmed to work
according to the function selected.
9
Position 1 Position 2
Function
Air Fry X X
Toast X
Crumpet X
Bake X X X X
Grill X X X X X X
Pizza X
(fresh)
X
(frozen;
inverted rack)
Roast X X X X
Dehydrate X
Proof X X
Slow X X X X
Reheat X X X X X X
Warm X X X X X X
Oven
Rack
Baking Tray/
Drip Pan
Air Fryer
Basket
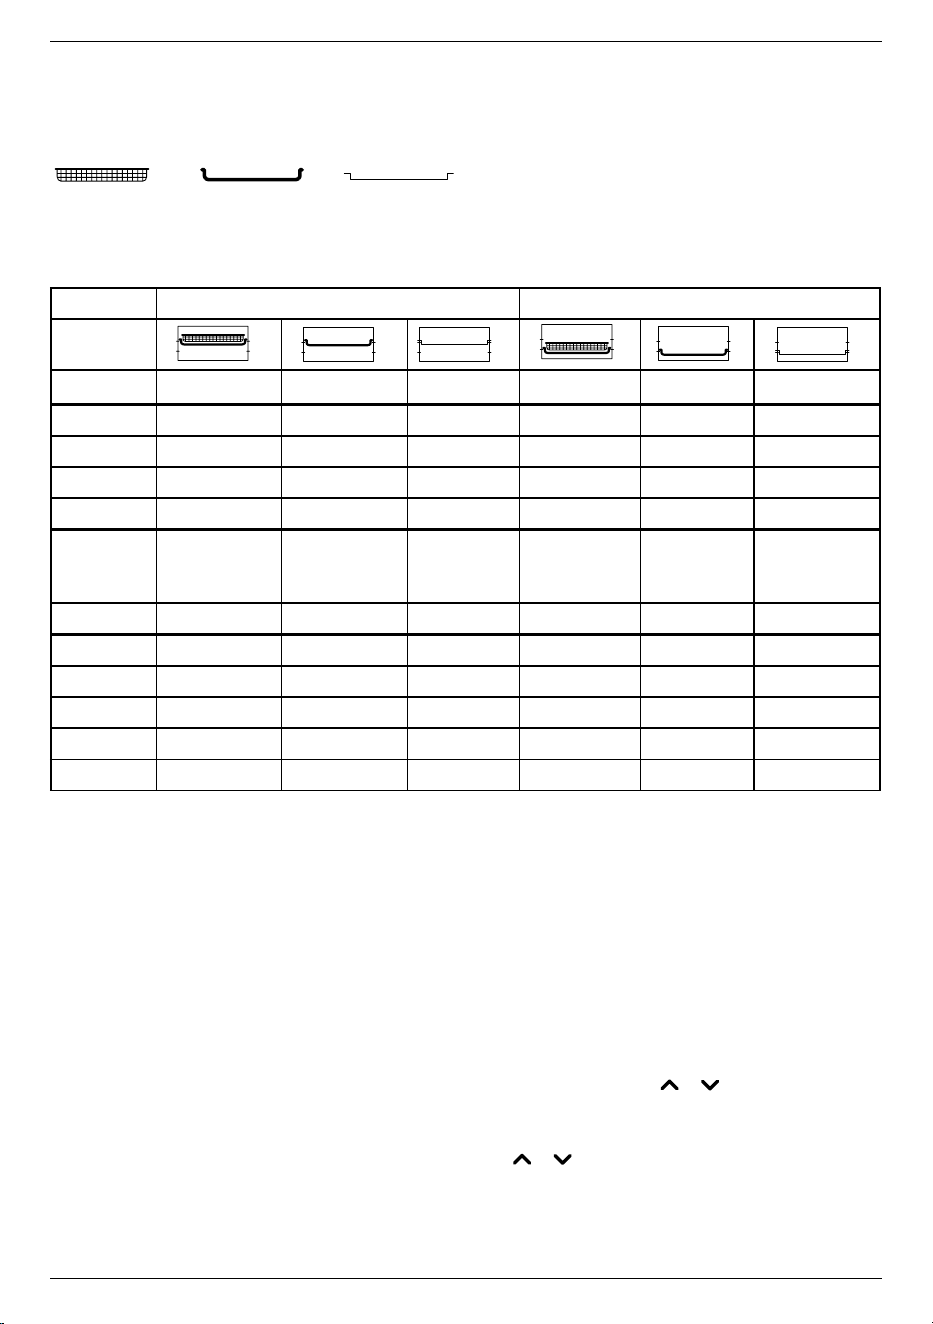
OVEN RACK & PAN POSITIONS
Please refer to the chart below for suggested Oven Rack, Baking Tray/Drip Pan, and Air Fryer Basket
positions.
Rack Position 1 and Position 2 are marked on the right side housing when the door is opened.
SUGGESTED RACK/PAN/BASKET POSITIONS
OPERATING INSTRUCTIONS
1. Place the appropriate rack, pan, and/or basket in the position recommended in the chart above.
2. Use the touch panel to select the appropriate function or pre-set.
3. After the desired function is selected, START / STOP will FLASH. The time and temperature display
will show the last selected or default time and temperature for that program. (Shade and slices for
toast and crumpet settings)
- To confirm the displayed time and temperature and confirm cooking, press START STOP.
4. To change the time / temperature settings:
- To change the temperature during, press TEMP / SHADE. The temperature display will begin to flash.
Adjust the temperature up or down by pressing the up or down arrows ("
"/" ") and press
TEMP / SHADE again to confirm the selection.
- To change the time during the press TIME / SLICES. The time display will begin to flash. Adjust the
time up or down by pressing the up or down arrows ("
"/" ") and press TIME / SLICES again to
confirm the selection. The Start/Stop button will flash, and LED screen will display the last selected or
default temperature and time (shade and slices for Toast and Crumpet settings).
5. If desired, press the Frozen or the Super Convection Fan button

10
6. Press Start/Stop to begin operation. START / STOP will stop flashing indicating the appliance is cooking.
NOTE: Bake and Pizza have a preheating stage during which display will show “Preheat”; once preheat
is complete, oven will beep, and “Ready” will be displayed and countdown timer will begin.
7. When countdown timer reaches 0:00, oven will beep three times and heating elements will turn off.
NOTE: If you wish to cancel during the cooking progress, simply hold Start/Stop for 3-5 seconds.
NOTE:
Cooling fan will remain on after cooking for cooling purposes.
COOKING FUNCTIONS
AIR FRY FUNCTION
For best results, use the provided Air Fryer Basket fitted into the Baking Tray/Drip Pan to catch any crumbs
or fats when cooking.
The Air Fry function can be used at 90°C–230°C for up to 1 hour. This function is used to air fry food
and meals as a healthy alternative to deep frying in oil. A high-speed fan and multiple heating elements
circulate hot air from the top down to prepare a variety of meals that can be both delicious and healthier
than traditional frying.
• Default setting: 220°C; 12 minutes
• Many foods that are usually fried can be air-fried without using excess amounts of oil. Air-fried foods will
taste lighter and be less greasy than deep-fried foods.
• Air-frying doesn’t require oil, but a light spray can enhance browning and crispiness. Use an oil sprayer
or a nonstick olive oil cooking spray to keep it extra light, a pastry brush to evenly coat, or pour a little
oil into a bowl, add food, and toss.
• Most oils can be used for air-frying. Olive oil is preferred for a richer flavour. Vegetable, canola or
grapeseed oils are recommended for milder flavours.
•
An assortment of coatings can be used on air fried foods. Some examples of different crumb mixtures include;
- breadcrumbs,
-seasoned breadcrumbs
-panko breadcrumbs
-crushed cornflakes
-crushed potato chips.
Various flours, including gluten-free, and other dry foods like cornmeal also work very well.
• Most foods do not need to be turned during cooking, but larger items, like chicken drumsticks, should
be turned halfway through the cooking cycle to ensure they are evenly cooked with browning results.
• When air-frying large quantities of food that fill the pan, toss food halfway through the cooking cycle
to ensure evenly cooked results and browning.
• Use higher temperatures for foods that cook quickly, like bacon and chips.
• Use lower temperatures for foods that take longer to cook, like crumbed chicken.
• Foods will cook more evenly if they are cut into the same-size pieces.
• Please note that many foods release water when they cook. When cooking large quantities for an
extended period, condensation may build up, which could leave moisture on your benchtop.
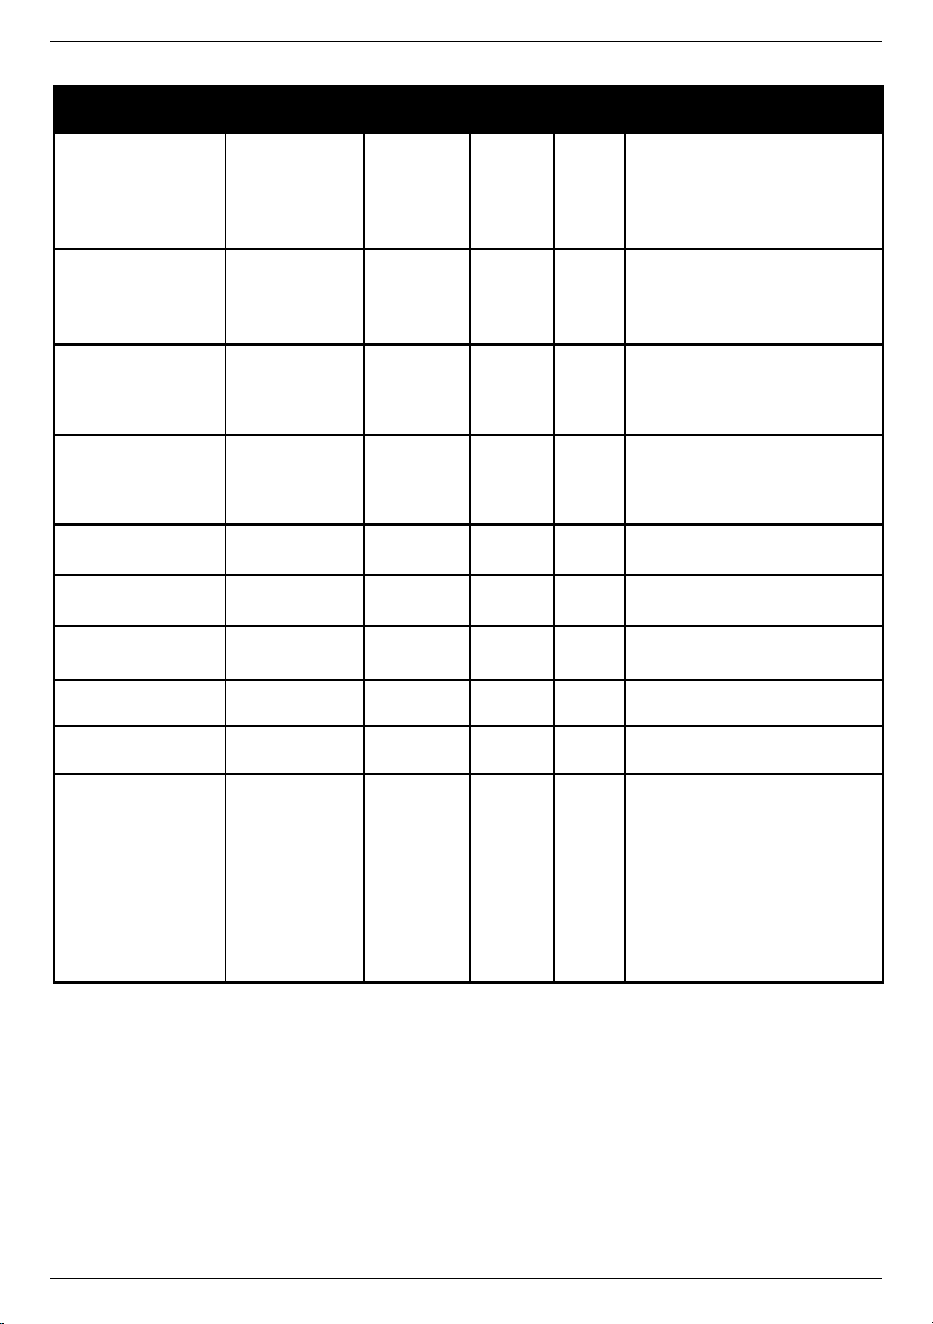
The chart below lists recommended amounts, cooking times and temperatures for various types of food
that can be air-fried in the Air Crisp Pro. If portions exceed recommendations, you can toss occasionally
while cooking to ensure crispiest, and even browning results. Smaller amounts of food may require less
time. For best air fry results, use the oven light to periodically check on the cooking food.
NOTE: When air-frying, always use the Air Fryer Basket with the Baking Tray/Drip Pan. For all foods below, we
suggest using the upper position (Position 1). for best results unless otherwise stated below.
11
AIR FRY COOKING CHART
NOTE: Air frying doesn’t require oil, but a light coating can enhance browning and crispiness.
Use an oil sprayer or a nonstick olive oil cooking spray to keep it extra light, a pastry brush to
evenly coat, or pour a little oil into a bowl, add food, and toss.
Food Recommended
Amount
Temperature Time Shelf
Position
Cooking
Instruction
Bacon
250g (about
5 rashers)
200°C
10 to 12
minutes
1
For all foods in the chart Air
Fryer Basket with Baking Tray/
Drip Pan using rack upper
postion (Position 1) unless
otherwise stated.
Chicken Wings
900g (about 10) -
Max 1.4kg
200°C
20 to 25
minutes
1
Avoid sugary marinades as this
may result in burning of the
sugar. Best cooked in a single
layer. Better on rack (Position 1).
Frozen Fries 450g - 900g 220°C
15 to 25
minutes
1
When cooking a larger volume
(Position 1) rack may be
required. Toss once during
cooking for even browning.
Frozen Wedges 450g - 900g 220°C
12 to 25
minutes
1
When cooking a larger volume
(Position 1) rack may be.
Toss once during cooking
required for even browning.
Frozen Snacks e.g.
Spring Rolls
500g 200°C
6 to 10
minutes
1
Frozen Chicken
Nuggets
400g 220ºC
8 to 10
minutes
1
Frozen Fish Fingers 450g - 900g 220ºC
8
minutes
1
Fresh Hand Cut Fries 450g - 900g 200°C
20 to 30
minutes
1
Salt & Pepper Squid 500g 200°C
10
minutes
1
Vegetables e.g. Sliced
Eggplant
500g 200°C
13 to 20
minutes
1 or 2
Lightly spray with olive oil all over
vegetables. For slices cut 1-½cm
thick and cook for 15 mins. For
larger cut vegetables 4cm x 4cm
cook for 15-20 mins. Use rack
Position 1 for thin slices , rack
Position 2 for thicker pieces of
vegetables. Turn halfway through
cooking to evenly brown.
12
ROAST
Roast can be used at 90ºC – 230ºC for up to 2 hours.
• Default: 180°C for 45 mins.
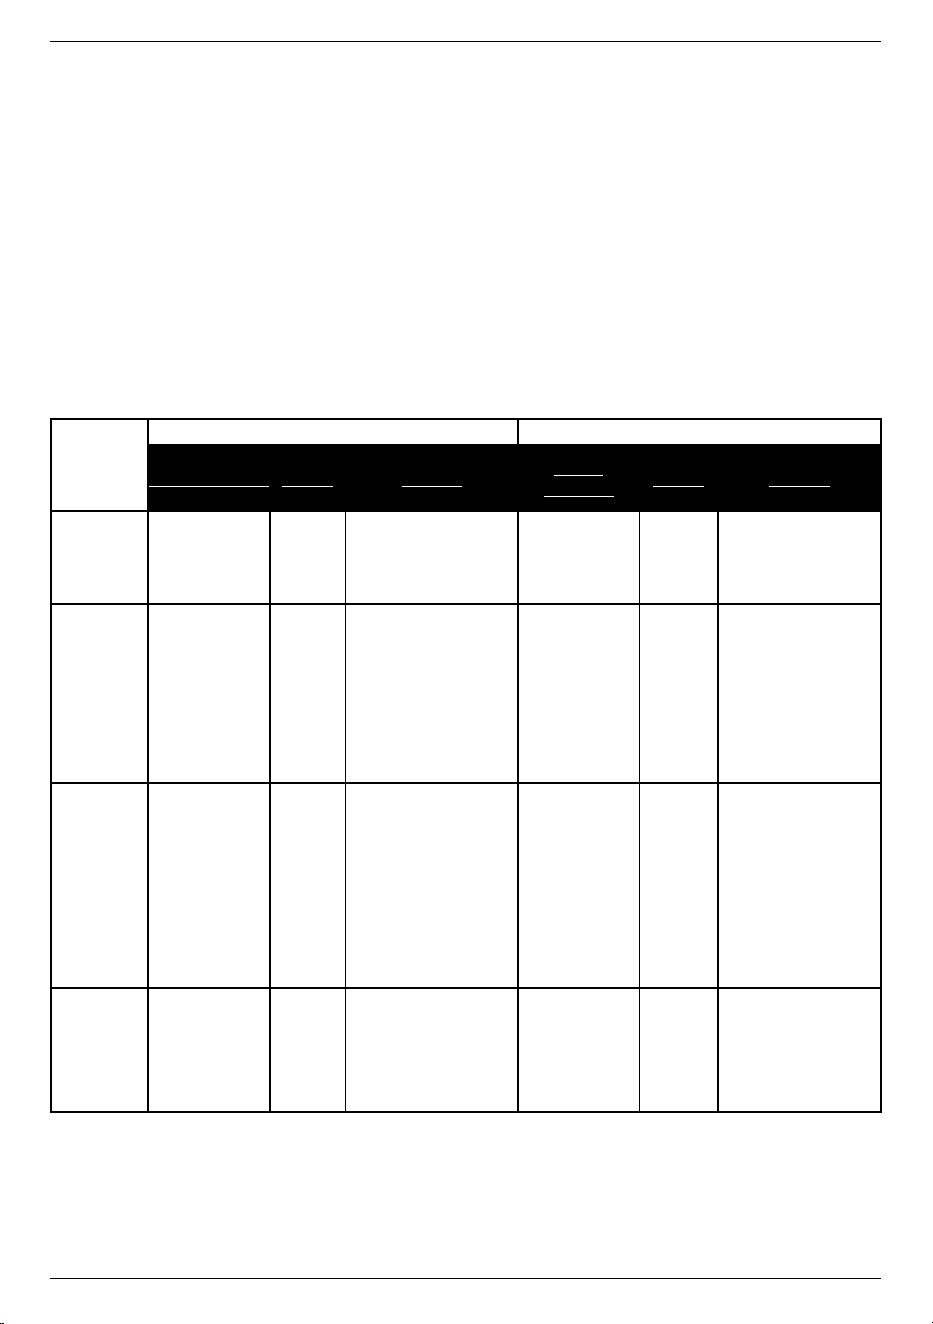
• Use the Dual Cook function for pre-browning at a high temperature then automatically reduce to a
lower temperature for a longer roasting time. This is ideal for a pork roast.
• Warm up vegetables and brown by roasting them; as they caramelise.
• As some foods roast faster, begin checking progress at least 5 to 10 minutes before the end of sug-
gested cooking time.
•
Using the Super Convection (or high fan) setting, roasts can cook up to 50% faster with enhanced browning.
After selecting the Roast function press the Super Convection button. The icon will display on the screen.
• Cooking times will need to be adjusted. We suggest you check your roast at least 20 minutes before
the suggested total cooking time.
ROASTING CHART
* For all roasts, it is recommended you remove the meat from the refrigerator 30 minutes prior to cooking
* Opening the oven during cooking may affect the overall cooking time
* It is recommended to allow any roast to sit covered with foil for 20 minutes before cutting to serve
CONVECTION SUPER CONVECTION
TIME/WEIGHT TEMP. NOTES
TIME/
WEIGHT
TEMP. NOTES
Chicken
(Unstuffed)
20min/500g 180°C
For stuffed
chicken adjust
time: 25min/500g
15min/500g 180°C
For stuffed
chicken
adjust time:
20min/500g
Beef
(Blade,
Round)
Medium
Rare
25min/500g
200°C
160°C
• Preheat oven at
200°C for 10min
• Reduce to
160°C & place
beef in oven
TIP: Go to page
14 to use the Dual
Cook Function
20min/500g 200°C
160°C
• Preheat oven at
200°C for 10min
• Reduce to
160°C & place
beef in oven
TIP: Go to page
14 to use the Dual
Cook Function
Pork
Loin
(Rolled
or Bone-
in)
Blush
Pink
15min/500g
230°C
180°C
• Cook at 230°C
for 30min any
size
• Reduce to
180°C & cook
for 15min/500g
TIP: Go to page
14 to use the Dual
Cook Function
10min/500g 230°C
180°C
• Cook at 230°C
for 25min any
size
• Reduce to
180°C & cook
for 10min/500g
TIP: Go to page
14 to use the Dual
Cook Function
Lamb
(On
Bone)
Medium
Rare
25min/500g 180°C 20min/500g 180°C

13
BAKE
Baking is recommended for a variety of foods you would normally prepare in a conventional oven.
Bake has a preheating stage during which display will show “Preheat”; once preheat is complete, oven will
beep. Place food in oven and display will show “Ready”; countdown timer will begin.
Bake can be used at 90°C – 230°C for up to 2 hours.
• Default: 180°C for 30 mins.
• The oven defaults to normal convection fan speed (i.e.
not displaying on screen) for more delicate
items like custards and eggs, as well as most baked foods like muffins, cakes and biscuits
• You can select the option of Super Convection fan (or high fan) speed (i.e. displaying
on screen),
for most baked foods that require even browning, like heartier baked foods and breads.
• When using the Super Convection function, cooking times and temperatures may need to be
reduced—start checking food about 5 to 10 minutes before the end of the suggested cooking time.
TOAST
This function is used to toast bread and other items; both fresh and frozen items can be used.
Toast shade can be set from 1 to 7 with up to 4 regular bread size slices.
• Default: Shade 4; 3-4 slices; not frozen
• For best results and more evenly toasted items:
– 2 slices: centre them in the middle of the oven rack
– 4 slices should be evenly spaced—2 in front, 2 in back
•
If toast is lighter to your liking, add time (up to 1 minute) by adjusting the time before toasting is complete.
• Shade Guide: Light (1, 2) • Medium (3, 4, 5) Dark (6, 7)
• For toasting frozen bread press the Frozen button
before toasting
WARNING:
Always use Rack Position 1 for toasting. Do not invert rack in Position 2 as this may result in burning.
PIZZA
Use this function to cook restaurant-quality fresh, or frozen pizza.
Pizza can be used at 170ºC – 230ºC for up to 2 hours.
• Default: 230°C for 10 minutes.
• Pizza has a preheating stage during which display will show “Preheat”; once preheat is complete, oven
will beep. Place pizza in oven and display will show “Ready”; countdown timer will begin.
• For freshly made pizza , place directly on Baking Tray/Drip Pan.
• For frozen pizza, invert the Wire Rack and place in shelf Position 1. After selecting Pizza function, press
the Frozen button setting (
will display). Place pizza directly onto rack once oven has preheated.
• Pizza can also be cooked on a pizza stone.
14
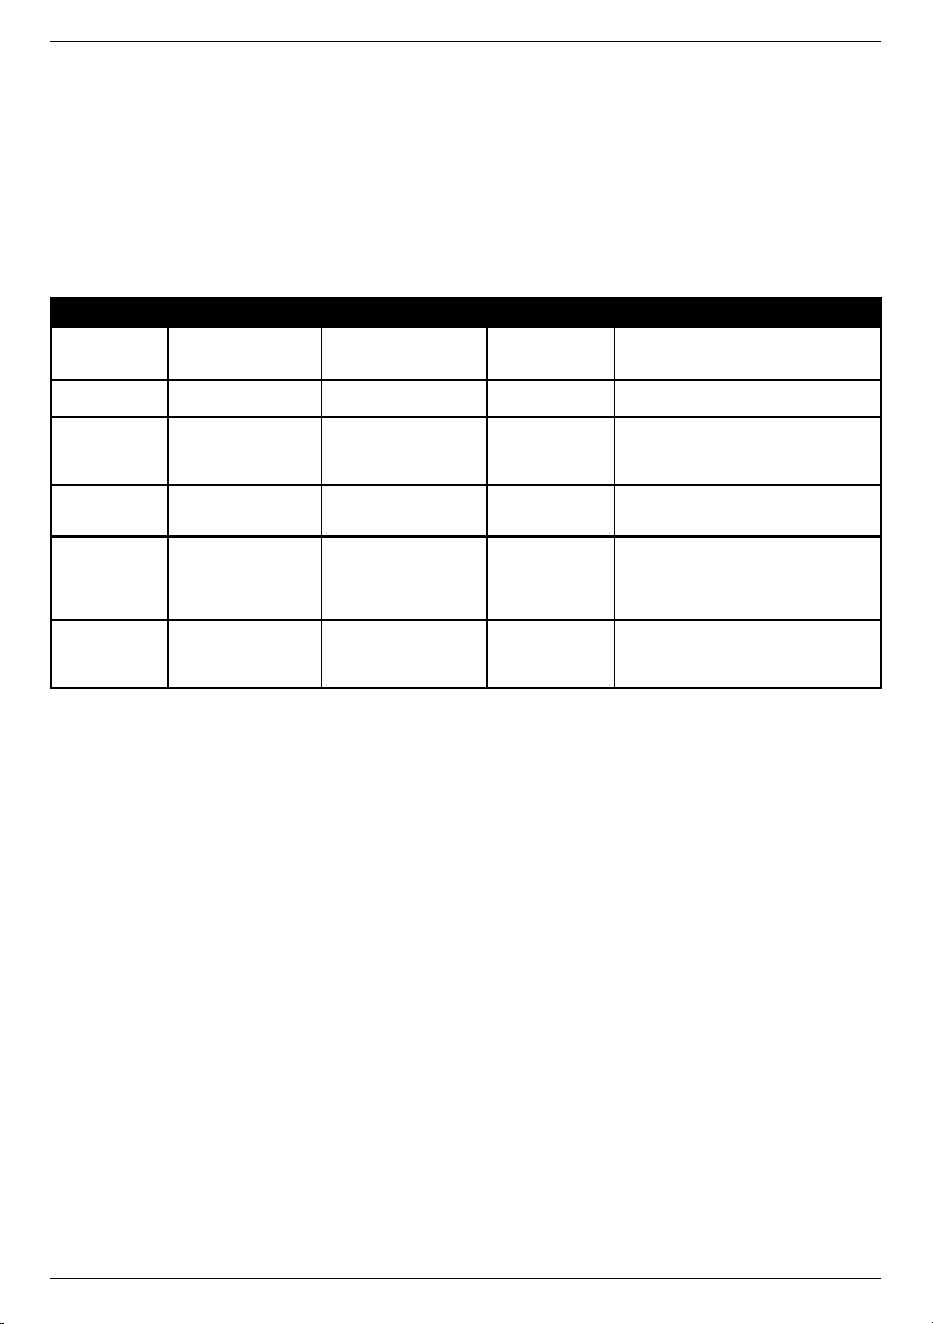
SLOW COOK
Select this function for braising and slow cooking.
Slow can be used at 40°C – 150°C for up to 12 hours
• Default: 100°C for 2 hours.
• For slow-cooked dishes with crispy exteriors and soft interiors, place ingredients directly on the Baking
Tray/Drip Pan.
• For results that are similar to recipes cooked in a slow cooker, place ingredients into a covered,
ovenproof dish with liquid coming up one-third of the way.
•
When using the Slow Cook function, it is important to seal the cooking dish well with foil or a secure fitted lid.
DUAL COOK
The dual cook function is ideal for recipes that require multiple cooking steps, e.g.
• Starting a casserole or a dish like nachos, use Bake to heat through and then switch to Grill for a
melted and browned cheese top.
• Beginning a dish on a higher heat to achieve a crispy crust and then reducing temperature for tender
results similar to slow cooking.
• Baking a dish then switching to the Keep Warm function to keep food ready until serving
• Browning pork rind at a high temperature on Air Fry to produce crackling then switching to the Roast
function to complete cooking.
Using the Dual Cook Function
1. Press the Dual Cook button
2.
The oven will display available functions for the first cooking cycle. And a number 1 will appear next to dual
cook in the display window to show that this is the first function to be programmed. Select function and
adjust the time and temperature if desired.
3. Press DUAL COOK again. The oven will display available functions for the second cooking cycle. The
number 2 will appear next to dual cook in the display window to show this the second function to be
programmed. Select function and adjust time and temperature if desired.
4. Press Start/Stop to start cooking on the first function.
5. When the first cycle is finished, the oven will automatically switch to the second cooking function.
6. When time reaches 0:00 and the second function cycle is completed, the oven will beep and heating
elements will turn off.
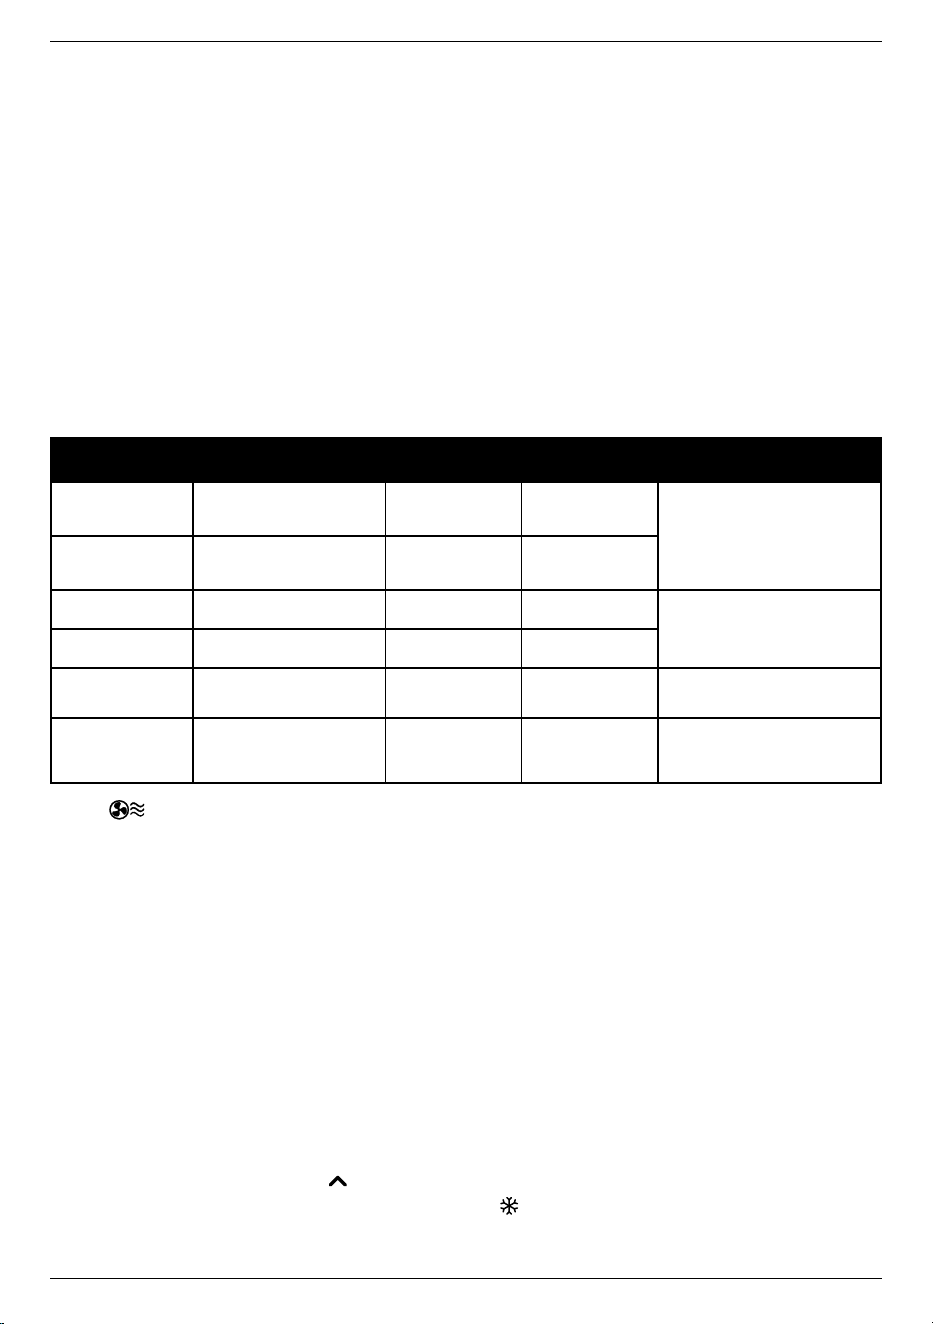
CATEGORY FOOD AMOUNT TEMP TIME
Meat Ribs, Short Ribs,
Shanks
1.25kg maximum 150ºC 2 to 4 hours
Meat Roasts 1.25kg maximum 150ºC 2 to 4 hours
Poultry Whole Chicken,
Chicken Thighs
1.5kg – 2.5kg roaster
chicken; 1.25kg
maximum for pieces
150ºC 4 to 4½ hours for whole chicken,
1½ to 2 hours for thighs
Poultry Duck Legs 1.25kg maximum 110ºC 2 to 3 hours
Fish/Seafood Whole Fish,
descaled and
gutted; fillets,
skinned if desired
1kg whole fish,
1.25kg maximum
fillet
100ºC to 150ºC 30 minutes
for fillets;
1 to 2 hours for whole fish
Vegetables Slow-roasted
Tomatoes, Root
Vegetables, etc.
1.25kg 125ºC 1 to 2 hours
15
USING AIR FRYER PRESETS
In addition to being able to program the temperature and time for air frying, the Air Crisp Pro has con-
venient, easy-to-use presets for your fried favourites— fries, chicken wings, chicken nuggets, snacks, and
vegetables. To use FUNCTION presets, follow these steps:
1. Press FUNCTION and use the up and down arrows to toggle through the pre-set options.
2. Preset temperature and time will display;
3. To use displayed settings, press START / STOP to commence cooking.
4. To change settings, see OPERATING INSTRUCTIONS on page 9.
5. To adjust the time / temperature or change settings please refer to OPERATING INSTRUCTIONS.
NOTE: The following pre-sets can be used for frozen foods:
Fries ............ Default is for frozen fries or wedges
Wings ............ Default is for fresh chicken wings
Nuggets ......... Default is for frozen pre-cooked nuggets
Snacks .......... Default is for frozen pre-cooked snacks
Vegetables .... Default is for fresh vegetables
Select the snowflake symbol when using these pre-sets with frozen foods.
NOTE:
Fan speed cannot be changed for Air Fryer presets; it is always on super convection.
WARM
Use this function to keep food warm once cooked.
Warm can be used at 60°C – 150°C for up to 2 hours
• Default: 70°C for 30 mins.
CRUMPET
This function provides full-heat on the top and half-heat on the bottom to toast both sides of a crumpet;
both fresh and frozen crumpets can be used.
The crumpet shade can be set from 1 to 7 for up to 6 crumpets at one time.
• Default: Shade 4; 3 to 4 slices; not frozen
• For best results, put your crumpets on the rack with the dimple side facing up.
• If crumpets are too light, time can be added (up to 1 minute) by pressing the "TIME/SLICES" button
and then pressing the up arrow
before toasting is complete.
• For toasting frozen crumpets press the Frozen button
before toasting.
PRESETS FOR
Air Fry
Recommended
Amount
Preset Temps
Pre set Time
- default
Other notes
Frozen Fries 450g -900g 220°C 15 minutes
Large amounts require
tossing to evenly brown
Fresh Fries 450g -900g 200°C 20 minutes
Wings
900g (about 15 wings)
200°C 25 minutes
Lay evenly & as spaced
out as possible
Nuggets 400g 220°C 8 minutes
Snacks 500g 200°C 6 minutes
E.g. - spring rolls,
samosas
Vegetables 500g 200°C 13 minutes
Sliced eggplant, zucchini,
pumpkin, sweet potato

16
GRILL
The Grill function can be used for beef, chicken, pork, fish, and more. It also can be used to top-brown
casseroles and gratins.
Grill is set at 230°C only and for up to 2 hours.
• Default: 230°C for 5 mins
• For best results, use the provided Air Fryer Basket fitted into the Baking Tray/ Drip Pan to grill
• Never use glass oven dishes to grill
• Be sure to keep an eye on food – items can brown quickly when grilling
REHEAT
Reheat leftover meals while maintaining the quality.
Reheat can be used at 90°C – 230°C for up to 2 hours
• Default: 120°C for 20 mins.
PROOF
Ideal for proofing bread and pizza dough.
• Default: 35°C for 45 mins.
Allow dough to complete at least one rise at room temperature.
• Shape dough and place on the Baking Tray/Drip Pan or separate baking dish such as a loaf pan and
then put directly in the oven in Position 2.
• Dough is ready when doubled in size. Start checking around 20 minutes.
• Once time elapses, complete dough preparation and bake according to recipe.
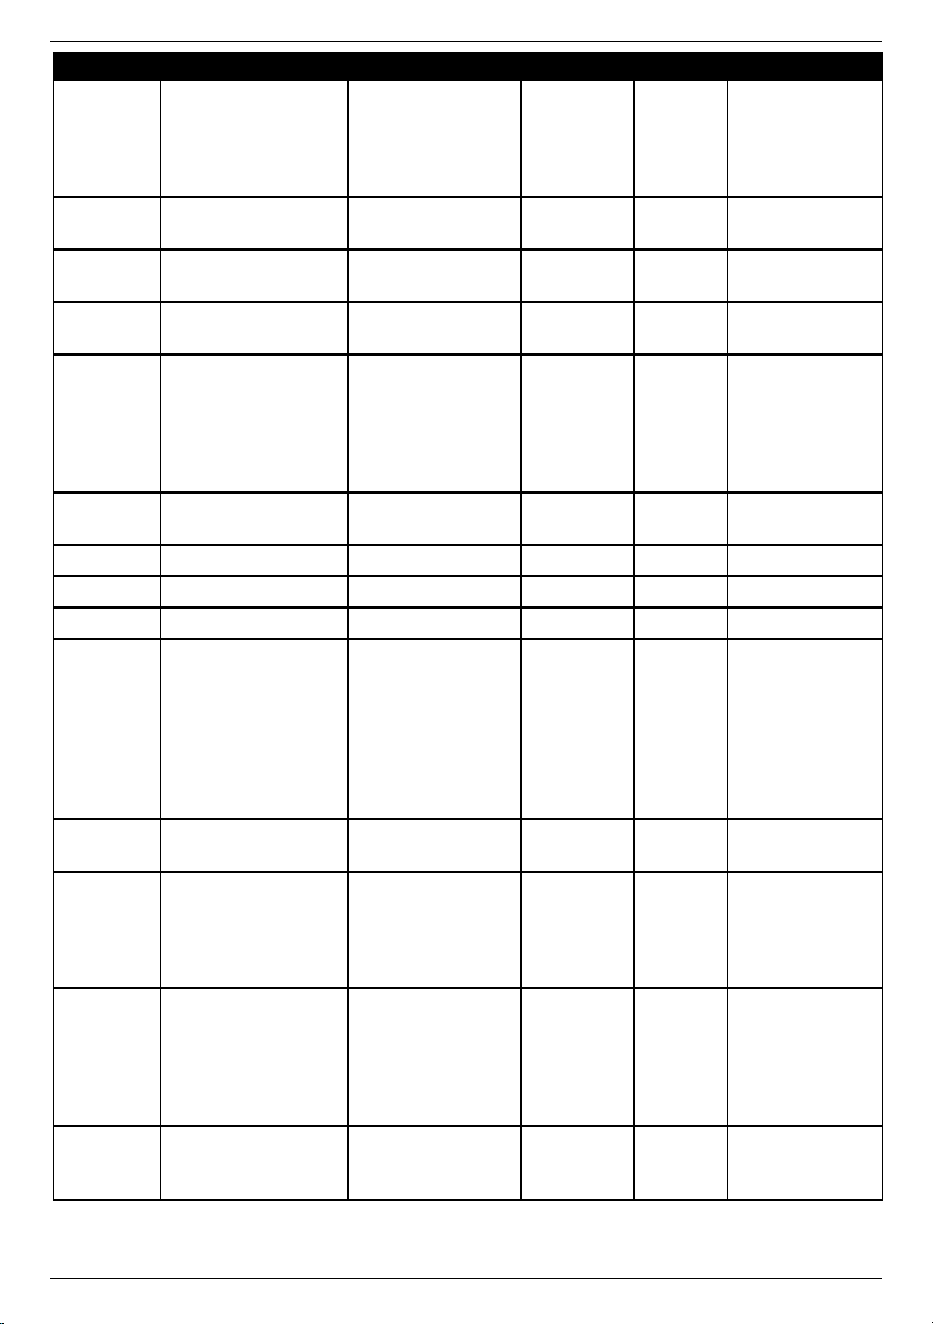
DEHYDRATE
The chart below lists recommendations on how to dehydrate different foods. These are guidelines only.
Drying times can vary due to thickness of cuts and relative humidity.
Dehydrate can be used at 40°C – 95°C for up to 72 hours
• Default: 55°C for 2 hours; Super Convection
• Lemon juice can be used to pre-treat fruits and vegetables to prevent browning
• Drying times can greatly vary due to the thickness of cuts and relative humidity
• Check foods often for dryness
• Do not overcrowd; foods should be arranged in a single layer with little to no overlap. The built-in fan
and low heat are used to create a flow of hot air that reduces the water content found in fresh foods.
Dehydrated food will continue to retain most of its original nutritional value.
17
CATEGORY FOOD PREPARATION TEMPERATURE FAN SPEED TIME
Herbs/
Spices
Basil, Chives,
Coriander, Dill, Mint,
Oregano, Parsley,
Rosemary, Sage,
Thyme
Rinse in cold water;
pat dry
40ºC–50ºC Low 3 to 6 hours
until stems are
brittle and leaves
crumble easily
Herbs/
Spices
Garlic Peel cloves; halve
lengthwise
40ºC–50ºC High 6 to 12 hours
Herbs/
Spices
Ginger Root Peel; grate or slice
thinly
40ºC–50ºC Low 2 to 6 hours
Fruit Apples Peel and core; slice
thinly
60ºC Low 4 to 10 hours
Fruit Apricots, Bananas,
Figs, Mangos,
Melons, Nectarines,
Pineapples, Pears,
Plums
Wash; core, deseed
or pit fruit; remove
rinds from melons
or some peels;
thinly slice
60ºC High 6 to 12 hours
Fruit Cranberries,
Blueberries
Dip in boiling water
to burst skins
60ºC High 10 to 18 hours
Fruit Cherries Wash; pit 60ºC High 12 to 24 hours
Fruit Citrus Wash; thinly slice 60ºC Low 2 to 12 hours
Fruit Grapes Wash; leave whole 60ºC High 10 to 36 hours
Vegetables Beans (Green/Wax),
Broccoli, Cauliflower,
Corn*, Mushrooms,
Peas*, Peppers,
Potatoes*, Onion,
Pumpkin, Tomatoes
Wash, peel
and deseed as
necessary; *blanch;
cut or slice into
uniform pieces;
remove corn from
cob; peas can be
left whole
55ºC–65ºC High 6 to 12 hours
Vegetables Beetroot Steam until tender;
peel and thinly slice
55ºC–65ºC High 3 to 10 hours
Vegetables Leafy Greens (Kale,
Spinach)
Wash; dry
thoroughly; remove
stems, tear leaves
into small pieces if
necessary
55ºC–65ºC Low 3 to 6 hours
Meat Pork/Beef Remove fat and
gristle; cut into
uniform strips;
marinate if desired;
pat off excess oil
during drying
70ºC High 4 to 15 hours
Fish Lean Fish Cut into uniform
strips; marinate if
desired
55ºC–60ºC High Until firm and dry

18
CLEANING & MAINTENANCE
• The oven interior needs to be cleaned as per below, after every use. The slide out Crumb Tray should
be checked and cleaned after every use if required.
• Always unplug the oven from the electrical outlet and allow it to cool completely before cleaning.
• Do not use abrasive cleaners, as they will damage the finish. Simply wipe the exterior with a clean,
damp cloth and dry thoroughly. Apply the cleansing agent to a cloth, not directly onto the toaster
oven, before cleaning.
• Cleaning the accessories:
– Crumb Tray should be hand-washed in hot, sudsy water, or use a nylon scouring pad or nylon brush,
and thoroughly rinsed. These items are NOT dishwasher safe.
– Oven Rack/Baking Tray/Drip Pan and Air Fryer Basket are stainless steel, dishwasher safe or can be
hand-washed in hot, sudsy water, or use a nylon scouring pad or nylon brush, and thoroughly rinsed.
• To clean interior walls, use a damp cloth and a mild liquid soap solution or a spray solution on a
sponge. Remove any residue from cleaners with a clean, damp rag. Never use harsh abrasives or
corrosive products. These could damage the oven surface. Never use steel wool pads, etc., on interior
of oven.
• After cooking greasy foods and once your oven has cooled, always clean top of oven interior. If this
is done on a regular basis, your oven will perform like new. Removing the grease will help to keep
toasting consistent, cycle after cycle.
•
To remove crumbs, slide out the front Crumb Tray and discard crumbs. Wipe clean and replace. To remove
baked-on grease, soak the tray in hot, sudsy water or use nonabrasive cleaners. Never operate the oven
without the Crumb Tray in place.
19
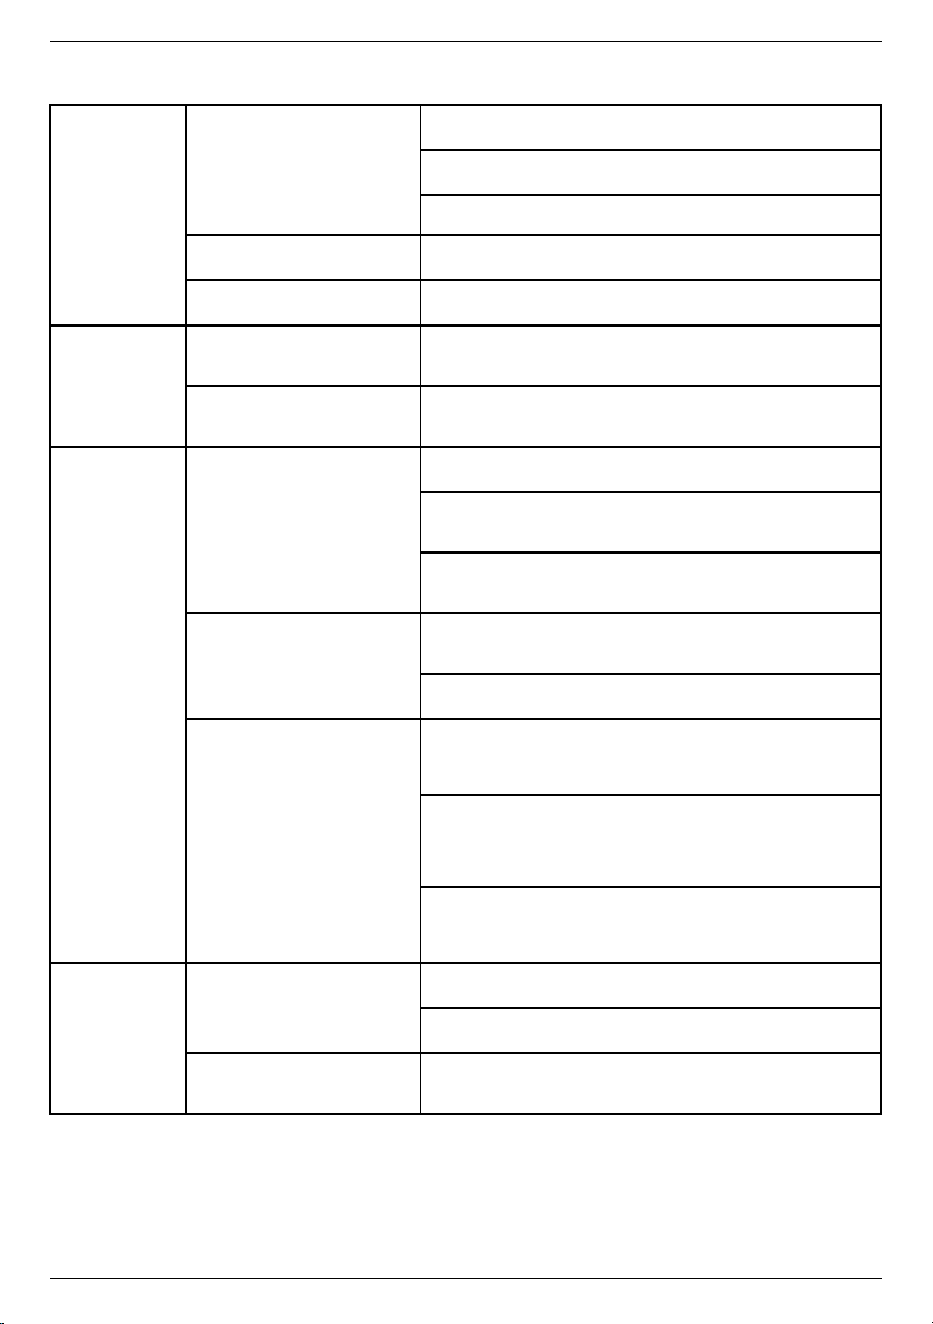
Operation Why won’t my appliance turn
on?
Make sure your appliance is plugged into a functional 230/240v
power outlet.
Make sure the oven door is closed, as it has an auto-cut out
feature when the door is ajar.
Call Consumer Service at 1800 566 567.
Why does the fan remain on
after cooking?
The fan remains on for cooling purposes.
Why does the light turn off? The light only stays on for 20 seconds each time the Light
button is pressed to conserve energy. This is normal.
Programming
Can I change my cooking
function when the appliance is
already cooking?
You need to first interrupt the current cooking function by
pressing Start/Stop. Hold START / STOP down for 3-5 seconds
to return to the main menu.
Can I change the time or
temperature when the
appliance is already cooking?
Yes. Please refer to instructions of page 6.
Cooking
Why is my food not crispy or
fried evenly?
Some foods may require more oil than others. If not crispy
enough, spray, brush or add some oil on the food.
Make sure food is spread evenly in one single layer in the Air
Fryer Basket with no overlap. If food still overlaps, toss or flip
food halfway through cooking cycle.
Put the food in for additional cooking time. Make sure to check
periodically until food reaches desired brownness.
Do not leave oven unattended.
Why is my food undercooked? If you put too much food in the basket, try with smaller batches
of food and single layers, rather than stacking food on top of
each other.
The temperature might be too low. Use the TEMP/SHADE
button to increase temperature.
When preparing greasy foods, oil may leak into the pan which
may produce steam. This will not affect the appliance or the
end result. It may fog up the viewing window on the sides or
corners.
Why does condensation
and steam come out of my
appliance?
When preparing foods with a high moisture content, the water
evaporates out of the food and causes condensation. This will
not affect the appliance or the end result. It may fog up the
viewing window on the sides or corners and condensation may
escape from the unit.
The pan, basket, or bottom of the oven may contain grease
residue from previous use. Make sure to clean the pan, basket
and oven interior after each use. Remove and clean the crumb
tray after each use.
Cleaning Are the parts dishwasher safe? The Oven Rack/ Baking Tray/ Drip Pan and the Air Fryer Basket
are stainless steel and dishwasher safe.
Do not put the Crumb Tray in the dishwasher; instead, hand-
wash with warm, sudsy water.
How do I clean tough-to-
remove food residue from my
accessories?
To remove baked-on grease, soak the accessories in hot, sudsy
water or use a nonabrasive cleanser.
TROUBLESHOOTING
©2024 Cuisinart
Suite 101 Ground Floor
18 Rodborough Rd
Frenchs Forest NSW, 2086
Australia
Visit our Website:
www.cuisinart.com.au
Printed in China
IB-24/277A
Trademarks or service marks of third parties referred to herein are
the trademarks or service marks of their respective owners.
cuisinart.com.au