1
L
R06-031018
2
EN
Dear customer!
Combined and gas built-in hob is intended for use in households.
Our products are packed in environment-friendly materials which can be recycled, disposed of,
or destroyed without imposing any burden on the environment.
Instructions for use
Instructions for use are intended for the user. They describe the appliance and its operation. The
instructions apply to various types of appliances and may therefore include description of
functions that may not be available on your appliance.
These instructions are only valid of the country symbol is indicated on the appliance. If there is
NO county symbol in the appliance, technical instructions should be observed for adapting the
appliance to comply with the requirements and regulations for use in your country.
Instructions fo
r
connection
The appliance must be connected in compliance with the instructions attached to it, as well as in
compliance with relevant regulations and standards. The connection may only be performed by
a qualifi ed person.
Rating plate
The rating plate indicating the basic information on the appliance is attached to the lower side of
the hob.
Important warnings 3
Installation 4
Connecting to the power mains 5
Connecting to the gas supply 6
Technical characteristics 7
Cooking zones 8
Operating the induction cooking zones 10
Operating the gas burners 13
Cleaning and maintenance 14
Special warnings and fault reporting 15

3
INSTALLATION AND TECHNICAL INSTRUCTIONS
IMPORTANT WARNINGS
• Installation of the appliance (installation class:3) into a kitchen worktop and its connection to
the power mains and the gas supply may only be performed by an adequately qualified
technician.
• When the appliance is in use, additional heat and moisture are emitted into the room. When
the appliance is used for a prolonged period of time at a high performance level, intensive
ventilation or use of kitchen hood may is required in the room where the appliance is installed.
• Do not use the gas burners, if the flame seems unstable.
• If you smell gas in the room, immediately close the gas supply valve either on the gas bottle or
gas pipeline, extinguish all sources of open fire (including cigarettes), aerate the room, do not
turn on any electric appliances, and call a natural gas expert.
• The main gas supply valve should also be closed if gas burners will be out of use for a long
period of time (e.g. when going on holiday).
• The appliance and its accessible parts become hot during use. Care should be
taken to avoid touching heating elements. Children less than 8 years of age shall
be kept away unless continuously supervised.
• This appliance can be used by children aged from 8 years and above, and persons with
reduced physical, sensory or mental capabilities or lack of experience and knowledge if they
have been given supervision or instruction concerning use of the appliance in a safe way and
understand the hazards involved. Children shall not play with the appliance. Cleaning and user
maintenance shall not be made by children without supervision.
• WARNING: Unattended cooking on a hob with fat or oil can be dangerous and
may result in fire.Be sure have the preparation of such food (fries) under constant control. Never
try to extinguish a fire with water, but switch off the appliance and then cover flame e.g. with a lid
or a fire blanket.
• WARNING: Danger of fire: do not store items on the cooking surfaces.
• Never place any metal objects upon the hob surface, such as knives, forks, spoons, pot lids,
and the like, as they may get very hot.
• Don't connect the hob to the power supply with an extension cable or multiple sockets,
because they don't assure a sufficient safety (e.g. overheating risk of multiple sockets).
• Connect the equipment to a permanent connection.
• Do not use the cooking hob for room heating. Do not place empty pans on the hob.
• Make sure that the parts of the burners are correctly positioned/installed.
• Hob should not be used as a worktop. Sharp objects may cause scratches.
• Preparing food in thin aluminum of plastic containers on hot cooking zones is not allowed. Do
not place any plastic objects or aluminum foil on the glass ceramic hob.
• If there is a wall power outlet located near the hob and another appliance is plugged into it,
make sure the power cord does not come into contact with the hot cooking zones.
• Do not store any temperature-sensitive objects, materials, or substances underneath the hob,
e.g. detergents, sprays, etc.
• Do not use the hob if it is cracked or broken. If any visible crack appears, immediately unplug
disconnect the appliance from the power supply.
• In case of a failure of the appliance, immediately disconnect the appliance from the power
mains and contact the service center.
• Do not use steam cleaners or high-pressure cleaners to clean the cooking hob, as this may
result in an electric shock.
• The appliance is manufactured in compliance with the relevant effective safety standards.
• After a prolonged use of cast iron plates, the area of the plate and the edge of the cooking
zone may discolour. Repair service is not covered by the warranty.
• The hob can not be activated by external timers or remote controls systems.
The symbol on the product or on its packaging indicates that this product may not be
treated as household waste. Instead it shall be handed over to the applicable collection
point for the recycling of electrical and electronic equipment. By ensuring this product is
disposed of correctly, you will help prevent potential negative consequences for the
environment and human health, which could otherwise be caused by inappropriate waste
handling of this product. For more detailed information about recycling of this product,
please contact your local city office, your household waste disposal service or the shop
where you purchased the product.
4
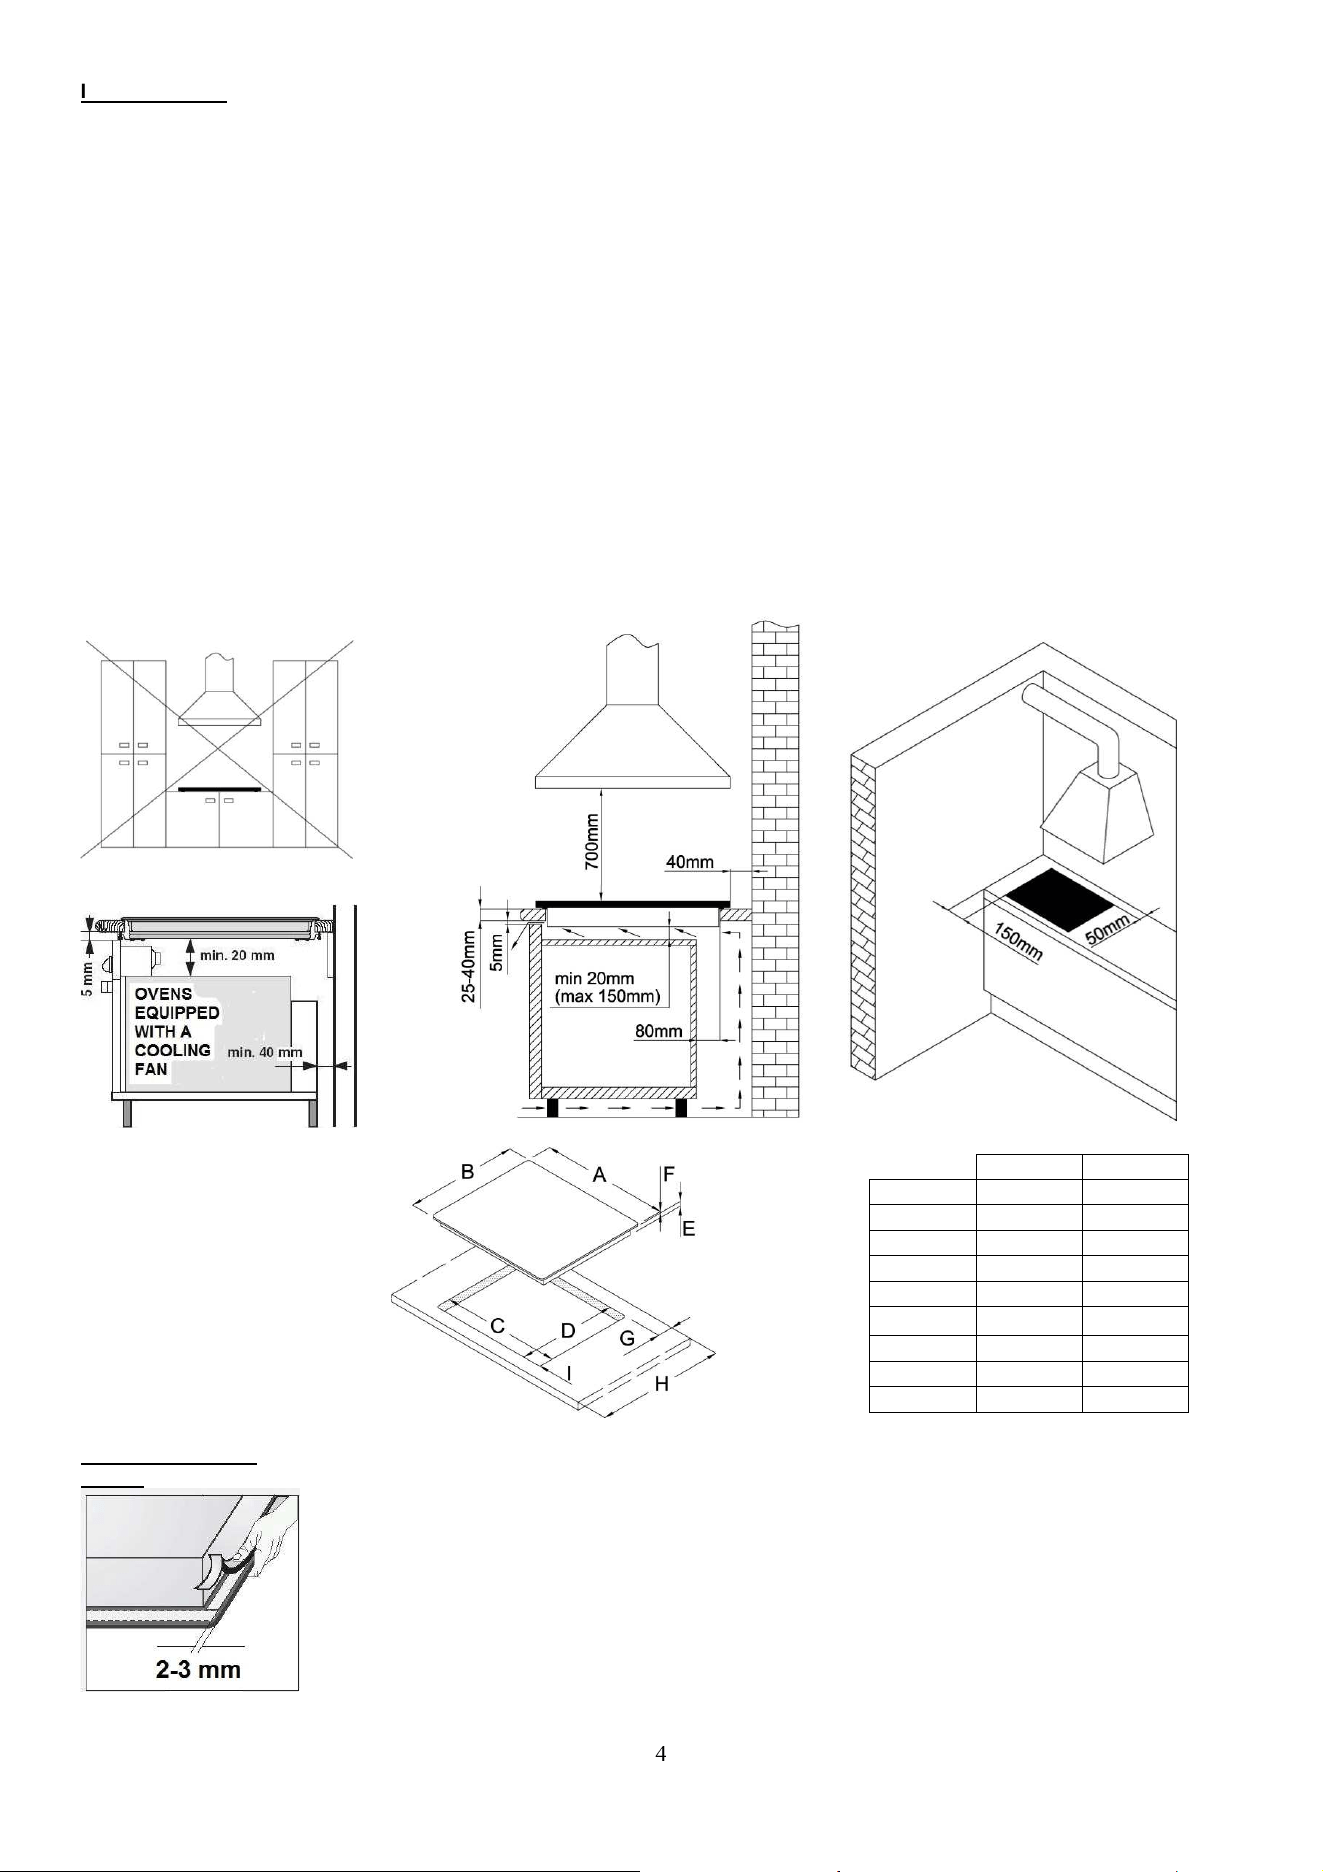
INSTALLATION
• Installation of the appliance into a kitchen worktop and its connection to the power mains may only be performed by an adequately
qualified technician.
• Veneer or other fi nish of the piece of kitchen furniture into which the hob is to be built in should be treated with heat resistant glue
(100°C); otherwise, the worktop finish may be discolored or deformed.
• Cooking hob is dimensioned to be built into the worktop over a piece of kitchen furniture, with a width of 600 mm or more.
• After installation, the front two fastening elements should be freely accessible from below.
• The kitchen furniture element underneath the hob should not be fitted with a drawer. If the kitchen furniture element as a
horizontal partition wall, it should be installed no less than min 20mm from the lower surface of the worktop. The space between the
partition wall and the hob must be empty; no objects should be placed into that gap.
• Hanging, or wall-mounted kitchen elements should be installed high enough not to interfere with the work process.
• The distance between the cooking hob and the kitchen hood should be no less than indicated in the instructions for kitchen hood
installation. The minimum distance is 700 mm.
• The distance between the appliance edge and the adjacent tall kitchen furniture element should amount to no less than 150 mm.
• Use of massive wood decoration plates or boards on the worktops behind the cooking hob is permitted, if the minimum distance
remains the same as indicated in the installation drawings.
• Minimum distance between the built-in cooking hob and the rear wall is indicated on the installation drawing.
• Cooking hobs can be installed into worktops that are 25 to 40 mm thick.
• Rear side of the kitchen element must also have a 50 mm high opening along the entire width of the element, and the front part
must have an opening of no less than 5 mm.
• Only ovens fitted with a cooling fan may be installed underneath this cooking hob.
• Before installing an oven, the rear wall of the kitchen furniture element should be removed in the area of the cooking hob cutout.
Furthermore, a gap of at least 5 mm should be left at the front side.
428712 731186
A (mm) 580 595
B (mm) 510 520
C (mm) 560 560
D (mm) 490 490
E (mm) 50 50
F (mm) 5 5
G (mm) 50 50
H (mm) 600 600
I (mm) 7 7
Installing the foam
gasket
Before inserting the appliance into the opening in the kitchen worktop, the supplied foam gasket
must be attached to the lower side of the glass ceramic (glass) cooking hob.
Do not install the appliance without the foam gasket!
The gasket should be attached to the appliance in the following way:
ƒ Remove the protective film from the gasket.
ƒ Then, attach the gasket to the lower side of the glass, approximately 2-3 millimetres from the
edge.
ƒ The gasket must be attached along the entire length of the glass edge and should not overlap
at the corners.
ƒ When installing the gasket, make sure that the glass does not come into contact with any
sharp objects.

5
Installation procedure
• Worktop must be placed absolutely horizontal.
• Suitably protect the edges of the cut aperture.
• Connect the cooking hob to the mains power supply (see instructions for the connection of the
cooking hob to mains power supply).
• Insert the hob into the cut aperture.
• Press the hob firmly towards the worktop from above.
CONNECTING TO THE POWER MAINS
• The appliance may only be connected by an authorized skilled technician.
• Electric system protection should comply with all relevant regulations.
• The connection clips can be accessed when the connection clip covers are opened / removed.
• Before connecting the appliance, make sure the voltage indicated on the rating plate is
consistent with the voltage in your home circuit.
• The rating plate with basic information is attached on the lower side of the hob.
• The appliance is manufactured for use with the power supply voltage 220-240V ~.
• The electric circuit should also include an omnipolar switch that will separate the appliance
from the mains, if required, with at least 3 mm of distance between contacts. Suitable devices
include fuses, current protection switches, etc.
• The connection should be selected according to the installation possibilities with regard to
current and fuses.
• Given the protection from the risk of fire, appliances of this type may be installed in a worktop
next to a piece of kitchen furniture that is taller than the appliance (when installed); however, in
this case, a kitchen furniture element must be installed on the other side, adjacent to the
appliance.
• The current conducting and isolated parts must be protected from any possibility of direct
contact.
WARNING!
• Before any intervention, disconnect the appliance from the power mains. Connect the
appliance in compliance with the electric connections diagram supplied; make sure the relevant
network voltage is observed! The ground wire should be connected to the clip indicated by the
earthing symbol.
• The mains cable should be fed through the fastening clip which protects it from being
accidentally pulled out.
• After connecting the appliance, turn on all cooking zones / heaters for approximately three
minutes to make sure they are operating correctly.
• Incorrect connection may destroy parts of the appliance, making the warranty void.
• Before connecting the appliance, make sure the voltage indicated on the rating plate is
consistent with the voltage in your home network. Connection voltage should be checked by a
qualified technician using a corresponding measuring device!
• Connection cable on the back of the appliance should be led in such way that it does not touch
the appliance back wall, as this part will get very hot during operation.
Connection diagram
The following can be used for connection:
x H05V2V2V-F

6
CONNECTING TO THE GAS SUPPLY
• The appliance must be connected in compliance with all relevant regulations, and it may only be used in well ventilated / aerated
rooms. Before connecting or using the appliance, please read the instruction manual.
• Before installing and connecting, make sure the local natural gas supply network and connection (type of gas and pressure), are
compatible with your appliance version.
• The version of this appliance is indicated on the rating plate.
The category with the related types of gas which can be used, is included in Table 5
• This appliance is not suitable for connection to a burning fumes exhaust system (i.e. a chimney). The appliance must be installed
and connected in compliance with the relevant effective installation regulations. Special care must be taken to ensure adequate
ventilation / aeration.
Connection
• When connecting the appliance to the gas supply, follow the regulations of the local gas
distributor.
• On the lower side, the cooking hob is fitted with a gas connection plug with a ISO7-1 R1/2
thread.
• When connecting, the knee R1/2 should be held firmly to prevent it from rotating.
• For sealing of the connection joints, use a non-metal approved gaskets and approved sealants.
• The gaskets should only be used once. The thickness of the flat non-metal gaskets should not
be deformed more than by 25 percent.
• To connect the appliance to the gas supply, use a tested and certified flexible hose.
• The flexible connection hose should be able to move freely.
It should not come into contact with the movable parts of the furniture, or the bottom of the
cooking hob.
• If an electric oven is built into the kitchen element under the cooking hob, it should be fitted
with a cooling fan.
After connecting the gas hob, check the joints for any leaks.
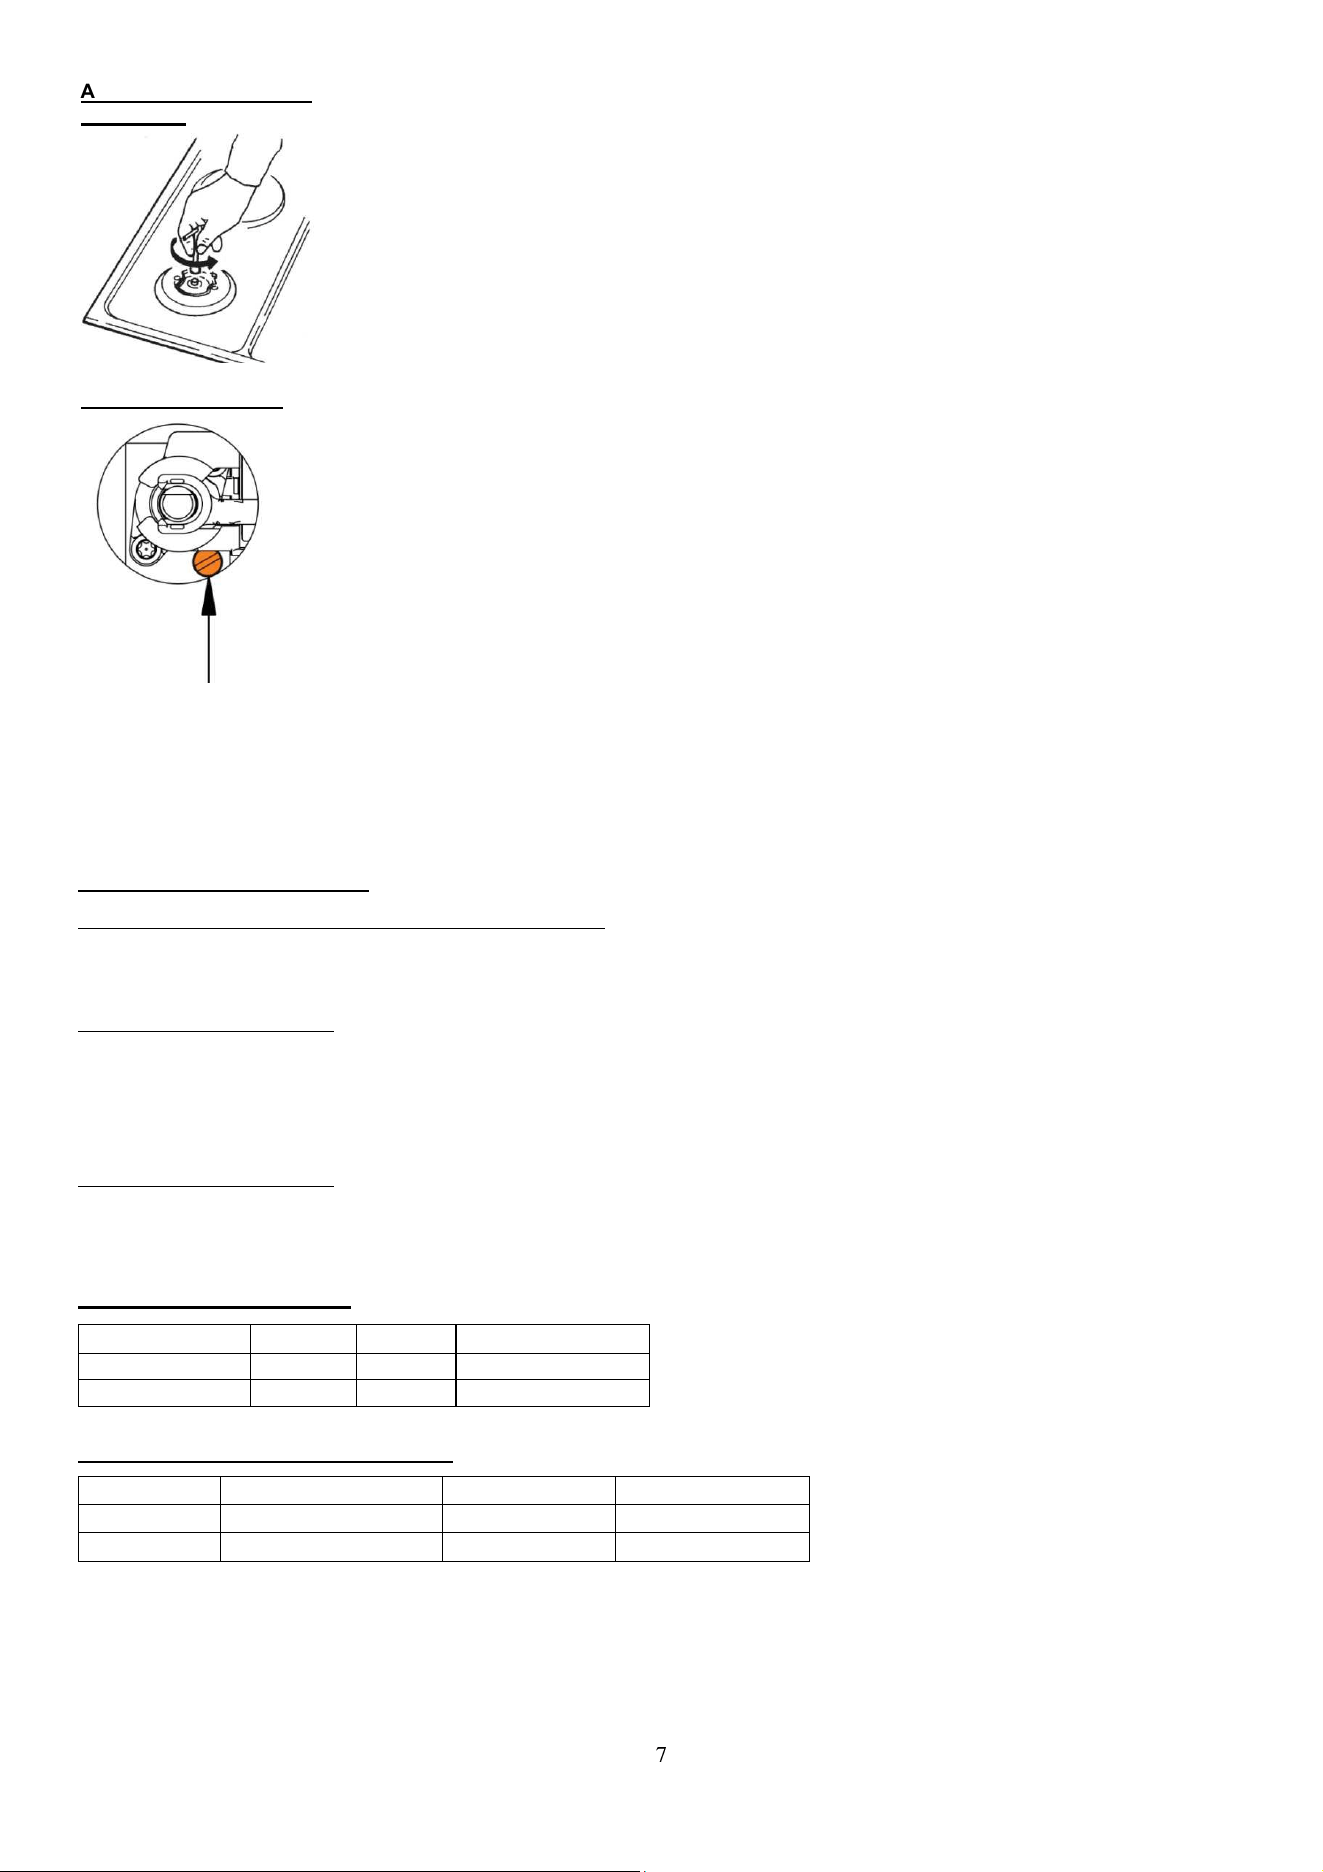
Gas supply connection plug
A ISO7-1 R1/2 connection plug
B Non-metal gasket with thickness of 2 mm
C Pipe adapter for liquid gas (depending on the model)
Only use pipes that comply with Standards UNI-CIG 9891 and seals that comply with UNI-CIG
9264. These pipes must be installed so that, when fully extended, their length does not exceed
2000 mm. To facilitate installation and to prevent gas leaks, firstly attach the swivel coupling to
the cook top and then to the gas mains pipe. Inverting this sequence may hamper the gas seal
between the pipe and the cook top.
Important: when installation is complete, check that all the couplings are completely
sealed by using a soapy solution. Never use a flame. Also ensure that the flexible pipe
cannot come into contact with any moving part of the cook top (e.g. drawer) and that it is
not in a position where it could be damaged.
After the connection, check the burners for correct operation.
The flames must be clearly visible, and should be blue and green at the center. If the flame is
unstable, increase the minimum power. Explain the use of the burners to the user and read the
instructions for use together.
7
Adaptation to a different
type of gas
• The procedure or adaptation of the cooker to another type of gas does not require removal of
the appliance from the worktop.
• Before adapting, disconnect the appliance from the power mains and close the gas supply
valve.
• Replace the existing nozzles for nominal thermal load with corresponding nozzles for the new
gas type and supplied with the hob (see table below).
• After finishing this sequence, replace the old setting label with the new one provided for the
new injectors.
Adjustment elements
To leave the adjustment elements accessible, please observe the following instructions:
• Remove the support grid and burner covers with respective crowns.
• In double burners, adjustment elements are accessible behind the main nozzle protective
plate.
• Remove the control knobs, including the gaskets.
Gas valve
Minimum thermal load regulation valve
• Regulation valves that are factory-built-in are intended for liquid gas; however, the valves are set for operation with the type of gas
for which the appliance is factory-preset.
• When adapting the appliance for use with another type of gas, the regulation screw (valve) should be fastened or release to
correspond with the required gas flow / throughput.
Burner power is indicated by observing the upper Hs caloric value.
Warning: these tasks may only be carried out by a qualified technician, authorized by the gas distributing company or
authorized service center!
TECHNICAL INFORMATION (TAB.1)
BURNERS INFORMATION (TAB.2)
Burner Qn EE
Min-Max Pan Ø
A
Auxiliary 1,0 kW - 10 - 18 cm
R
Rapid 3,0 kW 55,5% 14 - 22 cm
INDUCTION ZONES INFORMATION (TAB.3)
Zone Pn
electric cooking
EC
electric cooking
Ø Min-Max Pan
Ø21,4 cm
2,3 kW (P=3,0) kW 166,8 Wh/kg 15-20 cm
Ø16,4 cm
1,4 kW 185 Wh/kg 11-16 cm
P= EXTRA POWERFUL SETTING
428712 - 731186
Type of hob
Built-in
Electrical connection
220-240 V~ ; 50/60 Hz
Burners
2
Front
A
Rear
R
Regulated for gas G20=20mbar
Pn
TOT
g
as
p
art
4000 W
Induction zones
2
Front
Ø 16,4 cm
Rear
Ø 21,4 cm
Pn
TOT induction
p
art
3700 W
8
NOZZLE TABLE (TAB.4)
Burner A R
Reduced Rate (kW)
0,45 1,00
Ø INJECTOR (mm)
G30/G31 28..30/37mbar 0.50 0.85
G30/G31 37mbar 0.47 0.80
G20 20mbar 0.72 - X 1.28 - H3
Ø BY-PASS (mm)
G30/G31 28..30/37mbar 0.27 0.42
G30/G31 37mbar 0.27 0.42
G20 20mbar REG. REG.
ADJUSTMENT TO A DIFFERENT TYPE OF GAS (TAB.5) – pg 89
INDUCTION COOKING ZONES
Hotplate function principle
• Ceramic glass hob is fitted with three or four hotplates. Hob surface is completely flat and
smooth, without edges to accumulate dirt.
• The hob is fitted with high power induction hotplates. Heat is generated directly at the bottom
of the dish, where it is most needed, without any losses through the ceramic glass surface.
This way the required extent of energy is considerably smaller compared to traditional heaters,
which operate on radiation principle.
• Glass ceramic hotplate is not heated directly, but only by return heat transmitted by the dish.
This heat figures as “remaining heat” after the hotplate is turned off. The induction hotplate
generates heat from the induction coil, installed underneath the ceramic glass surface. The coil
creates magnetic field at the bottom of the dish (which can me magnetized) which in turn
originates whirling flows of current which then heat the hotplate.
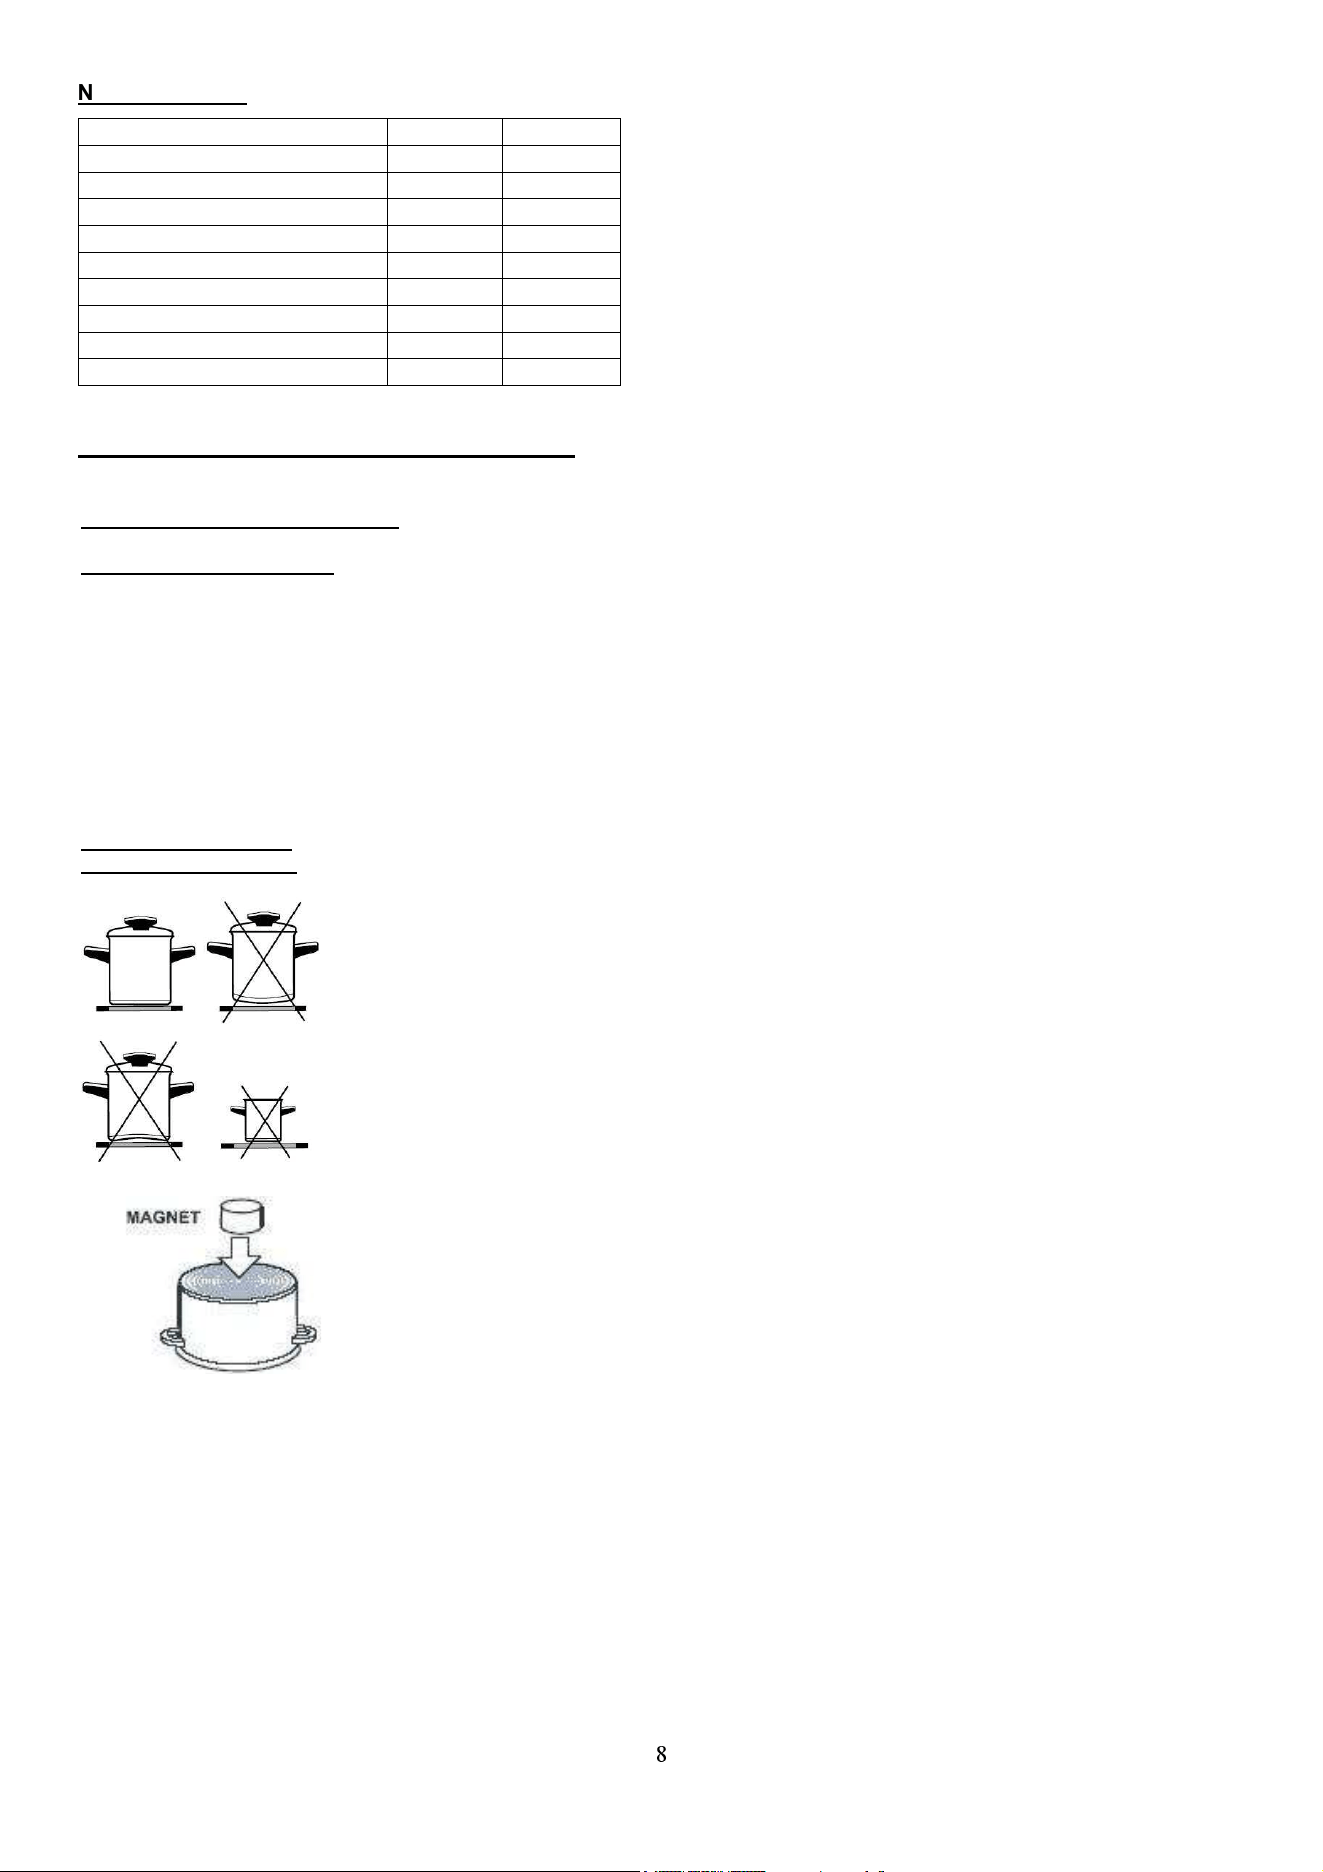
Appropriate cookware
for induction hotplates
IMPORTANT!
In case sugar or other heavily sweetened substance is spilled on the hotplate, wipe it
immediately and remove the sugar residues with a scraper although the cooking zone is still hot,
otherwise the hotplate may be damaged.
Avoid cleaning the cooktop while the cooking zones are still hot, as you may damage the hob.
• Induction hotplate will function perfectly only if appropriate cookware is used.
• Dish should be in the middle of the hotplate during cooking.
• The appropriate cookware is the one which enables induction, for example steel, enamel or
steel alloy cookware. Pots made from steel alloy with copper or aluminium bottom, or glass pots
are inappropriate.
• If you use the pressure cooker (“economy pot”) keep it under close surveillance until proper
pressure is obtained. Hotplate should first operate on maximum power, then follow the
manufacturer’s instructions and use the appropriate sensor to decrease the power.
• When buying cookware, check if it bears the label “allows induction”.
Magnet test
Use small magnet to test if the dish bottom is magnetic. Only dishes where magnet sticks to the
bottom are suitable for induction cooking.
Dish recognition
One of great advantages of the induction hotplate is dish recognition. Even if there are no dishes
upon the hotplate, or the dish diameter is smaller than the diameter of the relevant hotplate,
there are no thermal energy losses. When the hotplate is on, the power indicator displays letter
“U”. If you place the dish
over that hotplate within the following 10 minutes, the hotplate recognizes the dish and turns on
to the preset power value.
At the moment you remove the dish from the hotplate, power is suspended. If you place smaller
dish upon the hotplate and it is recognized, the hotplate will only use the amount of energy
required to heat the dish according to its size.
Hotplate may be damaged if:
• it is turned on and left empty, or an empty dish is placed on it;
• you use clay dishes which leave scratches on the ceramic glass surface;
• you fail to wipe the dish bottom dry prior placing it on the ceramic glass hotplate; heat induction
is obstructed and the hotplate may be damaged;
• you fail to use the appropriate dishes that can be magnetized: steel dishes, enamel or steel
alloy dishes; induction hotplate will not function otherwise.
9
Power regulation
Heating power of the hotplates may be set at nine different levels. The following chart indicates
illustrative use of each power setting.
Power
setting
Purpose
0
Off, using remaining heat
1-2
Maintaining warm food, slow simmer of smaller quantities (lowest setting)
3
Slow simmer (continuation of cooking after a powerful start-up)
4-5
Slow cooking (continuation) of larger quantities, roasting larger chunks
6
Roasting, browning
7-8
Roasting
9
Start of cooking, roasting
A
Automatic initial setting
P
Especially powerful setting for extremely large quantities of food
ENERGY SAVING TIPS
• When buying cookware be careful in selecting size: pot diameter usually refers to the top edge
of the dish, which is often larger than the dish bottom.
• Steam-pressure pots (economic pots), which use pressure in tightly sealed interior, are
especially economic, and save both time and energy. Shorter cooking time leaves more vitamins
in food.
• Always leave enough water in steam-pressure pots, otherwise it may result in overheating
which may damage both the pot and the hotplate.
• Always cover the cookware with lids of appropriate size.
• Use such dish size to accommodate the quantity of food to be prepared. If you use excessively
large pot for small amount of food, you will consume considerably more energy.
GAS COOKING ZONES
Important warnings
• If you wish to quickly fry some food, set the gas burner to the maximum power initially and
reduce the power as your continue.
• Gas burners are fitted with thermoelectric protection devices. If the burner flame is
extinguished accidentally or unintentionally (e.g. when some liquid boils over or when
there is draught in the room), gas supply is automatically cut off, thus preventing the gas
to be emitted into the room.
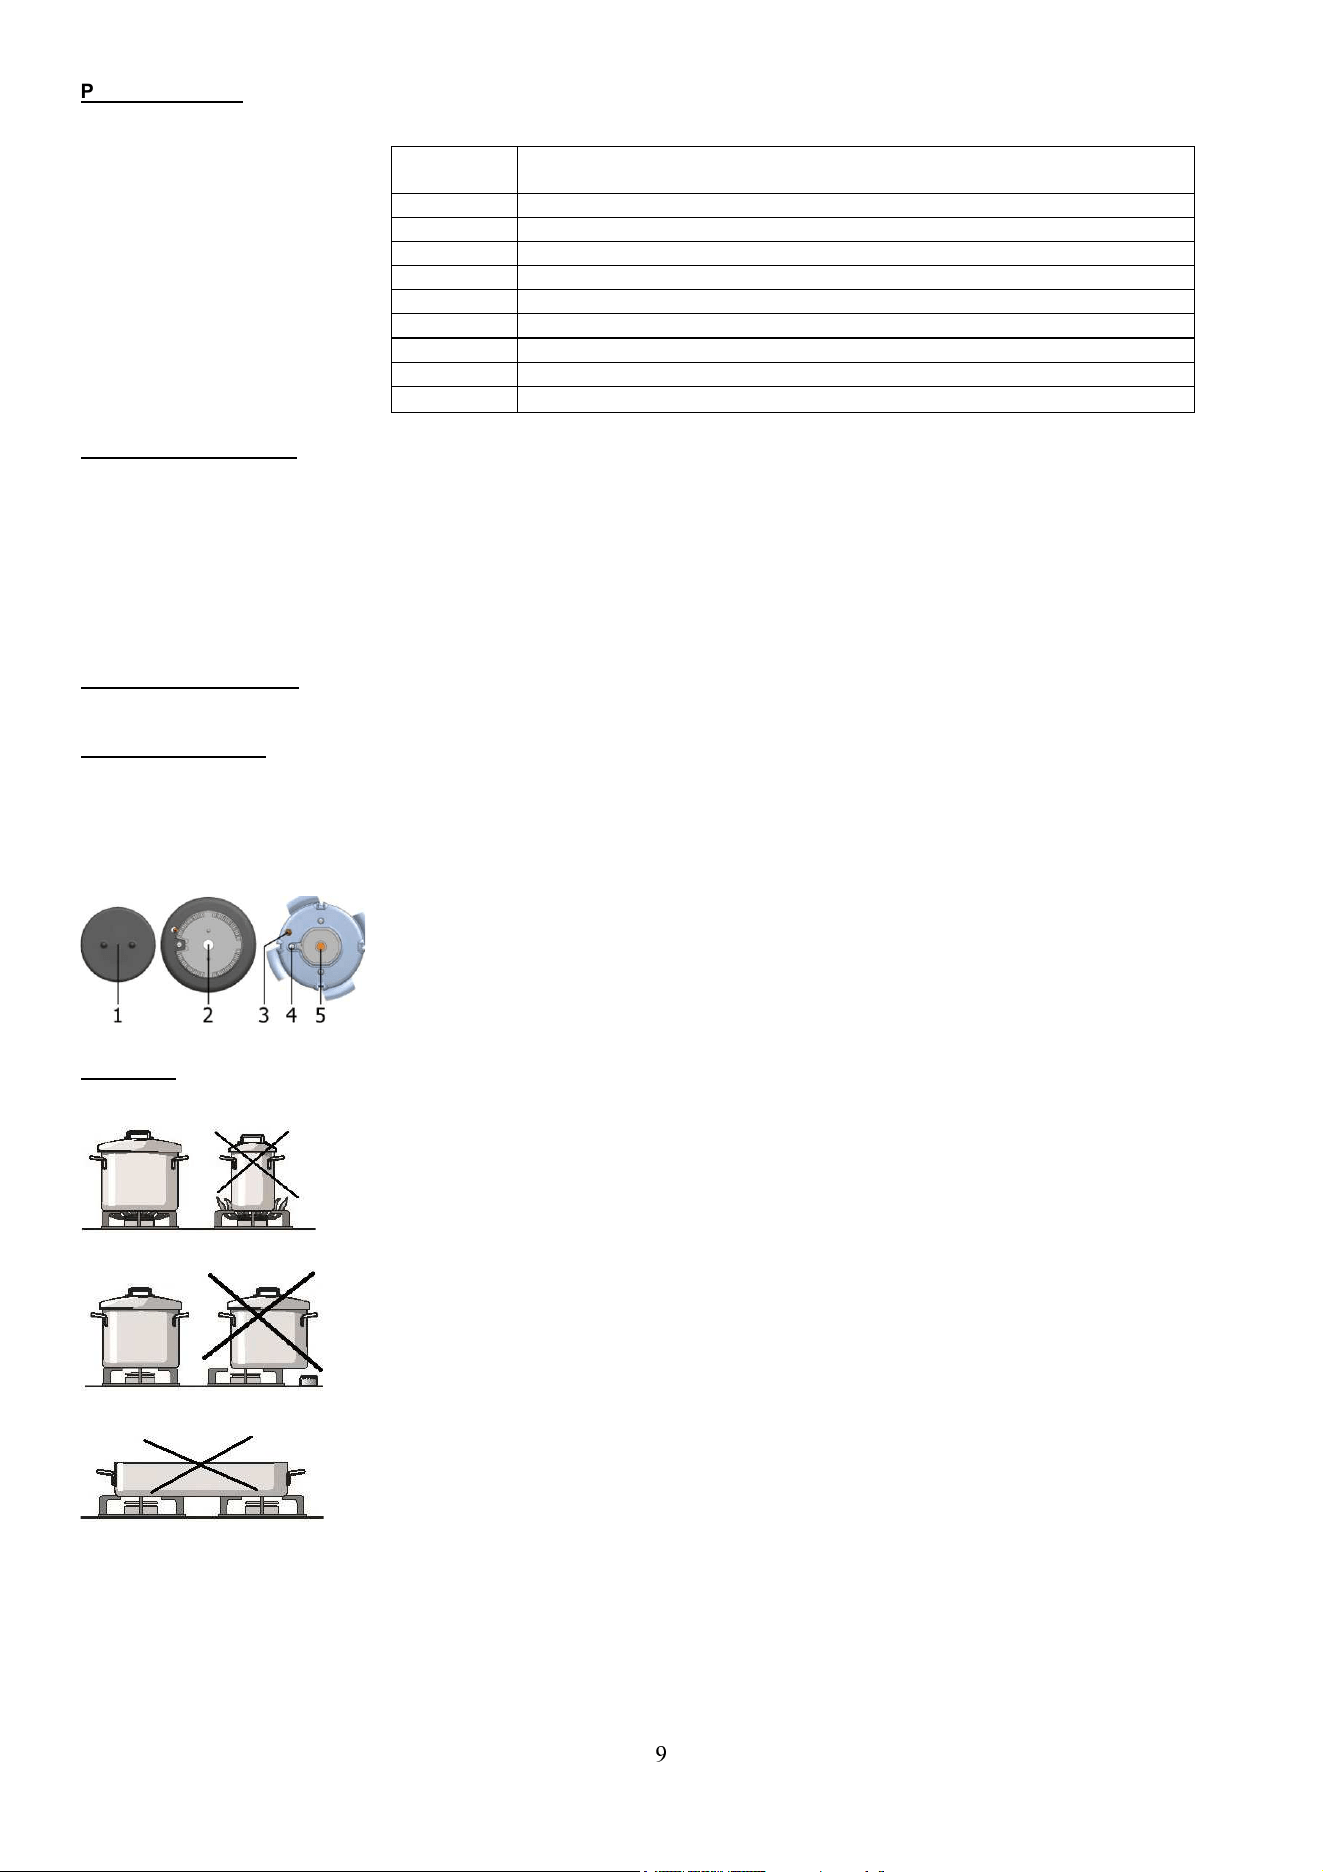
• Gas burner cover should always be placed very carefully on the burner crown. Make sure the
slots on the burner crown are never obstructed.
1 Burner crown cover
2 Burner crown with the support for the burner cover
3 Thermo-element (only with protected burners, available in some models)
4 Spark plug
5 Nozzle
Cookware
• Correctly selected cookware will enable optimum cooking time and gas consumption. Pan
diameter is the most important parameter.
• Flames that reach over the edge of a pan that is too small, can damage the cookware;
furthermore, gas consumption is higher in such cases.
• For combustion, the gas also needs air. If a pan is too large, air supply to the burner is
insufficient; as a result, combustion effect is lesser.
Important warnings regarding the glass ceramic hob
• Cooking zone reaches the selected power level or temperature very quickly; however, the area
surrounding the cooking zones remains relatively cool.
• The hob is resistant to temperature changes.
• The hob is also impact-resistant. The pans may be placed onto the hob roughly without
damaging the hob.
• Glass ceramic hobs should not be used as a worktop. Sharp objects can cause scratches.
• Preparing food in thin aluminum of plastic containers on hot cooking zones is not allowed. Do
not place any plastic objects or aluminum foil on the glass ceramic hob.
• Never use a glass-ceramic hob that is cracked or broken.
If an object falls on the hob with a sharp edge downwards, this could cause the hob / glass
ceramic panel to break. The consequences are visible immediately, or only after a while. If any
visible crack should appear, immediately disconnect the appliance from the power supply.
• If sugar is spilt on a hot glass ceramic hob, or a sugar-laden food, immediately wipe the hob.
INSTRUCTIONS FOR USE AND MAINTENANCE
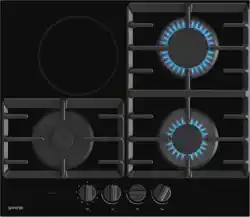
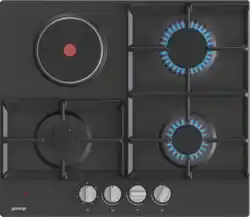
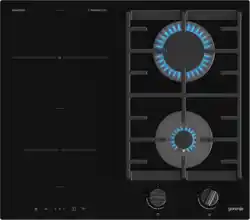
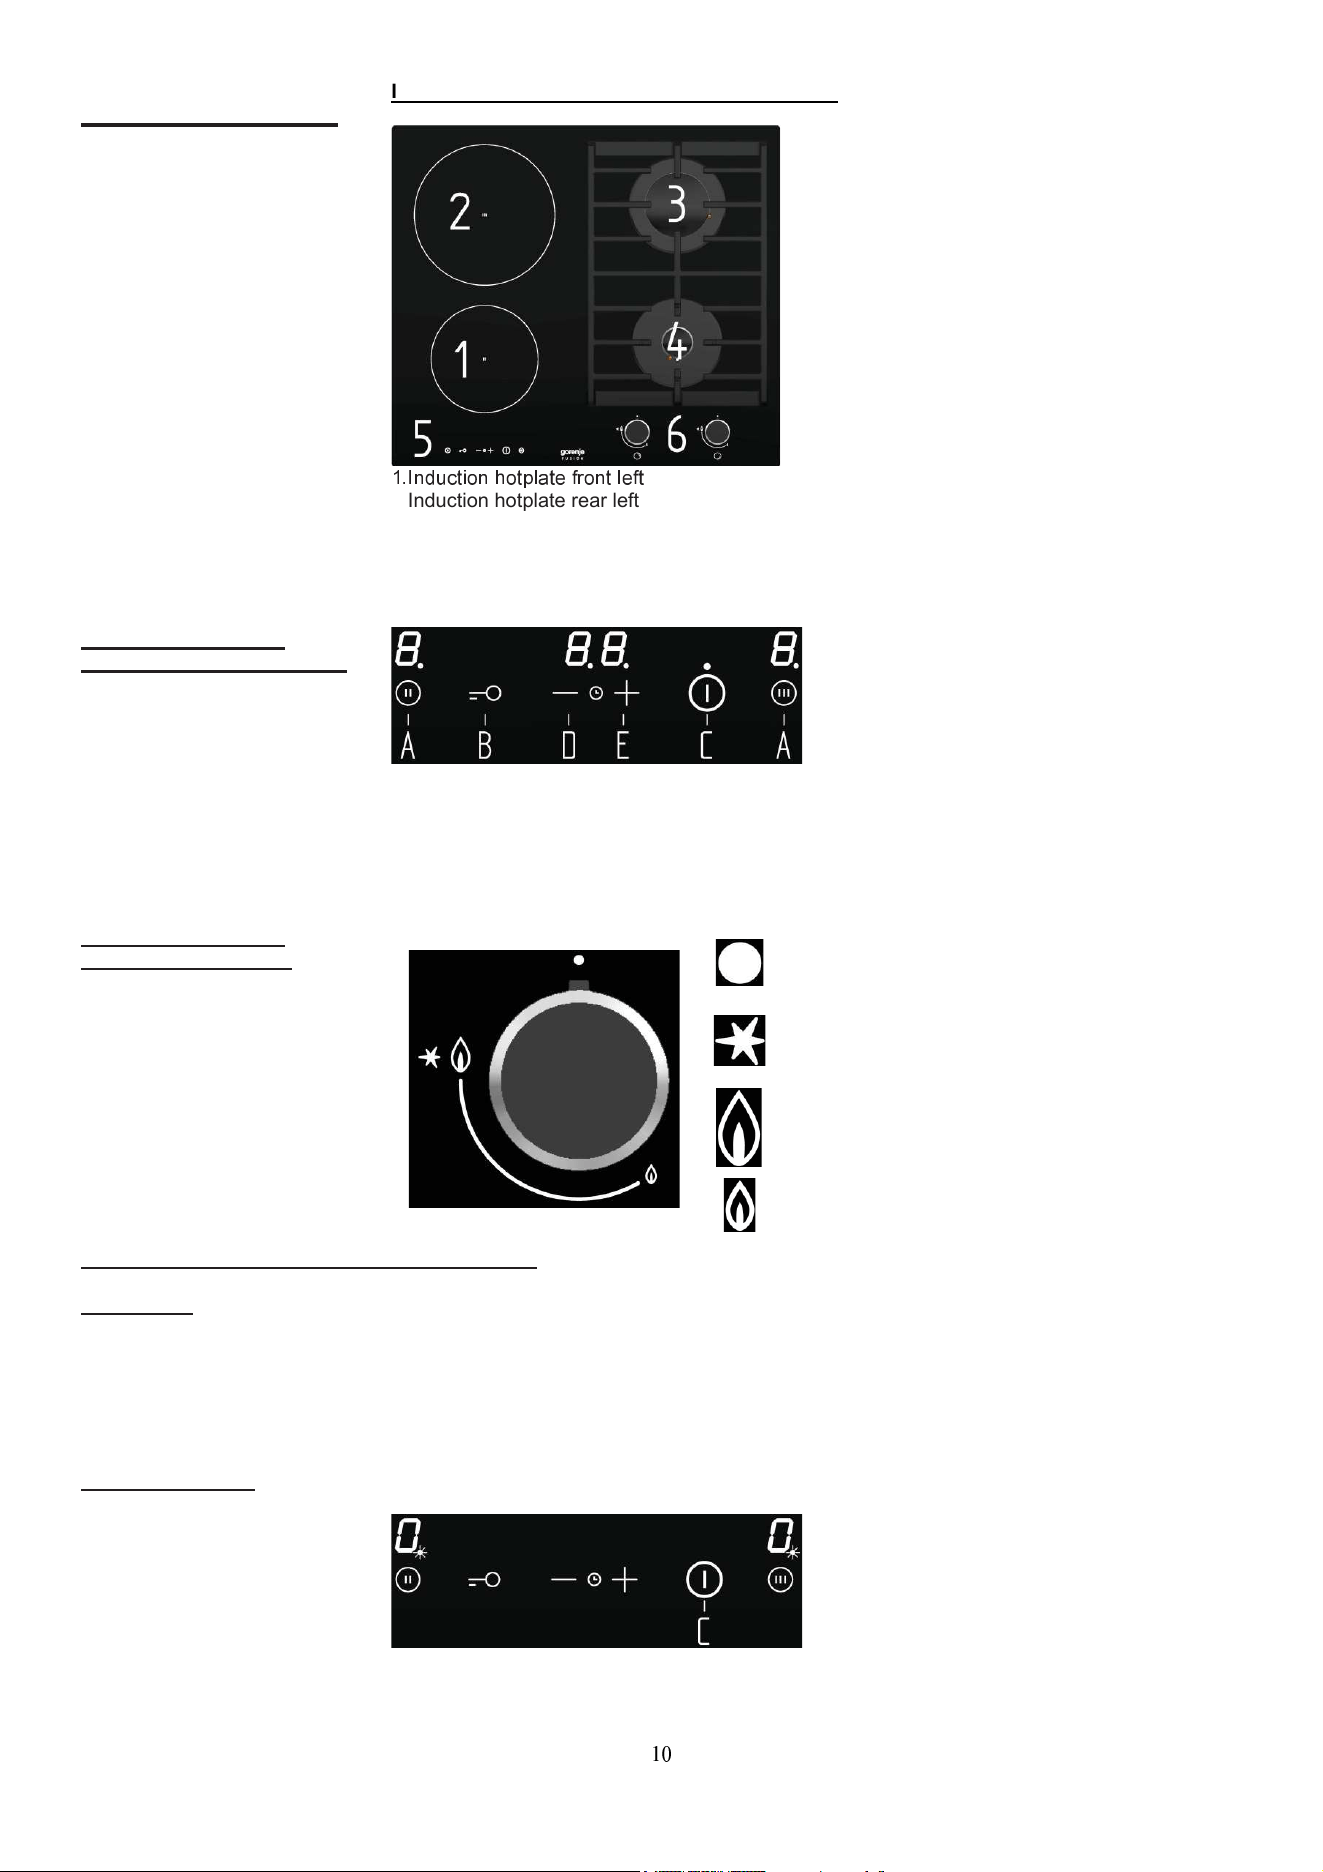
APPLIANCE DESCRIPTION
2.Induction hotplate rear left
3.Gas hotplate rear right
4.Gas hotplate front right
5.Hob control panel of induction part
6.Hob control panel of gas part
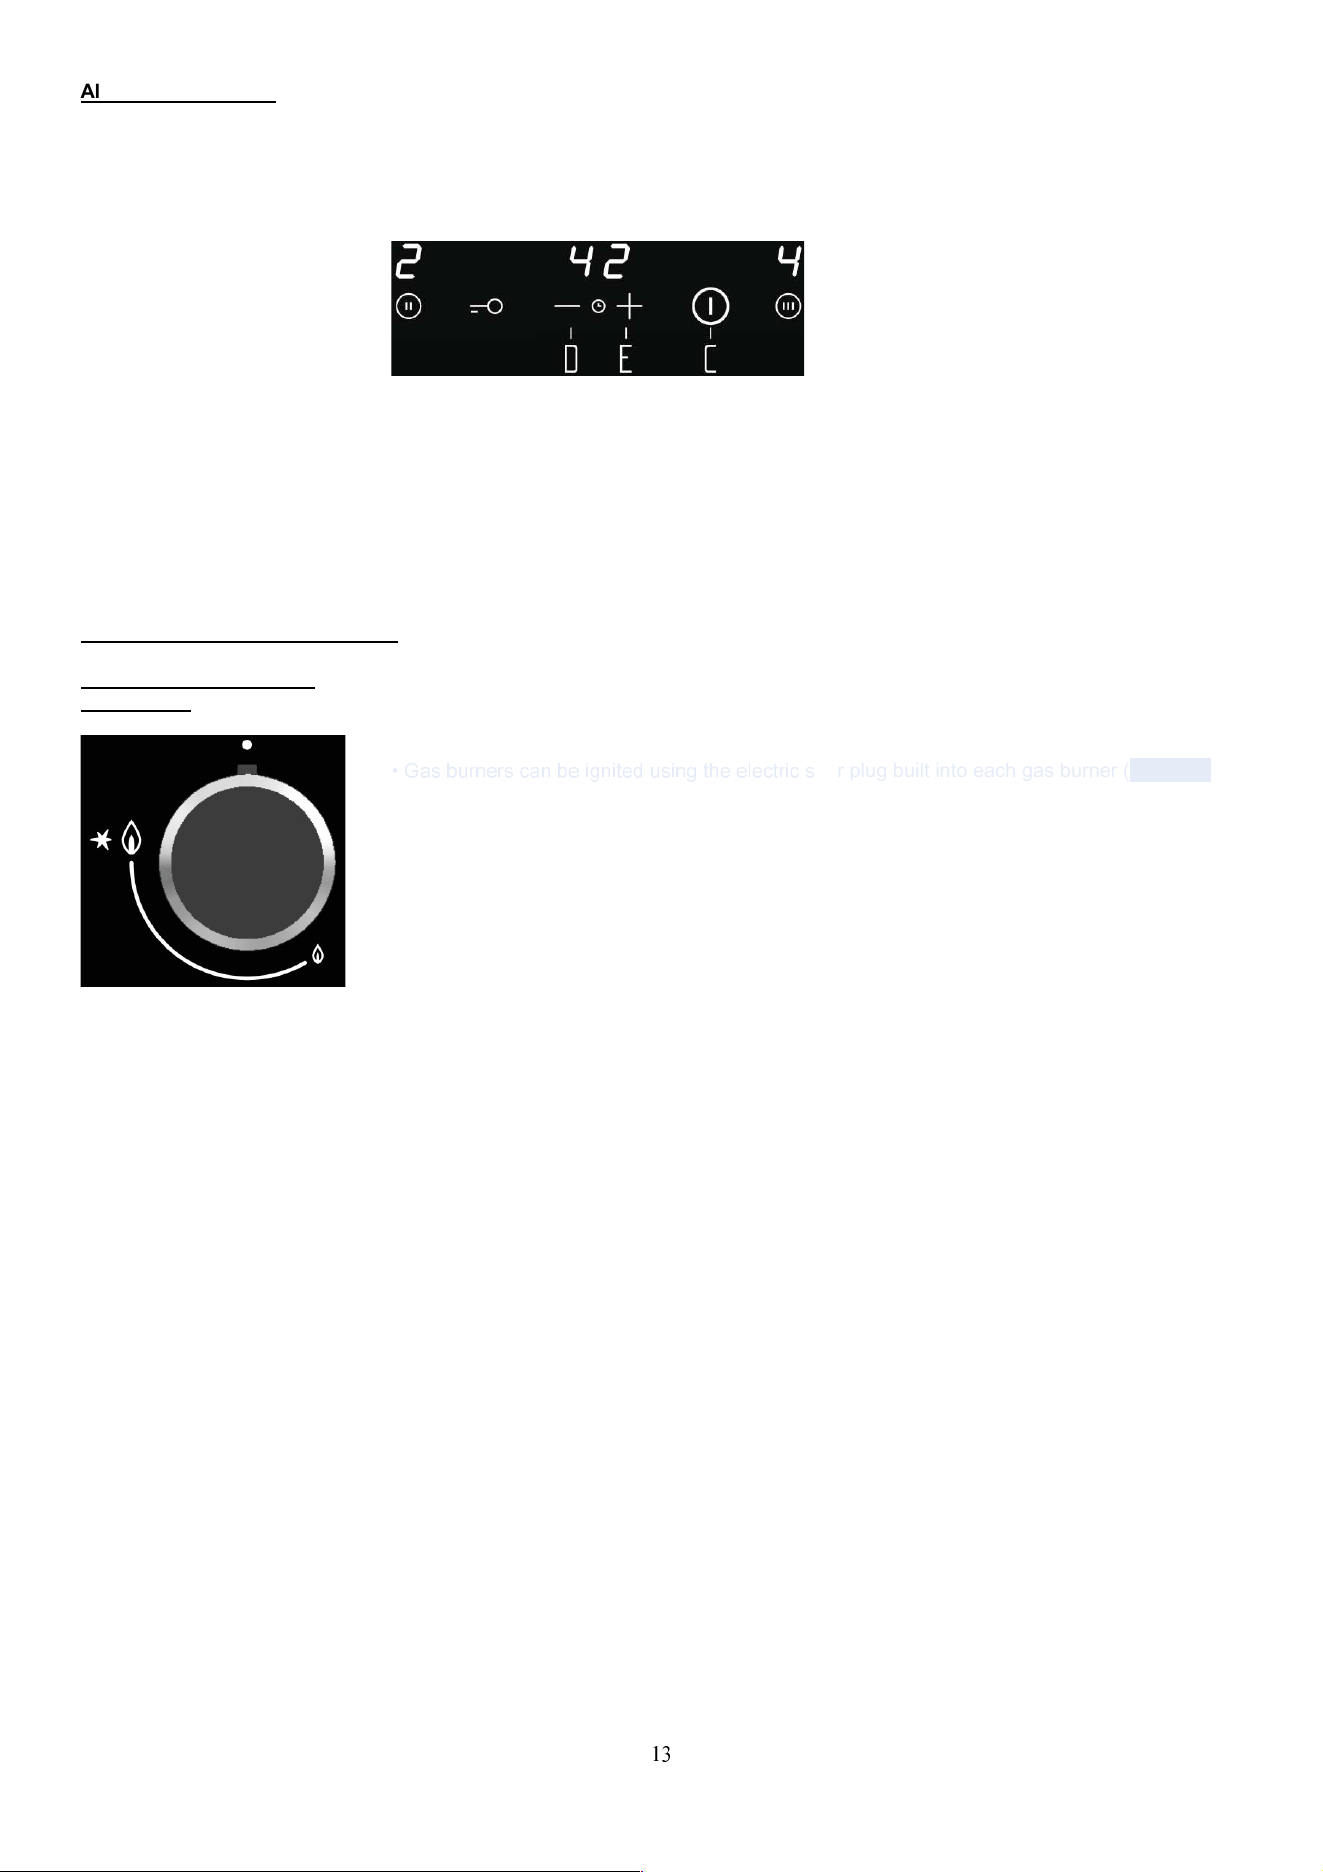
Hob control elements
for induction cooking zones
A
. ON/OFF sensor of cooking zones
B. Safety lock on/off and child lock sensor
C. ON/OFF sensor of cooktop
D. Sensor (-) of timer and cooking zone
E. Sensor (+) of timer and cooking zone
Hob control elements
for gas cooking zones
Gas valve closed
Ignition
Maximum power
Minimum power
OPERATING THE INDUCTION COOKING ZONES
Hob control
• After turning the ceramic glass hob on all displays come on for a moment. The hob is ready for
operation.
• The hob is fitted with electronic sensors which are switched on if you touch the relevant circle
for at least one second.
• Each sensor activation is followed by a sound signal.
• Avoid placing any objects on sensor surface (possible error signalization_Er03).
Always keep the sensor surface clean.
Activating the hob
Touch the ON/OFF sensor (C) for at least one second. The hob is now active, and all hotplate
power indicators indicate »0«, decimal dot is flashing.
Now you need to select the next setting within 20 seconds, otherwise the hob switches
off again.
Turning hotplates on
After turning the hob on using the ON/OFF sensor (C), within the next 20 seconds start one of
the hotplates.
• Touching the desired hotplate sensor (A), its relevant power indicator indicates »0«.
• By touching sensors »+» (E) or »-« (D) set the desired cooking
power from 1 to 9.
Continuous pressing of »+» (E) or »-« (D) sensors the power level is automatically
increased or reduced. Another procedure is to change power in steps is by intermediate
touching of relevant sensors.
Setting is always possible for one hotplate only at the time. Power display indicates »0«,
or „H“, depending on the existing temperature of the hotplate (see Section Remaining
Heat Indicator).
You can also turn the hotplate off prior the end of cooking and use the remaining heat,
and save energy.
Switching hotplates of
f
• Selected hotplate must be activated.
• Touching the hotplate sensor »-» (D) set the power level to »0«. After 10 seconds the hotplate
is turned off.
Fast deactivation
• Selected hotplate must be activated.
• Press both (A of selected hotplate) and (D) sensors simultaneously, and the hotplate is
immediately switched off.
Switching the hob of
f
• The hob can be switched off any time by pressing the ON/OFF sensor (C).
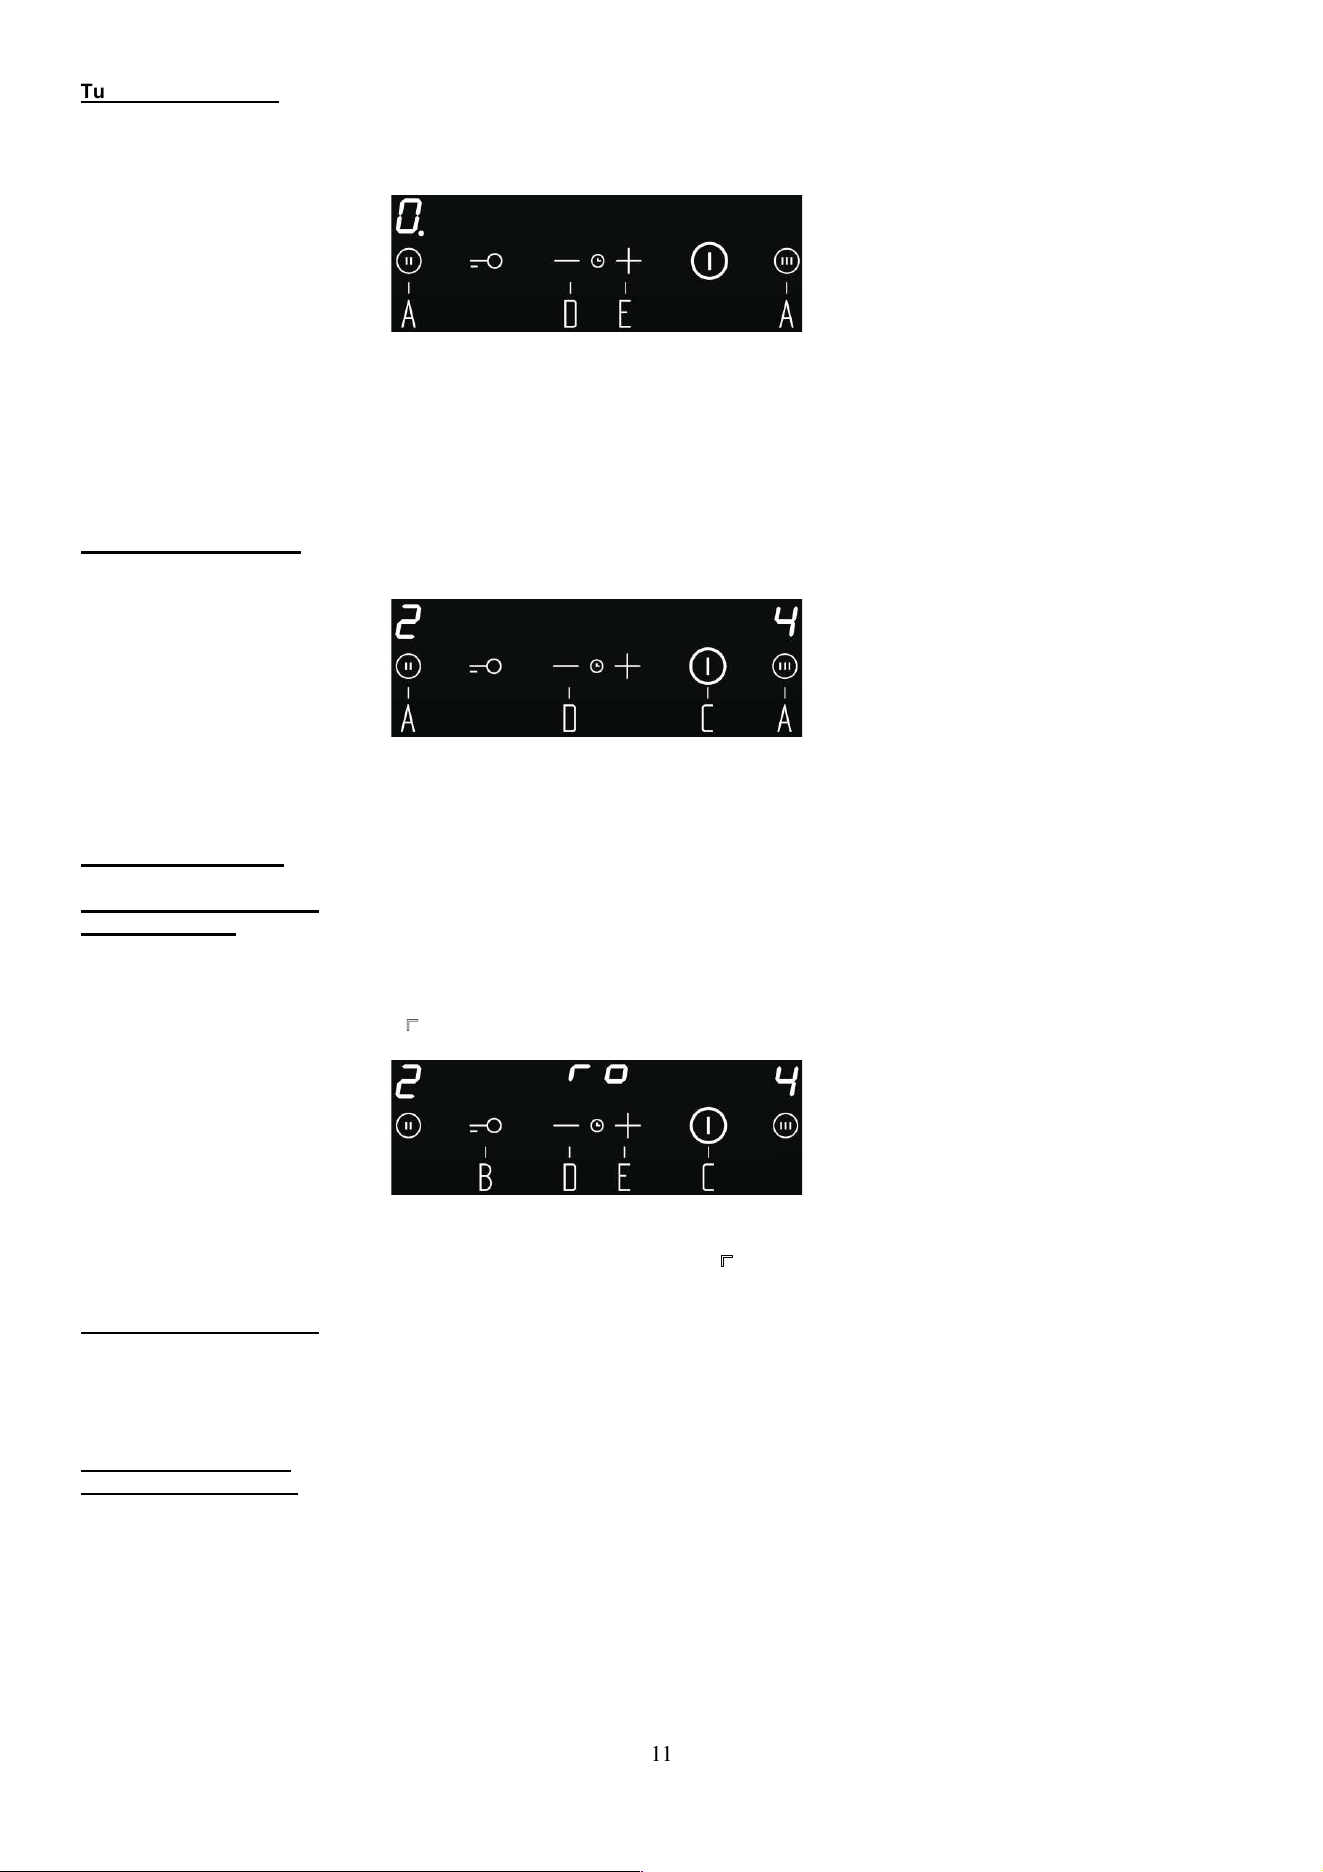
Locking the control unit /
child safety lock
By activating the child lock protection you can stop the operation of the appliance, i.e. the use of
hotplates, protecting the children from accidental start and eventual injury.
Activating child lock
• The hob is active.
• Press sensor (B) for at least 2 seconds. Timer’s display showes the symbol
(┏
o ) steady. Child lock is now activated.
•If hob is turned off by mistake, lock function is active still the next turn on.
Turning child lock off
• Protection is switched off by pressing the sensor (C).
Timer’s display showes the symbol (┏
o).
• Press sensor (B) for at least 2 seconds. Child lock is now off.
Remaining heat indicato
r
Glass ceramic hob also features remaining heat indicator “H”. Hotplates are not heated directly,
but through return heat radiating from the dish. As long as the symbol “H” is on after the hotplate
was switched off, the remaining heat may be used for warming up food or for melting.
Even when the symbol “H” disappears, the hotplate may still be hot.
Be careful of burns!
Extra powerful setting
(hotplates marked “P”)
Extra powerful setting may be additionally switched on for fast cooking on indicated hotplates.
This extra hotplate power is used for heating large quantities of food. After switching on, the
extra power is activated for:
• 5 minutes, then automatically switches back on to the maximum normal level 9.
During the time extra power is activated, the power of other hotplates is limited. This is indicated
on the power display by intermittently flashing the selected cooking level and limited power for a
few seconds.
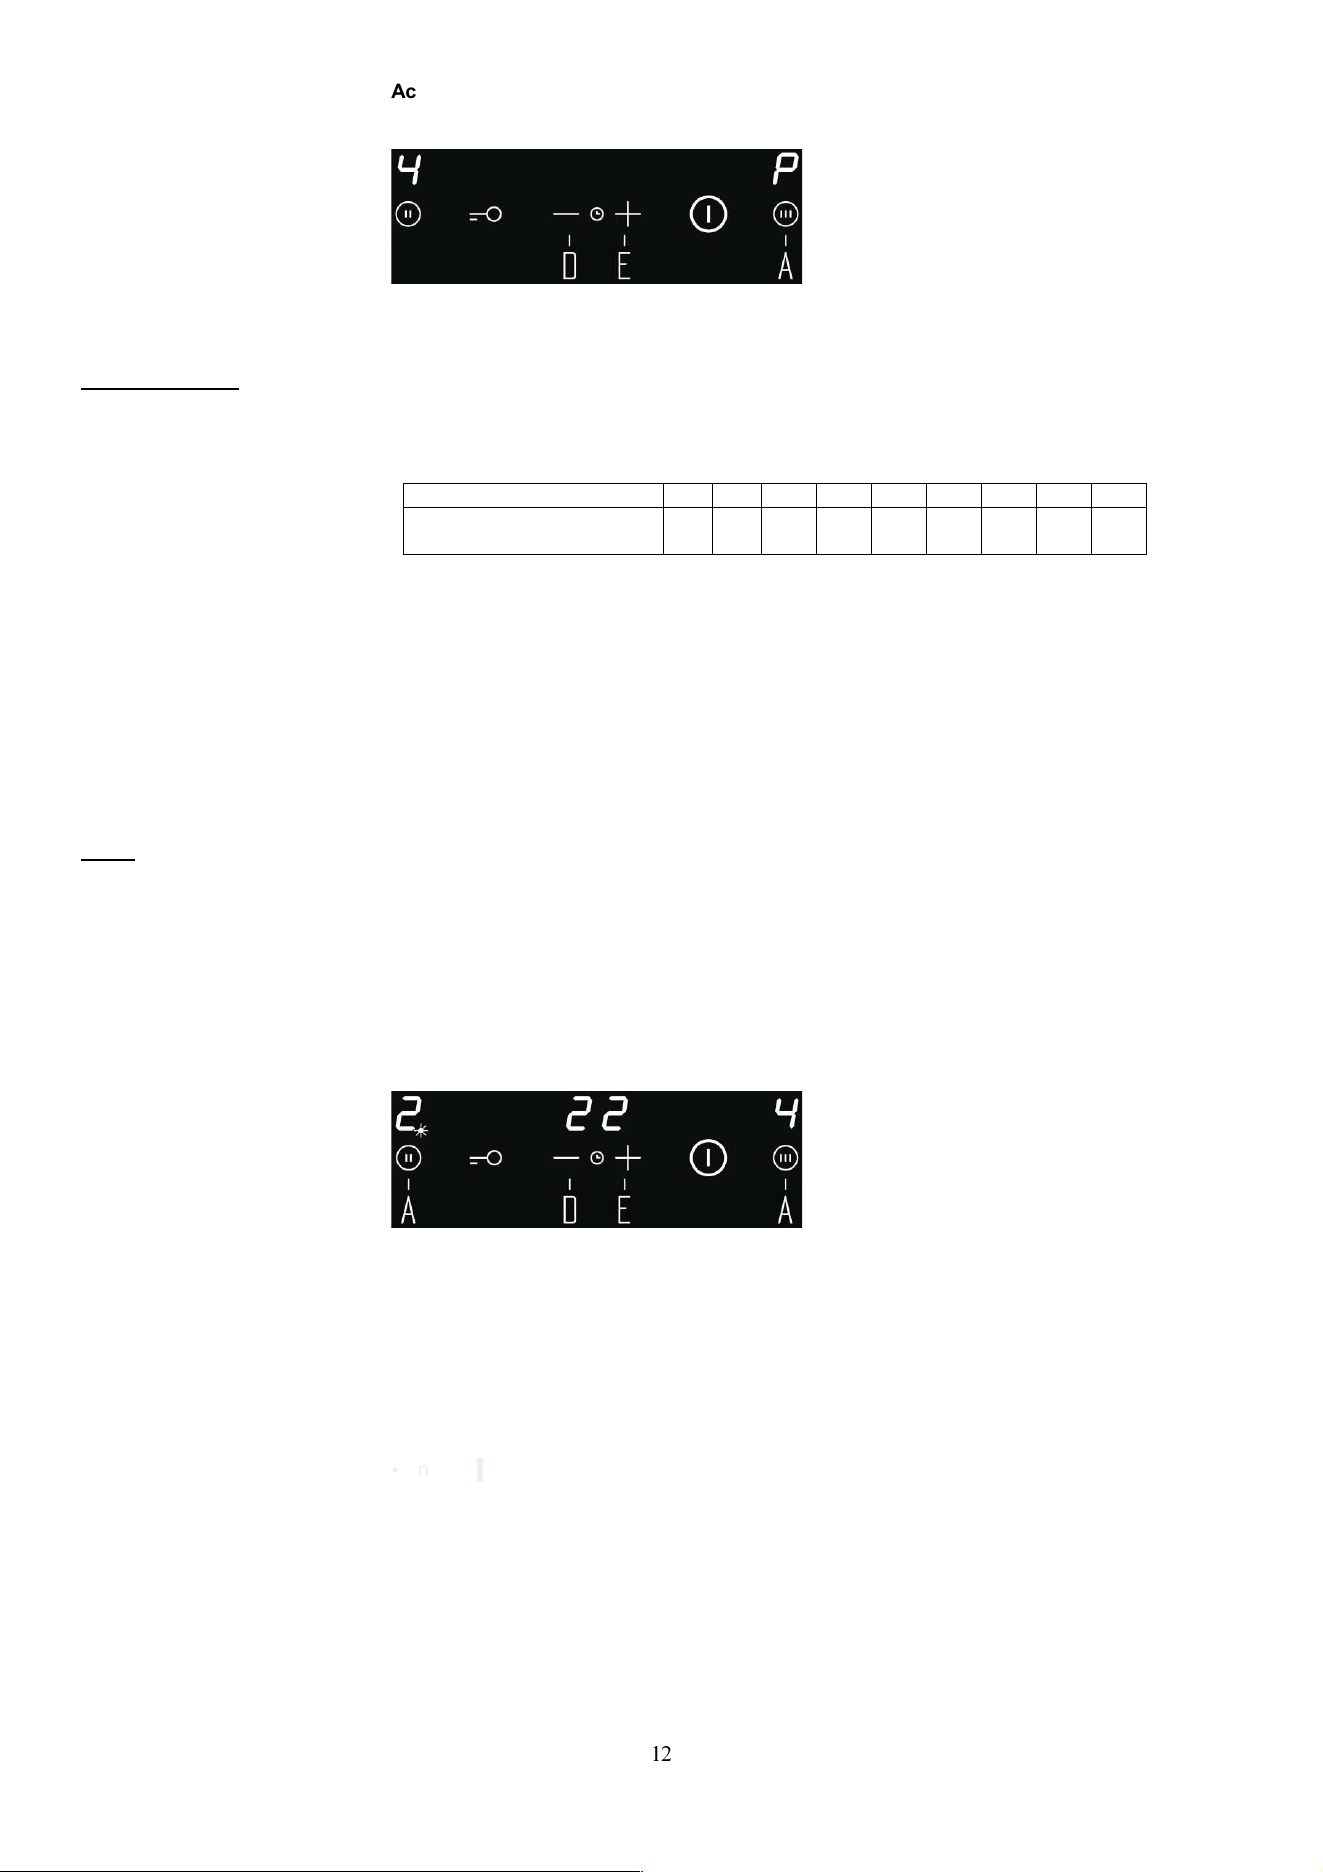
A
ctivating extra powerful setting
• First select the hotplate by touching its relevant sensor (A), and immediately after press the
sensor (D) then press (E) . Extra powerful setting is on, and power indicator displays symbol “P”.
Premature turning extra powerful setting off
Touch the desired hotplate sensor, and immediately after press the sensor »-« (D). Letter “P”
disappears and the hotplate automatically switches to level 9.
Safety switch of
f
Maximum continuous operation of a particular hotplate is limited, and the duration is displayed in
the above chart. When the hotplate is switched off by the safety mechanism, the indicator
displays symbols “0”, or “H” in case there is any remaining heat left.
In such cases switch the hotplate off by touching the relevant power setting sensor (D).
Power setting 1 2 3 4 5 6 7 8 9
Hours lapse prior safety
switch off
8 6 5 5 4 1,5 1,5 1,5 1,5
Example:
Set the hotplate to power level 5 and leave it operate for some time. If you do not change the
above setting, the safety mechanism will switch the hotplate off after 4 hour.
Protection from overheating
Induction hotplate is also fitted with safety device against overheating which protects electronic
parts from damages. This device operates on several levels. When temperature of the hotplate
excessively rises, it switches on two-stage fan. If this is not enough, extra powerful heating is
deactivated, and finally the safety device either reduces the heating power of certain hotplates or
turns them off completely. When the hotplate cools
off, the full power of hotplate is again available.
Time
r
Timer facilitates the cooking procedure by setting the period of hotplate operation, and it can
also be used as alarm timer.
Activating the timer
• Touch the hotplate ON/OFF sensor (A) of the relevant hotplate.
• By touching the »+« or »-« (E or D) sensor select the power setting from 1 to 9.
• Touch the timer ON/OFF sensors (E+D) to activate timer. Timer display indicates »00«.
• By touching sensors »+« or »-« (E or D) set the desired cooking time (from 01 to 99 minutes).
After a few seconds timer starts operating. Timer controlled hotplate control lamp is on and is
blinking.
You can use timer to set exact cooking time for each hotplate at the same time. To speed
up the timer setting keep the relevant sensors »+« or »-« (E or D) constantly pressed.
Altering preset cooking time
• You can change preset cooking time whenever you wish during the hotplate operation.
• Touch the hotplate ON/OFF sensor (A) to select the desired hotplate. Decimal dot is on.
• Touch the timer ON/OFF sensors (E+D) to activate the timer.
• By touching sensors »+« or »-« (E or D) set the new desired cooking time.
Remaining cooking time
You can display the remaining cooking time by touching the hotplate ON/OFF sensor (A) and
then (E+D), or by activating at the same time again and again (D+E) keys, the time that will be
showed is refered to to the zone that displays the dot blinking.
Shorter residual time will be always shown on timer’s display:
In case time is relative to a cooking zone, decimal point will flash at its display.
ƒ In case time is relative to “alarm timer”, there is not decimal point flashing.
Switching the timer off
When the preset time expires a beep is heard which you can either turn off by touching any
sensor or leave it to turn off automatically after 2 minutes. When the programmed time finish
also the cooking zone turns off.
Switching the timer of prior expiry of preset time:
• Touch the hotplate ON/OFF sensor (A) to select the desired hotplate. Decimal dot is on.
• Touch the timer ON/OFF sensors (E+D).
• By touching the sensor »-» (D) set cooking time to »00«. Timer function is off, but the hotplate
continues to operate until you switch it off manually.
Alarm timer function
Timer can be used as alarm also if it is already employed in timer control of one of the
hotplates. (The hob don’t turn off)
Timer setting
With the hob off:
• Touch the hob ON/OFF sensor (C) to activate the cooking hob.
• Touch the timer ON/OFF sensor (E+D) to activate the timer.
• By touching sensors »+« (E) or »-« (D) set the desired time.
Switching the alarm off
When the preset time expires a beep is heard which you can either turn off by touching any
sensor or leave it to turn off automatically after 2 minutes.
If you want to switch the timer off prior expiry of preset time:
With the hob off:
• Touch the hob ON/OFF sensor (C) to activate the cooking hob.
• Touch the timer ON/OFF sensor (E+D).
• By touching the sensor »-« (D) set cooking time to »00«. Alarm function is off.
Simultaneously touch both »+« and »-« (E and D) sensors and switch the timer off.
• During the time the alarm is activated, timer can be preset for any hotplate.
OPERATING THE GAS BURNERS
Ignition and operation o
f
the burners
• Operate the gas burners using the knobs on the hob. Power levels are indicated on the knobs
by large and small flame symbols (see section Appliance description).
• Rotate the knob through the large flame position to the small flame position and back.
Operation interval lies between the two flame symbols.
!
par plug built into each gas burner (supplied).
Before rotating the knob, it should first be depressed.
Single-handed ignition
• In order to ignite the gas burner, press the selected burner control knob and rotate it to the
maximum power (flame) position. An electric spark will be generated automatically, igniting the
releasing gas.
• If the electric ignition should not work due to a power failure or damp spark plugs, the gas can
also be ignited using a match or a gas lighter. After igniting the gas, keep the control knob
pressed for another ten seconds, until the flame settles.
• The flame can then be set between the maximum and minimum level. Any setting between 0
and the large flame is not recommended, as the flame is not stable in this interval and may be
extinguished.
If the burner hasn’t ignited after the knob has been depressed for 15 seconds, close the
burner and wait at least one minute. Then, repeat the ignition process.
If the burner flame is extinguished (for any reason), close the burner and wait at least one
minute before attempting to re-ignite it.
• To extinguish the flame and close the burner gas supply, rotate
the control knob to the right, to the ‘OFF’ position 0.
CAUTION: The gas cooking appliance use may cause heat, humidity and products of
combustion in the room where is installed. Ensure that the kitchen is well ventilated especially
when the appliance is in use: keep open any natural ventilation holes or install a mechanical
ventilation device (mechanical extractor hood).
Prolonged intensive use of the appliance may call for additional ventilation, for example opening
of a window, or more effective ventilation, for example increasing the level of mechanical
ventilation where present.
CAUTION: Accessible parts may be hot when the hob is in use. Young children should be kept
away.
CAUTION: This appliance is for cooking purposes only. It must not be used for other purposes,
for example room heating.
"#
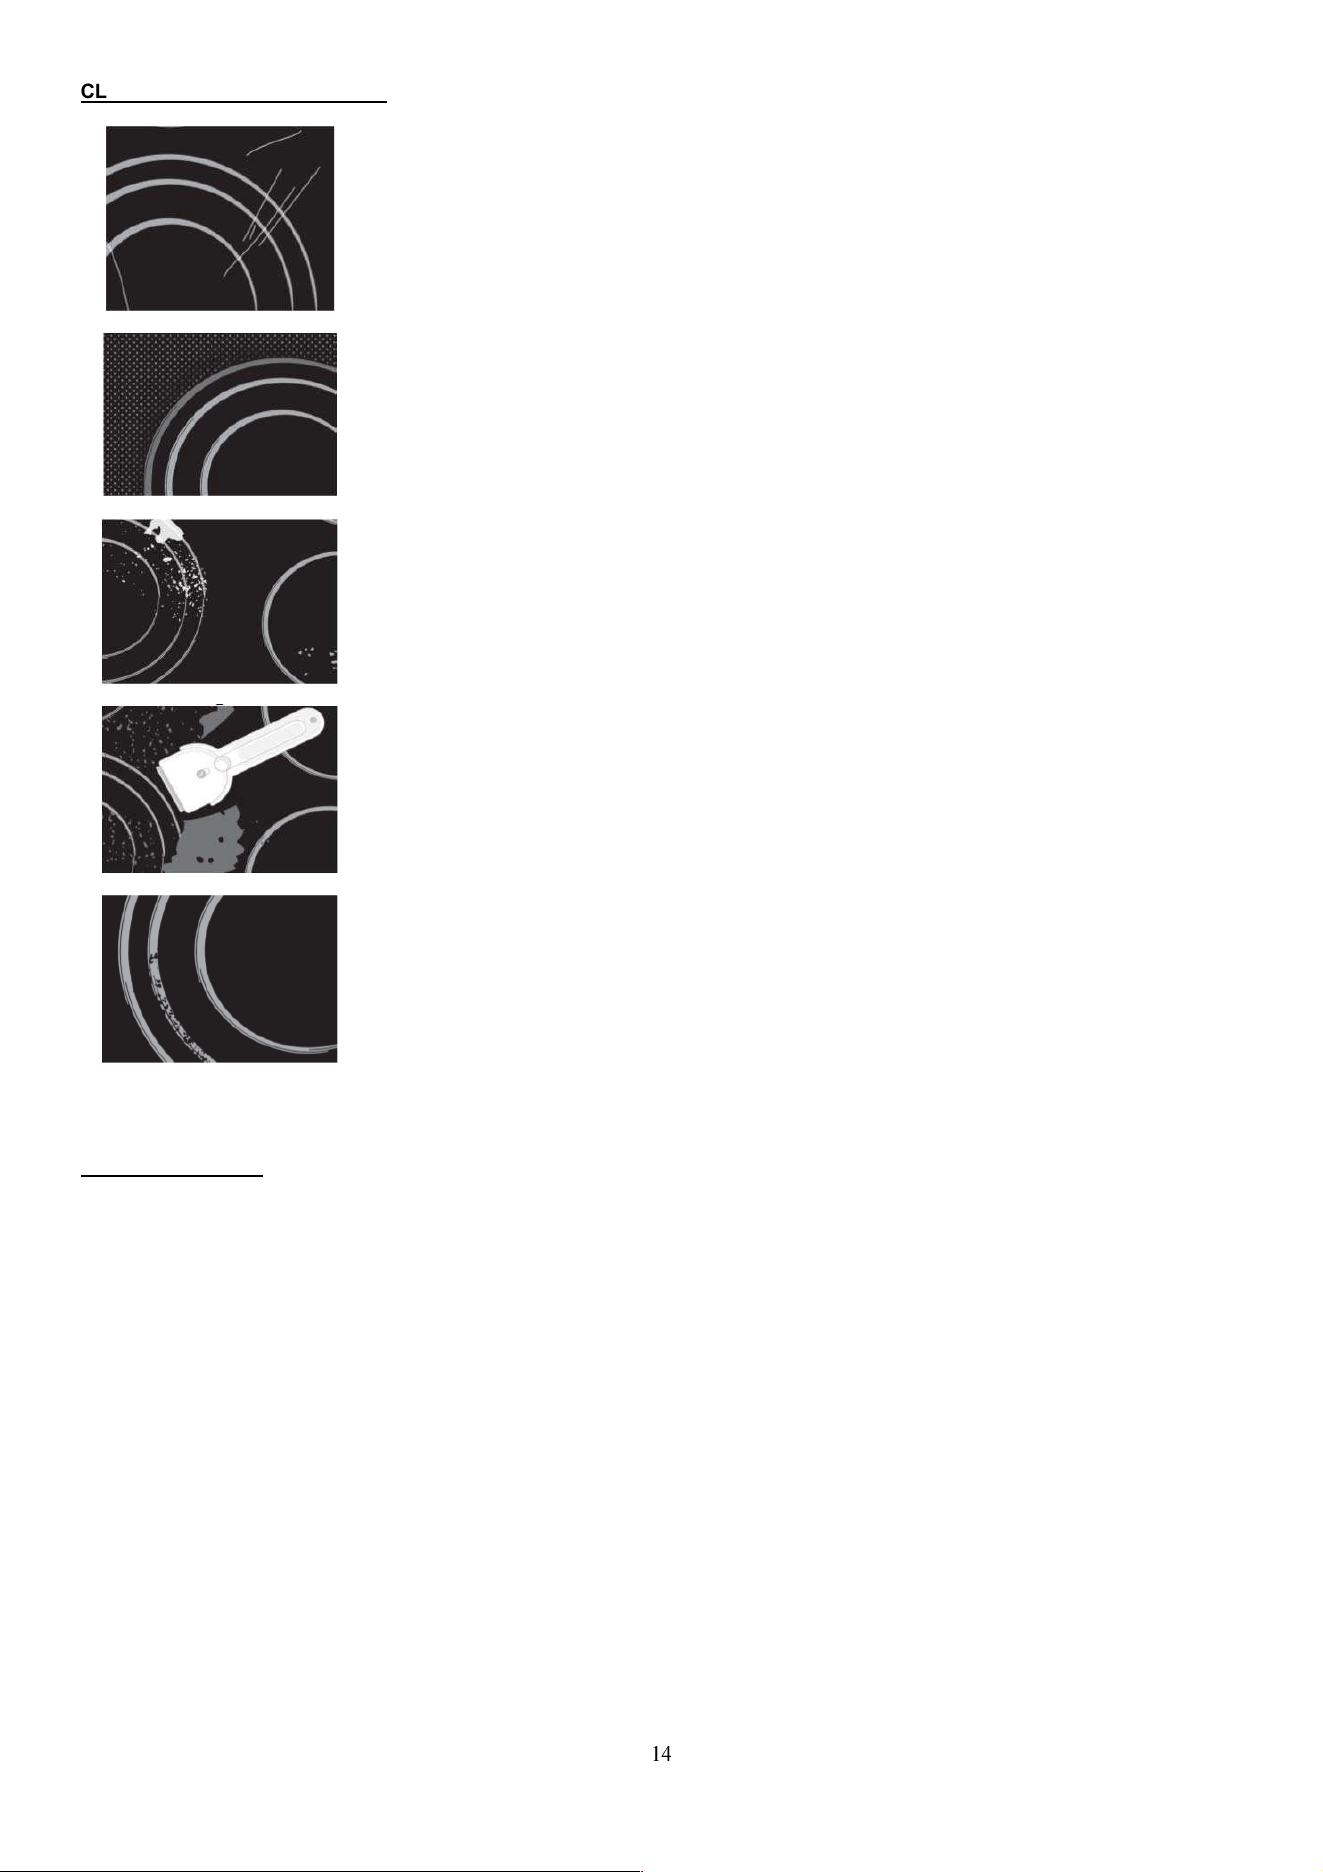
CLEANING AND MAINTENANCE
After each use of the glass-ceramic hob, wait for it to cool down and clean it; otherwise, even the
smallest food residue will be burnt onto the hot surface next time you use the appliance.
For regular cleaning and maintenance of the glass-ceramic surface, use special conditioning
agents which form a protective layer on the surface, shielding it from dirt. Before each use, wipe
any dust or other particles from the hob surface and pan bottom as these could scratch the
surface (Figure 1).
Careful: steel wool, abrasive sponges, and abrasive detergents can scratch the hob surface.
Glass ceramic surface can also be damaged by aggressive sprays and inappropriate or
insufficiently shaken (mixed) liquid cleaning agents (Figure 1 and Figure 2).
Signs and indications on the hob may be worn if aggressive cleaning aids are used on cooking
zone edges, or if pans with damaged bottom or used.
Light stains can be removed by a damp soft cloth; then, wipe the surface dry (Figure 3).
Water stains can be removed using a mild solution of vinegar; however, do not use this solution
to clean the frame (only with some models, as it may become dull. Do not use aggressive sprays
or decalcification agents (Figure 3).
Heavier stains can be removed using special agents and utensils for cleaning the glass-ceramic
hobs. When using these products, follow the instructions provided by their respective
manufacturers.
Make sure any residues of cleaning agents are thoroughly removed, as they could damage the
glass-ceramic hob when the cooking zones heat up (Figure 3).
Stubborn and burnt residues can be removed using a scraper.
Make sure the plastic part of the scraper does not come into contact with a hot cooking zone. Be
careful not to cut yourself with the scraper!
Sugar and sugar-laden food may permanently damage the glassceramic
surface (Figure 5); therefore, they should be removed from the glass-ceramic surface as soon
as possible, although the cooking zone may still be hot (Figure 4). Any change in the color of the
glass-ceramic surface does not affect its operation or the stability of the surface.
Such discolorations are mostly a result of burnt food residues or use of cookware made of
materials such as aluminum or copper; these stains are diffi cult to remove.
Warning: All damage described above predominantly relates to the aesthetics, i.e. appearance
of the appliance and do not affect its functionality directly. Such errors cannot be the subject of a
warranty claim.
Fig.1
Fig.2
Fig.3
Fig.4
Fig.5
Gas cooking zones
To clean the grid, cooking hob surface, and parts of the burner, use hot water with some
dishwashing detergent. Clean the thermo-element and the spark plug with a soft brush. These
parts must be kept impeccably clean, as only then will they operate correctly. Clean the crown
and the burner cover. Be particularly careful to keep all exit slots on the crown clean and
unobstructed. After cleaning, dry all parts thoroughly and replace or reassemble them correctly.
Parts that are placed askew will make lighting the burners more difficult.
Warning: Burner covers are coated in black enamel. Due to high temperatures, discoloration is
unavoidable; however, this will not affect the operation of the burners.
$
SPECIAL WARNINGS AND FAULT REPORTING
ƒ During the warranty period, only a service center authorized by the manufacturer may carry
out any repairs.
ƒ Before making any repairs, make sure the appliance is disconnected from the power mains
either by removing the fuse or by disconnecting the power plug from the wall outlet.
ƒ Unauthorized tampering with and repairs of the kitchen range (cooking hob) can result in
electric shock or short circuit; hence, do not attempt to perform any repairs by yourselves.
Leave such tasks to an expert or an authorized service unit.
ƒ In case of minor faults or problems with the appliance operation, check the following
instructions to see whether you can eliminate the causes by yourselves.
A visit by a service technician during the warranty period will be charged if the appliance is not
functioning because of improper use. Store these instructions in a place where they are always
readily accessible; if pas the appliance on to another person, the instructions should also be
included.
Following is some advice on rectifying some common problems.
P%&'()* P&++,'() -./+)
E(,*,0.:,&0
The flame is uneven
/ unstable
Wrong gas power setting. Have an expert check he gas
pipeline!
The flame from the
burners
suddenly changes
Wrongly assembled parts
of the kitchen hob
Assemble the burner correctly.
Burner ignition takes
more time
Wrongly assembled parts
of the kitchen hob
Assemble the burner correctly.
The flame is
extinguished
shortly after ignition
Knob pressed too short or
to weakly.
Keep the knob depressed for a
longer period of time. Before
releasing it, pres it harder.
The grid has
discolored in the
burner area
This is a commonplace
phenomenon resulting
from high temperature
Clean the grid with a metal care
detergent.
Electric power
supply in general is
interrupted
The fuse may be blown Check the fuse in the fuse box and
replace it if it is blown
Electric ignition of
the burners no
longer works
There are food or
detergent
residues between the
spark
plug and the burner
Open and carefully clean the
opening between the spark plug
and the burner
If the burner cover
looks unappealing
Regular dirt Clean the burner covers with a
metal care detergent.
If the problem persists despite observing the instructions above, call an authorized service
technician. Elimination of any errors or warranty claims that resulted from improper connection
or use of the appliance is not covered by our warranty. In such cases, the costs of repair are
borne by the user.
The Manufacturer strives for continuous improvements. For this reason, the text and
illustrations in this book are subject to change without notice.

;
<9
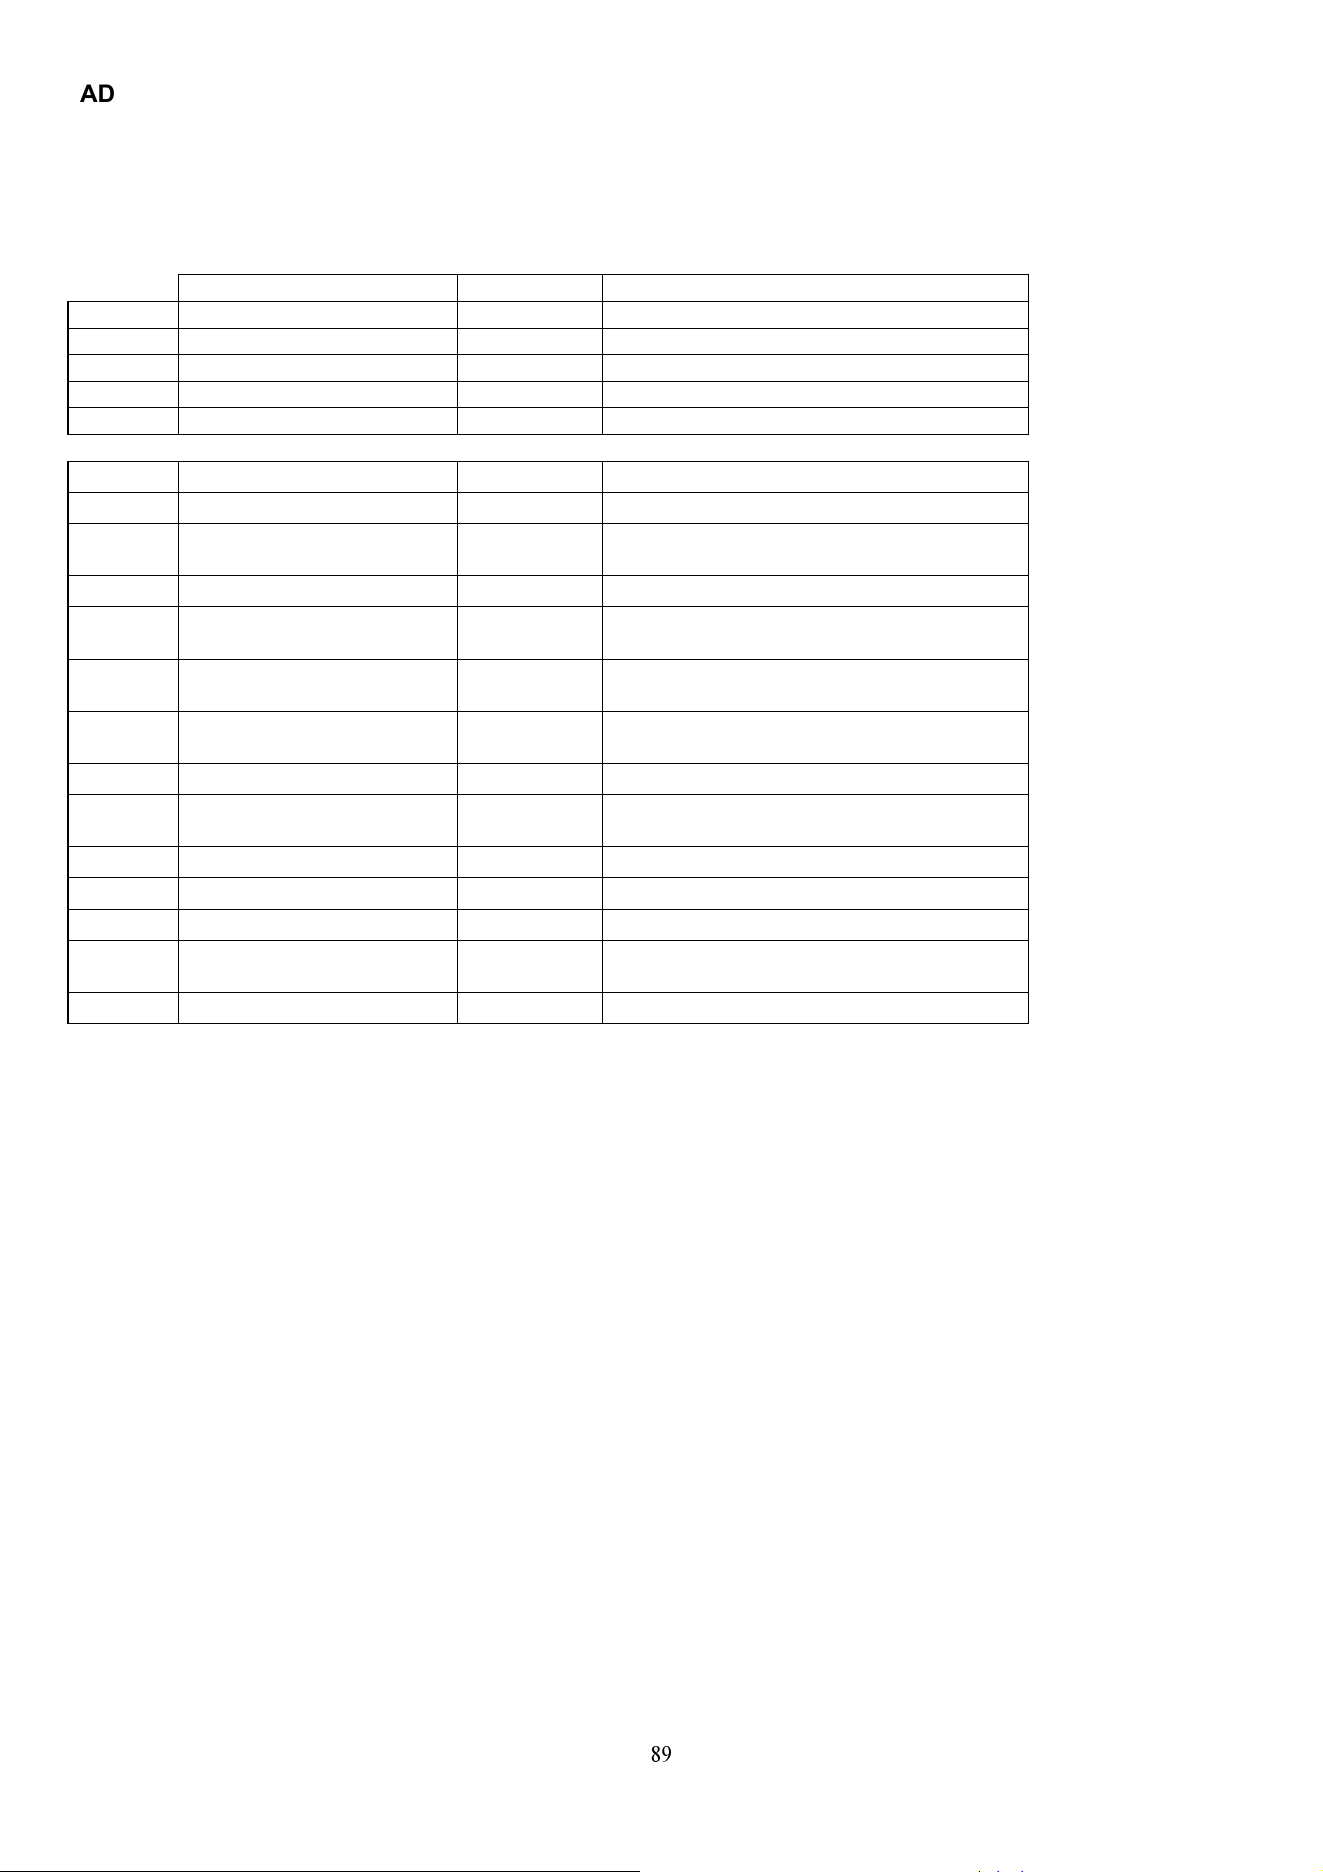
ADJUSTMENT TO A DIFFERENT TYPE OF GAS
CZ PRESTAVBA NA JINÝ DRUH PLYNU
SK PRISPÔSOBENIE NA INÝ DRUH PLYNU
PL DOSTOSOWANIE DO INNEGO RODZAJU GAZU
HU A KÉSZÜLÉK ÁTÁLLÍTÁSA MÁS TÍPUSÚ GÁZRA
SI PRIREDITEV NA DRUGO VRSTO PLINA
Country of destination Category Gas and supply pressures
CZ ZemČ urþení Kategorie Plynu a tlaky
SK Krajiny urþenia Kategórie Plynu a tlaky
PL Kraj przeznaczenia Kategoria Gazu i ciĞnienia
HU Célországban Kategóriák Gas és a nyomást
SI Namembna država Kategorija Plinom in tlaki
428712 CZ II2H3+ G20=20mbar ; G30/G31=28-30/37mbar
428712 SK II2H3B/P G20=20mbar ; G30/G31=30mbar
428712
731186
PL II2E3B/P G20=20mbar ; G30/G31=37mbar
428712 HU I3B/P G30/G31=30mbar
428712
731186
SI II2H3B/P G20=20mbar ; G30/G31=30mbar
428712
731186
HR II2H3B/P G20=20mbar ; G30/G31=30mbar
428712
731186
RS II2H3B/P G20=20mbar ; G30/G31=30mbar
428712 RO II2E3B/P G20=20mbar ; G30/G31=30mbar
428712
731186
RO II2H3B/P G20=20mbar ; G30/G31=30mbar
428712 RO II2L3B/P G25=20mbar ; G30/G31=30mbar
428712 MK II2H3B/P G20=20mbar ; G30/G31=30mbar
428712 RU G20=20mbar ; G30=30mbar
428712
731186
UA G20=20mbar ; G30=30mbar
731186 BA G20=20mbar ; G30=30mbar