Serial Number
Purchase Date
ATTACH YOUR RECEIPT HERE
1
19000577A0
Español p. 41
Français p. 21
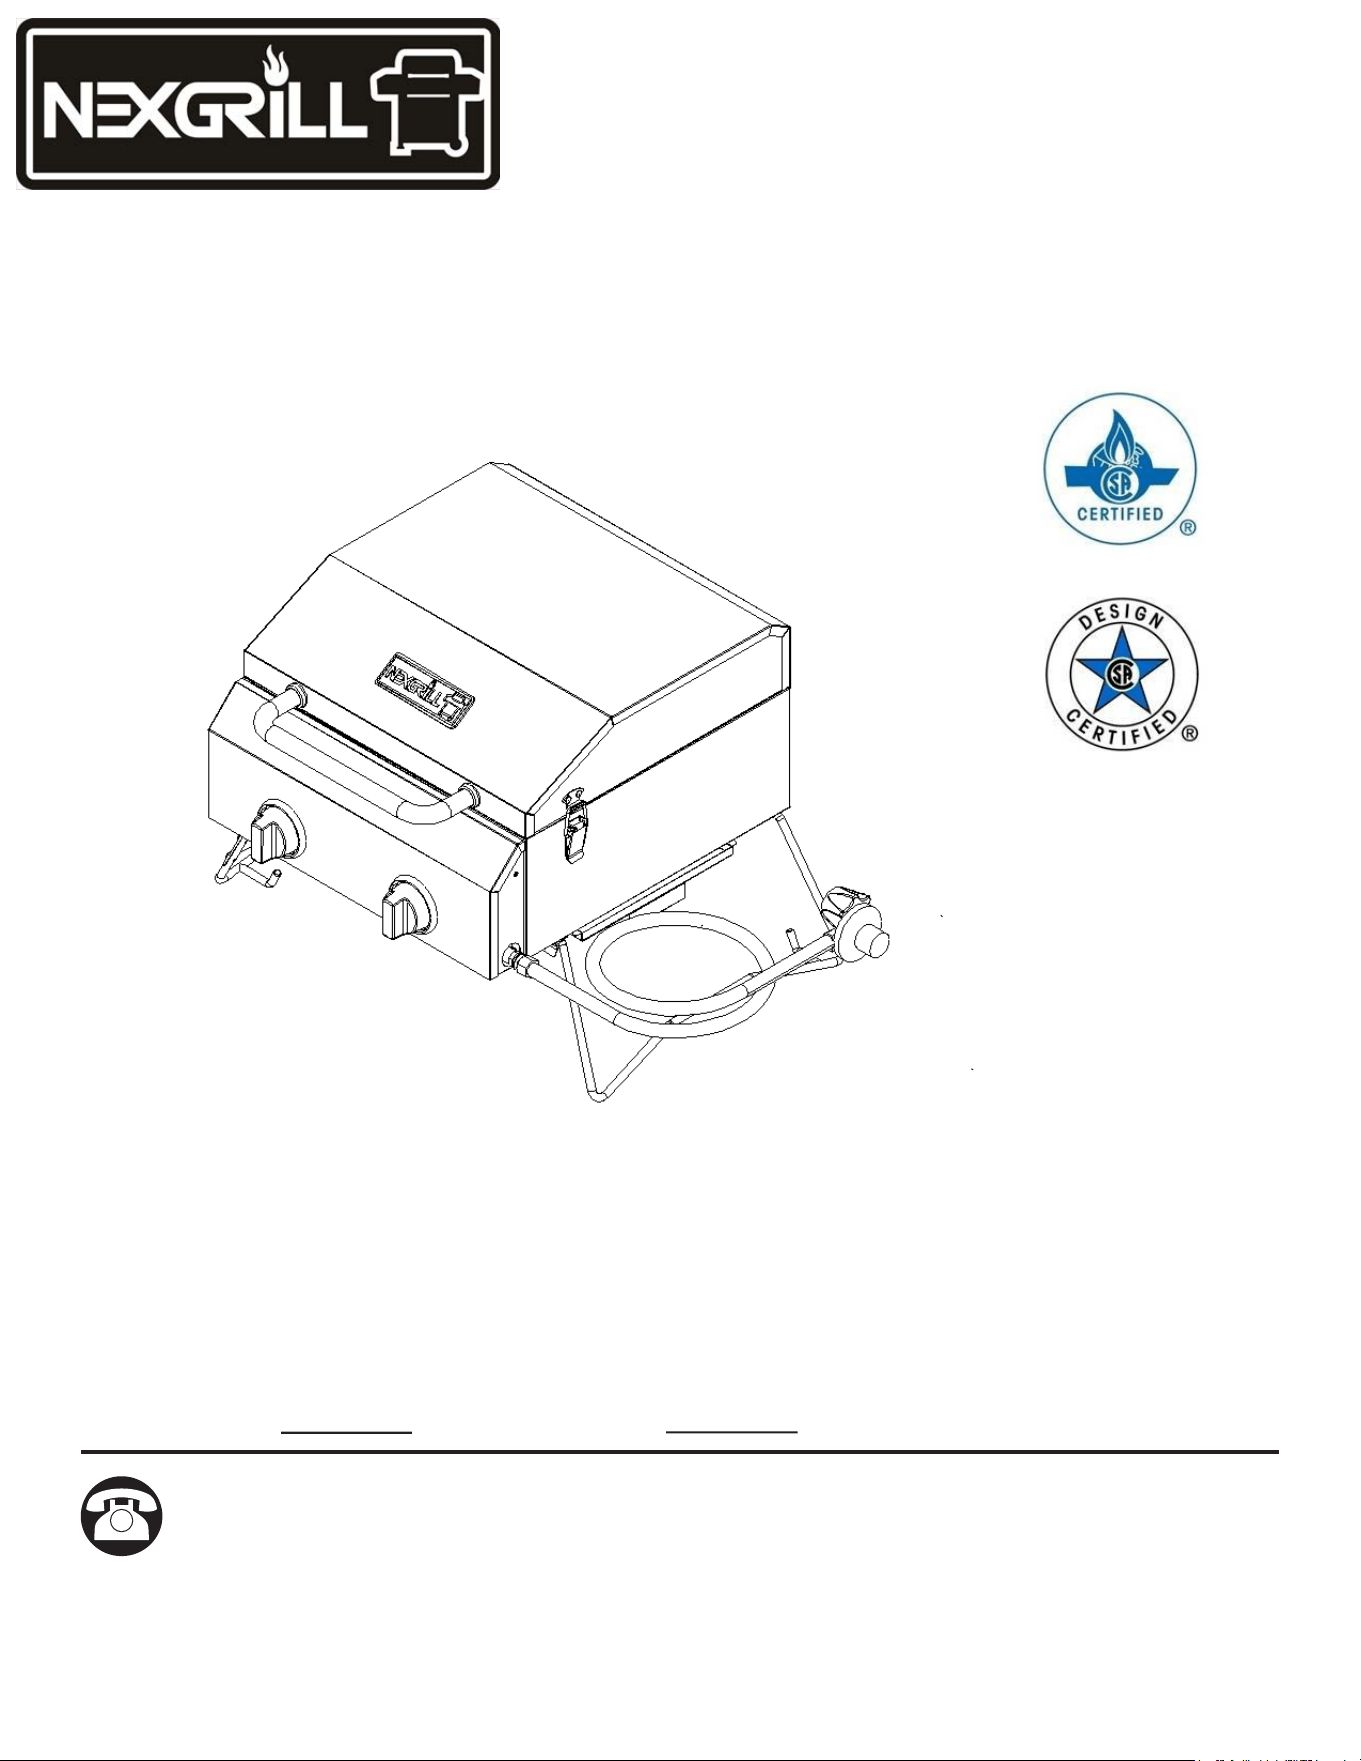
MODEL #820-0033
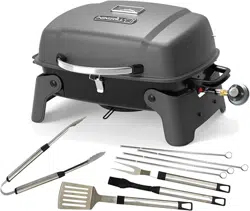
OUTDOOR TABLE TOP
GAS GRILL
Questions, problems, missing parts? Before returning to your retailer, call our
customer service department at 1-800-913-8999, 8 a.m. - 5 p.m., PST, Monday -
Friday.
ANS Z21.89a-2008
CSA 1.18a-2008
Outdoor Cooking
Gas Appliance

2
TABLE OF CONTENTS
Package Contents ............................................................................................................... 3
Safety Information
............................................................................................................... 4
Preparation
...........................................................................................................................7
Assembly Instructions.......................................................................................................... 7
Installation Instructions
..................................................................................................... 10
Operating Instructions
...................................................................................................... 13
Care and Maintenance
..................................................................................................... 15
Troubleshooting
................................................................................................................ 17
Warranty
........................................................................................................................... 18
Replacement Parts List
.................................................................................................... 20
3
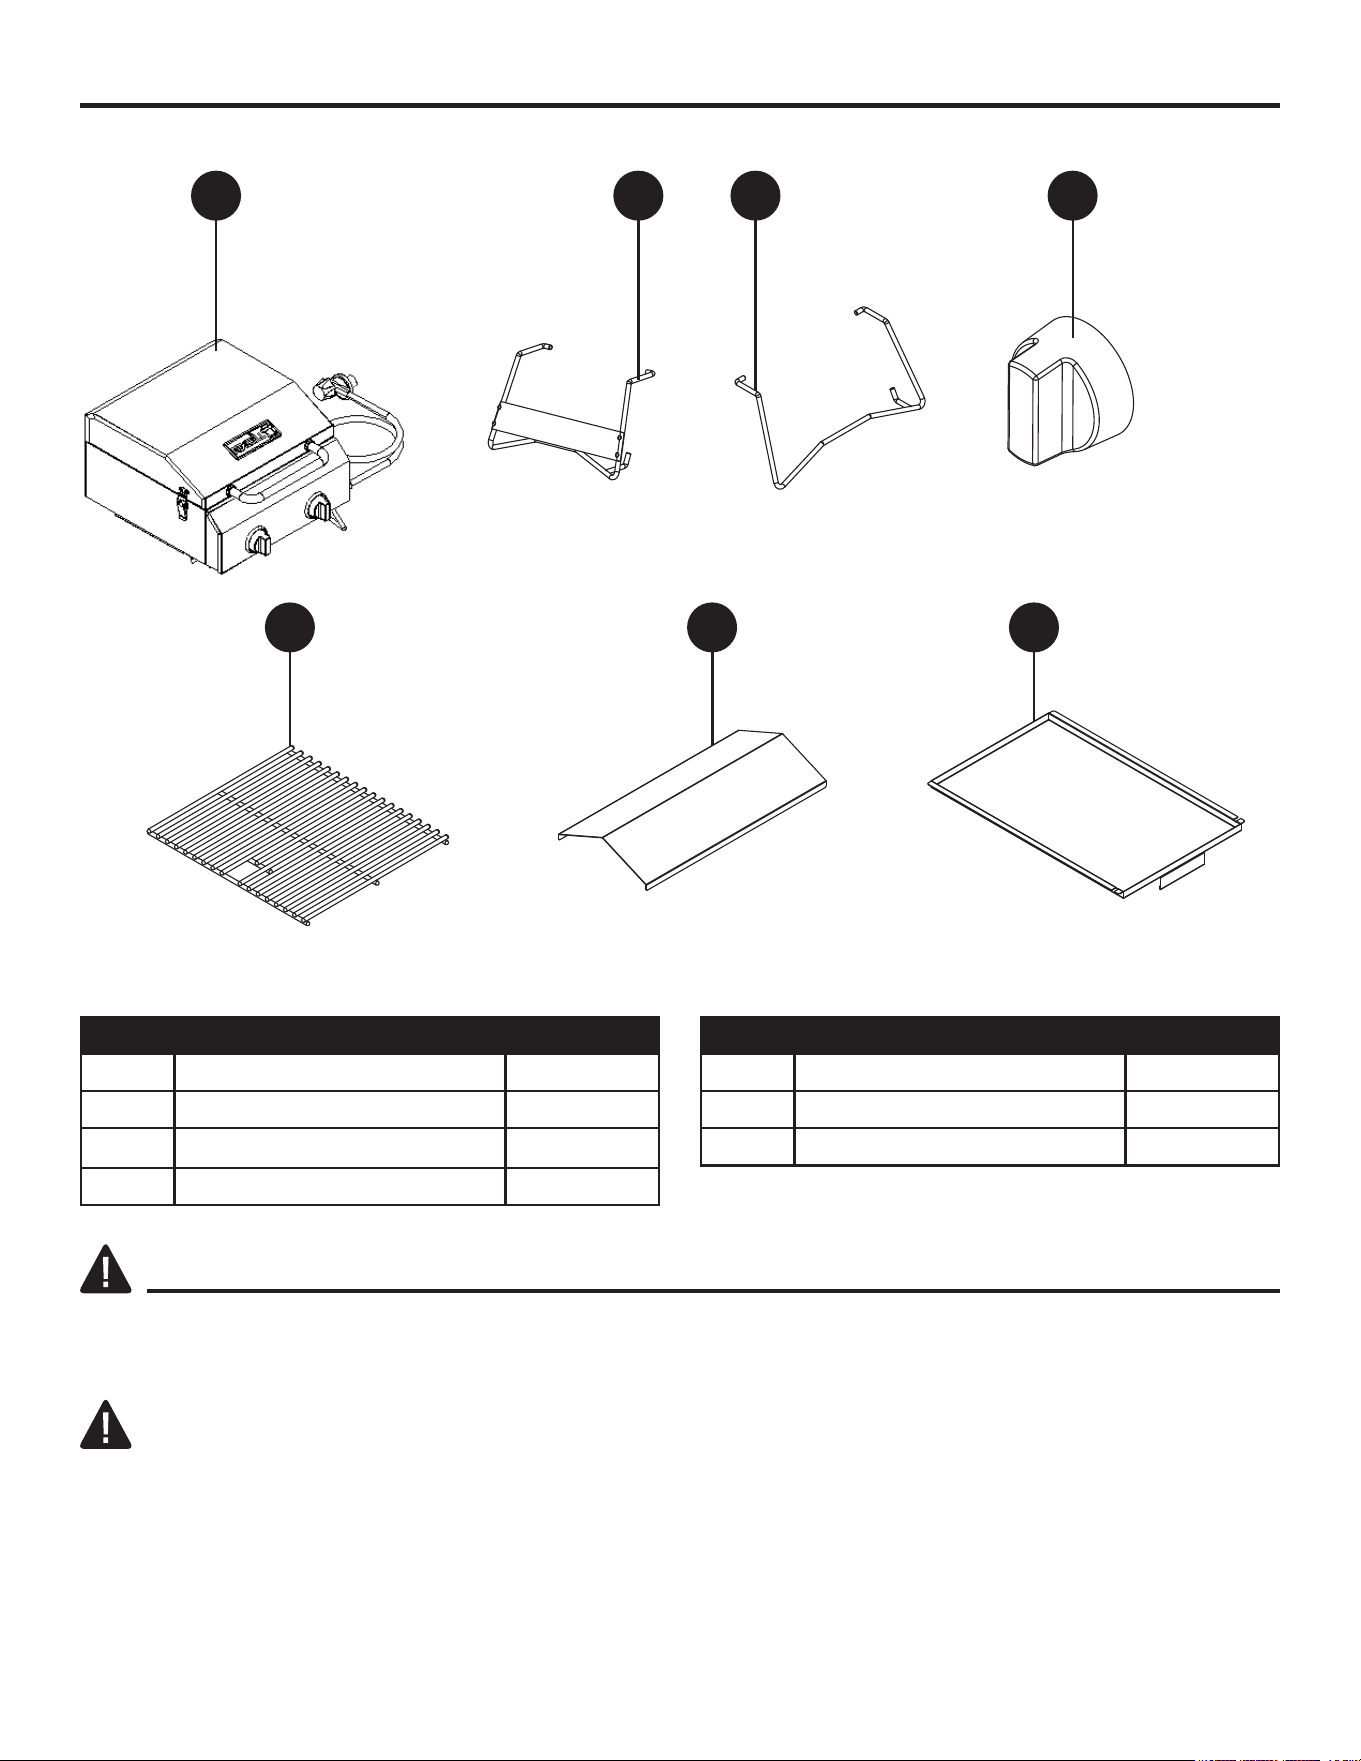
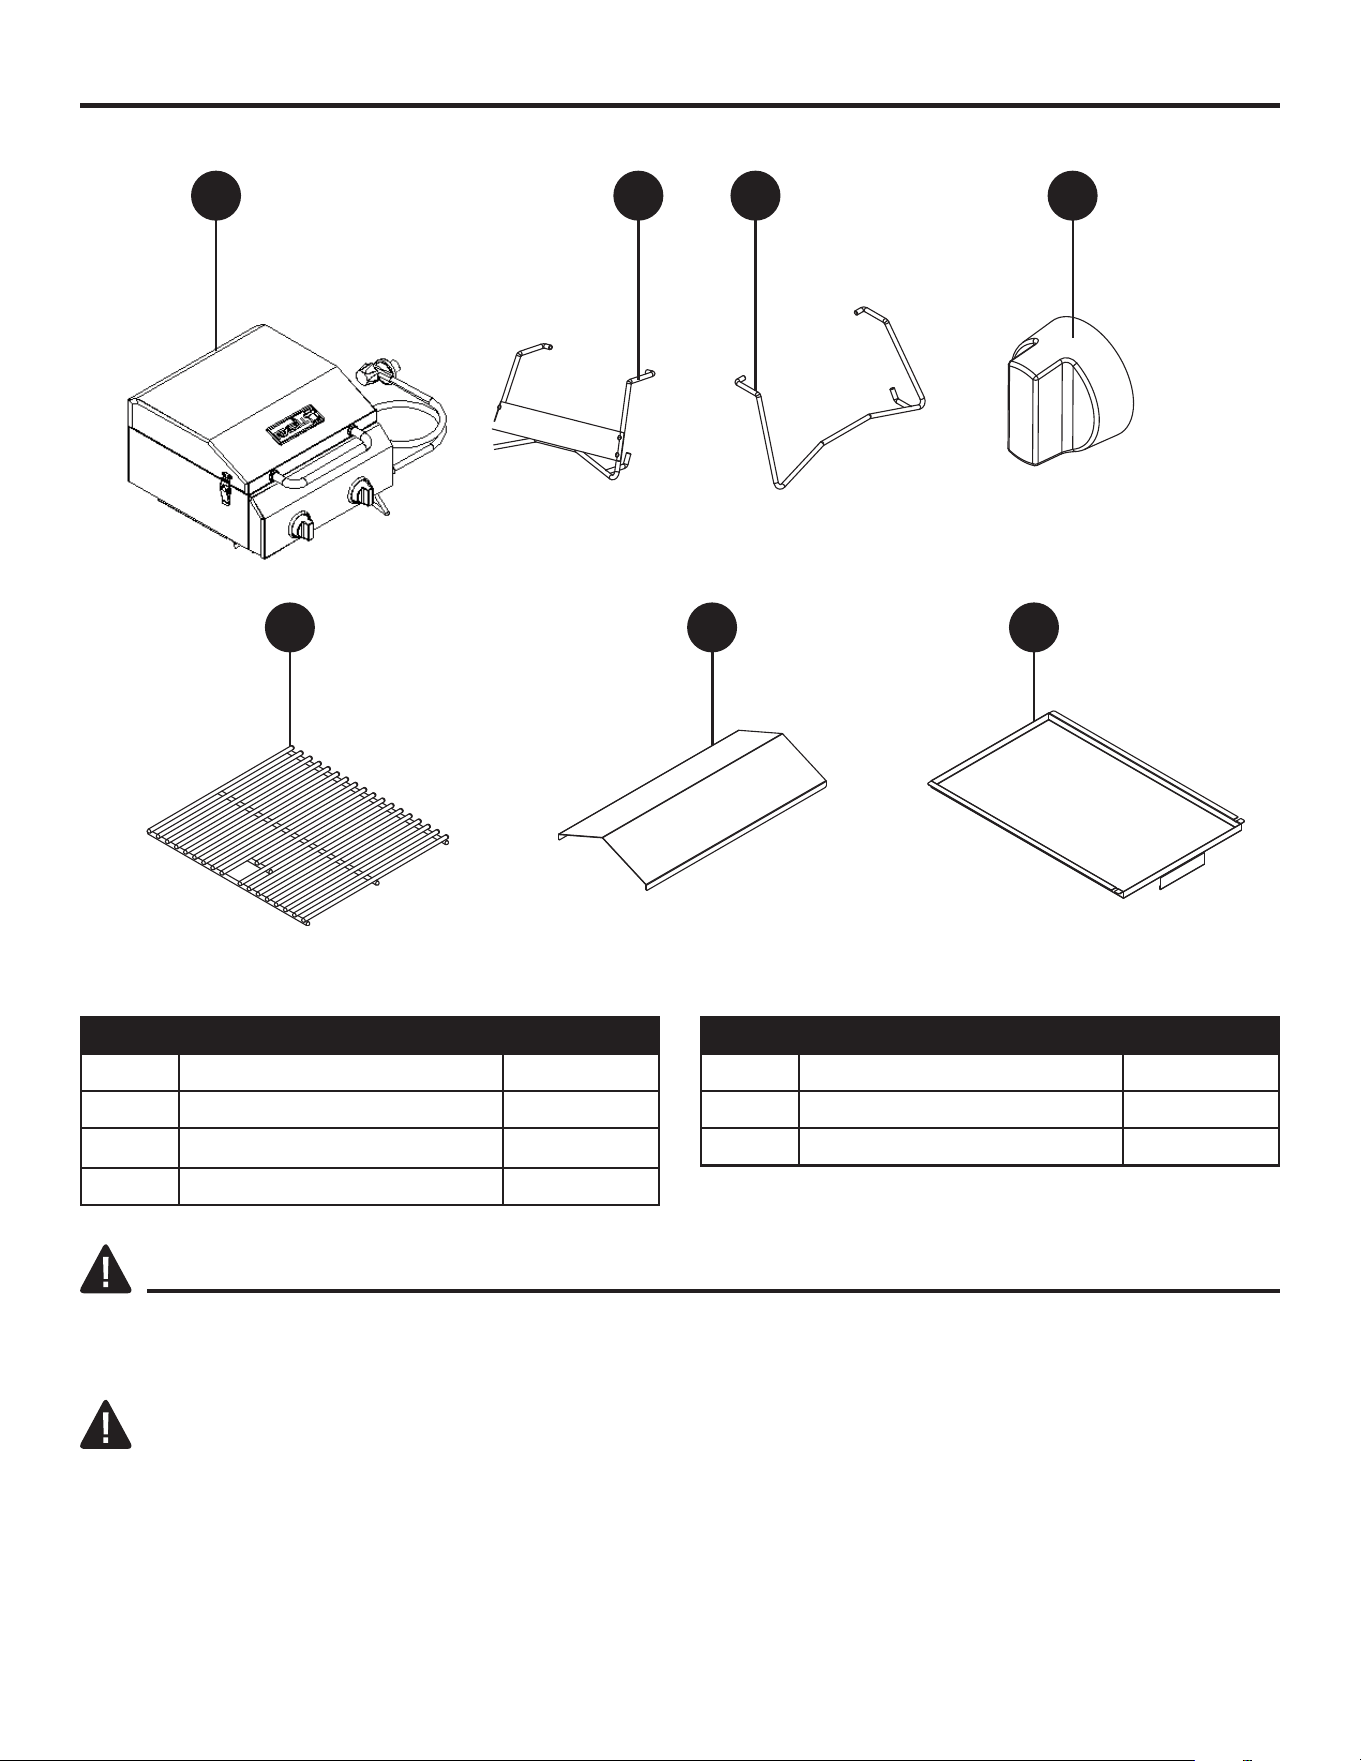
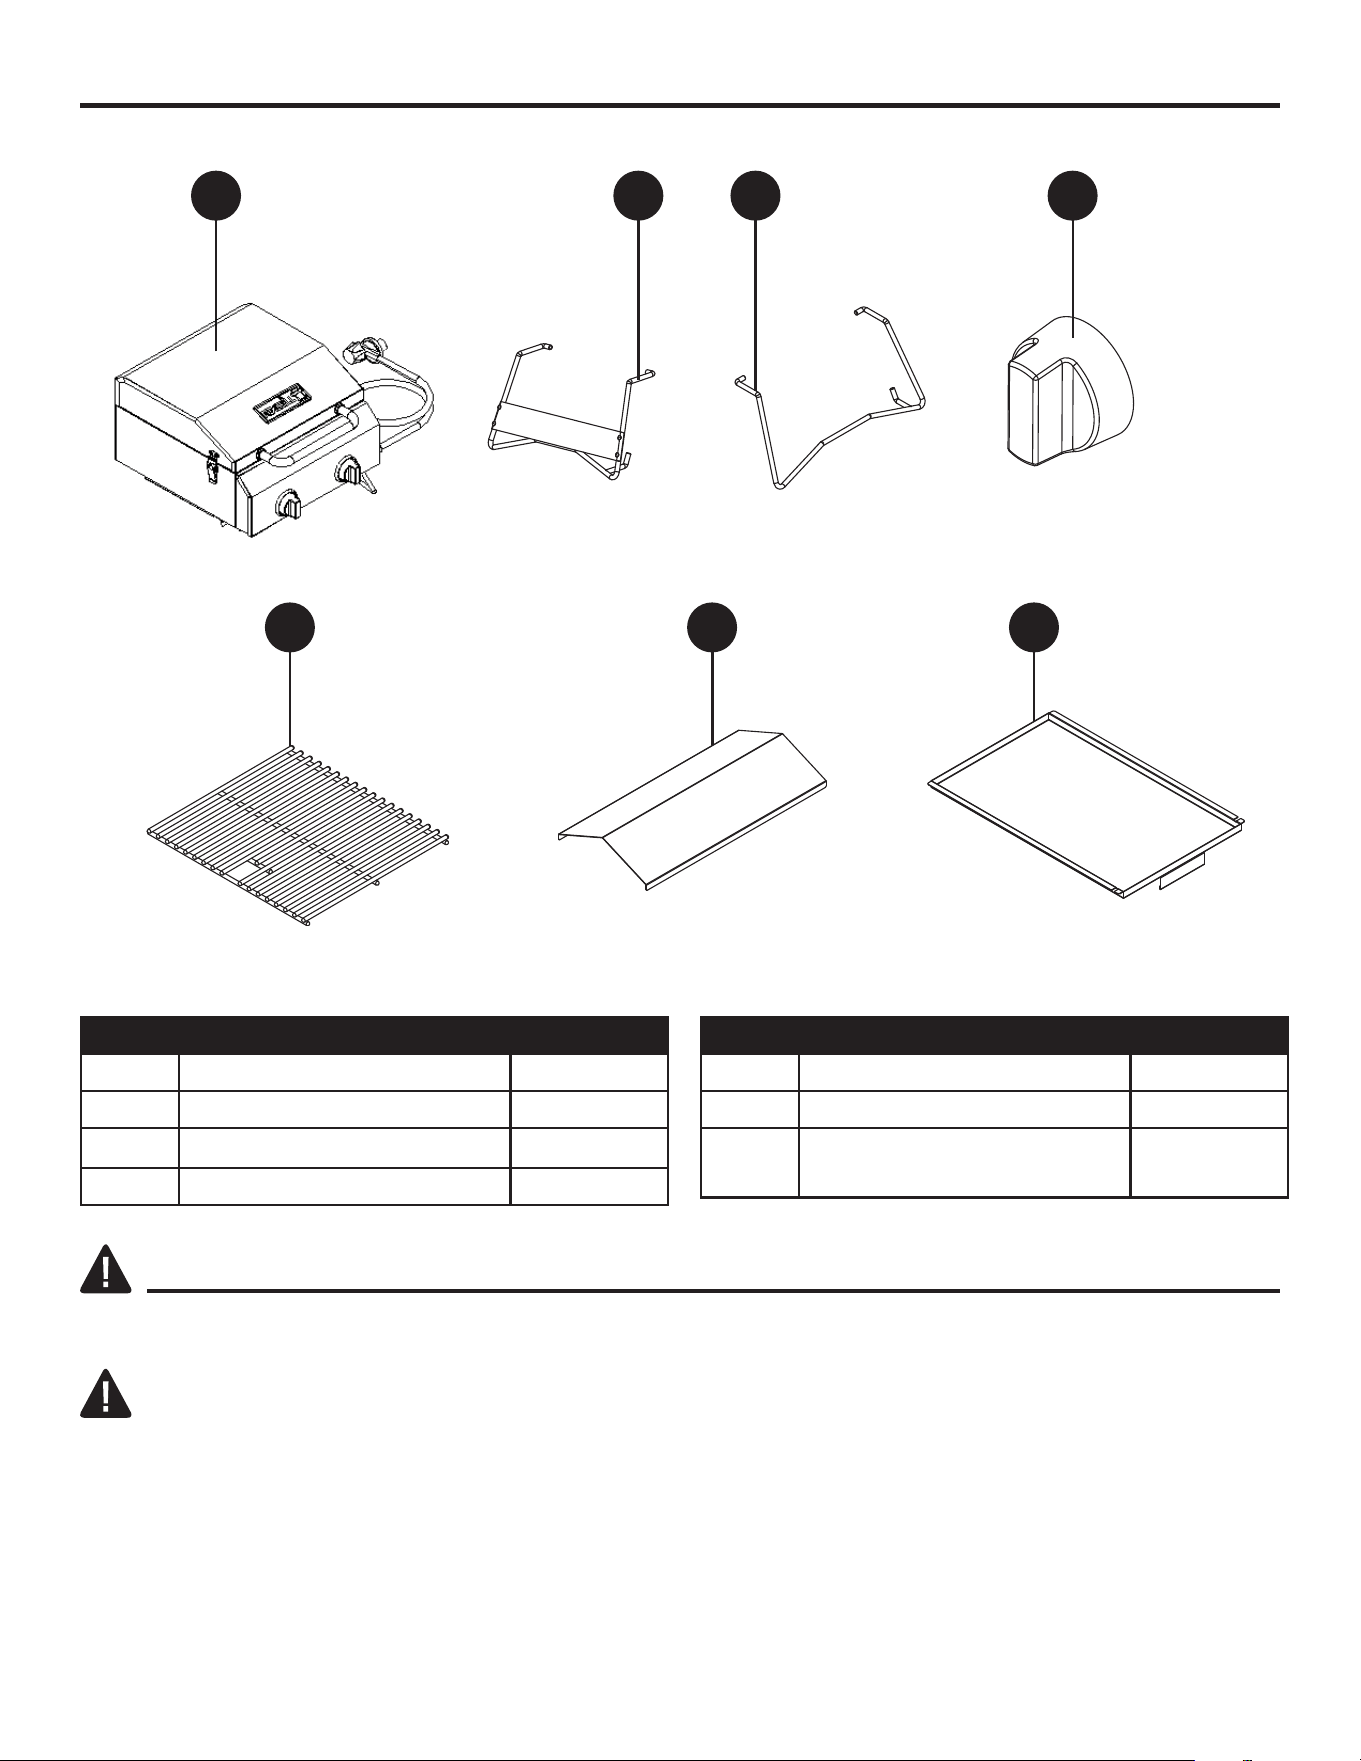
PACKAGE CONTENTS
PART DESCRIPTION QUANTITY
A Grill 1
B Left leg 1
C Right leg 1
D Knob 2
PART DESCRIPTION QUANTITY
E Cooking grid 1
F Flame tamer 2
G Grease tray 1
F GE
A B DC
SAFETY INFORMATION
Please read and understand this entire manual before attempting to assemble, operate or install the
product.
DANGER
If you smell gas:
1. Shut off gas to the appliance.
2. Extinguishanyopename.
3. Open lid.
4. Ifodorcontinues,keepawayfromtheapplianceandimmediatelycallyourgassupplierorlocalre
department.
4
SAFETY INFORMATION
Failure to follow these instructions could result in re or explosion, which could cause property
damage, personal injury or death.
DANGER
•
NEVER operate this appliance unattended.
•
NEVER operate this appliance within 10 ft. (3 m) of any structure, combustible material or other gas
cylinder.
•
NEVERoperatethisappliancewithin25ft.(7.5m)ofanyammableliquid.
•
DO NOTllcookingvesselbeyondmaximumllline.
•
This appliance is not intended for and should never be used as a heater.
•
Ifareshouldoccur,keepawayfromtheapplianceandimmediatelycallyourredepartment.
DO NOTattempttoextinguishanoilorgreaserewithwater.
LP-gassupplycylindertobeusedmustbeconstructedandmarkedinaccordancewiththespecications
for LP-gas cylinders of the U.S. Department of Transportation (DOT) or the National Standard of Canada,
CANB339, Cylinders, Spheres and Tubes for the Transportation of Dangerous Goods.
DANGER
•
The installation must conform with local codes or, in the absence of local codes, with the National
Fuel Gas Codes, with the National Fuel Gas Code, ANSI Z223.1/NFPA 54, Storage and Handling of
LiqueedPetroleumGases,ANSI/NFPA58,ortheStandardforRecreationalVehicles,ANSIA119.2/
NFPA1192,andtheRecreationalVehicleCode,CSAZ240RV,asapplicable.
•
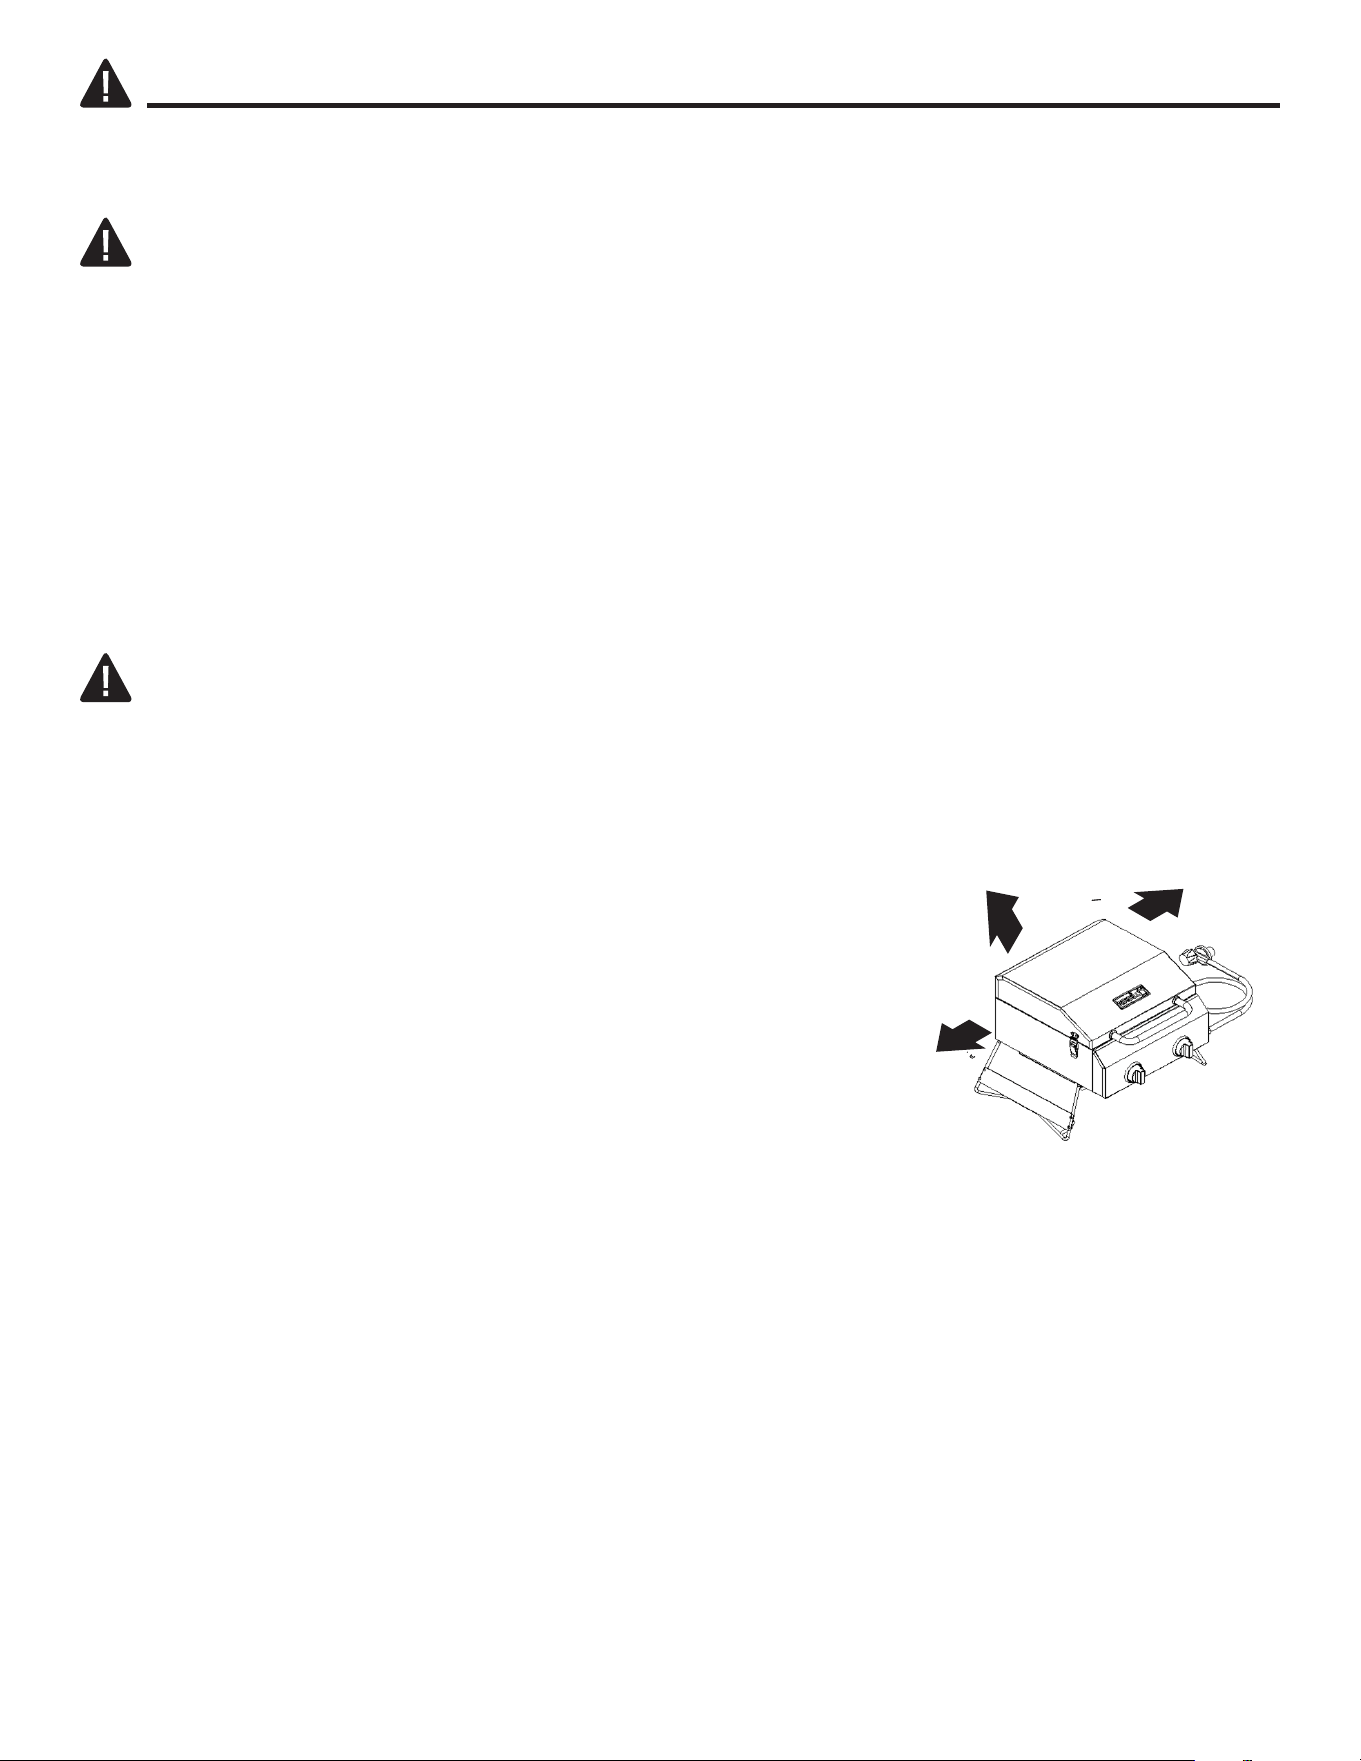
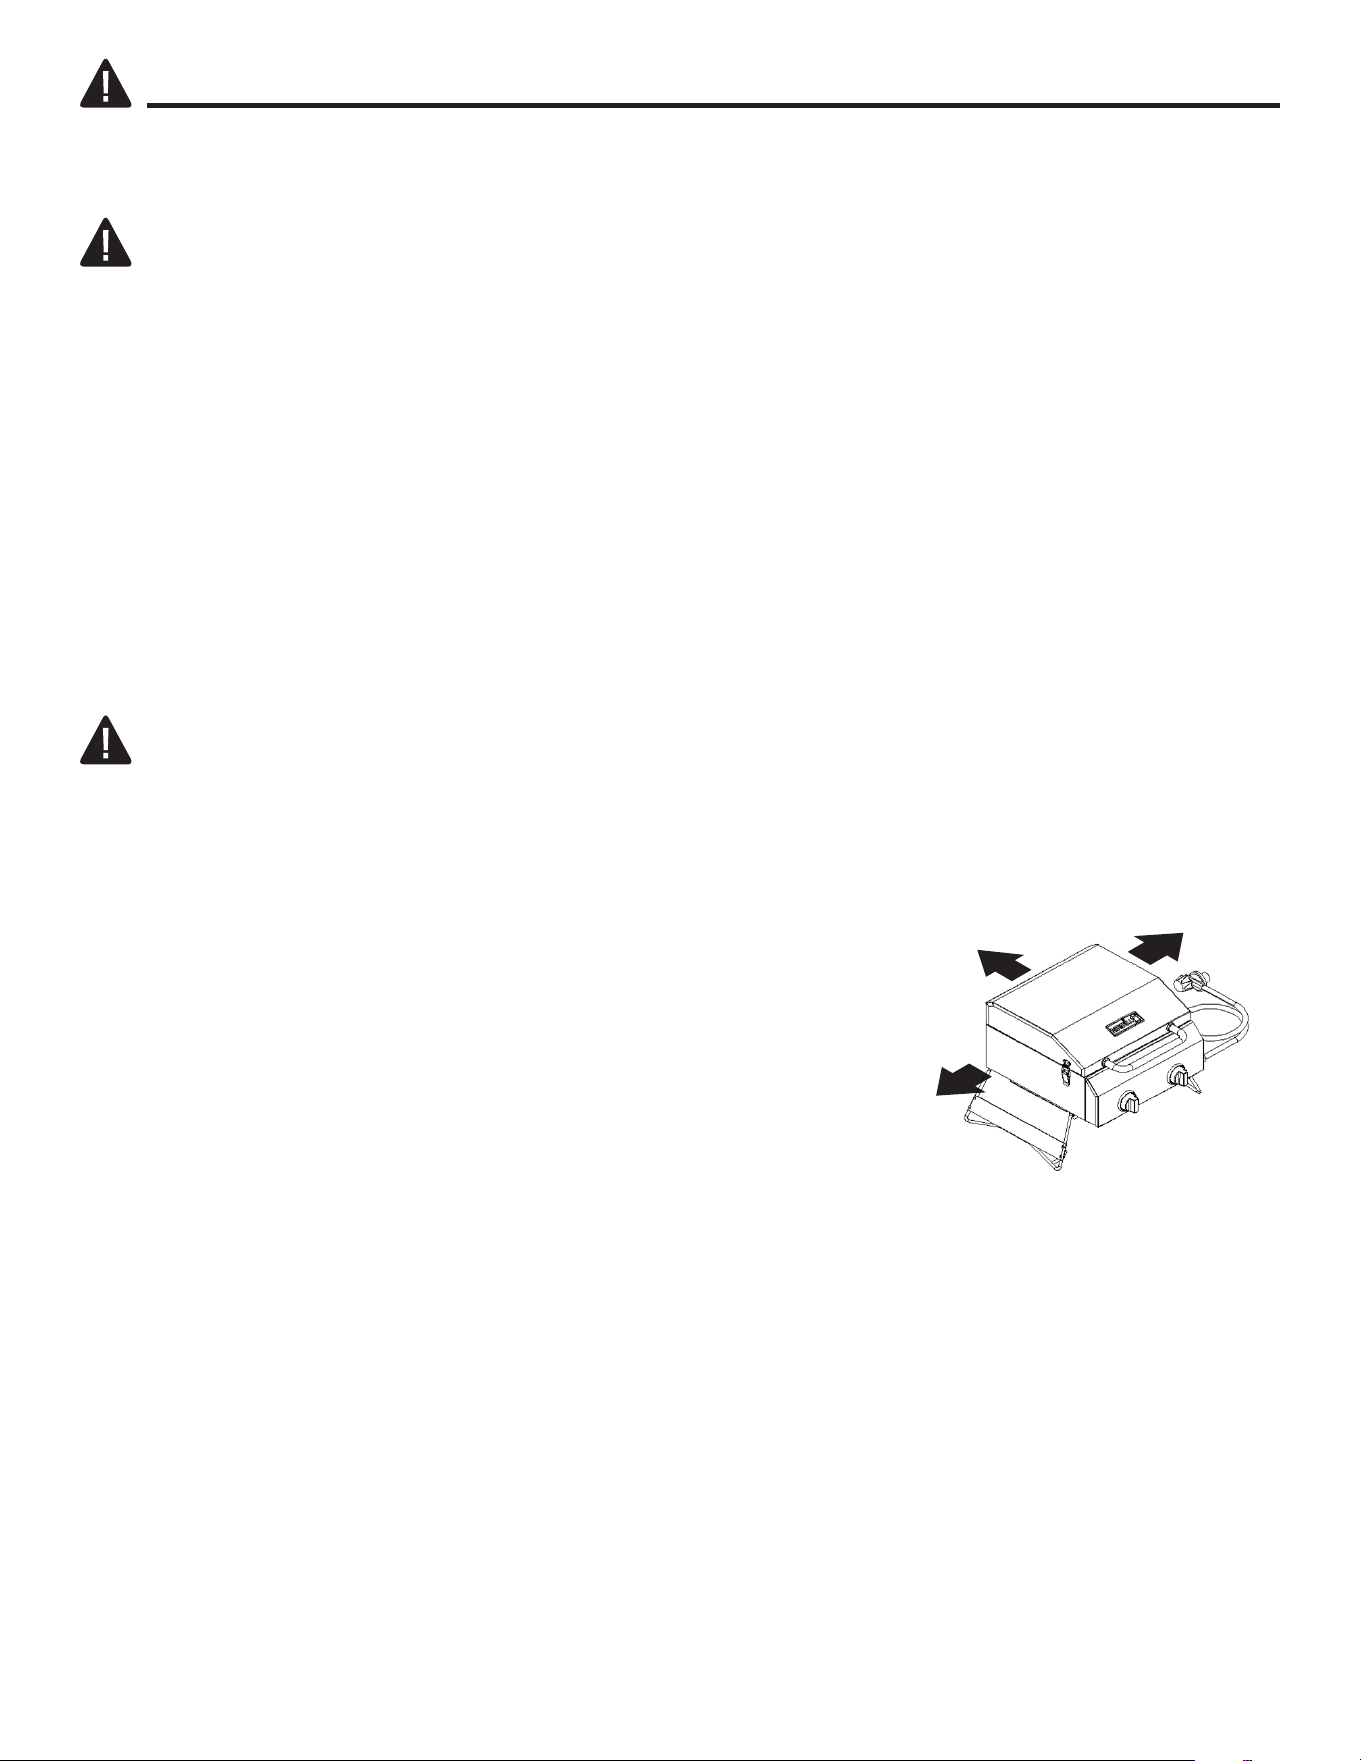
This table top grill is for outdoor use only. The grill should be operated in a well-ventilated space.
NEVER operate in an enclosed space, garage or building. Your grill is not intended to be installed in or
on recreational vehicles and/or boats.
•
Heatedliquidsremainatscaldingtemperatureslongafterthecooking
process. DO NOTtouchthecookingapplianceuntilliquidshave
cooled to 115°F (45°C) or less.
•
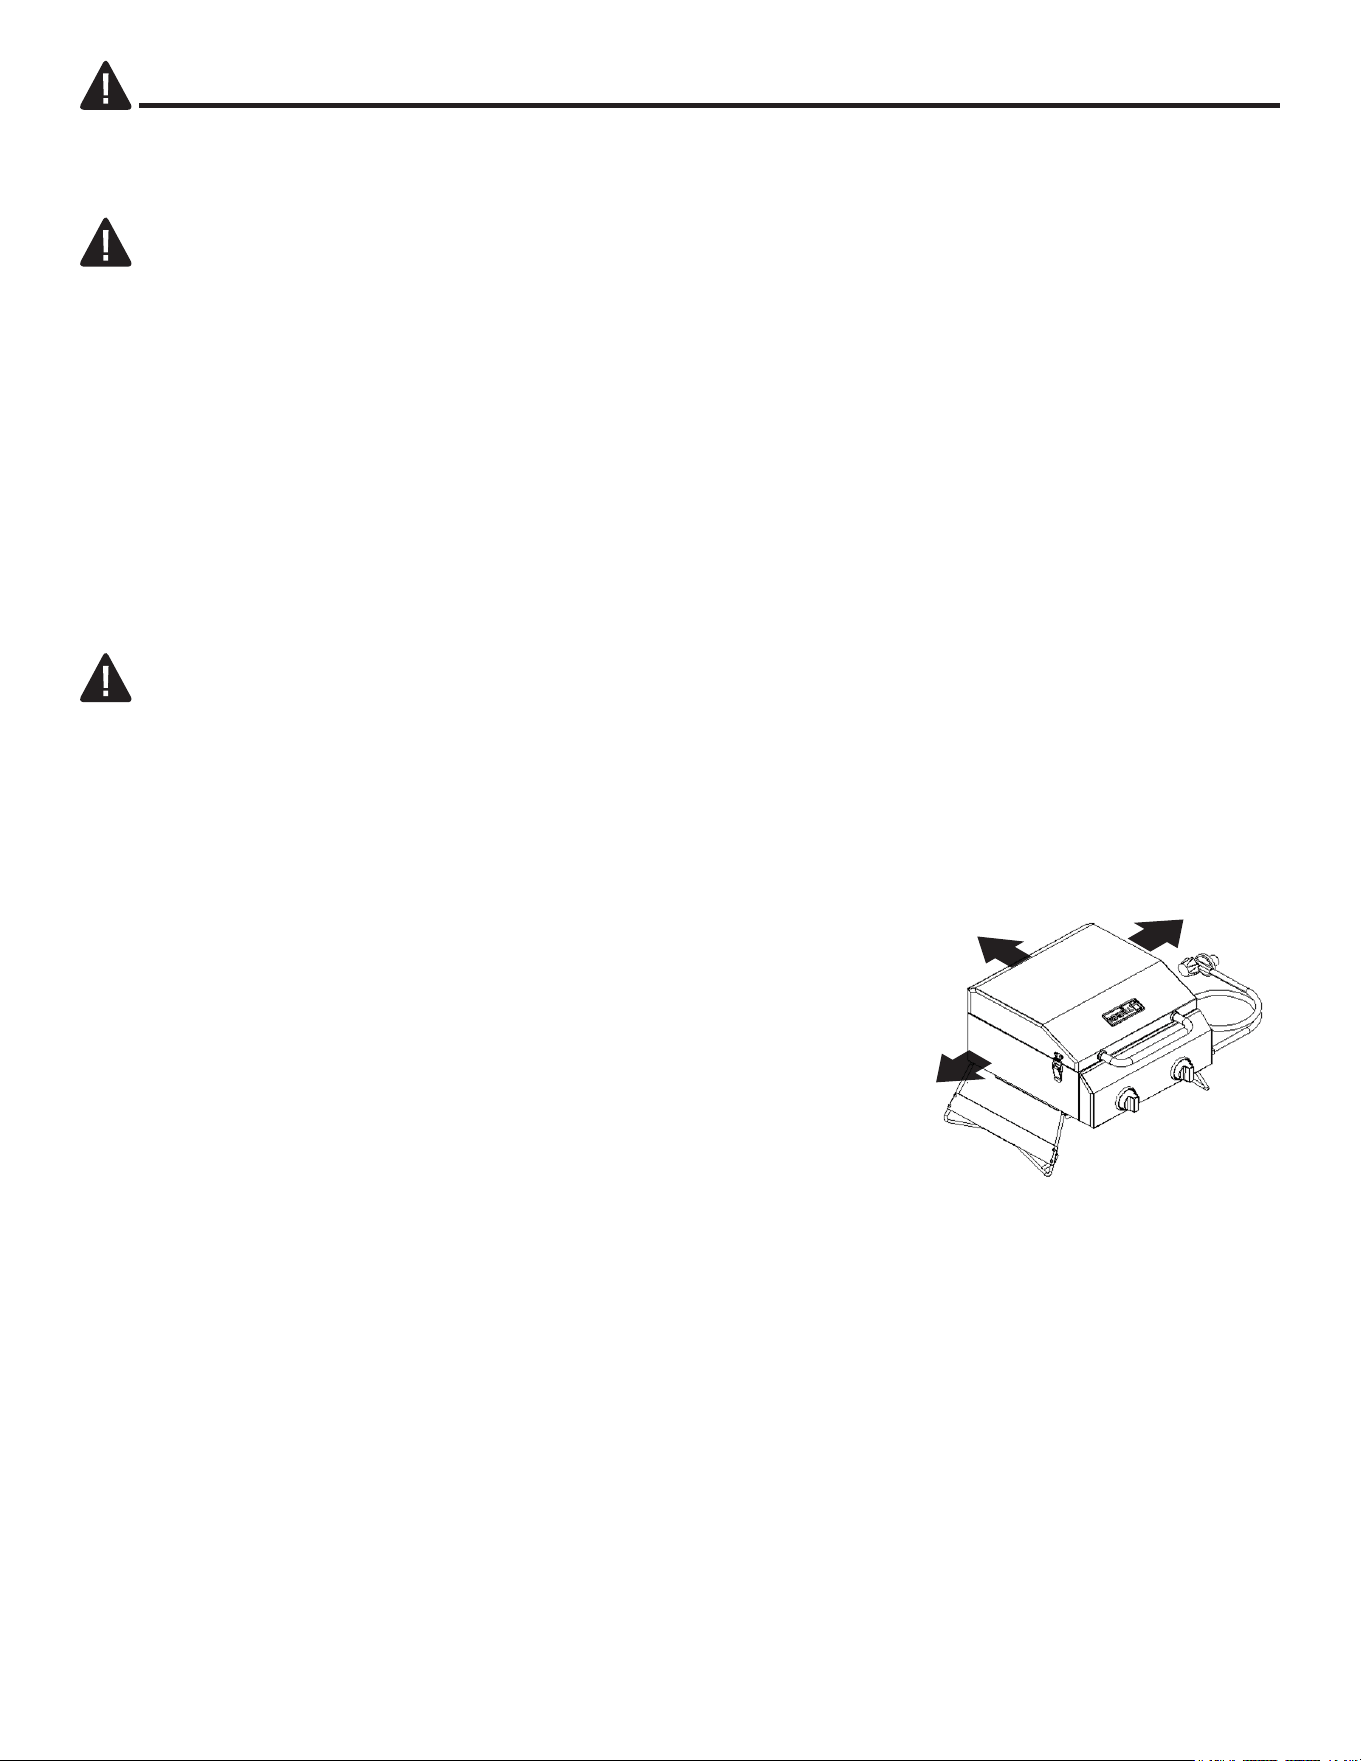
DO NOT install or use grill within 24 in. of combustible materials
from back and sides of grill. Grill shall not be located under overhead
surfaces(closedcarport,garage,porch,patio)thatcancatchre.
•
NEVER attempt to attach this grill to the self-contained LP gas system
of a camper trailer or motor home.
•
It is the responsibility of the assembler/owner to assemble, install and maintain the gas grill.
DO NOT let children and pets operate or play near your table top grill. Failure to follow these
instructions could result in serious personal injury and/or property damage.
•
Remove lid before lighting grill. When grill is not in use, turn off control knob on LP gas cylinder.
•
Carefully follow instructions in this manual for proper assembly and leak testing of your grill.
DO NOT use grill until leak checked. If a leak is detected at any time, it must be stopped and corrected
before using grill further.
•
Appliance area should be kept clear and free from combustible materials, gasoline, bottled gas in any
formandotherammablevaporsandliquids.DO NOTobstructowofcombustionandventilationair.
•
NEVER try to light grill with lid closed! Buildup of gases is very dangerous and could cause an
explosion.
•
Keep any electrical cord or fuel supply hose away from any heated surfaces.
5
SAFETY INFORMATION
•
Propaneisaammablegasandimproperhandlingmayresultinexplosionand/orreandserious
accident or injury.
•
This appliance will be hot during and after use. Use insulated oven mitts or gloves
forprotectionfromhotsurfacesorsplatterfromcookingliquids.
•
DO NOT leave your grill unattended while in operation.
•
DO NOTusewhileundertheinuenceofdrugsoralcohol.
•
DO NOT store any spare LP (propane) cylinder, full or empty, under or near your grill.
•
This appliance is not intended for commercial use or rental.
•
The cylinder must be disconnected when the appliance is not in use.
Sometimes spiders and other small insects climb into the burner tube. The spiders spin webs, build
nests and lay eggs. The webs or nests can be very small, but they are very strong and can block the
owofgas.Cleanburnerpriortouseafterstoring,atthebeginningofgrillingseasonorafteraperiod
of one month not being used.
THE FUEL SYSTEM
The items in the fuel system are designed for operation with this grill. They must not be replaced with
any other brand. (See parts list for replacement items.)
GAS BURNER:
Thegasburnerisconstructedofstainlesssteelandshouldnotrequiremaintenance
other than inspection for insects/nests inside the air intake slots.
CAUTION
Thegaspressureregulatorprovidedwiththisappliancemustbeused.Thisregulatorisequippedwith
therequiredoriceandissetfortherequiredoutletpressureforthisappliance.Thiscombinationof
oricesizeandpressureregulationspecicationsprovidesthecookingperformanceintendedbythe
manufacturer. Substitution of regulator for any other device is dangerous and could result in serious
injury.
FUEL SUPPLY HOSE
The hose connected regulator provided with this appliance is 3 ft. long. Keep the fuel hose away from
any heated surface(s).
WARNING
PROPANE FUEL:
Propaneisaammablegas.Improperhandlingmayresultinanexplosionand/or
reandseriousaccidentorinjury.Thisgrillisdesignedtooperatewithpropane(LP)gasonlyandis
equippedwiththeproperoriceforpropanegas.
CAUTION
DO NOT
connect this grill with any gas supply other than propane. Propane gas is heavier than air
andsettlesinlowerareas.Makecertainadequateventilationisavailablewhenusingthegrill.The
gas cylinder may be stored outside in a well-ventilated area out of the reach of children when the grill
is not in use.
6
SAFETY INFORMATION
The LP gas cylinder shall be used only outdoors in a well-ventilated space and not in a building,
garage, or any other enclosed area. The table top grill may be stored indoors if the LP gas cylinder is
removed and stored outdoors. The LP gas cylinder (not included) is threaded for connection directly
to the gas regulator supplied with this appliance. Care should be taken when threading the cylinder
to the regulator to engage threads correctly to achieve the proper and intended connection. When
disconnecting or connecting the gas cylinder, be careful that the regulator does not strike the grill,
the ground, or any other surfaces. Replace the protective cap over the threaded cylinder connection
whenremovedfromgrill.Ifanydifcultyoccurswhenconnectingordisconnectingthecylindertothe
regulator assembly, contact your local gas supplier for assistance.
When re-connecting the LP gas cylinder to the regulator, be sure to hand-tighten until snug. This
connection should be inspected for damage and leak tested after each re-connection.
Todoaleaktest,makeasoapsolutionofonepartliquiddetergentandonepartwater.Youwillneed
aspraybottle,brush,orragtoapplythesolutiontothetting.Bubblesindicateleaks.
WARNING
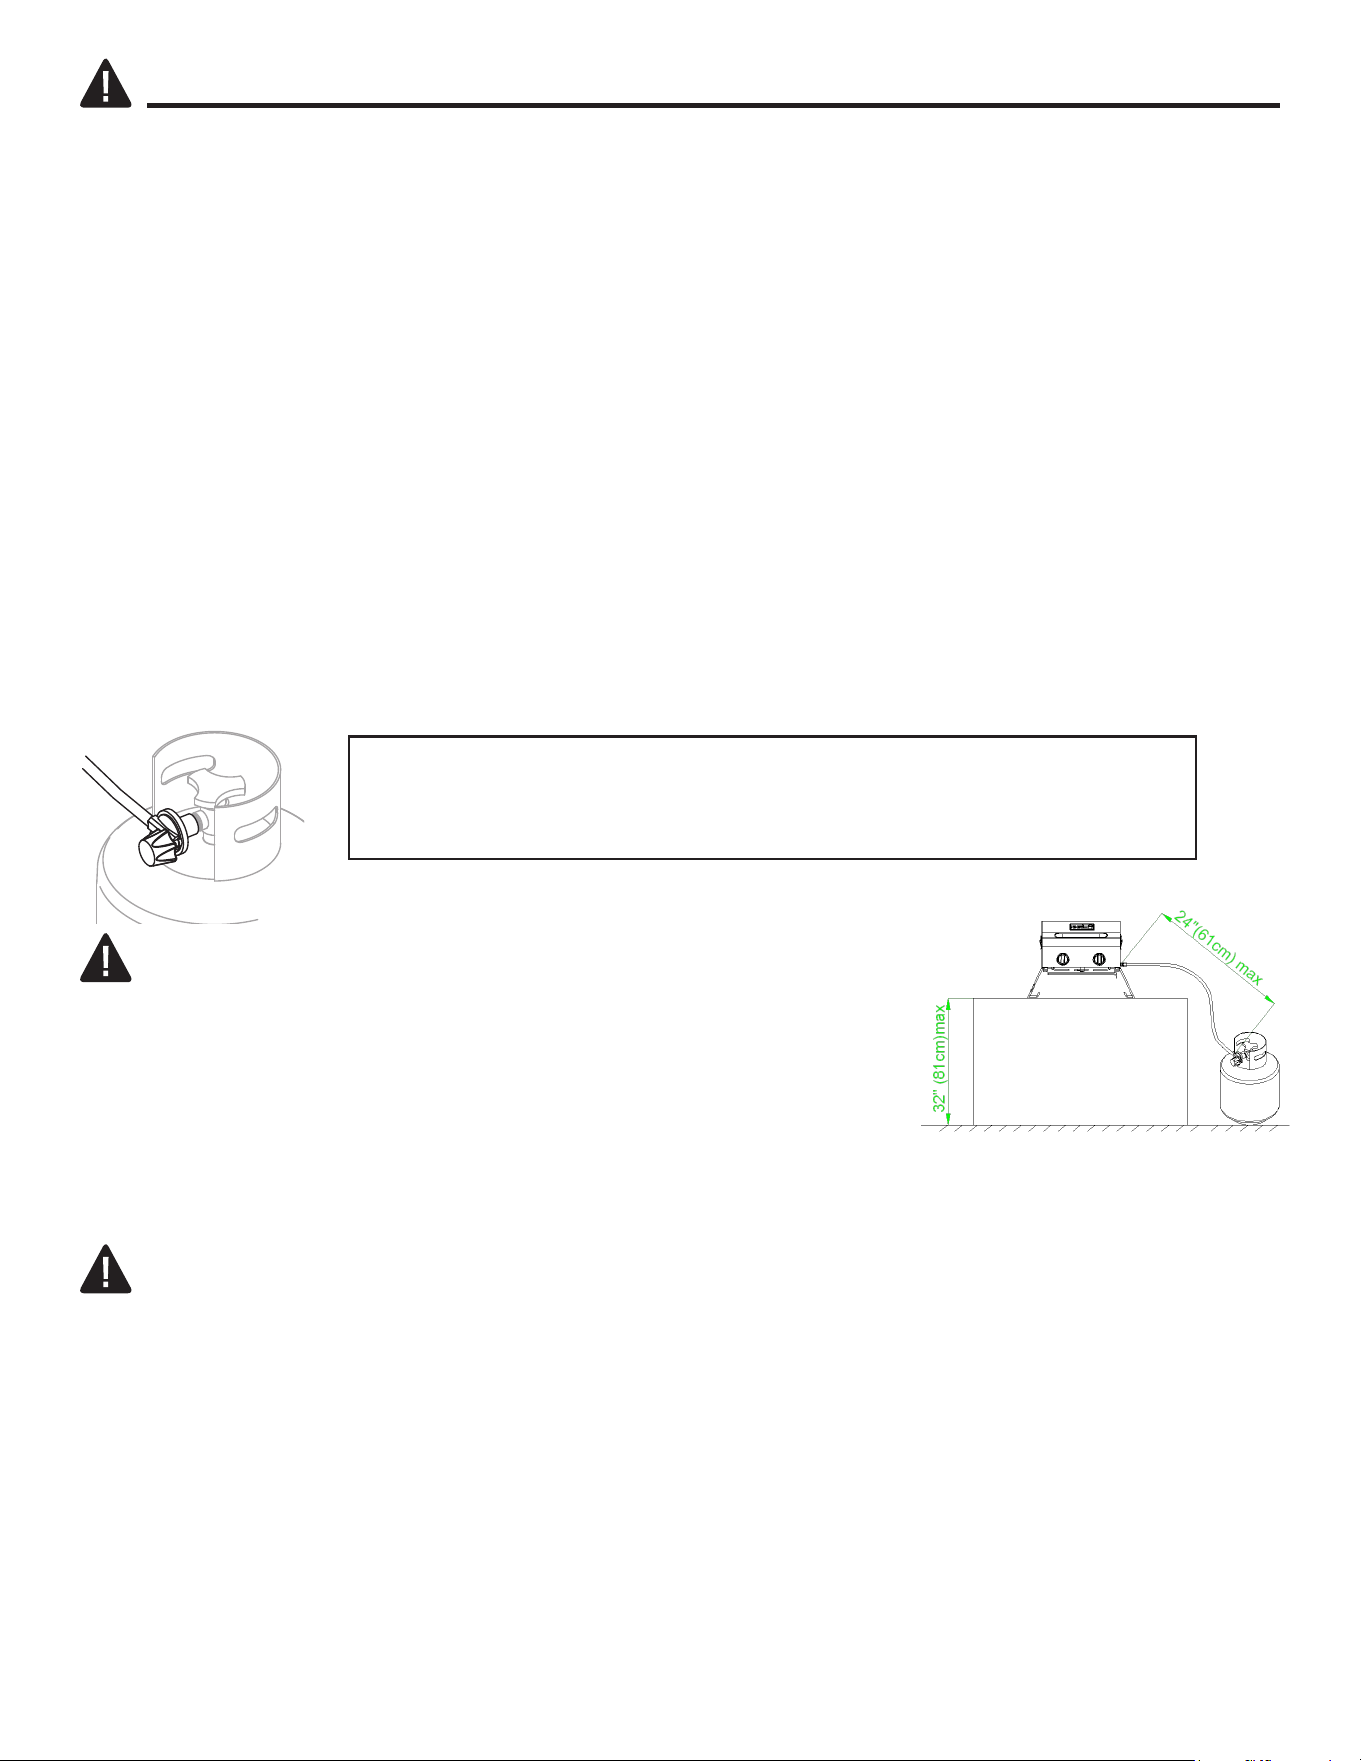
•
ALWAYS
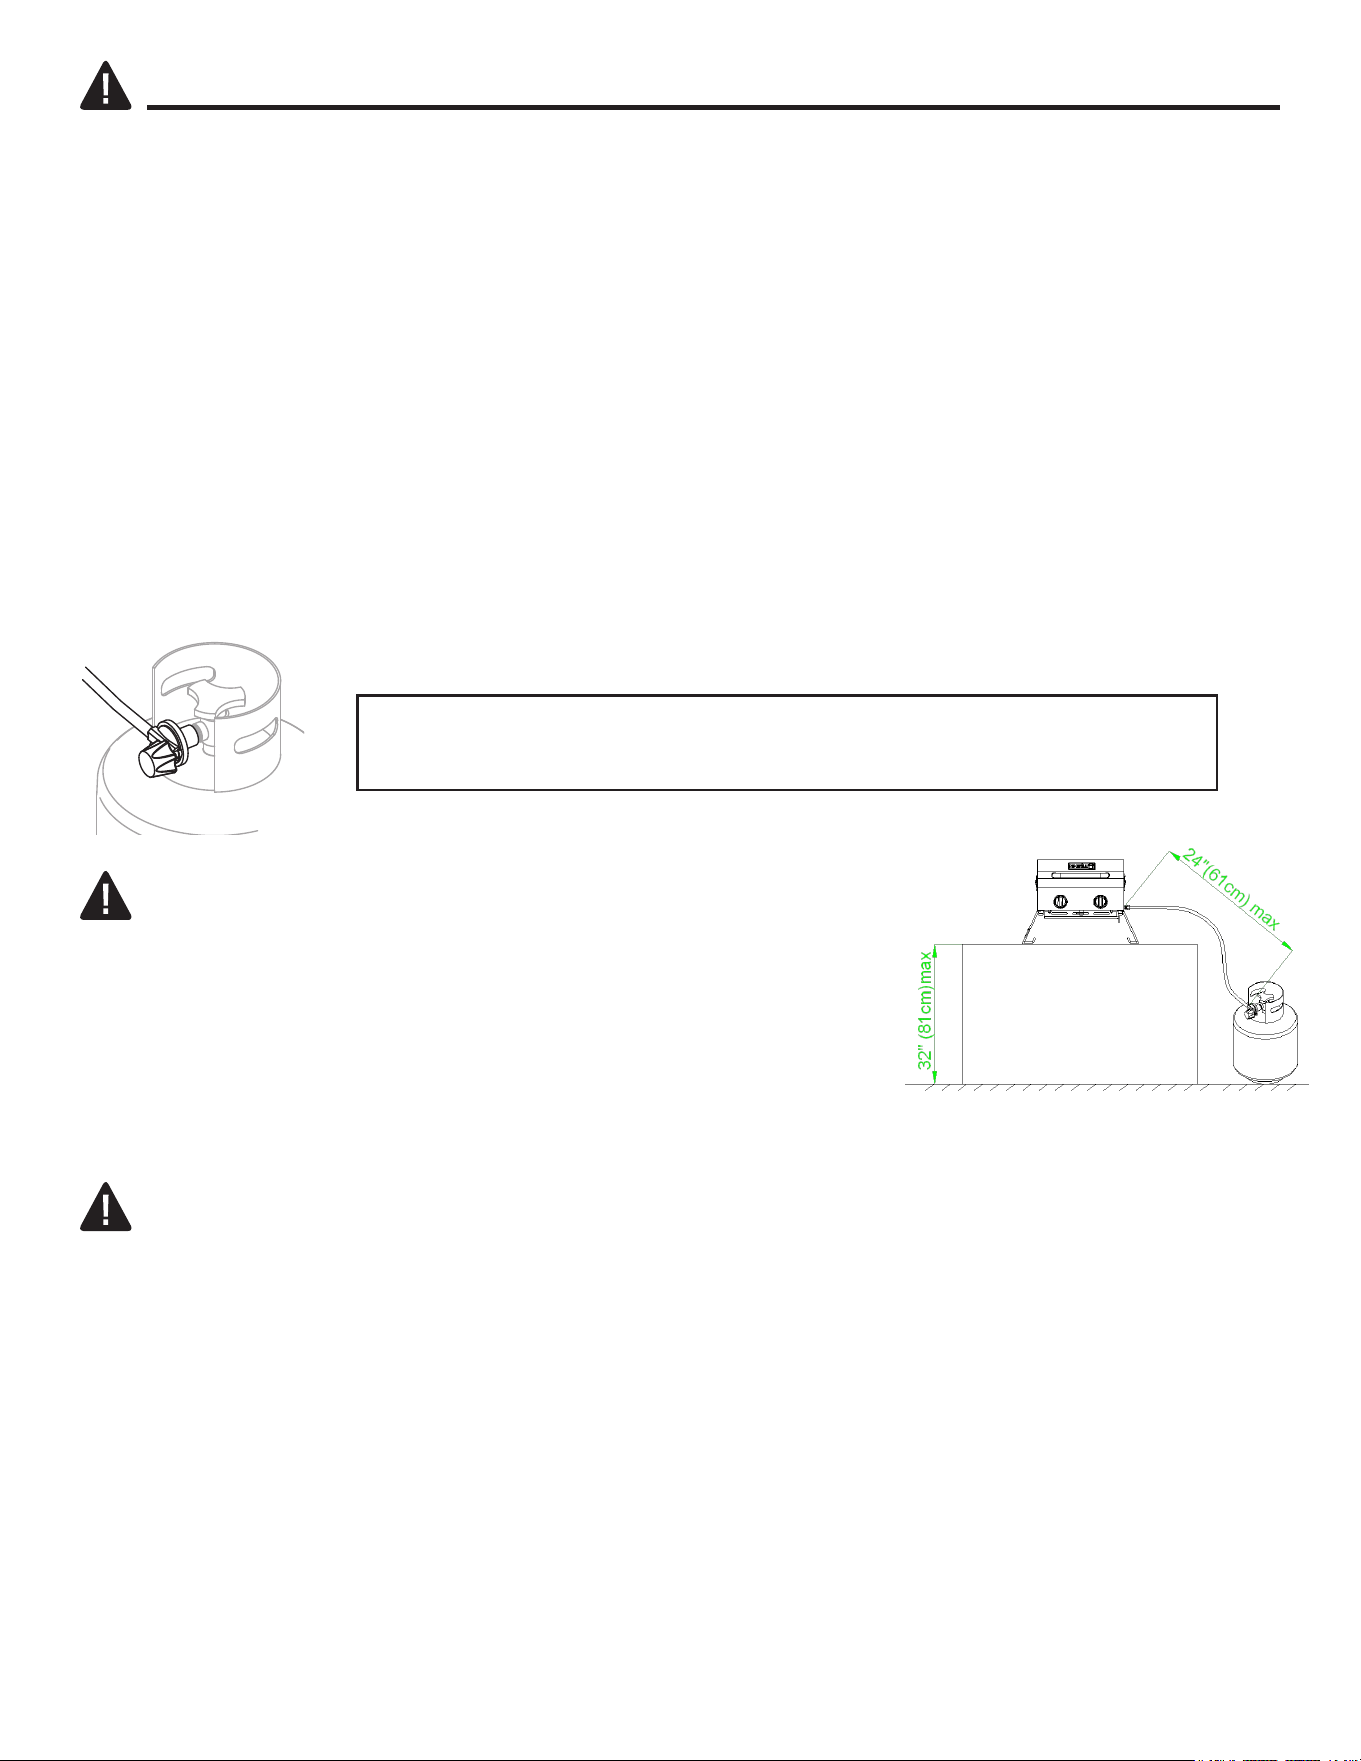
operate the grill on a tabletop, no higher than 32 in.
• Placethepropanetankonthegroundimmediatelyadjacenttothe
tabletop, no further than 24 in. from the grill.
• Failuretofollowtheseinstructionscouldcausethepropanetank
to overheat and vent propane which could ignite, causing serious
personalinjuriesorpropertydamage;and/orcreateatrippinghazard
with the gas hose or propane tank which could lead to the grill being
pulled off the tabletop, causing serious personal injuries or property damage.
PROPOSITION 65 WARNING
• Fuelsusedingasoroil-redappliancesandtheproductsofcombustionofsuchfuelscontain
chemicals known to the state of California to cause cancer, birth defects or other reproductive harm.
This warning is issued pursuant to California Health and Safety Code Sec. 25249.6.
KEEP THESE INSTRUCTIONS FOR FUTURE REFERENCE.
Checkallgassupplyttingsforleaksbeforeeachuse.DO NOT use
the grill until all connections have been checked and do not leak.
7
PREPARATION
ASSEMBLY INSTRUCTIONS
Before beginning assembly of product, make sure all parts are present. Compare parts with package
contents list. If any part is missing or damaged, do not attempt to assemble the product.
• Remove all the packing materials from the grill.
Estimated Assembly Time: 5 minutes
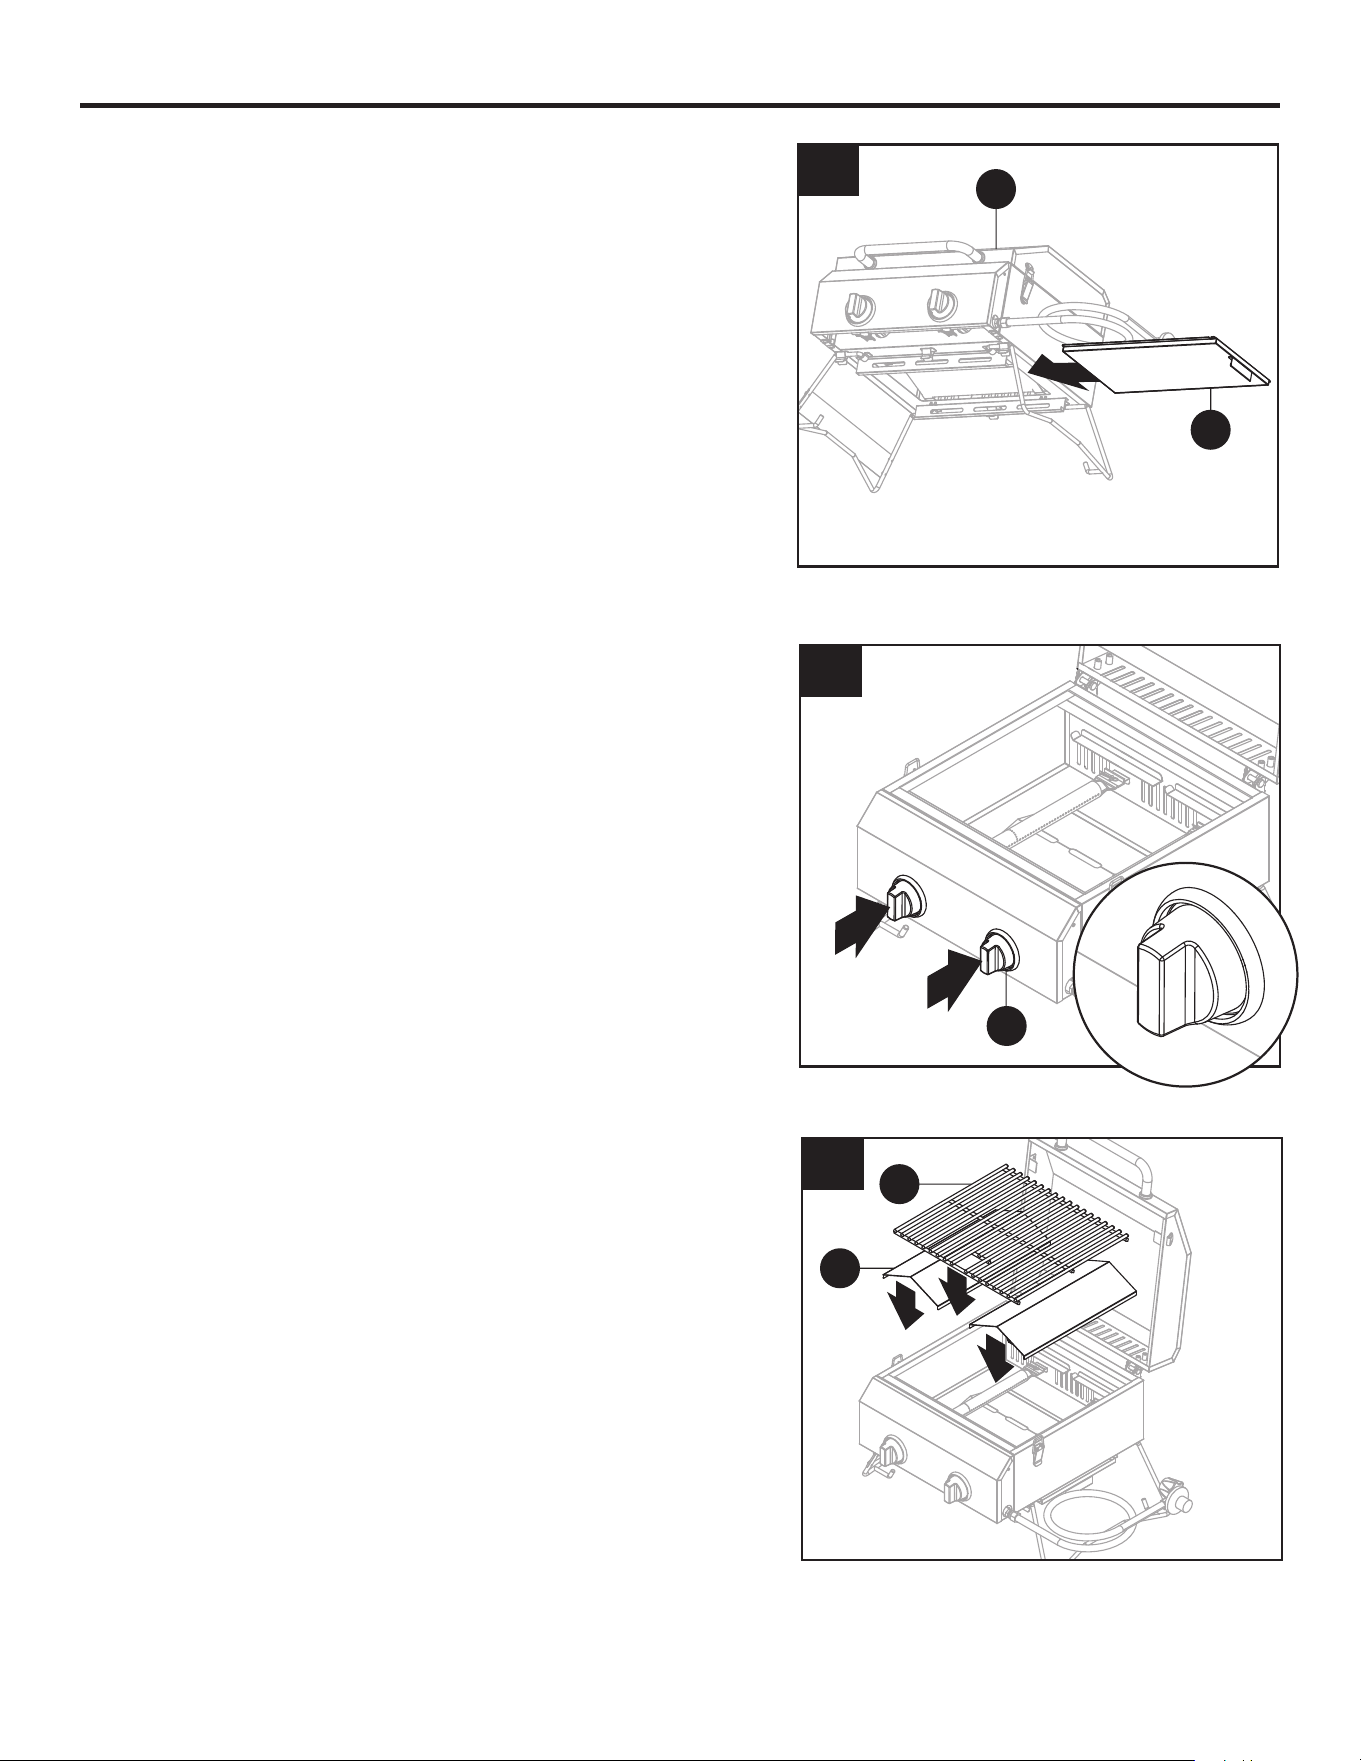
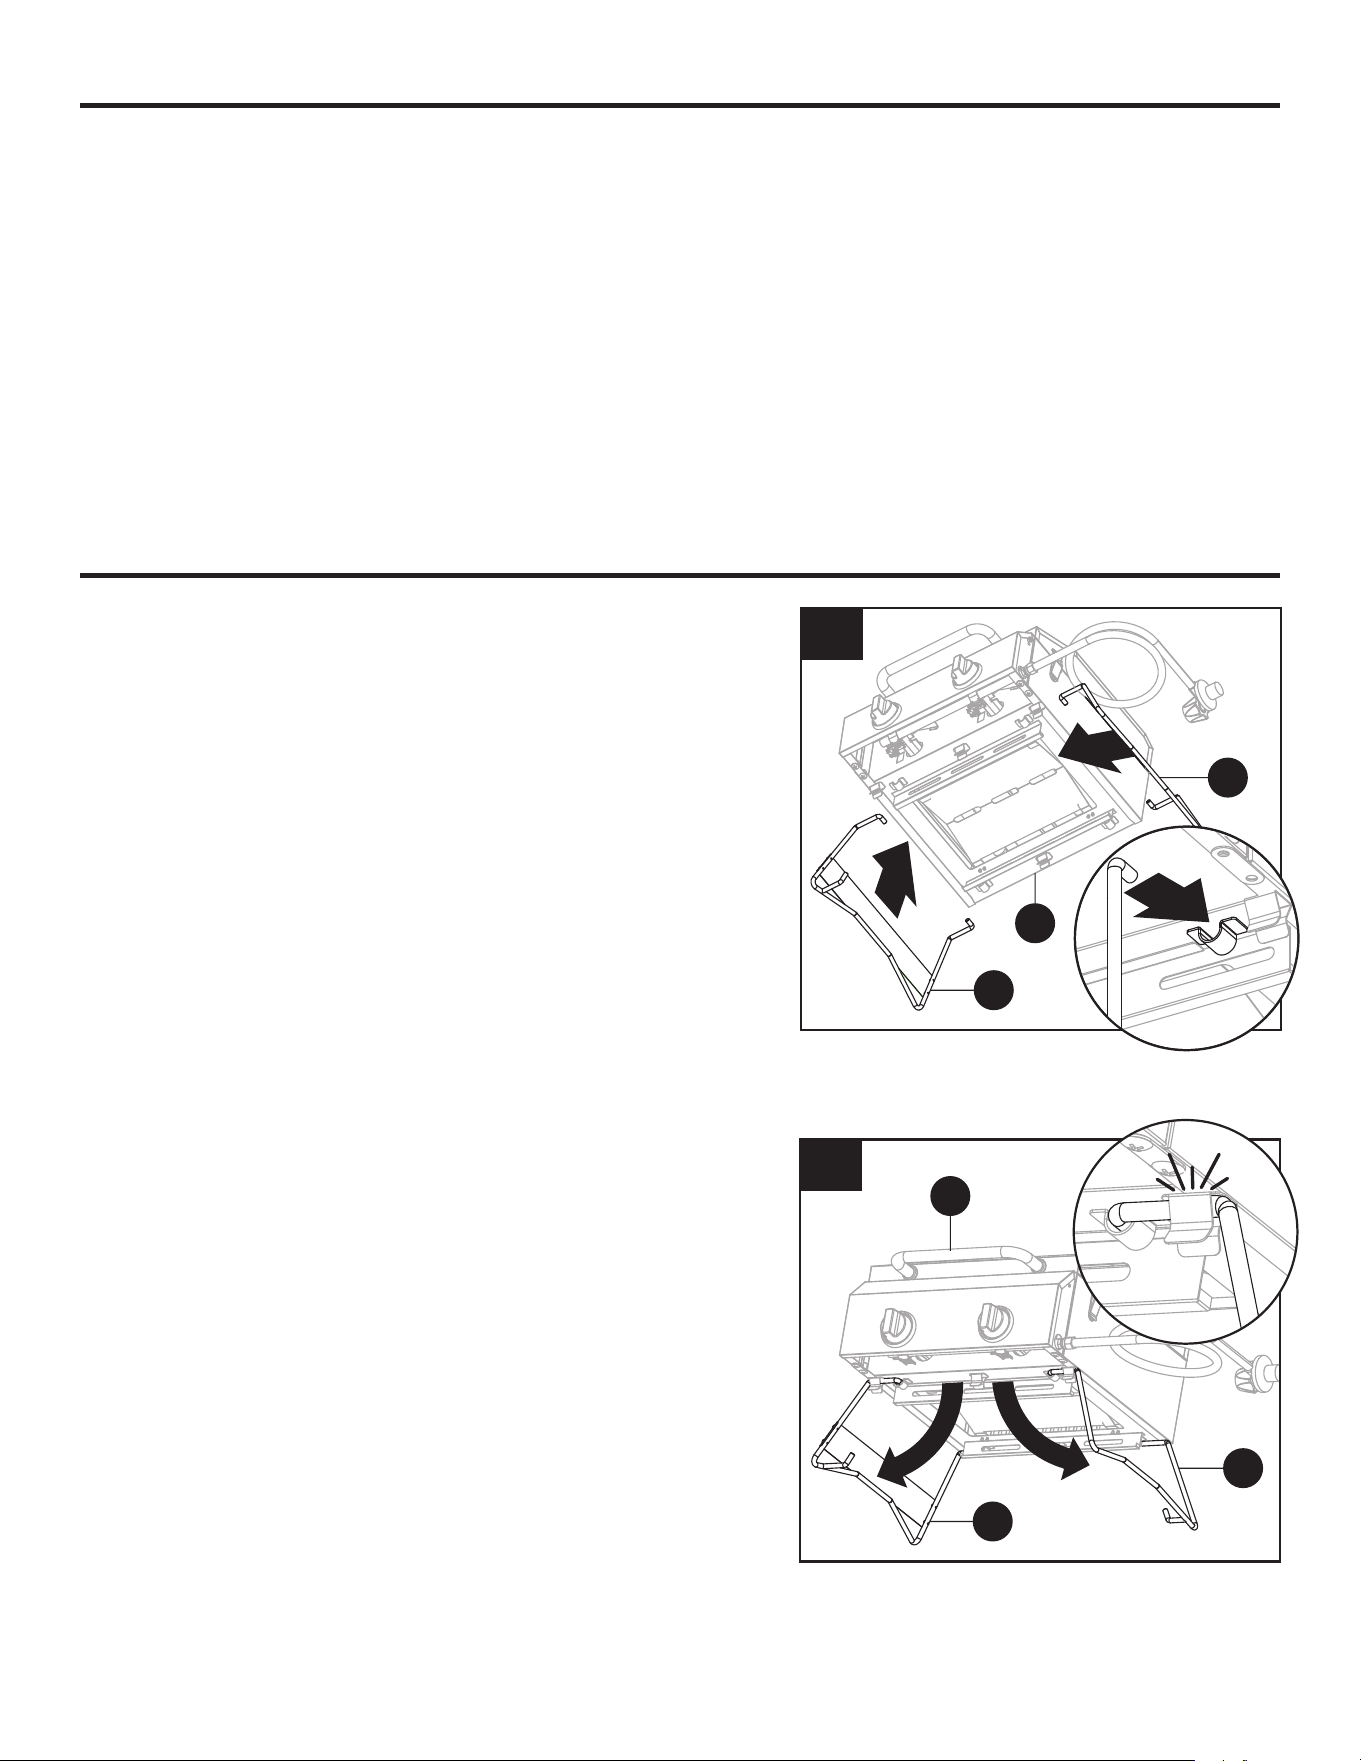
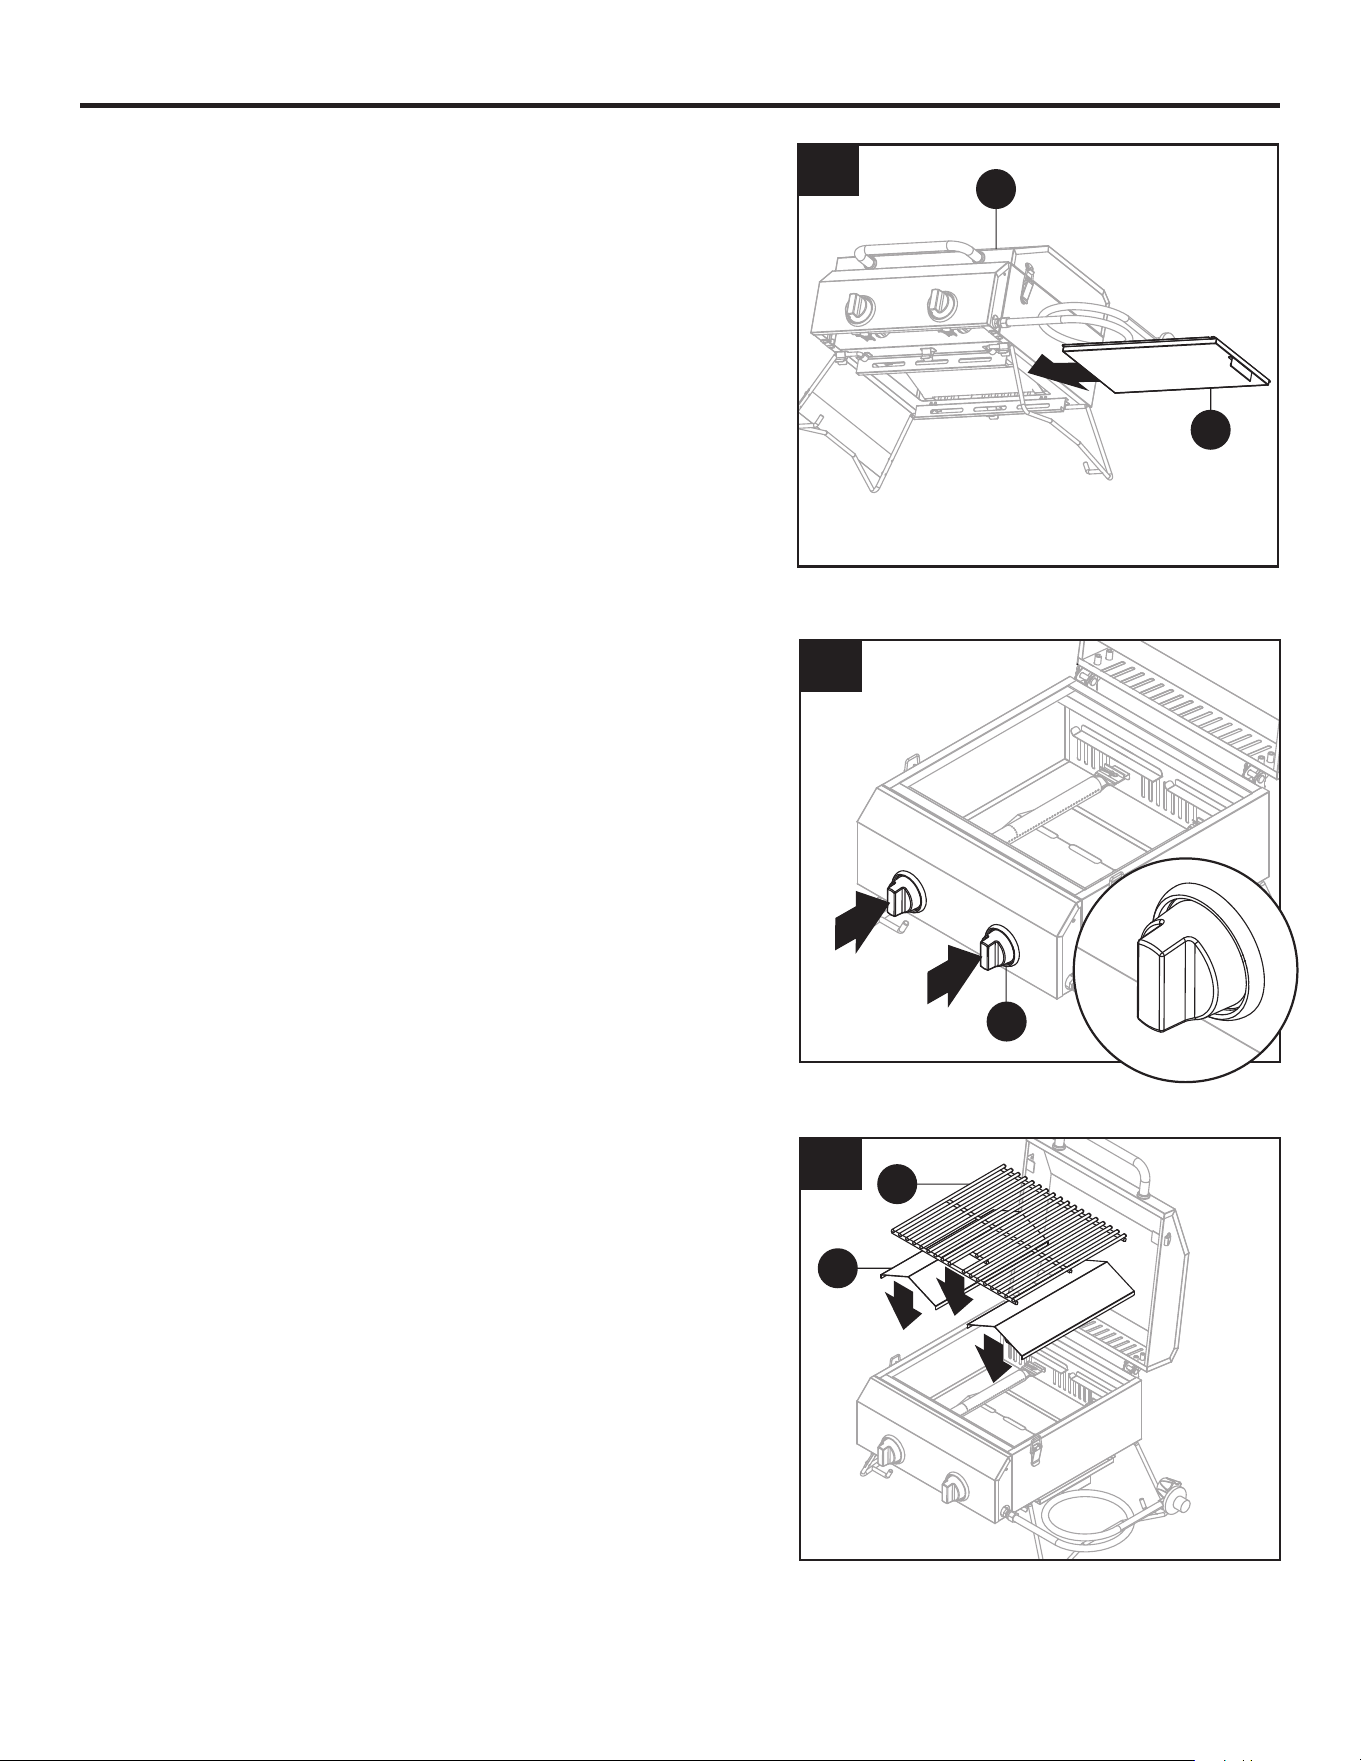
2. Unfold the left leg (B) and right leg (C) to lock them
into place.
1. Insert the left leg (B) and the right leg (C) into the
brackets on the bottom of the grill (A) as shown.
Note: With two hands, expand the foldable legs to
allow them to slide into the brackets.
1
B
C
A
2
B
C
A
8
ASSEMBLY INSTRUCTIONS
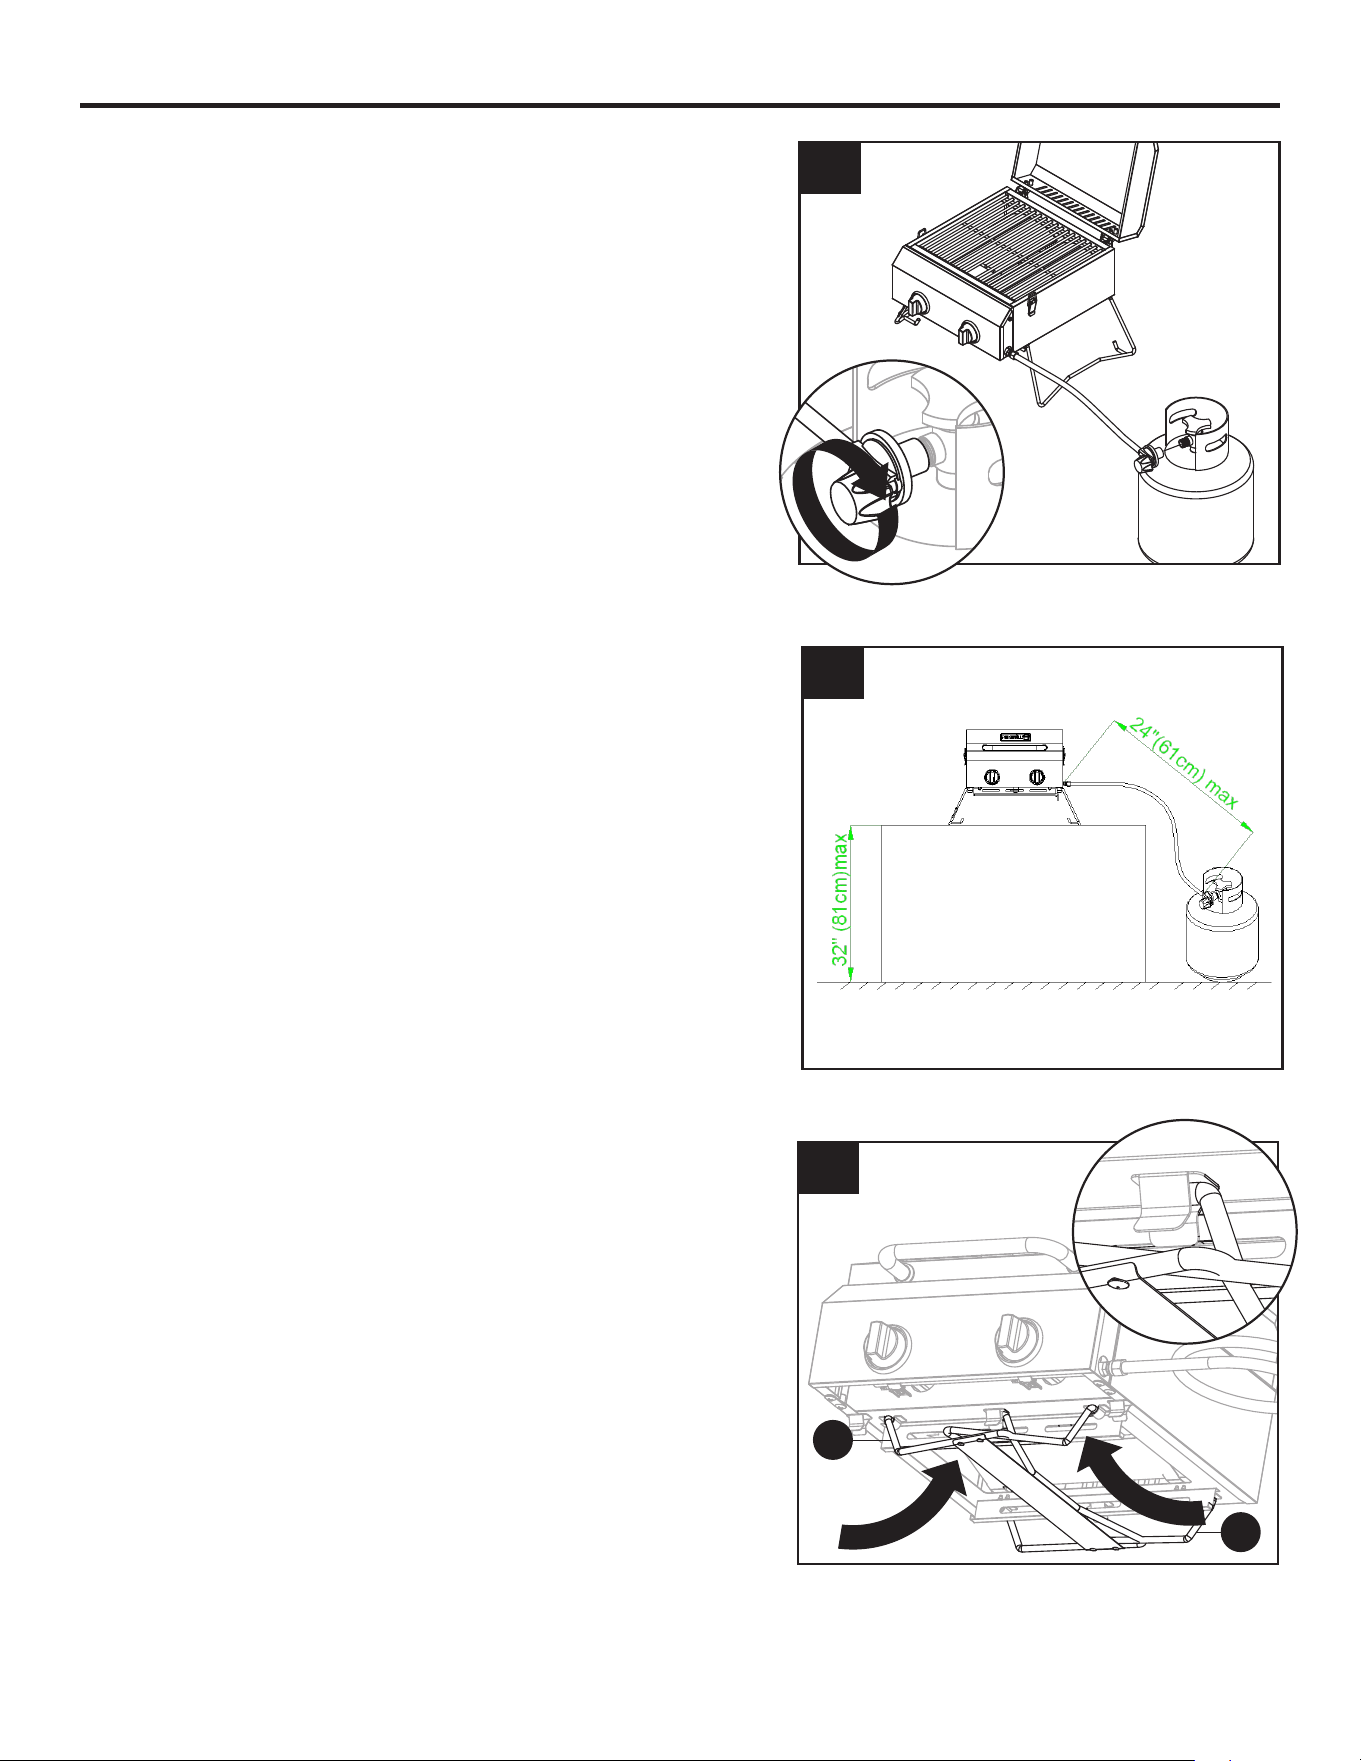
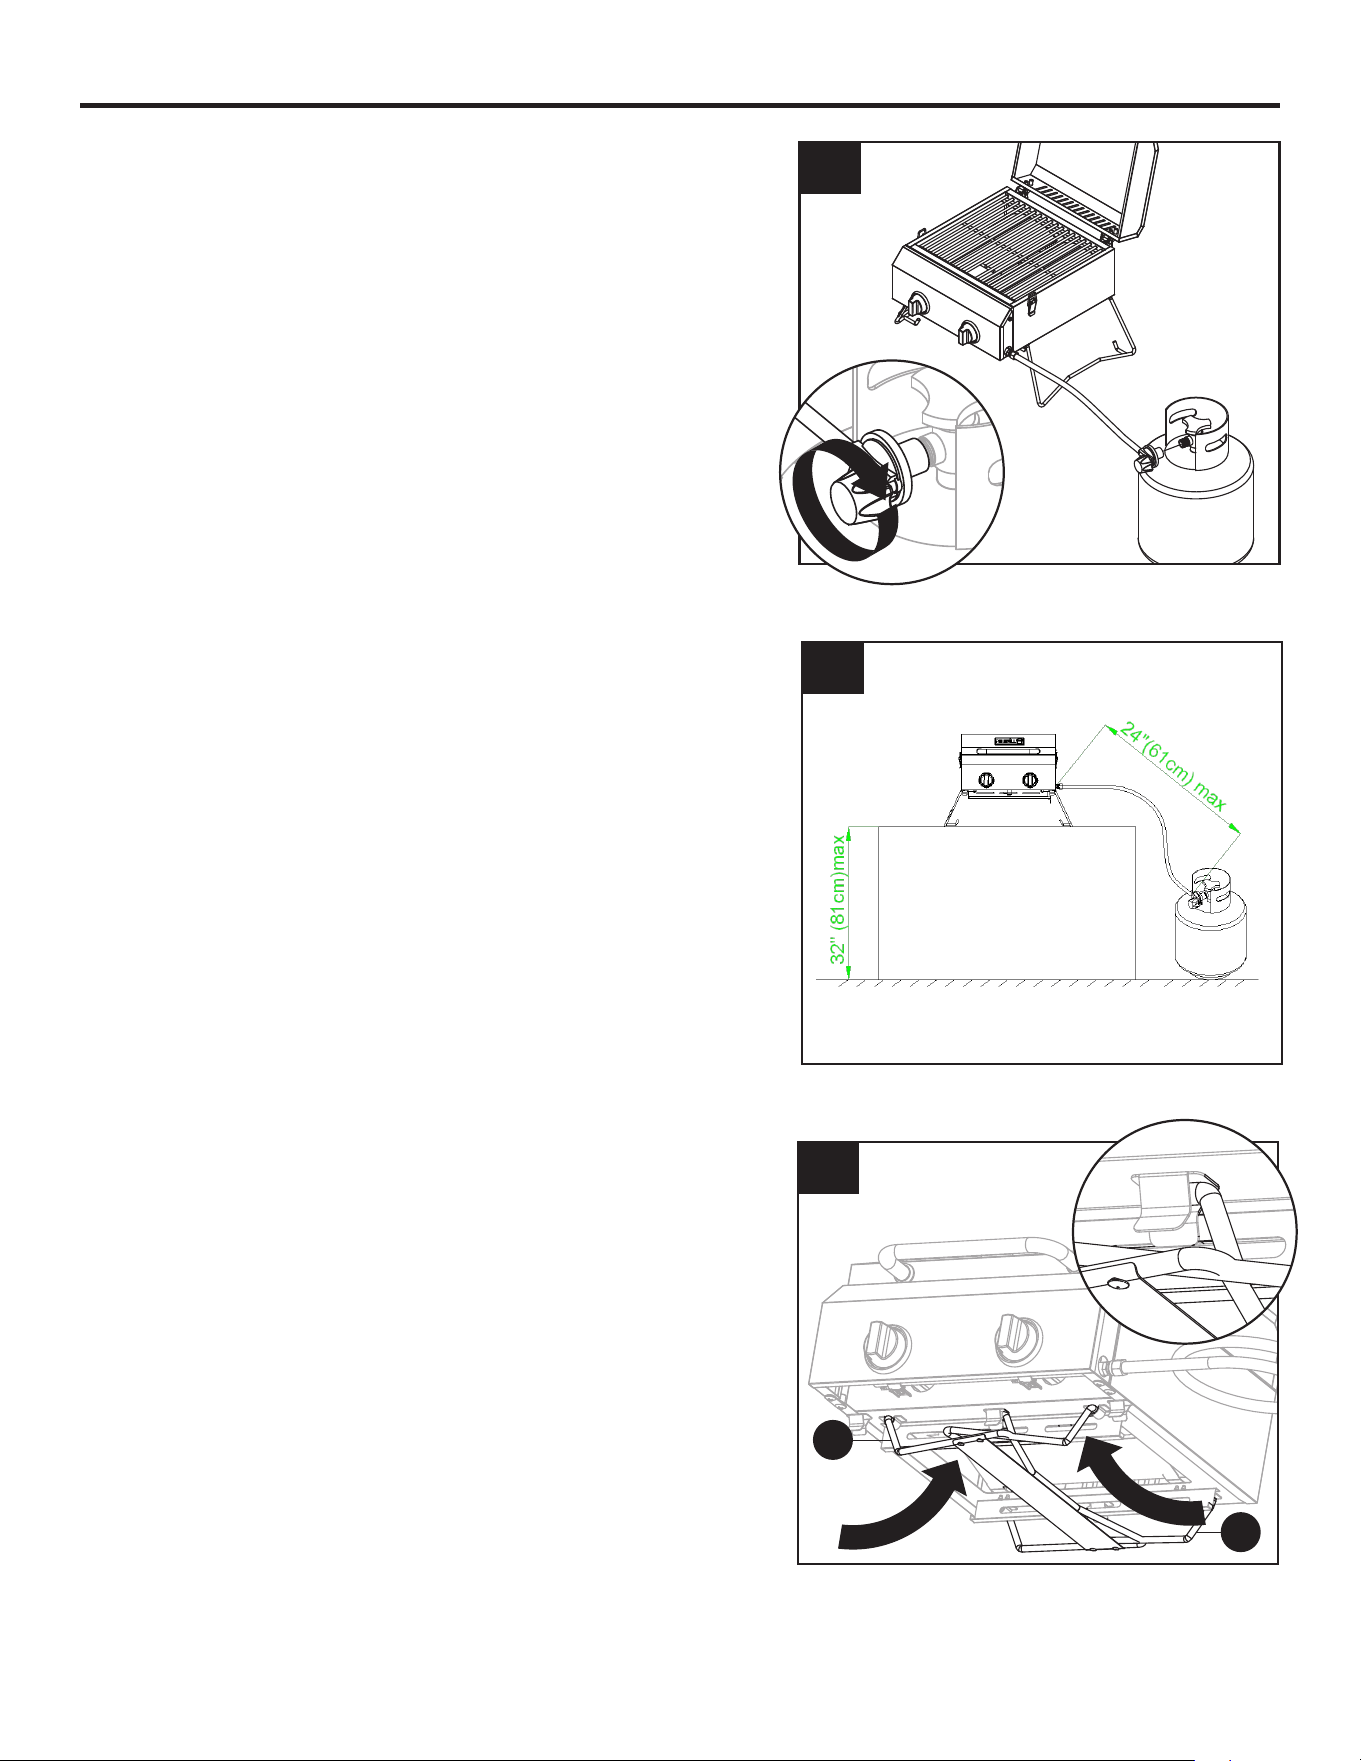
5. Placetheametamers(F)andcookinggrid(E)
insidetherebox.
4. Attach the control knobs (D) to the front of grill.
Push and turn the knob and check for sparks.
5
F
E
4
D
3. Insert the grease tray (G) into the bottom of
the grill (A).
3
G
A
9
ASSEMBLY INSTRUCTIONS
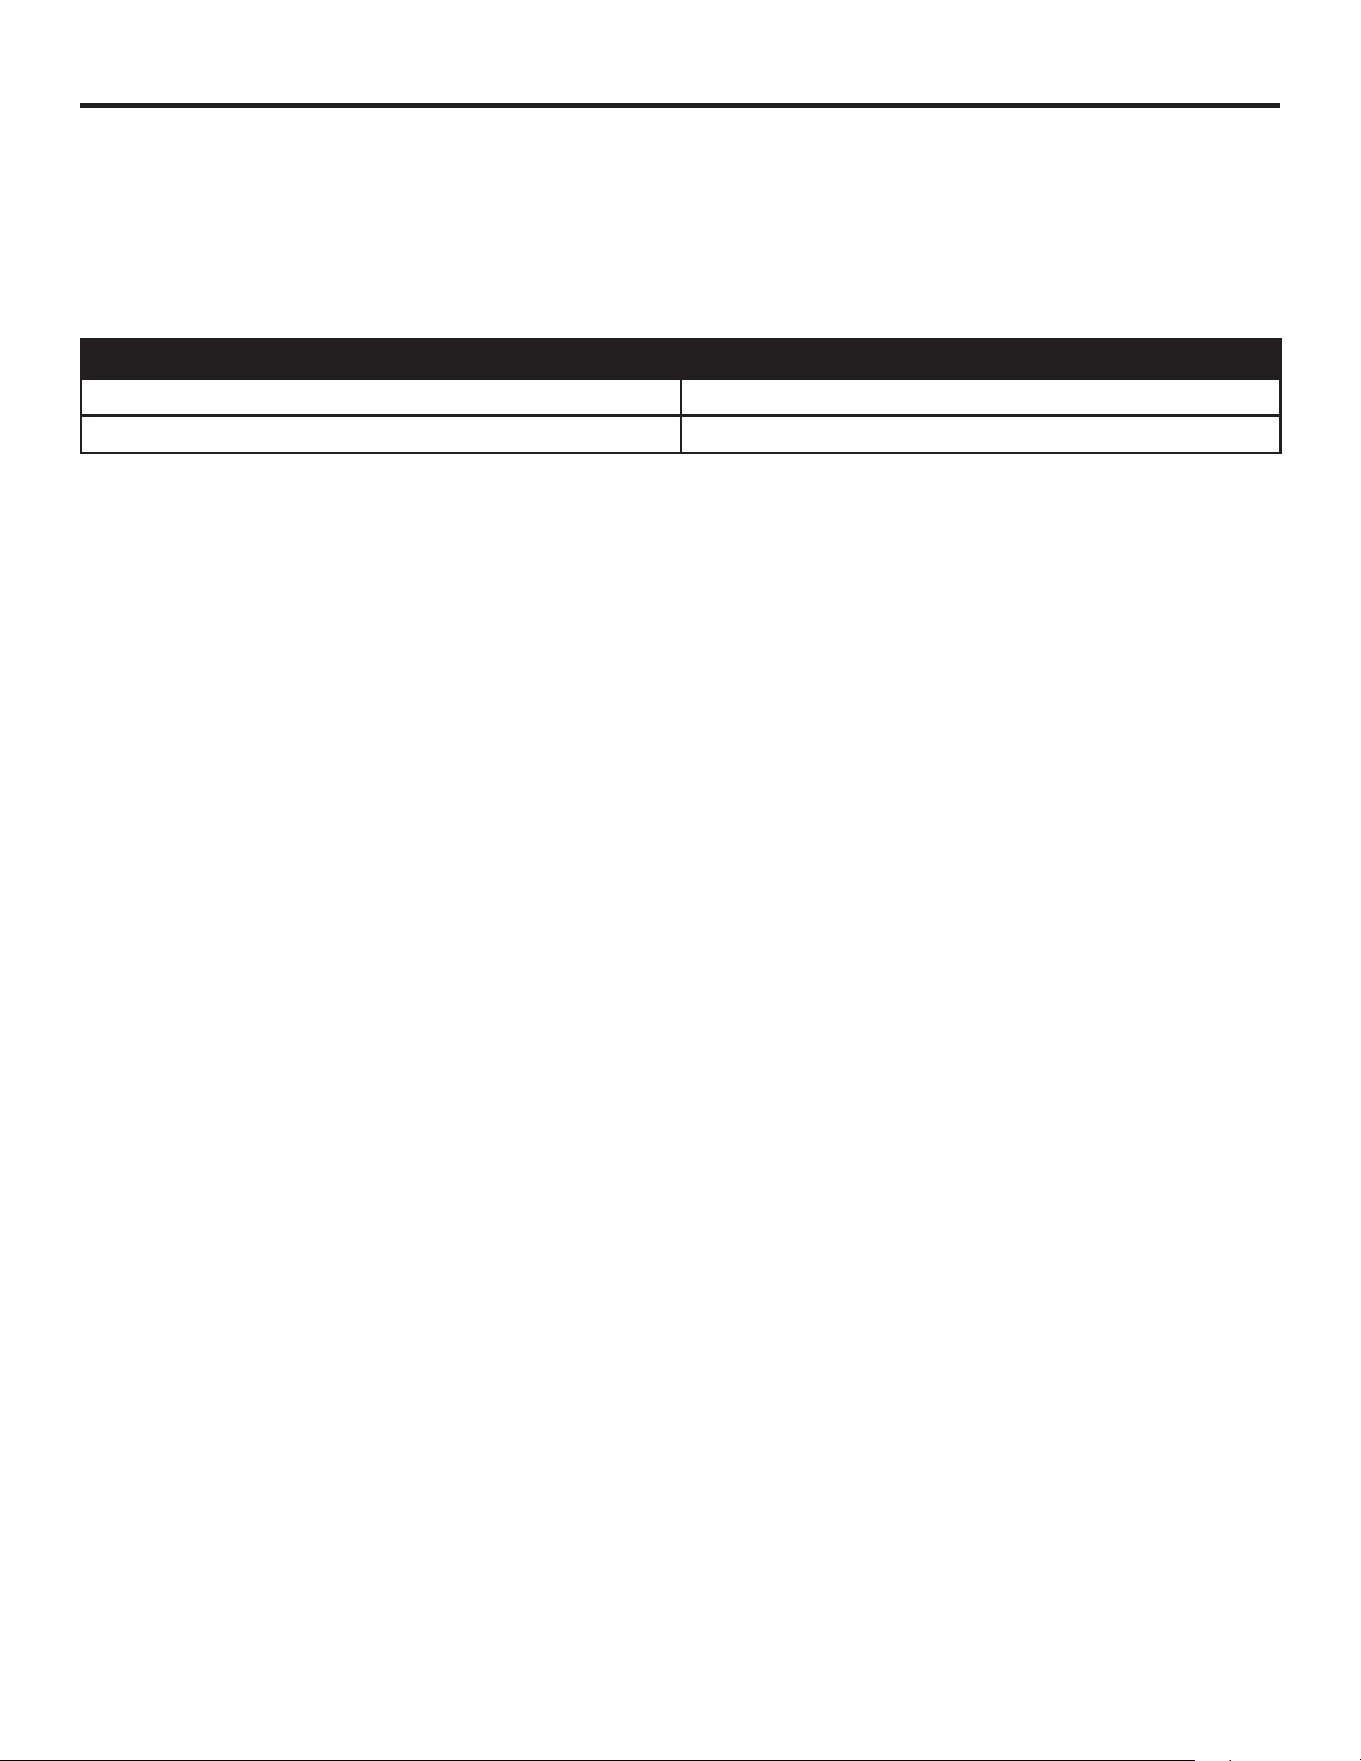
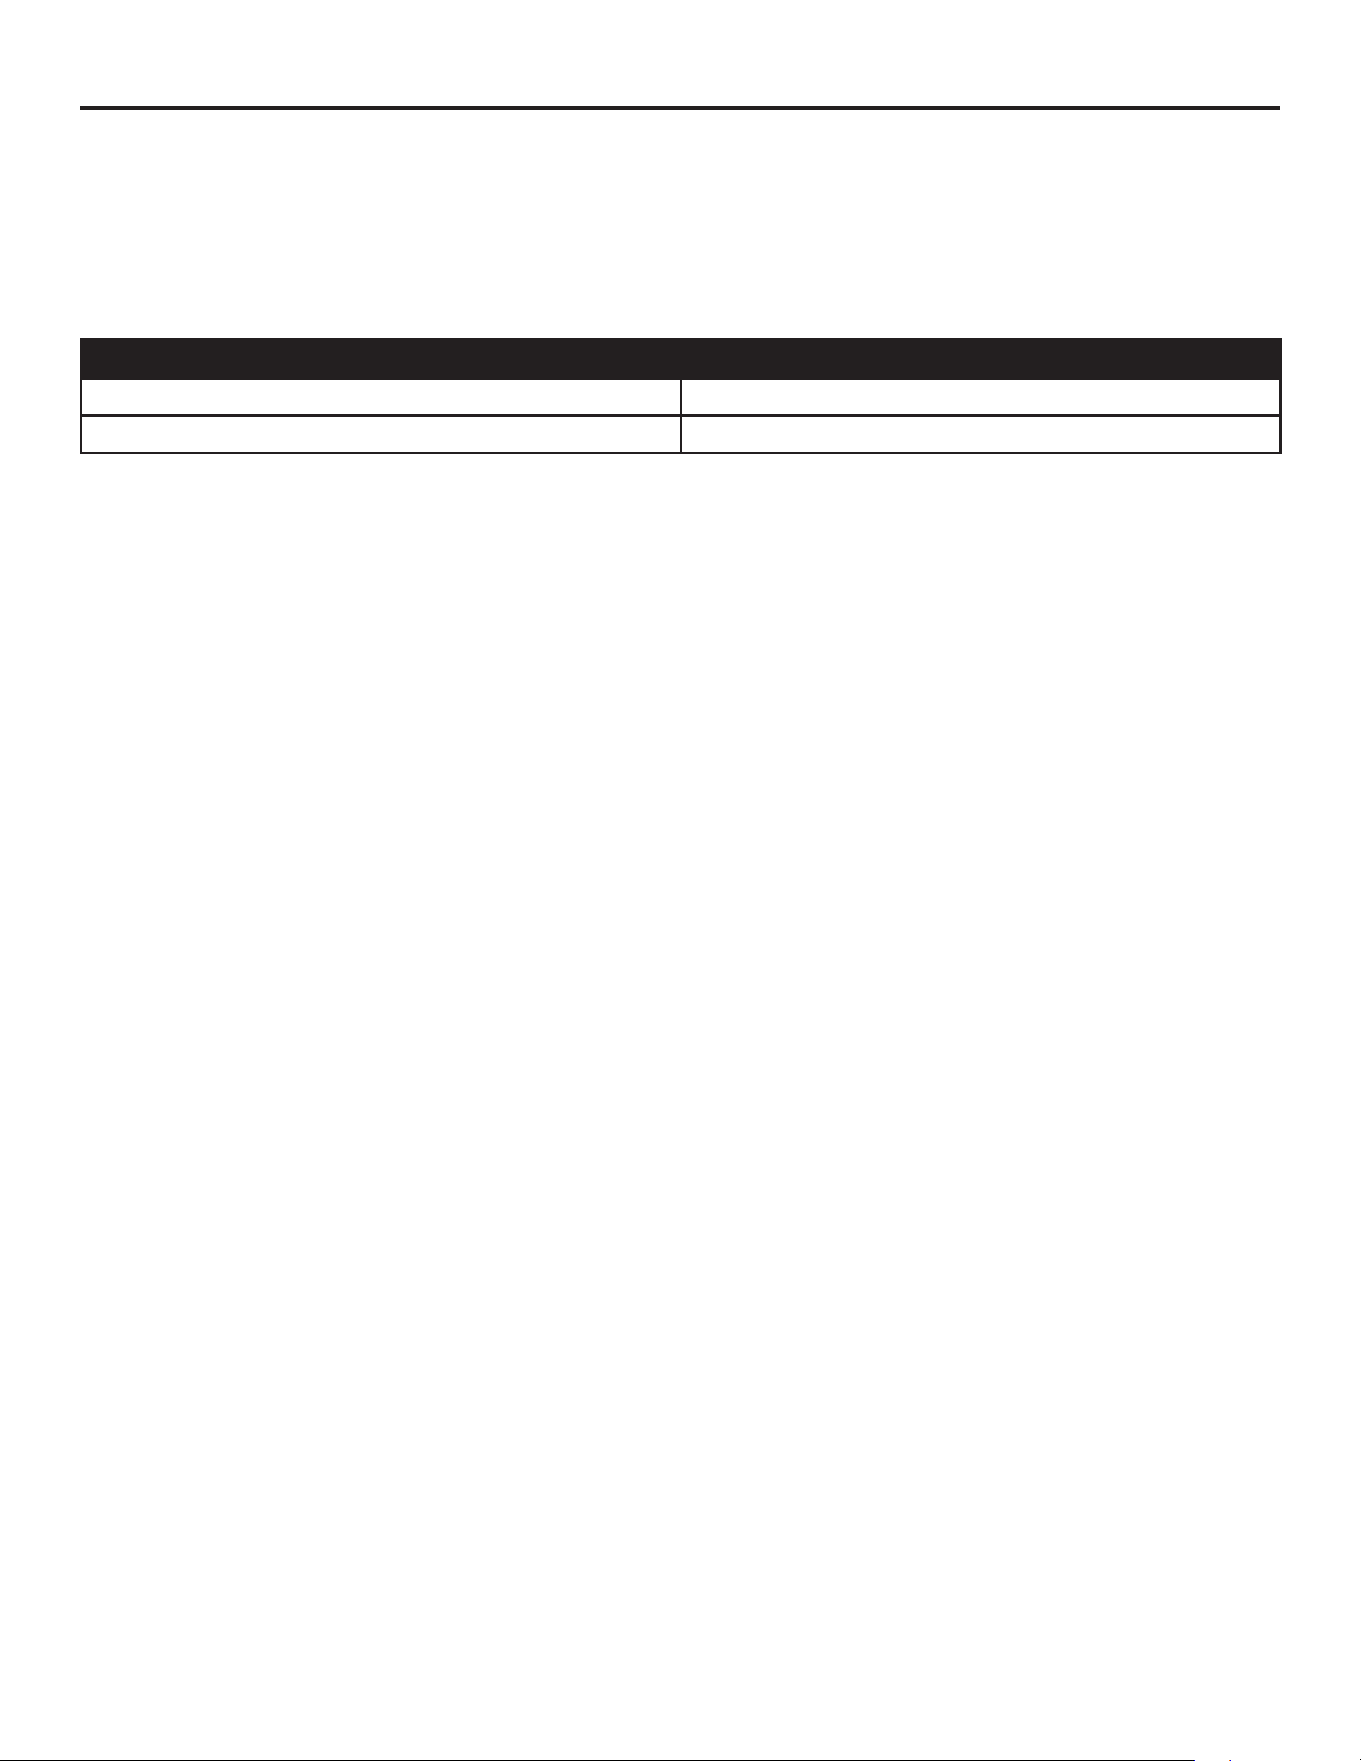
6. Attach the regulator found on the end of the
hose to the propane cylinder (not included) by
turning the regulator handle clockwise. If the grill
is not in use, the gas must be turned “OFF” at
theliquidpropanecylinder.
Checkallgassupplyttingsforleaksbefore
each use. DO NOT use the grill until all
connections have been checked and do not leak
(see “Leak Testing” instructions on pages 11 and
12).
6
8. When the grill is not in use, fold the left leg (B)
and the right leg (C) and lock them into the
brackets on the bottom of the grill for storage.
7. It is recommended to use this grill on a table 32
in.highwiththeliquidpropanecylindernomore
than 24 in. away.
8
B
C
7
10
GAS HOOK-UP
Only the pressure regulator and hose assembly supplied with the grill should be used. Any
replacementpressureregulatorandhoseassemblymustbespeciedbythegrillmanufacturer.This
grillisconguredforliquidpropane.DO NOT use a natural gas supply.
Total gas consumption (per hour) with all burners set on “HIGH”
Main burners 16,000 BTU/Hr.
Total 16,000 BTU/Hr.
The installation of this appliance must conform with local codes or, in the absence of local codes,
with either the National Fuel Gas Code, ANSI Z223.1/NFPA 54, National Gas Propane Installation
Code, CSA B149.1, or Propane Storage and Handling Code, B149.2,or the Standard for Recreation
Vehicles,ANSIA119.2/NFPA1192,andCSAZ240RVSeries,RecreationVehicleCode,as
applicable.
LIQUID PROPANE CYLINDER REQUIREMENTS (20-lb cylinder)
• Adentedorrustyliquidpropanecylindermaybehazardousandshouldbecheckedbyyoursupplier.
• NEVER use a cylinder with a damaged valve.
• Theliquidpropanecylindermustbeconstructedandmarkedinaccordancewiththespecications
forliquidpropanecylindersbytheUnitedStatesDepartmentofTransportation(DOT)orthe
National Standard of Canada, CAN/CSA-B339, Cylinders, Spheres and Tubes for Transportation of
Dangerous Goods Commission.
• The20-lbcylindermusthaveashutoffvalveterminatinginavalveoutletspecied,asapplicable,
for connection type QCC1 in the standard for compressed gas cylinder valve outlet and inlet
connectionANSI/CGA-V-1.
• Storageofanoutdoorcookinggasapplianceindoorispermissibleonlyifthecylinderis
disconnected and removed from the outdoor cooking gas appliance.
• Thecylindersystemmustbearrangedforvaporwithdrawal.
• Thecylindermustincludeacollartoprotectthecylindervalve.
• Manifoldpressure:(operating)11incheswatercolumn(W.C.),(non-operating)11.2incheswater
column. (W.C.).
• TheliquidpropanecylindermustbettedwithanOverllProtectionDevice(OPD).
• Removetheplasticvalvecoverfromtheliquidpropanecylinder.
• Makesurethegrillgashosesdonotcontactthegreasepanorgrillreboxwhentheliquidpropane
cylinder is placed into the cart.
INSTALLATION INSTRUCTIONS

11
INSTALLATION INSTRUCTIONS
CONNECTING THE LIQUID PROPANE CYLINDER
Toconnecttheliquidpropanegassupplycylinder:
1. The cylinder valve should be in the “OFF” position. If not, turn the valve clockwise until it stops.
2. Make sure the cylinder valve has the proper type-1 external male thread connections per ANSI
Z21.81.
3. Make sure the burner valves are in the “OFF” position.
4. Inspect the valve connections, port and regulator assembly. Remove debris and inspect the hose
for damage.
5. When connecting the regulator assembly to the valve, use your hand to tighten the nut clockwise
until it stops.
6. Useofawrenchcoulddamagethequickcouplingnutandresultinahazardoussituation.
7. Open the cylinder valve fully by turning the valve counterclockwise.
8. Before lighting the grill, use a soap and water solution to check all the connections for leaks.
9. If a leak is found, turn the cylinder valve “OFF” and DO NOTusethegrilluntilalocalliquid
propane dealer can make repairs.
WARNING
NEVER
attempttousedamagedorobstructedequipment.Seeyourlocalliquidpropanedealerfor
repair.
DISCONNECTING THE LIQUID PROPANE CYLINDER
1. Turn the grill burner valves “OFF” and make sure the grill is cool.
2. Turntheliquidpropanecylindervalve“OFF”byturningclockwiseuntilitstops.
3. Detachtheregulatorassemblyfromthecylindervalvebyturningthequickcouplingnut
counterclockwise.
4. Place dust cap on cylinder valve outlet whenever the cylinder is not in use. Only install the type of
dust cap on the cylinder valve outlet that is provided with the cylinder valve. Other types of caps or
plugs may result in leakage of propane.
LEAK TESTING
Although gas connections on the grill are leak tested prior to shipment, a complete leak test must
be performed at the installation site. Before each use, check all gas connections for leaks using the
procedures listed below. If the smell of gas is detected at any time, you should immediately check the
entire system for leaks.
BEFORE TESTING
Make sure all packing materials have been removed from the grill, including the burner tie-down
straps.
12
INSTALLATION INSTRUCTIONS
WARNING
Checkallgassupplyttingsforleaksbeforeeachuse.DO NOT use the grill until all connections
have been checked and do not leak. DO NOT smoke while leak testing. NEVER leak test with an
opename.Makeasolutionofonepartliquiddetergentandonepartwater.Youwillneedaspray
bottle,brush,orragtoapplythesolutiontothettings.Fortheinitialleaktest,makesuretheliquid
propane cylinder is full.
TO TEST
1. Turn the burner valves off.
2. Turntheliquidpropanecylindervalvecounterclockwisetoopenthevalve.
3. Applythesoapsolutiontoallgasttings.Soapbubbleswillappearwherealeakispresent.
4. Ifaleakispresent,immediatelyturnthegassupply“OFF”andtightenleakyttings.
5. Turn the gas back “ON” and recheck.
6. Shouldthegascontinuetoleakfromanyofthettings,turnthegassupply“OFF”andcontact
customer service at 1-800-913-8999.
7. If there is evidence of excessive abrasion or wear, or the hose is cut, it must be replaced prior to
the outdoor cooking gas appliance being put into operation.
• Onlythosepartsrecommendedbythemanufacturershouldbeusedonthegrill.Substitutionswill
void the warranty.
WARNING
DO NOT store grill indoors unless the cylinder is disconnected. DO NOT store cylinder in a building,
garage, or any other enclosed area, and keep out of reach of children at all times.
INSTALLER FINAL CHECK
Maintainspeciedclearanceof24inchesfromcombustiblematerialsandconstruction.
• Allinternalpackaginghasbeenremoved.
• Thehoseandregulatorareproperlyconnectedtotheliquidpropanecylinder.
• Theunithasbeentestedandisfreeofleaks.
• Thegassupplyshutoffvalvehasbeenlocated.
• Allburnersareinstalled.
• Keeptheinstructionmanualforfuturereference.
WARNING
• Thegrillanditsindividualshutoffvalvemustbedisconnectedfromthegassupplypipingsystem
during any pressure testing of that system at test pressure in excess of 1/2-in. PSI (3.5 kpa).
• Theoutdoorcookinggasappliancemustbeisolatedfromthegassupplypipingsystembyclosing
its individual manual shutoff valve during any pressure testing of the gas supply piping system at
testpressureequaltoorlessthan1/2-in.PSI(3.5kpa).
• DO NOTstorespareliquidpropanecylindersunderornearthisappliancetoavoidtheriskofre
which could cause death or serious injury.
• NEVERllthecylinderbeyond80percentcapacity.Failuretodosocouldresultinarecausing
death or serious injury.
13
OPERATING INSTRUCTIONS
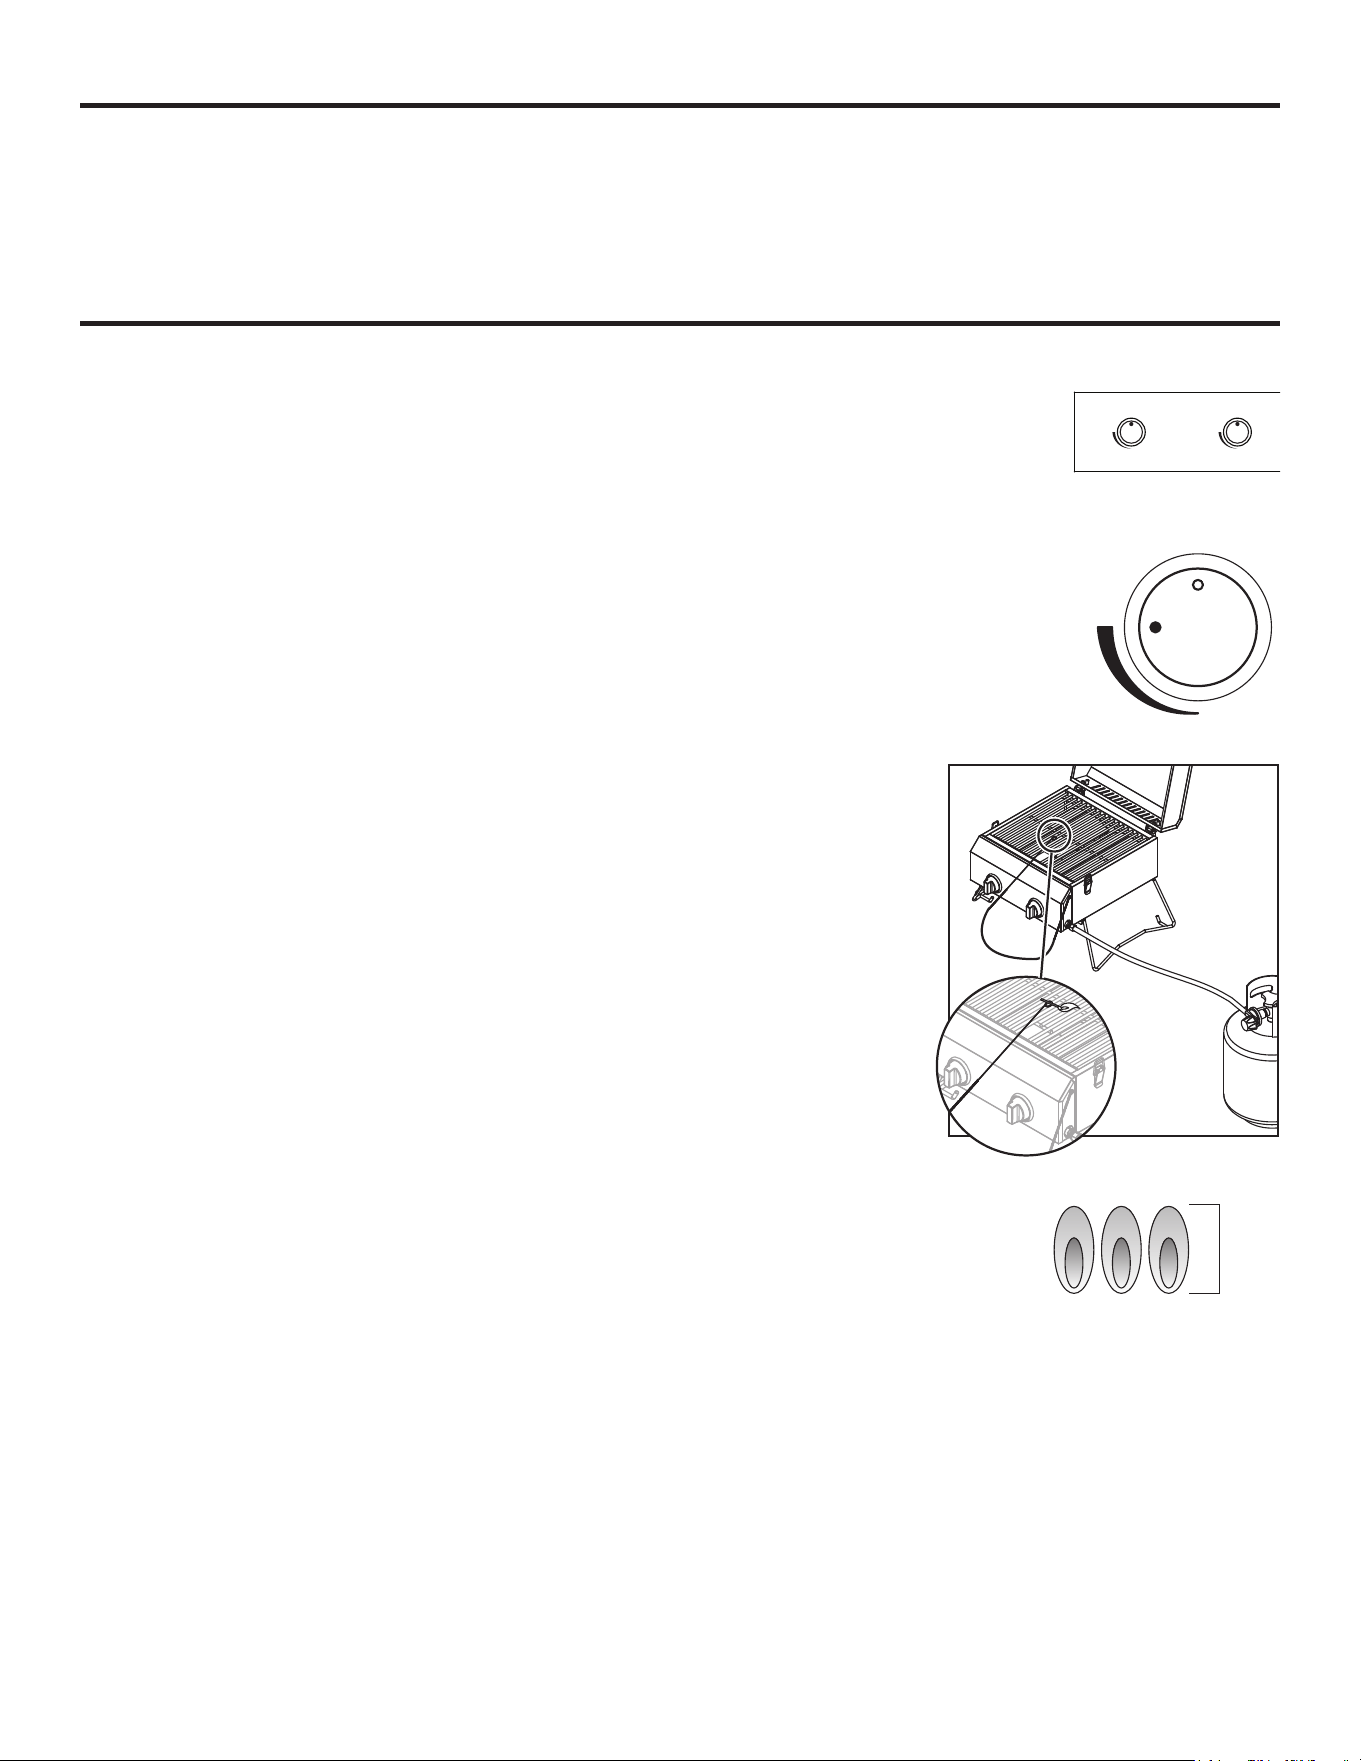
LIGHTING THE GRILL
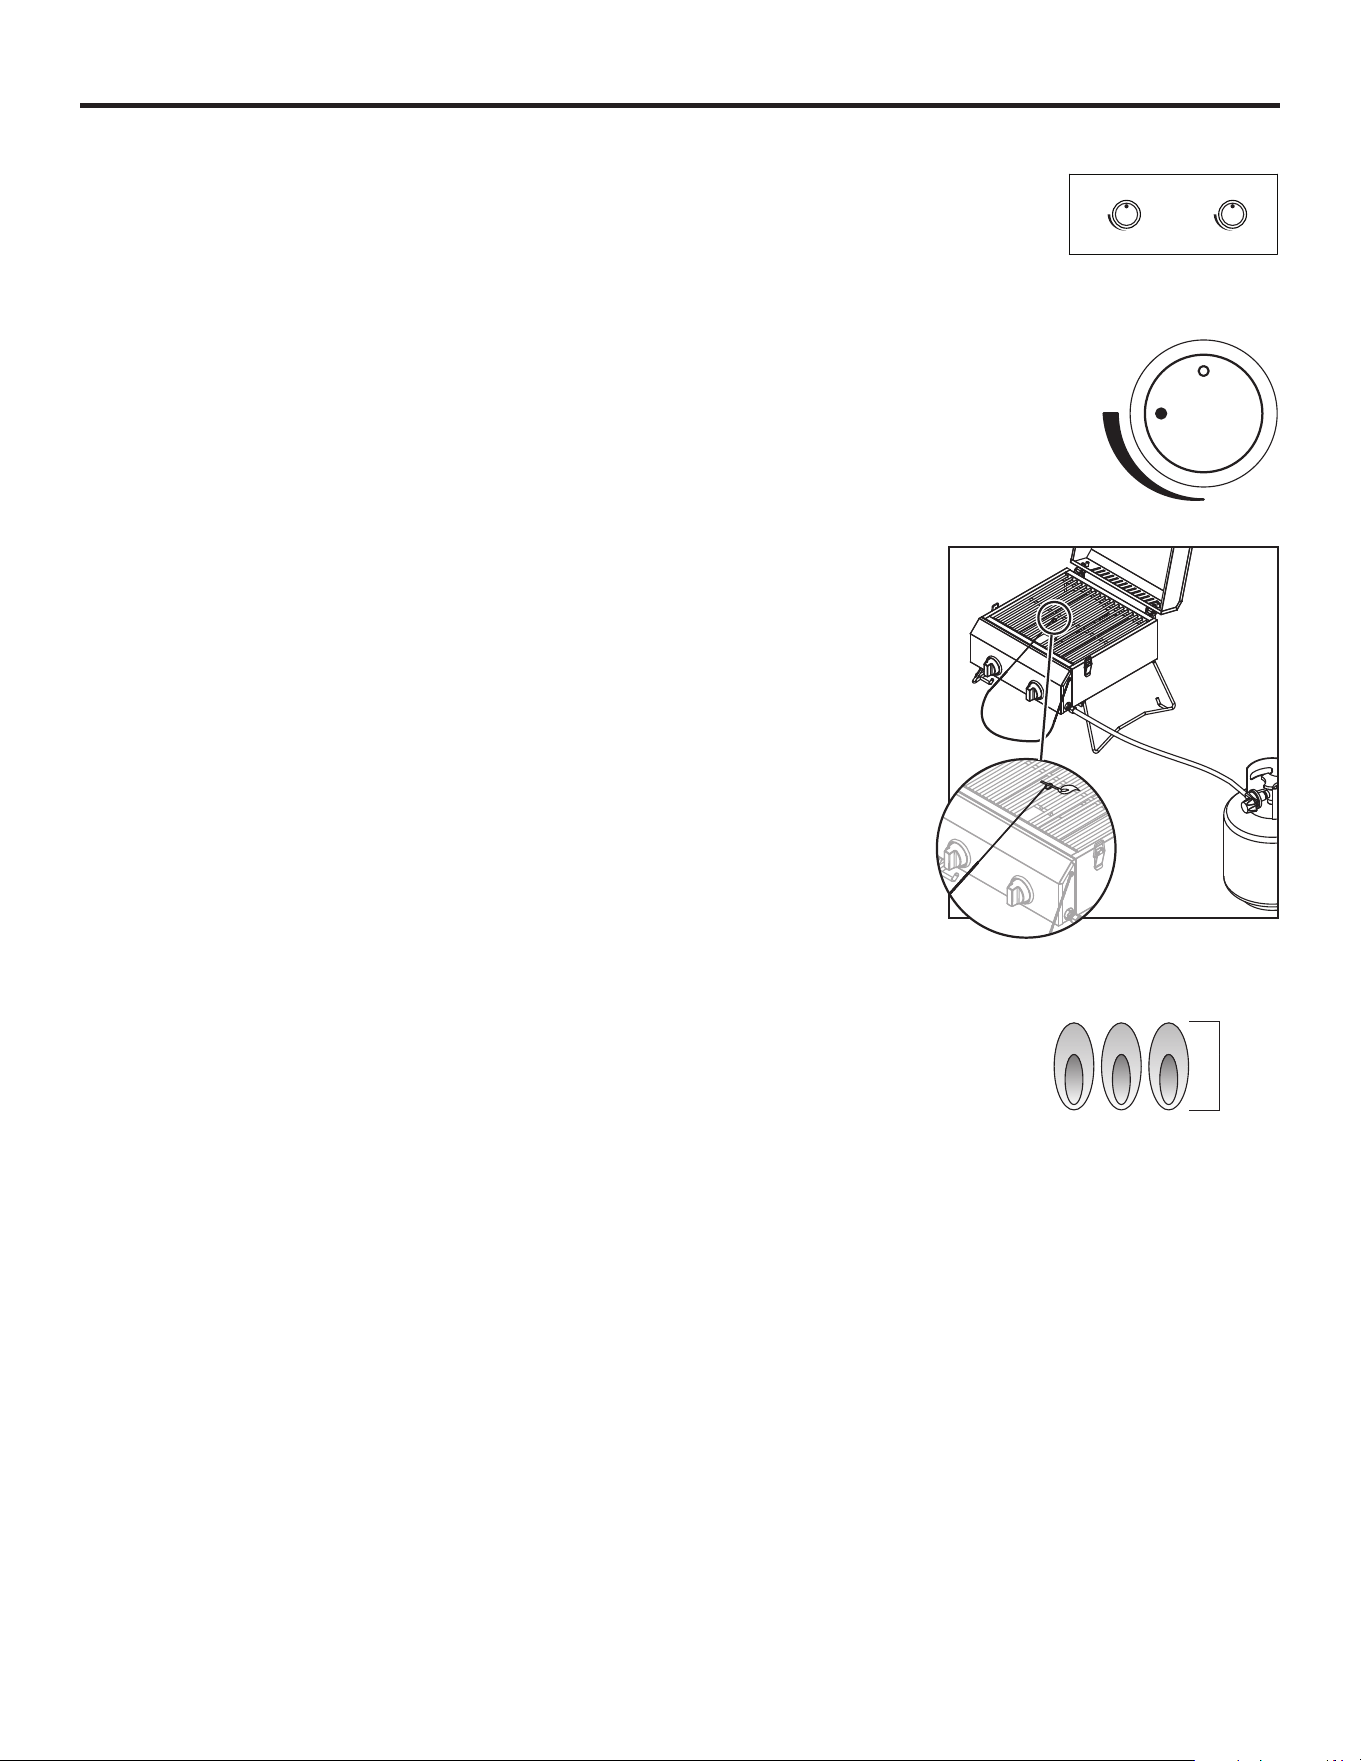
1. Place the legs in up position.
2. Make sure the propane cylinder is tightly threaded into the regulator (hand
tighten only).
3. Open lid. ALWAYS open lid when lighting.
4. Push and turn main burner knob slowly to IGNITE/HIGH; burner should light
immediately.
5. If ignition does not occur in 3-5 seconds, turn the control knob “OFF”. Wait 5
minutes before attempting to re-light the grill. If the grill fails to ignite after the
second attempt, call customer service at 1-800-913-8999 for assistance.
Note: If the knob can’t spark insert the match into the lighting rod. Ignite the
match and insert through the cooking grids to the burner.
TURNING THE GRILL OFF
1. Turn knob to “OFF” position.
2. Turn the propane cylinder control knob to the “OFF” position.
CAUTION: DO NOT attempt to re-light the grill without following all
the lighting instructions.
3. Allow the grill body to cool at least 30 minutes before attempting to
move or transport.
FLAME CHARACTERISTICS
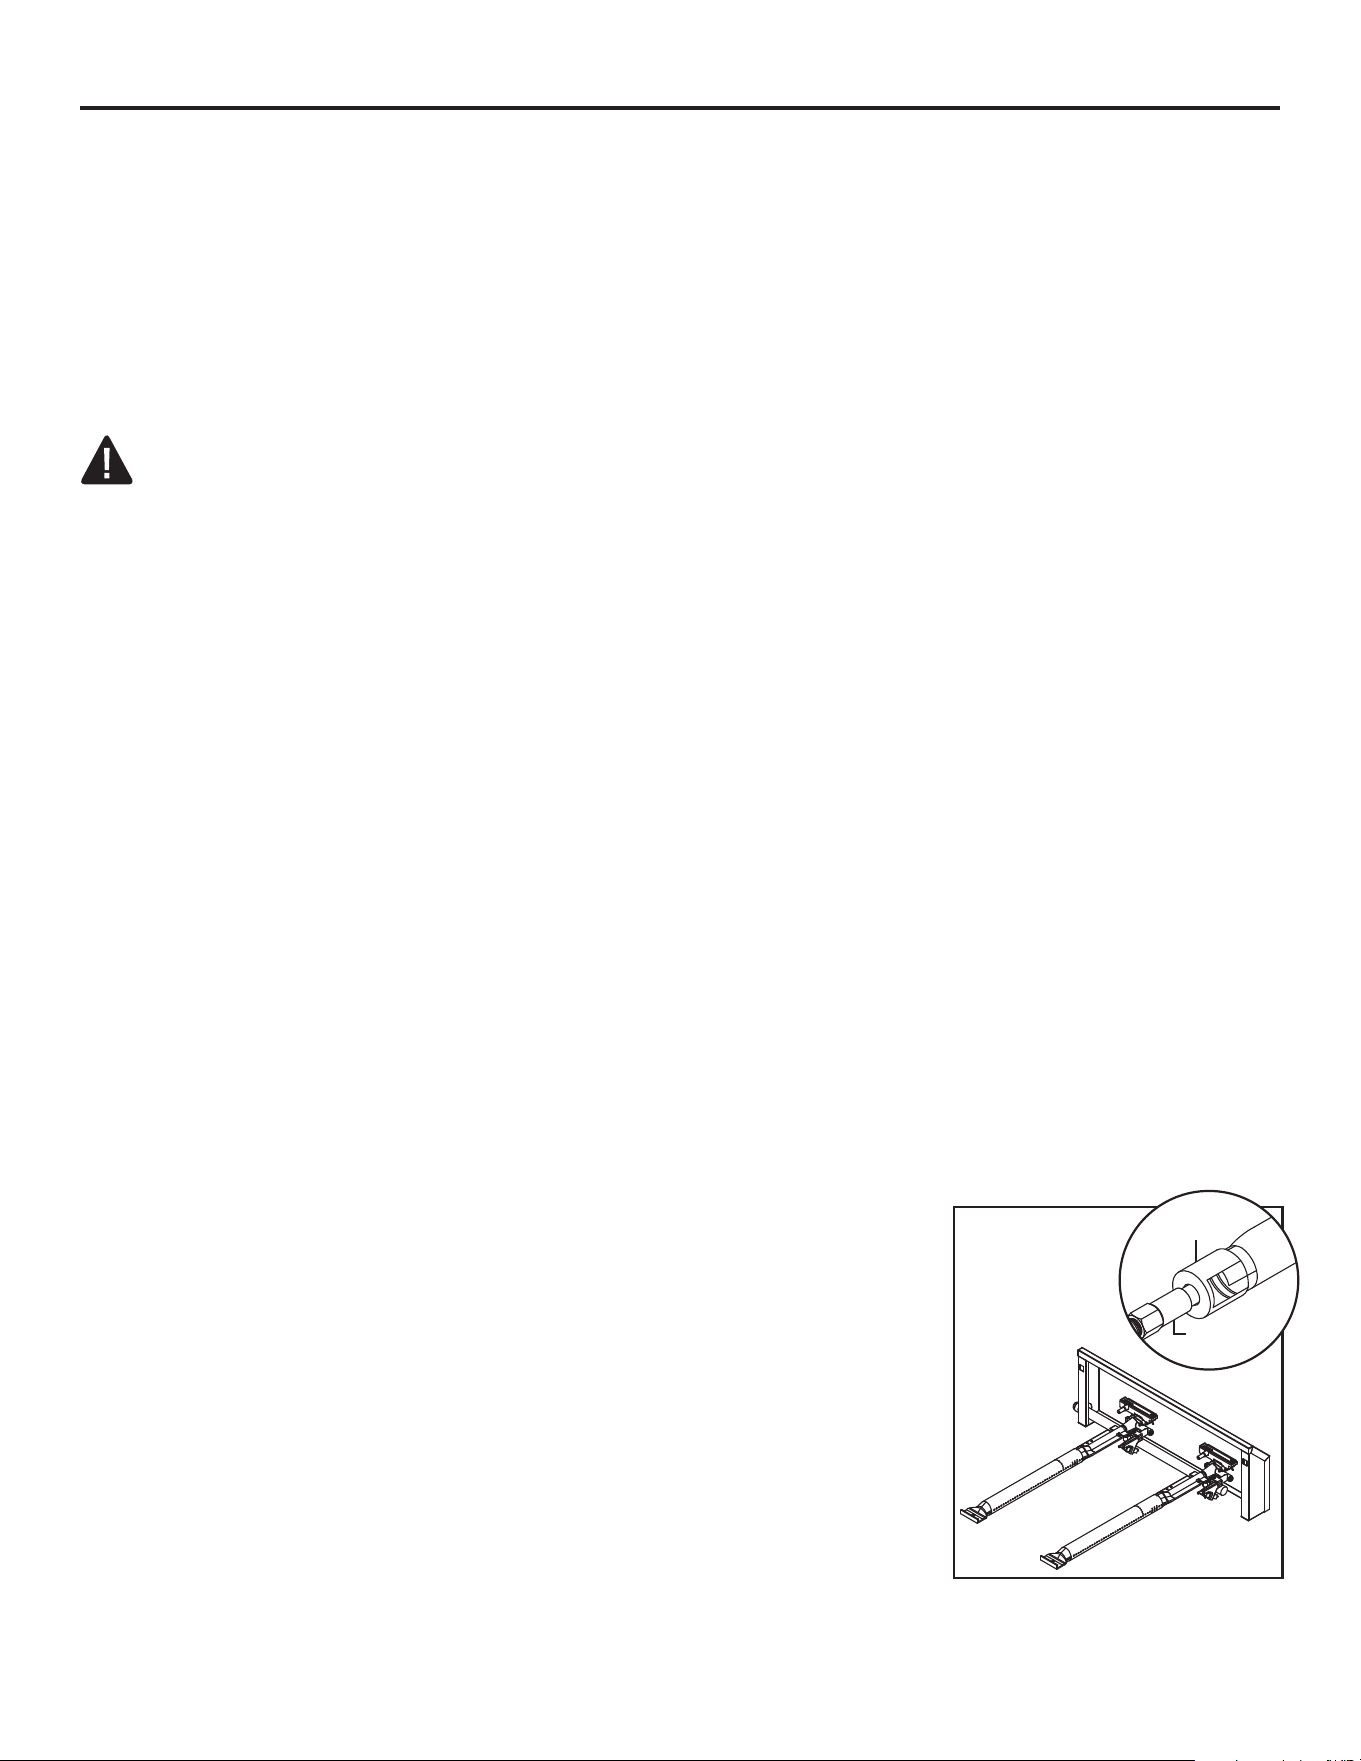
Checkforproperburneramecharacteristics.Burneramesshould
be blue and stable with no yellow tips, excessive noise, or lifting.
Thefollowingstepsshouldbefollowedforcorrectingtheame
characteristics:
• Turnthecontrolknobsandliquidpropanecylindervalves“OFF.”
• Allowthegrillandburnerstocool.
• Iftheameisyellow(notenoughair),turntheadjustmentscrewfoundat
the front of the burner counterclockwise.
• Iftheameisnoisyorliftsawayfromtheburner(toomuchair),turnthe
adjustment screw clockwise.
• Iftheseadjustmentsdonotcorrecttheproblem,contactcustomerserviceat
1-800-913-8999.
OFF
LO
OFF
LO
IGNITE
/ HIGH
IGNITE
/ HIGH
Main Burners
OFF
LO
IGNITE
/ HIGH
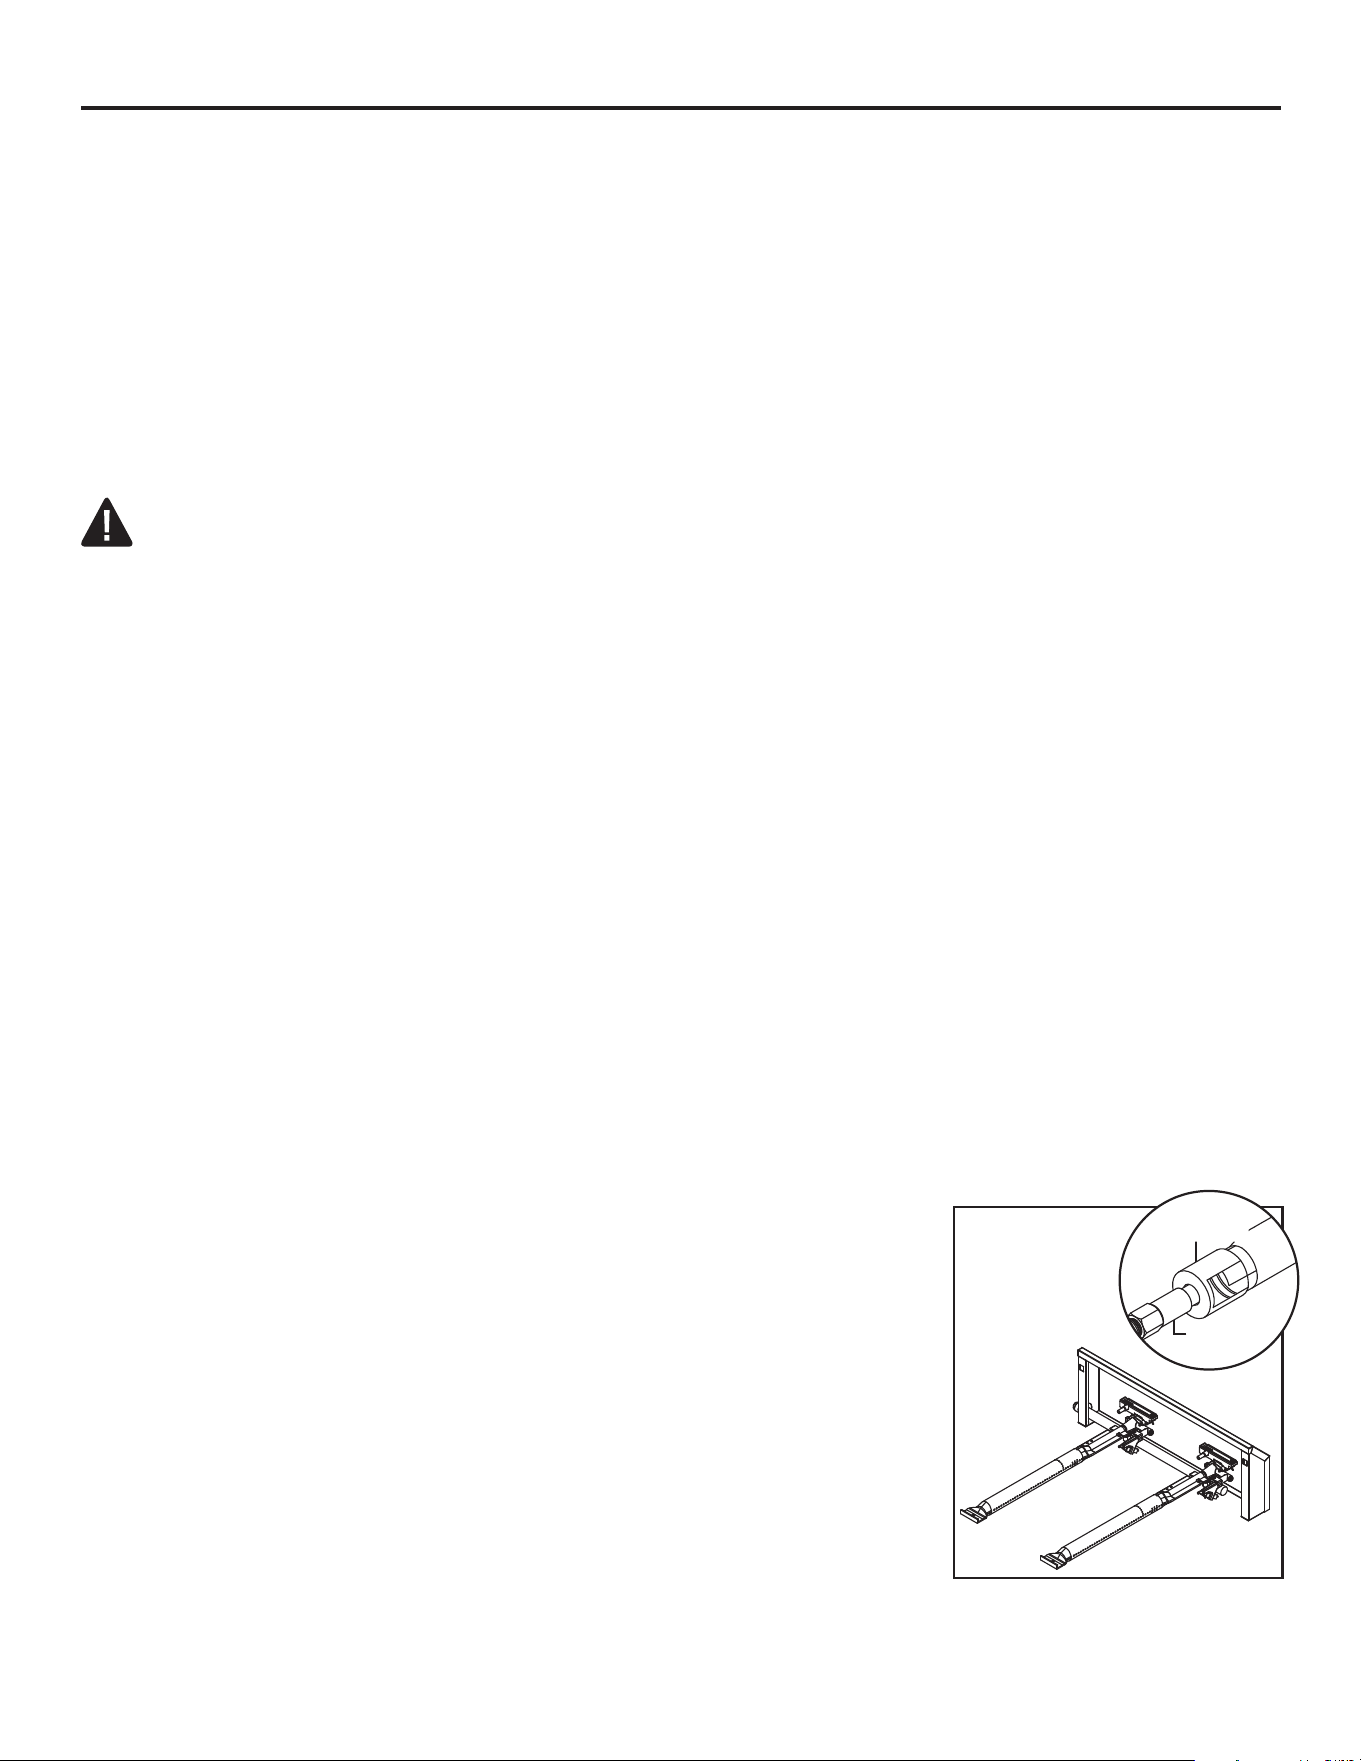
1 inch

14
OPERATING INSTRUCTIONS
USING THE GRILL
1. Find a level surface for the grill.
2. Allow the grill to warm up with the lid closed for 5 minutes prior to cooking.
3. You may cook on the grill in any weather. If the temperature is extremely cold or hot, the cooking
times will be slightly increased or decreased. Keep the grill out of excessive winds when
operating.
15
CARE AND MAINTENANCE
To ensure safe operation of your grill, the area of cooking should always be kept free of combustible
materialsofanytype,suchasgasolineorotherammablevaporsorliquids.
External Grill Parts - These are stainless steel. These can be cleaned easily with warm soapy water
or any stainless steel cleaner.
Cooking Grid and Grease Tray – The cooking grid is made of stainless steel. The cooking grid
should be brushed with a steel brush immediately after cooking while the grill is still warm. The
greasetrayisalsostainlesssteelandcanbecleanedwithaatscrapersuchasaputtyknife.
CAUTION
The grease tray must be kept clean and free of heavy buildup for the grill to perform properly and to
eliminateare-ups.
Grill Main Burners - Extreme care should be taken when removing a burner. It must be correctly
centeredontheoricebeforeanyattemptismadetorelightthegrill.Frequencyofcleaningwill
depend on how often you use the grill.
• Failuretoproperlyplacetheburnerovertheoricecouldcausearetooccurbehindandbeneath
the valve panel, thereby damaging the grill and making it unsafe to operate.
• Beforecleaning,makesurethegassupplyandcontrolknobsareinthe“OFF”positionandthe
burners have cooled.
To remove the main burners for cleaning:
1. Locatetheburnerscrewattherearoftherebox.
2. Removethescrewandlifttheburneroutoftherebox.
To clean the grill burners:
1. Clean the exterior of the burner with a wire brush. Use a metal scraper for stubborn stains or debris.
2. Clear clogged ports with a straightened paper clip. Never use a wooden toothpick as it may break
off and clog the port.
3. Check and clean burners/venturi tubes for insects and insect nests. A clogged tube can lead to a
rebeneathandbehindthemaincontrolpanel.
To reinstall the main burners:
1. Insert the burner over the main burner gas valve.
2. Makesuretheoricespudisinsidetheburnerventuriasshown.
3. Aligntheburnerscrewholewiththereboxhole,insertscrewand
tighten.
Burner
venturi
Orifice
spud

16
CARE AND MAINTENANCE
Firebox - Use warm soapy water to clean this area. DO NOT allow grease to build up.
Drain Hole – The drain hole must be kept clear of grease and food particles to allow drippings to
drain properly into the grease tray. This must be done to maintain proper operation of your grill.
General
-Thisgrill,likeallequipment,willlookbetterandlastlongerifkeptoutoftheweatherwhen
not in use.
CAUTION
DO NOT store propane cylinders in enclosed areas. When using a cover or moving the grill, always
wait until the grill has cooled for at least 30 minutes.
• Notobstructingtheowofcombustionandventilationair.
• Acloggedtubecanleadtoarebeneaththeappliance.
• Thisunitmustbekeptinanareafreefromcombustiblematerials,gasolineandotherammable
vaporsandliquids.
• Makesureallopeningsintothegrillbodyarefreeofblockagesordebrisandtherearenoobjects
ormaterialsblockingtheowofcombustionorventilation.Makesurethelegsareintheupposition
when using the grill.
• Checkburnerairinletopenings(behindtheinletguardontherightendofthegrillbody)forinsect
nests or blockages. Make sure the slots in the burner tube are clear.
• Whenthegrillisnotinuse,turnthecontrolknobtothe“OFF”positionandremovethepropane
cylinder from the regulator. Remove the regulator from the burner.
• Foroutdooruseonly,ifstoredindoors,detachpropanecylinderandstoreoutdoors.Propane
cylinders must be stored out of reach of children.
IMPORTANT
First-time use: It is important that the grill be lit and allowed to heat up for at least 30 minutes
before any food is placed on the cooking grid. It is normal for some smoke to appear during the initial
operation of the grill. After initial heating, the grill is ready for use. A cooking spray can be used on the
cooking grids to allow easier clean up.
THIS COOKING APPLIANCE IS FOR OUTDOOR USE ONLY AND SHALL NOT BE USED IN A
BUILDING, GARAGE OR ANY OTHER ENCLOSED AREA.
MOVING INSTRUCTIONS
CAUTION
NEVER move the grill with burner lit.
Make sure control knob is in the “OFF” position. Disconnect the propane cylinder from the regulator.
Remove the regulator from the grill. Be sure the grill has completely cooled for at least 30 minutes.
Close the lid and secure the latch. Place the legs in the down position. Use the handle to carry the grill.
Note: It is best to leave the grease tray in place attached to the bottom of the grill-some grease may
continue to drip from drain hole during transport.

17
TROUBLESHOOTING
PROBLEM CORRECTIVE ACTION
The grill will not light.
1. Checktoseeiftheliquidpropanecylinderisempty.
2. Check burner ports for any blockage. Use a soft wire brush
to clear plugged ports.
3. Checkthegasoriceontheburnerforanobstruction.If
oriceisblocked,cleanwithaneedleorthinwire.
NEVER USE A WOODEN TOOTHPICK.
Burnerameisyellowororange
in conjunction with gas odor.
1. Check for spiders and insects.
2. Call customer service at 1-800-913-8999.
Low heat with the control knob on
the "HIGH" setting.
1. Make sure the grill area is clear of dust.
2. Makesuretheburnerandoriceareclean.
3. Check for spiders and insects.
4. Isthereadequategassupplyavailable?
5. Is the grill being preheated for 15 minutes?
Ifyouhaveanyquestionsregardingtheproduct,pleasecallcustomerservice
at1-800-913-8999, 8 a.m. - 5 p.m., PST, Monday - Friday.
WARNING
Spidersandinsectscannestinsidetheburnersofthegrillanddisruptgasow.Thisverydangerous
conditioncouldcausearebehindthevalvepanel,therebydamagingthegrillandmakingitunsafe
for operation. Inspect the grill at least twice a year or immediately after any of the following conditions
occur:
1. Thesmellofgasinconjunctionwithburneramesappearingyellow.
2. The grill does not reach temperature.
3. The grill heats unevenly.
4. The burners make popping noises.
If the grill does not function properly, use the following checklist before contacting your dealer
for service.

18
WARRANTY
Manufacturer warrants to the original consumer-purchaser only that this product (Model #820-0033)
shall be free from defects in workmanship and materials after correct assembly and under normal
and reasonable home use for the periods indicated below beginning on the date of purchase. The
manufacturerreservestherighttorequirephotographicevidenceofdamage,orthatdefectiveparts
be returned, postage and or freight pre-paid by the consumer, for review and examination.
• MAIN BURNERS: 3 year LlMlTED warranty against perforation.
• CART: 1 Year LIMITED warranty against perforation; does not cover cosmetic issues like surface
corrosion, scratches and rust.
• PARTS: 1 Year LIMITED warranty (Includes, but not limited to, valves, frame, housing, control
panel, igniter, regulator, hoses) *Does not cover chipping, scratching, cracking surface corrosion,
scratches or rust.
Upon consumer supplying proof of purchase as provided herein, Manufacturer will repair or replace
thepartswhichareprovendefectiveduringtheapplicablewarrantyperiod.Partsrequiredto
complete such repair or replacement shall be free of charge to you except for shipping costs, as
long as the purchaser is within the warranty period from the original date of purchase. The original
consumer-purchaser will be responsible for all shipping charges of parts replaced under the terms of
this limited warranty. This limited warranty is applicable in the United States only, is only available to
theoriginalowneroftheproductandisnottransferable.Manufacturerrequiresreasonableproofof
your date of purchase. Therefore, you should retain your sales receipt and/or invoice. If the unit was
received as a gift, please ask the giftgiver to send in the receipt on your behalf, to the below address.
Defective or missing parts subject to this limited warranty will not be replaced without registration or
proof of purchase. This limited warranty applies to the functionality of the product ONLY and does
not cover cosmetic issues such as scratches, dents, corrosions or discoloring by heat, abrasive and
chemical cleaners or any tools used in the assembly or installation of the appliance, surface rust,
or the discoloration of stainless steel surfaces. Surface rust, corrosion, or powder paint chipping on
metal parts that does not affect the structural integrity of the product is not considered a defect in
workmanship or material and is not covered by this warranty. This limited warranty will not reimburse
you for the cost of any inconvenience, food, personal injury or property damage. If an original
replacement part is not available, a comparable replacement part will be sent. You will be responsible
for all shipping charges of parts replaced under the terms of this limited warranty.
ITEMS MANUFACTURER WILL NOT PAY FOR:
• Servicecallstoyourhome.
• Repairswhenyourproductisusedforotherthannormal,single-familyhouseholdorresidentialuse.
• Damageresultingfromaccident,alteration,misuse,lackofmaintenance/cleaning,abuse,re,ood,
acts of God, improper installation, and installation not in accordance with electrical or plumbing
codes or use of products not approved by the manufacturer.
• Anyfoodlossduetoproductfailures.
• ReplacementpartsorrepairlaborcostsforunitsoperatedoutsidetheUnitedStatesorCanada.

19
WARRANTY
• Pickupanddeliveryofyourproduct.
• Postagefeesorphotoprocessingfeesforphotossentinasdocumentation.
• Repairstopartsorsystemsresultingfromunauthorizedmodicationsmadetotheproduct.
• Theremovaland/orreinstallationofyourproduct.
• Shippingcost,standardorexpedited,forwarranty/nonwarrantyandreplacementparts.
DISCLAIMER OF IMPLIED WARRANTIES; LlMlTATlON OF REMEDIES
Repair or replacement of defective parts is your exclusive remedy under the terms of this limited
warranty.Manufacturerwillnotberesponsibleforanyconsequentialorincidentaldamagesarising
from the breach of either this limited warranty or any applicable implied warranty, or for failure or
damageresultingfromactsofGod,impropercareandmaintenance,greasere,accident,alteration,
replacement of parts by anyone other than Manufacturer, misuse, transportation, commercial
use, abuse, hostile environments (inclement weather, acts of nature, animal tampering), improper
installation or installation not in accordance with local codes or printed manufacturer instructions.
THlS LIMITED WARRANTY IS THE SOLE EXPRESS WARRANTY GIVEN BY THE
MANUFACTURER. NO PRODUCT PERFORMANCE SPECIFICATION OR DESCRIPTION
WHEREVER APPEARING IS WARRANTED BY MANUFACTURER EXCEPT TO THE EXTENT
SET FORTH IN THlS LIMITED WARRANTY. ANY IMPLIED WARRANTY PROTECTION ARISING
UNDER THE LAWS OF ANY STATE, INCLUDING IMPLIED WARRANTY OF MERCHANTABILITY
OR FITNESS FOR A PARTICULAR PURPOSE OR USE, IS HEREBY LIMITED IN DURATION TO
THE DURATION OF THlS LIMITED WARRANTY.
Neither dealers nor the retail establishment selling this product has any authority to make any
additional warranties or to promise remedies in addition to or inconsistent with those stated above.
Manufacturer's maximum liability, in any event, shall not exceed the documented purchase price of
the product paid by the original consumer. This warranty only applies to units purchased from an
authorizedretailerandorre-seller.NOTE:Somestatesdonotallowanexclusionorlimitationof
incidentalorconsequentialdamages,sosomeoftheabovelimitationsorexclusionsmaynotapplyto
you;thislimitedwarrantygivesyouspeciclegalrightsassetforherein.Youmayalsohaveother
rights which vary from state to state.
Allconsumerreturns,partsorders,generalquestions,andtroubleshootingassistancecan
beac
quiredbycalling1-800-913-8999,8a.m.-5p.m.,PST,Monday–Friday.
20
Printed in China
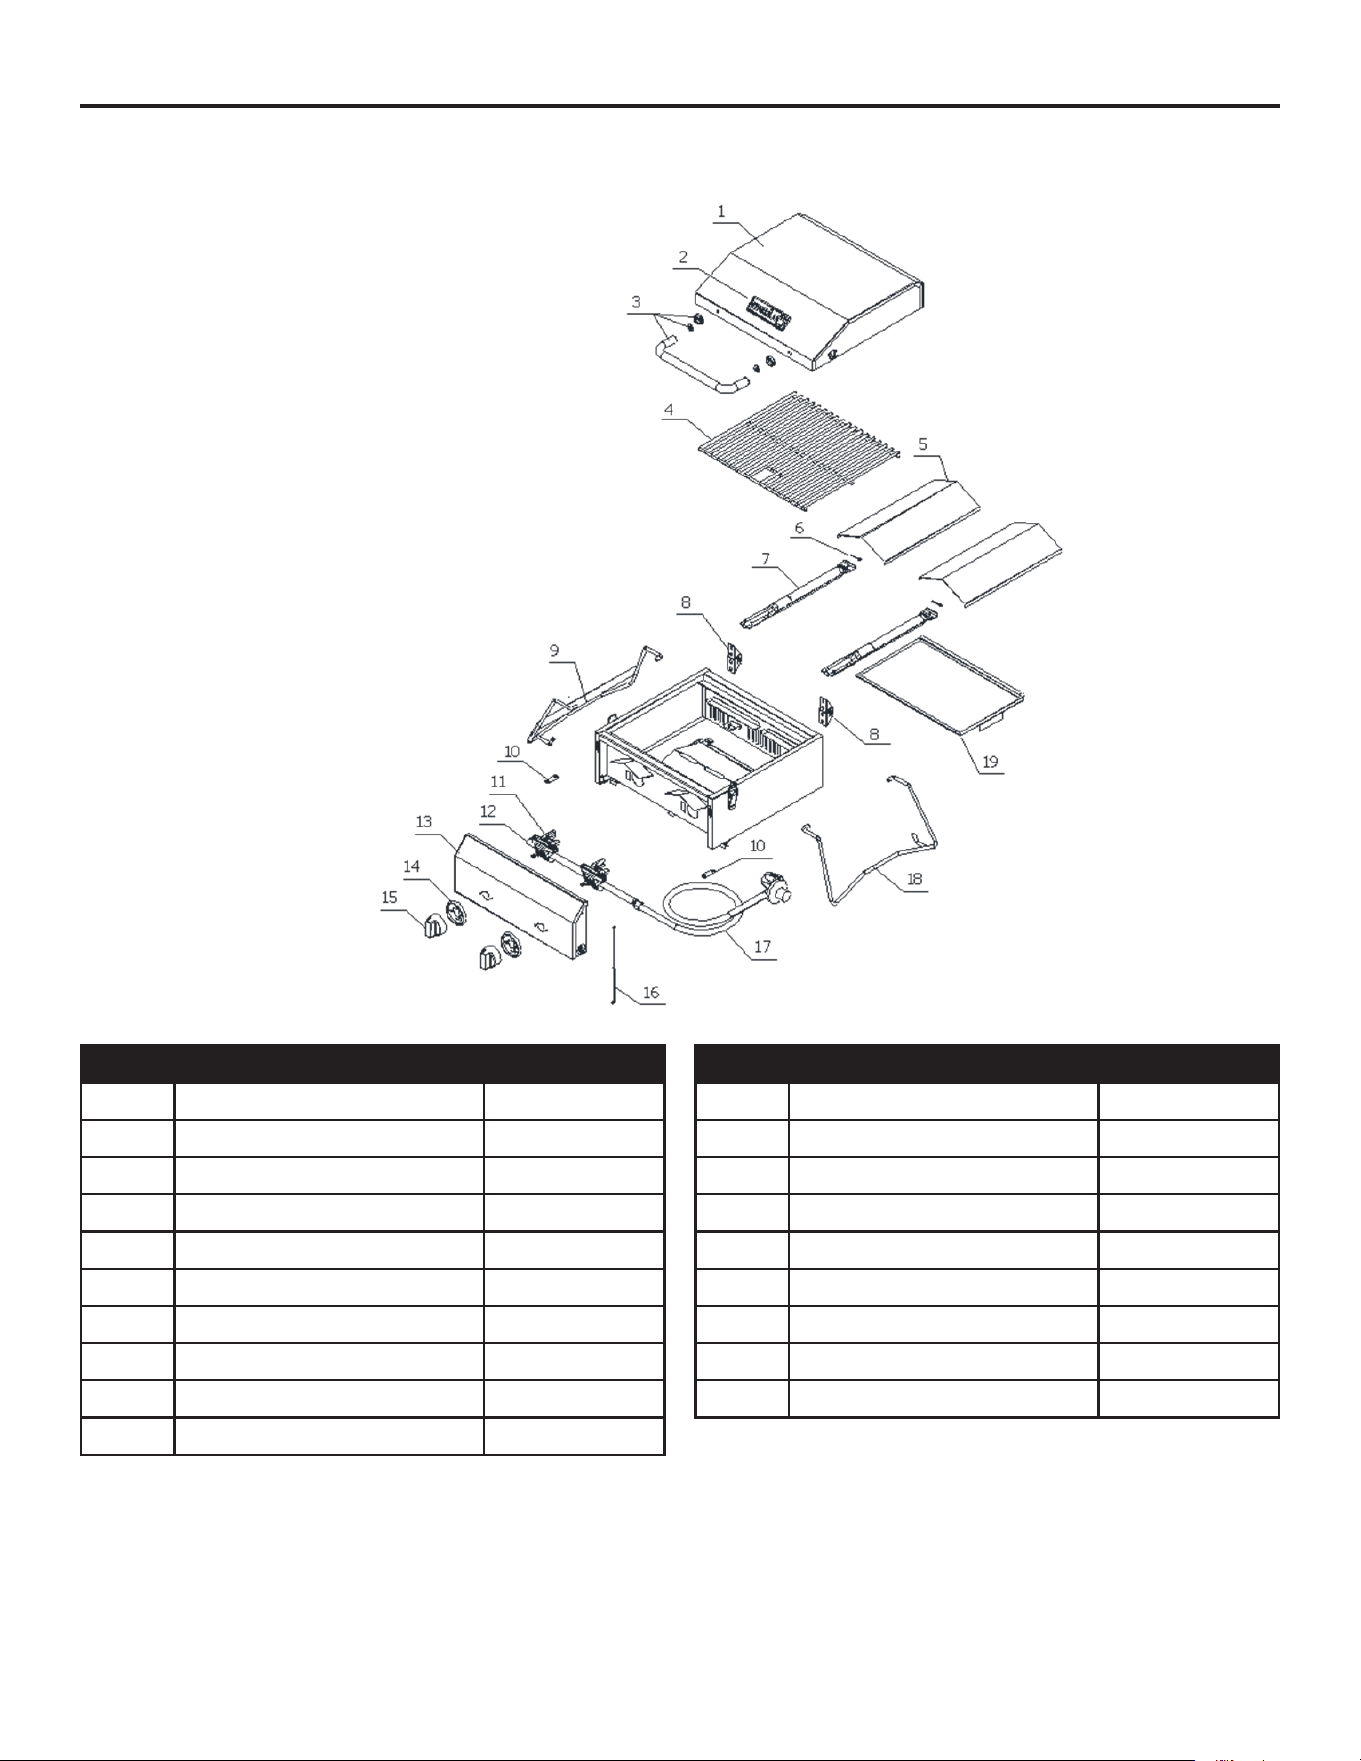
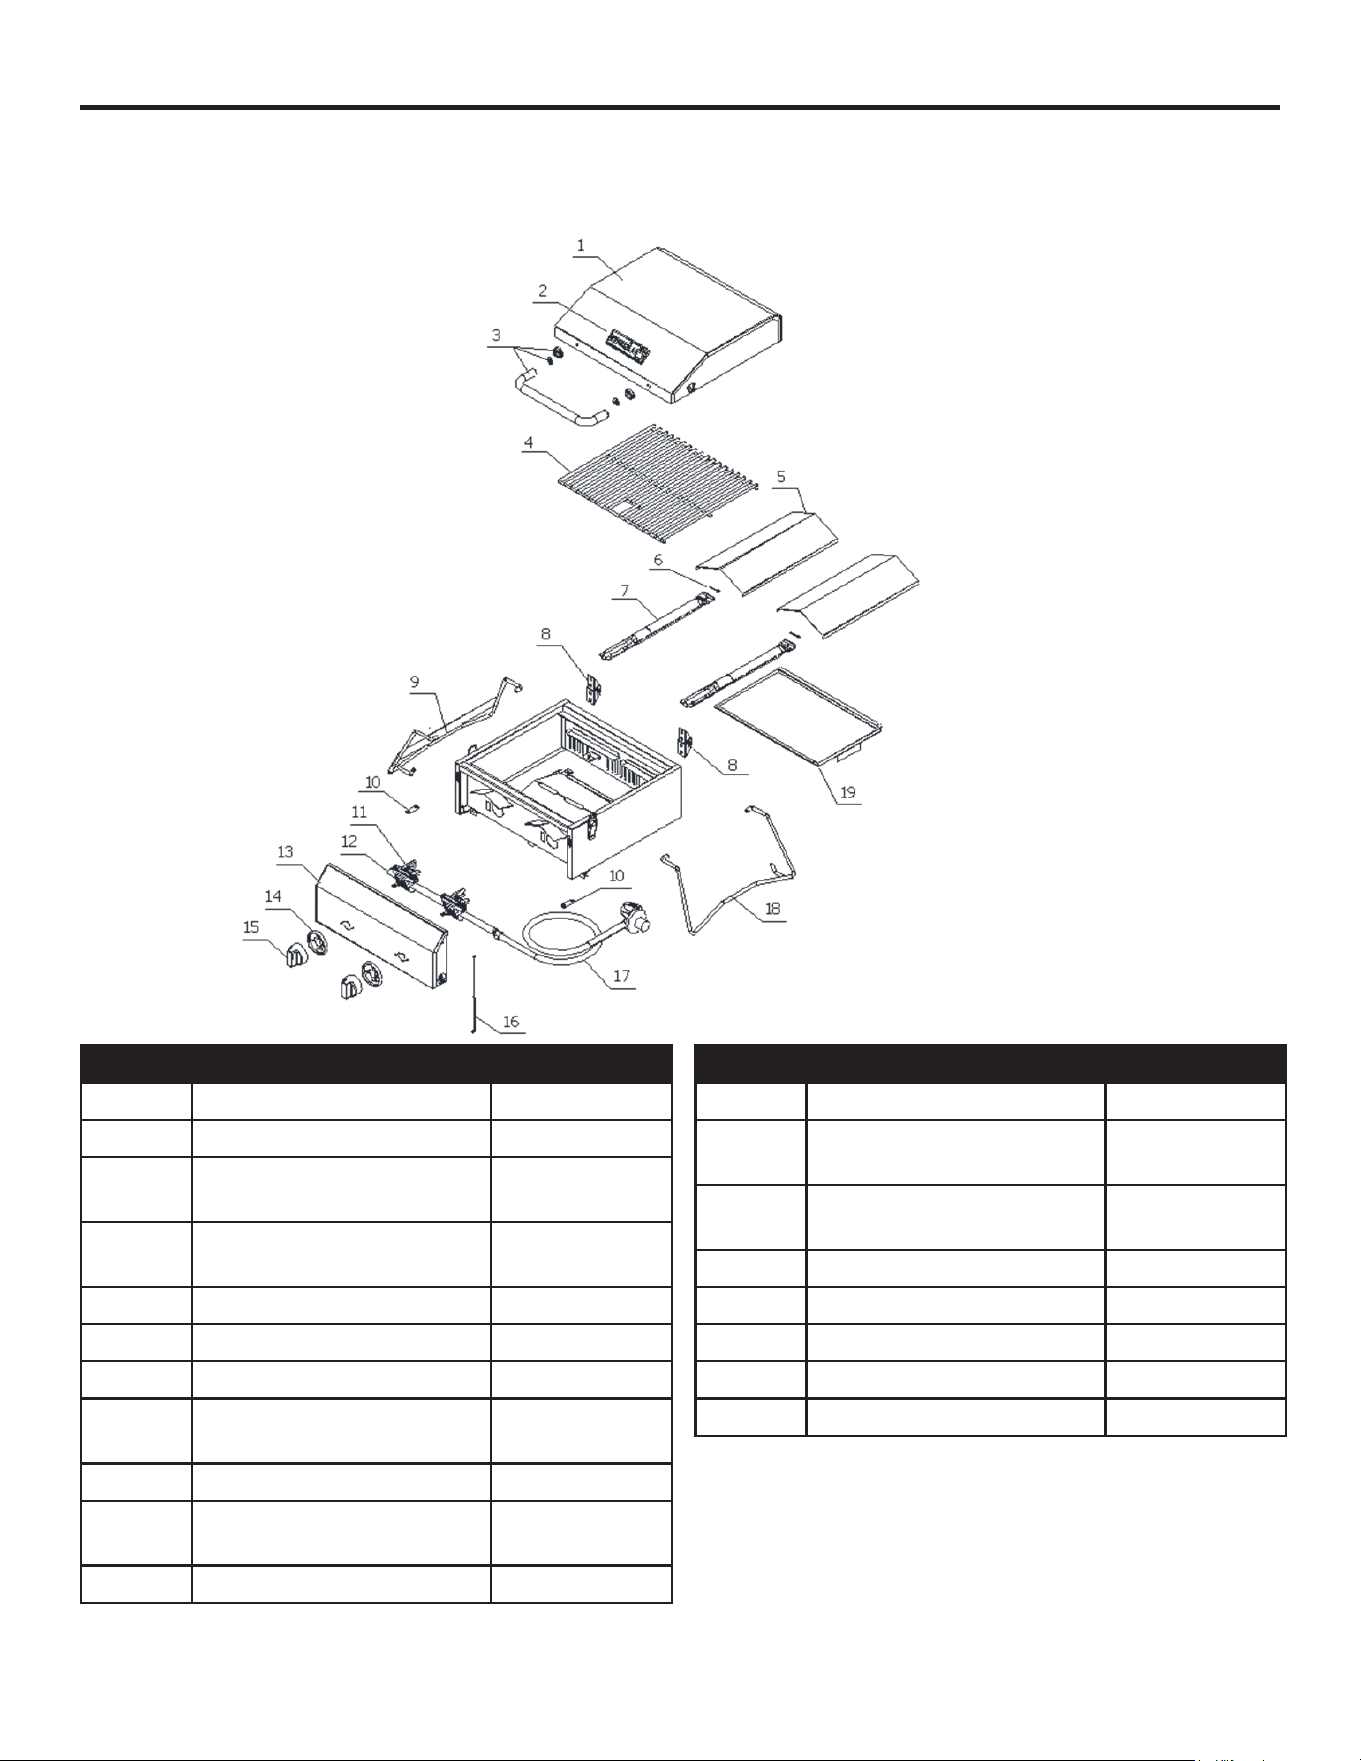
REPLACEMENT PARTS LIST
For replacement parts, call our customer service department at 1-800-913-8999, 8 a.m. - 5 p.m.,
PST, Monday – Friday.
PART DESCRIPTION PART #
1
Main Lid
820-0033-01
2
Logo
820-0033-02
3
Main Lid Handle Assembly
820-0033-03
4
Cooking Grid with Hole
820-0033-04
5
Flame Tamer
820-0033-05
6
Burner Pin Assembly
820-0033-06
7
Main Burner
820-0033-07
8
Main Lid Hinge
820-0033-08
9
Left Leg
820-0033-10
10
Control Panel Connector
820-0033-11
PART DESCRIPTION PART #
11
GasValve
820-0033-12
12
Main Manifold
820-0033-13
13
Main Control Panel
820-0033-14
14
ControlKnobBezel
820-0033-15
15
Control Knob
820-0033-16
16
Lighting Rod
820-0033-17
17
Regulator, LP
820-0033-18
18
Right Leg
820-0033-19
19
Grease Tray
820-0033-20
Numéro de série
Date d’achat
JOIGNEZ VOTRE REÇU ICI
21
Desquestions,desproblèmes,despiècesmanquantes?Avantderetournerl’articleau
détaillant,appeleznotreserviceàlaclientèleau1800913-8999,entre8het5h
(HNP),du lundi au vendredi.
MODÈLE #820-0033
BARBECUE DE TABLE AU
GAZ POUR L’EXTÉRIEUR
ANS Z21.89a-2008
CSA 1.18a-2008
Appareil de cuisson
au gaz extérieur
19000577A0

22
TABLE DES MATIÈRES
Contenu de l’emballage .................................................................................................... 23
Consignes de sécurité
...................................................................................................... 23
Préparation
........................................................................................................................ 27
Instructions pour l’assemblage
......................................................................................... 27
Instructions pour l’installation
........................................................................................... 30
Mode d’emploi
................................................................................................................... 33
Entretien
........................................................................................................................... 35
Dépannage
....................................................................................................................... 37
Garantie
............................................................................................................................ 38
Listedespiècesderechange ........................................................................................... 40
23
CONTENU DE L’EMBALLAGE
PIÈCE DESCRIPTION QUANTITÉ
A Barbecue 1
B Pied gauche 1
C Pied droit 1
D Bouton 2
PIÈCE DESCRIPTION QUANTITÉ
E Grille de cuisson 1
F
Protecteurdeamme 2
G
Plateauàgraisse 1
F GE
A B DC
CONSIGNES DE SÉCURITÉ
Assurez-vousdelireetdecomprendrel’intégralitéduprésentmanuelavantdetenterd’assembler,
d’utiliser ou d’installer le produit.
DANGER
Sivousdétectezuneodeurdegaz:
1. Coupezl’alimentationengazdel’appareil.
2. Éteigneztouteammenue.
3. Ouvrezlecouvercle.
4. Sil’odeurpersiste,tenez-vousloindel’appareiletappelezimmédiatementvotrefournisseurdegaz
ouleserviced’incendiedevotrequartier.
24
CONSIGNES DE SÉCURITÉ
Le non-respect de ces instructions peut entraîner un incendie ou une explosion et causer des
dommages matériels, des blessures ou la mort.
DANGER
•
NE LAISSEZ jamais cet appareil fonctionner sans surveillance.
•
N’UTILISEZjamaiscetappareilàmoinsde3,05m(10pi)detoutestructure,matièrecombustibleou
autrebouteilledegaz.
•
N’UTILISEZ jamaiscetappareilàmoinsde7,62m(25pi)detoutliquideinammable.
•
NE REMPLISSEZpaslerécipientdecuissonau-delàdelalignederemplissagemaximal.
•
Cet appareil ne doit pas être utilisé comme appareil de chauffage et n’est pas conçu pour le devenir.
•
Siunfeusedéclenche,restezàl’écartdel’appareiletappelezimmédiatementleserviced’incendie
devotrequartier.NE TENTEZ pas d’éteindre un feu d’huile ou de graisse avec de l’eau.
Labouteilledegazdepétroleliquéé(GPL)utiliséedoitêtrefabriquéeetidentiéeconformémentaux
normesduU.S.DepartmentofTransportation(DOT)pourdetellesbouteillesouàlanormenationaledu
Canada,CAN/CSA-B339 « Bouteilles et tubes utilisés pour le transport des marchandises dangereuses ».
DANGER
•
L’installation doit être conforme aux codes locaux ou, en l’absence de codes locaux, aux codes
nationauxdegaznaturel,àlanormerelativeàl’entreposageetlamanipulationdesgazdepétrole
liquéé(StorageandHandlingofLiqueedPetroleumGases)ANSIZ223.1/NFPA54duNationalFuel
GasCodeouàlanormeANSI/NFPA58,ouencoreàlanormerelativeauxvéhiculesrécréatifsANSI
A119.2/NFPA1192(StandardforRecreationalVehicles)ainsiqu’aucodeCSAZ240VCrelatifaux
véhicules récréatifs, selon le cas.
• Cebarbecuedetableestconçupouruneutilisationextérieure
seulement, dans un endroit bien aéré.
NE L’UTILISEZ
jamais dans
un bâtiment, un garage, ni tout autre espace clos. Il n’est pas conçu
pour être installé sur un véhicule récréatif ou un bateau.
• Lesliquideschauffésrestentbouillantsbienaprèslandelacuisson.
NEtouchezJAMAISunappareildecuissonavantquelesliquidesse
soientrefroidisetqu’ilssoientàunetempératurede46,11°C
(115 °F) ou moins.
•
MAINTENEZundégagementminimalde60,96cmentrelescôtésetl’arrièredubarbecueettoute
constructioncombustible.N’utilisezpaslebarbecuedansdesendroitscouvertscombustibles(abri
d’auto fermé, garage, porche ou terrasse recouverte).
•
NE TENTEZjamaisderaccordercebarbecueausystèmeautonomed’alimentationengazdepétrole
liquééd’unecaravaneoud’uneautocaravane.
• Ilincombeaupropriétaire(ouàl’installateur)d’assembler,d’installeretd’entretenirlebarbecue
NElaissezPASlesenfantsutiliserlebarbecuedetable.Nelaissezpaslesenfantsnilesanimaux
jouerprèsdecelui-ci.Lenon-respectdecesinstructionspeutcauserdesblessuresgravesoudes
dommages matériels.
•
Ouvrezlecouvercleavantd’allumerlebarbecue.Sivousn’utilisezpaslebarbecue,fermezlerobinet
de la bouteille de GPL.
•
Lisezattentivementlesinstructionsdeceguidepourassemblerl’appareilcorrectementetvérierles
fuites. N’UTILISEZpascebarbecueavantd’enavoirvériél’étanchéité.Sivousdétectezunefuite,
arrêtez-laetcorrigezlasituationavantd’utiliserdenouveaulebarbecue.
•
Lazoneautourdubarbecuedoitêtreexemptedetoutmatériaucombustible,d’essence,den’importe
quelgazembouteilléetd’autresvapeursetliquidesinammables.N’ENTRAVEZ
pasleuxd’airdecombustionetdeventilation.
25
CONSIGNES DE SÉCURITÉ
•
NE TENTEZjamaisd’allumerlebarbecuelorsquelecouvercleestfermé.L’accumulationdegazest
trèsdangereuseetpeutcauseruneexplosion.
•
Gardeztoutcordonélectriqueoutuyaud’alimentationengazàdistancedessurfaceschauffées.
• Lepropaneestungazinammable;unemauvaisemanipulationpeutcauseruneexplosion,un
incendie et un accident ou des blessures graves.
• Cetappareildégagedelachaleurpendantetaprèssonutilisation.Utilisezdesgantsdecuisine
oudesgantsisolantspourvousprotégerdessurfaceschaudesetdeséclaboussuresdeliquides
de cuisson.
•
NElaissezPASlebarbecuesanssurveillancelorsqu’ilfonctionne.
•
N’UTILISEZ PAS le barbecue sous l’effet de la drogue ou de l’alcool.
•
NEplacezPASdebouteilledepropanederechange,pleineouvide,souslebarbecueouàproximité
de celui-ci.
• Cetappareiln’estpasconçupourunusagecommercialnilocatif.
• Débranchezlabouteillelorsquel’appareiln’estpasutilisé.
Parfois, des araignées et d’autres petits insectes grimpent dans le tube du brûleur. Les araignées y
tissentdestoiles,fontdesnidsetdéposentdesœufs.Lestoilesetlesnidssontsouventtrèspetits,
maistrèsrésistantsetpeuventobstruerleuxdegaz.Aprèsl’entreposage,nettoyezlebrûleuravant
del’utiliser,quecesoitaudébutdelasaisondesgrilladesouaprèsunmoisd’inutilisation.
SYSTÈME D’ALIMENTATION
Lespiècesdusystèmed’alimentationsontconçuespourcebarbecue.Ellesnedoiventpasêtre
remplacéespardespiècesd’uneautremarque.Consultezlalistedespiècesderechangeci-dessous.
BRÛLEUR À GAZ :lebrûleuràgazestfaitd’acierinoxydableetnedevraitpasnécessiterd’entretien.
Vérieztoutefoissidesinsectesoudesnidssetrouventdanslesoricesd’aération.
ATTENTION
N’utilisezquelerégulateurdepressiondugazpropanefourniaveccetappareil.Cerégulateurestmuni
d’unoriceconçuetréglépourunepressiondesortiepropreàvotreappareil.Latailledel’oriceetles
indications de régulation de la pression sont prévues par le fabricant pour offrir une excellente cuisson.
Le remplacement du régulateur par tout autre dispositif est dangereux et peut entraîner des blessures
graves.
TUYAU D’ALIMENTATION EN GAZ
Letuyauraccordéaurégulateurfourniavecl’appareilmesure0,91m.Gardezle
tuyaud’alimentationengazàdistancedessurfaceschauffées.
AVERTISSEMENT
PROPANE :
lepropaneestungazinammable.Unemauvaisemanipulationpeutcauserune
explosion, un incendie et un accident ou des blessures graves. Ce barbecue est conçu pour être
utiliséavecdupropane(PL)seulementetsonoriceestprévuàcetten.
ATTENTION
NE
raccordezPAScebarbecueàunebouteillecontenantunautregazquedupropane.Lepropane
estpluslourdquel’airetseconcentreprèsdusol.Assurez-vousqu’ilyaunebonneventilation
pendantsonutilisation.Labouteilledepropanepeutêtrerangéeàl’extérieur,dansunespacebien
aéré.Gardez-lahorsdelaportéedesenfantslorsquevousn’utilisezpaslebarbecue.
26
CONSIGNES DE SÉCURITÉ
Labouteilledepropanedoitêtreutiliséeàl’extérieurseulement,dansunespacebienaéréetnon
dansunbâtiment,ungarageoutoutautreespaceclos.Lebarbecuedetablepeutêtrerangéà
l’intérieursilabouteillen’yestplusraccordéeetestentreposéeàl’extérieur.Labouteilledepropane
(nonincluse)estconçuepourêtreraccordéedirectementaurégulateurdegazfourniavecl’appareil.
Prenezsoindebienxerleraccordletédelabouteilleaurégulateurand’obtenirlebranchement
adéquatetprévu.Lorsquevousdébranchezouraccordezlabouteilledepropane,assurez-vous
quelerégulateurnefrappepaslebarbecue,lesoloutouteautresurface.Replacezlecapuchon
protecteursurleraccordletédelabouteilleaprèsavoirretirécedernierdubarbecue.Sivousavez
deladifcultéàraccorderlabouteilleàl’ensembledurégulateurouàladébrancher,demandezde
l’aideàvotrefournisseurdegazlocal.
Sivousraccordezdenouveaulabouteilledepropaneaurégulateur,assurez-vousdebienserrerle
toutàlamain.Vousdevriezexaminerleraccordaprèschaquenouveaubranchementpourvériers’il
y a des dommages ou une fuite.
Pourcefaire,préparezunesolutionsavonneusecomposéed’unepartdedétergentliquideetune
partd’eau.Appliquezlasolutionsavonneusesurleraccordenvousservantd’unaconpulvérisateur,
d’unebrosseoud’unlinge.Laformationdebullesindiquedesfuites.
AVERTISSEMENT
•
UTILISEZ toujours le barbecue sur une table d’une hauteur
maximale de 81,28 cm.
• Placezlabouteilledepropanesurlesol,directementàcôtédela
table,àunedistancemaximalede60,96cmdubarbecue.
• Lenon-respectdecesinstructionspeutentraînerlasurchauffedela
bouteille,lalibérationetl’inammationdupropane,letrébuchement
surletuyaud’alimentationengazouencorelachutedelabouteille,cequirisquedecauserdes
blessures graves et des dommages matériels.
AVERTISSEMENT EN VERTU DE LA PROPOSITION 65
• Lescombustiblesutilisésdanslesappareilsdechauffageaugazouàl’huileetlesproduitsdeleur
combustioncontiennentdesproduitschimiquesreconnusparl’ÉtatdelaCaliforniecommeétantla
causedecancers,d’anomaliescongénitalesetd’autresproblèmesliésauxfonctionsreproductrices.
Cetavertissementestémisconformémentàlasection25249.6duCodedesantéetdesécuritéde
l’État de la Californie.
VEUILLEZ CONSERVER CES INSTRUCTIONS POUR VOUS Y
RÉFÉRER ULTÉRIEUREMENT.
Vériezlaprésencedefuitessurtouslesraccordsd’alimentationen
gazavantchaqueutilisation.N’utilisezPAS le barbecue avant d’avoir
vériétouslesraccordsetvousêtreassuréqu’iln’yapasdefuite.
27
PRÉPARATION
INSTRUCTIONS POUR L’ASSEMBLAGE
Avantdecommencerl’assemblagedel’appareil,assurez-vousd’avoirtouteslespièces.Comparez
lecontenudel’emballageaveclalistedespièces.S’ilyadespiècesmanquantesouendommagées,
netentezpasd’assemblerleproduit.
• Retirezdubarbecuetouslesmatériauxd’emballage.
Temps d’assemblage approximatif : 5 minutes.
2. Dépliezlespiedsgauche(B)etdroit(C)pourles
xerenplace.
1. Insérezlespiedsgauche(B)etdroit(C)dansles
supports sous le barbecue (A), comme le montre
l’illustration.
Remarque : Avecvosdeuxmains,étirezlespieds
pliantsanqu’ilspuissentglisserdanslessupports.
1
B
C
A
2
B
C
A
28
INSTRUCTIONS POUR L’ASSEMBLAGE
5. Placezlesprotecteursdeamme(F)etlagrille
de cuisson (E)
4. Fixezlesboutonsdecommande(D)àl’avantdu
barbecue.Appuyezsurleboutonenletournant
etvériezs’ilyadesétincelles.danslefoyer.
5
F
E
4
D
3. Insérezleplateauàgraisse(G)aubasdu
barbecue (A).
3
G
A
29
INSTRUCTIONS POUR L’ASSEMBLAGE
6. Vissezlerégulateuràl’extrémitédutuyaudela
bouteille de propane (non incluse) en tournant la
poignée du régulateur dans le sens des aiguilles
d’une montre. Si le barbecue n’est pas en marche,
l’alimentationengazdoitêtreCOUPÉE.
Vériezlaprésencedefuitessurtouslesraccords
d’alimentationengazavantchaqueutilisation.
Utilisezuniquementlebarbecueunefoisquetous
lesraccordsontétévériésetqu’aucunefuiten’a
étédétectée(consultezlesinstructions
«Véricationdesfuites»àlapage31).
6
8. Sivousn’utilisezpaslebarbecue,pliezles
piedsgauche(B)etdroit(C),puisxez-les
danslessupportssouslebarbecueetrangez
l’appareil.
7. Il est recommandé d’utiliser ce barbecue sur
une table d’une hauteur de 81,28 cm et de
placerlabouteilledepropaneàunedistance
maximale de 60,96 cm.
8
B
C
7
30
INSTRUCTIONS POUR L’ASSEMBLAGE
RACCORDEMENT AU GAZ
Utilisezseulementl’ensemblerégulateurdepressionettuyaufourniaveclebarbecue.Tout
remplacementdel’ensemblerégulateurdepressionettuyaudoitêtreindiquéparlefabricantdu
barbecue. Ce barbecue est conçu pour le propane. N’utilisezPASunealimentationaugaznaturel.
Consommation totale de gaz (par heure) avec tous les brûleurs réglés à la position « HI » (élevée).
Brûleurs principaux 16 000 BTU/h
Total 16 000 BTU/h
L’installation de cet appareil doit être conforme aux codes locaux ou, en l’absence de codes locaux,
àlanormeANSIZ223.1/NFPA54duNationalFuelGasCode,ouauCoded’installationdugaz
naturel et du propane CSA B149.1, au Code sur le stockage et la manipulation du propane CSA
B149.2,ouencoreàlanormerelativeauxvéhiculesrécréatifsANSIA119.2/NFPA1192(Standardfor
RecreationalVehicles)ainsiqu’aucodeCSAZ240VCpourlesvéhiculesrécréatifs,selonlecas.
EXIGENCES CONCERNANT LA BOUTEILLE DE PROPANE (9,07 kg)
• Unebouteilledepropaneabîméeourouilléepeutêtredangereuseetdoitêtrevériéeparvotre
fournisseur.
• N’UTILISEZ jamais une bouteille dont le robinet est endommagé. La bouteille de propane doit être
fabriquéeetidentiéeconformémentauxnormesduU.S.DepartmentofTransportation(DOT)pour
detellesbouteillesouàlanormenationaleduCanada,CAN/CSA-B339«Bouteillesettubesutilisés
pour le transport des marchandises dangereuses ».
• Labouteillede9,07kgdoitêtremunied’unrobinetd’arrêtseterminantparlasortiederobinet
précisé, s’il y a lieu, pour raccord de type QCC1 dans la norme pour les raccords d’entrée et de
sortiepourrobinetàgazcompriméANSI/CGA-V-1.
• Vouspouvezentreposeràl’intérieurunappareildecuissonextérieuraugazseulementsila
bouteille est débranchée et retirée de l’appareil.
• Lesystèmedelabouteilledoitêtreplacédefaçonàpouvoirévacuerlesémanationsgazeuses.
• Lerobinetdelabouteilledoitcomporteruncolletprotecteur.
• Pressiond’admission:(enfonctionnement)colonned’eaude27,94cm,(enarrêt)colonned’eau
de 28,45 cm.
• Labouteilledepropanedoitêtreéquipéed’undispositifdeprotectioncontrelesdébordements.
• Retirezlecapuchonenplastiquedelabouteilledepropane.
• Assurez-vousquelestuyauxd’alimentationdubarbecuenetouchentpasleplateauàgraisseou
lefoyerdubarbecuelorsquelabouteilleestplacéedanslechariot.

31
INSTRUCTIONS POUR L’ASSEMBLAGE
RACCORDEMENT DE LA BOUTEILLE DE PROPANE
Pour raccorder la bouteille de propane :
1. Assurez-vousquelerobinetdelabouteilleestàlaposition«OFF»(arrêt).Sinon,tournezle
robinetdanslesensdesaiguillesd’unemontrejusqu’àcequ’ils’arrête.
2. Assurez-vousquelerobinetdelabouteillepossèdeleraccordletémâleexternedetype1,
norme ANSI Z21.81.
3. Assurez-vousquelesboutonsdecommandedesbrûleurssontàlaposition«OFF»(arrêt).
4. Vériezlesraccordsdurobinet,l’oriceetl’ensembledurégulateur.Retirezlesdébrisetvériez
si le tuyau est endommagé.
5. Lorsquevousraccordezl’ensembledurégulateuraurobinet,serrezàlamainl’écroudanslesens
desaiguillesd’unemontrejusqu’àcequ’ils’arrête.
6. L’utilisation d’une clé peut endommager l’écrou d’accouplement rapide et entraîner une situation
dangereuse.
7. Ouvrezcomplètementlerobinetdelabouteilleenletournantdanslesenscontrairedesaiguilles
d’une montre.
8. Avantd’allumerlebarbecue,utilisezdel’eausavonneusepourvériersilesraccordsfuient.
9. Sivousdétectezunefuite,tournezlerobinetdelabouteilleàlaposition«OFF»(arrêt)
et N’utilisezPASlebarbecuejusqu’àcequ’undétaillantdepropanelocalpuissefaireles
réparations.
AVERTISSEMENT
N’UTILISEZ
jamaisunarticleendommagéouobstrué.Consultezvotredétaillantdepropanelocalpour
les réparations.
RETRAIT DE LA BOUTEILLE DE PROPANE
1. Assurez-vousquelesboutonsdecommandedesbrûleurssontàlaposition«OFF»(arrêt)et
quelebarbecueestrefroidi.
2. Fermezlerobinetdelabouteilleenletournantdanslesensdesaiguillesd’unemontrejusqu’àla
position « OFF » (arrêt).
3. Enlevezl’ensembledurégulateurdelabouteilleentournantl’écroud’accouplementrapidedans
le sens contraire des aiguilles d’une montre.
4. Mettezlecapuchonprotecteursurletuyaudesortiedurobinetdelabouteillelorsquecelle-ci
n’estpasutilisée.Utilisezuniquementdescapuchonsprotecteursdumêmetypequeceluifourni
avec le robinet de la bouteille. D’autres types de capuchon ou de bouchon peuvent laisser fuir le
propane.
VÉRIFICATION DES FUITES
Bienquelesraccordsdegazsoientvériésavantl’expédition,untestcompletpourlesfuitesdoit
êtreeffectuésurlesitedel’installation.Vériezlaprésencedefuitessurtouslesraccordsdegaz
avantchaqueutilisation,selonlesinstructionsci-dessous.Aussitôtquevoussentezuneodeurde
gaz,vériezimmédiatementlesystèmeenentierpourrepérerlesfuites.
AVANT DE TESTER
Assurez-vousquetouslesmatériauxd’emballageontétéretirésdubarbecue,ycomprislessangles
de retenue des brûleurs.

32
INSTRUCTIONS POUR L’ASSEMBLAGE
AVERTISSEMENT
Vériezlaprésencedefuitessurtouslesraccordsd’alimentationengazavantchaqueutilisation.
N’UTILISEZpaslebarbecueavantd’avoirvériétouslesraccordsetvousêtreassuréqu’iln’yapas
de fuite. NE FUMEZ PAS lorsquevousvériezlaprésencedefuites.N’EFFECTUEZ jamais un test
defuitesenprésenced’uneammenue.Préparezunesolutioncomposéed’unepartdedétergent
liquideetd’unepartd’eau.Appliquezlasolutionsavonneusesurlesraccordsenvousservantd’un
aconpulvérisateur,d’unebrosseoud’unlinge.Assurez-vousquelabouteilledepropaneestpleine
pour effectuer le premier test de fuites.
EFFECTUER LE TEST
1. Fermezlesboutonsdecommandedesbrûleurs.
2. Tournezlerobinetdelabouteilledepropanedanslesenscontrairedesaiguillesd’unemontre
pour l’ouvrir.
3. Appliquezl’eausavonneusesurtouslesraccordsdegaz.Desbullesdesavonseformeronts’ily
a une fuite.
4. Siunefuiteestdétectée,fermezimmédiatementl’alimentationengazetserrezlesraccordsqui
présentent une fuite.
5. Rétablissezl’alimentationengazetfaitesunenouvellevérication.
6. Silesraccordsfuienttoujours,fermezl’alimentationengazettéléphonezauserviceàlaclientèle
au 1 800 913-8999.
7. Sivousconstatezdel’usureoudel’abrasionexcessive,ousiletuyauestcoupé,vousdevez
remplacerletuyauavantd’utiliserl’appareildecuissonaugazextérieur.
• Utilisezseulementlespiècesrecommandéesparlefabricantpourlebarbecue.Toutesubstitution
annulera la garantie.
AVERTISSEMENT
NE
rangezPAS lebarbecueàl’intérieuràmoinsquelabouteillenesoitdébranchée.N’entreposez
PASlabouteilledansunbâtiment,ungarage,nitoutautreendroitclosetconservez-lahorsdela
portée des enfants en tout temps.
VÉRIFICATION FINALE DE L’INSTALLATION
Ledégagementindiquéde60,96cmdetoutmatériaucombustibleetdetouteconstructionaété
respecté.
• Toutlematérield’emballageaétéretiré.
• Letuyauetlerégulateurontétéraccordéscorrectementàlabouteilledepropane.
• Letestpourlesfuitesaétéeffectuésurlebarbecueetaucunefuiten’aétédétectée.
• Lerobinetd’alimentationengazaétélocalisé.
• Touslesbrûleurssontinstallés.
• Leprésentguideestconservépourréférenceultérieure.
AVERTISSEMENT
• Lebarbecueetsonrobinetdoiventêtredébranchésdusystèmed’alimentationengazavanttout
testdepressiondusystème,pourdespressionsd’essaiexcédant3,5kPa(0,51lb/po2).
• L’appareildecuissonextérieurdoitêtreisolédusystèmed’alimentationengazparlafermeture
manuelledesonrobinet,pendanttoutessaidepressiondusystème,pourdespressionsd’essai
égalesouinférieuresà3,5kPa(0,51lb/po2).
33
MODE D’EMPLOI
ALLUMAGE DU BARBECUE
1. Ouvrezlespiedsdubarbecue.
2. Assurez-vousquelabouteilledepropaneestfermementraccordéeau
régulateur(serrezàlamainseulement).
3. Ouvrezlecouvercle.Ildoittoujoursêtreouvertlorsquevousallumezl’appareil.
4. Poussezsurleboutondebrûleurprincipal,puistournez-leàla
position « IGNITE/HI » (allumage/élevée); le brûleur devrait s’allumer
immédiatement.
5. S’ilnes’allumepasdansles3à5secondessuivantes,tournez
immédiatementleboutondecommandeàlaposition«OFF»(arrêt).
Attendez5minutesavantdetenterderallumerlebarbecue.Aprèslaseconde
tentative,silebarbecuenes’allumepas,veuillezcommuniqueravecnotre
serviceàlaclientèleau1800913-8999.
Remarque : Sileboutonnefonctionnepas,insérezuneallumettedans
latiged’allumage.Allumezl’allumetteetinsérez-laàtraverslesgrilles
decuissonjusqu’aubrûleur.
ARRÊT DU BARBECUE
1. Tournezleboutonàlaposition«OFF»(arrêt).
2. Tournezlerobinetdelabouteilledepropaneàlaposition«OFF»
(arrêt).
ATTENTION : NE TENTEZ PAS de rallumer le barbecue sans
suivre toutes les instructions d’allumage.
3. Laissezrefroidirlebarbecuependantaumoins30minutesavant
de le déplacer ou de le transporter.
CARACTÉRISTIQUES DE LA FLAMME
Vériezquelescaractéristiquesdelaammedubrûleursontadéquates.La
ammedubrûleurdoitêtrebleueetstablesanspointejaune,bruitexcessif,
niélévation.Suivezlesétapesci-dessouspourcorrigerlescaractéristiques
delaamme:
• Tournezlesboutonsdecommandeetlerobinetdelabouteilledepropaneàlaposition«OFF»
(arrêt).
• Attendezquelebarbecueetlesbrûleurssesoientrefroidis.
• Silaammeestjaune(manqued’air),tournezlavisderéglagesituéeàl’avantdubrûleurdansle
sens contraire des aiguilles d’une montre.
• Silaammeestbruyanteous’éloignedubrûleur(tropd’air),tournezlavisderéglagedanslesens
des aiguilles d’une montre.
• Sicesréglagesnecorrigentpasleproblème,communiquezavec
leserviceàlaclientèleau1800913-8999.
OFF (arrêt)
LO (faible)
OFF (arrêt)
LO (faible)
IGNITE/HIGH
(allumage/élevée)
Brûleurs principaux
IGNITE/HIGH
(allumage/élevée)
25 mm
INSTRUCTIONS POUR L’ASSEMBLAGE
• Pouréviterunincendie,quipourraitcauserdesblessuresgravesoumortelles,NE PLACEZ PAS
debouteillesdegazpropanederechangeàl’intérieurouprèsdecetappareil.
• NE REMPLISSEZjamaislabouteilleàplusde80%desacapacité.Lenon-respectdecette
instruction pourrait entraîner un incendie et causer la mort ou des blessures graves.
OFF (arrêt)
LO (faible)
IGNITE/HIGH
(allumage/élevée)

34
MODE D’EMPLOI
UTILISATION DU BARBECUE
1. Trouvezunesurfaceplanepourlebarbecue.
2. Préchauffezlebarbecuependant5minutes,lecouverclefermé,avantdel’utiliser.
3. Vouspouvezutiliserlebarbecue,quellesquesoientlesconditionsmétéorologiques.Dans
les cas de chaleur ou de froid extrême, le temps de cuisson peut augmenter ou diminuer
légèrement.Mettezlebarbecueàl’abri,sivousl’utilisezparventsforts.
35
Pour une utilisation en toute sécurité de votre barbecue, la surface de cuisson toujours doit être
exemptedetoutematièrecombustible,commedel’essenceetd’autresvapeursouliquides
inammables.
Pièces externes du barbecue
–cespiècessontenacierinoxydable.Ellessontfacilesànettoyer
avec de l’eau savonneuse ou un nettoyant pour acier inoxydable.
Grille de cuisson et plateau à graisse – la grille de cuisson est en acier inoxydable. La grille doit
êtrenettoyéedèsquelacuissonestterminée,alorsqu’elleestencorechaude.Leplateauàgraisse
estégalementenacierinoxydableetpeutêtrenettoyéàl’aided’ungrattoirplat,commeuncouteau
àmastiquer.
AVERTISSEMENT
Leplateauàgraissedoittoujoursêtrepropreetexemptd’accumulationsimportantespourquele
barbecuefonctionnecorrectementetpouréviterlesmontéesdeamme.
Brûleurs principaux du barbecue –soyeztrèsvigilantlorsquevousretirezunbrûleur.Ildoitêtre
correctementcentrédansl’oriceavantdetenterd’allumerdenouveaulebarbecue.Lafréquencedu
nettoyagevarieselonlafréquenced’utilisationdubarbecue.
• Lebrûleurdoitêtreadéquatementinstallésurl’orice.Uneinstallationinadéquatepeutcauser
unincendiederrièreetsouslepanneauderobinet,endommageantlebarbecueetrendantson
utilisation dangereuse.
• Avantlenettoyage,assurez-vousquelesboutonsd’alimentationengazetdecommandesontàla
position«OFF»(arrêt)etquelesbrûleursontrefroidi.
Pour retirer les brûleurs principaux pour le nettoyage :
1. Repérezlavisdubrûleuràl’arrièredufoyer.
2. Retirezlavisdubrûleuretsoulevezlebrûleurhorsdufoyer.
Pour nettoyer les brûleurs du barbecue :
1. Nettoyezl’extérieurdubrûleuravecunebrossemétallique.Utilisezungrattoirmétalliquepourles
taches récalcitrantes ou les débris.
2. Nettoyezlestrousbouchésàl’aided’untrombonedéplié.N’utilisez
jamais un cure-dent en bois, car il pourrait se briser et obstruer le
trou.
3. Vériezetnettoyezlesbrûleursetlestubesdeventuripourenlever
les insectes et les nids d'insectes. Un tube obstrué peut activer un
feusousl’appareiletderrièrelepanneaudecommandeprincipal.
Pour réinstaller les brûleurs principaux :
1. Insérezlebrûleursurlerobinetprincipaldegazdubrûleur.
2. Assurez-vousquel’oricedurobinetsetrouvedansletubeventuri
du brûleur, comme le montre l’illustration.
3. Alignezletroudevisdubrûleurautroudufoyer,insérezlavis,puis
serrez-la.
Orice du
robinet
Tube venturi
du brûleur
Tube venturi
du brûleur
ENTRETIEN

36
ENTRETIEN
Foyer –
utilisezdel’eausavonneusetièdepourlenettoyer.NE laissez PAS s’accumuler de graisse.
Trou de drainage – le trou de drainage doit être exempt de graisse et de morceaux de nourriture
and’assurerledrainagedesrésidusversleplateauàgraisse.Ledrainagedoitêtrefaitpourlebon
fonctionnement du barbecue.
Généralité – ce barbecue, comme tout autre appareil, aura meilleure apparence et durera plus
longtempssivouslerangezlorsquevousnel’utilisezpas.
ATTENTION
N’
entreposezPAS les bouteilles de propane dans des espaces clos. Avant de recouvrir le barbecue
oudeledéplacer,attendeztoujoursqu’ilrefroidisse(aumoins30minutes).
• N’entravezpasleuxd’airdecombustionetdeventilation.
• Untubeobstruépeutcauserunfeusousl’appareil.
• Cetappareildoitêtredansunendroitexemptdematièrescombustibles,d’essenceetd’autres
vapeursoudeliquidesinammables.
• Assurez-vousqu’aucundébrisn’obstruelesouverturesdubarbecueetqu’aucunobjetouproduitne
bloqueleuxd’airdecombustionoudeventilation.Assurez-vousquelespiedsdubarbecuesont
ouvertslorsquevousl’utilisez.
• Vériezs’ilyadesnidsd’insectesoudesmatièresquibloquentlessortiesd’airdubrûleur(derrière
lagrilledel’entréed’airducôtédroitdubarbecue).Assurez-vousquelesfentesdansletubedu
brûleur sont dégagées.
• Sivousn’utilisezpaslebarbecue,tournezleboutondecommandeàlaposition«OFF»(arrêt)et
retirezlabouteilledepropanedurégulateur.Retirezlerégulateurdubrûleur.
• Pourusageàl’extérieurseulement.Sivousrangezcetappareilàl’intérieur,débranchezlabouteille
depropaneetlaissez-laàl’extérieur.Lesbouteillesdepropanedoiventêtrerangéesàl’extérieur,
hors de la portée des enfants.
IMPORTANT
Première utilisation : il est important d’allumer le barbecue et de le préchauffer pendant 30 minutes
avantdedéposerdesalimentssursagrilledecuisson.Ilestnormalqu’àlapremièreutilisationdu
barbecueunpeudefuméesedégage.Aprèslepréchauffage,lebarbecuepeutêtreutilisé.Vous
pouvezvaporiserunaérosoldecuissonsurlesgrillesdecuissonpourfaciliterlenettoyage.
CET APPAREIL DE CUISSON DOIT SERVIR À L’EXTÉRIEUR SEULEMENT ET NE DOIT PAS
ÊTRE UTILISÉ DANS UN BÂTIMENT, UN GARAGE, NI TOUT AUTRE ESPACE CLOS.
INSTRUCTIONS RELATIVES AU TRANSPORT
ATTENTION
NE DÉPLACEZ jamais un barbecue allumé.
Assurez-vousqueleboutondecommandeestàlaposition«OFF»(arrêt).Débranchezlabouteillede
propanedurégulateur.Retirezlerégulateurdubarbecue.Assurez-vousdelaisserrefroidirlebarbecue
pendantaumoins30minutes.Fermezlecouvercleetenclenchezleverrou.Fermezlespiedsdu
barbecue.Servez-vousdelapoignéepourtransporterlebarbecue.
Remarque : Ilestpréférabledelaisserleplateauàgraisseenplace,xéaubasdubarbecue;la
graisse peut ainsi s’égoutter par le drain durant le transport.

37
DÉPANNAGE
PROBLÈME MESURE CORRECTIVE
Le barbecue ne s’allume pas.
1. Vériezsilabouteilledepropaneestvide.
2. Vériezsilesoricesdubrûleursontobstrués.Utilisezune
brossemétalliquesouplepournettoyerlesoricesobstrués.
3. Vériezsil’oriced’admissiondugazdubrûleurestobstrué.
Sitelestlecas,nettoyez-leavecuneaiguilleouunldefer
mince.
N’UTILISEZ JAMAIS UN CURE-DENT EN BOIS.
Laammedubrûleurestjaune
ouorangeetuneodeurdegazse
dégage.
1. Vériezs’ilyadesaraignéesetdesinsectes.
2. Communiquezavecleserviceàlaclientèleau
1 800 913-8999.
Lachaleurdemeurefaiblelorsque
le bouton de commande est réglé
àlaposition«HIGH»(élevée).
1. Veillezàcequelasurfacedecuissonsoitexemptede
poussière.
2. Veillezàcequelebrûleuretl’oricesoientpropres.
3. Vériezs’ilyadesaraignéesetdesinsectes.
4. L’alimentationengazest-elleadéquate?
5. Le barbecue a-t-il été préchauffé pendant 15 minutes?
Sivousavezdesquestionsconcernantceproduit,veuilleztéléphonerauserviceàlaclientèle
au1 800 913-8999, entre 8 h et 5 h (HNP), du lundi au vendredi.
AVERTISSEMENT
Lesaraignéesetlesinsectespeuventfaireleurnidàl’intérieurdesbrûleursdubarbecueetperturber
l’arrivéedegaz.Celapeutactiverunfeuderrièrelepanneauderobinet,cequiendommageraitle
barbecueetrendraitsonutilisationnonsécuritaire.Inspectezlebarbecueaumoinsdeuxfoispar
annéeouimmédiatementsicequisuitsurvient:
1. Uneodeurdegazsedégageetlesammesdubrûleursontjaunes.
2. Le barbecue n’atteint pas la température souhaitée.
3. La chaleur n’est pas répartie uniformément.
4. Lesbrûleursémettentdesbruitsdecraquement.
Si le barbecue fonctionne mal, vériez les points de la liste suivante avant de joindre le
service à la clientèle de votre détaillant.

GARANTIE
38
Lefabricantgarantituniquementauconsommateur(acheteur)initialqueleproduit(modèle
#820-0033) ne présentera aucun défaut de fabrication ou de matériaux, s’il est assemblé
correctementetutiliséàdesnsdomestiquesdansdesconditionsnormalesetraisonnables,
pourlespériodesindiquéesci-après,àpartirdeladated’achat.Lefabricantseréserveledroit
d’exigerdesphotographiesduproduitendommagéouleretourdespiècesdéfectueuses,fretou
portprépayéparleconsommateur,auxnsd’inspectionetd’examen.
• BRÛLEURS PRINCIPAUX : garantie LIMITÉE de 3 ans contre les perforations.
• CHARIOT : garantieLIMITÉEde1ancontrelesperforationsnecouvrantpaslesproblèmes
esthétiquescommelacorrosionensurface,leségratignuresetlarouille.
• PIÈCES : garantie LIMITÉE de 1 an (y compris, sans y être limité, les robinets, le cadre, le boîtier,
le panneau de commande, l’allumeur, le régulateur, les tuyaux). *Ne couvre pas les éclats, les
rayuresoulecraquementàcausedelacorrosion,deségratignuresoudelarouilledelasurface.
Unefoisqueleconsommateuraurafourniunepreuved’achat,commestipulédanslaprésente,
lefabricantrépareraouremplaceralespiècesjugéesdéfectueusesdurantlapériodedegarantie
applicable.Lespiècesnécessairesàlaréparationouauremplacementserontenvoyéessansfrais(à
l’exceptiondesfraisd’expédition)sil’acheteurenfaitlademandedanslapériodedegarantie,àpartir
de la date d’achat initiale. Le consommateur (acheteur) initial est responsable des frais d’expédition
despiècesremplacéesselonlesconditionsdelaprésentegarantielimitée.Cettegarantielimitée
estenvigueurauxÉtats-UnisetauCanadaseulement,elleestofferteuniquementàlapersonne
àlaquellel’appareilaétévenduàl’origineetn’estpastransférable.Lefabricantexigeunepreuve
raisonnabledeladated’achat.Ilfautparconséquentconserverlereçuoulafacture.Sil’appareil
estuncadeau,vousdevezdemanderàlapersonnevousayantoffertcetarticled’envoyerlereçu
envotrenom,àl’adresseci-dessous.Lespiècesdéfectueusesoumanquantesassujettiesàcette
garantie limitée ne seront pas remplacées sans inscription ou preuve d’achat. Cette garantie limitée
s’appliqueàlafonctionnalitéduproduitSEULEMENTetnecouvrepaslesproblèmesesthétiques
comme les rayures, les bosses, la corrosion ou la décoloration par la chaleur, les nettoyants abrasifs
ouchimiquesoutoutautreoutilutilisédurantl’assemblageoul’installationdel’appareil,larouille
en surface ou la décoloration des surfaces en acier inoxydable. La rouille en surface, la corrosion
ouleséclatsdepeinturepulvériséesurlespiècesmétalliquesnecompromettentpasl’intégrité
structurelle du produit et ne sont pas considérés comme un défaut de fabrication ou de matériaux et
nesontpascouvertsparcettegarantie.Cettegarantielimitéeneremboursepaslecoûtassociéà
toutdésagrément,àtoutenourriture,àtouteblessureouàtoutdommageàlapropriété.Siunepièce
derechangeoriginalen’estpasdisponible,unepiècederechangesimilaireseraenvoyée.Vous
êtesresponsabledesfraisd’expéditiondespiècesremplacéesselonlesconditionsdelaprésente
garantie limitée.
ÉLÉMENTS NON PAYÉS PAR LE FABRICANT :
• Appelsdeserviceàvotredomicile.
• Réparationslorsqueleproduitsertàd’autresnsqu’uneutilisationnormalefamilialeou
résidentielle.
• Dommagesrésultantd’unaccident,d’unemodication,d’unusageinappropriéouabusif,d’un
manqued’entretienoudenettoyage,d’unincendie,d’uneinondation,d’uncasdeforcemajeure,
d’uneinstallationinadéquateounonconformeauxcodesdel’électricitéoudelaplomberie,ou
l’utilisationduproduitd’unemanièrenonprescriteparlefabricant.
• Toutepertedenourritureliéeauxpannesduproduit.

GARANTIE
• Piècesderechangeoucoûtdelamain-d’œuvrederéparationpourunappareilutiliséàl’extérieur
des États-Unis ou du Canada.
• Ramassageetlivraisonduproduit.
• Fraisdeposteoufraisdedéveloppementdesphotosenvoyéescommepreuves.
• Réparationsdepiècesoudesystèmesrésultantdemodicationsnonautoriséessurl’appareil.
• Retraitouréinstallationduproduit.
• Fraisd’expédition,standardouaccélérée,despiècesgaranties,nongarantiesouderechange.
CLAUSE DE NON-RESPONSABILITÉ DES GARANTIES IMPLICITES; LIMITES DES RECOURS
Laréparationouleremplacementdespiècesdéfectueusesestvotreseulrecoursselonles
conditions de la présente garantie limitée. Le fabricant n’est pas responsable des dommages
consécutifsouaccessoiresdécoulantd’unmanquementàlaprésentegarantielimitéeouàtoute
autre garantie implicite applicable, ni des défaillances ou des dommages résultant des cas de
forcemajeure,d’unentretieninadéquat,d’unfeudegraisse,d’unaccident,d’unemodication,du
remplacementdepiècesparquiconqueautrequelefabricant,d’unusageinapproprié,dutransport,
d’unusagecommercialouabusif,d’unmilieuhostile(températureinclémente,phénomènesnaturels,
dommagescausésparlesanimaux)oud’uneinstallationinadéquateounonconformeauxcodes
locaux ou aux instructions imprimées du fabricant.
CETTE GARANTIE LIMITÉE EST LA SEULE GARANTIE EXPRESSE OFFERTE PAR LE
FABRICANT. AUCUNE SPÉCIFICATION DE RENDEMENT DU PRODUIT OU DESCRIPTION, PEU
IMPORTE OÙ ELLE FIGURE, N’EST GARANTIE PAR LE FABRICANT SAUF CELLE PRÉVUE
DANS LA PRÉSENTE GARANTIE LIMITÉE. TOUTE PROTECTION IMPLICITE ACCORDÉE PAR
LES LOIS DE TOUT ÉTAT OU PROVINCE, Y COMPRIS LA GARANTIE IMPLICITE DE QUALITÉ
MARCHANDE OU D’ADAPTATION À UN USAGE PARTICULIER SE LIMITE À LA DURÉE DE LA
PRÉSENTE GARANTIE.
Nilesdétaillantsnilescommercesdedétailvendantceproduitnesontautorisésàoffrirune
garantiesupplémentaireoudesrecourssupplémentairesoucontradictoiresàceuxmentionnés
précédemment. La responsabilité maximale du fabricant ne doit, en aucun cas, dépasser le prix
d’achatconsignépourleproduitpayéparleconsommateurinitial.Cettegarantienes’applique
qu’auxappareilsachetésd’undétaillantoud’unrevendeurautorisé.REMARQUE : Certains États
ou certaines provinces ne permettent pas la limitation ou l’exclusion des dommages accessoires
ouconsécutifs,desortequeleslimitationsetexclusionsmentionnéesci-dessuspeuventnepas
s’appliqueràvous.Cettegarantievousconfèredesdroitsprécistelsqu’ilssonténoncésdansla
présente.Ilestpossiblequevousdisposiezégalementd’autresdroitsquivarientd’unÉtatoud’une
provinceàl’autre
S
ivousavezdesquestionsgénéralesoudesquestionsconcernantlesretours,lescommandesde
piècesetledépannage,veuilleztéléphonerau1800913-8999,entre8het 5h(HNP),dulundiau
vendredi.
39
40
LISTE DES PIÈCES DE RECHANGE
Pourobtenirdespiècesderechange,communiquezavecnotreserviceàlaclientèleau
1 800 913-8999, entre 8 h et 5 h (HNP), du lundi au vendredi.
.
PIÈCE DESCRIPTION N
o
DE PIÈCE
1
Couvercle principal
820-0033-01
2
Logo
820-0033-02
3
Ensemble de la poignée
du couvercle principal
820-0033-03
4
Grille de cuisson avec
trou
820-0033-04
5
Protecteurdeamme
820-0033-05
6
Goupille du brûleur
820-0033-06
7
Brûleur principal
820-0033-07
8
Charnièreducouvercle
principal
820-0033-08
9
Pied gauche
820-0033-10
10
Raccord du panneau de
commande
820-0033-11
11
Robinetdegaz
820-0033-12
PIÈCE DESCRIPTION N
o
DE PIÈCE
12
Collecteur principal
820-0033-13
13
Panneau de commande
principal
820-0033-14
14
Collerette de bouton de
commande
820-0033-15
15
Bouton de commande
820-0033-16
16
Tige d’allumage
820-0033-17
17
Régulateur pour propane
820-0033-18
18
Pied droit
820-0033-19
19
Plateauàgraisse
820-0033-20
Imprimé in Chine
Número de serie
Fecha de compra
ADJUNTE SU RECIBO AQUÍ
41
¿Preguntas,problemas,piezasfaltantes?Antesdevolveralatienda,llamea
nuestroDepartaento de Servicio al Cliente al 1-800-913-8999 de lunes a viernes
de 8 a.m. a 5 p.m. Heure Normale du Pacifuque.
PARRILLA A GAS DE MESA
PARA EXTERIORES
MODELO #820-0033
ANS Z21.89a-2008
CSA 1.18a-2008
Electrodoméstico a gas
para cocinar en exteriores
19000577A0

42
ÍNDICE
Contenidodelpaquete ..................................................................................................... 43
Información de seguridad
................................................................................................. 43
Preparación
....................................................................................................................... 47
Instrucciones de ensamblaje
............................................................................................ 47
Instrucciones de instalación
............................................................................................. 50
Instrucciones de funcionamiento
...................................................................................... 52
Cuidado y mantenimiento
................................................................................................. 54
Solución de problemas
..................................................................................................... 57
Garantía............................................................................................................................ 58
Listadepiezasderepuesto.............................................................................................. 60
43
CONTENIDO DEL PAQUETE
PIEZA DESCRIPCIÓN CANTIDAD
A Parrilla 1
B
Pataizquierda 1
C Pata derecha 1
D Perilla 2
PIEZA DESCRIPCIÓN CANTIDAD
E Rejilla de cocción 1
F Difusor de llama 2
G Bandeja de recolección
de grasa
1
F GE
A B DC
INFORMACIÓN DE SEGURIDAD
Lea y comprenda completamente este manual antes de intentar ensamblar, usar o instalar el producto.
PELIGRO
Si percibe olor a gas:
1. Cierre el suministro de gas hacia el electrodoméstico.
2. Apaguecualquierllamaexpuesta.
3. Abra la tapa.
4. Si el olor persiste, manténgase alejado del electrodoméstico y llame de inmediato a su proveedor de
gas o al Departamento de Bomberos local.
44
INFORMACIÓN DE SEGURIDAD
Si no sigue estas instrucciones, podría provocar un incendio o una explosión que ocasione daños a
la propiedad, lesiones personales o la muerte.
PELIGRO
• NUNCA deje este electrodoméstico sin supervisión.
• NUNCAuseesteelectrodomésticoamenosde3,05metros(10pies)decualquierestructura,material
combustible u otro cilindro de gas.
• NUNCAuseesteelectrodomésticoamenosde7,62metros(25pies)delíquidosinamables.
• NO LLENE el recipiente de cocción más allá de la línea de llenado máximo.
• Esteelectrodomésticonoestádiseñadoparausarsecomocalentadorynuncadebeutilizarse
como tal.
• Siseproduceunincendio,manténgasealejadodelelectrodomésticoyllamedeinmediatoalDepartamento
de Bomberos. NO UTILICE agua para intentar extinguir un fuego provocado por aceite o grasa.
Elcilindrodesuministrodegaspropanolíquidodebeestarfabricadoymarcadosegúnlasespecicaciones
para este tipo de cilindros del Departamento de Transporte de EE.UU. (DOT, por sus siglas en inglés) o
la Ley Nacional de Canadá, CANB339, para "Cilindros, esferas y tubos para el transporte de mercancías
peligrosas".
PELIGRO
•
Lainstalacióndebecumplirconloscódigoslocaleso,ensuausencia,conlosCódigosnacionalesdegas
combustible, el Código nacional de gas combustible ANSI Z223.1/NFPA 54, la Norma ANSI/NFPA 58 para
el almacenaje y manipulación de gas licuado de petróleo o la Norma para vehículos recreacionales, ANSI
A119.2/NFPA1192yelCódigodevehículosrecreacionalesCSAZ240RV,segúncorresponda.
•
Estaparrillademesaestádestinadasoloparausoenexteriores.Laparrilladebehacersefuncionaren
un espacio con buena ventilación. NUNCA la use en espacios cerrados,
garajesniedicios.Laparrillanoestádiseñadaparainstalarseen
vehículos de recreación ni botes.
• Loslíquidoscalentadossemantienenaaltastemperaturaspormucho
tiempo después de haber terminado el proceso de cocción. NO TOQUE
elelectrodomésticodecocciónhastaqueloslíquidossehayanenfriado
hasta llegar a 46,1 °C o menos.
• NO INSTALE ni use la parrilla si hay materiales combustibles a menos de
60,96cmdelaparteposterioryloscostadosdeesta.Laparrillanosedebecolocardebajodesupercies
superiores(entradaparaautomóvilescerrada,garaje,porche,patio)quepuedanincendiarse.
• NUNCAintenteconectarestaparrillaalsistemadegasPLautocontenidodeunremolqueparacampingo
casa rodante.
• Elensamblaje,lainstalaciónyelmantenimientodelaparrillaagassonderesponsabilidaddequienla
ensambla. NO PERMITAqueniñosnimascotasoperenojueguencercadelaparrillademesa.Noseguir
estas instrucciones podría provocar lesiones personales graves o daños a la propiedad.
• Retirelatapaantesdeencenderlaparrilla.Cuandolaparrillanoestáenuso,cierrelaperilladecontrol
del cilindro de gas PL.
• Sigaatentamentelasinstruccionesdeestemanualpararealizarunensamblajeyunapruebadefugas
correctos a la parrilla. NO USElaparrillahastaquehayarealizadolapruebadefugas.Sisedetectauna
fugaencualquiermomento,sedebedetenerycorregirantesdecontinuarusandolaparrilla.
• Eláreadelelectrodomésticosedebemantenerlibredematerialescombustibles,gasolina,gas
embotelladoencualquierformayotrosvaporesylíquidosinamables.NO OBSTRUYA
elujodelairedecombustiónnideventilación.
45
INFORMACIÓN DE SEGURIDAD
• ¡NUNCA intente encender la parrilla con la tapa cerrada! La acumulación de gases es muy peligrosa y
puede causar una explosión.
• Mantengatodosloscableseléctricosolamangueradesuministrodecombustiblealejadosdecualquier
superciecaliente.
• Elpropanoesungasinamableysisemanipulademanerainadecuadapuedeprovocarunaexplosióno
un incendio y un accidente o lesión grave.
• Esteelectrodomésticoestarácalienteduranteelusoydespuésdelmismo.Utiliceguantesoguantespara
hornoaislantesparaprotegersedelassuperciescalientesolassalpicadurasdeloslíquidosdecocción.
• NO DEJE la parrilla sin supervisión mientras está en uso.
• NO USE la parrilla bajo los efectos de drogas o alcohol.
• NO ALMACENE cilindros de PL (propano), llenos o vacíos, debajo ni cerca de la parrilla.
• Esteelectrodomésticonoestádestinadoparausoscomercialesoalquiler.
• Debedesconectarelcilindrocuandoelelectrodomésticonoestéenuso.
Algunasveces,arañasyotrosinsectospequeñosingresanaltubodelquemador.Lasarañastejen
telarañas,construyennidosyponenhuevos.Lastelarañasolosnidospuedensermuypequeños,pero
sonmuyresistentesypuedenbloquearelujodegas.Limpieelquemadorantesdeusarloluegodel
almacenaje,alcomienzodelatemporadadeasadosodespuésdeunperíododeunmessinutilizarse.
SISTEMA DE COMBUSTIBLE
Los elementos del sistema de combustible están diseñados para funcionar con esta parrilla. No deben
reemplazarseconningunaotramarca.(Consultelalistadepiezasparaconocerlosartículosderepuesto.)
QUEMADOR DE GAS: Elquemadordegasestáfabricadodeaceroinoxidableynodeberíarequerirmayor
mantenimientoquelainspecciónenbuscadeinsectosonidosdentrodelasranurasdeentradadeaire.
PRECAUCIÓN
Se debe usar solamente el regulador de presión de gas incluido con este electrodoméstico. Este regulador
estáequipadoconeloriciorequeridoyestáajustadoparalapresióndesalidanecesariaparaeste
electrodoméstico.Estacombinacióndeespecicacionesdetamañodeloricioyreguladorlapresión
proporcionanelrendimientodecocciónprevistosporelfabricante.Sustituirelreguladorconcualquierotro
dispositivo es peligroso y podría provocar lesiones graves.
MANGUERA DE SUMINISTRO DE COMBUSTIBLE
Lamangueraconectadaalreguladorqueseproporcionaconesteelectrodomésticotiene0,91metrosde
largo.Mantengalamangueradecombustiblealejadadesuperciescalientes.
ADVERTENCIA
COMBUSTIBLE PROPANO:
Elpropanoesungasinamable.Sisemanipuladeformainadecuada
puede provocar una explosión o un incendio y un accidente o lesiones graves. Esta parrilla está
diseñadaparafuncionarcongaspropano(PL)solamenteyestáequipadaconeloricioadecuado
para este gas.
PRECAUCIÓN
NO CONECTE estaparrillaaningúnsuministrodegasquenoseapropano.Elgaspropanoes
máspesadoqueelaireysedepositaenáreasmásbajas.Asegúresededisponerdelaventilación
sucientecuandouselaparrilla.Elcilindrodegaspuedealmacenarseenexterioresenunárea
bien ventilada fuera del alcance de los niños cuando la parrilla no está en uso.
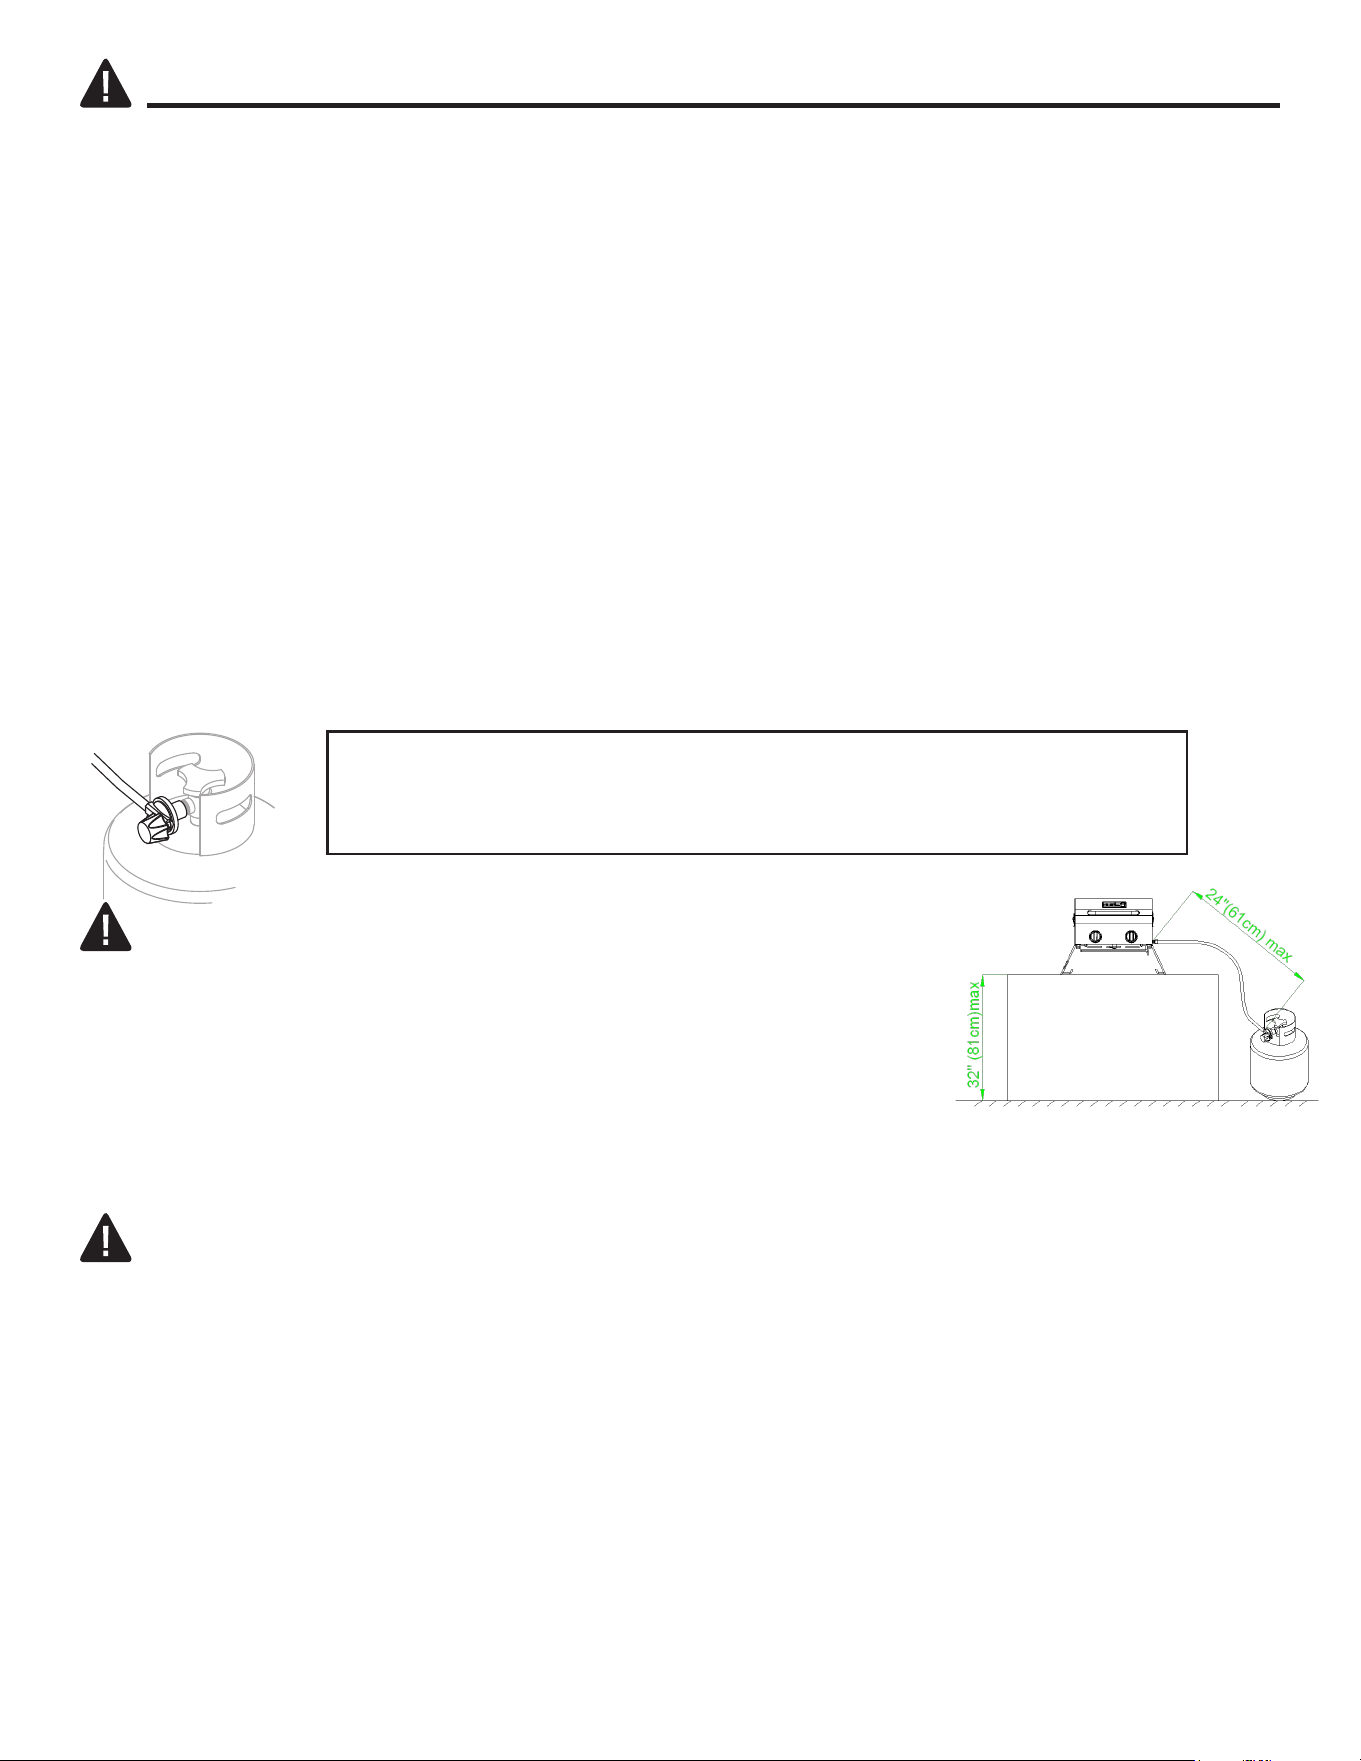
46
INFORMACIÓN DE SEGURIDAD
ElcilindrodegasPLsolosedebeusarenexterioresenunespaciobienventiladoynoenedicios,
garajes ni otras áreas cerradas. La parrilla de mesa puede almacenarse en interiores si el cilindro
de gas se retira y se almacena en exteriores. El cilindro de gas PL (no se incluye) es roscado para
conectarsedirectamentealreguladordegasqueseproporcionaconesteelectrodoméstico.Se
debetenercuidadoalenroscarelcilindroalreguladorandeconectarlasroscasdeformacorrecta
para lograr la conexión adecuada y prevista. Cuando desconecte o conecte el cilindro de gas, tenga
cuidadodequeelreguladornogolpeelaparrilla,elgasniningunaotrasupercie.Cuandoretireel
cilindro de la parrilla, vuelva a colocar la tapa de protección sobre la conexión roscada de este. Si
tienealgunadicultadalconectarodesconectarelcilindroalaestructuradelregulador,póngaseen
contacto con el proveedor de gas local para obtener ayuda.
CuandovuelvaaconectarelcilindrodegasPLalregulador,asegúresedeapretarloconlamano
hastaquequedeajustado.Sedebeinspeccionarestaconexiónparadetectardañosyseledebe
realizarlapruebadefugasdespuésdecadareconexión.
Parahacerunapruebadefugas,prepareunasolucióndejabóndedetergentelíquidoyaguaen
partes iguales. Necesitará un rociador, pincel o paño para aplicar la solución en la conexión. La
formacióndeburbujasindicaquehayfuga
s.
ADVERTENCIA
• SIEMPRE haga funcionar la parrilla sobre una mesa, de no más de 81,28 cm.
• Coloqueeltanquedepropanoeselsueloinmediatamentejuntoalacubierta
de la mesa, a no más de 60,96 cm de distancia de la parrilla.
• Sinosigueestasinstrucciones,eltanquedepropanosepodríasobrecalentar
yventilarpropano,loquesepodríaencenderyprovocarlesionespersonales
gravesodañosalapropiedad,ocrearunpeligrodetropiezoconla
mangueradegasoeltanquedepropano,loquepodríahacerquelaparrillasecaigadelamesayprovocar
lesiones personales graves o daños a la propiedad.
ADVERTENCIA DE LA PROPUESTA 65
• Loscombustiblesqueseusanenelectrodomésticosdecombustiónagasopetróleoylosproductos
delacombustióndedichoscombustiblescontienensustanciasquímicasreconocidasporelestadode
California como causantes de cáncer, defectos congénitos u otros daños en el aparato reproductivo. Esta
advertencia se emite conforme a la Sección 25249.6 del Código de Salud y Seguridad de California.
GUARDE ESTAS INSTRUCCIONES PARA REFERENCIA FUTURA.
Revise todos los conectores del suministro de gas para detectar fugas
antesdecadauso.NOutilicelaparrillahastaquehayarevisadotodas
lasconexionesycomprobadoquenohayfugas.
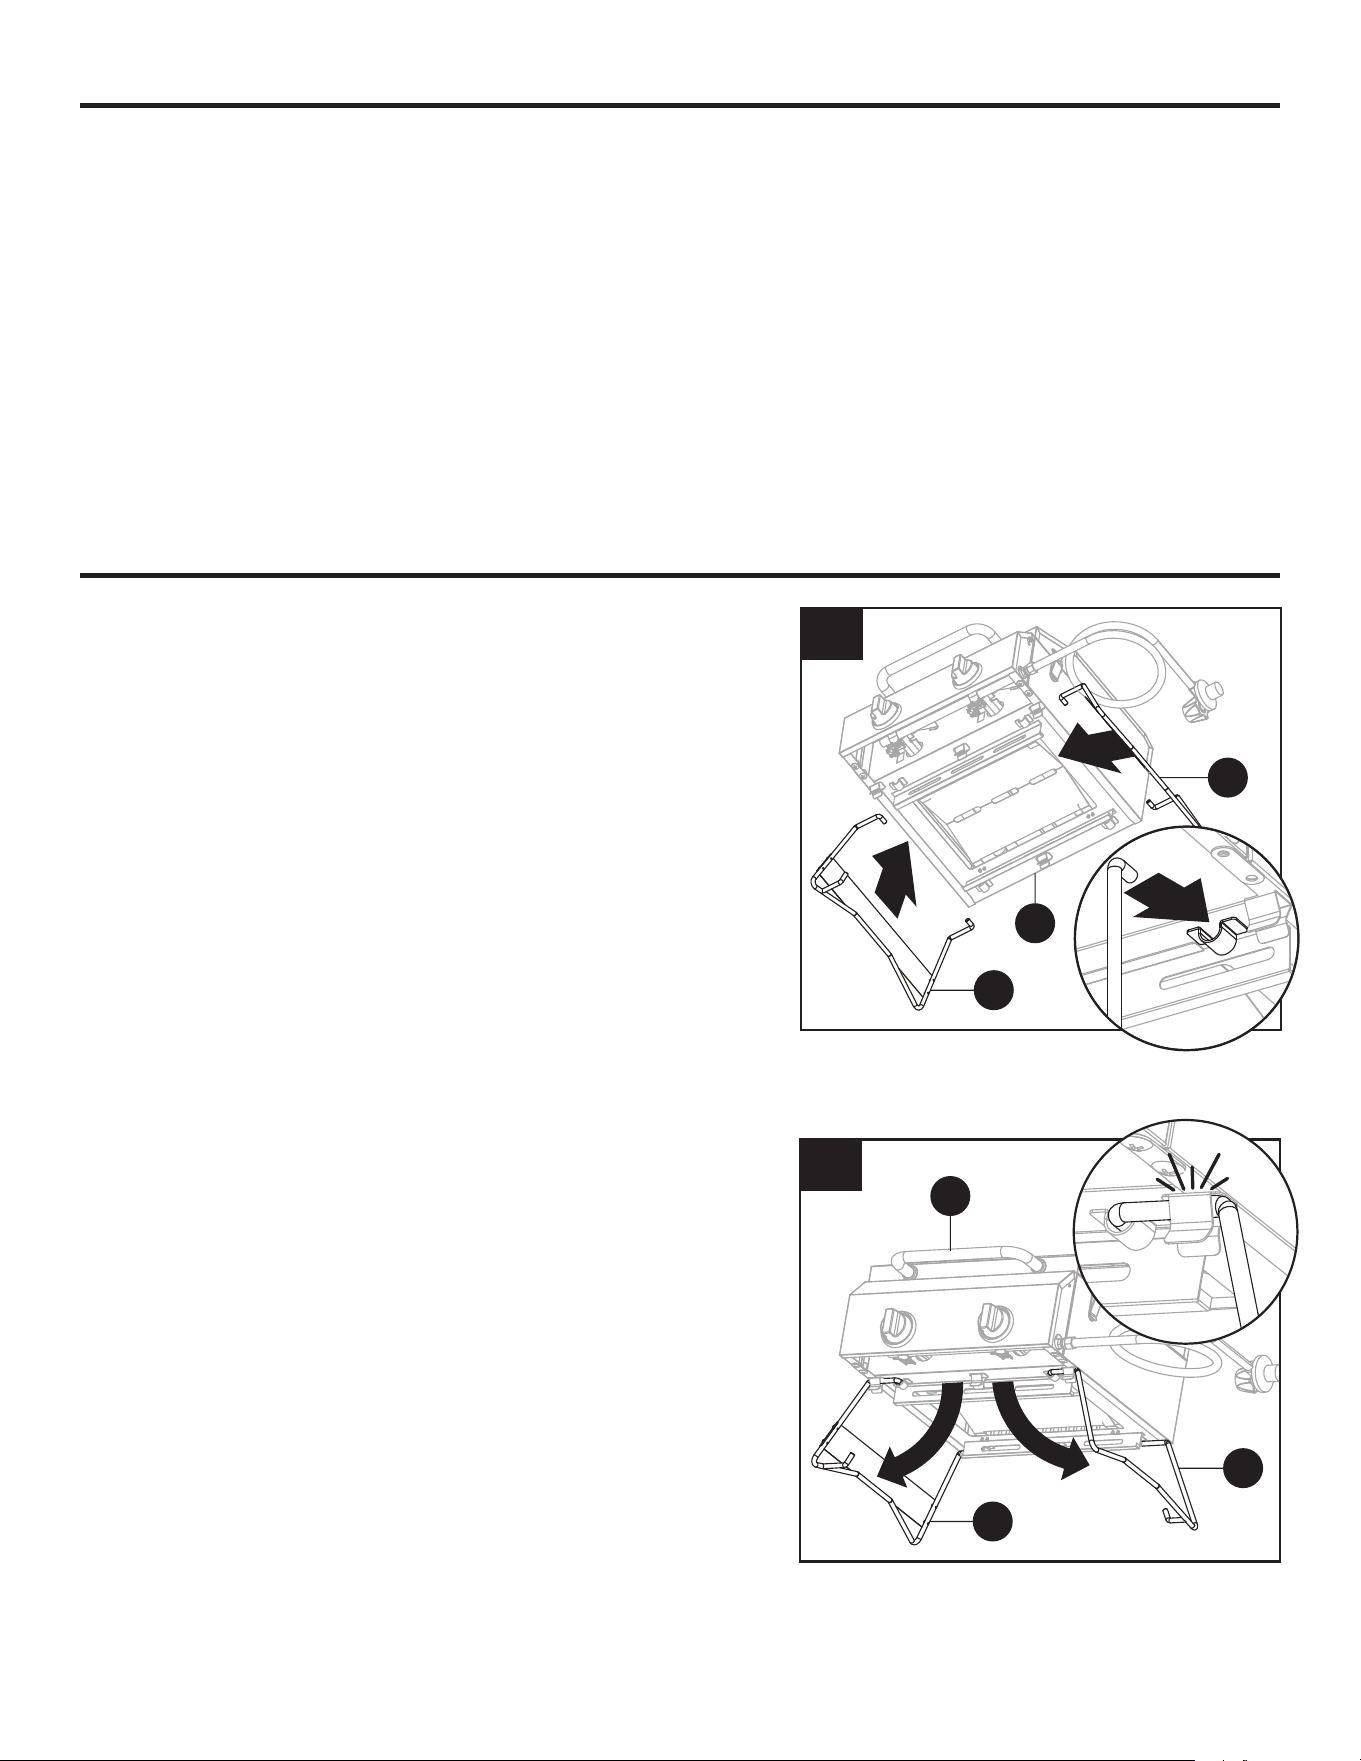
47
PREPARACIÓN
INSTRUCCIONES DE ENSAMBLAJE
Antesdecomenzaraensamblarelproducto,asegúresedetenertodaslaspiezas.Comparelas
piezasconlalistadelcontenidodelpaquete.Nointenteensamblarelproductosifaltaalgunapiezao
si estas están dañadas.
• Retiretodoelmaterialdeempaquedelaparrilla.
Tiempo estimado de ensamblaje: 5 minutos
2. Desplieguelapiernaizquierda(B)ylapierna
derecha (C) para asegurarlas en su lugar.
1. Insertelapataizquierda(B)ylapataderecha(C)en
lasabrazaderasenlaparteinferiordelaparrilla(A)
como se muestra.
Nota: Con dos manos, extienda las patas plegables
parapermitirquesedeslicendentrodelas
abrazaderas.
1
B
C
A
2
B
C
A
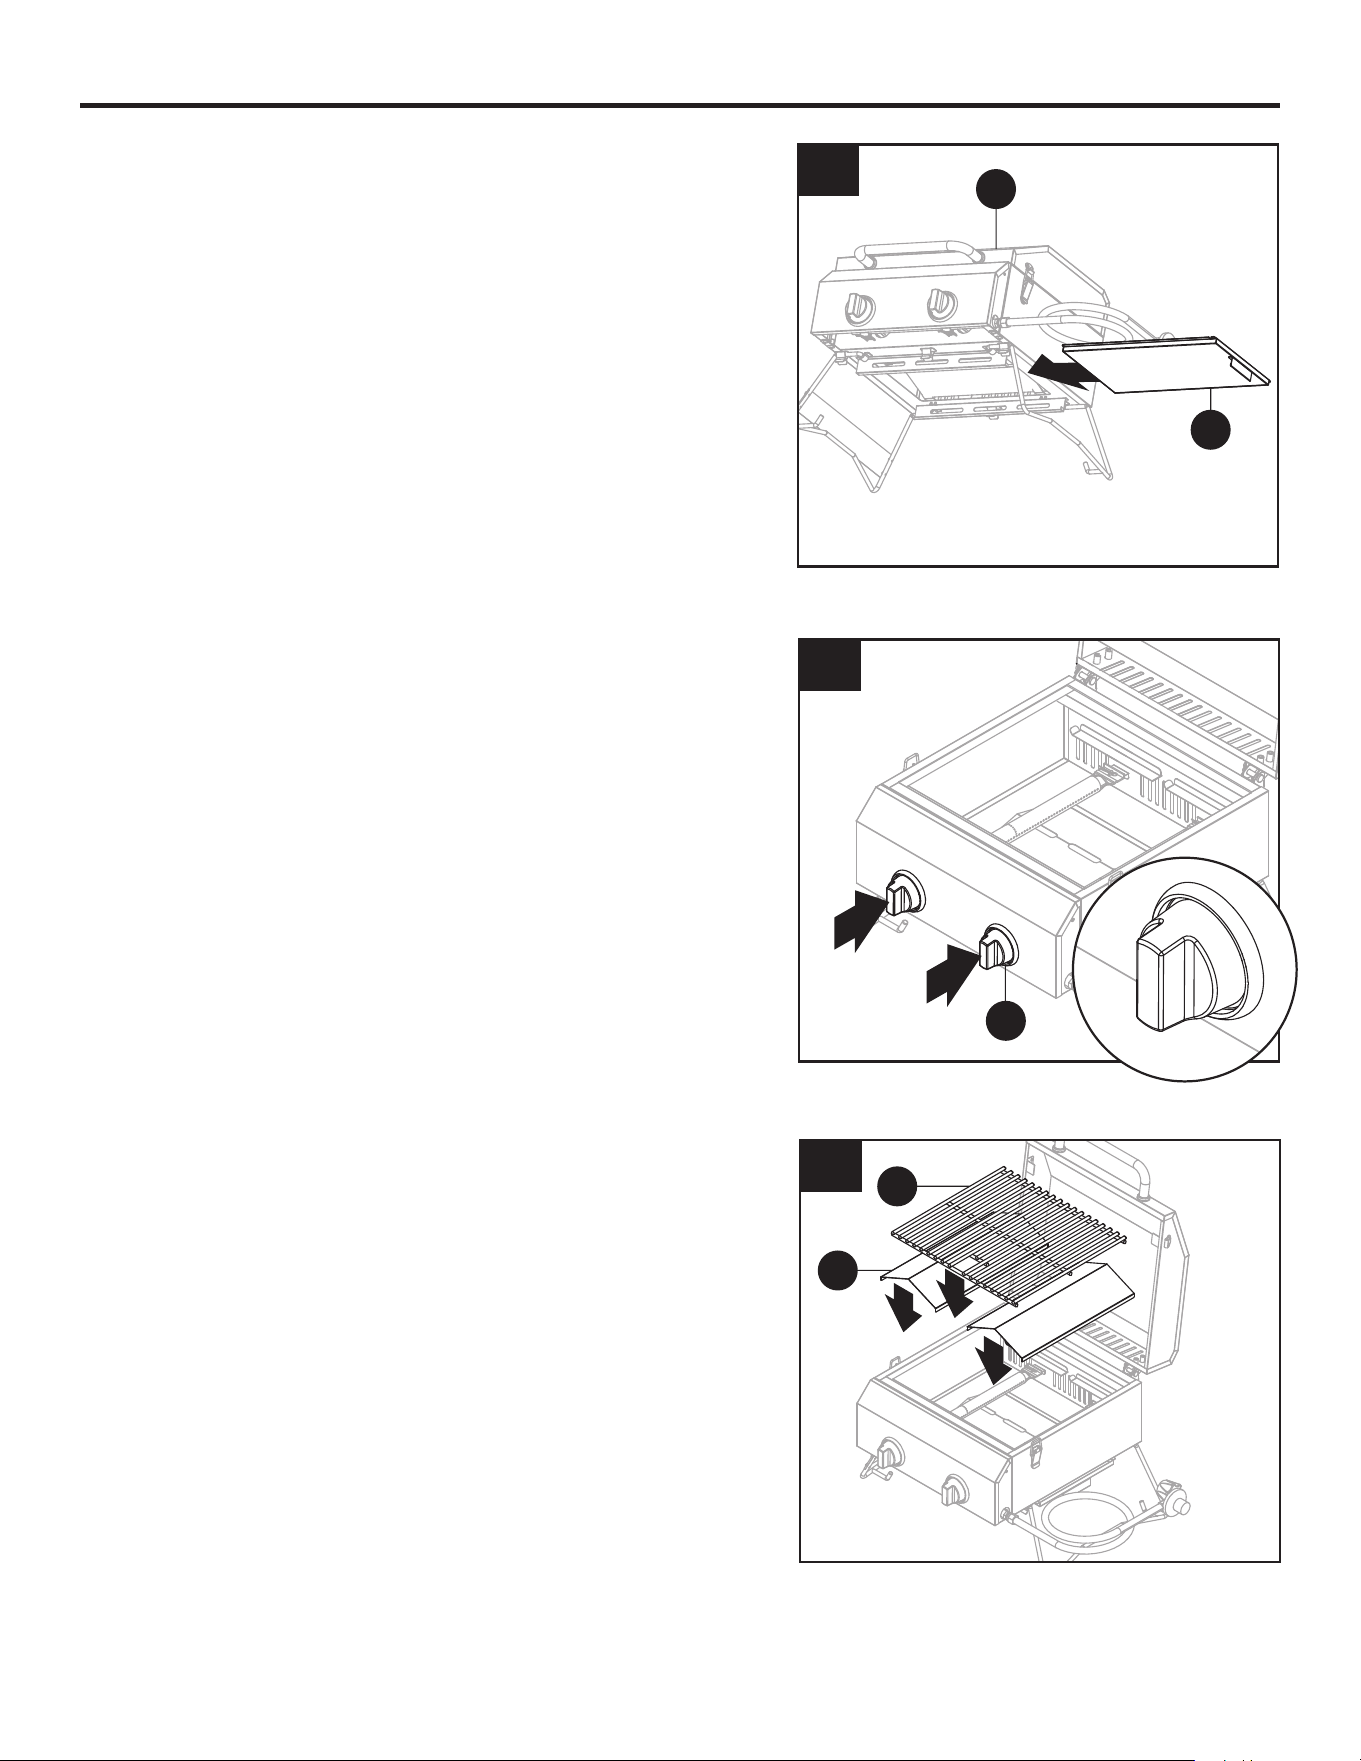
4848
INSTRUCCIONES DE ENSAMBLAJE
5. Coloqueeldifusordellama(F)ylarejillade
cocción (E) dentro de la cámara de combustión.
4. Fije las perillas de control (D) a la parte frontal
de la parrilla. Presione y gire la perilla, y revise
si hay chispas.
5
F
E
4
D
3. Inserte la bandeja de recolección de grasa (G)
en la parte inferior de la parrilla (A).
3
G
A
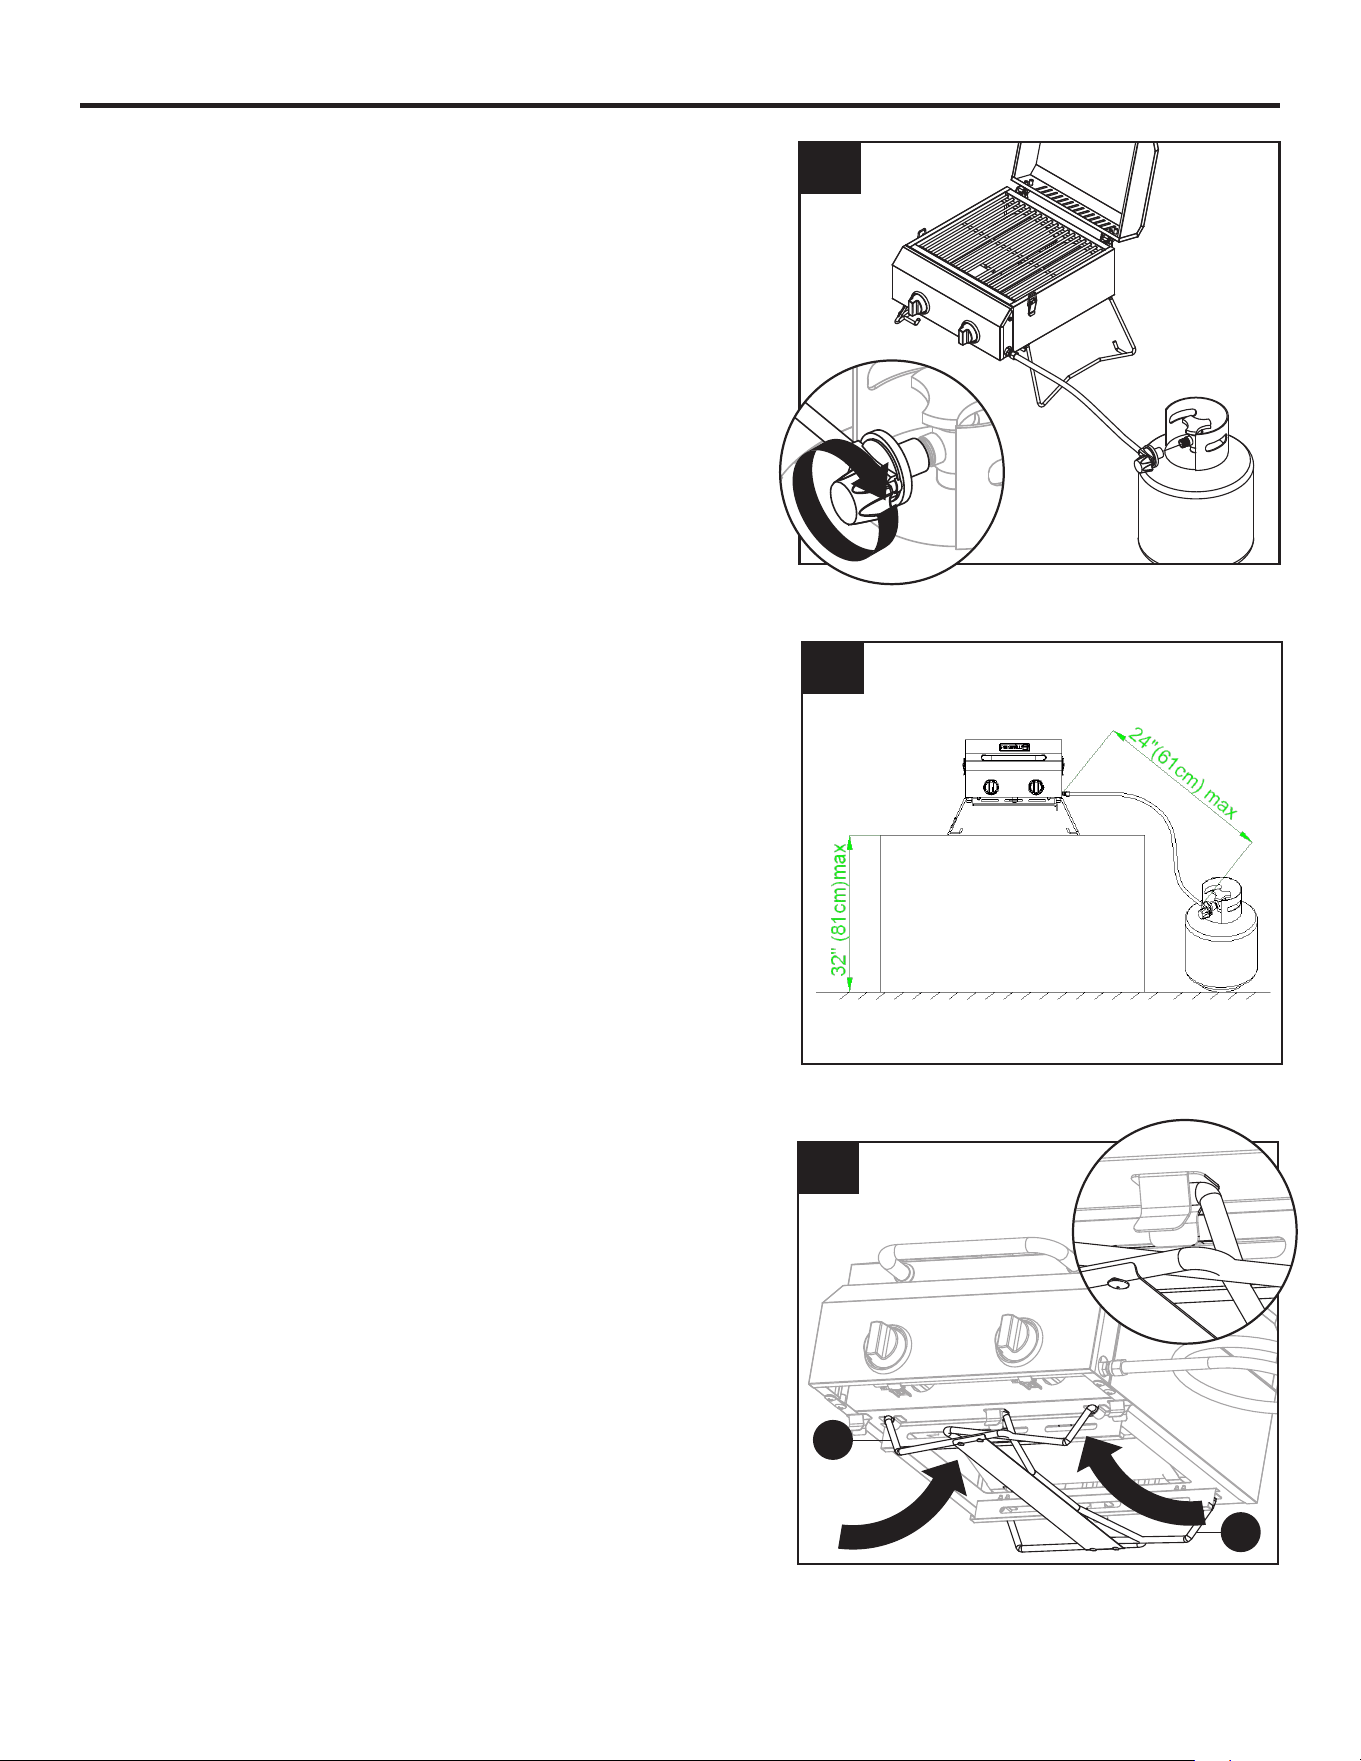
4949
INSTRUCCIONES DE ENSAMBLAJE
6. Fijeelreguladorqueseencuentraenel
extremo de la manguera al cilindro de propano
(no se incluye) girando la manija del regulador
en dirección de las manecillas del reloj. Si la
parrilla no está en uso se debe colocar el paso
de gas en la posición “OFF” (APAGADO) desde
el cilindro de propano.
Revise todos los conectores del suministro de
gas para detectar fugas antes de cada uso. No
uselaparrillahastaquehayarevisadotodaslas
conexionesycomprobadoquenohayfugas.
(Consulte las instrucciones "Prueba de fugas"
de las página 51).
6
8. Cuando la parrilla no esté en uso, doble la pata
izquierda(B)ylapataderecha(C)yfíjelasen
lasabrazaderasdelaparteinferiordelaparrilla
para almacenarla.
7. Se recomienda usar esta parrilla sobre una
mesa de 81,28 cm de alto con el cilindro de
propanolíquidoanomásde60,96cmde
distancia.
8
B
C
7
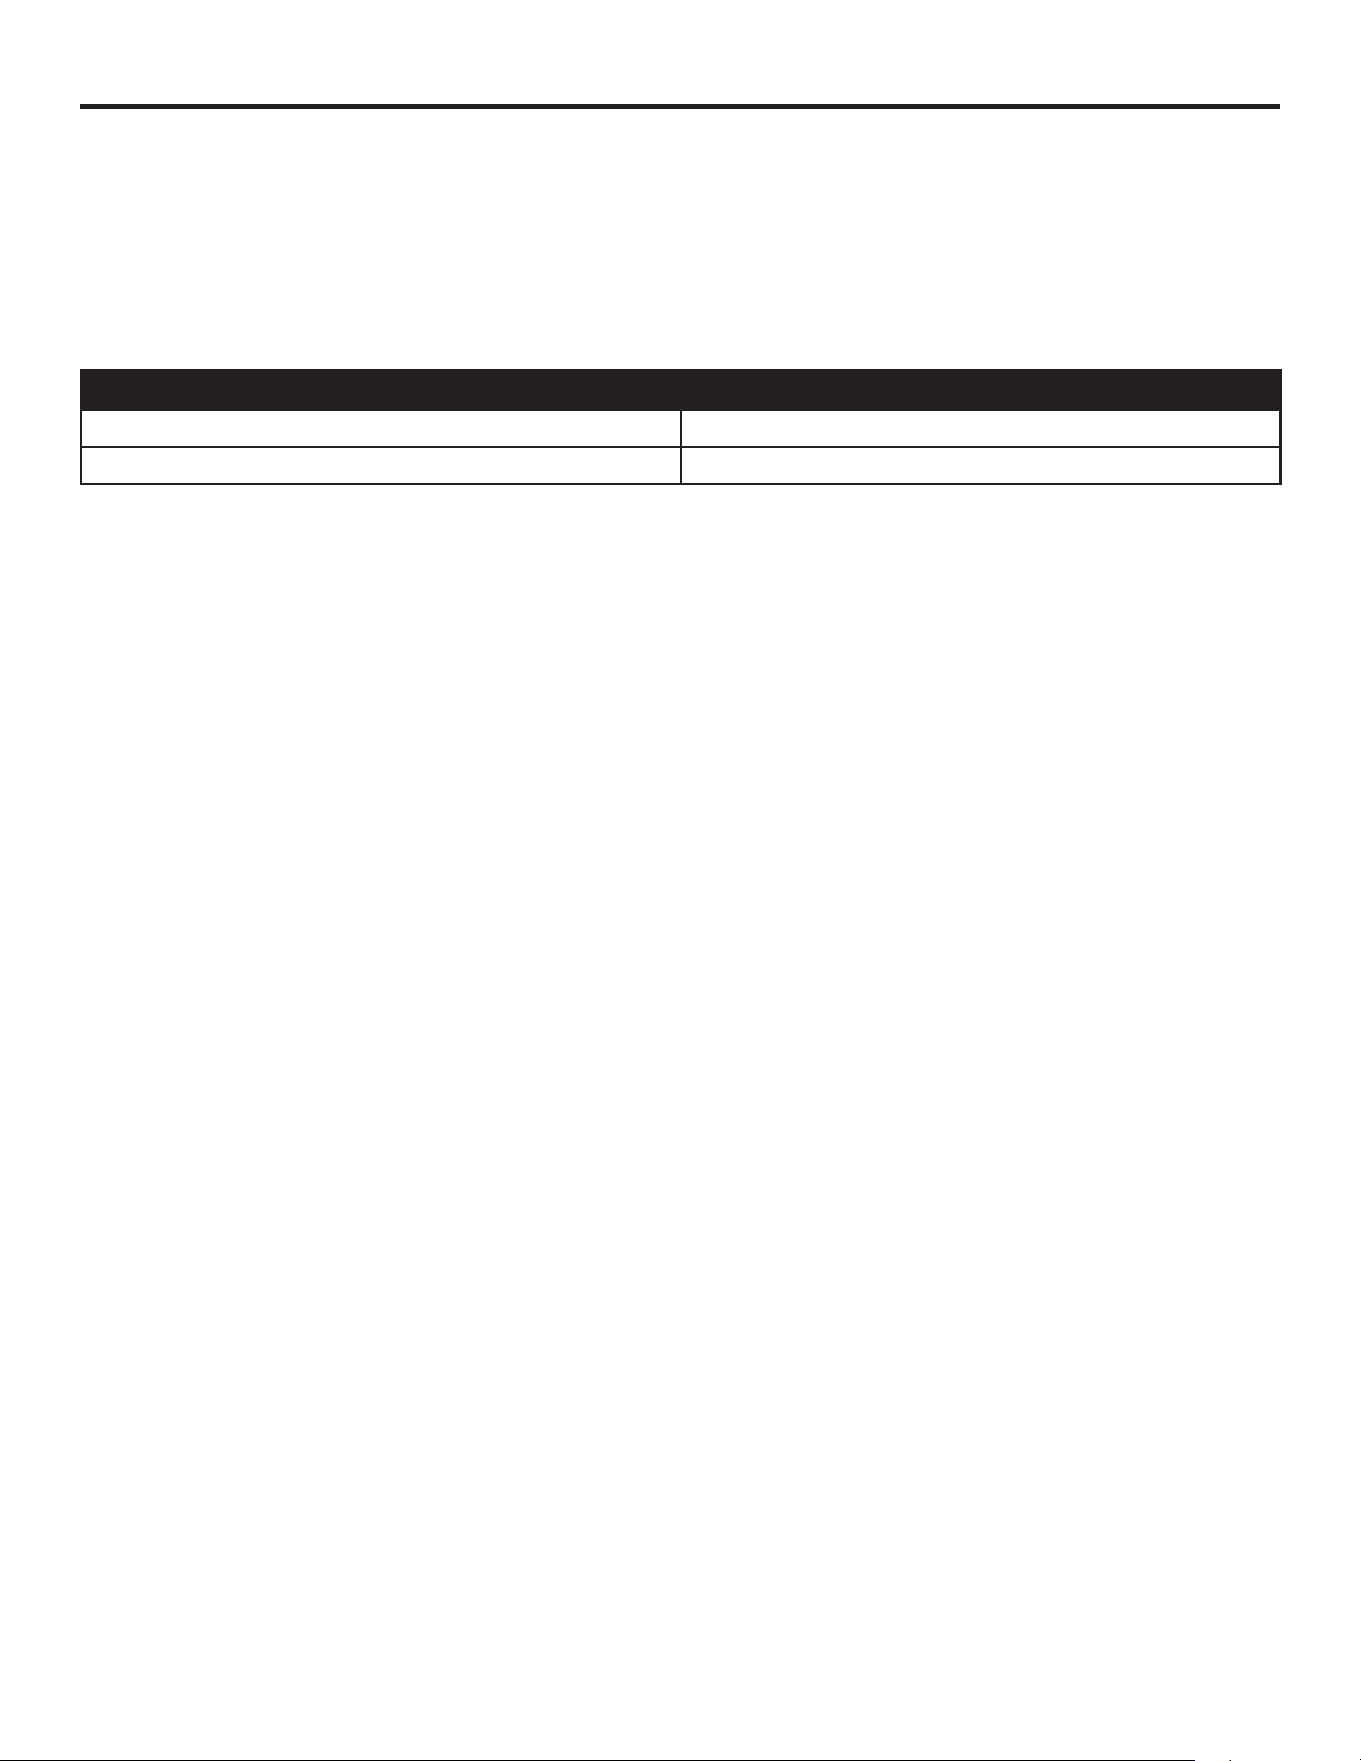
50
INSTRUCCIONES DE ENSAMBLAJE
CONEXIÓN AL GAS
Se debe usar solo el ensamble del regulador de presión y manguera incluido con la parrilla. El
reemplazodecualquieradeestosaccesoriosdebeestarespecicadoporelfabricantedelaparrilla.
Estaparrillaestáconguradaparausarsecongaspropanolíquido.NO use un suministro de gas
natural.
Consumo total de gas (por hora) con todos los quemadores establecidos en "HIGH" (ALTO).
Quemadores principales 16.000 BTU/Hr.
Total 16.000 BTU/Hr.
La instalación de este electrodoméstico debe cumplir con los códigos locales o, en su ausencia, con
el Código nacional de gas combustible, ANSI Z223.1/NFPA 54, el Código nacional de instalación
de gas propano y natural, CSA B149.1, o el Código de manipulación y almacenaje de propano,
B149.2, o la Norma para vehículos recreacionales, ANSI A119.2/NFPA 1192 y el Código de vehículos
recreacionalesCSAZ240serieRV,segúncorresponda.
REQUISITOS DEL CILINDRO DE PROPANO LÍQUIDO (cilindro de 9,07 kg)
• Loscilindrosdepropanolíquidoabolladosuoxidadospuedenserpeligrososydebenserrevisados
por el proveedor.
• NUNCA use un cilindro con la válvula dañada.
• Elcilindrodepropanolíquidodebeestarfabricadoymarcadosegúnlasespecicacionespara
cilindros de gas propano del Departamento de transporte de los EE. UU. (DOT) o la Ley Nacional
de Canadá CAN/CSA-B339, “Cilindros, esferas y tubos para el transporte de mercancías
peligrosas”.
• Elcilindrode9,07kgdebetenerunaválvuladecierrequetermineenunaválvuladesalida
especicada,segúncorresponda,paralaconexióntipoQCC1delanormaparalaconexiónde
entradaysalidadeválvuladelcilindrodegascomprimidoANSI/CGA-V-1.
• Estápermitidoelalmacenajedeunelectrodomésticodecocciónagasparaexterioressolosise
desconecta y retira el cilindro del electrodoméstico de cocción a gas.
• Sedebeadaptarelsistemadelcilindroparalaextraccióndevapores.
• Elcilindrodebeincluirunanilloparaprotegersuválvula.
• Presióndeltubocolector_(enfuncionamiento)279,4mmdecolumnadeagua(mmc.a.);(sin
funcionar) 284,48 mm de columna de agua (mm c.a.).
• Elcilindrodepropanolíquidodebecontarconundispositivodeproteccióncontrasobrellenado
(OPD, por sus siglas en inglés).
• Retirelacubiertaplásticadelaválvuladelcilindrodepropanolíquido.
• Asegúresedequelasmanguerasdelgasdelaparrillanoesténencontactoconlabandejade
grasa o la cámara de combustión de la parrilla en el momento de colocar el cilindro de propano
líquidoenelcarrito.

51
INSTRUCCIONES DE ENSAMBLAJE
CONEXIÓN DEL CILINDRO DE PROPANO LÍQUIDO
Paraconectarelcilindrodesuministrodegaspropanolíquido:
1. La válvula del cilindro debe estar en la posición "OFF". De no ser así, gire la válvula en dirección
delasmanecillasdelrelojhastaquesedetenga.
2. Asegúresedequelaválvuladelcilindrotengalasconexionesroscadasmachoexternastipo1
adecuadassegúnANSIZ21.81.
3. Asegúresedequelasválvulasdelquemadoresténenlaposición“OFF”.
4. Reviselasconexionesdelaválvula,eloricioyelensambledelregulador.Eliminelasuciedady
revisequelamangueranopresentedaños.
5. Cuando conecte el ensamble del regulador a la válvula, use la mano para apretar la tuerca en
direccióndelasmanecillasdelrelojhastaquesedetenga.
6. El uso de una llave inglesa podría dañar la tuerca de acoplamiento rápido y crear una situación
de riesgo.
7. Abra totalmente la válvula del cilindro girándola en dirección contraria a las manecillas del reloj.
8. Antes de encender la parrilla, use una solución de agua y jabón para revisar todas las conexiones
para detectar fugas.
9. Si se descubre una fuga, lleve la válvula del cilindro a la posición "OFF" y NO USE la parrilla
hastaqueundistribuidordepropanolíquidolocalhayahecholasreparaciones.
ADVERTENCIA
NUNCA
intenteutilizarunequipodañadouobstruido.Consulteconundistribuidorlocaldepropano
líquidoparalareparación.
DESCONEXIÓN DEL CILINDRO DE PROPANO LÍQUIDO
1. Girelasválvulasdelquemadordelaparrillahastalaposición"OFF"yasegúresedequela
parrilla esté fría.
2. Girelaválvuladelcilindrodepropanolíquidohastalaposición"OFF"endireccióndelas
manecillasdelrelojhastaquesedetenga.
3. Separe el ensamble del regulador de la válvula del cilindro girando la tuerca de acoplamiento
rápido en dirección contraria a las manecillas del reloj.
4. Coloquelatapaenlasalidadelaválvuladelcilindrocuandonoestéenuso.Soloinstaleeltipo
detapaparapolvoqueseproporcionaconlaválvuladelcilindroenlasalidadelaválvuladel
cilindro. Otros tipos de tapas o tapones pueden causar una fuga de propano.
PRUEBA DE FUGAS
Sibienlasconexionesdegasdelaparrillahansidoprobadasparavericarquenoexistanfugas
antesdesutraslado,sedeberealizarunapruebadefugascompletaenellugardeinstalación.Antes
de cada uso, revise todas las conexiones de gas para detectar fugas mediante los procedimientos
queseenumeranacontinuación.Sienalgúnmomentopercibeoloragas,veriqueinmediatamente
todo el sistema para detectar fugas.
ANTES DE LA PRUEBA
Asegúresedequesehayanretiradotodoslosmaterialesdeembalajedelaparrilla,incluidaslas
correasdesujecióndelosquemadores.
52
ADVERTENCIA
Revise todos los conectores del suministro de gas para detectar fugas antes de cada uso. NO
UTILICE
laparrillahastaquehayarevisadotodaslasconexionesycomprobadoquenohayfugas.
NO FUME durante las pruebas de fugas. NUNCA realice una prueba de fugas con una llama
expuesta.Prepareunasolucióndedetergentelíquidoyaguaenpartesiguales.Necesitaráun
rociador, pincel o paño para aplicar la solución en los conectores. Para la prueba de fugas inicial,
asegúresedequeelcilindrodepropanolíquidoestélleno.
PARA HACER LA PRUEBA
1. Cierrelasválvulasdelosquemadores.
2. Girelaválvuladelcilindrodepropanolíquidoendireccióncontrariaalasmanecillasdelrelojpara
abrirla.
3. Apliquelasoluciónjabonosaentodoslosconectoresdelsuministrodegas.Enellugardonde
haya una fuga se formarán burbujas de jabón.
4. Sisehadetectadounafuga,coloqueelsuministrodegasenlaposición"OFF"(APAGADO)y
aprietetodoslosconectoresquetenganfugas.
5. Coloqueelsuministrodegasenlaposición"ON"(ENCENDIDO)yvuelvaarevisar.
6. Encasodequealgunodelosconectorestuvierafugas,coloqueelsuministrodegasenla
posición “OFF” y póngase en contacto con el Servicio al Cliente al 1-800-963-0211.
7. Si hay pruebas de abrasión o desgaste excesivos o si la manguera está cortada, deberá
reemplazarlaantesdeponerelelectrodomésticoenfuncionamiento
• Solosedebenusarenlaparrillalaspiezasrecomendadosporelfabricante.Lassustituciones
anularán la garantía.
ADVERTENCIA
NO ALMACENE
laparrillaeninterioresamenosqueelcilindroseencuentredesconectado.
NO ALMACENE
elcilindroenunedicio,garajeoencualquierotraáreacerrada,ymanténgalo
siempre fuera del alcance de los niños.
VERIFICACIÓN FINAL DEL INSTALADOR
Mantengaunadistanciaprecisade60,96centímetrosdematerialesyestructurasinamables.
• Seretirarontodoslosenvoltoriosinternos.
• Lamanguerayelreguladorestándebidamenteconectadosalcilindrodepropanolíquido.
• Launidadsehaprobadoynoexistenfugas.
• Sehaubicadolaválvuladecierredelsuministrodegas.
• Seinstalarontodoslosquemadores.
• Conserveelmanualdeinstruccionesparareferenciafutura.
ADVERTENCIA
• Estaparrillaysuválvuladecierreindividualdebendesconectarsedelsistemadetuberíasde
suministro de gas durante las pruebas de presión de ese sistema a presiones superiores a 1/2 PSI
(3,5 kPa).
• Elelectrodomésticodecocciónagasparaexterioresdebedesconectarsedelsistemadetuberías
desuministrodegascerrandomanualmentelaválvuladecierreindividualdurantecualquierprueba
depresióndedichosistemaqueserealiceaunapresióninferioroequivalentea1/2PSI(3,5kPa).
INSTRUCCIONES DE ENSAMBLAJE
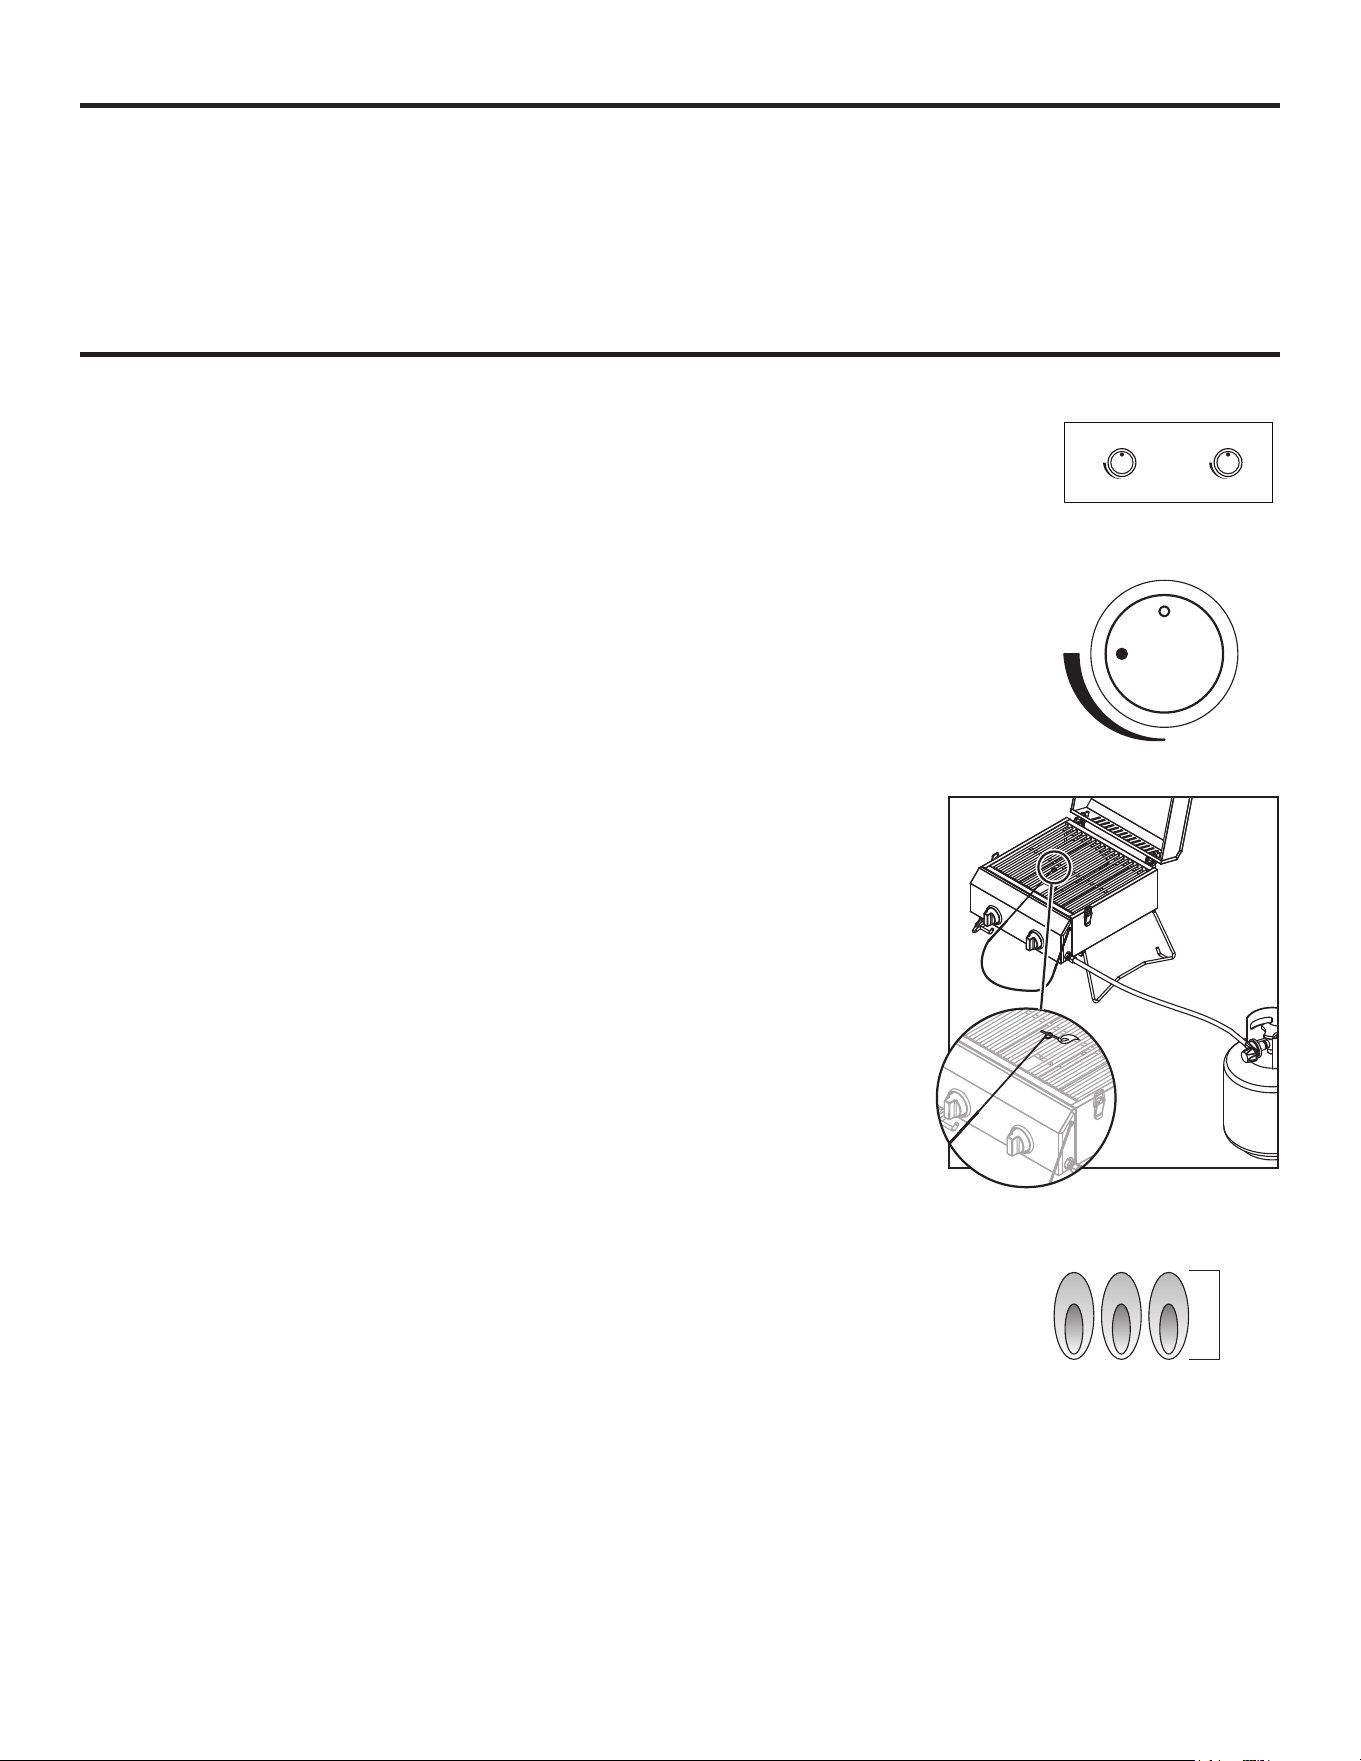
53
INSTRUCCIONES DE ENSAMBLAJE
ENCENDIDO DE LA PARRILLA
1. Coloquelaspatasenlaposiciónvertical.
2. Asegúresedequeelcilindrodepropanoestéroscadormementeenel
regulador (solo apretado a mano).
3. Abra la tapa. SIEMPRE abra la tapa para encender la parrilla.
4. Presioneygirelentamentelaperilladelquemadorprincipalhastalaposición
“IGNITE/HIGH”(ENCENDER/ALTO);elquemadordebe
encenderse de inmediato.
5. Si no se enciende dentro de 3 a 5 segundos, gire la perilla de
control a la posición “OFF” (APAGADO). Espere 5 minutos antes de volver a
intentar encender la parrilla. Si la parrilla no se enciende luego del segundo
intento, llame a Servicio al Cliente al 1-800-913-8999 para obtener ayuda.
Nota: Si la perilla no genera chispas, inserte el fósforo en la varilla de
encendido.Enciendaelfósforoeintrodúzcaloatravésdelasrejillas
decocciónenelquemador.
PARA APAGAR LA PARRILLA
1. 1. Gire la perilla a la posición “OFF”.
2. Gire la perilla de control del cilindro de propano a la posición “OFF”.
PRECAUCIÓN: NO INTENTE volver a encender la parrilla sin
seguir todas las instrucciones de encendido.
3. Dejequeelcuerpodelaparrillaseenfríedurantealmenos30
minutos antes de moverla o transportarla.
CARACTERÍSTICAS DE LA LLAMA
Veriquequelascaracterísticasdelallamadelquemadorseanlas
correctas.Lasllamasdelquemadordebenserazulesyestablessinpuntasamarillas,ruidoexcesivo
ni movimientos. Para corregir las características de la llama, se deben seguir
los siguientes pasos:
• Girelasperillasdecontrolylasválvulasdelcilindrodepropanolíquido
hasta la posición “OFF”.
• Dejeenfriarlaparrillaylosquemadores.
• Silallamaesamarilla(sinsucienteaire)gireeneltornilloreguladorque
estáenlapartefrontaldelquemadorendireccióncontrariaalasmanecillasdelreloj.
• Silallamaesruidosaosiseelevademasiadodelquemador(demasiadoaire),gireeltornillo
regulador en dirección de las manecillas del reloj.
• Siestosajustesnocorrigenelproblema,póngaseencontacto
con el Servicio al Cliente al 1-800-913-8999.
OFF (APAGADO)
LO (BAJO)
OFF (APAGADO)
IGNITE /HIGH
(ENCENDIDO/ALTO)
Quemadores principales
IGNITE /HIGH
(ENCENDIDO/ALTO)
LO (BAJO)
25 mm
INSTRUCCIONES DE FUNCIONAMIENTO
• NO ALMACENEcilindrosdepropanolíquidoderepuestodebajonicercadeesteelectrodoméstico
paraevitarelriesgodeincendio,quepodríaprovocarlamuerteolesionesgraves.
• NUNCAlleneelcilindroamásdel80%desucapacidad.Silohace,puedeprovocarunincendio
quecauselamuerteolesionesgraves.
OFF (APAGADO)
LO (BAJO)
IGNITE/HIGH
(ENCENDIDO/ALTO)

54
INSTRUCCIONES DE FUNCIONAMIENTO
CÓMO USAR LA PARRILLA
1. Encuentreunasupercieniveladaparalaparrilla.
2. Antesdecocinar,permitaquelaparrillasecalienteconlatapacerradadurante5minutos.
3. Puedecocinarenlaparrillaconcualquierclima.Silatemperaturaesextremadamentebajao
alta, los tiempos de cocción aumentarán o disminuirán ligeramente. Mantenga la parrilla alejada
de vientos excesivos cuando la use.
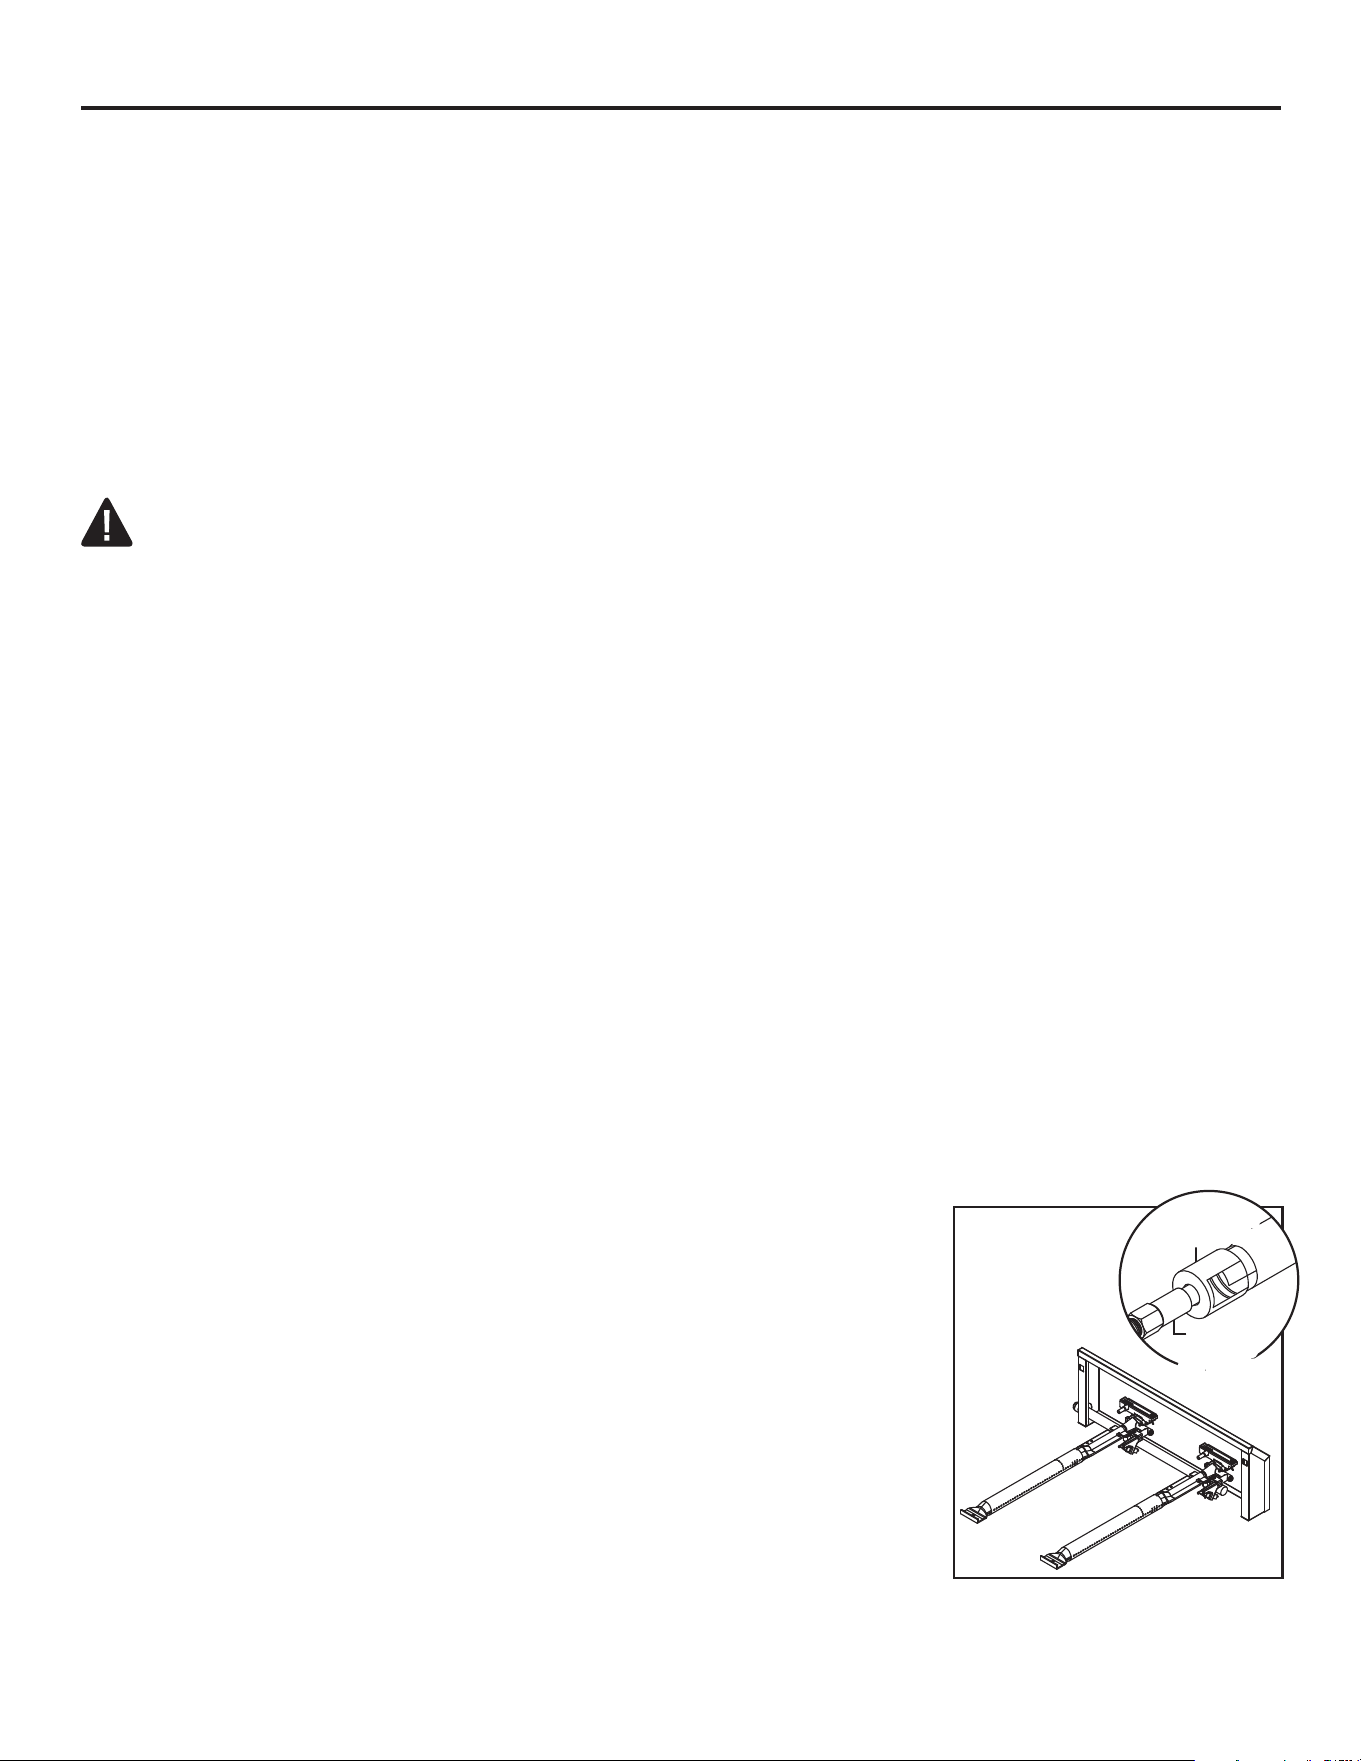
55
Paragarantizarunaoperaciónseguradelaparrilla,eláreadecoccióndebemantenersesiempre
libredecualquiertipodematerialescombustibles,comogasolinauotrosvaporesolíquidos
inamables.
Piezas externas de la parrilla – Son de acero inoxidable. Pueden limpiarse fácilmente con agua
jabonosatibiaocualquierlimpiadorparaaceroinoxidable.
Rejilla de cocción y bandeja de recolección de grasa – La rejilla de cocción está hecha de acero
inoxidable. La rejilla de cocción se debe cepillar con un cepillo de acero inmediatamente después de
cocinarmientraslaparrillaaúnestátibia.Labandejaderecoleccióndegrasatambiénesdeacero
inoxidable y se puede limpiar con un raspador plano, como una espátula.
ADVERTENCIA
La bandeja de recolección de grasa debe mantenerse limpia y libre de acumulaciones excesivas
paraquelaparrillafuncionecorrectamenteyevitarlasllamaradas.
Quemadores principales de la parrilla–Sedebetenerextremocuidadoalretirarunquemador.
Deberáestardebidamentecentradoeneloricioantesdeintentarencendernuevamentelaparrilla.
Lafrecuenciadelimpiezadependerádelafrecuenciaconqueuselaparrilla.
• Sinosecolocacorrectamenteelquemadorsobreeloricio,sepodríaocasionarunincendiopor
detrásydebajodelpaneldelaválvulaquedañaríalaparrillayseríainsegurohacerlafuncionar.
• Antesdelimpiarlaparrilla,asegúresedequelasperillasdelsuministrodegasydecontrolesténen
laposición“OFF”ydequelosquemadoressehayanenfriado.
Para retirar los quemadores principales y limpiarlos:
1. Ubiqueeltornillodelquemadorenlaparteposteriordelacámaradecombustión.
2. Extraigaeltornilloyretireelquemadordelacámaradecombustión.
Para limpiar los quemadores de la parrilla:
1. Limpieelexteriordelquemadorconuncepillodealambre.Utiliceunraspadormetálicopara
quitarmanchasosuciedaddifíciles.
2. Limpielosoriciosdelquemadorobstruidosconunsujetapapelesenderezado.Nuncautilice
unmondadientesdemadera,yaquepodríapartirseyobstruirel
oricio.
3. Veriquequenohayanidosdeinsectosniinsectosenlos
quemadoresoenlostubosVenturi.Untuboobstruidopuede
ocasionar un incendio debajo del panel de control principal o detrás
de este.
Para volver a colocar los quemadores principales:
1. Inserteelquemadorsobrelaválvuladegasdelquemadorprincipal.
2. Asegúresedequelacabezadeltornillodeloricioestéadentrodel
tuboVenturidelquemador,comosemuestra.
3. Alineeeloriciodeltornillodelquemadorconeloriciodela
cámaradecombustión,coloqueeltornilloyapriételo.
Cabeza
de tornillo
del oricio
Cabeza
de tornillo
del oricio
Tubo Venturi
del quemador
Tubo Venturi
del quemador
CUIDADO Y MANTENIMIENTO

56
CUIDADO Y MANTENIMIENTO
Cámara de combustión – Useaguatibiajabonosaparalimpiarestaárea.Nopermitaquelagrasaseacumule.
Oricio de drenaje – Eloriciodedrenajedebemantenerselibredegrasaypartículasdealimentospara
permitirquelosgoteosescurrancorrectamentehastalabandejaderecoleccióndegrasa.Estosedebehacer
para mantener el funcionamiento adecuado de la parrilla.
General
–Estaparrilla,comotodoslosequipos,severámejorydurarápormástiemposisemantieneasalvo
de las condiciones climáticas cuando no está en uso.
PRECAUCIÓN
NO almacene cilindros de propano en áreas cerradas. Cuando use una cubierta o vaya a mover la parrilla,
siempreesperealrededorde30minutoshastaquelaparrillasehayaenfriado.
• Noobstruyaelujodelairedecombustiónnideventilación.
• Untuboobstruidopuedeocasionarunincendiodebajodelelectrodoméstico.
• Estaunidaddebeguardarseenunárealibredematerialescombustibles,gasolinayotrosvaporesolíquidos
inamables.
• Asegúresedequetodaslasaperturasenelcuerpodelaparrillaesténlibresdebloqueosoresiduosyqueno
hayaobjetosomaterialesbloqueandoelujodecombustiónoventilación.Asegúresedequelaspatasestén
en la posición erguida cuando use la parrilla.
• Reviselasaberturasdeentradadeairedelquemador(detrásdelprotectordelaentradaenelextreme
derechodelcuerpodelaparrilla)paradetectarnidosdeinsectosobloqueos.Asegúresedequelasranuras
deltubodelquemadoresténdespejadas.
• Cuandolaparrillanoestéenuso,girelaperilladecontrolalaposición“OFF”yretireelcilindrodepropanodel
regulador.Retireelreguladordelquemador.Soloparausoenexteriores,sisealmacenaeninteriores,retireel
cilindro de propano y almacénelo en exteriores. Los cilindros de propano se deben almacenar en el exterior y
fuera del alcance de los niños.
IMPORTANTE
Primer uso –
Esimportantequeseenciendalaparrillaysedejecalentardurantealmenos30minutosantes
decolocarlosalimentosenlarejilladecocción.Esnormalqueaparezcaalgodehumoduranteelprimerusode
la parrilla. Luego del calentamiento inicial, la parrilla está lista para usarse. Se puede usar un aceite en aerosol
para cocinar en las rejillas de cocción y así poder limpiarla con mayor facilidad.
ESTE ELECTRODOMÉSTICO DE COCINA ES SOLO PARA USO EN EXTERIORES Y NO SE DEBE USAR
EN EDIFICIOS, GARAJES NI OTRAS ÁREAS CERRADAS
INSTRUCCIONES PARA MOVERLA
PRECAUCIÓN
NUNCA
muevalaparrillacuandoelquemadorestáencendido.
Asegúresedequelaperilladecontrolestéenlaposición"OFF".Desconecteelcilindrodepropanodel
regulador.Retireelreguladordelaparrilla.Asegúresedequelaparrillasehayaenfriadocompletamente
durantealmenos30minutos.Cierrelatapayasegureelpestillo.Coloquelaspatasenlaposiciónhaciaabajo.
Use la manija para transportar la parrilla.
Nota:
Serecomiendadejarlabandejaderecoleccióndegrasaensulugarjadaalaparteinferiordelaparrilla,
yaqueduranteeltransportepodríaseguirgoteandoalgodegrasadesdeeloriciodedrenaje
.

57
SOLUCIÓN DE PROBLEMAS
PROBLEMA ACCIÓN CORRECTIVA
La parrilla no enciende.
1. Reviseparaversielcilindrodepropanolíquidoestávacío.
2. Reviselospuertosdelquemadorparavericarsihay
bloqueos.Useuncepillodealambresuaveparadespejarlos
puertos obstruidos.
3. Reviseeloriciodelgasenelquemadorparavericarsihay
unaobstrucción.Sieloricioestábloqueado,limpieconuna
agujaounalambreno.
NUNCA USE UN MONDADIENTES DE MADERA.
Lallamadelquemadoresamarilla
o naranja y hay olor a gas.
1. Revise si hay arañas o insectos.
2. Llame al Servicio al Cliente al 1-800-913-8999.
Poco calor con la perilla de control
en la posición “HIGH”.
1. Asegúresedequeeláreadelaparrillaestélibredepolvo.
2. Asegúresedequeelquemadoryeloricioesténlimpios.
3. Revise si hay arañas o insectos.
4. ¿Hayunsuministrodegassuciente?
5. ¿Se precalentó la parrilla durante 15 minutos?
Si tiene preguntas relacionadas con el producto, llame al Servicio al Cliente al: 1-800-913-8999,
de lunes a viernes de 8 a.m. a 5 p.m.
ADVERTENCIA
Arañaseinsectospuedenanidardentrodelosquemadoresdelaparrillayalterarelujodegas.
Estacondición,muypeligrosa,podríaocasionarunincendiodetrásdelpaneldelaválvula,que
podríadañarlaparrillayhacerquesufuncionamientofuerainseguro.Inspeccionelaparrillaal
menosdosvecesalañooinmediatamentedespuésdequeocurranlassiguientescondiciones:
1. Sepercibeoloragasylasllamasdelquemadorsonamarillas.
2. La parrilla no levanta temperatura.
3. La parrilla no calienta de manera uniforme.
4. Losquemadoresproducenestallidos.
Si la parrilla no funciona correctamente, use la siguiente lista de vericación antes de ponerse
en contacto con el distribuidor para obtener servicio.

58
GARANTÍA
Elfabricantegarantizasolamentealpropietario/compradororiginalqueesteproducto(ModeloN.º
820-0033)notendrádefectosdemanodeobranimaterialesdespuésderealizarunensamblaje
correctoyencondicionesdeusodomésticonormalyrazonabledurantelosperíodosqueseindican
a continuación y a partir de la fecha de compra. El fabricante se reserva el derecho de exigir pruebas
fotográcasdeldaño,odeexigirladevolucióndelaspiezasdefectuosasmedianteenvíopostal
prepagadoporpartedelclienteparaquesurevisiónyexaminación.
• QUEMADORES PRINCIPALES: 3 años de garantía LIMITADA contra perforaciones.
• CARRITO: 1 año de garantía LIMITADA contra perforaciones; no cubre problemas estéticos, como
corrosióndelasupercie,rayonesyóxido.
• PIEZAS: 1 año de garantía LIMITADA (incluye, entre otros, válvulas, estructura, carcasa, panel de
control,encendedor,reguladorymangueras).*Nocubredesportilladuras,rayones,quebraduras,
corrosiónuoxidacióndelasupercie.
Unavezqueelclientehayapresentadoelcomprobantedecompracomoseindicaaquí,el
Fabricanterepararáoreemplazarálaspiezasquesehademostradoqueestabandefectuosas
dentrodelperíododelagarantíaaplicable.Laspiezasnecesariaspararealizardichareparación
o reemplazonotendráncostoparausted,aexcepcióndelosgastosdeenvío,siempreycuando
el propietario se encuentre dentro del período de garantía a partir de la fecha de compra original.
Elcliente/compradororiginalseráresponsabledetodosloscargosdeenvíodelaspiezas
reemplazadasenvirtuddelostérminosdeestagarantíalimitada.Estagarantíaseaplicasoloen
Estados Unidos, solo está disponible para el propietario original del producto y no es transferible.
Elfabricanteexigeuncomprobanterazonabledelafechadecompra.Porlotanto,debeconservar
sureciboy/ofacturadeventa.Silaunidadseobtuvocomounpresente,pídaleaquiénlaadquirió
queenvíeelreciboensunombrealadirecciónindicadaacontinuación.
Laspiezasdefectuosasofaltantesqueestánsujetasaestagarantíalimitadanosereemplazaránsi
no se tiene un comprobante de compra o registro. Esta garantía limitada se aplica a la funcionalidad
del producto SOLAMENTE y no cubre problemas estéticos como rayones, hendiduras, corrosiones
o decoloracionesprovocadasporelcalor,limpiadoresabrasivosyquímicos,oporherramientas
utilizadasduranteelensamblajeolainstalacióndelelectrodoméstico,oxidacióndelasupercieo
ladecoloracióndelassuperciesdeaceroinoxidable.Laoxidaciónycorrosióndelasupercieoel
desportilladodelapinturaenpolvosobrepiezasdemetalquenoafectanlaintegridadestructuraldel
producto no se consideran defectos de mano de obra ni en los materiales y no están cubiertos por
esta garantía. Esta garantía limitada reembolsará costos debido a inconvenientes, de alimentos, por
lesionespersonalesodañoalapropiedad.Sinohayunapiezaderepuestooriginaldisponible,se
enviaráunapiezaderepuestocomparable.Ustedseráresponsabledetodosloscargosdeenvíode
laspiezasreemplazadasenvirtuddelostérminosdeestagarantíalimitada.
CONCEPTOS POR LOS QUE EL FABRICANTE NO PAGARÁ:
• Lasllamadasdeservicioasudomicilio.
• Lasreparacionescuandoelproductoseutilizaparanesquenosonlosnormalesdeunhogaro
residencia de una familia.
• Dañosproductodeaccidentes,alteraciones,usoindebido,faltademantenimientoolimpieza,
maltrato,incendio,inundación,desastresnaturales,instalaciónincorrectaeinstalaciónqueno
cumpla con los códigos eléctricos o de plomería, o el uso de productos no aprobados por el
fabricante.
• Todapérdidadealimentosquesedebaafallasdelproducto.

GARANTÍA
59
• Piezasderepuestoocostosdemanodeobradereparaciónparaunidadesquefuncionanfuerade
Estados Unidos o Canadá.
• Retiroyentregadelproducto.
• Costosdefranqueoodeprocesamientodefotografíasenviadascomodocumentación.
• Reparacionesdepiezasosistemascomoconsecuenciademodicacionessinautorizaciónquese
hayan hecho al producto.
• Retirooreinstalacióndelproducto.
• Costosdeenvío,estándarorápido,depiezasconosingarantíayderepuesto.
EXENCIÓN DE GARANTÍAS LIMITADAS; LIMITACIÓN DE SOLUCIONES
Lareparaciónoelreemplazodelaspiezasdefectuosaseslaúnicasoluciónenvirtuddelostérminos
deestagarantíalimitada.Elfabricantenoseráresponsabledeningúndañoaccidentaloresultante
quesurjadelincumplimientodeestagarantíalimitadaocualquiergarantíaimplícitaaplicable,o
por fallas o daños provocados por desastres naturales, cuidados y mantenimientos inadecuados,
incendiosporgrasa,accidentes,alteraciones,reemplazodepiezasrealizadoporpersonasajenasal
fabricante, mal uso, transporte, uso comercial, maltrato, entornos hostiles (inclemencias del tiempo,
catástrofesnaturales,alteracionesocasionadasporanimales),instalacióninapropiadaoqueno
cumpla con los códigos locales o las instrucciones impresas del fabricante.
ESTA GARANTÍA LIMITADA ES LA ÚNICA GARANTÍA EXPRESA ENTREGADA POR EL
FABRICANTE. EL FABRICANTE NO GARANTIZA NINGUNA ESPECIFICACIÓN O DESCRIPCIÓN
DEL RENDIMIENTO DEL PRODUCTO SIN IMPORTAR DÓNDE APAREZCAN A EXCEPCIÓN DE
LO QUE SE ESTABLECE EN ESTA GARANTÍA LIMITADA. CUALQUIER PROTECCIÓN DE LA
GARANTÍA IMPLÍCITA QUE SURJA SEGÚN LAS LEYES DE CUALQUIER ESTADO, INCLUIDA
LA GARANTÍA DE COMERCIABILIDAD O DE IDONEIDAD PARA UN FIN O USO PARTICULAR
ESTÁ, POR LO TANTO, LIMITADA EN DURACIÓN A LA DURACIÓN DE ESTA GARANTÍA
LIMITADA.
Nilosdistribuidoresnielestablecimientoqueofreceesteproductotienenautoridadalgunapara
otorgar garantías adicionales o prometer otras soluciones adicionales o contrarias a las establecidas
anteriormente. La responsabilidad máxima del fabricante, en todos los casos, no superará el precio
decompradocumentadodelproductoqueelclienteoriginalpagó.Estagarantíaseaplicasoloa
unidadescompradasaunvendedorminoristaorevendedorautorizado.NOTA:Algunosestadosno
permitenlaexclusiónolimitacióndelosdañosaccidentalesoresultantes,demodoqueesposible
quelaslimitacionesoexclusionesanterioresnoseapliquenensucaso;estagarantíalimitadale
otorgaderechoslegalesespecícostalcomoseestableceaquí,peropodríatenertambiénotros
derechosquevaríansegúnelestado.
Todaslasdevolucionesdelcliente,lospedidosdepiezas,laspreguntasgeneralesylaayudaconla
solución de problemas se pueden obtener llamando al 1-800-913-8999, de lunes a viernes de 8
a.m. a 5 p.m., Heure Normale du Pacifuque.
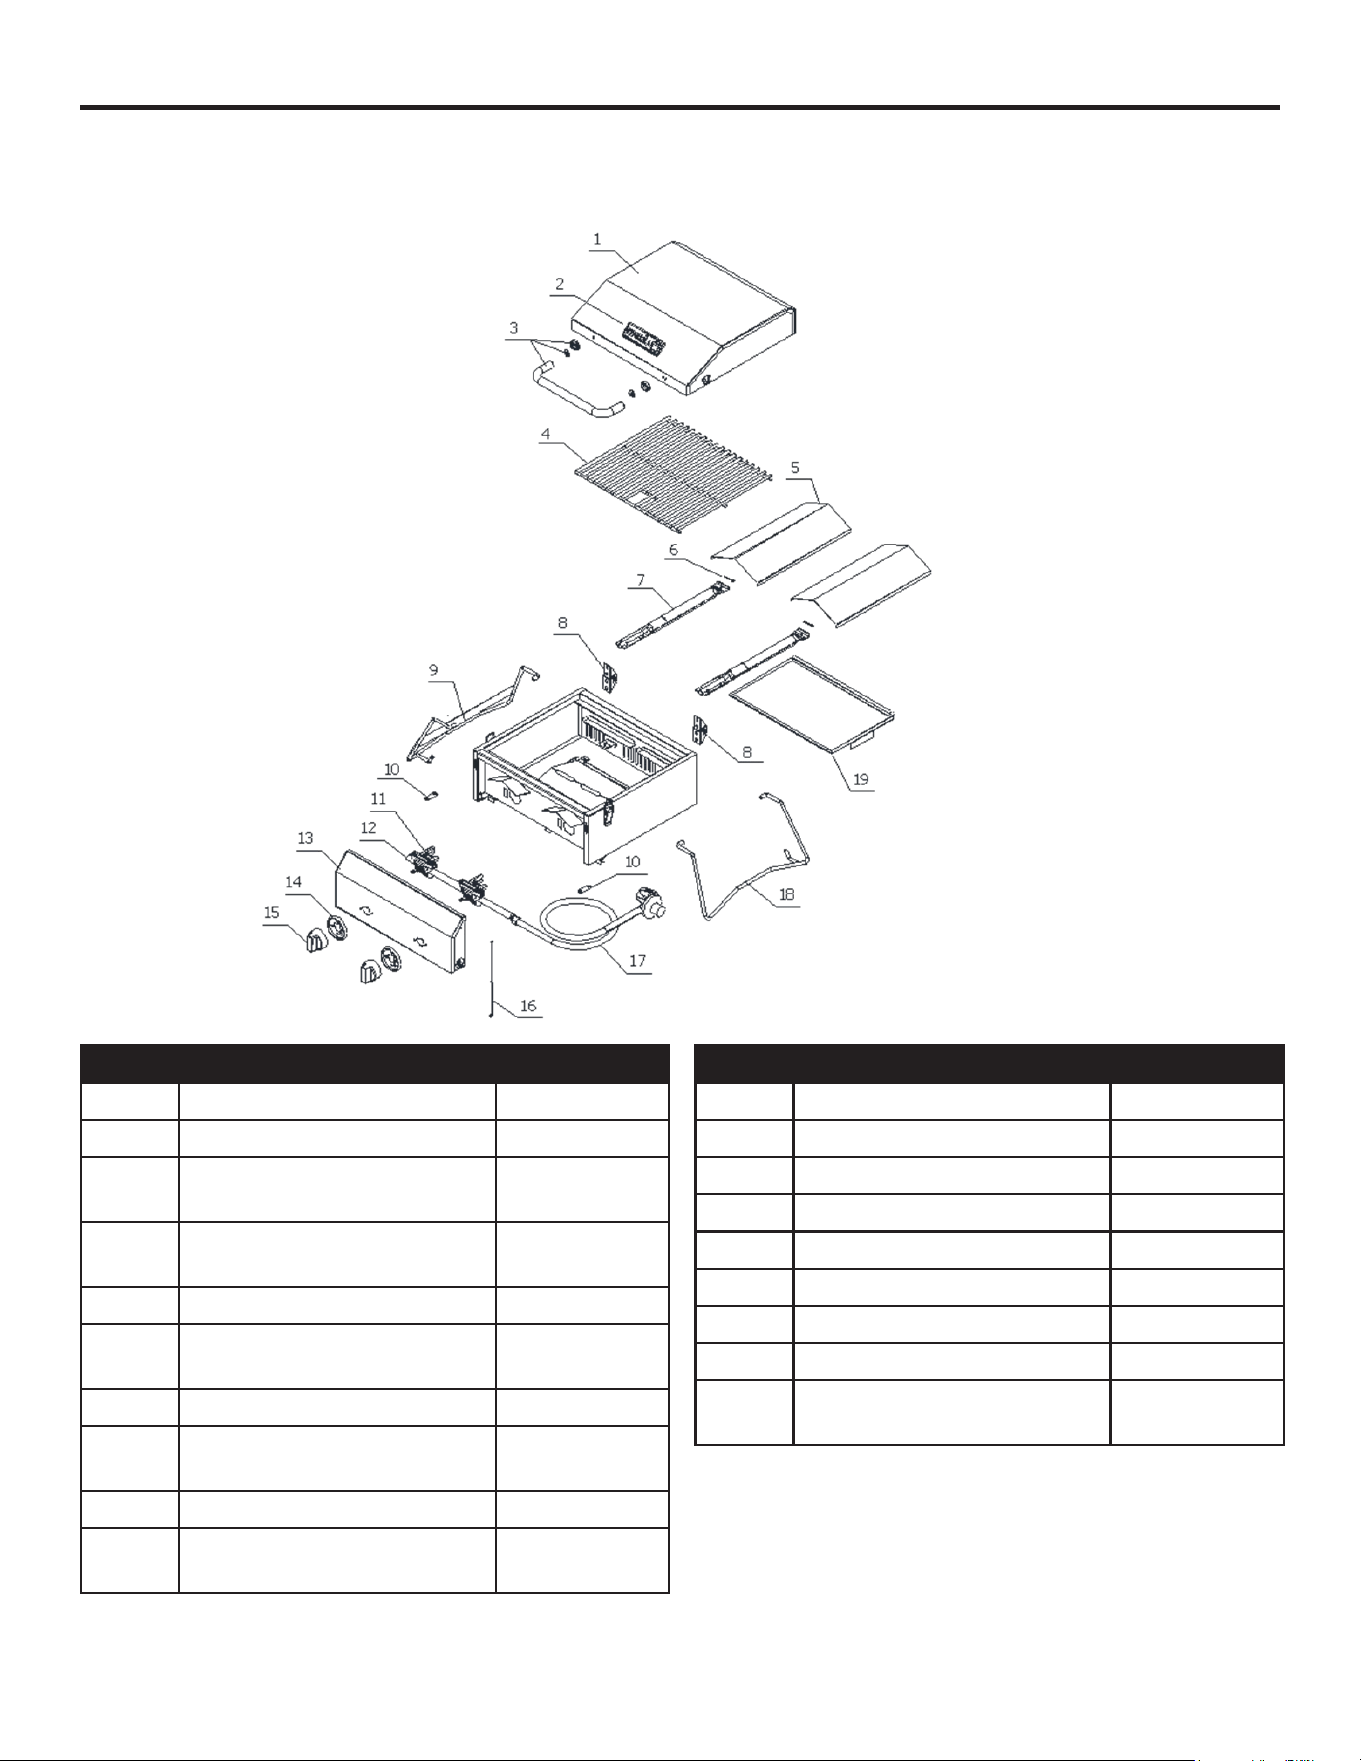
LISTA DE PIEZAS DE REPUESTO
Paraobtenerpiezasderepuesto,llameanuestroDepartamentodeServicioalCliente
all 1-800-913-8999, de lunes a viernes de 8 a.m. a 5 p.m.
PIEZA DESCRIPCIÓN PIEZA #
1
Tapa principal
820-0033-01
2
Logotipo
820-0033-02
3
Ensamble de la manija de
la tapa principal
820-0033-03
4
Rejilla de cocción con
oricio
820-0033-04
5
Difusor de llama
820-0033-05
6
Ensamble del pasador del
quemador
820-0033-06
7
Quemador principal
820-0033-07
8
Bisagra de la tapa
principal
820-0033-08
9
Pataizquierda
820-0033-10
10
Conector del panel
de control
820-0033-11
PIEZA DESCRIPCIÓN PIEZA #
11
Válvuladegas
820-0033-12
12
Tubo colector principal
820-0033-13
13
Panel de control principal
820-0033-14
14
Bisel de la perilla de control
820-0033-15
15
Perilla de control
820-0033-16
16
Varilladeencendido
820-0033-17
17
Regulador, PL
820-0033-18
18
Pata derecha
820-0033-19
19
Bandeja de recolección de
grasa
820-0033-20
Impreso en China
60