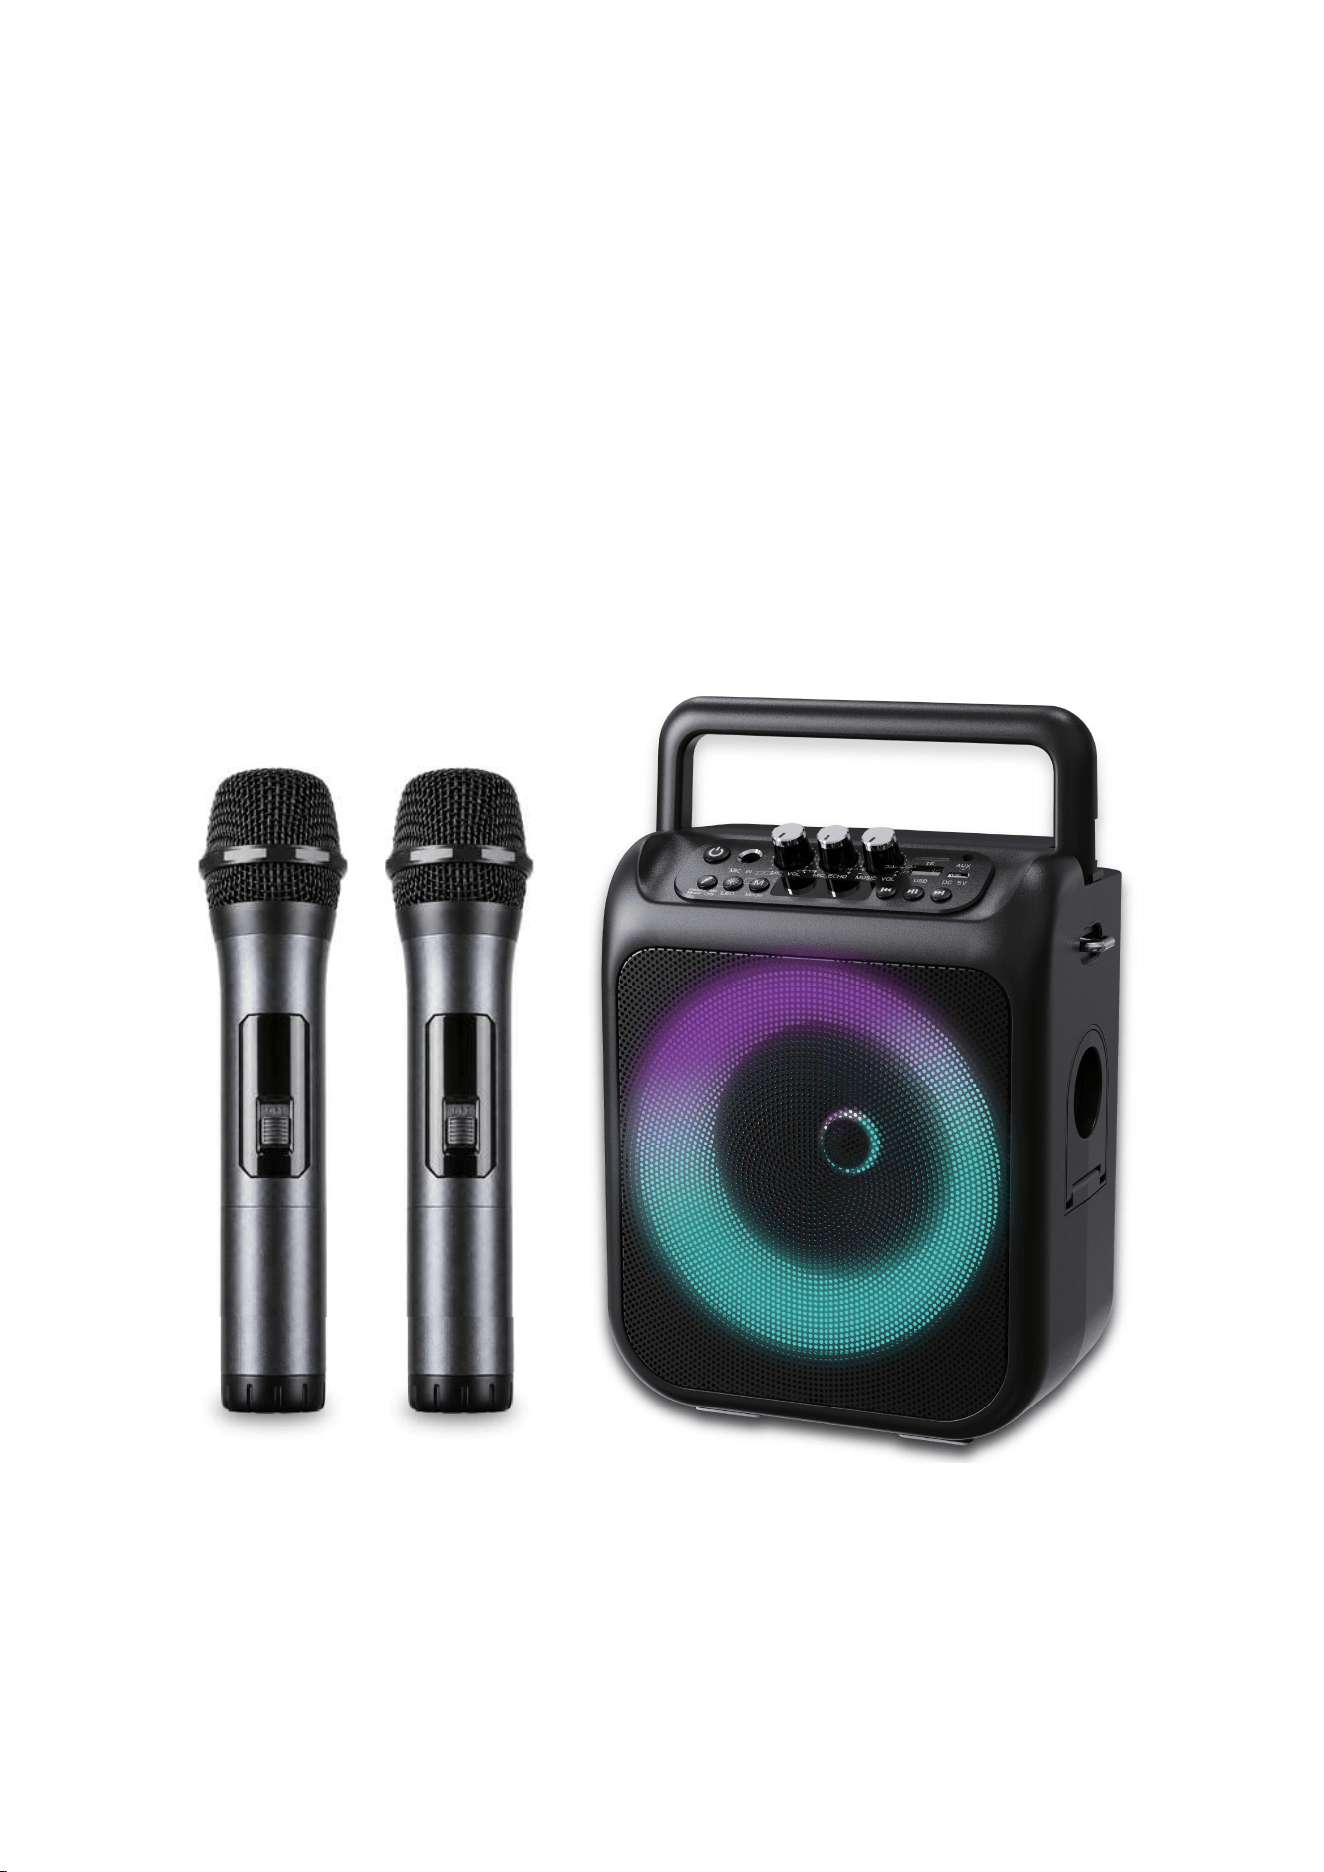
PORTABLE KARAOKE MACHINE
OWNER'S MANUAL
UWJ
Model: K700
OWNER'S MANUAL
ISM
BlueTooth
2.4GHz
ISM
BlueTooth
2.4GHz

1
TABLE OF CONTENTS
1.INTRODUCTION
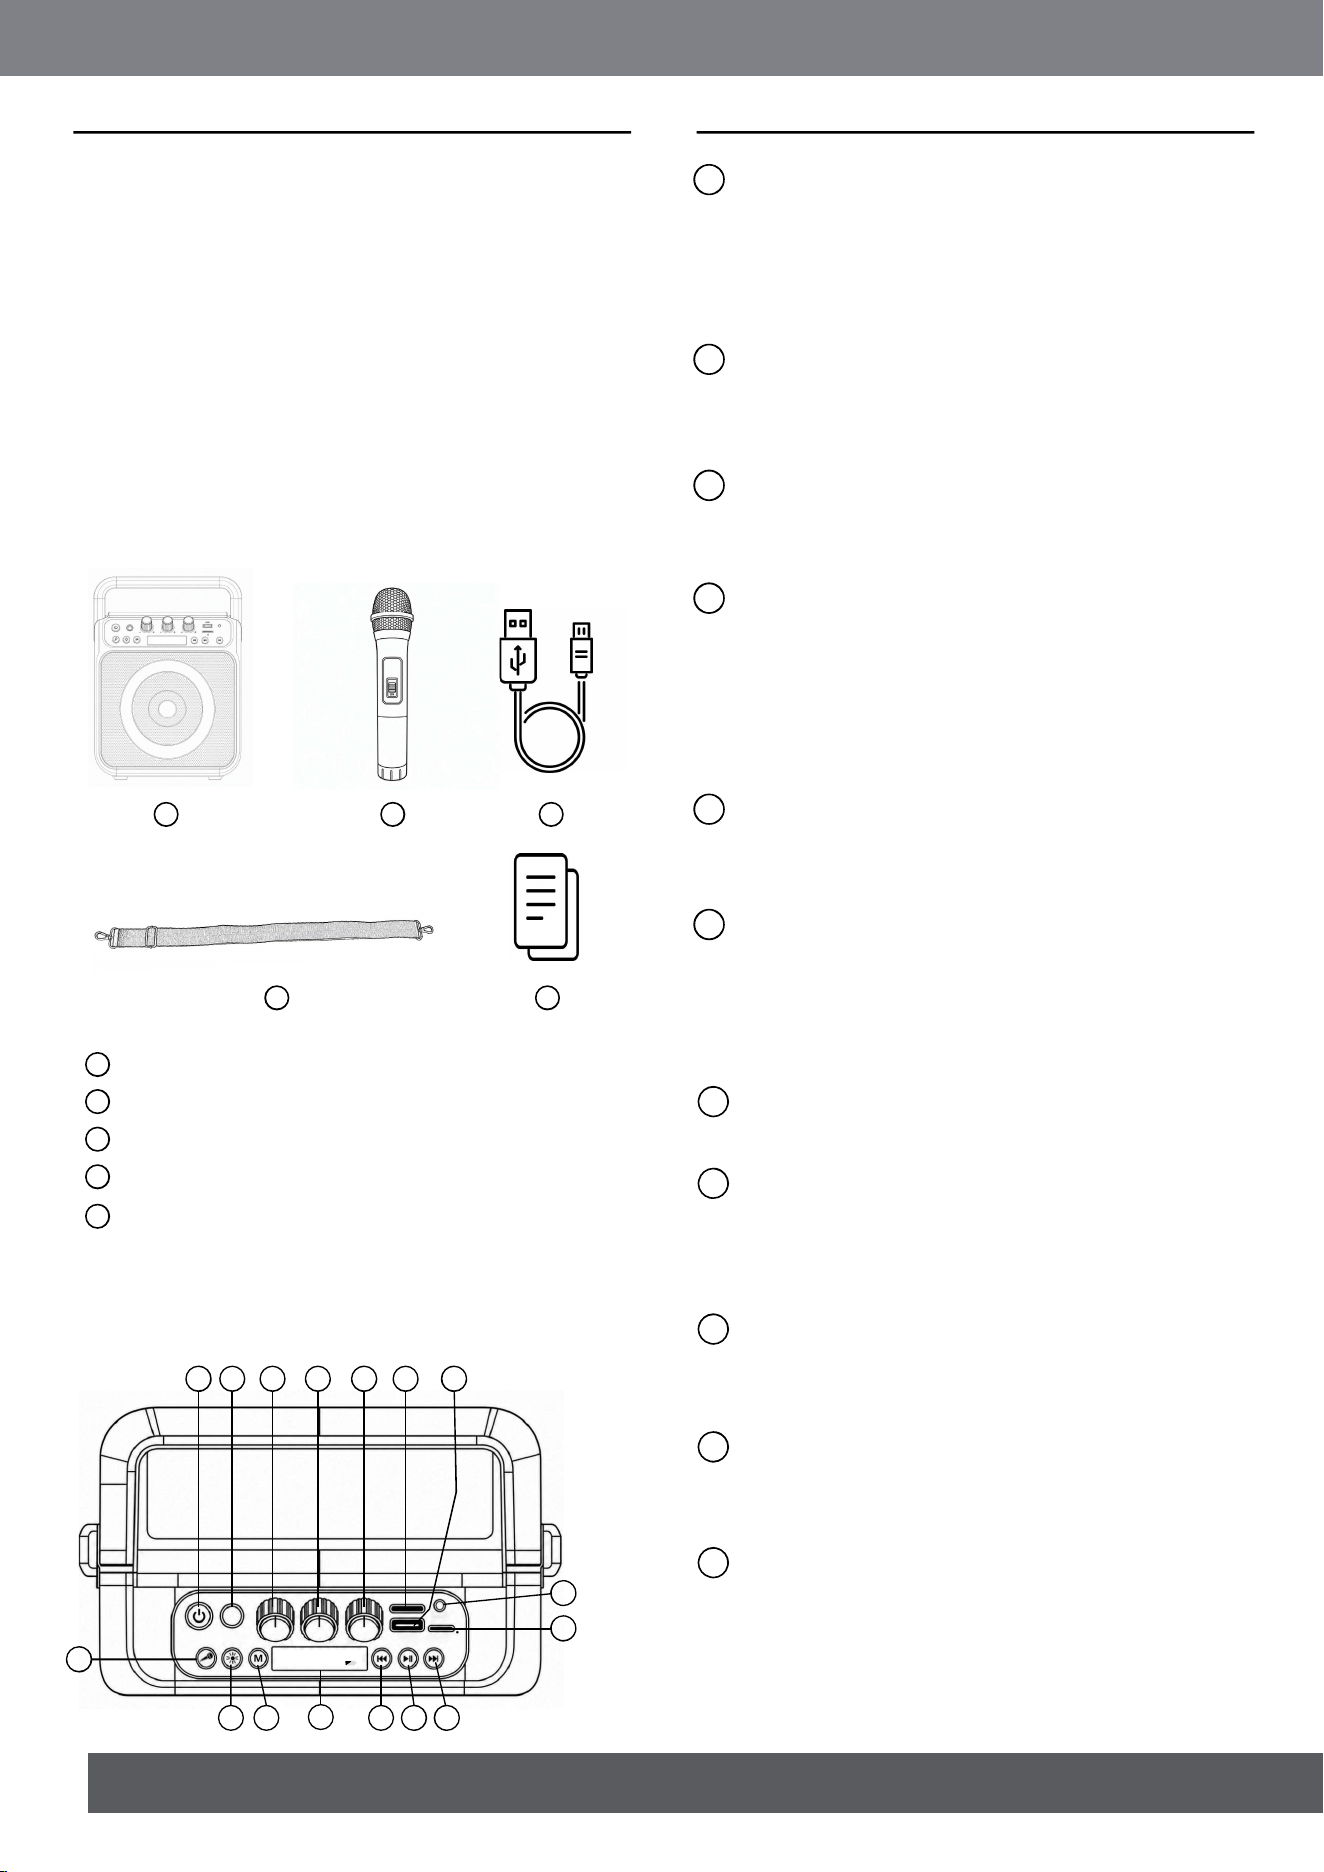
2.WHAT'S IN THE BOX
3.PRODUCT OVERVIEW
4.PLACEMENT
5.POWER ON
6.USING YOUR KARAOKE MACHINE
7. CARRYING YOUR KARAOKE MACHINE
8. COMPLIANCE
9. IMPORTANT SAFETY & CARE NOTES
10.TROUBLESHOOTING
11.FCC Statement
12.IMPORTANT SAFETY INSTRUCTIONS –
BATTERY WARNING
3.1 TOP PANEL
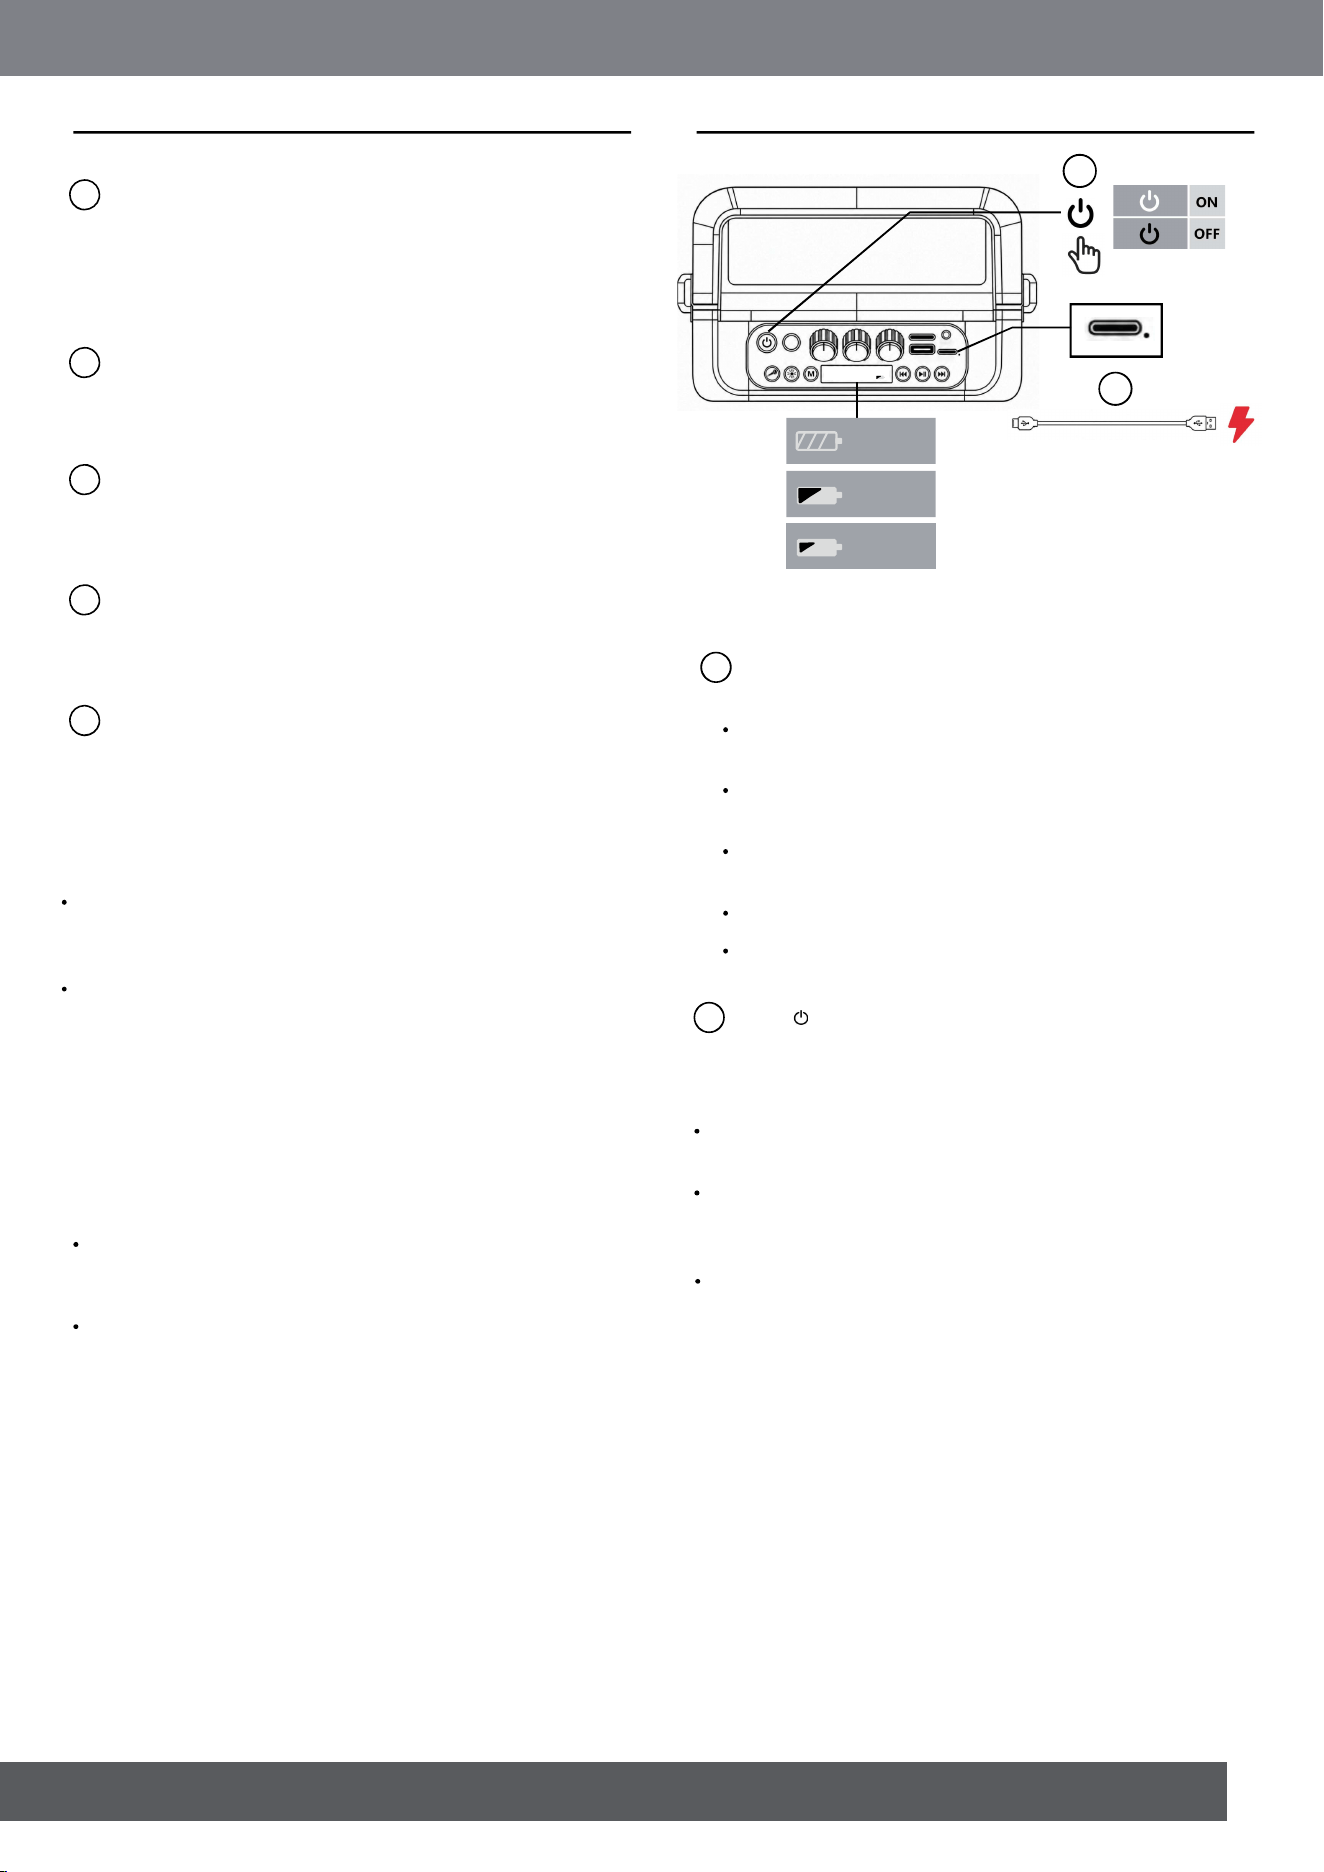
3.2 WIRELESS MICROPHONE
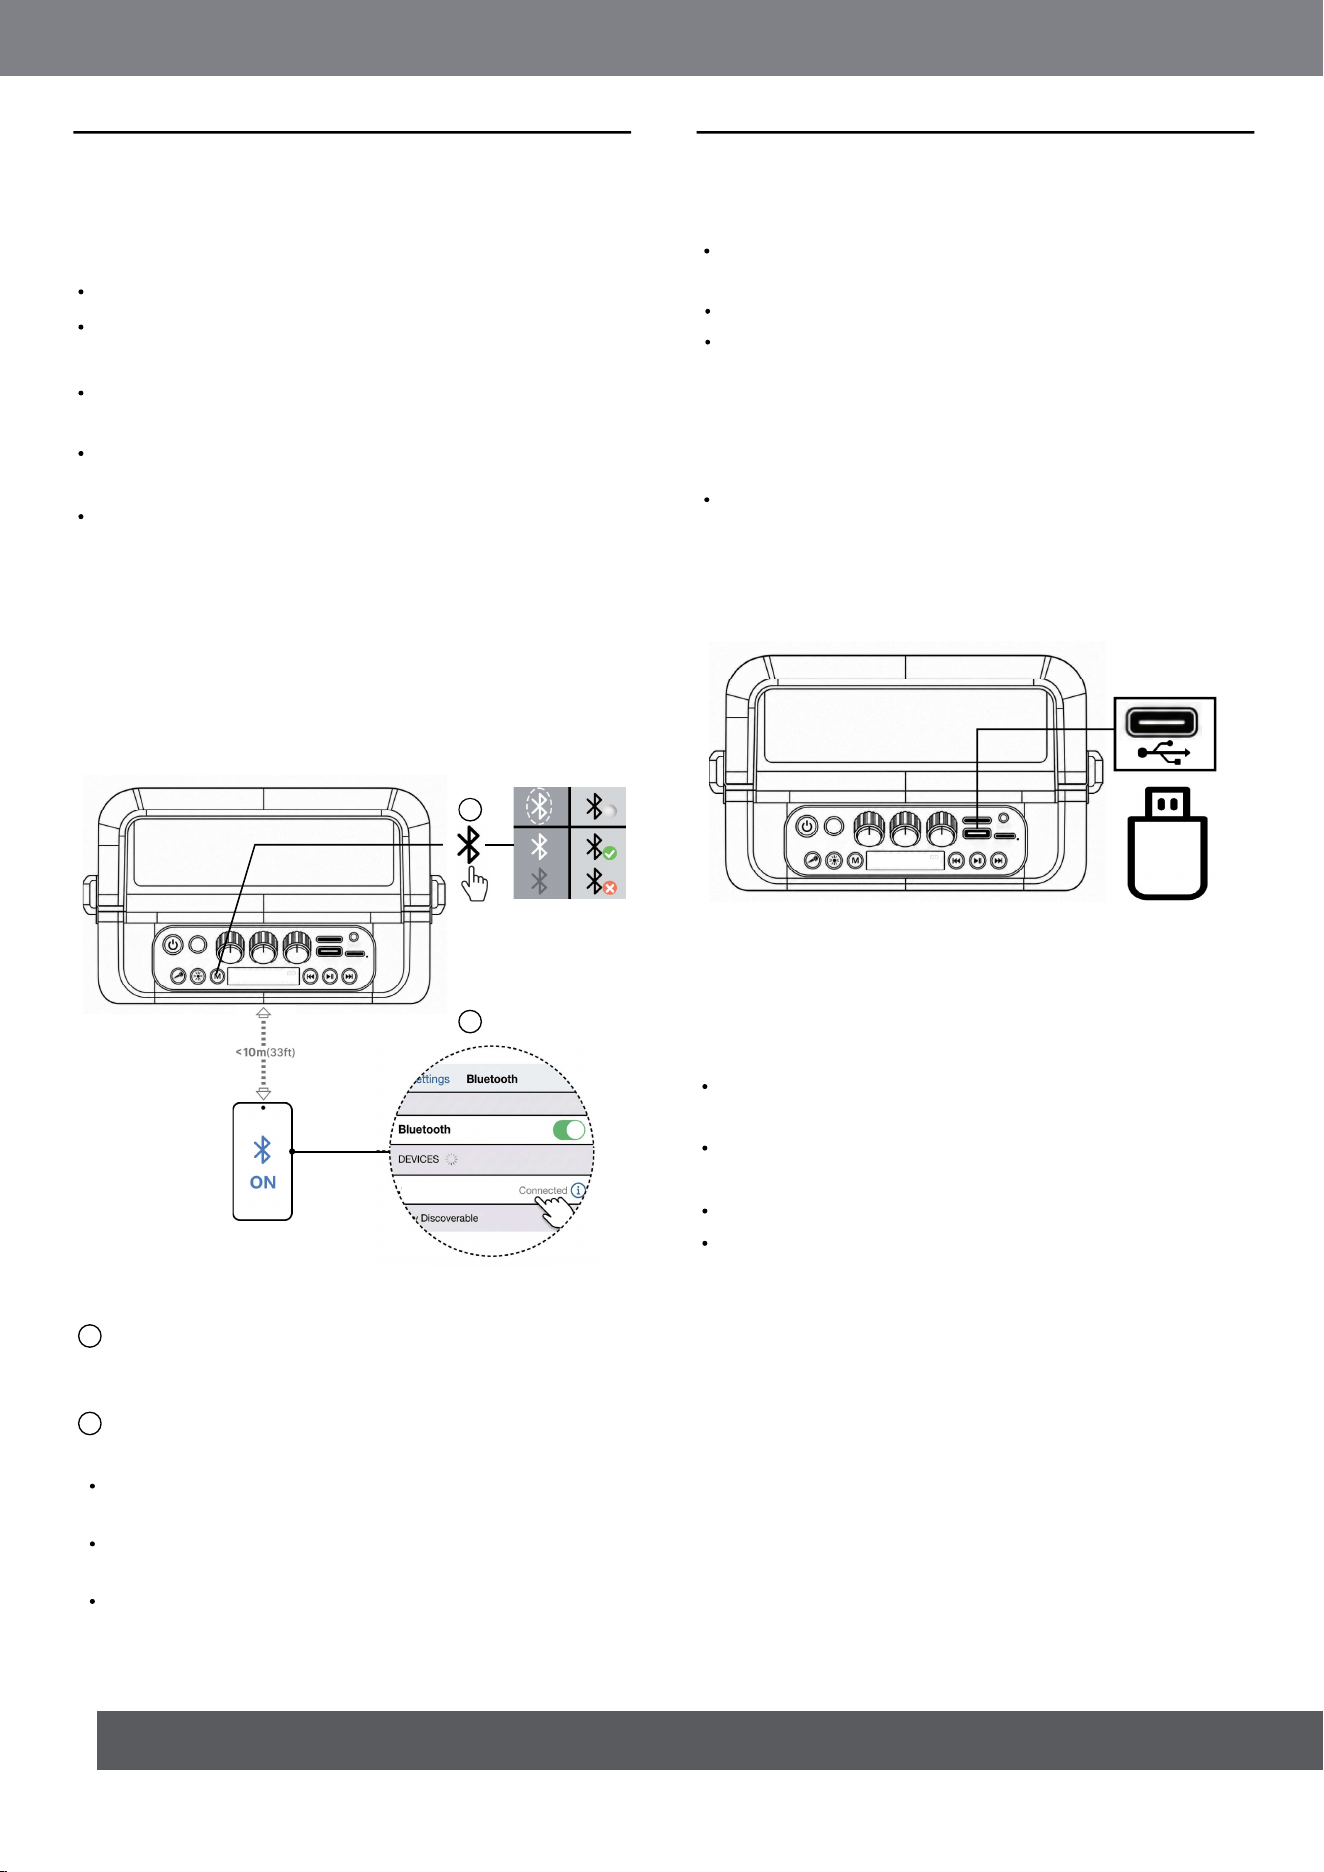
6.1 BLUETOOTH CONNECTION
6.2 USB CONNECTION
6.3 TF CARD CONNECTION
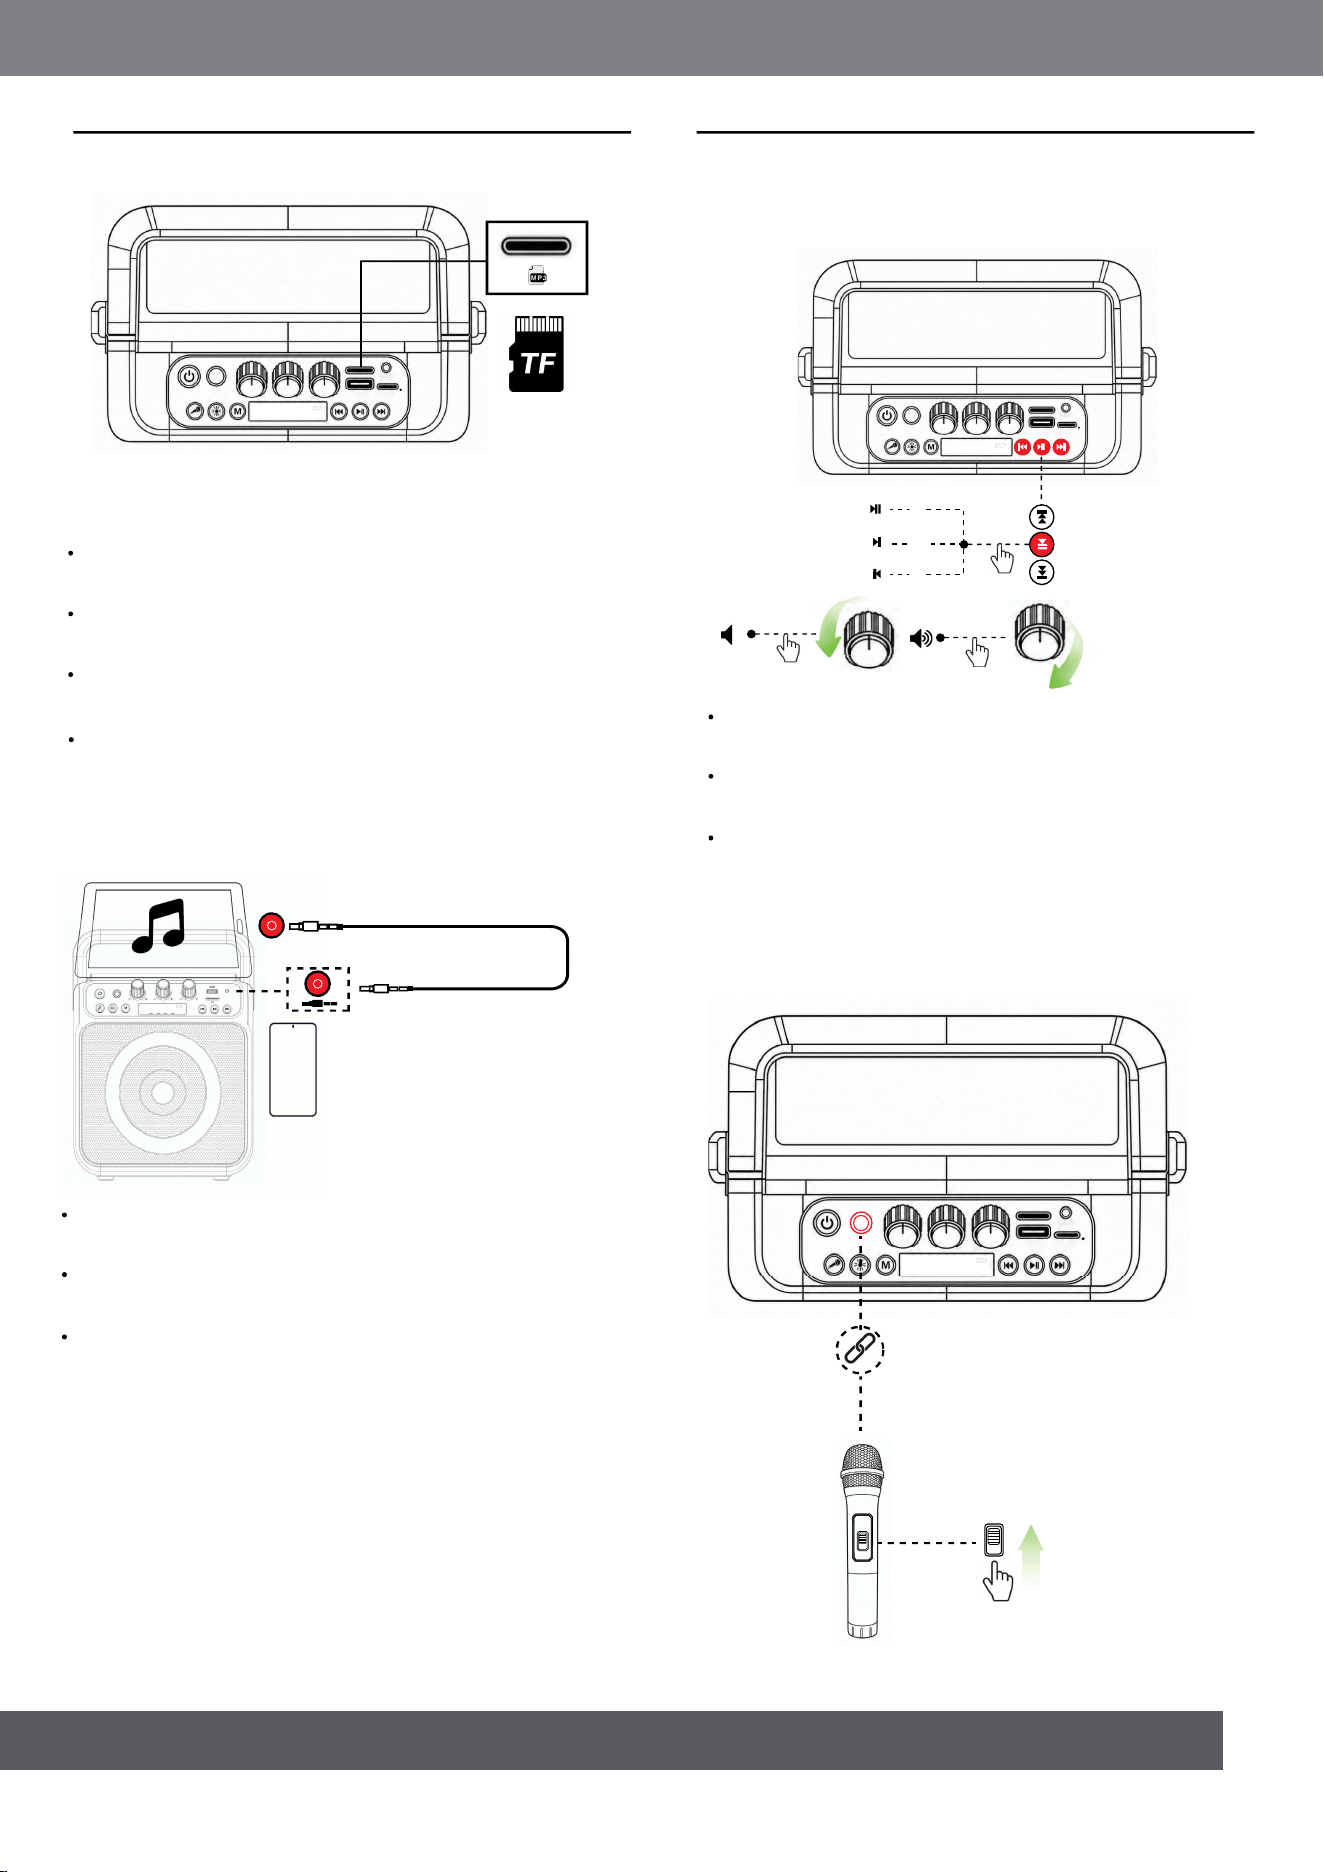
6.4 AUX CONNECTION
6.5 MUSIC CONTROLS
6.6 WIRELESS MICROPHONE
6.7 MIC PRIORITY / MUSIC ONLY MODE
6.8 TWS MODE
6.9 LED LIGHT EFFECTS
6.10 WIRED MICROPHONE, INSTRUMENT &
SOUND MIXING
2
1. INTRODUCTION
Congratulations on your purchase! This manual
includes information about the Portable Karaoke
Machine. Please take a few minutes to read this
manual before use. It includes product information,
setup instructions, operating guidance, Read and
understand all safety instructions before using this
product.If you have any questions about this product,
setup, or operation, please contact our customer
service team.
2. WHAT'S IN THE BOX
3. PRODUCT OVERVIEW
3.1 Top Panel
Power Button
Press this button to turn the karaoke machine on or
off. Once the wireless microphone is powered on, it
will automatically pair with the karaoke machine with
voice prompts.
AUX Input
Connect an external audio device via an AUX cable,
then press the Mode button to switch to AUX mode.
Insert a TF card and press the Mode button
to select TF mode and play MP3 files.
TF Card Slot
Insert a USB flash drive and press the Mode button to
select USB mode and play MP3 files.
USB Port
Mic Priority / Music Mode Button
Short-press to enable or disable Music-Only Mode.
Long-press to enable or disable Mic Priority Mode.
LED Button
Short press to cycle through 6 lighting modes. LED
lights flash in sync with music beats.
Mode Button
The karaoke machine enters Bluetooth mode by
default when powered on, and “BLUE” flashes on
the display. Short press the Mode button to switch
between available input modes: Bluetooth, AUX, TF,
and USB.
Previous Track Button
Short press to play the previous track. Press and hold
to rewind.
Play / Pause Button
Short press to play or pause music. The LED display
shows “PAUS”LED display when music is paused.
In Bluetooth mode, press and hold to disconnect the
Bluetooth connection.
Next Track Button
Short press to play the next track. Press and hold to fast forward.
DC 5V Charging Port
Charge the karaoke machine with the supplied USB-C
charging cable or another standard USB-C cable.
Power adapter is not included.
1
Main Unit ×1
Wireless Microphone ×2
USB-C Charging Cable ×1
Shoulder Strap ×1
User Manual ×1
1
2
3
4
5
4 5
2 3
1
1012131415 11
2
3 5
16
6 74
8
7
8
9
10
11
9
1
2
3
4
5
6
BLUE
3
3.2 Wireless Microphone LED display
Turn clockwise to increase master volume. Turn
counterclockwise to decrease master volume.
The display shows the master volume level
from U00 to U32.
Master Volume Knob
Rotate to adjust the microphone echo level. The
display shows the echo level from
Mic Echo Knob
Rotate to adjust the microphone volume. The display
shows the microphone volume level from
Mic Volume Knob
For connecting a wired microphone or musical
instruments such as guitar.
MIC / Instrument Jack
Shows playback mode, elapsed play time, battery level,
master volume, mic volume, and echo level.
LED Display Screen
Flashes while waiting to connect. Stays solid once the
wireless microphone successfully connects to the
karaoke machine.
Connection Indicator Light
Press and hold to turn the wireless microphone on or off.
Wireless Mic Power Button
4. PLACEMENT
5. POWER ON
Caution:
Do not sit on the karaoke machine, press it with force,
or place heavy objects on it. Otherwise, it may cause
malfunction, personal injury, or property damage.
Place the karaoke machine on a flat, stable surface
and make sure the rubber feet side is facing down.
12
13
14
15
16
2
1
Caution:
Use a standard 5V USB adapter to charge the karaoke
machine.
Recommended adapter output: 5V/1A or higher
current,such as 5V/2A.
Do not use fast chargers or adapters with output
voltage higher than 5V.
Adapters with output lower than 5V/1A are not
recommended, as charging may be slow or unstable.
The karaoke machine can be used while charging.
Use the supplied USB-C cable or another standard
USB-C cable.
Fully charge the karaoke machine before first-time use
to help protect the built-in battery.
To protect battery life, fully charge the karaoke machine
at least once every 3 months when not in use for a long
time.
Battery life will vary depending on usage patterns and
environmental conditions.
Press to power on or off.
Tips:
2
1
E-00 to E-16.
N-00 to N-16.
Low Battery
Sufficient Battery
Low Battery Flash
BLUE
4
6.1 Bluetooth Connection
6. USING YOUR KARAOKE MACHINE
Notes:
Only one audio source can be played at a time.
The karaoke machine starts in Bluetooth mode by
default.
Other modes will not be displayed or selected if a T
F card, USB flash drive, is not connected.
Press the Mode button to switch between available
modes.
For better Bluetooth performance, keep your Bluetooth
device within the effective connection range of the
karaoke machine and avoid walls or strong wireless
interference.
When powered on, the karaoke machine enters
Bluetooth mode by default, and “BLUE” flashes
on the LED display.
Turn on Bluetooth on your device and search for
“K700 KARAOKE MACHINE”.
Select “K700 KARAOKE MACHINE” to complete
the connection.
Once connected successfully, the display stops
flashing and a voice prompt will sound.
You can now play music from your Bluetooth device.
The karaoke machine will automatically reconnect to
the last paired device after powering on again.
If the connection fails, turn Bluetooth off and back on
your device, then reconnect.
Bluetooth performance may be affected by distance,
walls, or nearby wireless devices.
You can connect the karaoke machine to Bluetooth-
enabled smartphones, tablets, or other audio devices.
Pairing Status:
Notes:
Disconnect Bluetooth:
In Bluetooth mode, press and hold the Play / Pause
button, or turn off Bluetooth on your device.
6.2 USB Connection
Insert a USB flash drive containing MP3 files into the
USB port. "USB" appears on the LED display, and
playback starts automatically.
Tips:
The karaoke machine supports MP3 files stored on
USB flash drives.
The LED display shows the elapsed track time during
playback.
Press the Previous / Next Track button to change tracks.
Press the Play / Pause button to pause or resume
playback.
6.3 TF Card Connection
Insert a TF card containing MP3 files into the TF card slot.
"TF" appears on the LED display, and playback starts
automatically.
1
1
2
2
K700 KARAOKE MACHINE
BLUE
USB
00:00
5
Tips:
The karaoke machine supports MP3 files stored on
TF cards.
Short press the Play / Pause button to play or pause
music.
Short press the Previous Track button to play the
previous track. Press and hold to rewind.
Turn MUSIC VOL knob: Clockwise = louder music
volume; Counter-clockwise = quieter music volume.
Screen shows U 00-U 32.
The LED display shows the elapsed track time during
playback.
Press the Previous / Next Track button to change
tracks.
Press the Play / Pause button to pause or resume
playback.
Connect an external audio device to the AUX input
using an AUX cable.
Press the Mode button to select AUX mode. “AUX”
appears on the LED display.
Start playback on the connected device.
6.4 AUX Connection
Note:
Track selection using the karaoke machine controls
may not be available in AUX mode. Use the
connected device to control playback.
6.5 Music Controls
6.6 Wireless Microphone
×1
×1
×2
×3
×1
ON
ON
AUX
TF
00:00
AUX
W
32
0 M
6
6.7 Mic Priority / Music Only Mode
6.8 TWS Mode
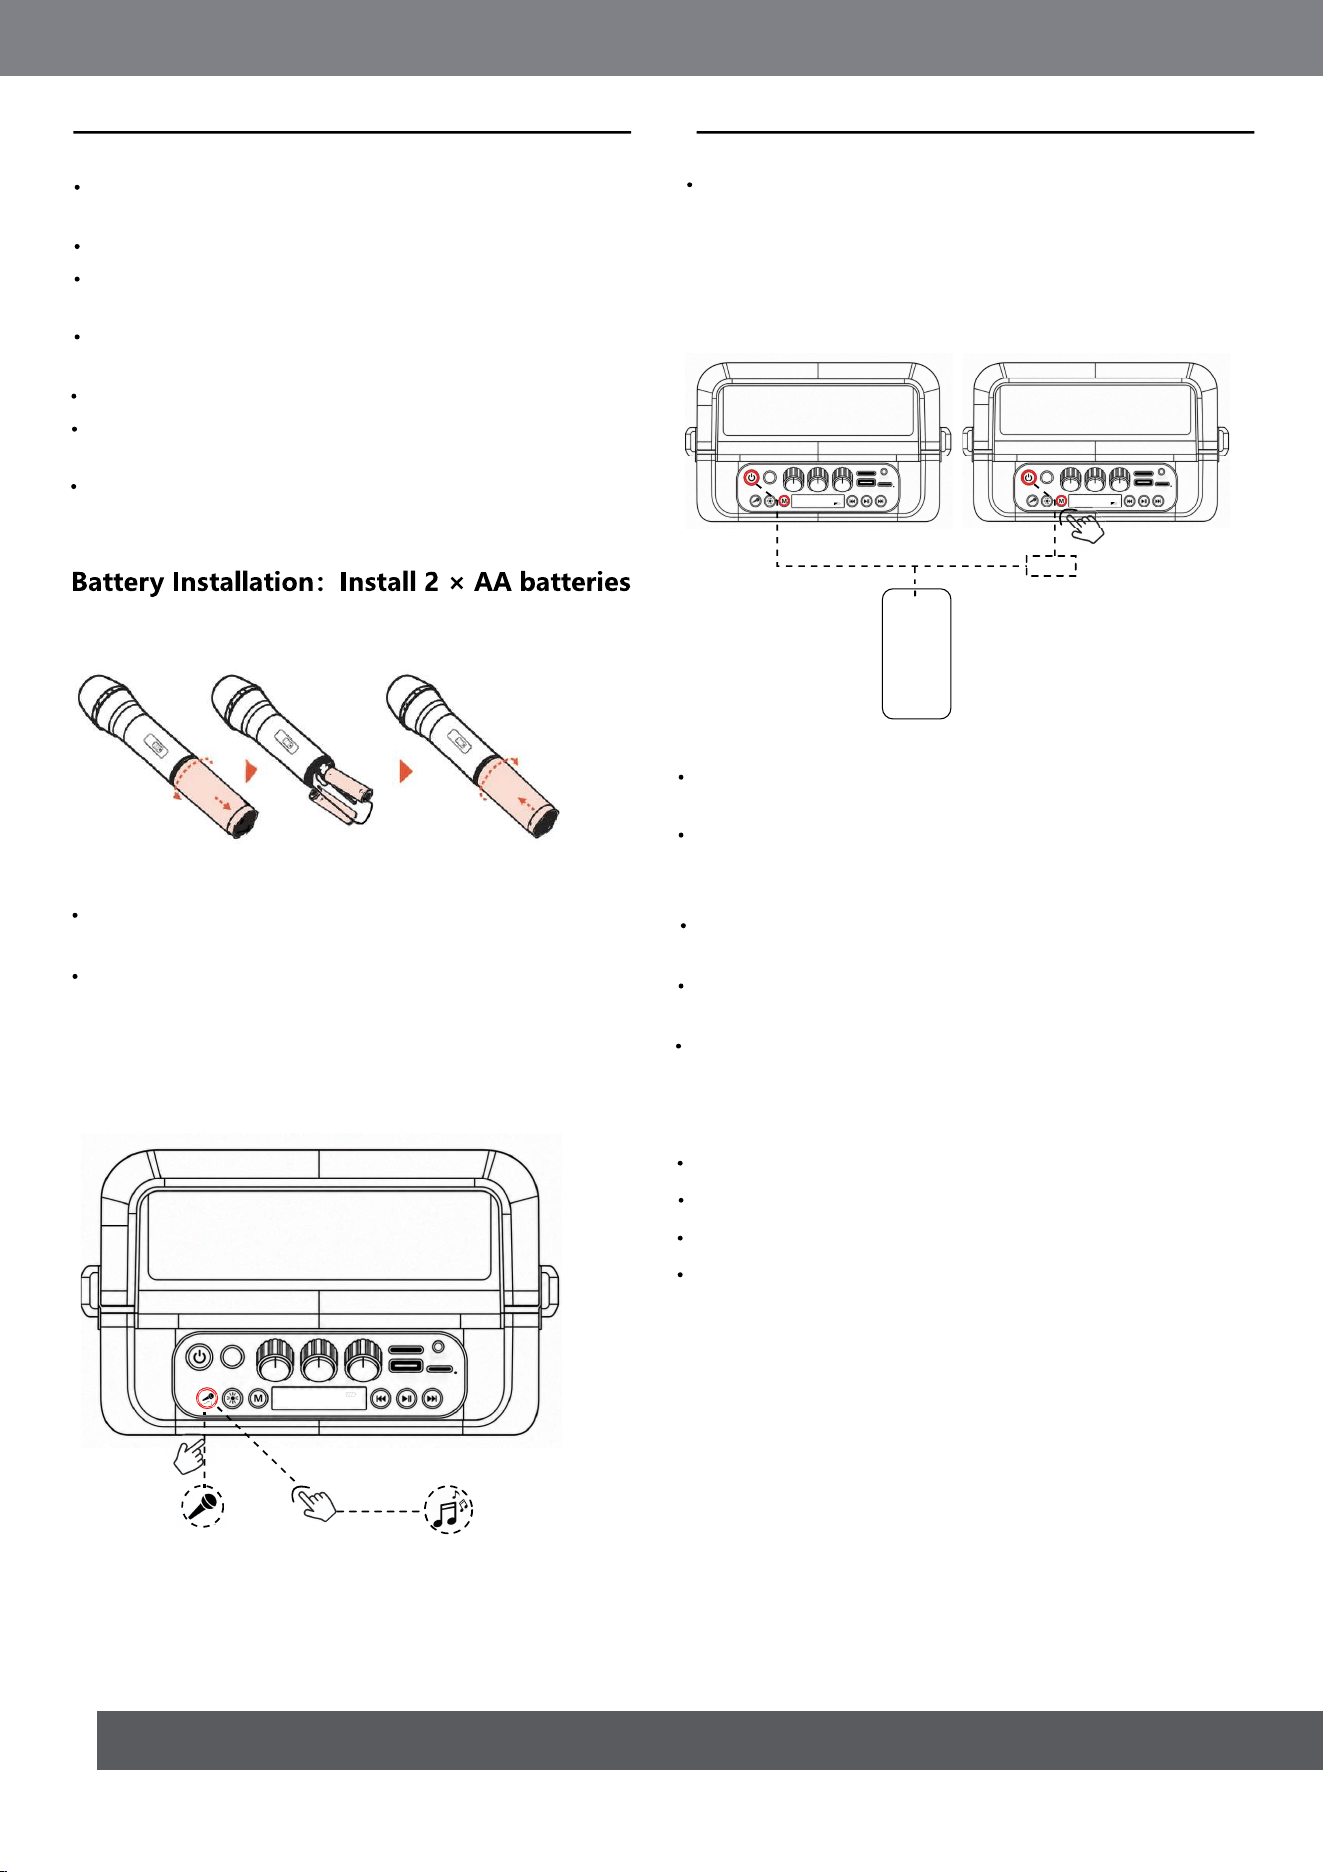
The wireless microphone will automatically pair with
the karaoke machine once both units are powered on.
Turn on the karaoke machine.
Slide the microphone power switch to OFF to power
on the wireless microphone.
The microphone indicator light flashes during
connection.
The indicator stays solid once connected successfully.
Power on both karaoke machines and enter Bluetooth
mode.
Under Bluetooth mode, long-press the MODE button
on **either unit** to activate the TWS function; the
screen shows “btst”.
A prompt tone will sound upon successful
connection.
After connection, the first unit displays “btst”
and the second unit displays “bt”.
Long-press MODE again to exit TWS mode.
Keep the wireless microphone within the effective
connection range of the karaoke machine.
If the microphone does not connect, turn off both
the karaoke machine and the microphone, then
turn them on again.
Long-press: Enable/disable Mic Priority Mode (Mute
background audio, mic-only output, screen shows
OPEN/OFF with prompt tone).
When activated, original vocals of songs are
suppressed for karaoke sing-along.
Notes:
6.9 LED Light Effects
Short-press: Enable/disable Music-Only Mode (Vocal
cancel, screen shows ON/OFF with prompt tone).
TWS
as shown. Batteries are not included.
0P EM
BT 5T
BT
Short press the LED button to switch lighting modes.
LED lights flash in sync with music beats.
Press repeatedly to cycle through different light styles.
Light effects may vary depending on the music rhythm
and selected mode.
7
6.10 Wired Microphone,
Instrument & Sound Mixing
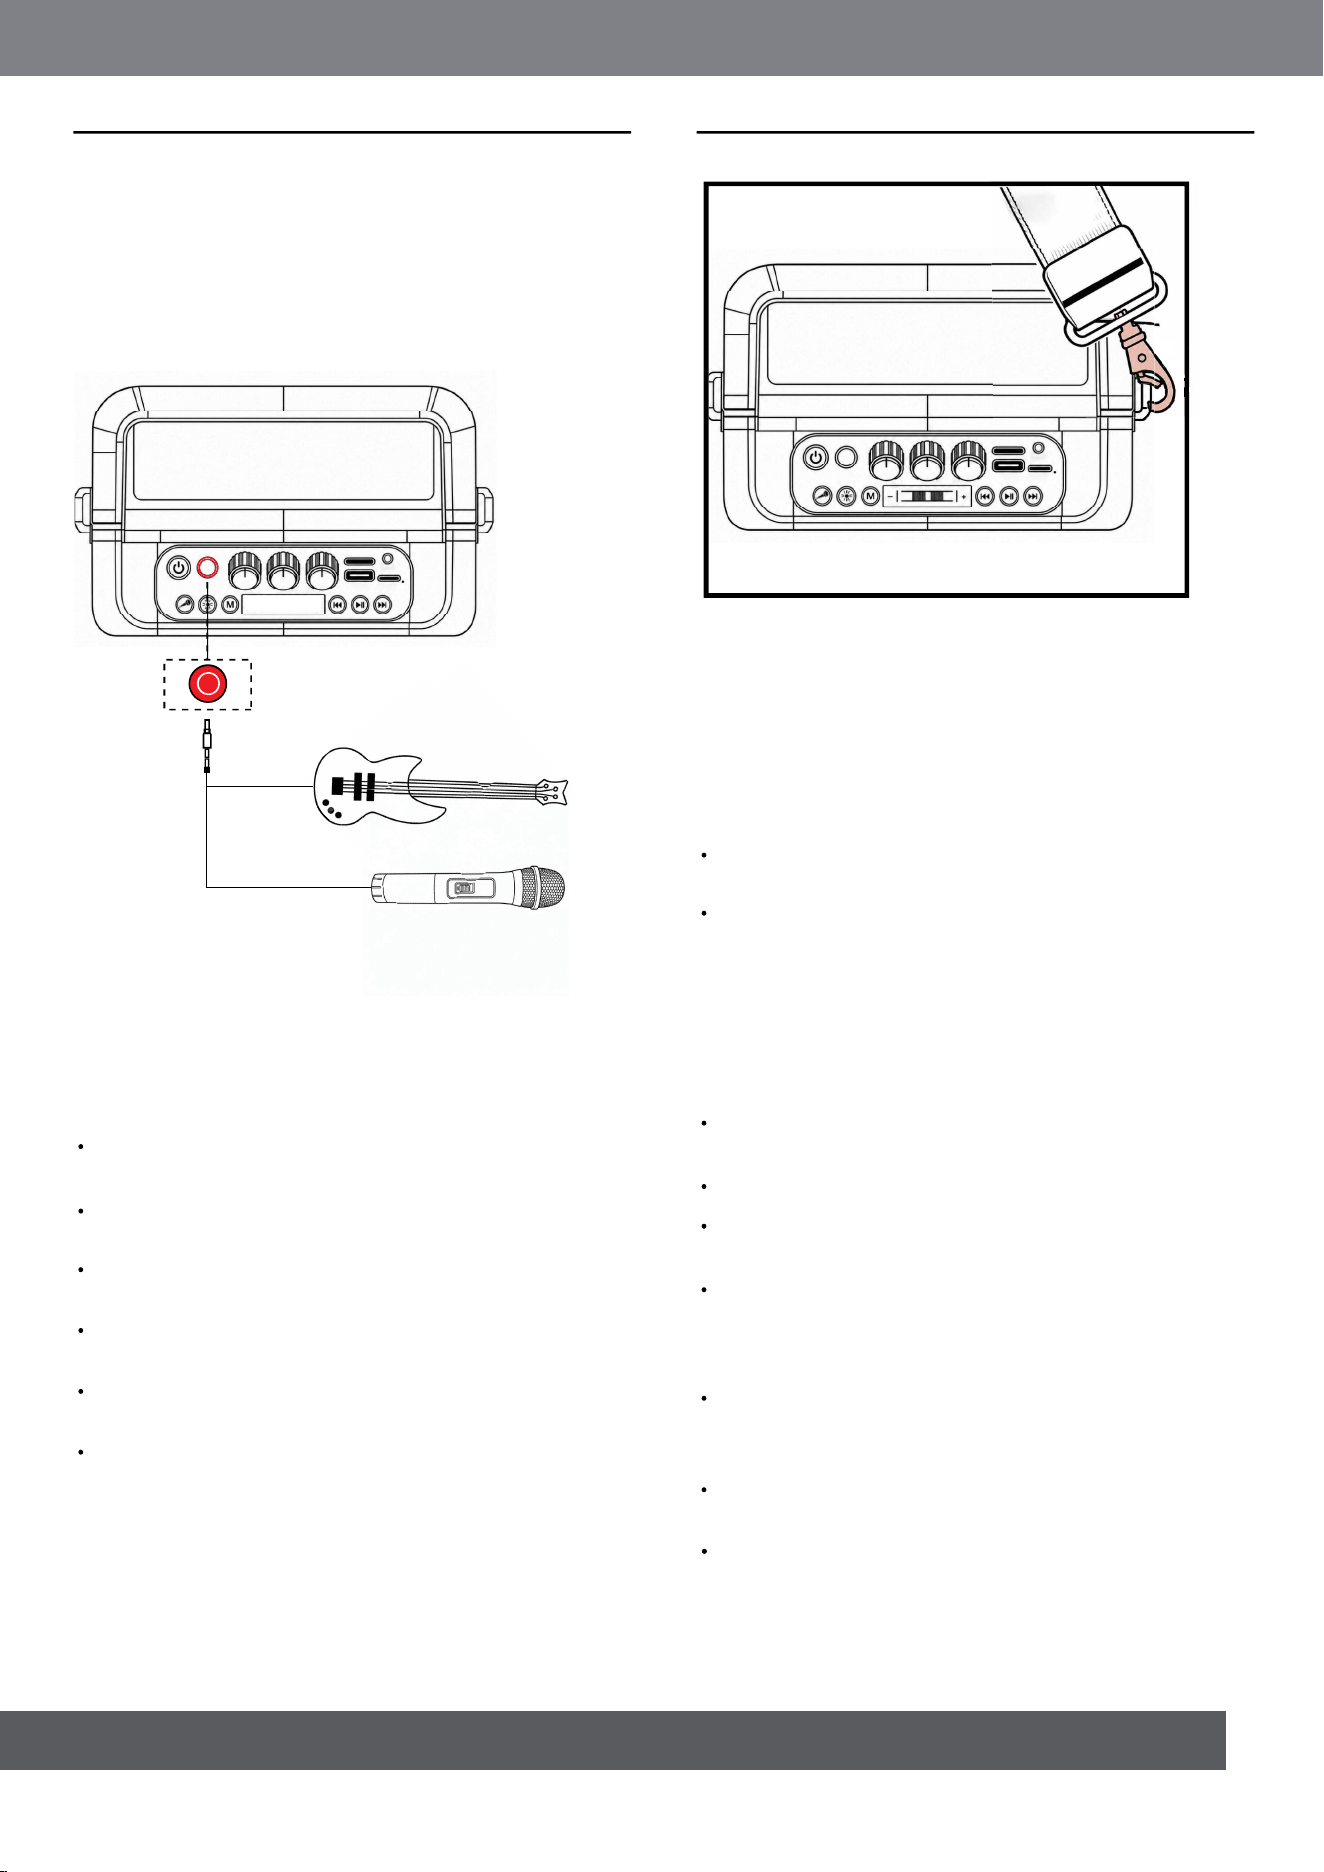
Connect a wired microphone or compatible instrument
to the MIC / Instrument jack.
Before carrying the karaoke machine, disconnect all
connecting cables.
To avoid personal injury or property damage, hold the
karaoke machine firmly while carrying it.
Use the built-in handle or the supplied shoulder strap
to carry the karaoke machine.
When using the shoulder strap, make sure it is securely
attached before carrying.
Do not shake, drop, or strongly impact the karaoke
machine.
Keep the karaoke machine away from water, heat
sources, and sharp objects.
7. CARRYING YOUR KARAOKE
MACHINE
Cautions:
8. COMPLIANCE
This product is designed for personal audio playback
and karaoke use only.
Wireless and Audio Functions
Battery and Charging
This karaoke machine supports audio playback via
Bluetooth, USB flash drive, TF card, and AUX input.
Unavailable modes will not be displayed or selected
if the corresponding device or cable is not connected.
Charge the karaoke machine through the USB-C
charging port using the supplied USB-C charging
cable or another standard USB-C cable.
Use a standard 5V USB power adapter rated at 1A or
higher (e.g., 5V/2A).
Fast-charging adapters are not supported.
Do not expose the battery or karaoke machine to
excessive heat, open flames, water, rain, direct
sunlight, or other wet locations.
Do not disassemble, puncture, crush, burn, or modify
the built-in lithium battery.
If the karaoke machine will not be used for an extended
period, fully charge it at least once every 3 months to
help protect battery life.
Power adapters rated below 5V/1A are not
recommended, as charging may be slow or unstable.
Keep the charging port clean and dry before charging.
Battery Safety and Care

8
Avoid listening at high volume for long periods to help
protect hearing.
Adult supervision is recommended when children use
the product.
Clean the karaoke machine with a soft, dry cloth only.
Do not rinse or immerse the unit in water.
Store the karaoke machine in a cool, dry place away
from heat, fire, moisture, and flammable materials.
Use and Care
9. IMPORTANT SAFETY & CARE
NOTES
Use only a standard 5V USB adapter and the
supplied USB-C charging cable or another standard
USB-C cable.
Make sure the battery level is sufficient.
Some controls may not be available in USB, TF, or
AUX mode.
Make sure the karaoke machine is turned on and the
correct mode is selected.
Increase the volume on both the karaoke machine
and the connected device.
Make sure the audio source is playing and not muted.
Check that all cables are securely connected.
Reduce the Mic Echo and Mic Volume levels.
Keep the microphone away from the karaoke machine,
walls, and other reflective surfaces.
Do not use fast chargers or adapters with output
voltage higher than 5V.
Do not use the karaoke machine near water, rain,
sinks, bathtubs, wet floors, or other wet locations.
Do not disassemble, puncture, crush, burn, or
expose the built-in lithium battery to high
temperature.
Avoid listening at high volume for long periods to
help protect hearing.
Adult supervision is recommended when children
use the product.
Clean with a soft, dry cloth only. Do not rinse or
immerse the unit in water.
Store in a cool, dry place away from heat, fire,
moisture, and flammable materials.
10. TROUBLESHOOTING
Note:
Do not attempt to repair the product yourself. Check
the following solutions before requesting service.
Power and Charging
Karaoke machine does not turn on
Karaoke machine does not charge
Charge the karaoke machine through the DC 5V
charging port using the supplied USB-C cable.
If the battery is fully depleted, charge it for 30–60
minutes before turning it on.
Make sure the charging cable and USB power
adapter are working properly.
Use a standard 5V USB power adapter.
Make sure the charging cable is securely connected.
Use the DC 5V charging port only. Do not use the
USB playback port for charging.
Keep the charging port clean and dry.
Turn the karaoke machine off, then turn it on again.
Buttons do not respond
Sound
No sound or low volume
Excessive echo or feedback
Bluetooth
Bluetooth pairing fails
Make sure the karaoke machine is in Bluetooth
mode and “BLUE” is flashing on the
LED display.
Turn on Bluetooth on your device and select
“K700 Karaoke Machine”.
If the karaoke machine is connected to another
device, press and hold the Play / Pause
button to disconnect it.
Move the Bluetooth device closer to the karaoke
machine and try again.
Bluetooth audio is unstable
Reduce the distance between the Bluetooth
device and the karaoke machine.
Remove obstacles and avoid strong wireless
interference.
Disconnect Bluetooth, then reconnect.

9
USB / TF Card
USB drive or TF card does not play
Make sure the USB drive or TF card contains
supported MP3 files.
Select the correct USB or TF mode.
Remove and reinsert the USB drive or TF card.
Try another USB drive or TF card if necessary.
USB or TF mode appears, but playback
does not start
Press the Play / Pause button.
Remove unsupported or corrupted audio files.
AUX
No sound in AUX mode
Make sure the AUX cable is fully inserted.
Select AUX mode and start playback on the
connected device.
Increase the volume on both the karaoke machine
and the connected device.
Previous / Next buttons do not work in
AUX mode
This is normal in AUX mode. Use the connected device
to change tracks.
Wireless Microphone
Wireless microphone does not connect
Press and hold the microphone power button to turn
it on.
Move the microphone closer to the karaoke machine.
Turn off both the karaoke machine and the
microphone, then turn them on again.
No microphone sound
Make sure the microphone is powered on and
connected.
Increase the Mic Volume level.
For a wired microphone, check the MIC / Instrument
connection.
Microphone indicator keeps flashing
The microphone is still waiting to connect.
Move the microphone closer to the karaoke
machine.
Restart both the karaoke machine and the
microphone if necessary.
TWS
Two karaoke machines do not connect
Make sure both karaoke machines are the same
model and both are in Bluetooth mode.
Long-press the MODE button on either unit to
activate TWS pairing.
Restart both karaoke machines and try again if
pairing fails.
TWS connection is unstable
Keep the two karaoke machines close to each
other.
Avoid strong wireless interference.
Restart both karaoke machines and reconnect
TWS.
11. FCC Statement
Reorient or relocate the receiving antenna.
Increase the separation between the equipment
and receiver.
Connect the equipment into an outlet on a circuit
different from that to which the receiver is connected.
Consult the dealer or an experienced radio/TV
technician for help.
If this equipment does cause harmful interference
to radio or television reception, which can be
determined by turning the equipment off and on,
the user is encouraged to try to correct the
interference by one or more of the following
measures:
This equipment has been tested and found to
comply with the limits for a Class B digital device,
pursuant to part 15 of the FCC Rules. These limits are
designed to provide reasonable protection against
harmful interference in a residential installation. This
equipment generates, uses and can radiate radio
frequency energy and, if not installed and used in
accordance with the instructions, may cause harmful
interference to radio communications. However,
there is no guarantee that interference will not occur
in a particular installation.

10
12.IMPORTANT SAFETY
INSTRUCTIONS – BATTERY
WARNING
WARNING
Risk of fire or burns. Do not disassemble, crush or
puncture the battery pack.Do not expose the battery to
high-temperature environments, open flame or direct
sunlight.Do not short-circuit external battery contacts.
Keep this device and battery away from young children.
Do not discard the battery in fire or household trash.
If battery leakage occurs, avoid contact with skin and
eyes. Rinse affected area with plenty of water if contact
happens.Only use the original supplied charging cable
for charging.Do not store the device in extreme hot or
cold places.
Changes or modifications not expressly approved by
the party responsible for compliance could void the
user’s authority to operate the equipment.
This device complies with Part 15 of the FCC Rules.
Operation is subject to the following two conditions:
(1) this device may not cause harmful interference,
and (2) this device must accept any interference
received, including interference that may cause
undesired operation.