
zlinekitchen.com
ICE MAKERS
IGMDST15, IGMDP15,
ICCDST15, & ICCDP15 MODELS
Installation and User Manual

ZLINE Kitchen and Bath provides Attainable Luxury, where the kitchen and bath of your dreams
is never out of reach. Through our unique designs and unparalleled quality, we’re dedicated to
providing you an elevated experience in the heart of your home. With an endless selection of
features and finishes, our inspiration is your reality.

ZLINE is fueled by a passion for innovation; A relentless pursuit of bringing the
highest end luxury designs and professional features into everyone’s homes.
Because we continually strive to improve our products, we may change
specifications and designs without prior notice.
Scan the QR code to view the most up-to-date version of the Installation
Manual and User Manual.
WARNING: This product can expose you to chemicals including nickel, which is known to the
State of California to cause cancer. For more information, go to www.P65Warnings.ca.gov.

IMPORTANT SAFETY INSTRUCTIONS . . . . . . . . . . . . . . . . . . . . . . . . . . . . . . . . . . . . . . . .1
Power Cord Precautions . . . . . . . . . . . . . . . . . . . . . . . . . . . . . . . . . . . . 3
Installation Precautions . . . . . . . . . . . . . . . . . . . . . . . . . . . . . . . . . . . . . 4
Moving Precautions . . . . . . . . . . . . . . . . . . . . . . . . . . . . . . . . . . . . . . . 5
Cleaning and Maintenance Precautions . . . . . . . . . . . . . . . . . . . . . . . . . . . . 5
BEFORE INSTALLATION . . . . . . . . . . . . . . . . . . . . . . . . . . . . . . . . . . . . . . . . . . . . . . . . . . . .7
Product Specifications . . . . . . . . . . . . . . . . . . . . . . . . . . . . . . . . . . . . . 7
Included Parts . . . . . . . . . . . . . . . . . . . . . . . . . . . . . . . . . . . . . . . . . . 8
Tools Needed . . . . . . . . . . . . . . . . . . . . . . . . . . . . . . . . . . . . . . . . . . 8
INSTALLATION . . . . . . . . . . . . . . . . . . . . . . . . . . . . . . . . . . . . . . . . . . . . . . . . . . . . . . . . . . .9
Leveling the Unit . . . . . . . . . . . . . . . . . . . . . . . . . . . . . . . . . . . . . . . 11
Installing the Anti-Tip System . . . . . . . . . . . . . . . . . . . . . . . . . . . . . . . . . 12
Connecting the Water Supply . . . . . . . . . . . . . . . . . . . . . . . . . . . . . . . . 13
Filter Installation/Replacement . . . . . . . . . . . . . . . . . . . . . . . . . . . . . . . 14
Electrical Connection . . . . . . . . . . . . . . . . . . . . . . . . . . . . . . . . . . . . . 15
Reversing the Door . . . . . . . . . . . . . . . . . . . . . . . . . . . . . . . . . . . . . . 17
Custom Panel Installation - Models IGMDP-15 and ICCDP-15 . . . . . . . . . . . . . . 20
OPERATION . . . . . . . . . . . . . . . . . . . . . . . . . . . . . . . . . . . . . . . . . . . . . . . . . . . . . . . . . . . 22
Controls - All Models . . . . . . . . . . . . . . . . . . . . . . . . . . . . . . . . . . . . . 22
Panel Display Notification . . . . . . . . . . . . . . . . . . . . . . . . . . . . . . . . . . 26
Ice Production . . . . . . . . . . . . . . . . . . . . . . . . . . . . . . . . . . . . . . . . . 27
CARE AND MAINTENANCE . . . . . . . . . . . . . . . . . . . . . . . . . . . . . . . . . . . . . . . . . . . . . . 28
TROUBLESHOOTING . . . . . . . . . . . . . . . . . . . . . . . . . . . . . . . . . . . . . . . . . . . . . . . . . . . . 32
WARRANTY . . . . . . . . . . . . . . . . . . . . . . . . . . . . . . . . . . . . . . . . . . . . . . . . . . . . . . . . . . . . 36
TABLE OF CONTENTS

1
IMPORTANT SAFETY INSTRUCTIONS
• IMPORTANT: Read all instructions before using this appliance. Use this appliance
only for its intended purpose as described in this manual. Always exercise basic safety
precautions, as described below. After reading this manual, store it in an accessible
place where users and services can easily reference it.
• The words DANGER, WARNING, CAUTION and NOTICE are used throughout this
manual to highlight important information. Be certain that the meanings of these alerts
are known to all who operate and install the appliance.
• The purpose of these safety precautions is to ensure safe and correct use of the product to
minimize risks that could cause serious damage and injury to you or others. Precautions
are split into WARNINGS and CAUTIONS. Incidences where improper handling of
the unit could lead to death or serious injury are listed under the WARNING heading.
Incidences listed under CAUTION could lead to serious injury. NOTICE indicates a
situation that can cause damage to the appliance and/or the environment or cause the
appliance to operate improperly.
DANGER
Risk of fire or explosion. FLAMMABLE REFRIGERANT used.
• Do not use mechanical devices to defrost refrigerator.
• Do not puncture refrigerant tubing.
• This appliance is to be repaired only by trained service personnel.
• Consult the appliance’s user and installation manuals before attempting service.
• All safety precautions must be followed.
CAUTION
CAUTION - Risk of fire or explosion. Dispose of refrigerator properly in
accordance with the applicable federal or local regulations. Flammable
refrigerant used.
CAUTION
Risk of fire or explosion if refrigerant tubing is punctured. FLAMMABLE
REFRIGERANT used. Follow handling instructions carefully.
DANGER
DANGER - Risk of fire or explosion. Flammable refrigerant used. Do not use
mechanical devices to defrost refrigerator. Do not puncture refrigerant tubing.
General Safety

2
IMPORTANT SAFETY INSTRUCTIONS
WARNING
Do not use mechanical devices or other means to accelerate the defrosting
process, other than those recommended by the manufacturer.
WARNING
Keep ventilation openings, in the appliance enclosure or in the built-in structure,
clear of obstruction.
WARNING
Do not damage the refrigerant circuit.
WARNING
Do not use electrical appliances inside the food storage compartments of the
appliance unless they are explicitly recommended by the manufacturer.
DANGER
DANGER - Risk of fire or explosion. Flammable refrigerant used. To be repaired
only by trained service personnel. Use only manufacturer-authorized service
parts. Any repair equipment used must be designed for flammable refrigerants.
Follow all manufacturer repair instructions. Do not puncture refrigerant tubing.
CAUTION
CAUTION - Risk of fire or explosion due to puncture of refrigerant tubing; follow
handling instructions carefully. Flammable refrigerant used.
WARNING
WARNING: Do not locate multiple portable socket-outlets or portable power
supplies at the rear of the appliance.
WARNING
• Installation and service should be performed by a qualified installer. The appliance should
not be adjusted or repaired by anyone except qualified service personnel. Attempting to
perform these yourself could result in fire, malfunction, or injury.
• Never splash water directly onto the appliance or wash it with water without unplugging
it from power, as a short circuit could result. If the appliance is installed outdoors in a
humid or rainy environment, a water-proof covering is imperative.
• Never store flammable, explosive, or volatile substances inside or on top of the unit, as
an explosion and fire could result.
General Safety

3
Power Card Precautions
IMPORTANT SAFETY INSTRUCTIONS
POWER CORD PRECAUTIONS
• Do not use the appliance if the power cord is damaged. If the power cord is damaged,
have a qualified electrician replace the power cord.
• Never lift, carry, or drag the appliance by the power cord.
• Do not damage, modify, excessively bend, strain, twist or bundle the power cord. Avoid
hot, sharp, or aggressive surfaces. Placing heavy objects on the cord or binding it could
damage the cord, possibly resulting in electrical shock and/or fire.
• Use a dedicated wall outlet. Do not use an extension cord or multiple-outlet adapter, as
this could result in electrical shock, overheating, and fire.
• Never use flammable spray cans or leave flammable substances near the unit. Sparks
from electrical switches could result in an explosion and/or fire.
• If a combustible gas is present near the appliance, turn off the source of the gas, then
open the windows and doors to allow the gas to dissipate. To avoid an explosion, do
not pull the plug or switch off the unit.
• The electrical socket must be properly grounded and the plug should always be
accessible. The ground wire cannot be connected with a gas pipe, heating pipe, water
pipe, telephone line, or lightning rod. It cannot be replaced with the neutral wire of
single-phase power.
• For standard indoor installation, it’s recommended that a dedicated electrical circuit
suitable for a NEMA 5-15 outlet serving only your appliance be used; please ensure
the outlet is easily accessible.
• In addition to the ground wire, an electrical leakage circuit breaker is required if the unit
is installed outdoors.
• An electrician-installed ground fault circuit interrupter (GFCI) electrical outlet is also
required for outdoor installation. If no GFCI is installed, electrical shock could result.
• Never climb onto or inside the unit. The unit could tip over or fall and cause material
damage or personal injury.
• Disconnect the power cord plug from the wall outlet before moving the unit and make
sure that the power cord is not damaged during transport. A damaged power cord
could result in electrical shock and/or fire.
• Never unplug the unit by pulling on the power cord. Always grip the plug firmly and
pull straight out from the outlet. Pulling the cord could cause wire breakage, possibly
resulting in overheating and fire. Never pull out plug when hands are wet.
• Have a qualified technician repair or replace any cord that is frayed or damaged. Do
not use a cord that shows cracks or abrasions along its length.
• Keep the appliance’s ventilation openings, whether in the appliance enclosure or in the
built-in structure, clear of any obstruction.

4
IMPORTANT SAFETY INSTRUCTIONS
INSTALLATION PRECAUTIONS
CAUTION
• This unit must be properly installed in accordance with the installation instructions
including in this manual, along with adhering to all local government codes, before it is
used. See electrical instructions on page 15.
• Connect to potable water supply only.
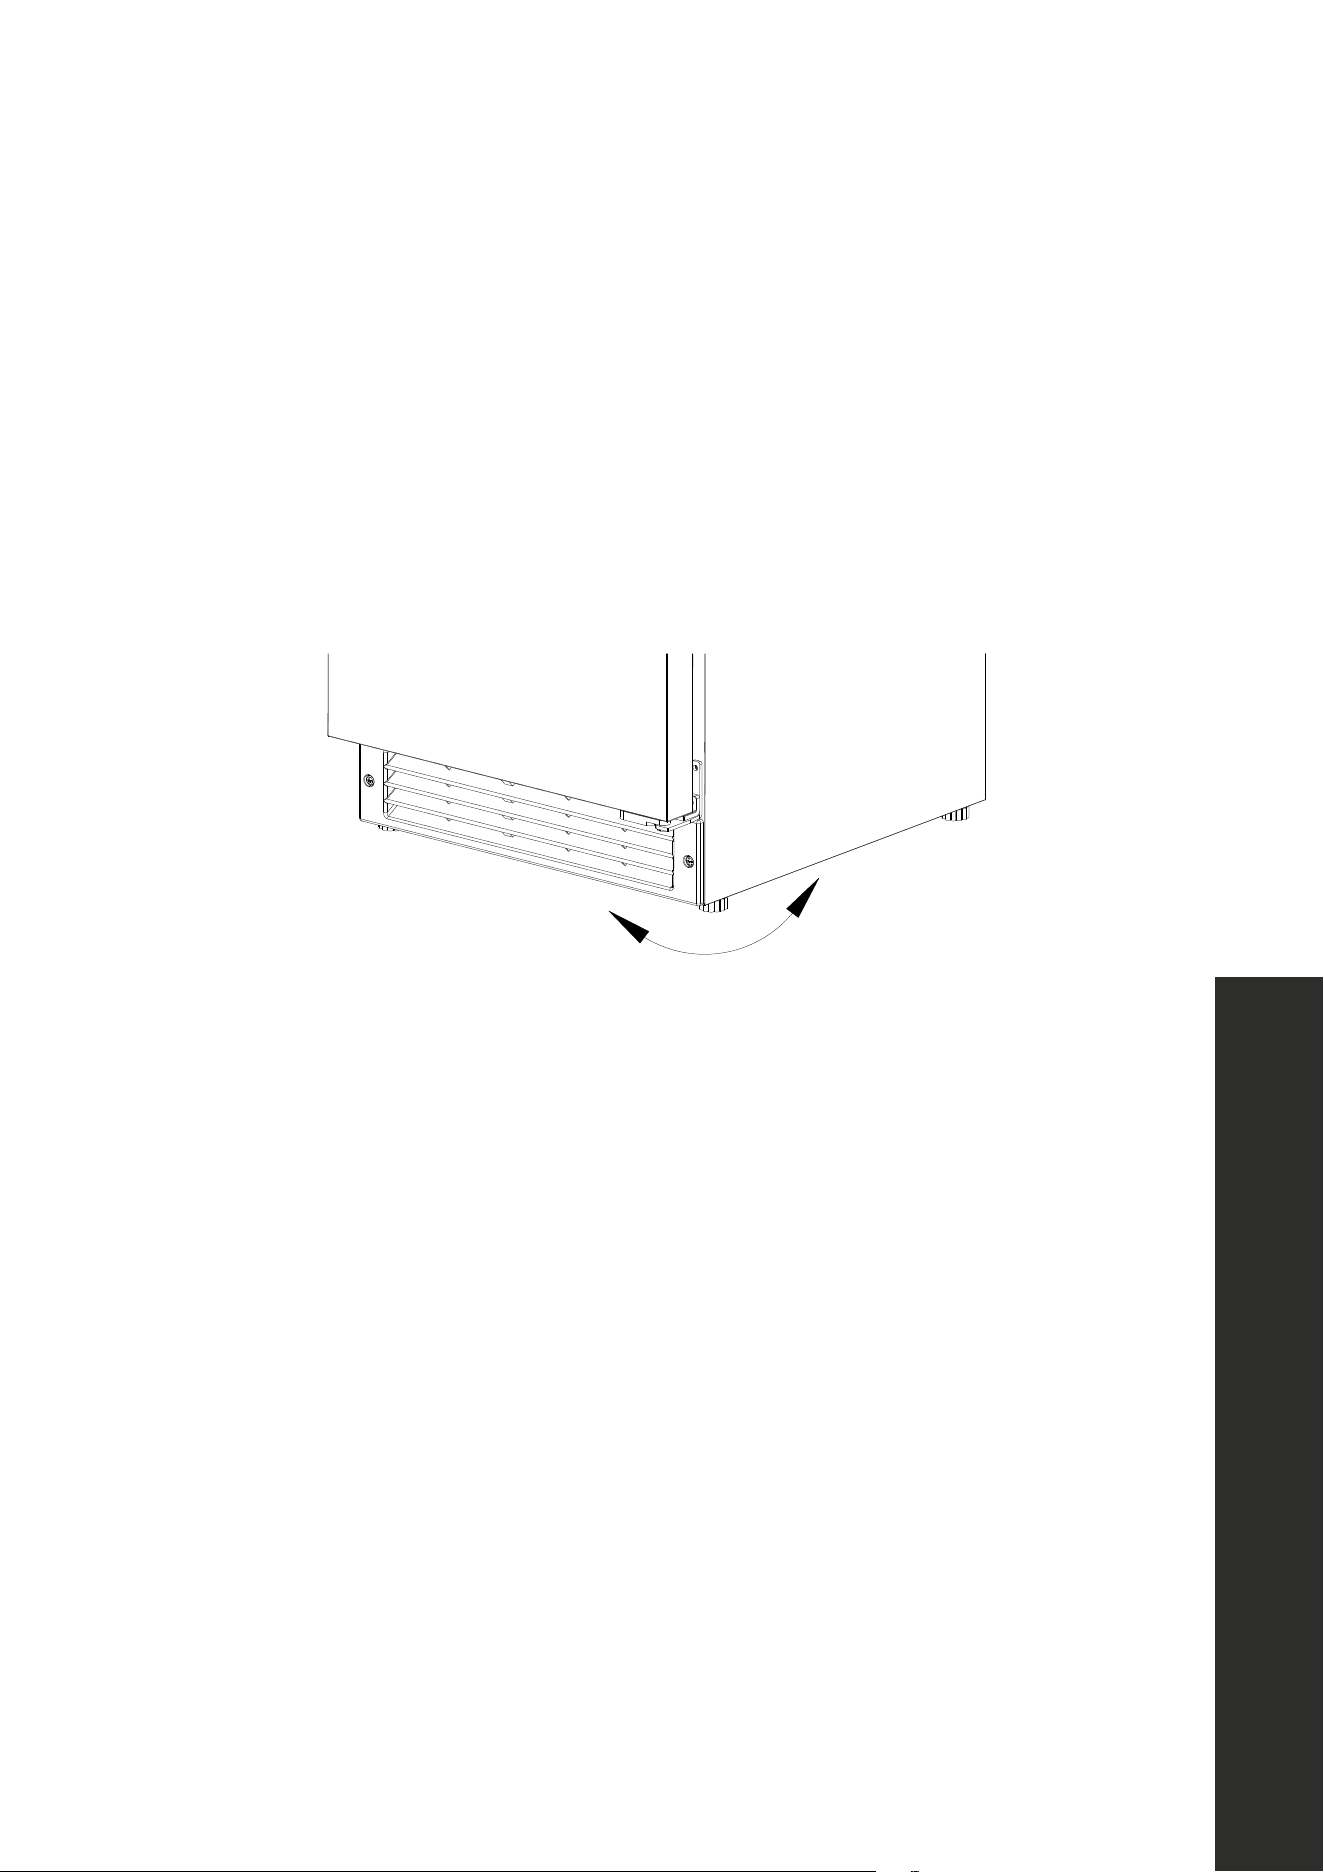
• Built-in units vent air out of the grill located at the bottom front of the ice maker. To ensure
proper service access and ventilation, all units should not have the grill openings covered.
There are no additional requirements for venting at the top, side, or rear of the unit.
• Install the unit in a location where the floor is sturdy enough to support the load of the
unit. If the floor is not sturdy enough or installation is incorrectly performed, the unit could
tip over and cause personal injury.
• Never place heavy objects or items containing water on top of the unit. Objects could
fall and cause injury, and spilled water or other liquids could cause the deterioration of
the insulation of electrical components and result in electrical shock.
• Disconnect the unit if it is behaving abnormally, and do not reconnect until the situation
is corrected. If normal troubleshooting measures do not work, contact ZLINE at
1-614-777-5004 for assistance.
• Unplug the appliance before performing any maintenance to avoid electric shock.
• This unit is not intended for the storage of medicines, vaccines, or chemical reagents.
• Keep all packing materials away from children.
WARNING
Risk of child entrapment. To avoid safety and suffocation risks for children or
pets, before you dispose of the appliance, take off the doors and drawers and
leave the shelves in place so children or pets may not climb inside.
• Condenser water from the appliance evaporator drains into a hole in the floor of the
storage compartment and is channeled into a drain pan located at the back of the
appliance on the compressor. Heat transferred from the compressor evaporates any
water that has collected in the pan. Be sure the drain hole in the floor of the unit is clear
and unobstructed.
• This appliance is CFC- and HFC-free and contains small quantities of propane (R290),
an environmentally friendly refrigerant.
Installation Precautions

5
Cleaning and Maintenance Precautions
IMPORTANT SAFETY INSTRUCTIONS
• During long absences, remove the unit’s contents, unplug the unit, clean it, and leave the
door open slightly to avoid possible formation of condensation, mold, or odors. Use a
cover to protect the unit and prolong its lifespan.
• Leave disassembly and disposal of the unit to qualified experts. The manufacturer will not
be responsible for any damage to property or to persons caused by incorrect installation,
improper use of the appliance, or failure to heed the warnings listed, and the warranty
will be voided.
• The manufacturer reserves the right to make changes to its products when considered
necessary and useful, without affecting the essential safety and operating characteristics.
• Please observe all local, state, and national codes and ordinances. Please ensure the
appliance is properly grounded. The plug should always be accessible.
• Never use an appliance with a damaged cooling system. If system is damaged upon
arrival, contact ZLINE at 1-614-777-5004.
DISPOSAL
The appliance cannot be treated as normal domestic trash and must be disposed of at a
collection point for recycling electric and electronic appliances. Your contribution to the
correct disposal of this product protects the environment. Further information about the
recycling of this product can be obtained from your local municipal authority.
MOVING PRECAUTIONS
• When moving the appliance, do not turn it upside-down and do not tilt it more than 45◦.
• Do not move the appliance without emptying it and securing the door in the closed position.
CLEANING AND MAINTENANCE PRECAUTIONS
• Never clean the appliance parts with flammable fluids. Do not store or use gasoline
or other flammable vapors and liquids in the vicinity of this appliance or any other
appliances. The fumes can create a fire hazard or explosion.
• Do not use solvent-based cleaning agents or abrasives on the interior. These cleaners
may transmit taste to the ice cubes, or damage or discolor the interior.
• If the appliance will not be used for a long time, thoroughly clean it before the next use.
Carefully follow any instructions provided for cleaning or the use of sanitizing solution.
Do not leave any solution inside the appliance after cleaning.

6
Other Precautions
IMPORTANT SAFETY INSTRUCTIONS
OTHER PRECAUTIONS
• To ensure proper ventilation for the appliance, keep obstructions away from the front
of the unit.
• Keep fingers out of the “pinch point” areas. Clearances between the door and cabinet
are necessarily small. Be careful closing the door when children are in the area.
• Do not touch the evaporator with your hand when the appliance is operating.
• Do not attempt to repair or replace any part of your appliance unless this manual
specifically recommends it. Have a qualified technician perform all other service
on the unit.
• Never allow children to operate, play with, or crawl inside the appliance.
• Never allow children to clean and maintain the machine without supervision.
• Do not use the appliance other than for its intended purpose.
• Do not touch the condenser surfaces. They are sharp and can be easily damaged.
• Never turn off the water supply while the unit is running. During installation, turn the
water supply on prior to turning on the unit. Always turn the unit off prior to turning off
the water supply.
• Except to take ice from the unit, keep the door closed to reduce melting and ensure
proper ice formation.
7
BEFORE INSTALLATION
PRODUCT SPECIFICATIONS
NOTE: Technical data and performance information are provided for reference only and
subject to change.
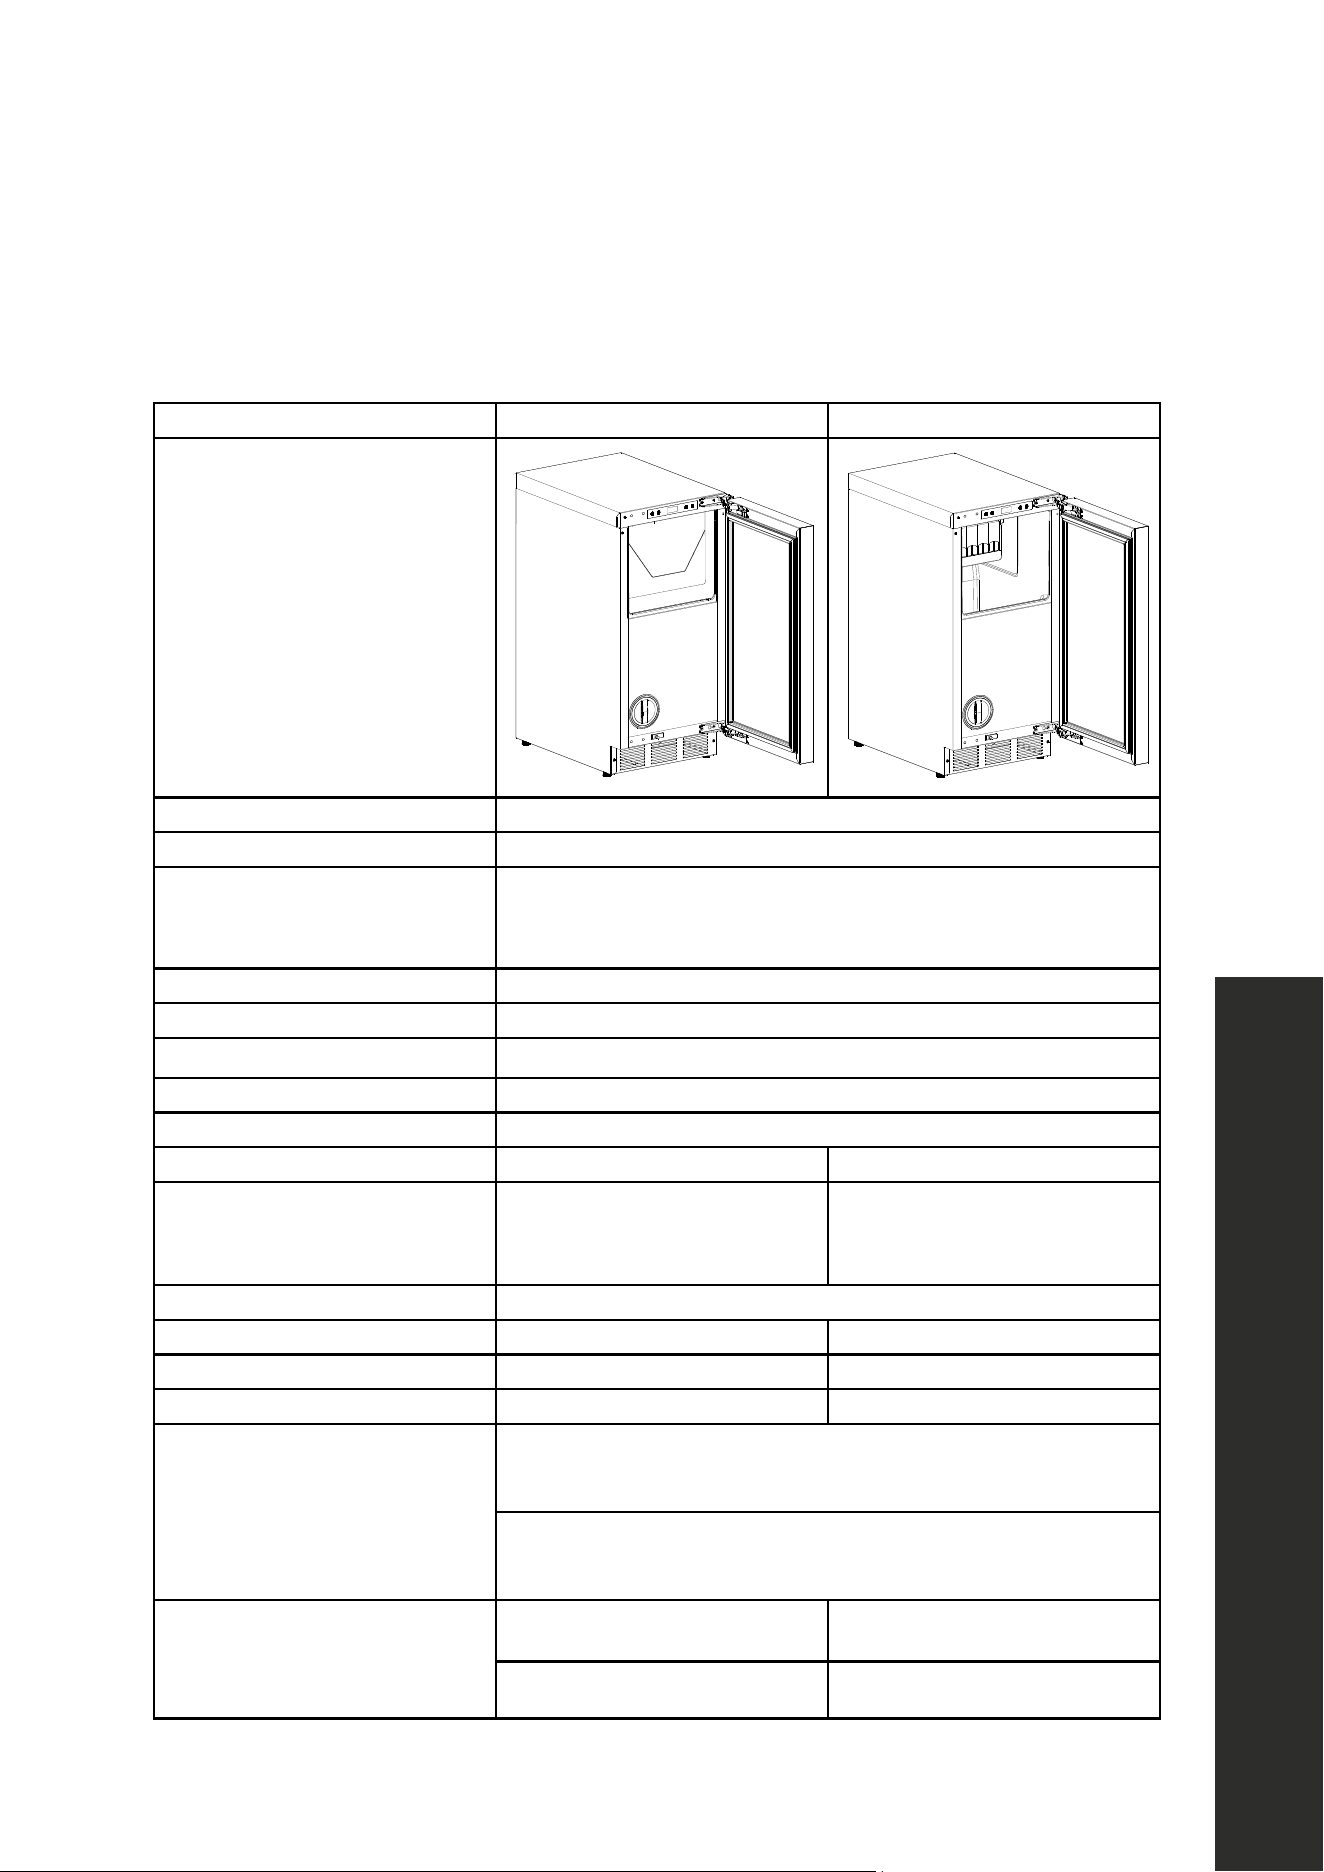
Model ICCD-ST-15 & ICCDP-15 IGMD-ST-15 & IGMDP-15
Image
Electrical requirements 115 VAC/60 Hz
Maximum amp fuse 15 amps
Indoor/Outdoor
Indoor/outdoor*
*The unit cannot be directly exposed to water or elements such as snow
or ice. For areas subject to freezing, follow the instructions for "Extended
periods of non-use" on page 30.
IP rating IPX4
Ambient operating range 50 °F–110 °F (10 °C–43 °C)
Water operating range 40 °F–90 °F (4 °C–32 °C)
Water pressure operating range 20~80 psi (0.138~0.55 MPa)
Water inlet adapter 1/4" OD compression fitting
Ice shape Cube Octagon/Gourmet
Ice production capacity
75.0 lb (34.0 kg)**
**The actual quantity of ice
produced per day will vary with
ambient room and water conditions.
66.0 lb (30.0 kg)**
**The actual quantity of ice
produced per day will vary with
ambient room and water conditions.
Ice storage capacity 26.0 lb (12.0 kg)
Ice size (W × D × H) 7/8" W x 7/8" D x 7/8" H 1 1/4" W x 1 1/4" D x 1" H
Ice weight About 0.4 oz (11.0 g) per cube About 0.81oz (23.0 g) per cube
Ice cube quantity per cycle 40 24
Unit dimensions (W × D × H)
[Not including handle]
ICCD-ST-15 & IGMD-ST-15
14 7/8" W x 23 1/4" D x 34" H
(378 mm W x 591 mm D x 864 mm H)
ICCDP-15 & IGMDP-15
14 7/8" W x 22 1/2" D x 34" H
(378 mm W x 572 mm D x 864 mm H)
Net weight
ICCD-ST-15
95.0 lb (43.0 kg)
IGMD-ST-15
97.0 lb (44.0 kg)
ICCDP-15
86.0 lb (39.0 kg)
IGMDP-15
88.0 lb (40.0 kg)
Product Specifications
8
Parts and Tools
BEFORE INSTALLATION
BEFORE USING YOUR ICE MAKER
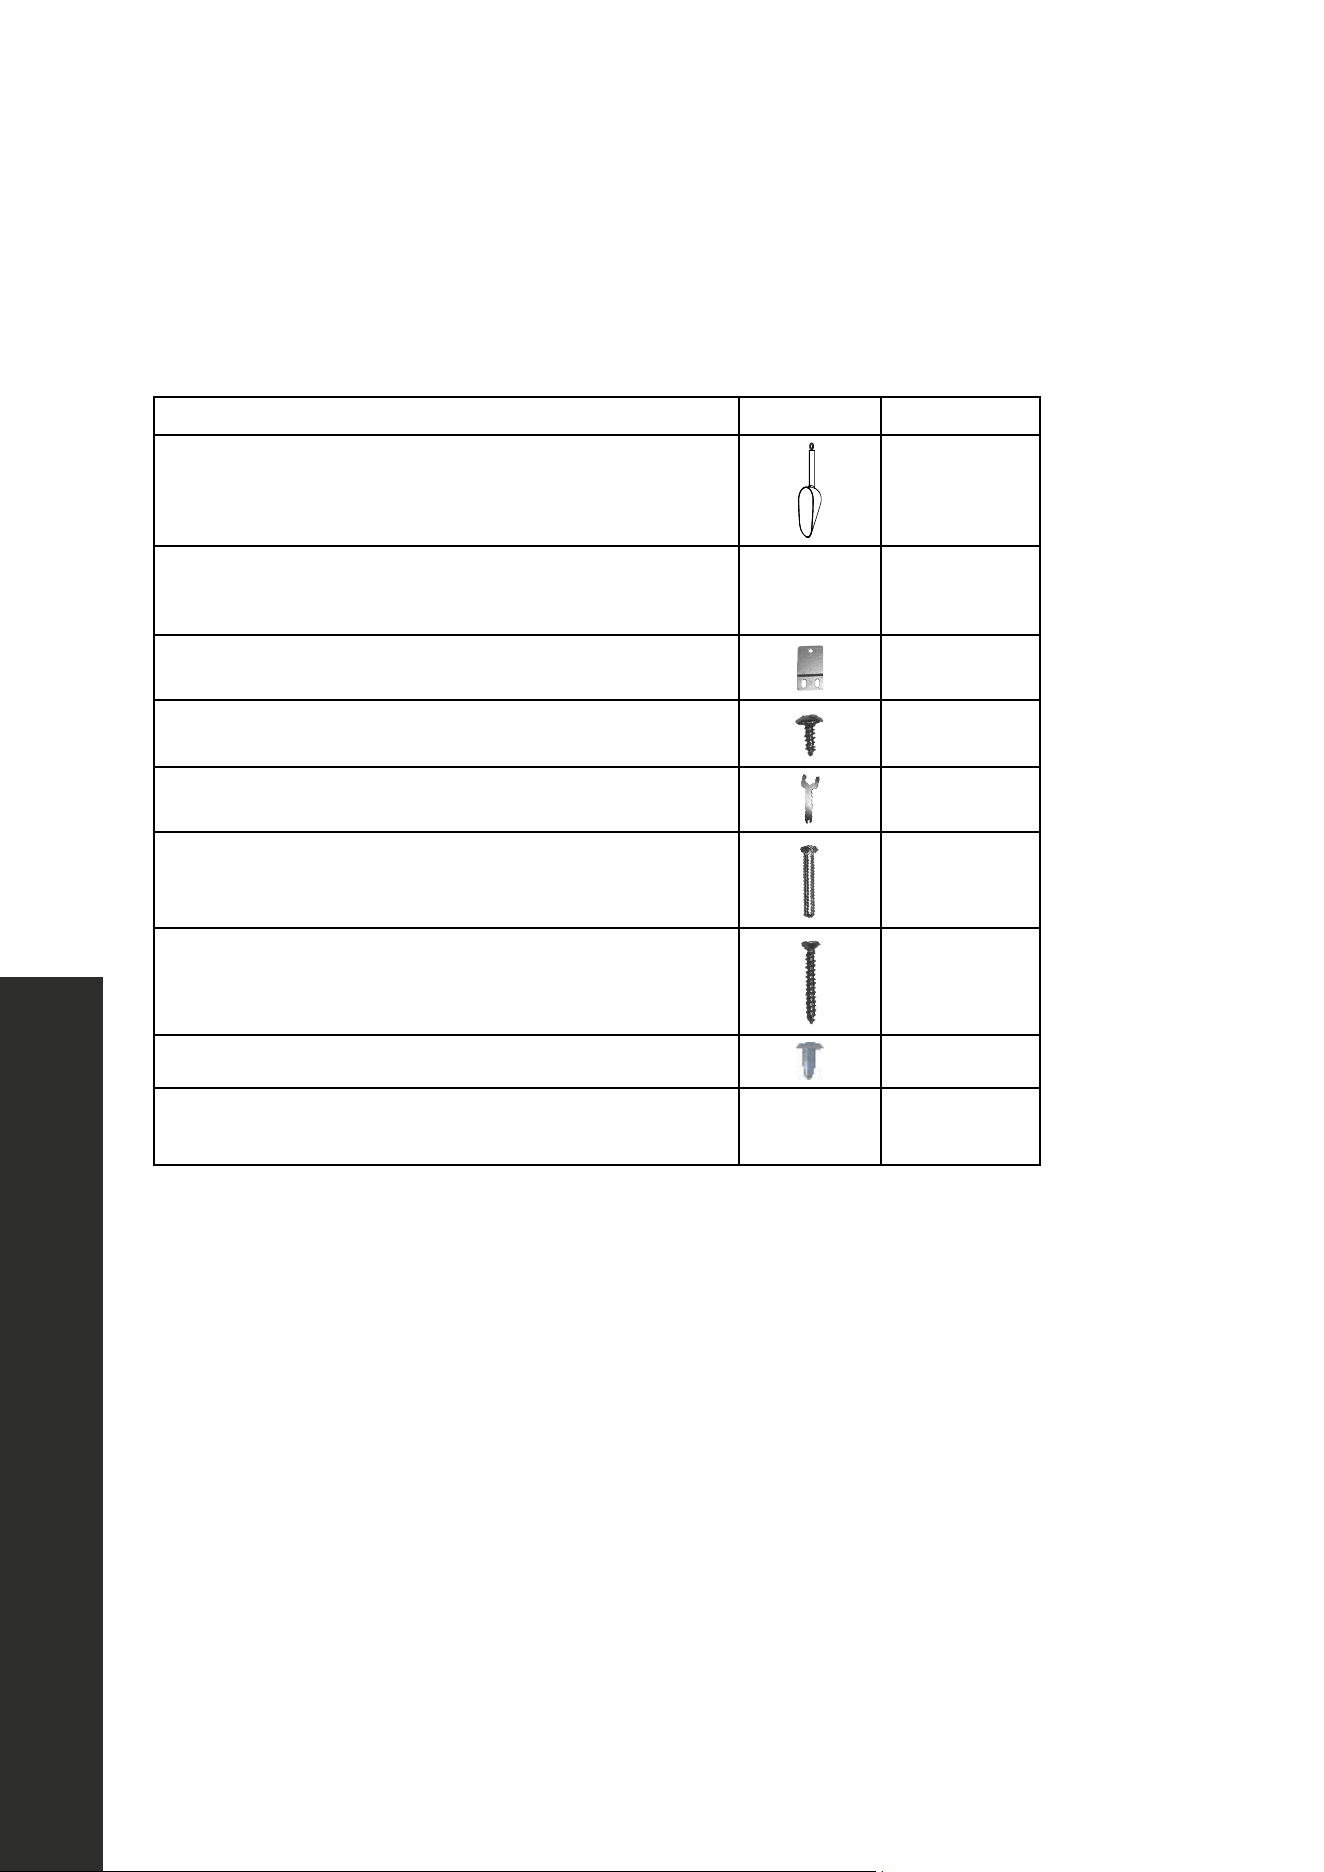
INCLUDED PARTS
DESCRIPTION IMAGE QUANTITY
Ice scoop
1
Installation and user manual
1
Anti-tip brackets
2
Screws for anti-tip brackets
6
Foot adjustment wrench
1
*Door limiting pins
2
**Screws for custom panel installation
(models IGMDP-15 and ICCDP-15 only)
6
Decorative plugs
4
Allen key
1
**Not needed for stainless steel door models; see page 20 for panel-ready information.
TOOLS NEEDED
• 1 Phillips screwdriver

9
Plumbing and Electrical Tips
INSTALLATION
PLUMBING AND ELECTRICAL TIPS
• A licensed plumber must install this appliance.
• This appliance must be installed with all electrical and water connections in accordance
with state and local codes.
• This unit requires a standard electrical supply properly grounded in accordance with
National Electrical Code and local codes and ordinances.
• The fuse (or circuit breaker) size should be 15 amperes for 115 V.
• We recommend that you provide a dedicated circuit that services only your appliance.
Use receptacles that cannot be turned off by a switch or pull chain.
• Plug the appliance into a grounded three-prong outlet. Do not remove the grounding
prong, do not use an adapter, and do not use an extension cord.
• Do not kink, pinch, or damage the power supply cord between the ice maker and wall
or cabinet.
• Before connecting the ice maker to the power source, let it stand upright for approximately
4 hours. Following this step will reduce the possibility of a malfunction in the cooling
system brought on by handling during transportation.
• Make sure to install on level surface and ensure drain line and waterline are not kinked.
TIPS ON MOVING AND SETTING UP THE UNIT
• Use two or more people to move and install the appliance. Failure to do so can result in
back or other injury.
• Remove the packing materials and clean the appliance before using it.
• Do not tip the unit beyond 45◦.
10
INSTALLATION
BUILT-IN INSTALLATION
A built-in installation will allow you to install the ice maker under a counter or in a kitchen
cabinet if you follow the required clearance space around the clear ice maker. The appliance
must be located in a manner that allows clearance for water, drain, and electrical connections
in the rear of the unit.
BUILT-IN CABINET DIMENSIONS
A built-in installation requires for a water line and plug clearance for proper operation. A
built-in unit is designed for zero clearance at the top and each side of the unit. The unit uses
fan-forced condenser cooling, which requires air circulation through the lower section of
the unit. To ensure proper service access and ventilation, the unit should not have the grill
openings covered. There are no additional requirements for venting at the top, side, or rear
of the unit.
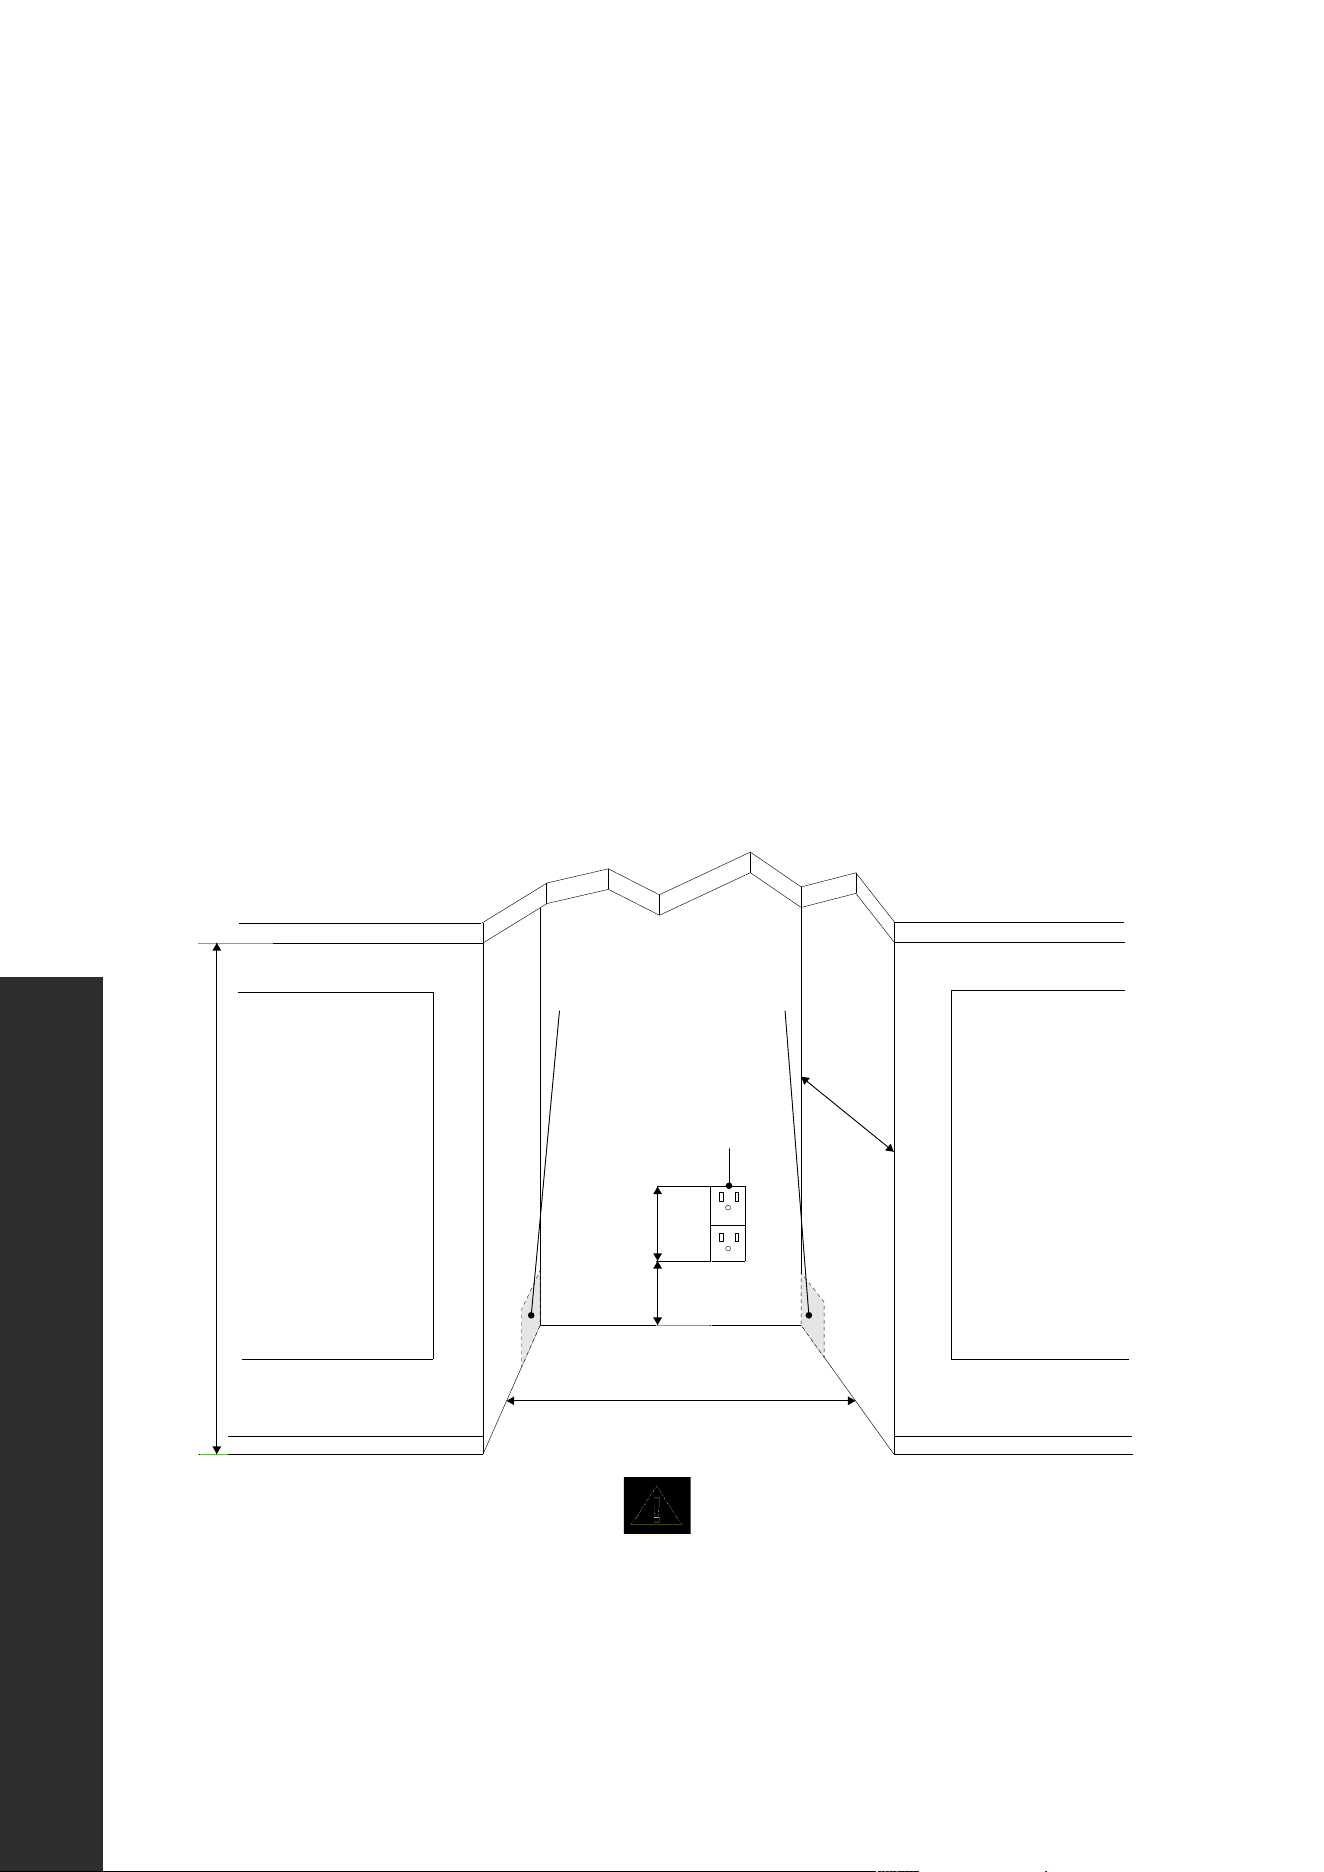
BUILT-IN CABINET DIMENSIONS
A built-in installaon requires for a water line and plug clearance for proper operaon. A built-in unit
is designed for zero clearance at the top and each side of the unit. The unit uses fan-forced condenser
cooling, which requires air circulaon through the lower secon of the unit.
To ensure proper service access and venlaon, the unit should not have the grill openings covered.
There are no addional requirements for venng at the top, side, or rear of the unit.
NOTICE
• Ensure that the air path for the grill remains unrestricted. Any
restricon of flair flow through the grill will disrupt normal operaon
of the unit, resulng in damage to components, and voids warranty.
• Connect the unit to a potable water supply only.
WARNING
Electrical Shock Hazard
Always disconnect power at the source before working on the unit. Failure to
unplug the clear ice machine could result in electrical shock or personal injury.
• Do not touch the power plug when your hands are wet.
• Never unplug the unit by pulling on the cord. Grasp the plug and pull out firmly.
CONNECTING THE WATER SUPPLY
1. Turn off the main water supply. Turn on the nearest faucet long enough to clear a line of water.
2. Find a 1/2" to 3/4" vercal
cold-water pipe near the installaon locaon. The distance should be
less than 9 feet.
3. Install a shut-off valve to the main water supply. If the water pipe has a plain piece of copper tubing,
aach a 1/4" O.D. compression union to the tubing and remove the nut.
4. Thread the nuts of the supplied water supply hose to the tap and water inlet valve. Access to the
water inlet valve is through the opening in the rear panel. Tighten firmly by hand, then one-half turn
34 1/8" (867 mm)
15 " (381 mm)
24"
(610 mm)
4"
(102 mm)
Recommended location
for water and drain line is
in either adjacent cabinet
Recommended
location for
electrical
connection
7"
(177 mm)
NOTICE
• Ensure that the air path for the grill remains unrestricted. Any restriction of air flow through
the grill will disrupt normal operation of the unit, resulting in damage to components,
which voids the warranty.
• Connect the unit to a potable water supply only.
Built-in Installation
11
INSTALLATION
LEVELING THE UNIT
CAUTION
The unit will be significantly heavier once it is operational and fully loaded.
Place your ice maker on a level surface that is strong enough to support the ice maker when
it is fully loaded. Level your ice maker by adjusting the legs at the front of the ice maker with
the foot adjustment wrench. If necessary, raise or lower the unit by turning the four leveling
feet on the bottom.
WARNING
Electrical Shock Hazard
Be sure the floor surfaces surrounding the appliance are dry before
plugging in and removing the power cord to the outlet to prevent
electrical shock.
Follow these steps to test the operation of the drain pump before final installation:
1. Check the power cord and make sure it is not plugged into the outlet.
2. Place the drain hose into a suitable container that can hold at least one gallon.
3. Pour one gallon of water into the ice storage bin.
4. Plug the power cord into a properly grounded, polarized electrical outlet.
5. The drain pump should start and pump the water into the container.
6. Unplug the power cord.
LEVELING THE UNIT
CAUTION
The unit will be significantly heavier once it is operational and fully
loaded.
Place your ice maker on a level surface that is strong enough to support the ice maker when it is
fully loaded. Level your ice maker by adjusting the legs at the front of the ice maker. If necessary,
raise or lower the unit by turning the four leveling feet on the bottom.
Down
Up
Leaving the Unit
12
INSTALLATION
INSTALLING THE ANTI-TIP SYSTEM
1. With built-in installations, once you’ve determined the appropriate height and have
ensured the appliance is level, position the unit at the front of the cutout to install the anti-
tip system, which is necessary to reduce risk of tipping.
2. Using a Phillips head screwdriver or drill, secure the 2 anti-tip brackets to the top of
the unit using 4 of the provided screws, 2 for each bracket, making sure the lips of the
brackets are facing up and out, as outlined in the image above. NOTE: The unit comes
with small plastic plugs that fit in the screw holes. The plugs will need to be removed from
the screw holes before proceeding.
3. Plug the power cord into the wall and push the unit into the cutout, using care to not
tangle or damage the power cord.
4. Once the appliance is in the cutout, secure the anti-tip brackets into the countertop above
using the last 2 screws.
WARNING
The anti-tip system must be properly engaged with built-in installations to avoid
the unit tipping over and increasing risk of serious injury or death.
Anti-Tip System

13
INSTALLATION
WARNING
ELECTRICAL SHOCK HAZARD
Always disconnect power at the source before working on the unit. Failure to unplug the ice
maker could result in electrical shock or personal injury.
• Do not touch the power plug when your hands are wet.
• Never unplug the unit by pulling on the cord. Grasp the plug and pull out firmly.
WATER SUPPLY TIPS
• Check for leaks after connecting the water line.
• The ice maker requires a continuous water supply with a minimum pressure of 20 psi
(0.138 MPa) and a static pressure not to exceed 80 psi (0.55 MPa).
• Using a reverse osmosis filter may cause the water pressure to be lower than the minimum
the ice maker requires.
• Ensure that the water supply hose is not pinched, kinked, or damaged during installation.
CONNECTING THE WATER SUPPLY
1. Turn off the main water supply. Turn on the nearest faucet long enough to clear a
line of water.
2. Find a 1/2" to 3/4" vertical cold-water pipe near the installation location. The distance
should be less than 9' (2743 mm).
3. Install a shut-off valve to the main water supply. If the water pipe has a plain piece of
copper tubing, attach a 1/4" O.D. compression union to the tubing and remove the nut.
4. Thread the nuts of the supplied water supply hose to the tap and water inlet valve. Access
to the water inlet valve is through the opening in the rear panel. Tighten firmly by hand,
then one-half turn with a wrench.
5. Turn on the main water supply and tap. Check for leaks in the water supply connection.
Tighten all connections.
Water Supply
14
INSTALLATION
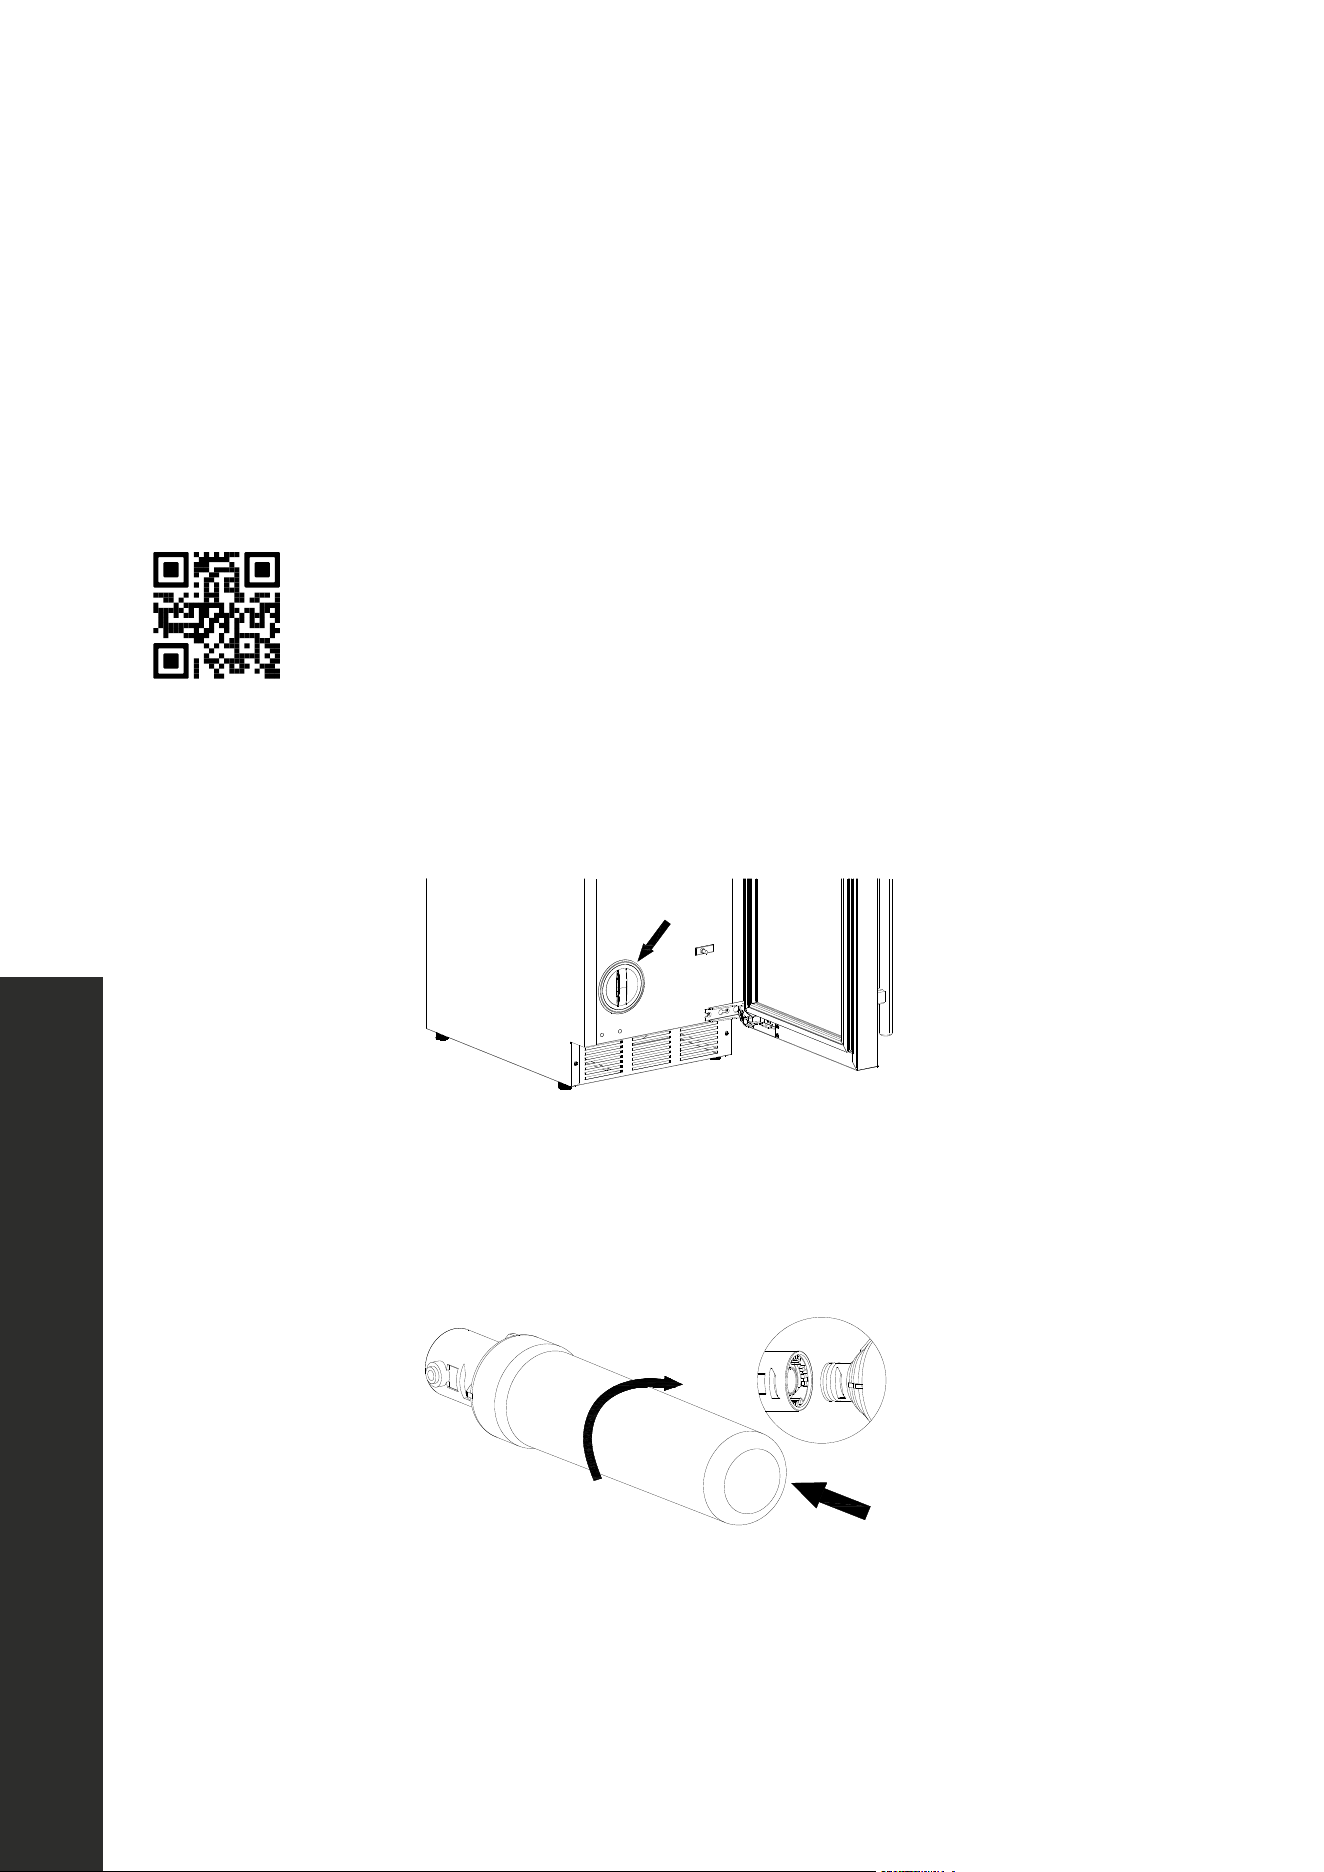
FILTER INSTALLATION/REPLACEMENT
The water filter must be installed in accordance with manufacturer's recommended
procedures and guidelines to reduce the risk associated with property damage due to water
leakage. You must read and follow installation and use instructions before installation and
use this product.
Visit www.zlineparts.com and search "IMP-013" to order a replacement.
1. Rotate the water filter cover 90◦ counterclockwise. Remove the cover.
2. Grasp the base of the water filter. Rotate the filter counterclockwise until it feels loose.
3. Pull the water filter out of the machine.
with a wrench.
5. Turn on the main water supply and tap. Check for leaks in the water supply connection. Tighten all
connections.
Filter Installation/Replacement
The filter must be installed in accordance with manufacturer's recommended procedures and
guidelines. To reduce the risk associated with property damage due to water leakage. you must read
and follow installation and use instructions before installation and use this product. For replacement,
contact your local dealer or place where you purchase.
Installation
1. Rotate the water filter cover 90 degrees counterclockwise. Remove the cover.
2. Grasp the base of the water filter. Rotate the fi lter counterclockwise until it feels loose.
3. Pull the water filter out of the machine.
4. Using a new water filter, insert the filter into the machine aligning tabs on the filter with slots in
the water filter head.
5. Push in the filter and rotate it clockwise to let the tabs lock into the slots.
6. Install the water filter cover by rotating the cover 90 degrees clockwise.
4. Using a new water filter, first remove its cap, then insert the filter into the machine aligning
tabs on the filter with slots in the water filter head.
5. Push in the filter and rotate it clockwise to let the tabs lock in to the slots.
6. Install the water filter cover by rotating the cover 90◦ clockwise.
CAUTION
The ice maker will NOT work if the filter is not properly installed.
ELECTRICAL CONNECTION
Do not, under any circumstances, cut or remove the third (ground) prong from the power cord.
For personal safety, you must properly ground this appliance. The power cord of this appliance
features a three-prong grounding plug that mates with a standard three-prong grounding wall outlet
to minimize the possibility of electric shock hazard from the appliance. Have a qualified electrician
check the wall outlet and circuit to make sure the outlet is properly grounded. It is your responsibility
and obligation to have a standard two-prong wall outlet replaced with a properly grounded three-
prong wall outlet.
Always plug the appliance into its own individual electrical outlet. The voltage rating of the outlet
must match the rating label on the appliance. This match provides the best performance and prevents
overloading the electrical circuits, which could cause a fire hazard from overheated wires.
Never unplug your appliance by pulling on the power cord. Always grip the plug firmly and pull straight
out from the outlet.
Repair or replace immediately all power cords that have become frayed or damaged. Do not use a
cord that shows cracks or abrasion damage along its length or at either end.
When moving the appliance, take care not to damage the power cord.
If the supply cord suffers damage, have the manufacturer, its service agent, or similarly qualified
persons replace the supply cord to avoid a hazard.
AVOIDING USE OF EXTENSION CORDS
Because of potential safety hazards under certain conditions, the manufacturer strongly recommends
that you do not use an extension cord with this appliance.
DRAIN PUMP TIPS
WARNING
The water filters come with a cap. Do not install with the cap on, as it will be
difficult to remove.
CAUTION
The ice maker will NOT work if the filter is not properly installed.
Filter Installation

15
INSTALLATION
ELECTRICAL CONNECTION
Do not, under any circumstances, cut or remove the third (ground) prong from the power
cord. For personal safety, you must properly ground this appliance. The power cord of this
appliance features a three-prong grounding plug that mates with a standard three-prong
grounding wall outlet to minimize the possibility of electric shock hazard from the appliance.
Have a qualified electrician check the wall outlet and circuit to make sure the outlet is
properly grounded. It is your responsibility and obligation to have a standard two-prong
wall outlet replaced with a properly grounded three-prong wall outlet.
Always plug the appliance into its own individual electrical outlet. The voltage rating of the
outlet must match the rating label on the appliance. This provides the best performance and
prevents overloading the electrical circuits, which could cause a fire hazard from overheated
wires. Never unplug your appliance by pulling on the power cord. Always grip the plug
firmly and pull straight out from the outlet.
Repair or replace immediately all power cords that have become frayed or damaged. Do
not use a cord that shows cracks or abrasion damage along its length or at either end. When
moving the appliance, take care not to damage the power cord. If the supply cord suffers
damage, have the manufacturer, its service agent, or similarly qualified, persons replace the
supply cord to avoid a hazard.
AVOIDING USE OF EXTENSION CORDS
Because of potential safety hazards under certain conditions, the manufacturer strongly
recommends that you do not use an extension cord with this appliance.
Electrical Connection

16
INSTALLATION
DRAIN PUMP TIPS
WARNING
ELECTRICAL SHOCK HAZARD
Be sure the floor surfaces surrounding the appliance are dry before plugging in
and removing the power cord to the outlet to prevent electrical shock.
Follow these steps to test the operation of the drain pump before final installation:
1. Check the power cord and make sure it is not plugged into the outlet.
2. Place the drain hose into a suitable container that can hold at least one gallon.
3. Pour one gallon of water into the ice storage bin.
4. Plug the power cord into a properly grounded, polarized electrical outlet.
5. The drain pump should start and pump the water into the container.
6. Unplug the power cord.
WARNING
Drain pump operation should be tested every time the appliance is cleaned and
sanitized. If the drain pump is not operating properly, water could back up and
overflow, leading to costly water damage.
Drain Pump
17
INSTALLATION
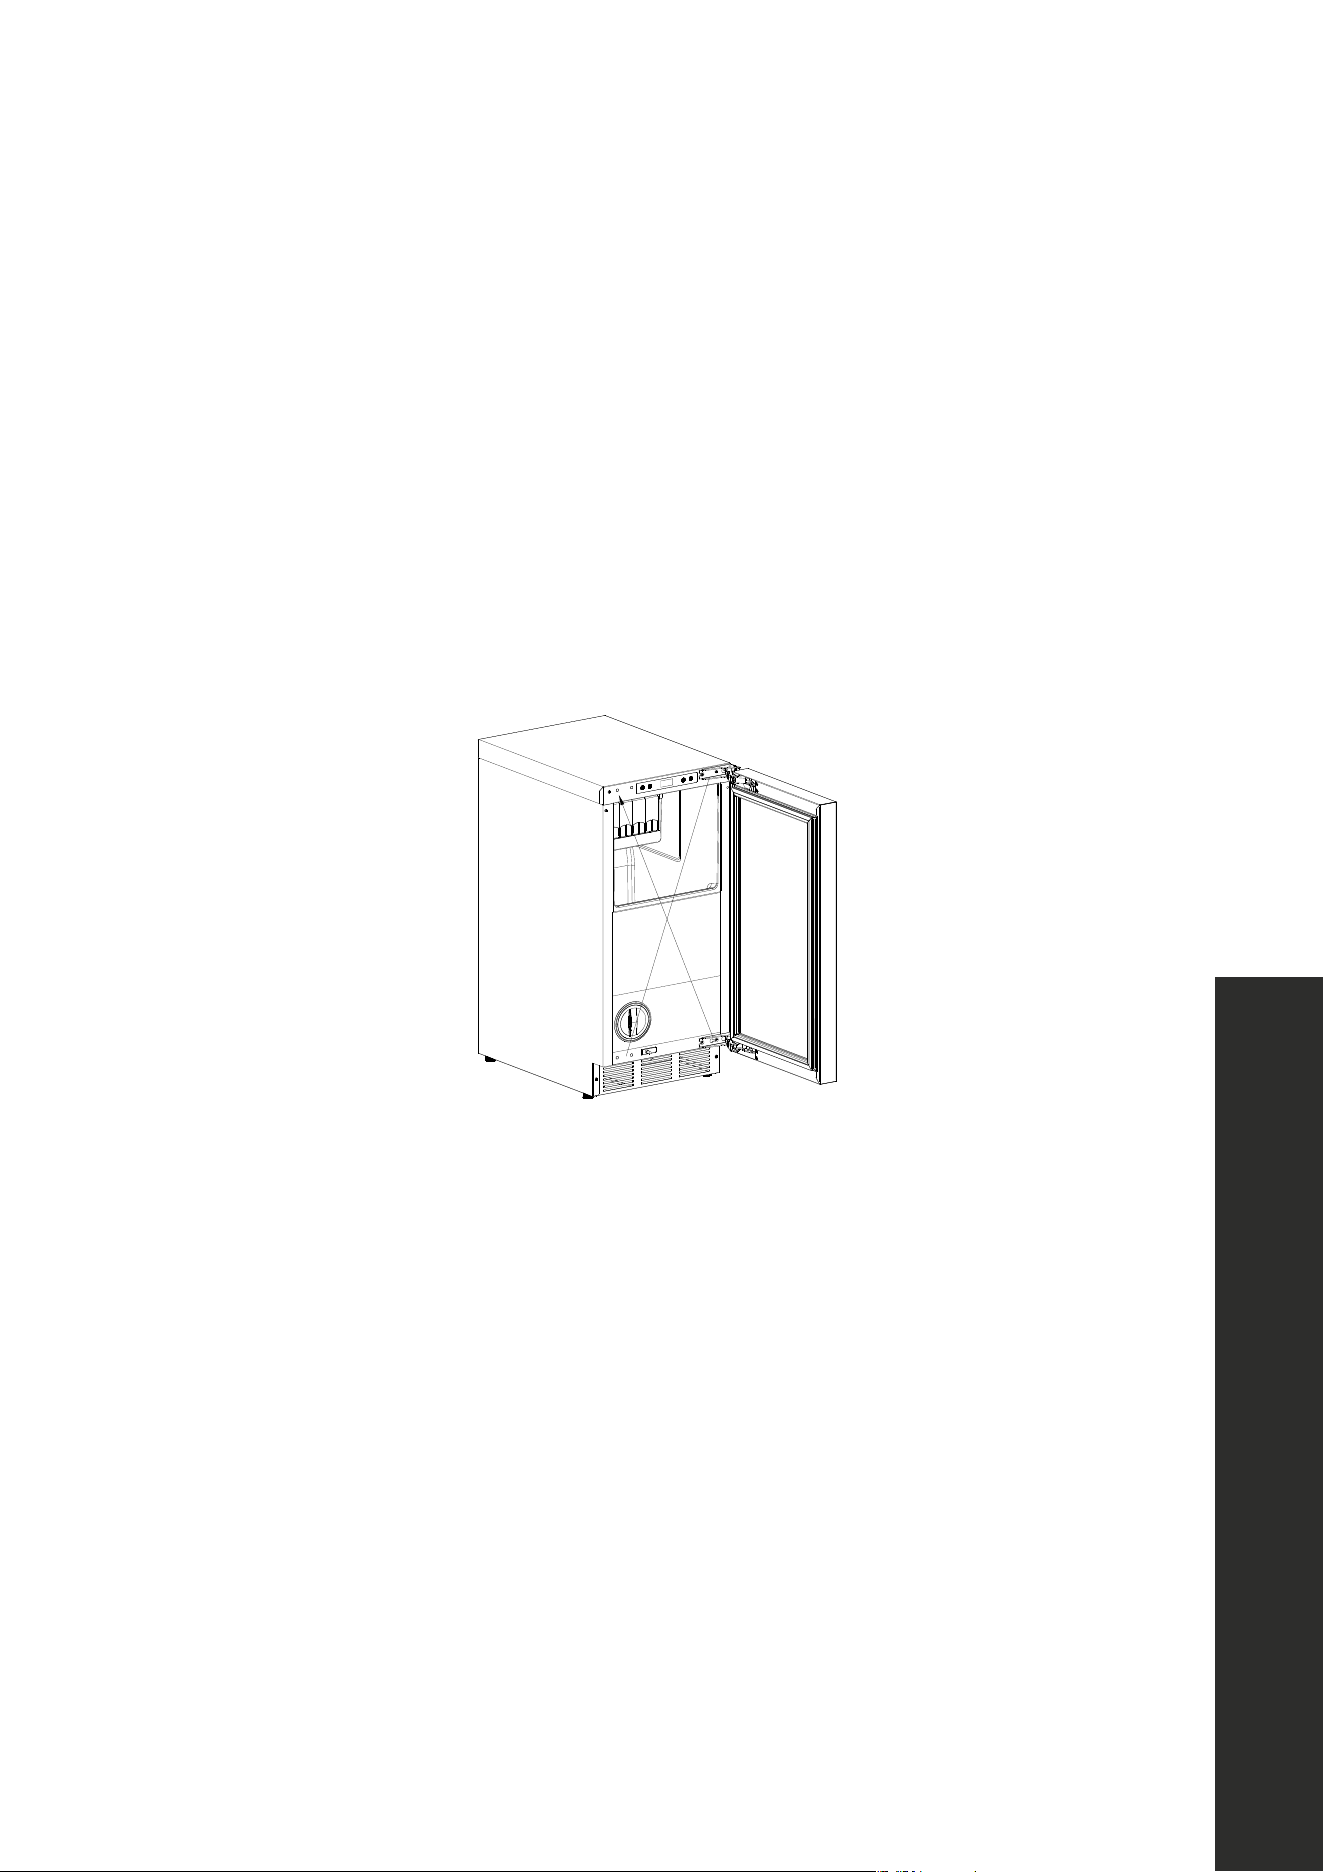
REVERSING THE DOOR
This appliance has the capability of the door opening from either the left or right side.
The appliance is delivered to you with the door opening from the left side. Follow these
instructions should you desire to reverse the opening direction.
CAUTION
Before operating, check the power cord and make sure it is not plugged into
the outlet.
NOTE: THE HANDLE DOES NOT NEED TO BE REMOVED TO REVERSE THE DOOR.
REVERSING THE DOOR
This appliance has the capability of the door opening from either the left or right side. The appliance
is delivered to you with the door opening from the left side. Follow these instructions should you
desire to reverse the opening direction.
CAUTION
Before operating, c
heck the power cord and make sure it is not plugged
into the outlet.
NOTE: THE HANDLE DOES NOT NEED TO BE REMOVED TO REVERSE THE DOOR
Tools needed: Flathead screwdriver, Phillips screwdriver
1. With the door open, carefully remove the 4 plugs at the top and bottom of the left side of the
appliance cabinet face. Save the plugs to reinstall once the door reversal is complete.
2. Loosen but do not remove the outer top and bottom screws on the right-side hinges.
3. Completely remove the inner top and bottom screw on the right-side and install the 2 removed
screws about three turns into the left-side outer top and bottom screw locations where the
plugs were removed.
4. Carefully slide and lift the door off of the 2 remaining screws on the right-side. Then turn/rotate
the door 180 degrees and reposition the hinges on the 2 partially installed left-side screws.
5. Remove the outer top and bottom screws from the right-side hinges and install them in the
open inner holes in the left-side hinge location. Tighten all screws.
6. Close the door and check for good alignment with the cabinet. If needed, loosen the 4 screws
enough to slide the door a bit to fine tune the alignment, then re-tighten all 4 screws and install
the plugs into the four open holes on the right side.
1. With the door open, carefully remove the 4 plugs at the top and bottom of the left side of
the appliance cabinet face. Save the plugs to reinstall once the door reversal is complete.
2. Loosen but do not remove the outer top and bottom screws on the right-side hinges.
3. Completely remove the inner top and bottom screw on the right-side and install the 2
removed screws about three turns into the left-side outer top and bottom screw locations
where the plastic plugs were removed.
4. Carefully slide and lift the door off of the 2 remaining screws on the right-side. Then
turn/rotate the door 180◦ and reposition the hinges on the 2 partially installed left-
side screws.
5. Remove the outer top and bottom screws from the right-side hinges and install them in the
open inner holes in the left-side hinge location. Tighten all screws.
6. Close the door and check for good alignment with the cabinet. If needed, loosen the
4 screws enough to slide the door a bit to fine tune the alignment, then re-tighten all 4
screws and install the plugs into the four open holes on the right side.
Reversing the Door

18
Door Swing and Tightening
INSTALLATION
DOOR SWING
All units come with doors installed at the pre-set maximum door swing of 135°. If you desire
to limit the door swing to 90°, insert the 2 provided door limiting pins into the pin hole on
the top and bottom door hinges, as show in the image below.
Door Limiting Pin Location
DOOR HINGE TIGHTENING
The appliance’s door hinges may loosen over time, which is normal with regular use. Use the
provided Allen key to loosen or tighten screws securing the hinges to the door as necessary,
as outlined in the image below for ICCDP-15 and IGMDP-15 models. For ICCD-ST-15 and
IGMD-ST-15 models, hinge screws are located behind the rubber door seal. You can easily
remove the upper corners of the seal by hand to access the screws.
19
Handle Installation
INSTALLATION
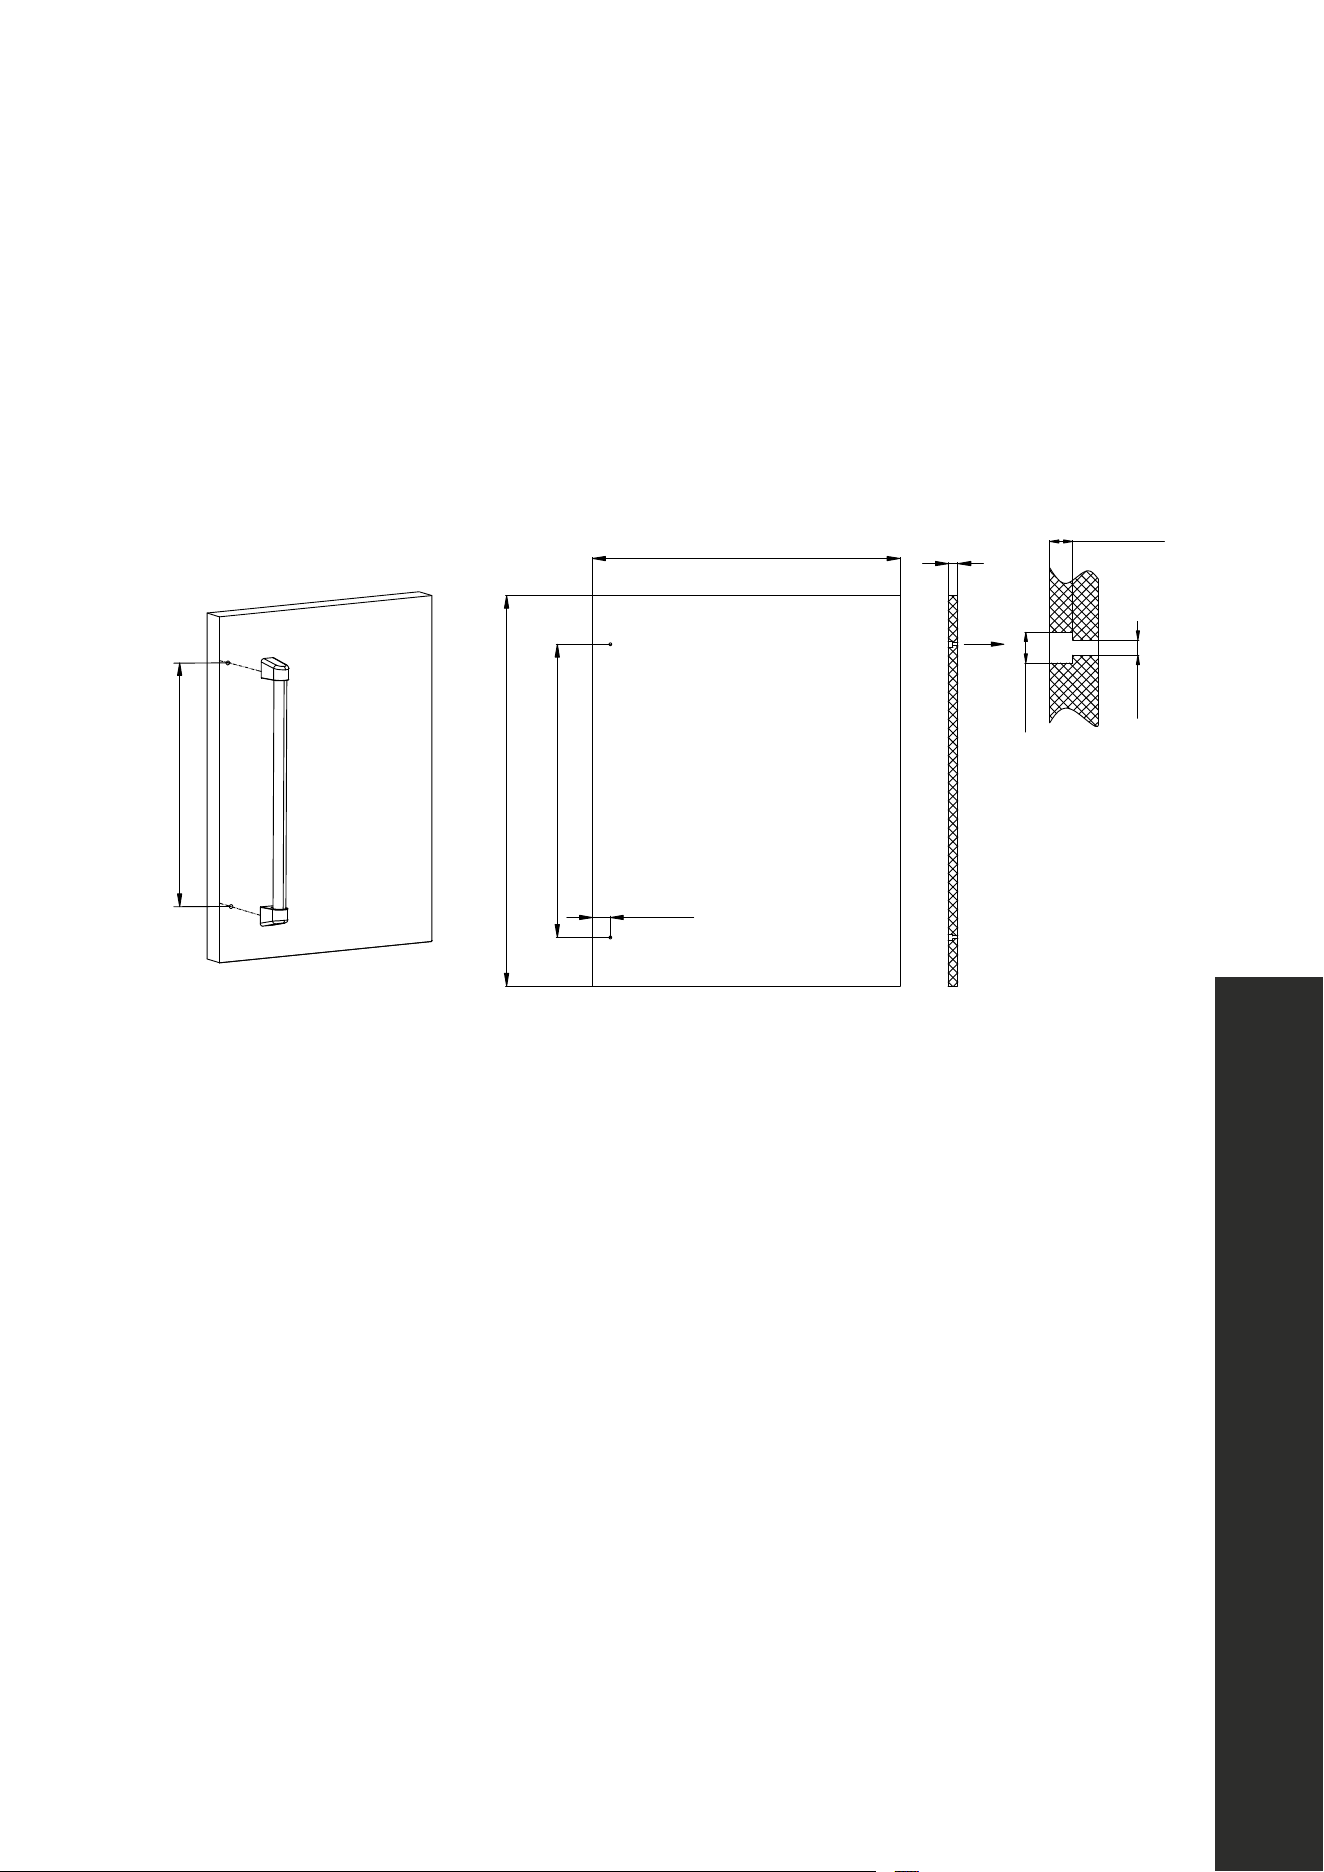
HANDLE INSTALLATION
Prior to installing a custom panel, handle(s) need to be affixed to the panel first. If you
wish to install a ZLINE Autograph Edition handle onto your custom panel, reference the
measurements displayed in the diagrams below regarding where to affix the mounting studs.
22 1/2" (572 mm)
14 5/8" (372 mm)
3/4"
(20 mm)
Ø1/2" (Ø12 mm)
Ø1/4" (Ø6 mm)
1/4"1/3"
(69 mm)
1 3/8" (35 mm)
30" (762 mm)
22 1/2" (572 mm)
20
Panel Installation
INSTALLATION
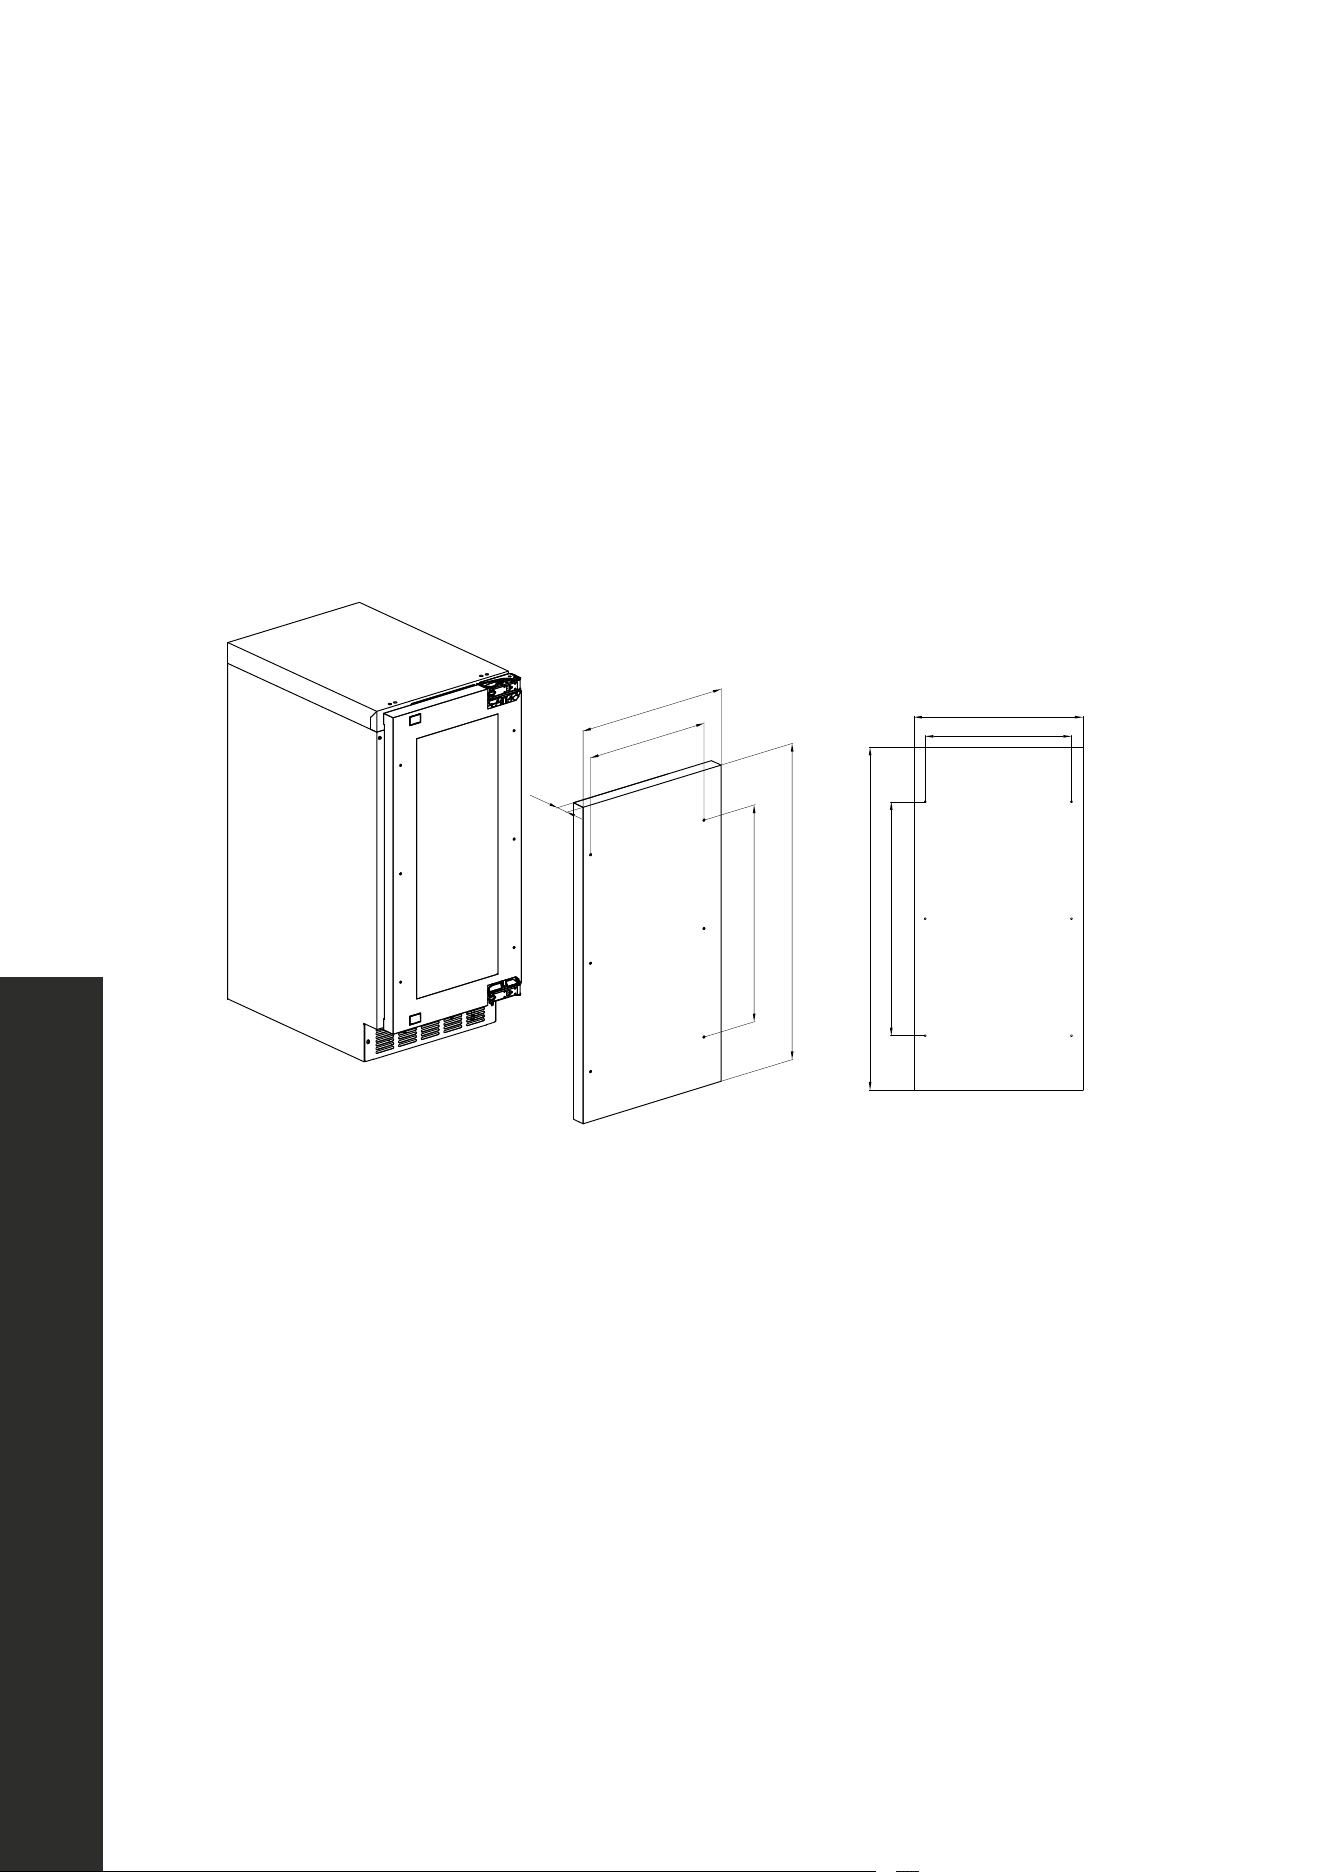
CUSTOM PANEL INSTALLATION - MODELS IGMDP-15 AND ICCDP-15
A custom door panel/frame can be fabricated for the appliance. Handle hardware must
also be provided, if needed.
Finish all sides of the custom panel. They may be visible when the door is open.
NOTE: Hole pattern dimensions for blind pilot holes only.
14 5/8" (372 mm)
3/4"
(19 mm)
12 13/16" (325 mm)
20 1/2" (520 mm)
30" (762 mm)
14 5/8" (372 mm)
3/4" (19 mm)
3/4" (19 mm)
Ø1/4"
(Ø6 mm)
Ø1/2"
(Ø12 mm)
1/4" (6 mm)
12 13/16" (325 mm)
30" (762 mm)
20 1/2" (520 mm)
14 5/8" (372 mm)
3/4"
(19 mm)
12 13/16" (325 mm)
20 1/2" (520 mm)
30" (762 mm)
14 5/8" (372 mm)
3/4" (19 mm)
3/4" (19 mm)
Ø1/4"
(Ø6 mm)
Ø1/2"
(Ø12 mm)
1/4" (6 mm)
12 13/16" (325 mm)
30" (762 mm)
20 1/2" (520 mm)
Maximum panel weight: 25 lb (11 kg)
Minimum panel thickness: 3/4" (19 mm)*
INSTALLING THE CUSTOM PANEL
1. Remove the door from the unit.
2. Remove the door seal to gain access to the custom door panel mounting holes.
3. Align the top of the custom door panel flush with the top of the door.
4. Adjust the overlap of the custom door panel so it is equal on both sides of the door.
5. Secure the custom door panel to the door using 6 wood screws (provided).
6. Reinstall the door seal. Be sure the seal is properly seated.
7. Reinstall the door to the unit.
* Take into account the thickness of the custom panel, as the provide screws may penetrate
through the face of the custom panel.
21
Panel Installation
INSTALLATION
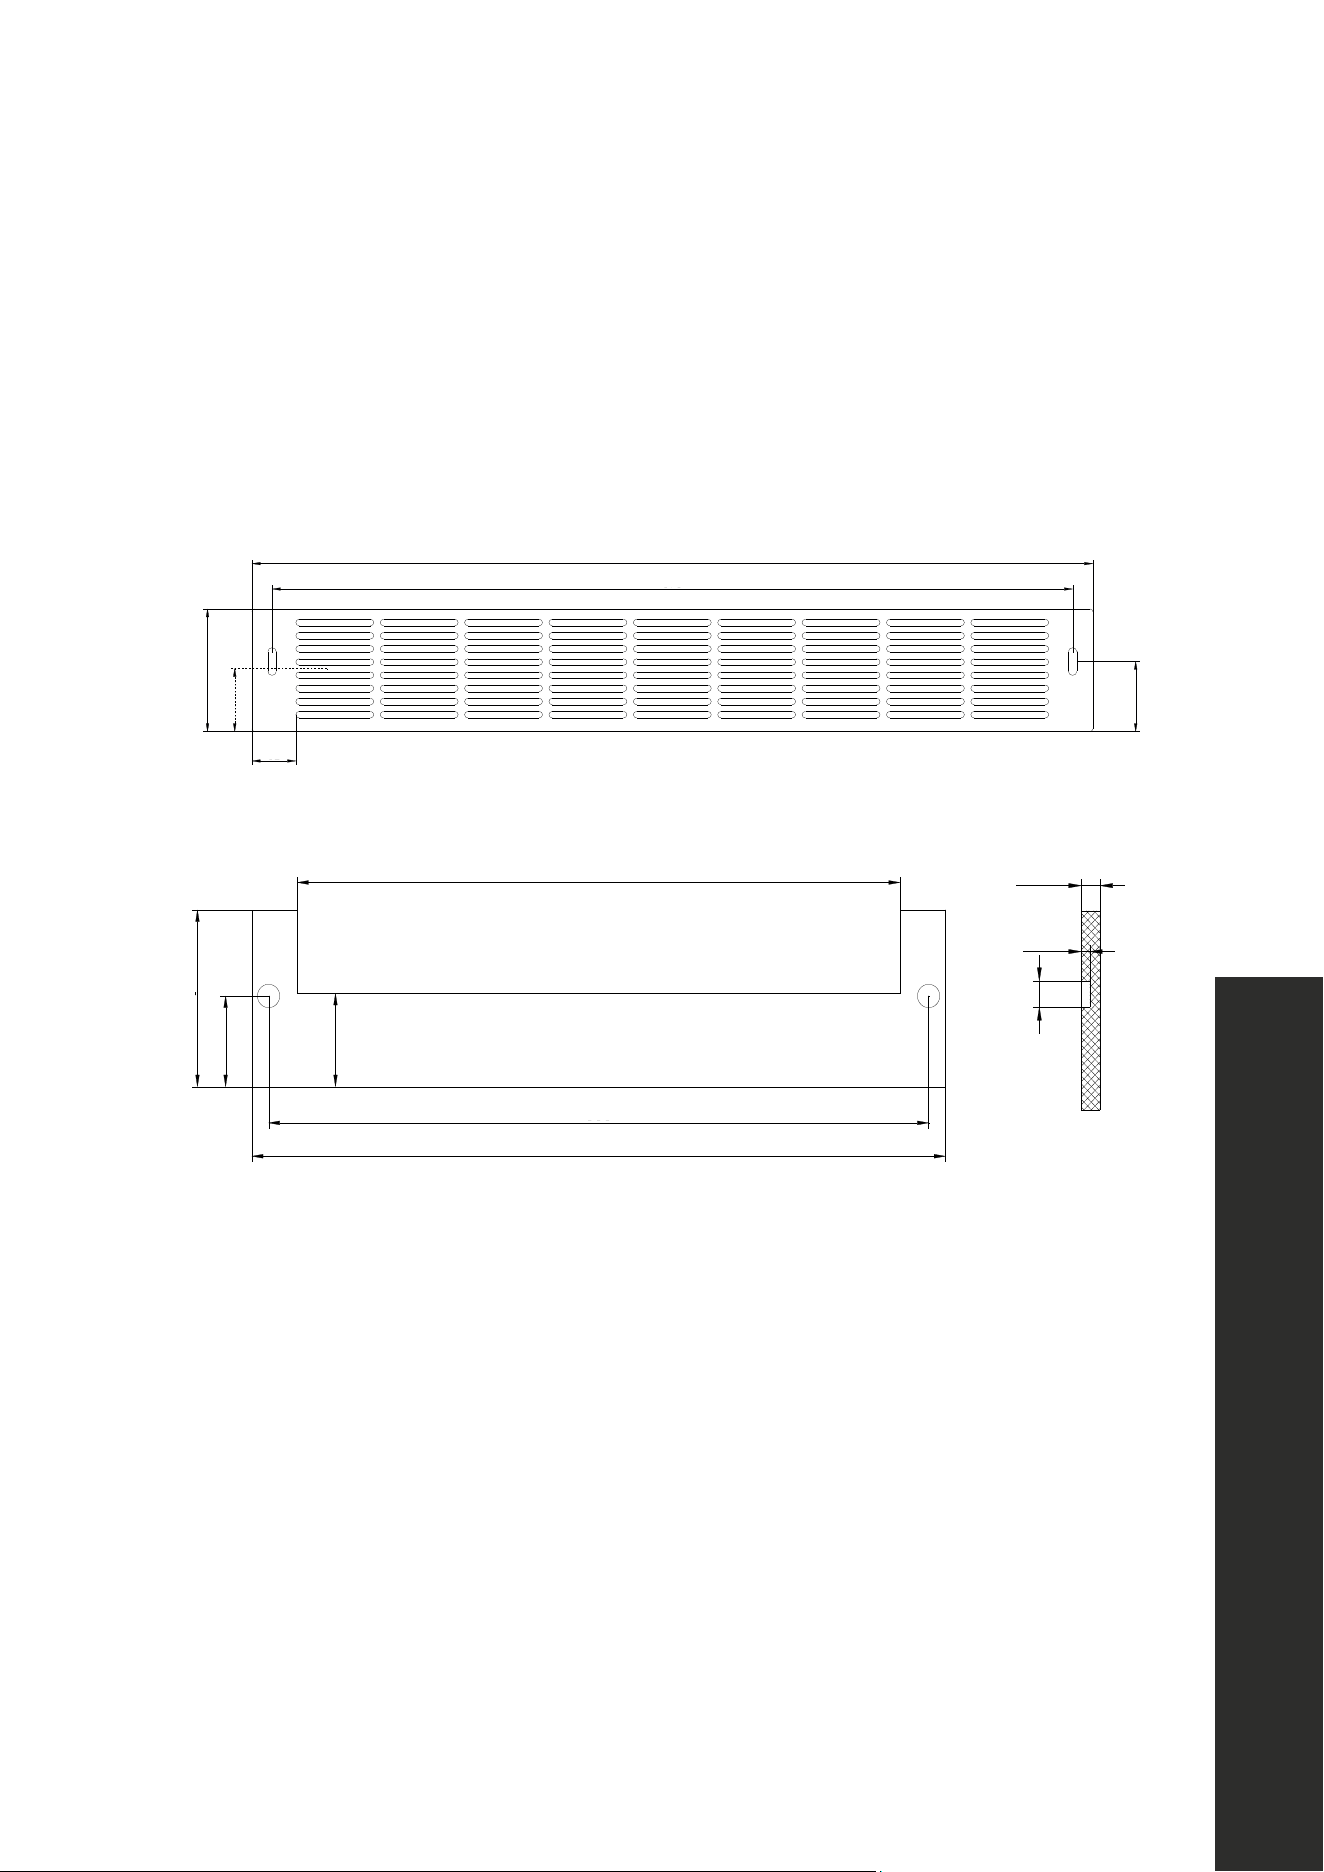
INTEGRATED GRILL/PLINTH
An integrated grill/plinth can be fabricated, if desired. The thickness of the panel should
be between 1/4" to 3/8" (6 mm to 9 mm) and the height will vary between 3 5/16" to
4 5/16" (84 mm to 110 mm) depending on your grill/plinth height. Be sure to fabricate slots
in the custom plinth to prevent venting issues.
INTEGRATED GRILL/PLINTH
An integrated grill/plinth can be fabricated if desired. The thickness of the panel should be between
¼ in. to 3/8 in. (6 mm to 9 mm) and the height will vary between 3-5/16 in to 4-5/16 in. (84 mm to
110 mm) depending on you grill grille/plinth height.
NOTE: When finishing the grill/plinth, be sure to stain front, back and all edges to prevent warping.
Apply double-sided tape to the surrounding edges of the integrated grill/plinth as shown in figure.
Remove the backing paper from the double-sided or hook and looptape. Carefully align the grill/plinth
over the integrated grill/plinth and press into position.
12 13/16" (325 mm)
1/4~3/8" (6 mm~9 mm)
1/8~3/16"
(3 mm~4 mm)
1/2"
(12 mm)
3 9/16" (91 mm)
1 7/8" (47 mm)
1 7/8"
(48 mm)
14 " (356 mm)
14 3/4" (374 mm)
14" (356 mm)
14 3/4" (374 mm)
3 9/16" (91 mm)
1 7/8" (47 mm)
3 9/16" (91 mm)
2 1/16" (53 mm)
1 1/4"
(32 mm)
1 5/16"
(34 mm)
1 7/8"
(48 mm)
1 7/8"
(48 mm)
22 5/8" (575 mm)
23 7/8" (606 mm)
1/4"~3/8"
(6~9 mm)
1/4"~3/16"
(3~4 mm)
1/2"
(12 mm)
NOTE: When finishing the grill/plinth, be sure to stain front, back, and all edges to
prevent warping.
22
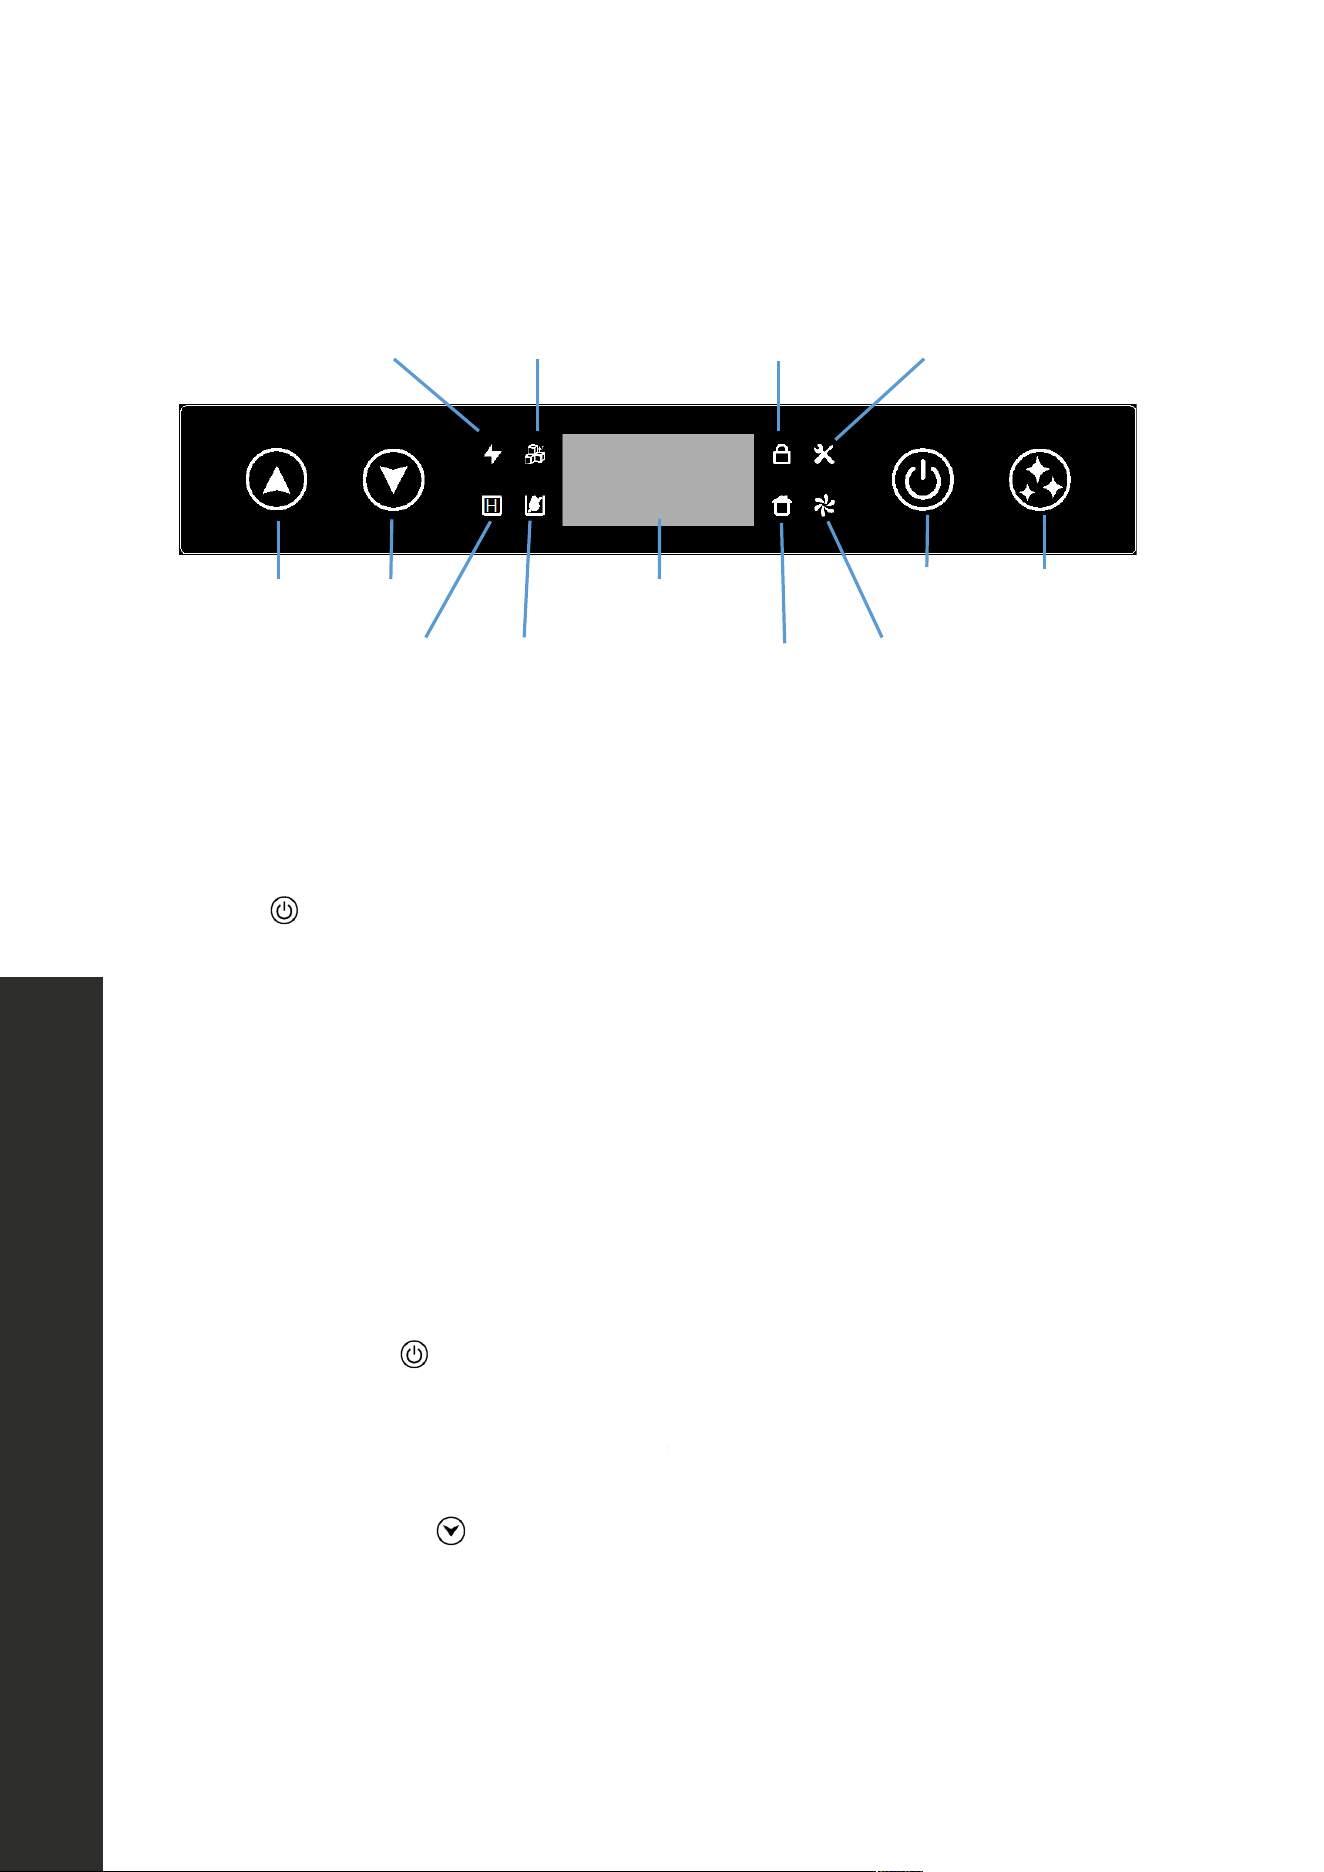
Controls
OPERATION
CONTROLS - ALL MODELS
USING THE CONTROLS
The control panel is located at the top of the cabinet. Including a display window, 4 buttons and 6
indicators.
FUNCTION OPERATING
Turn ON
Press POWER to turn ON the unit.
The unit will automatically start making ice and display
ICE
on ice making,
HVE
on ice harvesting,
FUL
on
ice full, and
FUO
on Ice making recovery countdown.
The Ice making indicator will light up on ice making cycle.
Turn OFF
Press and hold POWER for 3 seconds can immediately turn
OFF the unit.
The unit will standby in 30 seconds and displaying
OFF
.
Adjust the ice
cube size
Press and hold UP or DOWN over 3 seconds to enter ICE
SIZE ADJUSTING. Then press UP or DOWN to switch
settings.
Window display
1
to
6
(min to max).
3
is the default ice
size.
The setting will be saved after 7 seconds.
Fast Ice Making
Press and hold UP and DOWN over 3 seconds to toggle
ON/OFF the Fast Ice Making.
The fast ice making indicator will light, during this mode the
ice making cycle will be shorter.
UP
DOWN
POWER
CLEAN
DISPLAY WINDOW
Fast Ice Making
Ice Making
Screen Lock
Maintenance
Cleaning
Lack Water
Showroom
Timed Start
Screen lockIce makingFast ice making Maintenance
CleaningTimed start No water Showroom
POWER CLEANUP DOWN DISPLAY WINDOW
Timed Ice making
Press and hold POWER and CLEAN over 3 seconds on
Standby to toggle ON/OFF the Timed Ice Making
When enter the timer setting, press UP or DOWN to select
from
1
to
12
hours to set the timer to run ice making,
the setting will auto save after 10 seconds, then the window
display countdown time in hours and the timed ice making
indicator will light.
*Press POWER can jump the countdown and immediately
start ice making.
Cleaning
Press and hold CLEAN over 3 seconds to turn ON/OFF the
CLEANING.
Once start, window display
CLE
and the clean indicator
will light, the clean cycle will run for 30 minuets
and then exit
to standby.
*This function can only start on standby.
Sabbath
Press and hold UP and CLEAN over 6 seconds to turn
ON/OFF the SATTBATH.
Display will be shut off, and the interior light and any audible
sound are also disabled in SABBATH.
Showroom
Press and hold DOWN
and CLEAN over 6 seconds on standby
to toggle on/off the SHOWROOM mode.
The SHOWROOM indicator will light up.
*This mode is for dealers to display the unit, only the light and
the evaporator fan will function in this mode, all alarm will
disable except the door open alarm.
Screen Lock
Press and hold POWER and CLEAN over 6 seconds to toggle
ON/OFF the screen lock.
The Screen lock indicator will light up and the screen are
locked.
Filter Reset
Press and hold UP and POWER over 6 seconds to reset the
water filter life counter.
The window will be flashing
F11
and reset the filter
timer.
*This function can only start on standby. only use this after
replaced the water filter.
Firmware Version
&
System Recovery
Press and hold DOWN and POWER to display firmware
version
A5
Hold OVER 6 seconds will reset all settings to default.
*The firmware version is subject to change.
The control panel is located at the top of the cabinet. It includes a display window, 4 buttons,
and 8 indicators.
Turn ON (
USING THE CONTROLS
The control panel is located at the top of the cabinet. Including a display window, 4 buttons and 6
indicators.
FUNCTION OPERATING
Turn ON
Press POWER to turn ON the unit.
The unit will automatically start making ice and display
ICE
on ice making,
HVE
on ice harvesting,
FUL
on
ice full, and
FUO
on Ice making recovery countdown.
The Ice making indicator will light up on ice making cycle.
Turn OFF
Press and hold POWER for 3 seconds can immediately turn
OFF the unit.
The unit will standby in 30 seconds and displaying
OFF
.
Adjust the ice
cube size
Press and hold UP or DOWN over 3 seconds to enter ICE
SIZE ADJUSTING. Then press UP or DOWN to switch
settings.
Window display
1
to
6
(min to max).
3
is the default ice
size.
The setting will be saved after 7 seconds.
Fast Ice Making
Press and hold UP and DOWN over 3 seconds to toggle
ON/OFF the Fast Ice Making.
The fast ice making indicator will light, during this mode the
ice making cycle will be shorter.
UP
DOWN
POWER
CLEAN
DISPLAY WINDOW
Fast Ice Making
Ice Making
Screen Lock
Maintenance
Cleaning
Lack Water
Showroom
Timed Start
Screen lockIce makingFast ice making Maintenance
CleaningTimed start No water Showroom
POWER CLEANUP DOWN DISPLAY WINDOW
Timed Ice making
Press and hold POWER and CLEAN over 3 seconds on
Standby to toggle ON/OFF the Timed Ice Making
When enter the timer setting, press UP or DOWN to select
from
1
to
12
hours to set the timer to run ice making,
the setting will auto save after 10 seconds, then the window
display countdown time in hours and the timed ice making
indicator will light.
*Press POWER can jump the countdown and immediately
start ice making.
Cleaning
Press and hold CLEAN over 3 seconds to turn ON/OFF the
CLEANING.
Once start, window display
CLE
and the clean indicator
will light, the clean cycle will run for 30 minuets
and then exit
to standby.
*This function can only start on standby.
Sabbath
Press and hold UP and CLEAN over 6 seconds to turn
ON/OFF the SATTBATH.
Display will be shut off, and the interior light and any audible
sound are also disabled in SABBATH.
Showroom
Press and hold DOWN
and CLEAN over 6 seconds on standby
to toggle on/off the SHOWROOM mode.
The SHOWROOM indicator will light up.
*This mode is for dealers to display the unit, only the light and
the evaporator fan will function in this mode, all alarm will
disable except the door open alarm.
Screen Lock
Press and hold POWER and CLEAN over 6 seconds to toggle
ON/OFF the screen lock.
The Screen lock indicator will light up and the screen are
locked.
Filter Reset
Press and hold UP and POWER over 6 seconds to reset the
water filter life counter.
The window will be flashing
F11
and reset the filter
timer.
*This function can only start on standby. only use this after
replaced the water filter.
Firmware Version
&
System Recovery
Press and hold DOWN and POWER to display firmware
version
A5
Hold OVER 6 seconds will reset all settings to default.
*The firmware version is subject to change.
): Press POWER to turn ON the unit.
• The unit will automatically start making ice and display:
•
USING THE CONTROLS
The control panel is located at the top of the cabinet. Including a display window, 4 buttons and 6
indicators.
FUNCTION OPERATING
Turn ON
Press POWER to turn ON the unit.
The unit will automatically start making ice and display
ICE
on ice making,
HVE
on ice harvesting,
FUL
on
ice full, and
FUO
on Ice making recovery countdown.
The Ice making indicator will light up on ice making cycle.
Turn OFF
Press and hold POWER for 3 seconds can immediately turn
OFF the unit.
The unit will standby in 30 seconds and displaying
OFF
.
Adjust the ice
cube size
Press and hold UP or DOWN over 3 seconds to enter ICE
SIZE ADJUSTING. Then press UP or DOWN to switch
settings.
Window display
1
to
6
(min to max).
3
is the default ice
size.
The setting will be saved after 7 seconds.
Fast Ice Making
Press and hold UP and DOWN over 3 seconds to toggle
ON/OFF the Fast Ice Making.
The fast ice making indicator will light, during this mode the
ice making cycle will be shorter.
UP
DOWN
POWER
CLEAN
DISPLAY WINDOW
Fast Ice Making
Ice Making
Screen Lock
Maintenance
Cleaning
Lack Water
Showroom
Timed Start
Screen lockIce makingFast ice making Maintenance
CleaningTimed start No water Showroom
POWER CLEANUP DOWN DISPLAY WINDOW
Timed Ice making
Press and hold POWER and CLEAN over 3 seconds on
Standby to toggle ON/OFF the Timed Ice Making
When enter the timer setting, press UP or DOWN to select
from
1
to
12
hours to set the timer to run ice making,
the setting will auto save after 10 seconds, then the window
display countdown time in hours and the timed ice making
indicator will light.
*Press POWER can jump the countdown and immediately
start ice making.
Cleaning
Press and hold CLEAN over 3 seconds to turn ON/OFF the
CLEANING.
Once start, window display
CLE
and the clean indicator
will light, the clean cycle will run for 30 minuets
and then exit
to standby.
*This function can only start on standby.
Sabbath
Press and hold UP and CLEAN over 6 seconds to turn
ON/OFF the SATTBATH.
Display will be shut off, and the interior light and any audible
sound are also disabled in SABBATH.
Showroom
Press and hold DOWN
and CLEAN over 6 seconds on standby
to toggle on/off the SHOWROOM mode.
The SHOWROOM indicator will light up.
*This mode is for dealers to display the unit, only the light and
the evaporator fan will function in this mode, all alarm will
disable except the door open alarm.
Screen Lock
Press and hold POWER and CLEAN over 6 seconds to toggle
ON/OFF the screen lock.
The Screen lock indicator will light up and the screen are
locked.
Filter Reset
Press and hold UP and POWER over 6 seconds to reset the
water filter life counter.
The window will be flashing
F11
and reset the filter
timer.
*This function can only start on standby. only use this after
replaced the water filter.
Firmware Version
&
System Recovery
Press and hold DOWN and POWER to display firmware
version
A5
Hold OVER 6 seconds will reset all settings to default.
*The firmware version is subject to change.
during ice making
•
USING THE CONTROLS
The control panel is located at the top of the cabinet. Including a display window, 4 buttons and 6
indicators.
FUNCTION OPERATING
Turn ON
Press POWER to turn ON the unit.
The unit will automatically start making ice and display
ICE
on ice making,
HVE
on ice harvesting,
FUL
on
ice full, and
FUO
on Ice making recovery countdown.
The Ice making indicator will light up on ice making cycle.
Turn OFF
Press and hold POWER for 3 seconds can immediately turn
OFF the unit.
The unit will standby in 30 seconds and displaying
OFF
.
Adjust the ice
cube size
Press and hold UP or DOWN over 3 seconds to enter ICE
SIZE ADJUSTING. Then press UP or DOWN to switch
settings.
Window display
1
to
6
(min to max).
3
is the default ice
size.
The setting will be saved after 7 seconds.
Fast Ice Making
Press and hold UP and DOWN over 3 seconds to toggle
ON/OFF the Fast Ice Making.
The fast ice making indicator will light, during this mode the
ice making cycle will be shorter.
UP
DOWN
POWER
CLEAN
DISPLAY WINDOW
Fast Ice Making
Ice Making
Screen Lock
Maintenance
Cleaning
Lack Water
Showroom
Timed Start
Screen lockIce makingFast ice making Maintenance
CleaningTimed start No water Showroom
POWER CLEANUP DOWN DISPLAY WINDOW
Timed Ice making
Press and hold POWER and CLEAN over 3 seconds on
Standby to toggle ON/OFF the Timed Ice Making
When enter the timer setting, press UP or DOWN to select
from
1
to
12
hours to set the timer to run ice making,
the setting will auto save after 10 seconds, then the window
display countdown time in hours and the timed ice making
indicator will light.
*Press POWER can jump the countdown and immediately
start ice making.
Cleaning
Press and hold CLEAN over 3 seconds to turn ON/OFF the
CLEANING.
Once start, window display
CLE
and the clean indicator
will light, the clean cycle will run for 30 minuets
and then exit
to standby.
*This function can only start on standby.
Sabbath
Press and hold UP and CLEAN over 6 seconds to turn
ON/OFF the SATTBATH.
Display will be shut off, and the interior light and any audible
sound are also disabled in SABBATH.
Showroom
Press and hold DOWN
and CLEAN over 6 seconds on standby
to toggle on/off the SHOWROOM mode.
The SHOWROOM indicator will light up.
*This mode is for dealers to display the unit, only the light and
the evaporator fan will function in this mode, all alarm will
disable except the door open alarm.
Screen Lock
Press and hold POWER and CLEAN over 6 seconds to toggle
ON/OFF the screen lock.
The Screen lock indicator will light up and the screen are
locked.
Filter Reset
Press and hold UP and POWER over 6 seconds to reset the
water filter life counter.
The window will be flashing
F11
and reset the filter
timer.
*This function can only start on standby. only use this after
replaced the water filter.
Firmware Version
&
System Recovery
Press and hold DOWN and POWER to display firmware
version
A5
Hold OVER 6 seconds will reset all settings to default.
*The firmware version is subject to change.
during ice harvesting
•
USING THE CONTROLS
The control panel is located at the top of the cabinet. Including a display window, 4 buttons and 6
indicators.
FUNCTION OPERATING
Turn ON
Press POWER to turn ON the unit.
The unit will automatically start making ice and display
ICE
on ice making,
HVE
on ice harvesting,
FUL
on
ice full, and
FUO
on Ice making recovery countdown.
The Ice making indicator will light up on ice making cycle.
Turn OFF
Press and hold POWER for 3 seconds can immediately turn
OFF the unit.
The unit will standby in 30 seconds and displaying
OFF
.
Adjust the ice
cube size
Press and hold UP or DOWN over 3 seconds to enter ICE
SIZE ADJUSTING. Then press UP or DOWN to switch
settings.
Window display
1
to
6
(min to max).
3
is the default ice
size.
The setting will be saved after 7 seconds.
Fast Ice Making
Press and hold UP and DOWN over 3 seconds to toggle
ON/OFF the Fast Ice Making.
The fast ice making indicator will light, during this mode the
ice making cycle will be shorter.
UP
DOWN
POWER
CLEAN
DISPLAY WINDOW
Fast Ice Making
Ice Making
Screen Lock
Maintenance
Cleaning
Lack Water
Showroom
Timed Start
Screen lockIce makingFast ice making Maintenance
CleaningTimed start No water Showroom
POWER CLEANUP DOWN DISPLAY WINDOW
Timed Ice making
Press and hold POWER and CLEAN over 3 seconds on
Standby to toggle ON/OFF the Timed Ice Making
When enter the timer setting, press UP or DOWN to select
from
1
to
12
hours to set the timer to run ice making,
the setting will auto save after 10 seconds, then the window
display countdown time in hours and the timed ice making
indicator will light.
*Press POWER can jump the countdown and immediately
start ice making.
Cleaning
Press and hold CLEAN over 3 seconds to turn ON/OFF the
CLEANING.
Once start, window display
CLE
and the clean indicator
will light, the clean cycle will run for 30 minuets
and then exit
to standby.
*This function can only start on standby.
Sabbath
Press and hold UP and CLEAN over 6 seconds to turn
ON/OFF the SATTBATH.
Display will be shut off, and the interior light and any audible
sound are also disabled in SABBATH.
Showroom
Press and hold DOWN
and CLEAN over 6 seconds on standby
to toggle on/off the SHOWROOM mode.
The SHOWROOM indicator will light up.
*This mode is for dealers to display the unit, only the light and
the evaporator fan will function in this mode, all alarm will
disable except the door open alarm.
Screen Lock
Press and hold POWER and CLEAN over 6 seconds to toggle
ON/OFF the screen lock.
The Screen lock indicator will light up and the screen are
locked.
Filter Reset
Press and hold UP and POWER over 6 seconds to reset the
water filter life counter.
The window will be flashing
F11
and reset the filter
timer.
*This function can only start on standby. only use this after
replaced the water filter.
Firmware Version
&
System Recovery
Press and hold DOWN and POWER to display firmware
version
A5
Hold OVER 6 seconds will reset all settings to default.
*The firmware version is subject to change.
when the bin is full of ice
• The ice making symbol will illuminate when making ice.
• NOTE: When the unit is initially powered on, it will display
EXPECTING NORMAL SOUNDS
Your new ice machine may make sounds that are not familiar to you. Hard surfaces like the floor and
walls can make the sounds seem louder than they actually are. The following describes the kinds of
sounds that might be new to you and the source of those sounds:
the ice machine can also make noises.
• The high-efficiency compressor may make a pulsating or high-pitched sound.
• Water running from the evaporator to the water reservoir may make a splashing sound.
• As each cycle ends, you may hear a gurgling sound due to the refrigerant flowing in your ice
• Rattling noises may come from the flow of the refrigerant or the water line. Items store on top of
machine.
• You may hear the sound of the condenser fan forcing air over the condenser.
• During the harvest cycle, you may hear the sound of ice cubes falling into the ice bin.
PANEL DISPLAY NOTIFICATION
Below notifications will sound the alarm except the Ice full stop.
Self-diagnosis Pass
888
Only displays on the beginning of the working
progress.
Filling Water
FIL
Ice Full Stop
FUL
If the ice storage bin is full, the unit will
automatically stop.
Remove the ice and the unit will start making ice
after 3 minutes.
Door Ajar Alarm
dr
If the door is not closed completely for 5 minutes,
the panel will be flashing ‘dr’ with alarm sounds.
All these alerts will be cleared up when the door is
closed or press any button.
Clean Reminder
CLE
When the unit has worked for approx 6 month
without running CLEANING program, the panel will
be flashing ‘CL’ as the reminder.
Run CLEANING to clear the alarm.
Filter Replace Reminder
FI1
When the unit has worked for approx 6 month the
Panel will be flashing ‘FII’ as the reminder.
Replace the filter and reset the filter timer to clear
the alarm.
DEALING WITH POWER FAILURE
Most power failures are corrected within a few hours and should not affect the temperature of your
ice machine if you minimize the number of times, you open the ice machine door. If the power is
Timed Ice making
Press and hold POWER and CLEAN over 3 seconds on
Standby to toggle ON/OFF the Timed Ice Making
When enter the timer setting, press UP or DOWN to select
from
1
to
12
hours to set the timer to run ice making,
the setting will auto save after 10 seconds, then the window
display countdown time in hours and the timed ice making
indicator will light.
*Press POWER can jump the countdown and immediately
start ice making.
Cleaning
Press and hold CLEAN over 3 seconds to turn ON/OFF the
CLEANING.
Once start, window display
CLE
and the clean indicator
will light, the clean cycle will run for 30 minuets
and then exit
to standby.
*This function can only start on standby.
Sabbath
Press and hold UP and CLEAN over 6 seconds to turn
ON/OFF the SATTBATH.
Display will be shut off, and the interior light and any audible
sound are also disabled in SABBATH.
Showroom
Press and hold DOWN
and CLEAN over 6 seconds on standby
to toggle on/off the SHOWROOM mode.
The SHOWROOM indicator will light up.
*This mode is for dealers to display the unit, only the light and
the evaporator fan will function in this mode, all alarm will
disable except the door open alarm.
Screen Lock
Press and hold POWER and CLEAN over 6 seconds to toggle
ON/OFF the screen lock.
The Screen lock indicator will light up and the screen are
locked.
Filter Reset
Press and hold UP and POWER over 6 seconds to reset the
water filter life counter.
The window will be flashing
F11
and reset the filter
timer.
*This function can only start on standby. only use this after
replaced the water filter.
Firmware Version
&
System Recovery
Press and hold DOWN and POWER to display firmware
version
A5
Hold OVER 6 seconds will reset all settings to default.
*The firmware version is subject to change.
, then
EXPECTING NORMAL SOUNDS
Your new ice machine may make sounds that are not familiar to you. Hard surfaces like the floor and
walls can make the sounds seem louder than they actually are. The following describes the kinds of
sounds that might be new to you and the source of those sounds:
the ice machine can also make noises.
• The high-efficiency compressor may make a pulsating or high-pitched sound.
• Water running from the evaporator to the water reservoir may make a splashing sound.
• As each cycle ends, you may hear a gurgling sound due to the refrigerant flowing in your ice
• Rattling noises may come from the flow of the refrigerant or the water line. Items store on top of
machine.
• You may hear the sound of the condenser fan forcing air over the condenser.
• During the harvest cycle, you may hear the sound of ice cubes falling into the ice bin.
PANEL DISPLAY NOTIFICATION
Below notifications will sound the alarm except the Ice full stop.
Self-diagnosis Pass
888
Only displays on the beginning of the working
progress.
Filling Water
FIL
Ice Full Stop
FUL
If the ice storage bin is full, the unit will
automatically stop.
Remove the ice and the unit will start making ice
after 3 minutes.
Door Ajar Alarm
dr
If the door is not closed completely for 5 minutes,
the panel will be flashing ‘dr’ with alarm sounds.
All these alerts will be cleared up when the door is
closed or press any button.
Clean Reminder
CLE
When the unit has worked for approx 6 month
without running CLEANING program, the panel will
be flashing ‘CL’ as the reminder.
Run CLEANING to clear the alarm.
Filter Replace Reminder
FI1
When the unit has worked for approx 6 month the
Panel will be flashing ‘FII’ as the reminder.
Replace the filter and reset the filter timer to clear
the alarm.
DEALING WITH POWER FAILURE
Most power failures are corrected within a few hours and should not affect the temperature of your
ice machine if you minimize the number of times, you open the ice machine door. If the power is
Timed Ice making
Press and hold POWER and CLEAN over 3 seconds on
Standby to toggle ON/OFF the Timed Ice Making
When enter the timer setting, press UP or DOWN to select
from
1
to
12
hours to set the timer to run ice making,
the setting will auto save after 10 seconds, then the window
display countdown time in hours and the timed ice making
indicator will light.
*Press POWER can jump the countdown and immediately
start ice making.
Cleaning
Press and hold CLEAN over 3 seconds to turn ON/OFF the
CLEANING.
Once start, window display
CLE
and the clean indicator
will light, the clean cycle will run for 30 minuets
and then exit
to standby.
*This function can only start on standby.
Sabbath
Press and hold UP and CLEAN over 6 seconds to turn
ON/OFF the SATTBATH.
Display will be shut off, and the interior light and any audible
sound are also disabled in SABBATH.
Showroom
Press and hold DOWN
and CLEAN over 6 seconds on standby
to toggle on/off the SHOWROOM mode.
The SHOWROOM indicator will light up.
*This mode is for dealers to display the unit, only the light and
the evaporator fan will function in this mode, all alarm will
disable except the door open alarm.
Screen Lock
Press and hold POWER and CLEAN over 6 seconds to toggle
ON/OFF the screen lock.
The Screen lock indicator will light up and the screen are
locked.
Filter Reset
Press and hold UP and POWER over 6 seconds to reset the
water filter life counter.
The window will be flashing
F11
and reset the filter
timer.
*This function can only start on standby. only use this after
replaced the water filter.
Firmware Version
&
System Recovery
Press and hold DOWN and POWER to display firmware
version
A5
Hold OVER 6 seconds will reset all settings to default.
*The firmware version is subject to change.
.
EXPECTING NORMAL SOUNDS
Your new ice machine may make sounds that are not familiar to you. Hard surfaces like the floor and
walls can make the sounds seem louder than they actually are. The following describes the kinds of
sounds that might be new to you and the source of those sounds:
the ice machine can also make noises.
• The high-efficiency compressor may make a pulsating or high-pitched sound.
• Water running from the evaporator to the water reservoir may make a splashing sound.
• As each cycle ends, you may hear a gurgling sound due to the refrigerant flowing in your ice
• Rattling noises may come from the flow of the refrigerant or the water line. Items store on top of
machine.
• You may hear the sound of the condenser fan forcing air over the condenser.
• During the harvest cycle, you may hear the sound of ice cubes falling into the ice bin.
PANEL DISPLAY NOTIFICATION
Below notifications will sound the alarm except the Ice full stop.
Self-diagnosis Pass
888
Only displays on the beginning of the working
progress.
Filling Water
FIL
Ice Full Stop
FUL
If the ice storage bin is full, the unit will
automatically stop.
Remove the ice and the unit will start making ice
after 3 minutes.
Door Ajar Alarm
dr
If the door is not closed completely for 5 minutes,
the panel will be flashing ‘dr’ with alarm sounds.
All these alerts will be cleared up when the door is
closed or press any button.
Clean Reminder
CLE
When the unit has worked for approx 6 month
without running CLEANING program, the panel will
be flashing ‘CL’ as the reminder.
Run CLEANING to clear the alarm.
Filter Replace Reminder
FI1
When the unit has worked for approx 6 month the
Panel will be flashing ‘FII’ as the reminder.
Replace the filter and reset the filter timer to clear
the alarm.
DEALING WITH POWER FAILURE
Most power failures are corrected within a few hours and should not affect the temperature of your
ice machine if you minimize the number of times, you open the ice machine door. If the power is
Timed Ice making
Press and hold POWER and CLEAN over 3 seconds on
Standby to toggle ON/OFF the Timed Ice Making
When enter the timer setting, press UP or DOWN to select
from
1
to
12
hours to set the timer to run ice making,
the setting will auto save after 10 seconds, then the window
display countdown time in hours and the timed ice making
indicator will light.
*Press POWER can jump the countdown and immediately
start ice making.
Cleaning
Press and hold CLEAN over 3 seconds to turn ON/OFF the
CLEANING.
Once start, window display
CLE
and the clean indicator
will light, the clean cycle will run for 30 minuets
and then exit
to standby.
*This function can only start on standby.
Sabbath
Press and hold UP and CLEAN over 6 seconds to turn
ON/OFF the SATTBATH.
Display will be shut off, and the interior light and any audible
sound are also disabled in SABBATH.
Showroom
Press and hold DOWN
and CLEAN over 6 seconds on standby
to toggle on/off the SHOWROOM mode.
The SHOWROOM indicator will light up.
*This mode is for dealers to display the unit, only the light and
the evaporator fan will function in this mode, all alarm will
disable except the door open alarm.
Screen Lock
Press and hold POWER and CLEAN over 6 seconds to toggle
ON/OFF the screen lock.
The Screen lock indicator will light up and the screen are
locked.
Filter Reset
Press and hold UP and POWER over 6 seconds to reset the
water filter life counter.
The window will be flashing
F11
and reset the filter
timer.
*This function can only start on standby. only use this after
replaced the water filter.
Firmware Version
&
System Recovery
Press and hold DOWN and POWER to display firmware
version
A5
Hold OVER 6 seconds will reset all settings to default.
*The firmware version is subject to change.
is a Self-
Diagnosis pass that only occurs when the unit is initially powered on.
EXPECTING NORMAL SOUNDS
Your new ice machine may make sounds that are not familiar to you. Hard surfaces like the floor and
walls can make the sounds seem louder than they actually are. The following describes the kinds of
sounds that might be new to you and the source of those sounds:
the ice machine can also make noises.
• The high-efficiency compressor may make a pulsating or high-pitched sound.
• Water running from the evaporator to the water reservoir may make a splashing sound.
• As each cycle ends, you may hear a gurgling sound due to the refrigerant flowing in your ice
• Rattling noises may come from the flow of the refrigerant or the water line. Items store on top of
machine.
• You may hear the sound of the condenser fan forcing air over the condenser.
• During the harvest cycle, you may hear the sound of ice cubes falling into the ice bin.
PANEL DISPLAY NOTIFICATION
Below notifications will sound the alarm except the Ice full stop.
Self-diagnosis Pass
888
Only displays on the beginning of the working
progress.
Filling Water
FIL
Ice Full Stop
FUL
If the ice storage bin is full, the unit will
automatically stop.
Remove the ice and the unit will start making ice
after 3 minutes.
Door Ajar Alarm
dr
If the door is not closed completely for 5 minutes,
the panel will be flashing ‘dr’ with alarm sounds.
All these alerts will be cleared up when the door is
closed or press any button.
Clean Reminder
CLE
When the unit has worked for approx 6 month
without running CLEANING program, the panel will
be flashing ‘CL’ as the reminder.
Run CLEANING to clear the alarm.
Filter Replace Reminder
FI1
When the unit has worked for approx 6 month the
Panel will be flashing ‘FII’ as the reminder.
Replace the filter and reset the filter timer to clear
the alarm.
DEALING WITH POWER FAILURE
Most power failures are corrected within a few hours and should not affect the temperature of your
ice machine if you minimize the number of times, you open the ice machine door. If the power is
Timed Ice making
Press and hold POWER and CLEAN over 3 seconds on
Standby to toggle ON/OFF the Timed Ice Making
When enter the timer setting, press UP or DOWN to select
from
1
to
12
hours to set the timer to run ice making,
the setting will auto save after 10 seconds, then the window
display countdown time in hours and the timed ice making
indicator will light.
*Press POWER can jump the countdown and immediately
start ice making.
Cleaning
Press and hold CLEAN over 3 seconds to turn ON/OFF the
CLEANING.
Once start, window display
CLE
and the clean indicator
will light, the clean cycle will run for 30 minuets
and then exit
to standby.
*This function can only start on standby.
Sabbath
Press and hold UP and CLEAN over 6 seconds to turn
ON/OFF the SATTBATH.
Display will be shut off, and the interior light and any audible
sound are also disabled in SABBATH.
Showroom
Press and hold DOWN
and CLEAN over 6 seconds on standby
to toggle on/off the SHOWROOM mode.
The SHOWROOM indicator will light up.
*This mode is for dealers to display the unit, only the light and
the evaporator fan will function in this mode, all alarm will
disable except the door open alarm.
Screen Lock
Press and hold POWER and CLEAN over 6 seconds to toggle
ON/OFF the screen lock.
The Screen lock indicator will light up and the screen are
locked.
Filter Reset
Press and hold UP and POWER over 6 seconds to reset the
water filter life counter.
The window will be flashing
F11
and reset the filter
timer.
*This function can only start on standby. only use this after
replaced the water filter.
Firmware Version
&
System Recovery
Press and hold DOWN and POWER to display firmware
version
A5
Hold OVER 6 seconds will reset all settings to default.
*The firmware version is subject to change.
states that the
unit is filling with water in preparation for making ice.
Turn OFF/Standby (
USING THE CONTROLS
The control panel is located at the top of the cabinet. Including a display window, 4 buttons and 6
indicators.
FUNCTION OPERATING
Turn ON
Press POWER to turn ON the unit.
The unit will automatically start making ice and display
ICE
on ice making,
HVE
on ice harvesting,
FUL
on
ice full, and
FUO
on Ice making recovery countdown.
The Ice making indicator will light up on ice making cycle.
Turn OFF
Press and hold POWER for 3 seconds can immediately turn
OFF the unit.
The unit will standby in 30 seconds and displaying
OFF
.
Adjust the ice
cube size
Press and hold UP or DOWN over 3 seconds to enter ICE
SIZE ADJUSTING. Then press UP or DOWN to switch
settings.
Window display
1
to
6
(min to max).
3
is the default ice
size.
The setting will be saved after 7 seconds.
Fast Ice Making
Press and hold UP and DOWN over 3 seconds to toggle
ON/OFF the Fast Ice Making.
The fast ice making indicator will light, during this mode the
ice making cycle will be shorter.
UP
DOWN
POWER
CLEAN
DISPLAY WINDOW
Fast Ice Making
Ice Making
Screen Lock
Maintenance
Cleaning
Lack Water
Showroom
Timed Start
Screen lockIce makingFast ice making Maintenance
CleaningTimed start No water Showroom
POWER CLEANUP DOWN DISPLAY WINDOW
Timed Ice making
Press and hold POWER and CLEAN over 3 seconds on
Standby to toggle ON/OFF the Timed Ice Making
When enter the timer setting, press UP or DOWN to select
from
1
to
12
hours to set the timer to run ice making,
the setting will auto save after 10 seconds, then the window
display countdown time in hours and the timed ice making
indicator will light.
*Press POWER can jump the countdown and immediately
start ice making.
Cleaning
Press and hold CLEAN over 3 seconds to turn ON/OFF the
CLEANING.
Once start, window display
CLE
and the clean indicator
will light, the clean cycle will run for 30 minuets
and then exit
to standby.
*This function can only start on standby.
Sabbath
Press and hold UP and CLEAN over 6 seconds to turn
ON/OFF the SATTBATH.
Display will be shut off, and the interior light and any audible
sound are also disabled in SABBATH.
Showroom
Press and hold DOWN
and CLEAN over 6 seconds on standby
to toggle on/off the SHOWROOM mode.
The SHOWROOM indicator will light up.
*This mode is for dealers to display the unit, only the light and
the evaporator fan will function in this mode, all alarm will
disable except the door open alarm.
Screen Lock
Press and hold POWER and CLEAN over 6 seconds to toggle
ON/OFF the screen lock.
The Screen lock indicator will light up and the screen are
locked.
Filter Reset
Press and hold UP and POWER over 6 seconds to reset the
water filter life counter.
The window will be flashing
F11
and reset the filter
timer.
*This function can only start on standby. only use this after
replaced the water filter.
Firmware Version
&
System Recovery
Press and hold DOWN and POWER to display firmware
version
A5
Hold OVER 6 seconds will reset all settings to default.
*The firmware version is subject to change.
): Press and hold POWER for 3 seconds to immediately turn
OFF the unit.
• The unit will be in standby and will display
USING THE CONTROLS
The control panel is located at the top of the cabinet. Including a display window, 4 buttons and 6
indicators.
FUNCTION OPERATING
Turn ON
Press POWER to turn ON the unit.
The unit will automatically start making ice and display
ICE
on ice making,
HVE
on ice harvesting,
FUL
on
ice full, and
FUO
on Ice making recovery countdown.
The Ice making indicator will light up on ice making cycle.
Turn OFF
Press and hold POWER for 3 seconds can immediately turn
OFF the unit.
The unit will standby in 30 seconds and displaying
OFF
.
Adjust the ice
cube size
Press and hold UP or DOWN over 3 seconds to enter ICE
SIZE ADJUSTING. Then press UP or DOWN to switch
settings.
Window display
1
to
6
(min to max).
3
is the default ice
size.
The setting will be saved after 7 seconds.
Fast Ice Making
Press and hold UP and DOWN over 3 seconds to toggle
ON/OFF the Fast Ice Making.
The fast ice making indicator will light, during this mode the
ice making cycle will be shorter.
UP
DOWN
POWER
CLEAN
DISPLAY WINDOW
Fast Ice Making
Ice Making
Screen Lock
Maintenance
Cleaning
Lack Water
Showroom
Timed Start
Screen lockIce makingFast ice making Maintenance
CleaningTimed start No water Showroom
POWER CLEANUP DOWN DISPLAY WINDOW
Timed Ice making
Press and hold POWER and CLEAN over 3 seconds on
Standby to toggle ON/OFF the Timed Ice Making
When enter the timer setting, press UP or DOWN to select
from
1
to
12
hours to set the timer to run ice making,
the setting will auto save after 10 seconds, then the window
display countdown time in hours and the timed ice making
indicator will light.
*Press POWER can jump the countdown and immediately
start ice making.
Cleaning
Press and hold CLEAN over 3 seconds to turn ON/OFF the
CLEANING.
Once start, window display
CLE
and the clean indicator
will light, the clean cycle will run for 30 minuets
and then exit
to standby.
*This function can only start on standby.
Sabbath
Press and hold UP and CLEAN over 6 seconds to turn
ON/OFF the SATTBATH.
Display will be shut off, and the interior light and any audible
sound are also disabled in SABBATH.
Showroom
Press and hold DOWN
and CLEAN over 6 seconds on standby
to toggle on/off the SHOWROOM mode.
The SHOWROOM indicator will light up.
*This mode is for dealers to display the unit, only the light and
the evaporator fan will function in this mode, all alarm will
disable except the door open alarm.
Screen Lock
Press and hold POWER and CLEAN over 6 seconds to toggle
ON/OFF the screen lock.
The Screen lock indicator will light up and the screen are
locked.
Filter Reset
Press and hold UP and POWER over 6 seconds to reset the
water filter life counter.
The window will be flashing
F11
and reset the filter
timer.
*This function can only start on standby. only use this after
replaced the water filter.
Firmware Version
&
System Recovery
Press and hold DOWN and POWER to display firmware
version
A5
Hold OVER 6 seconds will reset all settings to default.
*The firmware version is subject to change.
.
Adjust the ice cube size (
USING THE CONTROLS
The control panel is located at the top of the cabinet. Including a display window, 4 buttons and 6
indicators.
FUNCTION OPERATING
Turn ON
Press POWER to turn ON the unit.
The unit will automatically start making ice and display
ICE
on ice making,
HVE
on ice harvesting,
FUL
on
ice full, and
FUO
on Ice making recovery countdown.
The Ice making indicator will light up on ice making cycle.
Turn OFF
Press and hold POWER for 3 seconds can immediately turn
OFF the unit.
The unit will standby in 30 seconds and displaying
OFF
.
Adjust the ice
cube size
Press and hold UP or DOWN over 3 seconds to enter ICE
SIZE ADJUSTING. Then press UP or DOWN to switch
settings.
Window display
1
to
6
(min to max).
3
is the default ice
size.
The setting will be saved after 7 seconds.
Fast Ice Making
Press and hold UP and DOWN over 3 seconds to toggle
ON/OFF the Fast Ice Making.
The fast ice making indicator will light, during this mode the
ice making cycle will be shorter.
UP
DOWN
POWER
CLEAN
DISPLAY WINDOW
Fast Ice Making
Ice Making
Screen Lock
Maintenance
Cleaning
Lack Water
Showroom
Timed Start
Screen lockIce makingFast ice making Maintenance
CleaningTimed start No water Showroom
POWER CLEANUP DOWN DISPLAY WINDOW
Timed Ice making
Press and hold POWER and CLEAN over 3 seconds on
Standby to toggle ON/OFF the Timed Ice Making
When enter the timer setting, press UP or DOWN to select
from
1
to
12
hours to set the timer to run ice making,
the setting will auto save after 10 seconds, then the window
display countdown time in hours and the timed ice making
indicator will light.
*Press POWER can jump the countdown and immediately
start ice making.
Cleaning
Press and hold CLEAN over 3 seconds to turn ON/OFF the
CLEANING.
Once start, window display
CLE
and the clean indicator
will light, the clean cycle will run for 30 minuets
and then exit
to standby.
*This function can only start on standby.
Sabbath
Press and hold UP and CLEAN over 6 seconds to turn
ON/OFF the SATTBATH.
Display will be shut off, and the interior light and any audible
sound are also disabled in SABBATH.
Showroom
Press and hold DOWN
and CLEAN over 6 seconds on standby
to toggle on/off the SHOWROOM mode.
The SHOWROOM indicator will light up.
*This mode is for dealers to display the unit, only the light and
the evaporator fan will function in this mode, all alarm will
disable except the door open alarm.
Screen Lock
Press and hold POWER and CLEAN over 6 seconds to toggle
ON/OFF the screen lock.
The Screen lock indicator will light up and the screen are
locked.
Filter Reset
Press and hold UP and POWER over 6 seconds to reset the
water filter life counter.
The window will be flashing
F11
and reset the filter
timer.
*This function can only start on standby. only use this after
replaced the water filter.
Firmware Version
&
System Recovery
Press and hold DOWN and POWER to display firmware
version
A5
Hold OVER 6 seconds will reset all settings to default.
*The firmware version is subject to change.
): Press and hold DOWN for over 3 seconds to enter Ice Size
Adjustment. Then press UP or DOWN to adjust.
• The display will show
USING THE CONTROLS
The control panel is located at the top of the cabinet. Including a display window, 4 buttons and 6
indicators.
FUNCTION OPERATING
Turn ON
Press POWER to turn ON the unit.
The unit will automatically start making ice and display
ICE
on ice making,
HVE
on ice harvesting,
FUL
on
ice full, and
FUO
on Ice making recovery countdown.
The Ice making indicator will light up on ice making cycle.
Turn OFF
Press and hold POWER for 3 seconds can immediately turn
OFF the unit.
The unit will standby in 30 seconds and displaying
OFF
.
Adjust the ice
cube size
Press and hold UP or DOWN over 3 seconds to enter ICE
SIZE ADJUSTING. Then press UP or DOWN to switch
settings.
Window display
1
to
6
(min to max).
3
is the default ice
size.
The setting will be saved after 7 seconds.
Fast Ice Making
Press and hold UP and DOWN over 3 seconds to toggle
ON/OFF the Fast Ice Making.
The fast ice making indicator will light, during this mode the
ice making cycle will be shorter.
UP
DOWN
POWER
CLEAN
DISPLAY WINDOW
Fast Ice Making
Ice Making
Screen Lock
Maintenance
Cleaning
Lack Water
Showroom
Timed Start
Screen lockIce makingFast ice making Maintenance
CleaningTimed start No water Showroom
POWER CLEANUP DOWN DISPLAY WINDOW
Timed Ice making
Press and hold POWER and CLEAN over 3 seconds on
Standby to toggle ON/OFF the Timed Ice Making
When enter the timer setting, press UP or DOWN to select
from
1
to
12
hours to set the timer to run ice making,
the setting will auto save after 10 seconds, then the window
display countdown time in hours and the timed ice making
indicator will light.
*Press POWER can jump the countdown and immediately
start ice making.
Cleaning
Press and hold CLEAN over 3 seconds to turn ON/OFF the
CLEANING.
Once start, window display
CLE
and the clean indicator
will light, the clean cycle will run for 30 minuets
and then exit
to standby.
*This function can only start on standby.
Sabbath
Press and hold UP and CLEAN over 6 seconds to turn
ON/OFF the SATTBATH.
Display will be shut off, and the interior light and any audible
sound are also disabled in SABBATH.
Showroom
Press and hold DOWN
and CLEAN over 6 seconds on standby
to toggle on/off the SHOWROOM mode.
The SHOWROOM indicator will light up.
*This mode is for dealers to display the unit, only the light and
the evaporator fan will function in this mode, all alarm will
disable except the door open alarm.
Screen Lock
Press and hold POWER and CLEAN over 6 seconds to toggle
ON/OFF the screen lock.
The Screen lock indicator will light up and the screen are
locked.
Filter Reset
Press and hold UP and POWER over 6 seconds to reset the
water filter life counter.
The window will be flashing
F11
and reset the filter
timer.
*This function can only start on standby. only use this after
replaced the water filter.
Firmware Version
&
System Recovery
Press and hold DOWN and POWER to display firmware
version
A5
Hold OVER 6 seconds will reset all settings to default.
*The firmware version is subject to change.
to
USING THE CONTROLS
The control panel is located at the top of the cabinet. Including a display window, 4 buttons and 6
indicators.
FUNCTION OPERATING
Turn ON
Press POWER to turn ON the unit.
The unit will automatically start making ice and display
ICE
on ice making,
HVE
on ice harvesting,
FUL
on
ice full, and
FUO
on Ice making recovery countdown.
The Ice making indicator will light up on ice making cycle.
Turn OFF
Press and hold POWER for 3 seconds can immediately turn
OFF the unit.
The unit will standby in 30 seconds and displaying
OFF
.
Adjust the ice
cube size
Press and hold UP or DOWN over 3 seconds to enter ICE
SIZE ADJUSTING. Then press UP or DOWN to switch
settings.
Window display
1
to
6
(min to max).
3
is the default ice
size.
The setting will be saved after 7 seconds.
Fast Ice Making
Press and hold UP and DOWN over 3 seconds to toggle
ON/OFF the Fast Ice Making.
The fast ice making indicator will light, during this mode the
ice making cycle will be shorter.
UP
DOWN
POWER
CLEAN
DISPLAY WINDOW
Fast Ice Making
Ice Making
Screen Lock
Maintenance
Cleaning
Lack Water
Showroom
Timed Start
Screen lockIce makingFast ice making Maintenance
CleaningTimed start No water Showroom
POWER CLEANUP DOWN DISPLAY WINDOW
Timed Ice making
Press and hold POWER and CLEAN over 3 seconds on
Standby to toggle ON/OFF the Timed Ice Making
When enter the timer setting, press UP or DOWN to select
from
1
to
12
hours to set the timer to run ice making,
the setting will auto save after 10 seconds, then the window
display countdown time in hours and the timed ice making
indicator will light.
*Press POWER can jump the countdown and immediately
start ice making.
Cleaning
Press and hold CLEAN over 3 seconds to turn ON/OFF the
CLEANING.
Once start, window display
CLE
and the clean indicator
will light, the clean cycle will run for 30 minuets
and then exit
to standby.
*This function can only start on standby.
Sabbath
Press and hold UP and CLEAN over 6 seconds to turn
ON/OFF the SATTBATH.
Display will be shut off, and the interior light and any audible
sound are also disabled in SABBATH.
Showroom
Press and hold DOWN
and CLEAN over 6 seconds on standby
to toggle on/off the SHOWROOM mode.
The SHOWROOM indicator will light up.
*This mode is for dealers to display the unit, only the light and
the evaporator fan will function in this mode, all alarm will
disable except the door open alarm.
Screen Lock
Press and hold POWER and CLEAN over 6 seconds to toggle
ON/OFF the screen lock.
The Screen lock indicator will light up and the screen are
locked.
Filter Reset
Press and hold UP and POWER over 6 seconds to reset the
water filter life counter.
The window will be flashing
F11
and reset the filter
timer.
*This function can only start on standby. only use this after
replaced the water filter.
Firmware Version
&
System Recovery
Press and hold DOWN and POWER to display firmware
version
A5
Hold OVER 6 seconds will reset all settings to default.
*The firmware version is subject to change.
(min to max).
USING THE CONTROLS
The control panel is located at the top of the cabinet. Including a display window, 4 buttons and 6
indicators.
FUNCTION OPERATING
Turn ON
Press POWER to turn ON the unit.
The unit will automatically start making ice and display
ICE
on ice making,
HVE
on ice harvesting,
FUL
on
ice full, and
FUO
on Ice making recovery countdown.
The Ice making indicator will light up on ice making cycle.
Turn OFF
Press and hold POWER for 3 seconds can immediately turn
OFF the unit.
The unit will standby in 30 seconds and displaying
OFF
.
Adjust the ice
cube size
Press and hold UP or DOWN over 3 seconds to enter ICE
SIZE ADJUSTING. Then press UP or DOWN to switch
settings.
Window display
1
to
6
(min to max).
3
is the default ice
size.
The setting will be saved after 7 seconds.
Fast Ice Making
Press and hold UP and DOWN over 3 seconds to toggle
ON/OFF the Fast Ice Making.
The fast ice making indicator will light, during this mode the
ice making cycle will be shorter.
UP
DOWN
POWER
CLEAN
DISPLAY WINDOW
Fast Ice Making
Ice Making
Screen Lock
Maintenance
Cleaning
Lack Water
Showroom
Timed Start
Screen lockIce makingFast ice making Maintenance
CleaningTimed start No water Showroom
POWER CLEANUP DOWN DISPLAY WINDOW
Timed Ice making
Press and hold POWER and CLEAN over 3 seconds on
Standby to toggle ON/OFF the Timed Ice Making
When enter the timer setting, press UP or DOWN to select
from
1
to
12
hours to set the timer to run ice making,
the setting will auto save after 10 seconds, then the window
display countdown time in hours and the timed ice making
indicator will light.
*Press POWER can jump the countdown and immediately
start ice making.
Cleaning
Press and hold CLEAN over 3 seconds to turn ON/OFF the
CLEANING.
Once start, window display
CLE
and the clean indicator
will light, the clean cycle will run for 30 minuets
and then exit
to standby.
*This function can only start on standby.
Sabbath
Press and hold UP and CLEAN over 6 seconds to turn
ON/OFF the SATTBATH.
Display will be shut off, and the interior light and any audible
sound are also disabled in SABBATH.
Showroom
Press and hold DOWN
and CLEAN over 6 seconds on standby
to toggle on/off the SHOWROOM mode.
The SHOWROOM indicator will light up.
*This mode is for dealers to display the unit, only the light and
the evaporator fan will function in this mode, all alarm will
disable except the door open alarm.
Screen Lock
Press and hold POWER and CLEAN over 6 seconds to toggle
ON/OFF the screen lock.
The Screen lock indicator will light up and the screen are
locked.
Filter Reset
Press and hold UP and POWER over 6 seconds to reset the
water filter life counter.
The window will be flashing
F11
and reset the filter
timer.
*This function can only start on standby. only use this after
replaced the water filter.
Firmware Version
&
System Recovery
Press and hold DOWN and POWER to display firmware
version
A5
Hold OVER 6 seconds will reset all settings to default.
*The firmware version is subject to change.
is the default ice size.
• The setting will be saved after 7 seconds.
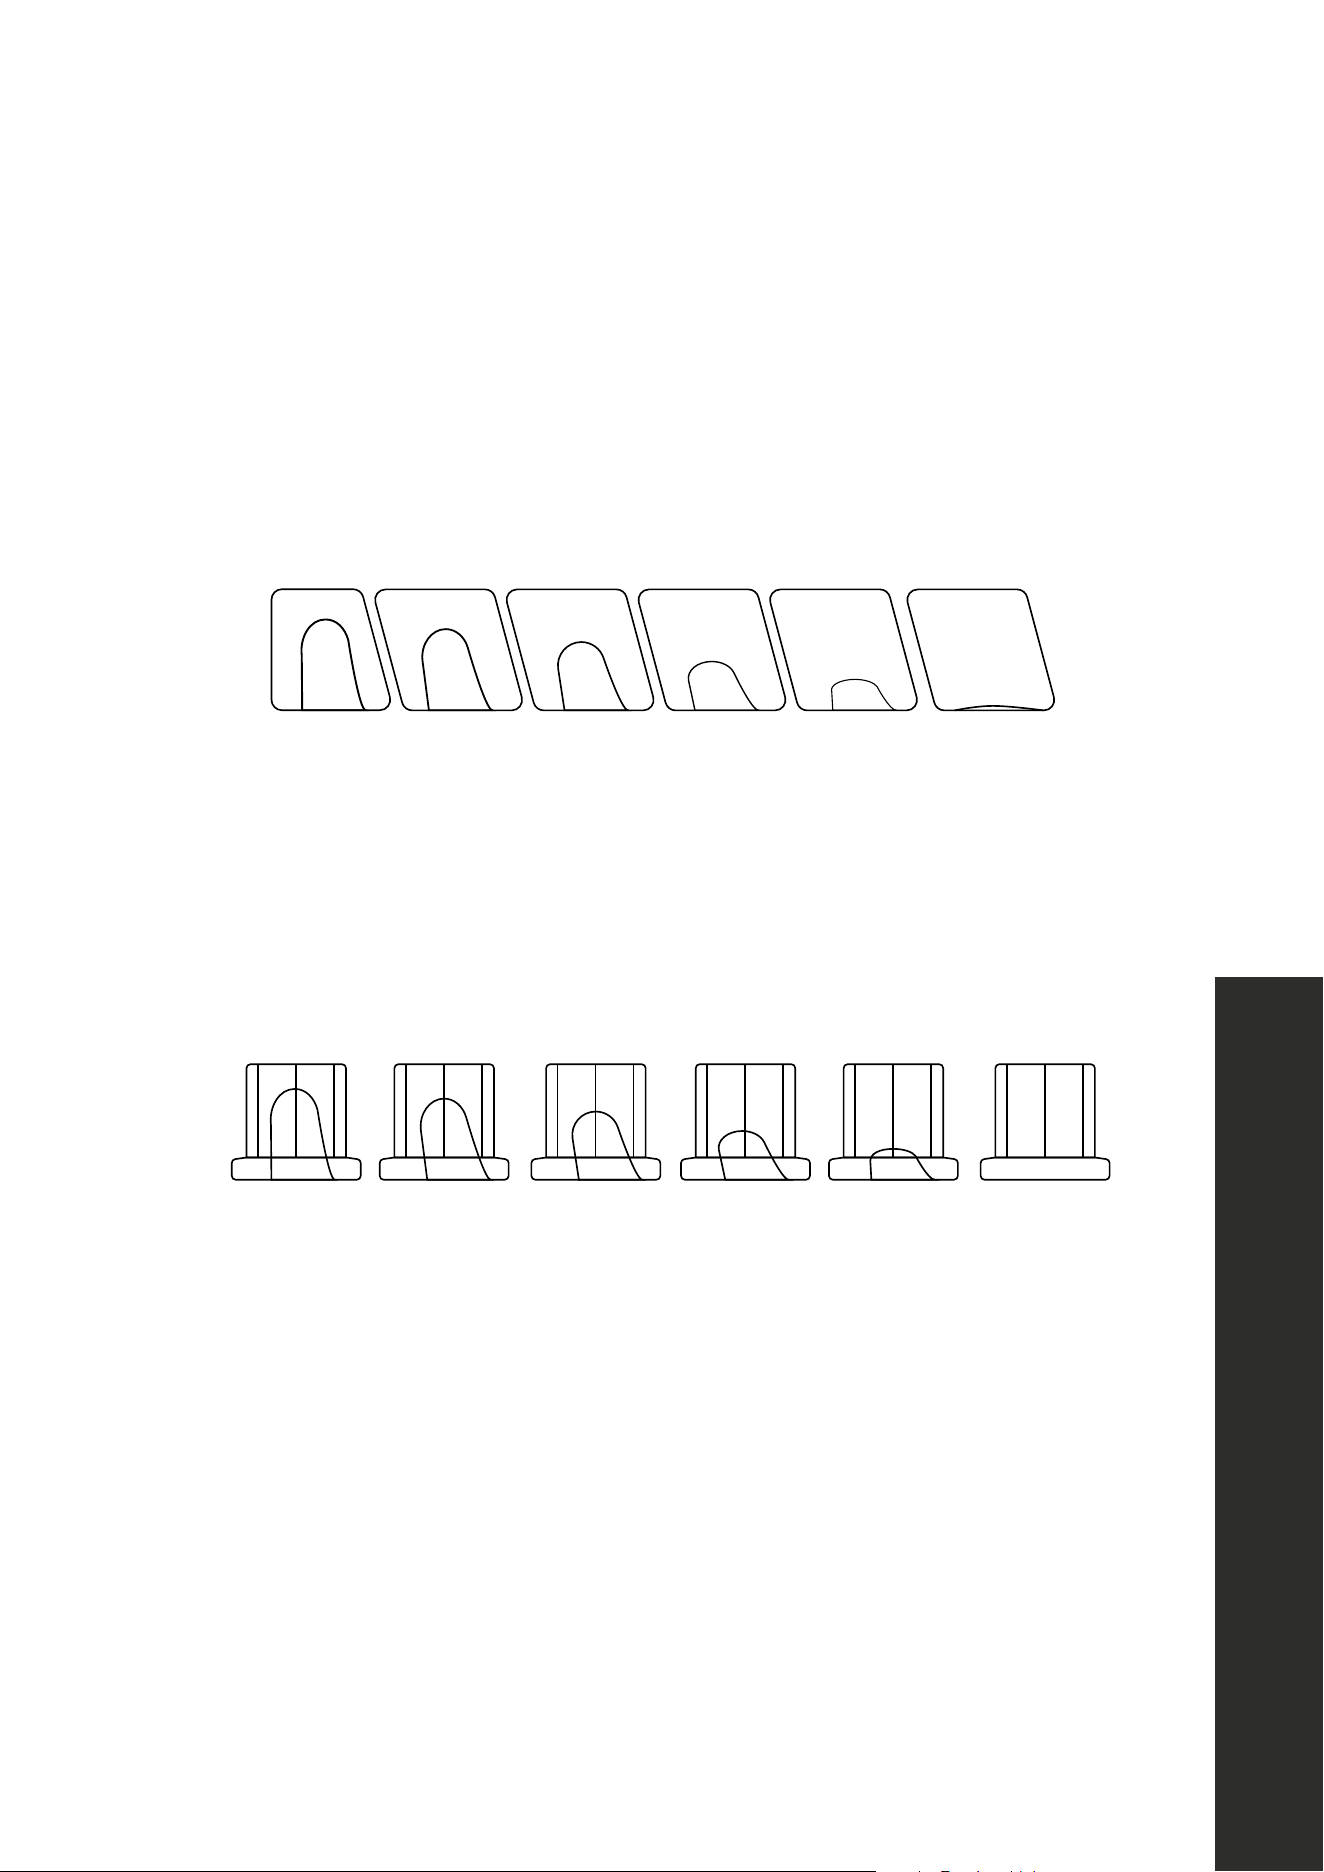
23
OPERATION
Ice Cube Size Settings
ICE CUBE SIZE SETTINGS
ICCD-ST-15 & ICCDP-15 MODELS
For ICCD-ST-15 & ICCDP-15 models, the hollow shape inside each cube will increase
or decrease depending on which size level is chosen. For example, Level 1 produces the
smallest cube, while Level 6 produces the largest, as outlined below.
Clear Cube Ice
Gourmet Ice
Notes: The clear cube Ice isn’t actually a perfectly square cube - but actually a variaton
of trapezoids - in which 90% match, with 10% being slightly Dierent.
This is also aected by the “Level” of ice (1 - 6) which actually create dierent
volumetric levels of ice per cube - rather than increase the overall size:
See the Following Diagram:
Notes: The Gourmet Ice - Similar Principle applies for the Gourmet Ice. For level 1 - 6, it creates a more
or less Hollow Variation - that increases or decreases the volume of Ice.
Please see the Following Diagram:
Ice Side View:
As you can see, the ice shape is more trapezoid in shape, where its made from the ice mold - with the rst
row of ice, have more of a straight back compared to the rest.
Level 1 Level 2 Level 3 Level 4 Level 5 Level 6
Level 1 Level 2 Level 3 Level 4 Level 5 Level 6
For the “Level” of ice - I - 6 create a hollow shape inside of the ice - this is that the machine does in order to have
“More” ice or “less” amount of Ice
Side View
NOTE: CURRENTLY REQUESTING MORE INFO FROM THE MFT. - BUT THIS IS WHAT OUR INTERNAL
FINDINGS ARE SO FAR.
IGMD-ST-15 & IGMDP-15 MODELS
For IGMD-ST-15 & IGMDP-15 models, the hollow shape inside each cube will increase
or decrease depending on which size level is chosen. For example, Level 1 produces the
smallest cube, while Level 6 produces the largest, as outlined below.
Clear Cube Ice
Gourmet Ice
Notes: The clear cube Ice isn’t actually a perfectly square cube - but actually a variaton
of trapezoids - in which 90% match, with 10% being slightly Dierent.
This is also aected by the “Level” of ice (1 - 6) which actually create dierent
volumetric levels of ice per cube - rather than increase the overall size:
See the Following Diagram:
Notes: The Gourmet Ice - Similar Principle applies for the Gourmet Ice. For level 1 - 6, it creates a more
or less Hollow Variation - that increases or decreases the volume of Ice.
Please see the Following Diagram:
Ice Side View:
As you can see, the ice shape is more trapezoid in shape, where its made from the ice mold - with the rst
row of ice, have more of a straight back compared to the rest.
Level 1 Level 2 Level 3 Level 4 Level 5 Level 6
Level 1 Level 2 Level 3 Level 4 Level 5 Level 6
For the “Level” of ice - I - 6 create a hollow shape inside of the ice - this is that the machine does in order to have
“More” ice or “less” amount of Ice
Side View
NOTE: CURRENTLY REQUESTING MORE INFO FROM THE MFT. - BUT THIS IS WHAT OUR INTERNAL
FINDINGS ARE SO FAR.

24
OPERATION
Fast Ice Making (
USING THE CONTROLS
The control panel is located at the top of the cabinet. Including a display window, 4 buttons and 6
indicators.
FUNCTION OPERATING
Turn ON
Press POWER to turn ON the unit.
The unit will automatically start making ice and display
ICE
on ice making,
HVE
on ice harvesting,
FUL
on
ice full, and
FUO
on Ice making recovery countdown.
The Ice making indicator will light up on ice making cycle.
Turn OFF
Press and hold POWER for 3 seconds can immediately turn
OFF the unit.
The unit will standby in 30 seconds and displaying
OFF
.
Adjust the ice
cube size
Press and hold UP or DOWN over 3 seconds to enter ICE
SIZE ADJUSTING. Then press UP or DOWN to switch
settings.
Window display
1
to
6
(min to max).
3
is the default ice
size.
The setting will be saved after 7 seconds.
Fast Ice Making
Press and hold UP and DOWN over 3 seconds to toggle
ON/OFF the Fast Ice Making.
The fast ice making indicator will light, during this mode the
ice making cycle will be shorter.
UP
DOWN
POWER
CLEAN
DISPLAY WINDOW
Fast Ice Making
Ice Making
Screen Lock
Maintenance
Cleaning
Lack Water
Showroom
Timed Start
Screen lockIce makingFast ice making Maintenance
CleaningTimed start No water Showroom
POWER CLEANUP DOWN DISPLAY WINDOW
Timed Ice making
Press and hold POWER and CLEAN over 3 seconds on
Standby to toggle ON/OFF the Timed Ice Making
When enter the timer setting, press UP or DOWN to select
from
1
to
12
hours to set the timer to run ice making,
the setting will auto save after 10 seconds, then the window
display countdown time in hours and the timed ice making
indicator will light.
*Press POWER can jump the countdown and immediately
start ice making.
Cleaning
Press and hold CLEAN over 3 seconds to turn ON/OFF the
CLEANING.
Once start, window display
CLE
and the clean indicator
will light, the clean cycle will run for 30 minuets
and then exit
to standby.
*This function can only start on standby.
Sabbath
Press and hold UP and CLEAN over 6 seconds to turn
ON/OFF the SATTBATH.
Display will be shut off, and the interior light and any audible
sound are also disabled in SABBATH.
Showroom
Press and hold DOWN
and CLEAN over 6 seconds on standby
to toggle on/off the SHOWROOM mode.
The SHOWROOM indicator will light up.
*This mode is for dealers to display the unit, only the light and
the evaporator fan will function in this mode, all alarm will
disable except the door open alarm.
Screen Lock
Press and hold POWER and CLEAN over 6 seconds to toggle
ON/OFF the screen lock.
The Screen lock indicator will light up and the screen are
locked.
Filter Reset
Press and hold UP and POWER over 6 seconds to reset the
water filter life counter.
The window will be flashing
F11
and reset the filter
timer.
*This function can only start on standby. only use this after
replaced the water filter.
Firmware Version
&
System Recovery
Press and hold DOWN and POWER to display firmware
version
A5
Hold OVER 6 seconds will reset all settings to default.
*The firmware version is subject to change.
): Press and hold UP and DOWN for over 3 seconds to toggle
ON/OFF Fast Ice Making.
• The fast ice-making symbol will illuminate — during this mode the ice-making cycle will
be shorter.
Timed Ice Making (
Timed Ice making
Press and hold POWER and CLEAN over 3 seconds on
Standby to toggle ON/OFF the Timed Ice Making
When enter the timer setting, press UP or DOWN to select
from
1
to
12
hours to set the timer to run ice making,
the setting will auto save after 10 seconds, then the window
display countdown time in hours and the timed ice making
indicator will light.
*Press POWER can jump the countdown and immediately
start ice making.
Cleaning
Press and hold CLEAN over 3 seconds to turn ON/OFF the
CLEANING.
Once start, window display
CLE
and the clean indicator
will light, the clean cycle will run for 30 minuets
and then exit
to standby.
*This function can only start on standby.
Sabbath
Press and hold UP and CLEAN over 6 seconds to turn
ON/OFF the SATTBATH.
Display will be shut off, and the interior light and any audible
sound are also disabled in SABBATH.
Showroom
Press and hold DOWN
and CLEAN over 6 seconds on standby
to toggle on/off the SHOWROOM mode.
The SHOWROOM indicator will light up.
*This mode is for dealers to display the unit, only the light and
the evaporator fan will function in this mode, all alarm will
disable except the door open alarm.
Screen Lock
Press and hold POWER and CLEAN over 6 seconds to toggle
ON/OFF the screen lock.
The Screen lock indicator will light up and the screen are
locked.
Filter Reset
Press and hold UP and POWER over 6 seconds to reset the
water filter life counter.
The window will be flashing
F11
and reset the filter
timer.
*This function can only start on standby. only use this after
replaced the water filter.
Firmware Version
&
System Recovery
Press and hold DOWN and POWER to display firmware
version
A5
Hold OVER 6 seconds will reset all settings to default.
*The firmware version is subject to change.
): When in Standby, press and hold POWER and CLEAN for
over 3 seconds to toggle ON/OFF Timed Ice Making.
• Once toggled ON, press UP or DOWN to select between
USING THE CONTROLS
The control panel is located at the top of the cabinet. Including a display window, 4 buttons and 6
indicators.
FUNCTION OPERATING
Turn ON
Press POWER to turn ON the unit.
The unit will automatically start making ice and display
ICE
on ice making,
HVE
on ice harvesting,
FUL
on
ice full, and
FUO
on Ice making recovery countdown.
The Ice making indicator will light up on ice making cycle.
Turn OFF
Press and hold POWER for 3 seconds can immediately turn
OFF the unit.
The unit will standby in 30 seconds and displaying
OFF
.
Adjust the ice
cube size
Press and hold UP or DOWN over 3 seconds to enter ICE
SIZE ADJUSTING. Then press UP or DOWN to switch
settings.
Window display
1
to
6
(min to max).
3
is the default ice
size.
The setting will be saved after 7 seconds.
Fast Ice Making
Press and hold UP and DOWN over 3 seconds to toggle
ON/OFF the Fast Ice Making.
The fast ice making indicator will light, during this mode the
ice making cycle will be shorter.
UP
DOWN
POWER
CLEAN
DISPLAY WINDOW
Fast Ice Making
Ice Making
Screen Lock
Maintenance
Cleaning
Lack Water
Showroom
Timed Start
Screen lockIce makingFast ice making Maintenance
CleaningTimed start No water Showroom
POWER CLEANUP DOWN DISPLAY WINDOW
Timed Ice making
Press and hold POWER and CLEAN over 3 seconds on
Standby to toggle ON/OFF the Timed Ice Making
When enter the timer setting, press UP or DOWN to select
from
1
to
12
hours to set the timer to run ice making,
the setting will auto save after 10 seconds, then the window
display countdown time in hours and the timed ice making
indicator will light.
*Press POWER can jump the countdown and immediately
start ice making.
Cleaning
Press and hold CLEAN over 3 seconds to turn ON/OFF the
CLEANING.
Once start, window display
CLE
and the clean indicator
will light, the clean cycle will run for 30 minuets
and then exit
to standby.
*This function can only start on standby.
Sabbath
Press and hold UP and CLEAN over 6 seconds to turn
ON/OFF the SATTBATH.
Display will be shut off, and the interior light and any audible
sound are also disabled in SABBATH.
Showroom
Press and hold DOWN
and CLEAN over 6 seconds on standby
to toggle on/off the SHOWROOM mode.
The SHOWROOM indicator will light up.
*This mode is for dealers to display the unit, only the light and
the evaporator fan will function in this mode, all alarm will
disable except the door open alarm.
Screen Lock
Press and hold POWER and CLEAN over 6 seconds to toggle
ON/OFF the screen lock.
The Screen lock indicator will light up and the screen are
locked.
Filter Reset
Press and hold UP and POWER over 6 seconds to reset the
water filter life counter.
The window will be flashing
F11
and reset the filter
timer.
*This function can only start on standby. only use this after
replaced the water filter.
Firmware Version
&
System Recovery
Press and hold DOWN and POWER to display firmware
version
A5
Hold OVER 6 seconds will reset all settings to default.
*The firmware version is subject to change.
to
Timed Ice making
Press and hold POWER and CLEAN over 3 seconds on
Standby to toggle ON/OFF the Timed Ice Making
When enter the timer setting, press UP or DOWN to select
from
1
to
12
hours to set the timer to run ice making,
the setting will auto save after 10 seconds, then the window
display countdown time in hours and the timed ice making
indicator will light.
*Press POWER can jump the countdown and immediately
start ice making.
Cleaning
Press and hold CLEAN over 3 seconds to turn ON/OFF the
CLEANING.
Once start, window display
CLE
and the clean indicator
will light, the clean cycle will run for 30 minuets
and then exit
to standby.
*This function can only start on standby.
Sabbath
Press and hold UP and CLEAN over 6 seconds to turn
ON/OFF the SATTBATH.
Display will be shut off, and the interior light and any audible
sound are also disabled in SABBATH.
Showroom
Press and hold DOWN
and CLEAN over 6 seconds on standby
to toggle on/off the SHOWROOM mode.
The SHOWROOM indicator will light up.
*This mode is for dealers to display the unit, only the light and
the evaporator fan will function in this mode, all alarm will
disable except the door open alarm.
Screen Lock
Press and hold POWER and CLEAN over 6 seconds to toggle
ON/OFF the screen lock.
The Screen lock indicator will light up and the screen are
locked.
Filter Reset
Press and hold UP and POWER over 6 seconds to reset the
water filter life counter.
The window will be flashing
F11
and reset the filter
timer.
*This function can only start on standby. only use this after
replaced the water filter.
Firmware Version
&
System Recovery
Press and hold DOWN and POWER to display firmware
version
A5
Hold OVER 6 seconds will reset all settings to default.
*The firmware version is subject to change.
hours for the timer. The
setting will auto-save after 10 seconds, the window will display the countdown time in
hours, and the timed ice-making symbol will illuminate.
• For example, if you set the timer to 6 hours, the unit will wait 6 hours before starting
the ice-making process.
• Pressing POWER will skip the countdown and immediately start ice making.
Cleaning (
Timed Ice making
Press and hold POWER and CLEAN over 3 seconds on
Standby to toggle ON/OFF the Timed Ice Making
When enter the timer setting, press UP or DOWN to select
from
1
to
12
hours to set the timer to run ice making,
the setting will auto save after 10 seconds, then the window
display countdown time in hours and the timed ice making
indicator will light.
*Press POWER can jump the countdown and immediately
start ice making.
Cleaning
Press and hold CLEAN over 3 seconds to turn ON/OFF the
CLEANING.
Once start, window display
CLE
and the clean indicator
will light, the clean cycle will run for 30 minuets
and then exit
to standby.
*This function can only start on standby.
Sabbath
Press and hold UP and CLEAN over 6 seconds to turn
ON/OFF the SATTBATH.
Display will be shut off, and the interior light and any audible
sound are also disabled in SABBATH.
Showroom
Press and hold DOWN
and CLEAN over 6 seconds on standby
to toggle on/off the SHOWROOM mode.
The SHOWROOM indicator will light up.
*This mode is for dealers to display the unit, only the light and
the evaporator fan will function in this mode, all alarm will
disable except the door open alarm.
Screen Lock
Press and hold POWER and CLEAN over 6 seconds to toggle
ON/OFF the screen lock.
The Screen lock indicator will light up and the screen are
locked.
Filter Reset
Press and hold UP and POWER over 6 seconds to reset the
water filter life counter.
The window will be flashing
F11
and reset the filter
timer.
*This function can only start on standby. only use this after
replaced the water filter.
Firmware Version
&
System Recovery
Press and hold DOWN and POWER to display firmware
version
A5
Hold OVER 6 seconds will reset all settings to default.
*The firmware version is subject to change.
): When in Standby, press and hold CLEAN for over 3 seconds to turn ON/
OFF the SELF CLEANING CYCLE.
• Once started, the window will display
Timed Ice making
Press and hold POWER and CLEAN over 3 seconds on
Standby to toggle ON/OFF the Timed Ice Making
When enter the timer setting, press UP or DOWN to select
from
1
to
12
hours to set the timer to run ice making,
the setting will auto save after 10 seconds, then the window
display countdown time in hours and the timed ice making
indicator will light.
*Press POWER can jump the countdown and immediately
start ice making.
Cleaning
Press and hold CLEAN over 3 seconds to turn ON/OFF the
CLEANING.
Once start, window display
CLE
and the clean indicator
will light, the clean cycle will run for 30 minuets
and then exit
to standby.
*This function can only start on standby.
Sabbath
Press and hold UP and CLEAN over 6 seconds to turn
ON/OFF the SATTBATH.
Display will be shut off, and the interior light and any audible
sound are also disabled in SABBATH.
Showroom
Press and hold DOWN
and CLEAN over 6 seconds on standby
to toggle on/off the SHOWROOM mode.
The SHOWROOM indicator will light up.
*This mode is for dealers to display the unit, only the light and
the evaporator fan will function in this mode, all alarm will
disable except the door open alarm.
Screen Lock
Press and hold POWER and CLEAN over 6 seconds to toggle
ON/OFF the screen lock.
The Screen lock indicator will light up and the screen are
locked.
Filter Reset
Press and hold UP and POWER over 6 seconds to reset the
water filter life counter.
The window will be flashing
F11
and reset the filter
timer.
*This function can only start on standby. only use this after
replaced the water filter.
Firmware Version
&
System Recovery
Press and hold DOWN and POWER to display firmware
version
A5
Hold OVER 6 seconds will reset all settings to default.
*The firmware version is subject to change.
and the clean indicator will illuminate. The
clean cycle will run for 30 minutes and then the unit will return to standby.
• This function can only be started from standby.
Sabbath Mode (
Timed Ice making
Press and hold POWER and CLEAN over 3 seconds on
Standby to toggle ON/OFF the Timed Ice Making
When enter the timer setting, press UP or DOWN to select
from
1
to
12
hours to set the timer to run ice making,
the setting will auto save after 10 seconds, then the window
display countdown time in hours and the timed ice making
indicator will light.
*Press POWER can jump the countdown and immediately
start ice making.
Cleaning
Press and hold CLEAN over 3 seconds to turn ON/OFF the
CLEANING.
Once start, window display
CLE
and the clean indicator
will light, the clean cycle will run for 30 minuets
and then exit
to standby.
*This function can only start on standby.
Sabbath
Press and hold UP and CLEAN over 6 seconds to turn
ON/OFF the SATTBATH.
Display will be shut off, and the interior light and any audible
sound are also disabled in SABBATH.
Showroom
Press and hold DOWN
and CLEAN over 6 seconds on standby
to toggle on/off the SHOWROOM mode.
The SHOWROOM indicator will light up.
*This mode is for dealers to display the unit, only the light and
the evaporator fan will function in this mode, all alarm will
disable except the door open alarm.
Screen Lock
Press and hold POWER and CLEAN over 6 seconds to toggle
ON/OFF the screen lock.
The Screen lock indicator will light up and the screen are
locked.
Filter Reset
Press and hold UP and POWER over 6 seconds to reset the
water filter life counter.
The window will be flashing
F11
and reset the filter
timer.
*This function can only start on standby. only use this after
replaced the water filter.
Firmware Version
&
System Recovery
Press and hold DOWN and POWER to display firmware
version
A5
Hold OVER 6 seconds will reset all settings to default.
*The firmware version is subject to change.
): Press and hold UP and CLEAN for over 6 seconds to turn ON/
OFF SABBATH MODE.
• When in Sabbath Mode, the display, interior light, and any audible tone will be disabled.
Showroom Mode (
Timed Ice making
Press and hold POWER and CLEAN over 3 seconds on
Standby to toggle ON/OFF the Timed Ice Making
When enter the timer setting, press UP or DOWN to select
from
1
to
12
hours to set the timer to run ice making,
the setting will auto save after 10 seconds, then the window
display countdown time in hours and the timed ice making
indicator will light.
*Press POWER can jump the countdown and immediately
start ice making.
Cleaning
Press and hold CLEAN over 3 seconds to turn ON/OFF the
CLEANING.
Once start, window display
CLE
and the clean indicator
will light, the clean cycle will run for 30 minuets
and then exit
to standby.
*This function can only start on standby.
Sabbath
Press and hold UP and CLEAN over 6 seconds to turn
ON/OFF the SATTBATH.
Display will be shut off, and the interior light and any audible
sound are also disabled in SABBATH.
Showroom
Press and hold DOWN
and CLEAN over 6 seconds on standby
to toggle on/off the SHOWROOM mode.
The SHOWROOM indicator will light up.
*This mode is for dealers to display the unit, only the light and
the evaporator fan will function in this mode, all alarm will
disable except the door open alarm.
Screen Lock
Press and hold POWER and CLEAN over 6 seconds to toggle
ON/OFF the screen lock.
The Screen lock indicator will light up and the screen are
locked.
Filter Reset
Press and hold UP and POWER over 6 seconds to reset the
water filter life counter.
The window will be flashing
F11
and reset the filter
timer.
*This function can only start on standby. only use this after
replaced the water filter.
Firmware Version
&
System Recovery
Press and hold DOWN and POWER to display firmware
version
A5
Hold OVER 6 seconds will reset all settings to default.
*The firmware version is subject to change.
): When in Standby, press and hold DOWN and CLEAN for over
6 seconds to toggle ON/OFF SHOWROOM MODE
• The Showroom indicator will illuminate.
• Showroom Mode allows you to the display the unit without operation.
Control Lock (
Timed Ice making
Press and hold POWER and CLEAN over 3 seconds on
Standby to toggle ON/OFF the Timed Ice Making
When enter the timer setting, press UP or DOWN to select
from
1
to
12
hours to set the timer to run ice making,
the setting will auto save after 10 seconds, then the window
display countdown time in hours and the timed ice making
indicator will light.
*Press POWER can jump the countdown and immediately
start ice making.
Cleaning
Press and hold CLEAN over 3 seconds to turn ON/OFF the
CLEANING.
Once start, window display
CLE
and the clean indicator
will light, the clean cycle will run for 30 minuets
and then exit
to standby.
*This function can only start on standby.
Sabbath
Press and hold UP and CLEAN over 6 seconds to turn
ON/OFF the SATTBATH.
Display will be shut off, and the interior light and any audible
sound are also disabled in SABBATH.
Showroom
Press and hold DOWN
and CLEAN over 6 seconds on standby
to toggle on/off the SHOWROOM mode.
The SHOWROOM indicator will light up.
*This mode is for dealers to display the unit, only the light and
the evaporator fan will function in this mode, all alarm will
disable except the door open alarm.
Screen Lock
Press and hold POWER and CLEAN over 6 seconds to toggle
ON/OFF the screen lock.
The Screen lock indicator will light up and the screen are
locked.
Filter Reset
Press and hold UP and POWER over 6 seconds to reset the
water filter life counter.
The window will be flashing
F11
and reset the filter
timer.
*This function can only start on standby. only use this after
replaced the water filter.
Firmware Version
&
System Recovery
Press and hold DOWN and POWER to display firmware
version
A5
Hold OVER 6 seconds will reset all settings to default.
*The firmware version is subject to change.
): Press and hold POWER and CLEAN for over 6 seconds to LOCK/
UNLOCK the controls.
• The screen lock indicator will illuminate and the controls will be locked. Repeat this action
to unlock the controls.
Controls

25
OPERATION
Filter Reset (
Timed Ice making
Press and hold POWER and CLEAN over 3 seconds on
Standby to toggle ON/OFF the Timed Ice Making
When enter the timer setting, press UP or DOWN to select
from
1
to
12
hours to set the timer to run ice making,
the setting will auto save after 10 seconds, then the window
display countdown time in hours and the timed ice making
indicator will light.
*Press POWER can jump the countdown and immediately
start ice making.
Cleaning
Press and hold CLEAN over 3 seconds to turn ON/OFF the
CLEANING.
Once start, window display
CLE
and the clean indicator
will light, the clean cycle will run for 30 minuets
and then exit
to standby.
*This function can only start on standby.
Sabbath
Press and hold UP and CLEAN over 6 seconds to turn
ON/OFF the SATTBATH.
Display will be shut off, and the interior light and any audible
sound are also disabled in SABBATH.
Showroom
Press and hold DOWN
and CLEAN over 6 seconds on standby
to toggle on/off the SHOWROOM mode.
The SHOWROOM indicator will light up.
*This mode is for dealers to display the unit, only the light and
the evaporator fan will function in this mode, all alarm will
disable except the door open alarm.
Screen Lock
Press and hold POWER and CLEAN over 6 seconds to toggle
ON/OFF the screen lock.
The Screen lock indicator will light up and the screen are
locked.
Filter Reset
Press and hold UP and POWER over 6 seconds to reset the
water filter life counter.
The window will be flashing
F11
and reset the filter
timer.
*This function can only start on standby. only use this after
replaced the water filter.
Firmware Version
&
System Recovery
Press and hold DOWN and POWER to display firmware
version
A5
Hold OVER 6 seconds will reset all settings to default.
*The firmware version is subject to change.
): After replacing the water filter, press and hold UP and POWER for
over 6 seconds to reset the filter timer.
• The display flashes
Timed Ice making
Press and hold POWER and CLEAN over 3 seconds on
Standby to toggle ON/OFF the Timed Ice Making
When enter the timer setting, press UP or DOWN to select
from
1
to
12
hours to set the timer to run ice making,
the setting will auto save after 10 seconds, then the window
display countdown time in hours and the timed ice making
indicator will light.
*Press POWER can jump the countdown and immediately
start ice making.
Cleaning
Press and hold CLEAN over 3 seconds to turn ON/OFF the
CLEANING.
Once start, window display
CLE
and the clean indicator
will light, the clean cycle will run for 30 minuets
and then exit
to standby.
*This function can only start on standby.
Sabbath
Press and hold UP and CLEAN over 6 seconds to turn
ON/OFF the SATTBATH.
Display will be shut off, and the interior light and any audible
sound are also disabled in SABBATH.
Showroom
Press and hold DOWN
and CLEAN over 6 seconds on standby
to toggle on/off the SHOWROOM mode.
The SHOWROOM indicator will light up.
*This mode is for dealers to display the unit, only the light and
the evaporator fan will function in this mode, all alarm will
disable except the door open alarm.
Screen Lock
Press and hold POWER and CLEAN over 6 seconds to toggle
ON/OFF the screen lock.
The Screen lock indicator will light up and the screen are
locked.
Filter Reset
Press and hold UP and POWER over 6 seconds to reset the
water filter life counter.
The window will be flashing
F11
and reset the filter
timer.
*This function can only start on standby. only use this after
replaced the water filter.
Firmware Version
&
System Recovery
Press and hold DOWN and POWER to display firmware
version
A5
Hold OVER 6 seconds will reset all settings to default.
*The firmware version is subject to change.
as a filter replacement reminder.
• This function can only be performed while the unit is on standby. Only reset this after
replacing the water filter
Factory Reset (
Timed Ice making
Press and hold POWER and CLEAN over 3 seconds on
Standby to toggle ON/OFF the Timed Ice Making
When enter the timer setting, press UP or DOWN to select
from
1
to
12
hours to set the timer to run ice making,
the setting will auto save after 10 seconds, then the window
display countdown time in hours and the timed ice making
indicator will light.
*Press POWER can jump the countdown and immediately
start ice making.
Cleaning
Press and hold CLEAN over 3 seconds to turn ON/OFF the
CLEANING.
Once start, window display
CLE
and the clean indicator
will light, the clean cycle will run for 30 minuets
and then exit
to standby.
*This function can only start on standby.
Sabbath
Press and hold UP and CLEAN over 6 seconds to turn
ON/OFF the SATTBATH.
Display will be shut off, and the interior light and any audible
sound are also disabled in SABBATH.
Showroom
Press and hold DOWN
and CLEAN over 6 seconds on standby
to toggle on/off the SHOWROOM mode.
The SHOWROOM indicator will light up.
*This mode is for dealers to display the unit, only the light and
the evaporator fan will function in this mode, all alarm will
disable except the door open alarm.
Screen Lock
Press and hold POWER and CLEAN over 6 seconds to toggle
ON/OFF the screen lock.
The Screen lock indicator will light up and the screen are
locked.
Filter Reset
Press and hold UP and POWER over 6 seconds to reset the
water filter life counter.
The window will be flashing
F11
and reset the filter
timer.
*This function can only start on standby. only use this after
replaced the water filter.
Firmware Version
&
System Recovery
Press and hold DOWN and POWER to display firmware
version
A5
Hold OVER 6 seconds will reset all settings to default.
*The firmware version is subject to change.
): Press and hold DOWN and POWER for over 6 seconds to reset all
the settings to default.
EXPECTING NORMAL SOUNDS
Your new ice maker may make sounds that are not familiar to you. Hard surfaces like the
floor and walls can make the sounds seem louder than they actually are. The following
describes the kinds of sounds that might be new to you and the source of those sounds,
which are normal as part of the machine's operation:
• The high-efficiency compressor may make a pulsating or high-pitched sound.
• Water running from the evaporator to the water reservoir may make a splashing sound.
• As each cycle ends, you may hear a gurgling sound due to the refrigerant flowing
through your ice maker.
• Rattling noises may come from the flow of the refrigerant or the water line or items stored
on top of machine.
• You may hear the sound of the condenser fan forcing air over the condenser.
• During the harvest cycle, you may hear the sound of ice cubes falling into the ice bin.
Normal Sounds
26
OPERATION
PANEL DISPLAY NOTIFICATION
Self-diagnosis pass
EXPECTING NORMAL SOUNDS
Your new ice machine may make sounds that are not familiar to you. Hard surfaces like the floor and
walls can make the sounds seem louder than they actually are. The following describes the kinds of
sounds that might be new to you and the source of those sounds:
the ice machine can also make noises.
• The high-efficiency compressor may make a pulsating or high-pitched sound.
• Water running from the evaporator to the water reservoir may make a splashing sound.
• As each cycle ends, you may hear a gurgling sound due to the refrigerant flowing in your ice
• Rattling noises may come from the flow of the refrigerant or the water line. Items store on top of
machine.
• You may hear the sound of the condenser fan forcing air over the condenser.
• During the harvest cycle, you may hear the sound of ice cubes falling into the ice bin.
PANEL DISPLAY NOTIFICATION
Below notifications will sound the alarm except the Ice full stop.
Self-diagnosis Pass
888
Only displays on the beginning of the working
progress.
Filling Water
FIL
Ice Full Stop
FUL
If the ice storage bin is full, the unit will
automatically stop.
Remove the ice and the unit will start making ice
after 3 minutes.
Door Ajar Alarm
dr
If the door is not closed completely for 5 minutes,
the panel will be flashing ‘dr’ with alarm sounds.
All these alerts will be cleared up when the door is
closed or press any button.
Clean Reminder
CLE
When the unit has worked for approx 6 month
without running CLEANING program, the panel will
be flashing ‘CL’ as the reminder.
Run CLEANING to clear the alarm.
Filter Replace Reminder
FI1
When the unit has worked for approx 6 month the
Panel will be flashing ‘FII’ as the reminder.
Replace the filter and reset the filter timer to clear
the alarm.
DEALING WITH POWER FAILURE
Most power failures are corrected within a few hours and should not affect the temperature of your
ice machine if you minimize the number of times, you open the ice machine door. If the power is
Timed Ice making
Press and hold POWER and CLEAN over 3 seconds on
Standby to toggle ON/OFF the Timed Ice Making
When enter the timer setting, press UP or DOWN to select
from
1
to
12
hours to set the timer to run ice making,
the setting will auto save after 10 seconds, then the window
display countdown time in hours and the timed ice making
indicator will light.
*Press POWER can jump the countdown and immediately
start ice making.
Cleaning
Press and hold CLEAN over 3 seconds to turn ON/OFF the
CLEANING.
Once start, window display
CLE
and the clean indicator
will light, the clean cycle will run for 30 minuets
and then exit
to standby.
*This function can only start on standby.
Sabbath
Press and hold UP and CLEAN over 6 seconds to turn
ON/OFF the SATTBATH.
Display will be shut off, and the interior light and any audible
sound are also disabled in SABBATH.
Showroom
Press and hold DOWN
and CLEAN over 6 seconds on standby
to toggle on/off the SHOWROOM mode.
The SHOWROOM indicator will light up.
*This mode is for dealers to display the unit, only the light and
the evaporator fan will function in this mode, all alarm will
disable except the door open alarm.
Screen Lock
Press and hold POWER and CLEAN over 6 seconds to toggle
ON/OFF the screen lock.
The Screen lock indicator will light up and the screen are
locked.
Filter Reset
Press and hold UP and POWER over 6 seconds to reset the
water filter life counter.
The window will be flashing
F11
and reset the filter
timer.
*This function can only start on standby. only use this after
replaced the water filter.
Firmware Version
&
System Recovery
Press and hold DOWN and POWER to display firmware
version
A5
Hold OVER 6 seconds will reset all settings to default.
*The firmware version is subject to change.
Display flashes
EXPECTING NORMAL SOUNDS
Your new ice machine may make sounds that are not familiar to you. Hard surfaces like the floor and
walls can make the sounds seem louder than they actually are. The following describes the kinds of
sounds that might be new to you and the source of those sounds:
the ice machine can also make noises.
• The high-efficiency compressor may make a pulsating or high-pitched sound.
• Water running from the evaporator to the water reservoir may make a splashing sound.
• As each cycle ends, you may hear a gurgling sound due to the refrigerant flowing in your ice
• Rattling noises may come from the flow of the refrigerant or the water line. Items store on top of
machine.
• You may hear the sound of the condenser fan forcing air over the condenser.
• During the harvest cycle, you may hear the sound of ice cubes falling into the ice bin.
PANEL DISPLAY NOTIFICATION
Below notifications will sound the alarm except the Ice full stop.
Self-diagnosis Pass
888
Only displays on the beginning of the working
progress.
Filling Water
FIL
Ice Full Stop
FUL
If the ice storage bin is full, the unit will
automatically stop.
Remove the ice and the unit will start making ice
after 3 minutes.
Door Ajar Alarm
dr
If the door is not closed completely for 5 minutes,
the panel will be flashing ‘dr’ with alarm sounds.
All these alerts will be cleared up when the door is
closed or press any button.
Clean Reminder
CLE
When the unit has worked for approx 6 month
without running CLEANING program, the panel will
be flashing ‘CL’ as the reminder.
Run CLEANING to clear the alarm.
Filter Replace Reminder
FI1
When the unit has worked for approx 6 month the
Panel will be flashing ‘FII’ as the reminder.
Replace the filter and reset the filter timer to clear
the alarm.
DEALING WITH POWER FAILURE
Most power failures are corrected within a few hours and should not affect the temperature of your
ice machine if you minimize the number of times, you open the ice machine door. If the power is
Timed Ice making
Press and hold POWER and CLEAN over 3 seconds on
Standby to toggle ON/OFF the Timed Ice Making
When enter the timer setting, press UP or DOWN to select
from
1
to
12
hours to set the timer to run ice making,
the setting will auto save after 10 seconds, then the window
display countdown time in hours and the timed ice making
indicator will light.
*Press POWER can jump the countdown and immediately
start ice making.
Cleaning
Press and hold CLEAN over 3 seconds to turn ON/OFF the
CLEANING.
Once start, window display
CLE
and the clean indicator
will light, the clean cycle will run for 30 minuets
and then exit
to standby.
*This function can only start on standby.
Sabbath
Press and hold UP and CLEAN over 6 seconds to turn
ON/OFF the SATTBATH.
Display will be shut off, and the interior light and any audible
sound are also disabled in SABBATH.
Showroom
Press and hold DOWN
and CLEAN over 6 seconds on standby
to toggle on/off the SHOWROOM mode.
The SHOWROOM indicator will light up.
*This mode is for dealers to display the unit, only the light and
the evaporator fan will function in this mode, all alarm will
disable except the door open alarm.
Screen Lock
Press and hold POWER and CLEAN over 6 seconds to toggle
ON/OFF the screen lock.
The Screen lock indicator will light up and the screen are
locked.
Filter Reset
Press and hold UP and POWER over 6 seconds to reset the
water filter life counter.
The window will be flashing
F11
and reset the filter
timer.
*This function can only start on standby. only use this after
replaced the water filter.
Firmware Version
&
System Recovery
Press and hold DOWN and POWER to display firmware
version
A5
Hold OVER 6 seconds will reset all settings to default.
*The firmware version is subject to change.
when the unit powers on.
Filling water
EXPECTING NORMAL SOUNDS
Your new ice machine may make sounds that are not familiar to you. Hard surfaces like the floor and
walls can make the sounds seem louder than they actually are. The following describes the kinds of
sounds that might be new to you and the source of those sounds:
the ice machine can also make noises.
• The high-efficiency compressor may make a pulsating or high-pitched sound.
• Water running from the evaporator to the water reservoir may make a splashing sound.
• As each cycle ends, you may hear a gurgling sound due to the refrigerant flowing in your ice
• Rattling noises may come from the flow of the refrigerant or the water line. Items store on top of
machine.
• You may hear the sound of the condenser fan forcing air over the condenser.
• During the harvest cycle, you may hear the sound of ice cubes falling into the ice bin.
PANEL DISPLAY NOTIFICATION
Below notifications will sound the alarm except the Ice full stop.
Self-diagnosis Pass
888
Only displays on the beginning of the working
progress.
Filling Water
FIL
Ice Full Stop
FUL
If the ice storage bin is full, the unit will
automatically stop.
Remove the ice and the unit will start making ice
after 3 minutes.
Door Ajar Alarm
dr
If the door is not closed completely for 5 minutes,
the panel will be flashing ‘dr’ with alarm sounds.
All these alerts will be cleared up when the door is
closed or press any button.
Clean Reminder
CLE
When the unit has worked for approx 6 month
without running CLEANING program, the panel will
be flashing ‘CL’ as the reminder.
Run CLEANING to clear the alarm.
Filter Replace Reminder
FI1
When the unit has worked for approx 6 month the
Panel will be flashing ‘FII’ as the reminder.
Replace the filter and reset the filter timer to clear
the alarm.
DEALING WITH POWER FAILURE
Most power failures are corrected within a few hours and should not affect the temperature of your
ice machine if you minimize the number of times, you open the ice machine door. If the power is
Timed Ice making
Press and hold POWER and CLEAN over 3 seconds on
Standby to toggle ON/OFF the Timed Ice Making
When enter the timer setting, press UP or DOWN to select
from
1
to
12
hours to set the timer to run ice making,
the setting will auto save after 10 seconds, then the window
display countdown time in hours and the timed ice making
indicator will light.
*Press POWER can jump the countdown and immediately
start ice making.
Cleaning
Press and hold CLEAN over 3 seconds to turn ON/OFF the
CLEANING.
Once start, window display
CLE
and the clean indicator
will light, the clean cycle will run for 30 minuets
and then exit
to standby.
*This function can only start on standby.
Sabbath
Press and hold UP and CLEAN over 6 seconds to turn
ON/OFF the SATTBATH.
Display will be shut off, and the interior light and any audible
sound are also disabled in SABBATH.
Showroom
Press and hold DOWN
and CLEAN over 6 seconds on standby
to toggle on/off the SHOWROOM mode.
The SHOWROOM indicator will light up.
*This mode is for dealers to display the unit, only the light and
the evaporator fan will function in this mode, all alarm will
disable except the door open alarm.
Screen Lock
Press and hold POWER and CLEAN over 6 seconds to toggle
ON/OFF the screen lock.
The Screen lock indicator will light up and the screen are
locked.
Filter Reset
Press and hold UP and POWER over 6 seconds to reset the
water filter life counter.
The window will be flashing
F11
and reset the filter
timer.
*This function can only start on standby. only use this after
replaced the water filter.
Firmware Version
&
System Recovery
Press and hold DOWN and POWER to display firmware
version
A5
Hold OVER 6 seconds will reset all settings to default.
*The firmware version is subject to change.
Water is filling up.
Ice production
USING THE CONTROLS
The control panel is located at the top of the cabinet. Including a display window, 4 buttons and 6
indicators.
FUNCTION OPERATING
Turn ON
Press POWER to turn ON the unit.
The unit will automatically start making ice and display
ICE
on ice making,
HVE
on ice harvesting,
FUL
on
ice full, and
FUO
on Ice making recovery countdown.
The Ice making indicator will light up on ice making cycle.
Turn OFF
Press and hold POWER for 3 seconds can immediately turn
OFF the unit.
The unit will standby in 30 seconds and displaying
OFF
.
Adjust the ice
cube size
Press and hold UP or DOWN over 3 seconds to enter ICE
SIZE ADJUSTING. Then press UP or DOWN to switch
settings.
Window display
1
to
6
(min to max).
3
is the default ice
size.
The setting will be saved after 7 seconds.
Fast Ice Making
Press and hold UP and DOWN over 3 seconds to toggle
ON/OFF the Fast Ice Making.
The fast ice making indicator will light, during this mode the
ice making cycle will be shorter.
UP
DOWN
POWER
CLEAN
DISPLAY WINDOW
Fast Ice Making
Ice Making
Screen Lock
Maintenance
Cleaning
Lack Water
Showroom
Timed Start
Screen lockIce makingFast ice making Maintenance
CleaningTimed start No water Showroom
POWER CLEANUP DOWN DISPLAY WINDOW
Timed Ice making
Press and hold POWER and CLEAN over 3 seconds on
Standby to toggle ON/OFF the Timed Ice Making
When enter the timer setting, press UP or DOWN to select
from
1
to
12
hours to set the timer to run ice making,
the setting will auto save after 10 seconds, then the window
display countdown time in hours and the timed ice making
indicator will light.
*Press POWER can jump the countdown and immediately
start ice making.
Cleaning
Press and hold CLEAN over 3 seconds to turn ON/OFF the
CLEANING.
Once start, window display
CLE
and the clean indicator
will light, the clean cycle will run for 30 minuets
and then exit
to standby.
*This function can only start on standby.
Sabbath
Press and hold UP and CLEAN over 6 seconds to turn
ON/OFF the SATTBATH.
Display will be shut off, and the interior light and any audible
sound are also disabled in SABBATH.
Showroom
Press and hold DOWN
and CLEAN over 6 seconds on standby
to toggle on/off the SHOWROOM mode.
The SHOWROOM indicator will light up.
*This mode is for dealers to display the unit, only the light and
the evaporator fan will function in this mode, all alarm will
disable except the door open alarm.
Screen Lock
Press and hold POWER and CLEAN over 6 seconds to toggle
ON/OFF the screen lock.
The Screen lock indicator will light up and the screen are
locked.
Filter Reset
Press and hold UP and POWER over 6 seconds to reset the
water filter life counter.
The window will be flashing
F11
and reset the filter
timer.
*This function can only start on standby. only use this after
replaced the water filter.
Firmware Version
&
System Recovery
Press and hold DOWN and POWER to display firmware
version
A5
Hold OVER 6 seconds will reset all settings to default.
*The firmware version is subject to change.
Ice is currently being made.
Ice harvesting
USING THE CONTROLS
The control panel is located at the top of the cabinet. Including a display window, 4 buttons and 6
indicators.
FUNCTION OPERATING
Turn ON
Press POWER to turn ON the unit.
The unit will automatically start making ice and display
ICE
on ice making,
HVE
on ice harvesting,
FUL
on
ice full, and
FUO
on Ice making recovery countdown.
The Ice making indicator will light up on ice making cycle.
Turn OFF
Press and hold POWER for 3 seconds can immediately turn
OFF the unit.
The unit will standby in 30 seconds and displaying
OFF
.
Adjust the ice
cube size
Press and hold UP or DOWN over 3 seconds to enter ICE
SIZE ADJUSTING. Then press UP or DOWN to switch
settings.
Window display
1
to
6
(min to max).
3
is the default ice
size.
The setting will be saved after 7 seconds.
Fast Ice Making
Press and hold UP and DOWN over 3 seconds to toggle
ON/OFF the Fast Ice Making.
The fast ice making indicator will light, during this mode the
ice making cycle will be shorter.
UP
DOWN
POWER
CLEAN
DISPLAY WINDOW
Fast Ice Making
Ice Making
Screen Lock
Maintenance
Cleaning
Lack Water
Showroom
Timed Start
Screen lockIce makingFast ice making Maintenance
CleaningTimed start No water Showroom
POWER CLEANUP DOWN DISPLAY WINDOW
Timed Ice making
Press and hold POWER and CLEAN over 3 seconds on
Standby to toggle ON/OFF the Timed Ice Making
When enter the timer setting, press UP or DOWN to select
from
1
to
12
hours to set the timer to run ice making,
the setting will auto save after 10 seconds, then the window
display countdown time in hours and the timed ice making
indicator will light.
*Press POWER can jump the countdown and immediately
start ice making.
Cleaning
Press and hold CLEAN over 3 seconds to turn ON/OFF the
CLEANING.
Once start, window display
CLE
and the clean indicator
will light, the clean cycle will run for 30 minuets
and then exit
to standby.
*This function can only start on standby.
Sabbath
Press and hold UP and CLEAN over 6 seconds to turn
ON/OFF the SATTBATH.
Display will be shut off, and the interior light and any audible
sound are also disabled in SABBATH.
Showroom
Press and hold DOWN
and CLEAN over 6 seconds on standby
to toggle on/off the SHOWROOM mode.
The SHOWROOM indicator will light up.
*This mode is for dealers to display the unit, only the light and
the evaporator fan will function in this mode, all alarm will
disable except the door open alarm.
Screen Lock
Press and hold POWER and CLEAN over 6 seconds to toggle
ON/OFF the screen lock.
The Screen lock indicator will light up and the screen are
locked.
Filter Reset
Press and hold UP and POWER over 6 seconds to reset the
water filter life counter.
The window will be flashing
F11
and reset the filter
timer.
*This function can only start on standby. only use this after
replaced the water filter.
Firmware Version
&
System Recovery
Press and hold DOWN and POWER to display firmware
version
A5
Hold OVER 6 seconds will reset all settings to default.
*The firmware version is subject to change.
Ice is currently being harvested.
Ice bin is full
EXPECTING NORMAL SOUNDS
Your new ice machine may make sounds that are not familiar to you. Hard surfaces like the floor and
walls can make the sounds seem louder than they actually are. The following describes the kinds of
sounds that might be new to you and the source of those sounds:
the ice machine can also make noises.
• The high-efficiency compressor may make a pulsating or high-pitched sound.
• Water running from the evaporator to the water reservoir may make a splashing sound.
• As each cycle ends, you may hear a gurgling sound due to the refrigerant flowing in your ice
• Rattling noises may come from the flow of the refrigerant or the water line. Items store on top of
machine.
• You may hear the sound of the condenser fan forcing air over the condenser.
• During the harvest cycle, you may hear the sound of ice cubes falling into the ice bin.
PANEL DISPLAY NOTIFICATION
Below notifications will sound the alarm except the Ice full stop.
Self-diagnosis Pass
888
Only displays on the beginning of the working
progress.
Filling Water
FIL
Ice Full Stop
FUL
If the ice storage bin is full, the unit will
automatically stop.
Remove the ice and the unit will start making ice
after 3 minutes.
Door Ajar Alarm
dr
If the door is not closed completely for 5 minutes,
the panel will be flashing ‘dr’ with alarm sounds.
All these alerts will be cleared up when the door is
closed or press any button.
Clean Reminder
CLE
When the unit has worked for approx 6 month
without running CLEANING program, the panel will
be flashing ‘CL’ as the reminder.
Run CLEANING to clear the alarm.
Filter Replace Reminder
FI1
When the unit has worked for approx 6 month the
Panel will be flashing ‘FII’ as the reminder.
Replace the filter and reset the filter timer to clear
the alarm.
DEALING WITH POWER FAILURE
Most power failures are corrected within a few hours and should not affect the temperature of your
ice machine if you minimize the number of times, you open the ice machine door. If the power is
Timed Ice making
Press and hold POWER and CLEAN over 3 seconds on
Standby to toggle ON/OFF the Timed Ice Making
When enter the timer setting, press UP or DOWN to select
from
1
to
12
hours to set the timer to run ice making,
the setting will auto save after 10 seconds, then the window
display countdown time in hours and the timed ice making
indicator will light.
*Press POWER can jump the countdown and immediately
start ice making.
Cleaning
Press and hold CLEAN over 3 seconds to turn ON/OFF the
CLEANING.
Once start, window display
CLE
and the clean indicator
will light, the clean cycle will run for 30 minuets
and then exit
to standby.
*This function can only start on standby.
Sabbath
Press and hold UP and CLEAN over 6 seconds to turn
ON/OFF the SATTBATH.
Display will be shut off, and the interior light and any audible
sound are also disabled in SABBATH.
Showroom
Press and hold DOWN
and CLEAN over 6 seconds on standby
to toggle on/off the SHOWROOM mode.
The SHOWROOM indicator will light up.
*This mode is for dealers to display the unit, only the light and
the evaporator fan will function in this mode, all alarm will
disable except the door open alarm.
Screen Lock
Press and hold POWER and CLEAN over 6 seconds to toggle
ON/OFF the screen lock.
The Screen lock indicator will light up and the screen are
locked.
Filter Reset
Press and hold UP and POWER over 6 seconds to reset the
water filter life counter.
The window will be flashing
F11
and reset the filter
timer.
*This function can only start on standby. only use this after
replaced the water filter.
Firmware Version
&
System Recovery
Press and hold DOWN and POWER to display firmware
version
A5
Hold OVER 6 seconds will reset all settings to default.
*The firmware version is subject to change.
If the ice storage bin is full, the unit will automatically
stop. Remove the ice and the unit will start making ice
after 3 minutes.
Door ajar alarm
EXPECTING NORMAL SOUNDS
Your new ice machine may make sounds that are not familiar to you. Hard surfaces like the floor and
walls can make the sounds seem louder than they actually are. The following describes the kinds of
sounds that might be new to you and the source of those sounds:
the ice machine can also make noises.
• The high-efficiency compressor may make a pulsating or high-pitched sound.
• Water running from the evaporator to the water reservoir may make a splashing sound.
• As each cycle ends, you may hear a gurgling sound due to the refrigerant flowing in your ice
• Rattling noises may come from the flow of the refrigerant or the water line. Items store on top of
machine.
• You may hear the sound of the condenser fan forcing air over the condenser.
• During the harvest cycle, you may hear the sound of ice cubes falling into the ice bin.
PANEL DISPLAY NOTIFICATION
Below notifications will sound the alarm except the Ice full stop.
Self-diagnosis Pass
888
Only displays on the beginning of the working
progress.
Filling Water
FIL
Ice Full Stop
FUL
If the ice storage bin is full, the unit will
automatically stop.
Remove the ice and the unit will start making ice
after 3 minutes.
Door Ajar Alarm
dr
If the door is not closed completely for 5 minutes,
the panel will be flashing ‘dr’ with alarm sounds.
All these alerts will be cleared up when the door is
closed or press any button.
Clean Reminder
CLE
When the unit has worked for approx 6 month
without running CLEANING program, the panel will
be flashing ‘CL’ as the reminder.
Run CLEANING to clear the alarm.
Filter Replace Reminder
FI1
When the unit has worked for approx 6 month the
Panel will be flashing ‘FII’ as the reminder.
Replace the filter and reset the filter timer to clear
the alarm.
DEALING WITH POWER FAILURE
Most power failures are corrected within a few hours and should not affect the temperature of your
ice machine if you minimize the number of times, you open the ice machine door. If the power is
Timed Ice making
Press and hold POWER and CLEAN over 3 seconds on
Standby to toggle ON/OFF the Timed Ice Making
When enter the timer setting, press UP or DOWN to select
from
1
to
12
hours to set the timer to run ice making,
the setting will auto save after 10 seconds, then the window
display countdown time in hours and the timed ice making
indicator will light.
*Press POWER can jump the countdown and immediately
start ice making.
Cleaning
Press and hold CLEAN over 3 seconds to turn ON/OFF the
CLEANING.
Once start, window display
CLE
and the clean indicator
will light, the clean cycle will run for 30 minuets
and then exit
to standby.
*This function can only start on standby.
Sabbath
Press and hold UP and CLEAN over 6 seconds to turn
ON/OFF the SATTBATH.
Display will be shut off, and the interior light and any audible
sound are also disabled in SABBATH.
Showroom
Press and hold DOWN
and CLEAN over 6 seconds on standby
to toggle on/off the SHOWROOM mode.
The SHOWROOM indicator will light up.
*This mode is for dealers to display the unit, only the light and
the evaporator fan will function in this mode, all alarm will
disable except the door open alarm.
Screen Lock
Press and hold POWER and CLEAN over 6 seconds to toggle
ON/OFF the screen lock.
The Screen lock indicator will light up and the screen are
locked.
Filter Reset
Press and hold UP and POWER over 6 seconds to reset the
water filter life counter.
The window will be flashing
F11
and reset the filter
timer.
*This function can only start on standby. only use this after
replaced the water filter.
Firmware Version
&
System Recovery
Press and hold DOWN and POWER to display firmware
version
A5
Hold OVER 6 seconds will reset all settings to default.
*The firmware version is subject to change.
If the door is not closed completely for 5 minutes, the
panel will flash
EXPECTING NORMAL SOUNDS
Your new ice machine may make sounds that are not familiar to you. Hard surfaces like the floor and
walls can make the sounds seem louder than they actually are. The following describes the kinds of
sounds that might be new to you and the source of those sounds:
the ice machine can also make noises.
• The high-efficiency compressor may make a pulsating or high-pitched sound.
• Water running from the evaporator to the water reservoir may make a splashing sound.
• As each cycle ends, you may hear a gurgling sound due to the refrigerant flowing in your ice
• Rattling noises may come from the flow of the refrigerant or the water line. Items store on top of
machine.
• You may hear the sound of the condenser fan forcing air over the condenser.
• During the harvest cycle, you may hear the sound of ice cubes falling into the ice bin.
PANEL DISPLAY NOTIFICATION
Below notifications will sound the alarm except the Ice full stop.
Self-diagnosis Pass
888
Only displays on the beginning of the working
progress.
Filling Water
FIL
Ice Full Stop
FUL
If the ice storage bin is full, the unit will
automatically stop.
Remove the ice and the unit will start making ice
after 3 minutes.
Door Ajar Alarm
dr
If the door is not closed completely for 5 minutes,
the panel will be flashing ‘dr’ with alarm sounds.
All these alerts will be cleared up when the door is
closed or press any button.
Clean Reminder
CLE
When the unit has worked for approx 6 month
without running CLEANING program, the panel will
be flashing ‘CL’ as the reminder.
Run CLEANING to clear the alarm.
Filter Replace Reminder
FI1
When the unit has worked for approx 6 month the
Panel will be flashing ‘FII’ as the reminder.
Replace the filter and reset the filter timer to clear
the alarm.
DEALING WITH POWER FAILURE
Most power failures are corrected within a few hours and should not affect the temperature of your
ice machine if you minimize the number of times, you open the ice machine door. If the power is
Timed Ice making
Press and hold POWER and CLEAN over 3 seconds on
Standby to toggle ON/OFF the Timed Ice Making
When enter the timer setting, press UP or DOWN to select
from
1
to
12
hours to set the timer to run ice making,
the setting will auto save after 10 seconds, then the window
display countdown time in hours and the timed ice making
indicator will light.
*Press POWER can jump the countdown and immediately
start ice making.
Cleaning
Press and hold CLEAN over 3 seconds to turn ON/OFF the
CLEANING.
Once start, window display
CLE
and the clean indicator
will light, the clean cycle will run for 30 minuets
and then exit
to standby.
*This function can only start on standby.
Sabbath
Press and hold UP and CLEAN over 6 seconds to turn
ON/OFF the SATTBATH.
Display will be shut off, and the interior light and any audible
sound are also disabled in SABBATH.
Showroom
Press and hold DOWN
and CLEAN over 6 seconds on standby
to toggle on/off the SHOWROOM mode.
The SHOWROOM indicator will light up.
*This mode is for dealers to display the unit, only the light and
the evaporator fan will function in this mode, all alarm will
disable except the door open alarm.
Screen Lock
Press and hold POWER and CLEAN over 6 seconds to toggle
ON/OFF the screen lock.
The Screen lock indicator will light up and the screen are
locked.
Filter Reset
Press and hold UP and POWER over 6 seconds to reset the
water filter life counter.
The window will be flashing
F11
and reset the filter
timer.
*This function can only start on standby. only use this after
replaced the water filter.
Firmware Version
&
System Recovery
Press and hold DOWN and POWER to display firmware
version
A5
Hold OVER 6 seconds will reset all settings to default.
*The firmware version is subject to change.
with alarm sounds. The alerts will
stop when the door is closed or any button is pressed.
Clean reminder
EXPECTING NORMAL SOUNDS
Your new ice machine may make sounds that are not familiar to you. Hard surfaces like the floor and
walls can make the sounds seem louder than they actually are. The following describes the kinds of
sounds that might be new to you and the source of those sounds:
the ice machine can also make noises.
• The high-efficiency compressor may make a pulsating or high-pitched sound.
• Water running from the evaporator to the water reservoir may make a splashing sound.
• As each cycle ends, you may hear a gurgling sound due to the refrigerant flowing in your ice
• Rattling noises may come from the flow of the refrigerant or the water line. Items store on top of
machine.
• You may hear the sound of the condenser fan forcing air over the condenser.
• During the harvest cycle, you may hear the sound of ice cubes falling into the ice bin.
PANEL DISPLAY NOTIFICATION
Below notifications will sound the alarm except the Ice full stop.
Self-diagnosis Pass
888
Only displays on the beginning of the working
progress.
Filling Water
FIL
Ice Full Stop
FUL
If the ice storage bin is full, the unit will
automatically stop.
Remove the ice and the unit will start making ice
after 3 minutes.
Door Ajar Alarm
dr
If the door is not closed completely for 5 minutes,
the panel will be flashing ‘dr’ with alarm sounds.
All these alerts will be cleared up when the door is
closed or press any button.
Clean Reminder
CLE
When the unit has worked for approx 6 month
without running CLEANING program, the panel will
be flashing ‘CL’ as the reminder.
Run CLEANING to clear the alarm.
Filter Replace Reminder
FI1
When the unit has worked for approx 6 month the
Panel will be flashing ‘FII’ as the reminder.
Replace the filter and reset the filter timer to clear
the alarm.
DEALING WITH POWER FAILURE
Most power failures are corrected within a few hours and should not affect the temperature of your
ice machine if you minimize the number of times, you open the ice machine door. If the power is
Timed Ice making
Press and hold POWER and CLEAN over 3 seconds on
Standby to toggle ON/OFF the Timed Ice Making
When enter the timer setting, press UP or DOWN to select
from
1
to
12
hours to set the timer to run ice making,
the setting will auto save after 10 seconds, then the window
display countdown time in hours and the timed ice making
indicator will light.
*Press POWER can jump the countdown and immediately
start ice making.
Cleaning
Press and hold CLEAN over 3 seconds to turn ON/OFF the
CLEANING.
Once start, window display
CLE
and the clean indicator
will light, the clean cycle will run for 30 minuets
and then exit
to standby.
*This function can only start on standby.
Sabbath
Press and hold UP and CLEAN over 6 seconds to turn
ON/OFF the SATTBATH.
Display will be shut off, and the interior light and any audible
sound are also disabled in SABBATH.
Showroom
Press and hold DOWN
and CLEAN over 6 seconds on standby
to toggle on/off the SHOWROOM mode.
The SHOWROOM indicator will light up.
*This mode is for dealers to display the unit, only the light and
the evaporator fan will function in this mode, all alarm will
disable except the door open alarm.
Screen Lock
Press and hold POWER and CLEAN over 6 seconds to toggle
ON/OFF the screen lock.
The Screen lock indicator will light up and the screen are
locked.
Filter Reset
Press and hold UP and POWER over 6 seconds to reset the
water filter life counter.
The window will be flashing
F11
and reset the filter
timer.
*This function can only start on standby. only use this after
replaced the water filter.
Firmware Version
&
System Recovery
Press and hold DOWN and POWER to display firmware
version
A5
Hold OVER 6 seconds will reset all settings to default.
*The firmware version is subject to change.
When the unit has worked for approximately 6 months
without running the CLEANING program, the panel
will flash
EXPECTING NORMAL SOUNDS
Your new ice machine may make sounds that are not familiar to you. Hard surfaces like the floor and
walls can make the sounds seem louder than they actually are. The following describes the kinds of
sounds that might be new to you and the source of those sounds:
the ice machine can also make noises.
• The high-efficiency compressor may make a pulsating or high-pitched sound.
• Water running from the evaporator to the water reservoir may make a splashing sound.
• As each cycle ends, you may hear a gurgling sound due to the refrigerant flowing in your ice
• Rattling noises may come from the flow of the refrigerant or the water line. Items store on top of
machine.
• You may hear the sound of the condenser fan forcing air over the condenser.
• During the harvest cycle, you may hear the sound of ice cubes falling into the ice bin.
PANEL DISPLAY NOTIFICATION
Below notifications will sound the alarm except the Ice full stop.
Self-diagnosis Pass
888
Only displays on the beginning of the working
progress.
Filling Water
FIL
Ice Full Stop
FUL
If the ice storage bin is full, the unit will
automatically stop.
Remove the ice and the unit will start making ice
after 3 minutes.
Door Ajar Alarm
dr
If the door is not closed completely for 5 minutes,
the panel will be flashing ‘dr’ with alarm sounds.
All these alerts will be cleared up when the door is
closed or press any button.
Clean Reminder
CLE
When the unit has worked for approx 6 month
without running CLEANING program, the panel will
be flashing ‘CL’ as the reminder.
Run CLEANING to clear the alarm.
Filter Replace Reminder
FI1
When the unit has worked for approx 6 month the
Panel will be flashing ‘FII’ as the reminder.
Replace the filter and reset the filter timer to clear
the alarm.
DEALING WITH POWER FAILURE
Most power failures are corrected within a few hours and should not affect the temperature of your
ice machine if you minimize the number of times, you open the ice machine door. If the power is
Timed Ice making
Press and hold POWER and CLEAN over 3 seconds on
Standby to toggle ON/OFF the Timed Ice Making
When enter the timer setting, press UP or DOWN to select
from
1
to
12
hours to set the timer to run ice making,
the setting will auto save after 10 seconds, then the window
display countdown time in hours and the timed ice making
indicator will light.
*Press POWER can jump the countdown and immediately
start ice making.
Cleaning
Press and hold CLEAN over 3 seconds to turn ON/OFF the
CLEANING.
Once start, window display
CLE
and the clean indicator
will light, the clean cycle will run for 30 minuets
and then exit
to standby.
*This function can only start on standby.
Sabbath
Press and hold UP and CLEAN over 6 seconds to turn
ON/OFF the SATTBATH.
Display will be shut off, and the interior light and any audible
sound are also disabled in SABBATH.
Showroom
Press and hold DOWN
and CLEAN over 6 seconds on standby
to toggle on/off the SHOWROOM mode.
The SHOWROOM indicator will light up.
*This mode is for dealers to display the unit, only the light and
the evaporator fan will function in this mode, all alarm will
disable except the door open alarm.
Screen Lock
Press and hold POWER and CLEAN over 6 seconds to toggle
ON/OFF the screen lock.
The Screen lock indicator will light up and the screen are
locked.
Filter Reset
Press and hold UP and POWER over 6 seconds to reset the
water filter life counter.
The window will be flashing
F11
and reset the filter
timer.
*This function can only start on standby. only use this after
replaced the water filter.
Firmware Version
&
System Recovery
Press and hold DOWN and POWER to display firmware
version
A5
Hold OVER 6 seconds will reset all settings to default.
*The firmware version is subject to change.
as the reminder. Run CLEANING to clear
the alarm.
Filter
replace reminder
EXPECTING NORMAL SOUNDS
Your new ice machine may make sounds that are not familiar to you. Hard surfaces like the floor and
walls can make the sounds seem louder than they actually are. The following describes the kinds of
sounds that might be new to you and the source of those sounds:
the ice machine can also make noises.
• The high-efficiency compressor may make a pulsating or high-pitched sound.
• Water running from the evaporator to the water reservoir may make a splashing sound.
• As each cycle ends, you may hear a gurgling sound due to the refrigerant flowing in your ice
• Rattling noises may come from the flow of the refrigerant or the water line. Items store on top of
machine.
• You may hear the sound of the condenser fan forcing air over the condenser.
• During the harvest cycle, you may hear the sound of ice cubes falling into the ice bin.
PANEL DISPLAY NOTIFICATION
Below notifications will sound the alarm except the Ice full stop.
Self-diagnosis Pass
888
Only displays on the beginning of the working
progress.
Filling Water
FIL
Ice Full Stop
FUL
If the ice storage bin is full, the unit will
automatically stop.
Remove the ice and the unit will start making ice
after 3 minutes.
Door Ajar Alarm
dr
If the door is not closed completely for 5 minutes,
the panel will be flashing ‘dr’ with alarm sounds.
All these alerts will be cleared up when the door is
closed or press any button.
Clean Reminder
CLE
When the unit has worked for approx 6 month
without running CLEANING program, the panel will
be flashing ‘CL’ as the reminder.
Run CLEANING to clear the alarm.
Filter Replace Reminder
FI1
When the unit has worked for approx 6 month the
Panel will be flashing ‘FII’ as the reminder.
Replace the filter and reset the filter timer to clear
the alarm.
DEALING WITH POWER FAILURE
Most power failures are corrected within a few hours and should not affect the temperature of your
ice machine if you minimize the number of times, you open the ice machine door. If the power is
Timed Ice making
Press and hold POWER and CLEAN over 3 seconds on
Standby to toggle ON/OFF the Timed Ice Making
When enter the timer setting, press UP or DOWN to select
from
1
to
12
hours to set the timer to run ice making,
the setting will auto save after 10 seconds, then the window
display countdown time in hours and the timed ice making
indicator will light.
*Press POWER can jump the countdown and immediately
start ice making.
Cleaning
Press and hold CLEAN over 3 seconds to turn ON/OFF the
CLEANING.
Once start, window display
CLE
and the clean indicator
will light, the clean cycle will run for 30 minuets
and then exit
to standby.
*This function can only start on standby.
Sabbath
Press and hold UP and CLEAN over 6 seconds to turn
ON/OFF the SATTBATH.
Display will be shut off, and the interior light and any audible
sound are also disabled in SABBATH.
Showroom
Press and hold DOWN
and CLEAN over 6 seconds on standby
to toggle on/off the SHOWROOM mode.
The SHOWROOM indicator will light up.
*This mode is for dealers to display the unit, only the light and
the evaporator fan will function in this mode, all alarm will
disable except the door open alarm.
Screen Lock
Press and hold POWER and CLEAN over 6 seconds to toggle
ON/OFF the screen lock.
The Screen lock indicator will light up and the screen are
locked.
Filter Reset
Press and hold UP and POWER over 6 seconds to reset the
water filter life counter.
The window will be flashing
F11
and reset the filter
timer.
*This function can only start on standby. only use this after
replaced the water filter.
Firmware Version
&
System Recovery
Press and hold DOWN and POWER to display firmware
version
A5
Hold OVER 6 seconds will reset all settings to default.
*The firmware version is subject to change.
When the unit has worked for approximately 6 months,
the panel will flash
EXPECTING NORMAL SOUNDS
Your new ice machine may make sounds that are not familiar to you. Hard surfaces like the floor and
walls can make the sounds seem louder than they actually are. The following describes the kinds of
sounds that might be new to you and the source of those sounds:
the ice machine can also make noises.
• The high-efficiency compressor may make a pulsating or high-pitched sound.
• Water running from the evaporator to the water reservoir may make a splashing sound.
• As each cycle ends, you may hear a gurgling sound due to the refrigerant flowing in your ice
• Rattling noises may come from the flow of the refrigerant or the water line. Items store on top of
machine.
• You may hear the sound of the condenser fan forcing air over the condenser.
• During the harvest cycle, you may hear the sound of ice cubes falling into the ice bin.
PANEL DISPLAY NOTIFICATION
Below notifications will sound the alarm except the Ice full stop.
Self-diagnosis Pass
888
Only displays on the beginning of the working
progress.
Filling Water
FIL
Ice Full Stop
FUL
If the ice storage bin is full, the unit will
automatically stop.
Remove the ice and the unit will start making ice
after 3 minutes.
Door Ajar Alarm
dr
If the door is not closed completely for 5 minutes,
the panel will be flashing ‘dr’ with alarm sounds.
All these alerts will be cleared up when the door is
closed or press any button.
Clean Reminder
CLE
When the unit has worked for approx 6 month
without running CLEANING program, the panel will
be flashing ‘CL’ as the reminder.
Run CLEANING to clear the alarm.
Filter Replace Reminder
FI1
When the unit has worked for approx 6 month the
Panel will be flashing ‘FII’ as the reminder.
Replace the filter and reset the filter timer to clear
the alarm.
DEALING WITH POWER FAILURE
Most power failures are corrected within a few hours and should not affect the temperature of your
ice machine if you minimize the number of times, you open the ice machine door. If the power is
Timed Ice making
Press and hold POWER and CLEAN over 3 seconds on
Standby to toggle ON/OFF the Timed Ice Making
When enter the timer setting, press UP or DOWN to select
from
1
to
12
hours to set the timer to run ice making,
the setting will auto save after 10 seconds, then the window
display countdown time in hours and the timed ice making
indicator will light.
*Press POWER can jump the countdown and immediately
start ice making.
Cleaning
Press and hold CLEAN over 3 seconds to turn ON/OFF the
CLEANING.
Once start, window display
CLE
and the clean indicator
will light, the clean cycle will run for 30 minuets
and then exit
to standby.
*This function can only start on standby.
Sabbath
Press and hold UP and CLEAN over 6 seconds to turn
ON/OFF the SATTBATH.
Display will be shut off, and the interior light and any audible
sound are also disabled in SABBATH.
Showroom
Press and hold DOWN
and CLEAN over 6 seconds on standby
to toggle on/off the SHOWROOM mode.
The SHOWROOM indicator will light up.
*This mode is for dealers to display the unit, only the light and
the evaporator fan will function in this mode, all alarm will
disable except the door open alarm.
Screen Lock
Press and hold POWER and CLEAN over 6 seconds to toggle
ON/OFF the screen lock.
The Screen lock indicator will light up and the screen are
locked.
Filter Reset
Press and hold UP and POWER over 6 seconds to reset the
water filter life counter.
The window will be flashing
F11
and reset the filter
timer.
*This function can only start on standby. only use this after
replaced the water filter.
Firmware Version
&
System Recovery
Press and hold DOWN and POWER to display firmware
version
A5
Hold OVER 6 seconds will reset all settings to default.
*The firmware version is subject to change.
as the reminder. Replace the
filter and reset the filter timer to clear the alarm.
Panel Display Notifications

27
OPERATION
IMPORTANT: ENSURING ICE FRESHNESS AND QUALITY
• Although the unit has been tested and cleaned at the factory, discard the first batch of
ice cubes due to long-term transit and storage.
• If you do not use the ice maker regularly, empty the ice bin periodically to ensure ice
freshness.
• The ice maker produces ice in layers resulting in a clear cube. The ice may appear wet
when first produced. Ice in the bin may develop surface frost which appears when the
cube in placed in liquid.
ICE PRODUCTION
ICCD-ST-15 & ICCDP-15 - The ice maker will continue to produce ice until the ice in the bin
reaches the discharge location, not allowing the harvested ice to enter the bin. Once the ice
level in the bin drops, the ice maker will continue to produce ice.
IGMD-ST-15 & IGMDP-15 - The ice maker will continue to produce ice until the ice in the
bin contacts the fill indicator in the bin. Once the ice level drops below the fill indicator, the
ice maker will continue to produce ice.
WARNING
Out of the Ordinary Ice Production
Please note that the ice production following a cleaning cycle could produce excessive
splashing and or uneven/irregular shaped ice cubes. This is normal and should correct
after several harvests.
OTHER OPERATING TIPS
• Keep the air intake and exhaust free of dust and lint to allow free air flow with hard
water, cleaning may have to be more frequent. NOTE: Ensure that custom kick plates
allow for ventilation.
• Never touch the evaporator when the unit is running.
• Keep the door closed to reduce ice melting and to promote proper ice formation. Open
the door only when taking ice from the appliance.
• Turn on the water supply tap before switching on the ice maker. Never turn the water
supply tap off when the ice maker is working.
Ice Production

28
CARE AND MAINTENANCE
CLEANING AND MAINTAINING THE UNIT
Perform periodic cleaning and proper maintenance to ensure efficiency, top performance,
and long life. Maintenance should be performed every 3 to 12 months depending on usage
and environment:
• Regularly inspect plumbing connections to ensure that no leaks exist.
• Disconnect the water supply line if the ice maker will not be used for a long period of time.
• Never keep anything in the ice storage bin that is not ice. Objects such as wine and beer
bottles are not sanitary and could damage the bin liner.
CONDENSER CLEANING
Periodically vacuum dust and dirt from the condenser, which is located behind the grill at the
bottom front of the unit. A condenser that is dirty or clogged will prevent proper airflow and
reduces ice making capacity.
WARNING
Do not use solvent-based or abrasive cleaners. Use a soft sponge and rinse the
unit with clean water. Wipe the unit with a soft, clean towel to prevent
water spotting.
CLEANING THE UNIT’S INTERIOR
When necessary, defrost and thoroughly clean the inside of the unit with mild soap and
water. Do not use electrical heating devices or sharp or pointed tools when defrosting the
unit. When defrosting or leaving the unit turned off, leave the door propped open. Leaving
the door open allows air to dry the inside of the cabinet, reducing the chance for mildew
and mold damage to mechanisms or components.
CLEANING THE UNIT’S EXTERIOR
Clean the door and cabinet with a mild detergent and warm-water solution, such as
1.0 oz. (28.0 g) of dish-washing liquid mixed with 2.0 gallons (7.5 L) of warm water. Clean
stainless steel with a mild detergent, a warm-water solution, and a damp cloth. Never use
an abrasive cleaning agent.
RUNNING THE CLEANING CYCLE
Minerals that are removed from water during the freezing cycle will eventually form a
hard, scaly deposit in the water system; cleaning the system regularly helps remove min-
eral buildup. How often to clean the system depends upon how hard your water is or how
effective a water filtration system may be. With hard water of 15 to 20 grains/gal, you
may need to clean the system more often. Normal timing will range from 3 to 12 months
depending on water, use and environment.
Care and Maintenance

29
CARE AND MAINTENANCE
Failure to regularly clean and maintain your ice maker may result in component
failures or damage, which will void your warranty.
STEPS TO CLEAN AND SANITIZE THE ICE MAKER
1. Turn off the ice maker – press power on/off button.
2. Remove ice from bin and evaporator:
a. Wait for ice to melt off the evaporator and leave the door open (approximately 30
to 60 minutes).
b. Remove remaining ice from the bin. Discard or store in a freezer until cleaning
is complete.
3. Remove evaporator cover to expose evaporator and water trough.
4. Pour 1.0 oz. to 2.0 oz. (28.0 g to 56.0 g) of nickel-safe ice maker cleaner in the water
trough (more cleaner depending on scale and timing in between cleanings).
5. Press light button for over 3 seconds to enter cleaning cycle -
Timed Ice making
Press and hold POWER and CLEAN over 3 seconds on
Standby to toggle ON/OFF the Timed Ice Making
When enter the timer setting, press UP or DOWN to select
from
1
to
12
hours to set the timer to run ice making,
the setting will auto save after 10 seconds, then the window
display countdown time in hours and the timed ice making
indicator will light.
*Press POWER can jump the countdown and immediately
start ice making.
Cleaning
Press and hold CLEAN over 3 seconds to turn ON/OFF the
CLEANING.
Once start, window display
CLE
and the clean indicator
will light, the clean cycle will run for 30 minuets
and then exit
to standby.
*This function can only start on standby.
Sabbath
Press and hold UP and CLEAN over 6 seconds to turn
ON/OFF the SATTBATH.
Display will be shut off, and the interior light and any audible
sound are also disabled in SABBATH.
Showroom
Press and hold DOWN
and CLEAN over 6 seconds on standby
to toggle on/off the SHOWROOM mode.
The SHOWROOM indicator will light up.
*This mode is for dealers to display the unit, only the light and
the evaporator fan will function in this mode, all alarm will
disable except the door open alarm.
Screen Lock
Press and hold POWER and CLEAN over 6 seconds to toggle
ON/OFF the screen lock.
The Screen lock indicator will light up and the screen are
locked.
Filter Reset
Press and hold UP and POWER over 6 seconds to reset the
water filter life counter.
The window will be flashing
F11
and reset the filter
timer.
*This function can only start on standby. only use this after
replaced the water filter.
Firmware Version
&
System Recovery
Press and hold DOWN and POWER to display firmware
version
A5
Hold OVER 6 seconds will reset all settings to default.
*The firmware version is subject to change.
will be displayed:
a. The unit will now run a cleaning cycle for 30 minutes
b. If excessive scale has built up, a second cleaning cycle may be required. Repeat
steps 4‒5.
6. After the cleaning cycle is complete, check to see if scale is visible on other parts in the
interior of the ice maker. If so, move to step 7 or, if no visible scale, move to step 8.
7. Dilute 1.0 oz. to 2.0 oz. (28.0 g to 56.0 g) of nickel-safe ice maker cleaner with 2.0
quarts (2.0 L) of warm water, then use a sponge or cloth to wipe the interior of the bin,
water reservoir, tubing, evaporator cover, and back of the door. DO NOT WIPE OR
TOUCH THE EVAPORATOR. For safety and effectiveness, use the solution immediately
after dilution.
a. After wiping down is complete, dilute 1 tablespoon (15.0 ml) of chlorine bleach with
1.0 gallon (4.0 L) of warm water. This solution will remove the ice maker cleaner.
Repeat the wipe down with this solution. (Be careful of using other cleaners to avoid
possible chemical reactions.) For safety and maximum effectiveness, use the solution
immediately after dilution.
b. Now using just water gently rinse the same parts. Again, DO NOT TOUCH OR PUT
WATER ON THE EVAPORATOR.
8. Reinstall the evaporator cover.
9. Turn power on – press power on/off button. The machine will begin making ice
10. Discard the first 2 harvests of ice, which will take around 60 minutes. Your ice maker is
now clean and ready to make ice again.
NOTICE
Care and Maintenance

30
CARE AND MAINTENANCE
POWER FAILURE PROCEDURES
Most power failures are corrected within a few hours and should not affect the temperature
of your ice maker if you minimize the number of times you open the ice maker door. If the
power is going to be off for a longer period of time, take the proper steps to disconnect your
appliance.
NOTE: When the ice maker is running, the evaporator is the only part that gets cold to
produce ice. A power failure will stop the ice-making process, but any ice already in the bin
will gradually melt over time as normal.
EXTENDED PERIODS OF NON-USE
WARNING
ELECTRICAL SHOCK HAZARD
Always disconnect power at the source before working on the unit.
NOTE: Do not winterize this unit with ANY type of anti-freeze; damage to the internal
coating will occur, invalidating the warranty and creating a potential health hazard.
1. Turn off the water at the main water supply.
2. Disconnect the water supply line from the water inlet of the ice maker.
3. Remove any remaining ice from the storage bin.
4. Unscrew the drain nut of the water trough to drain the water into the bin, then let the
remaining water drain out through the drain hole on the bottom of the bin. For models
with a drain pump, listen for the pump to turn on and run, draining the remaining water.
If you do not hear the drain pump run, pour some more water into the ice bin to trigger
the pump to turn on. Once the pump has turned on, run, and then turned off, the water
is sufficiently drained.
5. Turn the unit off and unplug the power cord.
6. Leave the door propped open to allow for circulation to prevent mold and mildew.
7. Leave the water supply line disconnected, and the power cord unplugged until
ready for use.
NOTICE: Never pull on the power cord to unplug the appliance form the electrical outlet.
Grasp the plug of the power cord and pull out firmly.
Power Failure Procedures

31
CARE AND MAINTENANCE
RECOMMISSIONING THE UNIT
1. If stored outside, it is recommended that the unit be thoroughly inspected to remove any
dirt or debris as well as for animals/insects. NOTE: The unit cannot be directly exposed
to water or elements such as snow or ice.
2. Connect the water supply line, turn on the water, check for leaks, and then restore power
to the unit.
3. It is recommended to clean the unit after long-term storage.
STARTING UP THE UNIT
1. Turn on the water, check for leaks, and then turn on power.
2. Turn on the unit by pressing the power button.
3. The water inlet valve will turn on immediately to supply water to the unit. The water pump
and compressor will turn on later (approximately 5 minutes) to initiate the ice making
cycle. If the machine was shut off while in the ice-harvesting cycle, make sure the ice is
harvested before starting up the unit.
4. The first harvest of ice should occur within 60 minutes of start-up.
5. After the unit purges air from the lines, normal harvesting and refilling occur every 40
minutes or less, under normal conditions.
Recommissioning the Unit
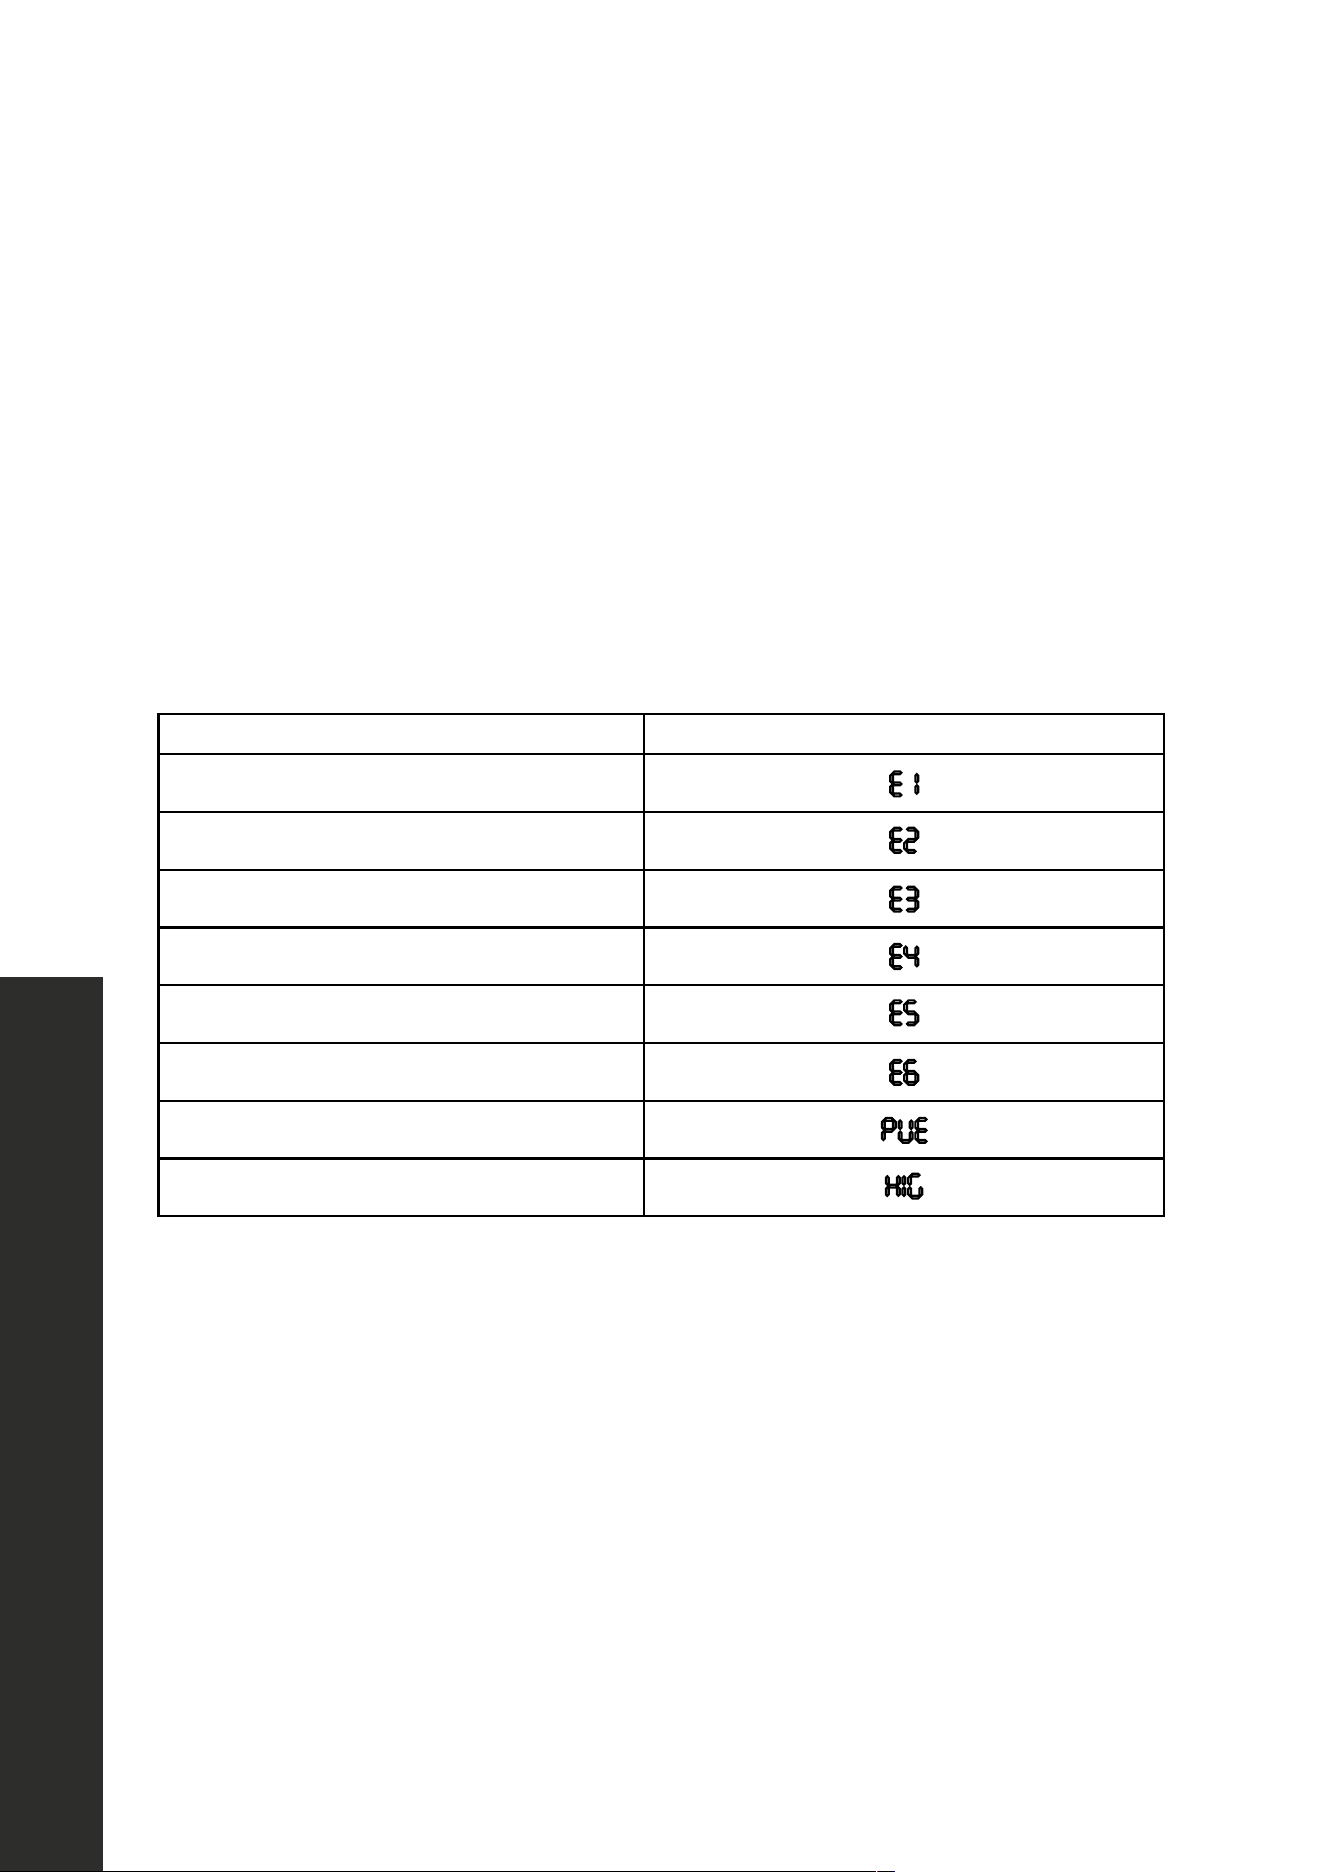
32
TROUBLESHOOTING
BEFORE CALLING FOR SERVICE
If the unit appears to be malfunctioning, read through the operation section of this manual
first. If the issue persists, check the troubleshooting guide on the following pages. Some of the
problems mentioned in the troubleshooting guide can be solved easily without a service call.
FAULT ALARM AND ERROR CODES
When the unit detects error, it will sound the alarm with the ALARM indicator flashing
and display the below error codes. Please provide the error codes when contacting
customer service.
FAULT ALARM ERROR CODES
Evaporator temperature sensor failure
going to be off for a longer period of time, take the proper steps to disconnect your appliance.
Note: When the ice machine is operating, the evaporator is only component that is cold to make ice.
A power failure will only impact the machine making ice. The ice in the bin would slowly melt as
normal.
FAULT ALARM AND ERROR CODES
When the unit detects error, it will sound the alarm with the ALARM indicatior flashing and display
below error codes. Please provide the error codes when contact the service.
FAULT ALARM
ERROR CODES
Evaporator temperature sensor failure
E1
Condenser temperature sensor failure
E2
ICE FULL temperature sensor Failure
E3
Long harvest alarm
E4
Low water alarm
E5
Long Ice Making alarm
E6
Drain pump failure
PUE
High ambient temperature
HIG
The ice machine will keep running on E1, E2 error with the RUN indicatior flashing, and will be
completely stop working on the rest of errors.
Check “troubleshooting” for esay self-diagnosis to try clear some error codes.
Condenser temperature sensor failure
going to be off for a longer period of time, take the proper steps to disconnect your appliance.
Note: When the ice machine is operating, the evaporator is only component that is cold to make ice.
A power failure will only impact the machine making ice. The ice in the bin would slowly melt as
normal.
FAULT ALARM AND ERROR CODES
When the unit detects error, it will sound the alarm with the ALARM indicatior flashing and display
below error codes. Please provide the error codes when contact the service.
FAULT ALARM
ERROR CODES
Evaporator temperature sensor failure
E1
Condenser temperature sensor failure
E2
ICE FULL temperature sensor Failure
E3
Long harvest alarm
E4
Low water alarm
E5
Long Ice Making alarm
E6
Drain pump failure
PUE
High ambient temperature
HIG
The ice machine will keep running on E1, E2 error with the RUN indicatior flashing, and will be
completely stop working on the rest of errors.
Check “troubleshooting” for esay self-diagnosis to try clear some error codes.
Ice full temperature sensor failure
going to be off for a longer period of time, take the proper steps to disconnect your appliance.
Note: When the ice machine is operating, the evaporator is only component that is cold to make ice.
A power failure will only impact the machine making ice. The ice in the bin would slowly melt as
normal.
FAULT ALARM AND ERROR CODES
When the unit detects error, it will sound the alarm with the ALARM indicatior flashing and display
below error codes. Please provide the error codes when contact the service.
FAULT ALARM
ERROR CODES
Evaporator temperature sensor failure
E1
Condenser temperature sensor failure
E2
ICE FULL temperature sensor Failure
E3
Long harvest alarm
E4
Low water alarm
E5
Long Ice Making alarm
E6
Drain pump failure
PUE
High ambient temperature
HIG
The ice machine will keep running on E1, E2 error with the RUN indicatior flashing, and will be
completely stop working on the rest of errors.
Check “troubleshooting” for esay self-diagnosis to try clear some error codes.
Long harvest alarm
going to be off for a longer period of time, take the proper steps to disconnect your appliance.
Note: When the ice machine is operating, the evaporator is only component that is cold to make ice.
A power failure will only impact the machine making ice. The ice in the bin would slowly melt as
normal.
FAULT ALARM AND ERROR CODES
When the unit detects error, it will sound the alarm with the ALARM indicatior flashing and display
below error codes. Please provide the error codes when contact the service.
FAULT ALARM
ERROR CODES
Evaporator temperature sensor failure
E1
Condenser temperature sensor failure
E2
ICE FULL temperature sensor Failure
E3
Long harvest alarm
E4
Low water alarm
E5
Long Ice Making alarm
E6
Drain pump failure
PUE
High ambient temperature
HIG
The ice machine will keep running on E1, E2 error with the RUN indicatior flashing, and will be
completely stop working on the rest of errors.
Check “troubleshooting” for esay self-diagnosis to try clear some error codes.
Low water alarm
going to be off for a longer period of time, take the proper steps to disconnect your appliance.
Note: When the ice machine is operating, the evaporator is only component that is cold to make ice.
A power failure will only impact the machine making ice. The ice in the bin would slowly melt as
normal.
FAULT ALARM AND ERROR CODES
When the unit detects error, it will sound the alarm with the ALARM indicatior flashing and display
below error codes. Please provide the error codes when contact the service.
FAULT ALARM
ERROR CODES
Evaporator temperature sensor failure
E1
Condenser temperature sensor failure
E2
ICE FULL temperature sensor Failure
E3
Long harvest alarm
E4
Low water alarm
E5
Long Ice Making alarm
E6
Drain pump failure
PUE
High ambient temperature
HIG
The ice machine will keep running on E1, E2 error with the RUN indicatior flashing, and will be
completely stop working on the rest of errors.
Check “troubleshooting” for esay self-diagnosis to try clear some error codes.
Long ice making alarm
going to be off for a longer period of time, take the proper steps to disconnect your appliance.
Note: When the ice machine is operating, the evaporator is only component that is cold to make ice.
A power failure will only impact the machine making ice. The ice in the bin would slowly melt as
normal.
FAULT ALARM AND ERROR CODES
When the unit detects error, it will sound the alarm with the ALARM indicatior flashing and display
below error codes. Please provide the error codes when contact the service.
FAULT ALARM
ERROR CODES
Evaporator temperature sensor failure
E1
Condenser temperature sensor failure
E2
ICE FULL temperature sensor Failure
E3
Long harvest alarm
E4
Low water alarm
E5
Long Ice Making alarm
E6
Drain pump failure
PUE
High ambient temperature
HIG
The ice machine will keep running on E1, E2 error with the RUN indicatior flashing, and will be
completely stop working on the rest of errors.
Check “troubleshooting” for esay self-diagnosis to try clear some error codes.
Drain pump failure
going to be off for a longer period of time, take the proper steps to disconnect your appliance.
Note: When the ice machine is operating, the evaporator is only component that is cold to make ice.
A power failure will only impact the machine making ice. The ice in the bin would slowly melt as
normal.
FAULT ALARM AND ERROR CODES
When the unit detects error, it will sound the alarm with the ALARM indicatior flashing and display
below error codes. Please provide the error codes when contact the service.
FAULT ALARM
ERROR CODES
Evaporator temperature sensor failure
E1
Condenser temperature sensor failure
E2
ICE FULL temperature sensor Failure
E3
Long harvest alarm
E4
Low water alarm
E5
Long Ice Making alarm
E6
Drain pump failure
PUE
High ambient temperature
HIG
The ice machine will keep running on E1, E2 error with the RUN indicatior flashing, and will be
completely stop working on the rest of errors.
Check “troubleshooting” for esay self-diagnosis to try clear some error codes.
High ambient temperature
going to be off for a longer period of time, take the proper steps to disconnect your appliance.
Note: When the ice machine is operating, the evaporator is only component that is cold to make ice.
A power failure will only impact the machine making ice. The ice in the bin would slowly melt as
normal.
FAULT ALARM AND ERROR CODES
When the unit detects error, it will sound the alarm with the ALARM indicatior flashing and display
below error codes. Please provide the error codes when contact the service.
FAULT ALARM
ERROR CODES
Evaporator temperature sensor failure
E1
Condenser temperature sensor failure
E2
ICE FULL temperature sensor Failure
E3
Long harvest alarm
E4
Low water alarm
E5
Long Ice Making alarm
E6
Drain pump failure
PUE
High ambient temperature
HIG
The ice machine will keep running on E1, E2 error with the RUN indicatior flashing, and will be
completely stop working on the rest of errors.
Check “troubleshooting” for esay self-diagnosis to try clear some error codes.
The ice maker will continue to operate when an E1 or E2 error occurs, with the RUN indicator
flashing. However, the unit will not function if any other error codes are displayed.
Troubleshooting
33
TROUBLESHOOTING
ISSUE POSSIBLE CAUSE POSSIBLE SOLUTION
The machine
won't operate.
The ice maker is
unplugged.
Plug the ice maker in.
The ice maker power
switch is OFF.
Verify that the control unit is properly
programmed.
The ice storage bin is
full of ice.
Remove some of the ice.
The compressor
works abnormally
with a
buzzing noise.
The voltage is lower than
recommended.
Stop the ice maker and do not restart
until the voltage is normal.
The water doesn't
feed in after the
ice maker starts.
(Possible error
codes E4/E5)
The water supply tap is
turned off.
Turn on the water supply tap.
The water supply pipe is
not properly connected.
Reconnect the water supply pipe.
The water filter is not
installed or not installed
correctly.
Check that the water filter is installed
correctly.
Water inlet valve
malfunction.
Contact ZLINE Customer Service at
1-614-777-5004 for assistance.
Machine makes
ice, but at a very
slow rate. (Possible
error code HIG)
The condenser
may be dirty.
Clean the condenser.
The air flow to the ice
maker may be obstructed.
Check the installation to ensure the air
flow to the ice maker is not blocked.
The ambient temperature
and water temperature
are high, or the unit is
near some heat source.
Check the installation to ensure
the ambient temperature is in the
proper range.
Troubleshooting
34
TROUBLESHOOTING
ISSUE POSSIBLE CAUSE POSSIBLE SOLUTION
Water is leaking out
of the unit. (Possible
error codes E4/E5)
A few water droplets are
on the door.
Under some conditions, humidity
may condense on the door. Consider
moving the unit or just be more careful
when you open the door.
The water supply
connection is leaking.
Tighten water supply hose-fitting.
Incorrect filter installation.
Check that the water filter is installed
correctly.
Cubes are partially
formed and are
white at the bottom.
(Possible error
codes E4/E5)
There is not enough water
in the water bin.
Check if the water supply pressure is
below 20 psi.
Check the water supply. It may be
restricted.
Check for a water leak at the
water trough.
Noise during
operation.
The feet are not leveled.
Level the feet. See "Leveling the unit"
on page 11.
Certain sounds
are normal.
See "Expecting normal sounds"
on page 25.
The ice made
is too large
and has pieces
sticking together.
The water temperature
in the storage tray or
ambient is too low.
Stop the machine and reset the ice
making cycle.
Restart the machine after turning it off.
Conditions for
ice making cycle
are right but no
ice is made.
The refrigerant leaks and/
or the sealed system
is blocked.
Contact ZLINE Customer Service at
1-614-777-5004 for assistance.
Water pressure is not
properly set.
The recommended water pressure is
58 psi. Pressures must not fall below
20 psi and static pressure must not
exceed 80 psi.
Troubleshooting

35
TROUBLESHOOTING
ISSUE POSSIBLE CAUSE POSSIBLE SOLUTION
The ice maker stops
suddenly while
making ice.
The electricity is off.
Reconnect the power supply line.
Cut off the electricity and let the
ice maker stop working until the
temperature returns within the
stated range.
The room temperature is
out of the stated range.
The body of the ice
maker is electrified.
The ground line is not in
the sockets.
Use the correct plug and outlet.
Scale builds up
quickly inside
the machine.
The calcium level in the
water is too high.
Use a water-softening apparatus
installed in front of the water
inlet valve.
Troubleshooting

WARRANTY
COVERAGE
ZLINE Kitchen and Bath ("ZLINE") ice makers have a two year parts and service warranty
and a five year parts warranty on the unit's sealed cooling system.
ZLINE warranty periods begin from the original date of product delivery and solely cover
the original purchaser of the product, delivered new and in its original carton. The limited
warranty covers all parts and labor for necessary repairs if any part of the product, or the
product itself, proves to be defective in materials or workmanship.
The product must be deemed serviceable via troubleshooting with the ZLINE Customer
Experience team. All service on ZLINE products under warranty must be performed by
ZLINE-approved and ZLINE-certified service providers unless otherwise specified by ZLINE.
Service will be provided during normal business hours.
Products must be unobstructed and accessible to the service provider at the time of service.
ZLINE’s liability is limited to the original purchase price of the product. Additional injuries,
losses, damages, or other inconveniences caused by product malfunction or defects in
materials are not covered under the terms of this warranty.
TERMS
ZLINE warranties for Touchstone Ice Makers apply only to the original purchaser of the
ZLINE product installed for residential or commercial use. Residential use is defined as a
single-family, residential dwelling in a non-commercial setting. Commercial settings include,
but are not limited to: schools, churches, hotels, restaurants, vacation rentals such as Airbnb,
daycare centers, private clubs, fire stations, common areas in multi-family dwellings, nursing
homes, food service locations, and institutional food service locations such as hospitals or
correctional facilities.
This warranty is non-transferable and will not under any circumstance be extended based
on the date of installation — the warranty period takes effect from the date of delivery and
only covers the original purchaser. The warranty applies only to products installed in the
contiguous United States and the District of Columbia.

WARRANTY
Failure to secure certified warranty service per these terms will result in a forfeiture of the
remaining warranty. Out-of-pocket payments will not be reimbursed unless prior approval
is received from ZLINE and/or ZLINE-certified service contract partners. Unapproved out-
of-pocket payments for service will not be reimbursed. All warranty procedures must be
followed to maintain warranty coverage.
If a product qualifies within the service window provided under these warranty terms, and
ZLINE is unable to repair the product or a defective part of the product after a reasonable
number of attempts, ZLINE reserves the right to offer to replace the defective part or the
product or provide the original purchaser a full refund of the purchase price of the product
(not including installation, removal, or other charges that were not included in the original
purchase price).
The original purchaser of the product must provide the original proof of purchase, including
the purchase date, when filing a claim to obtain replacement parts, service, or refunds.
Additionally, the original purchaser of the product must provide the serial number of the
product when filing a claim to obtain replacement parts, service, or refunds.
This warranty shall not apply to any ZLINE product in which the original factory serial
number has been removed, altered, or cannot be readily determined for any reason. Further,
ZLINE is not responsible for damage resulting from, but not limited to: shipment, delivery, or
improper installation; negligence or improper maintenance, misuse, or abuse of the product;
unauthorized alteration, modification, or tampering with the product; accident, fire, floods,
pest infestations, pandemics, natural disasters, or any other unpreventable or unexplained
acts of nature, commonly referred to as “acts of God”; flare-up fires or damages caused
by improper electric supply, electrical line current, voltage, or power surges; and service
to correct installation not in accordance with the instructions contained in ZLINE’s product
manuals and/or with local government codes.
In the event service is dispatched, and it is discovered that the reported issue is not covered
under warranty based on the disclaimers above, the customer will be responsible for all service
fees. Failure to pay these fees will result in the forfeiture of remaining warranty coverage.
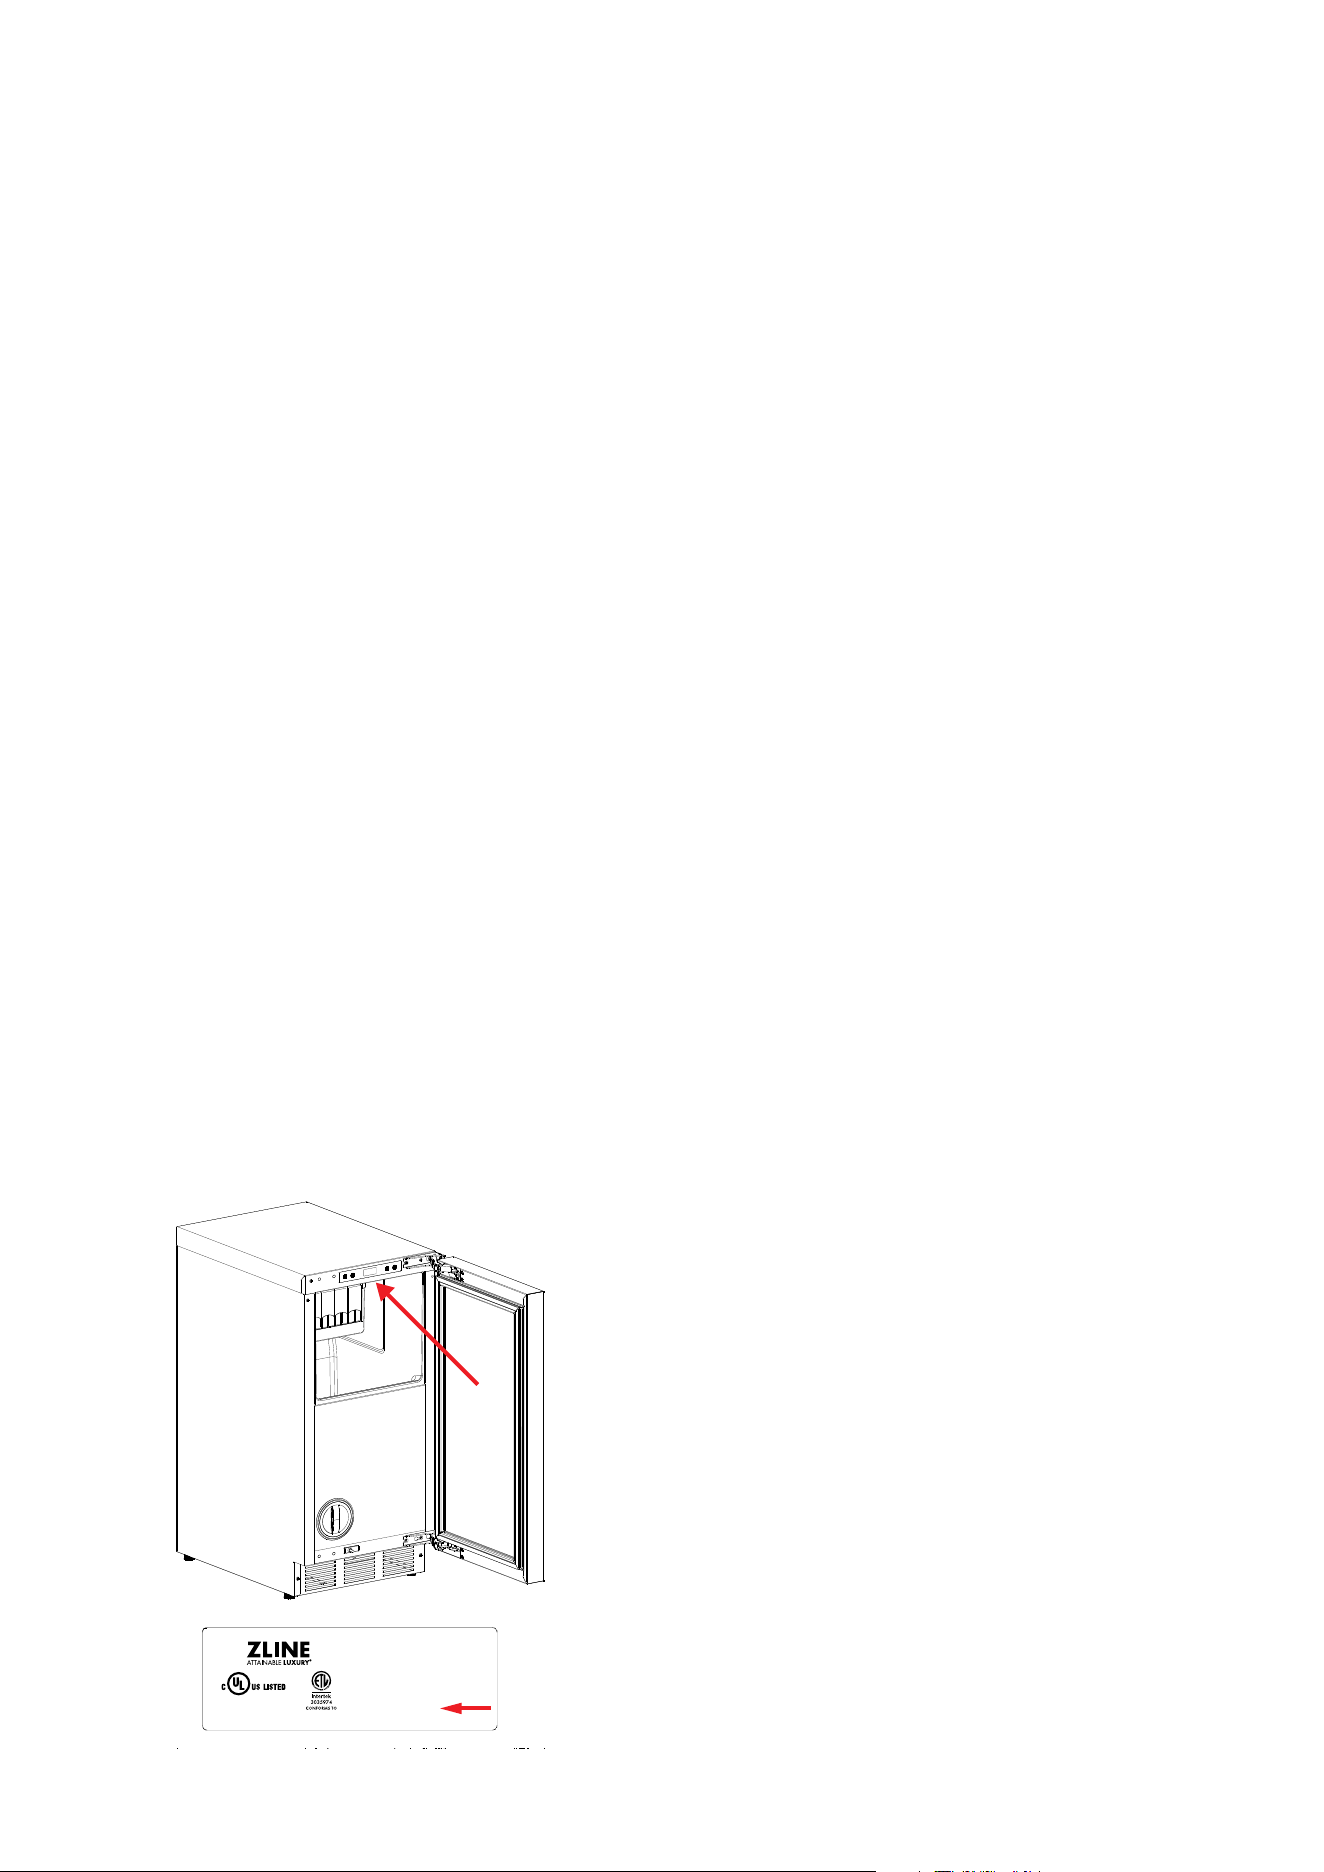
WARRANTY
Information contained within ZLINE’s installation and user manuals, in addition to product
information included on ZLINE’s website and all related digital listings, do not cover every
possible condition and situation that may occur during the installation or operation of
ZLINE products.
ZLINE reserves the right to make changes at any time to its products when considered safe,
necessary, and useful. Always check the ZLINE website for the most up-to-date version of its
product manuals: www.zlinekitchen.com/pages/manuals.
Do not install or operate any ZLINE product if it has missing or broken parts or if it arrives
damaged due to shipping. If ZLINE products arrive damaged, contact ZLINE Customer
Experience at 1-614-777-5004 for help. Failure to report a damaged appliance prior to
installation or operation may void the warranty.
ZLINE disclaims responsibility for damage or injury caused by improper installation or
use of any of its products. ZLINE is under no obligation, by law or otherwise, to provide
concessions, including repairs, prorates, rebates, discounts, or replacements, once the
warranty has expired.
SERIAL NUMBER LOCATION
18665
1.产品材质为铝箔不干胶;
2.所有字体为 Futura PT Medium ,颜色为黑色,字高大于等于
3.2mm,位置按图印刷;
3.使用材料符合UL969 标准及PAGG 认证要求,在高温80℃~低温-20℃
之间不脱落;
4.所有印刷经得起中性试剂的擦拭,为永久性标识;
5.基材厚度100um,背面涂胶40um.
ICE MAKER
Model: ICCD-ST-15
Rated voltage/frequency: 115 VAC/60 Hz
Rated ice making current: 2.9 A
Rated ice harvest current: 1.7 A
High/low side pressure: 290 psig/130 psig
Refrigerant: R290, 2.0 oz
Foaming agent: C-PENTANE
IP Rating: IPX4
Serial no.:
Date code:
NSF STD.7
ICE MAKER
10ZE
SA46401
Please write down the model number and serial
number of your appliance. The model number
and serial number are located on the rating
label, which is underneath the control panel.
Both numbers are needed to obtain warranty
service. Do not remove permanently affixed
labels, warnings, or plates from the product.
This will void the warranty. You may also
consider attaching your receipt or proof of
purchase to this manual.

WARRANTY
SERVICE
For warranty service, please contact our Customer Service team at
1-614-777-5004 or visit www.zlinekitchen.com/contact to utilize
our online Customer Experience Portal.
Scan the QR code to view the most up-to-date version of our
Installation Manual and User Manual.
Need to purchase a part or accessory for your ZLINE product? Visit
www.zlineparts.com, ZLINE’s official parts distribution partner.