Web: www.topzee.com Email: [email protected] Phone: 1-800-770-5222
Questions or Concerns?
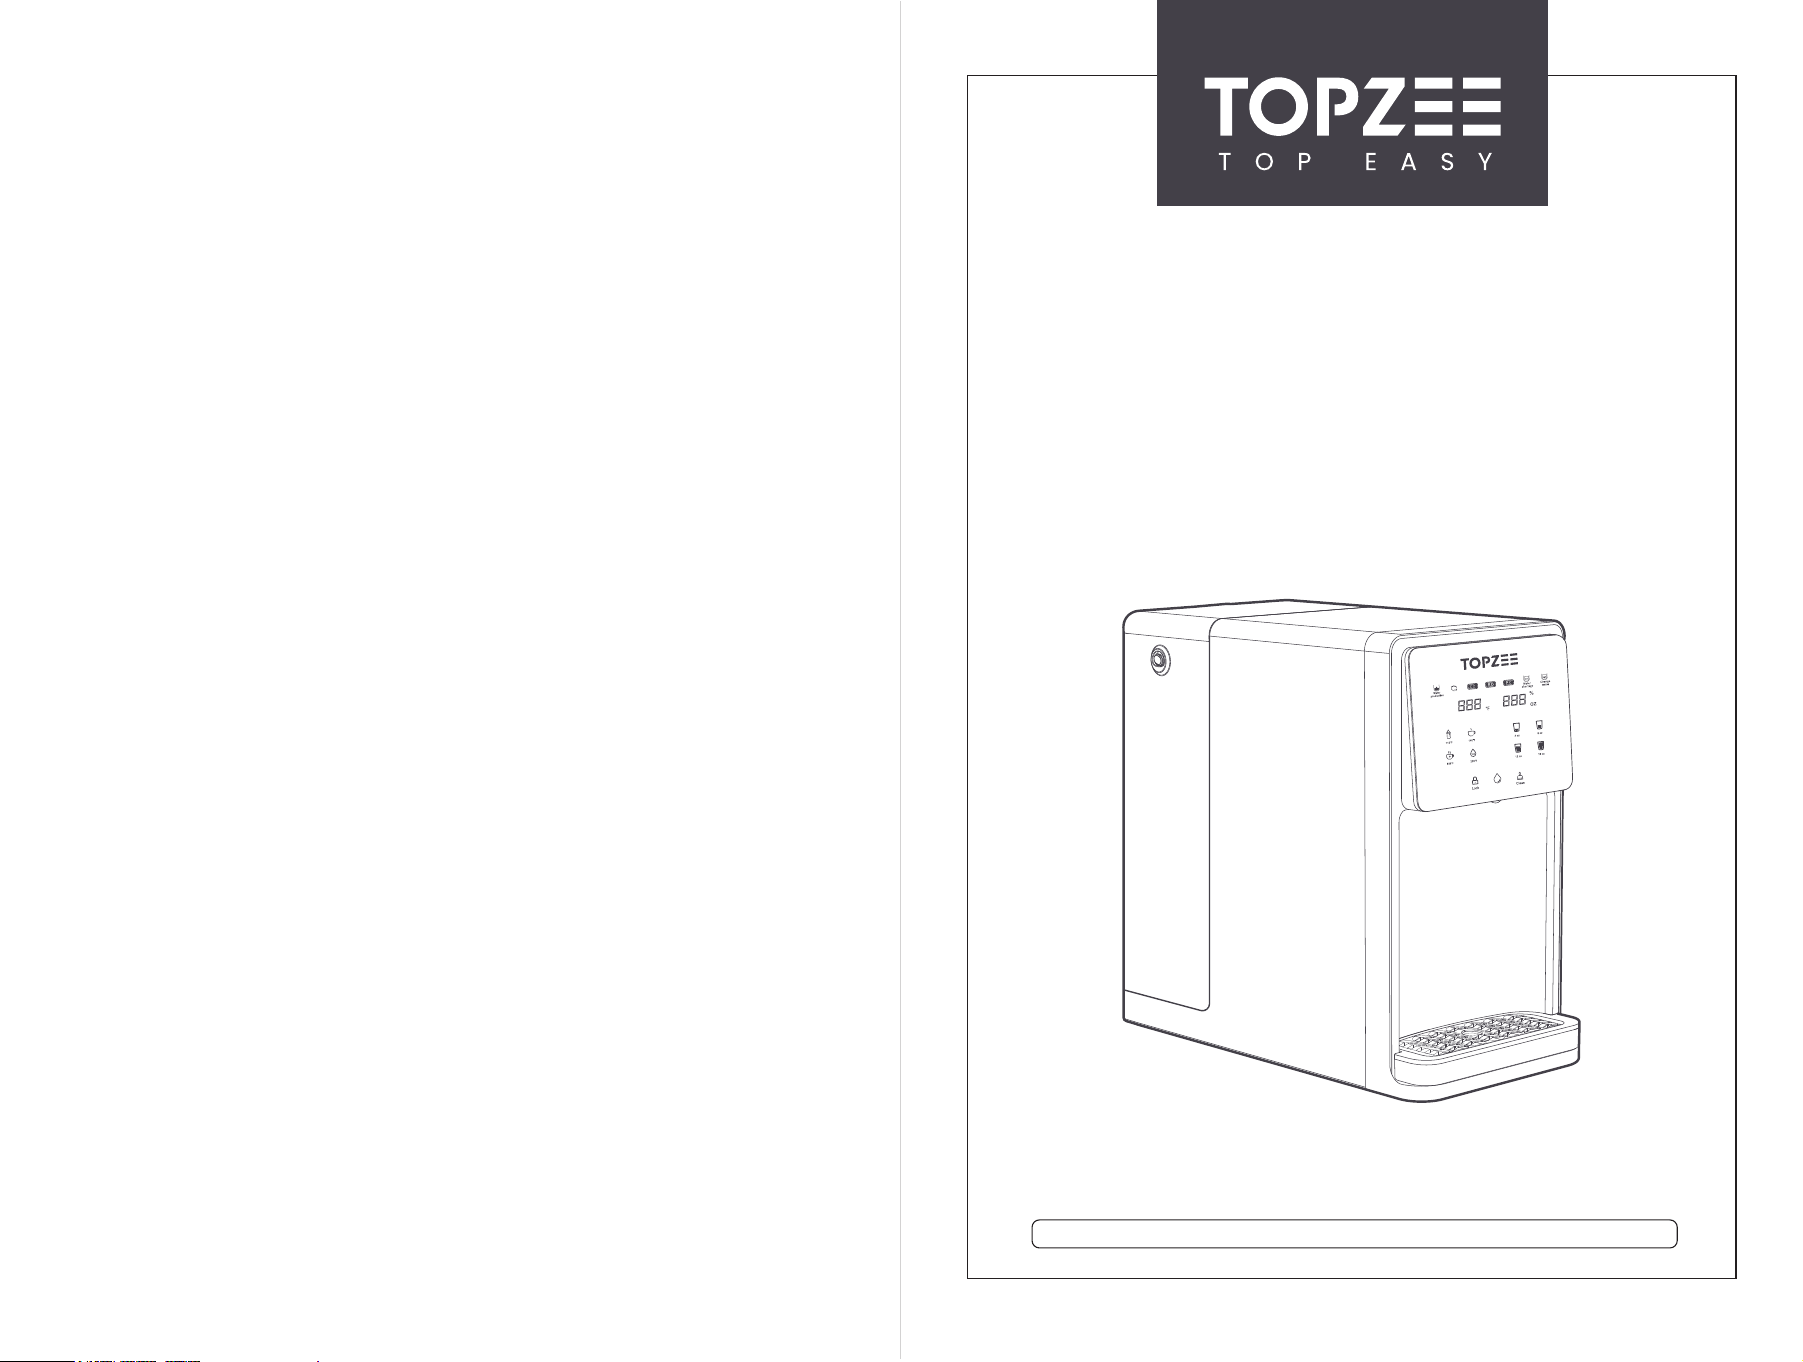
USER INSTRUCTION
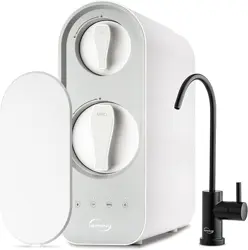
REVERSE OSMOSIS INSTANT HOT WATER DISPENSER
Model: FTP-E-UR02

CONTENTS
1.REGISTER AND EXTEND WARRANTY
2.PREPARATION
2.1 What’s in the box?
2.2 Getting to Know Your Dispenser
2.3 Overview of Product Working Process
2.4 Filter Features
2.5 Specifications
3.GETTING STARTED
4.OPERATION PANEL OVERVIEW
5.MAINTENANCE
5.1 Filter Replacement
5.2 Daily Use Notice
6.TROUBLESHOOTING
7.SAFETY NOTICE
....................................................... 1
....................................................... 2
....................................................... 2
....................................................... 2
....................................................... 3
....................................................... 4
....................................................... 5
....................................................... 6
........................................................9
..................................................... 10
..................................................... 10
..................................................... 12
..................................................... 13
..................................................... 14
1
1. Register your product for A FREE 2-YEAR Warranty within 14 days of receipt.
① Scan the QR code to email us your Order ID.
② Or directly send your Order ID to [email protected].
Note:
TOPZEE products come with a 1-year warranty from the date of purchase. Follow the
steps above to register and enjoy an extra year of product warranty - that's double the
peace of mind!
PEGISTER AND EXTEND WARRANTY
2
PREPARATION
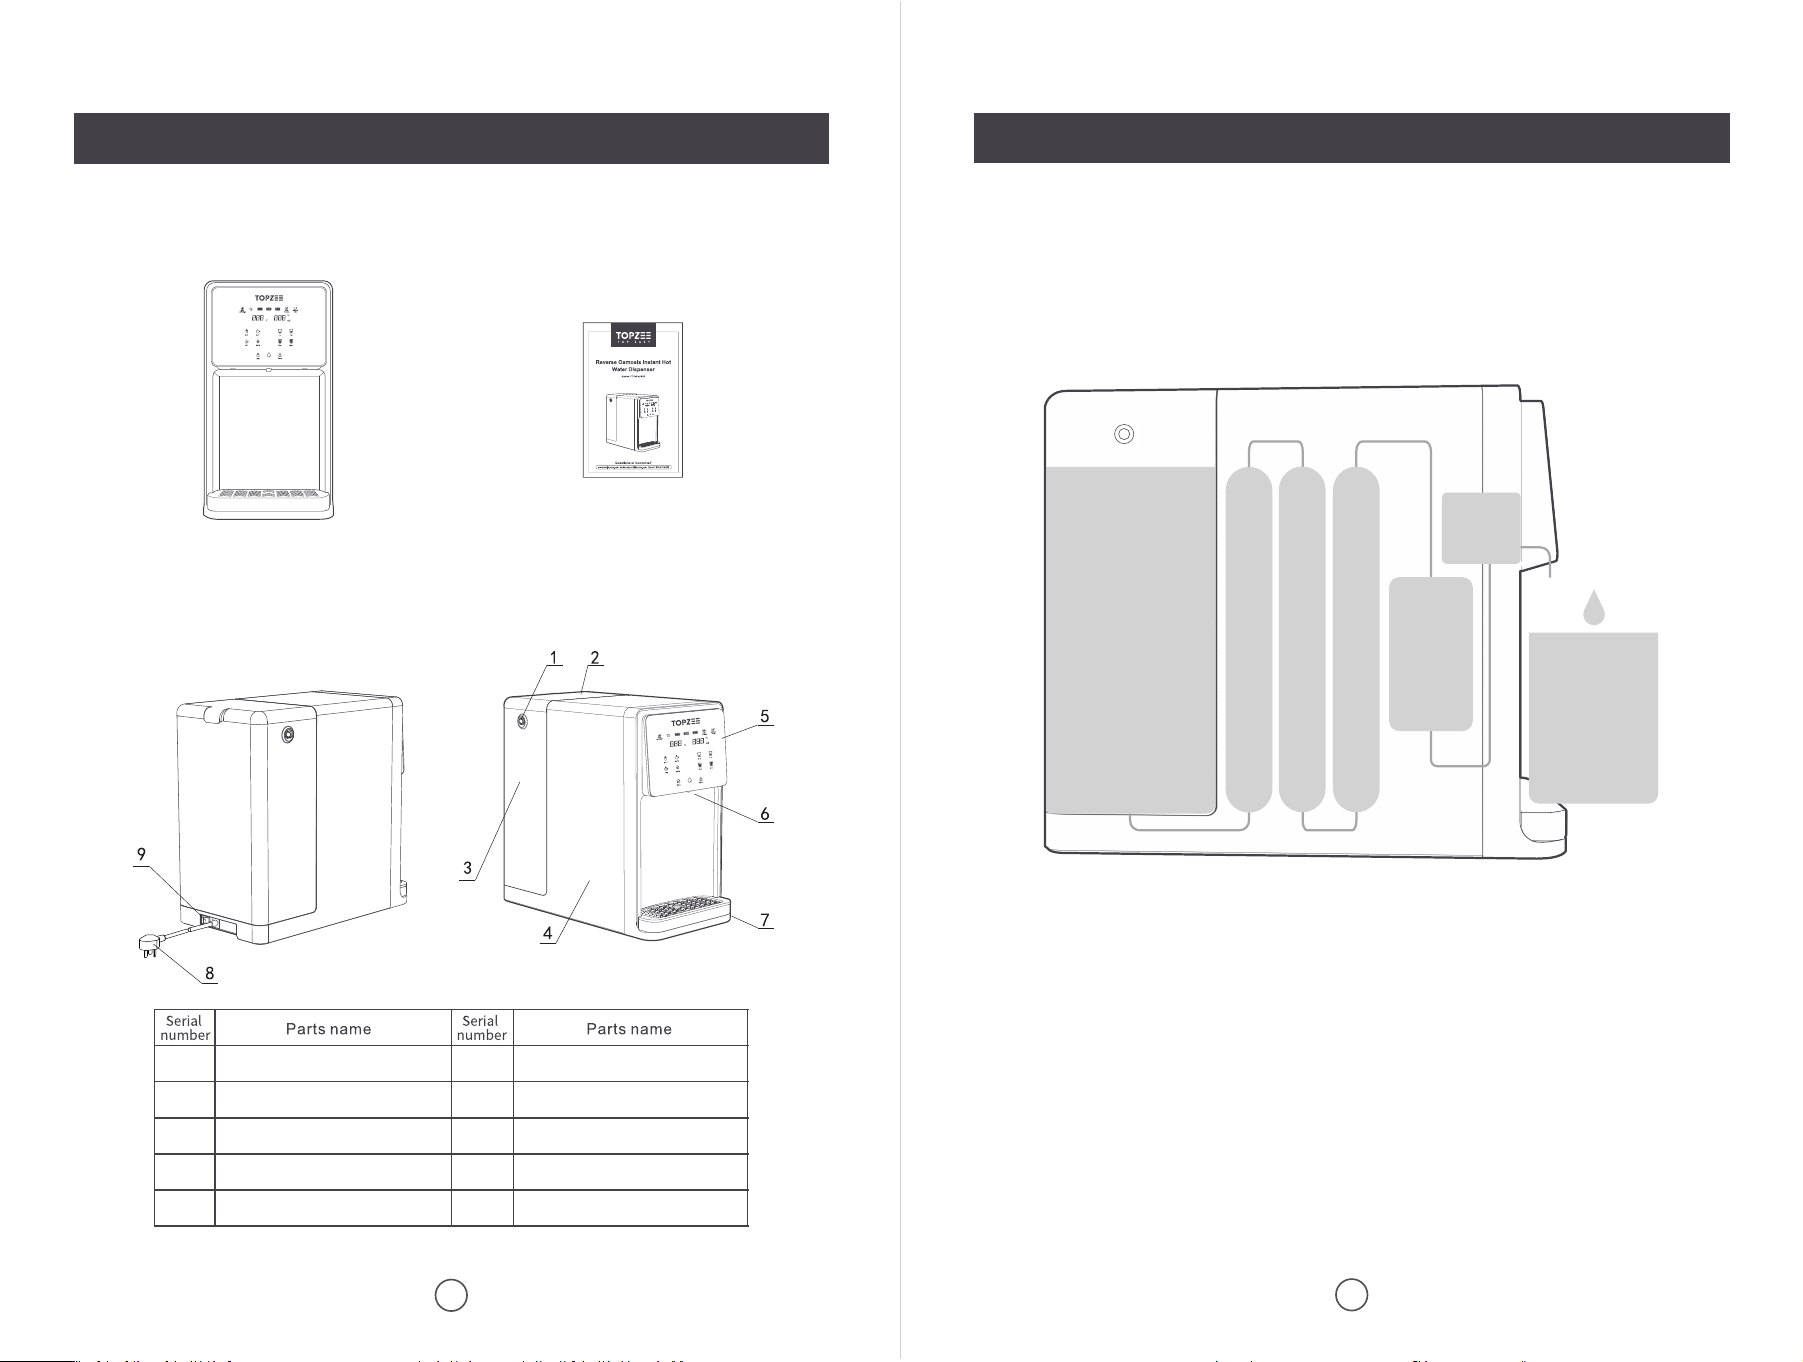
2.1 What’s in the Box?
2.2 Getting to Know Your Dispenser
3
PREPARATION
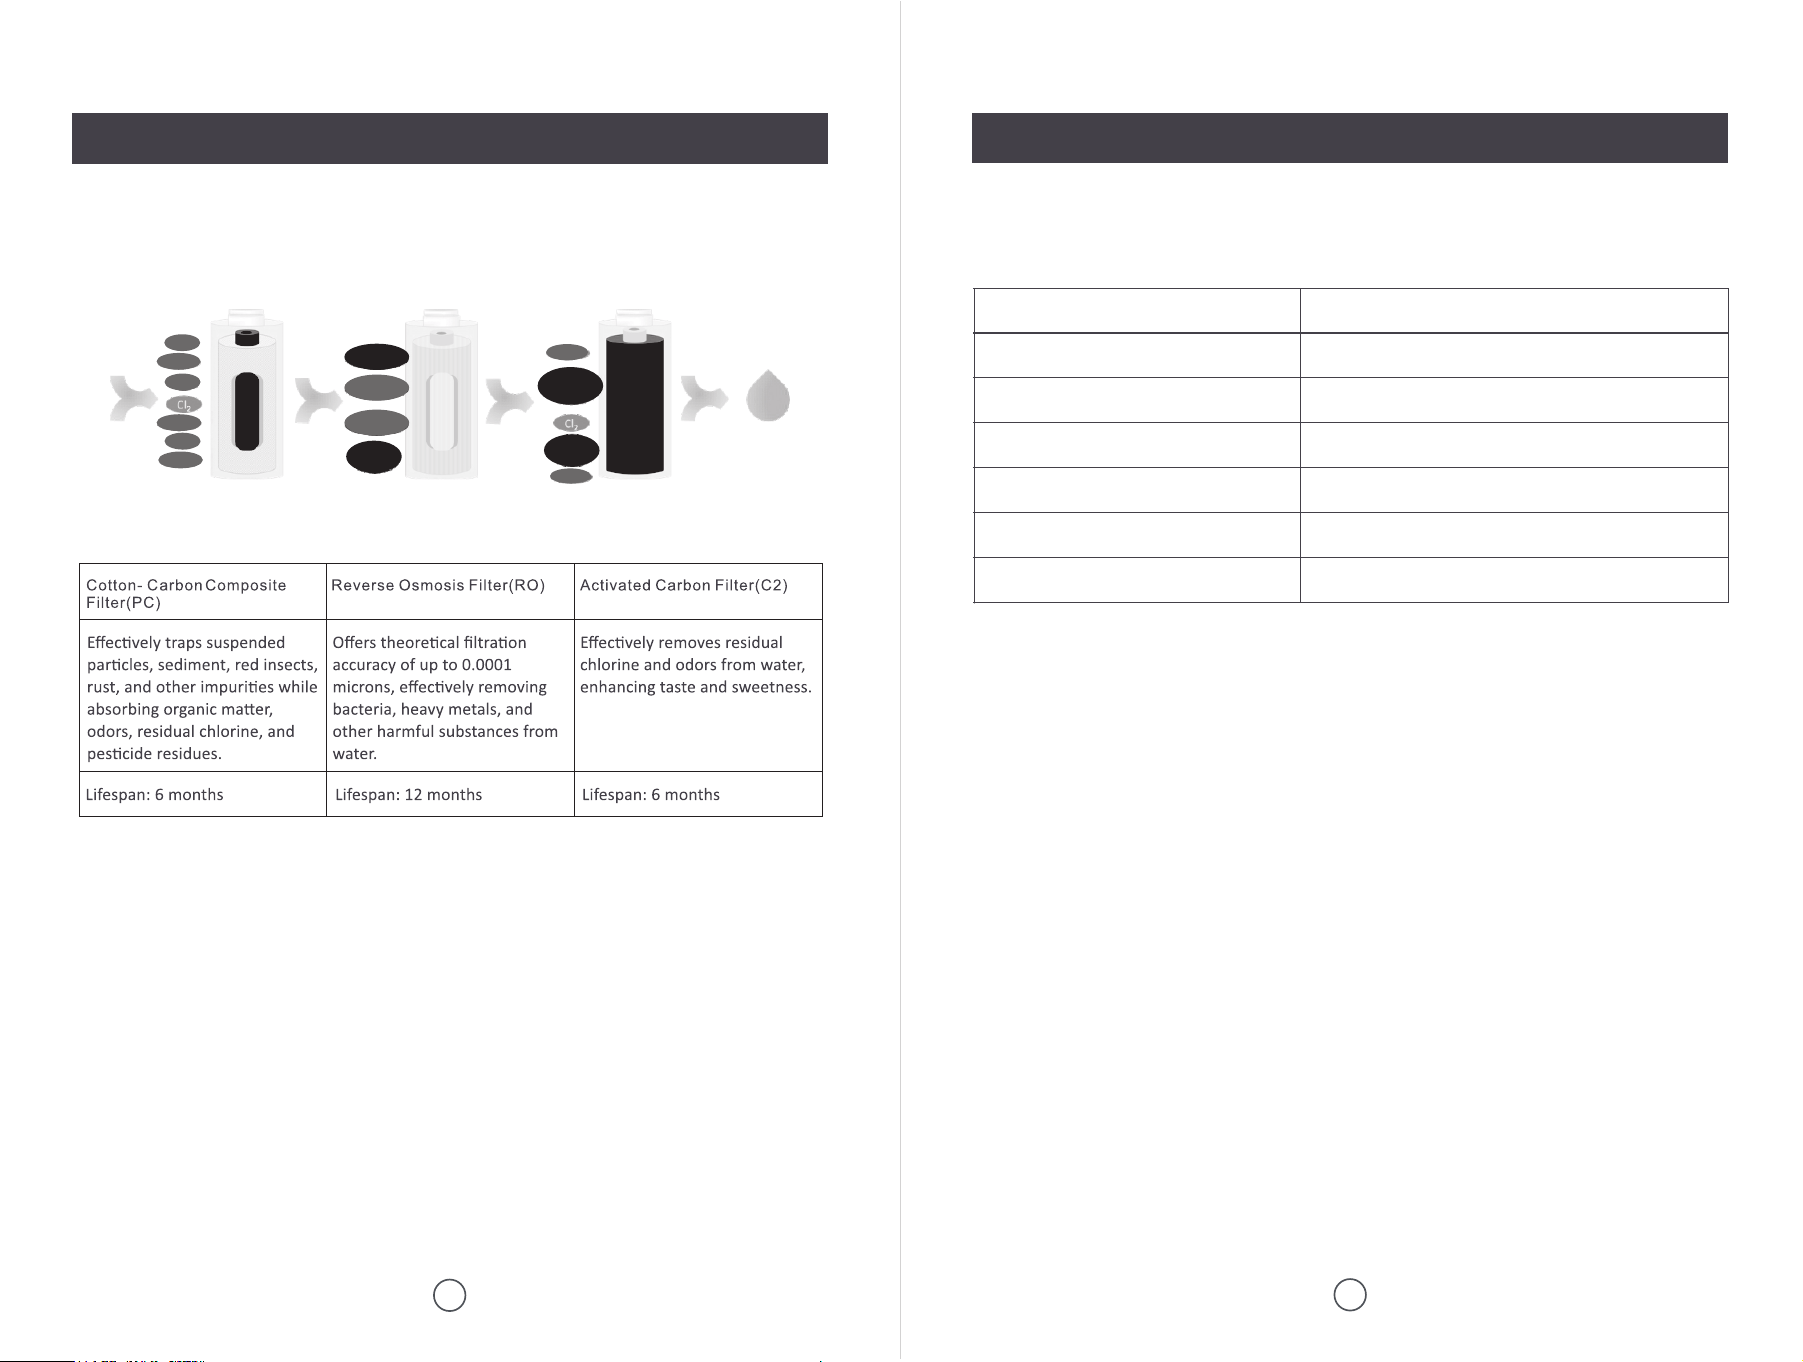
2.3 Overview of Product Working Process
RO Instant Hot Water Dispenser with PC+RO+C2 Filters Instruc�on Manual × 1
ogn
Raw Water Tank Handle
Raw Water Tank Cover
Raw Water Tank
Built-in Net Water Tank
Opera�on Panel
1
2
3
4
5
6
7
8
9
Water Outlet
Drip Tray
Power Plug
Power Switch
Pure
Water
0.4 Gal
Net Water
Tank
UV
Disinfec�on
PC RO C2
1.9 Gal
Raw Water
Tank
Heater
4
PREPARATION
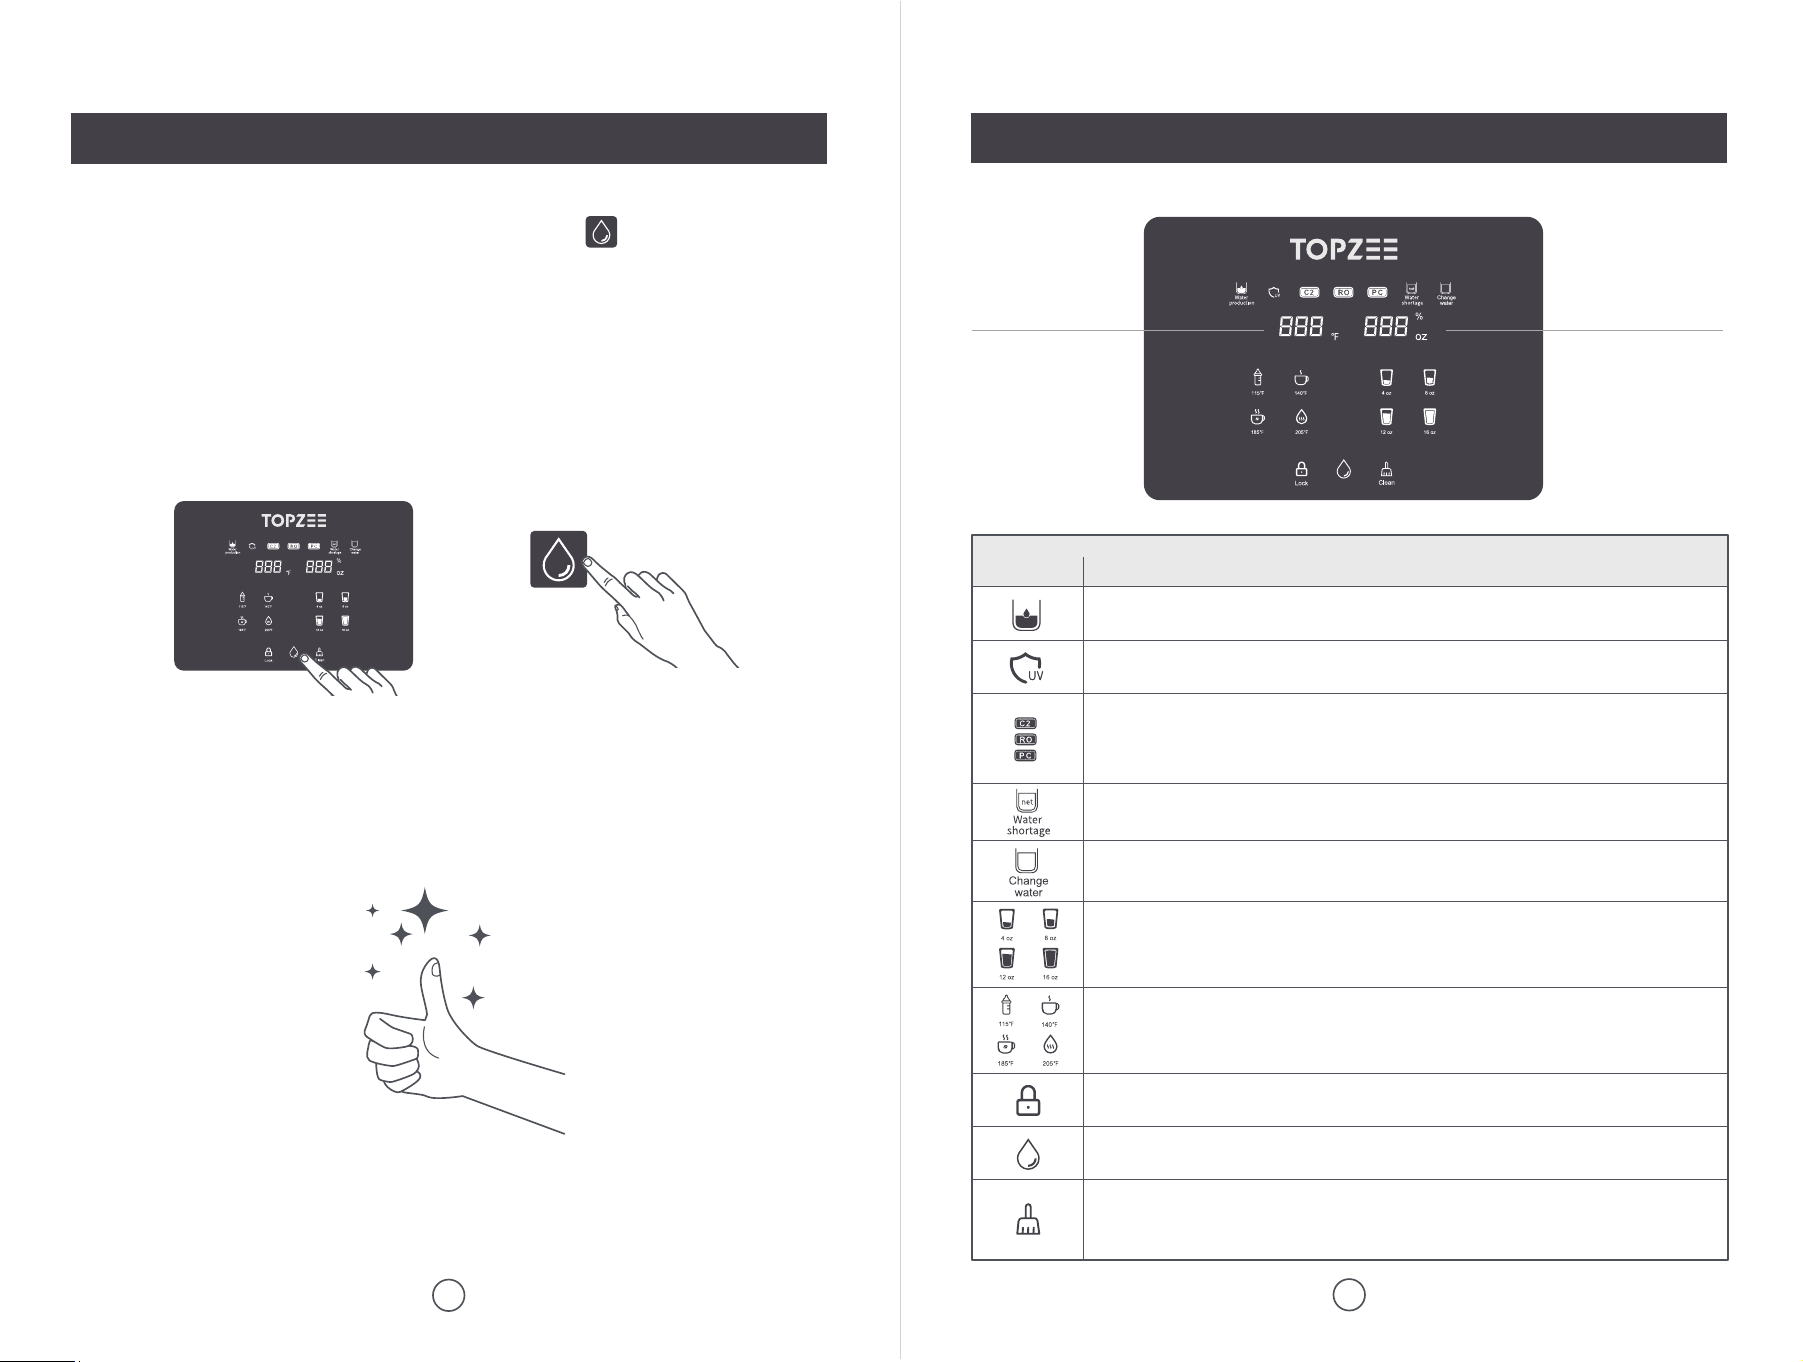
2.4 Filter Features
5
PREPARATION
2.5 Specifications
Pure and
healthy
water
Note:
The power outlet must have a reliable three-pronged grounded plug and be connected to
a surge protector to prevent electric shock.
Note:
The lifespan of the filter is affected by the local water quality. If you notice a slow water
flow, please refer to the troubleshooting section for solutions.
Rated Voltage AC 110V, 60 Hz
Net Water Flow 8.79 oz / min
Temp Choice Ambient / 115℉ / 140℉ / 185℉ / 205℉
Volume Choice 4 oz / 8 oz / 12 oz / 16 oz
Raw Water Tank Storage 1.9 Gal. (7L)
Net Water Tank Storage 0.4 Gal. (1.5L)
Dimensions L 16.14" x W 8.58" x H 15.75"
Color
Odour
Hair
Odour
Rust
Insect
Clay
Color
Bacteria
Organics
Viruses
Toxic
metals
Toxic
metals
Toxic
organics

6
GETTING STARTED
① Wash and fill the tank.
② Plug in and power on.
7
GETTING STARTED
④ Empty the tank and fill it with fresh water.
Note: White foam in the raw water tank during initial cleaning is normal.
③ Tap to start smart clean.
Tips:
1. Cleaning is necessary before first use or long time inactivity.
2. It will take about 15-30 mins, depending on the different tap water quality. Cleaning
ends after 5 beeps. The right display will show "4" and flash, and the "Change
Water" indicator will flash.
3. The cleaning process consists of 4 complete cycles of water transfer between the
raw water tank and the net water tank. The right display indicates the current cycle
number 1-2-3-4.
ogn
8
GETTING STARTED
9
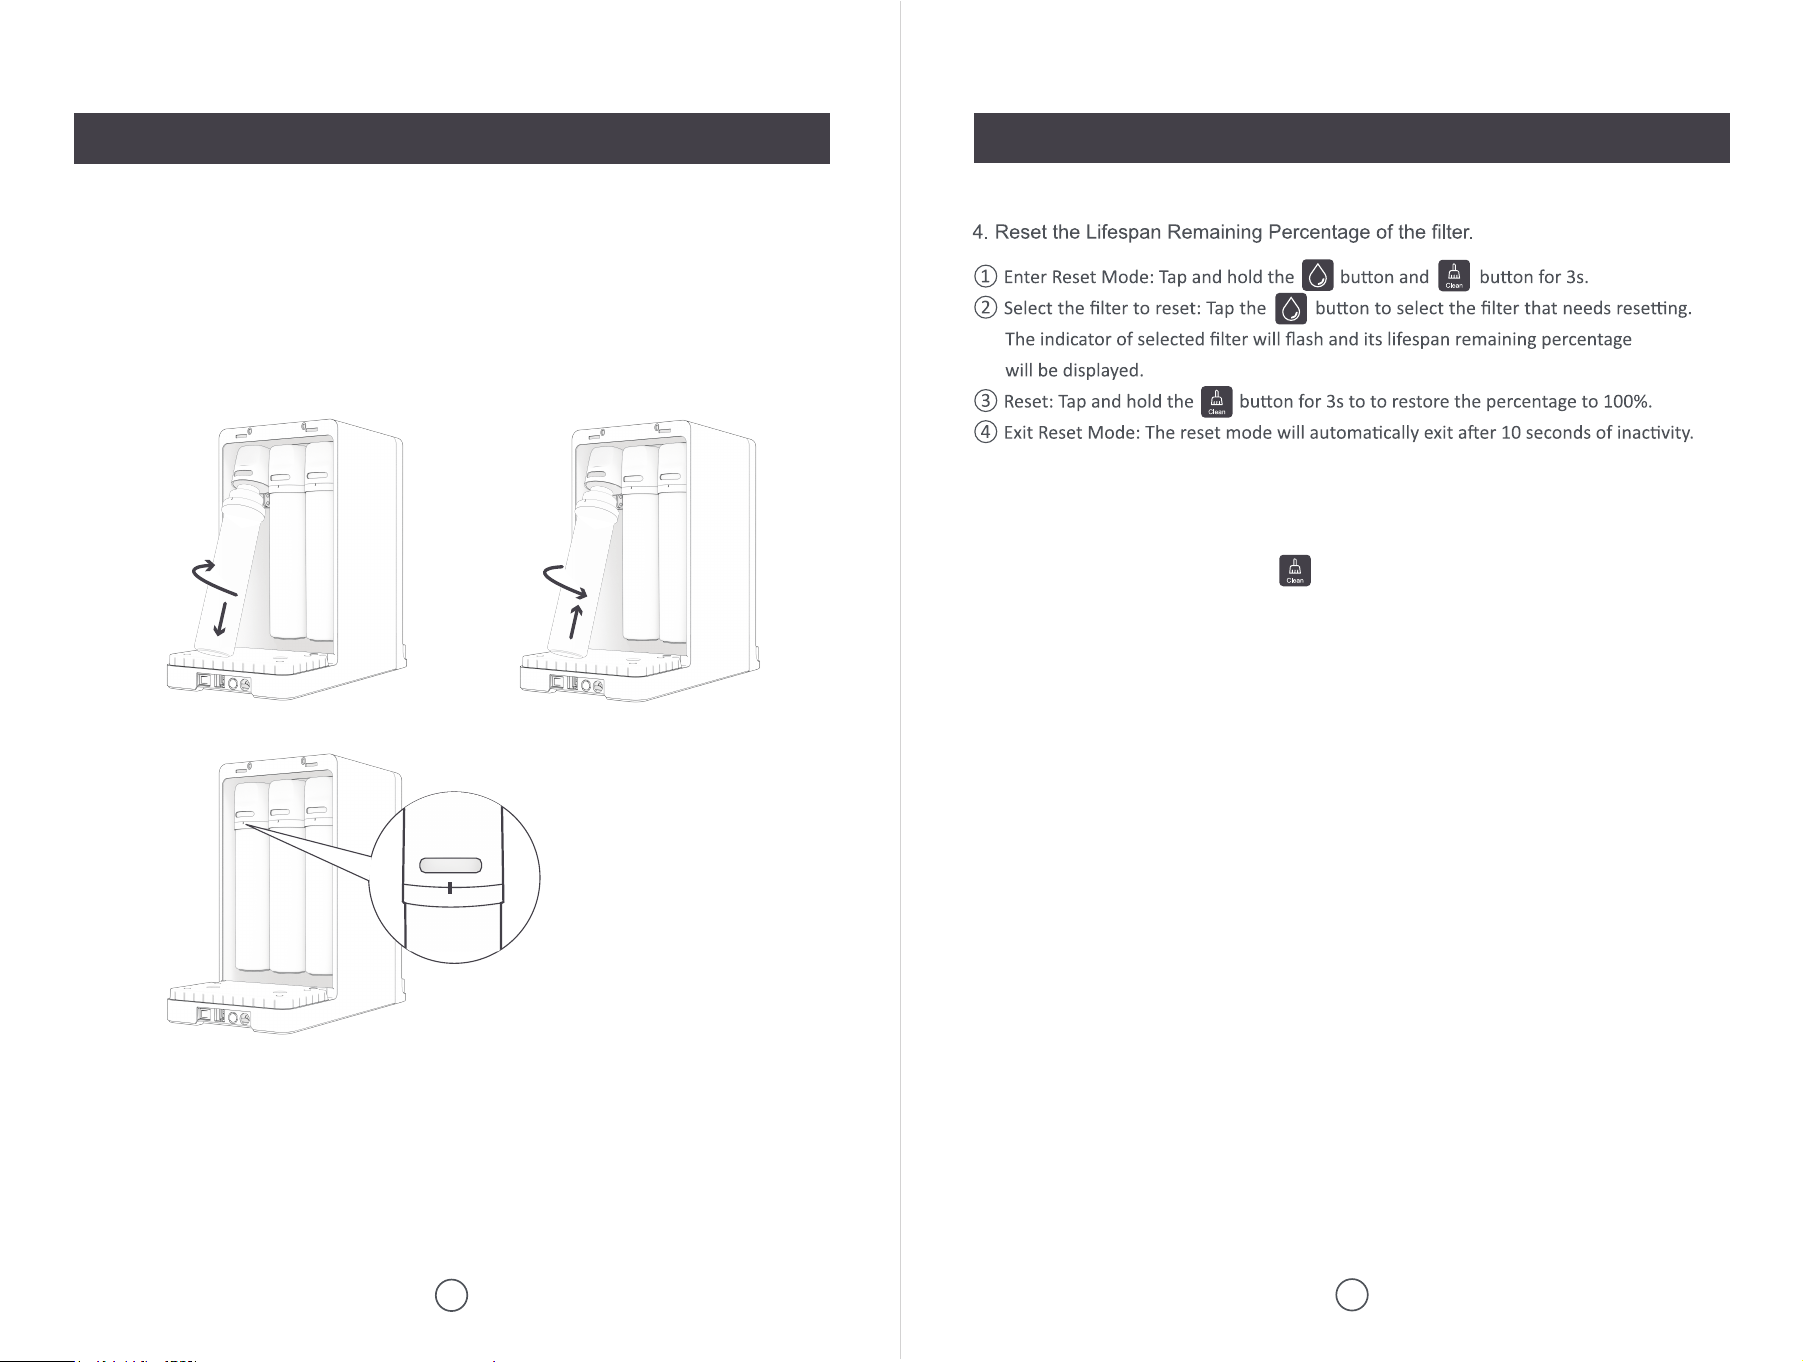
OPERATION PANEL OVERVIEW
Well done! You are ready to enjoy fresh clean water at your desired temp!
ogn
ogn
⑤ Select the temp and volume. Alternatively, tap the button directly to get
water at the default temp (ambient) and volume (4 oz).
Tips:
1. During your first use, the dispenser will provide ambient water first. Please wait a
few seconds for hot water to be available.
2. For your initial use, you can dispense 4 oz of boiled water and discard it to ensure
that the subsequent water is completely clean.
Selected Temp
Selected Volume &
Lifespan Remaining
Indicator Operating Status
On: Filtering Off: Filtered
Flash: Raw water is low; need to remove the tank and replace
it with fresh water
Tap to select desired volume (4/8/12/16oz)
Tap to select desired water temp (115/140/185/205℉)
On: Child lock activated; tap to unlock (Auto locks after 10
seconds of inactivity); tap and hold to cancel the auto lock
Tap to dispense water
Tap and hold for 3s to empty the net water tank
Tap to start smart clean
The unit is set to auto-clean every 24 hours
Tap and hold for 3s to turn the auto-clean on / off
On: UV light is working for disinfection
Filter Life Indicator:
On: Normal operation Flash: Less than 15 days left
Off: Filter life exhausted
On: Net water at low level; no output
Off: Normal output
ogn
5.1 Filter Replacement5.1 Filter Replacement
10
MAINTENANCE
11
MAINTENANCE
1. Turn off the power and empty the raw water tank.
2. Lift the filter to a 45-degree angle and twist it clockwise to remove the expired
filter.
3. Insert new filter into the filter base: PC→RO→C2 from left to right.
Twist the filter counterclockwise until it snaps securely into place.
Note:
When the reset is successful, the button will flash continuously to remind cleaning.
(For specific operating steps, please refer to the chapter "GETTING STARTED".)
12
MAINTENANCE
5.2 Daily Use Notice
13
TROUBLESHOOTING
1. Power Off and Drain: Before performing any maintenance, completely drain all
water from the tank until it is empty. Then, turn off the power and unplug the
machine. Ensure that the machine is kept away from any charged objects.
2. Filter Cartridge Monitoring: The machine monitors the lifespan of the filter cartridg-
es. Please replace the corresponding filter cartridge promptly. To ensure water
quality, use only our original filter cartridges. After replacing the filter cartridge,
remember to reset the filter lifespan.
3. Cleaning the Machine: Use a non-abrasive or neutral detergent to clean the
surface of the machine, ensuring that no water enters the machine during the
cleaning process. Note: The dispenser should not be submerged in water for
cleaning!
4. Draining Method: To discharge any water or residual water from the spout of the
dispenser, tap and hold the water dispense button.
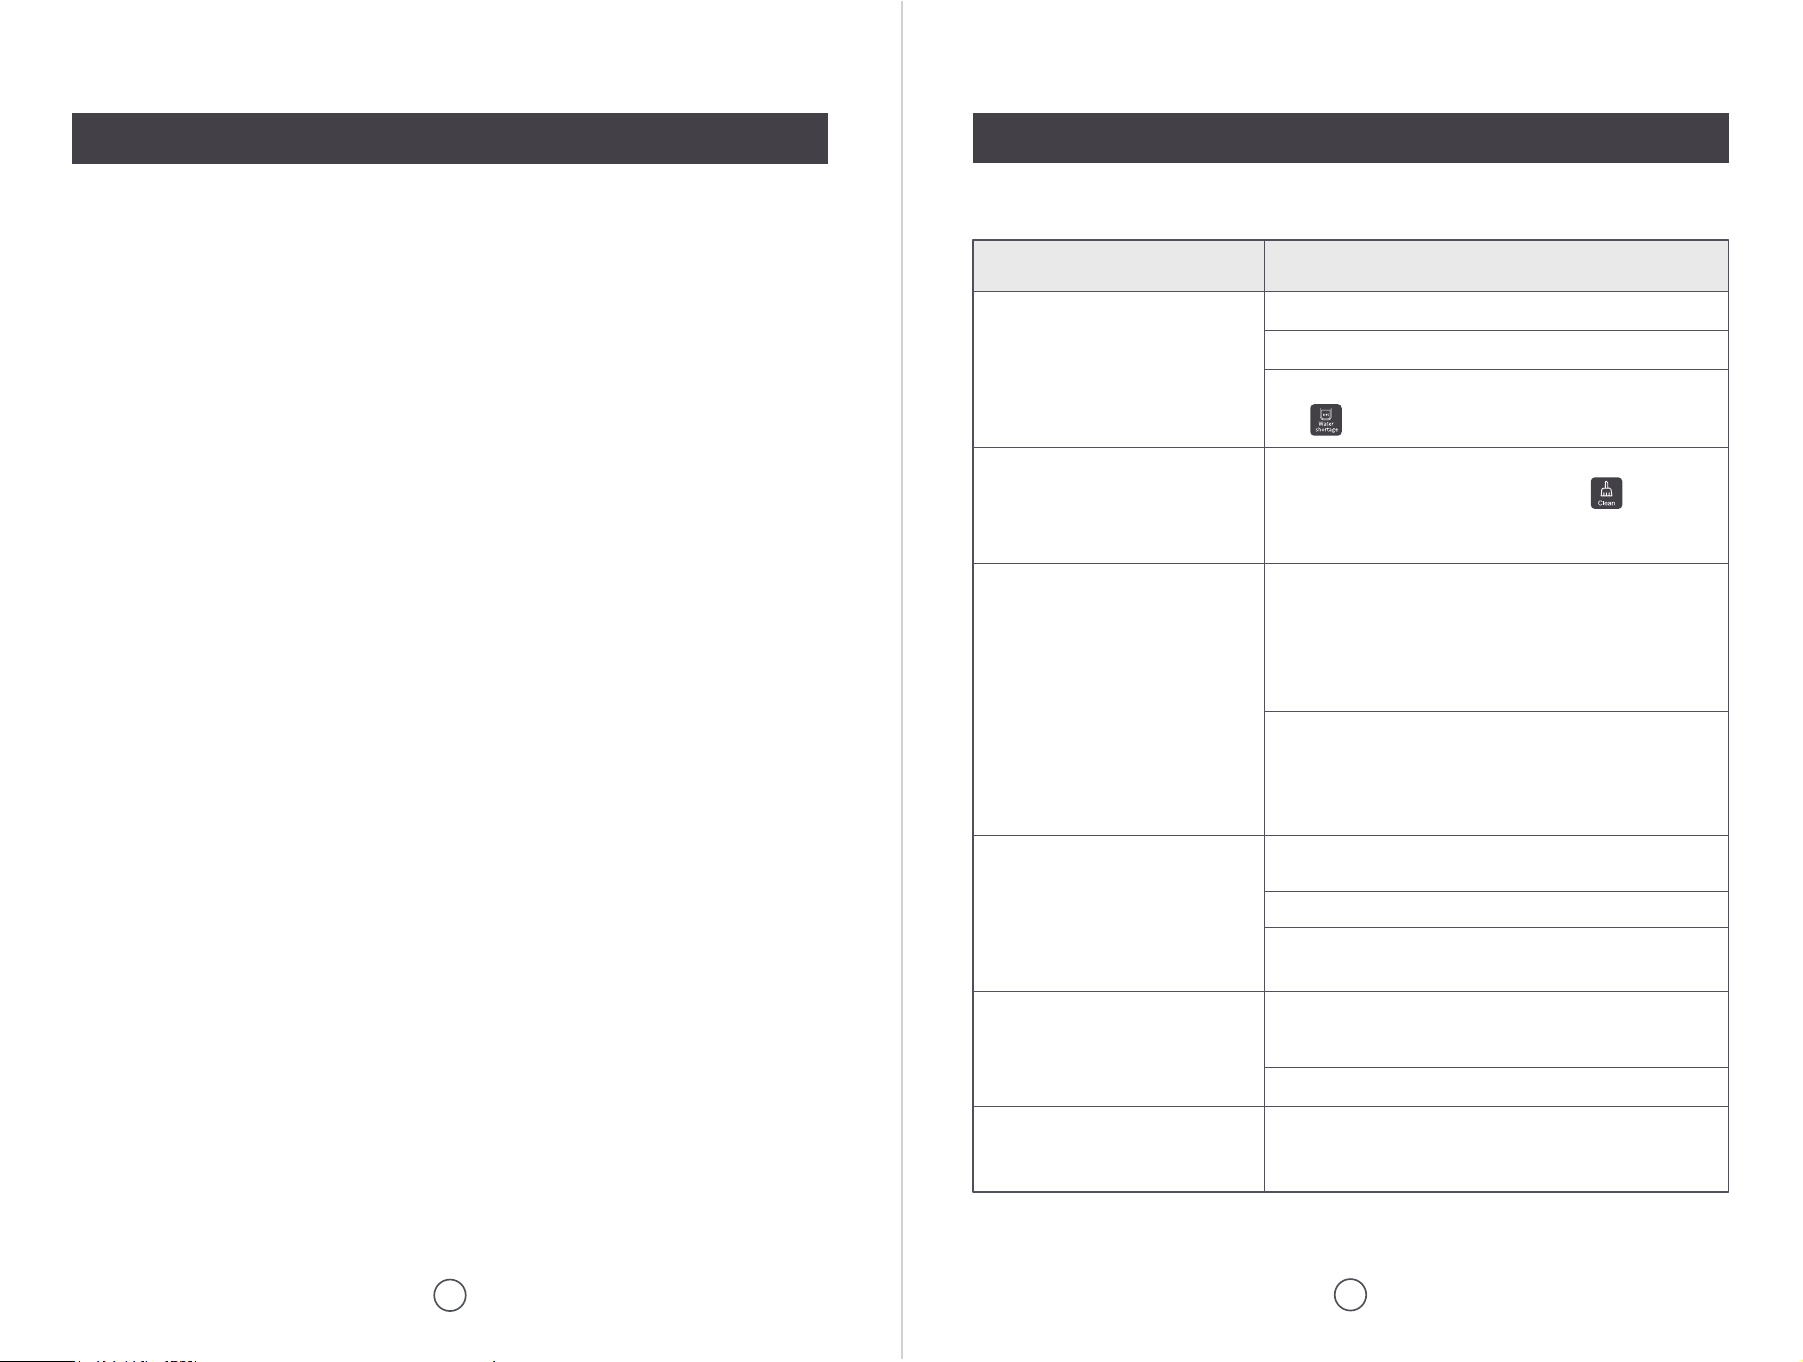
Problem Possible Reasons & Solutions
System does not dispense water
Water leakage
Water temperature does not reach
set level
White bubbles in the water
Slow water flow
White solid particles in water for
first use or after replacing the filter
Check if the raw water tank is installed correctly.
Check if the filter is installed correctly.
The raw water temperature is too low.
This is a normal phenomenon, and the heating process
can cause some air bubbles to remain in the water.
The heating element needs time to preheat. It may take a
few seconds for the water to reach the target temperature
during the pumping process.
Check if the filter is installed correctly.
When removing the raw water tank, residual water may
flow out from the bottom, which is normal.
Check if the rubber ring at the bottom of the raw water
tank is installed correctly or if it is deformed.
Check if the net water tank is empty
(the light will be on).
These may be residual particles from the production
process of the new filter. Please tap the button
before first use or after filter replacement. Once cleaning
is finished, replace the raw water tank with fresh water.
Slow water flow may be caused by scaling within the
internal pipes of the water purifier. Please run the
cleaning mode to remove it.
Note: Do not use acidic substances to clean the filter, as
this can easily damage the RO filter.
The filter's lifespan may have ended, resulting in
decreased filtration efficiency and causing water to leak
more slowly from the tank. Replace the filter before its
lifespan expires (the filter indicator light will flash).
14
SAFETY NOTICE
1. The dispenser should be placed horizontally; do not position it upside down or
diagonally.
2. This dispenser is intended for home use only and must be operated according to
the instructions in this manual. It is not for commercial use.
3. Do not energize the dispenser if the ambient temperature is below 41°F, as this
may cause damage.
4. The dispenser's plug must be inserted into a socket with a grounding wire to
prevent electric shock. Ensure grounding complies with local codes and regula-
tions.
5. Use a socket rated for more than 15A. Make sure the plug is fully inserted into the
socket to avoid damage caused by poor contact, which may lead to short circuits,
fires, and other hazards.
6. Only professional maintenance personnel should attempt to repair the dispenser if
it fails. Non-professionals may risk electric shock during maintenance.
7. When dispensing hot water, avoid touching the spout with your hands to prevent
burns.
8. Exercise caution when handling hot water to prevent scalding. Take extra care if
wearing revealing clothing to avoid burns.
9. Avoid touching the hot water button when cleaning the panel, as it may cause
burns.
10. Before connecting the dispenser, check that the voltage marked on the system
nameplate matches the power supply to avoid damaging components or causing
a fire.
11. Do not use wet hands to insert or unplug the cord, and avoid using a damp cloth
to clean the plug, as these actions may cause electric shock.
12. When unplugging the device, hold the plug itself and do not pull or twist the power
cord to prevent damage and avoid the risk of leakage.
13. Regularly inspect the power supply and power cords for damage to prevent signifi-
cant accidents due to leakage.
14. Always place the dispenser in a well-ventilated, moisture-proof, sun-proof, and
freeze-proof environment. Avoid contact with corrosive substances.
Follow Us on Social Media
@Topzeeofficial # TopEasyTopzee
Scan with your phone
Instagram
Scan with your phone
Facebook
Scan with your phone
YouTube
Scan with your phone
TikTok