
Quick Start Guide
02
01
What’s in the Box Introduce the NVR
Introduce the Camera
Expanding Storage(Optional)
Quick Start Guide
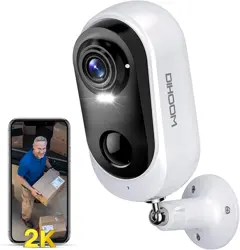
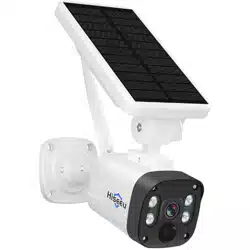
Wireless NVR Battery Camera
3.9ft(1.2m)USB-
C Extension Cord
USB Mouse HDMI Cable
NVR Power Adapter
Pack of Screws
Quick Start Guide
Reset Needle Pin
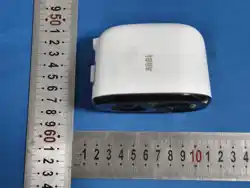
The NVR supports SD cards (maximum capacity of 512G) or 2.5-inch
hard drives for saving video recordings.
Indicator Light Status
Description
Red light is solid on
Off
Purple lightis solid on
Blue lightis flashing
Blue lightis solid on
IR lightis flashing
Remote preview
Sleep Mode / Fully charged
Camera is booting
Waiting for pairing
camera is charging
Camera is upgrading
Size 2.5 inch
Unlimited
Capacity
Recommended
Type
Western Digital, Seagate, SAMSUNG, Toshiba, Kingston,
PNY, Crucial, SanDisk
Hard disk drive (HDD) or solid state drive
(SSD) that uses the SATA interface
Blue light is solid on Camera is charging
Fully chargedOFF
Indicator Light Status Description
Charging the Camera
03
Note: Quantity of devices and accessories vary by different models that you
purchase.
We recommendfully charge the cameras before first use.
3.3ft (1m)
Network Cable
Prepare Your Hard Drive
Your hard drive must meet the following requirements:
Install Your Hard Drive
A new hard drive must be formatted. You may need to
transfer all the data from your hard drive to a secure location
if necessary.
NVR must be powered off when you install or remove a hard
drive.
Push down the bottom lid
to remove it.
Loosen the screw, then pull out the
hard drive bracket.
Fix your hard drive to the bracket with the provided screws.
Insert and screw the bracket back to NVR, then put the bottom lid
back into place.
1. 2.
3.
4.
6
7
8
9
10
11
12
13
14
15
1
4
5
2
3
Indicator Light
Red and Green Light
Spot Light
Infrared LED
Photosensitive Sensor
Camera Lens
Microphone
PIR Sensor
Solar Panel
Antenna
Speaker
Pair Button
USB-C Charging Port
Power Switch
Seal Plug
H ARD DRIV E
3
1
2
4
5
6
7
10
9
8
11
15
14
13
12
Screw Positioning
Stickers Antenna
Antenna
Network Status LED
HDMI Port
Ethernet Port
Reset Hole
USB Port
Power Port
USB Port
MicroSD Card Slot
Storage Status LED
Power Status LED
1
4
5
6
7
8
9
10
11
2
3
4
5
6
7
8
9
10
11
3
1
2
Install the antenna
IPC:B301
NVR:N18
Wireless Camera System

Declares that this device is in compliance with the essential requirements and
other relevant provision of Directive EN300328,EN301489-1,EN31489-17,EN IEC
62311、EN IEC 62368.
Simplified EU Declaration of Conformity
This marking indicates that this product should not be disposed with other
household wastes throughout the EU. To prevent possible harm to the
environment or human health from uncontrolled waste disposal, recycle it
responsibly to promote the sustainable reuse of material resources. To return
your used device, please use the return and collection systems or contact the
retailer where the product was purchased. They can take this product for
environment safe recycling.
Correct Disposal of This Product
Compliance Statement
The transmitter/receiver exempt from licensing contained in this device
complies with Innovation, Science and Economic Development Canada's
(ISED) regulations applicable to license-exempt radio apparatus. Operation is
subject to the following two conditions:
(1) This device must not cause interference, and
(2) this device must accept any interference, including interference that may
cause undesired operation of the device.
IC Radiation Exposure Statement:
This equipment complies with the radiation exposure limits set forth for
uncontrolled environments in Canada. This equipment should be installed
and operated with a minimum distance of 20 cm between the radiator and
your body. This transmitter must not be co-located or operating in conjunction
with any other antenna or transmitter.
Mounting the Camera
It is recommended to choose an installation location without eaves
and sunlight is not obstruc, to ensure the normal operation of the
solar panel.
Pairing the Camera
07
Download and install the free
app from the App Store (iOS
devices) or Google Play (Android
devices).
Or Download the APP by
scanning below QR code.
Run the app, sign up for a APP account. Then login with your
account ID, tap “+ Add Device” and scan the setup QR code on
the Device Bottom (remove the bottom lid). Or scan the setup QR
code in the NVR menu, and then follow the in-app instructions to
add the NVR to the device list.
5.
Pair your add-on camera or re-add existing camera to your NVR:
Option 1: Using the app, from the Live view, tap the "..." button, and
then tap "Pairing" to start the pairing process. You will have a
60-second timer to pair with your Camera.
6.
Please recycle this product responsibly to promote the sustainable reuse
of material resources and avoid potential harm to the environment.
Correct Disposal of This Product
5.
6.
Configuration->System->Information
Tighten the locking screw on the mount bracket, and then adjust to
the angel you need.
1
2
Install the camera onto its mounting bracket by turning it clockwise
until it clicks into place.
This device contains licence-exempt transmitter(s)/receiver(s) that comply with
Part 15 of the FCC Rules. Operation is subject to the following two conditions:
This equipment complies with FCC radiation exposure limits set forth for an
uncontrolled environment. This equipment should be installed and operated with
a minimum distance of 20cm between the radiator and your body.This
transmitter must not be co-located or operating in conjunction with any other
antenna or transmitter.
(1) This device may not cause interference.
(2) This device must accept any interference, including interference that may
cause undesired operation of the device.
Caution: The user is cautioned that changes or modifications not expressly
approved by the party responsible for compliance could void the user's authority
to operate the equipment.
NOTE: This equipment has been tested and found to comply with the limits for a
Class B digital device, pursuant to Part 15 of the FCC Rules. These limits are
designed to provide reasonable protection against harmful interference in a
residential installation. This equipment generates, uses and can radiate radio
frequency energy and, if not installed and used in accordance with the
instructions, may cause harmful interference to radio communications. However,
there is no guarantee that interference will not occur in a particular installation.
If this equipment does cause harmful interference to radio or television reception,
which can be determined by turning the equipment off and on, the user is
encouraged to try to correct the interference by one or more of the following
measures:
-- Reorient or relocate the receiving antenna.
-- Increase the separation between the equipment and receiver.
-- Connect the equipment into an outlet on a circuit different from that to which
the receiver is connected.
-- Consult the dealer or an experienced radio/TV technician for help.
Compliance Statement
FCC Radiation Exposure Statement:
Notification of Compliance
04
Troubleshooting
05
06
Turn the power switch to "ON" to turn on the IPC. Press the camera's
pairing button to start pairing with your NVR. A "paired successfully"
message should appear on the screen. If you do not see this message,
repeat the steps above.
Turn the power switch to "ON" to turn on the IPC. Press the camera's
pairing button to start pairing with your NVR. A "paired successfully"
message should appear on the screen. If you do not see this
message, repeat the steps above.
If there's no video output on the monitor from NVR, please try the
following solutions:
Monitor resolution should be at least 720P or above.
Option 2 : You can also add the camera via the Monitor, tap the “pair”
button on NVR Live View menu to start the pairing process.
No video output on the monitor
•
Hold down right mouse button for 10 seconds to restore
default resolution.
•
Double check the HDMI connection, or swap another cable
or monitor to test.
•
The terms HDMI and HDMI High-Definition Multimedia
Interface, and the HDMI Logo are trademarks or
registered trademarks of HDMI Licensing Administra-
tor, Inc. in the United States and other countries.
Setting Up the System
Connect the included power
adapter to the NVR, wait a few
minutes for the system to start
up.
Connect the NVR to your router
using the included Ethernet
cable. And then, connect the
USB mouse to the USB port of
the NVR.
Connect the NVR to the
monitor with a HDMI cable.
( Optional, if you wish to
monitor on a screen)
1. 2.
3. 4.
Turn the power switch to "ON" to
turn on the IPC. It will automati-
cally connect to the NVR via a
wireless signal.