( )
METZ
Lead the future
S
mm
�11111111111111111111111111111111111111111111111111111111
--J-�==5- 004543- 001
6mm
��,
: L X, �, l, ��. x-,
;
2
. R�. i0�, �J, , ,
' , t,Jl!�.
: Appearance and quality Requirements:
;
1.Contents should be clearly printed without defes or garbled characters.
, Contents and colo should be consistent with the dwing.
;
2.Size should be correct and conform to the tolerance requirements.
' The edges should be cut neatly, and the surface should be clean without
; scratches, damages, fading or printing through.
*,
I
. 1 :1
20
g, 80
G
�, j.
2
.
R:A5(148X210mm), R0(0/
-
3).
3. HJ:80P, iftilHT. > 80P�.
4
. ,
250
lHU..
5
.
: iRoHS
,
ReachTSCAf
.
Technical requirements:
1.Material: front and back cover 120g coated paper;
inner page 80G writing paper; black and white printing.
2.Size: AS (148 X 210 mm) with a tolerance of (0/-3) mm.
3.lf there are more than 80 pages, user manual is bound with
glue. If not
m
ore than 80 pages, it is bound with staples.
t��::��e�::��i�
i
���1i���� R����J�g��
d
m
ehr
UV
.
�l!1J-RGB��0�
SHENZHEN CHUANGWEI-RGB ELECTRONICS CO.,LTD.
�(T1TLE)
��(VODEL)
G
3
FN-9KA*G
(PROJECTION)
$
(UNITS)
mm
It
](SCALE)
1:1
'=,,..,_
LO
((BNE)
�(SMEL)
�(P.)
l/BM
o,,,./DATEl
H/ B M
(. /D,TE)
/BMm.10,rE>
METZ
MUD70
N080105-004543-00I
�
2025-05-I 9
[ 2025-05-I 9
2025-05-I 9

PREPARION
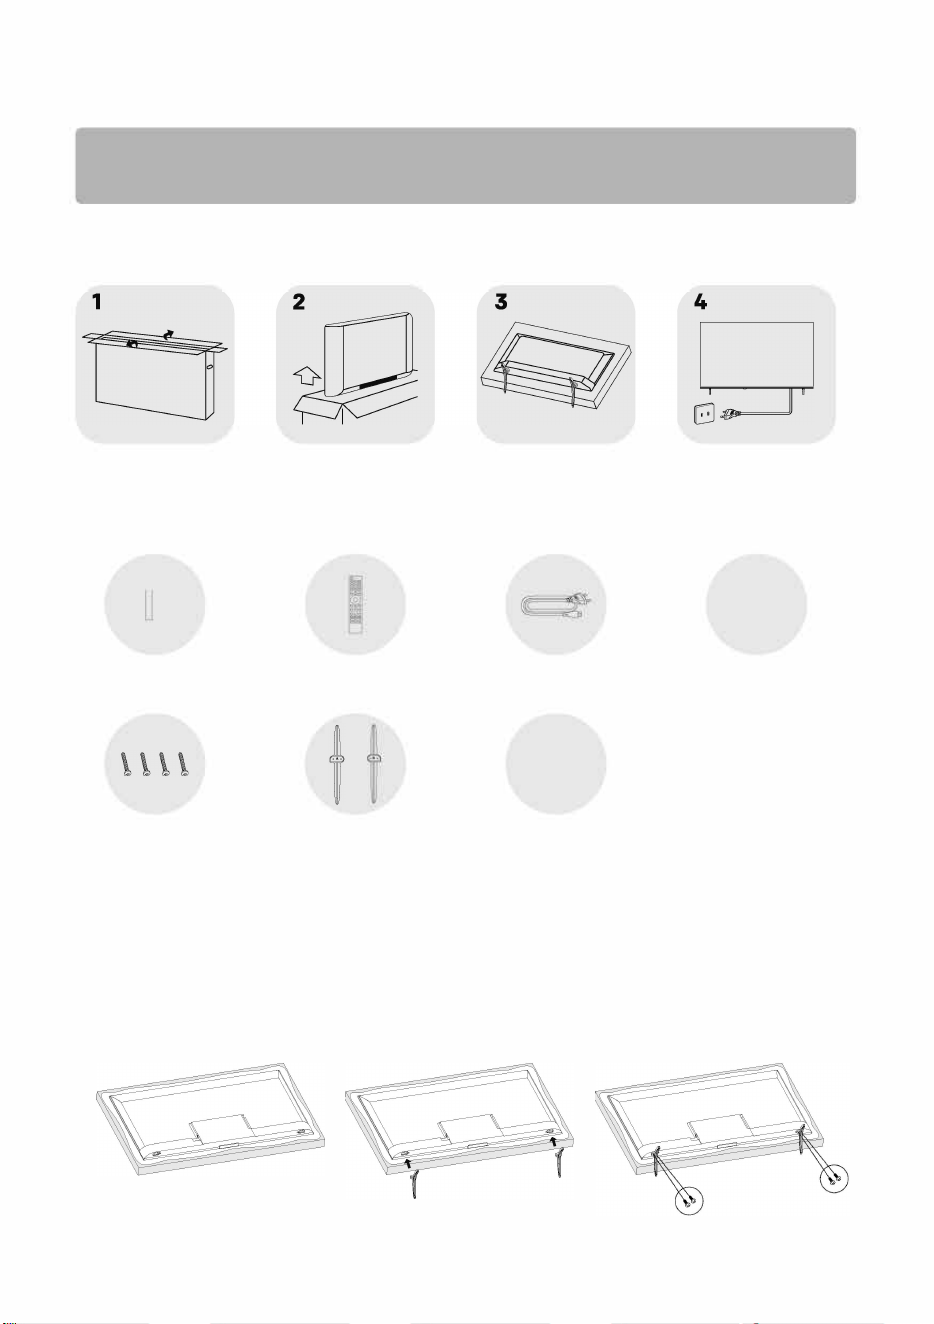
Note:
1). e pictures are only r rerences.
2). Avoid pressing the screen to prevent screen damage.
3). Two or more persons are required for safe handling of a large TV to prevent any damages or injuries.
Unpacking and Installation
Open the package.
ke out the TV.
Install the TV stands.
Connect the power cord.
Standard Accessories
I
J
E
Batteries /2
Remote Control Power Cord
Warranty Card
Stand Screws /4 Stand Bases /2
Quick Start Guide
Stand Installation Instructions
Step 1: Take out the TV and carefully put it (screen downward) on a stable and flat table with a soft cloth
or cushion on it.
Step 2: Please check to make sure there is the same mark(A/B) on the TV back and the correct stand base.
This step is not available for the bases without any mark on them, or not available for the TV with one
stand base only.
Step 3: Fix the stand bases to the TV by fastening the matching stand screws provided in the box.
The bases may vary depending on the region or model.

WARNING AND PRECAUTION
Read all of the instructions before operating the set. Keep these instructions well for later use.
Important Safety Instructions
• Read these instructions - All the safety and operating instructions should be read before this product is
operated.
• Keep these instructions - The safety and operating instructions should be retained for future reference.
• Heed all warnings - All warnings on the appliance and in the operating instructions should be adhered to.
• Follow all instructions - All operating and use instructions should be followed.
• Do not use this apparatus near water - The appliance should not be used near water or moisture - for
example, in a wet basement or near a swimming pool, and the like.
•
Clean only with dry cloth.
• Do not block any ventilation openings. Install in accordance with the manufacturer's instructions.
• Do not install near any heat sources such as direct sunlight, radiators, heat registers, stoves, or other
apparatus (including amplifiers) that produce heat.
• Do not defeat the safety purpose of the polarized or grounding plug. A polarized plug has two blades with
one wider than the other. A grounding plug has two blades and a third grounding prong. The wide blade or
the third prong is provided for your safety. If the provided plug does not fit into your outlet, consult an
electrician for replacement of the obsolete outlet.
• Protect the power cord from being walked on or pinched particularly at the plugs, convenience receptacles,
and at the point where they exit from the apparatus.
• Only use attachments/accessories specified by the manufacturer.
• a Use only with the cart, stand, tripod, bracket, or table specified by the manufacturer, or
sold with the apparatus. When a cart or rack is used, use caution when moving the
cart/apparatus combination to avoid injury from tip-over.
• Unplug the apparatus during lightning storms or when unused for long periods of time.
• Refer all servicing to qualified personnel. Servicing is required when the apparatus has been damaged in
any way, such as power supply cord or plug is damaged, liquid has been spilled or objects have fallen into
the apparatus, the apparatus has been exposed to rain or moisture, does not operate normally, or has been
dropped.
• CAUTION: These servicing instructions are for use by qualified service personnel only. To reduce the risk of
electric shock, do not perform any servicing other than that contained in the operating instructions unless
you are qualified to do so.
• Do not install this equipment in a confined or building-in space such as a book case or similar unit, and
remain a well ventilation conditions at open site. The ventilation should not be impeded by covering the
ventilation openings with items such as newspaper, table-cloths, curtains etc.
•
Please refer the information on rear enclosure for electrical and safety information before installing or
operating the apparatus.
• To reduce the risk of fire or electric shock, do not expose this apparatus to rain or moisture.
• The apparatus shall not be exposed to dripping or splashing and that no objects filled with liquids, such as
vases, shall be placed on the apparatus. Do not use the set near dust place.
•
For the terminals marked with symbol of "�" may be of sufficient magnitude to constitute a risk of electric
shock. The external wiring connected to the terminals requires installation by an instructed person or the
use of ready-made leads or cords.
•
prevent injury, use the stand/wall-mount bracket to securely install this apparatus on the table/wall in
accordance with the installation instructions.
•
Danger of explosion if battery is incorrectly replaced. Replace only with the same or equivalent type.
•
The battery (battery or batteries or battery pack) shall not be exposed to excessive heat such as sunshine,
fire or the like.
• Excessive sound pressure from earphones and headphones can cause hearing loss. Listening to music at
high volume levels and for extended durations can damage one's hearing. In order to reduce the risk of
damage to hearing, one should lower the volume to a safe, comfortable level, and reduce the amount of
time listening at high levels.
• The appliance coupler is used as disconnect device, the disconnect device shall remain readily operable.
•
When not in use and during movement, please take care of the power cord set, e.g. tie up the power cord
set with cable tie or something like that. It shall be free from sharp edges and the like that can cause
abrasion of the power cord set. When put into use again, please make sure the power cord set being not
damaged, If any damages found, please look for the service person to replace the power cord set specified
by the manufacturer or have the same characteristics as the original one.
• Attention should be drawn to environmental aspects of battery disposal.
• No naked flame sources, such as lighted candles, should be placed on the apparatus. To prevent the spread
of fire, keep candles or other open flames away from the apparatus at all times.
•
If the apparatus have the symbol in its rating label and the power cord has two pins, it means that the
equipment is a Class II or double insulated electrical appliance. It has been designed in such a way that it
does not require a safety connection to electrical earth (Only for Class II appliance).
•
Warning for Apparatus containing COIN/ BUTTON CELL BATTERIES (Below instruction only used for the
apparatus containing a user-replaceable coin/button cell battery)
•
WARNING: Do not ingest the battery, Chemical Burn Hazard (The remote control supplied with) this
product contains a coin/button cell battery. If the coin/button cell battery is swallowed, it can cause
severe internal burns in just 2 hours and can lead to death. Keep new and used batteries away from
children. If the battery compartment does not close securely, stop using the product and keep it
away from children. If you think batteries might have been swallowed or placed inside any part of the
body, seek immediate medical attention .
A ,�@
1
A
This lightning flash with arrowhead symbol within an equilateral triangle is
�
Intended to alert the user to the presence of non-insulated "dangerous
voltage" within the product's enclosure that may be of sufficient magnitude
AENno N,RISQUEDEcHocELECTRIQUE-NESOUVRIR.
to constitute a risk of electric shock.
reduce the risk of electric shock. Do not remove cover (or back). No user serviceable parts inside. Refer
to qualified service personnel. The exclamation point within an equilateral triangle is intended to alert the
user to the presence of important operating and maintenance instructions in the literature accompanying
the appliance.
•
The following information are recommended to be included as far as applicable where applicable:
Refer to alternating current(AC).
Refer to stand-by or power on.
Refer to direct current(DC).
Refer to power on.
Refer to Class II equipment.
Refer to dangerous voltage.
WEEE Directive
Correct Disposal of this product. This marking indicates that this product should not be disposed
with other household wastes throughout the EU. To prevent possible harm to the environment
or human health from uncontrolled waste disposal, recycle it responsibly to promote the
- sustainable reuse of material resources. To return your used device, please use the return and
collection systems or contact the retailer where the product was purchased. They can take this product for
environmental safe recycling.
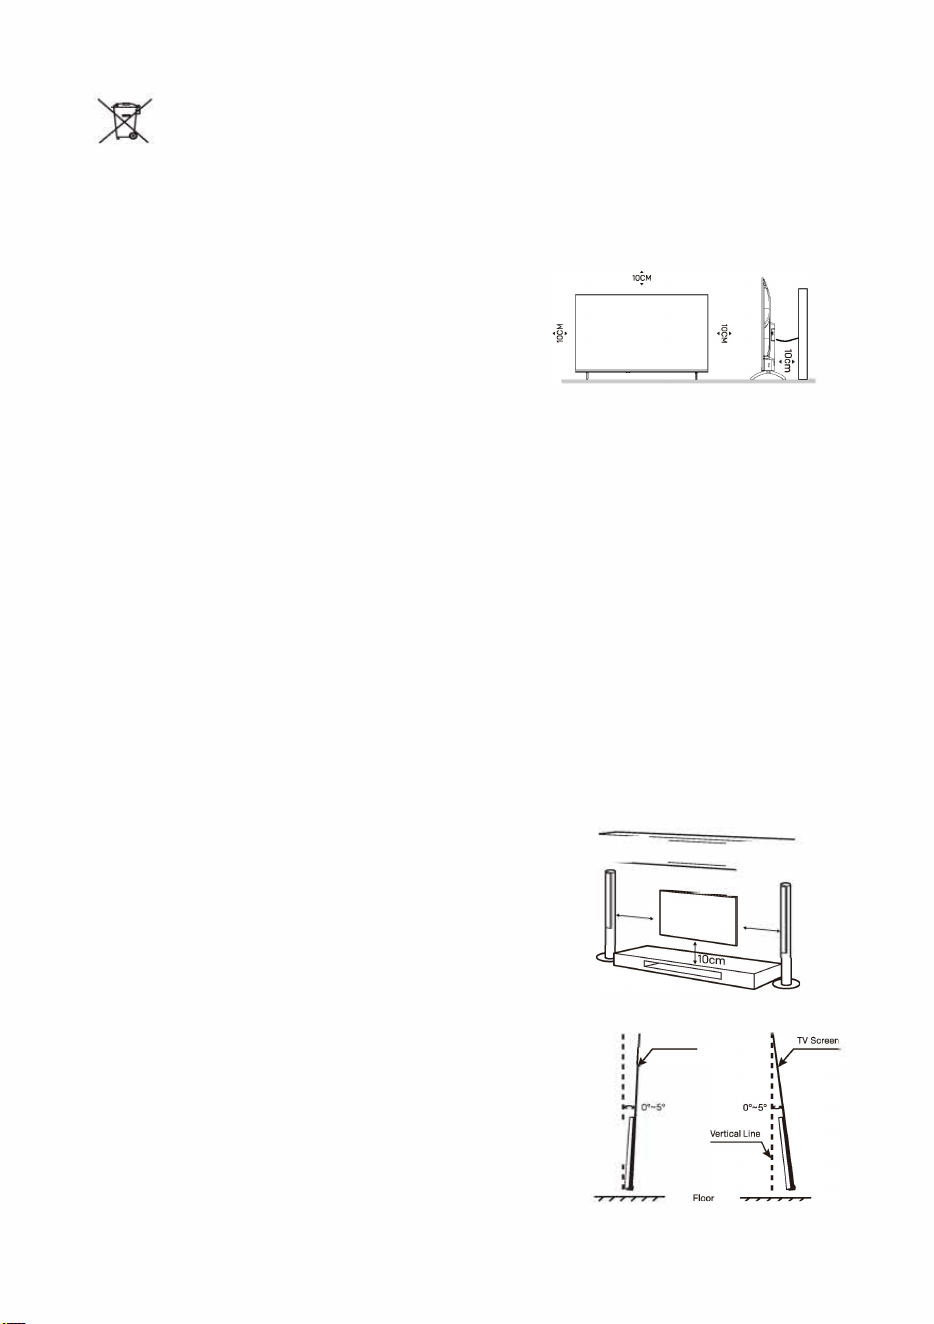
Positioning the TV
• Install TV set on solid horizontal surface such as a table or
desk. For ventilation, leave a space of at least 10cm free all
around the set. prevent any fault and unsafe situations,
please do not place any objects on top of the set.
• Fix the rear of enclosure to wall(only for some countries)
• Warning: Stability Hazard
A television set may fall, causing serious personal injury or death. Many injuries, particularly to
children, can be avoided by taking simple precautions such as:
- ALWS use cabinets or stands or mounting methods recommended by the manufacturer of the
television set.
- ALWS use furniture that can safely support the television set.
- ALWS ensure the television set is not overhanging the edge of the supporting furniture.
- ALWS educate children about the dangers of climbing on furniture to reach the television set or its
controls.
- ALWS route cords and cables connected to your television so they cannot be tripped over, pulled
or grabbed.
- NEVER place a television set in an unstable location.
- NEVER place the television set on tall furniture (for example, cupboards or bookcases) without
anchoring both the furniture and the television set to a suitable support.
- NEVER place the television set on cloth or other materials that may be located between the television
set and supporting furniture.
- NEVER place items that might tempt children to climb, such as toys and remote controls, on the top
of the television or furniture on which the television is placed. If the existing television set is being
retained and relocated, the same considerations as above should be applied.
Mounting on a Wall
• An optional wall mount can be used with your television.
Consult with your local dealer to purchase the recommended
wall mount bracket. Carefully attach the wall mount bracket at
the rear of the T Install the wall mount bracket on a solid wall
perpendicular to the floor. If you are attaching the TV to other
building materials, please contact qualified personnel to
install the wall mount. Detailed instructions will be included
with the wall mount. Please use a wall mount bracket where
the device is adequately secured to the wall with enough
space to allow connectivity to external devices.
•
To prevent product damages or personal injuries, please make
sure that the TV screen is kept upright, or tilted upward or
downward within the angle range of 0
°
-5
°
while mounting the
TV onto the wall.
• In case of exceeding the above angle range (0
°
-5
°
) of tilting
downward, please purchase the auxiliary accessories from the
local dealer to mount the TV for safe installation and usage.
Otherwise, it will not be covered by the warranty and the user
should be liable for all consequences and responsibilities.
IDL J]
110cm
10cm
'
Vertical Line
�
TV Screen
Tilting Downward
{4 inches)
10cm
Tilting Upward

• Disconnect the power before moving or installing the TV. Otherwise electric shock may occur.
• Remove the stand before installing the TV on a wall mount by performing the stand attachment in reverse.
• If you install the TV on a ceiling or slanted wall, it may fall and result in severe injury. Use an authorized wall
mount and contact the local dealer or qualified personnel. Otherwise it is not covered by the warranty.
• Do not over tighten the screws as this may cause damage to the TV and void your warranty.
• To prevent injury, this apparatus must be securely attached to the floor/wall in accordance with the
installation instructions.
• Use the screws and wall mounts that meet the following specifications. Any damages or injuries by misuse
or using an improper accessory are not covered by the warranty.
Model Size
43
"
50"/ 55"
Screw
Diameter(mm)
11
E
11
Depth(mm)I
Max
"
D
" I
Min
Quantity
Top
M6
13
11
2
Down
Top
Down
M6 M6 M6
13
20
13
11
13
10
2 2 2
A*B*C
200' 200' 200 200 ' 200 ' 200
Precautions For Using Remote Control
• Use the remote control by pointing it towards the remote sensor. The items between the remote control
and the remote sensor will interfere the normal operation.
• Do not make remote control vibrate violently. Also, do not splash liquid on the remote control, also do not
put the remote control in high humidity place.
• Do not place remote control under direct sunlight which will cause deformation of the unit by heat.
• When the remote sensor is under direct sunlight or strong lighting, the remote control will not work. If so
please change the lighting or TV's position, or operate the remote control closer to the remote sensor.
• Before Bluetooth searching, please make sure you have turned external Bluetooth devices in the
pairing mode. For the Bluetooth remote control supplied with the TV
(
may not be available
)
, you can
press BACK and HOME buttons together to open its pairing mode. For other Bluetooth devices, please
read their own instruction manuals for opening the pairing mode.
Precautions For Using Battery
Improper using of the battery will cause leakage. So please do as the following methods and use carefully.
• Please note the batteries' polarity, to avoid short circuit.
• When the battery's voltage is insufficient which affect the use range, you should replace new
battery. Remove the batteries from the remote control unit if you do not intend to use it for a long time.
• Do not use different types of batteries
(
for example, Manganese and Alkaline batteries)
together.
• Do not put the battery into fire, and charge or decompose the battery.
• Please dispose of batteries in compliance with relevant environmental protection regulations.
• WARNING: The batteries
(
battery pack or batteries installed) shall not be exposed to excessive
heat such as sunshine, fire or the like.
•
WARNING: A battery should not be exposed to extremely low air pressure that may result in an explosion or
the leakage of flammable liquid or gas.
Install Remote Control Batteries
Place two AAA size batteries in the remote control's
battery compartment, making sure to match the
polarity markings inside the compartment.
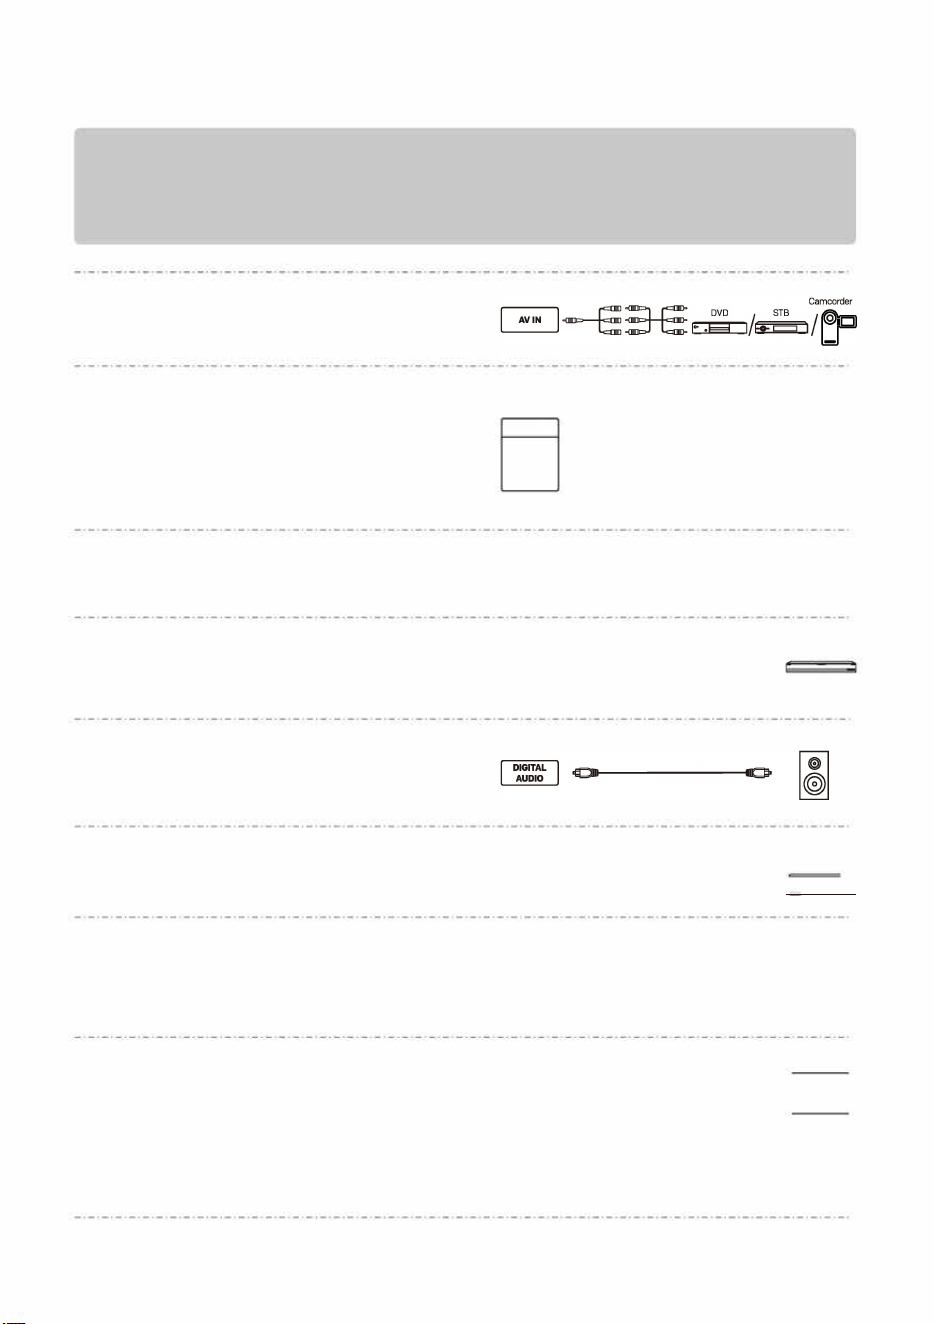
TERMINAL CONNECTION
Note:
. The pictures are only for rerence.
2). rminal quantities and names may vary depending on the region or model.
. teal equipments and cables shown herein are not supplied with the T
4). avoid product damage or personal injur please make sure that you have disconnected the TV power cord bere
connecting the exteal devices.
• IN
Receive analog audio and video signals
from external AV devices.
• ANTENNA IN (ANT.)
Connect a coaxial cable to receive signals
from the antenna, cable or satellite.
• USB
Connect a USB storage device.
• HDMI
Receive digital audio and video signals
from external HDMI devices.
• DIGITAL AUDIO (OUT)
Use an optical cable to output your TV's audio
signal to a compatible digital audio receiver.
• LAN
Wired network port.
•
HEADPHONE ( 0)
Output the TV sound to the connected
headphone. Speakers will be muted when
headphone is plugged in.
• Cl
Cl card port.
Note:
ANTENNA IN
SATELLITE
AIR/CABLE
�Satelnte
/�
Antenna or cable TV
USB□isk
�
◄
···········
·
·
·
·
·
·
·
·
·
·
·
·
·
·
·
·
·
·
·
·
·
·
·
·
·
·
·
·
·
·
·
·
·
·
·
·
·
·
·
·
·
·
·
·
·
·
·
·�
Camcorder
� � / Reoo,de, /DVD
Digital Audio Device
� I
Roets, �I
--n
Headphone
�
◄
···
·
·
·
·
·
·
·
·
·
·
·
·
·
·
·
·
·
·
·
·
·
·
·
·
·
·
·
·
·
·
·
·
·
·
·
·
·
·
·
·
·
·
·
·
·
·
·
·
·
·
·
·
·
·
·
·
·
II
reduce the risk of re, the Cl port should be covered by the plastic cover when it is not used. Bere you use the Cl port,
please make sure that the fire enclosure of connected equipment is made of non-combustible material or UL 94 V-0 rated
material. After you finish using the Cl port, please make sure the Cl port is covered by the plastic cove Please keep the
plastic cover well r future use. If the plastic cover is lost, please contact the local dealer r a new one.
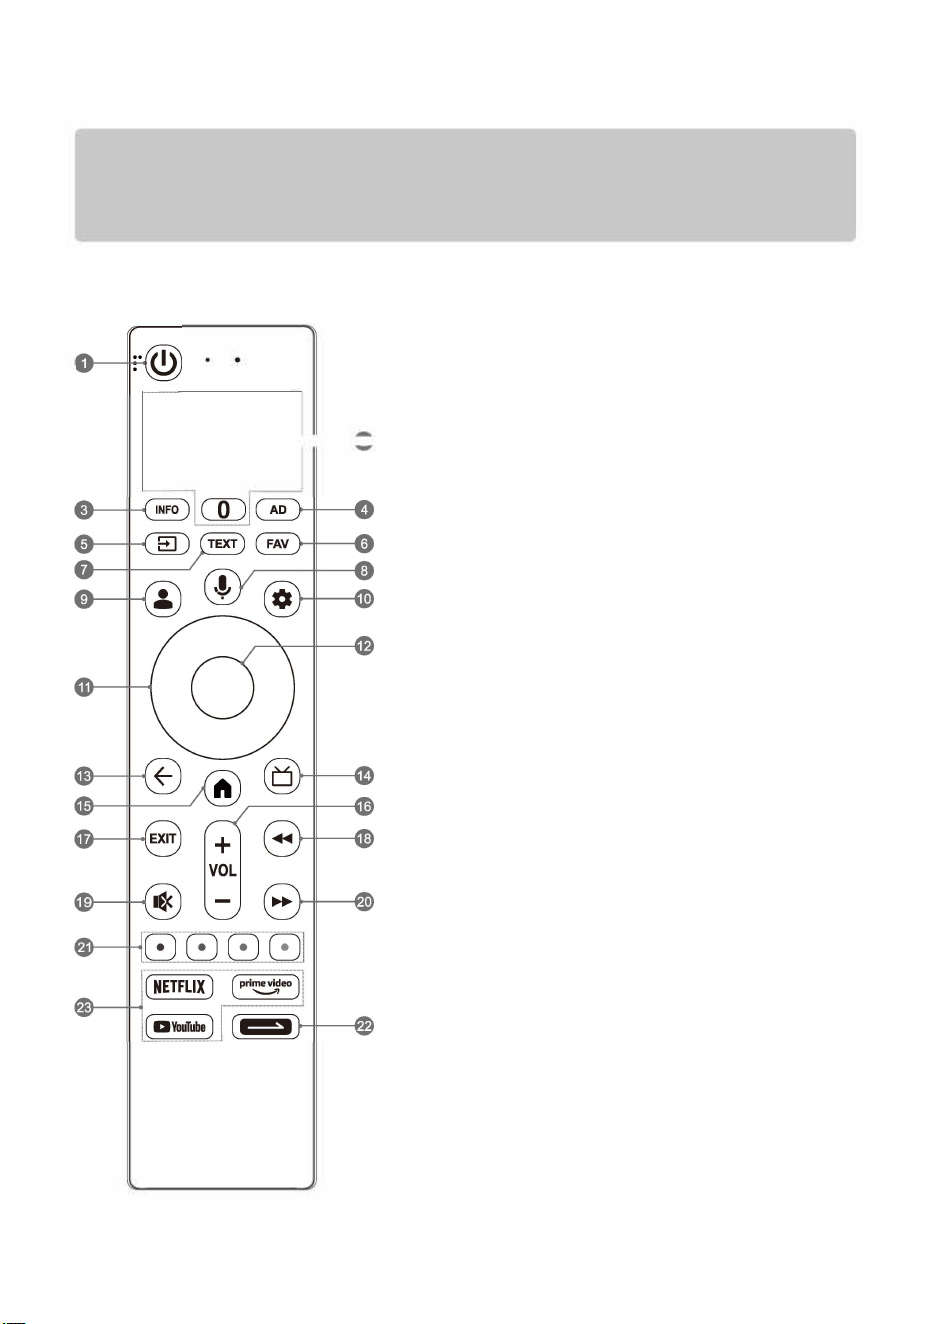
REMOTE CONTROL
Note:
1). The picture is only for rerence.
2). You can press the N/C button to quickly pair the Bluetooth remote control with your TV se
3). The image, buttons and functions of remote control may vary depending on the region or model.
4). Due to software upgrades or updates, the nctions of remote control are subject to change without notice.
Please rer to your actual TV set.
-
1. POWER ( ): Turn on or turn off the T
• In working status:
Short press POWER button to turn the TV to fastboot mode.
Long press POWER button to turn the TV to standby mode.
• In fastboot mode, which is less energy saving, press POWER
button to turn on the TV in a short time.
• In standby mode, which is more energy saving, press POWER
button to turn on the TV in a standard time.
2. NUMBER BUONS (0-9):
Select the channel directly, or input a number.
3. INFO: Access the INFO interface.
4. AD: Setup for accessibility features including audio
description, etc.
5. SOURCE (@ ): Access the source menu.
6. Access the list of favorite channels.
7. TEXT: Access or exit the teletext menu.
8. MIC ( ): Start using the near field voice function.
• Short press MIC button to wake up the voice assistant.
• Long press MIC button to start receiving your voice command.
After your speaking, release MIC button to run voice function.
9. ACCOUNT ( � ): Sign in with your Google account to get the
entertainment you love.
10. DASHBOARD ( 0): Access the dashboard of your Google T
11. UP/DOWN/LEFT/RIGHT
Navigate the menu to select the content you need, or press
UP/DOWN button to change channels.
12. OK: Confirm, enter or execute the selected item, or access
the channel list.
13. BACK ( ): Return to upper-level content, or exit the
current interface.
14. GUIDE ( ): Access Live TV or access the Electronic
Program Guide.
15. HOME ( ): Access the home screen.
16. VOLUME UP/DOWN (VOL +/-): Adjust the sound volume.
17. EXIT: Exit the current operation.
18. FAST BACKRD ( ): Fast backward the playback in
media player.
19. MUTE ( � ): Mute or restore the TV sound.
20. FAST FORWARD ( �):Fast forward the playback in
media player.
21. COLOUR BUONS (RED/GREEN/YELLOW/BLUE):
Execute the prompt function in specific mode.
22. DAILY KEY ( � ):
• Short press to start the shortcut function,
or setup it for the first time.
• Long press to setup the shortcut function.
23. APPLICATION BUTTONS: Access specific applications
quickly and directly.
BASIC OPERATION
Note:
1). e pictures are only for rerence.
2). e voice nction may not be available depending on the region, model or language.
3). Due to software upgrades or updates, the function of TV control button is subject to change without notice.
Please refer to your actual TV set.
TV Control Button
�-1�
@
■ In Standby Mode
Press TV control button to turn on the TV.
■ In Working Status
Short press TV control button to call out the
following menu of soft keyboard. Inside it, short
press TV control button to move the cursor and
select the desired item, then long press TV control
button to enter or execute the selected item.
Note:
Only when the Bluetooth remote control has a
buzzer on its back and has been paired with the TV
successfully, the item ", nd my remote" can be
found on the menu of soft keyboard.
2) "Channel-/+" may not be shown in the menu of
soft keyboard on specic interces like the home
screen, etc.
Voice Function
1. ice Function Microphone
Microphone of voice function. It is best to keep
your mouth within 5 centimeters away from the
microphone while using the voice function.
2. MIC Button of Voice Function
Press to start using the voice function.
Pair Bluetooth remote control
withyourTV
For the remote control supplied with your TV,
please finish pairing with your TV before using it
for voice function. The pairing can be done by just
pressing the MIC button on any interface, or at the
first step of "Initial Settings", or in "Settings".
In settings, please refer to the following steps to
pair the remote control:
1. Select DASHBOARD button <1\i',> icon
Re motes & Accessories Pair accessory.
2. Press BACK and HOME buttons simultaneously
until there shows the name of your Bluetooth
remote control on the TV searching interface.
3. Press OK button to start pairing.
4. It will show "Paired" after Bluetooth remote
control is paired with the TV successfully.
BASIC OPERATION
Note: e picture is only r reference.
E-Manual
E-Manual is built into your TV and can be displayed
on the screen. To learn more about your TV features,
access the E-Manual by referring to the following
operation. E-Manual may not be available depending
on the region or model.
1. Press HOME button to access the home screen.
2. Press UP/DOWN/LE/RIGHT and OK button to
select and enter "E-Manual" in the app list.
Flicker Free
E-Manual
Trouble Shooting
TV Program
07
L □
Remote Control
Home Page
©
®
User Settings
User Notice
Onscreen flicker may cause eye strain, fatigue and headaches after an extended viewing. With "Flicker Free"
technology featured in this product, you will have a comfortable viewing experience. No visible and invisible
flickers exist within the frequency range of 0~3000Hz, which can be certified when the central luminance is
set to any luminance.
Note: "Flicker Free" technology may not be supported depending on the region or model.
Eye-protection Function
Prolonged exposure to blue light may cause damage to your eyesight. This TV can protect your eyes by
filtering the blue light. enjoy it, please select< DASHBOARD button Picture Advanced Settings
Eye Protection Mode >.
Note:
1) Please don't watch TV for long time, and please take a break every half an hou looking into the distance
will help your eyes have a good rest.
2) Please take eye exercise regularl which can improve blood circulation, relieve asthenopia and prevent
myopia.
3) The eye-protection nction may not be available depending on the model.

TROUBLE SHOOTING
Before calling a service technician, please check the following table for a possible cause of the symptom and
some solutions.
General Problem / Solution
• Remote control does not work
Change the batteries.
Check if batteries are installed correctly.
Check if main power is connected.
Check if there are some items between remote sensor and remote control.
•
Poor Signal
This is usually caused by interference from electronic equipments or radio interference sources.
Picture and Sound / Solution
• No picture, no sound
Check the signal source.
Plug another electrical device into the outlet to check if it is working or turned on.
Check if power plug is in good contact with the outlet.
• No sound, picture OK
If no sound, unmute the sound or increase the volume.
Open the sound menu and adjust 'Balance'.
• Abnormal picture
For no col or or bad picture quality, you may:
1. Adjust the color option in menu settings.
2. Keep the TV at a sufficient distance from other electronic products.
3. Try another channel.
Bad TV signal (Display mosaic or snowflakes)
1. Check the signal cable and adjust the antenna.
2. Fine tune the channel.
3. Try another channel.
Multimedia Player/ Solution
• 'This file is invalid' /'Unsupported audio' appears , or audio is normal but video is abnormal, or video
is normal but audio is abnormal
The media file maybe damaged, check if the file can be played on the PC.
Check if video and audio codec is supported.
Network/ Solution
•
Network failure
Check if the router works well.
Make sure the TV has connected to the router successfully.
Browser/ Solution
• Web page can not be displayed completely
Some third-party extensions of the current web page may not be supported, and please close the current
web page.
•
Browser is forced to be shut down
The current web page may include too many contents which cause there isn't sufficient memory and the
browser is closed.
RADIO MODULE
Note: Hereb [Metz Consumer Electronics GmbH] declares that the radio equipment te [MUD70' Series] is in
compliance with Directive 2074/53/EU. e full text of the EU declaration of conrmity is available at the llowing
inteet address: www.metzblue.com.
Radio Module Specifications
Wireless Network(WLAN)
Frequency Band
Transmitting Power(Max.)
2.4G:
2412 ~ 2472 MHz
2422 ~ 2462 MHz
5G:
Band I:
5180~5240 MHz
5190~5230 MHz
5210 MHz (May not be available)
Band II:
<20dBm
5260~5320 MHz
5270~5310 MHz
5290 MHz (May not be available)
Band Ill:
5500~5700 MHz
5510~5670 MHz
5530~5610 MHz (May not be available)
Bluetooth
Frequency Band
Transmitting Power(Max.)
2.402GHz~2.480GHz
<20dBm
Remark:
1). The device should be positioned or operated at least 20cm away from the user.
2). Due to various sales regions, the wireless module may have different configurations
which will not exceed the maximum described in this manual.
3). Restrictions or Requirements in following countries: Indoor use only within
5150-5350MHz.
FR DE
UK
IT
NL BE
LU TR
DK IE GR ES PT AT FI LI
SE CY MT PL
HU
cz SK IS
SI
EE LV LT
BG
RO
HR
NO

SPECIFICATION
Note: Specications may vary depending on the region or model.
Working voltage:
Dimensions without stand
(WXHXD):
100-240V~ 50/60 Hz
43": 957 x 561 x 81 mm
50": 1110 x 647 x 81 mm
55": 1226 x 713 x 81 mm
43": 6.05 kg
Net weight without stand:
50": 7.6 kg
RF aerial input:
Language of OSD:
System:
Channel coverage:
Environment:
LICENSE
Google TV
It Dolby
VISION·ATMOS
Note:
55": 9.6 kg
75 ohm unbalanced
Multiple options
DTV: DVB-C/T/T2/S/S2
ATV: PAL-B/G D/K I, SECAM-B/G D/K KL, NTSC-M
DVB-C: 48MHz - 859MHz
DVB-T/T2: 50MHz - 862MHz
DVB-S/S2: 950MHz - 2150MHz
ATV: 44MHz - 870MHz
Working temperature: 5"C-40"C
Working humidity: 20%-80%
Storage temperature: -15"C-45"C
Storage humidity: 10%-90%, non-condensing
Google TV is the name of this device's software experience and a trademark
of Google LLC. Google, YouTube, and Google Cast and other related
marks are trademarks of Google LLC.
The Adopted Trademarks HDMI, HDMI High-Definition Multimedia Interface,
HDMI trade dress and the HDMI Logos are trademarks or registered trademarks
of HDMI Licensing Administrator, Inc. in the United States and other countries.
Dolby, Dolby Vision, Dolby Atmos, and the double-D symbol are registered
trademarks of Dolby Laboratories Licensing Corporation. Manufactured under
license from Dolby Laboratories. Confidential unpublished works.
Copyright© 2012-2024 Dolby Laboratories. All rights reserved.
1). The pictures in this document are only for reference.
2). Due to software upgrades or updates, functions are subject to change without notice. Please refer to your actual TV set.
3). In dry environment due to static electricity, the product may restart and retu to the main OSO interface, USB player
interce or the previous source mode. It is normal and please continue to operate the TV as you will.