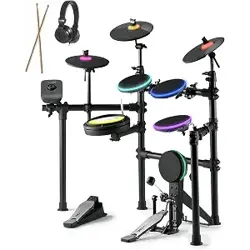

The ONE Polaris Drum
User Guide
theone.xiaoyezi.com
TOD1
User Guide
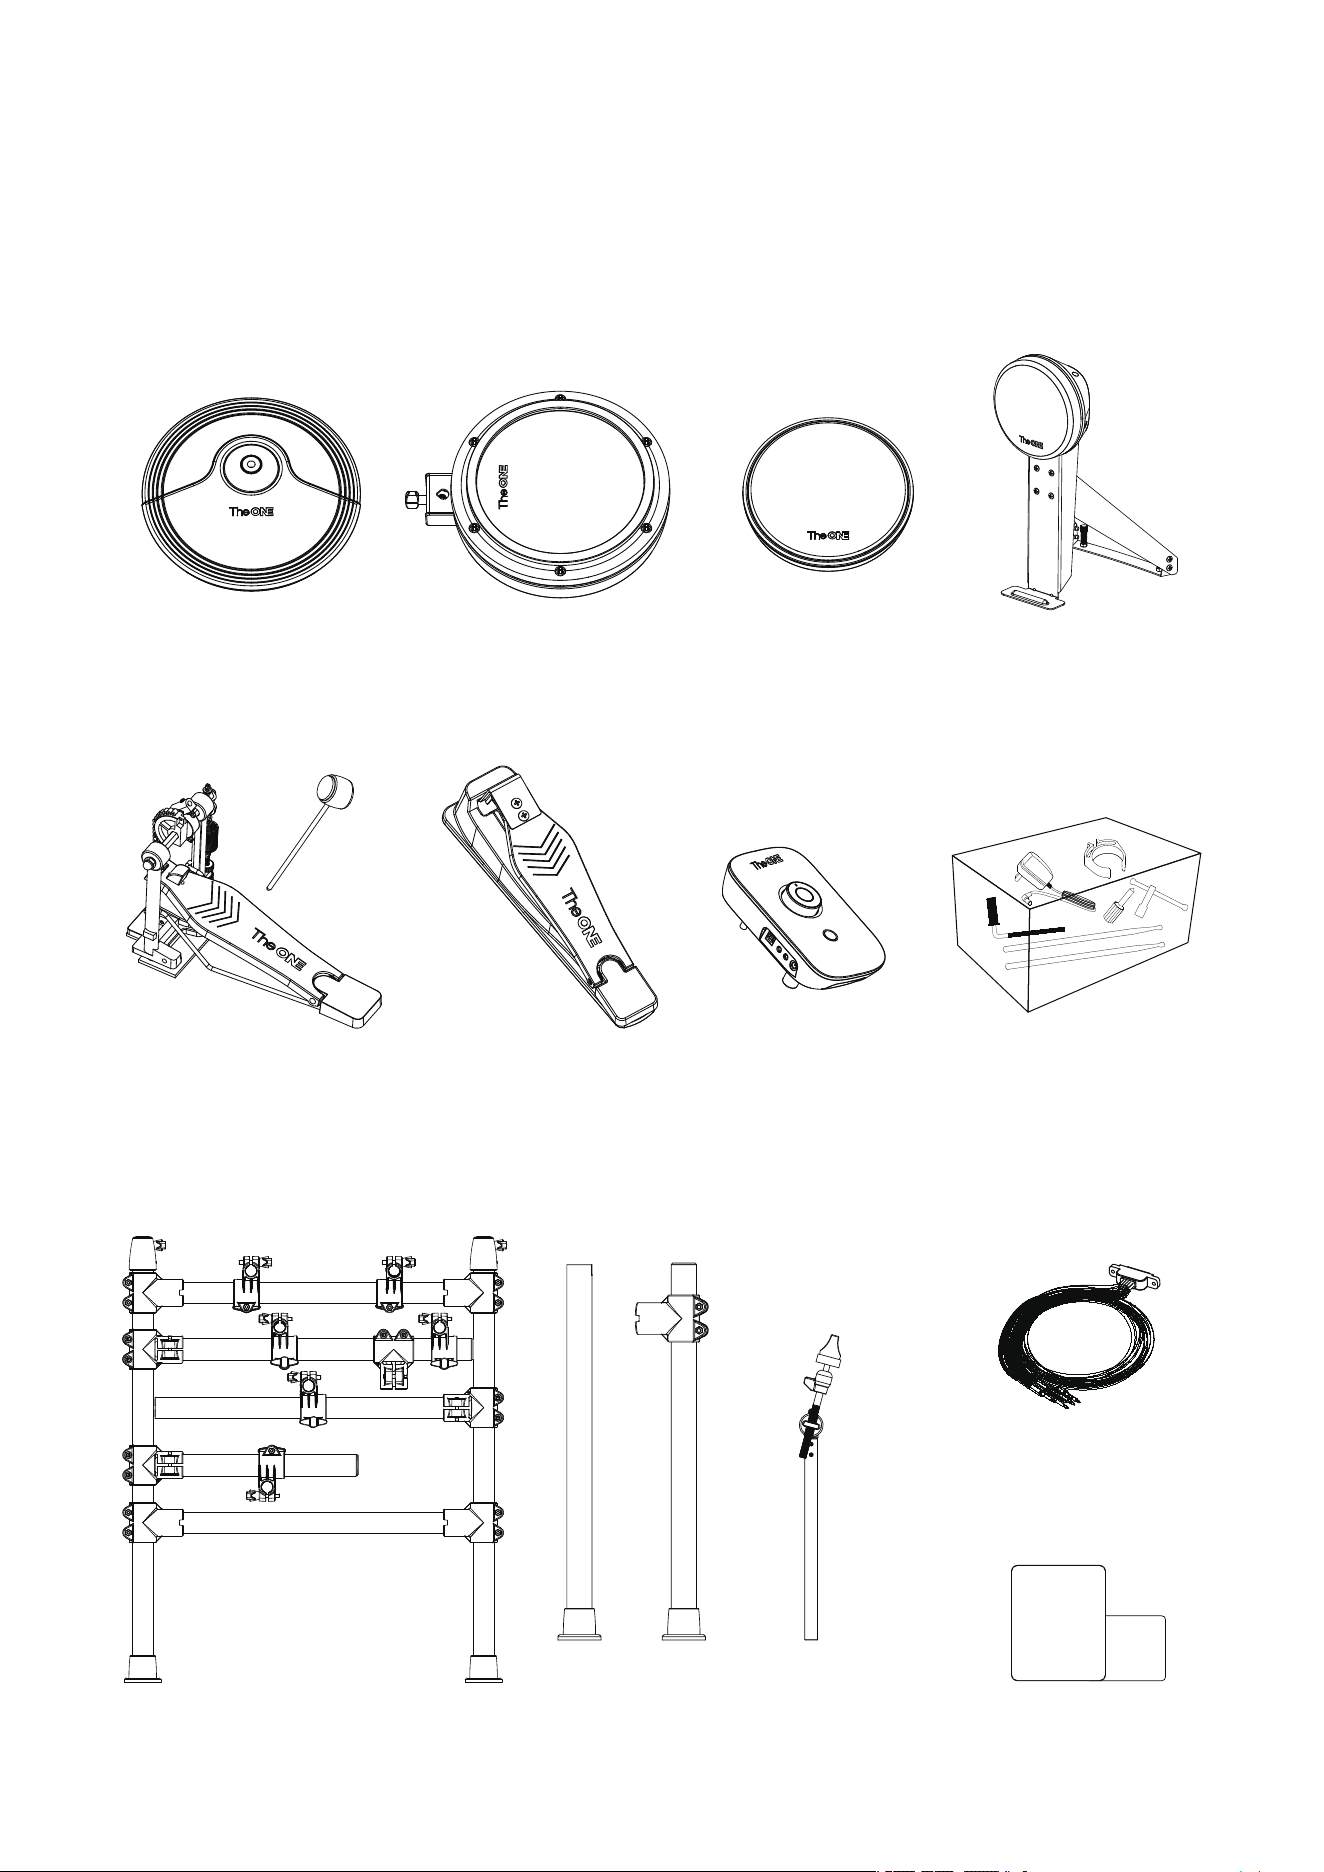
Packing list
Dear user, after you receive this product, please check whether the following items are
included:
Components
·
Cymbal*3
·
Snare*1
·
Tom*3
·
Kick*1
·
Kick Pedal*1
·
Hi-Hat Pedal*1
·
Drum Module*1
·
Connection Cable
·
Accessory Box
·
Drum Rack
·
Pillar
·
Pillar
·
Cymbal Holder*3
·
User Guide
Warranty
card
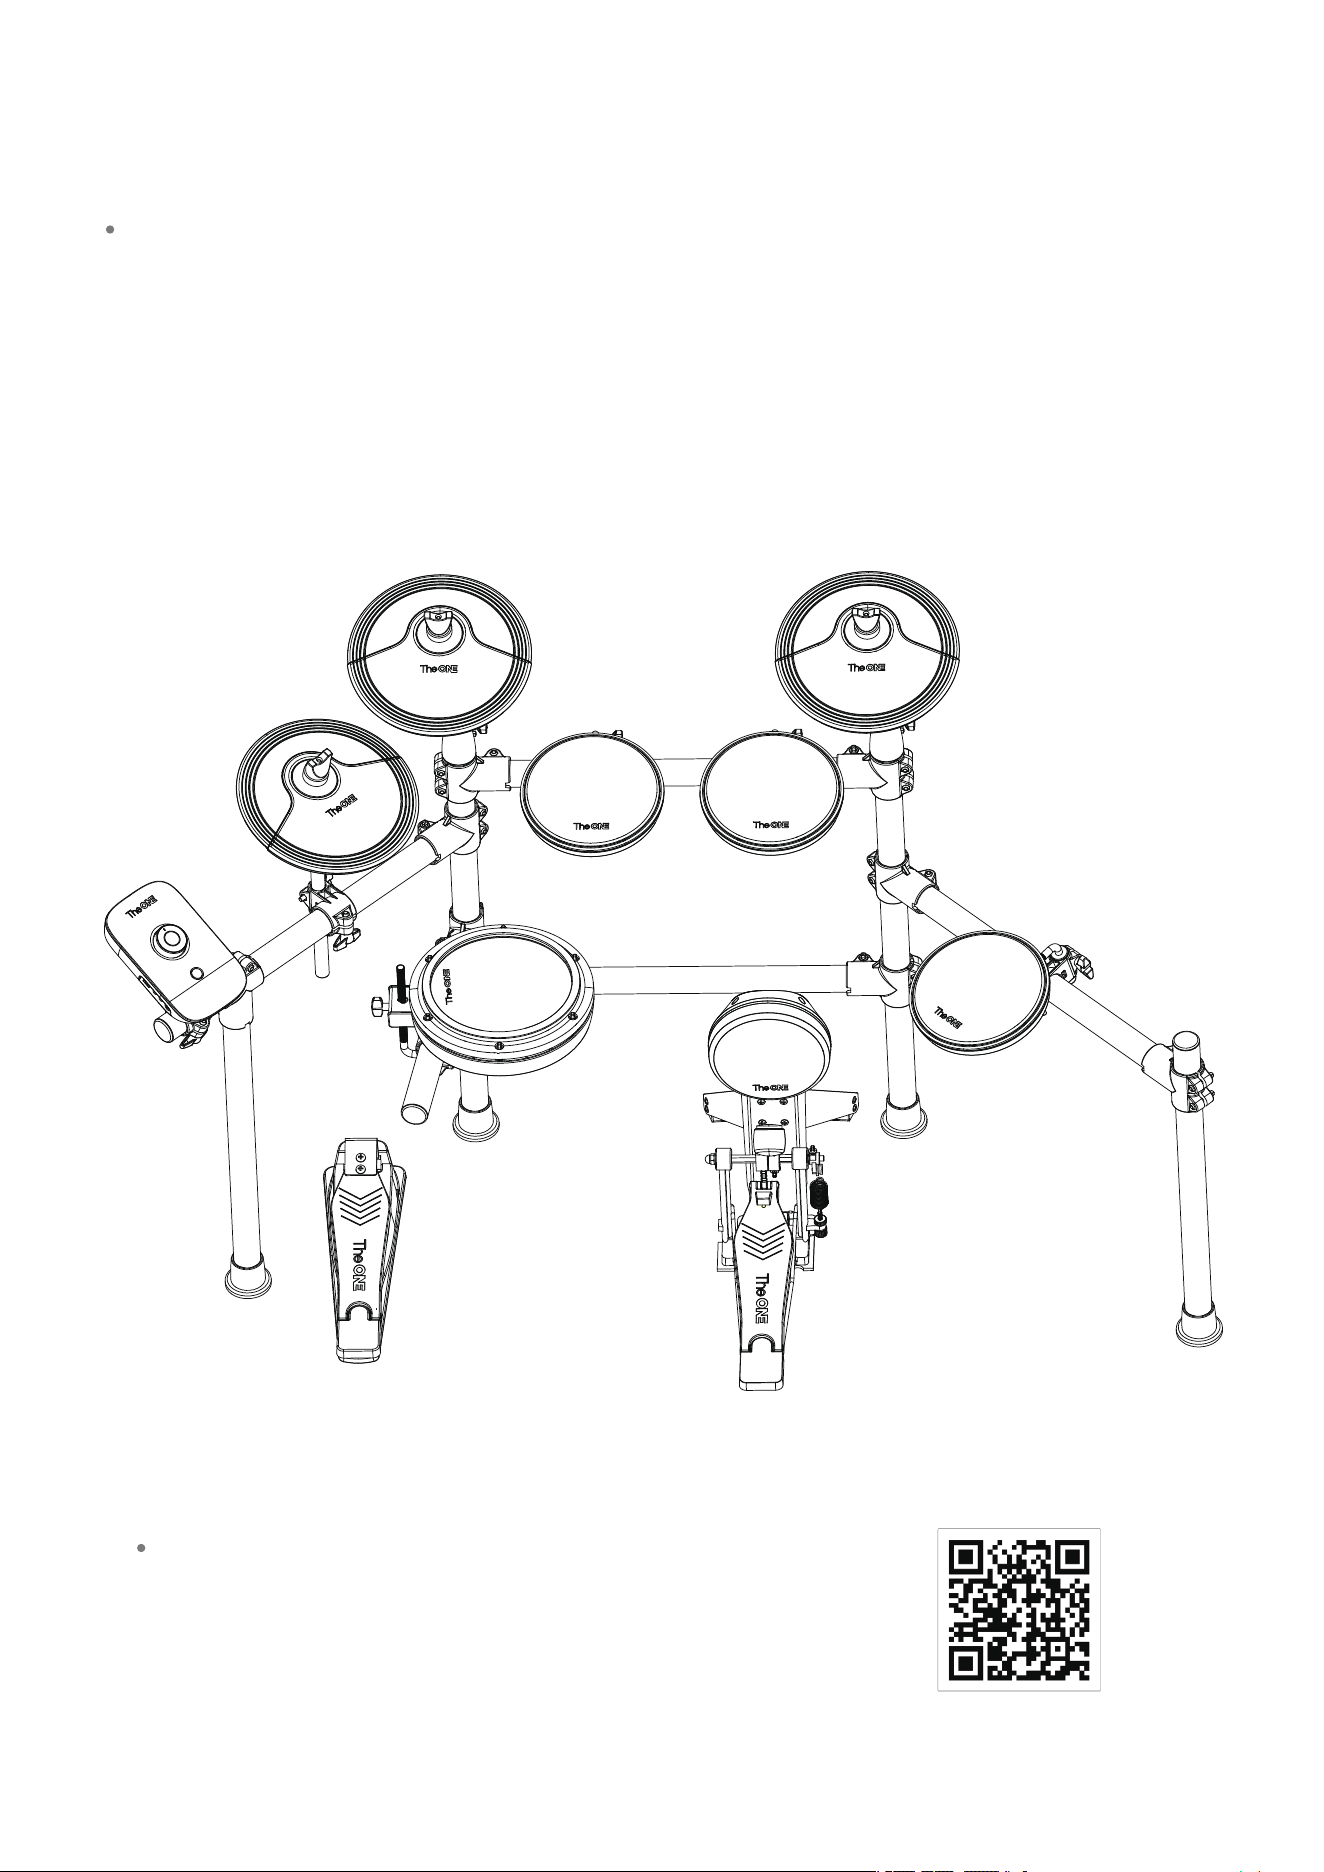
TheONE Smart Drum
TheONE Smart Drum is an intelligent instrument that teaches people to play drums with a
brand-new concept, breaking the traditional electronic drum learning style and interactive
way. It is suitable for music lovers and beginners who want to learn drums. It can connect with
mobile phones or tablet computer above Android 7.0 and IOS10.0 or above via Bluetooth or
dedicated connection cable, together with THE ONE drum learning APP for more functions.
InstaDrum
Product Introduction
Have more fun in learning drums with THE ONE’s drum
learning APP InstaDrum
Please scan the QR code on the right to
download and use the APP.
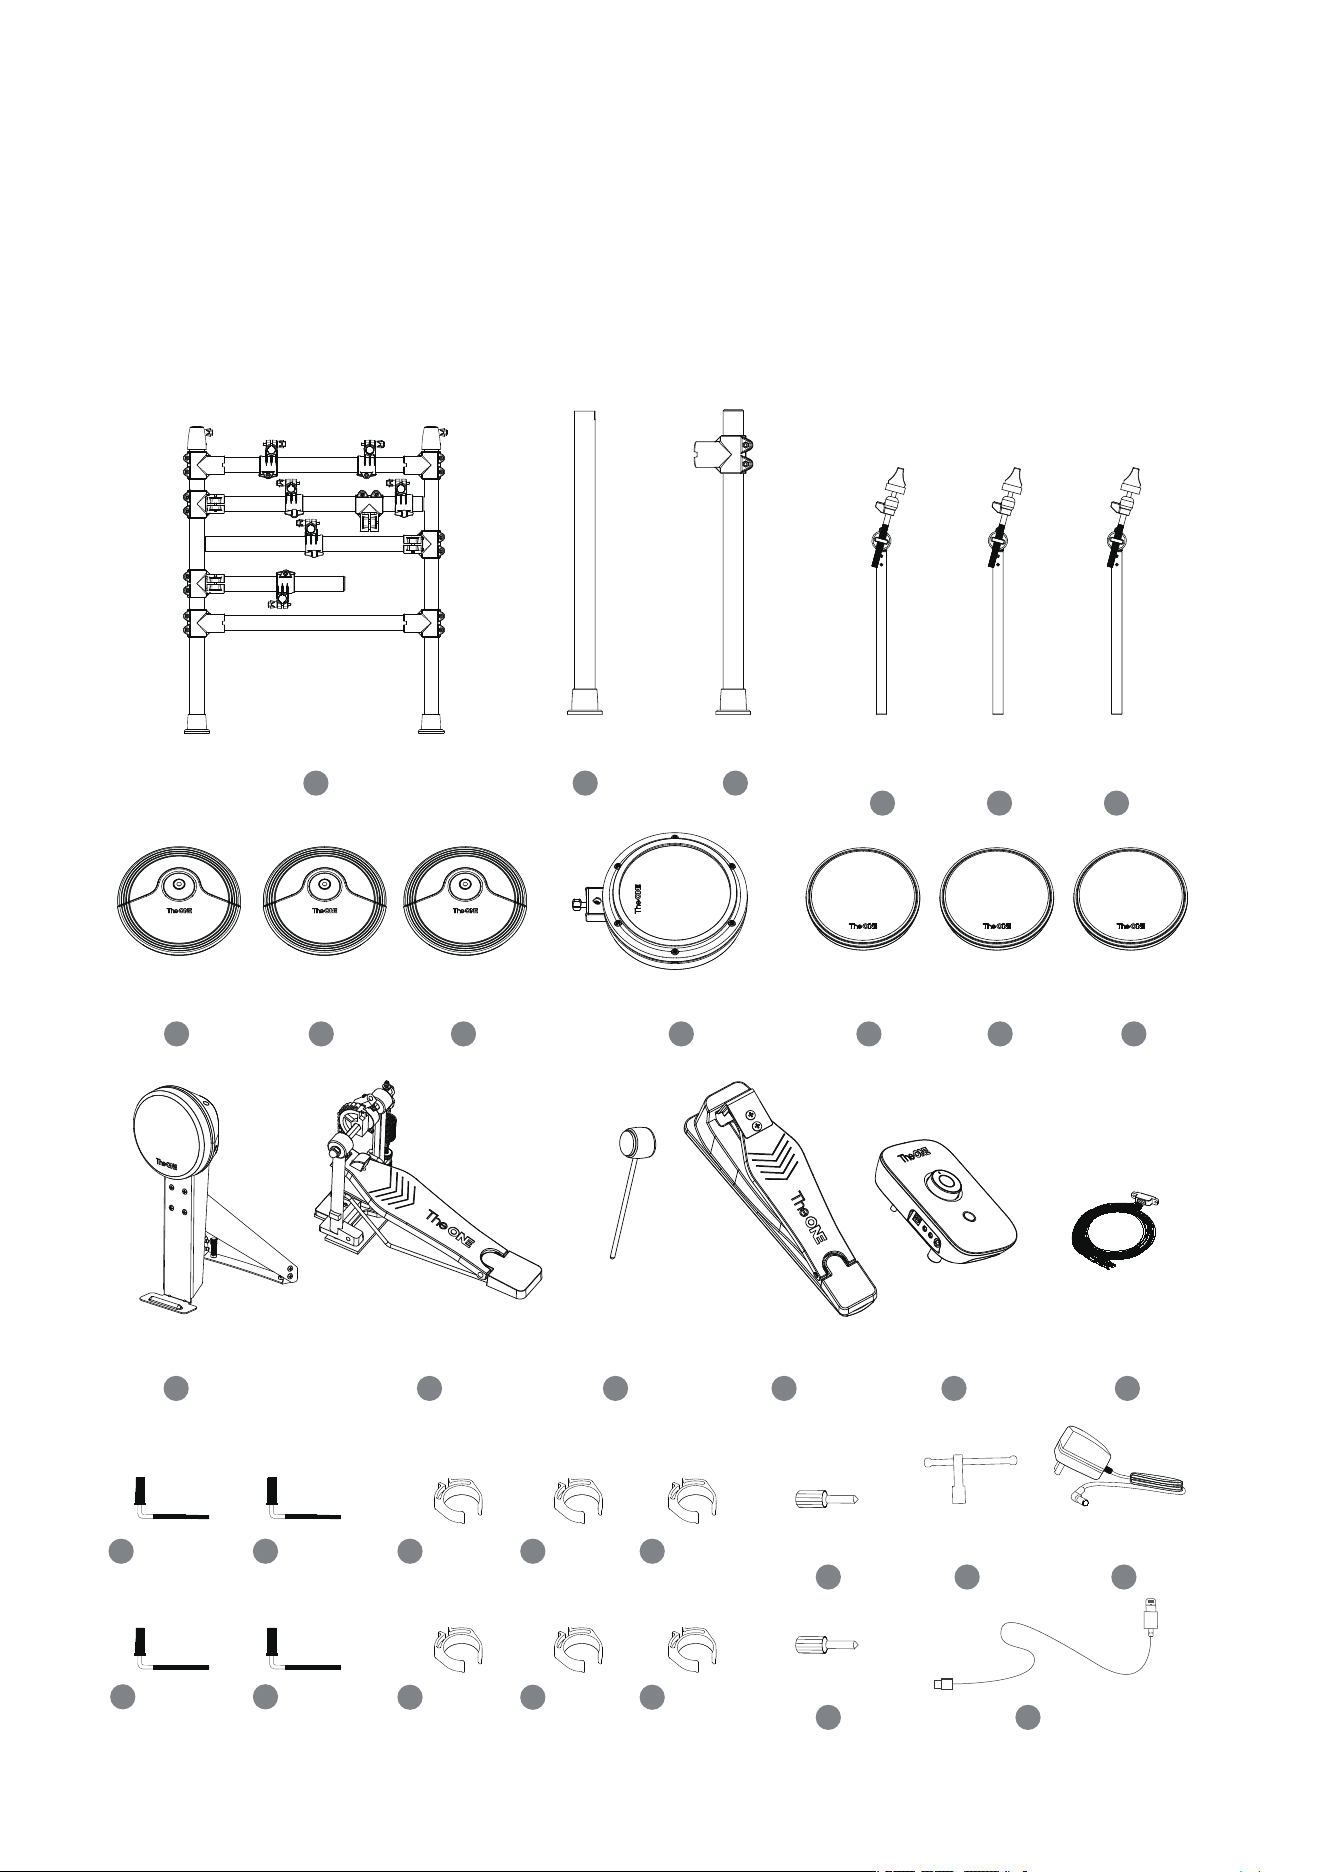
(Note: There are many spare parts. Each drum and cymbal has its own nameplate on the back, please confirm
carefully according to the nameplate)
1
7
8
14
20 21 24 25 26
27 28 29
2322
15 16 17
30
31
18
32 33
19
9 10 11 12 13
2
3
4 5 6
34
Parts Guide
Open the accessory box and remove the drum key when you are ready to assemble the
smart drum.
Please confirm that the following described parts are in the box.
Drum Rack Pillar Pillar
Cymbal
Holder
Cymbal
Holder
Cymbal
Holder
Hi-Hat Crash Ride Snare Tom1 Tom2 Tom3
Kick Pedal hammer Beater Hit-Hat pedal Drum Module Connection Cable
L-shaped
Holder
L-shaped
Holder
Harness
Buckle
Harness
Buckle
Harness
Buckle
L-shaped
Holder
L-shaped
Holder
Harness
Buckle
Harness
Buckle
Harness
Buckle
Hand Bolt
Hand Bolt
Drum Key Power Adapter
Data Cable
Installation Video
Scan the QR code for effective installation
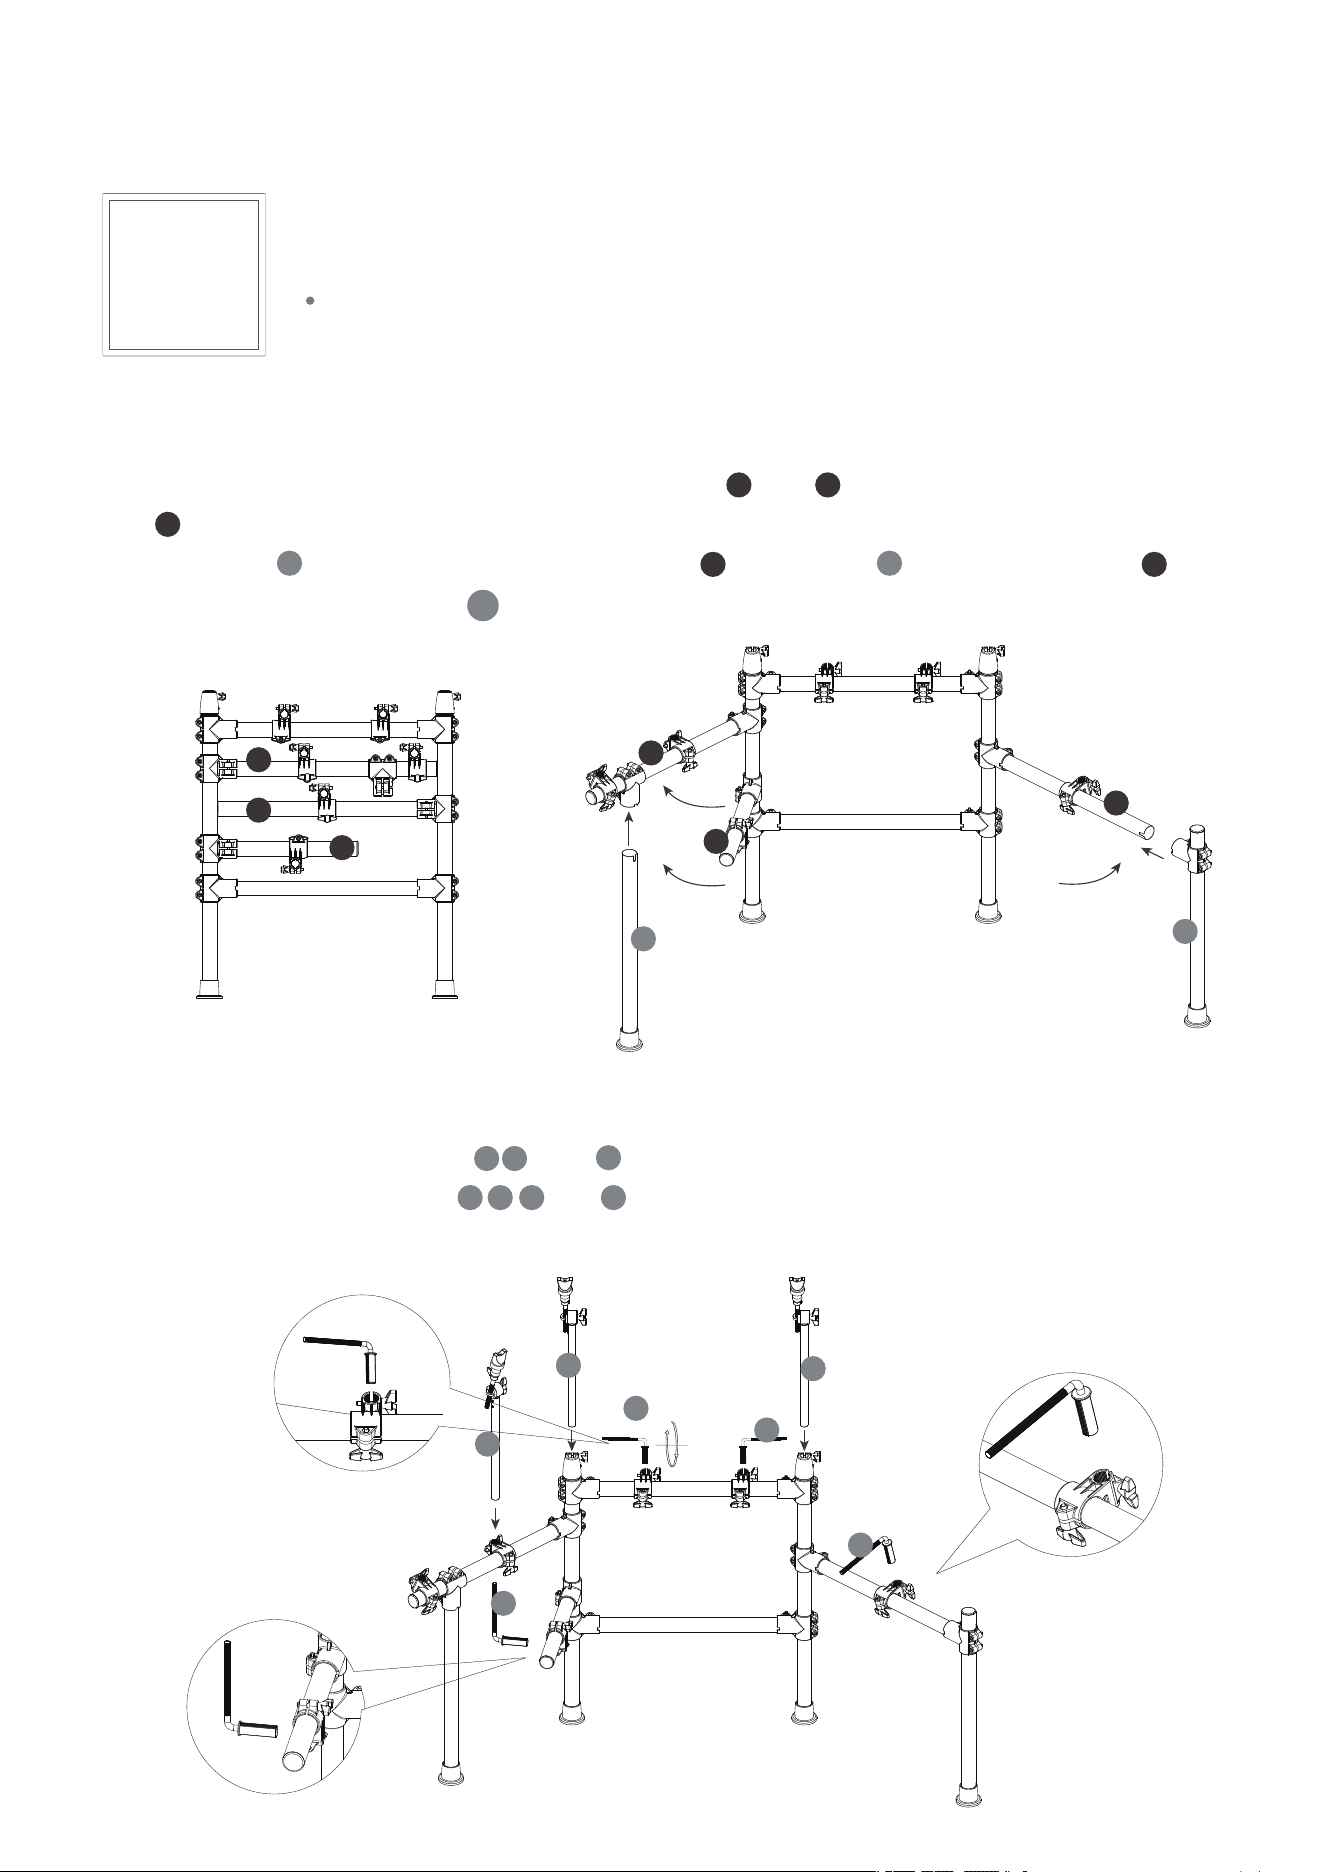
1、Open the pre-installed drum rack, pull holders and at different angles to the left,
and to the right as shown in the illustration below.
2、 Insert pillar into the sleeve pipe of holder ,and pillar into that of holder . Lock the
screw with the drum key .
A. Install the drum rack
1、 Insert the cymbal holders , and into the sleeve pipes and tighten the butterfly nut.
2、 Insert L-shaped holders and into the sleeve pipe of the drum rack as shown and tight-
en the butterfly nuts.
B. Install the holders
2
4 5
6
20 21 22 23
2
3
3
a
a
a
b
c
c
a
c
c
b
b
32
4
5
6
20
21
22
23
Packing list
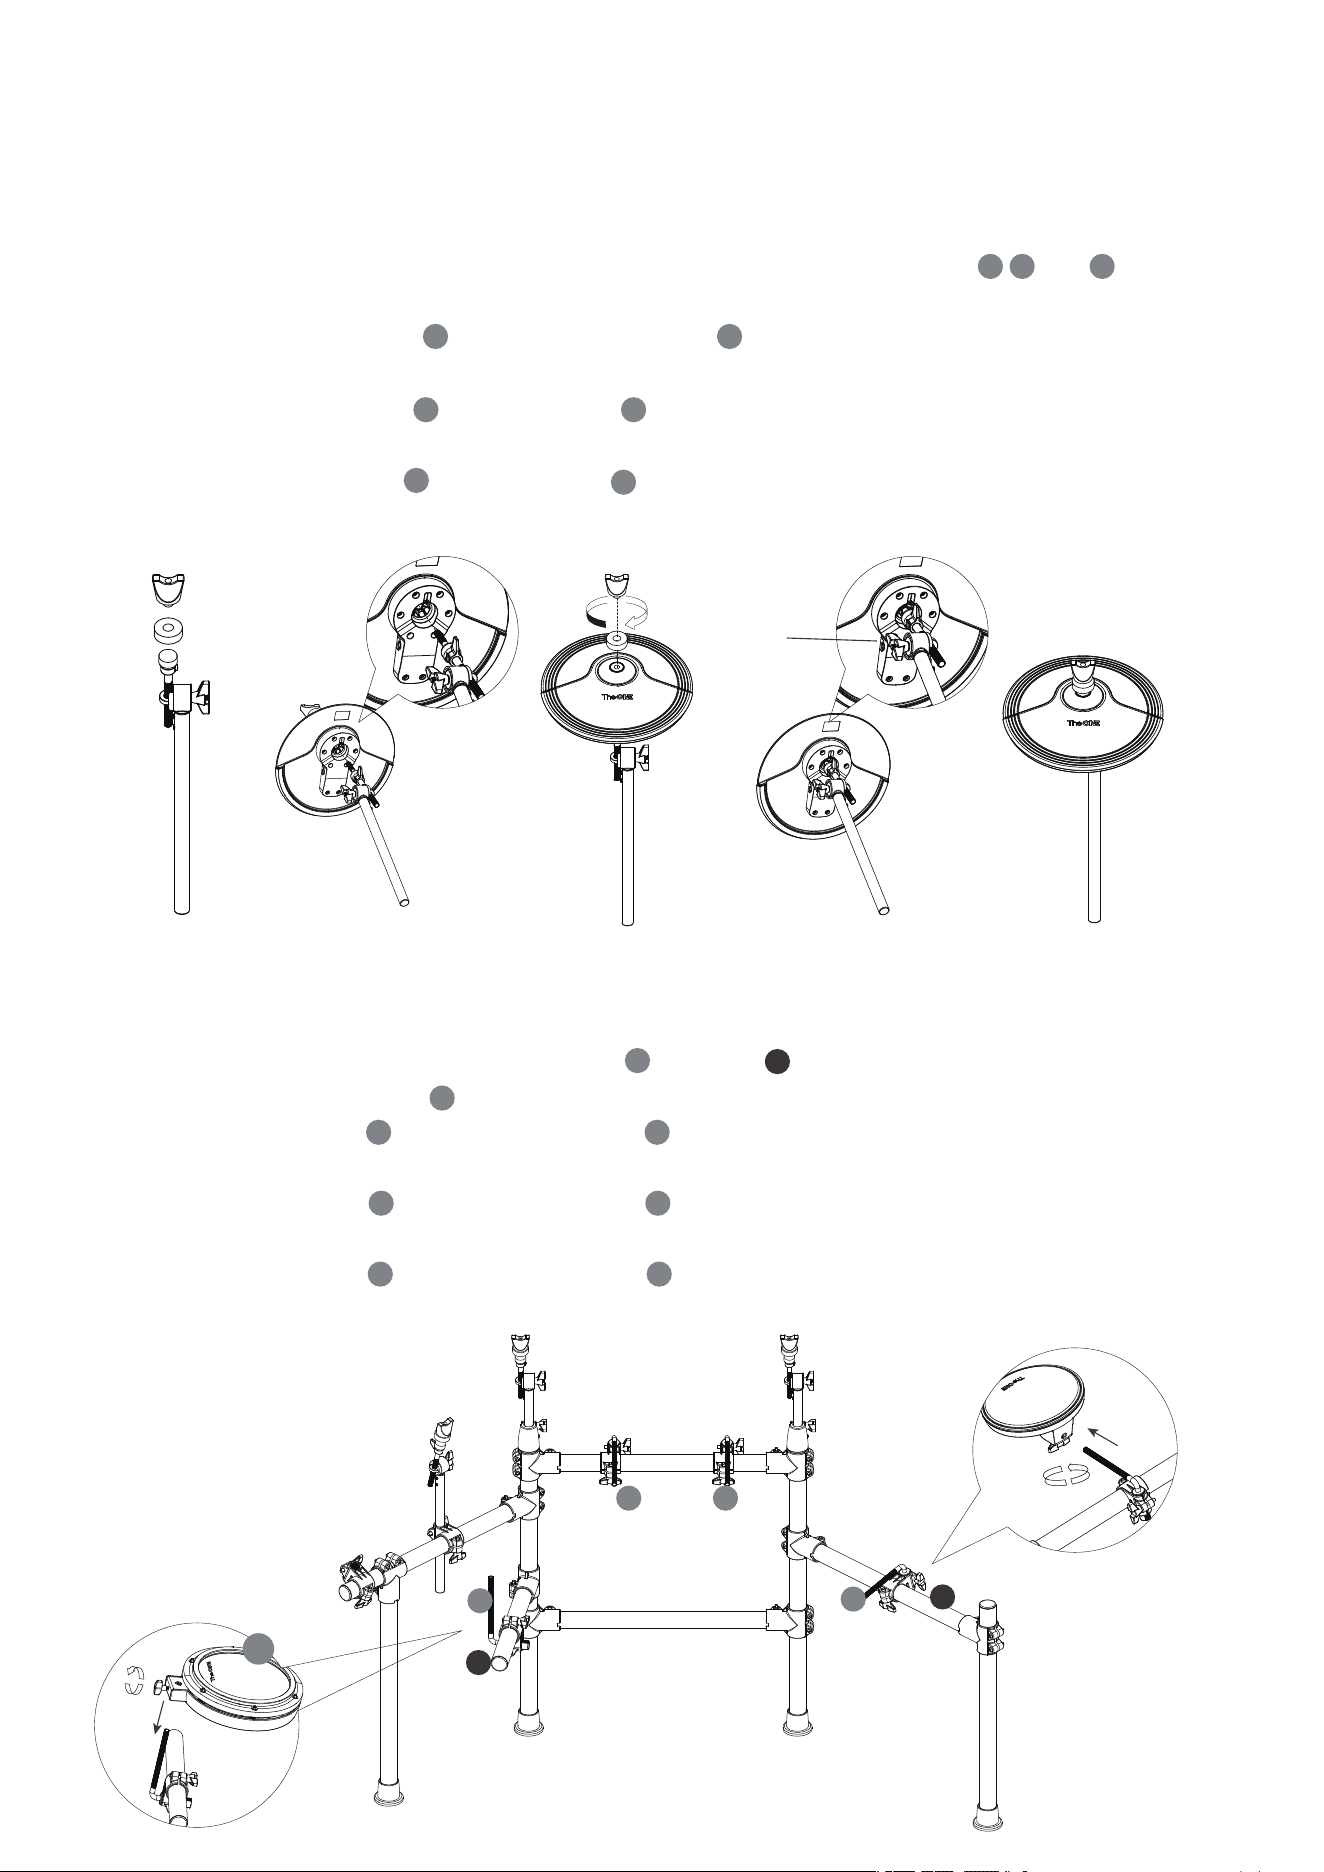
1、Disassemble the nut and felt gasket at the upper end of cymbal holders and (as shown in the
illustration below).
2、Put the “Hit-Hat” cymbal into the cymbal holder , successively cover the felt gasket, tighten the
nut on the top, adjust the position of the cymbal, and tighten to position the butterfly nut.
3、 Put the “Crash” cymbal into the holder , successively cover the felt gasket, tighten the nut on
the top, adjust the position of the cymbals, and tighten the butterfly nut.
4、 Put the “Ride” cymbal into the holder , successively cover the felt gasket, tighten the nut on the
top, adjust the position of the cymbal, and tighten the butterfly nut.
C. Install the cymbals
D. Install the drum pads
Step 1 Step 2 Step 3 Step 4 Complete
10
11 21
12 22
13 23
20
b
7 4
4 5 6
8 5
9
6
b
20
10
21 22
23
c
Packing list
Positioning
Butterfly Nut
1、 Insert snare drum 10 into L-shaped holder of holder , adjust to proper position and lock the upper
nut of the snare drum .
2、Insert “Tom Drum 1” into L-shaped holder on the horizontal holder of the drum rack, adjust to
the proper position and lock the upper nut of the snare drum 10.
3、Insert “Tom Drum 2” into L-shaped holder on the horizontal holder of the drum rack, adjust to
the proper position and lock the upper nut of the snare drum 10.
4、Insert “Tom Drum 3” into L-shaped holder on the horizontal holder of the drum rack, adjust to
proper position and lock the upper nut of the snare drum 10.
Note: The snare drum’s surface is in the mesh structure with great tension, which changes with the drum usage
time. If the drum’s surface is loose and the tension of it is insufficient, the tension can be changed by adjusting the
tuning screw.
Note: When adjusting the tuning nut, it shall not be tightened in place at one time, otherwise uneven tension of the
drum surface will occur.
Operate as follows:
Find the drum key and slowly adjust each tuning screw in the sequence shown in the illustra-
tion below.
During adjustment, the tightness of each tuning screw shall be approximately the same and
tightened gradually to make the drum surface’s tension uniform.
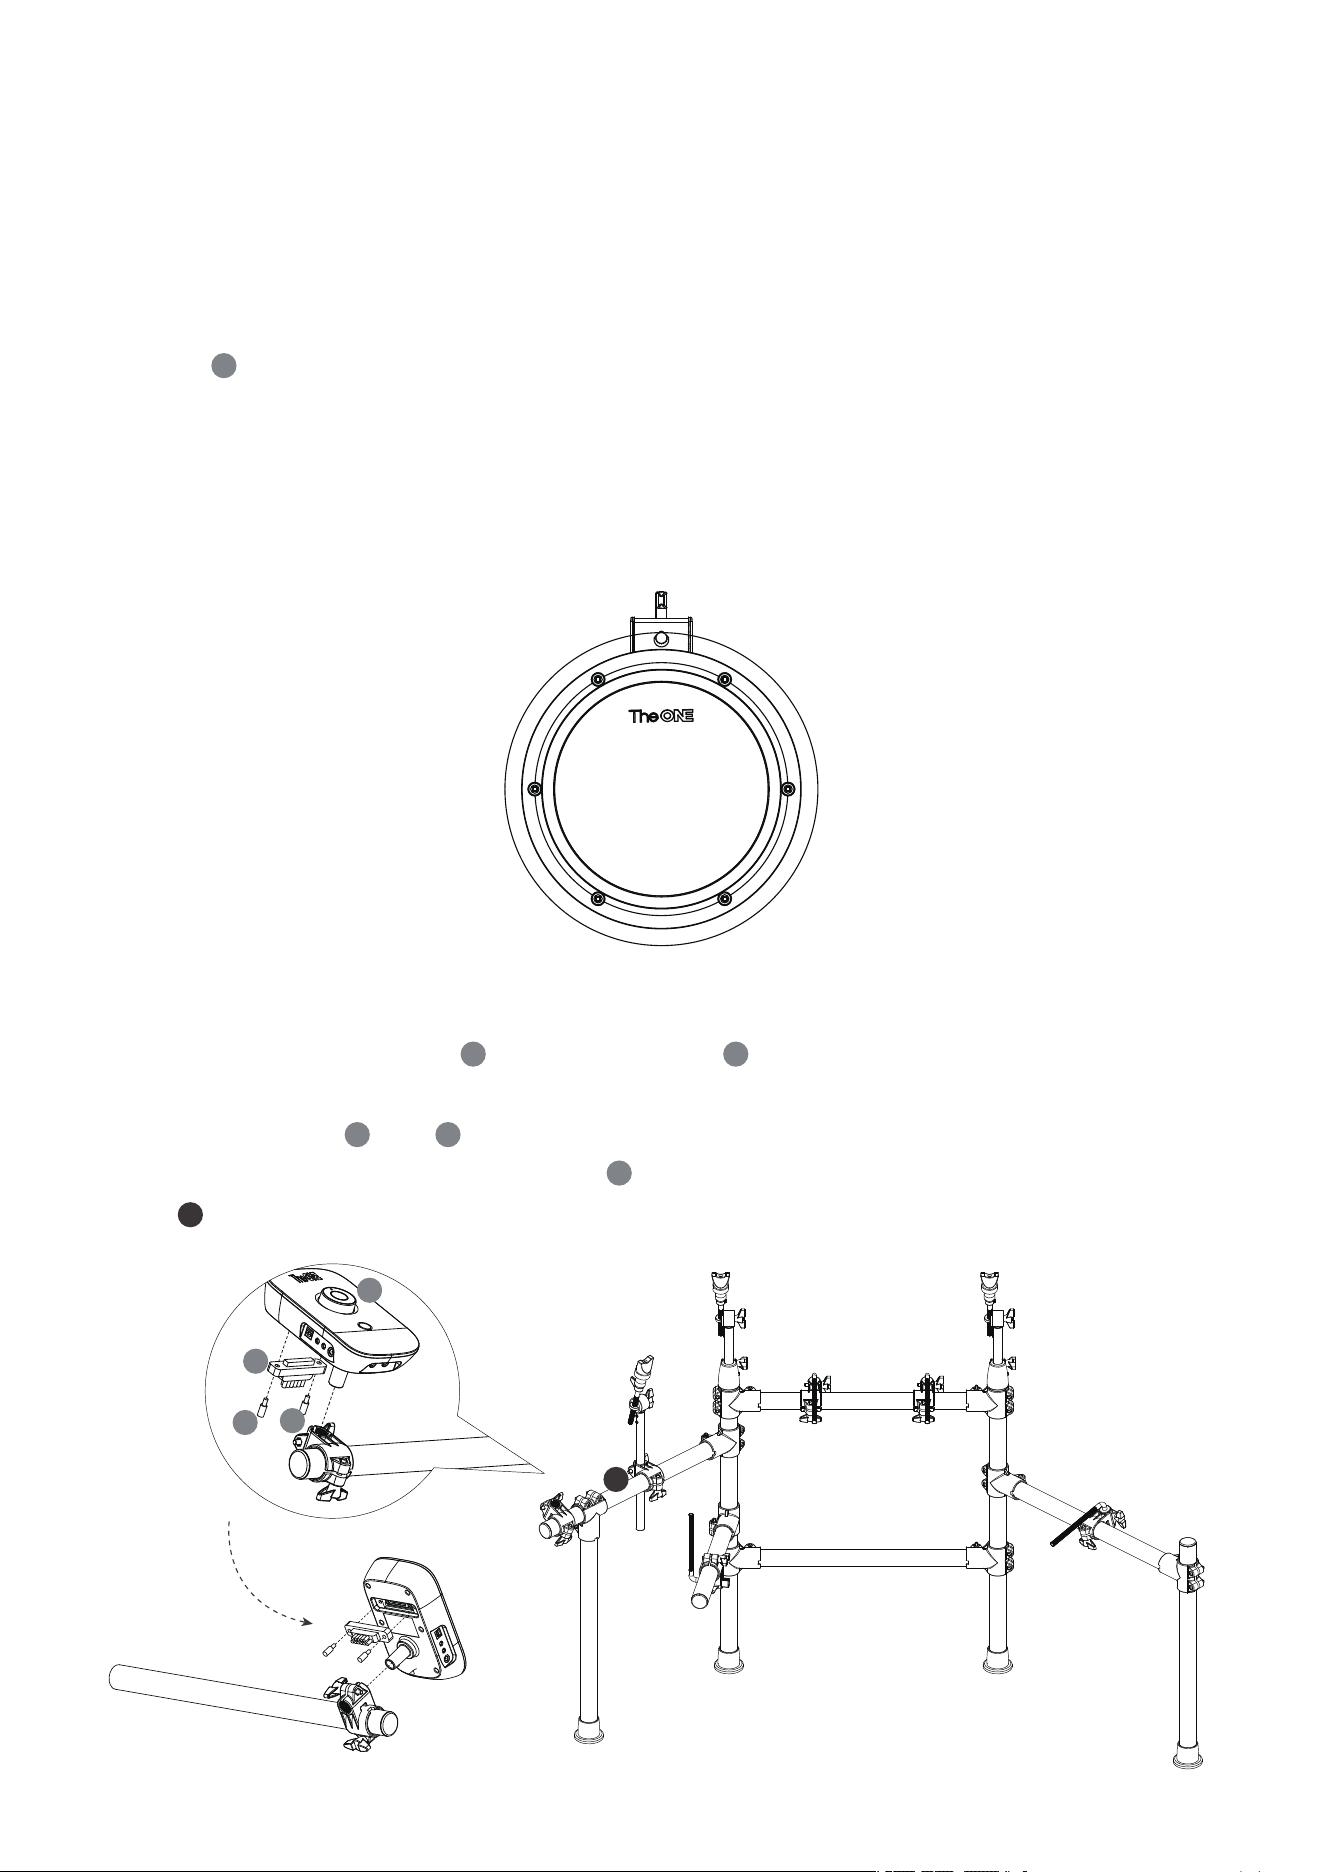
E. Install the drum module
1、Find the connection cable and drum module , and insert the plug of the connection
cable into the connector of the drum module harness.
2、Take hand bolts and and tighten the 2 screws as indicated in the illustration below.
3、After tightening, insert drum module into the sleeve pipe at the front end of the support-
er of drum frame, tighten it and to a fixed position.
32
2
5
3
1
6
4
19
30 31
18
18
a
a
19
18
30
31
Packing list
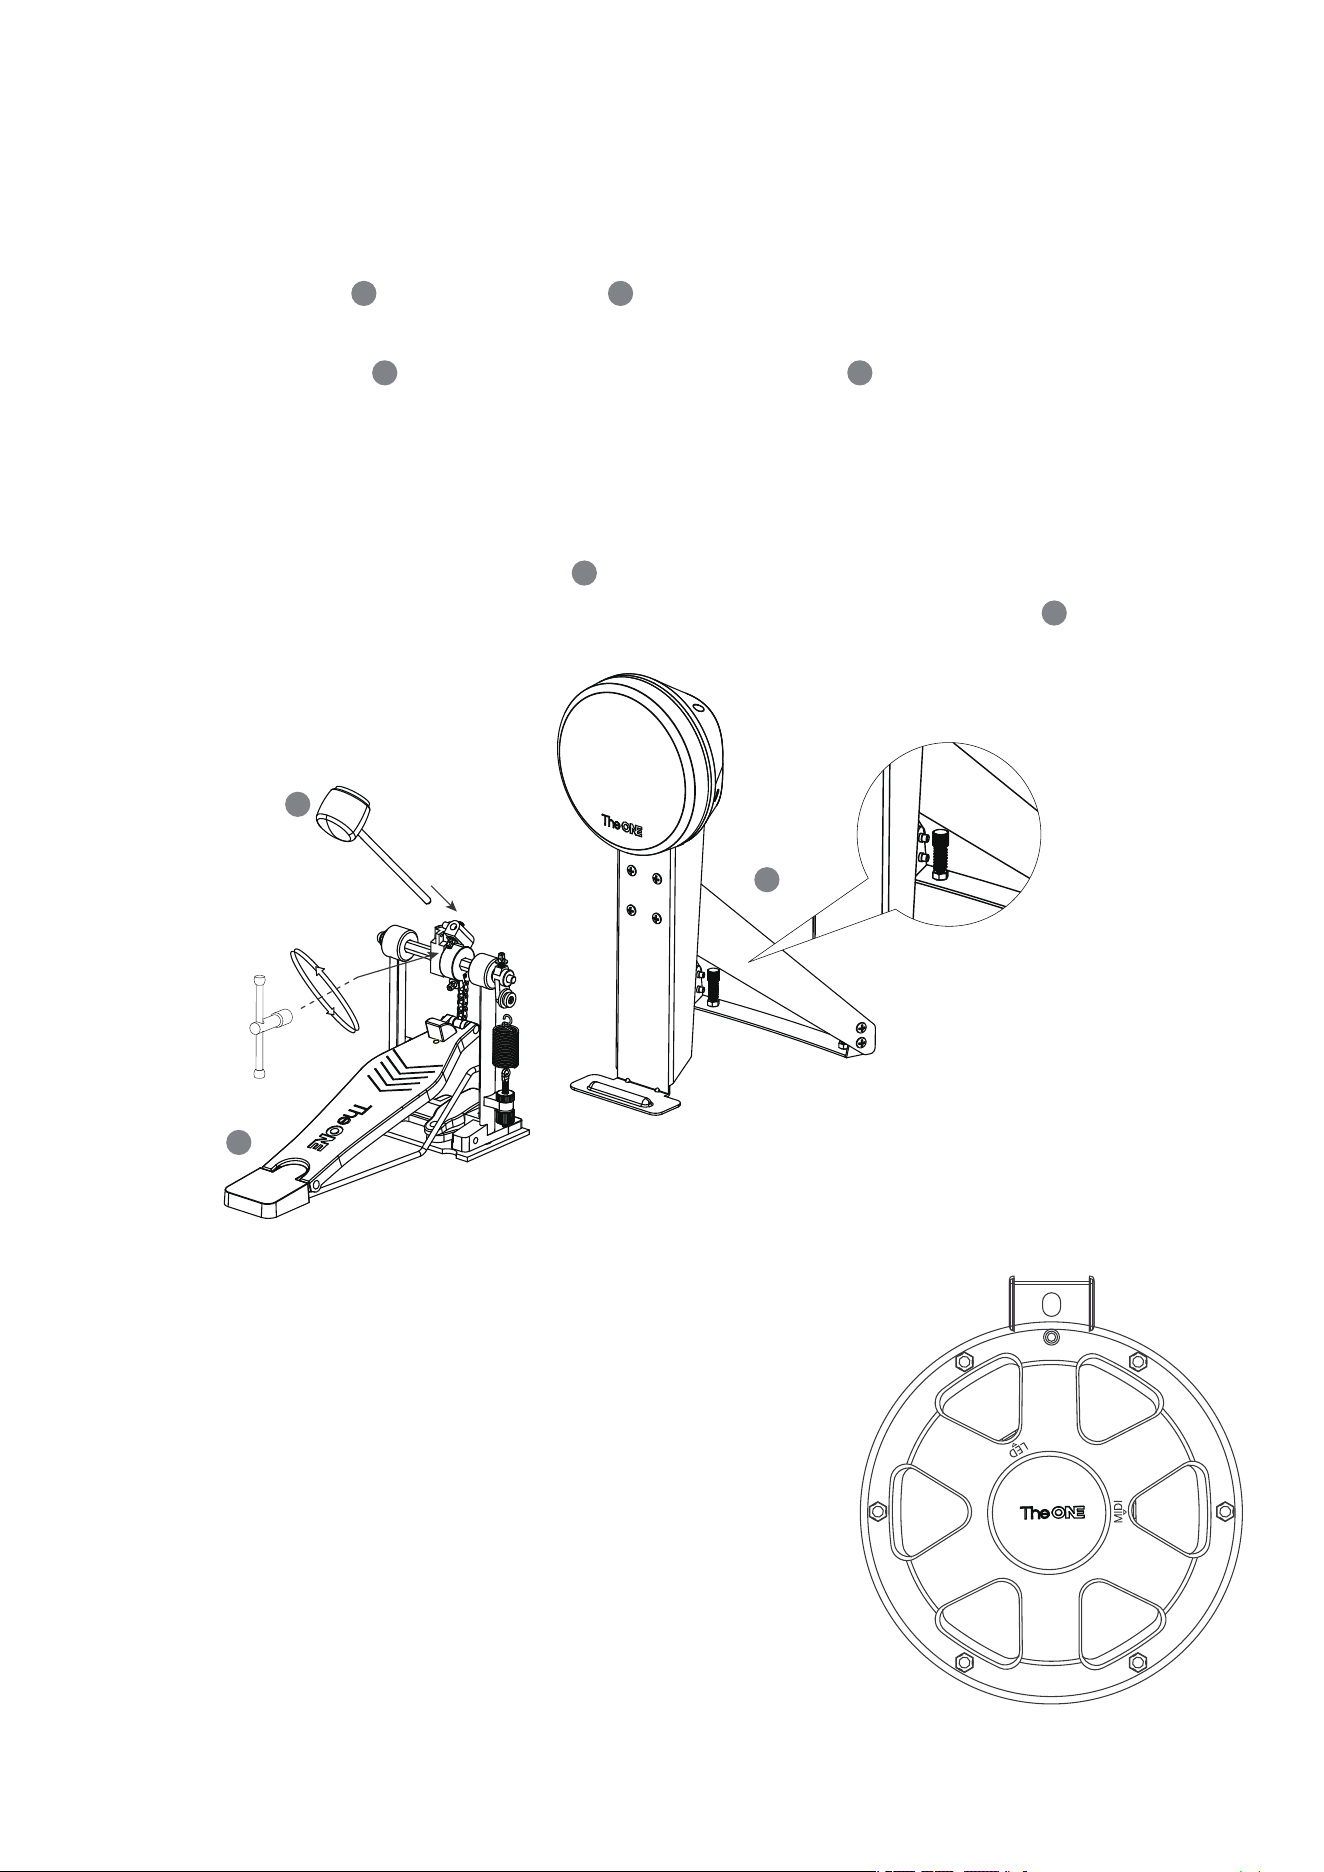
1、Insert the beater into the interface of the kick pedal, see the illustration below, and then
lock the screw with the drum key.
2、Pull the kick pedal on the convex surface of kick pad to make them just get stuck with
each other.
3、Hook & loop fastener is provided at the bottom of the kick pedal. In order to prevent the kick
pad from moving while using it, the kick pedal can be stuck to the carpet and the set screw of the
kick pad can be locked. (see the illustration below)
4) Take out the hit-hat cymbal pedal , and there is hook & loop fastener at the bottom of the
hit-hat cymbal pedal, which you can stick the hit-hat cymbal pedal to the carpet and fix the
pedal position.
In order to conveniently connect the drum cable, each con-
nection sleeve pipe of the connection cable plug is marked
with the name of the corresponding drum module to be con-
nected, and users can insert them into the drum pad and
snare drum one by one according to the corresponding name
of the connection cable.
F. Install the kick pad and pedal
G. Connect the drum module
16 15
15 14
17
17
14
16
15
Note: Except for snare drum, other drum pads and cymbalss
have 1 plug each.
The snare drum has 2 plugs, 1 LED plug and 1 MIDI plug. Please
carefully check the name of the jack on the back of the snare
drum when inserting plugs (as shown in the illustration
below).
The back view of the snare
Carriage Bolt
Packing list
Note: This product has full-drum lighting and flashing effect during switching on and off;
This product has no loudspeaker. After hitting, there is no sound when beating on the drum surface, which is
normal. If you want to experience the sound of the product, please plug in the headphone.
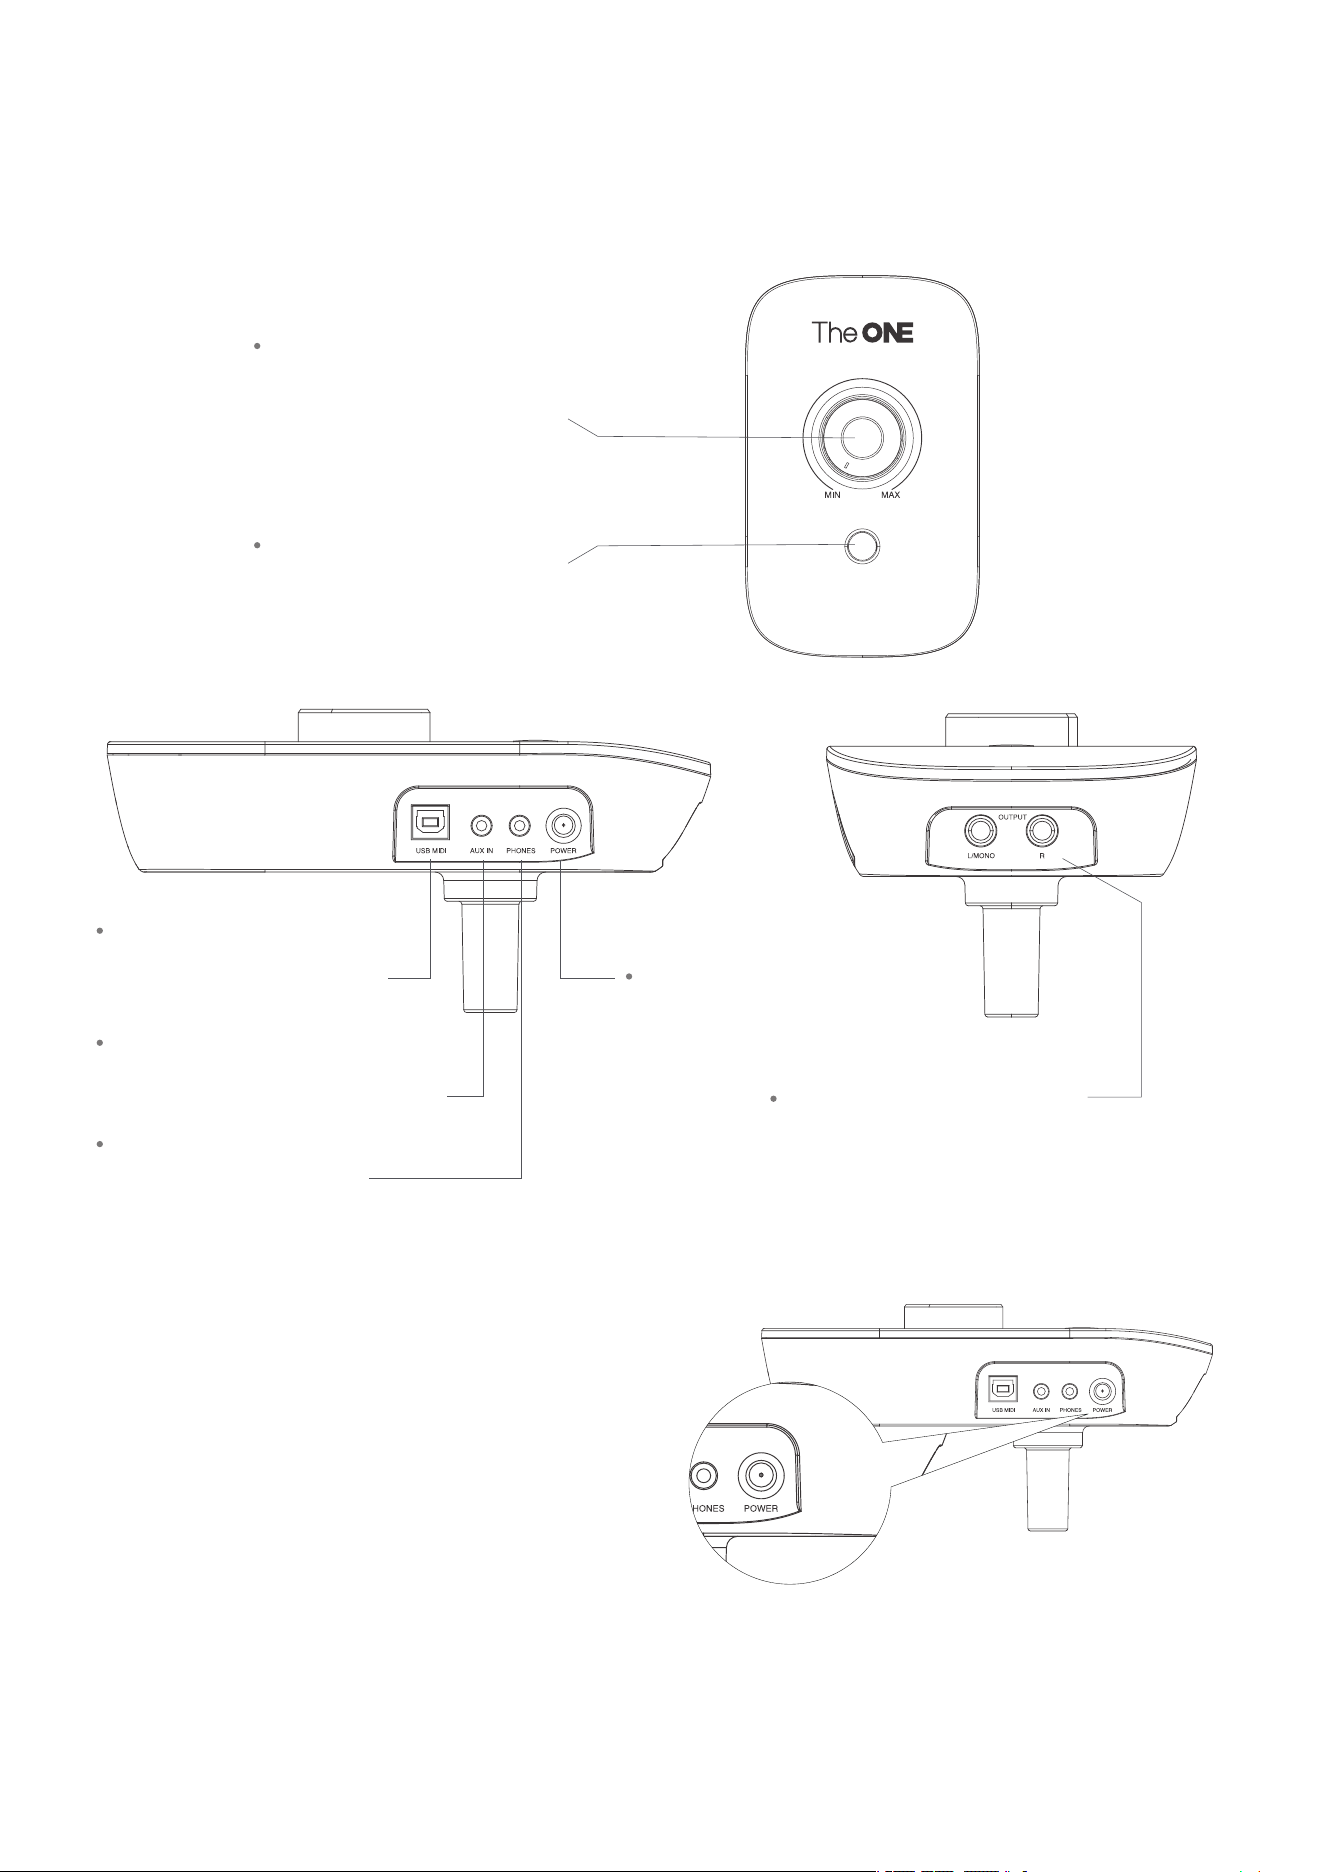
Drum module Function Panel
1. Take out the power adapter and plug into
the POWER INTERFACE of the jack panel on
the left side of the drum module. Insert the
other end into the socket.
olume Adjustment Knob
Used for adjusting the volume. Turn
the volume clockwise to increase and
rotate counterclockwise to decrease
the volume.
Power Switch
Press this button to turn on or off the
power supply.
USB MIDI Interface
The drum module can be connected to
a computer or other USB hosts.
POWER Interface
Connect to 12V DC power supply.
AUX IN Interface
Connect to external audio signals such as
MP3. Connect to your.
PHONES Interface
Connect to stereo headphones.
OUT PUT Port (L/MONO, R)
Connect to audio system or power amplifier equipment.
Connect to L/MONO and R jacks if it is stereo output; Connect
to the L/MONO jack only if it is mono output.
User Guide
2. Press the power switch of the drum module, and the drum set lights up and flashes.
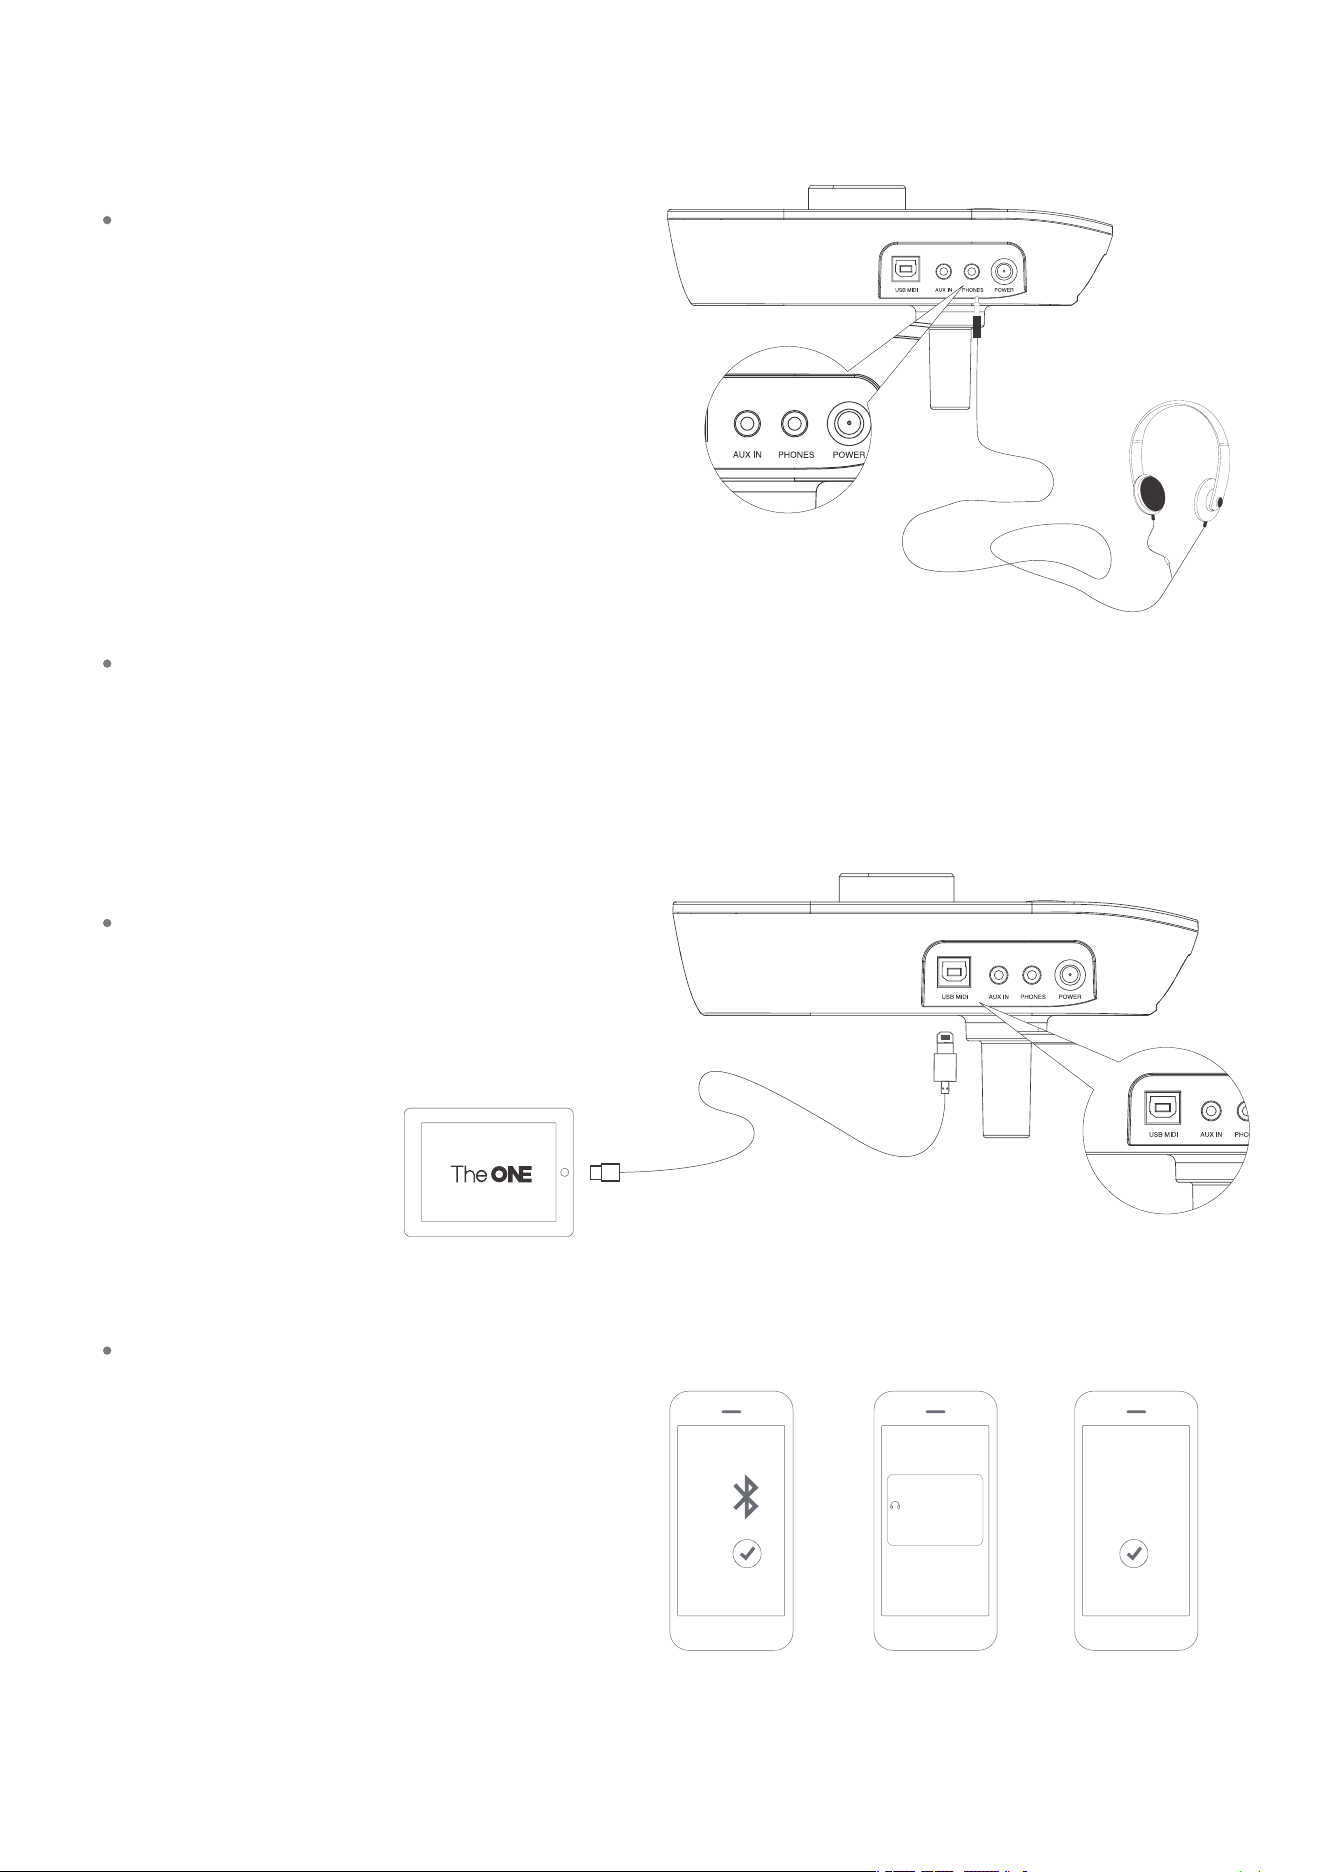
Note: Using headphones at high volume for a long
time will cause ear fatigue and hearing damage.
The headphone jack of this product is the typical
3.5mm stereo headphone jack.
This product has no loudspeaker, head-
phones should be inserted when being
used to hear the drum sound.
We are dedicated to creating a new type of intelligent instrument integrating networking,
learning and entertainment, to make users play drums with great fun. When connecting to your
mobile device via Bluetooth or a dedicated data cable, you'll find more unexpected surprises.
Connect headphones
This product’s dual-mode Bluetooth can
simultaneously connect to audio and
MIDI signals.
Operating procedures are as follows:
Bluetooth audio connection:
Bluetooth connection
The ONE
DRUM Audio
The ONE DRUM Audio
蓝牙
更多设置
Device Connection
Connect smart devices
Data cable connection
This products comes with a dedicated
data cable.
1、Turn on the
phone Bluetooth
2、Search Bluetooth
“The ONE DRUM
Audio”
3、Connect
Bluetooth
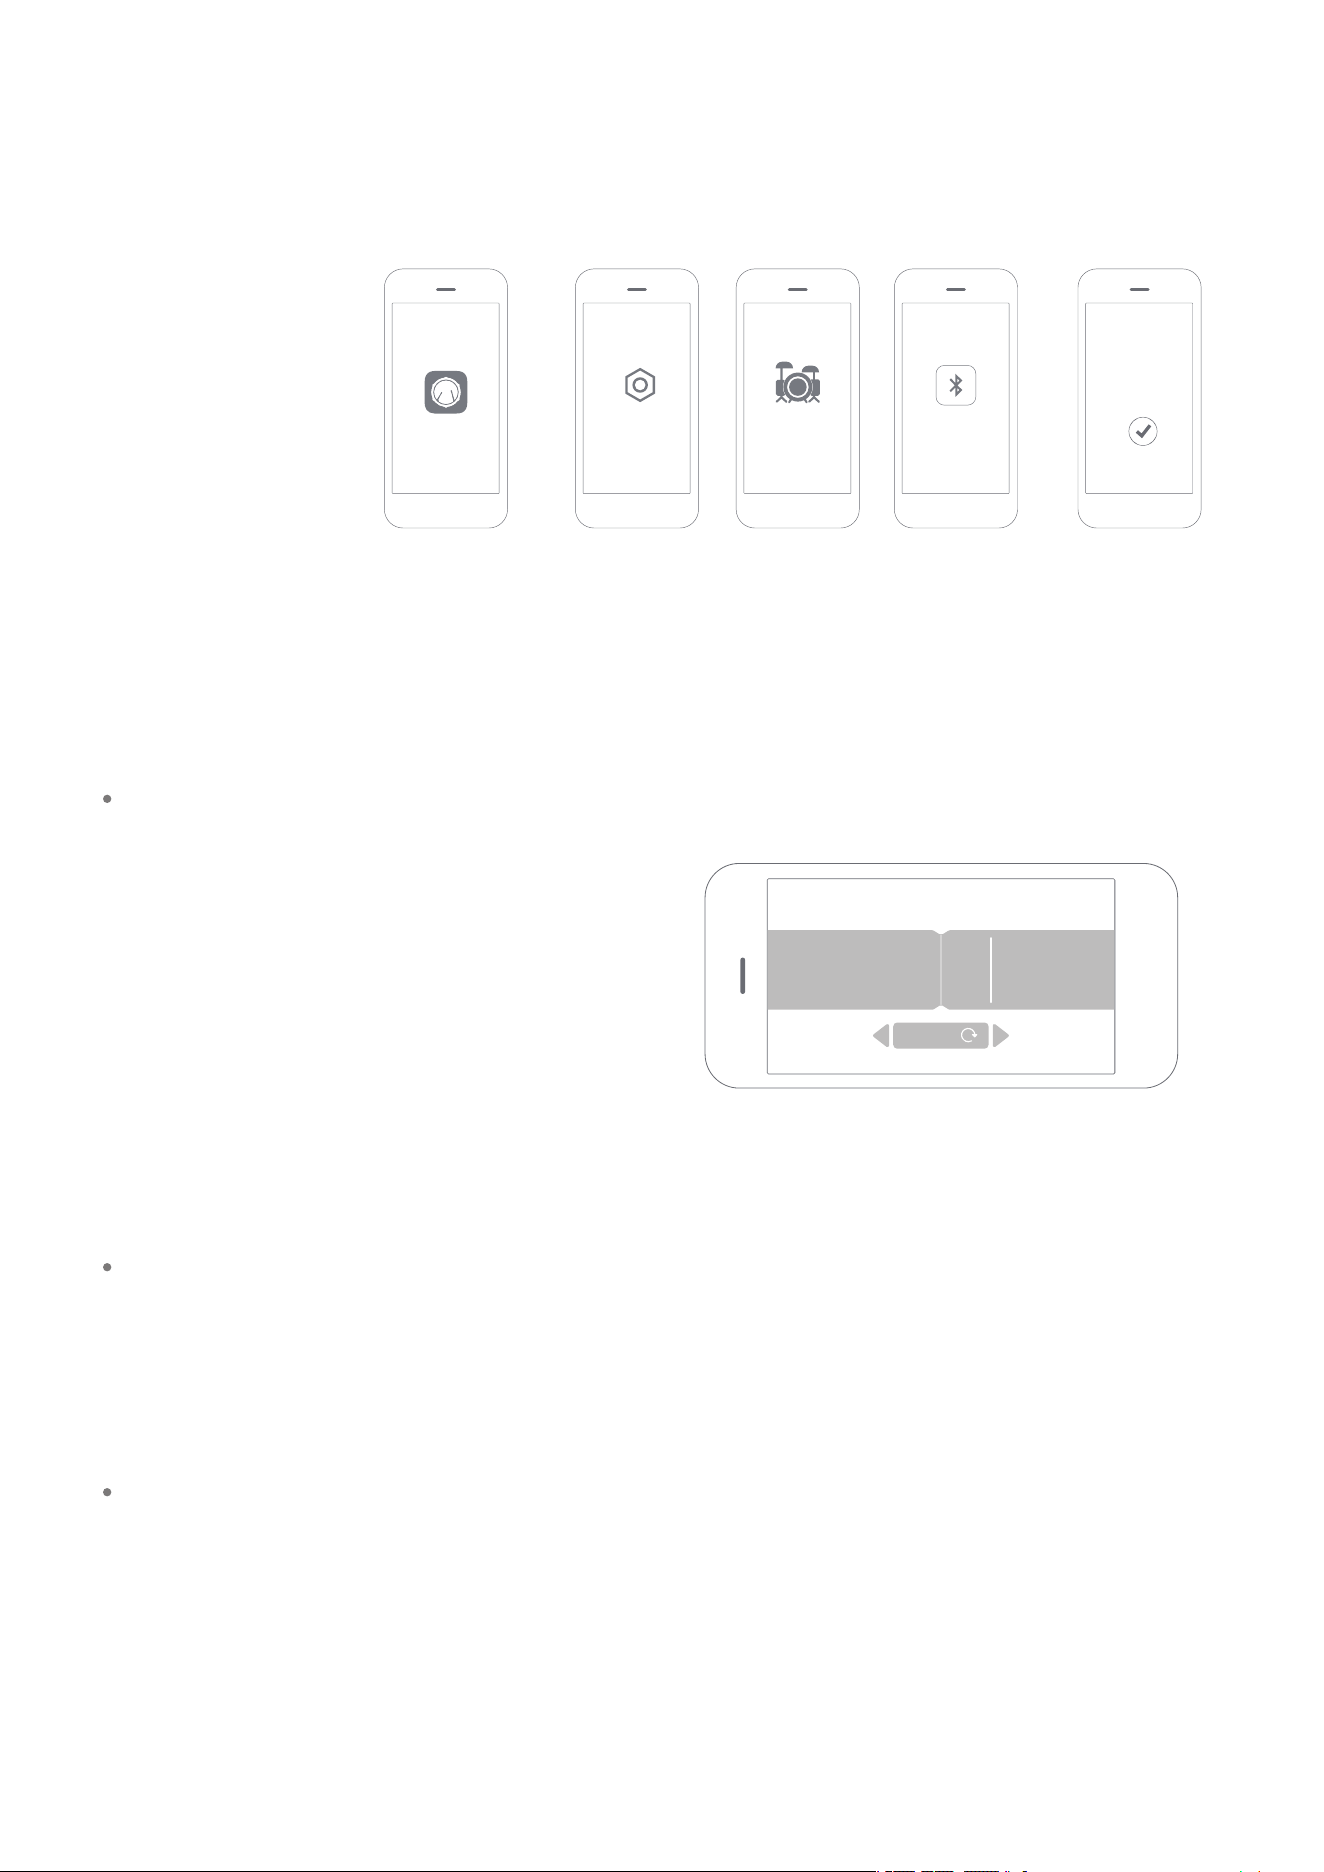
This instrument can be connected to your
smart device, and you can learn and play
drums with music in the “InstaDrum” APP
wirelessly.
Bluetooth dual-mode signal transmission
偏移调整
Note: When connecting your drum set to InstaDrum
through Bluetooth for the first time, you can go
through the Bluetooth delay calibrating according to
the APP prompt. This will improve your playing experi-
ence with InstaDrum.
Note: Before connecting other devices, make sure that all devices are powered off. Also, when turning on the
device, make sure that the volume of each device has been adjusted to a minimum.
Connect this instrument to the smart device, the music of the smart device and the sound of
your beating on the drum are all transmitted from the headphones or the connected loud-
speaker.
Dual transmission of USB MIDI and Audio data
The audio system or amplifier can be connected via the 6.35mm OUT PUT interface at the
bottom of the drum module.
Connect audio equipment
1、Open InstaDrum APP 2、Click Settings – Connect
E-drums - Bluetooth MIDI
3.Select “The ONE
DRUM MIDI”
and connect
Bluetooth MIDI
Connection:
The ONE
DRUM MIDI
0.000
Device Connection
My Drum Bluetooth
MIDI
Settings

Connect to the “InstaDrum” APP through Bluetooth Midi or data cable. In the APP, you can
select 308 playing sounds (main sounds, auxiliary sounds, and effect sounds) and 8 sets of
hit-hat sounds, which can well satisfy your performance needs.
In addition to the built-in functions of the drum module, you can connect the product to the
“InstaDrum” APP for more extended functions.
Choose rich playing sounds
This product has the function of drum kit selection. Connect InstaDrum APP and select drum
set in the APP; It includes 25 preset drum kits and 9 GM drum kits.
Drum Group Settings
The volume of the drum pad can be adjusted in the APP and you can adjust a certain drum
pad.
Drum kit sound control
The APP can store 5 sets of user-defined drum kit sounds.
Store user-defined drum kit sound
This product is equipped with initialization function, and users can operate the drum module
to restore factory settings in the APP.
Initialization function
This product automatically powers off after 30 minutes of no operations by default;
This function can be turned on/off and adjusted in the APP.
Automatic switch-on/off
This product is equipped with trigger performance setting. The users can adjust the
drum sensitivity parameter and velocity curve, and adjust the crosstalk value and
anti-jamming value to prevent double sound and crosstalk.
Triggering Function Settings
This product’s lighting mode can be set in the APP, such as full-light hitting and lighting
after hitting.
Lighting function
Details such as the connection version of APP and Smart Device can be consulted with Customer Service.
Download “InstaDrum” APP for to discover and experience more cool features.
Extended functions

* Warm Tips: In case of any change in specifications, the actual commodities shall prevail, and The ONE has the
final interpretation right to the product.
Maximum
Polyphony
Weight
Connection
Mode/
Equipment
LED
Interface
Bluetooth
Lighting Effect
during Switching
On/Off
Data Cable
64
25.5kg
LED of 8 colors
DC Power Interface, 12V
1 Headphone interface, 3.5mm
1 AUX IN interface, 3.5mm
2 OUT PUT interfaces, 2*6.3mm
USB MIDI Interface
Drum Harness Interface
Dual Bluetooth
The whole module is lightened with flash during switching on
The whole module’s light goes dim gradually during switching off
USB MIDI to TYPE-C Interface
Data Cable Connection/Dual Bluetooth Connection
iOS System 10.0 and above, and Android 7.0 and above, support USB
Host/OTG
Support Bluetooth BLE5.1 device connection
Product Specifications

Troubleshooting
After powering on, there is no
sound from the drum module.
After powering on, the snare
drum doesn't light up.
After hitting the kick pad, other
cymbals or drum pads sound
simultaneously.
This product has no loudspeaker. You can plug in the
headphone or external audio.
Check whether the connection cable of the MIDI inter-
face and the LED interface of the snare drum is wrong.
Check whether the kick pad is flattened against the
drum rack, and whether the force of foot on the kick
pad is strong. If the kick pad is flattened against the
drum rack, the kick pad after being beaten will cause
resonance and the shake of drum rack, which is easy
to cause consequent noise.
Issues
Causes and Solutions
Any Changes or modifications not expressly approved by the party responsible for compliance
could void the user's authority to operate the equipment.
This device complies with part 15 of the FCC Rules. Operation is subject to the following two
conditions: (1) This device may not cause harmful interference, and (2) this device must accept
any interference received, includling interference that may cause undesired operation.
FCC Caution:
This Transmitter must not be co-located or operating in coniunction with any other anten-
na or transmitter.
This equipment complies with RF radiation exposure limits set forth for an uncontrolled
environment.
The device has been evaluated to meet general RF
exposure requirement. The device can be used in portable exposure condition without
restriction.
FCC RF Radiation Exposure Statement:

Tel:833-970-2670(US)
E-mail:[email protected]
Web:www.theonemusic.com
Note: This product will be constantly updated and optimized. The manual may not be
synchronized with the product update in time. Please understand.
CONTACTUS:
Note: This equipment has been tested and found to comply with the limits for a Class B digital
device, pursuant to part 15 of the FCC Rules. These limits are designed to provide reasonable
protection against harmful interference in a residential installation.This equipment generates,
uses and can radiate radio frequency energy and, if not installed and used in accordance with
the instructions, may cause harmful interference to radio communications. However,there is
no guarantee that interference will not occur in a particular installation. If this equipment does
cause harmful interference to radio or television reception, which can be determined by turn-
ing the equipment off and on,the user is encouraged to try to correct the interference by one
or more of the following measures:
Reorient or relocate the receiving antenna.
Increase the separation between the equipment and receiver.
Connect the equipment into an outlet on a circuit different from that to which the receiver is
connected.
Consult the dealer or an experienced radio/TV technician for help.

NO.TOD12211015