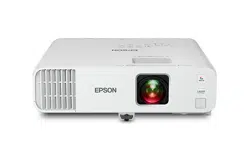

Epson iProjection Operation Guide (Windows/Mac)

Notations Used in This Guide 5
Using the Manual to Search for Information..................................... 6
Sear
ching by Keyword......................................................................................6
Jumping Directly from Bookmarks.....................................................................6
Printing Only the Pages You Need......................................................................6
Introduction to the Epson iProjection Software 7
Epson iProjection Features................................................................. 8
Connec
tion to Various Devices.......................................................................... 8
Four-Panel Display............................................................................................8
Change Presenters and Projection Position.........................................................9
Moderator Function..........................................................................................9
Screen Delivery and Thumbnail Display Function..............................................10
Easy Network Projection Using a USB Flash Drive (Windows Only)...................... 10
Setting Up the Software for the First Time 12
Installing the Software......................................................................13
Epson iPr
ojection System Requirements...........................................................13
Requirements for Extended Display.............................................................. 13
Epson iProjection Editions...............................................................................14
Installing the Epson iProjection Software (Windows)......................................... 14
Installing the Epson iProjection Software (Mac).................................................14
Selecting Projector Network Settings..............................................15
Connection Methods for Various Network Environments................................... 15
Recommended Wireless Environment for Multi PC Projection............................ 16
Setting Up a Projector to Connect in Quick Connection Mode............................16
Setting Up a Projector when Connecting by Wireless LAN..................................17
Setting Up a Projector when Connecting by Wired LAN..................................... 18
Connecting to the Projector and Projecting Images
19
Connection Methods......................................................................... 20
Connec
tion Methods for Various Meeting Styles............................................... 20
Connecting the Projector and a Computer Directly Using Wireless Communication
......................................................................................................................21
Connecting to the Projector from the Software over a Network System...............24
Selecting the Projector Search Method........................................... 27
Search Methods............................................................................................. 27
Searching for Network Projectors Automatically................................................27
Searching for Network Projectors by Specifying an IP Address or Projector Name
......................................................................................................................28
Searching for Network Projectors Using a Prole...............................................28
Proles for Search........................................................................................29
Performing a Prole Search.......................................................................... 29
Registering a Prole.....................................................................................29
Exporting a Prole.......................................................................................31
Importing a Prole.......................................................................................31
Sharing a Prole over a Network................................................................... 31
Controlling the Projected Display.................................................... 33
Screen Types for Projection Control..................................................................33
Operating the Projected Display Status............................................................ 33
Changing the Number of Projected Panels........................................................34
Changing the Presenter...................................................................................35
Changing the Projection Position.....................................................................36
Disconnecting.................................................................................... 37
Using Additional Functions 38
Searching for Network Projectors Using a Shortcut....................... 39
Cr
eating a Shortcut.........................................................................................39
Connecting to Network Projector Using a USB Flash Drive
(Windows Only)..................................................................................40
Contents
2

Creating a USB key on a USB Flash Drive (Windows Only)...................................40
Using a USB Key t
o Connect a Windows Computer............................................40
Connecting to Multiple Projectors (Mirroring)............................... 42
Outputting Audio from the Projector.............................................. 43
Projecting Your Screen...................................................................... 44
Changing the Moderator.................................................................. 45
Distributing the Projected Screen....................................................46
Selecting the Participant's Screen to Project Using Thumbnails...47
Hiding the Projection Control Screen.............................................. 48
Prohibiting Participant Operations..................................................49
Controlling the Connection Bandwidth...........................................50
Bandwidth Control Restrictions....................................................................... 51
Solving Problems 52
Solving Network Connection Problems...........................................53
Solutions W
hen You Cannot Connect Using Quick Connection Mode..................53
Solutions When You Cannot Connect Projectors Using Advanced Connection Mode
(Wireless).......................................................................................................53
Solutions When You Cannot Connect Projectors Using Advanced Connection Mode
(Wired).......................................................................................................... 55
Solving Problems During Projection............................................... 56
Solutions When the Screen is Not Projected Properly.........................................56
Solutions When Audio is Not Played Properly....................................................56
Solutions When the Moderator Function Does Not Work................................... 57
Solutions When the Projected Screen is Not Delivered.......................................57
Error Messages List............................................................................58
Error Messages When Starting up the Epson iProjection Software.......................58
Error Messages When Using a USB Key............................................................. 59
Error Messages When Searching for and Selecting Projectors.............................60
Error Messages When Projecting......................................................................61
Error Messages When Operating a Prole......................................................... 61
Error Messages When Using the Moderator Function.........................................61
Error Messages When Distributing the Projected Screen....................................62
Event ID List........................................................................................63
Screen Summary 64
Select Connection Mode Screen.......................................................65
Sear
ch Screen.....................................................................................66
Save Screen........................................................................................ 68
Set options......................................................................................... 69
Set options - User Settings...............................................................................69
Set options - General settings..........................................................................70
Set options - Adjust performance.....................................................................71
Set options - Audio Output..............................................................................72
Set options - Deliver........................................................................................73
Toolbar................................................................................................75
Projection Control Screen................................................................. 76
Thumbnail Screen..............................................................................79
Viewer Screen.....................................................................................80
Appendix 81
Updating and Uninstalling the Software.........................................82
Getting the Lat
est Version of the Software........................................................82
Uninstalling the Epson iProjection Software (Windows).....................................82
Uninstalling the Epson iProjection Software (Mac).............................................82
Supported Resolutions..................................................................... 83
Limitations......................................................................................... 84
Contents
3

Connection Limitations...................................................................................84
Notic
es................................................................................................ 85
Copyright Notice............................................................................................85
About Notations.............................................................................................85
Trademarks....................................................................................................85
Copyright Attribution..................................................................................... 85
Contents
4
Notations Used in This Guide
Saf
ety Symbols
e projector and its manuals use graphical symbols and labels to indicate content that tells you how to use the product safely.
Read and carefully follow the instructions that are marked with these symbols and labels to avoid injury to persons or damage to property.
Warning
is symbol indicates information that, if ignored, could possibly result in personal injury or even death.
Caution
is symbol indicates information that, if ignored, could possibly result in personal injury or physical damage due to incorrect handling.
General Information Notations
Attention
is label indicates procedures that may result in damage or injury if sucient care is not taken.
is label indicates additional information that may be useful to know.
[B
utton name] Indicates the name of the buttons on the remote control or the control panel.
Exam
ple: [Esc] button
Menu/Setting name Indicates projector menu and setting names.
Exam
ple:
Select the Image menu
s Image > Advanced
is label indicates links to the related pages.
s
i
s label indicates the projector's current menu level.
g
Related Links
•
"U
sing the Manual to Search for Information" p.6
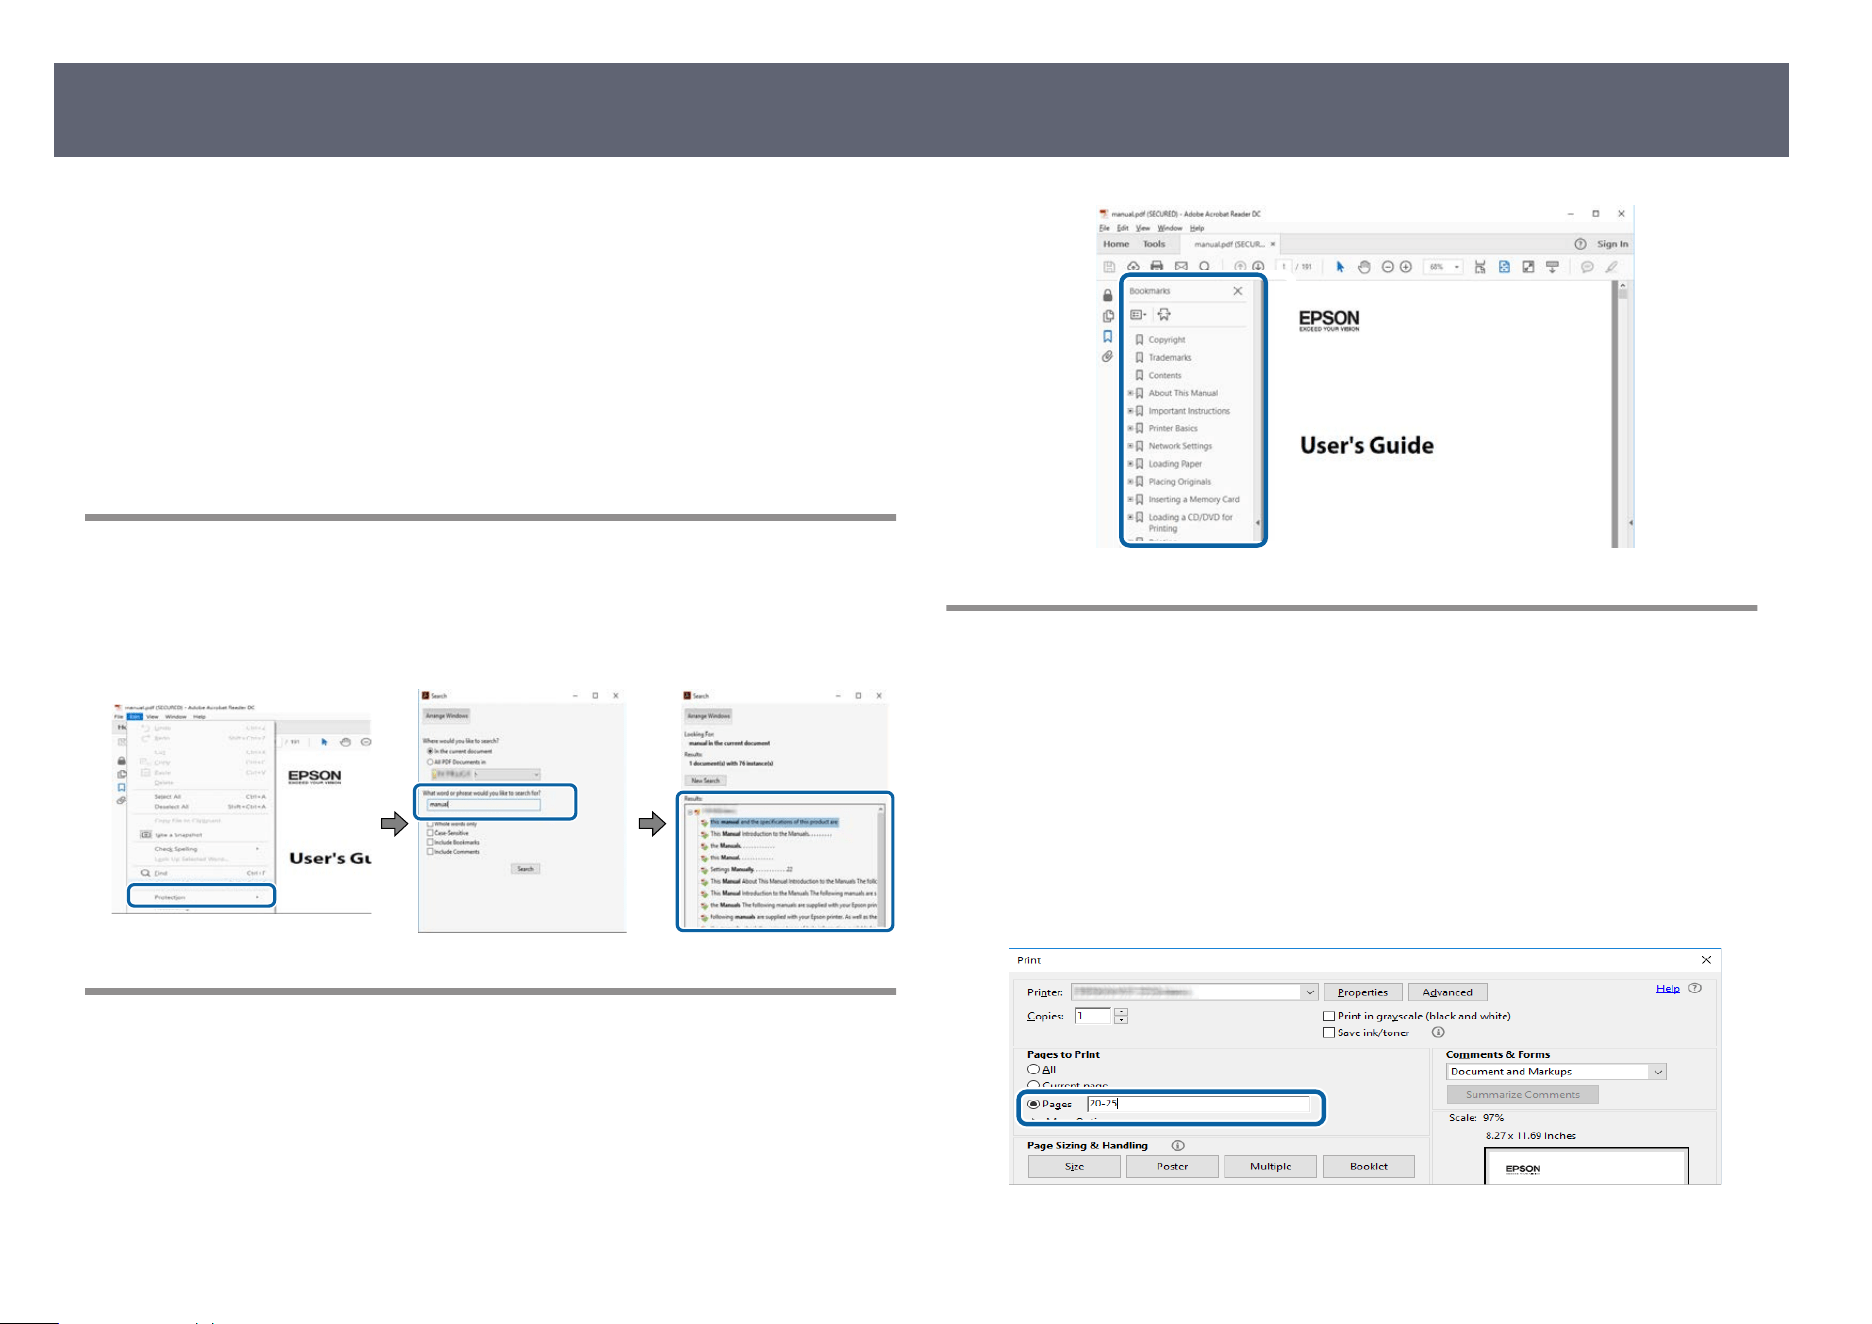
e PDF manual allows you to search for information you are looking for by
k
eyword, or jump directly to specic sections using the bookmarks. You can
also print only the pages you need. is section explains how to use a PDF
manual that has been opened in Adobe Reader X on your computer.
g
Related Links
•
"Searching by Keyword" p.6
•
"Jumping Directly from Bookmarks" p.6
•
"Printing Only the Pages You Need" p.6
Searching by Keyword
Click Edit > Advanced Search. Enter the keyword (text) for information you
want to nd in the search window, and then click Search. Hits are displayed as a
list. Click one of the displayed hits to jump to that page.
Jumping Directly from Bookmarks
Click a title to jump to that page. Click + or > to view the lower level titles in
th
at section. To return to the previous page, perform the following operation on
your keyboard.
•
Windows: Hold down Alt, and then press ←.
•
Mac OS: Hold down the command key, and then press ←.
Printing Only the Pages You Need
You can extract and print only the pages you need. Click Prin
t in the File menu,
and then specify the pages you want to print in Pages in Pages to Print.
•
To specify a series of pages, enter a hyphen between the start page and the
end page.
Example: 20-25
•
To specify pages that are not in series, divide the pages with commas.
Example: 5, 10, 15
Using the Manual to Search for Information
6

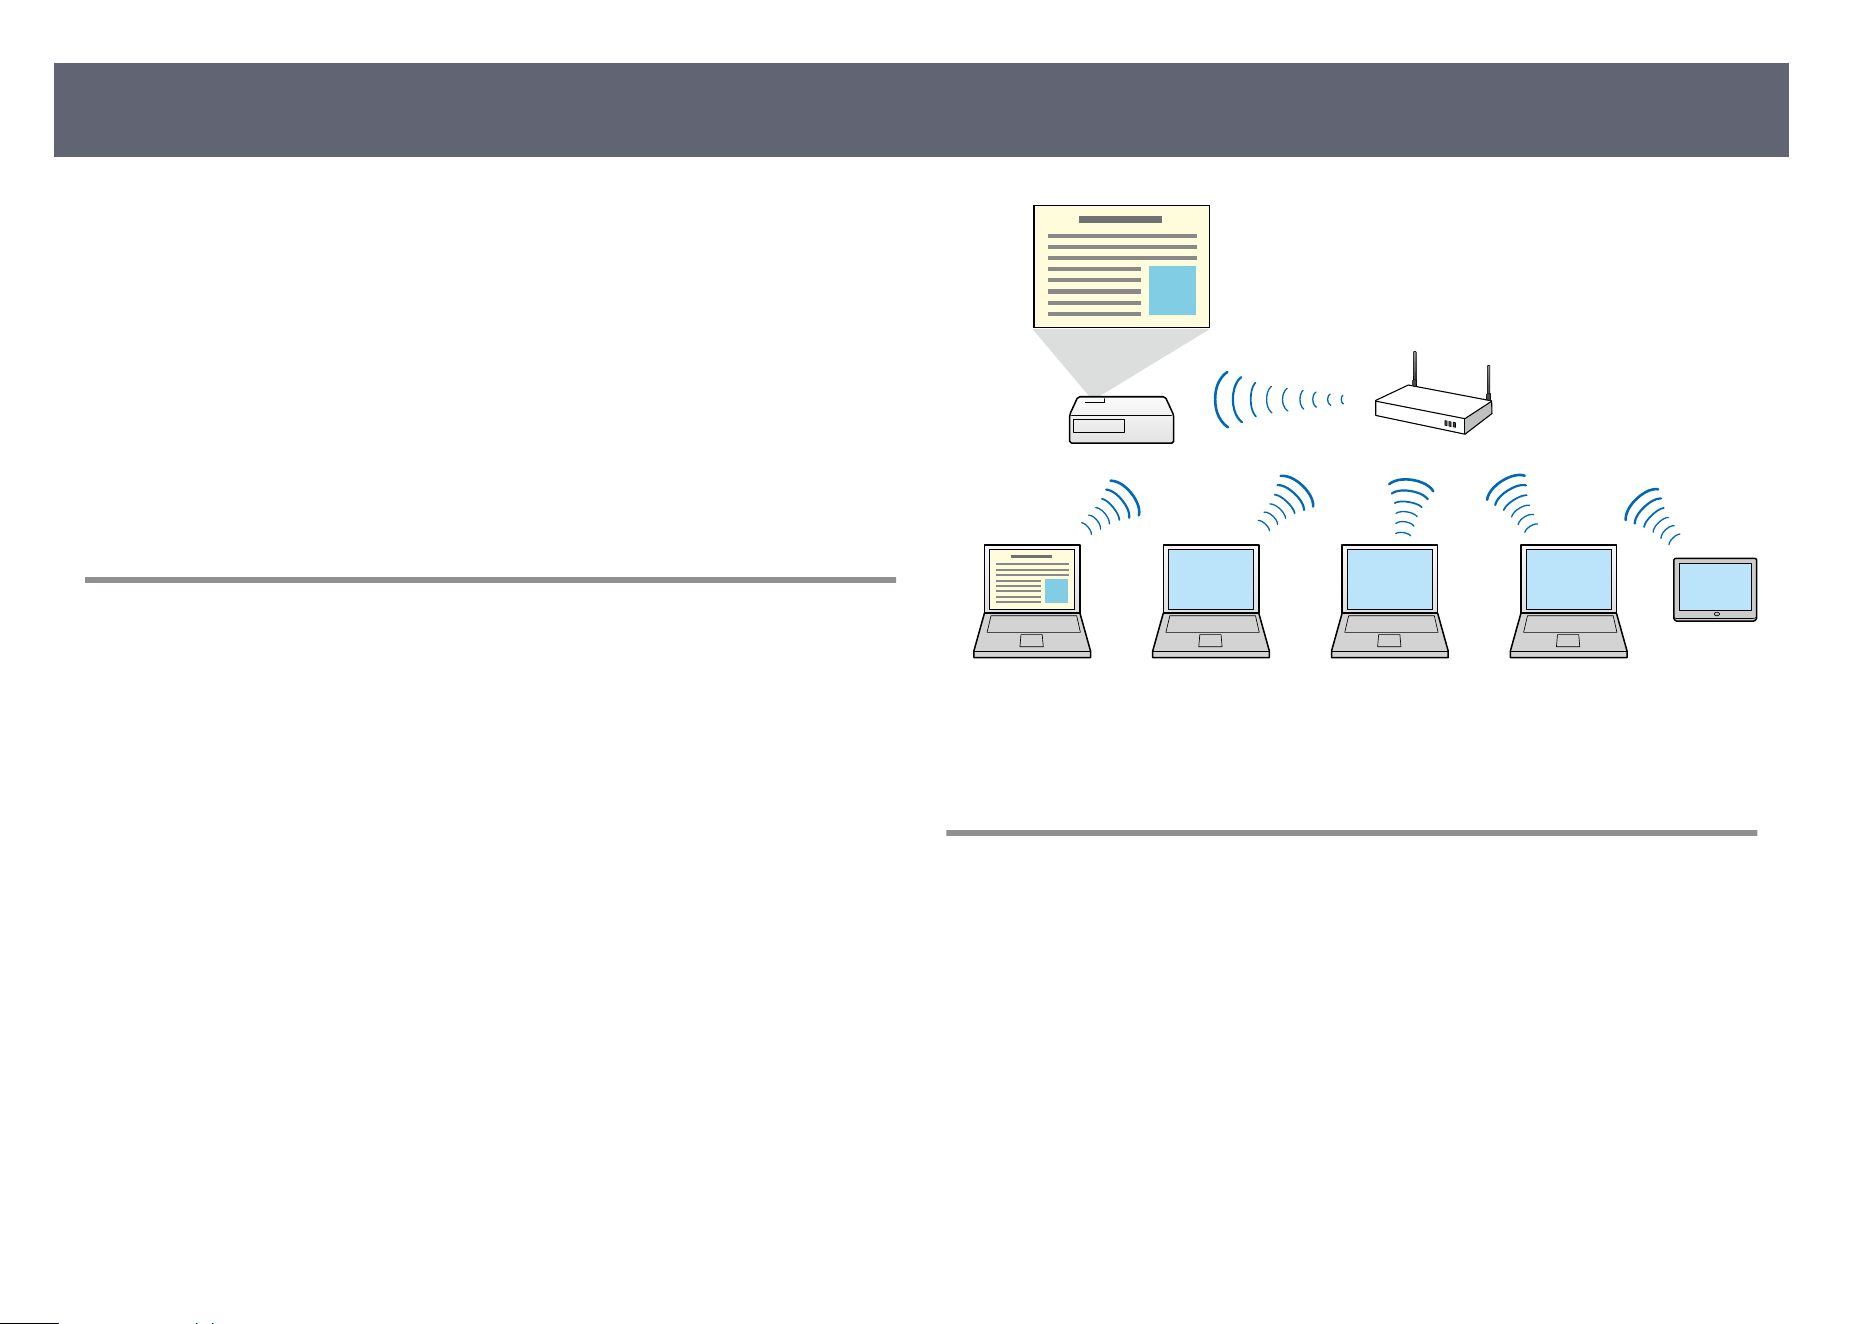
e Epson iProjection soware is an application that allows you to hold
in
teractive meetings or lessons by projecting images from network projectors.
You can use a variety of display options for your environment.
g
Related Links
•
"Connection to Various Devices" p.8
•
"Four-Panel Display" p.8
•
"Change Presenters and Projection Position" p.9
•
"Moderator Function" p.9
•
"Screen Delivery and umbnail Display Function" p.10
•
"Easy Network Projection Using a USB Flash Drive (Windows Only)" p.10
Connection to Various Devices
You can connect up to 50 devices to a projector simultaneously, such as
computers, smartphones and tablets using the Epson iProjection soware. (Up
to four devices can project at one time.)
You can also hold remote meetings over a network by simultaneously projecting
the same image on up to four projectors on the network.
g
Related Links
•
"C
onnecting to Multiple Projectors (Mirroring)" p.42
•
"Connection Methods" p.20
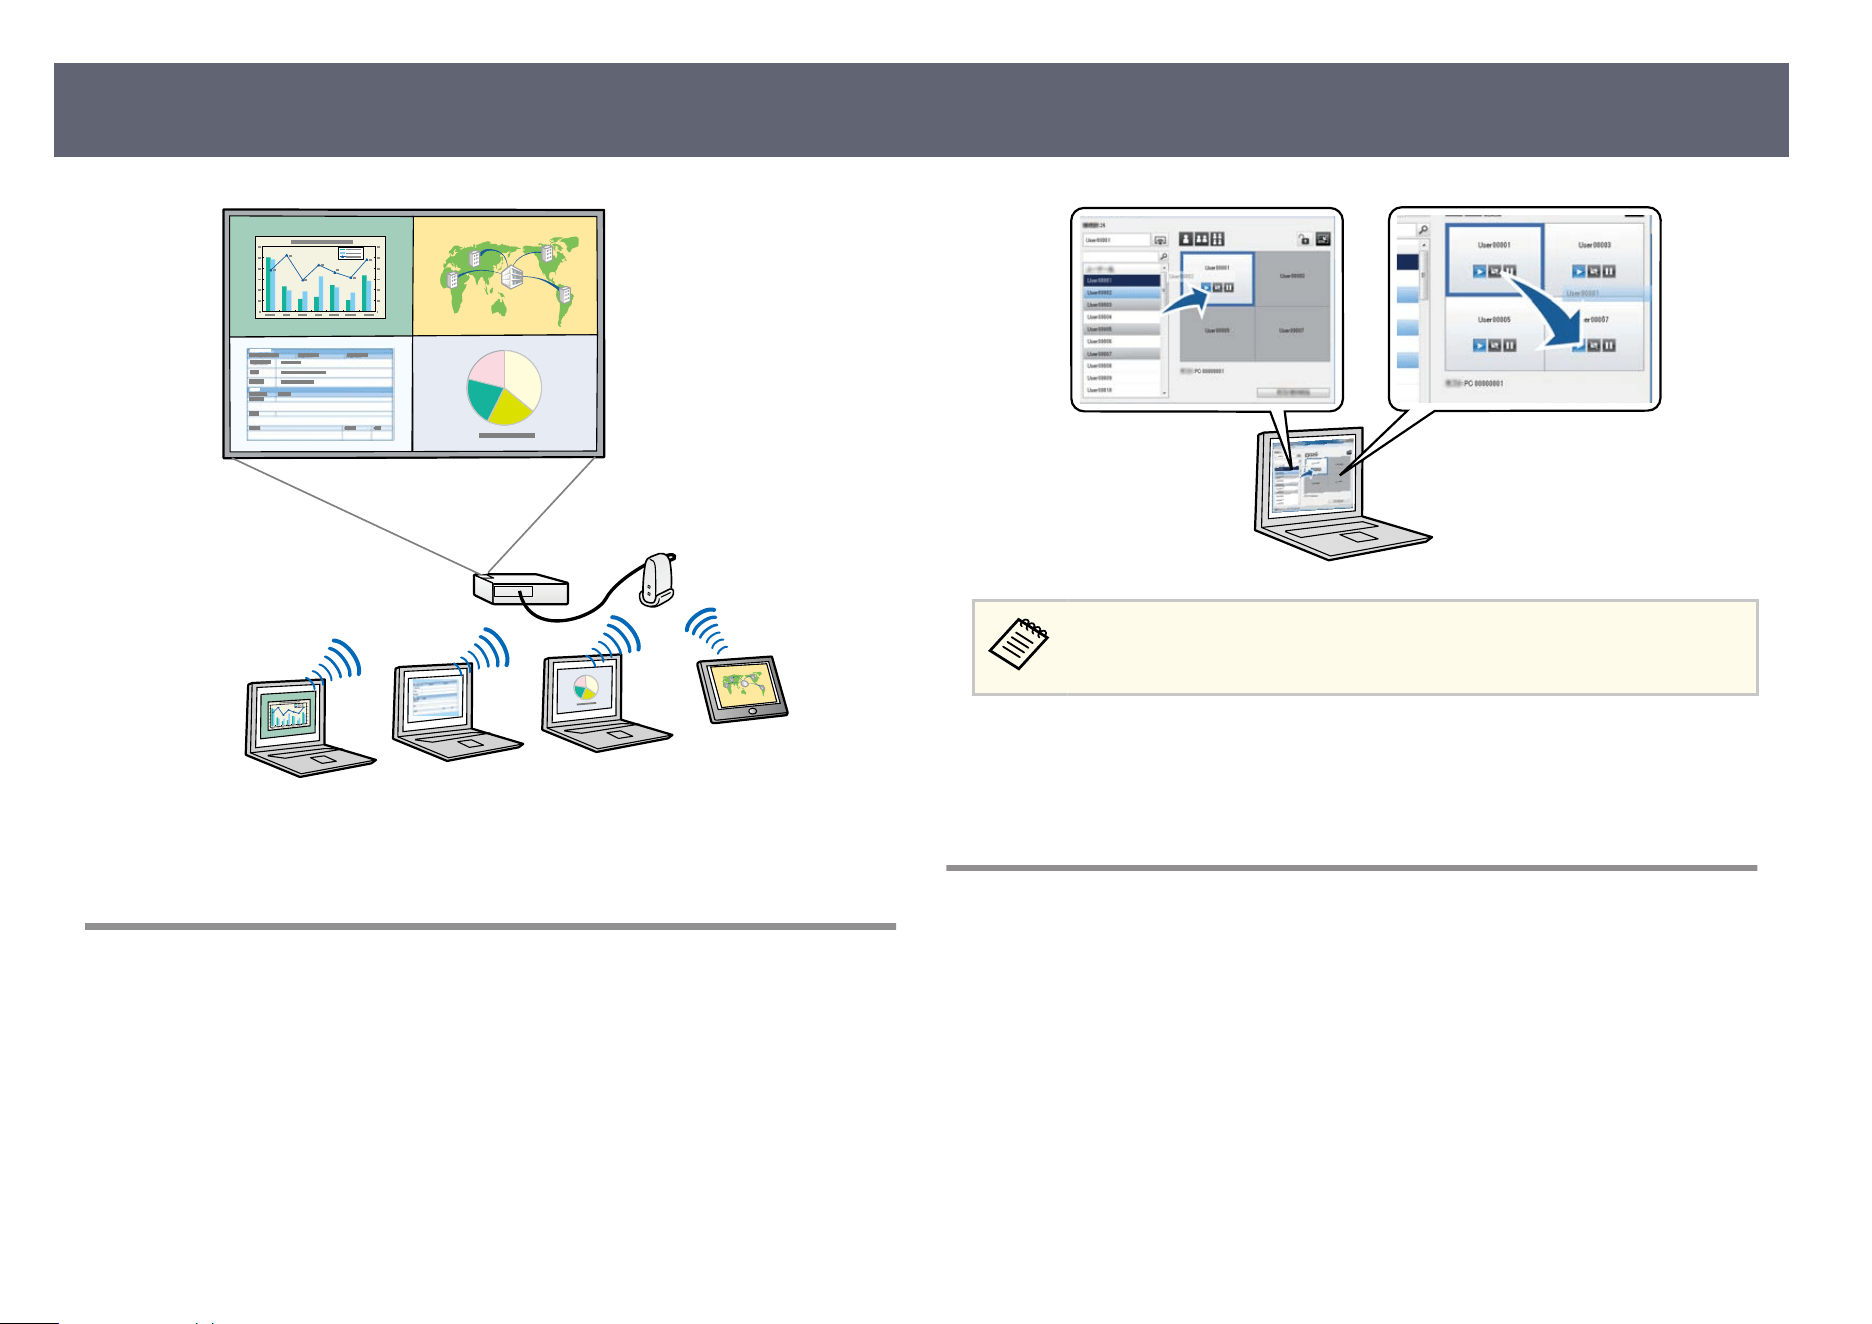
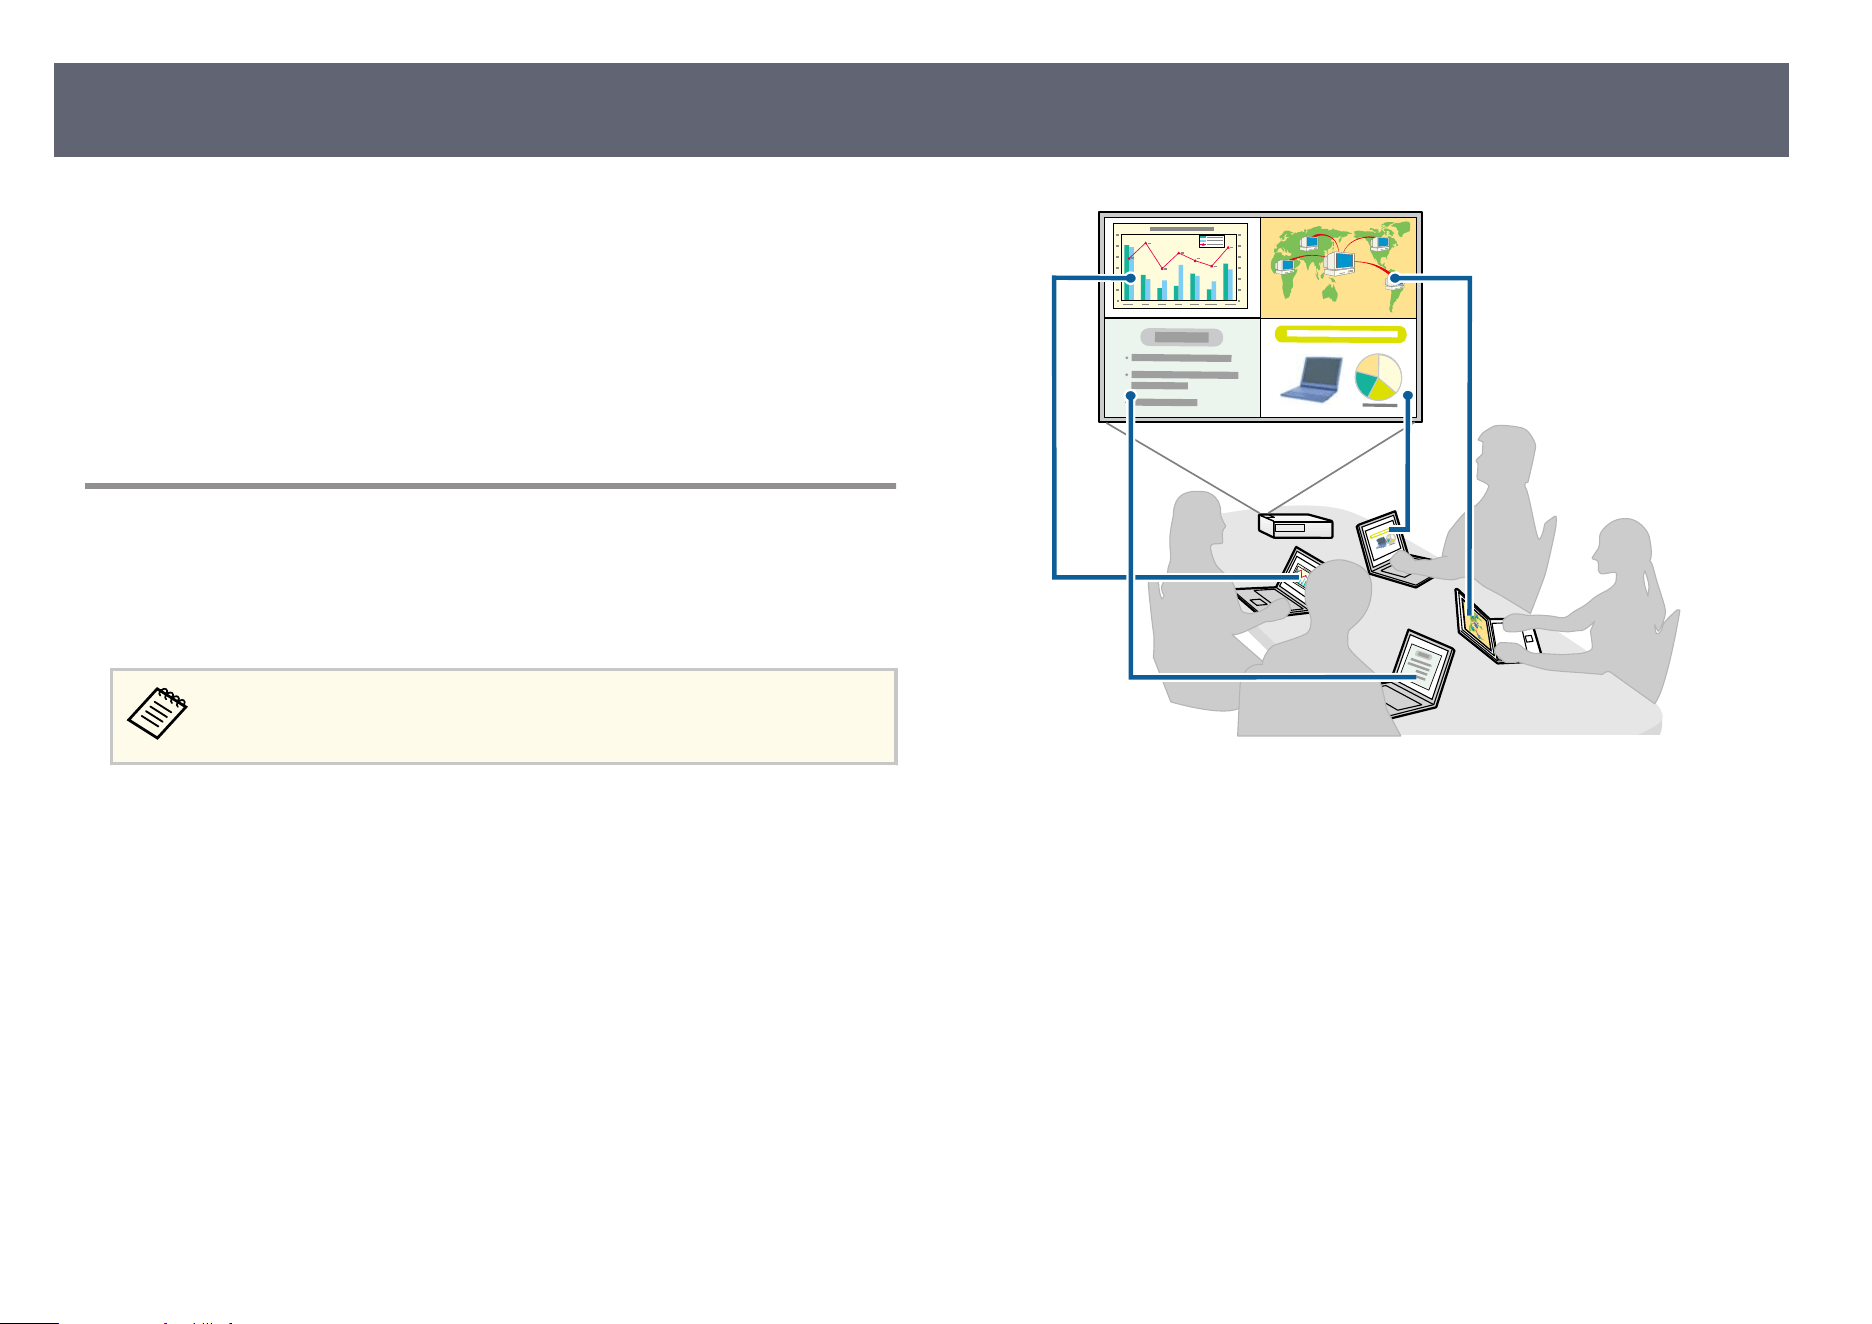
Four-Panel Display
You can simultaneously display up to four screens in separate projected panels,
whic
h is useful in both business and educational environments.
For example, you can compare and analyze data while simultaneously projecting
screens from multiple devices. In an educational environment, you can project
lesson material on one part of the screen and student answers on another to
enhance the learning experience.
Epson iProjection Features
8
g
Related Links
•
"C
hanging the Number of Projected Panels" p.34
Change Presenters and Projection Position
Using the Epson iProjection so
ware, you can easily change the screen being
projected and the projection position by simply dragging and dropping user
names in panels on the projection control screen.
You can share the projector with other users on the same network without
having to change cable connections, allowing users to take turns giving
presentations.
e projection control screen is available only on the Standard Edition of
t
he soware.
g
Related Links
•
"C
hanging the Presenter" p.35
•
"Changing the Projection Position" p.36
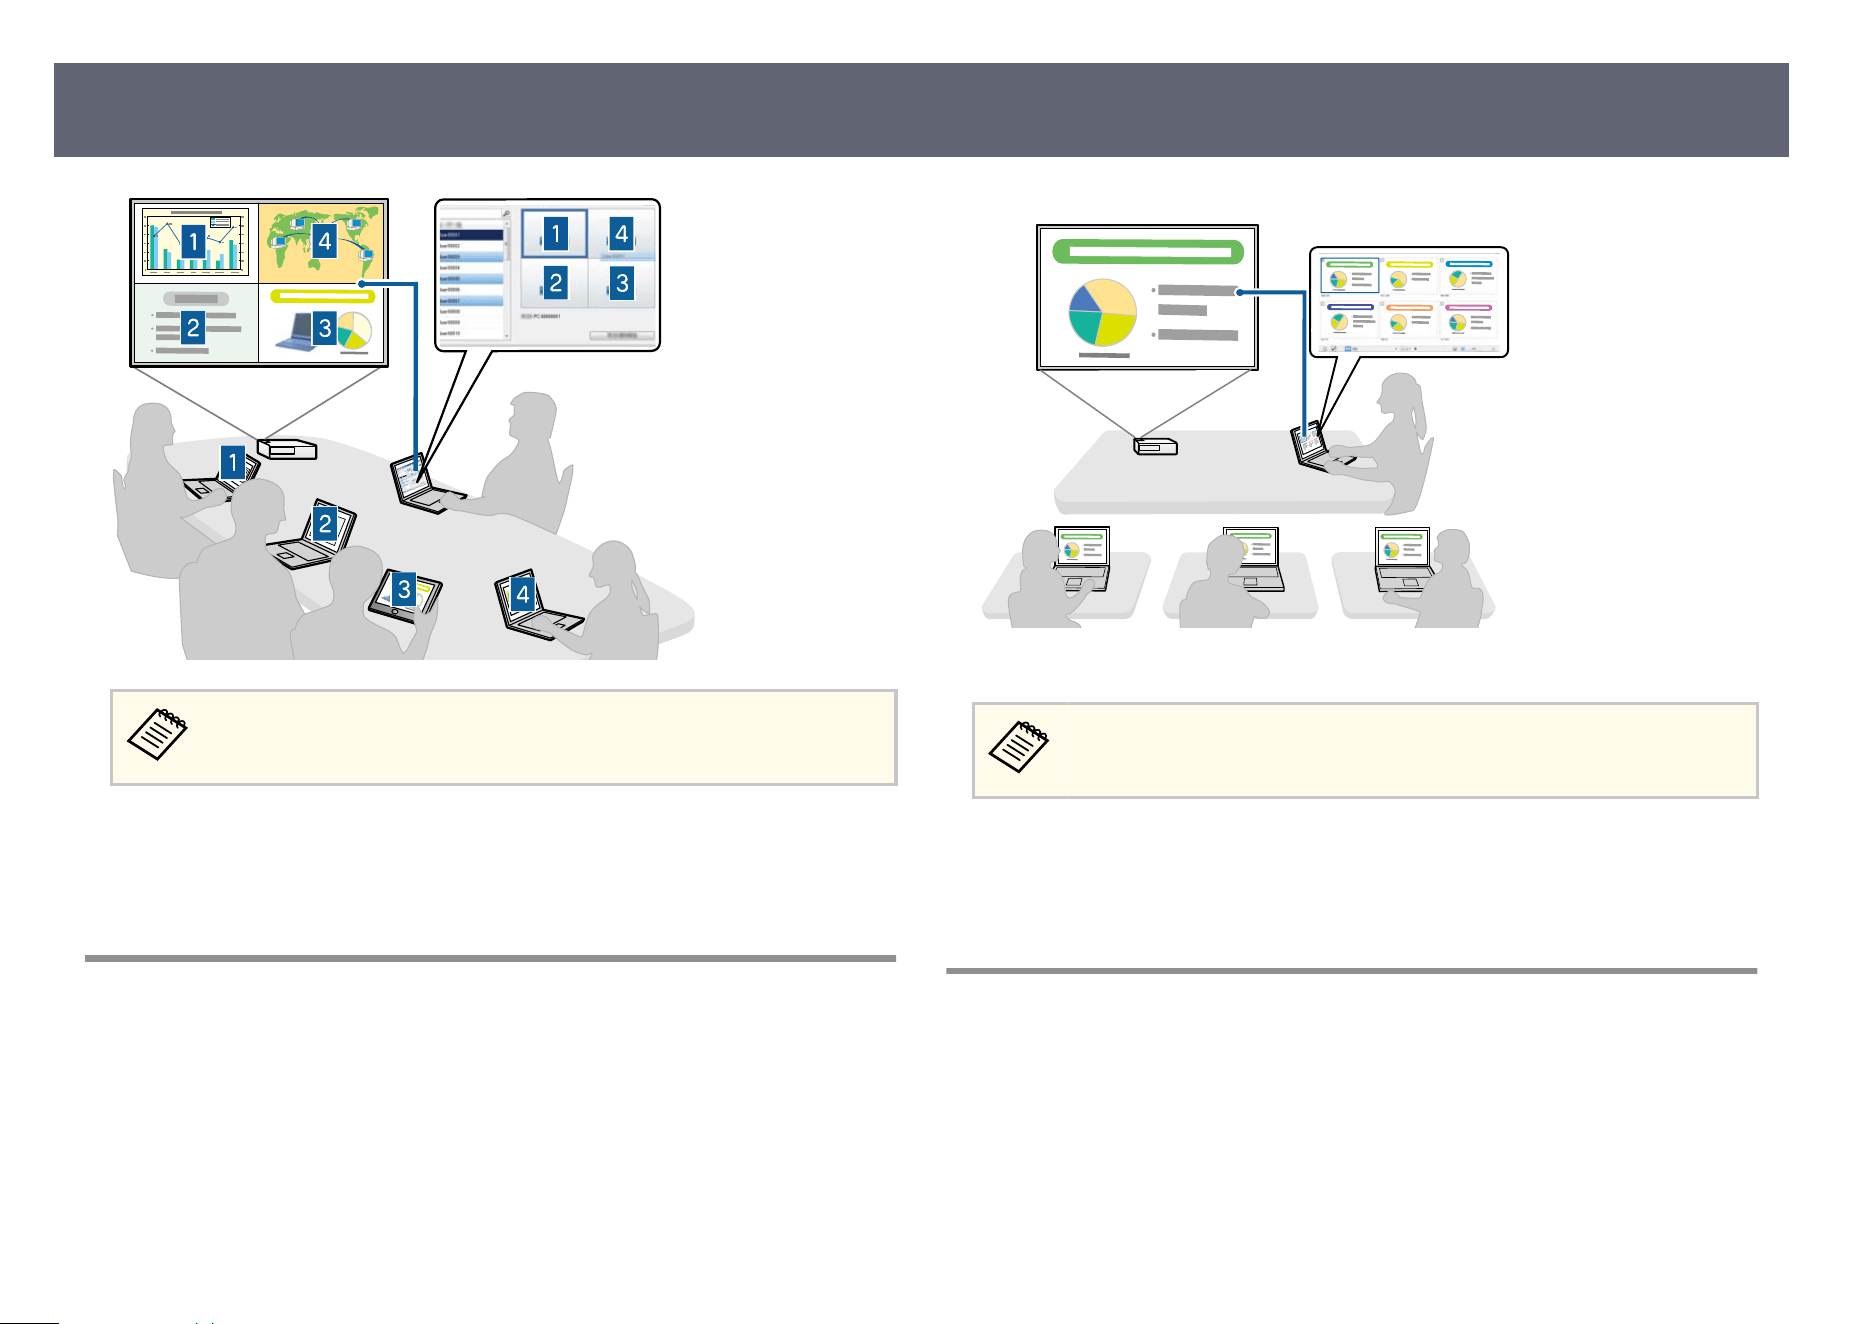
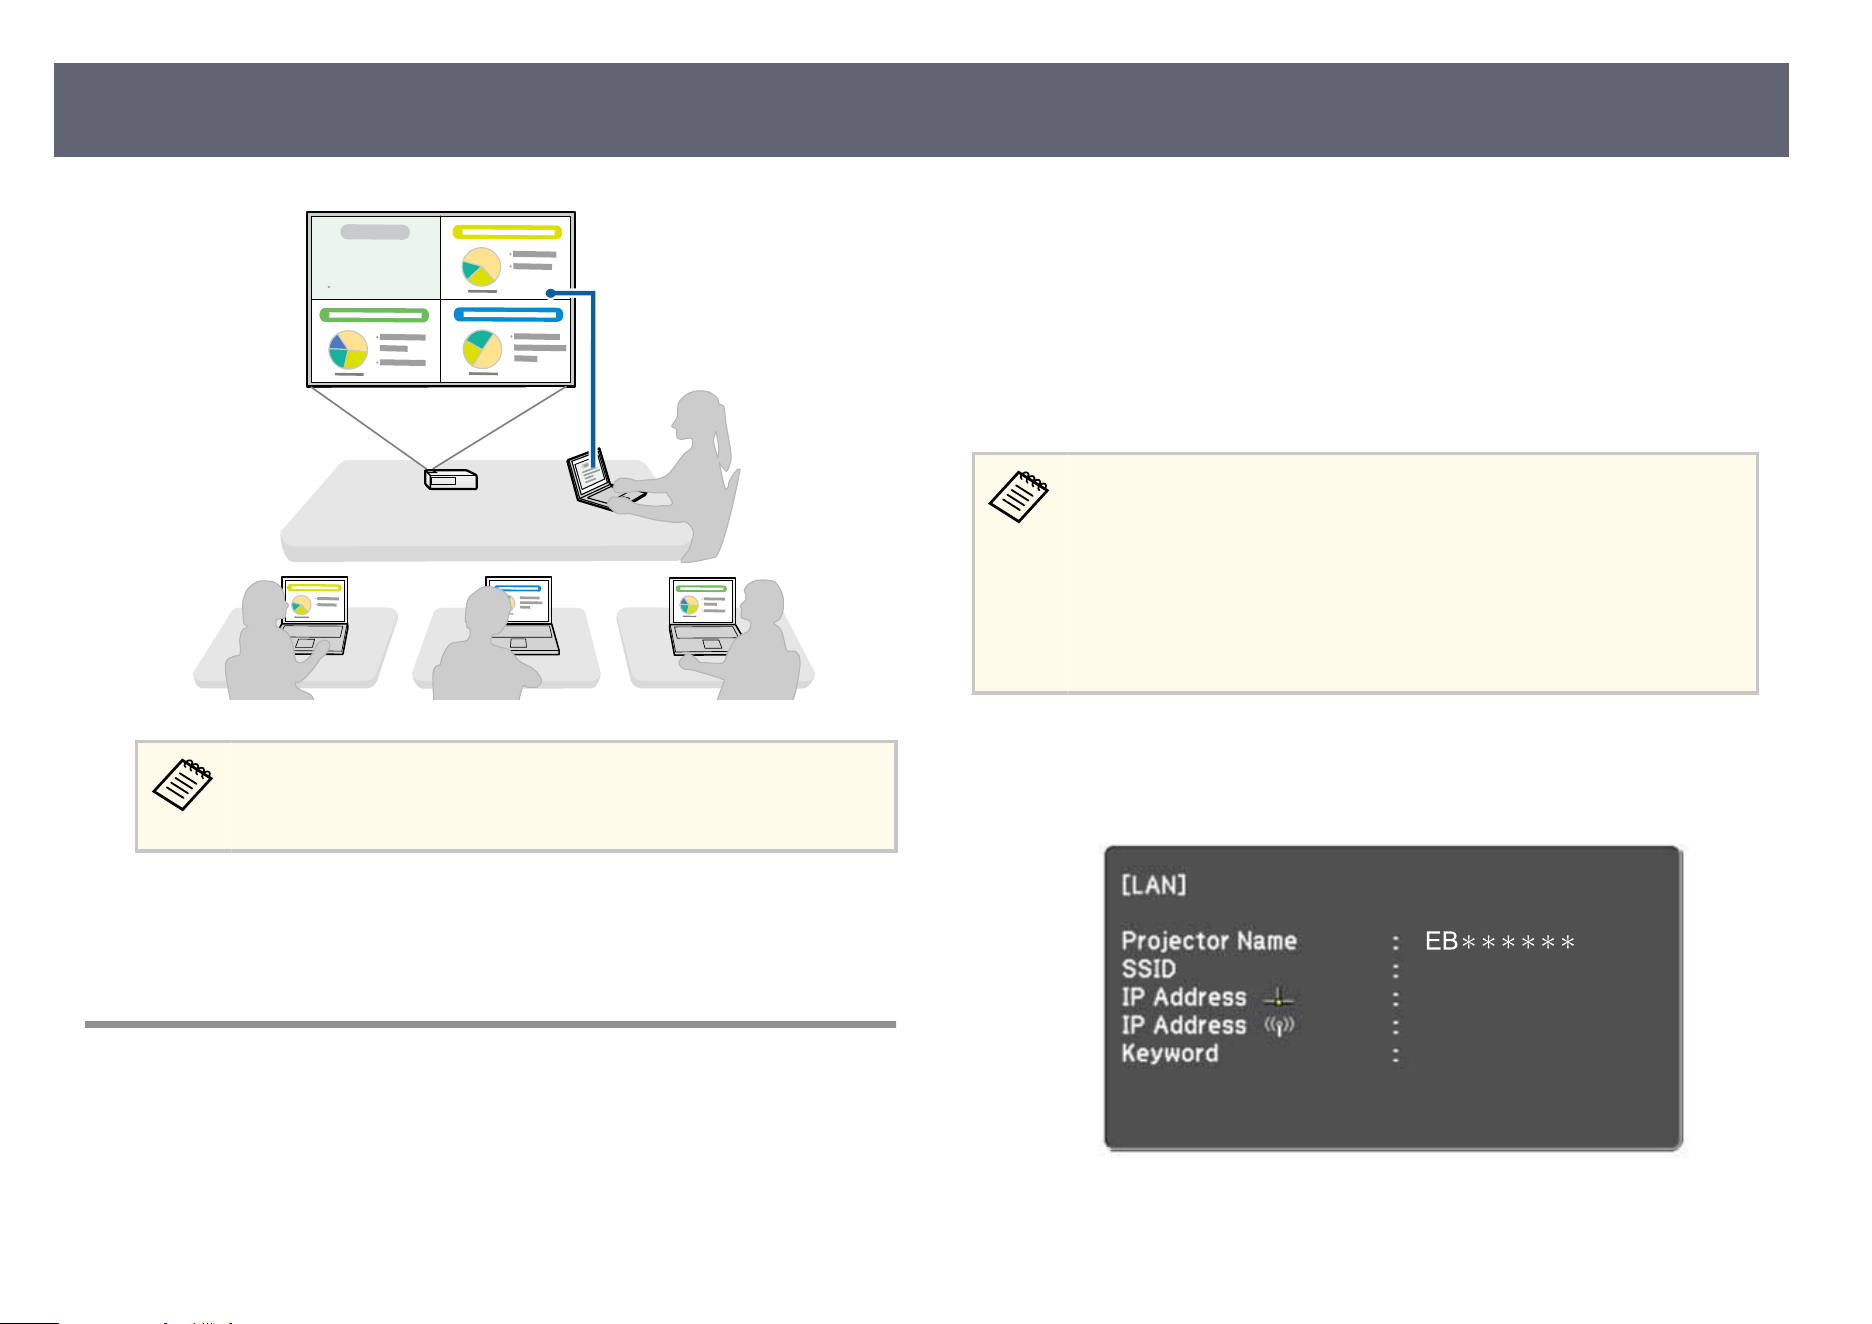
Moderator Function
When using the moderator function, only one person plays a role of moderator
wh
o can control the projected display. is function is suitable for meetings in
which one user is the moderator and the other users are participants, and the
moderator must control the projected display.
is can also be useful in a classroom environment where the moderator must
control the lesson without interruption.
Epson iProjection Features
9
is function is available only for supported models.
g
Related Links
•
"C
hanging the Moderator" p.45
•
"Connection Methods" p.20
Screen Delivery and Thumbnail Display Function
You can distribute the currently projected screen images to the participant's
dev
ices. e participants can then add notes to the received images using
drawing soware, which the moderator can check as thumbnails. is feature is
suitable for environments where the moderator wants to provide questions for
the participants to answer, and then select which answers or ideas to project in
response.
is f
unction is available only for supported models.
g
Related Links
•
"Di
stributing the Projected Screen" p.46
•
"Selecting the Participant's Screen to Project Using umbnails" p.47
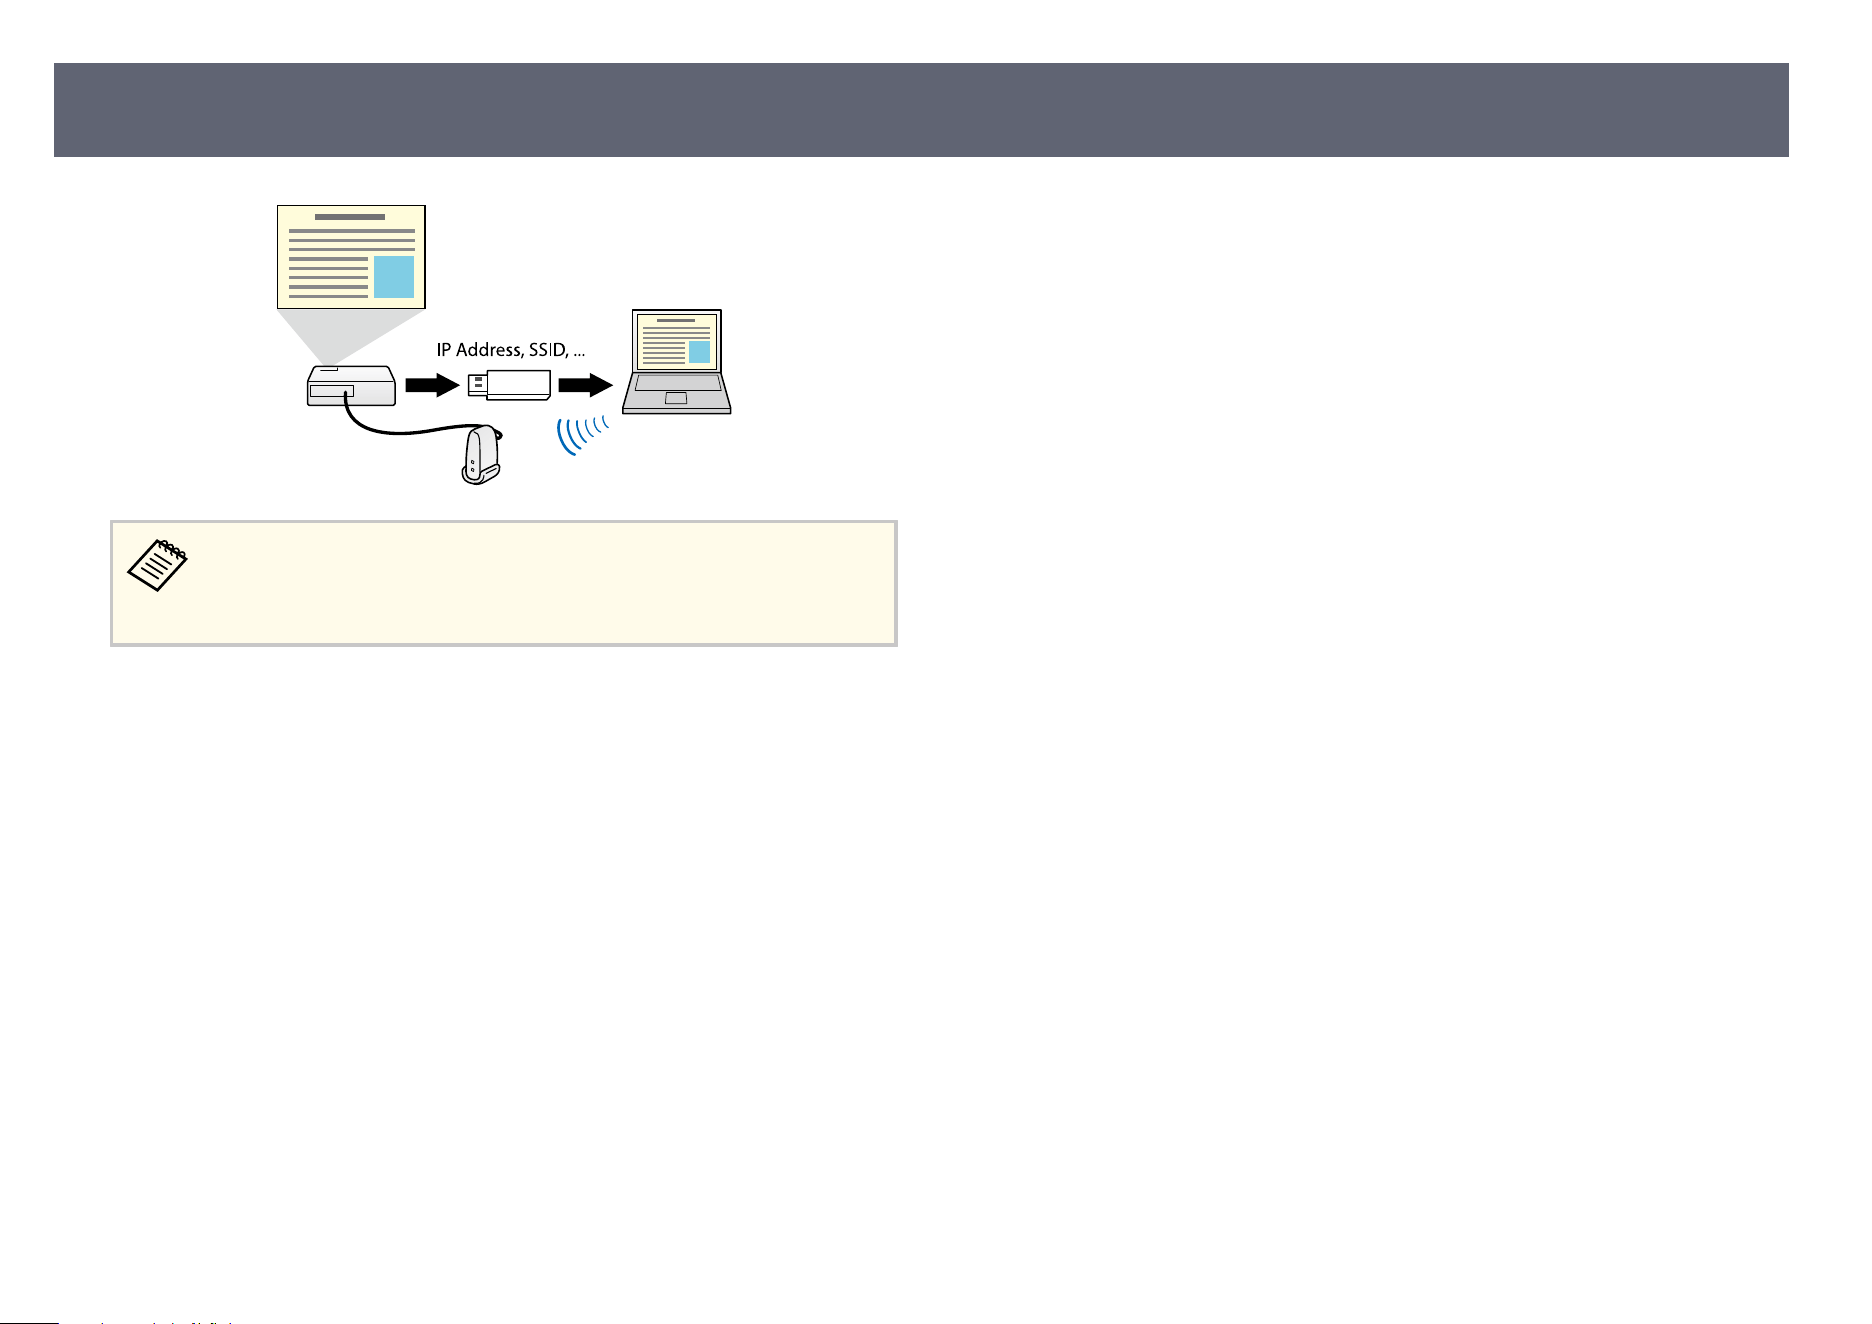
Easy Network Projection Using a USB Flash Drive
(Windows Only)
You can use a commercially available USB ash drive as a USB key to transfer
the projector's network information to a Windows computer. Creating the USB
key allows you to quickly project images from the network projector.
When you change the presenter, you can switch the projected screen by
inserting the USB key to a new presenter's computer.
Epson iProjection Features
10

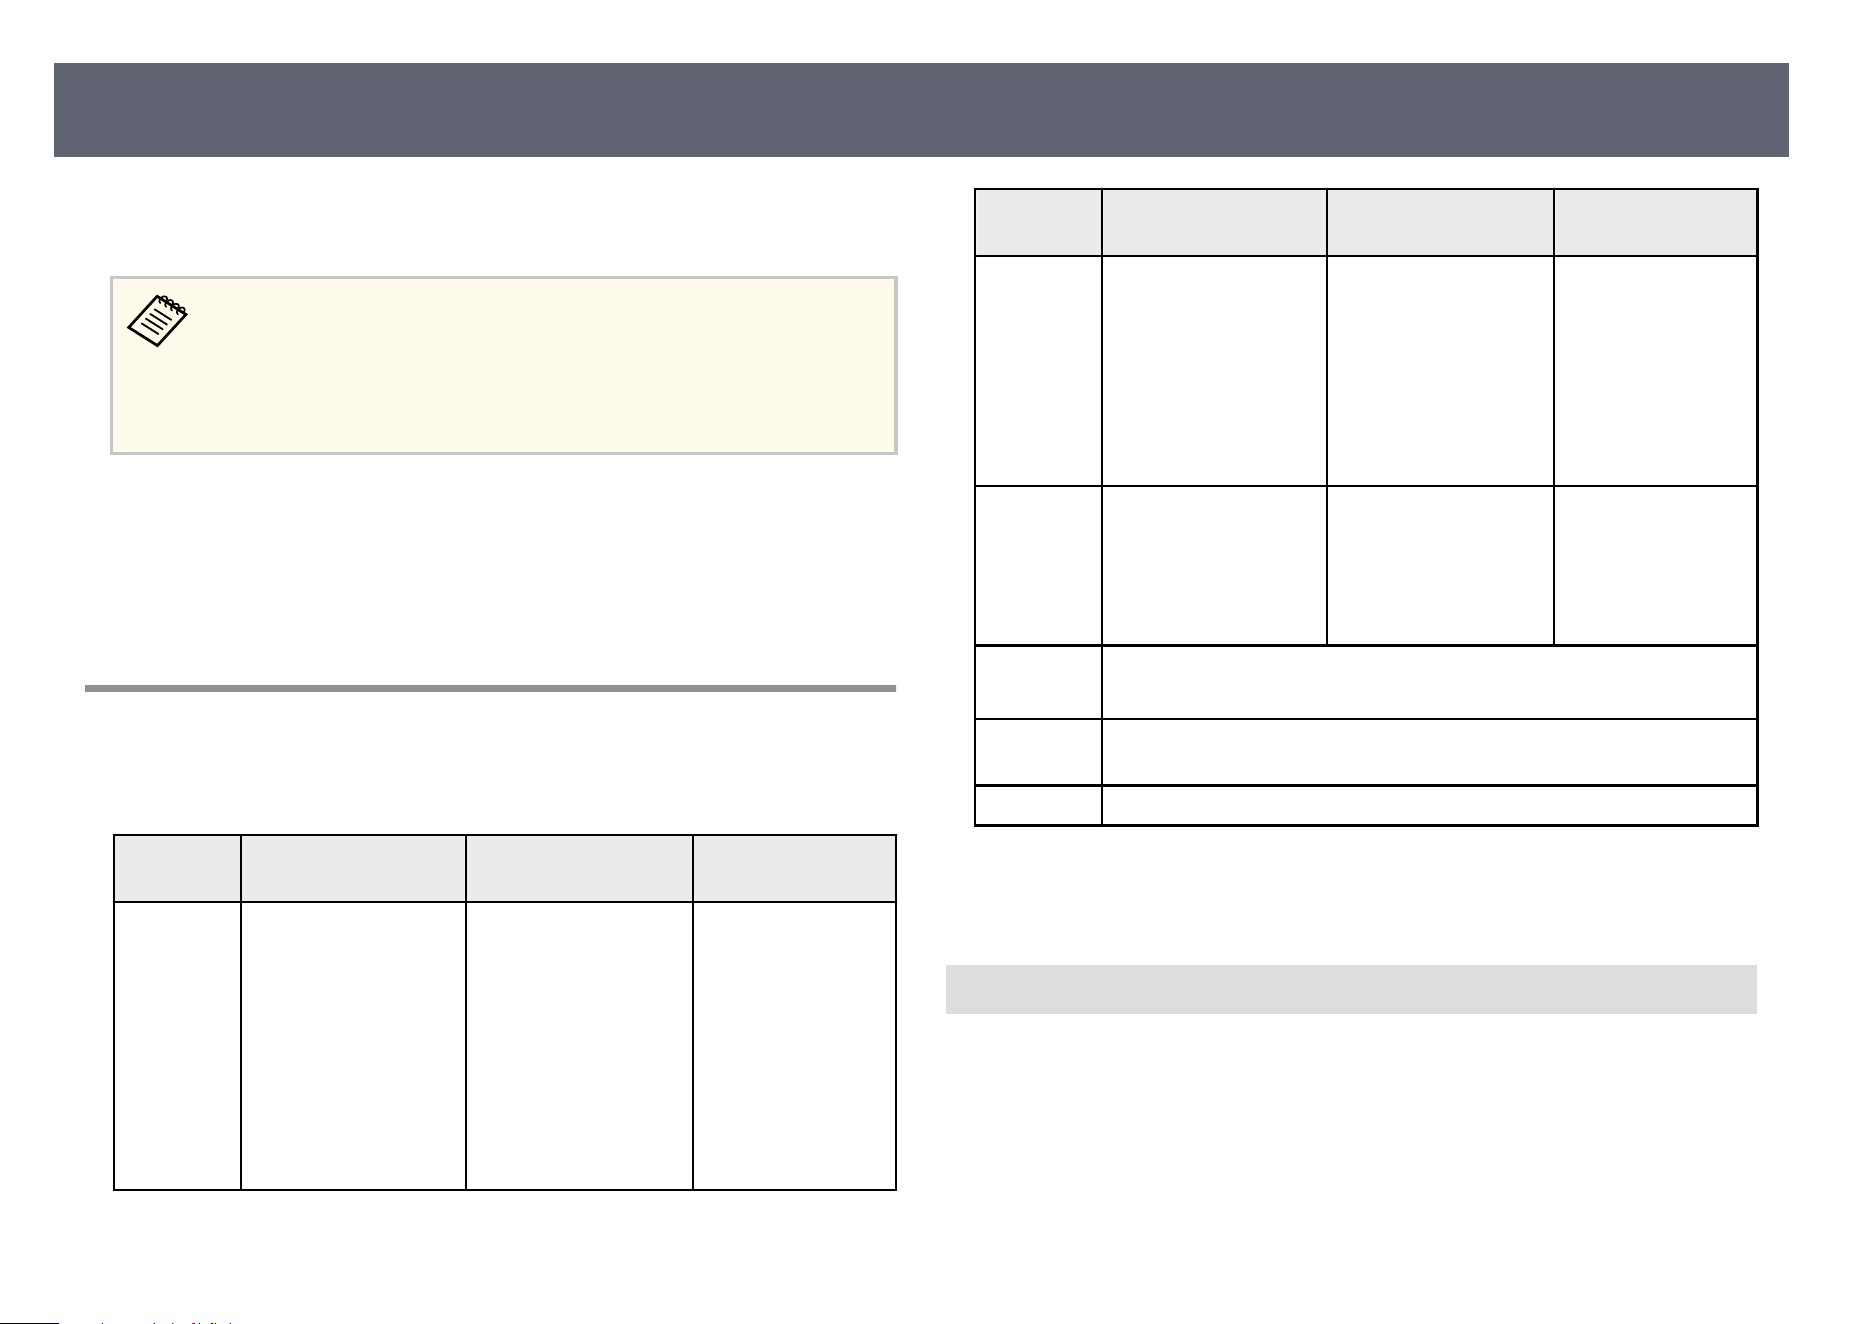
Install the Epson iProjection so
ware by downloading it from the Epson Web
site.
•
If t
he language selected for the installation diers from the language of
the operating system being used, the screens may not display correctly.
•
If any earlier version of this soware or EasyMP Multi PC Projection is
installed on your computer, uninstall it rst and then install the Epson
iProjection soware.
g
Related Links
•
"E
pson iProjection System Requirements" p.13
•
"Epson iProjection Editions" p.14
•
"Installing the Epson iProjection Soware (Windows)" p.14
•
"Installing the Epson iProjection Soware (Mac)" p.14
Epson iProjection System Requirements
Your computer must meet the following system requirements to use the Epson
iPr
ojection soware.
Requireme
nt
W
indows Windows (Arm) Mac
Operating
syst
em
Windows 10
•
Windows 10 Home
(32- and 64-bit)
•
Windows 10 Pro
(32- and 64-bit)
•
Windows 10
Enterprise (32- and
64-bit)
Windows 11
•
Windows 11 Home
(64-bit)
•
Windows 11 Pro
(64-bit)
•
Windows 11
Enterprise (64-bit)
macOS
•
macOS 13
(Ventura)
•
macOS 14
(Sonoma)
•
macOS 15
(Sequoia)
•
macOS 26
(Tahoe)
Requireme
nt
W
indows Windows (Arm) Mac
Windows 11
•
Win
dows 11 Home
(64-bit)
•
Windows 11 Pro
(64-bit)
•
Windows 11
Enterprise (64-bit)
CPU 8th Generation Intel
Ce
leron or faster
(8th Generation Intel
Core i5 or faster
recommended)
Snapdragon X or faster
(Snapdragon X Plus or
faster recommended)
•
8th Generation
Intel Core i5 or
faster
•
Apple M1 or later
(Apple Silicon)
Memory 4 GB or more
(8 GB or m
ore recommended)
Hard disk
sp
ace
50 MB or more
Display Resolution between 800×600 (SVGA) and 1920×1200 (WUXGA)
g
Relat
ed Links
•
"R
equirements for Extended Display" p.13
Requirements for Extended Display
Usin
g the extended display function of your operating system, you can view a
dierent screen on your computer display than the screen you project from your
projector.
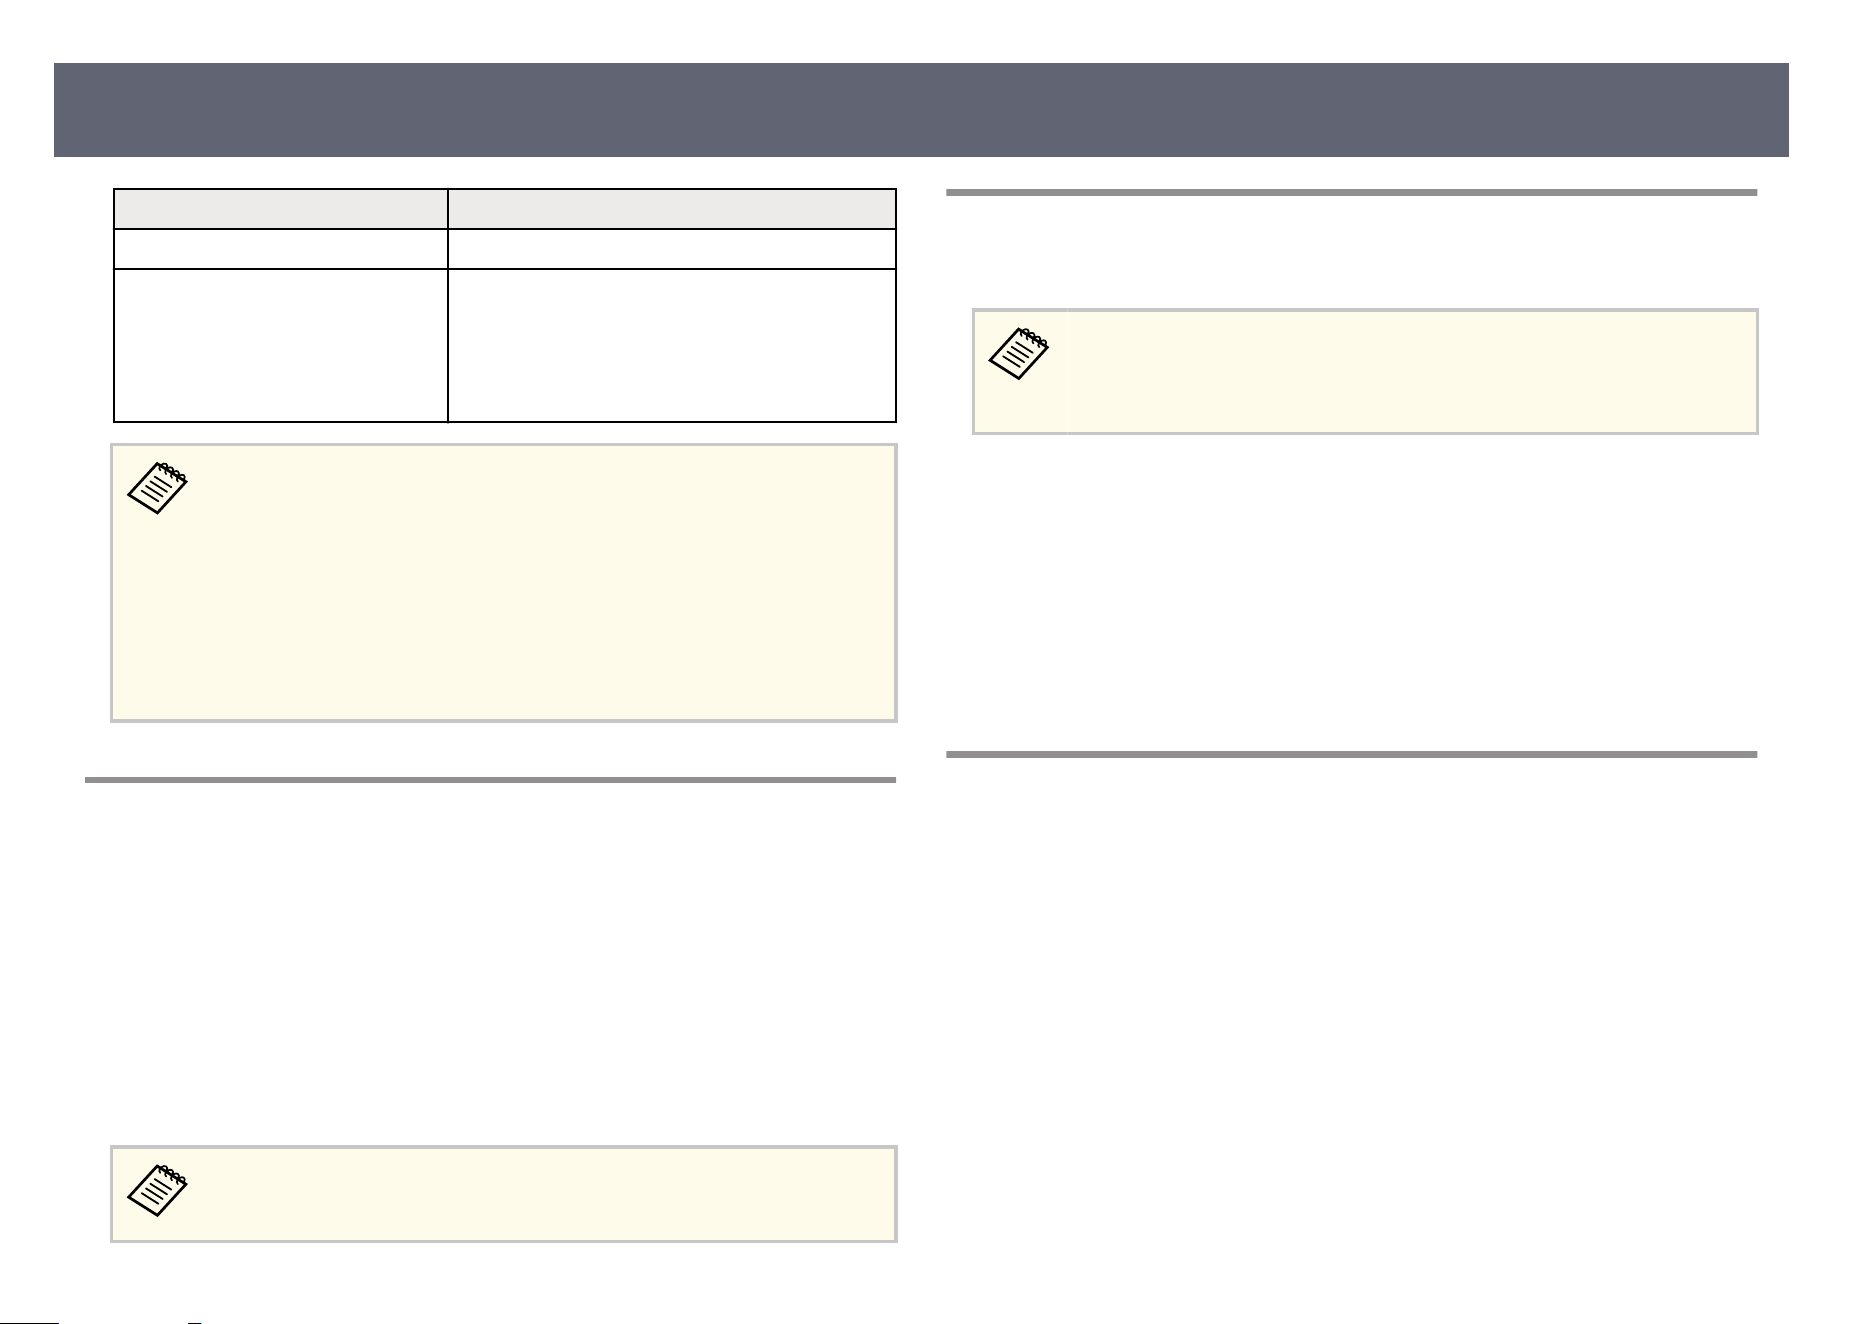
To use the extended display function, your computer must meet the following
system requirements.
Installing the Software
13
Requirement Description
Operating system Windows 10, version 2004 or later
Supported display resolution (for
both the computer display and
projector)
•
1920 × 1200
•
1920 × 1080
•
1280 × 800
•
1024 × 768
•
Wh
en using interactive projector features over a network, select a
primary and an extended display.
•
To use interactive projector features over a network as the extended
display, make sure of the following:
•
Use the Windows Control Panel > Tablet PC Settings to set up the
pen and display for projection
•
Select the same resolution for the primary display and the extended
display
Epson iProjection Editions
You can choose the so
ware edition to install that suits your role in the
projection environment.
•
Standard Edition
You can use all functions of the Epson iProjection soware.
You can control the projected image and also function as a moderator.
•
Participant Edition
You can connect to the projector only as a participant of the moderator
function and cannot control the projected images.
If you want to switch editions, uninstall and reinstall this so
ware.
Installing the Epson iProjection Software (Windows)
Install the Epson iProjection so
ware on your computer.
•
Yo
u need administrator authority to install the soware.
•
You need to install Microso .NET Framework 4.6.2 before installing
the Epson iProjection soware.
a
Turn on your computer.
b
Make sure all running applications are closed.
c
Download the s
o
ware from the Epson Web site.
d
Follow the on-screen instructions to install.
Installing the Epson iP
rojection Software (Mac)
Install the Epson iProjection so
ware on your computer.
a
Turn on your computer.
b
Make sure all running applications are closed.
c
Download the s
o
ware from the Epson Web site.
d
Follow the on-screen instructions to install.
Installing the Software
14
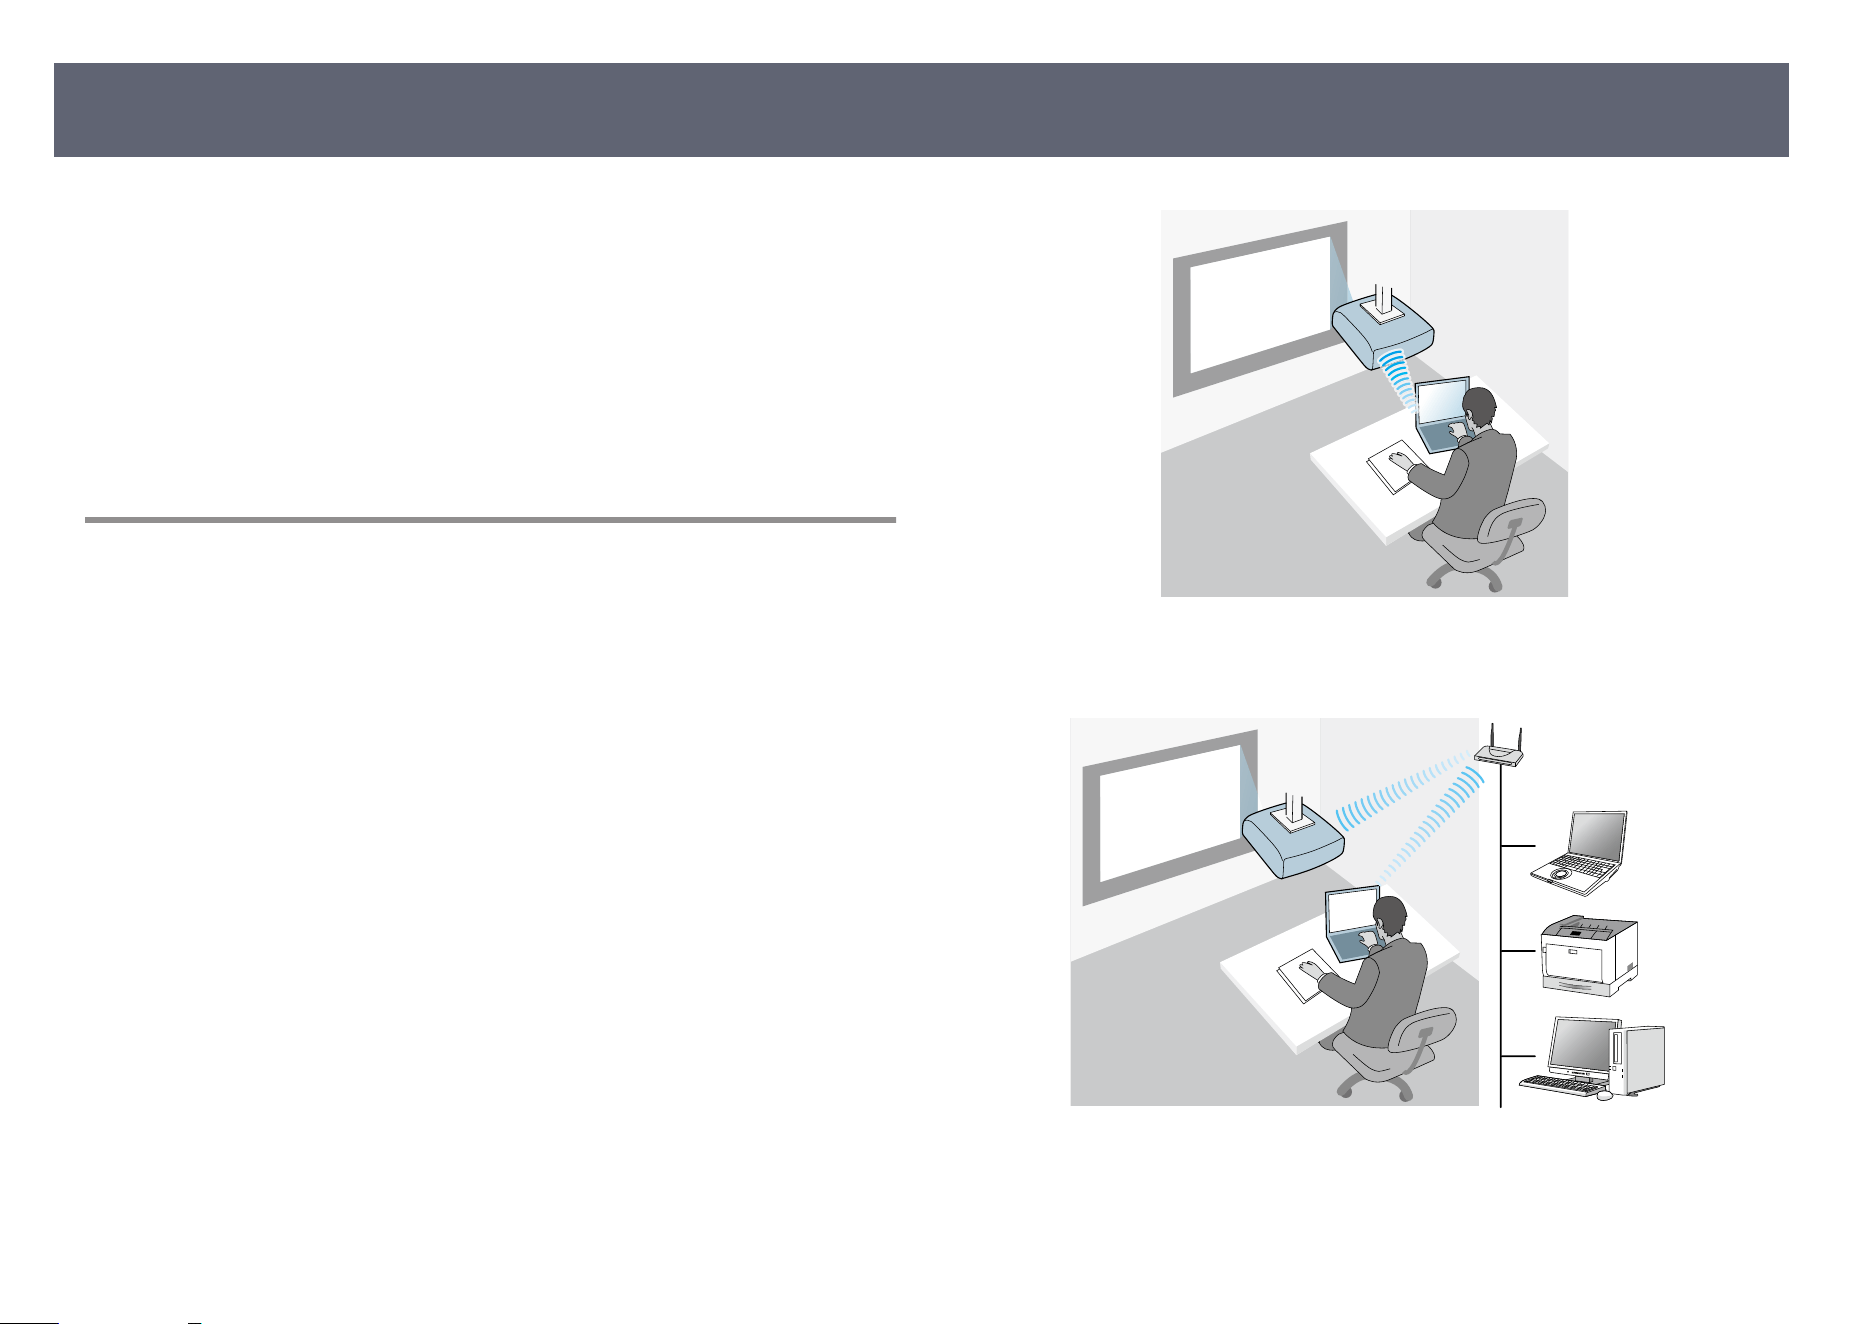
Follow these instructions to select a connection method between a computer
and t
he projector, and then set up the projector.
g
Related Links
•
"Connection Methods for Various Network Environments" p.15
•
"Recommended Wireless Environment for Multi PC Projection" p.16
•
"Setting Up a Projector to Connect in Quick Connection Mode" p.16
•
"Setting Up a Projector when Connecting by Wireless LAN" p.17
•
"Setting Up a Projector when Connecting by Wired LAN" p.18
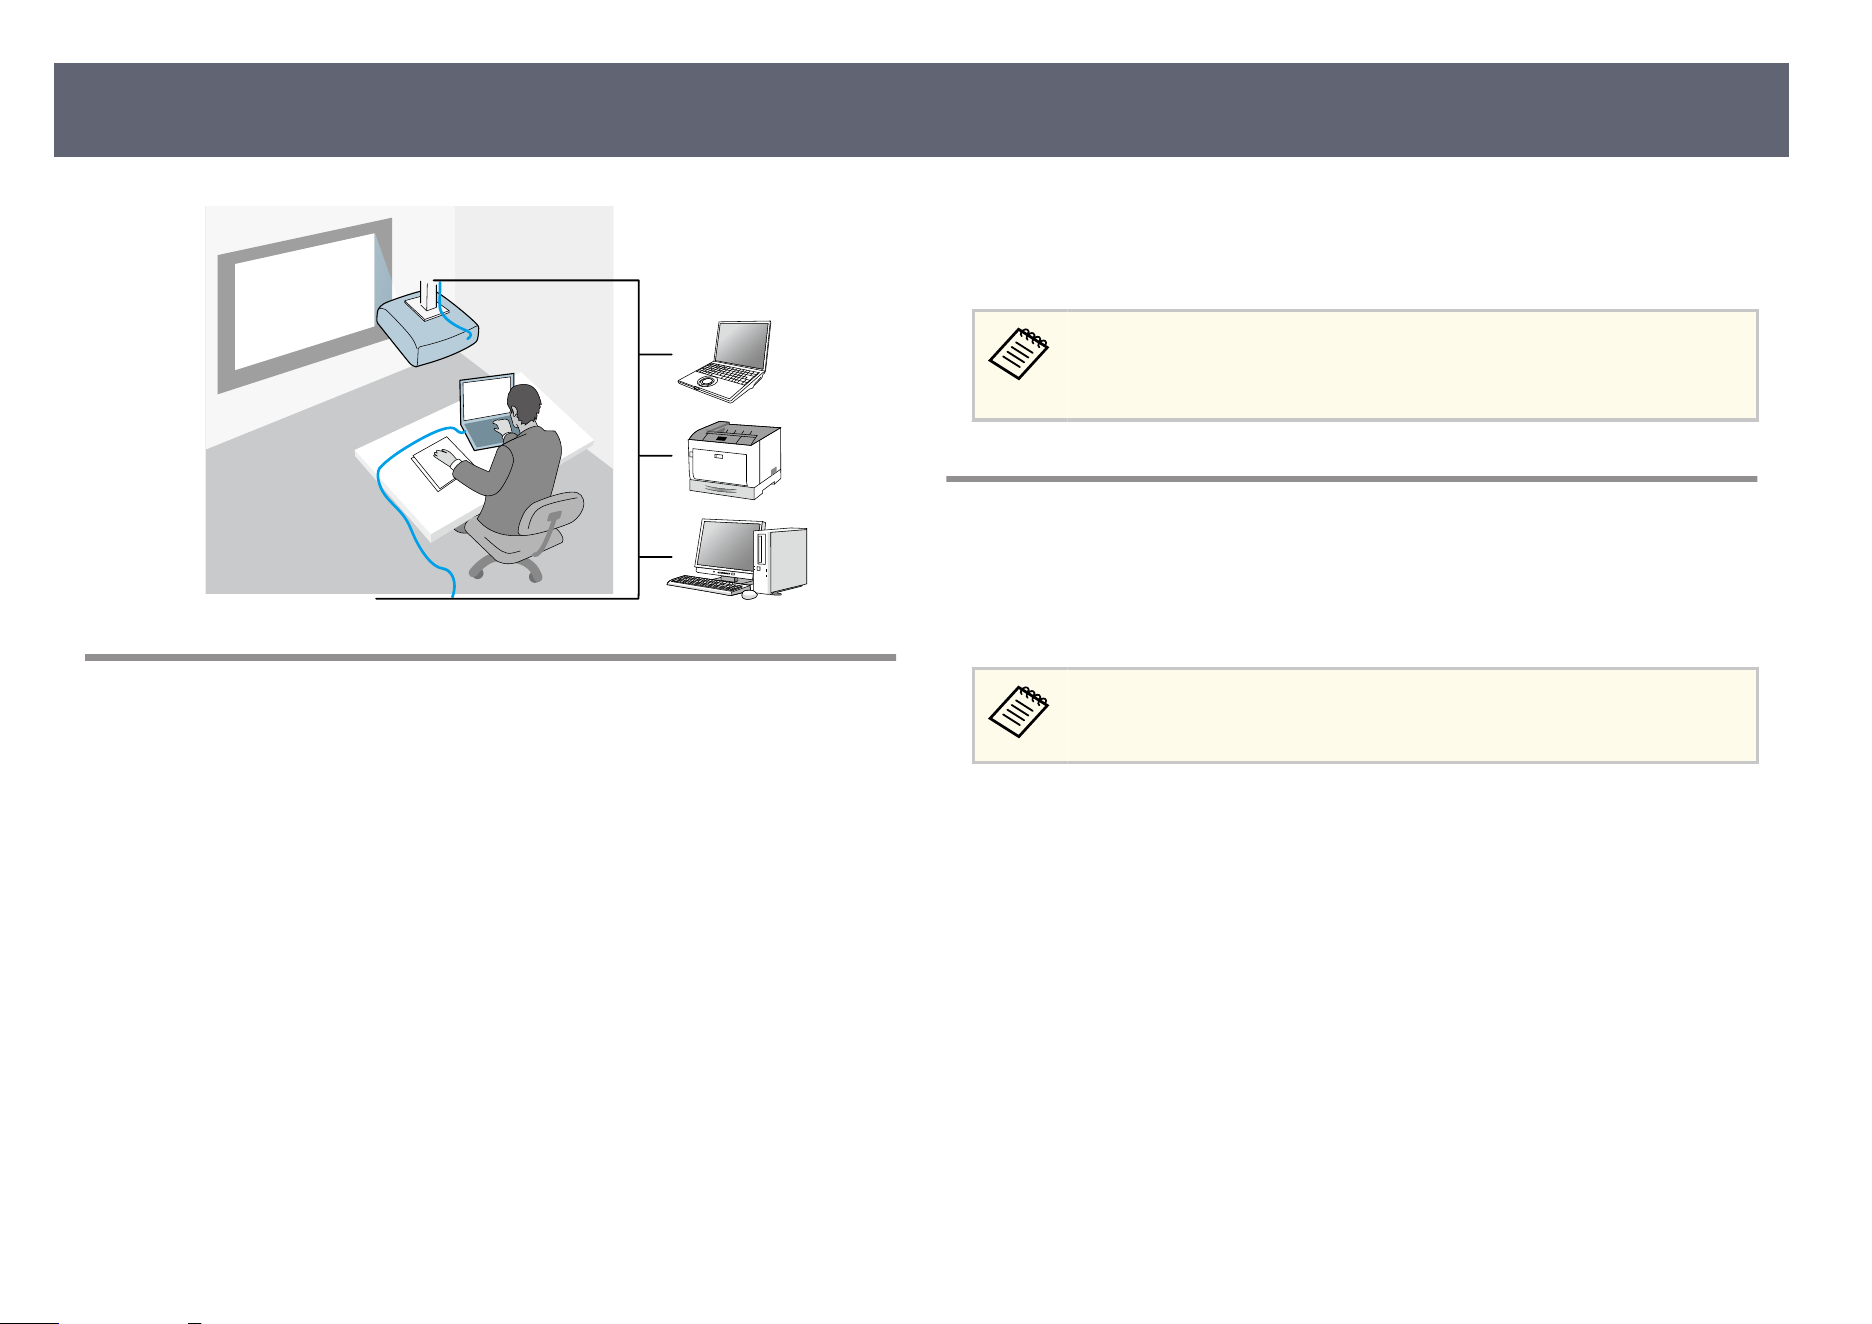
Connection Methods for Various Network
Environments
You can choose a connection mode to suit your network environment.
Check how the projector is connected to the network system (wireless or wired)
and the communication path from the computer to the projector.
Depending on your projector, some connection methods may not be available.
See your projector User's Guide for more details.
•
To connect the projector to the computer directly using wireless
communication: Use Quick Connection Mode.
•
To connect the projector to the computer using a wireless network system:
Use Advanced Connection Mode.
•
T
o co
nnect the projector to the computer using a wired network system: Use
Advanced Connection Mode.
Selecting Projector Network Settings
15
Recommended Wireless Environment for Multi PC
P
r
ojection
When you connect multiple devices to a projector using the Quick connection
m
o
de, we recommend limiting the number of devices to six or less to maintain
the projection performance. e number of devices that can connect to a
projector at the same time diers depending on the wireless communication
environment.
When you connect a projector to a wireless LAN and connect multiple
devices wirelessly using the Advanced connection mode, note the following
recommendations.
•
Set up multiple access points so that one of the access points can connect up
to 10 or 20 devices. See the access point manual for more information on the
maximum number of devices that can be connected.
•
When you use multiple access points, assign a dierent channel to each access
point, and use dierent access points for the projector connection and the
computer connection.
•
Use a wireless LAN controller, if possible, to enhance the connection stability.
•
Us
e an access point that supports 802.11n.
Contact your network administrator for help in setting up the wireless
environment.
If your projector supports a wired LAN connection, we recommend
usin
g a wired LAN connection when you connect multiple devices to the
projector.
Setting Up a Projector to Connect in Quick Connection
M
o
de
To connect a computer directly to the projector using wireless communication,
y
o
u need to select network settings on the computer and the projector.
e necessary settings vary depending on your projector. See your
p
rojector User's Guide for instructions.
a
Select the necessary settings to connect your computer to a wireless LAN.
S
e
e the documentation supplied with your computer for more details.
b
Install the wireless LAN unit in the projector, if necessary. See your
pr
ojector User's Guide for instructions.
c
Turn on the projector.
d
Press the [Menu] button on the remote control or the control panel, and
s
e
lect the Network menu.
e
Turn on wireless LAN support.
Selecting Projector Network Settings
16
f
Select one of these settings to connect the projector to the computer
dire
ctly using wireless communication. e necessary settings vary
depending on your projector.
•
Turn on the Simple AP setting.
•
Select Quick for Connection Mode.
g
Select other options as necessary for your network. See your projector
Us
er's Guide for instructions.
h
Select security settings. Check with your network administrator for more
info
rmation on choosing the correct settings.
i
When you have nis
hed selecting settings, save your settings and exit the
menus.
g
Related Links
•
"Connecting the Projector and a Computer Directly Using Wireless
Communication" p.21
Setting Up a Projector when Connecting by Wireless
LAN
To connect a computer to the projector over a wireless LAN, you need to select
net
work settings on the computer and the projector.
e necessary settings vary depending on your projector. See your
p
rojector User's Guide for instructions.
a
Contact your network administrator and write down the settings for the
access p
oint, such as the SSID and security settings.
b
Connect the computer to the network.
To set up a network connection, if necessary, see the documentation
su
pplied with your computer or network adapter.
c
If the projector does not have a built-in wireless LAN, install the
wir
eless LAN unit on the projector. See your projector User's Guide for
instructions.
d
Turn on the projector.
e
Press the [Menu] button on the remote control or the control panel, and
s
e
lect the Network menu.
f
Turn on wireless LAN support.
g
Select one of these settings to connect the projector to a wireless LAN. e
n
e
cessary settings vary depending on your projector.
•
Turn o the Simple AP setting.
•
Select Advanced for Connection Mode.
h
Select other options as necessary for your network. See your projector
Us
er's Guide for instructions.
i
Select security settings as necessary for your network. Check with your
net
work administrator for more information on choosing the correct
settings.
j
When you have nis
hed selecting settings, save your settings and exit the
menus.
Selecting Projector Network Settings
17
•
If n
o Web Control Password has been set, a screen prompting you to
set a password is displayed before you can save settings. Follow the
on-screen instructions to set the password.
g
Related Links
•
"C
onnecting to the Projector from the Soware over a Network System" p.24
Setting Up a Projector when Connecting by Wired LAN
To connect a computer to the projector using a wired LAN, you need to select
net
work settings on the computer and the projector.
e necessary settings vary depending on your projector. See your
projector User's Guide for instructions.
a
Contact your network administrator and check that DHCP is available
un
der t
he current network environment.
If DHCP is not available, write down the following values that are
avail
able for your projector.
•
IP Address
•
Subnet Mask
•
Gateway Address
b
Connect the computer to the network.
To set up a network connection, if necessary, see the documentation
supplied with your computer or network adapter.
c
Connect a LAN cable to the projector.
d
Turn on the projector.
e
Press the [Menu] button on the remote control or the control panel, and
s
e
lect the Network menu.
f
Select these IP settings for your wired LAN as necessary.
•
DH
CP is available: Set DHCP to On.
•
DHCP is not available: Set DHCP to O and enter the projector's IP
Address, Subnet Mask, and Gateway Address values as necessary.
g
When you have nis
hed selecting settings, save your settings and exit the
menus.
•
If no Web Control Password has been set, a screen prompting you to
set a password is displayed before you can save settings. Follow the
on-screen instructions to set the password.
g
Related Links
•
"C
onnecting to the Projector from the Soware over a Network System" p.24
Selecting Projector Network Settings
18

Connecting to the Projector and Projecting Images
Fo
llow these instructions to connect the computer and the projector over a network, and to project images from your computer's screen using the projector.
Make sure you have already set up the soware and selected a connection mode for the projector.
g
Related Links
•
"Connection Methods" p.20
•
"Selecting the Projector Search Method" p.27
•
"Controlling the Projected Display" p.33
•
"Disconnecting" p.37
You can select a suitable method to connect the computer and the projector over
a net
work depending on your meeting style.
g
Related Links
•
"Connection Methods for Various Meeting Styles" p.20
•
"Connecting the Projector and a Computer Directly Using Wireless
Communication" p.21
•
"Connecting to the Projector from the Soware over a Network System" p.24
Connection Methods for Various Meeting Styles
You can choose a connection method to suit the style of your meeting.
Decide how you want to hold your meeting. Depending on the connection
method you selected, the connection procedure diers.
Depending on your projector, some connection methods may not be
avail
able. See your projector User's Guide for more details.
•
All users can control the projected display and become presenters. (Holding
discussions and interacting with other users in a business environment.)
•
Onl
y one user is the moderator and has full control over the meeting using
the moderator function. (Holding a class or lesson using the participants'
computer screens in an educational environment.)
Connection Methods
20
To start a meeting using the moderator function, one user must
conn
ect to the projector as the moderator and the other users must
connect to the projector as participants.
g
Related Links
•
"C
hanging the Moderator" p.45
•
"Connecting to the Projector from the Soware over a Network System" p.24
Connecting the Projector and a Computer Directly
Using Wireless Communication
When your projector is set up as indicated below, you can connect the projector
and a co
mputer directly using wireless communication to project the computer's
screen.
•
e wir
eless LAN unit is installed in the projector or the projector has
built-in wireless LAN modules.
•
You select one of these settings to connect the projector to the
computer directly using wireless communication. e necessary settings vary
depending on your projector.
•
Turn on the Simple AP setting.
•
Select Quick for Connection Mode.
•
Wh
en you use the Participant Edition of the soware, you must
connect the projector and a computer over a network system.
•
When you connect the projector and a computer directly using wireless
communication, the connection between the computer and an access
point is disconnected.
•
Make sure you turn on your computer's wireless communication
function.
a
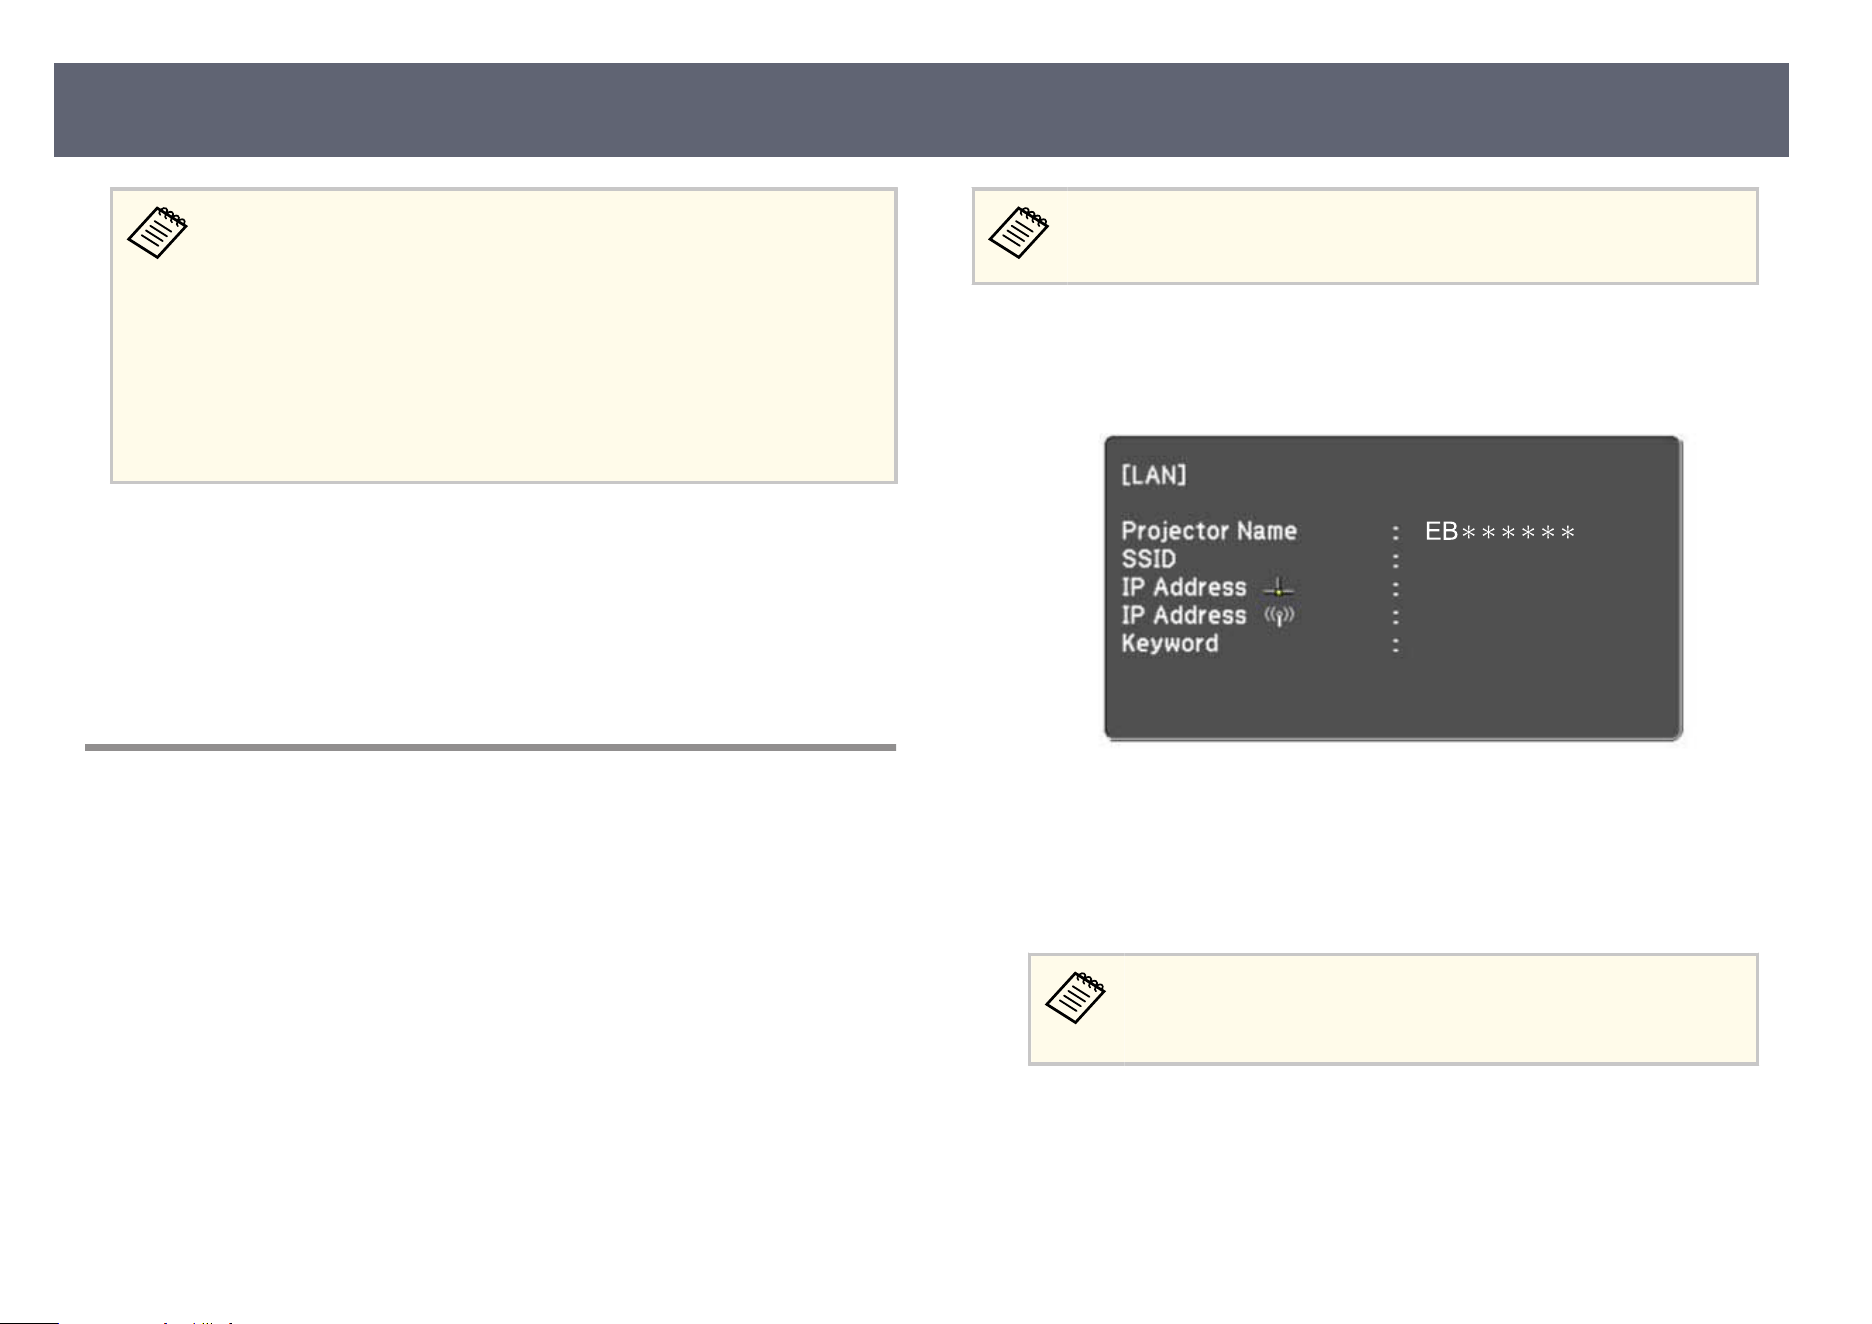
Press the [LAN] button or [Source Search] button on the remote control
to sw
itch the input source to LAN.
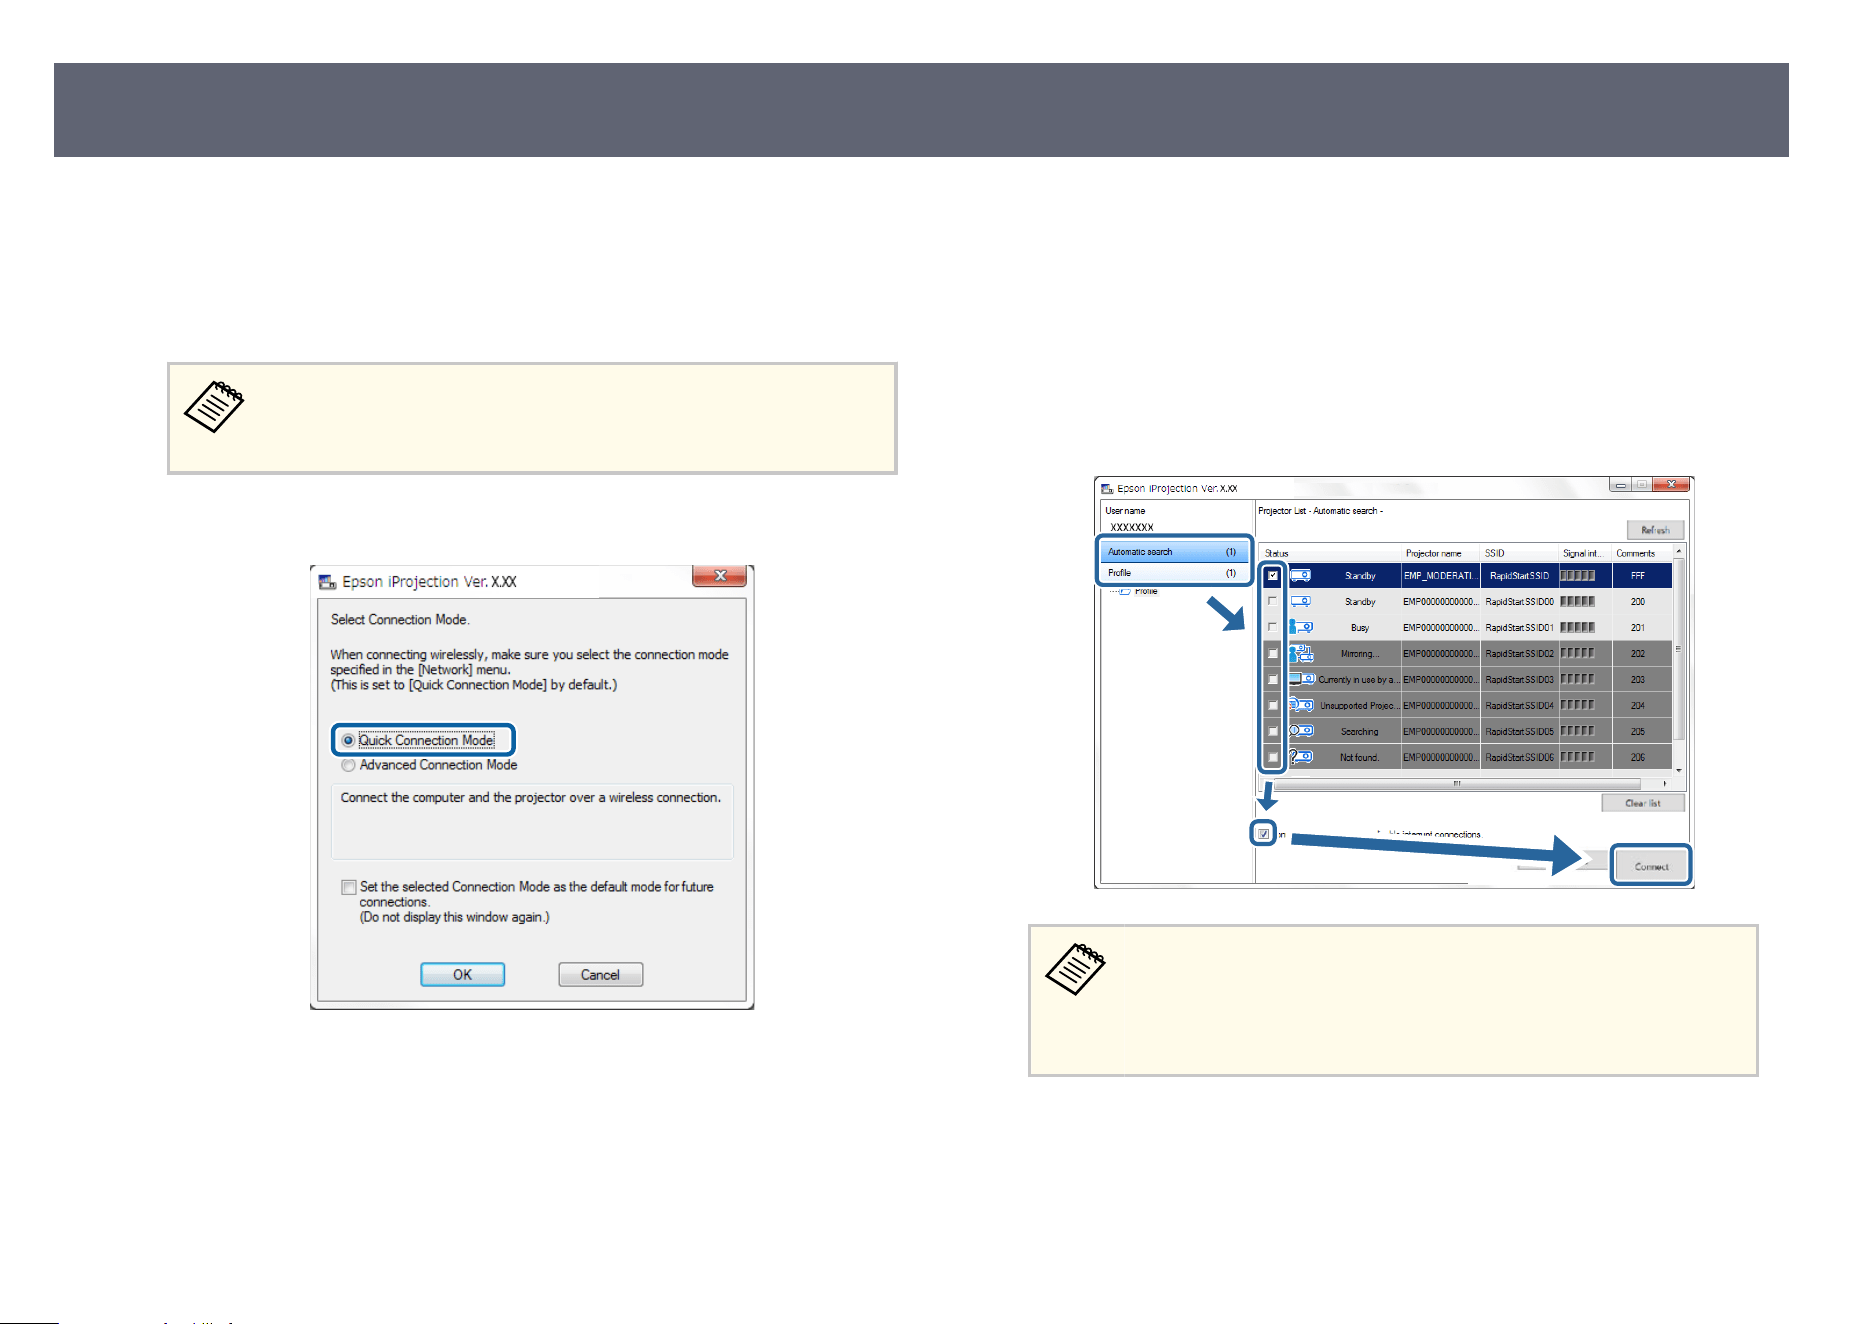
You see the network information screen.
Connection Methods
21
b
Start the Epson iProjection so
ware.
•
Windows: Select Start, EPSON Projector, and then select Epson
iProjection.
•
Mac: Double-click Epson iProjection from the Applications folder.
You can also create a shortcut and use it to start the Epson
iPr
ojection soware and to automatically search for saved
projectors.
c
Select Q
uick Connection Mode, and then click OK.
d
Search for the projector using one of the following methods.
•
Au
tomatic Search: Searches for the projector automatically.
•
Prole: Searches for the projector based on a previously saved prole.
e projector search results are displayed.
e
Select the projector you want to connect to from the P
r
ojector List, and
then select one of the following options.
•
You want all users to be able to become participants in the moderator
function: Make sure Connect as a Moderator, or disable interrupt
connections is not selected, and then click Connect.
•
You are the moderator user and you do not want other users to be
able to interrupt the moderator presentation: Select Connect as a
Moderator, or disable interrupt connections, and then click Connect.
•
e mo
derator function is available only for supported models
and is available only on the Standard Edition of the soware.
•
When one user connects as a moderator, the moderator function
turns on.
When the P
rojector Keyword is set to On or the Moderator Password is
s
et in the projector settings, the keyword entry screen is displayed.
f
Enter the Projector Keyword displayed on a screen, and then press OK
.
Connection Methods
22
g
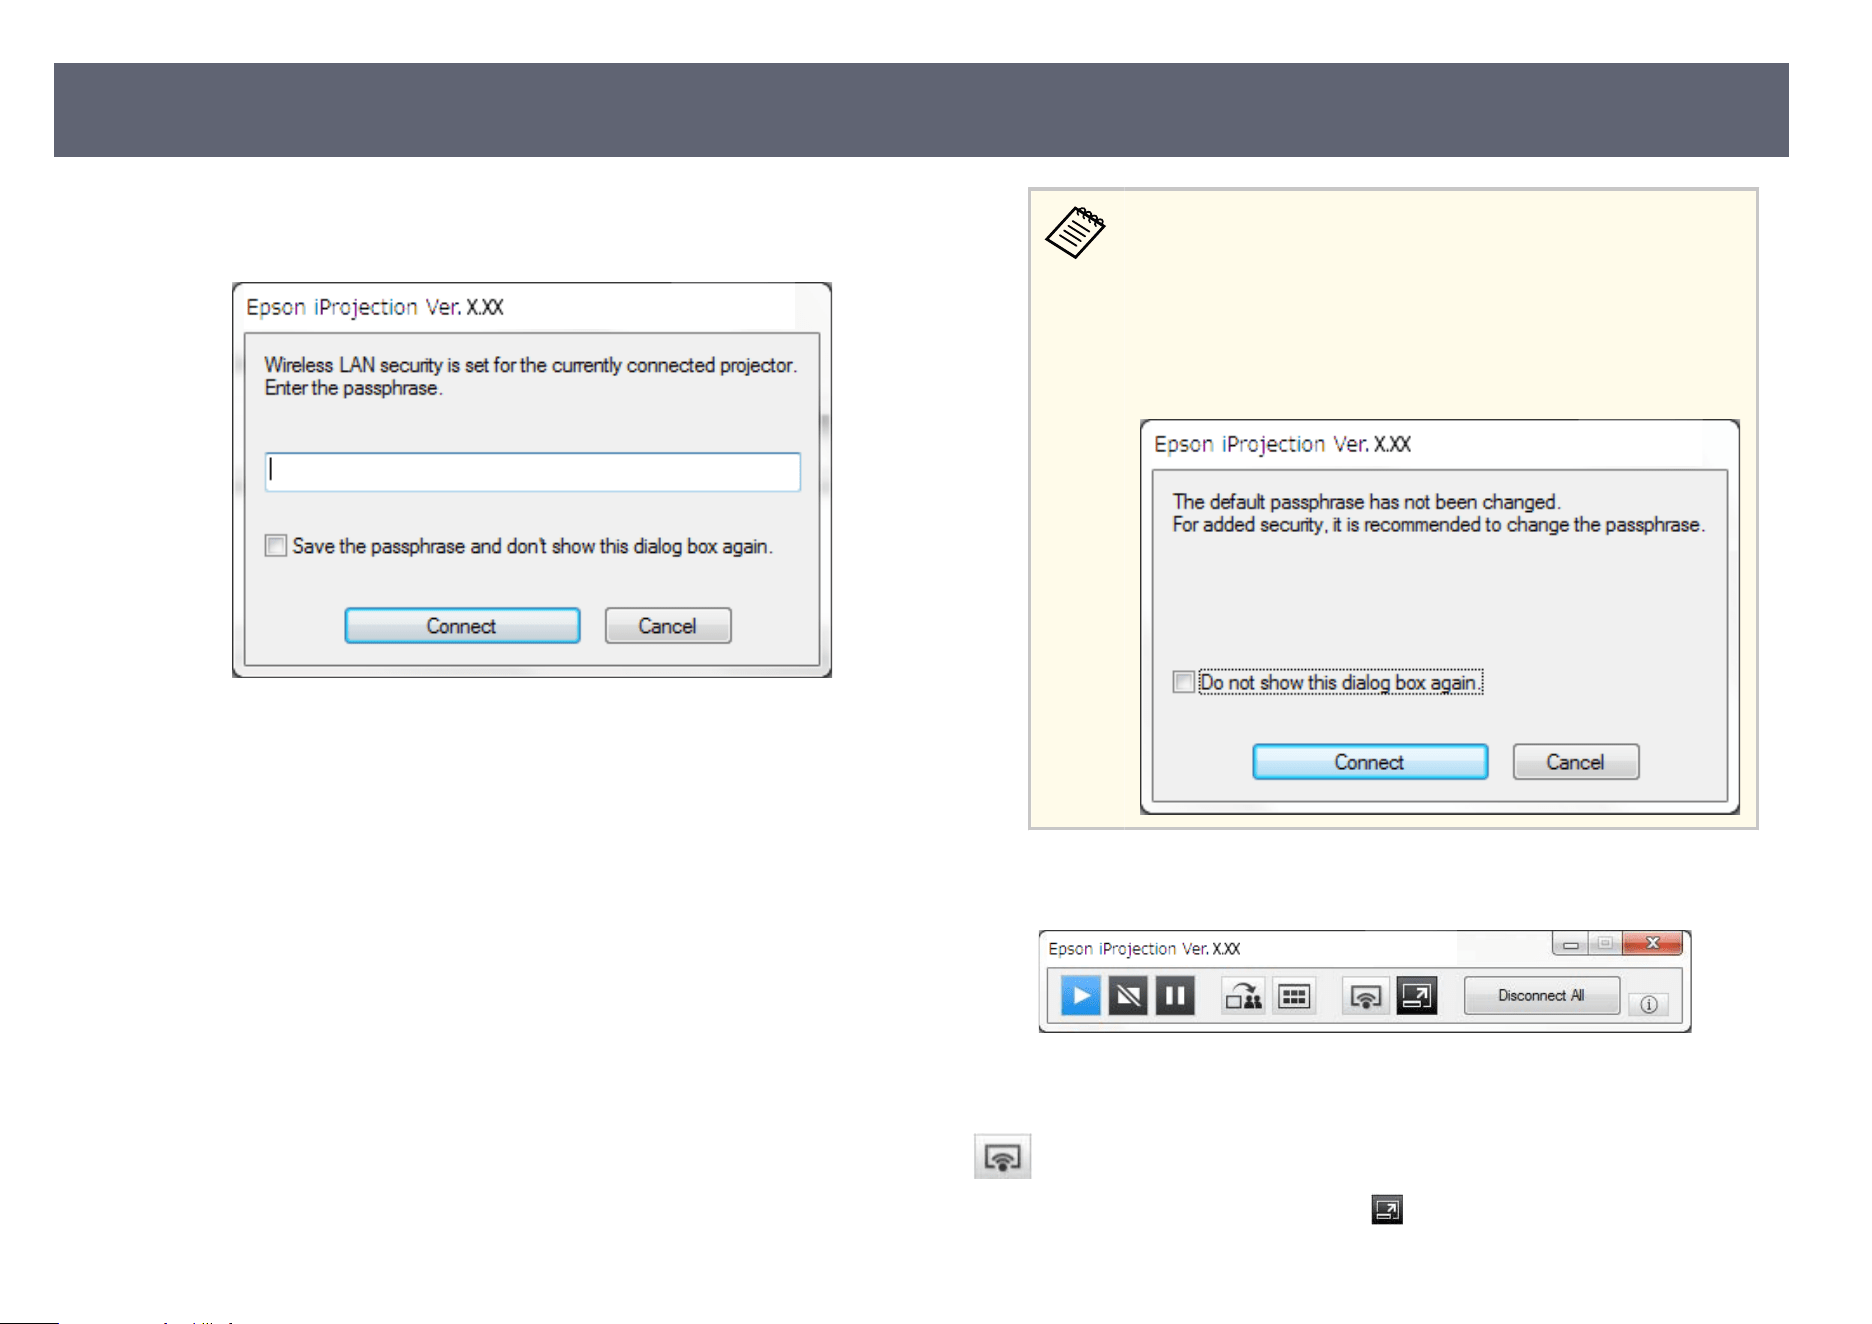
When the following dialog box is displayed, enter the passphrase set on
th
e projector, and then click Connect.
If you select Sav
e the passphrase and don't show this dialog
box again, the projector's SSID and passphrase are saved on the
computer and this dialog box is not displayed the next time you
connect. You do not have to enter the passphrase again.
If the projector's passphrase has not been changed from the default,
the following dialog box is displayed. Change the passphrase from
the projector's Network menu.
When a connection is established, the computer screen is projected and the
fo
llowing toolbar is displayed on the computer screen.
e computer screen for the user who connects rst is projected in full screen
m
ode. Users who connect later can project their own screen by clicking the
button on the toolbar or can control the projected display from the
pr
ojection control screen by clicking the
button on the toolbar.
Connection Methods
23
•
Wh
en a connection is established, the input source for the projector
automatically switches to the LAN source if no other signal is being
input. If the input source does not automatically switch to the LAN
source, press the [LAN] button or [Source Search] button on the
remote control.
•
e displayed toolbar varies depending on the connection method and
the edition of the soware.
•
When using the moderator function, only the moderator can control
the projected display.
g
Related Links
•
"S
etting Up a Projector to Connect in Quick Connection Mode" p.16
•
"Disconnecting" p.37
•
"Selecting the Projector Search Method" p.27
•
"Controlling the Projected Display" p.33
•
"Searching for Network Projectors Using a Shortcut" p.39
Connecting to the Projector from the Software over a
Network System
When your projector is set up as indicated below, you can connect the projector
and a co
mputer over a network by using the Epson iProjection soware.
•
e wireless LAN unit is installed if a projector does not have built-in
wireless LAN modules (wireless networks only).
•
You select one of these settings to connect the projector to a wireless LAN.
e necessary settings vary depending on your projector.
•
Turn o the Simple AP setting.
•
Select Advanced for Connection Mode.
•
A LAN cable is connected to the projector (wired networks only).
Make sure you also connected a computer to the network.
a
Press the [LAN] button or [Source Search] button on the remote control
to switch the input source to LAN.
You see the network information screen.
b
Start the Epson iProjection s
o
ware.
•
Windows: Select Start, EPSON Projector, and then select Epson
iProjection.
•
Mac: Double-click Epson iProjection from the Applications folder.
You can also create a shortcut and use it to start the Epson
iPr
ojection soware and to automatically search for saved
projectors.
Connection Methods
24
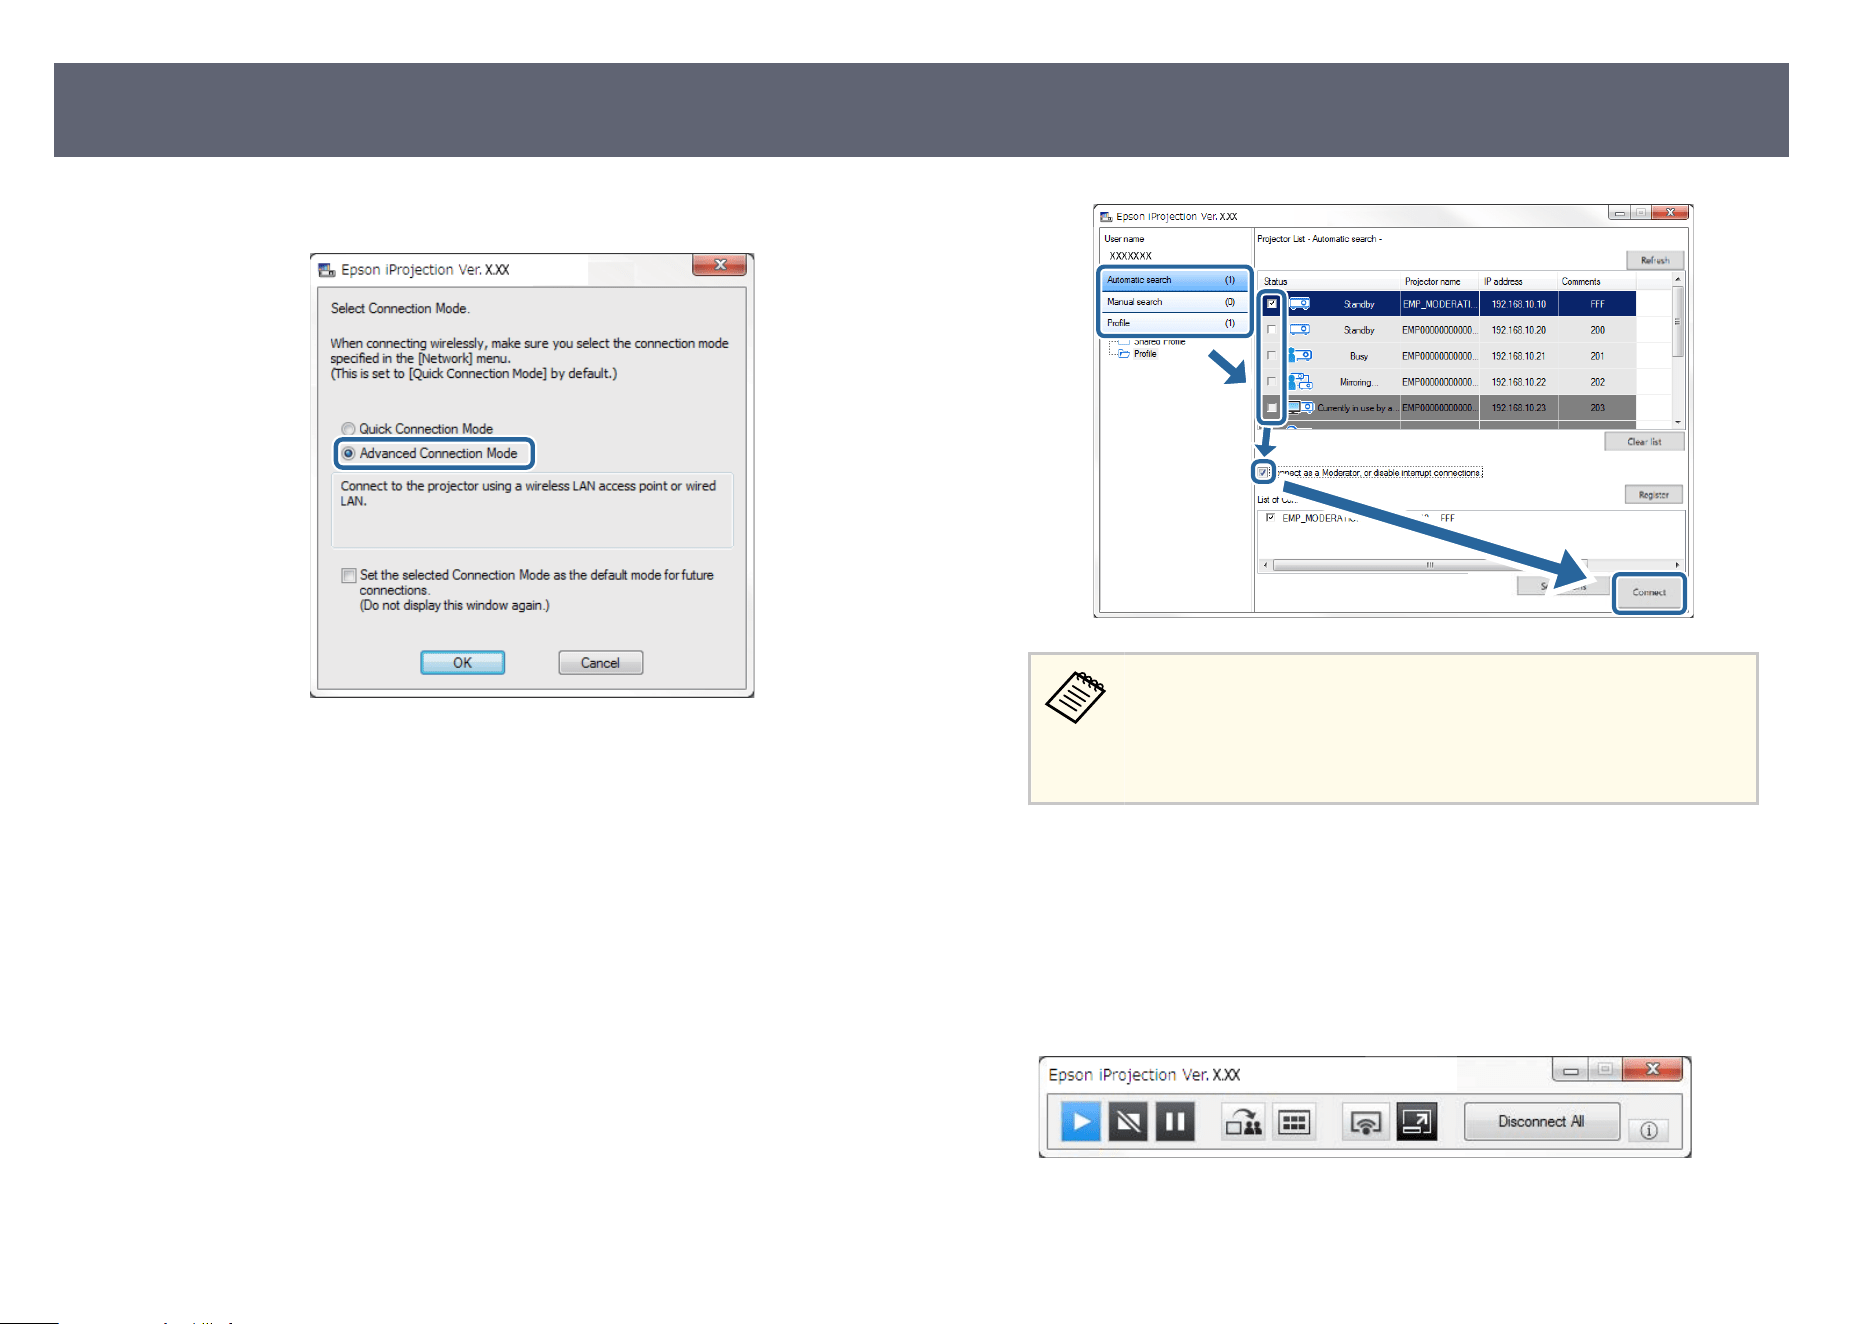
c
Select Advanced Connection Mode, and then click OK.
d
Search for the projector using one of the following methods.
•
A
u
tomatic search: Searches for the projector automatically.
•
Manual search: Searches for the projector based on a specied IP
address or projector name.
•
Prole: Searches for the projector based on a previously saved prole.
e projector search results are displayed.
e
Select the projector you want to connect to from the Pr
ojector List, and
then select one of the following options.
•
You want all users to be able to become participants in the moderator
function: Make sure Connect as a Moderator, or disable interrupt
connections is not selected, and then click Connect.
•
You are the moderator user and you do not want other users to be
able to interrupt the moderator presentation: Select Connect as a
Moderator, or disable interrupt connections, and then click Connect.
•
e mo
derator function is available only for supported models
and is available only on the Standard Edition of the soware.
•
When one user connects as a moderator, the moderator function
turns on.
When the Projector Keyword is set to On or the Moderator Password is
s
et in the projector settings, the keyword entry screen is displayed.
f
Enter the Projector Keyword displayed on a screen, and then press OK
.
When a connection is established, the computer screen is projected and the
following toolbar is displayed on the computer screen.
e computer screen for the user who connects rst is projected in full screen
m
ode. Users who connect later can project their own screen by clicking the
Connection Methods
25
button on the toolbar or can control the projected display from the
pr
ojection control screen by clicking the
button on the toolbar.
•
Wh
en a connection is established, the input source for the projector
automatically switches to the LAN source if no other signal is being
input. If the input source does not automatically switch to the LAN
source, press the [LAN] button or [Source Search] button on the
remote control.
•
e displayed toolbar varies depending on the connection method and
the edition of the soware.
•
When using the moderator function, only the moderator can control
the projected display.
g
Related Links
•
"S
etting Up a Projector when Connecting by Wireless LAN" p.17
•
"Setting Up a Projector when Connecting by Wired LAN" p.18
•
"Disconnecting" p.37
•
"Selecting the Projector Search Method" p.27
•
"Controlling the Projected Display" p.33
•
"Searching for Network Projectors Using a Shortcut" p.39
Connection Methods
26
You can select a suitable method to search for a projector depending on the
stat
us or location of the projector you want to connect to.
g
Related Links
•
"Search Methods" p.27
•
"Searching for Network Projectors Automatically" p.27
•
"Searching for Network Projectors by Specifying an IP Address or Projector
Name" p.28
•
"Searching for Network Projectors Using a Prole" p.28
Search Methods
You can use one of the following methods to search for the projector you want
to connect to. Choose the best method depending on your environment.
•
Searching for Network Projectors Automatically
You can automatically search for available projectors on the network.
Search results dier depending on the connection mode you use.
•
Quick Connection Mode: Displays the SSID for available projectors.
•
Advanced Connection Mode: Displays available projectors on the network.
Searches are performed only on the same subnet. Projectors on dierent
subnets are not displayed in the search results.
•
Searching for Network Projectors by Specifying an IP Address or Projector
Name
If the projector you want to connect to is not found automatically, you can
search for the target projector by specifying the IP address or a projector
name. By specifying the IP address, you can also search for the projector at
remote locations on a dierent subnet.
•
Searching for Network Projectors Using a Prole
You can save network projector information as a prole, and then specify the
prole to search for the same projector instead of providing projector details
each time you search. By creating a group of proles for each place where a
projector is set up and managing them with folders, the target projector can
be found quickly.
g
Related Links
•
"Searching for Network Projectors Automatically"
p.27
•
"Searching for Network Projectors by Specifying an IP Address or Projector
Name" p.28
•
"Searching for Network Projectors Using a Prole" p.28
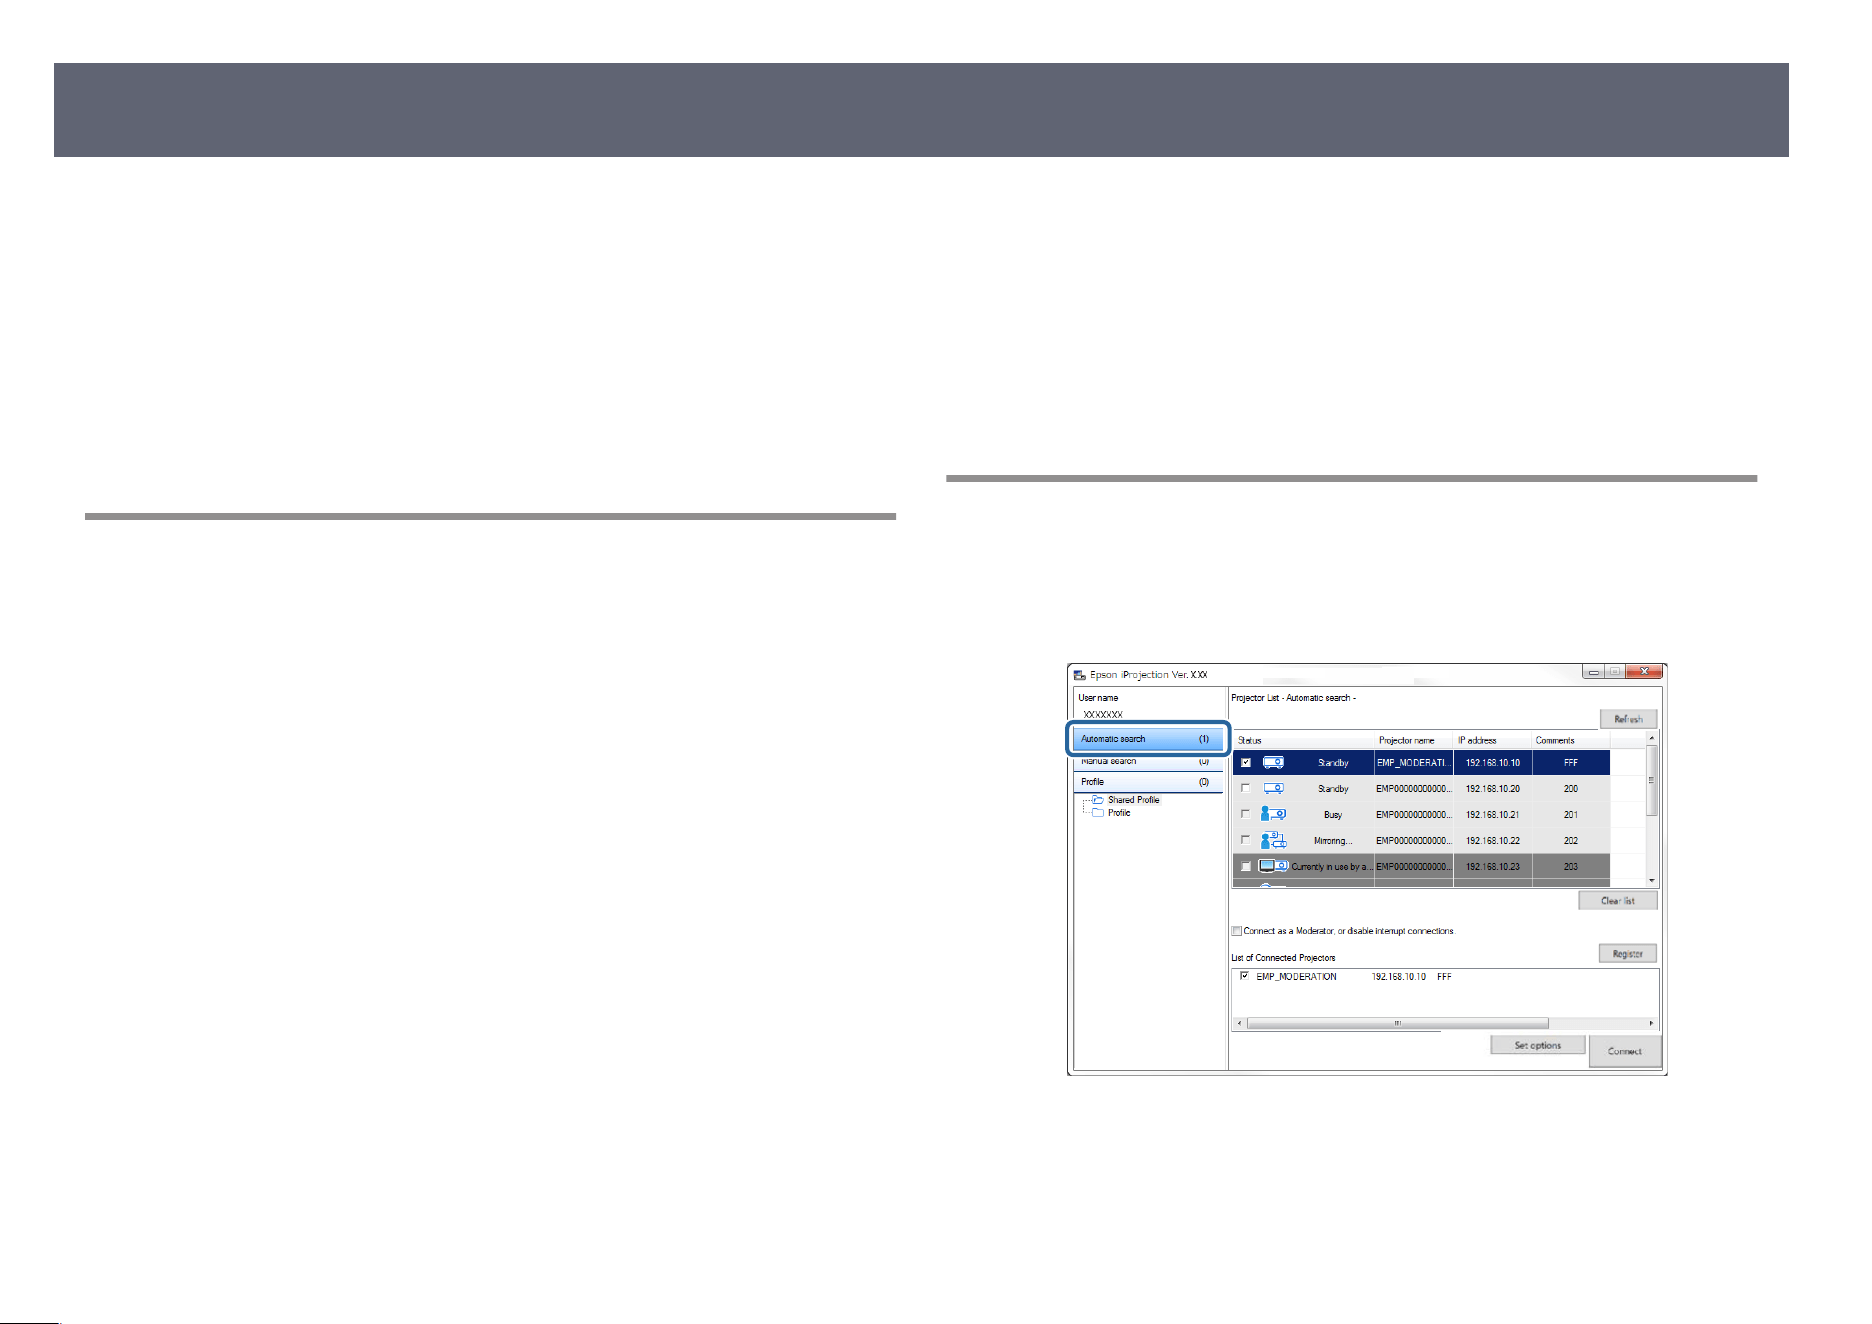
Searching for Network Projectors Automatically
You can automatically search for available projectors on the network, and then
project images by simply selecting the projector.
Click Automatic search on the search screen.
e search results are displayed.
Wh
en you click Refresh, the latest information is displayed.
If you cannot nd any projectors, try one of the other search methods.
Selecting the Projector Search Method
27
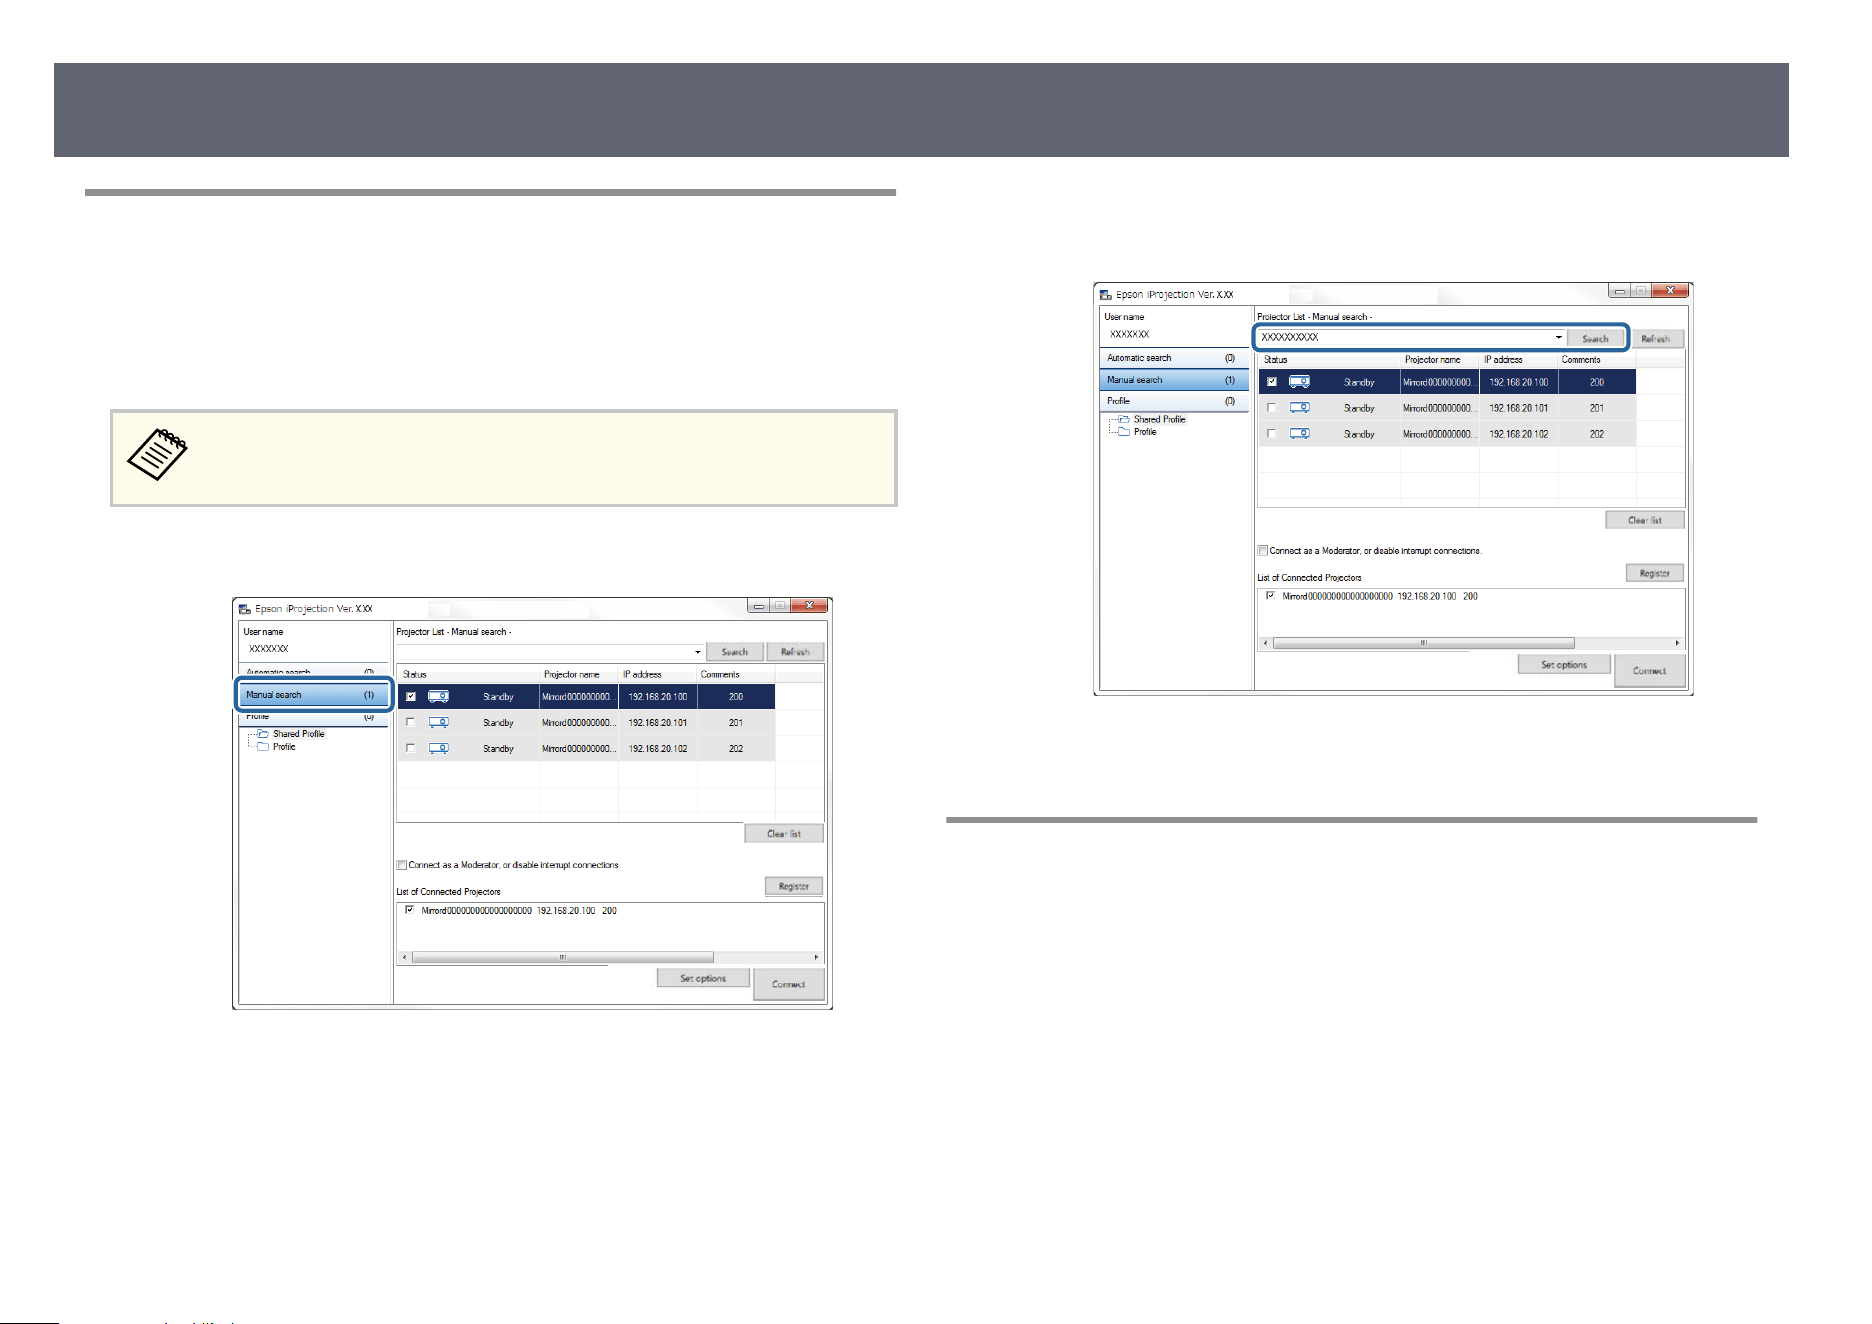
Searching for Network Projectors by Specifying an IP
Addr
ess or Projector Name
If the projector you want to connect to is not found automatically, you can
se
arch for the target projector by specifying the IP address or the projector
name.
Manual Search is avai
lable only in Advanced Connection Mode.
a
Click Manual search on the search screen.
b
Enter the IP address or the projector name for the projector you want to
conn
ect to, and then click Search.
e search results are displayed.
S
earching for Network Projectors Using a Prole
You can save network projector information as a pr
ole, and then search for the
same projector using the prole instead of specifying the projector details each
time.
g
Related Links
•
"Proles for Search" p.29
•
"Performing a Prole Search" p.29
•
"Registering a Prole" p.29
•
"Exporting a Prole" p.31
•
"Importing a Prole" p.31
•
"Sharing a Prole over a Network" p.31
Selecting the Projector Search Method
28
Proles for Search
Y
ou can save information for a network projector as a prole. A prole is a
le containing all of the projector's information, such as the projector name, IP
address, and SSID. By using a prole, you can easily search for saved projectors
instead of providing projector details.
You can export the registered prole to create a backup, and then import it
locally to easily search for projectors on another computer. You can also share
the exported prole over a network, allowing other users to easily search for
projectors.
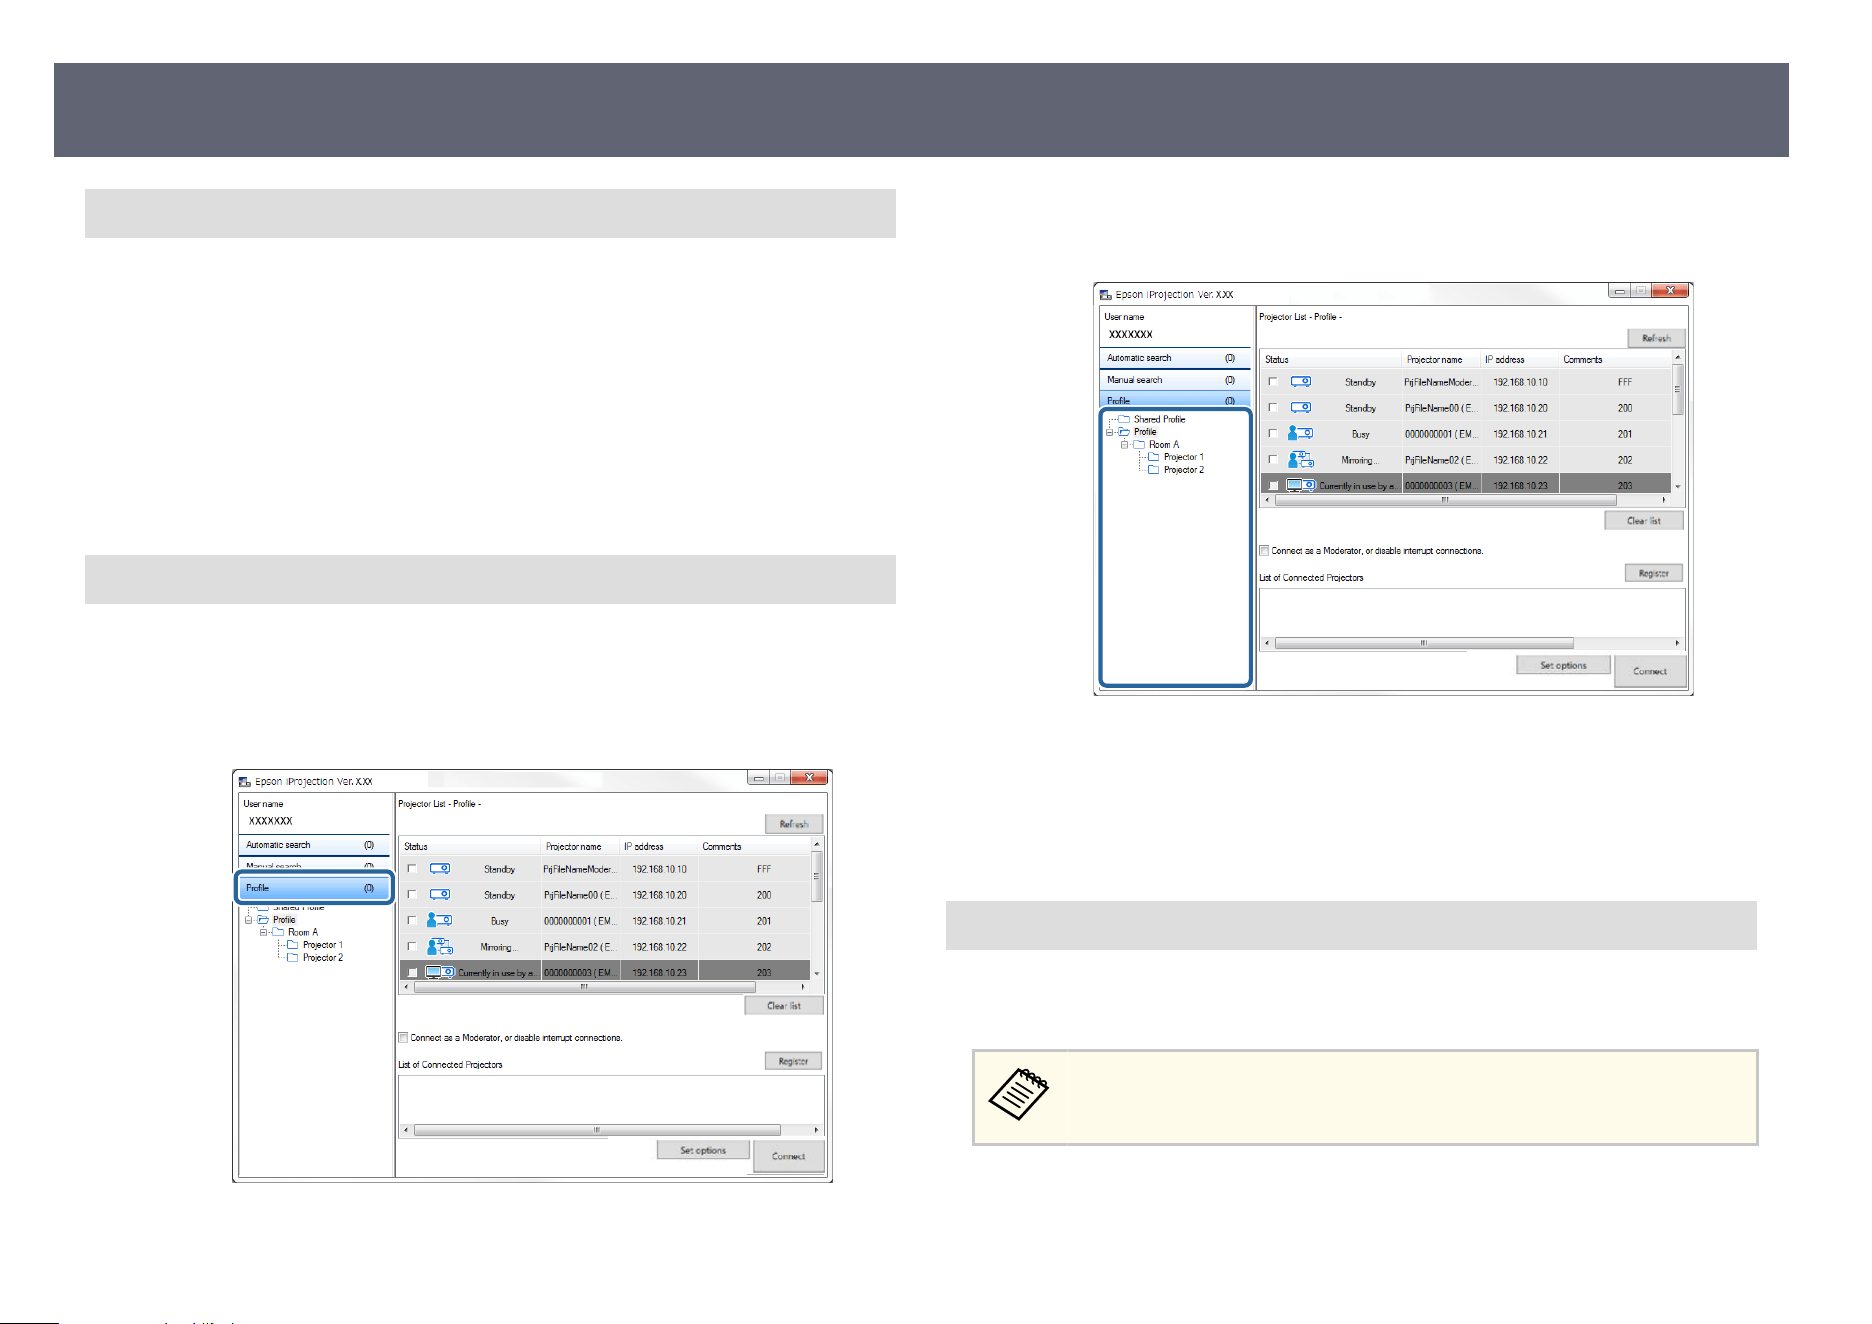
Performing a Pr
ole Search
You can specify the prole to search for the saved projector instead of providing
projector details each time you search.
a
Click Prole on the search screen.
b
Double-click the folder or the projector icon for the pr
ole you want to
use from the list.
e search results are displayed.
g
Relat
ed Links
•
"Registering a Prole" p.29
Registering a Pr
ole
Aer searching for a projector, you can save the projector details as a prole
using a memorable name that you can search for easily later.
You cannot register a pr
ole under the Shared Prole folder on the search
screen.
Selecting the Projector Search Method
29
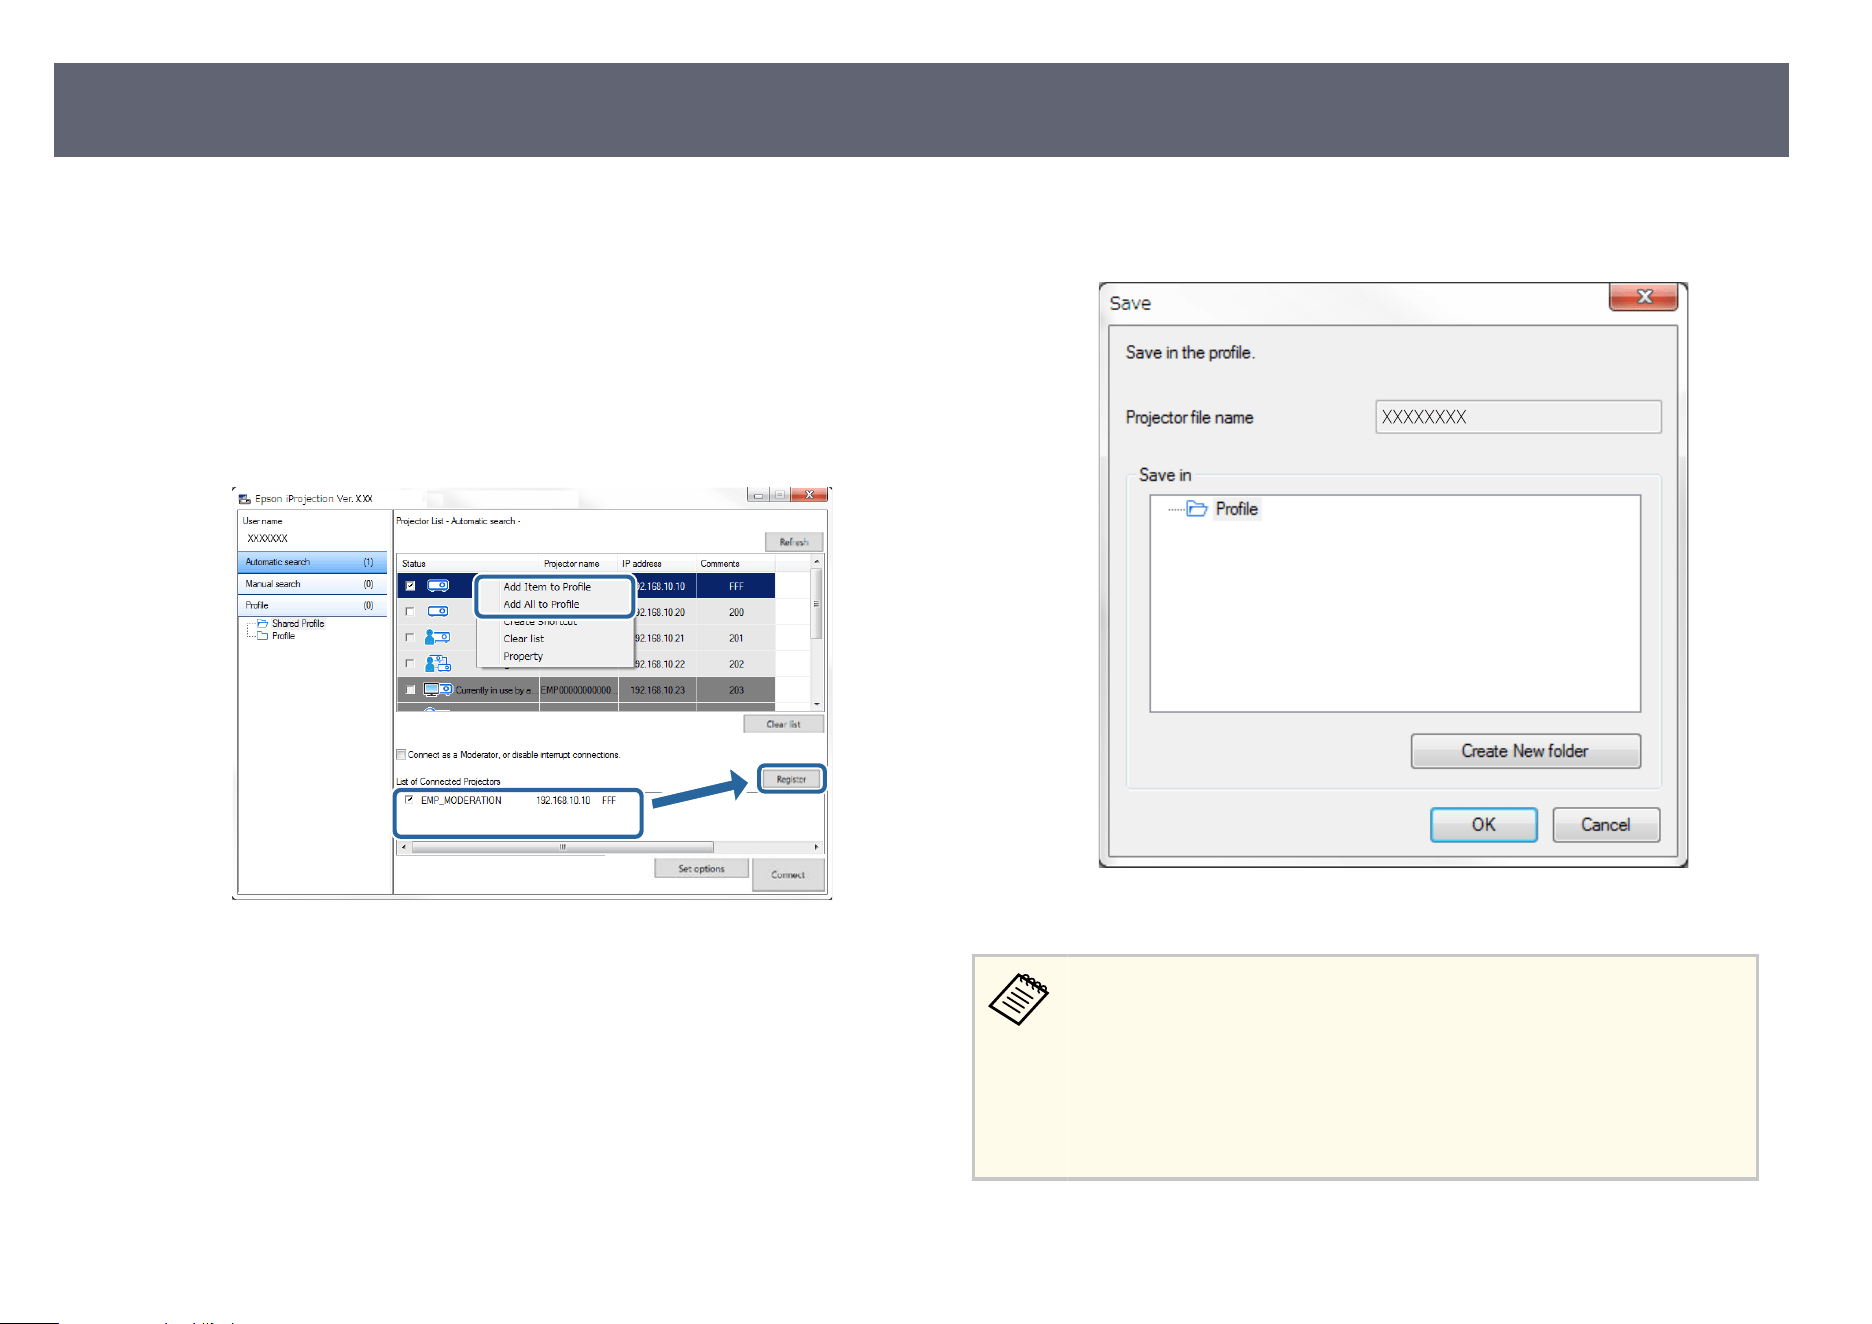
a
While the projectors are displayed on the search screen, perform one of
th
e following operations.
•
Register projectors displayed in the List of Connected Projectors: Click
Register.
•
Register a specic projector: Right-click the projector you want to
register in the Projector List, and then click Add Item to Prole.
•
Register all projectors found by the search: Right-click one of the
projectors in the Projector List, and then click Add All to Prol e.
e Save screen is displayed.
b
En
ter the Projector le name, and select the folder where you want to save
t
he prole, and then click OK.
e prole is registered and the projector information is saved in the prole.
•
e fo
lder structure can be six folders deep.
•
Click Create New folder if you want to create a new folder.
•
To register a specic projector, you can drag and drop the projector
from the Projector List to the folder under Prole.
•
You can drag and drop proles and folders to change the folder
structure.
Selecting the Projector Search Method
30

Exporting a Pr
ole
You can export a prole and share it with other users allowing them to easily
search for projectors and join a meeting.
You cannot export the pr
oles under the Shared Prole folder on the
search screen.
a
On the search screen, right-click the folder containing the prole you want
to share under Prole, and then click Export.
e Save As screen is displayed.
b
Select where you want to save the pr
ole (.mplist), and then click Save.
e prole is exported.
g
Related Links
•
"Registering a Prole" p.29
•
"Importing a Prole" p.31
•
"Sharing a Prole over a Network" p.31
Importing a Pr
ole
You can locally import an exported prole and use it to easily search for
projectors and join a meeting.
•
Yo
u can also import a prole (.plist) exported using EasyMP Network
Projection.
•
You cannot import proles under the Shared Prole folder on the
search screen.
•
You cannot import proles created in a dierent connection mode.
a
On the search screen, right-click the folder to which you want to import
th
e prole under Prole, and then click Import.
e Open screen is displayed.
b
Select the prole (.mplist), and then click Open.
e
prole is imported locally.
g
Related Links
•
"Exporting a Prole" p.31
Sharing a Prole over a Network
Y
ou can share an exported prole with other users over a network so that any
changed projector information is easily updated. e shared prole is read and
updated automatically when the Epson iProjection soware is started.
a
Place the prole (.mplist) in a shared network location such as a server.
b
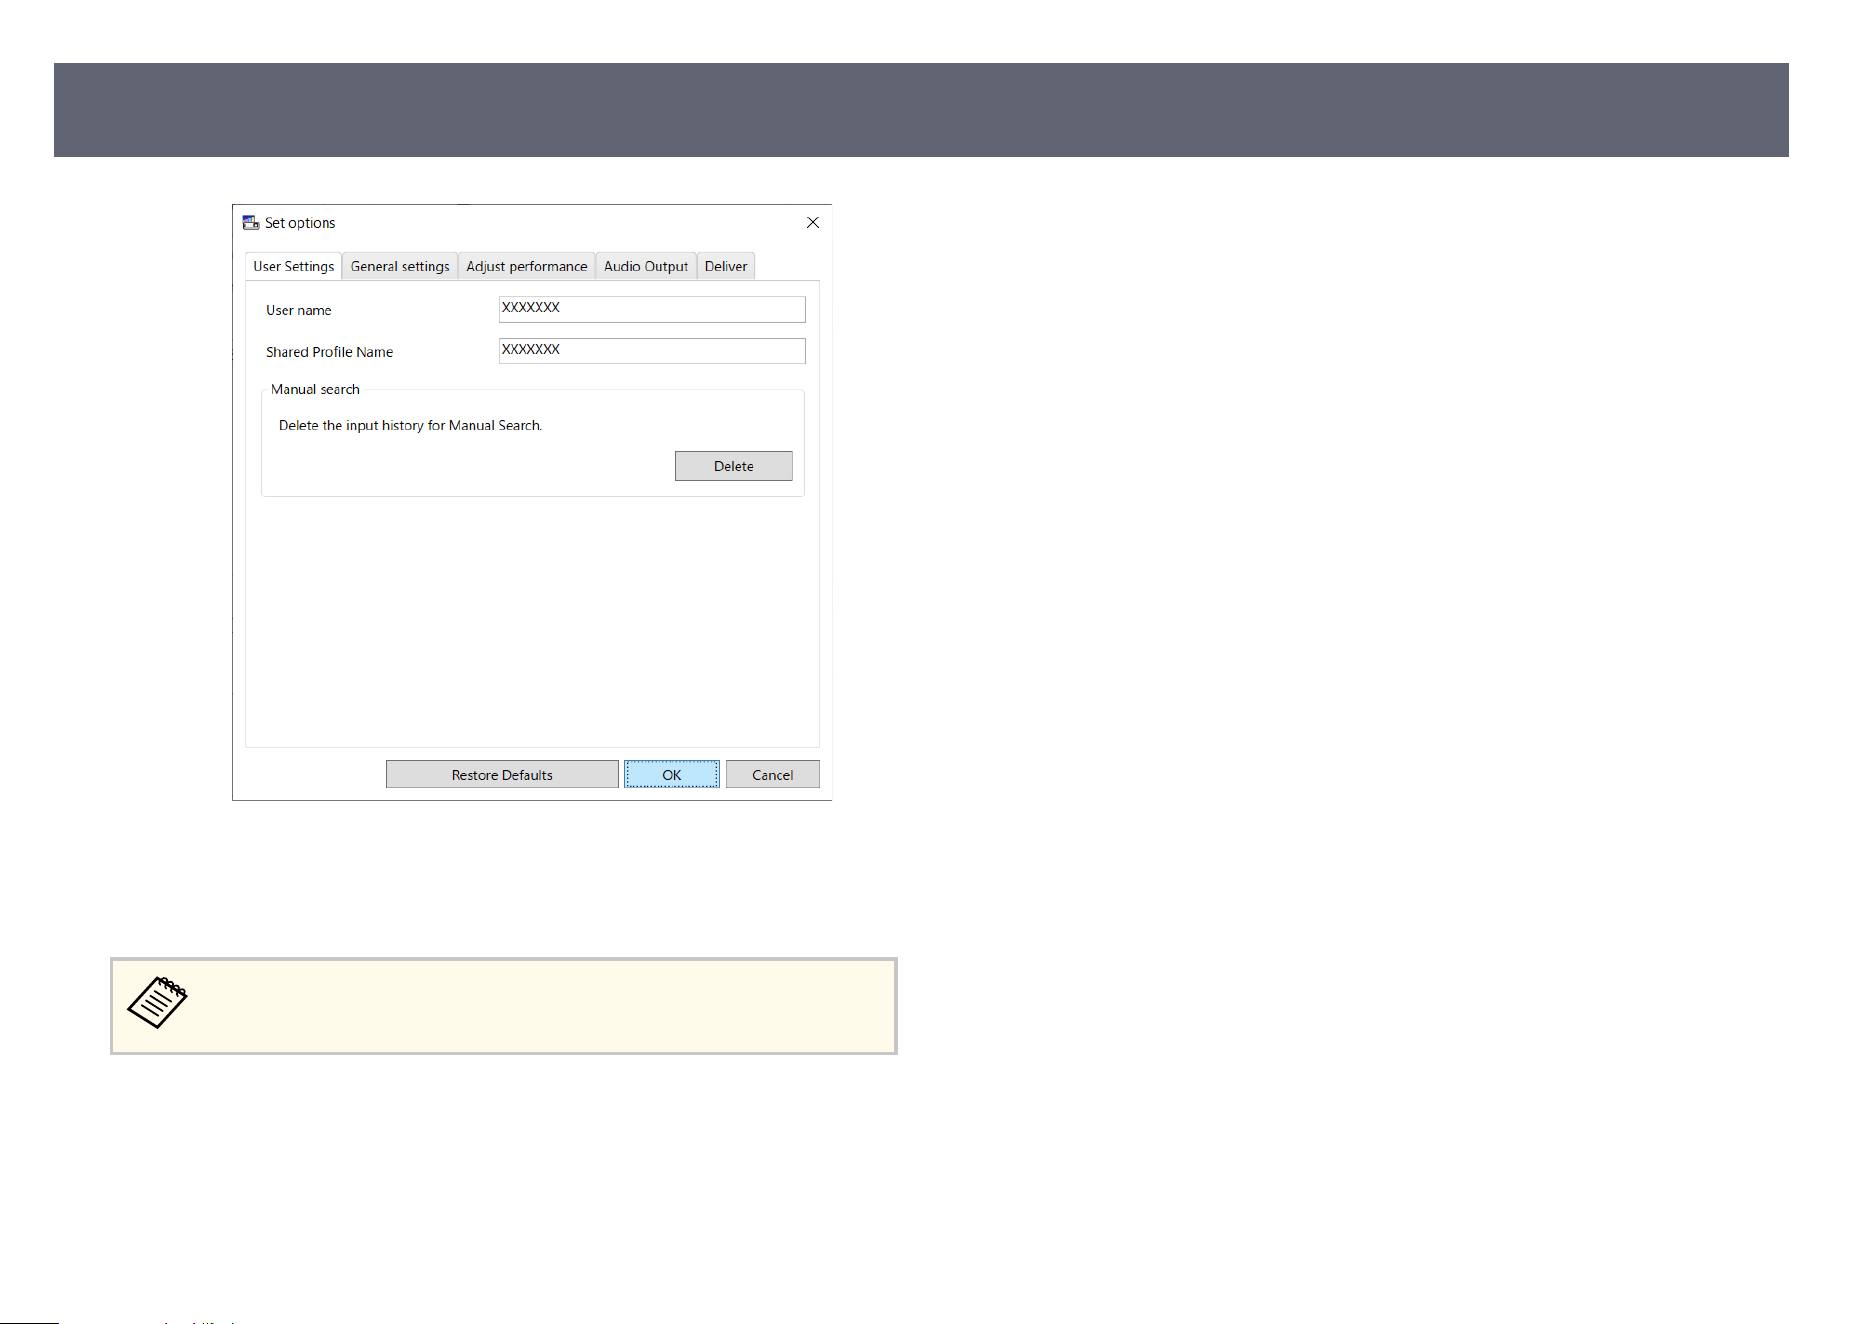
C
lick Set options on the search screen.
e
Set options screen is displayed.
c
Click the User Settings tab.
d
En
ter the network location or URL to the shared pr
ole (including the
name of the prole) in Shared Prole Name.
•
For a le server (Windows only): \\xxxxx\xxxxx.mplist
•
For a web server: http://xxxxx/xxxxx.mplist
Selecting the Projector Search Method
31
Follow these instructions to use the toolbar and the projection control screen to
con
trol the screen being projected.
g
Related Links
•
"Screen Types for Projection Control" p.33
•
"Operating the Projected Display Status" p.33
•
"Changing the Number of Projected Panels" p.34
•
"Changing the Presenter" p.35
•
"Changing the Projection Position" p.36
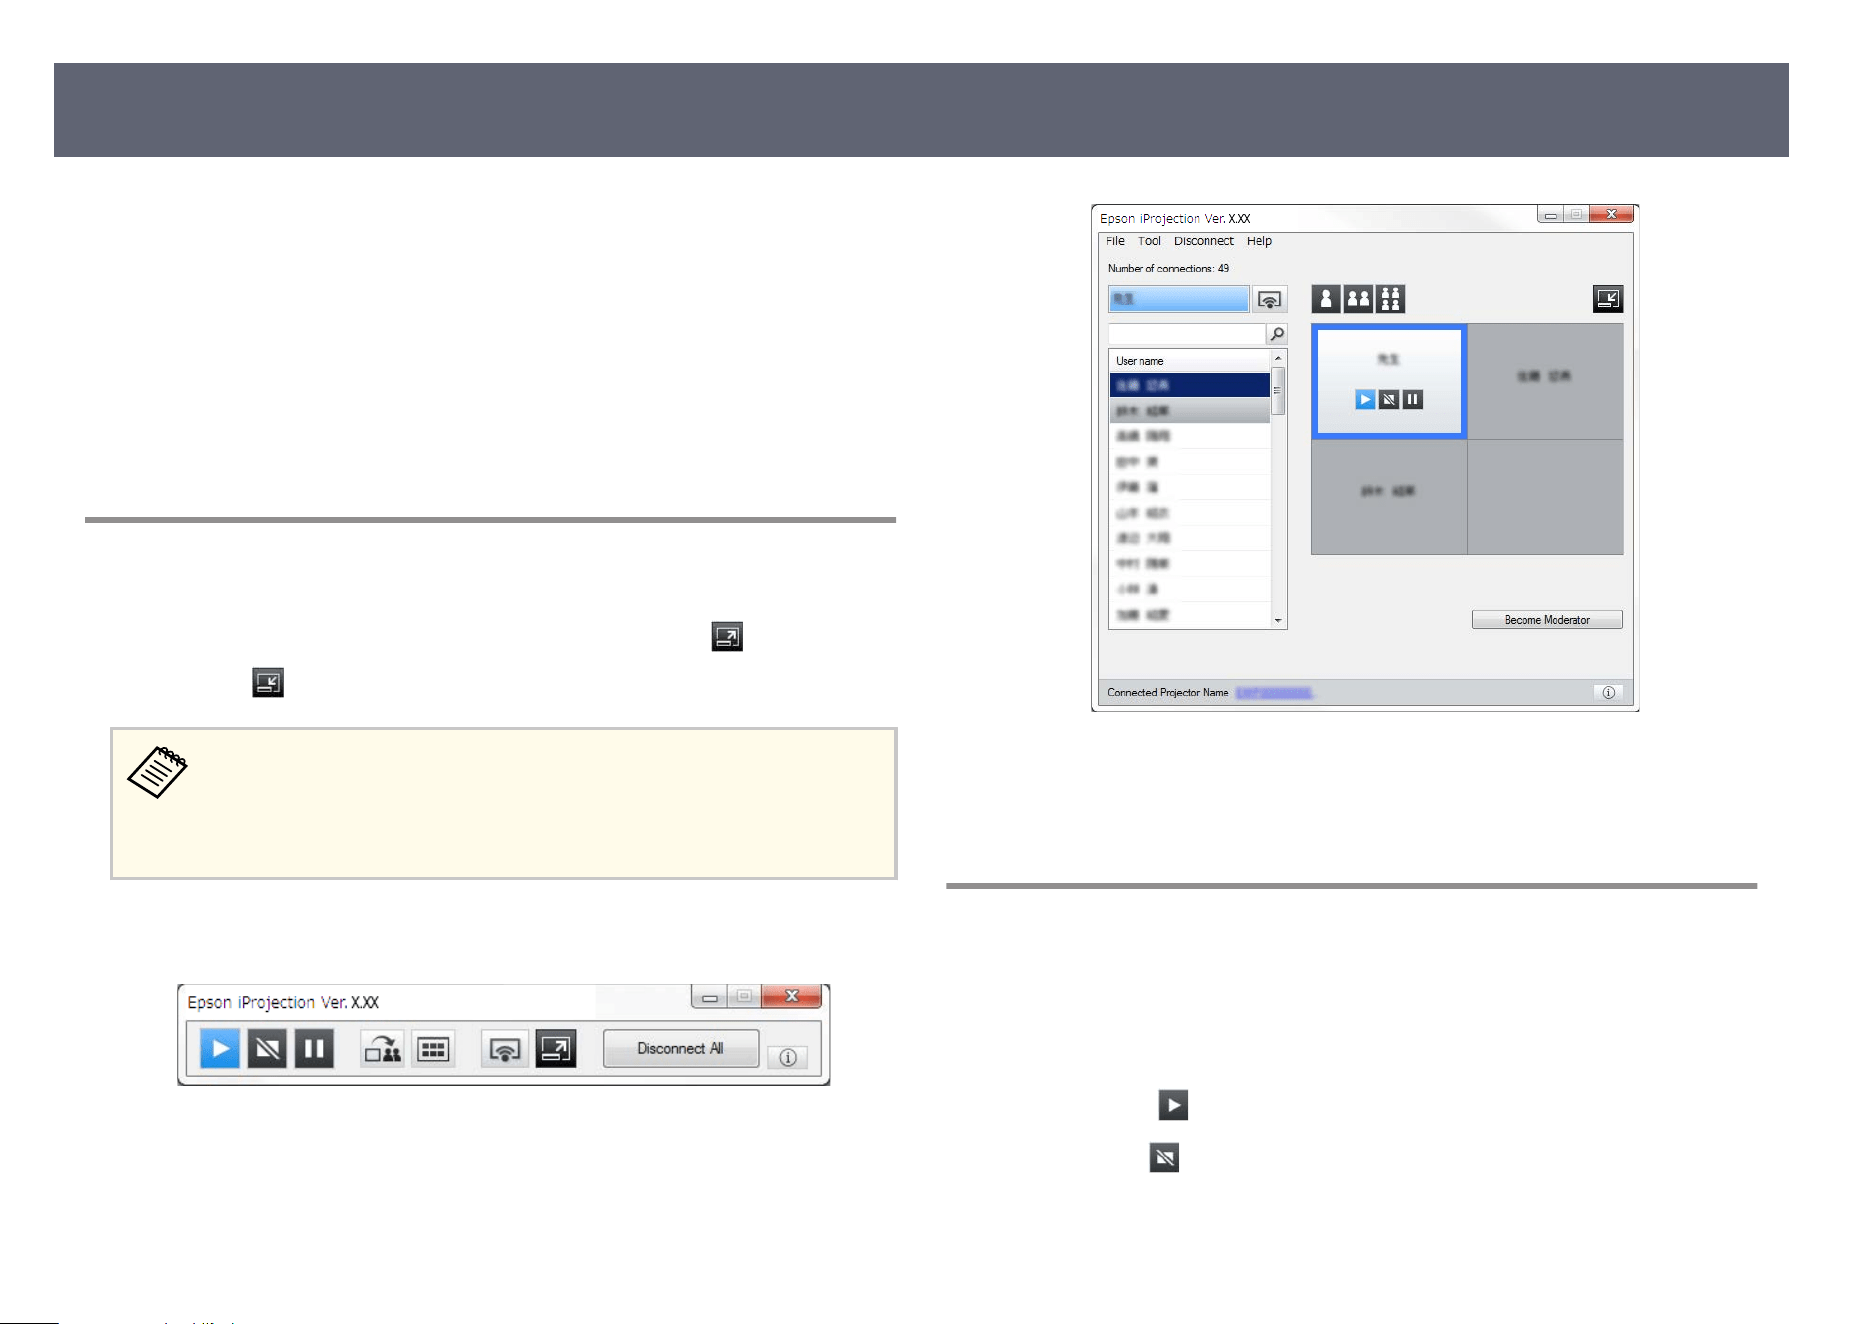
Screen Types for Projection Control
You can choose the type of screen you use to control projected images to suit
your situation. You can switch the screen type by clicking the button on the
to
olbar or the
button on the projection control screen.
•
e dis
played toolbar and the projection control screen vary depending
on the connection method and the edition or your role of this soware.
•
e projection control screen is available only on the Standard Edition
of the soware.
•
U
s
e the toolbar to display a wide image of the projected display and perform
operations on the projected image.
•
Us
e the projection control screen to change the number of projected panels,
presenters, or the projection position.
g
Related Links
•
"Toolbar" p.75
•
"Projection Control Screen" p.76
Operating the Projected Display Status
You can control the projected display while projecting your computer screen by
st
arting, stopping, or pausing the projected image.
Perform one of the following operations on the toolbar or the projection control
screen.
•
Show: Click the
button. e com
puter screen is projected as it is.
•
Stop: Click the
button. e pr
ojected image stops. A black screen is
projected while stopped.
Controlling the Projected Display
33
•
Pause: C
lick the
button. e proj
ected image pauses. e paused image is
projected, even if you make changes on the computer screen.
•
ese bu
ttons are not available for participants when using the
moderator function.
•
e moderator can also control the other users' projection using the
projection control screen when using the moderator function.
g
Related Links
•
"Projection Control Screen" p.76
Changing the Number of Projected Panels
You can divide the projected display into a maximum of four panels. By
chang
ing the number of panels, you can project screens from multiple devices at
the same time, or project one computer screen in full screen mode.
•
is function is not available for participants when using the
moderator function.
•
You can also use the
button to project your computer screen in
f
u
l
l s
creen mode.
a
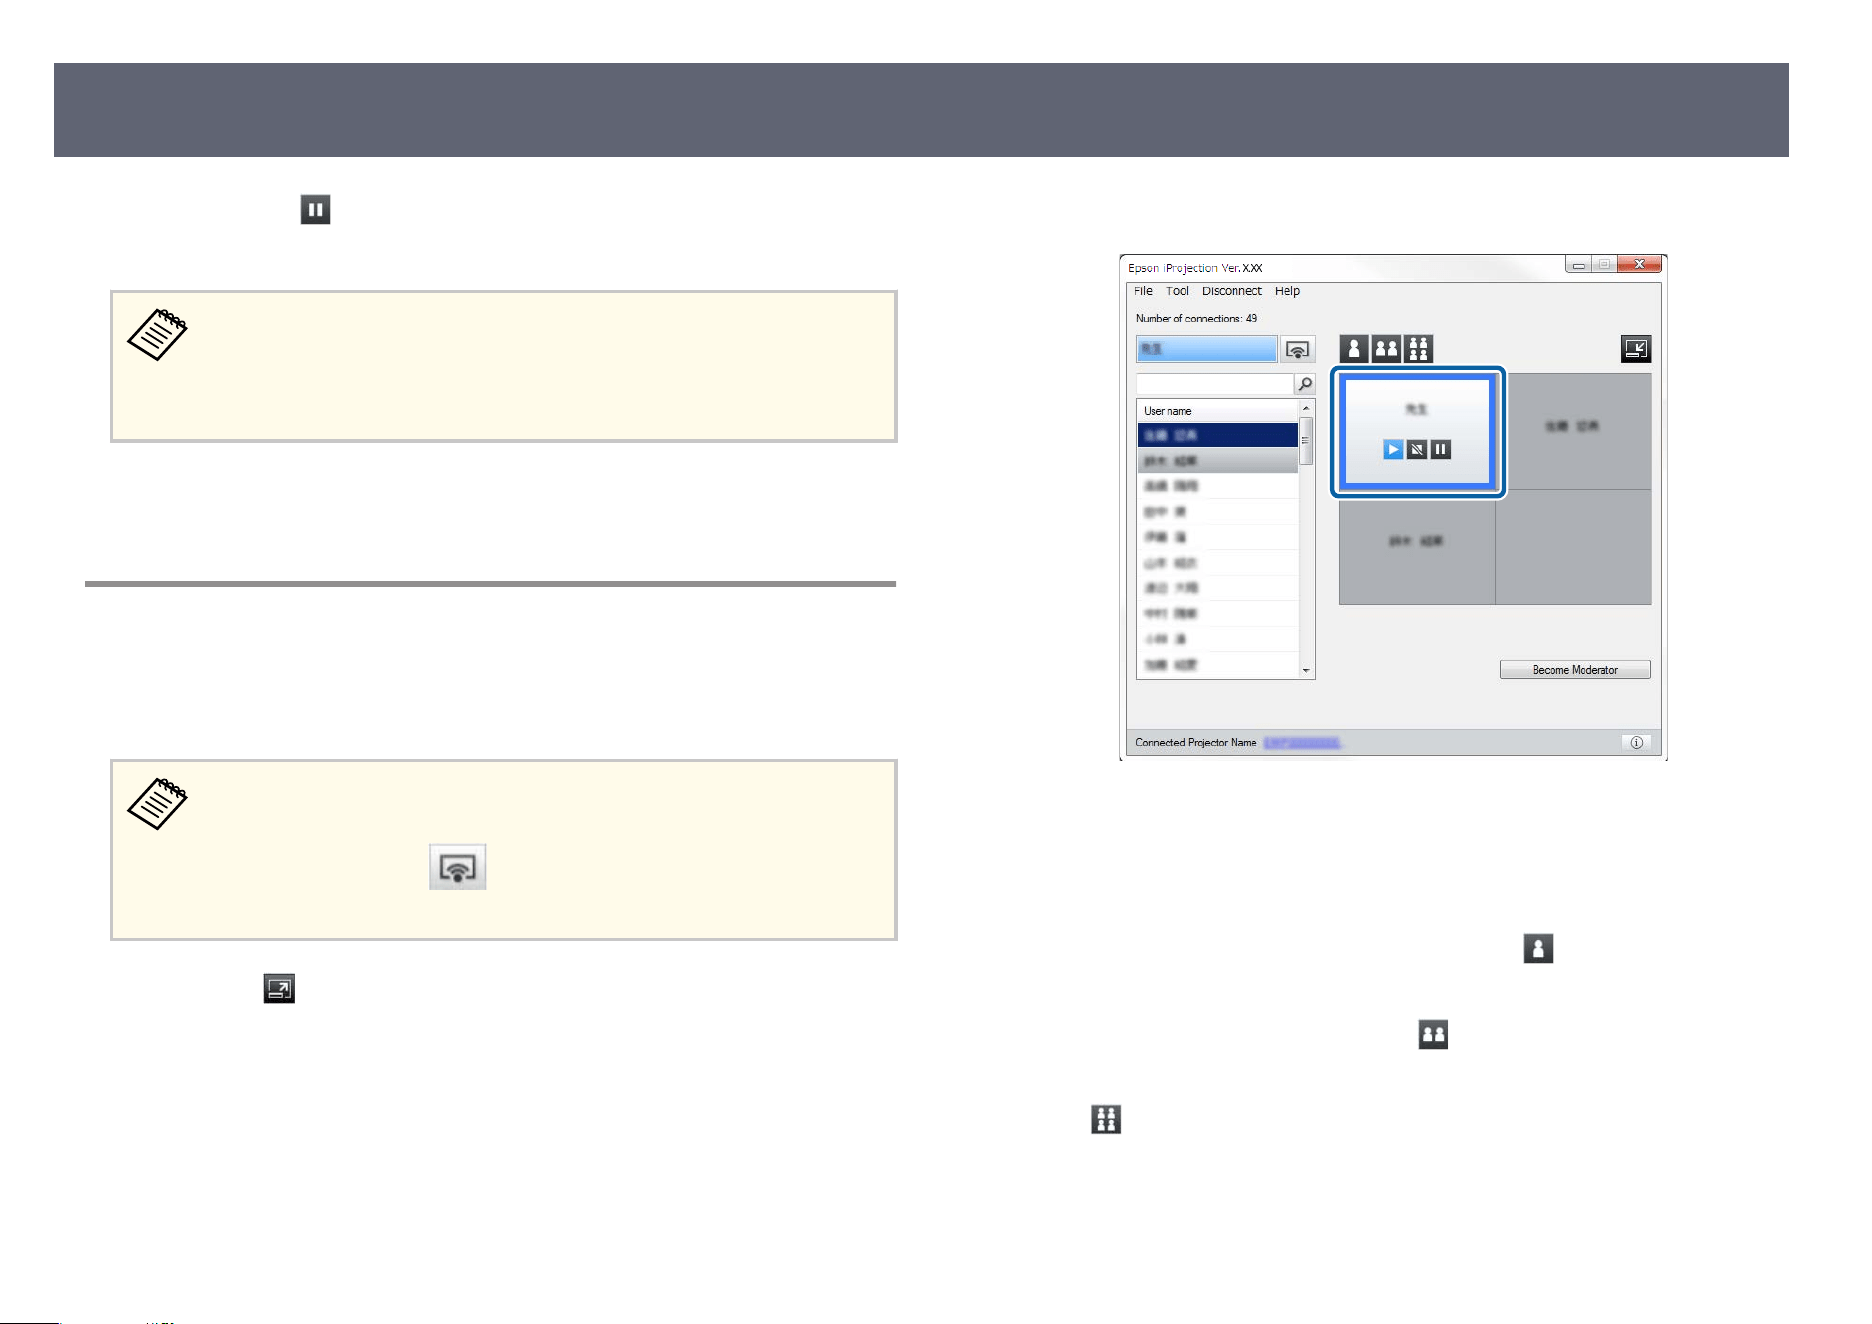
Click the
button on the toolbar.
e proj
ection control screen is displayed.
b
Click the panel of the user to be projected in the projection area.
e selected panel is framed in blue.
c
Perf
orm one of the following operations to change the number of available
panel
s in the projection area.
• Project one panel in full screen mode: Click the button.
• Split the projected display in two and project the selected panel and the
adjacent right or le panel: Click the button.
• Split the projected display into four panels and project them all: Click
the button.
e number of panels changes and the background color for panels being
projected becomes white.
Controlling the Projected Display
34
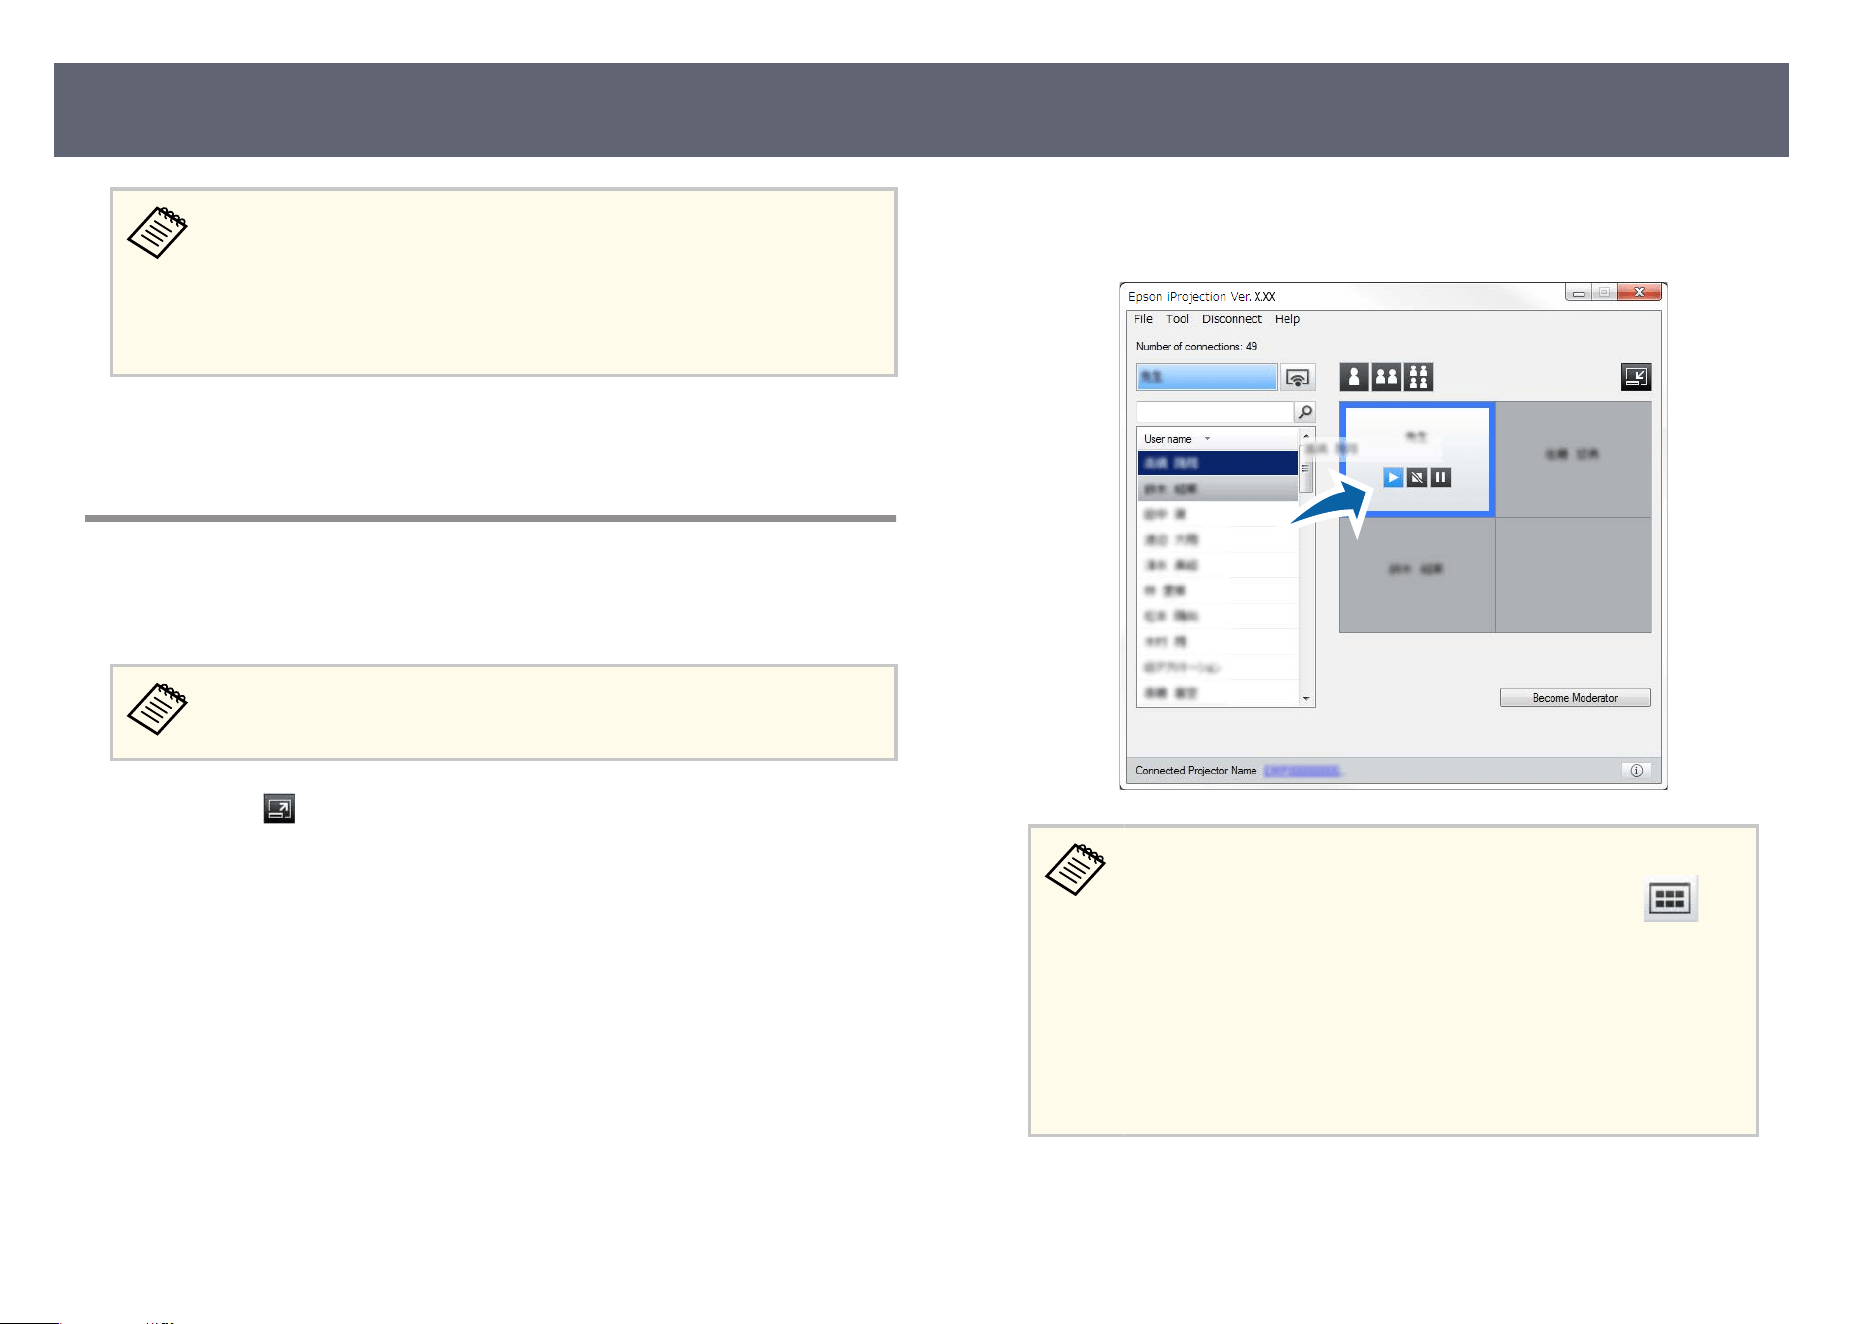
•
Yo
u can also change the number of panels by right-clicking in the
projection area. Right-click the panel, and then select the number of
total panels.
•
If there is no user in a white panel, a black screen is projected.
•
e background color for panels not being projected is gray.
g
Related Links
•
"P
rojection Control Screen" p.76
Changing the Presenter
You can change the presenter by dragging and dropping one of the connected
us
er names in the list onto a panel in the projection area.
is function is not available for participants when using the moderator
function.
a
Click the
button on the toolbar.
e pr
ojection control screen is displayed.
b
Select the user names in the user list, and then drag and drop the user
n
am
e onto a white panel in the projection area.
•
e mo
derator can check the participant's device screens as
thumbnails and select which user to project. Click the
button on the toolbar or the projection control screen.
•
If y
ou cannot nd the user that you want to project in the user
list, you can search for them using the user search box.
•
You can also right-click a user name in the user list to select the
projection position.
•
If there is no user in a white panel, a black screen is projected.
e selected user's computer screen is projected.
Controlling the Projected Display
35
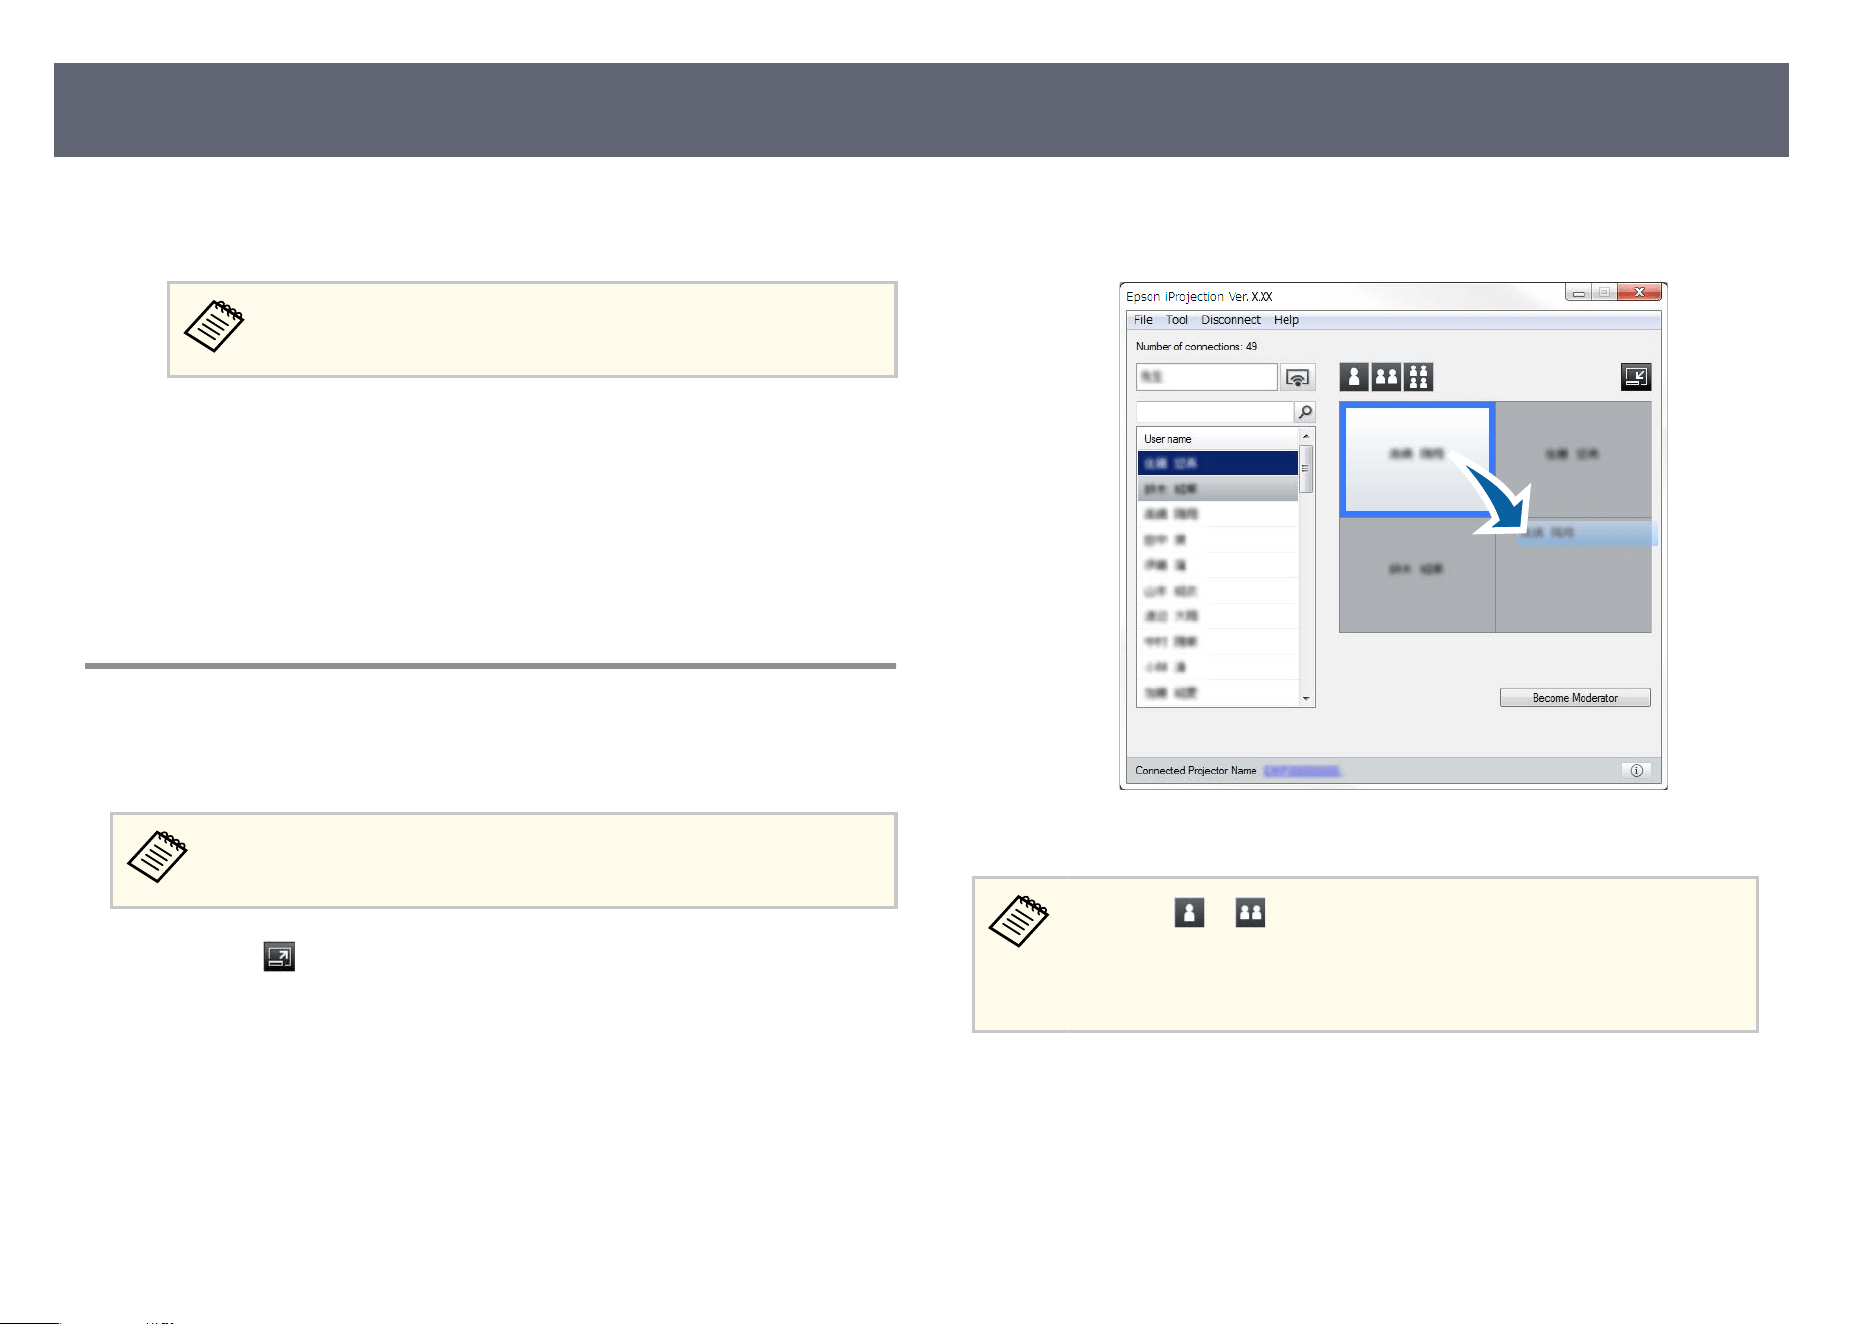
c
To nish projecting, drag and drop the user name from the projection area
t
o the user list.
You can also nis
h the selected user's projection by right-clicking
the panel in the projection area, and then clicking End Projection.
e background color of the user name in the user list is blue while their screen
is projected. e background color of the user name is gray when a user is in the
panel but their screen is not being projected.
g
Related Links
•
"Changing the Projection Position" p.36
•
"Selecting the Participant's Screen to Project Using umbnails" p.47
Changing the Projection Position
You can change the projection position by dragging and dropping the user name
fr
om one position to another in the projection area.
is function is not available for participants when using the moderator
f
unction.
a
Click the
button on the toolbar.
e pr
ojection control screen is displayed.
b
Select the user in the projection area, and then drag and drop the user
n
am
e into another position.
e projection position is changed.
When the or button is selected, you can drag and drop the
us
er name in a gray panel to the white panel to switch the image being
projected. If you drag and drop the user name in a white panel to the gray
panel, the image for that user will not be projected.
g
Related Links
•
"C
hanging the Number of Projected Panels" p.34
Controlling the Projected Display
36
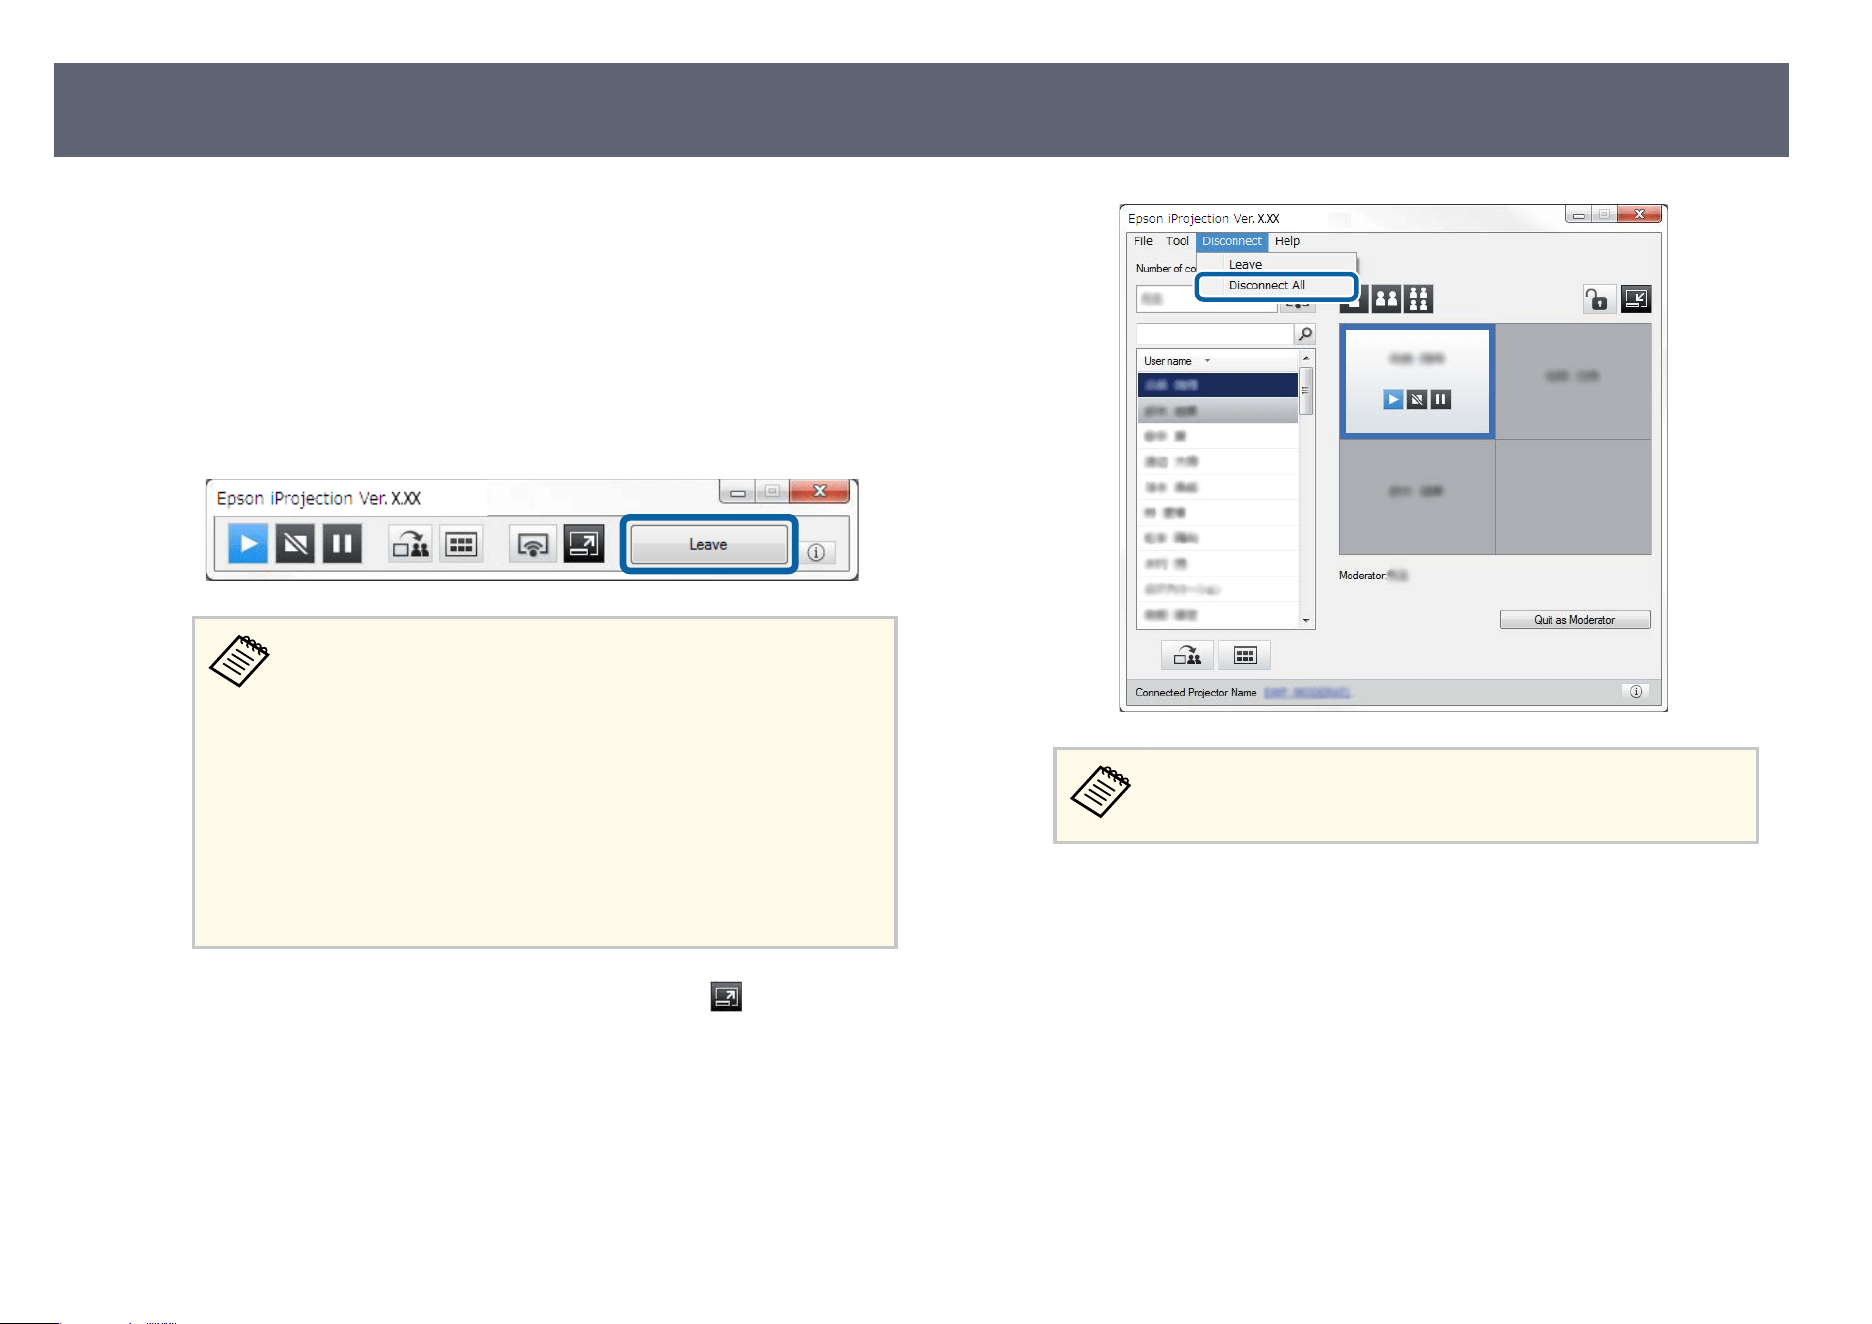
You can disconnect one computer or all devices from the projector when you
nish projecting.
a
P
erform one of the following operations.
• Disconnect your computer and the projectors: Click the Leave button
on the toolbar
.
e connection between your computer and the projectors is no
longer active.
•
When you are the moderator, the Disconnect All button is
displayed on the toolbar instead of this button.
•
You can also disconnect by clicking Leave from the
Disconnect menu on the projection control screen.
•
e moderator can disconnect other participants by right-
clicking the selected user in the user list, and then clicking
Leave on the projection control screen when using the
moderator function.
•
When the moderator leaves the meeting, the moderator
function turns o.
• Disconnect all devices from the projectors: Click the button on the
toolbar, and then click Disconnect All from the Disconnect menu on
the projection control screen.
The connection between all devices and projectors participating in the
meeting is no longer active.
is function is not available for participants when using the
moderat
or function.
e conrmation screen is displayed.
b
Click
Yes.
You ar
e returned to the search screen.
Disconnecting
37

Using Additional Functions
Fo
llow these instructions to use the additional Epson iProjection functions that may be useful during a meeting.
g
Related Links
•
"Searching for Network Projectors Using a Shortcut" p.39
•
"Connecting to Network Projector Using a USB Flash Drive (Windows Only)" p.40
•
"Connecting to Multiple Projectors (Mirroring)" p.42
•
"Outputting Audio from the Projector" p.43
•
"Projecting Your Screen" p.44
•
"Changing the Moderator" p.45
•
"Distributing the Projected Screen" p.46
•
"Selecting the Participant's Screen to Project Using umbnails" p.47
•
"Hiding the Projection Control Screen" p.48
•
"Prohibiting Participant Operations" p.49
•
"Controlling the Connection Bandwidth" p.50

You can save network projector information as a shortcut, and then double-click
it t
o start the Epson iProjection soware. is allows you to easily search for the
same projectors instead of specifying the projector details each time.
g
Related Links
•
"Creating a Shortcut" p.39
Creating a Shortcut
Aer searching for a projector, you can save the projector details as a shortcut
that you can use later. A shortcut contains all of the projector's information,
such as the projector name and IP address. Creating a folder shortcut saves
information for multiple projectors contained in the folder.
a
On the search screen, right-click the projector or folder from the Pr
ole
or Projector List, and then click Create Shortcut.
e Save As screen is displayed.
b
Select where you want to save the shortcut (.pme), and then click S
av
e.
e shortcut is created and the projector information is saved in the shortcut.
•
Do
uble-clicking a shortcut (.pme), you can start the Epson iProjection
soware in the same mode as you created its shortcut.
•
When you use the Participant Edition of the soware, use a shortcut le
created in Advanced Connection Mode.
•
You can also select the projector or folder from the Prole or Projector
List, and then drag and drop to the location where you want to create
the shortcut.
Searching for Network Projectors Using a Shortcut
39
You can use a commercially available USB ash
drive as a USB key to transfer
the projector's network information to a Windows computer. Creating the USB
key allows you to quickly project images from the network projector.
g
Related Links
•
"Creating a USB key on a USB Flash Drive (Windows Only)" p.40
•
"Using a USB Key to Connect a Windows Computer" p.40
Creating a USB key on a USB Flash Drive (Windows
Only)
You can create a USB key on a commercially available USB ash drive so you
can use it to connect to your projector wirelessly.
When creating a USB key, make sure you use a USB ash
drive that meets
the following conditions.
•
Formatted to FAT
•
No security functions
We recommend deleting any les on the drive before creating a USB key.
a
Start US
B Key Setup Tool.
S
elect Start, EPSON Projector, and then select USB Key Setup Tool.
b
Select the application type that starts when you insert the USB key to your
co
m
puter.
c
Insert an empty USB ash
drive directly to your computer's USB port.
d
Follow the on-screen instructions to create the USB key.
USB k
ey creation begins and the soware writes a le to the USB ash
drive.
Caution
Do n
ot remove the USB ash drive from the computer during USB key
creation. If you remove the drive, the USB key may not be created correctly. If
USB key creation fails, create the USB key again.
If there are multiple USB ash
drives connected to your computer,
follow the on-screen instructions to specify the drive for which you
want to create a USB key.
e
Select S
afely Remove Hardware in the Windows taskbar, and then remove
t
he USB ash drive.
You can now use the USB ash drive as a USB key.
g
Related Links
•
"Epson iProjection Editions" p.14
Using a USB Key to Connect a Windows Computer
Aer creating the USB key, you can quickly project images from the network
p
rojector. If you have previously used the USB key, you can use the network
projector by simply connecting the USB key to your computer.
a
Make sure your projector is using one of the following network
conn
ections:
•
e wireless LAN module is installed or built into your projector.
•
A wired LAN cable is connected to your projector.
b
Turn on the projector.
Connecting to Network Projector Using a USB Flash Drive (Windows Only)
40
c
Press the [LAN] button or [Source Search] button on the remote control
to sw
itch the input source to LAN.
You see the network information screen.
d
Verify that an SSID and IP address are displayed.
e
Insert the USB key into the projector's USB Type A port.
e lo
cation of the USB Type A port varies depending on your
p
rojector. See your projector User's Guide for more details.
You see a projected message that the network information update is
com
plete.
f
Remove the USB key.
g
Insert the USB key into a USB port on your computer.
h
Follow the on-screen instructions to install the Epson iProjection
s
o
ware.
•
If t
he Windows Firewall message is displayed, click Yes to disable
the rewall.
•
You need administrator authority to install the soware.
•
If it is not installed automatically, double-click MPPLaunch.exe
in the USB key.
Aer a few minutes, your computer image is displayed by the projector.
If you want to switch the presentation to your computer, click the
button on the toolbar.
i
When you have nis
hed projecting wirelessly, select Safely Remove
Hardware in the Windows taskbar, and then remove the USB key from
your computer.
•
Yo
u can share the USB key with other users without
disconnecting your computer. To do this, deselect the Quit
application when removing the USB key checkbox on the Set
options screen in the Epson iProjection soware.
•
You may need to restart your computer to reactivate your
wireless LAN connection.
Connecting to Network Projector Using a USB Flash Drive (Windows Only)
41
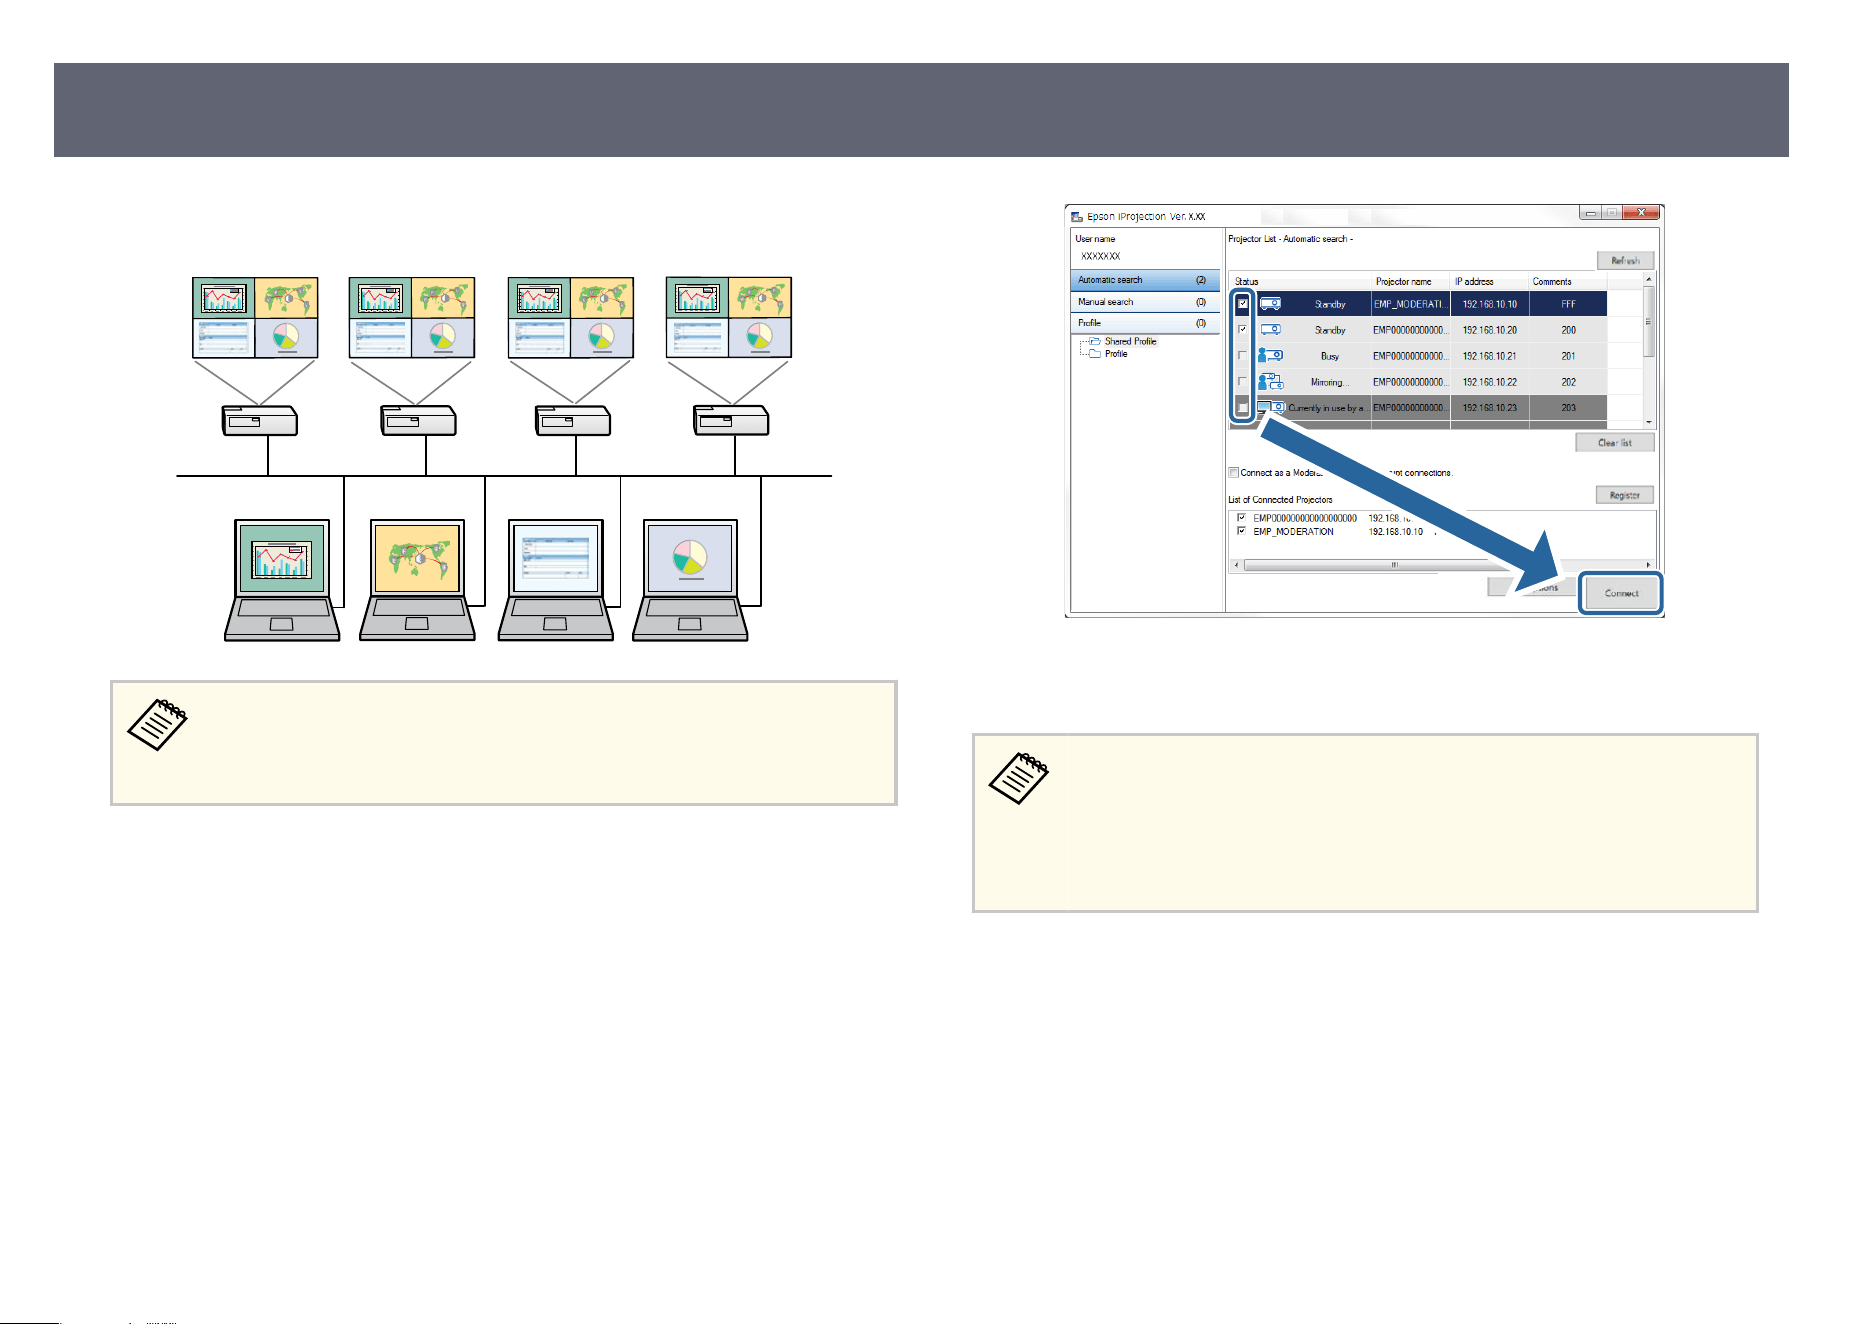
Connecting to multiple projectors and projecting the same image is known as
mirr
oring. You can perform mirroring with up to four projectors.
•
Mir
roring is available only in Advanced Connection Mode.
•
For best results, we recommend that you connect the projector to a
wired LAN to perform mirroring.
On the search screen, select up to four projectors you want to connect to, and
th
en click Connect.
A projector mirroring group is formed and the same image is projected from
mu
ltiple projectors.
•
Wh
en you select one projector from a projector mirroring group, all of
the projectors in that group are selected.
•
When other users are already connected to a projector in a mirroring
group, you can only select another projector from the same mirroring
group. You cannot select a projector that is not in a mirroring group.
Connecting to Multiple Projectors (Mirroring)
42
You can output audio from the projector only when one computer is connected
to o
ne projector, and you are projecting in full screen mode.
a
Click Set options on the search screen.
e
Set options screen is displayed.
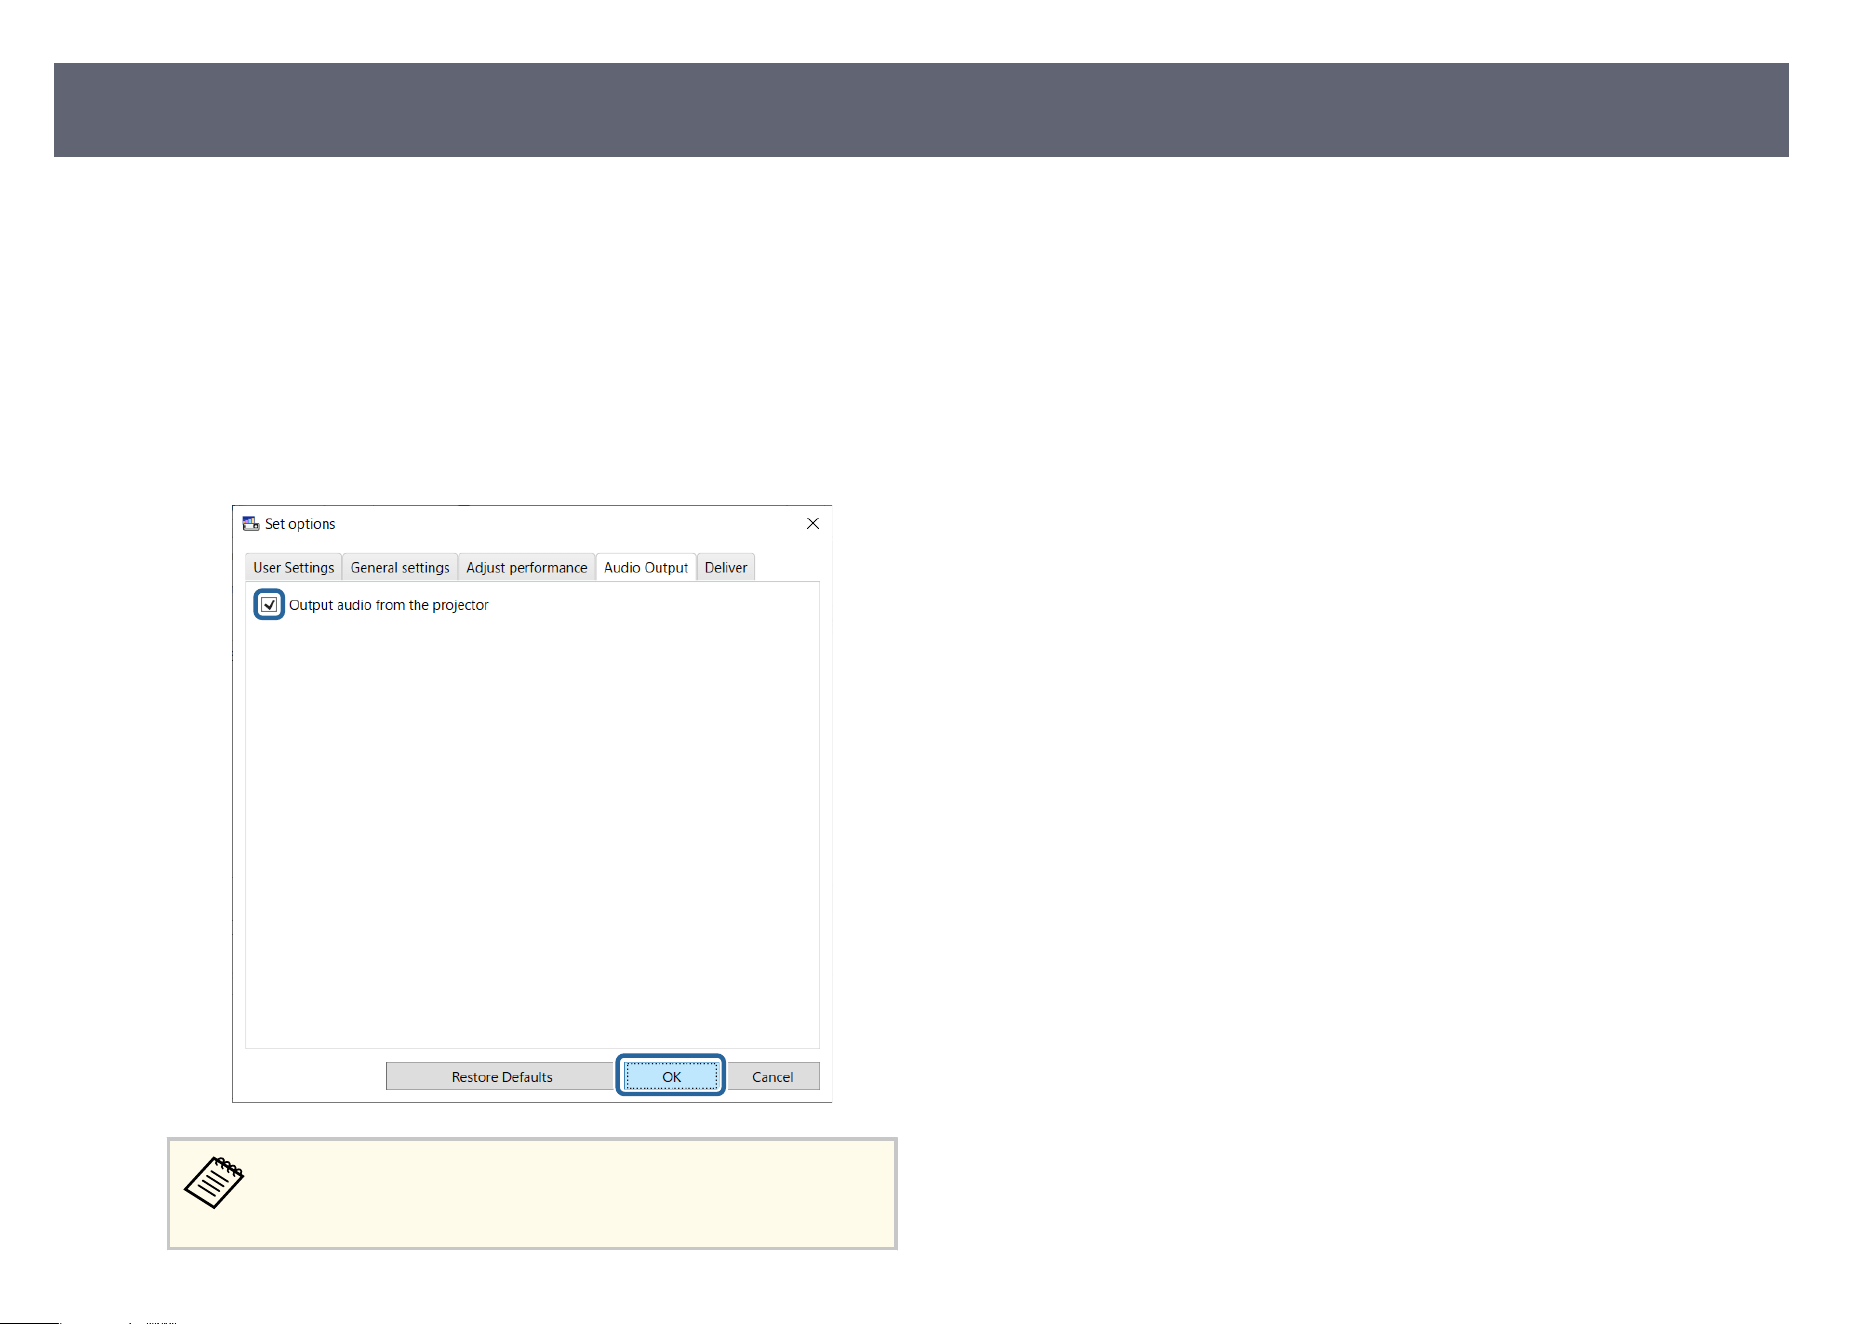
b
Click the Audio Output tab.
c
S
elect Output audio from the projector, and then click Apply.
When you select 256Kbps or 512Kbps as Us
e Bandwidth on
the Adjust performance tab, you cannot output audio from the
projector and cannot select this setting.
e Set options screen closes.
g
Relat
ed Links
•
"Projecting Your Screen" p.44
•
"Controlling the Connection Bandwidth" p.50
Outputting Audio from the Projector
43
You can project the computer screen in full screen mode without projecting any
ot
her users' screens.
a
On the search screen, select the projector you want to connect to, and then
clic
k Connect.
e toolbar is displayed.
b
Click the
button.
•
Yo
u can also use the
button on the projection control
scr
een.
•
is button is not available for participants when using the
moderator function.
Your computer screen is projected in full screen mode.
Projecting Your Screen
44
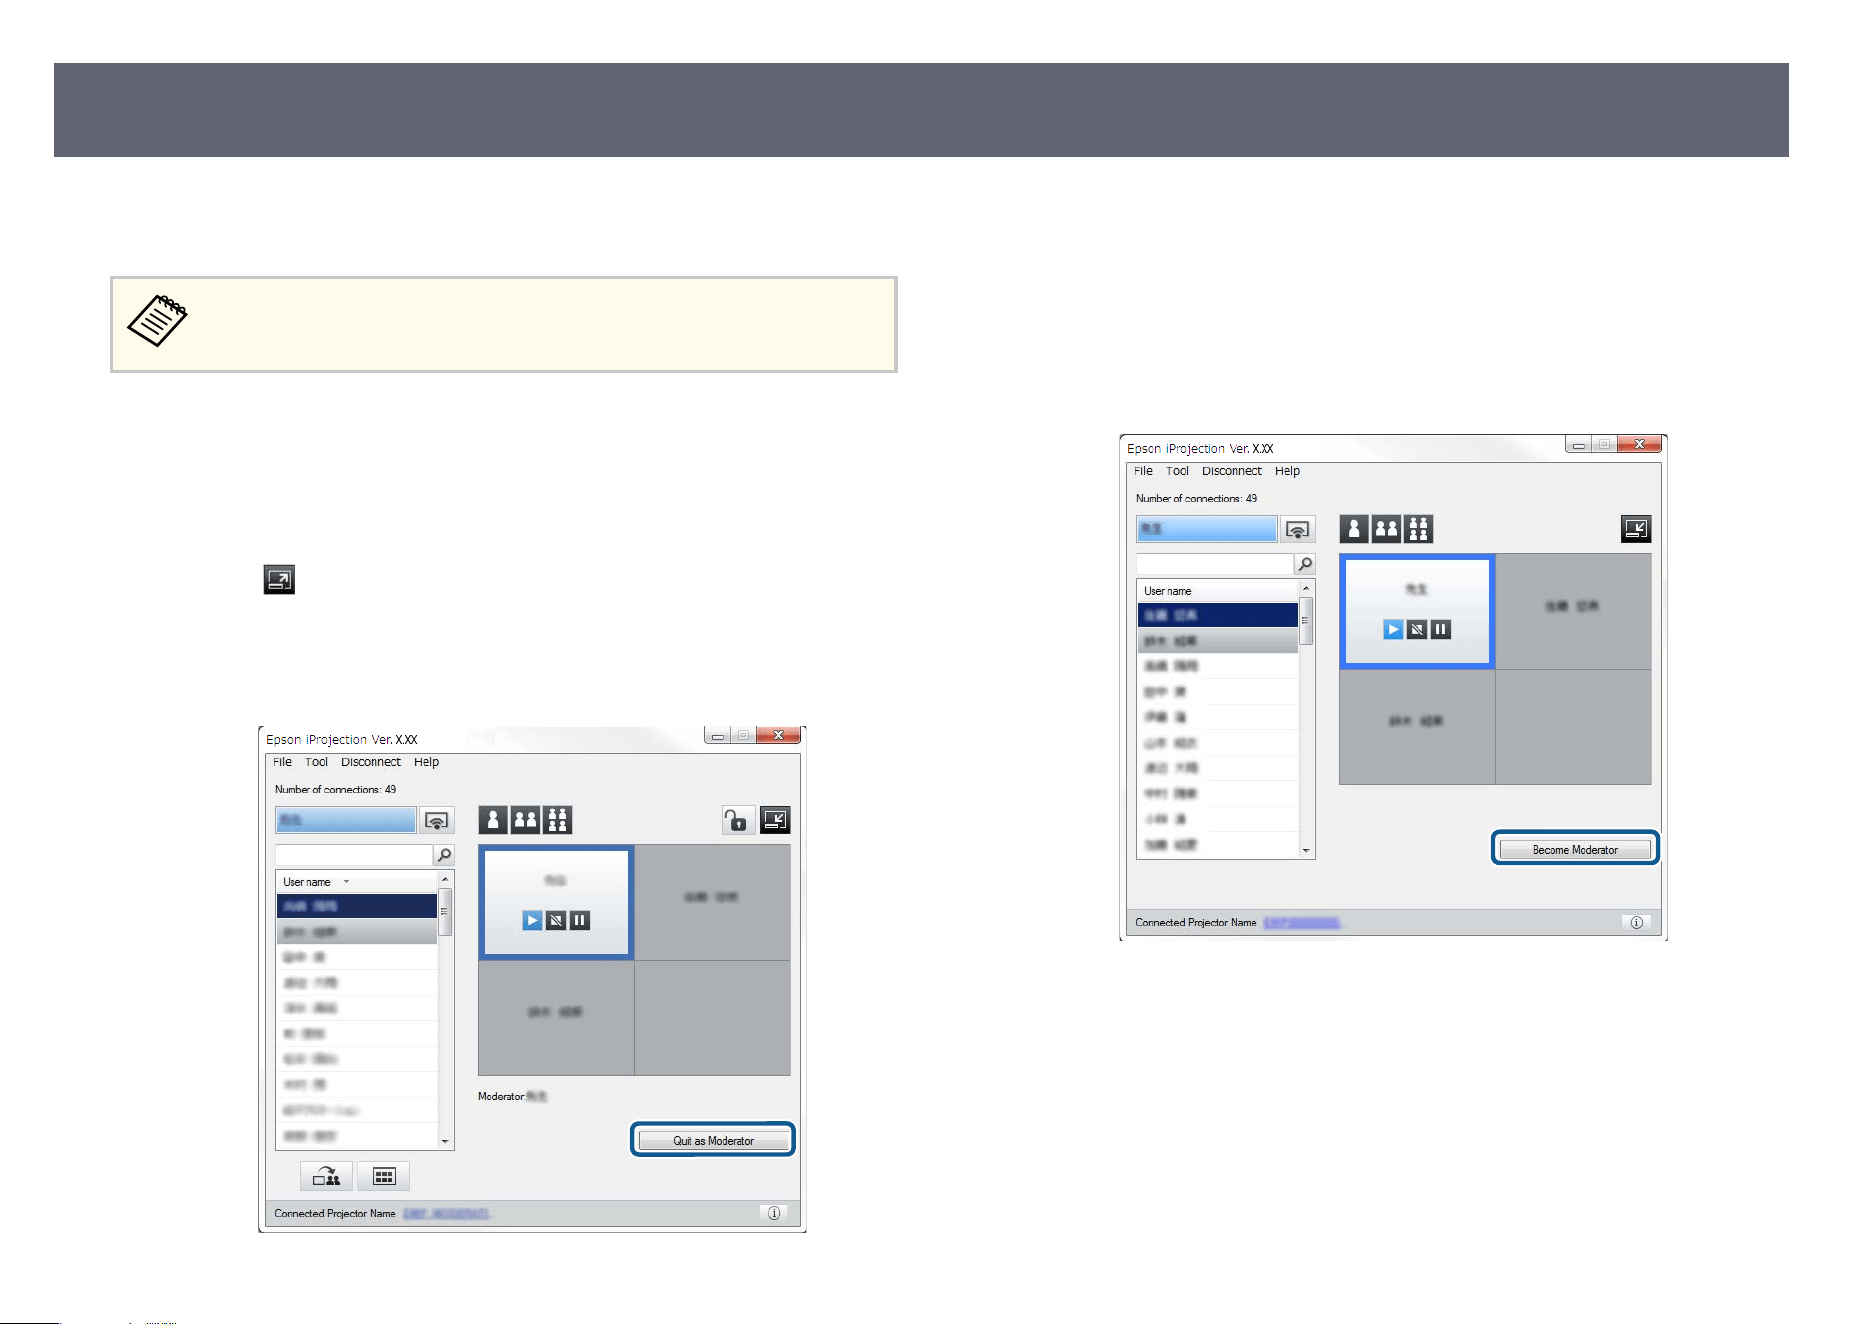
While using the moderator function, you can change the moderator when
ano
ther user needs to control the projected display.
e moderator function is available only on the Standard Edition of the
s
oware.
a
On the search screen, select the projector you want to connect to, select
Connect as a Moderator, or disable interrupt connections, and then click
Connect.
e moderator function turns on and the toolbar is displayed.
b
Click the button on the toolbar.
e pr
ojection control screen is displayed.
c
Click the Quit as Moderator button on the moderator's computer.
e conrmation screen is displayed.
d
C
lick Yes.
e
moderator function turns o.
e
Click the Become Moderator button on the projection control screen on a
dier
ent user's computer.
e conrmation screen is displayed.
f
C
lick Yes.
e
moderator function turns back on and the new moderator can control the
projected display.
g
Related Links
•
"Connection Methods for Various Meeting Styles" p.20
Changing the Moderator
45
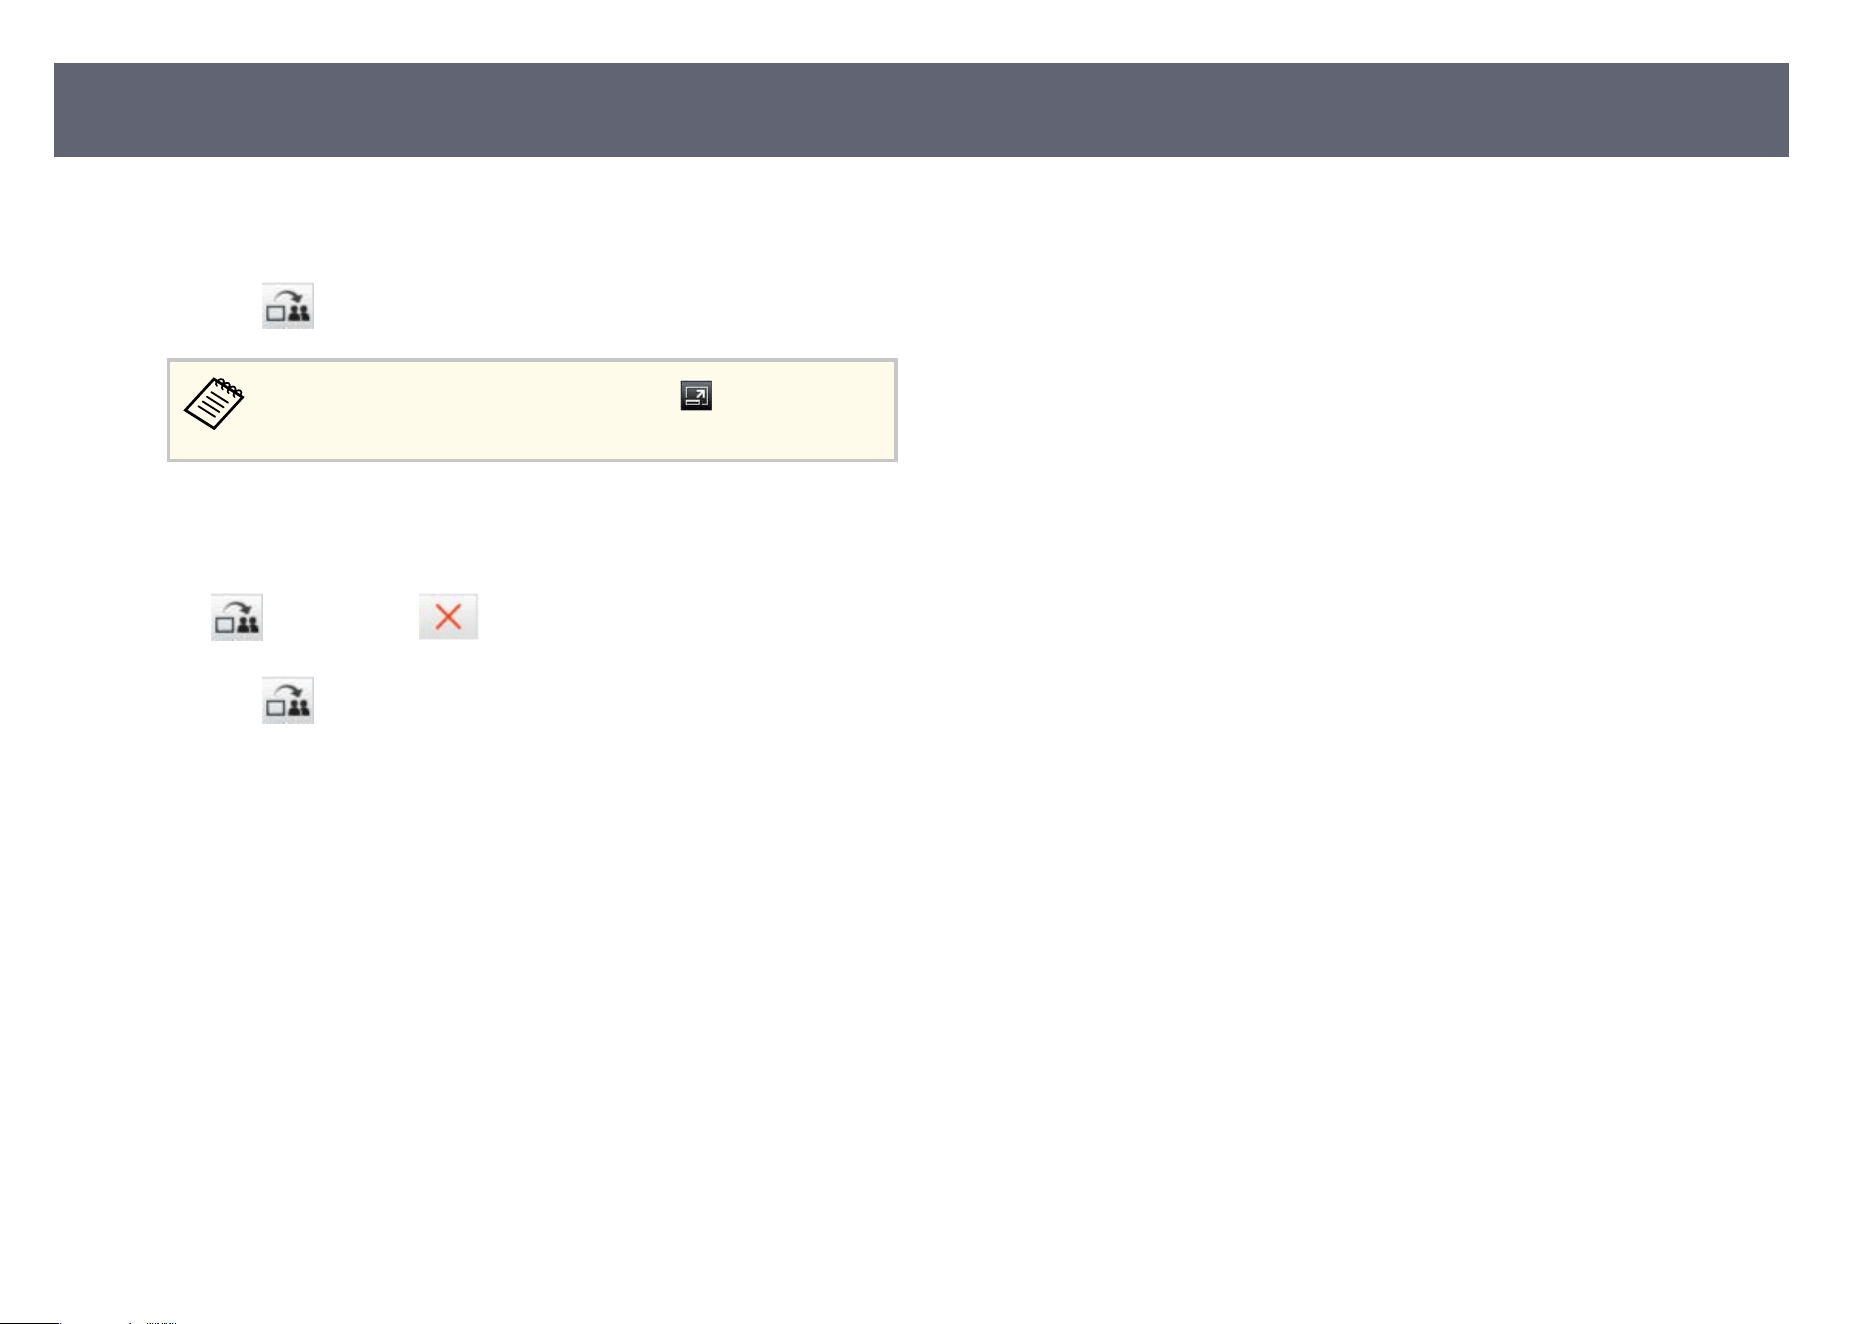
e moderator can distribute the currently projected screen images to the
p
articipant's devices.
a
Click the
button on the toolbar or the projection control screen.
You can also deliver a blank screen. Click the button on the
to
olbar, and then click Deliver Blank Screen from the Tool menu.
You see the conr
mation screen.
b
Click Start.
e
button and the button appear on the computer screen.
c
Click the button.
Wh
en the screen distribution succeeds, the moderator sees a completion
message and the distributed image automatically appears in the Viewer on the
participant's devices.
g
Related Links
•
"Viewer Screen" p.80
Distributing the Projected Screen
46
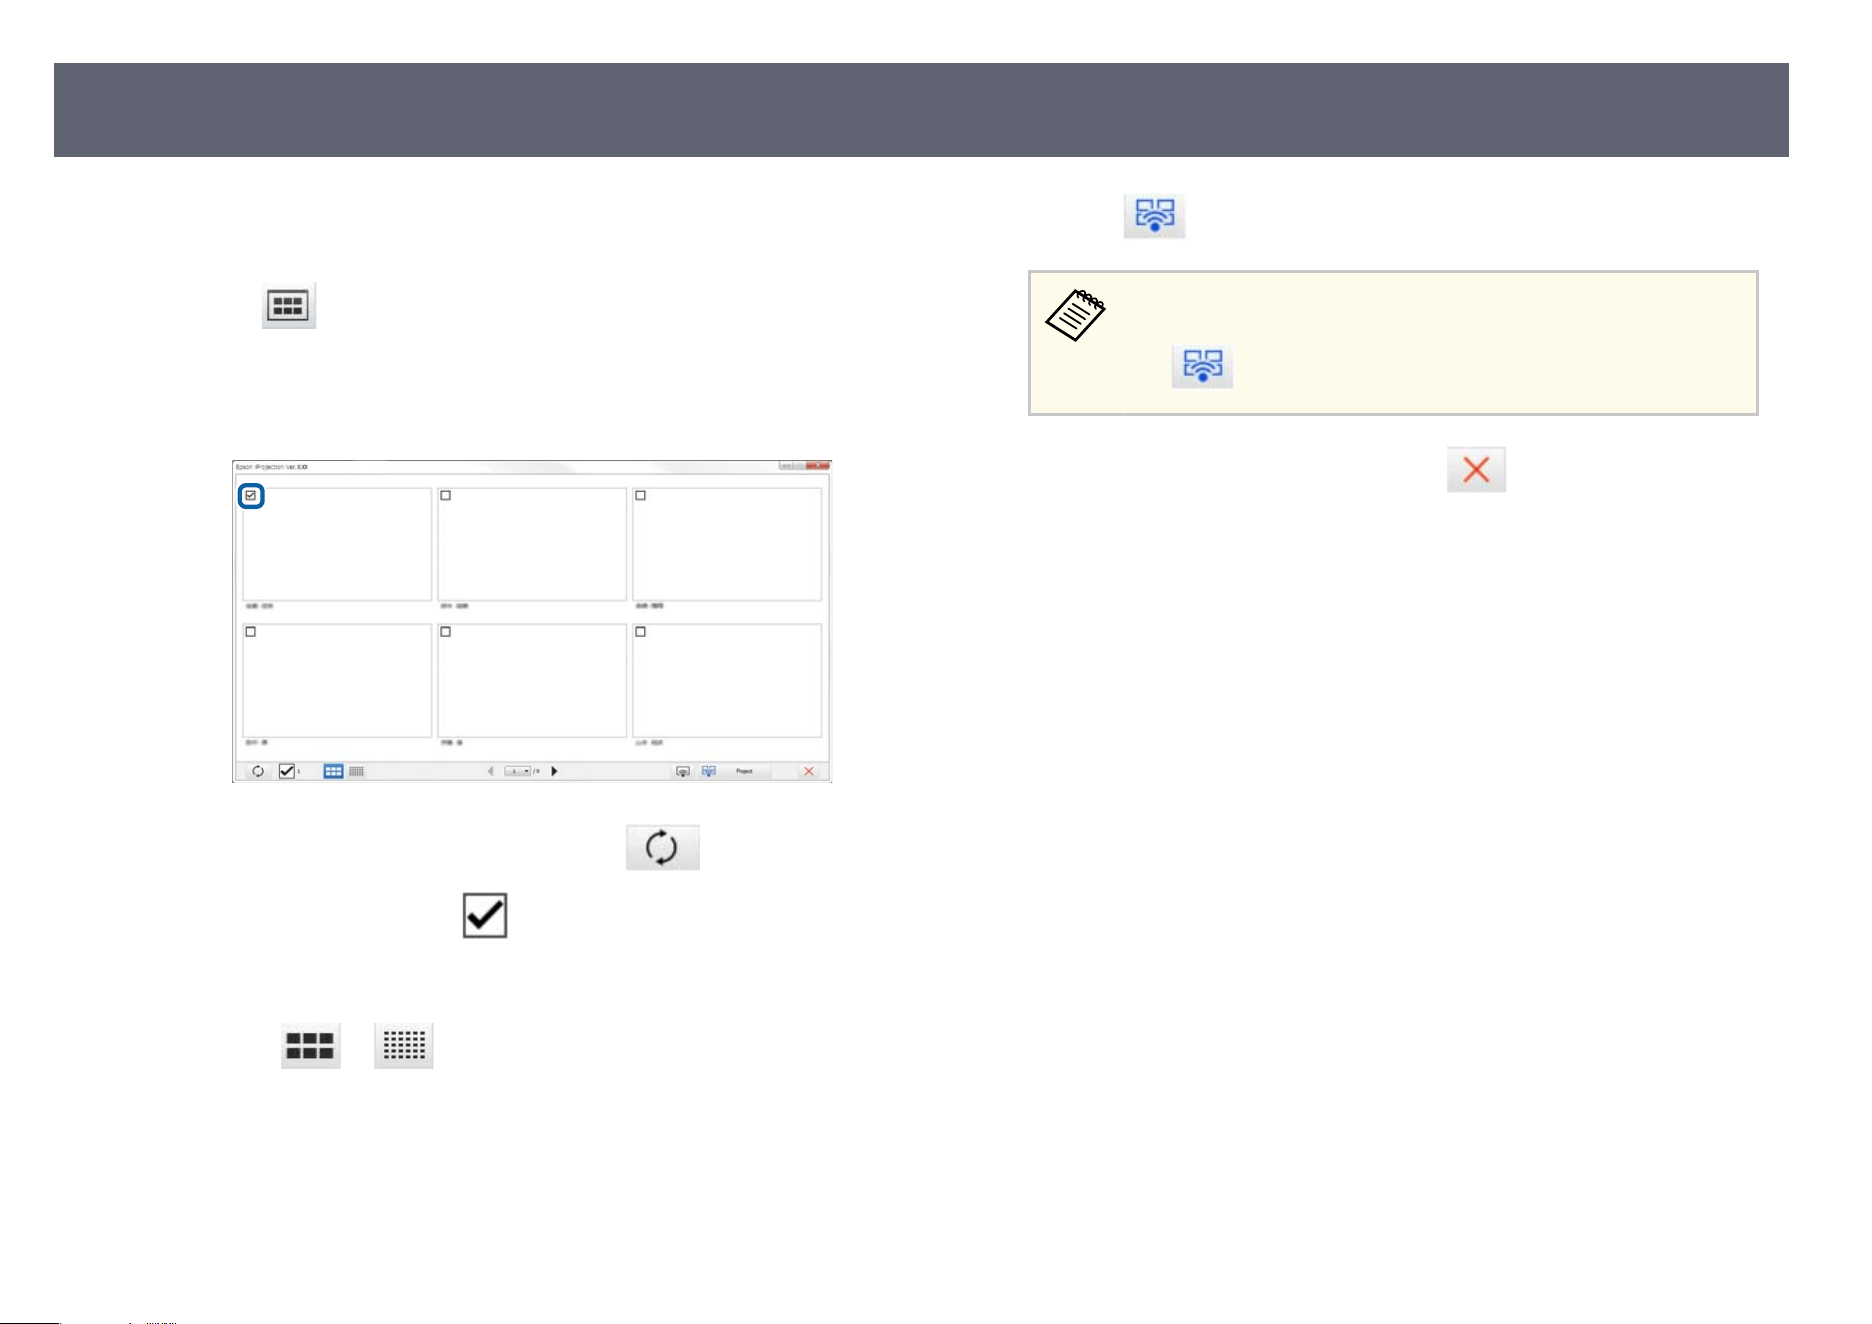
e moderator can check the participant's device screens as thumbnails and
s
elect which user to project.
a
Click the
button on the toolbar or the projection control screen.
e th
umbnails screen is displayed.
b
Select up to 12 thumbnails you want to project.
•
To u
pdate to the latest thumbnails, click the
button.
•
T
o c
lear all selections, click
. If you click this again, the previously
se
lected thumbnails are selected again.
•
To switch the size and the number of thumbnails displayed on one page,
click the
or button.
c
Click the button.
When you select more than 5 thumbnails, the thumbnail selection
scr
een appears. Aer selecting up to 4 thumbnails, you must click
the
button again.
e selected thumbnails are projected. Click the button to close the
th
umbnails screen and return to the toolbar or the projection control screen.
Selecting the Participant's Screen to Project Using Thumbnails
47
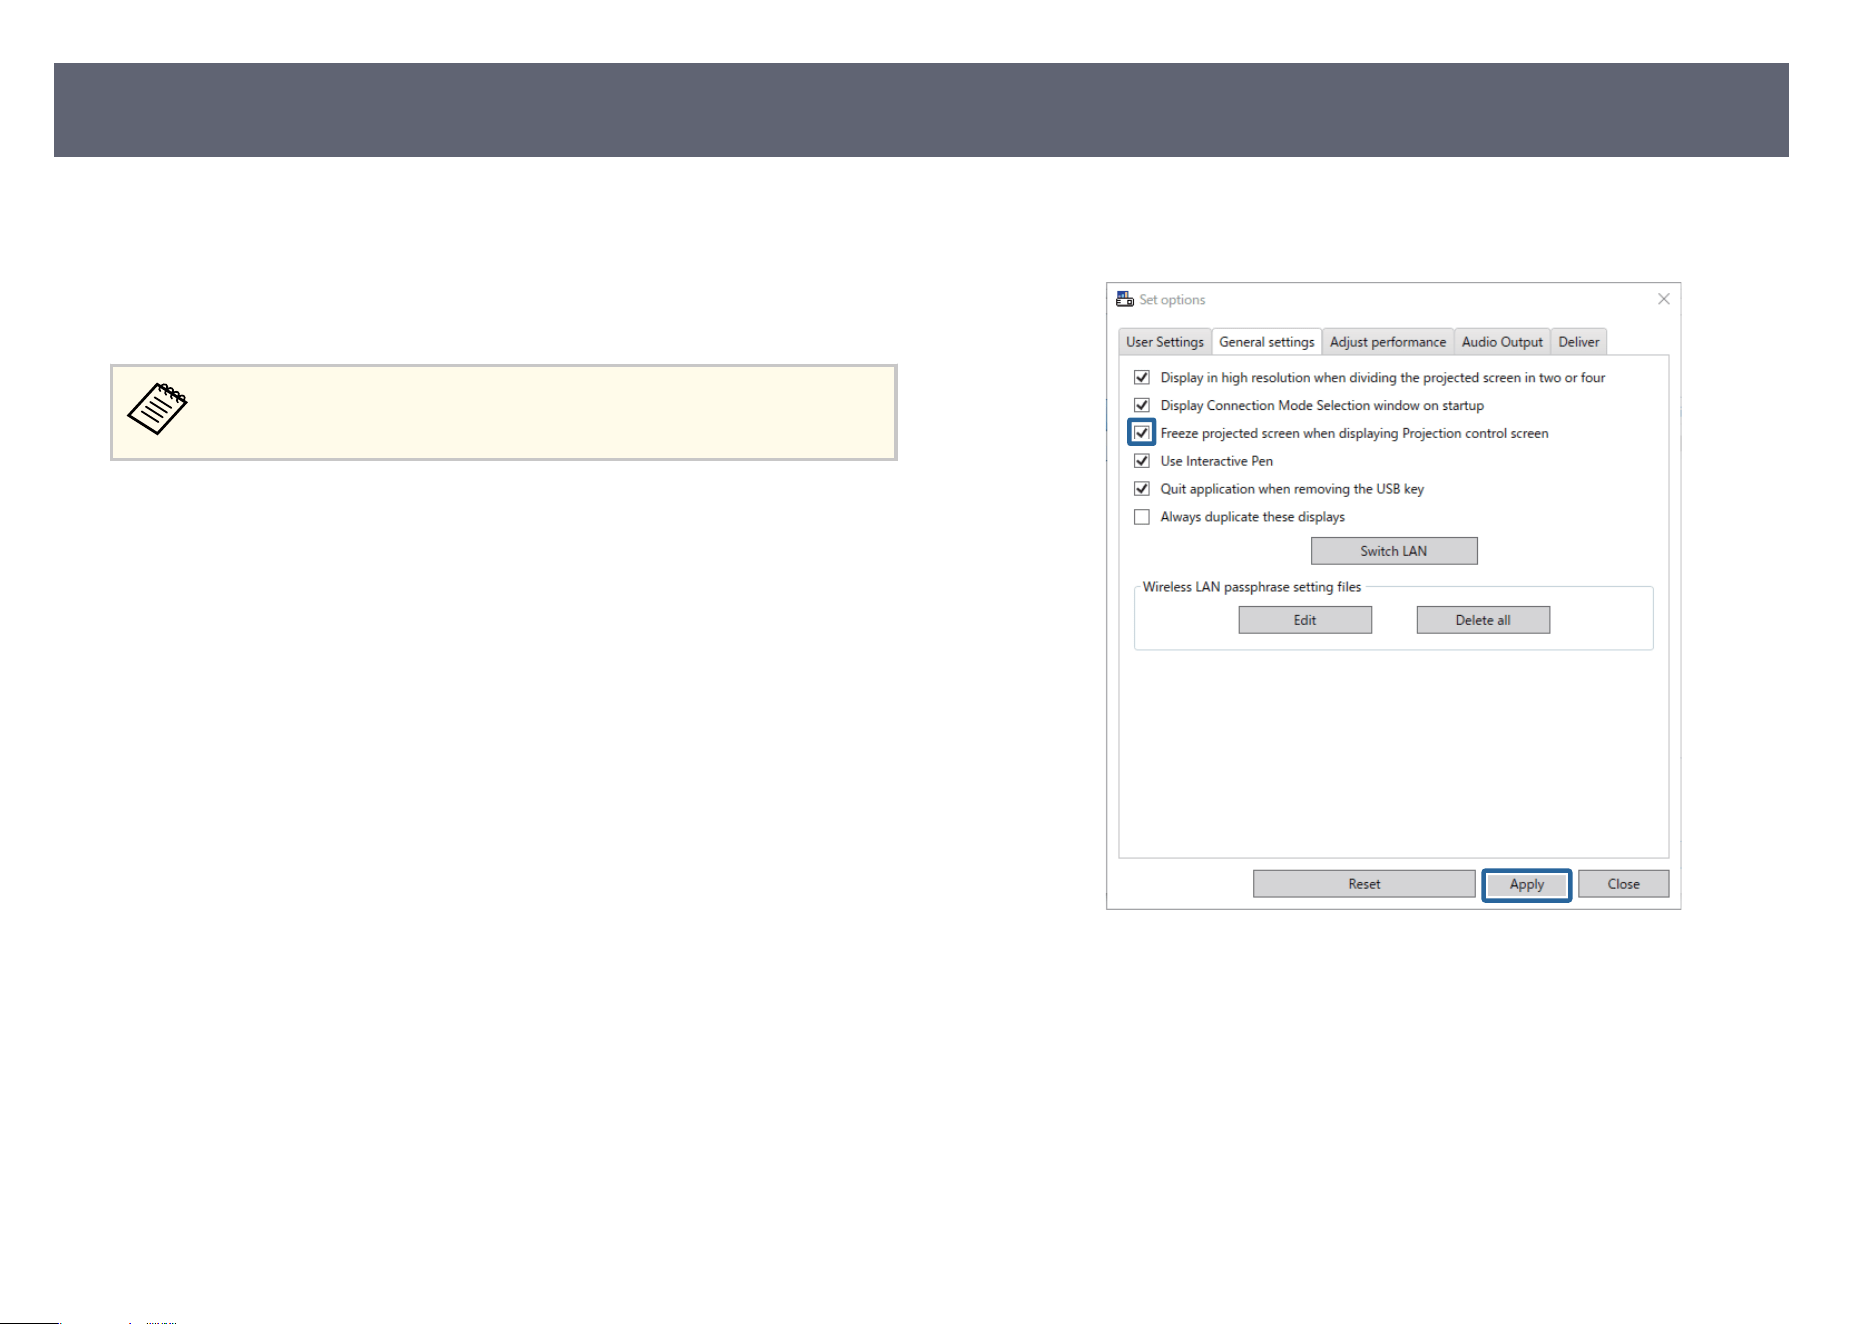
You can hide the projection control screen from other users while projecting
yo
ur computer screen. is allows you to change the necessary settings without
projecting the operation. e projected image currently displayed is paused
automatically when you switch the toolbar to the projection control screen. Your
computer screen is projected again when you return to the toolbar.
is function is available only for the moderator when using the
m
oderator function.
a
Click Set options on the search screen.
e Set options screen is displayed.
b
Click the General settings tab.
c
S
elect F
reeze projected screen when displaying Projection control
s
creen, and then click Apply.
e Set options screen closes. e operation on the projector control screen will
n
ot be projected next time you use it.
Hiding the Projection Control Screen
48
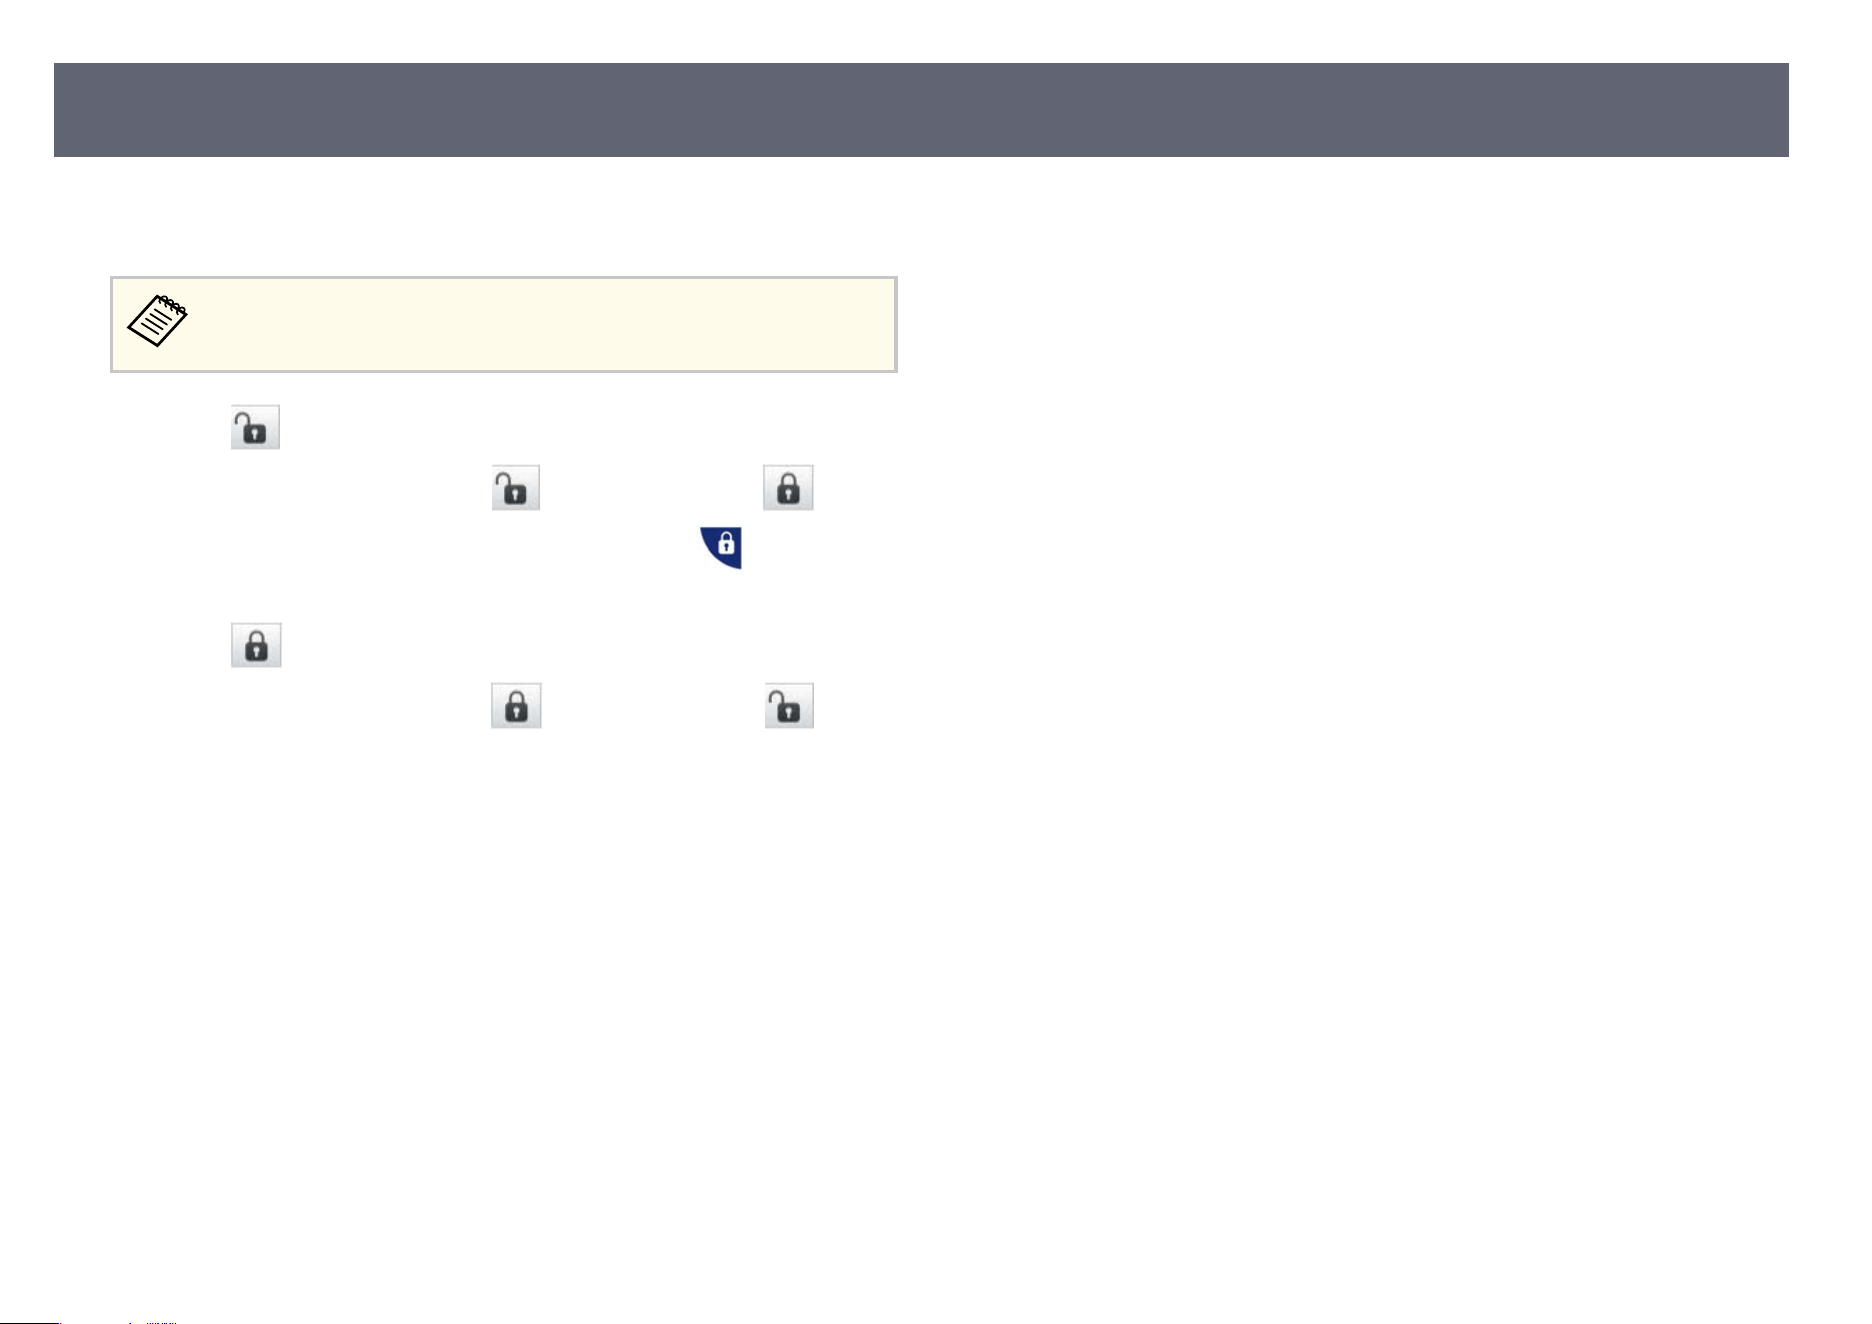
e moderator can lock mouse operations on participant's devices so that the
p
articipant cannot change the images being projected.
You cannot lock operations on the extended display.
•
Clic
k the
button on the projection control screen to lock the
par
ticipant's mouse operations. e
button changes to the button
on t
he projection control screen. e participants see the
icon to
indic
ate that mouse operations are locked.
•
Click the
button on the projection control screen to unlock the
par
ticipant's mouse operations. e
button changes to the button
on t
he projection control screen. e participants can operate the mouse on
their devices.
Prohibiting Participant Operations
49
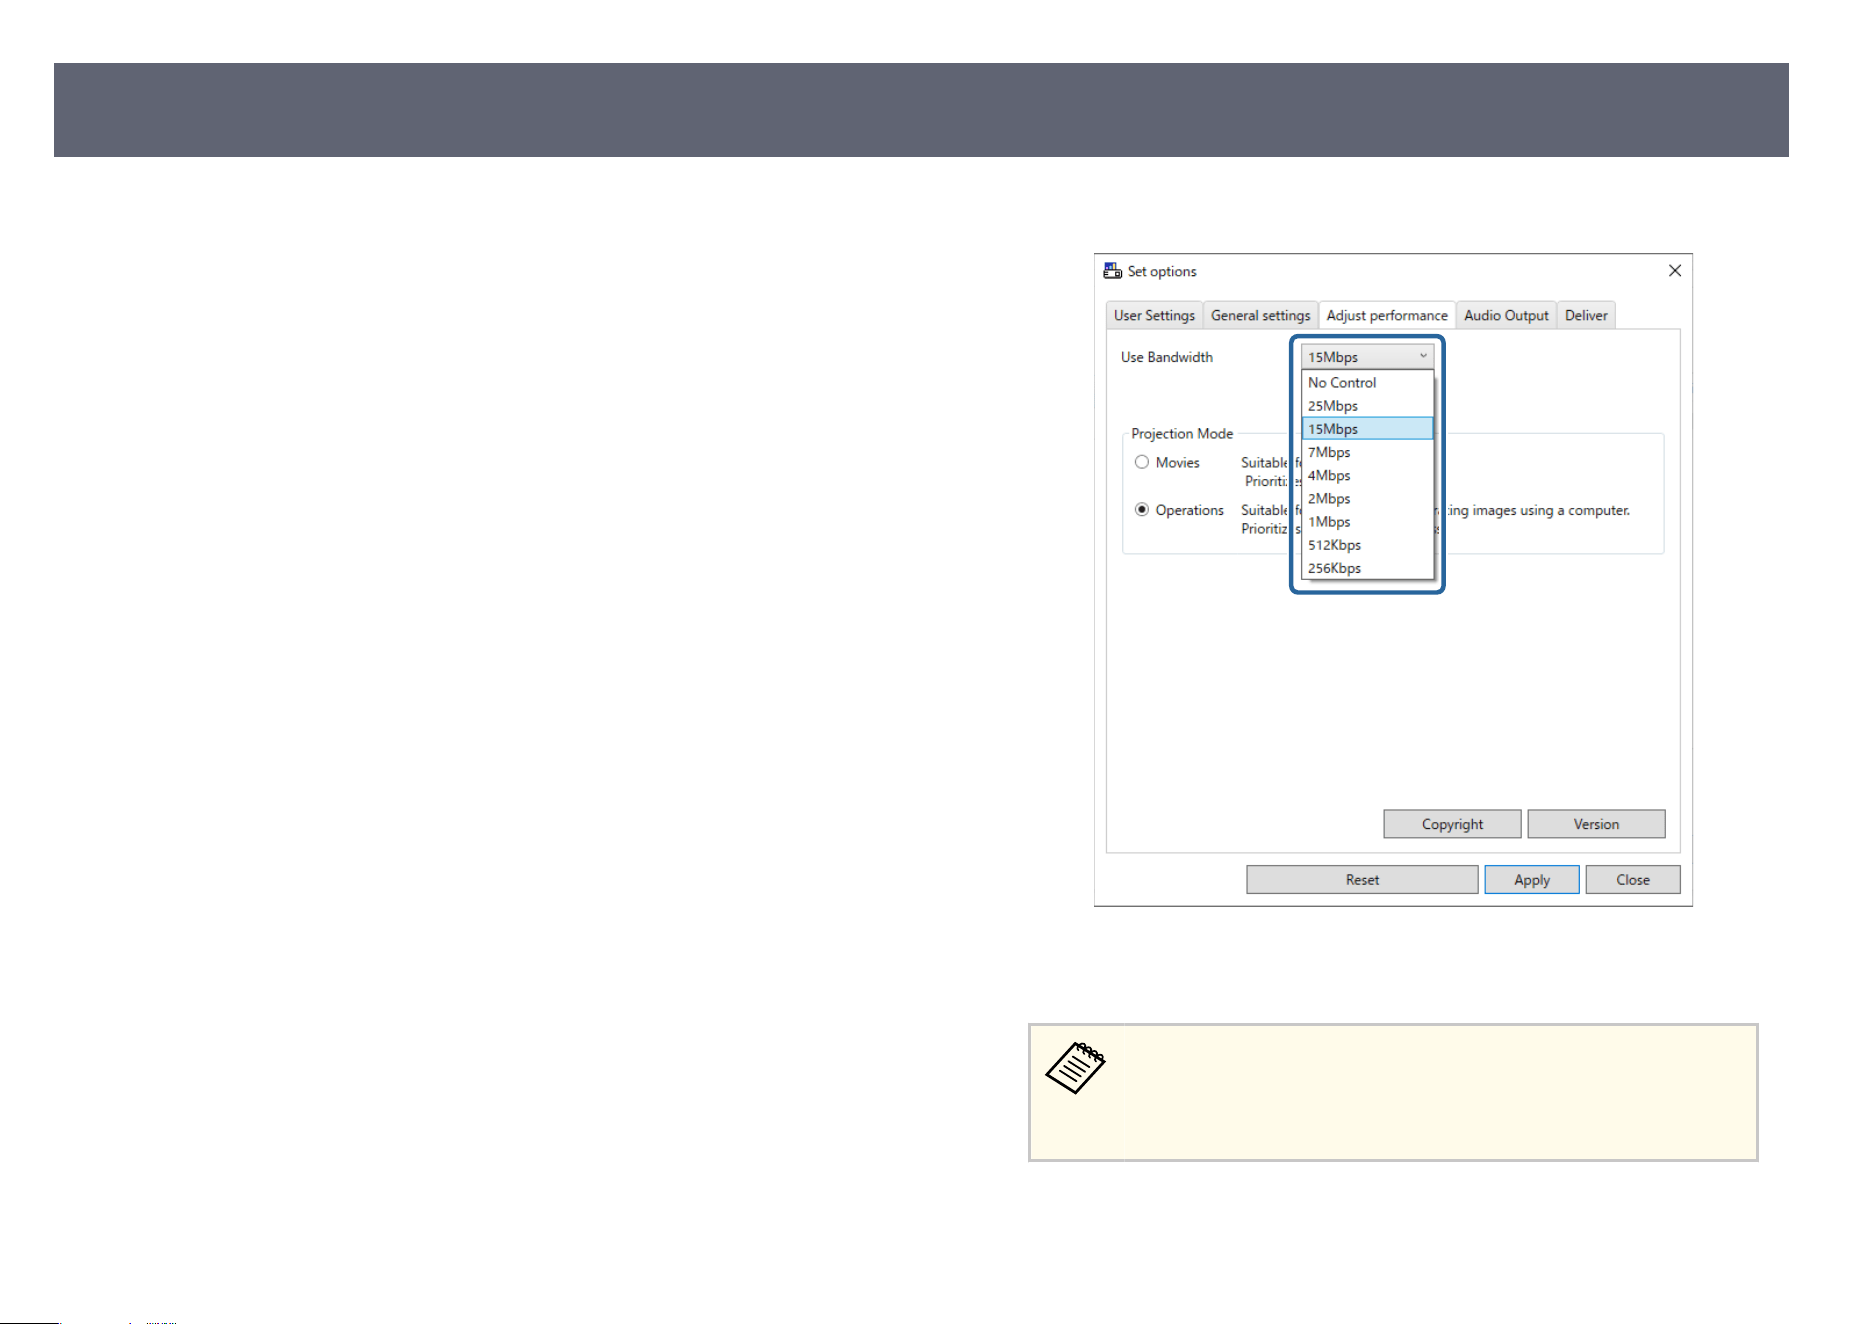
You can reduce the size of data transferred to the projector to decrease the
net
work load. To do this, you can control the connection bandwidth.
a
Click Set options on the search screen.
S
et options screen appears.
b
Click the Adjust performance tab.
c
S
elect Projection Mode according to the projection content.
•
M
ovies: Suitable for playing videos smoothly.
•
Operations: Suitable for displaying the mouse or soware operation on
PC smoothly.
d
Select the bandwidth you want to use as the Us
e Bandwidth setting.
When you select a narrower bandwidth, the projected image quality may
dec
line but the network load is reduced.
If you do not need to output audio while controlling bandwidth,
mak
e sure you clear the Output audio from the projector setting on
the Audio Output tab. e bandwidth used for audio can then be
used for the image transfer to improve the image quality.
g
Related Links
•
"B
andwidth Control Restrictions" p.51
Controlling the Connection Bandwidth
50

Bandwidth Control Restrictions
Note the following bandwidth limitations.
•
Wh
en you limit the bandwidth, the image quality may decline due to the
compression of the transferred data.
•
When you select 256Kbps or 512Kbps as Use Bandwidth on the Adjust
performance tab, you cannot output audio from the projector. If you want to
transfer audio, select the bandwidth to 1Mbps or more.
•
e bandwidth may momentarily exceed the value you selected because each
value in the list is an average value measured within 30 seconds.
•
You can limit the bandwidth only of data you send. You cannot limit data that
you receive, such as a thumbnail.
g
Related Links
•
"Outputting Audio from the Projector" p.43
Controlling the Connection Bandwidth
51


Try these solutions depending on your network environment.
g
Related Links
•
"S
olutions When You Cannot Connect Using Quick Connection Mode" p.53
•
"Solutions When You Cannot Connect Projectors Using Advanced
Connection Mode (Wireless)" p.53
•
"Solutions When You Cannot Connect Projectors Using Advanced
Connection Mode (Wired)" p.55
Solutions When You Cannot Connect Using Quick
Connection Mode
When you cannot connect the computer and the projector using Quick
Connection Mode, try the following solutions.
•
Check the status of the external devices used for the network connection or
the environment in which the network devices and the projector are located.
•
Connect the specied wireless LAN unit to the projector securely, if
necessary. See your projector User's Guide for details.
•
Check for any obstacles between the computer and projector, and
change their position to improve communication. Sometimes the indoor
environment prevents the projector from being found in a search.
•
Set the radio strength for the network devices to the maximum.
•
Check the projector's network settings.
•
Select one of these settings to connect the projector to the computer
directly using wireless communication. e necessary settings vary
depending on your projector.
•
Turn on the Simple AP setting.
•
Select Quick for Connection Mode.
•
Turn on the wireless LAN setting, if necessary.
•
When you enable the security setting, set the same passphrase to the
computer and the projector.
•
Clos
e the network settings menu on the projector.
•
Check the computer's network settings.
•
Make sure you are using a computer that can connect to a wireless LAN.
•
Enable the wireless LAN setting or AirPort on your computer.
•
Check the soware settings.
•
Make sure you start the soware in the correct connection mode. If you
cannot select or change the connection mode, select Display Connection
Mode Selection window on startup on the General settings tab in the Set
options screen. e projector displays the select connection mode screen
aer you restart the soware.
g
Related Links
•
"Set options - General settings" p.70
Solutions When You Cannot Connect Projectors Using
Advanced Connection Mode (Wireless)
When you cannot connect the computer and the projector using Advanced
Connection Mode over a wireless network, try the following solutions. If you
cannot resolve the problem, contact your network administrator.
•
Check the status of the external devices used for the network connection or
the environment in which the network devices and the projector are located.
•
Connect the specied wireless LAN unit to the projector securely, if
necessary. See your projector User's Guide for details.
•
Check for any obstacles between the access point and the computer
or projector, and change their position to improve communication.
Sometimes, indoor environments prevent the projector from being found
in a search.
•
Make sure that the access point and the computer or projector are not too
far apart. Move them closer together and try to connect again.
Solving Network Connection Problems
53

•
Ch
eck for interference from other equipment, such as a Bluetooth device
or microwave. Move the interfering device farther away or expand your
wireless bandwidth.
•
Set the radio strength for the network devices to the maximum.
•
Set the IP address, the subnet mask, and the gateway address for the access
point correctly.
•
Make sure the wireless LAN system of the access point supports the
projector's wireless LAN system.
•
Check the projector's network settings.
•
Select one of these settings to connect the projector to a wireless LAN. e
necessary settings vary depending on your projector.
•
Turn o the Simple AP setting.
•
Select Advanced for Connection Mode.
•
Set the computer, the access point, and the projector to the same SSID.
•
Set DHCP to O. When DHCP is set to On, it may take some time to
enter LAN standby status if an available DHCP server is not found.
•
Set the IP address, the subnet mask, and the gateway address for the
projector correctly.
•
Turn on the wireless LAN setting, if necessary.
•
Set the wireless LAN system to meet the standards supported by the access
point.
•
When you enable the security setting, set the same passphrase to the access
point, the computer, and the projector.
•
Close the network settings menu on the projector.
•
Check the computer's network settings.
•
Make sure you are using a computer that can connect to a wireless LAN.
•
Enable the wireless LAN setting or AirPort on your computer.
•
Connect to the access point to which the projector is connected.
•
Tur
n o the rewall. If you do not want to turn it o, register the rewall
as an exception. Make the necessary settings to open the ports. e ports
used by this soware are "3620", "3621", and "3629".
•
Check the access point settings.
•
Set connection permission at the access point to allow projectors to
connect if any functions that block connections, such as MAC Address
restrictions and port restrictions, are set to the access point.
•
Check the soware settings.
•
Select the network adapter you are using from Switch LAN on the
Set options screen. If the computer has multiple LAN environments, a
connection cannot be established unless the network adapter is selected
correctly.
•
If you cannot nd the projector you want to connect to using Automatic
search, select Manual search to specify the IP address.
•
Make sure you start the soware in the correct connection mode. If you
cannot select or change the connection mode, select Display Connection
Mode Selection window on startup on the General settings tab in the Set
options screen. e projector displays the select connection mode screen
aer you restart the soware.
•
Make sure the projector supports the Epson iProjection version being used.
Install the Epson iProjection soware by downloading it from the Epson
Web site.
•
Install the latest version of the Epson iProjection soware on all computers.
e maximum number of computer connections and the availability of the
moderator function varies depending on the projector model, no matter
which version of the Epson iProjection soware you are using.
•
When another user is already connected, you can only connect to
projectors in the same mirroring group as that selected by the other user.
Select a projector from the same mirroring group as the user who is
already connected, or select a projector that is in standby status.
g
Related Links
•
"Set options - General settings" p.70
Solving Network Connection Problems
54
•
"Se
arching for Network Projectors by Specifying an IP Address or Projector
Name" p.28
Solutions When You Cannot Connect Projectors Using
Advanced Connection Mode (Wired)
When you cannot connect the computer and the projector using Advanced
Co
nnection Mode over a wired network, try the following solutions. If you
cannot resolve the problem, contact your network administrator.
•
Check the status of the external devices used for the network connection or
the environment in which the network devices and the projector are located.
•
Connect the network cable securely.
•
Us
e a commercially available 100BASE-TX or 10BASE-T LAN
cable.
•
To prevent malfunctions, use a category 5 or higher shielded LAN
cable.
•
Ch
eck the projector's network settings.
•
Set DHCP to O. When DHCP is set to On, it may take some time to
enter LAN standby status if an available DHCP server is not found.
•
Set the IP address, the subnet mask, and the gateway address for the
projector correctly.
•
Close the network settings menu on the projector.
•
Check the computer's network settings.
•
Enable LAN settings on your computer.
Windows: Check Control Panel > Hardware and Sound > Device
Manager.
•
Tur
n o the rewall. If you do not want to turn it o, register the rewall
as an exception. Make the necessary settings to open the ports. e ports
used by this soware are "3620", "3621", and "3629".
•
Check the soware settings.
•
Select the network adapter you are using from Switch LAN on the
Set options screen. If the computer has multiple LAN environments, a
connection cannot be established unless the network adapter is selected
correctly.
•
If you cannot nd the projector you want to connect to using Automatic
search, select Manual search to specify the IP address.
•
Make sure you start the soware in the correct connection mode. If you
cannot select or change the connection mode, select Display Connection
Mode Selection window on startup on the General settings tab in the Set
options screen. e projector displays the select connection mode screen
aer you restart the soware.
•
Make sure the projector supports the Epson iProjection version being used.
Install the Epson iProjection soware by downloading it from the Epson
Web site.
•
Install the latest version of the Epson iProjection soware on all computers.
e maximum number of computer connections and the availability of the
moderator function varies depending on the projector model, no matter
which version of the Epson iProjection soware you are using.
•
When another user is already connected, you can only connect to
projectors in the same mirroring group as that selected by the other user.
Select a projector from the same mirroring group as the user who is
already connected, or select a projector that is in standby status.
g
Related Links
•
"Set options - General settings" p.70
•
"Searching for Network Projectors by Specifying an IP Address or Projector
Name" p.28
Solving Network Connection Problems
55

Try these solutions depending on your situation.
g
Related Links
•
"S
olutions When the Screen is Not Projected Properly" p.56
•
"Solutions When Audio is Not Played Properly" p.56
•
"Solutions When the Moderator Function Does Not Work" p.57
•
"Solutions When the Projected Screen is Not Delivered" p.57
Solutions When the Screen is Not Projected Properly
If the screen is not projected or there are problems with the project images try
the following solutions.
•
If you are using a Microso Oce application, stop moving the mouse
pointer. If you move the mouse pointer continuously, the screen may not be
refreshed quickly.
•
e Media Player movie playback screen may not be projected depending on
the computer.
•
e screen saver preview may not be projected properly depending on the
computer.
•
Reduce the number of connected devices if the connection speed declines.
•
For Mac, when playing back movies, start the Epson iProjection soware rst
before starting playback. If the Epson iProjection soware is started during
movie playback and the display screen resolution and color numbers are
changed, try moving the movie playback window, minimizing it, or resizing it
and so on.
•
When using a computer that does not meet the soware requirements,
images and audio for movies may stop.
•
When another user is the moderator, you cannot control your projected
display. Change the moderator or project the screen without a moderator.
•
When duplicating a display using a computer with a 3rd Generation Intel
Core i series or earlier CPU, select Always duplicate these displays on the
General settings tab in the Set options screen.
•
Wh
en the projected images are interrupted or freezing, change the Projection
Mode setting on the Adjust performance tab in the Set options screen.
•
Movies: Suitable for playing videos smoothly.
•
Operations: Suitable for displaying the mouse or soware operation on PC
smoothly.
g
Related Links
•
"Set options - General settings" p.70
•
"Set options - Adjust performance" p.71
•
"Changing the Moderator" p.45
Solutions When Audio is Not Played Properly
If there is no audio coming from the projector, try the following solutions.
•
Allow loading of the audio driver. Restart your computer, open System
Preferences, select Security & Privacy, and then select Allow under the
General tab.
•
Audio can only be transferred to one projector. When multiple projectors are
connected to one computer, disconnect other projectors and try again.
•
Select Output audio from the projector on the Audio Output tab on the Set
options screen.
•
You can only output the computer's audio from the projector when projecting
one computer screen in full screen mode.
•
If the bandwidth is limited on the Adjust performance tab on the Set options
screen, try increasing the connection bandwidth.
•
If the volume for the computer is set to the minimum while the projector
volume is set to the maximum, the noise may be mixed. Turn up the
computer's volume and turn down the projector's volume.
g
Related Links
•
"Set options - Audio Output" p.72
Solving Problems During Projection
56

Solutions When the Moderator Function Does Not
Wor
k
If the moderator function does not work properly, try the following solutions.
•
Mak
e sure you use the Standard Edition of the soware. If you use the
Participant Edition of the soware and need the moderator function, reinstall
this soware as necessary.
•
Make sure your projector supports the moderator function. See the User's
Guide supplied with the projector for more details.
•
When another user is the moderator, you cannot control your projected
display. Change the moderator.
•
Make sure you select Connect as a Moderator, or disable interrupt
connections when you connect a projector.
g
Related Links
•
"Changing the Moderator" p.45
Solutions When the Projected Screen is Not Delivered
If the screen delivery function does not work properly, try the following
s
o
lutions.
•
Make sure your projector supports the screen delivery function. See the User's
Guide supplied with the projector for more details.
•
Close running projector functions.
•
Make sure the image being projected is not protected by copyrights.
g
Related Links
•
"Distributing the Projected Screen" p.46
Solving Problems During Projection
57
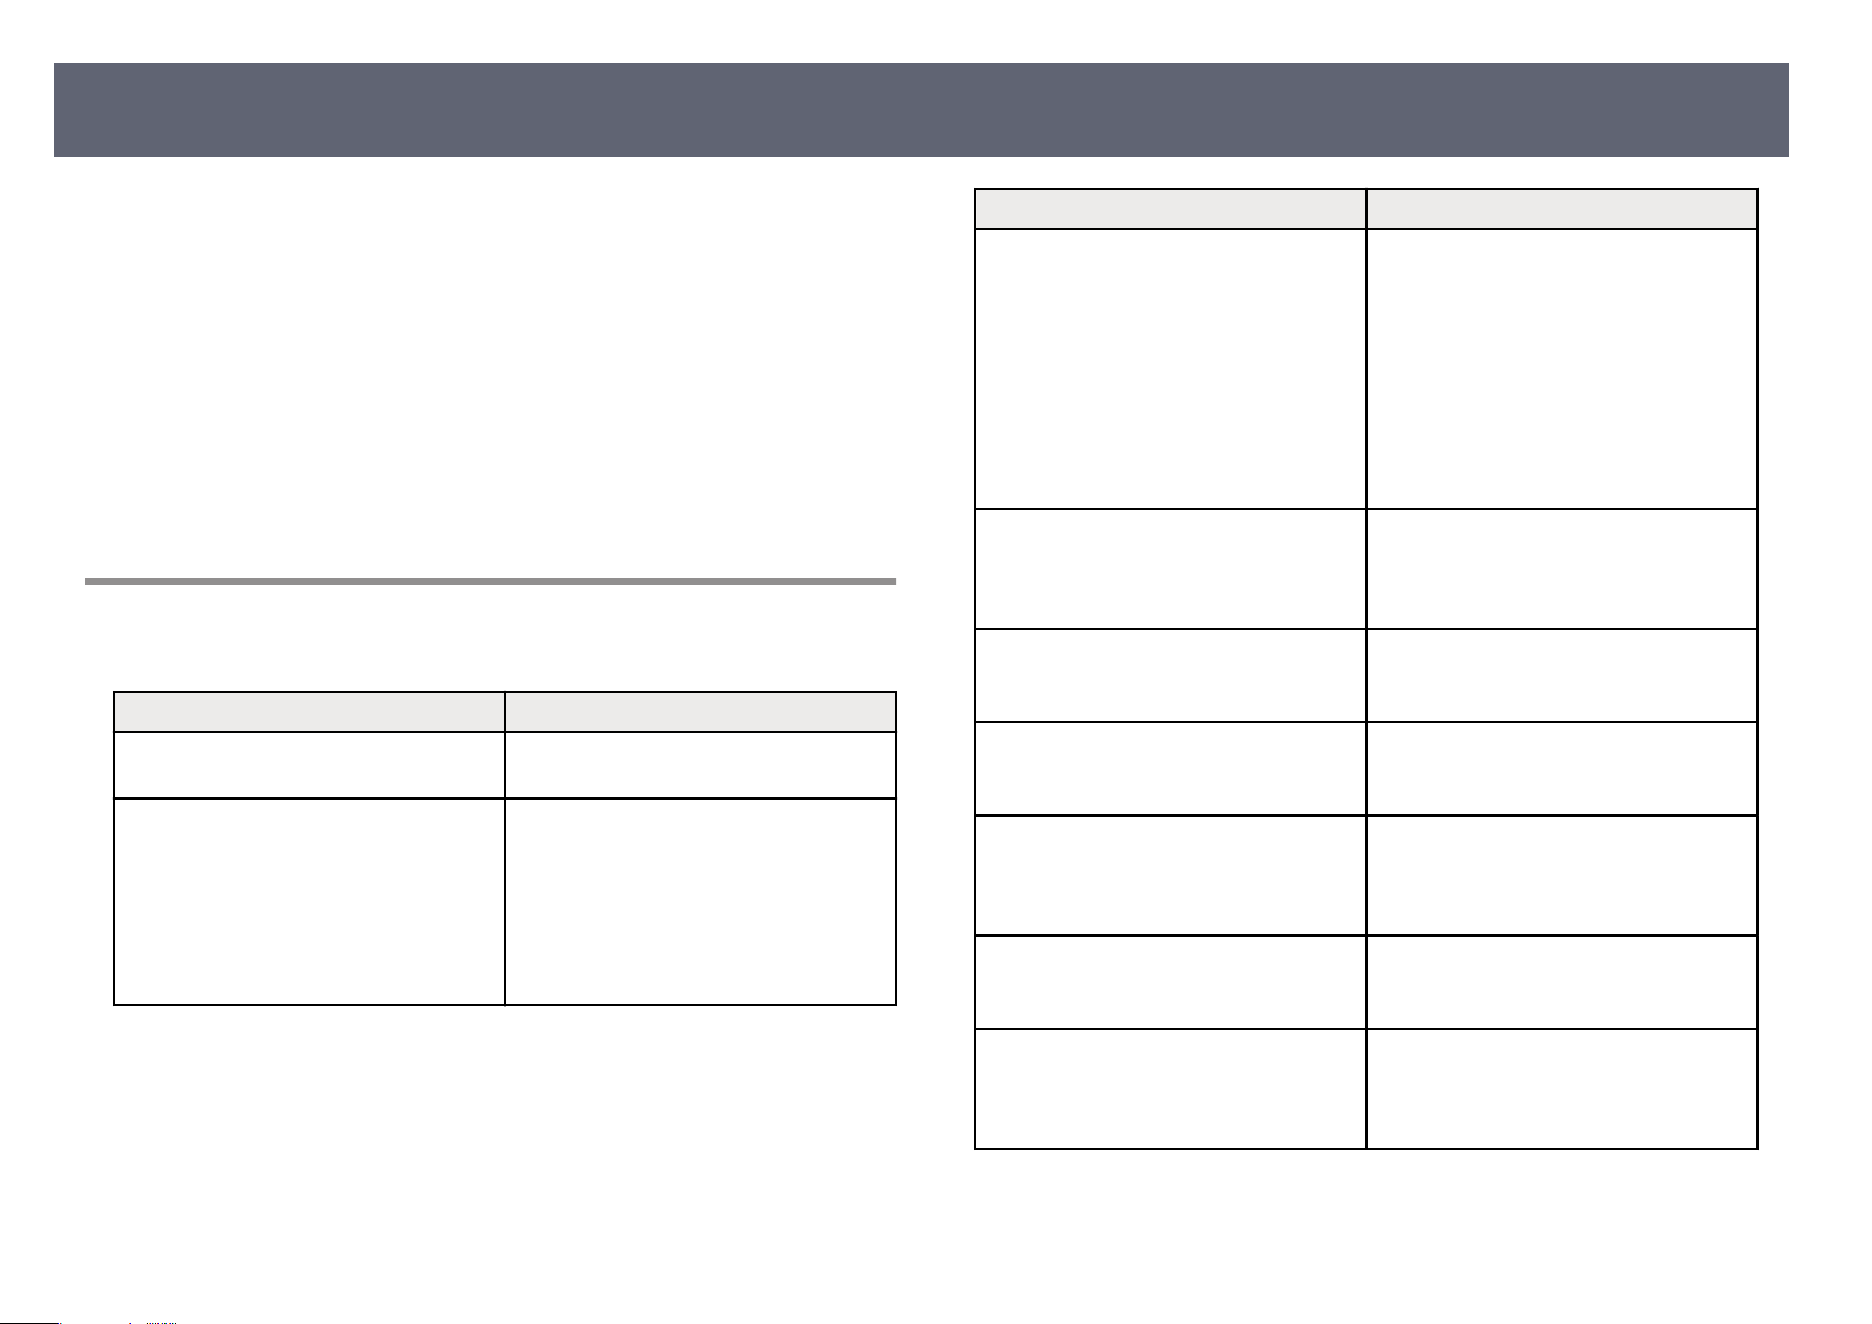
When an error occurs, an error message is displayed on your computer screen.
Ch
eck for your message and follow the instructions here to clear the error.
g
Related Links
•
"Error Messages When Starting up the Epson iProjection Soware" p.58
•
"Error Messages When Using a USB Key" p.59
•
"Error Messages When Searching for and Selecting Projectors" p.60
•
"Error Messages When Projecting" p.61
•
"Error Messages When Operating a Prole" p.61
•
"Error Messages When Using the Moderator Function" p.61
•
"Error Messages When Distributing the Projected Screen" p.62
Error Messages When Starting up the Epson
iProjection Software
Error Messages Remedy
is application is already running. Two instances of the Epson iProjection
so
ware have been started.
Cannot start this application because
ot
her EPSON Projector soware (Quick
Wireless Connection) is already running.
Close Quick Wireless Connection and
then start the Epson iProjection soware.
To close Quick Wireless Connection,
perform Safely Remove Hardware from
the icon on the task bar to remove the
Quick Wireless Connection USB Key
from the computer.
Error Messages Remedy
Cannot start this application because
ot
her EPSON Projector soware (USB
Display) is already running.
Close USB Display and then start the
Epson iProjection soware.
Do one of the following to close USB
Display:
•
Windows: Disconnect the USB cable
from the projector.
•
Mac: Select Disconnect from the USB
Display icon menu on the menu bar or
Dock, and then remove the USB cable.
Cannot start this application because
ot
her EPSON Projector soware
(EasyMP Network Projection) is already
running.
Close EasyMP Network Projection and
then start the Epson iProjection soware.
Cannot start this application because
ot
her EPSON Projector soware (USB
Key Setup Tool) is already running.
Close the USB Key Setup Tool and then
start the Epson iProjection soware.
Cannot start this application because
ot
her EPSON Projector soware (Epson
Wireless Presentation) is already running.
Close Epson Wireless Presentation and
then start the Epson iProjection soware.
Cannot start this application because
ot
her EPSON Projector soware (Epson
Wireless Transmitter Settings) is already
running.
Close Epson Wireless Transmitter
Settings and then start the Epson
iProjection soware.
Cannot start this application because
ot
her EPSON Projector soware (Epson
Classroom Connect) is already running.
Close Epson Classroom Connect and
then start the Epson iProjection soware.
Epson iProjection initialization failed. Restart the Epson iProjection so
ware. If
the message is still displayed, uninstall
and then reinstall the Epson iProjection
soware.
Error Messages List
58
Error Messages Remedy
Cannot open the shortcut le. e
shortcut le may be corrupted. Start
the Epson iProjection soware, and then
try searching for and connecting to the
projector again.
Cannot nd the projector linked to the
s
hortcut le. Search again.
Check the following items.
•
Open a shortcut le in the connection
mode for which you created the
shortcut le.
•
Open a shortcut le in Advanced
Connection Mode if you use the
Participant Edition of the soware.
Files are missing or invalid. Failed to
st
art the application. Reinstall/remove the
application.
Uninstall and then reinstall the Epson
iProjection soware.
Network adapter information could not
be o
btained.
Check the following items.
•
A network adapter is installed on the
computer.
•
e driver for the network adapter
being used is installed on the
computer.
•
e network adapter is enabled.
Aer checking, restart the computer
and then restart the Epson iProjection
soware.
If you still cannot connect, check the
network settings on the computer and the
network settings on the projector.
Cannot start from the shortcut while
pr
ojecting.
Stop projecting and then start projection
from the shortcut. You cannot start
projection from the shortcut when you
are already projecting using the Epson
iProjection soware.
Error Messages Remedy
Cannot start from the shortcut while the
Op
tion screen is displayed. Close the
Option screen, and then try opening the
shortcut again.
e Set options screen is displayed. Close
the Set options screen.
e slide show will not begin until
P
owerPoint is restarted.
Close PowerPoint, and then start the slide
show again.
Cannot be used with the current OS
ver
sion. Reinstall Epson iProjection.
Reinstall the Epson iProjection soware.
Unable to start from the shortcut. A
conn
ection has already been established
with the projector.
Stop projecting and then start projection
from the shortcut. If the USB key is
connected, remove the USB key.
g
Related Links
•
"U
ninstalling the Epson iProjection Soware (Windows)" p.82
•
"Uninstalling the Epson iProjection Soware (Mac)" p.82
•
"Installing the Epson iProjection Soware (Windows)" p.14
•
"Installing the Epson iProjection Soware (Mac)" p.14
Error Messages When Using a USB Key
Error Messages Remedy
Unable to nd
connection information.
Insert the USB key.
Insert the USB key securely into your
computer.
Unable to nd
connection information.
Insert the USB key into the projector.
Insert the USB key securely into the
projector to update the projector network
information.
Unable to nd
a projector that can
connect with Quick Connection Mode.
Close the Epson iProjection soware and
then insert the USB key again.
Unable to nd
a projector that can
connect with Advanced Connection
Mode.
Error Messages List
59
Error Messages Remedy
Unable to use the USB key while the
app
lication is running.
Unable to nd
a projector that can
connect with Participant Edition.
Make sure the projector is connected
to the network using the Advanced
connection mode, and then update the
projector network information saved on
the USB key.
Files are missing or invalid. Failed to start
th
e application. Set up the USB key again.
Delete all les on the USB ash drive,
and then start the USB Key Setup Tool to
create a USB key again.
Unable to set up the USB key. Files
are mi
ssing or invalid. Reinstall Epson
iProjection.
Unable to set up the USB key. Reinsert
th
e USB memory device and start USB
Key Setup Tool again.
Unable to set up the USB key. Check
th
e amount of free space. Necessary free
space: 150 MB
Administrator authority is required to
run US
B Key Setup Tool.
Run the USB Key Setup Tool as a user
with administrator authority.
g
Related Links
•
"Cr
eating a USB key on a USB Flash Drive (Windows Only)" p.40
•
"Using a USB Key to Connect a Windows Computer" p.40
Error Messages When Searching for and Selecting
P
r
ojectors
Error Messages Remedy
Cannot join. e maxim
um number of
participants has been exceeded.
e maximum number of devices are
already connected to the projector.
Disconnect users and projectors that are
not projecting screens.
e projector keyword does not match.
P
lease try again.
Check the Projector Keyword displayed
on the screen, and enter the Projector
Keyword.
Connection failed due to projector
ke
yword mismatch.
e selected projector is mirroring
an
other projector.
When another user is already connected,
you can only connect to the projectors in
the same mirroring group as that selected
by the other user. Select a projector from
the same mirroring group, or select a
projector that is in standby status.
One or more projectors are not
res
ponding.
You cannot connect to multiple projectors
simultaneously. Check the network
settings on the computer and the network
settings on the projector.
A network error occurred. Turn on your computer's wireless LAN,
and t
hen try searching for the projector
again. If you still cannot connect to the
projector, check the network settings on
the computer and the network settings on
the projector.
Connection to the projector failed. Check if the projector you want
to co
nnect to is already connected
to EasyMP Network Projection. You
cannot connect to a projector that
is already connected using EasyMP
Network Projection.
Error Messages List
60
g
Related Links
•
"S
upported Resolutions" p.83
•
"Uninstalling the Epson iProjection Soware (Windows)" p.82
•
"Uninstalling the Epson iProjection Soware (Mac)" p.82
•
"Getting the Latest Version of the Soware" p.82
•
"Installing the Epson iProjection Soware (Windows)" p.14
•
"Installing the Epson iProjection Soware (Mac)" p.14
Error Messages When Projecting
Error Messages Remedy
e projector has disconnected. An error may have occurred in the
pr
ojector. Check the projector's indicator
lights.
A network error occurred. Try connecting again. If you still cannot
conn
ect to the projector, check the
network settings on the computer and the
network settings on the projector.
Error Messages When Operating a Pr
ole
Error Messages Remedy
Enter max. 32 characters. e entered text exceeds 32 characters.
S
horten the name to 32 characters or less.
Enter a folder name. No folder name entered. Enter a folder
nam
e.
Folders should not be created more than
6 lay
ers deep.
e folder structure is deeper than six
folders. Create the new folder higher up
in the folder structure.
ere is already a folder named XXX in
t
his folder.
A folder with the same name already
exists. Enter another folder name.
Error Messages Remedy
ere is already a le named XXX in this
f
older.
A projector with the same name already
exists. Enter another projector name.
Cannot import. Format not supported by
thi
s application.
Check the prole you want to import. You
cannot import a prole when projector
information has not been registered, or
when the prole is corrupt.
Cannot import because the folder
st
ructure exceeds six folders.
e folder structure cannot exceed six
layers. Import, move, or copy to a folder
higher up in the folder structure.
Cannot move because the folder structure
exce
eds six folders.
Cannot copy because the folder structure
exce
eds six folders.
Failed to open the le. e
prole may be corrupted. Try
importing the prole again.
Failed to save the le. M
ake sure you have access rights to the
folder, and then try again.
Cannot import certain items because the
conn
ection modes dier.
Import a prole in the connection mode
in which you created a prole.
g
Related Links
•
"R
egistering a Prole" p.29
•
"Importing a Prole" p.31
Error Messages When Using the Moderator Function
Error Messages Remedy
Cannot switch to moderator. You cannot become the moderator when
ano
ther user is the moderator. Ask the
current moderator to quit, and then try
again.
Error Messages List
61
Error Messages Remedy
Failed to switch to Moderator Mode Make sure another user is not the
mo
derator, and then try again.
e moderator function is not available.
Y
ou have been connected as a participant.
e projector you are connecting to
does not support the moderator function.
To become the moderator, change to a
projector that supports the moderator
function.
g
Related Links
•
"C
hanging the Moderator" p.45
Error Messages When Distributing the Projected
Screen
Error Messages Remedy
e p
rojector is processing. Wait for a
w
hile, and then try to deliver again.
Close running projector functions, and
then try again.
Cannot deliver the image currently being
pr
ojected.
Make sure the image being projected is
not protected by copyrights.
A network error occurred while
deli
vering. Please try again.
Make sure the moderator can connect to
the projector.
Cannot save the received le.
Check the
amount of free space.
Make sure you have enough free space to
save the received images.
Cannot save the received le.
Check the
access rights to the Save To folder.
Check the location where the received
image is saved on the Deliver tab in the
Set options screen and make sure you
have access rights to the folder.
Cannot save the received le.
Check the
folder settings.
g
Related Links
•
"Di
stributing the Projected Screen" p.46
Error Messages List
62
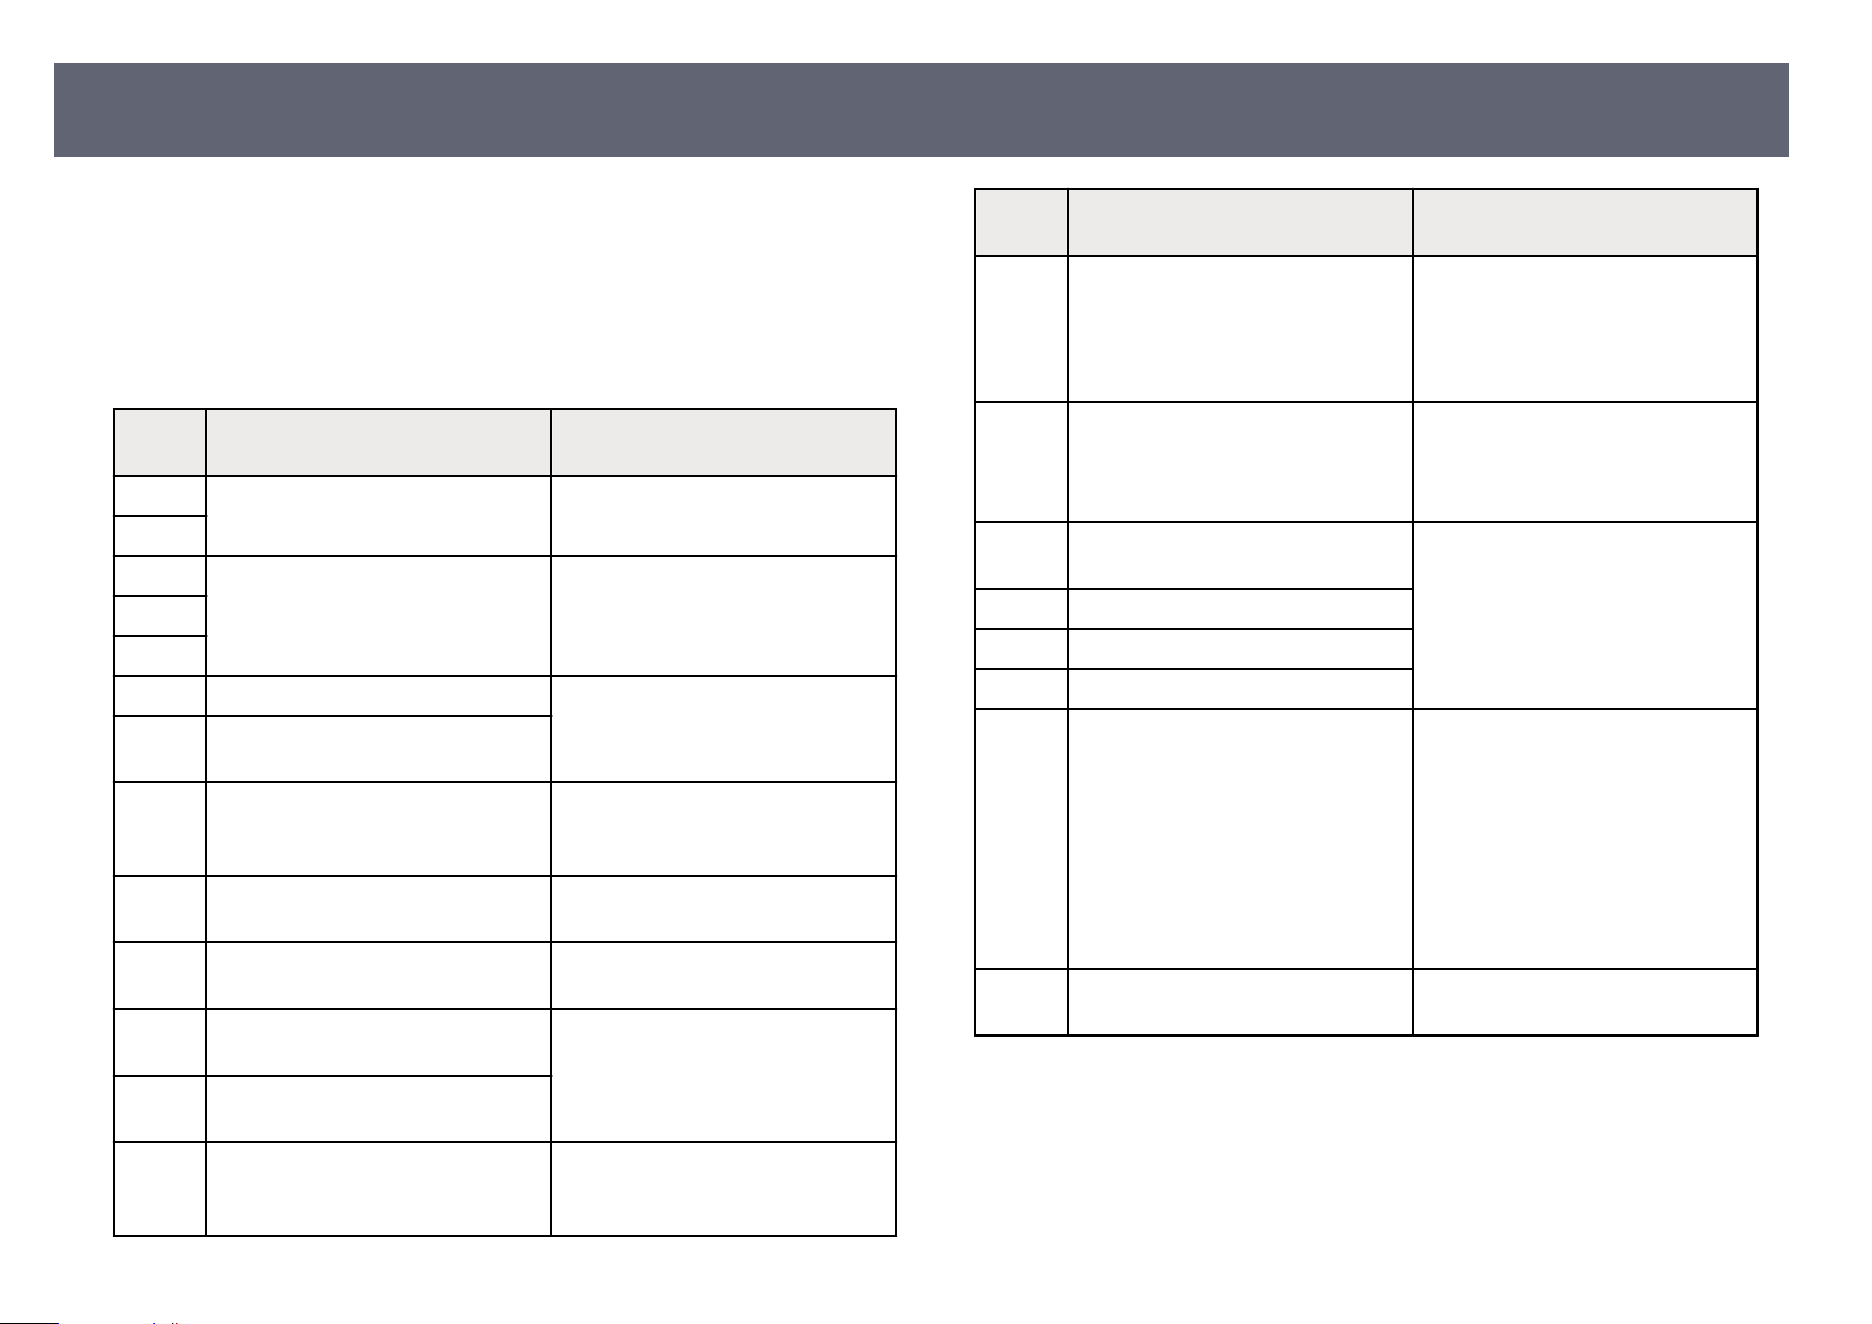
When a connection error occurs, a number indicating the type of error is
displ
ayed as follows.
Event ID: 04xx
Check the numbers and then apply the following countermeasures. If you
cannot resolve the problem, contact your network administrator, or contact
Epson as described in your projector User's Guide.
Event
ID
Cause Remedy
0432 Failed to start up the
network software.
Restart the projector.
0435
0434 Network communication is
unstable.
Check the network communication
status, and reconnect aer
waiting
for a while.
0481
0482
0433 Cannot play transferred images. Restart the network soware.
0484 Communication was disconnected
from the computer.
04FE e network
soware
ended
unexpectedly.
Check the status of network
communications. Restart the
projector.
04FF A system error occurred in the
projector.
Restart the projector.
0891 Cannot nd
an access point with the
same SSID.
Set the computer, the access point,
and the projector to the same SSID.
0892 e WPA/WPA2 authentication
type does not match.
Check that the wireless LAN
security settings are correct.
0893 e WEP/TKIP/AES encryption
type does not match.
0894 Communication was disconnected
because the projector connected to
an unauthorized access point.
Contact your network administrator
for more information.
Event
ID
Cause Remedy
0898 Failed to acquire DHCP. Check the DHCP server to see if it
is operat
ing correctly and check the
LAN cable to see if it is connected
correctly. If you are not using DHCP,
set DHCP to O.
0899 Other communication errors If restarting the projector or the
netwo
rk soware does not solve the
problem, contact Epson as described
in your projector User's Guide.
089A e EAP authentication type is not
the s
ame.
Check that the wireless LAN
security settings are correct. Also,
check if the certicate is installed
correctly.
089B EAP server authentication failed.
089C EAP client authentication failed.
089D Key exchange failed.
0B01 e b
uilt-in storage could not be
det
e
c
ted correctly.
Perform Delete All Internal Data.
When the internal storage is deleted
correctly, plugin the power cord for
the projector and turn it on. If it is
not deleted correctly, contact Epson
as described in your projector User's
Guide.
Go to Extended > Whiteboard
Settings > Internal Storage.
0BFF An error has occurred in the
White
board function.
Restart the projector.
Event ID List
63

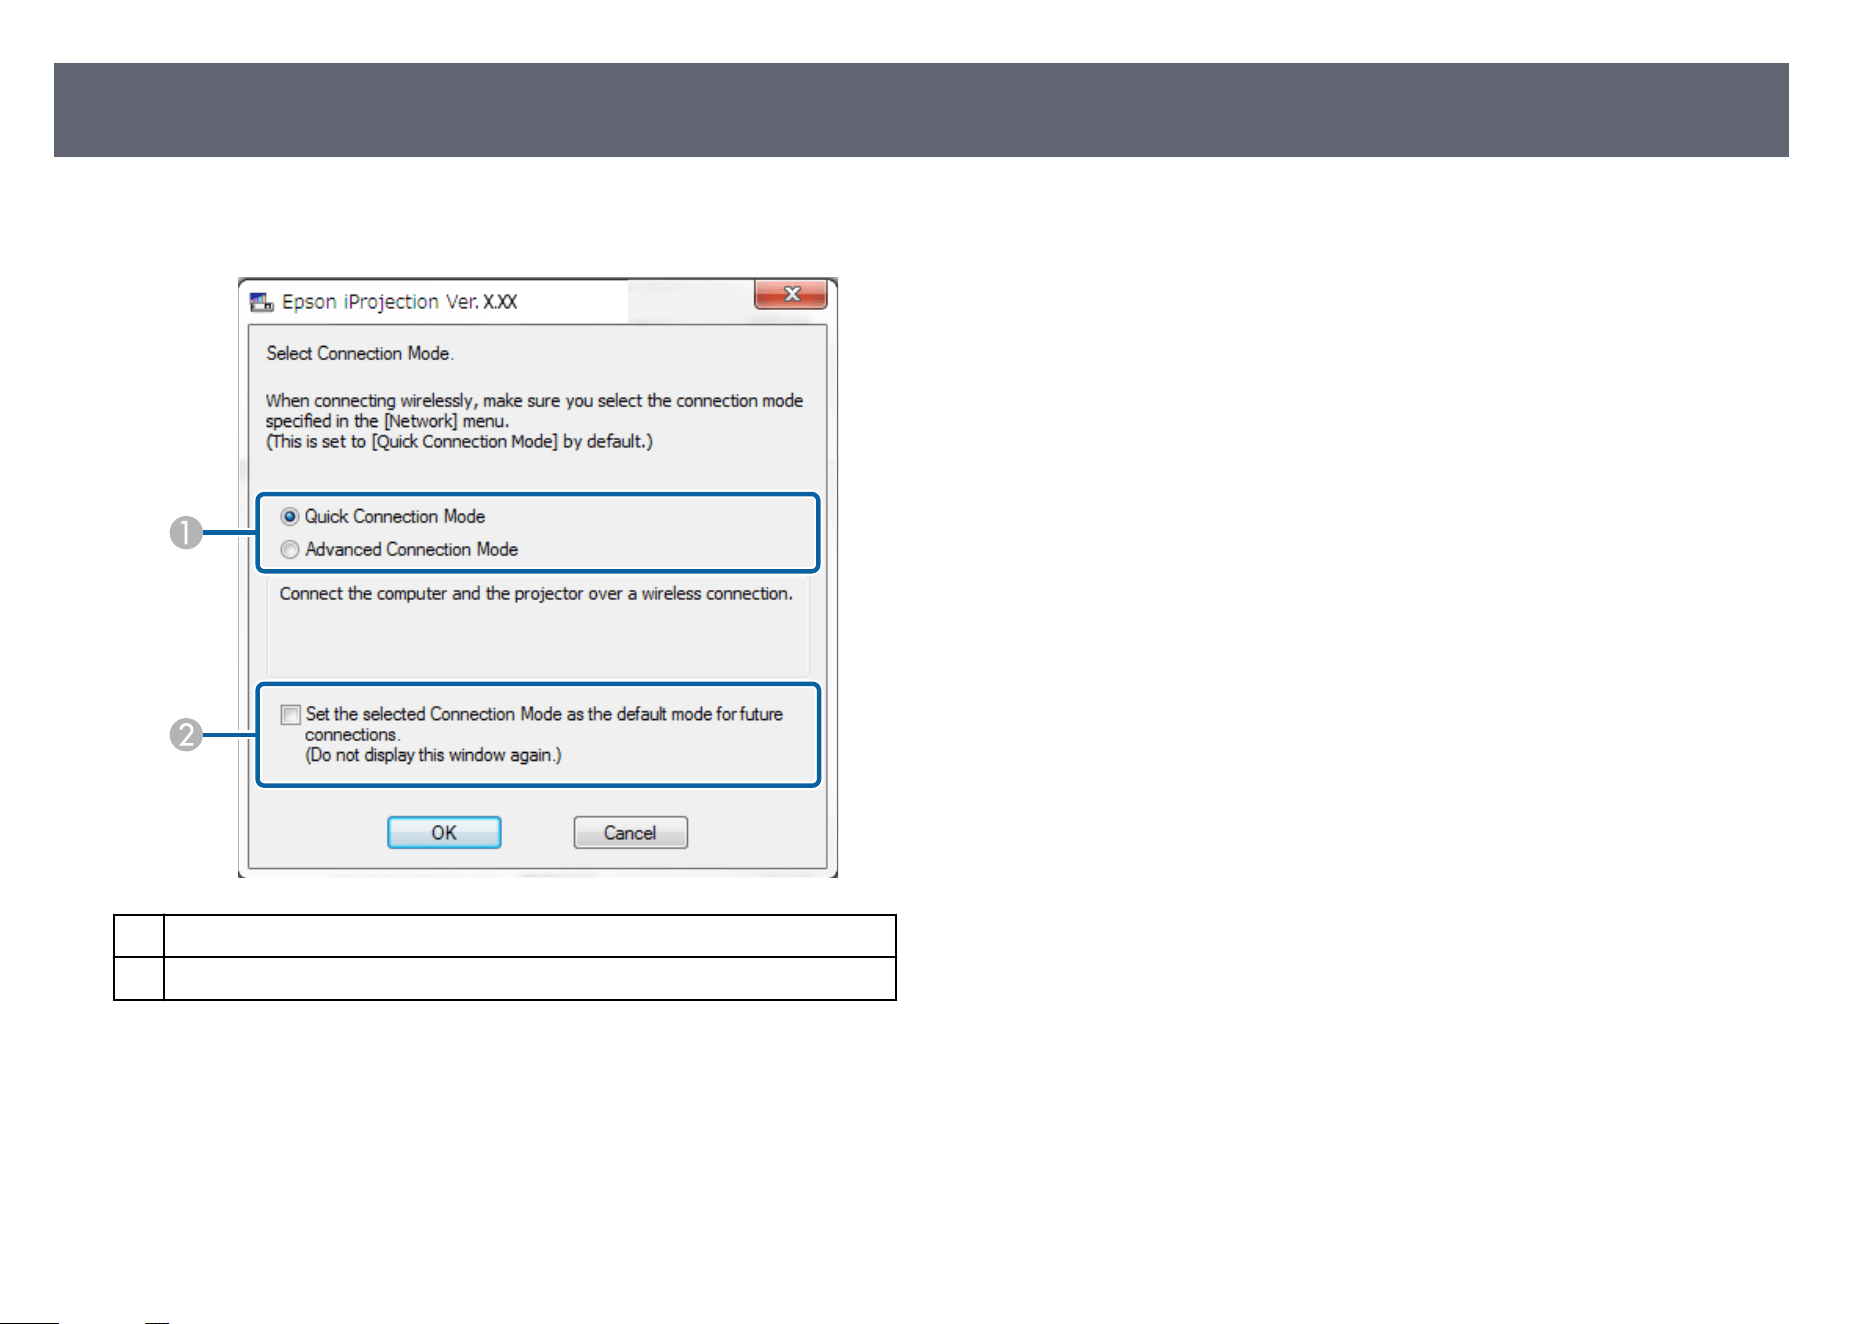
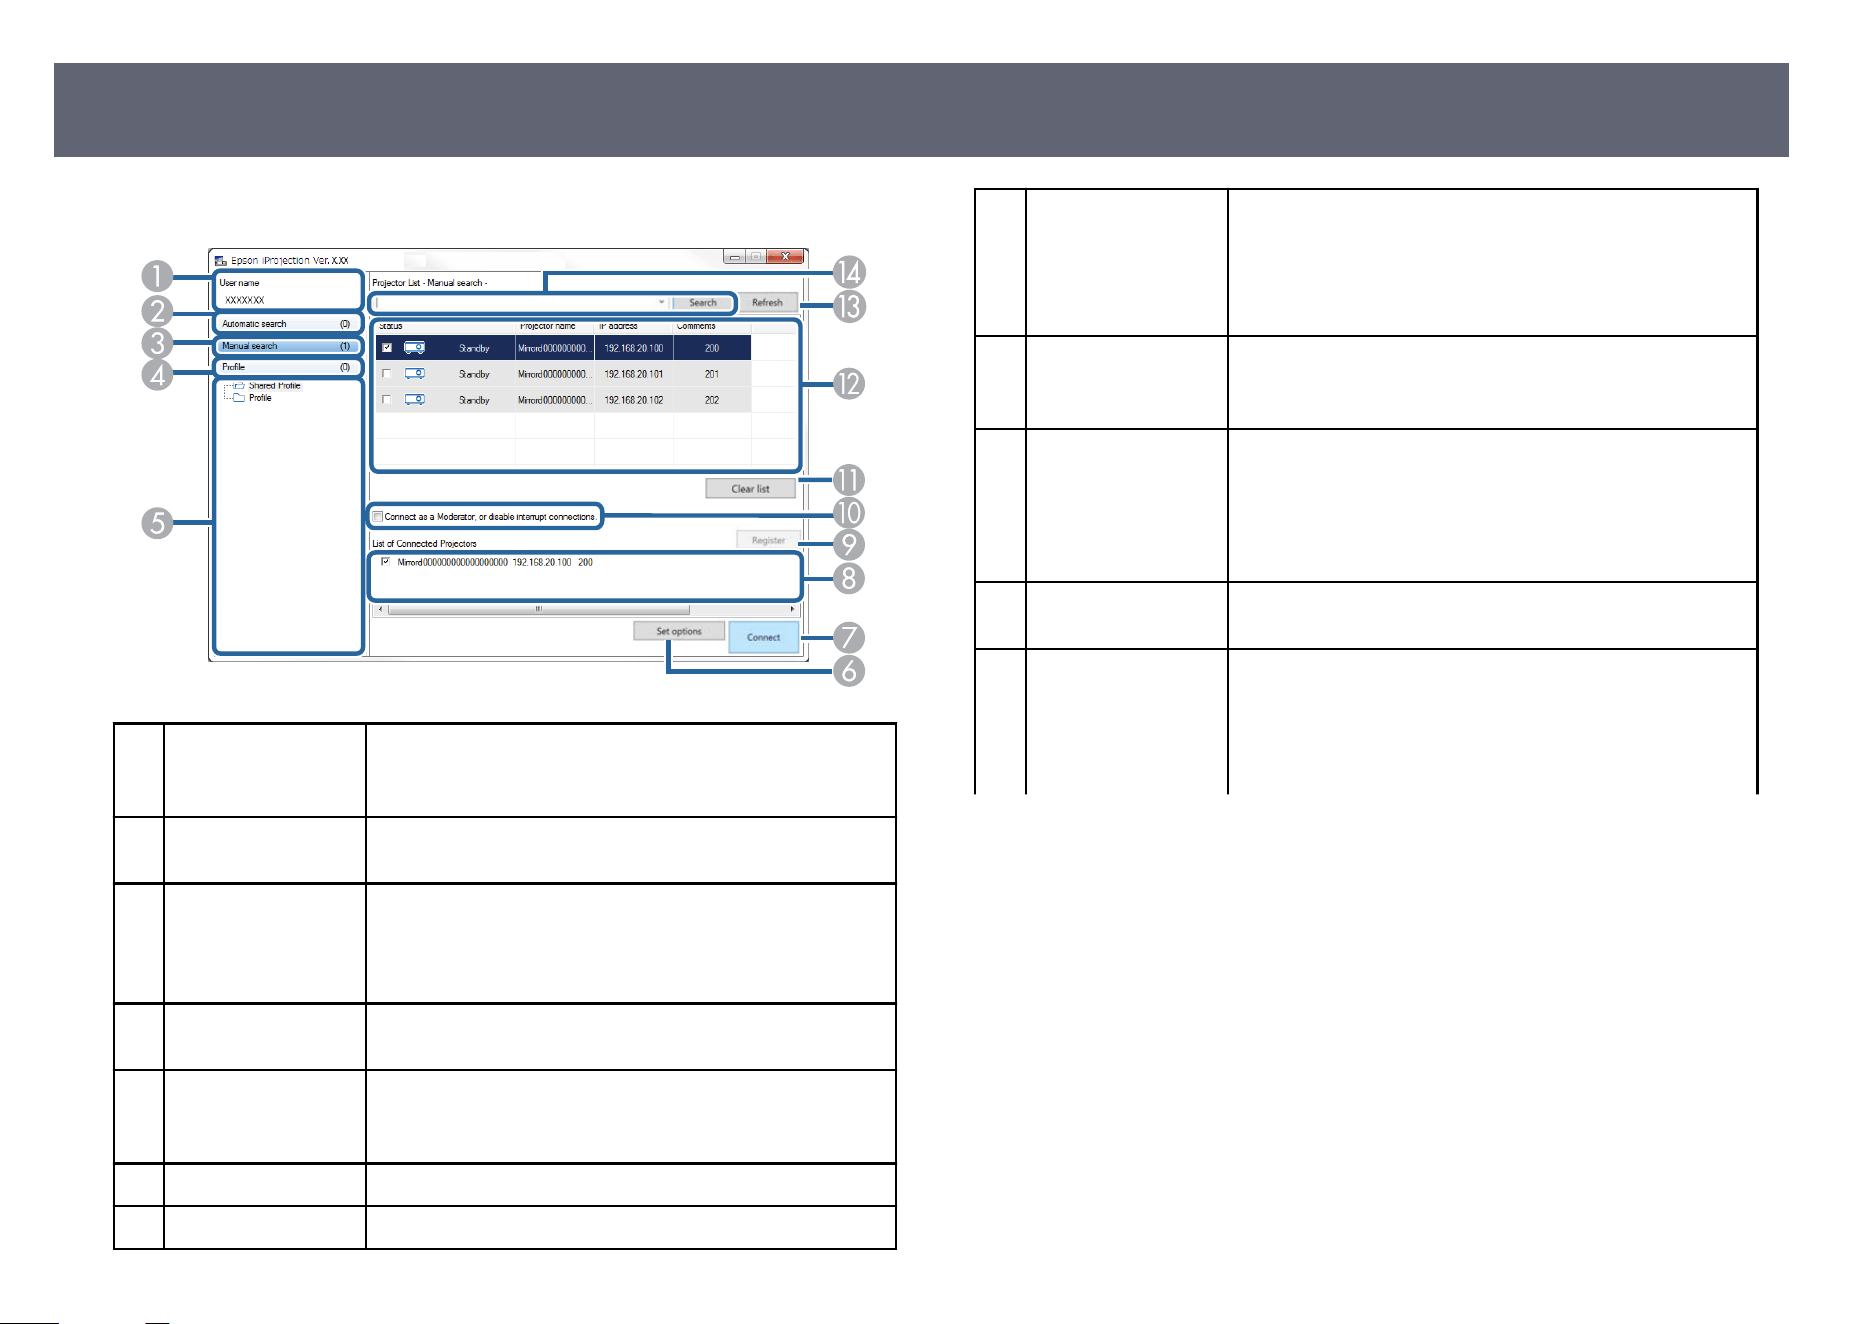
Aer selecting the connection mode, the search screen is displayed.
A
User name Displays the user name displayed in the user list on the
pr
ojection control screen. You can edit the user name on
the User Settings tab on the Set options screen.
B
Automatic search Searches for projectors on the network to which the
com
puter is connected.
C
Manual search
(Ad
vanced
Connection Mode
only)
Searches for projectors on the network by specifying the
projector's IP address or projector name.
D
Prole Searches for projectors on the network by using the
pr
ojector information saved previously.
E
Prole list Di
splays the registered proles (projector information).
When you double-click the prole, the projectors
registered in the prole are searched for on the network.
F
Set options Displays the Set options screen.
G
Connect Connects to the selected projectors.
H
List of Connected
Pr
ojectors
(Advanced
Connection Mode
only)
Displays information on the projectors selected from the
Projector List. Even if the search method is changed, the
content of the List of Connected Projectors remains the
same.
I
Register (Advanced
Co
nnection Mode
only)
Registers the projectors from the List of Connected
Projectors to a prole.
J
Connect as a
Mo
derator, or
disable interrupt
connections.
Connects to the selected projectors as the moderator and
you can prevent any other users from interrupting your
connection (supported models only).
e moderator function is available only on the Standard
Edition of the soware.
K
Clear list Clears information displayed in the Pr
ojector List and
the List of Connected Projectors.
L
Projector List Displays a list of the projectors found on the network.
Yo
u can then select projectors to connect to. e search
results for each search method (Automatic search,
Manual search, and Prole) are displayed in separate
lists.
Search Screen
66
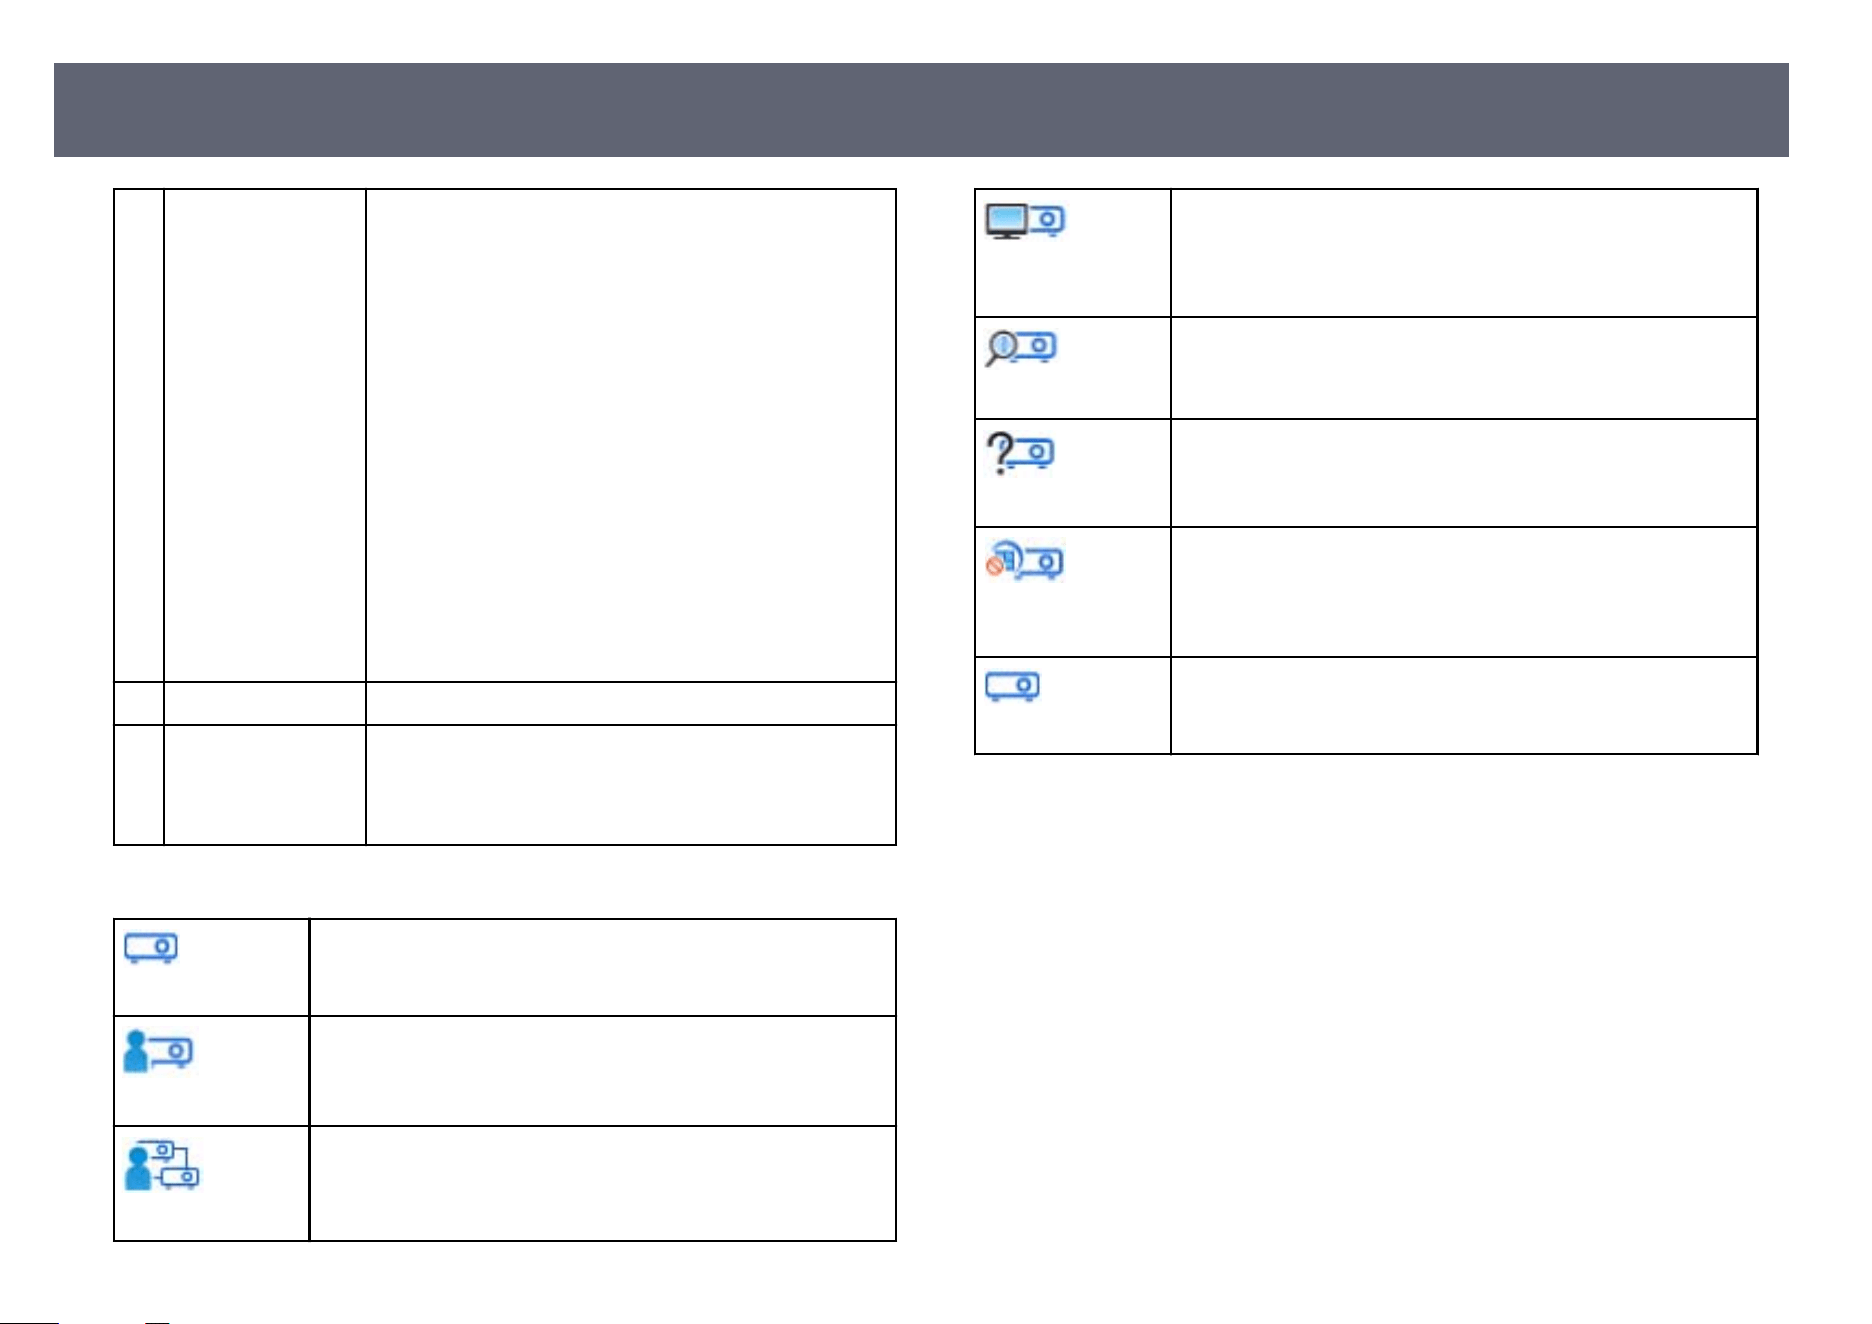
•
Stat
us: See the description of projector status icons in
the next table.
•
Projector name: Displays the projector's name.
•
SSID (Quick Connection Mode only): Displays the
projector's SSID.
•
Signal intensity (Quick Connection Mode only):
Displays the signal intensity when a connection is
made in Quick Connection Mode. As the Signal
intensity increases, so does the number of lit
indicators.
•
IP address (Advanced Connection Mode only):
Displays the projector's IP address.
•
Comments: Displays comments for the projector. You
can edit the comment by right-clicking the prole,
and then clicking Property. You can enter up to 32
characters.
M
Refresh Updates information in the Pr
ojector List.
N
Manual search
bo
x (Advanced
Connection Mode
only)
When using Manual search, enter the projector's IP
address or the projector name. Click the Search button
to search for the specied projector.
Projector status icons in the Pr
ojector List are described in the following table.
Standby
Available. You can connect to the projector.
Busy
Available. Although other computers are connected to the
pr
ojector, you can also connect at the same time.
Mirroring...
Available. You can connect to a group of projectors that are
p
r
ojecting the same image (mirroring).
Currently in use by
ano
ther application
Not available. e p
r
ojector is displaying the network
conguration screen or is being used by other projector
soware.
Searching
Not available. A M
an
ual search or Prole search is already
being used to search for the projector.
Not found.
Not available. e sp
ecied projector could not be found using
Manual search or Prole search.
Unsupported
Pr
ojectors
Not available. e projector is not compatible with the Epson
iProjection soware.
Not acquired
Available. Displayed when a projector with security settings
en
ab
led is found in Quick Connection Mode.
g
Related Links
•
"S
earching for Network Projectors Automatically" p.27
•
"Searching for Network Projectors by Specifying an IP Address or Projector
Name" p.28
•
"Searching for Network Projectors Using a Prole" p.28
•
"Searching for Network Projectors Using a Shortcut" p.39
Search Screen
67
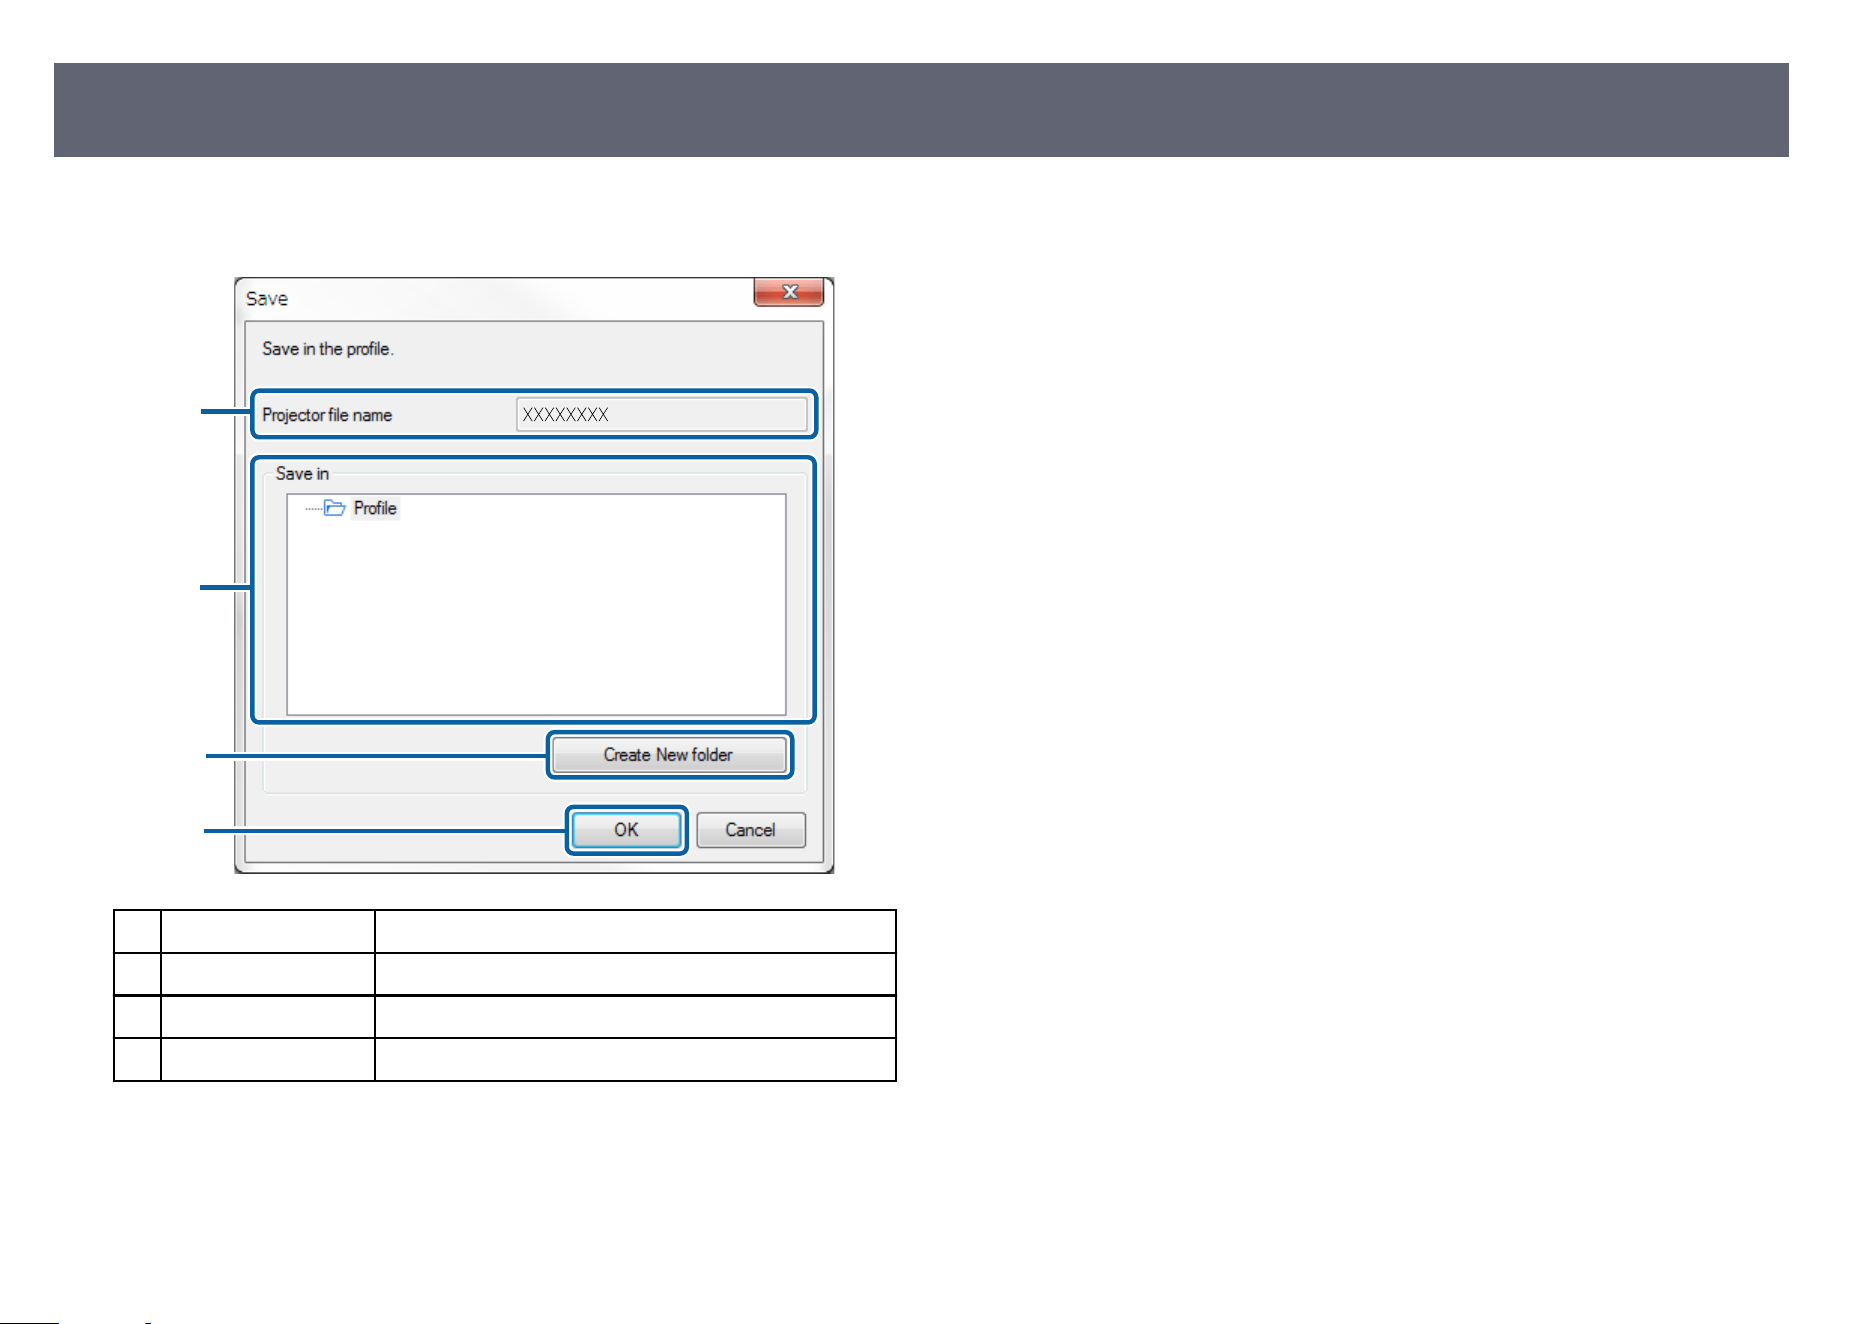
When you search for projectors and save information as a pr
ole on the search
screen, the Save screen is displayed.
A
C
D
B
A
Projector le n
am
e Enter the projector le name.
B
Save in Select the folder where you want to save the pr
ole.
C
Create New folder Creates a new folder.
D
OK Registers the projector information in the pr
ole.
g
Related Links
•
"R
egistering a Prole" p.29
Save Screen
68
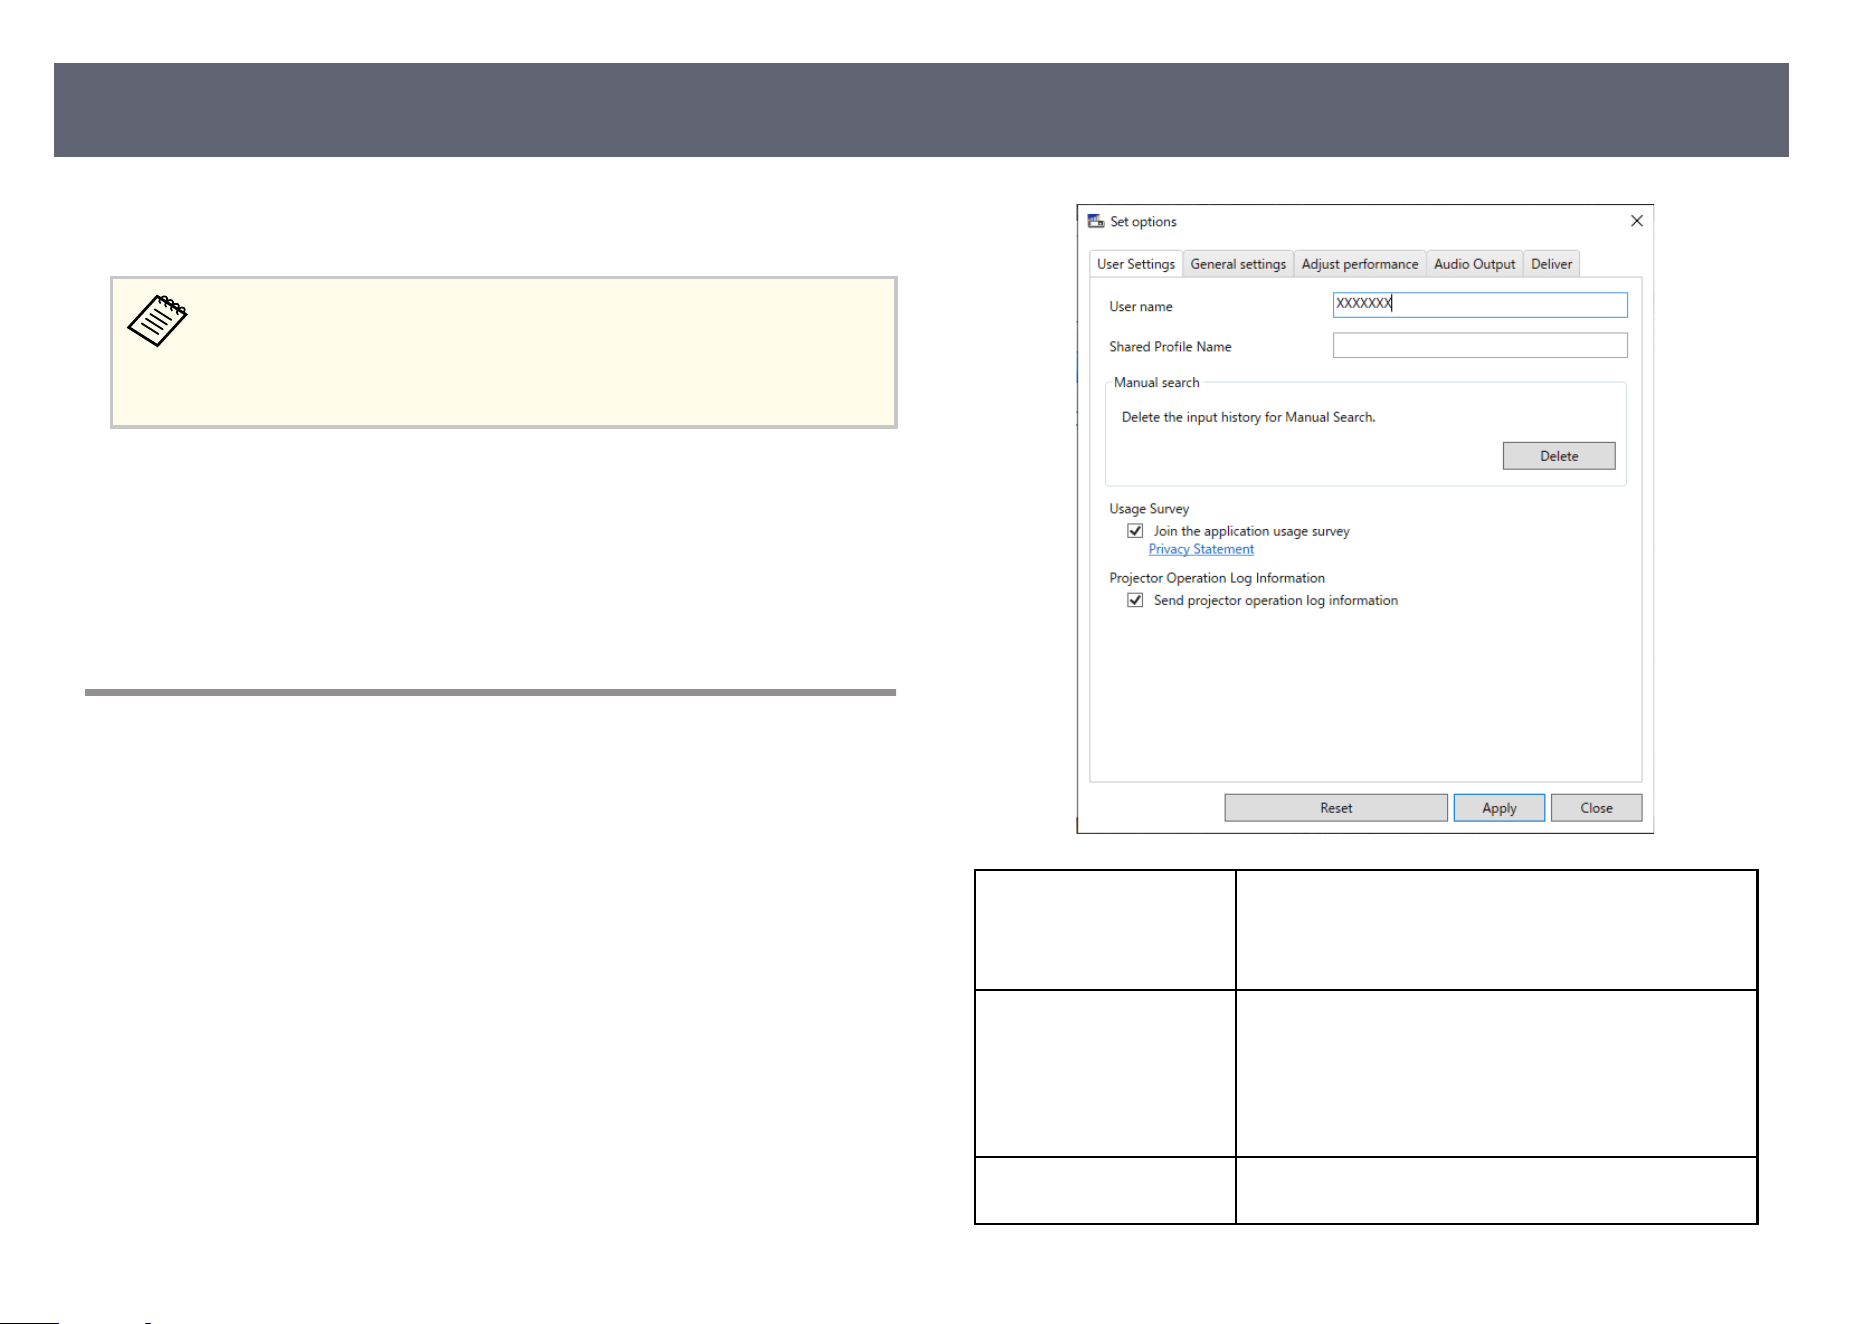
When you click Set o
ptions on the Epson iProjection search screen, the Set
options screen is displayed.
•
Yo
u can also access Set options from the Tool menu on the projection
control screen. When you access Set options from the projection
control screen, the User Settings tab is not displayed.
•
e available settings vary depending on the edition of the soware.
g
Related Links
•
"S
et options - User Settings" p.69
•
"Set options - General settings" p.70
•
"Set options - Adjust performance" p.71
•
"Set options - Audio Output" p.72
•
"Set options - Deliver" p.73
Set options - User Settings
When you click the Us
er Settings tab on the Set options screen, the following
screen is displayed.
User name Enter the user name displayed in the user list on
th
e projection control screen. You can enter up to 32
characters. is setting is synchronized with the setting
on the search screen.
Shared Prole Name
(A
dvanced Connection
Mode only)
Enter the network location or URL of the shared prole
(including the name of the prole) as shown below.
•
For a le server (Windows only): \
\xxxxx\xxxxx.mplist
•
For a web server: http://xxxxx/xxxxx.mplist
Delete (Advanced
Co
nnection Mode only)
Deletes the input history for Manual search.
Set options
69
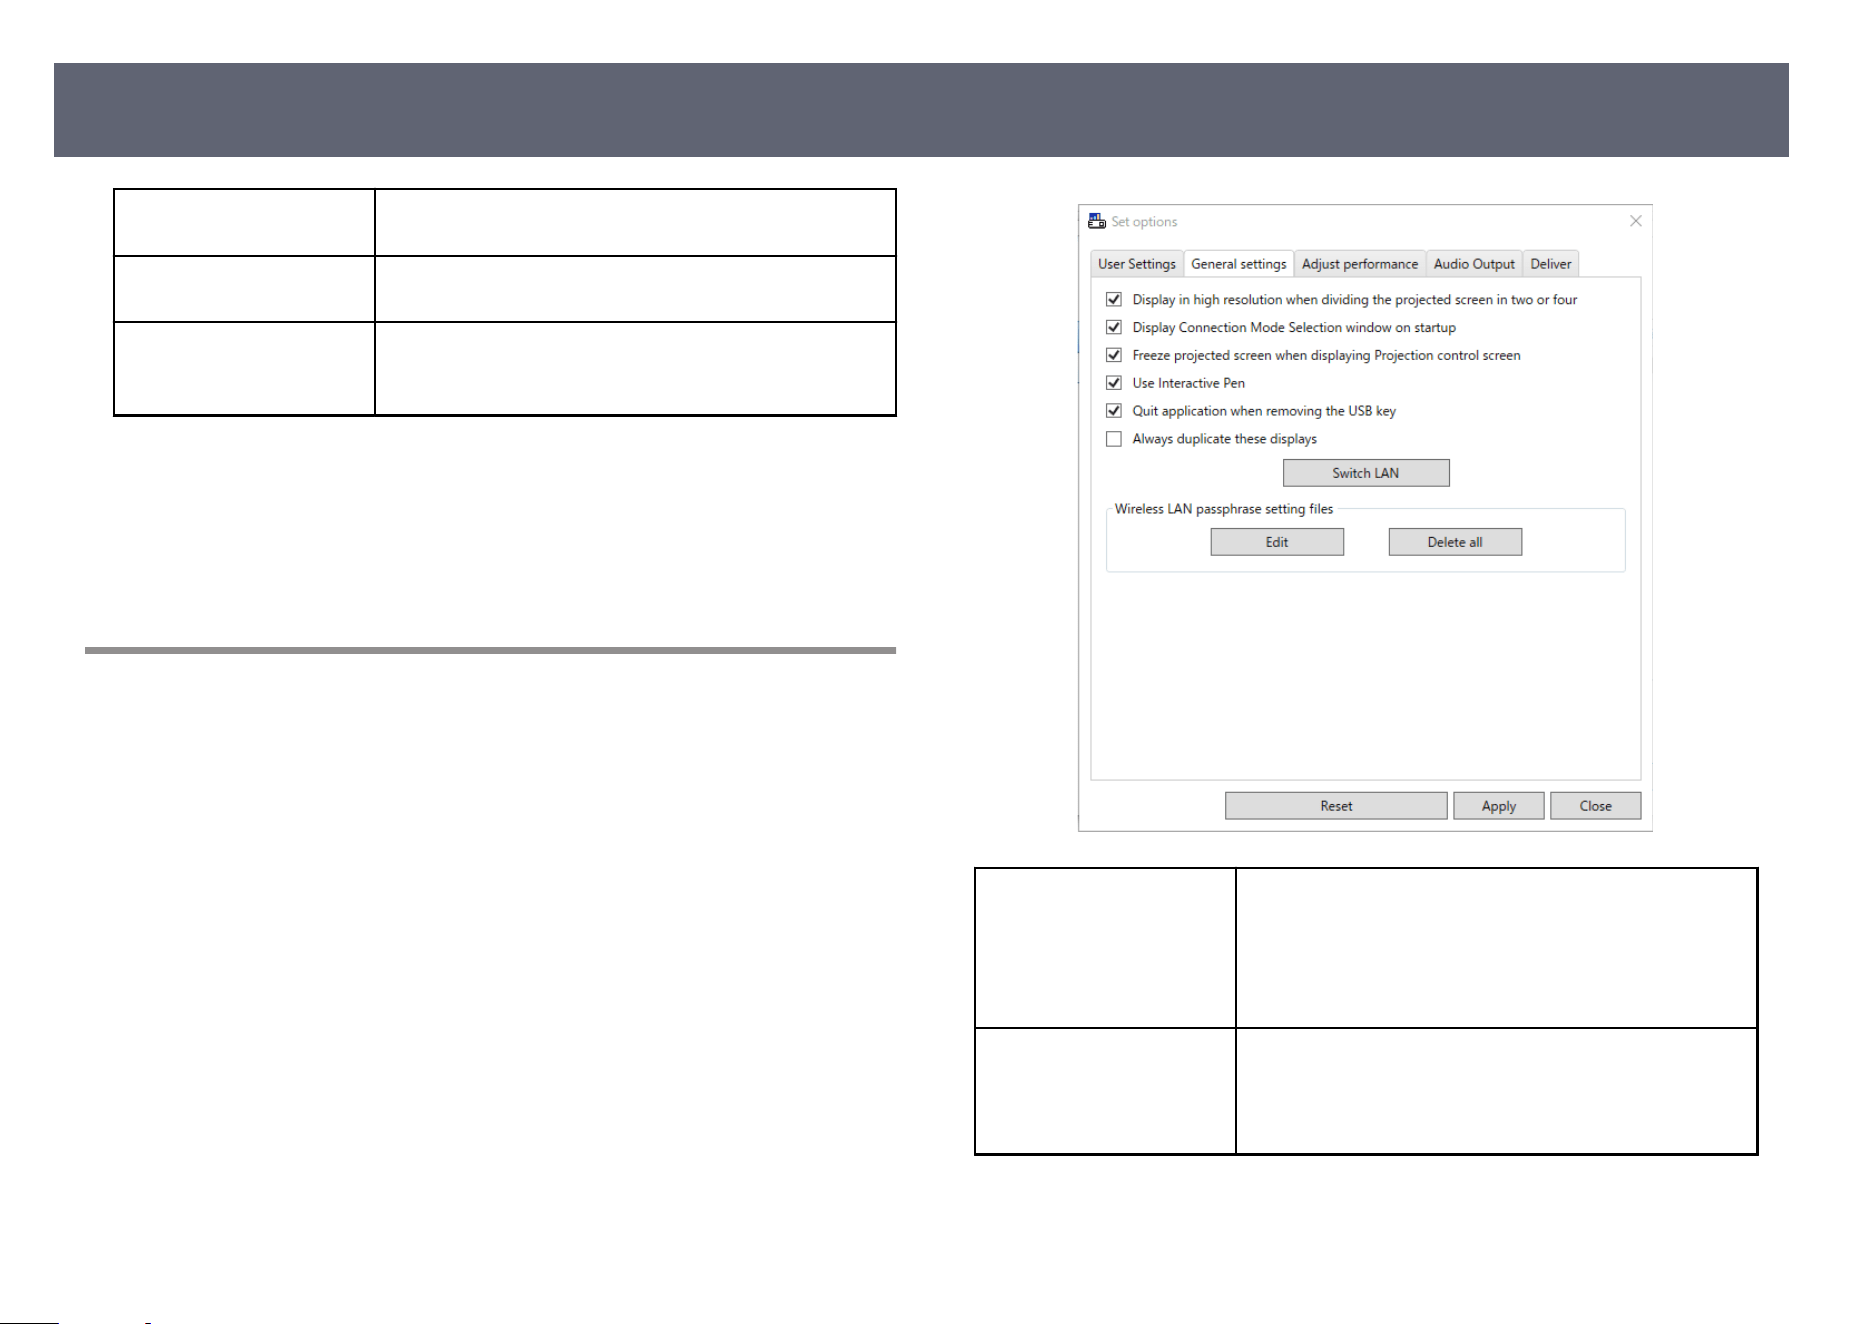
Usage Survey Select to allow Epson to acquire application usage
info
rmation.
Projector Operation Log
Inf
ormation
Select to allow Epson to acquire projector operation log
information.
Reset Resets all adjustment values for Set o
ptions to their
default settings, except for Switch LAN on the General
settings tab.
g
Related Links
•
"S
earch Screen" p.66
•
"Projection Control Screen" p.76
•
"Searching for Network Projectors Automatically" p.27
•
"Sharing a Prole over a Network" p.31
Set options - General settings
When you click the Ge
neral settings tab on the Set options screen, the following
screen is displayed.
Display in high resolution
wh
en dividing the
projected screen in two or
four
Available only for projectors with a resolution of
WUXGA (1920 × 1200) or Full HD (1920 × 1080).
Select to display all divided screens in high resolution.
Clear this setting if displaying the image takes too long
or is interrupted.
Display Connection Mode
Se
lection window on
startup
Select to display the Select Connection Mode screen
each time the soware starts.
Clear this checkbox once you have settled on a regular
startup method.
Set options
70
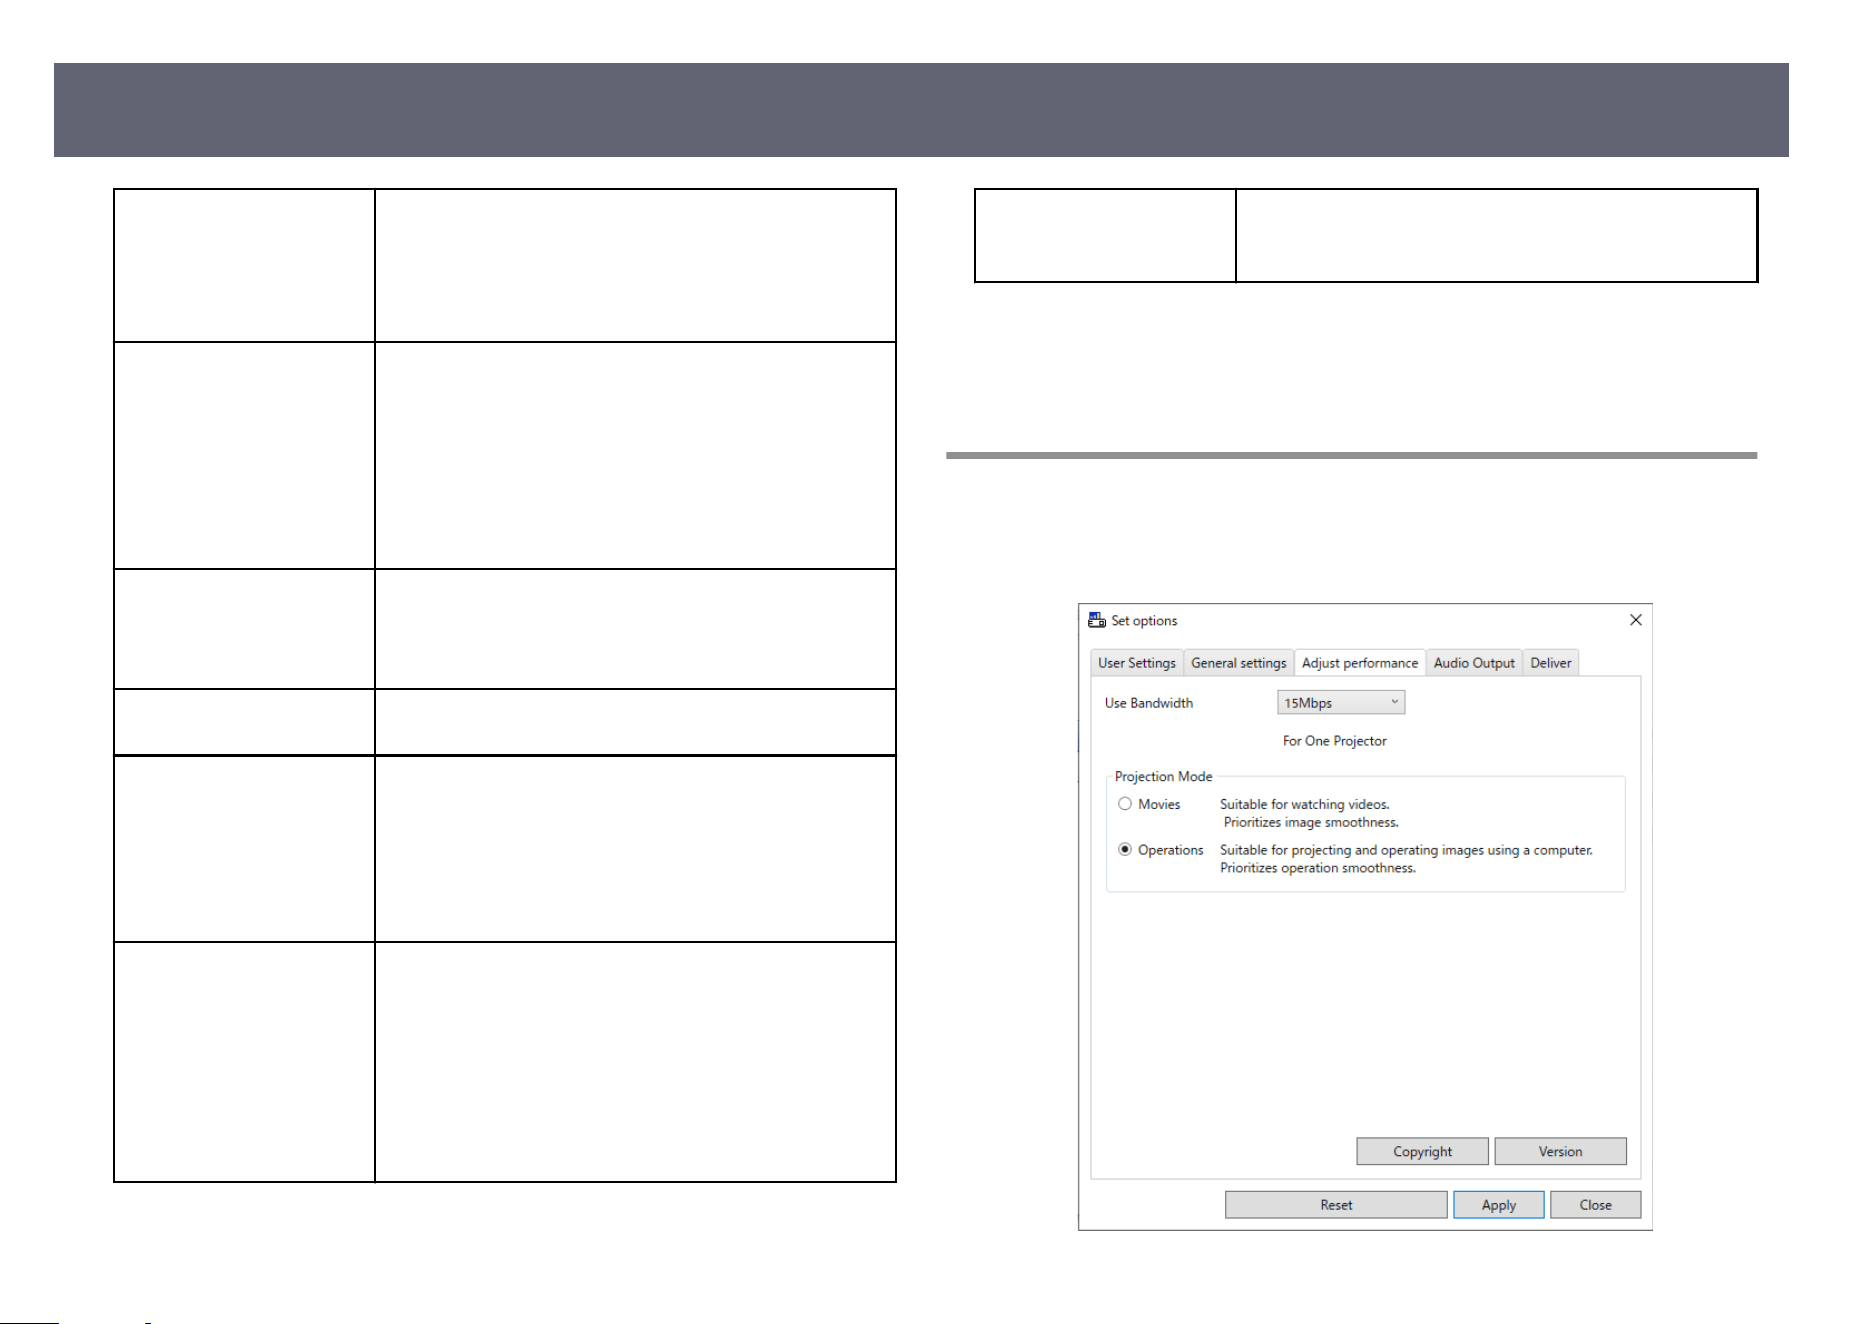
Freeze projected screen
wh
en displaying Projection
control screen
Available only for the moderator when using the
moderator function.
Select to hide the operations on the projection control
screen from other users while projecting your computer
screen.
Use Interactive Pen Select to use the interactive function over a network
(su
pported models only). You do not need to connect a
computer to the projector with a USB cable.
You can use the following devices at the same time.
•
Windows: Two Easy Interactive Pens and six touch
points
•
Mac: One mouse
Quit application when
rem
oving the USB key
Select to disconnect the computer when you remove the
USB key from your computer. Deselect this checkbox if
you want to share the USB key with other users without
disconnecting your computer.
Always duplicate these
dis
plays
Select to duplicate a display using a computer with a 3rd
Generation Intel Core i series or earlier CPU.
Switch LAN Windows only
Us
e this setting if you need to switch the network
adapter used to perform a search when a computer has
multiple adapters.
By default, all of the network adapters are used to
perform a search.
Wireless LAN passphrase
set
ting les (Quick
Connection Mode only)
In Quick Connection Mode, SSIDs and passphrases are
stored on the computer when connecting to a projector
with security settings enabled. You can edit and delete
the stored information.
Edit: Displays the wireless network management screen
for the computer.
Delete all: Deletes all the SSIDs and passphrases stored
on the computer.
Reset Resets all adjustment values for Set o
ptions to their
default settings, except for Switch LAN on the General
settings tab.
g
Related Links
•
"C
hanging the Number of Projected Panels" p.34
•
"Hiding the Projection Control Screen" p.48
Set options - Adjust performance
When you click the Ad
just performance tab on the Set options screen, the
following screen is displayed.
Set options
71
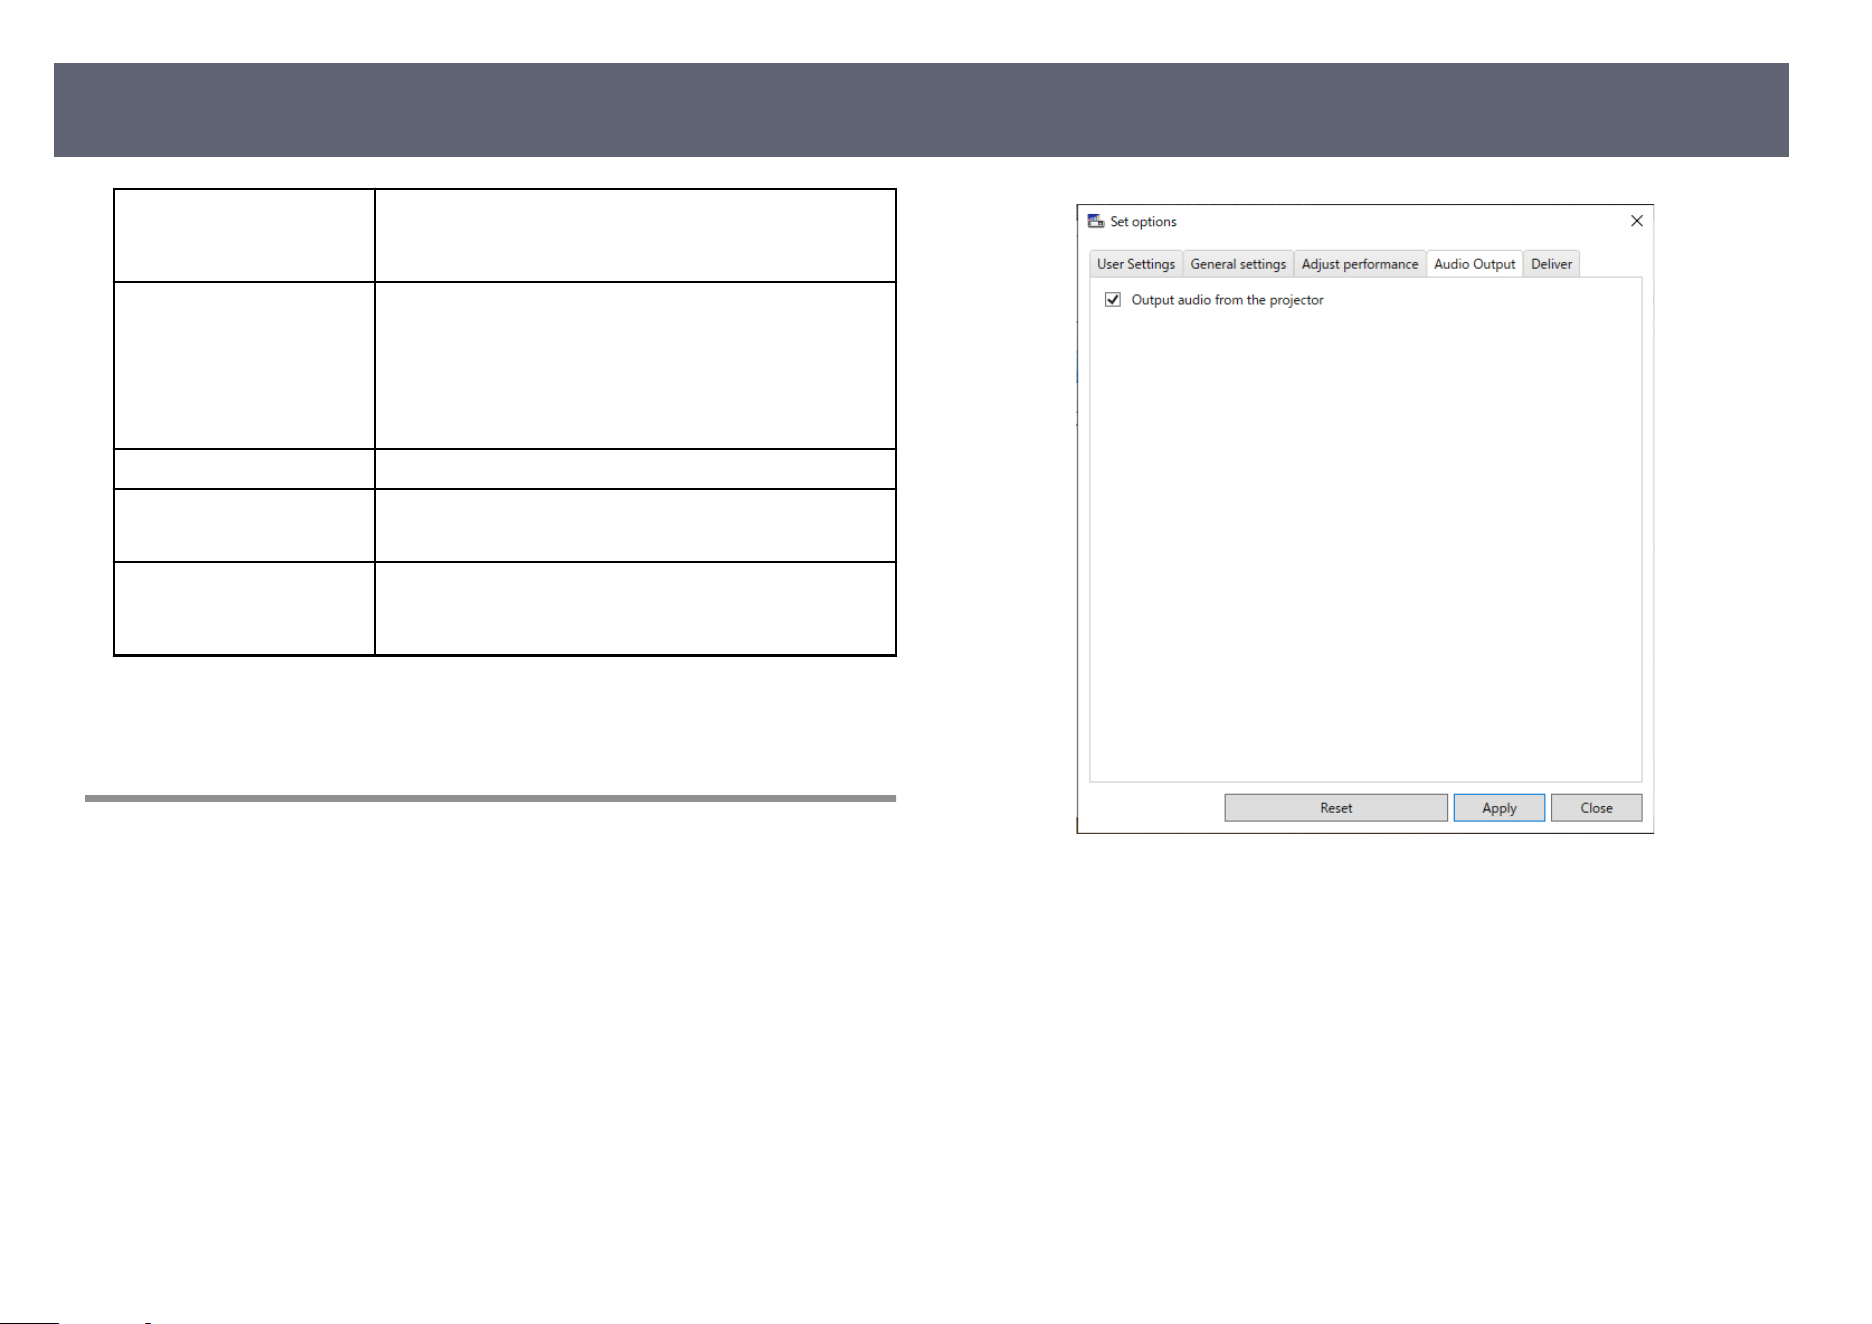
Use Bandwidth Controls the bandwidth for the data transfer. When you
se
lect a narrower bandwidth, the projected image quality
may decline but the network load is reduced.
Projection Mode Select an appropriate projection mode according to the
pr
ojected content.
•
Movies: Suitable for playing videos smoothly.
•
Operations: Suitable for displaying the mouse or
soware operation on PC smoothly.
Copyright Display Open-Source So
ware License Information
Version Windows only
Dis
plays the Epson iProjection version information.
Reset Resets all adjustment values for Set o
ptions to their
default settings, except for Switch LAN on the General
settings tab.
g
Related Links
•
"C
ontrolling the Connection Bandwidth" p.50
Set options - Audio Output
When you click the Au
dio Output tab on the Set options screen, the following
screen is displayed.
Set options
72
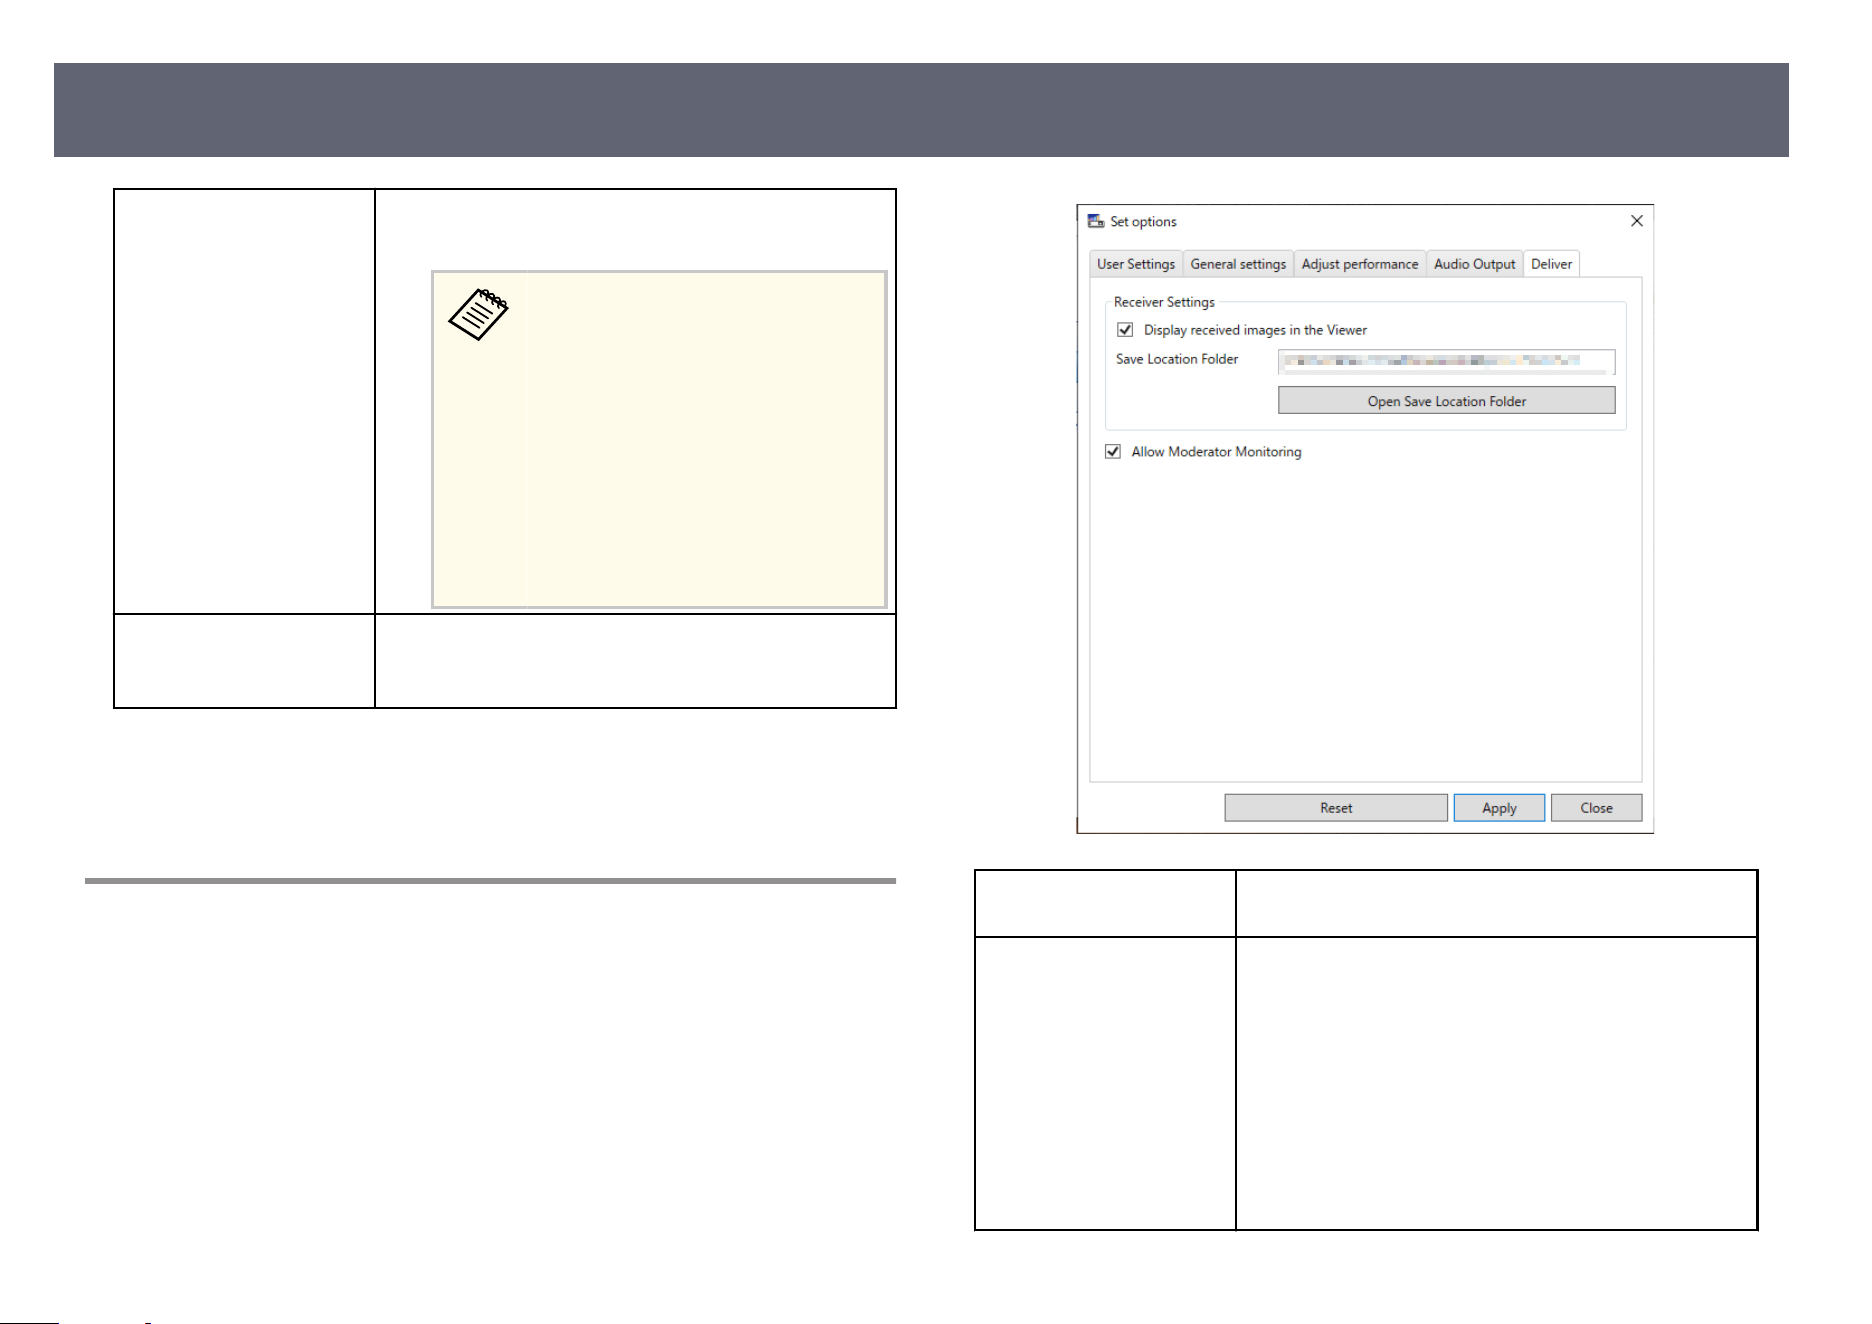
Output audio from the
pr
ojector
Select to output the computer's audio from the projector.
Clear to output audio from the computer.
•
Y
o
u can only output the
computer's audio from the
projector when projecting one
computer screen in full screen
mode.
•
When you select 256Kbps or
512Kbps as Use Bandwidth on
the Adjust performance tab, you
cannot output audio from the
projector and cannot select this
setting.
Reset Resets all adjustment values for Set o
ptions to their
default settings, except for Switch LAN on the General
settings tab.
g
Related Links
•
"O
utputting Audio from the Projector" p.43
•
"Controlling the Connection Bandwidth" p.50
Set options - Deliver
When you click the D
e
liver tab on the Set options screen, the following screen is
displayed.
Display received images in
th
e Viewer
Select to open the received image in the Viewer bundled
with the Epson iProjection soware.
Save Location Folder Displays the folder where the received image le is
s
aved.
Saved images are stored in the following folders.
•
Windows
<startup_drive>:\users\<user_name>\Documents\Ep
son iProjection
•
Mac
<startup_drive>:\Users\<user_name>\Pictures\Epson
iProjection
Set options
73
Open Save Location Folder Opens the folder where the received image le is s
aved.
Allow Moderator
Mo
nitoring
Select to allow the moderator to view the computer
screen as a thumbnail.
Reset Resets all adjustment values for Set o
ptions to their
default settings, except for Switch LAN on the General
settings tab.
g
Related Links
•
"Di
stributing the Projected Screen" p.46
Set options
74
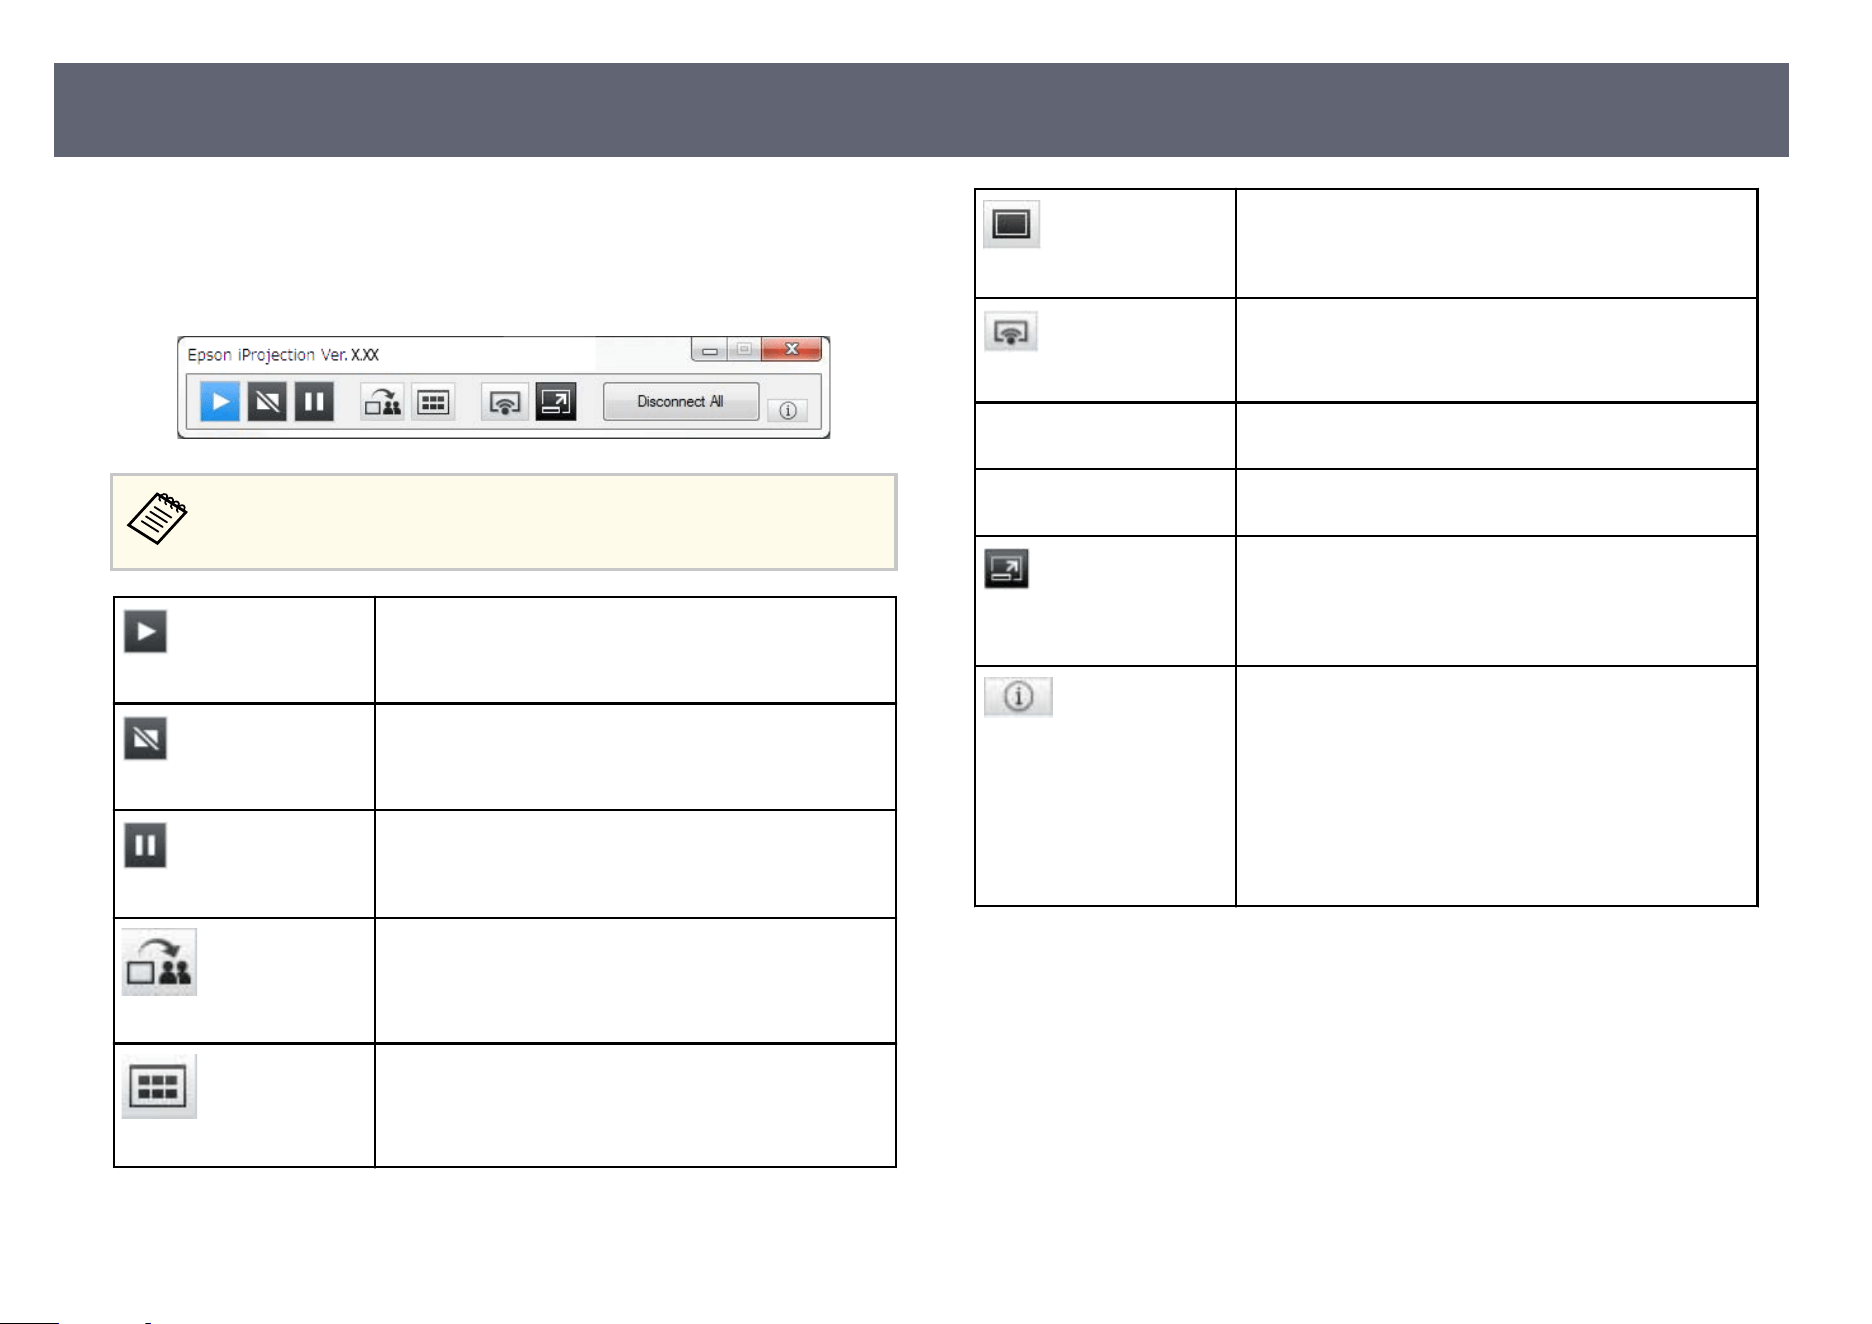
Aer the Epson iProjection soware starts and a connection is made with
t
he projector, the toolbar is displayed on the computer screen. You can use
this toolbar to control the projected image and to disconnect the network
connection.
e items displayed on the toolbar vary depending on the connection
m
ethod and the edition or your role of the soware.
Show
Releases Stop or Pause and projects the computer screen
as i
t is.
Stop
Stops projection while connected to the projector. A
b
l
ack screen is projected while stopped.
Pause
Pauses the computer screen currently displayed. e
p
r
ojected display does not change, even if you make
changes on the computer screen.
Deliver Projected Screen
Distributes the currently projected screen images to the
par
ticipant's devices.
Display umbnails
Displays thumbnails of the participant's device screens
f
o
r the moderator to check.
Display Received Image
Displays received images in the Viewer.
Project My Screen
Projects your computer screen in full screen mode.
Leave Disconnects the connection between your computer and
t
h
e projectors.
Disconnect All Disconnects the connection between all devices and
pr
ojectors participating in the meeting.
Switch to Projection
con
trol screen
Switches to the projection control screen.
Projector Information
Displays projector network information. e Pr
ojector
Keyword is the keyword you entered when you
connected to the projector.
----: e projector keyword is not set.
Unknown: e projector keyword is not acquired
because the connection is established without entering
the projector keyword such as reading QR code and
inserting the USB key.
g
Related Links
•
"P
rojection Control Screen" p.76
•
"Operating the Projected Display Status" p.33
•
"Projecting Your Screen" p.44
•
"Disconnecting" p.37
Toolbar
75
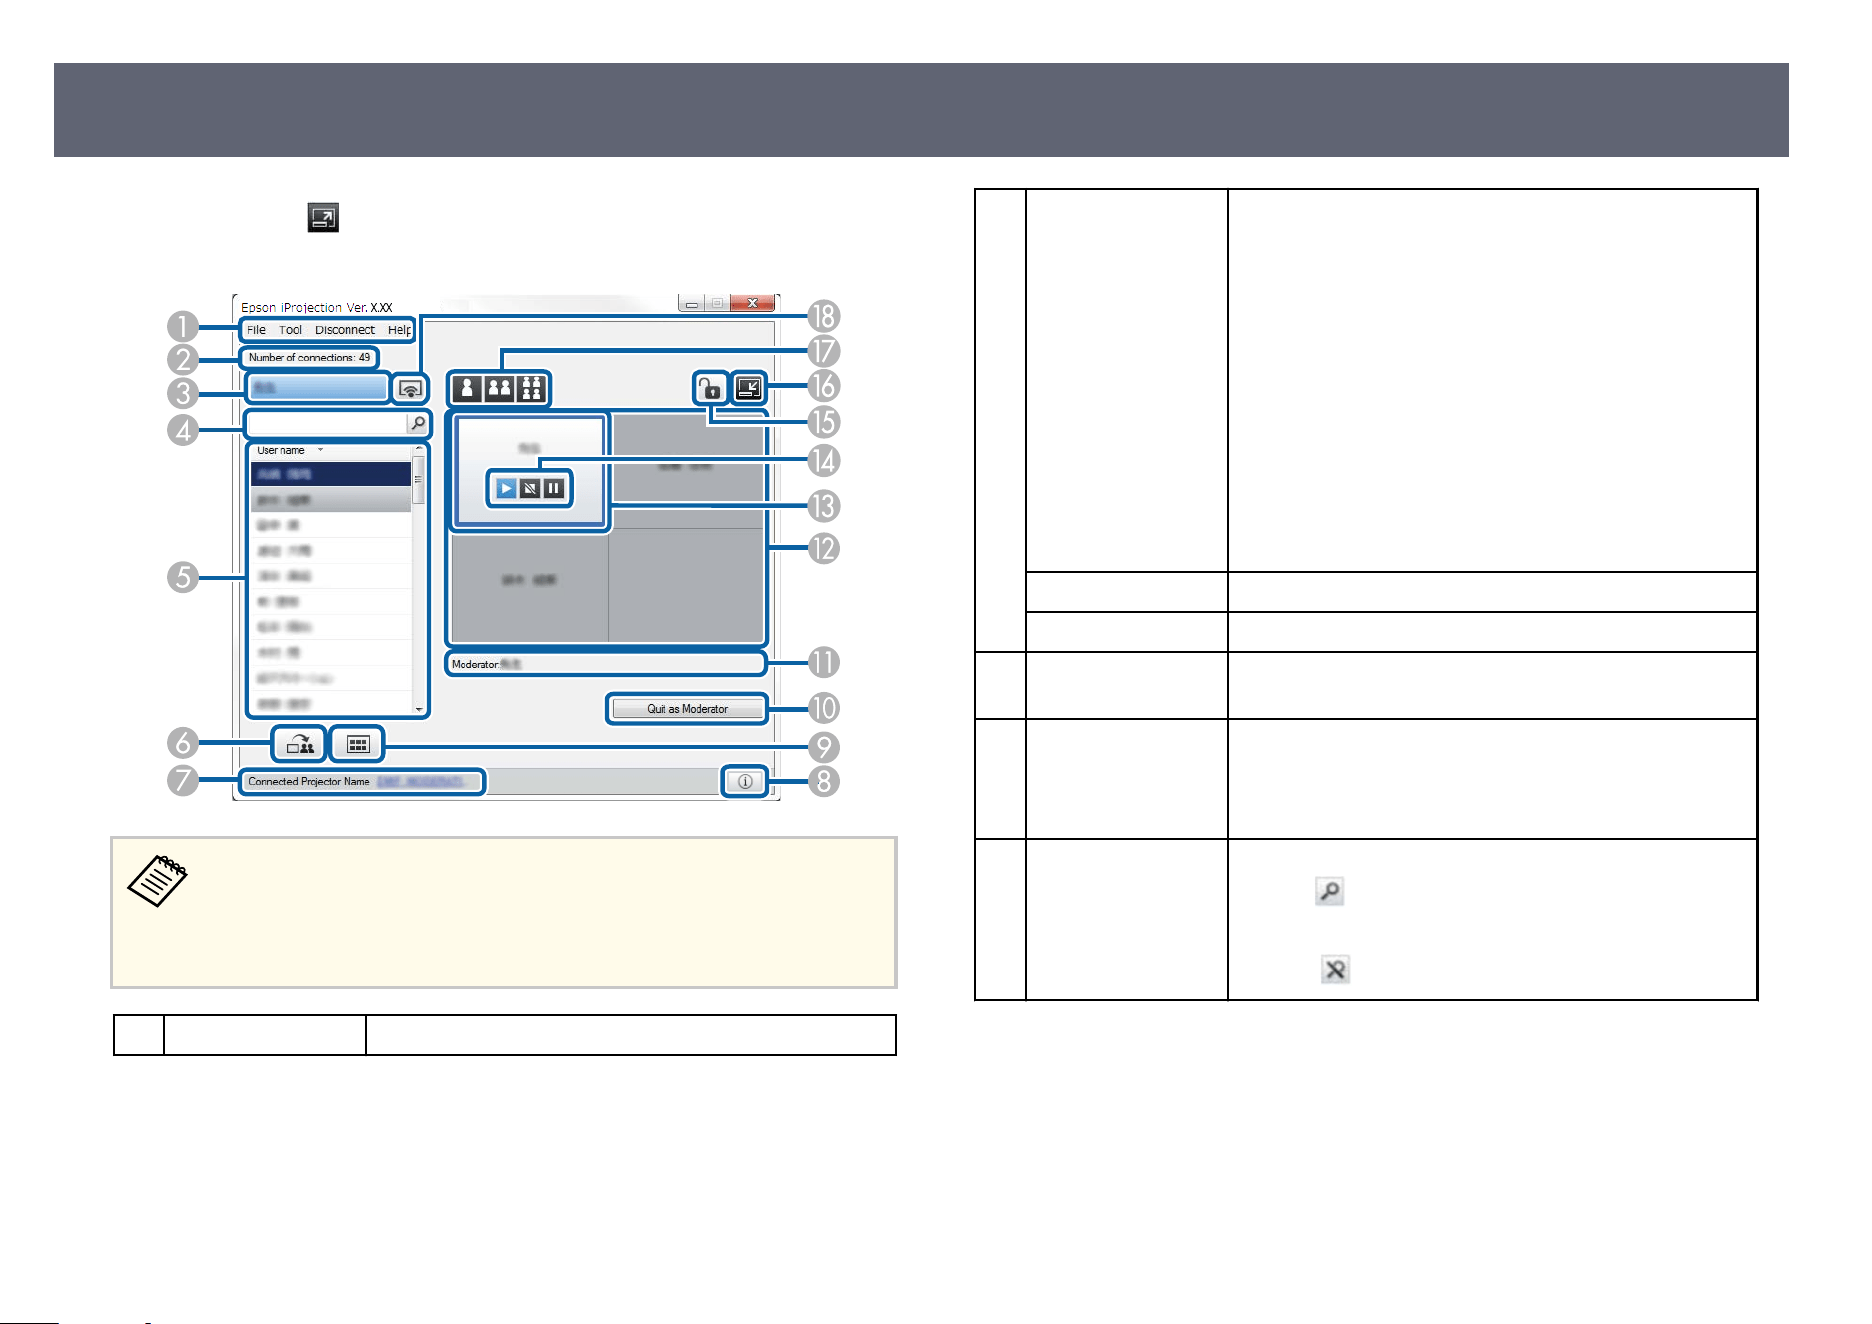
When you click the button on the toolbar, the projection control screen is
dis
played.
•
e pr
ojection control screen is available only on Standard Edition of
the soware.
•
e items displayed on the projection control screen vary depending on
your role of the soware and projector being used.
A
File menu Click to select Exi
t to close the soware.
Tool menu Click to select the following items.
•
De
ny User Operations: Locks the participant's mouse
operations. You cannot lock operations on the
extended display.
•
Allow User Operations: Unlocks the participant's
mouse operations.
•
Deliver Blank Screen: Distributes a blank screen to
the participant's devices so that participants can draw
freely.
•
Display Received Image: Displays received images in
the Viewer.
•
Set options: Displays the Set options screen.
Disconnect menu Click to select Le
ave or Disconnect All.
Help menu Click to select Ve
rsion information.
B
Number of
conn
ections
Displays the number of users connected to the projector.
C
User information Displays your name and status. Displayed in blue when
yo
ur computer screen is being projected. Displayed
in gray when you are in the projection area but not
projecting.
D
User search box Enter the user name you want to search for, and then
clic
k the
button. e se
arch results are displayed in
the user list.
Click the
button to return to the original user list.
Projection Control Screen
76
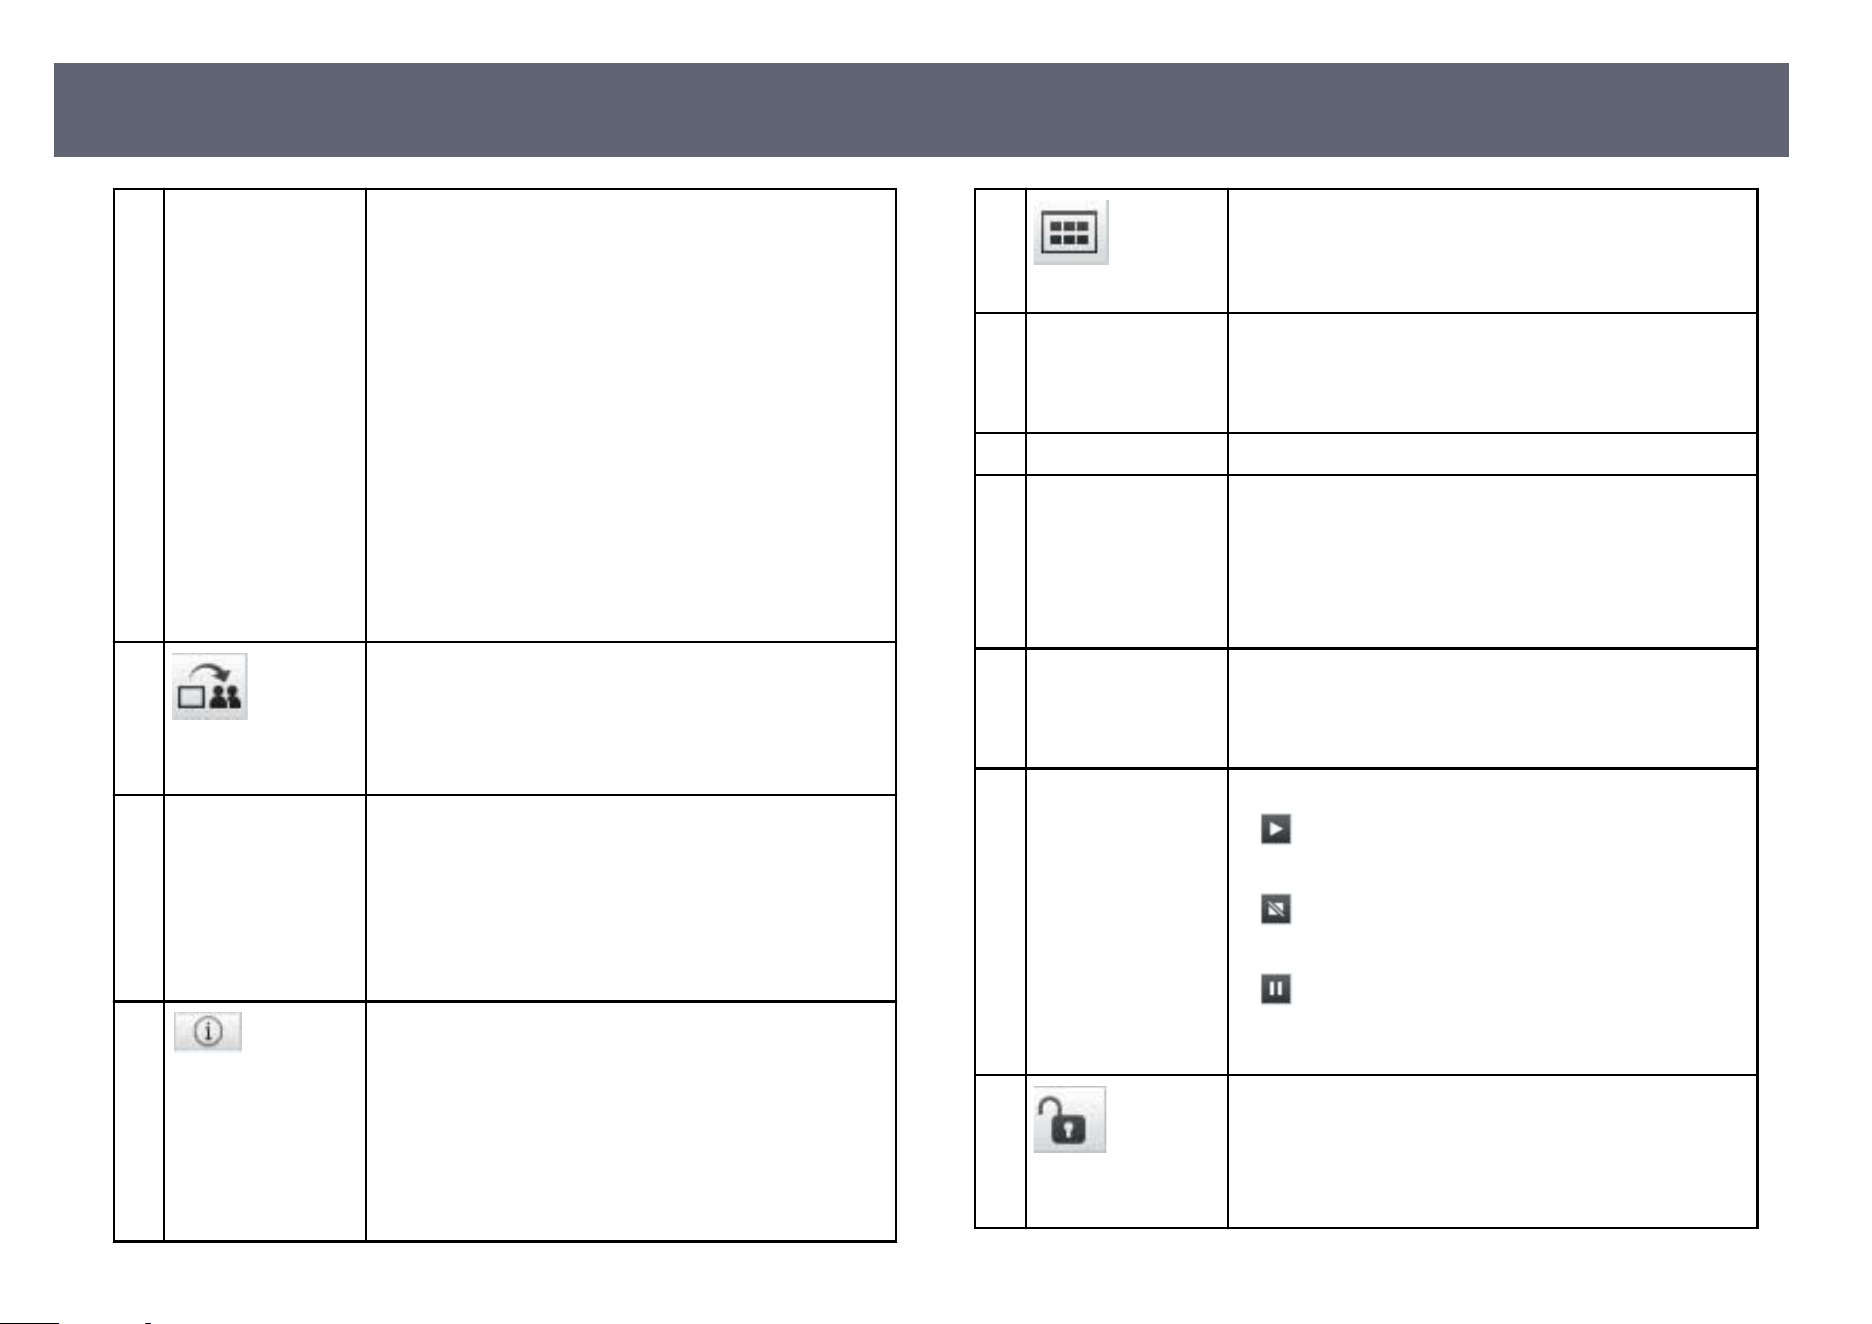
E
User list Displays the user names for the computers connected
to t
he projectors. You can connect up to 50 devices
to a projector simultaneously, such as computers,
smartphones and tablets using the Epson iProjection
soware.
When you drag and drop a user name to a white panel in
the projection area, the computer screen is projected. e
background for users that are currently being projected
is blue and users that are in the projection area but not
currently projecting is gray. Even if a user le the session,
their name remains in the user list and their text color is
gray.
e default setting for the user name is the log in
user name. You can change the user name on the User
Settings tab on the Set options screen, or the search
screen.
F
Deliver Projected
Scr
een
Distributes the currently projected screen images to the
participant's devices.
G
Connected
Pr
ojector Name
Displays the name of the projector you are currently
connected to.
When you click the projector name, the projector
control web page is displayed. You can control projector
operations on your computer screen in the same way as
using the remote control. See your projector User's Guide
for more details.
H
Projector
Inf
ormation
Displays projector network information. e Projector
Keyword is the keyword you entered when you
connected to the projector.
----: e projector keyword is not set.
Unknown: e projector keyword is not acquired
because the connection is established without entering
the projector keyword such as reading QR code and
inserting the USB key.
I
Display umb
nails
Displays thumbnails of the participant's device screens
f
o
r the moderator to check.
J
Quit as Moderator/
Be
come Moderator
Click the Quit as Moderator button to stop being the
moderator, or the Become Moderator button to become
the moderator. e displayed button varies depending on
the connection method.
K
Moderator Displays the moderator name when there is a moderator.
L
Projection area When the background color for a panel is white, the
com
puter screen for the user in that panel is projected.
If there is no user in the white panel, a black screen is
projected. By dragging and dropping the user name, you
can change the screen being projected and the position at
which the computer screen is projected.
M
Target panel Move the target panel framed in blue by clicking on
on
e of the panels in the projection area. You can project
the computer screen where the target panel is positioned
when you click one of the change projection buttons.
N
Screen control
bu
ttons
Indicates the following status of the projector.
•
Show: Releases Stop or Pause and projects the
co
mputer screen as it is.
•
Stop: Stops projection while connected to the
p
rojector. A black screen is projected while stopped.
•
Pause: Pauses the computer screen currently
di
splayed. e projected display does not change, even
if you make changes on the computer screen.
O
Deny/Allow User
Op
erations
Locks or unlocks the participant's mouse operations. You
cannot lock operations on the extended display.
Projection Control Screen
77
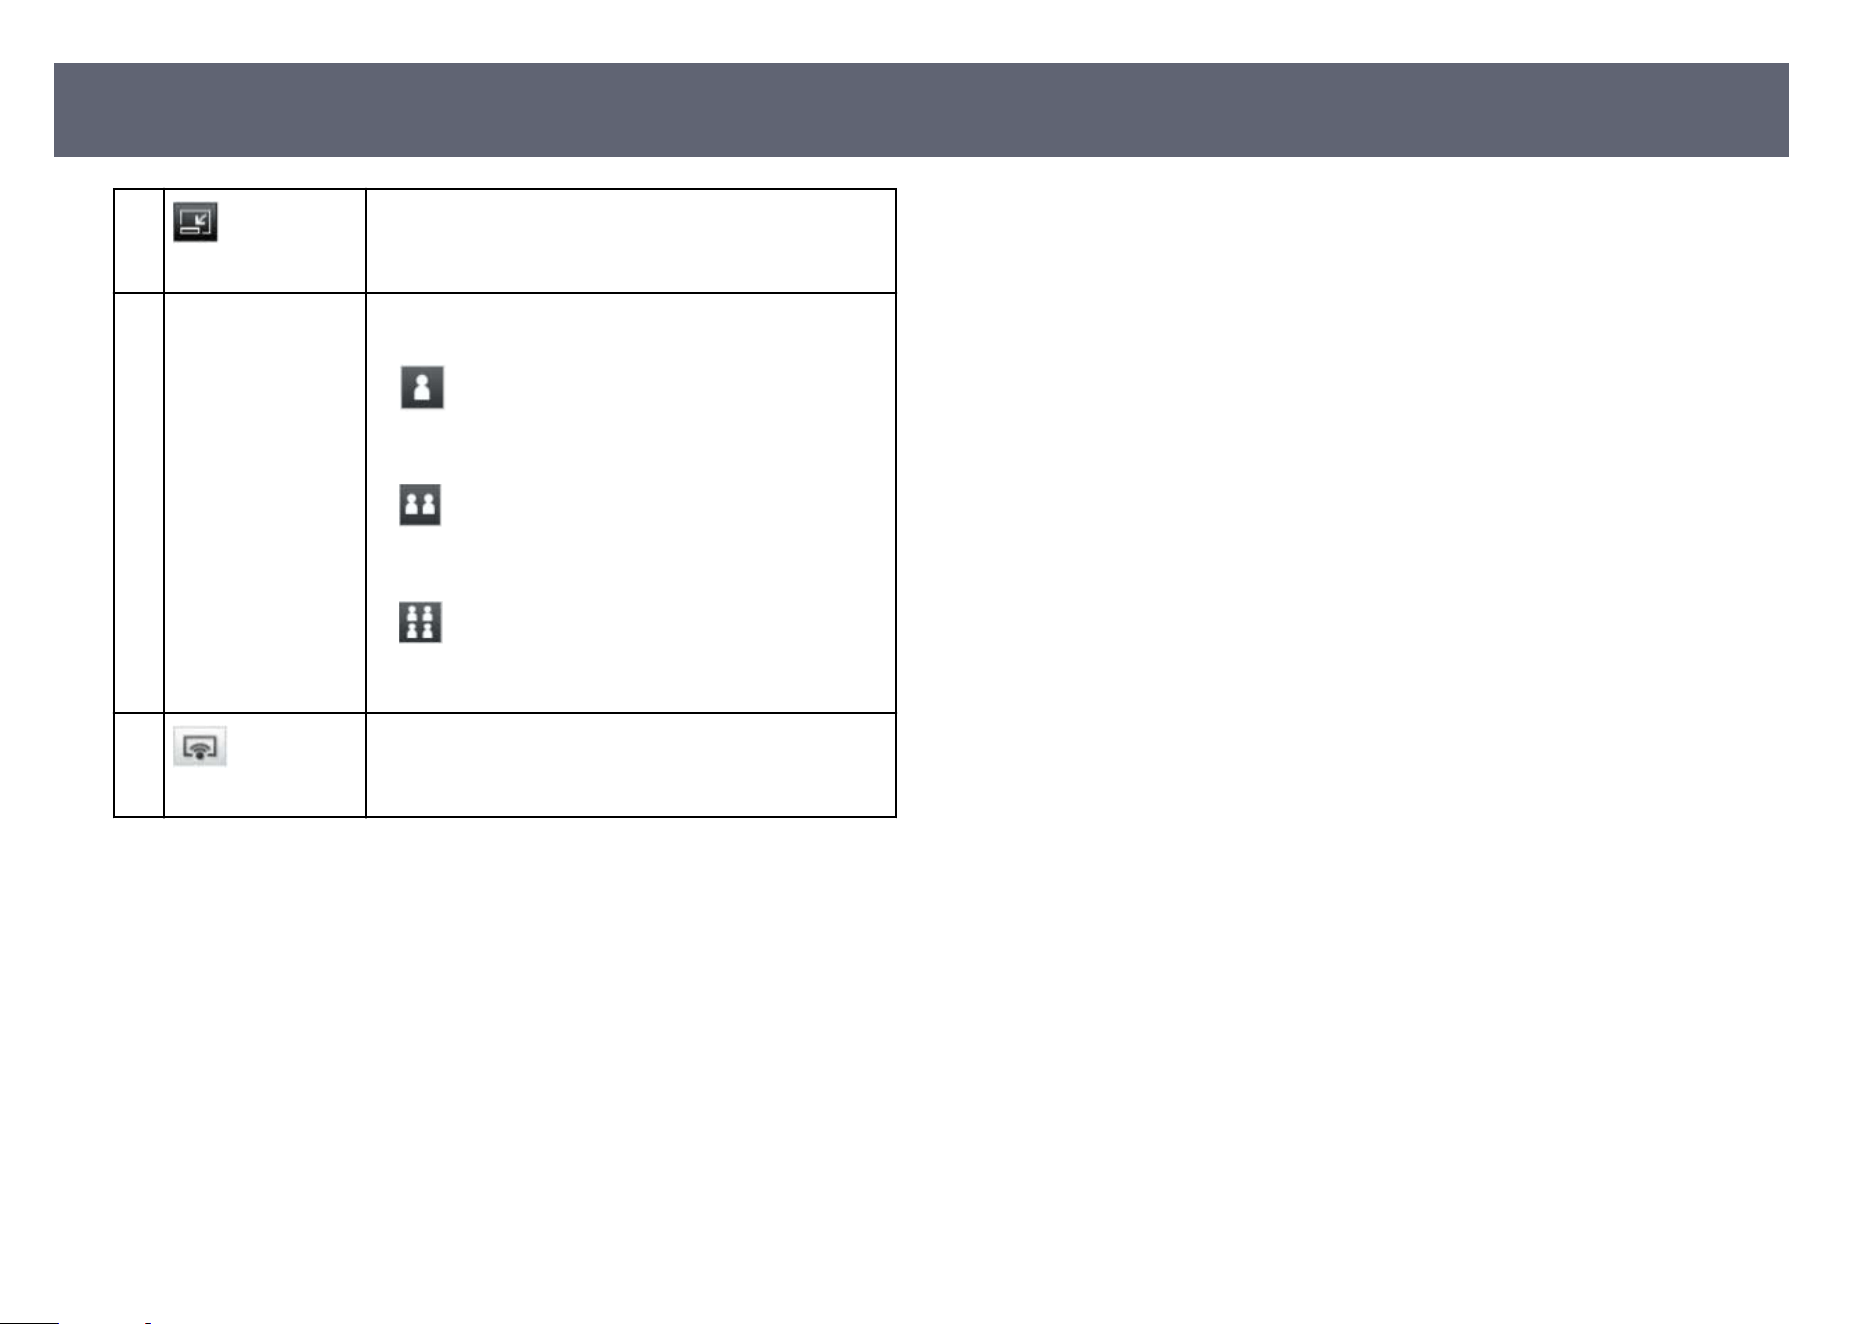
P
Switch to Toolbar
Switches to the toolbar.
Q
Change projection
b
u
ttons
Changes the number of panels available for projecting
computer screens.
•
One Screen: Projects the screen from one device
in f
ull screen mode without dividing the projected
display.
•
Two Screens: Projects the screens from up to
t
wo devices at the same time by dividing the projected
display in two.
•
Four Screens: Projects the screens from up to
f
our devices at the same time by dividing the projected
display in four.
R
Project My Screen
Projects your computer screen in full screen mode.
g
Related Links
•
"S
earch Screen" p.66
•
"Set options - User Settings" p.69
•
"Toolbar" p.75
•
"Disconnecting" p.37
•
"Projecting Your Screen" p.44
•
"Changing the Moderator" p.45
•
"Hiding the Projection Control Screen" p.48
•
"Distributing the Projected Screen" p.46
•
"Prohibiting Participant Operations" p.49
•
"Controlling the Projected Display" p.33
Projection Control Screen
78
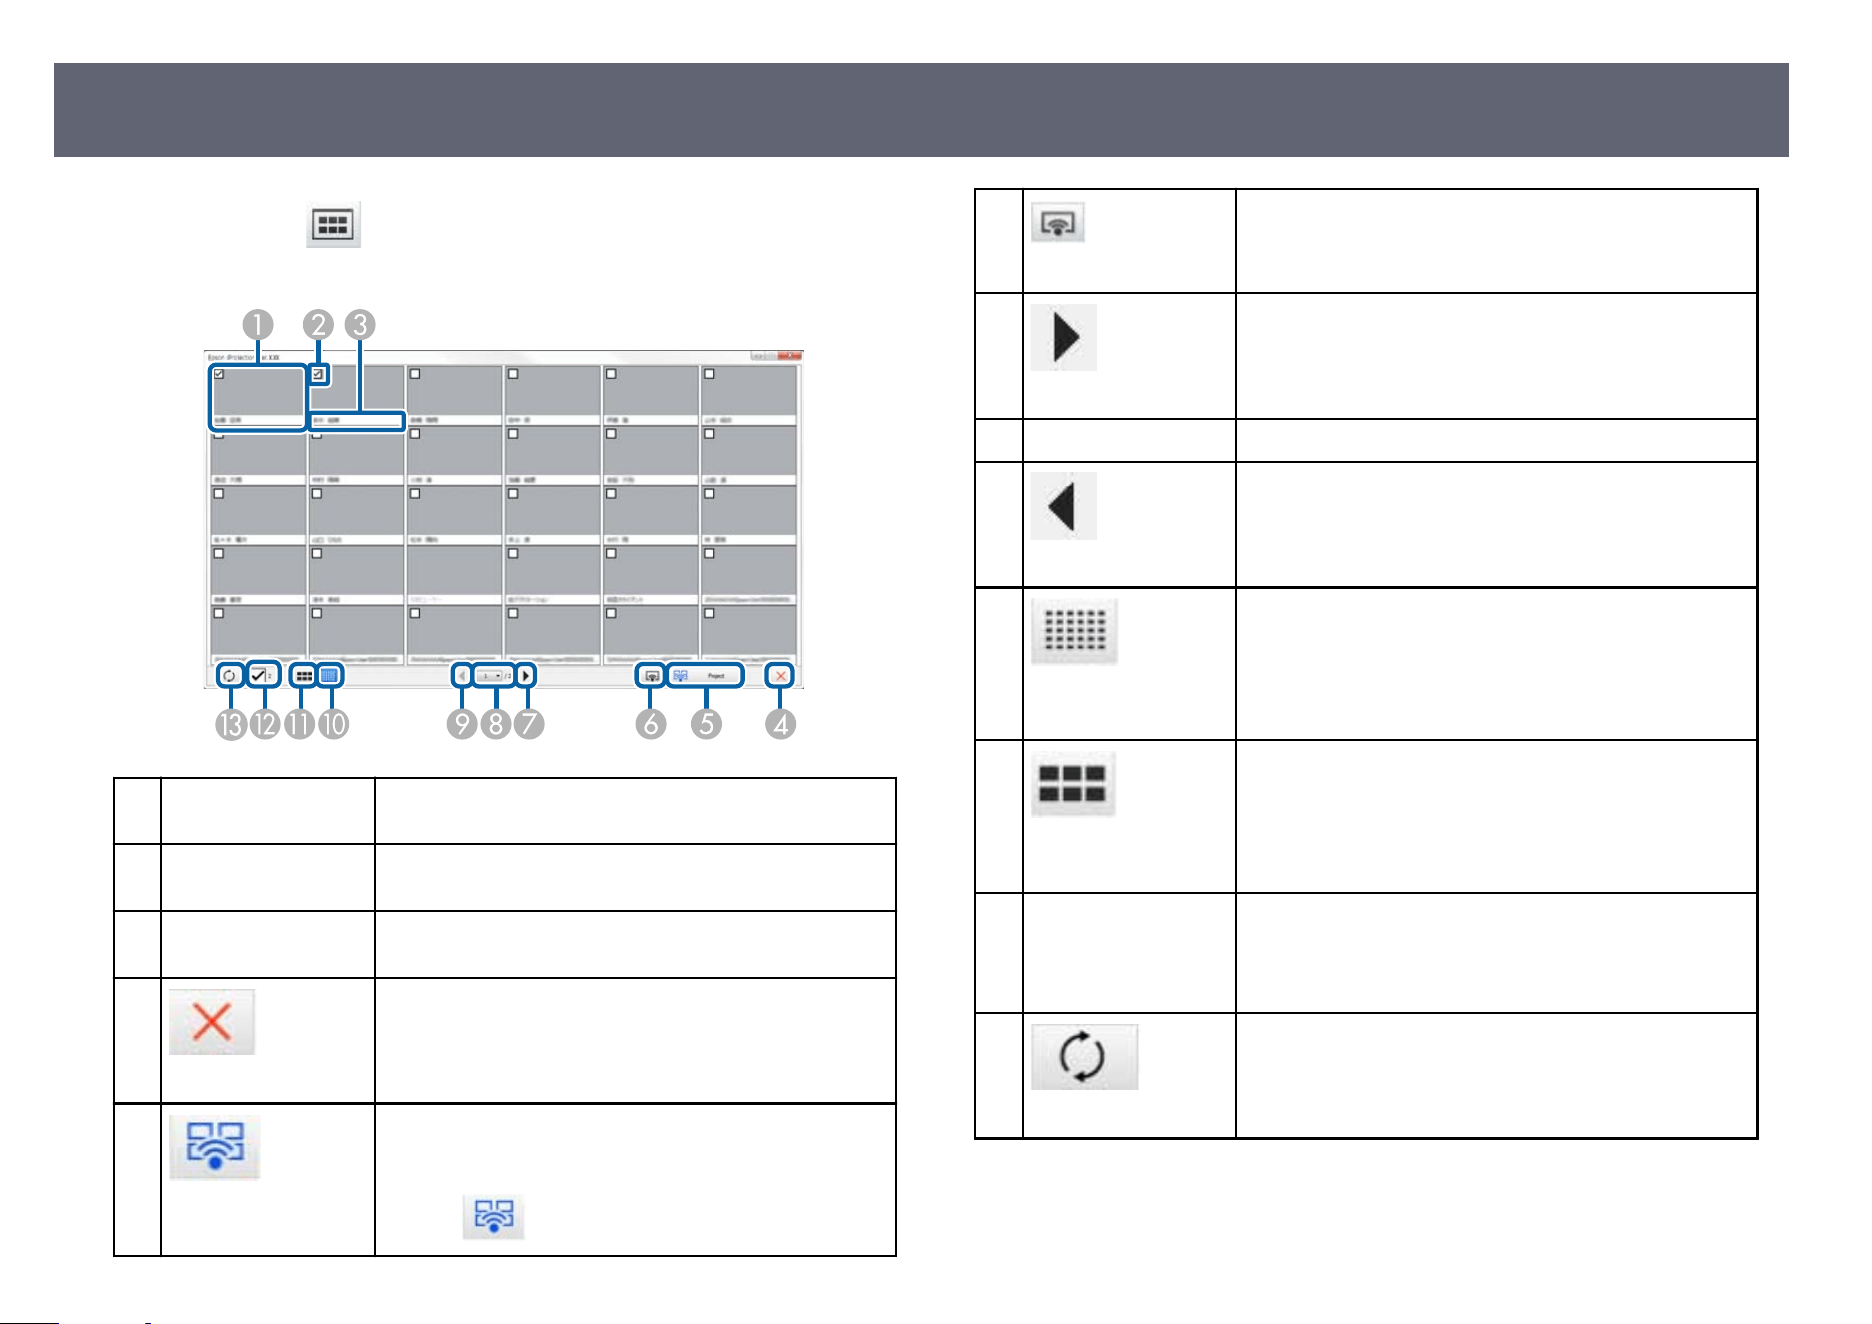
When you click the button on a toolbar or a projection control screen, the
fo
llowing screen is displayed.
A
umbnail Displays a participant's device screen. e th
umbnail
being projected is surrounded by a blue frame.
B
umbnail ch
eck box Select the thumbnail that you want to project. You can
select up to 12 thumbnails.
C
User name Displays the user name of each thumbnail. You can
dis
play up to 32 characters.
D
Close
Closes the thumbnail screen.
E
Project
Projects the thumbnail you selected. When you select
mo
re than 5 thumbnails, the thumbnail selection screen
appears. Aer selecting up to 4 thumbnails, you must
click the
button again.
F
Project My Screen
Projects the screen from your computer in full screen
mo
de without projecting any other users' screens.
G
Next
Displays next page.
H
Page list Switches to the page you want to view.
I
Previous
Displays previous page.
J
Display Small
umb
nails
Reduces the size of each thumbnail so you can view
more thumbnails on the screen.
K
Display Large
umb
nails
Increases the size of each thumbnail so you can view
more details on each one.
L
Clear All Displays the number of selected thumbnails. Deselect
th
e check box to clear all the selections. If you select the
check box again, the previously selected thumbnails are
selected again.
M
Refresh
Refreshes the thumbnails.
Thumbnail Screen
79
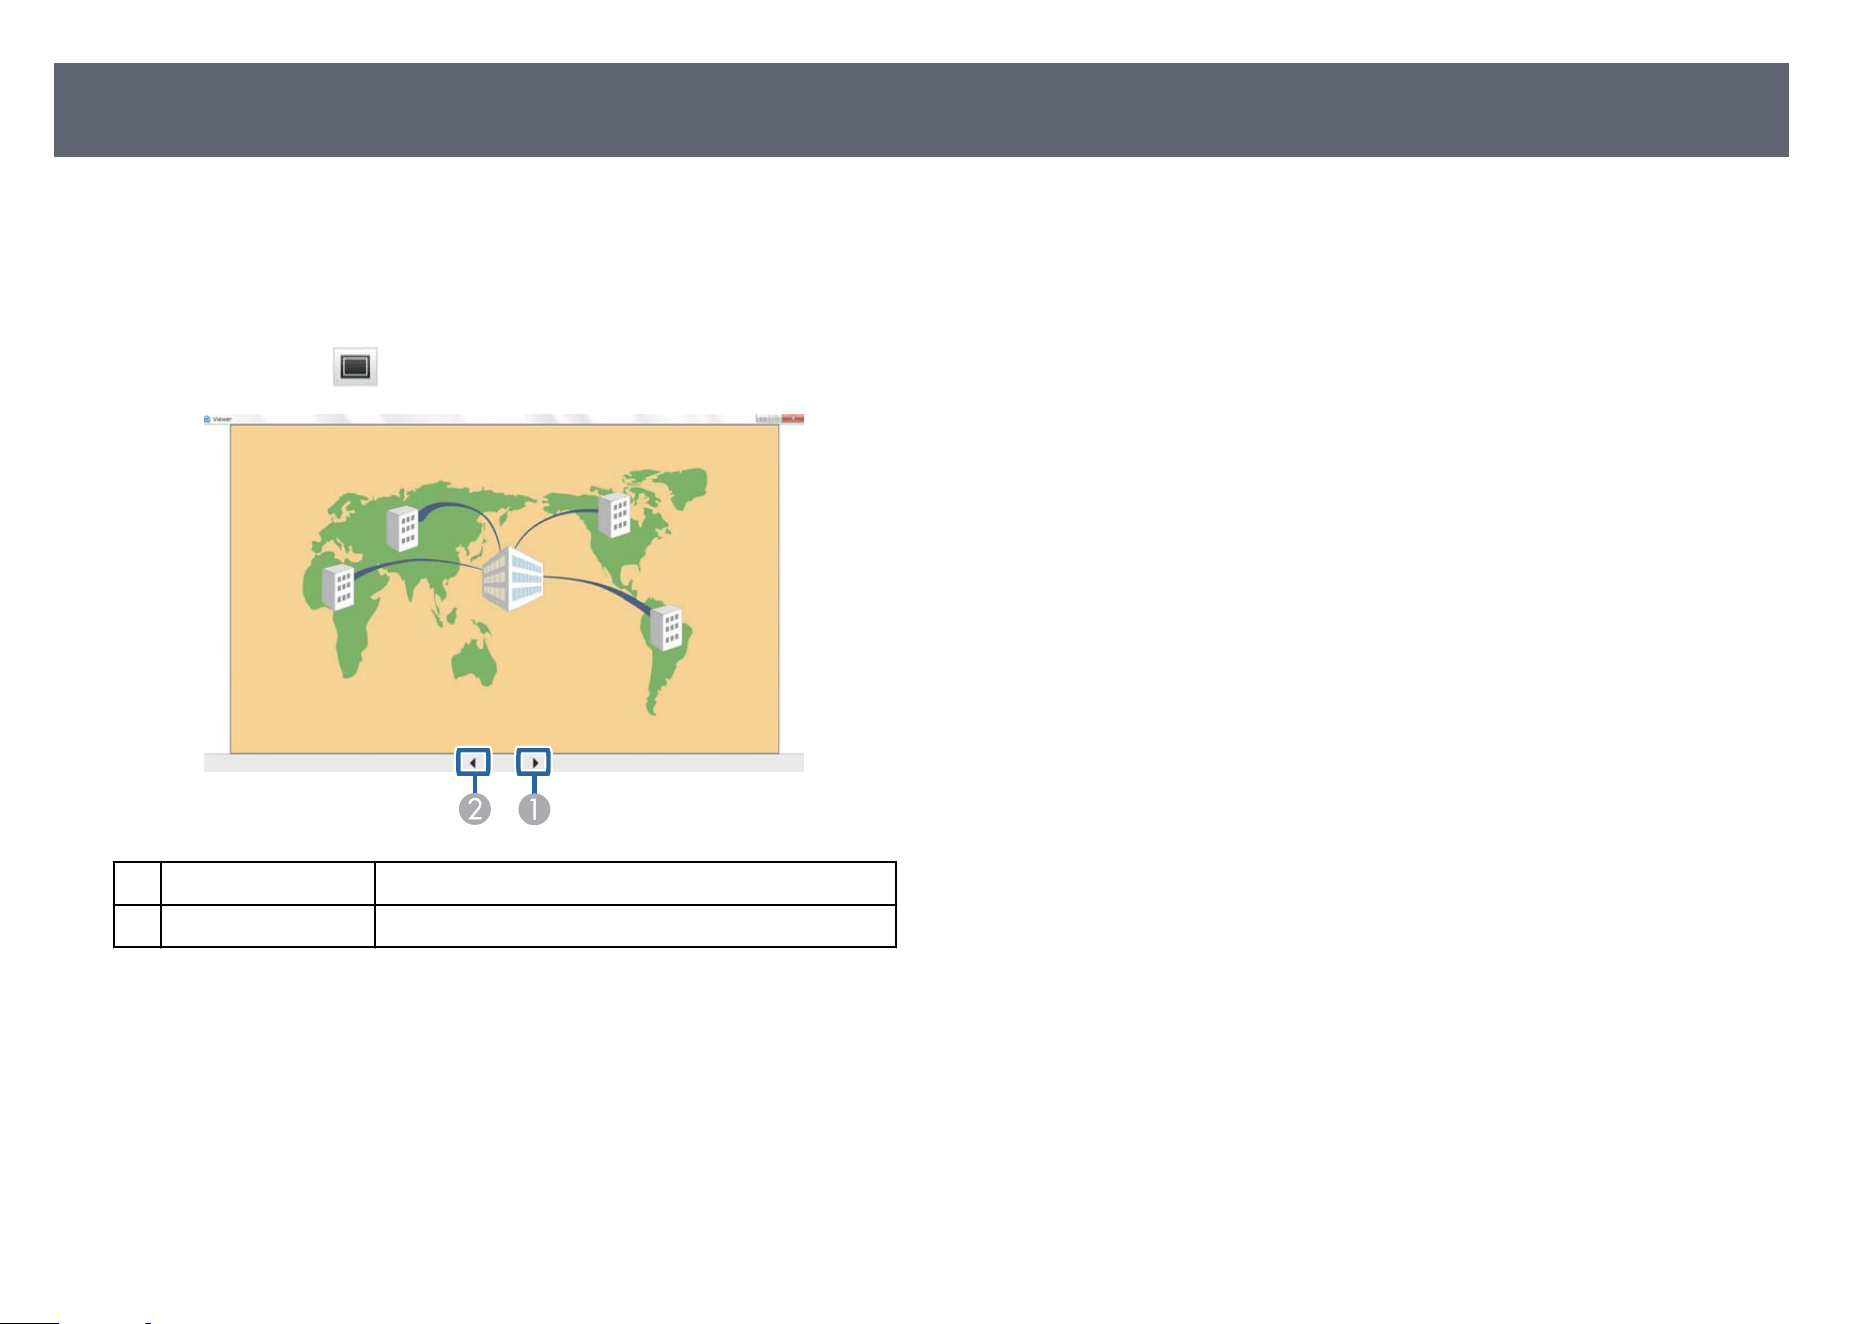
e viewer screen appears when you perform one of the following operations.
•
W
hen you receive the distributed image data.
•
When you select Display Received Image from the Tool menu on the
projection control screen.
•
When you click the
button on the toolbar.
A
Next data Displays next data.
B
Previous data Displays previous data.
Viewer Screen
80

Follow these instructions to update or uninstall the Epson iProjection sowar
e.
g
Related Links
•
"Getting the Latest Version of the Soware" p.82
•
"Uninstalling the Epson iProjection Soware (Windows)" p.82
•
"Uninstalling the Epson iProjection Soware (Mac)" p.82
Getting the Latest Version of the Software
Updates to this software and this guide may be available for your product. To
check for updates, visit support.epson.com and select your product.
Uninstalling the Epson iProjection Software (Windows)
Follow the instructions below to uninstall the Epson iProjection s
o
war
e.
You need administrator authority to uninstall the sowar
e.
a
Turn on your computer.
b
Make sure all running applications are closed.
c
Press the
key on the keyboard to display all apps.
d
Right-click (press and hold) E
pso
n iProjection Ver.X.XX, and then select
Uninstall.
e
Follow the on-screen instructions.
Uninstalling the Epson iProjection Software (Mac)
For Mac, follow the instructions below to uninstall the Epson iProjection
sowar
e.
a
Turn on your computer.
b
Make sure all running applications are closed.
c
Open the A
pplications folder.
d
Op
en the Epson iProjection - Tools folder, and then double-click Epson
iPr
ojection Uninstaller.app.
e
Follow the on-screen instructions.
Updating and Uninstalling the Software
82

e following computer screen resolutions can be projected. You cannot
co
nnect to a computer with a resolution greater than WUXGA.
•
SVGA )800×600(
•
XGA )1024×768(
•
SXGA )1280×960(
•
SXGA )1280×1024(
•
SXGA+ )1400×1050(
•
WXGA )1280×768(
•
WXGA )1280×800(
•
WXGA+ )1440×900(
•
UXGA )1600×1200(
•
Full HD )1920×1080(
•
WUXGA )1920×1200(
When using a computer screen with a unique aspect ratio, the resolution is
increased or decreased depending on the resolution of the computer and the
projector to avoid impairing image quality.
Depending on the resolution, the vertical or horizontal margins may be
projected in black.
Supported Resolutions
83

Check these sections for restrictions applied when projecting computer images
whi
le using the Epson iProjection soware.
g
Related Links
•
"Connection Limitations" p.84
Connection Limitations
Note the following limitations when using the Epson iProjection soware.
•
You can connect up to four projectors to one computer and project
simultaneously. (Multi-screen is not supported.)
•
You can connect up to 50 devices to a projector simultaneously, such as
computers, smartphones and tablets using the Epson iProjection soware.
•
Audio can only be transferred when connected to one projector and
projecting one computer screen in full screen mode. If multiple projectors are
connected or if the projected display is divided, audio cannot be transferred
during projection.
•
If the transmission speed of the wireless LAN is low, the network may
disconnect unexpectedly.
•
Applications that use part of DirectX functions may not be displayed
correctly (Windows only).
•
You cannot project full-screen MS-DOS prompts (Windows only).
•
ere are times when the image on the computer screen and the image
projected by the projector may not match exactly.
•
Movies are not played as smoothly as they are on a computer.
•
When you enable the Use Interactive Pen setting on the General settings tab
on the Set options and see black bands on the computer screen, the position
of the interactive pen may be misaligned.
Limitations
84

Check these sections for important notices about your soware
.
g
Related Links
•
"Copyright Notice" p.85
•
"About Notations" p.85
•
"Trademarks" p.85
•
"Copyright Attribution" p.85
Copyright Notice
All rights reserved. No part of this publication may be reproduced, stored in
a retrieval system, or transmitted in any form or by any means, electronic,
mechanical, photocopying, recording, or otherwise, without the prior written
permission of Seiko Epson Corporation. No patent liability is assumed with
respect to the use of the information contained herein. Neither is any liability
assumed for damages resulting from the use of the information contained
herein.
Neither Seiko Epson Corporation nor its aliates shall be liable to the purchaser
of this product or third parties for damages, losses, costs, or expenses incurred
by the purchaser or third parties as a result of: accident, misuse, or abuse of this
product or unauthorized modications, repairs, or alterations to this product,
or (excluding the U.S.) failure to strictly comply with Seiko Epson Corporation's
operating and maintenance instructions.
Seiko Epson Corporation shall not be liable against any damages or problems
arising from the use of any options or any consumable products other than
those designated as Original Epson Products or Epson Approved Products by
Seiko Epson Corporation.
e contents of this guide may be changed or updated without further notice.
Illustrations in this guide and the actual projector may dier.
About Notations
•
M
icr
os
o
®
Windows
®
10 operating system
•
Microso
®
Windows
®
11 operating system
In this guide, the operating systems above are referred to as "Windows 10" and
"Windows 11". Furthermore, the collective term "Windows" is used to refer to
them all.
•
macOS 13 (Ventura)
•
macOS 14 (Sonoma)
•
macOS 15 (Sequoia)
•
macOS 26 (Tahoe)
In this guide, the collective term "Mac" is used to refer to all of the operating
systems above.
Trademarks
Epson is a registered trademark of Seiko Epson Corporation.
XGA is a trademark or registered trademark of International Business Machines
Corporation.
Mac and macOS are registered trademarks of Apple Inc.
Microso and Windows are trademarks of the Microsoft group of companies.
Other product names used herein are also for identification
purposes only and
may be trademarks of their respective owners. Epson disclaims any and all
rights in those marks.
Software Copyright: T his product uses free software as well as software to which
this company holds the rights.
Copyright Attribution
is information is subject to change without notice.
Notices
85

© 2025 Epson America, Inc., 11/25
CPD-63686
Notices
86