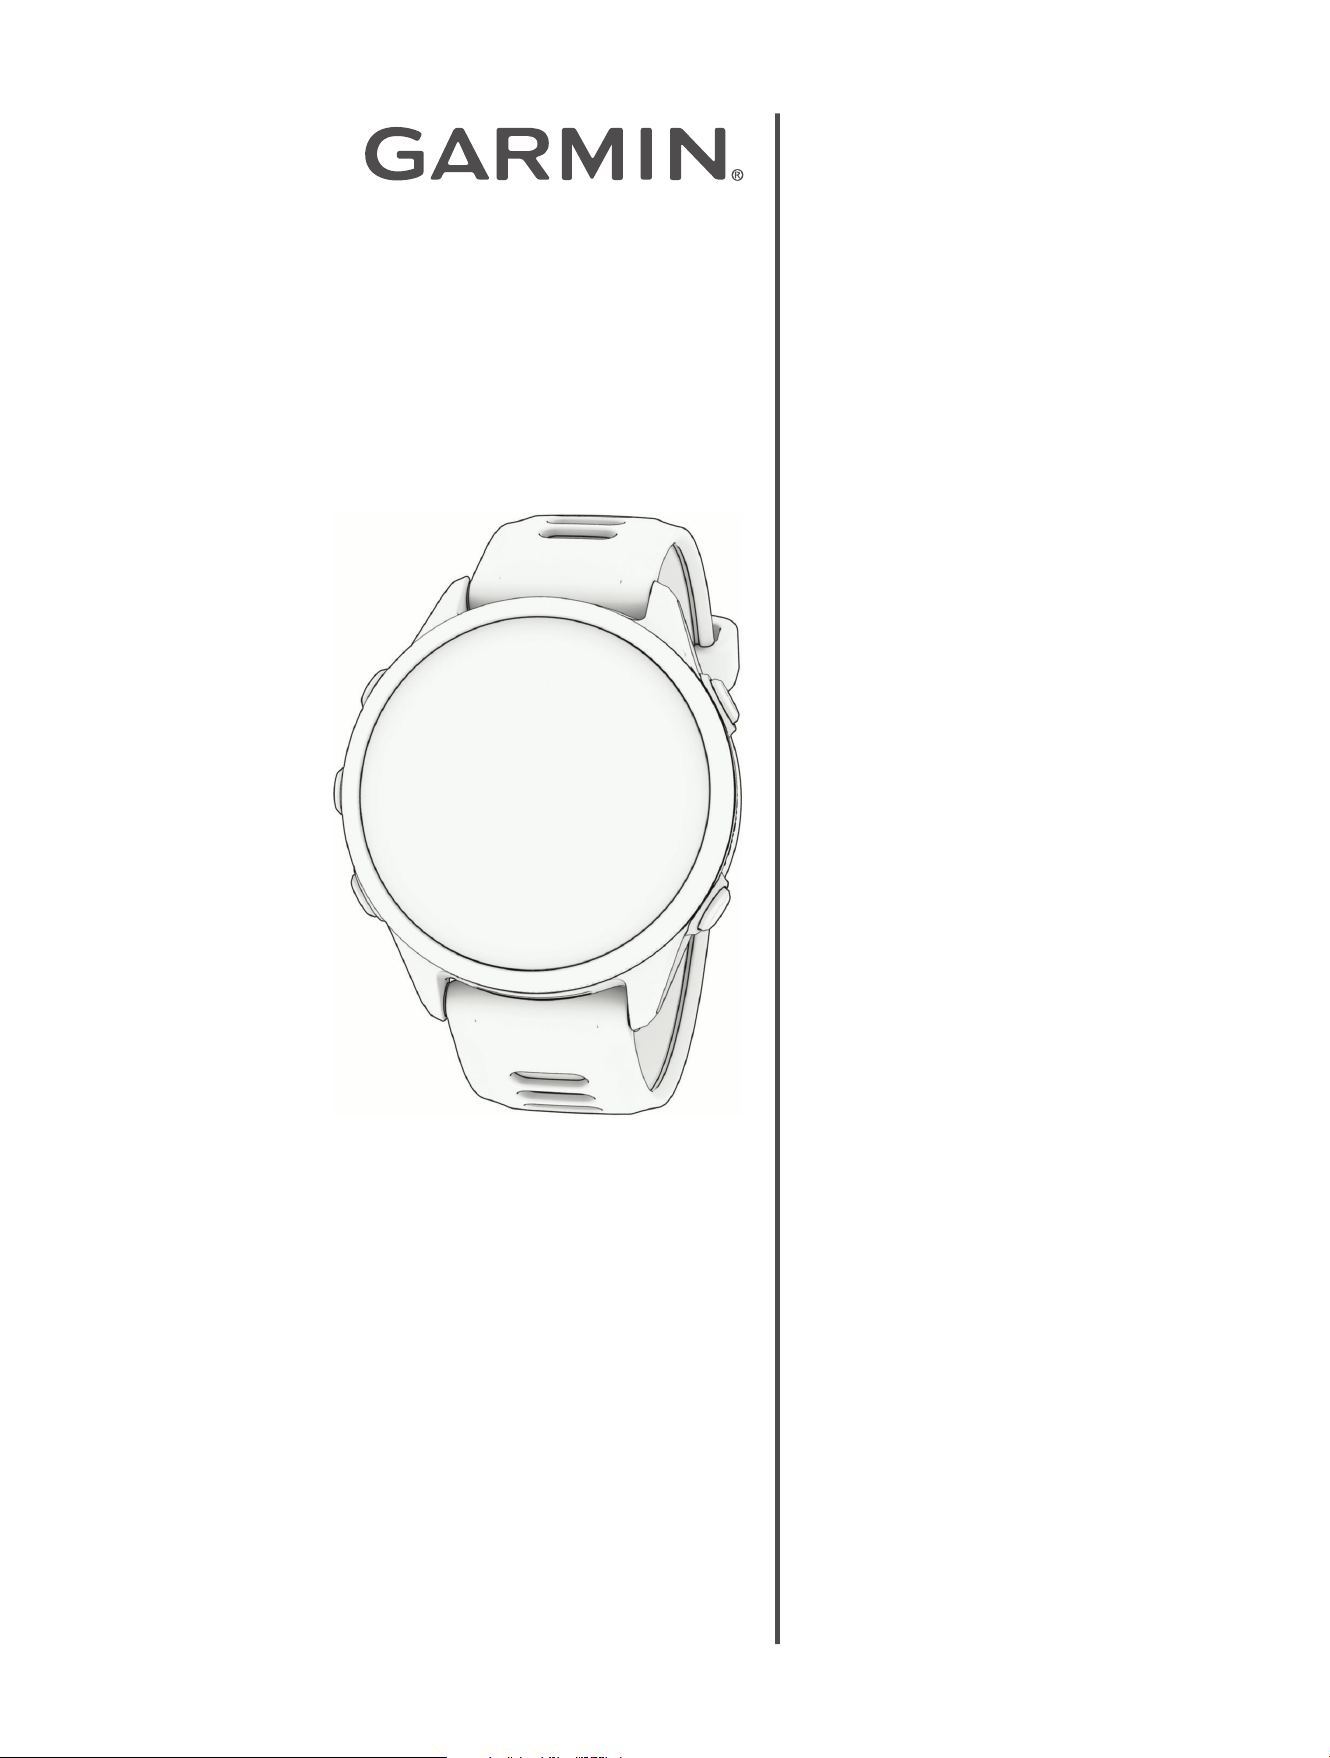
FORERUNNER
®
70
GPS Running Smartwatch
Owner's
Manual
Table of Contents
Introduction......................................5
Setting Up Your Watch...................... 5
Button Functions............................. 5
GPS Status and Status Icons.............. 6
Touchscreen Functions.....................6
Enabling and Disabling the
Touchscreen................................7
Customizing the Watch Face.............. 7
Apps and Activities...........................8
Apps............................................. 8
Workouts.................................... 9
Using the Messenger Feature........ 12
Activities...................................... 12
Starting an Activity...................... 13
Stopping an Activity..................... 14
Running.................................... 14
Cycling......................................18
Swimming................................. 18
Gym Activities............................ 20
Winter Sports............................. 21
Other Activities........................... 21
Customizing Activities and Apps.... 21
Controls......................................... 27
Customizing the Controls Menu........ 28
Using the Flashlight Screen.............. 28
Listening to Music on Your Phone......28
Music Playback Controls.............. 29
Glances.......................................... 30
Viewing Glances............................ 31
Customizing the Glances List............32
Creating a Glances Folder............. 32
Body Battery
™
................................ 32
Tips for Improved Body Battery
™
Data......................................... 32
Performance Measurements............ 32
About VO2 Max. Estimates............33
Viewing Your Predicted Race
Times....................................... 33
Heart Rate Variability Status.......... 34
Training Status.............................. 35
Training Status Levels.................. 35
Acute Load................................ 36
Recovery Time............................37
Pausing and Resuming Your Training
Status.......................................38
Training Readiness......................... 38
Race Calendar and Primary Race....... 39
Training for a Race Event.............. 39
Adding a Stock.............................. 40
Lifestyle Logging............................40
Tracking Lifestyle Logging
Behaviors.................................. 40
Clocks............................................ 41
Setting an Alarm............................ 41
Editing an Alarm......................... 41
Using the Countdown Timer............. 41
Deleting a Countdown Timer..........42
Using the Stopwatch.......................42
Adding Alternate Time Zones............43
Editing an Alternate Time Zone...... 43
Adding a Countdown Event.............. 43
Editing a Countdown Event............43
History........................................... 45
Using History.................................45
Personal Records........................... 45
Viewing Your Personal Records......45
Restoring a Personal Record..........45
Clearing Personal Records............ 45
Viewing Data Totals........................45
Notifications and Alerts Settings.... 47
Health and Wellness Alerts...............47
Setting an Abnormal Heart Rate
Alert......................................... 47
Move Alert................................. 47
Morning Report..............................48
Customizing Your Morning Report.. 48
Evening Report.............................. 48
Customizing Your Evening Report... 48
Setting Time Alerts......................... 48
Turning On Phone Connection Alerts.. 48
Sound and Vibration Settings......... 49
Display and Brightness Settings..... 50
Connectivity................................... 51
Sensors and Accessories.................51
Wireless Sensors........................ 51
Phone Connectivity Features............ 53
Pairing Your Phone...................... 53
Enabling Phone Notifications.........54
Turning Off the Bluetooth
®
Phone
Connection................................ 55
Turning On and Off Find My Phone
Alerts........................................55
Garmin Share................................ 55
Sharing Data with Garmin Share..... 55
Receiving Data with Garmin Share.. 56
Garmin Share Settings..................56
Phone Apps and Computer
Applications..................................56
Garmin Connect
™
........................ 56
Connect IQ Features.................... 58
Garmin Messenger
™
App...............58
Focus Modes.................................. 60
Customizing a Default Focus Mode....60
Creating a Custom Focus Mode........ 60
Health and Wellness Settings......... 62
Wrist Heart Rate.............................62
Wearing the Watch...................... 62
Tips for Erratic Heart Rate Data......62
Wrist Heart Rate Monitor Settings...62
Pulse Oximeter.............................. 63
Getting Pulse Oximeter Readings....64
Setting the Pulse Oximeter Mode....64
Tips for Erratic Pulse Oximeter
Data......................................... 64
Auto Goal..................................... 64
Intensity Minutes........................... 64
Earning Intensity Minutes..............65
Sleep Tracking...............................65
Using Automated Sleep Tracking....65
Breathing Variations.................... 65
Navigation...................................... 66
Saving Your Location...................... 66
Viewing and Editing Saved
Locations.................................. 66
Deleting a Location......................66
Navigating to a Destination.............. 66
Navigating Back to Start.................. 66
Stopping Navigation....................... 67
Courses....................................... 67
Creating a Course on Garmin
Connect
™
...................................67
Following a Course on Your
Device...................................... 67
Map................................................69
Adding the Map Data Screen............ 69
Panning and Zooming the Map......... 69
Map Settings.................................69
Safety and Tracking Features......... 70
Adding Emergency Contacts.............70
Adding Contacts............................ 70
Turning Incident Detection On and
Off.............................................. 70
Requesting Assistance.................... 71
User Profile.................................... 72
Setting Up Your User Profile............. 72
Gender Settings.......................... 72
Viewing Your Fitness Age............. 72
About Heart Rate Zones.................. 72
Fitness Goals............................. 72
Setting Your Heart Rate Zones....... 72
Letting the Watch Set Your Heart Rate
Zones....................................... 73
Heart Rate Zone Calculations........ 73
Setting Your Power Zones................73
Power Manager Settings................ 74
Customizing the Battery Saver
Feature........................................ 74
Accessibility................................... 75
Accessibility Settings...................... 75
System Settings............................. 76
Customizing the Button Shortcuts..... 76
Setting Your Watch Passcode........... 76
Changing Your Watch Passcode.....76
Turning Off Your Watch Passcode.. 76
Time Settings................................ 77
Syncing the Time........................ 77
Advanced System Settings...............77
Changing the Units of Measure...... 77
Data Recording Settings............... 77
Restore and Reset Settings.............. 77
Restoring Your Settings and Data from
Garmin Connect
™
........................ 78
Resetting All Default Settings.........78
Viewing Device Information..............78
Viewing E-label Regulatory and
Compliance Information............... 78
Device Information......................... 79
About the AMOLED Display.............. 79
Charging the Watch........................ 79
Wearing the Watch......................... 79
Device Care...................................80
Cleaning the Watch......................80
Changing the Bands........................80
Specifications............................... 81
Battery Information......................81
Informações de
Radiocomunicação.................... 0
Troubleshooting............................. 82
Product Updates............................ 82
Getting More Information.................82
My device is in the wrong language....82
Tips for Maximizing the Battery Life... 82
Restarting Your Watch.....................82
Is my phone compatible with my
watch?......................................... 82
My phone will not connect to the
watch.......................................... 83
Can I use my Bluetooth
®
sensor with my
watch?......................................... 83
How can I undo a lap button press?....83
Acquiring Satellite Signals................83
Improving GPS Satellite Reception.. 83
The heart rate on my watch is not
accurate.......................................83
The activity temperature reading is not
accurate.......................................84
Exiting Demo Mode........................ 84
Activity Tracking............................ 84
My step count does not seem
accurate....................................84
The step counts on my watch and my
Garmin Connect
™
account don't
match....................................... 84
Appendix........................................ 85
VO2 Max. Standard Ratings..............85
Color Gauges and Running Dynamics
Data............................................ 85
Ground Contact Time Balance
Data......................................... 85
Vertical Oscillation and Vertical Ratio
Data......................................... 86
Wheel Size and Circumference..........86
Data Fields..................................... 87
Introduction
WARNING
See the Important Safety and Product Information guide in the product box for product warnings and other
important information.
Always consult your physician before you begin or modify any exercise program.
Setting Up Your Watch
To take full advantage of the Forerunner
®
features, complete these tasks.
● Hold to turn on the watch (Button Functions, page5).
● Follow the on-screen instructions to complete the initial setup.
During the initial setup, you can pair your phone with your watch to receive notifications, sync your activities,
and more (Pairing Your Phone, page53). If you are upgrading from a compatible watch, you can migrate
your watch settings, saved courses, and more when you pair your new Forerunner watch with your phone.
● Charge the watch (Charging the Watch, page79).
● Check for software updates (System Settings, page76).
For the best experience, you should keep the software on your watch up to date. Software updates provide
changes and improvements to privacy, security, and features.
● Set up safety features (Safety and Tracking Features, page70).
● Go for a run (Going for a Run, page14).
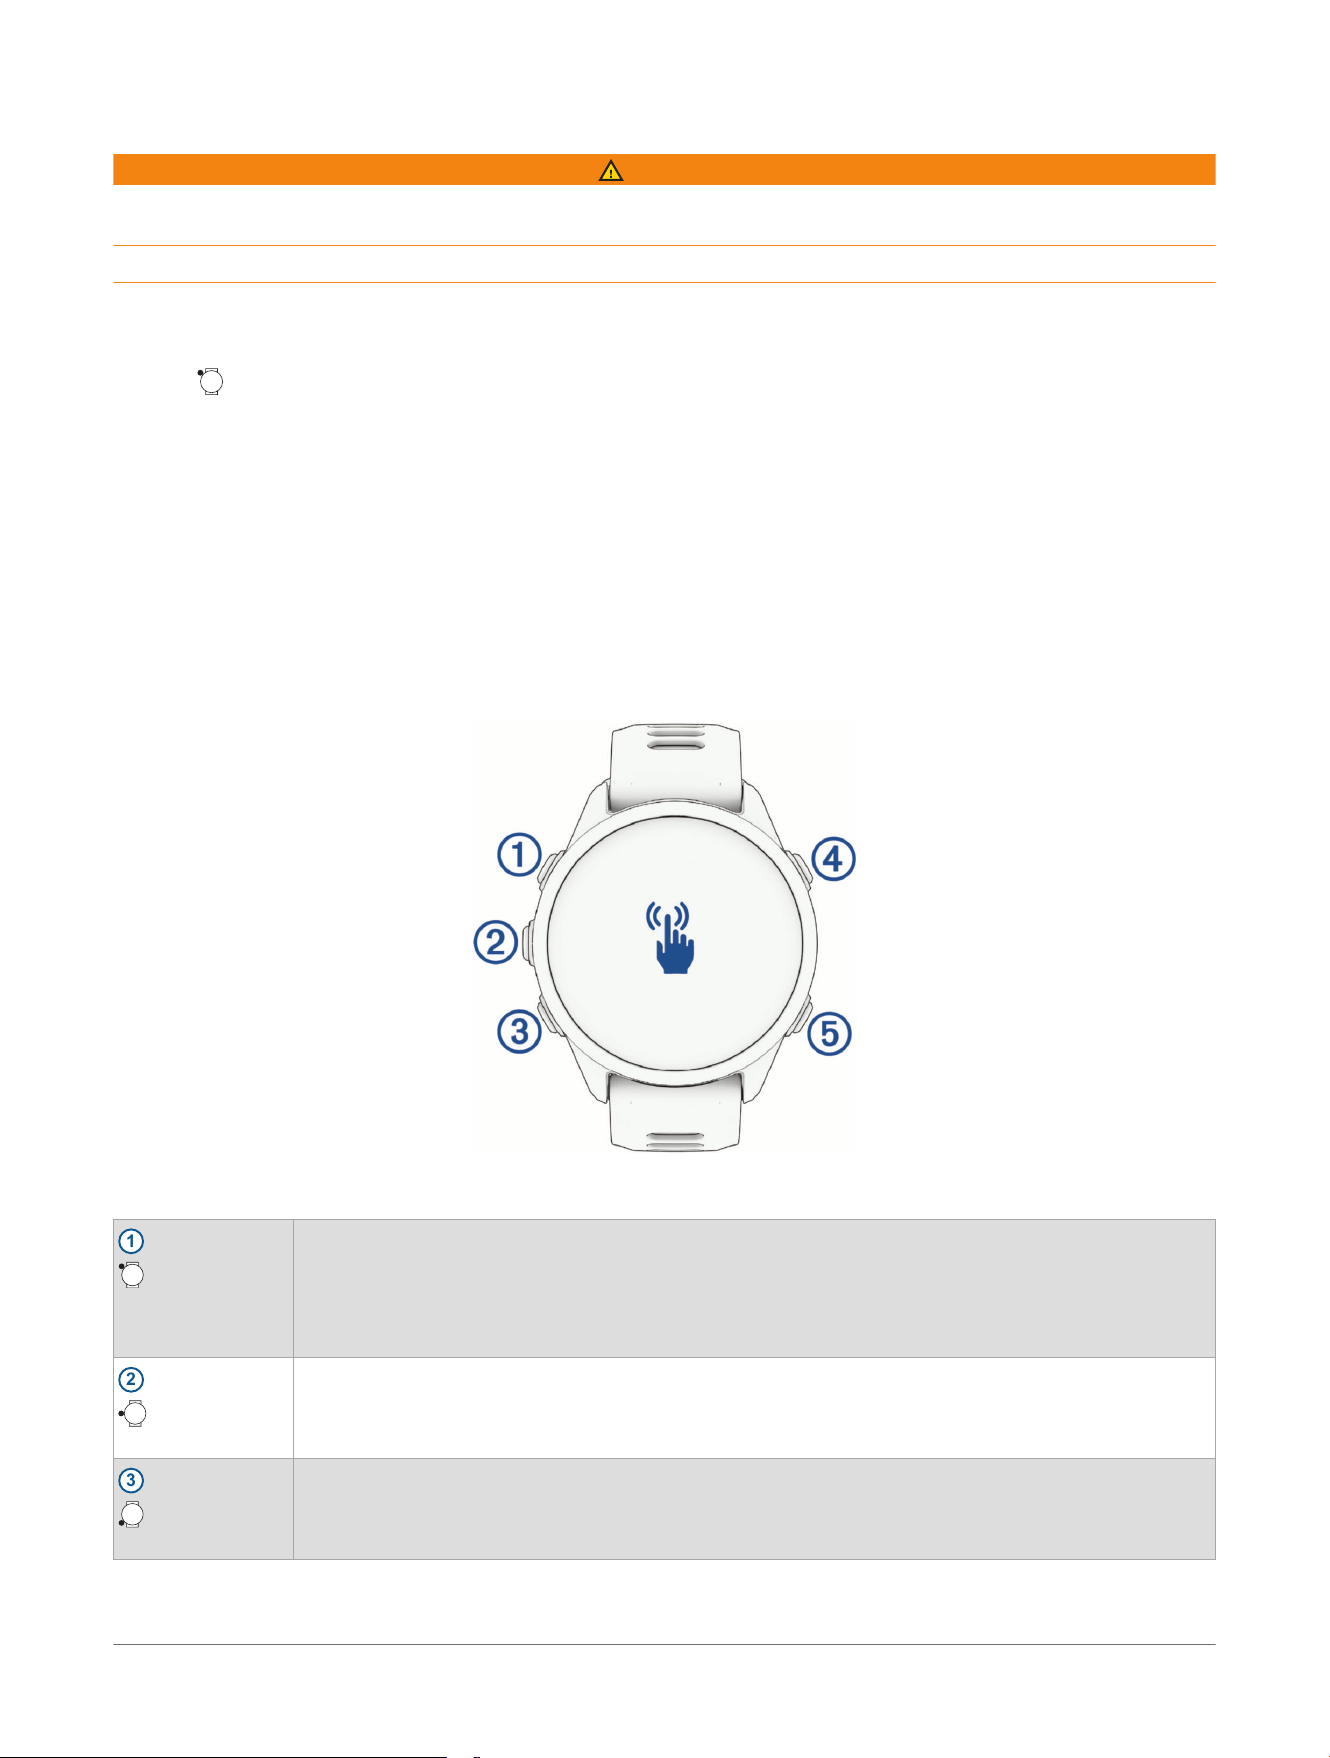
Button Functions
TIP: You can customize some button hold functions and create new button shortcuts (Customizing the Button
Shortcuts, page76).
1
Upper-left button
● Press to illuminate the screen.
● Quickly press twice to turn the flashlight on or off (Using the Flashlight Screen, page28).
● Hold for two seconds to view the controls menu (Controls, page27).
● Hold for three seconds to turn on the device.
● Hold for five seconds to request assistance (Requesting Assistance, page71).
2
Middle-left button
● From the watch face, press to view the notification center (Viewing Notifications, page54).
● Press to scroll through the menus or data screens.
● From the watch face, hold to access the main menu.
3
Lower-left button
● From the watch face, press to scroll through the glances list (Viewing Glances, page31).
● Press to scroll through the menus or data screens.
● Hold to view the music controls (Listening to Music on Your Phone, page28).
Introduction Forerunner® 70 GPS Running Smartwatch
Owner's Manual
5
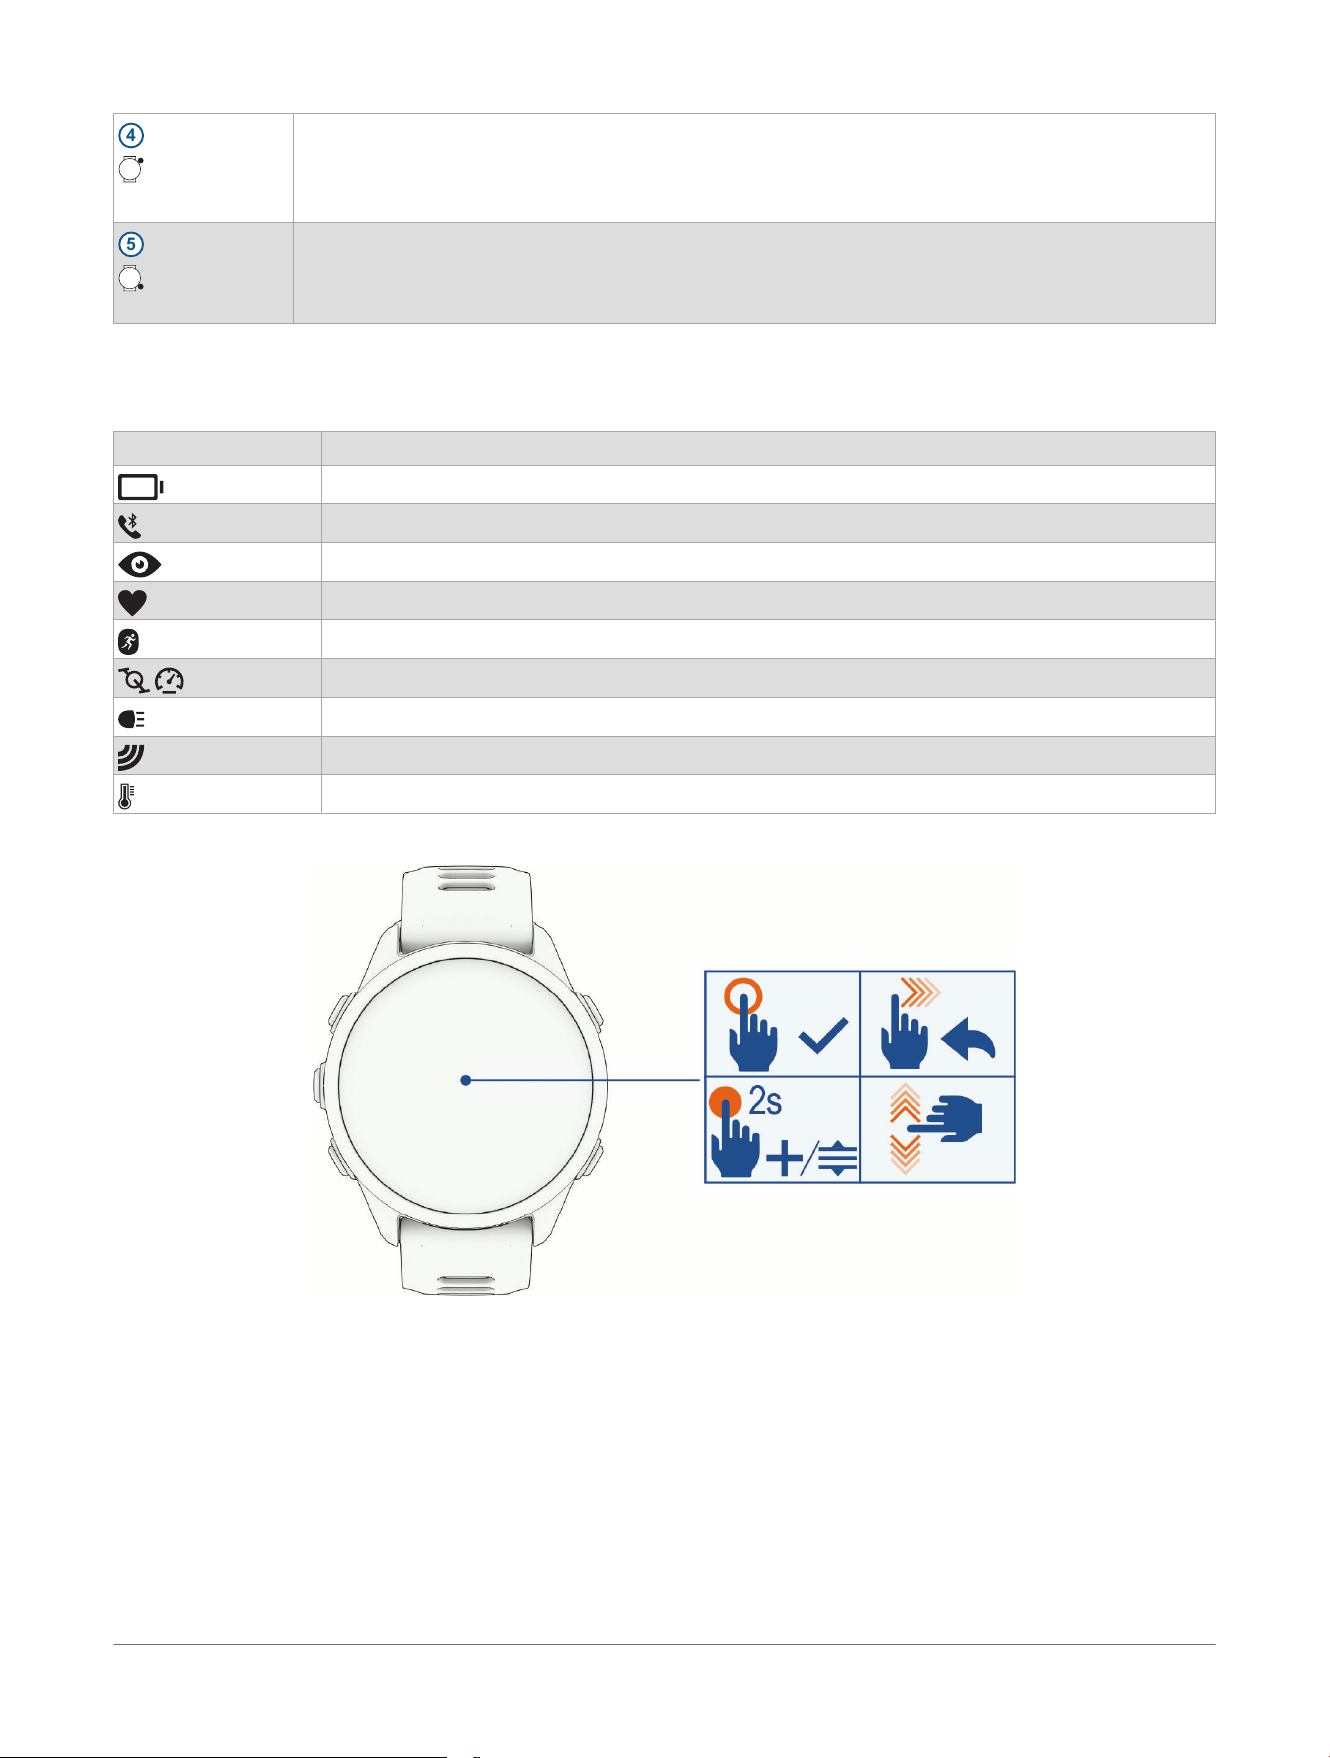
4
Upper-right button
● Press to choose an option in a menu.
● From the watch face, press to open the apps and activities menu (Apps and Activities,
page8).
● Press to start or stop an activity (Starting an Activity, page13).
5
Lower-right button
● Press to return to the previous screen.
● During an activity, press to record a lap, rest, or advance to the next workout step.
GPS Status and Status Icons
For outdoor activities, the status bar turns green when GPS is ready. A flashing icon means the watch is
searching for a signal. A solid icon means the signal was found or the sensor is connected.
GPS GPS status
Battery status
Phone connection status
LiveTrack status
Heart rate status
Running Dynamics Pod status
Speed and cadence sensor status
Bike lights status
Bike radar status
tempe
™
sensor status
Touchscreen Functions
● Tap to choose an option in a menu.
● Hold the watch face data to open the glance or feature.
NOTE: This feature is not available on all watch faces.
● Tap an icon at the top of the watch face to resume using the active app or activity.
● From the controls, glances, or apps menu, hold the watch face to edit, add to, or reorder the options.
● From the watch face, swipe down to view the notification center.
● From the watch face, swipe up to scroll through the glances list.
● Swipe up or down to scroll through the menus.
● Swipe right to return to the previous screen.
● Cover the screen with your palm to return to the watch face and turn down the screen brightness.
6
Forerunner® 70 GPS Running Smartwatch
Owner's Manual
Introduction
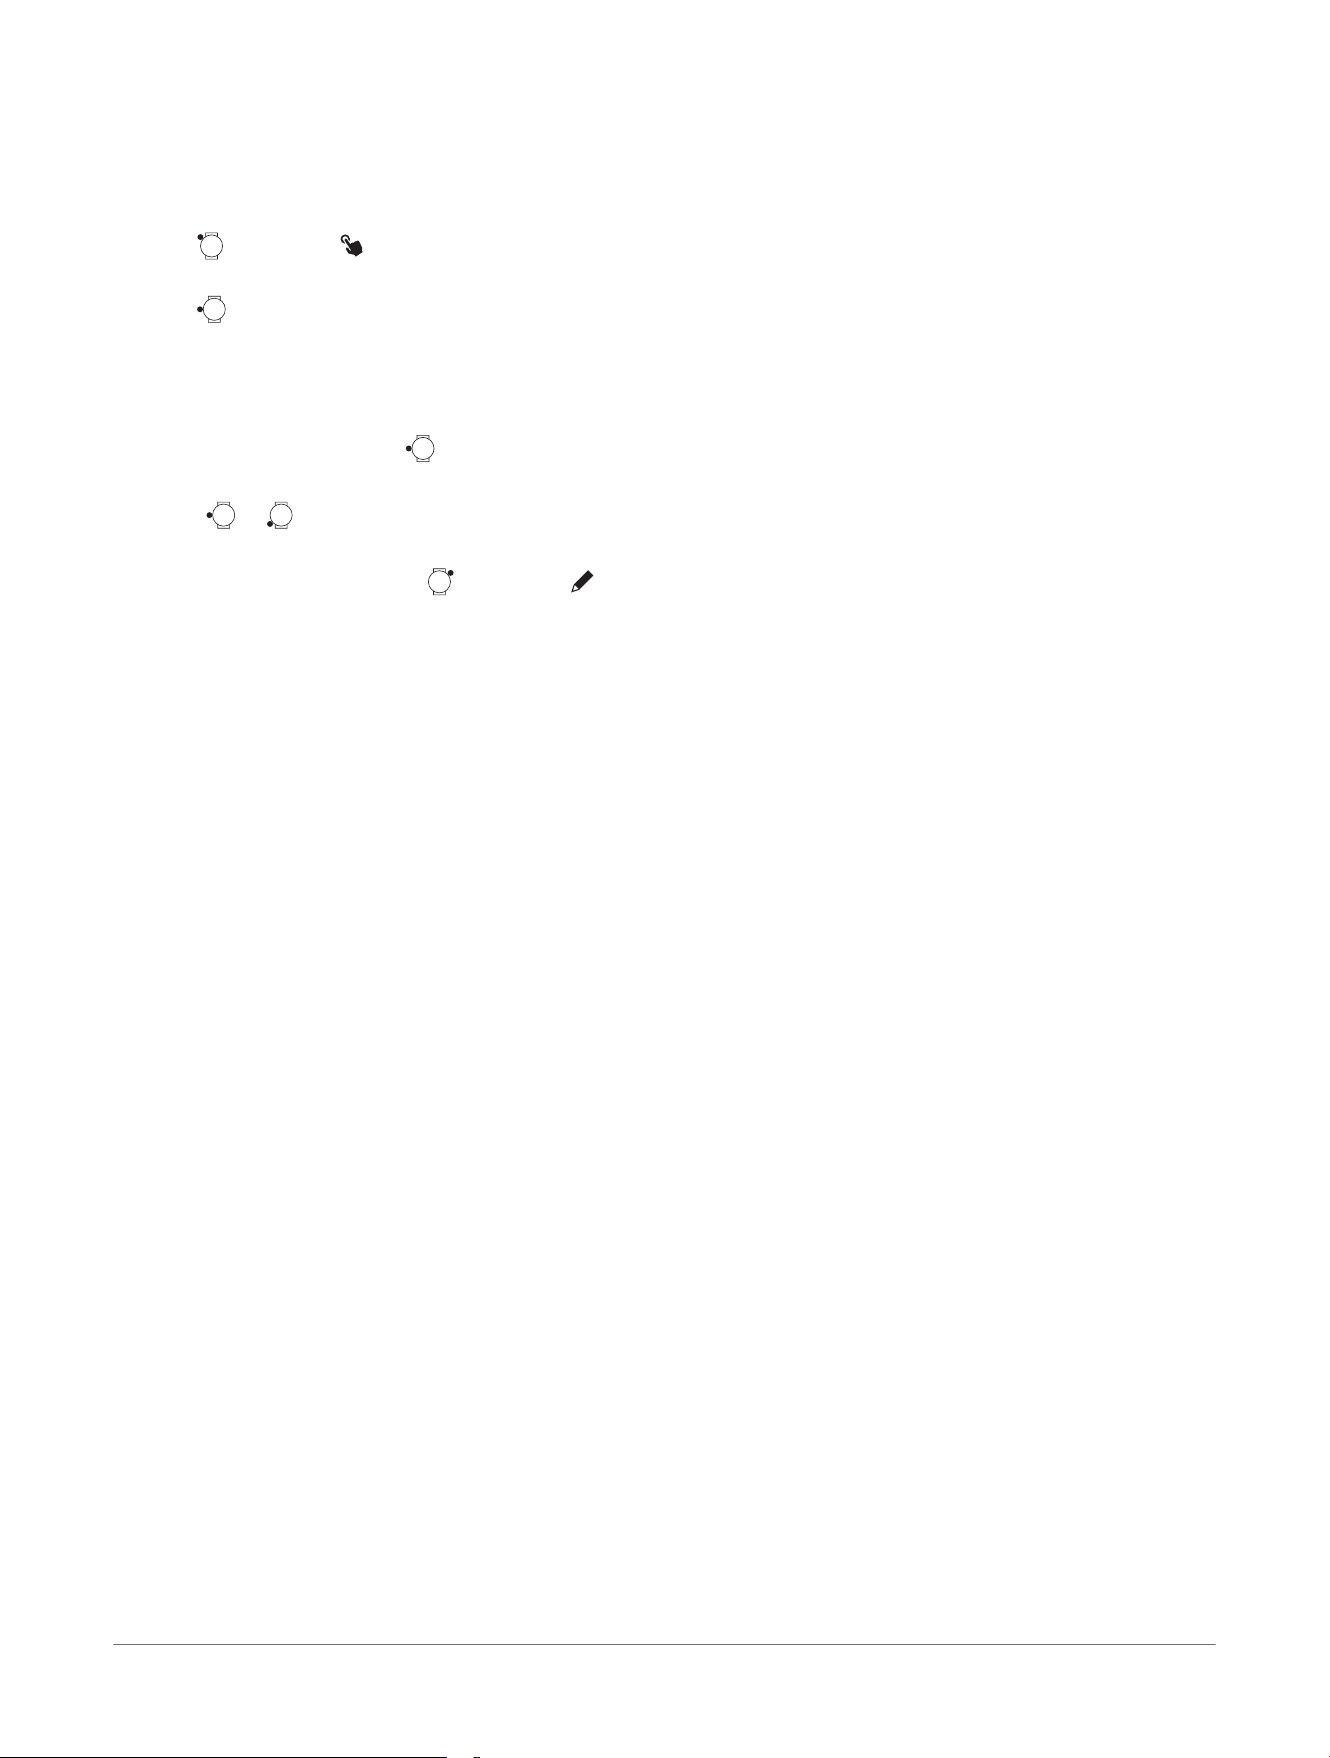
Enabling and Disabling the Touchscreen
You can customize the touchscreen for general watch use, each activity profile (Activity Settings, page23), and
each focus mode (Focus Modes, page60).
NOTE: The touchscreen is not available during swim activities.
● Hold , and select .
To add this option to the controls menu, see (Customizing the Controls Menu, page28).
● Hold , select Watch Settings> Display & Brightness> Touch, and select an option.
Customizing the Watch Face
You can customize the watch face information and appearance, or activate an installed Connect IQ
™
watch face
(Connect IQ Features, page58).
1 From the watch face, hold .
2 Select Watch Face.
3 Press or to preview the watch face options.
4 Select Add New to choose from additional watch face options.
5 Scroll to a watch face, press , and select .
6 Select an option:
NOTE: Not all options are available for all watch faces.
● To activate the watch face, select Apply.
● To change the data that appears on the watch face, select Data, select a field to edit, and select an
option.
● To add or change an accent color for the watch face, select Accent Color.
● To change the color of the data that appears on the watch face, select Data Color.
● To remove the watch face, select Delete.
Introduction
Forerunner® 70 GPS Running Smartwatch
Owner's Manual
7
Apps and Activities
Your watch includes a variety of preloaded apps and activities.
Apps: Apps provide interactive features for your watch, such as viewing workouts or checking the weather
forecast (Apps, page8).
Activities: Your watch comes preloaded with indoor and outdoor activity apps, including running, cycling,
strength training, pool swimming, and more (Activities, page12). When you start an activity, the watch
displays and records sensor data, which you can save and share with the Garmin Connect
™
community.
For more information about activity tracking and fitness metric accuracy, go to garmin.com/ataccuracy.
Connect IQ
™
Apps: You can add features to your watch by installing apps from the Connect IQ app (Connect IQ
Features, page58).
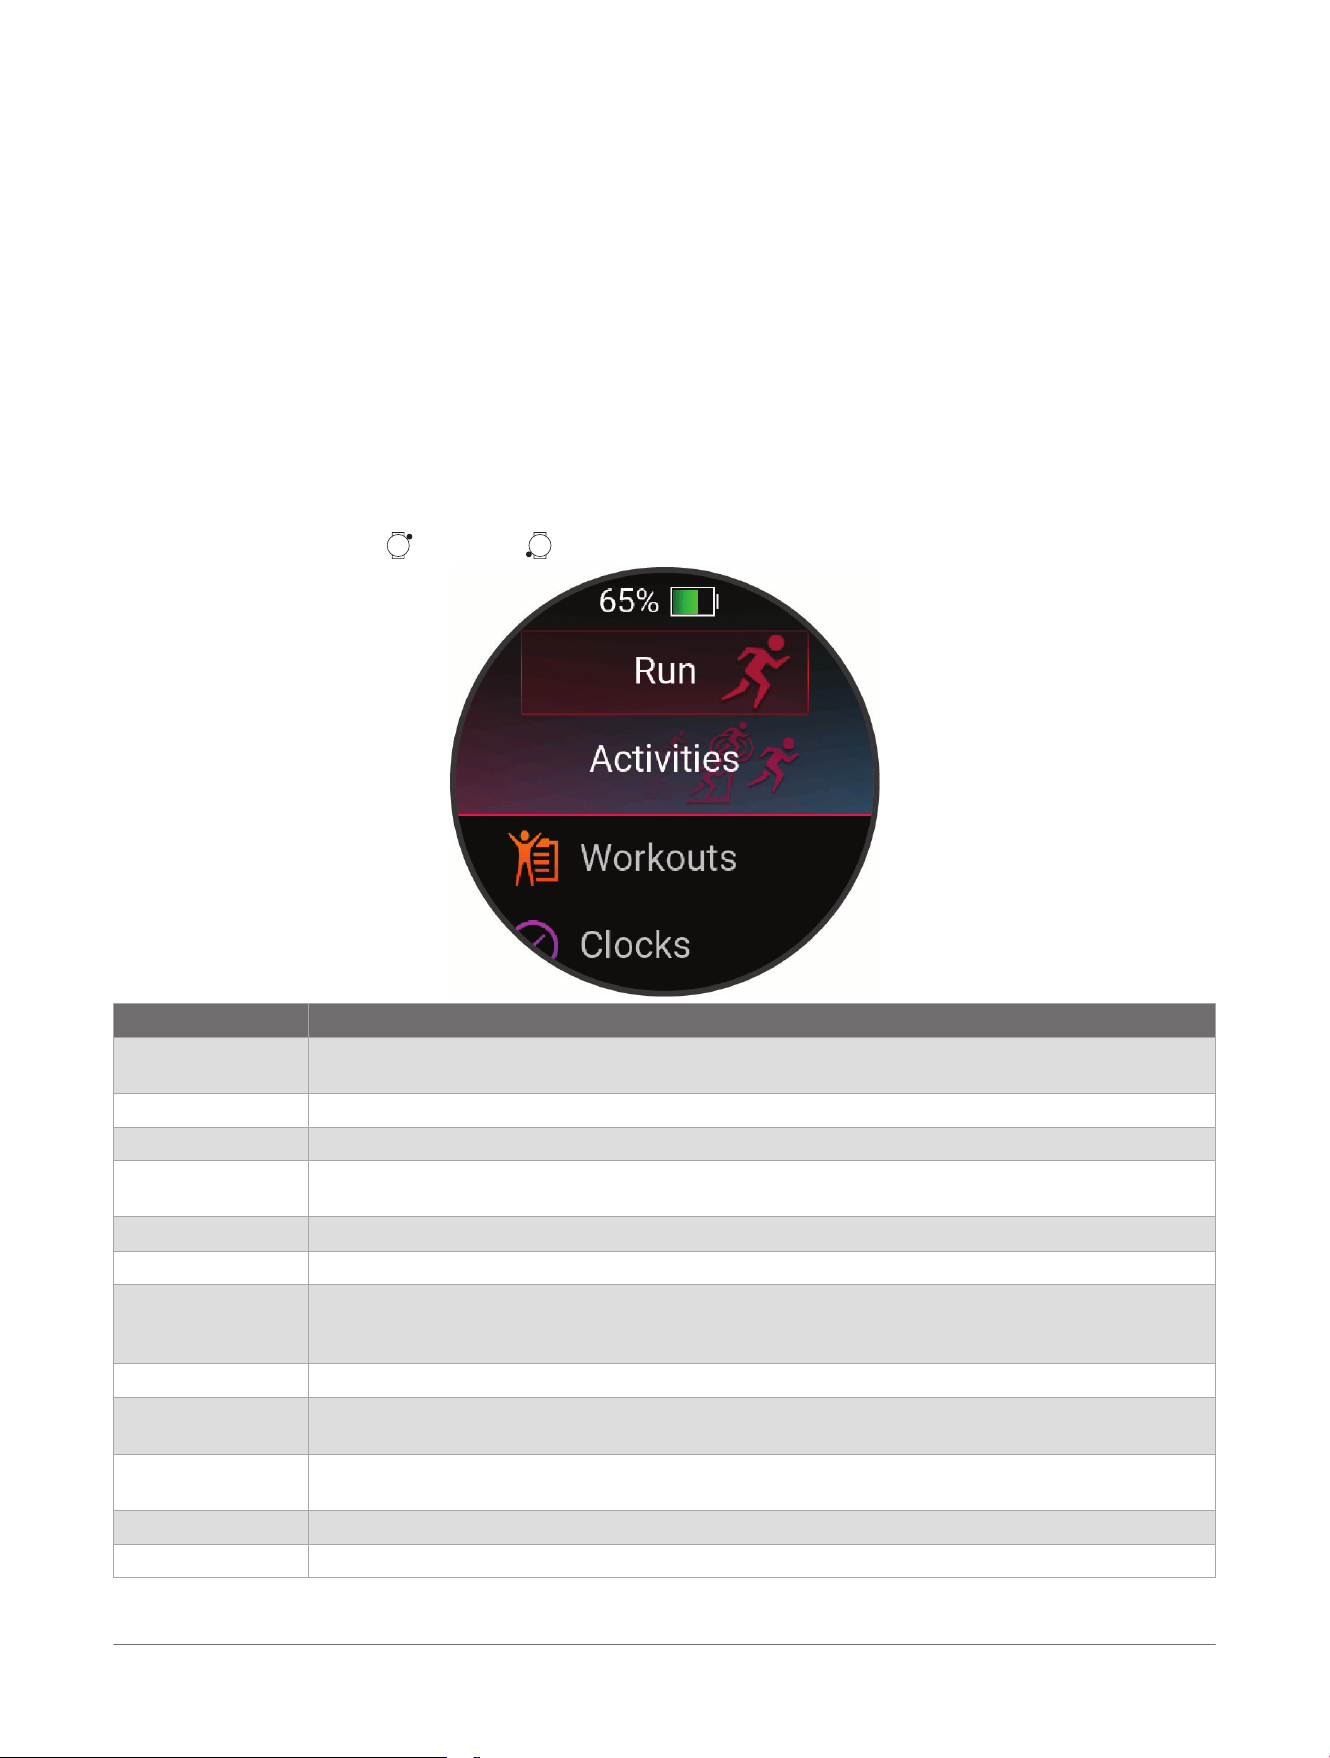
Apps
You can customize your watch using the apps menu, which lets you quickly access watch features and options.
Some apps require a Bluetooth
®
connection to a compatible phone. Many apps can also be found in the glances
(Glances, page30) or controls (Controls, page27).
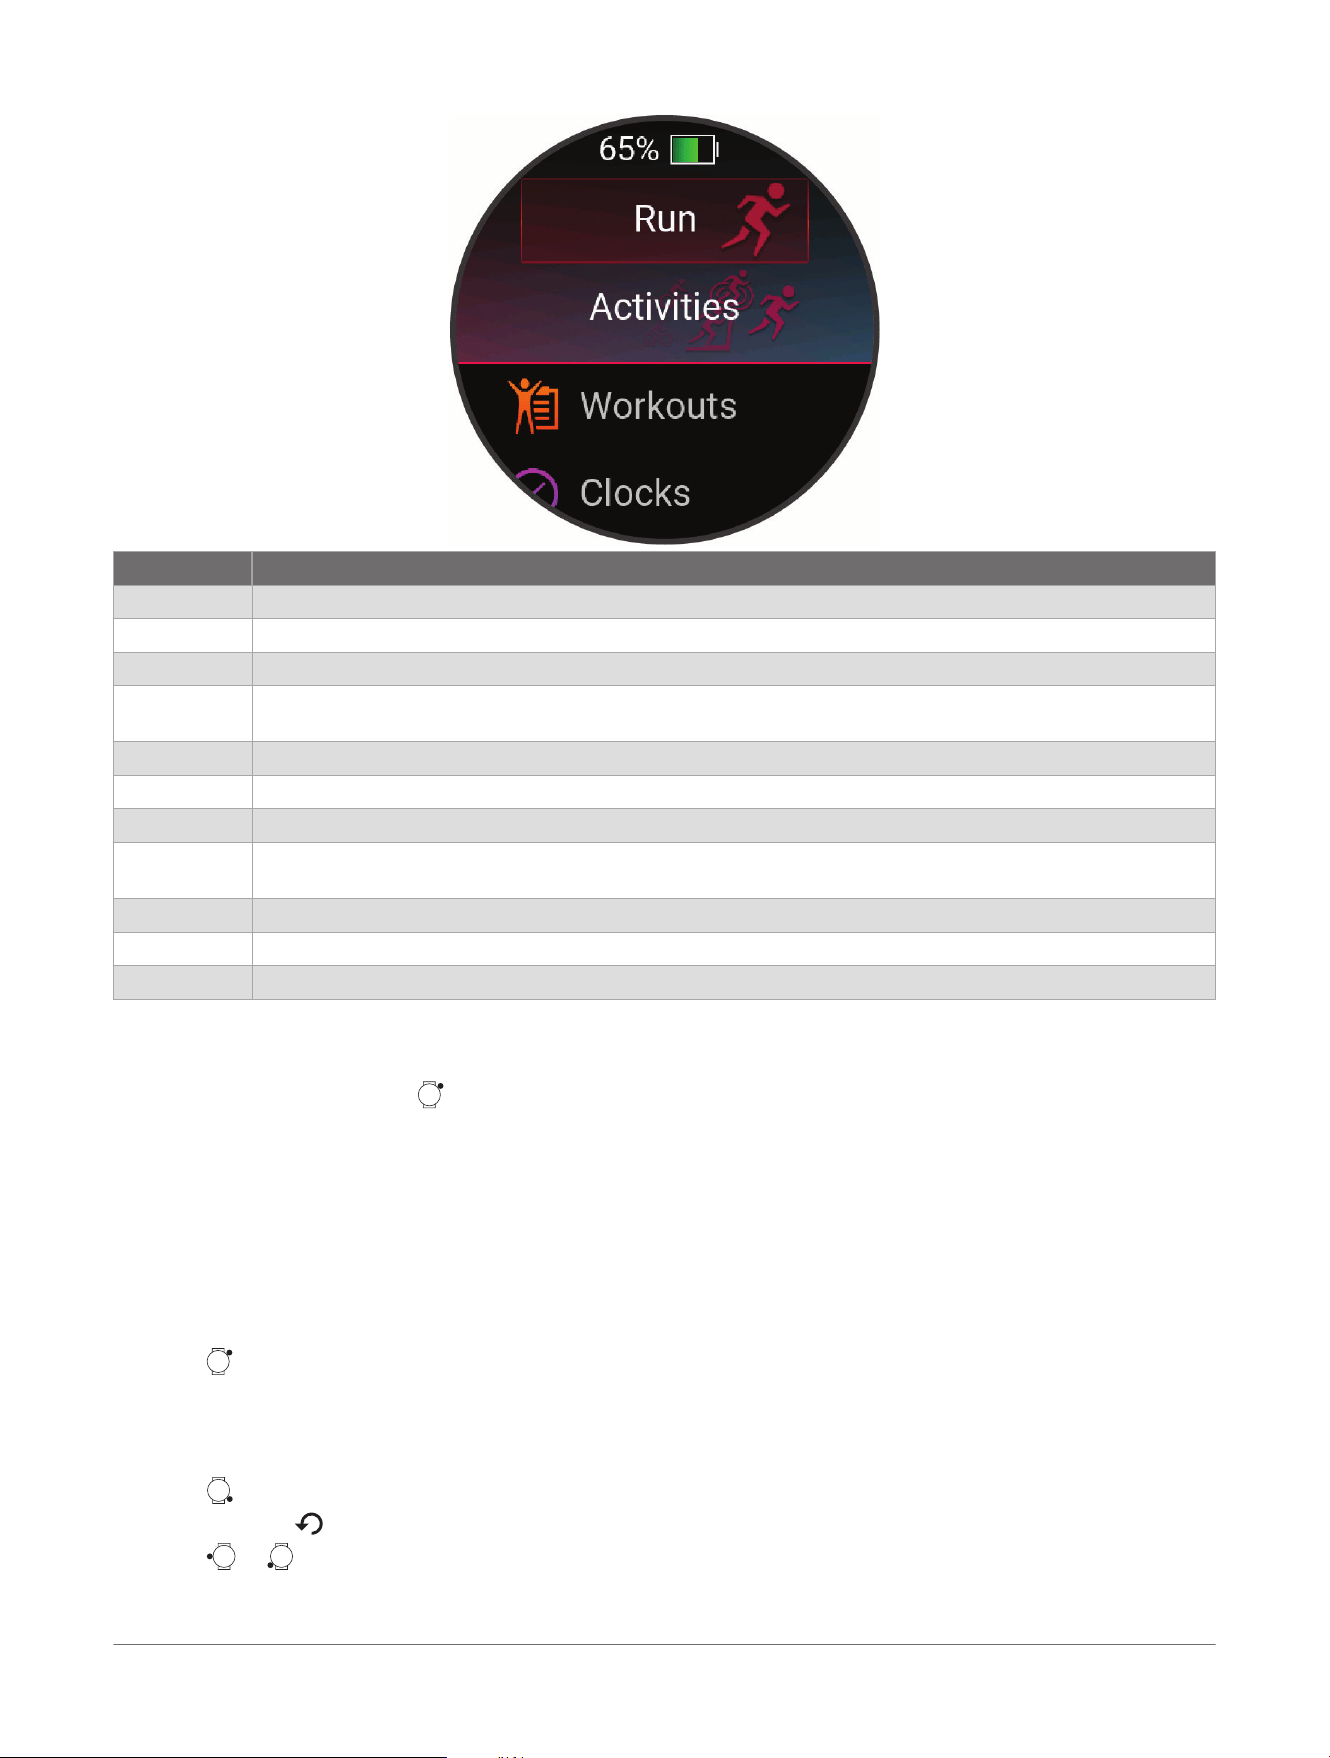
From the watch face, press , and press to scroll through the apps.
Name More Information
Broadcast Heart
Rate
Select to broadcast heart rate data to a paired device (Broadcasting Heart Rate Data, page63).
Calculator Select to use the calculator, including the tip calculator.
Calendar Select to view upcoming events from your phone calendar.
Clocks Select to set an alarm, timer, stopwatch, alternate time zone, or countdown event (Clocks,
page41).
Connect IQ
™
Select to use the Connect IQ Store on your watch (Connect IQ Features, page58).
Garmin Share Select to send or receive data with other Garmin
®
devices (Garmin Share, page55).
Health Snapshot
™
Select to record several key health metrics, such as your average heart rate, stress level, and
respiration rate, while you hold still for two minutes. It provides a glimpse of your overall cardio
vascular status.
History Select to view your recorded activity history, records, and totals (Using History, page45).
Messenger
Select to view and send messages using the Garmin Messenger
™
phone app (Using the
Messenger Feature, page12).
Moon Phase Select to view the moonrise and moonset times, along with the moon phase, based on your GPS
position.
Music Select to control audio playback using your watch (Listening to Music on Your Phone, page28).
Notifications Select to view your phone notifications (Viewing Notifications, page54).
8 Forerunner® 70 GPS Running Smartwatch
Owner's Manual
Apps and Activities
Name More Information
Nutrition Select to track your daily nutrition, including calories and macronutrients. You can also log your
food intake. You must have an active Garmin Connect+
™
subscription to track and view your
nutrition (Garmin Connect+
™
Subscription, page57).
Pulse Ox Select to take a pulse oximeter reading (Pulse Oximeter, page63).
Settings Select to open the settings menu.
Sports Scores Select to track college or professional sports teams with scores and live data.
Sunrise & Sunset Select to view sunrise, sunset, and twilight times.
Tips Select to view interactive watch tips, learn about new features on your watch, and scan a direct
link to support.garmin.com to access the owner's manual for your watch.
Weather Select to view the current weather forecast and conditions.
Workouts Select to view your saved workouts (Workouts, page9).
Workouts
You can create custom workouts that include goals for each workout step and for varied distances, times, and
calories. During your activity, you can view workout-specific data screens that contain workout step information,
such as the workout step distance or current pace.
On your watch: You can open the workouts app from the apps list to show all workouts currently loaded on your
watch (Apps and Activities, page8).
You can also view your workout history.
On the app: You can create and find more workouts, or select a training plan that has built-in workouts and
transfer them to your watch (Following a Workout From Garmin Connect
™
, page10).
You can schedule workouts.
You can update and edit your current workouts.
Starting a Workout
Your device can guide you through multiple steps in a workout.
1 From the watch face, press .
TIP: If you already have a scheduled or suggested workout for today, you can scroll down and select
Workouts.
2 Select Activities, and select an activity.
3 Press , and select Training.
4 Select an option:
● To let the watch suggest a workout after you select your intensity and time targets, select Quick Workout.
● To start an interval workout or to set a training target, select Targets & Intervals or Set a Target (Starting
an Interval Workout, page10, Setting a Training Target, page11).
●
To start a saved workout, select Workout Library (Following a Workout From Garmin Connect
™
, page10).
NOTE: To save a workout to your watch, you must download the workout from your Garmin Connect
™
account and sync.
● To start a scheduled workout from your Garmin Connect training calendar, select Training Calendar
(About the Training Calendar, page11).
NOTE: Not all options are available for all activity types.
5 Select a workout.
NOTE: Only workouts that are compatible with the selected activity appear in the list.
6 If necessary, select Do Workout.
7 Press to start the activity timer.
After you begin a workout, the device displays each step of the workout, step notes (optional), the target
(optional), and the current workout data.
Workout Execution Score
After you complete a workout, the watch displays your workout execution score based on how accurately you
completed the workout. The active workout steps are prioritized the highest, measuring how closely your effort
level matches the step target, and also that you completed all the steps. Warm up and recovery steps have a
lower impact on your score. The cool down step does not impact your workout execution score at all.
Apps and Activities
Forerunner® 70 GPS Running Smartwatch
Owner's Manual
9
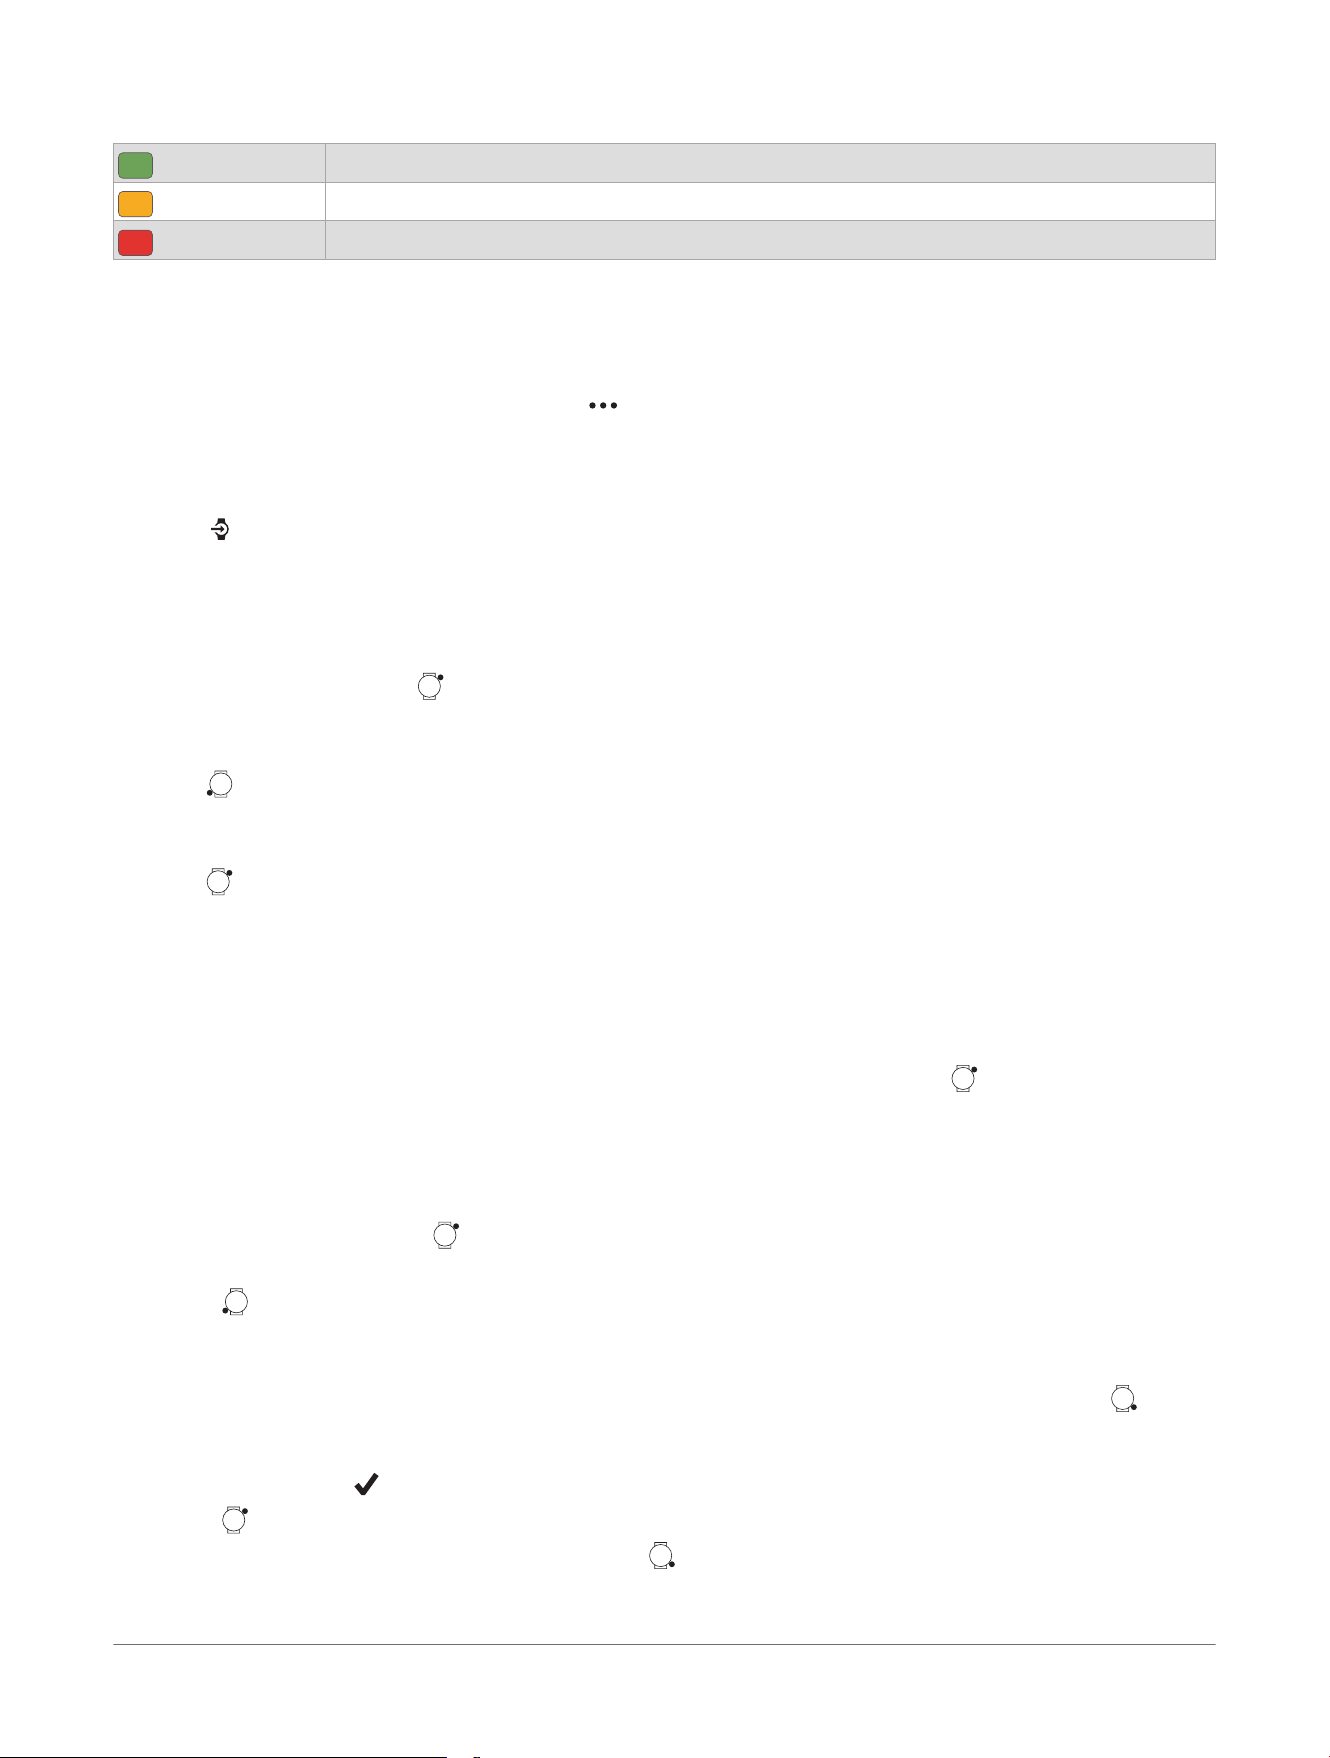
Your workout execution score appears only for running or cycling workouts.
Good, 67 to 100%
Average, 34 to 66%
Low, 0 to 33%
Following a Workout From Garmin Connect
™
Before you can download a workout from Garmin Connect, you must have a Garmin Connect account (Garmin
Connect
™
, page56).
1 Select an option:
● Open the Garmin Connect app, and select .
● Go to connect.garmin.com.
2 Select Training & Planning> Workouts.
3 Find a workout, or create and save a new workout.
4 Select or Send to Device.
5 Follow the on-screen instructions.
Following a Daily Suggested Workout
Before the watch can suggest a daily workout, you must have a VO2 max. estimate for that activity (About VO2
Max. Estimates, page33).
1 From the watch face, press .
2 Select Activities.
3 Select Running, and select an activity.
4 Press , and select the daily suggested workout.
No suggested workout appears if you have a scheduled rest day, or are following another training plan.
5 Scroll down to view details about the workout, such as the steps and estimated benefit.
6 Press , and select an option:
● To do the workout, select Do Workout.
● To skip the workout, select More> Dismiss.
● To view workout suggestions for the upcoming week, select More> More Suggestions.
● To view the workout settings, such as training days, target type, and workout prompts, select More>
Settings, and select an option.
TIP: If you disable the Workout Prompt option, you can enable prompts again later. From the activity,
select Training> Workout Library> Daily Suggestions, select a workout, press , and select Settings>
Workout Prompt.
The suggested workout updates automatically to changes in training habits, recovery time, and VO2 max.
Starting an Interval Workout
NOTE: This feature is not available for all activities.
1 From the watch face, press .
2 Select Activities, and select a run or bike activity.
3 Press .
4 Select Training> Targets & Intervals.
5 Select an option:
● Select Intervals> Open Repeats to mark your intervals and rest periods manually by pressing .
● Select Intervals> Structured Repeats> Do Workout to use an interval workout based on distance or
time.
6 If necessary, select to include a warm up before the workout.
7 Press to start the activity timer.
8 When your interval workout has a warm up, press to begin the first interval.
9 Follow the on-screen instructions.
10
Forerunner® 70 GPS Running Smartwatch
Owner's Manual
Apps and Activities
10 At any time, press to stop the current interval or rest period and transition to the next interval or rest
period (optional).
After you complete all of the intervals, a message appears.
Customizing an Interval Workout
NOTE: This feature is not available for all activities.
1 From the watch face, press .
2 Select Activities, and select a run or bike activity.
3 Press .
4 Select Training> Targets & Intervals> Intervals> Structured Repeats.
A workout appears.
5 Press .
6 Select More> Edit Workout.
7 Select one or more options:
● To set the interval duration and type, select Interval.
● To set the rest duration and type, select Rest.
● To set the number of repetitions, select Repeat.
● To add an open-ended warm up to your workout, select Warm Up> On.
8 Press .
Setting a Training Target
The training target feature enables you to train toward a set distance, distance and time, distance and pace, or
distance and speed goal. During your training activity, the watch gives you real-time feedback about how close
you are to achieving your training target.
NOTE: This feature is not available for all activities.
1 From the watch face, press .
2 Select Activities, and select an activity, such as Walk or Hike.
3 Press .
4 Select Training> Set a Target.
5 Select an option:
● Select Distance and Time to select a distance and time target.
● Select Distance and Pace or Distance and Speed to select a distance and pace or speed target.
● Select Distance Only to enter a custom distance.
NOTE: Not all options are available for all activity types.
6 Press to start the activity timer.
Racing a Previous Activity
You can race a previously recorded or downloaded activity.
NOTE: This feature is not available for all activities.
1 From the watch face, press .
2 Select Activities, and select an activity.
3 Scroll down.
4 Select Training> Race Yourself.
5 Select an option:
● Select From History to select a previously recorded activity from your device.
●
Select Downloaded to select an activity you downloaded from your Garmin Connect
™
account.
6 Select the activity.
7 Press to start the activity timer.
8 After you complete your activity, press , and select Save.
About the Training Calendar
The training calendar on your watch is an extension of the training calendar or schedule you set up in your
Garmin Connect
™
account. After you have added a few workouts to the Garmin Connect calendar, you can send
Apps and Activities
Forerunner® 70 GPS Running Smartwatch
Owner's Manual
11
them to your device. All scheduled workouts sent to the device appear in the calendar glance. When you select
a day in the calendar, you can view or do the workout. The scheduled workout stays on your watch whether
you complete it or skip it. When you send scheduled workouts from Garmin Connect, they overwrite the existing
training calendar.
Using Garmin Connect
™
Training Plans
Before you can download and use a training plan, you must have a Garmin Connect account, and you must pair
your
Garmin
®
watch or bike computer with a compatible phone (Garmin Connect
™
, page56).
1 From the Garmin Connect app, select .
2 Select Training & Planning> Garmin Coach Plans.
3 Select and schedule a training plan.
4 Follow the on-screen instructions.
5 Review the training plan in your calendar.
Adaptive Training Plans
Your Garmin Connect
™
account has an adaptive training plan and Garmin
®
coach to fit your training goals. For
example, you can answer a few questions and find a plan to help you complete a 5 km race. The plan adjusts
to your current level of fitness, coaching and schedule preferences, and race date. When you start a plan, the
Garmin coach glance is added to the glances list on your Forerunner
®
watch.
Using the Messenger Feature
CAUTION
The non-satellite messaging features of the Garmin Messenger
™
app alone should not be relied on as a primary
method to obtain emergency assistance.
NOTICE
To use the Messenger feature, your Forerunner
®
watch must be connected to the Garmin Messenger app on
your compatible phone using Bluetooth
®
technology.
The Messenger feature on your watch allows you to view, compose, and reply to messages from the Garmin
Messenger phone app.
1 From the watch face, press to view the Messenger glance.
TIP: The Messenger feature is available as a glance, app, or controls menu option on your watch.
2 Select the glance.
3 If this is your first time using the Messenger feature, scan the QR code with your phone, and follow the
on-screen instructions to complete the pairing and setup process.
4 On your watch, select an option:
● To compose a new message, select New Message, select a recipient, and either select a pre-defined
message or compose your own.
● To view a conversation, scroll down, and select a conversation.
● To reply to a message, select a conversation, select Reply, and either select a pre-defined message or
compose your own.
Activities
From the watch face, press , select Activities, and press to scroll through the activities. Your favorite
activities list appears at the top of the list (Customizing Your Favorite Activities List, page22).
NOTE: Some activities appear in more than one category.
12
Forerunner® 70 GPS Running Smartwatch
Owner's Manual
Apps and Activities
Category Activities
Running Indoor Track, Obstacle Racing, Run, Track Run, Trail Run, Treadmill, Ultra Run, Virtual Run
Cycling Bike, Bike Commute, Bike Indoor, Bike Tour, Cyclocross, eBike, eMTB, Gravel Bike, MTB, Road Bike
Swimming Pool Swim
Gym Boxing, Cardio, Elliptical, HIIT, Jump Rope, Mixed Martial Arts, Mobility, Pilates, Row Indoor, Stair
Stepper, Strength, Walk Indoor, Yoga
Outdoor Archery, Disc Golf, Hike, Horseback, Inline Skating, Mountaineering, Rucking, Walk
Winter Sports Ice Skating, Ski, Snowboard, Snowmobile, Snowshoe, XC Classic Ski, XC Skate Ski
Water Sports Kayak, Row, Snorkel, SUP
Team Sports American Football, Baseball, Basketball, Cricket, Field Hockey, Ice Hockey, Lacrosse, Rugby, Soccer/
Football, Softball, Volleyball, Ultimate Disc
Racket Sports Badminton, Padel, Pickleball, Platform Tennis, Racquetball, Squash, Table Tennis, Tennis
Motorsports ATV, Motocross, Motorcycle, Overland
Other Breathwork
Starting an Activity
When you start an activity, GPSturns on automatically (if required).
1 From the watch face, press .
2 Select Activities.
3 Select an option:
● Select an activity from your favorites.
● Scroll to the More activities list, select an activity category, and select an activity.
4 If the activity requires GPS signals, go outside to an area with a clear view of the sky, and wait until the GPS
status bar is filled.
The watch is ready after it establishes your heart rate, acquires GPSsignals (if required), and connects to
your wireless sensors (if required).
5 Press to start the activity timer.
The watch records activity data only while the activity timer is running.
Tips for Recording Activities
● Charge the watch before starting an activity (Charging the Watch, page79).
● Press to record laps, start a new set or pose, or advance to the next workout step.
You can select to discard a lap for certain activities (How can I undo a lap button press?, page83).
● Press or to view additional data screens.
● Swipe up or down to view additional data screens.
TIP: You can swipe down from the top of the screen to unlock the touchscreen during an activity.
Apps and Activities
Forerunner® 70 GPS Running Smartwatch
Owner's Manual
13
● Swipe right or left to view the music controls or activity settings.
Stopping an Activity
Not all options are available for all activity types.
1 Press .
2 Select an option:
● To resume your activity, select Resume.
● To save the activity and view the details, select Save, and select an option.
NOTE: After you save the activity, you can enter self-evaluation data (Evaluating an Activity, page14).
● To suspend your activity and resume it at a later time, select Resume Later.
● To mark a lap, select Lap.
You can select to discard a lap for certain activities (How can I undo a lap button press?, page83).
● To navigate back to the starting point of your activity along the path you traveled, select Back to Start>
TracBack.
NOTE: This feature is available only for activities that use GPS.
● To navigate back to the starting point of your activity by the most direct path, select Back to Start>
Straight Line.
NOTE: This feature is available only for activities that use GPS.
● To measure the difference between your heart rate at the end of the activity and your heart rate two
minutes later, select Recovery Heart Rate, and wait while the timer counts down (Recovery Heart Rate,
page37).
● To discard the activity, select Discard, and press .
NOTE: After stopping the activity, the watch saves it automatically after 30 minutes.
Evaluating an Activity
NOTE: This feature is not available for all activities.
You can customize the self-evaluation setting for certain activities (Activity Settings, page23).
1 After you complete an activity, select Save (Stopping an Activity, page14).
2 Select a number that corresponds with your perceived effort.
NOTE: You can select to skip the self evaluation.
3 Select how you felt during the activity.
You can view evaluations in the Garmin Connect
™
app.
Running
Going for a Run
The first fitness activity you record on your watch can be a run, ride, or any outdoor activity. You may need to
charge the watch before starting the activity (Charging the Watch, page79).
The watch records activity data only while the activity timer is running.
1 Press , and select an activity.
2 Go outside, and wait while the watch locates satellites.
3 Press .
4 Go for a run.
14
Forerunner® 70 GPS Running Smartwatch
Owner's Manual
Apps and Activities
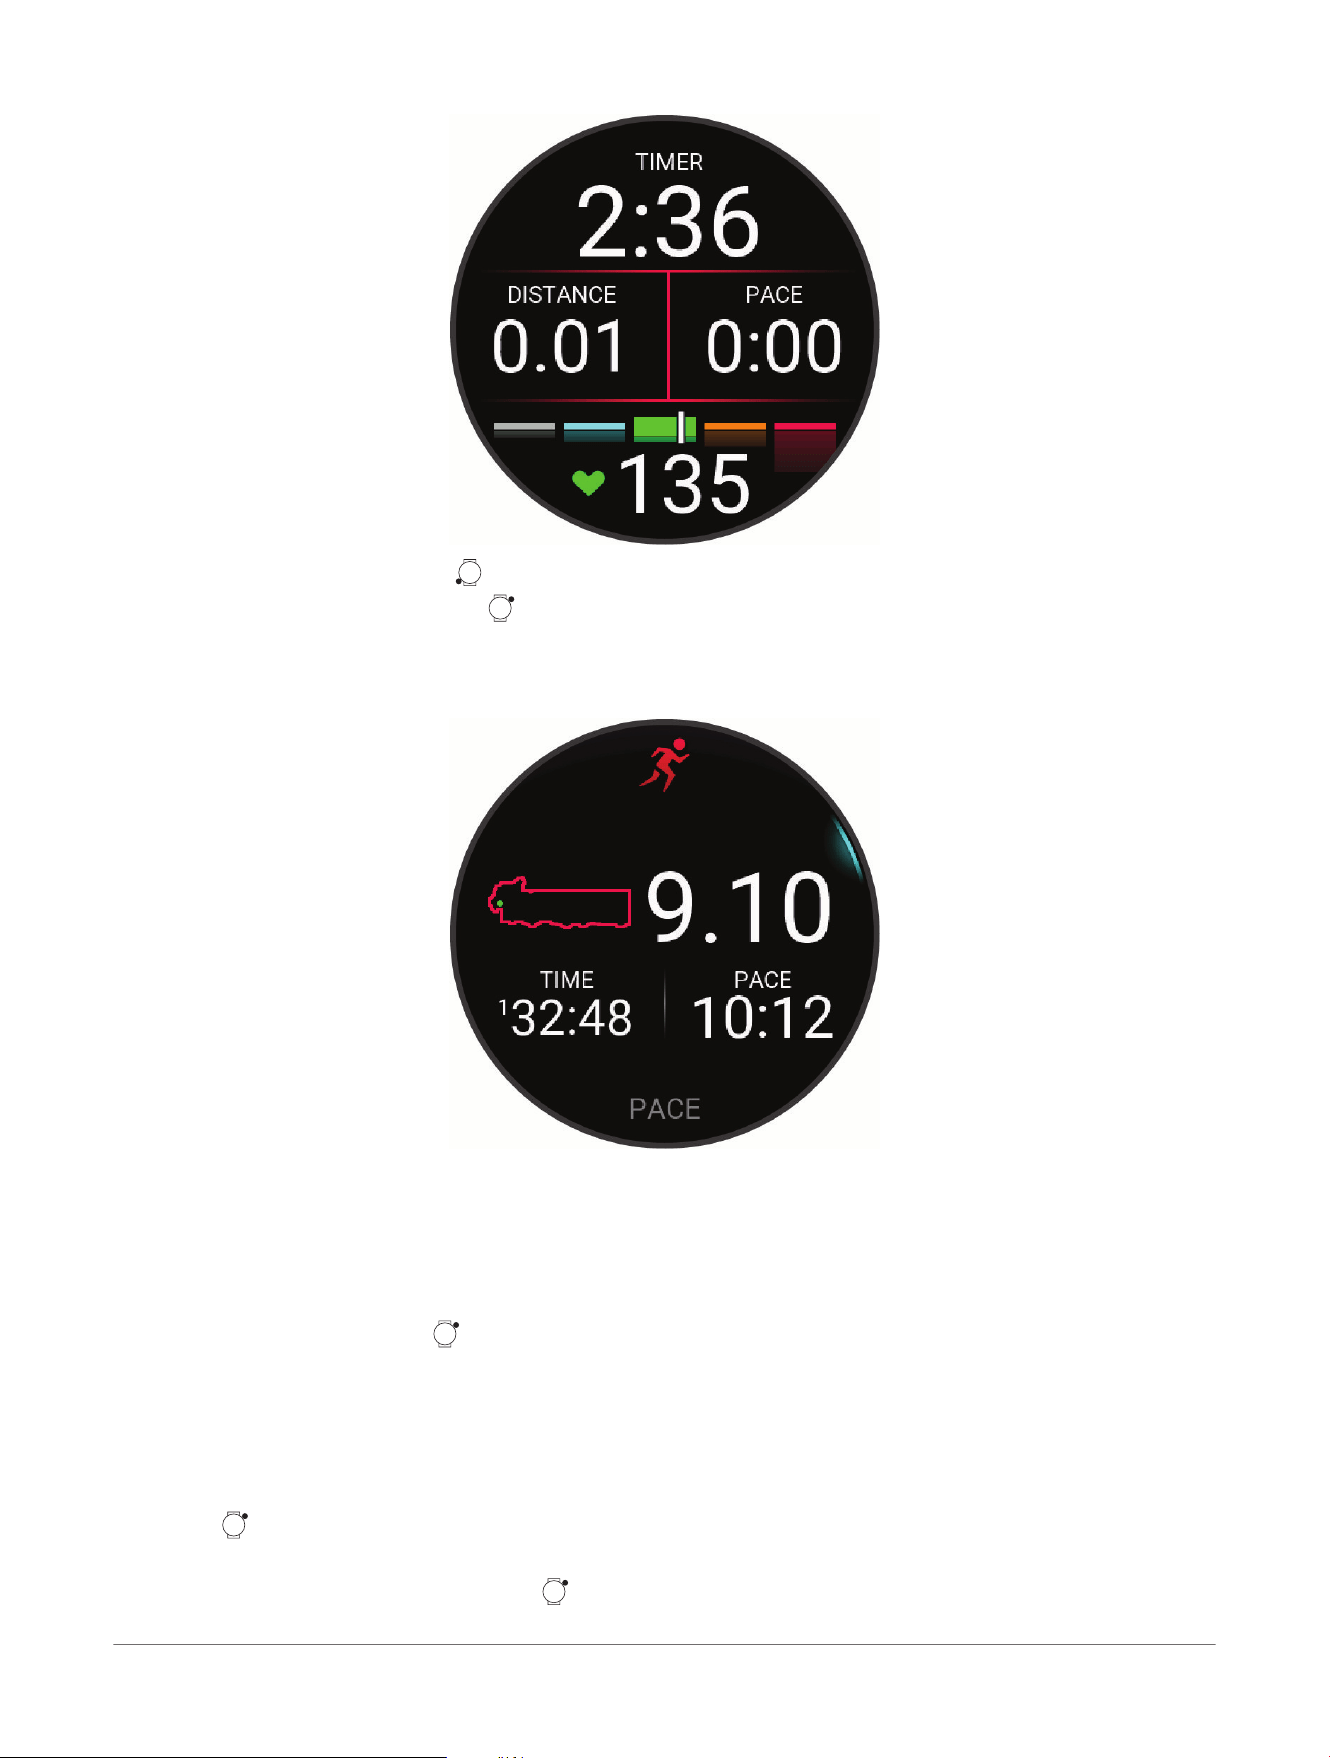
During an activity, you can hold to open the music controls (Music Playback Controls, page29).
5 After you complete your run, press .
6 Select an option:
● Select Resume to restart the activity timer.
● Select Save to save the run and reset the activity timer. You can select the run to view a summary.
For more run options, see Stopping an Activity, page14.
Going for a Track Run
Before you go for a track run, make sure you are running on a standard-shape, 400 m track.
You can use the track run activity to record your outdoor track data, including distance in meters and lap splits.
1 Stand on the outdoor track.
2 From the watch face, press .
3 Select Activities> Running> Track Run.
4 Wait while the watch locates satellites.
5 If you are running in lane 1, skip to step 8.
6 Select Lane Number.
7 Select a lane number.
8 Press .
9 Run around the track.
10 After you complete your activity, press , and select Save.
Apps and Activities
Forerunner® 70 GPS Running Smartwatch
Owner's Manual
15
Tips for Recording a Track Run
The Garmin
®
track database contains over 10,000 tracks from all over the world.
● Wait until the watch acquires satellite signals before starting a track run.
● If your watch does not recognize the track, run four laps to calibrate your track distance.
You should run slightly past your starting point to complete the lap.
● Run each lap in the same lane.
NOTE: The default Auto Lap
®
distance is 1600 m, or four laps around the track.
● If you are running in a lane other than lane 1, set the lane number in the activity settings.
Going for a Virtual Run
You can pair your watch with a compatible third-party app to transmit pace, heart rate, or cadence data.
1 From the watch face, press .
2 Select Activities> Running> Virtual Run.
3
On your tablet, laptop, or phone, open the Zwift
™
app or another virtual training app.
4 Follow the on-screen instructions to start a running activity and pair the devices.
5 Press to start the activity timer.
6 After you complete your activity, press , and select Save.
Calibrating the Treadmill Distance
To record more accurate distances for your treadmill runs, you can calibrate the treadmill distance after you run
at least 2.4km (1.5mi.) on a treadmill. If you use different treadmills, you can manually calibrate the treadmill
distance on each treadmill or after each run.
1 Start a treadmill activity (Starting an Activity, page13).
2 Run on the treadmill until your watch records at least 2.4km (1.5mi.).
3 After you finish the activity, press to stop the activity timer.
4 Select an option:
● To calibrate the treadmill distance the first time, select Save.
The device prompts you to complete the treadmill calibration.
● To manually calibrate the treadmill distance after the first-time calibration, select Calibrate & Save> .
5 Check the treadmill display for the distance traveled, and enter the distance on your watch.
Recording an Ultra Run Activity
1 From the watch face, press .
2 Select Activities> Running> Ultra Run.
3 Press to start the activity timer.
4 Start running.
5 Press to record a lap and start the rest timer.
TIP: You can configure how the Auto Rest setting records rest splits and laps.
6 When you are done resting, press to resume running.
7 Press or to view additional data screens (optional).
8 After you complete your activity, press , and select Save.
Ultra Run Auto Rest Settings
You can customize the options for automatically starting and stopping the rest timer for the Ultra Run activity.
Status: Enables automatically recording rest splits.
Rest Start: Automatically starts the rest timer when you stop running. You can use the Manual Only option to
start the rest timer only when you press .
Rest End: Sets the pace required to end a rest split.
Minimum Time: Sets the amount of time before a rest split starts or ends.
Lap Key: Sets the button to record a lap and start the rest timer, start the rest timer only, or record a lap only.
16
Forerunner® 70 GPS Running Smartwatch
Owner's Manual
Apps and Activities
Recording an Obstacle Racing Activity
When you participate in an obstacle course race, you can use the Obstacle Racing activity to record your time on
each obstacle and your time running between obstacles.
1 From the watch face, press .
2 Select Activities> Running> Obstacle Racing.
3 Press to start the activity timer.
4 Press to manually mark the beginning and end of each obstacle.
NOTE: You can configure the Obstacle Tracking setting to save obstacle locations from your first loop of the
course. On repeat loops of the course, the watch uses the saved locations to switch between obstacle and
running intervals.
5 After you complete your activity, press , and select Save.
PacePro
™
Training
Many runners like to wear a pace band during a race to help achieve their race goal. The PacePro feature allows
you to create a custom pace band based on distance and pace or distance and time. You can also create a pace
band for a known course to optimize your pace effort based on elevation changes.
You can create a PacePro plan using the Garmin Connect
™
app. You can preview the splits and elevation plot
before you run the course.
Downloading a PacePro
™
Plan from Garmin Connect
™
Before you can download a PacePro plan from Garmin Connect, you must have a Garmin Connect account
(Garmin Connect
™
, page56).
1 Select an option:
● Open the Garmin Connect app, and select .
● Go to connect.garmin.com.
2 Select Training & Planning> PacePro Pacing Strategies.
3 Follow the on-screen instructions to create and save a PacePro plan.
4 Select or Send to Device.
Starting a PacePro
™
Plan
Before you can start a PacePro plan, you must download a plan from your Garmin Connect
™
account
(Downloading a PacePro
™
Plan from Garmin Connect
™
, page17).
1 From the watch face, press .
2 Select an outdoor running activity.
3 Scroll down to select Training> PacePro Plans.
4 Select a plan.
TIP: You can scroll down to preview the splits and elevation plot before you accept the PacePro plan.
5 Press .
6 Select Use Plan to start the plan.
7 If necessary, select to enable course navigation.
8 Press to start the activity timer.
Apps and Activities
Forerunner® 70 GPS Running Smartwatch
Owner's Manual
17
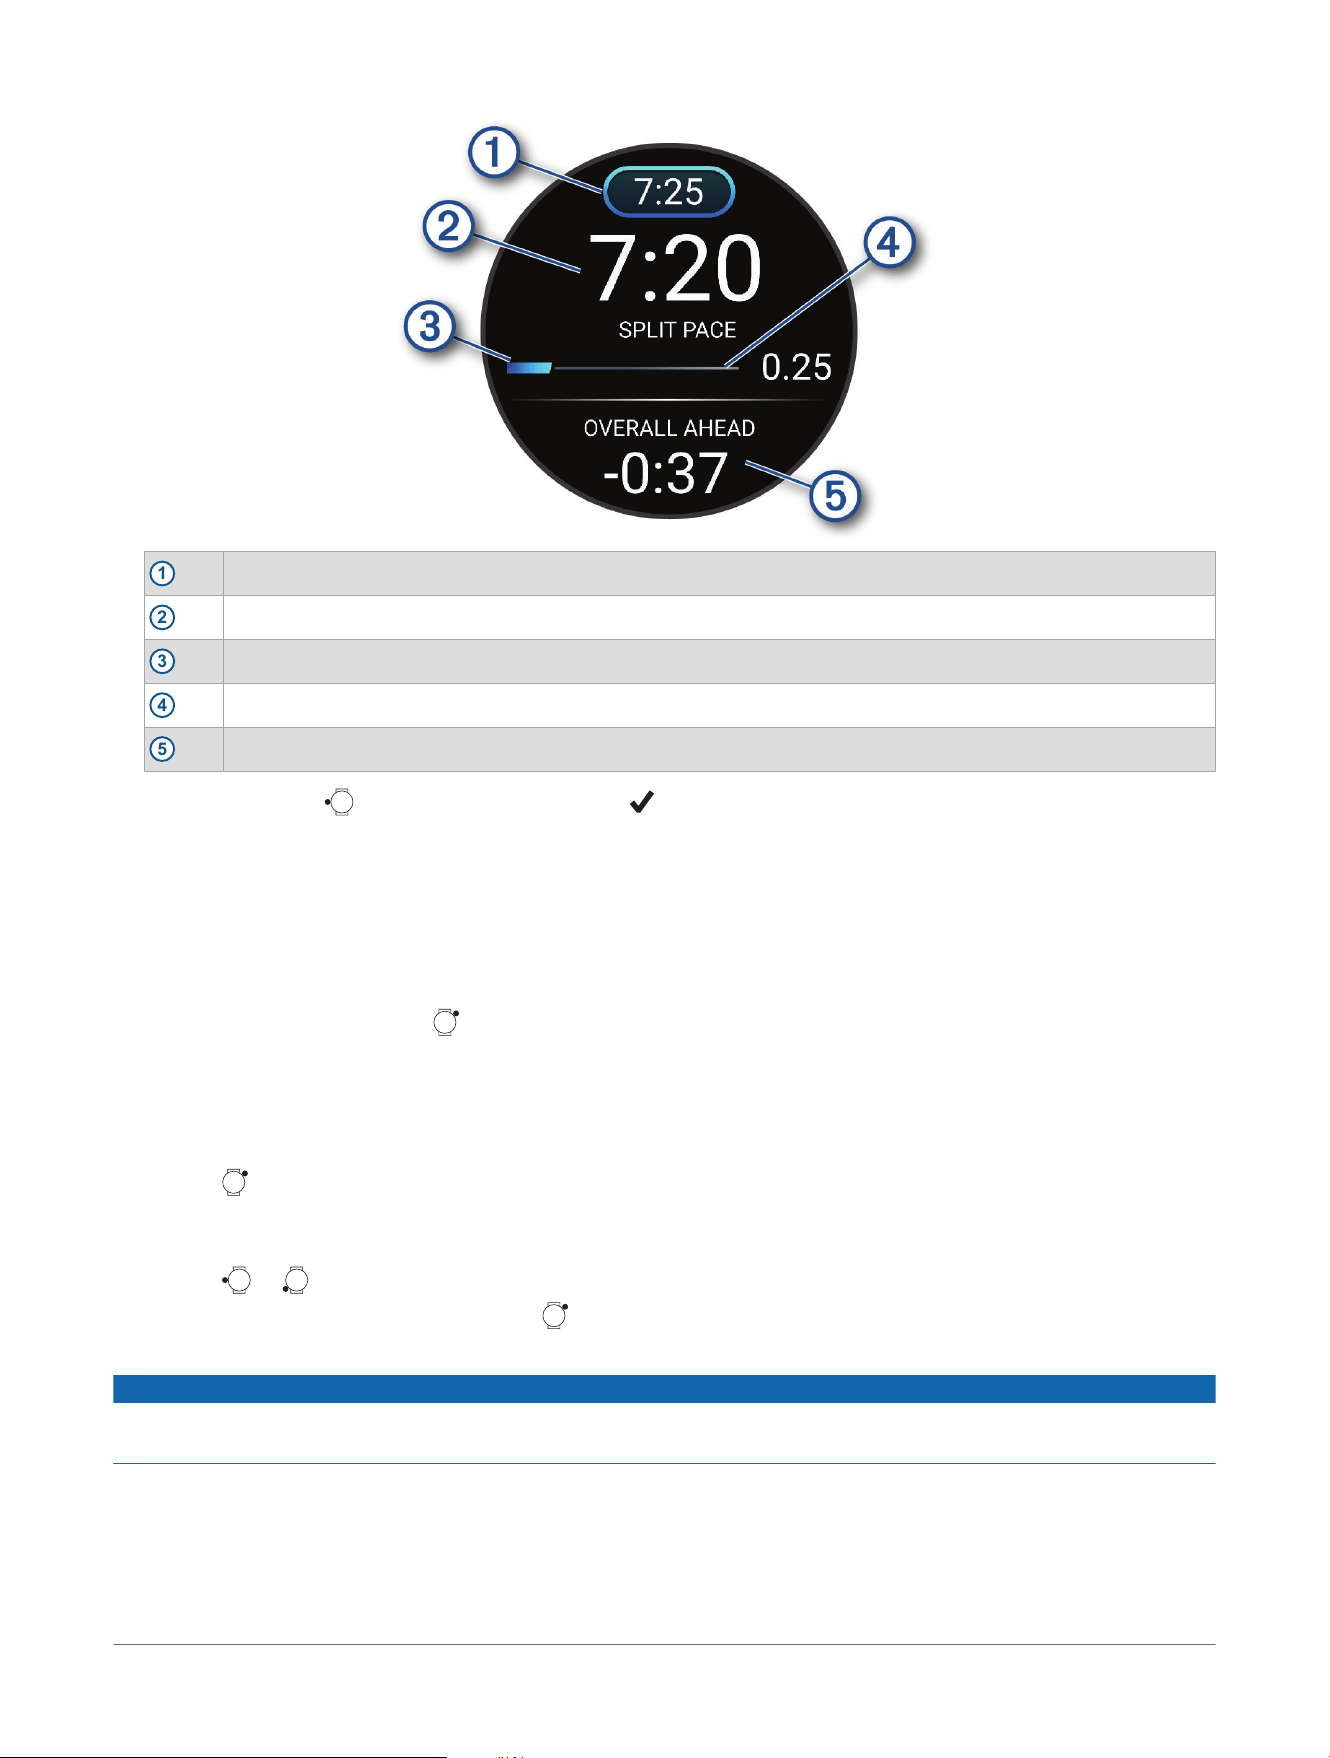
1
Target split pace
2
Current split pace
3
Completion progress for the split
4
Distance remaining in the split
5
Overall time ahead of or behind your target time
TIP: You can hold , and select Stop PacePro> to stop the PacePro plan. The activity timer continues
running.
Cycling
Going for a Ride
Before you can use a wireless sensor for your ride, you must pair the sensor with your watch (Pairing Your
Wireless Sensors, page51).
1 Pair your wireless sensors, such as a heart rate monitor or bike lights (optional).
2 From the watch face, press .
3 Select Activities> Cycling.
4 Select a cycling activity.
5 When using optional wireless sensors, wait while the watch connects to the sensors.
6 Go outside, and wait while the watch locates satellites.
7 Press to start the activity timer.
The watch records activity data only while the activity timer is running.
8 Start your activity.
9 Press or to scroll through the data screens.
10 After you complete your activity, press , and select Save.
Swimming
NOTICE
The device is intended for surface swimming. Scuba diving with the device may damage the product and will
void the warranty.
NOTE: The watch has wrist-based heart rate enabled for swim activities.
Swim Terminology
Length: One trip down the pool.
Interval: One or more consecutive lengths. A new interval starts after a rest.
Stroke: A stroke is counted every time your arm wearing the watch completes a full cycle.
18
Forerunner® 70 GPS Running Smartwatch
Owner's Manual
Apps and Activities
Swolf: Your swolf score is the sum of the time for one pool length and the number of strokes for that length.
For example, 30 seconds plus 15 strokes equals a swolf score of 45. Swolf is a measurement of swimming
efficiency and, like golf, a lower score is better.
Stroke Types
Stroke type identification is available only for pool swimming. Your stroke type is identified at the end of a
length. Stroke types appear in your swimming history and in your Garmin Connect
™
account. You can also select
stroke type as a custom data field (Customizing the Data Screens, page22).
Free Freestyle
Back Backstroke
Breast Breaststroke
Fly Butterfly
Mixed More than one stroke type in an interval
Drill Used with drill logging (Training with the Drill Log, page19)
Tips for Swimming Activities
● Before starting a pool swimming activity, follow the on-screen instructions to select your pool size or enter a
custom size.
The watch measures and records distance by completed pool lengths. The pool size must be correct to
display accurate distance. The next time you start a pool swimming activity, the watch uses this pool size.
You can scroll down to select the activity settings, and select Pool Size to change the size.
● For accurate results, swim the entire pool length, and use one stroke type for the entire length. Pause the
activity timer when resting.
● Press to record a rest during pool swimming (Swim Auto Rest and Manual Rest, page19).
The watch automatically records swim intervals and lengths for pool swimming.
● To help the watch count your lengths, use a strong push off the wall and glide before your first stroke.
● When doing drills, you must either pause the activity timer or use the drill logging feature (Training with the
Drill Log, page19).
Swim Auto Rest and Manual Rest
The auto rest feature is available only for pool swimming. Your watch automatically detects when you are
resting, and the rest screen appears. If you rest for more than 15 seconds, the watch automatically creates a
rest interval. When you resume swimming, the watch automatically starts a new swim interval.
TIP: For best results using the auto rest feature, minimize your arm motions while resting.
To use manual rests instead, you can turn off the auto rest feature in the activity options (Activity Settings,
page23). During a swimming activity, you can manually mark a rest interval by pressing . Swim data is not
recorded during a rest interval.
TIP: Use manual rests if you are taking short rests or you want very precise swim interval timing.
Training with the Drill Log
The drill log feature is available only for pool swimming. You can use the drill log feature to manually record kick
sets, one-arm swimming, or any type of swimming that is not one of the four major strokes.
1 During your pool swim activity, scroll up or down to view the drill log screen.
2 Press to start the drill timer.
3 After you complete a drill interval, press .
The drill timer stops, but the activity timer continues to record the entire swim session.
4 Select a distance for the completed drill.
Distance increments are based on the pool size selected for the activity profile.
5 Select an option:
● To start another drill interval, press .
● To start a swim interval, scroll up or down to return to the swim training screens.
After you complete the drill, the activity enters rest mode.
6 Select an option:
● To resume the activity, press .
Apps and Activities
Forerunner® 70 GPS Running Smartwatch
Owner's Manual
19
● To end the activity, press .
Gym Activities
The watch can be used for training indoors, such as running on an indoor track or using a stationary bike. GPS is
turned off for indoor activities (Activity Settings, page23).
When running or walking with GPS turned off, speed and distance are calculated using the accelerometer in the
watch. The accelerometer is self-calibrating. The accuracy of the speed and distance data improves after a few
outdoor runs or walks using GPS.
TIP: Holding the handrails of the treadmill reduces accuracy.
When cycling with GPS turned off, speed and distance data are not available unless you have an optional sensor
that sends speed and distance data to the watch, such as a speed or cadence sensor.
Recording a Strength Training Activity
You can record sets during a strength training activity. A set is multiple repetitions (reps) of a single move. You
can create and find strength workouts in your Garmin Connect
™
account and send them to your watch.
1 From the watch face, press .
2 Select Activities> Gym> Strength.
3 Select an option:
● To do an open-ended workout, select Free.
TIP: You can enable the Rest Countdown option to alert you after a specified rest timer duration.
● To follow a structured workout, select a workout, scroll down and select a step to view the exercise
animation (if available), and when you have finished viewing the workout select
Do Workout.
TIP: You can select More to view the required equipment, edit the workout, and more before you start
the workout.
4 Press to start the activity.
5 Start your first set.
The watch counts your reps. Your rep count appears when you complete at least four reps.
TIP: The watch can only count reps of a single move for each set. When you want to change moves, you
should finish the set and start a new one.
6 Press to finish the set and move to the next exercise, if available.
The watch displays the total reps for the set.
7 If necessary, edit the set, the number of reps, and the weight used for the set.
8 If necessary, press when you are done resting to start your next set.
9 Repeat for each strength training set until your activity is complete.
TIP: During your workout, you can press to edit your previous sets. For structured workouts, you have
options to skip a set or change the next set.
10 After your last set, press , and select Stop Workout.
11 Select Save.
Recording a Mobility Activity
You can record a mobility activity using active and rest intervals, or you can download mobility workouts from
Garmin Connect
™
.
1 From the watch face, press .
2 Select Activities> Gym> Mobility.
3 Scroll down, and select Training.
4 Select an option:
● To change the active and rest intervals, select Intervals.
● To download and complete a workout from Garmin Connect, select Workout Library> Browse Workouts,
and follow the on-screen instructions.
5 Press to start the activity timer.
The watch guides you through the mobility exercises.
6 Scroll to view additional data screens.
20
Forerunner® 70 GPS Running Smartwatch
Owner's Manual
Apps and Activities
Recording a HIIT Activity
You can use specialized timers to record a high-intensity interval training (HIIT) activity.
1 From the watch face, press .
2 Select Activities> Gym> HIIT.
3 Select an option:
● Select Free to record an open, unstructured HIIT activity.
● Select HIIT Timers> AMRAP to record as many rounds as possible during a set time period.
● Select HIIT Timers> EMOM to record a set number of moves every minute on the minute.
● Select HIIT Timers> Tabata to alternate between 20-second intervals of maximum effort with 10
seconds of rest.
● Select HIIT Timers> Custom to set your move time, rest time, number of moves, and number of rounds.
● Select Workouts to follow a saved workout.
4 If necessary, follow the on-screen instructions.
5 Press to start your first round.
The watch displays a countdown timer and your current heart rate.
6 If necessary, press to manually move to the next round or rest.
7 After you finish the activity, press to stop the activity timer.
8 Select Save.
Winter Sports
Viewing Your Ski Runs
You can use the lap key to record runs while downhill skiing or snowboarding.
1 Start a skiing or snowboarding activity.
2 Press when you complete a run.
3 Hold .
4 Select View Runs.
5 Scroll to view details of your last run, your current run, and your total runs.
The run screens include time, distance traveled, maximum speed, average speed, and total descent.
Other Activities
Recording a Breathwork Activity
1 From the watch face, press .
2 Select Activities> Other> Breathwork.
3 Select an option:
● Select Coherence to achieve a state of calm alertness.
● Select Relax and Focus to relax your body and focus the mind.
● Select Relax and Focus (Short) to relax your body and focus the mind in a shorter time frame.
● Select Tranquility to lower your stress level and get ready for sleep.
4 If necessary, select Do Workout.
5 Press to start the activity.
6 Follow the on-screen instructions as the watch guides you through the breathing exercises.
7 Press to skip to the next step in the breathwork phase.
8 After you complete your activity, press , and select Save.
Your average respiration rate and heart rate appear.
9 Press .
10 Select All Stats.
Your average heart rate, maximum heart rate, average respiration rate, and stress change appear.
Customizing Activities and Apps
You can customize the activities and apps list, data screens, data fields, and other settings.
Apps and Activities
Forerunner® 70 GPS Running Smartwatch
Owner's Manual
21
Customizing the App List
1 From the watch face, press .
2 Select Edit.
3 Select an option:
● To change the location of an app in the list, select an app, press or to move the app, and press
to select the new location.
● To remove an app from the list, select the app, and select .
● To add an app, select Add, and select one or more apps.
Customizing Your Favorite Activities List
Your favorite activities list appears at the top of the list, and it provides quick access to the activities you use
frequently. You can add or remove favorite activities at any time.
1 From the watch face, press .
2 Select Activities.
Your favorite activities appear at the top of the list.
3 Select Edit.
4 Select an option:
● To change the location of an activity in the list, select an activity, press or to move the activity, and
press to select the new location.
● To remove a favorite activity, select the activity, and select > Remove.
● To add a favorite activity, select Add, and select one or more activities.
Pinning a Favorite Activity to the List
You can pin up to three favorite activities to the top of the app and activity lists.
1 From the watch face, press .
2 Select Activities.
3 Scroll to a favorite activity (Customizing Your Favorite Activities List, page22).
4 Hold , and select Pin Activity.
The next time you press from the watch face to open the app and activity lists, the pinned activity appears at
the top of the list.
Customizing the Data Screens
You can show, hide, and change the layout and content of data screens for each activity.
1 From the watch face, press .
2 Select Activities, and select an activity.
3 Scroll down, and select the activity settings.
4 Select Data Screens.
5 Scroll to the data screen you want to customize.
6 Select .
7 Select an option:
● Select Layout to adjust the number of data fields on the data screen.
● Select Data Fields, and select a field to change the data that appears in the field.
TIP: For a list of all the available data fields, go to Data Fields, page87. Not all data fields are available
for all activity types.
● Select Reorder to change the location of the data screen in the loop.
● Select Remove to remove the data screen from the loop.
8 If necessary, select Add New to add a data screen to the loop.
You can add a custom data screen, or select one of the predefined data screens.
Adding the Map Data Screen
You can add the map to the data screens loop for a GPS activity.
1 From the watch face, press .
2 Select Activities, and select a GPS activity.
22
Forerunner® 70 GPS Running Smartwatch
Owner's Manual
Apps and Activities
3 Scroll down, and select the activity settings.
4 Select Data Screens> Add New> Map.
Creating a Custom Activity
1 From the watch face, press .
2 Select Activities> Edit> Add.
3 Select an option:
● Select Copy Activity to create your custom activity starting from one of your saved activities.
● Select Other> Other to create a new custom activity.
4 If necessary, select an activity type.
5 Select a name or enter a custom name.
Duplicate activity names include a number, for example: Bike(2).
6 Select an option:
● Select an option to customize specific activity settings. For example, you can customize the data screens
or auto features.
● Select Done to save and use the custom activity.
Activity Settings
These settings allow you to customize each preloaded activity based on your needs. For example, you can
customize data screens and enable alerts and training features. Not all settings are available for all activity
types.
Select , select an activity, hold , and select the activity settings.
Accent Color: Sets the accent color for the activity icon.
Alerts: Sets the training or navigation alerts for the activity (Activity Alerts, page24).
Audio Output: Enables connected audio devices for voice alerts (Playing Voice Alerts During Your Activity,
page25).
Auto Lap: Sets the options for the Auto Lap
®
feature to automatically mark laps. The By Distance option marks
laps at a specific distance. The By Position option marks laps at a location where you previously pressed .
When you complete a lap, a customizable lap alert message appears. This feature is helpful for comparing
your performance over different parts of an activity.
Auto Pause: Sets the options for the Auto Pause
®
feature to stop recording data when you stop moving or when
you drop below a specified speed. This feature is helpful if your activity includes stop lights or other places
where you must stop.
Auto Rest: Automatically creates a rest interval when you stop moving during a pool swim activity (Swim Auto
Rest and Manual Rest, page19). Sets the options for automatically starting and stopping the rest timer for the
ultra run activity (Ultra Run Auto Rest Settings, page16).
Auto Set: Automatically starts and stops exercise sets during a strength training activity.
Broadcast Heart Rate: Automatically broadcasts heart rate data from your watch to paired devices when you
start the activity (Broadcasting Heart Rate Data, page63).
Countdown Start: Enables a countdown timer for pool swimming intervals.
Data Screens: Customizes data screens and adds new data screens for the activity (Customizing the Data
Screens, page22).
Edit Weight: Prompts you to add the weight used for an exercise set during a strength training or cardio activity.
Gear Selection: After you complete an activity, prompts you to select the gear or equipment you used during the
activity. You can add and delete gear in your Garmin Connect
™
account (Garmin Connect
™
, page56).
Jump Mode: Sets the jump rope activity target to a set time, number of reps, or open ended.
Lane Number: Sets your lane number for track running.
Laps: Configures the settings for the Auto Lap, Lap Key, and Lap Alert options.
Lap Alert: Sets the data fields to show for laps.
Lap Key: Enables the button for recording a lap or rest during an activity.
Obstacle Tracking: Saves obstacle locations from your first loop of the course. On repeat loops of the course,
the watch uses the saved locations to switch between obstacle and running intervals (Recording an Obstacle
Racing Activity, page17).
Pack Weight: Sets the weight of the pack you are carrying.
Pool Size: Sets the pool length for pool swimming.
Apps and Activities
Forerunner® 70 GPS Running Smartwatch
Owner's Manual
23
Power Save Timeout: Sets the timeout limit for the watch to stay in activity mode while waiting for you to start
the activity, for example, when you are waiting for a race to start. The Normal option sets the watch to enter
low-power watch mode after 5 minutes of inactivity. The Extended option sets the watch to enter low-power
watch mode after 25 minutes of inactivity. The extended mode can result in shorter battery life between
charges.
Record VO2 Max.: Records a VO2 max. estimate for trail run and ultra run activities.
Rename: Sets the activity name.
Rep Counting: Records rep counts during a workout. The Workouts Only option records rep counts during
guided workouts only.
Restore Defaults: Resets the activity settings.
Running Power: Records running power data and customizes the settings (Running Power Settings, page53).
Runs: Configures the settings for the Auto Run, Lap Key, and Lap Alert options.
Satellites: Sets the GNSS satellite system to use for the activity (Satellite Settings, page26).
Self Evaluation: Sets how often you evaluate your perceived effort for the activity (Evaluating an Activity,
page14).
Stroke Detection: Automatically detects your stroke type for pool swimming.
Touch: Enables the touchscreen during an activity or only for the map screen.
Touch Lock: Enables swiping down from the top of the screen to unlock the touchscreen.
Track Detection: Automatically detects if you are on a track for running.
Units: Sets the units of measure for the activity.
Vibration Alerts: Notifies you to inhale or exhale during a breathwork activity.
Workout Videos: Plays instructive workout animations for a strength, cardio, yoga, or Pilates activity.
Animations are available for pre-installed workouts and workouts downloaded from your Garmin Connect
account.
Activity Alerts
You can set alerts for each activity, which can help you to train toward specific goals, to increase your
awareness of your environment, and to navigate to your destination. Some alerts are available only for specific
activities. There are three types of alerts: event alerts, range alerts, and recurring alerts.
Event alert: An event alert notifies you one time. The event is a specific value. For example, you can set the
watch to alert you when you burn a specified number of calories.
Range alert: A range alert notifies you each time the watch is above or below a specified range of values. For
example, you can set the watch to alert you when your heart rate is below 60beats per minute (bpm) and
over 210bpm.
Recurring alert: A recurring alert notifies you each time the watch records a specified value or interval. For
example, you can set the watch to alert you every 30minutes.
Recurring alert:
Alert Name Alert Type Description
Cadence Range You can set minimum and maximum cadence values.
Calories Event, recurring You can set the number of calories.
Custom Event, recurring You can select an existing message or create a custom message and select an alert
type.
Distance Event, recurring You can set a distance interval.
Heart Rate Range You can set minimum and maximum heart rate values or select zone changes. See
About Heart Rate Zones, page72 and Heart Rate Zone Calculations, page73.
Pace Range You can set minimum and maximum pace values.
Power Range You can set the high or low power level.
Run/Walk Recurring You can set timed walking breaks at regular intervals (Using Run and Walk Alerts,
page25).
Running Power Event, range You can set minimum and maximum power zone values.
Speed Range You can set minimum and maximum speed values.
Stroke Rate Range You can set high or low strokes per minute.
24 Forerunner® 70 GPS Running Smartwatch
Owner's Manual
Apps and Activities
Alert Name Alert Type Description
Time Event, recurring You can set a time interval.
Track Timer Recurring You can set a track time interval in seconds.
Setting an Alert
1 From the watch face, press .
2 Select Activities, and select an activity.
NOTE: This feature is not available for all activities.
3 Scroll down, and select the activity settings.
4 Select Alerts.
5 Select an option:
● Select Add New to add a new alert for the activity.
● Select the alert name to edit an existing alert.
6 If necessary, select the type of alert.
7 Select a zone, enter the minimum and maximum values, or enter a custom value for the alert.
8 If necessary, turn on the alert.
For event and recurring alerts, a message appears each time you reach the alert value. For range alerts, a
message appears each time you exceed or drop below the specified range (minimum and maximum values).
Using Run and Walk Alerts
NOTE: You must set up the run/walk interval alerts before starting a run. After you start the run timer, you
cannot change the settings.
1 From the watch face, press .
2 Select a running activity.
NOTE: Walk break alerts are available only for running activities.
3 Scroll down, and select the activity settings.
4 Select Alerts> Add New> Run/Walk.
5 Set the run time for each alert.
6 Set the walk time for each alert.
7 Go for a run.
Each time you complete an interval, a message appears. The watch also beeps or vibrates if audible tones are
turned on (System Settings, page76). After you turn on the run/walk alerts, it is used each time you go for a run
until you turn it off or enable a different run mode.
Playing Voice Alerts During Your Activity
You can enable your watch or phone to play motivational status announcements during a run or other activity.
During a voice alert, the volume of the primary audio is lowered to play the announcement. Voice alerts play on
your phone paired through the Garmin Connect
™
app.
NOTE: This feature is not available for all activities.
1 From the watch face, hold .
2 Select Watch Settings> Focus Modes> Activity> Voice Alerts.
3 Select an option:
● To set voice alerts to play through your phone, select Audio Output> Connected Devices.
● To hear an alert for each lap, select Lap Alert.
● To customize alerts with your pace and speed information, select Pace/Speed Alert.
● To customize alerts with your heart rate information, select Heart Rate Alert.
● To customize alerts with power data, select Power Alert.
● To hear alerts when you start and stop the activity timer, including the Auto Pause
®
feature, select Timer
Events.
● To hear workout alerts play as a voice alert, select Workout Alerts.
● To hear activity alerts play as a voice alert, select Activity Alerts (Activity Alerts, page24).
Apps and Activities
Forerunner® 70 GPS Running Smartwatch
Owner's Manual
25
Satellite Settings
You can change the GNSS satellite settings to customize the satellite systems used for each activity. For more
information about GNSS satellite systems, go to garmin.com/aboutGPS.
From the watch face, press , select Activities, select an activity, scroll down and select the activity settings,
and select Satellites.
NOTE: This feature is not available for all activities.
Off: Disables GNSS satellite systems for the activity.
Use Default: Enables the watch to use the default activity focus mode setting for GNSS satellites (Customizing a
Default Focus Mode, page60).
GPS Only: Enables the GPS satellite system.
All Systems: Enables multiple GNSS satellite systems. Using multiple GNSS satellite systems together offers
increased performance in challenging environments and faster position acquisition than using GPS only.
However, using multiple GNSS systems can reduce battery life more quickly than using GPS only.
UltraTrac: Records track points and sensor data less frequently. Enabling the UltraTrac feature increases
battery life but decreases the quality of recorded activities. You should use the UltraTrac feature for activities
that demand longer battery life and for which frequent sensor data updates are less important.
26 Forerunner® 70 GPS Running Smartwatch
Owner's Manual
Apps and Activities
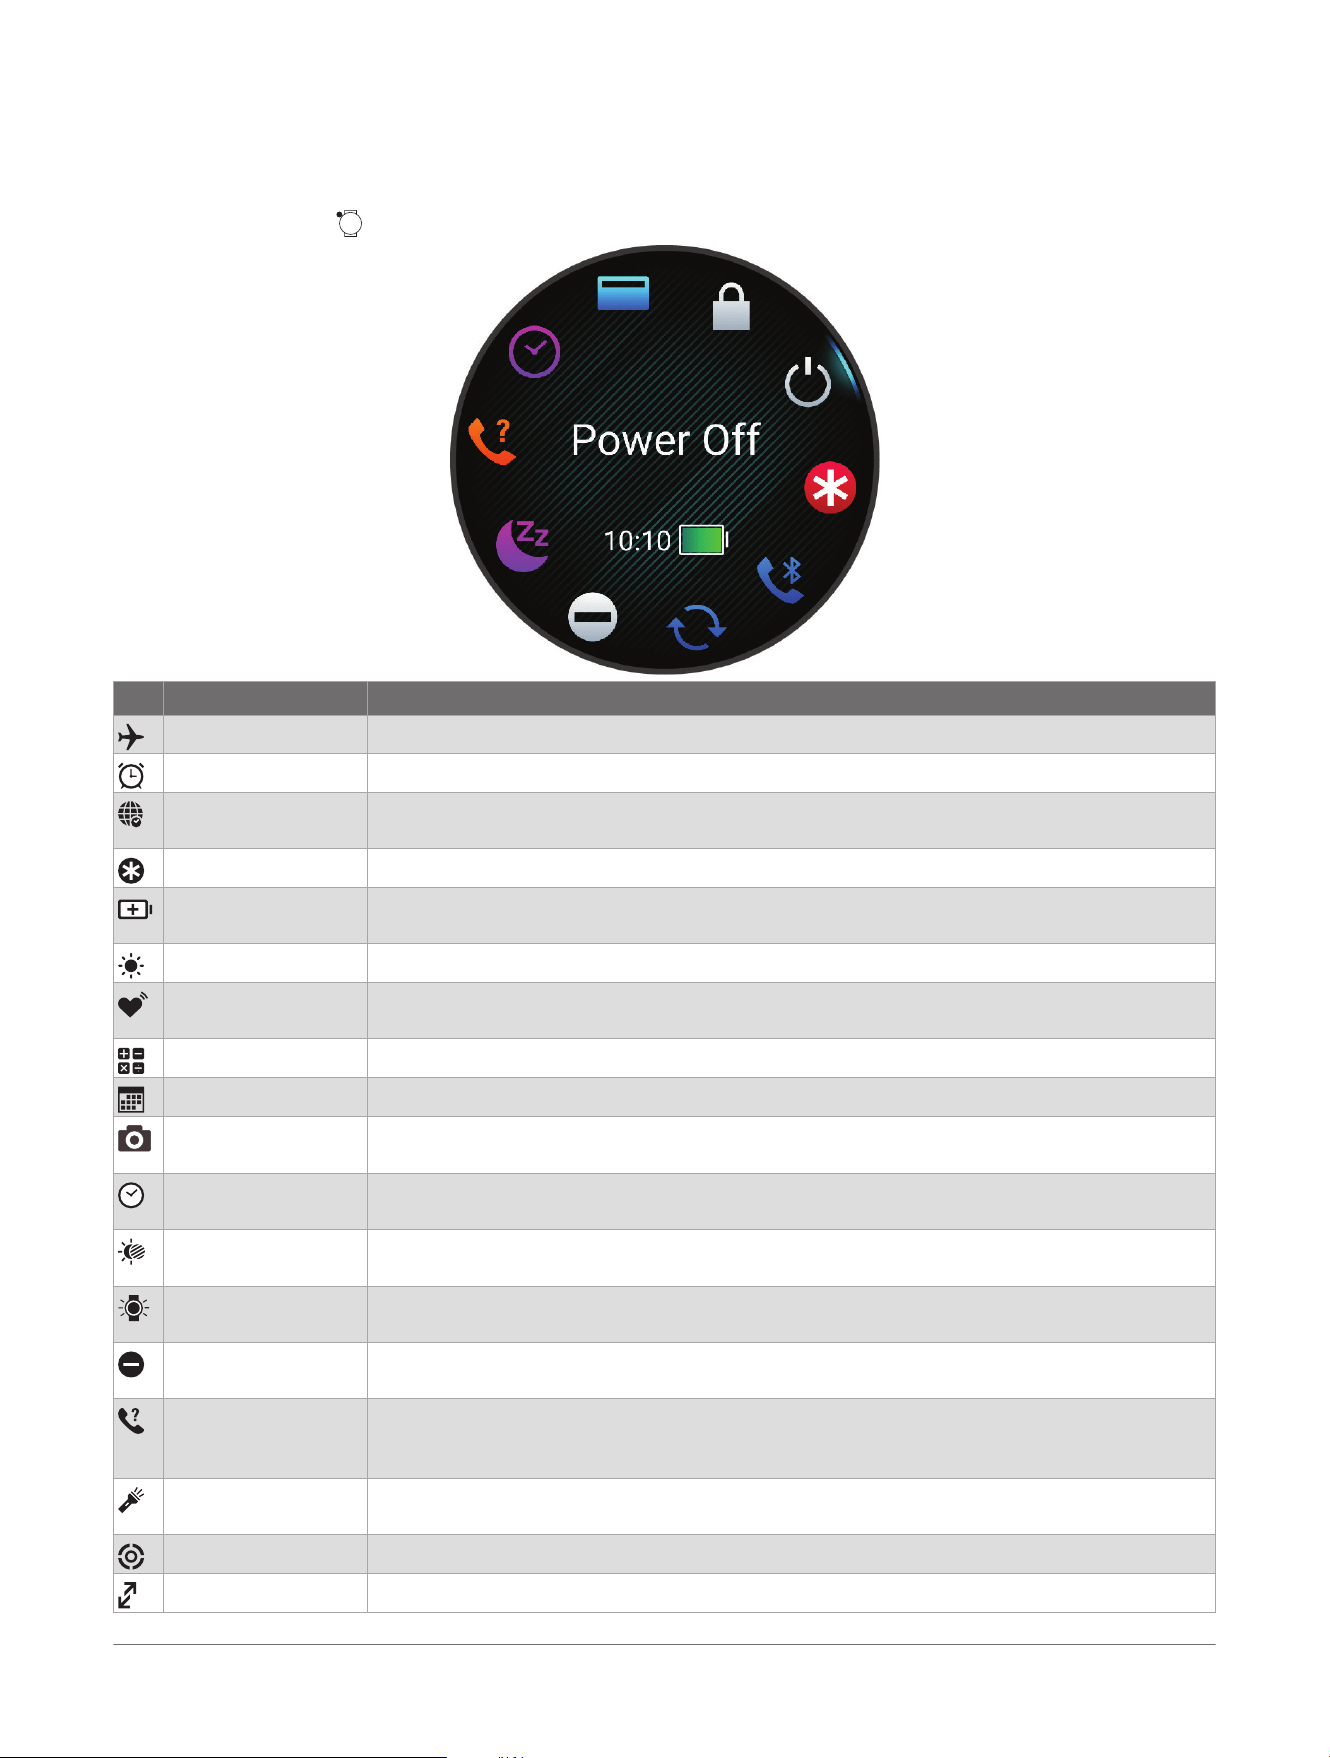
Controls
The controls menu lets you quickly access watch features and options. You can add, reorder, and remove the
options in the controls menu (Customizing the Controls Menu, page28).
From any screen, hold .
Icon Name Description
Airplane Mode Select to enable airplane mode to turn off all wireless communications.
Alarm Clock Select to add or edit an alarm (Setting an Alarm, page41).
Alt. Time Zones Select to view the current time of day in additional time zones (Adding Alternate Time
Zones, page43).
Assistance Select to send an assistance request (Requesting Assistance, page71).
Battery Saver Select to enable the battery saver feature (Customizing the Battery Saver Feature,
page74).
Brightness Select to adjust the screen brightness (Display and Brightness Settings, page50).
Broadcast Heart
Rate
Select to turn on heart rate broadcasting to a paired device (Broadcasting Heart Rate Data,
page63).
Calculator Select to use the calculator, including the tip calculator.
Calendar Select to view upcoming events from your phone calendar.
Camera Controls
Select to manually take a photo and record a video clip (Using the Varia
™
Camera Controls,
page53).
Clocks Select to open the Clocks app to set an alarm, timer, stopwatch, or view alternate time
zones (Clocks, page41).
Color Shift Select to turn the screen to shades of red, green, or orange to use the watch in low light
conditions.
Display Select to turn off the screen for alerts, gestures, and Always On Display mode (Display and
Brightness Settings, page50).
Do Not Disturb Select to enable do not disturb mode to dim the screen and disable alerts and notifica
tions. For example, you can use this mode while watching a movie.
Find My Phone Select to play an audible alert on your paired phone, if it is within Bluetooth
®
range. The
Bluetooth signal strength appears on the Forerunner
®
watch screen, and it increases as you
move closer to your phone.
Flashlight Select to turn on the screen to use your watch as a flashlight (Using the Flashlight Screen,
page28).
Focus Mode Select to change the current focus mode (Focus Modes, page60).
Garmin Share Select to open the Garmin Share app (Garmin Share, page55).
Controls Forerunner® 70 GPS Running Smartwatch
Owner's Manual
27
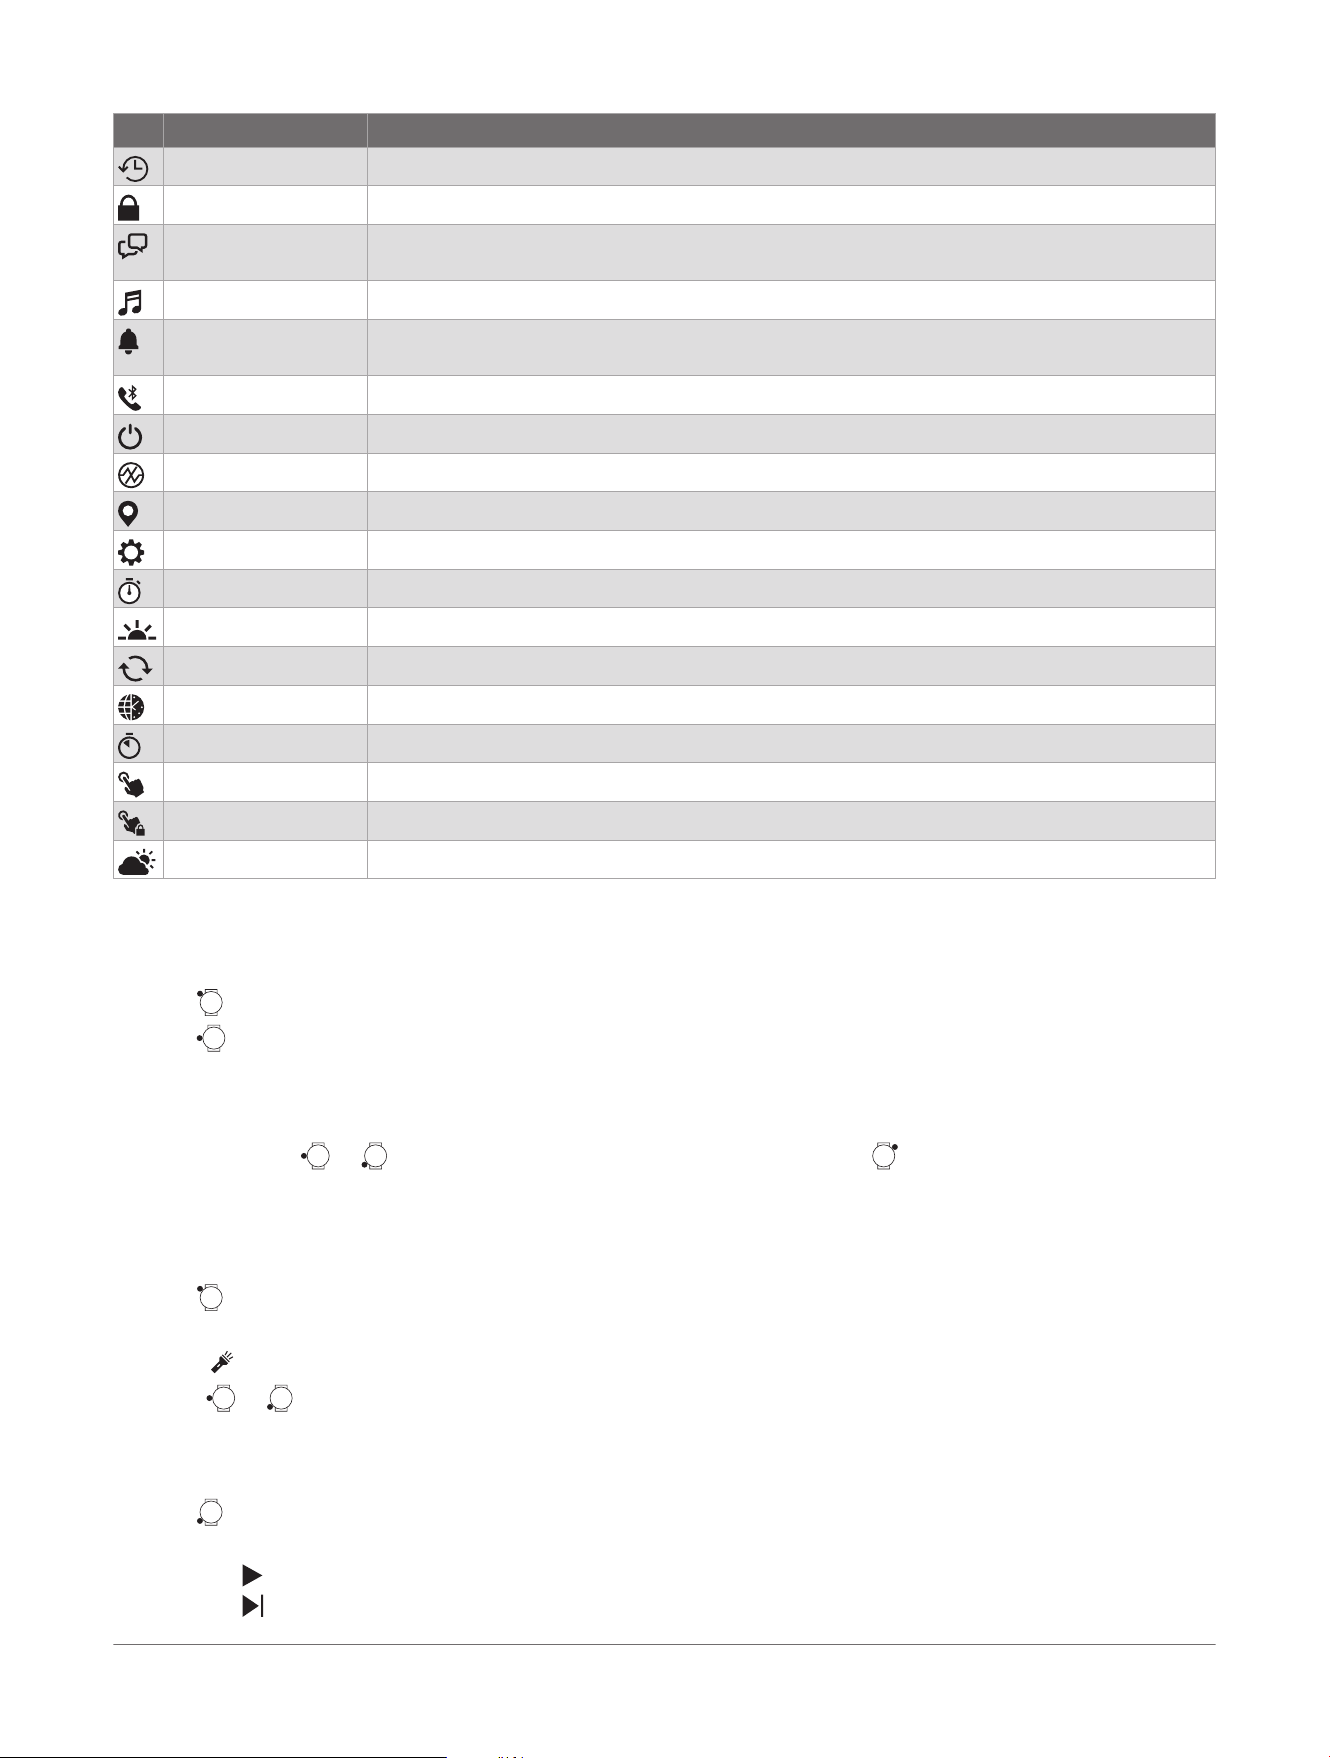
Icon Name Description
History Select to view your activity history, records, and totals.
Lock Device Select to lock the buttons and the touchscreen to prevent inadvertent presses and swipes.
Messenger Select to view and send messages using the Messenger app (Using the Messenger Feature,
page12).
Music Select to control music playback (Listening to Music on Your Phone, page28).
Notifications Select to view calls, texts, social network updates, and more, based on your phone notifica
tion settings (Enabling Phone Notifications, page54).
Phone Select to disable Bluetooth technology and your connection to your paired phone.
Power Off Select to turn off the watch.
Pulse Oximeter Select to open the pulse oximeter app (Pulse Oximeter, page63).
Save Location Select to save your current location to navigate back to it later.
Settings Select to open the settings menu.
Stopwatch Select to start the stopwatch (Using the Stopwatch, page42).
Sunrise & Sunset Select to view sunrise, sunset, and twilight times.
Sync Select to sync your watch with your paired phone.
Time Sync Select to sync your watch with the time on your phone or using satellites.
Timer Select to set a countdown timer (Using the Countdown Timer, page41).
Touch Select to disable touchscreen controls.
Touch Lock Select to enable swiping down from the top of the screen to unlock the touchscreen.
Weather Select to view the current weather forecast and current conditions.
Customizing the Controls Menu
You can add, remove, and change the order of the shortcut menu options in the controls menu (Controls,
page27).
1 Hold to open the controls menu.
2 Hold .
3 Select an option:
● To add a control to the menu, select Add Controls, and select a control to add.
● To change the location of a shortcut in the controls menu, select Reorder Controls, select a control to
move, press or to move the control to a new position, and press to select the new location.
● To remove shortcut from the controls menu, select Remove Controls, and select a control to remove.
Using the Flashlight Screen
Using the flashlight can reduce battery life.
1 Hold .
NOTE: You can customize the controls menu (Customizing the Controls Menu, page28).
2 Select .
3 Press or to adjust the brightness and color.
Listening to Music on Your Phone
You can control music playback on your phone from your Forerunner
®
70 watch.
1 Hold from any screen to open the music controls.
2 Select an option:
● Select to play and pause the current music track.
● Select to skip to the next music track.
28
Forerunner® 70 GPS Running Smartwatch
Owner's Manual
Controls
● Select to access more music controls and volume.
3 Start listening to music from your paired phone.
Music Playback Controls
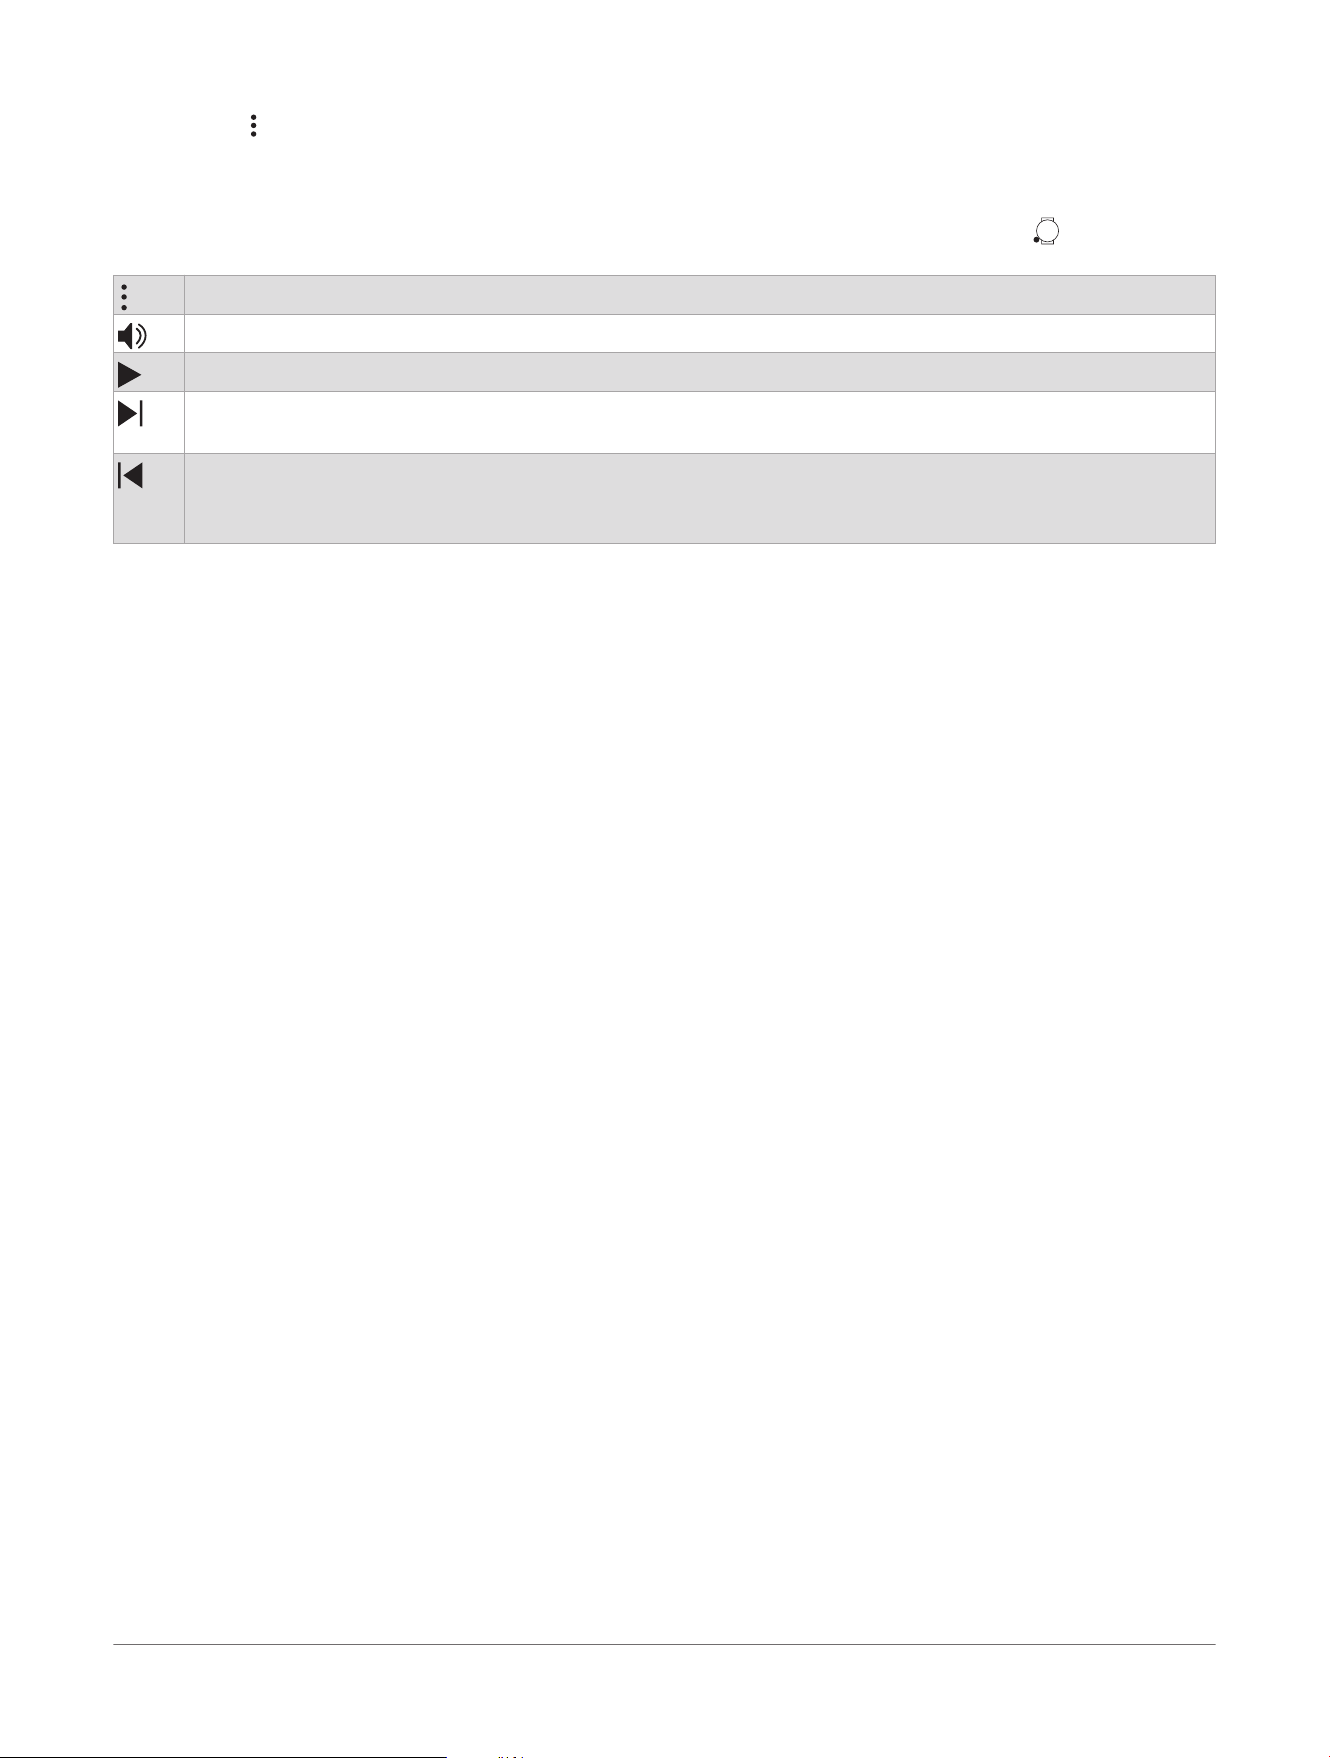
During an activity, you can swipe left to view the music playback controls. You can also press to open the
music controls.
Select to view more music playback controls.
Select to adjust the volume.
Select to play and pause the current audio file.
Select to skip to the next audio file in the playlist.
Hold to fast forward through the current audio file.
Select to restart the current audio file.
Select twice to skip to the previous audio file in the playlist.
Hold to rewind through the current audio file.
Controls Forerunner® 70 GPS Running Smartwatch
Owner's Manual
29
Glances
Your watch comes preloaded with glances that provide quick information (Viewing Glances, page31). Some
glances require a Bluetooth
®
connection to a compatible phone.
Some glances are not visible by default. You can add them to the glances list manually (Customizing the
Glances List, page32). Some glances appear in a grouping of related metrics, such as health or activity
performance.
TIP: You can also download glances from the Connect IQ
™
Store (Connect IQ Features, page58).
Name Description
Alternate time
zones
Displays the current time of day in additional time zones (Adding Alternate Time Zones, page43).
Battery
Displays the estimated battery life and recent battery usage data, including a breakdown of
battery use by activity and feature.
Body Battery
™
With all-day wear, displays your current Body Battery level and a graph of your level for the last
several hours (Body Battery
™
, page32).
Calendar Displays upcoming meetings from your phone calendar.
Calories Displays your calorie information for the current day.
Countdowns Displays upcoming countdown events.
Garmin
®
coach Displays scheduled workouts when you select a Garmin coach adaptive training plan in your
Garmin Connect
™
account. The plan adjusts to your current level of fitness, coaching and
schedule preferences, and race date if applicable.
Health Snapshot
™
Starts a Health Snapshot session on your watch that records several key health metrics while you
hold still for two minutes. It provides a glimpse of your overall cardiovascular status. The watch
records metrics such as your average heart rate, stress level, and respiration rate.
Displays summaries of your saved Health Snapshot sessions.
Health status
Displays health metrics, such as your respiration and heart rate variability.
Heart rate Displays your current heart rate in beats per minute (bpm) and a graph of your average resting
heart rate (RHR).
History Displays your activity history and a graph of your recorded activities (Using History, page45).
HRV status Displays your seven-day average of your overnight heart rate variability (Heart Rate Variability
Status, page34).
Intensity minutes Tracks your time spent participating in moderate to vigorous activities, your weekly intensity
minutes goal, and progress toward your goal.
Last activity Displays a brief summary of your last recorded activity.
Last ride
Last run
Last swim
Displays a brief summary of your last recorded activity and history of the specified sport.
Lifestyle logging Tracks your day-to-day behaviors, and allows you to see how the behaviors affect certain health
metrics in the Garmin Connect app (Lifestyle Logging, page40).
Messenger
Displays your Garmin Messenger
™
app conversations and allows you to reply to messages from
your watch (Garmin Messenger
™
App, page58).
Moon phase Displays the moonrise and moonset times, along with the moon phase, based on your GPS
position.
Naps Displays total nap time and Body Battery level gains. You can start the nap timer and set an alarm
to wake you up (Focus Modes, page60).
Notifications Alerts you to incoming calls, texts, social network updates, and more, based on your phone
notification settings (Enabling Phone Notifications, page54).
Nutrition Displays your daily nutritional overview, including calories and macronutrients. You can also log
your food intake. You must have an active Garmin Connect+ subscription to track and view your
nutrition (Garmin Connect+
™
Subscription, page57).
Primary race Displays the race event you designate as the primary race in your Garmin Connect calendar (Race
Calendar and Primary Race, page39).
30 Forerunner® 70 GPS Running Smartwatch
Owner's Manual
Glances
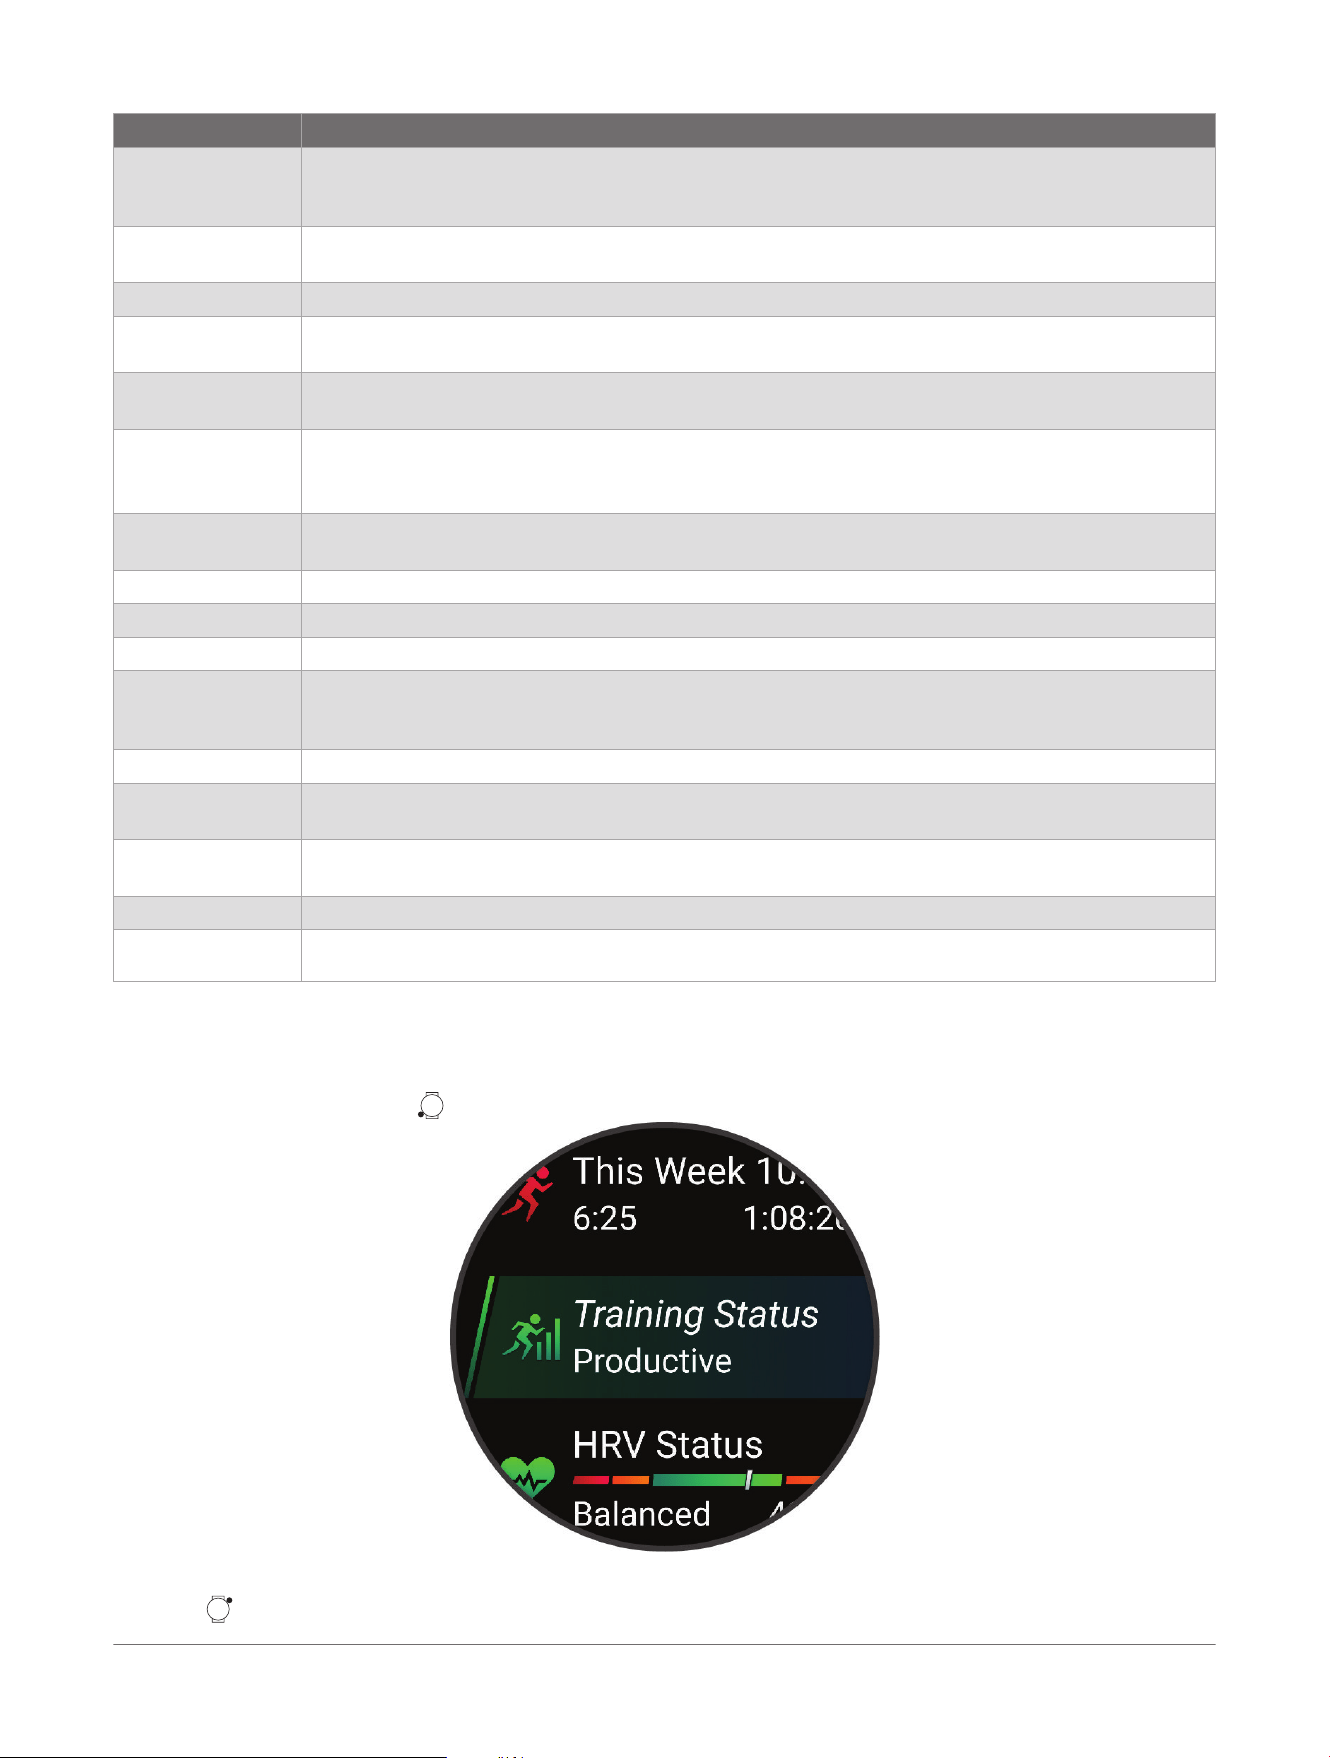
Name Description
Pulse oximeter Allows you to take a manual pulse oximeter reading (Getting Pulse Oximeter Readings, page64).
If you are too active for the watch to determine your pulse oximeter reading, the measurements
are not recorded.
Race calendar Displays your upcoming race events set in your Garmin Connect calendar (Race Calendar and
Primary Race, page39).
Recovery Displays your recovery time. The maximum time is four days.
Respiration Your current respiration rate in breaths per minute and seven-day average. You can do a breathing
activity to help you relax.
Running perform
ance
Displays running performance metrics, such as your VO2 max. estimate and lactacte threshold
(Performance Measurements, page32).
Sleep coach Provides recommendations for your sleep need based on sleep and activity history, circadian
rhythm, HRV status, and naps.
NOTE: You can view sleep insights, enable sleep mode, set alarms, and update sleep settings.
Sleep score Displays total sleep time, a sleep score, and sleep stage information for the previous night. You
can also view any overnight breathing variations (Sleep Tracking, page65).
Sports scores Tracks college or professional sports teams with scores and live data.
Steps Tracks your daily step count, step goal, and data for previous days.
Stocks Displays a customizable list of stocks (Adding a Stock, page40).
Stress Displays your current stress level and a graph of your stress level. You can do a breathing
activity to help you relax. If you are too active for the watch to determine your stress level, stress
measurements are not recorded.
Sunrise and sunset Displays sunrise, sunset, and civil twilight times.
Training readiness Displays a score and a short message that helps you determine how ready you are for training
each day (Training Readiness, page38).
Training status Displays your current training status and training load, which shows you how your training affects
your fitness level and performance (Training Status, page35).
Weather Displays the current temperature and weather forecast.
Weight tracking
Displays your recent weight trends and history. You can enter your weight manually. If you have an
Index
™
scale paired to your Garmin Connect account, your weight data appears in the glance.
Viewing Glances
Glances provide quick access to health data, activity information, built-in sensors, and more. When you pair your
watch, you can view data from your phone, such as health information, weather, and calendar events.
1 From the watch face, press to scroll through the glances list.
TIP: You can also swipe to scroll or tap to select options.
2 Press to view more information.
Glances
Forerunner® 70 GPS Running Smartwatch
Owner's Manual
31
3 Select an option:
● Press to view details about a glance.
● Press to view additional options and functions for a glance.
Customizing the Glances List
1 From the watch face, press to view the glances list.
2 Select Edit.
3 Select an option:
● To change the location of a glance in the list, select a glance, press or to move the glance, and
press to select the new location.
● To remove a glance from the list, select a glance, and select .
● To add a glance to the list, select Add, and select one or more glances.
TIP: You can select Create Folder to create a folder that contains multiple glances (Creating a Glances
Folder, page32).
Creating a Glances Folder
You can customize the glances list to create folders of related glances.
1 From the watch face, press to view the glances list.
2 Select Edit> Add> Create Folder.
3 Select the glances to include in the folder, and select Done.
NOTE: If the glances are already in the glance list, you can move or copy them into the folder.
4 Select or enter a name for the folder.
5 Select an icon for the folder.
6 If necessary, select an option:
● To edit the folder, scroll to the folder in the glances list, and hold .
● To edit the glances in the folder, open the folder and select Edit (Customizing the Glances List, page32) .
Body Battery
™
Your watch analyzes your heart rate variability, stress level, sleep quality, and activity data to determine your
overall Body Battery level. Like a gas gauge on a car, it indicates your amount of available reserve energy. The
Body Battery level range is from 5 to 100, where 5 to 25 is very low reserve energy, 26 to 50 is low reserve
energy, 51 to 75 is medium reserve energy, and 76 to 100 is high reserve energy.
You can sync your watch with your Garmin Connect
™
account to view your most up-to-date Body Battery level,
long-term trends, and additional details (Tips for Improved Body Battery
™
Data, page32).
Tips for Improved Body Battery
™
Data
● For more accurate results, wear the watch while sleeping.
● Good sleep charges your Body Battery.
● Strenuous activity and high stress can cause your Body Battery to drain more quickly.
● Food intake, as well as stimulants like caffeine, has no impact on your Body Battery.
Performance Measurements
These performance measurements are estimates that can help you track and understand your training activities
and race performances. The measurements require a few activities using wrist-based heart rate or a compatible
chest heart rate monitor.
These estimates are provided and supported by Garmin Human Performance Lab
™
. For more information, go to
garmin.com/performance-data/running.
NOTE: The estimates may seem inaccurate at first. The watch requires you to complete a few activities to learn
about your performance.
HRV status: The watch analyzes your wrist heart rate readings while you are sleeping to determine your heart
rate variability (HRV) status based on your personal, long-term HRV averages (Heart Rate Variability Status,
page34).
Predicted race times: The watch uses the VO2 max. estimate and your training history to provide a target race
time based on your current state of fitness (Viewing Your Predicted Race Times, page33).
32
Forerunner® 70 GPS Running Smartwatch
Owner's Manual
Glances
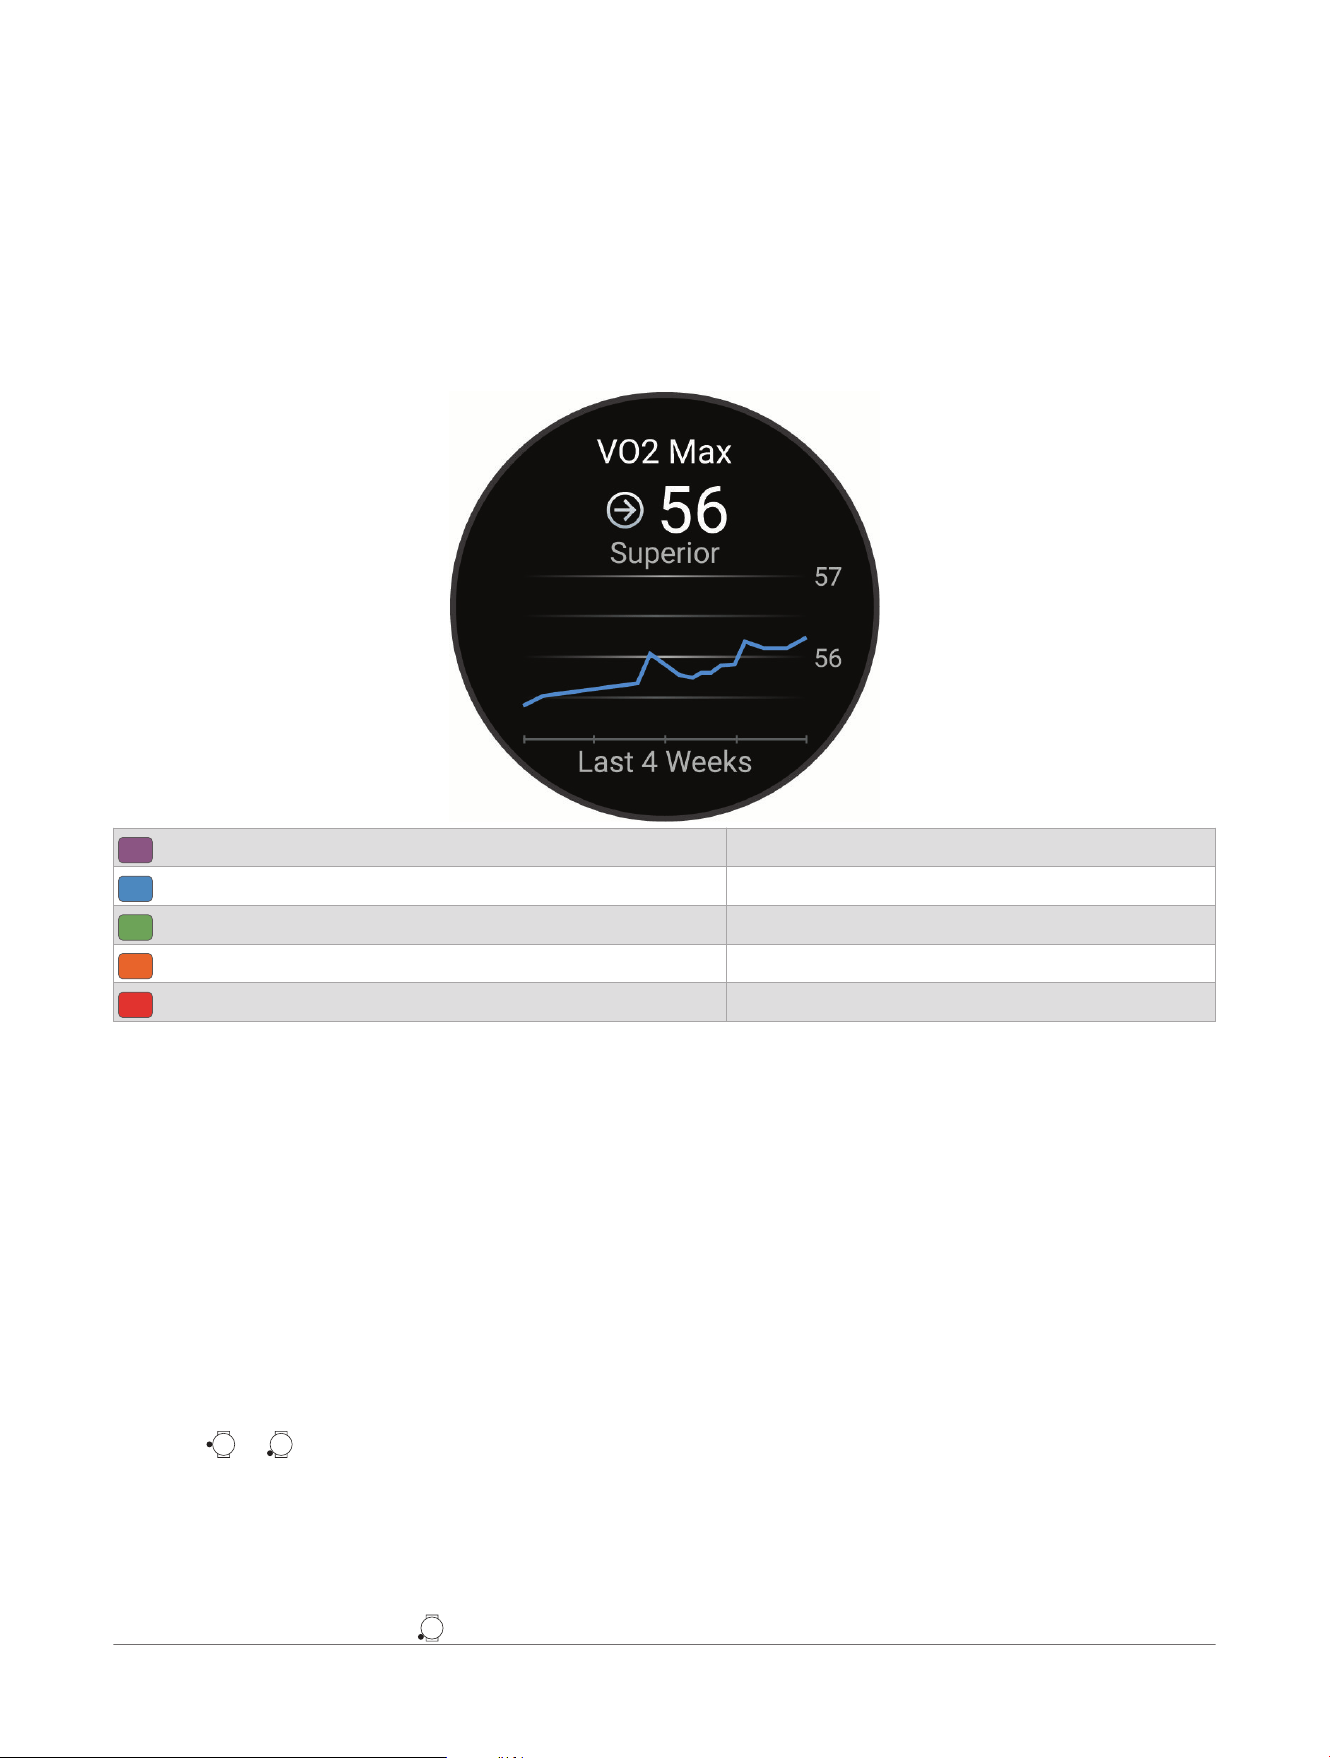
VO2 max.: VO2 max. is the maximum volume of oxygen (in milliliters) you can consume per minute per kilogram
of body weight at your maximum performance (About VO2 Max. Estimates, page33).
About VO2 Max. Estimates
VO2 max. is the maximum volume of oxygen (in milliliters) you can consume per minute per kilogram of body
weight at your maximum performance. In simple terms, VO2 max. is an indication of athletic performance and
should increase as your level of fitness improves. The Forerunner
®
device requires wrist-based heart rate or a
compatible chest heart rate monitor to display your VO2 max. estimate.
On the device, your VO2 max. estimate appears as a number, description, and position on the color gauge. On
your Garmin Connect
™
account, you can view additional details about your VO2 max. estimate, such as where it
ranks for your age and sex.
Purple
Superior
Blue
Excellent
Green
Good
Orange
Fair
Red
Poor
VO2 max. data is provided by Garmin Human Performance Lab
™
. VO2 max. analysis is provided with permission
from The Cooper Institute
®
. For more information, see the appendix (VO2 Max. Standard Ratings, page85), and
go to www.CooperInstitute.org.
Getting Your VO2 Max. Estimate for Running
This feature requires wrist-based heart rate or a compatible chest heart rate monitor. If you are using a chest
heart rate monitor, you must put it on and pair it with your watch (Pairing Your Wireless Sensors, page51).
For the most accurate estimate, complete the user profile setup (Setting Up Your User Profile, page72), and set
your maximum heart rate (Setting Your Heart Rate Zones, page72). The estimate may seem inaccurate at first.
The watch requires a few runs to learn about your running performance. You can disable VO2 max. recording
for ultra run and trail run activities if you do not want those run types to affect your VO2 max. estimate (Activity
Settings, page23).
1 Start a running activity.
2 Run outdoors at a moderate or high intensity, reaching at least 70% of your maximum heart rate.
3 After at least 10 minutes, select Save.
4 Press or to scroll through the performance measurements.
Viewing Your Predicted Race Times
For the most accurate estimate, complete the user profile setup (Setting Up Your User Profile, page72), and set
your maximum heart rate (Setting Your Heart Rate Zones, page72).
Your watch uses the VO2 max. estimate and your training history to provide a target race time (About VO2 Max.
Estimates, page33). The watch analyzes several weeks of your training data to refine the race time estimates.
1 From the watch face, press to view the running performance glance.
Glances
Forerunner® 70 GPS Running Smartwatch
Owner's Manual
33
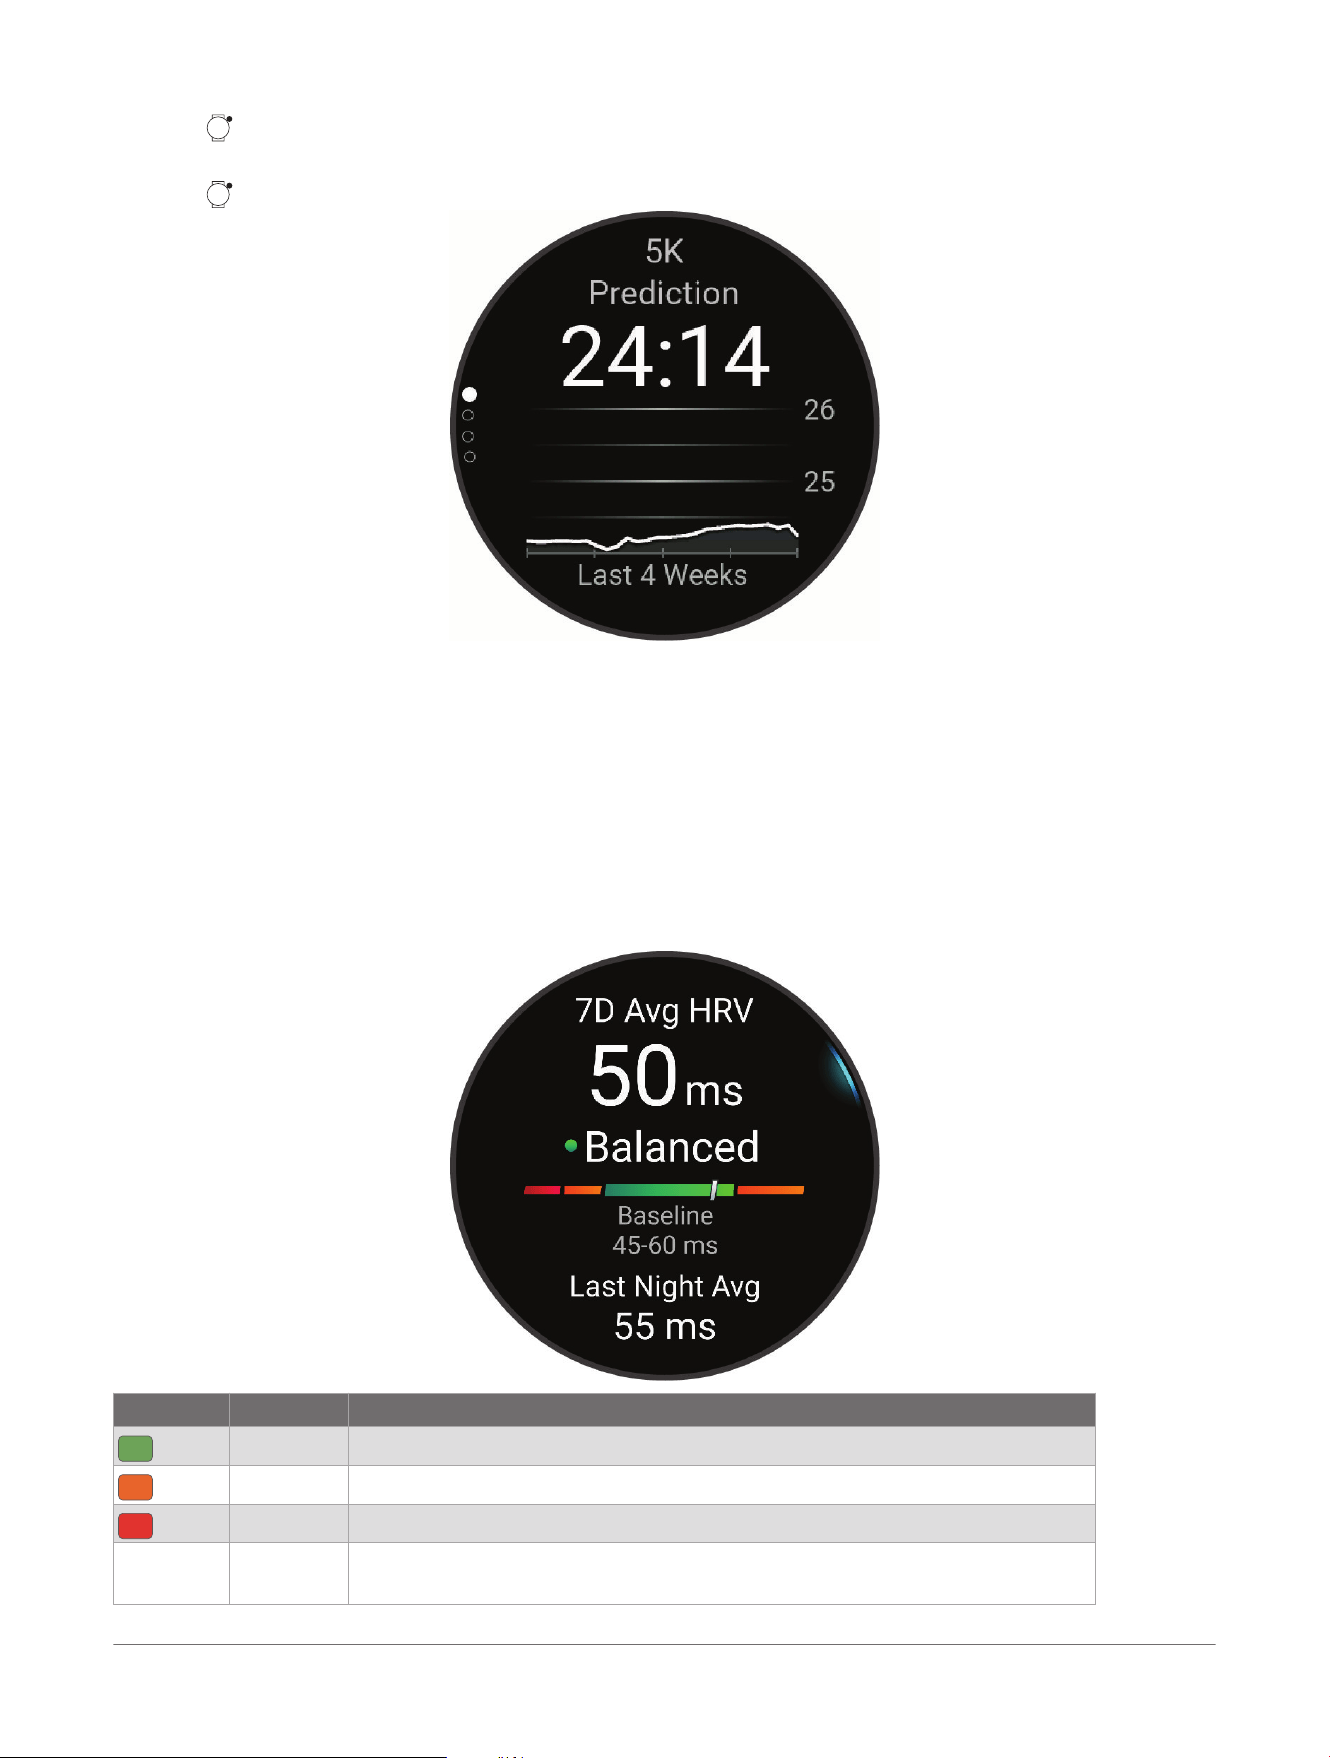
2 Press .
3 Scroll to view a predicted race time.
4 Press to view more details.
5 Scroll to view predictions for other distances.
NOTE: The predictions may seem inaccurate at first. The watch requires a few runs to learn about your
running performance.
Heart Rate Variability Status
Your watch analyzes your wrist heart rate readings while you are sleeping to determine your heart rate variability
(HRV). Training, physical activity, sleep, nutrition, and healthy habits all impact your heart rate variability. HRV
values can vary widely based on gender, age, and fitness level. A balanced HRV status may indicate positive
signs of health such as good training and recovery balance, greater cardiovascular fitness, and resilience to
stress. An unbalanced or poor status may be a sign of fatigue, greater recovery needs, or increased stress. For
best results, you should wear the watch while sleeping. The watch requires three weeks of consistent sleep data
to display your heart rate variability status.
Color Zone Status Description
Green
Balanced Your seven-day average HRV is within your baseline range.
Orange
Unbalanced Your seven-day average HRV is above or below your baseline range.
Red
Low Your seven-day average HRV is well below your baseline range.
No color Poor
No status
Your HRV values are averaging well below the normal range for your age.
No status means that there is insufficient data to generate a seven-day average.
34 Forerunner® 70 GPS Running Smartwatch
Owner's Manual
Glances
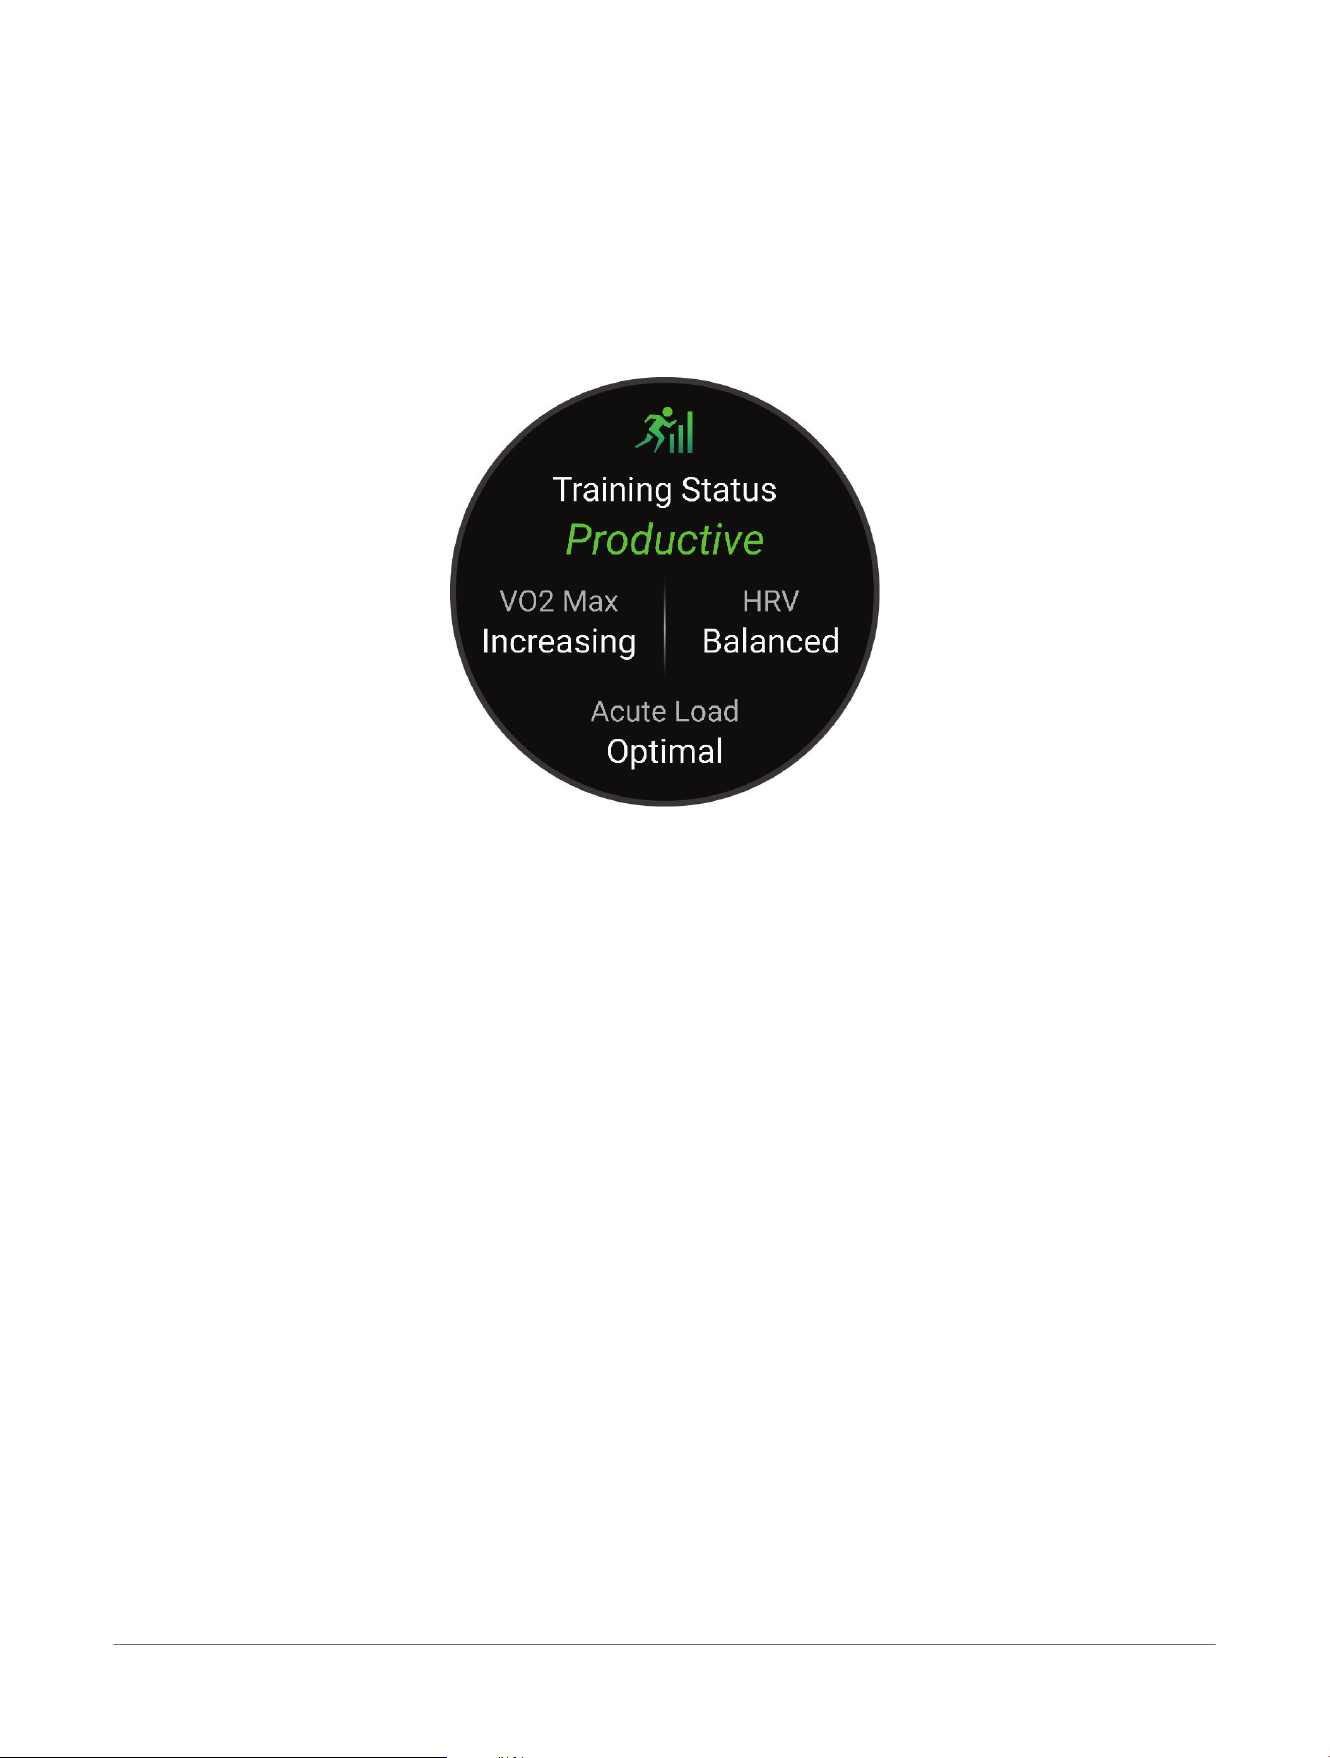
You can sync your watch with your Garmin Connect
™
account to view your current heart rate variability status,
trends, and educational feedback.
Training Status
These measurements are estimates that can help you track and understand your training activities. The
measurements require you to complete activities for two weeks using wrist-based heart rate or a compatible
chest heart rate monitor. The measurements may seem inaccurate at first when the watch is still learning about
your performance.
These estimates are provided and supported by Garmin Human Performance Lab
™
. For more information, go to
garmin.com/performance-data/running.
Training status: Training status shows you how your training affects your fitness and performance. Your
training status is based on changes to your VO2 max., acute load, and HRV status over an extended time
period.
VO2 max.: VO2 max. is the maximum volume of oxygen (in milliliters) you can consume per minute per kilogram
of body weight at your maximum performance (About VO2 Max. Estimates, page33).
HRV: HRV is your heart rate variability status over the last seven days (Heart Rate Variability Status, page34).
Acute load: Acute load is a weighted sum of your recent exercise load scores including exercise duration and
intensity. (Acute Load, page36).
Training load focus: Your watch analyzes and distributes your training load into different categories based on
the intensity and structure of each activity recorded. Training load focus includes the total load accumulated
per category, and the focus of the training. Your watch displays your load distribution over the last 4 weeks
(Training Load Focus, page36).
Recovery time: The recovery time displays how much time remains before you are fully recovered and ready for
the next hard workout (Recovery Time, page37).
Training Status Levels
Training status shows you how your training affects your fitness level and performance. Your training status is
based on changes to your VO2 max., acute load, and HRV status over an extended time period. You can use
your training status to help plan future training and continue improving your fitness level.
No Status: The watch needs you to record multiple activities over two weeks, with VO2 max. results from
running or cycling, to determine your training status.
Detraining: You have a break in your training routine or you are training much less than usual for a week
or more. Detraining means that you are unable to maintain your fitness level. You can try increasing your
training load to see improvement.
Recovery: Your lighter training load is allowing your body to recover, which is essential during extended periods
of hard training. You can return to a higher training load when you feel ready.
Maintaining: Your current training load is enough to maintain your fitness level. To see improvement, try adding
more variety to your workouts or increasing your training volume.
Productive: Your current training load is moving your fitness level and performance in the right direction. You
should plan recovery periods into your training to maintain your fitness level.
Glances
Forerunner® 70 GPS Running Smartwatch
Owner's Manual
35
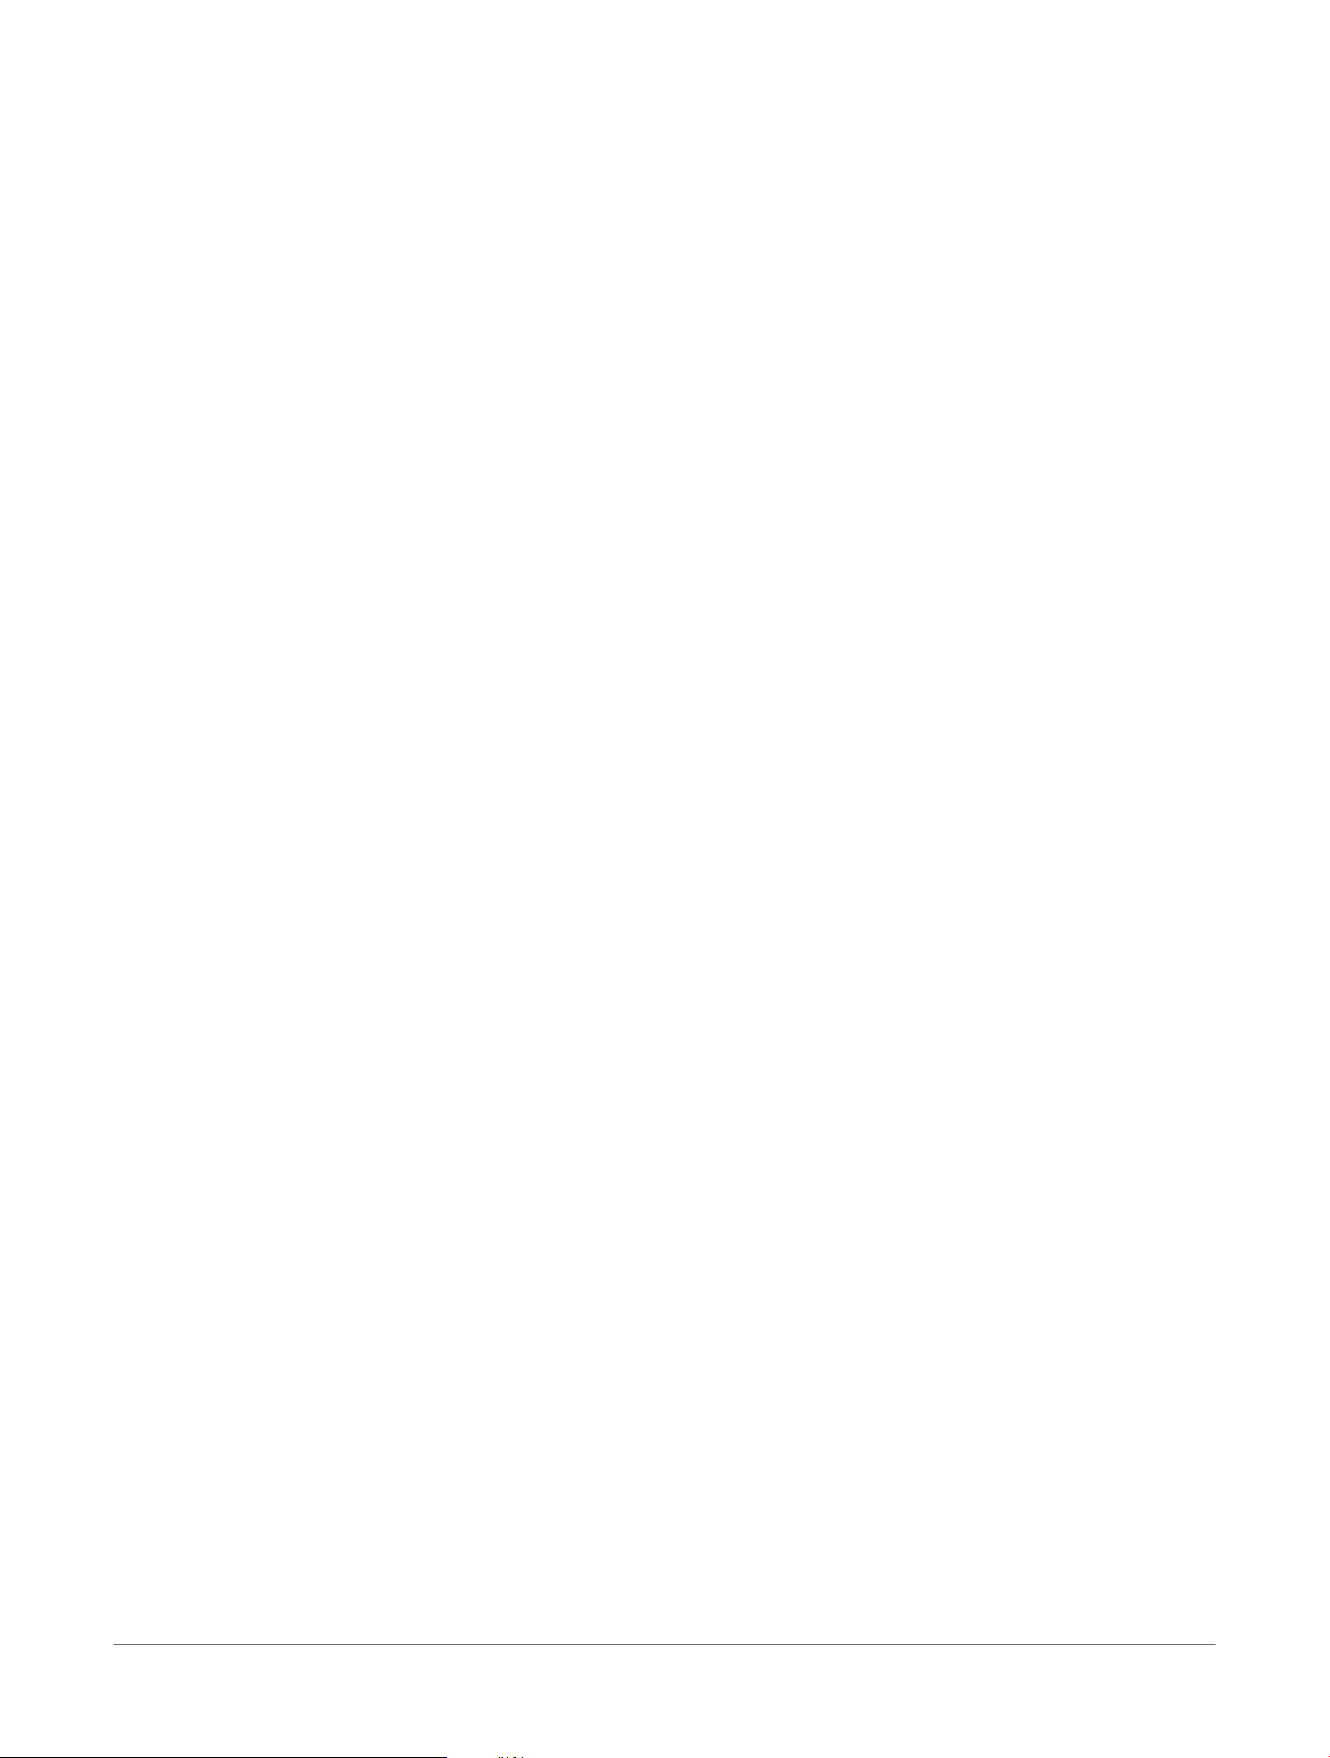
Peaking: You are in ideal race condition. Your recently reduced training load is allowing your body to recover
and fully compensate for earlier training. You should plan ahead, since this peak state can only be maintained
for a short time.
Overreaching: Your training load is very high and counterproductive. Your body needs a rest. You should give
yourself time to recover by adding lighter training to your schedule.
Unproductive: Your training load is at a good level, but your fitness is decreasing. Try focusing on rest, nutrition,
and stress management.
Strained: There is imbalance between your recovery and training load. It is a normal result after a hard training
or major event. Your body may be struggling to recover, so you should pay attention to your overall health.
Tips for Getting Your Training Status
The training status feature depends on updated assessments of your fitness level, including at least one VO2
max. measurement per week (About VO2 Max. Estimates, page33). Indoor run activities do not generate a VO2
max. estimate in order to preserve the accuracy of your fitness level trend. You can disable VO2 max. recording
for ultra run and trail run activities if you do not want those run types to affect your VO2 max. estimate (Activity
Settings, page23).
To get the most out of the training status feature, you can try these tips.
● At least one time per week, run outdoors and reach a heart rate higher than 70% of your maximum heart rate
for at least 10 minutes.
After using the watch for one or two weeks, your training status should be available.
● Record all of your fitness activities on your primary training device, allowing your watch to learn about your
performance (Syncing Activities and Performance Measurements, page57).
● Wear the watch consistently while you sleep, to continue generating an up-to-date HRV status. Having a valid
HRV status can help maintain a valid training status when you do not have as many activities with VO2 max.
measurements.
Acute Load
Acute load is a weighted sum of your excess post-exercise oxygen consumption (EPOC) for the last several
days. The gauge indicates whether your current load is low, optimal, high, or very high. The optimal range is
based on your individual fitness level and training history. The range adjusts as your training time and intensity
increase or decrease.
Training Load Focus
In order to maximize performance and fitness gains, training should be distributed across three categories: low
aerobic, high aerobic, and anaerobic. Training load focus shows you how much of your training is currently in
each category and provides training targets. Training load focus requires at least 7 days of training to determine
if your training load is low, optimal, or high. After 4 weeks of training history, your training load estimate will
have more detailed target information to help you balance your training activities.
Below targets: Your 4-week training load is lower than optimal in all intensity categories.
Low aerobic shortage: Try adding more low aerobic activities to provide recovery and balance for your higher
intensity activities.
High aerobic shortage: Try adding more high aerobic activities to help improve your lactate threshold and VO2
max. over time.
Anaerobic shortage: Try adding a few more intense, anaerobic activities to improve your speed and anaerobic
capacity over time.
Balanced: Your training load is balanced and provides all-around fitness benefits as you continue training.
Low aerobic focus: Your training load is mostly low aerobic activity. This provides a solid foundation and
prepares you for adding more intense workouts.
High aerobic focus: Your training load is mostly high aerobic activity. These activities help to improve lactate
threshold, VO2 max., and endurance.
Anaerobic focus: Your training load is mostly intense activity. This leads to rapid fitness gains, but should be
balanced with low aerobic activities.
Above targets: Your 4-week training load is higher than optimal.
Load Ratio
Load ratio is the ratio of your acute (short-term) training load to your chronic (long-term) training load. It's
helpful for tracking your training load changes.
36
Forerunner® 70 GPS Running Smartwatch
Owner's Manual
Glances
Status Value Description
No Status None Load ratio will be visible after 2 weeks of training.
Low Lower than 0.8 Your short-term training load is lower than your long-term training load.
Optimal
0.8 to 1.4 The short-term and long-term training loads are balanced. The optimal range is based on
your individual fitness level and training history.
High 1.5 to 1.9 Your short-term training load is higher than your long-term training load.
Very High 2.0 or higher Your short-term training load is significantly higher than your long-term training load.
About Training Effect
Training Effect measures the impact of an activity on your aerobic and anaerobic fitness. Training Effect
accumulates during the activity. As the activity progresses, the Training Effect value increases. Training Effect
is determined by your user profile information and training history, and heart rate, duration, and intensity of your
activity. There are seven different Training Effect labels to describe the primary benefit of your activity. Each
label is color coded and corresponds to your training load focus (Training Load Focus, page36). Each feedback
phrase, for example, "Highly Impacting VO2 Max." has a corresponding description in your Garmin Connect
™
activity details.
Aerobic Training Effect uses your heart rate to measure how the accumulated intensity of an exercise affects
your aerobic fitness and indicates if the workout had a maintaining or improving effect on your fitness level.
Your excess post-exercise oxygen consumption (EPOC) accumulated during exercise is mapped to a range of
values that account for your fitness level and training habits. Steady workouts at moderate effort or workouts
involving longer intervals (>180 seconds) have a positive impact on your aerobic metabolism and result in an
improved aerobic Training Effect.
Anaerobic Training Effect uses heart rate and speed (or power) to determine how a workout affects your ability
to perform at very high intensity. You receive a value based on the anaerobic contribution to EPOC and the
type of activity. Repeated high-intensity intervals of 10 to 120 seconds have a highly beneficial impact on your
anaerobic capability and result in an improved anaerobic Training Effect.
You can add Aerobic Training Effect and Anaerobic Training Effect as data fields to one of your training screens
to monitor your numbers throughout the activity.
Training Effect Aerobic Benefit Anaerobic Benefit
From 0.0 to 0.9 No benefit. No benefit.
From 1.0 to 1.9 Minor benefit. Minor benefit.
From 2.0 to 2.9 Maintains your aerobic fitness. Maintains your anaerobic fitness.
From 3.0 to 3.9 Impacts your aerobic fitness. Impacts your anaerobic fitness.
From 4.0 to 4.9 Highly impacts your aerobic fitness. Highly impacts your anaerobic fitness.
5.0 Overreaching and potentially harmful without
enough recovery time.
Overreaching and potentially harmful without
enough recovery time.
Training Effect technology is provided and supported by Garmin Human Performance Lab
™
. For more
information, go to garmin.com/performance-data/running.
Recovery Time
You can use your Garmin
®
device with wrist-based heart rate or a compatible chest heart rate monitor to display
how much time remains before you are fully recovered and ready for the next hard workout.
The recovery time recommendation uses your VO2 max. estimate and may seem inaccurate at first. The device
requires you to complete a few activities to learn about your performance.
The recovery time appears immediately following an activity. The time counts down until it is optimal for you to
attempt another hard workout. The device updates your recovery time throughout the day based on changes in
sleep, stress, relaxation, and physical activity.
Recovery Heart Rate
If you are training with wrist-based heart rate or a compatible chest heart rate monitor, you can check your
recovery heart rate value after each activity. Recovery heart rate is the difference between your exercising heart
rate and your heart rate two minutes after the exercise has stopped. For example, after a typical training run,
you stop the timer. Your heart rate is 140bpm. After two minutes of no activity or cool down, your heart rate
is 90 bpm. Your recovery heart rate is 50 bpm (140 minus 90). Some studies have linked recovery heart rate to
cardiac health. Higher numbers generally indicate healthier hearts.
Glances
Forerunner® 70 GPS Running Smartwatch
Owner's Manual
37
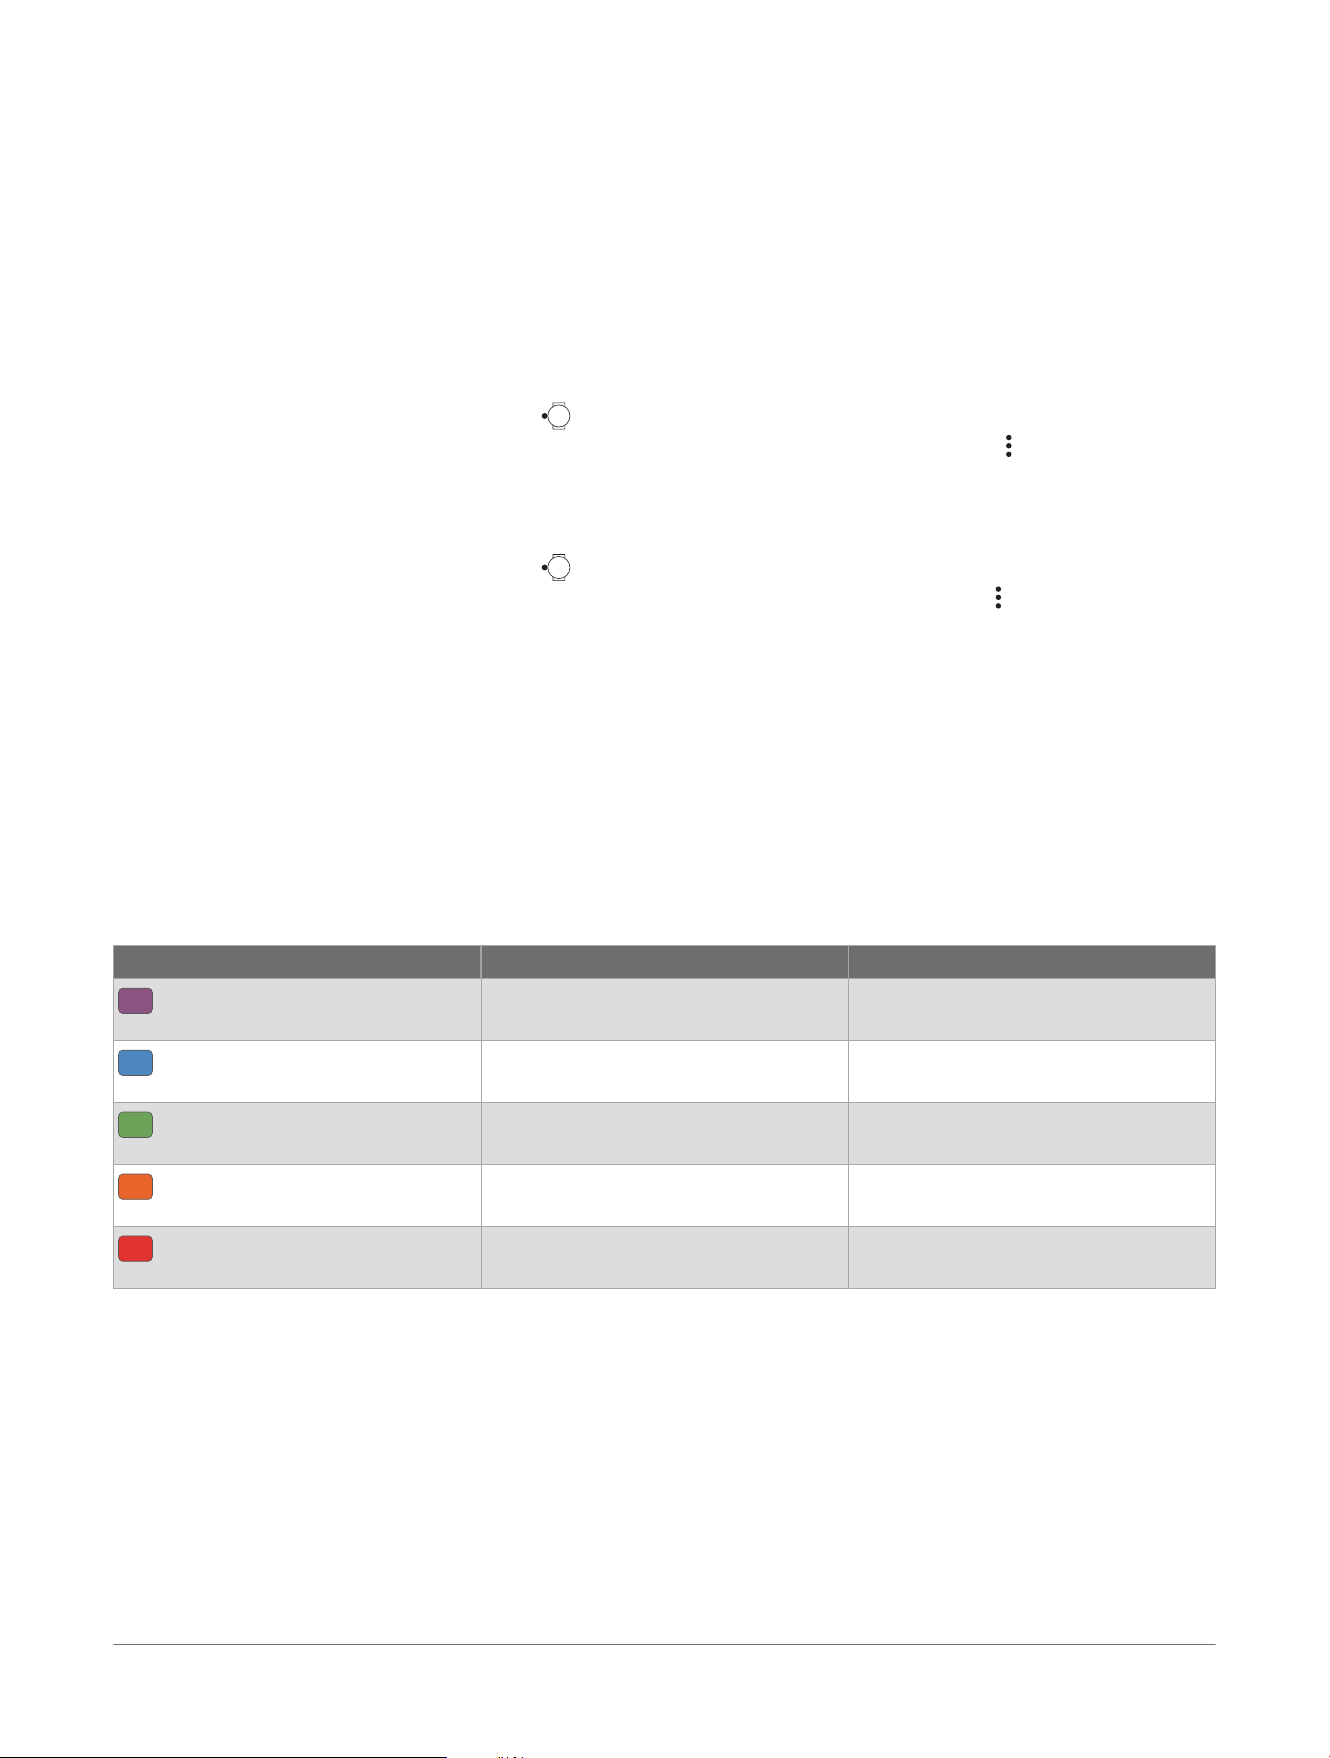
TIP: For best results, you should stop moving for two minutes while the device calculates your recovery heart
rate value.
NOTE: Your recovery heart rate is not calculated for low-impact activities, such as yoga.
Pausing and Resuming Your Training Status
If you are injured or sick, you can pause your training status. You can continue to record fitness activities,
but your training status, training load focus, recovery feedback, and workout recommendations are temporarily
disabled.
You can resume your training status when you are ready to start training again. For best results, you need at
least one VO2 max. measurement each week (About VO2 Max. Estimates, page33).
1 When you want to pause your training status, select an option:
● From the training status glance, hold , and select Pause Training Status.
● From your Garmin Connect
™
settings, select Performance Stats> Training Status> > Pause Training
Status.
2 Sync your watch with your Garmin Connect account.
3 When you want to resume your training status, select an option:
● From the training status glance, hold , and select Resume Training Status.
● From your Garmin Connect settings, select Performance Stats> Training Status> > Resume Training
Status.
4 Sync your watch with your Garmin Connect account.
Training Readiness
Your training readiness is a score and a short message that helps you determine how ready you are for training
each day. The score is continuously calculated and updated throughout the day using these factors:
● Sleep score (last night)
● Recovery time
● HRV status
● Acute load
● Sleep history (last 3 nights)
● Stress history (last 3 days)
Color Zone Score Description
Purple
95 to 100 Prime
Best possible
Blue
75 to 94 High
Ready for challenges
Green
50 to 74 Moderate
Good to go
Orange
25 to 49 Low
Time to slow down
Red
1 to 24 Poor
Let your body recover
38 Forerunner® 70 GPS Running Smartwatch
Owner's Manual
Glances
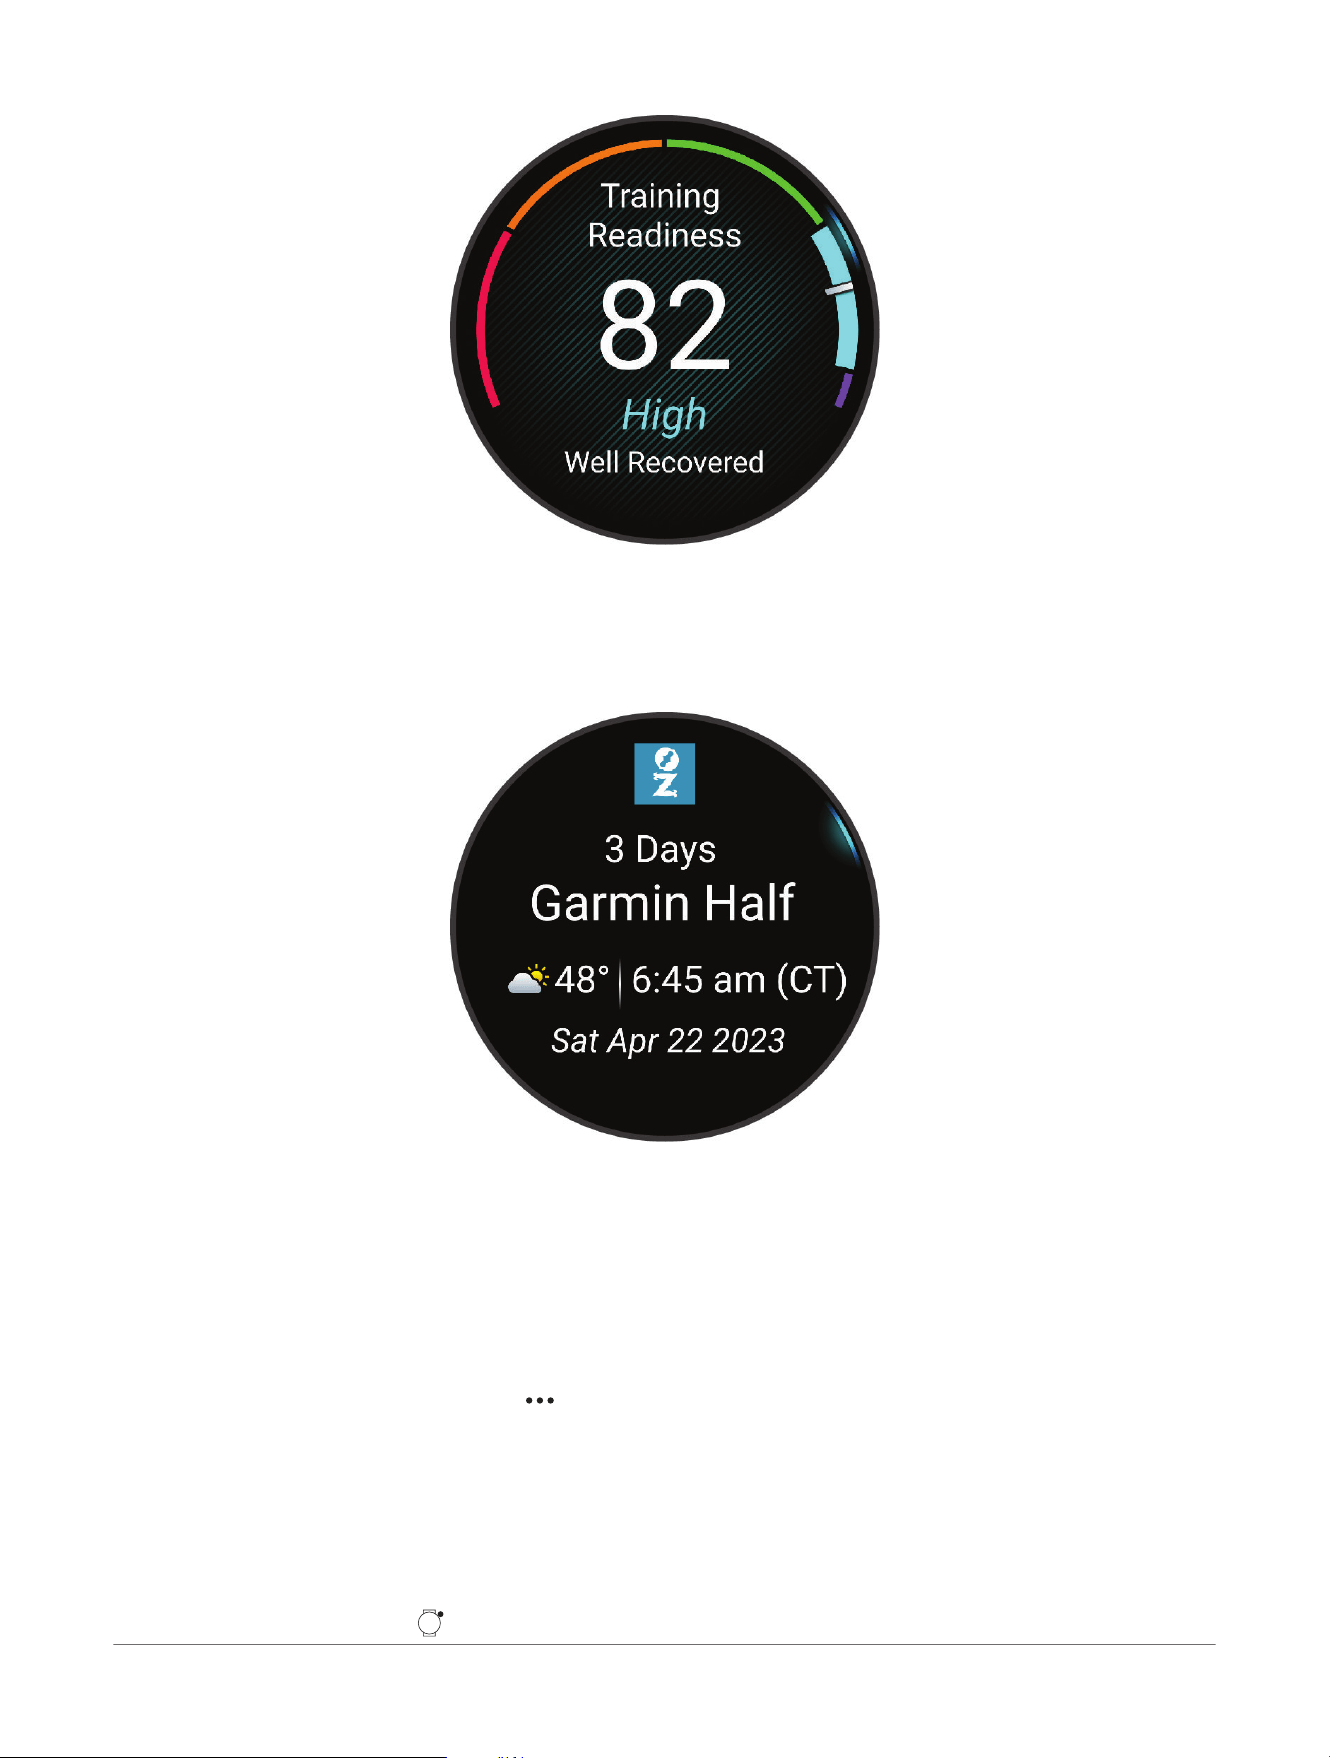
To view historical training readiness scores, go to your Garmin Connect
™
account.
Race Calendar and Primary Race
When you add a race event to your Garmin Connect
™
calendar, you can view the event on your watch by adding
the primary race glance (Glances, page30). The event date must be in the next 365 days. The watch displays a
countdown to the event, your goal time or predicted finish time (running events only), and weather information.
NOTE: Historical weather information for the location and date is available right away. Local forecast data
appears approximately 14 days before the event.
If you add more than one race event, you are prompted to choose a primary event.
Depending on the available course data for your event, you can view elevation data, the course map, and add a
PacePro
™
plan (PacePro
™
Training, page17).
Training for a Race Event
Your watch can suggest daily workouts to help you train for a running or cycling event, if you have a VO2 max.
estimate (About VO2 Max. Estimates, page33).
1 From the Garmin Connect
™
app, select .
2 Select Training & Planning> Races & Events> Find an Event.
3 Search for an event in your area.
You can also select Create an Event to create your own event.
4 Select Add to Calendar.
5 Sync your watch with your Garmin Connect account.
6 On your watch, scroll to the primary race glance to see a countdown to your primary race event.
7 From the watch face, press , and select a running or cycling activity.
Glances
Forerunner® 70 GPS Running Smartwatch
Owner's Manual
39
NOTE: If you have completed at least one outdoor run with heart rate data or one ride with heart rate and
power data, daily suggested workouts appear on your watch.
Adding a Stock
Before you can customize the stocks list, you must add the stocks glance to the glances list (Customizing the
Glances List, page32).
1 From the watch face, press to view the stocks glance.
2 Press .
3 Select Edit> Add.
4 Enter the company name or stock symbol for the stock you want to add, and select .
The watch displays search results.
5 Select the stock you want to add.
6 Select the stock to view more information.
TIP: To display the stock on the glances list, you can press , and select Set as Favorite.
Lifestyle Logging
Use the lifestyle logging glance on your Forerunner
®
watch to discover how everyday behaviors affect several
health metrics, such as your sleep score, resting heart rate, and more. You can log and track behaviors that
reflect your daily habits and actions, such as late caffeine intake, cold plunges, or reading before bedtime, on the
Garmin Connect
™
app (Tracking Lifestyle Logging Behaviors, page40). You can even create and track custom
behaviors.
Tracking Lifestyle Logging Behaviors
Before you can use the lifestyle logging feature, you must have a Garmin Connect
™
account, download the
Garmin Connect app, and pair your Garmin
®
watch with the Garmin Connect app.
1 From the Garmin Connect app, select .
2 Select Health Stats> Lifestyle Logging.
3 Follow the on-screen instructions.
4 Set up logging reminders (optional).
You can view detailed lifestyle logging reports on the Garmin Connect app.
TIP: You can enable the lifestyle logging glance on your watch to view and log lifestyle behaviors (Customizing
the Glances List, page32).
40
Forerunner® 70 GPS Running Smartwatch
Owner's Manual
Glances
Clocks
Setting an Alarm
You can set multiple alarms.
1 Select an option:
● From the watch face, hold .
● From the watch face, press .
● Hold .
2 Select Clocks> Alarms.
3 Select an option:
● To set and save an alarm for the first time, enter the alarm time.
● To set and save additional alarms, select Add Alarm, and enter the alarm time.
4 Scroll down for more options.
5 Select Save.
Editing an Alarm
1 Select an option:
● From the watch face, hold .
● From the watch face, press .
● Hold .
2 Select Clocks> Alarms.
3 Select an alarm.
4 Select an option:
● To turn the alarm on or off, select Status.
● To change the alarm time, select Time.
● To set an alarm to gently wake you in the 30-minute window before your scheduled alarm based on
optimal sleep timing, select Smart Wake.
NOTE: Your alarm will always go off at your selected time in addition to any earlier alarms. For example,
if you set your alarm for 8:00 am, the alarm may gently alert you to wake up some time between 7:30 and
8:00 am.
● To set the alarm to repeat regularly, select Repeat, and select when the alarm should repeat.
● To select the type of alarm notification, select Sound & Vibe.
NOTE: You can also preview the alarm sound and select vibration options. You can select Quiet Start if
you want your alarm to start vibrating softly and then get stronger.
● To select a description for the alarm, select Label.
5 Select an option:
● To save your edits, select Done.
● To delete the alarm, select Delete.
Using the Countdown Timer
1 Select an option:
● From the watch face, hold .
● From the watch face, press .
● Hold .
2 Select Clocks> Timers.
3 If you have never saved a timer, enter the time using the touchscreen or the and buttons.
4 If you previously saved a timer, select an option:
● To set a new countdown timer without saving it, select Quick Timer, and enter the time.
● To set and save a new countdown timer, select Edit> Add Timer, and enter the time.
● To set a saved countdown timer, select the saved timer.
5 Press to start the timer.
Clocks
Forerunner® 70 GPS Running Smartwatch
Owner's Manual
41
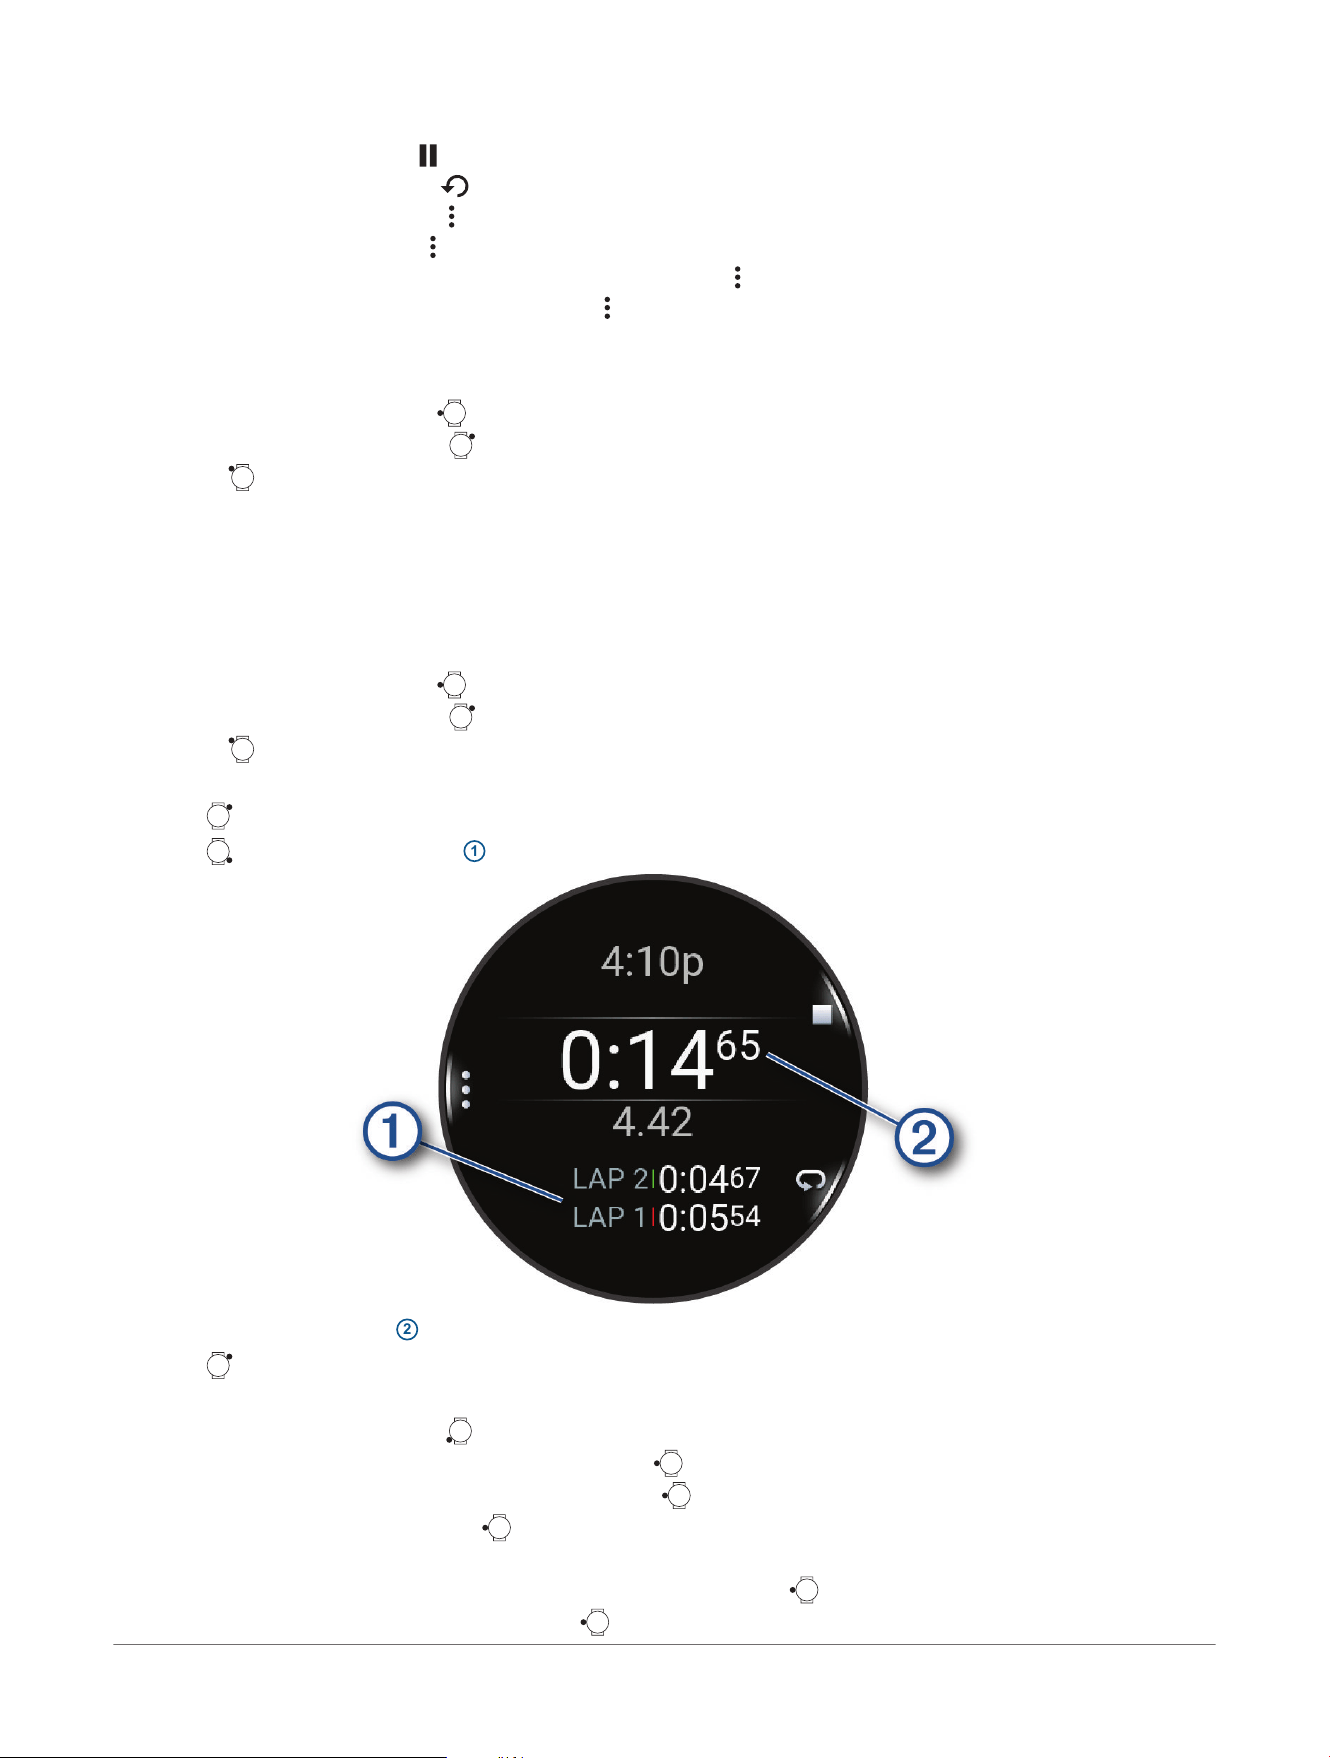
6 If necessary, select an option:
● To stop the timer, select .
● To restart the timer, select .
● To cancel the timer, select > Cancel Timer.
● To save the timer, select > Save Timer.
● To automatically restart the timer after it expires, select > Auto Restart> On.
● To customize the timer notification, select > Sound & Vibe.
Deleting a Countdown Timer
1 Select an option:
● From the watch face, hold .
● From the watch face, press .
● Hold .
2 Select Clocks> Timers> Edit.
3 Select a timer.
4 Select Delete.
Using the Stopwatch
1 Select an option:
● From the watch face, hold .
● From the watch face, press .
● Hold .
2 Select Clocks> Stopwatch.
3 Press to start the timer.
4 Press to restart the lap timer
1
.
The total stopwatch time
2
continues running.
5 Press to stop both timers.
6 Select an option:
● To reset both timers, press .
● To save the stopwatch time as an activity, press , and select Save Activity.
● To reset the timers and exit the stopwatch, press , and select Done.
● To review the lap timers, press , and select Review.
NOTE: The Review option only appears if there have been multiple laps.
● To return to the watch face without resetting the timers, press , and select Go to Watchface.
● To enable or disable lap recording, press , and select Lap Key.
42
Forerunner® 70 GPS Running Smartwatch
Owner's Manual
Clocks
Adding Alternate Time Zones
You can display the current time of day in additional time zones.
1 Select an option:
● From the watch face, hold .
● From the watch face, press .
● Hold .
TIP: You can also view your alternate time zones in the glances list (Customizing the Glances List, page32).
2 Select Clocks> Alt. Time Zones> Add Zone.
3 Press or to highlight a region, and press to select it.
4 Select a time zone.
Editing an Alternate Time Zone
1 Select an option:
● From the watch face, hold .
● From the watch face, press .
● Hold .
TIP: You can also view your alternate time zones in the glances list (Customizing the Glances List, page32).
2 Select Clocks> Alt. Time Zones.
3 Select a time zone.
4 Press .
5 Select an option:
● To set the time zone to display on the glances list, select Set as Favorite.
● To enter a custom name for the time zone, select Rename.
● To enter a custom abbreviation for the time zone, select Abbreviate.
● To change the time zone, select Change Zone.
● To delete the time zone, select Delete.
Adding a Countdown Event
1 Select an option:
● From the watch face, hold .
● From the watch face, press .
● Hold .
TIP: You can also view your countdown events in the glances list (Customizing the Glances List, page32).
2 Select Clocks> Countdowns> Add.
3 Enter a name.
4 Select a year, month, and day.
5 Select an option:
● Select All Day.
● Select Specific Time, and enter a time.
6 Select an icon.
Editing a Countdown Event
1 Select an option:
● From the watch face, hold .
● From the watch face, press .
● Hold .
TIP: You can also view your countdown events in the glances list (Customizing the Glances List, page32).
2 Select Clocks> Countdowns.
3 Select a countdown event.
4 Press , and select Set as Favorite to show the countdown event in the glances list (optional).
Clocks
Forerunner® 70 GPS Running Smartwatch
Owner's Manual
43
5 Press , and select Edit Countdown.
6 Select an option to edit:
● To rename the event, select Name.
● To change the date, select Date.
● To change the time, select Time.
● To change the icon, select Icon.
● To add an abbreviated name for the event, select Abbreviation.
● To add event reminders, select Reminders.
● To repeat the event every year, select Repeat Annually.
● To remove the event, select Delete Countdown.
44 Forerunner® 70 GPS Running Smartwatch
Owner's Manual
Clocks
History
History includes time, distance, calories, average pace or speed, lap data, and optional sensor information.
NOTE: When the device memory is full, your oldest data is overwritten.
Using History
History contains saved activity data, records, and totals.
The watch has a history glance for quick access to your activity data (Glances, page30).
1 From the watch face, hold .
2 Select History.
A bar graph of your recent activities appears.
3 Select an option:
● To change the time period for the bar graph, press , and select Graph Options.
● To view your personal records by sport, press , and select Records (Personal Records, page45).
● To view your weekly or monthly totals, press , and select Totals (Viewing Data Totals, page45).
● To view your activity history, press , and select an activity.
Personal Records
When you complete an activity, the watch displays any new personal records you achieved during that activity.
Personal records include your fastest time over several typical race distances, highest strength activity weight
for major movements, and longest run, ride, or swim.
Viewing Your Personal Records
1 From the watch face, hold .
2 Select History.
3 Press , and select Records.
4 Select a sport.
5 Select a record.
6 Select View Record.
Restoring a Personal Record
You can set each personal record back to the one previously recorded.
1 From the watch face, hold .
2 Select History.
3 Press , and select Records.
4 Select a sport.
5 Select a record to restore.
6 Select Previous> .
NOTE: This does not delete any saved activities.
Clearing Personal Records
1 From the watch face, hold .
2 Select History.
3 Press , and select Records.
4 Select a sport.
5 Select an option:
● To delete one record, select a record, and select Clear Record> .
● To delete all records for the sport, select Clear All Records> .
NOTE: This does not delete any saved activities.
Viewing Data Totals
You can view the accumulated distance and time data saved to your watch.
History
Forerunner® 70 GPS Running Smartwatch
Owner's Manual
45
1 From the watch face, hold .
2 Select History.
3 Press , and select Totals.
4 Select an activity.
5 Select an option to view weekly or monthly totals.
46 Forerunner® 70 GPS Running Smartwatch
Owner's Manual
History
Notifications and Alerts Settings
From the watch face, hold , and select Watch Settings> Notifications & Alerts.
Smart Notifications: Customizes the smart notifications that appear on your watch (Enabling Phone
Notifications, page54).
Health & Wellness: Customizes the health and wellness alerts that appear on your watch (Health and Wellness
Alerts, page47).
Report Settings: Enables reports, and customizes the report data and theme. You can select Morning Report
to create and edit daily messages in the morning report (Customizing Your Morning Report, page48). You
can select Evening Report to set the schedule for the evening report (Customizing Your Evening Report,
page48). You can select Choose Theme to customize the background theme for your reports.
System Alerts: Sets time (Setting Time Alerts, page48) or phone connection alerts (Turning On Phone
Connection Alerts, page48).
Notification Center: Enables the notification center for viewing new notifications (Viewing Notifications,
page54).
Health and Wellness Alerts
From the watch face, hold , and select Watch Settings> Notifications & Alerts> Health & Wellness.
Daily Summary: A Body Battery
™
daily summary appears a few hours before the start of your sleep window. The
daily summary provides insight on how your daily stress and activity history impacted your Body Battery level
(Body Battery
™
, page32).
Stress Alerts: Notifies you when periods of stress have drained your Body Battery level.
Rest Alerts: Notifies you after you have a restful period and its impact on your Body Battery level.
Abnormal Heart Rate Alerts: Notifies you when your heart rate exceeds or drops below a target value (Setting an
Abnormal Heart Rate Alert, page47).
Move Alert: Reminds you to keep moving.
Goal Alerts: Notifies you when you reach your daily steps goal and weekly intensity minutes goal.
Setting an Abnormal Heart Rate Alert
CAUTION
This feature only alerts you when your heart rate exceeds or drops below a certain number of beats per minute,
as selected by the user, after at least ten minutes of inactivity. This feature does not notify you when your heart
rate drops below the selected threshold during your chosen sleep window configured in the Garmin Connect
™
app. This feature does not notify you of any potential heart condition and is not intended to treat or diagnose
any medical condition or disease. Always defer to your health care provider for any heart-related issues.
You can set the heart rate threshold value.
1 From the watch face, hold .
2 Select Watch Settings> Notifications & Alerts> Health & Wellness> Abnormal Heart Rate Alerts.
3 Select High Alert or Low Alert.
4 Set the heart rate threshold value.
Each time your heart rate exceeds or drops below the threshold value, a message appears and the watch
vibrates.
Move Alert
Sitting for prolonged periods of time can trigger undesirable metabolic state changes. The move alert reminds
you to keep moving. After one hour of inactivity, a message appears. The watch also beeps or vibrates if audible
tones are turned on (System Settings, page76). You can customize your move alert to be dismissed by walking
or other types of movement.
Customizing Move Alerts
1 Hold .
2 Select Watch Settings> Notifications & Alerts> Health & Wellness> Move Alert> On.
3 Select an option:
● Select Alert Type to set the alert based on steps or other types of movement.
● Select Movements to allow sitting moves or free motion moves to clear the alert.
● Select Movement Duration to set the alert to be cleared after 30, 45, or 60 seconds.
Notifications and Alerts Settings
Forerunner® 70 GPS Running Smartwatch
Owner's Manual
47
Morning Report
Your watch displays a morning report based on your normal wake time. Scroll to view the report, which includes
weather, sleep, overnight heart rate variability status, and more (Customizing Your Morning Report, page48).
Customizing Your Morning Report
NOTE: You can customize these settings on your watch or in your Garmin Connect
™
account.
1 From the watch face, hold .
2 Select Watch Settings> Notifications & Alerts> Report Settings> Morning Report.
3 Select an option:
● To enable or disable the morning report, select Show Report.
● To customize the order and type of data that appears in your morning report, select Edit Report.
● To write and add custom messages to your morning report, select Customize Daily Messages> Edit
Messages.
Evening Report
Your watch displays an evening report prior to your sleep time. Scroll to view the report, which includes your
Body Battery
™
details, tomorrow's workout and weather, sleep coach recommendation, and more (Customizing
Your Evening Report, page48).
Customizing Your Evening Report
NOTE: You can customize these settings on your watch or in your Garmin Connect
™
account.
1 From the watch face, hold .
2 Select Watch Settings> Notifications & Alerts> Report Settings> Evening Report.
3 Select an option:
● Select Show Report to enable or disable the evening report.
● Select Edit Report to customize the order and type of data that appears in your evening report.
● Select Schedule Report to set the amount of time between the report and your sleep start (Focus Modes,
page60).
Setting Time Alerts
1 From the watch face, hold .
2 Select Watch Settings> Notifications & Alerts> System Alerts> Time.
3 Select an option:
● To set an alert to sound a specific number of minutes or hours before the actual sunset occurs, select Til
Sunset> Status> On, select Time, and enter the time.
● To set an alert to sound a specific number of minutes or hours before the actual sunrise occurs, select Til
Sunrise> Status> On, select Time, and enter the time.
● To set an alert to sound every hour, select Hourly> On.
Turning On Phone Connection Alerts
You can set your watch to alert you when your paired phone connects and disconnects using Bluetooth
®
technology.
1 From the watch face, hold .
2 Select Watch Settings> Notifications & Alerts> System Alerts> Phone.
48
Forerunner® 70 GPS Running Smartwatch
Owner's Manual
Notifications and Alerts Settings
Sound and Vibration Settings
From the watch face, hold , and select Watch Settings> Sound & Vibe. You can also customize these
settings for different situations, such as sleep and activities (Focus Modes, page60).
Alert Tones: Plays a tone for alerts.
Button Tones: Plays a tone when you press a button.
Vibration: Sets watch vibrations for alerts and button presses.
Sound and Vibration Settings Forerunner® 70 GPS Running Smartwatch
Owner's Manual
49
Display and Brightness Settings
From the watch face, hold , and select Watch Settings> Display & Brightness. You can also customize these
settings for different situations, such as sleep and activities (Focus Modes, page60).
Brightness: Sets the brightness level of the screen.
Always On Display: Sets the watch face data to remain visible and turn down the brightness and background.
This option impacts the battery and display life (About the AMOLED Display, page79).
Watch Face Seconds: Sets how often the watch face seconds appear when the Always On Display setting is
turned on. This option impacts the battery and display life (About the AMOLED Display, page79).
Text Size: Adjusts the size of the text on the screen.
Color Shift: Turns the screen to shades of red, green, or orange so that you can use the watch in low light
conditions and help preserve your night vision or reduce eye strain. You can select Mode> Blue Light Filter
to reduce the amount of blue light emitting from the watch. You can select Schedule to set the timing of the
filters, such as Before Sleep Start.
Wake On Alert: Turns on the screen when you receive a notification or alert.
Wake On Gesture: Turns on the screen when you raise and turn your arm to look at your wrist.
Timeout: Sets the length of time before the screen turns off.
Touch: Enables the touchscreen.
Touch Lock: Locks the touchscreen after the screen turns off. When this setting is enabled, you can swipe down
to unlock the touchscreen.
50 Forerunner® 70 GPS Running Smartwatch
Owner's Manual
Display and Brightness Settings
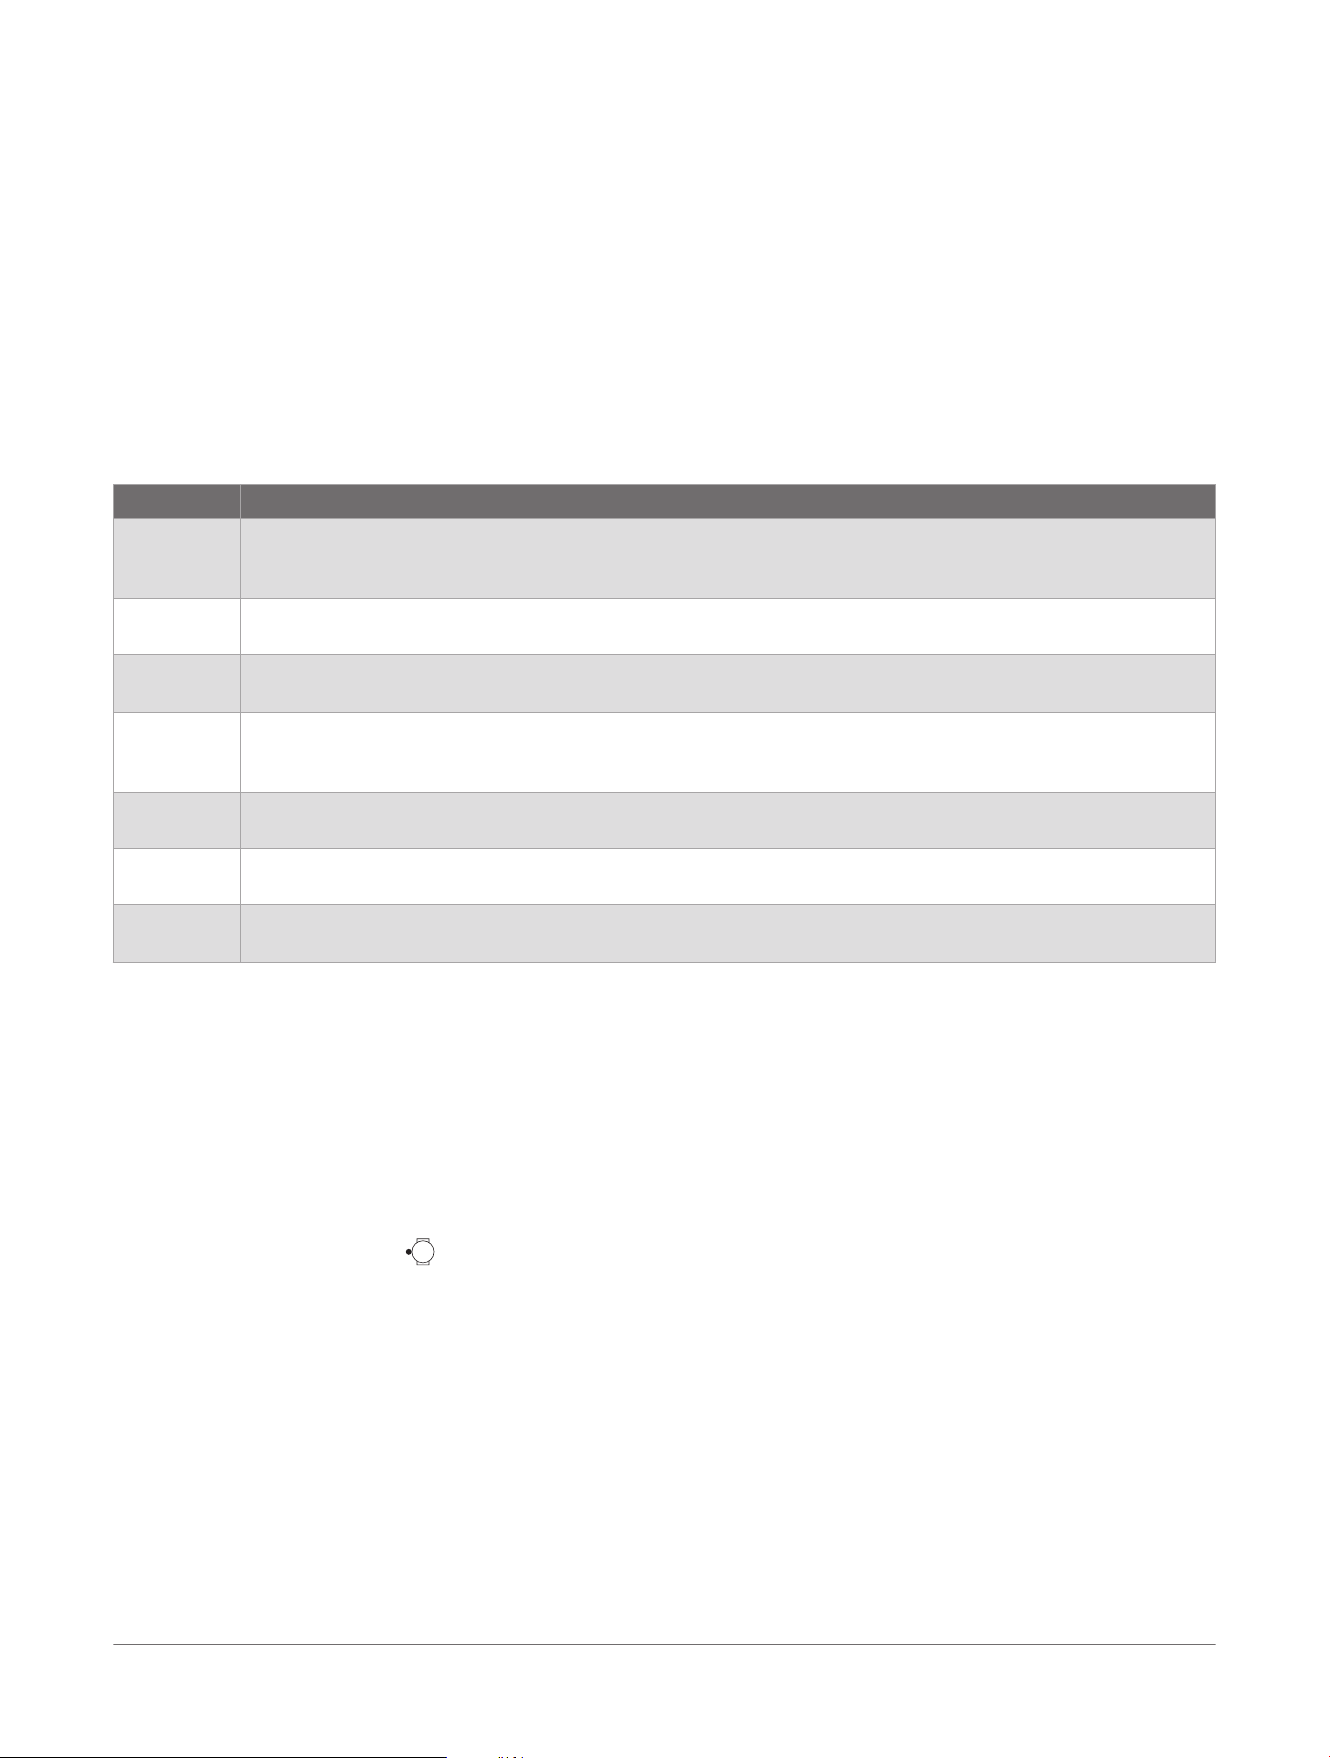
Connectivity
Connectivity features are available for your watch when you pair with your compatible phone (Pairing Your
Phone, page53).
Sensors and Accessories
The Forerunner
®
watch has several internal sensors, and you can pair additional wireless sensors for your
activities.
Wireless Sensors
Your watch can be paired and used with wireless sensors using ANT+
®
or Bluetooth
®
technology (Pairing
Your Wireless Sensors, page51). After the devices are paired, you can customize the optional data fields
(Customizing the Data Screens, page22). If your watch was packaged with a sensor, they are already paired.
For information about specific Garmin
®
sensor compatibility, purchasing, or to view the owner's manual, go to
buy.garmin.com for that sensor.
Sensor Type Description
External HR
You can use an external sensor, such as the HRM 200, HRM 600, HRM-Fit
™
, or HRM-Pro
™
series heart
rate monitor, to view heart rate data during your activities. Some heart rate monitors can also store data
or provide advanced running data (Running Dynamics, page52) (Running Power, page53).
Foot Pod You can use a foot pod to record pace and distance instead of using GPS when you are training indoors
or when your GPS signal is weak.
Lights
You can use Varia
™
smart bike lights to improve situational awareness. With a Varia headlight camera,
you can also take photos and record video during a ride (Using the Varia
™
Camera Controls, page53).
Radar You can use a Varia rearview bike radar to improve situational awareness and send alerts about
approaching vehicles. With a Varia radar camera tail light, you can also take photos and record video
during a ride (Using the Varia
™
Camera Controls, page53).
RD Pod You can use a Running Dynamics Pod to record running dynamics data and view it on your watch
(Running Dynamics, page52).
Spd./Cad. You can attach speed or cadence sensors to your bike and view the data during your ride. If necessary,
you can manually enter your wheel circumference (Wheel Size and Circumference, page86).
Tempe
You can attach the tempe
™
temperature sensor to a secure strap or loop where it is exposed to ambient
air, so it provides a consistent source of accurate temperature data.
Pairing Your Wireless Sensors
The first time you connect a wireless sensor to your watch using ANT+
®
or Bluetooth
®
technology, you must
pair the watch and sensor. After they are paired, the watch connects to the sensor automatically when you
start an activity and the sensor is active and within range. For more information about connection types, go to
garmin.com/hrm_connection_types.
1 Put on the heart rate monitor, install the sensor, or press the button to wake up the sensor.
NOTE: See your wireless sensor owner's manual for pairing information.
2 Bring the watch within 3m (10ft.) of the sensor.
NOTE: Stay 10m (33ft.) away from other wireless sensors while pairing.
3 From the watch face, hold .
4 Select Watch Settings> Connectivity> Sensors & Accessories> Add New.
5 Select an option:
● Select Search All.
● Select your sensor type.
After the sensor is paired with your watch, the sensor status changes from Searching to Connected. Sensor
data appears in the data screen loop or a custom data field. You can customize the optional data fields
(Customizing the Data Screens, page22).
Heart Rate Accessory Running Pace and Distance
The HRM 600, HRM-Fit
™
, and HRM-Pro
™
series accessories calculate your running pace and distance based
on your user profile and the motion measured by the sensor on every stride. The heart rate monitor provides
running pace and distance when GPS is not available, such as during treadmill running. You can view your
running pace and distance on your compatible Forerunner
®
watch when connected using ANT+
®
technology or
secure Bluetooth
®
technology. You can also view it on compatible third-party training apps.
Connectivity
Forerunner® 70 GPS Running Smartwatch
Owner's Manual
51
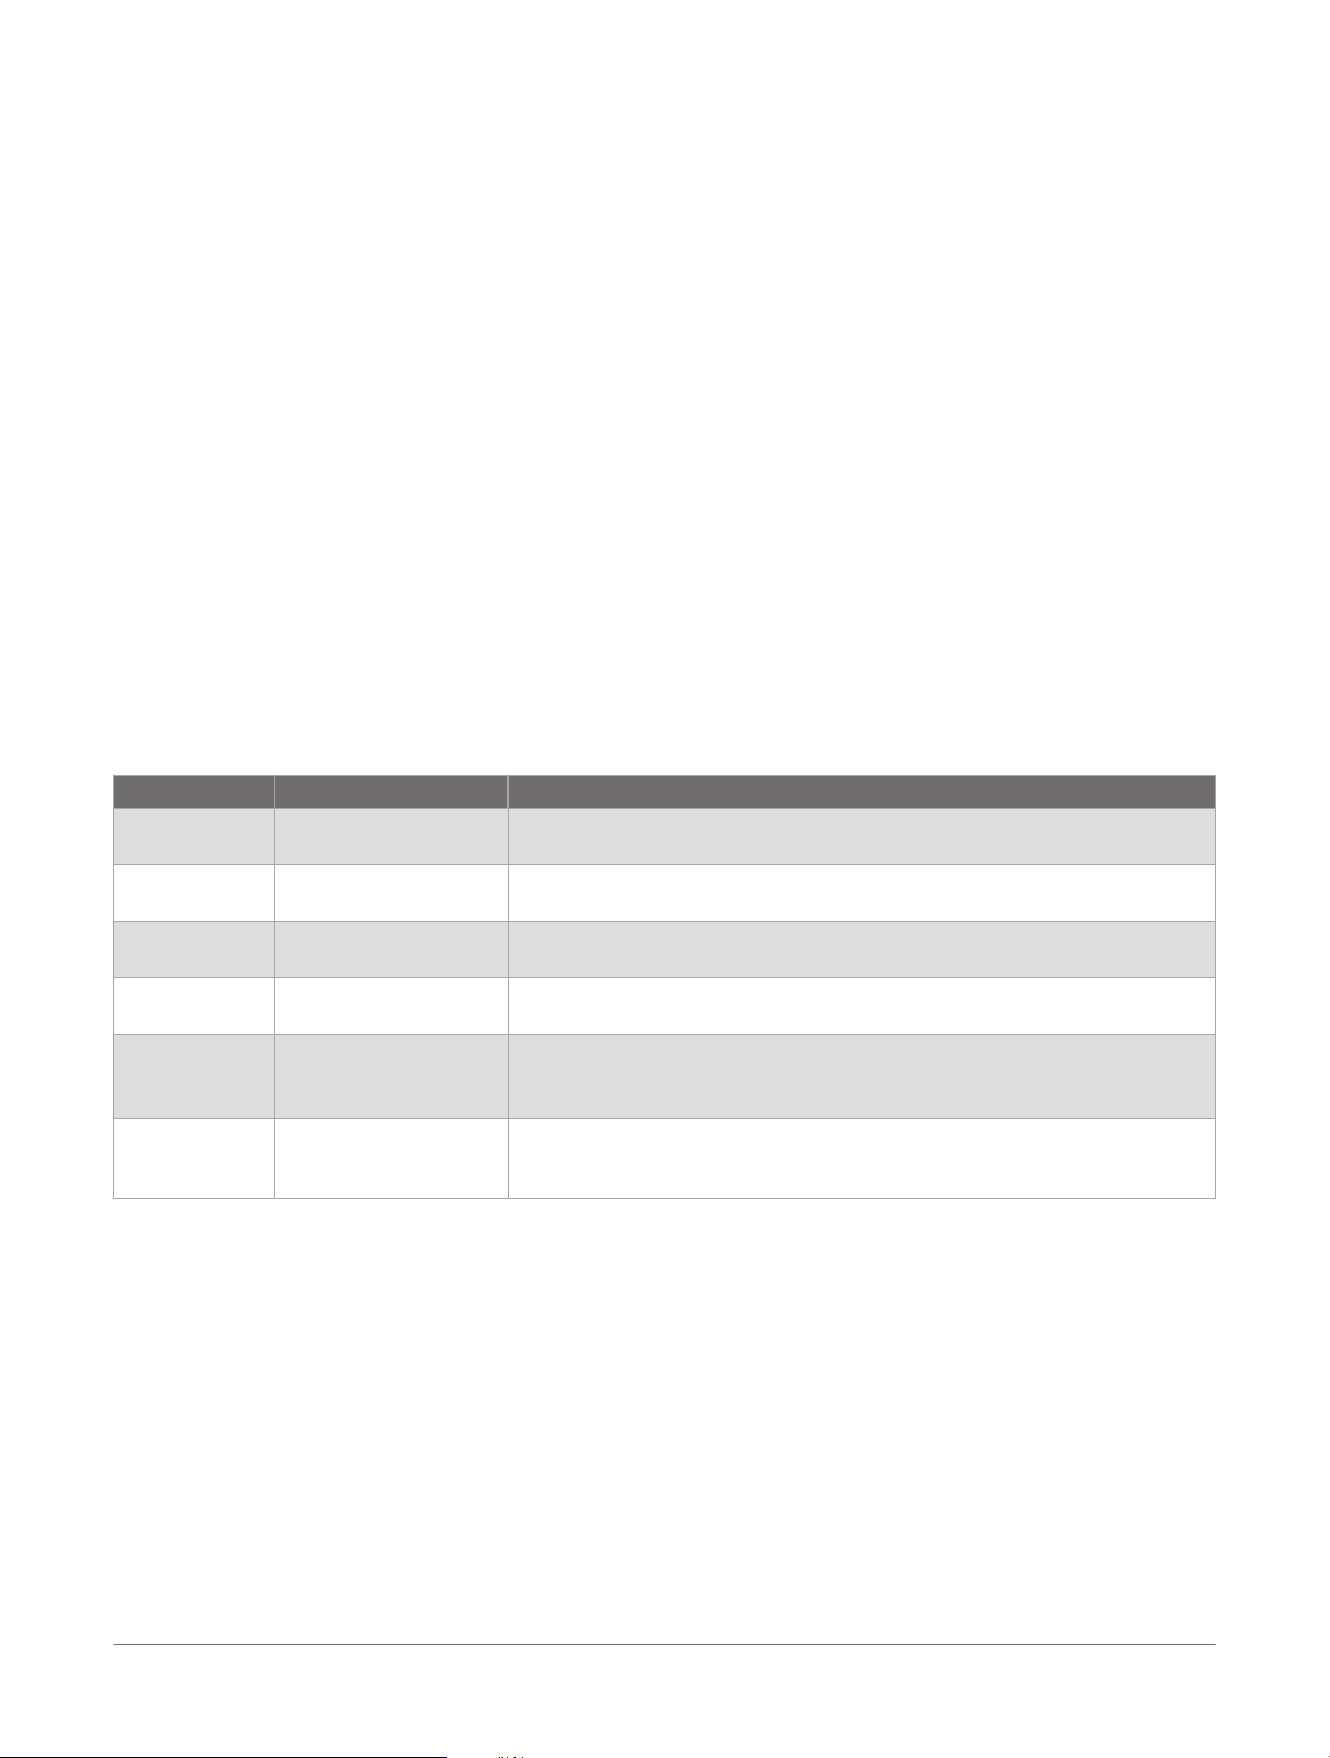
The pace and distance accuracy improves with calibration.
Automatic calibration: The default setting for your watch is Auto Calibrate. The heart rate accessory calibrates
each time you run outside with it connected to your compatible Forerunner watch.
NOTE: Automatic calibration does not work for indoor, trail, or ultra run activities (Tips for Recording Running
Pace and Distance, page52).
Manual calibration: You can select Calibrate & Save after a treadmill run with your connected heart rate
accessory (Calibrating the Treadmill Distance, page16).
Tips for Recording Running Pace and Distance
● Update your Forerunner
®
watch software (Product Updates, page82).
●
Complete several outdoor runs with GPS and your connected HRM 600, HRM-Fit
™
, or HRM-Pro
™
series
accessory. It's important that your outdoor range of paces matches your range of paces on the treadmill.
● If your run includes sand or deep snow, go to the sensor settings, and turn off Auto Calibrate.
● If you previously connected a compatible foot pod using ANT+
®
technology, set the foot pod status to Off, or
remove it from the list of connected sensors.
● Complete a treadmill run with manual calibration (Calibrating the Treadmill Distance, page16).
● If automatic and manual calibrations don't seem accurate, go to the sensor settings, and select HRM Pace &
Distance> Reset Calibration Data.
NOTE: You can try turning off Auto Calibrate, and then manually calibrate again (Calibrating the Treadmill
Distance, page16).
Running Dynamics
Running dynamics is real-time feedback about your running form. Your Forerunner
®
watch has an accelerometer
to calculate five running form metrics. To view all of the running form metrics, you must pair your Forerunner
watch with the HRM 600, HRM-Fit
™
, HRM-Pro
™
series accessory, or other running dynamics accessory that
measures torso movement. For more information, go to garmin.com/performance-data/running.
Metric Sensor Type Description
Cadence Watch or compatible
accessory
Cadence is the number of steps per minute. It displays the total steps (right
and left combined).
Stride length Watch or compatible
accessory
Stride length is the length of your stride from one footfall to the next. It is
measured in meters.
Vertical oscilla
tion
Watch or compatible
accessory
Vertical oscillation is your bounce while running. It displays the vertical
motion of your torso, measured in centimeters.
Vertical ratio Watch or compatible
accessory
Vertical ratio is the ratio of vertical oscillation to stride length. It displays a
percentage. A lower number typically indicates better running form.
Ground contact
time
Watch or compatible
accessory
Ground contact time is the amount of time in each step that you spend on
the ground while running. It is measured in milliseconds.
NOTE: Ground contact metrics are not available while walking.
Ground contact
time balance
Compatible accessory
only
Ground contact time balance displays the left/right balance of your ground
contact time while running. It displays a percentage. For example, 53.2 with
an arrow pointing left or right.
Tips for Missing Running Dynamics Data
This topic provides tips for using a compatible running dynamics accessory. If the accessory is not connected
to your watch, the watch automatically switches to wrist-based running dynamics.
●
Make sure you have a running dynamics accessory, such as the HRM 600, HRM-Fit
™
, or HRM-Pro
™
series
accessory.
● Pair the running dynamics accessory with your watch again, according to the instructions.
● If you are using an HRM 600 accessory, pair it with your watch using the secure Bluetooth
®
connection, rather
than the open connection.
For more information about connection types, go to garmin.com/hrm_connection_types.
● If you are using an HRM-Fit or HRM-Pro series accessory, pair it with your watch using ANT+
®
technology,
rather than Bluetooth technology.
● If the running dynamics data display shows only zeros, make sure the accessory is worn right-side up.
NOTE: Some metrics do not appear while walking (Running Dynamics, page52).
52
Forerunner® 70 GPS Running Smartwatch
Owner's Manual
Connectivity
Running Power
Garmin
®
running power is calculated using measured running dynamics information, user mass, environmental
data, and other sensor data. The power measurement estimates the amount of power a runner applies to the
road surface, and it is displayed in watts. Using running power as a gauge of effort may suit some runners
better than using either pace or heart rate. Running power can be more responsive than heart rate for indicating
the level of effort, and it can account for the uphills, downhills, and wind, which a pace measurement does not
do. For more information, go to garmin.com/performance-data/running.
Running power can be measured using a compatible running dynamics accessory or the watch sensors. You
can customize the running power data fields to view your power output and make adjustments to your training
(Data Fields, page87). You can set up power alerts to be notified when you reach a specified power zone
(Activity Alerts, page24).
Running power zones use default values based on gender, weight, and average ability, and may not match your
personal abilities. You can manually adjust your zones on the watch or using your Garmin Connect
™
account
(Setting Your Power Zones, page73).
Running Power Settings
From the watch face, press , select Activities, select a running activity, press , select the activity settings,
and select Running Power.
Status: Enables or disables recording Garmin
®
running power data. You can use this setting if you prefer to use
third-party running power data.
Source: Allows you to select which device to use to record running power data. The Smart Mode option
automatically detects and uses the running dynamics accessory, when available. The watch uses wrist-based
running power data when an accessory is not connected.
Account for Wind: Enables or disables using wind data when calculating your running power. Wind data is a
combination of the speed, heading, and barometer data from your watch and the available wind data from
your phone.
Using the Varia
™
Camera Controls
NOTICE
Some jurisdictions may prohibit or regulate the recording of video, audio, or photographs, or may require that
all parties have knowledge of the recording and provide consent. It is your responsibility to know and follow all
laws, regulations, and any other restrictions in jurisdictions where you plan to use this device.
Before you can use the Varia camera controls, you must pair the accessory with your watch (Pairing Your
Wireless Sensors, page51).
1 Select an option:
● Add the Camera Controls control to your watch (Customizing the Controls Menu, page28).
● Add the Camera Controls glance to your watch (Customizing the Glances List, page32).
2 From the Camera Controls control or glance, select an option:
● Select > to view the camera settings.
● Select > to record the ride.
● Select to take a photo.
● Select to save a clip.
Phone Connectivity Features
Phone connectivity features are available for your Forerunner
®
watch when you pair it using the Garmin
Connect
™
app (Pairing Your Phone, page53).
●
App features from the Garmin Connect app (Garmin Connect
™
, page56)
●
App features from the Connect IQ
™
app, and more (Phone Apps and Computer Applications, page56)
● Glances (Glances, page30)
● Controls menu features (Controls, page27)
● Safety and tracking features (Safety and Tracking Features, page70)
● Phone interactions, such as notifications (Enabling Phone Notifications, page54)
Pairing Your Phone
To use the connected features on your watch, you must pair it directly through the Garmin Connect
™
app,
instead of from the Bluetooth
®
settings on your phone.
1 Select an option:
Connectivity
Forerunner® 70 GPS Running Smartwatch
Owner's Manual
53
● During the initial setup on your watch, select when you are prompted to pair with your phone.
● If you previously skipped the pairing process, from the watch face, hold , and select Watch Settings>
Connectivity> Pair Phone.
● If you want to pair a new phone, from the watch face, hold , and select Watch Settings> Connectivity>
Phone> Pair Phone.
2 Scan the QR code with your phone, and follow the on-screen instructions to complete the pairing and setup
process.
Enabling Phone Notifications
You can customize how notifications from your paired phone sound and appear on your watch during normal
use.
NOTE: You can customize notifications during sleep or activities in the Focus Modes settings (Focus Modes,
page60).
1 From the watch face, hold .
2 Select Watch Settings> Connectivity> Phone> Notifications.
3 Select an option:
● To enable phone notifications, select Status> On.
● To enable notifications for phone calls, select Calls, and select status and alert options.
● To enable notifications for text messages, select Texts, and select status and alert options.
● To enable notifications for phone apps, select Apps, and select status and alert options.
● To configure notifications for each phone app, select Apps> Connected Apps, select an app, and select
an option.
NOTE: You can manage app notifications in your phone settings. When your phone and watch receive a
notification from an app, the app appears in the Connected Apps list on your watch.
For Android
™
phones, you can also use the Garmin Connect
™
app to manage which app notifications
appear on your watch. In the Garmin Connect app, you can select > Settings> Notifications> App
Notifications.
● To hide notification details until you perform an action, select Privacy, and select an option.
● To change how long the watch displays notifications, select Timeout.
● To add a signature to your text message replies from your watch, select Signature.
NOTE: This feature is available only for compatible Android phones.
Viewing Notifications
You can view your phone notifications on your watch from several menu locations.
1 Select an option:
● From the watch face, swipe down to view the notification center.
● From the watch face, swipe up to view the notifications glance.
TIP: From the glance, you can swipe left to dismiss a notification.
● From the watch face, press , and select Notifications to view the notifications app.
● Hold , and select Notifications to view the notifications control.
2 Select a notification.
3 Press for more options.
4 Scroll to the top of the notifications, and select Dismiss All to dismiss all notifications.
Replying to a Text Message
NOTE: This feature is available only for compatible Android
™
phones.
When you receive a text message notification on your watch, you can send a quick reply by selecting from a list
of messages. You can customize messages in the Garmin Connect
™
app.
NOTE: This feature sends text messages using your phone. Regular text message limits and charges from your
carrier and phone plan may apply. Contact your mobile carrier for more information about text message charges
or limits.
1 From the watch face, press to view the notification center.
2 Select a text message notification.
3 Press .
54
Forerunner® 70 GPS Running Smartwatch
Owner's Manual
Connectivity
4 Select Reply.
5 Select a message from the list.
Your phone sends the selected message as an SMS text message.
Turning Off the Bluetooth
®
Phone Connection
You can turn off the Bluetooth phone connection from the controls menu.
NOTE: You can customize the controls menu (Customizing the Controls Menu, page28).
1 Hold to view the controls menu.
2 Select .
Refer to the owner's manual for your phone to turn off Bluetooth technology on your phone.
Turning On and Off Find My Phone Alerts
1 From the watch face, hold .
2 Select Watch Settings> Connectivity> Phone> Find My Phone Alerts.
Locating a Phone Lost During a GPS Activity
Your Forerunner
®
watch automatically stores a GPS location when your paired phone is disconnected during a
GPS activity. You can use this feature to help locate a phone that is lost during an activity.
For more information, see garmin.com/findmyphonewithgps.
1 Start a GPS activity.
2 When prompted to navigate to the last known location of your device, select .
3 Navigate to the location on the map.
4 Press to view a compass pointing to the location (optional).
5 When your watch is within Bluetooth
®
range of your phone, the Bluetooth signal strength appears on the
screen.
The signal strength increases as you move closer to your phone.
Garmin Share
NOTICE
It is your responsibility to use discretion when sharing information with others. Always ensure you are aware of
and comfortable with the individual with whom you share information.
The Garmin Share feature allows you to use Bluetooth
®
technology to wirelessly share your data with other
compatible Garmin
®
devices. With Garmin Share enabled and compatible Garmin devices in range of each other,
you can select saved locations, courses, and workouts to transfer to another device through a direct, secured
device-to-device connection, without the need for a phone or Wi‑Fi
®
connectivity.
Sharing Data with Garmin Share
Before you can use this feature, you must have Bluetooth
®
technology enabled on both compatible devices, and
they must be within 3m (10 ft.) of each other. When prompted, you must also consent to share your data with
other Garmin
®
devices using Garmin Share.
Your Forerunner
®
watch can send and receive data when connected to another compatible Garmin device
(Receiving Data with Garmin Share, page56). You can also transfer your data between different devices. For
example, you can share a favorite course from your Edge
®
bike computer to your compatible Garmin watch.
1 From the watch face, press .
2 Select Garmin Share> Share.
3 Select a category, and select one item.
4 Select an option:
● Select Share.
● Select Add More> Share to select more than one item to share.
5 Wait while the device locates compatible devices.
6 Select a device.
7 Confirm the six-digit PIN matches on both devices, and select .
8 Wait while the devices transfer the data.
9 Select Share Again to share the same items with another user (optional).
Connectivity
Forerunner® 70 GPS Running Smartwatch
Owner's Manual
55
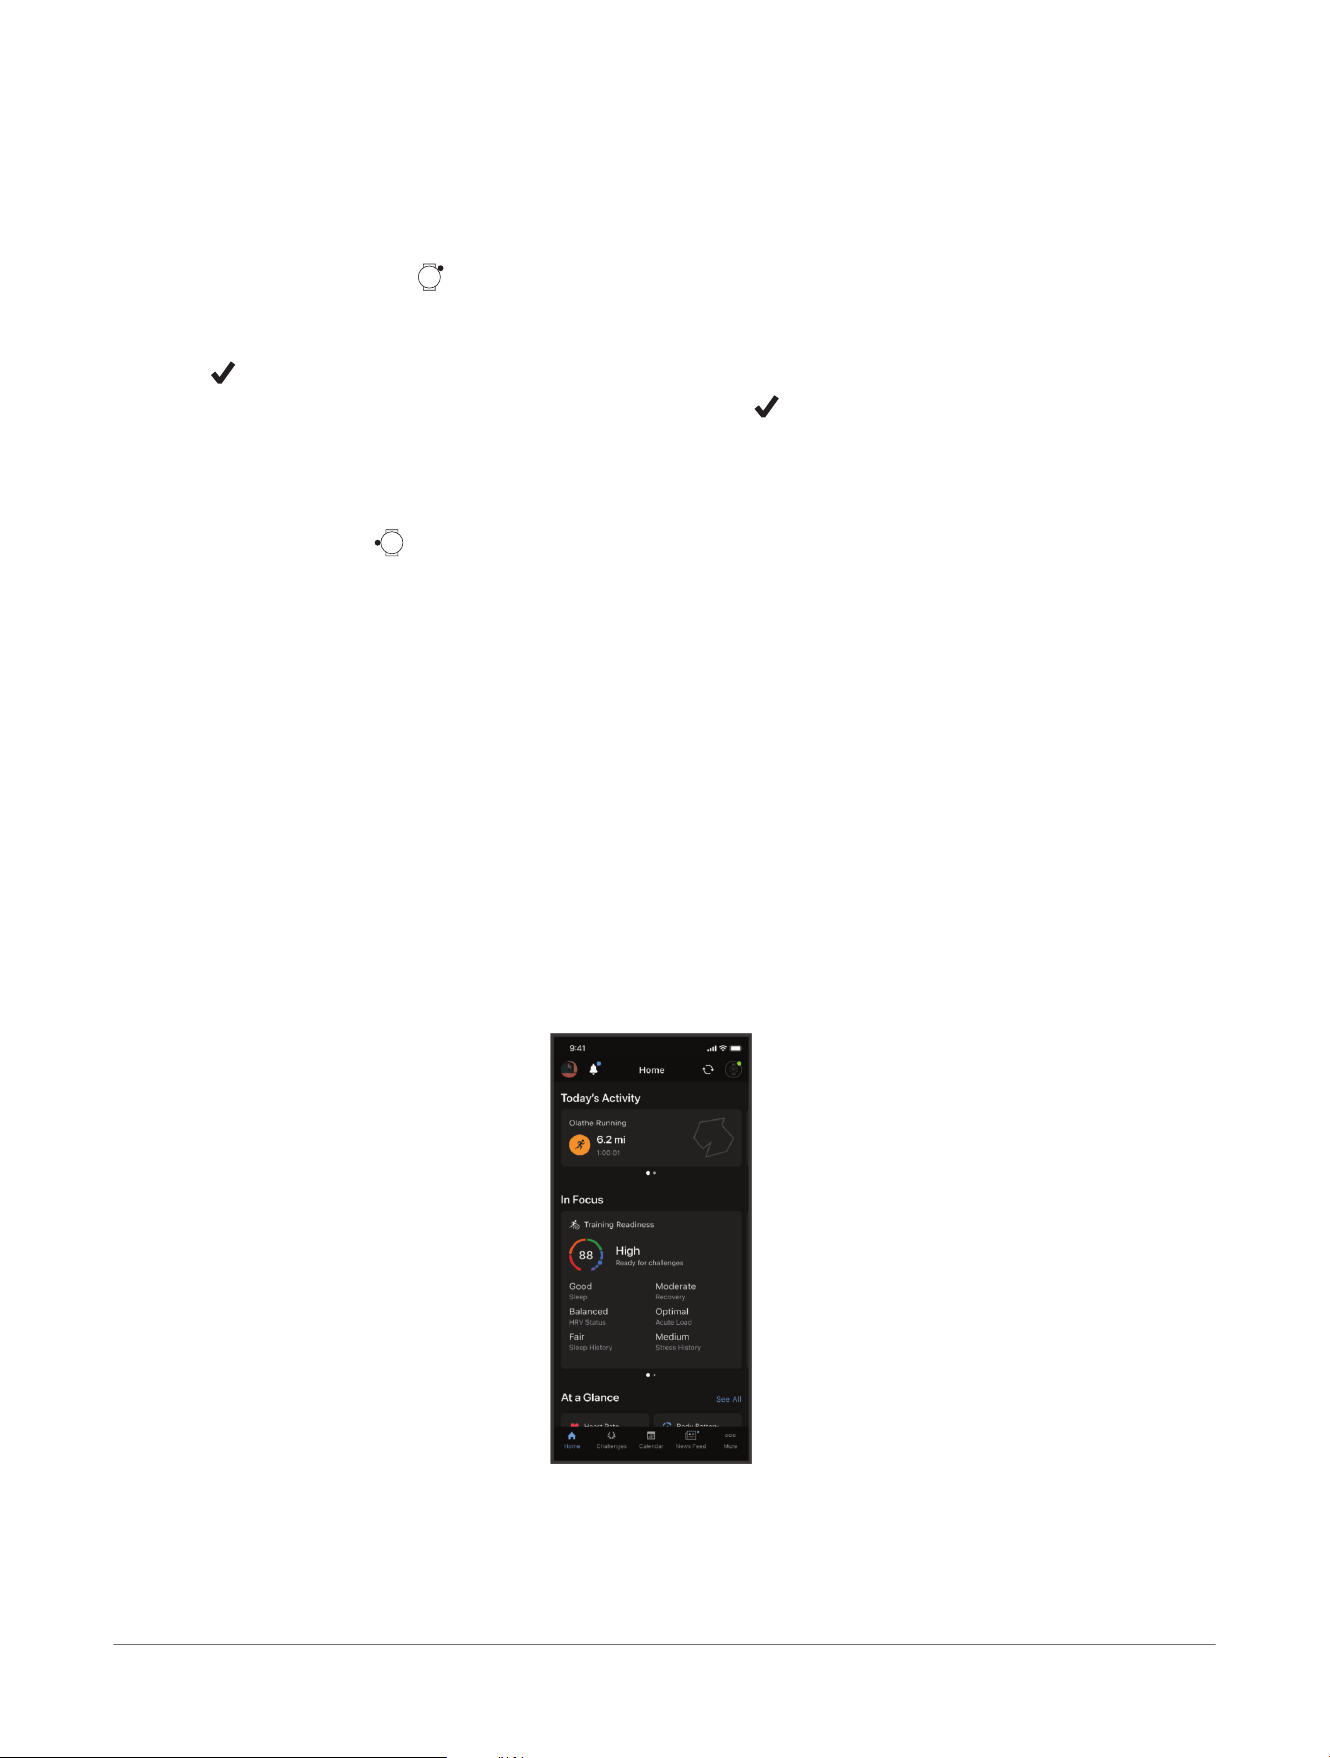
10 Select Done.
Receiving Data with Garmin Share
Before you can use this feature, you must have Bluetooth
®
technology enabled on both compatible devices, and
they must be within 3m (10 ft.) of each other. When prompted, you must also consent to share your data with
other Garmin
®
devices using Garmin Share.
1 From the watch face, press .
2 Select Garmin Share.
3 Wait while the device locates compatible devices in range.
4 Select .
5
Confirm the six-digit PIN matches on both devices, and select .
6 Wait while the devices transfer the data.
7 Select Done.
Garmin Share Settings
From the watch face, hold , and select Watch Settings> Connectivity> Garmin Share.
Status: Enables the watch to send and receive items through Garmin Share.
Forget Devices: Removes all of the devices the watch has previously shared items with.
Phone Apps and Computer Applications
You can connect your watch to multiple Garmin
®
phone apps and computer applications using the same Garmin
account.
Garmin Connect
™
You can connect with your friends on Garmin Connect. Garmin Connect gives you the tools to track, analyze,
share, and encourage each other. Record the events of your active lifestyle including runs, walks, rides, swims,
hikes, and more. To sign up for a free account, you can download the app from the app store on your phone
(garmin.com/connectapp), or go to connect.garmin.com.
Store your activities: After you complete and save an activity with your watch, you can upload that activity to
your Garmin Connect account and keep it as long as you want.
Analyze your data: You can view more detailed information about your activity, including time, distance,
elevation, heart rate, calories burned, cadence, running dynamics, an overhead map view, pace and speed
charts, and customizable reports.
NOTE: Some data requires an optional accessory such as a heart rate monitor.
Plan your training: You can choose a fitness goal and load one of the day-by-day training plans.
Track your progress: You can track your daily steps, join a friendly competition with your connections, and meet
your goals.
Share your activities: You can connect with friends to follow each other's activities or share links to your
activities.
Manage your settings: You can customize your watch and user settings on your Garmin Connect account.
56
Forerunner® 70 GPS Running Smartwatch
Owner's Manual
Connectivity
Garmin Connect+
™
Subscription
You can enhance the data, connections, and training available on your Garmin Connect account with a Garmin
Connect+ subscription. To sign up, you can download the Garmin Connect app from the app store on your
phone, or go to connect.garmin.com.
Active Intelligence (AI): Receive AI insights about your data and activities, including nutrition.
LiveTrack+: Send LiveTrack text messages, receive a personalized profile page, and view previous LiveTrack
sessions.
Follow Garmin Trails: Access outdoor trails and courses recommended by Garmin
®
databases and other Garmin
users, with pictures, ratings, trip reports, and more.
Track indoor activities: View your indoor activity and workout data in real time, enabling you to adjust your
performance during the activity.
Training guidance: Get additional expert support and guidance for select Garmin Coach training plans.
Nutritional logging: Track your daily nutrition with extensive food databases and view detailed reports on
macronutrients and calories consumed. From your compatible Garmin watch, you can easily view your daily
nutritional overview, log food manually, and receive morning and evening nutrition reports. From the Garmin
Connect app, you can scan the UPC, log new food items, create nutrition goals, and more.
Performance dashboard: View your training data your way with customized charts and graphs, including
nutrition metrics.
Social features: Gain access to exclusive badges, badge challenges, and double points for challenges. You can
update your profile avatar with customizable frames.
Using the Garmin Connect
™
App
After you pair your watch with your phone (Pairing Your Phone, page53), you can use the Garmin Connect app to
upload all of your activity data to your Garmin Connect account.
1 Verify the Garmin Connect app is running on your phone.
2 Bring your watch within 10m (30ft.) of your phone.
Your watch automatically syncs your data with the Garmin Connect app and your Garmin Connect account.
Updating the Software Using the Garmin Connect
™
App
Before you can update your watch software using the Garmin Connect app, you must have a Garmin Connect
account, and you must pair the watch with a compatible phone (Pairing Your Phone, page53).
Sync your watch with the Garmin Connect app (Using the Garmin Connect
™
App, page57).
When new software is available, the Garmin Connect app automatically sends the update to your watch.
Unified Training Status
When you use more than one Garmin
®
device with your Garmin Connect
™
account, you can choose which device
is the primary data source for everyday use and for training purposes.
From the Garmin Connect app, select > Settings.
Primary Training Device: Sets the priority data source for training metrics like your training status and load
focus.
Primary Wearable: Sets the priority data source for daily health metrics like steps and sleep. This should be the
watch you wear most often.
TIP: For the most accurate results, Garmin recommends that you sync often with your Garmin Connect account.
Syncing Activities and Performance Measurements
You can sync activities and performance measurements from other Garmin
®
devices to your Forerunner
®
watch
using your
Garmin Connect
™
account. This allows your watch to more accurately reflect your training and
fitness. For example, you can record a ride with an Edge
®
bike computer, and view your activity details and
recovery time on your Forerunner watch.
Sync your Forerunner watch and other Garmin devices to your Garmin Connect account.
TIP: You can set a primary training device and primary wearable in the Garmin Connect app (Unified Training
Status, page57).
Recent activities and performance measurements from your other Garmin devices appear on your Forerunner
watch.
Using Garmin Connect
™
on Your Computer
The Garmin Express
™
application connects your watch to your Garmin Connect account using a computer. You
can use the Garmin Express application to upload your activity data to your Garmin Connect account and to
Connectivity
Forerunner® 70 GPS Running Smartwatch
Owner's Manual
57
send data, such as workouts or training plans, from the Garmin Connect website to your watch. You can also
install software updates and manage your Connect IQ
™
apps.
1 Connect the watch to your computer using the USB cable.
2 Go to garmin.com/express.
3 Download and install the Garmin Express application.
4 Open the Garmin Express application, and select Add Device.
5 Follow the on-screen instructions.
Updating the Software Using Garmin Express
™
Before you can update your watch software, you must have a Garmin Connect
™
account, and you must
download the Garmin Express application.
1 Connect the watch to your computer using the USB cable.
When new software is available, Garmin Express sends it to your watch.
2 Follow the on-screen instructions.
3 Do not disconnect your watch from the computer during the update process.
Manually Syncing Data with Garmin Connect
™
NOTE: You can add options to the controls menu (Customizing the Controls Menu, page28).
1 Hold to view the controls menu.
2 Select Sync.
Connect IQ Features
You can add Connect IQ
™
features to your watch using the Connect IQ store on your watch or phone
(garmin.com/connectiqapp).
Watch Faces: Customize the appearance of the clock.
Device Apps: Add interactive features to your watch, such as glances and new outdoor and fitness activity
types.
Data Fields: Download new data fields that present sensor, activity, and history data in new ways. You can add
Connect IQ data fields to built-in features and pages.
Downloading Connect IQ
™
Features
Before you can download features from the Connect IQ app, you must pair your Garmin
®
watch or bike computer
with your phone (Pairing Your Phone, page53).
1 From the app store on your phone, install and open the Connect IQ app.
2 If necessary, select your watch or bike computer.
3 Select a Connect IQ feature.
4 Follow the on-screen instructions.
Downloading Connect IQ
™
Features Using Your Computer
1 Connect the watch to your computer using a USB cable.
2 Go to apps.garmin.com, and sign in.
3 Select a Connect IQ feature, and download it.
4 Follow the on-screen instructions.
Garmin Messenger
™
App
WARNING
The inReach
®
features of the Garmin Messenger app on your phone, including SOS, tracking, and inReach
Weather, are not available without a connected inReach device and an active inReach service plan. Always test
the app outdoors before using it on a trip.
CAUTION
The non-satellite messaging features of the Garmin Messenger app on your phone should not be solely relied
upon as a primary method to obtain emergency assistance.
NOTICE
The app works over both the internet (using a wireless connection or cellular data on your phone) and the
satellite network. If you are using cellular data, your paired phone must be equipped with a data plan and be in
58
Forerunner® 70 GPS Running Smartwatch
Owner's Manual
Connectivity
an area of network coverage where data is available. If you are in an area without network coverage, you must
have an active inReach service plan for your device to use the satellite network.
You can use the app to message other Garmin Messenger app users, including friends and family without
Garmin
®
devices. Anyone can download the app and connect their phone, allowing them to communicate with
other app users over the internet (no login is required). App users can also create group messaging threads
with other SMS phone numbers. New members added to the group message can download the app to see what
others are saying.
Messages sent using a wireless connection or cellular data on your phone do not incur data charges or
additional charges on your inReach service plan. Messages received may incur charges if message delivery is
attempted over both the satellite network and the internet. Standard text messaging rates for your cellular data
plan apply.
You can download the Garmin Messenger app from the app store on your phone (garmin.com/messengerapp).
Connectivity
Forerunner® 70 GPS Running Smartwatch
Owner's Manual
59
Focus Modes
Focus modes adjust the watch settings and behavior for different situations, such as sleep and activities. When
you change the settings with a focus mode enabled, the settings are updated only for that focus mode.
Customizing a Default Focus Mode
1 From the watch face, hold .
2 Select Watch Settings> Focus Modes.
3 Select a focus mode.
4 Select an option:
NOTE: Not all options are available for all focus modes.
● Select Status to turn the focus mode on or off.
● Select Schedule to configure the schedule.
● Select Watch Face to change the watch face.
● Select Satellites to set the GNSS satellite systems to use for all activities.
TIP: You can customize the Satellites setting for individual activities (Activity Settings, page23).
● Select Voice Alerts to enable voice alerts during activities (Playing Voice Alerts During Your Activity,
page25).
● In the Notifications & Alerts section, select an option to configure phone notifications, health and
wellness alerts, or system alerts (Notifications and Alerts Settings, page47).
● In the Sound & Vibe section, select an option to configure tones and vibration settings (Sound and
Vibration Settings, page49).
● In the Display & Brightness section, select an option to configure the screen settings (Display and
Brightness Settings, page50).
● Select Name to edit the name of the focus mode.
● Select Icon to update the icon symbol or color.
● Select Add to add more customizations.
● Select Delete Focus to remove the focus mode.
● Select Defaults to restore the default settings.
Creating a Custom Focus Mode
1 From the watch face, hold .
2 Select Watch Settings> Focus Modes> Add.
3 Select an option:
● Select Standard to create a custom focus mode to be used any time.
● Select Activity to configure a focus mode for a specific activity.
4 Enter a name for the focus mode, and select .
5 Select an icon and color.
6 Select an option:
● Select Notifications & Alerts to configure the phone and watch notifications and alerts (Notifications and
Alerts Settings, page47).
● Select Sound & Vibe to configure the settings for tones and vibration (Sound and Vibration Settings,
page49).
● Select Display & Brightness to configure the screen settings (Display and Brightness Settings, page50).
7 Select Done.
8 Select an option:
Not all options are available for both Standard and Activity focus modes.
● Select Status to turn the custom focus mode on or off.
● Select Schedule to configure the schedule.
● Select Watch Face to update the watch face
● Select Auto-Triggered to choose which activity will trigger the custom activity focus mode.
● Select Satellites to set the GNSS satellite option.
● Select Voice Alerts to enable voice alerts.
● Select Name to edit the name of the custom focus mode.
60
Forerunner® 70 GPS Running Smartwatch
Owner's Manual
Focus Modes
● Select Icon to edit the custom focus mode icon symbol and color.
Focus Modes Forerunner® 70 GPS Running Smartwatch
Owner's Manual
61
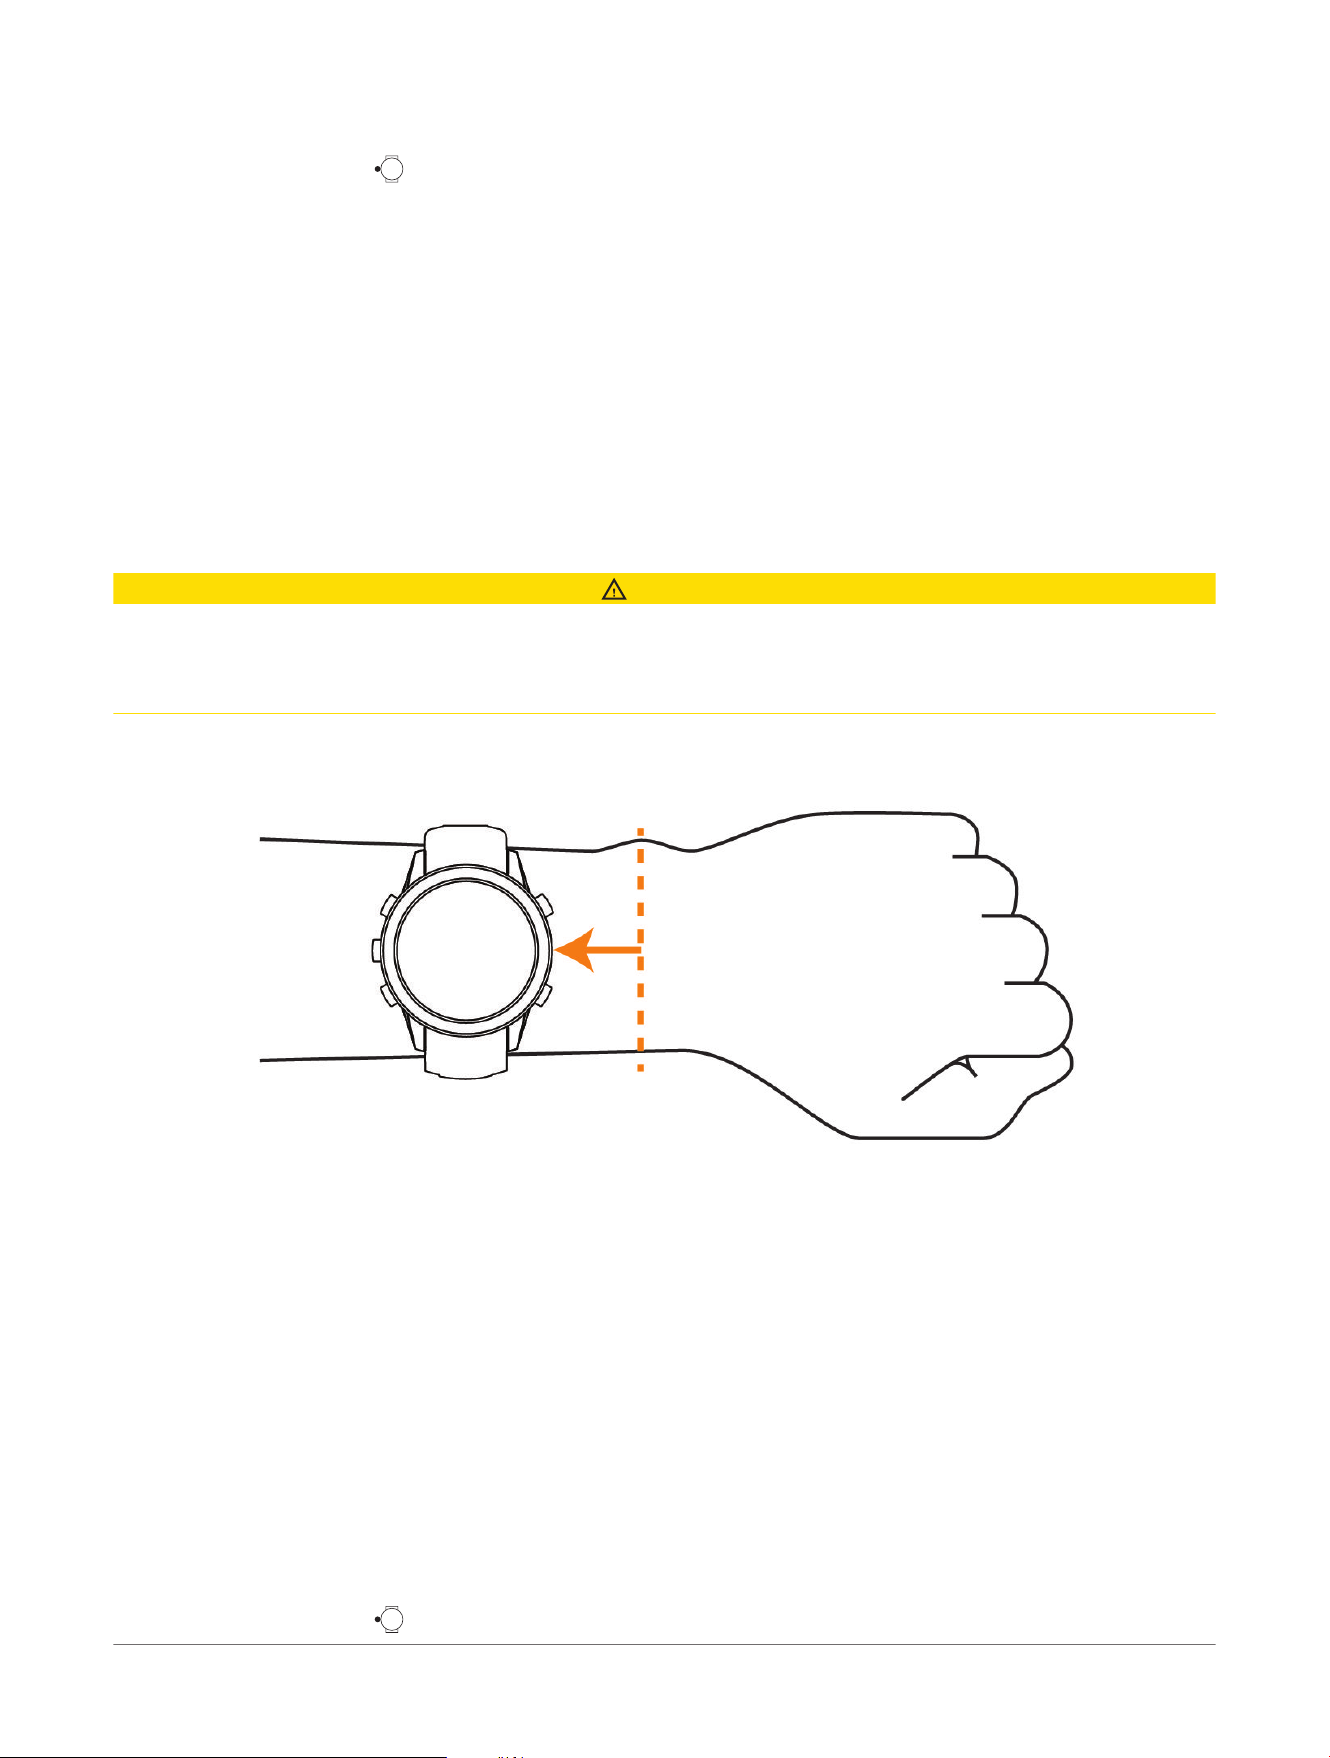
Health and Wellness Settings
From the watch face, hold , and select Watch Settings> Health & Wellness.
Wrist Heart Rate: Customizes the wrist heart rate monitor settings (Wrist Heart Rate Monitor Settings,
page62).
Pulse Oximeter: Sets the pulse oximeter mode (Setting the Pulse Oximeter Mode, page64).
Move IQ: Enables Move IQ
®
events. When your movements match familiar exercise patterns, the Move IQ
feature automatically detects the event and displays it in your timeline. The Move IQ events show activity
type and duration, but they do not appear in your activities list or newsfeed. For more detail and accuracy, you
can record a timed activity on your device.
Wrist Heart Rate
Your watch has a wrist-based heart rate monitor, and you can view your heart rate data on the heart rate glance
(Viewing Glances, page31).
The watch is also compatible with chest heart rate monitors. If both wrist-based heart rate and chest heart rate
data are available when you start an activity, your watch uses the chest heart rate data.
Wearing the Watch
CAUTION
Some users may experience skin irritation after prolonged use of the watch, especially if the user has sensitive
skin or allergies. If you notice any skin irritation, remove the watch and give your skin time to heal. To help
prevent skin irritation, ensure the watch is clean and dry, and do not overtighten the watch on your wrist. For
more information, go to garmin.com/fitandcare.
● Wear the watch above your wrist bone.
NOTE: The watch should be snug but comfortable. For more accurate heart rate readings, the watch should
not shift while running or exercising. For pulse oximeter readings, you should remain motionless.
NOTE: The optical sensor is located on the back of the watch.
● See Tips for Erratic Heart Rate Data, page62 for more information about wrist-based heart rate.
● See Tips for Erratic Pulse Oximeter Data, page64 for more information about the pulse oximeter sensor.
● For more information about accuracy, go to garmin.com/ataccuracy.
● For more information about watch wear and care, go to garmin.com/fitandcare.
Tips for Erratic Heart Rate Data
If the heart rate data is erratic or does not appear, you can try these tips.
● Clean and dry your arm before putting on the watch.
● Avoid wearing sunscreen, lotion, and insect repellent under the watch.
● Avoid scratching the heart rate sensor on the back of the watch.
● Wear the watch above your wrist bone. The watch should be snug but comfortable.
● Warm up for 5 to 10 minutes and get a heart rate reading before starting your activity.
NOTE: In cold environments, warm up indoors.
● Rinse the watch with fresh water after each workout.
Wrist Heart Rate Monitor Settings
From the watch face, hold , and select Watch Settings> Health & Wellness> Wrist Heart Rate.
62
Forerunner® 70 GPS Running Smartwatch
Owner's Manual
Health and Wellness Settings
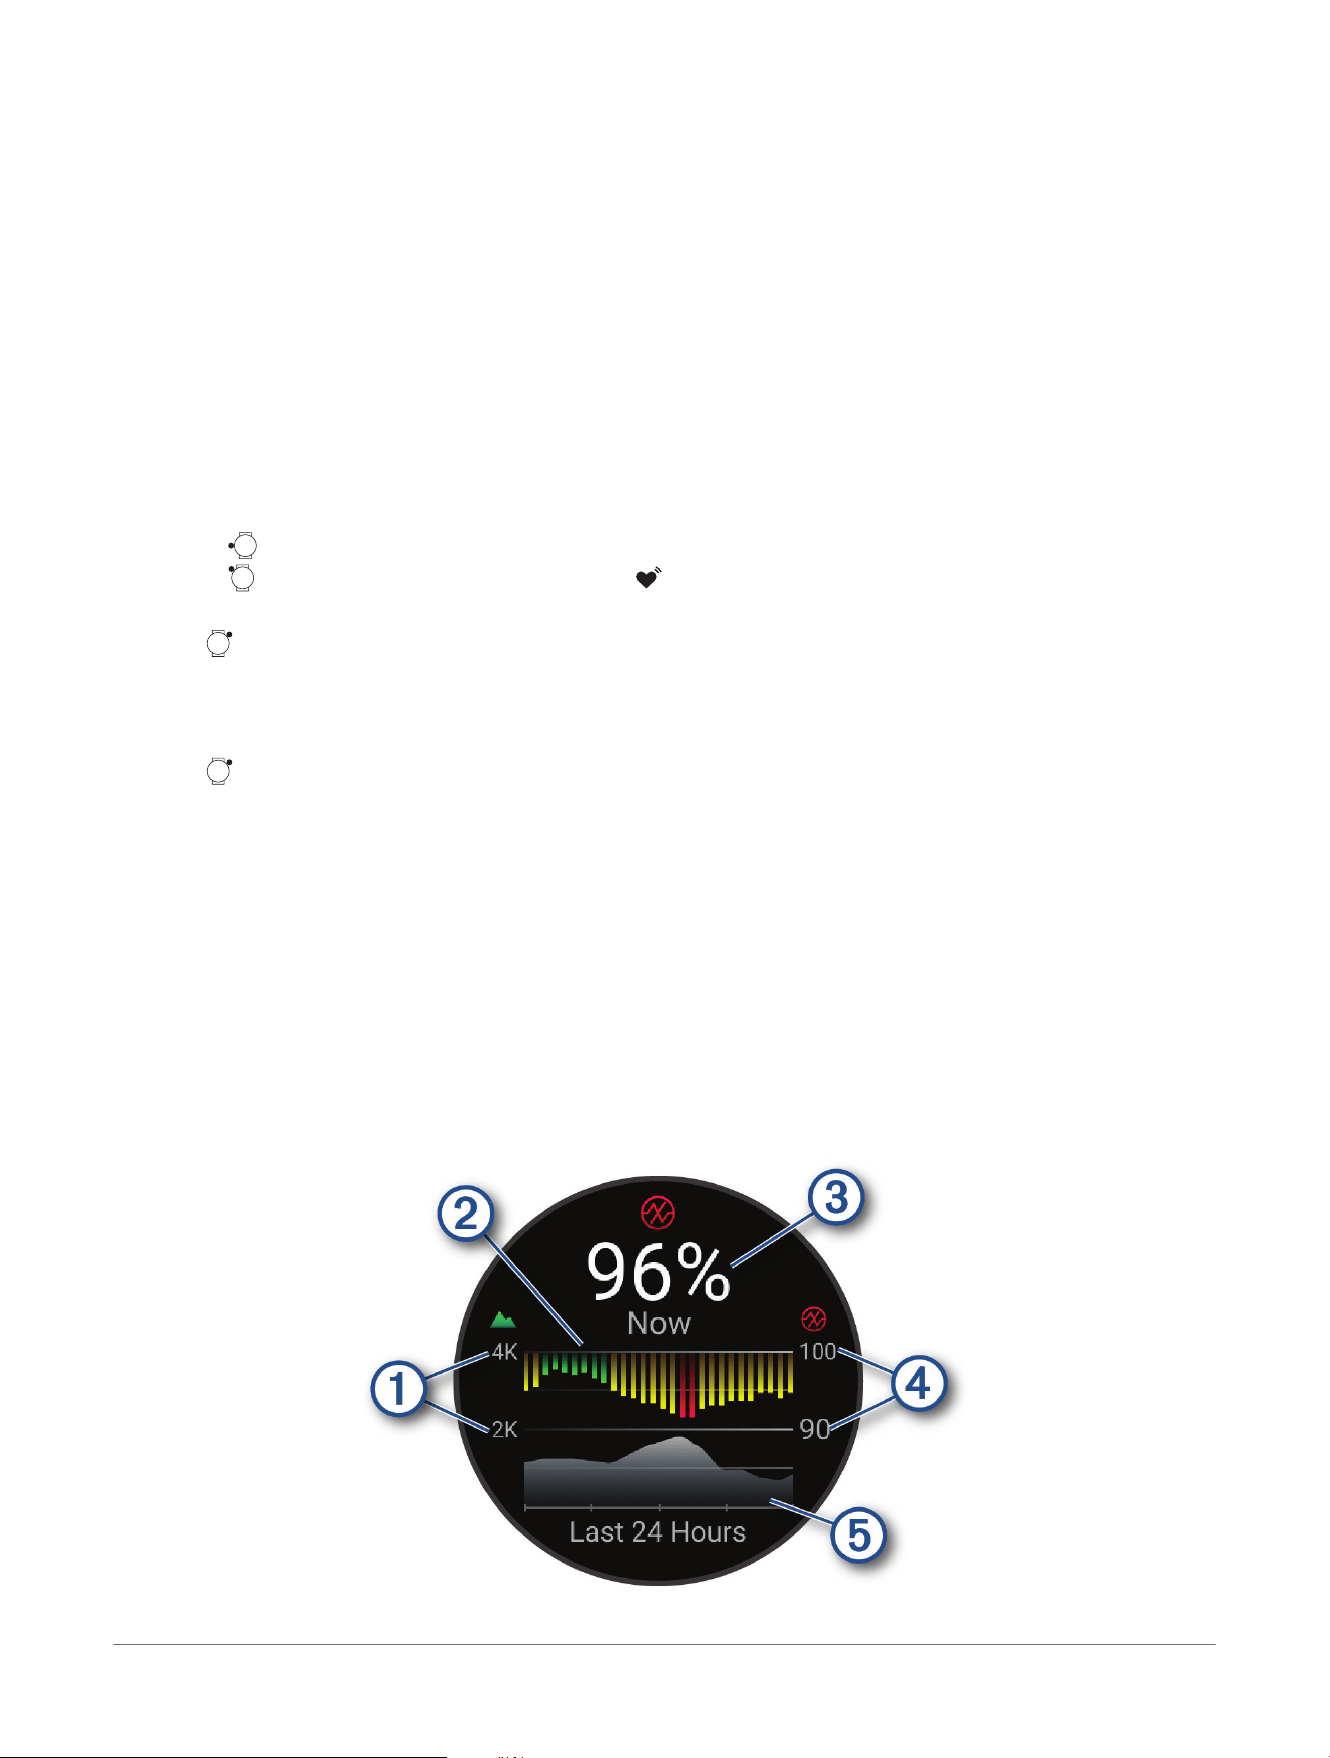
Status: Enables the wrist heart rate monitor. The default value is Auto, which automatically uses the wrist heart
rate monitor unless you pair an external heart rate monitor.
NOTE: Disabling the wrist heart rate monitor also disables the wrist-based pulse oximeter sensor. You can
perform a manual reading from the pulse oximeter glance.
Source Switching: Selects the best source of heart rate data when wearing your watch and an external heart
rate monitor. For more information, go to www.garmin.com/dynamicsourceswitching/.
Broadcast Heart Rate: Broadcasts your heart rate data to a paired device (Broadcasting Heart Rate Data,
page63).
Broadcasting Heart Rate Data
You can broadcast your heart rate data from your watch and view it on paired devices. Broadcasting heart rate
data decreases battery life.
TIP: You can customize the activity settings to broadcast your heart rate data automatically when you begin
an activity (Activity Settings, page23). For example, you can broadcast your heart rate data to an Edge
®
bike
computer while cycling.
1 Select an option:
● Hold , and select Watch Settings> Health & Wellness> Wrist Heart Rate> Broadcast Heart Rate.
● Hold to open the controls menu, and select .
NOTE: You can add options to the controls menu (Customizing the Controls Menu, page28).
2 Press .
The watch starts broadcasting your heart rate data.
3 Pair your watch with your compatible device.
NOTE: The pairing instructions differ for each Garmin
®
compatible device. See your owner's manual.
4 Press to stop broadcasting your heart rate data.
Pulse Oximeter
Your watch has a wrist-based pulse oximeter to gauge the peripheral saturation of oxygen in your blood (SpO2).
As your altitude increases, the level of oxygen in your blood can decrease. Knowing your oxygen saturation can
help you determine how your body is acclimating to high altitudes for alpine sport and other activities.
You can manually begin a pulse oximeter reading by viewing the pulse oximeter glance (Getting Pulse Oximeter
Readings, page64). You can also turn on all-day readings (Setting the Pulse Oximeter Mode, page64). When
you view the pulse oximeter glance while you are not moving, your watch analyzes your oxygen saturation and
your elevation. The elevation profile helps indicate how your pulse oximeter readings are changing, relative to
your elevation.
On the watch, your pulse oximeter reading appears as an oxygen saturation percentage and color on the graph.
On your Garmin Connect
™
account, you can view additional details about your pulse oximeter readings, including
trends over multiple days.
For more information about pulse oximeter accuracy, go to garmin.com/ataccuracy.
Health and Wellness Settings
Forerunner® 70 GPS Running Smartwatch
Owner's Manual
63
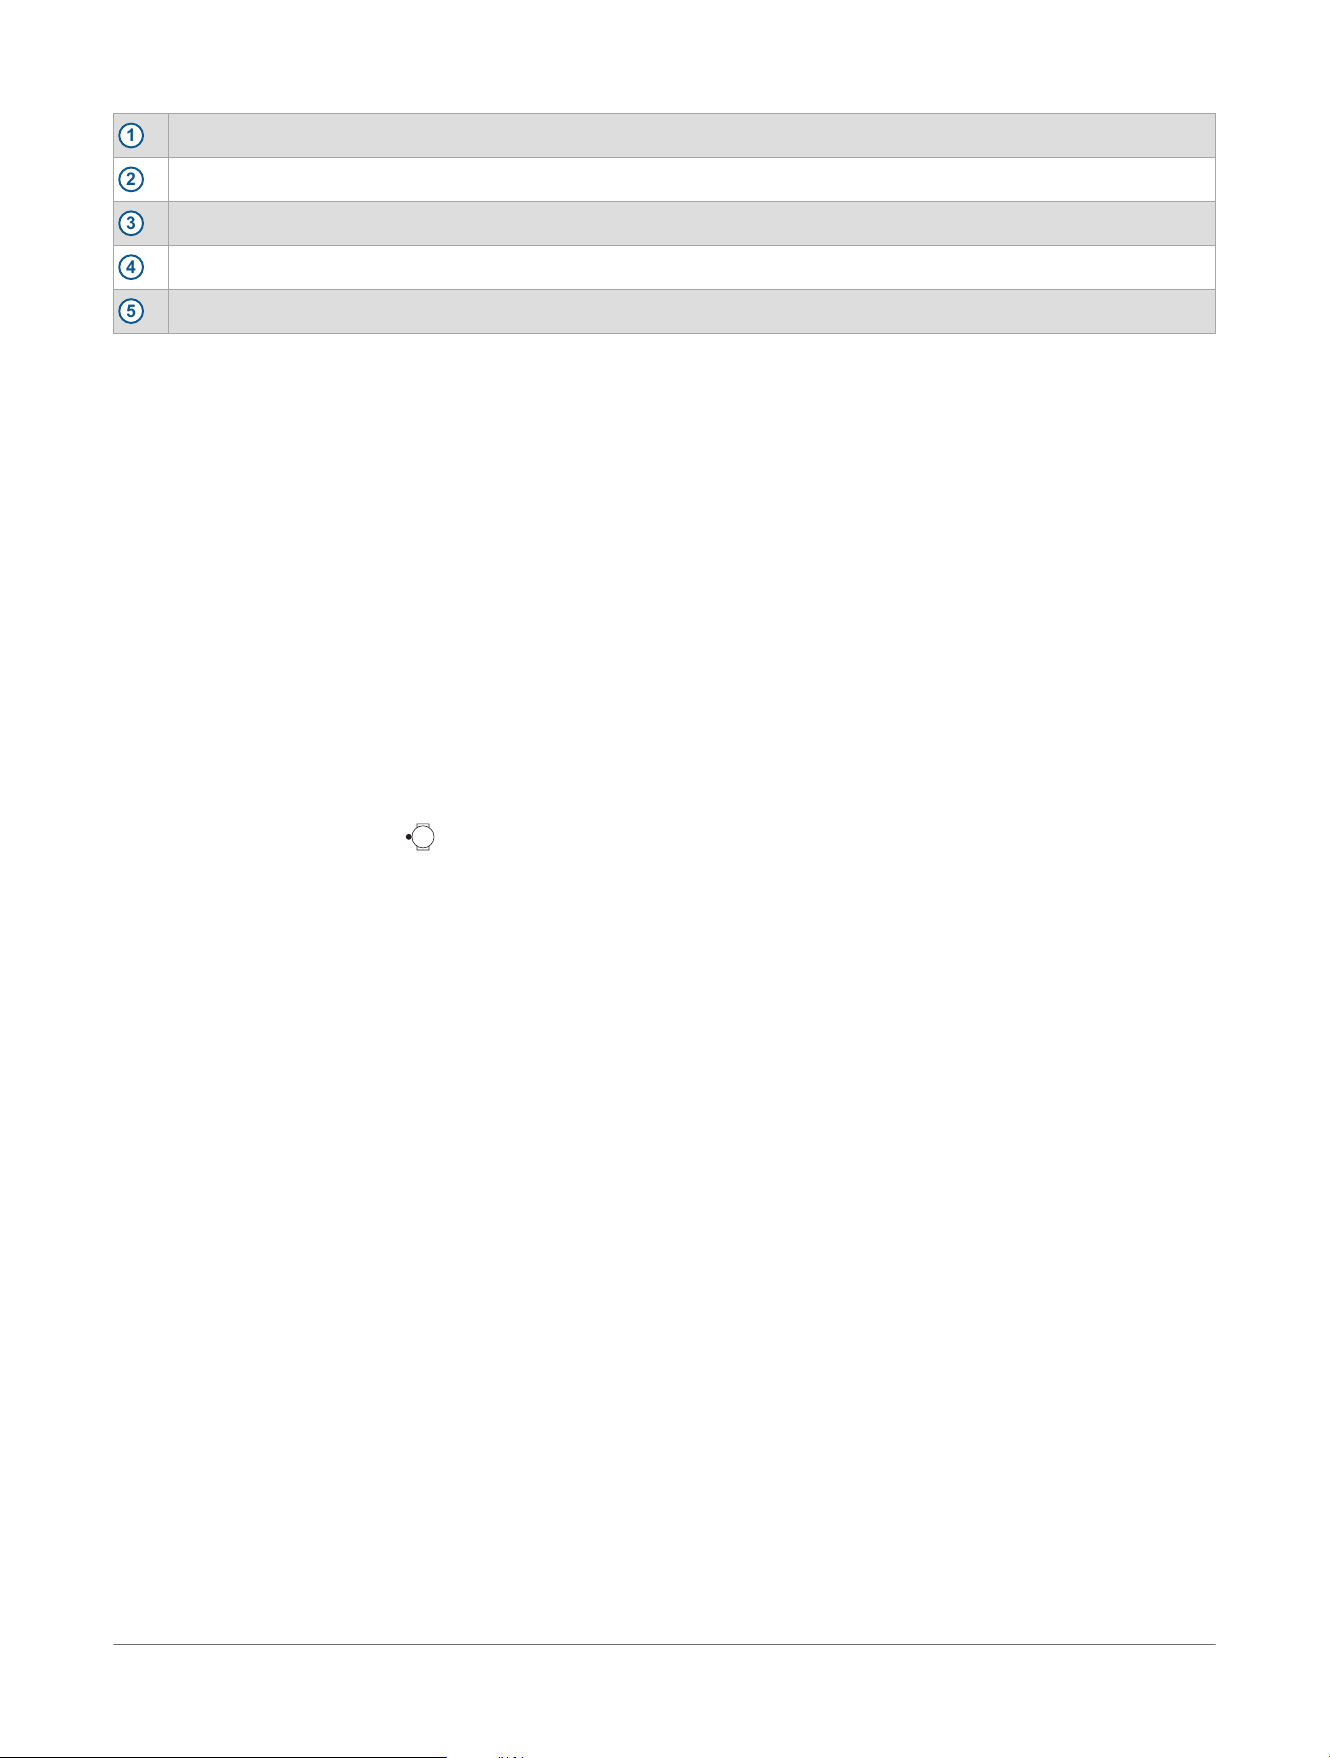
1
The elevation scale.
2
A graph of your average oxygen saturation readings for the last 24 hours.
3
Your most recent oxygen saturation reading.
4
The oxygen saturation percentage scale.
5
A graph of your elevation readings for the last 24 hours.
Getting Pulse Oximeter Readings
You can manually begin a pulse oximeter reading by viewing the pulse oximeter glance. The glance displays
your most recent blood oxygen saturation percentage, a graph of your hourly average readings for the last 24
hours, and a graph of your elevation for the last 24 hours.
NOTE: The first time you view the pulse oximeter glance, the watch must acquire satellite signals to determine
your elevation. You should go outside, and wait while the watch locates satellites.
1 While you are sitting or inactive, swipe up from the watch face.
2 Scroll to the pulse oximeter glance.
3 Select the pulse oximeter glance.
The watch begins a pulse oximeter reading.
4 Remain motionless for up to 30 seconds.
NOTE: If you are too active for the watch to get a pulse oximeter reading, a message appears instead of a
percentage. You can check again after several minutes of inactivity. For best results, hold the arm wearing
the watch at heart level while the watch reads your blood oxygen saturation.
5 Scroll down to view a graph of your pulse oximeter readings for the last seven days.
Setting the Pulse Oximeter Mode
1 From the watch face, hold .
2 Select Watch Settings> Health & Wellness> Pulse Oximeter.
3 Select an option:
● To turn on measurements while you are inactive during the day, select All Day.
NOTE: Turning on All Day mode decreases battery life.
● To turn on continuous measurements while you sleep, select During Sleep.
NOTE: Unusual sleep positions can cause abnormally low sleep-time SpO2 readings.
● To turn off automatic measurements, select On Demand.
Tips for Erratic Pulse Oximeter Data
If the pulse oximeter data is erratic or does not appear, you can try these tips.
● Remain motionless while the watch reads your blood oxygen saturation.
● Wear the watch above your wrist bone. The watch should be snug but comfortable.
● Hold the arm wearing the watch at heart level while the watch reads your blood oxygen saturation.
● Use a silicone or nylon band.
● Clean and dry your arm before putting on the watch.
● Avoid wearing sunscreen, lotion, and insect repellent under the watch.
● Avoid scratching the optical sensor on the back of the watch.
● Rinse the watch with fresh water after each workout.
Auto Goal
Your device creates a daily step goal automatically, based on your previous activity levels. As you move during
the day, the device shows your progress toward your daily goal.
If you choose not to use the auto goal feature, you can set a personalized step goal on your Garmin Connect
™
account.
Intensity Minutes
To improve your health, organizations such as the World Health Organization recommend at least 150 minutes
per week of moderate intensity activity, such as brisk walking, or 75 minutes per week of vigorous intensity
activity, such as running.
64
Forerunner® 70 GPS Running Smartwatch
Owner's Manual
Health and Wellness Settings
The watch monitors your activity intensity and tracks your time spent participating in moderate to vigorous
intensity activities (heart rate data is required to quantify vigorous intensity). The watch adds the amount of
moderate activity minutes with the amount of vigorous activity minutes. Your total vigorous intensity minutes
are doubled when added.
Earning Intensity Minutes
Your Forerunner
®
watch calculates intensity minutes by comparing your heart rate data to your average resting
heart rate. If heart rate is turned off, the watch calculates moderate intensity minutes by analyzing your steps
per minute.
● Start a timed activity for the most accurate calculation of intensity minutes.
● Wear your watch all day and night for the most accurate resting heart rate.
Sleep Tracking
While you are sleeping, the watch automatically detects your sleep and monitors your movement during your
normal sleep hours. You can set your normal sleep hours in the Garmin Connect
™
app or in the watch settings
(Focus Modes, page60). Sleep statistics include total hours of sleep, sleep stages, sleep movement, and
sleep score. Your sleep coach provides sleep need recommendations based on your sleep and activity history,
circadian rhythm, HRV status, and naps (Glances, page30). Naps are added to your sleep statistics, and can
also impact your recovery. You can view detailed sleep statistics on your Garmin Connect account.
NOTE: You can use do not disturb mode to turn off notifications and alerts, with the exception of alarms
(Controls, page27).
Using Automated Sleep Tracking
1 Wear your watch while sleeping.
2
Upload your sleep tracking data to your Garmin Connect
™
account (Using the Garmin Connect
™
App, page57).
You can view your sleep statistics on your Garmin Connect account.
You can view sleep information, including naps, on your Forerunner
®
watch (Glances, page30).
Breathing Variations
WARNING
The Forerunner
®
device is not a medical device and is not intended for use in the diagnosis or monitoring of any
medical condition. For more information on pulse oximeter accuracy, go to garmin.com/ataccuracy.
The optical heart rate sensor on the Forerunner device has a pulse oximeter feature that can measure your
overnight breathing variations. Breathing variation insights are provided to enhance awareness of your sleep
environment and general wellness. Occasional or frequent breathing variations may be due to your individual
lifestyle factors or your sleeping environment. Contact your doctor or healthcare provider if you're concerned
about your level of breathing variations.
You must turn on pulse oximeter sleep tracking to detect breathing variations (Setting the Pulse Oximeter Mode,
page64).
The sleep score glance displays your current breathing variations data.
You may need to add the glance to your glances list (Customizing the Glances List, page32).
On your Garmin Connect
™
account, you can view additional details about breathing variations, including trends
over multiple days.
Health and Wellness Settings
Forerunner® 70 GPS Running Smartwatch
Owner's Manual
65
Navigation
You can use the GPS navigation features on your watch to save locations, navigate to locations, and find your
way home.
Saving Your Location
You can save your current location to navigate back to it later.
1 Hold .
2 Select Save Location.
You can customize the controls menu (Customizing the Controls Menu, page28).
3 Follow the on-screen instructions.
Viewing and Editing Saved Locations
TIP: You can save a location from the controls menu (Controls, page27).
1 From the watch face, press .
2 Select an activity.
3 Scroll down, and select Navigate> Saved Locations.
4 Select a saved location.
5 Select an option to view or edit the location details.
Deleting a Location
1 Press .
2 Select an activity that uses GPS, for example, Run.
3 Scroll down, and select Navigate> Saved Locations.
4 Select a saved location.
5 Select Delete.
Navigating to a Destination
You can use your device to navigate to a previous destination or a saved location.
1 From the watch face, press .
2 Select a GPS activity.
3 Scroll down, and select Navigate.
4 Select an option.
● Select Past Activities, select an activity, and select Go.
● Select Saved Locations, select a location, and select Go To.
TIP: You can save a location from the controls menu (Controls, page27).
5 Press to begin navigation.
Navigating Back to Start
Before you can navigate back to start, you must locate satellites, start the timer, and start your activity.
At any time during your activity, you can return to your starting location. For example, if you are running in a
new city, and you are unsure how to get back to the trail head or hotel, you can navigate back to your starting
location. This feature is not available for all activities.
1 Press .
2 Select an activity that uses GPS, for example, Run.
3 During your activity, hold .
4 Select Navigate> Back to Start.
5 Select TracBack or Straight Line.
The navigation screen appears.
6 Move forward.
The arrow points toward your starting point.
TIP: For more accurate navigation, orient your watch toward the direction in which you are navigating.
66
Forerunner® 70 GPS Running Smartwatch
Owner's Manual
Navigation
Stopping Navigation
1 While navigating during an activity, hold .
2 Scroll down and select Stop Navigation or Stop Course.
3 Select
Navigation to your destination stops, but your activity remains active. You can press to return to the activity
timer.
Courses
WARNING
This feature allows users to download courses created by other users. Garmin
®
makes no representations about
the safety, accuracy, reliability, completeness, or timeliness of courses created by third parties. Any use or
reliance on courses created by third parties is at your own risk.
You can send a course from your Garmin Connect
™
account to your device. After it is saved to your device, you
can navigate the course on your device.
You can follow a saved course simply because it is a good route. For example, you can save and follow a bike
friendly commute to work.
You can also follow a saved course, trying to match or exceed previously set performance goals.
Creating a Course on Garmin Connect
™
Before you can create a course on the Garmin Connect app, you must have a Garmin Connect account (Garmin
Connect
™
, page56).
1 From the Garmin Connect app, select .
2 Select Training & Planning> Courses> Create Course.
3 Select a course type.
4 Follow the on-screen instructions.
5 Select Done.
NOTE: You can send this course to your device (Sending a Course to Your Device, page67).
Sending a Course to Your Device
You can send a course you created using the Garmin Connect
™
app to your device (Creating a Course on Garmin
Connect
™
, page67).
1 From the Garmin Connect app, select .
2 Select Training & Planning> Courses.
3 Select a course.
4 Select .
5 Select your compatible device.
6 Follow the on-screen instructions.
Following a Course on Your Device
1 From the watch face, press .
2 Select a GPS activity.
3 Scroll down, and select Navigate> Courses.
4 Select a course.
5 Press
6 Select Do Course or Do Course in Reverse.
7 Press to begin navigation.
Viewing or Editing Course Details
You can view or edit course details before you navigate a course.
1 From the watch face, press .
2 Select a GPS activity.
3 Scroll down, and select Navigate> Courses.
Navigation
Forerunner® 70 GPS Running Smartwatch
Owner's Manual
67
4 Select a course.
5 Press
6 Select an option:
● To begin navigation, select Do Course.
● To view course points, such as water stops, obstacles, or steep climbs, select View Course Points.
TIP: You can add course points when you create a course on the Garmin Connect
™
app (Creating a Course
on Garmin Connect
™
, page67).
●
To create a custom pace band, select PacePro (PacePro
™
Training, page17).
● To view the course on the map and pan or zoom the map, select Map.
● To begin the course in reverse, select Do Course in Reverse.
● To view an elevation plot of the course, select Elevation Plot.
● To change the course name, select Name.
● To delete the course, select Delete.
68 Forerunner® 70 GPS Running Smartwatch
Owner's Manual
Navigation
Map
represents your location on the map. Location names and symbols appear on the map. When you are
navigating to a destination, your route is marked with a line on the map.
Adding the Map Data Screen
You can add the map to the data screens loop for a GPS activity.
1 From the watch face, press .
2 Select Activities, and select a GPS activity.
3 Scroll down, and select the activity settings.
4 Select Data Screens> Add New> Map.
Panning and Zooming the Map
1 While navigating, press or to view the map.
You may need to add the map data screen for the activity (Customizing the Data Screens, page22).
2 Hold .
3 Select Map Controls.
4 Select an option:
● To toggle between panning up and down, panning left and right, or zooming, press .
● To pan or zoom the map, press or .
● To quit, press .
Map Settings
You can customize how the map appears in the map data screens.
Hold , select Watch Settings> Map & Navigation.
Orientation: Sets the orientation of the map. The North Up option shows north at the top of the screen. The
Track Up option shows your current direction of travel at the top of the screen.
User Locations: Shows or hides user locations on the map.
Auto Zoom: Automatically selects the zoom level for optimal use of your map. When disabled, you must zoom
in or out manually.
Map
Forerunner® 70 GPS Running Smartwatch
Owner's Manual
69
Safety and Tracking Features
CAUTION
The safety and tracking features available through the Garmin Connect
™
app are supplemental features and
should not be relied on as a primary method to obtain emergency assistance. The Garmin Connect app does not
contact emergency services on your behalf.
NOTICE
To use the safety and tracking features, your watch must be connected to the Garmin Connect app using
Bluetooth
®
technology. Your paired phone must be equipped with a data plan and be in an area of network
coverage where data is available. You can enter emergency contacts in your Garmin Connect account.
For more information about safety and tracking features, go to garmin.com/safety.
Assistance: When you request assistance, the watch sends a message with your name, LiveTrack link, and GPS
location (if available) to your emergency contacts (Requesting Assistance, page71).
Incident Detection: When the Forerunner
®
watch detects an incident during certain outdoor activities, the watch
sends an automated message with a LiveTrack link and GPS location (if available) to your emergency
contacts (Turning Incident Detection On and Off, page70).
Live Event Sharing: Sends messages to friends and family during an event, providing real-time updates.
NOTE: This feature is available only if your watch is connected to a compatible Android
™
phone.
LiveTrack: Sends a web page link to friends and family to follow your races and training activities in real time.
You can use the Garmin Connect app to invite followers using email or social media, allowing them to view
your live data.
Adding Emergency Contacts
Emergency contact phone numbers are used for the safety and tracking features.
1 From the Garmin Connect
™
app, select .
2 Select Safety & Tracking> Safety Features> Emergency Contacts> Add Emergency Contacts.
3 Follow the on-screen instructions.
Your emergency contacts receive a notification when you add them as an emergency contact, and can accept or
decline your request. If a contact declines, you must choose another emergency contact.
Adding Contacts
You can add up to 50 contacts to the Garmin Connect
™
app. Contact emails can be used with the LiveTrack
feature. Three of these contacts can be used as emergency contacts (Adding Emergency Contacts, page70).
1 From the Garmin Connect app, select .
2 Select Contacts.
3 Follow the on-screen instructions.
After you add contacts, you must sync your data to apply the changes to your Forerunner
®
device (Using the
Garmin Connect
™
App, page57).
Turning Incident Detection On and Off
CAUTION
Incident detection is a supplemental feature available only for certain outdoor activities. Incident detection
should not be relied on as a primary method to obtain emergency assistance. The
Garmin Connect
™
app does
not contact emergency services on your behalf.
NOTICE
Before you can enable incident detection on your watch, you must set up emergency contacts in the Garmin
Connect app (Adding Emergency Contacts, page70). Your paired phone must be equipped with a data plan and
be in an area of network coverage where data is available. Your emergency contacts must be able to receive
emails or text messages (standard text messaging rates may apply).
1 From the watch face, hold .
2 Select Watch Settings> Safety & Tracking> Incident Detection.
3 Select a GPS activity.
NOTE: Incident detection is available only for certain outdoor activities.
70
Forerunner® 70 GPS Running Smartwatch
Owner's Manual
Safety and Tracking Features
When an incident is detected by your Forerunner
®
watch and your phone is connected, the Garmin Connect
app can send an automated text message and email with your name and GPS location (if available) to your
emergency contacts. A message appears on your device and paired phone indicating your contacts will be
informed after 15 seconds have elapsed. If assistance is not needed, you can cancel the automated emergency
message.
Requesting Assistance
CAUTION
Assistance is a supplemental feature and should not be relied upon as a primary method to obtain emergency
assistance. The Garmin Connect
™
app does not contact emergency services on your behalf.
NOTICE
Before you can request assistance, you must set up emergency contacts in the Garmin Connect app (Adding
Emergency Contacts, page70). Your paired phone must be equipped with a data plan and be in an area of
network coverage where data is available. Your emergency contacts must be able to receive emails or text
messages (standard text messaging rates may apply).
1 Hold .
The watch vibrates when the assistance feature is activated.
2 Wait for the countdown timer.
The watch sends a message to your emergency contacts.
TIP: Before the countdown is complete, you can hold any button to cancel the message.
Safety and Tracking Features
Forerunner® 70 GPS Running Smartwatch
Owner's Manual
71
User Profile
You can update your user profile on your watch or on the Garmin Connect
™
app.
Setting Up Your User Profile
You can update your personal information, such as height, weight, training zones, and more. The watch uses
this information to calculate accurate training data.
1 From the watch face, hold .
2 Select Watch Settings> User Profile.
3 Select an option.
Gender Settings
When you first set up the watch, you must choose a sex. Most fitness and training algorithms are binary. For the
most accurate results, Garmin
®
recommends selecting your sex assigned at birth. After the initial setup, you can
customize the profile settings in your Garmin Connect
™
account.
Profile & Privacy: Enables you to customize the data on your public profile.
User Settings: Sets your sex. If you select Not Specified, the algorithms that require a binary input will use the
sex you specified when you first set up the watch.
Viewing Your Fitness Age
Your fitness age gives you an idea of how your fitness compares with a person of the same sex. Your watch
uses information, such as your age, body mass index (BMI), resting heart rate data, and vigorous activity history
to provide a fitness age. If you have an Index
™
scale, your watch uses the body fat percentage metric instead of
BMI to determine your fitness age. Exercise and lifestyle changes can impact your fitness age.
NOTE: For the most accurate fitness age, complete the user profile setup (Setting Up Your User Profile, page72).
1 From the watch face, hold .
2 Select Watch Settings> User Profile> Fitness Age.
About Heart Rate Zones
Many athletes use heart rate zones to measure and increase their cardiovascular strength and improve their
level of fitness. A heart rate zone is a set range of heartbeats per minute. The five commonly accepted
heart rate zones are numbered from 1 to 5 according to increasing intensity. Generally, heart rate zones are
calculated based on percentages of your maximum heart rate.
Fitness Goals
Knowing your heart rate zones can help you measure and improve your fitness by understanding and applying
these principles.
● Your heart rate is a good measure of exercise intensity.
● Training in certain heart rate zones can help you improve cardiovascular capacity and strength.
If you know your maximum heart rate, you can use the table (Heart Rate Zone Calculations, page73) to
determine the best heart rate zone for your fitness objectives.
If you do not know your maximum heart rate, use one of the calculators available on the Internet. Some gyms
and health centers can provide a test that measures maximum heart rate. The default maximum heart rate is
220 minus your age.
Setting Your Heart Rate Zones
The watch uses your user profile information from the initial setup to determine your default heart rate zones.
You can set separate heart rate zones for sport profiles, such as running and cycling. For the most accurate
calorie data during your activity, set your maximum heart rate. You can also set each heart rate zone and
enter your resting heart rate manually. You can manually adjust your zones on the watch or using your Garmin
Connect
™
account.
1 From the watch face, hold .
2 Select Watch Settings> User Profile> Heart Rate & Power Zones> Heart Rate.
3 Select Max. Heart Rate, and enter your maximum heart rate.
You can use the Auto Detection feature to automatically record your maximum heart rate during an activity.
4 Select LTHR, and enter your lactate threshold heart rate if you know your lactate threshold heart rate value.
5 Select Resting HR> Set Custom, and enter your resting heart rate.
72
Forerunner® 70 GPS Running Smartwatch
Owner's Manual
User Profile
You can use the average resting heart rate measured by your watch, or you can set a custom resting heart
rate.
6 Select Zones> Based On.
7 Select an option:
● Select BPM to view and edit the zones in beats per minute.
● Select %Max. HR to view and edit the zones as a percentage of your maximum heart rate.
● Select %HRR to view and edit the zones as a percentage of your heart rate reserve (maximum heart rate
minus resting heart rate).
● Select %LTHR to view and edit the zones as a percentage of your lactate threshold heart rate.
8 Select a zone, and enter a value for each zone.
9 Select Sport Heart Rate, and select a sport profile to add separate heart rate zones (optional).
10 Repeat the steps to add sport heart rate zones (optional).
Letting the Watch Set Your Heart Rate Zones
The default settings allow the watch to detect your maximum heart rate and set your heart rate zones as a
percentage of your maximum heart rate.
● Verify that your user profile settings are accurate (Setting Up Your User Profile, page72).
● Run often with the wrist or chest heart rate monitor.
●
View your heart rate trends and time in zones using your Garmin Connect
™
account.
Heart Rate Zone Calculations
Zone
% of Maximum Heart
Rate
Perceived Exertion Benefits
1 50–60% Relaxed, easy pace, rhythmic breathing Beginning-level aerobic training, reduces
stress
2 60–70% Comfortable pace, slightly deeper breathing,
conversation possible
Basic cardiovascular training, good
recovery pace
3 70–80% Moderate pace, more difficult to hold conver
sation
Improved aerobic capacity, optimal car
diovascular training
4 80–90% Fast pace and a bit uncomfortable, breathing
forceful
Improved anaerobic capacity and
threshold, improved speed
5 90–100% Sprinting pace, unsustainable for long period
of time, labored breathing
Anaerobic and muscular endurance,
increased power
Setting Your Power Zones
The power zones use default values based on gender, weight, and average ability, and may not match your
personal abilities. If you know your threshold power (TP) value, you can enter it and allow the software to
calculate your power zones automatically. You can manually adjust your zones on the watch or using your
Garmin Connect
™
account.
1 From the watch face, hold .
2 Select Watch Settings> User Profile> Heart Rate & Power Zones> Running Power.
3 Select Based On.
4 Select an option:
● Select Watts to view and edit the zones in watts.
● Select % of TP to view and edit the zones as a percentage of your threshold power.
5 Select Threshold Power, and enter your value.
6 Select a zone, and enter a value for each zone.
7 If necessary, select Minimum, and enter a minimum power value.
User Profile
Forerunner® 70 GPS Running Smartwatch
Owner's Manual
73
Power Manager Settings
From the watch face, hold , and select Watch Settings> Power Manager.
Battery Saver: Customizes system settings to extend battery life in watch mode (Customizing the Battery Saver
Feature, page74).
Battery Percentage: Displays remaining battery life as a percentage.
Battery Estimates: Displays remaining battery life as an estimated number of days or hours.
Low Battery Alert: Notifies you when the battery level is low.
Customizing the Battery Saver Feature
The battery saver feature allows you to quickly adjust system settings to extend battery life in watch mode.
You can turn on the battery saver feature from the controls menu (Controls, page27).
1 From the watch face, hold .
2 Select Watch Settings> Power Manager> Battery Saver.
The watch displays the hours of battery life gained with each setting change.
74 Forerunner® 70 GPS Running Smartwatch
Owner's Manual
Power Manager Settings
Accessibility
Your Forerunner
®
watch has accessibility features, such as custom color filters and other audio and display
settings.
Accessibility Settings
From the watch face, hold , and select Watch Settings> Accessibility.
Color Filters: Sets the color mode for all screens, increasing color visibility for colorblindness. You can remove
specific colors such as red, green, or blue, or select Grayscale to remove all color.
Hourly Alert: Enables an alert at the start of each hour.
Accessibility Forerunner® 70 GPS Running Smartwatch
Owner's Manual
75
System Settings
From the watch face, hold , and select Watch Settings> System.
Language: Sets the language displayed on the watch.
Shortcuts: Assigns shortcuts to buttons (Customizing the Button Shortcuts, page76).
Passcode: Sets a four-digit passcode to secure your personal information when the watch is not on your wrist
(Setting Your Watch Passcode, page76).
Do Not Disturb: Enables do not disturb mode to dim the screen and disable alerts and notifications.
Time: Adjusts the time settings (Time Settings, page77).
Voice: Sets the watch voice dialect and voice type. You can also set voice alerts during an activity (Playing Voice
Alerts During Your Activity, page25).
Advanced: Opens the advanced system settings for setting the units of measure, data recording mode, and USB
mode (Advanced System Settings, page77).
Restore & Reset: Configures watch data backups and resets user data and settings (Restore and Reset Settings,
page77).
Software Update: Installs downloaded software updates, enables automatic updates, and allows you to
manually check for updates (Product Updates, page82).
About: Displays device, software, license, and regulatory information (Viewing Device Information, page78).
Customizing the Button Shortcuts
You can customize the hold function of individual buttons and combinations of buttons.
1 From the watch face, hold .
2 Select Watch Settings> System> Shortcuts.
3 Select a button or combination of buttons to customize.
4 Select a function.
Setting Your Watch Passcode
NOTICE
If you enter your passcode incorrectly three times, the watch locks temporarily. After five incorrect attempts, the
watch locks until you reset your passcode in the Garmin Connect
™
app. If you have not paired your watch with
your phone, the watch deletes your data and resets to the factory default settings after five incorrect attempts.
You can set up a watch passcode to secure your personal information when the watch is not on your wrist.
1 From the watch face, hold .
2 Select Watch Settings> System> Passcode> Set Passcode.
3 Enter a four-digit passcode.
The next time you remove the watch from your wrist, you must enter the passcode before you can view any
information.
Changing Your Watch Passcode
You must know your existing watch passcode to change it. If you forget your passcode or make too many
incorrect passcode attempts, you must reset it in the Garmin Connect
™
app.
1 From the watch face, hold .
2 Select Watch Settings> System> Passcode> Change Passcode.
3 Enter your existing four-digit passcode.
4 Enter a new four-digit passcode.
The next time you remove the watch from your wrist, you must enter the passcode before you can view any
information.
Turning Off Your Watch Passcode
NOTE: You must know your existing device passcode to turn it off. If you forget your passcode or make too
many incorrect passcode attempts, you must reset it in the Garmin Connect
™
app.
1 From the watch face, hold .
2 Select Watch Settings> System> Passcode> Passcode> Off.
3 Enter your existing four-digit passcode.
76
Forerunner® 70 GPS Running Smartwatch
Owner's Manual
System Settings
The watch turns off the passcode option.
Time Settings
From the watch face, hold , and select Watch Settings> System> Time.
Time Format: Sets the watch to show time in a 12-hour, 24-hour, or military format.
Date Format: Sets the display order for the day, month, and year for dates.
Set Time: Sets the time zone for the watch. The Auto option sets the time zone automatically based on your
GPS position.
Time: Sets the time if the Set Time option is set to Manual.
Time Sync: Syncs the time when you change time zones, and updates the time for daylight saving time (Syncing
the Time, page77).
Syncing the Time
Each time you turn on the watch and acquire satellites or open the Garmin Connect
™
app on your paired phone,
the watch automatically detects your time zone and the current time of day. You can also manually sync the
time when you change time zones, and to update for daylight saving time.
1 From the watch face, hold .
2 Select Watch Settings> System> Time> Time Sync.
3 Wait while the watch connects to your paired phone or locates satellites (Acquiring Satellite Signals,
page83).
TIP: You can press to switch the source.
Advanced System Settings
From the watch face, hold , and select Watch Settings> System> Advanced.
Format: Sets general format preferences, such as the units of measure, pace and speed shown during activities,
and the start of the week (Changing the Units of Measure, page77).
Data Recording: Configures how the watch records activity data (Data Recording Settings, page77).
USB Mode: Sets the watch to use MTP (media transfer protocol) or Garmin
®
mode when connected to a
computer.
Changing the Units of Measure
You can customize units of measure for distance, pace and speed, elevation, and more.
1 From the watch face, hold .
2 Select Watch Settings> System> Advanced> Format> Units.
3 Select a measurement type.
4 Select a unit of measure.
Data Recording Settings
From the watch face, hold , and select Watch Settings> System> Advanced> Data Recording.
Frequency: Sets how often the watch records activity data. The Smart frequency recording option (default)
allows for longer activity recordings. The Every Second recording option provides more detailed activity
recordings, but may not record entire activities that last for longer periods of time. It records key points where
you change direction, pace, or heart rate. Your activity record is smaller, allowing you to store more activities
on the device memory.
Log HRV: Enables the watch to record your heart rate variability during an activity (Heart Rate Variability Status,
page34).
Restore and Reset Settings
You can back up the settings from an existing Garmin
®
watch and restore those settings to a different,
compatible Garmin watch using the Garmin Connect
™
app (Restoring Your Settings and Data from Garmin
Connect
™
, page78). Settings include sport profiles, glances, user settings, workouts, and more.
From the watch face, hold , and select Watch Settings> System> Restore & Reset.
Automatic Backups: Periodically backs up your settings to your Garmin Connect account.
Back Up Now: Manually backs up your settings to your Garmin Connect account.
View Report: Displays any issues from when your watch last restored settings.
System Settings
Forerunner® 70 GPS Running Smartwatch
Owner's Manual
77
This setting only appears if some watch settings did not restore properly.
Backup Contents: Displays the type of data that is saved.
Reset: Resets the selected settings to the factory default values (Resetting All Default Settings, page78).
Restoring Your Settings and Data from Garmin Connect
™
1 From the Garmin Connect app, select .
2 Select Garmin Devices, and select your watch.
3 Select System> Restore & Reset> Device Backups.
4 Select a backup from the list.
5 Select Restore from Backup> Restore.
6 Follow the on-screen instructions.
7 Wait for your watch to sync with the app.
8 On your watch, press , and select .
The watch restarts and restores your settings and data.
9 Follow the on-screen instructions.
Resetting All Default Settings
Before you reset all default settings, you should sync the watch with the Garmin Connect
™
app to upload your
activity data.
You can reset all of the watch settings to the factory default values.
1 From the watch face, hold .
2 Select Watch Settings> System> Restore & Reset> Reset.
3 Select an option:
● To reset all of the watch settings to the factory default values and save all user-entered information and
activity history, select Reset Default Settings.
● To delete all activities from the history, select Delete All Activities.
● To reset all distance and time totals, select Reset Totals.
● To reset all of the watch settings to the factory default values and delete all user-entered information and
activity history, select Delete Data and Reset Settings.
● To delete all temporary files from the watch, select Delete Temporary Files.
Viewing Device Information
You can view device information, such as the unit ID, software version, regulatory information, and license
agreement.
1 From the watch face, hold .
2 Select Watch Settings> System> About.
Viewing E-label Regulatory and Compliance Information
The label for this device is provided electronically. The e-label may provide regulatory information, such as
identification numbers provided by the FCC or regional compliance markings, as well as applicable product and
licensing information.
1 From the watch face, hold .
2 From the settings menu, select System.
3 Select About.
78
Forerunner® 70 GPS Running Smartwatch
Owner's Manual
System Settings
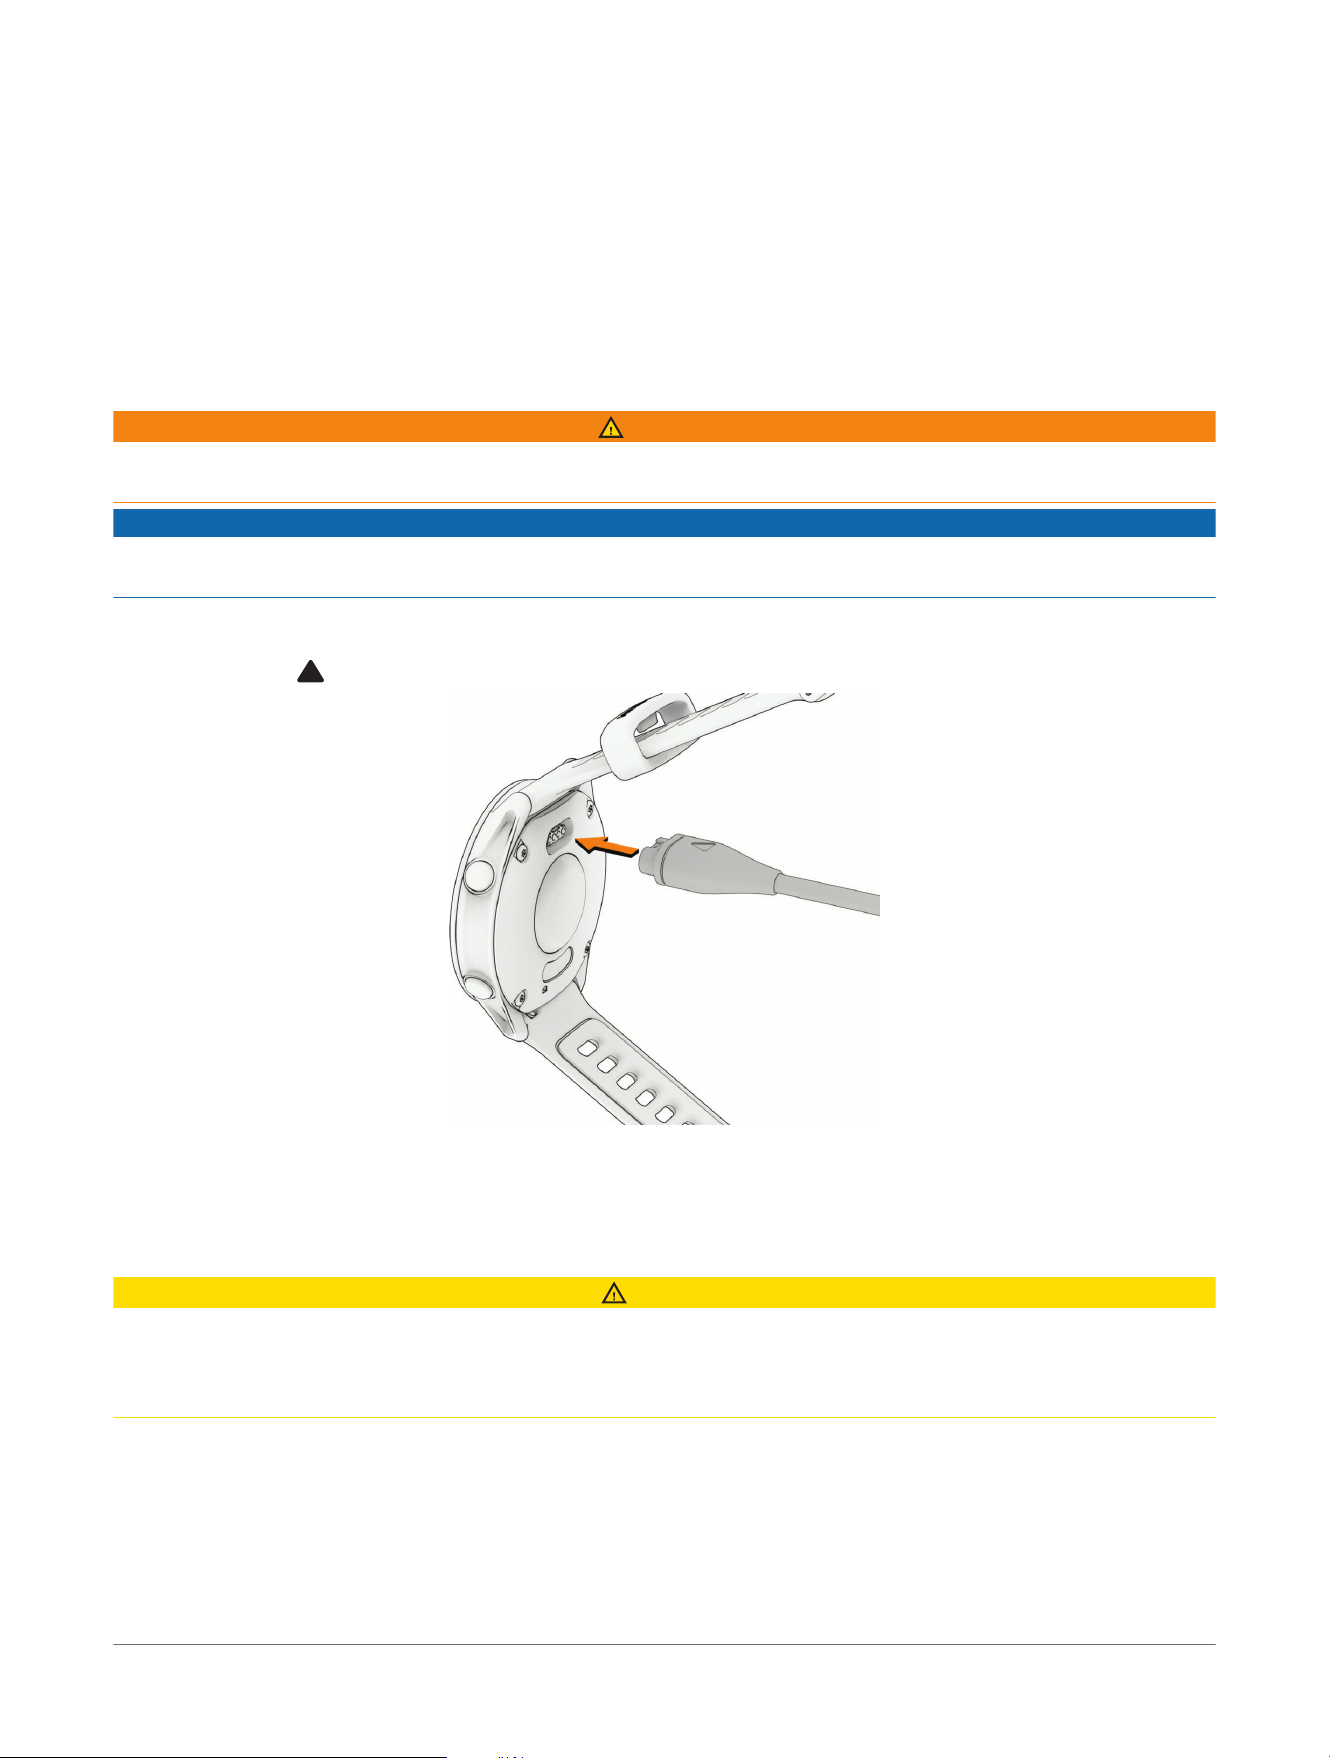
Device Information
About the AMOLED Display
By default, the watch settings are optimized for battery life and performance (Tips for Maximizing the Battery
Life, page82).
Image persistence, or pixel "burn-in," is normal behavior for AMOLED devices. To extend the display life, you
should avoid displaying static images at high brightness levels for long time periods. To minimize burn-in, the
Forerunner
®
display turns off after the selected timeout (Display and Brightness Settings, page50). You can turn
your wrist toward your body, tap the touchscreen, or press a button to wake the watch.
Charging the Watch
WARNING
This device contains a lithium-ion battery. See the Important Safety and Product Information guide in the product
box for product warnings and other important information.
NOTICE
To prevent corrosion, thoroughly clean and dry the contacts and the surrounding area before charging or
connecting to a computer. Refer to the cleaning instructions (Device Care, page80).
Your watch comes with a proprietary charging cable. For optional accessories and replacement parts, go to
buy.garmin.com, or contact your Garmin
®
dealer.
1 Plug the cable ( end) into the charging port on your watch.
2 Plug the other end of the cable into a USB-C
®
computer port or AC adapter (5 W minimum power rating).
The watch displays the current battery charge level.
3 Disconnect the watch after the battery charge level reaches 100%.
Wearing the Watch
CAUTION
Some users may experience skin irritation after prolonged use of the watch, especially if the user has sensitive
skin or allergies. If you notice any skin irritation, remove the watch and give your skin time to heal. To help
prevent skin irritation, ensure the watch is clean and dry, and do not overtighten the watch on your wrist. For
more information, go to garmin.com/fitandcare.
● Wear the watch above your wrist bone.
NOTE: The watch should be snug but comfortable. For more accurate heart rate readings, the watch should
not shift while running or exercising. For pulse oximeter readings, you should remain motionless.
Device Information
Forerunner® 70 GPS Running Smartwatch
Owner's Manual
79
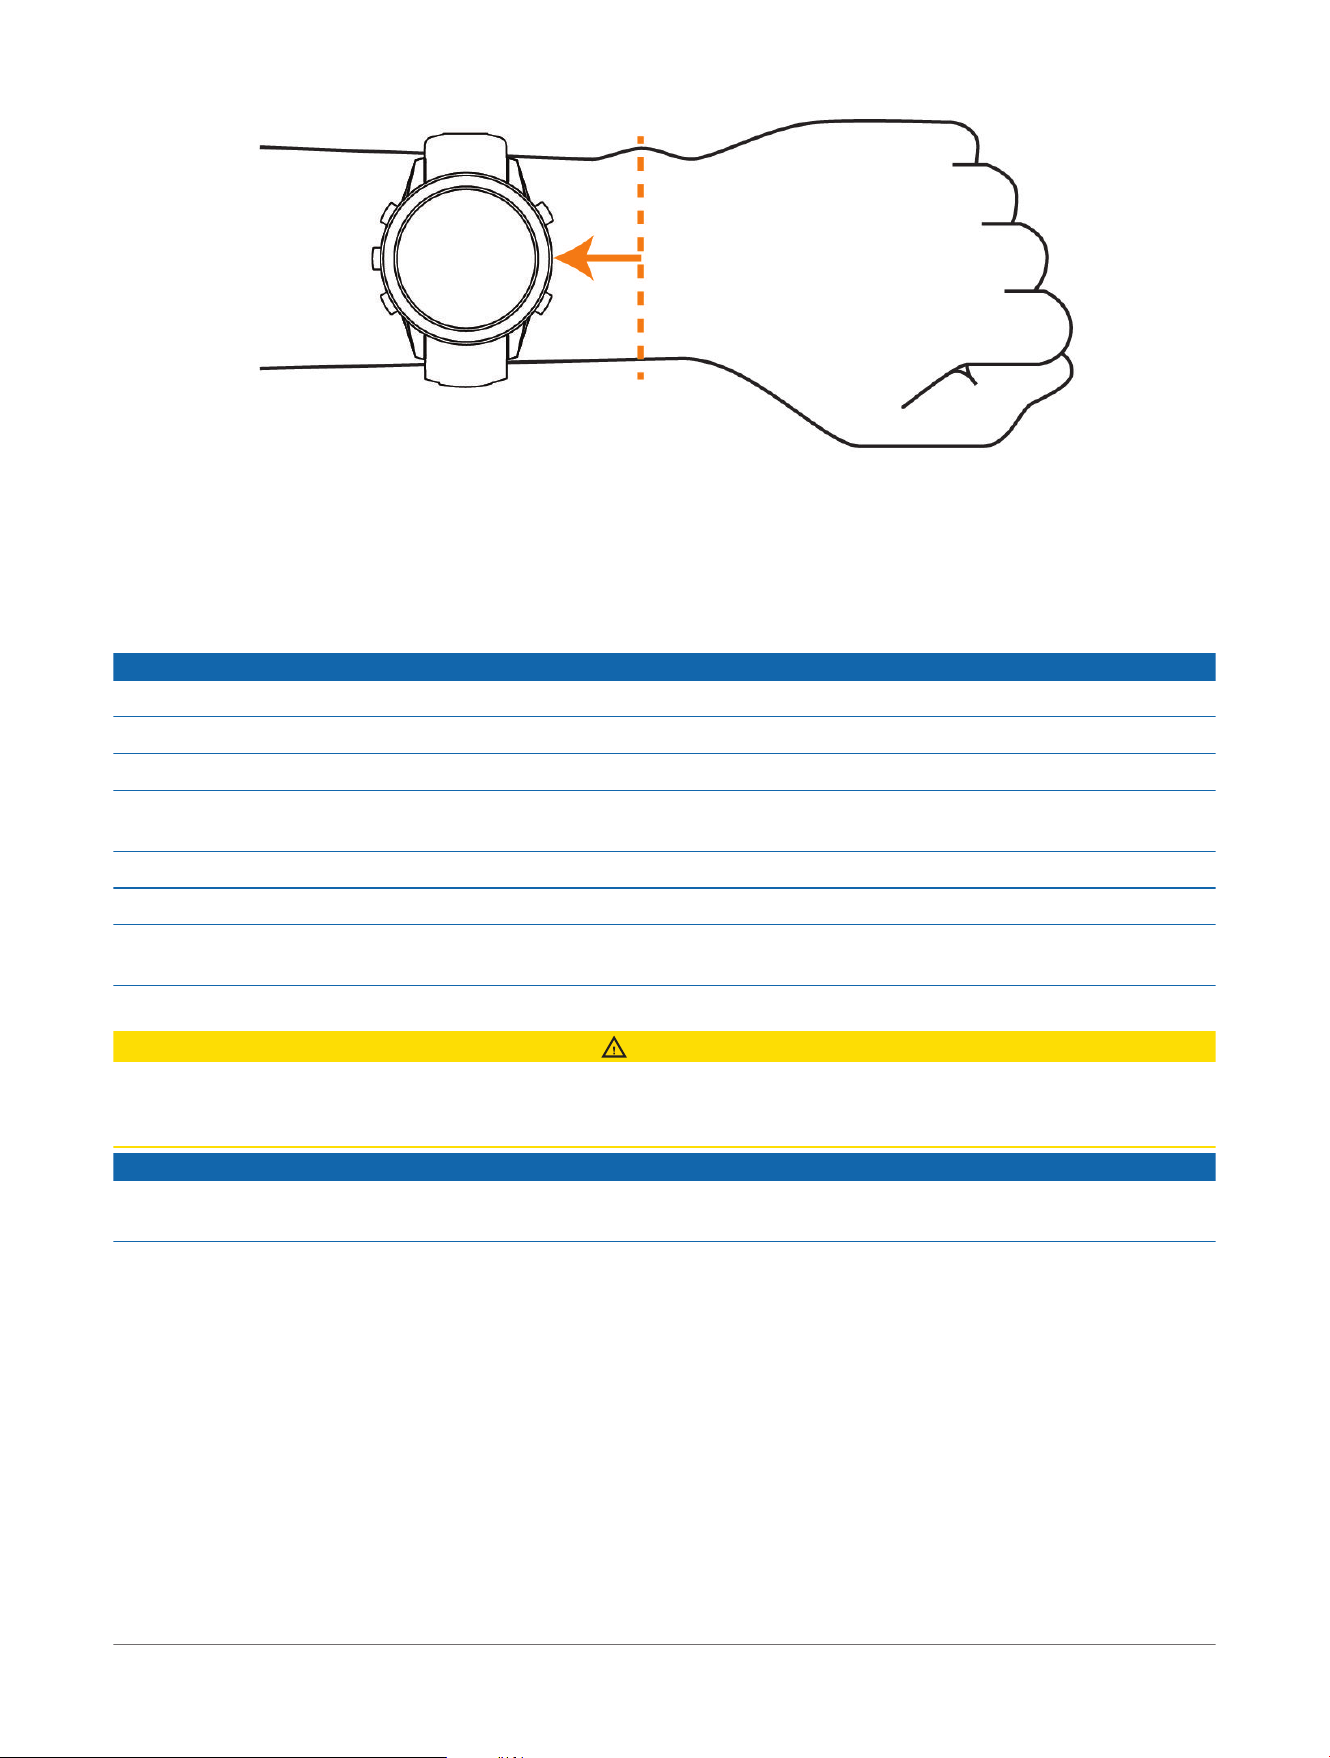
NOTE: The optical sensor is located on the back of the watch.
● See Tips for Erratic Heart Rate Data, page62 for more information about wrist-based heart rate.
● See Tips for Erratic Pulse Oximeter Data, page64 for more information about the pulse oximeter sensor.
● For more information about accuracy, go to garmin.com/ataccuracy.
● For more information about watch wear and care, go to garmin.com/fitandcare.
Device Care
NOTICE
Do not use a sharp object to clean the device.
Never use a hard or sharp object to operate the touchscreen, or damage may result.
Avoid chemical cleaners, solvents, and insect repellents that can damage plastic components and finishes.
Thoroughly rinse the device with fresh water after exposure to chlorine, salt water, sunscreen, cosmetics,
alcohol, or other harsh chemicals. Prolonged exposure to these substances can damage the case.
Avoid pressing the buttons under water.
Avoid extreme shock and harsh treatment, because it can degrade the life of the product.
Do not store the device where prolonged exposure to extreme temperatures can occur, because it can cause
permanent damage.
Cleaning the Watch
CAUTION
Some users may experience skin irritation after prolonged use of the watch, especially if the user has sensitive
skin or allergies. If you notice any skin irritation, remove the watch and give your skin time to heal. To help
prevent skin irritation, ensure the watch is clean and dry, and do not overtighten the watch on your wrist.
NOTICE
Even small amounts of sweat or moisture can cause corrosion of the electrical contacts when connected to a
charger. Corrosion can prevent charging and data transfer.
TIP: For more information, go to garmin.com/fitandcare.
1 Rinse with water, or use a damp lint-free cloth.
2 Allow the watch to dry completely.
Changing the Bands
The watch is compatible with 20mm wide, standard, quick-release bands.
1 Slide the quick-release pin on the spring bar to remove the band.
80
Forerunner® 70 GPS Running Smartwatch
Owner's Manual
Device Information
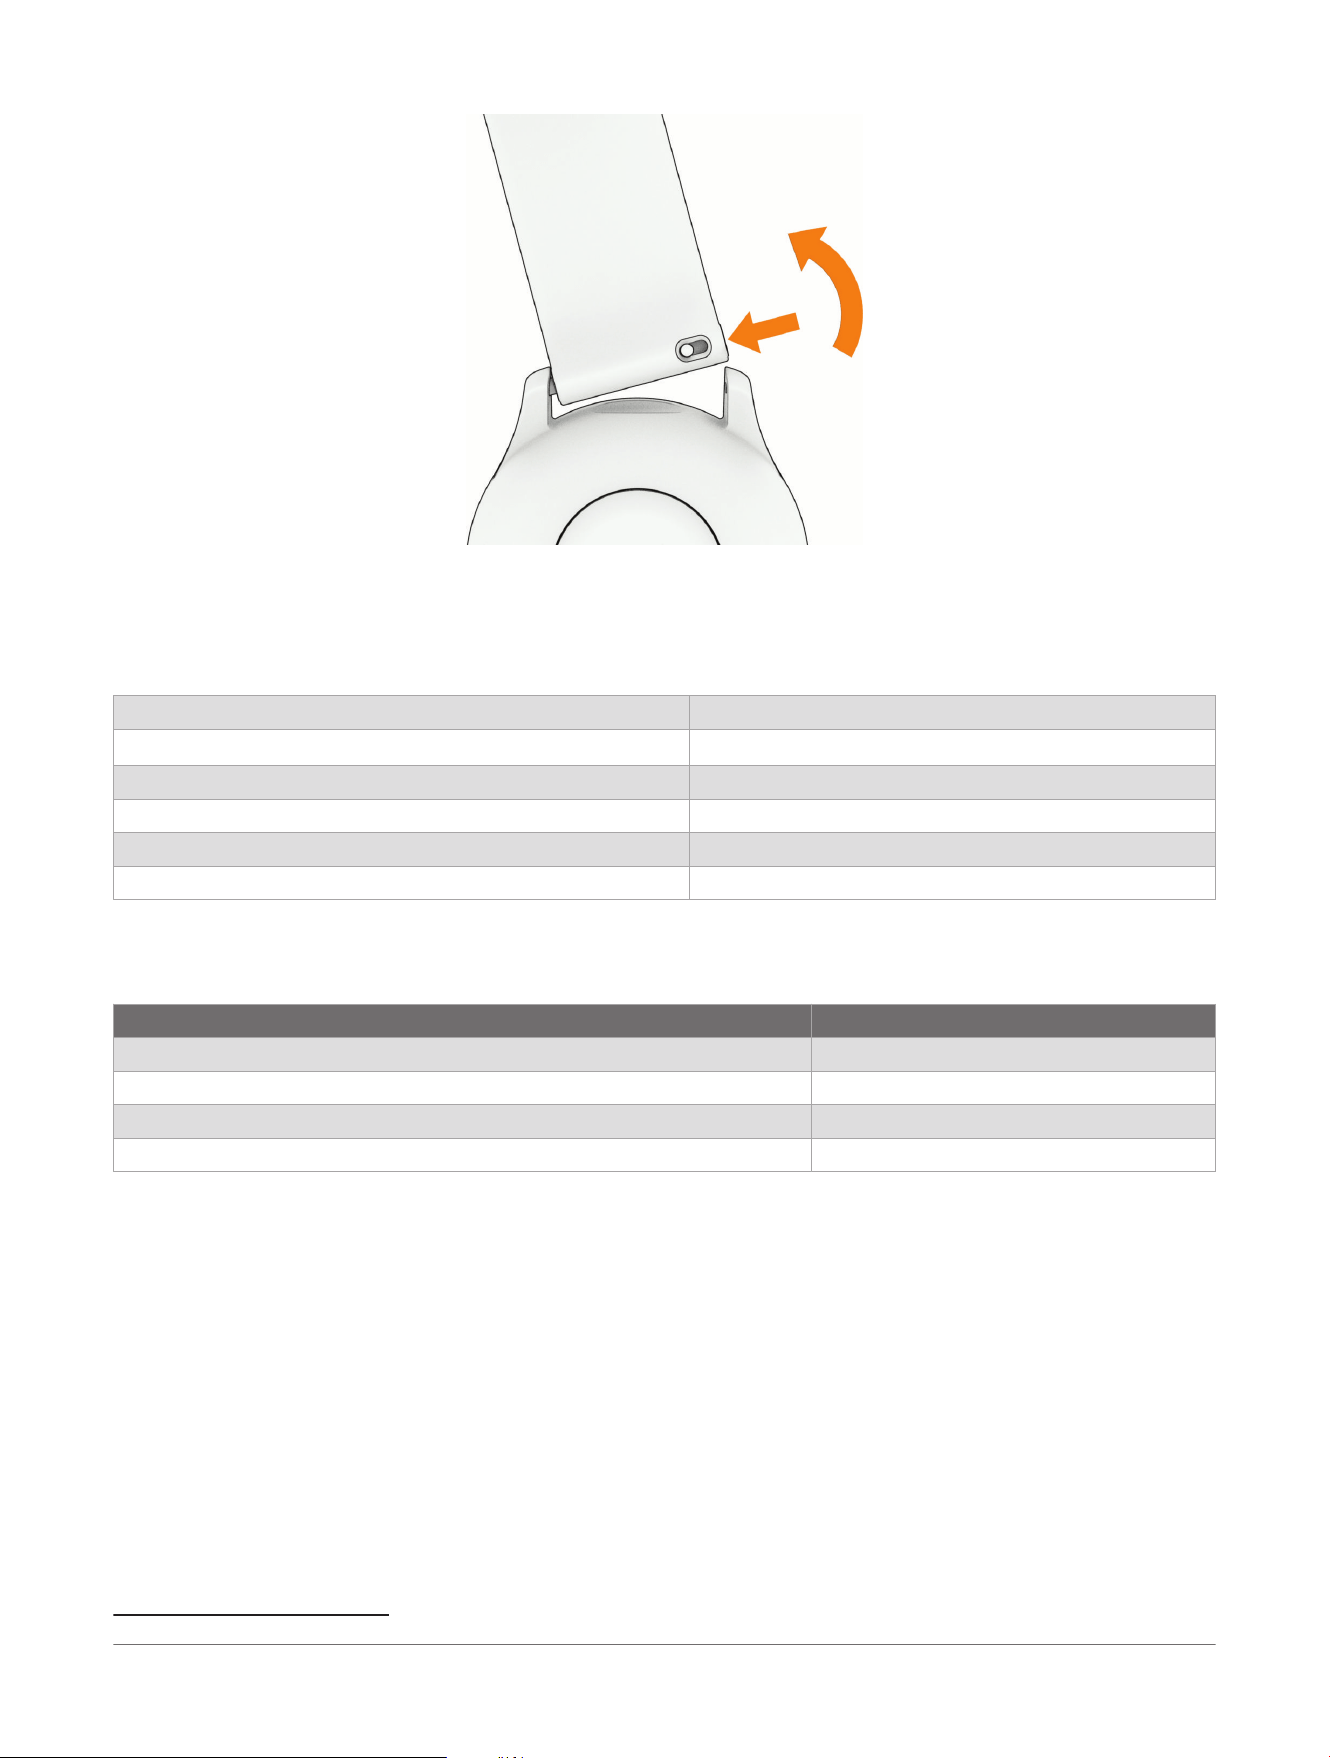
2 Insert one side of the spring bar for the new band into the watch.
3 Slide the quick-release pin, and align the spring bar with the opposite side of the watch.
4 Repeat steps 1 through 3 to change the other band.
Specifications
Battery type Rechargeable, built-in lithium-ion battery
Water rating
5ATM
1
Operating and storage temperature range From -20º to 60ºC (from -4º to 140ºF)
USB charging temperature range From 0º to 45ºC (from 32º to 113ºF)
EU wireless frequencies and transmit power 2400 - 2483,5MHz: < 13 dBm
EU SAR values 0,056 W/kg limb
Battery Information
The actual battery life depends on the features enabled on your watch, such as wrist-based heart rate, phone
notifications, GPS, internal sensors, and connected sensors.
Mode Battery Life
Smartwatch mode Up to 13 days
Battery saver watch mode Up to 28 days
GPS Only GNSS mode Up to 23 hours
All Systems GNSS mode Up to 16 hours
1
The device withstands pressure equivalent to a depth of 50m. For more information, go to www.garmin.com/waterrating.
Device Information Forerunner® 70 GPS Running Smartwatch
Owner's Manual
81
Troubleshooting
Product Updates
Your device automatically checks for updates when paired with a phone using Bluetooth
®
technology. You can
manually check for updates from the system settings (System Settings, page76). On your computer, install
Garmin Express
™
(garmin.com/express). On your phone, install the Garmin Connect
™
app.
This provides easy access to these services for Garmin
®
devices:
● Software updates
● Data uploads to the Garmin Connect app on your phone
● Product registration
Getting More Information
You can find more information about this product on the Garmin
®
website.
● Go to support.garmin.com for additional manuals, articles, and software updates.
● Go to buy.garmin.com, or contact your Garmin dealer for information about optional accessories and
replacement parts.
● Go to www.garmin.com/ataccuracy for information about feature accuracy.
This is not a medical device.
My device is in the wrong language
You can change the watch language selection if you have accidentally selected the wrong language.
1 From the watch face, hold .
2 Select .
3 Select .
4 Select the first item in the list, and press .
5 Select your language.
Tips for Maximizing the Battery Life
To extend the life of the battery, you can try these tips.
● Turn on the battery saver feature from the controls menu (Controls, page27).
● Use the battery glance to view usage details and adjust system settings (Glances, page30).
● Reduce the screen timeout (Display and Brightness Settings, page50).
● Stop using the Always On Display screen timeout option, and select a shorter timeout (Display and
Brightness Settings, page50).
● Reduce the screen brightness (Display and Brightness Settings, page50).
● Use UltraTrac GNSS satellite mode for your activity (Satellite Settings, page26).
● Turn off Bluetooth
®
technology when you are not using connected features (Controls, page27).
● When pausing your activity for a longer period of time, use the Resume Later option (Stopping an Activity,
page14).
● Limit the phone notifications the watch displays (Enabling Phone Notifications, page54).
● Stop broadcasting heart rate data to paired devices (Broadcasting Heart Rate Data, page63).
● Turn off wrist-based heart rate monitoring (Wrist Heart Rate Monitor Settings, page62).
NOTE: Wrist-based heart rate monitoring is used to calculate vigorous intensity minutes and calories burned.
● Turn on manual pulse oximeter readings (Setting the Pulse Oximeter Mode, page64).
Restarting Your Watch
If your watch stops responding, you can try these steps to restart it.
● Hold until the watch turns off, and hold to turn on the watch.
● Plug the watch into a USB-C
®
charging port for at least 30 seconds, unplug the cable, and plug the cable in
again.
Is my phone compatible with my watch?
The Forerunner
®
watch is compatible with phones using Bluetooth technology.
Go to garmin.com/ble for Bluetooth compatibility information.
82
Forerunner® 70 GPS Running Smartwatch
Owner's Manual
Troubleshooting
My phone will not connect to the watch
If your phone will not connect to the watch, you can try these tips.
● Turn off your phone and your watch, and turn them back on again.
● Enable Bluetooth
®
technology on your phone.
●
Update the Garmin Connect
™
app to the latest version.
● Remove your watch from the Garmin Connect app and the Bluetooth settings on your phone to retry the
pairing process.
● If you bought a new phone, remove your watch from the Garmin Connect app on the phone you intend to
stop using.
● Bring your phone within 10m (33ft.) of the watch.
● On your phone, open the Garmin Connect app, and select > Garmin Devices> Add Device to enter pairing
mode.
● From the watch face, hold , and select Watch Settings> Connectivity> Phone> Pair Phone.
Can I use my Bluetooth
®
sensor with my watch?
The watch is compatible with some Bluetooth sensors. The first time you connect a sensor to your Garmin
®
watch, you must pair the watch and sensor. After they are paired, the watch connects to the sensor
automatically when you start an activity and the sensor is active and within range.
1 From the watch face, hold .
2 Select Watch Settings> Connectivity> Sensors & Accessories> Add New.
3 Select an option:
● Select Search All.
● Select your sensor type.
You can customize the optional data fields (Customizing the Data Screens, page22).
How can I undo a lap button press?
During an activity, you might accidently press the lap button. In most cases, appears on the screen next to
a button, and you will have a few seconds to press the button and discard the most recent lap or sport change.
The lap undo feature is available for activities that support manual laps, manual sport changes, and automatic
sport changes. The lap undo feature is not available for activities that trigger automatic laps, runs, rests, or
pauses, such as gym activities, pool swimming, and workouts.
Acquiring Satellite Signals
The device may need a clear view of the sky to acquire satellite signals. The time and date are set automatically
based on the GPS position.
TIP: For more information about GPS, go to garmin.com/aboutGPS.
1 Go outdoors to an open area.
The front of the device should be oriented toward the sky.
2 Wait while the device locates satellites.
It may take 30–60 seconds to locate satellite signals.
Improving GPS Satellite Reception
● Frequently sync the watch to your Garmin
®
account:
●
Connect your watch to a computer using the USB cable and the Garmin Express
™
application.
●
Sync your watch to the Garmin Connect
™
app using your Bluetooth
®
enabled phone.
While connected to your Garmin account, the watch downloads several days of satellite data, allowing it to
quickly locate satellite signals.
● Take your watch outside to an open area away from tall buildings and trees.
● Remain stationary for a few minutes.
The heart rate on my watch is not accurate
For more information on your heart rate sensor, go to garmin.com/heartrate.
Troubleshooting
Forerunner® 70 GPS Running Smartwatch
Owner's Manual
83
The activity temperature reading is not accurate
Your body temperature affects the temperature reading for the internal temperature sensor. To get the most
accurate temperature reading, you should remove the watch from your wrist and wait 20 to 30 minutes.
You can also use an optional tempe
™
external temperature sensor to view accurate ambient temperature
readings while wearing the watch.
Exiting Demo Mode
Demo mode shows a preview of features on your watch.
1 Quickly press eight times.
2 Select .
Activity Tracking
For more information about activity tracking accuracy, go to garmin.com/ataccuracy.
My step count does not seem accurate
If your step count does not seem accurate, you can try these tips.
● Wear the watch on your non-dominant wrist.
● Carry the watch in your pocket when pushing a stroller or lawn mower.
● Carry the watch in your pocket when actively using your hands or arms only.
NOTE: The watch may interpret some repetitive motions, such as washing dishes, folding laundry, or
clapping your hands, as steps.
The step counts on my watch and my Garmin Connect
™
account don't match
The step count on your Garmin Connect account updates when you sync your watch.
1 Select an option:
●
Sync your step count with the Garmin Express
™
application (Using Garmin Connect
™
on Your Computer,
page57).
●
Sync your step count with the Garmin Connect app (Using the Garmin Connect
™
App, page57).
2 Wait while your data syncs.
Syncing can take several minutes.
NOTE: Refreshing the Garmin Connect app or the Garmin Express application does not sync your data or
update your step count.
84
Forerunner® 70 GPS Running Smartwatch
Owner's Manual
Troubleshooting
Appendix
VO2 Max. Standard Ratings
These tables include standardized classifications for VO2 max. estimates by age and sex.
Males Percentile 20–29 30–39 40–49 50–59 60–69 70–79
Superior 95 55.4 54 52.5 48.9 45.7 42.1
Excellent 80 51.1 48.3 46.4 43.4 39.5 36.7
Good 60 45.4 44 42.4 39.2 35.5 32.3
Fair 40 41.7 40.5 38.5 35.6 32.3 29.4
Poor 0–40 <41.7 <40.5 <38.5 <35.6 <32.3 <29.4
Females Percentile 20–29 30–39 40–49 50–59 60–69 70–79
Superior 95 49.6 47.4 45.3 41.1 37.8 36.7
Excellent 80 43.9 42.4 39.7 36.7 33 30.9
Good 60 39.5 37.8 36.3 33 30 28.1
Fair 40 36.1 34.4 33 30.1 27.5 25.9
Poor 0–40 <36.1 <34.4 <33 <30.1 <27.5 <25.9
Data reprinted with permission from The Cooper Institute
®
. For more information, go to
www.CooperInstitute.org.
Color Gauges and Running Dynamics Data
The running dynamics screens display a color gauge for the primary metric. You can display cadence, vertical
oscillation, ground contact time, ground contact time balance, or vertical ratio as the primary metric. The color
gauge shows you how your running dynamics data compare to those of other runners. The color zones are
based on percentiles.
Garmin
®
has researched many runners of all different levels. The data values in the red or orange zones are
typical for less experienced or slower runners. The data values in the green, blue, or purple zones are typical
for more experienced or faster runners. More experienced runners tend to exhibit shorter ground contact times,
lower vertical oscillation, lower vertical ratio, and higher cadence than less experienced runners. However, taller
runners typically have slightly slower cadences, longer strides, and slightly higher vertical oscillation. Vertical
ratio is your vertical oscillation divided by stride length. It is not correlated with height.
Go to garmin.com/runningdynamics for more information on running dynamics. For additional theories and
interpretations of running dynamics data, you can search reputable running publications and websites.
Color Zone Percentile in Zone Cadence Range Ground Contact Time Range
Purple
>95 >183spm <218ms
Blue
70–95 174–183spm 218–248ms
Green
30–69 164–173spm 249–277ms
Orange
5–29 153–163spm 278–308ms
Red
<5 <153spm >308ms
Ground Contact Time Balance Data
Ground contact time balance measures your running symmetry and appears as a percentage of your total
ground contact time. For example, 51.3% with an arrow pointing left indicates the runner is spending more time
on the ground when on the left foot. If your data screen displays both numbers, for example 48–52, 48% is the
left foot and 52% is the right foot.
Color Zone
Red Orange Green Orange Red
Symmetry Poor Fair Good Fair Poor
Appendix Forerunner® 70 GPS Running Smartwatch
Owner's Manual
85
Percent of Other Runners 5% 25% 40% 25% 5%
Ground Contact Time Balance >52.2%L 50.8–52.2%L 50.7%L–50.7%R 50.8–52.2%R >52.2%R
While developing and testing running dynamics, the Garmin
®
team found correlations between injuries and
greater imbalances with certain runners. For many runners, ground contact time balance tends to deviate
further from 50–50 when running up or down hills. Most running coaches agree that a symmetrical running
form is good. Elite runners tend to have quick and balanced strides.
You can watch the gauge or data field during your run or view the summary on your Garmin Connect
™
account after your run. As with the other running dynamics data, ground contact time balance is a quantitative
measurement to help you learn about your running form.
Vertical Oscillation and Vertical Ratio Data
The data ranges for vertical oscillation and vertical ratio are slightly different depending on the sensor and
whether it is positioned at the chest (HRM 600, HRM-Fit
™
, or HRM-Pro
™
series accessories) or at the waist
(Running Dynamics Pod accessory).
Color Zone
Percentile in
Zone
Vertical Oscillation
Range at Chest
Vertical Oscillation
Range at Waist
Vertical Ratio at
Chest
Vertical Ratio at
Waist
Purple
>95 <6.4cm <6.8cm <6.1% <6.5%
Blue
70–95 6.4–8.1cm 6.8–8.9cm 6.1–7.4% 6.5–8.3%
Green
30–69 8.2–9.7cm 9.0–10.9cm 7.5–8.6% 8.4–10.0%
Orange
5–29 9.8–11.5cm 11.0–13.0cm 8.7–10.1% 10.1–11.9%
Red
<5 >11.5cm >13.0cm >10.1% >11.9%
Wheel Size and Circumference
When used for cycling, your speed sensor automatically detects your wheel size. If necessary, you can manually
enter your wheel circumference in the speed sensor settings.
The tire size for cycling is marked on both sides of the tire. You can measure the circumference of your wheel or
use one of the calculators available on the internet.
86 Forerunner® 70 GPS Running Smartwatch
Owner's Manual
Appendix
Data Fields
NOTE: Not all data fields are available for all activity types. Some data fields require ANT+
®
or Bluetooth
®
accessories to display data. Some data fields appear in more than one category on the watch.
TIP: You can also customize the data fields from the watch settings in the Garmin Connect
™
app.
Cadence Fields
Name Description
Average Cadence Cycling. The average cadence for the current activity.
Average Cadence Running. The average cadence for the current activity.
Cadence Cycling. The number of revolutions of the crank arm. Your device must be connected to a cadence
accessory for this data to appear.
Cadence Running. The steps per minute (right and left).
Lap Cadence Cycling. The average cadence for the current lap.
Lap Cadence Running. The average cadence for the current lap.
Last Lap Cadence Cycling. The average cadence for the last completed lap.
Last Lap Cadence Running. The average cadence for the last completed lap.
Charts
Name Description
Heart Rate Chart A chart showing your heart rate throughout the activity.
Pace Chart A chart showing your pace throughout the activity.
Speed Chart A chart showing your speed throughout the activity.
Distance Fields
Name Description
Distance The distance traveled for the current track or activity.
Int. Distance The distance traveled for the current interval.
Lap Distance The distance traveled for the current lap.
Last Lap Dist. The distance traveled for the last completed lap.
Last Move Dist. The distance traveled for the last completed move.
Move Distance The distance traveled for the current move.
Graphical
Name Description
Cadence Gauge Running. A color gauge showing your current cadence range.
GCT Balance Gauge A color gauge showing the left/right balance of ground contact time while running.
Ground Contact Time Gauge A color gauge showing the amount of time in each step that you spend on the ground
while running, measured in milliseconds.
Heart Rate Gauge A color gauge showing your current heart rate zone.
Heart Rate Zones Ratio A color gauge showing the ratio of time spent in each heart rate zone.
PacePro Gauge Running. Your current split pace and your target split pace.
Training Effect Gauge The impact of the current activity on your aerobic and anaerobic fitness levels.
Vertical Oscillation Gauge A color gauge showing the amount of bounce while you are running.
Vertical Ratio Gauge A color gauge showing the ratio of vertical oscillation to stride length.
Heart Rate Fields
Name Description
% Heart Rate Reserve The percentage of heart rate reserve (maximum heart rate minus resting heart rate).
Aerobic Training Effect The impact of the current activity on your aerobic fitness level.
Anaerobic Training Effect The impact of the current activity on your anaerobic fitness level.
Data Fields Forerunner® 70 GPS Running Smartwatch
Owner's Manual
87
Name Description
Avg. %HRR The average percentage of heart rate reserve (maximum heart rate minus resting heart rate)
for the current activity.
Average HR The average heart rate for the current activity.
Avg. HR %Max. The average percentage of maximum heart rate for the current activity.
Heart Rate Your heart rate in beats per minute (bpm). Your device must have wrist-based heart rate or
be connected to a compatible heart rate monitor.
HR %Max. The percentage of maximum heart rate.
HR Zone The current range of your heart rate (1 to 5). The default zones are based on your user
profile and maximum heart rate (220 minus your age).
Int. Avg. %HRR The average percentage of heart rate reserve (maximum heart rate minus resting heart rate)
for the current swim interval.
Int. Avg. %Max. The average percentage of maximum heart rate for the current swim interval.
Int. Avg. HR The average heart rate for the current swim interval.
Int. Max. %HRR The maximum percentage of heart rate reserve (maximum heart rate minus resting heart
rate) for the current swim interval.
Int. Max. %Max. The maximum percentage of maximum heart rate for the current swim interval.
Int. Max. HR The maximum heart rate for the current swim interval.
Lap %HRR The average percentage of heart rate reserve (maximum heart rate minus resting heart rate)
for the current lap.
Lap HR The average heart rate for the current lap.
Lap HR %Max. The average percentage of maximum heart rate for the current lap.
Last Lap %HRR The average percentage of heart rate reserve (maximum heart rate minus resting heart rate)
for the last completed lap.
Last Lap HR The average heart rate for the last completed lap.
L. Lap HR %Max. The average percentage of maximum heart rate for the last completed lap.
Last Move %HRR The average percentage of heart rate reserve (maximum heart rate minus resting heart rate)
for the last completed move.
Last Move HR The average heart rate for the last completed move.
L. Move HR %Max. The average percentage of maximum heart rate for the last completed move.
Move %HRR The average percentage of heart rate reserve (maximum heart rate minus resting heart rate)
for the current move.
Move HR The average heart rate for the current move.
Move HR %Max. The average percentage of maximum heart rate for the current move.
Time in Zone The time elapsed in each heart rate zone.
Lengths Fields
Name Description
Interval Lengths The number of pool lengths completed during the current interval.
Lengths The number of pool lengths completed during the current activity.
Other Fields
Name Description
Active Calories The calories burned during the activity.
Battery Hours The number of hours remaining before the battery power is depleted.
Battery Level The remaining battery power.
eBike Battery The remaining battery power of an ebike.
eBike Range The estimated remaining distance the ebike can provide assistance.
GPS The strength of the GPS satellite signal.
88 Forerunner® 70 GPS Running Smartwatch
Owner's Manual
Data Fields
Name Description
Intervals The number of intervals completed for the current activity.
Laps The number of laps completed for the current activity.
Last Round Reps The number of repetitions in the last round of the activity.
Load The training load for the current activity. Training load is the amount of excess post-exercise oxygen
consumption (EPOC), which indicates the strenuousness of your workout.
Moves The total number of moves completed during the current activity.
Reps During a gym activity, the number of repetitions in a workout set.
Respiration Rate Your respiration rate in breaths per minute (brpm).
Rounds The number of exercise groups performed in an activity, such as jump rope.
Steps The number of steps taken during the current activity.
Stress Your current stress level.
Sunrise The time of sunrise based on your GPS position.
Sunset The time of sunset based on your GPS position.
Time of Day The time of day based on your current location and time settings (format, time zone, daylight saving
time).
Total Calories The amount of total calories burned for the day.
Pace Fields
Name Description
500m Pace The current rowing pace per 500 meters.
Average 500m Pace The average rowing pace per 500meters for the current activity.
Average Pace The average pace for the current activity.
Int. Pace The average pace for the current interval.
Lap 500m Pace The average rowing pace per 500meters for the current lap.
Lap Pace The average pace for the current lap.
Last Lap 500m Pace The average rowing pace per 500meters for the last lap.
Last Lap Pace The average pace for the last completed lap.
Last Len. Pace The average pace for your last completed pool length.
Last Move Pace The average pace for the last completed move.
Move Pace The average pace for the current move.
Pace The current pace.
Rolling Pace The continuous average pace of the last completed mile or kilometer.
PacePro Fields
Name Description
Next Split Distance Running. The total distance of the next split.
Next Split Target Pace Running. The target pace for the next split.
Split Distance Running. The total distance of the current split.
Split Distance Remaining Running. The remaining distance of the current split.
Split Pace Running. The pace for the current split.
Split Target Pace Running. The target pace for the current split.
Rest Fields
Name Description
Repeat On The timer for the last interval plus the current rest (pool swimming).
Rest Timer The timer for the current rest (pool swimming).
Data Fields Forerunner® 70 GPS Running Smartwatch
Owner's Manual
89
Run Dynamics
Name Description
Average GCT Balance The average ground contact time balance for the current session.
Average Ground Contact
Time
The average amount of ground contact time for the current activity.
Average Stride Length The average stride length for the current session.
Average Vertical Oscillation The average amount of vertical oscillation for the current activity.
Average Vertical Ratio The average ratio of vertical oscillation to stride length for the current session.
GCT Balance The left/right balance of ground contact time while running.
Ground Contact Time The amount of time in each step that you spend on the ground while running, measured
in milliseconds. Ground contact time is not calculated while walking.
Lap GCT Balance The average ground contact time balance for the current lap.
Lap Ground Contact Time The average amount of ground contact time for the current lap.
Lap Stride Length The average stride length for the current lap.
Lap Vertical Oscillation The average amount of vertical oscillation for the current lap.
Lap Vertical Ratio The average ratio of vertical oscillation to stride length for the current lap.
Stride Length The length of your stride from one footfall to the next, measured in meters.
Vertical Oscillation The amount of bounce while you are running. The vertical motion of your torso,
measured in centimeters for each step.
Vertical Ratio The ratio of vertical oscillation to stride length.
Speed Fields
Name Description
Avg. Moving Speed The average speed when moving for the current activity.
Avg. Overall Speed The average speed for the current activity, including both moving and stopped speeds.
Avg. Speed The average speed for the current activity.
Lap Speed The average speed for the current lap.
Last Lap Speed The average speed for the last completed lap.
Last Move Speed The average speed for the last completed move.
Maximum Speed The top speed for the current activity.
Move Speed The average speed for the current move.
Speed The current rate of travel.
Vertical Speed The rate of ascent or descent over time.
Stroke Fields
Name Description
Average Distance Per Stroke Paddle sports. The average distance traveled per stroke during the current activity.
Average Stroke Rate Paddle sports. The average number of strokes per minute (spm) during the current
activity.
Average Strokes Per Length The average number of strokes per pool length during the current activity.
Distance Per Stroke Paddle sports. The distance traveled per stroke.
Interval Strokes Per Length The average number of strokes per pool length during the current interval.
Interval Stroke Type The current stroke type for the interval.
Lap Distance Per Stroke Paddle sports. The average distance traveled per stroke during the current lap.
Lap Stroke Rate Paddle sports. The average number of strokes per minute (spm) during the current lap.
Lap Strokes Paddle sports. The total number of strokes for the current lap.
Last Lap Distance Per Stroke Paddle sports. The average distance traveled per stroke during the last completed lap.
90 Forerunner® 70 GPS Running Smartwatch
Owner's Manual
Data Fields
Name Description
Last Lap Stroke Rate Paddle sports. The average number of strokes per minute (spm) during the last
completed lap.
Last Lap Strokes Paddle sports. The total number of strokes for the last completed lap.
Last Length Strokes The total number of strokes for the last completed pool length.
Last Length Stroke Type The stroke type used during the last completed pool length.
Stroke Rate Paddle sports. The number of strokes per minute (spm).
Strokes Paddle sports. The total number of strokes for the current activity.
Swolf Fields
Name Description
Average Swolf The average swolf score for the current activity. Your swolf score is the sum of the time for one
length plus the number of strokes for that length (Swim Terminology, page18).
Interval Swolf The average swolf score for the current interval.
Last Length Swolf The swolf score for the last completed pool length.
Temperature Fields
Name Description
24-Hour Maximum The maximum temperature recorded in the last 24hours from a compatible temperature sensor.
24-Hour Minimum The minimum temperature recorded in the last 24hours from a compatible temperature sensor.
Temperature The temperature of the air. Your body temperature affects the temperature sensor. You can pair a
tempe
™
sensor with your device to provide a consistent source of accurate temperature data.
Timer Fields
Name Description
Active Time The total time of active movement for the current activity.
Average Lap Time The average lap time for the current activity.
Average Move Time The average move time for the current activity.
Average Pose Time The average pose time for the current activity.
Elapsed Time The total time recorded. For example, if you start the activity timer and run for 10 minutes, then
stop the timer for 5 minutes, then start the timer and run for 20 minutes, your elapsed time is
35 minutes.
Estimated Finish Time The estimated finish time of the current activity.
Interval Time The stopwatch time for the current interval.
Lap Time The stopwatch time for the current lap.
Last Lap Time The stopwatch time for the last completed lap.
Last Move Time The stopwatch time for the last completed move.
Last Pose Time The stopwatch time for the last completed pose.
Move Time The stopwatch time for the current move.
Moving Time The total time moving for the current activity.
Overall Ahead/Behind The overall time ahead or behind of the target pace or speed.
Pose Time The stopwatch time for the current pose.
Set Timer During a strength training activity, the amount of time spent in the current workout set.
Stopped Time The total time stopped for the current activity.
Swim Time The swimming time for the current activity, not including rest time.
Timer The current time of the activity timer.
Data Fields Forerunner® 70 GPS Running Smartwatch
Owner's Manual
91
Workout Fields
Name Description
Reps to Go During a workout, the remaining repetitions.
Step Duration The time or distance remaining for the workout step.
Step Pace The current pace during the workout step.
Step Speed The current speed during the workout step.
Step Time The time elapsed for the workout step.
92 Forerunner® 70 GPS Running Smartwatch
Owner's Manual
Data Fields
support.garmin.com
© 2026 Garmin Ltd. or its subsidiaries
Garmin
®
, the Garmin logo, ANT+
®
, Auto Lap
®
, Auto Pause
®
, Edge
®
, Forerunner
®
, inReach
®
, Move IQ
®
, and TracBack
®
are trademarks of Garmin Ltd. or its
subsidiaries, registered in the USA and other countries. Body Battery
™
, Connect IQ
™
, Garmin Connect
™
, Garmin Connect+
™
, Garmin Express
™
, Garmin Human
Performance Lab
™
, Garmin Messenger
™
, Health Snapshot
™
, HRM-Fit
™
, HRM-Pro
™
series, Index
™
, PacePro
™
, tempe
™
, and Varia
™
are trademarks of Garmin Ltd. or
its subsidiaries. These trademarks may not be used without the express permission of Garmin.
Android
™
is a trademark of Google Inc. The Bluetooth
®
word mark and logos are owned by the Bluetooth SIG, Inc. and any use of such marks by Garmin is
under license. The Cooper Institute
®
, as well as any related trademarks, are the property of The Cooper Institute. USB-C
®
is a registered trademark of USB
Implementers Forum. Zwift
™
is a trademark of Zwift, Inc. Other trademarks and trade names are those of their respective owners.
M/N: AB5206
May 2026 GUID-E3AB50C9-691D-4482-8387-7EEB3961CA87 v1