
2 DR
®
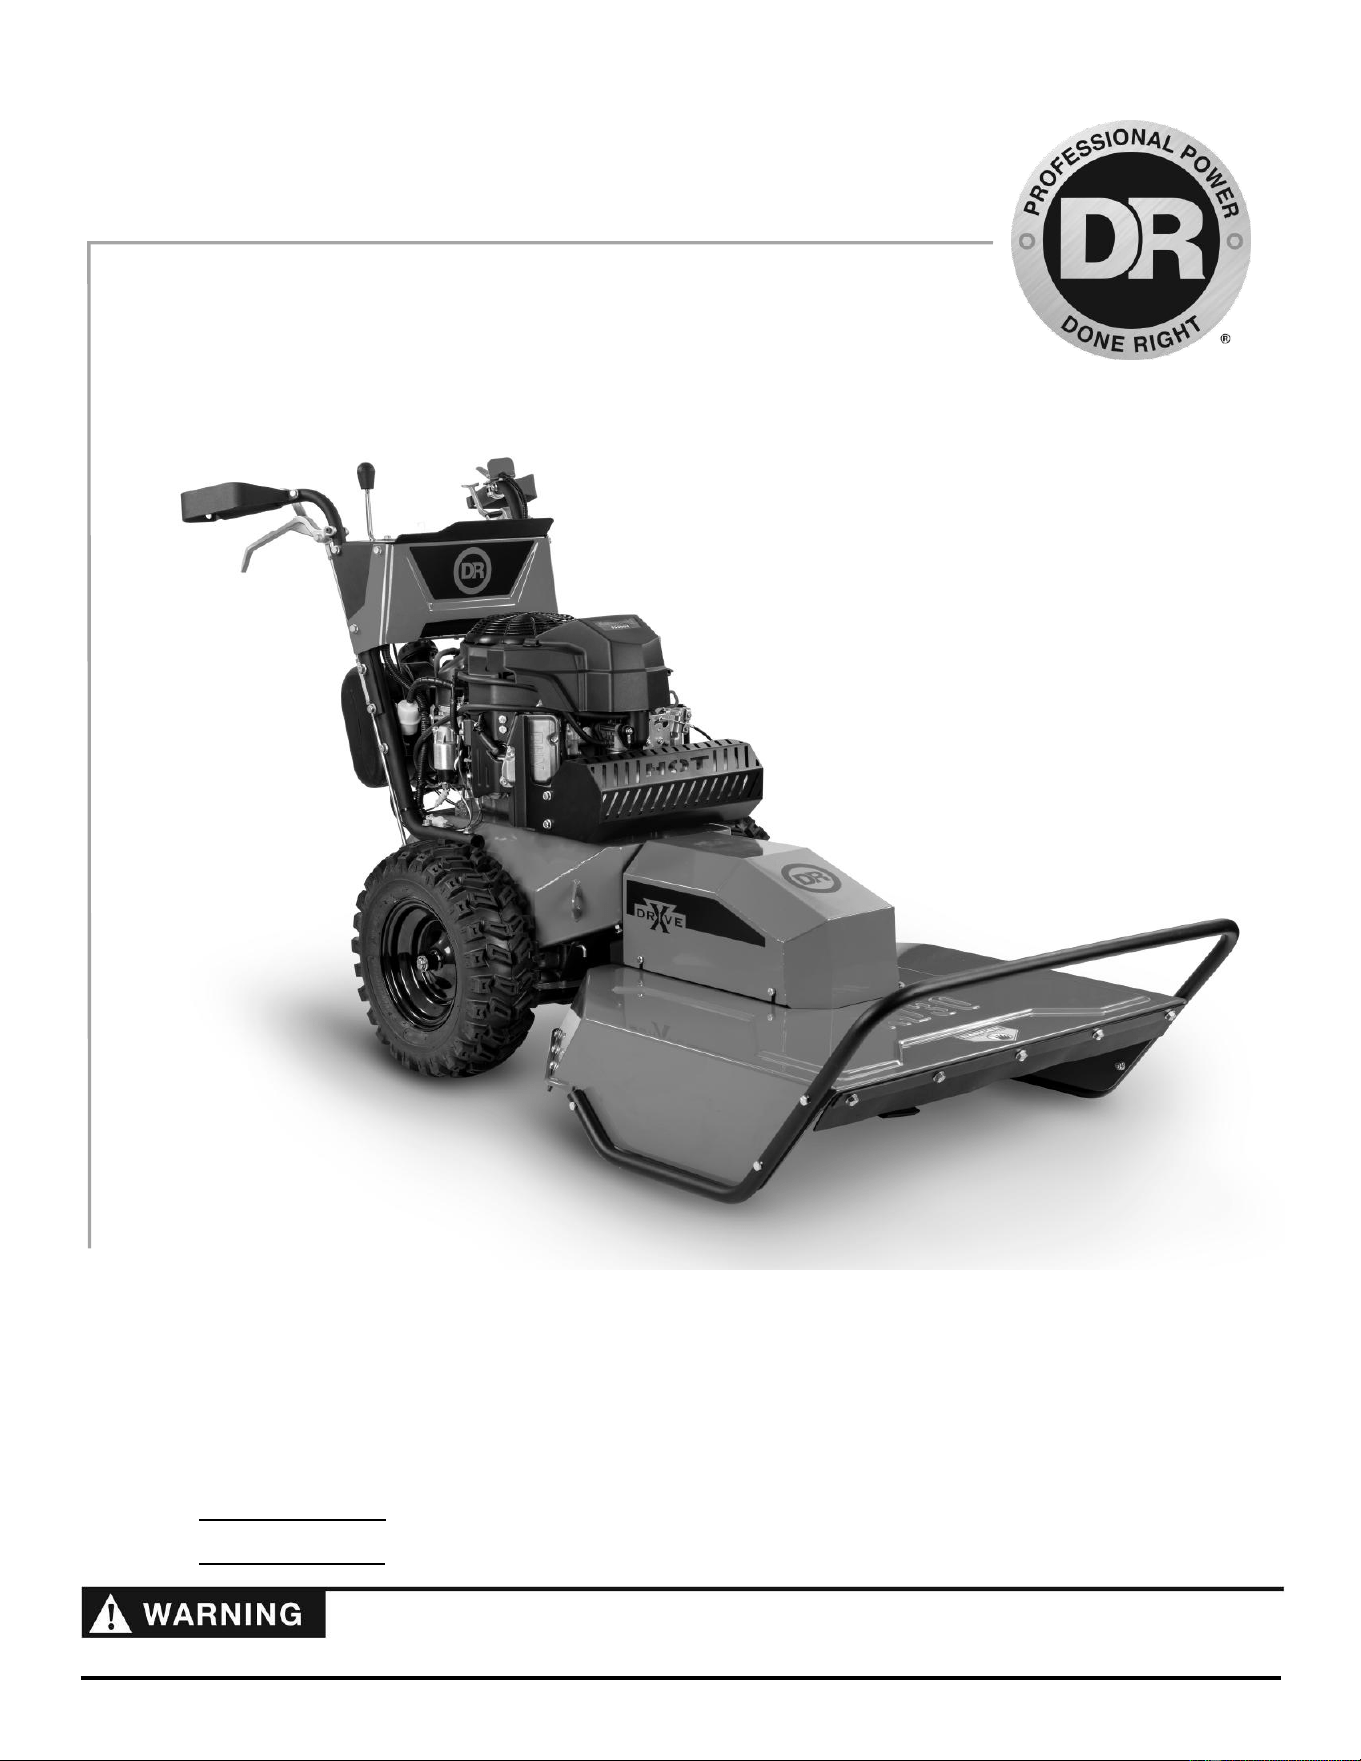
FIELD and BRUSH MOWER
CONTACT US AT www.DRpower.com 3
Table of Contents
Chapter 1: General Safety Rules ............................................................................................................................................................ 4
Chapter 2: Setting Up the DR FIELD and BRUSH MOWER ................................................................................................................ 7
Chapter 3: Operating the DR FIELD and BRUSH MOWER ................................................................................................................. 13
Chapter 4: Maintaining the DR FIELD and BRUSH MOWER .............................................................................................................. 18
Chapter 5: Troubleshooting .................................................................................................................................................................. 30
Chapter 6: Parts Lists and Schematic Diagrams .................................................................................................................................. 32
Conventions used in this manual
Serial Number and Order Number
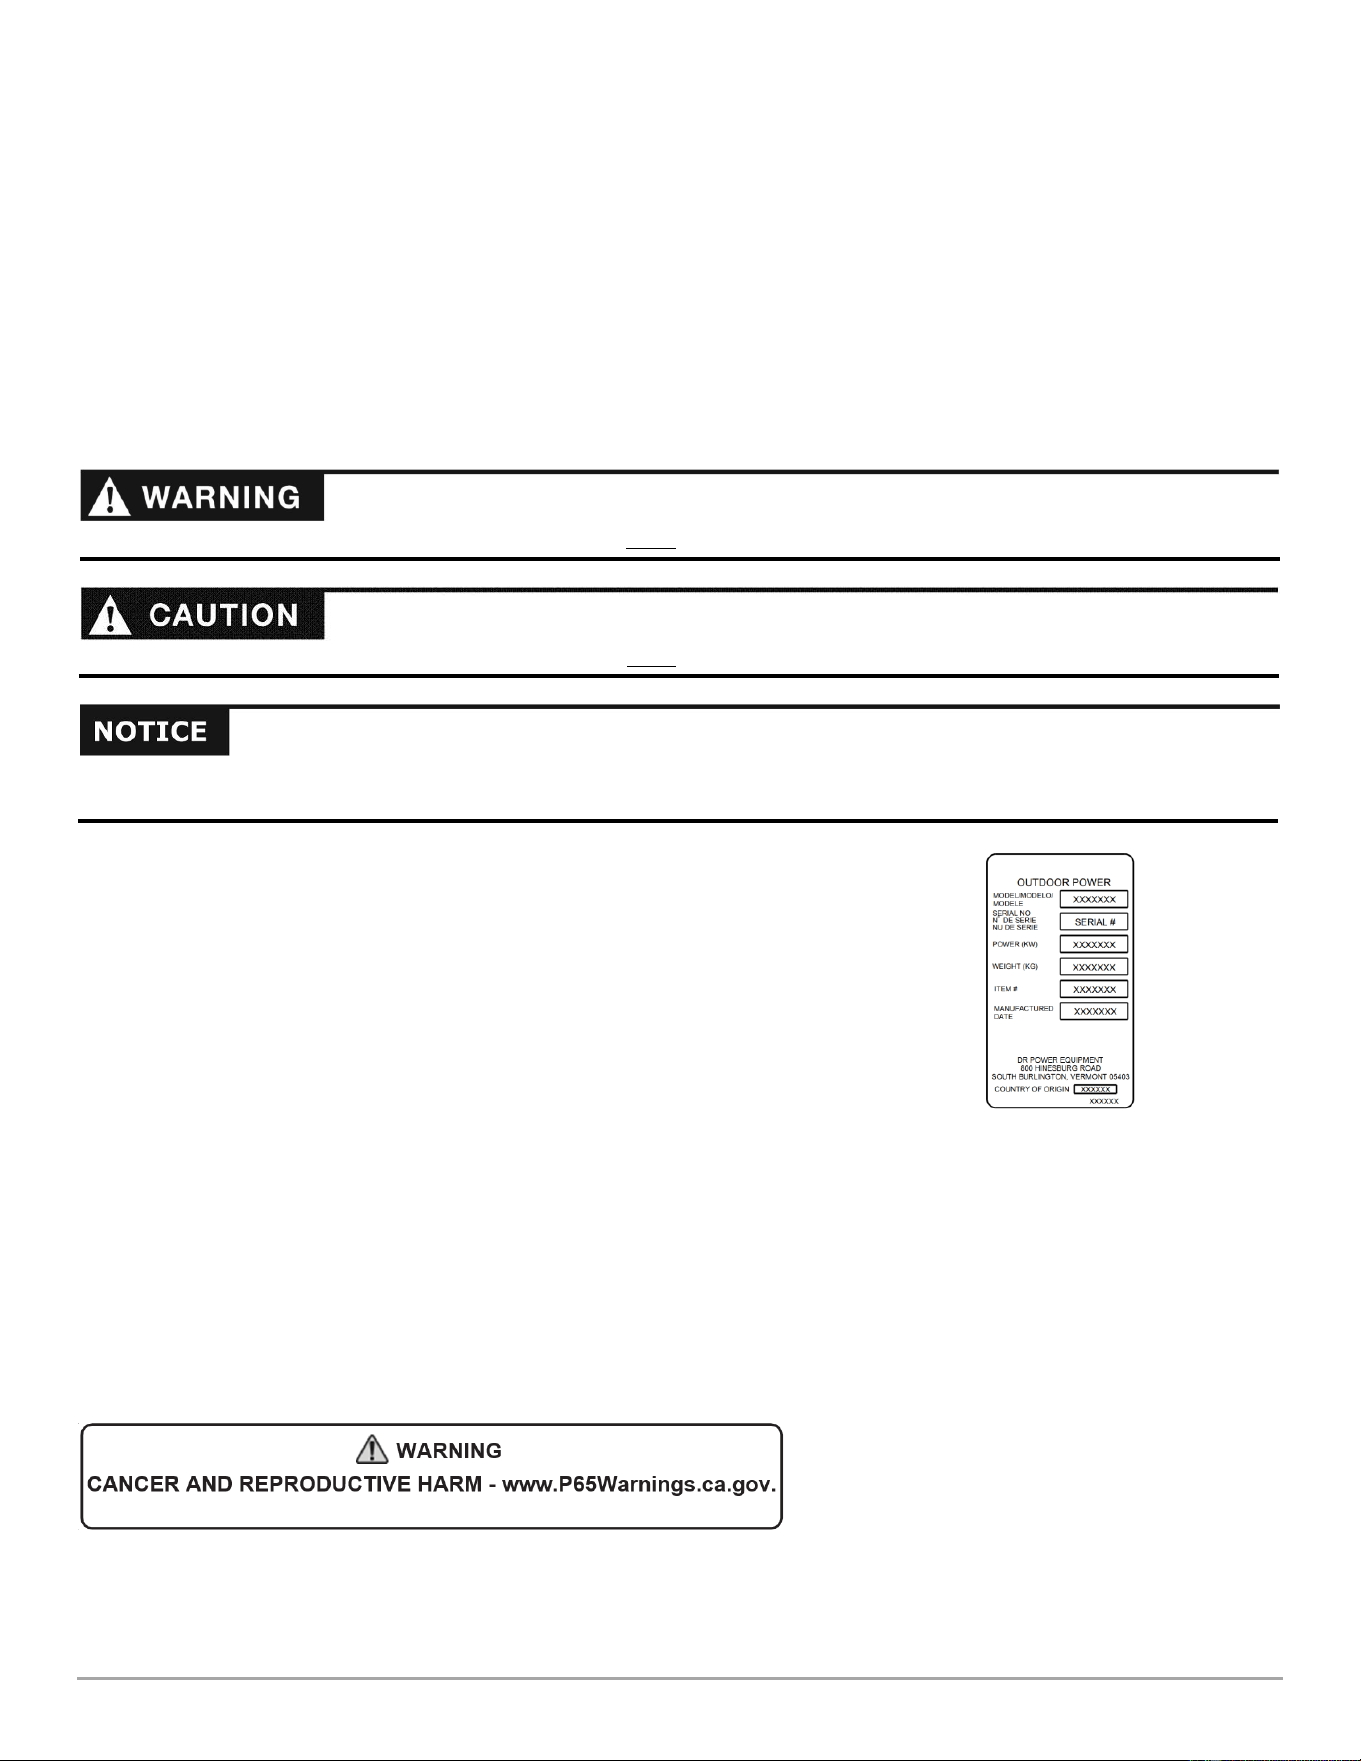
A Serial Number is used to identify your machine and is located on the Serial
Number Label on your machine (Figure 1). An Order Number is used to check
and maintain your order history and is located on your packing slip. For your
convenience and ready reference, enter the Serial Number and Order Number in
the space provided on the front cover of this manual.
Additional Information and Potential Changes
DR Power Equipment reserves the right to discontinue, change, and improve its
products at any time without notice or obligation to the purchaser. The
descriptions and specifications contained in this manual were in effect at
printing. Equipment described within this manual may be optional. Some
illustrations may not be applicable to your machine.
California Proposition 65
Figure 1
This indicates a hazardous situation, which, if not avoided, could result in death or serious injury.
This indicates a hazardous situation, which, if not avoided, could result in minor or moderate injury.
This information is important in the proper use of your machine. Failure to follow this instruction could result in damage
to your machine or property.
4 DR
®
FIELD and BRUSH MOWER
Chapter 1: General Safety Rules
Labels
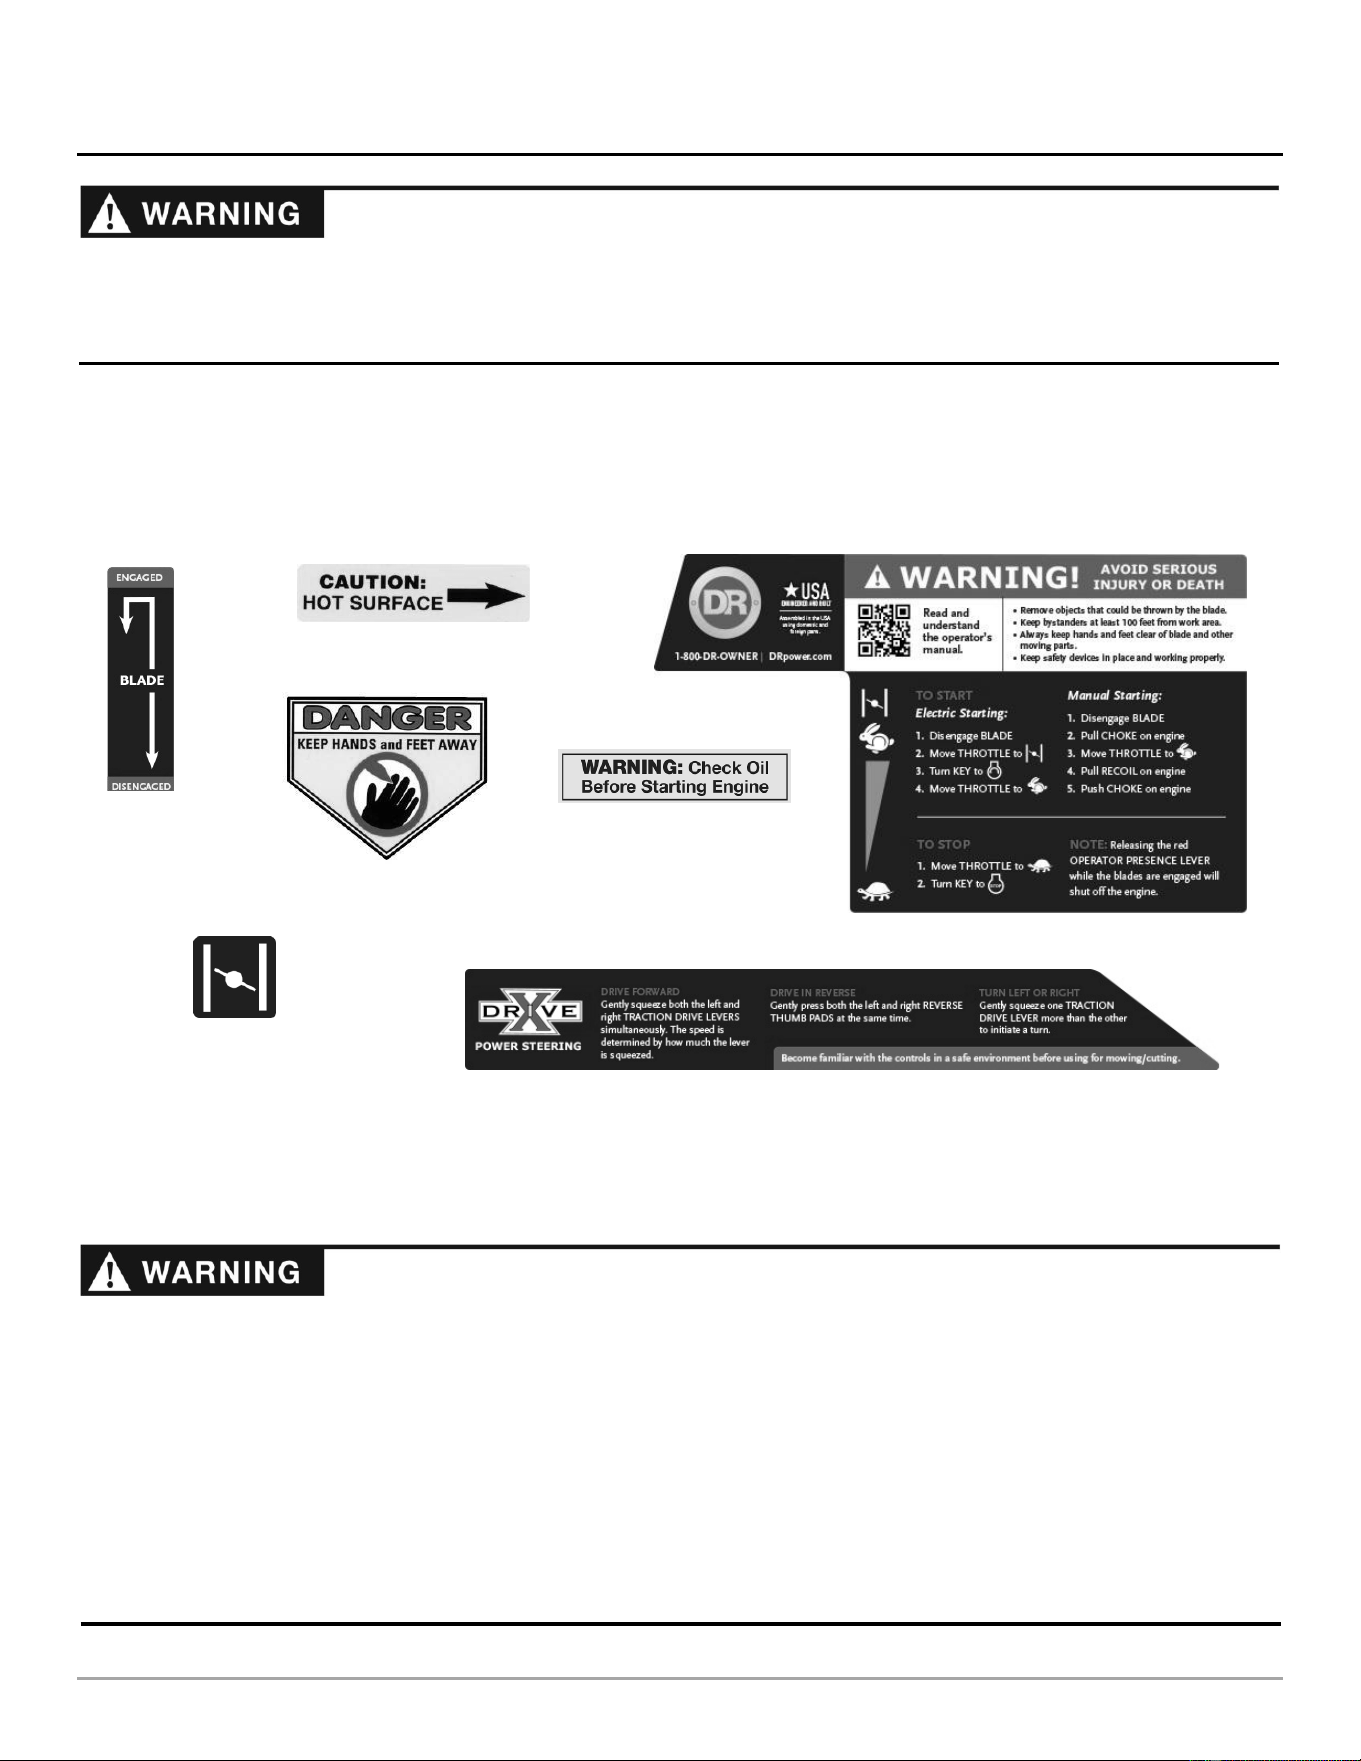
The DR FIELD and BRUSH MOWER carries prominent labels as reminders for its proper and safe use. Shown below are copies of
all the Safety and Information labels that appear on the equipment. Take a moment to study them and make a note of their
location on your mower as you set up and before you operate the unit. Replace damaged or missing safety and information labels
immediately.
Warnings, Cautions, and Notices
General Safety
Read this safety & operating instructions manual before you use the DR FIELD and BRUSH MOWER. Become familiar with the
operation and service recommendations to ensure the best performance from your machine. If you have any questions or need
assistance, please contact us at www.DRpower.com or call toll-free 1-800-DR-OWNER (376-9637) and one of our Technical
Support Representatives will be happy to help you.
Safe operation of the DR FIELD and BRUSH MOWER is necessary to prevent death or serious injury. Always take the following
precautions when operating this machine:
The DR FIELD and BRUSH MOWER is designed to mow grass and brush. Do not use it for any other purpose.
If the machine makes an unusual noise or vibration or if there are obstructions underneath the machine, shut off the DR
FIELD and BRUSH MOWER engine. Wait five minutes for the engine to cool. Disconnect the spark plug wire(s) and then
inspect the machine for clogs or loose parts. Clear any obstructions and repair and/or replace damaged parts.
The mower blades are sharp. Wrap the blades or wear gloves and use extra caution when servicing.
Always keep the machine in good, safe operating condition. Always make certain nuts and bolts are tight. Do not use
substitute hardware.
See manufacturer’s instructions for proper operation and installation of accessories. Only use accessories approved by DR
Power Equipment.
#136831
#A0001645278
#A0001645284
#136491
#137581
#A0001645279
#A0001645291
(XD26)
CONTACT US AT www.DRpower.com 5
General Safety (Continued)
Protecting Yourself and Those around You
Slope Operation
Slopes are a major factor related to slip and fall accidents. All slopes require caution. If you feel uneasy on a slope, do not mow it.
Always take the following precautions when using this machine on slopes:
Always mow across the face of slopes. Exercise extreme caution when changing direction on slopes.
Never operate near drop-offs, ditches, or embankments, or on slopes greater than 20 degrees
Never operate on wet or slippery slopes.
This is a high-powered machine with moving parts operating at high speeds. Always take the following precautions when
operating this machine:
Always wear protective goggles or safety glasses with side shields.
Wear sturdy shoes with non-slip treads.
Wear long pants while operating the mower.
Avoid wearing loose clothing or jewelry which can catch on moving parts
Use ear protectors or ear plugs.
We recommend wearing gloves while mowing. Be sure your gloves fit properly and do not have loose cuffs or drawstrings.
Allow only responsible adults who are familiar with these safety rules and operating instructions to use your DR FIELD and
BRUSH MOWER.
Keep your hands and feet away from the blades, belt, pulley, and concealed areas while the engine is running.
Keep people and pets away from your machine and out of the work area at all times. Disengage the blade and stop the engine
if a person or pet is within 100 feet of the machine.
Children are often attracted to the machine and the mowing activity. Never assume that children will remain where you last
saw them.
Never allow people to ride on the mower.
Before mowing, clear the area of objects such as rocks, toys, wire, bones, sticks, etc.
Never remove or alter standard parts or add anything to the DR FIELD and BRUSH MOWER especially all shields and guards.
Before and while moving backwards, look behind, and down, for small children.
Use extra care when approaching blind corners, shrubs, trees, or other objects that may obscure your vision.
Use caution when mowing close to fences, buildings, and trees so as not to hit the handle bar. You could injure your hand or
lose control of the machine.
Use the DR FIELD and BRUSH MOWER only in daylight or very well lit work areas.
Be sure all blade and wheel controls are disengaged before attempting to start the engine.
Always give undivided attention to the machine and your surroundings. Watch for traffic when mowing near roadways.
Disengage the mower blades and exercise extreme caution when on or crossing drives, walks, or roads.
In an emergency, to quickly stop the cutting blade and shut off the engine, remove your hand from the operator presence
lever on the left handlebar.
Always shut off the engine whenever you leave the machine.
When operating over uneven and/or slippery terrain, use extreme caution to ensure solid and firm footing. Keep a firm hold
on the handlebars and walk, never run.
Do not operate the machine when under the influence of drugs, alcohol, or medication.

6 DR
®
FIELD and BRUSH MOWER
Safety with Gasoline - Powered Machines
A Note to All Users
Under California law, and the laws of some other states, you are not permitted to operate an internal combustion engine using
hydrocarbon fuels without an engine spark arrester. This also applies to operation on US Forest Lands. All DR
®
FIELD and
BRUSH MOWERS shipped to California, New Mexico and Washington State are provided with spark arresters. Failure of the
owner or operator to maintain this equipment in compliance with state regulations is a misdemeanor under California law and
may be in violation of other state and/or federal regulations. Contact your appropriate local or state organization for specific
information in your area.
No list of warnings and cautions can be all-inclusive. If situations occur that are not covered by this manual, the operator must
apply common sense and operate this DR FIELD and BRUSH MOWER in a safe manner. Contact us at www.DRpower.com or call
1-800-DR-OWNER (376-9637) for assistance.
Gasoline is a highly flammable liquid that gives off flammable vapor that can be ignited and cause a fire or explosion. Always
follow these precautions:
Never run the engine in an enclosed area or without proper ventilation as the exhaust contains carbon monoxide, an odorless,
tasteless, and poisonous gas.
Store all fuel and oil in containers specifically designed and approved for this purpose. Keep away from heat and open flame
and out of the reach of children.
Replace rubber fuel lines and grommets when worn or damaged or after 5 years of use, whichever comes first.
Fill the gasoline tank outdoors with the engine off and after the engine has cooled completely. Do not handle gasoline if you
or anyone nearby is smoking.
If you spill gasoline do not start the engine. Move the machine away from the area until the gas vapors have dissipated.
Before performing engine maintenance or repairs; shut down the engine, disconnect the spark plug wire(s), and wait 5
minutes for the engine to cool.
Never change the engine governor settings or modify the engine speed.
Never check for an ignition spark with the spark plug or spark plug wire(s) removed. Always use an approved spark tester.
Never tamper with safety devices. Regularly check their proper operation.
Allow the engine to cool completely before storing in any enclosed area.
Keep combustible substances away from the engine when it is hot. Never cover the machine while the muffler is still hot.
To reduce fire hazard, keep the engine and muffler free of debris build-up.
Do not operate the engine with the air cleaner or the carburetor air intake cover removed.
Do not use flammable solutions to clean the air filter.
Never operate the engine without the muffler and deflector, if so equipped. Inspect the muffler and deflector periodically and
replace if necessary.
The muffler and engine become very hot and can cause a severe burn. Do not touch.
CONTACT US AT www.DRpower.com 7
Brush Bar
Rubber Debris
Guard
Brush Deck with
Heavy Duty 30″
Brush Blade
Oil Fill/
Dipstick
Oil Drain
Tube
ON
OFF
18.5 hp
Kawasaki Engine
Muffler
Oil Filter
Belt Cover
Key Switch
Battery
Hand Guards
Neutral Bypass
Link (Both Sides)
Multi Tool
Service Wrench
Right Side Traction
Drive Lever
Left Side Traction
Drive Lever
Operator Presence
Control Lever
Throttle/Choke
Lever
Blade Engage
Lever
Maintenance
Meter
All Terrain
Pneumatic
Wheels with
Sealant
Chapter 2: Setting Up the DR FIELD and BRUSH MOWER
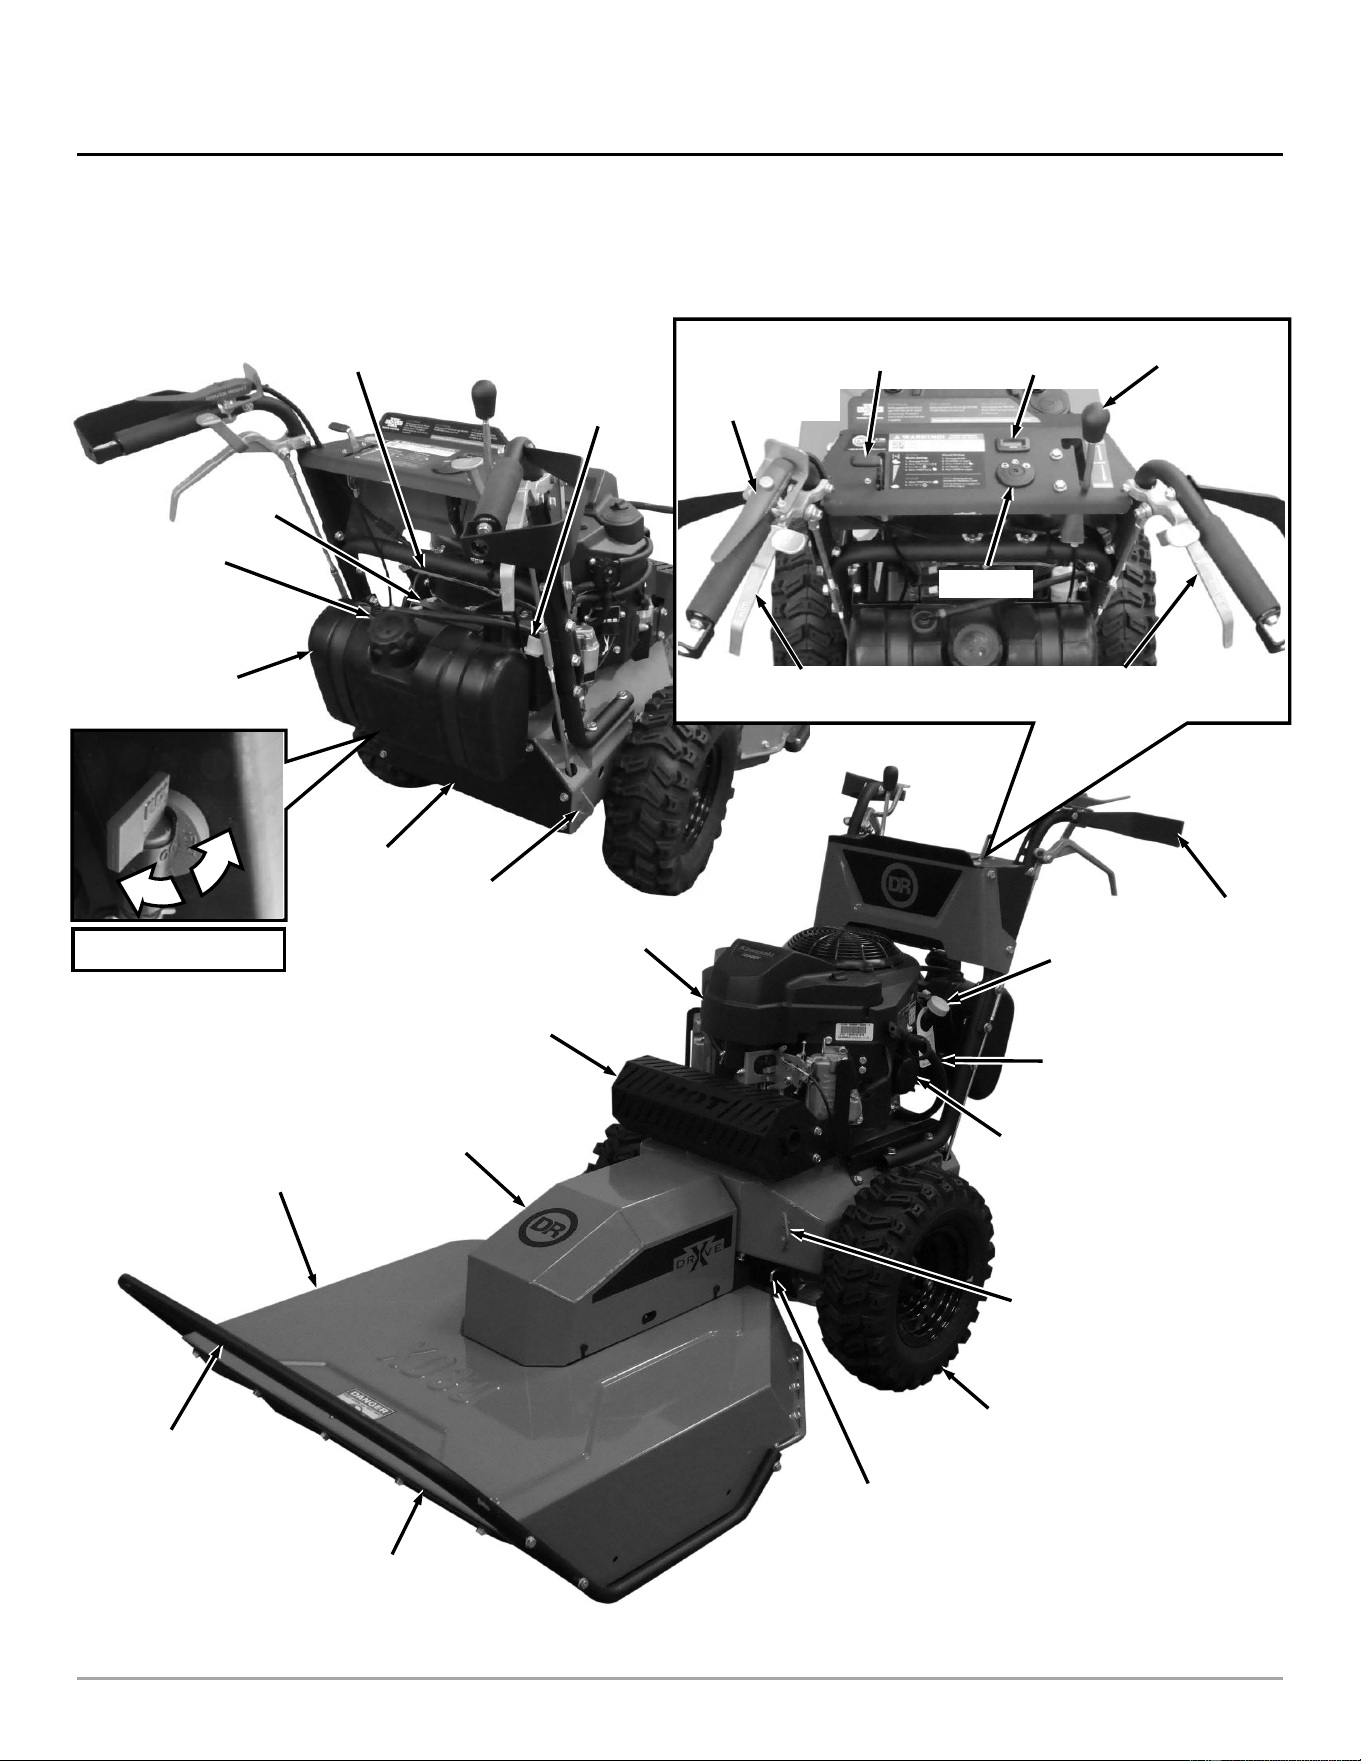
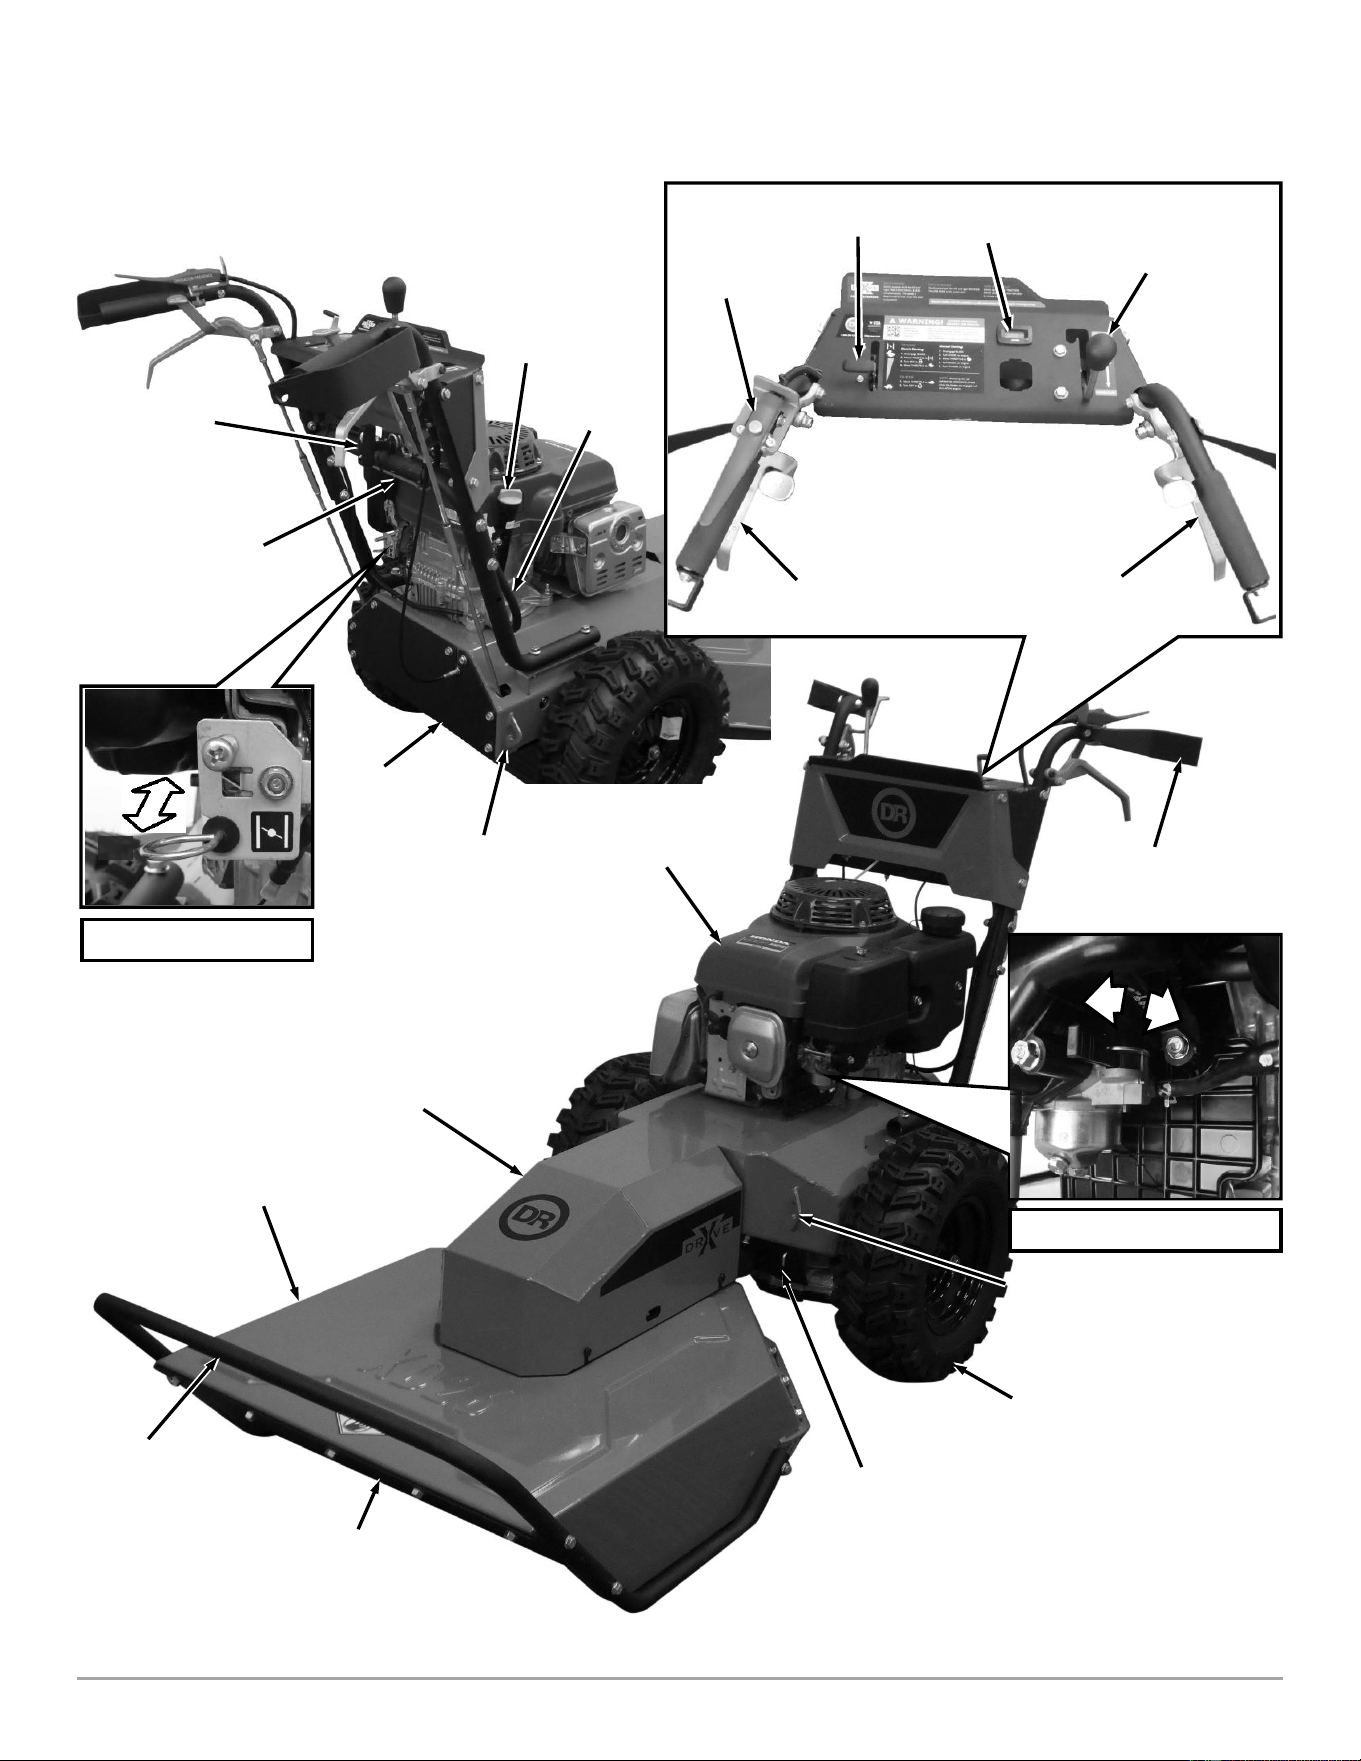
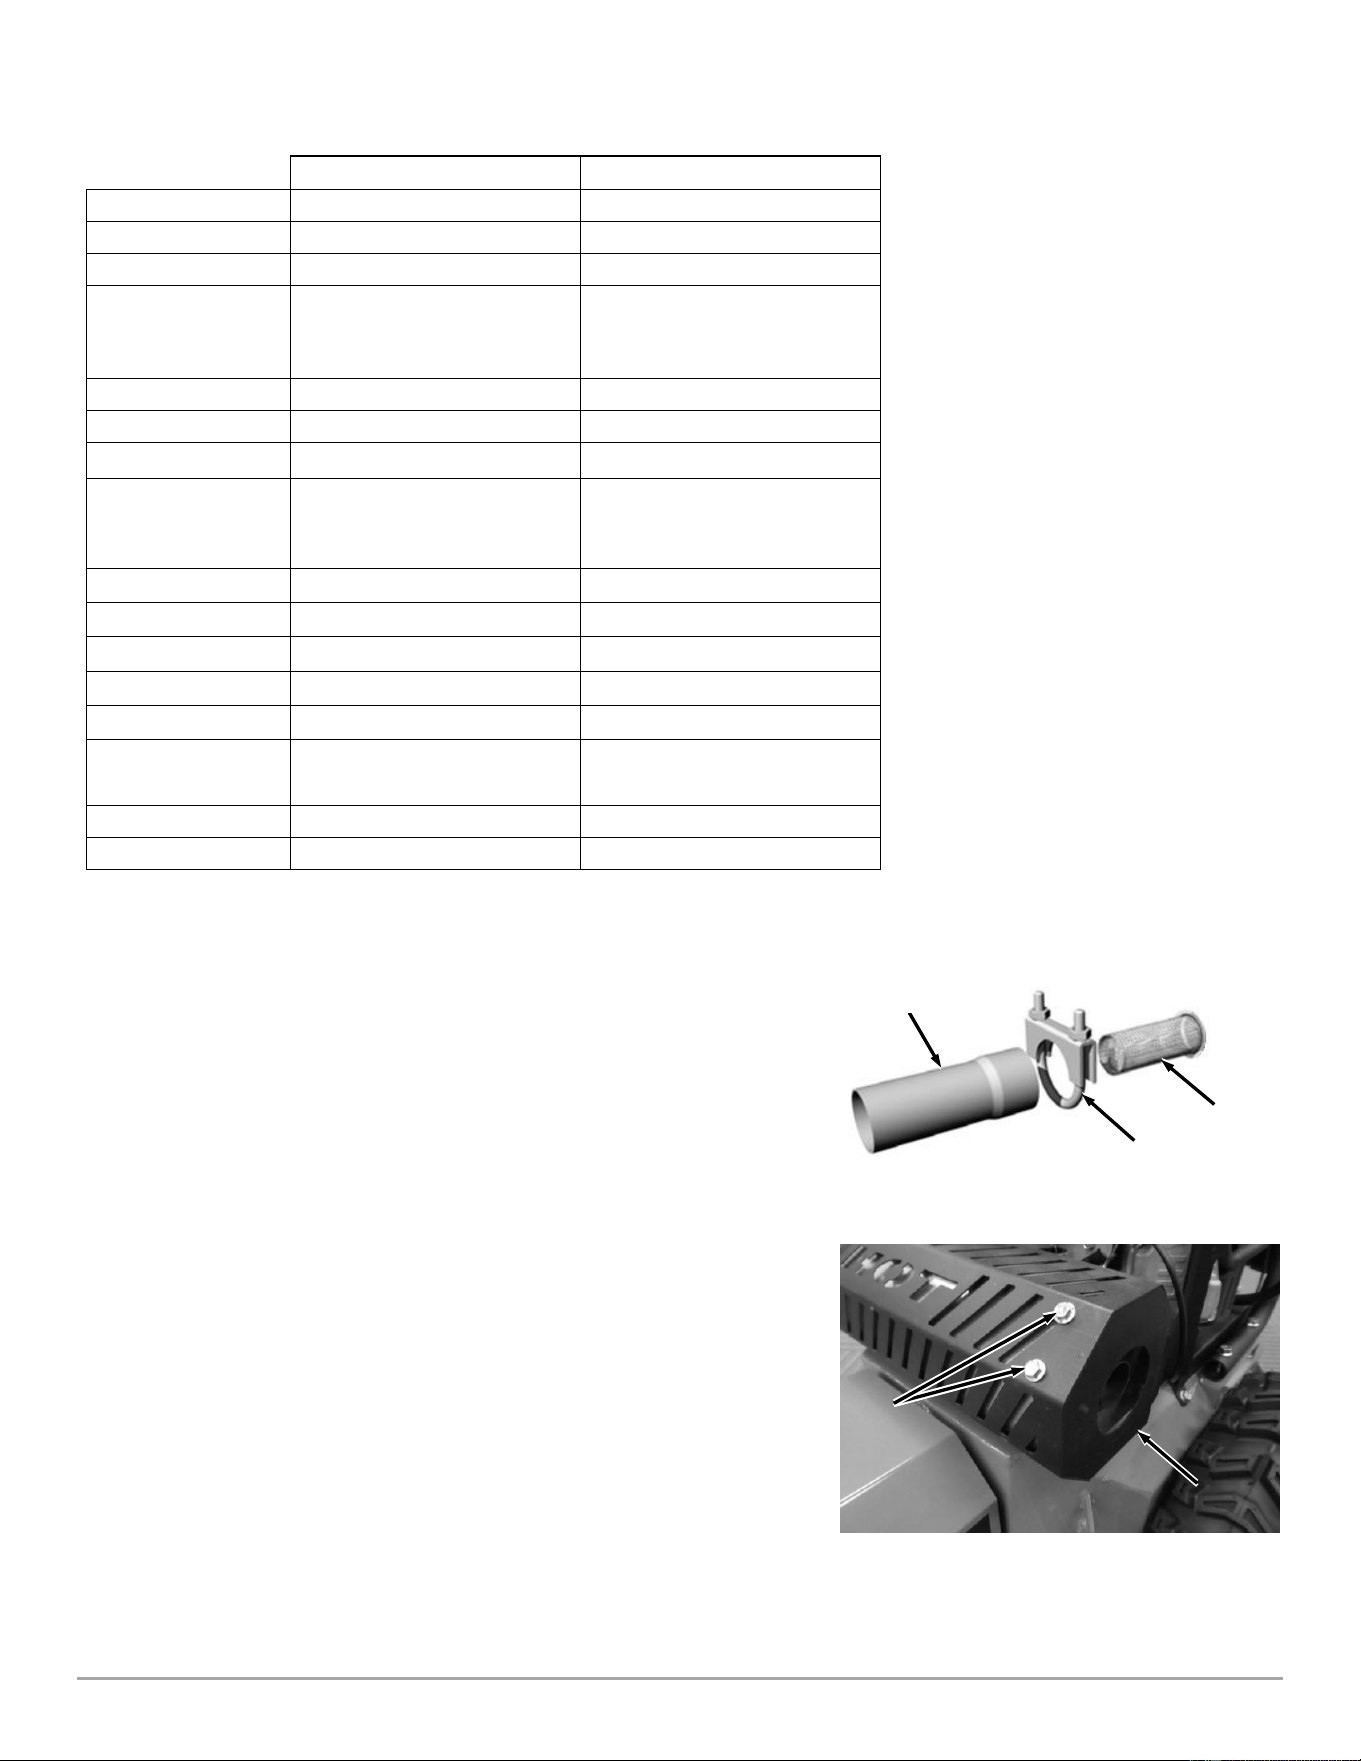
It may be helpful to familiarize yourself with the controls and features of your DR FIELD and BRUSH MOWER as shown in Figure
2a and 2b before beginning these procedures. If you have any questions, contact us at www.DRpower.com.
DR FIELD and BRUSH MOWER Controls and Features (XD30 with Kawasaki Engine)
Figure 2a
Fuel Shut-Off Valve
Fuel Fill
Cap
Fuel Tank
Fuel Filter
Rear Cover
Plate
Transport
Tie-down
(Both Sides)
Transport
Tie-down
(Both Sides)
8 DR
®
FIELD and BRUSH MOWER
Right Side
Traction Drive
Lever
Left Side Traction
Drive Lever
Operator Presence
Control Lever
Throttle Lever
Blade Engage
Lever
Maintenance
Meter
Oil Fill/
Dipstick
Hand Guards
Oil Drain
Tube
All Terrain
Pneumatic
Wheels with
Sealant
Neutral Bypass
Link (Both Sides)
Rubber Debris
Guard
Belt Cover
Brush Deck with
Heavy Duty 26″
Brush Blade
Brush Bar
10.2 hp Honda
Engine
Multi Tool
Service Wrench
ON
OFF
ON
OFF
DR FIELD and BRUSH MOWER Controls and Features (XD26 with Honda Engine)
Figure 2b
Rear Cover
Plate
Transport Tie-down
(Both Sides)
Transport
Tie-down
(Both Sides)
Pull Start
Handle
Fuel Shut-Off Valve
Choke Lever
CONTACT US AT www.DRpower.com 9
OFF
Specifications
XD26
XD30
Engine
Honda 10.2 HP
Kawasaki 18.5 HP
Fuel Capacity
2.2 Quarts
2 Gal. (7.57 L)
Oil Capacity
38.4 oz.
57.6 oz.
Cutting Capacity
4' Tall Grass
8' Tall Brush
2" Thick Saplings
6' Tall Grass
8' Tall Brush
3" Thick Saplings
Cutting Width
26"
30"
Cutting Height
4"
4"
Drive/Steering System
Dual Hydrostatic Transmissions
Dual Hydrostatic Transmissions
Speeds
Infinite Variable Speed
0-3.2MPH Forward
0-1.9MPH Reverse
Infinite Variable Speed
0-3.2MPH Forward
0-1.9MPH Reverse
Torque
Up to 100 lb-ft
Up to 100 lb-ft
Shaft
.75″ Diameter, Keyed
.75″ Diameter, Keyed
Maintenance
None
None
Weight
18 lbs per Transaxle
18 lbs per Transaxle
Steering
X-Drive Power Steering
X-Drive Power Steering
Tires
16X6.5, All Terrain
Sealant Filled
16X6.5, All Terrain
Sealant Filled
Machine Dimensions
74″ L, 30″ W, 42″ H
76″ L, 34″ W, 42″ H
Machine Weight
313 lbs.
379 lbs.
Installing the Spark Arrestor (XD30 Only)
Note: The XD26 Honda model is shipped with the Spark Arrestor already installed.
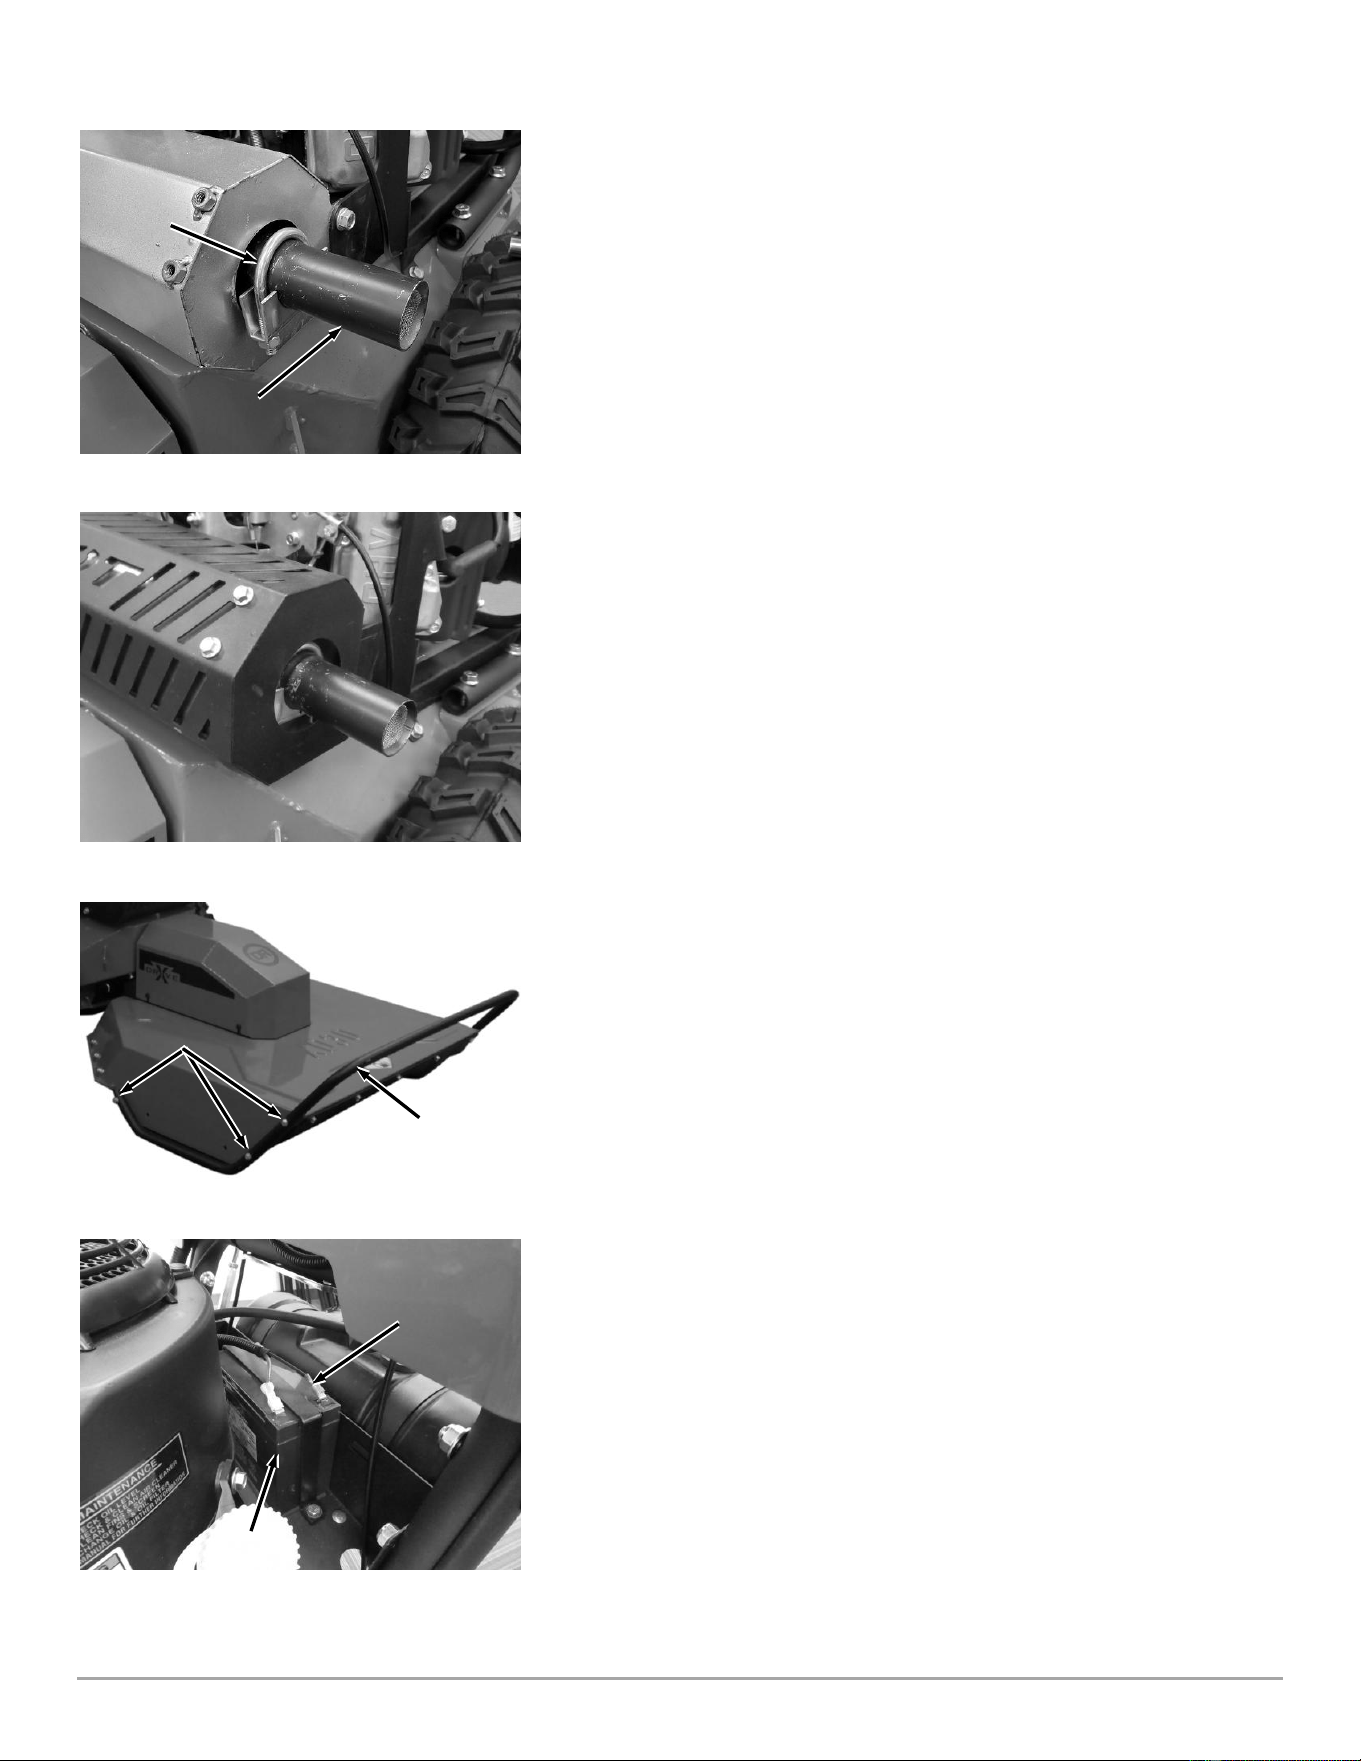
There is a Tube, Screen, and Clamp included in the Spark Arrestor Kit (Figure 3).
The Kit is shipped in the Product Package. The Instructions included in the Kit
are not used this application.
Tools and Needed:
3/8″ Wrench
1/2″ Wrench
1. Remove the Spark Arrestor Parts from the Product Package (Figure 3).
2. Remove the four Bolts (two on each side) securing the Muffler Guard using
a 3/8″ Wrench (Figure 4).
Muffler
Guard
Figure 4
Bolts
Screen
Figure 3
Tube
Clamp
10 DR
®
FIELD and BRUSH MOWER
Figure 6
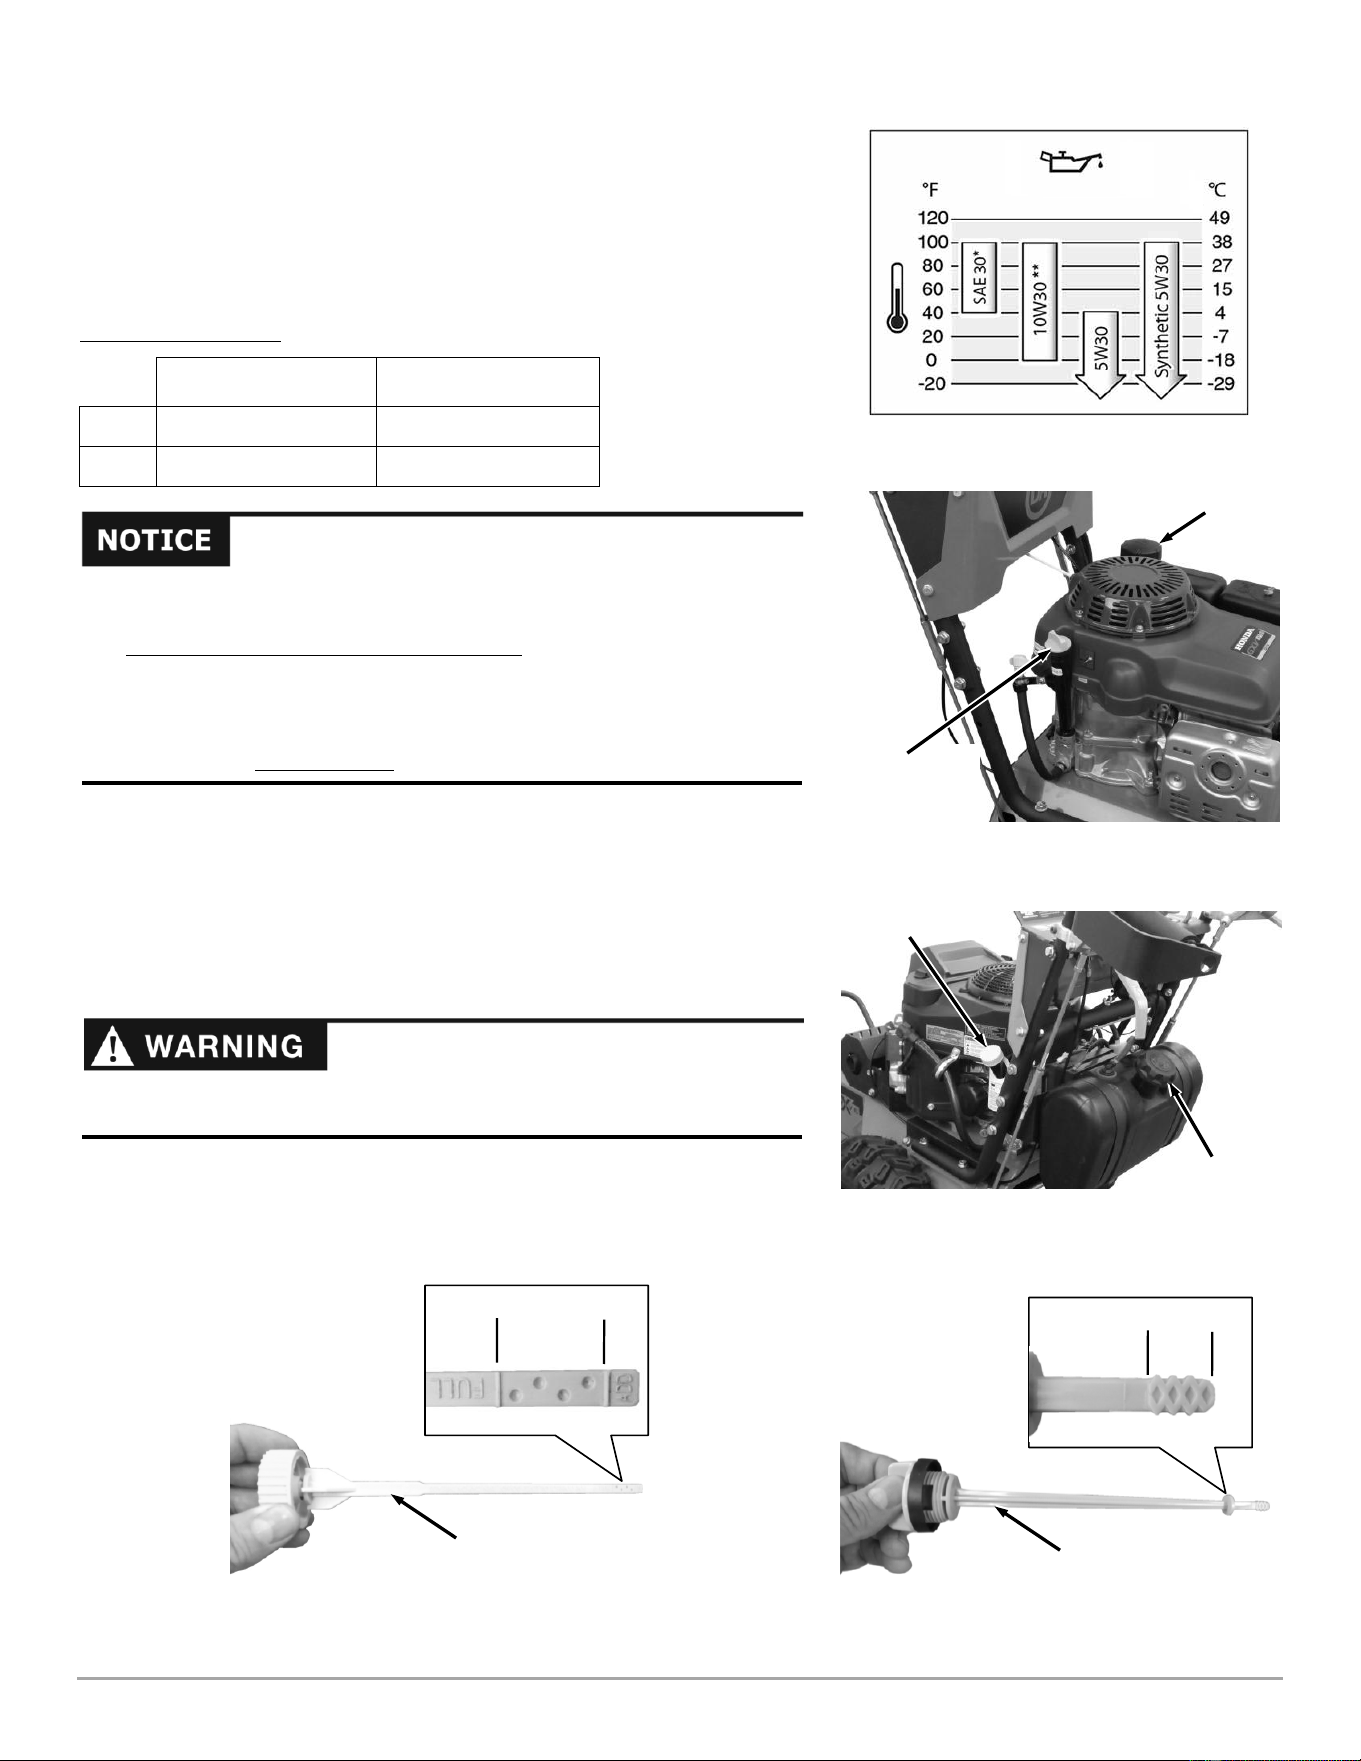
3. Insert the Screen into the Spark Arrestor Tube and position the larger end of
the Tube fully onto the Muffler (Figure 5).
4. Install the Clamp around the Spark Arrestor Tube and against the Inner
Muffler Guard. Secure using a 1/2″ Wrench.
5. Reposition the Muffler Guard over the Spark Arrestor first and then down
over the opposite end (Figure 6). Note: You may need to pull the end of the
Guard out as you position the Guard on the opposite side to clear the
Muffler.
6. Secure the Guard onto the Muffler with the four Bolts.
Installing the Brush Bar (XD30 Only)
Note: The XD26 model is shipped with the Brush Bar installed.
Tools and Supplies Needed:
Gloves
Wire Cutters
Two 1/2" Wrenches
1. Cut the Cable Ties securing the Brush Bar to the Frame with Wire Cutters
and rotate the Brush Bar forward to align with the mounting holes at the
front of the Deck. (Figure 7).
Note: the XD30 model is shipped with Brush Bar mounting Hardware included in
the product package.
2. Secure the Brush Bar to the Deck with the six 5/16-18 X 1-1/4″ Bolts and
5/16-18 Locknuts. Note: Install all by hand first and then use two 1/2″
Wrenches to tighten.
Connecting the Battery Wire (Electric Start Models)
We ship all Electric-Starting Mowers with the negative terminal Battery wire
disconnected. This prevents the Battery from discharging during shipment.
Before using your Mower, you must connect the Battery wire.
1. Connect the negative (black) wire to the negative terminal on the Battery by
sliding the Connector onto the Terminal (Figure 8).
Figure 8
Negative
Battery Wire
Battery
Bolts and
Locknuts
Figure 7
Brush Bar
Spark
Arrestor
Figure 5
Clamp
CONTACT US AT www.DRpower.com 11
Figure 9
Adding Oil and Gasoline
* SAE 30 is our recommendation for typical warmer season use.
** 10W30 is our recommendation for typical colder season use.
Note: Refer to the Oil type Chart for selecting the proper Oil for ambient
temperature range (Figure 9).
ENGINE CAPACITIES
Honda
Kawasaki
Oil
38.4 oz.
57.6 oz.
Fuel
2.2 Quarts
2 Gal
1. Place the machine on a level surface and initially add 1/2 of oil
recommended into the Oil Fill (Figure 10a for XD26 Honda machines or
Figure 10b for XD30 Kawasaki machines).
2. Wait one minute for the oil to settle and check the Dipstick (Figure 11a for
XD26 Honda machines or Figure 11b for XD30 Kawasaki machines).
Continue adding a few ounces of oil at a time, rechecking the Dipstick until
the oil reaches the full mark. Be careful not to overfill.
3. Remove the Gas Fill Cap and add Gas to the Fuel Tank to not more than
1/4" from the bottom of the Fill Neck with fresh, unleaded gas (Figure 10a
for XD26 Honda machines or Figure 10b for XD30 Kawasaki machines).
Full
Figure 11b
Add
XD30 Oil
Fill/Dipstick
Full
Figure 11a
Add
XD26 Oil
Fill/Dipstick
Figure 10b
Gas Fill Cap
Oil Fill/Dipstick
Figure 10a
Oil
Fill/Dipstick
Gas Fill Cap
Before filling the Fuel Tank at any point after this initial fill; turn the Engine
OFF and let it cool at least five minutes before removing the Gas Fill Cap
You must add Oil before starting the engine. This machine is shipped
without oil. Traces of oil may be in the reservoir from factory testing, but
you must add oil before starting the engine. Fill the reservoir slowly,
checking the level frequently to avoid overfilling.
To get an accurate reading when checking the oil level:
- The machine must be on a level surface.
- The dipstick SHOULD NOT be screwed down.
12 DR
®
FIELD and BRUSH MOWER
Valve Stem
Protective Cap
Figure 12
Check the Tire Pressure
Tools Needed:
Tire Pressure Gauge
Air Compressor
1. Remove the Valve Stem Protective Cap (Figure 12) and check the tire
pressure with a Tire Pressure Gauge.
2. Compare the tire pressure reading from step 1 with the manufacturer's
recommended tire pressure stamped on the side of the tire.
3. If the pressure is too low, add air through the Valve Stem with an air hose.
4. Replace the Valve Stem Protective Cap when finished.
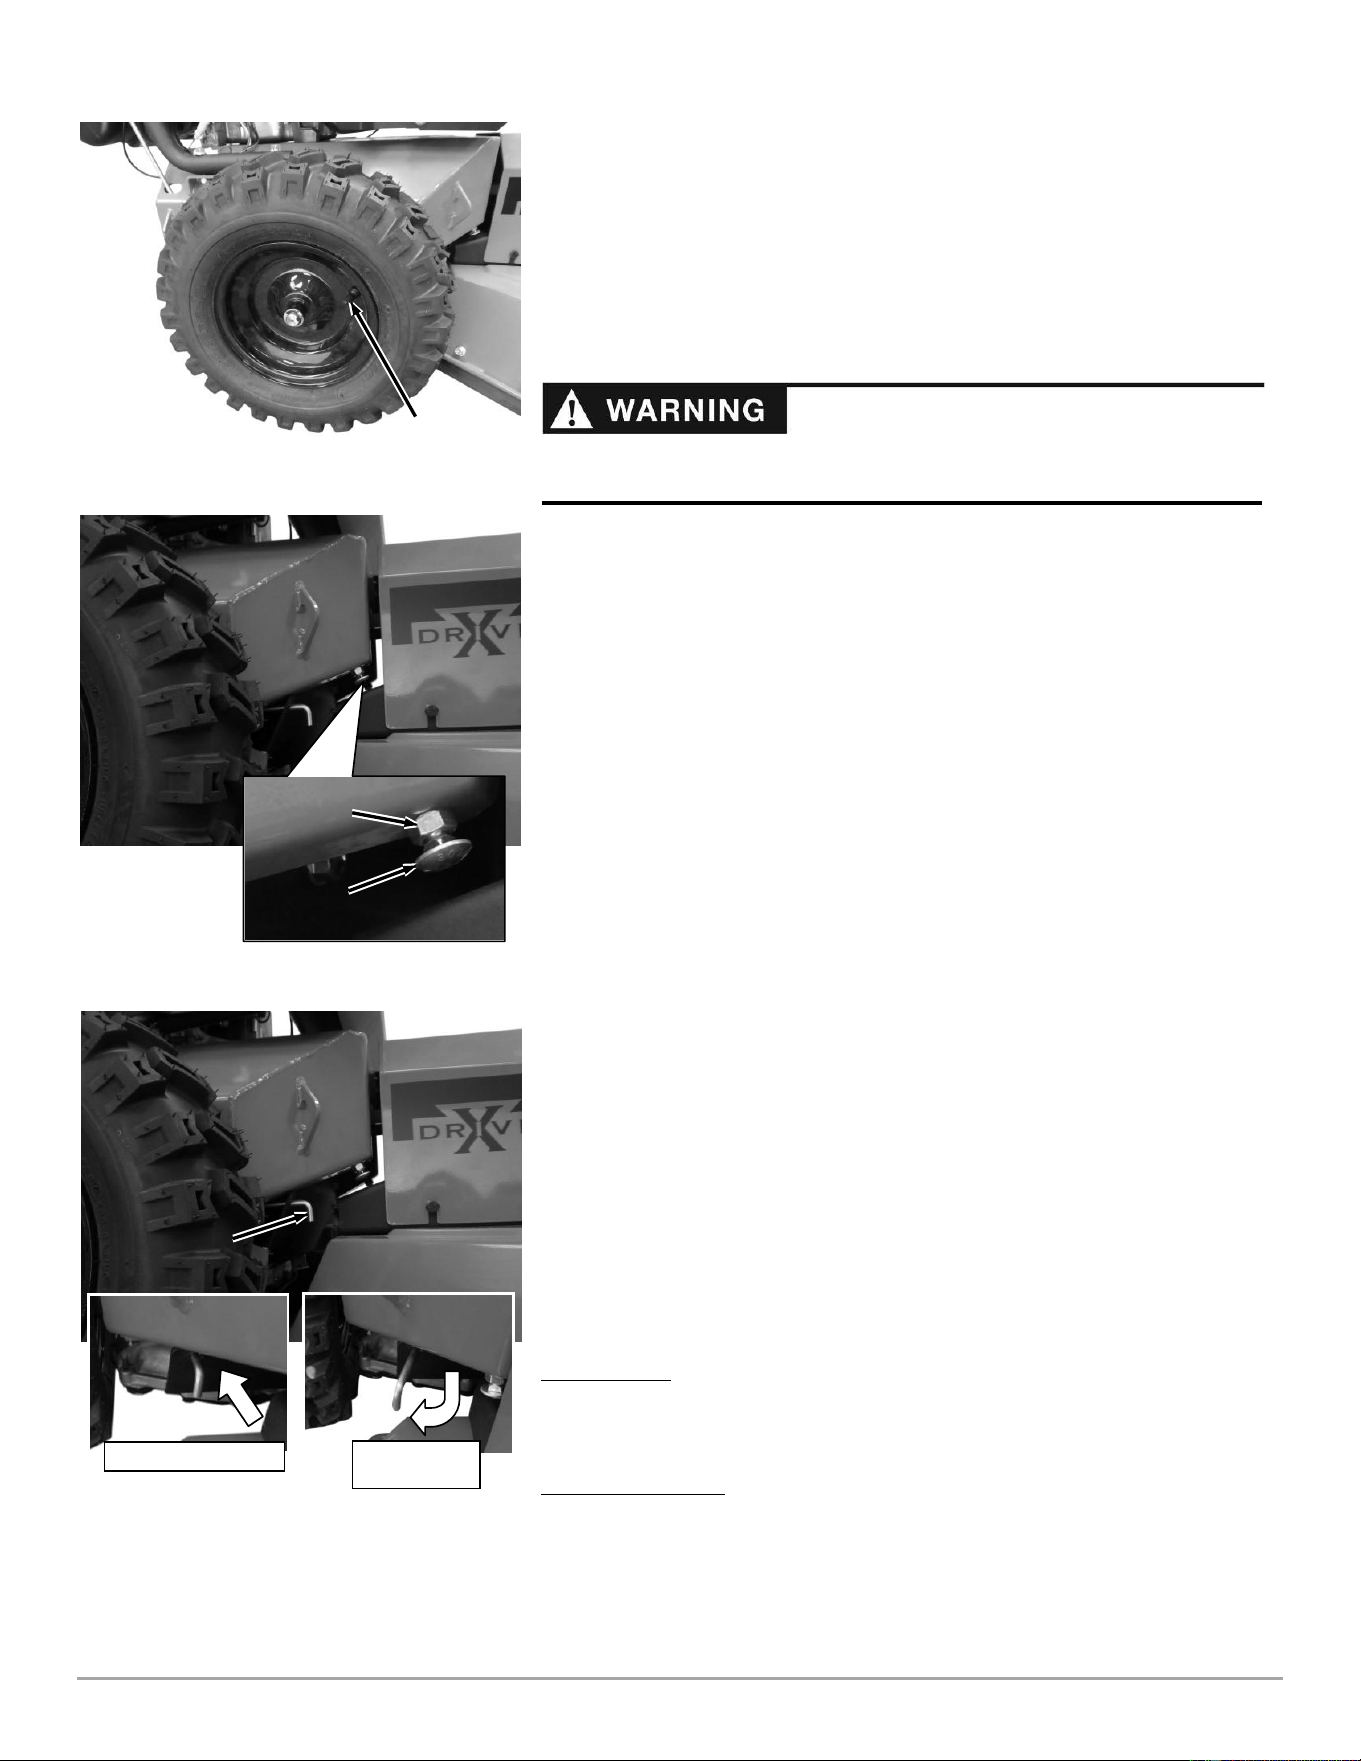
Deck Pivot Bolt Check/Adjustment
There are two Deck Pivot Carriage Bolts on your DR Field and Brush Mower
Frame. The machine should have been shipped with both Bolts in the highest
position (screwed in fully) as shown (Figure 13). If they are not both in the
highest position, and some of the Carriage Bolt threads are shown, perform the
following procedures.
Tools Needed:
1/2″ Wrench
5/16″ Wrench
Note: The Carriage Bolts should be adjusted all the way up for easy to moderate
mowing. For aggressive mowing adjustment, see “Cutting Brush and Saplings” in
Chapter 3.
1. Loosen both Locknuts using a 1/2" Wrench as you hold the square portion
of the Carriage Bolts using a 5/16" Wrench (Figure 13). Turn the Locknut
down against the Bolt Head.
2. Turn the Carriage Bolts up into the Frame until the Nut is contacting the
Frame.
3. Turn the Locknut against the Frame to lock the Carriage Bolt into position.
Engaging/Disengaging the Transmissions
The Hydrostatic Transmissions (one for each Wheel) must be engaged for the
Drive Levers to function (machines are shipped in the Drive orientation). They
also can be disengaged when moving the machine by hand. The following
instructions explain this procedure.
Drive Position
1. Push each of the two Neutral Bypass Links in toward the Frame until they
stop (Figure 14).
Free Wheel Position
1. Pull each of the two Neutral Bypass Links out toward the deck and at the
same time toward the outside of the Frame (Figure 14).
Note: The machine will not move easily even with the Transmissions disengaged.
Pulling in reverse may be easier depending on conditions and slope.
Figure 14
Neutral Bypass
Link
Engaged for Mowing
Disengaged for
Transporting
Figure 13
Locknut
Frame
Carriage
Bolt
Do not over inflate the tires. Inflate to the manufacturers recommended
pressure found on the tires.
CONTACT US AT www.DRpower.com 13
Key Switch
Figure 16
Throttle Lever
Blade Engage Lever
Chapter 3: Operating the DR FIELD and BRUSH MOWER
You may find it helpful to review the DR FIELD and BRUSH MOWER Controls
and Features in Figure 2a (page 7) or Figure 2b (page 8) before reading this
chapter.
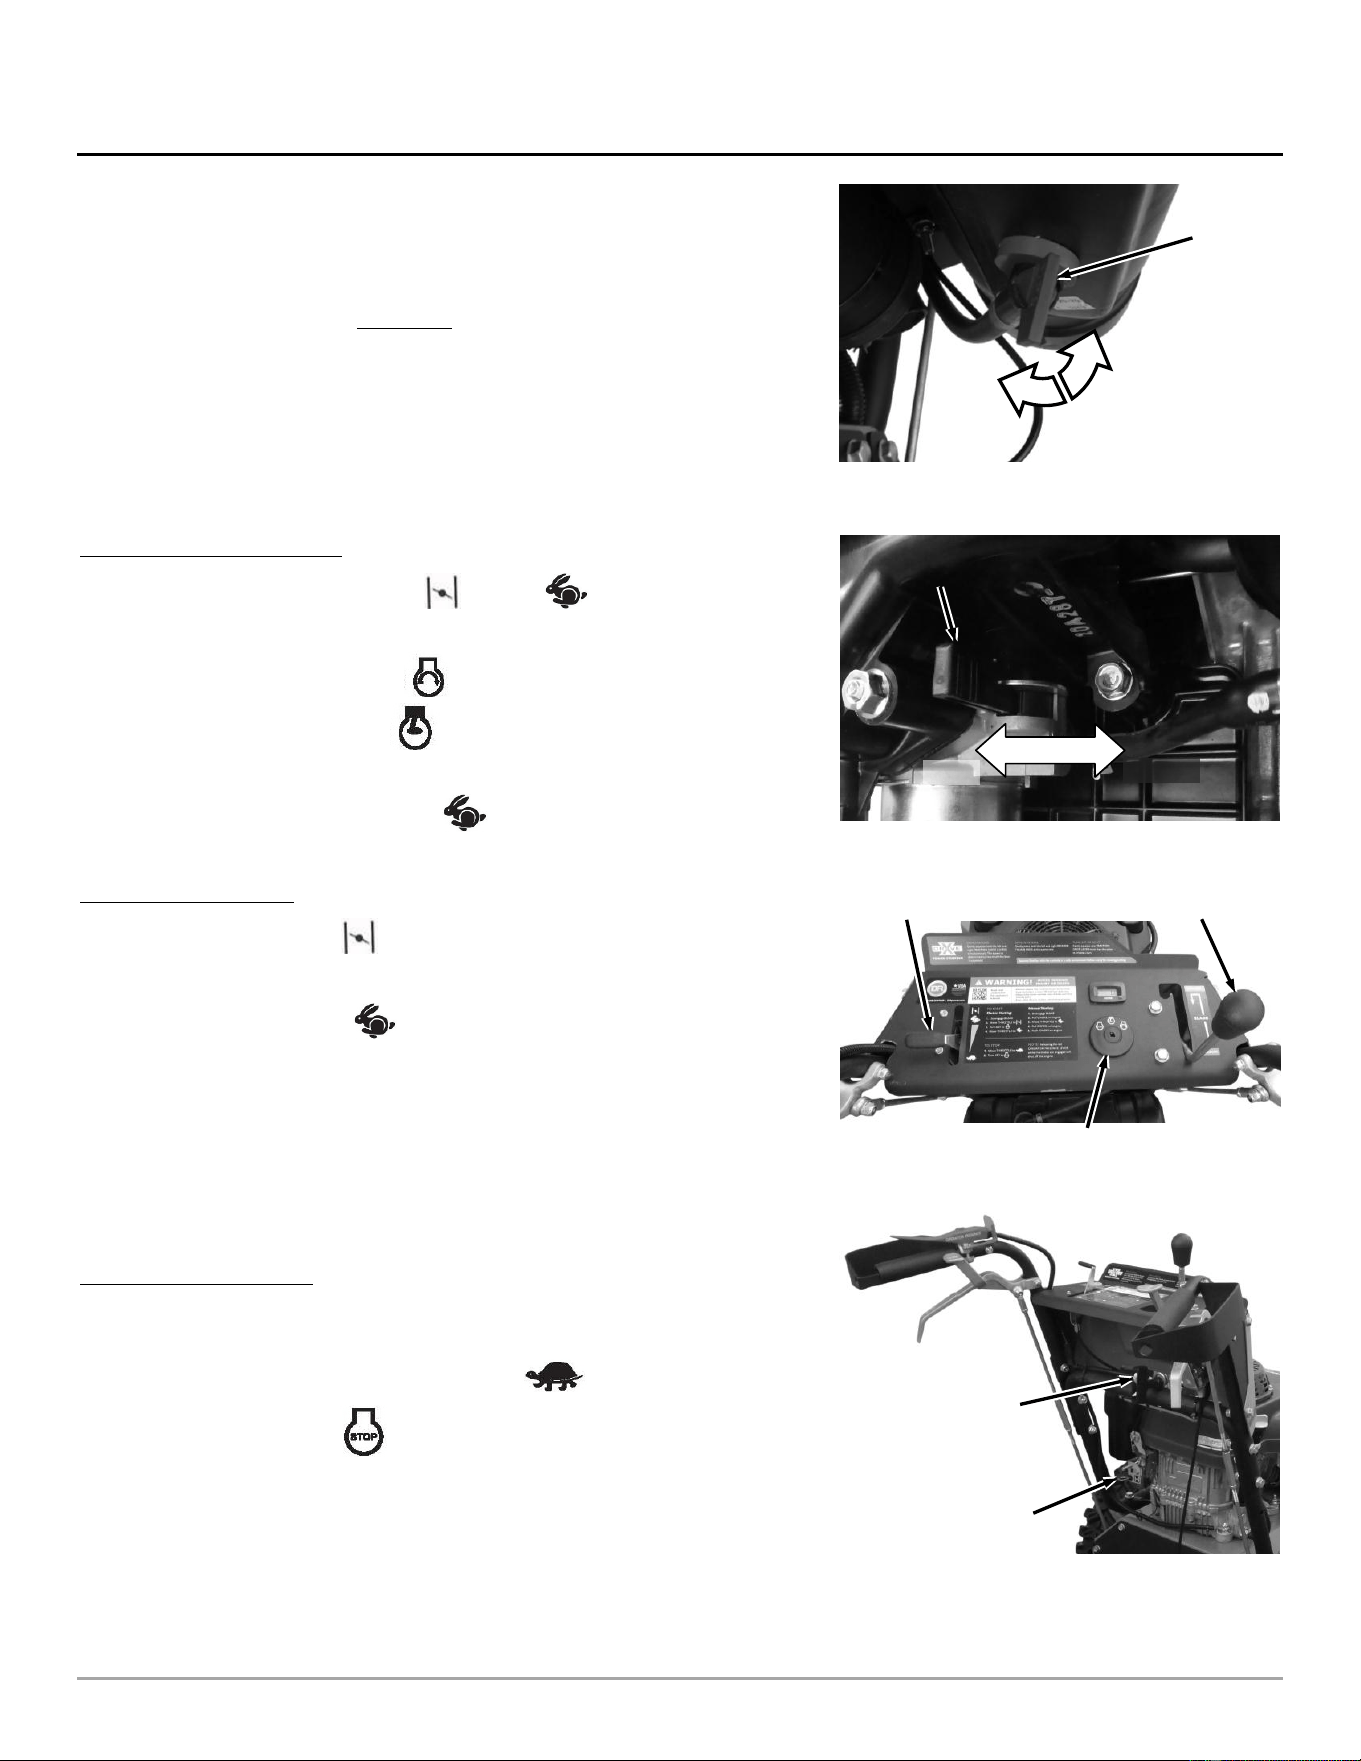
Before Starting the Engine
Check the Engine Oil level every time before you use the machine.
Check the gas level.
Ensure that the Fuel Shut-Off Valve located under the Fuel Tank is open
(Figure 15a XD30 Machines or Figure 15b XD26 machines).
Ensure the Blade Engage Lever is disengaged.
Starting
XD 30 with Kawasaki Engine
1. Move the Throttle Lever to Choke (to Fast if the Engine is already
warm) (Figure 16).
2. Rotate Key to the Start position until the Engine starts, then release.
The Key will return to the Run position and the Engine will continue to
run.
3. Move the Throttle Lever to the Fast position.
XD 26 with Honda Engine
1. Pull out the Choke Lever located on the back of the Engine (leave Choke
pushed in if the Engine is already warm) (Figure 17).
2. Move the Throttle to Fast Position (Figure 16).
3. Grasp the Recoil Starter Handle and slowly pull until you feel resistance. Let
the Cord retract a little bit, and then pull the Cord rapidly to start the Engine.
4. When the Engine starts, push the Choke Lever all the way in. (Figure 17).
Stopping the Engine
XD 30 with Kawasaki Engine
1. Ensure the Blade Engage Lever is Disengaged (Figure 16).
2. Move the Throttle Control Lever to the IDLE position.
3. Turn the Key to the Stop position and remove it for safety.
Note: Close the Fuel Shut-Off Valve when transporting or storing the Mower
(Figure 15a).
Fuel
Shutoff
Valve
Figure 15a
Gas Tank
CLOSED
OPEN
Recoil Starter
Handle
Figure 17
Choke Lever
Fuel Shutoff
Valve
Figure 15b
Engine
CLOSED
OPEN
14 DR
®
FIELD and BRUSH MOWER
Operator Presence
Control Lever
Figure 18
XD 26 with Honda Engine
1. Ensure the Blade Engage Lever is Disengaged (Figure 16).
2. Move the Throttle Control Lever fully to the IDLE position.
Note: Close the Fuel Shut-Off Valve when transporting or storing the Mower
(Figure 15b).
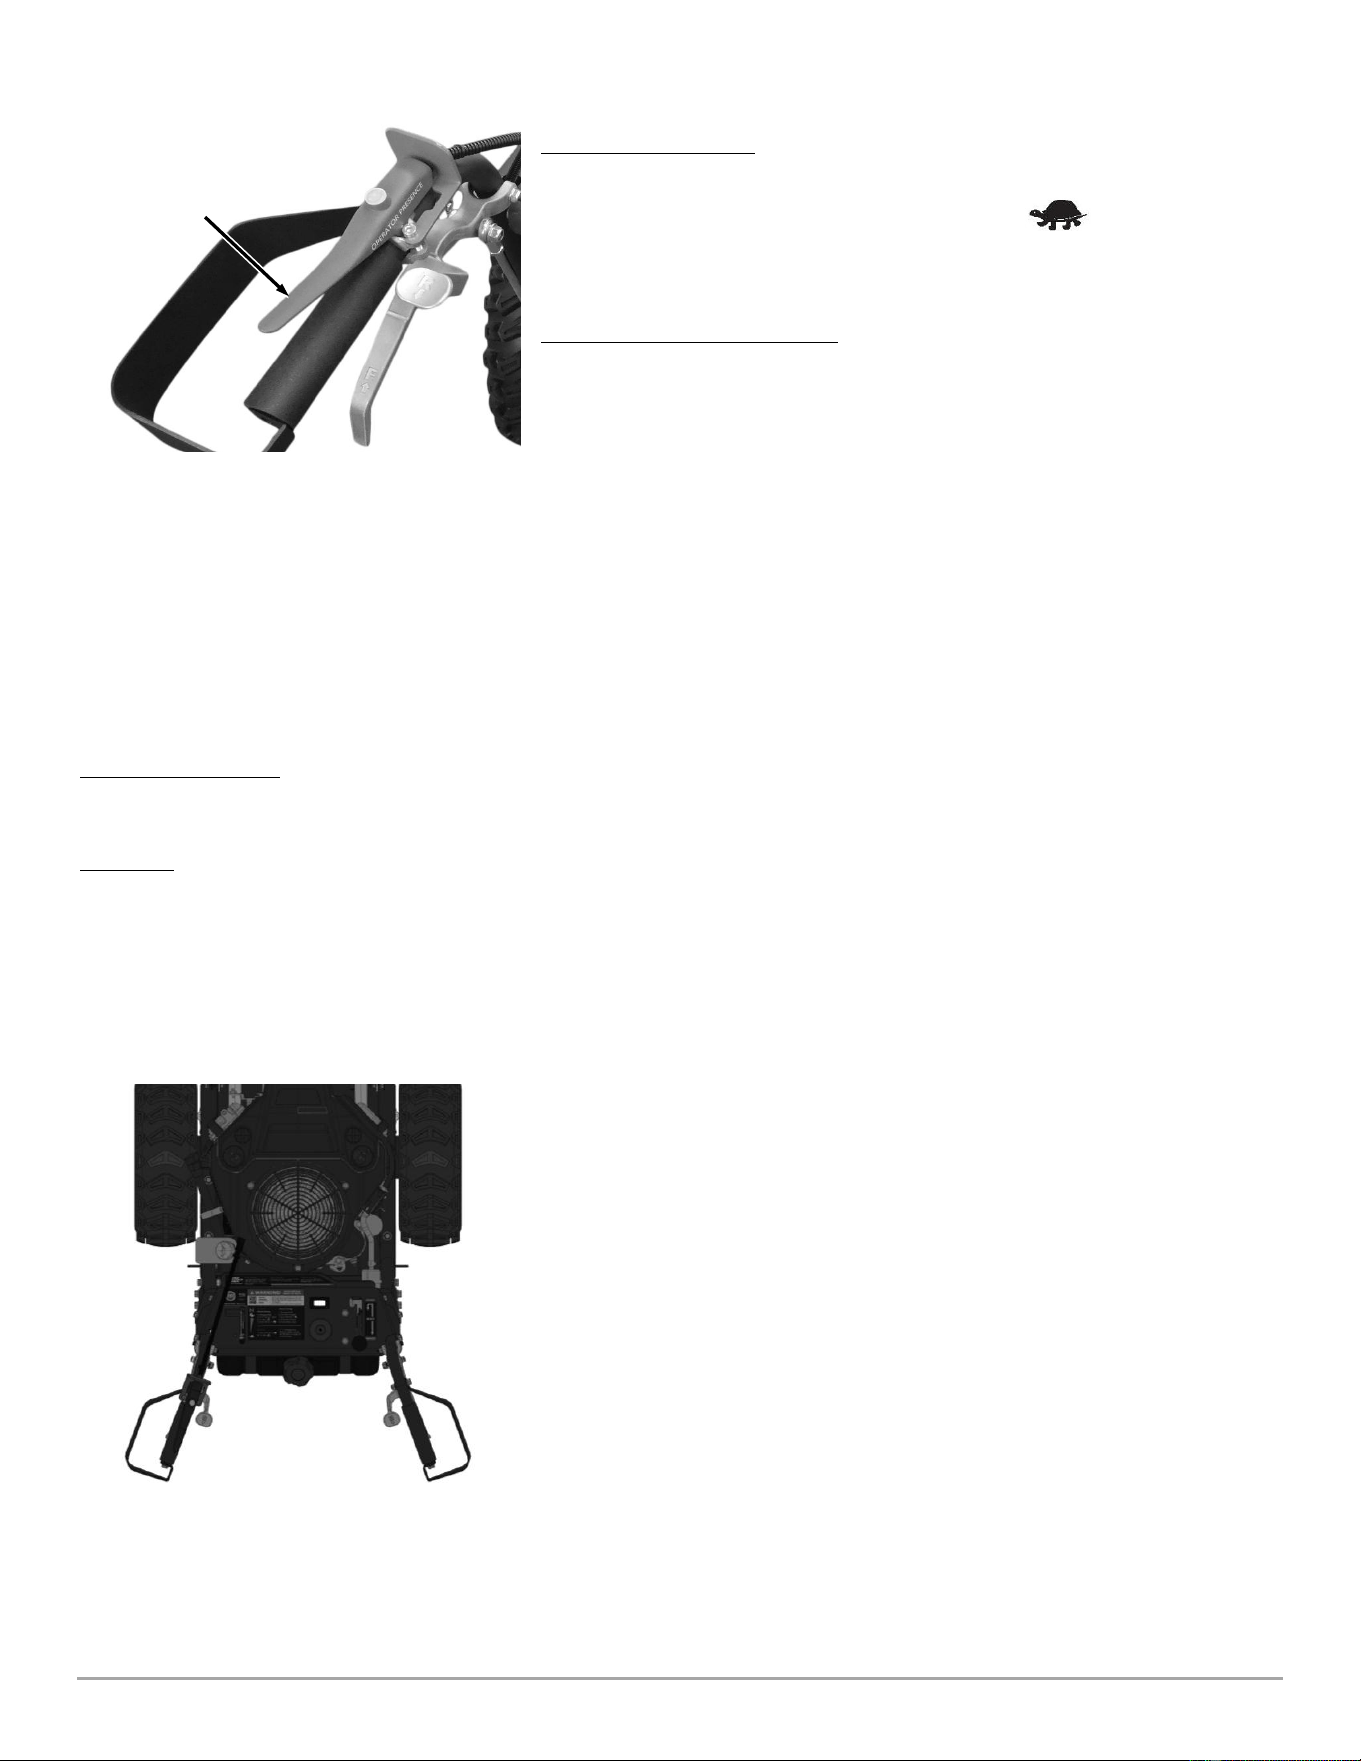
Emergency Stopping When Mowing
Releasing the Operator Presence Control Lever with the Blade engaged with
stop the Engine (Figure 18). If the Blade is not engaged, releasing the Operator
Presence Control Lever will not stop the Engine.
Transmission Engagement
See “Engaging/Disengaging the Transmissions” on page 12
X-Drive Power Steering
The DR FIELD and BRUSH MOWER features the X-Drive Power Steering which gives you independent control of each wheel to
provide enhanced maneuverability and traction. The System has two configurations; Cross-Drive and Inline Drive. All Machines
are shipped from the factory in the Cross Drive Configuration. Some practice time is necessary to become comfortable with the
controls.
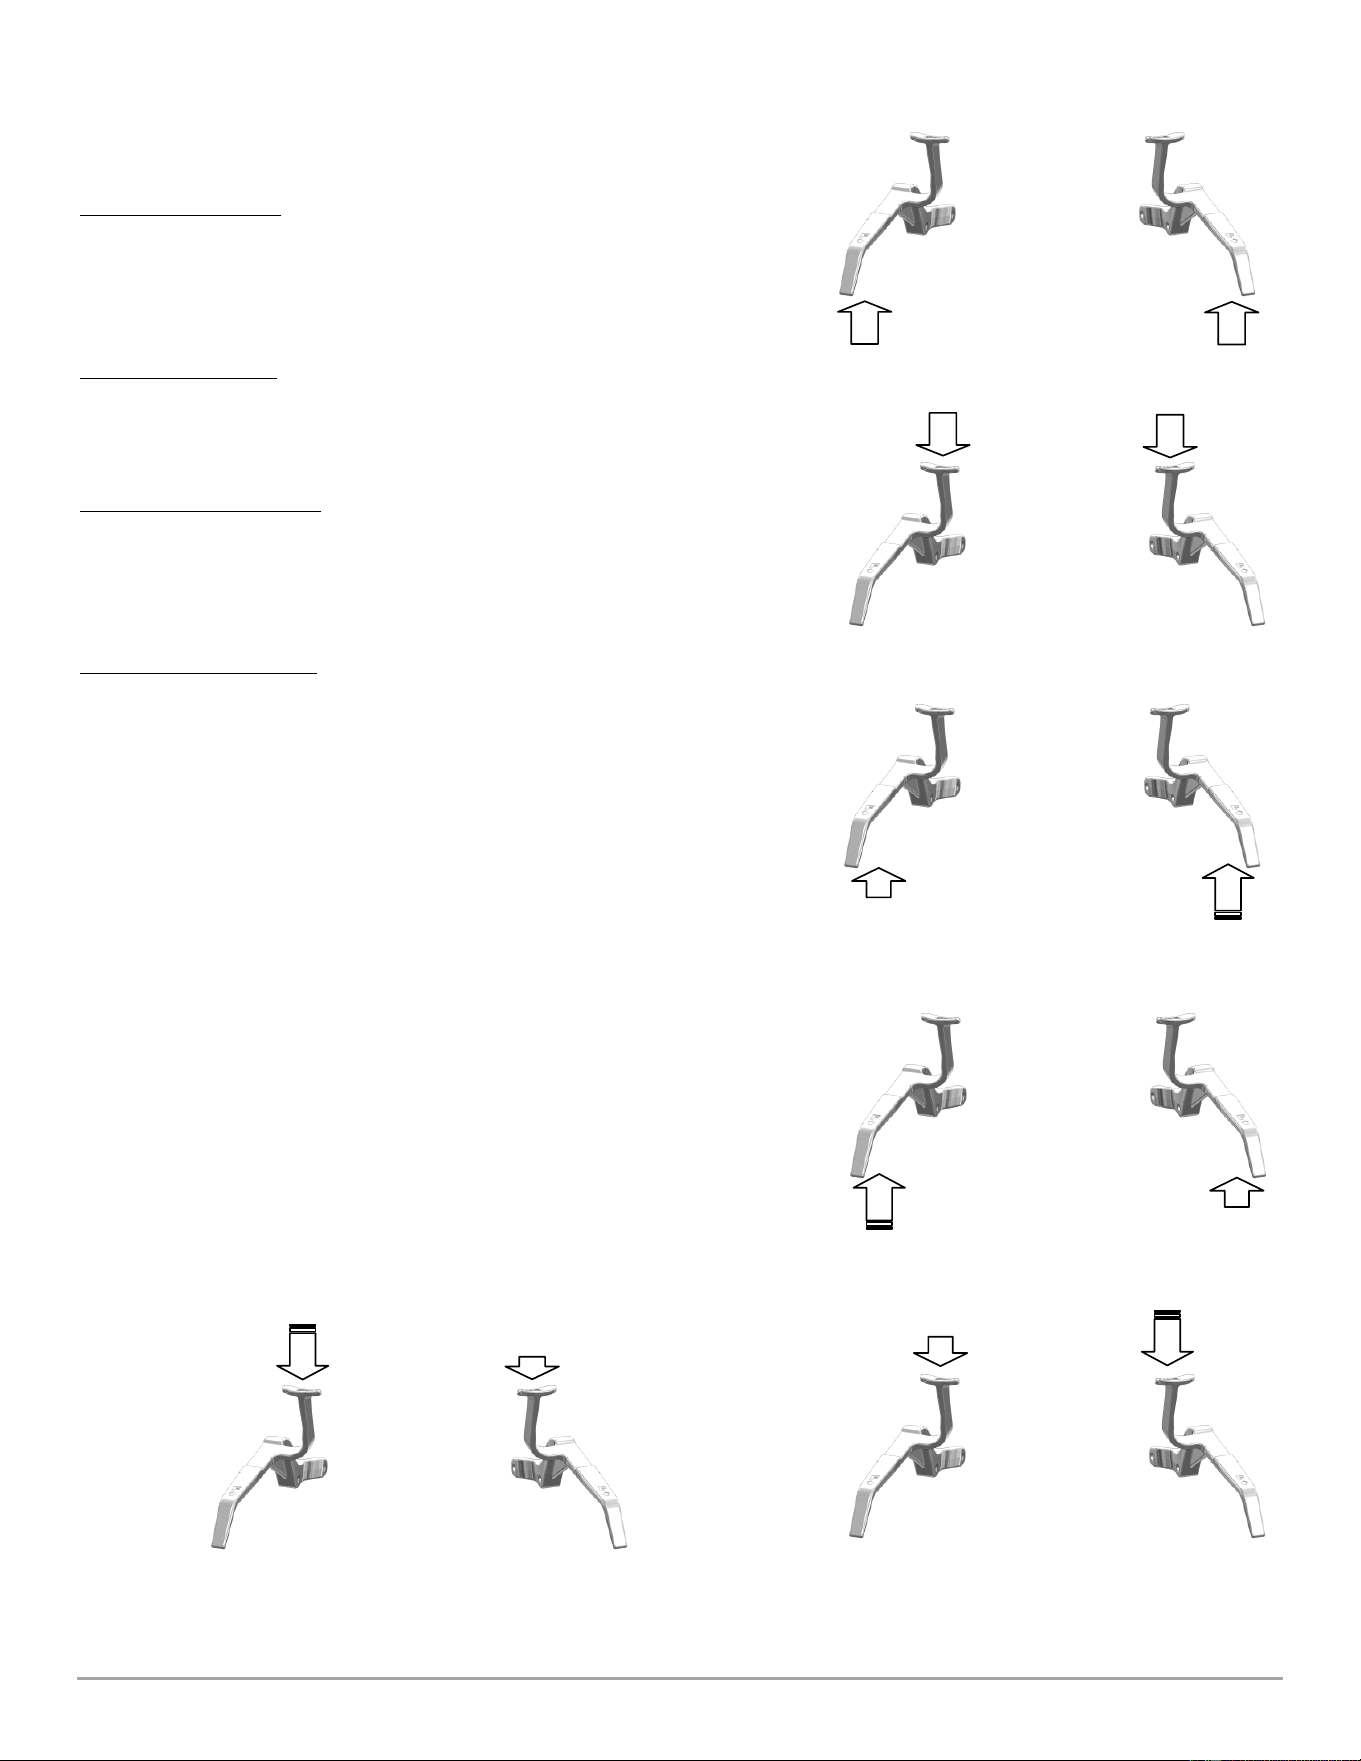
Cross Drive (as shipped)
In the Cross Drive Configuration, the machine will turn in the direction of the lever that is squeezed (i.e. squeeze right Lever to
turn right or squeeze left Lever to turn left) (Figure 19).
Inline Drive
In the Inline Drive Configuration, each wheel is controlled by the lever that is on the same side (i.e. squeeze right to operate the
right wheel to turn left and squeeze left to operate the left wheel to turn right).
Note: We recommend practicing and becoming comfortable with cross drive configuration at varying speeds and terrain before
considering changing to inline drive. If after practicing with cross drive you find that you would prefer the inline configuration, see
Chapter 4 “Changing Drive Configurations” for instructions on changing drive configurations.
Operating the X-Drive Power Steering
Practice and become comfortable with the controls at slow speed in a safe
environment before using faster speed or for mowing/cutting.
The X-drive power steering system is designed to minimize operator fatigue.
Use the hand controls as much as possible to drive the machine in the
desired direction rather than trying to muscle it around.
Mowing Speed will impact cutting performance. Mowing at a slower speed
will improve cut quality.
For best operator control of the DR Field and Brush Mower, always drive at
speed that matches the conditions. For example, use a slower speed when
operating in wet, heavy growth, slippery, and/or steeply sloped areas.
When improved traction is needed, apply a downward force on the handlebar
to get more grip on the tires
Figure 19
Right Turn
Controls
Left Turn
Controls
Cross Drive
Configuration
CONTACT US AT www.DRpower.com 15
Cross Drive Configuration
Driving Straight Forward
Gently squeeze both the left and the right Traction Drive Levers the same
amount. The speed is determined by how much the levers are squeezed
(Figure 20).
Driving Straight Reverse
Gently press both left and right Reverse Thumb Pads the same amount (Figure
21).
To Turn Left or Right Forward
Gently squeeze one Traction Drive Lever more than the other to initiate a turn
(Figure 22 thru Figure 25). Apply more force to the lever on the right side to turn
right or more force to the lever on the left side to turn left.
To Turn Left or Right Reverse
Uses the same concept as above but push down on the Thumb Pads instead.
Inline Drive Configuration
The Inline Drive procedures for engaging the wheel drive is the same when
driving in a straight line. Inline Drive is the opposite of what is described for
the Cross Drive Configuration for turning. Pull more on the right Lever to turn
left etc.
X-Drive Troubleshooting
The transmission speeds have been adjusted at the factory to be balanced left
to right. However, due to variances within the transmissions and linkages, it is
possible that there is a slight variance in wheel speeds when traveling at full
speed. If the machine is tracking noticeably to the left or to the right at full
speed forward or full speed reverse, refer to Chapter 4 “Adjusting the Forward
Speed Limit” for adjusting the forward speed limits to match or “Reverse Drive
Limit Adjustment” for adjusting the reverse speed limits to match.
Turn
Reverse/Left
Figure 25
Turn
Forward/Left
Figure 23
Turn
Forward/Right
Figure 22
Turn
Reverse/Right
Figure 24
Figure 20
Forward
Straight
Figure 21
Reverse
Straight
16 DR
®
FIELD and BRUSH MOWER
Blade Engage
Lever
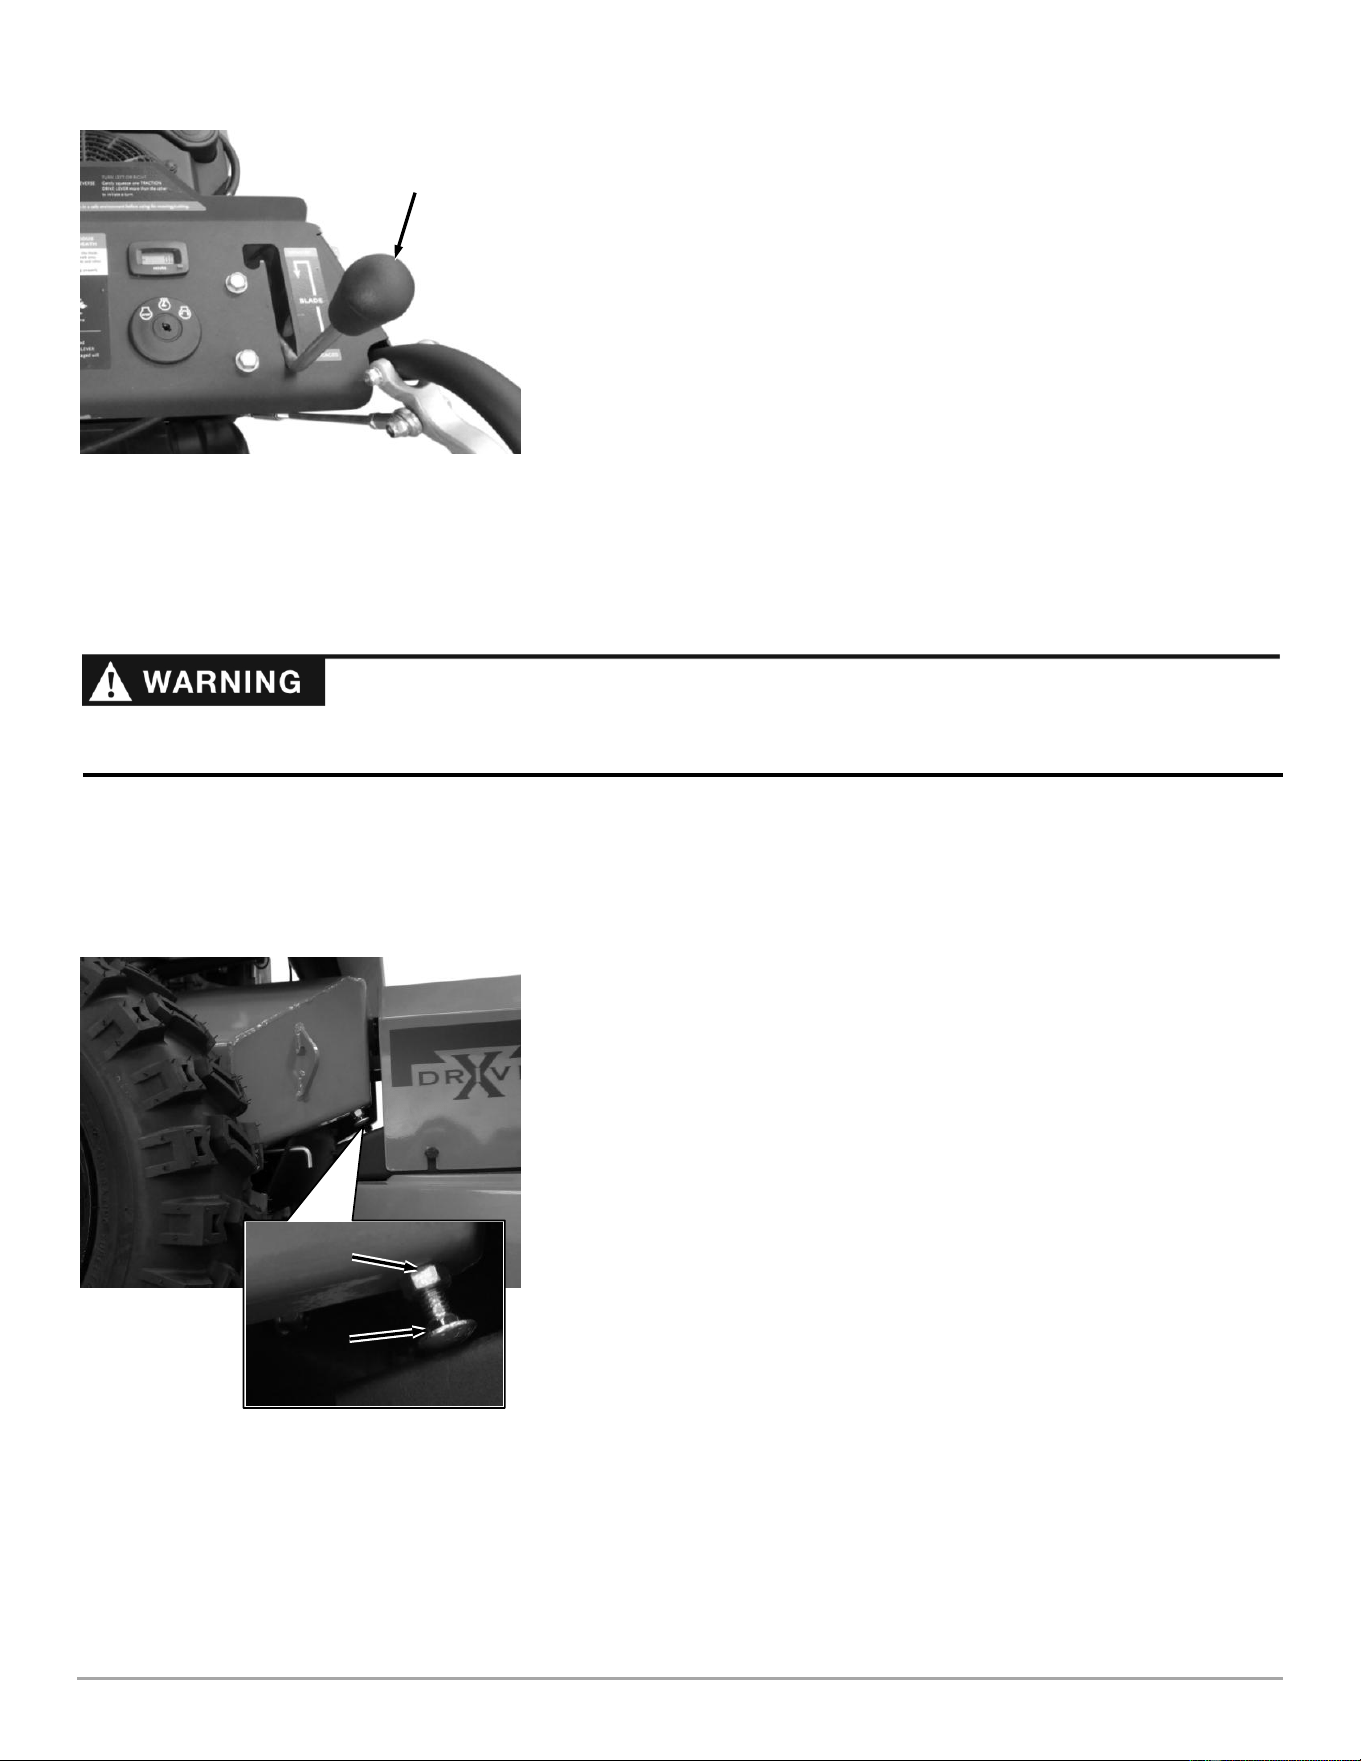
Figure 26
Engaging the Blade
1. With the Engine running, hold the Operator Presence Control Lever down to
the Grip with your left hand without touching the Drive Levers. (Figure 18).
2. Push the Blade Control Lever forward, then to the left and down to the
“Engaged” position (Figure 26).
Note: If you engage the Blade Control Lever before holding down the Operator
Presence Lever, the Engine will shut off.
Stopping the Blade
1. Stop the Blade by pushing the Blade Control Knob up and to the right, then
pulling back to the “Disengaged” position (Figure 26).
Note: Releasing the Operator Presence Lever will stop the Blade and also cause the
Engine to shut off. The Engine will not start again until the Blade Control Lever is
moved to the “Disengaged” position.
Cutting Brush and Saplings
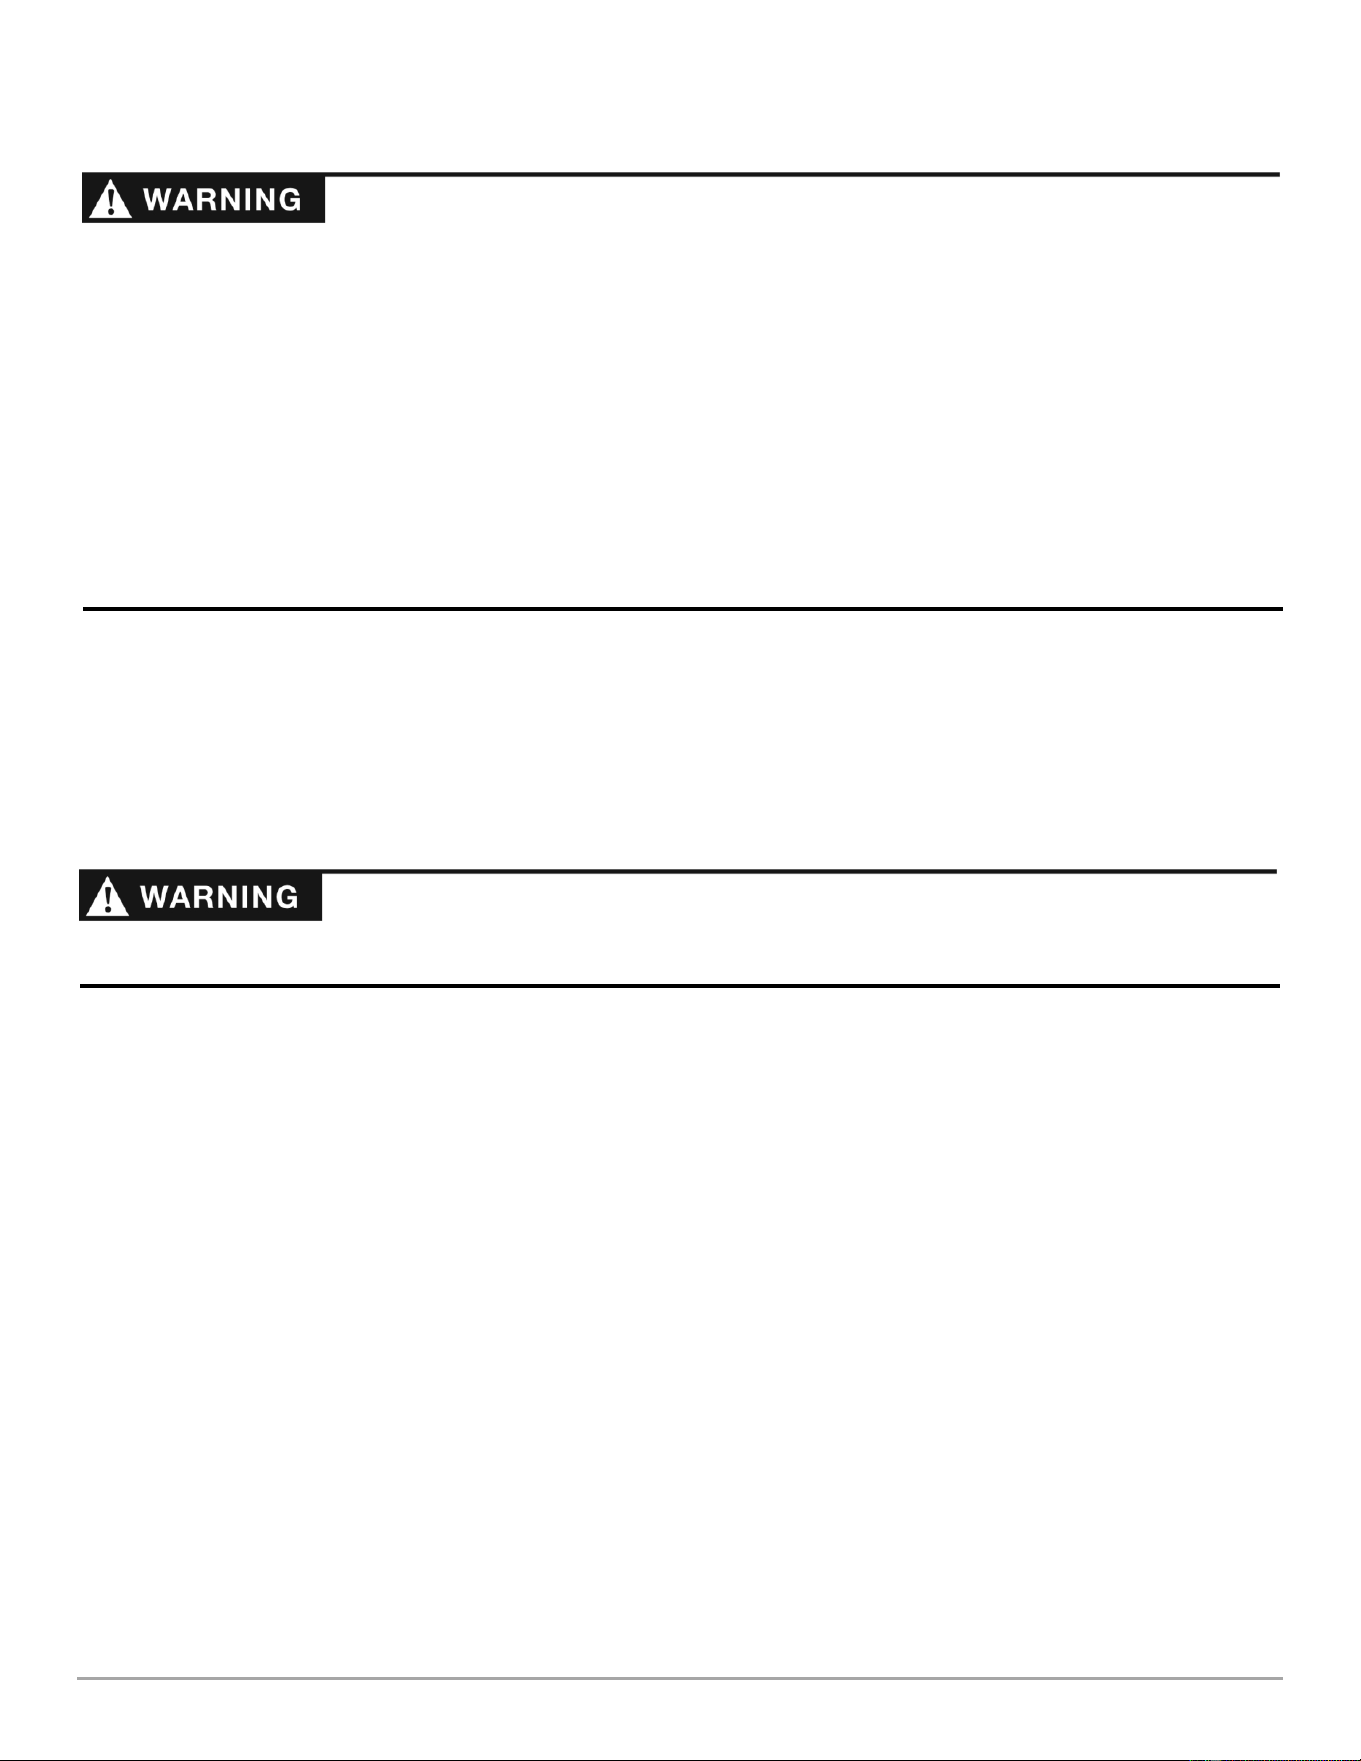
DECK PIVOT BOLT ADJUSTMENT (aggressive mowing conditions)
For aggressive mowing (Brush and Saplings) the Deck Carriage Bolts should be adjusted all the way down to stabilize the Deck.
Note: The entire machine must be on a flat surface for the following procedures.
Tools Needed:
1/2″ Wrench
5/16″ Wrench
1. Hold the square portion of the Carriage Bolts using a 5/16" Wrench and
loosen both Locknuts from against the Frame using a 1/2" Wrench (Figure
27).
2. Turn the Carriage Bolts down until they are contacting the Deck Bracket.
3. Hold the square portion of the Carriage Bolts as you turn the Locknut
against the Frame to lock them into position.
Note: The Carriage Bolts should be adjusted all the way up for easy to moderate
mowing when aggressive mowing is finished.
Figure 27
Locknut
Frame
Carriage
Bolt
Deck Bracket
If you need to leave the operating position to clear debris from the deck, stop the engine, wait five minutes to allow all parts to
cool. Disconnect the spark plug wire(s), keeping it away from the spark plug(s).
CONTACT US AT www.DRpower.com 17
Mowing on Slopes
Tip: Cross Drive operation - When mowing on side hills, press the uphill Drive Lever more than the downhill Lever so the machine
steers slightly up the hill. This should keep the machine moving in a straighter line without additional operator effort. Operate the
opposite Levers for Inline Drive setups.
Obstacle Tips
Dealing with obstacles in the terrain is easy with your new DR FIELD and BRUSH MOWER. The following section explains how to
approach most common obstacles.
Always check your work area before mowing and remove any debris that might tangle or damage the machine.
If you do run into debris and the mower becomes tangled, turn off the Engine, allow the engine to cool for 5 minutes and
disconnect the Spark Plug wire(s) before attempting to untangle the machine.
If the machine gets hung up
1. Disengage the Blade. Do not try to free the machine from stumps or debris with the Blade engaged.
2. Push down on the Handlebars to lift the Mowing Deck over the obstacle.
3. Move the machine in reverse and try backing away from the obstacle.
Transporting
Ensure the Transmissions are engaged before transporting the machine in a truck (see Engaging/Disengaging the Transmissions
on page 12). Also use Wood Chocks for the Wheels and Tie-down Straps so the machine does not shift during transport. There are
four convenient and secure Tie Down points on the Frame.
New Photo
The mower’s blade can easily throw stones, sticks, and other debris at great velocity, which could cause personal injury or property
damage. Do not run the machine over gravel driveways or over loose stones or mulch with the mower blade spinning.
Slopes are a major factor related to slip and fall accidents. All slopes require caution. If you feel uneasy on a slope, do not mow it.
Always take the following precautions when using this machine on slopes:
Always mow across the face of slopes. Do not mow up and down.
Exercise extreme caution when changing direction on slopes.
Never operate near drop-offs, ditches, or embankments.
Never operate on wet or slippery slopes.
When operating the DR FIELD and BRUSH MOWER over uneven terrain or slopes, use extreme caution not to tip the machine
over.
Use a much slower speed when mowing on slopes.
Do not use the DR FIELD and BRUSH MOWER on slopes greater than 20 degrees. Doing so could result in serious injury or
damage to your machine.
Be very careful of your footing when operating the machine in reverse. Know what's behind you and take your time.
Mow when moving Forward only, using Reverse for maneuvering.
18 DR
®
FIELD and BRUSH MOWER
Chapter 4: Maintaining the DR FIELD and BRUSH MOWER
Regular maintenance will ensure the best performance and long life of your machine. Please refer to this manual and the engine
manufacturer's owner's manual for maintenance procedures. Service intervals listed in the checklist below supersede those listed
in the engine manufacturer's owner's manual.
Regular Maintenance Checklist
PROCEDURE
BEFORE EACH USE
EVERY 25 HOURS
EVERY 100 HOURS
Check function of Operator Presence Switch
Check Engine Oil Level
Check General Equipment Condition
Check Blade for Sharpness
Clean Engine Exterior and Cooling Fins
Check Blade Belt Condition (replace if damaged)
Check Drive Belt Condition (replace if damaged)
Lubricate Grease Fittings
Check Tire Pressures
Change Engine Oil and Filter*
1
st
time 5 hours
Check the Battery charge (Electric Start Machines)
Replace Air Paper Filter and outer Foam Filter
Check Blade Engage Cable Tension
Replace Blade Belt
Replace Drive Belt
Replace Spark Plug(s)
Replace Fuel Filter (Electric Start Machines)
* The XD26 model does not have an Oil Filter.
LUBRICATION
Replacing Engine Oil (XD26 with Honda Engine)
Note: Drain the oil when the Engine is warm. Warm Oil drains more quickly and
completely than cold Oil.
Tools & Supplies Needed:
Oil (Refer to “Adding Oil and Gasoline” in Chapter 2 for Oil type and
quantity)
Rags and an approved Oil Container
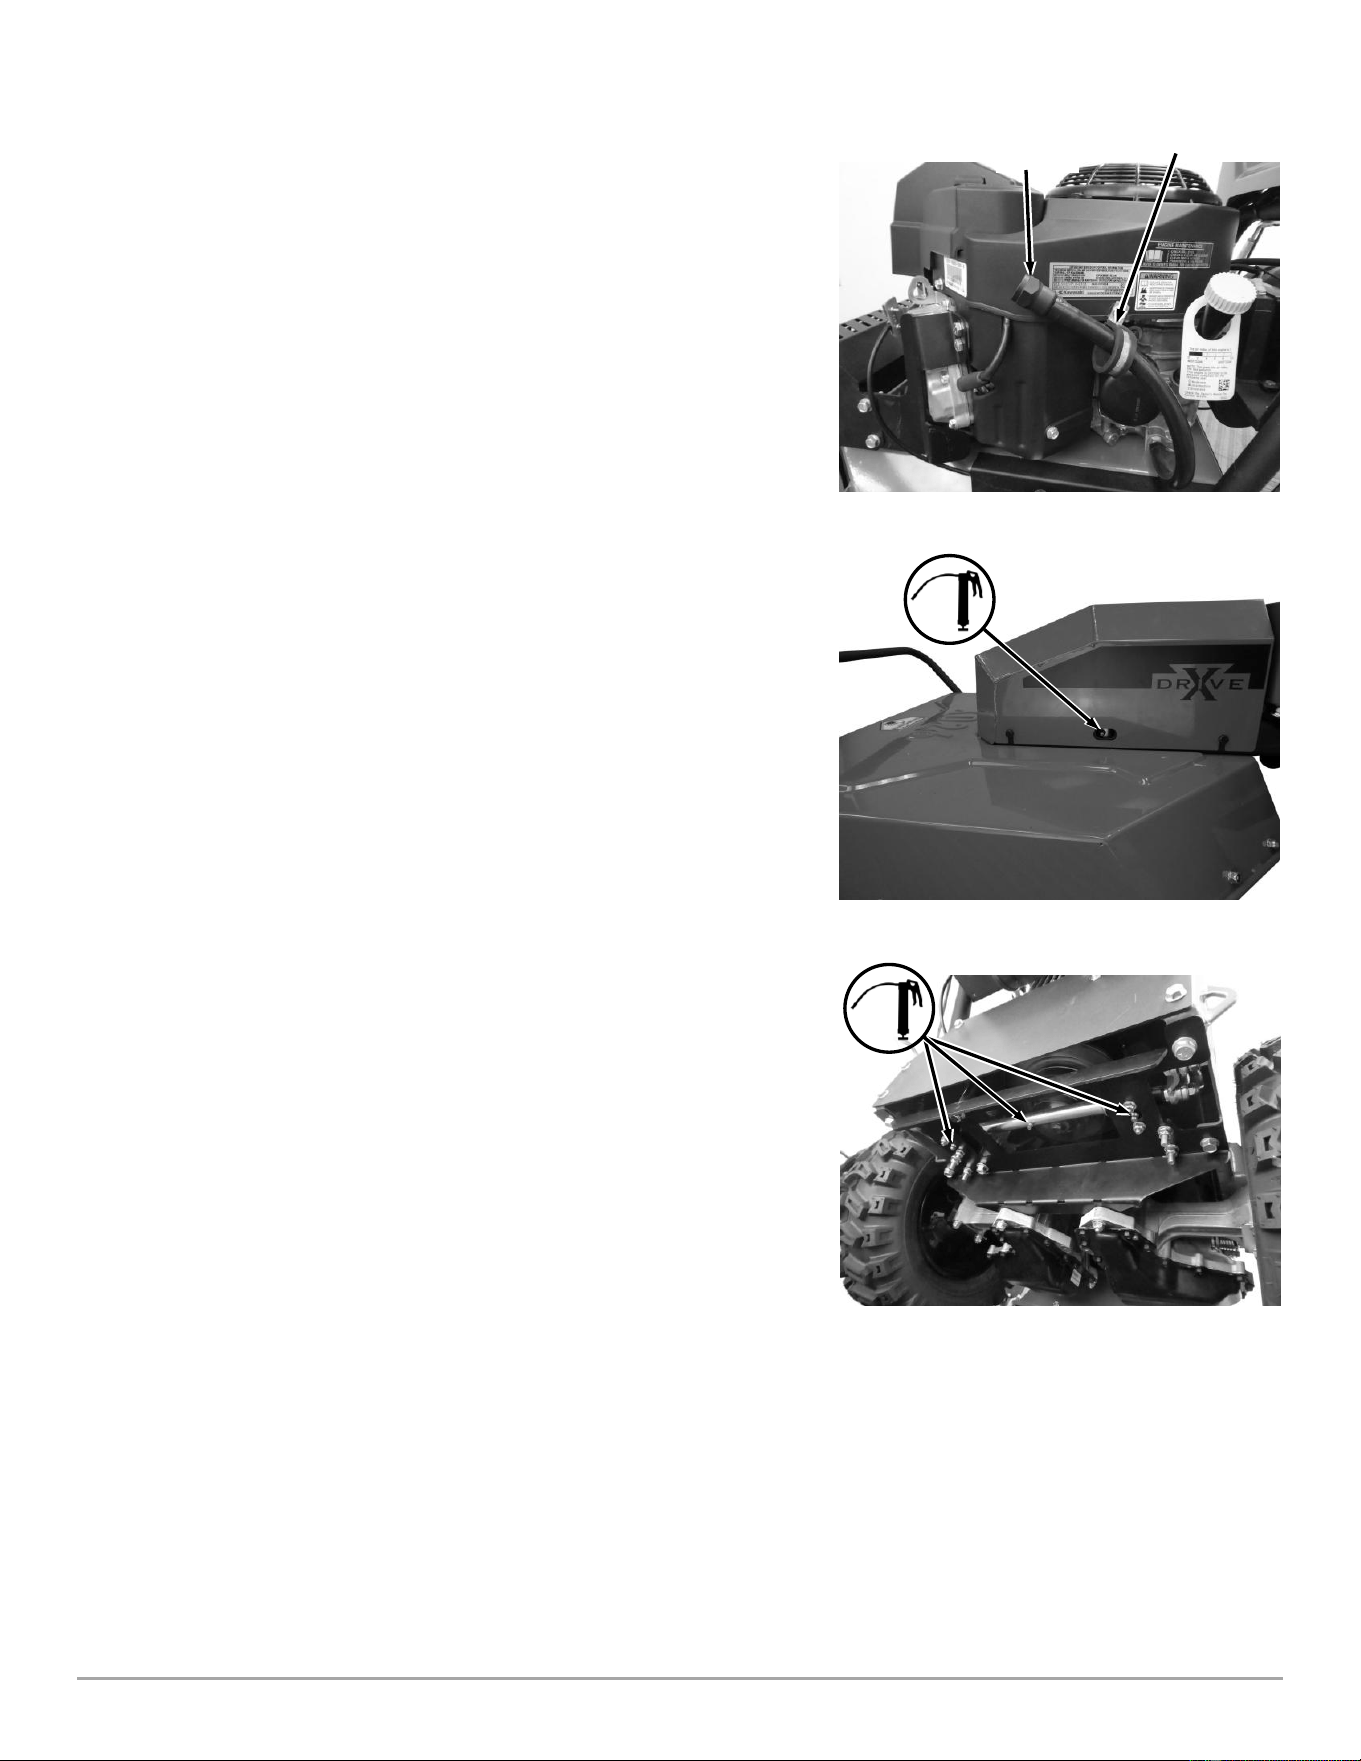
1. Position an approved oil container near the Oil Drain Hose.
2. Unscrew the Oil Drain Cap counterclockwise to open the end of the Drain
Hose Assembly (Figure 28).
3. Remove the Oil Drain Hose Assembly from the Retainer and lower the drain
end over the Oil Container to drain.
4. Replace the Hose onto the Retainer and close the Oil Drain Cap. Replace
the Oil as described on page 11.
Figure 28
Oil Drain
Hose Cap
Hose
Retainer
Before performing any maintenance procedure or inspection, stop the engine, wait ten minutes to allow all parts to cool.
Remove the Key and disconnect the spark plug wire(s), keeping it away from the spark plug(s)
Always wear gloves when performing maintenance on the machine.
CONTACT US AT www.DRpower.com 19
Figure 31
Figure 30
Replacing Engine Oil and Filter (XD30 with Kawasaki Engine)
Note: Drain the oil when the Engine is warm. Warm oil drains quickly and
completely.
Tools & Supplies Needed:
Oil Filter Wrench
Oil (Refer To Engine Operator Manual for Oil type and Capacity)
Rags and an approved oil container
1. Position an approved oil container near the Oil Drain Hose.
2. Unscrew the Oil Drain Cap counterclockwise to open the end of the Drain
Hose Assembly (Figure 29).
3. Remove the Oil Drain Hose Assembly from its stowed position and lower
the drain end over the Oil Container to drain.
4. Position Rags under the Oil Filter to catch oil drips.
5. Remove the old Oil Filter with an Oil Filter Wrench. Ensure that the rubber
Seal comes off with the Oil Filter.
6. Apply a thin layer of fresh Oil over the face of the new Filter rubber Seal.
7. Install the Oil Filter by hand until the rubber Seal is touching the mounting
surface, then turn the Oil Filter 3/4 turn to create a snug fit.
8. Replace the Oil Drain Hose Assembly onto the Storage Hook and close the
Oil Drain Cap. Replace the Oil as described on page 11.
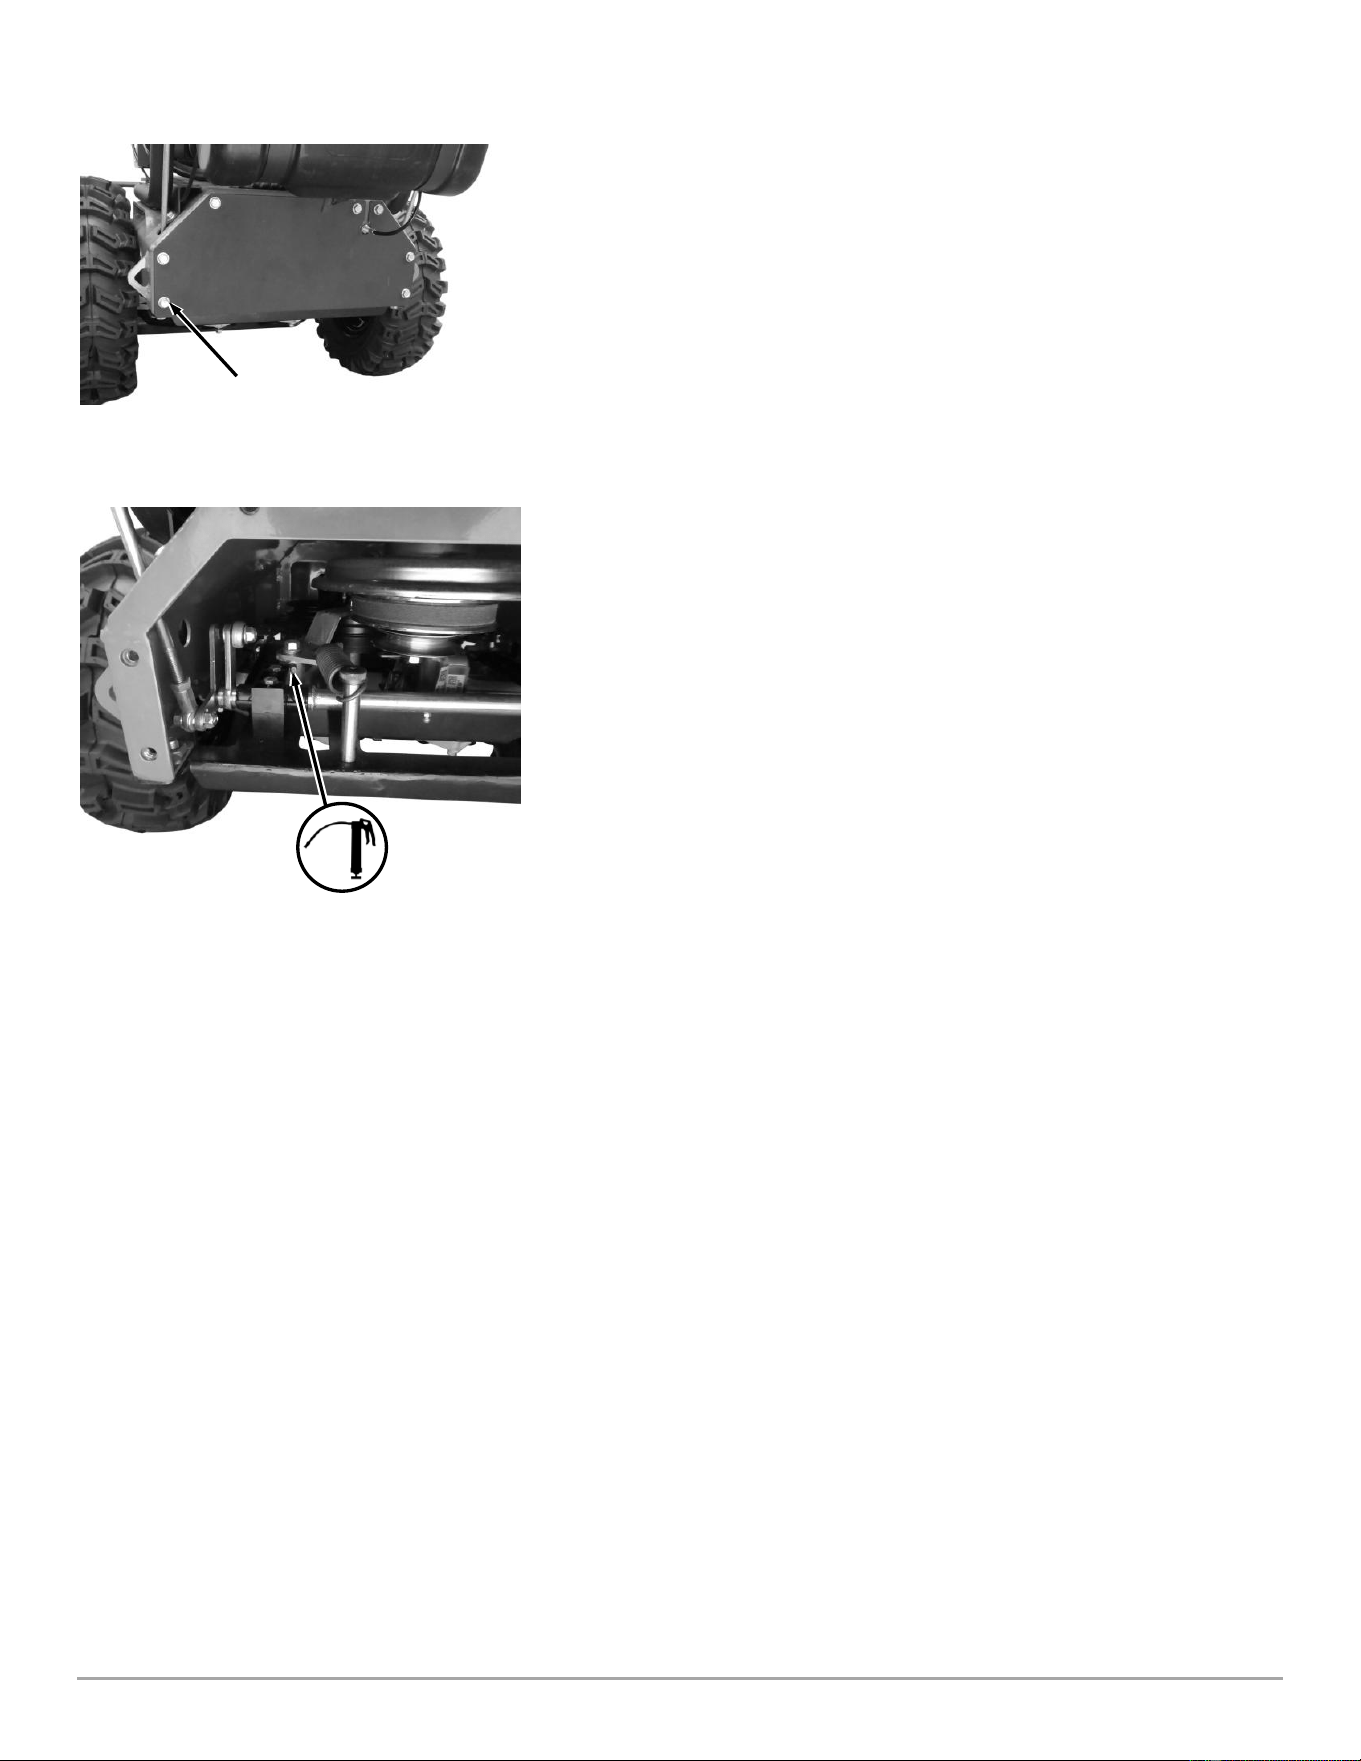
Greasing the Belt Idler
Tools needed:
Grease Gun with General purpose Grease
Clean Rags
1. Clean the Grease Fitting with a clean Rag (Figure 30).
2. Add a few pumps of Grease to the Zerk Fitting.
Greasing the Transmission Linkage
Tools needed:
Grease Gun with General purpose Grease
Clean Rags
1. Clean the Grease Fitting with a clean Rag (Figure 31).
2. Add a few pumps of Grease to each Grease Fitting.
Figure 29
Oil Drain
Hose Cap
Hose Retainer
20 DR
®
FIELD and BRUSH MOWER
Figure 33
Greasing the Transmission Idler
Tools needed:
Grease Gun with General purpose Grease
Clean Rags
1. Remove the seven Bolts that secure the rear Cover Plate to the Frame using
a 9/16″ Wrench and remove the Cover Plate (Figure 32).
2. Clean the Grease Fitting with a clean Rag (Figure 33).
3. Add a few pumps of Grease to the Grease Fitting.
4. Replace the Cover when finished.
Rear Cover
Plate
Figure 32
Bolt (7 Places)
CONTACT US AT www.DRpower.com 21
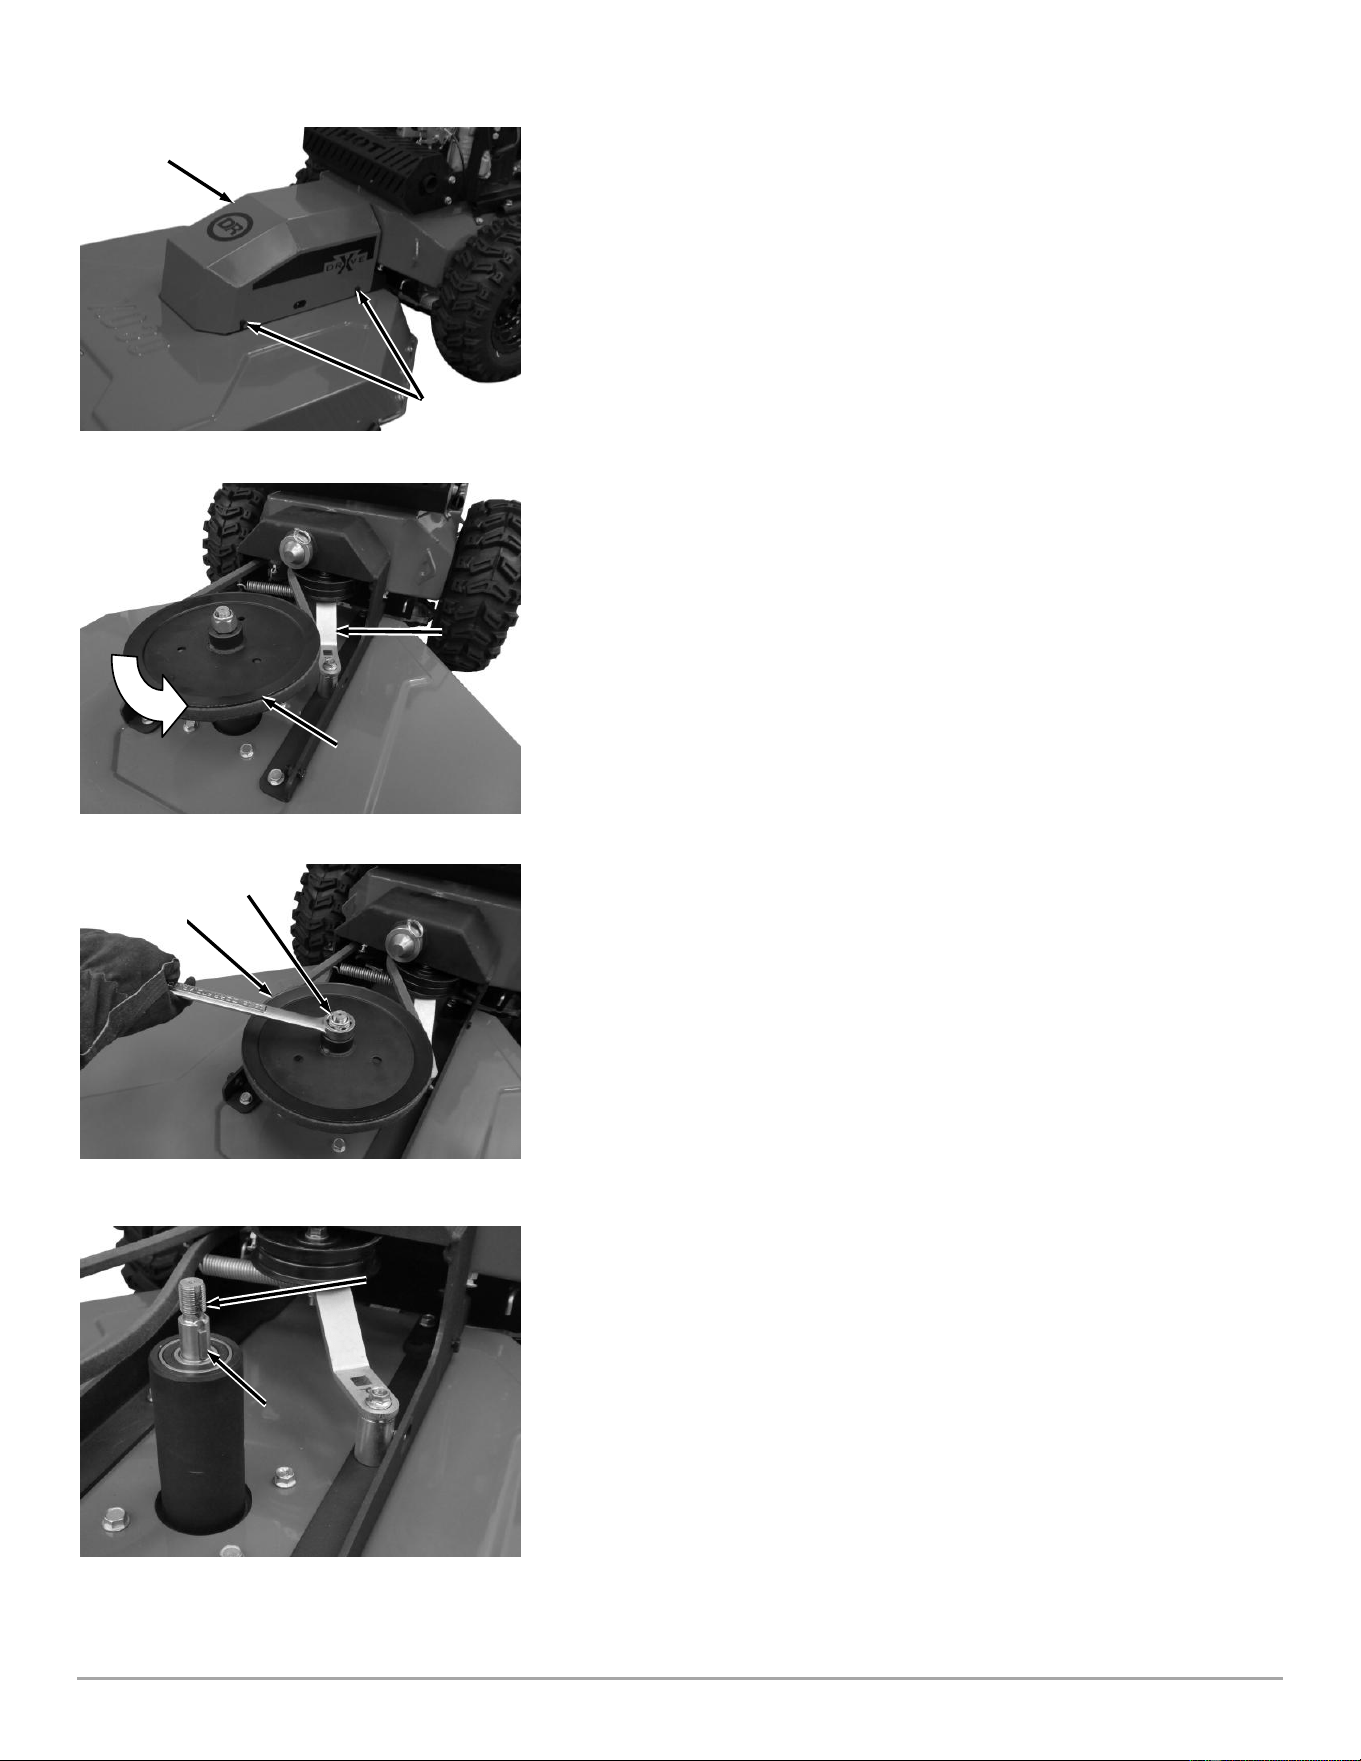
Removing/Replacing the Blade Belt
Tools and Supplies needed:
1/2″ Wrench
1/2″ Drive Ratchet
Gloves
1. Remove the Drive Belt. See “Removing and Replacing the Drive Belt” on the
next page.
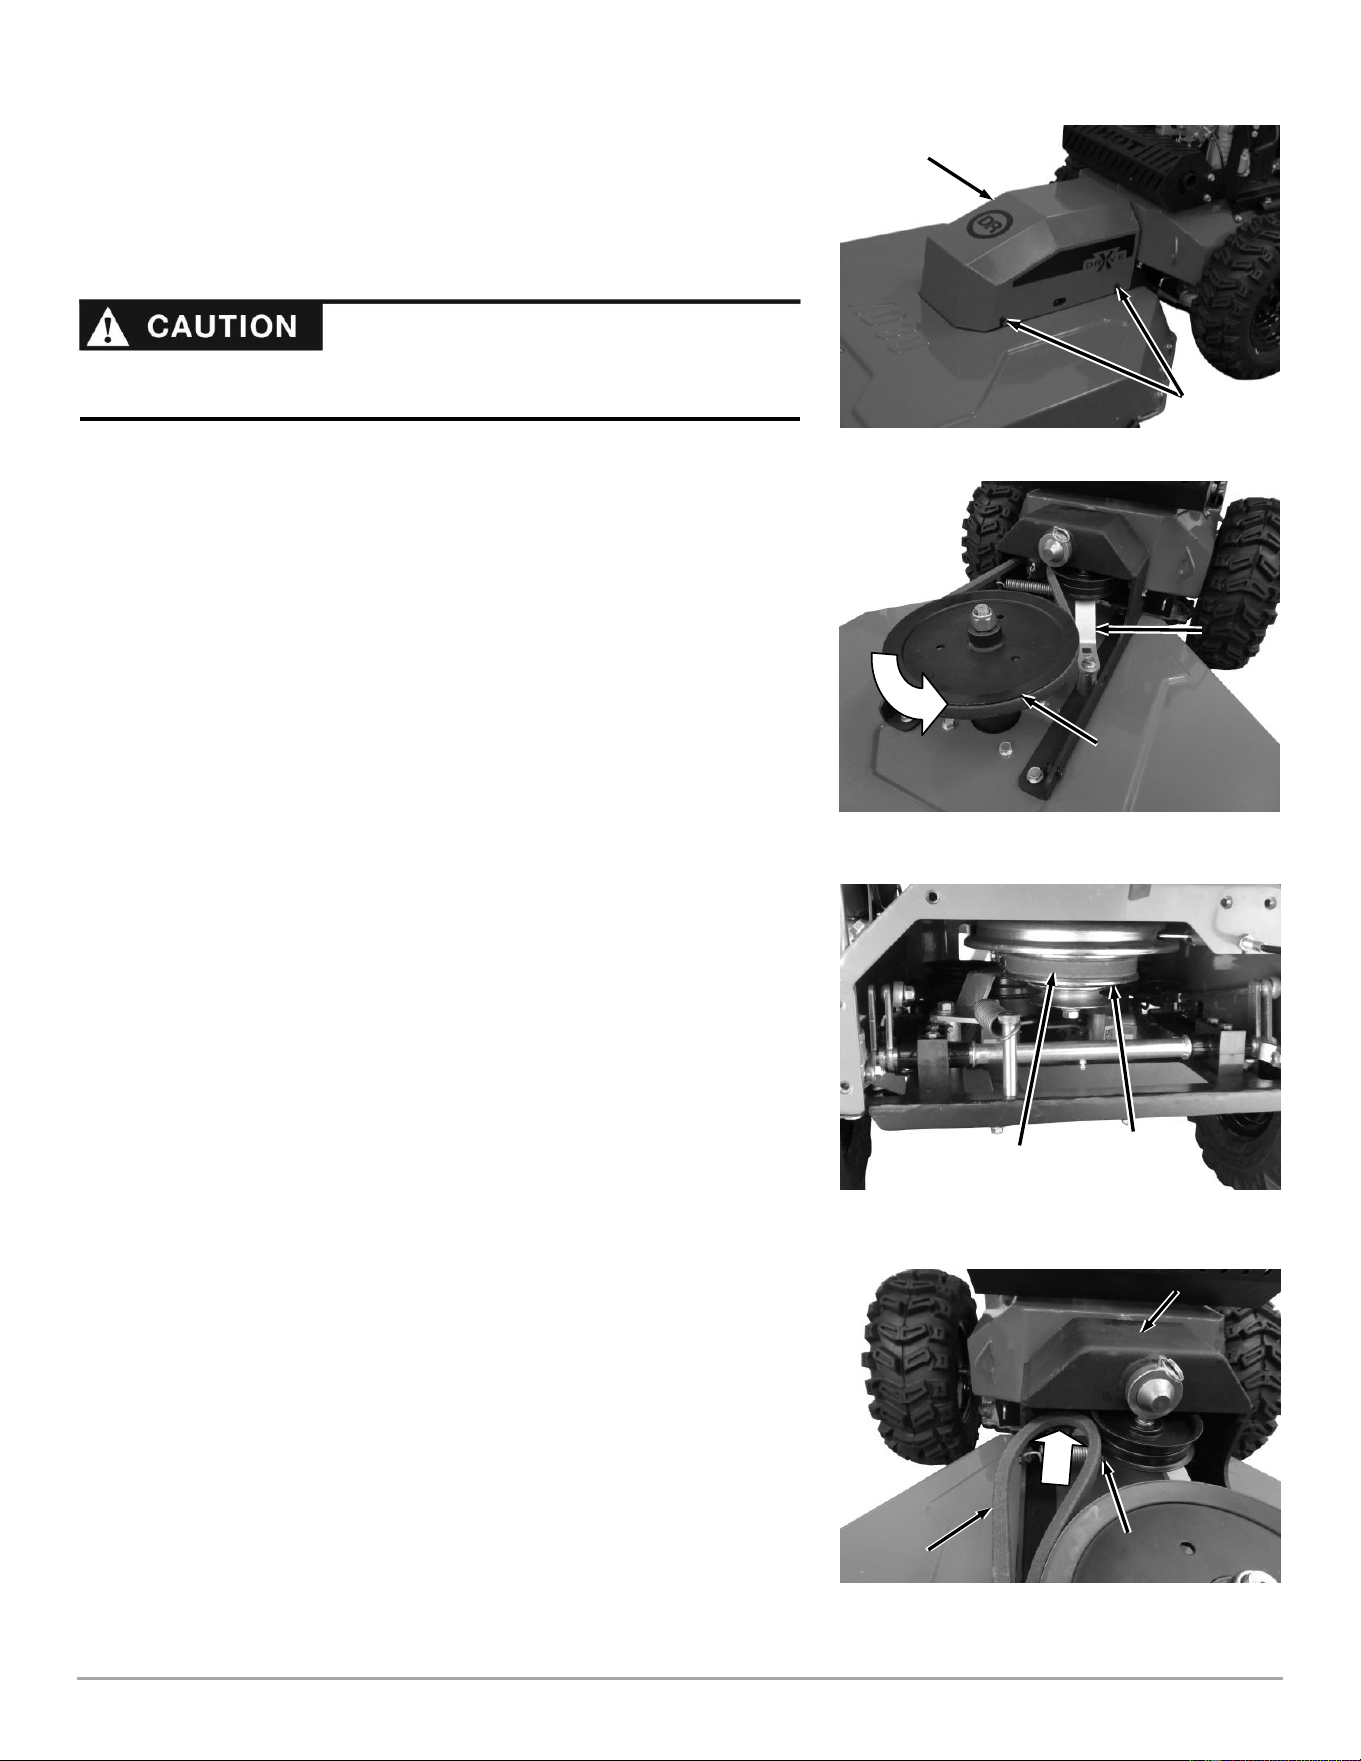
2. Loosen, but do not remove, the four Bolts that secure the Belt Cover using a
1/2″ Wrench. Remove the Belt Cover (Figure 34).
3. Insert the 1/2″ Ratchet into the square in the Idler Arm (Figure 35). Turn the
Ratchet clockwise to move the Pulley away from the Belt.
Note: If you use your hand to remove the Belt, wear Gloves. A Rope looped around
the Belt also works well to pull it off the Pulley.
4. As you hold the Idler out of the way with the Ratchet using your right hand,
rotate and lift the Belt up and out of the Pulley groove using your left hand.
5. Push the belt in toward the Power Unit and the belt will fall off the Clutch
Pulley (Figure 36).
6. Pull the Belt toward the Deck to remove the Belt completely.
7. To install a new Belt, insert the Belt over the Tensioner Spring and through
the inside of the Deck Pivot Bracket (Figure 37).
8. Wrap the Belt around the Clutch Pulley under the Power Unit (Figure 36).
9. Start the Belt into the groove of the Blade Pulley and turn the Pulley as you
guide the Belt around and into the Pulley groove (Figure 35).
10. Install The Drive Belt, Spring, Rear Cover, and Multi Tool. See “Removing
and Replacing the Drive Belt”.
11. Install the Belt Cover and tighten the four Bolts (Figure 34).
Blade
Pulley
Figure 35
Idler
Clutch
Pulley
Figure 36
Belt
Figure 34
Belt Cover
Bolts
Your hands could get pinched when removing or installing the Belt onto the
Belt Pulley. Wear Gloves to prevent injury.
Belt
Figure 37
Deck Pivot Bracket
Tensioner
Spring
22 DR
®
FIELD and BRUSH MOWER
Removing and Replacing the Drive Belt
Tools and Supplies needed:
1/2″ Wrench
Gloves
Note: Wear Gloves to protect your hands.
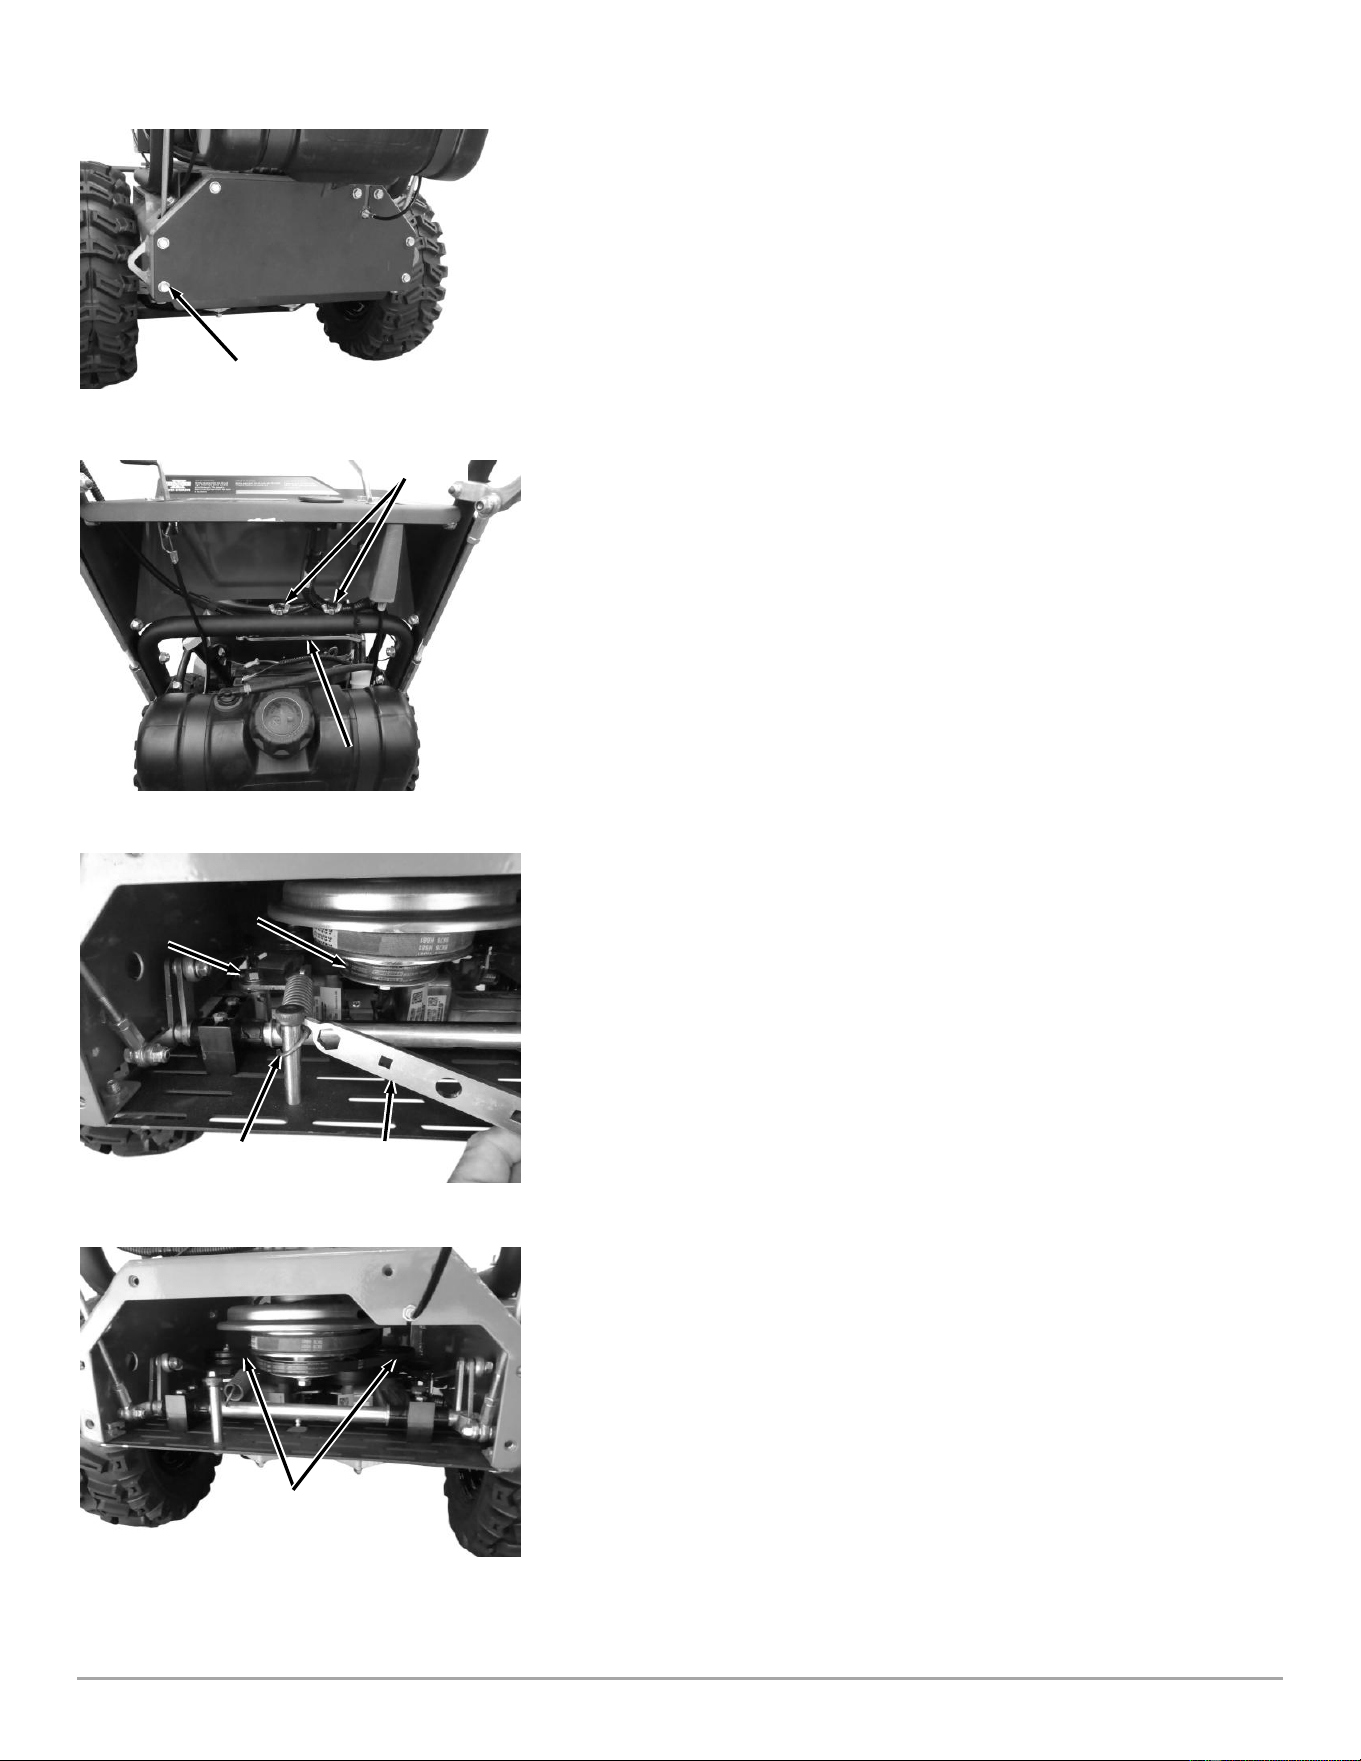
1. Remove the Seven Bolts that secure the Rear Cover Plate using a 1/2″
Wrench and Remove the Cover (Figure 38).
2. Remove the Two Bolts and Wing Nuts that secure the Multi-tool to the
Lower Handlebar (Figure 39).
3. Use the Multi Tool to pull the Tensioner Spring off the Shoulder Bolt (Figure
40).
Tip: If you insert the hook end of the Multi tool from the right side of the Spring
loop, you can grab the end of the Spring to pull it from the Shoulder Bolt.
4. Wrap a rope around one side of the Drive Belt and pull down and to the side
to remove the belt from the Drive Pulley.
5. Reach inside the Frame to lift the Belt off the Transmission Pulleys (Figure
41).
6. Remove the Belt.
7. Reverse steps for installing a new Belt.
Transmission
Pulleys
Figure 41
Idler Pulley
Bracket
Figure 40
Drive
Belt
Spring
Multi Tool
Multi Tool
Figure 39
Bolts and
Wing Nuts
Rear Cover
Plate
Figure 38
Bolt (7 Places)
CONTACT US AT www.DRpower.com 23
E-Clip and Shim
Figure 43
Wheel
Removing and Replacing the Blade
Tools and Supplies needed:
15/16" Wrench
Torque Wrench
Gloves
Wood Block to brace the Blade*
*The Wood Block must be strong enough to safely secure the Blade and long
enough to rest against the Deck as shown.
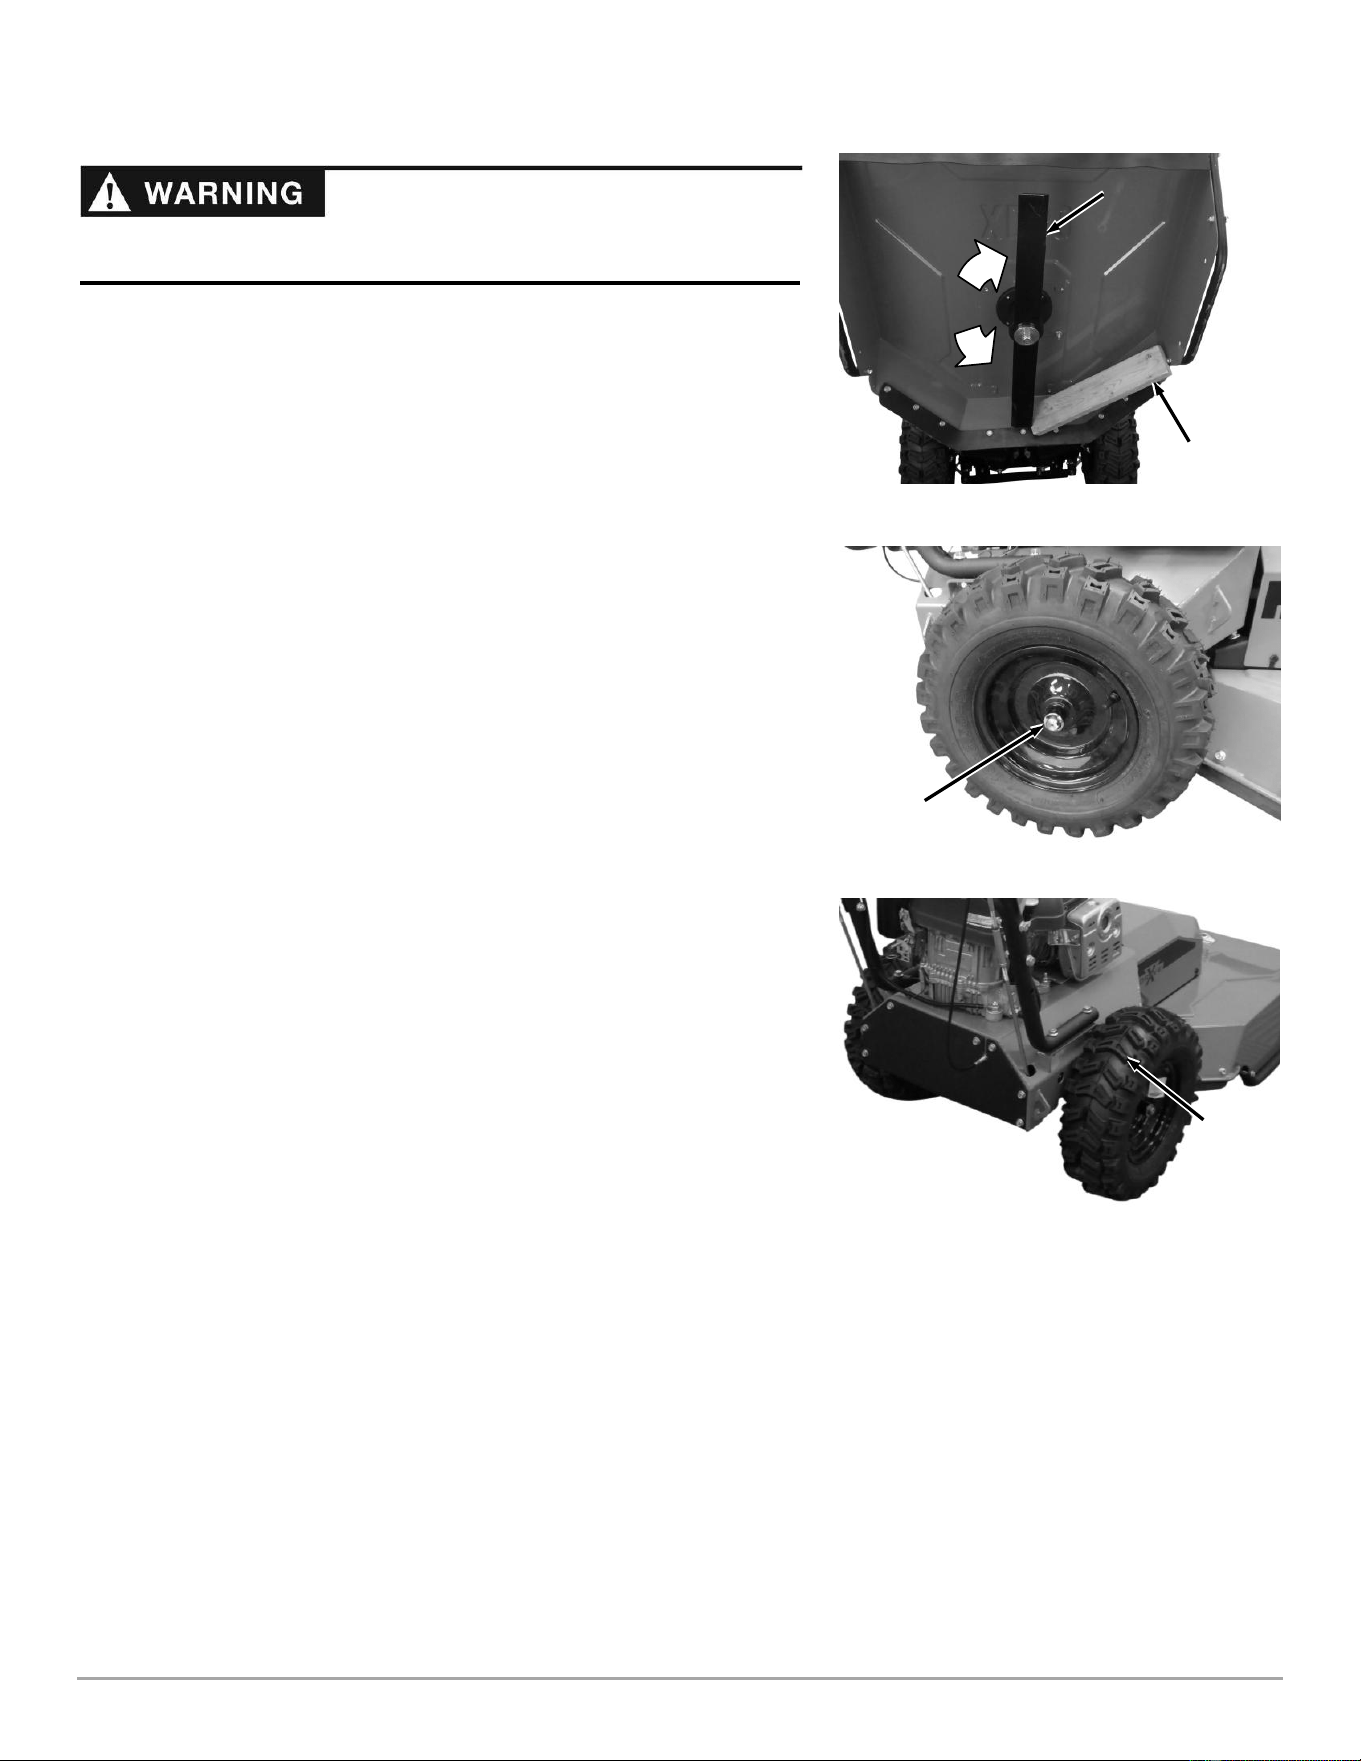
1. Insert a Wood Block between the Blade and the Deck to stop rotation (Figure
42).
2. Remove the Lock Nut (standard, right-hand thread) and Washer using a
15/16" Wrench.
3. Remove the Blade and the Anti-Wrap Guard.
Note: The Blade has two cutting edges on each end. It can be turned over to use the
other side. There is also the option to sharpen the dull cutting edge.
4. Mount the Anti-Wrap Guard, new Blade, Washer, and Lock Nut and tighten
securely (Torque to 100 ft-lbs.). If the Locknut is removed and installed
more than once, it should be replaced with a new one.
Note: Be sure to seat the Blade completely over the small ridge in the Spindle Hub
before tightening the Lock Nut.
Removing the Wheels
Tools and Supplies needed:
Floor Jack
E-Clip Removal Tool (Large Flat Head Screwdriver or Needle Nose Pliers will
work also)
Eye Protection
Rag
1. Jack up the machine so the Wheel is off the ground.
2. Wear eye protection as you remove the E-Clip and Shim from the Axle
(Figure 43). Slide the Wheel off the Axle ensuring that the Square Key stays
in the Axle Key slot.
3. Align the Key slot in the Wheel Hub to the Key in the Axle and install the
new/repaired Wheel with the “V” tread pointing forward (Figure 44). Secure
with the Washer and E-Clip.
4. Lower the machine to the ground.
“V”
Pointing
Forward
Figure 44
Wood Block
Figure 42
Blade
Loosen
Tighten
Replace the Blade when worn or damaged to prevent serious injury to the
operator or possible machine damage.
24 DR
®
FIELD and BRUSH MOWER
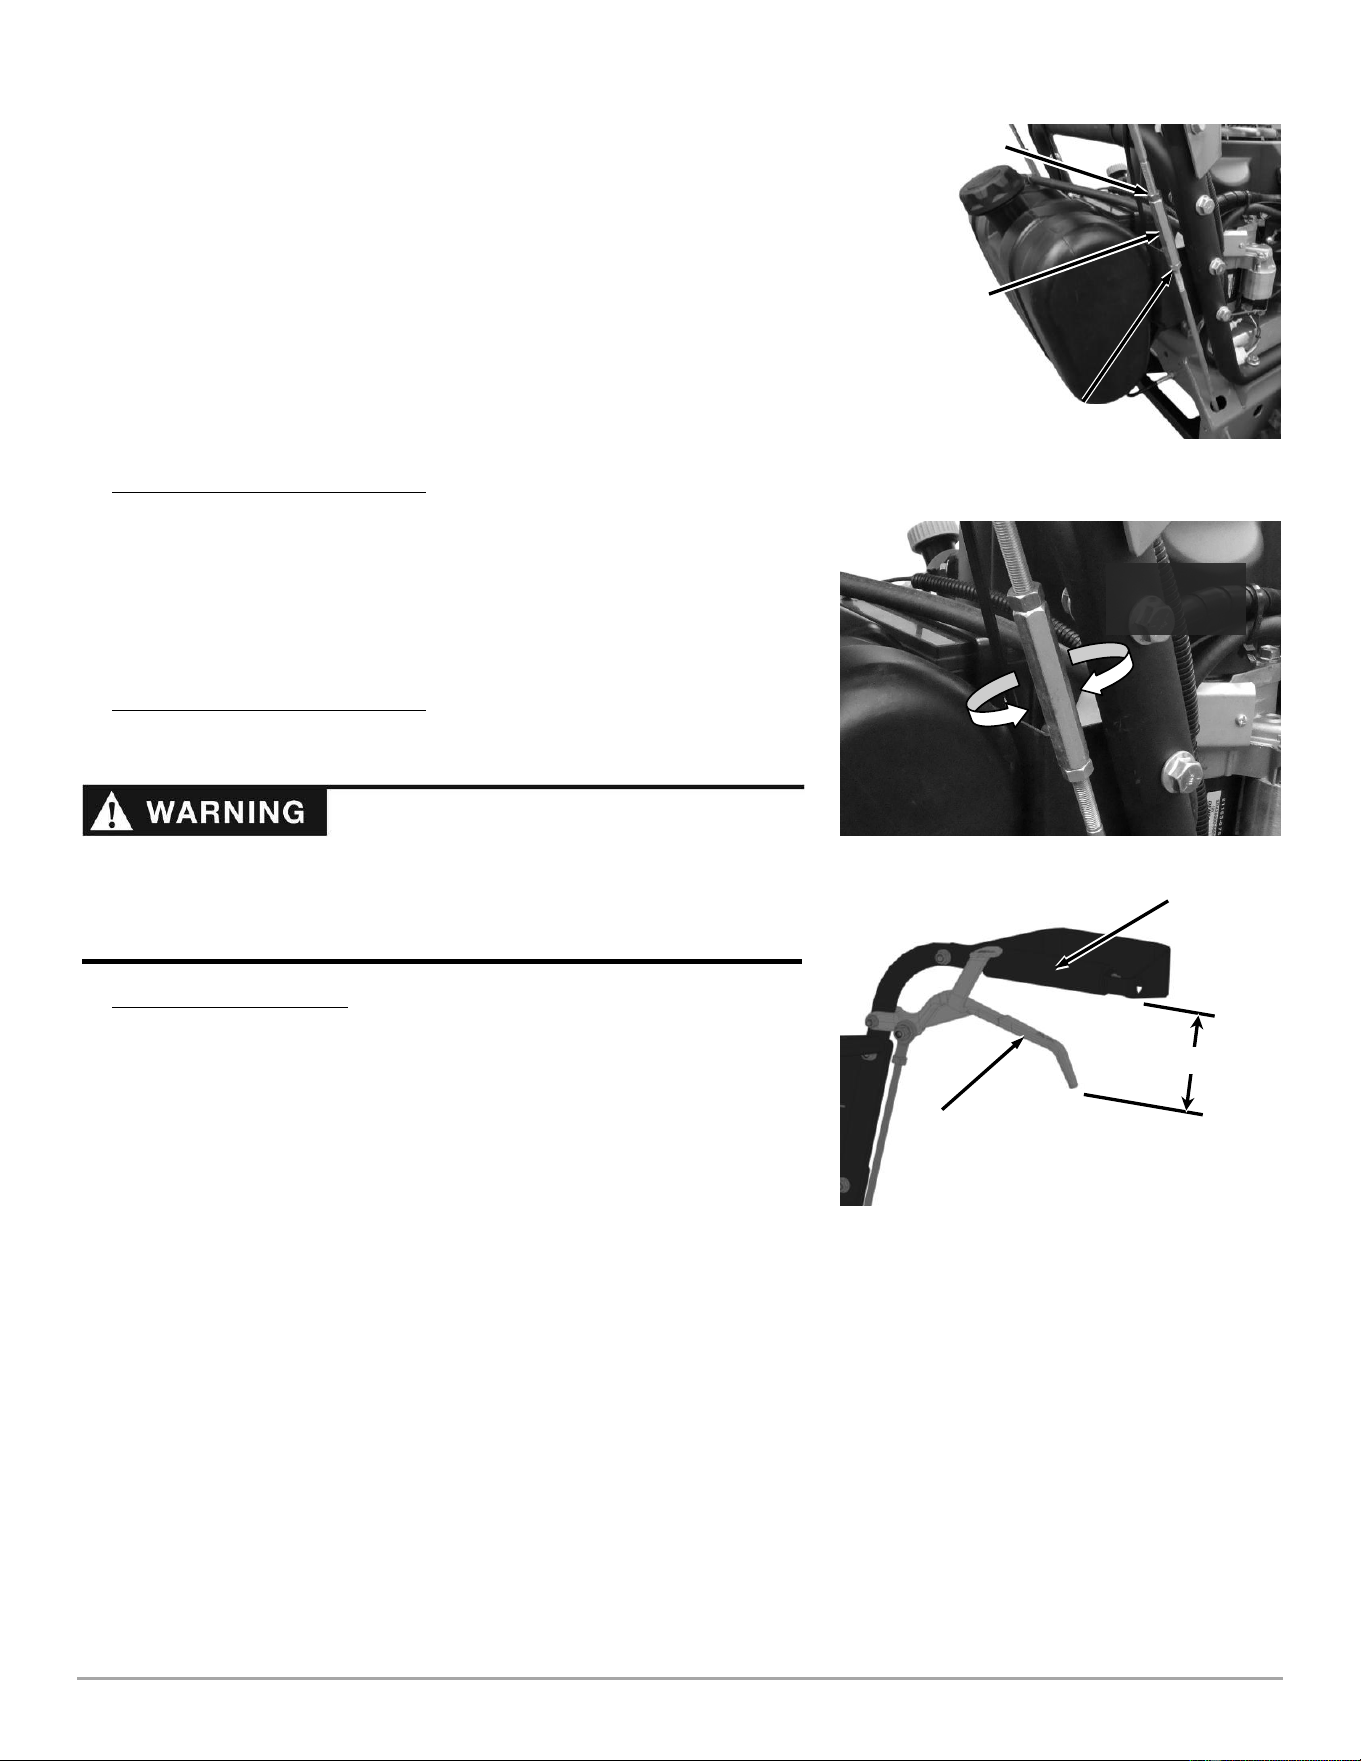
Replacing the Blade Pulley
The Blade Pulley is designed to protect the drive system of the machine. If the
machine is overloaded the hub and pulley may fail. Please follow these
instructions to replace
Tools and Supplies Needed:
Gloves
1/2" Wrench
1/2" Drive Ratchet
15/16" Wrench
Torque Wrench with 15/16″ Socket
1. Loosen the four Bolts using a 1/2″ Wrench and lift up to remove the Belt
Cover (Figure 45).
2. Insert the 1/2″ Ratchet into the square in the Idler Arm. Turn the Ratchet
clockwise to move the Pulley away from the Belt.
Note: If you use your hand to remove the Belt, wear Gloves. A Rope looped around
the Belt also works well to pull it off the Pulley.
3. As you hold the Idler out of the way with the Ratchet using your right hand,
rotate and lift the Belt up and out of the Pulley groove using your left hand
(Figure 46).
4. Block the blade with a block of wood (Figure 42) as you remove the Pulley
Locknut using a 15/16" Wrench (Figure 47).
5. Remove the damaged Pulley and replace with a new Pulley.
Note: Ensure that the square Key is in the Shaft (Figure 48) and that the Hub of
the new Pulley is facing up.
6. Secure the Pulley with the Locknut and torque to 50lb-fts (68N-m).
7. Start the Belt into the groove of the Blade Pulley and turn the Pulley as you
guide the Belt around and into the Pulley groove (Figure 46).
8. Install the Belt Guard onto the Deck and tighten the four Bolts to secure it
(Figure 45).
Blade
Pulley
Figure 46
Idler
Spindle
Shaft
Figure 48
Square
Key
Figure 47
Blade Pulley
Lock Nut
Figure 45
Belt Cover
Bolts
CONTACT US AT www.DRpower.com 25
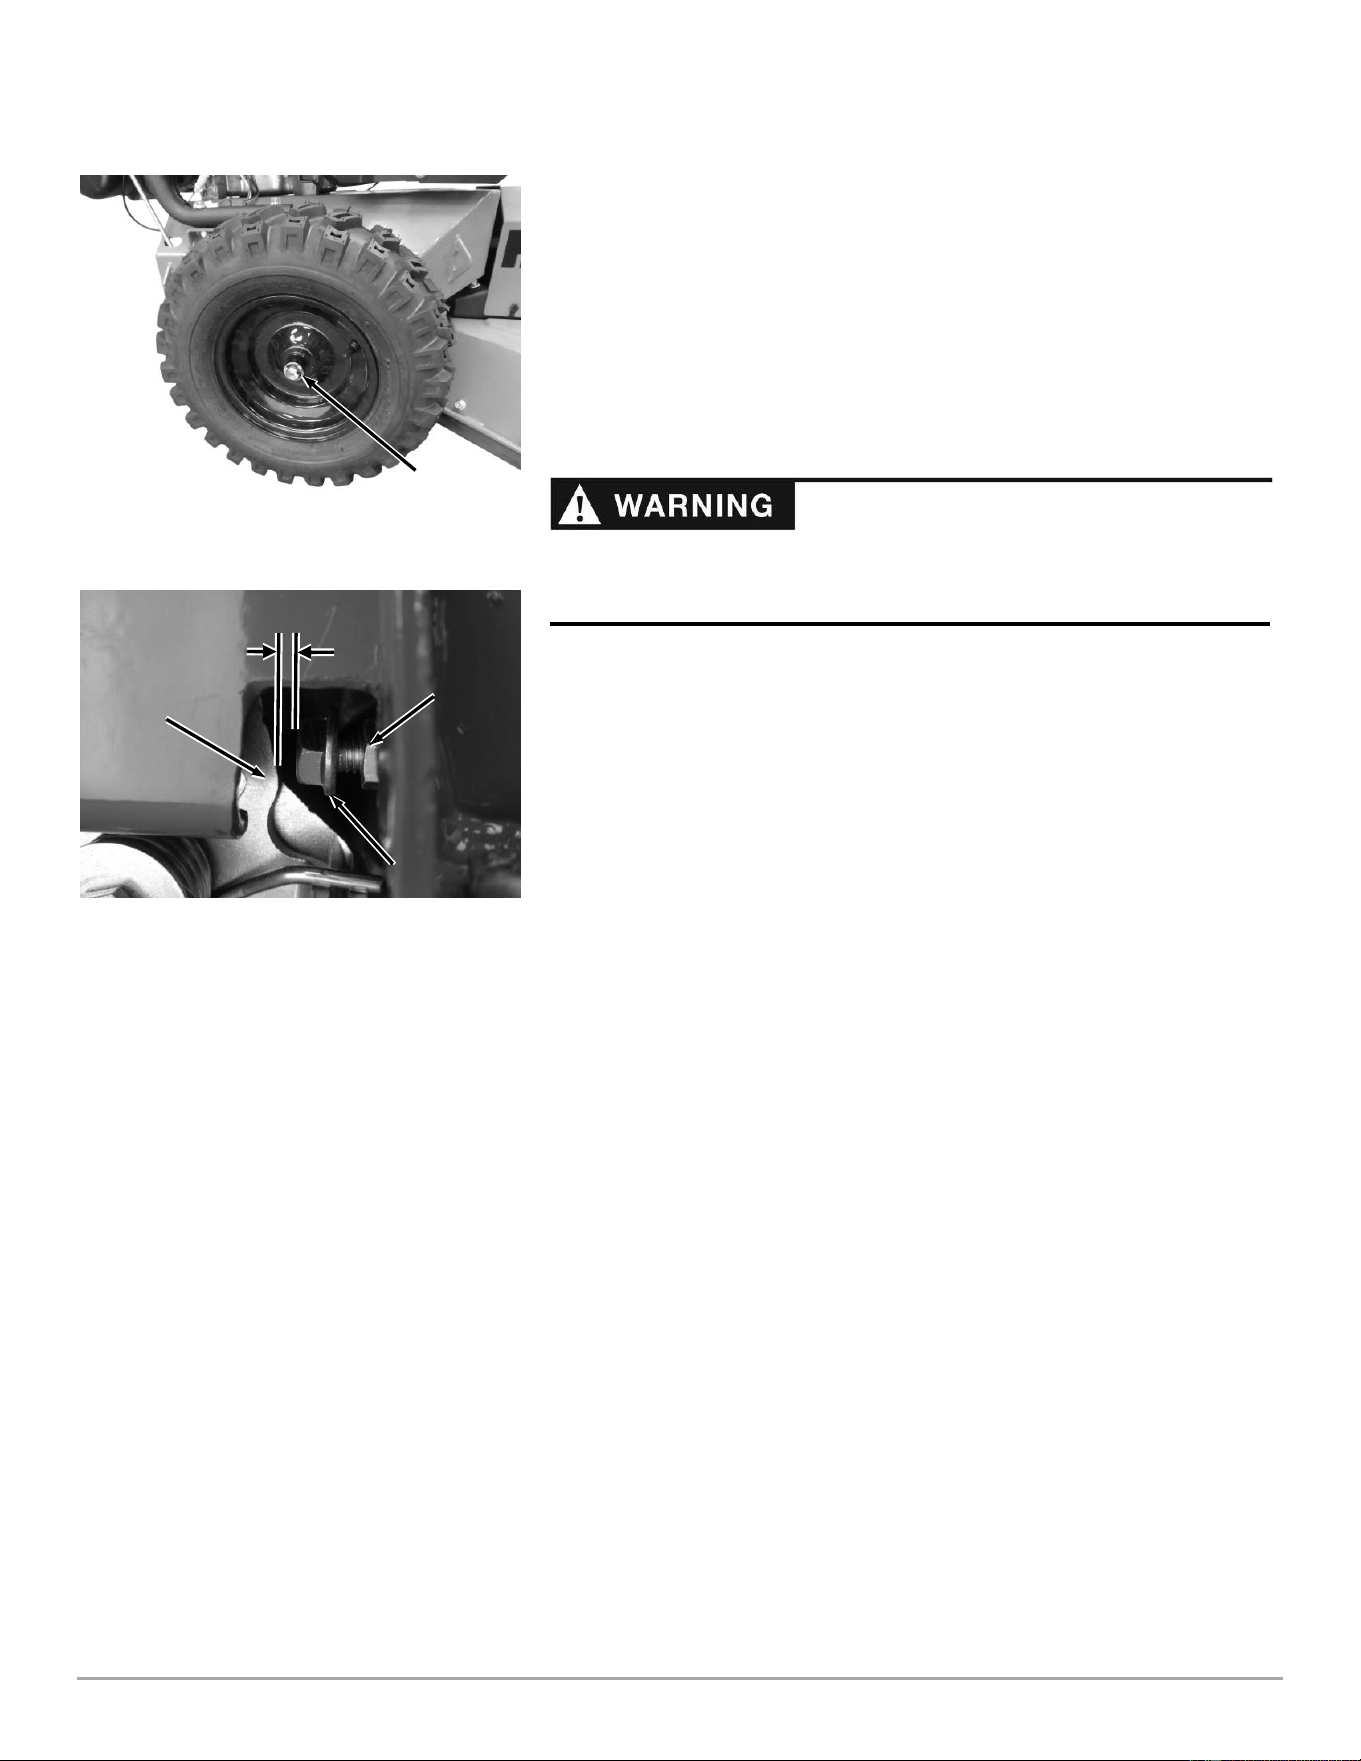
Adjusting the Forward Speed Limit
If you notice your machine is tracking to the left or right when traveling forward
at full speed (both Levers fully against the Handlebar Grips) you may need to
adjust your traction Drive levers.
The following instructions are for the Cross Drive configuration. For the Inline
configuration, adjust in the opposite direction for step 5.
Tools Needed:
Two 1/2″Wrenches
Note: “Clockwise” and “counterclockwise” reference turning direction when looking
down at the top of the Adjuster.
1. Both Right and Left side Adjusters - Hold the center hex section in place
using a 1/2″ Wrench as you turn both Jam Nuts clockwise to move them
away from the center section a couple of turns using a 1/2″ Wrench (Figure
49).
Note: In the next step, turning the center section clockwise will move the Lever away
from the Handlebar Grip and counterclockwise will move the Lever closer to
the Grip.
2. Both Right and Left side Adjusters - Turn the center Hex Sections in the
necessary direction to set the distance between the lowest points of the
Levers to the Handlebar Grips at 4″ (Figure 50 and 51).
3. Right side Adjuster only - Tighten the Jam Nuts against the center section
(Figure 49) counterclockwise to lock the Adjuster at the 4″ setting. Right side
adjustment is finished.
4. Drive the machine forward at full speed with both Levers fully against the
Handlebar Grips. If the machine travels in a straight line tighten the Jam
Nuts counterclockwise on the left side and adjustment is complete. If the
machine does not travel in a straight line, continue to the next step.
5. If the machine is turning more to the right, adjust the center section on the
left hand side 1/8 turn clockwise. If the machine is turning more to the left,
adjust the center section on the left hand side 1/8 turn counterclockwise.
6. Continue driving and adjusting the left side handlebar until the machine
travels in a straight line at full speed.
7. Tighten the left handlebar Jam nuts counterclockwise against the center
section. Adjustment is complete.
Handlebar
Grip
Figure 51
Traction
Drive Lever
4″ Max.
Counterclockwise
Moves Lever
Closer to Grip
Figure 50
Clockwise Moves
Lever Away from
Grip
Figure 49
Traction Control
Adjuster
Upper Jam Nut
Lower Jam Nut
Never go beyond 4″ when setting the baseline distance from the lowest point
on the Traction Drive Levers to Handlebar Grip. A setting more than 4″ may
cause the machine to lose control, causing damage to the machine and
personal injury to the operator.
26 DR
®
FIELD and BRUSH MOWER
E-Clip
Figure 52
Reverse Drive Limit Adjustment
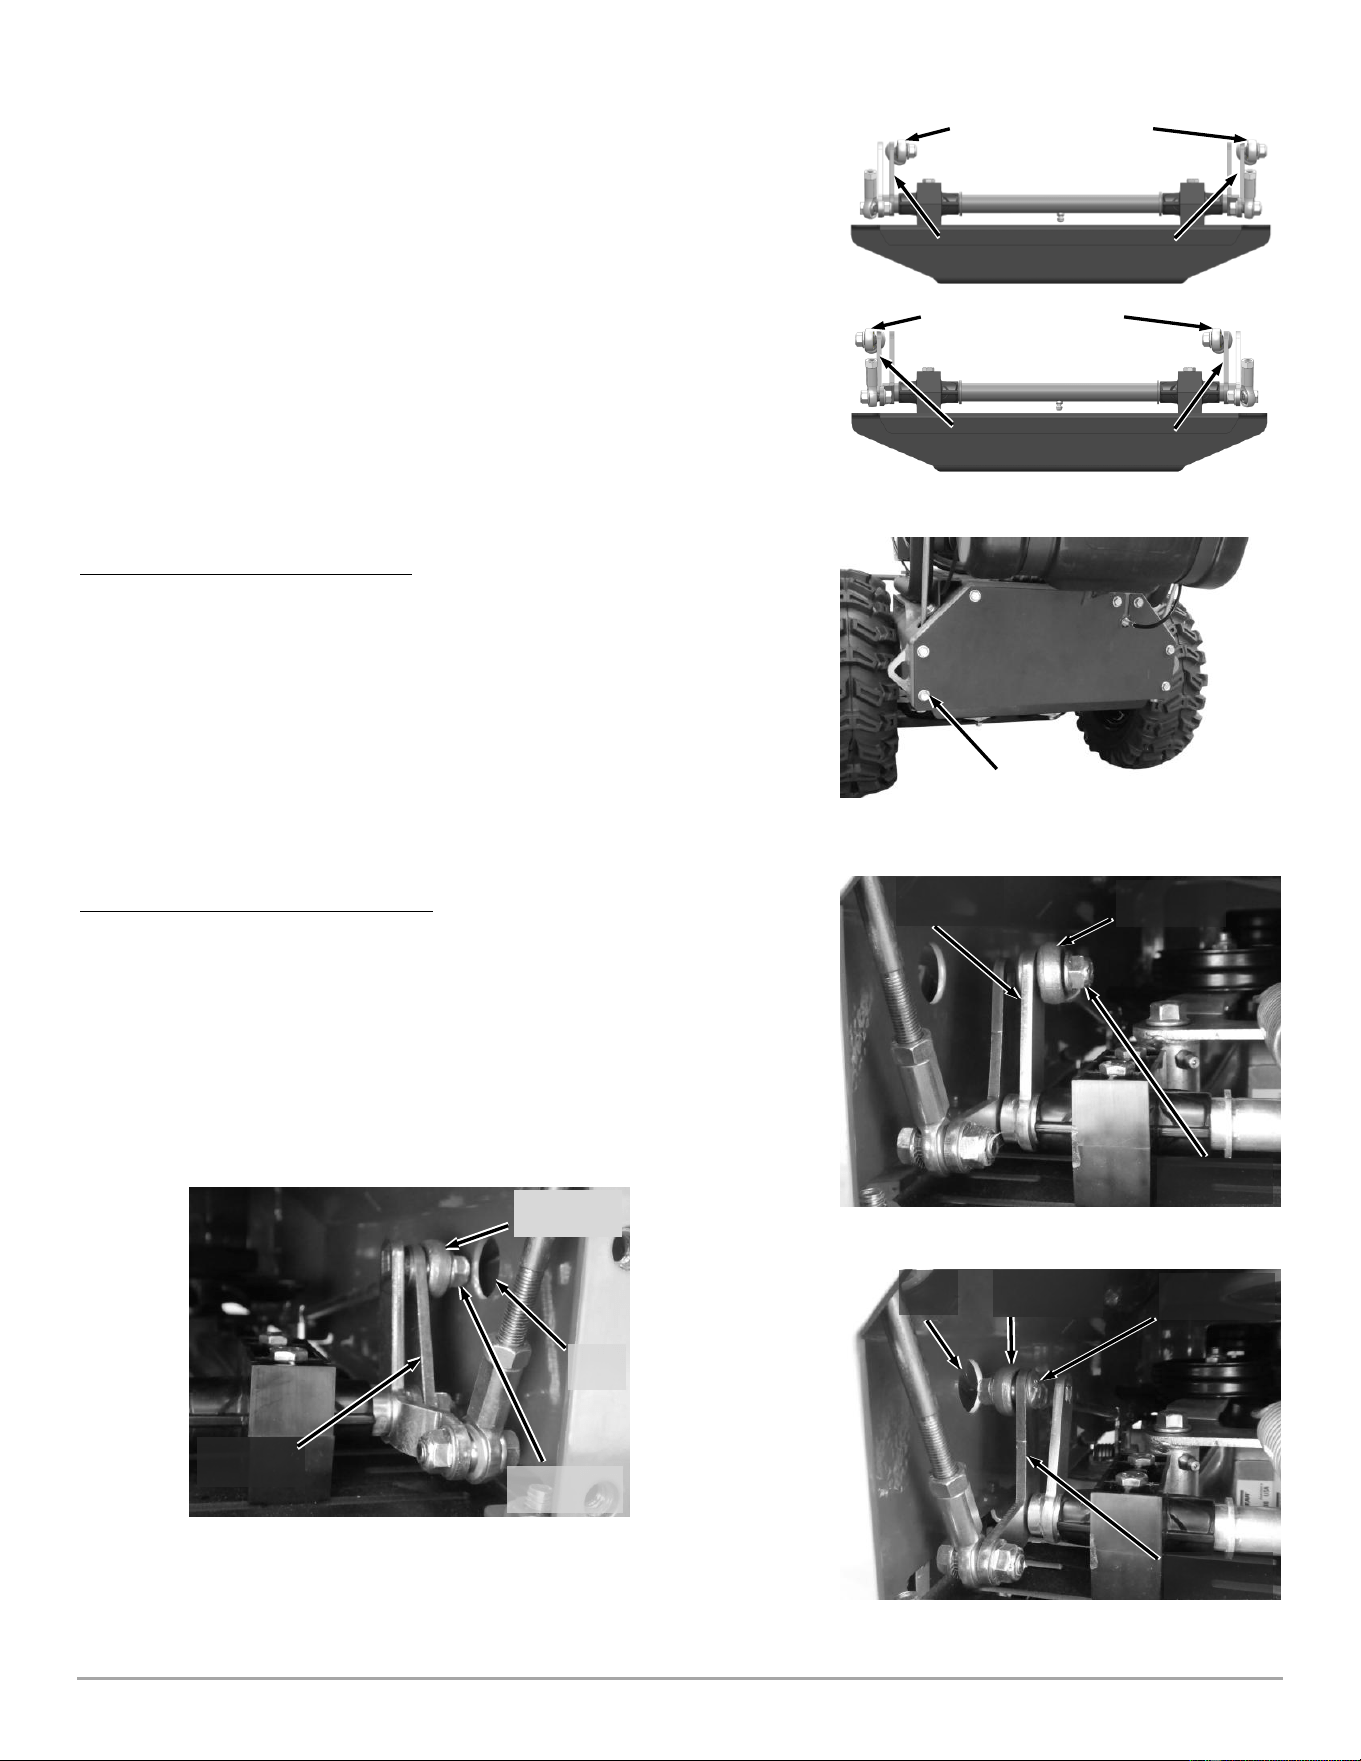
The reverse Drive limit adjustment set at the adjustable limit bolts on the inside
of the frame on each side. If your machine is tracking straight when traveling in
full speed reverse (both Thumb Pads pressed fully), do not make any
adjustments. If your machine is tracking to the left or right when traveling in full
speed reverse (both levers pressed equally), you may need to adjust the reverse
drive limit as follows.
Tools Needed:
1/2" Wrench
Gap Gauge (A narrow piece of 7 or 8 gage sheet metal, or other suitable
material that is between 0.15 to 0.18 thick)
1. Jack up the rear of the machine and remove the e-clips securing the wheels
to axle. Remove the Wheels (Figure 52).
2. Use a narrow piece of 7 or 8 gage sheet metal, or other suitable material that
is between 0.15 to 0.18 thick to check the gap between the Reverse Limit Bolt
and the Transmission Control Plate on both Transmissions (Figure 53).
3. If the gaps appear to be set the same as they come from the factory, no
adjustment is necessary. If the gaps are different, follow the next steps for
proper adjustment.
4. Use a 1/2" Wrench to loosen the Jam Nut on the Adjustment Bolt as you
hold the Bolt with another 1/2″ Wrench.
5. Rotate the Adjustment Bolt until it contacts the Gauge that is between the
Bolt and the Transmission Control Plate.
6. Hold the Bolt Head with a Wrench as you tighten the Jam Nut against the
Bracket with another Wrench to secure the Adjustment Bolt in place.
7. Ensure the gaps on both sides of the machine are set the same using the
Gauge.
Note: For the machine to track straight in reverse, it is important that the gap
between the adjustment bolt and the transmission control plate is the same for both
the left and right transmissions. The proper gap should be between 0.15″ and 0.18″.
8. Reinstall the Wheels and check that the Machine Travels in a straight line in
reverse. If the machine is still tracking in one direction, repeat the process
above.
Figure 53
Locknut
Bolt
Gap
Transmission
Control Plate
A gap of 0.15″-0.18″ results in a reverse speed limit of approximately 2MPH.
Setting the gap larger than recommended result in a reverse speed limit that
is faster than 2MPH and is considered unsafe and could cause injury.
CONTACT US AT www.DRpower.com 27
Changing the Drive Configuration (from Cross Drive to Inline
Drive)
The Cross Drive configuration uses the Control Arms on the right as shown in
the upper illustration (Figure 54). We found this to be to be the preferred
configuration for the majority of users so Machines are shipped from the factory
as Cross Drive. We recommend extensive practice by anyone that may be using
this machine before switching drive configurations.
The Inline Drive configuration uses the Control Arms on the left as shown in the
lower illustration (Figure 54). Converting to this configuration is explained in the
following steps.
Tools Needed:
1/2" Socket with Extension
1. Remove the Rear Cover Plate using a 1/2" Wrench (Figure 55).
Adjustment at left side of the Frame
Note: Move the Linkage as needed to allow removal and installation of the Carriage
Bolts. The head of the Carriage Bolts are always positioned between the
Control Arms.
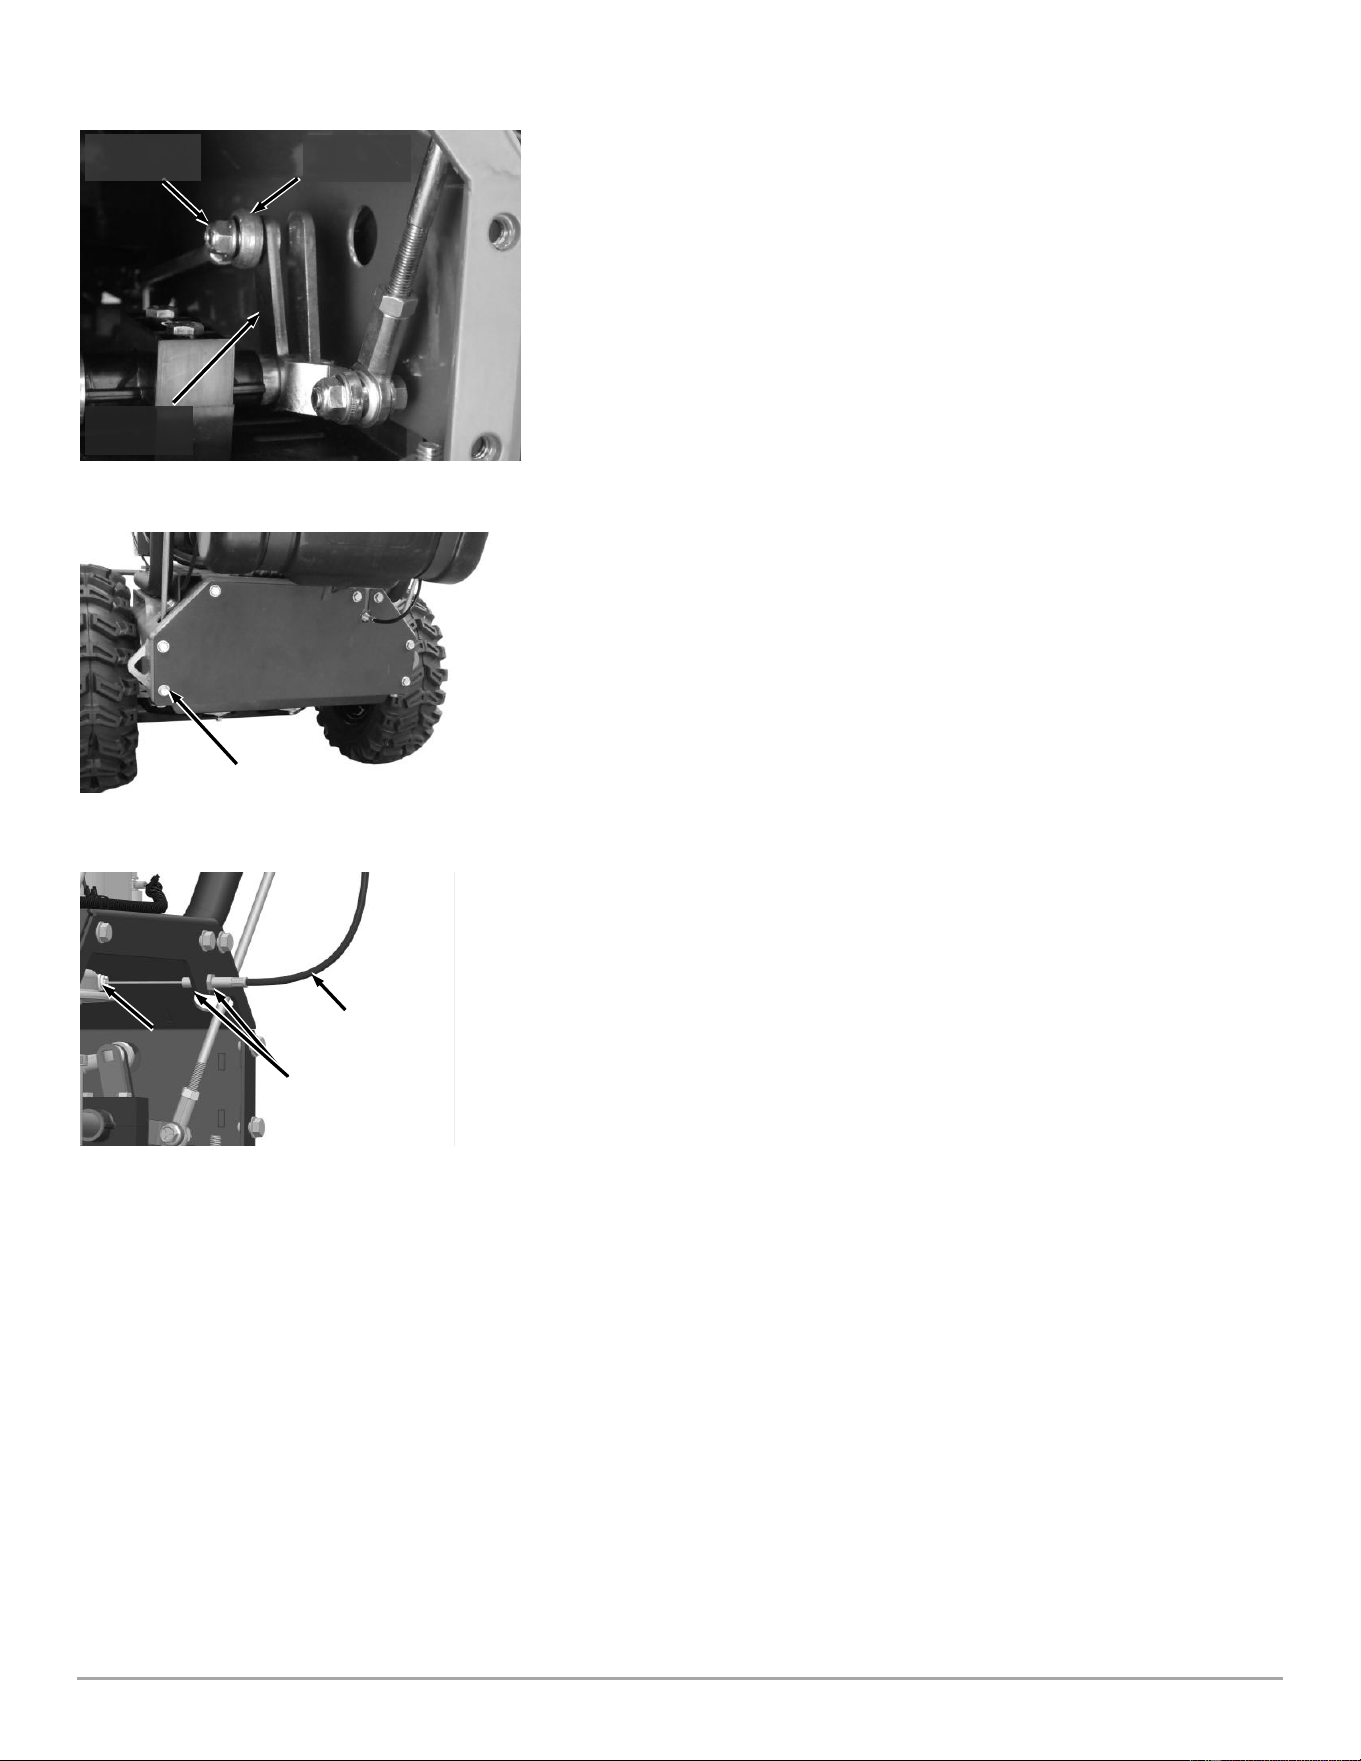
2. Use a 1/2” Socket to remove the Locknut and Carriage Bolt securing the
Transmission Link to the right Control Arm (Figure 56).
3. Move the Transmission Link to the left Control Arm and secure with the
Carriage Bolt and Locknut using the 1/2 Socket and Extension (Figure 57).
Note: Use a socket with extension when accessing the locknut through the cut-out in
the Frame.
Adjustment at Right Side of the Frame
4. Use a 1/2” Socket and Extension to remove the Locknut and Carriage Bolt
securing the Transmission Link to the right Control Arm (Figure 58).
Note: Use a socket with extension when accessing the locknut through the cut-out in
the Frame.
Figure 54
Cross Drive uses Right Control Arms
Inline Drive uses Left Control Arms
Transmission Link Rods
Transmission Link Rods
Figure 58
Transmission
Link
Carriage Bolt
and Locknut
Cross Drive
Control Arm
Access
Hole
Figure 57
Inline Drive
Control Arm
Carriage Bolt
and Locknut
Transmission
Link
Access
Hole
Figure 56
Cross Drive
Control Arm
Carriage Bolt
and Locknut
Transmission
Link
Rear Cover
Plate
Figure 55
Bolt (7 Places)
28 DR
®
FIELD and BRUSH MOWER
5. Move the Transmission Link to the left Control Arm and secure with the
Carriage Bolt and Locknut using a 1/2″ Socket (Figure 59).
6. Reinstall the Rear Cover Plate.
7. Check the Forward Drive speed and re-adjust the control levers as needed.
See section “Adjusting the Forward Speed”.
Blade Engage Cable Adjustment
1. Ensure the Blade Engage Lever is in the disengaged position.
2. Remove the Rear Cover Plate using a 1/2" Wrench (Figure 60).
3. Adjust the Jan Nuts as needed to remove and slack in the cable without
putting any tension on the Spring (Figure 61).
Blade Engage
Cable
Figure 61
Jam Nuts
Spring
Rear Cover
Plate
Figure 60
Bolt (7 Places)
Figure 59
Inline Drive
Control Arm
Transmission
Link
Carriage Bolt
and Locknut

CONTACT US AT www.DRpower.com 29
Please dispose of used batteries responsibly, according to your local hazardous materials regulations. Never throw away used
batteries in your household trash.
Battery Care (Electric Start Machines)
Proper care can extend the life of a Battery. Follow these recommendations to ensure your Battery’s best performance and long
life:
Do not allow the Battery charge to get too low. If the machine is not used, charge the Battery every 4 – 6 weeks. Operate the
Engine for at least 45 minutes to maintain proper Battery charge.
Store an unused Battery in a dry area that does not freeze.
Do not charge an already charged Battery. In theory, you cannot overcharge our Battery with a trickle Charger; however, when
a Battery is fully charged and the Charger is still on, it generates heat that could be harmful to the Battery. A fully charged
Battery will read 12V-13.2V with a Voltmeter.
Do not continue to crank the Engine when the Battery charge is low.
If the machine will not be used for an extended period of time, we recommend disconnecting the negative battery terminal to
help preserve the battery charge.
Charging the Battery
Operate the Mower Engine for at least 45 minutes to maintain proper Battery charge. If the Battery loses its charge, you'll need to
use a trickle Charger (like the DR Battery Charger) to recharge it. The Charger should have an output of 12 volts at no more than 2
amps.
Note: The charging system of a running engine is designed to maintain a battery’s present charge. Starting a machine that has a
significantly discharged or dead Battery using the Recoil Starter or Jumper Cables will not recharge the Battery.
To connect a Battery Charger to your DR FIELD and BRUSH MOWER, follow the steps listed below.
1. Detach the two Battery wires going to the Battery on your DR FIELD and BRUSH MOWER.
2. Attach the black (-) Battery Charger wire to the Battery negative (-) terminal, and attach the red (+) Battery Charger wire to the
Battery positive (+) terminal.
3. Plug the Battery Charger into an outlet.
4. Charge until Battery Charger indicates that it is charged or Battery measures to 12-14V.
At 1 amp, you may have to charge the Battery for as long as 24 hours.
At 2 amps, you may have to charge the Battery for as long as 12 hours.
5. Once Charged, disconnect Charger from outlet.
6. Disconnect Battery from the Charger.
Disposing of the Battery Responsibly
The Battery is a sealed lead-acid Battery. Recycle or dispose of it in an environmentally sound way.
Do not dispose of a lead-acid Battery in a fire; the Battery may explode or leak.
Do not dispose of a lead-acid Battery in your regular, household trash. Laws in most areas prohibit incinerating, disposing in a
landfill, or mixing a sealed lead-acid Battery with household trash.
Recycling a Used Battery
Please dispose of your used Batteries responsibly by recycling them. Call your local Solid Waste Management District or your local waste
handler to locate the collection site nearest you. Some collection sites recycle Batteries year-round; others collect them periodically.
You can also visit the Web site of Earth 911 for more information [www.earth911.org]. Once there, click “Where to recycle”, and type
Lead Acid Batteries under the “search for” box and enter your zip code in the “ZIP CODE” area, then select “search”. The site lists
recycling centers located near you.
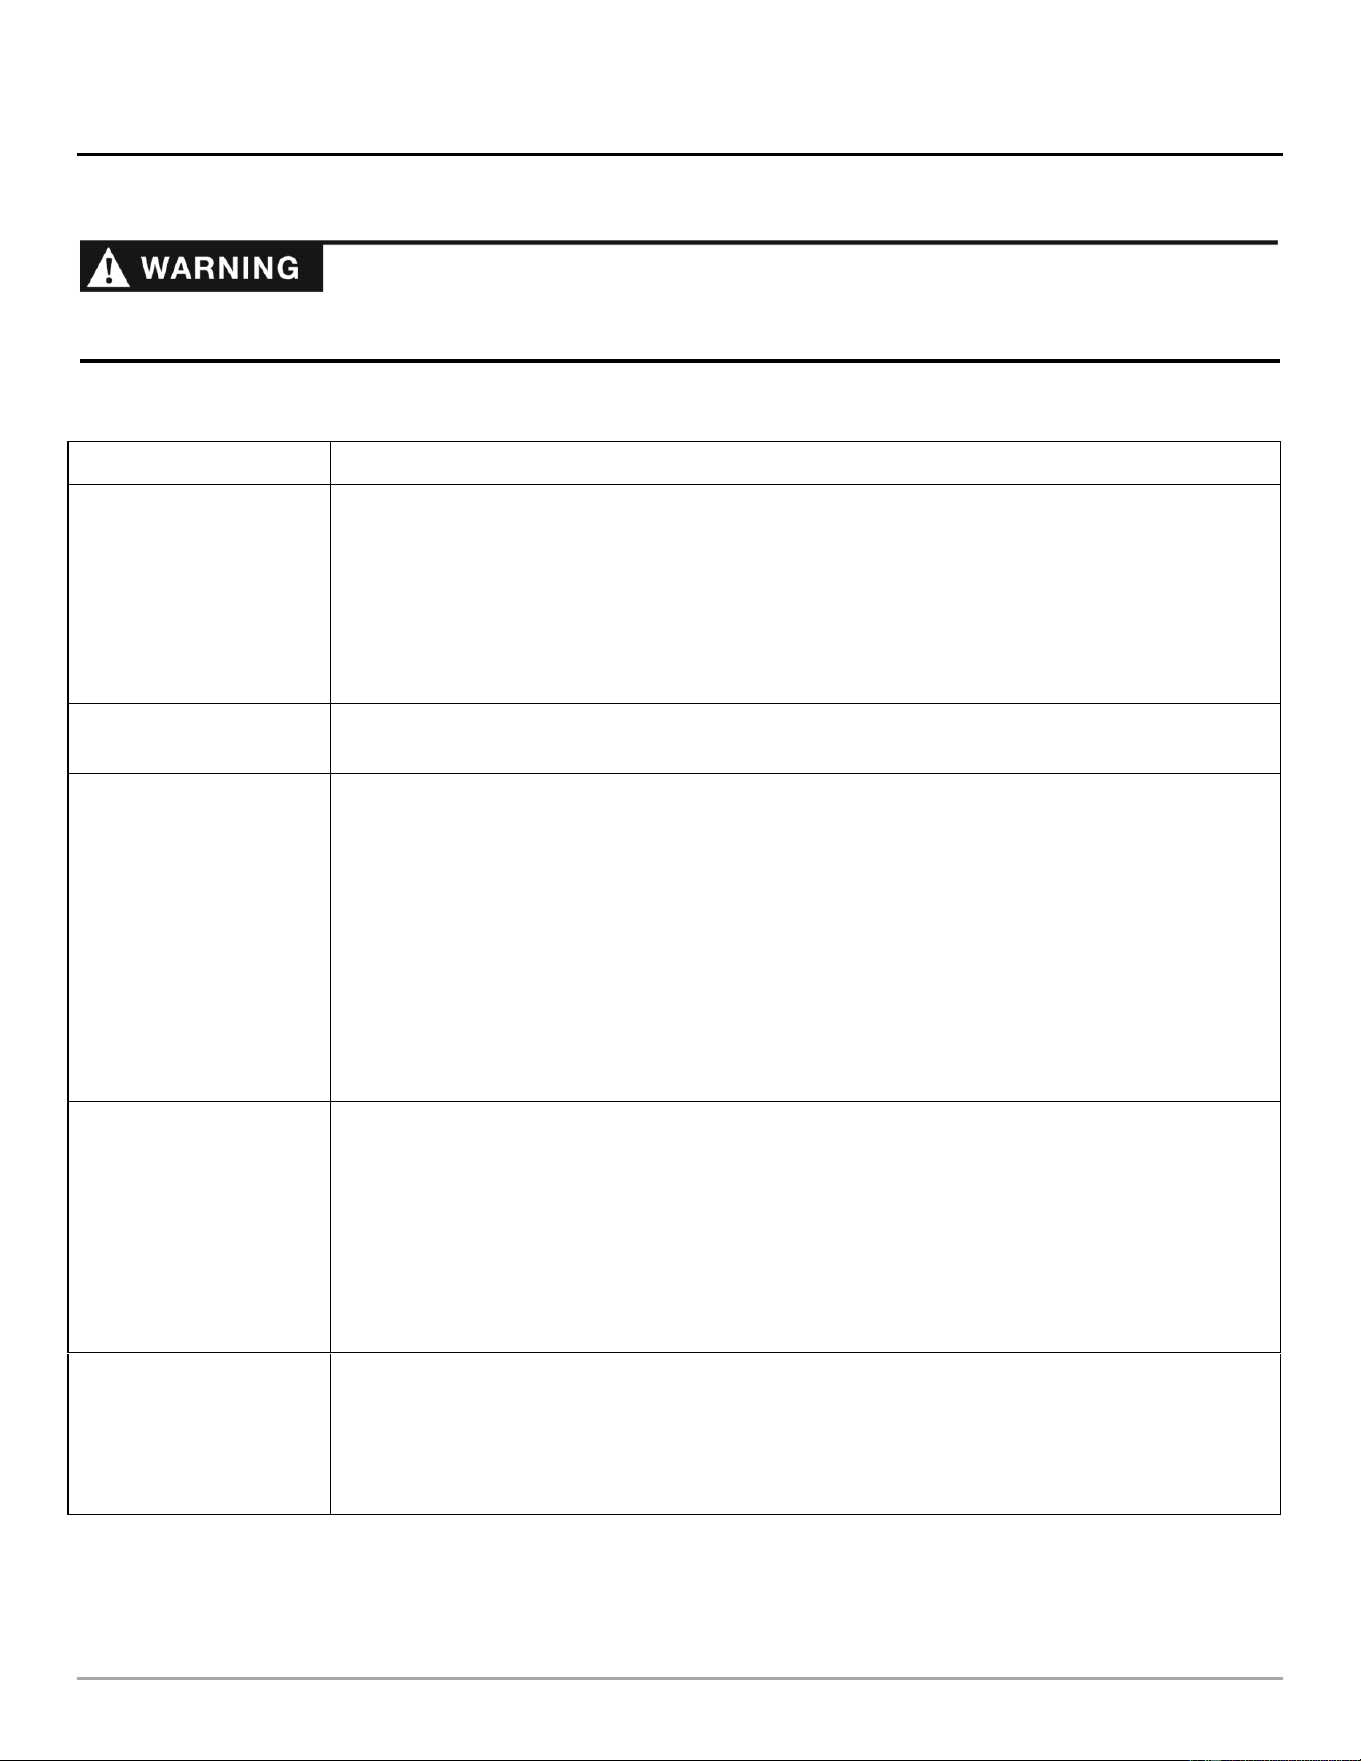
30 DR
®
FIELD and BRUSH MOWER
Chapter 5: Troubleshooting
Most problems are easy to fix. Consult the Troubleshooting Table below for common problems and their solutions. If you
continue to experience problems, contact us at www.DRpower.com or call toll-free 1-800-DR-OWNER (376-9637) for support.
Troubleshooting Table
SYMPTOM
POSSIBLE CAUSE; SOLUTION
Engine Starter Won’t Crank
on Electric Start machines
Blade Engage Lever is in “ENGAGED” position; Disengage Blade Engage Lever.
Operator Presence Wires are disconnected; Reconnect Operator Presence Connector
Check the fuse located on the Starter Wire; Replace fuse if blown
Battery power is low; Check the battery is more than 12V- Refer to Battery Care Section
Wires are disconnected or corroded; Check all wire connections. Disconnect the green Battery
ground wire first to avoid sparks. Check to be sure that all of the connections are clean and
tight. Reconnect the Battery ground wire.
Engine turns but won’t start
Check that the gas tank is at least half full and that the fuel shut off Valve is in the ON position
Try starting with the throttle in the CHOKE position; if this doesn’t work try the RUN position.
The Engine lacks power or is
not running smoothly.
(Please refer to the Engine
Owner’s Manual for engine-
specific procedures.)
Check the Throttle Lever travel and adjustment. Make sure the Throttle Lever is in the Run
position.
Check that the Air Filter is clean. If it is dirty, change it following the procedure in the Engine
Owner’s Manual.
The Spark Plug(s) may be dirty or cracked, change it. If it’s oily, leave it out, hold a rag over the
Plug Hole(s) and crank the Engine several times to blow out any oil in the Cylinder(s), then wipe
off the Plug(s) and reinsert it.
The gas may be old, change it. Use a fuel stabilizer if you keep gas longer than one month.
Check the Fuel Filter, it may be clogged. Replace if necessary.
Check to make sure that your Engine has the right amount of clean oil. If it is dirty, change it
following the procedure in the Engine Owner’s Manual.
Engine smokes.
Check the oil level and adjust as needed.
You may be operating the machine on too great an incline. See “Mowing on Slopes” on page
17.
Check the Air Filter and clean or replace if needed.
You may be using the wrong oil—too light for the temperature. Refer to your Engine Owner’s
Manual for detailed information.
Clean the Cooling Fins if they are dirty.
If the Engine still smokes, visit our web site at www.DRpower.com for assistance.
Traction Drive does not
Engage
The Drive Belt is off the Pulleys; Reinstall the Belt onto the Pulleys
The Drive Belt is damaged; Replace the Drive Belt.
Drive Idler Spring is broken or not attached, Reattach or replace.
The Neutral Bypass Links are in the transport position; Push Neutral Bypass Links in so they are
in the drive position.
Before performing any maintenance procedure or inspection, stop the engine, wait five minutes to allow all parts to cool.
Disconnect the spark plug wire(s), keeping it away from the spark plug(s).

CONTACT US AT www.DRpower.com 31
Troubleshooting Table (Cont.)
SYMPTOM
POSSIBLE CAUSE; SOLUTION
Machine tracks left or right
when traveling at full speed
with both Levers against
the Handlebar Grips.
Control Levers may need to be adjusted; See “Adjustment the forward speed limit” on page 25.
Check the Wheel Tire pressures against the manufacturer’s recommendation listed on the side
of the Tires.
Machine turns fully left or
right when engaging both
Levers the same.
Check that both Neutral Bypass Links are pushed into the engaged/drive position
Check that axle/wheel key is installed locking both wheels to the axle.
A Belt frays or rolls over the
Pulley.
A Pulley groove may be rusty or have a nick in it. Clean the pulley with steel wool or file off any
nicks.
Check the Belt for wear and hard spots.
The Belt may be stretched, replace it.
Excessive vibration when
engaging the Blade.
Check the Blade for nicks and wear. Replace or sharpen and balance the Blade if they become
dull, or have them professionally sharpened if needed. Never try to straighten a bent Blade. Be
sure to replace the Blade in the proper orientation. See page 23.
May have debris wrapped around Blade (wire, etc.), Remove debris from Blade.
The Blade may not be seated properly on the Hub. Loosen the Blade Nut, reseat the Blade, and
tighten the Nut. Be sure to turn OFF the Engine and remove the Spark Plug wire(s) before
performing this operation.
Check and retighten all of the fasteners as required.
The Blade is not cutting or
is loose.
The Blade may not be seated properly on the Hub. Loosen the Blade Nut, reseat the Blade, and
tighten the Nut. Be sure to turn OFF the Engine and remove the Spark Plug wire(s) before
performing this operation.
Sharpen the Blade; it may be dull or nicked. Be sure to replace the Blade in the proper
orientation. See page 23.
The Blade will not Engage
and/or Disengage.
Be sure you are holding down on the Operator Presence Lever.
Be sure that the Cable is connected at both ends and not damaged.
Engagement Arm on clutch is stuck; Ensure that the clutch arm is returning to its resting
position.
Do not continue to use the machine if the blade will not disengage; visit our web site at
www.DRpower.com for assistance.
Blade is not cutting or
squealing noise is heard
when cutting.
Check the Belt for wear or stretching; Replace Belt as needed (see page 21).
Check the Blade Engage Cable for proper adjustment; Adjust Cable (see page 28).

32 DR
®
FIELD and BRUSH MOWER
Chapter 6: Parts Lists and Schematic Diagrams
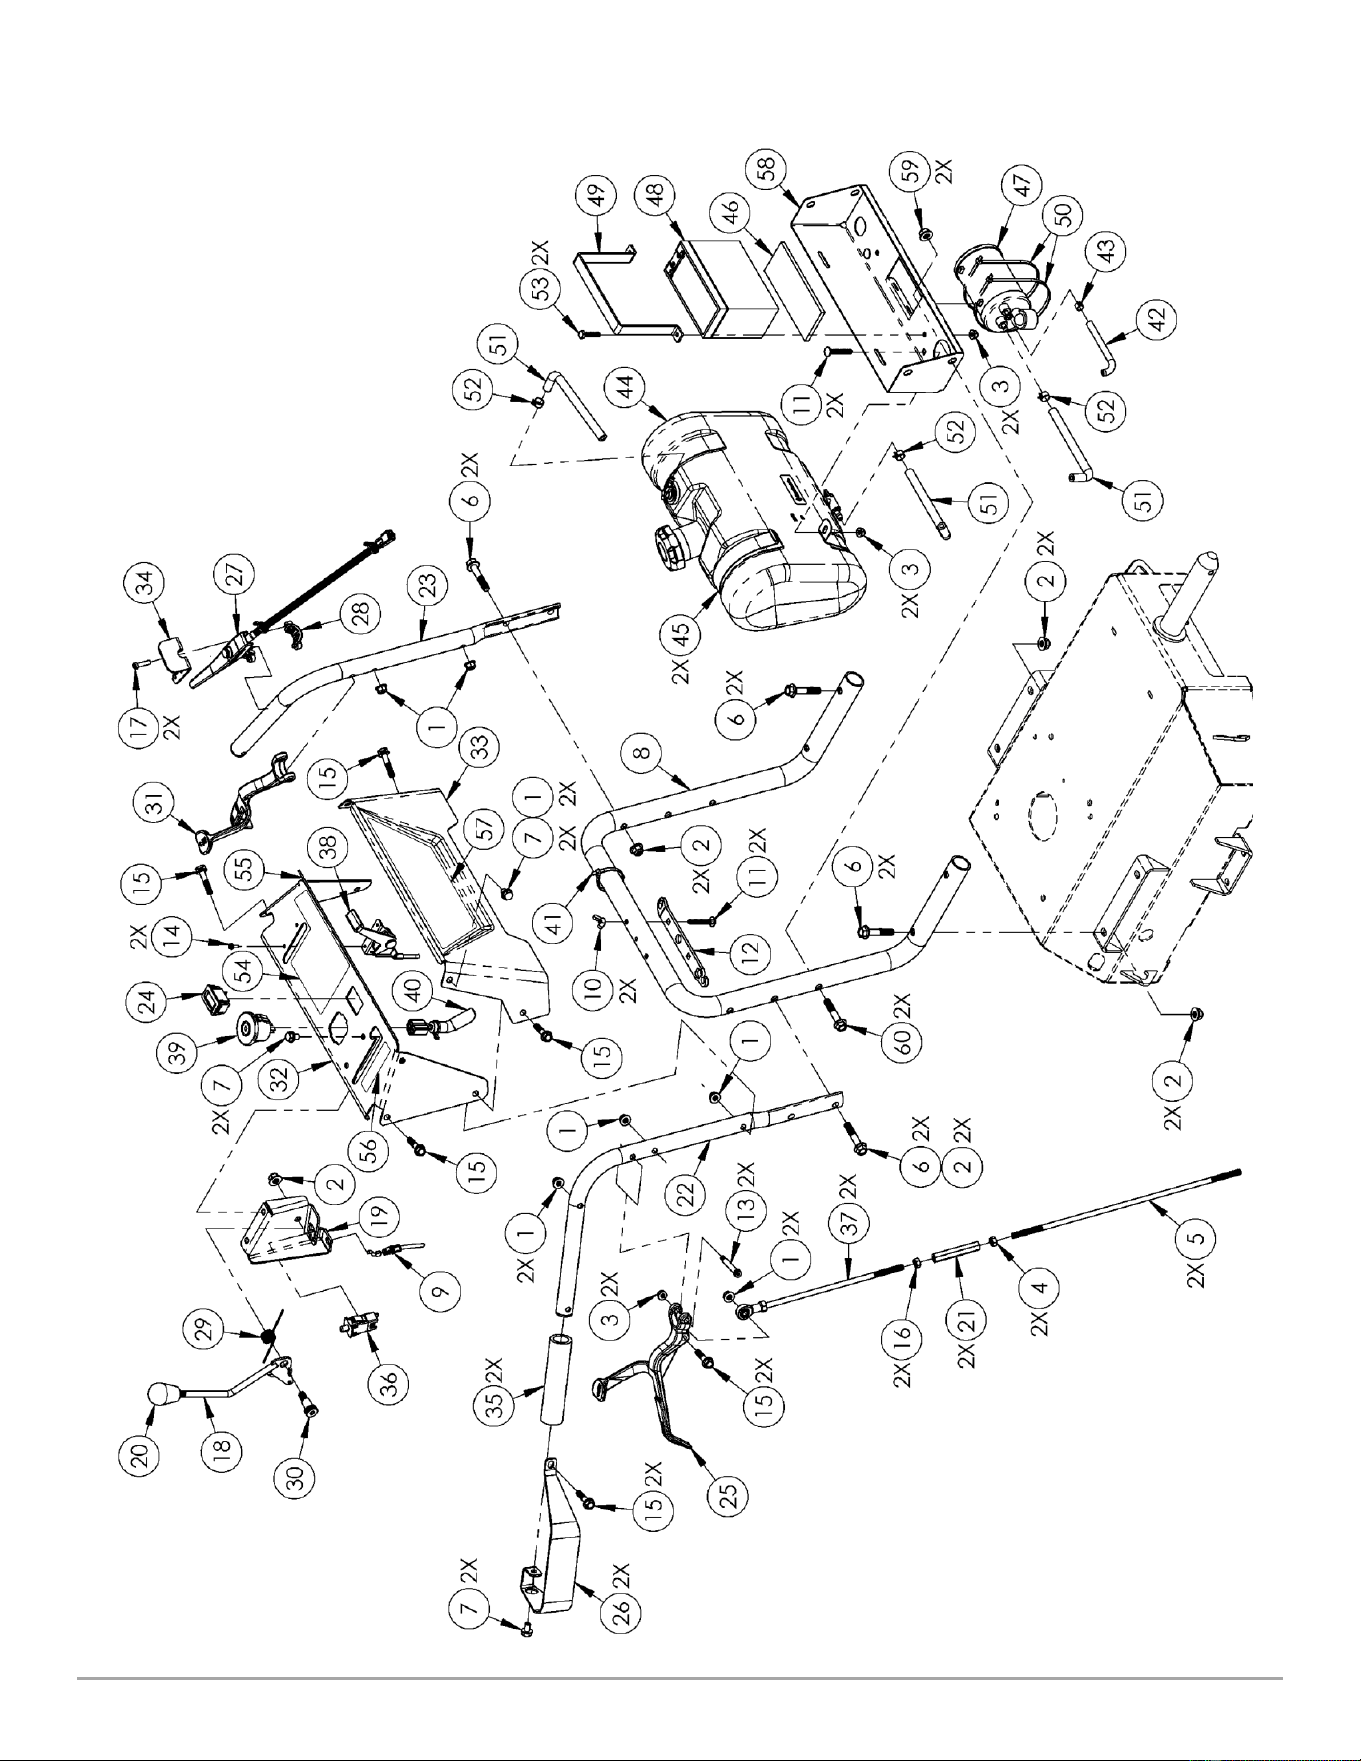
Parts List - Handlebar Assembly
Note: Part numbers listed are available through DR Power Equipment.
Ref# Part# Description
1 333321 Nut, Nylon Lock, Flanged, 5/16-18
2 333331 Nut, Nylon Lock, Flanged, 3/8-16
3 333311 Nut, Nylon Lock, Flanged, 1/4-20
4 A0001293097 Nut, Finish, 5/16-24, ZP
5 A0000646660 Link, Traction Control, Lower
6 333501 Bolt, Hex, Flange, 3/8-16 X 2″
7 111731 Screw, 5/16-18 X 1/2″, Tri
8 A0000646531 Handlebar, Lower
9 A0000648496 Cable, Blade Engage
10 G037561 Nut, Wing, 1/4-20, W/Ny Ins St Zn
11 A0001699594 Bolt, Carriage, 1/4-20 X 1.75″, GR5,
ZP
12 A0001446686 Wrench
13 A0001293143 Bolt, Shoulder, 1/4-20, 5/16″ X 1.75″
14 150491 Screw-8-32 X 1/2
15 333521 Bolt, Hex, Flange, 5/16-18 X 1.5″
16 A0001293103 Nut, Finish,-5/16-24, Left Hand, ZP
17 179231 Screw, SH, M6 25mm
18 A0000646612 Lever, Blade Engage
19 A0000646610 Bracket, Blade Engage
20 150361 Knob, PTO Clutch Cable
21 A0000646661 Adjuster, Traction Drive
22 A0000646546 Handlebar, Upper-Right
23 A0000646547 Handlebar, Upper-Left
24 217201 Maintenance Meter, W/66″ Wire
25 A0000648498 Lever, Traction Drive, Right
26 A0000648497 Guard, Hand
27 180691 Lever, Operator Presence, W/Wire
28 370511 Collar, Lever, 1″, Threaded
29 A0001293201 Spring, Torsion, Blade Engage Return
30 A0001293144 Bolt, Shoulder, 3/8-16, 1/2″ X 3/4″
31 A0000648499 Lever, Traction Drive, Left
32 A0002045838 Control Panel, Top Plate, w/labels
33 A0000967082 Control Panel, Front
Ref# Part# Description
34 164971 Guard, Switch
35 A0001231337 Grip, Vynafoam, 1″ID X 5.5″L
36 A0001231346 Switch, Plunger, NO/NC, Snap In
37 A0000646659 Link, Traction Control, Upper
38 139051 Cable, Throttle, 50″ (XD30)
A0000702424 Cable, Throttle, Honda (XD26)
39 222231 Switch, Snap-In, ES (XD30)
40 A0000702431 Wire Harness, ES (XD30)
A0002224499 Wire Harness, GXV390 (XD26)
41 112141 Cable Tie, 7-1/2″, L
42 10000040536 Hose, Vapor, 3/16″, ID (XD30)
43 265811 Clamp, Vapor Hose (XD30)
44 352831 Gas Tank Assembly, EPA/CARB
(XD30)
45 344431 Strap, Tank (XD30)
46 286971 Pad, Battery, 2.5″ X 6.125″ (XD30)
47 385301 Carbon Canister, 300cc, 1/4″ Tank
3/16″ Purge (XD30)
48 134471 Battery, 9 AH, 12V (XD30)
49 242301 Strap, Battery (XD30)
50 127971 Cable Tie, 17″, 50 GA (XD30)
51 A0000522190 Hose, Fuel, EPA/CARB Certified
(XD30)
52 A0000313387 Clamp, Fuel Line (XD30)
53 114681 Bolt, HCS, 1/4-20 X 1-1/4″, GR5, ZP
(XD30)
54 A0001645278 Label, Info, Control Panel
55 A0001645284 Label, Info, X-Drive
56 A0001645279 Label, Blade Engage
57 A0001645286 Label, Control Panel, Front
58 A0000627935 Bracket, Fuel Tank (XD30)
59 333331 Nut, Nylon Lock, Flanged, 3/8-16
(XD30)
60 333501 Bolt, Hex, Flange, 3/8-16 X 2″ (XD30)
CONTACT US AT www.DRpower.com 33
Schematic – Handlebar Assembly

34 DR
®
FIELD and BRUSH MOWER
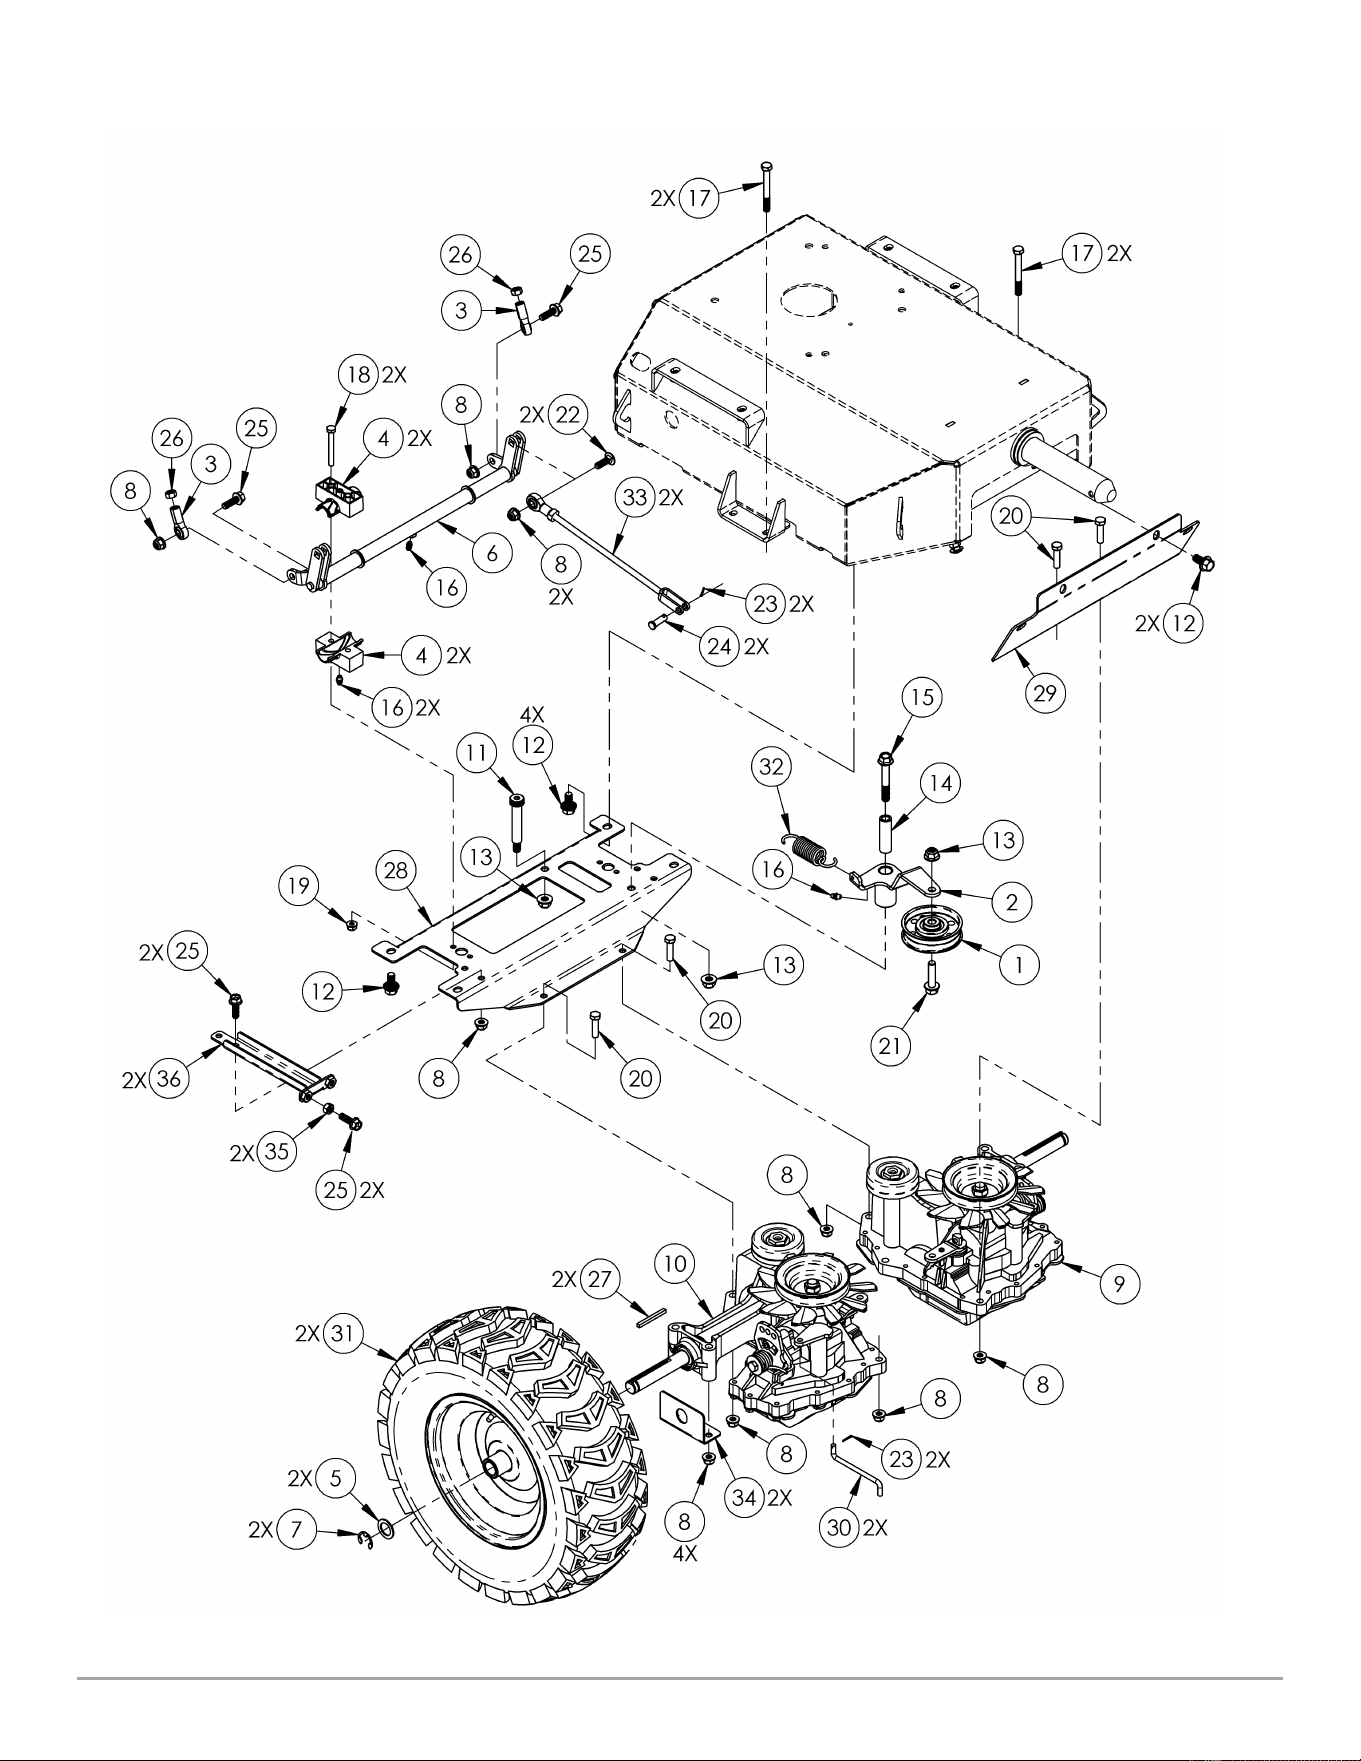
Parts List – Transmission Assembly
Note: Part numbers listed are available through DR Power Equipment.
Ref# Part# Description
1 108501 Pulley, Flat Idler, 3″
2 A0000646666 Idler, Transmission
3 A0000647001 Rod End, Ball Joint, 5/16-24, Female
Thread
4 A0000647009 Bushing, Pivot Assembly
5 389451 Washer,-Flat .75″ X 1.125″ X .012″
6 A0001776491 Pivot Assembly
7 A0000313388 Ring, Retaining, 3/4″, E
8 333321 Nut, Nylon Lock, Flanged, 5/16-18
9 A0000214942 Transmission, Hydrostatic, LH
10 A0000206829 Transmission, Hydrostatic, RH
11 A0000648484 Bolt, Shoulder, 0.5″ X 2.5″ X 3/8-16
12 352811 Bolt, Hex, Flange, TL, 3/8-16 X 3/4″
13 333331 Nut, Nylon Lock, Flanged, 3/8-16
14 351431 Bushing, Idler
15 333481 Bolt, Hex, Flange, 3/8-16 X 2.5″
16 A0000332299 Grease Zerk, Straight, 1/4-28
17 111411 Bolt, HCS, 5/16-24 X 3″, GR, ZP
18 313061 Bolt, HCS, 1/4-20 X 2-1/4″, GR5, ZP
19 333311 Nut, Nylon Lock, Flanged, 1/4-20
Ref# Part# Description
20 123361 Bolt, HCS, 5/16-18 X 1-1/4″, GR5, ZP
21 344071 Bolt, Hex, Flange, 3/8-16 X 1.5″ GR5, ZP
22 187621 Bolt, Carriage, 5/16-18 X1″, GR5, ZP
23 276761 Cotter Pin, 3/32″ X 1/2″, ZP
24 A0001292325 Pin, Clevis, 5/16″ Dia X 3/4″ L
25 393541 Bolt, Hex, Flange, 5/16-18 X 1.00″, GR5,
ZP
26 A0001293097 Nut, Finish, 5/16-24, ZP
27 101191 Key, Square, 3/16″ X 2″
28 A0000646663 Bracket, Transmission, Rear
29 A0000646664 Bracket, Transmission, Front
30 A0000646665 Link, Wire Form, Neutral Bypass
31 A0000682736 Wheel, X Trac, 16x6.5, Pnuematic,
W/Sealant
32 A0000648475 Spring, Extension, Traction Drive
33 A0000683747 Link Weldment, Transmission
34 A0001458984 Guard, Seal, Hydro Trans
35 110691 Nut, Finish, 5/16-18, ZP
36 A0001445206 Bracket, Adjustment, Reverse Limit
CONTACT US AT www.DRpower.com 35
Schematic – Transmission Assembly

36 DR
®
FIELD and BRUSH MOWER
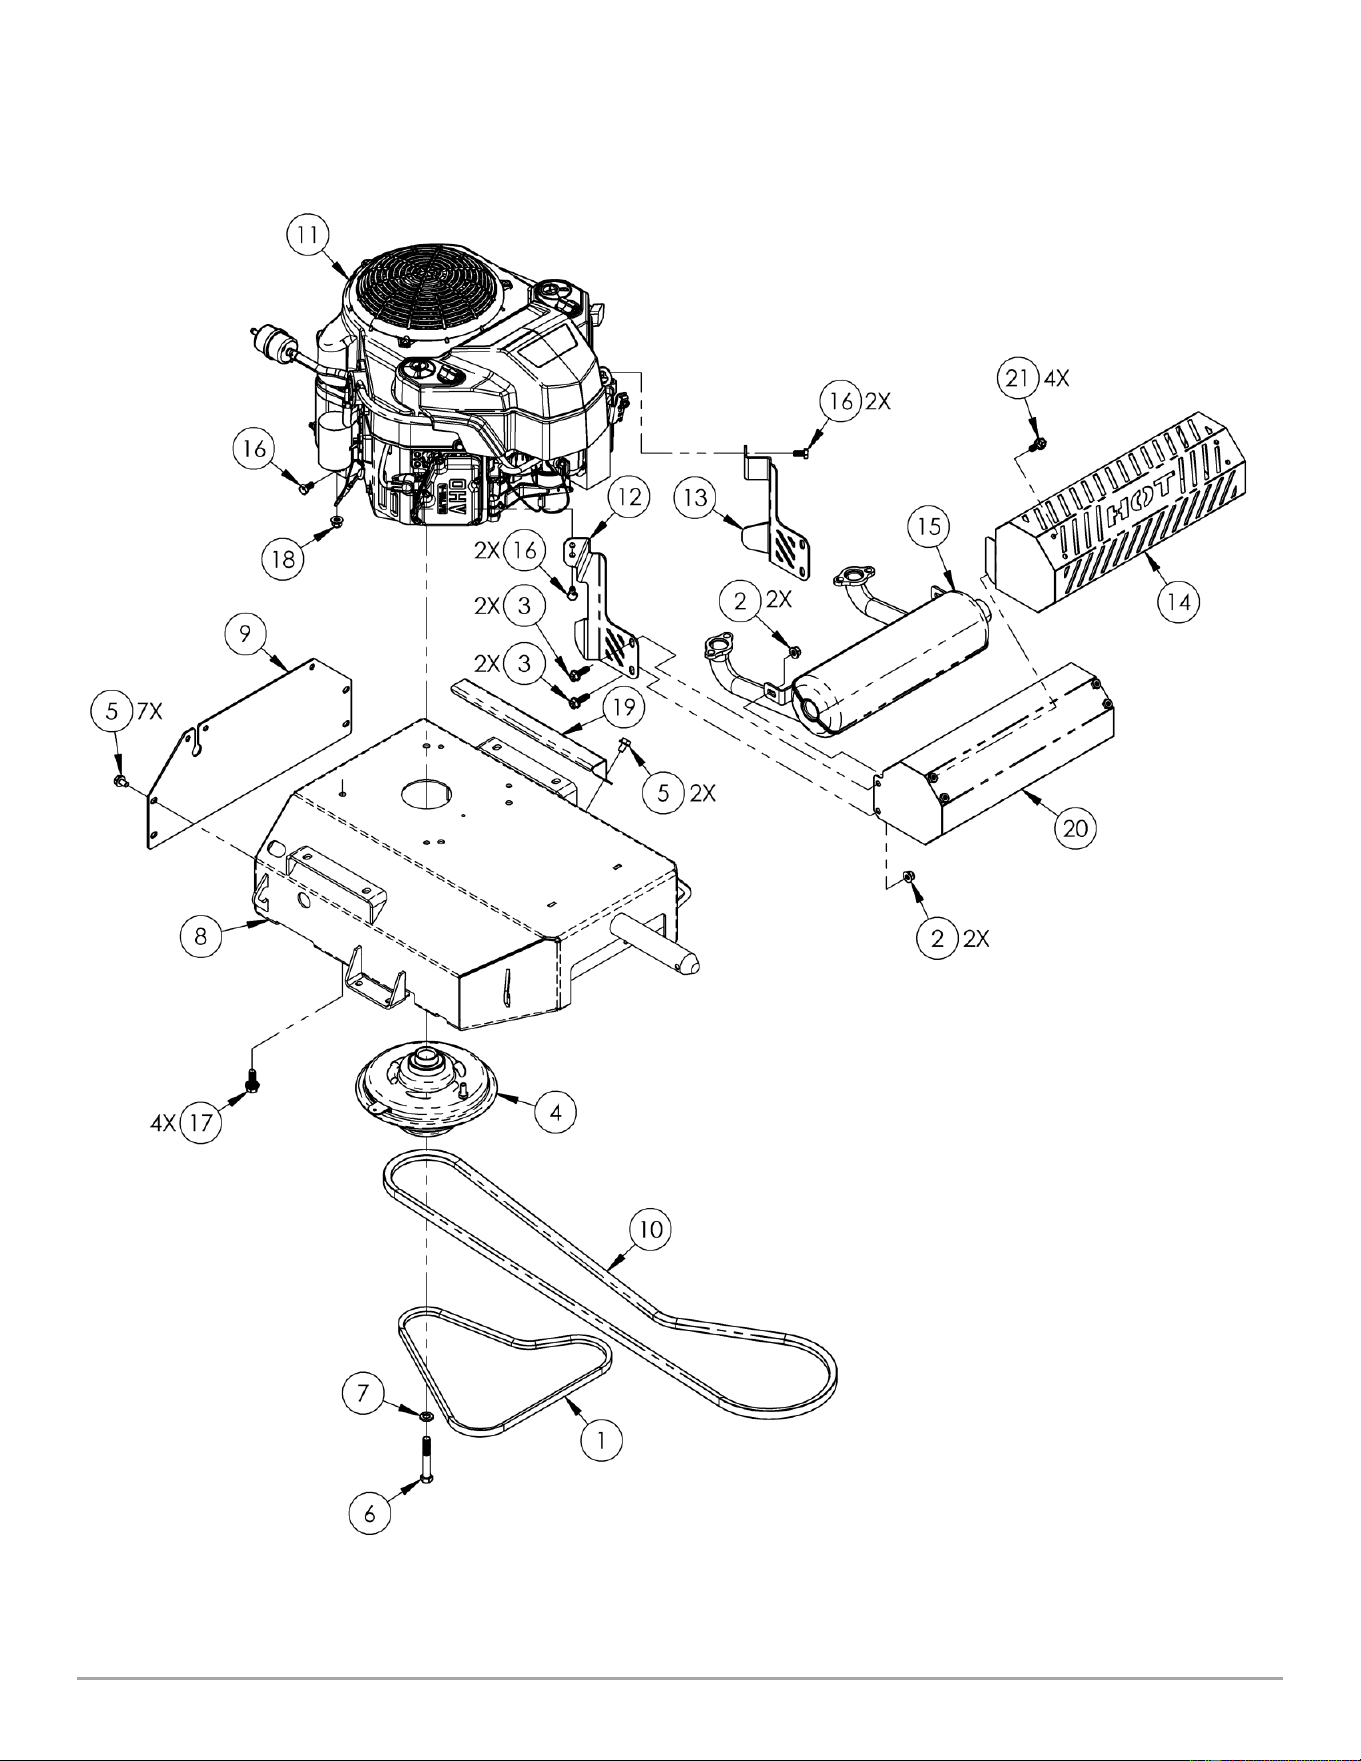
Parts List – Drive Assembly (Kawasaki)
Note: Part numbers listed are available through DR Power Equipment.
Note: Items 1 and 4 thru 10 are on all models.
Ref# Part# Description
1 A0000646671 Belt, A38, 1/2″ X 40″
2 333321 Nut, Nylon Lock, Flanged, 5/16-18
3 393541 Bolt, Hex, Flange, 5/16-18 X 1.00″,
GR5, ZP
4 A0000560848 Clutch, Mechanical
5 111731 Screw, 5/16-18 X 1/2″, TRI
6 223241 Bolt, HCS, 7/16-20 x 2.75″, GR8, ZP
7 A0000367010 Washer, Split, 7/16″ GR8
8 A0000646517 Frame
9 A0000646621 Cover Plate, Rear
10 A0000646670 Belt, Bk78, 5/8″ X 80″
11 A0000974583 Engine, Kawasaki, FS600V, 18.5hp, ES
Ref# Part# Description
12 A0000702439 Muffler Support, Right
13 A0000702440 Muffler Support, Left
14 A0001903710 Guard, Muffler, Outer
15 A0001104312 Exhaust, Muffler
16 220981 Bolt, Hex Head, M8 X 16
17 289901 Screw, Unsltd Trilobe, 3/8-16 X 1″
18 333421 Nut, Nylon Lock, Flanged, M8-1.25,
CL8, ZP
19 A0000930250 Conduit, Hose and Cable
20 A0001903708 Guard, Muffler
21 365211 Bolt, Hex, Flange, 1/4-20 X 5/8″, ZP
CONTACT US AT www.DRpower.com 37
Schematic – Drive Assembly (Kawasaki)

38 DR
®
FIELD and BRUSH MOWER
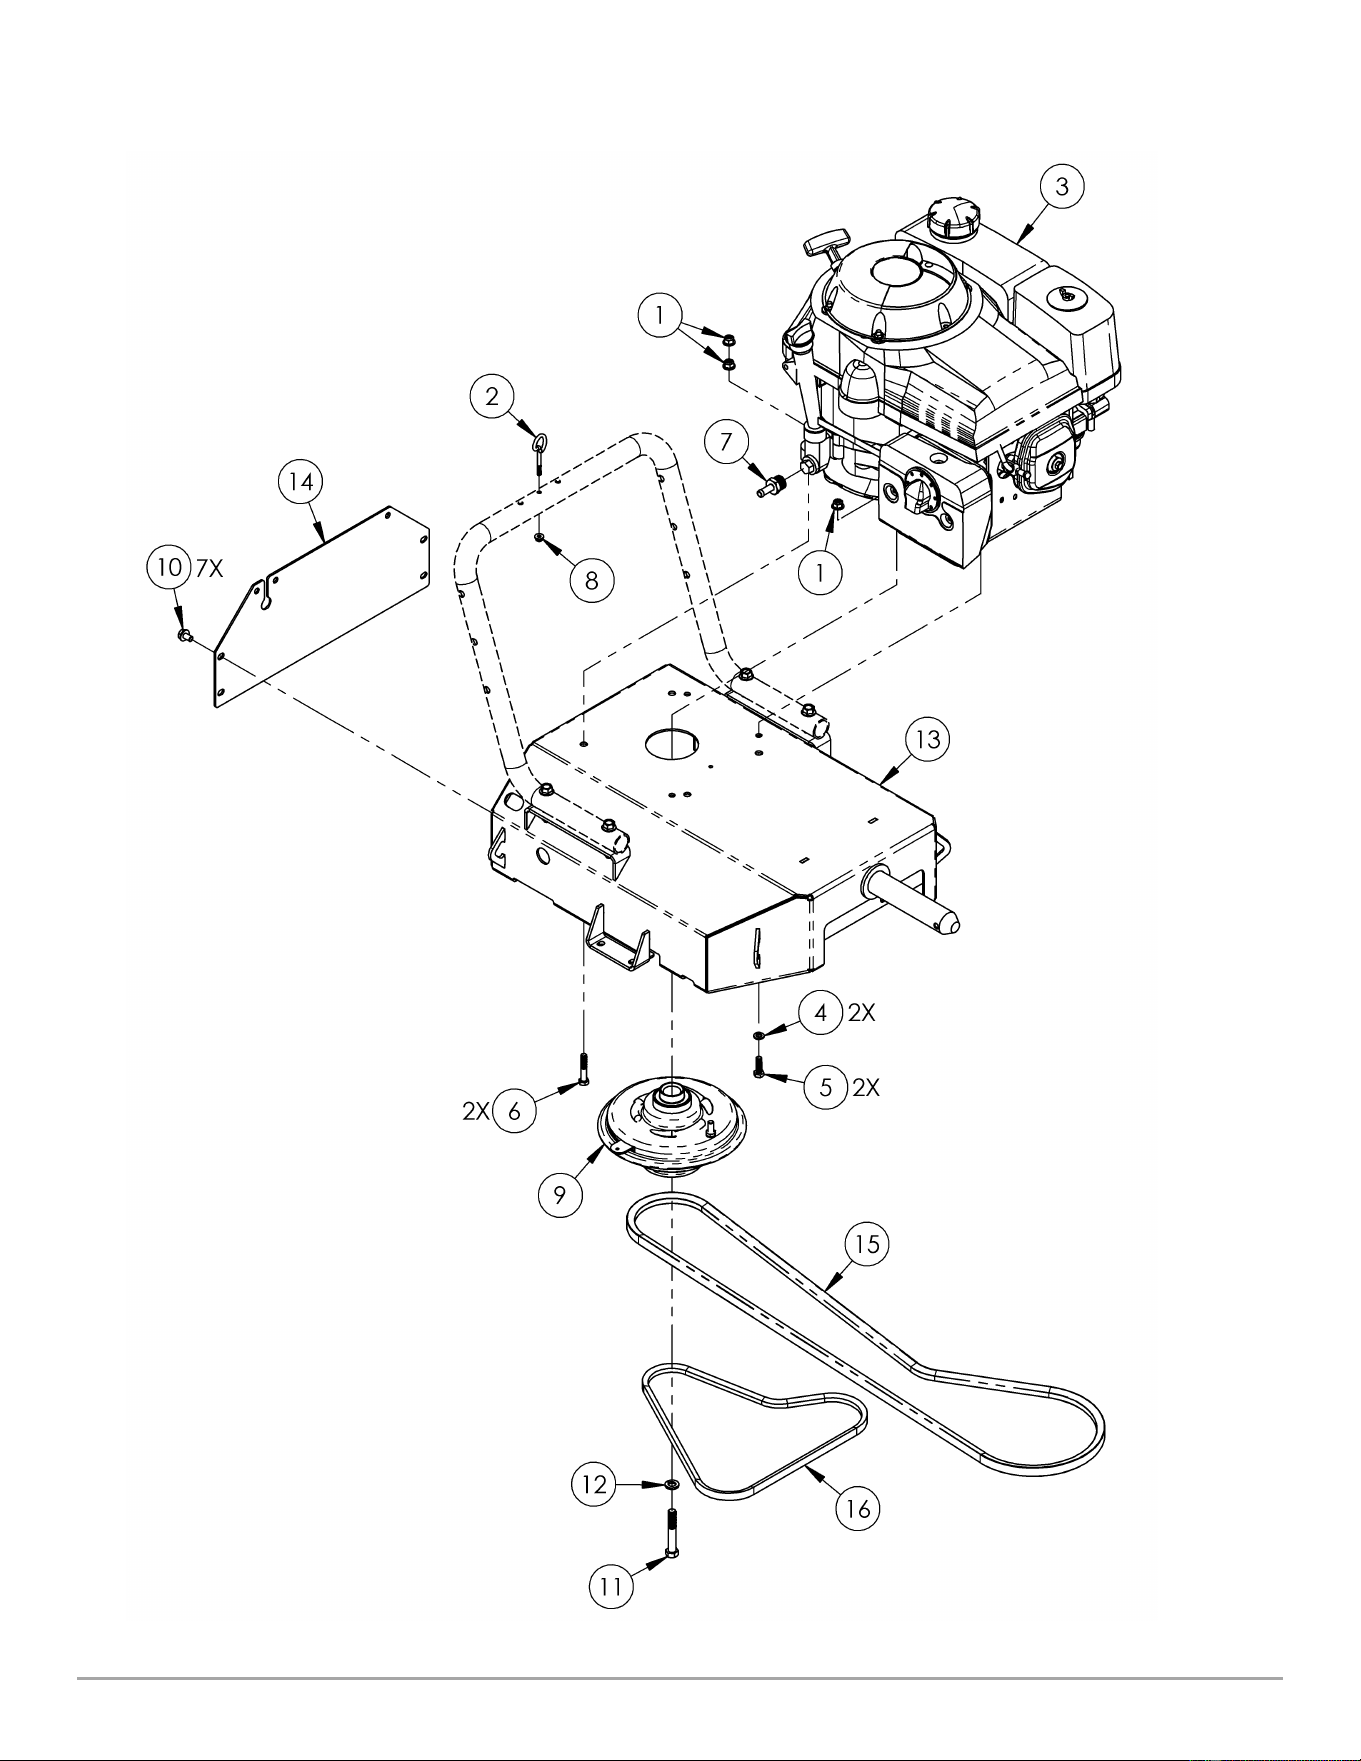
Parts List – Drive Assembly (Honda)
Note: Part numbers listed are available through DR Power Equipment.
Note: Items 9 thru 16 are on all models.
Ref# Part# Description
1 333321 Nut, Nylon Lock, Flanged, 5/16-18
2 A0000655096 Recoil Holder, Wire Form
3 A0000560846 Engine, Honda GXV390, 10.2HP, MS
4 112431 Washer, Lock, 5/16
5 A0001346725 Bolt, HCS, 5/16-24 X 1″, GR5 ZP
6 150451 Bolt, HCS, 5/16-18 X 1-3/4″, GR5 ZP
7 A0000952591 Barb Fitting, 3/8″ Hose ID, M20
Thread
8 350381 Nut, Nylon lock, Flange, 10-24, ZP
Ref# Part# Description
9 A0000560848 Clutch, Mechanical
10 111731 Screw, 5/16-18 X 1/2″, TRI
11 223241 Bolt, HCS, 7/16-20 x 2.75″, GR8, ZP
12 A0000367010 Washer, Split, 7/16″ GR8
13 A0000646517 Frame
14 A0000646621 Cover Plate, Rea
15 A0000646670 Belt, Bk78, 5/8″ X 80″
16 A0000646671 Belt, A38, 1/2″ X 40″
Not Shown
A0001645291 Label, Choke Symbol
CONTACT US AT www.DRpower.com 39
Schematic – Drive Assembly (Honda)

40 DR
®
FIELD and BRUSH MOWER
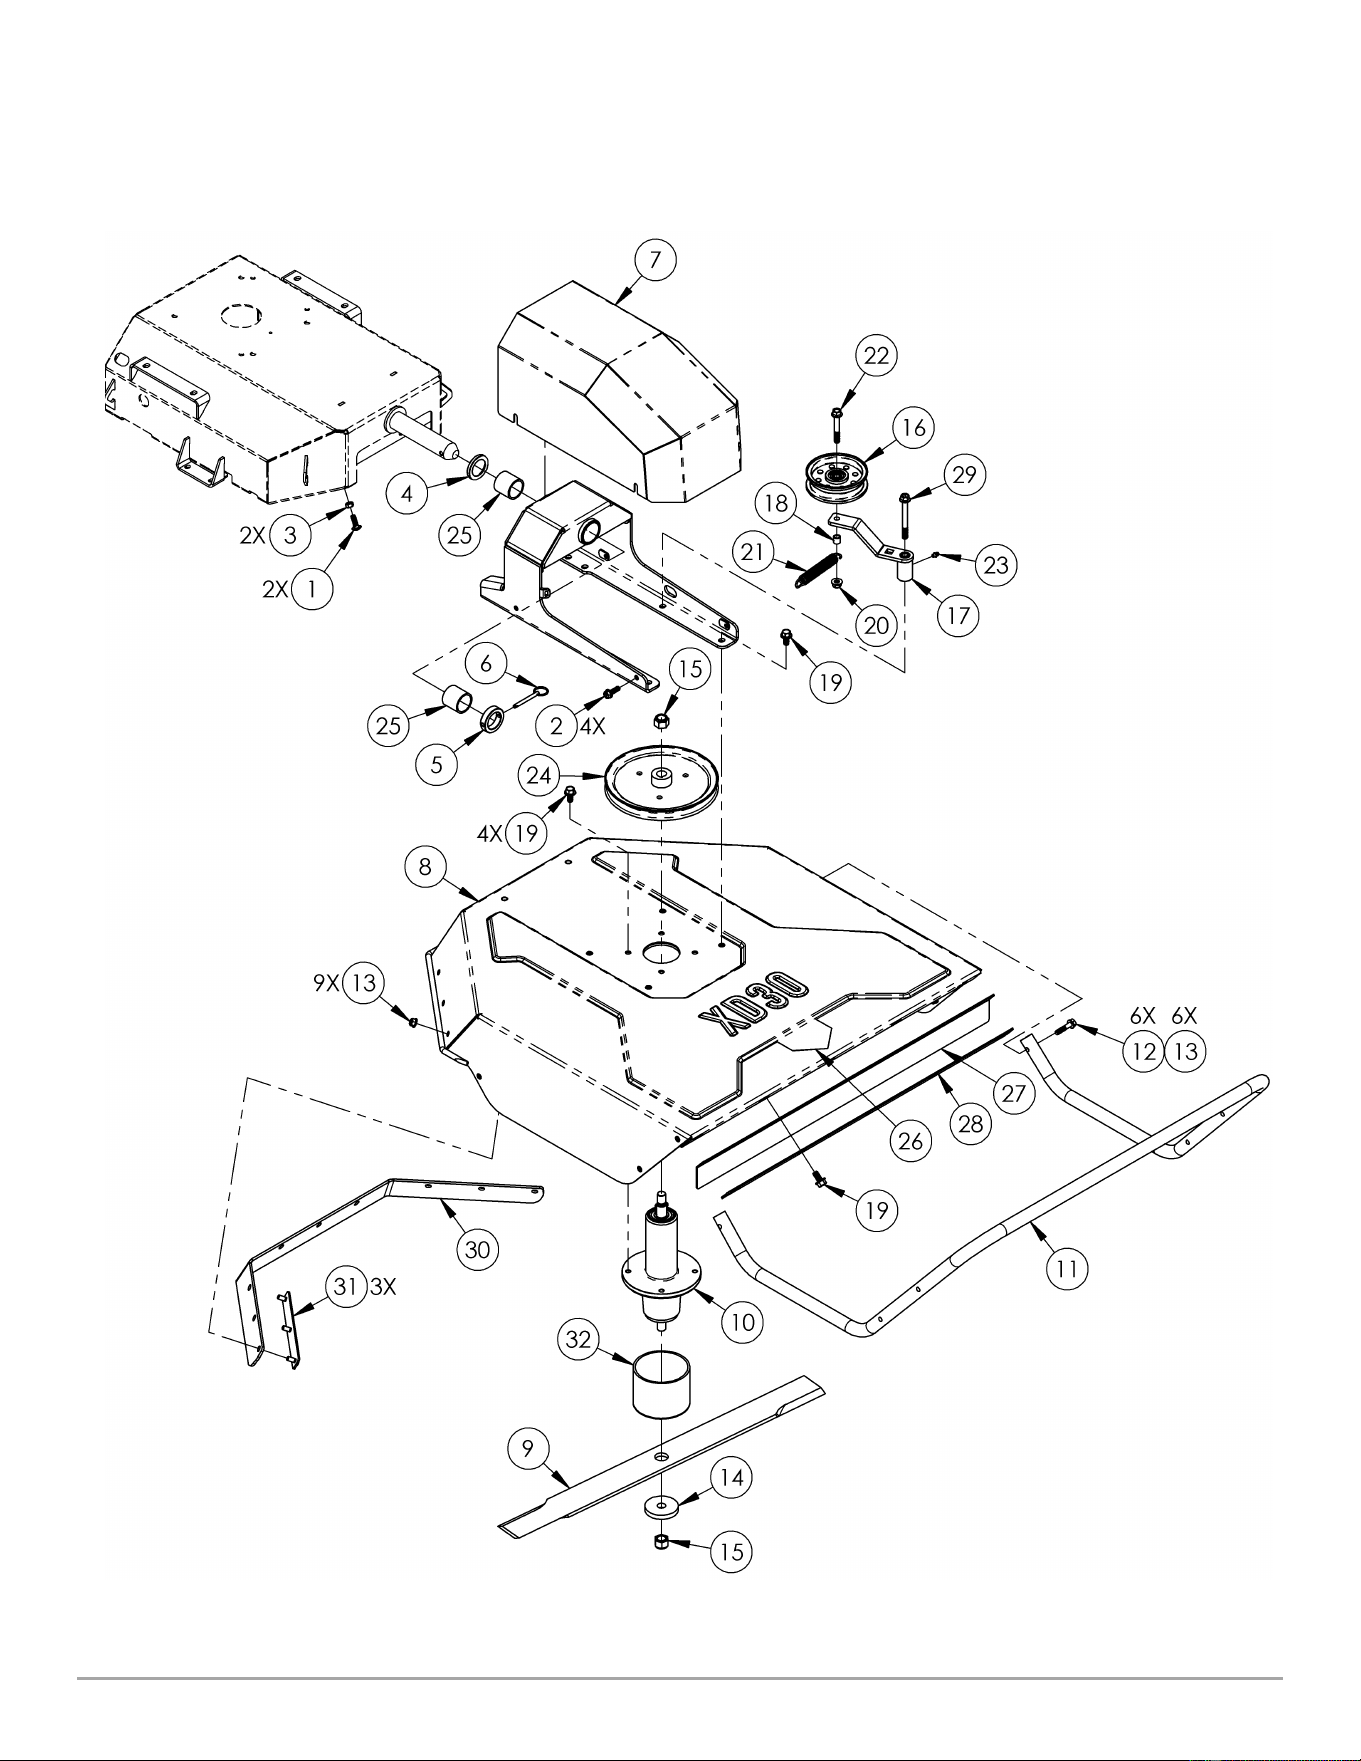
Parts List – Brush Deck Assembly
Note: Part numbers listed are available through DR Power Equipment.
Ref# Part# Description
1 187621 Bolt, Carriage, 5/16-18 X 1″, GR5, ZP
2 393541 Bolt, Hex, Flange, 5/16-18 X 1.00″,
GR5, ZP
3 110691 Nut, Finish, 5/16-18, ZP
4 151381 Washer, 1.375″ ID, 2.0″ OD
5 A0000253469 Washer, 1.38″ ID, 2.0″ OD .5L
6 150461 Pin, Detent, 1/4″ X 2″
7 A0000647158 Cover, Belt
8 A0002045835 Brush Deck, 26″, w/Labels (XD26)
A0002045827 Brush Deck, 30″, w/Labels (XD30)
9 100491 Blade, Brush, Heavy Duty, 26″ (XD26)
166311 Blade, Brush, Heavy Duty, 30″ (XD30)
10 A0000647273 Spindle Assembly
11 A0000648419 Brush Bar, 26″ (XD26)
A0000966706 Brush Bar, Solid, 30″ (XD30)
12 333521 Bolt, Hex, Flange, 5/16-18 X 1.5″
13 333321 Nut, Nylon Lock, Flanged, 5/16-18
14 101771 Washer, .640″ ID X 2-1/2″ OD
15 160071 Nut, Nylon Lock, 5/8-18, GR2, ZP
16 151271 Pulley, Flat Idler, 4″
Ref# Part# Description
17 A0000648427 Idler, Brush Deck
18 350511 Spacer, Idler
19 352811 Bolt, Hex, Flange, TL, 3/8-16 X 3/4″
20 333331 Nut, Nylon Lock, Flanged, 3/8-16
21 150941 Spring, E, .750″OD .112Wire 5.0L
22 333481 Bolt, Hex, Flange, 3/8-16 X 2.5″
23 A0000332299 Grease Zerk, Straight, 1/4-28
24 164451 Pulley, V-Belt, 8-1/2″, 7G
25 150721 Bushing, 1.38″ ID, 1.63″OD, 1.5L
26 136491 Label, Danger
27 10000031856 Skirt, Front, Rubber, 26″ (XD26)
10000031814 Skirt, Front, Rubber, 30″ (XD30)
28 366161 Strap, Skirt Mounting, 26″ (XD26)
366151 Strap, Skirt Mounting, 30″ (XD30)
29 345171 Bolt, Hex, Flange, 3/8-16 X 3.5″
30 A0000648432 Guard, Rear, 26″ Deck (XD26)
A0000648433 Guard, Rear, 30″ Deck (XD30)
31 A0000253559 Plate, Stud Guard
32 A0000910019 Guard, Anti Wrap
CONTACT US AT www.DRpower.com 41
Schematic – Brush Deck Assembly
42 DR
®
FIELD and BRUSH MOWER
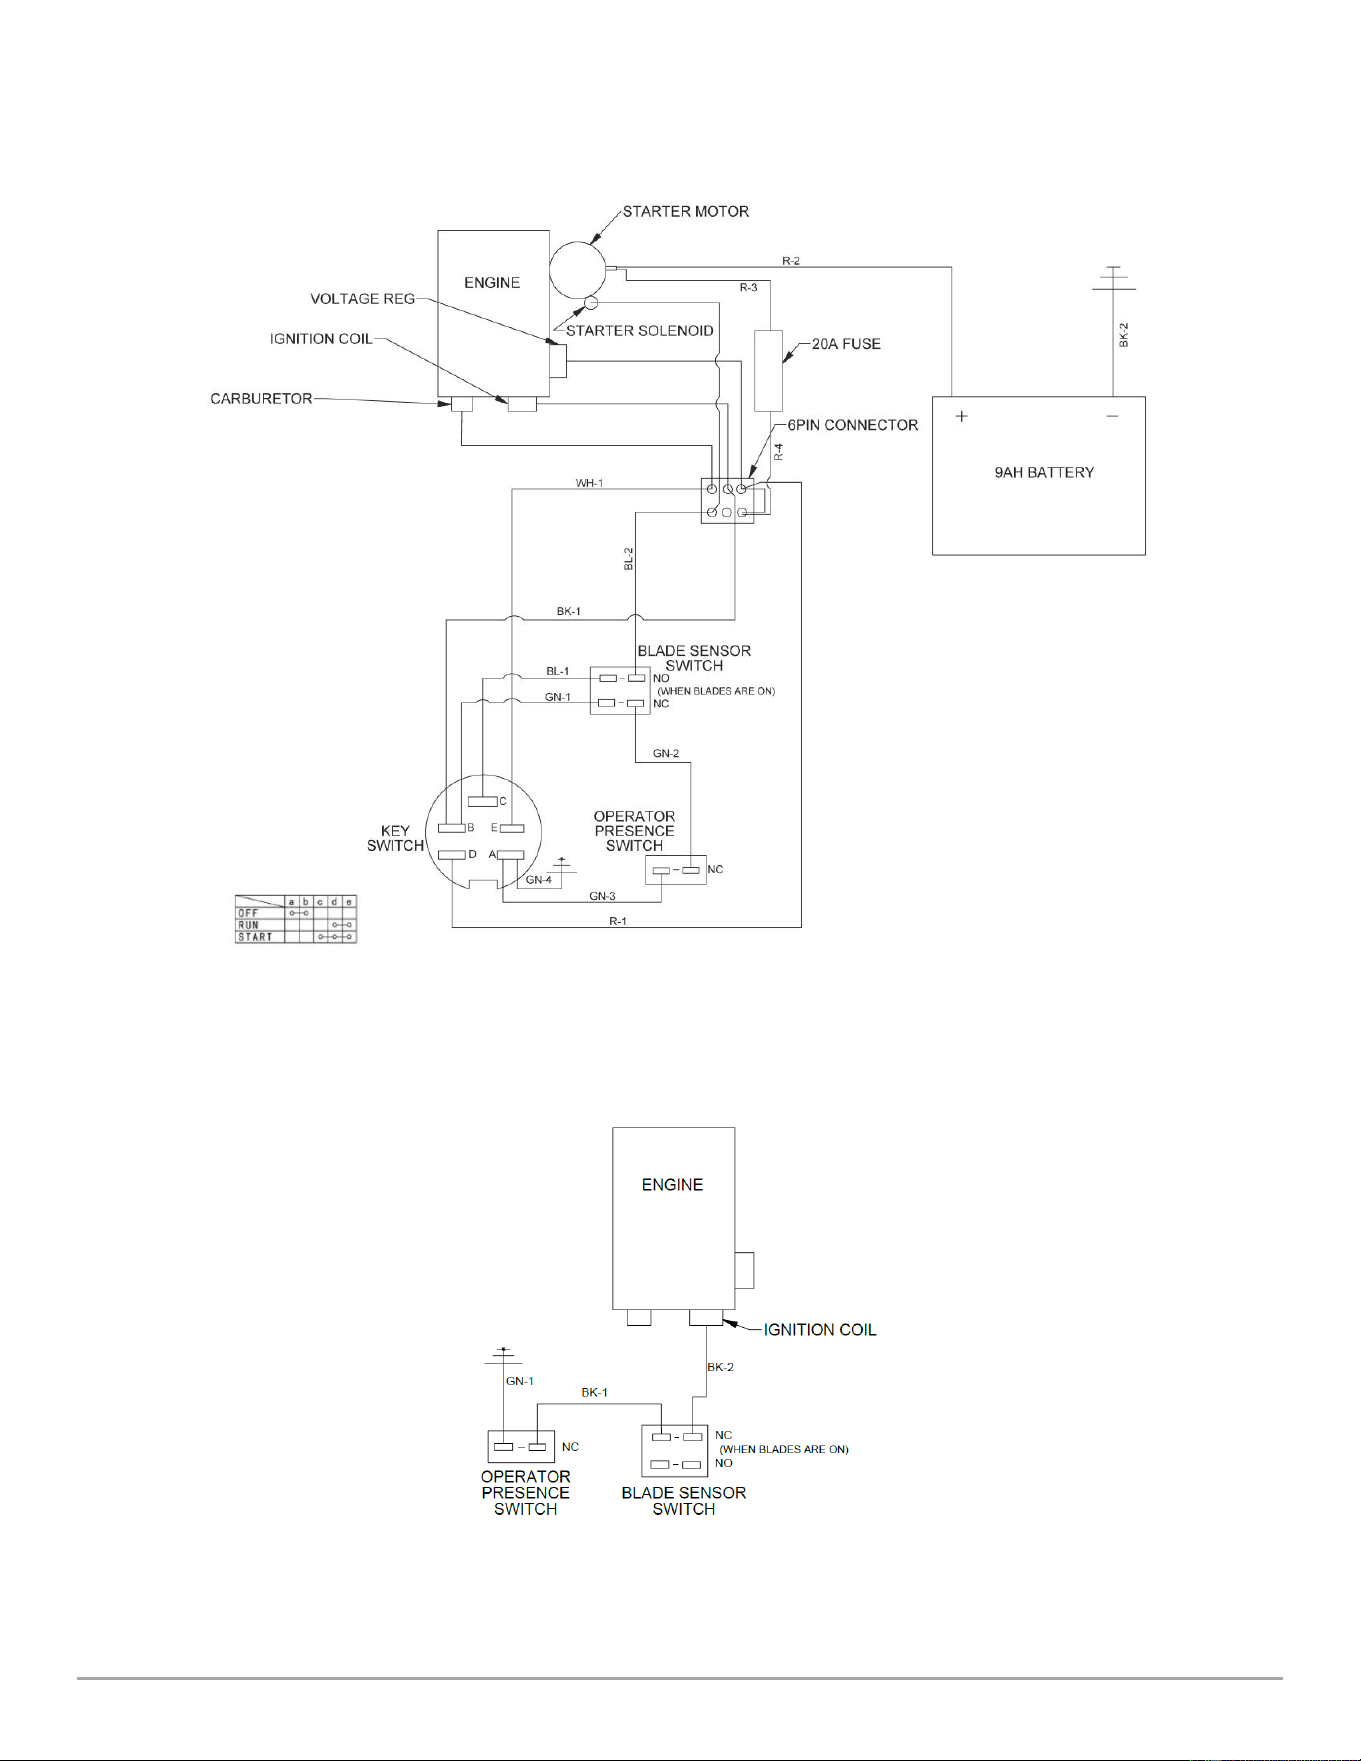
Wiring Diagram –Kawasaki Engine (Electric Start)
Wiring Diagram –Honda Engine (Manual Start)
DR
®
FIELD and BRUSH MOWER
2-Year Limited Warranty
Terms and Conditions
The DR
FIELD and BRUSH MOWER is warranted for two (2) years against defects in materials or workmanship
when put to ordinary and normal consumer use as well as commercial use.
For the purposes of all the above warranties, “ordinary and normal use” and “commercial use” does not include
misuse, accidents or damage due to inadequate maintenance.
DR Power Equipment certifies that the DR
FIELD and BRUSH MOWER is fit for ordinary purposes for which a
product of this type is used. DR Power Equipment however, limits the implied warranties of merchantability and
fitness in duration to a period of two (2) years in consumer use as well as commercial use. DR Power Equipment
limits the implied warranties of merchantability and fitness in duration to a period of two (2) years for all emissions
related components. The Engine manufacturer warrants the Engine separately.
The 2-Year Limited Warranty on the DR
FIELD and BRUSH MOWER starts on the date the machine ships from our
factory. The 2-Year Limited Warranty is applicable only to the original owner.
The warranty holder is responsible for the performance of the required maintenance as defined by the manufacturer's
owner's manuals. The warranty holder is responsible for replacement of normally wearing parts such as the Drive
Belts, Blade, Filters, Spark Plug(s), Brake Components and Battery. Accessories to the machine are not covered by
this warranty.
During the warranty period, the warranty holder is responsible for the machine transportation charges, if required.
During the warranty period, warranty parts will be shipped by standard method at no charge to the warranty holder.
Expedited shipping of warranty parts is the responsibility of the warranty holder.
SOME STATES DO NOT ALLOW LIMITATIONS ON THE LENGTH OF IMPLIED WARRANTIES, SO THE ABOVE
LIMITATIONS MAY NOT APPLY TO YOU.
DR Power Equipment shall not be liable under any circumstances for any incidental or consequential damages or
expenses of any kind, including, but not limited to, cost of equipment rentals, loss of profit, or cost of hiring services
to perform tasks normally performed by the DR
FIELD and BRUSH MOWER.
SOME STATES DO NOT ALLOW THE EXCLUSION OR LIMITATION OF INCIDENTAL OR CONSEQUENTIAL
DAMAGES, SO THE ABOVE LIMITATIONS MAY NOT APPLY TO YOU.
THIS WARRANTY GIVES YOU SPECIFIC LEGAL RIGHTS, AND YOU ALSO HAVE OTHER RIGHTS, WHICH VARY
FROM STATE TO STATE.
8 0 0 H I N E S B U R G R O A D , S O U T H B U R L I N G T O N , V E R M O N T 0 5 4 0 3
©2022 DR Power Equipment. All rights reserved A0001645377_B
Daily Checklist for the DR FIELD and BRUSH MOWER
To help maintain your DR FIELD and BRUSH MOWER for optimum performance, we recommend you follow this checklist
each time you use your machine.
[ ] Check the engine oil level.
[ ] Check the gas Level
[ ] Check the general condition of the Mower, e.g.; nuts, bolts, welds, etc.
[ ] Check Tire Pressure
[ ] Check belts for wear, proper alignment and tension.
[ ] Check the blade for tightness, nicks and wear. Remove any wrapped weeds and grass from the Blade Bearing Housing to
prevent buildup.
[ ] Check that the engine air cooling system is clean of debris.
End of Season and Storage
Note: Please refer to the Engine Owner's Manual for engine-specific procedures.
Change the oil (and oil filter, if applicable). For winter use, use SAE 5W – 30 HD.
Remove the Spark Plug(s) and pour about 1 ounce of motor oil into the Cylinder hole. Replace the Plug(s) and crank the
Engine a couple of times. This will coat the piston(s) and seat the valves to prevent moisture buildup.
Clean/replace the Air Filters.
Clean dirt and debris from the Cylinder Head Cooling Fins, Blower Housing, Debris Screen, and Muffler area of the
Engine.
If your Engine has a Fuel Filter, replace it.
If your DR FIELD and BRUSH MOWER will be idle for more than 30 days, we recommend using a gas stabilizer. This will
prevent sediment from gumming up the Carburetor. If there is dirt or moisture in the gas or Tank, remove it by draining
the Tank. Completely fill the Tank with fresh, unleaded gas and add the appropriate amount of stabilizer or gasoline
additive. Run the Engine for a short time to allow the additive to circulate. Close the Fuel Shut-Off Valve, if your machine
is equipped with one, to prevent Carburetor overflow and leakage.
Store the Battery in a dry area that will not freeze. If you will not use the machine over a long period, charge the Battery
every four to six weeks.
Remove any wrapped weeds from the Blade Bearing Housing. Clean grass and debris from the top and underneath the
Mower Deck with a stiff brush.
Check the Blade for nicks and wear. Remove the Blade and sharpen, or have it professionally sharpened if needed.
Perform the lubrication as outlined starting on page 18.
Before performing any maintenance procedure or inspection, stop the engine, wait five minutes to allow all parts to coo and
disconnect spark plug
lug wire(s), keeping it away from the spark plug(sShoulder BolFiguShift CaBCableAxlFrame lifted Away From Transaxle
).
Before performing any maintenance procedure or inspection, stop the engine, wait five minutes to allow all parts to cool.
Disconnect the spark plug wire(s), keeping it away from the spark plug(s).