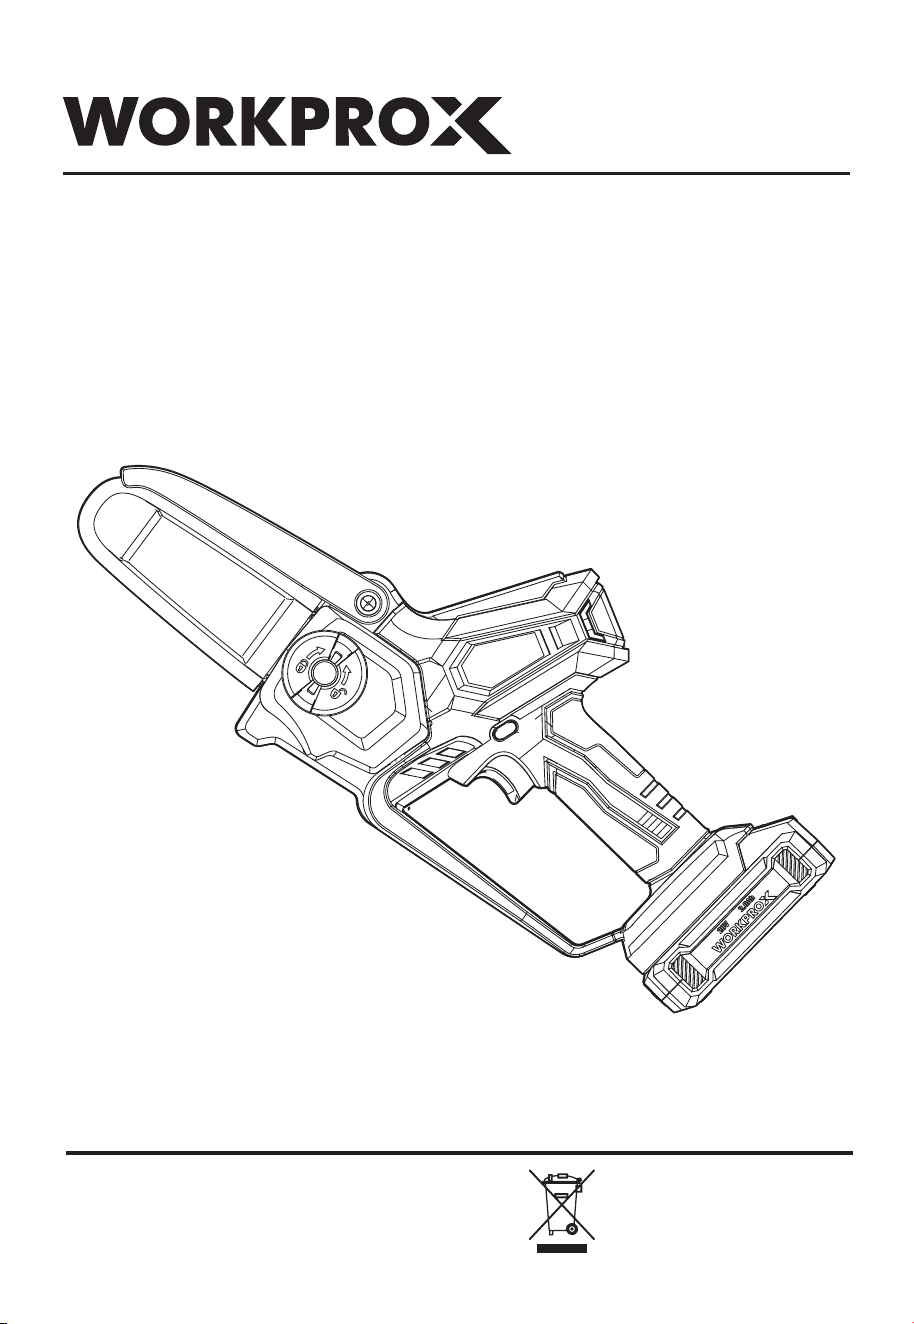
WX125316A
ORIGINAL OPERATING INSTRUCTIONS
20V CORDLESS PRUNING SAW
Distributed by:
Hangzhou GreatStar Industrial Co., Ltd.
No.35 Jiuhuan Road, Shangcheng District,
Hangzhou 310019, China
www.greatstartools.com
Made in China
1
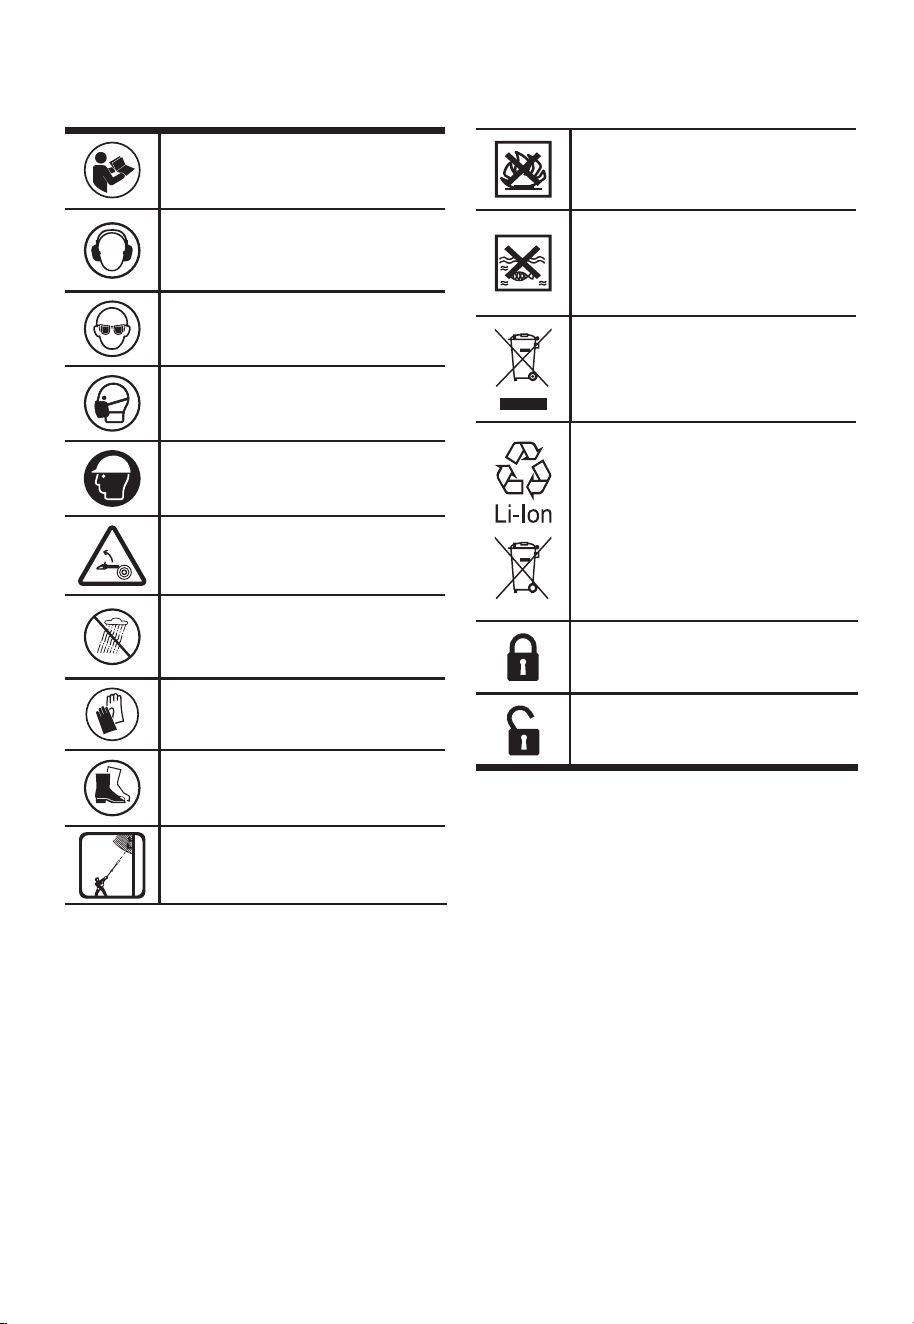
SYMBOLS
To reduce the risk of injury, user must
read instruction manual
Wear ear protection
Wear eye protection
Wear dust mask
Wear head protection
Beware of pruning saw kickback
and avoid contact with bar tip
Do not expose to rain
Wear protective gloves
Wear protective footwear
1
0
m
Warning of danger from overhead
electric-power lines
Do not burn
Batteries may enter water cycle if
disposed improperly, which can be
hazardous for ecosystem. Do not
dispose of waste batteries as unsorted
municipal waste.
Waste electrical products must not
be disposed of with household waste.
Please recycle where facilities exist.
Check with your local authorities or
retailer for recycling advice.
Li-Ion battery. This product has been
marked with a symbol relating to
‘separate collection’ for all battery
packs and battery pack. It will then
be recycled or dismantled in order to
reduce the impact on the environment.
Battery packs can be hazardous
for the environment and for human
health since they contain hazardous
substances.
Lock
Unlock
2
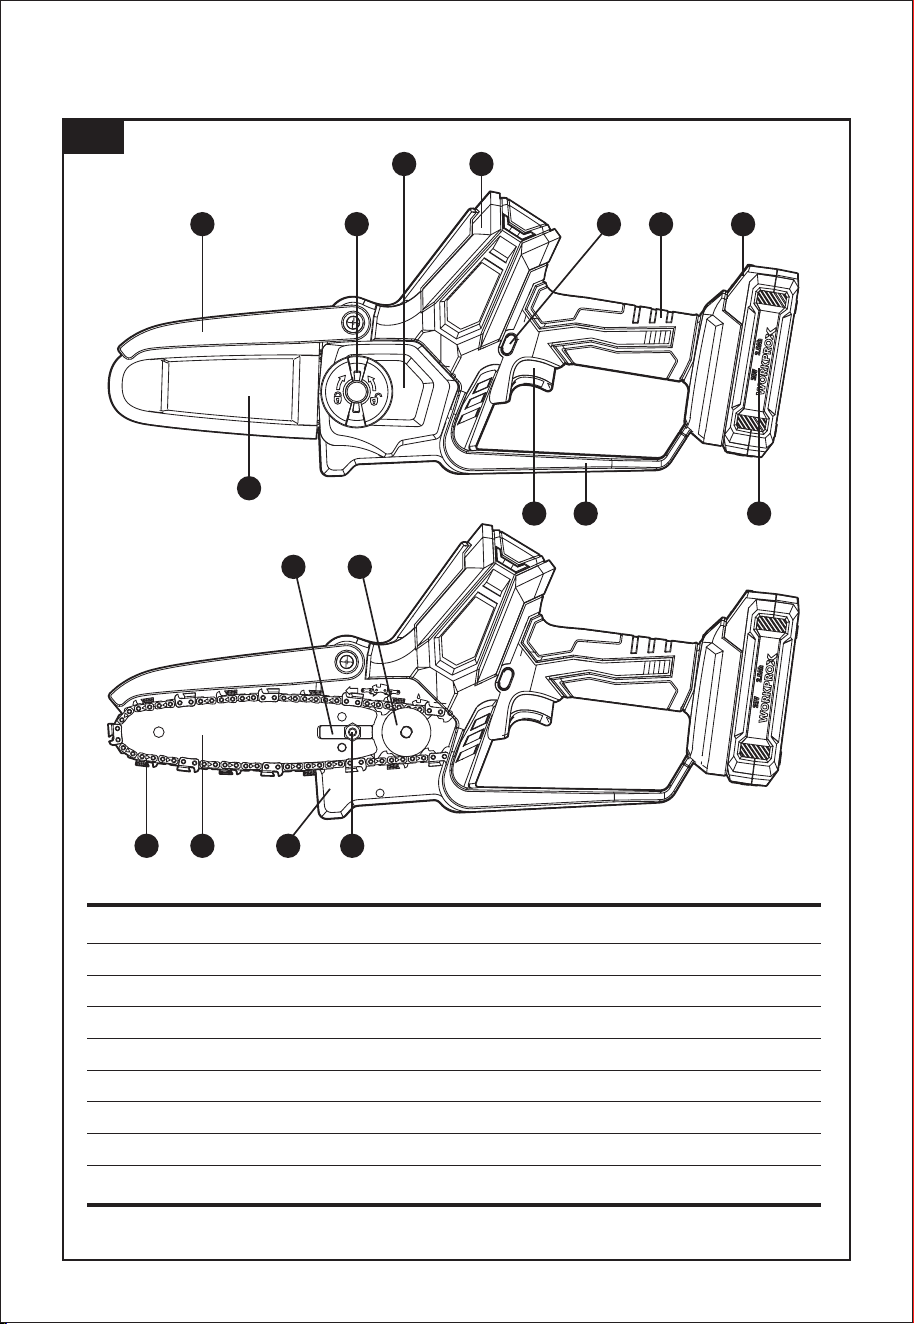
COMPONENT LIST
1 3
5
9 116
2
7 108
14 17
12 13 15 16
1. CHAIN GUARD
2. BAR AND CHAIN SHEATH/SCABBARD
3. HOUSING-COVER KNOB
4. HOUSING-COVER
5. SECONDARY GRIP AREA
6. LOCK-OUT BUTTON
7. ON/OFF SWITCH
8. HAND GUARD
9. GRIP AREA
10. BATTERY PACK
11. BATTERY PACK RELEASE BUTTON
12. CHAIN
13. GUIDE BAR
14. BAR LOCATING TAB
15. BAR PAD
16. FASTENING BAR BOLT
17. DRIVE SPROCKET
Fig.1
4

3
When operating a power tool outdoors, use an
extension cord suitable for outdoor use. Use of
a cord suitable for outdoor use reduces the risk of
electric shock.
If operating a power tool in a damp location is
unavoidable, use a residual current device
(RCD) protected supply. Use of an RCD reduces
the risk of electric shock.
3) PERSONAL SAFETY
Stay alert, watch what you are doing and use
common sense when operating a power tool.
Do not use a power tool while you are tired or under
the inuence of drugs, alcohol or medication. A
moment of inattention while operating power tools
may result in serious personal injury.
Use personal protective equipment. Always wear
eye protection. Protective equipment such as a
dust mask, non-skid safety shoes, hard hat or
hearing protection used for appropriate conditions
will reduce personal injuries.
Prevent unintentional starting. Ensure the
switch is in the off-position before connecting
to power source and/or battery pack, picking up
or carrying the tool. Carrying power tools with
your nger on the switch or energising power tools
that have the switch on invites accidents.
Remove any adjusting key or wrench before
turning the power tool on. A wrench or a key left
attached to a rotating part of the power tool may
result in personal injury.
Do not overreach. Keep proper footing and
balance at all times. This enables better control of
the power tool in unexpected situations.
Dress properly. Do not wear loose clothing or
jewellery. Keep your hair and clothing away from
moving parts. Loose clothes, jewellery or long hair
can be caught in moving parts.
If devices are provided for the connection of
dust extraction and collection facilities, ensure
these are connected and properly used. Use of
dust collection can reduce dust-related hazards.
Do not let familiarity gained from frequent use
of tools allow you to become complacent and
ignore tool safety principles. A careless action
can cause severe injury within a fraction of a second.
4) POWER TOOL USE AND CARE
Do not force the power tool. Use the correct
power tool for your application. The correct power
tool will do the job better and safer at the rate for
which it was designed.
Do not use the power tool if the switch does not
turn it on and off. Any power tool that cannot be
controlled with the switch is dangerous and must
be repaired.
DANGER!
When using the equipment, a few safety precautions
must be observed to avoid injuries and damage.
Please read the complete operating instructions and
safety regulations with due care. Keep this manual in
a safe place, so that the information is available at all
times. If you give the equipment to any other person,
hand over these operating instructions and safety
regulations as well. We cannot accept any liability for
damage or accidents which arise due to a failure to
follow these instructions and the safety instructions.
SAFETY REGULATIONS
WARNING!
Read all safety warnings, instructions, illustrations
and specications provided with this power tool.
Failure to follow all instructions listed below may result
in electric shock, re and/or serious injury.
Save all warnings and instructions for future reference.
The term "power tool" in the warnings refers to your
mains-operated (corded) power tool or battery-operat-
ed (cordless) power tool.
1) WORK AREA SAFETY
Keep work area clean and well lit. Cluttered or
dark areas invite accidents.
Do not operate power tools in explosive
atmospheres, such as in the presence of
ammable liquids, gases or dust. Power tools
create sparks which may ignite the dust or fumes.
Keep children and bystanders away while
operating a power tool. Distractions can cause
you to lose control.
2) ELECTRICAL SAFETY
Power tool plugs must match the outlet. Never
modify the plug in any way. Do not use any
adapter plugs with earthed (grounded) power tools.
Unmodied plugs and matching outlets will reduce
risk of electric shock.
Avoid body contact with earthed or grounded
surfaces, such as pipes, radiators, ranges and
refrigerators. There is an increased risk of electric
shock if your body is earthed or grounded.
Do not expose power tools to rain or wet conditions.
Water entering a power tool will increase the risk of
electric shock.
Do not abuse the cord. Never use the cord for
carrying, pulling or unplugging the power tool.
Keep cord away from heat, oil, sharp edges or moving
parts. Damaged or entangled cords increase the risk
of electric shock.

4
e.Under abusive conditions, liquid may be ejected
from the battery; avoid contact. If contact
accidentally occurs, ush with water. If liquid
contacts eyes, additionally seek medical help.
Liquid ejected from the battery may cause irritation
or burns.
ADDITIONAL SAFETY INSTRUCTIONS RELATED
TO THE BATTERY PACK AND BATTERY SAFETY
Use only the WORKPROX batteries supplied with the
WORKPROX Tool or WORKPROX-approved
replacements.
Do not use the battery to power any device other than
the WORKPROX tool it was sold with.
Charge the battery only with the WORKPROX charger
supplied with the tool or WORKPROX-approved
replacements and according to the instructions in the
WORKPROX Instruction Manual.
Do not charge the battery in a place where static
electricity is generated nor let the battery touch
something that is statically charged.
The battery can be stored at temperatures between
40°F(4°C) and 104°F(40°C).
Never store or leave your lithium ion battery in
temperatures over that recommended otherwise re
may occur.
DO NOT store the Lithium Ion battery anywhere that
the temperature can easily reach higher temperatures
than recommended -this includes garden type sheds,
and vehicles where the inside temperature can climb
to dangerous levels in the direct sunlight and on high
temperature days. THINK BEFORE LEAVING YOUR
LITHIUM ION BATTERY PACK IN STORAGE.
The battery can be charged or operated at tempera-
tures between 40°F(4°C) and 104°F(40°C). NEVER
CHARGE YOU LITHIUM ION BATTERY BELOW OR
ABOVE TEMPERATURES RECOMMENDED
OTHERWISE FIRE OR SERIOUS DAMAGE TO THE
BATTERY PACK MAY OCCUR.
The most suitable temperatures to charge the battery
pack are between 68°F(20°C) -77°F(25°C).
Always allow the battery pack to cool down after
charging, do not place it in a hot environment such as
a metal shed or open trailer left in the sun.
Take care where the tool is stored. Do not store in
areas of corrosive fumes, or salt air or similar
conditions. Try and store the tool in the packaging
supplied with the tool.
Do not dispose of the battery in a re or put the
battery into a microwave oven, conventional oven,
dryer, or high-pressure container. Under these
conditions, the battery may explode.
Disconnect the plug from the power source and/or
remove the battery pack, if detachable, from the
power tool before making any adjustments,
changing accessories, or storing power tools.
Such preventive safety measures reduce the risk of
starting the power tool accidentally.
Store idle power tools out of the reach of children
and do not allow persons unfamiliar with the
power tool or these instructions to operate the
power tool. Power tools are dangerous in the
hands of untrained users.
Maintain power tools and accessories. Check for
misalignment or binding of moving parts, breakage
of parts and any other condition that may affect
the power tool’s operation. If damaged, have the
power tool repaired before use. Many accidents are
caused by poorly maintained power tools.
Keep cutting tools sharp and clean. Properly
maintained cutting tools with sharp cutting edges are
less likely to bind and are easier to control.
Use the power tool, accessories and tool bits etc.
in accordance with these instructions, taking into
account the working conditions and the work to be
performed. Use of the power tool for operations
different from those intended could result in a
hazardous situation.
Keep handles and grasping surfaces dry, clean
and free from oil and grease. Slippery handles and
grasping surfaces do not allow for safe handling and
control of the tool in unexpected situations.
5) SERVICE
Have your power tool serviced by a qualied repair
person using only identical replacement parts. This
will ensure that the safety of the power tool is
maintained.
6) BATTERY TOOL USE AND CARE
a. Ensure the switch is in the off position before
inserting battery pack. Inserting the battery pack
into power tools that have the switch on invites
accidents.
b. Recharge only with the charger specied by the
manufacturer. A charger that is suitable for one type
of battery pack may create a risk of re when used
with another battery pack.
c. Use power tools only with specically designated
battery packs. Use of any other battery packs may
create a risk of injury and re.
d. When battery pack is not in use, keep it away from
other metal objects like paper clips, coins, keys, nails,
screws, or other small metal objects that can make a
connection from one terminal to another. Shorting the
battery terminals together may cause burns or a re.

5
Never attempt to open the battery pack, puncture the
battery or subject the battery to strong physical
shock.
If the plastic housing of the battery pack breaks open
or cracks, immediately discontinue its use and do not
recharge it. Ensure the battery pack clip is in good
condition and will not allow the pack to fall free from
the tool. If the clip is damaged or for any reason is not
locking the pack in place, Do Not continue to use.
Stop using the battery if it exhibits abnormal heat,
odour, colour, deformation, or is in an abnormal
condition.
If you detect leakage or a foul odour, it is especially
important to keep the battery away from re. If battery
liquid leaks onto your skin or clothes, wash well with
clean water immediately. If liquid leaking from the
battery gets into your eyes, do not rub your eyes.
Rinse your eyes well (for at least 10 minutes) with
clean water, and consult a doctor immediately.
Do not use a leaking battery.
Handle batteries with care to avoid shorting the
battery with conducting materials, such as nails,
screws, metal watch bands, rings, bracelets, and
keys. The battery may overheat and could burn you.
After the battery has reached the end of its useful life,
we recommend recycling the materials at your local
municipal council recycling centre. DO NOT attempt
to replace the battery cells in the battery pack, repair
or modify any part of the battery pack assembly.
When recycling, make it nonconductive by applying
insulating tape to the terminals located on the battery.
WHEN TO CHARGE THE BATTERY
New batteries are shipped in a low charged condition
and should be fully charged before Use. The battery
pack can be recharged at any time during use,
provided the pack is not overheated.
If the battery pack starts to cut out due to low voltage,
or previous tasks undertaken can no longer be
performed, it is suggested to stop using the tool and
recharge the battery.
For storage, it is suggested to recharge the battery
between 50% and 75% charge.
SAFETY INSTRUCTION FOR
PRUNING SAW
WARNING!
Drilling, sawing, sanding or machining wood products
can expose you to wood dust, a substance known to
the State of California to cause cancer. Avoid inhaling
wood dust or use a dust mask or other safeguards for
personal protection. For more information go to
www.P65Warnings.ca.gov/wood.
a) Keep all parts of the body away from the saw chain
when the pruning saw is operating. Before you start
the pruning saw, make sure the saw chain is not
contacting anything. A moment of inattention while
operating pruning saws may cause entanglement
of your clothing or body with the saw chain.
b) Always hold the pruning saw with your one hand
on the Grip Area (6) and your other hand on the
Secondary Grip Area (3). Holding the pruning saw
improperly increases the risk of personal injury and
should never be done.
c) Hold the pruning saw by insulated gripping surfaces
only, because the saw chain may contact hidden
wiring. Saw chains contacting a live wire may make
exposed metal parts of the pruning saw live and
could give the operator an electric shock.
d) Wear safety glasses protection. Further protective
equipment for hearing, head, hands, legs and feet
is recommended. Adequate protective clothing will
reduce personal injury by ying debris or accidental
contact with the saw chain.
e) Do not operate a pruning saw in a tree, on a ladder,
from a rooftop, or any unstable support. Operation
of a pruning saw in this manner could result in serious
personal injury.
f) Always keep proper footing and operate the pruning
saw only when standing on xed, secure and level
surface. Slippery or unstable surfaces may cause a
loss of balance or control of the pruning saw.
g) When cutting a limb that is under tension, be alert
for spring back. When the tension in the wood bers
is released, the spring loaded limb may strike the
operator and/or throw the pruning saw out of control.
h) Use extreme caution when cutting brush and saplings.
The slender material may catch the saw chain and
be whipped toward you or pull you off balance.
i) Carry the pruning saw with the pruning saw switched
off and away from your body. When transporting or
storing the pruning saw, always t the guide bar cover.
Proper handling of the pruning saw will reduce the
likelihood of accidental contact with the moving saw
chain.
j) Follow instructions for lubricating, chain tensioning
and changing the bar and chain. Improperly tensioned
or lubricated chain may either break or increase the
chance for kickback.

RESIDUAL RISKS
Even with the intended use of the appliance there is
always a residual risk, which can not prevent. Accord-
ing to the type and construction of the appliance the
following potential hazards might apply:
- Contact with exposed saw teeth of the saw chain
(cutting hazards)
- Access to the rotating saw chain (cutting hazards)
- Unforeseen, abrupt movement of the guide bar
(cutting hazards)
- Flung out of parts from the saw chain
(Cutting / injection hazards)
- Flung out of parts of the work piece Skin contact
with the oil
- Loss of hearing, if no required ear protection used
during work
CONTENTS OF PACKING
1× WORKPROX garden pruning saw
1× Guide bar cover
1× Chain
1× Guide bar
1× Instruction manual
1× 2.0Ah Battery pack
1× USB-C charging cable
1× Carrying bag
1× Lubricant bottle
k) Cut wood only. Do not use pruning saw for purposes
not intended. For example: do not use pruning saw
for cutting metal, plastic, masonry or non-wood
building materials. Use of the pruning saw for
operations different than intended could result in a
hazardous situation.
l) This pruning saw is not intended for tree felling.
Use of the pruning saw for operations different than
intended could result in serious injury to the operator
or bystanders.
m) Follow all instructions when clearing jammed material,
storing or servicing the pruning saw. Make sure
the switch is off and the battery pack is removed.
Unexpected actuation of the pruning saw while
clearing jammed material or servicing may result in
serious personal injury.
n) Recommendation that the rst-time user should,
as a minimum, practice cutting logs on a saw-horse
or cradle.
o) Recommendation to have sharpening and
maintenance of the saw chain performed by
authorized service centers.
CAUSES AND OPERATOR PRE-
VENTION OF KICK-BACK
Kickback may occur when the nose or tip of the guide
bar touches an object, or when the wood closes in
and pinches the saw chain in the cut.
Tip contact in some cases may cause a sudden
reverse reaction, kicking the guide bar up and back
towards the operator.
Pinching the saw chain along the top of the guide bar
may push the guide bar rapidly back towards the
operator.
Either of these reactions may cause you to lose
control of the saw which could result in serious
personal injury. Do not rely exclusively upon the
safety devices built into your saw. As a pruning saw
user, you should take several steps to keep your
cutting jobs free from accident or injury.
Kickback is the result of pruning saw misuse and/or
incorrect operating procedures or conditions and can
be avoided by taking proper precautions as given
below:
a) Maintain a rm grip, with thumbs and ngers encircling
the pruning saw handles, with both hands on the saw
and position your body and arm to allow you to resist
kickback forces. Kickback forces can be controlled by
the operator, if proper precautions are taken. Do not let
go of the pruning saw.
6
b) Do not overreach and do not cut above shoulder
height. This helps prevent unintended tip contact and
enables better control of the pruning saw in
unexpected situations.
c) Only use replacement bars and chains specied by
the manufacturer. Incorrect replacement guide bars
and saw chains may cause chain breakage and/or
kickback.
d) Follow the manufacturer’s sharpening and
maintenance instructions for the saw chain.
Decreasing the depth gauge height can lead to
increased kickback.
WARNING!
The vibration and noise emissions during actual use
of the power tool can differ from the declared value
depending on the ways in which the tool is used
especially what kind of workpiece is processed
dependant on the following examples and other
variations on how the tool is used:
How the tool is used and the materials being cut or
drilled.
The tool being in good condition and well maintained.
The use of the correct accessory for the tool and
ensuring it is sharp and in good condition.
The tightness of the grip on the handles and if any
anti vibration and noise accessories are used.
And the tool is being used as intended by its design
and these instructions.
This tool may cause hand-arm vibration syndrome if
its use is not adequately managed.
WARNING!
To be accurate, an estimation of exposure level in the
actual conditions of use should also take account of
all parts of the operating cycle such as the times when
the tool is switched off and when it is running idle but
not actually doing the job. This may signicantly reduce
the exposure level over the total working period.
Helping to minimise your vibration and noise exposure
risk.
Always use sharp chisels, drills and blades.
Maintain this tool in accordance with these instructions
and keep well lubricated (where appropriate).
If the tool is to be used regularly then invest in anti
vibration and noise accessories.
Plan your work schedule to spread any high vibration
tool use across a number of days.
INTENDED USE
a) The pruning saw is intended for cutting only wood
and branches up to a diameter corresponding to
the length of the pruning saw guide bar.
b) The pruning saw must be used at ground level or
from a suitable platform that is completely stable
and secure.
c) During using, the pruning saw should be held in
both hands, right hand on the Grip Area and left
hand on the Secondary Grip Area.
d) The pruning saw is intended for outdoor use only.
e) The pruning saw is not intended for any other use.
f ) Mounting of parts on the pruning saw is authorized
only for original or manufacturer-approved spare
parts (chain guides or saw chains for example) as
well as for authorized chain guide / saw chain
combinations as indicated in the manual.
g) The user is responsible for any accident resulting
from improper use or unauthorized modication of
the pruning saw.
Guide bar length 6"
Cutting ability 5.91" (150mm)
Chain pitch 0.3"(7.6mm)
32
3.09 lbs (1.40kg)
Machine weight
(chain & bar included)
2000mAh
Battery
Capacity
Voltage
Usb-C Input/Output
OutputUsb-A
Maximum:20V
Nominal:18V
Max. 30W, 5V/3A,
9V/3A,12V/2.5A,
15V/2A, 20V/1.5A
Max. 15W 5V/3A
Number of chain
drive links
7
TECHNICAL DATA
ASSEMBLY
WARNING!
Do not install the battery pack before it has been
completely assembled.
Always use gloves when handling the chain.
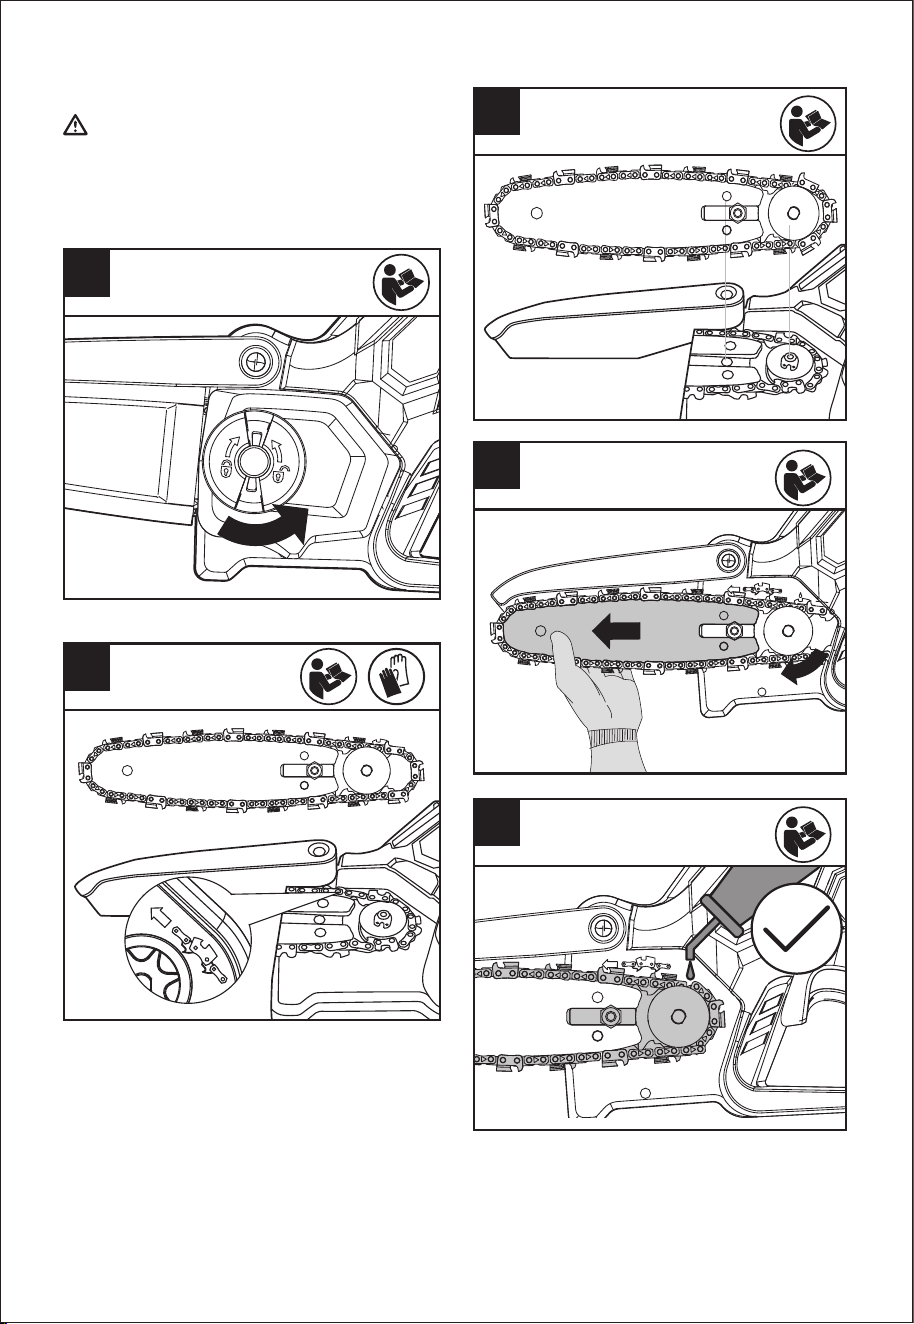
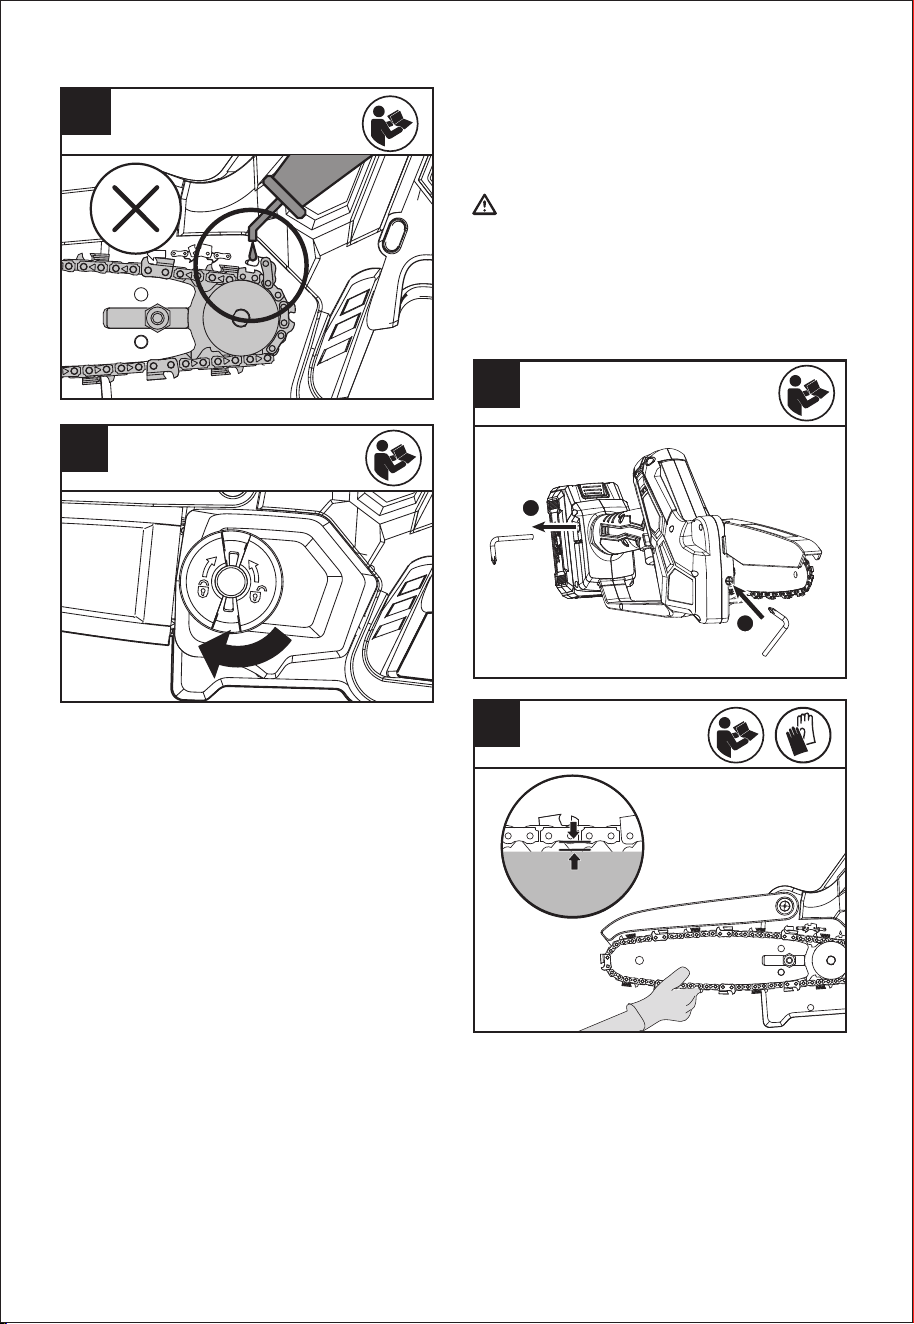
MOUNTING THE SAW CHAIN (See Fig. A1 to Fig. D)
A2
B1
8
A1
1
B2
1
2
C1
E1
Bar
3-5 mm
E2
D
WARNING!
The Chain is not yet tensioned. Tensioning the Chain
applies as described under “TENSIONING CHAIN”.
The Chain now needs to be inspected to make sure it
is properly tensioned.
TENSIONING CHAIN (See Fig. E1 to E3)
9
1) Unpack all parts carefully. Remove the Housing-
Cover by turning the Housing-Cover Knob in a
counterclockwise direction. (See Fig. A1)
2) Place the pruning saw on a solid, level surface.
3) Use only recommended saw chain for Guide Bar.
4) Slide the Chain in the slot around the Guide Bar.
Ensure the Chain is in correct running direction by
comparing it to the chain icon on the Guide Bar, or
referring to the chain direction symbol found on the
saw body. (See Fig. A2)
5) Fit the Chain onto the Drive Sprocket, so that the
Fastening Bar Bolt and the Bar Locating Tab on the
Bar Pad t into the keyway of the opening on the
Guide Bar. (See Fig. B1, B2)
6) Assure all parts are seated properly. Make sure the
drive links are fully seated in the Drive Sprocket
(See Fig. C1), avoiding a kink as shown in Fig. C2.
If kink occurs, pick up the Chain at the Guide Bar
just ahead of the kink and then pull the kink out.
7) NOTE: Chain should rotate freely and be free of kinks.
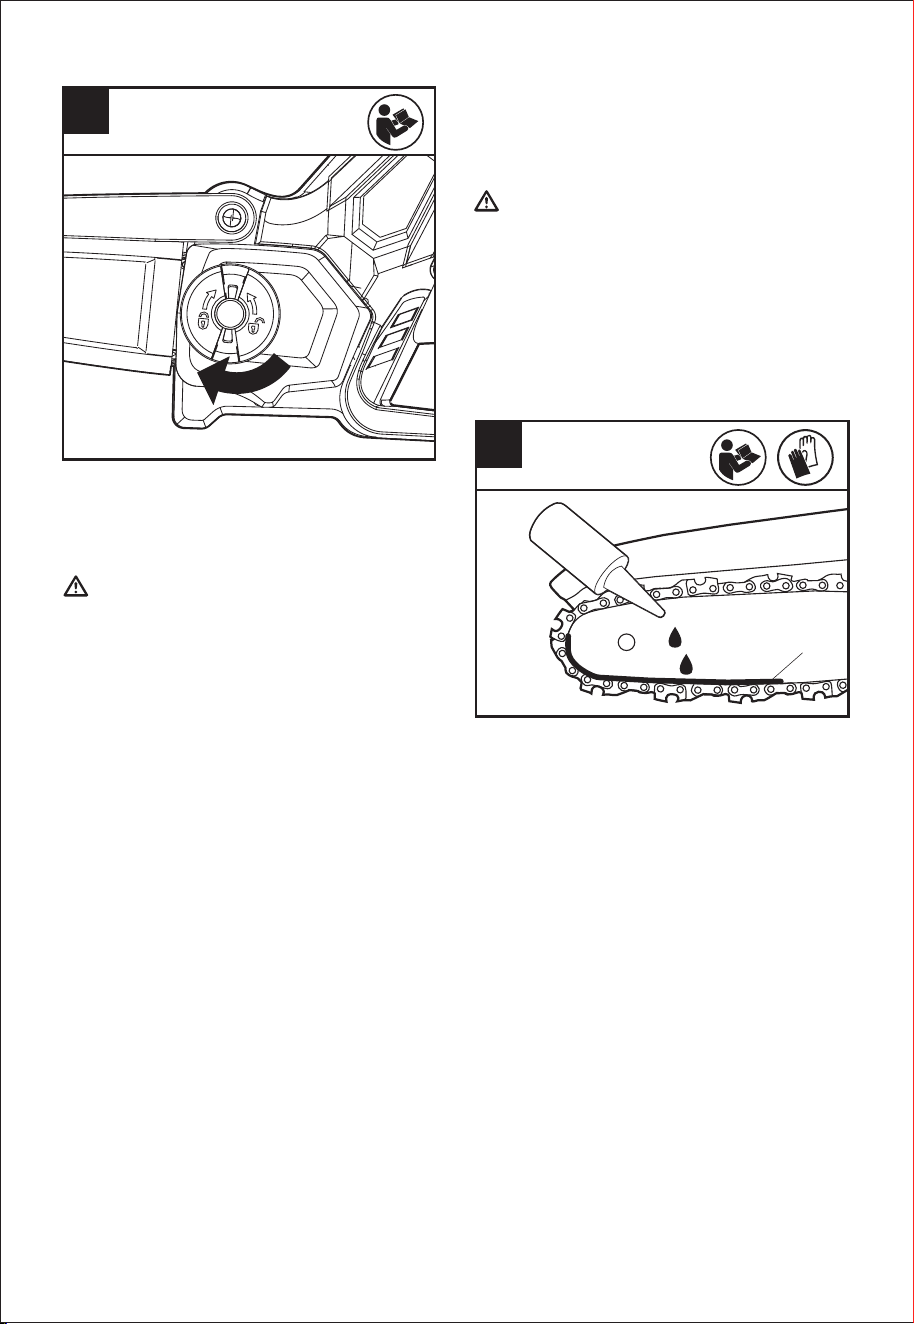
8) Fit the Chain Cover and tighten the Chain Cover by
turning the Housing-Cover Knob clockwise until it is
tight. (See Fig. D)
C2
Kink
1
2
IMPORTANT:
It is important to use bar and chain lubricant that is
formulated to perform over a wide temperature range
with no dilution required. This can be found at your local
hardware store. Do not use dirty, used or otherwise
contaminated oil. Damage may occur to the bar or
chain. Use of non-approved oil will void the warranty.
Do not swallow. If swallowed, call a physician
immediately. Keep out of reach of children. Store
away from heat or open ame.
E3
a
F
NOTE: New saw chains will stretch. Check the chain
tension frequently when rst used and tighten when
the Chain becomes loose around the Guide Bar.
WARNING:
Removing the battery pack before adjusting saw
chain tension.
Cutting edges on chain are sharp. Use protective
gloves when handling chain.
Maintain proper chain tension always. A loose chain
will increase the risk of kickback. A loose chain may
jump out of guide bar groove. This may injure
operator and damage chain. A loose chain will
cause chain, bar, and sprocket to wear rapidly.
1) Place the pruning saw on any suitable at surface.
2) Loosen the Housing-Cover Knob a bit to loosen the
Chain Cover lightly.
3) Adjust the chain tension.
4) The correct chain tension is reached when the Chain
can be raised approx. half the drivelink depth from
the Guide Bar in the center. (See Fig. E2)
5) Tighten the Housing-Cover Knob to secure the Chain
Cover. (See Fig. E3)
10
NOTE: The Chain is properly tensioned when it can be
lifted off of the Guide Bar and the drivelink is within the
rail of the Guide Bar.
NOTE: The chain will naturally stretch and lose proper
tension under general use. To re-tention, repeat steps
1-5 listed above.
1) Switch off the pruning saw and remove the battery.
2) Place the pruning saw on a level surface with the
Housing-Cover facing up.
3) Clean the Guide Bar and Chain with a soft brush or
solvent.
4) Apply lubrication oil in area (a) between Guide Bar
and Chain. (See Fig. F)
5) Fit the battery. Switch on the pruning saw.
Lubrication oil is evenly distributed over the chain.
The saw chain is lubricated.
LUBRICATION
NOTE: Chain life and cutting capacity depend on
optimum lubrication. Therefore, the chain should be
oiled before operation.
OPERATION
11
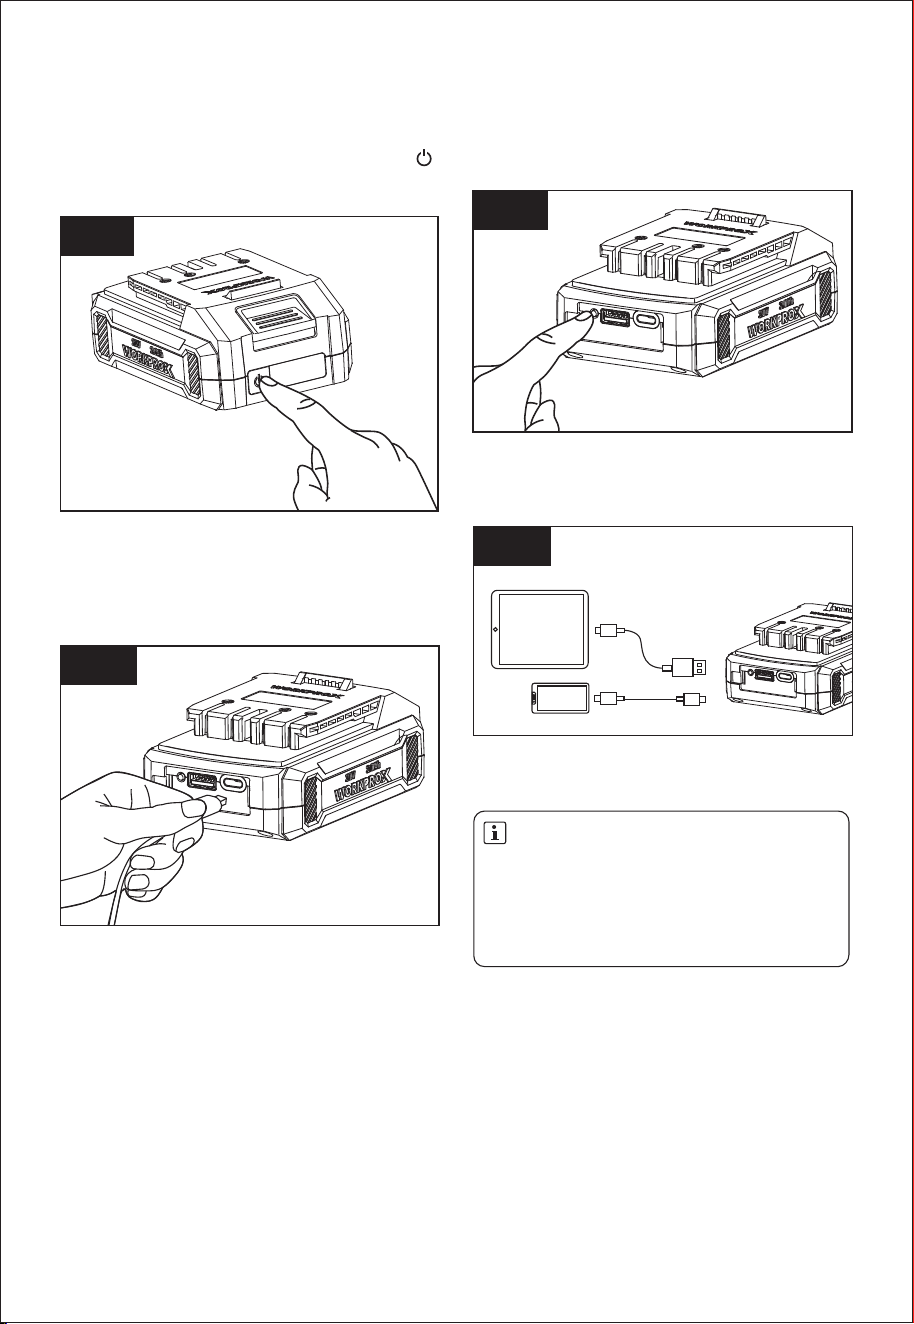
a) Battery capacity indicator(Fig.G1)
The battery pack has an LED screen, and press the
can display real-time power level. The screen will
automatically turn off in three seconds.
b) Recharge the battery pack (Fig. G2)
To charge your battery pack, connect one end of the
USB cable with a USB-C port to the corresponding
USB-C port on the battery pack, and connect the other
end to a USB-C or USB-A interface charger.
c) Charge portable device (Fig.G3 & Fig. G4)
Press the button as shown in Fig. G3, the indicator will
light up green to indicate that the battery pack is active
and that the USB ports are ready to be used.
After charging, disconnect the USB cables, press the
buttonto turn the indicator off.
Plug the USB cable into the correct port, and the other
end of the cable into your device to begin charging the
device.(Fig. G4)
NOTE:
The green light remains on during output.
After pressing the button (as shown in Fig. G3), if
no USB cable is connected for an extended period,
the green light will automatically turn off after 5
minutes.
Fig. G1
Fig. G2
Fig. G4
Fig. G3
2. SWITCHING ON AND OFF (See Fig. J)
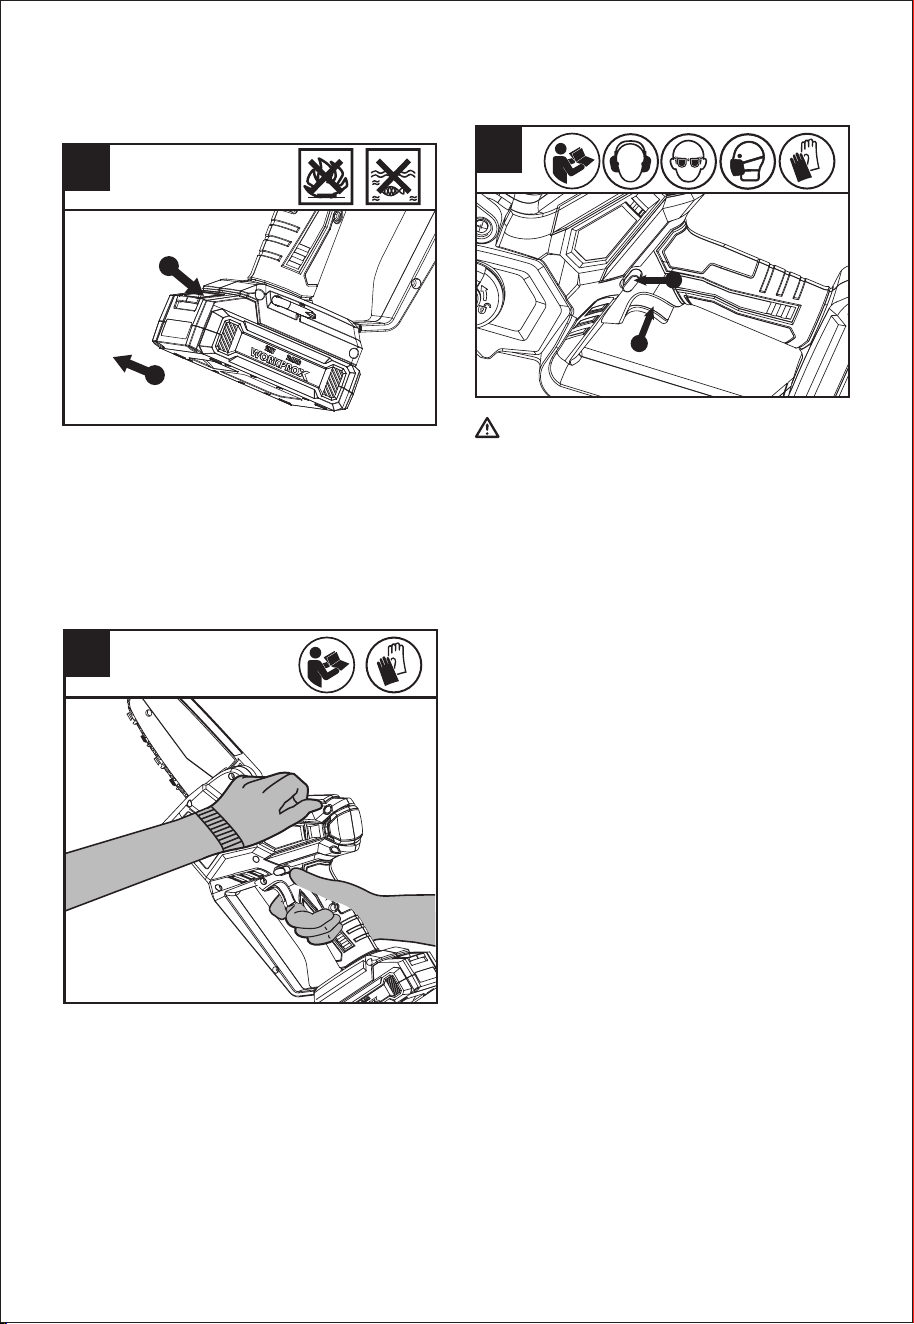
TO REMOVE OR INSTALL BATTERY PACK
(See Fig. H)
Depress the Battery Pack Release Button to remove
the Battery Pack from your tool. After recharging,
insert the Battery Pack into the battery port. A simple
push and slight pressure will be sufcient until a click
is heard. Check to see if the battery is fully secured.
NOTE: When removing the battery pack, hold it
rmly to avoid dropping and injury.
1
2
H
J
1
2
12
d)
e) HOLDING AND CONTROLLING THE ELECTRIC
CHAIN SAW (See Fig. I)
Hold and control the electric chain saw with one hand
on the Grip Area – wrap your thumb around the Grip
Area.
Hold and control the electric chain saw with your other
hand on the Secondary Grip Area.
3. CUTTING
IMPORTANT: Check recent replaced chain, tension
about every 10 minutes during operation.
1) Installing the battery pack into the machine. Make
sure section of log to be cut is not laying on the
ground. This will keep the chain from touching the
ground as it cuts through the log.
2) Touching the ground while the Chain is moving is
dangerous and will dull the Chain.
3) When ready to make a cut, push the Lock-Out
Button completely in with the right thumb and
squeeze the trigger. This will turn saw on. Releasing
the trigger will turn the saw off. Make sure the saw
is running at full speed before starting a cut.
4) When starting a cut, slowly place moving chain
against the wood. The wood should be as close to
the saw body as possible. Hold saw rmly in place
to avoid possible bouncing or skating (sideways
movement) of saw.
5) Guide the saw using light pressure and do not put
excessive force on the saw, letting the saw do its
work. The motor will overload and can burn out. It
will do the job better and safer at the rate for which
it was intended.
6) Remove the saw from a cut with the saw running at
full speed. Stop the saw by releasing the On/off
Switch. Make sure the chain has stopped before
setting the saw down.
7) Keep practicing on scrap logs in a secure working
area until you are comfortable, using a uid motion
and a steady cutting rate.
I
ATTENTION: Check the battery pack before
using your cordless tool. Only use the battery
pack supplied with the tool or recommended by
the manufacturer. For switching on the tool, press
the Lock-Out Button, then fully press the On/Off
Switch and hold in this position. The Lock-Out Button
can now be released.
For switching off, release the On/Off Switch.
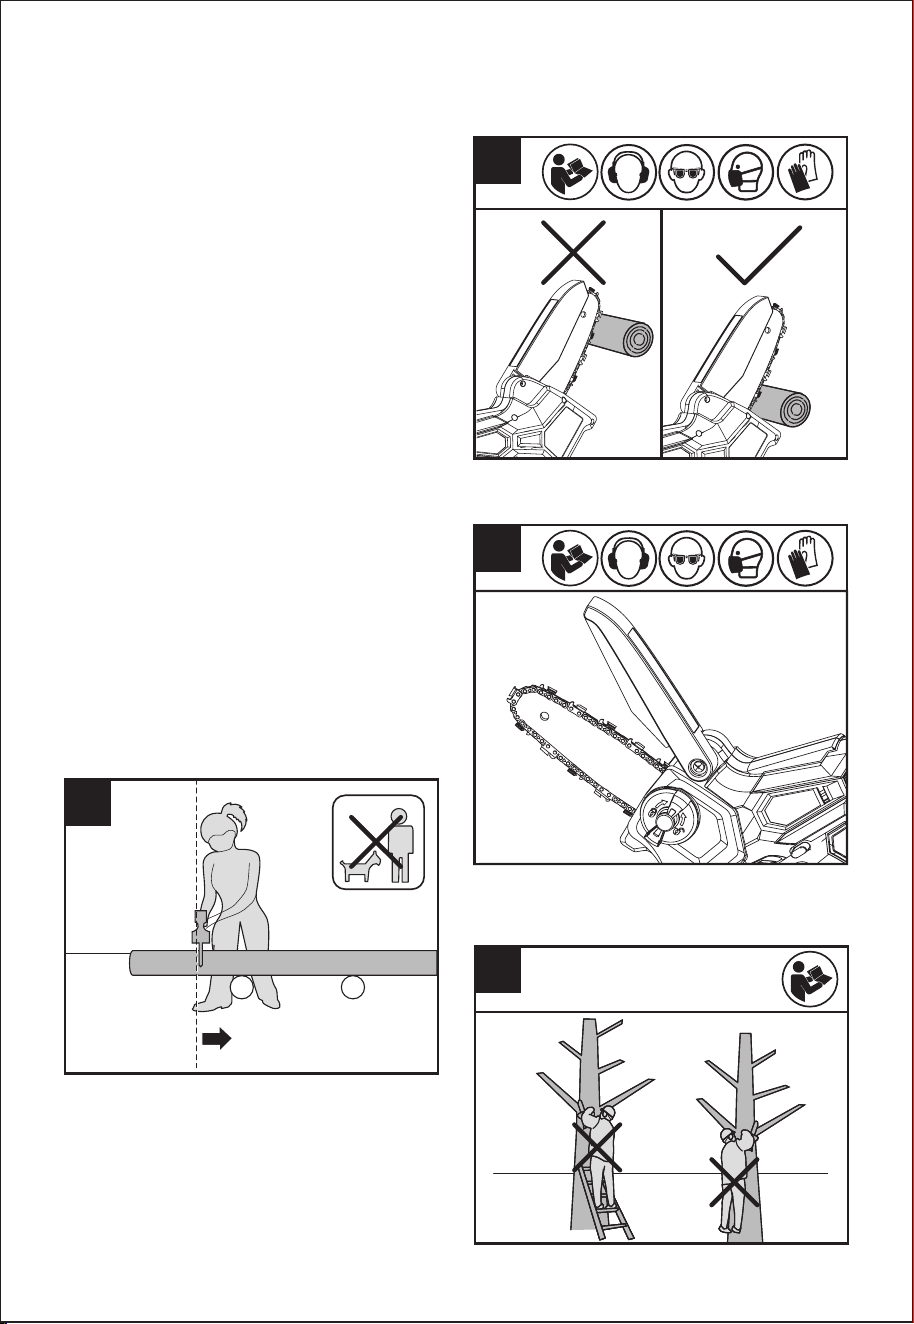
f ) Raise the Chain Guard when cutting from bottom to
top of material. (See Fig. M)
g) Do not operate the saw with arms fully extended,
attempt to saw areas which are difcult to reach, or
stand on a ladder while sawing. (See Fig. N)
M
N
K
L
13
4. KICKBACK SAFETY DEVICES ON THIS SAW
This saw has a low-kickback chain and reduced
kickback Guide Bar. Both items reduce the chance of
kickback. However, kickback can still occur with this
saw.
The following steps will reduce the risk of kickback.
Keep all safety items in place on saw. Make sure
they work properly.
Do not overreach or cut above shoulder height.
Keep solid footing and balance at all times.
Stand slightly to the left side of saw. This keeps
your body from being in direct line with chain.
Do not let Guide Bar nose touch anything when
chain is moving.
Never try cutting through two logs at same time.
Only cut one log at a time.
Do not bury the Guide Bar nose or try plunge cut
(boring into wood using Guide Bar nose).
Watch for shifting of wood or other forces that may
pinch chain.
Use extreme caution when reentering a previous cut.
Use only the low-kickback chain and Guide Bar that
were supplied with this pruning saw or recommended.
Never use a dull or loose chain. Keep chain sharp
with proper tension.
5. HOW TO USE SAW SAFELY
a) Use the pruning saw only with secure footing.
b) Hold the pruning saw at the right-hand side of your
body (See Fig. K).
c) The Chain must be running at full speed before it
makes contact with the wood.
d) Use the Cutting base panel to secure the saw onto
the wood before starting to cut.
e) Use the Cutting base panel as a leverage point while
cutting. (See Fig. L)
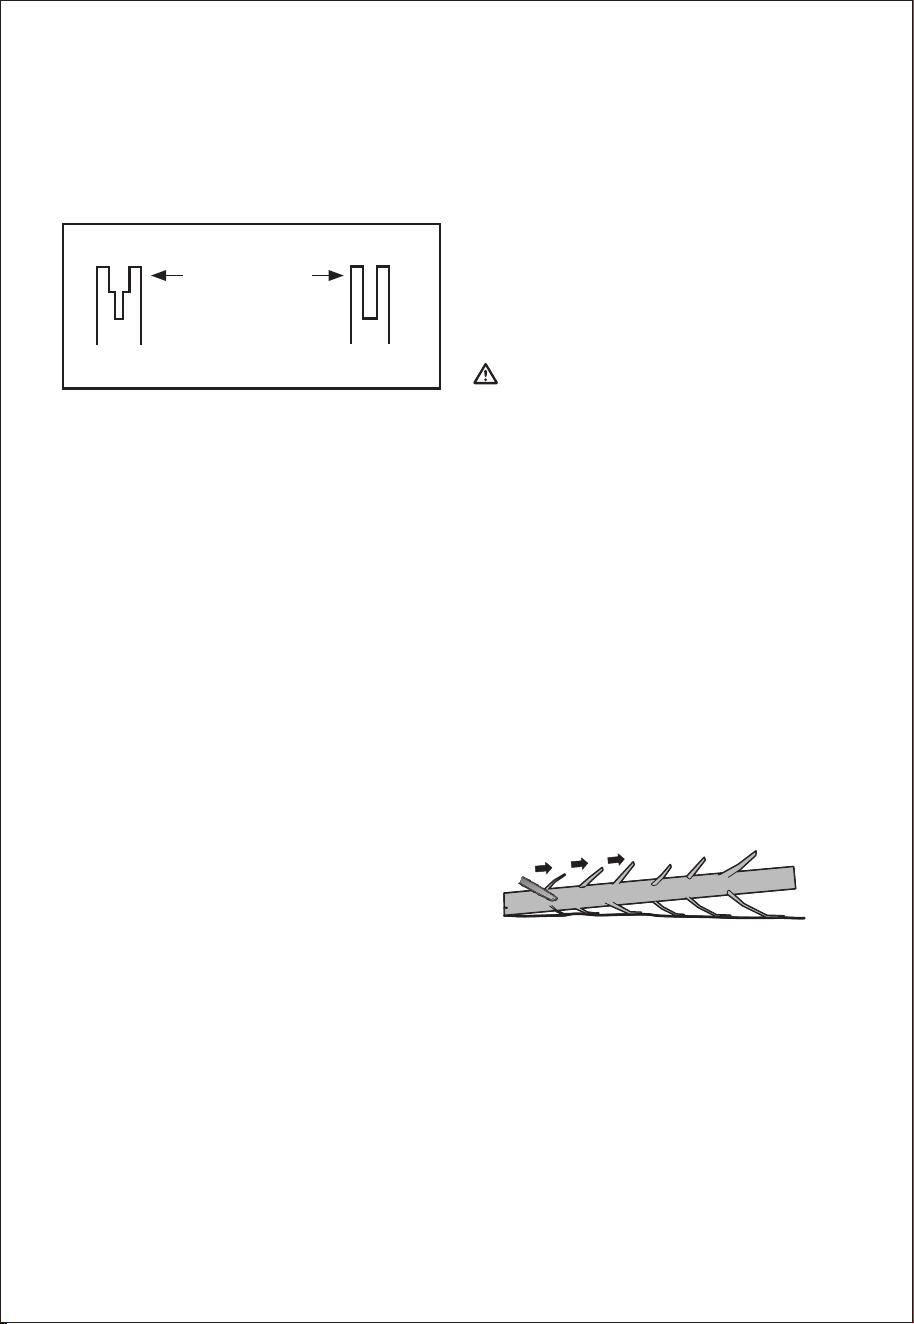
To clean the Bar rails
1) Remove Housing-Cover, Bar and Chain.
(see section ASSEMBLY)
2) Using a wire brush, screwdriver or similar tool, clear
the residue from the inner groove of the bar.
(See Fig. R)
3) Make sure to clean oil passages thoroughly.
Conditions which require Chain and Guide Bar
maintenance:
Saw cuts to one side or at an angle.
Saw has to be forced through the cut.
Inadequate supply of oil to the bar and chain.
Check the condition of the Guide Bar each time the
chain is sharpened. A worn Guide Bar will damage the
chain and make cutting difcult.
After each use, remove the battery pack, clean all
sawdust from the Guide Bar and sprocket hole.
When rail top is uneven, use a at le to restore
square edges and sides.
Replace the Guide Bar when the groove is worn, the
Guide Bar is bent or cracked, or when excess heating
or burring of the rails occurs. If replacement is
necessary, use only the Guide Bar specied for your
saw in the repair parts list or on the decal located on
the electric chain saw.
WARNING!
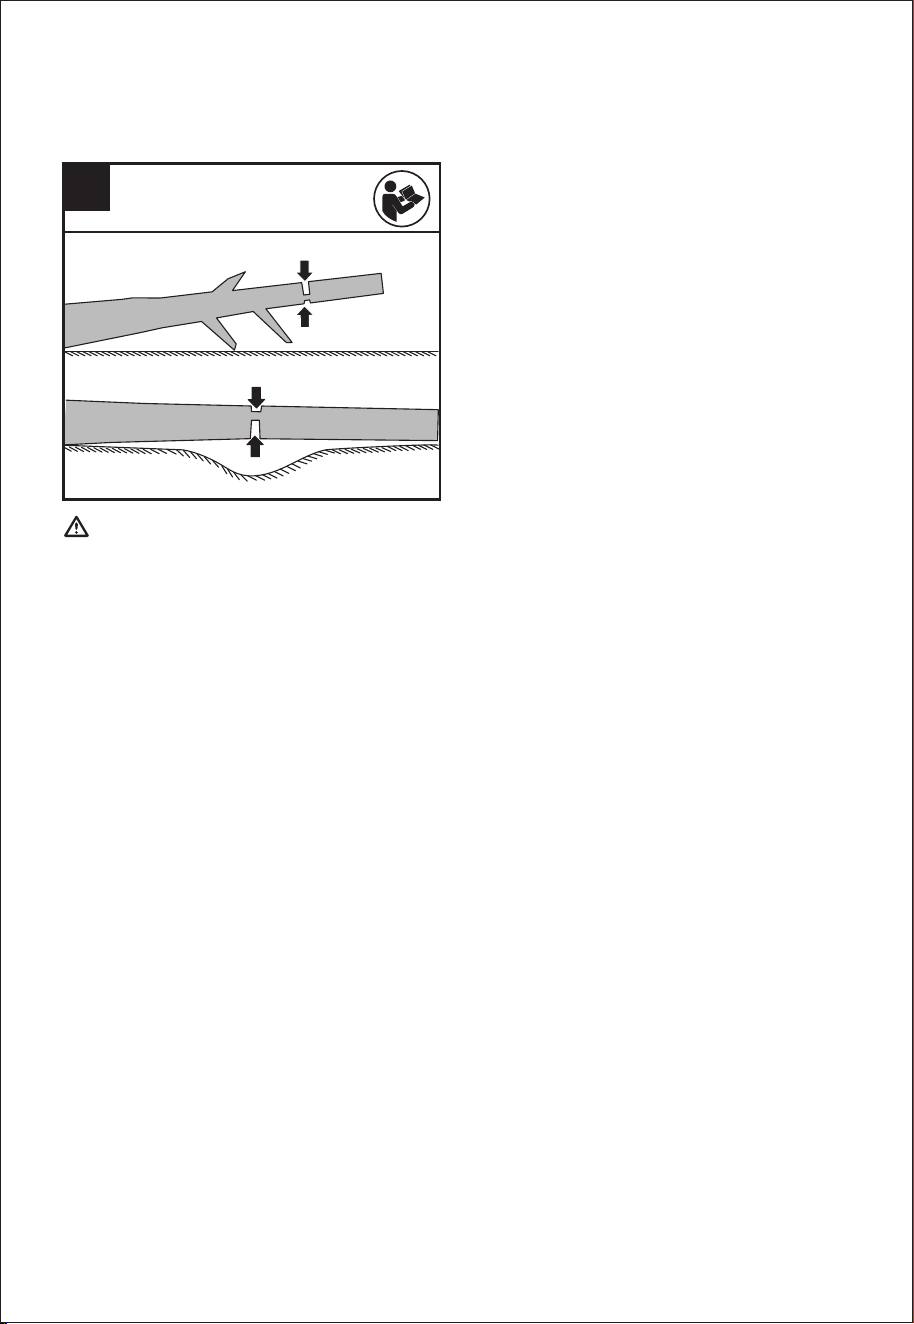
When cutting a limb that is under tension, use
extreme caution. Be alert for woodspringing back.
When wood tension is released, limb could spring
back and strike operator causing severe injury or
death.
When sawing logs supported on both ends, start the
cut from upper side of the saw(Y) about 1/3 of the
diameter into the log (overbuck) and then nish the
cut (Z) from lower side of the saw, in order to avoid
contact of the electric chain saw with the ground.
When sawing logs supported on only one end, start
the cut from below (Y) about 1/3 of the diameter into
the log (underbuck) and nish the cut from above (Z)
in order to avoid log splitting or jamming of the
electric chain saw.
MAINTENANCE AND STORAGE OF ELECTRIC
CHAIN SAW
1) Remove the battery pack
When not in use
Before moving from one place to another
Before servicing
Before changing accessories or attachments, such
as saw chain and guard
2) Inspect electric chain saw before and after each
use. Check saw closely if guard or other part has
been damaged. Check for any damage that may
affect operator safety or operation of saw. Check
for alignment or binding of moving parts. Check for
broken or damaged parts. Do not use electric chain
saw if damage affects safety or operation. Have
damage repaired by authorized service center.
3) Maintain electric chain saw with care.
Never expose saw to rain or direct moisture.
Keep chain sharp, clean, and lubricated for better
and safer performance.
Follow steps outlined in this manual to sharpen
chain.
Keep handles dry, clean, and free of oil and grease.
4) When servicing, use only identical replacement
parts.
5) When not in use, always store electric chain saw in
a high or locked place, out of children’s reach in a
dry place with Bar and Chain Cover in place.
Bar Maintenance
To maximize bar life, the following bar maintenance is
recommended.
The bar rails that carry the chain should be cleaned
before storing the tool or if the bar or chain appear to
be dirty.
The rails should be cleaned every time the chain is
removed.
Never use the electric chain saw above shoulder
height.
Cutting wood under tension (See Fig. O)
Z
Z
Y
Y
O
14
SAW MAINTENANCE
Follow maintenance instructions in this manual. Proper
cleaning of saw and chain and Guide Bar maintenance
can reduce chances of kickback. Inspect and maintain
saw after each use. This will increase the service life of
your saw.
NOTE: Even with proper sharpening, risk of kickback
can increase with each sharpening.
Please note the running direction of the saw chain.
The saw chain icon is shown on housing nearby
Drive sprocket (17).
Use an oiler to oil the saw Chain (12) and the Drive
sprocket (17).
Tighten the saw Chain (12)
Re-tighten the Housing-cover (4) with the
Housing-cover knob (3) on the Housing-cover (4).
Let each new saw chain break-in first!
When attaching the saw chain, observe the running
direction!
SHARPENING SAW CHAIN
WARNING:
Remove the battery pack before servicing. Severe
injury or death could occur from electrical shock
or body contact with moving chain. Cutting edges
on chain are sharp. Use protective gloves when
handling chain. Keep chain sharp. Your saw will cut
faster and more safely. A dull chain will cause undue
sprocket, Guide Bar, chain, and motor wear. If you
must force chain into wood and cutting creates only
sawdust with few large chips, chain is dull.
INSTRUCTIONS CONCERNING
THE PROPER TECHNIQUES FOR
LIMBING AND CROSS-CUTTING
1). Limbing a tree
Limbing is removing the branches from a fallen tree.
When limbing leave larger lower limbs to support the
log off the ground. Remove the small limbs in one cut
as illustrated in Figure 1. Branches under tension
should be cut from the bottom up to avoid binding
the electric chain saw.
2). Bucking a log
Bucking is cutting a log into lengths. It is important to
make sure your footing is firm and your weight is
evenly distributed on both feet. When possible, the log
should be raised and supported by the use of limbs,
logs or chocks. Follow the simple directions for easy
cutting.
When the log is supported along its entire length as
illustrated in Figure 2, it is cut from the top (overbuck),
avoid contacting ground as this will greatly reduce the
chain sharpness.
Replacing Chain
Replace chain when cutters are too worn to sharpen
or when chain stops. Only use replacement chain
noted in this manual.
Only handle the saw chain with gloves and remove
the battery first!
Inspect the saw chain and the guide bar for damage
or signs of wear.
Never put a new saw chain on a worn guide bar.
Unscrew the Housing-cover knob (3)
counter-clockwise in order to remove the
Housing-cover (4).
Unscrew the Fastening bar bolt(16) to release
saw Chain (12).
Remove the old saw Chain (12).
Round the new saw chain over the Drive sprocket
(17) and Guide bar (13).
To clean the Bar rails
1) Remove Housing-Cover, Bar and Chain.
(see section ASSEMBLY)
2) Using a wire brush, screwdriver or similar tool, clear
the residue from the inner groove of the bar.
(See Fig. R)
3) Make sure to clean oil passages thoroughly.
Conditions which require Chain and Guide Bar
maintenance:
Saw cuts to one side or at an angle.
Saw has to be forced through the cut.
Inadequate supply of oil to the bar and chain.
Check the condition of the Guide Bar each time the
chain is sharpened. A worn Guide Bar will damage the
chain and make cutting difcult.
After each use, remove the battery pack, clean all
sawdust from the Guide Bar and sprocket hole.
When rail top is uneven, use a at le to restore
square edges and sides.
Replace the Guide Bar when the groove is worn, the
Guide Bar is bent or cracked, or when excess heating
or burring of the rails occurs. If replacement is
necessary, use only the Guide Bar specied for your
saw in the repair parts list or on the decal located on
the electric chain saw.
MAINTENANCE AND STORAGE OF ELECTRIC
CHAIN SAW
1) Remove the battery pack
When not in use
Before moving from one place to another
Before servicing
Before changing accessories or attachments, such
as saw chain and guard
2) Inspect electric chain saw before and after each
use. Check saw closely if guard or other part has
been damaged. Check for any damage that may
affect operator safety or operation of saw. Check
for alignment or binding of moving parts. Check for
broken or damaged parts. Do not use electric chain
saw if damage affects safety or operation. Have
damage repaired by authorized service center.
3) Maintain electric chain saw with care.
Never expose saw to rain or direct moisture.
Keep chain sharp, clean, and lubricated for better
and safer performance.
Follow steps outlined in this manual to sharpen
chain.
Keep handles dry, clean, and free of oil and grease.
4) When servicing, use only identical replacement
parts.
5) When not in use, always store electric chain saw in
a high or locked place, out of children’s reach in a
dry place with Bar and Chain Cover in place.
Bar Maintenance
To maximize bar life, the following bar maintenance is
recommended.
The bar rails that carry the chain should be cleaned
before storing the tool or if the bar or chain appear to
be dirty.
The rails should be cleaned every time the chain is
removed.
15
Figure 1
SAW MAINTENANCE
Follow maintenance instructions in this manual. Proper
cleaning of saw and chain and Guide Bar maintenance
can reduce chances of kickback. Inspect and maintain
saw after each use. This will increase the service life of
your saw.
NOTE: Even with proper sharpening, risk of kickback
can increase with each sharpening.
File Rail Edges
and Sides
Square
Worn Groove Correct Groove
Fig.R
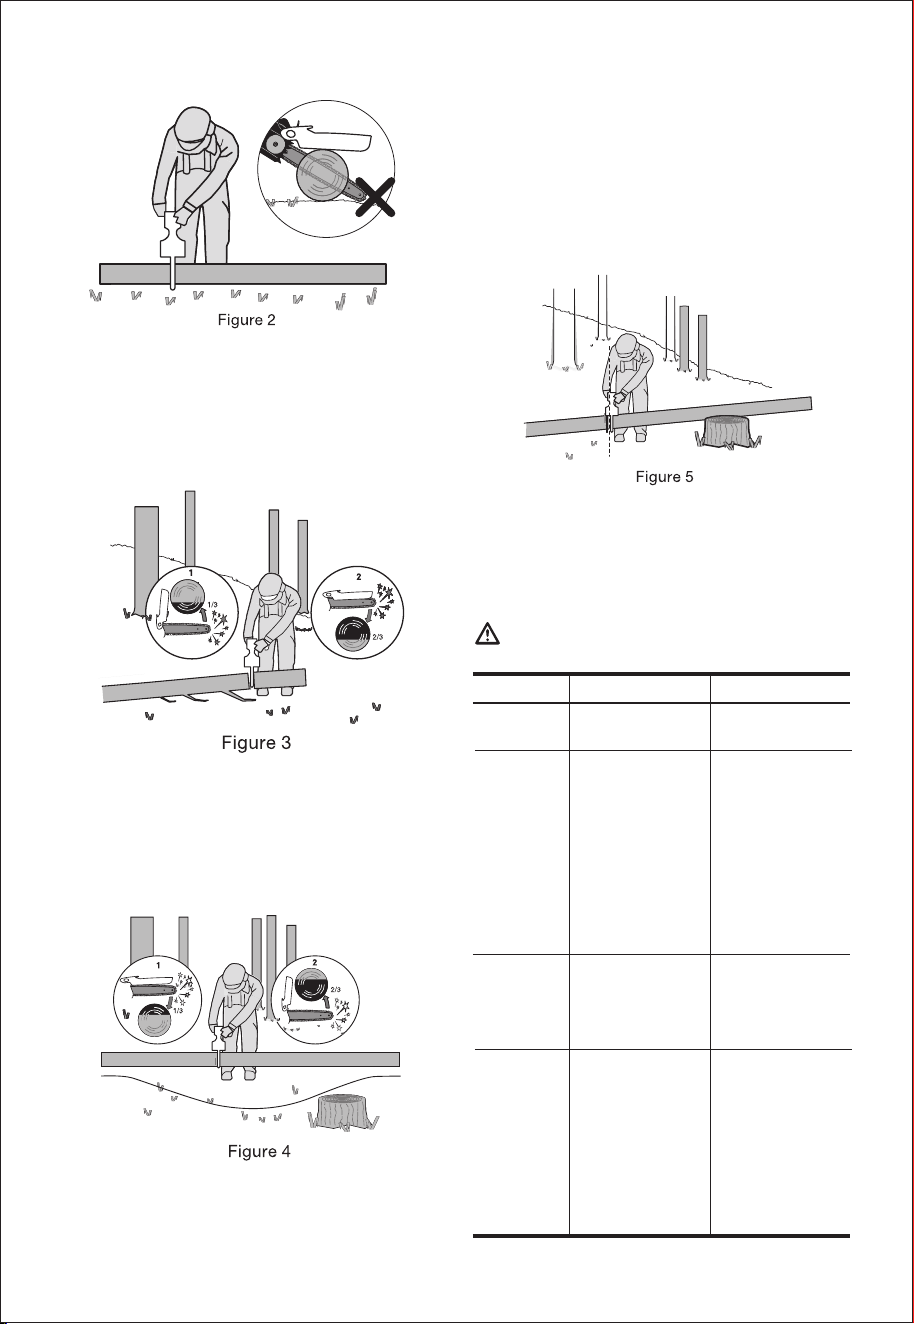
When the log is supported on one end, as illustrated
in Figure 3, cut 1/3 the diameter from the underside
(underbuck) (1). Then make the finished cut by
overbucking (2) to meet the first cut.
When the log is supported on both ends, as
illustrated in Figure 4, cut 1/3 the diameter from the
top overbuck) (1). Then make the finished cut by
underbucking (2) the lower 2/3 to meet the first cut.
When bucking on a slope always stand on the uphill
side of the log, as illustrated in Figure 5. When
“cutting through”, to maintain complete control
release the cutting pressure near the end of the cut
without relaxing your grip on the electric chain saw
handles. Don’t let the chain contact the ground. After
completing the cut, wait for the saw chain to stop
before you move the electric chain saw. Always stop
the motor before moving from tree to tree.
TROUBLESHOOTING TABLE
The following table gives checks and actions that you
can perform if your machine does not operate
correctly. If these do not identify/remedy the problem,
contact your service agent.
WARNING: Switch off and remove the battery
pack before investigating fault.
16
Symptom Possible Cause Remedy
Pruning Saw
fails to operate
Out of battery.
Charge the battery
pack.
Pruning Saw
operates
intermittently
Over heating
Applying too much
pressure while
cutting.
Loose connection.
Internal wiring
defective.
On/Off switch
defective.
Place the machine
in a cool,ventilated
place to cool it
down
Applying relatively
less pressure
while cutting
Contact service
agent.
Chain/chain
bar
over-heats
Chain is over
tensioned
Dull chain
Adjust chain
tension
Sharpen chain or
replace
Pruning Saw
rips,
vibrates,
does not
saw properly
Chain tension
too loose
Dull chain
Chain worn out
Chain teeth are
facing in the
wrong direction
Adjust chain
tension
Sharpen chain or
replace
Replace chain
Reassemble with
chain in correct
direction
17
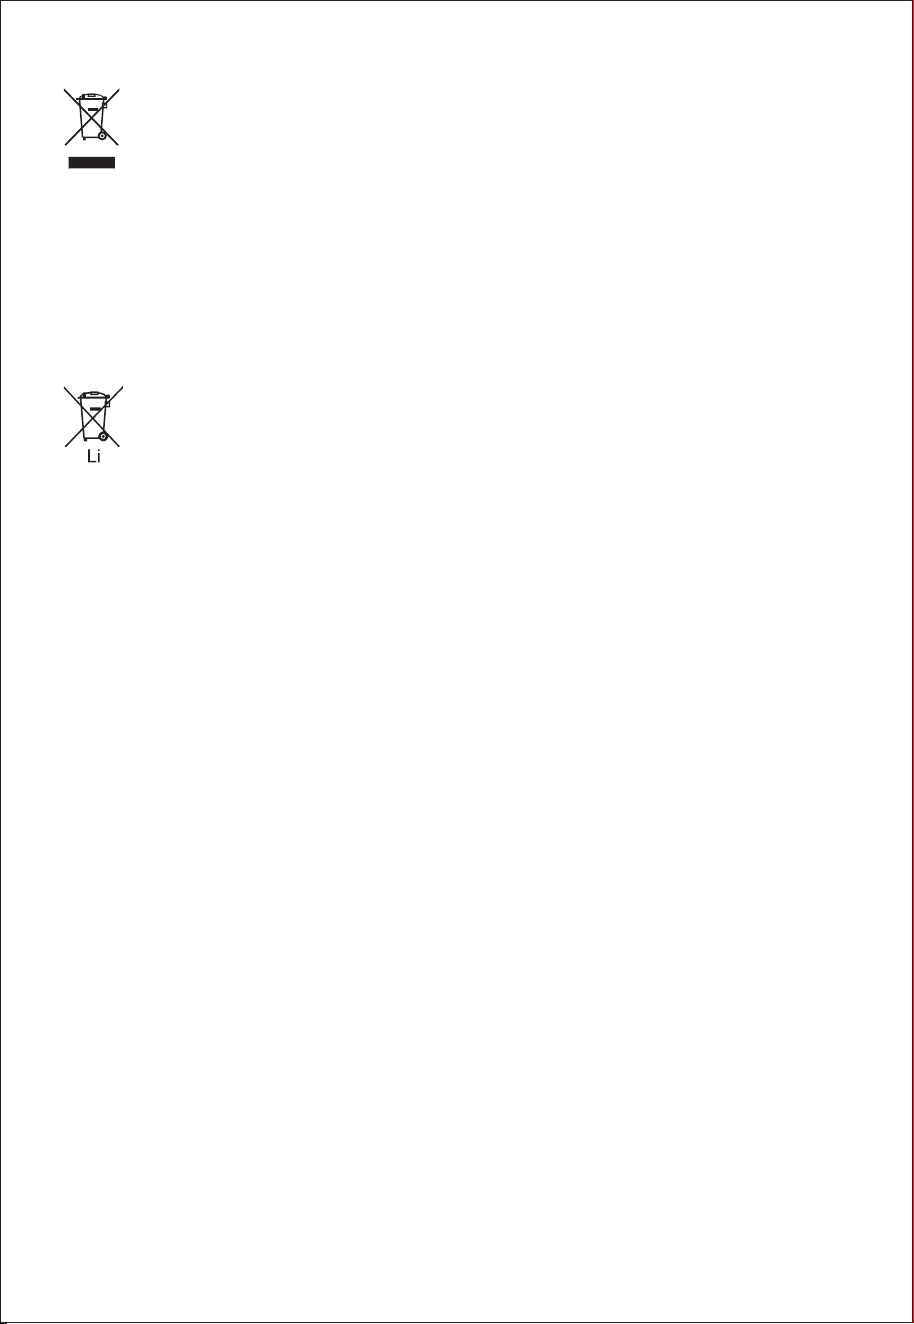
DISPOSAL
Do not dispose of electric power tools with
domestic refuse.
The electric power tool is shippedin packaging
to reduce transport damage.
This packaging is a raw material and as such
can either be reused or can be fed back into
the raw material cycle. The electric power tool
and its accessories are made from various
materials such as metals and plastics. Take
defective components to a special refuse
collection point.Ask about these at your
specialist shop or local council.
Batteries
Think of the environment when disposing of
batteries. Contact your local authorities to nd
out where your nearest disposal area is.
Do not dispose of batteries with domestic
refuse. Do not dispose of by burning, risk of
explosion.