USER MANUAL
THANK
YOU!
Thank You for Purchasing from
Made in China
NOTE:
To continuously improve its products, reserves the right to
modify this information without prior notification.
For any questions regarding assembly, please watch the video on the
product page or contact our customer service. Our customer service will
Thank you for using products in your home!
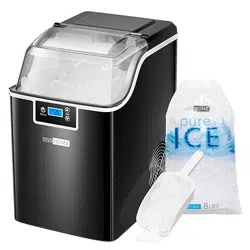
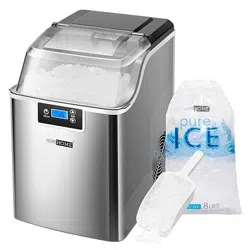
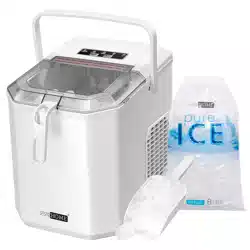
Countertop Nugget Ice Maker


1
USER MANUAL
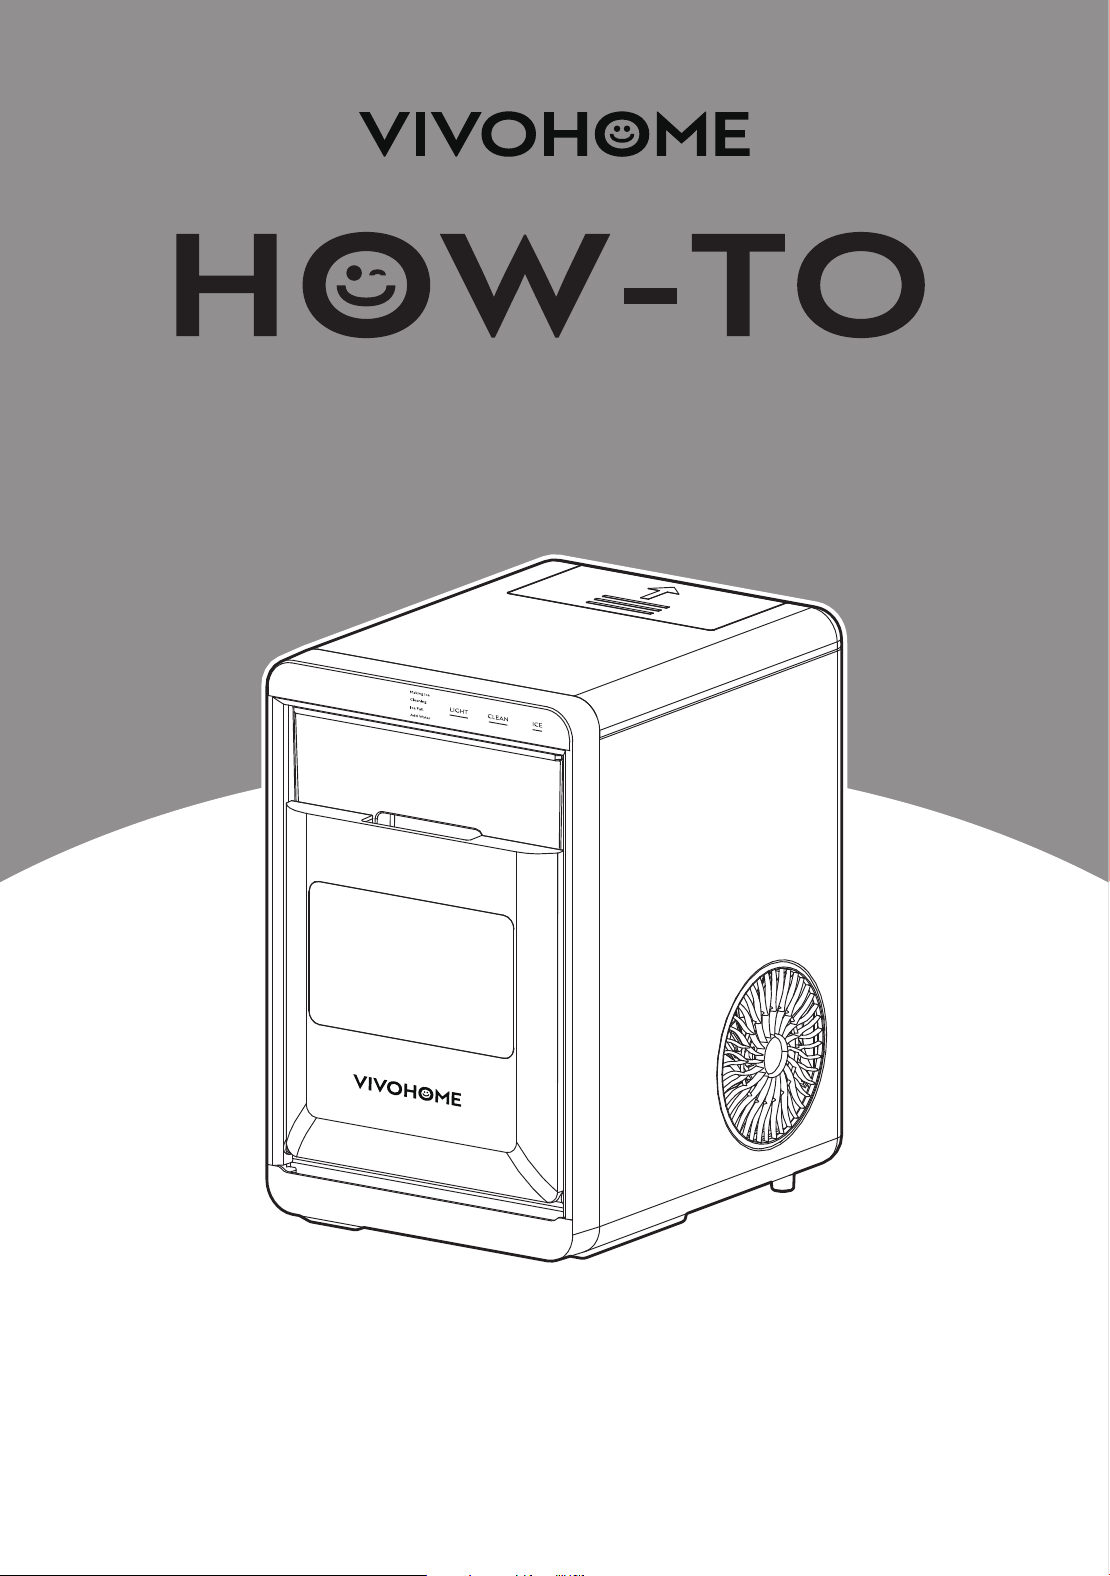
HOW-TO
Countertop Nugget Ice
Maker 33lbs
CONTENTS
Important Safety Instruction ..........................................1
Preparing Your Ice Maker For Use ..............................2
Important Safety Tips ...................................................2
Getting to Know Your Unit .............................................4
Operating Procedures & Maintenance ...................5
Using Your Ice Maker .........................................................6
How to Start the Unit ....................................................6
Operation and Display Areas ..................................7
System Cleaning/Sanitizing Procedure ...............8
How to Obtain the Ice-cube .....................................11
Tips .........................................................................................11
Troubleshooting ..................................................................12
Technical Parameters .......................................................13
Circuit Diagram ....................................................................13
Warranty
* After receiving the machine, it needs to be left to
stand for 24 hours.
.................................................................................14
SECTION A
Important Safety Instructions
Your safety and the safety of others are very important.
We have provided many important safety messages in the
manual for your appliance.
Always read and obey all safety messages.
This is the safety alert symbol:
AlI safety messages will follow the safety alert symbol and the
word "DANGER" or "WARNING".
These words mean:
You can be killed or seriously injured if you don't immediately
follow instructions.
All safety messages will tell you what the potential hazard is, tell
you how to reduce the chance of injury, and tell you what can
happen if the instructions are not followed.
WARNINGDANGER
1
USER MANUAL
HOW-TO
Countertop Nugget Ice
Maker 33lbs
CONTENTS
Important Safety Instruction ..........................................1
Preparing Your Ice Maker For Use ..............................2
Important Safety Tips ...................................................2
Getting to Know Your Unit .............................................4
Operating Procedures & Maintenance ...................5
Using Your Ice Maker .........................................................6
How to Start the Unit ....................................................6
Operation and Display Areas ..................................7
System Cleaning/Sanitizing Procedure ...............8
How to Obtain the Ice-cube .....................................11
Tips .........................................................................................11
Troubleshooting ..................................................................12
Technical Parameters .......................................................13
Circuit Diagram ....................................................................13
Warranty
* After receiving the machine, it needs to be left to
stand for 24 hours.
.................................................................................14
SECTION A
Important Safety Instructions
Your safety and the safety of others are very important.
We have provided many important safety messages in the
manual for your appliance.
Always read and obey all safety messages.
This is the safety alert symbol:
AlI safety messages will follow the safety alert symbol and the
word "DANGER" or "WARNING".
These words mean:
You can be killed or seriously injured if you don't immediately
follow instructions.
All safety messages will tell you what the potential hazard is, tell
you how to reduce the chance of injury, and tell you what can
happen if the instructions are not followed.
WARNINGDANGER

2 3
1.
2.
3.
4.
5.
6.
7.
8.
9.
10.
Do not operate this, or any other appliance with a damaged
cord. If the supply cord is damaged, it must be replaced by the
manufacturer, its service agent, or a similarly qualified person in
order to avoid a hazard.
This ice-maker must be positioned so that the plug is
accessible.
Connect to properly grounded outlets only. No other appliance
should be plugged into the same outlet. Be sure that the plug is
fully inserted into the receptacle.
Do not run the power cord over carpeting or other heat insula-
tors. Do not cover the cord. Keep cords away from traffic areas,
and do not submerge in water.
We do not recommend the use of an extension cord, as it may
overheat and become a risk of fire. If you must use an extension
cord, use No. 14AWG minimum size and rated at no less than
1875 watts.
Unplug the ice maker before cleaning or making any repairs or
servicing.
Exercise caution and use reasonable supervision when appli-
ance is used near children.
Do not use your ice-maker outdoors. Place the ice-maker away
from direct sunlight and make sure that there is at least 6 inches
of space between the back of your unit and the wall. Keep a
minimum distance of 6 inches on each side of your unit free.
Do not use any other liquid to make the ice-cube other than
water.
Do not clean your ice maker with flammable fluids. The fumes
can create a fire hazard or explosion.
Do not tip over.
If the ice maker is brought in from outside in wintertime, give it a
few hours to warm up to room temperature before plugging it
in.
WARNING: This appliance must be earthed.
IMPORTANT SAFETY TIPS
SECTION B
Preparing Your Ice Maker For Use
When using electrical appliances, basic safety precautions should
be followed to reduce the risk of fire, electric shock, and injury to
persons or property. Read all instructions before using any appli-
ance.
11.
12.
13.
14.
15.
16.
17.
DANGER - Risk Of Fire or Explosion. Flammable Refrigerant Is
Used. Do Not Use Mechanical Devices To Defrost Ice Maker. Do
Not Puncture Refrigerant Tubing.
DANGER -Risk Of Fire Or Explosion. Flammable Refrigerant Is
Used. To Be Repaired Only By Trained Service Personnel. Do
Not Puncture Refrigerant Tubing.
CAUTION-Risk Of Fire Or Explosion. Flammable Refrigerant Is
Used. Consult Repair Manual/Owner's Guide Before Attempt-
ing To Install or Service This Product. All Safety Precautions
Must be Followed.
CAUTION-Risk Of Fire Or Explosion. Dispose Of Property In
Accordance With Federal Or Local Regulations. Flammable Is
Refrigerant Used.
CAUTION - Risk Of Fire Or Explosion Due To Puncture Of Re-
frigerant Tubing;Follow Handling Instructions Carefully. Flam-
mable Refrigerant Is Used.
The ice maker should be installed in accordance with the
safety standard for Refrigeration Systems, ASHRAE15. The ice
maker shall not be installed in corridors or hallways of public
buildings.
If the unit has problems and needs to be maintained, replace-
ment with like components and servicing shall be done by
factory-authorized service personnel so as to minimize the risk
of possible ignition due to incorrect parts or improper service.
IMPORTANT:
The wires in this mains lead are colored in accordance with the
following code:
Green or Green with a strip yellow: Grounding
White: Neutral
Black: Live
To avoid a hazard due to instability of the appliance, it must be
placed at a even or flat surface.
4 5
WARNING: fill with potable water only. Only use drinking water.
*lmproper use of the grounded plug can result in the risk of elec-
trical shock. If the power cord is damaged, please call our cus-
tomer service.
1.
2.
3.
4.
5.
6.
7.
8.
9.
10.
11.
12.
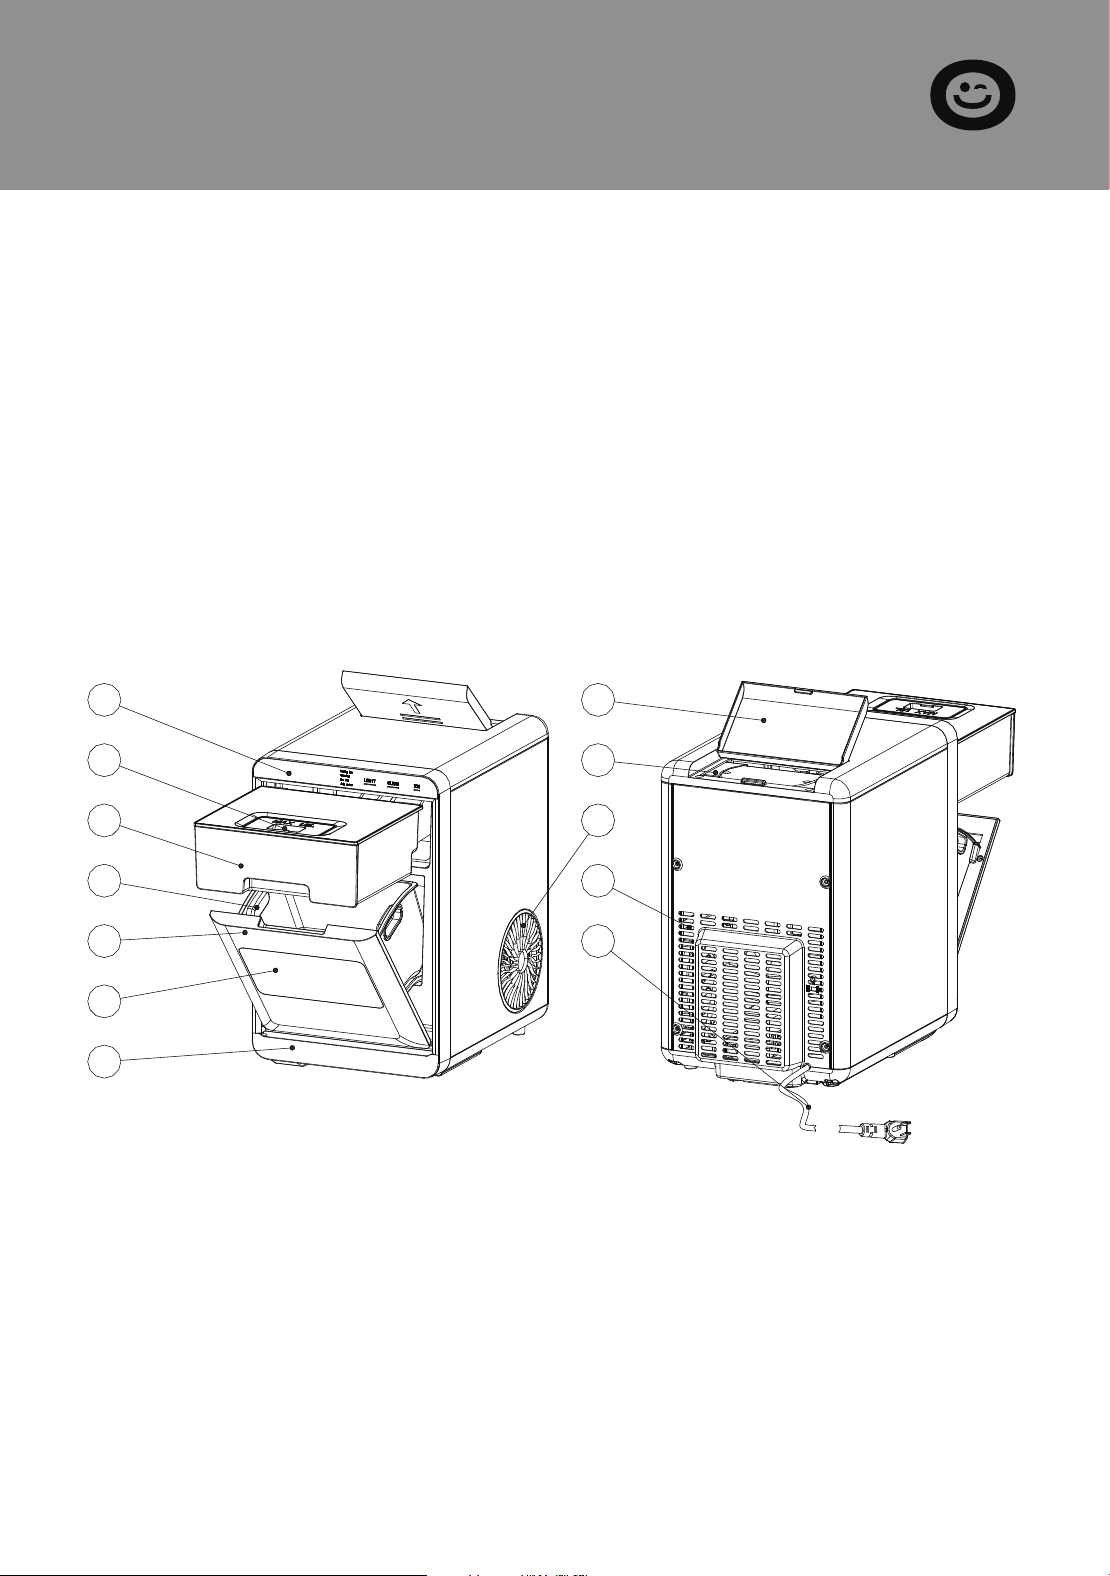
Control Panel.
Cover for water tank.
Water tank.
Ice basket.
Flip door.
Window.
Drip tray.
Cover for secondary water tank.
Secondary water tank.
Hot Air outlet.
Rear Panel.
Power cord.
SECTION C
Getting To Know Your Unit
1.
2.
3.
4.
5.
6.
Remove the exterior and interior packaging, and then check
that all the accessories are included. If any parts are missing,
please contact our customer service.
Remove all the tapes on the unit; take out the accessory parts
inside.
Clean the interior with lukewarm water and a soft cloth.
Locating your ice maker on a level counter table far from
direct sunlight and other sources of heat (i.e., stove, furnace,
and radiator). Make sure that there is at least 6 inches between
the back and sides of your ice maker and the wall.
Allow one hour for the refrigerant fluid to settle down before
plugging your ice maker in.
The power plug must be accessible directly.
1.
2.
3.
This unit should be properly grounded for your safety. The
power cord of this appliance is equipped with a grounding
plug that mates with standard grounding wall outlets to mini-
mize the possibility of electric shock.
Plug your appliance into an exclusive, properly installed,
grounding wall outlet. Do not under any circumstances,
damage the grounding means of the plug. Any questions con-
cerning power and/or grounding should be directed toward a
certified electrician.
This appliance requires a standard 110-120Volt, 60Hz electrical
outlet with good grounding means.
SECTION D
Operating Procedures &
Maintenance
DANGER
1
7
8
9
10
11
12
2
3
4
5
6
4 5
WARNING: fill with potable water only. Only use drinking water.
*lmproper use of the grounded plug can result in the risk of elec-
trical shock. If the power cord is damaged, please call our cus-
tomer service.
1.
2.
3.
4.
5.
6.
7.
8.
9.
10.
11.
12.
Control Panel.
Cover for water tank.
Water tank.
Ice basket.
Flip door.
Window.
Drip tray.
Cover for secondary water tank.
Secondary water tank.
Hot Air outlet.
Rear Panel.
Power cord.
SECTION C
Getting To Know Your Unit
1.
2.
3.
4.
5.
6.
Remove the exterior and interior packaging, and then check
that all the accessories are included. If any parts are missing,
please contact our customer service.
Remove all the tapes on the unit; take out the accessory parts
inside.
Clean the interior with lukewarm water and a soft cloth.
Locating your ice maker on a level counter table far from
direct sunlight and other sources of heat (i.e., stove, furnace,
and radiator). Make sure that there is at least 6 inches between
the back and sides of your ice maker and the wall.
Allow one hour for the refrigerant fluid to settle down before
plugging your ice maker in.
The power plug must be accessible directly.
1.
2.
3.
This unit should be properly grounded for your safety. The
power cord of this appliance is equipped with a grounding
plug that mates with standard grounding wall outlets to mini-
mize the possibility of electric shock.
Plug your appliance into an exclusive, properly installed,
grounding wall outlet. Do not under any circumstances,
damage the grounding means of the plug. Any questions con-
cerning power and/or grounding should be directed toward a
certified electrician.
This appliance requires a standard 110-120Volt, 60Hz electrical
outlet with good grounding means.
SECTION D
Operating Procedures &
Maintenance
DANGER
1
7
8
9
10
11
12
2
3
4
5
6
6 7
Before using your ice maker, it is strongly recommended to clean
it thoroughly.
Unplug the unit before cleaning or making any maintenance.
1.
2.
3.
4.
5.
6.
Take out the ice basket.
Clean the interior with diluted detergent, warm water and a
soft cloth.
Then use the water to rinse the inside parts, and drain out the
water by unplugging the drain cap on the front bottom side.
The outside of the ice maker should be cleaned regularly with
a mild detergent solution and warm water.
Dry the interior and exterior with a clean soft cloth.
When the machine is not to be used for a long time, drain
water completely & dry the interior.
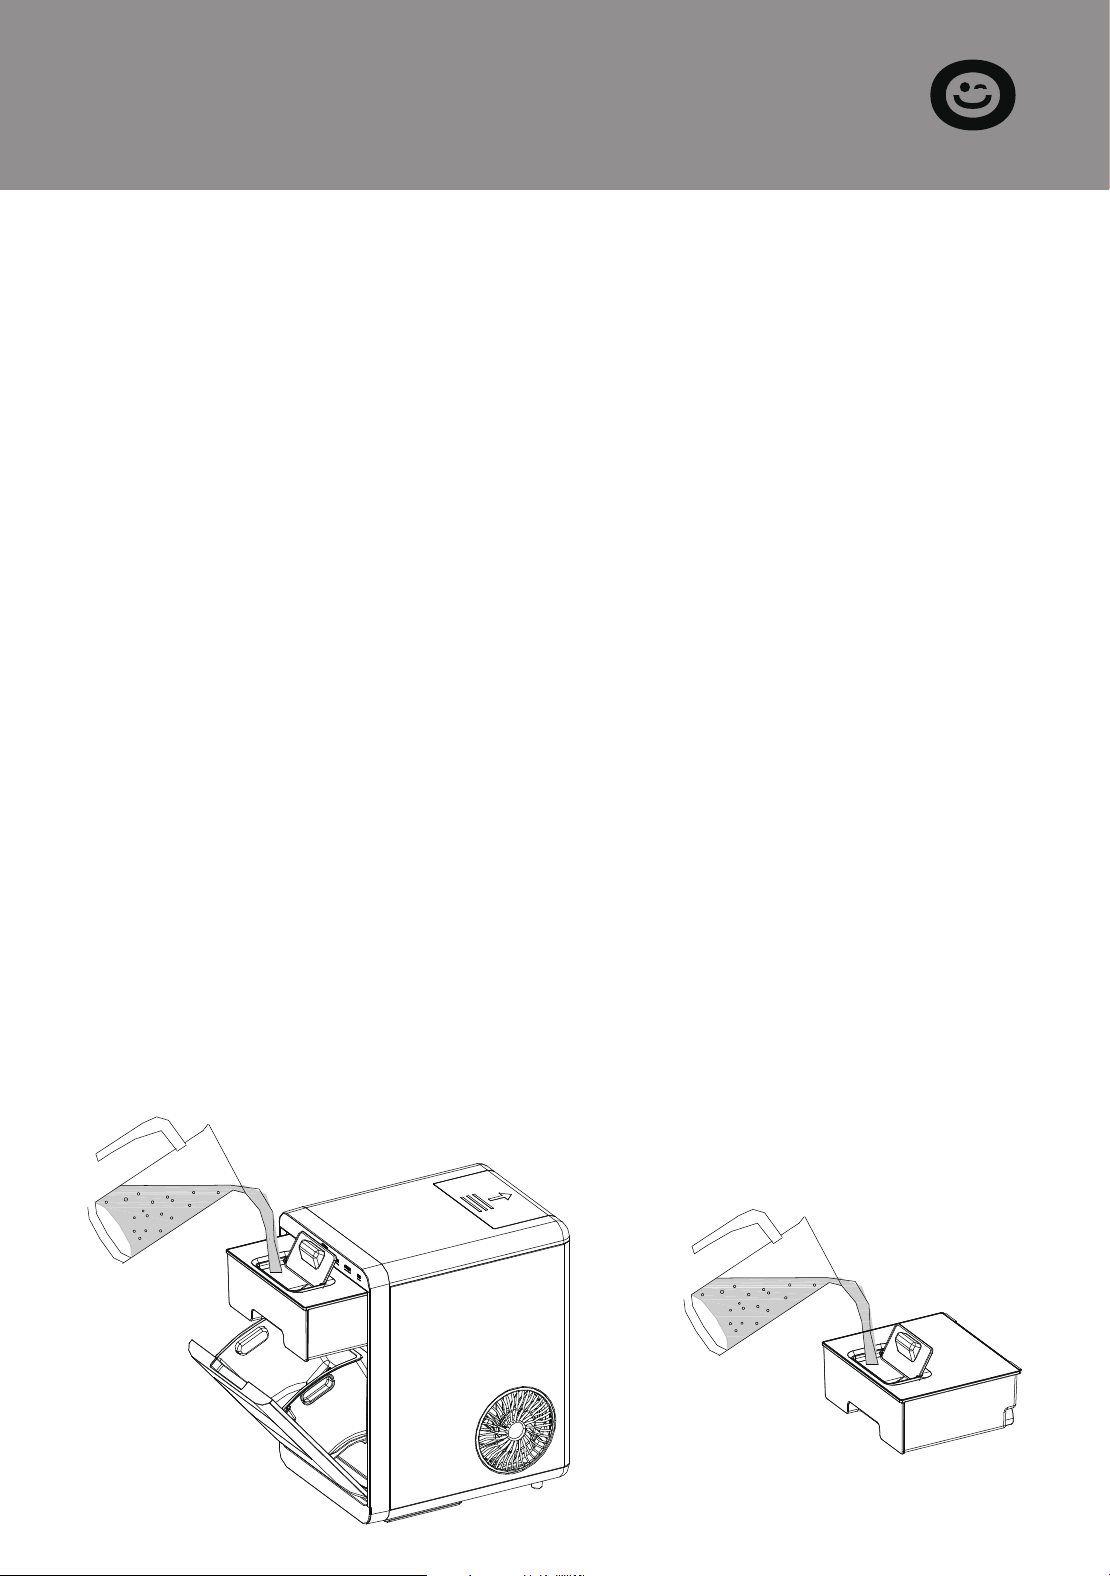
1.
2.
3.
Pour potable water into a water reservoir, containing 0.47
gallon (1.8 liters) of water at most at one time.
Open the flip door, pull out half of the water tank, flip open
the lid of the water tank, then inject water, and after the injec-
tion is complete, push the water tank forward until it is in posi-
tion.
Note: Please make sure that the water tank is pushed in place;
otherwise, it may show a water shortage!
Plug in the power cord.
SECTION E
Using Your Ice Maker
How to start the unit
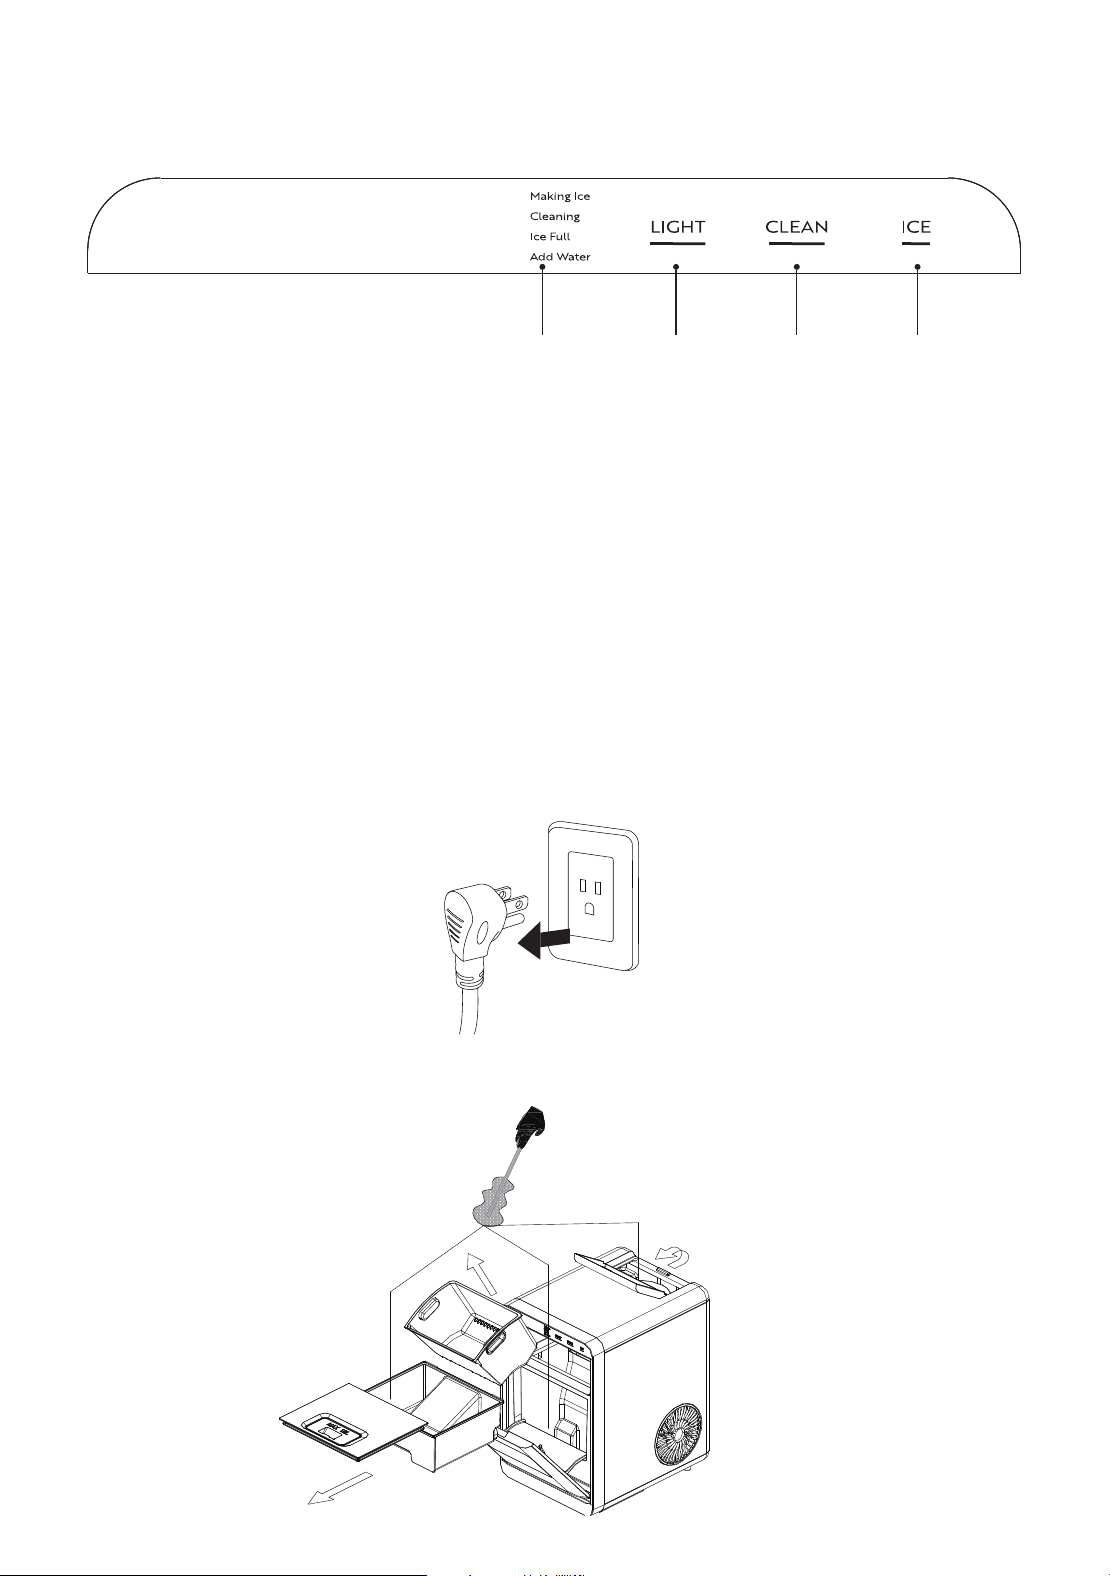
A: Status indicator B: LIGHT button
C: CLEAN button D: ICE button
Plug in the power cord, the screen is on, and you can operate this
appliance by touching the button on the panel as shown above.
The main functions include ice, cleaning, and light.
Operation and Display Areas
A B C D
1. Unplug the nugget ice maker.
2. Clean the water reservoir and internal water tanks with a soft
brush.
System Cleaning/Sanitizing Procedure
6 7
Before using your ice maker, it is strongly recommended to clean
it thoroughly.
Unplug the unit before cleaning or making any maintenance.
1.
2.
3.
4.
5.
6.
Take out the ice basket.
Clean the interior with diluted detergent, warm water and a
soft cloth.
Then use the water to rinse the inside parts, and drain out the
water by unplugging the drain cap on the front bottom side.
The outside of the ice maker should be cleaned regularly with
a mild detergent solution and warm water.
Dry the interior and exterior with a clean soft cloth.
When the machine is not to be used for a long time, drain
water completely & dry the interior.
1.
2.
3.
Pour potable water into a water reservoir, containing 0.47
gallon (1.8 liters) of water at most at one time.
Open the flip door, pull out half of the water tank, flip open
the lid of the water tank, then inject water, and after the injec-
tion is complete, push the water tank forward until it is in posi-
tion.
Note: Please make sure that the water tank is pushed in place;
otherwise, it may show a water shortage!
Plug in the power cord.
SECTION E
Using Your Ice Maker
How to start the unit
A: Status indicator B: LIGHT button
C: CLEAN button D: ICE button
Plug in the power cord, the screen is on, and you can operate this
appliance by touching the button on the panel as shown above.
The main functions include ice, cleaning, and light.
Operation and Display Areas
A B C D
1. Unplug the nugget ice maker.
2. Clean the water reservoir and internal water tanks with a soft
brush.
System Cleaning/Sanitizing Procedure
8 9
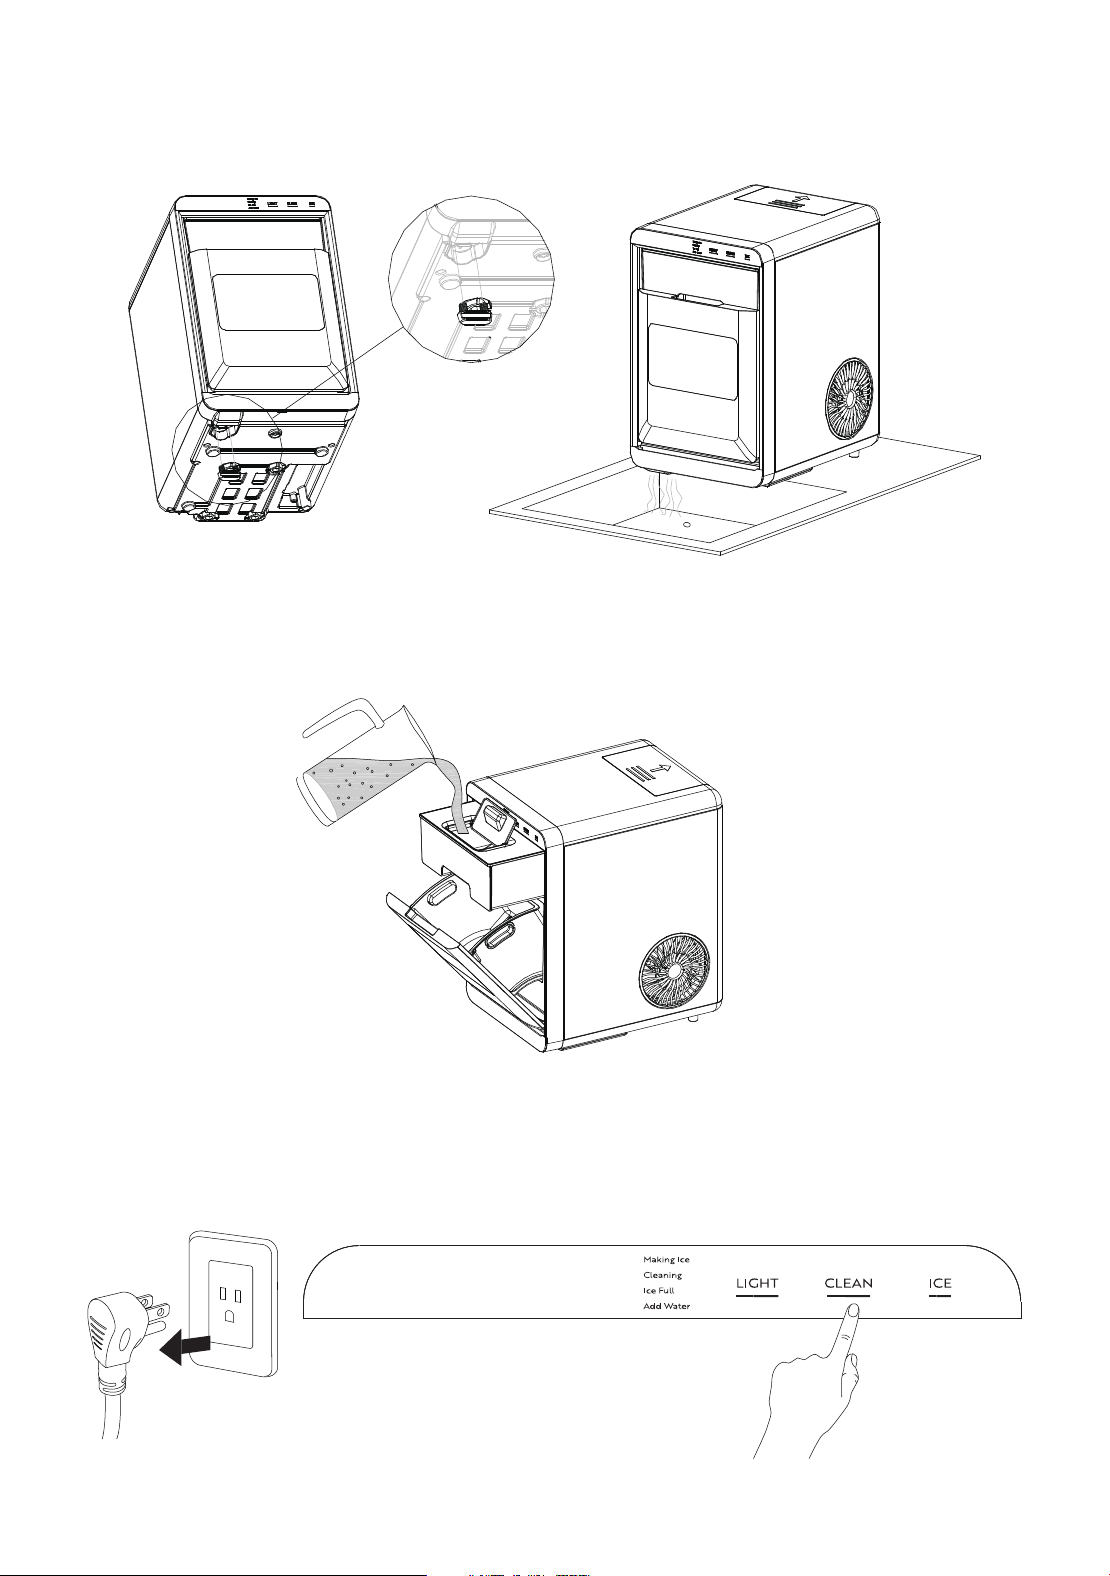
3. Take off the bottom drain cap and drain out the water to a
sink. See the figure below.
Drain Cap
4. Pour the solution into the water reservoir (1.8 L at most). See
the figure below.
5. Plug in the Nugget ice maker, press the "CLEAN" button to
initiate the cleaning process (20 minutes). See the figure below.
6. When the "cleaning" indicator lights off, take off the drain cap
and drain the water to a sink.
Drain Cap
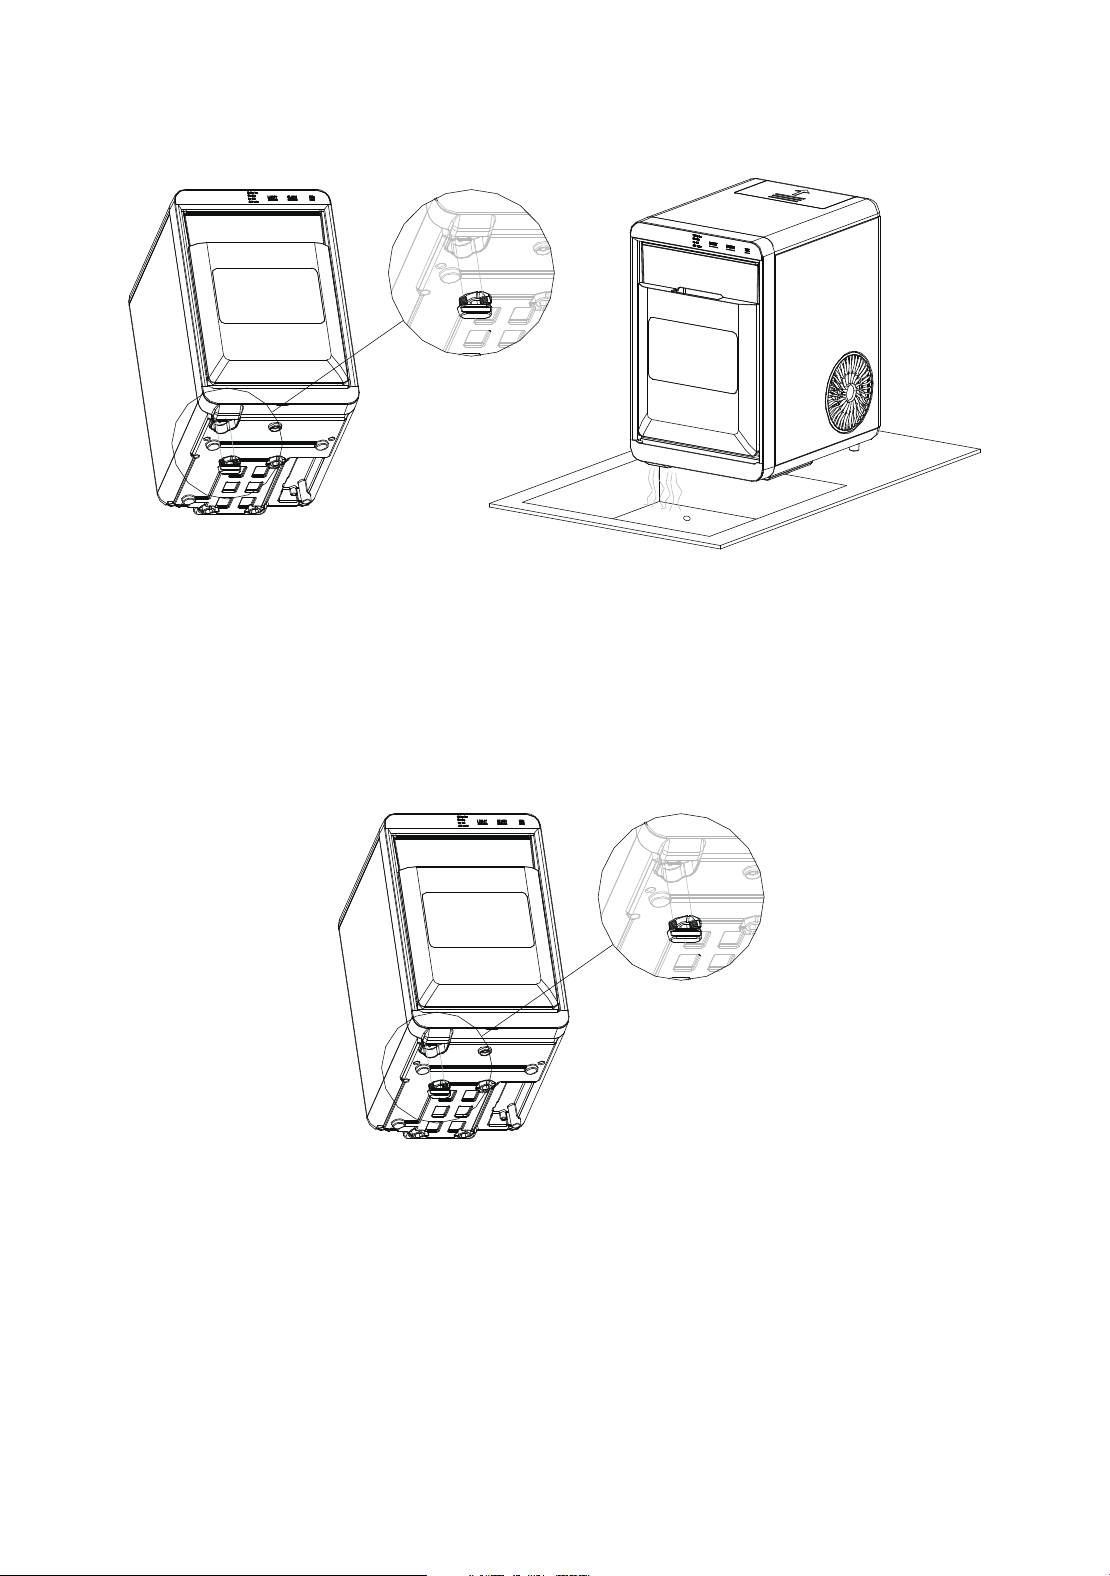
7.
8.
Repeat the step 5 to 7 with fresh water for two more cycles to
rinse the inside.
Replace the drain cap. See the figure below.
Drain Cap
8 9
3. Take off the bottom drain cap and drain out the water to a
sink. See the figure below.
Drain Cap
4. Pour the solution into the water reservoir (1.8 L at most). See
the figure below.
5. Plug in the Nugget ice maker, press the "CLEAN" button to
initiate the cleaning process (20 minutes). See the figure below.
6. When the "cleaning" indicator lights off, take off the drain cap
and drain the water to a sink.
Drain Cap
7.
8.
Repeat the step 5 to 7 with fresh water for two more cycles to
rinse the inside.
Replace the drain cap. See the figure below.
Drain Cap
10 11
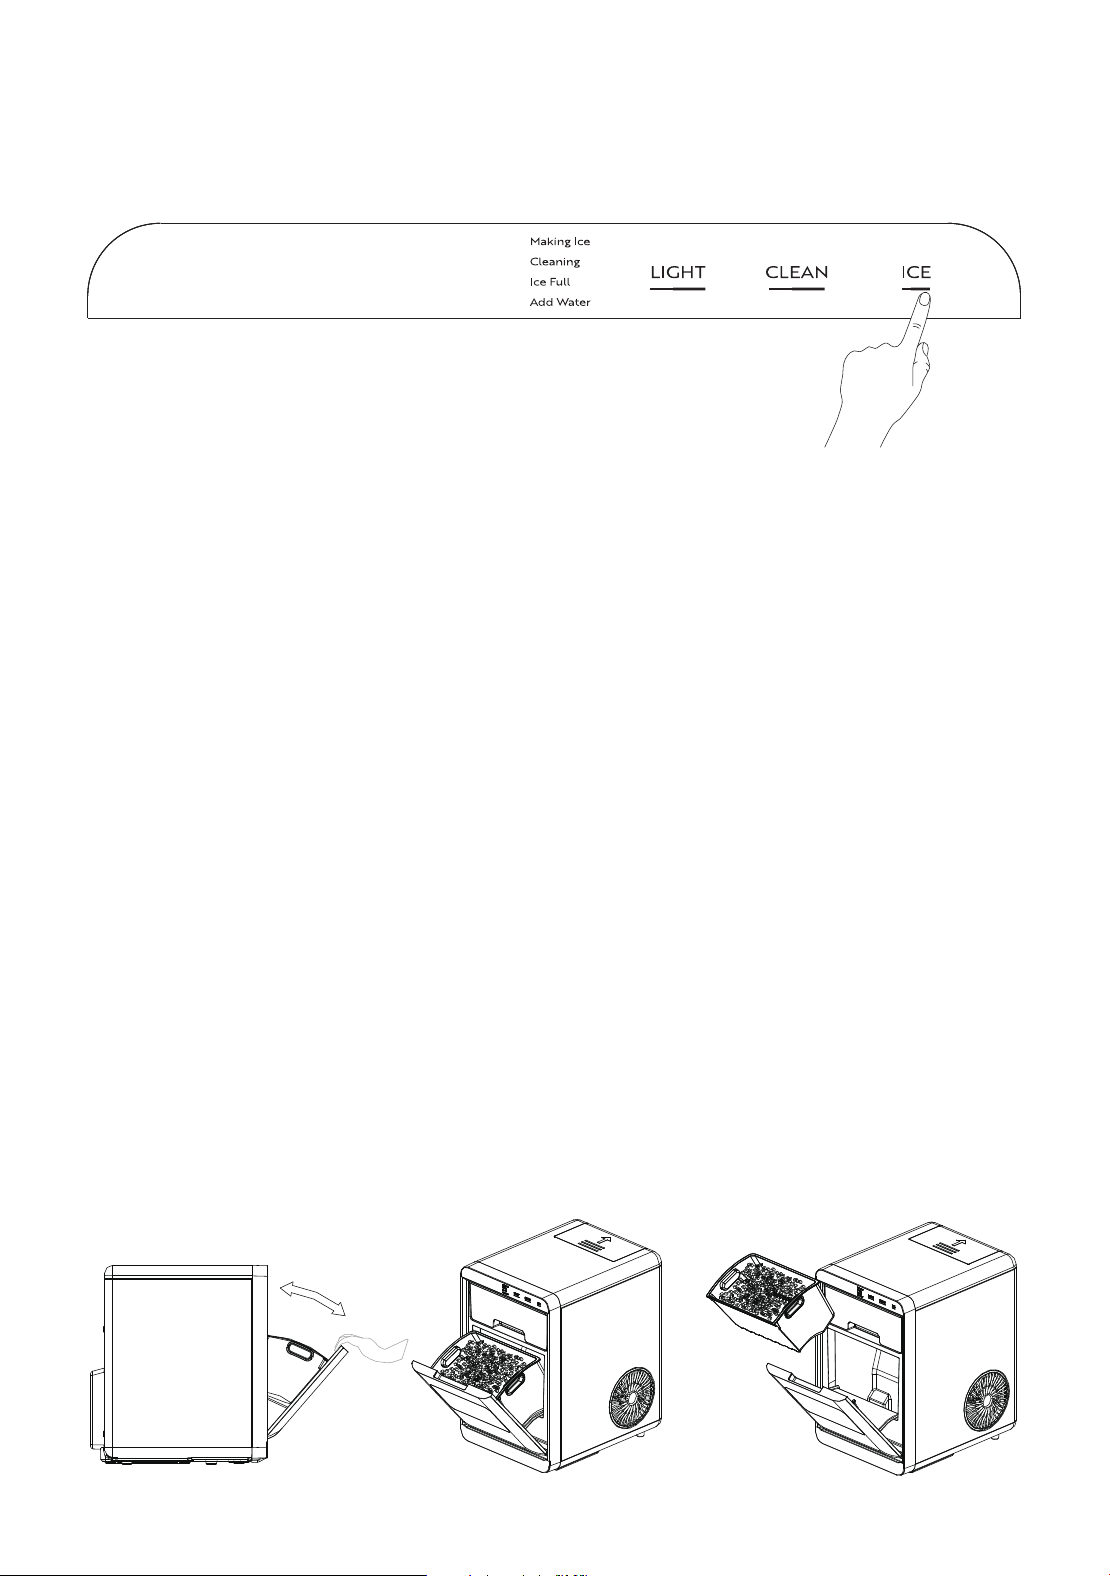
9. When completed, fill the unit with fresh water and press the
"ICE" button to start ice making process. See the figure below.
Change water in the water reservoir every 24 hours to ensure a
reasonable hygiene level. If the unit isn’t to be used, drain all
water & dry the water reservoir.
1.
2.
3.
4.
Before we start making ice, please make sure the water drain
cap has been inserted into the appliance; otherwise, it will not
work properly.
Press the “ICE” button; the “Making Ice” indicator will be on; it
will begin to work; press this button again; it will stop making
ice.
TIPS: For the first time, or if the appliance has not been used
for a long time, it is recommended to clean this appliance
before you start to make ice.
While the ice-maker is on, verify water level periodically. If
water pump can’t pump out water, the ice maker will stop
automatically, and the “Add Water” indicator will on. Need to
pour water into the water reservoir.
You can enjoy your ice cubs when the control panel show “Ice
full”.
How to obtain the ice-cube
1.
2.
3.
4.
5.
6.
7.
When there is water in the water tank and the Add water indi-
cator is on, please push the top water tank into the unit in
place.
When the ice maker is not in use for a period of time, please
drain the water inside the unit, because bacteria can easily
breed in humid environments.
After using the ice maker continuously for more than one
month, please thoroughly clean the entire unit before use. The
cleaning steps refer to the System Cleaning/Sanitizing Proce-
dure of this manual.
Please gently open the flip door, especially when the ice cubs
in the basket is full.
When ice cubs fall into the gap between the flip door and the
front panel accidentally, causing the door to fail to close,
please remove the ice cubes first.
When putting the basket back into the unit, please ensure that
it is accurately placed in the limit slot.
If the basket falls into the internal water tank of the unit due to
not being placed in the limit slot, please first remove the water
tank at the top of the basket, then you can take out the basket
with your bare hands.
Tips

10 11
9. When completed, fill the unit with fresh water and press the
"ICE" button to start ice making process. See the figure below.
Change water in the water reservoir every 24 hours to ensure a
reasonable hygiene level. If the unit isn’t to be used, drain all
water & dry the water reservoir.
1.
2.
3.
4.
Before we start making ice, please make sure the water drain
cap has been inserted into the appliance; otherwise, it will not
work properly.
Press the “ICE” button; the “Making Ice” indicator will be on; it
will begin to work; press this button again; it will stop making
ice.
TIPS: For the first time, or if the appliance has not been used
for a long time, it is recommended to clean this appliance
before you start to make ice.
While the ice-maker is on, verify water level periodically. If
water pump can’t pump out water, the ice maker will stop
automatically, and the “Add Water” indicator will on. Need to
pour water into the water reservoir.
You can enjoy your ice cubs when the control panel show “Ice
full”.
How to obtain the ice-cube
1.
2.
3.
4.
5.
6.
7.
When there is water in the water tank and the Add water indi-
cator is on, please push the top water tank into the unit in
place.
When the ice maker is not in use for a period of time, please
drain the water inside the unit, because bacteria can easily
breed in humid environments.
After using the ice maker continuously for more than one
month, please thoroughly clean the entire unit before use. The
cleaning steps refer to the System Cleaning/Sanitizing Proce-
dure of this manual.
Please gently open the flip door, especially when the ice cubs
in the basket is full.
When ice cubs fall into the gap between the flip door and the
front panel accidentally, causing the door to fail to close,
please remove the ice cubes first.
When putting the basket back into the unit, please ensure that
it is accurately placed in the limit slot.
If the basket falls into the internal water tank of the unit due to
not being placed in the limit slot, please first remove the water
tank at the top of the basket, then you can take out the basket
with your bare hands.
Tips
12 13
SECTION F
Troubleshooting
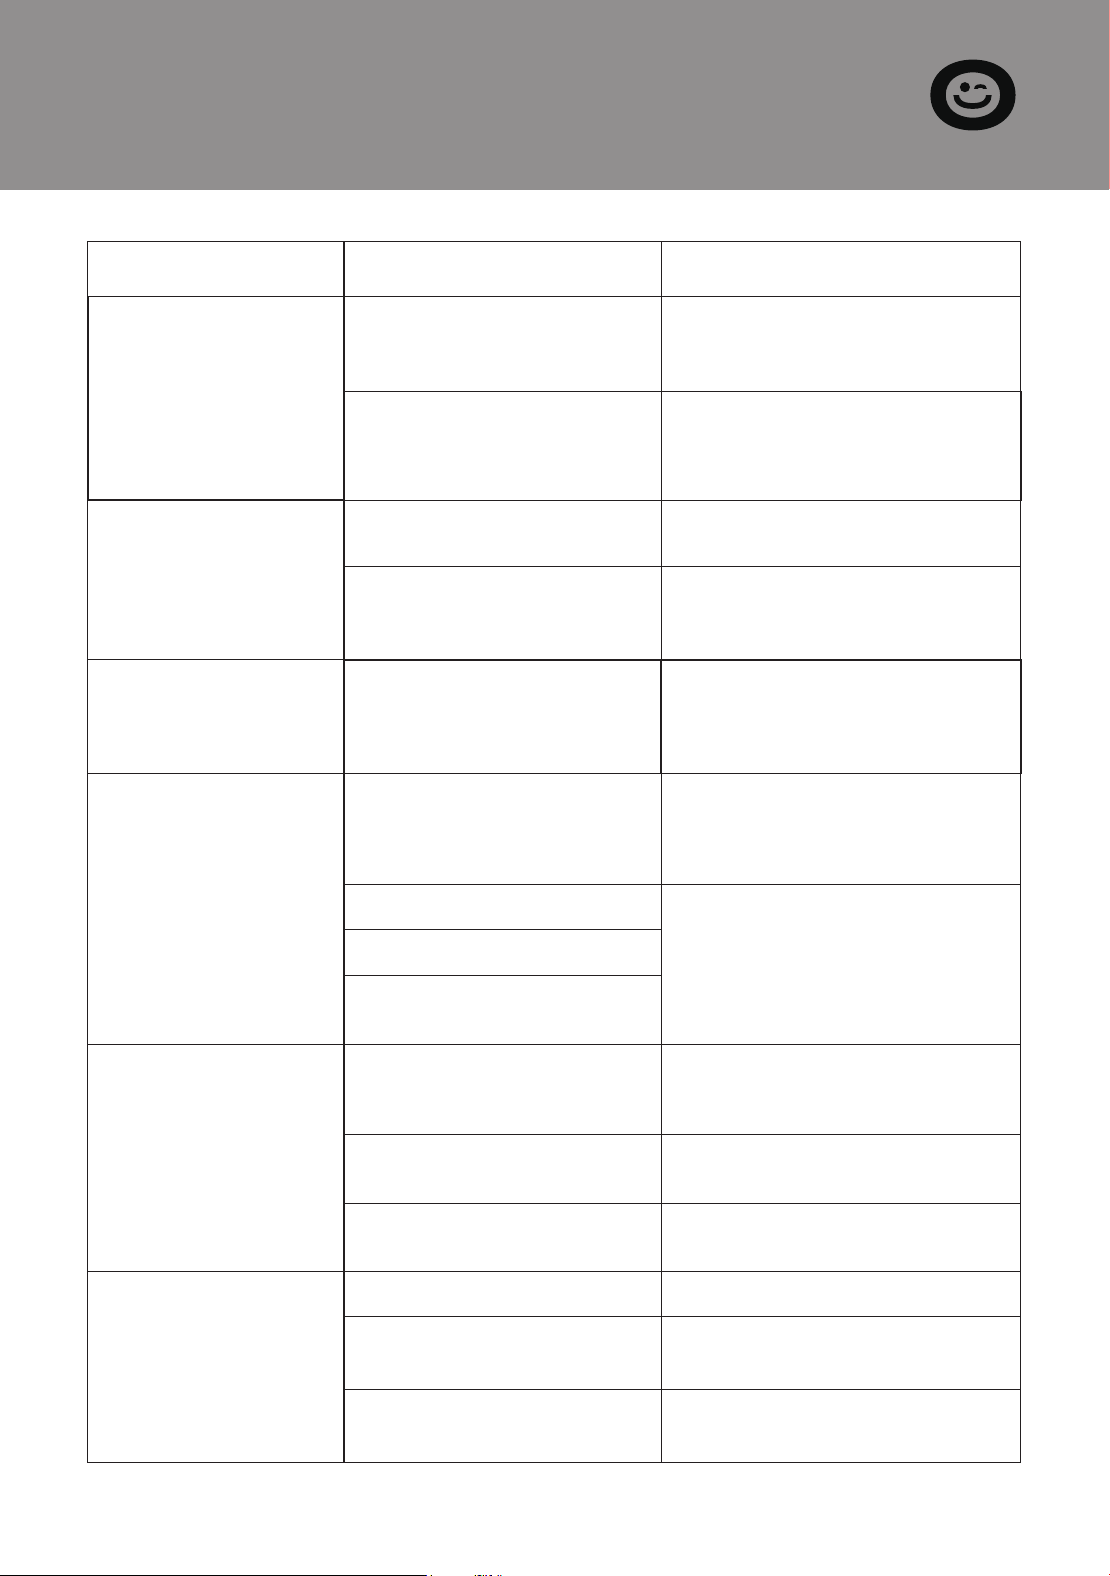
Problem Possible Cause Solution
"Add Water"
indicator lights up
There is no water in the
water tank.(Lack of Water)
Stop the ice maker, fill water,
and press "ICE" button again
to restart the unit.
Water tank is not in place. Push the water tank forward
till it in position, and press
"ICE" button again to restart
the unit.
"ICE FULL"
indicator lights up
or flash
There is too much ice. Suggest you to obtain the
ice-cube.
"Ice" indicator
lights and "Making
Ice" indicator flash
Ambient temperature
or water temperature in
inner tank is too high.
Please run the ice maker
below 90 Fahrenheit degree
ambient and pour colder
water into tank.
Making lce too
slowly
Hot Air outlet has been
blocked by something.
Water temperature in
inner tank is too high.
Refrigeration system
malfunctions.
Hot Air outlet must be guar-
anteed to have more than
15cm of ventilation distance.
Water leakage Drain plug not in place Put the drain plug in place.
Pipe Joint in the appli-
ance may Loose
Verify by a qualified techni-
cian.
The seal has reached
service life
Verify by a qualified techni-
cian.
Water temperature require-
ment between 7°C-32°C.
Verify by a qualified techni-
cian.
Refrigerant liquid leakage.
Cover motor is broken
Pipe in the cooling
system is blocked.
Press the ICE button twice,
restart ice making program, if
this problem show up again,
verify by a qualified techni-
cian.
"Making Ice"
indicator lights flash
The system is under
repair
It will automatically resume
work. When this problem
occurs frequently, please
clean the machine carefully.
No ice cube inside. Remove the probable obsta-
cle inside or clean the inside
wall of the ice storage
SECTION G
Technical Parameters
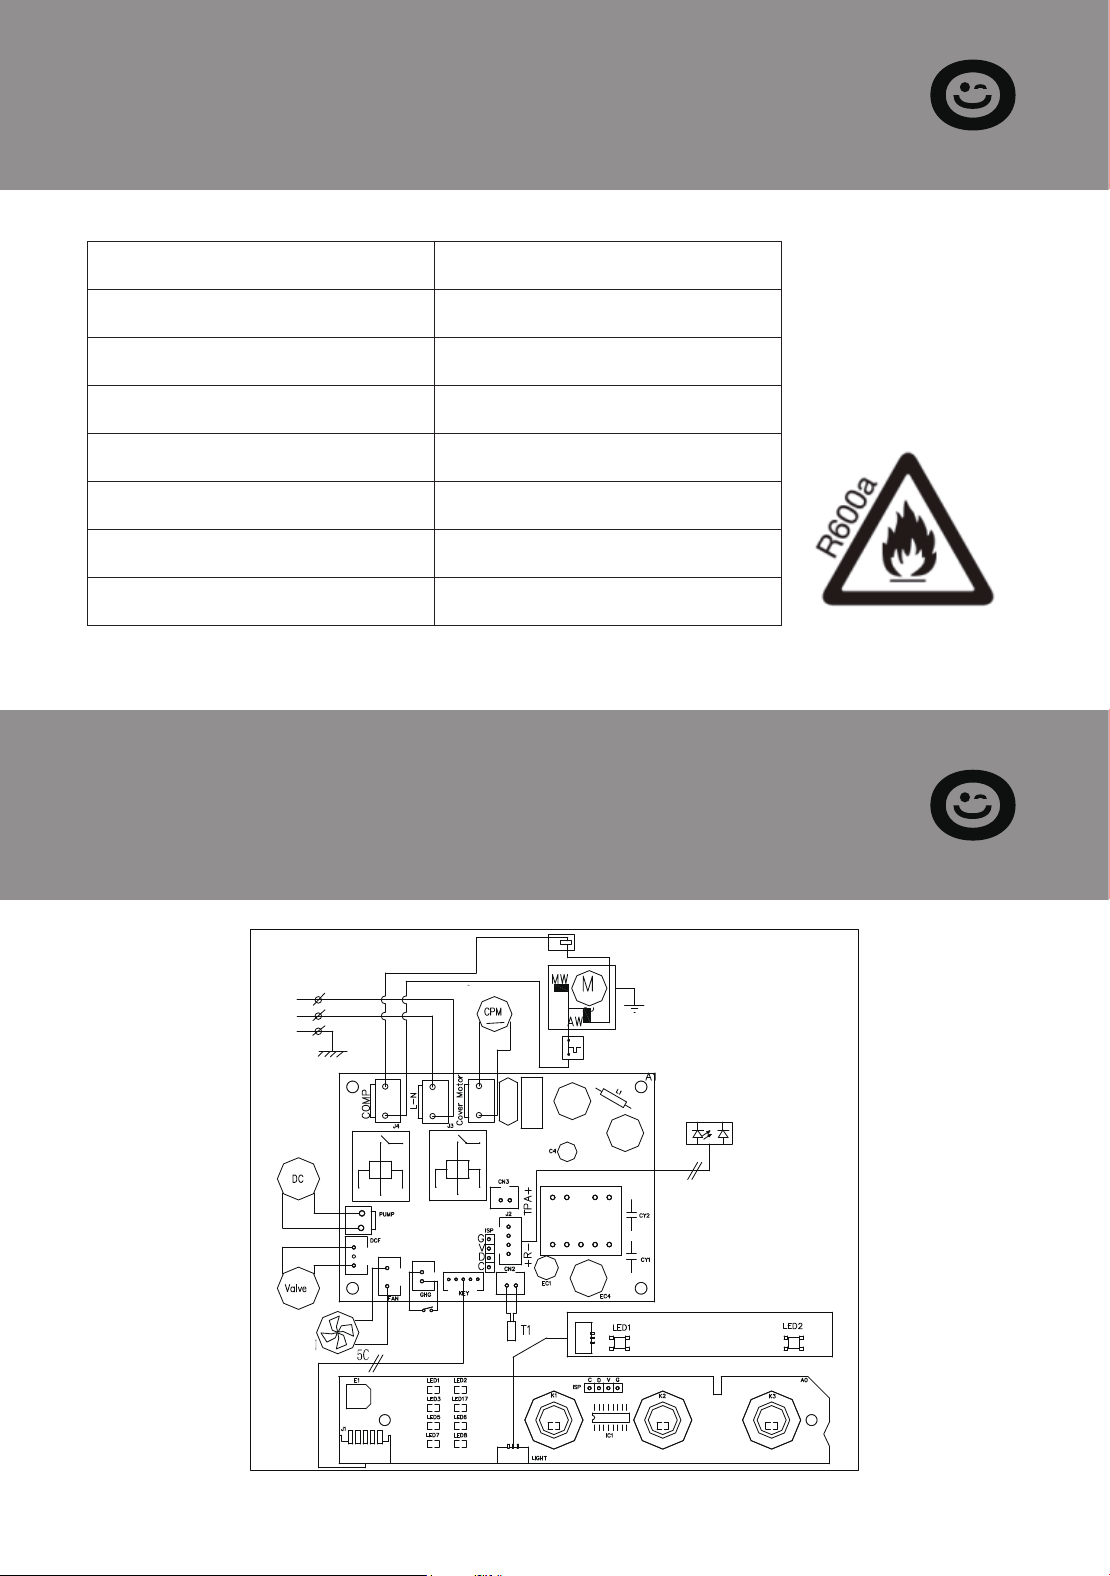
SECTION H
Circuit Diagram
Model VH1575
Protection Type I
Power 115V/60Hz
Ice Making Current 2.7A
Refrigerant R600a , 0.74Oz // 21g
Vesicant C
5
H
10
Net Weight 11Kg
Dimension 240x345x376mm
ELECTRICAL DIAGRAM
Overload Protector
POWER
SUPPLY
DC
WATER
PUMP
VALVE
DC FAN
MOTOR
5C
4C
INFRARED
SENSOR
DETECTOR
PTC STARTER
COMP
COVER MOTOR
WATER LEVEL
DETECTING 1
N
L
G
12 13
SECTION F
Troubleshooting
Problem Possible Cause Solution
"Add Water"
indicator lights up
There is no water in the
water tank.(Lack of Water)
Stop the ice maker, fill water,
and press "ICE" button again
to restart the unit.
Water tank is not in place. Push the water tank forward
till it in position, and press
"ICE" button again to restart
the unit.
"ICE FULL"
indicator lights up
or flash
There is too much ice. Suggest you to obtain the
ice-cube.
"Ice" indicator
lights and "Making
Ice" indicator flash
Ambient temperature
or water temperature in
inner tank is too high.
Please run the ice maker
below 90 Fahrenheit degree
ambient and pour colder
water into tank.
Making lce too
slowly
Hot Air outlet has been
blocked by something.
Water temperature in
inner tank is too high.
Refrigeration system
malfunctions.
Hot Air outlet must be guar-
anteed to have more than
15cm of ventilation distance.
Water leakage Drain plug not in place Put the drain plug in place.
Pipe Joint in the appli-
ance may Loose
Verify by a qualified techni-
cian.
The seal has reached
service life
Verify by a qualified techni-
cian.
Water temperature require-
ment between 7°C-32°C.
Verify by a qualified techni-
cian.
Refrigerant liquid leakage.
Cover motor is broken
Pipe in the cooling
system is blocked.
Press the ICE button twice,
restart ice making program, if
this problem show up again,
verify by a qualified techni-
cian.
"Making Ice"
indicator lights flash
The system is under
repair
It will automatically resume
work. When this problem
occurs frequently, please
clean the machine carefully.
No ice cube inside. Remove the probable obsta-
cle inside or clean the inside
wall of the ice storage
SECTION G
Technical Parameters
SECTION H
Circuit Diagram
Model VH1575
Protection Type I
Power 115V/60Hz
Ice Making Current 2.7A
Refrigerant R600a , 0.74Oz // 21g
Vesicant C
5
H
10
Net Weight 11Kg
Dimension 240x345x376mm
ELECTRICAL DIAGRAM
Overload Protector
POWER
SUPPLY
DC
WATER
PUMP
VALVE
DC FAN
MOTOR
5C
4C
INFRARED
SENSOR
DETECTOR
PTC STARTER
COMP
COVER MOTOR
WATER LEVEL
DETECTING 1
N
L
G

14
SECTION I
Warranty
The VIVOHOME warranty program is our commitment to you.
We are committed to providing you with a high-quality product
that meets your needs and expectations. To demonstrate our
confidence in the durability and performance of our products,
we offer the following warranty.
This warranty program applies to any orders, purchases, receipts,
or use of any products sold by VIVOHOME and is valid for a
period of 1 year from the date of purchase. However, please note
that this warranty period is only valid for the original order. If
you receive a replacement order during the warranty period, it
will not include a separate warranty period.
WARRANTY COVERAGE
This warranty does not cover damage resulting from misuse,
accident, unauthorized modification, or any other circumstances
not directly related to the manufacturing and design of the
product, including but not limited to:
Parts lost during use.
Normal wear and tear of products or parts.
Incorrect installation (such as using the wrong voltage) or
assembly.
Exceeding the bearing capacity of the product.
Use under extremely harsh conditions.
WARRANTY EXCLUSIONS
●
●
●
●
●
SECTION I
Warranty
VIVOHOME will provide technical support, replacement, refund,
or other solutions based on the nature of the issue. If you wish
to return the original package for any reason, please contact us
for confirmation before proceeding. You can expect to receive a
response within 48 hours.
Thank you for choosing VIVOHOME. We are committed to en-
suring the quality and satisfaction of your purchase. If you have
any questions or need assistance, please do not hesitate to con-
tact our customer service team.
15
If you find any defects that affect the use of the product or if the
product stops working and cannot be repaired during the war-
ranty period, please contact our customer service team at our
email or via Amazon & app’ s direct messaging service as soon as
possible. Provide the following information to expedite the
process:
HOW TO MAKE A WARRANTY CLAIM
Order number
Images and/or videos illustrating the issue
A detailed description of the problem
●
●
●
Improper cleaning or maintenance.
Damage caused by any reason other than the intended use
of the product.
Indirect loss or damage caused by the product.
●
●
●

USER MANUAL
THANK
YOU!
Thank You for Purchasing from
Made in China
NOTE:
To continuously improve its products, reserves the right to
modify this information without prior notification.
For any questions regarding assembly, please watch the video on the
product page or contact our customer service. Our customer service will
Thank you for using products in your home!
Countertop Nugget Ice Maker