Form No. WIB-900 Manual - R00-0626
For California Customers
WARNING: Cancer and Reproductive
Harm - www.P65Warnings.ca.gov
OPERATION MANUAL
BEFORE OPERATING ANY EQUIPMENT, READ AND FAMILIARIZE YOURSELF WITH THESE USE AND SAFETY INSTRUCTIONS
Congratulations on the purchase of your WINCO® equipment. WINCO takes pride in the quality of its products. When used as
intended, and with proper care and maintenance, you will experience years of reliable operation from this equipment. To ensure
best results, it is impoant that you read and follow the instructions in this manual carefully. It’s impoant to save these
instructions for future reference.
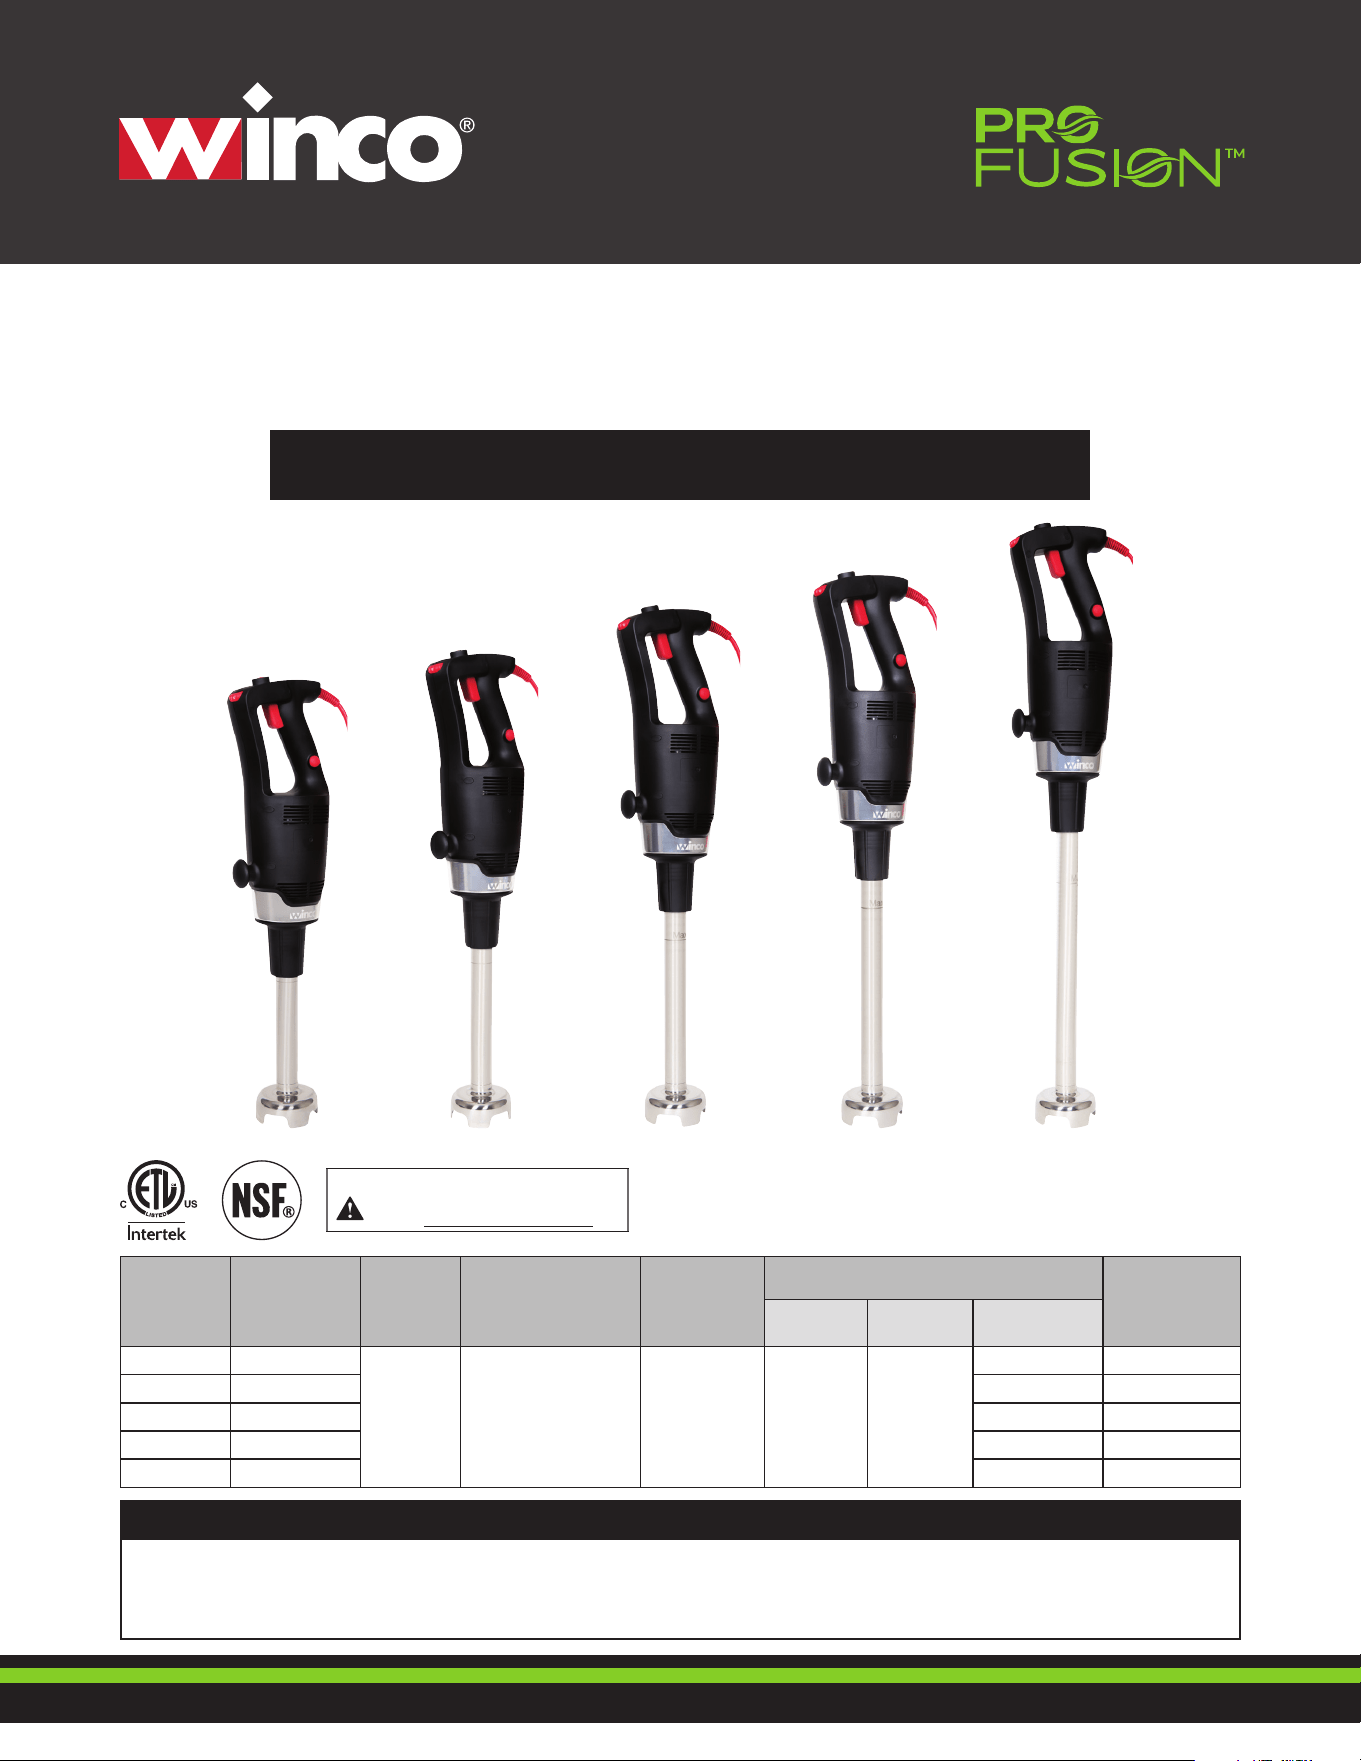
Model Description Power Electrical Specs Plug Type
Overall Dimensions
Product
Weight
Length Depth Height
WIB-90012
12” Sha
900W 120V/60Hz/7.5A
NEMA
5-15P
6.1"
(154 mm)
5.2"
(131 mm)
26.8" (681 mm) 9.7 lbs (4.4 kg)
WIB-90014
14” Sha 28.8" (732 mm) 10 lbs (4.5 kg)
WIB-90016
16” Sha 30.8" (782 mm) 10.2 lbs (4.6 kg)
WIB-90018
18” Sha 32.8" (833 mm) 10.4 lbs (4.7 kg)
WIB-90021
21” Sha 35.8" (910 mm) 10.7 lbs (4.8 kg)
IMMERSION BLENDER
VARIABLE SPEED, 900W
2
IMMERSION
BLENDERS
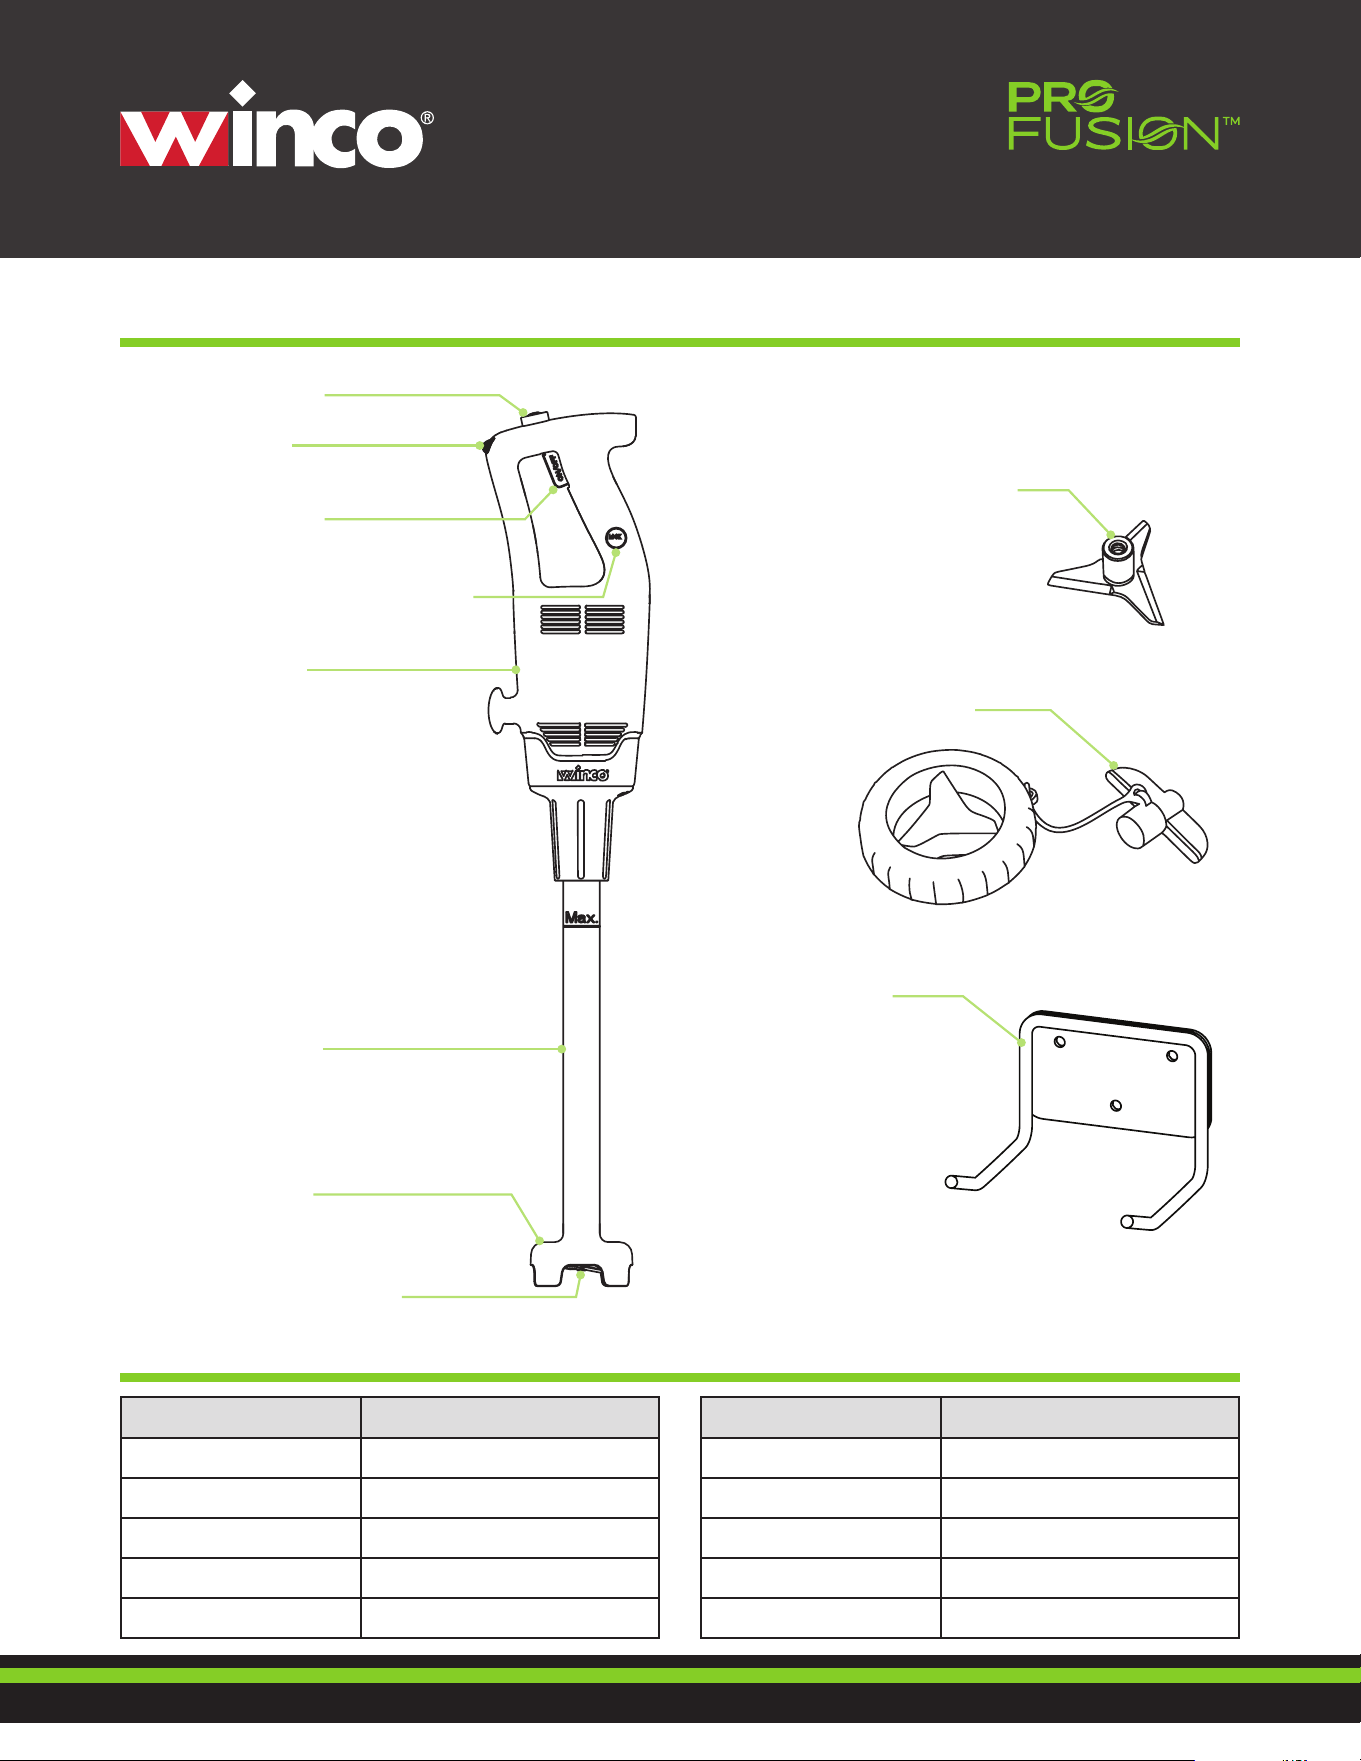
Safety Buon
Power Buon
Continuous ON Lock Buon
Speed Dial
Drive Motor
Blender Sha
Spare High Power Blade
Blade Removal Tool
Protective
Blade Guard
Stainless Steel Blade
Package Contents & Components
Accessories & Replacement Parts
Pa # Description
WIB-SHAFT12 12" Sha
WIB-SHAFT14 14" Sha
WIB-SHAFT16 16" Sha
WIB-SHAFT18 18" Sha
WIB-SHAFT21 21" Sha
Pa # Description
WIB-BLADETOOL Blade Removal Tool
WIB-WHISKHP High Power Whisk
WIB-WHISKHPSET High Power Whisk Paddles
WIB-BLADEHP High Power Blade
WIB-WALLHANGER Wall Hanger
Wall Hanger

3
IMMERSION
BLENDERS
Important Safety Instructions
When using electrical appliances, basic safety precautions must always be followed, including the following.
Failure to follow these instructions may result in fire, electrical shock, personal injury, or propey damage.
1. Disconnect Power
Always unplug this appliance from the electrical outlet when it is not in use and before cleaning.
2. Electric Shock Hazard
WARNING: To reduce the risk of electric shock, DO NOT immerse the motor housing, power cord, or
plug in water or any other liquid. Only the blade guard and drive sha are designed for immersion. No
other pa of this appliance is intended to be submerged.
3. Intended Users
This appliance is not intended for use by persons (including children) with reduced physical, sensory,
or mental capabilities, or by individuals lacking experience or knowledge, unless they are supervised or
have received adequate instruction regarding safe use from a person responsible for their safety.
4. Moving Pas Hazard
WARNING: Keep hands, hair, clothing, and utensils away from the blade and blending container during
operation to avoid serious injury and/or damage to the appliance. A spatula may be used only when
the appliance is turned off. Avoid contact with moving pas at all times.
5. Damaged Appliance
Do not operate this appliance if the power cord or plug is damaged, if the appliance malfunctions, or
if it has been dropped or damaged in any manner. Return the appliance to an authorized service agent
for examination, repair, or mechanical or electrical adjustment.
6. Aachments
The use of aachments or accessories not recommended or sold by Winco for this specific model may
result in fire, electric shock, or personal injury.
7. Location of Use
This appliance is intended for indoor use only. Do not use outdoors.
8. Cord Safety
Do not allow the power cord to hang over the edge of a table or counteop, or to come into contact
with hot suaces, including stovetops. Do not carry the unit by the power cord. If the supply cord is
damaged, it must be replaced by an authorized service agent or a qualified technician in order to
avoid a hazard.
9. Heat Sources
Do not place this appliance on or near a hot gas or electric burner, or inside a heated oven.
10. Sharp Blade
CAUTION: The blade is sharp. Handle carefully to prevent injury. Always hold the blending sha instead
of the cuing edge when handling and cleaning the blade.
11. Vent Holes
Avoid splashing paicles or liquids into the vent holes of the unit body. These can damage the internal
components of the blender and result in a loss of function.
12. Hot Liquids
WARNING: When blending liquids, especially hot liquids, use a tall container or blend small quantities at
a time to reduce splashing and the risk of burns or other injuries.
4
IMMERSION
BLENDERS
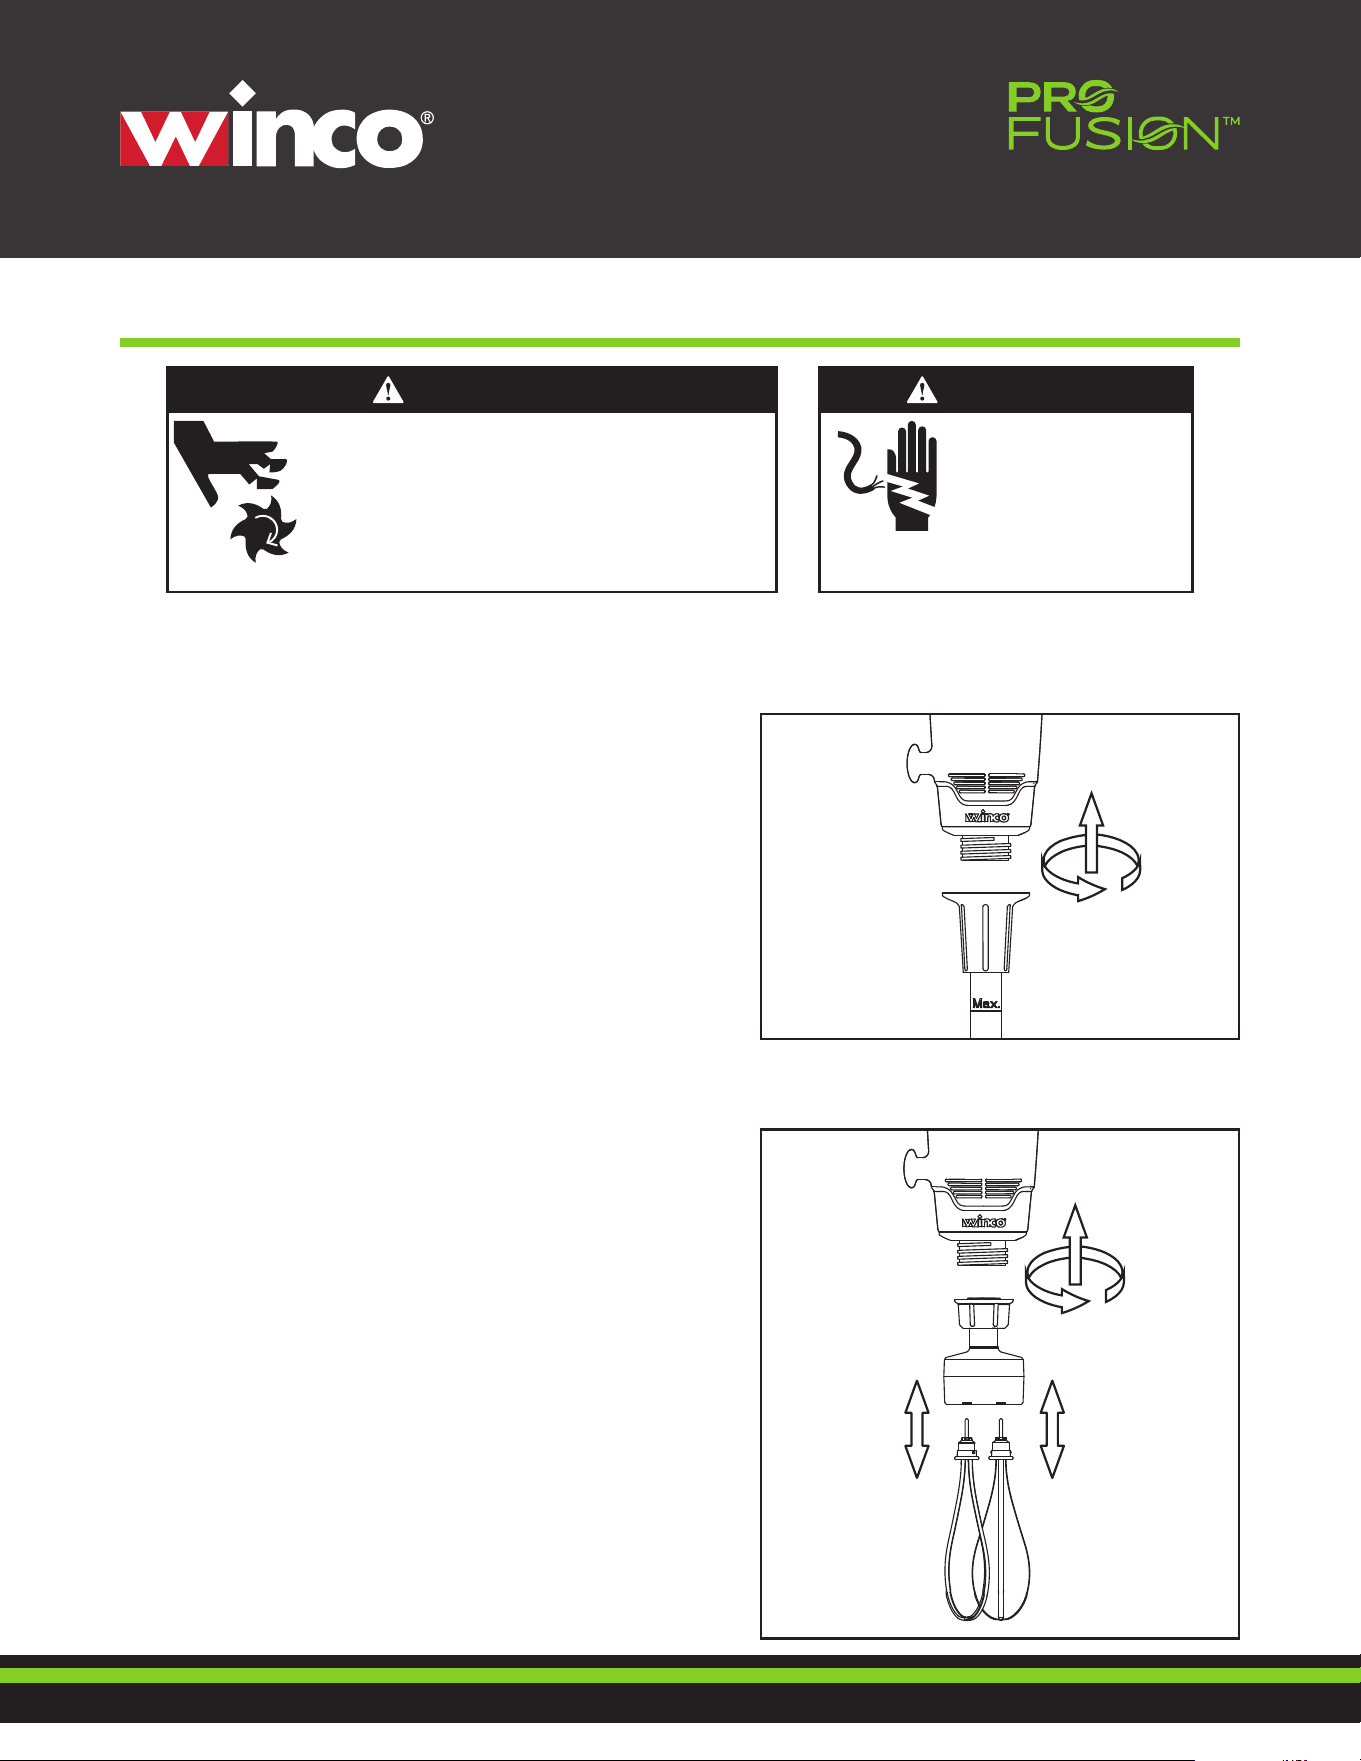
Installing Attachments
WARNING
Electrical Shock Hazard
Do not use an extension cord.
Do not put motor housing,
cord or plug in water or any
other liquid.
Failure to follow these
instructions can result in
death, fire, or electrical shock.
WARNING
Pinch, Cut, and Crush Hazard
Make sure that the immersion blender is off and unplugged
before installing or removing aachments and pas.
Blades are sharp! Use extreme care when handling.
DO NOT reach or inse utensils into the container while the
immersion blender is running.
Failure to follow these instructions can result in broken bones,
cuts, or other serious injury.
How to install:
1. Turn the blending sha clockwise until it is tightened.
How to remove:
1. Turn in the counterclockwise direction.
How to install:
1. Inse the two whisk paddles into the whisk hub.
2. Inse the whisk hub into the threaded inner hole of
the unit body. When inseing, align the slot of the
connector with the ribs of the threaded inner hole to
ensure that the step of connector is inseed in place.
3. Tighten the lock nut to fix the whisk hub firmly onto
the body.
How to remove:
1. Loosen the lock nut.
2. Remove the whisk holder and then remove the whisks.
Blending Sha
Whisk (sold separately)
5
IMMERSION
BLENDERS
Operation Instructions
WARNING
Electrical Shock Hazard
Do not use an extension cord.
Do not put motor housing,
cord or plug in water or any
other liquid.
Failure to follow these
instructions can result in
death, fire, or electrical shock.
WARNING
Pinch, Cut, and Crush Hazard
Make sure that the immersion blender is off and unplugged
before installing or removing aachments and pas.
Blades are sharp! Use extreme care when handling.
DO NOT reach or inse utensils into the container while the
immersion blender is running.
Failure to follow these instructions can result in broken bones,
cuts, or other serious injury.
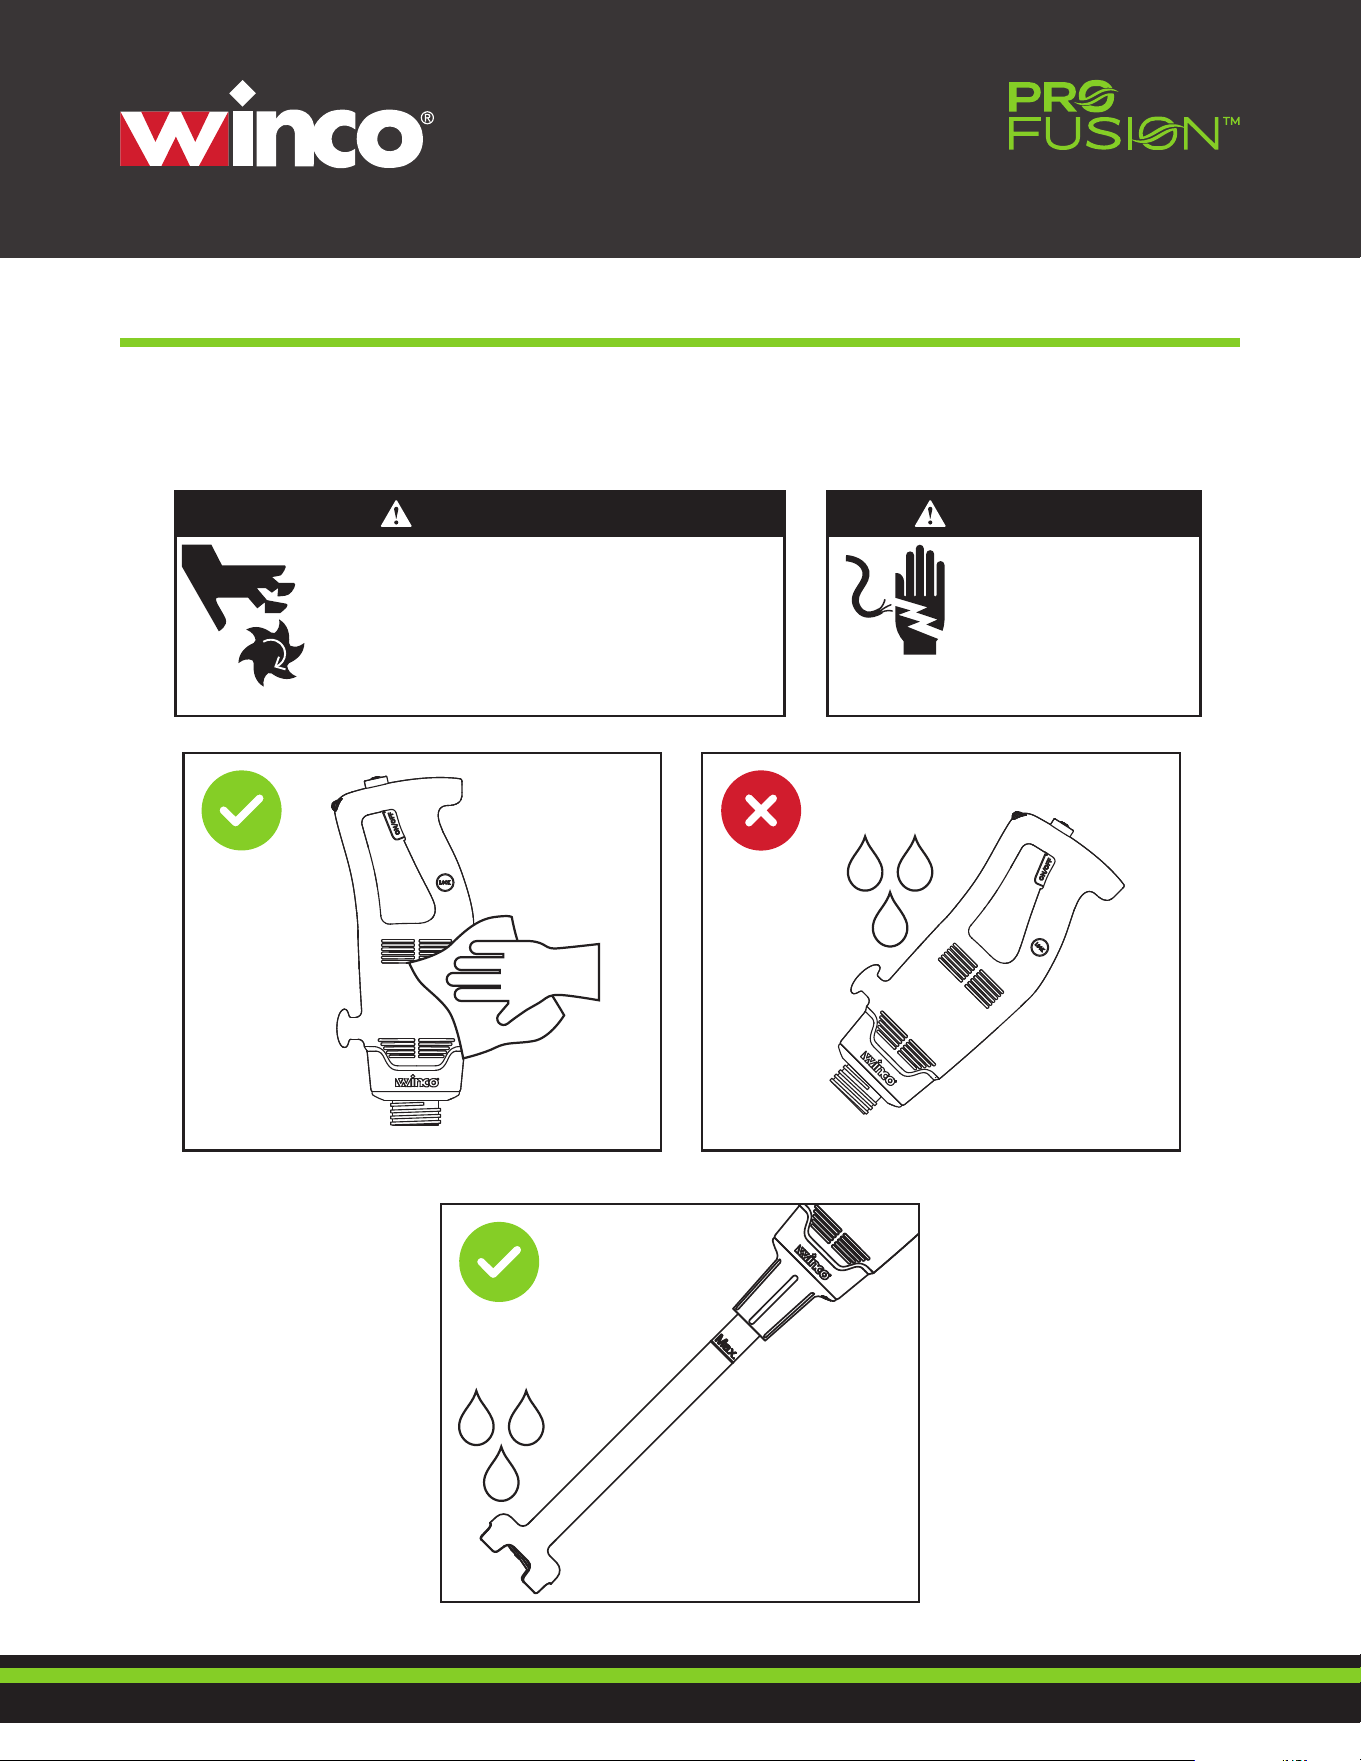
Prior to first use, Winco recommends wiping the appliance with a clean, lightly moistened cloth to remove
any accumulated dust or residue. Rinse the metal blade poion of the immersion blender under running
water. Aer rinsing, dry all components completely using a so, absorbent towel. Be sure to review all
instructions thoroughly to ensure proper operation and safe use.
6
IMMERSION
BLENDERS
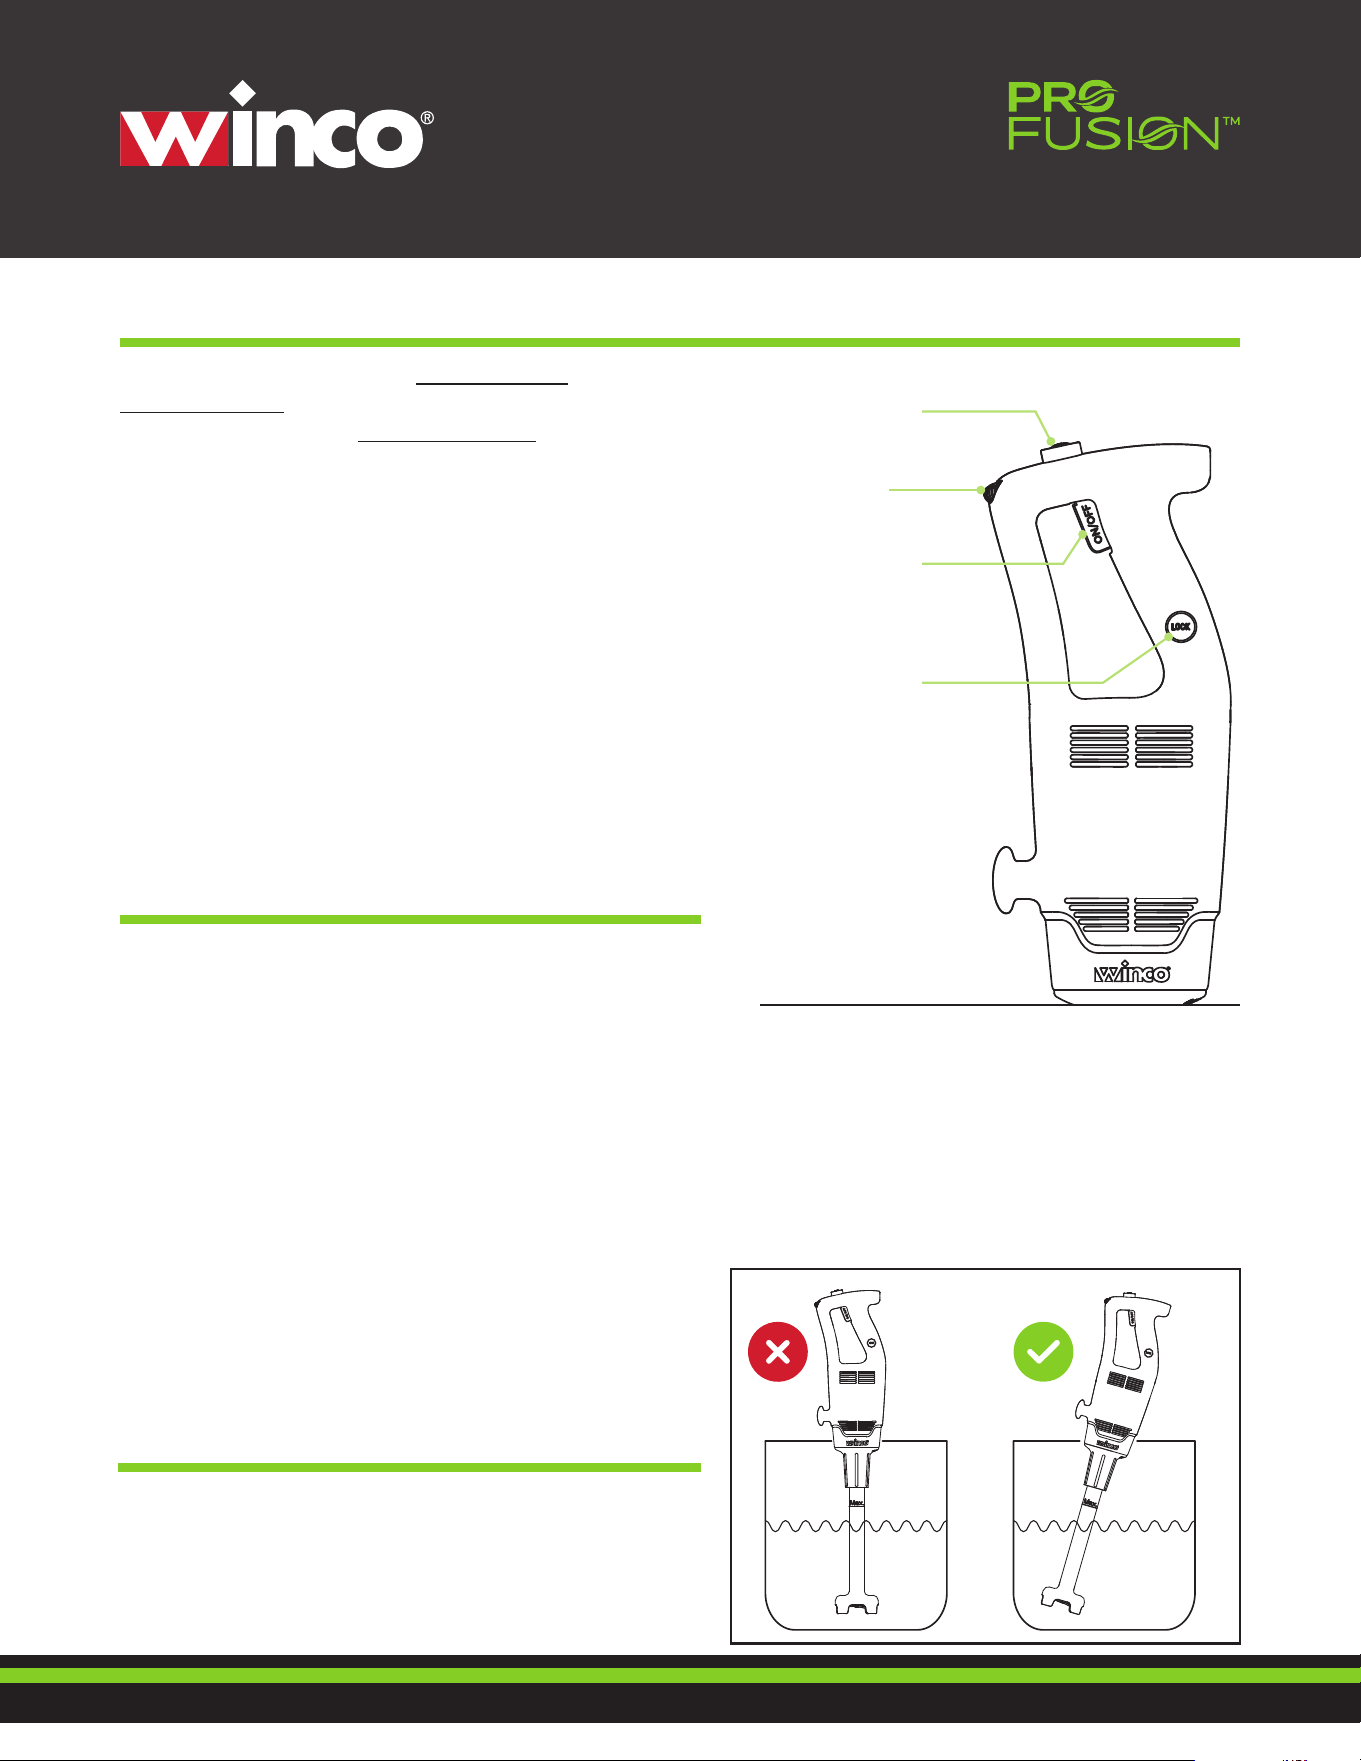
Recommended Operation
For best peormance and long equipment life, tilt the
blender sha at a slight angle to prevent the protective
blade guard from touching the boom of the container.
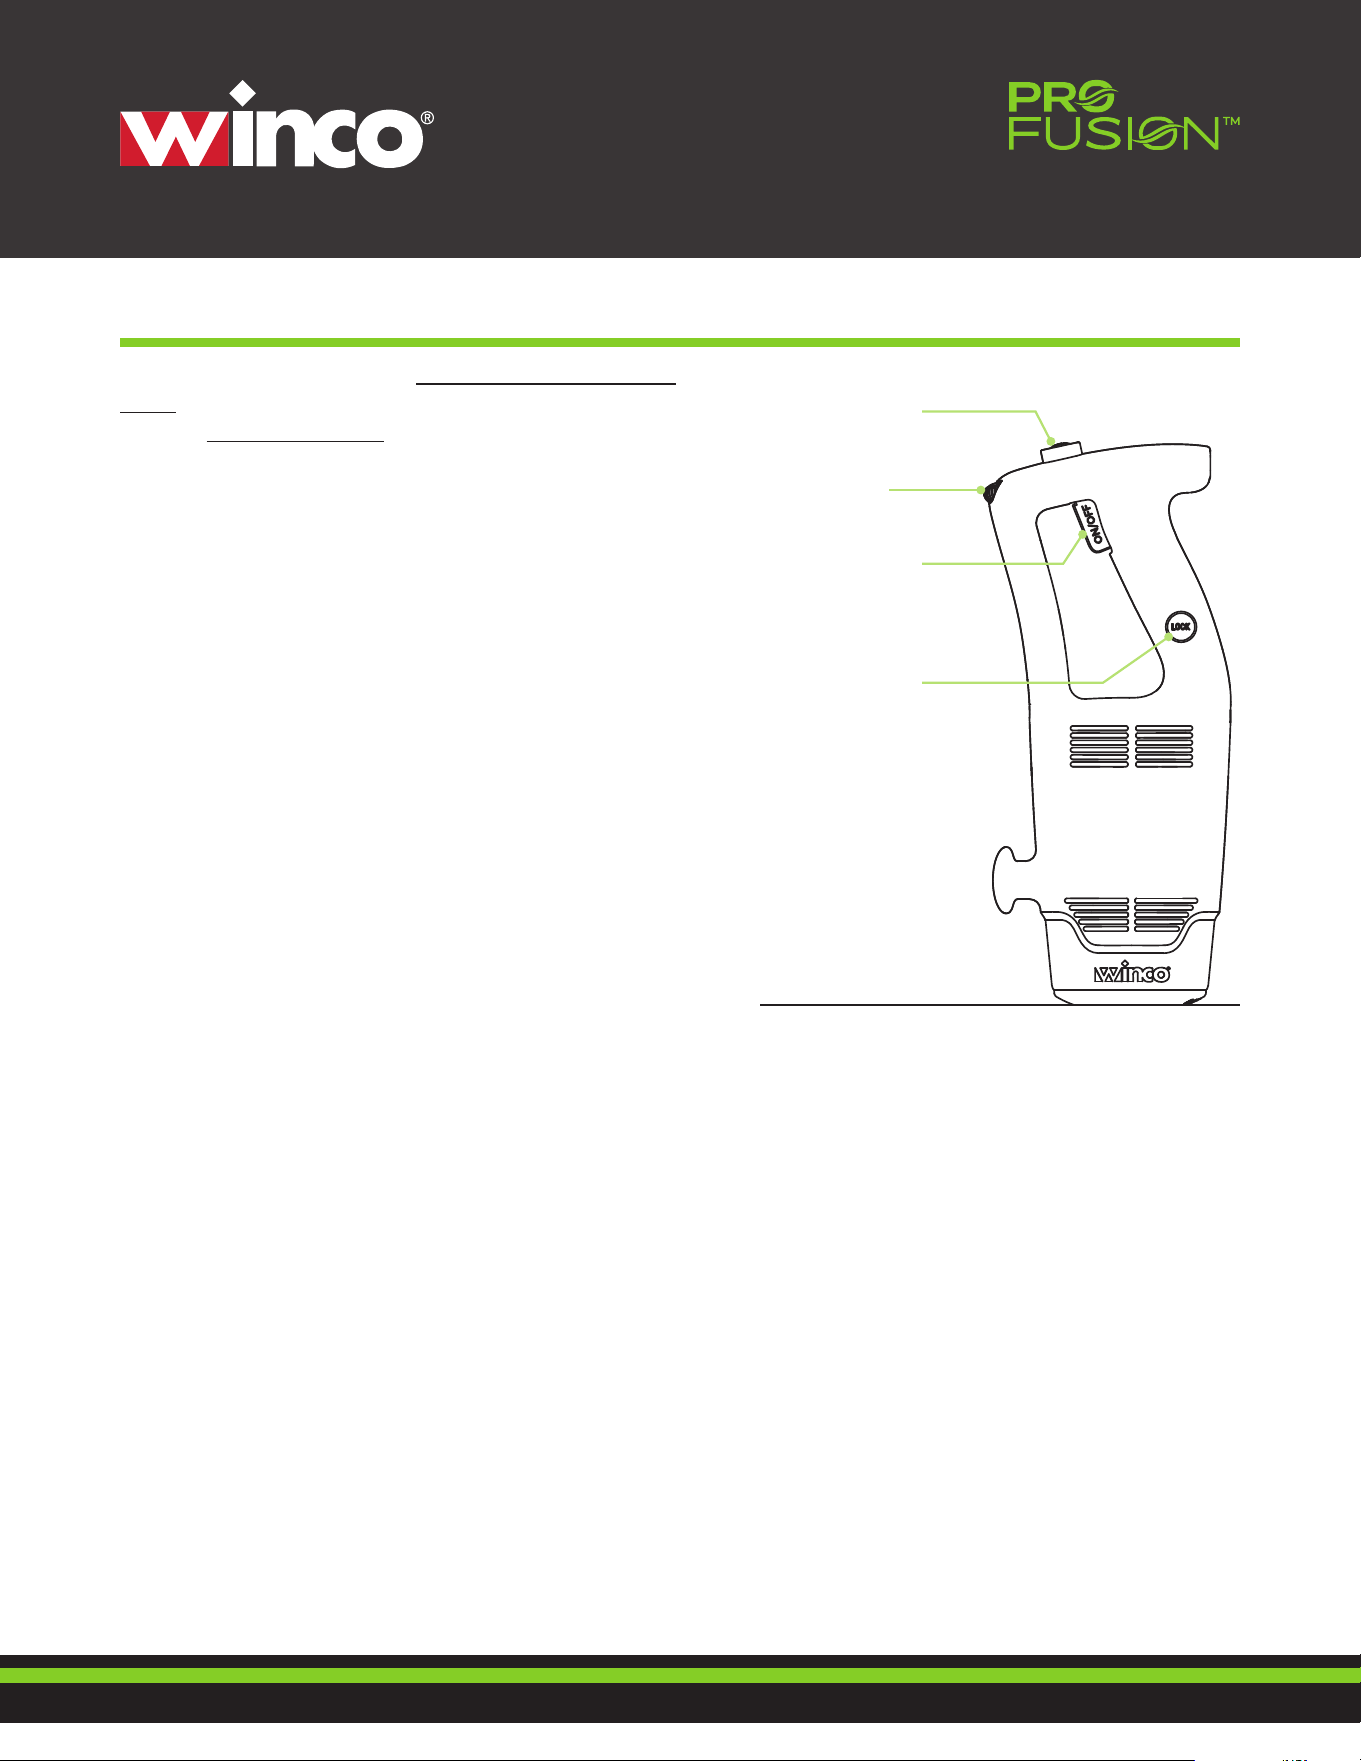
Starting & Stopping Operation - Blending Shaft
1. Install the blending sha.
2. Plug the drive motor into a power outlet.
3. Press the safety buon and proceed to the next
step within 5 seconds. If the unlocking fails aer 5
seconds, press the safety buon again.
4. Press the power buon to sta the immersion
blender.
5. Release the power buon and the unit will stop
automatically.
6. The immersion blender has a speed dial control
knob. Clockwise increases speed, counterclockwise
decreases speed.
IMPORTANT: DO NOT exceed 3 minutes per
operation cycle. Aer two consecutive cycles,
let immersion blender rest for 1 minute.
Safety Buon
Power Buon
Continuous ON
Lock Buon
Speed Dial
Continuous ON Function
Aer completing steps 1-5 above, proceed to the
following steps:
1. Press and hold the lock buon while the power
buon is pressed down. The lock buon will light up
and remain pressed.
2. Release the power buon first and then release
the lock buon. The immersion blender will work
continuously, and the red indicator light turns on and
remains lit.
3. Press the power buon again, the blender stops
rotating. The lock buon will release up and the red
indicator light will turn off.
Note: During Continuous ON do not touch the power
buon when holding the blender to avoid turning it off.
7
IMMERSION
BLENDERS
Safety Buon
Power Buon
Continuous ON
Lock Buon
Speed Dial
Starting & Stopping Operation - Whisk Attachment
IMPORTANT: DO NOT exceed 3 minutes per operation
cycle. Aer two consecutive cycles, let immersion
blender rest for 1 minute to prevent overheating and
damage to internal gear components.
1. Install the whisk aachment.
2. Put the food to be whisked into a container.
3. Inse the power plug into the power socket.
4. Lower the whisk into the container.
5. Press the safety buon and proceed to the next
step within 5 seconds. If the unlocking fails aer 5
seconds, press the safety buon again.
6. Press the power buon to sta the immersion
blender.
7. Release the power buon and the unit will stop
automatically.
8. The immersion blender has a speed dial control
knob. Clockwise increases speed, counterclockwise
decreases speed.

8
IMMERSION
BLENDERS
Cleaning and Sanitizing
CLEANING AND MAINTENANCE
1. Unplug the immersion blender.
2. Thoroughly rinse both the inside and outside suaces of the stainless steel blender sha under
running water. Scrub and flush the area to remove as much food residue as possible.
3. Using a so sponge or cloth dampened with cleaning solution, wipe down the exterior of the
stainless steel sha and the outer suace of the plastic motor housing.
4. Submerge approximately three-quaers of the stainless steel sha into a container filled with the
washing solution. Operate the blender at High speed for two (2) minutes.
5. Repeat steps 2 and 3 using clean rinse water instead of the detergent solution.
6. Stainless steel shas ARE dishwasher safe.
7. Whisk paddles ARE dishwasher safe.
8. Whisk hub IS NOT dishwasher safe. Hand clean only.
9. Do not immerse the whisk hub or the blender sha.
10. Do not immerse the plastic drive motor housing and prevent any liquid from geing into the
housing or ventilation holes. Remove excess water from cleaning cloths and sponges before using
them to clean the drive motor housing.
IMPORTANT: Always disconnect the Winco® ProFusion™ Immersion Blender from the power source
before cleaning the stainless-steel blade.
The Winco ProFusion™ immersion blender must be properly cleaned and fully dried aer every use by
following the procedures outlined below. Increased cleaning frequency will help extend the service
life of the equipment.
NOTE: Do not immerse the detachable blending sha in water. Prolonged immersion in water will flush
the lubricating oil out of the bearings.
REQUIREMENTS FOR FOOD SERVICE USE
• High alkaline cleaning agents are known to damage plastic components and rubber seals. Use a mild
detergent when cleaning the blender and components.
• Use cleaning agents that are non-foaming detergents and sanitizers that are chlorine-based, containing
at least 100 pas per million (PPM) of chlorine.
• The stainless steel sha must be washed, rinsed, and sanitized:
• Before first-time use
• Aer each use
• When the unit will remain unused for longer than one (1) hour
• The plastic motor housing must be cleaned and sanitized:
• Before initial use
• Aer every use
9
IMMERSION
BLENDERS
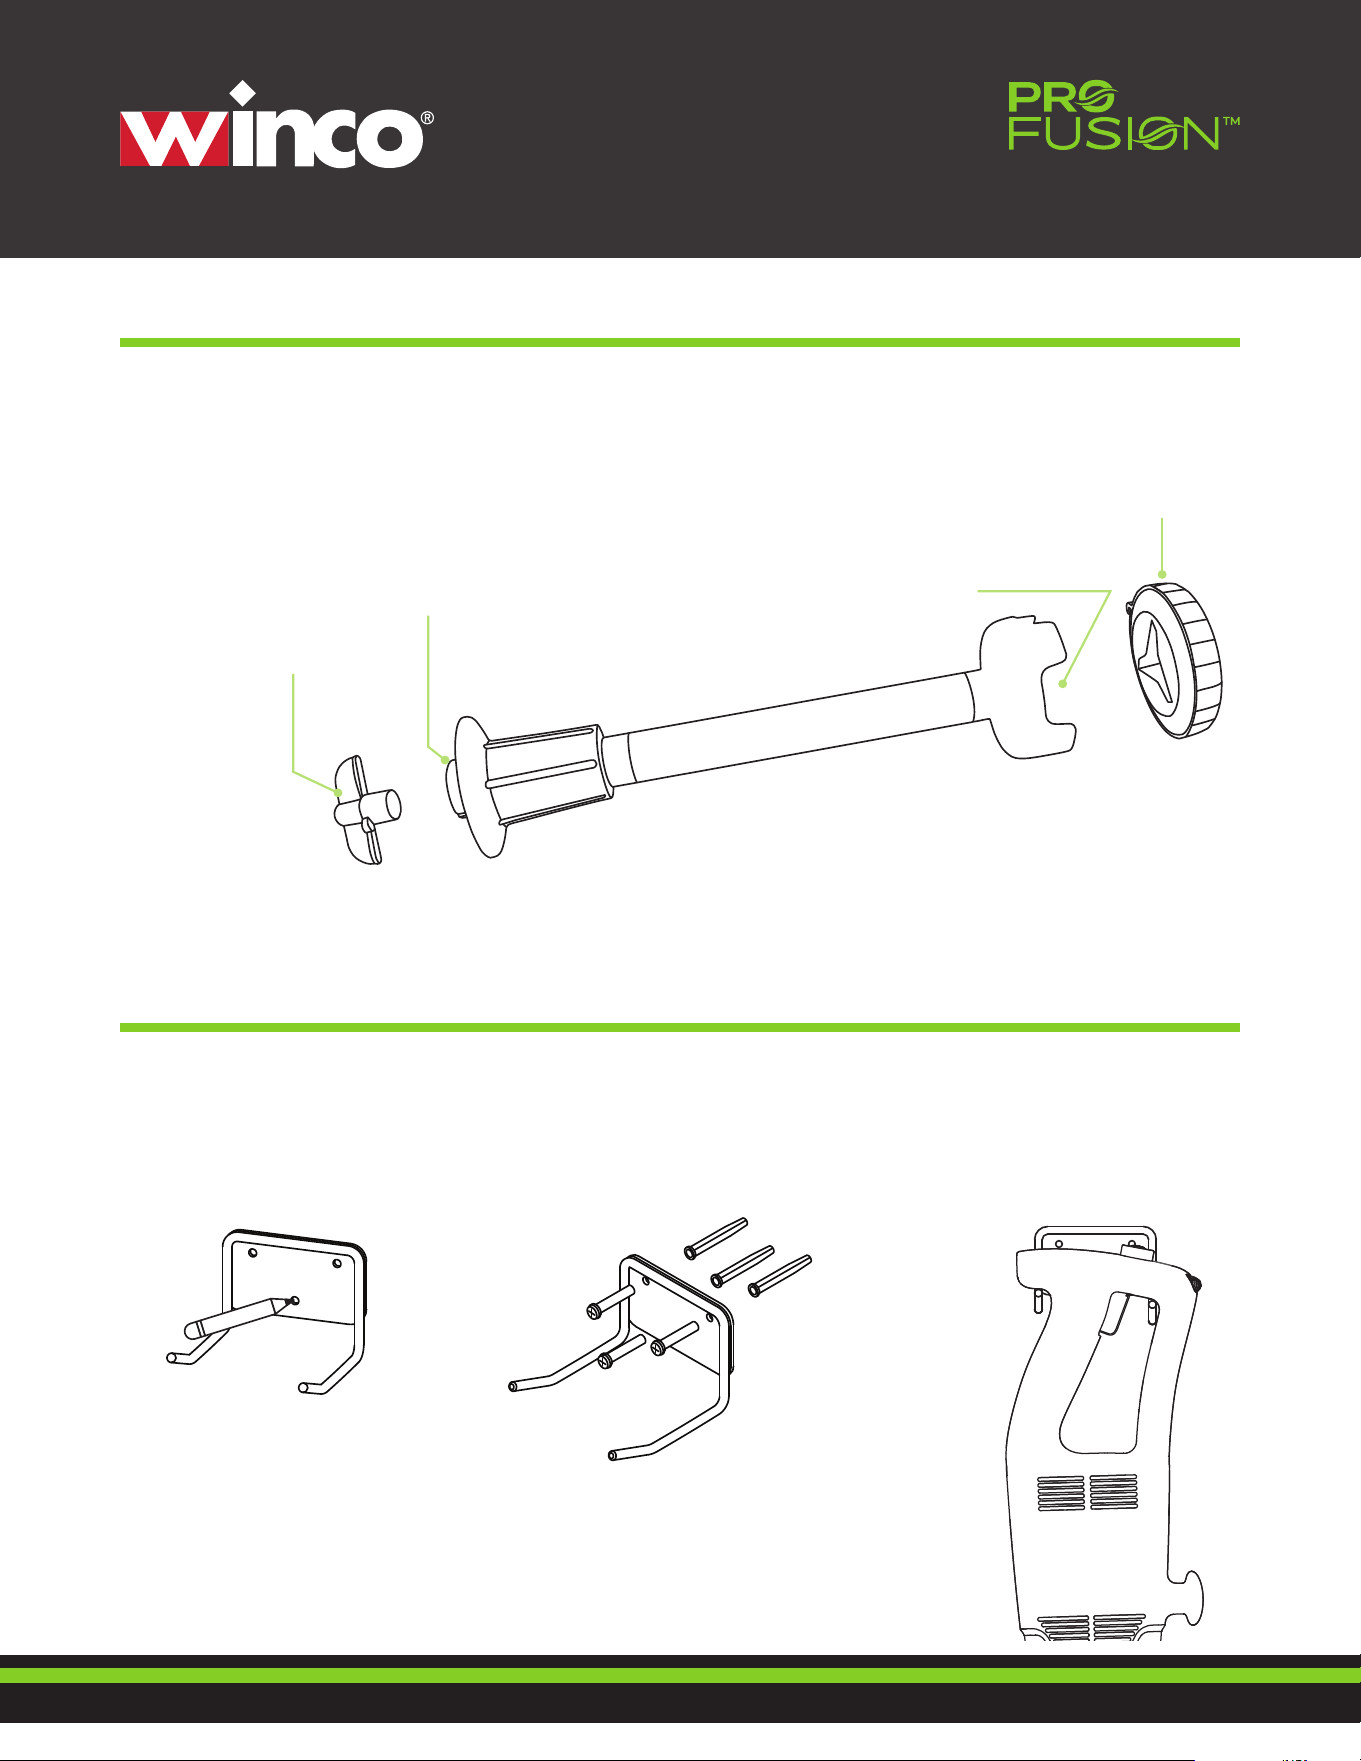
Wall Mount Bracket Installation
NOTE: The le hook is higher than the right hook to accommodate the immersion blender handle.
1. Align and mark holes of the wall bracket.
2. Drill holes into wall and inse anchors. Aach the wall bracket with the screws.
3. Hang the immersion blender from the handle as shown.
Removal and Installation of Blade Assembly
1. Align and inse the Blade Wrench with the Blade Assembly.
2. Align and inse the Coupling Wrench to the Blending Sha Head Coupling.
3. Turn counterclockwise to remove the Blade, clockwise to tighten.
Coupling Wrench
Blending Sha
Head Coupling
Blade Wrench
Blade Assembly

NEW JERSEY
DISTRIBUTION CENTER
65 Industrial Road,
Lodi, NJ 07644
FLORIDA SHOWROOM &
DISTRIBUTION CENTER
10800 NW 103rd Street,
Bldg 22, Ste 11, Miami, FL 33178
4711 East Hefner Road, Oklahoma City, OK 73131
NEVADA
DISTRIBUTION CENTER
3777 Marion Drive,
Las Vegas, NV 89115
Web: www.wincous.comEmail: cs@wincous.comFax: 1-973-916-9959Phone: 1-888-946-2682