User manual
Register your product and get support at:
www.philips.com/support
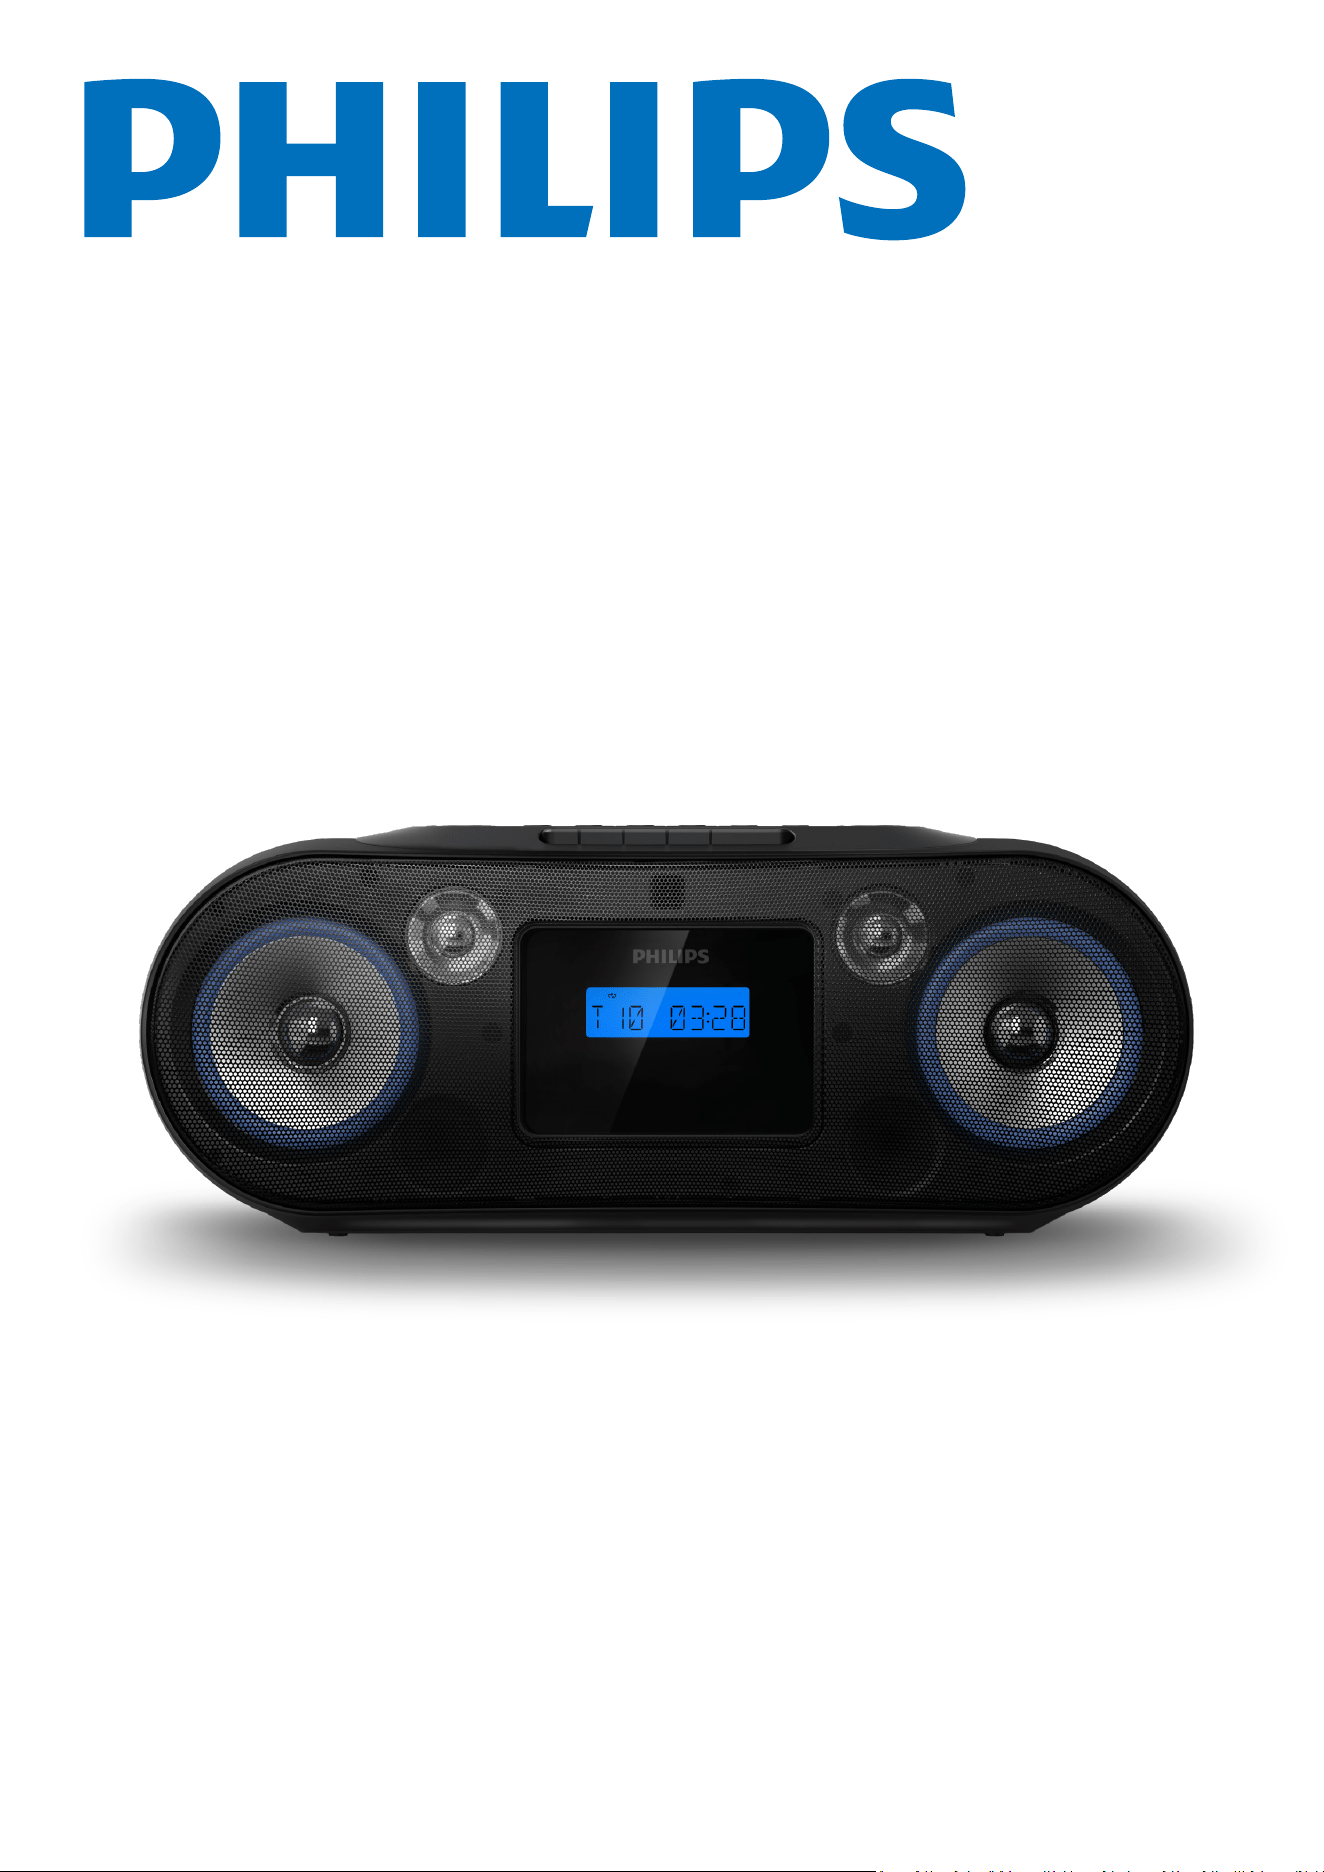
CD Soundmachine
TAZ7200

Contents
1 Important
3
2
Your CD soundmachine 4
3
Get started 6
6
7
EN 2
Safety
Notice
3
3
Trademarks 3
4
4
5
What's in the box
Overview of the main unit
Overview of the remote control
4 Play from CD
7
7
7
7
6 Listen to the radio 8
8
9
9
9 Play from USB 11
Product speci�cation13 14
Troubleshooting14 15
Other features
11
Connect power
Turn on/Standby
Play a CD
Use CD menu
Program tracks
Listen to FM radio
Listen to an external device
10
5
8
Play from classic Bluetooth
Use BT menu
Play from Bluetooth
7
9
11
11
Use USB menu
11Use AUDIO IN menu
Philips Entertainment App
12
12
12
12
Pair the App with your
CD soundmcachine
8 Play from Auracast
TM
10
10Auracast receiver
10Use Auracast menu
10Auracast broadcast
10Disconnect Auracast broadcast
Play from tape
8Play a tape
8Use tape menu
12
13Play music and adjust the sound
13Switch sources
13General settings
14Virtual remote control
14User guide
14Software upgrade
12Set the sleep timer
12Connect with headphones
12Factory reset
App download
1
Important
Make sure that there is enough free space around the product for
ventilation.
Only use attachments/accessories specifed by the manufacturer.
Battery usage CAUTION -to prevent battery leakage which may
result in bodily injury, property damage, or damage to the product:
Install the battery correctly, + and - as marked on the product.
The battery (packed or installed) shall not be exposed to
excessive heat such as sunshine, �re or the like.
Remove the battery when the product is not used for a long
time.
The product shall not be exposed to dripping or splashing.
Do no place any source of danger on the product (e.g. liquid �lled
objects. lit candles).
Where the MAlNS plug or an appliance coupler is used as the
disconnect device, the disconnect device shall remain readily
operable.
Please use the product safely in an environment with temperature
between 0°C and 40°C.
Warning
Never remove the casing of this apparatus.
Never lubricate any part of this apparatus.
Never look into the laser beam inside this apparatus.
Never place this apparatus on other electrical equipment.
Keep this apparatus away from direct sunlight, naked �ames or heat.
Ensure that you always have easy access to the power cord, plug or adaptor
to disconnect the apparatus from the power.
Your product is designed and manufactured with high quality
materials and components, which can be recycled and reused.
This symbol on a product means that the product is covered by
European Directive 2012/19/EU.
This symbol means that the product contains batteries covered
by European Regulation (EU) 2023/1542 which cannot be
disposed of with normal household waste.
Inform yourself about the local separate collection system for electrical
and electronic products and batteries. Follow local rules and never
dispose of the product and batteries with normal household waste.
Correct disposal of old products and batteries helps prevent negative
consequences for the environment and human health.
Removing the disposable batteries
To remove the disposable batteries, see battery installation section.
Environmental information
All unnecessary packaging has been omitted. Your system consists of
materials which can be recycled and reused if disassembled by a
specialized company. Please observe the local regulations regarding the
disposal of packaging materials, exhausted batteries and old equipment.
Care for your product
Do not insert any objects other than discs into the disc compart-
ment.
Do not insert warped or cracked discs into the disc compartment.
Remove the discs from the disc compartment if you are not using
the product for an extended period of time.
Only use micro�ber cloth to clean the product.
This apparatus includes this label:
Note
The type plate is located on the back of the product.
CLASS 1
LASER PRODUCT
Safety
3 EN
Read and understand all instructions before you use this CD soundmachine
system.
If damage is caused by failure to follow the instructions, the warranty
does not apply.
CAUTION
RISK OF ELECTRIC SHOCK
DO NOT OPEN
CAUTION: TO REDUCE THE RISK OF ELECTRIC SHOCK, DO NOT
REMOVE COVER (OR BACK).NO USER-SERVICEABLE PARTS
INSIDE. REFER SERVICING TO OUALIFIED SERVICE PERSONNEL.
This 'bolt of lightning' indicates uninsulated material within the device
may cause an electrical shock. For the safety of everyone in your
household, please do not remove the covering.
The ‘exclamation mark’ calls attention to features for which you should
read the enclosed literature closely to problems.
WARNING: To reduce the risk of �re or electric shock, the device should
not be exposed to rain or moisture and objects �led with liquids, such as
vases, should not be placed on the device.
CAUTION: To prevent electric shock fully insert the plug. (For regions with
polarized plugs: To prevent electric shock, match wide blade to wide
slot.)
Notice
Compliance
Any changes or modifcations made to this device that are not expressly
approved by MMD Hong Kong Holding Limited may void the user's
authority to operate the equipment.
Care of the environment
Disposal of your old product and battery
Hereby, TP Vision Europe B.V. declares that this product is in compliance
with the essential requirements and other relevant provisions of RED
Directive 2014/53/EU and UK Radio Equipment Regulations SI 2017 No
1206. You can �nd the Declaration of Conformity on
www.philips.com/support.
Trademarks
The Bluetooth word mark and logos are registered trademarks owned
by Bluetooth SIG, Inc. and any use of such marks by MMD Hong Kong
Holding Limited is under license.
The Auracast™ word mark and logos are trademarks owned by Bluetooth
SIG, Inc. and any use of such marks by MMD Hong Kong Holding Limited
is under license. Other trade marks and trade names are those of their
respective owners.
The making of unauthorized copies of copy-protected material, including
computer programs, �ies, broadcasts and sound recordings, may be an
infringement of copyrights and constitute a criminal offence. This
equipment should not be used for such purposes.
2
Congratulations on your purchase, and welcome to Philips! To fully
bene�t from the support that Philips offers, register your product at
www.philips.com/support.
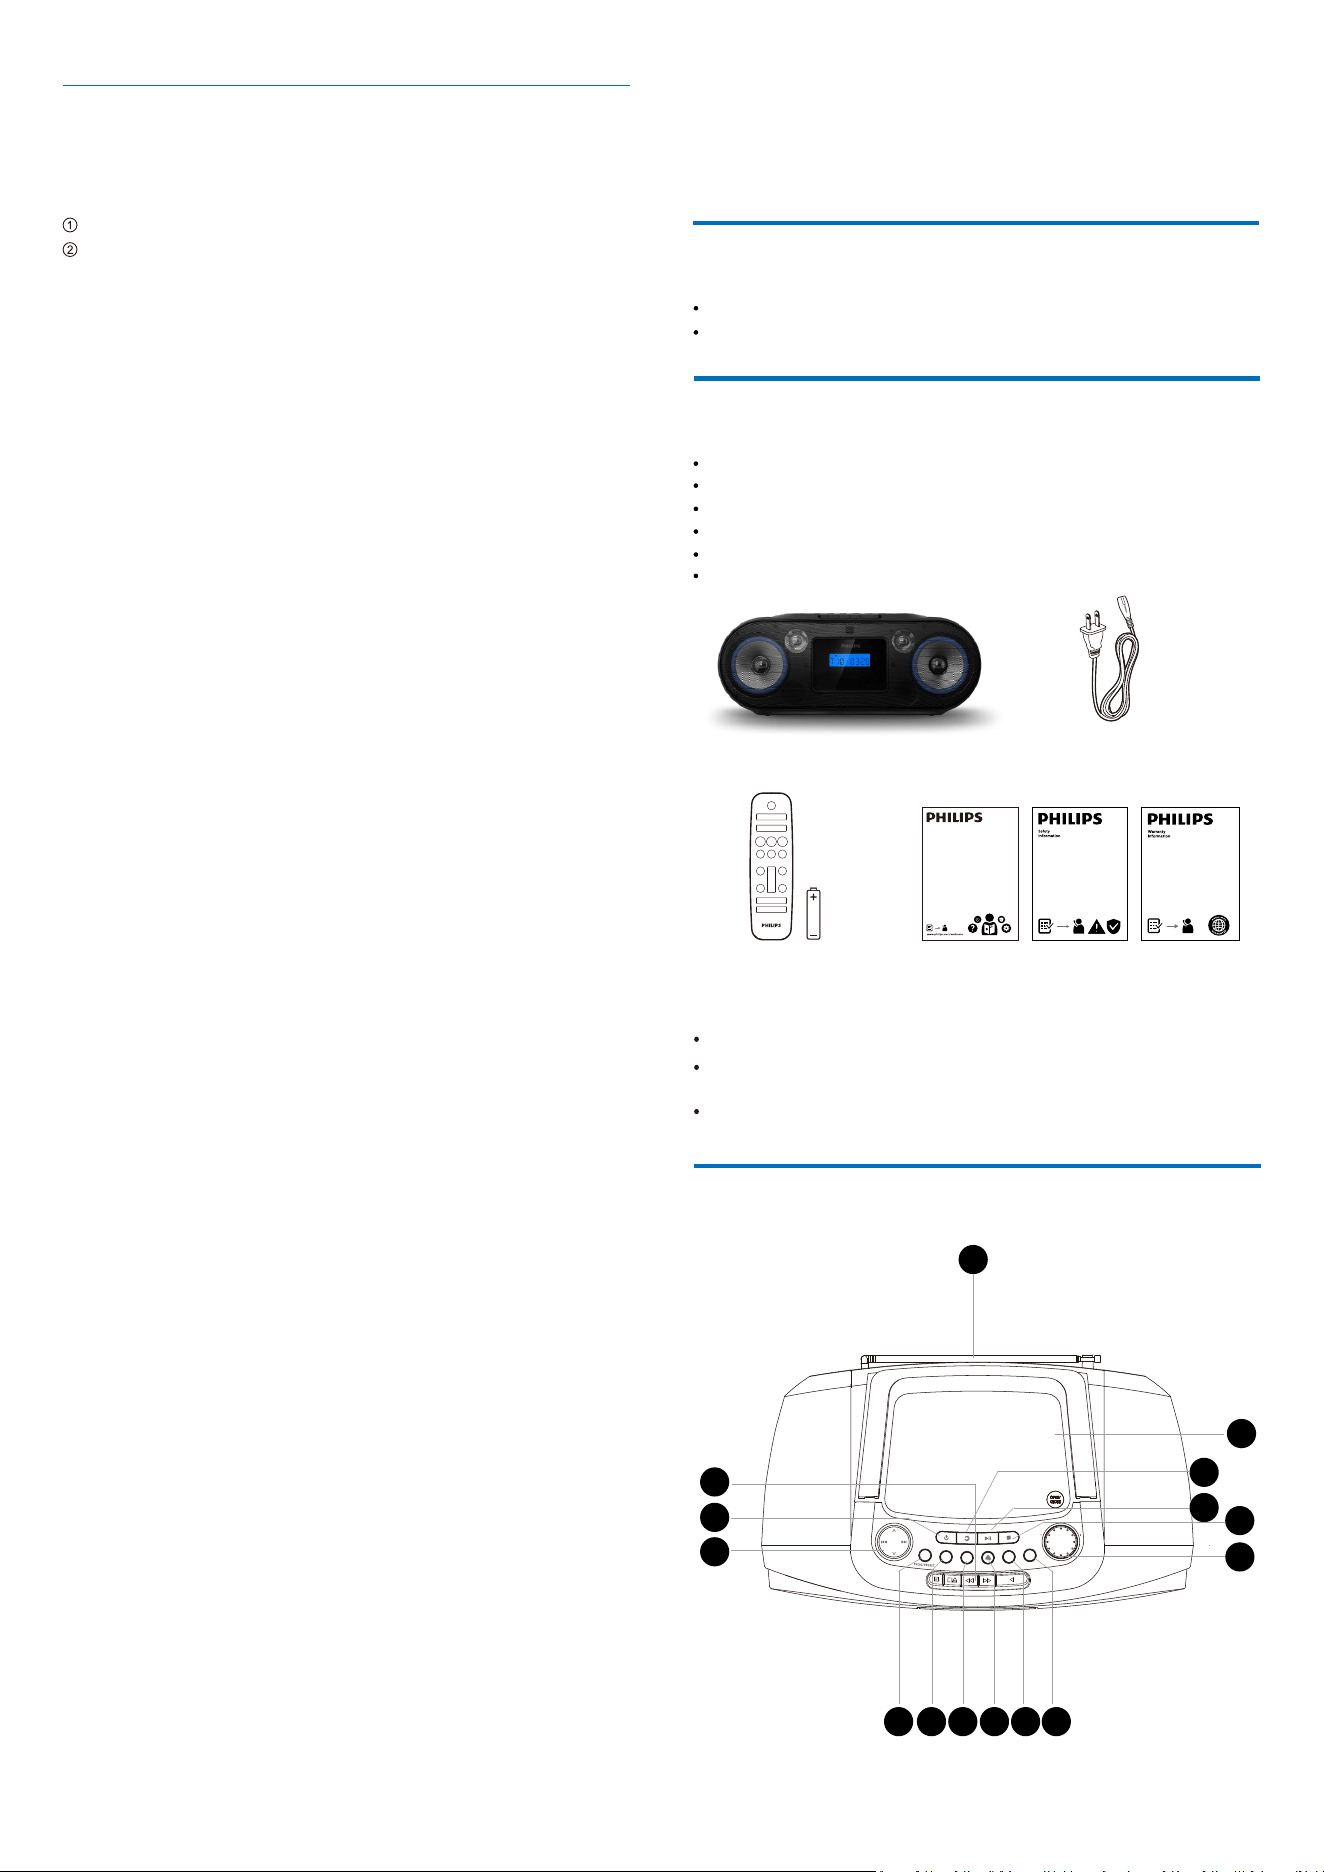
What's in the box
Check and identify the contents of your package:
Power cord
Overview of the main unit
Your CD soundmachine
Main unit
EN 4
Introduction
Listen to FM radio;
With this CD soundmachine, you can:
Enjoy audio from discs, Bluetooth, and other external audio devices.
9
VOLUME
INFO
MENU
MODE
OK
DBB
SOUND
1 2 3 4 5 6
8
14
7
11
12
13
1010
15
FCC and IC statement
-
Warning: Changes or modi�cations not expressly approved by the party
responsible for compliance could void the user's authority to operate the
equipment.
Note:
This equipment has been tested and found to comply with the
limits for a Class B digital device, pursuant to Part 15 of the FCC Rules.
These limits are designed to provide reasonable protection against
harmful interference in a residential installation.
FCC information
The device complies with the FCC rules, Part 15. Operation is subject to
the following two conditions:
interference that may cause undesired operation.
This device may not cause harmful interference, and.
This device must accept any interference received, including
This equipment generates, uses and can radiate radio frequency energy
and, if not installed and used in accordance with the instructions, may
cause harmful interference to radio communications. However, there is
no guarantee that interference will not occur in a particular installation.
If this equipment does cause harmful interference to radio or television
reception, which can be determined by turning the equipment off and on,
the user is encouraged to try to correct the interference by one or more
of the following measures: (1) Reorient or relocate the receiving antenna.
(2) Increase the separation between the equipment and receiver.
(3) Connect the equipment into an outlet on a circuit different from that
to which the receiver is connected. (4) Consult the dealer or an experien-
ced radio/TV technician for help.
IC-Canada: CAN ICES-(B)/NMB-(B)
This device contains licence-exempt transmitter(s)/receiver(s) that comply
with Innovation, Science and Economic Development Canada's licence-
exempt RSS(s). Operation is subject to the following two conditions:
1. This device may not cause interference.
2. This device must accept any interference, including interference that
may cause undesired operation of the device.
Avis d’Industrie Canada: CAN ICES-(B)/NMB-(B)
L’émetteur/récepteur exempt de licence contenu dans le present appareil
est conforme aux CNR d’Innovation, Sciences et Développement économ-
ique Canada applicables aux appareils radio exempts de licence. L’exploit-
ation est autorisée aux deux conditions suivantes :
1. L’appareil ne doit pas produire debrouillage;
2. L’appareil doit accepter tout brouillage radioélectrique subi, même si
le brouillage est susceptible d’en compromettre le fonctionnement.
Radiation Exposure Statement: The product comply with the Canada
portable RF exposure limit set forth for an uncontrolled environment and
are safe for intended operation as described in this manual. Déclaration
d’exposi tion aux radiations: Le produit est conforme aux limites d’exposi
tion pour les appareils portables RF pour les Etats-Unis et le Canada
établies pour un environnement non contrtlé.
Après examen de ce matériel aux conformité ou aux limites d’intensité de
champ RF, les utilisateurs peuvent sur l’exposition aux radiofréquences et
la conformité and compliance d’ac-quérir les informations correspondantes.
La distance minimale du corps à utiliser le dispositif est de 20cm.
This equipment complies with radiation exposure limits set forth for an
uncontrolled envi-ronment. This transmitter must not be co-located or
operating in conjunction with any other antenna or transmitter. This
equipment should be installed and operated with minimum distance
20cm between the radiator& your body.
CD Soundmachine
Quick Start Guide / Safety sheet / Warranty card Remote control
(with one AAA battery)
AAA R03 1.5V
Images, illustrations and drawings shown on this user manual are for
reference only.
Power cord quantity and plug type vary by region.
Actual product may vary in appearance.
Main unit
Power cord
Quick Start Guide
Safety sheet
×1
Warranty card
×1
×1
×1
×1
Remote control (with one AAA battery) ×1
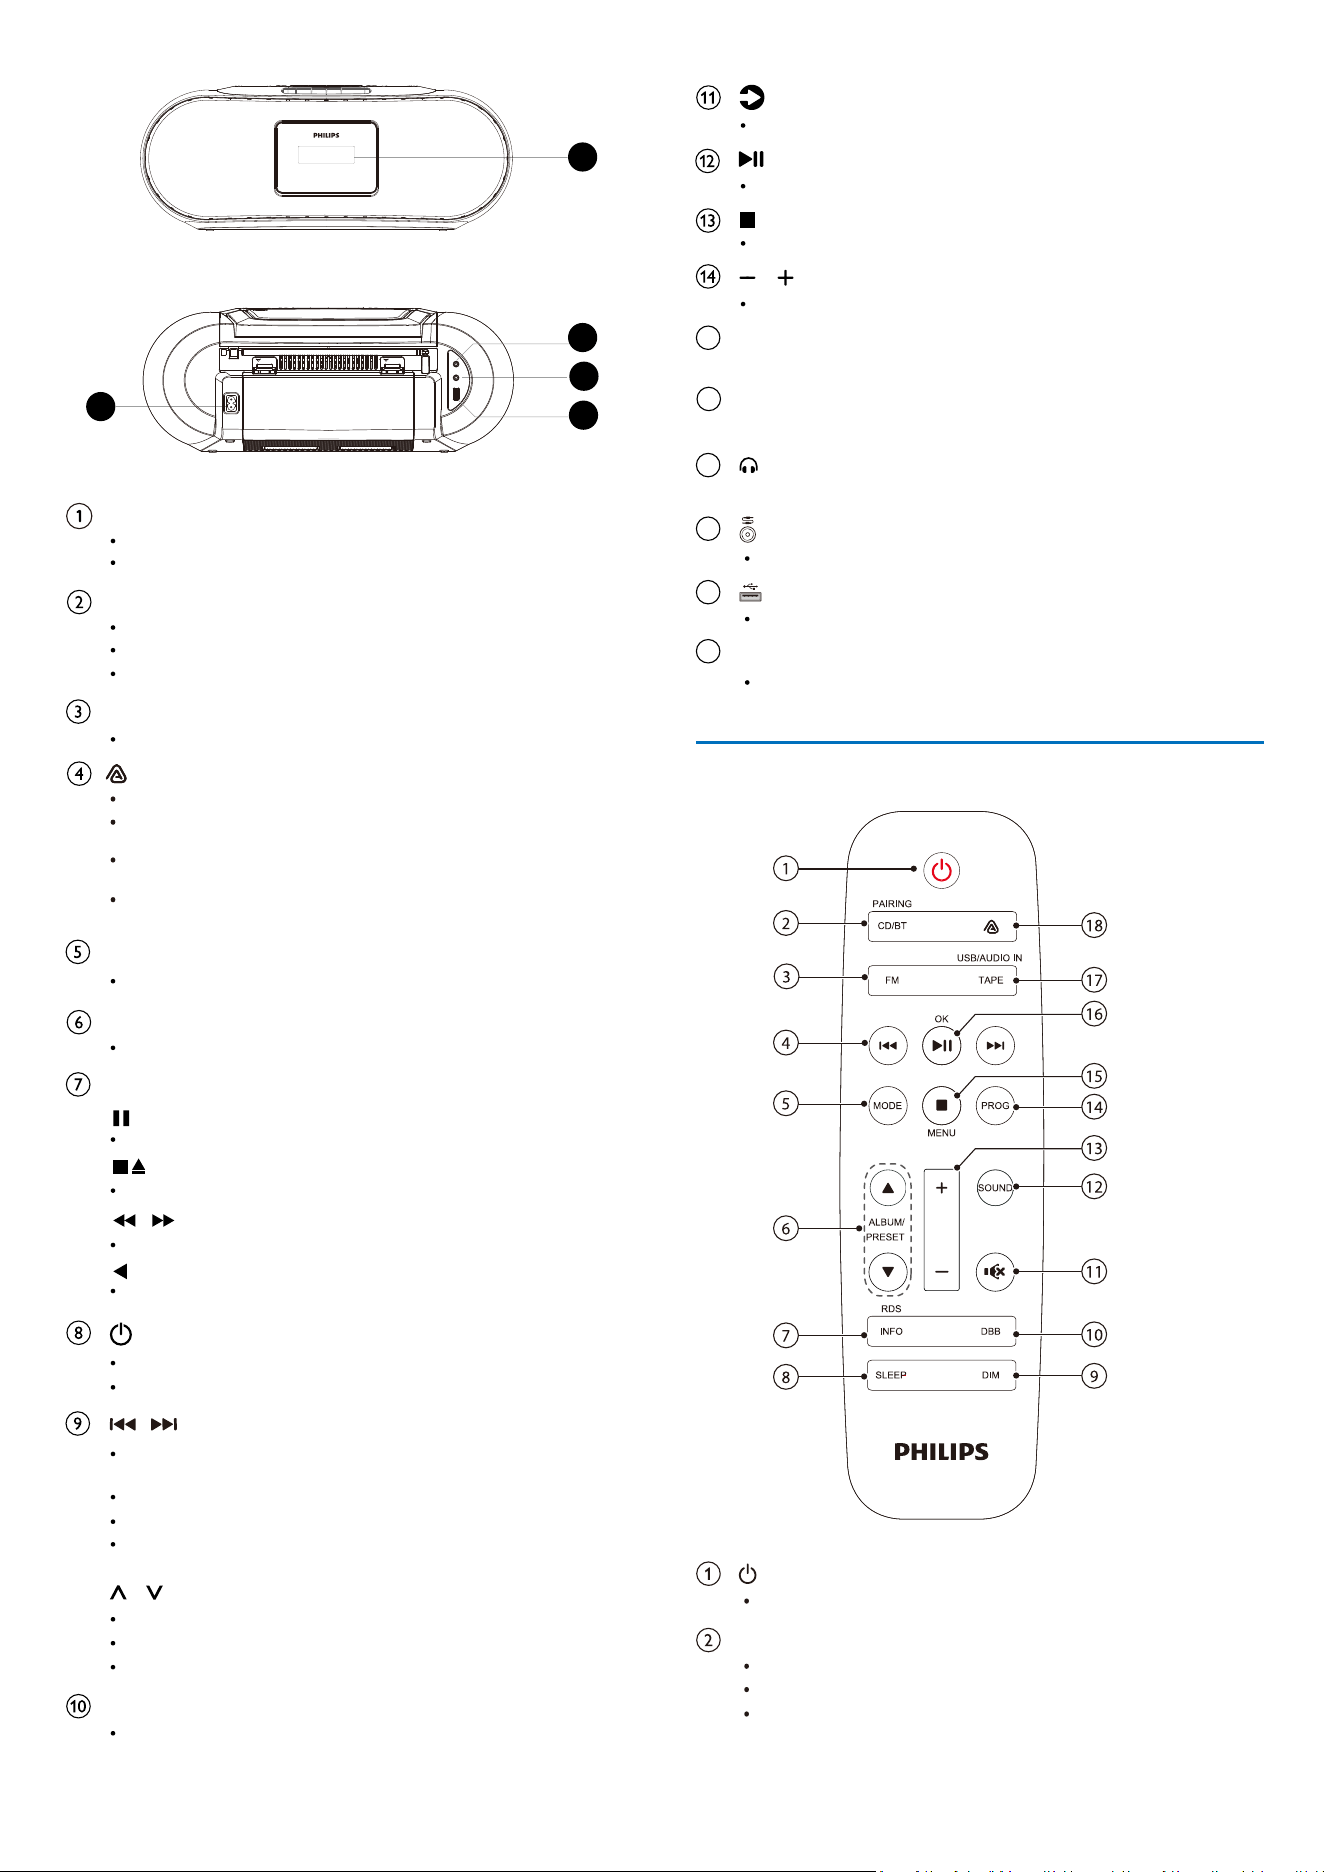
20
1018
5 EN
~ACIN
OPEN OPEN
Overview of the remote control
17
19
16
SOUND
Disc tray
Disc compartment.
AC power: Short press to turn on or to standby.
Select a preset sound effect.
OK/PROG/PRESET
DBB
Turn Dynamic Bass Boost 1/2/OFF.
In the menu, scroll menu options up or down.
In USB/CD (MP3) mode, switch to the previous or next album.
In the FM mode, switch to the previous/next preset radio station.
Pause tape playback.
Start tape play.
Tape controls
/
Fast rewind or fast forward.
Stop the tape play or open the tape door.
In CD/USB/Bluetooth mode, play the previous or next track.
In CD/USB mode, long press to fast forward or fast backward.
In Auracast mode, switch to the previous/next unencrypted
broadcast.
Tune to an FM radio station in radio source, �ne tune
(increase/decrease) frequency.
/
Con�rm your selection on the menu.
MODE/INFO
In Auracast receiver mode, press to rescan Auracast broadcast
channel.
In Auracast receiver mode, long press for 8 seconds to clear the
encrypted information.
Press to switch to Auracast receiver mode.
Long press for more than 3 seconds to activate/deactivate
Auracast broadcast mode.
MENU
Access source menu setting.
/
Program tracks or preset radio stations.
Short press: Switch playback mode in CD/USB mode.
Short press: Switch between mono and stereo in FM mode.
Long press: Display information.
Battery operated: Short press to power off/long press to power on.
•
FM antenna.
Antenna
AC IN
Insert power cable plug to AC IN socket.
USB port.
Audio-in socket.
Stop the play.
/
Decrease/Increase the volume.
15
17
18
19
20
•
16
•
Display panel
Display current status.
Headphones jack.
Start and pause play.
Press to select source.
Select CD source.
CD/BT PAIRING
Switch this product on or to standby.
Select Bluetooth source.
In BT mode, press and hold for 3 seconds to disconnect; press
and hold for 8 seconds to clear Bluetooth pairing history.
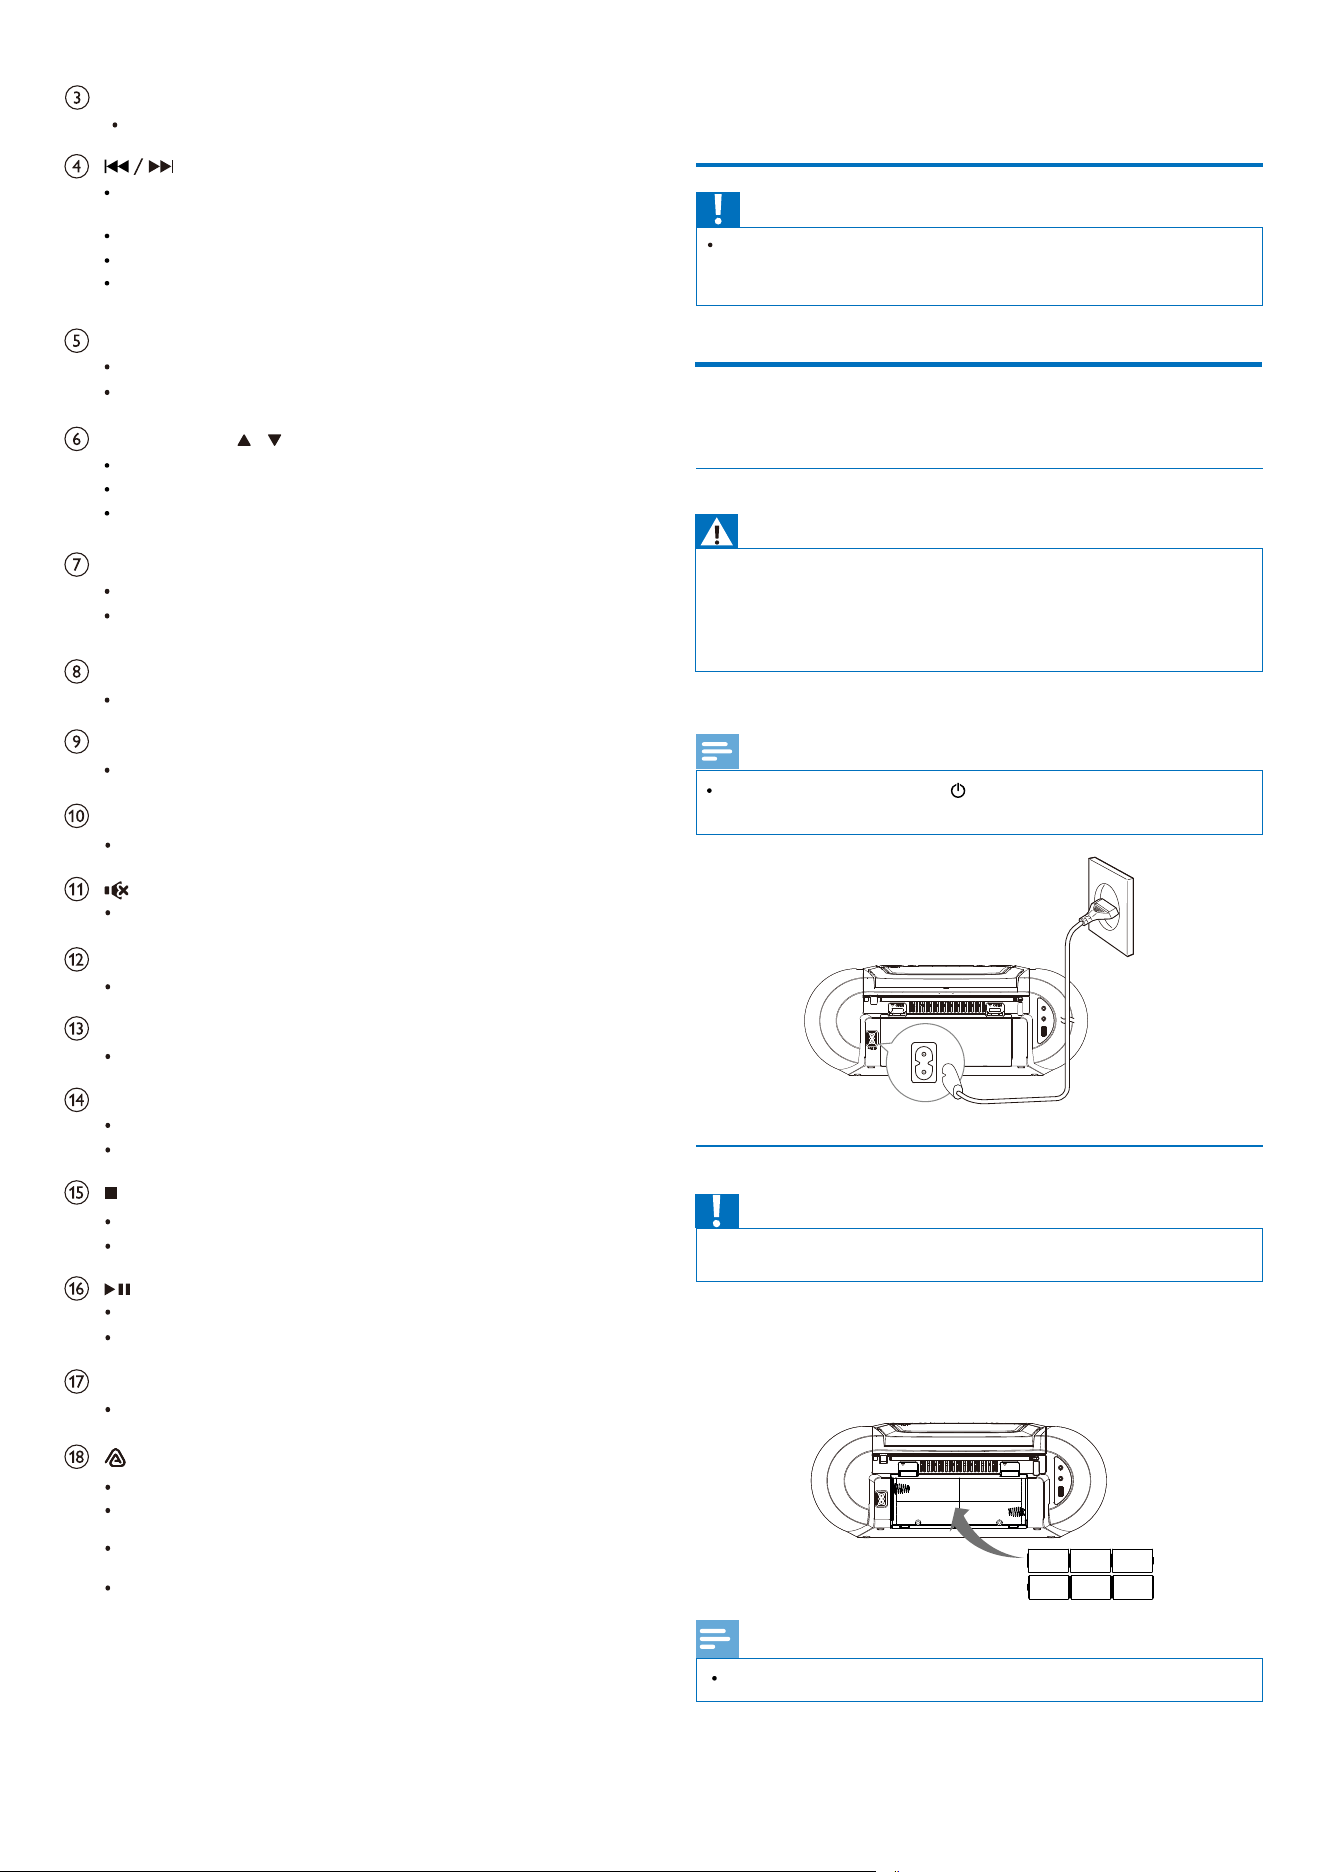
EN 6
MODE
Short press: Switch playback mode in CD/USB mode.
Short press: Switch between mono and stereo in FM mode.
INFO/RDS
During playback, display the play information.
For selected FM radio stations, display RDS information
(if available).
SLEEP
Set sleep timer.
DIM
Adjust the display brightness.
DBB
Turn Dynamic Bass Boost 1/2/OFF.
Mute or unmute.
SOUND
Select a preset sound effect.
+/- (volume)
Adjust volume.
FM
Select FM source.
PROG
Program tracks.
Program FM radio stations.
/MENU
Stop play or erase a program.
Long press to enter the menu; short press to exit the menu.
/OK
Start or pause play.
Con�rm your selection on the menu.
TAPE/USB/AUDIO IN
Switch between TAPE/USB/AUDIO IN sources.
ALBUM/PRESET
/
In CD/USB/BT mode, play the previous or next track.
In CD/USB mode, long press to fast forward or fast backward.
In Auracast mode, switch to the previous/next unencrypted
broadcast.
Tune to an FM radio station in radio source, �ne tune
(increase/decrease) frequency.
In the menu, scroll menu options up or down.
In USB/CD (MP3) mode, switch to the previous or next album.
In the FM mode, switch to the previous/next preset radio station.
In Auracast receiver mode, press to rescan Auracast broadcast
channel.
In Auracast receiver mode, long press for 8 seconds to clear the
encrypted information.
Press to switch to Auracast receiver mode.
Long press for more than 3 seconds to activate/deactivate
Auracast broadcast mode.
3 Get started
Caution
Always follow the instructions in this chapter in sequence.
Use of controls or adjustments or performance of procedures other than
herein may result in hazardous radiation exposure or other unsafe
operation.
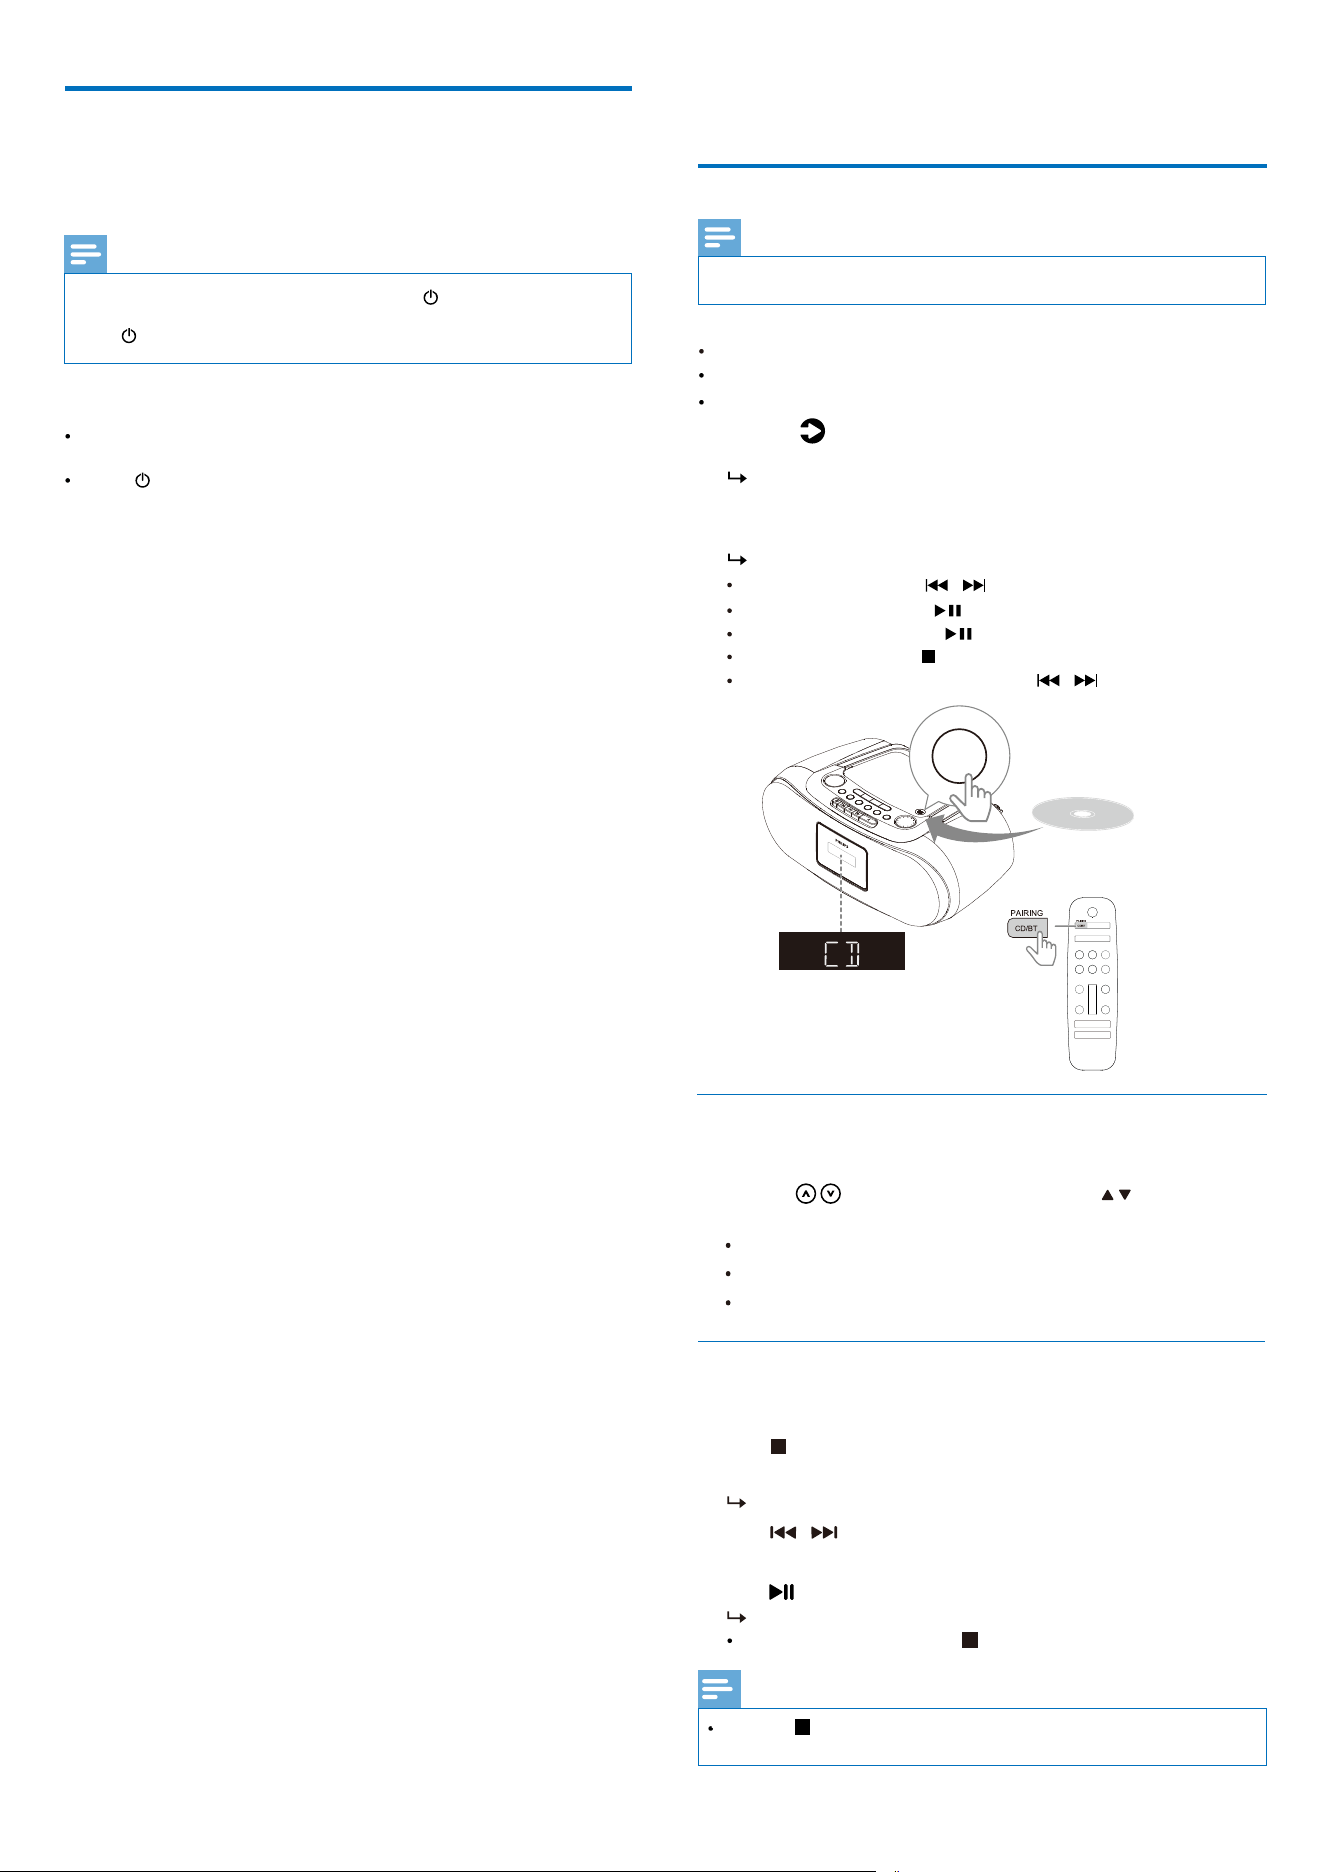
Connect power
The unit can be powered by either AC power or batteries.
Option 1:AC power
Warning
To conserve energy, press the button after use to switch the unit to
standby mode or cut off power to the main unit.
Note
•
•
Risk of product damage! Make sure that the power supply voltage
corresponds to the voltage printed on the back or the underside of the
unit.
Risk of electric shock! When you disconnect the AC power, always pull the
plug from the socket. Never pull the cord.
Connect the AC power cord to the wall socket.
Option 2: Battery power
Open the battery compartment at the back of the unit.
Insert 6 batteries (type: 1.5V R20/UM2/C CELL) with correct polarity (+/-)
as indicated.
Close the battery compartment.
Caution
•
Batteries contain chemical substances, so they should be disposed of
properly.
Note
The batteries are not supplied. Please purchase separately.
~ACIN
OPEN OPEN
+
-
+
-
+
-
+
-
+
-
+
-
1
2
3
7 EN
Turn on/Standby
Switch to standby mode
AC power: Short press to turn on and switch to last source, or to standby.
Battery operated: Short press to power off/long press to power on and
switch to last source.
The product switches to standby mode automatically when there is no
audio detected for over 15 minutes.
Press button to wake up the product from standby mode.
Note
•
When powered by battery, after you press the button on the remote
control to power off the device, you can only turn it on by long-pressing
the button on the main unit panel.
4 Play from CD
Play a CD
You can play commercially available audio CDs:
Note
•
You cannot play CDs encoded with copyright protection technologies.
Program tracks
In CD mode, you can program a maximum of 20 tracks in CD disc.
Press to stop playback.
Repeat Step 3 to program more tracks.
4
1
2
Press to select a track number, then press PROG to con�rm.
3
Press PROG to activate the program mode.
/
Press to play the programmed tracks.
5
CD-Recordables (CD-R)
CD-Rewritables (CD-RW)
CD-MP3 discs
To erase the program, press twice.
During play, [PROG] (program) is displayed.
[P01 T01] displays on the screen.
Note
Press the button to exit the program mode in program status. When the
number of program tracks reaches 20, a [FULL] message will be displayed.
Press the button on the main unit to switch to CD source, or press
the CD/BT button on the remote control to switch to CD source.
[CD] displays on the screen.
Open the CD compartment.
Insert a CD with the printed side facing up and close the CD lid gently.
Your CD soundmachine starts to play automatically.
To select a track, press .
To pause CD play, press .
To resume CD play, press again.
To stop CD play, press .
/
Use CD menu
Press the buttons on the main panel or the buttons on the
remote control.
In CD mode, press the MENU button to enter the menu settings.
1
2
3
To fast forward or rewind, long press .
OPEN/
CLOSE
/
1
2
[SLEEP]: Set sleep timer (OFF/15/30/60/90/120min).
[DIM]
: Adjust the display
brightness (HIGH/MED/LOW/OFF).
[SYSTEM]: Access system settings.
EN 8
1
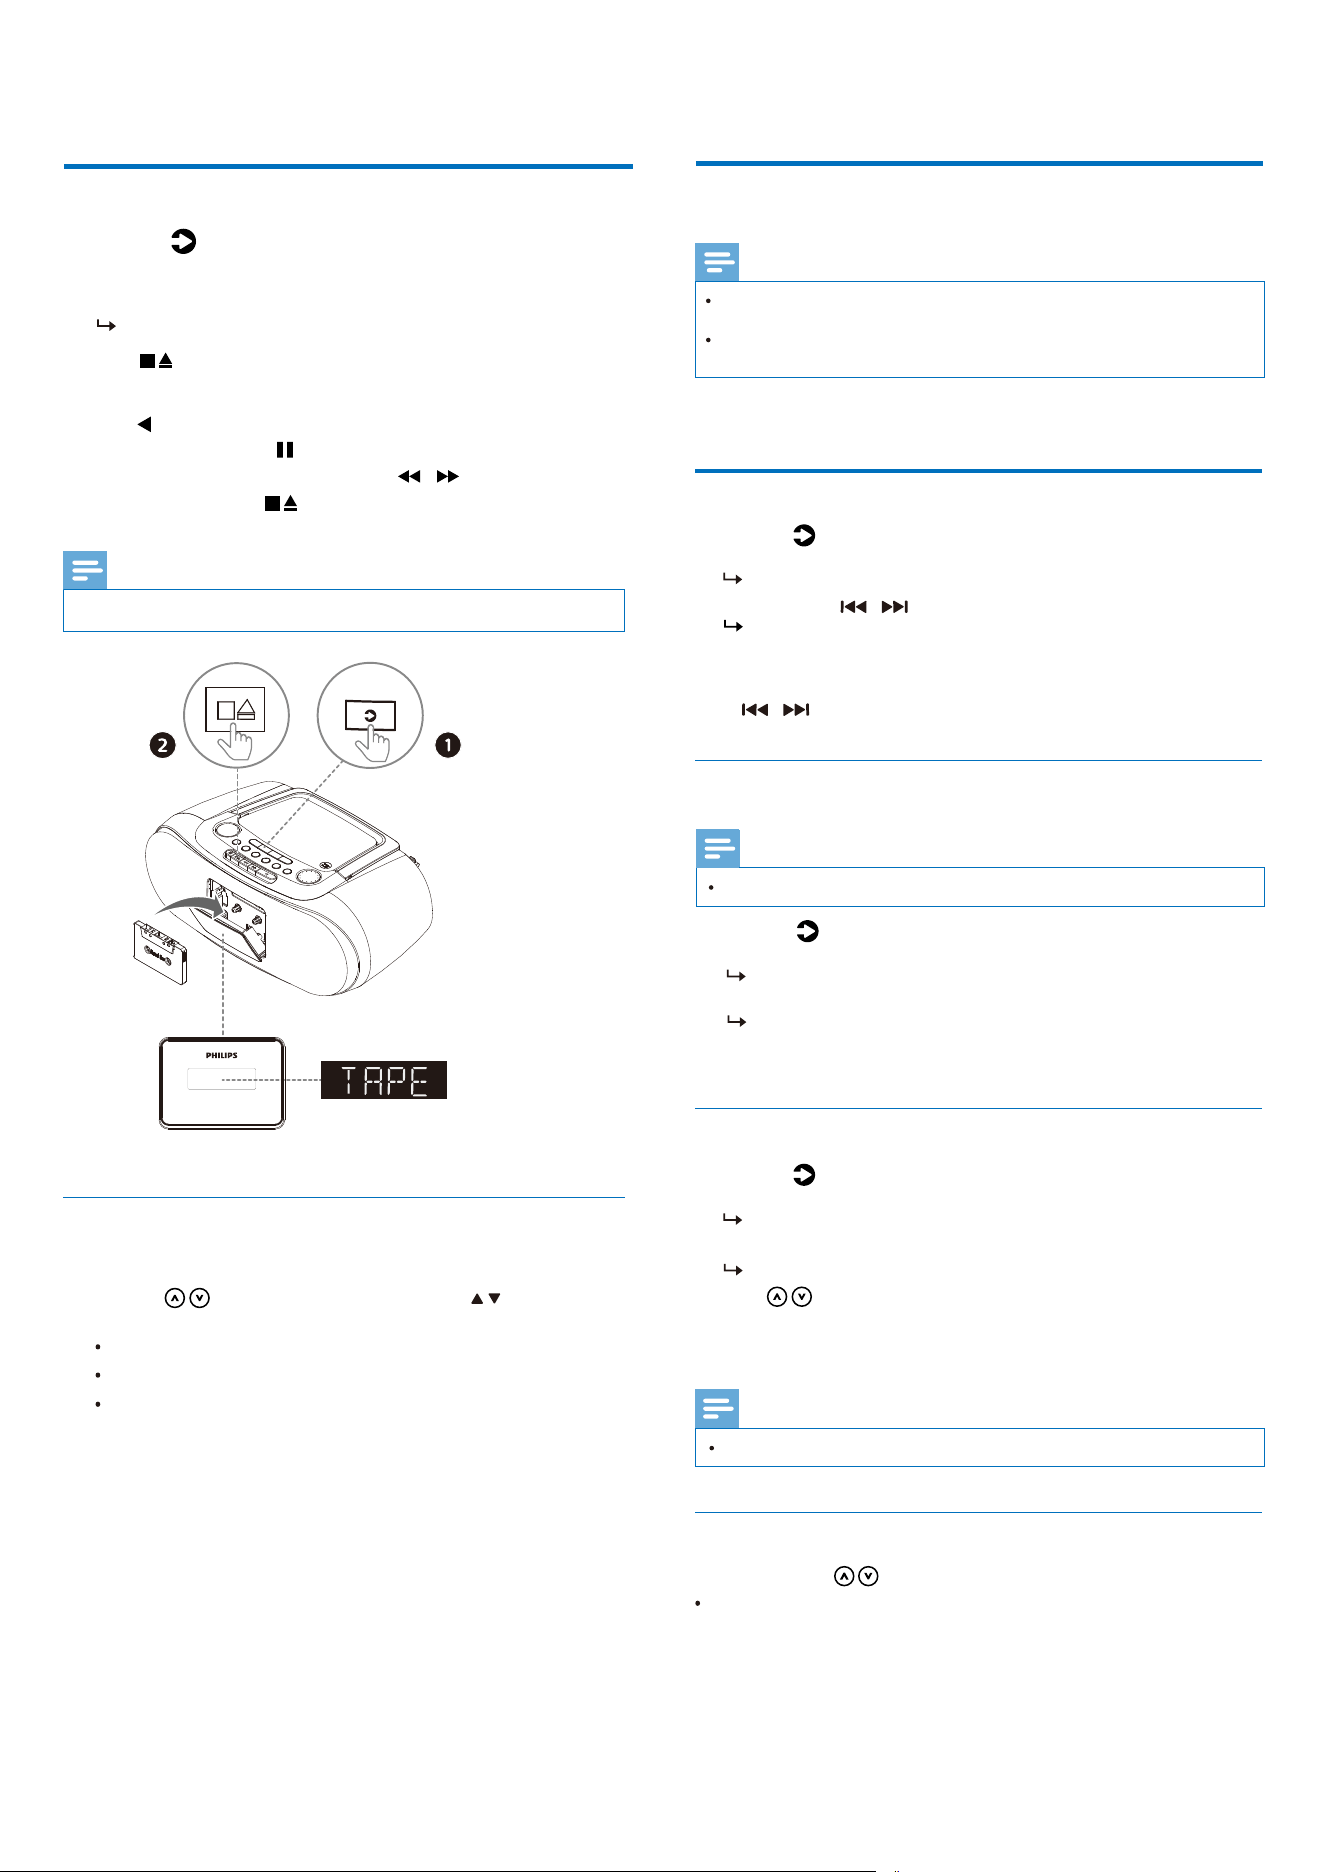
[TAPE] displays on the screen.
Press the button on the main unit to switch to tape source, or
press the TAPE/USB/AUDIO IN button on the remote control to switch
to tape source.
2 Press on the main unit to open the tape door.
3
4 Press on the main unit to start play.
•
To pause play, press on the main unit .
•
To fast rewind or fast forward, press on the main unit .
•
To stop play, press .
Note
•
Load the tape with the open side upward and close the tape door.
Tape playback will stop automatically when playback reaches the end.
Use tape menu
In tape mode, press the MENU button to enter the menu settings.
1
/
5
Play from tape
Play a tape
2
[SLEEP]: Set sleep timer (OFF/15/30/60/90/120min).
[DIM]
: Adjust the display
brightness (HIGH/MED/LOW/OFF).
[SYSTEM]: Access system settings.
Press the buttons on the main panel or the buttons on the
remote control.
In FM mode, press
to select a preset number.
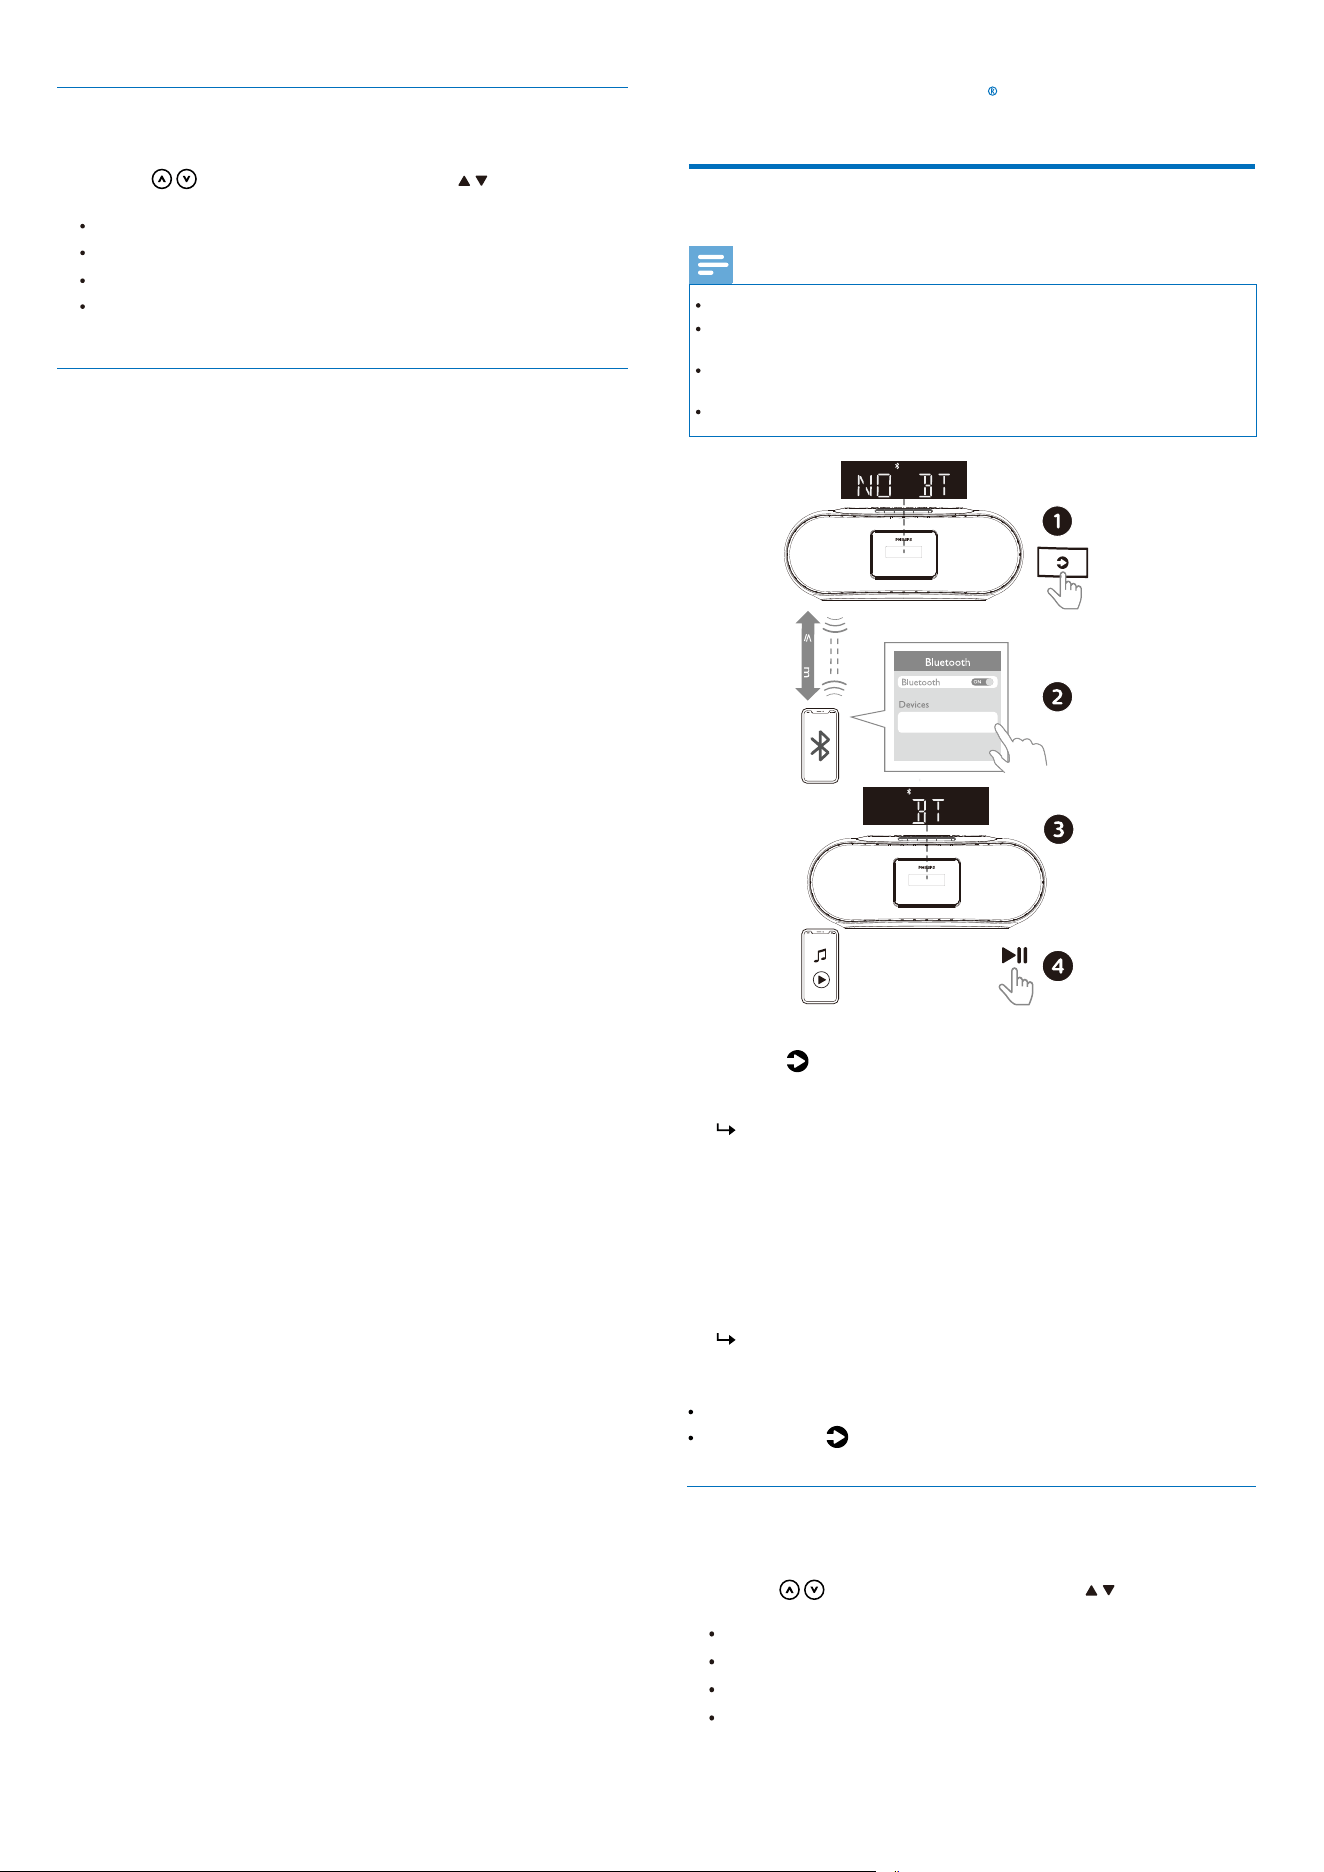
Press the button on the main unit to switch to FM source, or press
the FM button on the remote control to switch to FM source.
6 Listen to the radio
Note
Position the antenna as far as possible from TV, or other radiation
sources.
For optimal reception, fully extend and adjust the position of the
antenna.
Listen to FM radio
Note
You can store a maximum of 30 FM radio stations.
Store FM radio stations automatically
Store FM radio stations manually
Press and hold PROG/PRESET for three seconds.
All available radio stations are stored automatically, then the �rst
stored radio station is broadcast when 30 preset radio radio
stations are stored.
1
Press PROG/PRESET to activate program mode.
[P01] is displayed.
2
Note
To overwrite a programmed station, store another station in its place.
Select a preset FM radio station
Press repeatedly until you �nd optimal reception.
Tune to an FM radio station
Repeat Step 2 to tune to more stations.
3
To tune to a radio station with weak signal:
1
The radio tunes to a station with strong reception automatically.
2
Press and hold for three seconds.
/
/
1
2
While listening to FM radio, you can switch between stereo and mono
by pressing the MODE button.
With this product, you can listen to FM radio.
3
Press to allocate a number from 1-30 to this radio station,
and then press PROG to con�rm.
4 Repeat steps 1-3 to program more stations.
[FM] displays on the screen.
Press the button on the main unit to switch to FM source, or press
the FM button on the remote control to switch to FM source.
[FM] displays on the screen.
Press the button on the main unit to switch to FM source, or press
the FM button on the remote control to switch to FM source.
[FM] displays on the screen.
9 EN
Use FM menu
1 In FM mode, press the MENU button to enter the menu settings.
[SCAN SET]: Access the scan setting.
[SLEEP]: Set sleep timer (OFF/15/30/60/90/120min).
[DIM]: Adjust the display brightness (HIGH/MED/LOW/OFF).
[SYSTEM]: Access system settings.
2
Press the buttons on the main panel or the buttons on the
remote control.
Display RDS information
RDS (Radio Data System) is a service that allows FM stations to show
additional information.
Tune to a FM radio station.
Press INFO button repeatedly to display various RDS information
(if available) such as station name, program type, time, etc.
1
2
7 Play from Bluetooth
Play from classic Bluetooth
Note
Compatibility with all Bluetooth devices is not guaranteed.
Any obstacle between the unit and the device can reduce the operational
range.
The effective operation range between this unit and your Bluetooth
enabled device is approximately 10 meters (30 feet).
The unit can memorize up to 8 previously connected Bluetooth devices.
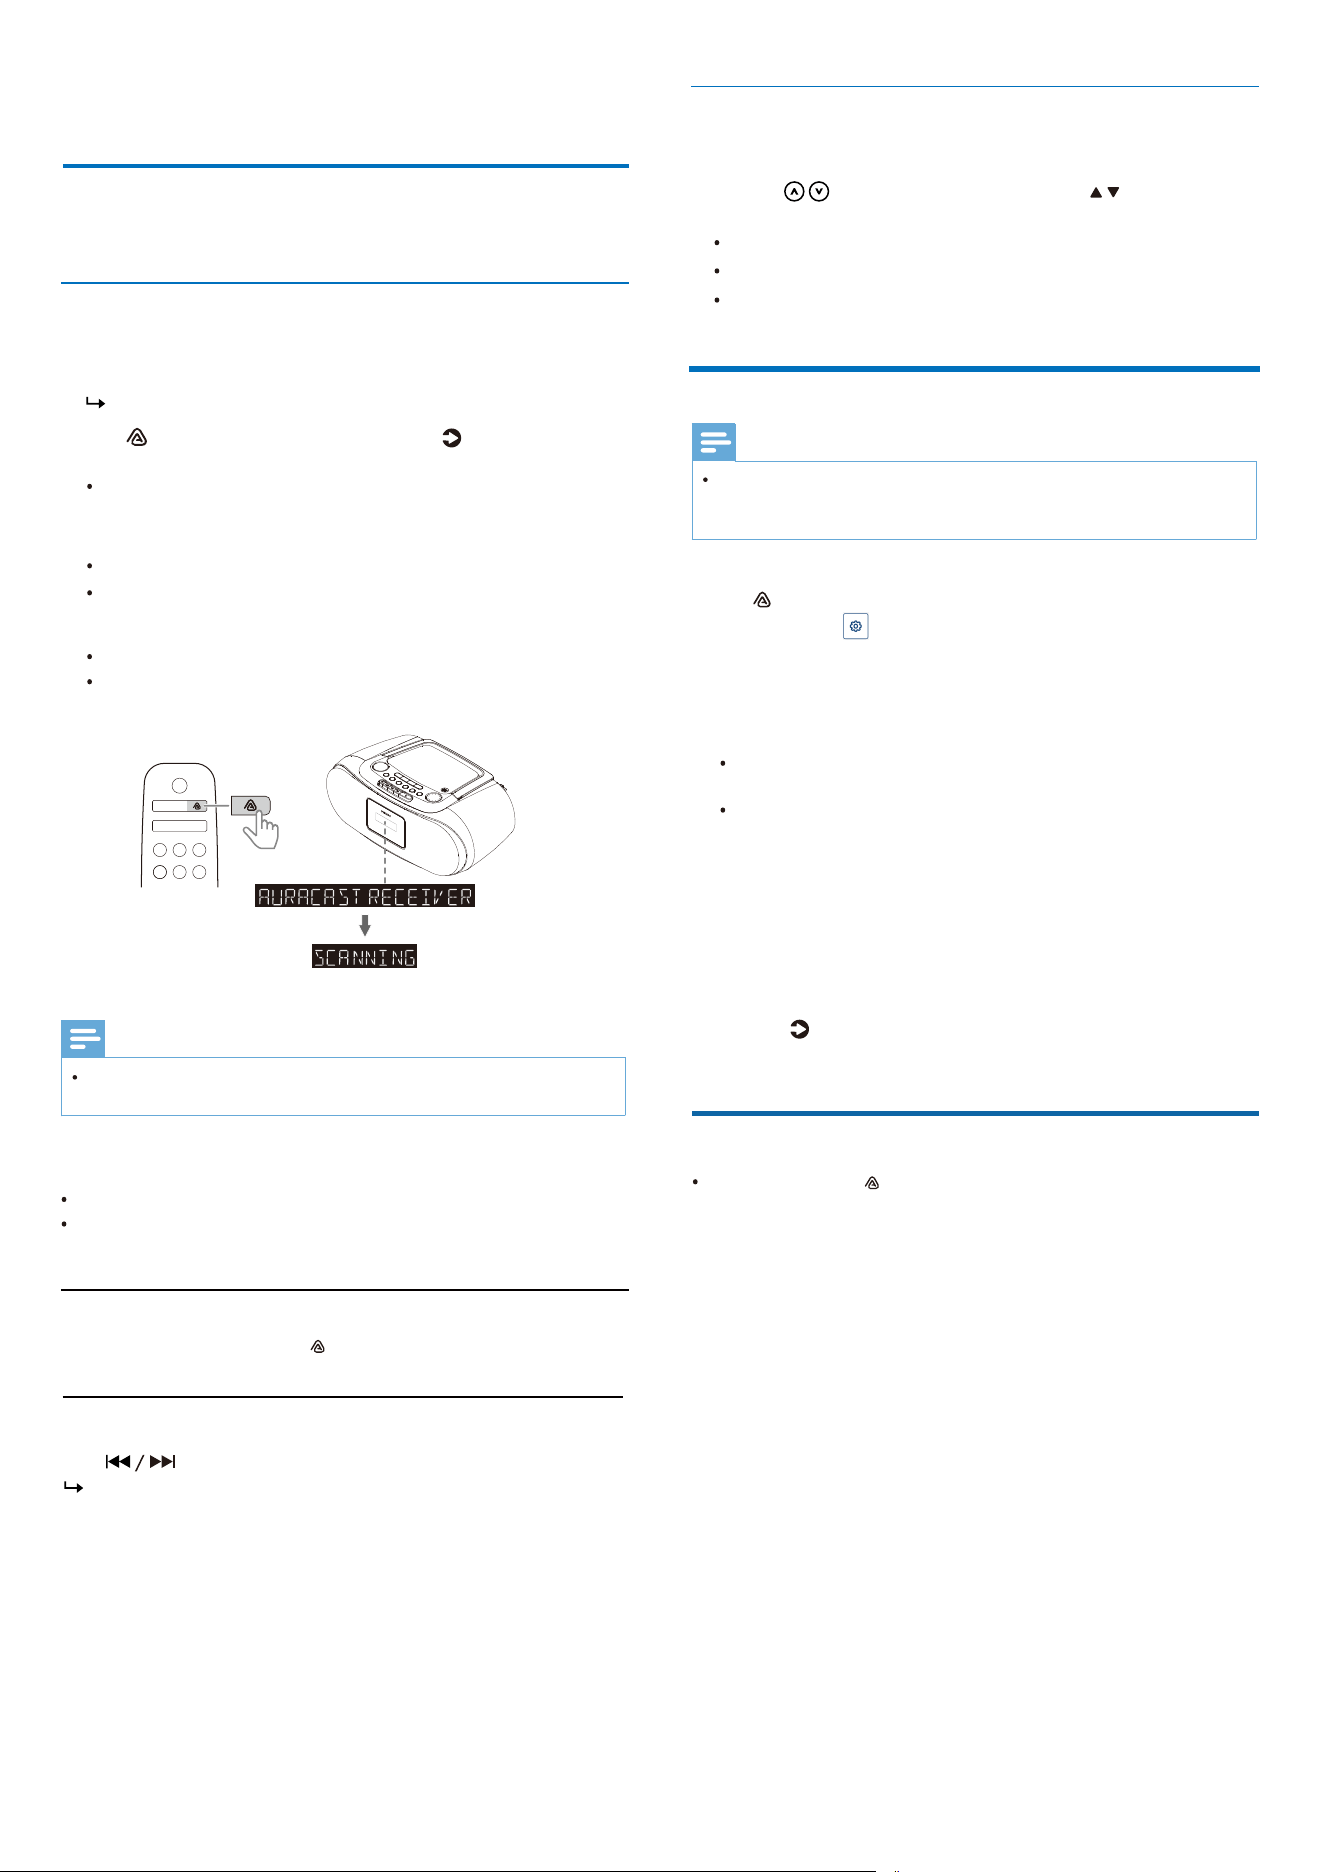
Play audio on the connected device.
To disconnect the Bluetooth-enabled device:
Audio streams from your Bluetooth enabled device to this product.
After successful pairing and connection, [BT] is displayed and you will
hear the prompt sound from the unit.
Deactivate Bluetooth on your device.
Press the button on the main unit to switch to Bluetooth source, or
press the CD/BT button on the remote control to switch to Bluetooth
source.
[NO BT] (Bluetooth) is displayed.
Press and hold on the product for 3 seconds to enter pairing mode.
Use BT menu
1 In BT mode, press the MENU button to enter the menu settings.
[BT PAIR]: Access the pair state.
[SLEEP]: Set sleep timer (OFF/15/30/60/90/120min).
[DIM]: Adjust the display brightness (HIGH/MED/LOW/OFF).
[SYSTEM]: Access system settings.
3
4
1
2
On your device that supports Advanced Audio Distribution Pro�le.
(A2DP), enable Bluetooth and search for Bluetooth devices that can be
paired (refer to the user manual of the device). Select 'Philips TAZ7200'
on your Bluetooth enabled device.
Philips TAZ7200
10
2
Press the buttons on the main panel or the buttons on the
remote control.
EN 10
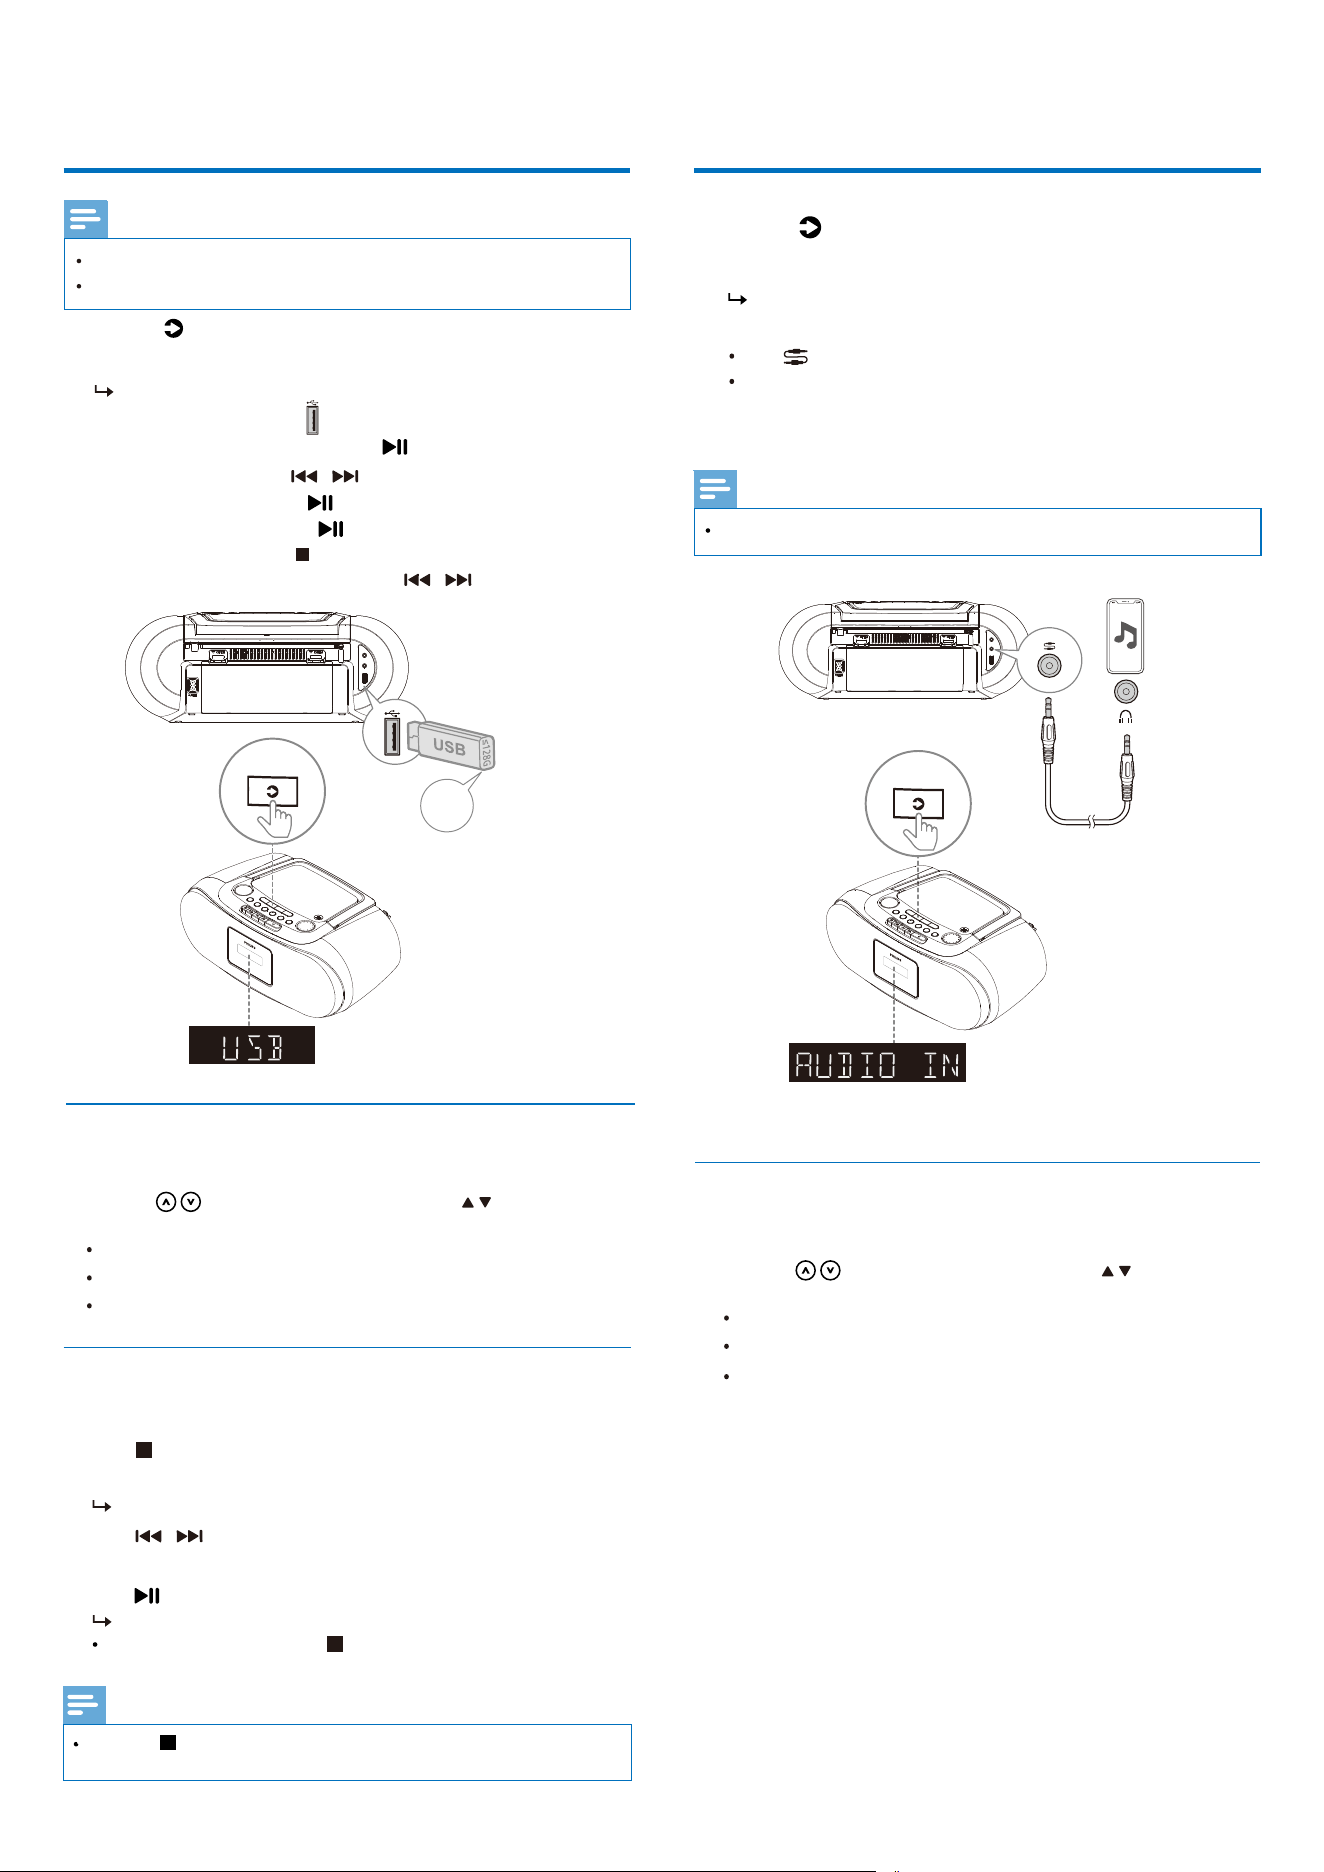
Press to select the Auracast source, or press button on the main
unit to switch to Auracast source.
You can stream the audio from your Auracast enabled device to this
product:
If the encrypted Auracast broadcast comes from your mobile device,
go to the Auracast list in the APP and enter the same password used
when setting up the Auracast broadcast on your mobile device.
8 Play from Auracast
TM
[AURACAST RECEIVER] is displayed.
Auracast
TM
can be used either as a transmitter or a receiver. You can
broadcast your music to this product or any other Auracast-compatible
products.
Auracast receiver
[SCANNING] is displayed.
The product will automatically search for nearby Auracast
broadcasts and connect to the unencrypted broadcast with the
strongest signal.
If Auracast broadcast is not found within 20 seconds, it will enter
idle mode .
After successful connection, Auracast source name is displayed.
To disconnect Auracast, you can:
Switch the product to another source.
Press to select an Auracast broadcast.
Note
Only unencrypted broadcast is selected and encrypted broadcast is
skipped.
Manually scan Auracast broadcast
Select Auracast broadcast
In Auracast receiver mode, press to rescan Auracast broadcast channels.
If you are using the Auracast source for the �rst time, the product will
automatically perform a comprehensive scan.
Deactivate Auracast broadcast on your device if this product is
receiving the Auracast broadcast from your device.
2
1
3
Enable Auracast broadcast on your device that supports Auracast.
When an unencrypted broadcast is selected, the Auracast icon will
be displayed on both the main unit screen and the APP interface.
When an encrypted broadcast is selected, the main unit displays
both the Auracast icon and lock icon, while only the Auracast icon
will be shown on the APP interface.
Auracast broadcast
2 On Philips Entertainment App, enter General Settings, select
Public (unencrypted broadcast) or Personal (encrypted broadcast)
from Auracast broadcaster.
3
You can broadcast to any number of Auracast enabled products.
Follow the instruction of those Auracast enabled products to enable
Auracast connection.
4
If Auracast broadcast channel is encrypted, Auracast recceiver products
are required to enter the password in order to listen to it.
Disconnect Auracast broadcast
Press and hold the button for 3 seconds. Exit Auracast broadcast
from your CD soundmachine.
Note
Auracast receiver and Auracast broadcast cannot be turned on
simultaneously. If you try to turn on Auracast broadcast in Auracast
receiver mode, you will not be able to switch successfully. Vice versa.
1
In CD/Bluetooth/FM/TAPE/USB/Audio in source, press and hold
the button for 3 seconds or select General Settings on Philips
Entertainment( →Auracast broadcast) to enter into Auracast
broadcast.
5 Press the button to switch between CD/Bluetooth/FM/TAPE/USB
/Audio in to play different audio sources.
Use Auracast menu
In Auracast mode, press the MENU button to enter the menu settings.
[SLEEP]: Set sleep timer (OFF/15/30/60/90/120min).
[DIM]
: Adjust the display
brightness (HIGH/MED/LOW/OFF).
[SYSTEM]: Access system settings.
2
1
Press the buttons on the main panel or the buttons on the
remote control.
11 EN
9 Play from USB
Play starts automatically. lf not , press .
Note
Press the button on the main unit to switch to USB source, or press
the USB/AUDIO IN/TAPE button on the remote control to switch to USB
source.
3
1
2
Insert a USB device into the port.
Make sure that the USB device contains playable audio content.
Support FAT16/FAT32 �le format. Support ≤128G.
• To select a track, press .
• To pause USB play, press .
• To resume USB play, press again.
• To stop USB play, press .
• To fast forward or rewind, long press .
/
Use USB menu
In USB mode, press the MENU button to enter the menu settings.
[SLEEP]: Set sleep timer (OFF/15/30/60/90/120min).
[DIM]
: Adjust the display
brightness (HIGH/MED/LOW/OFF).
[SYSTEM]: Access system settings.
≤128G
/
Program tracks
In USB mode, you can program a maximum of 99 tracks in USB.
Press to stop playback.
Repeat Step 3 to program more tracks.
4
1
2
Press to select a track number, then press PROG to con�rm.
3
Press PROG to activate the program mode.
/
Press to play the programmed tracks.
5
To erase the program, press twice.
During play, PROG (program) is displayed.
[P01 T01] displays on the screen.
Note
Press the button to exit the program mode in program status. When
the number of program tracks reaches 99, a FULL message will be displayed.
2
1
Press the buttons on the main panel or the buttons on the
remote control.
[USB] is displayed.
10 Listen to an external device
Note
The AUDIO IN socket is not for headphones.
2
3
You can listen to an external device through this unit with an audio cable.
1
Use AUDIO IN menu
In AUDIO IN mode, press the MENU button to enter the menu settings.
1
2
[SLEEP]: Set sleep timer (OFF/15/30/60/90/120min).
[DIM]
: Adjust the display
brightness (HIGH/MED/LOW/OFF).
[SYSTEM]: Access system settings.
Press the button on the main unit to switch to AUDIO IN source,
or press the USB/AUDIO IN/TAPE button on the remote control to
switch to AUDIO IN source (3.5mm, not supplied).
Connect the audio cable to:
The socket on the unit ;
The headphone jack on the external device.
Play audio on the external device (see the device's user manual).
Press the buttons on the main panel or the buttons on the
remote control.
[AUDIO IN] displays on the screen.
EN 12
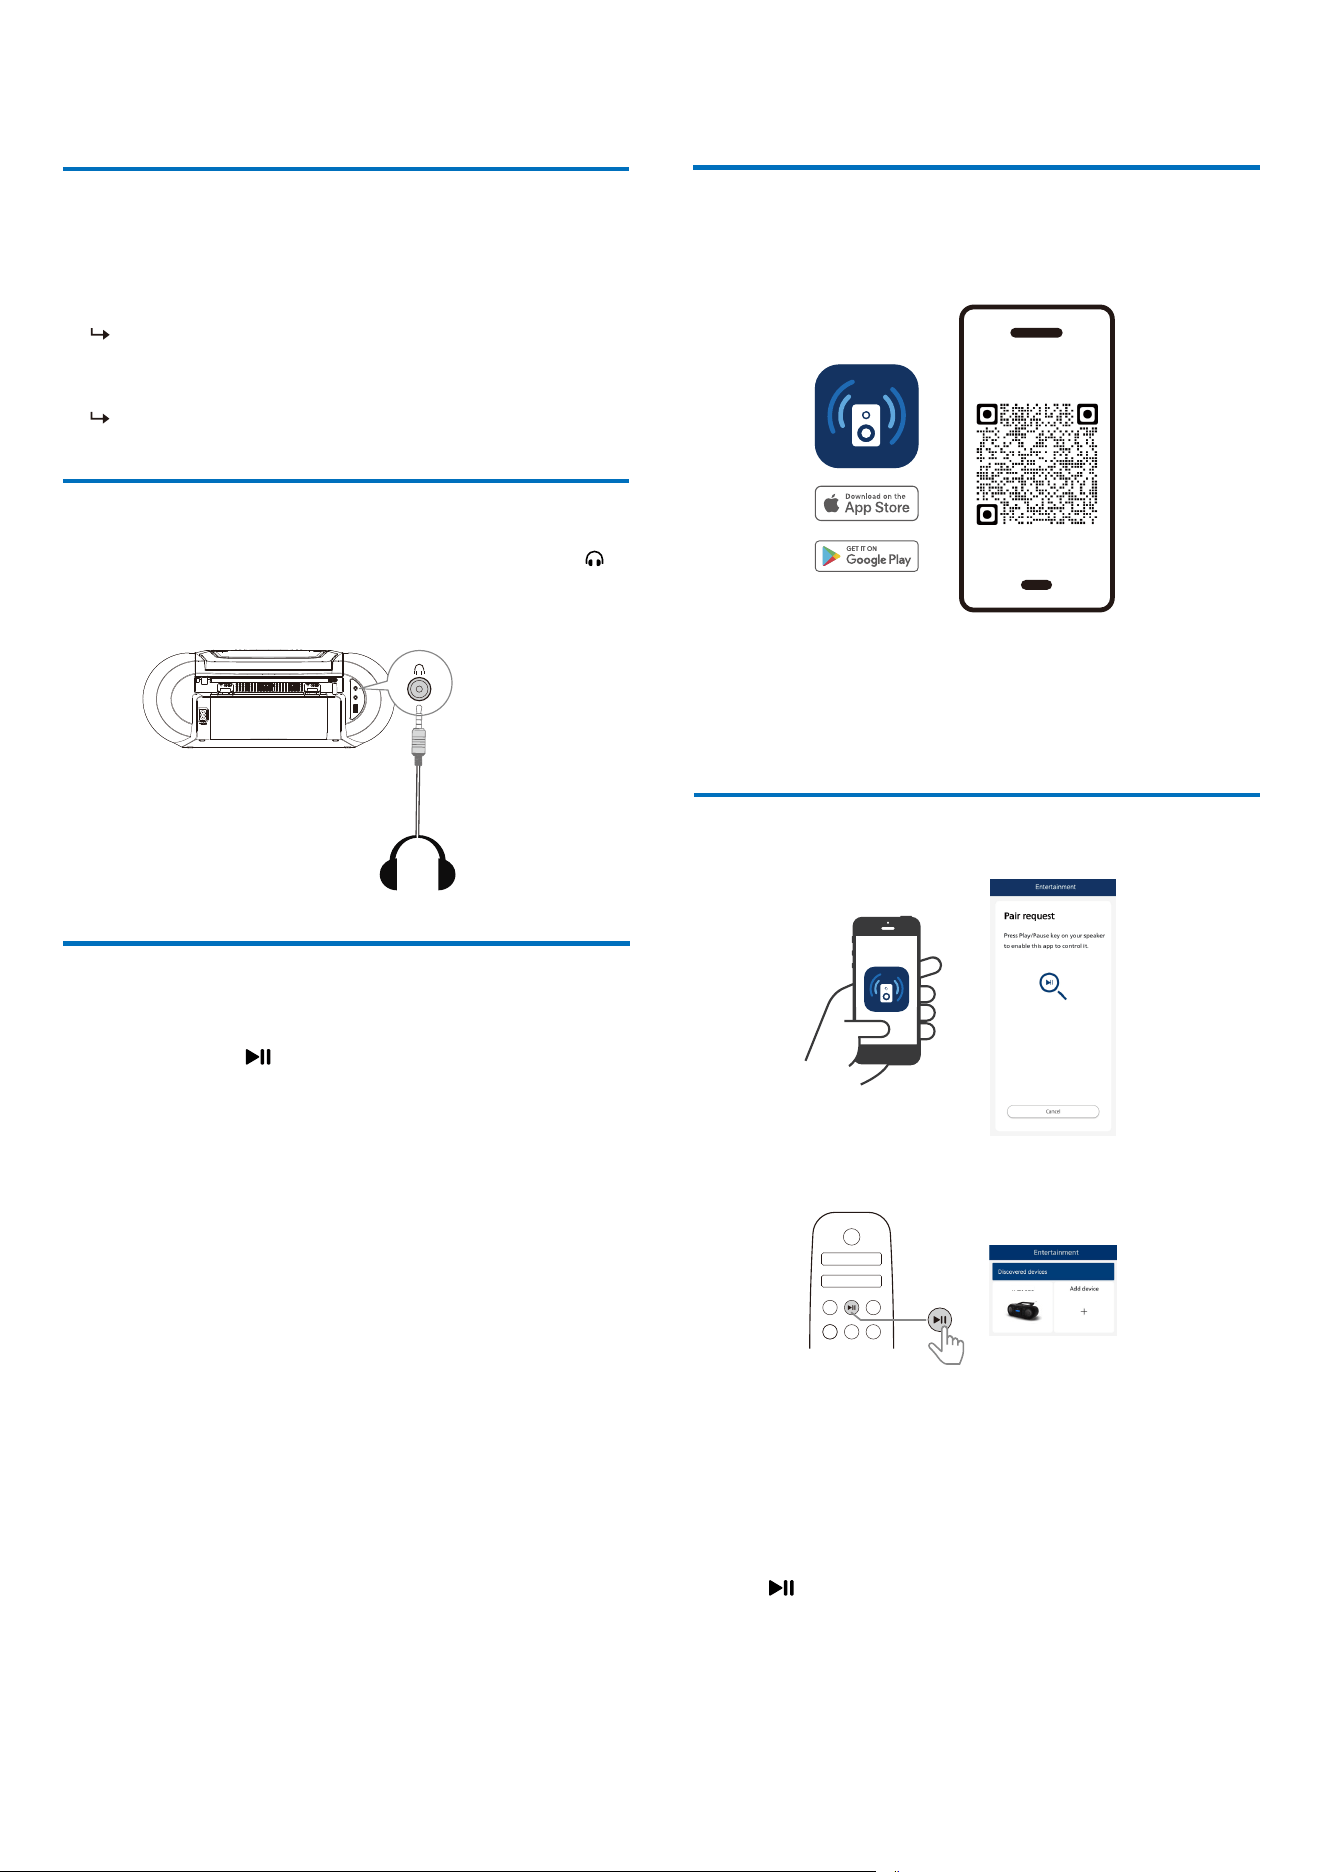
To listen via wired headphones, connect the headphones to the jack .
11 Other features
• When the CD soundmachine is turned on, press the SLEEP button
repeatedly to select minutes (OFF/15/30/60/90/120min).
When sleep timer is activated, the SLEEP icon will be displayed.
To deactivate sleep timer
• Press SLEEP repeatedly until [OFF] (sleep off) is displayed.
When sleep timer is deactivated, the SLEEP icon will disappear.
Set the sleep timer
Connect with headphones
Factory reset
This CD soundmachine can switch to standby automatically after a set
period of time.
Reset device to default setting:
After the unit is powered on, set to AUDIO IN source with volume level 2,
then press and hold the button on the main unit panel for 5 seconds.
Once restored to factory default settings, the device will restart.
12 Philips Entertainment App
App download
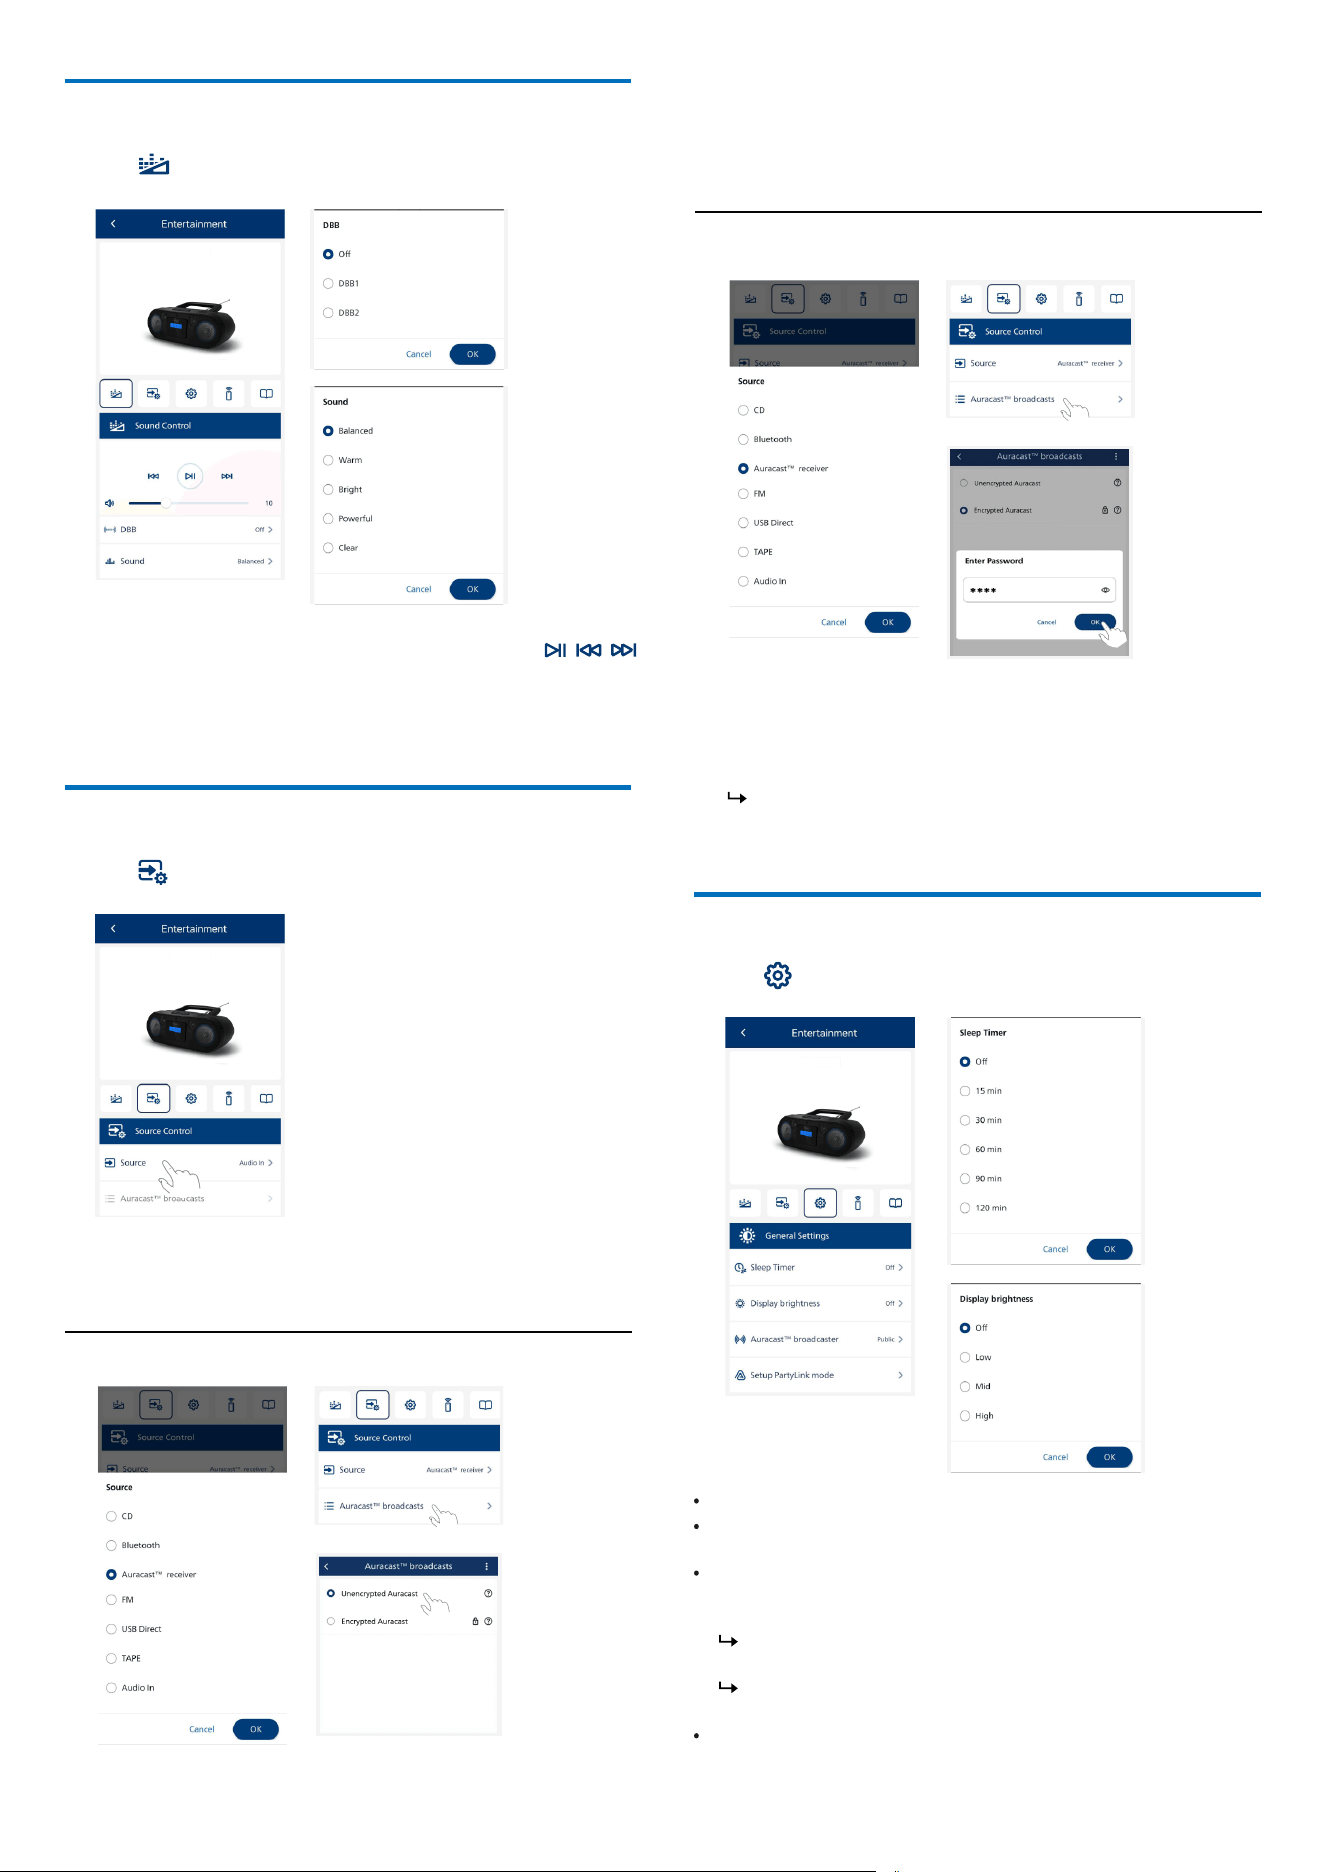
Scan the QR code and press "Download" button, or search "Philips
Entertainment" in the Apple App Store or Google Play to download the App.
philips.to/entapp
The Philips Entertainment App puts you in charge of the music you are
listening to. You can use your smart device to easily choose the sound style
you want, switch between sources, and more.
Pair the App with your CD soundmachine
3
2
1
Launch the Philips Entertainment App on your mobile device.
Make sure Bluetooth is enabled on your mobile device.
If you connect the Philips Entertainment App with your CD
soundmachine for the �rst time, you are asked to pair the App with
your CD soundmachine.
4
Press button on your CD soundmachine to enable the App to
discover and control it.
TAZ7200
13 EN
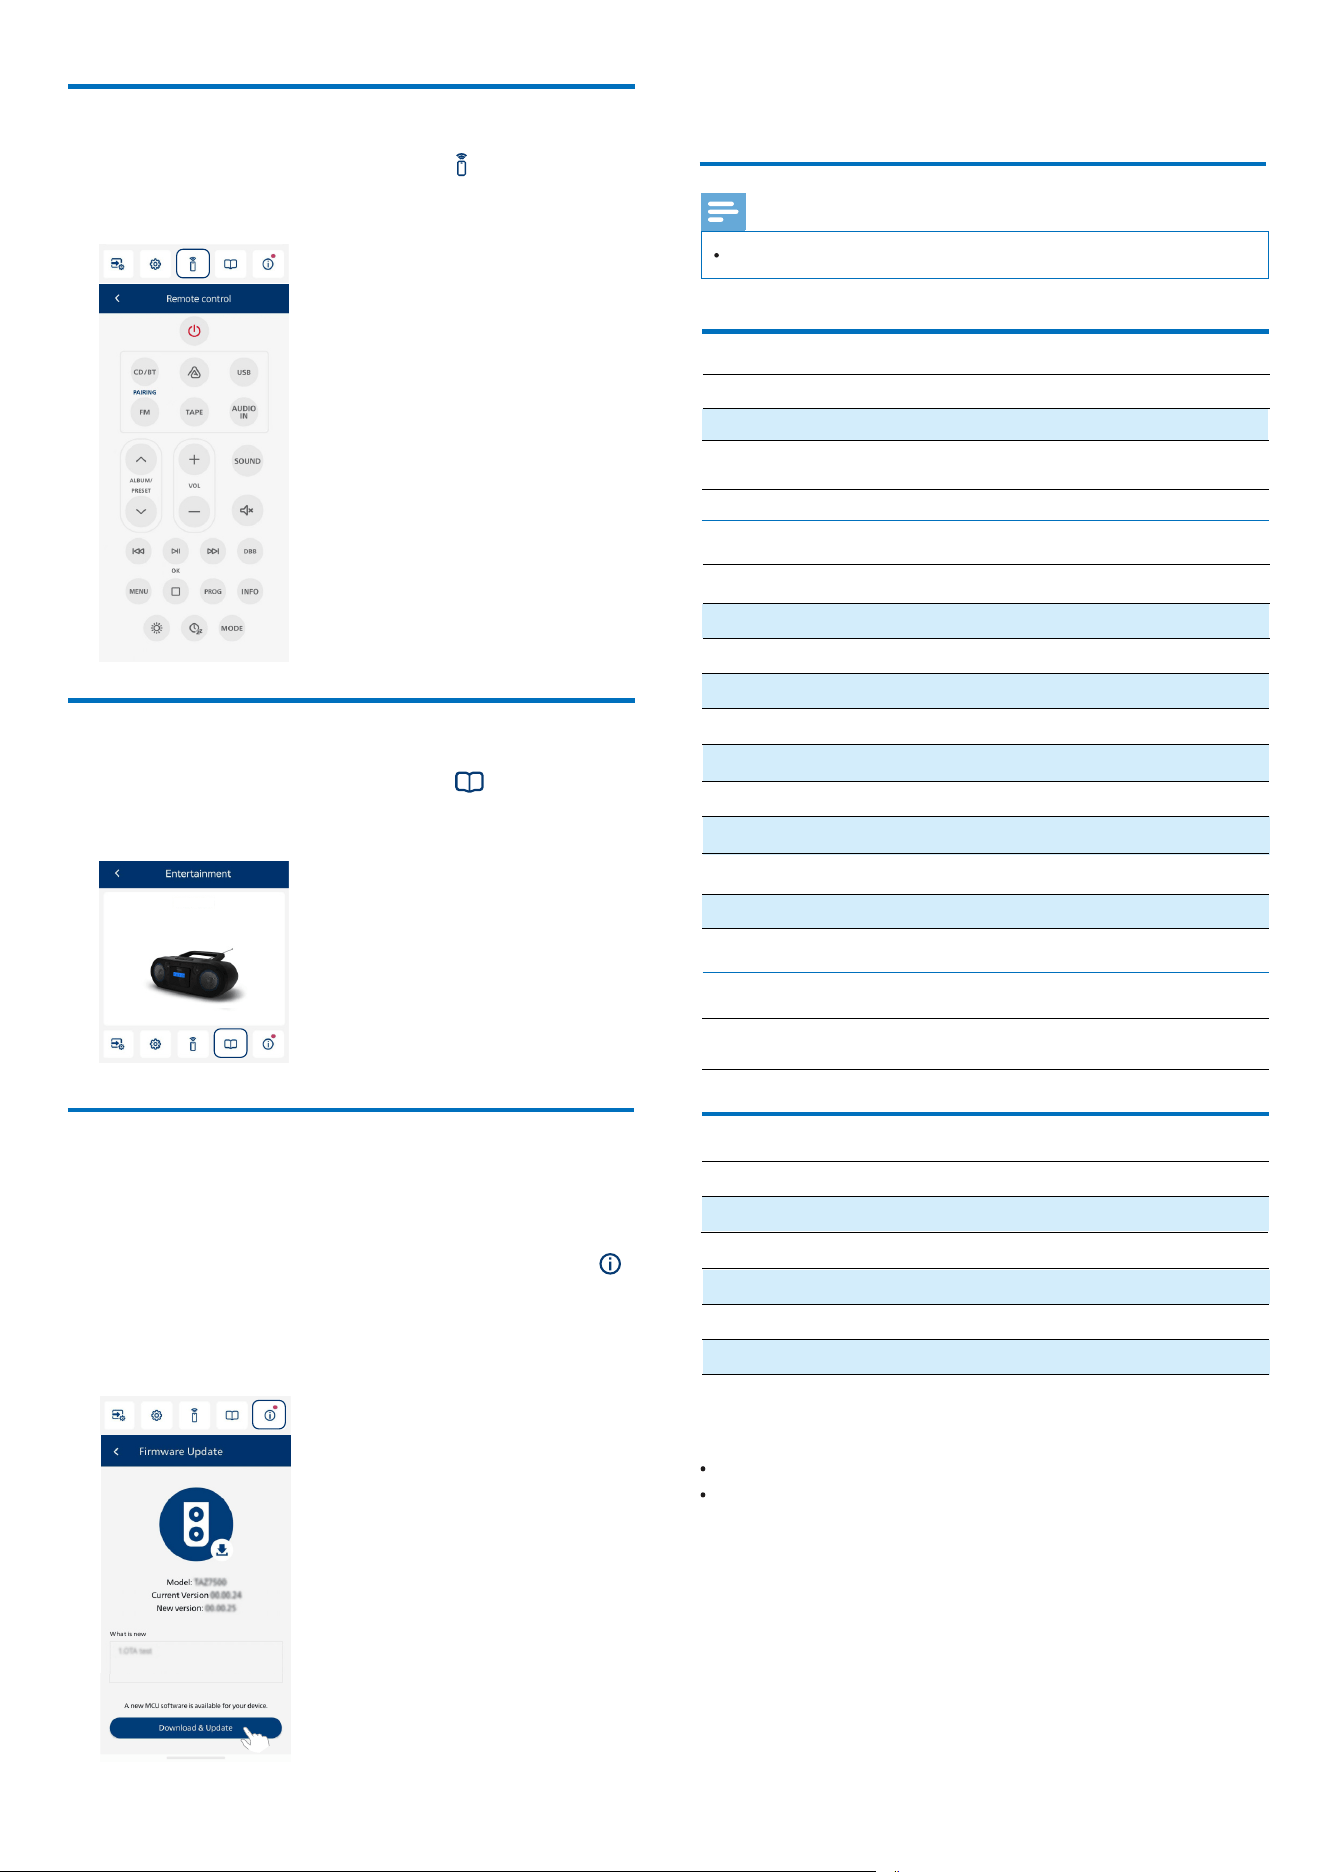
You can control the music playback on the App by pressing the , ,
buttons, and adjust the volume by dragging the control bar.
You can also tap [DBB] to turn dynamic Bass Boost 1/2/OFF. Press [Sound]
to select from the prede�ned sound modes to suit your music: Balanced/
Warm/Bright/Powerful/Clear.
Click [Source] to select from various sources: CD/Bluetooth/Auracast
TM
receiver/FM/USB Direct/TAPE/Audio in.
Play music and adjust the sound
Press the icon to enter sound control.
Switch sources
Press the icon to enter Source control.
Listen to unencrypted Auracast™ broadcast
TAZ7200
TAZ7200
3
2
1
Click [Source] and select the [Auracast
TM
receiver] source.
Click [Auracast
TM
broadcasts] to enter the Auracast
TM
broadcast list.
When an unencrypted playback source is selected, the main unit will
search and connect to it.
Listen to encrypted Auracast™ broadcast
3
2
1
Click [Source] and select the [Auracast
TM
receiver] source.
Click [Auracast
TM
broadcasts] to enter the Auracast
TM
broadcast list.
When an encrypted playback source is selected, you will be asked to
input a password.
If the encrypted Auracast broadcast is from your mobile device,
enter the same password that you input when setting up the
Auracast
TM
broadcast from your mobile device.
General settings
Press the icon to enter General settings.
Click [Auracast
TM
broadcaster] to set this main unit as an Auracast
transmitter and allow other Aurcast-enabled devices to receive its
Auracast broadcast.
Click [Setup Partylink mode] and follow the prompts to connect your
main unit with other Auracast
TM
-compatible main units.
Click [Display brightness] to set the display brightness level (OFF/LOW/
MID/HIGH).
Click [Sleep Timer] to set the sleep duration (OFF/15/30/60/90/120 minutes).
Select [Public]: Other devices can receive the broadcast from this
main unit without a password.
Select [Personal]: You need to set a password. Other devices will be
required for the password to receive the broadcast from this main unit.
TAZ7200
EN 14
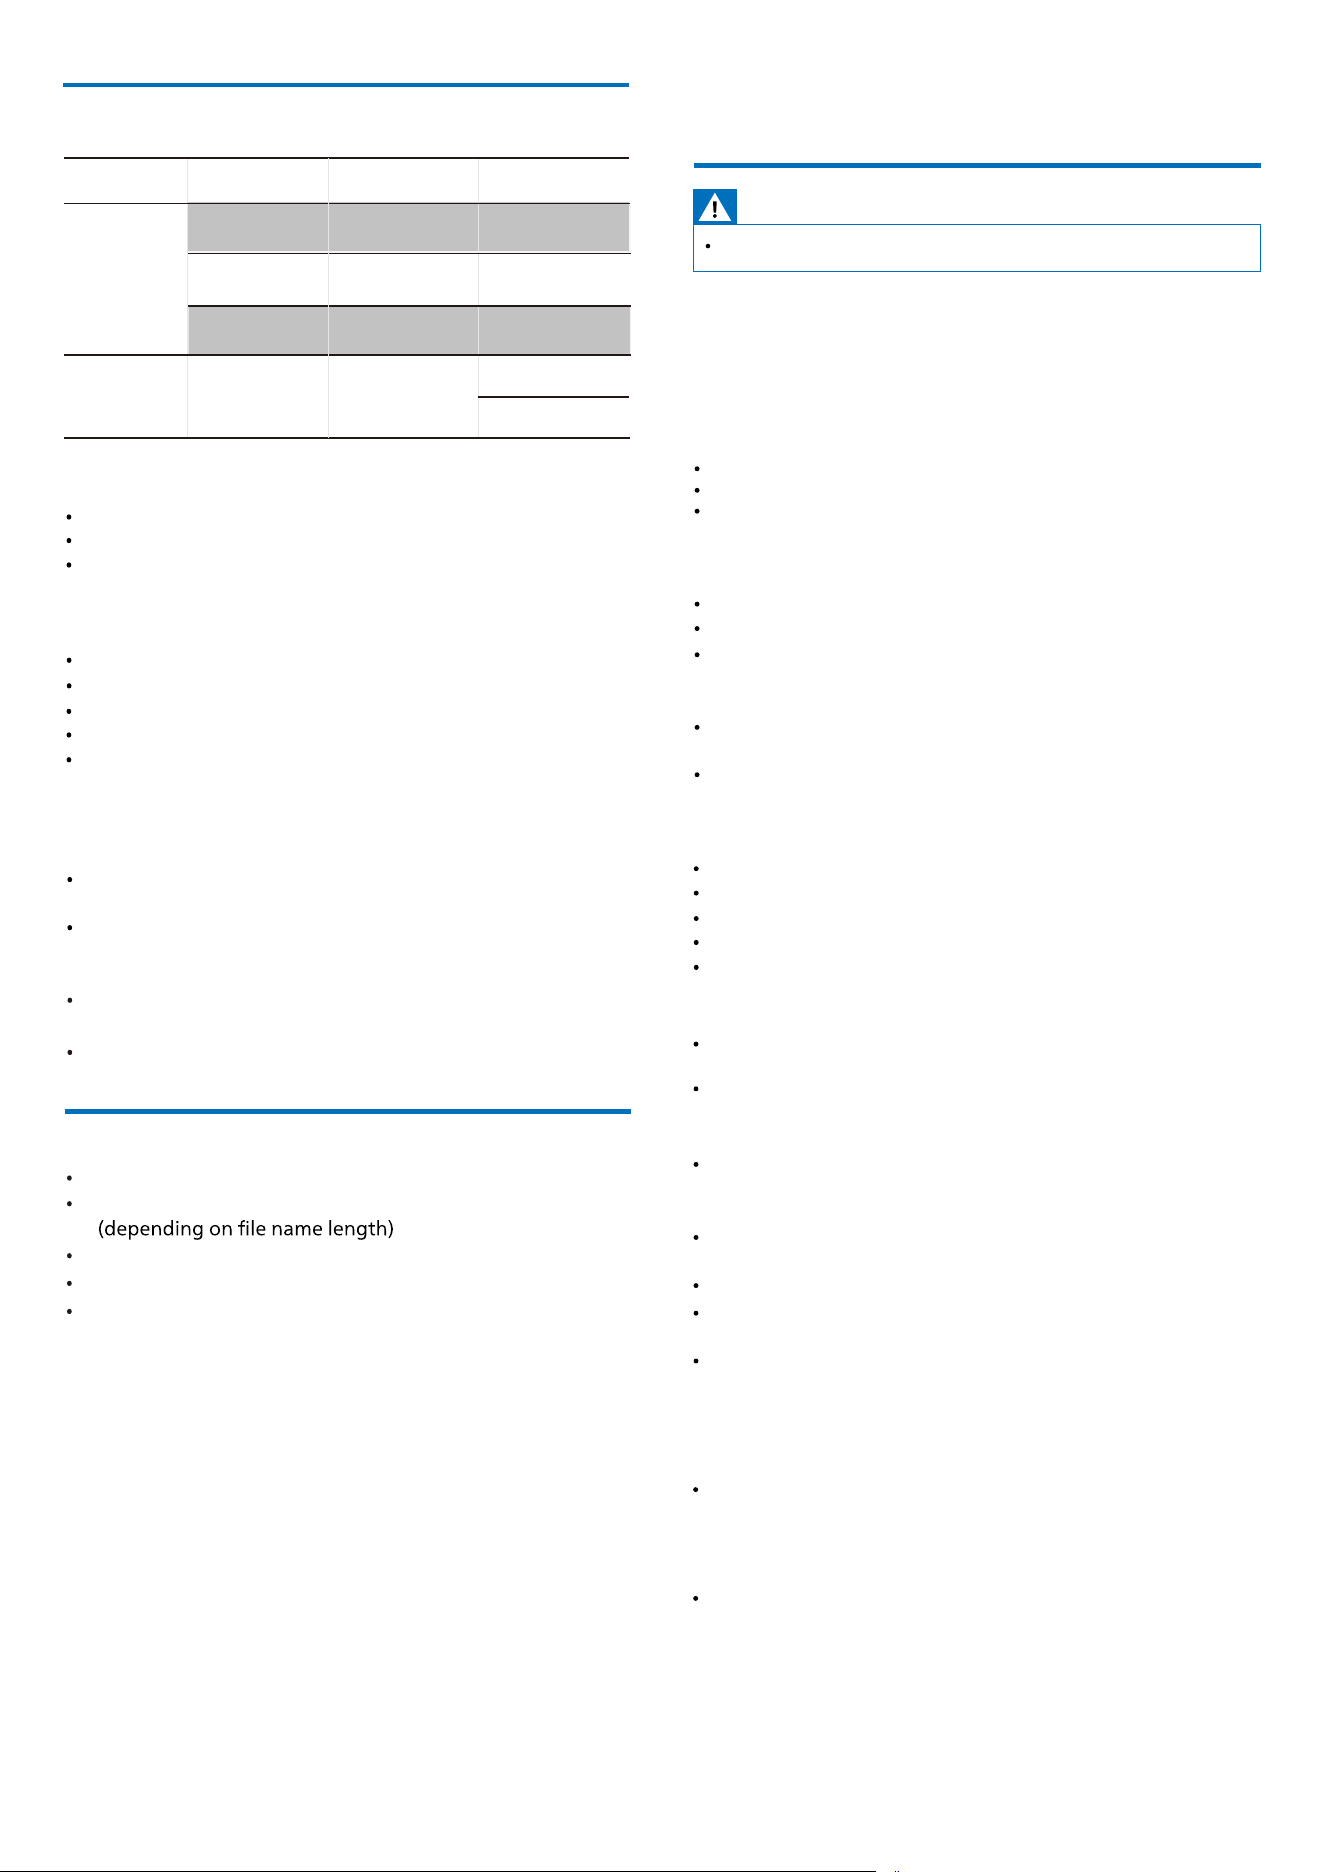
Swipe the menu icons to the left until you �nd the icon. Press it to enter
the virtual remote control interface. You can use the virtual remote control
for music playback and adjust any settings of the main unit.
Virtual remote control
Swipe the menu icons to the left until you �nd the icon. Press it to
check the user manual and quick start guide for more information about
using this main unit.
User guide
To get the best features and support, update your product with the latest
software version.
The software of this product can be upgraded to the latest version via the
Philips Entertainment App.
If the upgrade is released, you'll see a red number popping up on the
icon of the App. Click into it and you'll �nd the [Download & Upgrade] icon
can be pressed to proceed automatically.
Once this product is connected to the Philips Entertainment App, it can
receive over-the-air software update. Always upgrade to the latest software
version to improve the performance of this product.
Software upgrade
TAZ7200
13 Product speci�cation
Note
USB playback
CD soundmachine
Supported audio formats
Tuner f
requency
range
AUDlO IN input level 700mV
Power 100-240V~, 50/60 Hz (AC Input)
Rated output power
T
otal 12W (RMS)
Acoustic frequency response
125Hz-20kHz
Main unit driver
2 x 4” full range, 8Ω
Operation power consumption
6 W
Standby power consumption
Dimensions (W x H x D)
Weight
3 kg
Bluetooth
Bluetooth pro�les
A2DP, AVRCP
Bluetooth version
V 6.0
Bluetooth frequency
range/Transmitter power (EIRP)
2402 ~ 2480MHz, < 9dBm
12cm/8cm
24Bits/44.1kHz
< 1%
CD-DA, CD-R, CD-RW, CD-MP3
semiconductor
Disc
Laser Type
Disc Diameter
Support Disc
Audio DAC
> 55 dBAS/N Ratio
Total Harmonic Distortion
Product information is subject to change without prior notice.
FM 87.5-108MHz
435 x168 x 253 mm
Type A, USB Direct 2.0, MSC �le
format, FAT16/32
< 0.5W (Display off)
Battery life
Playback of CD Approx. 28 hours
Playback of FM reception Approx. 106 hours
Measured per Philips standards: Brightness (Medium), Volume (16),
Philips battery R20/UM2/C CELL, the actual battery life may vary
depending on the circumstances of the unit or operating conditions.
15 EN
USB play ability information
Compatible USB devices:
USB �ash memory (USB2.0 or USB1.1)
USB �ash players (USB2.0 or USB1.1)
Memory cards (requires an additional card reader to work with this
unit)
Unsupported USB formats:
Supported USB formats:
MP3 bit rate (data rate): 32-320 kbps
WMA bit rate (data rate): 48-192 kbps/64-161 kbps VBR
Directory nesting up to a maximum of 8 levels
Number of albums/folders: maximum 99
Number of tracks/titles: maximum 999
File name in Unicode UTF8 (maximum length: 32 bytes)
USB or memory �e format: FAT16, FAT32 (sector size: 512 bytes)
Empty albums: an empty album is an album that does not contain
MP3 �les, and will not be shown in the display.
Unsupported �le formats will be skipped. For example, Word �les
(. doc) or MP3 �les with the extension (.dif) will be ignored and will
not be played.
WMA, AAC, WAV, PCM audio �les: DRM protected WMA �les. (Note:
only support some wav audio �les.)
WMA �les in lossless format.
.mp3
Extension
Codec
Sample Rate Bitrate
MPEG 1
Layer 1
MPEG 1
Layer 2
MPEG 1
Layer 3
32~48 kHz
32~48 kHz
32~48 kHz
48~320 kbps
48~320 kbps
48~320 kbps
IS09660, Joliet
Maximum title number: 128
Maximum album number: 99
Supported sampling frequencies: 44.1 kHz, 48 kHz
Supported Bit-rates: 48~256(kbps), variable bit rates
Supported MP3 discformats
16~48 kHz
48~192 kbps
.
wma WMA
64~161 kbps VBR
Warning
14
Troubleshooting
Never remove the casing of this device.
To keep the warranty valid, never try to repair the system yourself.
If you encounter problems when using this device, check the following
points before requesting service. lf the problem remains unsolved, go to
the Philips webpage (www.philips.com/support). When you contact
Philips, make sure that the device is nearby and the model number and
serial number are available.
No power
No sound or poor sound
Cannot display some �les in USB device
USB device not supported
Adjust the volume.
Check that the product is connected correctly.
Check if the stripped wires are clamped.
No reponse from the unit
Make sure that the AC power cord of the device is connected properly.
Make sure that there is power at the AC outlet.
As a power-saving feature, the system switches off automatically 15
minutes after track play reaches the end and no control is operated.
Disconnect and reconnect the AC power plug, then turn on the unit
again.
As a power-saving feature, the system switches off automatically 15
minutes after track play reaches the end and no control is operated.
No disc detected
Insert a disc.
Check if the disc is inserted upside down.
Wait until the moisture condensation at the lens has cleared.
Replace or clean the disc.
Use a �nalized CD or correct format disc.
The number of folders or �les in the USB device has exceeded a
certain limit. This phenomenon is not a malfunction.
The formats of these �les are not supported.
Poor radio reception
The USB device is incompatible with the unit. Try another one.
Increase the distance between the unit and your TV or other radiation
sources.
Connect an outdoor radio antenna. You may purchase a replace-
ment antenna cable with a L-shape plug on one end.
The Bluetooth reception is poor. Move the device closer to this unit
or remove any obstacle between them.
Connect the L-shape plug to this product, and �t the plug on the
other end into your wall socket.
Fully extend the radio antenna.
The device cannot be used to play music through this unit wirelessly.
Music playback is unavailable on this unit even after
successful Bluetooth connection.
The audio quality is poor after connection with a Bluetooth
-enabled device.

The device does not support the pro�les required for this unit.
The Bluetooth function of the device is not enabled. Refer to the user
manual of the device to �nd out how to enable the function.
This unit is not in pairing mode.
This unit is already connected with another Bluetooth-enabled device.
Disconnect that device and then try again.
Bluetooth cannot be connected with this unit.
The paired mobile device connects and disconnects
constantly.
The Bluetooth reception is poor. Move the device closer to this unit or
remove any obstacle between them.
Some mobile phones may connect and disconnect constantly when
you make or end calls. This does not indicate any malfunction of this
unit.
EN 16
Speci�cations are subject to change without notice.
2026 Philips and the Philips Shield Emblem are registered trademarks of Koninklijke Philips N.V. and are used under
license. This product has been manufactured by and is sold under the responsibility of MMD Hong Kong Holding
Limited or one of its affiliates, and MMD Hong Kong Holding Limited is the warrantor in relation to this product.
TAZ7200_37_UM_V1.0