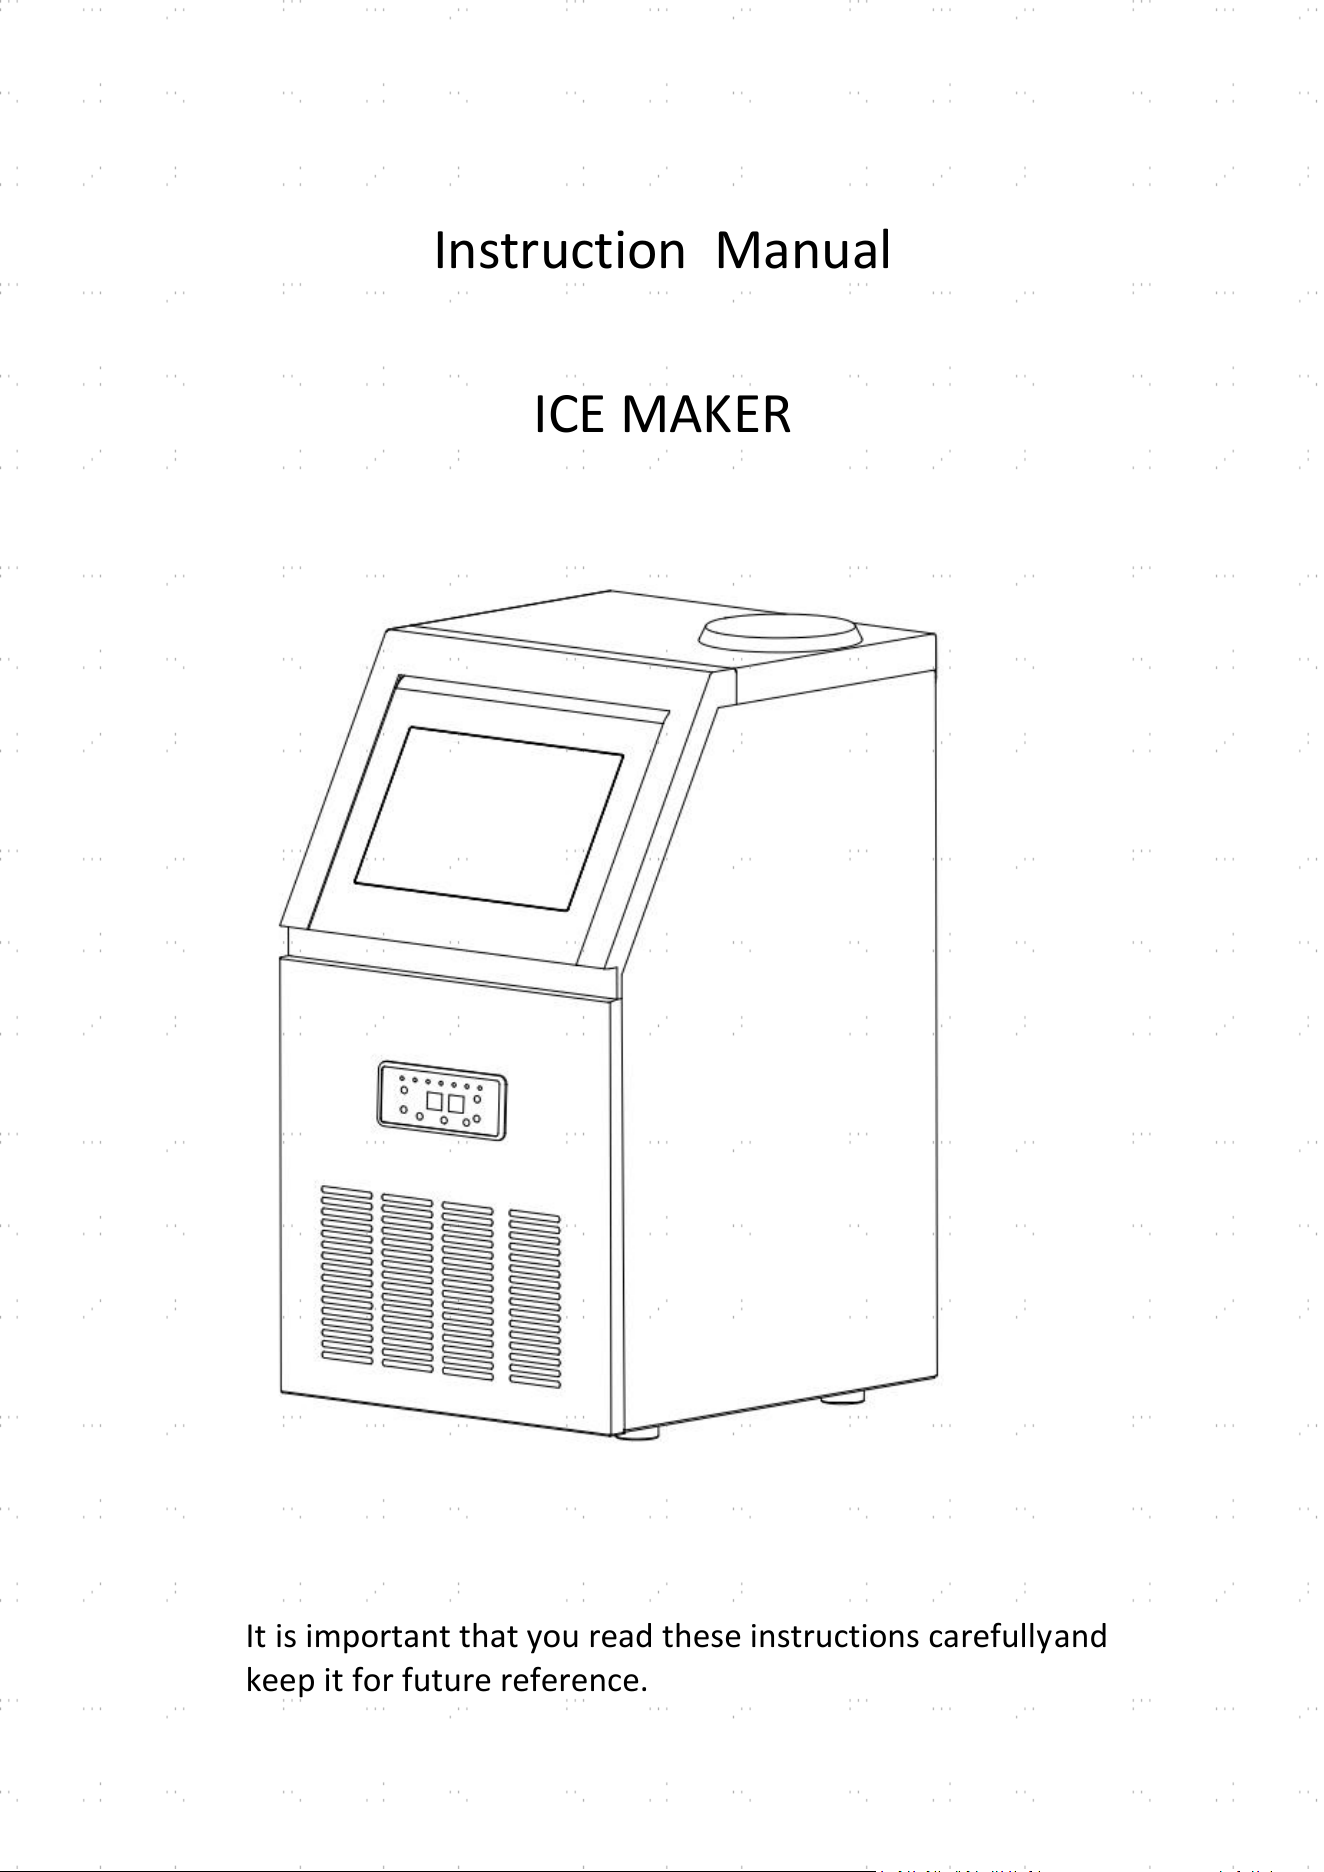
Instruction Manual
ICE MAKER
It is important that you read these instructions carefullyand
keep it for future reference.

IMPORTANT SAFETY INSTRUCTIONS
When using electrical appliances, basic safety precautions should be followed to reduce
the riskoffire,electricshockandinjurytopersonsorproperty.Read all instructions before
operating the machine for the first time.
CAUTION: ICE CAN’T BE STORED IN THE ICE BIN DURING NIGHT TIME,IT’S NOT FRIDGE,ICE
WILL BE MELTED TO WATER AND GET OUT OF THE MACHINE.
1. If connect with water supply, CAUTION: must connect the potable water supply;
2. The machine is intended to be used in household and similar applications such as:
-staff kitchen areas in shops,offices and other working environments;
-farm houses
-by clients in hotels,motels and other residential type environments;
-Catering industry and similar non-retail industry.
3. The machine should be used in household and without obstacles surrounded, good
ventilation place.There is must be 15cm at least between the four sides of the
machine with the wall.
4. When using electrical appliances,basic safety precautions should be followed to
reduce the risk of fire,electric shock and injury to persons or property.Read all
instructions before using any appliance.
5. Don’t operate this or any other appliance with a damaged cord.
6. Connect to properly polarized outlets only.No other appliance should be plugged into
the same outlet.Be sure that the plug is fully inserted into the socket.
7. Don’t place the machine and power cord near flammable material.Do not cover the
cord.Do not submerge it in water.
8. We do not recommend the use of an extension cord,as it may overheat and become a
risk of fire.
9. Unplug the ice maker before cleaning or making any repairs or servicing.
10. Exercise caution and supervision when appliance is used near children.
11. Don
’
t use your ice maker outdoors.Avoid direct sunlight and make sure that there is
at least 5 inches of space between the back and sides of your unit and the wall.
12. Don
’
t use any liquid other than water in the unit to make the ice.
13. Do not clean your ice maker with flammable detergents.The fumes can create a fire
hazard or explosion.
14. Do not tip the machine over.
15. If the ice maker is brought indoors from outdoors during the wintertime,give it a few
hours to warm up to room temperature before plugging to power source.
16. This unit should be properly grounded for your safety.The power cord is equipped
with a three-prong plug which mated with standard three prong wall outlets to
minimize the possibility of electric shock.
17. Plug your appliance into a dedicated,properly installed and grounded wall outlet.Do
not,under any circumstance power and /or grounding should be directed toward a
certified electrician.
18. The foaming materials inside is combustible which must be kept away from fire.
19. It’s forbidden to pull the cable to unplug the plug,pull the plug is a must.
IMPORTANCE: To avoid hazard due to instability,unit must be placed on an even and flat
surface.
WARNING: This appliance must be grounded.
1) The fuse on the PCB must be >10A,if change,must be operated by a
technician.
2) voltage fluctuation can’t be exceed ±10% than rated voltage,or a Voltage
stabilizer is needed.
IMPORTANCE:To avoidhazard dueto instability, unitmustbe placed on an even
andflat surface.
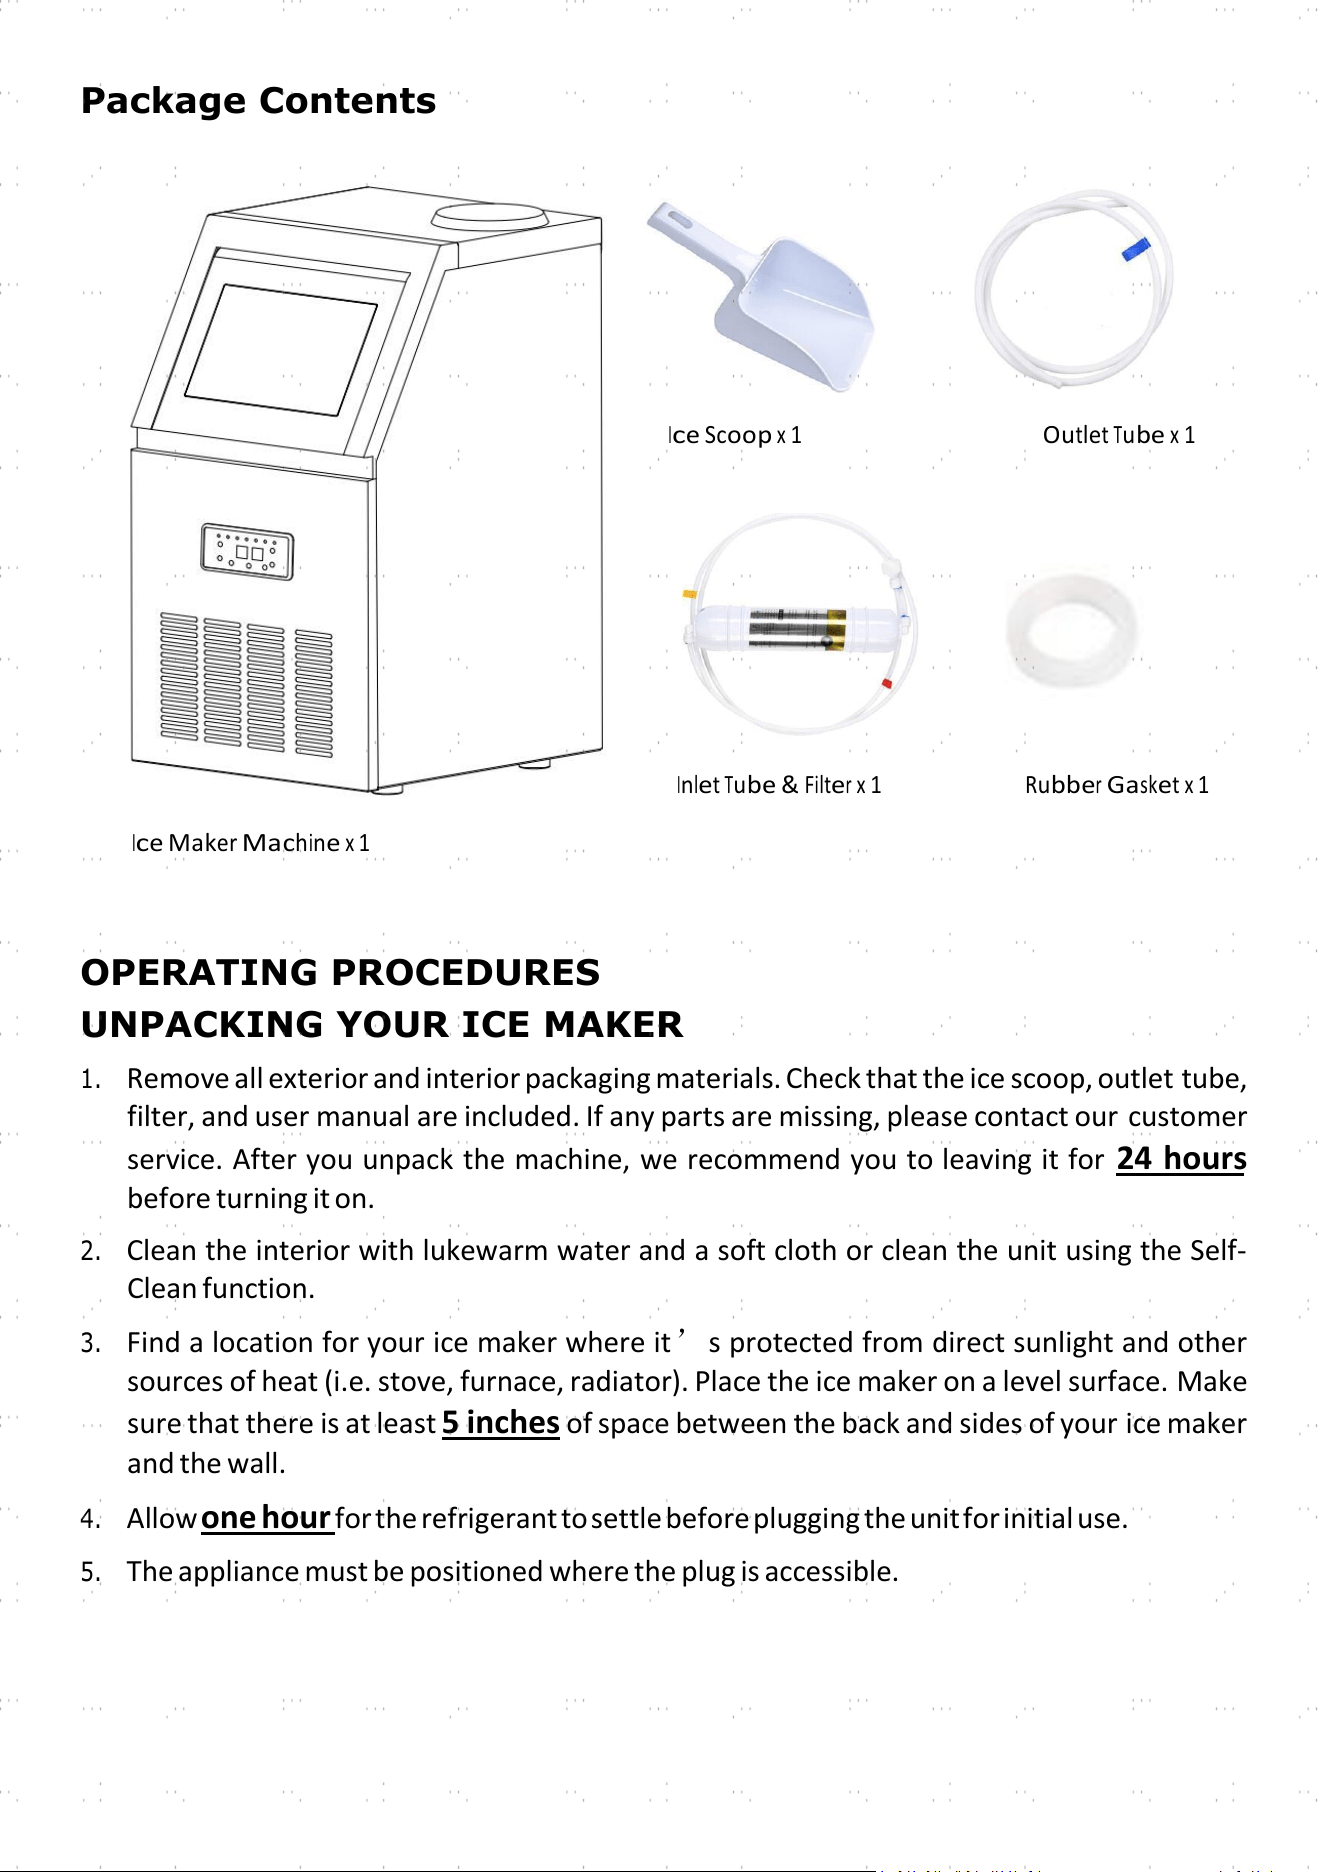
Package Contents
I
c
e
Mak
er
Mac
h
i
n
e
x
1
I
c
e
Sc
oo
p
x
1
Ou
t
le
t
T
u
be
x
1
I
n
l
e
t
T
u
be
&
F
i
lt
e
r
x
1 R
u
bbe
r
Ga
sk
e
t
x
1
OPERATING PROCEDURES
UNPACKING YOUR ICE MAKER
1.
Remove all exterior and interior packaging materials. Check that the ice scoop, outlet tube,
filter, and user manual are included. If any parts are missing, please contact our customer
service. After you unpack the machine, we recommend you to leaving it for 24 hours
before turning it on.
2.
Clean the interior with lukewarm water and a soft cloth or clean the unit using the Self-
Clean function.
3.
Find a location for your ice maker where it’s protected from direct sunlight and other
sources of heat (i.e. stove, furnace, radiator). Place the ice maker on a level surface. Make
sure that there is at least 5 inches of space between the back and sides of your ice maker
and the wall.
4.
Allowone hour fortherefrigeranttosettlebeforeplugging the unitforinitialuse.
5.
The appliance must be positioned where the plug is accessible.
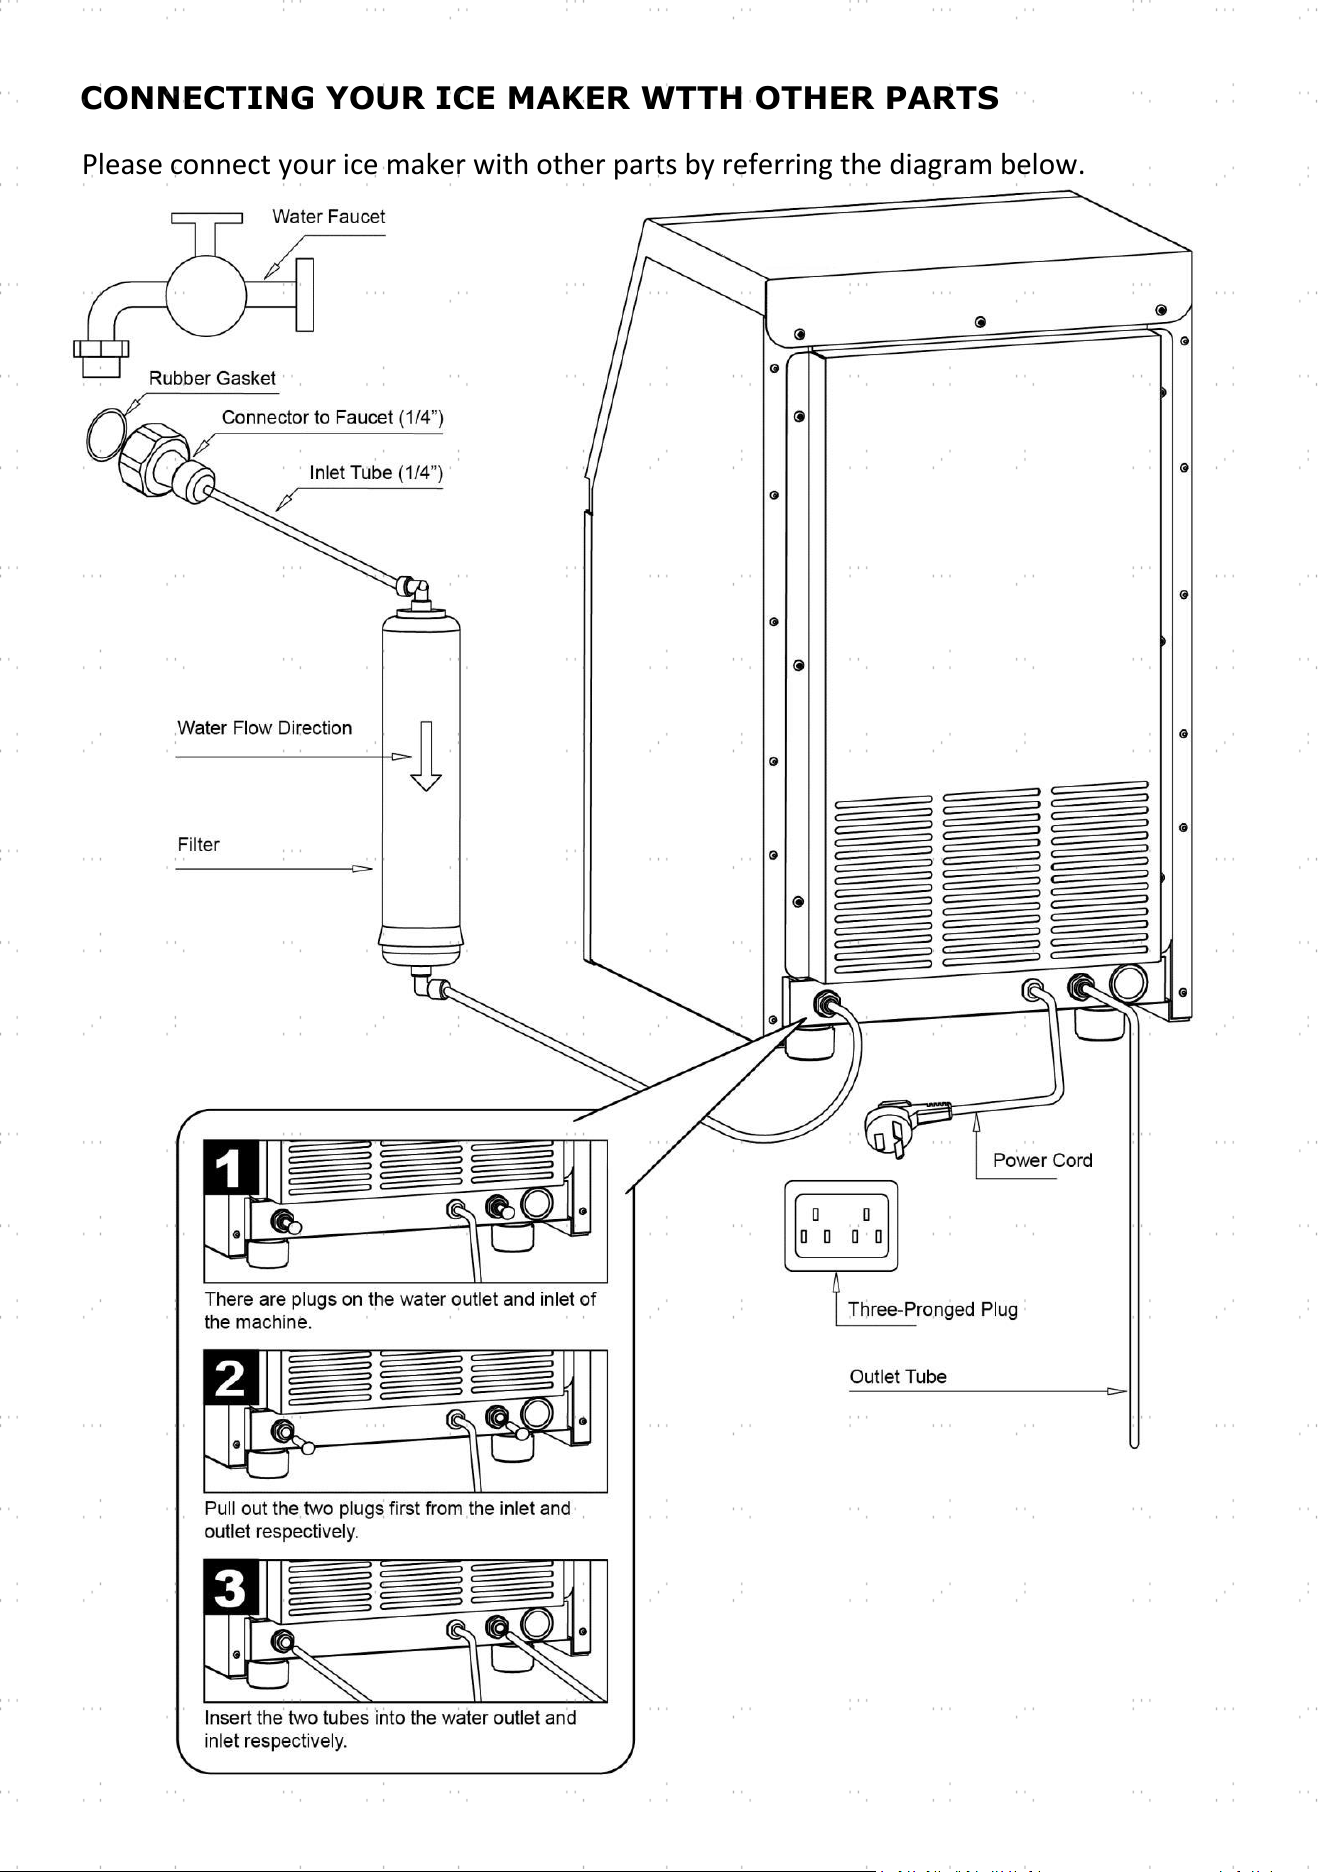
CONNECTING YOUR ICE MAKER WTTH OTHER PARTS
Please connect your ice maker with other parts by referring the diagram below.
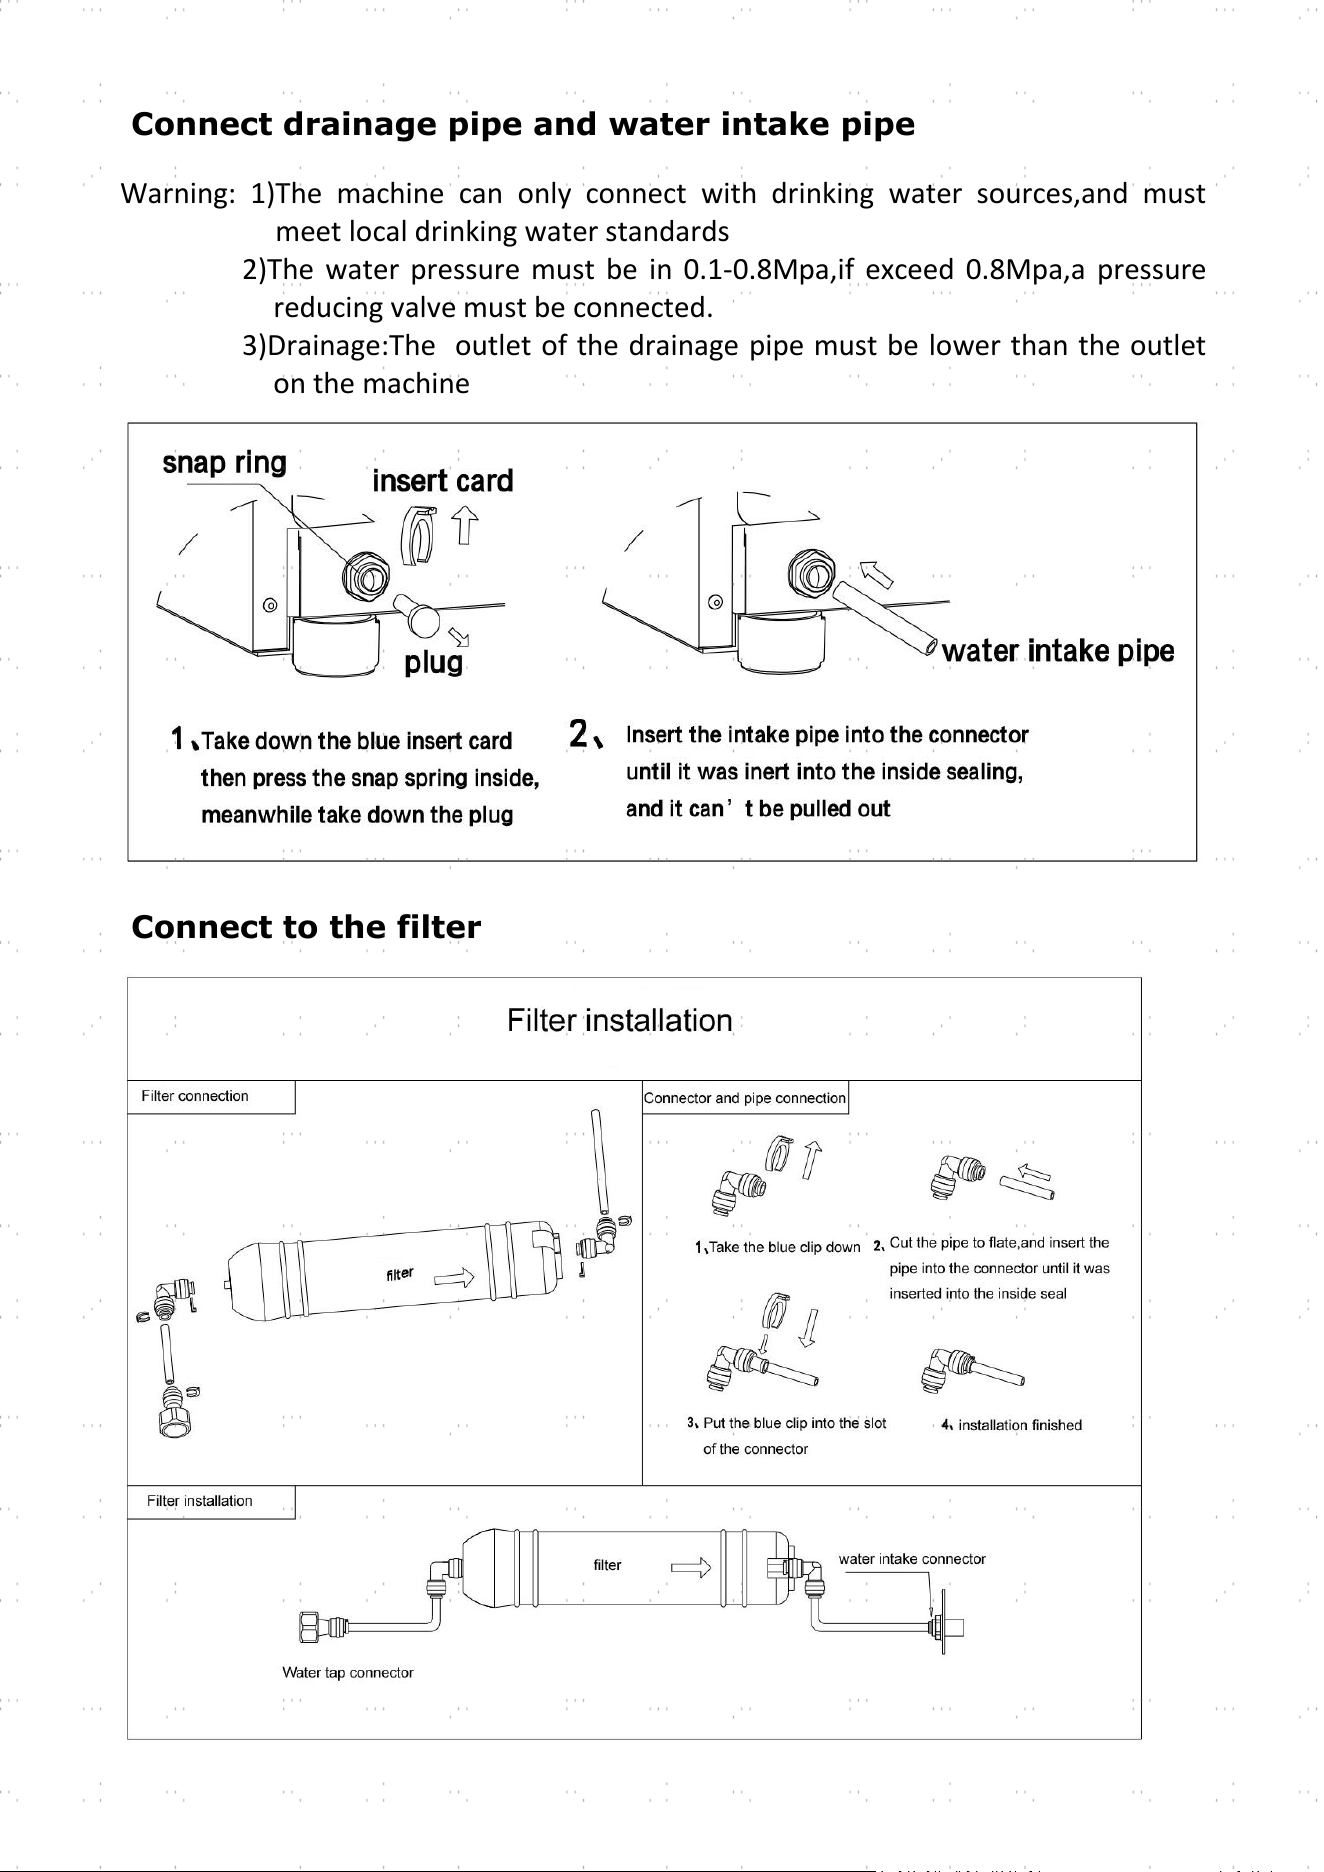
Connect drainage pipe and water intake pipe
Warning: 1)The machine can only connect with drinking water sources,and must
meet local drinking water standards
2)The water pressure must be in 0.1-0.8Mpa,if exceed 0.8Mpa,a pressure
reducing valve must be connected.
3)Drainage:The outlet of the drainage pipe must be lower than the outlet
on the machine
Connect to the filter
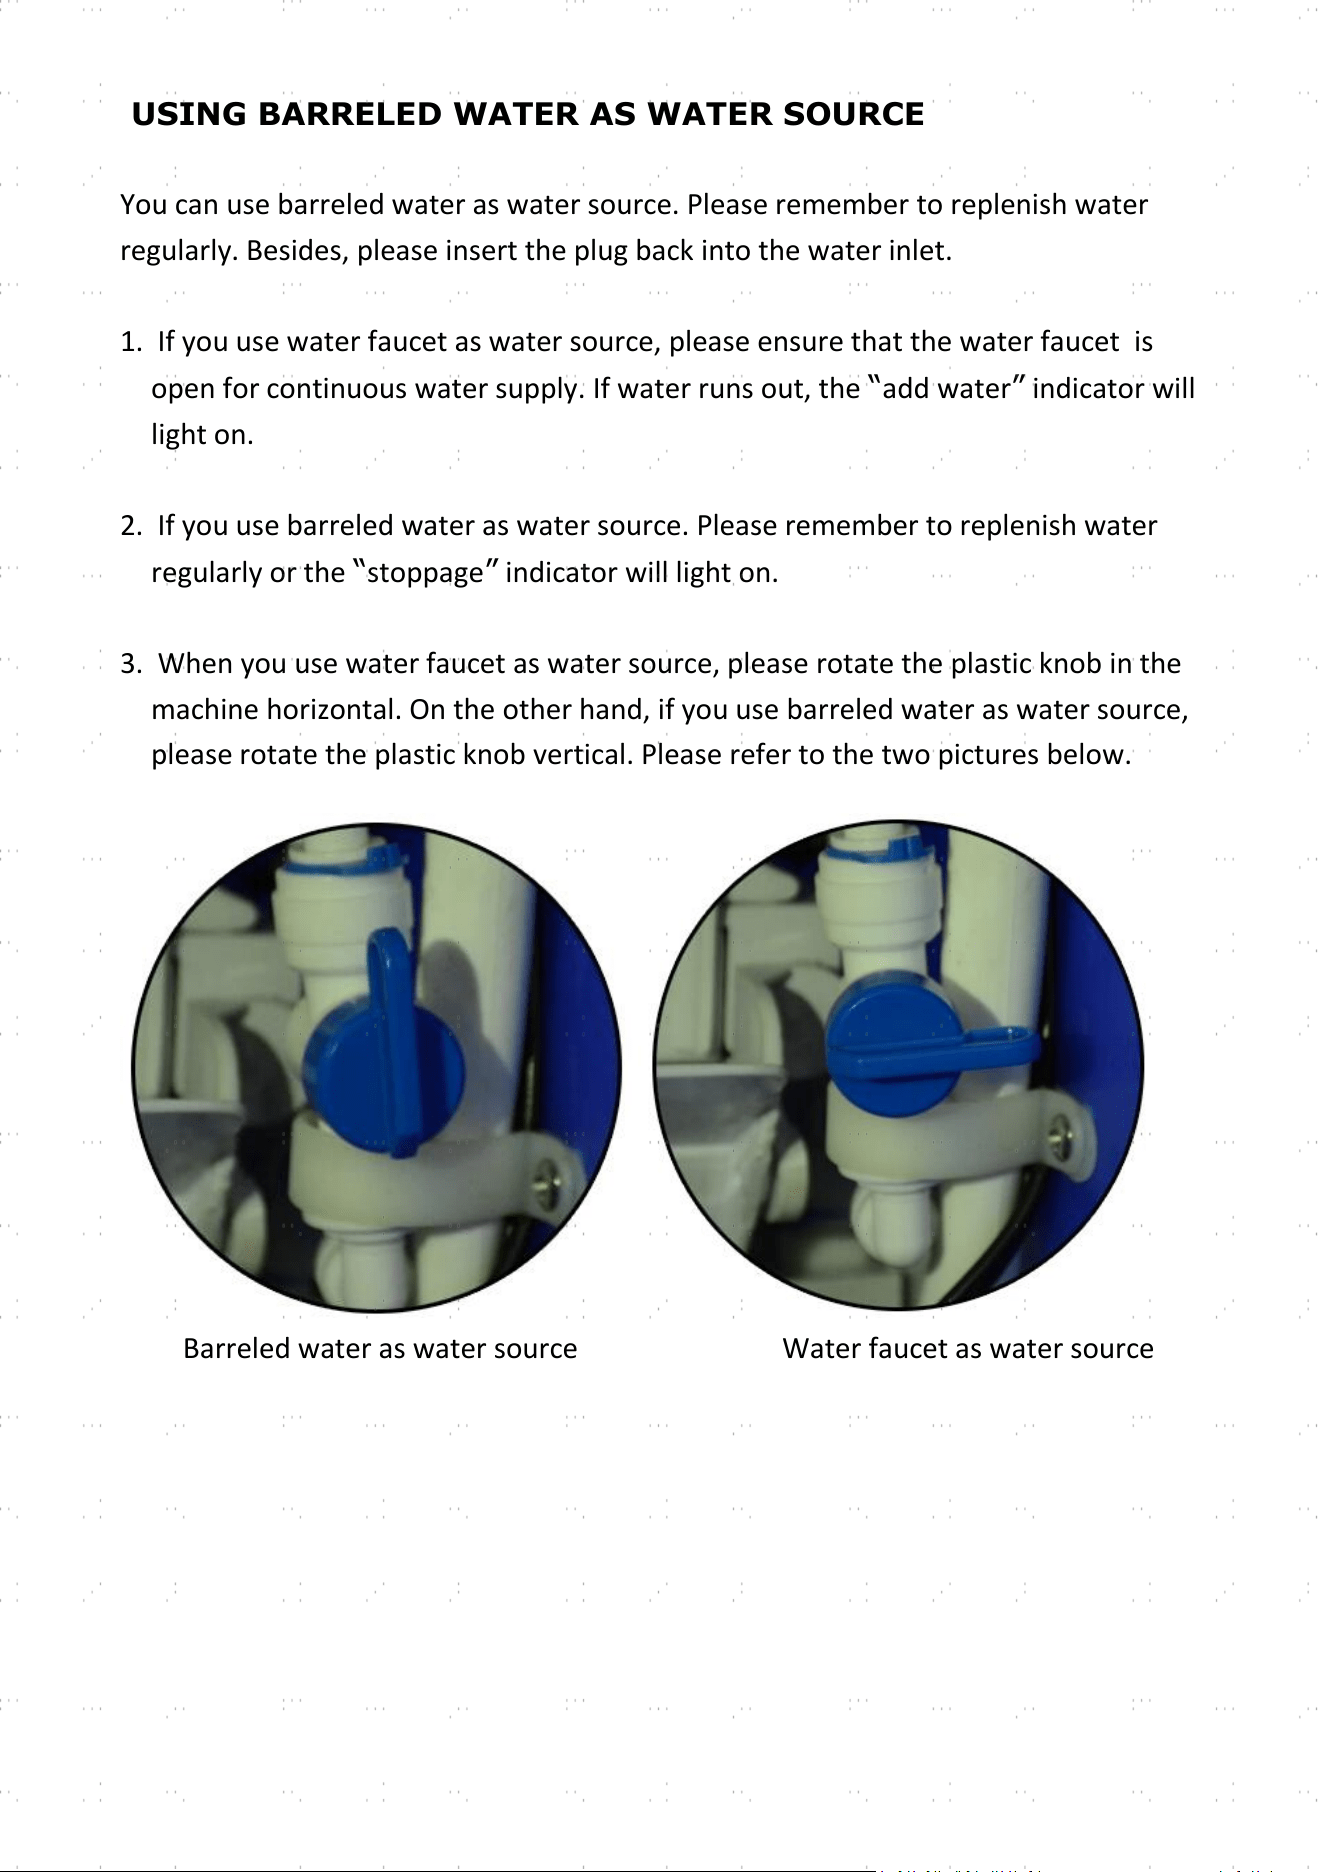
USING BARRELED WATER AS WATER SOURCE
You can use barreled water as water source. Please remember to replenish water
regularly. Besides, please insert the plug back into the water inlet.
1. If you use water faucet as water source, please ensure that the water faucet is
open for continuous water supply. If water runs out, the “add water” indicator will
light on.
2. If you use barreled water as water source. Please remember to replenish water
regularly or the “stoppage” indicator will light on.
3. When you use water faucet as water source, please rotate the plastic knob in the
machine horizontal. On the other hand, if you use barreled water as water source,
please rotate the plastic knob vertical. Please refer to the two pictures below.
Barreled water as water source Water faucet as water source

MACHINE OPERATIONS
Operation Panel
Ice making operation:
1. Connectthemachinetothepowerandpressthe button.The“ice” indicator will light on,
press the button for 2 seconds during working time,the machine will be power off.
2. Press the “+”/“-” button to set the countdown time for the ice making procedure (The time
range is from 5 minutes to 50 minutes). The time will be effective in the next cycle.
3. When the countdown of time is finished, the “melting” indicator will light on. The ice cubes will
come off the freezing panel later.
4. After the ice cubes come off. The machine will enter another cycle of ice making automatically.
Auto Turning On/Off:
1.
When the machine is turned off while connected to the power, press the
“Reservation”
button and the
“+”/“ - ”
button to set the auto-turning-on time (in
hours). The machine will
automaticallyturnsonafterthecountdownisfinished.
2.
When the machine is at the middle of ice making, press the “Reservation” button and the
“+”/“-”
buttontosettheauto-turning-offtime(inhours).Themachine will automatically turns
off after the countdown is finished.
Cleaning:
When the machine is turned off while connected to the power, press the
“Cleaning”
button and
hold it for a while. The machine will automatically enter self-cleanprogram.
“Light”:
As power is on,the blue light will be on,press
“light”
,the blue light will be off,press
“light”
will be on again.
Min/H:
The digit
under “ice”
mode will be shown in min,but if under
“Reservation”
mode,will be
shown in hour.
Ambient Temp:
Ambient temperature will be shown in the LED screen.
Notes:
(1)
If you change the countdown time during the middle of the ice making procedure, it will take
effect at the next loop. You can long press the “Defrost” button during the ice making to
unload the ice cubes ahead of time.
(2)
The surrounding environmental temperature will influence the time needed for ice making.

CLEANING & MAINTENANCE
Please thoroughly clean your ice maker before initial use.
Exterior: the outside of the ice maker should be cleaned regularly with a mild
detergent and warm water. Always use a soft cloth to avoid scratching or damaging
the housing.
INTERIOR: please use the following Self-Clean function:
1. Add water and vinegar or lemon juice mix (1:1 ratio)
2. Plug in unit,press and hold the CLEAN button for approximately 6-7 seconds,then
release.The unit will automatically enter Self-clean program. This process takes
about 5-6 minutes.When the Self-Clean program is finished,unit will automatically
power off.
3. The fan blade will be rotating.This process rinses the inside parts several times/
4. After the Self-Clean program is completed,unplug the power cord and drain out
the water by unplugging the drain cap on the side.Replace drain cap.
5. Add fresh water to the water reservoir,up to the water level mark.
6. Plug the unit and repeat the Self-Clean process by repeating steps 3 to 5. This will
rinse out the vinegar/lemon residue.
7. After draining the water,replace and tighten drain cap.
8. Dry the interior and exterior with a clean,soft cloth.
NOTE: It is strongly recommended to clean the unit before initial use or after the unit
has not been in use for a long period of time.
NOTE
1. As the production of ice cubes increases, the plastic panel inside the machine
(shown above) might be pressed down by the ice cubes. When the plastic panel is
pressed down, the machine will stop producing ice cubes automatically and the
“ stoppage ” indicator will light on. Please clean out the ice cubes regularly for
continuation of icemaking.
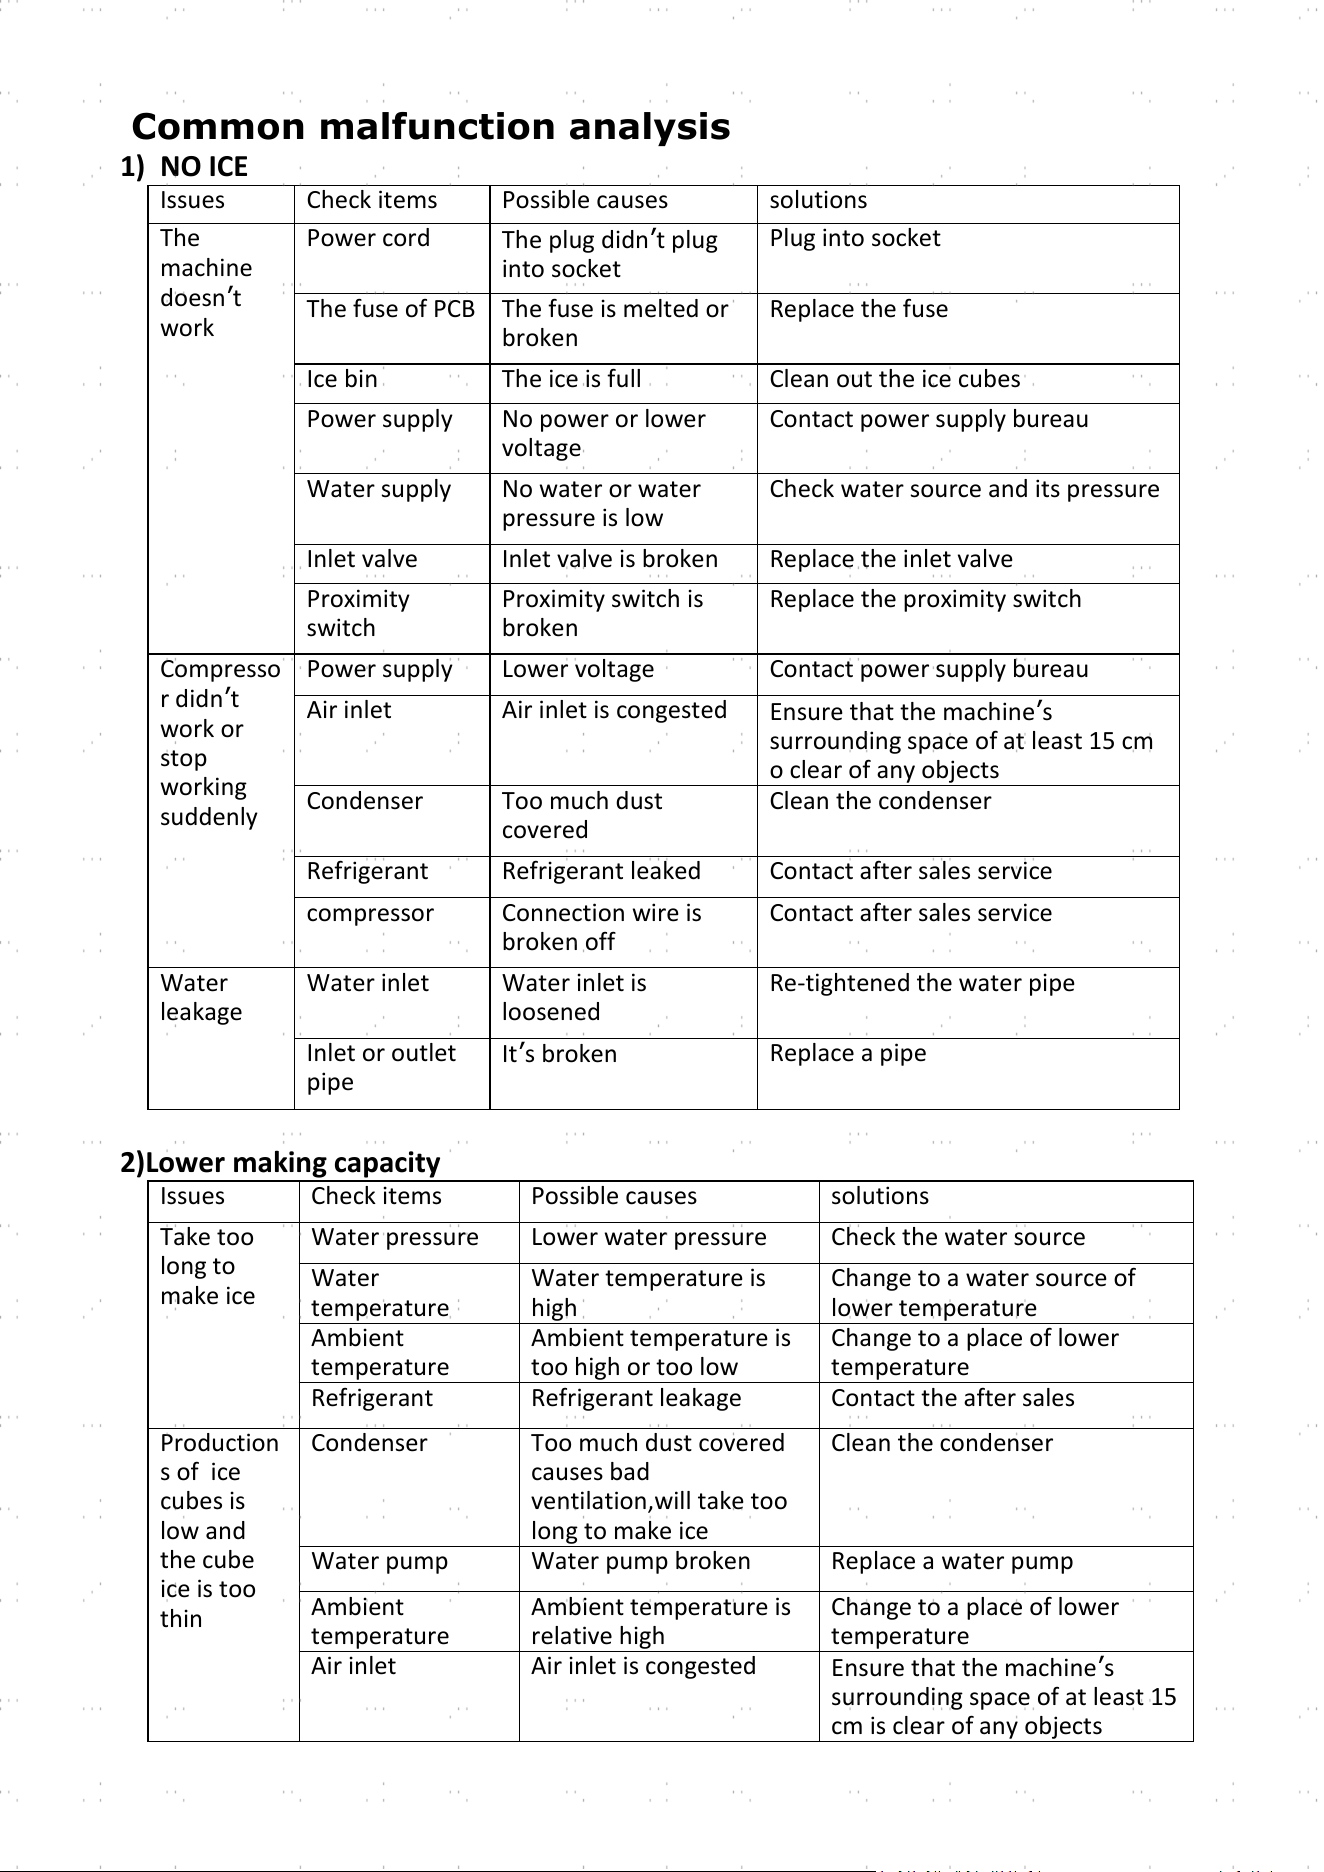
Common malfunction analysis
1) NO ICE
Issues
Check items
Possible causes
solutions
The
machine
doesn’t
work
Power cord
The plug didn’t plug
into socket
Plug into socket
The fuse of PCB
The fuse is melted or
broken
Replace the fuse
Ice bin
The ice is full
Clean out the ice cubes
Power supply
No power or lower
voltage
Contact power supply bureau
Water supply
No water or water
pressure is low
Check water source and its pressure
Inlet valve
Inlet valve is broken
Replace the inlet valve
Proximity
switch
Proximity switch is
broken
Replace the proximity switch
Compresso
r didn’t
work or
stop
working
suddenly
Power supply
Lower voltage
Contact power supply bureau
Air inlet
Air inlet is congested
Ensure that the machine’s
surrounding space of at least 15 cm
o clear of any objects
Condenser
Too much dust
covered
Clean the condenser
Refrigerant
Refrigerant leaked
Contact after sales service
compressor
Connection wire is
broken off
Contact after sales service
Water
leakage
Water inlet
Water inlet is
loosened
Re-tightened the water pipe
Inlet or outlet
pipe
It’s broken
Replace a pipe
2)Lower making capacity
Issues
Check items
Possible causes
solutions
Take too
long to
make ice
Water pressure
Lower water pressure
Check the water source
Water
temperature
Water temperature is
high
Change to a water source of
lower temperature
Ambient
temperature
Ambient temperature is
too high or too low
Change to a place of lower
temperature
Refrigerant
Refrigerant leakage
Contact the after sales
Production
s of ice
cubes is
low and
the cube
ice is too
thin
Condenser
Too much dust covered
causes bad
ventilation,will take too
long to make ice
Clean the condenser
Water pump
Water pump broken
Replace a water pump
Ambient
temperature
Ambient temperature is
relative high
Change to a place of lower
temperature
Air inlet
Air inlet is congested
Ensure that the machine’s
surrounding space of at least 15
cm is clear of any objects