GNA
™
10 JOG LEVER ADAPTER
INSTALLATION INSTRUCTIONS
Important Safety Information
WARNING
See the Important Safety and Product Information guide in the product box for product warnings and other
important information.
To avoid possible personal injury and damage to your boat, the autopilot system should be installed by a
qualified marine installer. Specific knowledge of marine steering and electrical systems is required for proper
installation.
You are responsible for the safe and prudent operation of your vessel. The autopilot is a tool that enhances your
capability to operate your boat. It does not relieve you of the responsibility of safely operating your boat. Avoid
navigational hazards and never leave the helm unattended.
Always be prepared to promptly regain manual control of your boat.
Learn to operate the autopilot on calm and hazard-free open water.
Use caution when operating the autopilot near hazards in the water, such as docks, pilings, and other boats.
CAUTION
Failure to install and maintain this equipment in accordance with these instructions could result in damage or
injury.
When in use, beware the risk of entrapment or pinching from moving parts to avoid possible personal injury.
Tools and Supplies Needed
• Wire cutters/strippers
• Waterproof wire connectors (wire nuts) or heat-shrink tubing and a heat gun
• Cable ties
• Jog lever or switch to connect to the system
GUID-0C1D7FD1-94FE-4820-A2B9-F4708CEEB67C v3August 2024

Compatible and Recommended Jog Levers and Other Devices
This device has been tested and confirmed to be compatible with the jog lever models listed below, and
complete wiring and configuration details for these models are provided in these instructions. Jog levers from
other manufacturers may work with this device when connected and configured using these instructions, but
compatibility cannot be guaranteed.
• Jastram
™
JO100-1 and JO300-1
• Kobelt
™
7170
• Simrad
™
S35
When selecting a switch to use with this device, consider these guidelines.
• A single-pole, single-throw (SPST) switch, either latching or momentary, can be used to trigger actions.
• A switch rated for IEC IP67 is recommended to best withstand installation and use in a marine environment.
When selecting an indicator light to use with this device, consider these guidelines.
• Although both incandescent and LED indicator lights are compatible, an LED indicator is recommended
because LED indicator lights last longer and require less power to operate.
• The output signals from this device when using wiring harness A as directed are regulated to 22mA max.
You can use most LED indicator lights without installing a current limiter.
• An indicator light rated for IEC IP67 is recommended to best withstand installation and use in a marine
environment.
Installing the Adapter
You can use this adapter to connect an external device to the autopilot system, such as a jog lever, a normally
open momentary or latching switch, or an indicator light.
NOTE: You can install only one jog lever per GNA 10 adapter. If you have multiple jog levers, you must install a
separate adapter for each jog lever.
1 Mount the external device according to the instructions provided with the device.
2 Connect the bare wires from the external device to the GNA 10 adapter (Wiring Connections, page3).
3 Repeat the previous two steps for additional external devices, if necessary.
4 Connect the GNA 10 adapter to the same NMEA 2000
®
network as the autopilot system (NMEA 2000
Connection Considerations, page4).
5 Configure the behavior of the connected devices in the software (Configuring the Adapter on a Chartplotter,
page4).
2
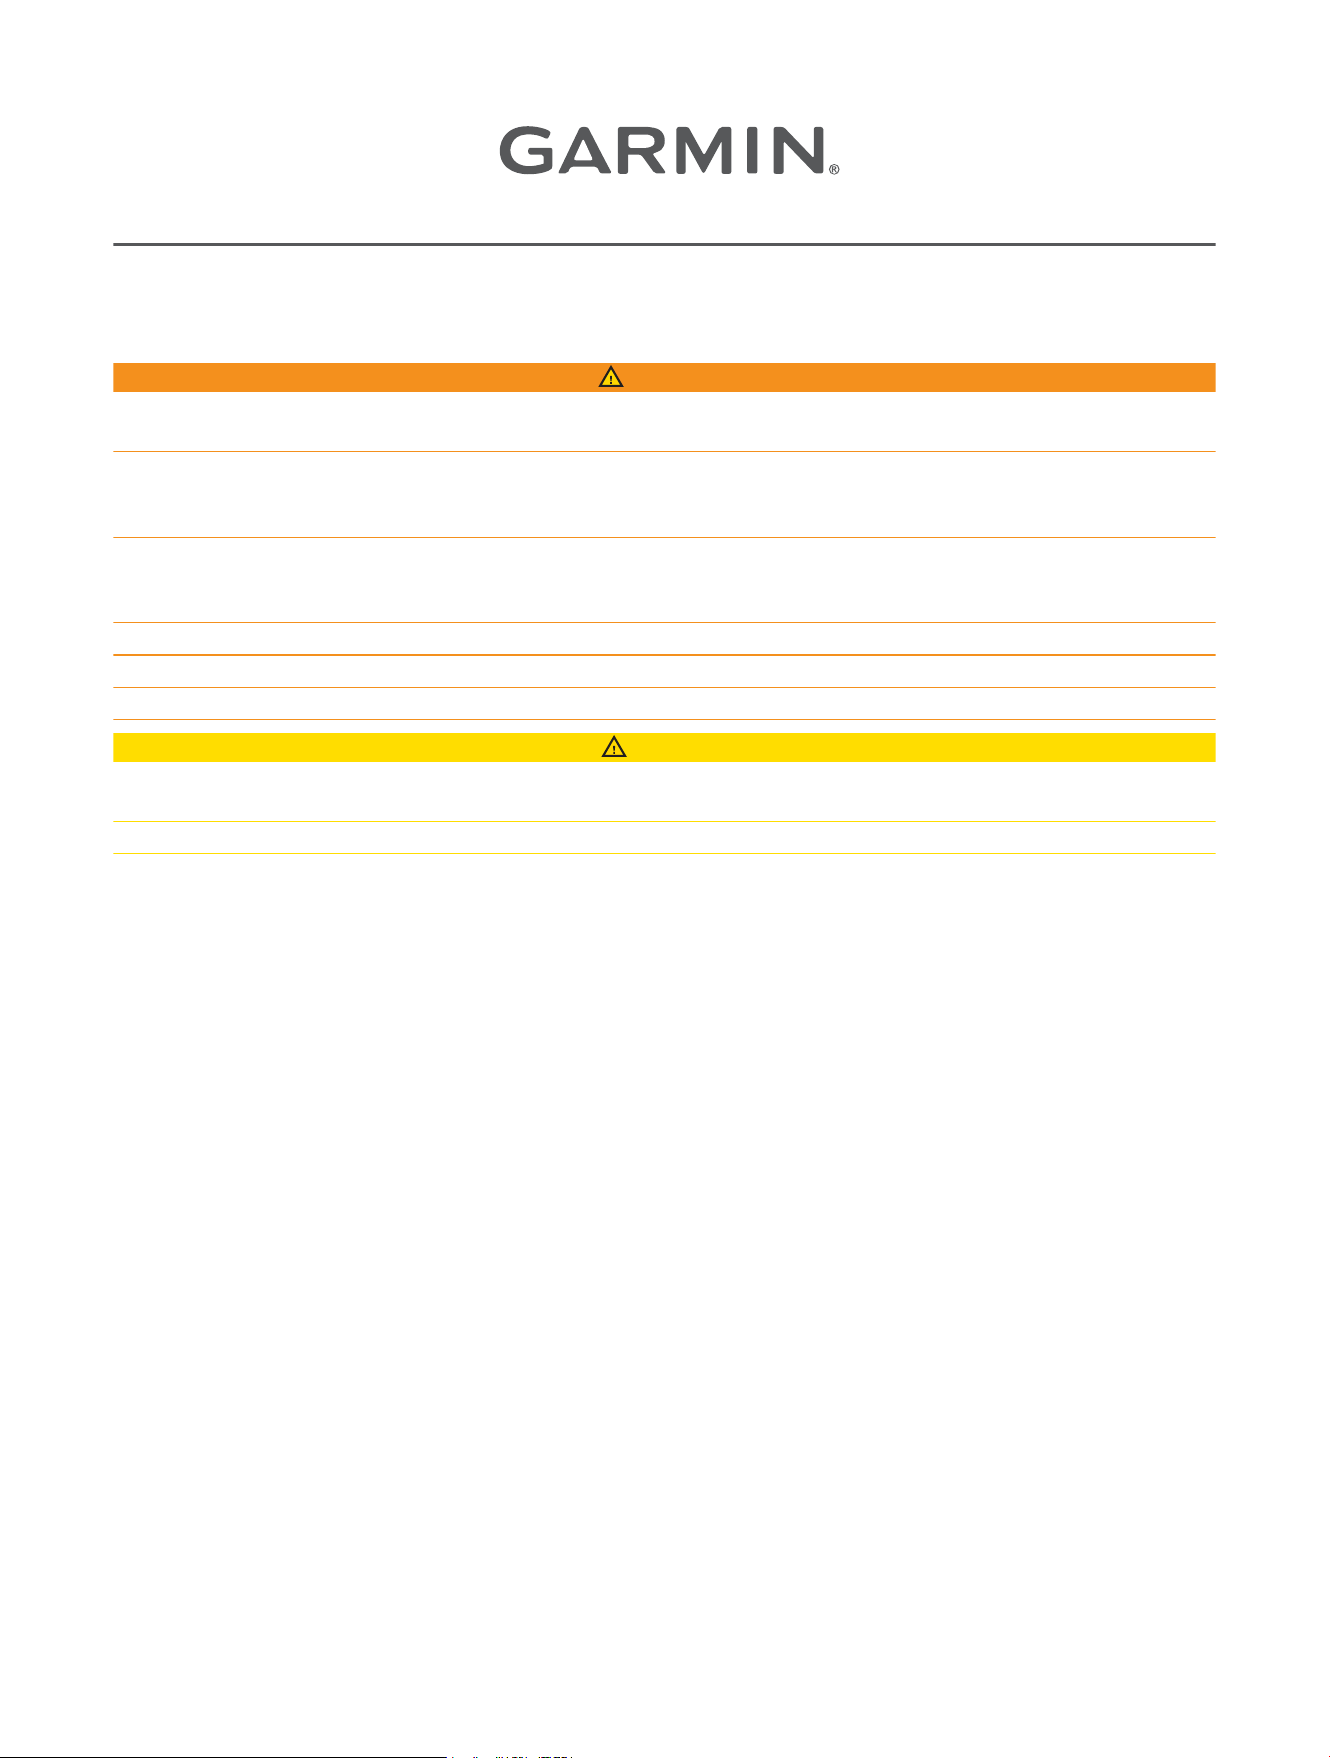
Wiring Connections
For most installations, the wires on the harness with the A label are all that is needed when connecting a jog
lever, a button, or both. The harness with the B label can be left unconnected if you successfully connect your
device using the harness with the A label.
The wires are organized in pairs, and each input and output channel has both a positive (+) and negative (-) wire.
You should always connect your device using both wires in the pair.
If you need to extend these wires, you should use 24 AWG (0.2mm
2
) wire.
You should use solder and heat-shrink tubing when connecting your device to these wires.
Wiring Harness A
Function Wire Colors
Input 1
Brown (+)
Black (-)
Input 2
Yellow (+)
Black (-)
Input 3
Blue (+)
Black (-)
Output 5
Green (+)
Violet (-)
Output 6
Red (+)
Orange (-)
Output 7
White (+)
Gray (-)
Wiring Harness B
Function Wire Colors
Input 4 (request)
Red (+)
Black (-)
Output 8 (acknowledge)
White (+)
Green (-)
Drain (ground) Clear
3
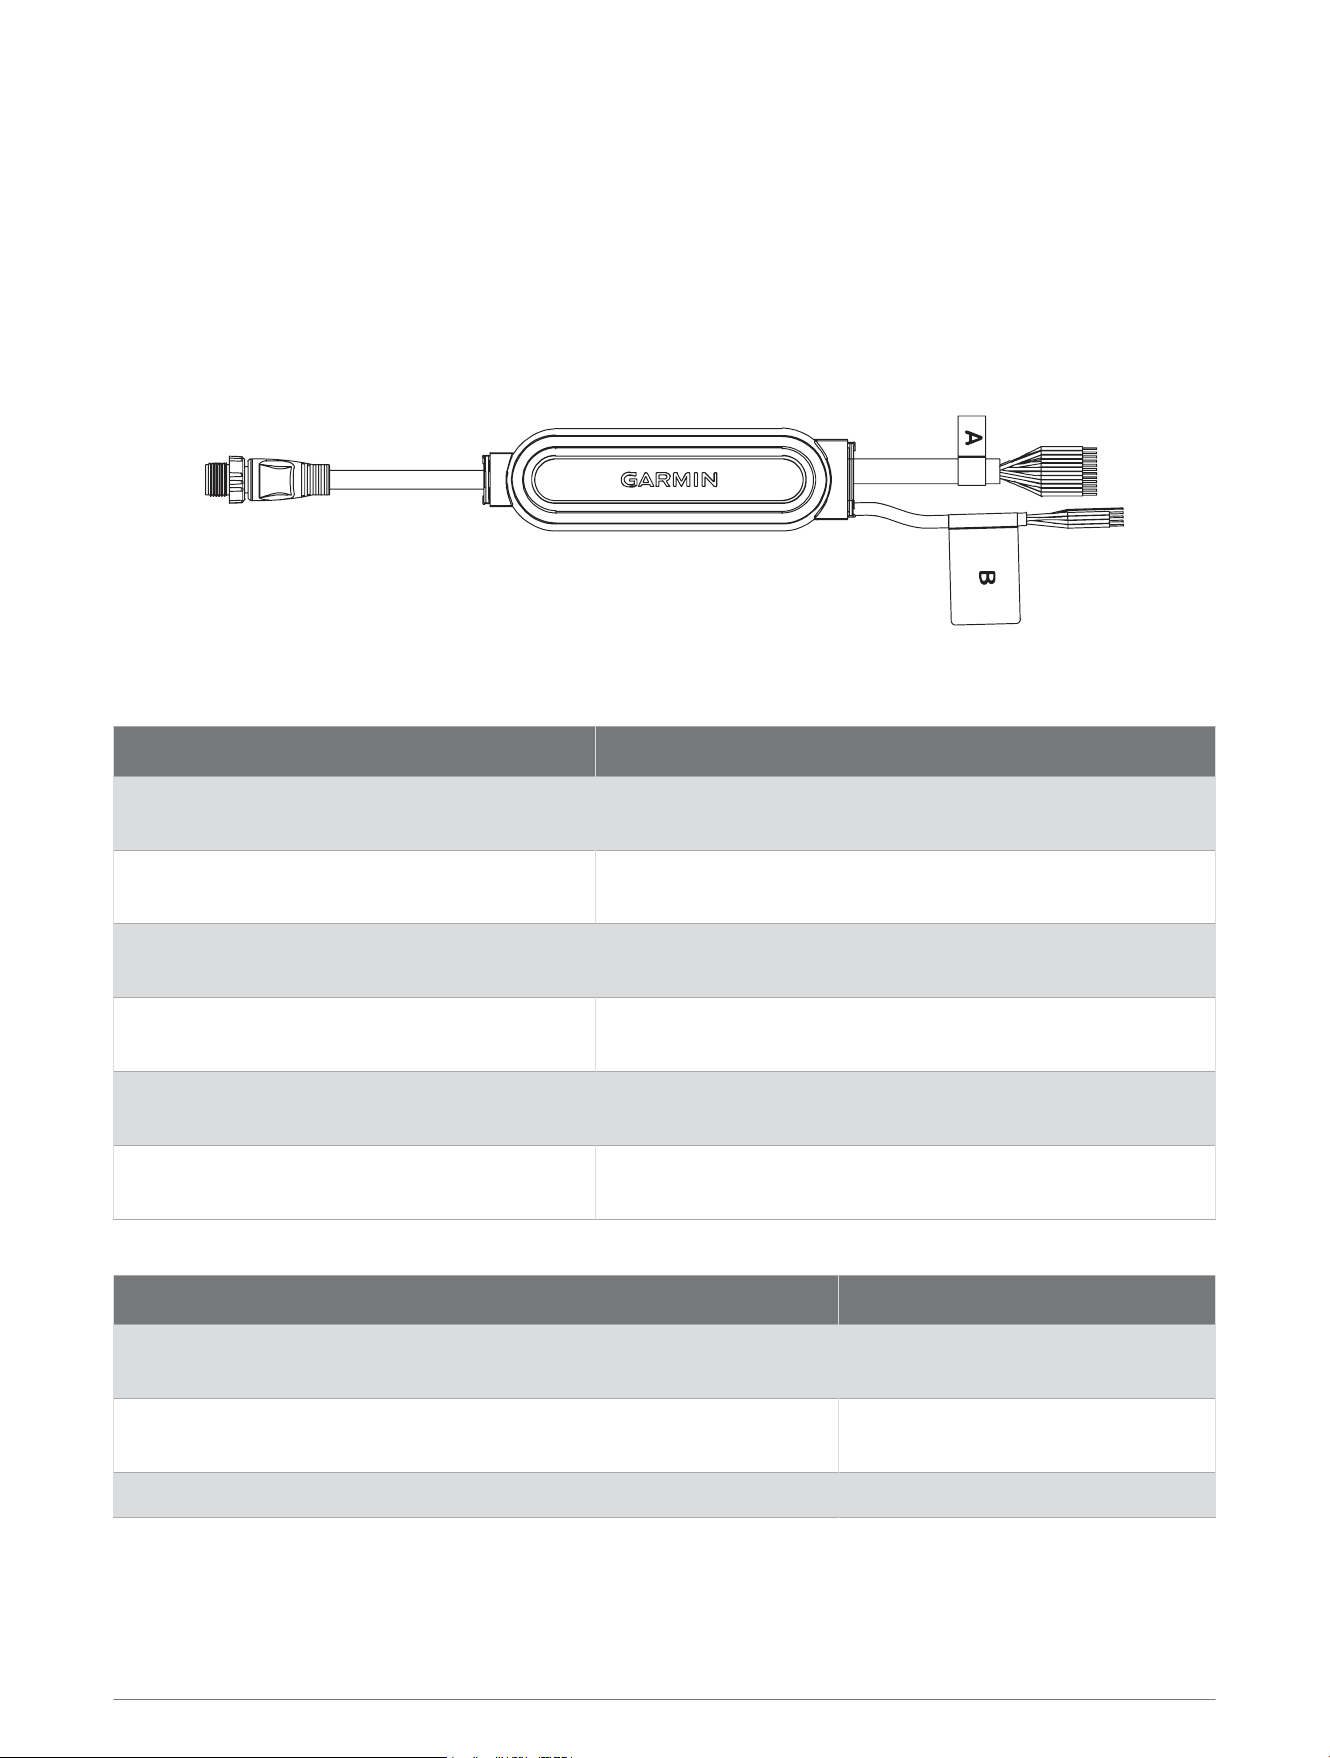
NMEA 2000 Connection Considerations
You must connect the GNA 10 device to the same NMEA 2000 network as the other Garmin
®
autopilot
components.
If you are unfamiliar with NMEA 2000, you should read the Technical Reference for NMEA 2000 Products at
garmin.com/manuals/nmea_2000..
Item Description
Helm control
CCU
NMEA 2000 drop cable
NMEA 2000 terminator
NMEA 2000 power cable
GNA 10 device
Configuration
After connecting the GNA 10 adapter, you must configure it for use with the autopilot system.
You can configure the adapter using a connected helm control or compatible chartplotter.
Configuring the Adapter on a Chartplotter
1 Select Settings > Communications > NMEA 2000 Setup > Device List.
2 Select the GNA 10 adapter.
3 Select Review > Configuration
4 Select the input or output channel you want to configure, and select Set Action.
5 Select an action for the input or output wire (Adapter Configuration Options, page5).
6 To test the configuration, perform the action you selected for the input or output channel.
If the channel is configured correctly, the Status for the channel changes to High.
4

Configuring the Adapter on a Helm Control
1 Select Menu > Setup > NMEA 2000 Devices.
2 Select the GNA 10 adapter.
3 Select Configuration
4 Select the input or output channel you want to configure, and select Action.
5 Select an action for the input or output wire (Adapter Configuration Options, page5).
6 To test the configuration, select the input or output channel and select Information.
7 Perform the action you selected for the input or output channel.
If the channel is configured correctly, the Status for the channel changes to High.
Adapter Configuration Options
The options available for the GNA 10 adapter are different for input and output wires.
NOTE: You can install only one jog lever per GNA 10 adapter. If you set a channel to Jog Lever Port or Jog Lever
Starboard, you cannot set another channel on the adapter to the same action.
No Action (input and output): Sets the channel so that it does not send or receive any signals.
Jog Lever Port (input): Sets the channel to receive a port-steering signal from a jog lever.
Jog Lever Starboard (input): Sets the channel to receive a starboard-steering signal from a jog lever.
Autopilot Heading Hold/Standby (input): Sets the channel to receive a signal to toggle the autopilot between
heading hold and standby. You can specify the type of signal switch as either momentary or latching.
Momntry: Should be selected for a type of switch, typically in the form of a push button, that engages only when
the switch is pressed, and disengages when the switch is released.
Latching: Should be selected for a type of switch that toggles between two positions, like a light switch. When
the switch is moved to the closed position, the input action is activated until the switch is moved back to the
open position.
Autopilot Standby (input): Sets the channel to receive a signal to place the autopilot into standby.
Autopilot Engage Status (output): Sets the channel to output a signal indicating that the autopilot is engaged.
Power Steering Mode
CAUTION
When using a jog lever in power steering mode, the autopilot system does not establish a heading hold. You are
responsible for the safe operation of your boat.
When using a GNA 10 adapter to connect a jog lever to an autopilot system installed on a power displacement
hull vessel, you can enable an optional power steering mode to use the jog lever to steer the vessel with no
autopilot intervention. When using the jog lever in power steering mode, it behaves differently than using it in the
standard autopilot heading hold or when using the autopilot to follow a route.
When using a jog lever while in standard autopilot heading hold, pressing or holding the jog lever port or
starboard turns the boat until you release the jog lever. The autopilot system then resumes a heading hold for
your new heading, making adjustments as needed to maintain the new heading.
When using a jog lever while following a route using the autopilot system, pressing or holding the jog lever
port or starboard stops following the route and turns the boat until you release the jog lever. The autopilot
system then resumes a heading hold for your new heading, making adjustments as needed to maintain the new
heading. It does not resume the initial route.
When using the jog lever while in power steering mode, pressing or holding the jog lever port or starboard turns
the boat until you release the jog lever. The autopilot system does not establish a heading hold and the rudder
stays in the position where you released the jog lever.
5

Enabling Power Steering Mode
Before you can select the option to Engage Power Steering on the chartplotter or helm control device, you must
first enable power steering mode in the autopilot settings.
NOTE: The option to enable power steering mode is available only when the GNA 10 adapter is installed
correctly and the vessel type is set to power planing.
Select an action:
• From the autopilot page on the chartplotter or a GHC
™
50 helm control device, select > Autopilot Setup
> Power Steering.
• On a GHC 20 helm control device, select Menu > Autopilot Setup > User Autopilot Setup > Power
Steering.
The Power Steering setting is enabled, and the option to Engage Power Steering is now available in the autopilot
menu.
Connection and Configuration Examples
Jog Lever Connection Examples
You can use these tables for reference when connecting a jog lever to the autopilot system. In addition to the
recommended jog lever models, generic connection examples are also provided, but Garmin cannot guarantee
compatibility with a jog lever other than the recommended models.
Jastram JO100-1/JO300-1 and Kobelt 7170
Wires from Jog Lever Wires on GNA 10 (Harness A) Configuration Options
Black Brown
Input 1
Jog Lever Port
White Yellow
Input 2
Jog Lever Starboard
Green (common) Black (common) N/A
Simrad S35
Wires from Jog Lever Wires on GNA 10 (Harness A) Configuration Options
Pink and gray Brown
Input 1
Jog Lever Port
Brown and white Yellow
Input 2
Jog Lever Starboard
Yellow Green
Output 5
Autopilot Engage Status
Green (common/ground) Black (common) N/A
Generic Jog Lever
Wires from Jog Lever Wires on GNA 10 (Harness A) Configuration Options
Steer port Brown
Input 1
Jog Lever Port
Steer starboard Yellow
Input 2
Jog Lever Starboard
Common Black N/A
6

Switch and Indicator Connection Examples
You can use these tables for reference when connecting a switch or an indicator to the autopilot system.
Autopilot Engage/Standby Button
Wires from Button or Switch Wires on GNA 10 (Harness A) Configuration Options
Positive (+) if specified
Negative (-) if specified
Blue (+)
Black (-)
Input 3
Autopilot Heading Hold/Standby
(Momntry or Latching)
Autopilot Engaged Status Light
Wires from Indicator Light Wires on GNA 10 (Harness A) Configuration Options
Positive (+)
Negative (-)
Violet (+)
Green (-)
Output 5
Autopilot Engage Status
Specifications
Specification Measurement
Housing dimensions (L × W × H) 135 × 37 × 39mm (5.3 × 1.5 × 1.54in.)
NMEA 2000 cable length 35cm (13.45in.)
Wiring harness length 2.5m(8.2ft.)
Weight 600g (21.2oz.)
Temperature range From -15° to 70°C (from 5° to 158°F)
Material Fully gasketed, high-impact plastic
Water resistance IEC 60529 IPX7
1
NMEA 2000 input voltage From 9 to 32Vdc
NMEA 2000 LEN @ 9Vdc 5 (250mA)
Compass-safe distance Negligible
Limited Warranty
The Garmin standard limited warranty applies to this accessory. For more information, go to garmin.com
/support/warranty.
Australian Purchases: Our goods come with guarantees that cannot be excluded under the Australian
Consumer Law. You are entitled to a replacement or refund for a major failure and for compensation for any
other reasonably foreseeable loss or damage. You are also entitled to have the goods repaired or replaced if the
goods fail to be of acceptable quality and the failure does not amount to a major failure. The benefits under our
Limited Warranty are in addition to other rights and remedies under applicable law in relation to the products.
Garmin Australasia, 30 Clay Place, Eastern Creek, NSW 2766, Australia. Phone: 1800 235 822.
Innovation, Science and Economic Development Canada Compliance
This device contains licence-exempt transmitter(s)/receiver(s) that comply with Innovation, Science and
Economic Development Canada's licence-exempt RSS(s). Operation is subject to the following two conditions:
(1) this device may not cause interference, and (2) this device must accept any interference, including
interference that may cause undesired operation of the device.
1
The device withstands incidental exposure to water of up to 1m for up to 30min. For more information, go to
www.garmin.com/waterrating.
7

Declaration of Conformity
Hereby, Garmin declares that this product is in compliance with the Directive 2014/30/EU. The full text of the EU
declaration of conformity is available at the following internet address: garmin.com/compliance.
© 2020 Garmin Ltd. or its subsidiaries
Garmin
®
and the Garmin logo are trademarks of Garmin Ltd. or its subsidiaries, registered in the USA and other countries. GNA
™
is a trademark of Garmin Ltd. or its
subsidiaries. These trademarks may not be used without the express permission of Garmin.
Jastram
™
is a trademark of Jastram Engineering Ltd. Kobelt
™
is a trademark of Kobelt Manufacturing Co. Ltd. NMEA
®
, NMEA 2000
®
, and the NMEA 2000 logo are
trademarks of the National Marine Electronics Association. Simrad
™
is a trademark of Simrad Yachting.
© 2020 Garmin Ltd. or its subsidiaries
support.garmin.com
