
Technical Support and E-Warranty Certificate
www.vevor.com/support
STRIP CURTAIN
USER MANUAL
We continue to be committed to provide you tools with competitive price.
"Save Half", "Half Price" or any other similar expressions used by us only represents an
estimate of savings you might benefit from buying certain tools with us compared to the major
top brands and does not necessarily mean to cover all categories of tools offered by us. You
are kindly reminded to verify carefully when you are placing an order with us if you are
actually saving half in comparison with the top major brands.

- 1 -
SKU1-SKU12
SKU13-SKU19
Have product questions? Need technical support? Please feel free to
contact us:
Technical Support and E-Warranty Certificate
www.vevor.com/support
NEED HELP? CONTACT US!
This is the original instruction, please read all manual instructions
carefully before operating. VEVOR reserves a clear interpretation of our
user manual. The appearance of the product shall be subject to the
product you received. Please forgive us that we won't inform you again if
there are any technology or software updates on our product.
STRIP CURTAIN

- 2 -
1. WARNING!
(1) Do not draw, cut, or use sharp objects on the door curtain to avoid damage.
(2) Do not expose the door curtain to sunlight or high-temperature environments
to prevent deformation or aging of the door curtain.
(3) If you need to disassemble the door curtain, please follow the reverse steps to
disassemble it and store it properly.
(4) Clean the door curtain regularly to keep it clean and fresh; you can use a
vacuum cleaner or damp cloth to gently wipe the door curtain.
(5) If you purchase a roll-up strip curtain(SKU1-SKU12), you need to purchase
the installation parts yourself.
(6) Beware of scratching your fingers when installing.
2. Maintenance Guide
(1) Regularly clean the door curtain, use a damp cloth to wipe the surface, and
remove dust and dirt.
(2) Avoid using corrosive cleaning agents or chemical solvents to clean the door
curtain.
(3) If the door curtain is found to be damaged, please replace the door curtain
piece in time to ensure its normal use.
(4) Striped curtains turning yellow can be caused by prolonged use or exposure
to sunlight. If the curtains have turned severely yellow or been damaged,
replace them with new ones.
3. Product Description
Striped door curtains are a type of decoration installed at the entrance of a door,
which can effectively prevent insects, dust, and noise from entering the room,
protect privacy, and provide thermal insulation, wind resistance, and sound
insulation. Please read this manual carefully before use.
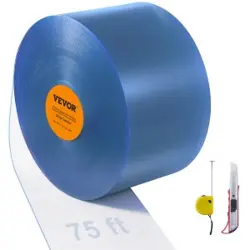
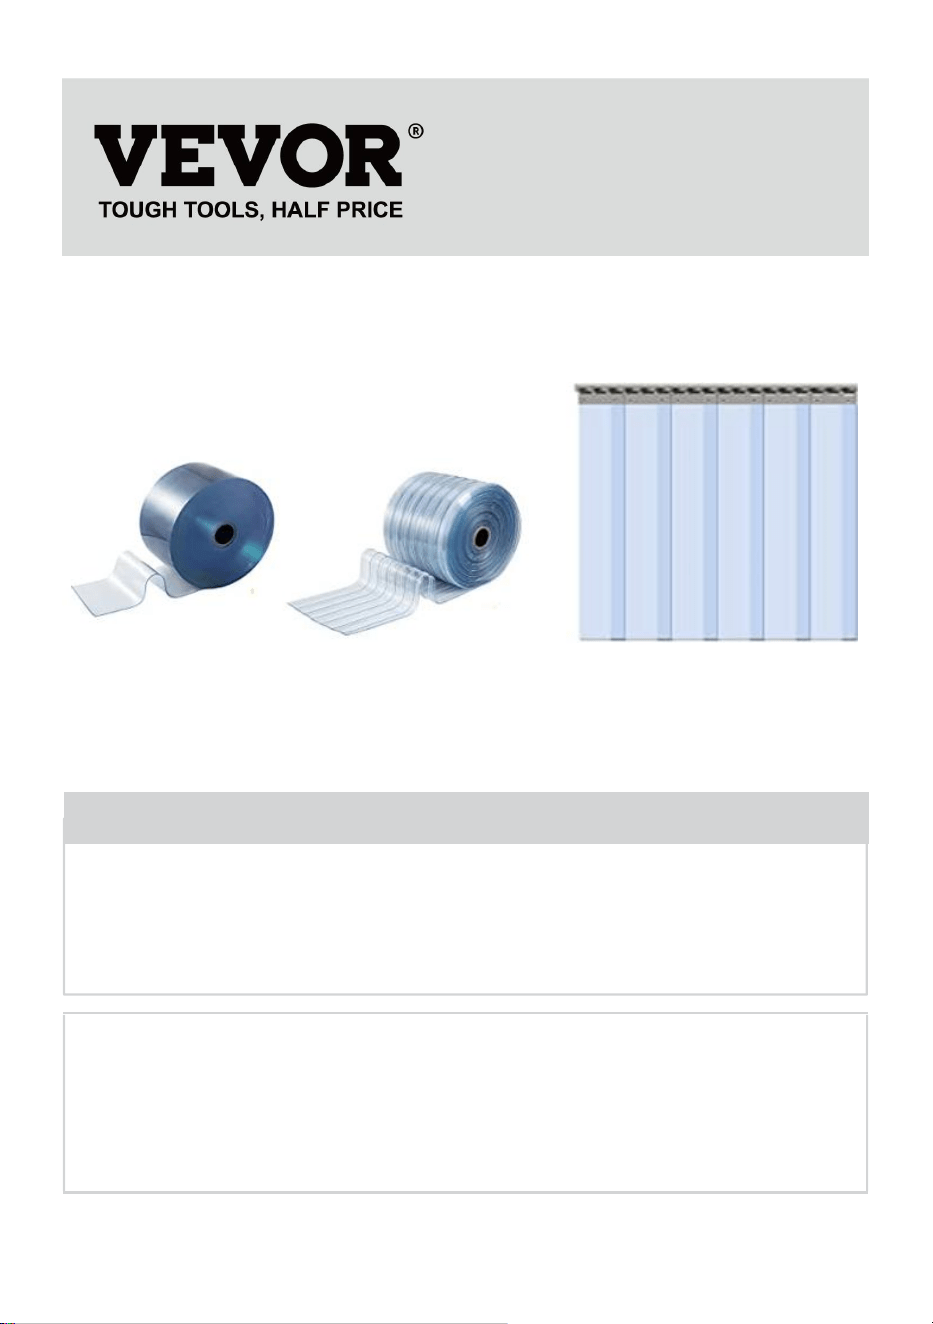
The striped door curtains are made of high-quality, environmentally-friendly
PVC materials.
The door curtain is lightweight and breathable, which can effectively prevent
indoor air from escaping, reducing energy waste.
The door curtain has a certain shading performance, which can effectively
- 3 -
prevent dust, debris, and other items from entering the room.
4. Installation Guide
(1) Please check if your goods are complete according to the product list.
(2) Install the keel:
1) Before installing the door curtain, please clean the doorway area to ensure a
clean and level surface.
2) Measure the width and height of the doorway. Cut the keel to an appropriate
length according to the size of the doorway.
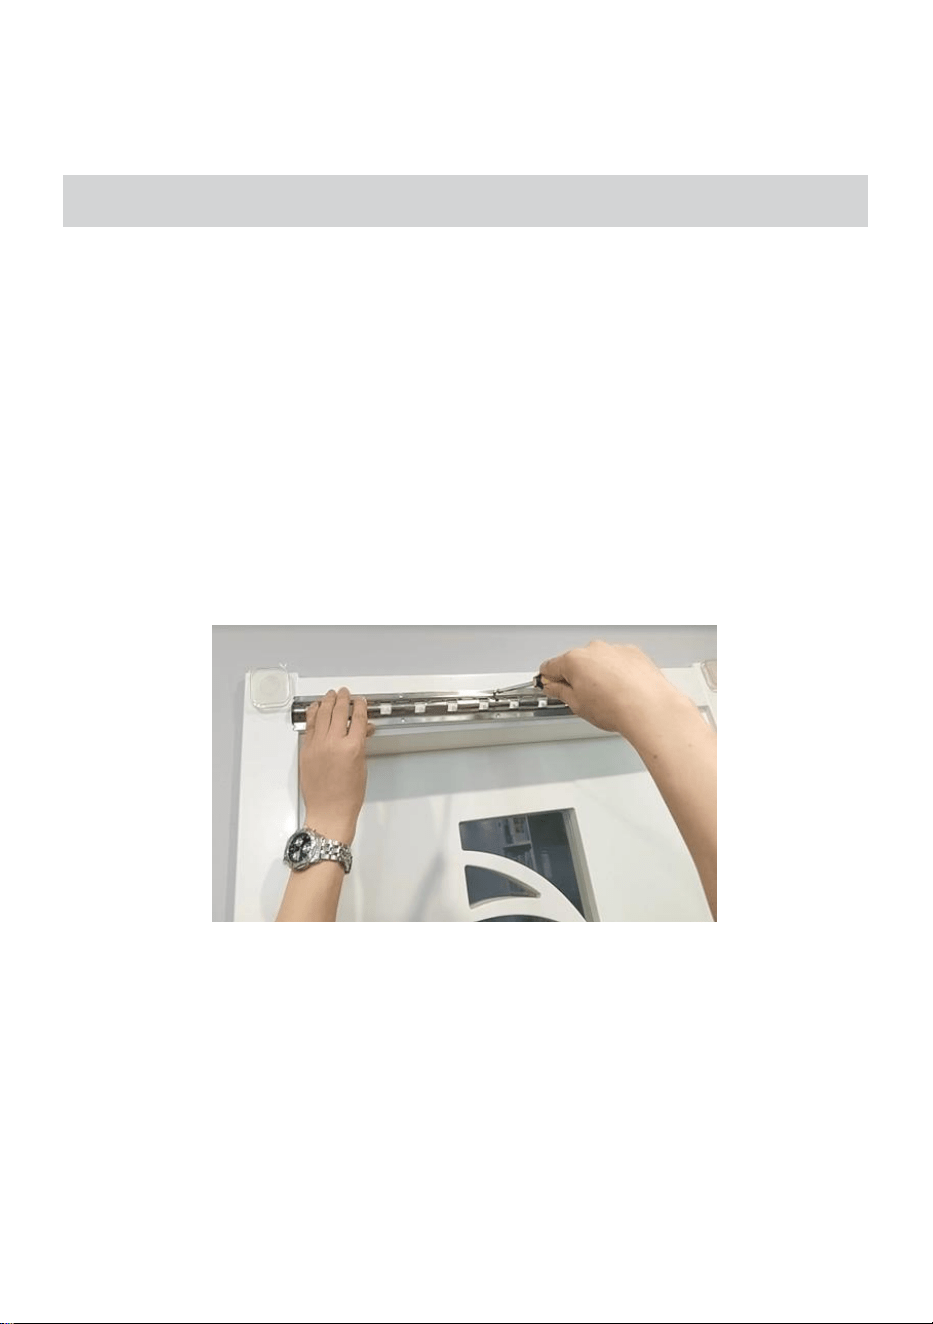
3) Use a tool to drill holes in the door frame. The hole positions should
correspond to the pre-drilled holes on the keel.
4) Place the keel above the door frame and fix it with a screwdriver and screws.
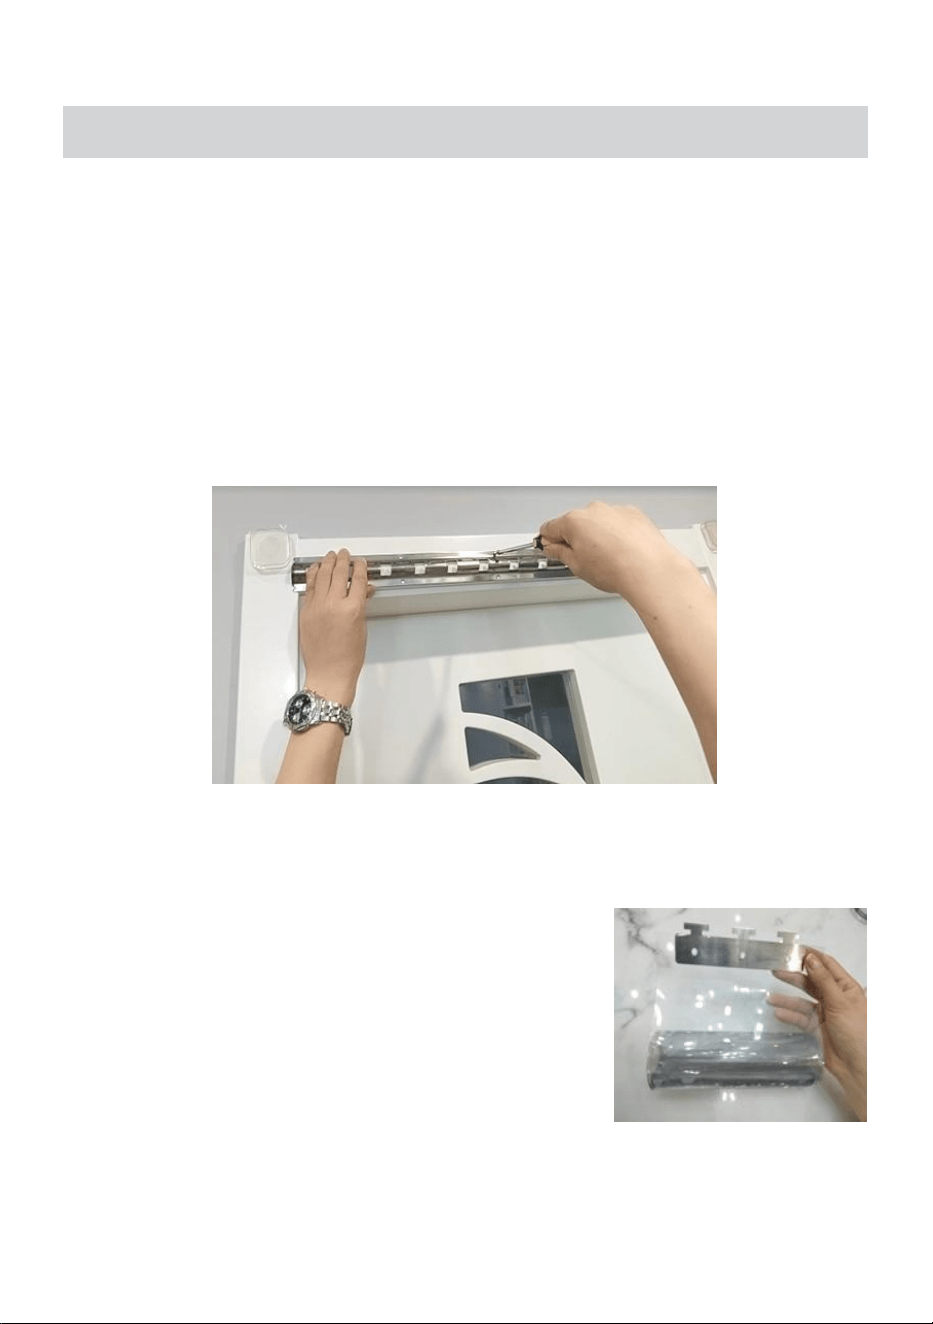
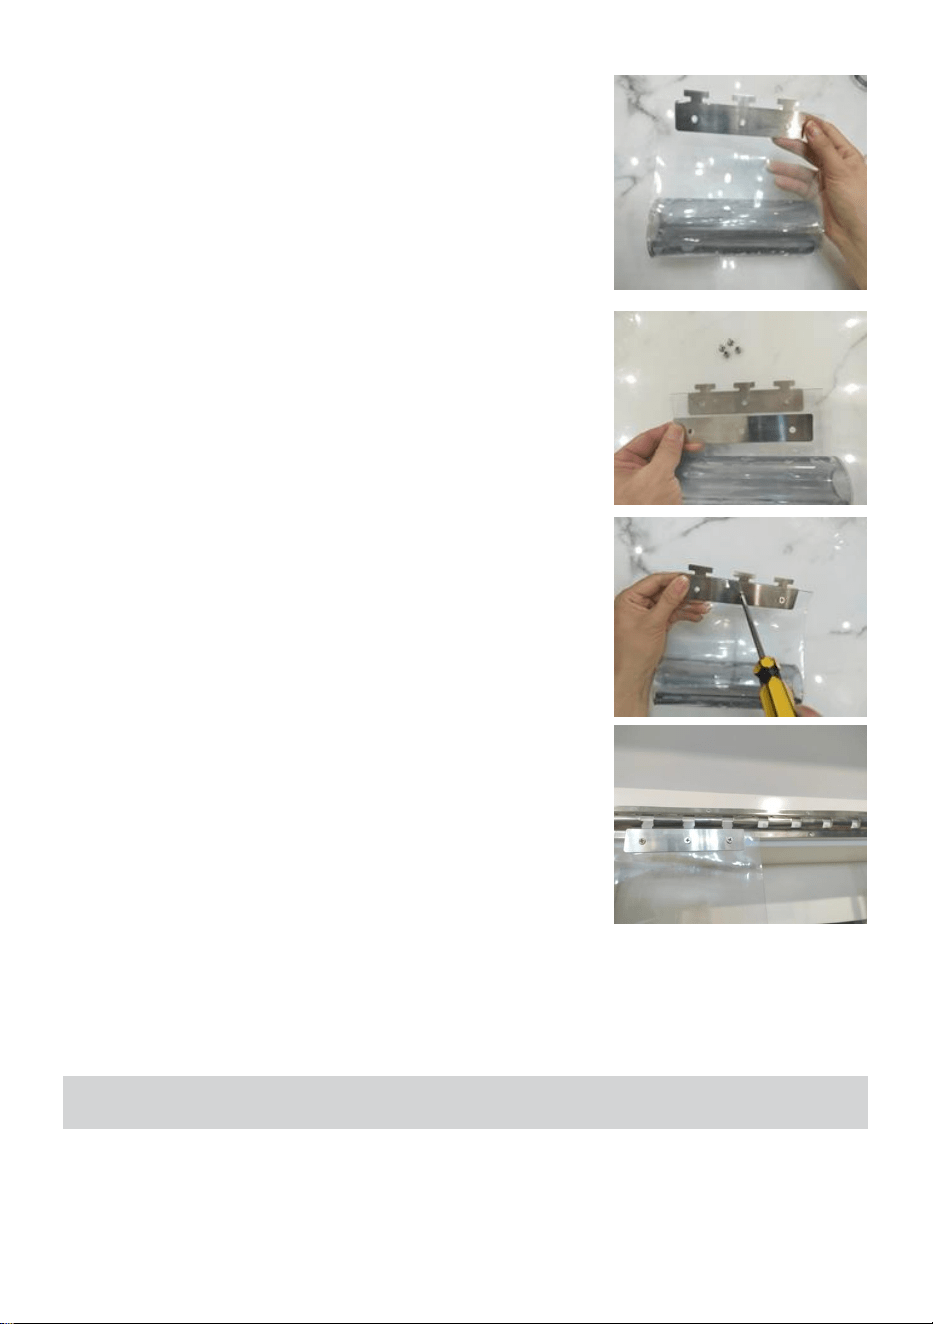
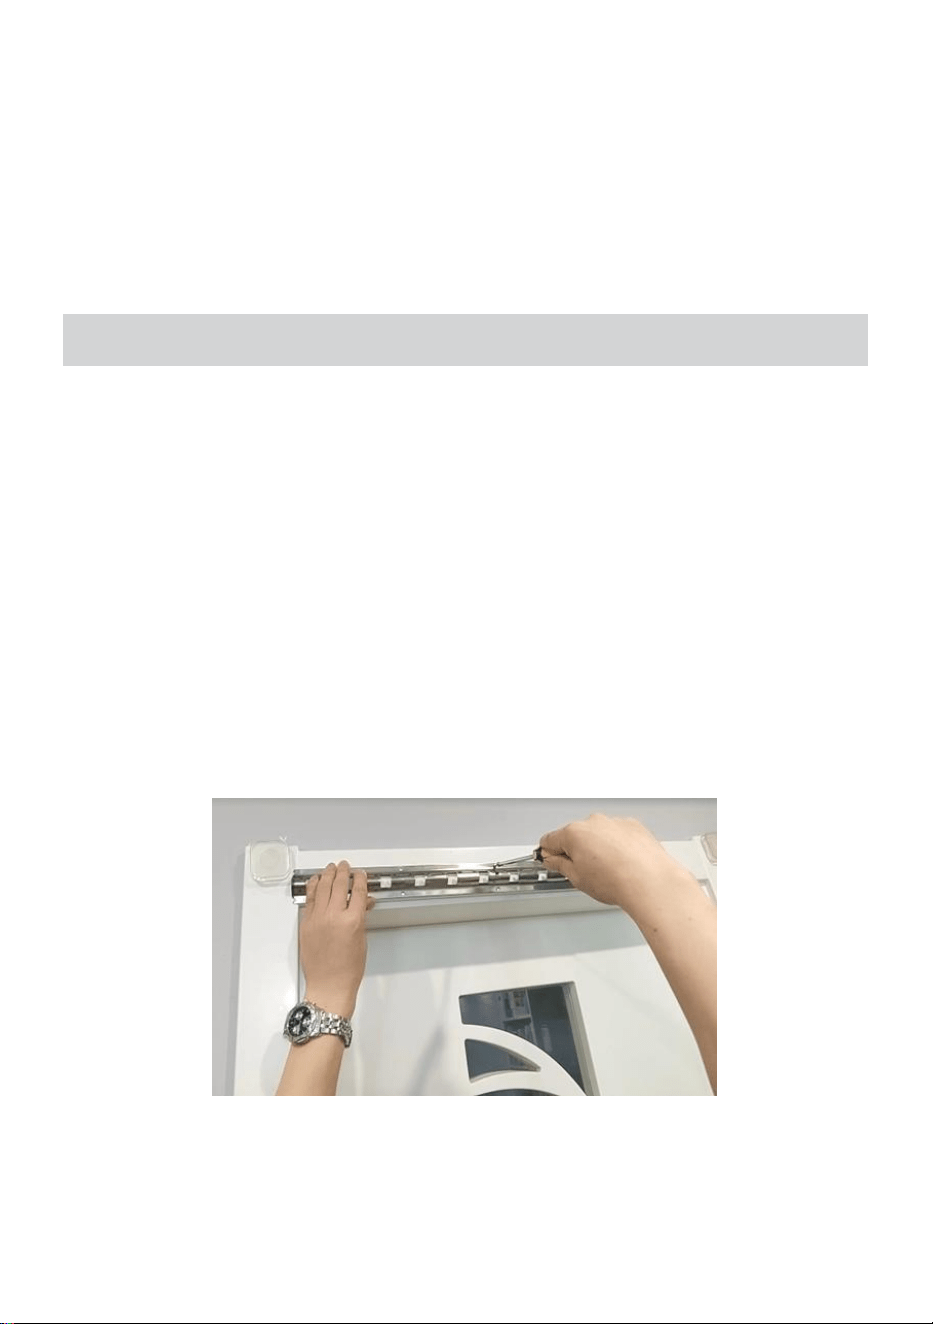
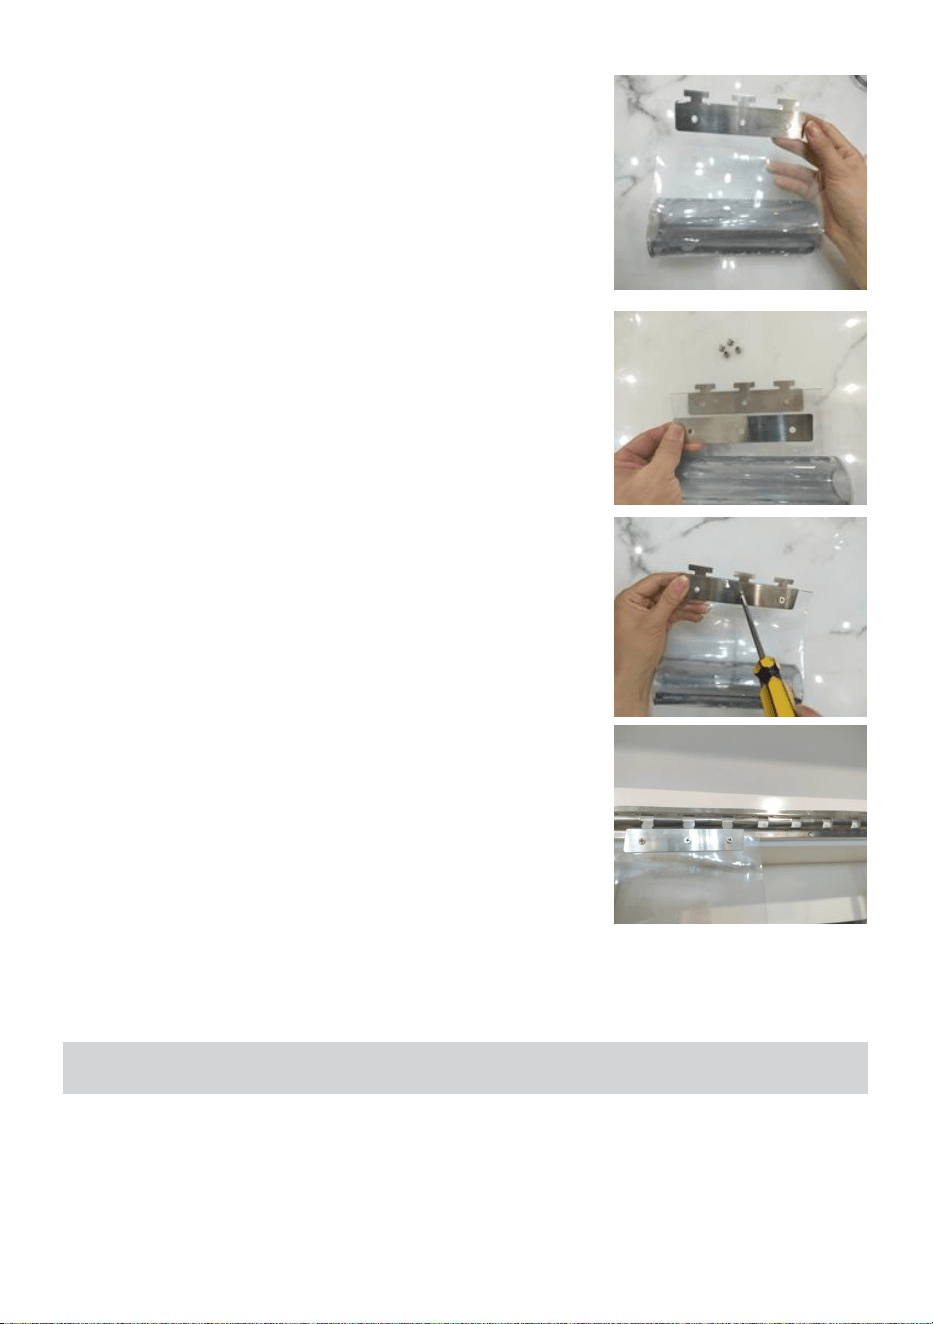
(3) Install the strip curtain:
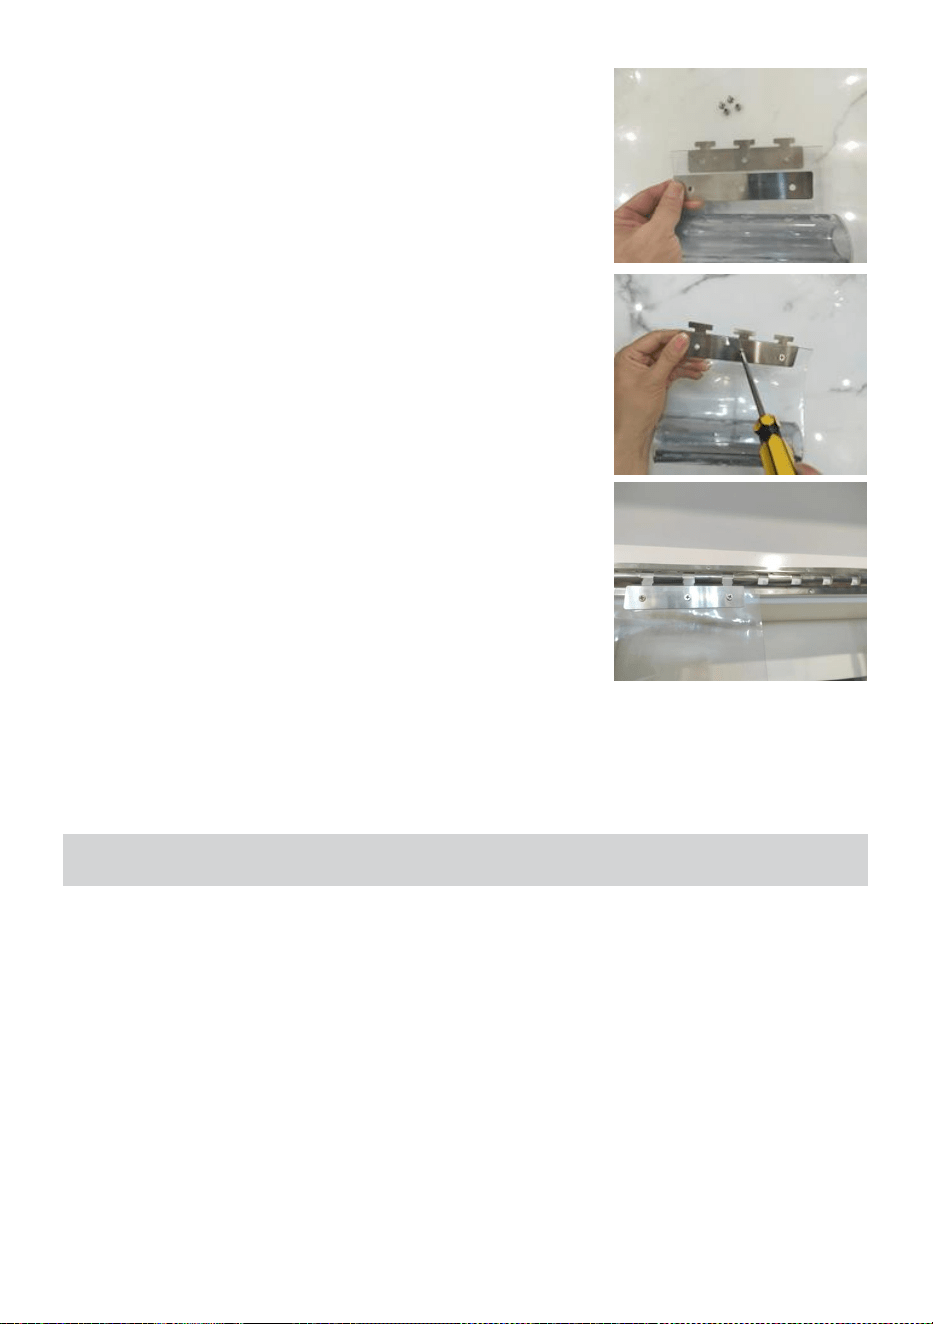
1) Choose a suitable length and width for the door curtain based on the size of the
doorway. Cut the curtain to an appropriate length and width using scissors.
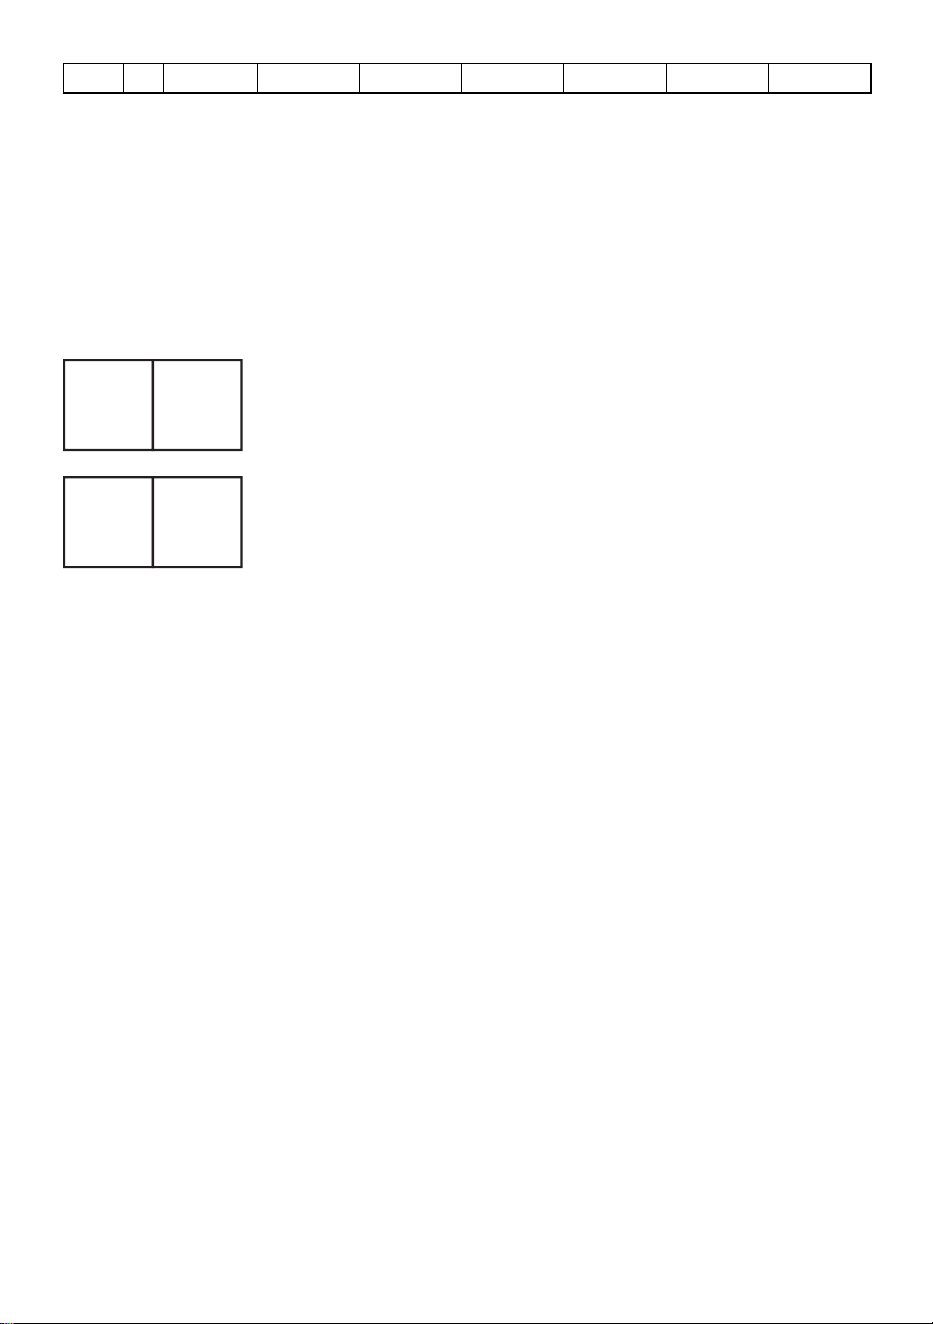
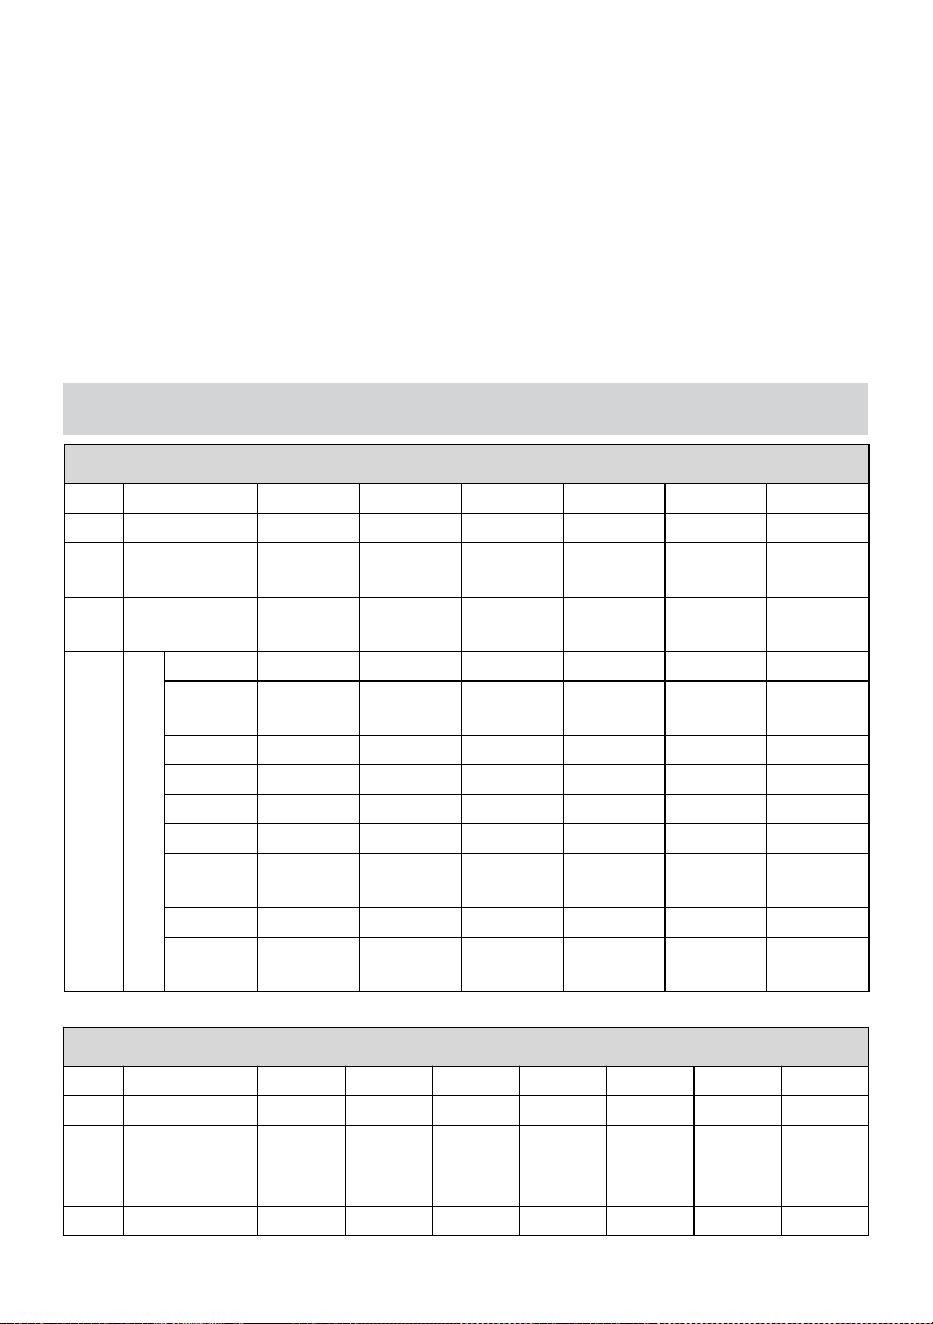
2)Take clip-A to align the curtain hole and put it
underneath.
- 4 -
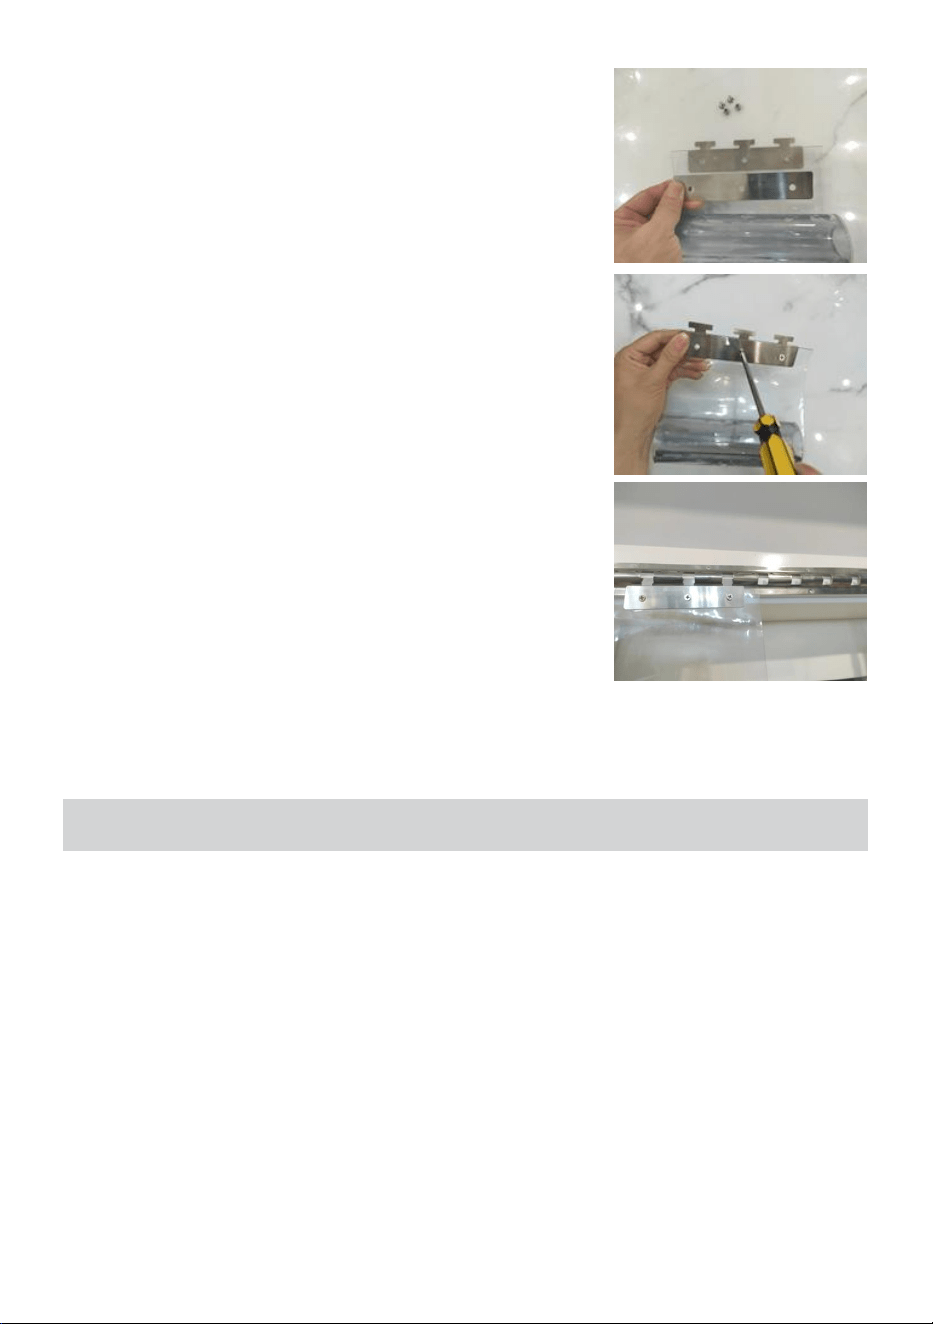
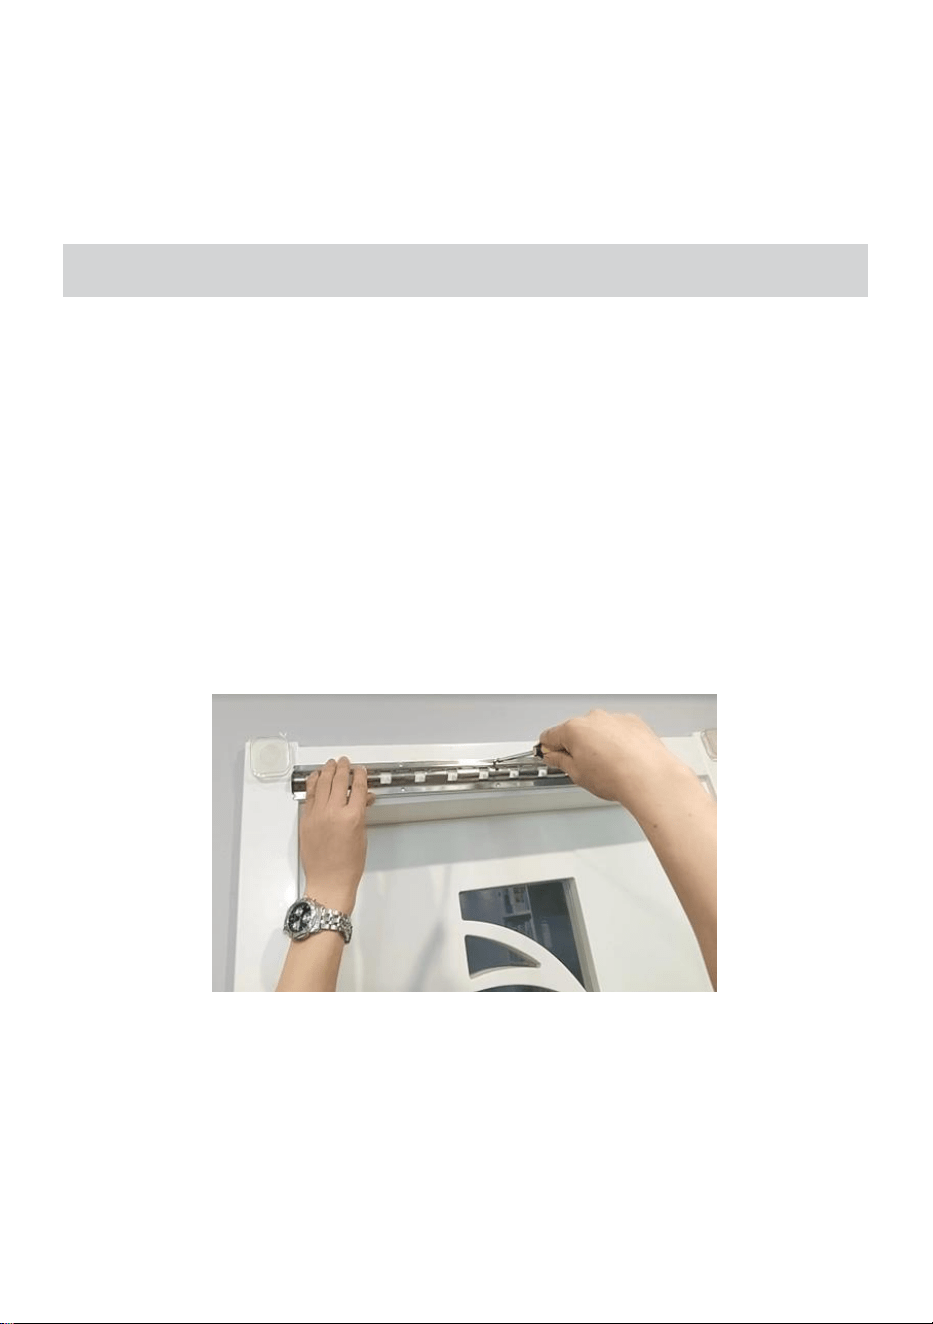
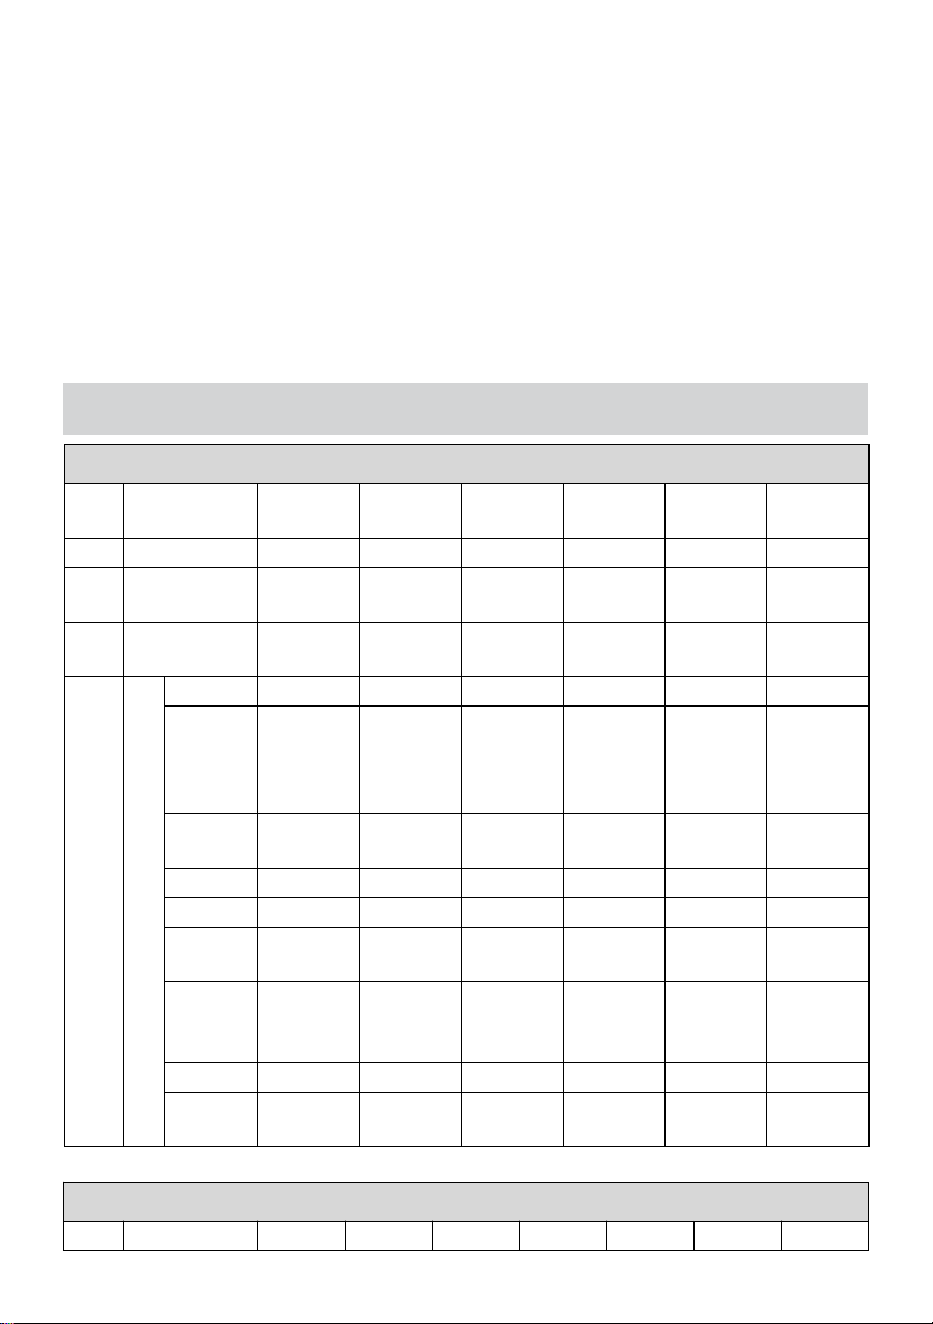
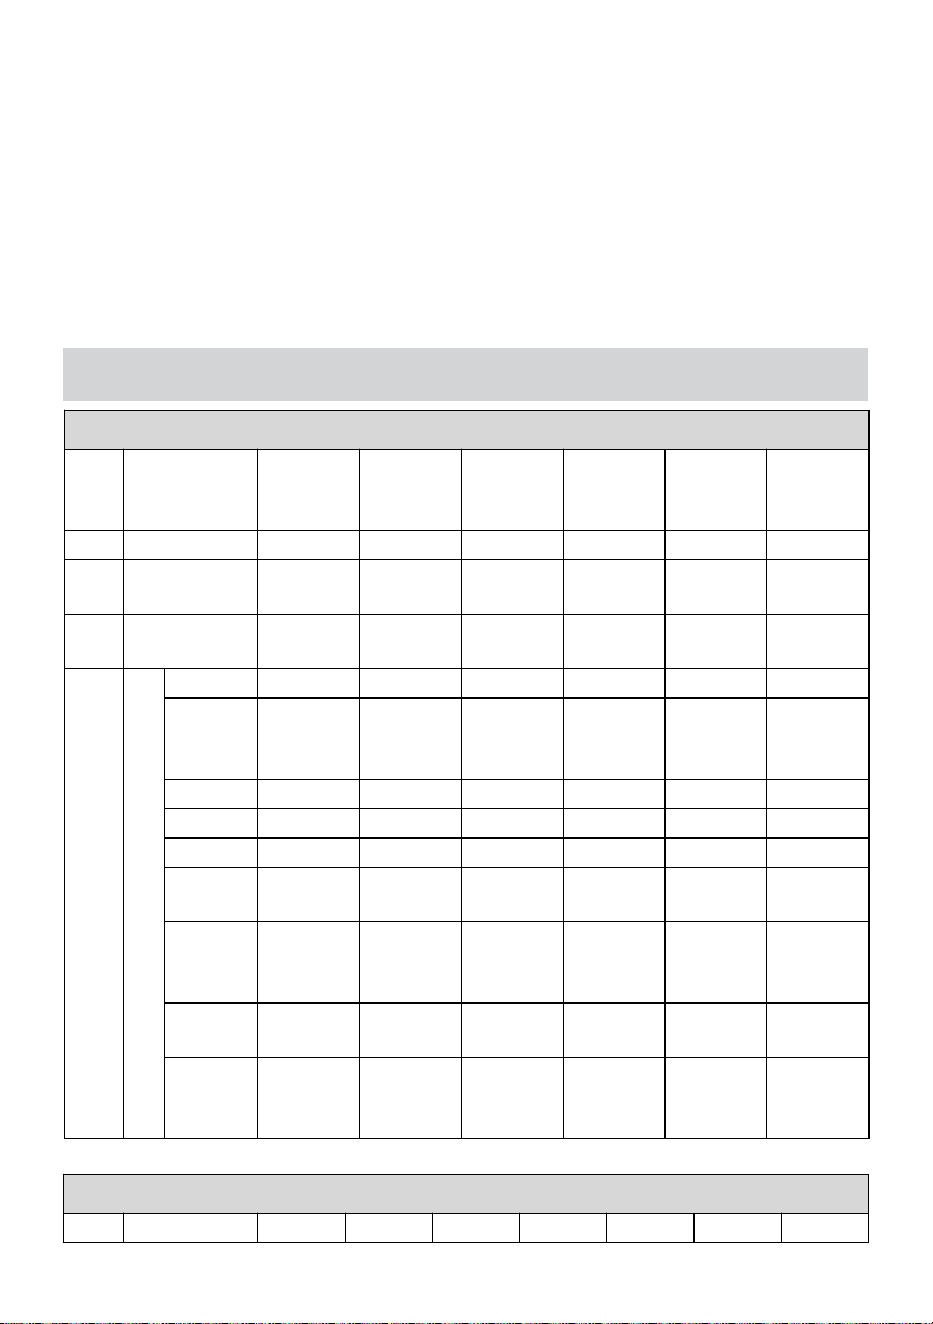
3)Tack clip-B to align the curtain hole and put it
above.
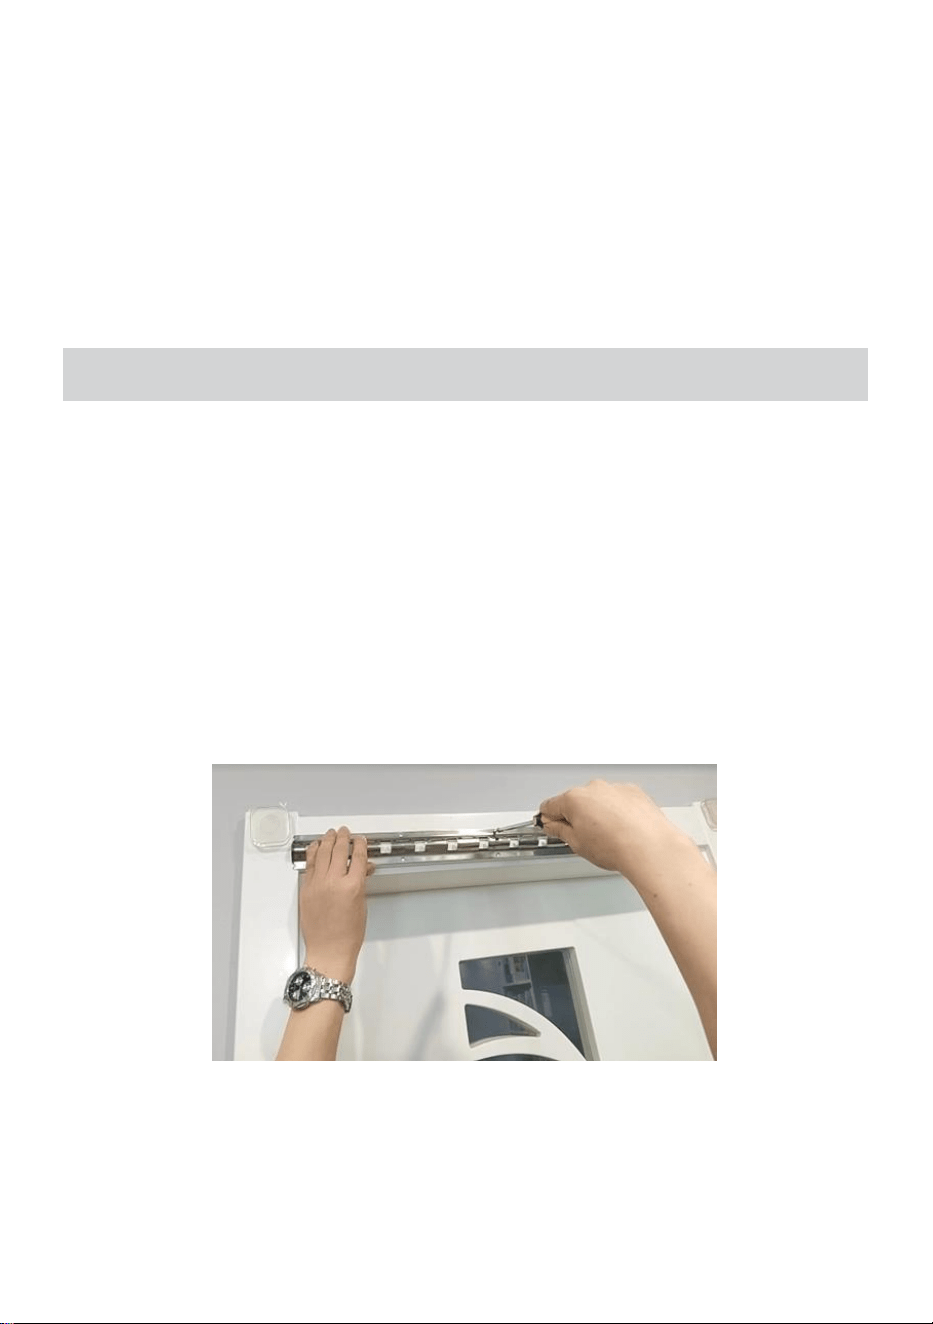
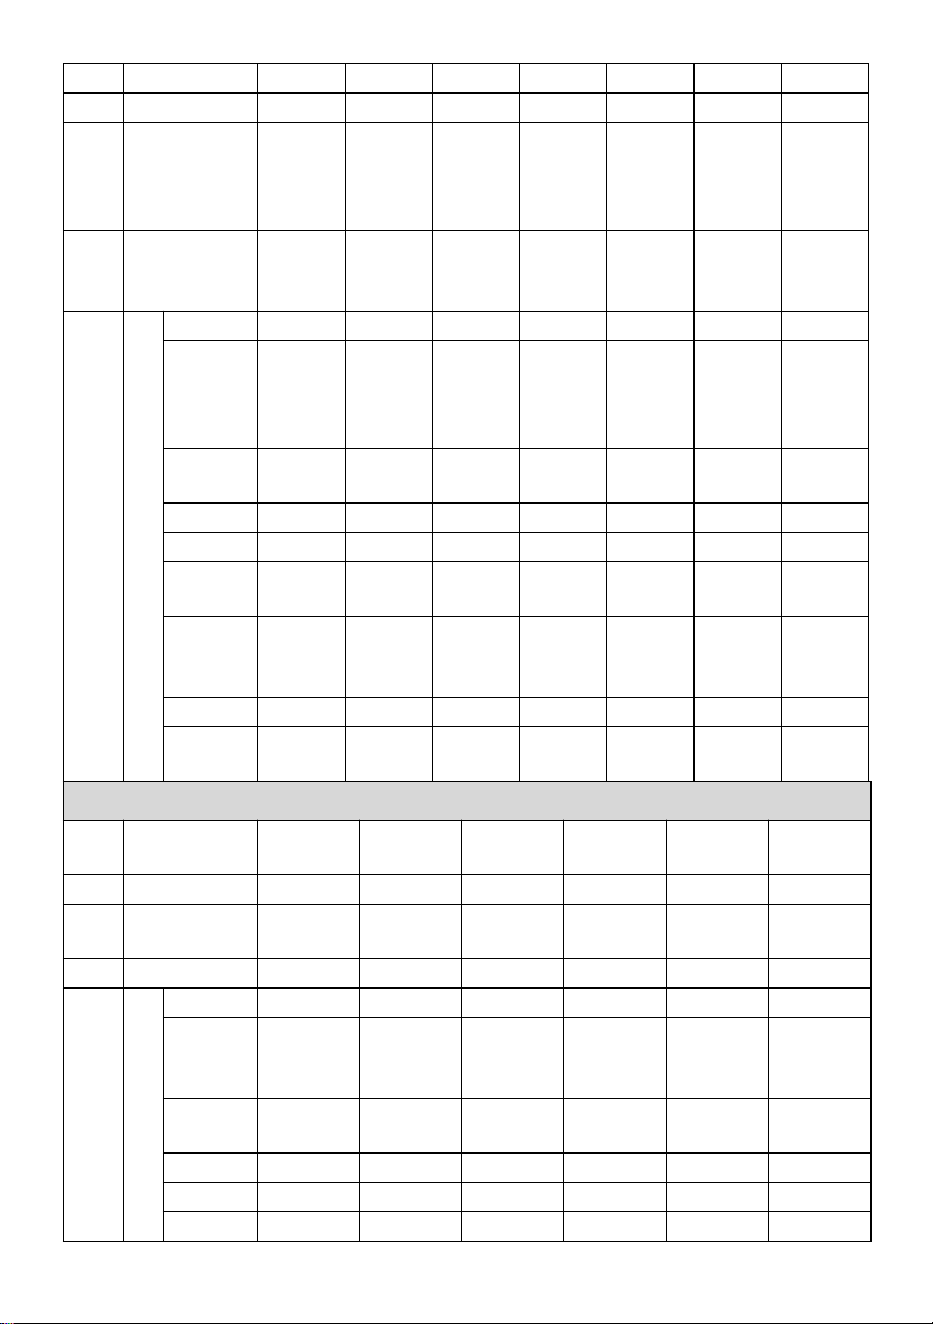
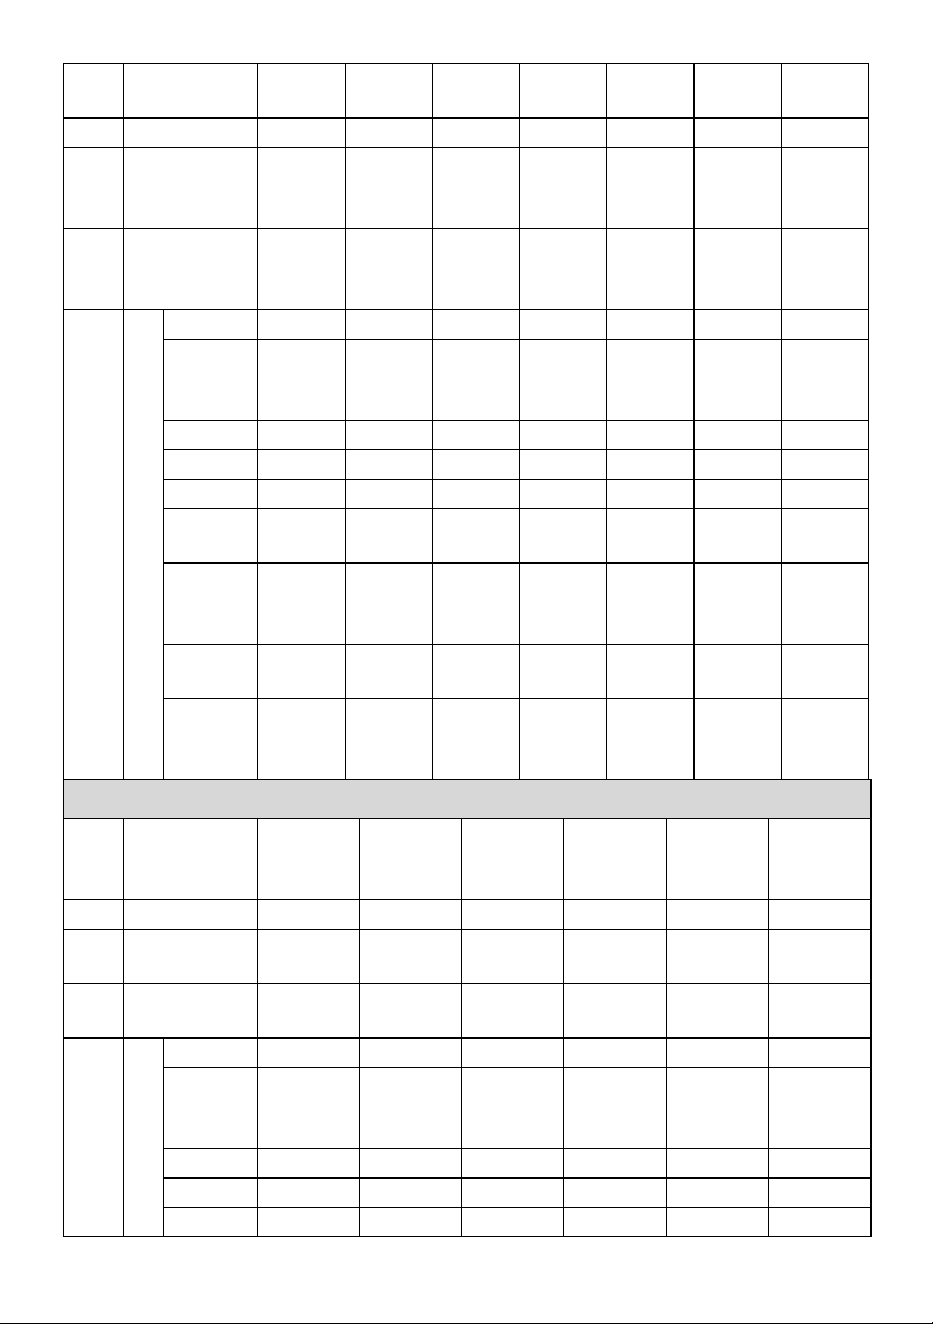
4)Tighten the screws in the clips to clamp the curtain
firmly.
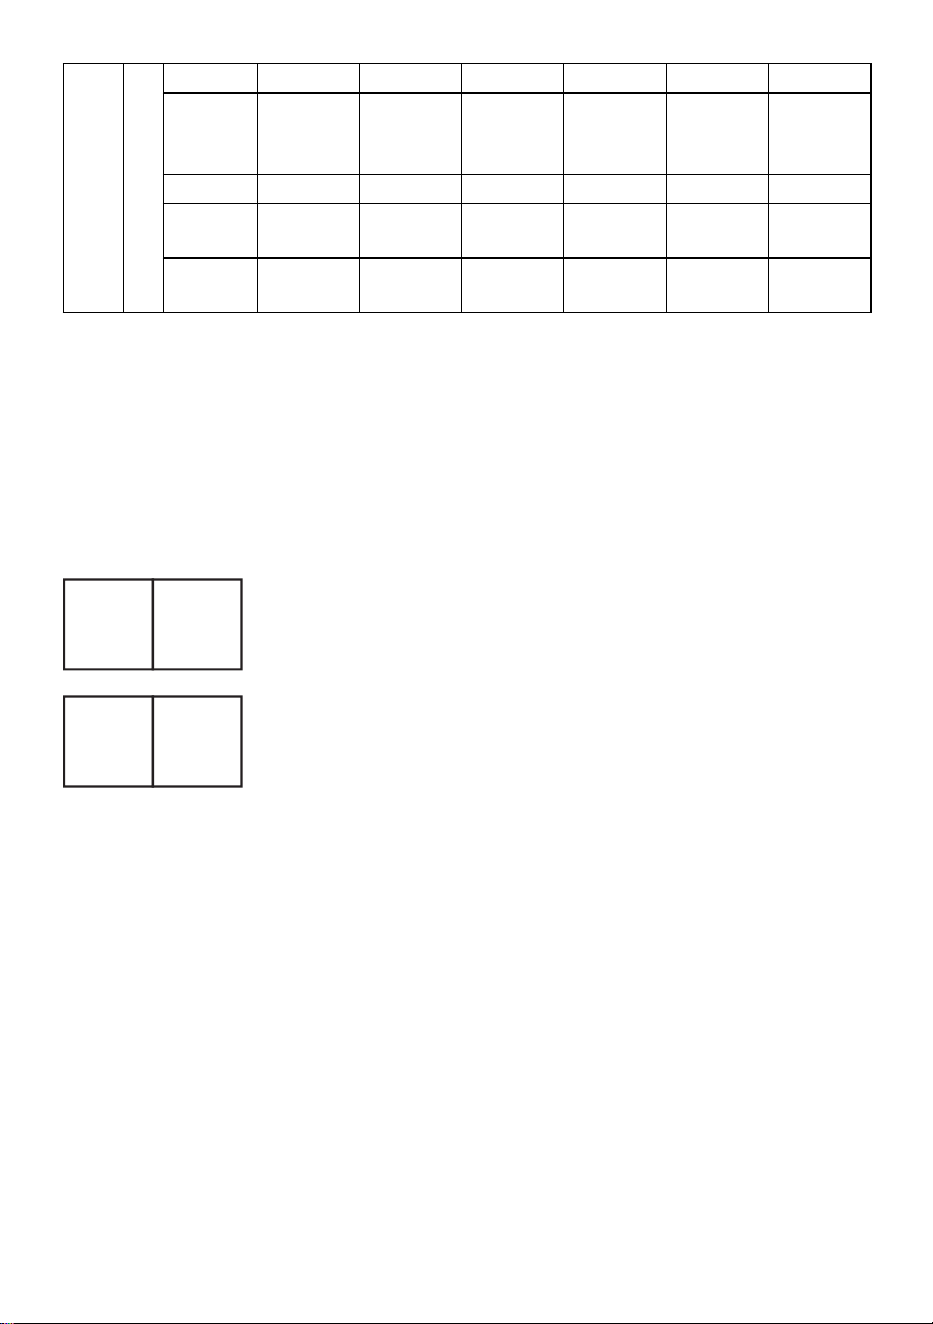
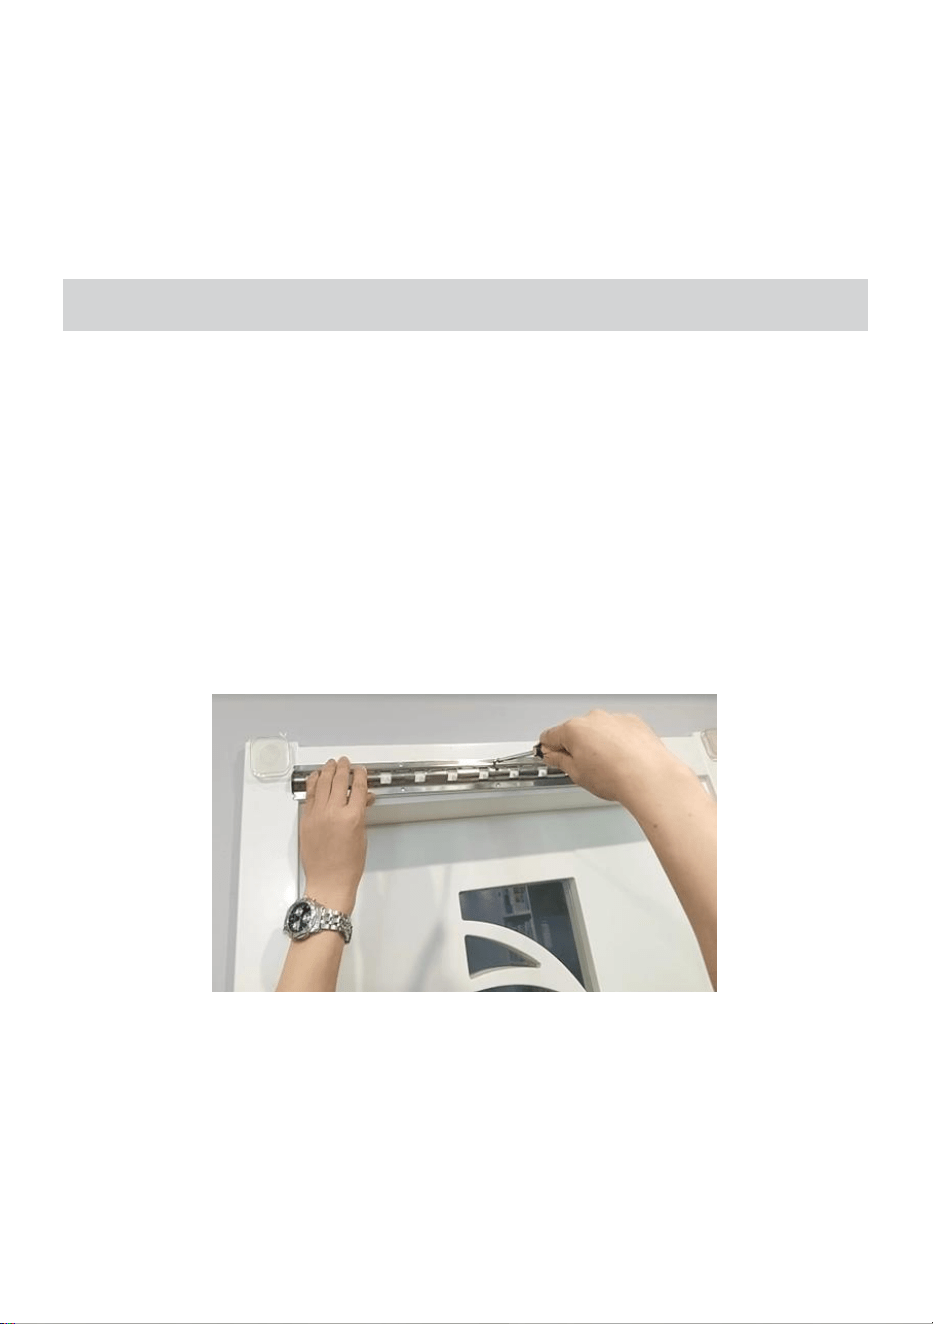
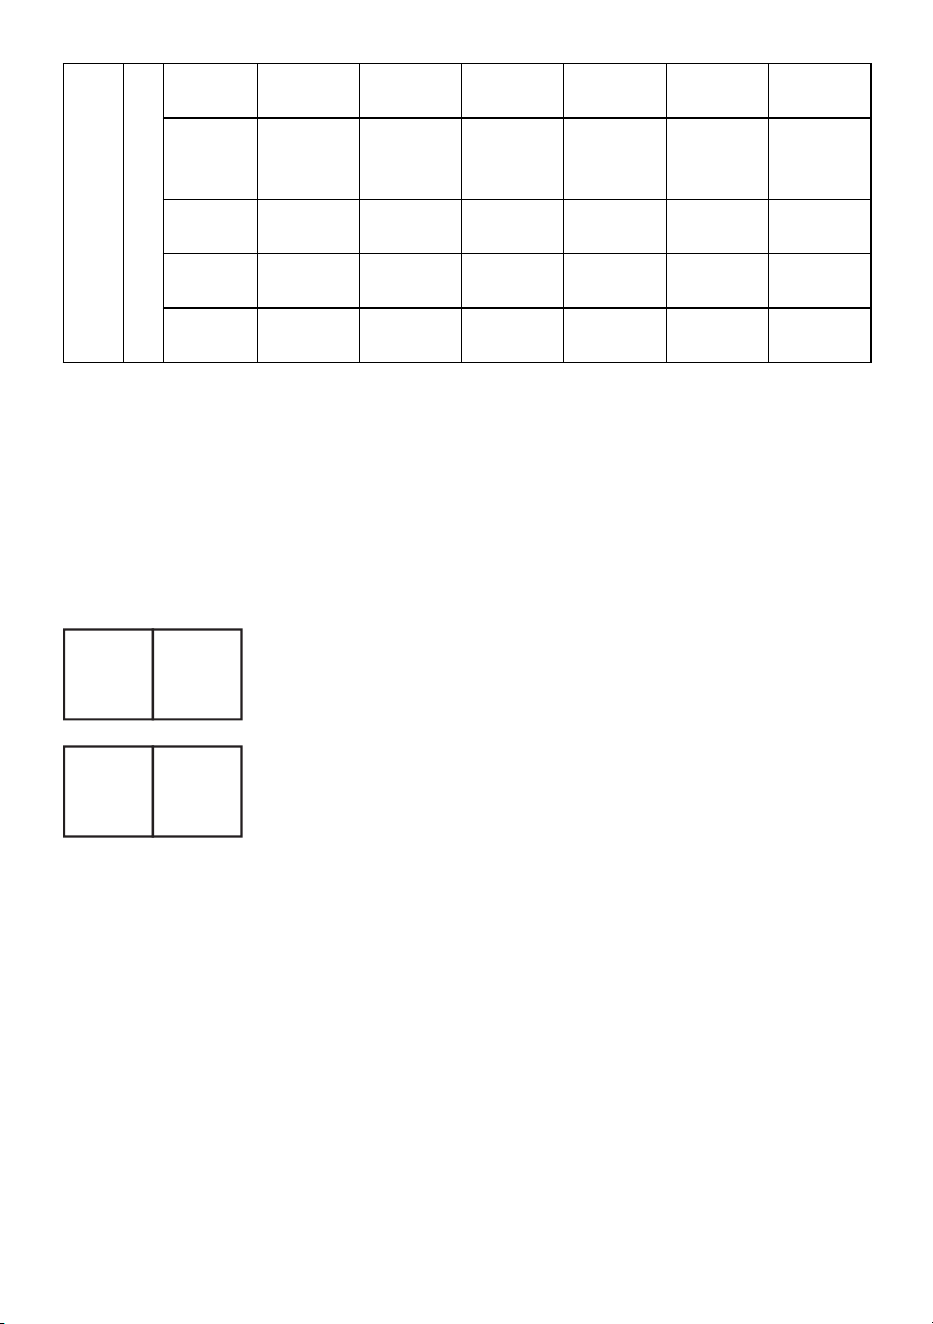
5) Insert the hanging hook of the door curtain into the
hole on the keel. Make sure the curtain is installed in
the correct position.
Adjust the height and width of the door curtain to fit the size and shape of the
doorway.
Check if the door curtain installation is secure, ensuring its stability and reliability.
5. User Guide
(1) Before use, please make sure that the door curtain is correctly installed and
adjusted to the appropriate position.
(2) When opening the door curtain, please first hold the edge of the door curtain
and gently pull it to one side to avoid the door curtain falling off or being
damaged.
(3) When closing the door curtain, please pull it towards the center and make
sure it is completely attached to the door frame.
(4) If the door curtain is found to be loose or damaged during use, please perform
maintenance or replacement in time.
(5) To reduce packaging volume, the bottom of the PVC curtain may curl when it
is first used, but it will gradually recover.

- 5 -
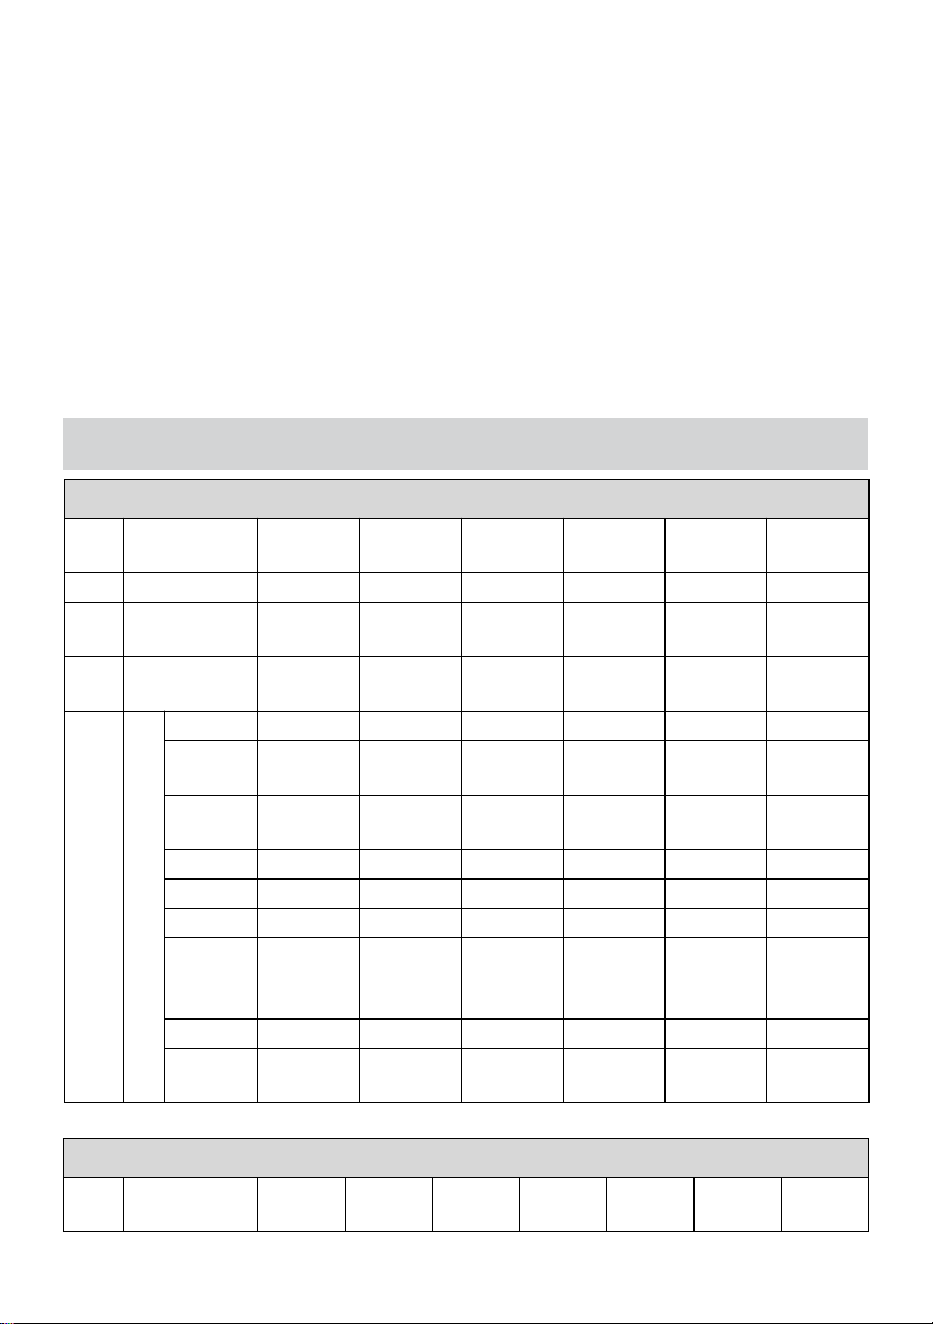
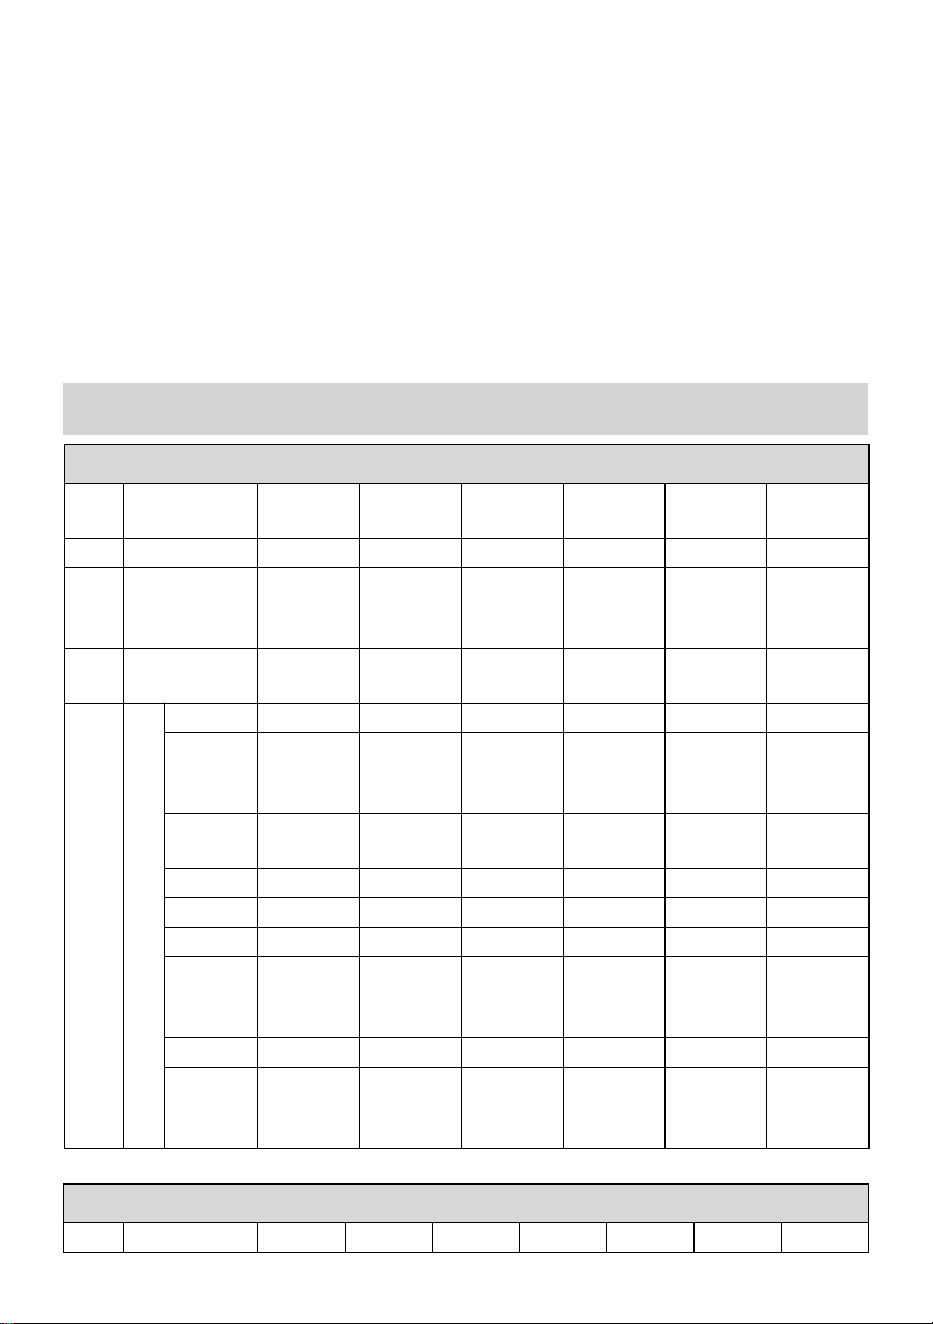
6. Product Parameter
Strip Curtain-Parameter
Item
Item
1
2
3
4
5
6
1
Model#
ZAV0
G8V0
JYV0
4SV0
55V0
HMV0
2
Product Size
50ft ×
8inch
50ft ×
8inch
75ft ×
8inch
75ft ×
8inch
150ft ×
8inch
150ft ×
8inch
3
Surface
Smooth
With ribs
Smooth
With ribs
Smooth
With ribs
4
Component Qty/pcs
Curtain
1
1
1
1
1
1
Tape
Measure
1
1
1
1
1
1
Knife
1
1
1
1
1
1
Clip-A
×
×
×
×
×
×
Clip-B
×
×
×
×
×
×
Keel
×
×
×
×
×
×
Machine
Screw
×
×
×
×
×
×
Nut
×
×
×
×
×
×
Wood
Screw
×
×
×
×
×
×
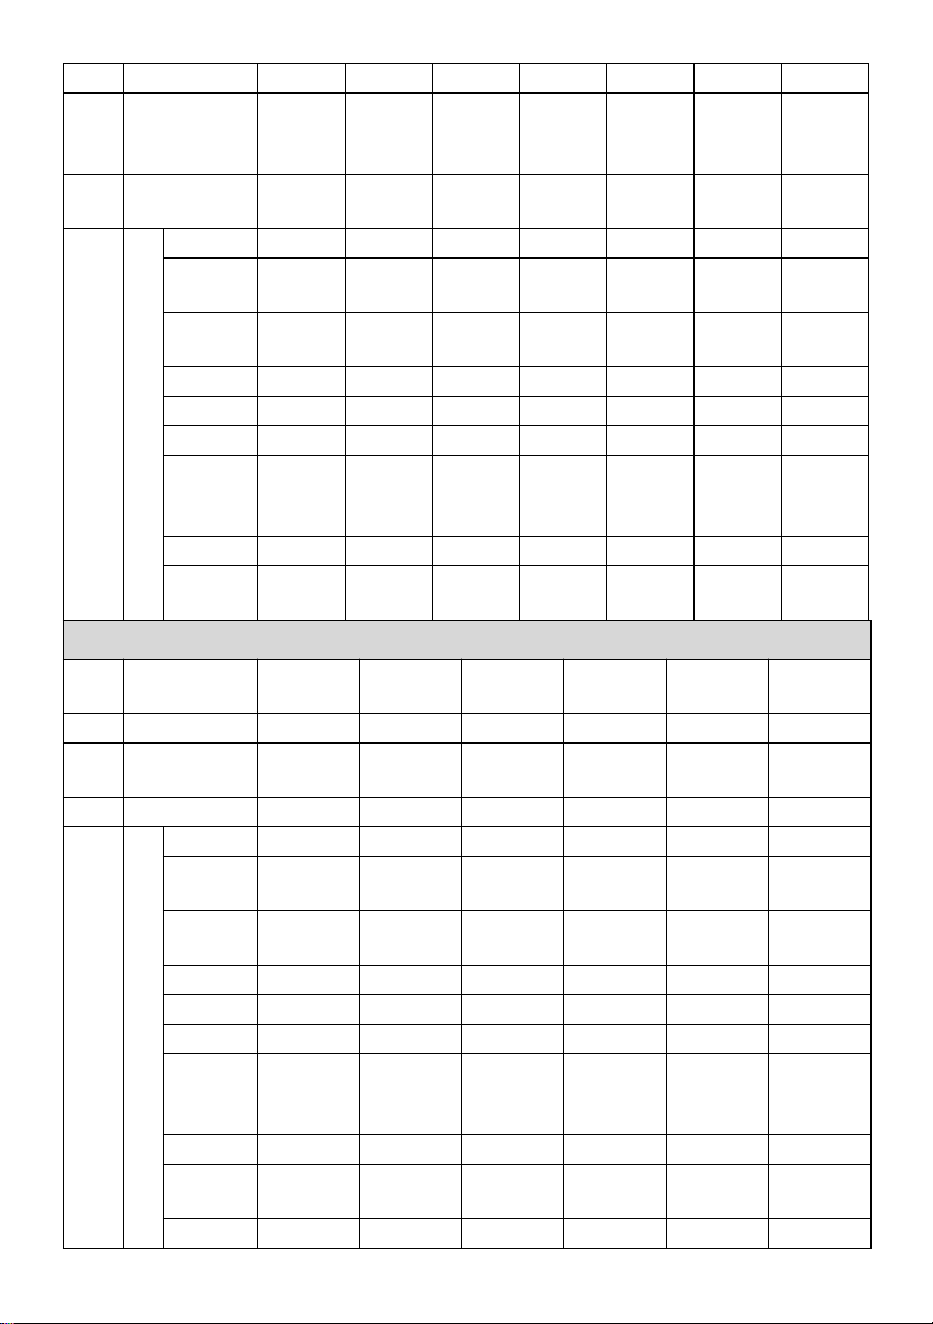
Strip Curtain-Parameter
Item
Item
7
8
9
10
11
12
13
1
Model#
S0V0
M8V0
WBV0
TTV0
Q4V0
TCV0
RCV0
2
Product Size
82ft ×
12inch
82ft ×
8inch
164ft ×
8inch
164ft ×
8inch
100ft ×
12inch
100ft ×
12inch
38×
84inch
3
Surface
Smooth
Smooth
Smooth
With
ribs
Smooth
With
ribs
Smooth
4
Component Qty/pcs
Curtain
1
1
1
1
1
1
6
Tape
Measure
1
1
1
1
1
1
0
Knife
1
1
1
1
1
1
0
Clip-A
×
×
×
×
×
×
6
Clip-B
×
×
×
×
×
×
6
Keel
×
×
×
×
×
×
2
Machine
Screw
×
×
×
×
×
×
18
Nut
×
×
×
×
×
×
18
Wood
Screw
×
×
×
×
×
×
16
- 6 -
Strip Curtain-Parameter
Item
Item
14
15
16
17
18
19
1
Model#
KDV0
IBV0
F0V0
0PV0
VXV0
GGV0
2
Product Size
42×
84inch
48×
84inch
48×
96inch
60×
84inch
72×
96inch
96×
96inch
3
Surface
Smooth
Smooth
Smooth
Smooth
Smooth
Smooth
4
Component Qty/pcs
Curtain
7
8
8
10
12
16
Tape
Measure
0
0
0
0
0
0
Knife
0
0
0
0
0
0
Clip-A
7
8
8
10
12
16
Clip-B
7
8
8
10
12
16
Keel
2
3
2
3
3
4
Machine
Screw
21
24
24
30
36
48
Nut
21
24
24
30
36
48
Wood
Screw
14
20
20
24
20
40
Bolt
Driver
1
1
1
1
1
1
Address: Baoshanqu Shuangchenglu 803long 11hao 1602A-1609shi Shanghai
Imported to AUS: SIHAO PTY LTD, 1 ROKEVA STREETEASTWOOD NSW 2122
Australia
Imported to USA: Sanven Technology Ltd, Suite 250, 9166 Anaheim Place,
Rancho Cucamonga, CA 91730
REP
EC
SHUNSHUN GmbH
Römeräcker 9 Z2021, 76351
Linkenheim-Hochstetten, Germany
REP
UK
Pooledas Group Ltd
Unit 5 Albert Edward House, The
Pavilions Preston, United Kingdom
Made In China


- 2 -
Technique Certificat d'assistance et de garantie électronique
www.vevor.com/support
RIDEAU À LANIÈRES
MANUEL D'UTILISATION
We continue to be committed to provide you tools with competitive price.
"Save Half", "Half Price" or any other similar expressions used by us only represents an
estimate of savings you might benefit from buying certain tools with us compared to the major
top brands and does not necessarily mean to cover all categories of tools offered by us. You
are kindly reminded to verify carefully when you are placing an order with us if you are
actually saving half in comparison with the top major brands.

- 1 -
SKU1-SKU12
SKU13-SKU19
Have product questions? Need technical support? Please feel free to
contact us:
Technical Support and E-Warranty Certificate
www.vevor.com/support
NEED HELP? CONTACT US!
This is the original instruction, please read all manual instructions
carefully before operating. VEVOR reserves a clear interpretation of our
user manual. The appearance of the product shall be subject to the
product you received. Please forgive us that we won't inform you again if
there are any technology or software updates on our product.
STRIP CURTAIN

- 2 -
7. WARNING!
(7) Ne tirez pas, ne coupez pas et n'utilisez pas d'objets tranchants sur le rideau
de porte pour éviter tout dommage.
(8) N'exposez pas le rideau de porte au soleil ou à des environnements à haute
température pour éviter la déformation ou le vieillissement du rideau de porte.
(9) Si vous devez démonter le rideau de porte, veuillez suivre les étapes inverses
pour le démonter et le ranger correctement.
(10) Nettoyez régulièrement le rideau de porte pour le garder propre et frais ; vous
pouvez utiliser un aspirateur ou un chiffon humide pour essuyer délicatement
le rideau de porte.
(11) Si vous achetez un voyage enroulable rideau (SKU1 - SKU12) , vous devez
acheter vous-même les pièces d'installation.
(12)Attention à ne pas vous gratter les doigts lors de l'installation.
8. Maintenance Guide
(5) Nettoyez régulièrement le rideau de porte, utilisez un chiffon humide pour
essuyer la surface et éliminez la poussière et la saleté.
(6) Évitez d’utiliser des agents de nettoyage corrosifs ou des solvants chimiques
pour nettoyer le rideau de porte.
(7) Si le rideau de porte est endommagé, veuillez remplacer la pièce du rideau
de porte à temps pour garantir son utilisation normale.
(8) Les rideaux rayés qui jaunissent peuvent être causés par une utilisation
prolongée ou une exposition au soleil. Si les rideaux ont jauni fortement ou
ont été endommagés, remplacez-les par des neufs.
9. Product Description
Les rideaux de porte rayés sont un type de décoration installé à l'entrée d'une
porte, qui peut empêcher efficacement les insectes, la poussière et le bruit de
pénétrer dans la pièce, protéger l'intimité et fournir une isolation thermique, une
résistance au vent et une isolation phonique. Veuillez lire attentivement ce manuel
avant utilisation.
Les rideaux de porte rayés sont fabriqués à partir de matériaux en PVC de
haute qualité et respectueux de l'environnement.
- 3 -
Le rideau de porte est léger et respirant, ce qui peut empêcher efficacement
l'air intérieur de s'échapper, réduisant ainsi le gaspillage d'énergie.
Le rideau de porte a une certaine performance d'ombrage, ce qui peut
empêcher efficacement la poussière, les débris et autres objets de pénétrer
dans la pièce.
10. Installation Guide
(4) Veuillez vérifier si vos marchandises sont complètes selon la liste des
produits.
(5) Installer la quille :
5) Avant d'installer le rideau de porte, veuillez nettoyer la zone de la porte pour
garantir une surface propre et plane.
6) Mesurez la largeur et la hauteur de la porte. Coupez la quille à une longueur
appropriée en fonction de la taille de la porte.
7) Utilisez un outil pour percer des trous dans le cadre de la porte. Les positions
des trous doivent correspondre aux trous pré-percés sur la quille.
8) Placez la quille au-dessus du cadre de la porte et fixez-la avec un tournevis et
des vis.
(6) Installer le rideau à lanières :
2) Choisissez une longueur et une largeur adaptées au rideau de porte en
fonction de la taille de la porte. Coupez le rideau à une longueur et une largeur
appropriées à l'aide de ciseaux.

- 4 -
2) Prenez le clip -A pour aligner le trou du rideau et
placez-le en dessous.
3) Pince à clous -B pour aligner le trou du rideau et le
mettre au dessus.
4) Serrez les vis dans les clips pour fixer fermement
le rideau.
5) Insérez le crochet de suspension du rideau de
porte dans le trou de la quille. Assurez-vous que le
rideau est installé dans la bonne position.
Ajustez la hauteur et la largeur du rideau de porte pour l’adapter à la taille et à la
forme de la porte.
Vérifiez si l'installation du rideau de porte est sécurisée, en garantissant sa
stabilité et sa fiabilité.
11. User Guide
(6) Avant utilisation, assurez-vous que le rideau de porte est correctement
installé et réglé dans la position appropriée.
(7) Lors de l'ouverture du rideau de porte, veuillez d'abord tenir le bord du rideau
- 5 -
de porte et le tirer doucement d'un côté pour éviter que le rideau de porte ne
tombe ou ne soit endommagé.
(8) Lors de la fermeture du rideau de porte, tirez-le vers le centre et assurez-vous
qu'il est complètement fixé au cadre de la porte.
(9) Si le rideau de porte est desserré ou endommagé pendant l'utilisation,
veuillez effectuer l'entretien ou le remplacement à temps.
(10) Afin de réduire le volume de l'emballage, le bas du rideau en PVC peut
s'enrouler lors de sa première utilisation, mais il reprendra progressivement
sa forme.
12. Product Parameter
Rideau à lanières - Paramètre
Arti
cle
Article
1
2
3
4
5
6
1
Modèle#
ZAV0
G8V0
JYV0
4SV0
55V0
HMV0
2
Taille du
produit
50 pieds
× 8
pouces
50 pieds
× 8
pouces
75 pieds
× 8
pouces
75 pieds
× 8
pouces
150 pieds
× 8
pouces
150 pieds
× 8
pouces
3
Surface
Lisse
Avec des
côtes
Lisse
Avec des
côtes
Lisse
Avec des
côtes
4
Composant Qté/pièces
Rideau
1
1
1
1
1
1
M ètre à
ruban
1
1
1
1
1
1
Couteau
1
1
1
1
1
1
Clip-A
×
×
×
×
×
×
Clip-B
×
×
×
×
×
×
Quille
×
×
×
×
×
×
Vis à
métaux
×
×
×
×
×
×
Noix
×
×
×
×
×
×
Vis à
bois
×
×
×
×
×
×
Rideau à lanières - Paramètre
Artic
le
Article
7
8
9
10
11
12
13
1
Modèle#
S0V0
M8V0
WBV0
TTV0
Q4V0
TCV0
RCV0
2
Taille du
82
82
164
164
100
100
38× 84
- 6 -
produit
pieds ×
12
pouces
pieds ×
8
pouces
pieds ×
8
pouces
pieds ×
8
pouces
pieds ×
12
pouces
pieds ×
12
pouces
pouces
3
Surface
Lisse
Lisse
Lisse
Avec
côtes
Lisse
Avec
des
côtes
Lisse
4
Composant Qté/pièces
Rideau
1
1
1
1
1
1
6
M ètre à
ruban
1
1
1
1
1
1
0
Couteau
1
1
1
1
1
1
0
Clip-A
×
×
×
×
×
×
6
Clip-B
×
×
×
×
×
×
6
Quille
×
×
×
×
×
×
2
Vis à
métaux
×
×
×
×
×
×
18
Noix
×
×
×
×
×
×
18
Vis à
bois
×
×
×
×
×
×
16
Rideau à lanières - Paramètre
Artic
le
Article
14
15
16
17
18
19
1
Modèle#
KDV0
IBV0
F0V0
0PV0
VXV0
GGV0
2
Produit
Taille
42× 84
pouces
48× 84
pouces
48× 96
pouces
60× 84
pouces
72× 96
pouces
96× 96
pouces
3
Surface
Lisse
Lisse
Lisse
Lisse
Lisse
Lisse
4
Composant Qté/pièces
Rideau
7
8
8
10
12
16
M ètre à
ruban
0
0
0
0
0
0
Couteau
0
0
0
0
0
0
Clip-A
7
8
8
10
12
16
Clip-B
7
8
8
10
12
16
Quille
2
3
2
3
3
4
Vis à
métaux
21
24
24
30
36
48
Noix
21
24
24
30
36
48
Vis à
bois
14
20
20
24
20
40
Tournevi
s à
boulon
1
1
1
1
1
1

- 7 -
Adresse : Baoshanqu Shuangchenglu 803long 11hao 1602A-1609shi Shanghai
Importé en Australie : SIHAO PTY LTD, 1 ROKEVA STREET, ASTWOOD NSW
2122 Australie
Importé aux États-Unis : Sanven Technology Ltd, Suite 250, 9166 Anaheim
Place, Rancho Cucamonga, CA 91730
REP
EC
SHUNSHUN GmbH
Römeräcker 9 Z2021, 76351
Linkenheim-Hochstetten, Germany
REP
UK
Pooledas Group Ltd
Unit 5 Albert Edward House, The
Pavilions Preston, United Kingdom
Fabriqué en Chine


- 2 -
Technisch Support und E-Garantie-Zertifikat
www.vevor.com/support
STREIFENVORHANG
BENUTZERHANDBUCH
We continue to be committed to provide you tools with competitive price.
"Save Half", "Half Price" or any other similar expressions used by us only represents an
estimate of savings you might benefit from buying certain tools with us compared to the major
top brands and does not necessarily mean to cover all categories of tools offered by us. You
are kindly reminded to verify carefully when you are placing an order with us if you are
actually saving half in comparison with the top major brands.

- 1 -
SKU1-SKU12
SKU13-SKU19
Have product questions? Need technical support? Please feel free to
contact us:
Technical Support and E-Warranty Certificate
www.vevor.com/support
NEED HELP? CONTACT US!
This is the original instruction, please read all manual instructions
carefully before operating. VEVOR reserves a clear interpretation of our
user manual. The appearance of the product shall be subject to the
product you received. Please forgive us that we won't inform you again if
there are any technology or software updates on our product.
STRIP CURTAIN

- 2 -
13. WARNING!
(13) Um eine Beschädigung zu vermeiden, dürfen Sie nicht am Türbehang ziehen,
schneiden oder scharfe Gegenstände verwenden.
(14) Setzen Sie den Türvorhang nicht dem Sonnenlicht oder hohen Temperaturen
aus, um eine Verformung oder Alterung des Türvorhangs zu vermeiden.
(15) Wenn Sie den Türvorhang zerlegen müssen, befolgen Sie bitte die Schritte in
umgekehrter Reihenfolge, um ihn zu zerlegen und ordnungsgemäß zu
lagern.
(16) Reinigen Sie den Türvorhang regelmäßig, um ihn sauber und frisch zu
halten . Sie können einen Staubsauger oder ein feuchtes Tuch verwenden,
um den Türvorhang vorsichtig abzuwischen.
(17) Wenn Sie eine Roll-Up - Reise kaufen Vorhang (SKU1 – SKU12) , Sie
müssen die Installationsteile selbst kaufen.
(18)Passen Sie auf, dass Sie sich beim Einbau nicht die Finger zerkratzen.
14. Maintenance Guide
(9) Reinigen Sie den Türbehang regelmäßig, wischen Sie die Oberfläche mit
einem feuchten Tuch ab und entfernen Sie Staub und Schmutz.
(10) Vermeiden Sie die Verwendung von ätzenden Reinigungsmitteln oder
chemischen Lösungsmitteln zum Reinigen des Türvorhangs.
(11) Wenn sich herausstellt, dass der Türvorhang beschädigt ist, ersetzen Sie das
Türvorhangstück bitte rechtzeitig, um eine normale Verwendung
sicherzustellen.
(12)Das Vergilben gestreifter Vorhänge kann durch längere Nutzung oder
Sonneneinstrahlung verursacht werden. Wenn die Vorhänge stark vergilbt
oder beschädigt sind, ersetzen Sie sie durch neue.
15. Product Description
Gestreifte Türvorhänge sind eine Art Dekoration, die am Eingang einer Tür
angebracht wird. Sie können das Eindringen von Insekten, Staub und Lärm in den
Raum wirksam verhindern, die Privatsphäre schützen und Wärmedämmung,
Windbeständigkeit und Schalldämmung bieten. Bitte lesen Sie dieses Handbuch
vor der Verwendung sorgfältig durch.
- 3 -
Die gestreiften Türvorhänge bestehen aus hochwertigen, umweltfreundlichen
PVC-Materialien.
Der Türvorhang ist leicht und atmungsaktiv, wodurch er das Entweichen von
Raumluft wirksam verhindern und so Energieverschwendung reduzieren
kann.
Der Türvorhang verfügt über eine gewisse Beschattungsleistung, die wirksam
verhindern kann, dass Staub, Schmutz und andere Gegenstände in den
Raum gelangen.
16. Installation Guide
(7) Bitte prüfen Sie die Vollständigkeit Ihrer Ware gemäß Produktliste.
(8) Installieren Sie den Kiel:
9) Bevor Sie den Türvorhang montieren, reinigen Sie bitte den Türbereich, um
eine saubere und ebene Oberfläche sicherzustellen.
10) Messen Sie die Breite und Höhe der Türöffnung. Schneiden Sie den Kiel
entsprechend der Größe der Türöffnung auf eine geeignete Länge.
11) Bohren Sie mit einem Werkzeug Löcher in den Türrahmen. Die Positionen
der Löcher sollten mit den vorgebohrten Löchern im Kiel übereinstimmen.
12) Platzieren Sie den Kiel über dem Türrahmen und befestigen Sie ihn mit einem
Schraubendreher und Schrauben.
(9) Montage des Streifenvorhangs:
3) Wählen Sie je nach Größe der Türöffnung eine geeignete Länge und Breite für
den Türvorhang. Schneiden Sie den Vorhang mit einer Schere auf die passende
Länge und Breite zu.

- 4 -
2) Nehmen Sie den Clip -A , um das Vorhangloch
auszurichten, und legen Sie ihn darunter.
3) Heftklammer -B um das Gardinenloch auszurichten
und darüber zu legen.
4) Ziehen Sie die Schrauben in den Clips fest, um den
Vorhang festzuklemmen.
5) Stecken Sie den Aufhängehaken des Türvorhangs
in das Loch am Kiel. Stellen Sie sicher, dass der
Vorhang in der richtigen Position angebracht ist.
Passen Sie die Höhe und Breite des Türvorhangs an die Größe und Form der
Türöffnung an.
Überprüfen Sie, ob die Türvorhangmontage sicher ist, und stellen Sie deren
Stabilität und Zuverlässigkeit sicher.
17. User Guide
(11) Bitte achten Sie vor der Inbetriebnahme darauf, dass der Türbehang
ordnungsgemäß montiert und in der richtigen Position eingestellt ist.
(12) Beim Öffnen des Türvorhangs halten Sie bitte zunächst die Kante des
- 5 -
Türvorhangs fest und ziehen Sie ihn vorsichtig zur Seite, um ein
Herunterfallen oder eine Beschädigung des Türvorhangs zu vermeiden.
(13) Beim Schließen des Türvorhangs ziehen Sie diesen bitte zur Mitte hin und
achten Sie auf die vollständige Befestigung am Türrahmen.
(14) Wenn sich während des Gebrauchs herausstellt, dass der Türvorhang locker
ist oder beschädigt wird, führen Sie bitte rechtzeitig eine Wartung oder einen
Austausch durch.
(15) Um das Verpackungsvolumen zu verringern, kann sich die Unterseite des
PVC-Vorhangs bei der ersten Verwendung wellen, dies erholt sich jedoch mit
der Zeit.
18. Product Parameter
Streifenvorhang-Parameter
Arti
kel
Artikel
1
2
3
4
5
6
1
Modell#
ZAV0
G8V0
JYV0
4SV0
55V0
HMV0
2
Produktgröße
50 Fuß ×
8 Zoll
50 Fuß ×
8 Zoll
75 Fuß ×
8 Zoll
75 Fuß ×
8 Zoll
150 Fuß
× 8 Zoll
150 Fuß
× 8 Zoll
3
Oberfläche
Glatt
Mit
Rippen
Glatt
Mit
Rippen
Glatt
Mit
Rippen
4
Komponente Menge/Stück
Vorhang
1
1
1
1
1
1
Maßban
d
1
1
1
1
1
1
Messer
1
1
1
1
1
1
Clip-A
×
×
×
×
×
×
Clip-B
×
×
×
×
×
×
Kiel
×
×
×
×
×
×
Maschin
enschra
ube
×
×
×
×
×
×
Nuss
×
×
×
×
×
×
Holzschr
aube
×
×
×
×
×
×
Streifenvorhang-Parameter
Artik
el
Artikel
7
8
9
10
11
12
13
- 6 -
1
Modell#
S0V0
M8V0
WBV0
TTV0
Q4V0
TCV0
RCV0
2
Produktgröße
82 Fuß
× 12
Zoll
82 Fuß
× 8 Zoll
164
Fuß × 8
Zoll
164
Fuß × 8
Zoll
100
Fuß ×
12 Zoll
100
Fuß ×
12 Zoll
38× 84
Zoll
3
Oberfläche
Glatt
Glatt
Glatt
Mit
Rippen
Glatt
Mit
Rippen
Glatt
4
Komponente Menge/Stück
Vorhang
1
1
1
1
1
1
6
Maßban
d
1
1
1
1
1
1
0
Messer
1
1
1
1
1
1
0
Clip-A
×
×
×
×
×
×
6
Clip-B
×
×
×
×
×
×
6
Kiel
×
×
×
×
×
×
2
Maschin
enschra
ube
×
×
×
×
×
×
18
Nuss
×
×
×
×
×
×
18
Holzschr
aube
×
×
×
×
×
×
16
Streifenvorhang-Parameter
Artik
el
Artikel
14
15
16
17
18
19
1
Modell#
KDV0
IBV0
F0V0
0PV0
VXV0
GGV0
2
Produkt
Größe
42× 84
Zoll
48× 84
Zoll
48× 96
Zoll
60× 84
Zoll
72× 96
Zoll
96× 96
Zoll
3
Oberfläche
Glatt
Glatt
Glatt
Glatt
Glatt
Glatt
4
Komponente Menge/Stück
Vorhang
7
8
8
10
12
16
Maßban
d
0
0
0
0
0
0
Messer
0
0
0
0
0
0
Clip-A
7
8
8
10
12
16
Clip-B
7
8
8
10
12
16
Kiel
2
3
2
3
3
4
Maschin
enschra
ube
21
24
24
30
36
48
Nuss
21
24
24
30
36
48
Holzschr
aube
14
20
20
24
20
40
Bolzentr
1
1
1
1
1
1
- 7 -
eiber
Adresse: Baoshanqu Shuangchenglu 803long 11hao 1602A-1609shi Shanghai
Nach AUS importiert: SIHAO PTY LTD, 1 ROKEVA STREETEASTWOOD NSW
2122 Australien
Importiert in die USA: Sanven Technology Ltd, Suite 250, 9166 Anaheim Place,
Rancho Cucamonga, CA 91730
REP
EC
SHUNSHUN GmbH
Römeräcker 9 Z2021, 76351
Linkenheim-Hochstetten, Germany
REP
UK
Pooledas Group Ltd
Unit 5 Albert Edward House, The
Pavilions Preston, United Kingdom
In China hergestellt


- 2 -
Tecnico Supporto e certificato di garanzia elettronica
www.vevor.com/support
TENDA A STRISCE
MANUALE D'USO
We continue to be committed to provide you tools with competitive price.
"Save Half", "Half Price" or any other similar expressions used by us only represents an
estimate of savings you might benefit from buying certain tools with us compared to the major
top brands and does not necessarily mean to cover all categories of tools offered by us. You
are kindly reminded to verify carefully when you are placing an order with us if you are
actually saving half in comparison with the top major brands.

- 1 -
SKU1-SKU12
SKU13-SKU19
Have product questions? Need technical support? Please feel free to
contact us:
Technical Support and E-Warranty Certificate
www.vevor.com/support
NEED HELP? CONTACT US!
This is the original instruction, please read all manual instructions
carefully before operating. VEVOR reserves a clear interpretation of our
user manual. The appearance of the product shall be subject to the
product you received. Please forgive us that we won't inform you again if
there are any technology or software updates on our product.
STRIP CURTAIN

- 2 -
19. WARNING!
(19) Per evitare danni, non tirare, tagliare o utilizzare oggetti affilati sulla tenda
della porta.
(20) Non esporre la tenda della porta alla luce solare o ad ambienti ad alta
temperatura per evitare deformazioni o invecchiamenti della tenda.
(21) Se è necessario smontare la tenda della porta, seguire la procedura inversa
per smontarla e riporla correttamente.
(22) Pulisci regolarmente la tenda della porta per mantenerla pulita e fresca ; puoi
usare un aspirapolvere o un panno umido per strofinarla delicatamente.
(23) Se acquisti un viaggio roll - up tenda (SKU1 - SKU12) , è necessario
acquistare autonomamente i componenti per l'installazione.
(24)Fate attenzione a non graffiarvi le dita durante l'installazione.
20. Maintenance Guide
(13) Pulire regolarmente la tenda della porta, utilizzando un panno umido per
strofinare la superficie e rimuovere polvere e sporcizia.
(14) Evitare di utilizzare detergenti corrosivi o solventi chimici per pulire la tendina
della porta.
(15) Se si riscontra che la tenda della porta è danneggiata, sostituire
tempestivamente il pezzo della tenda per garantirne il normale utilizzo.
(16)Le tende a strisce che ingialliscono possono essere causate dall'uso
prolungato o dall'esposizione alla luce solare. Se le tende sono diventate
molto gialle o sono state danneggiate, sostituiscile con delle nuove.
21. Product Description
Le tende a strisce sono un tipo di decorazione installata all'ingresso di una porta,
che può efficacemente impedire a insetti, polvere e rumore di entrare nella stanza,
proteggere la privacy e fornire isolamento termico, resistenza al vento e
isolamento acustico. Si prega di leggere attentamente questo manuale prima
dell'uso.
Le tende a strisce sono realizzate in materiali PVC di alta qualità e rispettosi
dell'ambiente.
La tenda della porta è leggera e traspirante, il che impedisce efficacemente la
- 3 -
fuoriuscita dell'aria interna, riducendo così lo spreco di energia.
La tenda della porta ha una certa capacità di oscuramento, che può impedire
efficacemente a polvere, detriti e altri oggetti di entrare nella stanza.
22. Installation Guide
(10) Si prega di controllare che la merce sia completa in base all'elenco dei
prodotti.
(11) Installare la chiglia:
13) Prima di installare la tenda sulla porta, pulire la zona della porta per garantire
una superficie pulita e piana.
14) Misurare la larghezza e l'altezza della porta. Tagliare la chiglia a una
lunghezza appropriata in base alle dimensioni della porta.
15) Utilizzare un utensile per praticare i fori nel telaio della porta. Le posizioni dei
fori devono corrispondere ai fori preforati sulla chiglia.
16) Posizionare la chiglia sopra il telaio della porta e fissarla con un cacciavite e
delle viti.
(12) Installare la tenda a strisce:
4) Scegli una lunghezza e una larghezza adatte per la tenda della porta in base
alle dimensioni della porta. Taglia la tenda a una lunghezza e una larghezza
appropriate usando le forbici.
- 4 -
2) Prendi la clip -A per allineare il foro della tenda e
posizionala sotto.
3) Fermaglio di fissaggio -B per allineare il foro della
tenda e posizionarla sopra.
4) Stringere le viti nelle clip per fissare saldamente la
tenda.
5) Inserire il gancio di sospensione della tenda della
porta nel foro sulla chiglia. Assicurarsi che la tenda
sia installata nella posizione corretta.
Regolare l'altezza e la larghezza della tenda della porta in base alle dimensioni e
alla forma della porta.
Controllare che l'installazione della tenda della porta sia sicura, assicurandone la
stabilità e l'affidabilità.
23. User Guide
(16) Prima dell'uso, assicurarsi che la tenda della porta sia installata
correttamente e regolata nella posizione appropriata.
(17) Quando si apre la tenda della porta, afferrare prima il bordo della tenda e
- 5 -
tirarla delicatamente verso un lato per evitare che cada o si danneggi.
(18) Quando si chiude la tenda della porta, tirarla verso il centro e assicurarsi che
sia completamente fissata allo stipite della porta.
(19) Se durante l'uso si riscontra che la tendina della porta è allentata o
danneggiata, si prega di provvedere tempestivamente alla manutenzione o
alla sostituzione.
(20) Per ridurre il volume dell'imballaggio, la parte inferiore della tenda in PVC
potrebbe arricciarsi quando viene utilizzata per la prima volta, per poi
riprendersi gradualmente.
24. Product Parameter
Parametro tenda a strisce
Arti
colo
Articolo
1
2
3
4
5
6
1
Modello#
ZAV0
G8V0
JYV0
4SV0
55V0
HMV0
2
Dimensioni
del prodotto
50 piedi ×
8 pollici
50 piedi ×
8 pollici
75 piedi ×
8 pollici
75 piedi ×
8 pollici
150 piedi
× 8 pollici
150 piedi
× 8 pollici
3
Superficie
Liscio
Con le
costole
Liscio
Con le
costole
Liscio
Con le
costole
4
Componente Qtà/pz
Tenda
1
1
1
1
1
1
Nastro
di
misurazi
one
1
1
1
1
1
1
Coltello
1
1
1
1
1
1
Clip-A
×
×
×
×
×
×
Clip-B
×
×
×
×
×
×
Chiglia
×
×
×
×
×
×
Vite per
macchin
a
×
×
×
×
×
×
Noce
×
×
×
×
×
×
Vite per
legno
×
×
×
×
×
×
Parametro tenda a strisce
Artic
Articolo
7
8
9
10
11
12
13
- 6 -
olo
1
Modello#
S0V0
M8V0
Italiano:
TTV0
Q4V0
TCV0
RCV0
2
Dimensioni
del prodotto
82 piedi
× 12
pollici
82 piedi
× 8
pollici
164
piedi ×
8 pollici
164
piedi ×
8 pollici
100
piedi ×
12
pollici
100
piedi ×
12
pollici
38× 84
pollici
3
Superficie
Liscio
Liscio
Liscio
Con
costolet
te
Liscio
Con le
costole
Liscio
4
Componente Qtà/pz
Tenda
1
1
1
1
1
1
6
Nastro
di
misurazi
one
1
1
1
1
1
1
0
Coltello
1
1
1
1
1
1
0
Clip-A
×
×
×
×
×
×
6
Clip-B
×
×
×
×
×
×
6
Chiglia
×
×
×
×
×
×
2
Vite per
macchin
a
×
×
×
×
×
×
18
Noce
×
×
×
×
×
×
18
Vite per
legno
×
×
×
×
×
×
16
Parametro tenda a strisce
Artic
olo
Articolo
14
15
16
17
18
19
1
Modello#
Italiano:
IBV0
F0V0
0PV0
VXV0
GGV0
2
Prodotto
Misurare
42× 84
pollici
48× 84
pollici
48× 96
pollici
60× 84
pollici
72× 96
pollici
96× 96
pollici
3
Superficie
Liscio
Liscio
Liscio
Liscio
Liscio
Liscio
4
Componente Qtà/pz
Tenda
7
8
8
10
12
16
Nastro di
misurazi
one
0
0
0
0
0
0
Coltello
0
0
0
0
0
0
Clip-A
7
8
8
10
12
16
Clip-B
7
8
8
10
12
16
Chiglia
2
3
2
3
3
4
- 7 -
Vite per
macchin
a
21
24
24
30
36
48
Noce
21
24
24
30
36
48
Vite per
legno
14
20
20
24
20
40
Cacciavi
te
1
1
1
1
1
1
Indirizzo: Baoshanqu Shuangchenglu 803long 11hao 1602A-1609shi Shanghai
Importato in AUS: SIHAO PTY LTD, 1 ROKEVA STREETEASTWOOD NSW
2122 Australia
Importato negli USA: Sanven Technology Ltd, Suite 250, 9166 Anaheim Place,
Rancho Cucamonga, CA 91730
REP
EC
SHUNSHUN GmbH
Römeräcker 9 Z2021, 76351
Linkenheim-Hochstetten, Germany
REP
UK
Pooledas Group Ltd
Unit 5 Albert Edward House, The
Pavilions Preston, United Kingdom
Made in China


- 2 -
Técnico Certificado de soporte y garantía electrónica
www.vevor.com/support
CORTINA DE TIRAS
MANUAL DEL USUARIO
We continue to be committed to provide you tools with competitive price.
"Save Half", "Half Price" or any other similar expressions used by us only represents an
estimate of savings you might benefit from buying certain tools with us compared to the major
top brands and does not necessarily mean to cover all categories of tools offered by us. You
are kindly reminded to verify carefully when you are placing an order with us if you are
actually saving half in comparison with the top major brands.

- 1 -
SKU1-SKU12
SKU13-SKU19
Have product questions? Need technical support? Please feel free to
contact us:
Technical Support and E-Warranty Certificate
www.vevor.com/support
NEED HELP? CONTACT US!
This is the original instruction, please read all manual instructions
carefully before operating. VEVOR reserves a clear interpretation of our
user manual. The appearance of the product shall be subject to the
product you received. Please forgive us that we won't inform you again if
there are any technology or software updates on our product.
STRIP CURTAIN

- 2 -
25. WARNING!
(25) No tire, corte ni utilice objetos afilados sobre la cortina de la puerta para evitar
dañarla.
(26) No exponga la cortina de la puerta a la luz solar ni a ambientes de alta
temperatura para evitar la deformación o el envejecimiento de la cortina de la
puerta.
(27) Si necesita desmontar la cortina de la puerta, siga los pasos inversos para
desmontarla y guardarla correctamente.
(28) Limpie la cortina de la puerta periódicamente para mantenerla limpia y
fresca ; puede utilizar una aspiradora o un paño húmedo para limpiar
suavemente la cortina de la puerta.
(29) Si compras un roll-up s trip cortina (SKU1 - SKU12) , debe comprar las piezas
de instalación usted mismo.
(30)Tenga cuidado de no rayarse los dedos durante la instalación.
26. Maintenance Guide
(17) Limpie periódicamente la cortina de la puerta, utilice un paño húmedo para
limpiar la superficie y eliminar el polvo y la suciedad.
(18) Evite utilizar agentes de limpieza corrosivos o disolventes químicos para
limpiar la cortina de la puerta.
(19) Si se encuentra que la cortina de la puerta está dañada, reemplácela a
tiempo para garantizar su uso normal.
(20)Las cortinas a rayas que se vuelven amarillas pueden deberse al uso
prolongado o a la exposición a la luz solar. Si las cortinas se han vuelto muy
amarillas o están dañadas, reemplácelas por otras nuevas.
27. Product Description
Las cortinas de rayas para puertas son un tipo de decoración que se instala en la
entrada de una puerta y que puede evitar eficazmente que entren insectos, polvo
y ruido en la habitación, proteger la privacidad y brindar aislamiento térmico,
resistencia al viento y aislamiento acústico. Lea atentamente este manual antes
de usar.
Las cortinas de puerta a rayas están hechas de materiales de PVC de alta
- 3 -
calidad y respetuosos con el medio ambiente.
La cortina de la puerta es liviana y transpirable, lo que puede evitar
eficazmente que el aire interior se escape, reduciendo el desperdicio de
energía.
La cortina de la puerta tiene un cierto rendimiento de sombreado, que puede
evitar eficazmente que el polvo, los escombros y otros elementos ingresen a
la habitación.
28. Installation Guide
(13) Verifique si sus productos están completos de acuerdo con la lista de
productos.
(14) Instalar la quilla:
17) Antes de instalar la cortina de la puerta, limpie el área de la entrada para
garantizar una superficie limpia y nivelada.
18) Mida el ancho y la altura de la puerta. Corte la quilla a una longitud adecuada
según el tamaño de la puerta.
19) Utilice una herramienta para hacer agujeros en el marco de la puerta. Las
posiciones de los agujeros deben coincidir con los agujeros pretaladrados en
la quilla.
20) Coloque la quilla sobre el marco de la puerta y fíjela con un destornillador y
tornillos.
(15) Instalar la cortina de tiras:
5) Elija una cortina de puerta de un largo y ancho adecuados según el tamaño de
la entrada. Corte la cortina con unas tijeras al largo y ancho adecuados.

- 4 -
2) Tome el clip -A para alinear el orificio de la cortina y
colóquelo debajo.
3) Clip de tachuela -B Para alinear el agujero de la
cortina y colocarla encima.
4) Apriete los tornillos en los clips para sujetar la
cortina firmemente.
5) Inserte el gancho para colgar la cortina de la
puerta en el orificio de la quilla. Asegúrese de que la
cortina esté instalada en la posición correcta.
Ajuste la altura y el ancho de la cortina de la puerta para que se adapte al tamaño
y la forma de la puerta.
Verifique que la instalación de la cortina de la puerta sea segura, asegurando su
estabilidad y confiabilidad.
29. User Guide
(21) Antes de usar, asegúrese de que la cortina de la puerta esté correctamente
instalada y ajustada en la posición adecuada.
(22) Al abrir la cortina de la puerta, primero sostenga el borde de la cortina de la
- 5 -
puerta y tire suavemente hacia un lado para evitar que la cortina de la puerta
se caiga o se dañe.
(23) Al cerrar la cortina de la puerta, tire de ella hacia el centro y asegúrese de
que esté completamente fijada al marco de la puerta.
(24) Si la cortina de la puerta está suelta o dañada durante el uso, realice el
mantenimiento o reemplácela a tiempo.
(25) Para reducir el volumen del embalaje, la parte inferior de la cortina de PVC
puede curvarse cuando se utiliza por primera vez, pero se recuperará
gradualmente.
30. Product Parameter
Parámetros de la cortina de tiras
Artí
culo
Artículo
1
2
3
4
5
6
1
Modelo#
ZAV0
G8V0
JYV0
4SV0
55V0
HMV0
2
Tamaño del
producto
50 pies ×
8
pulgadas
50 pies ×
8
pulgadas
75 pies ×
8
pulgadas
75 pies ×
8
pulgadas
150 pies
× 8
pulgadas
150 pies
× 8
pulgadas
3
Superficie
Liso
Con
costillas
Liso
Con
costillas
Liso
Con
costillas
4
Componente Cant./uds.
Cortina
1
1
1
1
1
1
Cinta
métrica
1
1
1
1
1
1
Cuchillo
1
1
1
1
1
1
Clip-A
×
×
×
×
×
×
Clip-B
×
×
×
×
×
×
Quilla
×
×
×
×
×
×
Tornillo
de
máquina
×
×
×
×
×
×
Tuerca
×
×
×
×
×
×
Tornillo
para
madera
×
×
×
×
×
×
Parámetros de la cortina de tiras
Artí
Artículo
7
8
9
10
11
12
13

- 6 -
culo
1
Modelo#
S0V0
M8V0
WBV0
TTV0
Q4V0
TCV0
RCV0
2
Tamaño del
producto
82 pies
× 12
pulgad
as
82 pies
× 8
pulgad
as
164
pies × 8
pulgad
as
164
pies × 8
pulgad
as
100
pies ×
12
pulgad
as
100
pies ×
12
pulgad
as
38× 84
pulgada
s
3
Superficie
Liso
Liso
Liso
Con
costilla
s
Liso
Con
costilla
s
Liso
4
Componente Cant./uds.
Cortina
1
1
1
1
1
1
6
Cinta
métrica
1
1
1
1
1
1
0
Cuchillo
1
1
1
1
1
1
0
Clip-A
×
×
×
×
×
×
6
Clip-B
×
×
×
×
×
×
6
Quilla
×
×
×
×
×
×
2
Tornillo
de
máquina
×
×
×
×
×
×
18
Tuerca
×
×
×
×
×
×
18
Tornillo
para
madera
×
×
×
×
×
×
16
Parámetros de la cortina de tiras
Artíc
ulo
Artículo
14
15
16
17
18
19
1
Modelo#
KDV0
IBV0
F0V0
0PV0
VXV0
GGV0
2
Producto
Tamaño
42× 84
pulgadas
48× 84
pulgadas
48× 96
pulgadas
60× 84
pulgadas
72× 96
pulgadas
96× 96
pulgadas
3
Superficie
Liso
Liso
Liso
Liso
Liso
Liso
4
Componente Cant./uds.
Cortina
7
8
8
10
12
16
Cinta
métrica
0
0
0
0
0
0
Cuchillo
0
0
0
0
0
0
Clip-A
7
8
8
10
12
16
Clip-B
7
8
8
10
12
16
Quilla
2
3
2
3
3
4

- 7 -
Tornillo
de
máquina
21
24
24
30
36
48
Tuerca
21
24
24
30
36
48
Tornillo
para
madera
14
20
20
24
20
40
Destornil
lador de
pernos
1
1
1
1
1
1
Dirección: Baoshanqu Shuangchenglu 803long 11hao 1602A-1609shi Shanghai
Importado a AUS: SIHAO PTY LTD, 1 ROKEVA STREETEASTWOOD NSW
2122 Australia
Importado a EE. UU.: Sanven Technology Ltd, Suite 250, 9166 Anaheim Place,
Rancho Cucamonga, CA 91730
REP
EC
SHUNSHUN GmbH
Römeräcker 9 Z2021, 76351
Linkenheim-Hochstetten, Germany
REP
UK
Pooledas Group Ltd
Unit 5 Albert Edward House, The
Pavilions Preston, United Kingdom
Hecho en china


- 2 -
Techniczny Wsparcie i certyfikat e-gwarancji
www.vevor.com/support
ZASŁONA PASKOWA
INSTRUKCJA OBSŁUGI
We continue to be committed to provide you tools with competitive price.
"Save Half", "Half Price" or any other similar expressions used by us only represents an
estimate of savings you might benefit from buying certain tools with us compared to the major
top brands and does not necessarily mean to cover all categories of tools offered by us. You
are kindly reminded to verify carefully when you are placing an order with us if you are
actually saving half in comparison with the top major brands.
- 1 -
SKU1-SKU12
SKU13-SKU19
Have product questions? Need technical support? Please feel free to
contact us:
Technical Support and E-Warranty Certificate
www.vevor.com/support
NEED HELP? CONTACT US!
This is the original instruction, please read all manual instructions
carefully before operating. VEVOR reserves a clear interpretation of our
user manual. The appearance of the product shall be subject to the
product you received. Please forgive us that we won't inform you again if
there are any technology or software updates on our product.
STRIP CURTAIN

- 2 -
31. WARNING!
(31) Aby uniknąć uszkodzeń, nie należy zaciągać, przecinać ani używać ostrych
przedmiotów do zasłony drzwiowej.
(32) Nie wystawiaj osłony drzwi na działanie promieni słonecznych ani wysokich
temperatur, aby zapobiec jej odkształceniu lub starzeniu się.
(33) Jeśli zachodzi potrzeba zdemontowania zasłony drzwiowej, należy wykonać
czynności w odwrotnej kolejności, aby ją zdemontować i prawidłowo
przechowywać.
(34) Regularnie czyść zasłonę drzwiową, aby zachować ją w czystości i
świeżości . Do delikatnego przecierania zasłony możesz użyć odkurzacza lub
wilgotnej szmatki.
(35) Jeśli kupisz wycieczkę typu roll - up zasłony (SKU1 - SKU12) , elementy
montażowe należy zakupić samodzielnie.
(36)Podczas instalacji uważaj, aby nie porysować sobie palców.
32. Maintenance Guide
(21) Regularnie czyść zasłonę drzwiową, przecierając powierzchnię wilgotną
szmatką i usuwając kurz i brud.
(22) Do czyszczenia zasłony drzwiowej należy unikać stosowania żrących
środków czyszczących i rozpuszczalników chemicznych.
(23) W przypadku stwierdzenia uszkodzenia zasłony drzwiowej należy wymienić
ją na nową, aby zapewnić jej normalne użytkowanie.
(24)Żółknięcie pasiastych zasłon może być spowodowane długotrwałym
użytkowaniem lub narażeniem na działanie promieni słonecznych. Jeśli
zasłony mocno zżółkły lub zostały uszkodzone, wymień je na nowe.
33. Product Description
Pasiaste zasłony drzwiowe to rodzaj dekoracji instalowanej przy wejściu do drzwi,
która może skutecznie zapobiegać przedostawaniu się owadów, kurzu i hałasu do
pomieszczenia, chronić prywatność i zapewniać izolację cieplną, odporność na
wiatr i izolację akustyczną. Przed użyciem należy uważnie przeczytać tę
instrukcję.
Pasiaste zasłony drzwiowe wykonane są z wysokiej jakości, przyjaznych dla
- 3 -
środowiska materiałów PVC.
Zasłona drzwiowa jest lekka i oddychająca, co skutecznie zapobiega
ucieczce powietrza z pomieszczenia, a tym samym ogranicza straty energii.
Zasłona drzwiowa ma pewne właściwości zacieniające, które mogą
skutecznie zapobiegać przedostawaniu się do pomieszczenia kurzu,
zanieczyszczeń i innych przedmiotów.
34. Installation Guide
(16) Sprawdź czy dostarczony towar jest kompletny i zgodny z listą produktów.
(17) Montaż stępki:
21) Przed zamontowaniem zasłony drzwiowej należy oczyścić obszar wokół
drzwi, aby mieć pewność, że powierzchnia jest czysta i równa.
22) Zmierz szerokość i wysokość drzwi. Przytnij kil do odpowiedniej długości
zgodnie z rozmiarem drzwi.
23) Użyj narzędzia, aby wywiercić otwory w ramie drzwi. Pozycje otworów
powinny odpowiadać wstępnie wywierconym otworom w kilu.
24) Umieść stępkę nad ościeżnicą drzwi i zamocuj ją za pomocą śrubokręta i
śrub.
(18) Montaż kurtyny paskowej:
6) Wybierz odpowiednią długość i szerokość zasłony drzwiowej w oparciu o
rozmiar drzwi. Przytnij zasłonę do odpowiedniej długości i szerokości za pomocą
nożyczek.
- 4 -
2) Weź klips -A , aby wyrównać otwór w zasłonie i
umieść go pod spodem.
3) Klips mocujący -B aby wyrównać otwór zasłony i
umieścić ją powyżej.
4) Dokręć śruby w klipsach, aby mocno zamocować
zasłonę.
5) Włóż hak do zawieszania zasłony drzwiowej do
otworu w kilu. Upewnij się, że zasłona jest
zamontowana w prawidłowej pozycji.
Dopasuj wysokość i szerokość zasłony do rozmiaru i kształtu drzwi.
Sprawdź, czy montaż zasłony drzwiowej jest bezpieczny, zapewniając jej
stabilność i niezawodność.
35. User Guide
(26) Przed użyciem należy upewnić się, że zasłona drzwiowa jest prawidłowo
zamontowana i wyregulowana w odpowiedniej pozycji.
(27) Otwierając zasłonę drzwiową, najpierw przytrzymaj jej krawędź i delikatnie
pociągnij na bok, aby zapobiec jej odpadnięciu lub uszkodzeniu.
- 5 -
(28) Zamykając zasłonę drzwiową, należy pociągnąć ją w kierunku środka i
upewnić się, że jest całkowicie przymocowana do ościeżnicy.
(29) Jeśli podczas użytkowania okaże się, że zasłona drzwi jest luźna lub
uszkodzona, należy jak najszybciej przeprowadzić jej konserwację lub
wymienić.
(30) Aby zmniejszyć objętość opakowania, dolna część zasłony z PVC może się
zwinąć przy pierwszym użyciu, lecz stopniowo powróci do pierwotnego
kształtu.
36. Product Parameter
Parametr kurtyny paskowej
Prz
edm
iot
Przedmiot
1
2
3
4
5
6
1
Model#
ZAV0
G8V0
JYV0
4SV0
55V0
HMV0
2
Rozmiar
produktu
50 stóp ×
8 cali
50 stóp ×
8 cali
75 stóp ×
8 cali
75 stóp ×
8 cali
150 stóp
× 8 cali
150 stóp
× 8 cali
3
Powierzchnia
Gładki
Z
żebrami
Gładki
Z
żebrami
Gładki
Z
żebrami
4
Komponent Ilość/szt.
Kurtyna
1
1
1
1
1
1
Miarka
taśmow
a
1
1
1
1
1
1
Nóż
1
1
1
1
1
1
Klip-A
×
×
×
×
×
×
Klip-B
×
×
×
×
×
×
Węgorz
×
×
×
×
×
×
Śruba
maszyn
owa
×
×
×
×
×
×
Nakrętk
a
×
×
×
×
×
×
Wkręt
do
drewna
×
×
×
×
×
×
Parametr kurtyny paskowej
Prz
Przedmiot
7
8
9
10
11
12
13
- 6 -
edm
iot
1
Model#
S0V0
M8V0
WBV0
TTV0
Q4V0
TCV0
RCV0
2
Rozmiar
produktu
82
stopy ×
12 cali
82
stopy ×
8 cali
164
stopy ×
8 cali
164
stopy ×
8 cali
100
stóp ×
12 cali
100
stóp ×
12 cali
38× 84
cale
3
Powierzchnia
Gładki
Gładki
Gładki
Z
żeberk
a
Gładki
Z
żebram
i
Gładki
4
Komponent Ilość/szt.
Kurtyna
1
1
1
1
1
1
6
Miarka
taśmow
a
1
1
1
1
1
1
0
Nóż
1
1
1
1
1
1
0
Klip-A
×
×
×
×
×
×
6
Klip-B
×
×
×
×
×
×
6
Węgorz
×
×
×
×
×
×
2
Śruba
maszyn
owa
×
×
×
×
×
×
18
Nakrętk
a
×
×
×
×
×
×
18
Wkręt
do
drewna
×
×
×
×
×
×
16
Parametr kurtyny paskowej
Prze
dmi
ot
Przedmiot
14
15
16
17
18
19
1
Model#
KDV0
IBV0
F0V0
0PV0
WXV0
GGV0
2
Produkt
Rozmiar
42× 84
cale
48× 84
cale
48× 96
cali
60× 84
cale
72× 96
cali
96× 96
cali
3
Powierzchnia
Gładki
Gładki
Gładki
Gładki
Gładki
Gładki
4
Komponent Ilość/szt.
Kurtyna
7
8
8
10
12
16
Miarka
taśmow
a
0
0
0
0
0
0
Nóż
0
0
0
0
0
0
Klip-A
7
8
8
10
12
16
Klip-B
7
8
8
10
12
16
- 7 -
Węgorz
2
3
2
3
3
4
Śruba
maszyn
owa
21
24
24
30
36
48
Nakrętk
a
21
24
24
30
36
48
Wkręt do
drewna
14
20
20
24
20
40
Śrubokr
ęt
1
1
1
1
1
1
Adres: Baoshanqu Shuangchenglu 803long 11hao 1602A-1609shi Szanghaj
Importowane do AUS: SIHAO PTY LTD, 1 ROKEVA STREETEASTWOOD NSW
2122 Australia
Importowane do USA: Sanven Technology Ltd, Suite 250, 9166 Anaheim Place,
Rancho Cucamonga, CA 91730
REP
EC
SHUNSHUN GmbH
Römeräcker 9 Z2021, 76351
Linkenheim-Hochstetten, Germany
REP
UK
Pooledas Group Ltd
Unit 5 Albert Edward House, The
Pavilions Preston, United Kingdom
Wyprodukowano w Chinach


- 2 -
Technisch Ondersteuning en E-garantiecertificaat
www.vevor.com/support
STROKENGORDIJN
GEBRUIKERSHANDLEIDING
We continue to be committed to provide you tools with competitive price.
"Save Half", "Half Price" or any other similar expressions used by us only represents an
estimate of savings you might benefit from buying certain tools with us compared to the major
top brands and does not necessarily mean to cover all categories of tools offered by us. You
are kindly reminded to verify carefully when you are placing an order with us if you are
actually saving half in comparison with the top major brands.

- 1 -
SKU1-SKU12
SKU13-SKU19
Have product questions? Need technical support? Please feel free to
contact us:
Technical Support and E-Warranty Certificate
www.vevor.com/support
NEED HELP? CONTACT US!
This is the original instruction, please read all manual instructions
carefully before operating. VEVOR reserves a clear interpretation of our
user manual. The appearance of the product shall be subject to the
product you received. Please forgive us that we won't inform you again if
there are any technology or software updates on our product.
STRIP CURTAIN

- 2 -
37. WARNING!
(37) Trek, knip of gebruik geen scherpe voorwerpen op het deurgordijn om schade
te voorkomen.
(38) Stel het deurgordijn niet bloot aan zonlicht of hoge temperaturen om
vervorming of veroudering van het deurgordijn te voorkomen.
(39) Als u het deurgordijn moet demonteren, volg dan de omgekeerde stappen om
het te demonteren en op de juiste manier op te bergen.
(40) Maak het deurgordijn regelmatig schoon om het schoon en fris te houden . U
kunt het deurgordijn voorzichtig afvegen met een stofzuiger of een vochtige
doek.
(41) s- reis koopt gordijn (SKU1 - SKU12) , dient u de installatieonderdelen zelf
aan te schaffen.
(42)Wees voorzichtig dat u uw vingers niet bekrast tijdens de installatie.
38. Maintenance Guide
(25) Maak het deurgordijn regelmatig schoon. Gebruik een vochtige doek om het
oppervlak af te vegen en verwijder stof en vuil.
(26) Gebruik geen bijtende schoonmaakmiddelen of chemische oplosmiddelen om
het deurgordijn schoon te maken.
(27) Als blijkt dat het deurgordijn beschadigd is, vervang het dan tijdig om ervoor
te zorgen dat het weer normaal functioneert.
(28)Gestreepte gordijnen die geel worden, kunnen worden veroorzaakt door
langdurig gebruik of blootstelling aan zonlicht. Als de gordijnen ernstig geel
zijn geworden of beschadigd zijn, vervang ze dan door nieuwe.
39. Product Description
Gestreepte deurgordijnen zijn een soort decoratie die bij de ingang van een deur
wordt geïnstalleerd, die effectief kan voorkomen dat insecten, stof en geluid de
kamer binnenkomen, privacy beschermt en thermische isolatie, windweerstand en
geluidsisolatie biedt. Lees deze handleiding zorgvuldig door voordat u deze
gebruikt.
De gestreepte deurgordijnen zijn gemaakt van hoogwaardige,
milieuvriendelijke PVC-materialen.

- 3 -
Het deurgordijn is lichtgewicht en ademend, waardoor de binnenlucht effectief
wordt tegengehouden en energieverspilling wordt verminderd .
Het deurgordijn heeft een bepaalde schaduwwerking, waardoor stof, vuil en
andere voorwerpen effectief worden tegengehouden.
40. Installation Guide
(19) Controleer of uw goederen compleet zijn volgens de productlijst.
(20) Kiel installeren:
25) Maak de deuropening schoon voordat u het deurblad monteert, zodat het
oppervlak schoon en vlak is.
26) Meet de breedte en hoogte van de deuropening. Zaag de kiel op een
geschikte lengte volgens de grootte van de deuropening.
27) Gebruik een gereedschap om gaten in het deurkozijn te boren. De gaten
moeten overeenkomen met de voorgeboorde gaten op de kiel.
28) Plaats de kiel boven het deurkozijn en bevestig deze met een
schroevendraaier en schroeven.
(21) Het strokengordijn installeren:
7) Kies een geschikte lengte en breedte voor het deurgordijn op basis van de
grootte van de deuropening. Knip het gordijn op een geschikte lengte en breedte
met een schaar.

- 4 -
2) Neem clip -A om het gordijngat uit te lijnen en
plaats deze eronder.
3) Pinnenclip -B om het gordijngat uit te lijnen en
erboven te plaatsen.
4) Draai de schroeven in de clips vast zodat het
gordijn stevig vastzit.
5) Steek de ophanghaak van het deurgordijn in het
gat op de kiel. Zorg ervoor dat het gordijn op de juiste
positie is geïnstalleerd.
Pas de hoogte en breedte van het deurgordijn aan de grootte en vorm van de
deuropening aan.
Controleer of de deur stevig is geïnstalleerd en of de stabiliteit en betrouwbaarheid
gewaarborgd zijn.
41. User Guide
(31) Controleer voor gebruik of het deurgordijn correct is geïnstalleerd en in de
juiste positie is afgesteld.
(32) Wanneer u het deurgordijn opent, dient u eerst de rand van het deurgordijn
- 5 -
vast te pakken en het voorzichtig opzij te trekken. Zo voorkomt u dat het
deurgordijn eraf valt of beschadigd raakt.
(33) Wanneer u het deurgordijn sluit, trekt u het naar het midden en zorgt u ervoor
dat het volledig aan het deurkozijn vastzit.
(34) Als blijkt dat het deurgordijn tijdens gebruik los zit of beschadigd is, voer dan
tijdig onderhoud uit of vervang het.
(35) Om het verpakkingsvolume te verkleinen, kan de onderkant van het
PVC-gordijn bij het eerste gebruik omkrullen. Dit zal echter geleidelijk
herstellen.
42. Product Parameter
Strokengordijn-Parameter
Item
Item
1
2
3
4
5
6
1
Model#
ZAV0
G8V0
JYV0
4SV0
55V0
HMV0
2
Productgroott
e
15 meter
× 8 inch
15 meter
× 8 inch
75 voet ×
8 inch
23 meter
× 8 inch
150 voet
× 8 inch
150 voet
× 8 inch
3
Oppervlak
Zacht
Met
ribben
Zacht
Met
ribben
Zacht
Met
ribben
4
Component Hoeveelheid/stks
Gordijn
1
1
1
1
1
1
Meetlint
1
1
1
1
1
1
Mes
1
1
1
1
1
1
Clip-A
×
×
×
×
×
×
Clip-B
×
×
×
×
×
×
Kiel
×
×
×
×
×
×
Machine
schroef
×
×
×
×
×
×
Moer
×
×
×
×
×
×
Houtsch
roef
×
×
×
×
×
×
Strokengordijn-Parameter
Item
Item
7
8
9
10
11
12
13
1
Model#
S0V0
M8V0
WBV0
TTV0
Q4V0
TCV0
RCV0
2
Productgroott
e
82 voet
× 12
inch
82 voet
× 8 inch
164
voet × 8
inch
164
voet × 8
inch
100
voet ×
12 inch
100
voet ×
12 inch
38× 84
inch
3
Oppervlak
Zacht
Zacht
Zacht
Met
Zacht
Met
Zacht

- 6 -
ribben
ribben
4
Component Hoeveelheid/stks
Gordijn
1
1
1
1
1
1
6
Meetlint
1
1
1
1
1
1
0
Mes
1
1
1
1
1
1
0
Clip-A
×
×
×
×
×
×
6
Clip-B
×
×
×
×
×
×
6
Kiel
×
×
×
×
×
×
2
Machine
schroef
×
×
×
×
×
×
18
Moer
×
×
×
×
×
×
18
Houtsch
roef
×
×
×
×
×
×
16
Strokengordijn-Parameter
Item
Item
14
15
16
17
18
19
1
Model#
KDV0
IBV0
F0V0
0PV0
VXV0
GGV0
2
Product
Maat
42× 84
inch
48× 84
inch
48× 96
inch
60× 84
inch
72× 96
inch
96× 96
inch
3
Oppervlak
Zacht
Zacht
Zacht
Zacht
Zacht
Zacht
4
Component Hoeveelheid/stks
Gordijn
7
8
8
10
12
16
Meetlint
0
0
0
0
0
0
Mes
0
0
0
0
0
0
Clip-A
7
8
8
10
12
16
Clip-B
7
8
8
10
12
16
Kiel
2
3
2
3
3
4
Machine
schroef
21
24
24
30
36
48
Moer
21
24
24
30
36
48
Houtsch
roef
14
20
20
24
20
40
Bout
Driver
1
1
1
1
1
1
Adres: Baoshanqu Shuangchenglu 803long 11hao 1602A-1609shi Shanghai
Geïmporteerd naar AUS: SIHAO PTY LTD, 1 ROKEVA STREETEASTWOOD
NSW 2122 Australië
Geïmporteerd naar de VS: Sanven Technology Ltd, Suite 250, 9166 Anaheim
Place, Rancho Cucamonga, CA 91730

- 7 -
REP
EC
SHUNSHUN GmbH
Römeräcker 9 Z2021, 76351
Linkenheim-Hochstetten, Germany
REP
UK
Pooledas Group Ltd
Unit 5 Albert Edward House, The
Pavilions Preston, United Kingdom
Gemaakt in China


- 2 -
Teknisk Support och e-garanticertifikat
www.vevor.com/support
STRIP GARDIN
ANVÄNDARMANUAL
We continue to be committed to provide you tools with competitive price.
"Save Half", "Half Price" or any other similar expressions used by us only represents an
estimate of savings you might benefit from buying certain tools with us compared to the major
top brands and does not necessarily mean to cover all categories of tools offered by us. You
are kindly reminded to verify carefully when you are placing an order with us if you are
actually saving half in comparison with the top major brands.

- 1 -
SKU1-SKU12
SKU13-SKU19
Have product questions? Need technical support? Please feel free to
contact us:
Technical Support and E-Warranty Certificate
www.vevor.com/support
NEED HELP? CONTACT US!
This is the original instruction, please read all manual instructions
carefully before operating. VEVOR reserves a clear interpretation of our
user manual. The appearance of the product shall be subject to the
product you received. Please forgive us that we won't inform you again if
there are any technology or software updates on our product.
STRIP CURTAIN

- 2 -
43. WARNING!
(43) Dra inte, skär eller använd inte vassa föremål på dörrgardinen för att undvika
skador.
(44) Utsätt inte dörrgardinen för solljus eller högtemperaturmiljöer för att förhindra
deformering eller åldrande av dörrgardinen.
(45) Om du behöver demontera dörrgardinen, följ de omvända stegen för att ta
isär den och förvara den på rätt sätt.
(46) Rengör dörrgardinen regelbundet för att hålla den ren och fräsch ; du kan
använda en dammsugare eller fuktig trasa för att försiktigt torka av
dörrgardinen.
(47) Om du köper en roll- up resa gardin (SKU1 - SKU12) måste du köpa
installationsdelarna själv.
(48)Se upp för att repa fingrarna vid installation.
44. Maintenance Guide
(29) Rengör dörrgardinen regelbundet, använd en fuktig trasa för att torka av ytan
och ta bort damm och smuts.
(30) Undvik att använda frätande rengöringsmedel eller kemiska lösningsmedel
för att rengöra dörrgardinen.
(31) Om dörrgardinen visar sig vara skadad, vänligen byt ut dörrgardindelen i tid
för att säkerställa normal användning.
(32)Randiga gardiner som blir gula kan orsakas av långvarig användning eller
exponering för solljus. Om gardinerna har blivit kraftigt gula eller skadade, byt
ut dem mot nya.
45. Product Description
Randiga dörrgardiner är en typ av dekoration installerad vid ingången till en dörr,
som effektivt kan förhindra insekter, damm och buller från att komma in i rummet,
skydda integriteten och ge värmeisolering, vindmotstånd och ljudisolering. Läs
denna bruksanvisning noggrant före användning.
De randiga dörrgardinerna är tillverkade av högkvalitativa, miljövänliga
PVC-material.
Dörrgardinen är lätt och andas, vilket effektivt kan förhindra att inomhusluften

- 3 -
strömmar ut, vilket minskar energislöseriet .
Dörrgardinen har en viss skuggningsprestanda, som effektivt kan förhindra att
damm, skräp och andra föremål kommer in i rummet.
46. Installation Guide
(22) Kontrollera om dina varor är kompletta enligt produktlistan.
(23) Installera kölen:
29) Innan du installerar dörrgardinen, vänligen rengör dörröppningen för att
säkerställa en ren och jämn yta.
30) Mät dörröppningens bredd och höjd. Skär kölen till en lämplig längd efter
storleken på dörröppningen.
31) Använd ett verktyg för att borra hål i dörrkarmen. Hålpositionerna ska
motsvara de förborrade hålen på kölen.
32) Placera kölen ovanför dörrkarmen och fixera den med en skruvmejsel och
skruvar.
(24) Montera listgardinen:
8) Välj en lämplig längd och bredd för dörrgardinen utifrån dörröppningens storlek.
Klipp gardinen till lämplig längd och bredd med en sax.
2) Ta klämma -A för att rikta in gardinhålet och lägg
det under.
- 4 -
3) Tackklämma -B för att rikta in gardinhålet och
placera det ovanför.
4) Dra åt skruvarna i klämmorna för att klämma fast
gardinen ordentligt.
5) Sätt in dörrgardinens hängkrok i hålet på kölen. Se
till att gardinen är installerad i rätt läge.
Justera höjden och bredden på dörrgardinen för att passa storleken och formen på
dörröppningen.
Kontrollera om dörrgardininstallationen är säker, för att säkerställa dess stabilitet
och tillförlitlighet.
47. User Guide
(36) Före användning, se till att dörrgardinen är korrekt installerad och justerad till
lämplig position.
(37) När du öppnar dörrgardinen, vänligen håll först i kanten på dörrgardinen och
dra den försiktigt åt sidan för att undvika att dörrgardinen faller av eller
skadas.
(38) När du stänger dörrgardinen, dra den mot mitten och se till att den är helt
fastsatt i dörrkarmen.
(39) Om dörrgardinen visar sig vara lös eller skadad under användning, vänligen
utför underhåll eller byte i tid.
(40) För att minska förpackningsvolymen kan botten av PVC-gardinen krulla sig
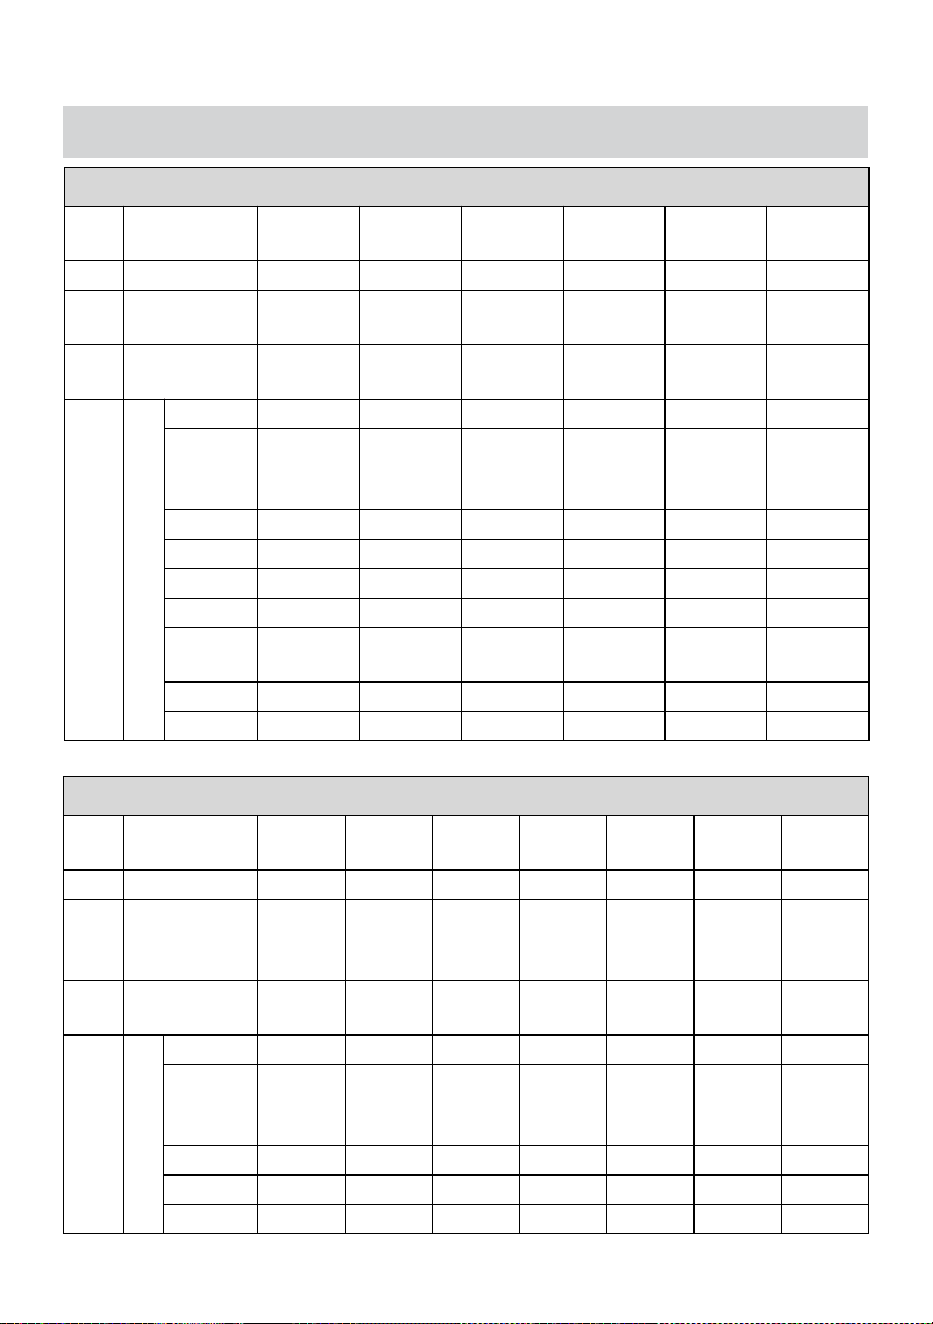
- 5 -
när den används första gången, men den kommer gradvis att återhämta sig.
48. Product Parameter
Strip Gardin-Parameter
Pun
kt
Punkt
1
2
3
4
5
6
1
Modell#
ZAV0
G8V0
JYV0
4SV0
55V0
HMV0
2
Produktstorle
k
50 fot × 8
tum
50 fot × 8
tum
75 fot × 8
tum
75 fot × 8
tum
150 fot ×
8 tum
150 fot ×
8 tum
3
S yta
Jämna
Med
revben
Jämna
Med
revben
Jämna
Med
revben
4
Komponent Antal/st
Gardin
1
1
1
1
1
1
B
ANDMÄ
TT
1
1
1
1
1
1
K nife
1
1
1
1
1
1
Klipp-A
×
×
×
×
×
×
Klipp-B
×
×
×
×
×
×
K ål
×
×
×
×
×
×
Maskins
kruv
×
×
×
×
×
×
Mutter
×
×
×
×
×
×
Träskruv
×
×
×
×
×
×
Strip Gardin-Parameter
Pun
kt
Punkt
7
8
9
10
11
12
13
1
Modell#
S0V0
M8V0
WBV0
TTV0
Q4V0
TCV0
RCV0
2
Produktstorle
k
82 fot ×
12 tum
82 fot ×
8 tum
164 fot
× 8 tum
164 fot
× 8 tum
100 fot
× 12
tum
100 fot
× 12
tum
38× 84
tum
3
S yta
Jämna
Jämna
Jämna
Med
revben
Jämna
Med
revben
Jämna
4
Komponent Antal/st
Gardin
1
1
1
1
1
1
6
B
ANDMÄ
TT
1
1
1
1
1
1
0
K nife
1
1
1
1
1
1
0
Klipp-A
×
×
×
×
×
×
6
Klipp-B
×
×
×
×
×
×
6
- 6 -
K ål
×
×
×
×
×
×
2
Maskins
kruv
×
×
×
×
×
×
18
Mutter
×
×
×
×
×
×
18
Träskruv
×
×
×
×
×
×
16
Strip Gardin-Parameter
Pun
kt
Punkt
14
15
16
17
18
19
1
Modell#
KDV0
IBV0
F0V0
0PV0
VXV0
GGV0
2
Produkt
Storlek
42× 84
tum
48× 84
tum
48× 96
tum
60× 84
tum
72× 96
tum
96× 96
tum
3
S yta
Jämna
Jämna
Jämna
Jämna
Jämna
Jämna
4
Komponent Antal/st
Gardin
7
8
8
10
12
16
B
ANDMÄ
TT
0
0
0
0
0
0
K nife
0
0
0
0
0
0
Klipp-A
7
8
8
10
12
16
Klipp-B
7
8
8
10
12
16
K ål
2
3
2
3
3
4
Maskins
kruv
21
24
24
30
36
48
Mutter
21
24
24
30
36
48
Träskruv
14
20
20
24
20
40
Bultförar
e
1
1
1
1
1
1
Adress: Baoshanqu Shuangchenglu 803long 11hao 1602A-1609shi Shanghai
Importerad till AUS: SIHAO PTY LTD, 1 ROKEVA STREETEASTWOOD NSW
2122 Australien
Importerad till USA: Sanven Technology Ltd, Suite 250, 9166 Anaheim Place,
Rancho Cucamonga, CA 91730

- 7 -
REP
EC
SHUNSHUN GmbH
Römeräcker 9 Z2021, 76351
Linkenheim-Hochstetten, Germany
REP
UK
Pooledas Group Ltd
Unit 5 Albert Edward House, The
Pavilions Preston, United Kingdom
Tillverkad i Kina

