*
Upon registering your product
at morphyrichards.co.uk
3 Year
Guarantee
*
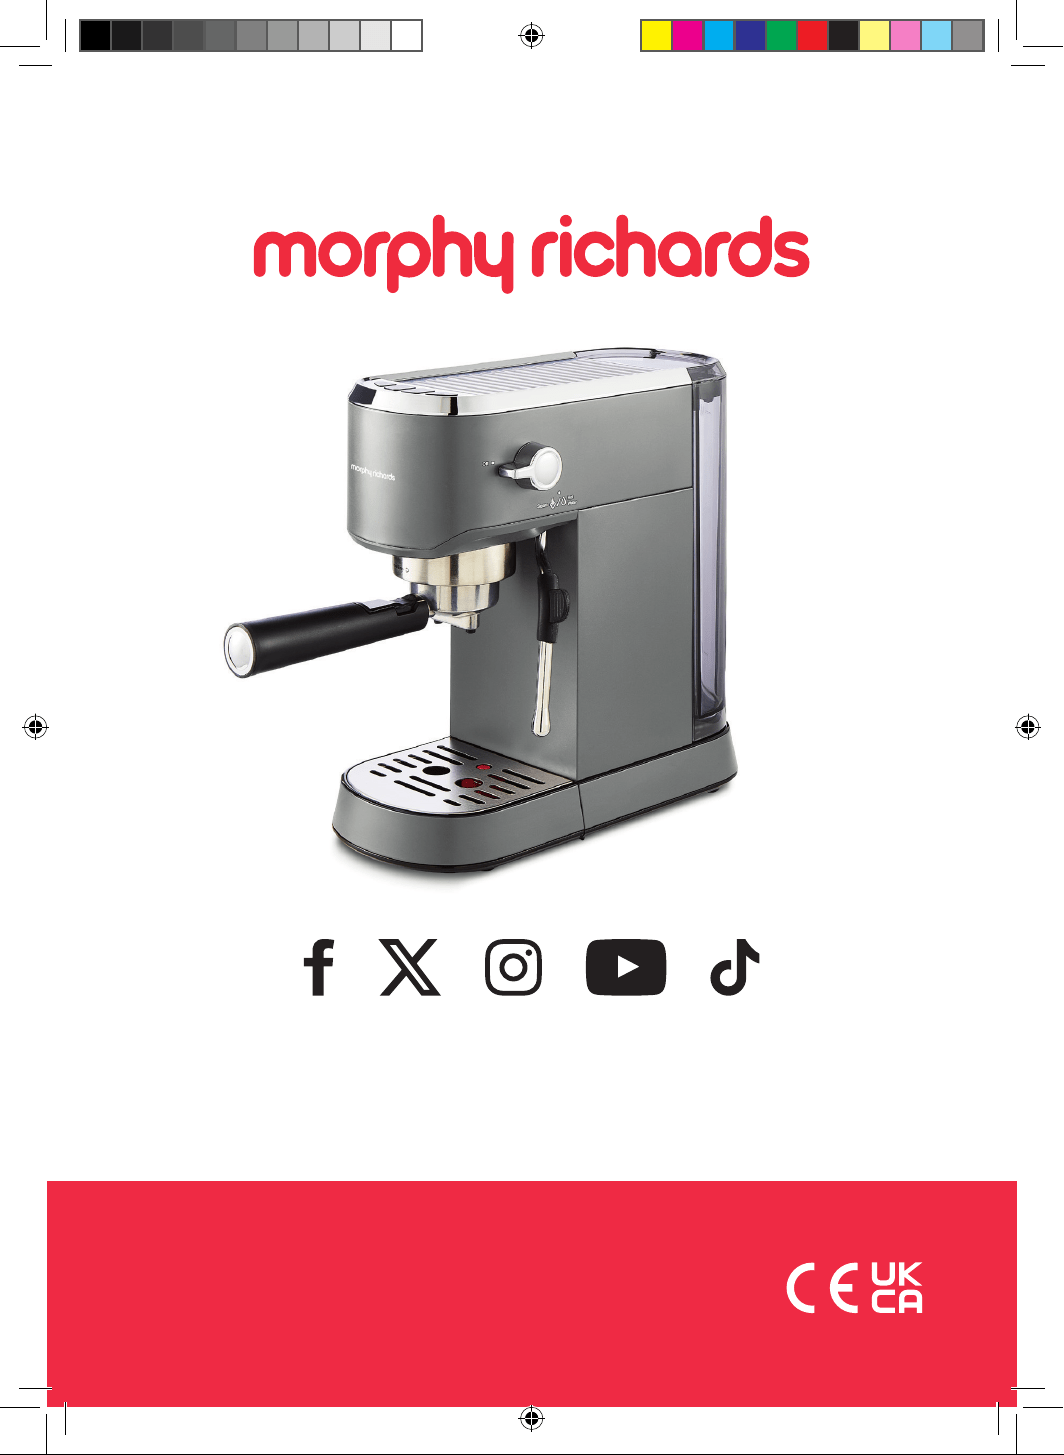
SIGNATURE
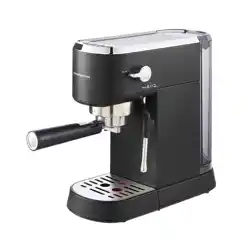
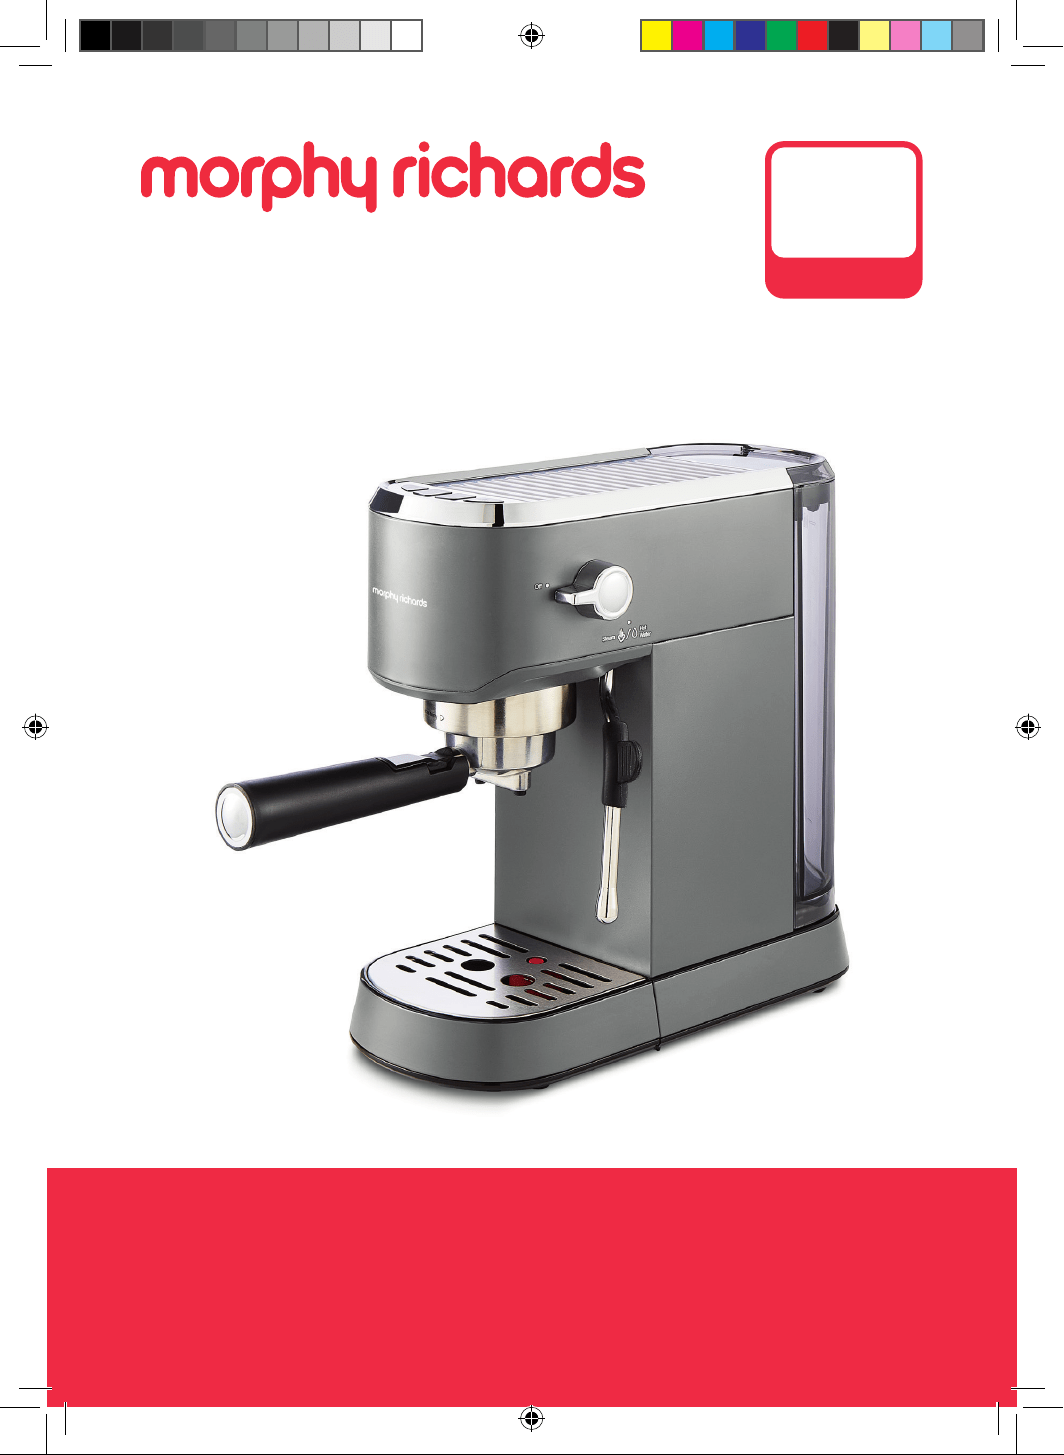
Compact Espresso Maker
Please read and keep these instructions for future use
User Manual
Model No.
172024/172025/
172026
CM172022MUK Rev3 Signature Compact Espresso Maker IM.indd 1CM172022MUK Rev3 Signature Compact Espresso Maker IM.indd 1 19/09/2024 17:0519/09/2024 17:05
2
HEALTH AND SAFETY
The use of any electrical appliance requires
the following common sense safety rules.
Please read these instructions carefully
before using the product.
• WARNING: This appliance incorporates
a heating element which is subject to
residual heat after use.
• WARNING: Misuse of the appliance could
cause personal injury.
• CAUTION: To prevent damage to the
appliance, do not use alkaline cleaning
agents when cleaning, use a soft cloth
and mild detergent.
• This appliance can be used by children
aged from 8 years and above if they
have been given supervision or instruction
concerning the use of the appliance
in a safe way and if they understand
the hazards involved. Cleaning and
user maintenance shall not be made by
children unless they are older than 8 and
supervised. Keep the appliance and its
cord out of the reach of children aged
less than 8 years.
CM172022MUK Rev3 Signature Compact Espresso Maker IM.indd 2CM172022MUK Rev3 Signature Compact Espresso Maker IM.indd 2 19/09/2024 17:0519/09/2024 17:05
3
HEALTH AND SAFETY
• For care and cleaning, refer to the
relevant sections in these instructions.
• If the mains cable is damaged, it must be
replaced by the manufacturer, its service
agent or similarly qualied person in order
to avoid a hazard.
• Appliances can be used by persons
with reduced physical, sensory or mental
capabilities or lack of experience and
knowledge if they have been given
supervision or instruction concerning
use of the appliance in a safe way and
understand the hazards involved.
• Children shall not play with the appliance.
• This appliance is intended for household
use only. It is not suitable for use in sta
kitchen areas in shops, oces and other
commercial environments.
• This product is not suitable for use in
altitudes above 2000m.
• This appliance incorporates an earth
connection for functional purposes only.
• CAUTION: In order to avoid a hazard due
to inadvertent resetting of the thermal
CM172022MUK Rev3 Signature Compact Espresso Maker IM.indd 3CM172022MUK Rev3 Signature Compact Espresso Maker IM.indd 3 19/09/2024 17:0519/09/2024 17:05
4
cut-out, this appliance must not be
supplied through an external switching
device, such as a timer, or connected to
a circuit that is regularly switched on and
o by the utility.
• This appliance is not intended to be
operated on an extension cable or by
means of an external timer or a separate
remote control system.
• The coee maker shall not be placed in a
cabinet when in use.
HEALTH AND SAFETY
CM172022MUK Rev3 Signature Compact Espresso Maker IM.indd 4CM172022MUK Rev3 Signature Compact Espresso Maker IM.indd 4 19/09/2024 17:0519/09/2024 17:05
5
HEALTH AND SAFETY
LOCATION
• Always locate your appliance
away from the edge of the
worktop.
• Ensure that the appliance is
used on a rm, flat surface.
• Do not use the appliance
outdoors or near water.
• WARNING! Do not place the
appliance onto a metal tray
or metal surface whilst in use.
MAINS CABLE
• Do not let the mains cable hang
over the edge of the worktop
where a child could reach it.
• Do not let the mains cable
run across an open space e.g.
between a low socket and a table.
• Do not let the mains cable run
across a cooker or other hot area
which might damage the cable.
• The mains cable should reach
from the socket to the base of
the unit without straining the
connections.
PERSONAL SAFETY
• WARNING! To protect against
re, electric shock and personal
injury do not immerse cord, plug
and appliance in water or any
other liquid.
• Unplug from the outlet before
cleaning.
• Allow to cool before putting on
or taking o parts and before
cleaning.
• Do not move the coee maker
while switched on.
• The use of attachments or tools
not recommended or sold by
Morphy Richards may cause re,
electric shock or injury.
• Do not use the appliance for
any use other than its intended
purpose.
• Do not place the appliance on or
near a hot gas or electric burner,
or in a heated oven.
• WARNING! The appliance must
not be immersed for cleaning.
• CAUTION! To prevent damage
to the appliance, do not use
alkaline cleaning agents when
cleaning. Use a soft cloth and
detergent.
CM172022MUK Rev3 Signature Compact Espresso Maker IM.indd 5CM172022MUK Rev3 Signature Compact Espresso Maker IM.indd 5 19/09/2024 17:0519/09/2024 17:05
6
HEALTH AND SAFETY
ELECTRICAL REQUIREMENTS
TREATING SCALDS
• Run cold water over the aected area immediately.
• Do not stop to remove clothing.
• Get medical help quickly.
Check that the voltage on the rating plate of your appliance
corresponds with your house electricity supply which must be A.C.
(Alternating Current).
WARNING: The plug removed from the mains lead, if severed, must be
destroyed, as a plug with a bared flexible cord is hazardous if engaged
into a live socket outlet.
Should the fuse in the mains plug require changing, replace it with a fuse of
the same rating as originally tted.
WARNING: This appliance must be earthed.
CM172022MUK Rev3 Signature Compact Espresso Maker IM.indd 6CM172022MUK Rev3 Signature Compact Espresso Maker IM.indd 6 19/09/2024 17:0519/09/2024 17:05
7
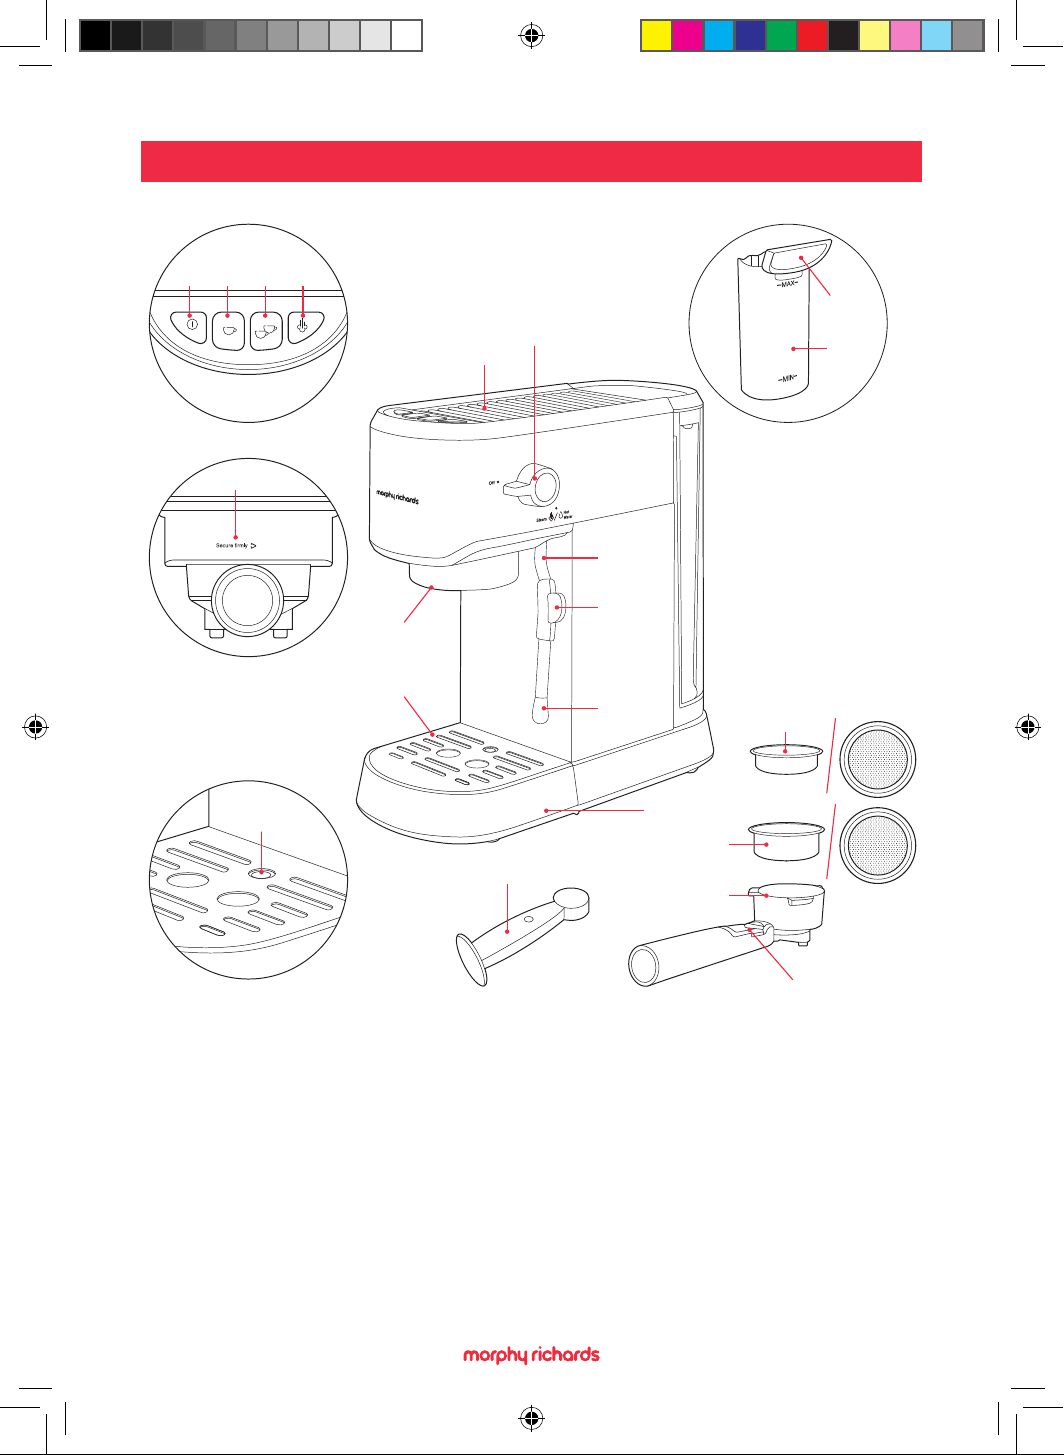
1. On/standby button
2. One cup button
3. Two cup button
4. Steam button
5. Espresso cups holder
6. Steam control dial
7. Water tank lid
8. Water tank
9. Filter holder lock
position
10. Brewing head
11. Removable drip
tray grid
12. Steam wand
13. Steam wand grip tab
14. Steam wand nozzle
15. Removable drip tray
16. Drip tray full indicator
17. Small one cup lter
(for single shot use)
18. Larger two cup lter
(for double shot use)
19. Filter holder
20. Filter holder clip
21. Tamp spoon
1 2
9
21
3
5
6
4
PRODUCT OVERVIEW
8
7
16
17
10
11
12
13
14
15
20
19
18
CM172022MUK Rev3 Signature Compact Espresso Maker IM.indd 7CM172022MUK Rev3 Signature Compact Espresso Maker IM.indd 7 19/09/2024 17:0519/09/2024 17:05
8
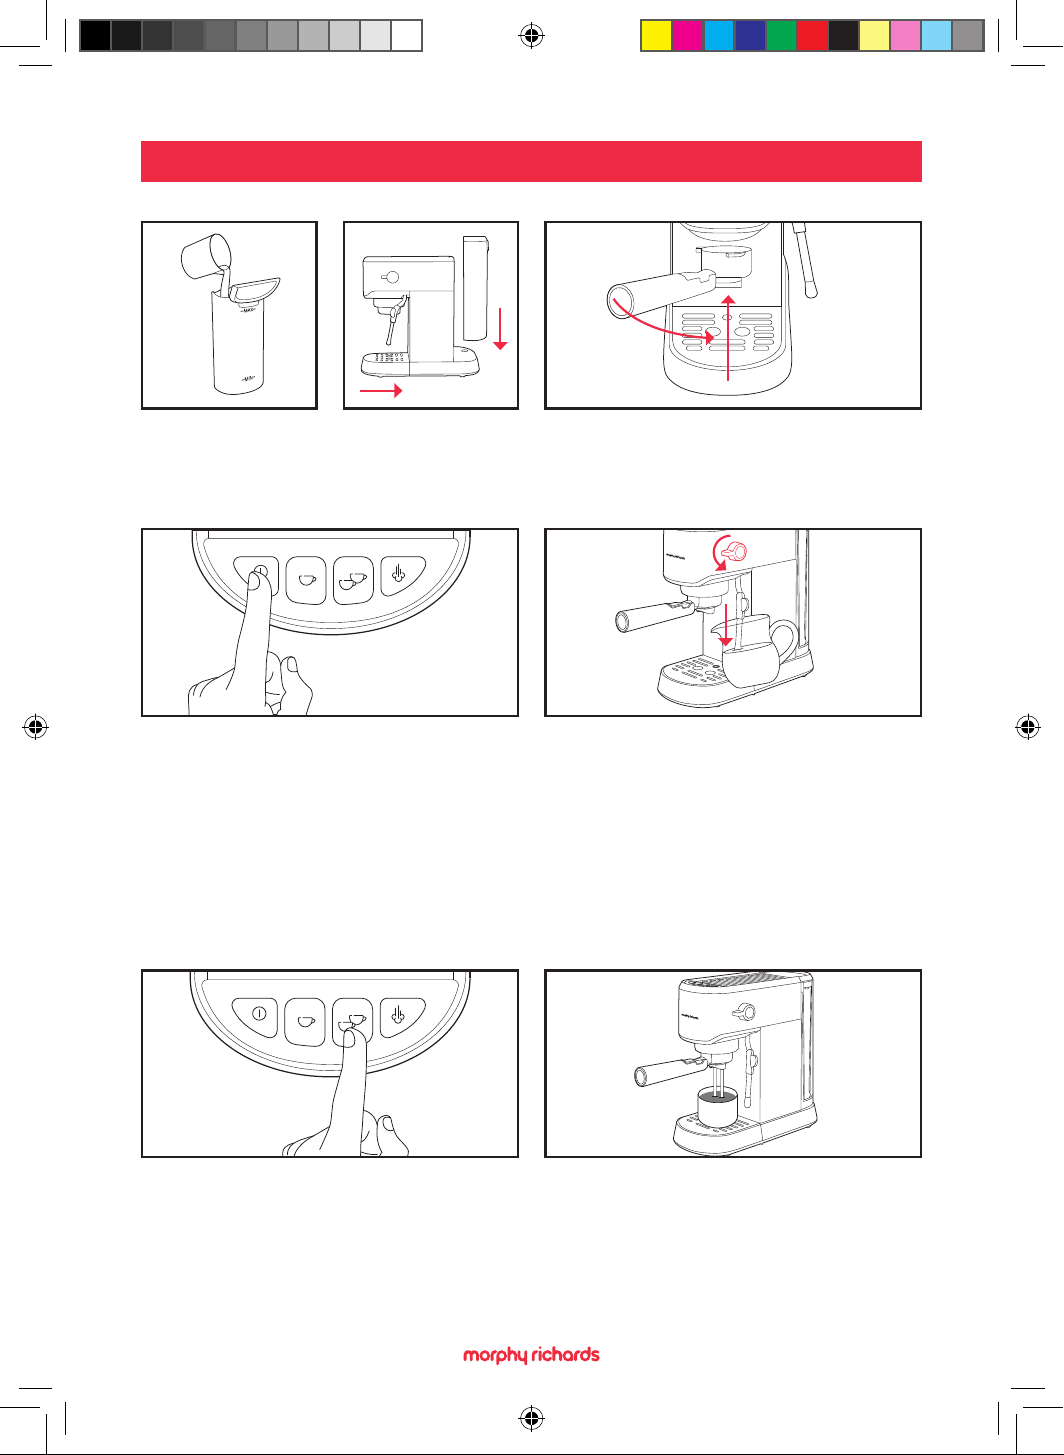
Ensure the water tank (8) is lled up to the
MAX line. Assemble the espresso coee
machine as above, ensuring the removable
drip tray (15) is in place.
1
Ensure the steam control dial (6) is in the o
position and press the on/standby button (1).
The one cup and two cup buttons (2/3) will
pulse as the unit is heating up.
3
Following action No.4, wait for the one cup
and two cup buttons (2/3) to illuminate
solidly. Then place a receptacle, capable of
holding 150ml, on the drip tray grid (11) and
press the two cup button (3).
5
Water will pass through the system into the
receptacle, which then must be emptied.
Repeat a further 3 times - the coee
machine is now primed for making coee.
6
Without placing any lters (17/18) into the
lter holder (19), place the lter holder into the
brewing head (10) and turn until at a right angle
to the main unit to lock into position securely.
2
PRIMING THE COFFEE MACHINE
When the one cup and two cup buttons
(2/3) illuminate solidly, place the steam
wand (12) into a mug or jug and slowly
turn the steam control (6) until the water
dispenses - keep the dial open for at least
30 seconds and close the dial. Take care
performing this process as the hot water
will pulse into the receptacle, and it may
emit steam. Dispose of the water and
repeat the process a further two times.
4
CM172022MUK Rev3 Signature Compact Espresso Maker IM.indd 8CM172022MUK Rev3 Signature Compact Espresso Maker IM.indd 8 19/09/2024 17:0519/09/2024 17:05
9
PREHEATING (OPTIONAL)
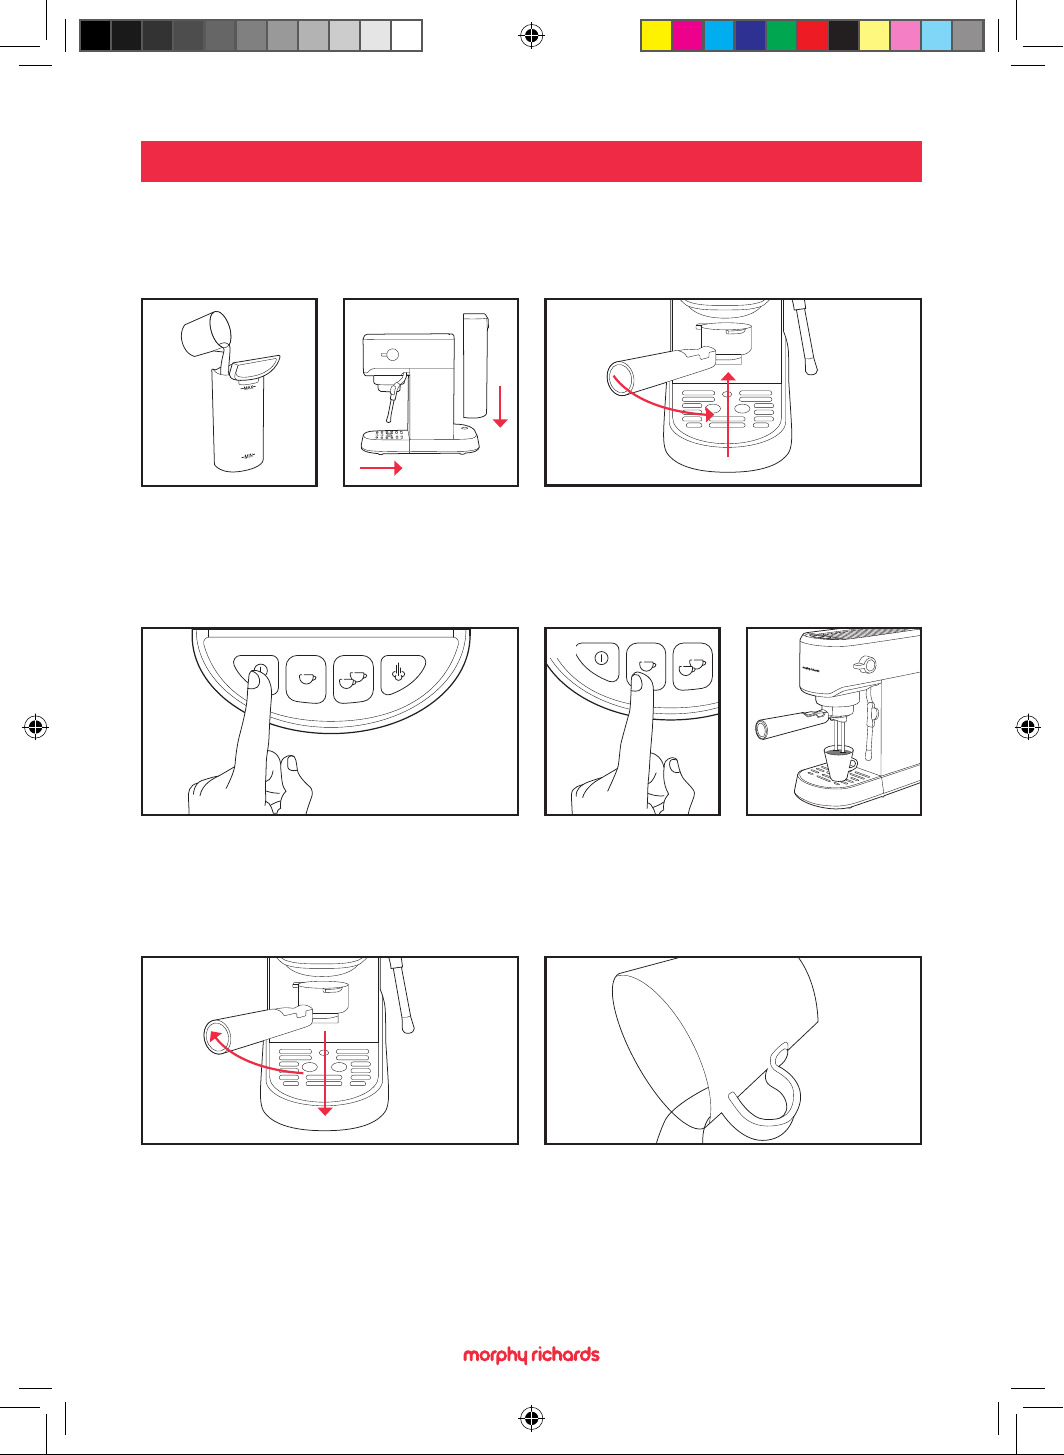
Fill water tank (8) up to the MAX line.
Assemble the espresso coee machine as
above, ensuring the removable drip tray
(15) is in place.
1
When the one cup and two cup buttons (2/3)
illuminate solidly, place your cup(s) on the drip
tray grid (11). Press either the one or two cup
button to dispense set amount, approximately
50ml for one cup and 100ml for two.
4
Empty the water from your espresso cup.
Next, follow steps 2 onwards under ‘Using
Your Coee Maker’, using your preheated
espresso cup.
6
Place the coee lter (17/18) into the lter
holder (19) without coee in the lter. Place
the lter holder into the brewing head (10)
and turn until at a right angle to the main
unit to lock into position securely.
Plug the espresso coee machine in and
press the on/standby button (1). The button
will illuminate and remain on until the coee
machine is switched o again. The one cup
and two cup buttons (2/3) will pulse.
3
Remove the warmed lter holder (19), ready
for use (see steps 2 and 3 under ‘Using Your
Coee Maker’).
For a hot espresso, we recommend preheating the appliance before following the
instructions on the next page. Preheating ensures the lter holder and cup are warm
enough to enhance the coee flavour.
2
5
CM172022MUK Rev3 Signature Compact Espresso Maker IM.indd 9CM172022MUK Rev3 Signature Compact Espresso Maker IM.indd 9 19/09/2024 17:0519/09/2024 17:05
10
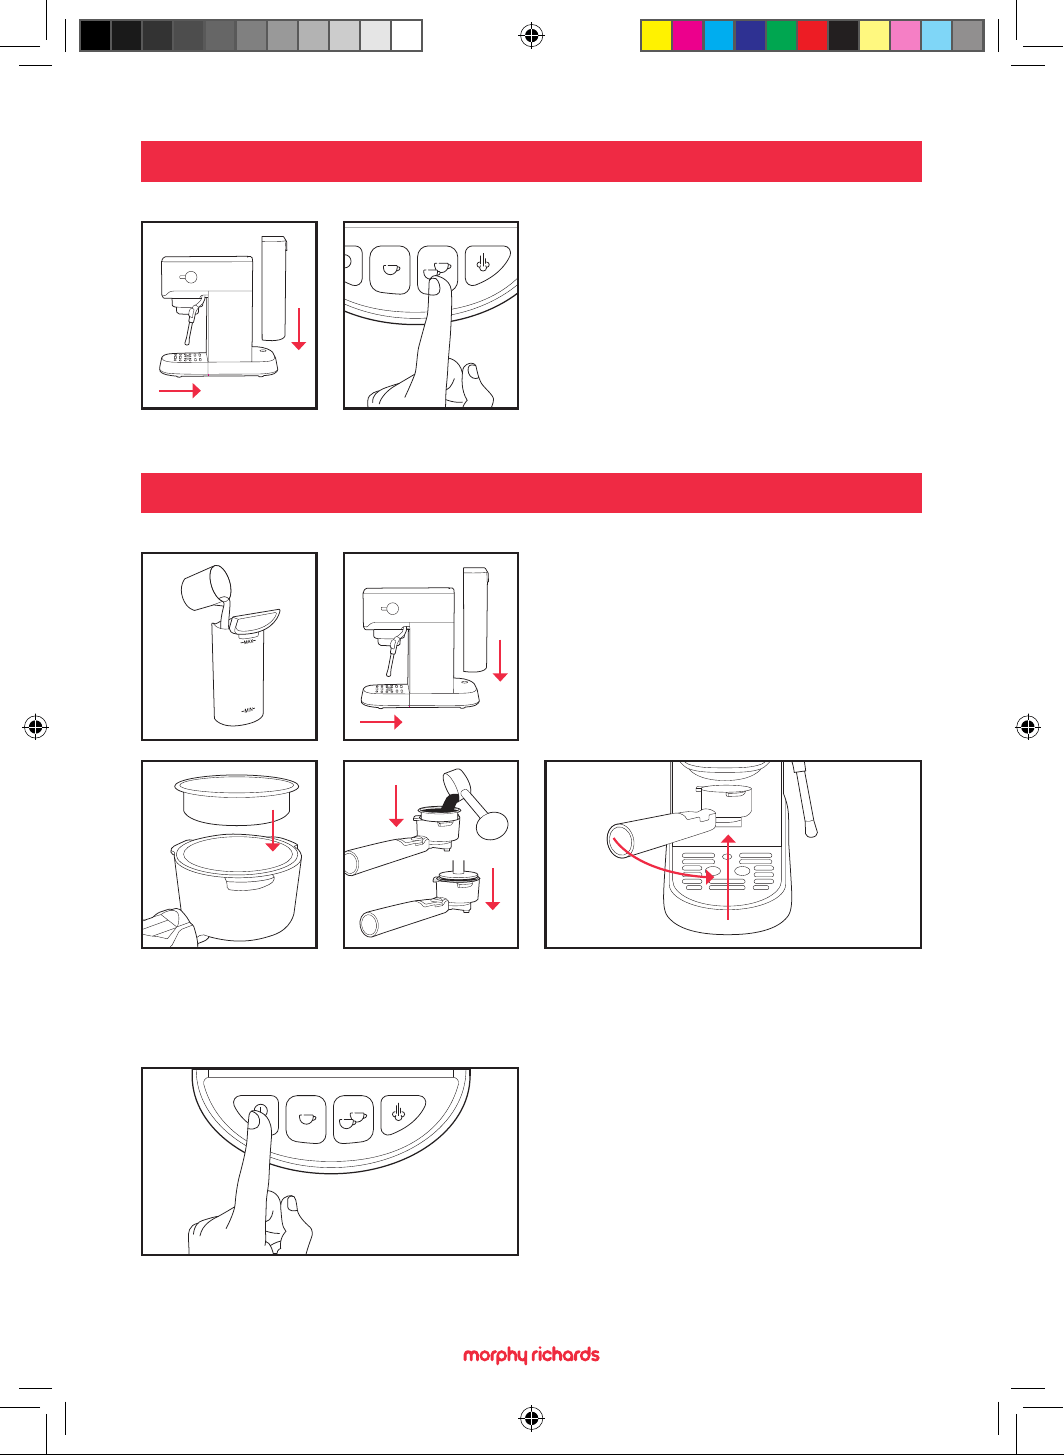
If the water tank (8) runs dry, after re-lling
it may require two or more presses of the
one cup and/or two cup buttons (2/3) for
water to flow through the system to make
an espresso.
Your espresso coee machine uses espresso
ground coee and comes with two suitable
lters. The smaller one cup lter (17) is for
single shot use and the larger two cup lter
(18) is for double shot use.
Fill the water tank (8) up to the MAX line.
Assemble the espresso coee machine
as shown on the left.
Plug the espresso coee machine in and
press the on/standby button (1). The button
will illuminate and remain on until the
coee machine is switched o again or
automatically goes into standby after 30
minutes. The one cup and two cup buttons
(2/3) will pulse.
Place the espresso lter into the lter
holder (19). Fill the lter with ne espresso
ground coee to just below the top rim and
compact it down with the tamp spoon (21).
Place the lter holder into the brewing
head (10) and turn until at a right angle to
the main unit to lock into position securely.
RE-FILLING THE WATER TANK
USING YOUR COFFEE MAKER
3
4
1 2
CM172022MUK Rev3 Signature Compact Espresso Maker IM.indd 10CM172022MUK Rev3 Signature Compact Espresso Maker IM.indd 10 19/09/2024 17:0519/09/2024 17:05
11
RE-FILLING THE WATER TANK
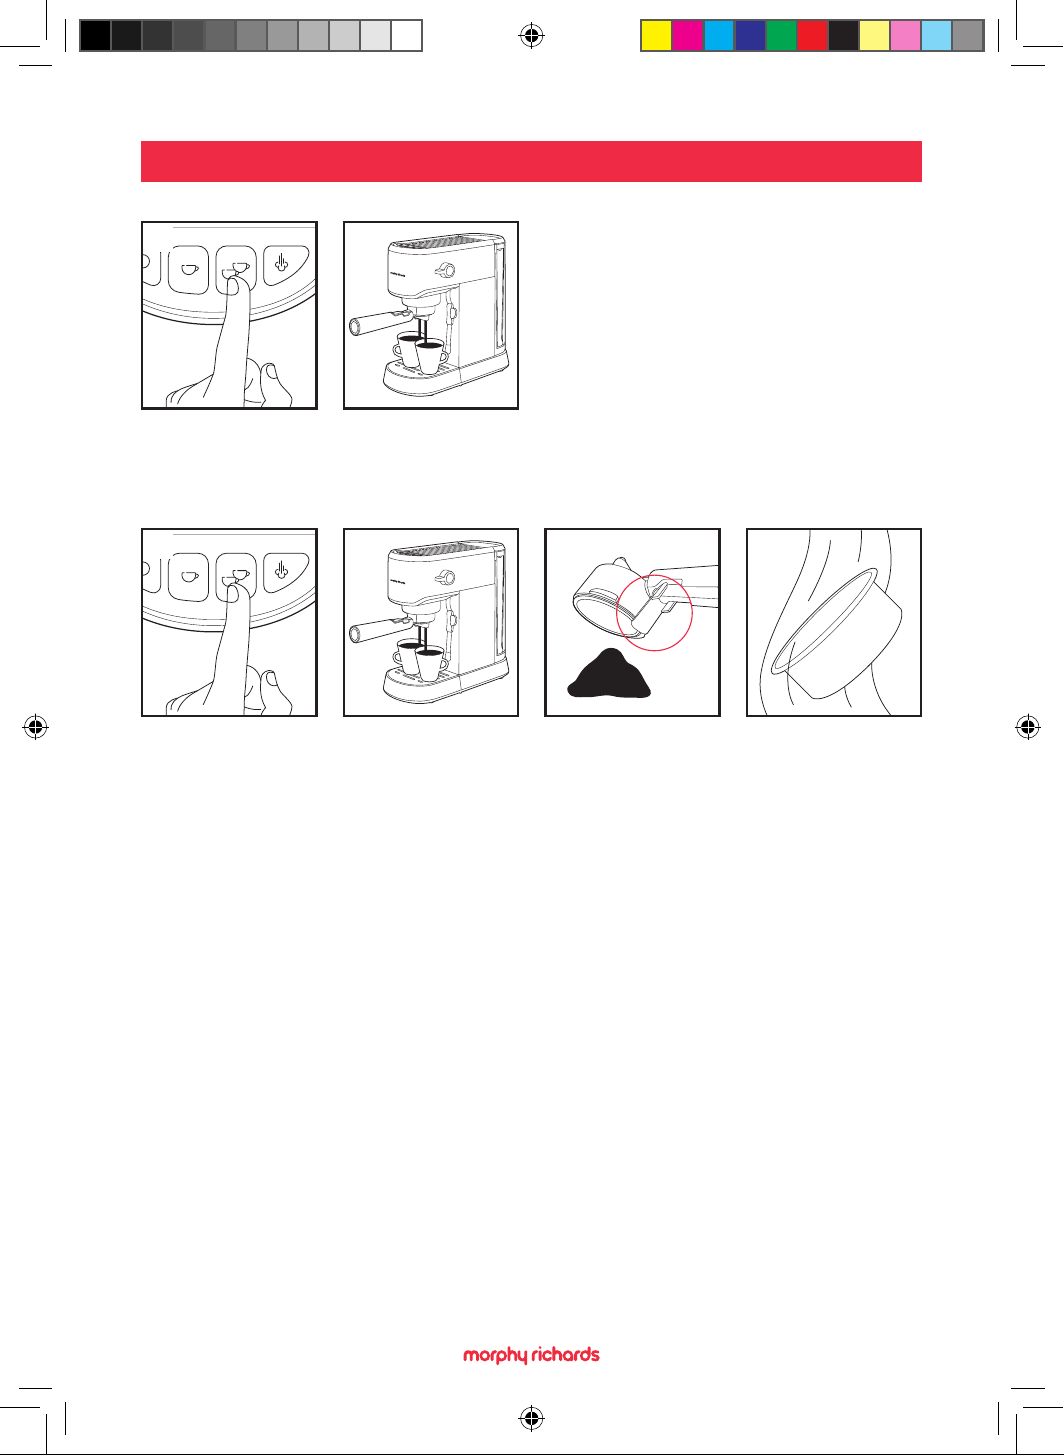
When the one cup and two cup buttons
(2/3) stop pulsing, place your cup(s) on
the drip tray. Press either the one or two
cup button to dispense the set amount:
approximately 40ml for one cup and 80ml
for two. At the end of the dispensing time,
the machine will beep once.
If the coee machine is switched o by the user by pressing the on/standby button (1);
or if it automatically goes into standby mode (after 30 minutes), the machine can exit
standby mode by a single press of the on/standby button. This will start pre-heating the
machine, and the one cup and two cup buttons (2/3) will pulse.
You may press and hold the one or two
cup button to continue dispensing until
the button is released. See ‘Alternating
Dispense Amounts’ for details.
Allow the grinds/pods to cool. Empty the
coee grinds, using the lter holder clip
(20) to keep the lter in place. Remove the
lter and clean.
5
6 7
CM172022MUK Rev3 Signature Compact Espresso Maker IM.indd 11CM172022MUK Rev3 Signature Compact Espresso Maker IM.indd 11 19/09/2024 17:0519/09/2024 17:05
12
10mm
USING THE STEAM WAND
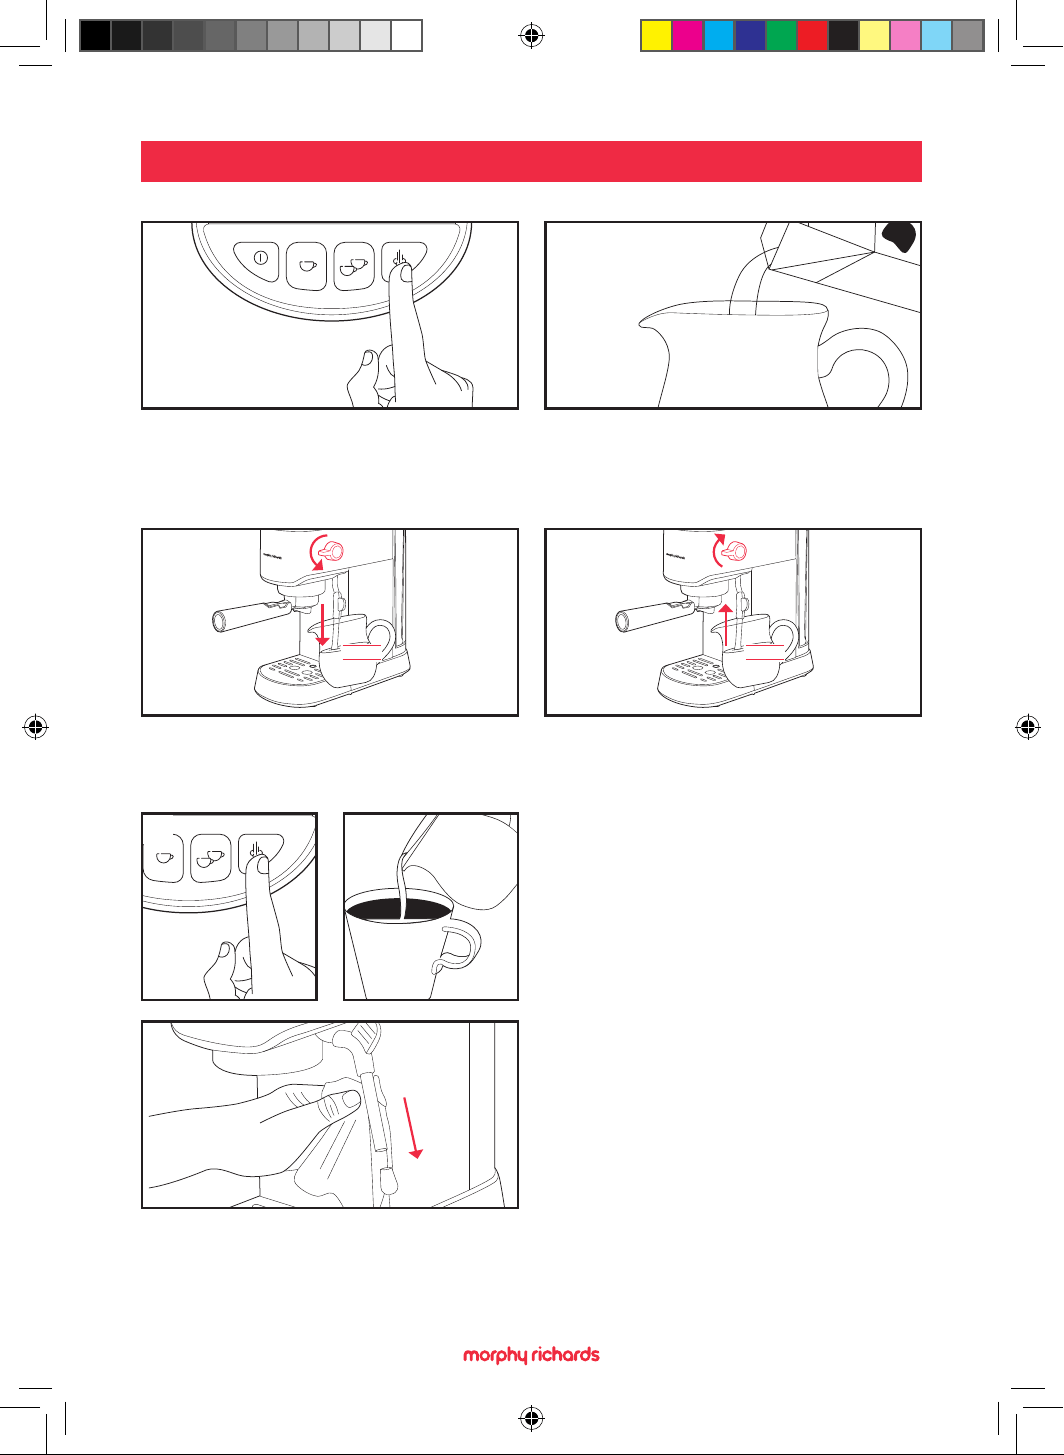
Pour 100-200ml of chilled milk into a jug.
When enough froth has been produced,
turn the steam control dial (6) to OFF.
Press the steam button - the button will
pulse until the machine is up to steam
temperature. When the button stops pulsing,
the steam wand is ready to be used.
Place the steam wand (12) into the milk,
slowly turn the steam control dial (6) until
steam is dispensed. Adjust to your liking.
2
4
1
3
Press the steam button (4) to exit the
steam function. Serve the frothy milk.
Press the on/standby button (1) to turn
o the unit.
IMPORTANT! The steam wand must be
cleaned after every use.
Allow the steam wand to cool before
cleaning. To clean, remove the nozzle (14)
and use a wet cloth to clean the wand.
If another coee is required after frothing
milk, see ‘Notes on Using the Steam
Wand’ for instructions on how to cool the
machine.
5
100ml-200ml
10mm
CM172022MUK Rev3 Signature Compact Espresso Maker IM.indd 12CM172022MUK Rev3 Signature Compact Espresso Maker IM.indd 12 19/09/2024 17:0519/09/2024 17:05
13
NOTES ON USING THE STEAM WAND
USAGE WARNING
ALTERING DISPENSE AMOUNTS
If the unit is switched on with the steam control dial (6) on, all buttons
will flash. The steam control dial must be turned to the o position.
If you want to make another coee after using steam, ensure the
steam control dial (6) is in its o state and the one cup and two cup
buttons (2/3) are pulsing, the unit is cooling down. The buttons will
illuminate solidly when it’s back down to temperature and ready to
make coee again. This can be accelerated by turning the steam
control dial to on - water will pump through and cool the system.
Ensure there is a receptacle under the steam wand (12).
ENSURE THE FILTER HOLDER (19) IS LOCKED INTO POSITION
CORRECTLY AT A RIGHT ANGLE TO THE MAIN UNIT AND SECURELY
LOCATED IN THE BREWING HEAD (10) BEFORE USE.
WHEN FROTHING MILK, ENSURE THE STEAM CONTROL DIAL (6) IS OFF
BEFORE REMOVING THE STEAM WAND (12) FROM THE MILK.
To change the volume dispensed for the one cup program, begin by
pressing and holding the one cup button for 3 seconds, then releasing.
Both the one cup and power button will stay lit. Press the one cup
button again and your coee will start to pour. When you are happy
with the amount of coee that has been dispensed, press the one cup
button again to stop the coee. The machine will beep, the buttons will
all light up, and coee will stop dispensing. This will now be stored in the
machine for the next time you make a coee. Repeat for the two cup if
necessary.
NOTE: The range of volumes can be between 25ml and 60ml for
the one cup program, and between 70ml and 110ml for the two cup
program.
CM172022MUK Rev3 Signature Compact Espresso Maker IM.indd 13CM172022MUK Rev3 Signature Compact Espresso Maker IM.indd 13 19/09/2024 17:0519/09/2024 17:05
14
TIP
STANDBY MODE
EMPTYING THE DRIP TRAY
After using the steam wand (12), the water in the boiling chamber will
be too hot to brew coee without burning the grinds. The water will be
the correct temperature when the one cup and two cup buttons (2/3)
illuminate solidly. The two cup and one cup buttons will not function
until they are illuminated solidly.
Your espresso coee machine will automatically switch o 30 minutes
after brewing coee. To reactivate the coee maker, press the on/
standby button (1) once to exit standby and start pre-heating for
further use.
ADDING HOT WATER
The best way to add more hot water to your coee is to use the steam
wand: simply place your cup under the steam wand, and rotate the dial
to the hot water position to dispense hot water, then turn to o when
you have topped up your drink.
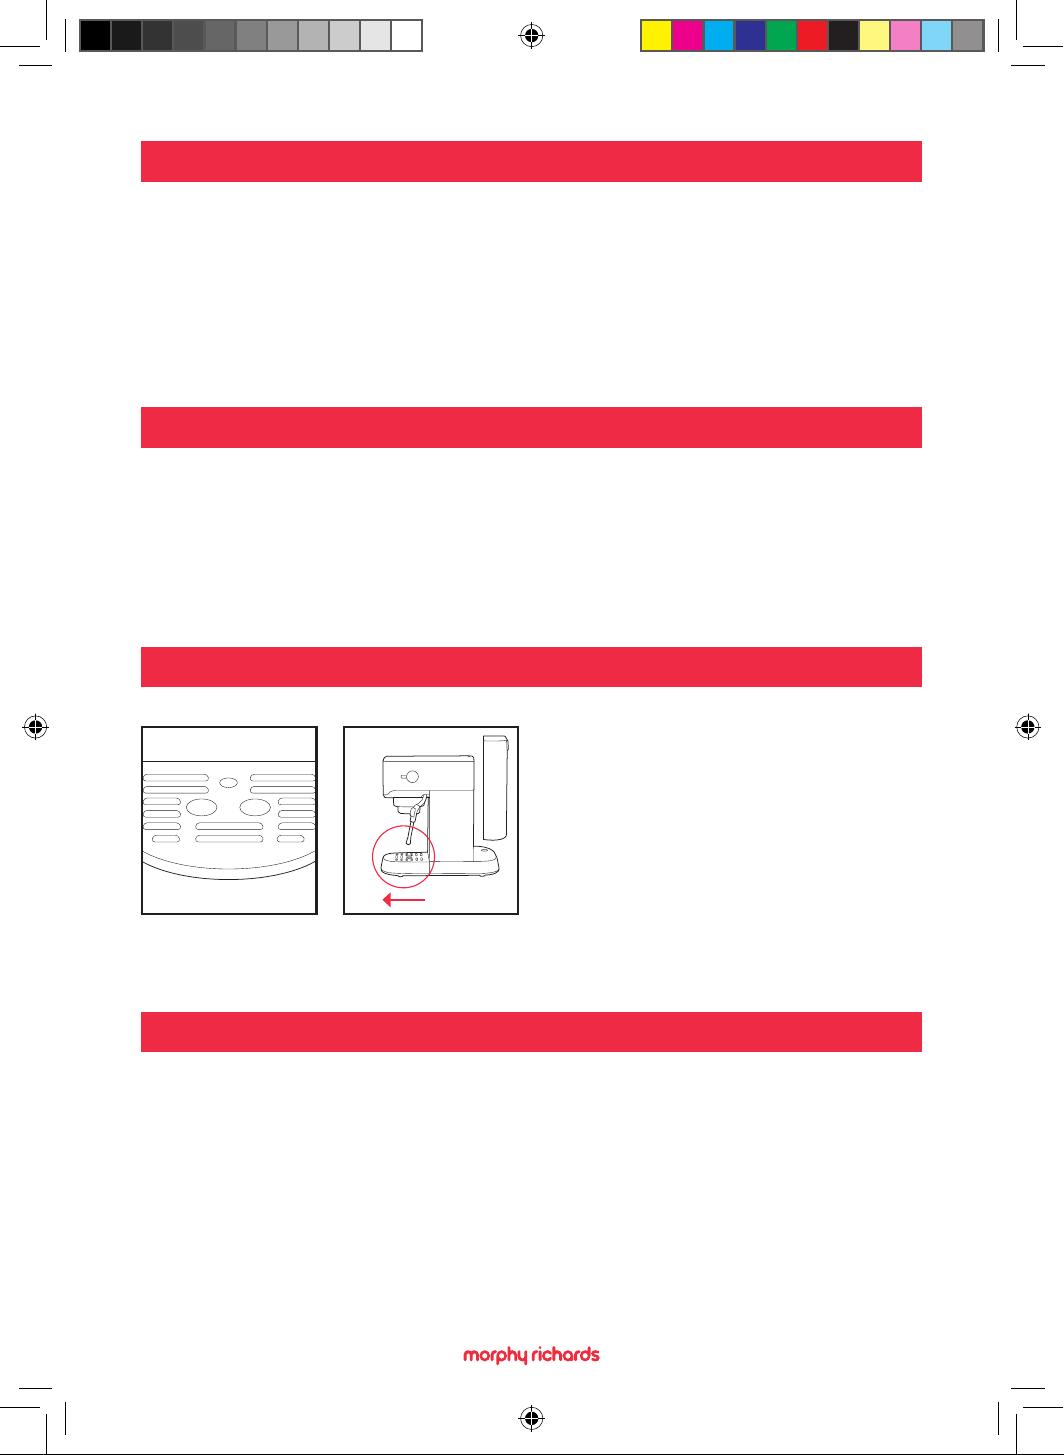
When the water in the removable
drip tray (14) is full, the drip tray
full indicator (15) will be visible.
1. Remove the drip tray from the
appliance and empty.
2. Clean the drip tray grid (11) and
drip tray with a damp cloth
before replacing.
CM172022MUK Rev3 Signature Compact Espresso Maker IM.indd 14CM172022MUK Rev3 Signature Compact Espresso Maker IM.indd 14 19/09/2024 17:0519/09/2024 17:05
15
CLEANING YOUR ESPRESSO COFFEE MACHINE
1. Disconnect the appliance from the mains supply.
2. Make sure the appliance has completely cooled down.
3. Simply wipe the steam wand (12) and exterior with a clean, damp cloth.
Use a pin to clean the nozzle head and air holes in the sleeve.
Do not use any abrasives or metal scourers as this will damage the
nish on the unit
4. The lter holder (19) and water tank (8) should be washed after each
use by rinsing them under water. To assist in keeping the lter holder
clean, we recommend you periodically run the machine with the lter
holder in place without coee using water only.
Should the holes in the lters become blocked with coee grinds, use
a ne bristled brush to help clean.
When your coee maker is not being used, we recommend that you
do not leave the lter holder attached to the machine as this will
reduce the life of the seal.
5. Remove the drip tray grid (11) and drip tray (15) from the appliance
and remove any spilt coee and water. Then, clean them with a
damp cloth or a damp sponge.
6. You must clean the steam wand (12) immediately after each use.
Place the steam wand in a jug or mug and use the steam setting to
clear any remaining milk out of the wand. After it has cooled down,
remove the steam wand sleeve and place under warm running water
to remove excess milk. If the steam wand becomes blocked, use a
small pin to clean more thoroughly.
WARNING! Steam from the steam wand is extremely hot and can scald.
IMPORTANT! Never wash your coee machine accessories in a
dishwasher.
CM172022MUK Rev3 Signature Compact Espresso Maker IM.indd 15CM172022MUK Rev3 Signature Compact Espresso Maker IM.indd 15 19/09/2024 17:0519/09/2024 17:05
16
DESCALING
Your machine will need to be descaled regularly for better tasting
coee and maintenance.
When the machine is turned on after 500 cycles, all the lights will flash
5 times- don’t worry, you can still use the machine normally afterwards!
To descale, follow the instructions below:
1. Disconnect the appliance from the mains supply.
2. Make sure the appliance has cooled down completely.
3. Remove the water tank (8) from the machine.
4. Fill the water tank with dissolved descaler solution (as per the
manufacturer’s instructions) up to the MAX level marked on the tank.
5. Re-t the water tank to the machine.
6. Connect the appliance to the mains supply.
7. Press the on/standby button (1) and wait for the one cup and two
cup buttons (2/3) to illuminate solidly.
8. Place a cup or bowl on the drip tray.
9. Press the two cup button (3) once, which will dispense hot water into
the cup/bowl.
10. Repeat step 9 three times, making sure to empty the cup/bowl when full.
11. Place the steam wand (12) into a cup or bowl, and slowly turn the
steam control dial (6) until hot water dispenses.
12. Keep dispensing into the cup/bowl until the water tank (8) is empty -
make sure to stop and empty the cup/bowl when it is full.
13. Immediately rell the water tank with clean water, and repeat
steps 9-12.
After descaling has been completed, simultaneously press and hold
the one cup, two cup and steam buttons for 3 seconds to cancel the
descaling reminder (flashing lights).
CM172022MUK Rev3 Signature Compact Espresso Maker IM.indd 16CM172022MUK Rev3 Signature Compact Espresso Maker IM.indd 16 19/09/2024 17:0519/09/2024 17:05
17
MAKING COFFEE
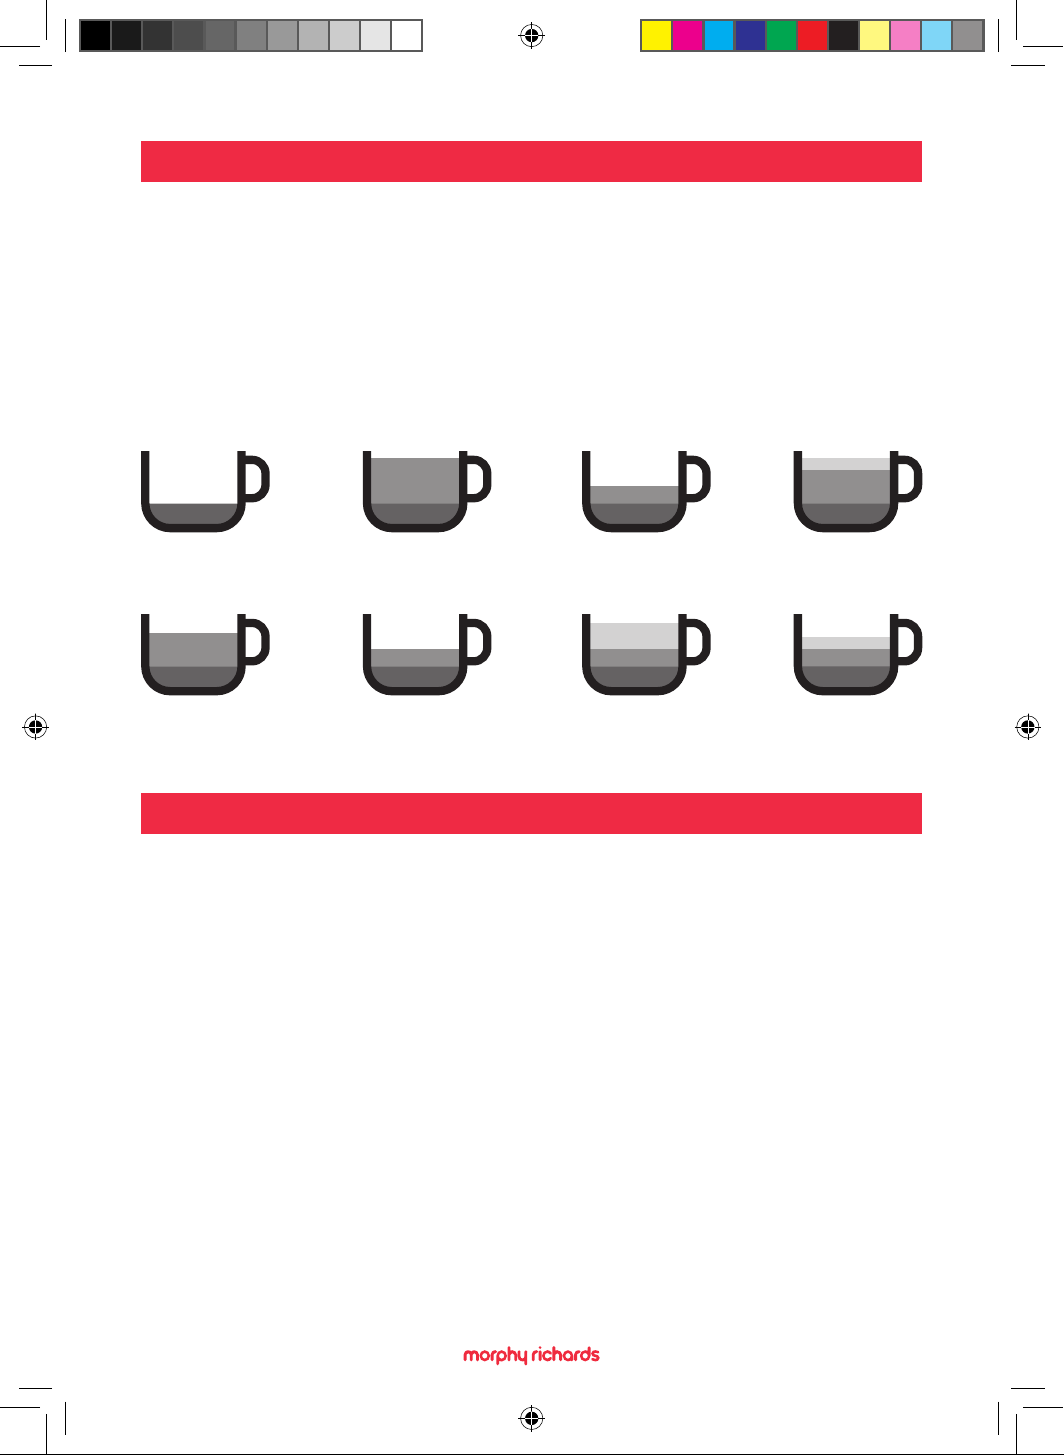
Your espresso compact machine allows you to create a variety of
coee drinks, helping you to create the coee shop experience in your
own home. The diagrams on this page are a simple guide showing you
the percentage of ingredients that make up each of the drink types.
To see how to create the perfect espresso and frothy milk, scan the QR
code on the sticker on your water tank and take a look at our online tips.
Espresso
Flat White
Americano
Espresso Macchiato
Espresso con Panna
Cappuccino
Caé Latte
Caé Mocha
CONTACT US
If you are having a problem with your appliance, please contact our
Helpline, as we are more likely to be able to help than the store you
purchased the item from. Please have the product name, model number
and serial number to hand when you contact us to help us deal with
your enquiry quicker.
email: hello@morphyrichards.co.uk
www.morphyrichards.co.uk
Espresso
Espresso Espresso Espresso Espresso
Chocolate Syrup
Hot Milk
Whipped Cream
Hot Milk
Milk Froth
Milk froth
Espresso EspressoEspresso
Whipped Cream
Water
Hot Milk
Hot Milk
Milk froth
CM172022MUK Rev3 Signature Compact Espresso Maker IM.indd 17CM172022MUK Rev3 Signature Compact Espresso Maker IM.indd 17 19/09/2024 17:0519/09/2024 17:05
18
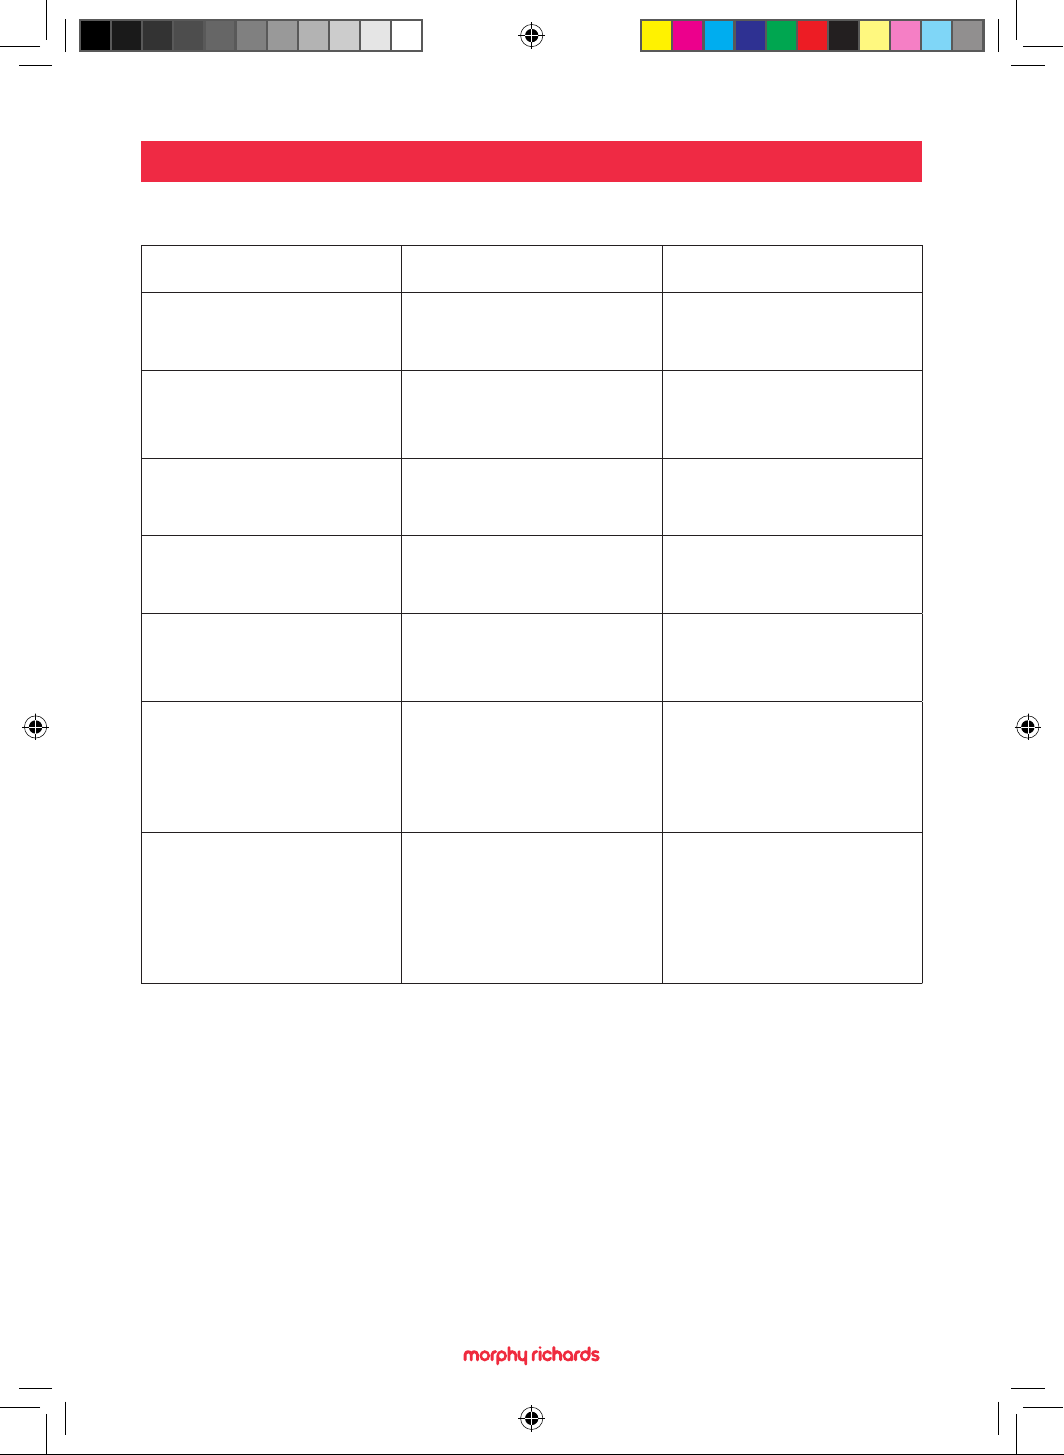
TROUBLESHOOTING
Problem Reason Solution
Water is dispensing from
the steam wand (12).
Steam control dial
(6) is open.
Rotate the steam control
dial (6) so it is closed.
The coee temperature
is too cold.
Heater block is not
hot enough before
dispensing.
Conduct a preheating
process, see ‘Preheating
(Optional)’ on page 9.
The coee grinds are
wet after use.
Coee is not
compact enough.
Tamp the coee
before inserting.
Espresso is weak.
Wrong coee type.
Always use espresso
coee grinds.
Milk is not frothing.
Air and steam are not
getting into the milk.
Use a pin to clean the
steam wand nozzle
head (14).
Coee is too strong
or weak.
Wrong volume of coee.
Use the correct coee lter:
1 person -
Smaller one cup lter (17)
2 person -
Larger two cup lter (18)
All lights are flashing 5
times when turned on.
The coee maker
needs descaling.
Descale following
instructions. After
descaling hold one cup,
two cup and steam
button for 3 seconds to
cancel the reminder.
CM172022MUK Rev3 Signature Compact Espresso Maker IM.indd 18CM172022MUK Rev3 Signature Compact Espresso Maker IM.indd 18 19/09/2024 17:0519/09/2024 17:05
19
For electrical products sold within the European
Community, at the end of the electrical products useful
life, it should not be disposed of with household waste.
Please recycle where facilities exist.
Check with your Local Authority or retailer for recycling
advice in your country.
PRODUCT RECYCLING
CM172022MUK Rev3 Signature Compact Espresso Maker IM.indd 19CM172022MUK Rev3 Signature Compact Espresso Maker IM.indd 19 19/09/2024 17:0519/09/2024 17:05
20
Your standard 2 year guarantee is extended for an additional 1 year
when you register the product within 28 days of purchase with Morphy
Richards. If you do not register the product with Morphy Richards within
28 days, your product is guaranteed for 2 years.
To validate your 3 year guarantee,
scan the QR code or register online
at www.morphyrichards.co.uk
N.B. Each qualifying product needs to be registered with Morphy
Richards individually. Please note that the 2 year guarantee is only
available in the UK. Please refer to the 2 year guarantee for more
information.
YOUR 2 YEAR GUARANTEE
It is important to retain the retailer’s receipt as proof of purchase.
Staple your receipt to the back cover for future reference.
Please quote the following information if the product develops a fault.
These numbers can be found on the base of the product.
Model no.
Serial no.
All Morphy Richards products are individually tested before leaving the
factory. In the unlikely event of any appliance proving to be faulty within
28 days of purchase, it should be returned to the place of purchase
for it to be replaced. If the fault develops after 28 days and within 24
months of original purchase, you should contact the Helpline quoting
Model number and Serial number on the product, or write to Morphy
Richards at the address shown. You may be asked to return a copy of
proof of purchase.
Subject to the exclusions set out below (see Exclusions), the faulty
appliance will then be repaired or replaced as appropriate and
dispatched usually within 7 working days of receipt.
If, for any reason, this item is replaced or repaired during the 2 year
REGISTERING YOUR 3 YEAR GUARANTEE
CM172022MUK Rev3 Signature Compact Espresso Maker IM.indd 20CM172022MUK Rev3 Signature Compact Espresso Maker IM.indd 20 19/09/2024 17:0519/09/2024 17:05
21
guarantee period, the guarantee on the new item will be calculated
from the original purchase date. Therefore it is vital to retain your
original till receipt or invoice to indicate the date of initial purchase.
To qualify for the 2 year guarantee, the appliance must have been used
according to the instructions supplied.
The appliance is intended for domestic use only. Misuse or use for
commercial or any other purpose will render the guarantee invalid.
Exclusions
Morphy Richards shall not be liable to replace or repair the goods under
the terms of the guarantee where:
1. The fault has been caused or is attributable to accidental use,
misuse, negligent use or used contrary to the manufacturer’s
recommendations or where the fault has been caused by power
surges or damage caused in transit.
2. The appliance has been used on a voltage supply other than that
stamped on the products.
3. Repairs have been attempted by persons other than our service
sta (or authorised dealer).
4. The appliance has been used for hire purposes or non domestic use.
5. The appliance is second hand or refurbished.
6. Morphy Richards reserves the right not to carry out any type of
servicing under the guarantee at its discretion.
This guarantee does not confer any rights other than those expressly
set out above and does not cover any claims for consequential loss
or damage. This guarantee is oered as an additional benet and
does not aect your statutory rights as a consumer. Morphy Richards
products are intended for household use only. See usage limitations
within the location safety instructions.
Disclaimer
Morphy Richards has a policy of continuous improvement in product
quality and design. The company, therefore reserves the right to
change the specication of its models at any time.
REGISTERING YOUR 3 YEAR GUARANTEE
CM172022MUK Rev3 Signature Compact Espresso Maker IM.indd 21CM172022MUK Rev3 Signature Compact Espresso Maker IM.indd 21 19/09/2024 17:0519/09/2024 17:05
22
NOTES
CM172022MUK Rev3 Signature Compact Espresso Maker IM.indd 22CM172022MUK Rev3 Signature Compact Espresso Maker IM.indd 22 19/09/2024 17:0519/09/2024 17:05
23
NOTES
CM172022MUK Rev3 Signature Compact Espresso Maker IM.indd 23CM172022MUK Rev3 Signature Compact Espresso Maker IM.indd 23 19/09/2024 17:0519/09/2024 17:05
morphyrichards.co.uk
CM172022MUK Rev3
@morphyrichardsuk #loveyourmorphy
Morphy Richards
9 Cabot Lane, Poole, Dorset, BH17 7BY, UK
CM172022MUK Rev3 Signature Compact Espresso Maker IM.indd 24CM172022MUK Rev3 Signature Compact Espresso Maker IM.indd 24 19/09/2024 17:0519/09/2024 17:05