Best Care for Ever !
Manufacturer: Zhongshan City Cironbaby Co.,Ltd.
Address: No.6,Yongxing North Road,Yongxing Industrial Zone, Henglan Town,
Zhongshan City,Guangdong,China
Model: CR018B
User Manual
Or scan the QR code below:
https:www.larexcare.com
larexbabycare Larex Baby Care Larex Baby Care
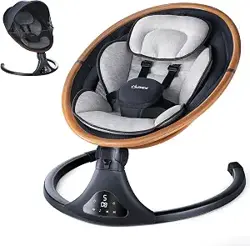
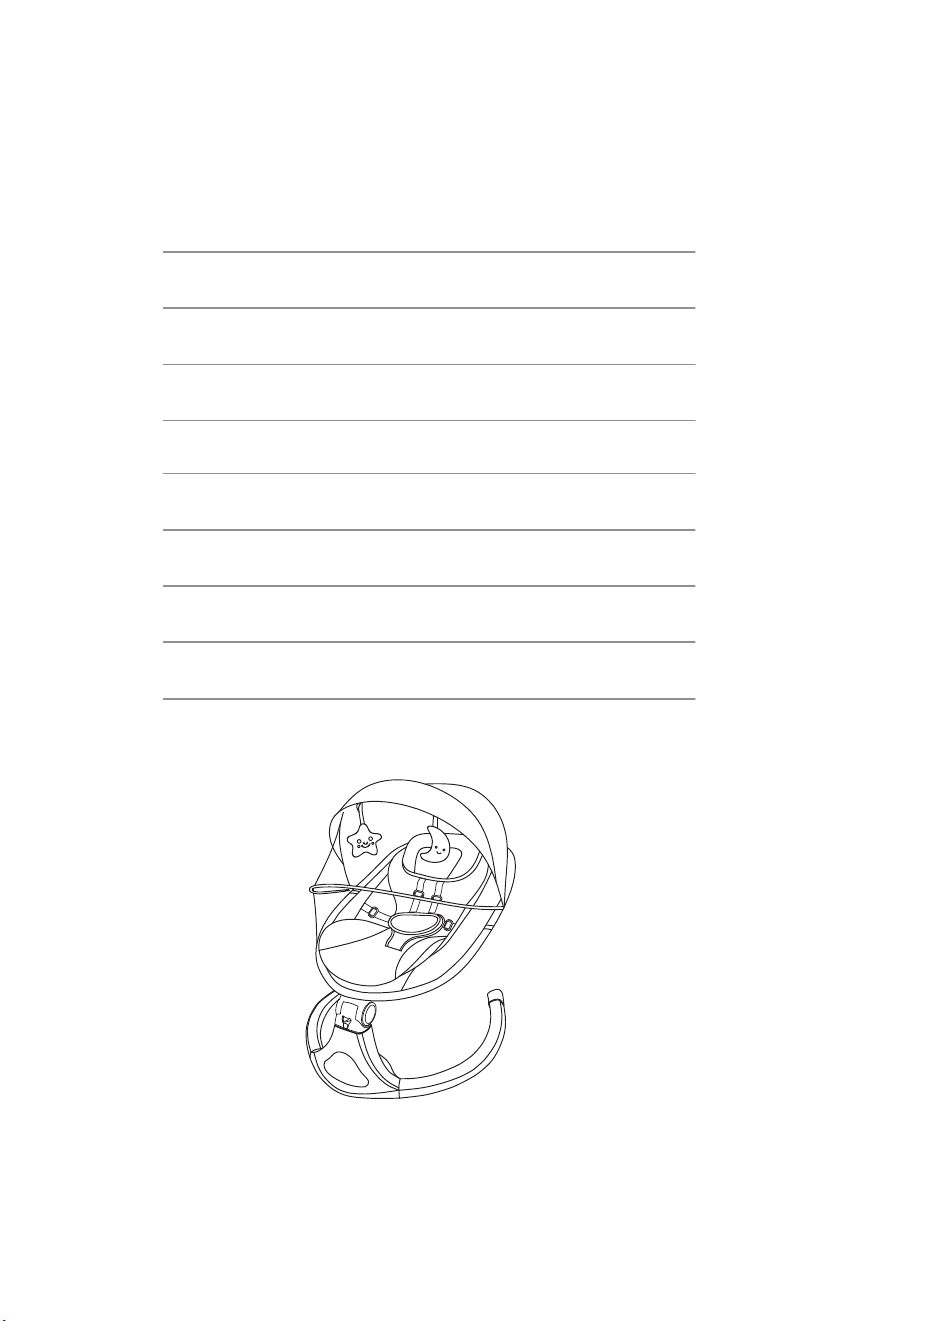
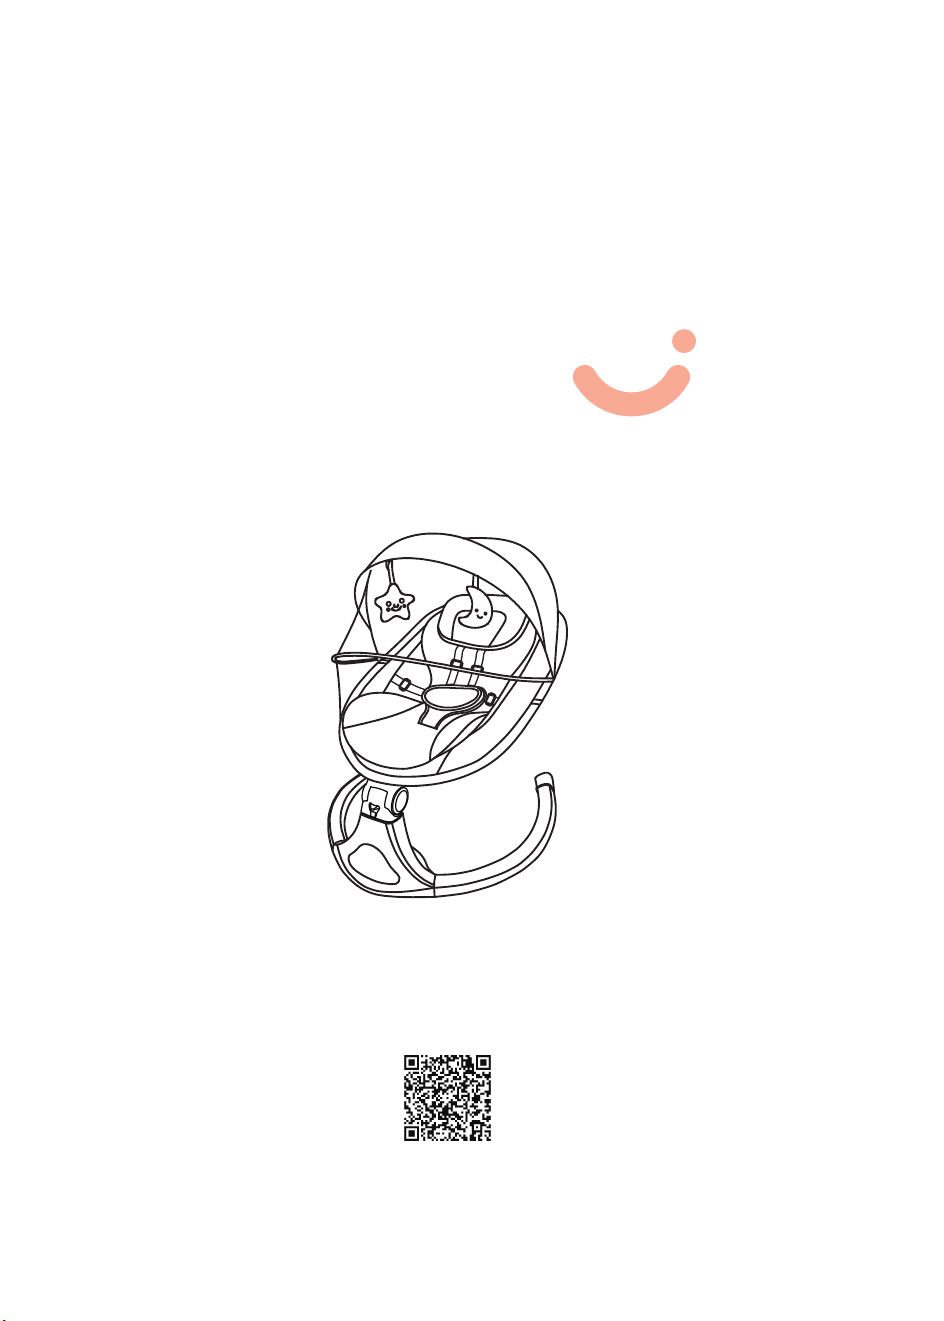
Electric Baby Swing
For tutorial videos, customer service, extended
12-month warranty, and more information, please visit:
Please scan the QR code beside:
WARNING
FCC WARNING
Parts Instruction
Assembly Steps
Disassembly Steps
Using Methods
Function Introduction
Product Contents
01
02
03
04-05
06
07-08
09-11
11
Clean, Maintenance& Troubleshooting
12-13

01 02
In the event of damage or problems, discontinue use and contact LAREX
customer service: [email protected]
To prevent serious injury or death from infants falling or being strangled in straps:
• Do NOT use this device if it is damaged or broken.Keep small parts away from
children.
• This product is not intended for prolonged periods of sleeping.
• Do not use the LAREX swing once your children can sit up unaided or attempt to climb
out,regardless of age or weight(better use within 6 months).
• Never leave the infant unattended.
• Never use on soft surfaces (bed, sofa, cushion), as the seat may tip over and
cause su䇠ocation.
• Use only on a floor.Never use on any elevated surface.
• Maximum weight 20 lbs (9 kg).
• Be sure to use a seat belt that is tightly attached to your baby to protect their safety
DQGSUHYHQWWKHPIURPIDOOLQJR䇠
• Do not use accessories or replacement parts other than those approved by LAREX
• Do not use the product if any components are broken or missing.
• Do not place the product in any location where there are cords, such as window blind
cords, drapes, phone cords, etc.
• Power adapter cable can cause strangulation hazard! Keep cable out of reach of
children.
• Do not move or lift this product with the baby inside it.
• Keep away from children when unfolding and folding this product.
• Only use the power cord provided.
IMPORTANT SAFETY GUARDS
SAFETY PRECAUTION
: FAILURE TO FOLLOW THESE WARNINGS AND ASSEMBLY
INSTRUCTIONS COULD RESULT IN SERIOUS INJURY OR DEATH.
WARNING
The device complies with part 15 of the FCC Rules. Operation is subject to the
following two conditions: (1) This device may not cause harmful interference, and (2)
This device must accept any interference received, including interference that may
cause undesired operation.
WARNING:
ChangHVRUPRGL䇡cations to this unit not expressly approved by the party
responsible for compliance could void the user’s authority to operate the equipment.
NOTE: This equipment has been tested and found to comply with the limits for a Class
B digital device, pursuant to part 15 of the FCC Rules. These limits are designed to
provide reasonable protection against harmful interference in a residential
installation. This equipment generates, uses, and can radiate radio frequency energy
and if not installed and used in accordance with the instructions, may cause harmful
interference to radio communications. However, there is no guarantee that
interference will not occur in a particular installation. If this equipment does cause
harmful interfer
ence to radio or television reception, which can be determined by
turning the equipPHQWR䇠DQd on, the user is encouraged to try to connect the
interference by one or more of the following measures:
• Reorient or relocate the receiving antenna.
• Increase the separation between the equipment and receiver.
• Connect the equipment to an outlet on a circuit di䇠erent from that to which the
receiver is connected.
• Consult the dealer or an experienced radio/TV technician for help.
CAN ICES-3(B)/NMB-3(B)
FCC WARNING
SUFFOCATION HAZARDS: Young infants have limited head
and neck control. If the seat is too upright, infant’s head can drop
forward and compress the airway.
ALWAYS keep swing seat fully reclined until infant is at least 4
months old AND can hold up head without help.
Only use the power cord provided
Caution: Changes or modifications not expressly approvedby the party
responsible for compliance could void theuser's authority to operate
the equipment This equipment complies with fCC radiation exposure
limits set forth for an uncontrolled environment.Thistransmitter must
not be co-located or operating in conjunction with any other antenna
or transmitter.The base bracket should be installed and operated with
minimum distance 10cm between the radiator and your body.
Changes or modifications to this unit not expressly approved by the party
responsible for compliance could void the user’s authority to operate the equipment.
NOTE: This equipment has been tested and found to comply with the limits for a Class
B digital device, pursuant to part 15 of the FCC Rules. These limits are designed to
provide reasonable protection against harmful interference in a residential
installation. This equipment generates, uses, and can radiate radio frequency energy
and if not installed and used in accordance with the instructions, may cause harmful
interference to radio communications. However, there is no guarantee that
interference will not occur in a particular installation. If this equipment does cause
harmful interference to radio or television reception, which can be determined by
turning the equipment off and on, the user is encouraged to try to connect the
interference by one or more of the following measures:
· Reorient or relocate the receiving antenna.
· Increase the separation between the equipment and receiver.
· Connect the equipment to an outlet on a circuit different from that to which the
receiver is connected.
· Consult the dealer or an experienced radio/TV technician for help.
CAN ICES-3(B)/NMB-3(B)
WARNING:
To prevent battery leaks, which can burn skin and eyes:
· Always replace the entire set of batteries at one time.
· Never mix old and new batteries, or batteries of different brands or types.
· Remove batteries when storing product for a long time.
· Dispose of used batteries immediately.
CAUTION
!!

01 02
In the event of damage or problems, discontinue use and contact LAREX
To prevent serious injury or death from infants falling or being strangled in straps:
• Do NOT use this device if it is damaged or broken.Keep small parts away from
children.
• This product is not intended for prolonged periods of sleeping.
• Do not use the LAREX swing once your children can sit up unaided or attempt to climb
out,regardless of age or weight(better use within 6 months).
• Never leave the infant unattended.
• Never use on soft surfaces (bed, sofa, cushion), as the seat may tip over and
cause su䇠ocation.
• Use only on a floor.Never use on any elevated surface.
• Maximum weight 20 lbs (9 kg).
• Be sure to use a seat belt that is tightly attached to your baby to protect their safety
DQGSUHYHQWWKHPIURPIDOOLQJR䇠
• Do not use accessories or replacement parts other than those approved by LAREX
• Do not use the product if any components are broken or missing.
• Do not place the product in any location where there are cords, such as window blind
cords, drapes, phone cords, etc.
• Power adapter cable can cause strangulation hazard! Keep cable out of reach of
children.
• Do not move or lift this product with the baby inside it.
• Keep away from children when unfolding and folding this product.
• Only use the power cord provided.
IMPORTANT SAFETY GUARDS
SAFETY PRECAUTION
: FAILURE TO FOLLOW THESE WARNINGS AND ASSEMBLY
INSTRUCTIONS COULD RESULT IN SERIOUS INJURY OR DEATH.
WARNING
The device complies with part 15 of the FCC Rules. Operation is subject to the
following two conditions: (1) This device may not cause harmful interference, and (2)
This device must accept any interference received, including interference that may
cause undesired operation.
WARNING:
ChangHVRUPRGL䇡cations to this unit not expressly approved by the party
responsible for compliance could void the user’s authority to operate the equipment.
NOTE: This equipment has been tested and found to comply with the limits for a Class
B digital device, pursuant to part 15 of the FCC Rules. These limits are designed to
provide reasonable protection against harmful interference in a residential
installation. This equipment generates, uses, and can radiate radio frequency energy
and if not installed and used in accordance with the instructions, may cause harmful
interference to radio communications. However, there is no guarantee that
interference will not occur in a particular installation. If this equipment does cause
harmful interfer
ence to radio or television reception, which can be determined by
turning the equipPHQWR䇠DQd on, the user is encouraged to try to connect the
interference by one or more of the following measures:
• Reorient or relocate the receiving antenna.
• Increase the separation between the equipment and receiver.
• Connect the equipment to an outlet on a circuit di䇠erent from that to which the
receiver is connected.
• Consult the dealer or an experienced radio/TV technician for help.
CAN ICES-3(B)/NMB-3(B)
FCC WARNING
SUFFOCATION HAZARDS: Young infants have limited head
and neck control. If the seat is too upright, infant’s head can drop
forward and compress the airway.
ALWAYS keep swing seat fully reclined until infant is at least 4
months old AND can hold up head without help.
Only use the power cord provided
Caution: Changes or modifications not expressly approvedby the party
responsible for compliance could void theuser's authority to operate
the equipment This equipment complies with fCC radiation exposure
limits set forth for an uncontrolled environment.Thistransmitter must
not be co-located or operating in conjunction with any other antenna
or transmitter.The base bracket should be installed and operated with
minimum distance 10cm between the radiator and your body.
Changes or modifications to this unit not expressly approved by the party
responsible for compliance could void the user’s authority to operate the equipment.
NOTE: This equipment has been tested and found to comply with the limits for a Class
B digital device, pursuant to part 15 of the FCC Rules. These limits are designed to
provide reasonable protection against harmful interference in a residential
installation. This equipment generates, uses, and can radiate radio frequency energy
and if not installed and used in accordance with the instructions, may cause harmful
interference to radio communications. However, there is no guarantee that
interference will not occur in a particular installation. If this equipment does cause
harmful interference to radio or television reception, which can be determined by
turning the equipment off and on, the user is encouraged to try to connect the
interference by one or more of the following measures:
· Reorient or relocate the receiving antenna.
· Increase the separation between the equipment and receiver.
· Connect the equipment to an outlet on a circuit different from that to which the
receiver is connected.
· Consult the dealer or an experienced radio/TV technician for help.
CAN ICES-3(B)/NMB-3(B)
WARNING:
To prevent battery leaks, which can burn skin and eyes:
· Always replace the entire set of batteries at one time.
· Never mix old and new batteries, or batteries of different brands or types.
· Remove batteries when storing product for a long time.
· Dispose of used batteries immediately.
CAUTION
!!
03 04
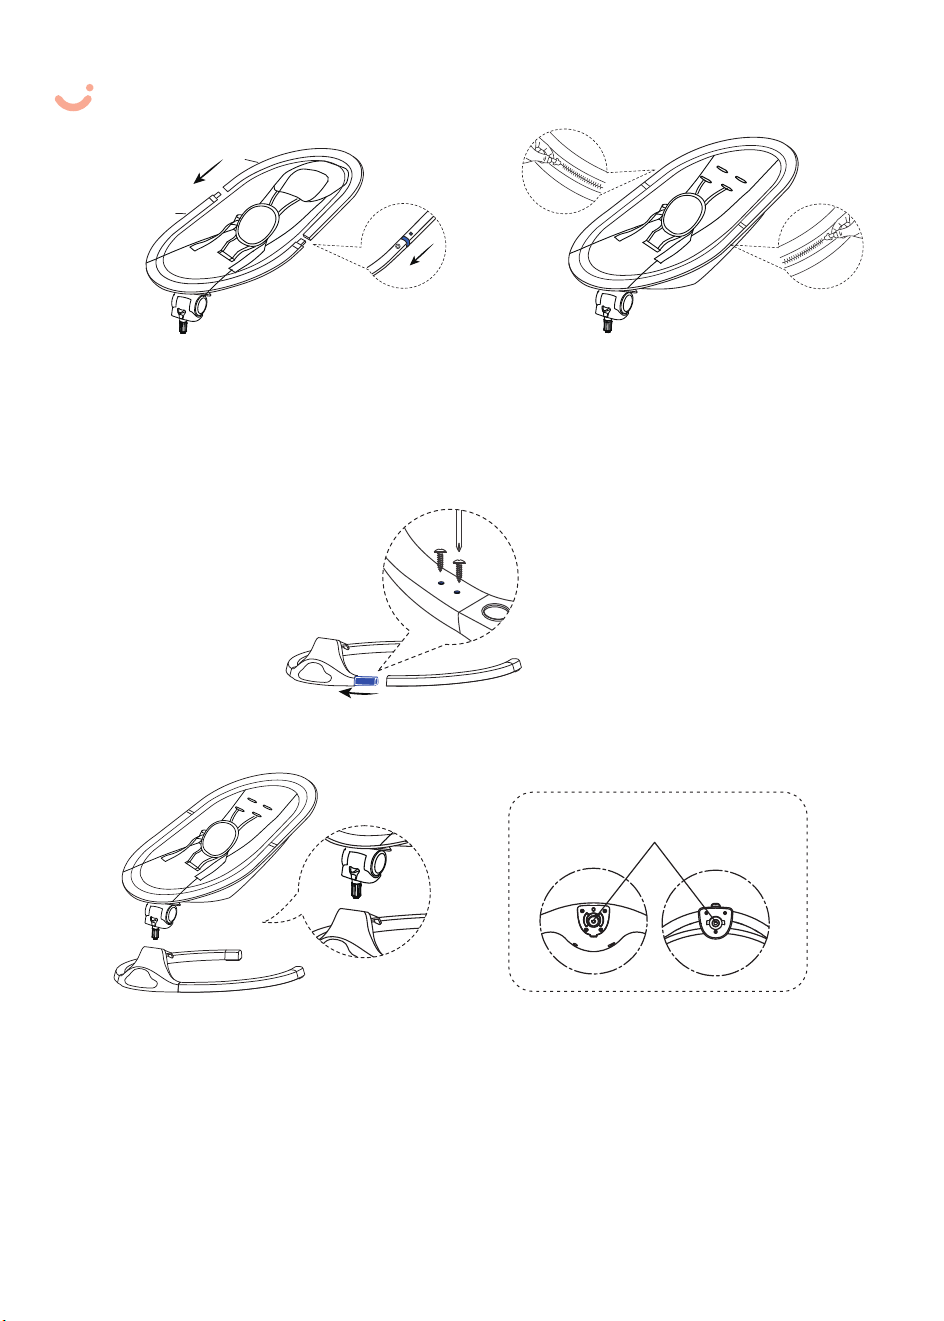
1. Unfold the backrest to the same level.
Connecting A with B together and installing
securely.
2. Put the seat cover on the seat frame
and zip up the top and bottom sections
to secure it.
3. Assemble the base bracket to the touch panel base.Tighten with screws to secure.
4. Insert the seat's frame into the base support post.
WARNING: After completing the installation of the seat, please check the seat to
ensure that it is well locked before using it.
insert the seat into the mainframe base,then rotate the seat left and right slightly,then press down the
seat DIWHUDOLJQPHQWWKHQ䇡QLVKWKHVHDWLQVWDOODWLRQ
Seat installation details: Keep the same direction of seat D hole and mainframe base D iron shaft,then
Note: &RQQHFWRQHVLGH䇡UVWWKHQWKHRWKHUVLGH3OHDVH
ensure the buttons on the back of the frame are fully
closed after connecting.
Assembly StepsParts Instruction
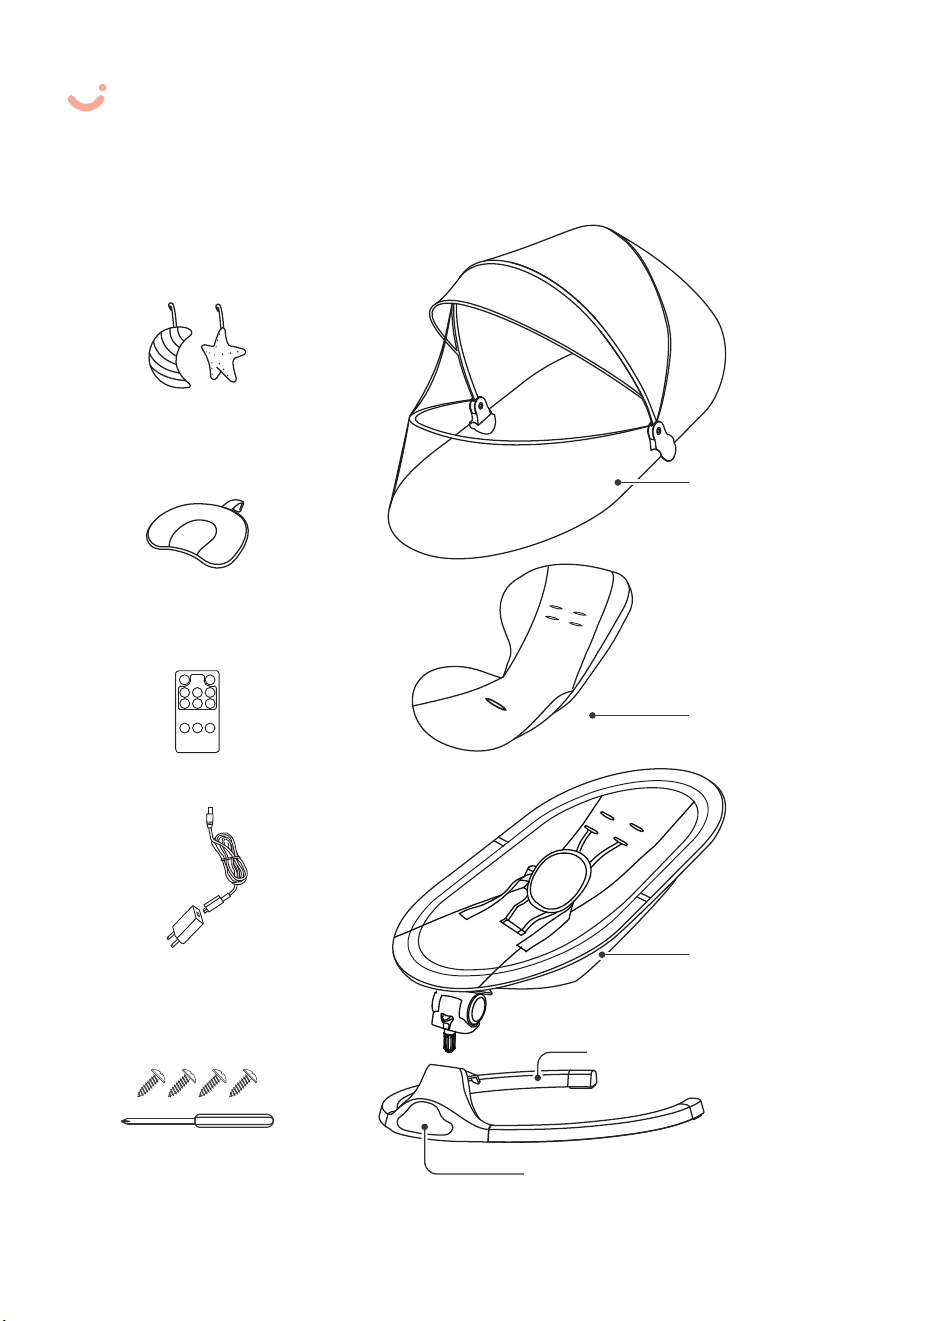
Make sure that all of the following parts listed are included in the box. If any part
is missing, please contact us before operating.
Remote controller
Adaptor*1
USB cable*1
Plush toy*2
Reversible
headrest
Screws*4
Screwdrivers*1
Canopy with
mosquito net
Touch screen panel base
Reversible body pad
Seat cover seat frame
Base bracket
A
B
A
B
Seat D hole and mainframe base D iron
shaft keep the same direction
03 04
1. Unfold the backrest to the same level.
Connecting A with B together and installing
securely.
2. Put the seat cover on the seat frame
and zip up the top and bottom sections
to secure it.
3. Assemble the base bracket to the touch panel base.Tighten with screws to secure.
4. Insert the seat's frame into the base support post.
WARNING: After completing the installation of the seat, please check the seat to
ensure that it is well locked before using it.
insert the seat into the mainframe base,then rotate the seat left and right slightly,then press down the
seat DIWHUDOLJQPHQWWKHQ䇡QLVKWKHVHDWLQVWDOODWLRQ
Seat installation details: Keep the same direction of seat D hole and mainframe base D iron shaft,then
Note: &RQQHFWRQHVLGH䇡UVWWKHQWKHRWKHUVLGH3OHDVH
ensure the buttons on the back of the frame are fully
closed after connecting.
Assembly StepsParts Instruction
Make sure that all of the following parts listed are included in the box. If any part
is missing, please contact us before operating.
Remote controller
Adaptor*1
USB cable*1
Plush toy*2
Reversible
headrest
Screws*4
Screwdrivers*1
Canopy with
mosquito net
Touch screen panel base
Reversible body pad
Seat cover seat frame
Base bracket
A
B
A
B
Seat D hole and mainframe base D iron
shaft keep the same direction
05 06
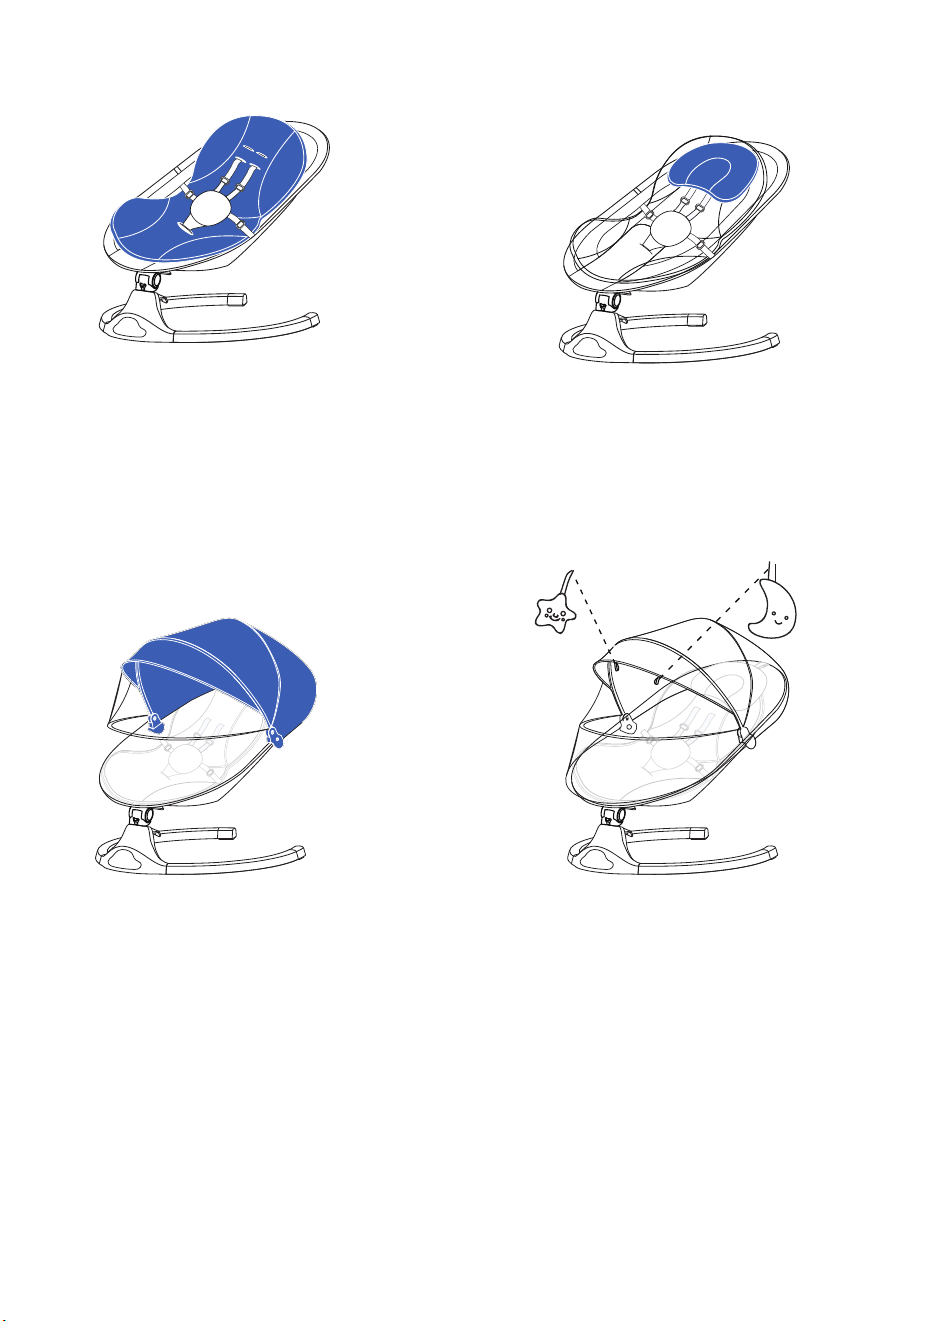
7.Attach the canopy to the seat frame.
Snap the two canopy brackets onto
either side of the seat frame to secure.
8.Hang the two plush toys to the canopy
by wrapping the straps through loops on
the canopy. Attach the mosquito net to
the seat frame.
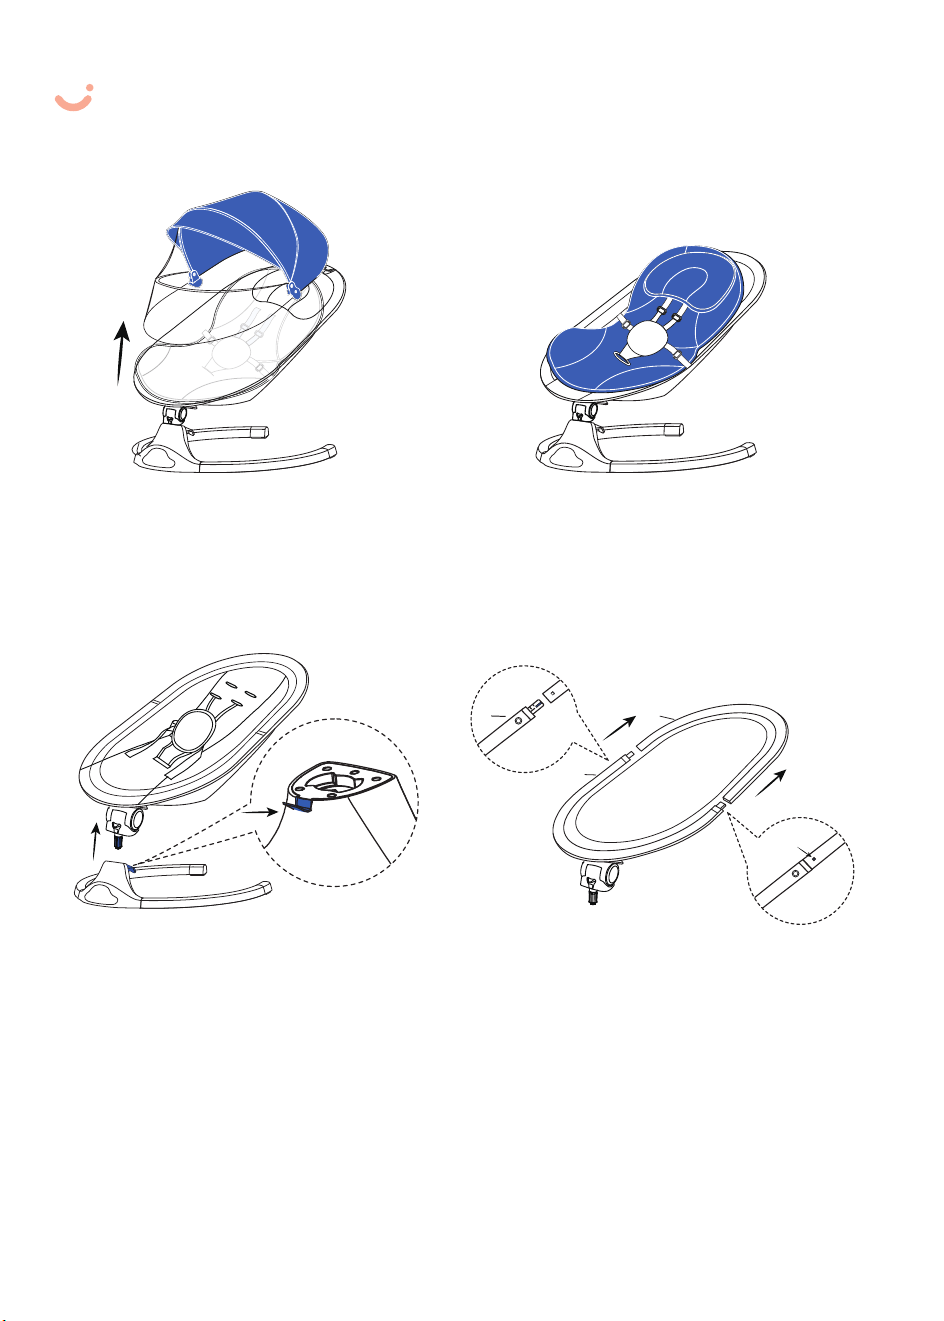
Disassembly Steps
5.Place the reversible body pad onto
the seat, then thread the harness strap
through the top and bottom slot of
the body pad.( The top slot has two
options, you can choose one of the two. )
6. Place the headrest onto the seat,
then pull the hook-and-loop strap
through the ring. Fold to secure.
1.Pull out the clasp to remove the
canopy.
2.Pull the velcro to separate the
headrest and thread the harness
strap through the slot of the body
pad to remove the body pad.
3. Push the iron sheet in and then
lift the seat from the support post.
4.Find the left and right side buttons
on the back of the seat frame,press
GRZQ䇡UPO\RQRQHRIWKHEXWWRQV
DQGSXOO䇡UPO\DZD\WKHQSUHVVWKH
button on the other side and pull
䇡UPO\DZD\)ROGWKHVHDWIUDPH
A
B
B
Press
05 06
7.Attach the canopy to the seat frame.
Snap the two canopy brackets onto
either side of the seat frame to secure.
8.Hang the two plush toys to the canopy
by wrapping the straps through loops on
the canopy. Attach the mosquito net to
the seat frame.
Disassembly Steps
5.Place the reversible body pad onto
the seat, then thread the harness strap
through the top and bottom slot of
the body pad.( The top slot has two
options, you can choose one of the two. )
6. Place the headrest onto the seat,
then pull the hook-and-loop strap
through the ring. Fold to secure.
1.Pull out the clasp to remove the
canopy.
2.Pull the velcro to separate the
headrest and thread the harness
strap through the slot of the body
pad to remove the body pad.
3. Push the iron sheet in and then
lift the seat from the support post.
4.Find the left and right side buttons
on the back of the seat frame,press
GRZQ䇡UPO\RQRQHRIWKHEXWWRQV
DQGSXOO䇡UPO\DZD\WKHQSUHVVWKH
button on the other side and pull
䇡UPO\DZD\)ROGWKHVHDWIUDPH
A
B
B
Press
07 08
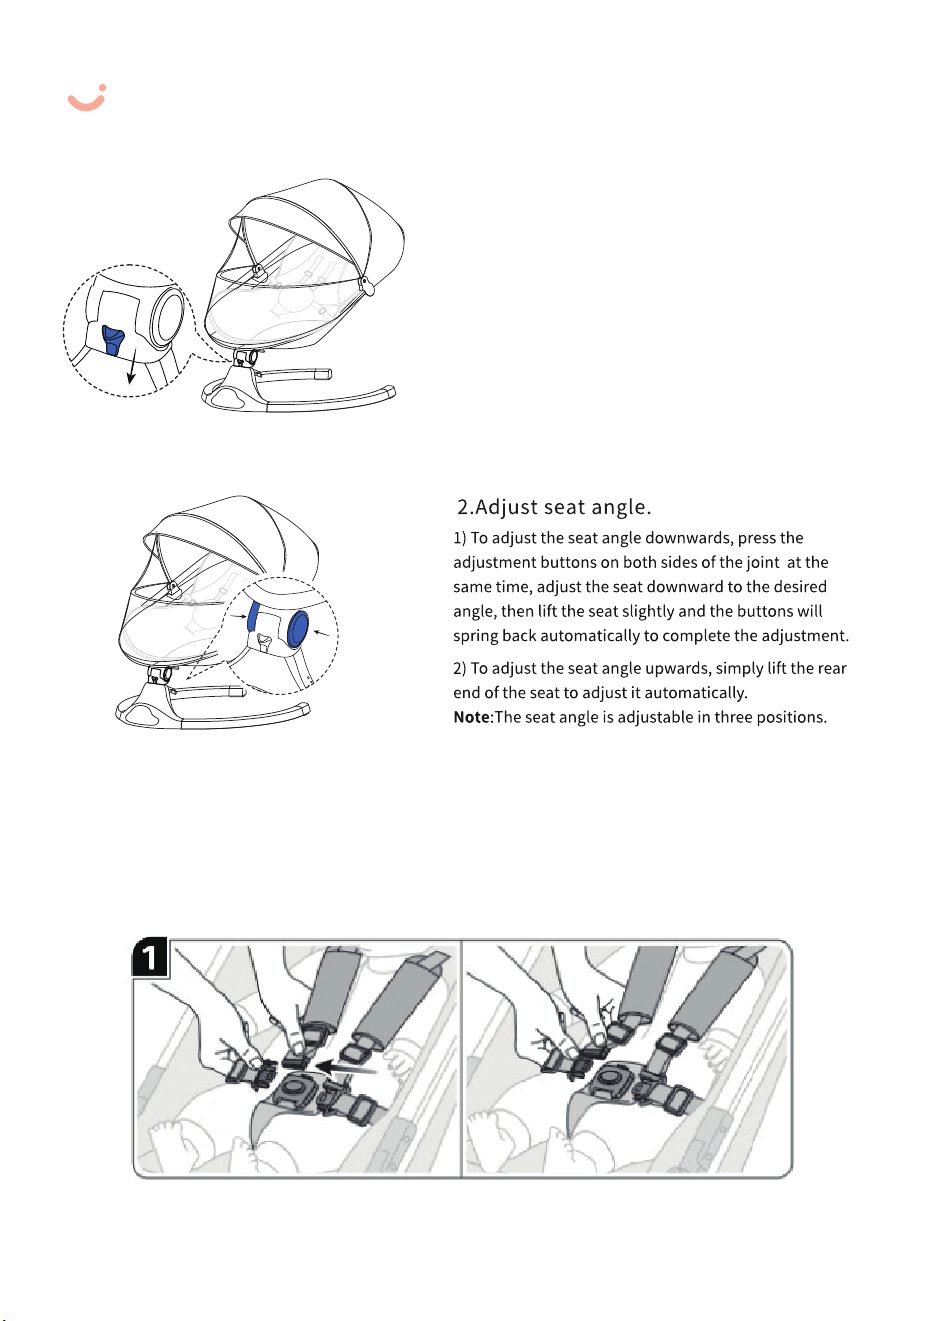
1.Push the motion down to lock the
seat frame to prevent the seat from
moving.
IMPORTANT: Always set the swing on a flat, stable
surface. Never use the seat without safely
buckling your child into the harness.
Using Methods
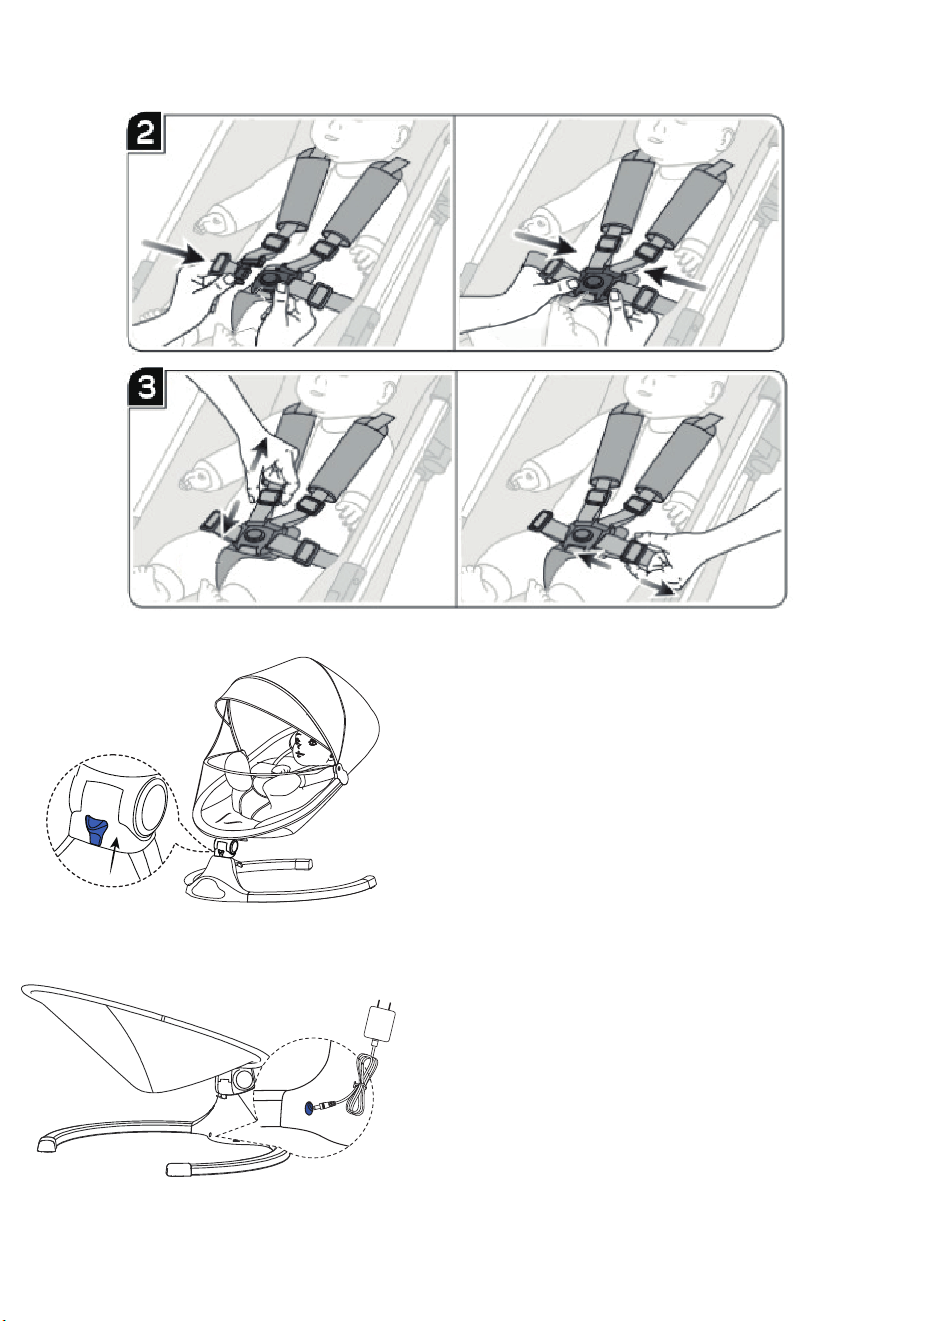
3.Put the baby in the seat and then fasten the seat belt.Adjust the strap
length if necessary. Cover the buckle bag well.
Shoulder belt install details:
5.Connect the power cord to the port
on the back of the display panel. Then
plug the cord into an electrical outlet.
NOTE: The swing does not operatHR䇠RIbatteries.
The power cord is the only source of power. Only use
the original adapter. If the adapter is missing please
email us at [email protected]
4.After the baby is secure, pull the
motion lock up to unlock the seat
frame.
07 08
1.Push the motion down to lock the
seat frame to prevent the seat from
moving.
IMPORTANT: Always set the swing on a flat, stable
surface. Never use the seat without safely
buckling your child into the harness.
Using Methods
3.Put the baby in the seat and then fasten the seat belt.Adjust the strap
length if necessary. Cover the buckle bag well.
Shoulder belt install details:
5.Connect the power cord to the port
on the back of the display panel. Then
plug the cord into an electrical outlet.
NOTE: The swing does not operatHR䇠RIbatteries.
The power cord is the only source of power. Only use
the original adapter. If the adapter is missing please
email us at [email protected]
4.After the baby is secure, pull the
motion lock up to unlock the seat
frame.
09 10
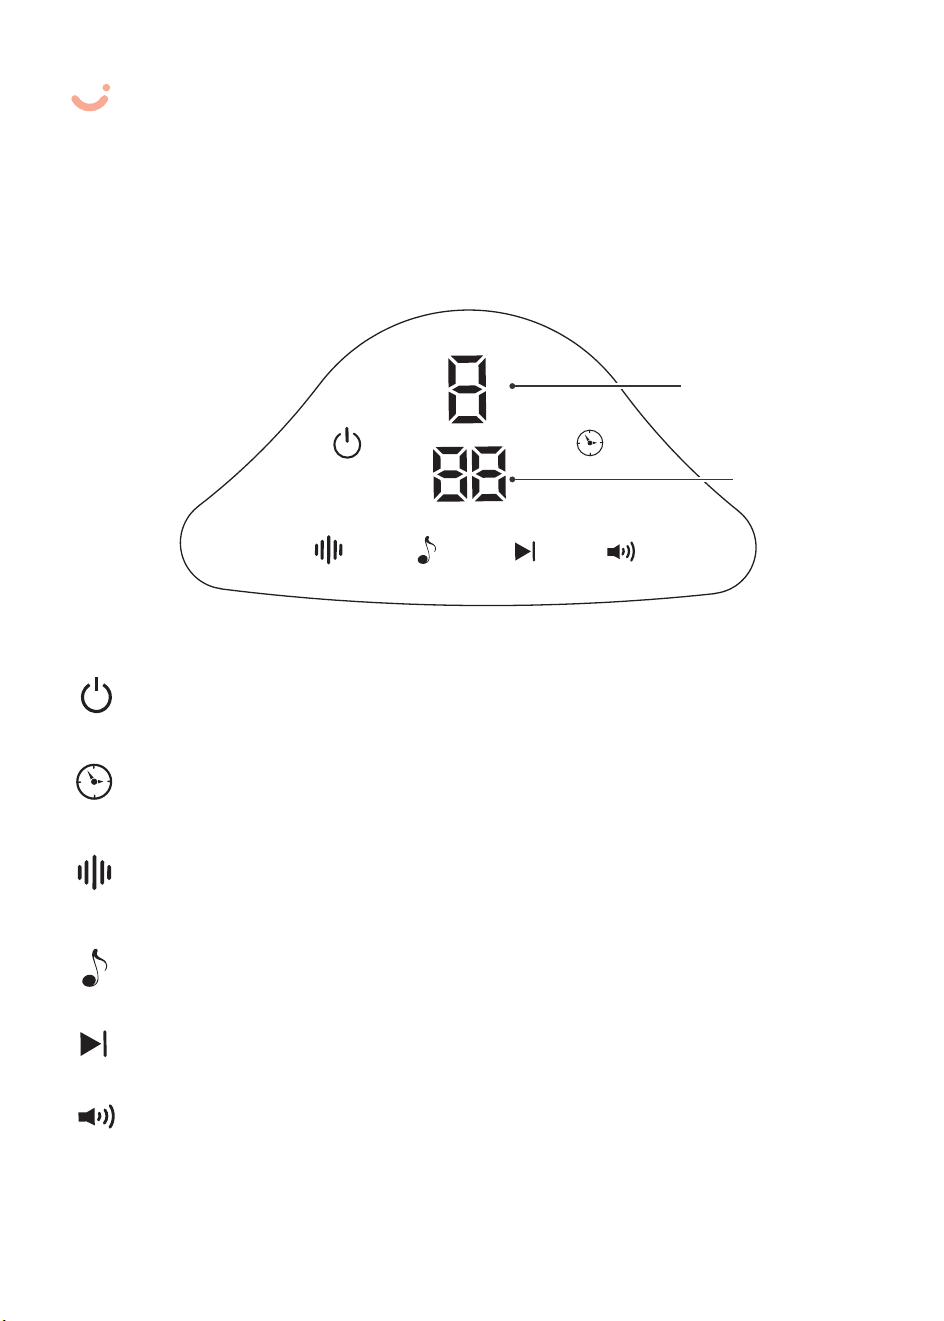
Control the unit's functions with the buttons indicated below:
Caution: To ensure the safety of the baby, the swing amplitude and speed will slowly
increase when setting the initial gear.
Power Switch: Plug in and the indicator light is on.
Press the button to turn the swing on/o䇠.
Timing button: Touch the button to set time to 8mins, 15mins, 30mins, or cancel.
7KHXQLWZLOOWXUQR䇠DXWRPDWLFDOO\ZKHQWKHWLPHU䇡QLVKHV
*There are 4 levels of volume available, long touch the button for 2 seconds to select one, cycling
through them in sequence.
Swing Speeds Setting: Touch the button to make swing settings. There are 䇡ve
swing gears available. After 5 gears, the speed resets to zero.
Music Play/Pause:Touch the button to play the built-in music. Touch it again to turn
WKHPXVLFR䇠
Next Tune: Touch the button to play the next song.
Function Introduction
Panel Function
Volume Adjustment: Touch the button to adjust the volume.
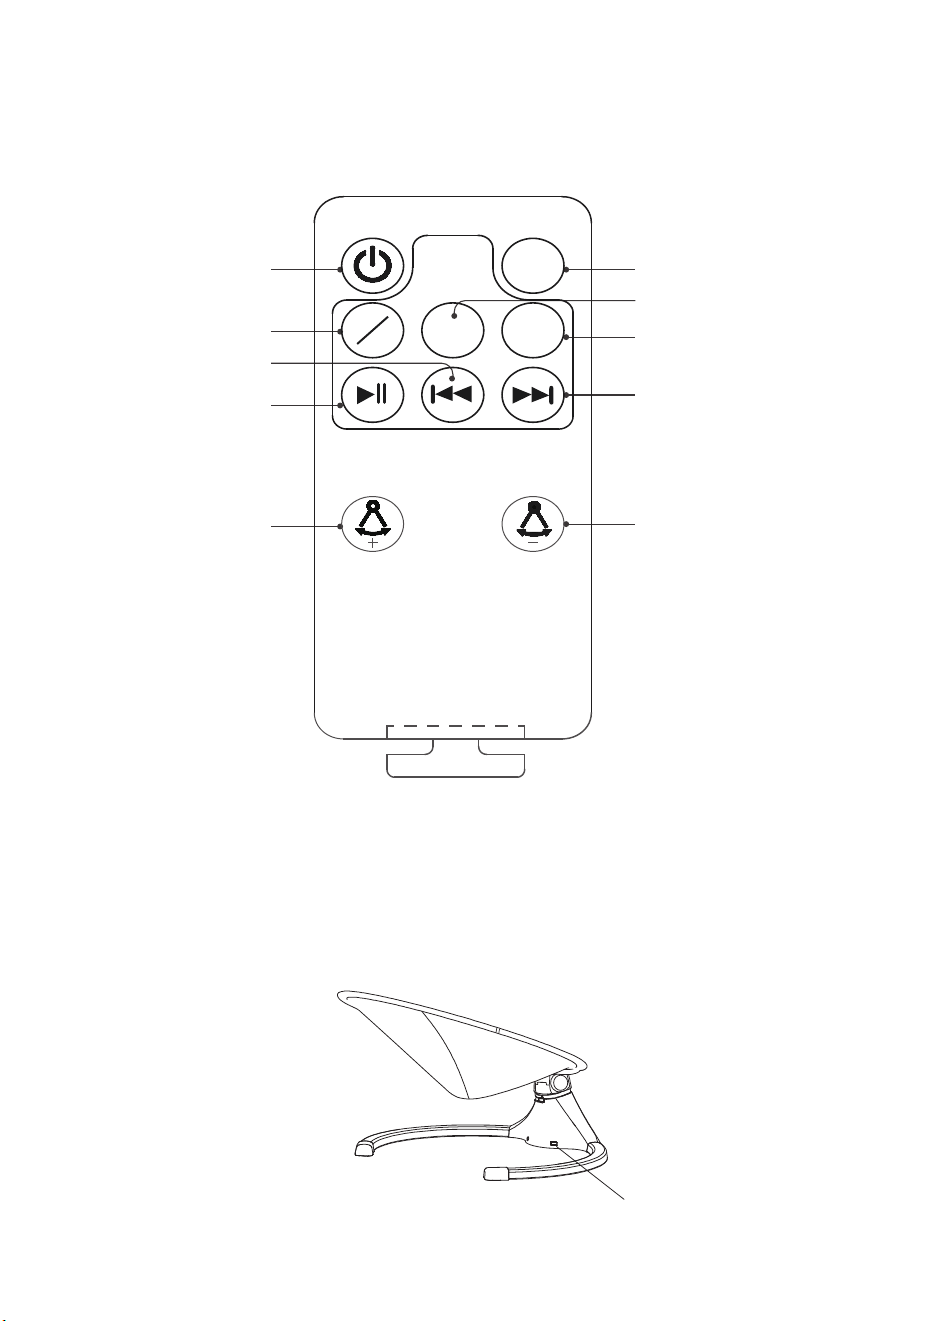
Remote Function
Power on/o䇠
Time setting
USB music/
Built-in music
olume up
Play/
Gear up
pause
Last song
ext song
Gear down
olume down
MUSIC
Timer
USB
Music
VOL+ VOL-
V
N
V
1) Plug the USB device into the USB interface port to play the music inside the
USB device.
2) Unplug the USB device and turn on the music button to play the music built
into the product.
MP3 Function
USB interface port
Swing Speeds
Timer
09 10
Control the unit's functions with the buttons indicated below:
Caution: To ensure the safety of the baby, the swing amplitude and speed will slowly
increase when setting the initial gear.
Power Switch: Plug in and the indicator light is on.
Press the button to turn the swing on/o䇠.
Timing button: Touch the button to set time to 8mins, 15mins, 30mins, or cancel.
7KHXQLWZLOOWXUQR䇠DXWRPDWLFDOO\ZKHQWKHWLPHU䇡QLVKHV
*There are 4 levels of volume available, long touch the button for 2 seconds to select one, cycling
through them in sequence.
Swing Speeds Setting: Touch the button to make swing settings. There are 䇡ve
swing gears available. After 5 gears, the speed resets to zero.
Music Play/Pause:Touch the button to play the built-in music. Touch it again to turn
WKHPXVLFR䇠
Next Tune: Touch the button to play the next song.
Function Introduction
Panel Function
Volume Adjustment: Touch the button to adjust the volume.
Remote Function
Power on/o䇠
Time setting
USB music/
Built-in music
olume up
Play/
Gear up
pause
Last song
ext song
Gear down
olume down
MUSIC
Timer
USB
Music
VOL+ VOL-
V
N
V
1) Plug the USB device into the USB interface port to play the music inside the
USB device.
2) Unplug the USB device and turn on the music button to play the music built
into the product.
MP3 Function
USB interface port
Swing Speeds
Timer
11 12
1. Clean the base bracket and seat frame with a wet cloth and a mild detergent.
Dry thoroughly then. Please do not use corrosive cleaner.
2.Removable and washable fabric
• Seat fabric: Clean it with a wet cloth and a mild detergent.Do not bleach, air dry.
• Canopy. TakHLWR䇠and put a little cleaner, wash it gently by hands. Rinse it with
clean water, and then hang it to dry, avoiding exposure to the sun.
Product Name Electric Baby Swing
Model No.
Input Voltage
9䊈+]$
Applicable Age
0-6 MONTH
Application
Children up to a weight of 9 kg
and unable to sit up unaided
Output Voltage
DC5.8V/1A
Main Material
SRO\HVWHU䇡EHU
Aviation aluminum base bracket
Standard
ASTM F2088-22, ASTM F963-17
Product Contents
Clean
1. Please check this baby swing regularly. Make sure each part is well-connected
and well-installed. Stop using it for poor connection and connect/install it again
if necessary.
2. This product contains electronic components, which shall not be used in water or
a humid environment. Please ensure the product is dry, and store it in a cool and
dry place, avoiding direct sunshine for a long time.
Maintenance
Fast self-inspection solution below.
Note: For other issues, please contact our customer service for help.
Never disassemble and repair the swing by yourself.
No.
1
2
3
4
Trouble
Not energized
The power lamp keeps
flashing
1. Check whether the adapter and DC cable are
䇡rmly connected. If loose, connect them 䇡rmly.
2. The DC cable may be damaged, Please contact
customer service to replace the DC cable.
Use a matchable adapter with an output
voltage of 5V and 1A.
Motion lock stuck
Check the motion lock. Put it up to unlock
the seat frame.
Overstring/Strike
3RZHUR䇠DQGUHVWDUWLWDJDLQ
Solution
Troubleshooting
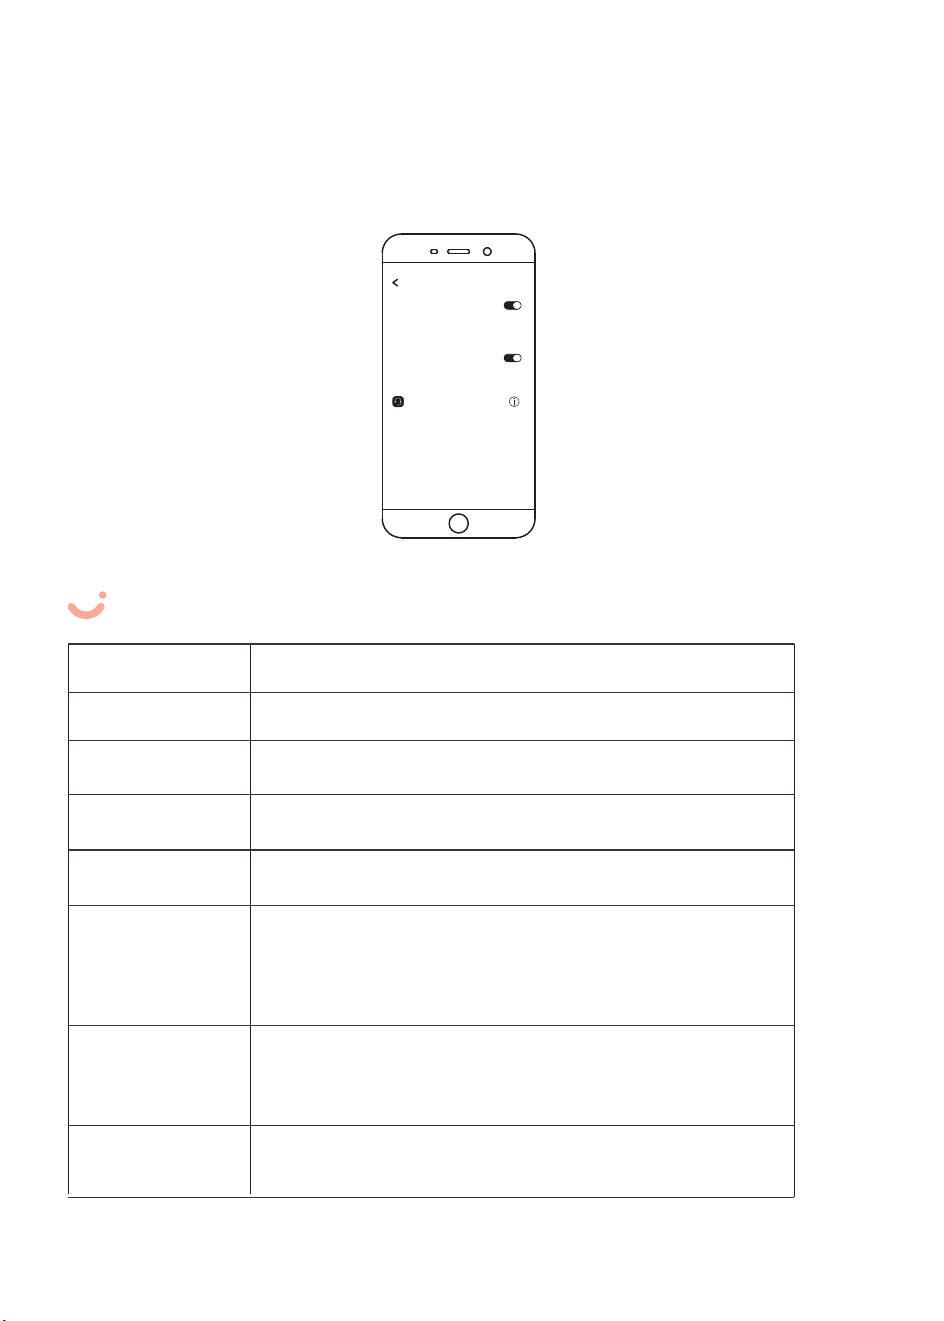
Bluetooth Function
Turn on the Bluetooth fuction in your phone to search the name of "swing chair",
the product could play the music inside your phone after successful Bluetooth
connection.
Bluetooth
Turn on bluetooth
Mobile phone name
Search bluetooth device
Paired device
swing chair
CR018B
11 12
1. Clean the base bracket and seat frame with a wet cloth and a mild detergent.
Dry thoroughly then. Please do not use corrosive cleaner.
2.Removable and washable fabric
• Seat fabric: Clean it with a wet cloth and a mild detergent.Do not bleach, air dry.
• Canopy. TakHLWR䇠and put a little cleaner, wash it gently by hands. Rinse it with
clean water, and then hang it to dry, avoiding exposure to the sun.
Product Name Electric Baby Swing
Model No.
Input Voltage
9䊈+]$
Applicable Age
0-6 MONTH
Application
Children up to a weight of 9 kg
and unable to sit up unaided
Output Voltage
DC5.8V/1A
Main Material
SRO\HVWHU䇡EHU
Aviation aluminum base bracket
Standard
ASTM F2088-22, ASTM F963-17
Product Contents
Clean
1. Please check this baby swing regularly. Make sure each part is well-connected
and well-installed. Stop using it for poor connection and connect/install it again
if necessary.
2. This product contains electronic components, which shall not be used in water or
a humid environment. Please ensure the product is dry, and store it in a cool and
dry place, avoiding direct sunshine for a long time.
Maintenance
Fast self-inspection solution below.
Note: For other issues, please contact our customer service for help.
Never disassemble and repair the swing by yourself.
No.
1
2
3
4
Trouble
Not energized
The power lamp keeps
flashing
1. Check whether the adapter and DC cable are
䇡rmly connected. If loose, connect them 䇡rmly.
2. The DC cable may be damaged, Please contact
customer service to replace the DC cable.
Use a matchable adapter with an output
voltage of 5V and 1A.
Motion lock stuck
Check the motion lock. Put it up to unlock
the seat frame.
Overstring/Strike
3RZHUR䇠DQGUHVWDUWLWDJDLQ
Solution
Troubleshooting
Bluetooth Function
Turn on the Bluetooth fuction in your phone to search the name of "swing chair",
the product could play the music inside your phone after successful Bluetooth
connection.
Bluetooth
Turn on bluetooth
Mobile phone name
Search bluetooth device
Paired device
swing chair
CR018B

13
LAREX's Swing includes a 1-year limited warranty against defects from the date of
purchase. In the event of a malfunction or defect during the in-warranty period, we
will replace the product under warranty. Upon receipt of the product and proof of
purchase with a valid date of purchase,we will send you a new one freely.Please send
the defective unit, proof of purchase and a description of the problem you have
encountered to our customer service email: support@larexcare.com
Note:This warranty does not cover claims resulting from misuse, abuse, alteration, inflicted damage,
accidental damage, normal wear and tear, involvement in an accident, and/or failure to comply with the
instructions on assembly, maintenance and use.
ONE-YEAR LIMITED WARRANTY
Customer Service
Thank you for purchasing our products. If you have any questions or suggestions
about this product, feel free to contact our customer service at
support@larexcare.com
Contact US
Best Care for Ever !
Manufacturer: Zhongshan City Cironbaby Co.,Ltd.
Address: No.6,Yongxing North Road,Yongxing Industrial Zone, Henglan Town,
Zhongshan City,Guangdong,China
Model: CR018B
User Manual
Or scan the QR code below:
https:www.larexcare.com
larexbabycare Larex Baby Care Larex Baby Care
Electric Baby Swing
support@larexcare.com
For tutorial videos, customer service, extended
12-month warranty, and more information, please visit:
Please scan the QR code beside: