
WINE REFRIGERATION
RBCWVR-18, RBCWVL-18,
& RBCWV24 MODELS
www.zlinekitchen.com
User Manual

ZLINE Kitchen and Bath provides Attainable Luxury, where the kitchen and bath of your dreams is
never out of reach. Through our unique designs and unparalleled quality, we’re dedicated to providing
you an elevated experience in the heart of your home. With an endless selection of features and
finishes, our inspiration is your reality.
ZLINE is fueled by a passion for innovation; A relentless pursuit of bringing the
highest end luxury designs and professional features into everyone’s homes.
Because we continually strive to improve our products, we may change
specifications and designs without prior notice.
Scan the QR code to view the most up-to-date version of the Installation Manual
and User Manual.
WARNING: This product can expose you to chemicals including nickel, which is known to the
State of California to cause cancer. For more information, go to www.P65Warnings.ca.gov.

TABLE OF CONTENTS
IMPORTANT SAFETY INSTRUCTIONS . . . . . . . . . . . . . . . . . . . . . . . 1
OPERATION . . . . . . . . . . . . . . . . . . . . . . . . . . . . . . . . . . . . . . . . . . . . 9
MAINTENANCE AND CLEANING . . . . . . . . . . . . . . . . . . . . . . . . 18
TROUBLESHOOTING . . . . . . . . . . . . . . . . . . . . . . . . . . . . . . . . . . . . 21
WARRANTY . . . . . . . . . . . . . . . . . . . . . . . . . . . . . . . . . . . . . . . . . . . . 26

1
General Safety
PLEASE READ THIS MANUAL BEFORE INSTALLING AND USING THE PRODUCT
• Always follow the applicable safety instructions.
• The installer should leave these instructions with the consumer who should retain for local
inspectors’ use and for future reference.
• Please read all other documents provided with this product.
• Please keep in mind this manual may apply to several product models.
• This manual expressly indicates the differences between various models.
• IMPORTANT: This is a complex installation procedure that should only be performed by
qualified professionals and technicians.
• The manufacturer will not be responsible for any damage to property or to persons caused
by incorrect installation, improper use of the appliance, or failure to heed the warnings listed.
Symbols used in the installation manual are as follows.
i
Important information and useful hints.
INFO
Conditions that may damage the product or its operating functions.
WARNING
ATTENTION
Conditions containing serious injury risk.
CAUTION
Conditions containing electric shock risk.
IMPORTANT SAFETY INSTRUCTIONS

2
Refrigerant Safety
R600A REFRIGERANT
This product contains R600a isobutane refrigerant, which is a very eco-
friendly natural gas. However, it is also flammable. Please follow the
warnings and installation instructions below:
• If the product has been transported horizontally, you must wait a minimum
of 4 hours after standing it upright before plugging it in.
• Cut-out dimensions of the installation area must be suitable to safely fit the
product for full installation.
• Dimensions, features, and position of objects used to support and affix the
product to this area must be suitable.
• Minimum clearances between product parts and surrounding structures
must be suitable.
• Minimum dimensions and proper organization of ventilation holes must
be observed.
• The product must be connected to the main power outlet, and corresponding
connections of other components must be suitable.
• The product must be able to be disconnected from the power supply if
needed after installation.
• The outlet or fuse must be accessible to disconnect the product.
• Extension cables or ungrounded (two-terminal) adapters must not be used
with this unit.
WARNING
ATTENTION
You must wear gloves and eye protectors when installing the product.
You must also take measures against high noise levels when using a drill to
drill into the floor or wall.
ATTENTION
Make sure that your product is suitable for your local codes.
ATTENTION
The product must be installed by a qualified technician according to the
installation instructions.
The product may tip over since it is quite heavy. For this reason, safety
precautions must be taken. The door of the product must be kept closed until it
reaches the final install destination, and it must be transported in accordance
with the installation instructions.
WARNING
IMPORTANT SAFETY INSTRUCTIONS
3
Disposing of Materials
DISPOSING OF THE PACKAGING MATERIALS
• The package has been designed to protect the product during transport and shipping.
The packaging materials used are designed to not harm the environment and should be
recycled after the appliance is installed.
• All plastic packaging materials, bags, etc., must be disposed of safely and kept out of the
reach of children.
This Installation Manual has been prepared to help qualified professionals
with installation of the appliance. The User Manual provided with the product
must also be taken into consideration, as it contains important information
about operation and safety. You may get seriously injured and your product
may get damaged if you ignore the warnings given in this manual. Please read
the following carefully.
WARNING
Risk of child entrapment. To avoid safety and suffocation risks for children or
pets, before you dispose of the appliance, take off the door and drawers and
leave the shelves in place so children or pets may not climb inside.
WARNING
COMPLIANCE WITH THE WEEE DIRECTIVE AND DISPOSING OF E-WASTE
• This product conforms to the EU WEEE Directive (2012/19 EU).
• This product bears a classification symbol for "waste electrical and electronic
equipment," otherwise known as WEEE.
• This product has been manufactured from high-quality parts and materials
that can be reused and are suitable for recycling.
• Therefore, do not dispose of the product with normal domestic waste or other waste at the
end of its service life.
• Take it to a collection center for recycling electrical and electronic equipment.
• Please consult your local government authority to learn about appropriate collection
center location.
IMPORTANT SAFETY INSTRUCTIONS

4
Preparing the Refrigerator Enclosure
INSTALLATION ENCLOSURE
You must follow the instructions below:
• The floor on which the product will be installed must be capable of bearing a minimum of
1,200 pounds (544 kilograms).
• The kitchen floor and bottom of the product must be at the same level. Otherwise, the air
flow for the unit's cooling system may be impeded or reduced.
• There must be no objects preventing installation of the product to the back and side walls of
the product's cut-out installation area.
• The electrical outlet receptacle must be properly located and easily accessed.
• Cut-out dimensions of the cabinets where the product will be installed must be in strict
conformity with the dimensions given in the manual.
• Do not install the refrigerator directly adjacent to another refrigerator unless using the
appropriate joining kit. Otherwise, condensation and damage may occur. (Please see
"Dual Cabin Installation Methods" on page 11 of the Installation Manual for imagery)
• Check if the floor where the product will be installed is level. Use a level when doing
so to be sure.
• The installation area must not be subjected to direct sunlight and it must be away from heat
sources, such as microwaves, ovens, radiators, etc.
• The ambient temperature must be between 55 °F and 100 °F (13 °C and 38 °C),
depending on where the unit is installed. Otherwise, functional errors may occur when the
product is running.
• If it is not possible to avoid installing the product near a heat source, the minimum clearances
given below must be maintained:
• 2" (51 mm) from electric ranges or ovens.
• 12" (305 mm) from gas or fuel operated ranges or ovens.
IMPORTANT SAFETY INSTRUCTIONS

5
Preparing the Refrigerator Enclosure
Please observe the following rules:
• The dedicated circuit breaker for this unit must be easily accessible in case of an emergency;
it must not be hidden behind the product.
• The electrical plug and cord must not touch the back surface of the product. Otherwise, it
may get damaged due to the vibration of the product.
• Do not connect the plugs of other appliances behind this product.
• If the humidity level is high where the product is used, corrosion may occur on the outer
surface of the product. Keep the area where the unit will be installed dry and well-cleaned
to avoid corrosion.
CAUTION
To avoid the risk of electric shock:
• Connect the plug to a dedicated grounded electrical outlet.
• Do not remove the ground terminal of the plug.
• Do not use adapters.
• Do not use extension cables or cords.
ATTENTION
Do not install your refrigerator:
• In open areas.
• In environments where water is dripping.
• In environments where temperature is lower than 55 °F (13 °C).
IMPORTANT SAFETY INSTRUCTIONS

6
Preparing the Refrigerator Enclosure
IMPORTANT SAFETY INSTRUCTIONS
ATTENTION
Failure to follow these instructions may result in death, fire, or electric shock.
Connecting the grounding conductor of the equipment to an improper
place may lead to electric shock. Please have the grounding checked by a
qualified electrician or service technician.
Installation, repair, and other procedures performed by unqualified
persons may cause danger. Before installing the appliance, make sure that
the voltage, load, and circuit current parameters on the data plate are in
compliance with the power mains in your house.
The appliance is provided with a NEMA 5-15P plug and a 3-pin power
cable, which is UL listed and ready to be connected to a 120VAC, 60Hz
power supply. The fuse is 15 amps, and the appliance must be connected to
a dedicated electrical outlet.
If combining multiple units, ZLINE recommends all be plugged into
independent circuits. They can be plugged into the same outlet, but the
circuit must have a dedicated 15-amp breaker.
If the electrical wiring or power supply of the house needs alteration,
the necessary procedures must be performed by a qualified electrician.
The plug must be installed only by a licensed electrician.
CABINETS
• Make sure that the cabinets where you will install the appliance have been safely mounted
in your kitchen. Your cabinets must be securely connected to the floor and walls properly
and with suitable connections.
• For the best installation, clearances between the cabinets and the product must be in
compliance with the values specified in the installation instructions of this manual.
• Side walls must be free of any obstructions and their surfaces must be flat.
• NOTE: Minimum thickness of the side walls is 5/8" (16 mm). The minimum thickness of the
door to be attached to the product must be 3/4" (19 mm).

7
VENTILATION
Ventilation panels where the air enters and exits the unit must not be blocked or obstructed. In
addition, you must periodically clean the dust and dirt that accumulates on the vent holes to
ensure adequate ventilation.
ELECTRICAL CONNECTION
CAUTION
RISK OF ELECTRIC SHOCK
Electrical grounding is necessary. This appliance is equipped with a 3-pin plug
to protect you against possible electric shocks.
• Do not remove the round grounding terminal from the plug.
• Do not use 2-pin grounding adapters.
• Do not use extension cables or cords to energize the product.
ATTENTION
Do not connect the grounding cable to any gas pipes. Please have the grounding
checked by a qualified electrician if you are not sure about the grounding of
the product. Do not install a fuse on the neutral line or grounding circuit.
Please wait 3-6 hours after installing the unit before plugging it in to protect it
against possible damages. This way, the refrigerant and the lubricants in the
system are given proper time to balance.
WARNING
Electrical Connection
IMPORTANT SAFETY INSTRUCTIONS

8
Electrical Connection
IMPORTANT SAFETY INSTRUCTIONS
• Never use an extension cable or cord with this unit.
• The dedicated electrical outlet receptacle for this unit must be grounded and checked by
an authorized electrician.
• The location of the electrical wiring must comply with the dimensions specified in this
installation manual.
• Check that the voltage marked on the product corresponds with your supply voltage.
• This appliance should be properly grounded for your safety. The power cord of this
appliance is equipped with a three-pin plug which mates with standard three-pin wall
outlets to minimize the possibility of electrical shock.
• Never under any circumstances cut or remove the third ground prong from the power cord
supplied. For personal safety, this appliance must be properly grounded.
• Have the wall outlet and circuit checked by a qualified electrician to make sure the outlet
is properly grounded. When a standard two-pin wall outlet is encountered, it is your
responsibility and obligation to have it replaced with a properly grounded three-pin
wall outlet.
• To prevent accidental injury, the cord should be secured behind the appliance and not left
exposed or dangling.
• The appliance should always be plugged into its own individual electrical outlet which
has a voltage rating that matches the rating label on the appliance. This provides the best
performance and also prevents overloading wiring circuits that could cause a fire hazard
from overheating. Never unplug the appliance by pulling the power cord. Always grip
the plug firmly and pull straight out from the receptacle. Repair or replace immediately
all power cords that have become frayed or otherwise damaged. Never use a cord that
shows cracks or abrasion damage along its length or at either end. When moving the
appliance, be careful not to damage the power cord.
• Never use your appliance with an extension cord unless this cord has been checked and
tested by a qualified technician or service person. The extension cord must be a UL/CUL
Listed, 3-wire grounding extension cord that has a grounding plug and outlet and that the
electrical rating of the cord is 115 volts and at least 10 amperes.
9
Product Specifications
OPERATION
PRODUCT SPECIFICATIONS
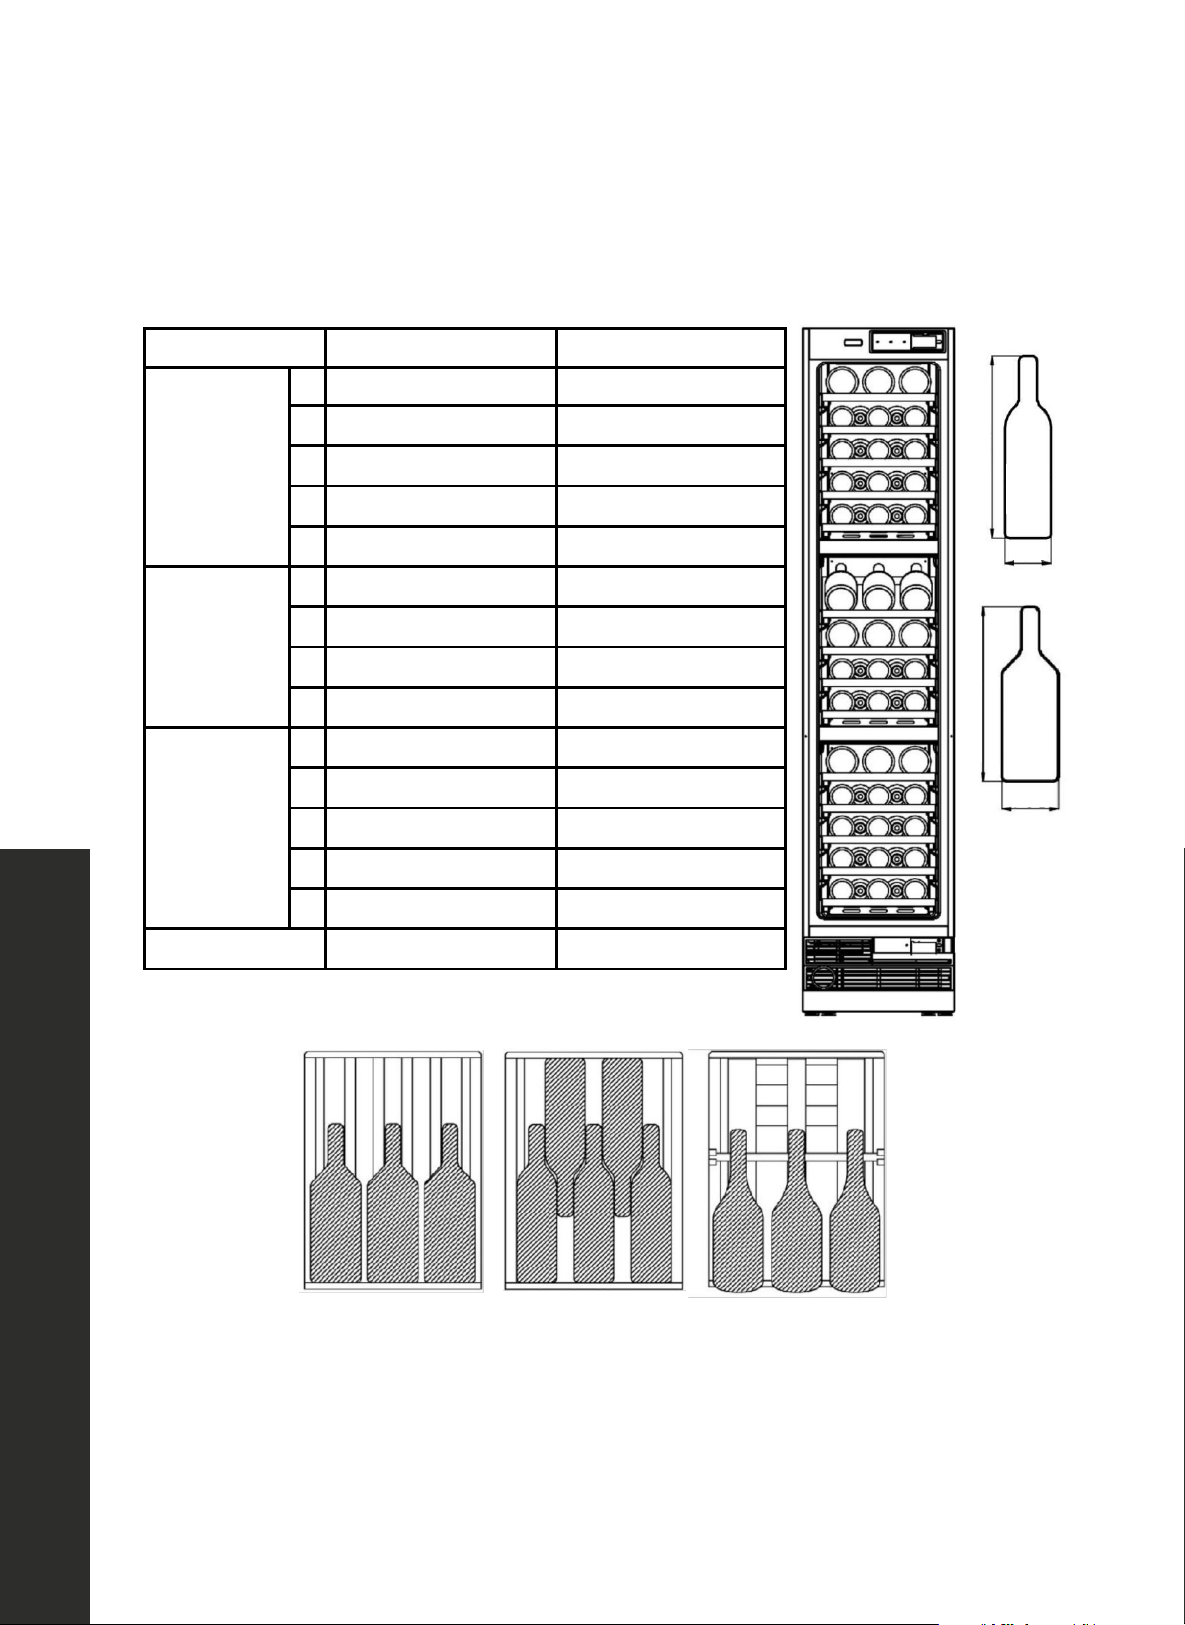
Description of Product Wine Cooler
Model RBCWVR-18/RBCWVL-18 series models
Voltage/Frequency VAC 115/60Hz
Amperage 1.5A
Storage Capacity* 68 standard bottles or 62 Bordeaux-style bottles
Refrigerant R600a
Temperature Range 41 °F – 68 °F (5 °C – 20 °C)
Dimensions
17 3/4" W x 23 5/16" D x 83 9/16 " H
(451 mm W x 597 mm D x 2130 mm H)
*Storage capacity is based on standard wine bottles and 750 ml Bordeaux-style wine bottles.
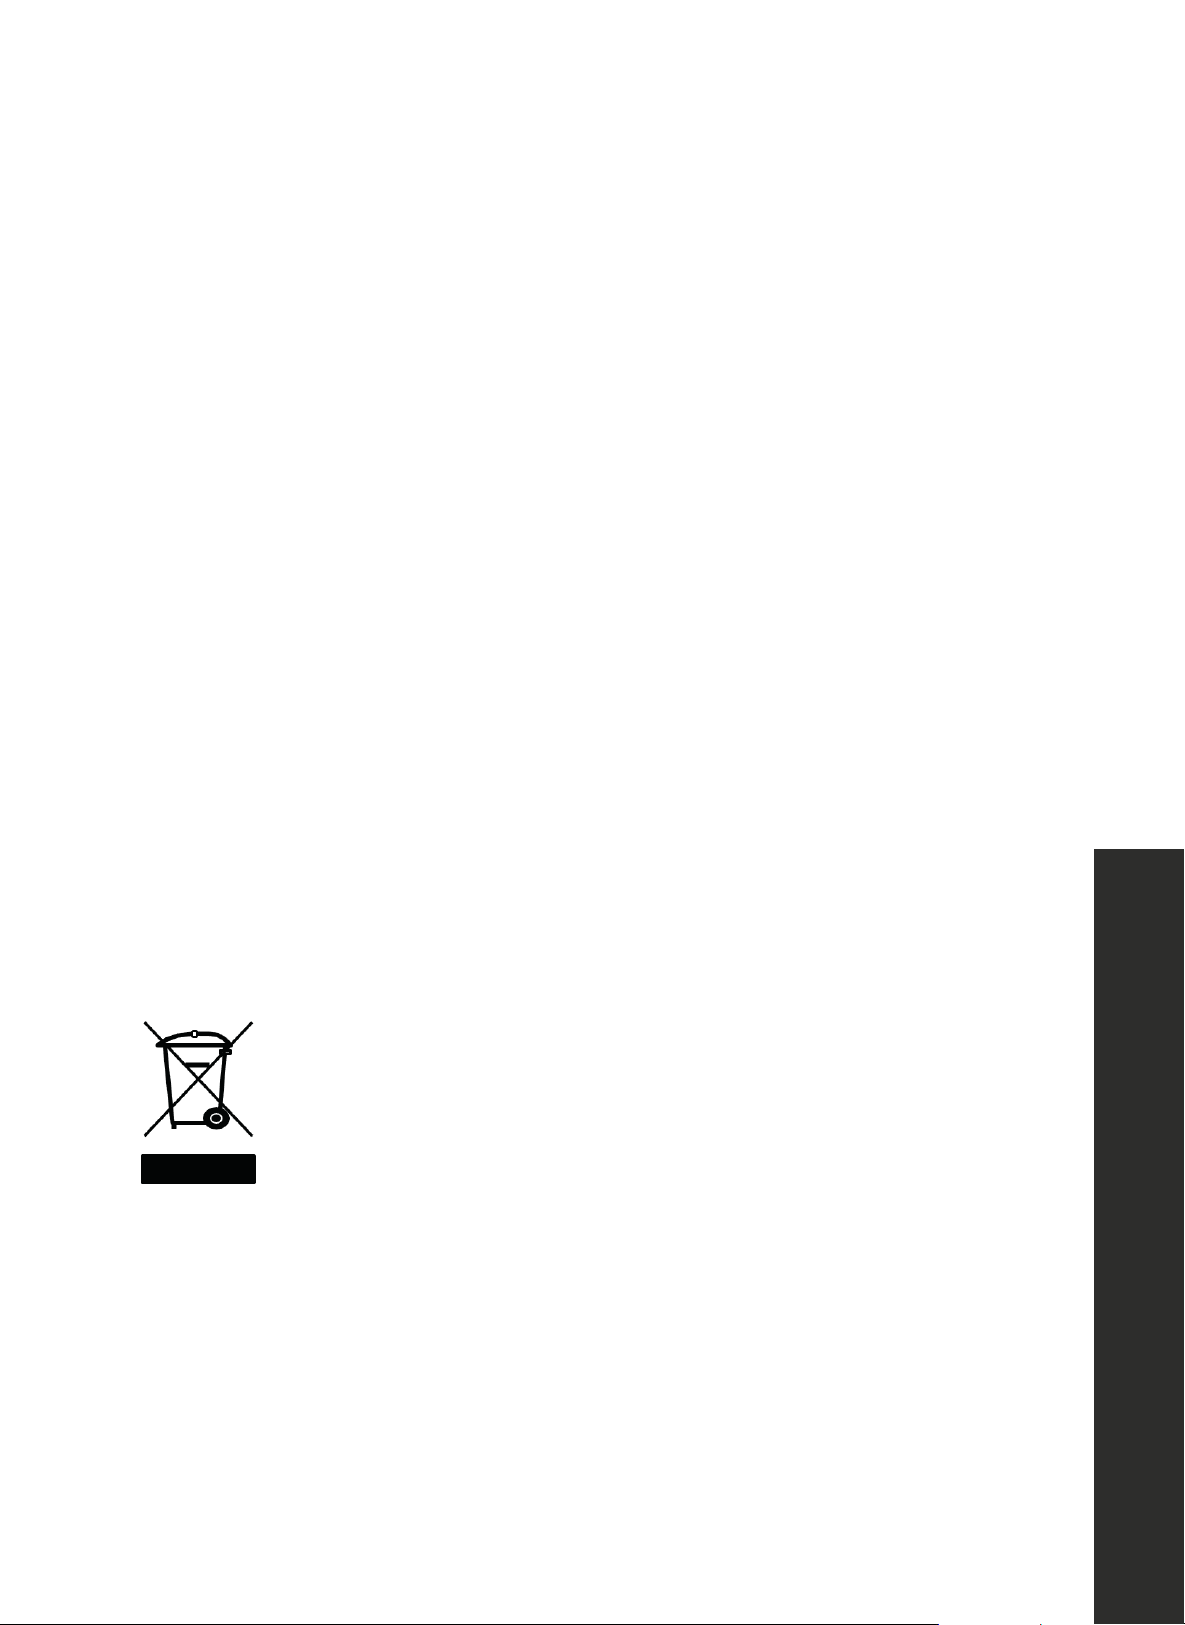
Internal storage options
+$"
!"#$%&'(#$%')*%+)",'--',./)%01.*#%
@$4812*'(1AA%$+'
3</5%"448/"+>$%-$Q=/-$5%"%5("+B"-B%229d2KH%b,8(%CJlVHT\%$8$>(-/>"8%#-,=+B%,=(8$(Y%
!
!
!"
!
@I&JP*!3*AW%AS%!PA@EJ3%
U/+$%>,,8$-%
MA@IL%
6IN1KVVD*%
bAL3C7IdSPImEIWJF%
CJ%229dVHT\%
CM!IPC7I%
2Y9C%
JALAP%
6</($%AP%7-$)%
&3APC7I%JC!CJ*3Fn% V?%o%VK%D,((8$5%
PISP*7IPCW3%
PVHH"%
3IM!IPC3EPI%PCW7I%
02pS%1%V?pS%
@*MIW&*AW&%fTZ6Z@g%
?N%Gd2V%Z%2:%Nd0%Z%KN%9d2VqK2NHZ092Z9GK..r%
!
.%/01234!526257/8!79!:294;!0<!9/2<;21;!=>!0?@!52<9!2<;!ABC!DE@!F01;42GHI9/8E4!J7<4!:0//E49@!
0#*"$#%&'(*4$%<"'!"#$%&&'()
!
!"#$
% &#'#&()*%
+")),-
%.)"/#0-%
1+")),-
%23%
)
!
4''-/
%
5"6-
%
7
%
8
%
9
%
8
%
:
%
8
%
;
%
8
%
8
%
8
%
"
<($%$,-
%
5"6-
%
7
%
:
%
9
%
8
%
:
%
8
%
;
%
8
%
)
!
!"=-/
% 5"6-%
7
%
8
%
9
%
8
%
:
%
8
%
;
%
8
%
8
%
8
%
>")#,% ?@%
11 13/16" (300 mm)
3"
(76 mm)
Bottle
A
Load capacity Bottle storage (Bottle A)
Upper zone
1 5
2 5
3 5
4 5
5 5
Middle zone
1 3
2
5
3
5
4
5
Lower zone
1
5
2
5
3
5
4
5
5
5
Total
68
10
Product Specifications
OPERATION
PRODUCT SPECIFICATIONS
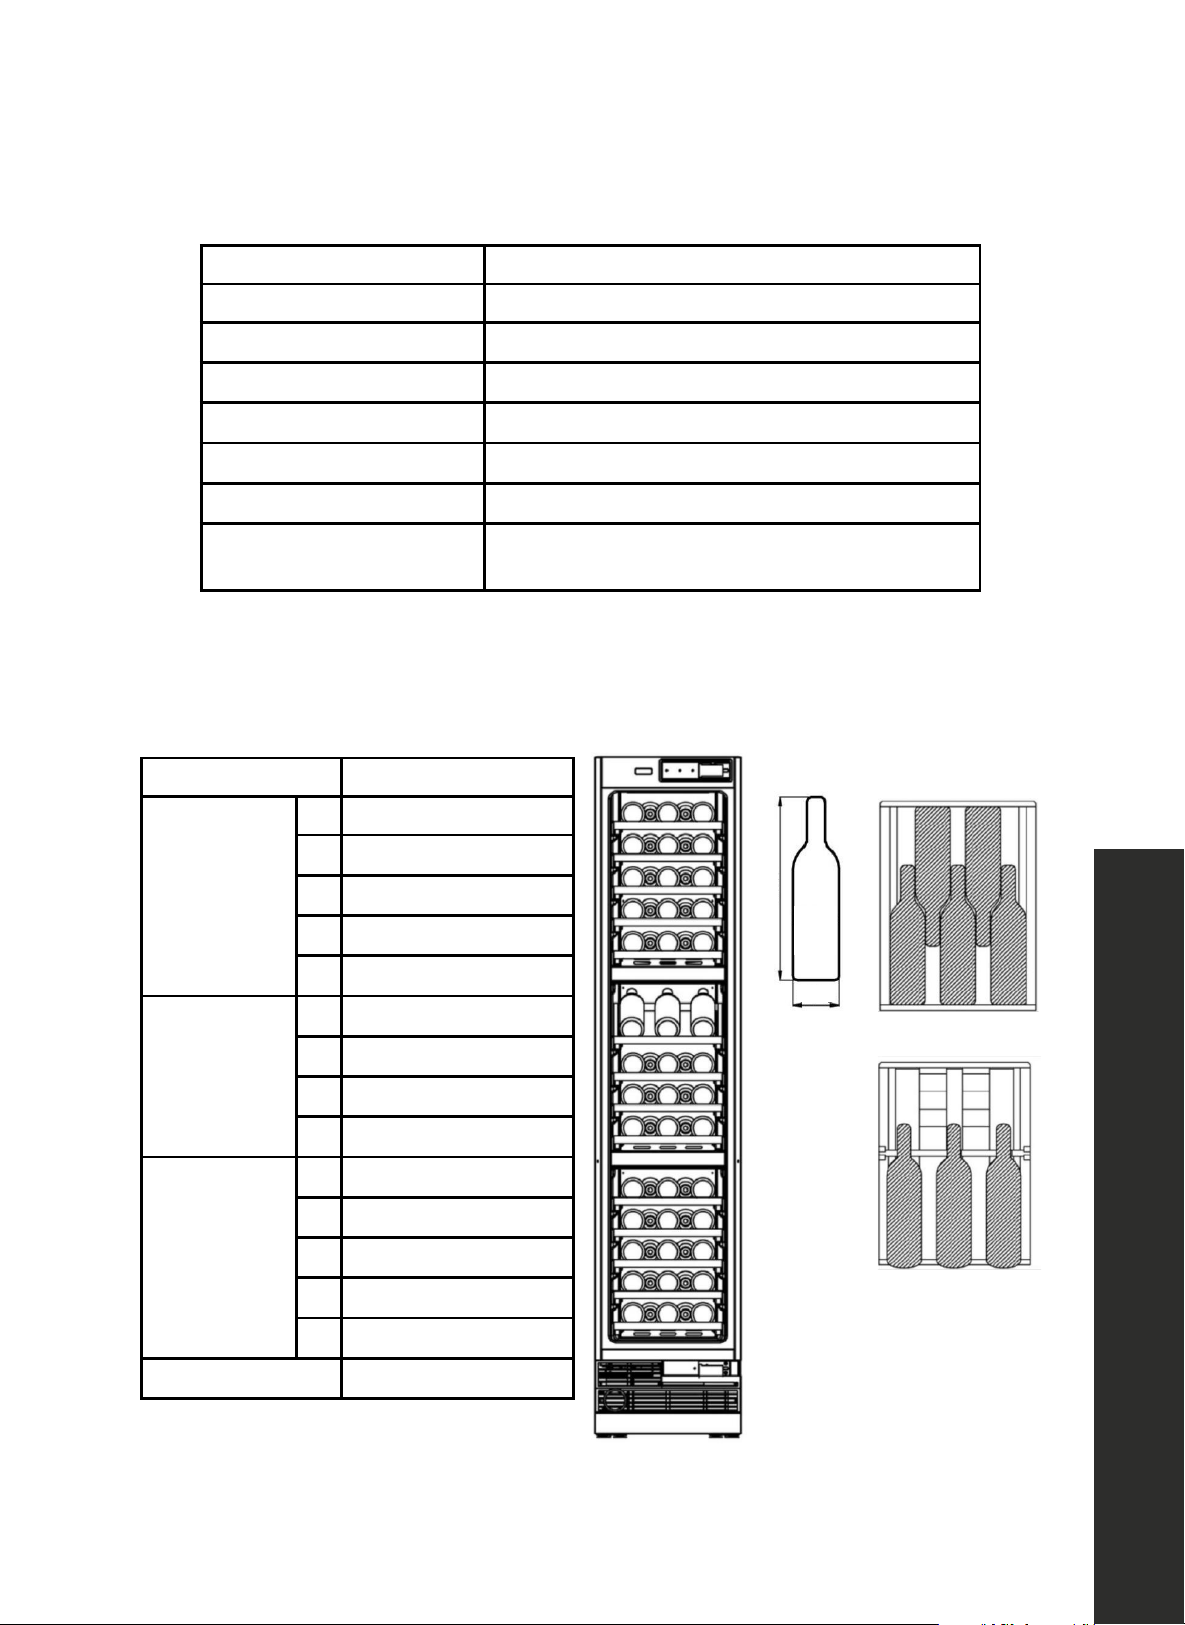
Internal storage options
!"
0#*"$#%&'(*4$%<"
'
!"#$%&&'()
+&"
!"#$%&'(#$%')*%+)",'--',./)%01.*#%
!
!
!
!
!
!
!
!
!"#$
% &#'#&()*%
+")),-
%
.)"/#0-
%
1+")),-
%23%
+")),-
%
.)"/#0-
%
1+")),-
%+3%
)
!
4''-/
%5"6-%
7
%
A
%
:
%
9
%
8
%
A
%
:
%
8
%
A
%
;
%
8
%
A
%
8
%
8
%
A
%
"
<($%$,-
%
5"6-
%
7
%
A
%
:
%
9
%
A
%
:
%
:
%
8
%
A
%
;
%
8
%
A
%
)
!
!"=-/
% 5"6-%
7
%
A
%
:
%
9
%
8
%
A
%
:
%
8
%
A
%
;
%
8
%
A
%
8
%
8
%
A
%
>")#,% 8B% 79%
%
11 13/16" (300 mm)
3"
(76 mm)
Bottle
A
11 13/16" (300 mm)
3 3/4"
(76 mm)
Bottle
B
Load capacity Bottle storage (Bottle A) Bottle storage (Bottle B)
Upper zone
1 - 3
2 5 -
3 5 -
4 5 -
5 5 -
Middle zone
1 - 3
2
- 3
3
5 -
4
5 -
Lower zone
1
- 3
2
5 -
3
5 -
4
5 -
5
5 -
Total
50 12
!"
0#*"$#%&'(*4$%<"
'
!"#$%&&'()
+&"
!"#$%&'(#$%')*%+)",'--',./)%01.*#%
!
!
!
!
!
!
!
!
!"#$
% &#'#&()*%
+")),-
%
.)"/#0-
%
1+")),-
%23%
+")),-
%
.)"/#0-
%
1+")),-
%+3%
)
!
4''-/
%5"6-%
7
%
A
%
:
%
9
%
8
%
A
%
:
%
8
%
A
%
;
%
8
%
A
%
8
%
8
%
A
%
"
<($%$,-
%
5"6-
%
7
%
A
%
:
%
9
%
A
%
:
%
:
%
8
%
A
%
;
%
8
%
A
%
)
!
!"=-/
% 5"6-%
7
%
A
%
:
%
9
%
8
%
A
%
:
%
8
%
A
%
;
%
8
%
A
%
8
%
8
%
A
%
>")#,% 8B% 79%
%
11 13/16" (300 mm)
3"
(76 mm)
Bottle
A
11 13/16" (300 mm)
3 3/4"
(76 mm)
Bottle
B
11
Product Specifications
PRODUCT SPECIFICATIONS
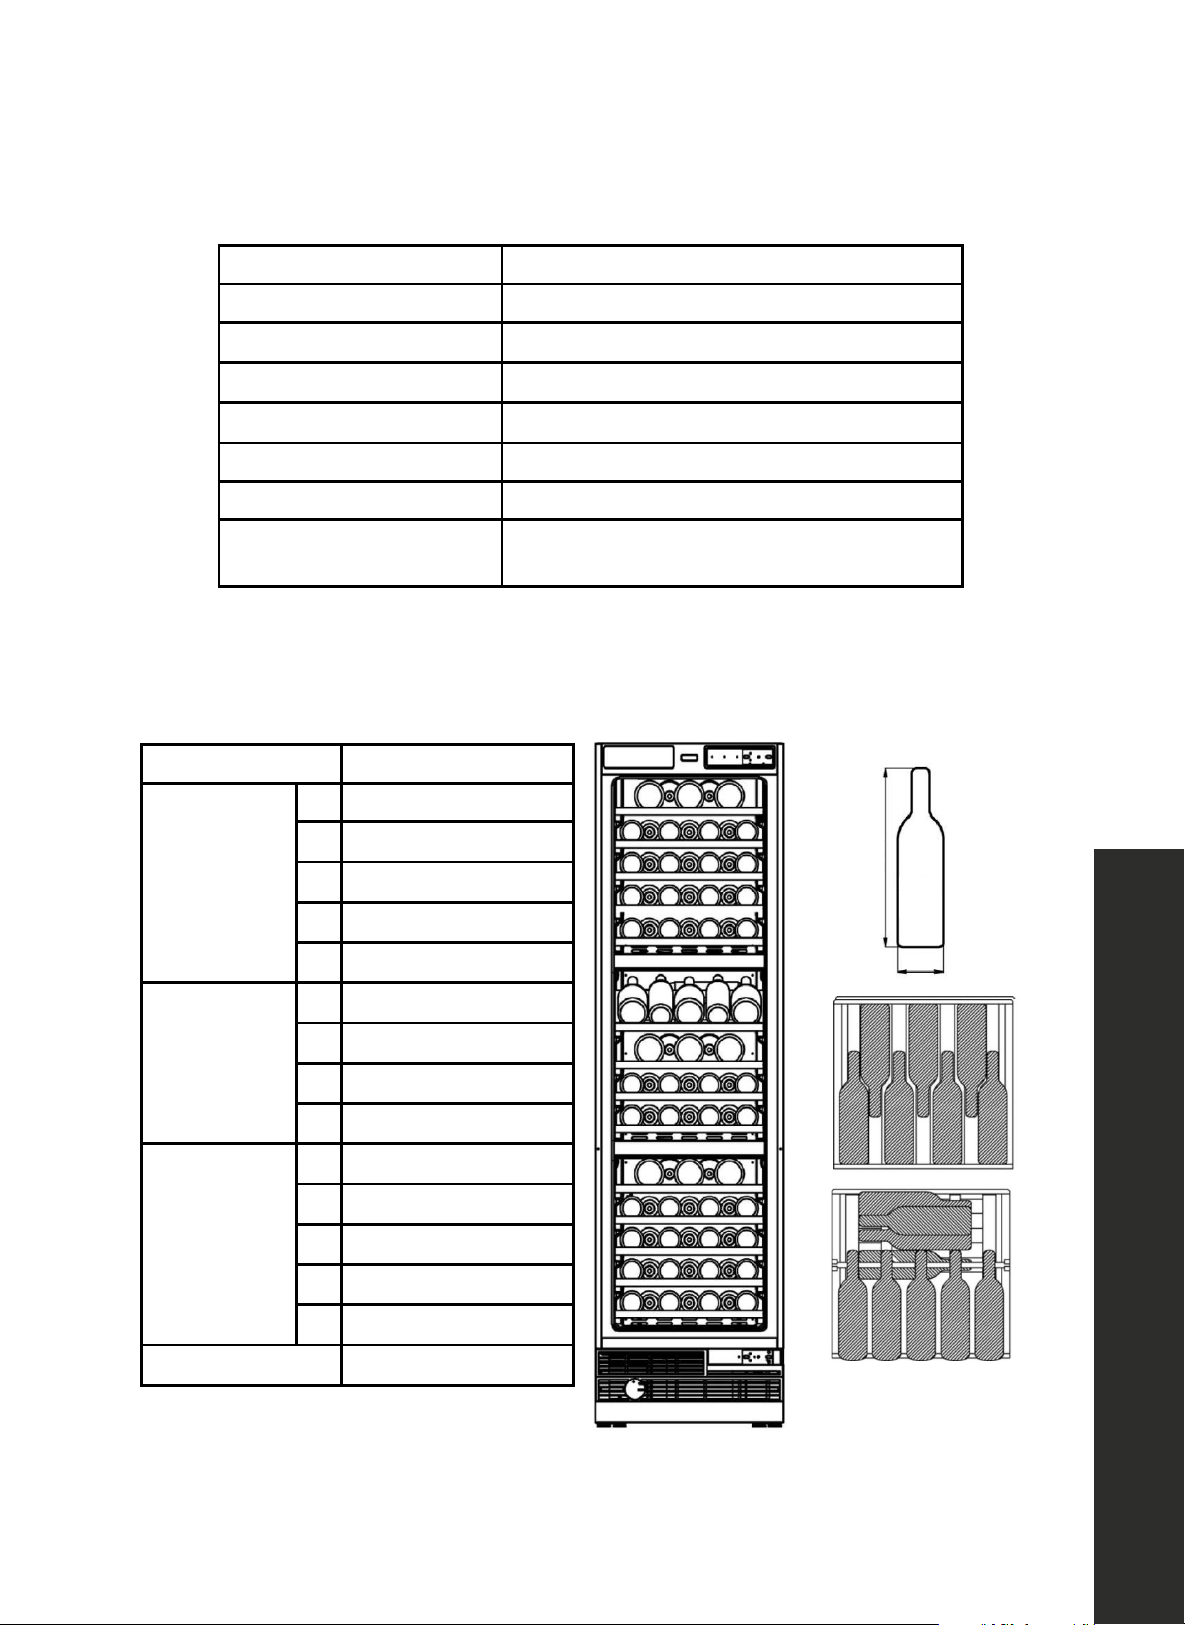
Description of Product Wine Cooler
Model RBCWV-24 models
Voltage/Frequency VAC 115/60Hz
Amperage 1.5A
Storage Capacity* 100 standard bottles or 94 Bordeaux-style bottles
Refrigerant R600a
Temperature Range 41 °F – 68 °F (5 °C – 20 °C)
Dimensions
23 3/4" W x 23 5/16" D x 83 9/16" H
603 mm W x 592 mm D x 2123 mm H
*Storage capacity is based on standard wine bottles and 750 ml Bordeaux-style wine bottles.
Internal storage options
+'"
!"#$%&'(#$%')*%+)",'--',./)%01.*#%
@$4812*'(1AA%$+'
3</5%"448/"+>$%-$Q=/-$5%"%5("+B"-B%229d2KH%b,8(%CJlVHT\%$8$>(-/>"8%#-,=+B%,=(8$(Y%
!
!
!"
!
@I&JP*!3*AW%AS%!PA@EJ3%
U/+$%>,,8$-%
MA@IL%
6IN1K:VD*%
bAL3C7IdSPImEIWJF%
CJ%229dVHT\%
CM!IPC7I%
2Y9C%
JALAP%
6</($%,-%7-$)% %
&3APC7I%JC!CJ*3Fn% 2HH%o%G0%D,((8$5%
PISP*7IPCW3%
PVHH"%
3IM!IPC3EPI%PCW7I%
02pS%1%V?pS%
@*MIW&*AW&%fTZ6Z@g%
?N%Gd2V%Z%KN%Nd0%Z%KN%9d2V%
qK2KN%Z%VHN%Z%9GK..r%
!
.%/01234!526257/8!79!:294;!0<!9/2<;21;!=>!0?@!52<9!2<;!ABC!DE@!F01;42GHI9/8E4!J7<4!:0//E49@!
0#*"$#%&'(*4$%<"'!"#$%*&'()
!
!"#$
%&#'#&()*%
+")),-
%.)"/#0-%
1+")),-
%23%
)
!
4''-/
%5"6-%
7
%
C
%
9
%
C
%
:
%
C
%
;
%
C
%
8
%
C
%
"
<($%$,-
%
5"6-
%
7
%
D
%
9
%
C
%
:
%
C
%
;
%
C
%
)
%
!"=-/
% 5"6-%
7
%
C
%
9
%
C
%
:
%
C
%
;
%
C
%
8
%
C
%
>")#,% 7BB%
11 13/16" (300 mm)
3"
(76 mm)
Bottle
A
Load capacity Bottle storage (Bottle A)
Upper zone
1 7
2 7
3 7
4 7
5 7
Middle zone
1 9
2
7
3
7
4
7
Lower zone
1
7
2
7
3
7
4
7
5
7
Total
100
OPERATION
12
OPERATION
Product Specifications
PRODUCT SPECIFICATIONS
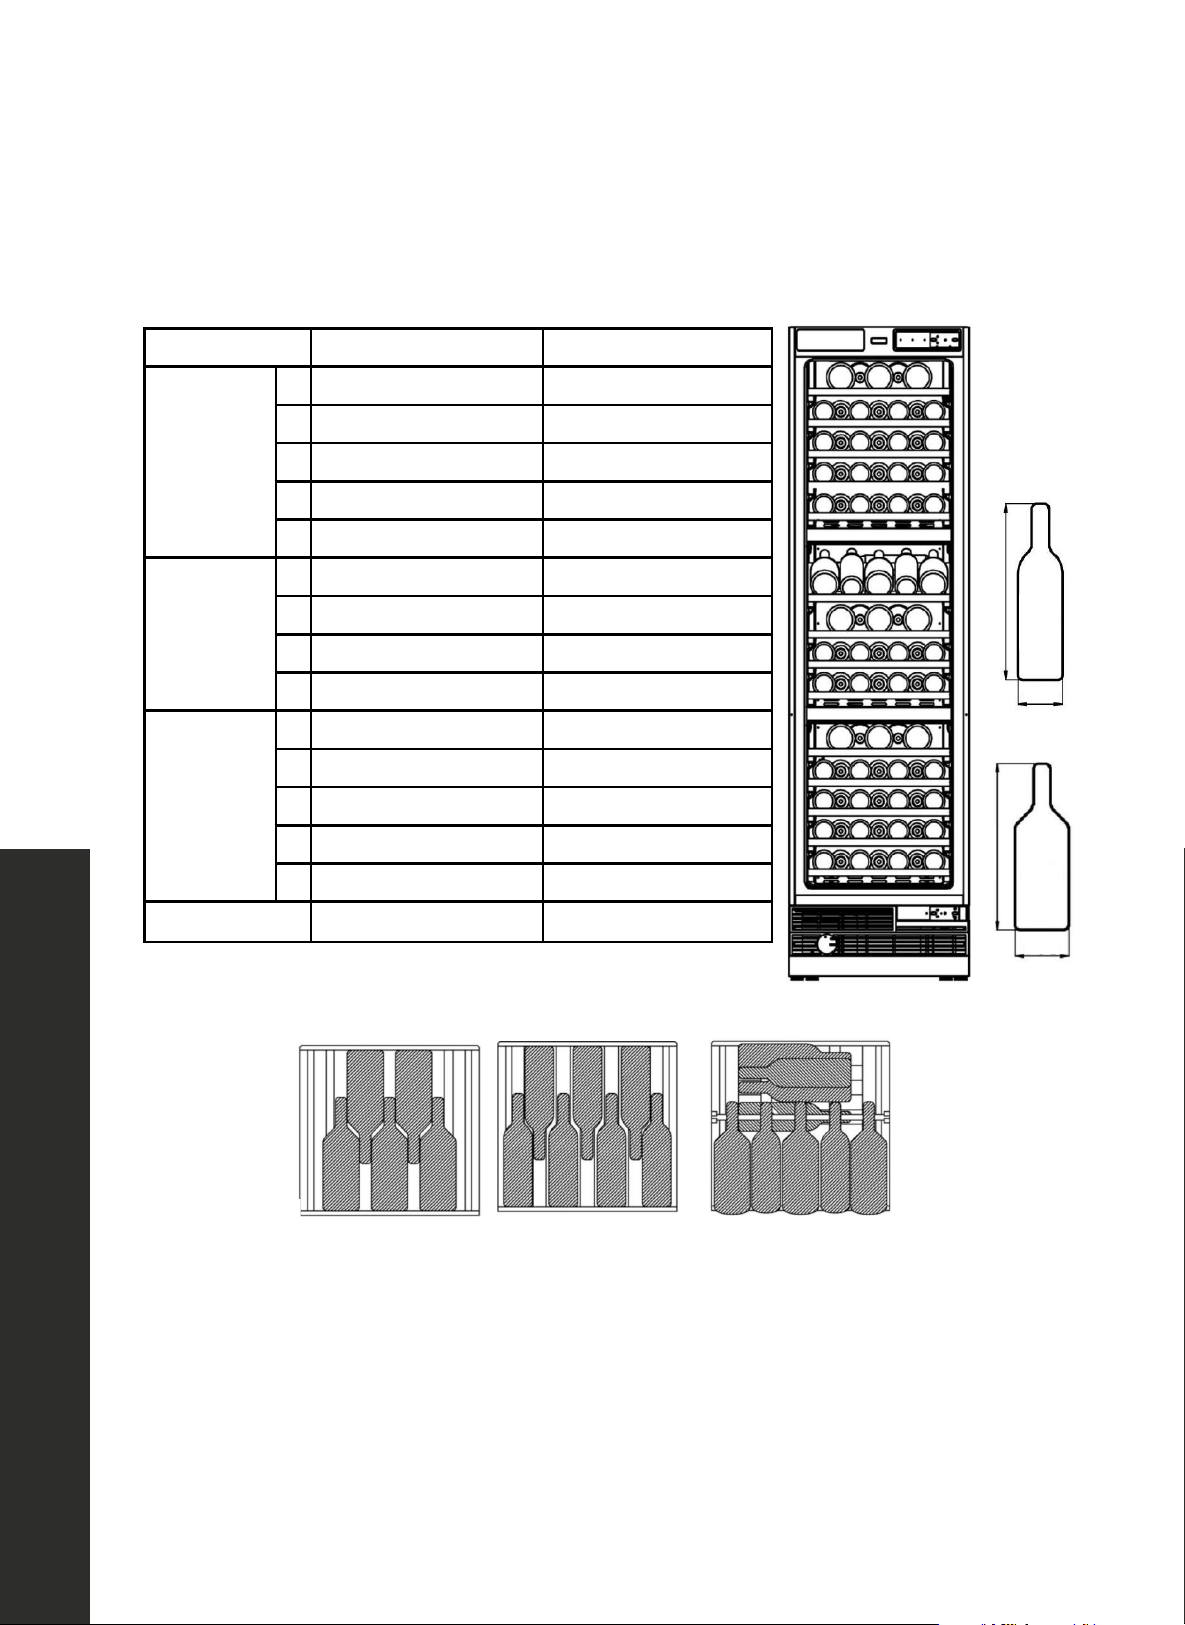
Internal storage options
0#*"$#%&'(*4$%<"'!"#$%*&'()
+("
!"#$%&'(#$%')*%+)",'--',./)%01.*#%
!
!
%
!
!
!
!"#$
% &#'#&()*%
+")),-
%.)"/#0-%
1+")),-
%23%
+")),-
%
.)"/#0-
%
1+")),-
%+3%
)
!
4''-/
%5"6-%
7
%
A
%
8
%
9
%
C
%
A
%
:
%
C
%
A
%
;
%
C
%
A
%
8
%
C
%
A
%
"
<($%$,-
%
5"6-
%
7
%
?
%
:
%
9
%
A
%
8
%
:
%
C
%
A
%
;
%
C
%
A
%
)
%
!"=-/
% 5"6-%
7
%
A
%
8
%
9
%
C
%
A
%
:
%
C
%
A
%
;
%
C
%
A
%
8
%
C
%
A
%
>")#,% C?% 7@%
%
11 13/16" (300 mm)
3"
(76 mm)
Bottle
A
11 13/16" (300 mm)
3 3/4"
(96 mm)
Bottle
A
Load capacity Bottle storage (Bottle A) Bottle storage (Bottle B)
Upper zone
1 - 5
2 7 -
3 7 -
4 7 -
5 7 -
Middle zone
1 6 3
2 - 5
3 7 -
4 7 -
Lower zone
1 - 5
2 7 -
3 7 -
4 7 -
5 7 -
Total 76 18
0#*"$#%&'(*4$%<"'!"#$%*&'()
+("
!"#$%&'(#$%')*%+)",'--',./)%01.*#%
!
!
%
!
!
!
!"#$
% &#'#&()*%
+")),-
%.)"/#0-%
1+")),-
%23%
+")),-
%
.)"/#0-
%
1+")),-
%+3%
)
!
4''-/
%5"6-%
7
%
A
%
8
%
9
%
C
%
A
%
:
%
C
%
A
%
;
%
C
%
A
%
8
%
C
%
A
%
"
<($%$,-
%
5"6-
%
7
%
?
%
:
%
9
%
A
%
8
%
:
%
C
%
A
%
;
%
C
%
A
%
)
%
!"=-/
% 5"6-%
7
%
A
%
8
%
9
%
C
%
A
%
:
%
C
%
A
%
;
%
C
%
A
%
8
%
C
%
A
%
>")#,% C?% 7@%
%
11 13/16" (300 mm)
3"
(76 mm)
Bottle
A
11 13/16" (300 mm)
3 3/4"
(96 mm)
Bottle
A
13
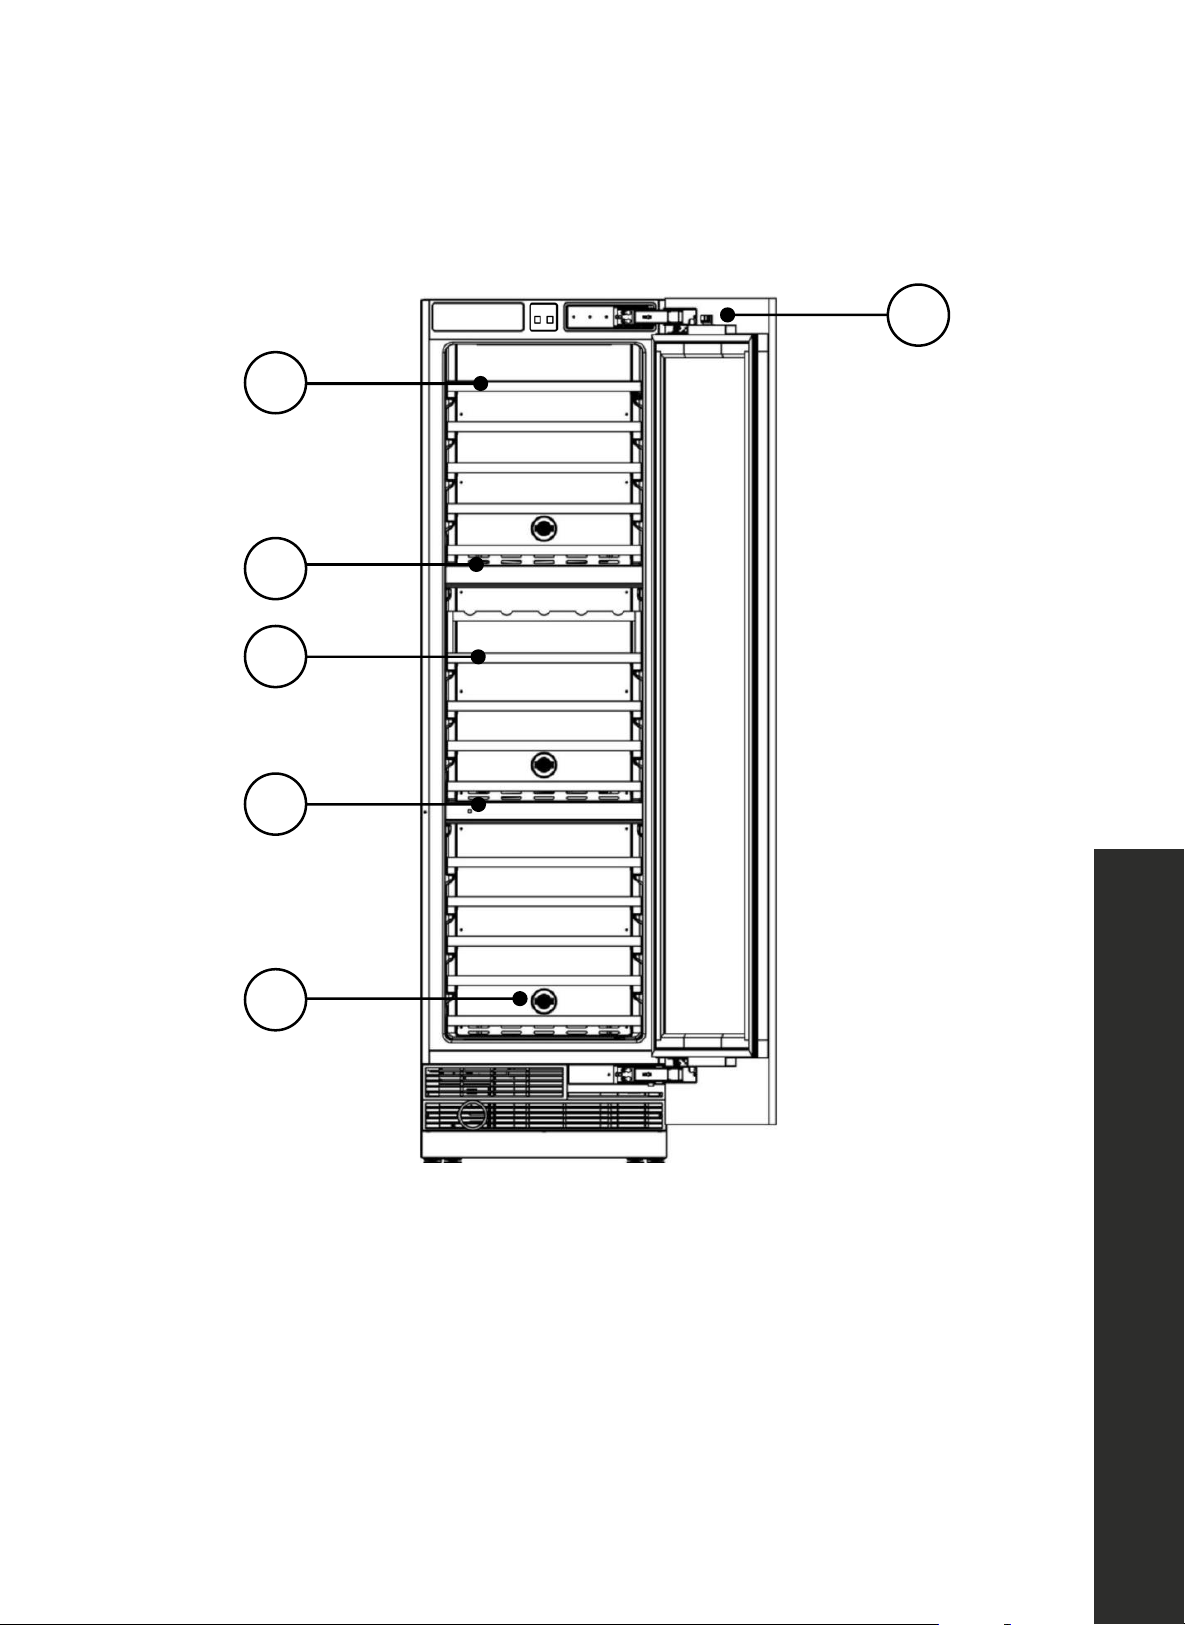
Keys and Controls
OPERATION - ALL MODELS
@%$*/'08"#*3)32%*34#'!"#$%*&'()
!"#$%&'(#$%')*%+)",'--',./)%01.*#%
!
!
!(
"
*+)
*,)
*-)
*.)
*-)
*/)
!
!
!
!
!
!
!
!
!
!
!
!
!
!
!
!
!
!
!"# !"#$%&'$()% *%
!$# !"#$%&'$()% 2%
3($+,-./01#$,"+%42",+'%
!%#3.#,-.(% 40#$(% 5
%
3./60-,/$#,% !0((%
!&#
&'(5/)%6.-,#(%
1
5
2
3
2
4
1. Standard Wine Rack
2. Zone Divider
3. Display Wine Rack
4. Carbon Filter
5. Door Switch
OPERATION
14
OPERATION
OPERATION
If the unit is unplugged, turned off, or loses power, you must wait 3 to 5 minutes before restarting
the unit. If you attempt to restart before this time delay, the appliance may not start and will not
keep the last set temperature.
!)"
!"#$%&'(#$%')*%+)",'--',./)%01.*#%
!
!
!
!
!
!
!
&0)123)4561)67)45894::3;<)8=>3?)9=71<)=?)14?53;)=@<)A=4)B471)>C61).)1=)+)B654137)D30=?3)?371C?165:)123)4561E)&0)A=4)C113B81)
1=)?371C?1)D30=?3)1267)16B3);39CA<)123)C8896C5F3)BCA)5=1)71C?1)C5;)>699)5=1)G338)123)9C71)731)13B83?C14?3E)
;/3#<'*."'?4#*$4&'@%#"&'
!
!
"
#$%&'
"
()*(++
"
,
"
-.//.01
"
2$3&
"
4
"
566&'
"
7$)&"8&96
"
:";/$<&
"
7$)&"8&96=
"
>$)0'$?
"
@
"
2A33?&
"
7$)&
"
8&96
"
B
"
2A33?&
"
7$)&
"
8&96=
"
>$)0'$?
"
C
"
D$%&'
"
7$)&
"
8&96
"
E"/&?$%
"
7$)&"8&96=
"
>$)0'$?
"
F" DAG10"-%A0H1"
I
"
8&96=
"
JAK6?.L
"
>1.)G&
"
MNOP
"
!
*+,-#
#
! P(#0!^%-!,(301#!'(#!'#$7#.3'-.#!%0!'(#!730#*5!'(#!730#*!4/+7*3^+!'(#!,-..#0'!
! '#$7#.3'-.#!304!'(#!'#$7#.3'-.#!%0!'(#!4/+7*3^!;/**!1.34-3**^!,(301#!3,,%.4/01!'%!
! '(#!/0'#.03*!'#$7#.3'-.#!-0'/*!/'!.#3,(#+!'(#!4#+/.#4!'#$7#.3'-.#F!Y%'#!'(3'!/'!;/**!'3\#!
! '/$#!2%.!'(#!;/0#!,#**3.!'%!.#3,(!'(#!0#;!'#$7#.3'-.#F!O(/+!/+!0%.$3*F!a%-!4%!0%'!0##4!
! '%!+#'!'(#!4#+/.#4!'#$7#.3'-.#!H-+'!)#,3-+#!'(#!4/+7*3^!4%#+!0%'!+(%;!^%-.!4#+/.#4!
! '#$7#.3'-.#F
!
!
<2!'(#!,%0'.%*!730#*!(3+!$%/+'-.#!%.!*/]-/4!%0!/'+!+-.23,#5!/'!$3^!23/*F!P/7#!'(#!$%/+'-.#!
%.!*/]-/4!-+/01!3!4.^!,*%'(5!304!'(#0!'.^!313/0F
!
!
G%;#.!23/*-.#!$#$%.^!2-0,'/%0
!
B32'#.!7%;#.R%05!'(#!=#''/01+!.#$3/0!/0!'(#!+'3'#!)#2%.#!7%;#.!23/*-.#E
!
!
!
! O#$7#.3'-.#! 3,,-.3,^C! b8M"
"
5##QR"7(SQ"8&96&'.0T'&U"VWXYtq02pS%1%V?pSr%
M*@@LI%uAWI%8&96&'.0T'&U"VWXYtq02pS%1%V?pSr%
L% A6IP%uAWI%8&96&'.0T'&U"VWXYtq02pS%1%V?pSr%
%
10
9
8
7
6
5
4
3
2
1
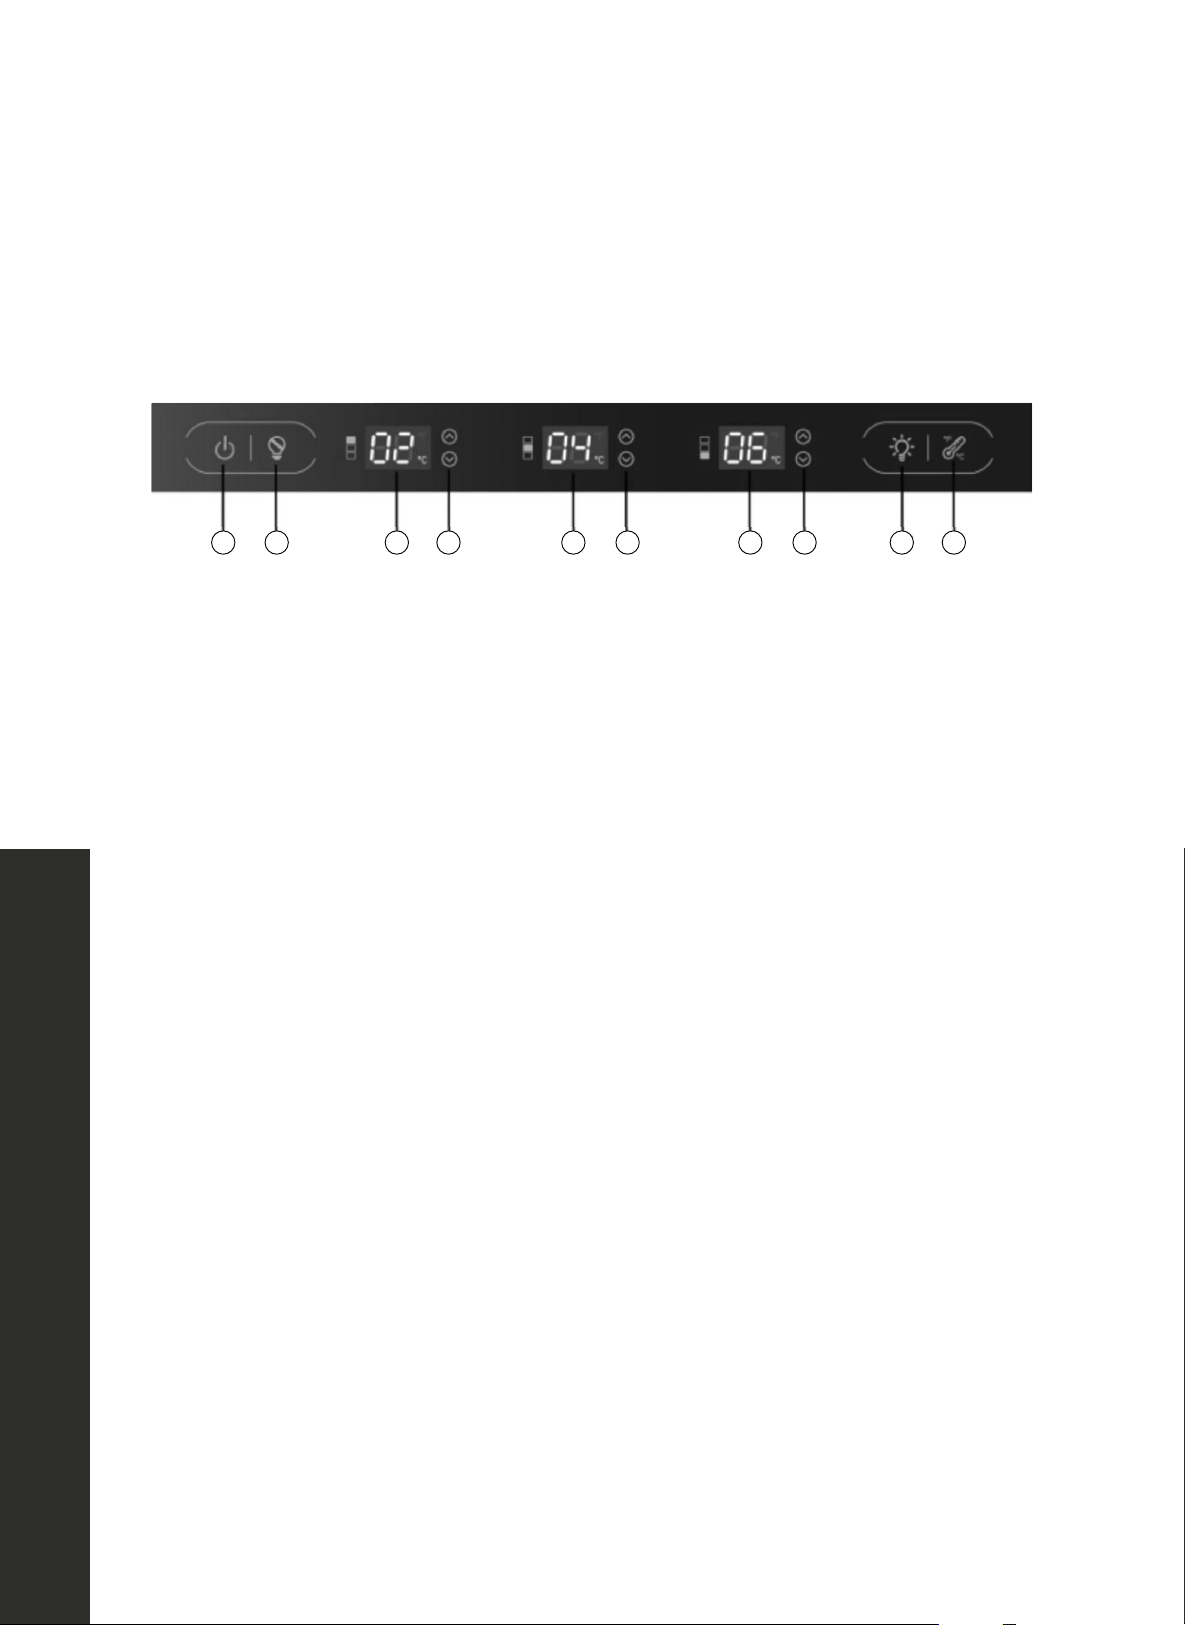
1. Power On/OFF
2. Sabbath Mode
3. Upper Zone Temp
4. Upper Zone Temp. Control
5. Middle Zone Temp
6. Middle Zone Temp. Control
7. Lower Zone Temp
8. Lower Zone Temp. Control
9. Light Button
10. Temp. Display Change
NOTE: If the control panel has moisture or liquid on its surface, it may be unresponsive. Wipe
the moisture or liquid using a dry cloth, and then try again.
Power failure memory function: After powering on, the settings default to the previously set
adjustments before power failure.
Temperature: 41 °F – 68 °F (5 °C – 20 °C)
Keys and Controls

15
Keys and Controls
OPERATION
OPERATION
NOTE: Whenever a key is pressed, the buzzer beeps.
• Control Panel Lock (
!"#$%&'(#$%')*%+)",'--',./)%01.*#%
!
!
%("
!
!
!
!
&J)<?6)>@D<)D8)>@C5>II6HM)C=G69)5=8<M)=9)<>9@6H)=OM)B=>):>8<)G7D<).)<=)+):D@><68);6J=96)968<79<D@I)<?6)>@D<K)&J)B=>)7<<6:C<)
<=)968<79<);6J=96)<?D8)<D:6)H657BM)<?6)7CC5D7@A6):7B)@=<)8<79<)7@H)GD55)@=<)N66C)<?6)578<)86<)<6:C697<>96K)
;/3#<'*."'?4#*$4&'@%#"&'
!
!
"
#$%&'
"
()*(++
"
,
"
-.//.01
"
2$3&
"
4
"
566&'
"
7$)&"8&96
"
:";/$<&
"
7$)&"8&96=
"
>$)0'$?
"
@
"
2A33?&
"
7$)&
"
8&96
"
B
"
2A33?&
"
7$)&
"
8&96=
"
>$)0'$?
"
C
"
D$%&'
"
7$)&
"
8&96
"
E"/&?$%
"
7$)&"8&96=
"
>$)0'$?
"
F" DAG10"-%A0H1"
I
"
8&96=
"
JAK6?.L
"
>1.)G&
"
MNOP
"
"! "#$%&!%'()!)*+!,! - ! ./!0'1*2!'3!4#*!&*567%4!73%'()*&!8464*9!$5!+'7!3**&!4'!%'():!
+'7!3**&!4'!02*88!,! -! .:!;6376%!%'()$3<:!87(#!68!4#*!3**&!4'!73%'():!02*88!
,! - ! .!4'!73%'()9!%'():!02*88!63+!)*+:!
! 4#*!='>!1$4#$3!
4#*!4#2**!4*;0*26472*!?'3*8!'5!4#*!4*;0*26472*!@6%7*!'5!4#*!&$<$46%!8(2**3!64!4#*!
86;*!4$;*!=%$3)$3<!5'2!A!8*('3&8:!6((';063$*&!=+!=**0$3<!4'!87<<*84!4#64!$3!4#*!
%'()$3<!8464*9!
"! B3CB55!)*+! /!D'3<!02*88!E ! E!5'2!A8!4'!4723!'3!'2!4723!'55!4#*!0'1*29!1#*3!8#744$3<!
&'13:!(74!'55!4#*!0'1*2!'5!6%%!0*2$0#*26%8!63&!*34*2!8463&=+!;'&*9!
"! DFG!%$<#4$3<!=744'3 /!DFG!%$<#4$3<!('342'%%*&!=+!4#*!&''2!81$4(#:!'0*3!4#*!&''2!%$<#4:!
"%'8*!4#*!&''2!%$<#4!'559!8#'24!02*88!E ! E!4'!2*6%$?*!4#*!DFG!%$<#4$3<!6;=*2:!=%7*:!1#$4*:!
'55!4#*!%$<#4!(+(%*!=*41**3!81$4(#$3<:!;*;'2+!'5!4#*!%684!8464*!,'55!4#*!8464*!'5!4#*!%$<#4!
$8!3'4!;*;'2$?*&.9!%'3<!02*88!E! E!A!8*('3&8!4'!2*6%$?*!4#*!%$<#4!$8!6%16+8!'3:!64!4#*!
86;*!4$;*:!
!"#$%&'()*+,-$*.""/'%(0#*
+
!"#$%&'(#$%')*%+)",'--',./)%01.*#%
!
!
%("
!
!
!
!
&J)<?6)>@D<)D8)>@C5>II6HM)C=G69)5=8<M)=9)<>9@6H)=OM)B=>):>8<)G7D<).)<=)+):D@><68);6J=96)968<79<D@I)<?6)>@D<K)&J)B=>)7<<6:C<)
<=)968<79<);6J=96)<?D8)<D:6)H657BM)<?6)7CC5D7@A6):7B)@=<)8<79<)7@H)GD55)@=<)N66C)<?6)578<)86<)<6:C697<>96K)
;/3#<'*."'?4#*$4&'@%#"&'
!
!
"
#$%&'
"
()*(++
"
,
"
-.//.01
"
2$3&
"
4
"
566&'
"
7$)&"8&96
"
:";/$<&
"
7$)&"8&96=
"
>$)0'$?
"
@
"
2A33?&
"
7$)&
"
8&96
"
B
"
2A33?&
"
7$)&
"
8&96=
"
>$)0'$?
"
C
"
D$%&'
"
7$)&
"
8&96
"
E"/&?$%
"
7$)&"8&96=
"
>$)0'$?
"
F" DAG10"-%A0H1"
I
"
8&96=
"
JAK6?.L
"
>1.)G&
"
MNOP
"
"! "#$%&!%'()!)*+!,! - ! ./!0'1*2!'3!4#*!&*567%4!73%'()*&!8464*9!$5!+'7!3**&!4'!%'():!
+'7!3**&!4'!02*88!,! -! .:!;6376%!%'()$3<:!87(#!68!4#*!3**&!4'!73%'():!02*88!
,! - ! .!4'!73%'()9!%'():!02*88!63+!)*+:!
! 4#*!='>!1$4#$3!
4#*!4#2**!4*;0*26472*!?'3*8!'5!4#*!4*;0*26472*!@6%7*!'5!4#*!&$<$46%!8(2**3!64!4#*!
86;*!4$;*!=%$3)$3<!5'2!A!8*('3&8:!6((';063$*&!=+!=**0$3<!4'!87<<*84!4#64!$3!4#*!
%'()$3<!8464*9!
"! B3CB55!)*+! /!D'3<!02*88!E ! E!5'2!A8!4'!4723!'3!'2!4723!'55!4#*!0'1*29!1#*3!8#744$3<!
&'13:!(74!'55!4#*!0'1*2!'5!6%%!0*2$0#*26%8!63&!*34*2!8463&=+!;'&*9!
"! DFG!%$<#4$3<!=744'3 /!DFG!%$<#4$3<!('342'%%*&!=+!4#*!&''2!81$4(#:!'0*3!4#*!&''2!%$<#4:!
"%'8*!4#*!&''2!%$<#4!'559!8#'24!02*88!E ! E!4'!2*6%$?*!4#*!DFG!%$<#4$3<!6;=*2:!=%7*:!1#$4*:!
'55!4#*!%$<#4!(+(%*!=*41**3!81$4(#$3<:!;*;'2+!'5!4#*!%684!8464*!,'55!4#*!8464*!'5!4#*!%$<#4!
$8!3'4!;*;'2$?*&.9!%'3<!02*88!E! E!A!8*('3&8!4'!2*6%$?*!4#*!%$<#4!$8!6%16+8!'3:!64!4#*!
86;*!4$;*:!
!"#$%&'()*+,-$*.""/'%(0#*
): To unlock, press (
!"#$%&'(#$%')*%+)",'--',./)%01.*#%
!
!
%("
!
!
!
!
&J)<?6)>@D<)D8)>@C5>II6HM)C=G69)5=8<M)=9)<>9@6H)=OM)B=>):>8<)G7D<).)<=)+):D@><68);6J=96)968<79<D@I)<?6)>@D<K)&J)B=>)7<<6:C<)
<=)968<79<);6J=96)<?D8)<D:6)H657BM)<?6)7CC5D7@A6):7B)@=<)8<79<)7@H)GD55)@=<)N66C)<?6)578<)86<)<6:C697<>96K)
;/3#<'*."'?4#*$4&'@%#"&'
!
!
"
#$%&'
"
()*(++
"
,
"
-.//.01
"
2$3&
"
4
"
566&'
"
7$)&"8&96
"
:";/$<&
"
7$)&"8&96=
"
>$)0'$?
"
@
"
2A33?&
"
7$)&
"
8&96
"
B
"
2A33?&
"
7$)&
"
8&96=
"
>$)0'$?
"
C
"
D$%&'
"
7$)&
"
8&96
"
E"/&?$%
"
7$)&"8&96=
"
>$)0'$?
"
F" DAG10"-%A0H1"
I
"
8&96=
"
JAK6?.L
"
>1.)G&
"
MNOP
"
"! "#$%&!%'()!)*+!,! - ! ./!0'1*2!'3!4#*!&*567%4!73%'()*&!8464*9!$5!+'7!3**&!4'!%'():!
+'7!3**&!4'!02*88!,! -! .:!;6376%!%'()$3<:!87(#!68!4#*!3**&!4'!73%'():!02*88!
,! - ! .!4'!73%'()9!%'():!02*88!63+!)*+:!
! 4#*!='>!1$4#$3!
4#*!4#2**!4*;0*26472*!?'3*8!'5!4#*!4*;0*26472*!@6%7*!'5!4#*!&$<$46%!8(2**3!64!4#*!
86;*!4$;*!=%$3)$3<!5'2!A!8*('3&8:!6((';063$*&!=+!=**0$3<!4'!87<<*84!4#64!$3!4#*!
%'()$3<!8464*9!
"! B3CB55!)*+! /!D'3<!02*88!E ! E!5'2!A8!4'!4723!'3!'2!4723!'55!4#*!0'1*29!1#*3!8#744$3<!
&'13:!(74!'55!4#*!0'1*2!'5!6%%!0*2$0#*26%8!63&!*34*2!8463&=+!;'&*9!
"! DFG!%$<#4$3<!=744'3 /!DFG!%$<#4$3<!('342'%%*&!=+!4#*!&''2!81$4(#:!'0*3!4#*!&''2!%$<#4:!
"%'8*!4#*!&''2!%$<#4!'559!8#'24!02*88!E ! E!4'!2*6%$?*!4#*!DFG!%$<#4$3<!6;=*2:!=%7*:!1#$4*:!
'55!4#*!%$<#4!(+(%*!=*41**3!81$4(#$3<:!;*;'2+!'5!4#*!%684!8464*!,'55!4#*!8464*!'5!4#*!%$<#4!
$8!3'4!;*;'2$?*&.9!%'3<!02*88!E! E!A!8*('3&8!4'!2*6%$?*!4#*!%$<#4!$8!6%16+8!'3:!64!4#*!
86;*!4$;*:!
!"#$%&'()*+,-$*.""/'%(0#*
+
!"#$%&'(#$%')*%+)",'--',./)%01.*#%
!
!
%("
!
!
!
!
&J)<?6)>@D<)D8)>@C5>II6HM)C=G69)5=8<M)=9)<>9@6H)=OM)B=>):>8<)G7D<).)<=)+):D@><68);6J=96)968<79<D@I)<?6)>@D<K)&J)B=>)7<<6:C<)
<=)968<79<);6J=96)<?D8)<D:6)H657BM)<?6)7CC5D7@A6):7B)@=<)8<79<)7@H)GD55)@=<)N66C)<?6)578<)86<)<6:C697<>96K)
;/3#<'*."'?4#*$4&'@%#"&'
!
!
"
#$%&'
"
()*(++
"
,
"
-.//.01
"
2$3&
"
4
"
566&'
"
7$)&"8&96
"
:";/$<&
"
7$)&"8&96=
"
>$)0'$?
"
@
"
2A33?&
"
7$)&
"
8&96
"
B
"
2A33?&
"
7$)&
"
8&96=
"
>$)0'$?
"
C
"
D$%&'
"
7$)&
"
8&96
"
E"/&?$%
"
7$)&"8&96=
"
>$)0'$?
"
F" DAG10"-%A0H1"
I
"
8&96=
"
JAK6?.L
"
>1.)G&
"
MNOP
"
"! "#$%&!%'()!)*+!,! - ! ./!0'1*2!'3!4#*!&*567%4!73%'()*&!8464*9!$5!+'7!3**&!4'!%'():!
+'7!3**&!4'!02*88!,! -! .:!;6376%!%'()$3<:!87(#!68!4#*!3**&!4'!73%'():!02*88!
,! - ! .!4'!73%'()9!%'():!02*88!63+!)*+:!
! 4#*!='>!1$4#$3!
4#*!4#2**!4*;0*26472*!?'3*8!'5!4#*!4*;0*26472*!@6%7*!'5!4#*!&$<$46%!8(2**3!64!4#*!
86;*!4$;*!=%$3)$3<!5'2!A!8*('3&8:!6((';063$*&!=+!=**0$3<!4'!87<<*84!4#64!$3!4#*!
%'()$3<!8464*9!
"! B3CB55!)*+! /!D'3<!02*88!E ! E!5'2!A8!4'!4723!'3!'2!4723!'55!4#*!0'1*29!1#*3!8#744$3<!
&'13:!(74!'55!4#*!0'1*2!'5!6%%!0*2$0#*26%8!63&!*34*2!8463&=+!;'&*9!
"! DFG!%$<#4$3<!=744'3 /!DFG!%$<#4$3<!('342'%%*&!=+!4#*!&''2!81$4(#:!'0*3!4#*!&''2!%$<#4:!
"%'8*!4#*!&''2!%$<#4!'559!8#'24!02*88!E ! E!4'!2*6%$?*!4#*!DFG!%$<#4$3<!6;=*2:!=%7*:!1#$4*:!
'55!4#*!%$<#4!(+(%*!=*41**3!81$4(#$3<:!;*;'2+!'5!4#*!%684!8464*!,'55!4#*!8464*!'5!4#*!%$<#4!
$8!3'4!;*;'2$?*&.9!%'3<!02*88!E! E!A!8*('3&8!4'!2*6%$?*!4#*!%$<#4!$8!6%16+8!'3:!64!4#*!
86;*!4$;*:!
!"#$%&'()*+,-$*.""/'%(0#*
). The control panel is
unlocked by default.
• To lock: Press
!"#$%&'(#$%')*%+)",'--',./)%01.*#%
!
!
%("
!
!
!
!
&J)<?6)>@D<)D8)>@C5>II6HM)C=G69)5=8<M)=9)<>9@6H)=OM)B=>):>8<)G7D<).)<=)+):D@><68);6J=96)968<79<D@I)<?6)>@D<K)&J)B=>)7<<6:C<)
<=)968<79<);6J=96)<?D8)<D:6)H657BM)<?6)7CC5D7@A6):7B)@=<)8<79<)7@H)GD55)@=<)N66C)<?6)578<)86<)<6:C697<>96K)
;/3#<'*."'?4#*$4&'@%#"&'
!
!
"
#$%&'
"
()*(++
"
,
"
-.//.01
"
2$3&
"
4
"
566&'
"
7$)&"8&96
"
:";/$<&
"
7$)&"8&96=
"
>$)0'$?
"
@
"
2A33?&
"
7$)&
"
8&96
"
B
"
2A33?&
"
7$)&
"
8&96=
"
>$)0'$?
"
C
"
D$%&'
"
7$)&
"
8&96
"
E"/&?$%
"
7$)&"8&96=
"
>$)0'$?
"
F" DAG10"-%A0H1"
I
"
8&96=
"
JAK6?.L
"
>1.)G&
"
MNOP
"
"! "#$%&!%'()!)*+!,! - ! ./!0'1*2!'3!4#*!&*567%4!73%'()*&!8464*9!$5!+'7!3**&!4'!%'():!
+'7!3**&!4'!02*88!,! -! .:!;6376%!%'()$3<:!87(#!68!4#*!3**&!4'!73%'():!02*88!
,! - ! .!4'!73%'()9!%'():!02*88!63+!)*+:!
! 4#*!='>!1$4#$3!
4#*!4#2**!4*;0*26472*!?'3*8!'5!4#*!4*;0*26472*!@6%7*!'5!4#*!&$<$46%!8(2**3!64!4#*!
86;*!4$;*!=%$3)$3<!5'2!A!8*('3&8:!6((';063$*&!=+!=**0$3<!4'!87<<*84!4#64!$3!4#*!
%'()$3<!8464*9!
"! B3CB55!)*+! /!D'3<!02*88!E ! E!5'2!A8!4'!4723!'3!'2!4723!'55!4#*!0'1*29!1#*3!8#744$3<!
&'13:!(74!'55!4#*!0'1*2!'5!6%%!0*2$0#*26%8!63&!*34*2!8463&=+!;'&*9!
"! DFG!%$<#4$3<!=744'3 /!DFG!%$<#4$3<!('342'%%*&!=+!4#*!&''2!81$4(#:!'0*3!4#*!&''2!%$<#4:!
"%'8*!4#*!&''2!%$<#4!'559!8#'24!02*88!E ! E!4'!2*6%$?*!4#*!DFG!%$<#4$3<!6;=*2:!=%7*:!1#$4*:!
'55!4#*!%$<#4!(+(%*!=*41**3!81$4(#$3<:!;*;'2+!'5!4#*!%684!8464*!,'55!4#*!8464*!'5!4#*!%$<#4!
$8!3'4!;*;'2$?*&.9!%'3<!02*88!E! E!A!8*('3&8!4'!2*6%$?*!4#*!%$<#4!$8!6%16+8!'3:!64!4#*!
86;*!4$;*:!
!"#$%&'()*+,-$*.""/'%(0#*
+
!"#$%&'(#$%')*%+)",'--',./)%01.*#%
!
!
%("
!
!
!
!
&J)<?6)>@D<)D8)>@C5>II6HM)C=G69)5=8<M)=9)<>9@6H)=OM)B=>):>8<)G7D<).)<=)+):D@><68);6J=96)968<79<D@I)<?6)>@D<K)&J)B=>)7<<6:C<)
<=)968<79<);6J=96)<?D8)<D:6)H657BM)<?6)7CC5D7@A6):7B)@=<)8<79<)7@H)GD55)@=<)N66C)<?6)578<)86<)<6:C697<>96K)
;/3#<'*."'?4#*$4&'@%#"&'
!
!
"
#$%&'
"
()*(++
"
,
"
-.//.01
"
2$3&
"
4
"
566&'
"
7$)&"8&96
"
:";/$<&
"
7$)&"8&96=
"
>$)0'$?
"
@
"
2A33?&
"
7$)&
"
8&96
"
B
"
2A33?&
"
7$)&
"
8&96=
"
>$)0'$?
"
C
"
D$%&'
"
7$)&
"
8&96
"
E"/&?$%
"
7$)&"8&96=
"
>$)0'$?
"
F" DAG10"-%A0H1"
I
"
8&96=
"
JAK6?.L
"
>1.)G&
"
MNOP
"
"! "#$%&!%'()!)*+!,! - ! ./!0'1*2!'3!4#*!&*567%4!73%'()*&!8464*9!$5!+'7!3**&!4'!%'():!
+'7!3**&!4'!02*88!,! -! .:!;6376%!%'()$3<:!87(#!68!4#*!3**&!4'!73%'():!02*88!
,! - ! .!4'!73%'()9!%'():!02*88!63+!)*+:!
! 4#*!='>!1$4#$3!
4#*!4#2**!4*;0*26472*!?'3*8!'5!4#*!4*;0*26472*!@6%7*!'5!4#*!&$<$46%!8(2**3!64!4#*!
86;*!4$;*!=%$3)$3<!5'2!A!8*('3&8:!6((';063$*&!=+!=**0$3<!4'!87<<*84!4#64!$3!4#*!
%'()$3<!8464*9!
"! B3CB55!)*+! /!D'3<!02*88!E ! E!5'2!A8!4'!4723!'3!'2!4723!'55!4#*!0'1*29!1#*3!8#744$3<!
&'13:!(74!'55!4#*!0'1*2!'5!6%%!0*2$0#*26%8!63&!*34*2!8463&=+!;'&*9!
"! DFG!%$<#4$3<!=744'3 /!DFG!%$<#4$3<!('342'%%*&!=+!4#*!&''2!81$4(#:!'0*3!4#*!&''2!%$<#4:!
"%'8*!4#*!&''2!%$<#4!'559!8#'24!02*88!E ! E!4'!2*6%$?*!4#*!DFG!%$<#4$3<!6;=*2:!=%7*:!1#$4*:!
'55!4#*!%$<#4!(+(%*!=*41**3!81$4(#$3<:!;*;'2+!'5!4#*!%684!8464*!,'55!4#*!8464*!'5!4#*!%$<#4!
$8!3'4!;*;'2$?*&.9!%'3<!02*88!E! E!A!8*('3&8!4'!2*6%$?*!4#*!%$<#4!$8!6%16+8!'3:!64!4#*!
86;*!4$;*:!
!"#$%&'()*+,-$*.""/'%(0#*
• When the controls are locked, any input on the control panel will result in the display
flashing for 3 seconds, indicating the locked status.
• Power On/Off (
!"#$%&'(#$%')*%+)",'--',./)%01.*#%
!
!
%("
!
!
!
!
&J)<?6)>@D<)D8)>@C5>II6HM)C=G69)5=8<M)=9)<>9@6H)=OM)B=>):>8<)G7D<).)<=)+):D@><68);6J=96)968<79<D@I)<?6)>@D<K)&J)B=>)7<<6:C<)
<=)968<79<);6J=96)<?D8)<D:6)H657BM)<?6)7CC5D7@A6):7B)@=<)8<79<)7@H)GD55)@=<)N66C)<?6)578<)86<)<6:C697<>96K)
;/3#<'*."'?4#*$4&'@%#"&'
!
!
"
#$%&'
"
()*(++
"
,
"
-.//.01
"
2$3&
"
4
"
566&'
"
7$)&"8&96
"
:";/$<&
"
7$)&"8&96=
"
>$)0'$?
"
@
"
2A33?&
"
7$)&
"
8&96
"
B
"
2A33?&
"
7$)&
"
8&96=
"
>$)0'$?
"
C
"
D$%&'
"
7$)&
"
8&96
"
E"/&?$%
"
7$)&"8&96=
"
>$)0'$?
"
F" DAG10"-%A0H1"
I
"
8&96=
"
JAK6?.L
"
>1.)G&
"
MNOP
"
"! "#$%&!%'()!)*+!,! - ! ./!0'1*2!'3!4#*!&*567%4!73%'()*&!8464*9!$5!+'7!3**&!4'!%'():!
+'7!3**&!4'!02*88!,! -! .:!;6376%!%'()$3<:!87(#!68!4#*!3**&!4'!73%'():!02*88!
,! - ! .!4'!73%'()9!%'():!02*88!63+!)*+:!
! 4#*!='>!1$4#$3!
4#*!4#2**!4*;0*26472*!?'3*8!'5!4#*!4*;0*26472*!@6%7*!'5!4#*!&$<$46%!8(2**3!64!4#*!
86;*!4$;*!=%$3)$3<!5'2!A!8*('3&8:!6((';063$*&!=+!=**0$3<!4'!87<<*84!4#64!$3!4#*!
%'()$3<!8464*9!
"! B3CB55!)*+! /!D'3<!02*88!E ! E!5'2!A8!4'!4723!'3!'2!4723!'55!4#*!0'1*29!1#*3!8#744$3<!
&'13:!(74!'55!4#*!0'1*2!'5!6%%!0*2$0#*26%8!63&!*34*2!8463&=+!;'&*9!
"! DFG!%$<#4$3<!=744'3 /!DFG!%$<#4$3<!('342'%%*&!=+!4#*!&''2!81$4(#:!'0*3!4#*!&''2!%$<#4:!
"%'8*!4#*!&''2!%$<#4!'559!8#'24!02*88!E ! E!4'!2*6%$?*!4#*!DFG!%$<#4$3<!6;=*2:!=%7*:!1#$4*:!
'55!4#*!%$<#4!(+(%*!=*41**3!81$4(#$3<:!;*;'2+!'5!4#*!%684!8464*!,'55!4#*!8464*!'5!4#*!%$<#4!
$8!3'4!;*;'2$?*&.9!%'3<!02*88!E! E!A!8*('3&8!4'!2*6%$?*!4#*!%$<#4!$8!6%16+8!'3:!64!4#*!
86;*!4$;*:!
!"#$%&'()*+,-$*.""/'%(0#*
): Press and hold "
!"#$%&'(#$%')*%+)",'--',./)%01.*#%
!
!
%("
!
!
!
!
&J)<?6)>@D<)D8)>@C5>II6HM)C=G69)5=8<M)=9)<>9@6H)=OM)B=>):>8<)G7D<).)<=)+):D@><68);6J=96)968<79<D@I)<?6)>@D<K)&J)B=>)7<<6:C<)
<=)968<79<);6J=96)<?D8)<D:6)H657BM)<?6)7CC5D7@A6):7B)@=<)8<79<)7@H)GD55)@=<)N66C)<?6)578<)86<)<6:C697<>96K)
;/3#<'*."'?4#*$4&'@%#"&'
!
!
"
#$%&'
"
()*(++
"
,
"
-.//.01
"
2$3&
"
4
"
566&'
"
7$)&"8&96
"
:";/$<&
"
7$)&"8&96=
"
>$)0'$?
"
@
"
2A33?&
"
7$)&
"
8&96
"
B
"
2A33?&
"
7$)&
"
8&96=
"
>$)0'$?
"
C
"
D$%&'
"
7$)&
"
8&96
"
E"/&?$%
"
7$)&"8&96=
"
>$)0'$?
"
F" DAG10"-%A0H1"
I
"
8&96=
"
JAK6?.L
"
>1.)G&
"
MNOP
"
"! "#$%&!%'()!)*+!,! - ! ./!0'1*2!'3!4#*!&*567%4!73%'()*&!8464*9!$5!+'7!3**&!4'!%'():!
+'7!3**&!4'!02*88!,! -! .:!;6376%!%'()$3<:!87(#!68!4#*!3**&!4'!73%'():!02*88!
,! - ! .!4'!73%'()9!%'():!02*88!63+!)*+:!
! 4#*!='>!1$4#$3!
4#*!4#2**!4*;0*26472*!?'3*8!'5!4#*!4*;0*26472*!@6%7*!'5!4#*!&$<$46%!8(2**3!64!4#*!
86;*!4$;*!=%$3)$3<!5'2!A!8*('3&8:!6((';063$*&!=+!=**0$3<!4'!87<<*84!4#64!$3!4#*!
%'()$3<!8464*9!
"! B3CB55!)*+! /!D'3<!02*88!E ! E!5'2!A8!4'!4723!'3!'2!4723!'55!4#*!0'1*29!1#*3!8#744$3<!
&'13:!(74!'55!4#*!0'1*2!'5!6%%!0*2$0#*26%8!63&!*34*2!8463&=+!;'&*9!
"! DFG!%$<#4$3<!=744'3 /!DFG!%$<#4$3<!('342'%%*&!=+!4#*!&''2!81$4(#:!'0*3!4#*!&''2!%$<#4:!
"%'8*!4#*!&''2!%$<#4!'559!8#'24!02*88!E ! E!4'!2*6%$?*!4#*!DFG!%$<#4$3<!6;=*2:!=%7*:!1#$4*:!
'55!4#*!%$<#4!(+(%*!=*41**3!81$4(#$3<:!;*;'2+!'5!4#*!%684!8464*!,'55!4#*!8464*!'5!4#*!%$<#4!
$8!3'4!;*;'2$?*&.9!%'3<!02*88!E! E!A!8*('3&8!4'!2*6%$?*!4#*!%$<#4!$8!6%16+8!'3:!64!4#*!
86;*!4$;*:!
!"#$%&'()*+,-$*.""/'%(0#*
" for 3 seconds to power the unit on or off.'
• Light Button (
!"#$%&'(#$%')*%+)",'--',./)%01.*#%
!
!
%("
!
!
!
!
&J)<?6)>@D<)D8)>@C5>II6HM)C=G69)5=8<M)=9)<>9@6H)=OM)B=>):>8<)G7D<).)<=)+):D@><68);6J=96)968<79<D@I)<?6)>@D<K)&J)B=>)7<<6:C<)
<=)968<79<);6J=96)<?D8)<D:6)H657BM)<?6)7CC5D7@A6):7B)@=<)8<79<)7@H)GD55)@=<)N66C)<?6)578<)86<)<6:C697<>96K)
;/3#<'*."'?4#*$4&'@%#"&'
!
!
"
#$%&'
"
()*(++
"
,
"
-.//.01
"
2$3&
"
4
"
566&'
"
7$)&"8&96
"
:";/$<&
"
7$)&"8&96=
"
>$)0'$?
"
@
"
2A33?&
"
7$)&
"
8&96
"
B
"
2A33?&
"
7$)&
"
8&96=
"
>$)0'$?
"
C
"
D$%&'
"
7$)&
"
8&96
"
E"/&?$%
"
7$)&"8&96=
"
>$)0'$?
"
F" DAG10"-%A0H1"
I
"
8&96=
"
JAK6?.L
"
>1.)G&
"
MNOP
"
"! "#$%&!%'()!)*+!,! - ! ./!0'1*2!'3!4#*!&*567%4!73%'()*&!8464*9!$5!+'7!3**&!4'!%'():!
+'7!3**&!4'!02*88!,! -! .:!;6376%!%'()$3<:!87(#!68!4#*!3**&!4'!73%'():!02*88!
,! - ! .!4'!73%'()9!%'():!02*88!63+!)*+:!
! 4#*!='>!1$4#$3!
4#*!4#2**!4*;0*26472*!?'3*8!'5!4#*!4*;0*26472*!@6%7*!'5!4#*!&$<$46%!8(2**3!64!4#*!
86;*!4$;*!=%$3)$3<!5'2!A!8*('3&8:!6((';063$*&!=+!=**0$3<!4'!87<<*84!4#64!$3!4#*!
%'()$3<!8464*9!
"! B3CB55!)*+! /!D'3<!02*88!E ! E!5'2!A8!4'!4723!'3!'2!4723!'55!4#*!0'1*29!1#*3!8#744$3<!
&'13:!(74!'55!4#*!0'1*2!'5!6%%!0*2$0#*26%8!63&!*34*2!8463&=+!;'&*9!
"! DFG!%$<#4$3<!=744'3 /!DFG!%$<#4$3<!('342'%%*&!=+!4#*!&''2!81$4(#:!'0*3!4#*!&''2!%$<#4:!
"%'8*!4#*!&''2!%$<#4!'559!8#'24!02*88!E ! E!4'!2*6%$?*!4#*!DFG!%$<#4$3<!6;=*2:!=%7*:!1#$4*:!
'55!4#*!%$<#4!(+(%*!=*41**3!81$4(#$3<:!;*;'2+!'5!4#*!%684!8464*!,'55!4#*!8464*!'5!4#*!%$<#4!
$8!3'4!;*;'2$?*&.9!%'3<!02*88!E! E!A!8*('3&8!4'!2*6%$?*!4#*!%$<#4!$8!6%16+8!'3:!64!4#*!
86;*!4$;*:!
!"#$%&'()*+,-$*.""/'%(0#*
): LED lighting is controlled by the door switch. When the door is opened,
the light turns on. When the door is closed, the light turns off.
• Color Change: Press "
!"#$%&'(#$%')*%+)",'--',./)%01.*#%
!
!
%("
!
!
!
!
&J)<?6)>@D<)D8)>@C5>II6HM)C=G69)5=8<M)=9)<>9@6H)=OM)B=>):>8<)G7D<).)<=)+):D@><68);6J=96)968<79<D@I)<?6)>@D<K)&J)B=>)7<<6:C<)
<=)968<79<);6J=96)<?D8)<D:6)H657BM)<?6)7CC5D7@A6):7B)@=<)8<79<)7@H)GD55)@=<)N66C)<?6)578<)86<)<6:C697<>96K)
;/3#<'*."'?4#*$4&'@%#"&'
!
!
"
#$%&'
"
()*(++
"
,
"
-.//.01
"
2$3&
"
4
"
566&'
"
7$)&"8&96
"
:";/$<&
"
7$)&"8&96=
"
>$)0'$?
"
@
"
2A33?&
"
7$)&
"
8&96
"
B
"
2A33?&
"
7$)&
"
8&96=
"
>$)0'$?
"
C
"
D$%&'
"
7$)&
"
8&96
"
E"/&?$%
"
7$)&"8&96=
"
>$)0'$?
"
F" DAG10"-%A0H1"
I
"
8&96=
"
JAK6?.L
"
>1.)G&
"
MNOP
"
"! "#$%&!%'()!)*+!,! - ! ./!0'1*2!'3!4#*!&*567%4!73%'()*&!8464*9!$5!+'7!3**&!4'!%'():!
+'7!3**&!4'!02*88!,! -! .:!;6376%!%'()$3<:!87(#!68!4#*!3**&!4'!73%'():!02*88!
,! - ! .!4'!73%'()9!%'():!02*88!63+!)*+:!
! 4#*!='>!1$4#$3!
4#*!4#2**!4*;0*26472*!?'3*8!'5!4#*!4*;0*26472*!@6%7*!'5!4#*!&$<$46%!8(2**3!64!4#*!
86;*!4$;*!=%$3)$3<!5'2!A!8*('3&8:!6((';063$*&!=+!=**0$3<!4'!87<<*84!4#64!$3!4#*!
%'()$3<!8464*9!
"! B3CB55!)*+! /!D'3<!02*88!E ! E!5'2!A8!4'!4723!'3!'2!4723!'55!4#*!0'1*29!1#*3!8#744$3<!
&'13:!(74!'55!4#*!0'1*2!'5!6%%!0*2$0#*26%8!63&!*34*2!8463&=+!;'&*9!
"! DFG!%$<#4$3<!=744'3 /!DFG!%$<#4$3<!('342'%%*&!=+!4#*!&''2!81$4(#:!'0*3!4#*!&''2!%$<#4:!
"%'8*!4#*!&''2!%$<#4!'559!8#'24!02*88!E ! E!4'!2*6%$?*!4#*!DFG!%$<#4$3<!6;=*2:!=%7*:!1#$4*:!
'55!4#*!%$<#4!(+(%*!=*41**3!81$4(#$3<:!;*;'2+!'5!4#*!%684!8464*!,'55!4#*!8464*!'5!4#*!%$<#4!
$8!3'4!;*;'2$?*&.9!%'3<!02*88!E! E!A!8*('3&8!4'!2*6%$?*!4#*!%$<#4!$8!6%16+8!'3:!64!4#*!
86;*!4$;*:!
!"#$%&'()*+,-$*.""/'%(0#*
" once to change the LED lighting color from amber, to
blue, to white, to off. NOTE: The light does not retain its previous setting.
• Exhibition Mode:
• Press and hold "
!"#$%&'(#$%')*%+)",'--',./)%01.*#%
!
!
%("
!
!
!
!
&J)<?6)>@D<)D8)>@C5>II6HM)C=G69)5=8<M)=9)<>9@6H)=OM)B=>):>8<)G7D<).)<=)+):D@><68);6J=96)968<79<D@I)<?6)>@D<K)&J)B=>)7<<6:C<)
<=)968<79<);6J=96)<?D8)<D:6)H657BM)<?6)7CC5D7@A6):7B)@=<)8<79<)7@H)GD55)@=<)N66C)<?6)578<)86<)<6:C697<>96K)
;/3#<'*."'?4#*$4&'@%#"&'
!
!
"
#$%&'
"
()*(++
"
,
"
-.//.01
"
2$3&
"
4
"
566&'
"
7$)&"8&96
"
:";/$<&
"
7$)&"8&96=
"
>$)0'$?
"
@
"
2A33?&
"
7$)&
"
8&96
"
B
"
2A33?&
"
7$)&
"
8&96=
"
>$)0'$?
"
C
"
D$%&'
"
7$)&
"
8&96
"
E"/&?$%
"
7$)&"8&96=
"
>$)0'$?
"
F" DAG10"-%A0H1"
I
"
8&96=
"
JAK6?.L
"
>1.)G&
"
MNOP
"
"! "#$%&!%'()!)*+!,! - ! ./!0'1*2!'3!4#*!&*567%4!73%'()*&!8464*9!$5!+'7!3**&!4'!%'():!
+'7!3**&!4'!02*88!,! -! .:!;6376%!%'()$3<:!87(#!68!4#*!3**&!4'!73%'():!02*88!
,! - ! .!4'!73%'()9!%'():!02*88!63+!)*+:!
! 4#*!='>!1$4#$3!
4#*!4#2**!4*;0*26472*!?'3*8!'5!4#*!4*;0*26472*!@6%7*!'5!4#*!&$<$46%!8(2**3!64!4#*!
86;*!4$;*!=%$3)$3<!5'2!A!8*('3&8:!6((';063$*&!=+!=**0$3<!4'!87<<*84!4#64!$3!4#*!
%'()$3<!8464*9!
"! B3CB55!)*+! /!D'3<!02*88!E ! E!5'2!A8!4'!4723!'3!'2!4723!'55!4#*!0'1*29!1#*3!8#744$3<!
&'13:!(74!'55!4#*!0'1*2!'5!6%%!0*2$0#*26%8!63&!*34*2!8463&=+!;'&*9!
"! DFG!%$<#4$3<!=744'3 /!DFG!%$<#4$3<!('342'%%*&!=+!4#*!&''2!81$4(#:!'0*3!4#*!&''2!%$<#4:!
"%'8*!4#*!&''2!%$<#4!'559!8#'24!02*88!E ! E!4'!2*6%$?*!4#*!DFG!%$<#4$3<!6;=*2:!=%7*:!1#$4*:!
'55!4#*!%$<#4!(+(%*!=*41**3!81$4(#$3<:!;*;'2+!'5!4#*!%684!8464*!,'55!4#*!8464*!'5!4#*!%$<#4!
$8!3'4!;*;'2$?*&.9!%'3<!02*88!E! E!A!8*('3&8!4'!2*6%$?*!4#*!%$<#4!$8!6%16+8!'3:!64!4#*!
86;*!4$;*:!
!"#$%&'()*+,-$*.""/'%(0#*
" for 5 seconds to enable the lighting whether the door is
open or closed. Once entered, the display will show "ON" for 5 seconds and
the display will stay on for 30 seconds after closing the door. The interior light
stays on until this setting is disabled.
• To disable this setting, press and hold the light button again. The display will
show "OFF" for 5 seconds. After closing the door, the display will stay on for
30 seconds but the interior light turns off immediately.
• Brightness Adjustment: When the display shows the "ON" state (setting above),
the key "
!"#$%&'(#$%')*%+)",'--',./)%01.*#%
!
!
%)"
'
'
4#*!&$<$46%!8(2**3!'5!4#*!4#2**!4*;0*26472*!?'3*8!62*!&$80%6+*&!BH!5'2!I!8*('3&8:!
I!8*('3&8!654*2!4#*!&$<$46%!8(2**3!4'!2*84'2*!4#*!4*;0*26472*!@6%7*!&$80%6+9!$3!4#*!
&$<$46%!8(2**3!&$80%6+!BH!8464*:!4#*!)*+ ! (63!=*!6&J784*&!70!63&!&'13!4'!6&J784!
4#*!=2$<#43*88!'5!4#*!DFG!%$<#4$3<:!DK!L!DM!(+(%*!'5!6&J784;*34:!6!4'46%!'5!M!%*@*%8:!
DM!$8!4#*!=2$<#4*84:!4#*!;*;'2+!'5!4#*!%684!4$;*!8464*9!
"! B0*3!63&!(%'8*!4#*!&''2!('342'%/!1#*3!4#*!&''2!$8!'0*3*&:!4#*!%$<#4$3<!$8!4723*&!'3:!
4#*!&$80%6+!$8!%$4!63&!)*04!734$%!4#*!&''2!$8!(%'8*&:!4#*!563!84'08:!1#*3!4#*!&''2!$8!'0*3*&!
5'2!;'2*!4#63!I!;$374*8:!4#*!'0*3!&''2!6%62;!$8!'0*3*&:!63&!4#*!6%62;!$8!(63(*%*&!=+!
02*88$3<!63+!)*+9!1#*3!4#*!&''2!$8!(%'8*&:!4#*!%$<#4$3<!$8!4723*&!'55!,*>(*04!5'2!4#*!;6376%!
'0*264$'3!'5!4#*!%$<#4.:!4#*!563!84'08!4#*!8464*!'5!%$54$3<!63&!84624$3<!$;;*&$64*%+:!63&!4#*!
&''2!$8!(%'8*&!5'2!AN!8*('3&8:!63&!4#*!&$80%6+!$8!4723*&!'55O!
"! P6==64#!'3C'55!)*+!/!P#'24!02*88!E! E!)*+!4'!*34*2!'2!*>$4!P6==64#9!654*2!*34*2$3<!
P6==64#:!4#*!02*88!63&!563!1$%%!273!3'2;6%%+:!4#*!%$<#4$3<!1$%%!<'!'74!%'3<!4$;*:!4#*!
&$80%6+!1$%%!<'!'74!%'3<!4$;*:!4#*!=7??*2!1$%%!4723!'55:!63&!4#*!0'1*2!56$%72*!1$%%!=*!
;*;'2$?*&:!63&!4#*!0'1*2!56$%72*!1$%%!=*!674';64$(6%%+!*>$4*&!654*2!QR!#'728!'5!
'0*264$'3:!63&!4#*!56$%72*!1$%%!6%8'!=*!674';64$(6%%+!*>$4*&9!$5!+'7!3**&!4'!*>$4!;6376%%+:!
02*88!E! E!)*+!4'!*>$4!4#*!P6==64#!;'&*:!63&!654*2!*>$4$3<:!$4!1$%%!273!$3!3'2;6%!;'&*9!
!
"!
>+0B!'00(!(01&W.0$%!8'&))!Y x Z!K&2!,0'!i!)&90$1):!&$*&'!*+&!>+0B!'00(!(01&5I$!#11-*-0$!*0!*+&!
90(8'&))0'!)*08)!B0'K-$%:!#..!0*+&'!$0'(#.!B0'K:!)+/*10B$!)*#*&!0,!*+&!*+'&&!*&(8&'#*/'&!A0$&)!
0,!*+&!1-%-*#.!*/@&!#'&!1-)8.#2&1!>$5!T0B&'!,#-./'&!(&(0'2:!$0!K&2!08&'#*-0$:!oe!+0/')!#,*&'!*+&!
#/*0(#*-9!&7-*`!>+0B!'00(!(01&:!8'&))!*+&!Y x Z!K&2!#%#-$:!&7-*!*+&!>+0B!'00(!(01&5
!
!
!
!
!
!
!
!
!"#$%&'()*+,-$*.""/'%(0#*
" can be pressed up or down to adjust the lighting brightness. Adjust
between 7 levels of brightness, L1-L7, with L7 being the brightest. Once set, the unit
retains this brightness setting.
16
Keys and Controls
OPERATION
OPERATION
• Door Opening and Closing Functionality:
• When the door is opened, the interior light turns on, and the display is active until
the door is closed. The door alarms when the door is left open for 2 minutes. The fan
stops when the door is left open for more than 5 minutes. When the open door alarm
is active, the alarm can be canceled by pressing any button.
• When the door is closed, the interior light is off (unless in Exhibition Mode), and the
fan runs normally. The display will be off when the door is closed for 30 seconds.
• Sabbath Mode: Press and hold "
!"#$%&'(#$%')*%+)",'--',./)%01.*#%
!
!
%)"
'
'
4#*!&$<$46%!8(2**3!'5!4#*!4#2**!4*;0*26472*!?'3*8!62*!&$80%6+*&!BH!5'2!I!8*('3&8:!
I!8*('3&8!654*2!4#*!&$<$46%!8(2**3!4'!2*84'2*!4#*!4*;0*26472*!@6%7*!&$80%6+9!$3!4#*!
&$<$46%!8(2**3!&$80%6+!BH!8464*:!4#*!)*+ ! (63!=*!6&J784*&!70!63&!&'13!4'!6&J784!
4#*!=2$<#43*88!'5!4#*!DFG!%$<#4$3<:!DK!L!DM!(+(%*!'5!6&J784;*34:!6!4'46%!'5!M!%*@*%8:!
DM!$8!4#*!=2$<#4*84:!4#*!;*;'2+!'5!4#*!%684!4$;*!8464*9!
"! B0*3!63&!(%'8*!4#*!&''2!('342'%/!1#*3!4#*!&''2!$8!'0*3*&:!4#*!%$<#4$3<!$8!4723*&!'3:!
4#*!&$80%6+!$8!%$4!63&!)*04!734$%!4#*!&''2!$8!(%'8*&:!4#*!563!84'08:!1#*3!4#*!&''2!$8!'0*3*&!
5'2!;'2*!4#63!I!;$374*8:!4#*!'0*3!&''2!6%62;!$8!'0*3*&:!63&!4#*!6%62;!$8!(63(*%*&!=+!
02*88$3<!63+!)*+9!1#*3!4#*!&''2!$8!(%'8*&:!4#*!%$<#4$3<!$8!4723*&!'55!,*>(*04!5'2!4#*!;6376%!
'0*264$'3!'5!4#*!%$<#4.:!4#*!563!84'08!4#*!8464*!'5!%$54$3<!63&!84624$3<!$;;*&$64*%+:!63&!4#*!
&''2!$8!(%'8*&!5'2!AN!8*('3&8:!63&!4#*!&$80%6+!$8!4723*&!'55O!
"! P6==64#!'3C'55!)*+!/!P#'24!02*88!E! E!)*+!4'!*34*2!'2!*>$4!P6==64#9!654*2!*34*2$3<!
P6==64#:!4#*!02*88!63&!563!1$%%!273!3'2;6%%+:!4#*!%$<#4$3<!1$%%!<'!'74!%'3<!4$;*:!4#*!
&$80%6+!1$%%!<'!'74!%'3<!4$;*:!4#*!=7??*2!1$%%!4723!'55:!63&!4#*!0'1*2!56$%72*!1$%%!=*!
;*;'2$?*&:!63&!4#*!0'1*2!56$%72*!1$%%!=*!674';64$(6%%+!*>$4*&!654*2!QR!#'728!'5!
'0*264$'3:!63&!4#*!56$%72*!1$%%!6%8'!=*!674';64$(6%%+!*>$4*&9!$5!+'7!3**&!4'!*>$4!;6376%%+:!
02*88!E! E!)*+!4'!*>$4!4#*!P6==64#!;'&*:!63&!654*2!*>$4$3<:!$4!1$%%!273!$3!3'2;6%!;'&*9!
!
"!
>+0B!'00(!(01&W.0$%!8'&))!Y x Z!K&2!,0'!i!)&90$1):!&$*&'!*+&!>+0B!'00(!(01&5I$!#11-*-0$!*0!*+&!
90(8'&))0'!)*08)!B0'K-$%:!#..!0*+&'!$0'(#.!B0'K:!)+/*10B$!)*#*&!0,!*+&!*+'&&!*&(8&'#*/'&!A0$&)!
0,!*+&!1-%-*#.!*/@&!#'&!1-)8.#2&1!>$5!T0B&'!,#-./'&!(&(0'2:!$0!K&2!08&'#*-0$:!oe!+0/')!#,*&'!*+&!
#/*0(#*-9!&7-*`!>+0B!'00(!(01&:!8'&))!*+&!Y x Z!K&2!#%#-$:!&7-*!*+&!>+0B!'00(!(01&5
!
!
!
!
!
!
!
!
!"#$%&'()*+,-$*.""/'%(0#*
" for 5 seconds to enter or exit Sabbath Mode.
When enabled, the cooling system will run normally, and the lights, display, and all
tones/alarms will be off. Sabbath Mode will automatically disable after 96 hours unless
disabled manually.
• Showroom Mode: While the power is off, press and hold "
!"#$%&'(#$%')*%+)",'--',./)%01.*#%
!
!
%("
!
!
!
!
&J)<?6)>@D<)D8)>@C5>II6HM)C=G69)5=8<M)=9)<>9@6H)=OM)B=>):>8<)G7D<).)<=)+):D@><68);6J=96)968<79<D@I)<?6)>@D<K)&J)B=>)7<<6:C<)
<=)968<79<);6J=96)<?D8)<D:6)H657BM)<?6)7CC5D7@A6):7B)@=<)8<79<)7@H)GD55)@=<)N66C)<?6)578<)86<)<6:C697<>96K)
;/3#<'*."'?4#*$4&'@%#"&'
!
!
"
#$%&'
"
()*(++
"
,
"
-.//.01
"
2$3&
"
4
"
566&'
"
7$)&"8&96
"
:";/$<&
"
7$)&"8&96=
"
>$)0'$?
"
@
"
2A33?&
"
7$)&
"
8&96
"
B
"
2A33?&
"
7$)&
"
8&96=
"
>$)0'$?
"
C
"
D$%&'
"
7$)&
"
8&96
"
E"/&?$%
"
7$)&"8&96=
"
>$)0'$?
"
F" DAG10"-%A0H1"
I
"
8&96=
"
JAK6?.L
"
>1.)G&
"
MNOP
"
"! "#$%&!%'()!)*+!,! - ! ./!0'1*2!'3!4#*!&*567%4!73%'()*&!8464*9!$5!+'7!3**&!4'!%'():!
+'7!3**&!4'!02*88!,! -! .:!;6376%!%'()$3<:!87(#!68!4#*!3**&!4'!73%'():!02*88!
,! - ! .!4'!73%'()9!%'():!02*88!63+!)*+:!
! 4#*!='>!1$4#$3!
4#*!4#2**!4*;0*26472*!?'3*8!'5!4#*!4*;0*26472*!@6%7*!'5!4#*!&$<$46%!8(2**3!64!4#*!
86;*!4$;*!=%$3)$3<!5'2!A!8*('3&8:!6((';063$*&!=+!=**0$3<!4'!87<<*84!4#64!$3!4#*!
%'()$3<!8464*9!
"! B3CB55!)*+! /!D'3<!02*88!E ! E!5'2!A8!4'!4723!'3!'2!4723!'55!4#*!0'1*29!1#*3!8#744$3<!
&'13:!(74!'55!4#*!0'1*2!'5!6%%!0*2$0#*26%8!63&!*34*2!8463&=+!;'&*9!
"! DFG!%$<#4$3<!=744'3 /!DFG!%$<#4$3<!('342'%%*&!=+!4#*!&''2!81$4(#:!'0*3!4#*!&''2!%$<#4:!
"%'8*!4#*!&''2!%$<#4!'559!8#'24!02*88!E ! E!4'!2*6%$?*!4#*!DFG!%$<#4$3<!6;=*2:!=%7*:!1#$4*:!
'55!4#*!%$<#4!(+(%*!=*41**3!81$4(#$3<:!;*;'2+!'5!4#*!%684!8464*!,'55!4#*!8464*!'5!4#*!%$<#4!
$8!3'4!;*;'2$?*&.9!%'3<!02*88!E! E!A!8*('3&8!4'!2*6%$?*!4#*!%$<#4!$8!6%16+8!'3:!64!4#*!
86;*!4$;*:!
!"#$%&'()*+,-$*.""/'%(0#*
+
!"#$%&'(#$%')*%+)",'--',./)%01.*#%
!
!
%)"
'
'
4#*!&$<$46%!8(2**3!'5!4#*!4#2**!4*;0*26472*!?'3*8!62*!&$80%6+*&!BH!5'2!I!8*('3&8:!
I!8*('3&8!654*2!4#*!&$<$46%!8(2**3!4'!2*84'2*!4#*!4*;0*26472*!@6%7*!&$80%6+9!$3!4#*!
&$<$46%!8(2**3!&$80%6+!BH!8464*:!4#*!)*+ ! (63!=*!6&J784*&!70!63&!&'13!4'!6&J784!
4#*!=2$<#43*88!'5!4#*!DFG!%$<#4$3<:!DK!L!DM!(+(%*!'5!6&J784;*34:!6!4'46%!'5!M!%*@*%8:!
DM!$8!4#*!=2$<#4*84:!4#*!;*;'2+!'5!4#*!%684!4$;*!8464*9!
"! B0*3!63&!(%'8*!4#*!&''2!('342'%/!1#*3!4#*!&''2!$8!'0*3*&:!4#*!%$<#4$3<!$8!4723*&!'3:!
4#*!&$80%6+!$8!%$4!63&!)*04!734$%!4#*!&''2!$8!(%'8*&:!4#*!563!84'08:!1#*3!4#*!&''2!$8!'0*3*&!
5'2!;'2*!4#63!I!;$374*8:!4#*!'0*3!&''2!6%62;!$8!'0*3*&:!63&!4#*!6%62;!$8!(63(*%*&!=+!
02*88$3<!63+!)*+9!1#*3!4#*!&''2!$8!(%'8*&:!4#*!%$<#4$3<!$8!4723*&!'55!,*>(*04!5'2!4#*!;6376%!
'0*264$'3!'5!4#*!%$<#4.:!4#*!563!84'08!4#*!8464*!'5!%$54$3<!63&!84624$3<!$;;*&$64*%+:!63&!4#*!
&''2!$8!(%'8*&!5'2!AN!8*('3&8:!63&!4#*!&$80%6+!$8!4723*&!'55O!
"! P6==64#!'3C'55!)*+!/!P#'24!02*88!E! E!)*+!4'!*34*2!'2!*>$4!P6==64#9!654*2!*34*2$3<!
P6==64#:!4#*!02*88!63&!563!1$%%!273!3'2;6%%+:!4#*!%$<#4$3<!1$%%!<'!'74!%'3<!4$;*:!4#*!
&$80%6+!1$%%!<'!'74!%'3<!4$;*:!4#*!=7??*2!1$%%!4723!'55:!63&!4#*!0'1*2!56$%72*!1$%%!=*!
;*;'2$?*&:!63&!4#*!0'1*2!56$%72*!1$%%!=*!674';64$(6%%+!*>$4*&!654*2!QR!#'728!'5!
'0*264$'3:!63&!4#*!56$%72*!1$%%!6%8'!=*!674';64$(6%%+!*>$4*&9!$5!+'7!3**&!4'!*>$4!;6376%%+:!
02*88!E! E!)*+!4'!*>$4!4#*!P6==64#!;'&*:!63&!654*2!*>$4$3<:!$4!1$%%!273!$3!3'2;6%!;'&*9!
!
"!
>+0B!'00(!(01&W.0$%!8'&))!Y x Z!K&2!,0'!i!)&90$1):!&$*&'!*+&!>+0B!'00(!(01&5I$!#11-*-0$!*0!*+&!
90(8'&))0'!)*08)!B0'K-$%:!#..!0*+&'!$0'(#.!B0'K:!)+/*10B$!)*#*&!0,!*+&!*+'&&!*&(8&'#*/'&!A0$&)!
0,!*+&!1-%-*#.!*/@&!#'&!1-)8.#2&1!>$5!T0B&'!,#-./'&!(&(0'2:!$0!K&2!08&'#*-0$:!oe!+0/')!#,*&'!*+&!
#/*0(#*-9!&7-*`!>+0B!'00(!(01&:!8'&))!*+&!Y x Z!K&2!#%#-$:!&7-*!*+&!>+0B!'00(!(01&5
!
!
!
!
!
!
!
!
!"#$%&'()*+,-$*.""/'%(0#*
" for 5 seconds to enter
the Showroom Mode. The compressor turns off, but all other functions are normal. The three
temperature zones display "Sn". No keys can be pressed when the panel displays "Sn".
Press "
!"#$%&'(#$%')*%+)",'--',./)%01.*#%
!
!
%("
!
!
!
!
&J)<?6)>@D<)D8)>@C5>II6HM)C=G69)5=8<M)=9)<>9@6H)=OM)B=>):>8<)G7D<).)<=)+):D@><68);6J=96)968<79<D@I)<?6)>@D<K)&J)B=>)7<<6:C<)
<=)968<79<);6J=96)<?D8)<D:6)H657BM)<?6)7CC5D7@A6):7B)@=<)8<79<)7@H)GD55)@=<)N66C)<?6)578<)86<)<6:C697<>96K)
;/3#<'*."'?4#*$4&'@%#"&'
!
!
"
#$%&'
"
()*(++
"
,
"
-.//.01
"
2$3&
"
4
"
566&'
"
7$)&"8&96
"
:";/$<&
"
7$)&"8&96=
"
>$)0'$?
"
@
"
2A33?&
"
7$)&
"
8&96
"
B
"
2A33?&
"
7$)&
"
8&96=
"
>$)0'$?
"
C
"
D$%&'
"
7$)&
"
8&96
"
E"/&?$%
"
7$)&"8&96=
"
>$)0'$?
"
F" DAG10"-%A0H1"
I
"
8&96=
"
JAK6?.L
"
>1.)G&
"
MNOP
"
"! "#$%&!%'()!)*+!,! - ! ./!0'1*2!'3!4#*!&*567%4!73%'()*&!8464*9!$5!+'7!3**&!4'!%'():!
+'7!3**&!4'!02*88!,! -! .:!;6376%!%'()$3<:!87(#!68!4#*!3**&!4'!73%'():!02*88!
,! - ! .!4'!73%'()9!%'():!02*88!63+!)*+:!
! 4#*!='>!1$4#$3!
4#*!4#2**!4*;0*26472*!?'3*8!'5!4#*!4*;0*26472*!@6%7*!'5!4#*!&$<$46%!8(2**3!64!4#*!
86;*!4$;*!=%$3)$3<!5'2!A!8*('3&8:!6((';063$*&!=+!=**0$3<!4'!87<<*84!4#64!$3!4#*!
%'()$3<!8464*9!
"! B3CB55!)*+! /!D'3<!02*88!E ! E!5'2!A8!4'!4723!'3!'2!4723!'55!4#*!0'1*29!1#*3!8#744$3<!
&'13:!(74!'55!4#*!0'1*2!'5!6%%!0*2$0#*26%8!63&!*34*2!8463&=+!;'&*9!
"! DFG!%$<#4$3<!=744'3 /!DFG!%$<#4$3<!('342'%%*&!=+!4#*!&''2!81$4(#:!'0*3!4#*!&''2!%$<#4:!
"%'8*!4#*!&''2!%$<#4!'559!8#'24!02*88!E ! E!4'!2*6%$?*!4#*!DFG!%$<#4$3<!6;=*2:!=%7*:!1#$4*:!
'55!4#*!%$<#4!(+(%*!=*41**3!81$4(#$3<:!;*;'2+!'5!4#*!%684!8464*!,'55!4#*!8464*!'5!4#*!%$<#4!
$8!3'4!;*;'2$?*&.9!%'3<!02*88!E! E!A!8*('3&8!4'!2*6%$?*!4#*!%$<#4!$8!6%16+8!'3:!64!4#*!
86;*!4$;*:!
!"#$%&'()*+,-$*.""/'%(0#*
" to access functions such as light and temperature adjustment. Press and hold
"
!"#$%&'(#$%')*%+)",'--',./)%01.*#%
!
!
%("
!
!
!
!
&J)<?6)>@D<)D8)>@C5>II6HM)C=G69)5=8<M)=9)<>9@6H)=OM)B=>):>8<)G7D<).)<=)+):D@><68);6J=96)968<79<D@I)<?6)>@D<K)&J)B=>)7<<6:C<)
<=)968<79<);6J=96)<?D8)<D:6)H657BM)<?6)7CC5D7@A6):7B)@=<)8<79<)7@H)GD55)@=<)N66C)<?6)578<)86<)<6:C697<>96K)
;/3#<'*."'?4#*$4&'@%#"&'
!
!
"
#$%&'
"
()*(++
"
,
"
-.//.01
"
2$3&
"
4
"
566&'
"
7$)&"8&96
"
:";/$<&
"
7$)&"8&96=
"
>$)0'$?
"
@
"
2A33?&
"
7$)&
"
8&96
"
B
"
2A33?&
"
7$)&
"
8&96=
"
>$)0'$?
"
C
"
D$%&'
"
7$)&
"
8&96
"
E"/&?$%
"
7$)&"8&96=
"
>$)0'$?
"
F" DAG10"-%A0H1"
I
"
8&96=
"
JAK6?.L
"
>1.)G&
"
MNOP
"
"! "#$%&!%'()!)*+!,! - ! ./!0'1*2!'3!4#*!&*567%4!73%'()*&!8464*9!$5!+'7!3**&!4'!%'():!
+'7!3**&!4'!02*88!,! -! .:!;6376%!%'()$3<:!87(#!68!4#*!3**&!4'!73%'():!02*88!
,! - ! .!4'!73%'()9!%'():!02*88!63+!)*+:!
! 4#*!='>!1$4#$3!
4#*!4#2**!4*;0*26472*!?'3*8!'5!4#*!4*;0*26472*!@6%7*!'5!4#*!&$<$46%!8(2**3!64!4#*!
86;*!4$;*!=%$3)$3<!5'2!A!8*('3&8:!6((';063$*&!=+!=**0$3<!4'!87<<*84!4#64!$3!4#*!
%'()$3<!8464*9!
"! B3CB55!)*+! /!D'3<!02*88!E ! E!5'2!A8!4'!4723!'3!'2!4723!'55!4#*!0'1*29!1#*3!8#744$3<!
&'13:!(74!'55!4#*!0'1*2!'5!6%%!0*2$0#*26%8!63&!*34*2!8463&=+!;'&*9!
"! DFG!%$<#4$3<!=744'3 /!DFG!%$<#4$3<!('342'%%*&!=+!4#*!&''2!81$4(#:!'0*3!4#*!&''2!%$<#4:!
"%'8*!4#*!&''2!%$<#4!'559!8#'24!02*88!E ! E!4'!2*6%$?*!4#*!DFG!%$<#4$3<!6;=*2:!=%7*:!1#$4*:!
'55!4#*!%$<#4!(+(%*!=*41**3!81$4(#$3<:!;*;'2+!'5!4#*!%684!8464*!,'55!4#*!8464*!'5!4#*!%$<#4!
$8!3'4!;*;'2$?*&.9!%'3<!02*88!E! E!A!8*('3&8!4'!2*6%$?*!4#*!%$<#4!$8!6%16+8!'3:!64!4#*!
86;*!4$;*:!
!"#$%&'()*+,-$*.""/'%(0#*
+
!"#$%&'(#$%')*%+)",'--',./)%01.*#%
!
!
%)"
'
'
4#*!&$<$46%!8(2**3!'5!4#*!4#2**!4*;0*26472*!?'3*8!62*!&$80%6+*&!BH!5'2!I!8*('3&8:!
I!8*('3&8!654*2!4#*!&$<$46%!8(2**3!4'!2*84'2*!4#*!4*;0*26472*!@6%7*!&$80%6+9!$3!4#*!
&$<$46%!8(2**3!&$80%6+!BH!8464*:!4#*!)*+ ! (63!=*!6&J784*&!70!63&!&'13!4'!6&J784!
4#*!=2$<#43*88!'5!4#*!DFG!%$<#4$3<:!DK!L!DM!(+(%*!'5!6&J784;*34:!6!4'46%!'5!M!%*@*%8:!
DM!$8!4#*!=2$<#4*84:!4#*!;*;'2+!'5!4#*!%684!4$;*!8464*9!
"! B0*3!63&!(%'8*!4#*!&''2!('342'%/!1#*3!4#*!&''2!$8!'0*3*&:!4#*!%$<#4$3<!$8!4723*&!'3:!
4#*!&$80%6+!$8!%$4!63&!)*04!734$%!4#*!&''2!$8!(%'8*&:!4#*!563!84'08:!1#*3!4#*!&''2!$8!'0*3*&!
5'2!;'2*!4#63!I!;$374*8:!4#*!'0*3!&''2!6%62;!$8!'0*3*&:!63&!4#*!6%62;!$8!(63(*%*&!=+!
02*88$3<!63+!)*+9!1#*3!4#*!&''2!$8!(%'8*&:!4#*!%$<#4$3<!$8!4723*&!'55!,*>(*04!5'2!4#*!;6376%!
'0*264$'3!'5!4#*!%$<#4.:!4#*!563!84'08!4#*!8464*!'5!%$54$3<!63&!84624$3<!$;;*&$64*%+:!63&!4#*!
&''2!$8!(%'8*&!5'2!AN!8*('3&8:!63&!4#*!&$80%6+!$8!4723*&!'55O!
"! P6==64#!'3C'55!)*+!/!P#'24!02*88!E! E!)*+!4'!*34*2!'2!*>$4!P6==64#9!654*2!*34*2$3<!
P6==64#:!4#*!02*88!63&!563!1$%%!273!3'2;6%%+:!4#*!%$<#4$3<!1$%%!<'!'74!%'3<!4$;*:!4#*!
&$80%6+!1$%%!<'!'74!%'3<!4$;*:!4#*!=7??*2!1$%%!4723!'55:!63&!4#*!0'1*2!56$%72*!1$%%!=*!
;*;'2$?*&:!63&!4#*!0'1*2!56$%72*!1$%%!=*!674';64$(6%%+!*>$4*&!654*2!QR!#'728!'5!
'0*264$'3:!63&!4#*!56$%72*!1$%%!6%8'!=*!674';64$(6%%+!*>$4*&9!$5!+'7!3**&!4'!*>$4!;6376%%+:!
02*88!E! E!)*+!4'!*>$4!4#*!P6==64#!;'&*:!63&!654*2!*>$4$3<:!$4!1$%%!273!$3!3'2;6%!;'&*9!
!
"!
>+0B!'00(!(01&W.0$%!8'&))!Y x Z!K&2!,0'!i!)&90$1):!&$*&'!*+&!>+0B!'00(!(01&5I$!#11-*-0$!*0!*+&!
90(8'&))0'!)*08)!B0'K-$%:!#..!0*+&'!$0'(#.!B0'K:!)+/*10B$!)*#*&!0,!*+&!*+'&&!*&(8&'#*/'&!A0$&)!
0,!*+&!1-%-*#.!*/@&!#'&!1-)8.#2&1!>$5!T0B&'!,#-./'&!(&(0'2:!$0!K&2!08&'#*-0$:!oe!+0/')!#,*&'!*+&!
#/*0(#*-9!&7-*`!>+0B!'00(!(01&:!8'&))!*+&!Y x Z!K&2!#%#-$:!&7-*!*+&!>+0B!'00(!(01&5
!
!
!
!
!
!
!
!
!"#$%&'()*+,-$*.""/'%(0#*
" again to exit Showroom Mode.
• Power failure memory means that Showroom Mode won't quit if the cooler
unexpectedly turns off. To exit Showroom Mode, use the method above or
wait 72 hours.

17
DEFROSTING
The wine cooler is designed with an automatic defrost system. However, on colder settings,
some frost may build up. Additionally, the more humid the ambient conditions, the more frost
that may build up. Keep the door closed as much as possible and avoid opening the door
unnecessarily to minimize frost build-up.
If frost is preventing the door from closing properly, you may need to power the unit off until the
frost melts (possibly up to 24 hours). Use a soft absorbent towel to dry the unit.
WARNING
Do not puncture refrigerant tubing
NORMAL SOUNDS
Your new wine cooler may make sounds that are not familiar to you. Most of the sounds are
normal. Hard surfaces like the floor or walls can make the sounds seem louder than they actually
are. The following describes the kinds of sounds that might be new to you and what may be
making them.
• Rattling noises may come from the flow of the refrigerant or the water line.
• Items stored on top of the wine cooler can also make noises.
• The high efficiency compressor may make a pulsating or high-pitched sound.
• Water running from the evaporator to the water bin may make a splashing sound.
• As each cycle ends, you may hear a gurgling sound due to the refrigerant flowing in your
wine cooler.
• You may hear air being forced over the condenser by the condenser fan.
Defrosting
OPERATION
18
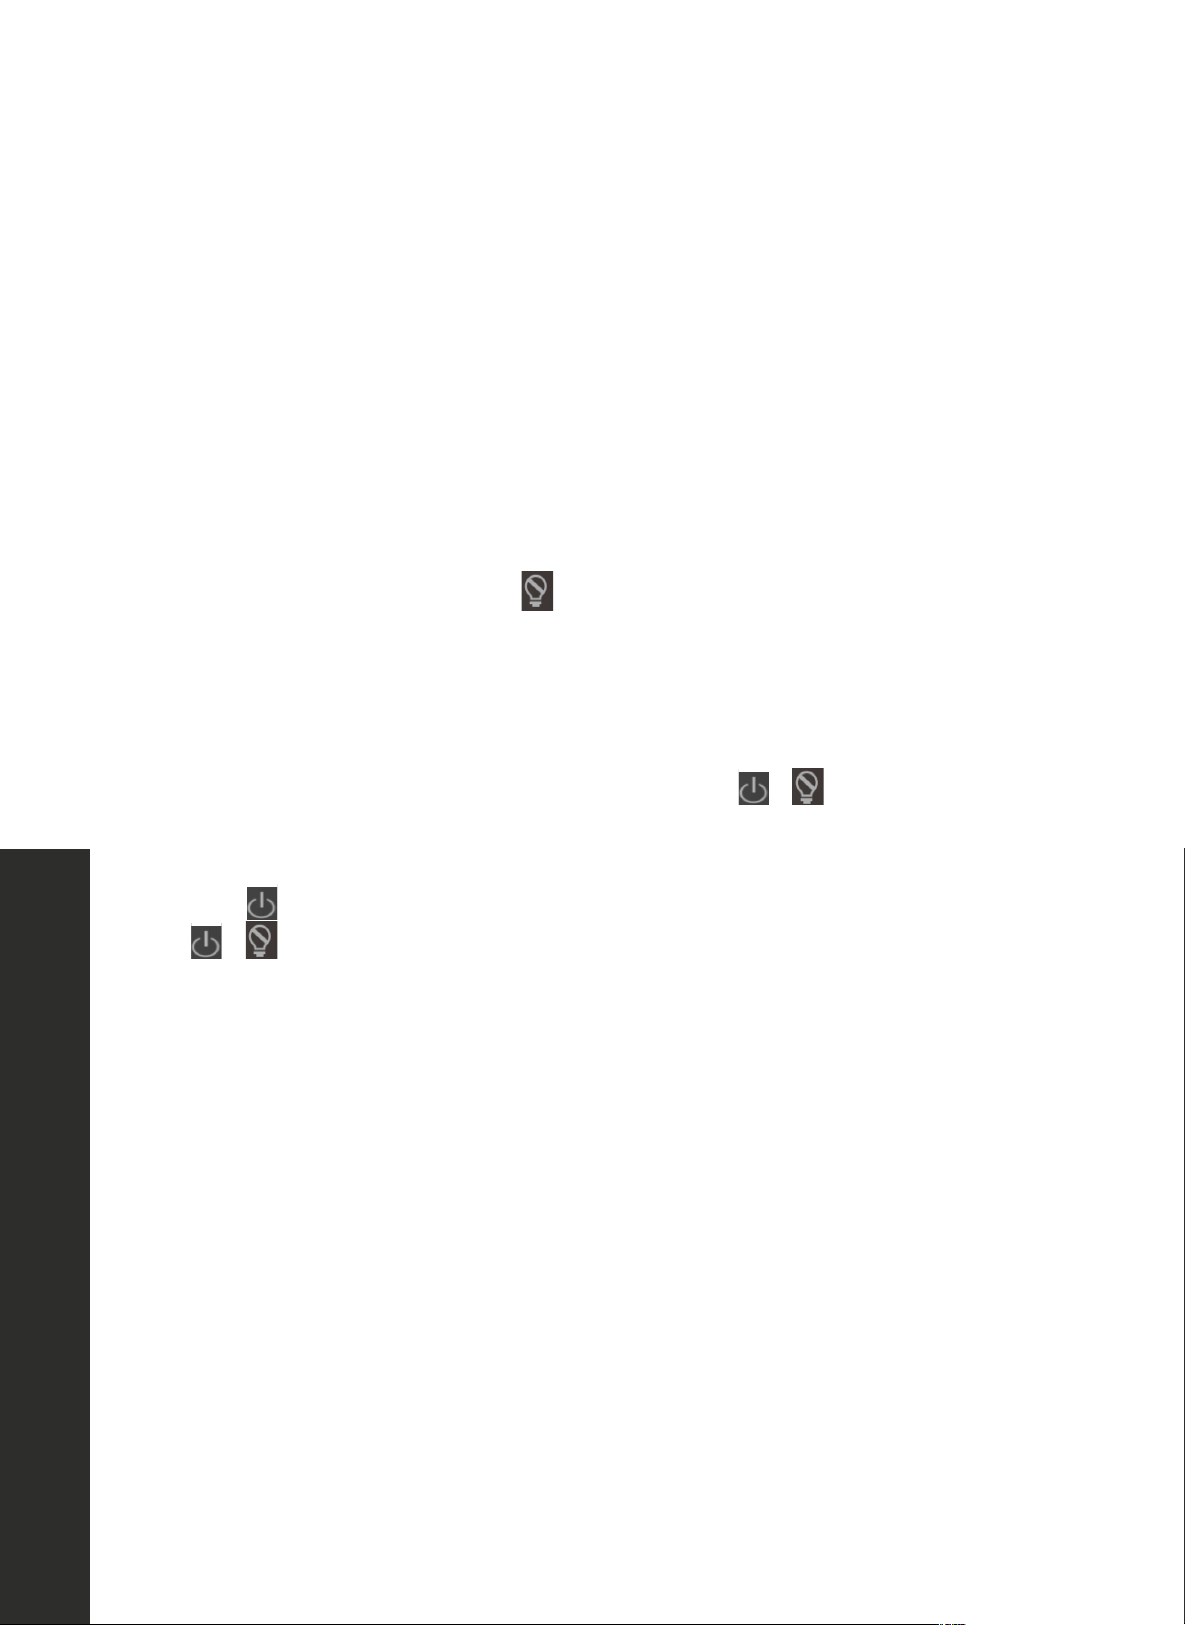
Removing the Wooden Shelves
REMOVING THE WOODEN SHELVES
1. Pull the rack all the way out, then lift the front of the rack so that it is no longer resting on the
peg toward the front.
!("
!"#$%&'(#$%')*%+)",'--',./)%01.*#%
!
!
I"A4,3#<'*."'C448"#'(."&,"/'
!"#G-**!'(#!;/0#!.3,\F! P/0#!.3,\!,3.4!+*%'!%-'!%2!'(#!1-/4#!.3/*!N>#4!,%*-$0F!
!
)
$"#G-**!'(#!;/0#!.3,\!2%.;3.4F!O(#!1-/4#!.#'3/0/01!7%+'!/+!+'-,\!/0!'(#!7%+/'/%0!
/04/,3'#4!/0!'(#!N1-.#!'(3'!'(#!.#'3/0/01F!
!
!
%"#G-**!'(#!;/0#!.3,\!'%
!
.#$%&#F!
!
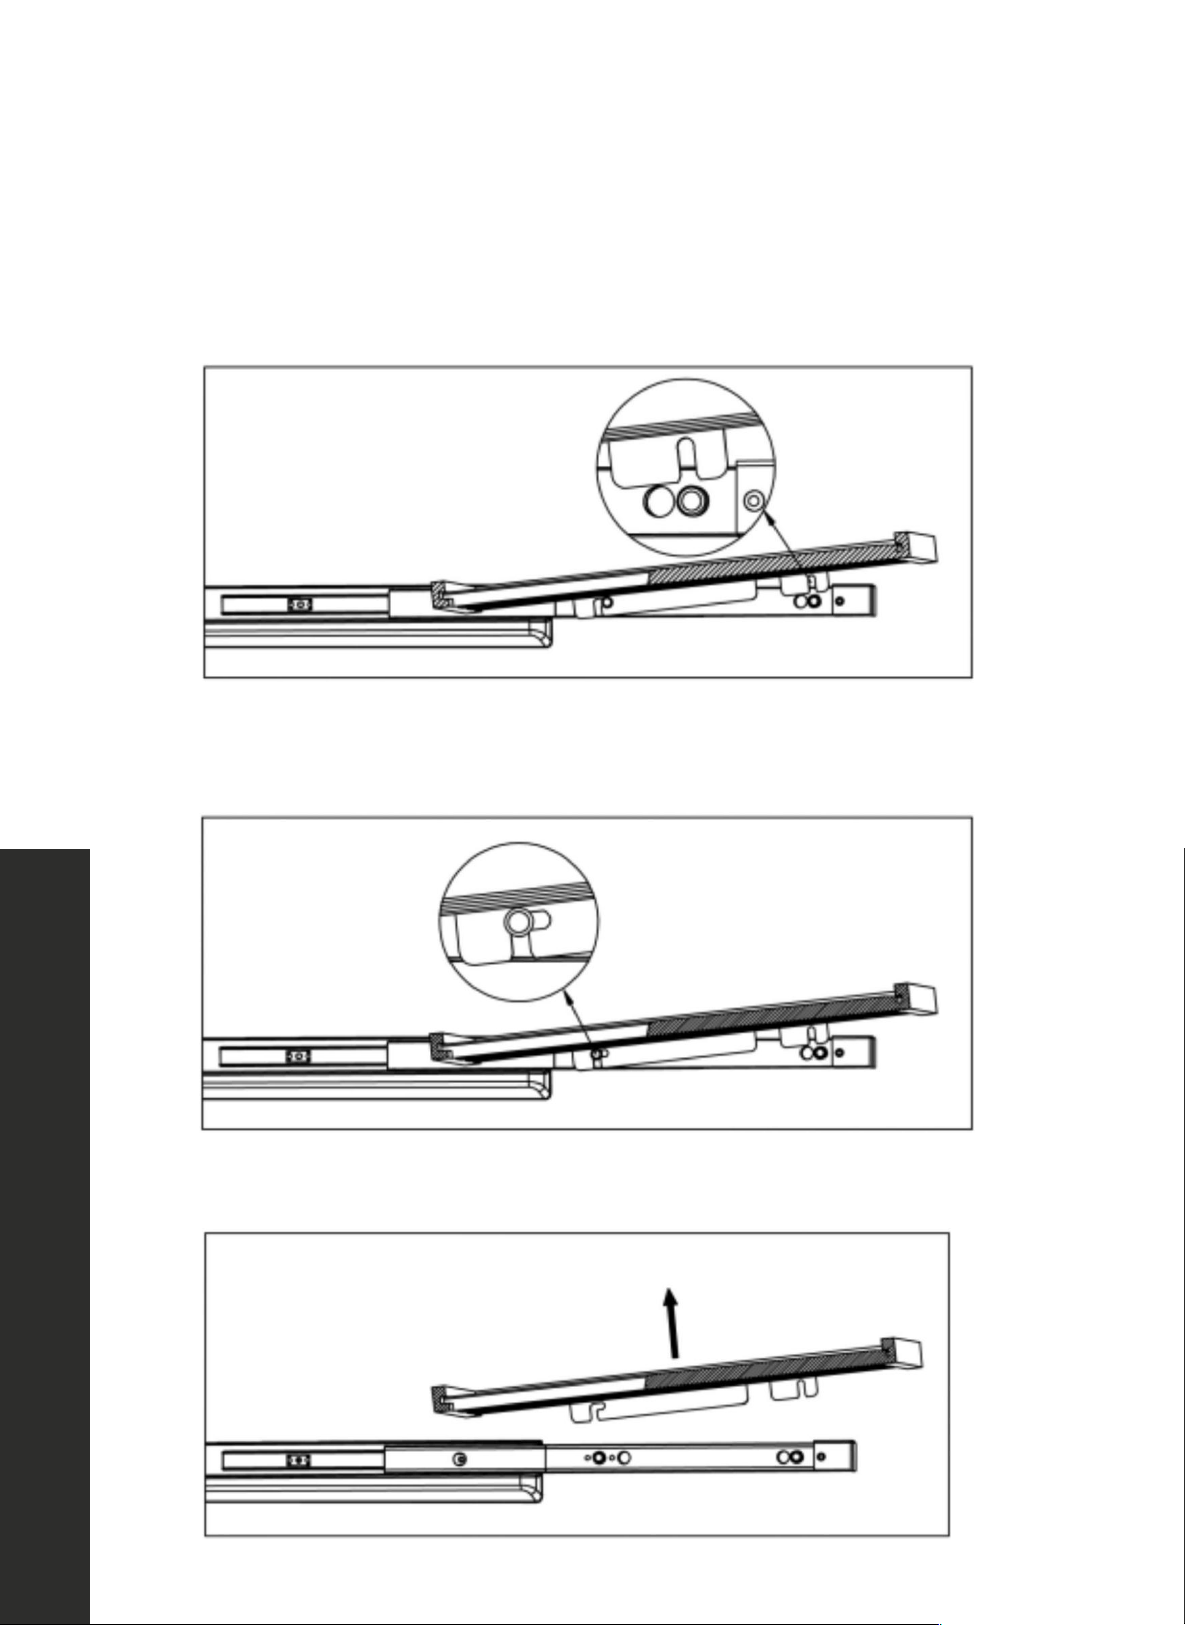
2. Continue pulling the rack forward so that it is no longer resting in the L-shaped slot
toward the rear.
!("
!"#$%&'(#$%')*%+)",'--',./)%01.*#%
!
!
I"A4,3#<'*."'C448"#'(."&,"/'
!"#G-**!'(#!;/0#!.3,\F! P/0#!.3,\!,3.4!+*%'!%-'!%2!'(#!1-/4#!.3/*!N>#4!,%*-$0F!
!
)
$"#G-**!'(#!;/0#!.3,\!2%.;3.4F!O(#!1-/4#!.#'3/0/01!7%+'!/+!+'-,\!/0!'(#!7%+/'/%0!
/04/,3'#4!/0!'(#!N1-.#!'(3'!'(#!.#'3/0/01F!
!
!
%"#G-**!'(#!;/0#!.3,\!'%
!
.#$%&#F!
!
3. Lift the wine rack up to remove.
!("
!"#$%&'(#$%')*%+)",'--',./)%01.*#%
!
!
I"A4,3#<'*."'C448"#'(."&,"/'
!"#G-**!'(#!;/0#!.3,\F! P/0#!.3,\!,3.4!+*%'!%-'!%2!'(#!1-/4#!.3/*!N>#4!,%*-$0F!
!
)
$"#G-**!'(#!;/0#!.3,\!2%.;3.4F!O(#!1-/4#!.#'3/0/01!7%+'!/+!+'-,\!/0!'(#!7%+/'/%0!
/04/,3'#4!/0!'(#!N1-.#!'(3'!'(#!.#'3/0/01F!
!
!
%"#G-**!'(#!;/0#!.3,\!'%
!
.#$%&#F!
!
MAINTENANCE AND CLEANING
19
Cleaning the Unit
!#"
!"#$%&'(#$%')*%+)",'--',./)%01.*#%
!
!
?%$K4#'L3&*"$'
C%R=/8(1/+%>"-R,+%O8($-%4-,($>(5%),=-%R$;$-"#$5%R)%">(/+#%
"5%"%+"(=-"8%R"--/$-%"#"/+5(%<"-.'=8%,B,-5Y%3<$%>"-R,+%
O8($-%5<,=8B%R$%-$48">$B%$;$-)%N1V%.,+(<5%B$4$+B/+#%,+%
(<$%=+/(s5%$Z4,5=-$%8$;$8%(,%,B,-Y%*'%(<$%=+/(%/5%48">$B%/+%"%
_/(><$+[%-$#=8"-%-$48">$.$+(%$;$-)%(<-$$%.,+(<5%/5%/B$"8Y%
P$.,;$%(<$%>"-R,+%O8($-%R)%(=-+/+#%>,=+($->8,>_U/5$%(,%
=+8,>_%'-,.%-$"-%4"+$8Y%
!
!
!
!
!
0#/*%&&'*."'.%#8&"' ' M3)'%66&32%K&"N'
*'%"%4-,%<"+B8$%,-%B/j$-$+(%>,8,-$B%>,+($.4,-"-)%<"+B8$5%"-$%B$5/-$B[%-$'$-%R$8,U%',-%(<$%<"+B8$%
B/.$+5/,+5%"+B%4"-(%+=.R$-Y%
2Y%C8/#+%(<$%<"+B8$%OZ/+#%<,8$5%U/(<%(<$%<,8$5%,+%(<$%U,,B$+%B,,-[%(<$+%/+5("88%(<$%<"+B8$%U/(<%
"%5>-$UB-/;$-Y%
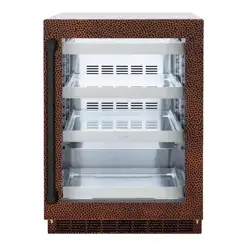
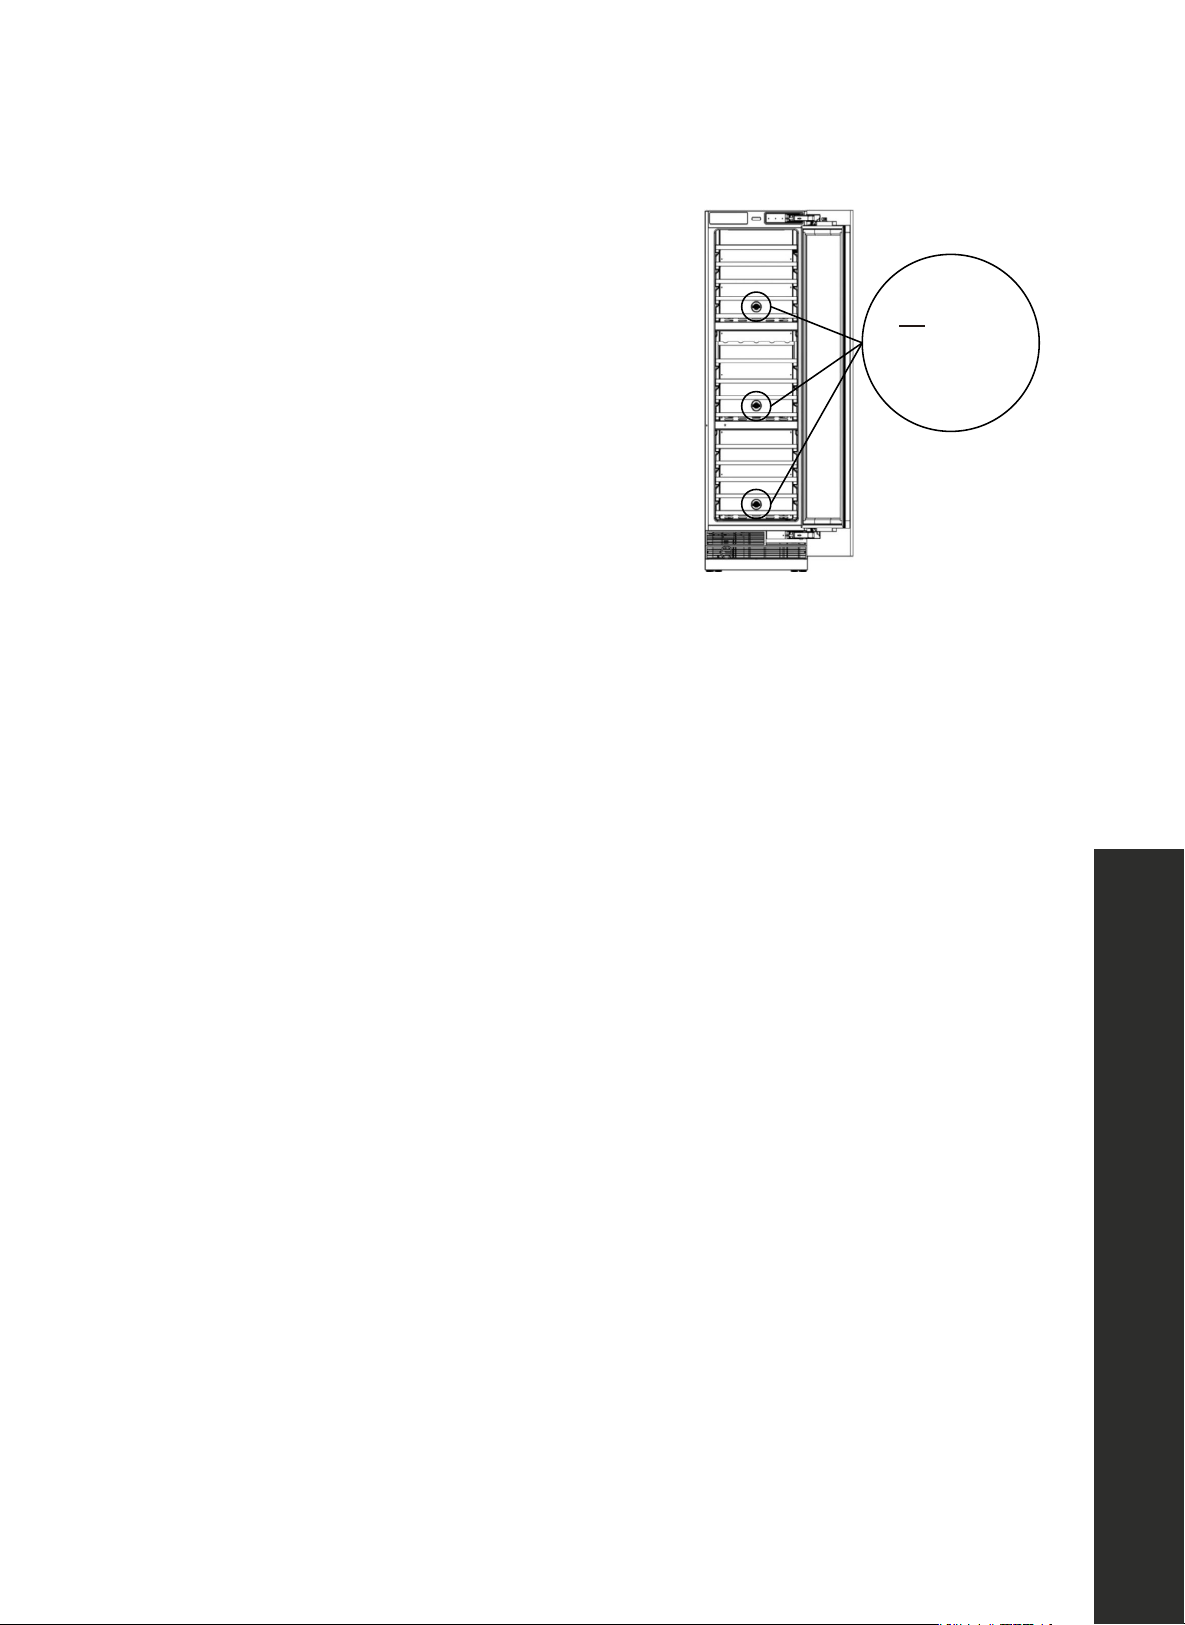
CARBON FILTER
A built-in carbon filter protects your wine by acting
as a natural barrier against harmful odors. The
carbon filter should be replaced every 3-6 months
depending on the unit’s exposure level to odor. If the
unit is placed in a kitchen, regular replacement every
3 months is ideal.
Remove the carbon filter by turning counterclockwise
to unlock from rear panel.
CLEANING THE UNIT
Periodic cleaning and proper maintenance will ensure efficiency, top performance, and long life.
Interior Cleaning
1. Disconnect power to the unit.
2. Open the door and remove the contents and shelves.
3. With a clean cloth, wipe down the interior of the unit.
4. Reinsert the shelves and wine.
5. Reconnect power to the unit.
Exterior Cleaning
The door and cabinet may be cleaned with a mild detergent and lukewarm water solution such
as two (2) tablespoons of baking soda to one (1) quart of water. Do not use solvent based or
abrasive cleaners. Use a soft sponge and rinse with clean water. Wipe with a soft clean towel
to prevent water spotting. If the door panel is stainless steel, it can discolor when exposed to
moisture. Clean stainless steel with a cloth dampened with a mild detergent and warm water
solution. Never use an abrasive or caustic cleaning agent.
MAINTENANCE AND CLEANING

20
Power Failure
POWER FAILURE
Most power failures are corrected within a few hours and should not affect the temperature of
your appliance if you minimize the number of times the door is opened. If the power is going to
be off for a longer period of time, you need to take the proper steps to protect your contents.
MOVING YOUR WINE COOLER
• Remove all items.
• Securely tape down all loose items (shelves) inside your appliance.
• Turn the adjustable leg all the way up (counter-clockwise) to the base to avoid damage.
• Tape the door shut.
• Be sure the appliance stays secure in the upright position during transportation. Also protect
outside of appliance with a blanket, or similar item.
ENERGY SAVING TIPS
• The appliance should be located in the coolest area of the room, away from heat producing
appliances, and out of the direct sunlight.
• Ensure that the unit is adequately ventilated. Never cover air vents.
• Only open the door for as long as necessary.
MAINTENANCE AND CLEANING
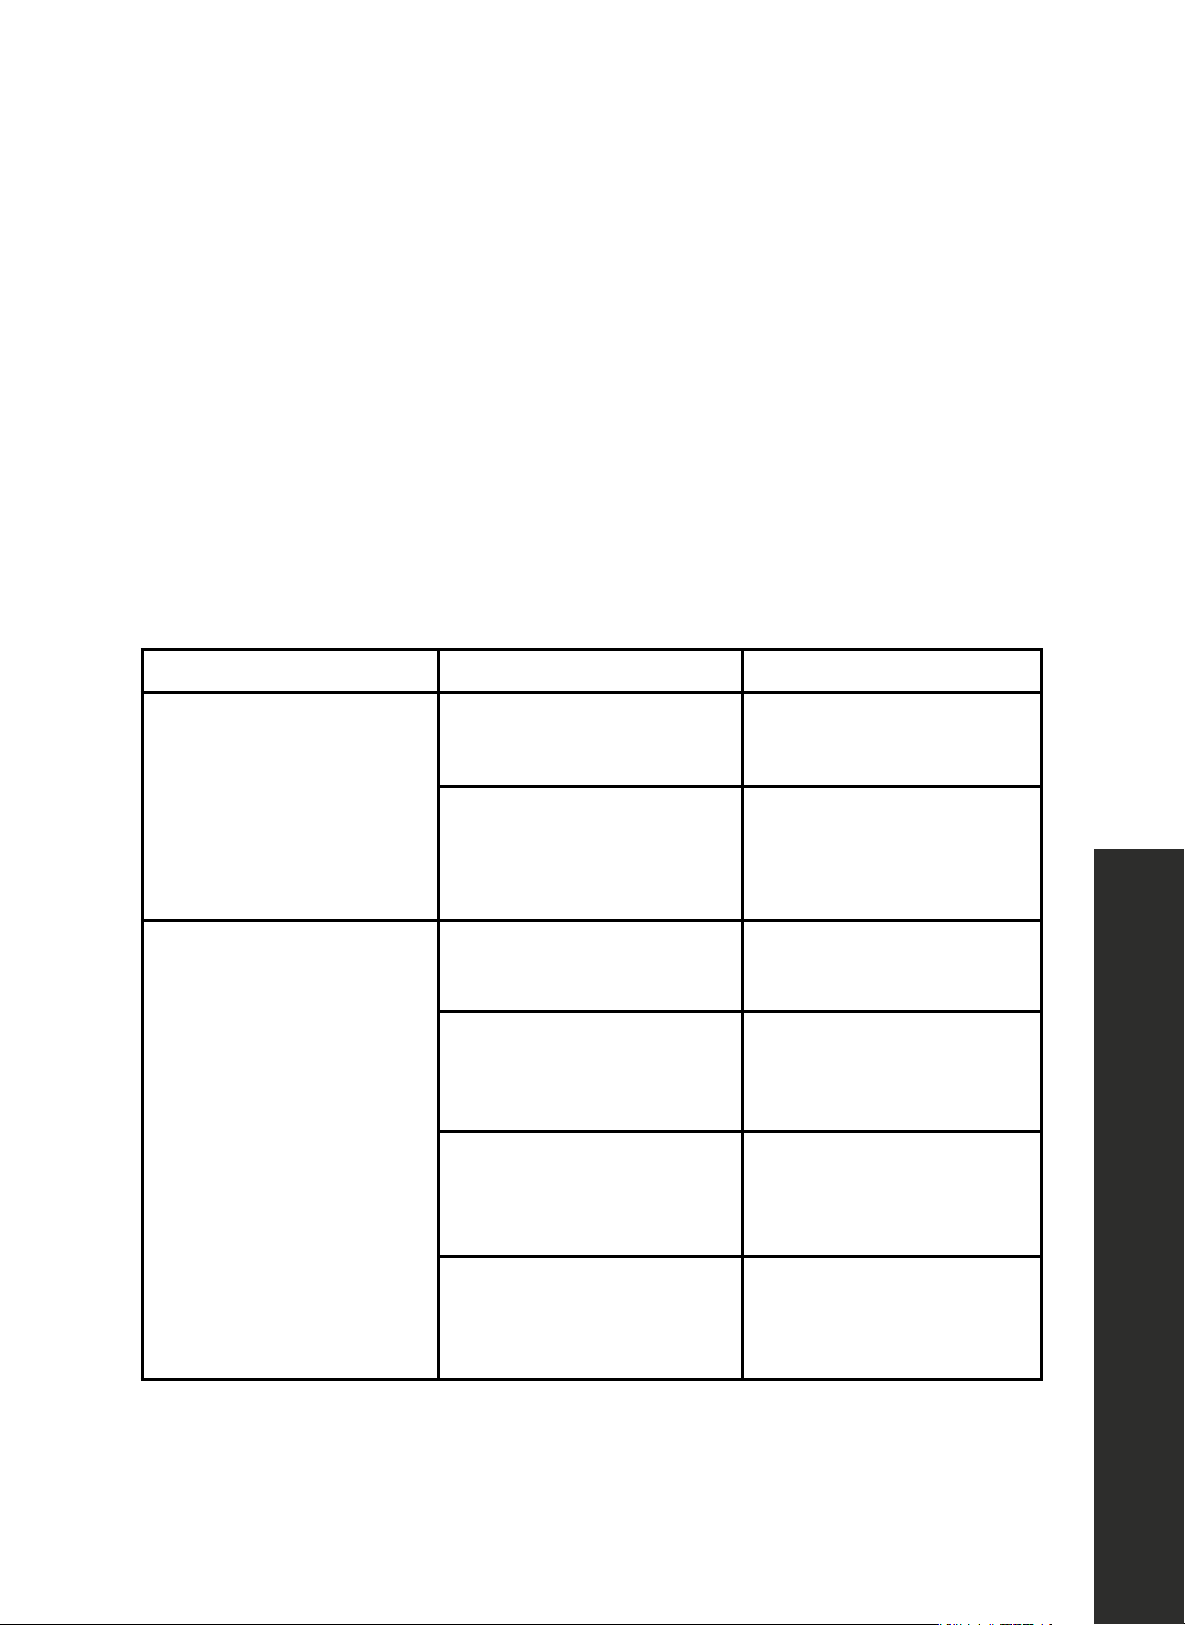
21
Troubleshooting
TROUBLESHOOTING
• Please review this list for common troubleshooting tips before calling for service, as this may
save you time and money.
• This list contains frequently encountered problems that are not results of faulty workmanship
or material use.
• Your product may not have some of the features described here.
WARNING
If a problem cannot be resolved after following the instructions in the manuals,
please contact ZLINE customer service at 1-614-777-5004. Never attempt
to repair or disassemble a faulty refrigerator sealed system as there are no
user-serviceable parts. Always consult a professional.
PROBLEM POSSIBLE CAUSE POSSIBLE SOLUTION
The refrigerator is
not operating.
It may not be plugged
in properly.
Plug in the product properly.
Loss of power to the outlet
to which your refrigerator
is connected.
Check the circuit breaker or
fuse may have blown.
There is condensation in the
refrigerator compartment
The door may have been
opened/closed frequently.
Do not open/close the
refrigerator door frequently.
The environment may
be too humid.
Do not install the refrigerator
at locations with a very high
level of humidity.
Liquid may have been
placed into the refrigerator in
containers without covers.
Do not place liquid
into the refrigerator in
unsealed containers.
The door of the refrigerator
may have been left ajar.
Do not keep the door of
your refrigerator open for
a long time.

22
Troubleshooting
TROUBLESHOOTING
PROBLEM POSSIBLE CAUSE POSSIBLE SOLUTION
The compressor is
not operating.
The internal protector
of the compressor will
open, protecting the
compressor, and it will reset
automatically.
The refrigerator will start
running approximately after
6 minutes. Please call ZLINE
at 1-614-777-5004 if the
refrigerator does not start at
the end of this period.
The unit is in defrosting cycle.
This is normal for a
refrigerator that performs
full-automatic defrosting.
Defrosting cycle is
performed periodically.
This is normal for the unit to
defrost periodically.
The refrigerator may not be
plugged in.
Make sure that the plug
fits the socket.
Temperature settings may
be incorrect.
Select the correct
temperature value.
Possible power failure.
The refrigerator will start
to operate normally when
power restores.
The operation noise
increases when the
refrigerator is running.
Operating performance
of the refrigerator may
vary based on the ambient
temperature changes.
This is normal and
not a fault.
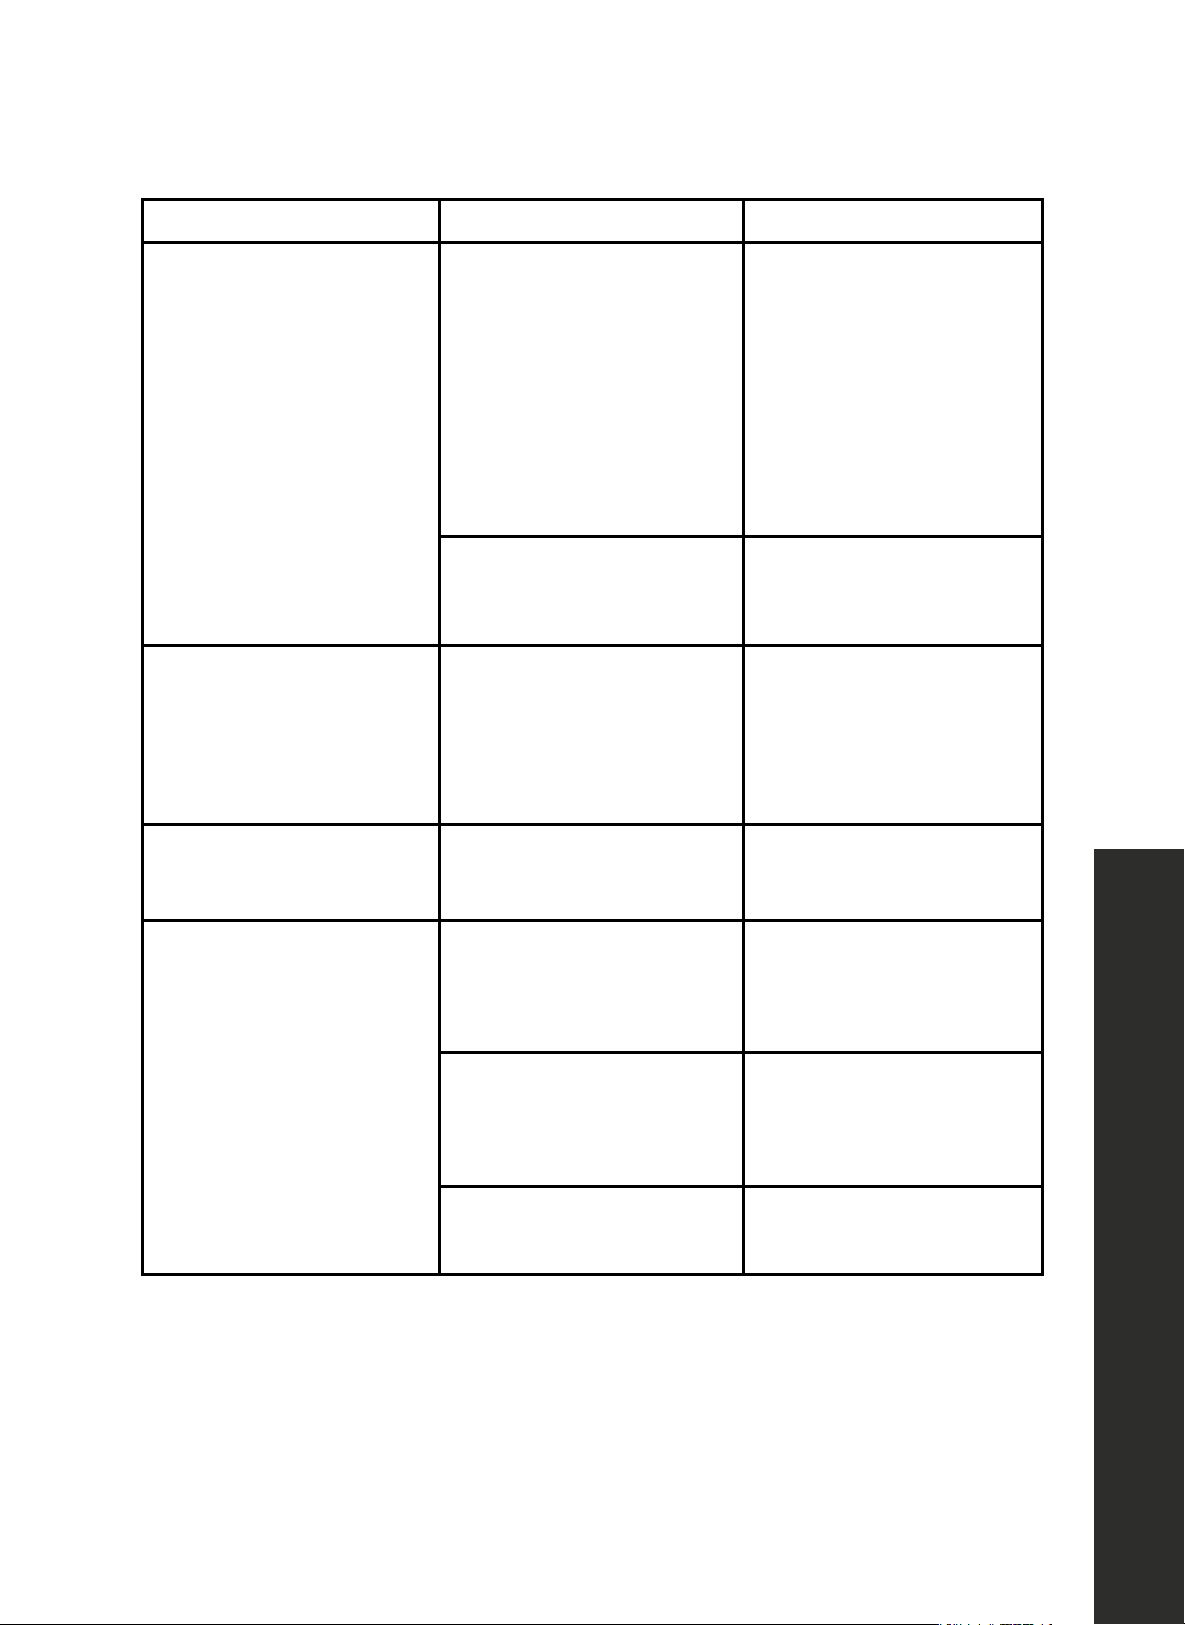
23
Troubleshooting
TROUBLESHOOTING
PROBLEM POSSIBLE CAUSE POSSIBLE SOLUTION
Vibration or noise.
The floor may not be
stable or level.
If you notice that the
refrigerator shakes when
moved slightly, make sure
that the floor is level and
capable of carrying the
refrigerator. Adjust feet
as necessary.
Objects placed on top of the
refrigerator may cause noise.
Remove the objects on the
refrigerator.
There are noises coming
from the refrigerator like
liquid spilling or spraying.
Liquid and gas flows occur
normally in accordance with
the operating principles of
the refrigerator.
This is normal and
not a fault.
A whistling noise is heard
from the refrigerator.
There are fans that are used
to cool the refrigerator.
This is normal and
not a fault.
Condensation accumulates
on the inner walls of
refrigerator.
Hot and humid weather
increases icing and
condensation.
This is normal and
not a fault.
The door may have been
opened frequently or left
ajar for a long time.
Do not open the door
frequently. Close the
door, if open.
The door may have
been left ajar.
Close the door completely.

24
TROUBLESHOOTING
Troubleshooting
PROBLEM POSSIBLE CAUSE POSSIBLE SOLUTION
Humidity occurs on the
outer surface of the
refrigerator.
Air might be humid.
This is quite normal in
humid weathers.
Condensation will
disappear as the humidity
level decreases.
There is a bad odor inside
the refrigerator.
No regular cleaning may
have been performed.
Clean the inside of the
refrigerator with a sponge
and lukewarm water or
carbonated water.
Items may be
expired or spoiled.
Take out expired or spoiled
items from the refrigerator.
The door cannot be closed.
Bottles may be preventing
the door from closing.
Re-locate the bottles
obstructing the door.
The refrigerator may be
unstable on the floor.
Adjust the refrigerator feet
as required to keep the
refrigerator in balance.
The floor may not be
level or solid.
Make sure that the floor
is level and capable of
carrying the refrigerator.
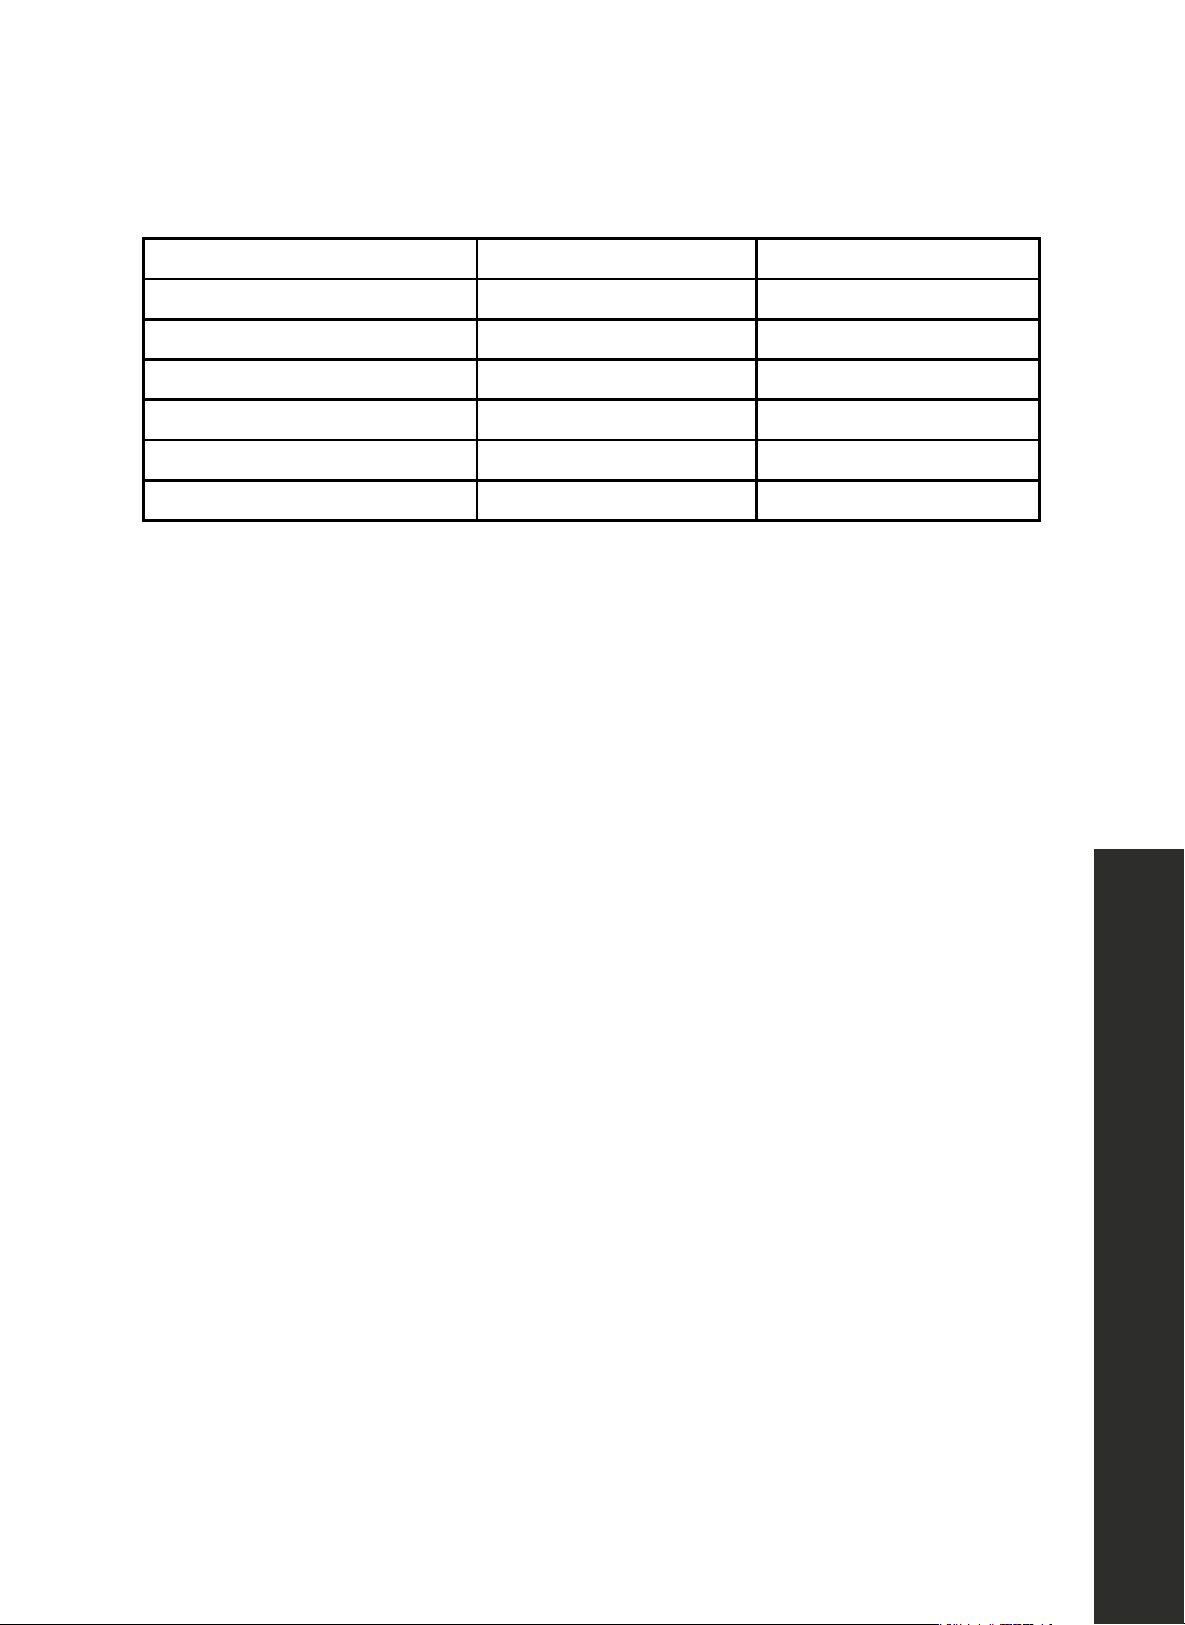
25
TROUBLESHOOTING
Troubleshooting
ERROR CODES*
EXPLANATION OPEN CIRCUIT CODE SHORT CIRCUIT CODE
Upper Zone In-Cabinet Probes E1 E2
Upper Zone Frosting Probe E3 E4
Middle Zone In-Cabinet Probe E5 E6
Middle Zone Frosting Probe E7 E8
Lower Zone In-Cabinet Probes E9 E10
Lower Zone Frosting Probe E 11 E 12
*When there is an error code, the buzzer will emit three consecutive beeps and the error code
will flash every 10 seconds. If you want to mute the alarm sound, press the On/Off key.

WARRANTY
COVERAGE
ZLINE Kitchen and Bath ("ZLINE") column refrigerators have a two year parts and service
warranty and a five year parts warranty on the unit's sealed cooling system.
ZLINE warranty periods begin from the original date of product delivery and solely cover the
original purchaser of the product, delivered new and in its original carton. The limited warranty
covers all parts and labor for necessary repairs if any part of the product, or the product itself,
proves to be defective in materials or workmanship.
The product must be deemed serviceable via troubleshooting with the ZLINE Customer Experience
team. All service on ZLINE products under warranty must be performed by ZLINE-approved and
ZLINE-certified service providers unless otherwise specified by ZLINE. Service will be provided
during normal business hours.
Products must be unobstructed and accessible to the service provider at the time of service.
ZLINE’s liability is limited to the original purchase price of the product. Additional injuries, losses,
damages, or other inconveniences caused by product malfunction or defects in materials are not
covered under the terms of this warranty.
TERMS
ZLINE warranties apply only to the original purchaser of a ZLINE product installed for normal
residential use. This is defined as a single-family, residential dwelling in a non-commercial setting.
Any warranty claim stemming from installation, operation, or any other use within a commercial
setting is not covered under this limited warranty. Commercial settings include, but are not limited
to: schools, churches, hotels, restaurants, vacation rentals such as Airbnb, daycare centers,
private clubs, fire stations, common areas in multi-family dwellings, nursing homes, food service
locations, and institutional food service locations such as hospitals or correctional facilities.
This warranty is non-transferable and will not under any circumstance be extended based on the
date of installation — the warranty period takes effect from the date of delivery and only covers
the original purchaser. The warranty applies only to products installed in the contiguous United
States and the District of Columbia.

Failure to secure certified warranty service per these terms will result in a forfeiture of the
remaining warranty. Out-of-pocket payments will not be reimbursed unless prior approval is
received from ZLINE and/or ZLINE-certified service contract partners. Unapproved out-of-
pocket payments for service will not be reimbursed. All warranty procedures must be followed to
maintain warranty coverage.
If a product qualifies within the service window provided under these warranty terms, and ZLINE
is unable to repair the product or a defective part of the product after a reasonable number of
attempts, ZLINE reserves the right to offer to replace the defective part or the product or provide
the original purchaser a full refund of the purchase price of the product (not including installation,
removal, or other charges that were not included in the original purchase price).
The original purchaser of the product must provide the original proof of purchase, including the
purchase date, when filing a claim to obtain replacement parts, service, or refunds. Additionally,
the original purchaser of the product must provide the serial number of the product when filing a
claim to obtain replacement parts, service, or refunds.
This warranty shall not apply to any ZLINE product in which the original factory serial number
has been removed, altered, or cannot be readily determined for any reason. Further, ZLINE is
not responsible for damage resulting from, but not limited to: shipment, delivery, or improper
installation; negligence or improper maintenance, misuse, or abuse of the product; unauthorized
alteration, modification, or tampering with the product; accident, fire, floods, pest infestations,
pandemics, natural disasters, or any other unpreventable or unexplained acts of nature,
commonly referred to as “acts of God”; flare-up fires or damages caused by improper electric
supply, electrical line current, voltage, or power surges; and service to correct installation not
in accordance with the instructions contained in ZLINE’s product manuals and/or with local
government codes.
In the event service is dispatched, and it is discovered that the reported issue is not covered under
warranty based on the disclaimers above, the customer will be responsible for all service fees.
Failure to pay these fees will result in the forfeiture of remaining warranty coverage.
WARRANTY
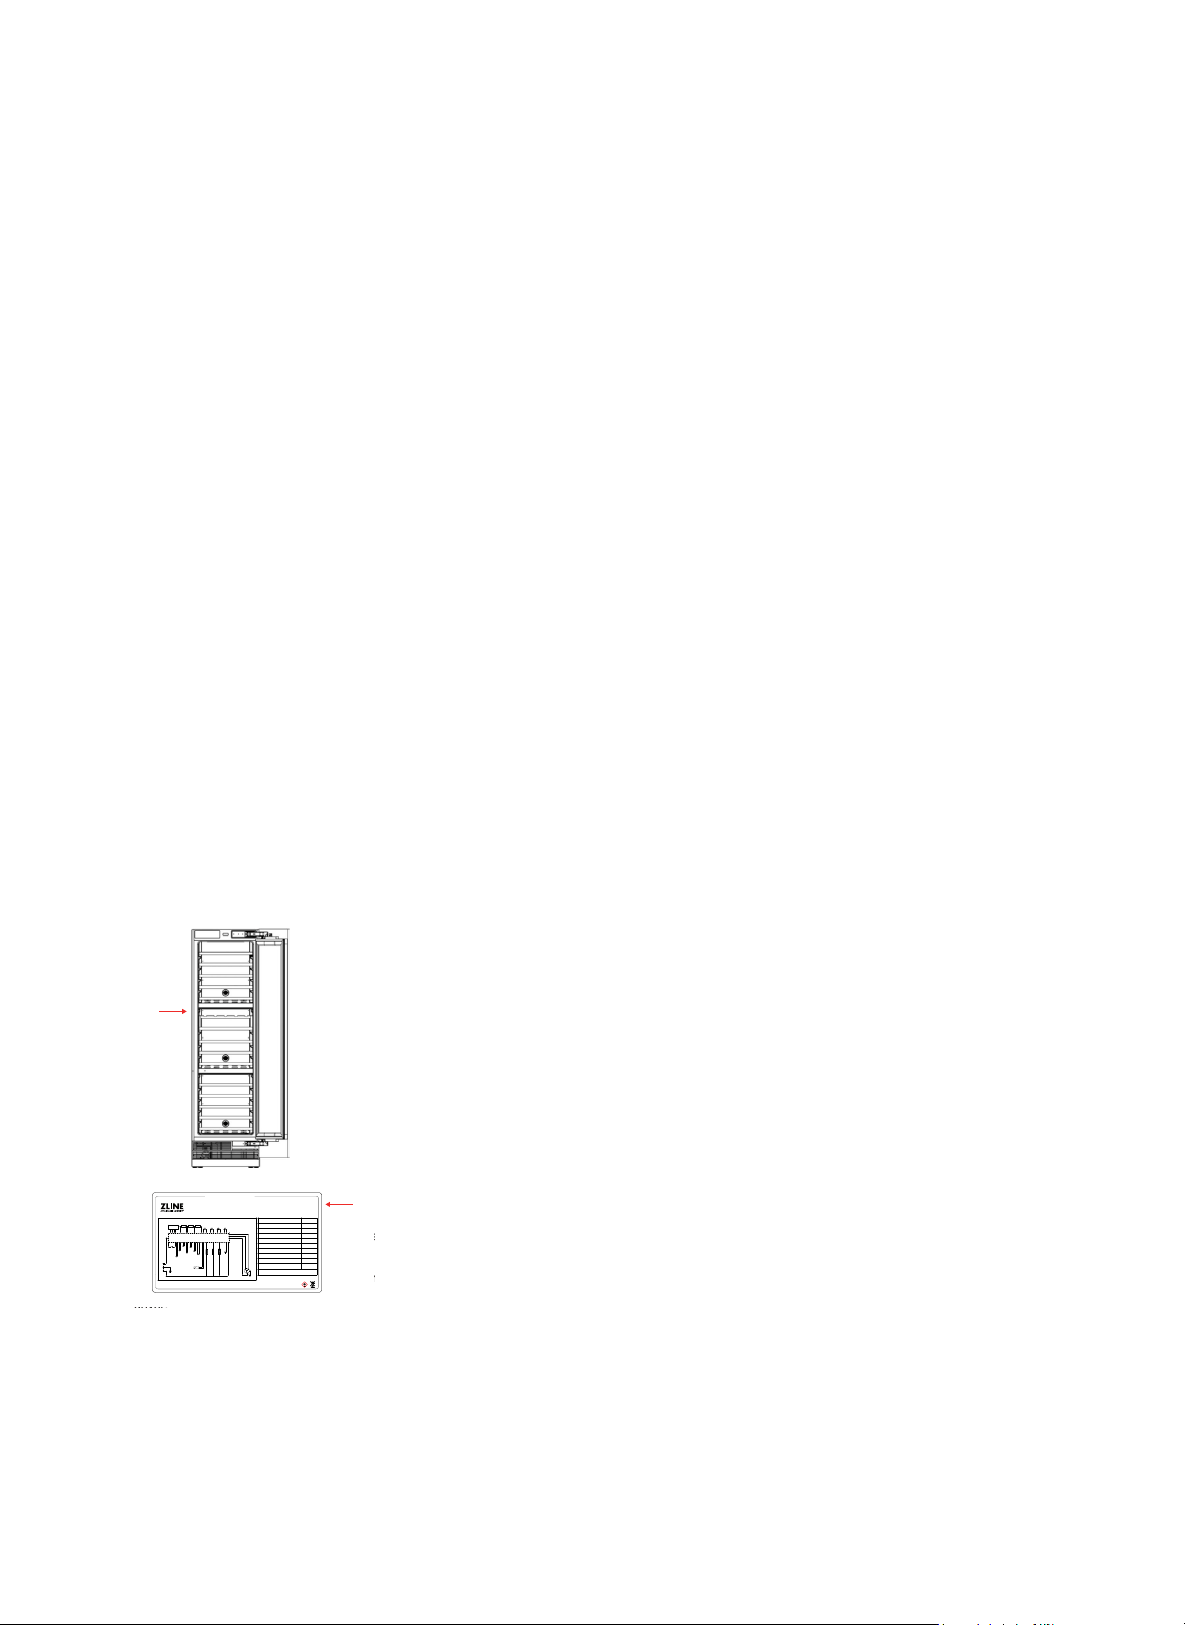
Information contained within ZLINE’s installation and user manuals, in addition to product
information included on ZLINE’s website and all related digital listings, do not cover every possible
condition and situation that may occur during the installation or operation of ZLINE products.
ZLINE reserves the right to make changes at any time to its products when considered safe,
necessary, and useful. Always check the ZLINE website for the most up-to-date version of its
product manuals: www.zlinekitchen.com/pages/manuals.
Do not install or operate any ZLINE product if it has missing or broken parts or if it arrives damaged
due to shipping. If ZLINE products arrive damaged, contact ZLINE Customer Experience at
1-614-777-5004 for help. Failure to report a damaged appliance prior to installation or
operation may void the warranty.
ZLINE disclaims responsibility for damage or injury caused by improper installation or use of
any of its products. ZLINE is under no obligation, by law or otherwise, to provide concessions,
including repairs, prorates, rebates, discounts, or replacements, once the warranty has expired.
SERIAL NUMBER LOCATION
!"#$%&'(#$%')*%+)",'--',./)%01.*#%
!
!
##"
?%$B4#'C3&*"$'
?!@/-.*a-$!9#'@0$!L.*&'!8'0*&9*)!20/'!@&3&'#%&)!@2!#9*-$%!
#)!#!$#*/'#.!@#''-&'!#%#-$)*!+#'(,/.!010')5!=+&!9#'@0$!
L.*&'!)+0/.1!@&!'&8.#9&1!&3&'2!iaU!(0$*+)!1&8&$1-$%!0$!
*+&!/$-*r)!&780)/'&!.&3&.!*0!010'5!I,!*+&!/$-*!-)!8.#9&1!-$!#!
K-*9+&$:!'&%/.#'!'&8.#9&(&$*!&3&'2!*+'&&!(0$*+)
!-)!-1&#.5!
G&(03&!*+&!9#'@0$!L.*&'!@2!*/'$-$%!90/$*&'9.09KB-)&
!*0!
/$.09K!,'0(!'&#'!8#$&.5!
!
!
!
!
!
!
0#/*%&&'*."'.%#8&"' ' D3)'%66&32%B&"
E'
I,!#!8'0!+#$1.&!0'!1-c&'&$*!90.0'&1!90$*&(80'#'2
!+#$1.&)!#'&!1&)-'&1:!'&,&'!@&.0B!,0'!*+&!
+#$1.&!
1-(&$)-0$)!#$1!8#'*!$/(@&'5
!
j5!?.-%$!*+&!+#$1.&!L7-$%!+0.&)!B-*+!*+&!+0.&)!0$!*+&
!B001&$!100':!*+&$!-$)*#..!*+&!+#$1.&!
B-*+!
#!)9'&B1'-3&'5!
HIGH SIDE
C-pentane
1.5A
5W
LOW SIDE
RATED VOLTAGE
RATED FREQUENCY
REFRIGERANT
AMOUNT
BLOWING AGENT
RATED CURRENT
LAMP POWER
125 PSIG
R600a
68 PSIG
115V AC
60Hz
1.31Oz
)4''0
150WPTC POWER
MADE IN CHINA
%10&'05'4
(#0
/1614
/#+0$1#4&
(#0
/1614
USER
INTERFACE
241$'
&114
59+6%*
%1/0%
EV
8#.8'
N
L
%1/24'5514
8
9
)4''0
)4''0
HEATER
#/$+'06
6'/2'4#674'
241$'
411/
241$'
241$'
241$'
2.7)
.
'
0
)4''0
LED
LIGHT
LED
LIGHT
LED
LIGHT
(#0
/1614
(#0
/1614
HEATER
HEATER
411/
241$'
411/
241$'
Model: RBCWV-24
Wine Cooler
The rating tag shows the model and serial number of your refrigerator.
The product label and rating tag are located on the left-hand side of the
cabinet. The tag is visible when the refrigerator door is open. Do not
remove permanently affixed labels, warnings, or plates from the
product. This will void the warranty.
WARRANTY

SERVICE
For warranty service, please contact our Customer Service team at
1-614-777-5004 or visit www.zlinekitchen.com/contact to utilize our
online Customer Experience Portal.
Scan the QR code to view the most up-to-date version of our user manual
and installation manual.
Need to purchase a part or accessory for your ZLINE product?
Visit www.zlineparts.com, ZLINE's official parts distribution partner.
WARRANTY