EN
Owner’s Manual
THANK YOU FOR BUYING A HOTPOINT PRODUCT
In order to receive a more complete assistance, please
register your product on www . register10 . eu
PLEASE SCAN THE QR CODE ON
YOUR APPLIANCE IN ORDER TO
REACH MORE INFORMATION
Before using the appliance carefully read the Safety
Instruction.
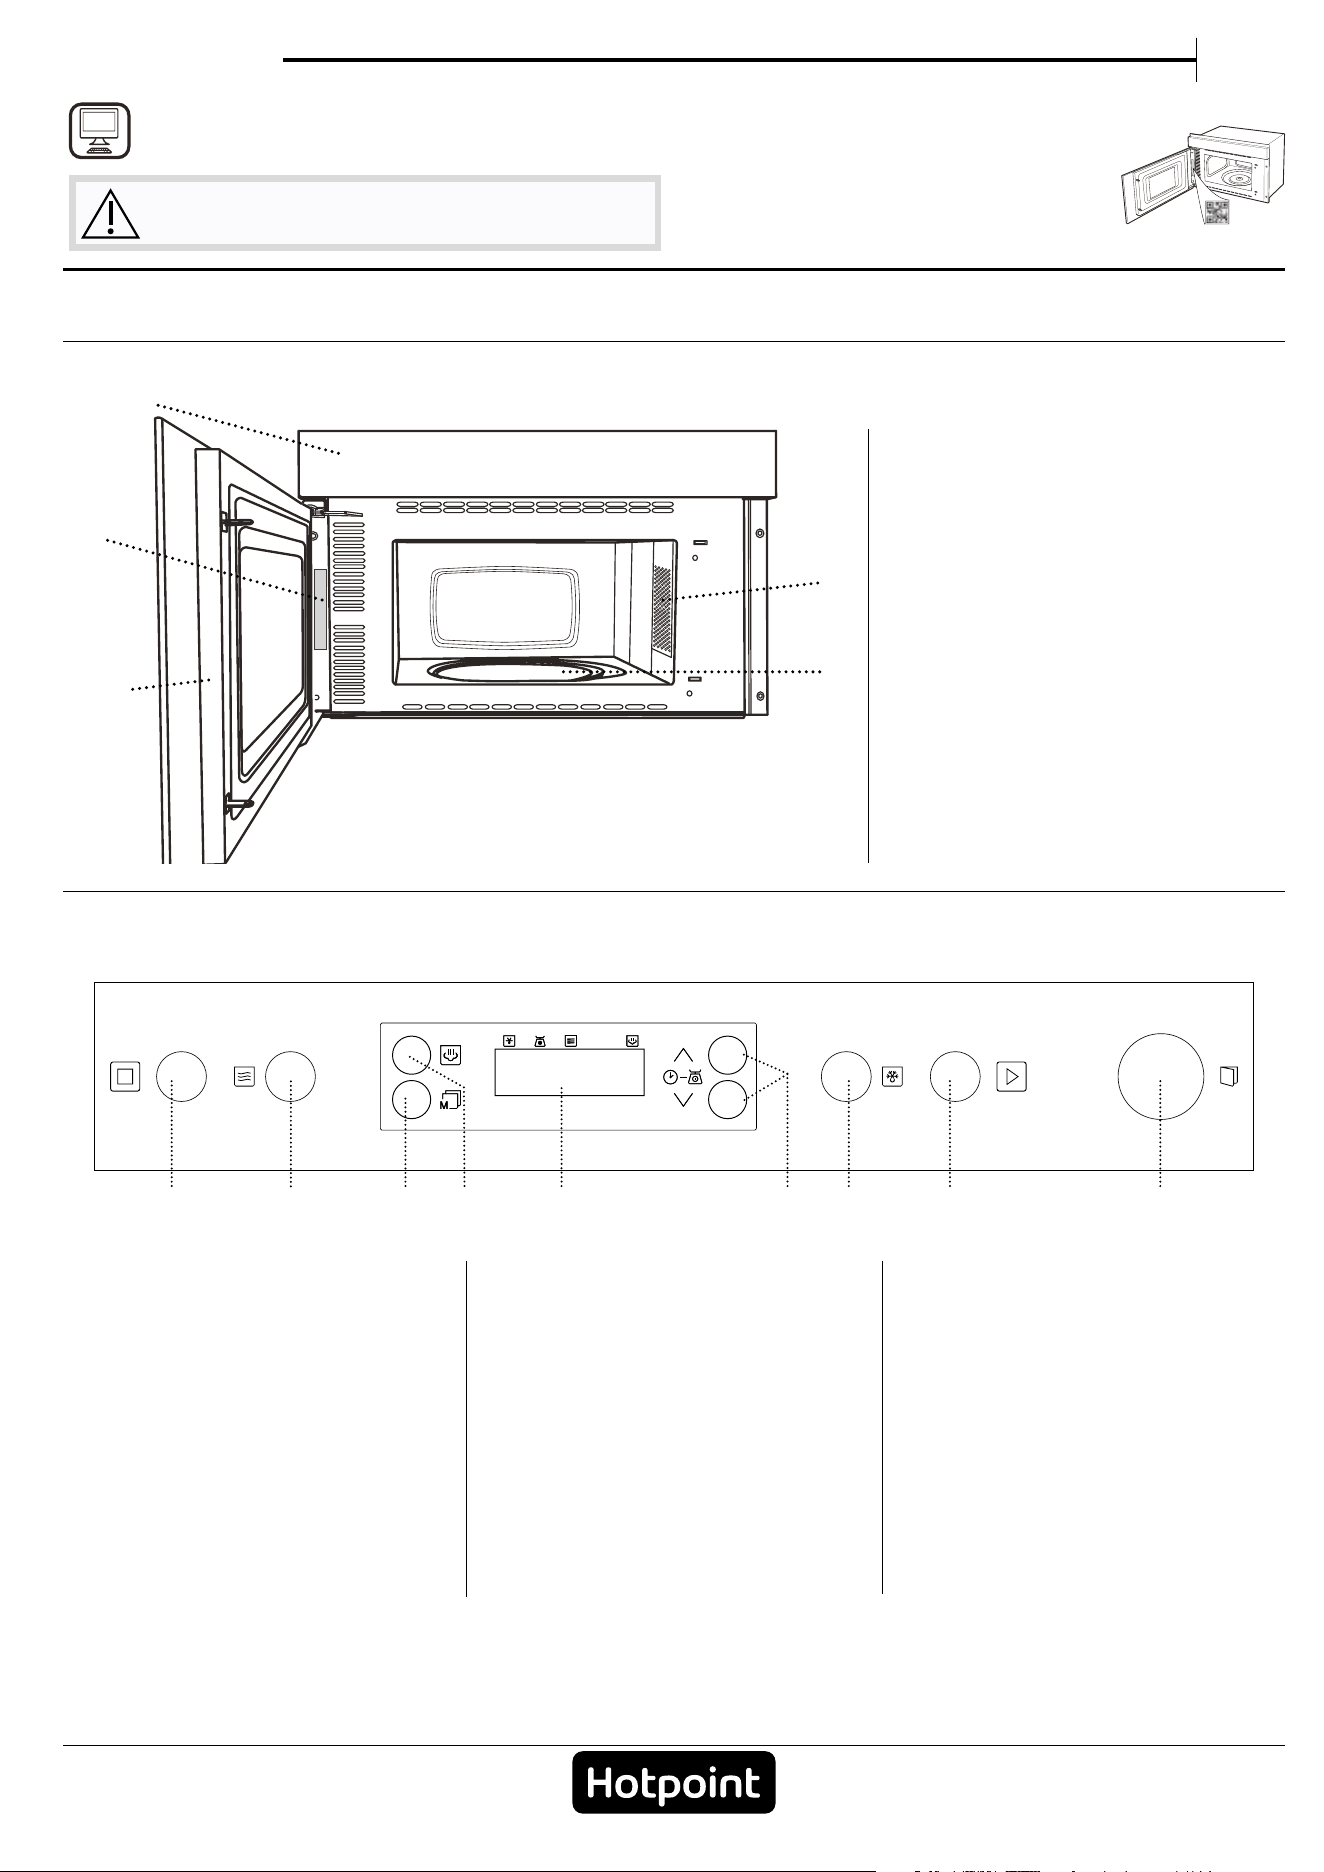
PRODUCT DESCRIPTION
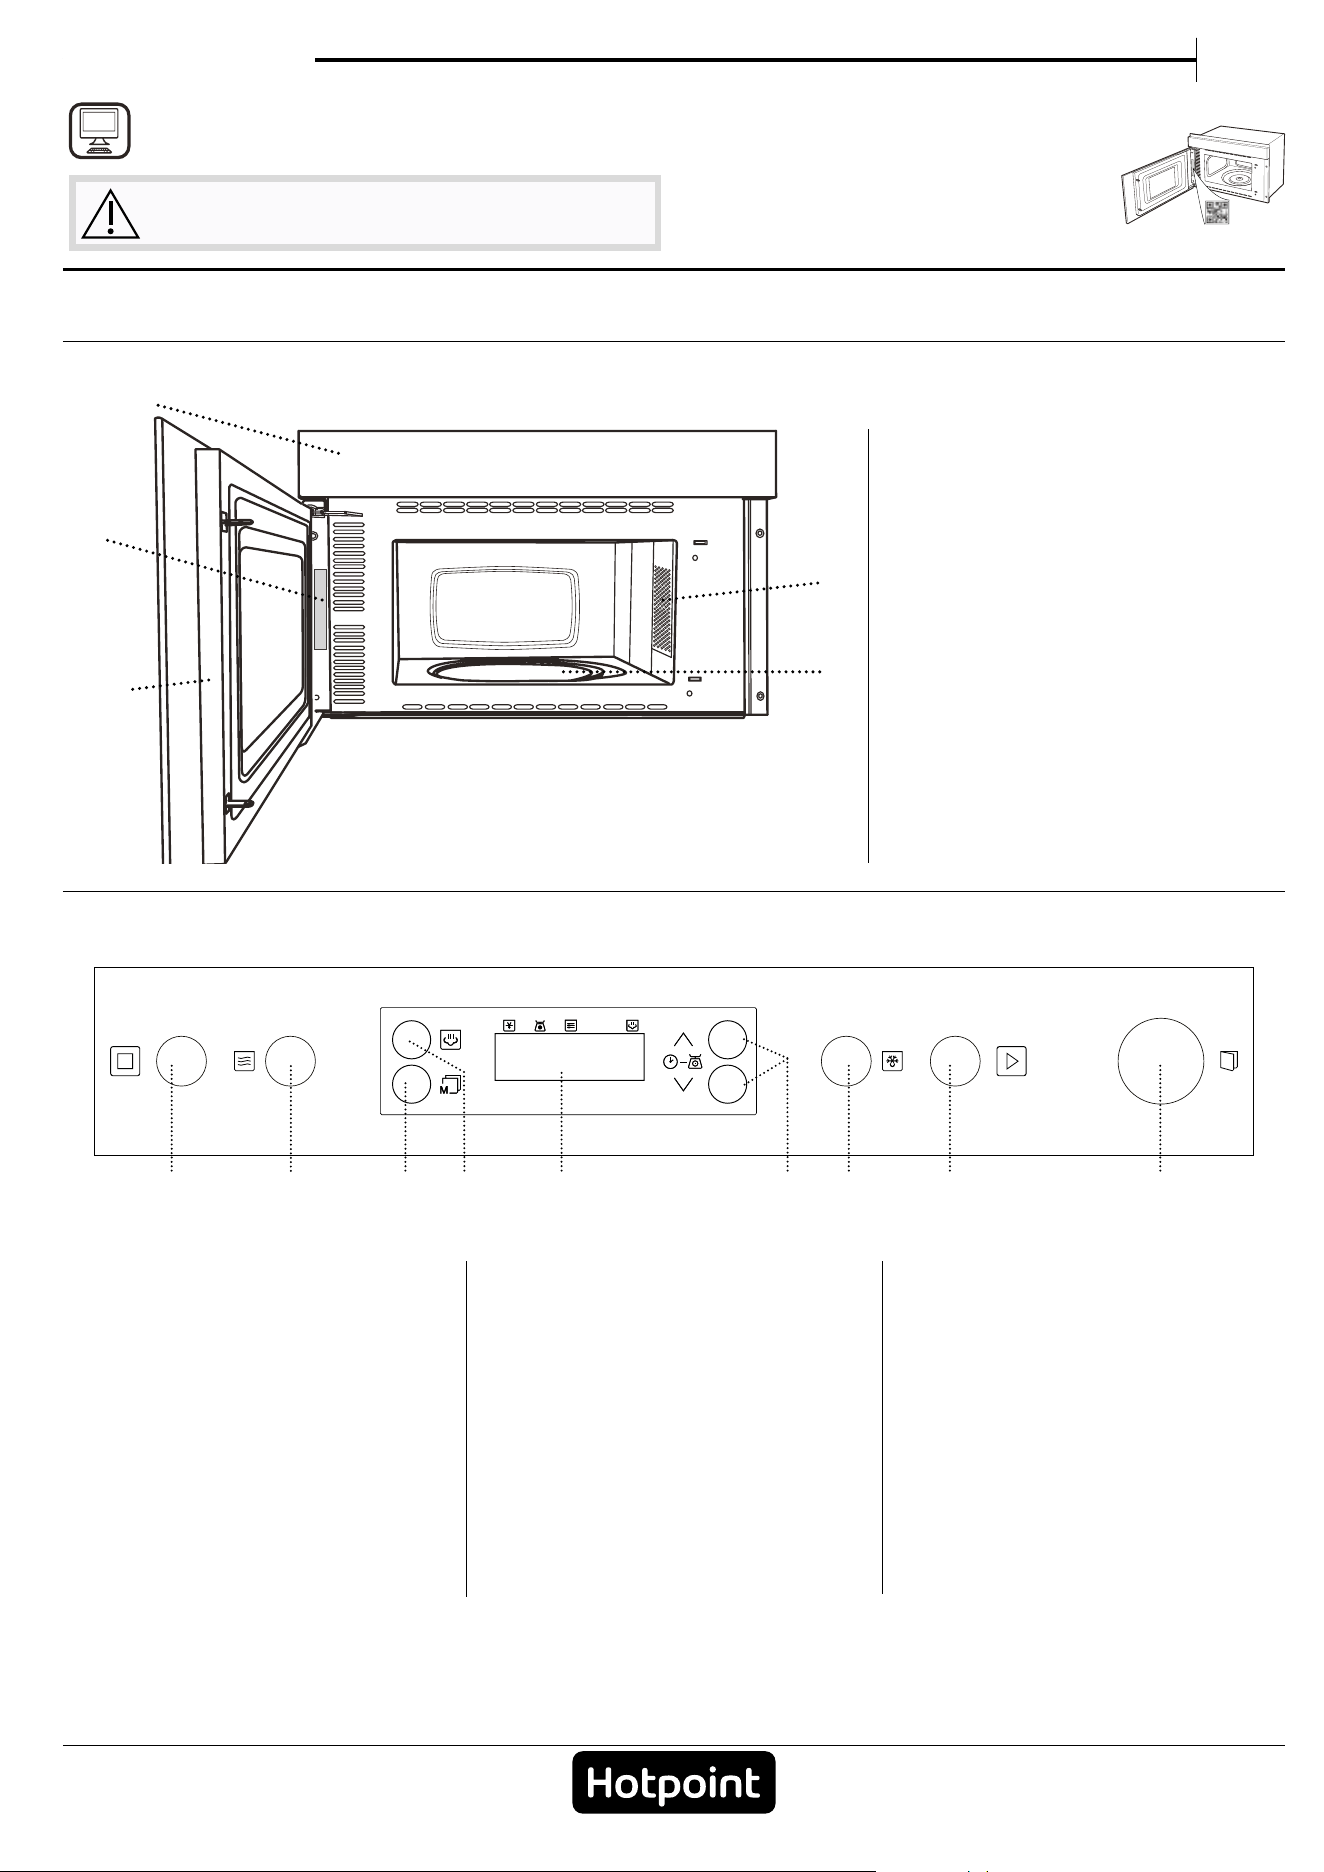
CONTROL PANEL
1. Control panel
2. Identification plate
(do not remove)
3. Door
4. Light
5. Turntable
1. STOP
For stopping a function or an
audible signal, cancelling the
settings and switching off the
oven.
2. MICROWAVE / POWER
FUNCTION
For selecting the microwaves
function and setting the required
power level.
3. SETTINGS MEMORY
4. STEAM FUNCTION
5. DISPLAY
6. + / - BUTTONS
For adjusting the settings of a
function
(e.g. length, weight).
7. DEFROST DYNAMIC
8. START
For starting a function. When the
oven is switched off, it activates
the “Jet Start” microwave
function.
9. DOOR OPENING BUTTON
1
2
5
4
3
1 3 4 6
8 95
2 7
ACCESSORIES
Download the Use and Care Guide from
docs.hotpoint.eu for more information
WWW
The number and type of accessories may vary depending on which model is purchased.
Other accessories that are not supplied can be purchased separately from the After-Sales Service.
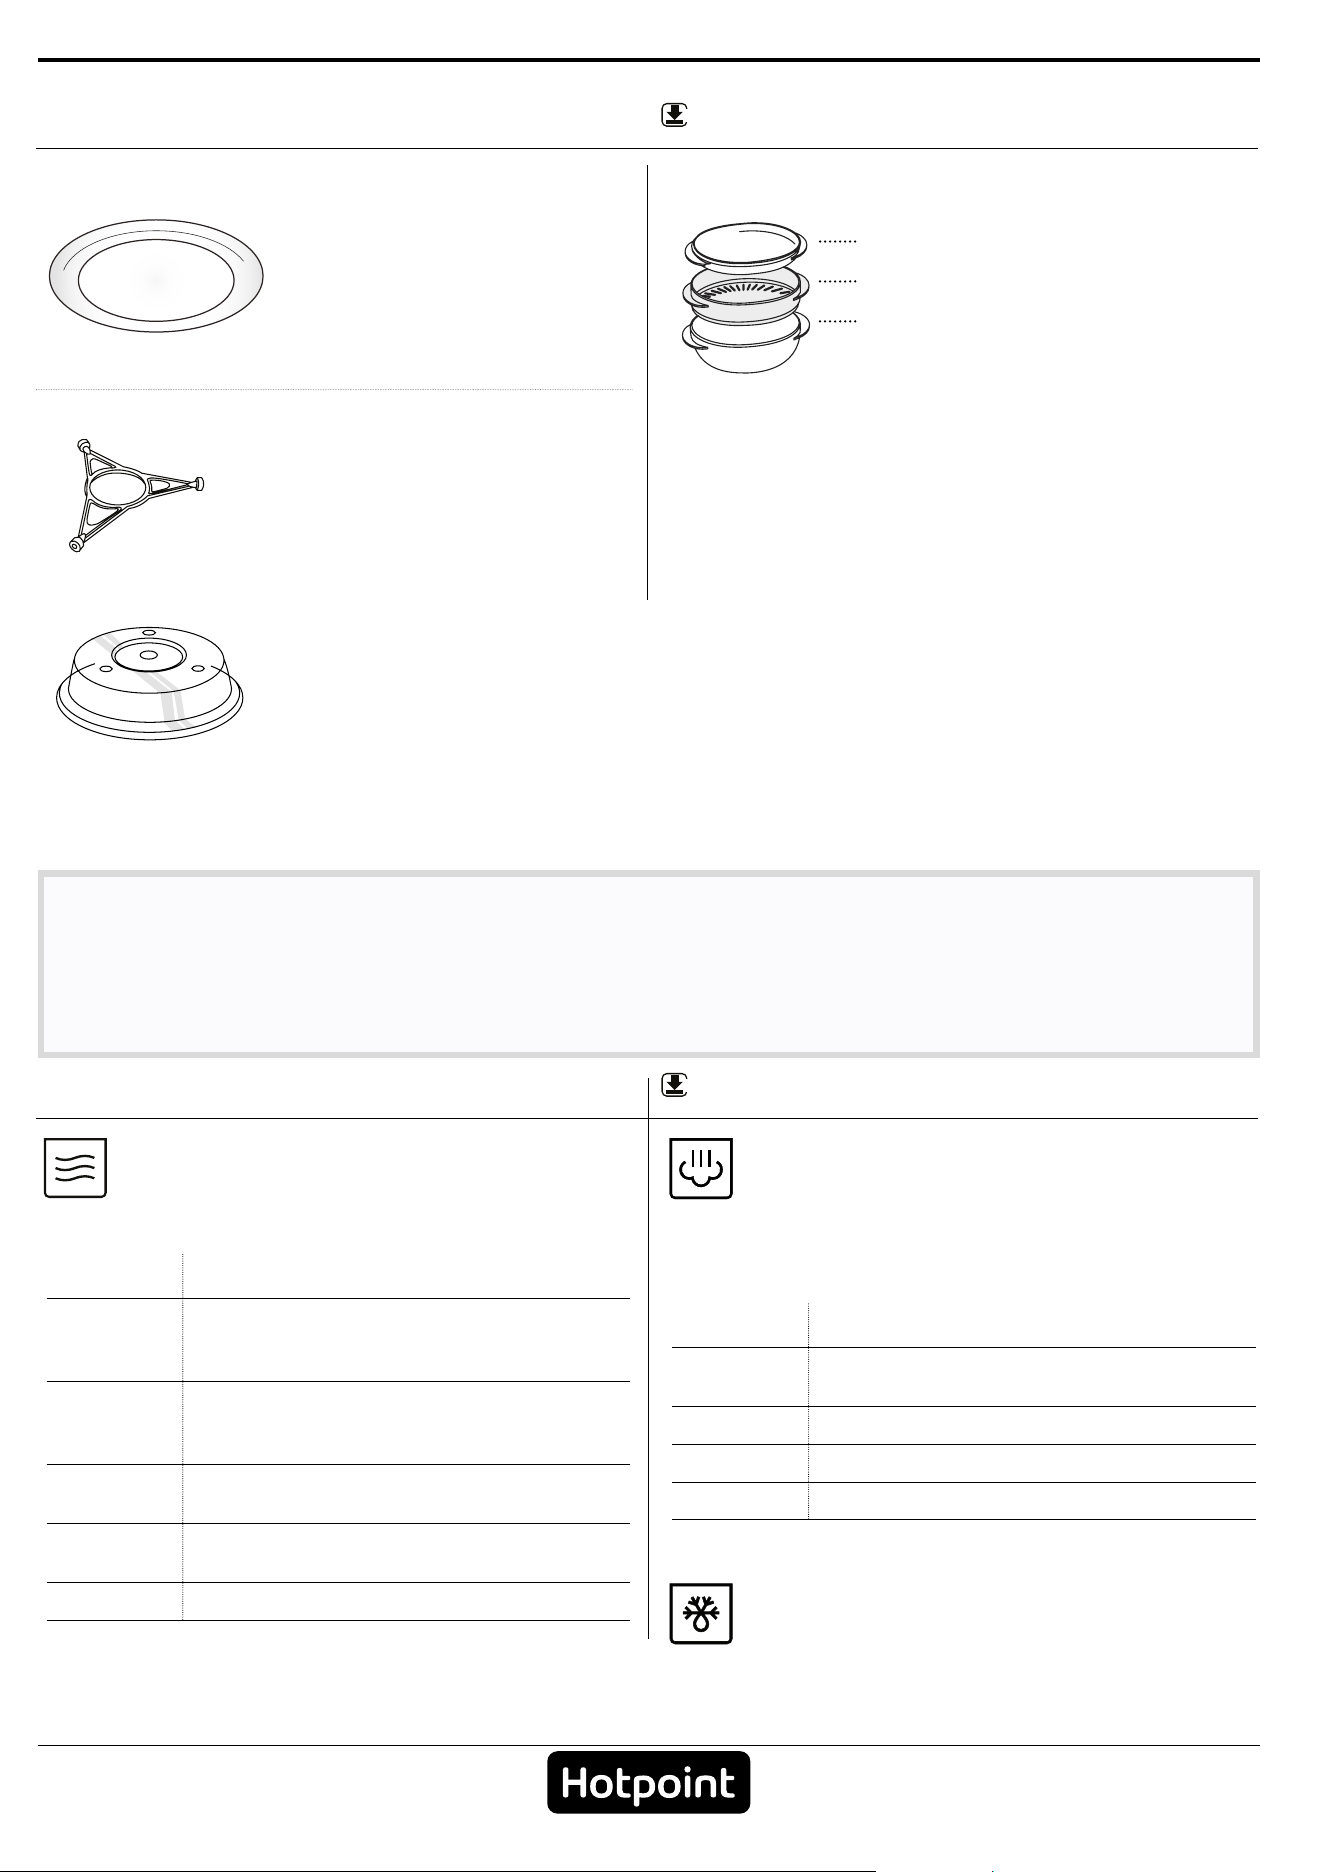
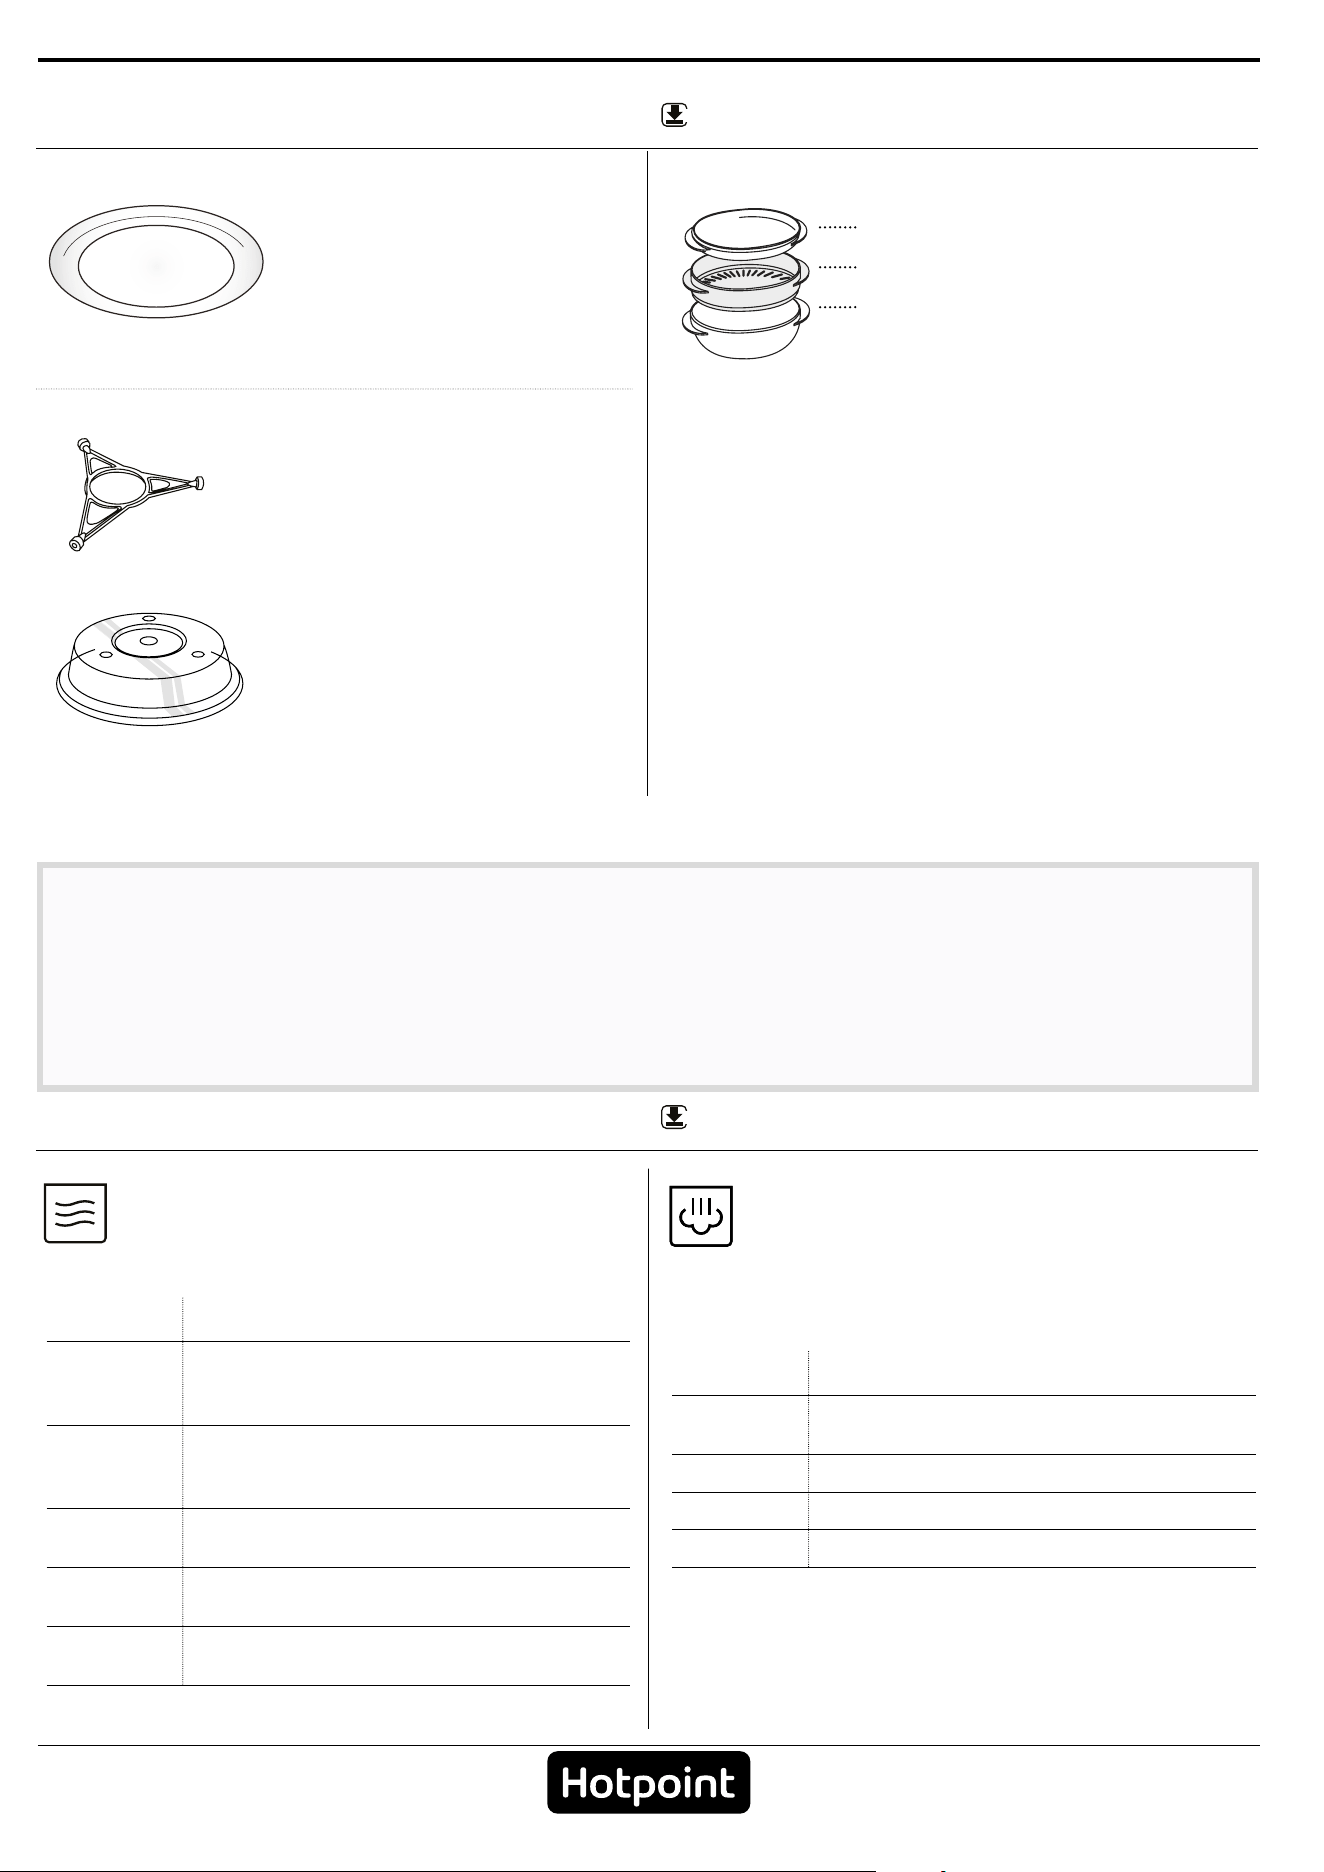
STEAMER
3
2
1
To steam foods such as fish or
vegetables, place these in the
basket (2) and pour drinking water
(100 ml) into the bottom of the
steamer (3) to achieve the right
amount of steam.
To boil foods such as potatoes,
pasta, rice or cereals, place these
directly on the bottom of the steamer (the basket
is not required) and add an appropriate amount of
drinking water for the amount you are cooking.
For best results, cover the steamer with the lid (1)
provided.
Always place the steamer on the glass turntable and
only use it with the appropriate cooking functions, or
with microwave function.
TURNTABLE
Placed on its support, the
glass turntable can be used
with all cooking methods.
The turntable must always be
used as a base plate for other
containers and accessories.
TURNTABLE SUPPORT
Only use the support for the glass
turntable. Do not rest other
accessories on the support.
COVER (IF SUPPLIED)
Useful for covering food while it is
cooking or heating in the
microwave. The cover reduces
splashes, keeps foods moist and
can also be used to create two
cooking levels.
There are a number of accessories available on the
market. Before you buy, ensure they are suitable for
microwave use and resistant to oven temperatures.
Metallic containers for food or drink should never
be used during microwave cooking.
Always ensure that foods and accessories do not
come into contact with the inside walls of the oven.
Always ensure that the turntable is able to turn
freely before starting the oven. Take care not to
unseat the turntable whilst inserting or removing
other accessories.
FUNCTIONS
Download the Use and Care Guide from
docs.hotpoint.eu for more information
WWW
MICROWAVES
For quickly cooking and reheating food or
drinks.
POWER RECOMMENDED FOR
750 W
Quickly reheating drinks or other foods
with a high water content or meat and
vegetables.
500 W
Cooking fish, meaty sauces, or sauces
containing cheese or egg. Finishing off
meat pies or pasta bakes.
350 W
Slow, gently cooking. Perfect for melting
butter or chocolate.
160 W
Defrosting frozen food or softening butter
and cheese.
0 W
When using the timer only
AUTO-STEAM
For steam-cooking foods such as vegetables
or fish, using the steamer provided. Pour 100 ml of
drinking water into the bottom of the steamer, place
the food on the wire shelf and cover it, then proceed
with cooking.
CATEGORY FOOD
1
Tubers and root vegetables (e.g. potatoes,
carrots, turnips)
2
Fresh vegetables (e.g. cauliflower, broccoli)
3
Frozen vegetables
4
Fillets of fish
Required accessory: Steamer
DEFROST
For quickly defrosting food such as meat,
poultry and fish weighing between 100 g and 2 kg.
Food should be placed directly onto the glass
turntable. Turn the food when prompted.
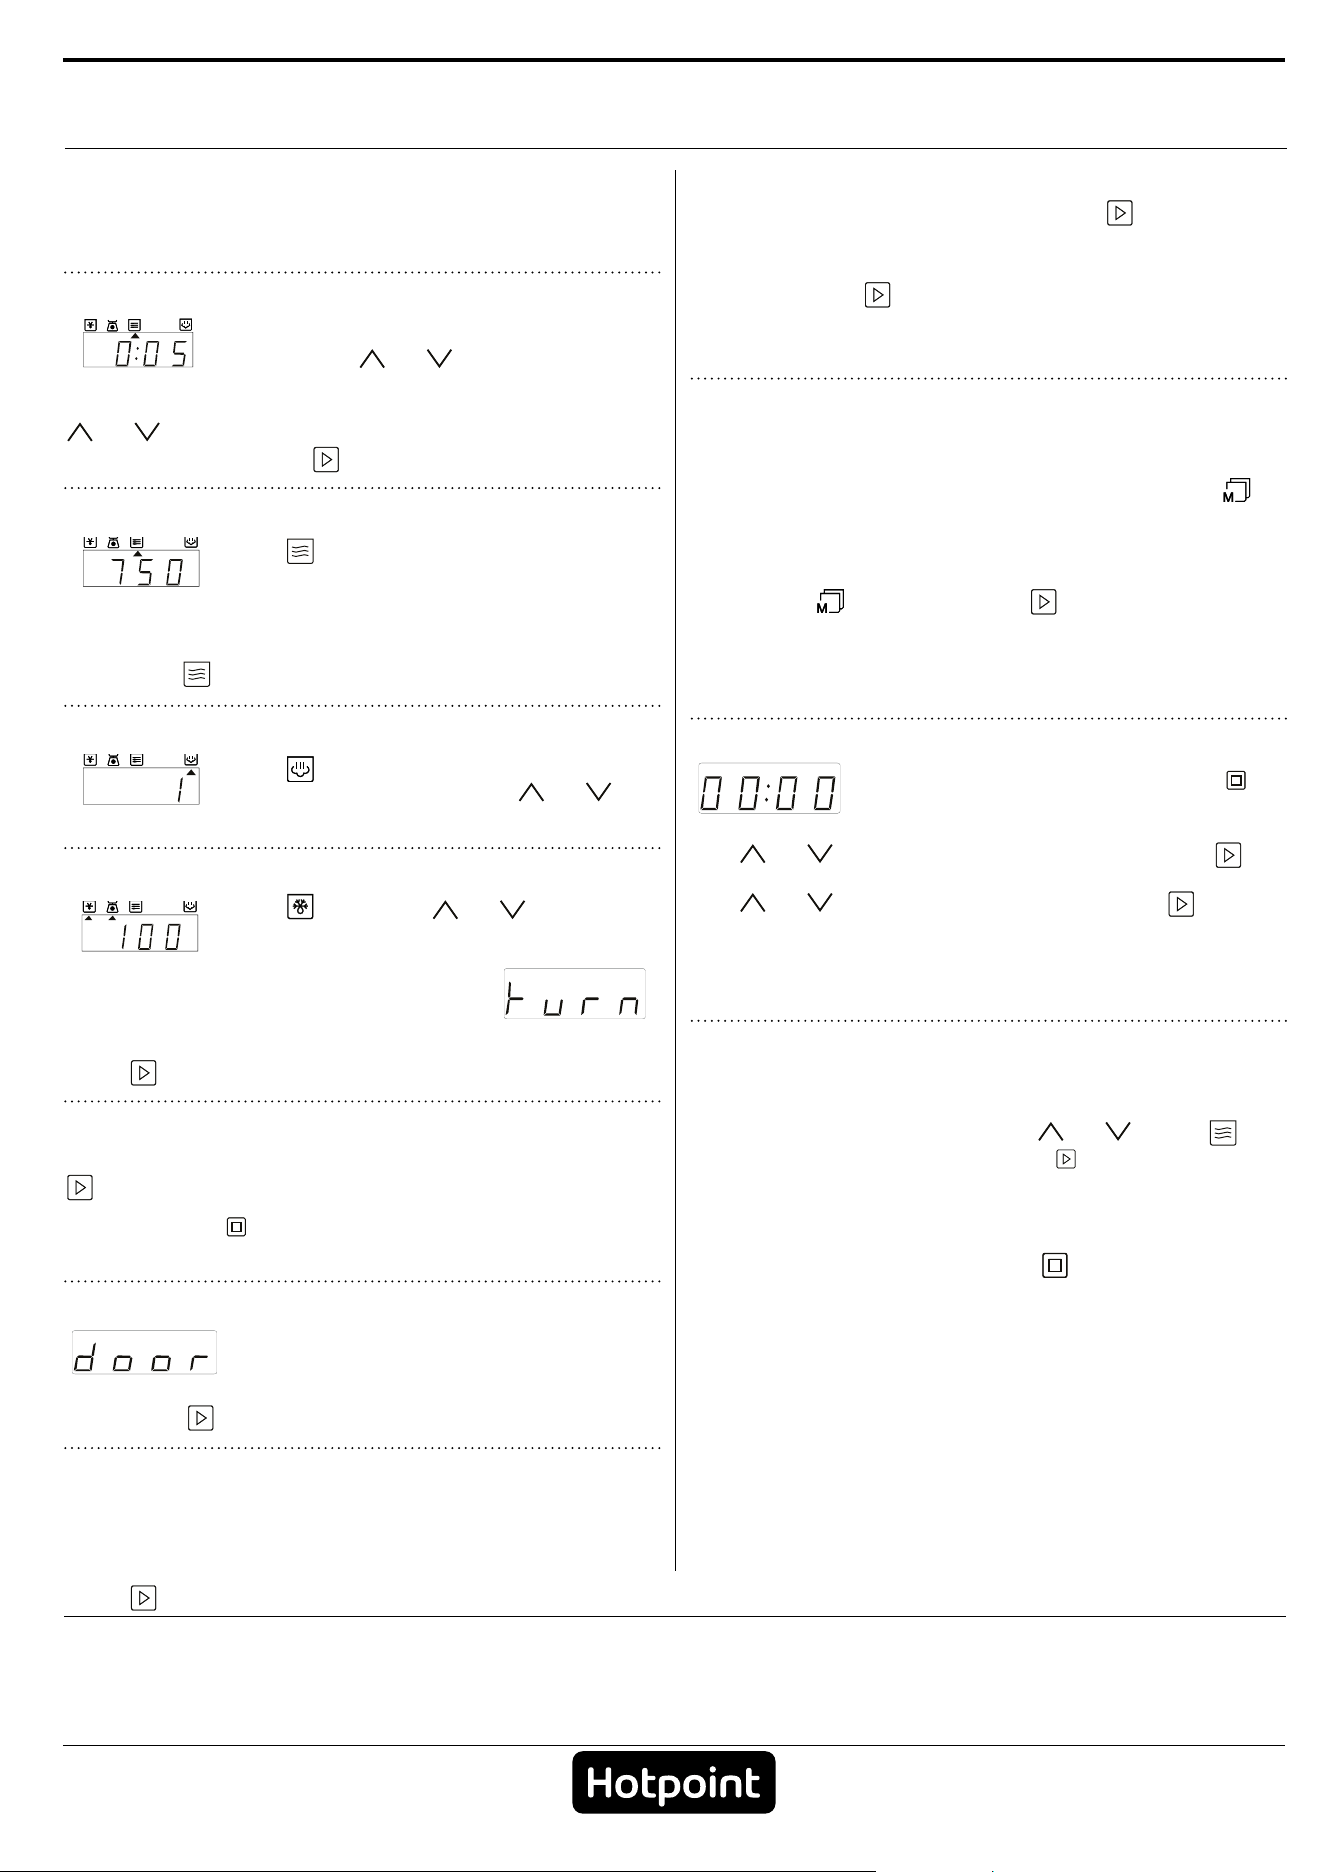
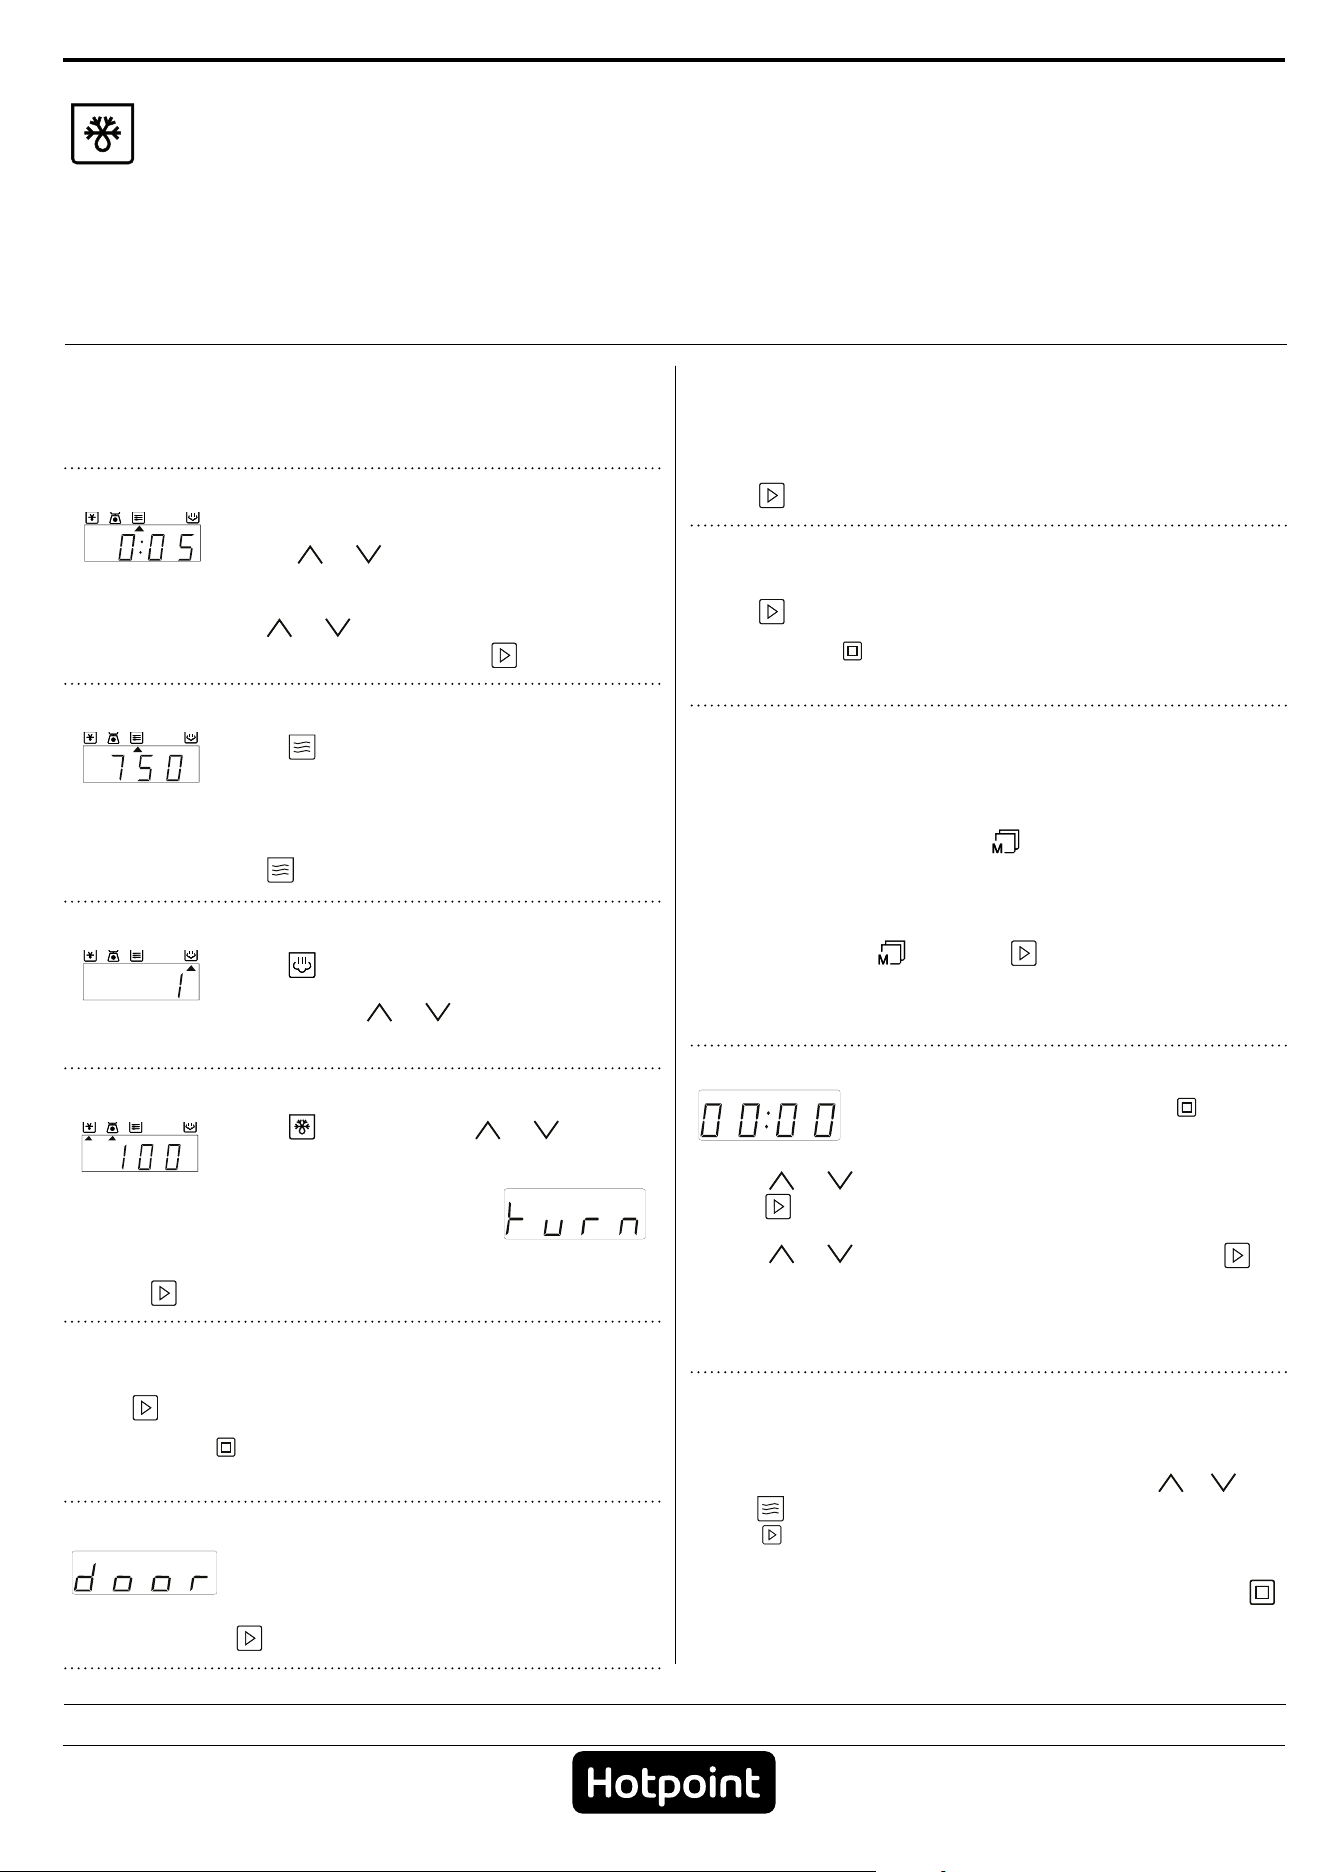
. SELECT A FUNCTION
Simply press the button for the function you require
to select it.
. SET THE LENGTH
After selecting the function you
require, use
or to set the length
for it to run.
The time can be changed during cooking by pressing
or or by increasing the length for 30 seconds
each time by pressing
. SET THE POWER OF THE MICROWAVE
Press as many times as required to
select the power level for the
microwave.
Please note: You can also change this setting during cooking
by pressing .
. AUTO-STEAM
Press until the food category you
require is shown, then use
or to
set the weight of the food.
. DEFROST
Press , then use or to set the
weight of the food.
During defrosting, the function will
pause briefly to allow you to turn the
food.
Once the operation is complete, close the door and
press
.
. ACTIVATE THE FUNCTION
Once you have applied the settings you require, press
to activate the function.
You can press
at any time to pause the function
that is currently active.
. SAFETY LOCK
This function is automatically activated
to prevent the oven from being
switched on accidentally. Open and close the door,
then press
to start the function.
. PAUSE
To pause an active function, for example to stir or turn
the food, simply open the door.
To resume the cooking process, close the door and
press
.
. JET START
When the oven is switched off, press to activate
cooking with the microwave function set at full power
(750 W) for 30 seconds.
Every time the
button is pressed again, the
cooking time will be increased by a further 30
seconds.
. MEMORY FUNCTION
The save the function and settings shown on the
display once you have selected a function and
adjusted its settings as required, press and hold
: An audible signal will indicate that the settings have
been saved correctly.
To recall one of your favourite functions at a later
date, press
and then press to activate the
function.
Please note: You can resave the settings at any time by
repeating these steps.
. SET THE TIME
With the oven switched off, press
until the two digits for the hour (on the
left) starting flashing.
Use
or to set the correct hour and press to
confirm: The minutes will flash on the display.
Use
or to set the minutes and press to
confirm.
Please note: You may need to set the time again following
lengthy power outages.
. TIMER
When the oven is switched off, the display can be
used as a timer. To activate the function and set the
length of time you require, use
or . Press to
set the power to 0 W, then press
to activate the
countdown.
Please note: The timer does not activate any of the cooking
cycles.
To stop the timer at any time, press .
DAILY USE
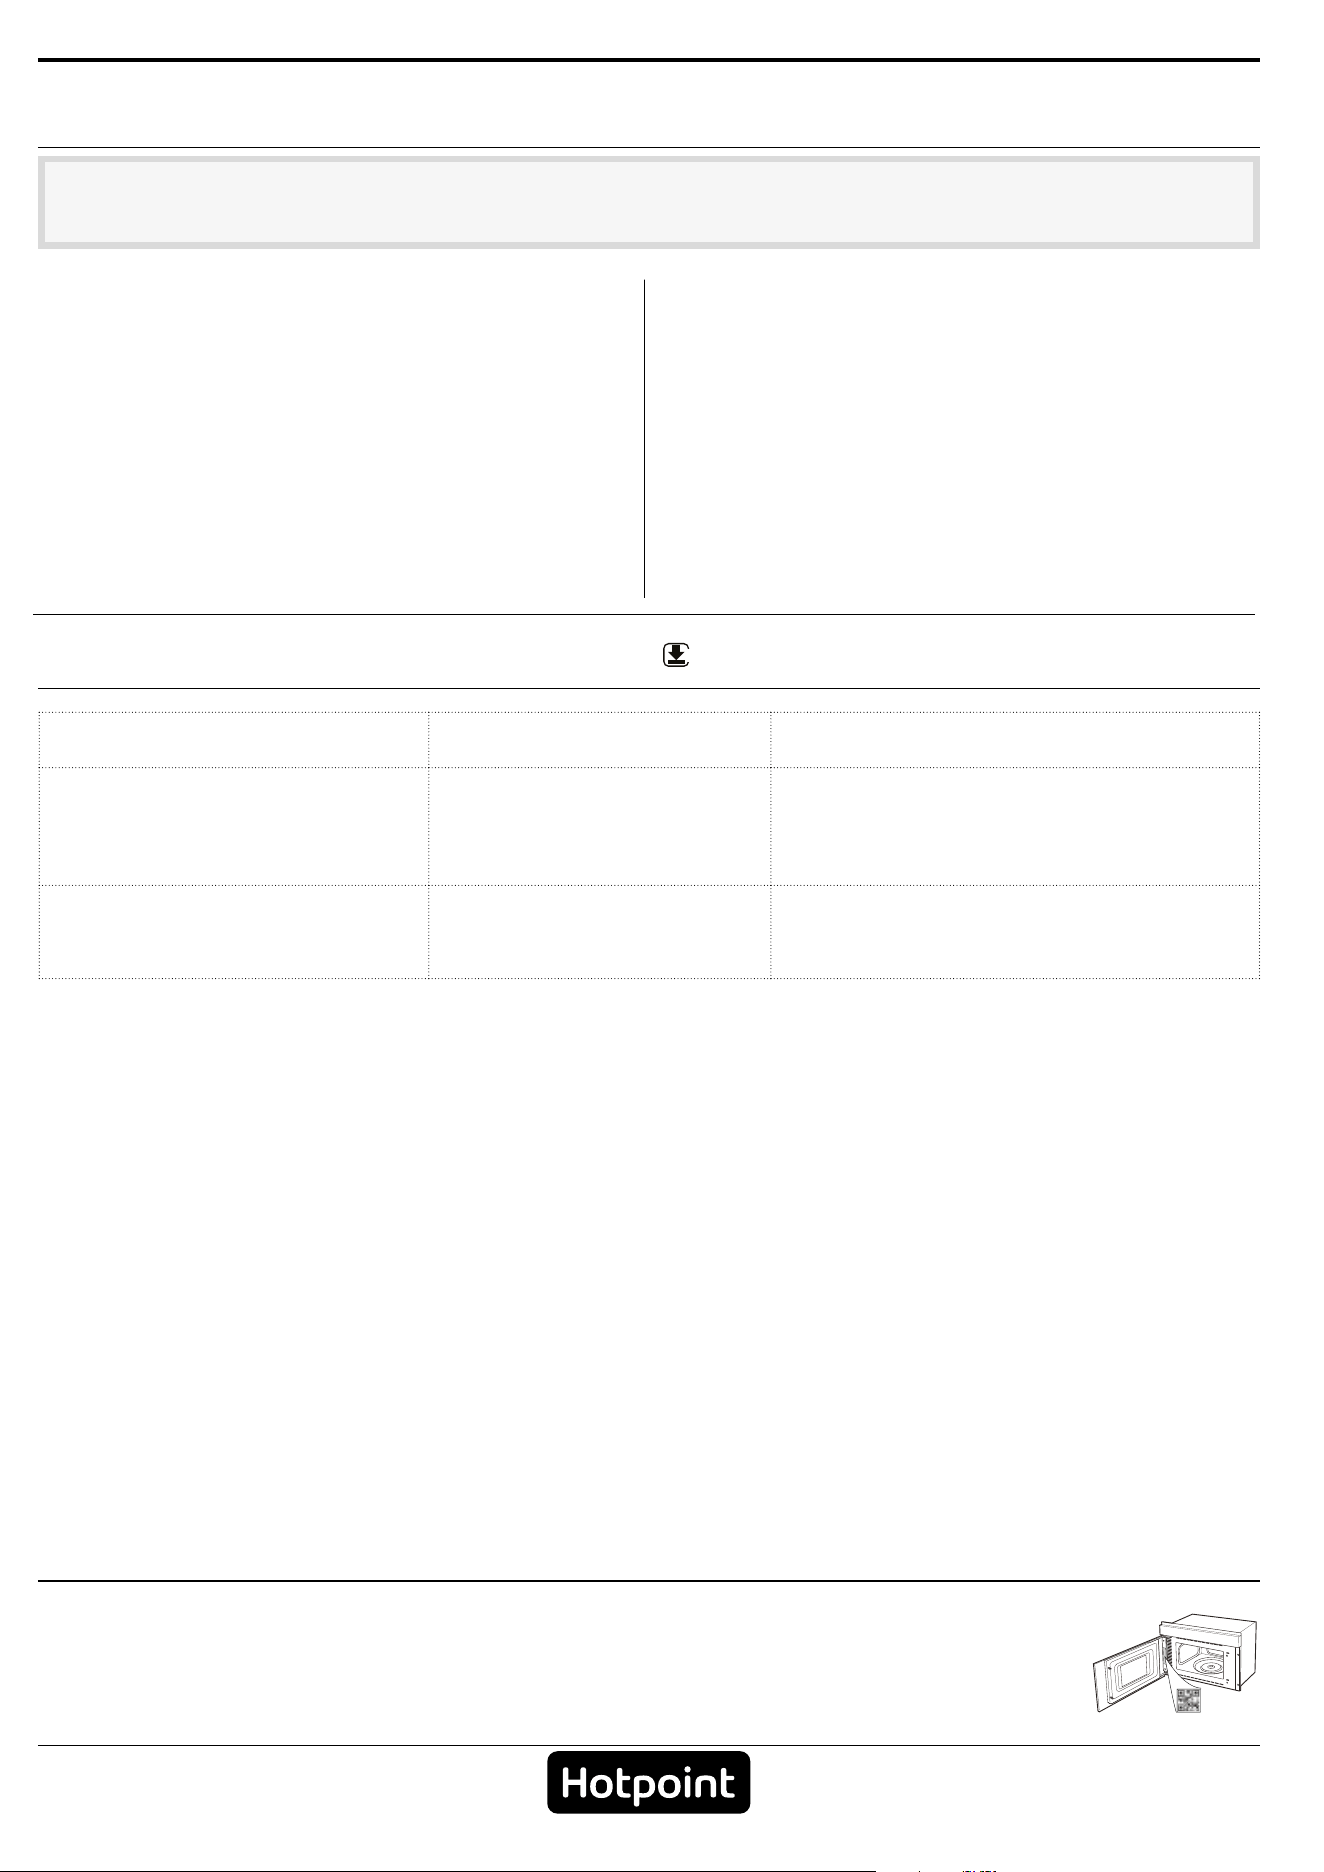
TROUBLESHOOTING
Download the Use and Care Guide from
docs.hotpoint.eu for more information
WWW
CLEANING
Do not use steam cleaners. Do not use wire wool, abrasive scourers or abrasive/
corrosive cleaning agents, as these could damage
the surfaces of the appliance.
INTERIOR AND EXTERIOR SURFACES
• Clean the surfaces with a damp cloth. If they are
very dirty, add a few drops of pH-neutral detergent.
Finish off with a dry cloth.
• Clean the door glass with a suitable liquid
detergent.
• At regular intervals or in case of spills, remove the
turntable and its support to clean the bottom of the
oven, removing all food residue.
ACCESSORIES
All the accessories can be cleaned in the dishwasher.
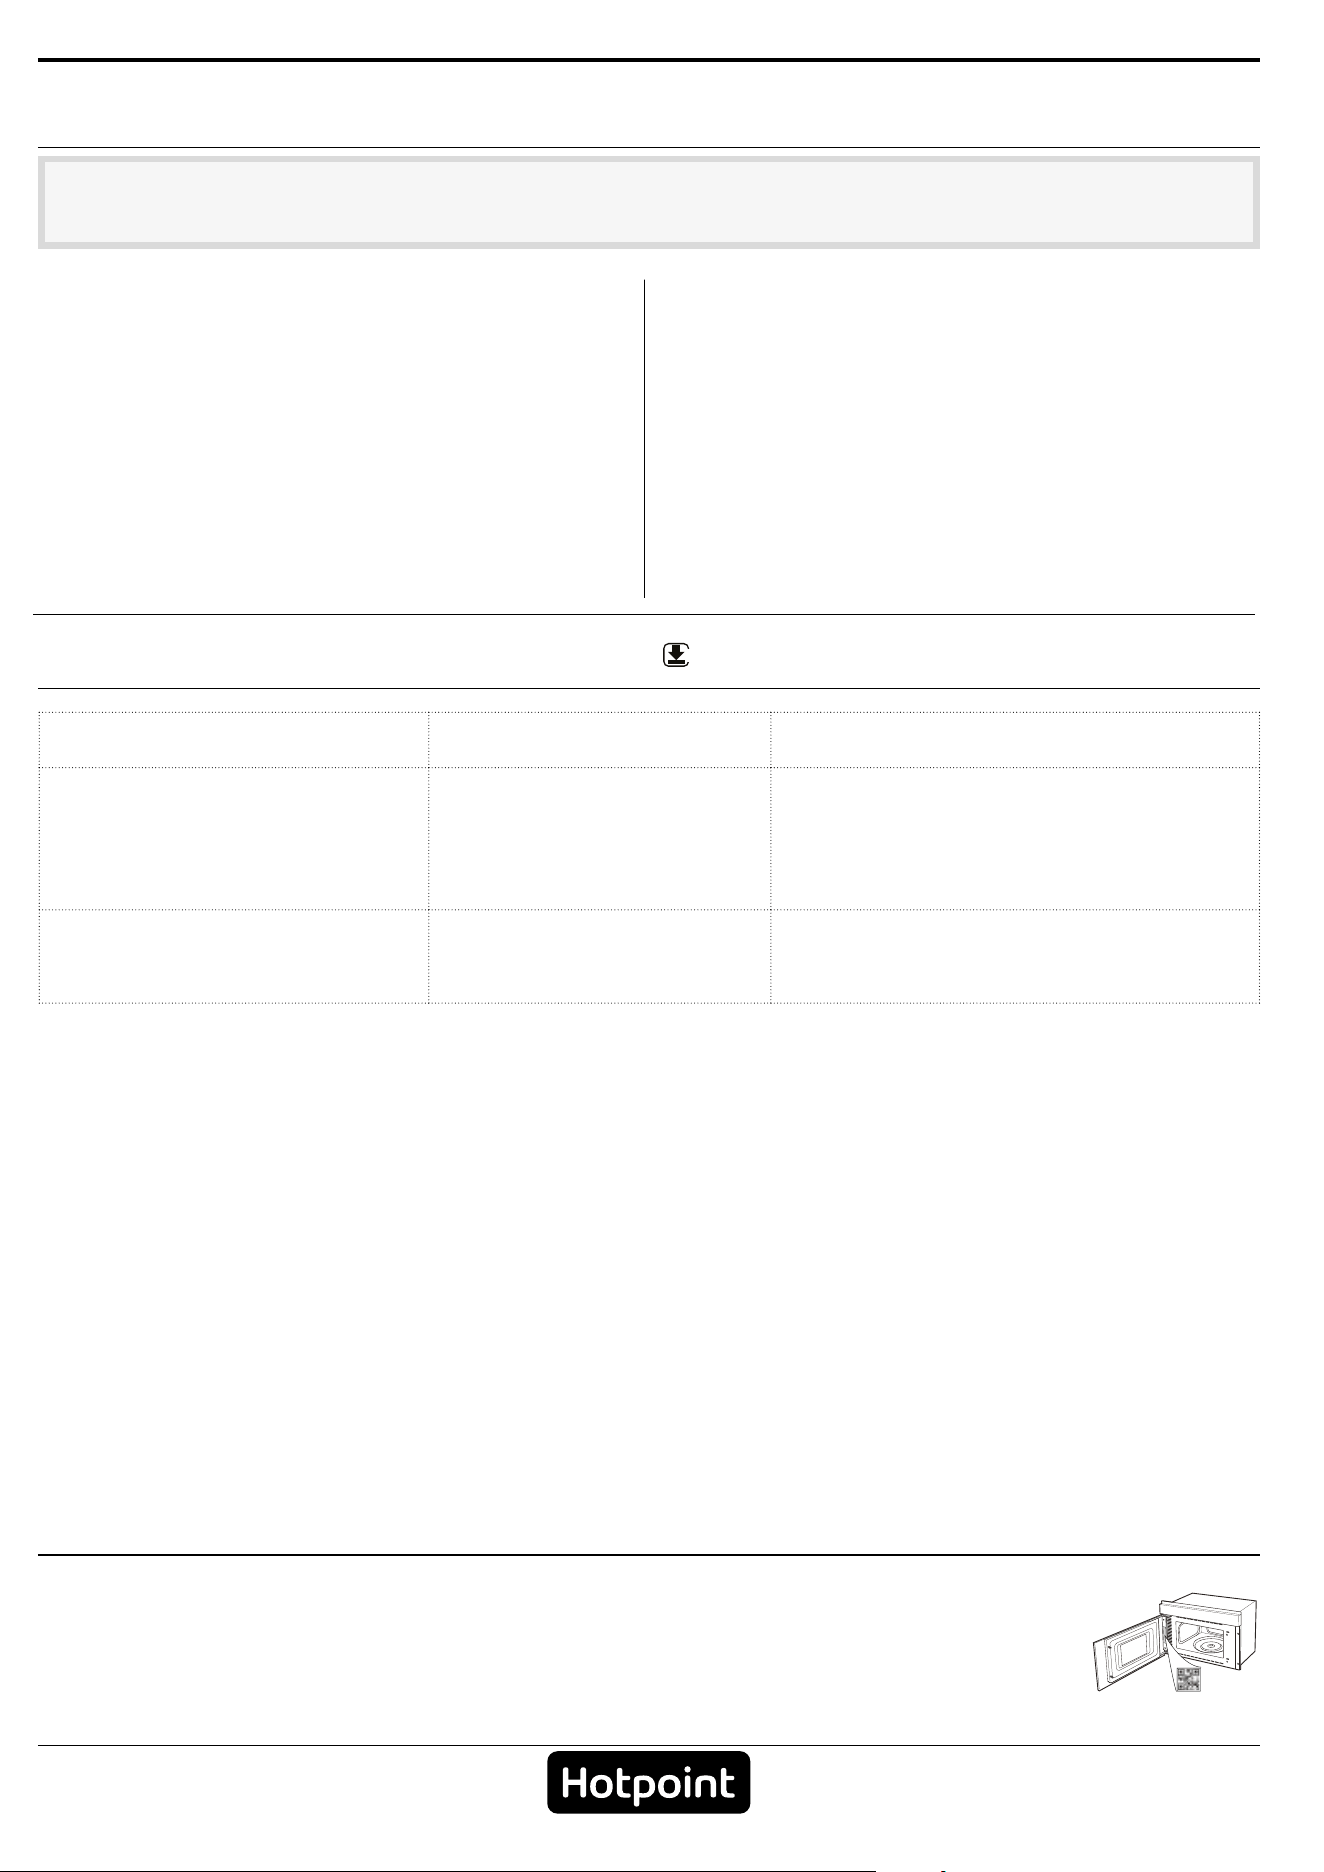
Problem Possible cause Solution
The oven does not work Power cut.
Disconnection from the
mains.
Check for the presence of mains electrical
power and whether the oven is connected
to the electricity supply. Turn off the oven
and restart it to see if the fault persists.
The display is showing “Err”. Software fault. Contact you nearest After-sales Service
Centre and state the letter or number that
follows “Err”.
Policies, standard documentation and additional product information can be found by:
• Using the QR code in your appliance
• Visiting our website docs . hotpoint . eu
• Alternatively, contact our After-sales Service (See phone number in the warranty booklet). When contacting our After-
sales Service, please state the codes provided on your product's identication plate.
ES
Manual del usuario
GRACIAS POR COMPRAR UN PRODUCTO HOTPOINT
Para recibir una asistencia más completa, registre su
producto en www . register10 . eu
ESCANEE EL CÓDIGO QR DE SU
APARATO PARA OBTENER MÁS
INFORMACIÓN
Antes de usar el aparato, lea atentamente las
Instrucciones de seguridad.
DESCRIPCIÓN DEL PRODUCTO
PANEL DE CONTROL
1. Panel de control
2. Placa de características
(no debe retirarse)
3. Puerta
4. Luz
5. Plato giratorio
1. STOP
Para detener una función o
una señal acústica, borrar las
configuraciones y apagar el horno.
2. POTENCIA/FUNCIÓN DEL
MICROONDAS
Para la seleccionar la función
microondas y configurar el nivel de
potencia necesario.
3. CONFIGURACIÓN DE LA
MEMORIA
4. FUNC IÓN VAPOR
5. PANTALLA
6. PULSADORES + / -
Para ajustar las configuraciones de
una función
(p. ej. duración, peso).
7. DEFROST DYNAMIC
8. INICIO
Sirve para activar una función.
Cuando el horno está apagado,
activa la función de «Jet Start» del
microondas.
9. PULSADOR APERTURA DE LA
PUERTA
1
2
5
4
3
1 3 4 6
8 95
2 7
ACCESORIOS
Descargue la Guía de uso y cuidado en
docs.hotpoint.eu para más información
WWW
El número y tipo de accesorios puede variar de un modelo a otro.
Los accesorios no incluidos pueden adquirirse aparte en el Servicio Postventa.
VAPORERA
3
2
1
Para cocinar al vapor alimentos
como pescados o verduras,
colóquelos en el cesto (2) y ponga
agua potable (100 ml) en el fondo
de la vaporera (3) para crear la
cantidad de vapor correcta.
Para hervir alimentos como
pasta, arroz, patatas, colóquelos
directamente en el fondo de la vaporera (no es
necesario el cesto) y añada la cantidad de agua
adecuada a la cantidad de alimentos que esté
cocinando.
Para obtener los mejores resultados, cubra la
vaporera con la tapa (1) suministrada. Coloque
siempre la vaporera en el plato giratorio y utilícela
solamente con las funciones de cocción adecuadas
o con las funciones de microondas.
PLATO GIRATORIO
El plato giratorio debe estar
colocado en su soporte y
puede utilizarse en todos los
métodos de cocción.
El plato giratorio siempre
debe utilizarse como base para los contenedores y
accesorios.
SOPORTE DEL PLATO GIRATORIO
Utilice el soporte solamente para el
plato giratorio de cristal. No coloque
otros accesorios en el soporte.
TAPA (SI HAY)
Es útil para cubrir los alimentos
cuando se cocina o se calienta en
el microondas. La tapa reduce las
salpicaduras, mantiene la
humedad de los alimentos y
también se puede utilizar para
crear dos niveles de cocción.
Hay varios accesorios disponibles en el mercado.
Antes de adquirirlos, asegúrese de que son aptos
para el microondas y resistentes a las temperaturas
del horno.
Los contenedores metálicos para alimentos o
bebidas no deben utilizarse nunca para la cocción
con el microondas.
Asegúrese siempre de que ni los alimentos ni los
accesorios entren en contacto con las paredes
internas del horno.
Compruebe siempre que el plato giratorio gira sin
problemas antes de poner en marcha el horno.
Tenga cuidado de no desencajar el plato giratorio
cuando introduzca o saque otros accesorios.
FUNCIONES
Descargue la Guía de uso y cuidado en
docs.hotpoint.eu para más información
WWW
MICROONDAS
Para cocinar y recalentar alimentos o bebidas
con rapidez.
POTENCIA RECOMENDADA PARA
750 W
Calentar rápidamente bebidas u otros
alimentos con alto contenido en agua, o
carne y verduras.
500 W
Cocción de pescado, salsas con carne, o salsas
que contengan queso o huevo. Acabado de
pasteles de carne o pasta al horno.
350 W
Cocción lenta y suave. Perfecta para derretir
mantequilla o chocolate.
160 W
Descongelar alimentos o ablandar
mantequilla o queso.
0 W
Cuando se utiliza solamente el
temporizador
AUTO-VAPOR
Para cocinar al vapor alimentos como verduras
o pescado, utilizando la vaporera suministrada.
Ponga 100 ml de agua potable en el fondo de la
vaporera, coloque los alimentos en la rejilla y cubra,
luego proceda con la cocción.
CATEGORÍA ALIMENTO
1
Hortalizas de raíz y tubérculos (por ej.
patatas, zanahorias, nabos)
2
Verduras frescas (por ej. coliflor, brócoli)
3
Verduras congeladas
4
Filetes de pescado
Accesorio necesario: Vaporera
. SELECCIONAR UNA FUNCIÓN
Para seleccionar una función solamente debe pulsar
el botón correspondiente.
. ESTABLECER EL TIEMPO
Después de seleccionar que desee,
utilice
o para establecer el
tiempo de funcionamiento.
El tiempo establecido pueden cambiarse durante la
cocción pulsando
o o aumentando el tiempo
en 30 segundos cada vez que se pulsa
. ESTABLECER LA POTENCIA DEL MICROONDAS
Pulse tantas veces como sea
necesario para seleccionar el nivel de
potencia del microondas.
Nota: Esta conguración también se puede cambiar durante
la cocción pulsando .
. AUTO-VAPOR
Pulse hasta que aparezca la
categoría de alimentos que desea,
luego utilice
o para establecer el
peso de la comida.
. DESCONGELAR
Pulse , luego utilice o para
establecer el peso de los alimentos.
Durante la descongelación, la función
se detendrá brevemente para que
pueda girar los alimentos.
Cuando haya finalizado la operación, cierre la puerta
y pulse
.
. ACTIVAR LA FUNCIÓN
Una vez que haya aplicado la configuración deseada,
pulse
para activar la función.
Puede pulsar
en cualquier momento para poner en
pausa la función que esté activada en ese momento.
. BLOQUEO DE SEGURIDAD
Esta función se activa
automáticamente para evitar la
activación accidental del horno. Abra y cierre la
puerta, y pulse
para activar la función.
. PAUSA
Para detener una función activa, por ejemplo para mover
o girar la comida, solamente tendrá que abrir la puerta.
Para reanudar el proceso de cocción, cierre la puerta y
pulse
.
. ACTIVAR LA FUNCIÓN
Una vez que haya aplicado la configuración deseada,
pulse
para activar la función.
Puede pulsar
en cualquier momento para poner en
pausa la función que esté activada en ese momento.
. FUNCIÓN MEMORIA
La función memorizar aparecerá en la pantalla
cuando haya seleccionado una función y ajustado
las configuraciones necesarias, para activarla deberá
pulsar y mantener pulsado
: Se emitirá una señal
acústica para indicar que las configuraciones se han
guardado correctamente.
Para activar una de sus funciones preferidas en otro
momento, pulse
y luego para activarla.
Nota: Puede volver a guardar las conguraciones siempre
que lo desee repitiendo estas operaciones.
. CÓMO CONFIGURAR LA HORA
Con el horno apagado, pulse hasta
que empiecen a parpadear los dos
dígitos de la hora (a la izquierda).
Utilice
o para establecer la hora correcta y
pulse
para confirmar: Los minutos parpadearán
en la pantalla.
Utilice
o para ajustar los minutos y pulse
para confirmar.
Nota: Después de un corte de suministro prolongado, es
posible que tenga que volver congurar la hora.
. TIMER
Cuando el horno está apagado, la pantalla puede
utilizarse como temporizador. Para activar la función y
seleccionar el tiempo que necesite, utilice
o .
Pulse
para establecer la potencia en 0 W, luego
pulse
para activar la cuenta atrás.
Nota: El temporizador no activa ninguno de los ciclos de cocción.
Para detener el temporizador en cualquier momento, pulse .
USO DIARIO
DESCONGELAR
Para descongelar rápidamente carne, aves y
pescado con un peso comprendido entre 100 g y 2 kg.
Los alimentos deben colocarse directamente en el
plato giratorio. Remueva los alimentos cuando lo
indique.
RESOLUCIÓN DE PROBLEMAS
Descargue la Guía de uso y cuidado en
docs.hotpoint.eu para más información
WWW
LIMPIEZA
No utilice aparatos de limpieza con vapor. No utilice estropajos de acero, estropajos abrasivos
ni productos de limpieza abrasivos/corrosivos, ya
que podrían dañar las superficies del aparato.
SUPERFICIES INTERNAS Y EXTERNAS
• Limpie las superficies con un paño húmedo. Si están
muy sucias, añada unas gotas de detergente neutro
al agua. Seque con un paño seco.
• Limpie el cristal de la puerta con un detergente
líquido adecuado.
• A intervalos regulares o si se derrama algo, retire el
plato giratorio y el soporte para limpiar el fondo del
horno, retirando todos los restos de alimentos.
ACCESORIOS
Todos los accesorios pueden lavarse en el lavavajillas.
Problema Posible causa Solución
El horno no funciona Corte de suministro.
Desconexión de la red eléctrica.
Compruebe que haya corriente eléctrica
en la red y que el horno esté enchufado a
la toma de electricidad. Apague el horno y
vuelva a encenderlo para comprobar si se ha
solucionado el problema.
La pantalla muestra «Err». Fallo del software. Póngase en contacto con el Servicio Postventa
más cercano e indique la letra o número que
aparecen detrás de «Err».
Puede consultar los reglamentos, la documentación estándar e información adicional sobre productos mediante
alguna de las siguientes formas:
• Utilizando el código QR en tu aplicación
• Visitando nuestra página web docs . hotpoint . eu
• También puede ponerse en contacto con nuestro Servicio Postventa (Consulte el número de teléfono en el folleto de
la garantía). Cuando se ponga en contacto con nuestro Servicio Postventa, deberá indicar los códigos que guran en la
placa de características de su producto.
400020041679