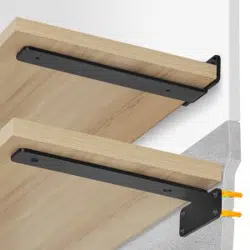

FLOATING SHELF BRACKET
MODEL:FT-16-2 \ FT-22-2 \ FT-34-1 \ FT-43-1 \ FT-46-1
Technical Support and E-Warranty Certificate
www.vevor.com/support

- 1 -
MODEL:FT-16-2 \ FT-22-2 \ FT-34-1 \ FT-43-1 \ FT-46-1
(FT-16-2 \ FT-22-2) ( FT-34-1) (FT-43-1 \ FT-46-1)
This is the original instruction, please read all manual instructions
carefully before operating. VEVOR reserves a clear interpretation of our
user manual. The appearance of the product shall be subject to the
product you received. Please forgive us that we won't inform you again if
there are any technology or software updates on our product.
Warning-To reduce the risk of injury, user must read
instructions manual carefully.
FLOATING SHELF
BRACKET

- 2 -
Warnings
1.1 Shelf brackets must be correctly installed into studs or wall blocking.
Failure to do so may result in sagging shelves, falling objects, or serious
injury.
1.21Every bracket weight class and length has been engineered for use
with specific shelf capacities/dimensions. Failure to follow our specified
capacity ratings and correct shelf dimensions may result in sagging
shelves, falling objects, or serious injury.
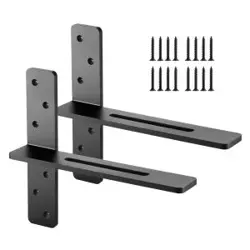
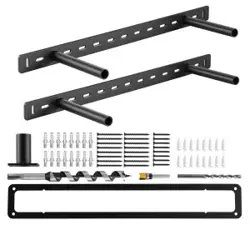
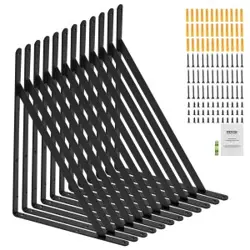
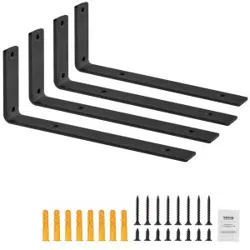
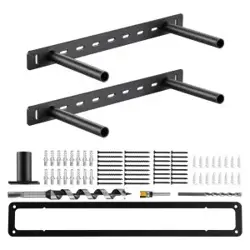
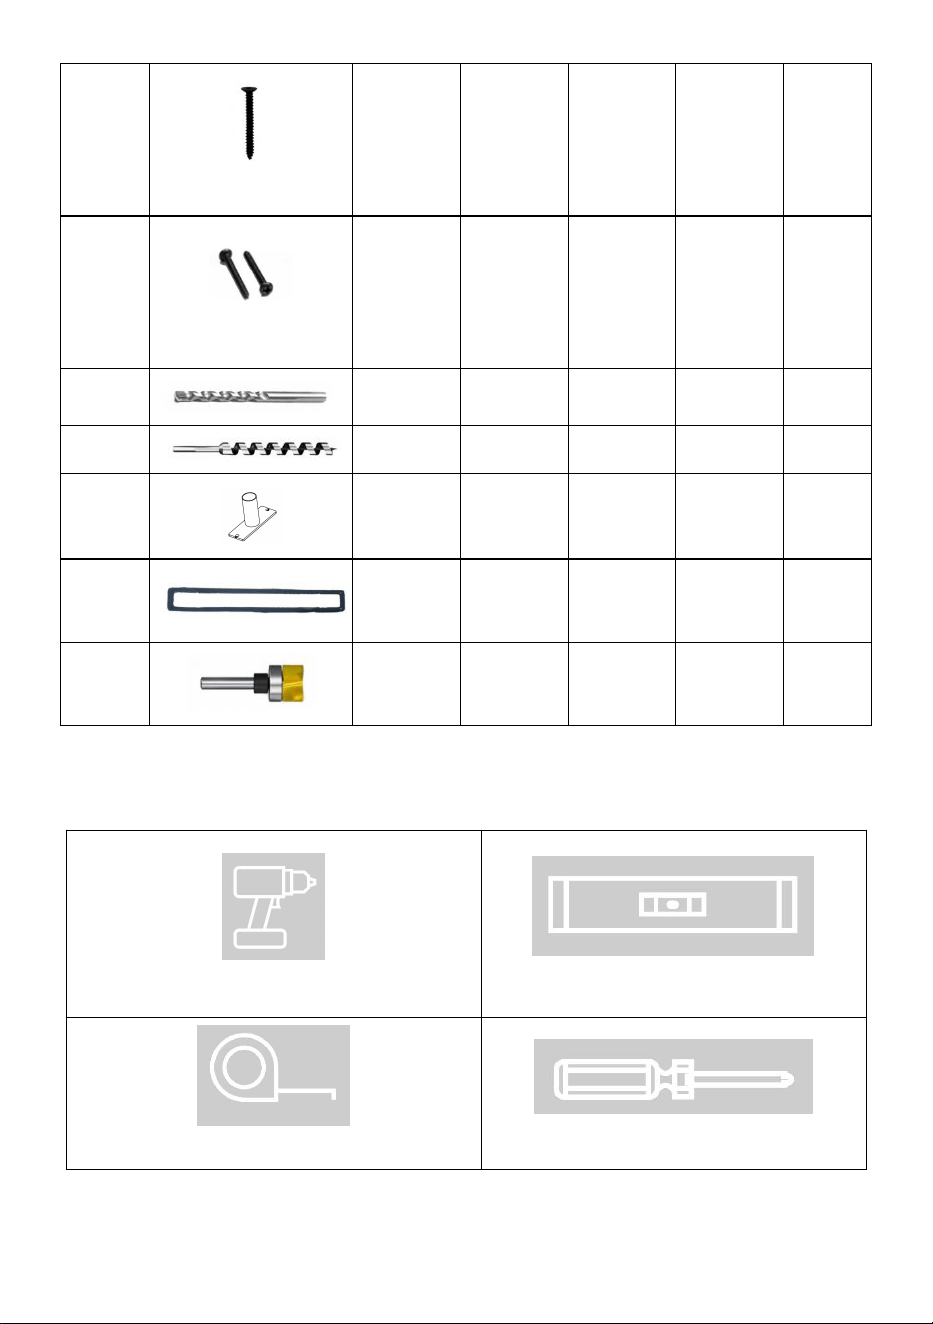
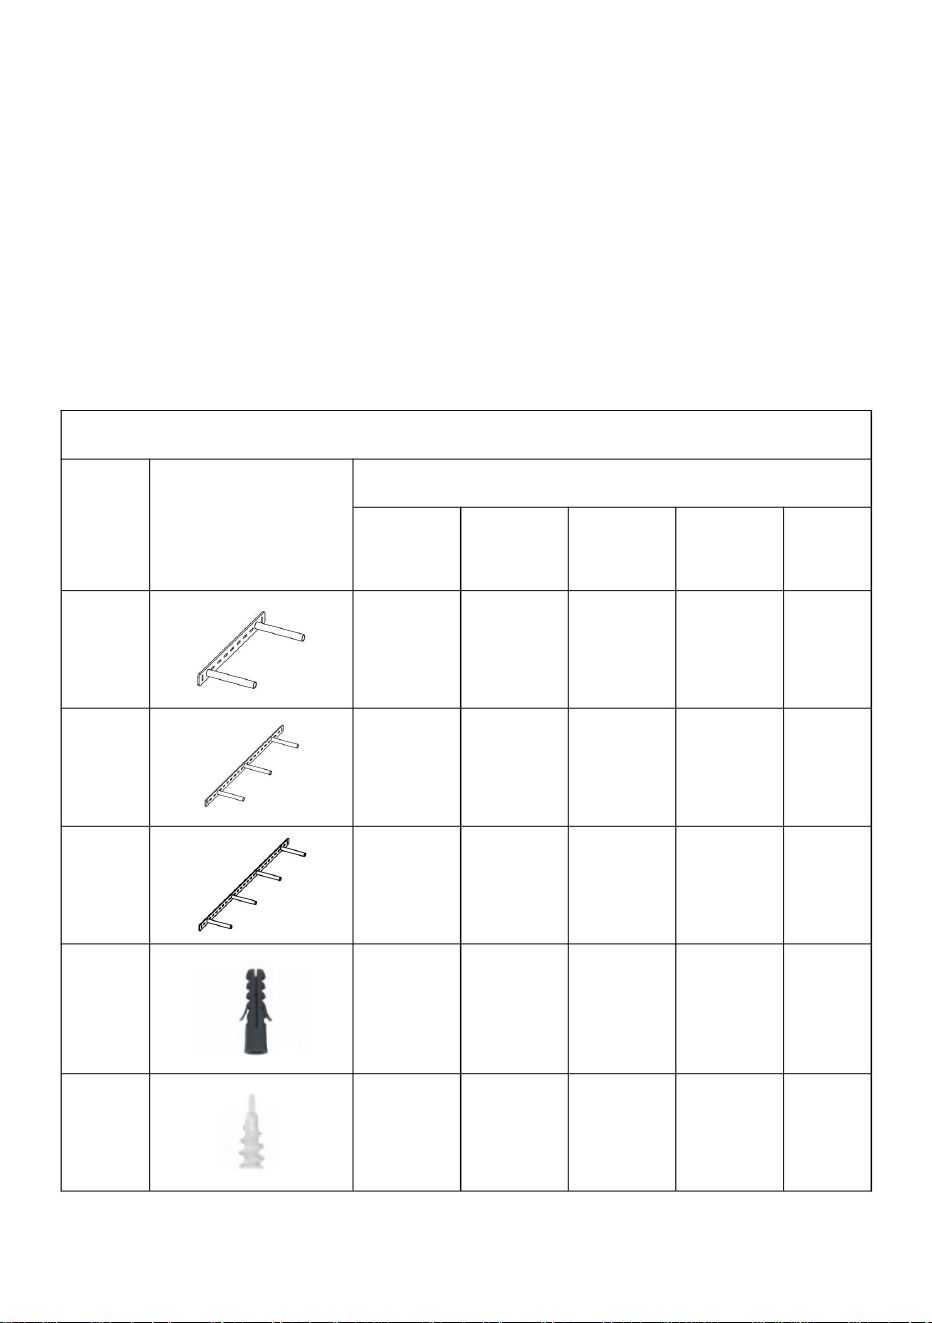
Part List
Code
Picture
Qty.
FT-16
-2
FT-22
-2
FT-34
-1
FT-43
-1
FT-
46-1
1
2
2
-
-
-
2
-
-
1
-
-
3
-
-
-
1
1
4
16
16
10
14
14
5
16
16
10
14
14
- 3 -
6
ST4.5*50mm
16
16
10
14
14
7
ST4*30mm
6
6
8
10
10
8
1
1
1
1
1
9
1
1
1
1
1
10
1
1
1
1
1
11
1
1
1
1
1
12
1
1
1
1
1
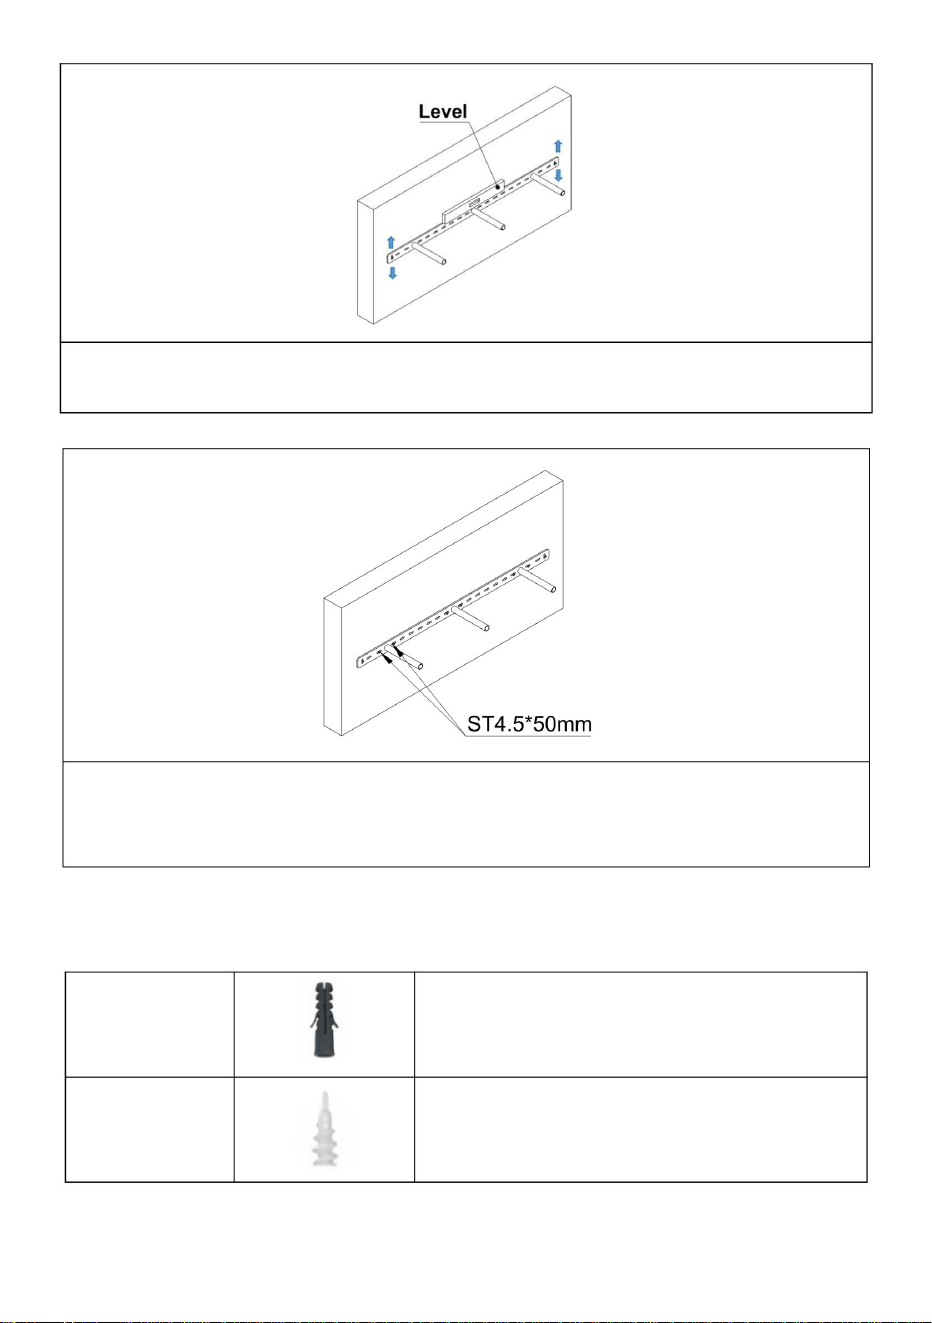
Required Tools
Drill
Level
Measuring Tape
Phillips-head Screwdriver
- 4 -
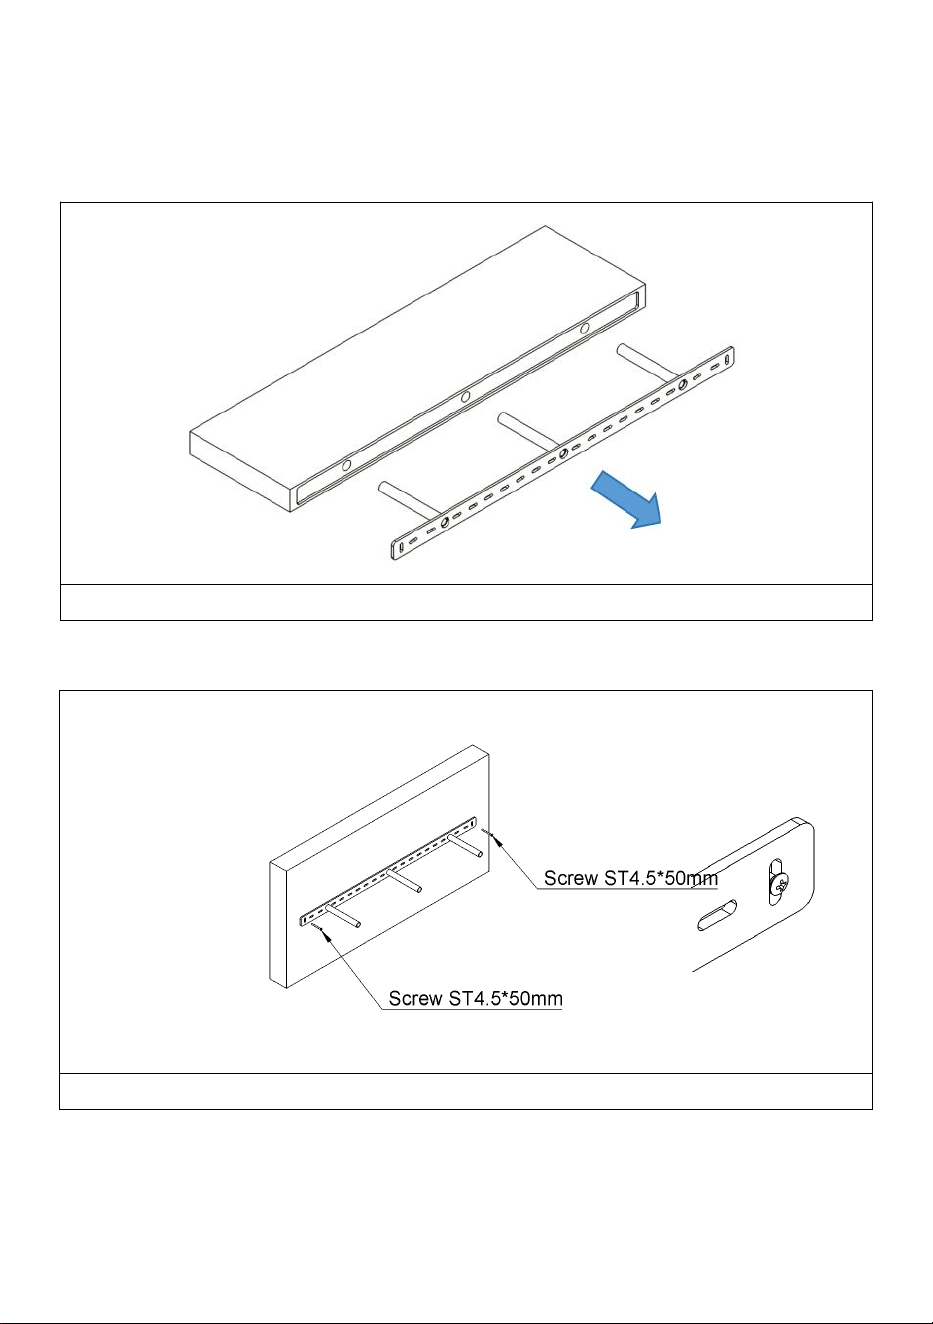
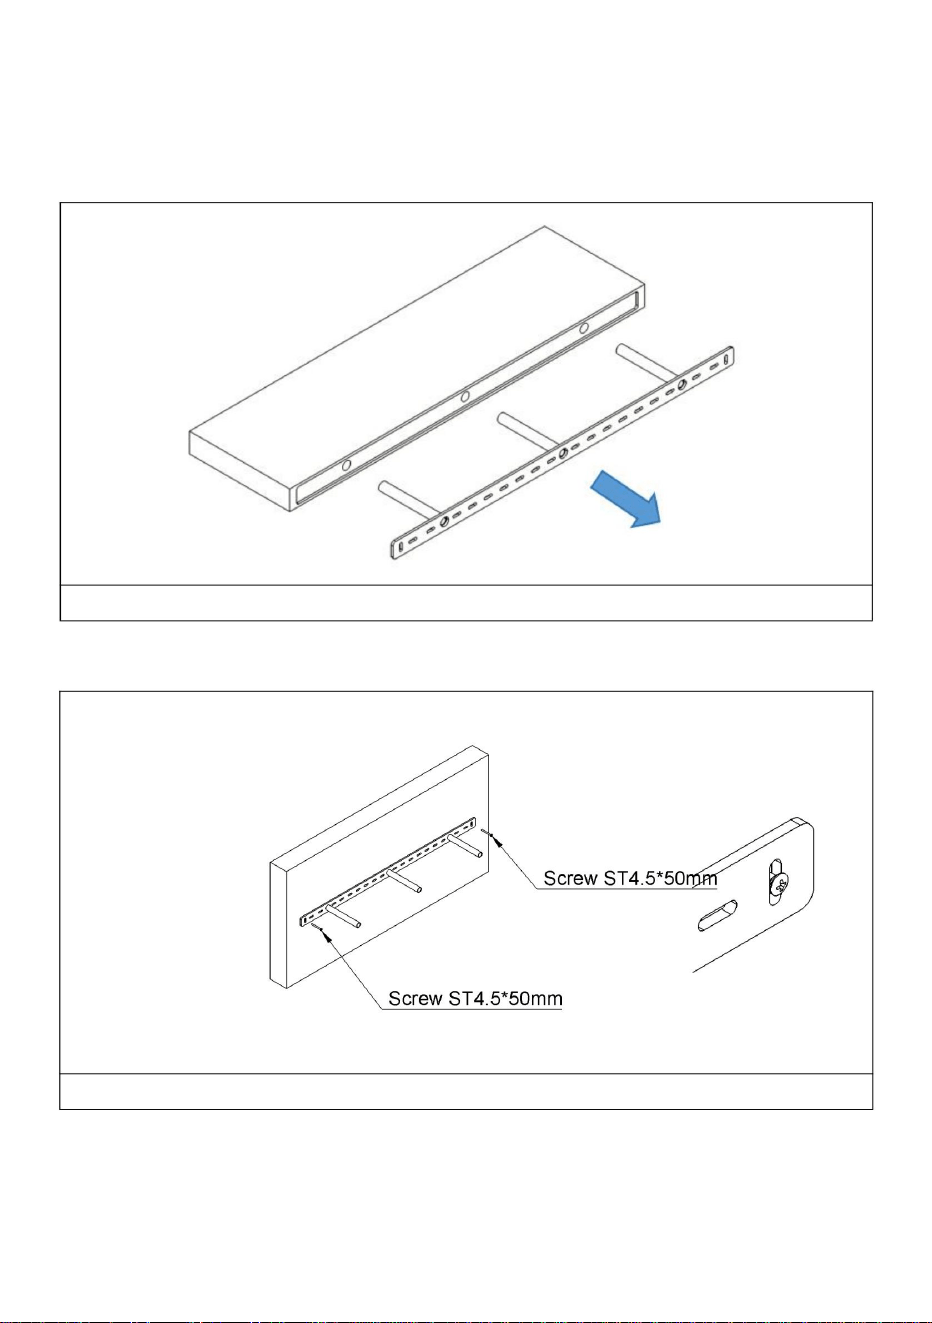
Product Installation
(Take the FT-34-1 for example.)
Step 1: After pairing the shelf, remove the bracket.
Step 2: Position the bracket preliminarily with screws.
- 5 -
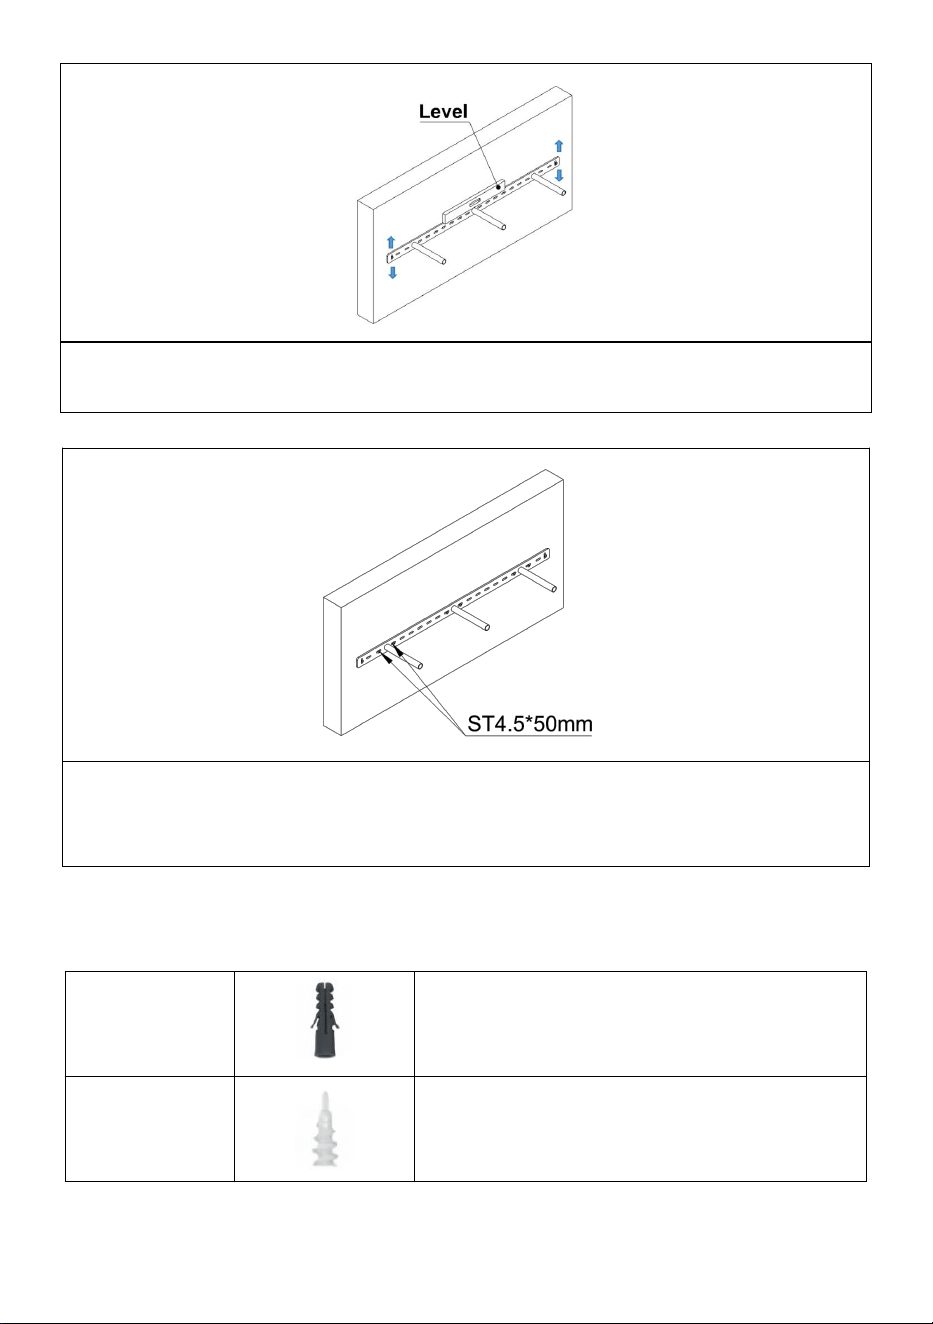
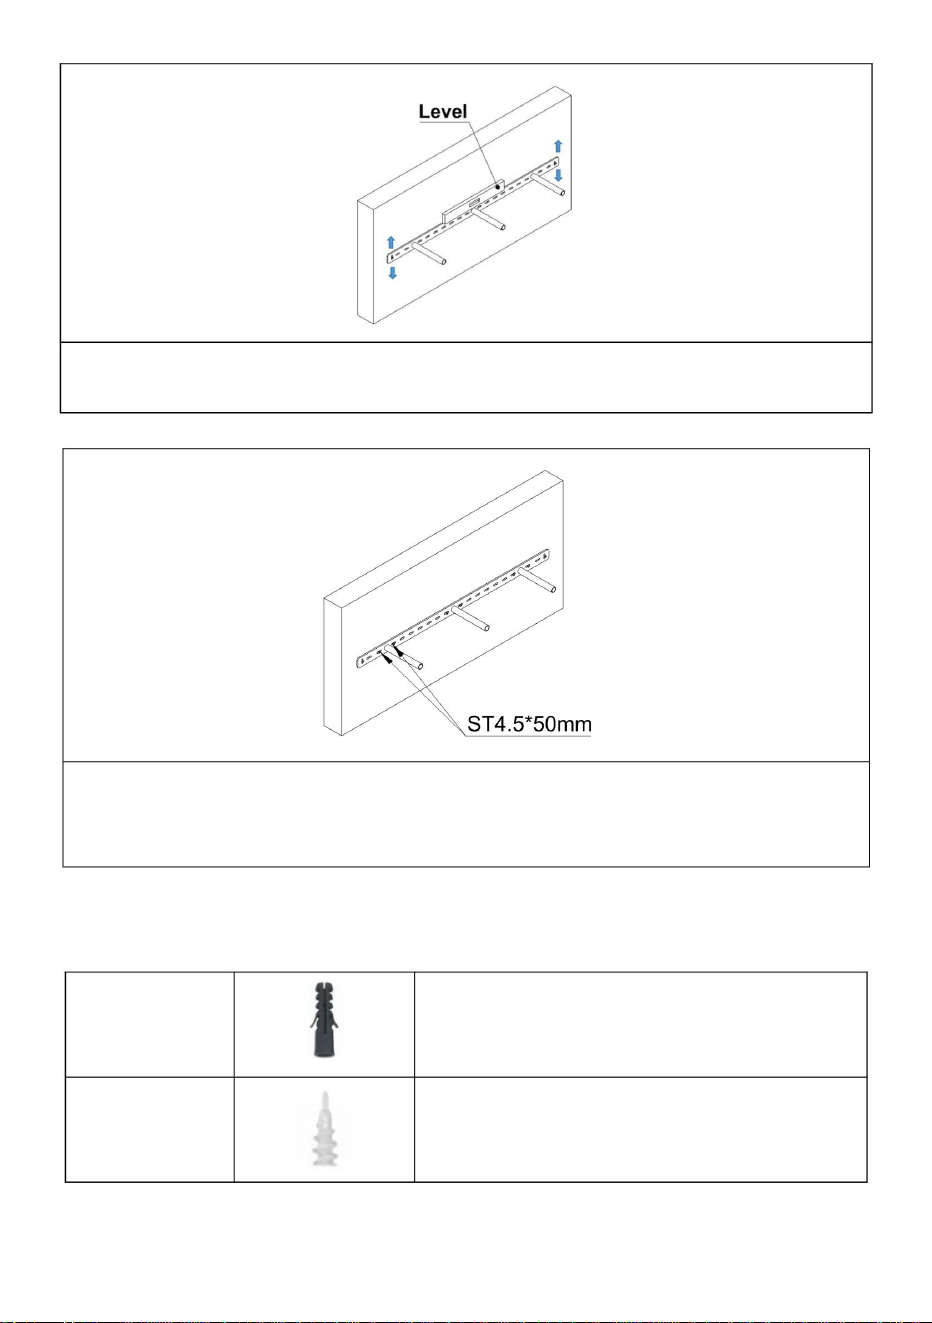
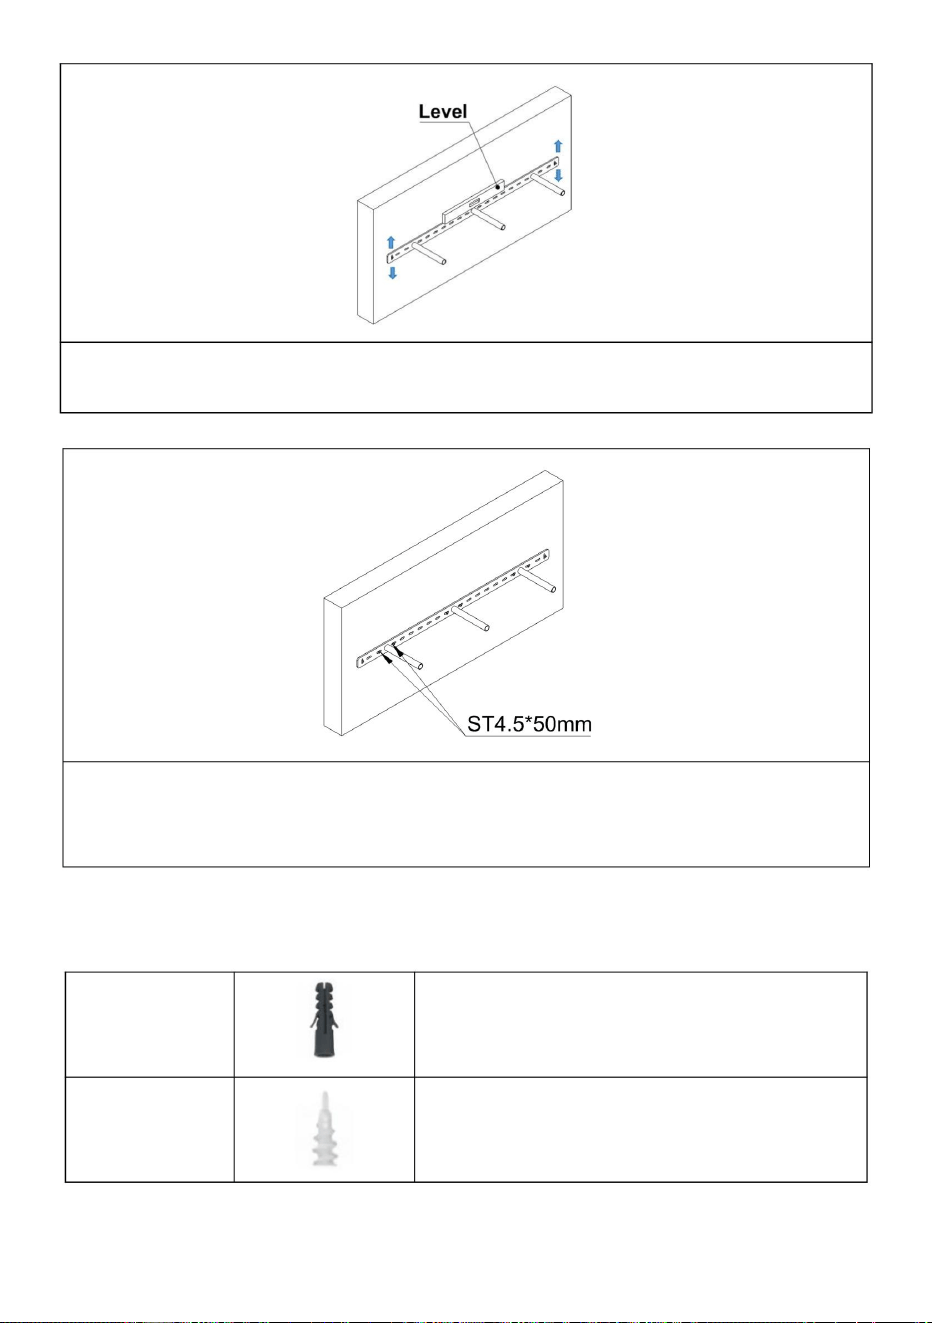
Step 3: Use a level to adjust the bracket.Tighten the screws after
adjustment.
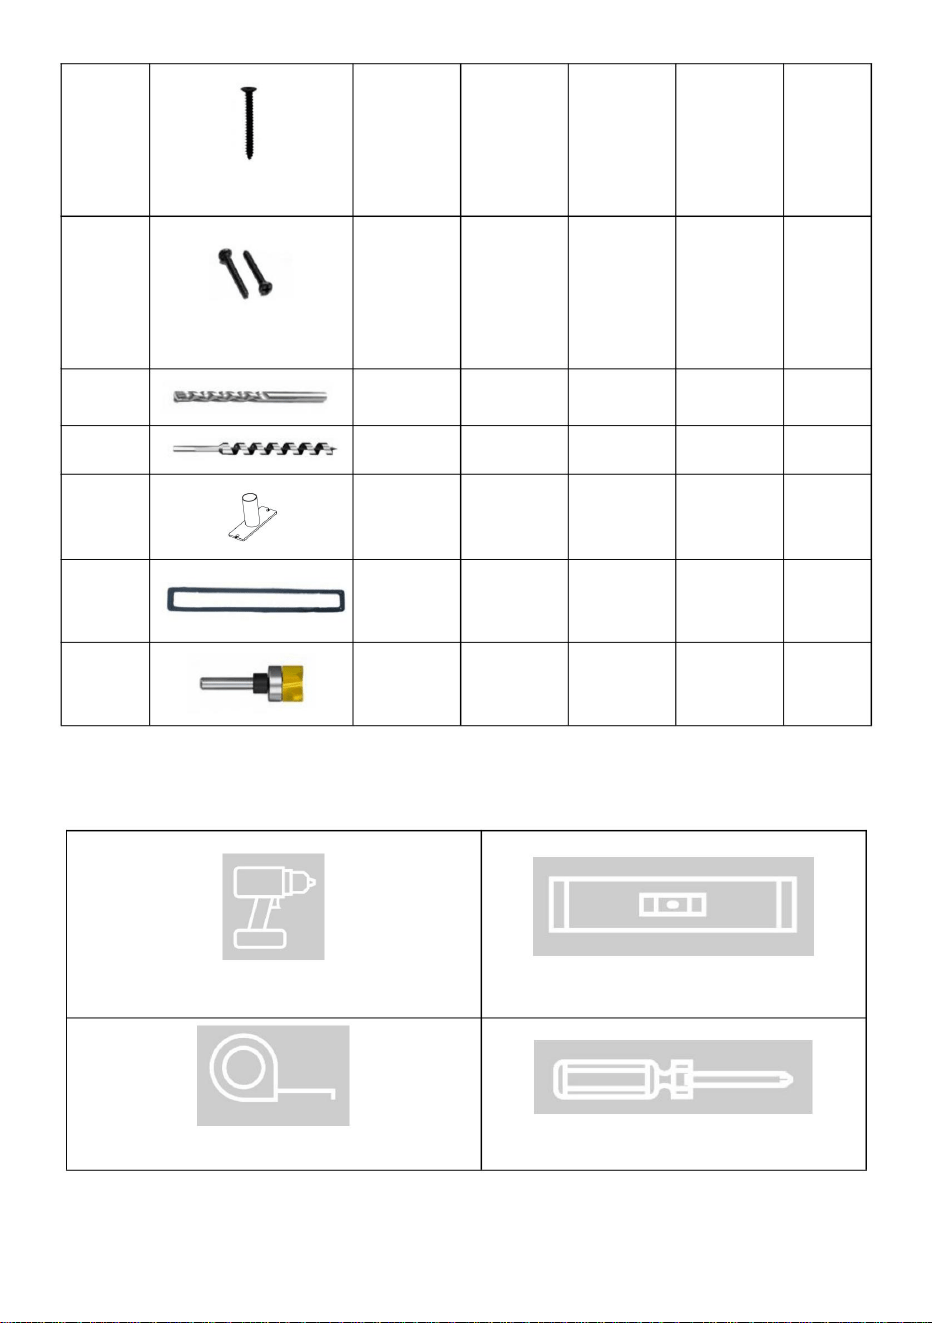
Step 4: Install remaining screws.
Note:Install the screws in the holes on both sides of the rod, and the
bracket load will be better.
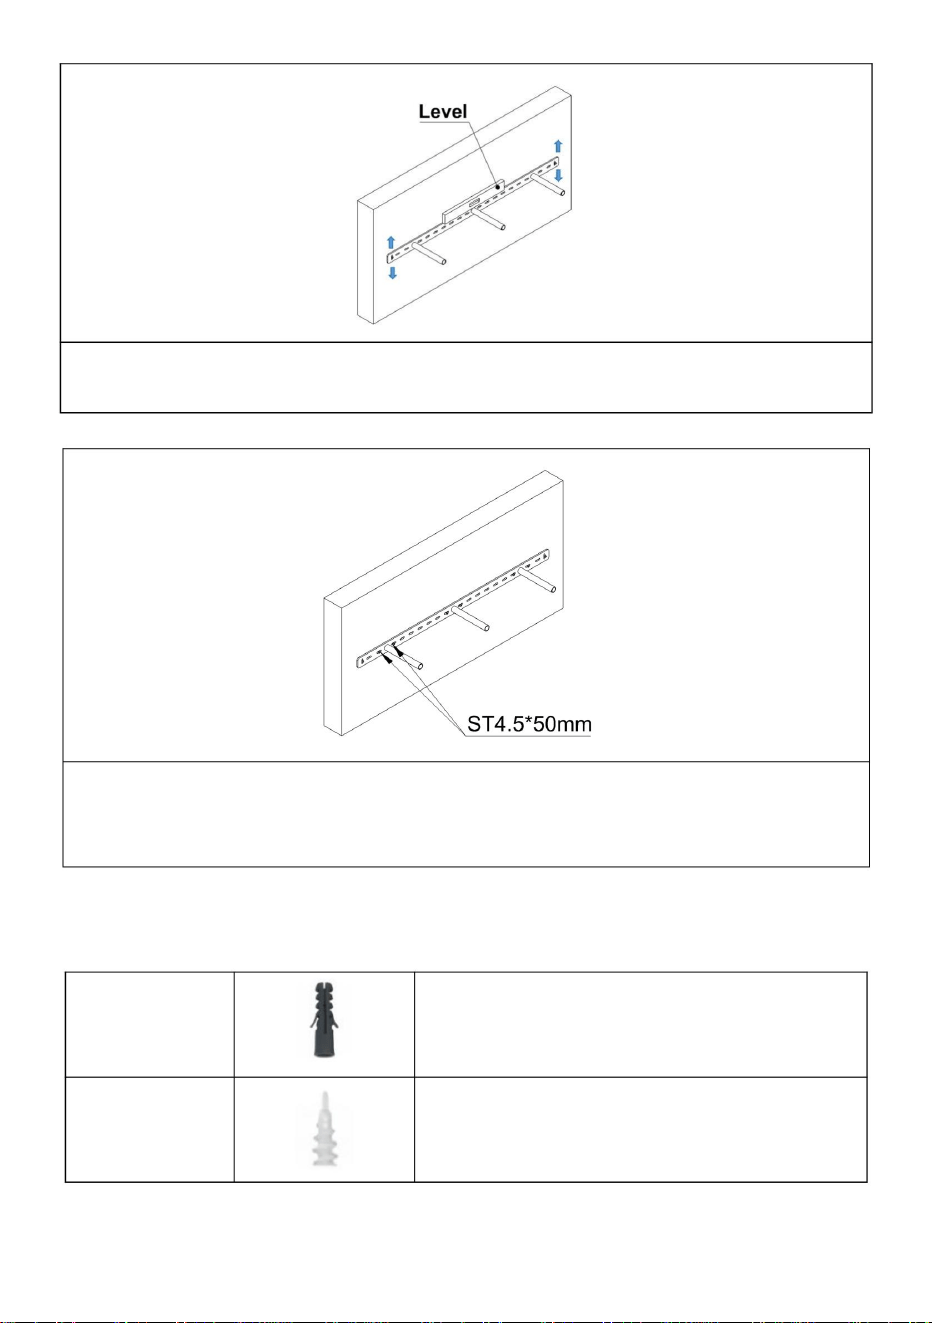
How to use accessories
1
For cement walls.
2
For drywall.

- 6 -
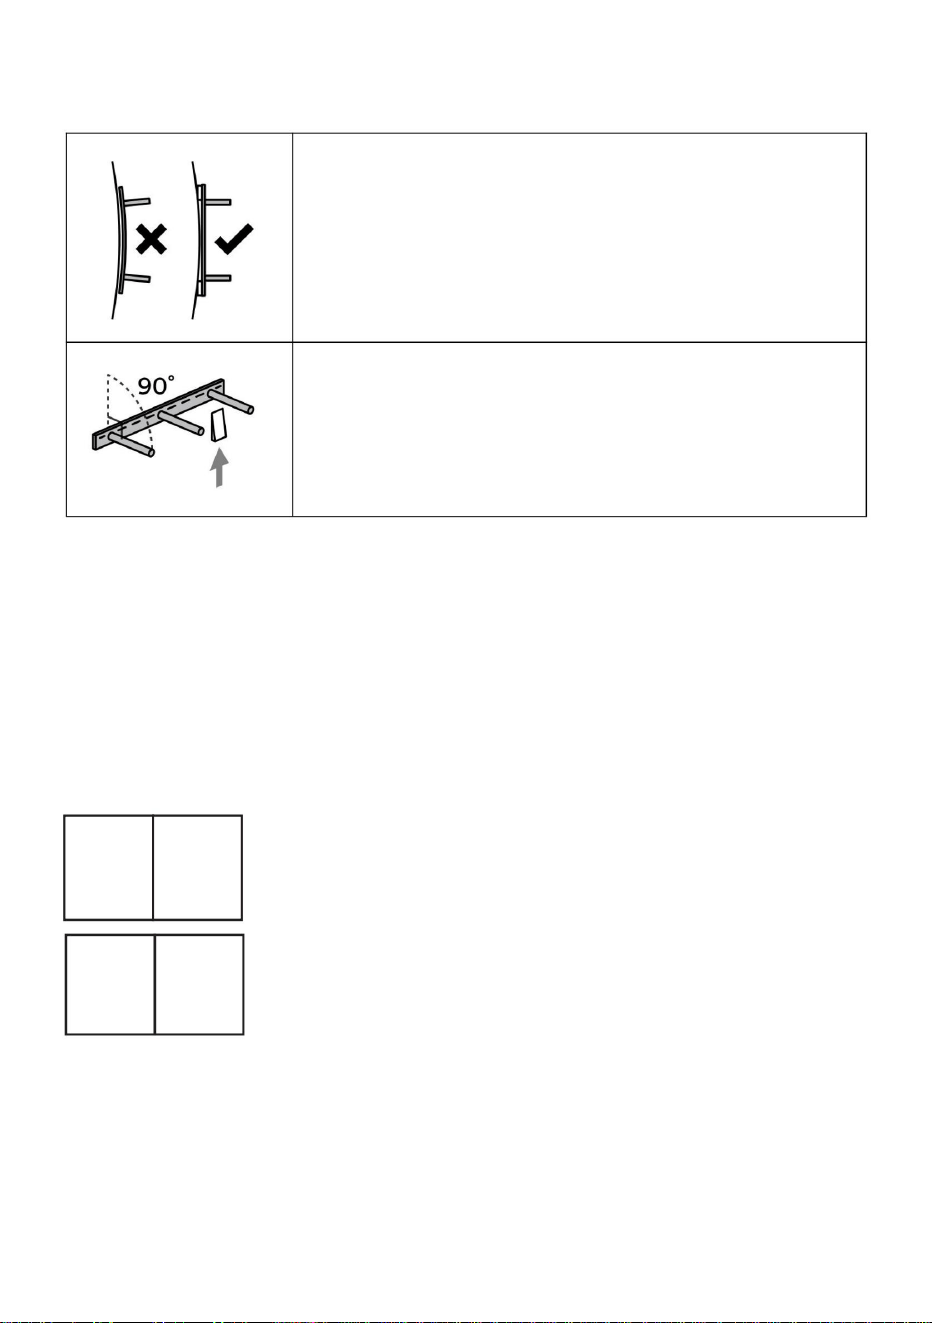
Using Shims With Your Bracket
If your wall is not straight, use shims to ensure your
bracket is installed straight across the wall face
and square to the wall. The shelf slab and bracket
will properly mate only if the bracket is straight and
plum.
If your bracket continues to sag after correct install,
use wood shims underneath the backbar to adjust
front to back level.
Manufacturer: Shanghaimuxinmuyeyouxiangongsi
Address: Shuangchenglu 803nong11hao1602A-1609shi, baoshanqu,
shanghai 200000 CN.
Imported to AUS: SIHAO PTY LTD. 1 ROKEVA STREETEASTWOOD
NSW 2122 Australia
Imported to USA: Sanven Technology Ltd. Suite 250, 9166 Anaheim
Place, Rancho Cucamonga, CA 91730
REP
UK
YH CONSULTING LIMITED. C/O YH Consulting
Limited Office 147, Centurion House, London
Road, Staines-upon-Thames, Surrey, TW18 4AX
REP
EC
E-CrossStu GmbH
Mainzer Landstr.69,
60329 Frankfurt am Main.

Technical Support and E-Warranty Certificate
www.vevor.com/support

Assistancetechniqueetcertificatdegarantie
électroniquewww.vevor.com/support
MODÈLE:FT162\FT222\FT341\FT431\FT461
SUPPORTD'ÉTAGÈREFLOTTANTE
Machine Translated by Google

Ceciestl'instructionoriginale,veuillezliretouteslesinstructionsdumanuel
attentivementavanttouteutilisation.VEVORseréserveuneinterprétationclairedenos
manueld'utilisation.L'apparenceduproduitserasoumiseaux
produitquevousavezreçu.Veuilleznousexcuser,nousnevousinformeronspassi
(FT341) (FT431\FT461)(FT162\FT222)
MODÈLE:FT162\FT222\FT341\FT431\FT461
ilyadesmisesàjourtechnologiquesoulogiciellessurnotreproduit.
AvertissementPourréduirelerisquedeblessure,l'utilisateurdoitlire
Lisezattentivementlemanueld'instructions.
SUPPORT
ÉTAGÈREFLOTTANTE
1
Machine Translated by Google

4
1.21Chaquecatégoriedepoidsetlongueurdesupportaétéconçuepourêtreutilisée
Image
1
1016
Lenonrespectdecetteconsignepeutentraînerl'affaissementdesétagères,lachuted'objetsoudegravesdommages.
1
FT
1
1.1Lessupportsd’étagèredoiventêtrecorrectementinstallésdanslesmontantsoulesblocagesmuraux.
FT34
1
Listedespièces
2
1
14
14
lescapacitésnominalesetlesdimensionscorrectesdesétagèrespeuvententraînerunaffaissement
2
2
avecdescapacités/dimensionsd'étagèresspécifiques.Lenonrespectdenosspécifications
FT16
2
16 16
16
14
blessure.
Code
461
2
FT43
1
14
5
Qté.
étagères,chuted'objetsoublessuresgraves.
FT22
3
10
Avertissements
2
Machine Translated by Google
Outilsrequis
1
14
ST4*30mm
1
1
12
Mètreàruban
16
10
1
1
8
16
1
6
1
10
1
ST4,5*50mm
9
1
1
14
8
1
11
1 1
Tourneviscruciforme
10
10
1
1 1
1
1
1
1
1
Niveau
Percer
6
7
1
1
6
1
1
3
Machine Translated by Google

Étape2:Positionnezpréalablementlesupportavecdesvis.
(Prenonsl’exempleduFT341.)
Étape1:Aprèsavoirassociél’étagère,retirezlesupport.
Installationduproduit
4
Machine Translated by Google
Commentutiliserlesaccessoires
lachargedusupportserameilleure.
1
Pourmursenciment.
2
Étape4:Installezlesvisrestantes.
Remarque:installezlesvisdanslestrousdesdeuxcôtésdelatigeet
ajustement.
Étape3:Utilisezunniveaupourajusterlesupport.Serrezlesvisaprès
Pourcloisonssèches.
5
Machine Translated by Google

REPRÉSENTANTDELACE
ReprésentantduRoyaumeUni
Fabricant:ShanghaimuxinmuyeyouxiangongsiAdresse:
Shuangchenglu803nong11hao1602A1609shi,baoshanqu,shanghai200000CN.
ImportéenAustralie:SIHAOPTYLTD.1ROKEVASTREET,ASTWOODNSW2122AustralieImporté
auxÉtatsUnis:Sanven
TechnologyLtd.Suite250,9166AnaheimPlace,RanchoCucamonga,CA91730
Sivotresupportcontinuedes'affaisseraprèsuneinstallation
correcte,utilisezdescalesenboissouslabarrearrièrepour
ajusterleniveauavantarrière.
Sivotremurn'estpasdroit,utilisezdescalespourquevotre
supportsoitinstalléperpendiculairementaumuret
perpendiculairementàceluici.L'étagèreetlesupportne
s'emboîterontcorrectementquesilesupportestdroitet
perpendiculaire.
YHCONSULTINGLIMITED.A/SYHConsultingLimited,
bureau147,CenturionHouse,LondonRoad,Staines
uponThames,Surrey,TW184AX
ECrossStuGmbH
MainzerLandstr.69,
60329FrancfortsurleMain.
Utilisationdecalesavecvotresupport
6
Machine Translated by Google

Assistancetechniqueetcertificatdegarantie
électroniquewww.vevor.com/support
Machine Translated by Google

SCHWEBENDE REGALHALTERUNG
MODELL: FT-16-2 \ FT-22-2 \ FT-34-1 \ FT-43-1 \ FT-46-1
Technischer Support und E-Garantie-Zertifikat
www.vevor.com/support
Machine Translated by Google

- 1 -
HALTERUNG
SCHWEBENDES REGAL
Dies ist die Originalanleitung. Bitte lesen Sie alle Anweisungen im Handbuch.
sorgfältig vor der Inbetriebnahme. VEVOR behält sich eine klare Auslegung unserer
Benutzerhandbuch. Das Aussehen des Produkts unterliegt den
Produkt, das Sie erhalten haben. Bitte haben Sie Verständnis, dass wir Sie nicht erneut informieren, wenn
(FT-34-1) (FT-43-1 \ FT-46-1)(FT-16-2 \ FT-22-2)
MODELL: FT-16-2 \ FT-22-2 \ FT-34-1 \ FT-43-1 \ FT-46-1
es Technologie- oder Software-Updates für unser Produkt gibt.
Warnung - Um das Verletzungsrisiko zu verringern, muss der Benutzer
Lesen Sie die Bedienungsanleitung sorgfältig durch.
Machine Translated by Google

- 2 -
Warnhinweise
4
1.21Jede Gewichtsklasse und Länge der Halterung wurde für den Einsatz entwickelt
Bild
1
-
-
1016
Andernfalls kann es zu durchhängenden Regalen, herabfallenden Gegenständen oder schweren
-1
FT-
1
1.1 Regalhalterungen müssen ordnungsgemäß in Ständern oder Wandblöcken installiert werden.
FT-34
-1
Teileliste
-2
-
1
14
14
Tragfähigkeitsangaben und korrekte Regalabmessungen können zu einem Durchhängen führen
-2
2
-
mit bestimmten Regalkapazitäten/-abmessungen. Die Nichtbeachtung unserer angegebenen
FT-16
2
-
16 16
16
14
Verletzung.
Code
46-1
2
-
-
FT-43
-
1
-
14
5
Menge
Regale, herabfallende Gegenstände oder schwere Verletzungen.
FT-22
-
3
10
Machine Translated by Google

- 3 -
1
14
ST4*30mm
1
1
12
Maßband
16
10
1
1
16
8
1
6
1
10
1
ST4,5*50mm
9
1
1
14
8
1
11
1 1
Kreuzschlitzschraubendreher
10
10
1
1 1
1
1
1
1
1
Ebene
Bohren
6
7
1
1
6
1
1
Benötigtes Werkzeug
Machine Translated by Google

- 4 -
Produktinstallation
Schritt 1: Entfernen Sie nach dem Koppeln des Regals die Halterung.
(Nehmen Sie zum Beispiel den FT-34-1.)
Schritt 2: Halterung vorab mit Schrauben positionieren.
Machine Translated by Google
- 5 -
Die Halterungslast wird besser.
1
Für Betonwände.
2
Schritt 4: Bringen Sie die restlichen Schrauben an.
Hinweis: Die Schrauben in die Löcher auf beiden Seiten der Stange einsetzen und die
Einstellung.
Schritt 3: Verwenden Sie eine Wasserwaage, um die Halterung einzustellen. Ziehen Sie die Schrauben fest, nachdem
Für Trockenbau.
So verwenden Sie Zubehör
Machine Translated by Google

Hersteller: Shanghaimuxinmuyeyouxiangongsi Adresse:
Shuangchenglu 803nong11hao1602A-1609shi, baoshanqu, Shanghai 200000 CN.
Importiert nach AUS: SIHAO PTY LTD. 1 ROKEVA STREETEASTWOOD NSW 2122
Australien Importiert in
die USA: Sanven Technology Ltd. Suite 250, 9166 Anaheim Place, Rancho Cucamonga,
CA 91730
Wenn Ihre Halterung nach der korrekten Installation weiterhin
durchhängt, verwenden Sie Holzkeile unter der Rückstange, um die
Vorder- und Rückseite auszugleichen.
Wenn Ihre Wand nicht gerade ist, verwenden Sie Unterlegscheiben,
um sicherzustellen, dass die Halterung gerade und
rechtwinklig zur Wand montiert wird. Regalplatte und Halterung
passen nur dann richtig zusammen, wenn die Halterung gerade
und lotrecht ist.
YH CONSULTING LIMITED. C/O YH Consulting Limited, Büro
147, Centurion House, London Road, Staines-upon-
Thames, Surrey, TW18 4AX
E-CrossStu GmbH
Mainzer Landstr.69,
60329 Frankfurt am Main.
EG-Vertreter
Britische Republik
Verwenden von Unterlegscheiben mit Ihrer Halterung
- 6 -
Machine Translated by Google

Technischer Support und E-Garantie-Zertifikat
www.vevor.com/support
Machine Translated by Google

Supporto tecnico e certificato di garanzia
elettronica www.vevor.com/support
MODELLO: FT-16-2 \ FT-22-2 \ FT-34-1 \ FT-43-1 \ FT-46-1
SUPPORTO PER MENSOLA FLOTTANTE
Machine Translated by Google

attentamente prima di operare. VEVOR si riserva una chiara interpretazione del nostro
(FT-43-1 \ FT-46-1)
manuale utente. L'aspetto del prodotto sarà soggetto alla
prodotto che hai ricevuto. Perdonaci se non ti informeremo di nuovo se
( FT-34-1 )
Questa è l'istruzione originale, si prega di leggere tutte le istruzioni del manuale
(FT-16-2 \ FT-22-2)
MODELLO: FT-16-2 \ FT-22-2 \ FT-34-1 \ FT-43-1 \ FT-46-1
ci sono aggiornamenti tecnologici o software sul nostro prodotto.
attentamente il manuale di istruzioni.
Attenzione: per ridurre il rischio di lesioni, l'utente deve leggere
STAFFA
MENSOLA FLUTTUANTE
- 1 -
Machine Translated by Google
10
-
1
Immagine
4
10
1.21Ogni categoria di peso e lunghezza della staffa è stata progettata per l'uso
FT-
1
In caso contrario, si potrebbero verificare cedimenti dei ripiani, caduta di oggetti o gravi
-1
-
16
-
1.1 Le staffe per mensole devono essere installate correttamente nei montanti o nei blocchi a parete.
FT-34
-2
1
14
-1
Elenco delle parti
-2
2
14
-
16
le capacità nominali e le dimensioni corrette degli scaffali possono causare cedimenti
16
con capacità/dimensioni specifiche degli scaffali. La mancata osservanza delle nostre specifiche
FT-16
16
2
infortunio.
Codice
2
-
-
5
46-1
-
-
14
1
FT-43
-
Quantità
14
scaffali, caduta di oggetti o lesioni gravi.
FT-22
-
3
Avvertenze
- 2 -
Machine Translated by Google

Strumenti necessari
1
1
1
ST4*30mm
1
14
1
1
16
10
12
Nastro di misurazione
10
16
8
1
1
1
6
9
1
1
1
ST4.5*50mm
Cacciavite a croce
14
8
1
1
10
10
1
11 1
Trapano
1
1
1
1
6
1
1
6
Livello
7
1
1
1
- 3 -
Machine Translated by Google

Fase 1: Dopo aver abbinato lo scaffale, rimuovere la staffa.
(Prendiamo ad esempio il FT-34-1.)
Fase 2: Posizionare preliminarmente la staffa con le viti.
Installazione del prodotto
- 4 -
Machine Translated by Google

Come utilizzare gli accessori
1
Per muri in cemento.
Nota: installare le viti nei fori su entrambi i lati dell'asta e
2
aggiustamento.
il carico della staffa sarà migliore.
Fase 4: installare le viti rimanenti.
Fase 3: Utilizzare una livella per regolare la staffa. Dopo aver serrato le viti
Per cartongesso.
- 5 -
Machine Translated by Google
Rappresentante della CE
RAPPRESENTANZA DEL REGNO UNITO
- 6 -
Produttore: Shanghaimuxinmuyeyouxiangongsi Indirizzo:
Shuangchenglu 803nong11hao1602A-1609shi, baoshanqu, shanghai 200000 CN.
Importato in AUS: SIHAO PTY LTD. 1 ROKEVA STREETEASTWOOD NSW 2122
Australia Importato negli
USA: Sanven Technology Ltd. Suite 250, 9166 Anaheim Place, Rancho Cucamonga,
CA 91730
Se la staffa continua a cedere anche dopo un'installazione corretta, utilizzare
dei cunei di legno sotto la barra posteriore per regolare il livello tra la parte
anteriore e quella posteriore.
Se il muro non è dritto, utilizzare spessori per garantire che la
staffa sia installata dritta sulla superficie del muro e
perpendicolare al muro. La lastra della mensola e la staffa si
accoppiano correttamente solo se la staffa è dritta e a piombo.
E-CrossStu GmbH
Mainzer Landstr.69,
60329 Francoforte sul Meno.
YH CONSULTING LIMITED. C/O YH Consulting Limited
Ufficio 147, Centurion House, London Road, Staines-
upon-Thames, Surrey, TW18 4AX
Utilizzo di spessori con la staffa
Machine Translated by Google

Supporto tecnico e certificato di garanzia
elettronica www.vevor.com/support
Machine Translated by Google

SOPORTEDEESTANTEFLOTANTE
Soportetécnicoycertificadodegarantía
electrónicawww.vevor.com/support
MODELO:FT162\FT222\FT341\FT431\FT461
Machine Translated by Google

1
SOPORTE
ESTANTEFLOTANTE
Estassonlasinstruccionesoriginales,leatodaslasinstruccionesdelmanual.
Antesdeoperar,VEVORsereservaelderechodeinterpretarnuestrostérminosycondiciones.
manualdeusuario.Laaparienciadelproductoestarásujetaala
Advertencia:Parareducirelriesgodelesiones,elusuariodebeleer
(FT341) (FT431\FT461)(FT162\FT222)
MODELO:FT162\FT222\FT341\FT431\FT461
Leaatentamenteelmanualdeinstrucciones.
productoquerecibió.Disculpesinoleinformamosnuevamentesi
¿Hayalgunaactualizacióntecnológicaodesoftwareennuestroproducto?
Machine Translated by Google

2
Advertencias
4
1.21Cadaclasedepesoylongituddesoportehasidodiseñadaparasuuso
Imagen
1
1016
Sinosehaceasí,losestantespodríanhundirse,losobjetospodríancaerseopodríanproducirsedañosgraves.
1
PIE
1
1.1Lossoportesdelosestantesdebeninstalarsecorrectamenteenlosmontantesobloquesdelapared.
FT34
1
Listadepiezas
2
1
14
14
Lasclasificacionesdecapacidadylasdimensionescorrectasdelosestantespuedenprovocarhundimientos.
2
2
concapacidades/dimensionesdeestanteespecíficas.Elincumplimientodenuestrasespecificaciones...
FT16
2
16 16
16
14
lesión.
Código
461
2
FT43
1
14
5
Cantidad.
estantes,caídadeobjetosolesionesgraves.
FT22
3
10
Machine Translated by Google

3
1
14
ST4*30mm
1
1
12
Cintamétrica
16
10
1
1
16
8
1
6
1
10
1
ST4.5*50mm
9
1
1
14
8
1
11
1 1
DestornilladordecabezaPhillips
10
10
1
1 1
1
1
1
1
1
Nivel
Perforar
6
7
1
1
6
1
1
Herramientasnecesarias
Machine Translated by Google
Paso1:Despuésdeemparejarelestante,retireelsoporte.
(TomemoscomoejemploelFT341).
Paso2:Coloquepreliminarmenteelsoportecontornillos.
Instalacióndelproducto
4
Machine Translated by Google

Cómoutilizarlosaccesorios
Lacargadelsoporteserámejor.
1
Paraparedesdecemento.
Paso4:Instalelostornillosrestantes.
Nota:Instalelostornillosenlosorificiosdeambosladosdelavarillay
ajuste.
Paso3:Useunnivelparaajustarelsoporte.Aprietelostornillosdespués
Parapanelesdeyeso.
2
5
Machine Translated by Google

REPRESENTANTEDELREINOUNIDO
RepresentantedelCE
Fabricante:ShanghaimuxinmuyeyouxiangongsiDirección:
Shuangchenglu803nong11hao1602A1609shi,baoshanqu,shanghai200000CN.
ImportadoaAUS:SIHAOPTYLTD.1ROKEVASTREETEASTWOODNSW2122
AustraliaImportadoa
EE.UU.:SanvenTechnologyLtd.Suite250,9166AnaheimPlace,RanchoCucamonga,
CA91730
Sielsoportecontinúahundiéndosedespuésdeunainstalación
correcta,usecalzasdemaderadebajodelabarratraseraparaajustar
elniveldeadelantehaciaatrás.
Silaparednoestárecta,usecalzasparaasegurarqueel
soporteestéinstaladorectoyperpendicularalapared.La
placadelarepisayelsoportesoloencajaráncorrectamente
sielsoporteestárectoyaplomado.
YHCONSULTINGLIMITADA.A/CYHConsultingLimited
Oficina147,CenturionHouse,LondonRoad,Staines
uponThames,Surrey,TW184AX
ECrossStuGmbH
MainzerLandstr.69,
60329FráncfortdelMeno.
Usodecalzasconelsoporte
6
Machine Translated by Google

Soportetécnicoycertificadodegarantía
electrónicawww.vevor.com/support
Machine Translated by Google

Wsparcie techniczne i certyfikat gwarancji
elektronicznej www.vevor.com/support
MODEL:FT-16-2 \ FT-22-2 \ FT-34-1 \ FT-43-1 \ FT-46-1
PŁYWAJĄCY UCHWYT PÓŁKI
Machine Translated by Google

przed rozpoczęciem użytkowania należy dokładnie zapoznać się z treścią niniejszego Regulaminu. VEVOR zastrzega sobie prawo do jednoznacznej interpretacji naszych
To jest oryginalna instrukcja, proszę przeczytać wszystkie instrukcje w podręczniku
instrukcja obsługi. Wygląd produktu podlega
produkt, który otrzymałeś. Przepraszamy, że nie poinformujemy Cię ponownie, jeśli
(FT-16-2 \ FT-22-2) (FT-43-1 \ FT-46-1)(FT-34-1)
MODEL:FT-16-2 \ FT-22-2 \ FT-34-1 \ FT-43-1 \ FT-46-1
czy w naszym produkcie pojawiły się jakieś aktualizacje technologii lub oprogramowania.
Przeczytaj uważnie instrukcję obsługi.
Ostrzeżenie – aby zmniejszyć ryzyko obrażeń, użytkownik musi przeczytać
NAWIAS
PÓŁKA PŁYWAJĄCA
- 1 -
Machine Translated by Google

Niedopełnienie tego obowiązku może spowodować ugięcie się półek, upadek przedmiotów lub poważne uszkodzenia.
-1
FT-
-
1
1
-
14
Zdjęcie
1
-
1.21Każda klasa wagowa i długość uchwytu została zaprojektowana do użytku
4
16 10
-
16
14
nieprawidłowa nośność i wymiary półek mogą powodować ich uginanie
-2
2
Lista części
-2
-
1.1 Wsporniki półek muszą być prawidłowo zamontowane w słupkach lub blokach ściennych.
FT-34
-1
1
14
2
-
obrażenia.
Kod
46-1
-
-
5 16
2
-
16
z określonymi pojemnościami/wymiarami półek. Nieprzestrzeganie naszych określonych
FT-16
14
10
półki, spadające przedmioty lub poważne obrażenia.
FT-22
-
Ilość.
3
FT-43
Ostrzeżenia
- 2 -
Machine Translated by Google

Wymagane narzędzia
16
10
1
1 1
1
12
Poziom
ST4*30mm
1
1
14
1
Taśma miernicza
1
1
ST4.5*50mm
9
1
6
1
10
16
8
1
1
1
1
10
10
1
1
1
Wiertarka
Śrubokręt krzyżakowy
1
11
1
14
8
1
7
1
1
6
6
1
1
- 3 -
Machine Translated by Google

Krok 1: Po sparowaniu półki należy zdjąć wspornik.
(Weźmy na przykład FT-34-1.)
Krok 2: Wstępnie umieść wspornik za pomocą śrub.
Instalacja produktu
- 4 -
Machine Translated by Google
Jak korzystać z akcesoriów
Do ścian cementowych.
obciążenie wspornika będzie lepsze.
1
2
modyfikacja.
Uwaga: Wkręć śruby w otwory po obu stronach pręta, a następnie
Krok 4: Przykręć pozostałe śruby.
Krok 3: Użyj poziomicy, aby wyregulować wspornik. Po ustawieniu dokręć śruby.
Do płyt gipsowo-kartonowych.
- 5 -
Machine Translated by Google

Przedstawiciel UE
REP WIELKIEJ BRYTANII
Jeśli po prawidłowym zamontowaniu uchwyt nadal się ugina, należy
podłożyć drewniane podkładki pod tylną poprzeczkę, aby wyregulować
poziomowanie przodu i tyłu.
YH CONSULTING LIMITED. C/O YH Consulting Limited Biuro
147, Centurion House, London Road, Staines-upon-
Thames, Surrey, TW18 4AX
Producent: Shanghaimuxinmuyeyouxiangongsi Adres:
Shuangchenglu 803nong11hao1602A-1609shi, baoshanqu, szanghaj 200000 CN.
Jeśli ściana nie jest prosta, użyj podkładek, aby upewnić się, że
wspornik jest zainstalowany prosto na ścianie i prostopadle
do ściany. Płyta półki i wspornik będą prawidłowo dopasowane
tylko wtedy, gdy wspornik będzie prosty i pionowy.
Importowane do AUS: SIHAO PTY LTD. 1 ROKEVA STREETEASTWOOD NSW 2122 Australia
Importowane do USA:
Sanven Technology Ltd. Suite 250, 9166 Anaheim Place, Rancho Cucamonga, CA 91730
E-CrossStu GmbH
Mainzer Landstr.69,
60329 Frankfurt nad Menem.
Używanie podkładek z uchwytem
- 6 -
Machine Translated by Google

Wsparcie techniczne i certyfikat gwarancji
elektronicznej www.vevor.com/support
Machine Translated by Google

Zwevende plankhouder
MODEL:FT-16-2 \ FT-22-2 \ FT-34-1 \ FT-43-1 \ FT-46-1
Technische ondersteuning en e-garantiecertificaat
www.vevor.com/support
Machine Translated by Google

- 1 -
BEUGEL
Zwevende plank
Dit is de originele instructie, lees alle instructies in de handleiding
zorgvuldig door voordat u gaat werken. VEVOR behoudt zich een duidelijke interpretatie van onze
gebruikershandleiding. Het uiterlijk van het product is onderworpen aan de
er technologische of software-updates voor ons product zijn.
(FT-34-1) (FT-43-1 \ FT-46-1)(FT-16-2 \ FT-22-2)
MODEL:FT-16-2 \ FT-22-2 \ FT-34-1 \ FT-43-1 \ FT-46-1
Waarschuwing - Om het risico op letsel te verminderen, moet de gebruiker de volgende informatie lezen:
Lees de gebruiksaanwijzing zorgvuldig door.
product dat u hebt ontvangen. Vergeef ons dat we u niet opnieuw zullen informeren als
Machine Translated by Google

- 2 -
Waarschuwingen
- -
5
1.1 Plankdragers moeten op de juiste manier in de staanders of wandblokken worden geïnstalleerd.
Onderdelenlijst
-2
-
FT-34
-1
1
14
capaciteitsclassificaties en de juiste plankafmetingen kunnen leiden tot doorzakken
-2
2
-
16
14
1.21Elke beugelgewichtsklasse en -lengte is ontworpen voor gebruik
Afbeelding
1
-
-
4
16 10
Als u dit niet doet, kan dit leiden tot doorzakkende planken, vallende voorwerpen of ernstige schade.
-1
FT-
FT-43
-
1
1
14
Aantal
planken, vallende voorwerpen of ernstig letsel.
-
FT-22
3
10
met specifieke plankcapaciteiten/afmetingen. Het niet naleven van onze gespecificeerde
FT-16
2
-
16
16
14
Code
blessure.
2
46-1
-
Machine Translated by Google

- 3 -
1
1
Oefening
86
1
10
16
1
1
ST4,5*50mm
9
1
1
1
14
ST4*30mm
1
1
12 1
Meetlint
16
10
1
11
1
1
Niveau
6
6
1
7
1
1
1
14
8
1
11
1
Kruiskopschroevendraaier
10
10
1
1 1
Benodigde hulpmiddelen
Machine Translated by Google

- 4 -
Productinstallatie
Stap 1: Nadat u de plank hebt gekoppeld, verwijdert u de beugel.
(Neem bijvoorbeeld de FT-34-1.)
Stap 2: Plaats de beugel voorlopig met schroeven.
Machine Translated by Google

- 5 -
De beugelbelasting zal beter zijn.
1
Voor cementmuren.
Stap 4: Plaats de overige schroeven.
Let op: Plaats de schroeven in de gaten aan beide zijden van de stang en de
aanpassing.
Stap 3: Gebruik een waterpas om de beugel af te stellen. Draai de schroeven vast nadat
Voor gipsplaat.
2
Hoe accessoires te gebruiken
Machine Translated by Google

Fabrikant: Shanghaimuxinmuyeyouxiangongsi Adres:
Shuangchenglu 803nong11hao1602A-1609shi, baoshanqu, shanghai 200000 CN.
Geïmporteerd naar AUS: SIHAO PTY LTD. 1 ROKEVA STREETEASTWOOD NSW
2122 Australië
Geïmporteerd naar de VS: Sanven Technology Ltd. Suite 250, 9166 Anaheim Place,
Rancho Cucamonga, CA 91730
Als de beugel na een correcte installatie nog steeds doorhangt,
gebruik dan houten vulstukken onder de achterbalk om de voor- en
achterkant waterpas te stellen.
Als uw muur niet recht is, gebruik dan shims om ervoor te zorgen
dat uw beugel recht over de muur en haaks op de muur
wordt geïnstalleerd. De plankplaat en beugel passen alleen
goed als de beugel recht en loodrecht is.
YH CONSULTING LIMITED. C/O YH Consulting Limited
Kantoor 147, Centurion House, London Road, Staines-
upon-Thames, Surrey, TW18 4AX
E-CrossStu GmbH
Mainzer Landstr.69,
60329 Frankfurt am Main.
EC-REP
VK REP
Het gebruik van vulplaatjes met uw beugel
- 6 -
Machine Translated by Google

Technische ondersteuning en e-
garantiecertificaat www.vevor.com/support
Machine Translated by Google

Teknisk support och e-garanticertifikat
www.vevor.com/support
MODELL:FT-16-2 \ FT-22-2 \ FT-34-1 \ FT-43-1 \ FT-46-1
FLYTANDE HYLLFÄSTE
Machine Translated by Google

noggrant innan användning. VEVOR reserverar sig för en tydlig tolkning av vår
(FT-43-1 \ FT-46-1)
bruksanvisning. Produktens utseende ska vara beroende av
produkt du fått. Förlåt oss att vi inte kommer att informera dig igen om
( FT-34-1)
Detta är den ursprungliga instruktionen, läs alla manualer
(FT-16-2 \ FT-22-2)
MODELL:FT-16-2 \ FT-22-2 \ FT-34-1 \ FT-43-1 \ FT-46-1
det finns någon teknik eller mjukvaruuppdateringar på vår produkt.
bruksanvisningen noggrant.
Varning - För att minska risken för skada måste användaren läsa
KONSOL
FLYTANDE HYLLA
- 1 -
Machine Translated by Google

10
-
1
Bild
4
10
1.21 Varje fästets viktklass och längd har konstruerats för användning
FT-
1
Underlåtenhet att göra det kan resultera i hängande hyllor, fallande föremål eller allvarliga
-1
-
16
-
1.1 Hyllfästen måste installeras korrekt i reglar eller väggblockering.
FT-34
-2
1
14
-1
Dellista
-2
2
14
-
16
kapacitetsklasser och korrekta hyllmått kan resultera i sjunkning
16
med specifika hyllkapaciteter/mått. Underlåtenhet att följa vår specificerade
FT-16
16
2
Koda
skada.
2
-
-
5
46-1
-
-
14
1
FT-43
-
Antal.
14
hyllor, fallande föremål eller allvarliga skador.
FT-22
-
3
Varningar
- 2 -
Machine Translated by Google

Nödvändiga verktyg
1
1
1
ST4*30mm
1
14
1
1
16
10
12
Måttband
10
16
8
1
1
1
6
9
1
1
1
ST4,5*50mm
Phillips-skruvmejsel
14
8
1
1
10
10
1
11 1
Borra
1
1
1
1
6
1
1
6
Nivå
7
1
1
1
- 3 -
Machine Translated by Google

Steg 1: Efter att ha parat ihop hyllan tar du bort fästet.
(Ta FT-34-1 till exempel.)
Steg 2: Placera fästet preliminärt med skruvar.
Produktinstallation
- 4 -
Machine Translated by Google
- 5 -
1
För cementväggar.
Obs: Sätt i skruvarna i hålen på båda sidor av stången och
2
Steg 4: Montera återstående skruvar.
fästets belastning blir bättre.
justering.
Steg 3: Använd ett vattenpass för att justera fästet. Dra åt skruvarna efter
För gipsskivor.
Hur man använder tillbehör
Machine Translated by Google

Om din konsol fortsätter att sjunka efter korrekt installation,
använd träshims under bakstången för att justera fram- och
baknivå.
Importerad till AUS: SIHAO PTY LTD. 1 ROKEVA STREETEASTWOOD NSW 2122
Australien Importerad till
USA: Sanven Technology Ltd. Suite 250, 9166 Anaheim Place, Rancho Cucamonga, CA
91730
Tillverkare: Shanghaimuxinmuyeyouxiangongsi Adress:
Shuangchenglu 803nong11hao1602A-1609shi, baoshanqu, shanghai 200000 CN.
Om din vägg inte är rak, använd shims för att säkerställa att din
konsol installeras rakt över väggytan och vinkelrätt mot
väggen. Hyllplattan och konsolen kommer endast att passa ihop
om konsolen är rak och plommon.
E-CrossStu GmbH
Mainzer Landstr.69,
60329 Frankfurt am Main.
YH CONSULTING LIMITED. C/O YH Consulting Limited
Office 147, Centurion House, London Road, Staines-upon-
Thames, Surrey, TW18 4AX
- 6 -
EC REP
UK REP
Använda shims med ditt fäste
Machine Translated by Google

Teknisk support och e-garanticertifikat
www.vevor.com/support
Machine Translated by Google