
User Manual
www.zlinekitchen.com
INDUCTION COOKTOP

ZLINE Kitchen and Bath provides Attainable Luxury, where the kitchen and bath of your dreams
is never out of reach. Through our unique designs and unparalleled quality, we’re dedicated to
providing you an elevated experience in the heart of your home. With an endless selection of
features and finishes, our inspiration is your reality.

ZLINE is fueled by a passion for innovation; A relentless pursuit of bringing the
highest end luxury designs and professional features into everyone’s homes.
Because we continually strive to improve our products, we may change
specifications and designs without prior notice.
Scan the QR code to view the most up-to-date version of the Installation
Manual and User Manual.
WARNING: This product can expose you to chemicals including nickel, which is known to the
State of California to cause cancer. For more information, go to www.P65Warnings.ca.gov.

TABLE OF CONTENTS
IMPORTANT SAFETY INSTRUCTIONS . . . . . . . . . . . . . . . . . . . 1
Electrical Safety . . . . . . . . . . . . . . . . . . . . . . . . . . . . . . . . . . 3
Cooking Safety . . . . . . . . . . . . . . . . . . . . . . . . . . . . . . . . . . 4
Environmental Safety . . . . . . . . . . . . . . . . . . . . . . . . . . . . . . . 5
OPERATION . . . . . . . . . . . . . . . . . . . . . . . . . . . . . . . . . . . . . . . . 6
Surface Burner Layouts . . . . . . . . . . . . . . . . . . . . . . . . . . . . . . 6
Power Sharing . . . . . . . . . . . . . . . . . . . . . . . . . . . . . . . . . . . 9
Compatible Cookware . . . . . . . . . . . . . . . . . . . . . . . . . . . . . 12
Cooktop Operation . . . . . . . . . . . . . . . . . . . . . . . . . . . . . . . 13
Cooking Tips . . . . . . . . . . . . . . . . . . . . . . . . . . . . . . . . . . . 20
CARE AND CLEANING . . . . . . . . . . . . . . . . . . . . . . . . . . . . . . 22
TROUBLESHOOTING . . . . . . . . . . . . . . . . . . . . . . . . . . . . . . . . 23
WARRANTY . . . . . . . . . . . . . . . . . . . . . . . . . . . . . . . . . . . . . . . . 25

1
IMPORTANT SAFETY INSTRUCTIONS
General Safety
GENERAL SAFETY
WARNING
If the information in this manual is not followed exactly, a fire or explosion may
result causing property damage, personal injury, or death.
• Before beginning installation, please read and follow these important instructions for the
safety of your home and the people living in it.
• The manufacturer will not be responsible for any damage to property or to persons
caused by incorrect installation, improper use of the appliance, or failure to heed the
warnings listed.
• Installation and service must be performed by a qualified installer and/or service provider.
• The installer should leave these instructions with the consumer who should retain for local
inspectors’ use and for future reference.
• This appliance has been designed for non-commercial, domestic use only.
• No combustible or flammable materials or products should be placed or stored on or
near this appliance at any time.
• Never use your appliance for warming or heating the room.
• Wear proper apparel. Loose-fitting or hanging garments should never be worn while
installing or operating the appliance.
• Do not repair or replace any part of the appliance unless specifically recommended
in this User Manual or in the Installation Manual provided with this appliance. All
installation and other servicing should be referred to a qualified technician.
• NEVER use water on grease fires — smother fire or flame or use dry chemicals or a
foam-type extinguisher.
WARNING
The appliance and its accessible parts become hot during use. Do not store any
items on the cooking surface, as this increases fire danger.
• Do not touch hot surfaces. Use dry potholders or oven mitts to hold the handles of pots
and pans. Do not use a towel or other bulky cloth.
• Use only dry potholders – moist or damp potholders on hot surfaces may result in burns
from steam. Do not let potholders touch hot heating elements.

2
IMPORTANT SAFETY INSTRUCTIONS
General Safety
• Use only proper pan sizes. This appliance is equipped with one or more surface units
of different size. Use pots and pans with flat bottoms large enough to cover the entire
surface unit. Using undersized pans may expose a portion of the heating element to
direct contact and may result in burns or ignition of clothing.
• Never leave surface units unattended at high heat settings. Boil-overs may cause smoking
and greasy spillovers that may ignite.
• To reduce the risk of burns, ignition of flammable materials, and spillage due to
unintentional contact with pots and pans, handles should be positioned so they are
turned inward and do not extend over adjacent surface units.
• Do not cook on a broken cooktop, as cleaning solutions and spillovers may penetrate
the broken cooktop and create a risk of electric shock.
• Clean your cooktop with caution. If a wet sponge or cloth is used to wipe spills on a hot
cooking area, be careful to avoid steam burns. Some cleaners can produce noxious
fumes if applied to a hot surface.
• Do not use a steam cleaner or high-pressure cleaners to clean your cooktop. Do not use
scourers or harsh abrasive cleaning agents, as these can scratch the ceramic glass.
• Do not place metallic objects such as knives, forks, spoons, or lids on the cooktop surface
since they can get hot and increase risk of burns.
• DO NOT TOUCH SURFACE UNITS OR AREAS NEAR UNITS. Surface units may be hot
even though they are dark in color. Areas near surface units may become hot enough to
cause burns.
• During and after use, do not touch, or let clothing or other flammable materials contact
surface units or areas near units until they have had sufficient time to cool.
WARNING
Light (Error Code) signals a component failure. If you see this error, disconnect
the power supply and contact ZLINE at 1-614-777-5004, as the appliance
must be repaired by a qualified service provider.
• This appliance should be connected to a dedicated circuit that incorporates an isolating
switch providing full disconnection from the power supply.
• Connect only to a 3-wire, 240-volt power supply; the neutral conductor is not required
for operation of the appliance. The potential at the power supply electrical connections
shall be 150 volts-to-ground or less. Please ensure the cooktop is properly grounded.

3
IMPORTANT SAFETY INSTRUCTIONS
Electrical Safety
HOT SURFACE HAZARD
• During use, accessible parts of this appliance will become hot enough to
cause burns. Do not let your body, clothing, or any item other than suitable cookware
contact the ceramic glass until the surface is cool.
• Handles of saucepans and other cookware may be hot to touch. Check to make sure
handles do not overhang other cooking zones that are on.
• Keep handles and cookware out of reach of children.
• Failure to follow this advice could result in burns and scalds.
ELECTRICAL SAFETY
ELECTRICAL SHOCK HAZARD
• Do not cook on a broken or cracked cooktop. If the surface is broken or cracked, switch
the appliance off immediately from the main power circuit (wall switch) and contact
ZLINE at 1-614-777-5004.
• Switch the cooktop off at the wall before cleaning or maintenance.
• To reduce the risk of electric shock, do not mount the unit over a sink.
• No attempt should be made to operate the appliance during power failure.
• Failure to follow this advice may result in electrical shock or death.
WARNING
If the cooktop surface is damaged or cracked in any way, switch off the
appliance to avoid the possibility of electric shock.
CUTTING HAZARD
• Using a single-edge razor blade scraper at a 30° to 45° angle against the glass surface
is appropriate during cleaning to scrape off hard-to-clean residue.
• Please note that the razor-sharp blade of a cooktop scraper is exposed when the safety
cover is retracted. Use with extreme care, always store safely, and keep out of reach
of children.
• Failure to use caution could result in injury or cuts.
HEALTH HAZARD
This appliance complies with electromagnetic safety standards.

4
IMPORTANT SAFETY INSTRUCTIONS
Cooking SafetySafety
COOKING SAFETY
• Never use your appliance as a work station or storage surface. Certain substances such
as salt, sugar, or sand can scratch the glass ceramic surface.
• Never leave any objects or utensils on the appliance other than appropriately sized and
induction-safe cookware.
• After use, always turn off the cooking zones and the cooktop as described in this manual
(i.e. by using the touch controls as outlined in "Using Your Cooktop" on page 13).
• Children should not be left alone or unattended in the area where appliance is in use.
Children should also never be allowed to sit, stand, or climb on any part of the appliance,
as they could be seriously injured.
• Cleaning and user maintenance shall not be made by children without supervision.
• Do not store items of interest to children in cabinets above or adjacent to the appliance.
• Do not place or drop heavy objects on your cooktop.
• Do not stand on your cooktop.
• Do not use pans with jagged edges and do not drag pans or utensils across the glass
surface, as this can scratch the glass.
• If the power cord is damaged, it must be replaced by the manufacturer or a qualified service
agent. If the unit arrives with the power cord damaged, contact ZLINE at 1-614-777-5004.
• When the unit is on, do not touch outside the control panel, as the surface may contain
residual heat. It is important to be aware that the unit’s surface will remain hot for a short
period of time after use.
• The appliance is not intended to be operated by means of an external timer or separate
remote-control system.
• To prevent accidents and achieve optimal ventilation, allow for sufficient space around the
cooking area.
• This appliance is designed for built-in household use only. Do not use outdoors.
• Avoid preparing food in aluminum foil or plastic containers over the hot cooking zones.
• Do not allow pans to boil dry or empty.
• Always remove the covers on sealed or canned goods before heating to avoid explosion.
• If the cooktop is near a window, ensure that curtains and drapes do not blow over or
near the unit.
5
IMPORTANT SAFETY INSTRUCTIONS
Environmental Safety
WARNING
Unattended cooking on a cooktop with fat or oil can be dangerous and may
result in a fire. NEVER try to extinguish a fire with water. Instead, immediately
disconnect the appliance from power and then cover flames with a lid or a
fire blanket.
ENVIRONMENTAL SAFETY
This appliance is labeled in compliance with European
directive 2012/19/EU for Waste Electrical and Electronic
Equipment (WEEE).
By ensuring that this appliance is disposed of correctly, you
will help prevent any possible damage to the environment and
to human health, which might otherwise be caused if it were
disposed of in the wrong way.
The symbol on the product indicates that it may NOT be treated
as normal household waste. It should be taken to a collection
point for the recycling of electrical and electronic goods.
This appliance requires special waste disposal to ensure
environmental safety. For further information regarding the
treatment, recovery, and recycling of this product, please contact
your local government office, your household waste disposal
service, or the shop where you purchased it.
APPROPRIATE
PRODUCT
DISPOSAL:
Do not dispose
this product
as unsorted
municipal waste.
NOTE: All ZLINE Kitchen and Bath range and cooktop products carry a one-year parts and
service warranty. If you experience any issues with your product, contact ZLINE at 1-614-
777-5004. The ZLINE customer service team is ready to work on resolving your issues and
assessing if service is required. All service repairs must only be conducted by an industry
professional with prior approval from the ZLINE customer service team.
6
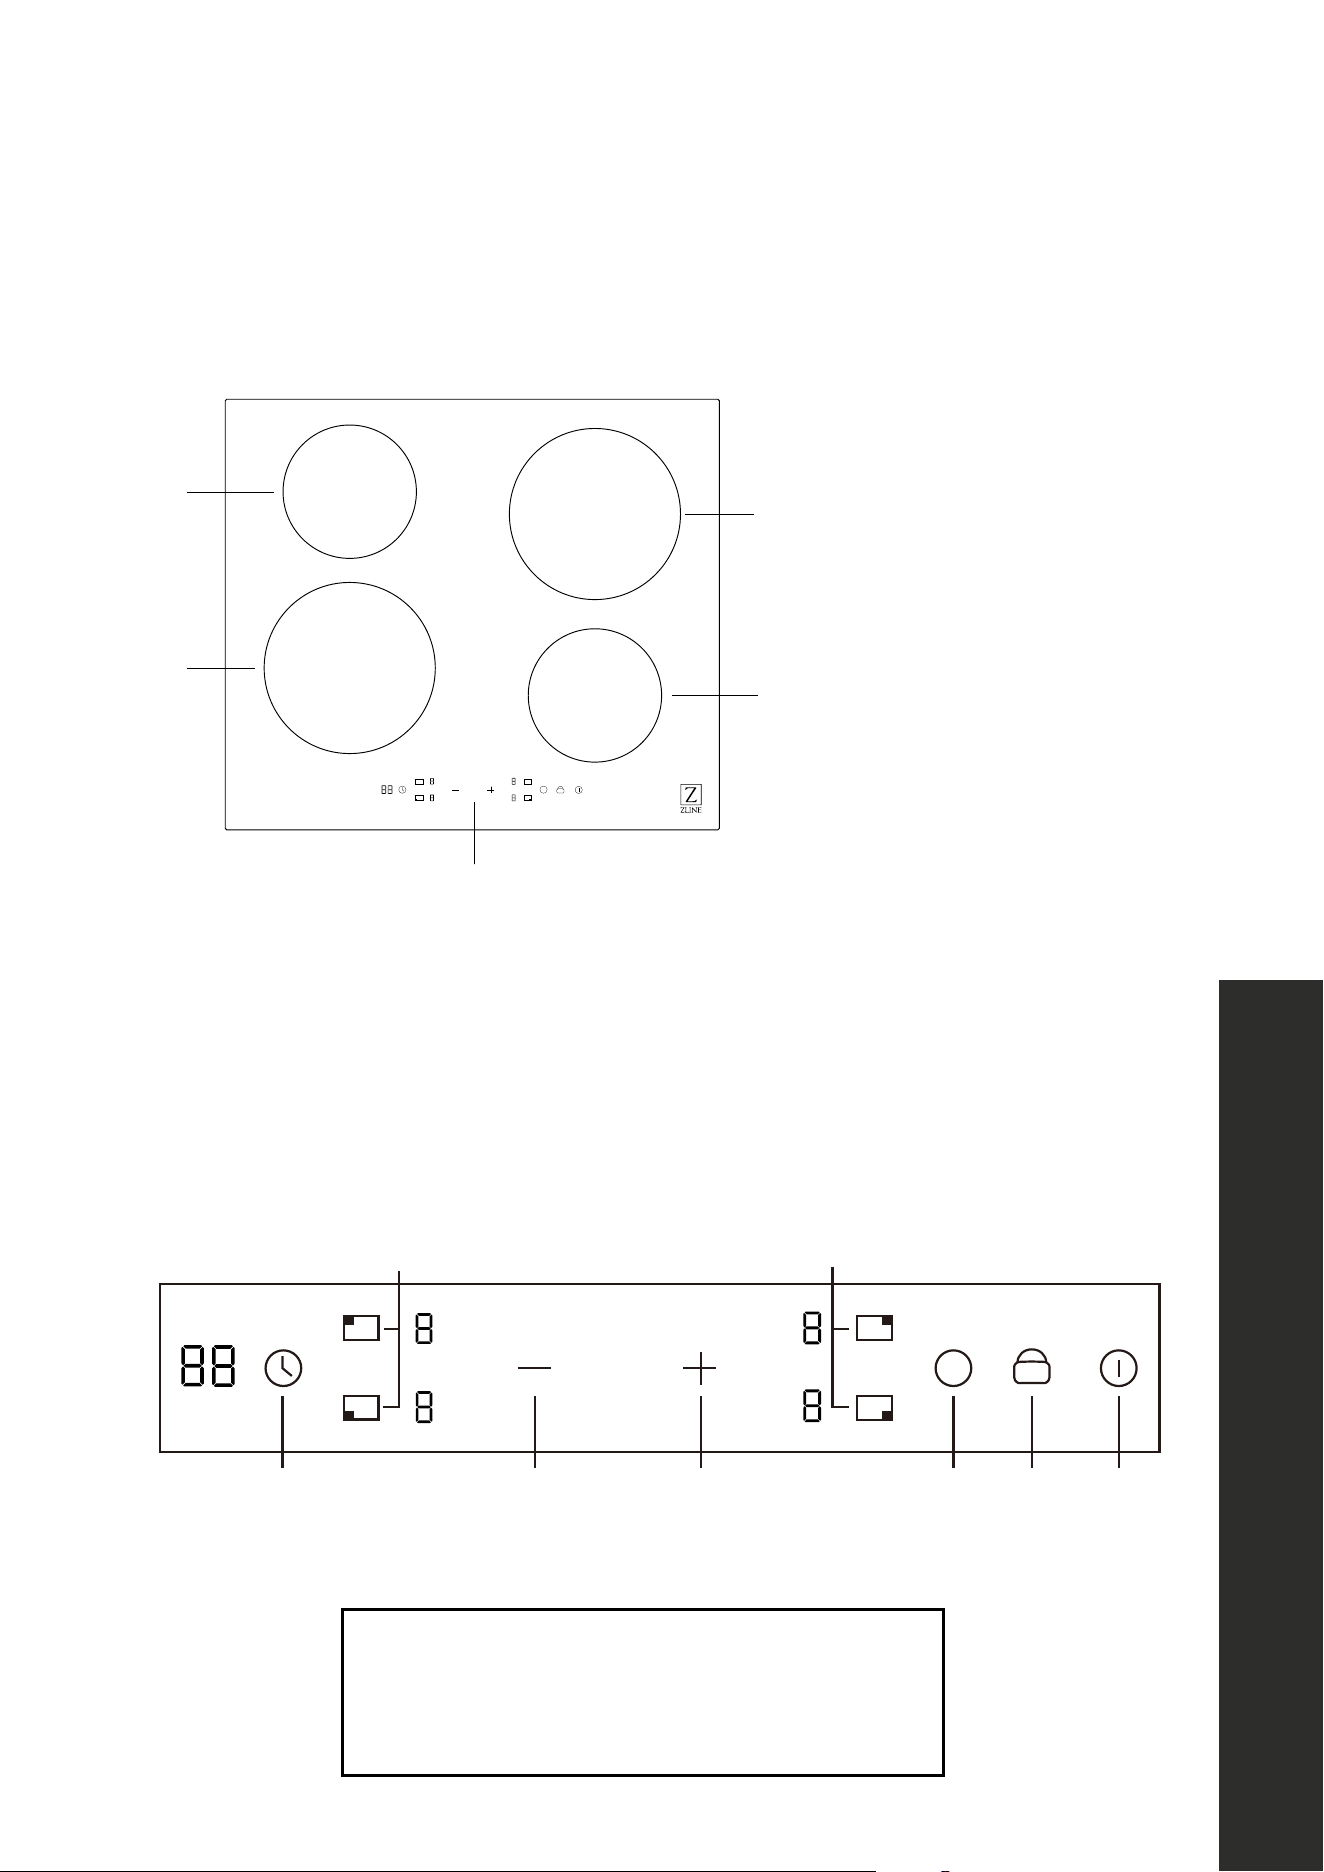
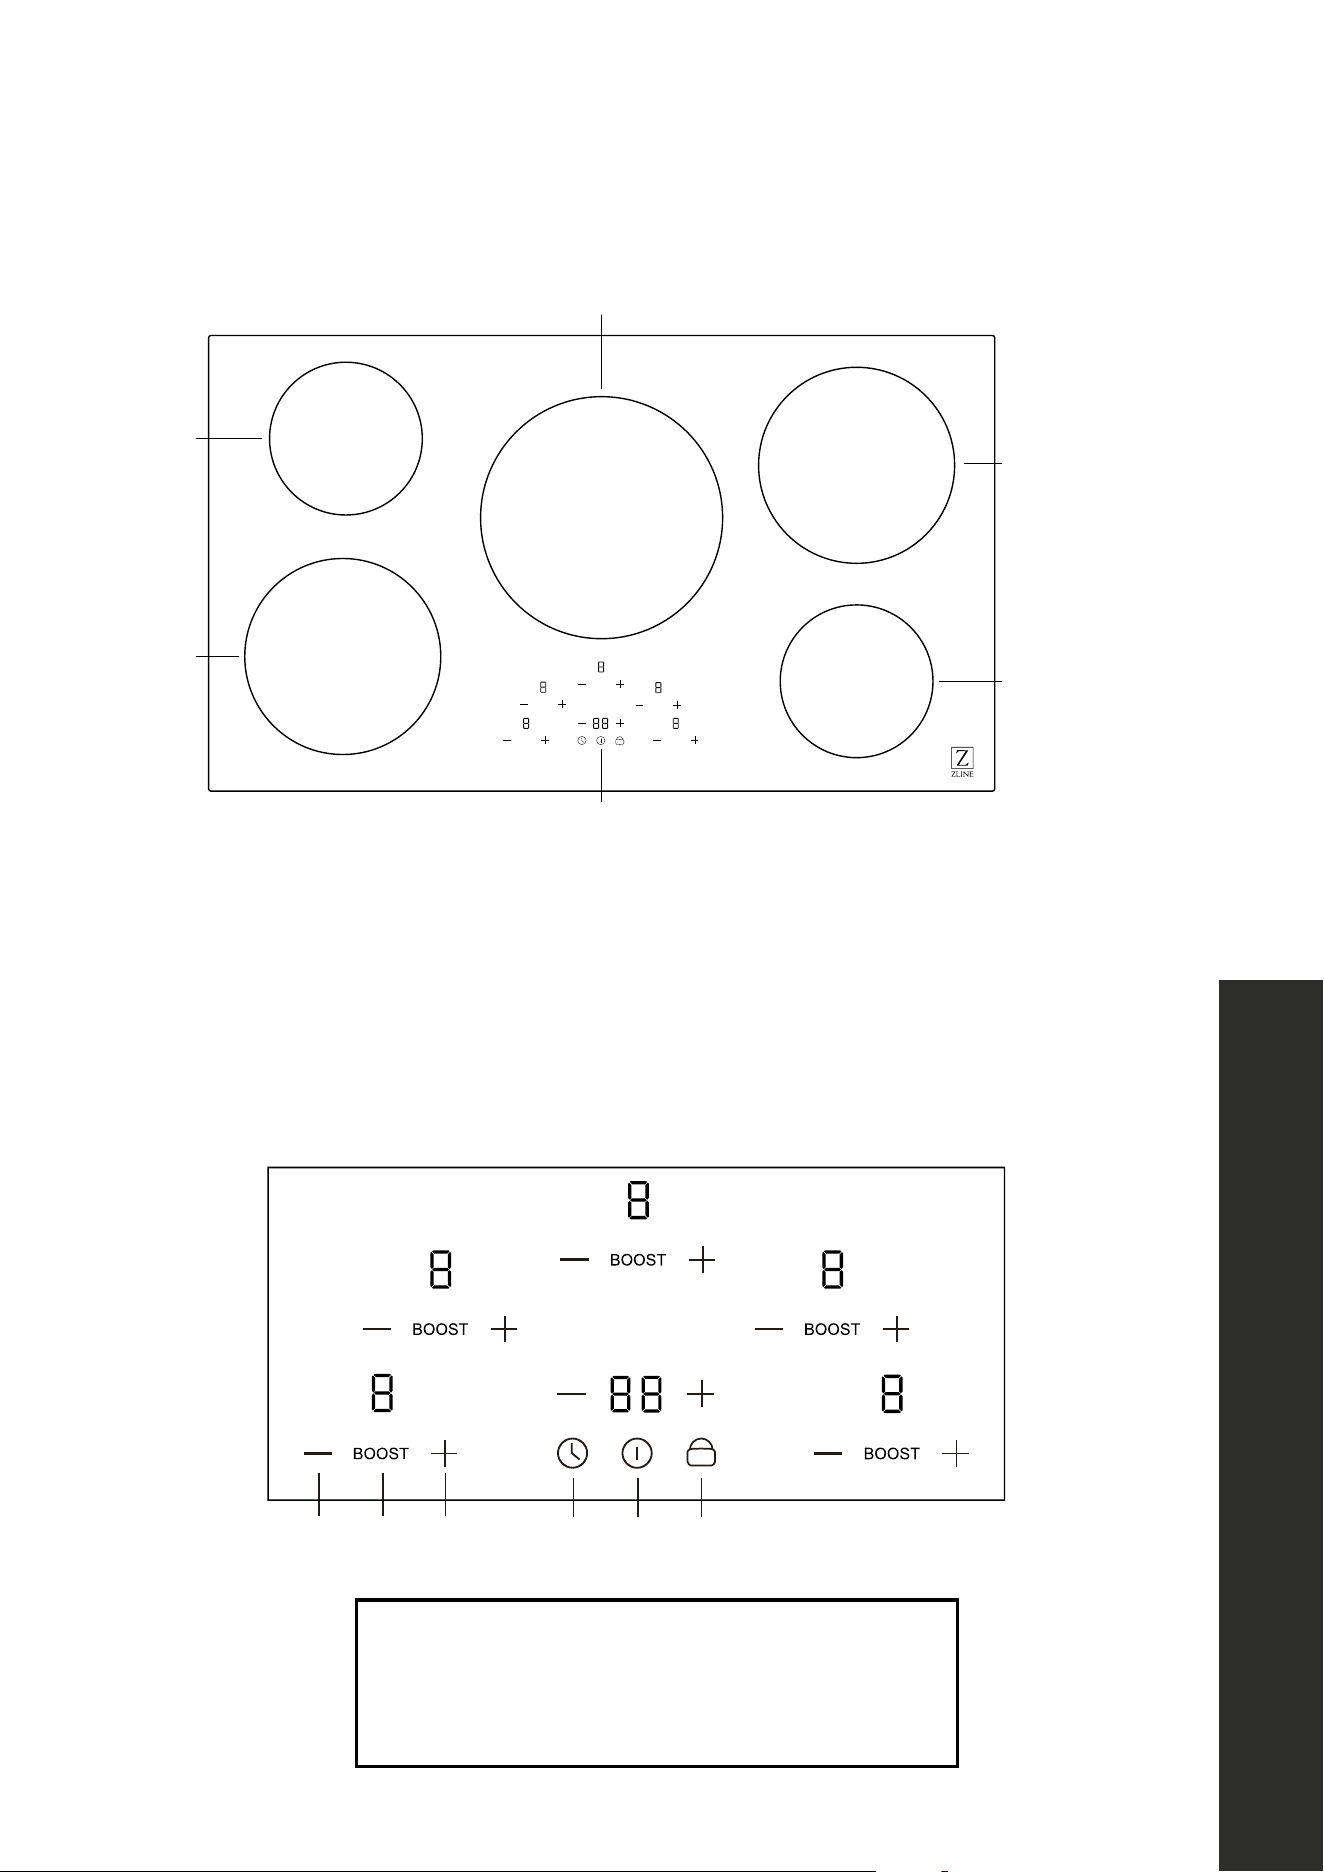
SURFACE BURNER LAYOUTS
RCIND-24 SERIES SURFACE BURNER LAYOUT
1
2
3
4
5
B
1. Left front cooking element
2. Left back cooking element
3. Right rear cooking element
4. Right front cooking element
5. Touch control panel
B
15 4223
6 6
1. ON/OFF switch
2. Select power level
3. Setting the timer
4. Child lock
5. Boost control
6. Heating zone
OPERATION
Surface Burner Layout
7
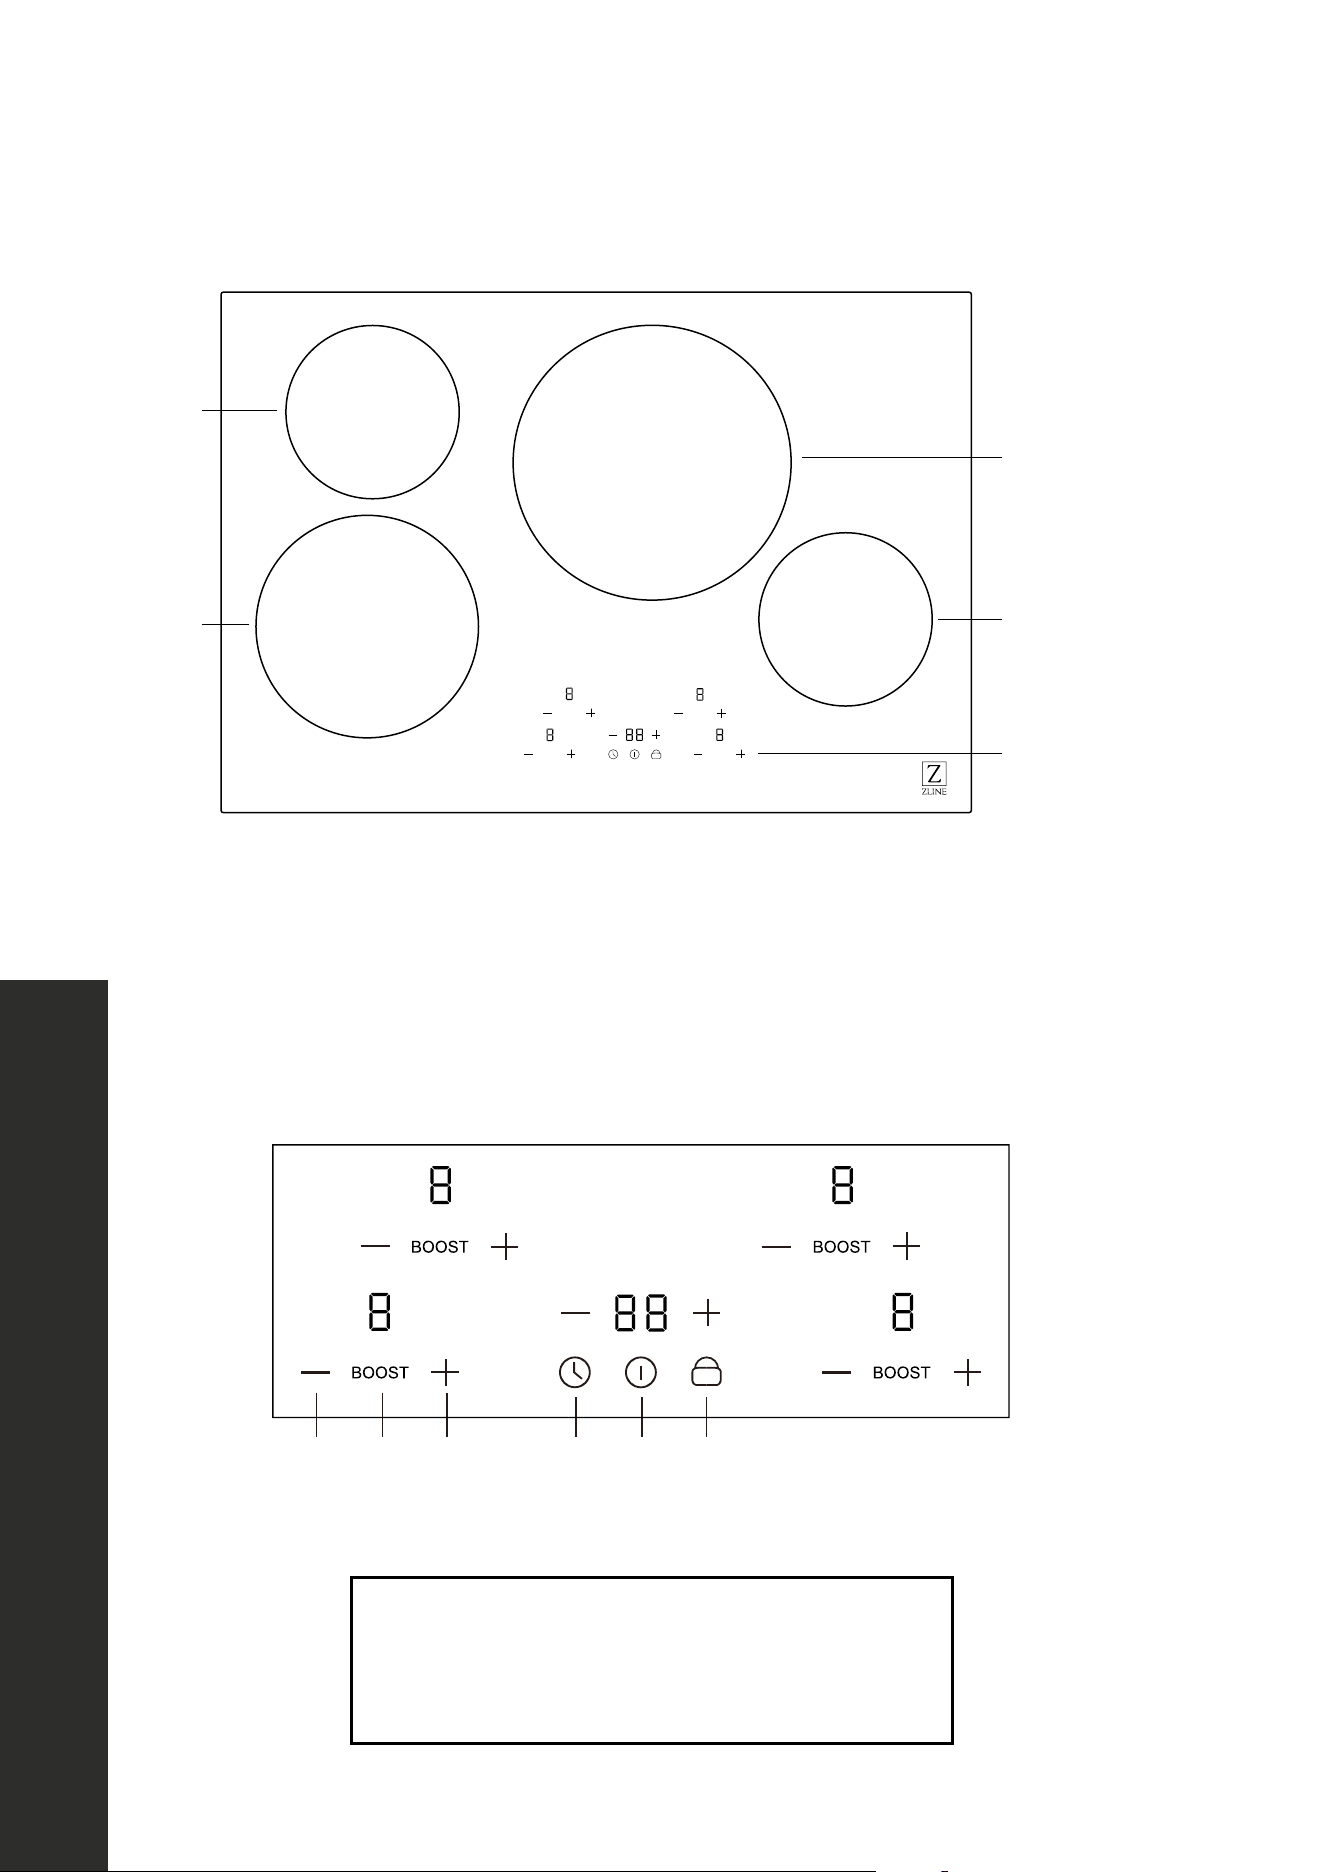
RCIND-30 SERIES SURFACE BURNER LAYOUT
BOOST
BOOST
BOOST
BOOST
1
2
3
4
5
1. Left front cooking element
2. Left back cooking element
3. Right rear cooking element
4. Right front cooking element
5. Control panel
2 5 2 3 1 4
1. ON/OFF switch
2. 2. Select power level
3. Setting the timer
4. Child lock
5. Boost control
OPERATION
Surface Burner Layout
8
RCIND-36 SERIES SURFACE BURNER LAYOUT
BOOST
BOOST
BOOST
BOOST
BOOST
6
1
2
3
4
5
1. Left front cooking element
2. Left back cooking element
3. Middle cooking element
4. Right rear cooking element
5. Right front cooking element
6. Control panel
1. ON/OFF switch
2. Select power level
3. Setting the timer
4. Child lock
5. Boost control
2 5 2 3 1 4
OPERATION
Surface Burner Layout

9
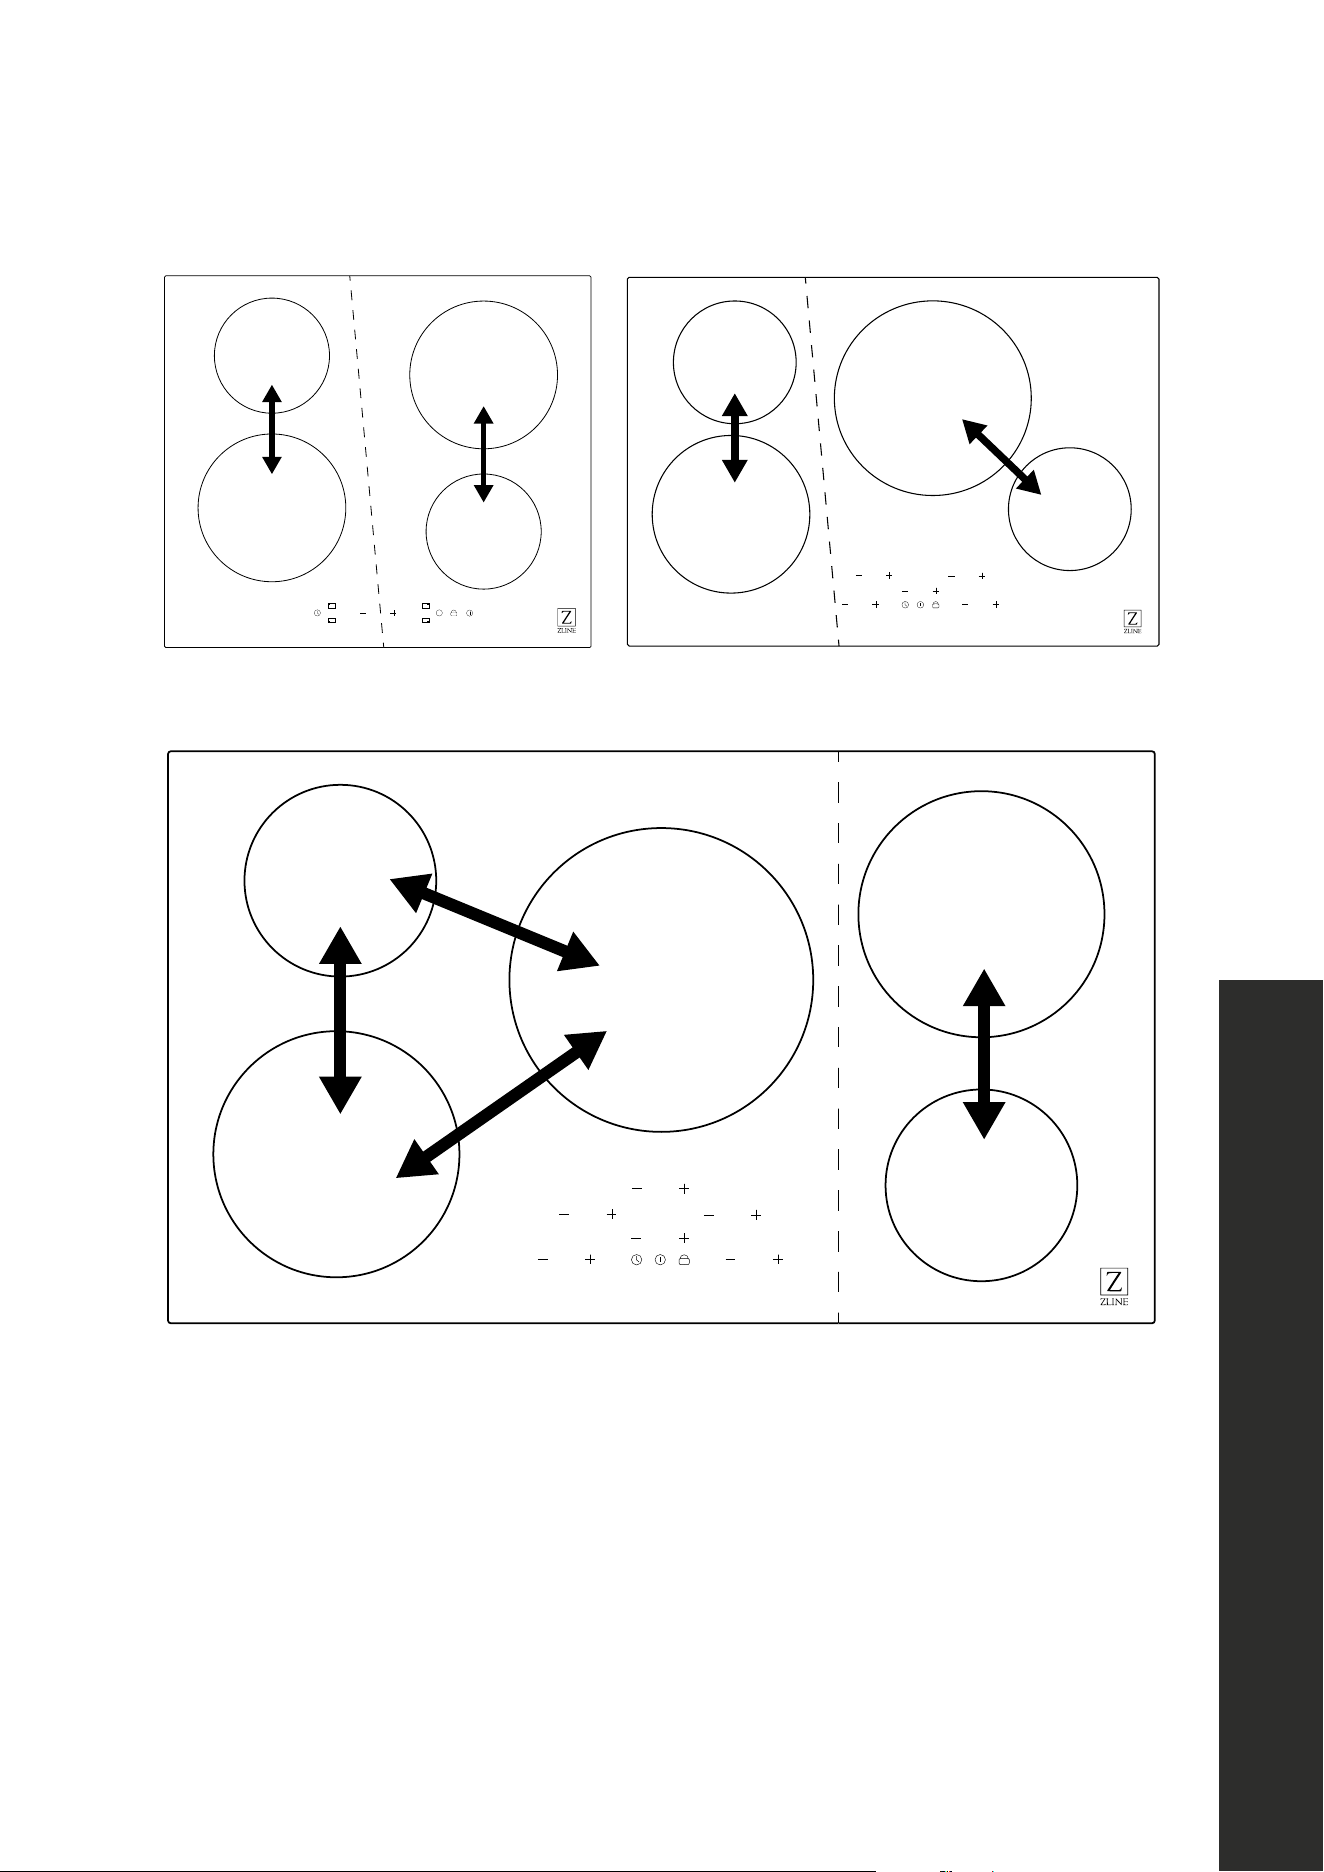
Power sharing
OPERATION
POWER SHARING
• Induction cooktops are divided into two separate cooking areas; the right and left side
cooking elements share power.
• Power sharing is activated when the cooking element in the same area is activated;
the controls adjust power automatically. Power sharing is administered by the unit's
microprocessors, which will alternate power in one area.
• Power sharing happens when the total amount of watts is above the rated wattage,
which is 7200W for RCIND-24 and RCIND-30 and 9300W for RCIND-36. Max watts
is the first number in the diagrams on "Operation" on page 10 and "Boost" watts is
the second number.
• Power levels 3 through 9 use the max watts on the burner being used. When using three
burners at once above power level 3 — and then adding a fourth on Boost — this will
combine the total being used above the rated wattage.
• Power sharing then activates, ensuring total watt usage stays at 7200W/9300W; to do
so, the appliance will drop the Boost level to 9 and show the change on the display panel.
• Power sharing tips: Select the power setting last for the cooking element you want to
maintain at the highest heat setting. When cooking two items at the same time, place one
on an element in one section (the left side, for example) and the other item in another
section (right side).
• The diagrams on page 10 demonstrate how each cooktop is split into two cooking
areas and how power sharing works between the elements.
10
Power Sharing
B
1200W
1500W
2300W
3000W
1800W
2100W
1200W
1500W
RCIND-24 SERIES
BOOST
BOOST
BOOST
BOOST
BOOST
1200W
1500W
1800W
2100W
1800W
2100W
2300W
3700W
1200W
1500W
RCIND-36 SERIES
BOOST
BOOST
BOOST
BOOST
1200W
1500W
1200W
1500W
1800W
2100W
2300W
3700W
RCIND-30 SERIES
OPERATION
11
OPERATION
Induction Cooking
ABOUT INDUCTION COOKING
Induction cooking is a safe, advanced, efficient, and economical cooking technology. It
works by electromagnetic vibrations generating heat directly in the pan, rather than indirectly
through heating the glass surface. The glass becomes hot only because the pan eventually
warms it up.
Iron pot
Magnetic circuit
Ceramic glass plate
Induced currents
Induction coil
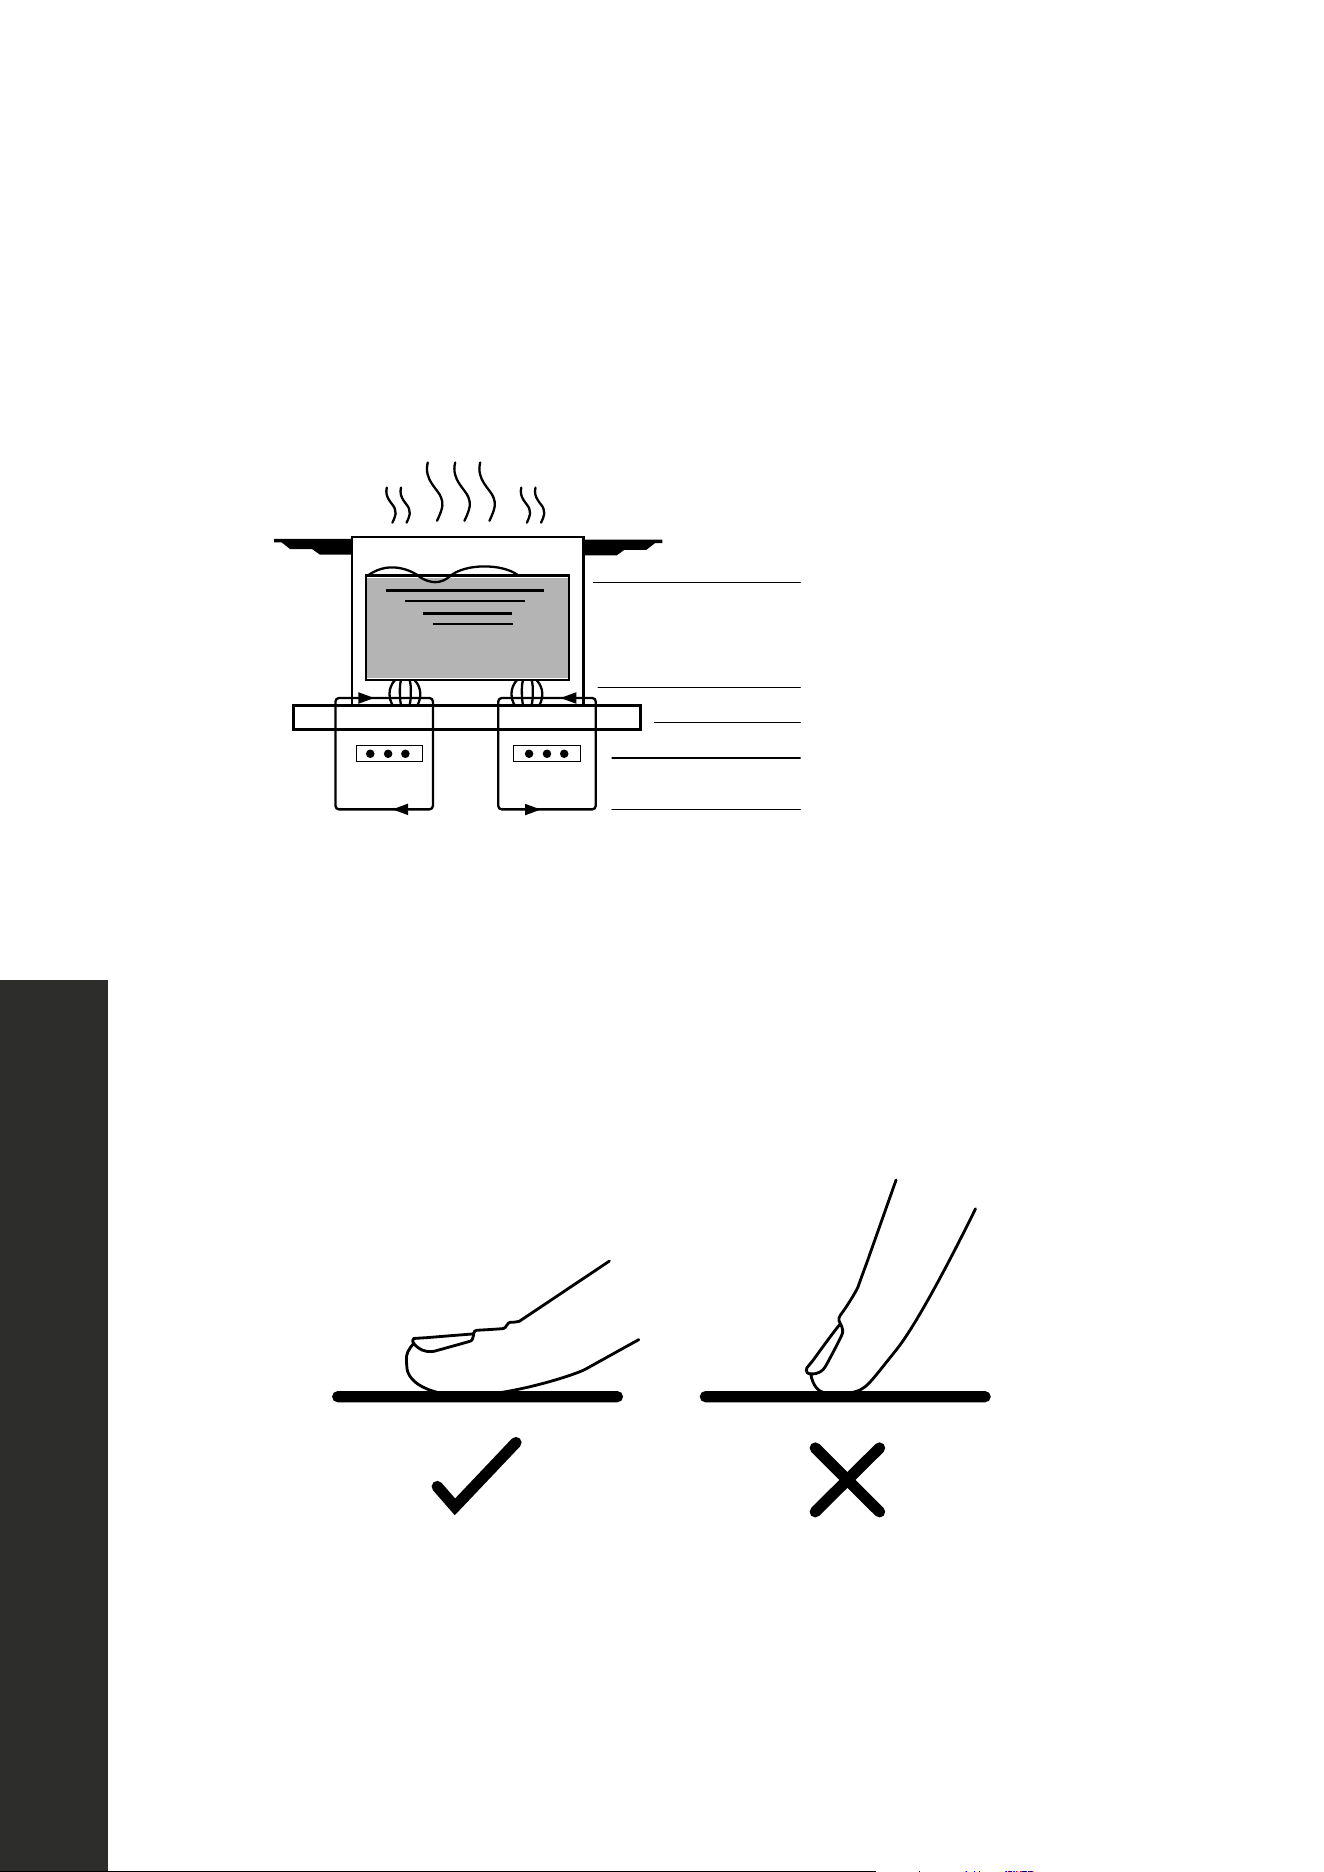
USING THE TOUCH CONTROLS
• The controls respond to touch, so you don’t need to apply any pressure.
• Use the ball of your finger, not the tip.
• You will hear a beep each time a touch is registered.
• Make sure the controls are always clean, dry, and that there is no object (e.g. a utensil or
a cloth) covering them. Even a thin film of water may make the controls difficult to operate.
12
Compatible Cookware
OPERATION
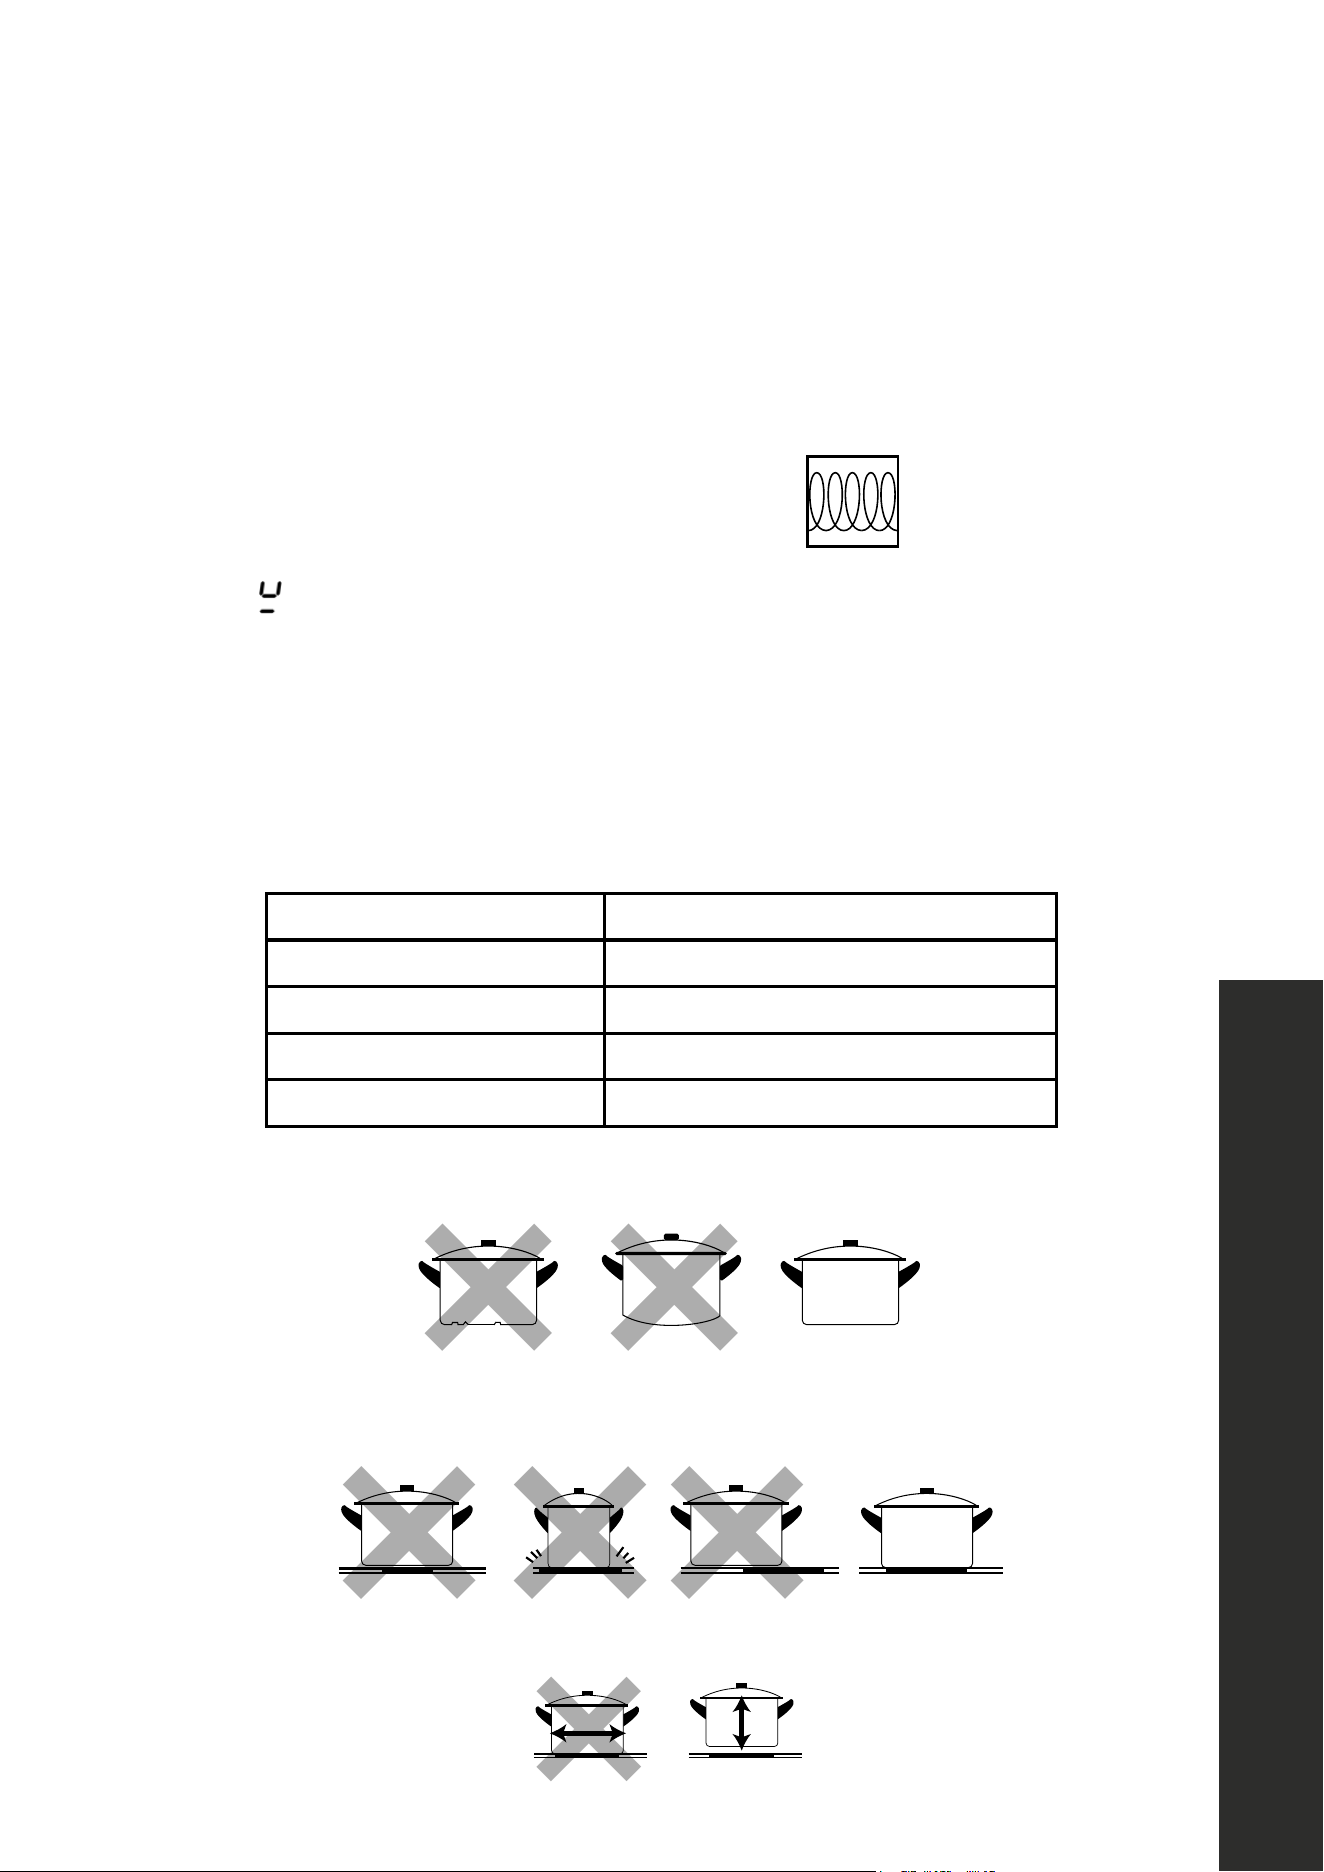
CHOOSING THE RIGHT COOKWARE
• Only use cookware with a base suitable for induction cooking. Look for the induction
symbol on the packaging or on the bottom of the pan.
• You can check if cookware is suitable by carrying out a magnet test. Move a magnet
toward the base of the pan. If it is attracted, the pan is suitable for induction.
• If you do not have a magnet:
1. Put some water in the pan you want to check.
2. Follow the steps under "To start cooking".
3. If
does not flash in the display and the water is heating, the pan is suitable.
COMPATIBLE COOKWARE
• Flat-bottomed pots or pans made from cast iron, enameled iron, nickel, or magnetic
stainless steel work best on induction cooktops.
• The following cookware is not suitable: pure stainless steel, aluminum or copper without
a magnetic base, glass, wood, porcelain, ceramic, and earthenware.
Size of burner (diameter) Minimum cookware size (diameter)
6 5/16" (160 mm) 4 3/4" (121 mm)
7 1/16" (179 mm) 5 1/2" (140 mm)
8 1/4" (210 mm) 6 5/16" (160 mm)
11" (279 mm) 7 1/16" (179 mm)
Do not use cookware with jagged edges or a curved base.
×
×
Make sure that the base of your pan is smooth, sits flat against the glass, and is the same size
as the cooking zone. Always center your pan on the cooking zone.
×
×
×
Always lift pans off the ceramic cooktop — do not slide or they may scratch the glass.
×
Compatible Cookware
NOTE: Some cookwares can produce noises when used on induction
cooking zones. This is not a fault in the cooktop, and its function will not
be impaired in any way as a result.
Because induction cooking requires a magnetic vessel for heating, only
certain materials can be used on your cooktop.
Induction
Optimally the cookware will have this
induction image on the retail box:
Induction requires pots and pans that are
made of ferrous(meaning magnetic)
materials.
Check your cookware’s retail box for the
induction symbol. To tell if your current
cookware is compatible with the induction
technology, grab a magnet and see if it
holds to the bottom of the cookware. If
your magnet stays on then your cookware
is ready to be used on the Induction
cooktop!
The quality of your cooking is dependent on the cookware you use.
The following are not compatible: heat-resist
glass, ceramic, copper, aluminum pan/pots,
round-bottomed cookware, or cookware with a
base less than 5 inches.
INSTALL GUIDE
MASTER CONTRACT: 272713
REPORT: 80028905
PROJECT: 80028905
Att3 Instructions
Page 31
Induction symbol
13
Using the Cooktop
OPERATION
COOKTOP OPERATION
USING YOUR COOKTOP - RCIND-30 AND RCIND-36 SERIES
After powering on, the buzzer will beep once and all the indicators light up for 1 second then go
out, indicating the cooktop has entered standby mode.
Touch the power ON/OFF switch, all the indicators show “—“.
Place a suitable pan on the cooking zone that you wish to use. Make sure the bottom of the pan
and the surface of the cooking zone are clean and dry.
Select a heat setting by touching the “—” “+” control.
•If you don’t choose a heat setting within 1 minute, the cooktop will
automatically switch off.
•You can modify the heat setting at any time during cooking.
Power down Power up
WHEN YOU HAVE FINISHED COOKING - RCIND-30 AND RCIND-36 SERIES
Power down
Power up
Turn the single heating zone off by touching the “-”
control and make sure the display shows”0”.
Turn the whole cooktop off by touching the power ON/
OFF control.
Beware of hot surfaces
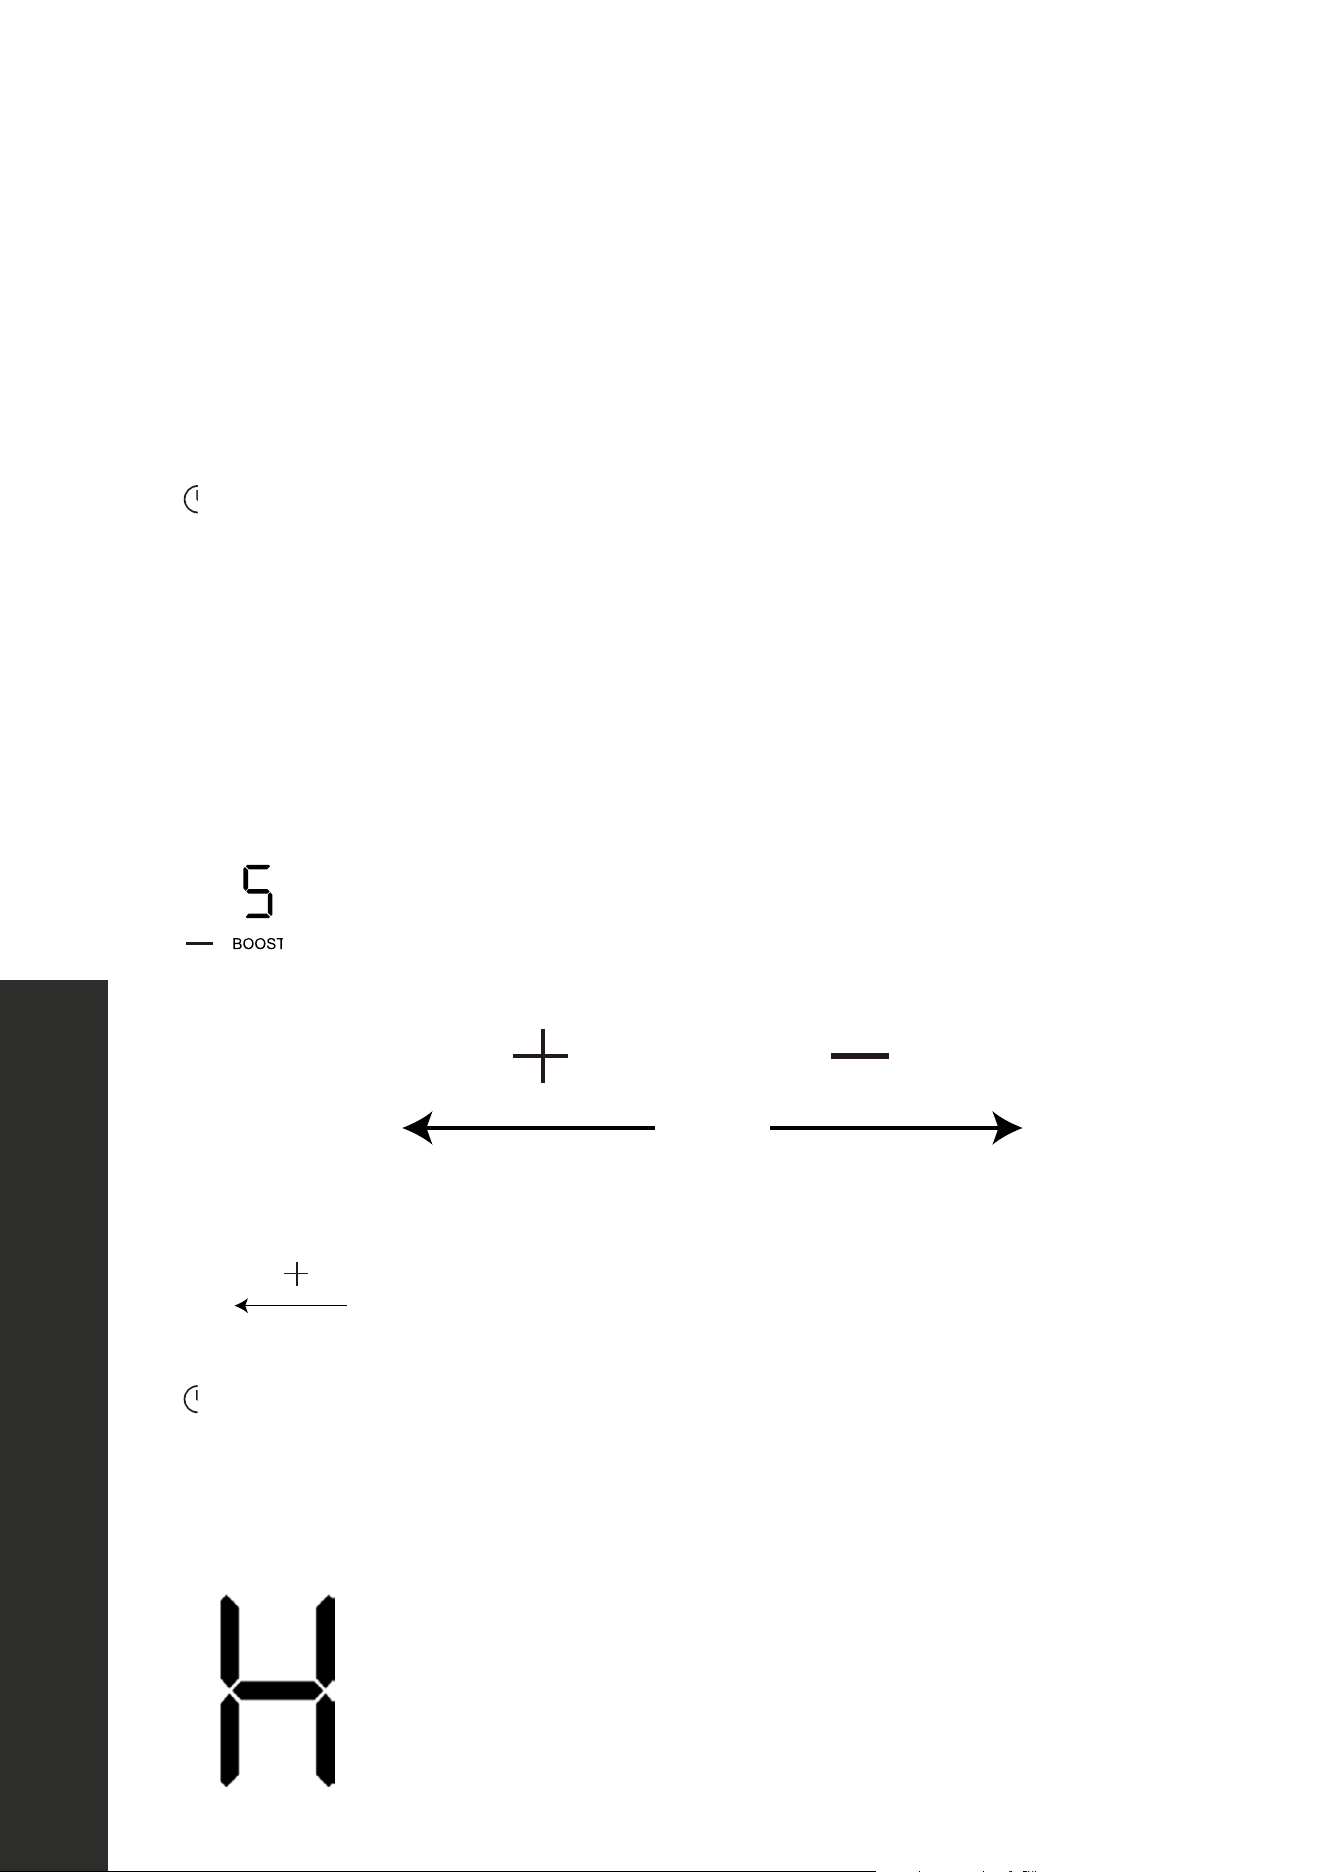
An “H" in the display means the cooking zone is too hot to touch. It
will disappear when the surface has cooled to a safe temperature.
It can also be used as an energy saving function. If you want to
heat other pans, use the hotplate that is still hot.
14
Using the Cooktop
OPERATION
USING BOOST FUNCTION - RCIND-36 AND RCIND-30 SERIES
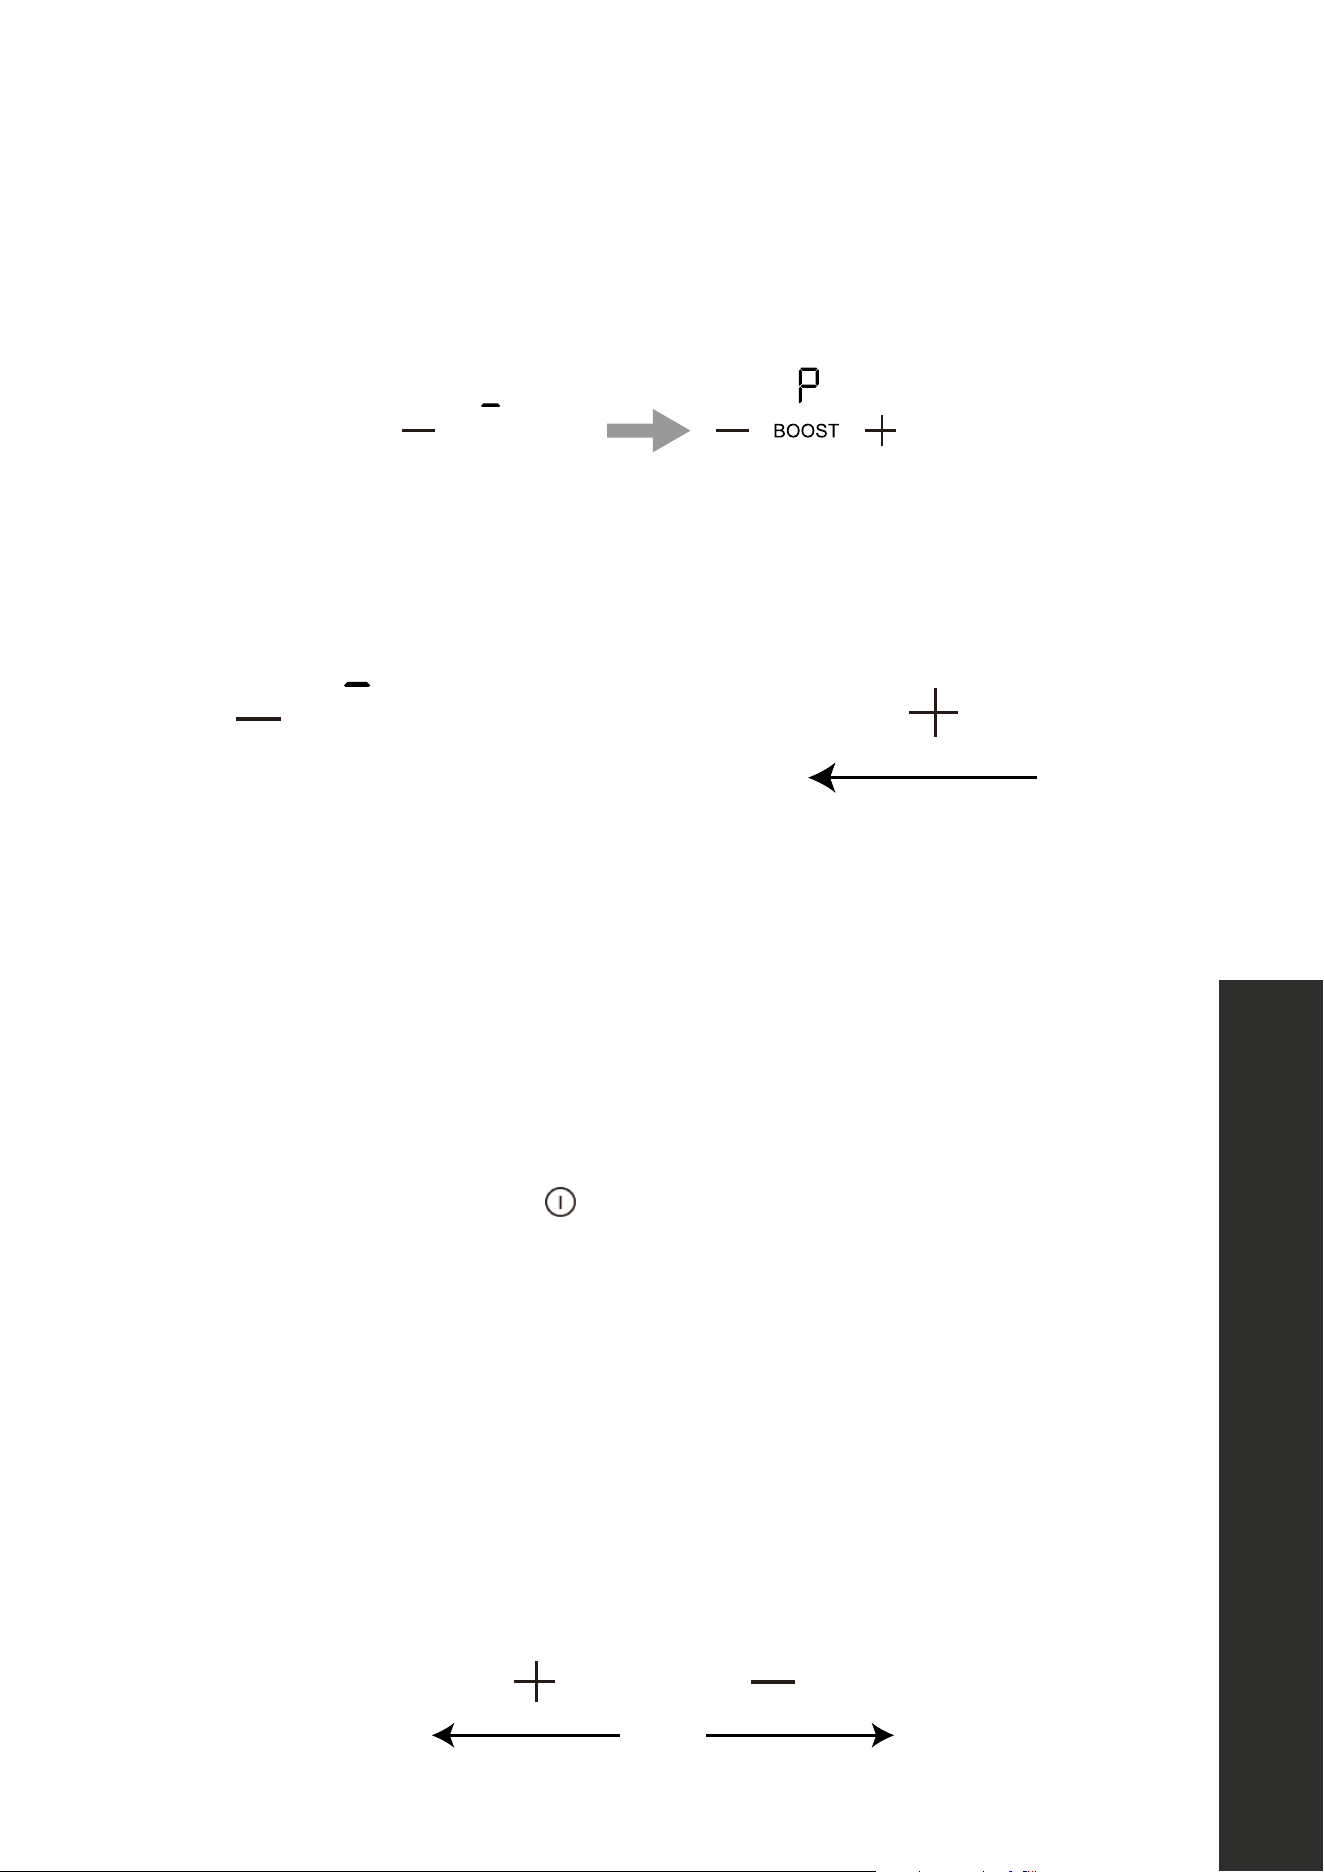
Activate the Boost function
Touch the heating zone BOOST control and the indication shows “P”.
Cancel the Boost function
Touch BOOST again or touch the “—” control to cancel the Boost function, and select the
level you want to set.
Power down
Power up
OR
NOTE: The Boost function can only last for 5 minutes, after which the zone will decrease to
level 9 automatically.
USING YOUR COOKTOP - RCIND-24 SERIES
After powering on, the buzzer will beep once and all the indicators light up for 1 second
then go out, indicating the cooktop has entered standby mode.
Touch the ON/OFF switch, all the indicators show “– “
Place a suitable pan on the cooking zone that you wish to use. Make sure the bottom of the
pan and the surface of the cooking zone are clean and dry.
Touch the heating zone selection control, and an indicator
next to the key will flash. Select a heat setting by touching the “-”“+” control.
• If you don’t choose a heat setting within 1 minute, the cooktop will automatically
switch off.
• You can modify the heat setting at any time during cooking.
Power down Power up

15
Using the Cooktop
OPERATION
WHEN YOU HAVE FINISHED COOKING - RCIND-24 SERIES
Touch the heating zone selection that you wish to switch off.
Power down
Power up
Turn the cooking zone off by touching the “—” control; make
sure the display shows”0”.
Turn the whole cooktop off by touching the ON/OFF control.
Beware of hot surfaces
An “H" in the display means the cooking zone is too hot to touch. It
will disappear when the surface has cooled to a safe temperature.
It can also be used as an energy saving function. If you want to
heat other pans, use the hotplate that is still hot.
USING BOOST FUNCTION - RCIND-24 SERIES
Activate the Boost function
Select the zone with the Boost function (front left zone).
B
Touch and the power level indication shows “P”.

16
Using the Cooktop
OPERATION
USING THE CHILD LOCK - ALL MODELS
You can lock the controls to prevent unintended use (for example, children accidentally
turning the cooking zones on). When the controls are locked, all the controls except the
ON/OFF control are disabled.
To lock the controls
Touch the keylock control; the timer indicator will show “Lo “.
To unlock the controls
Make sure the cooktop is turned on. Touch and hold the keylock control for 3 seconds. You
can now start using your cooktop.
When the cooktop is in lock mode, all the controls are disabled except ON/OFF. You can
always turn the cooktop off with the ON/OFF control in an emergency, but you must unlock
the cooktop first in the next operation.
RESIDUAL HEAT WARNING - ALL MODELS
Regardless of model, any induction cooktop that has been operating for
some time will generate some residual heat. The letter “H” appears to warn
you of such situations.
AUTO SHUTDOWN - ALL MODELS
A safety feature of the cooktop is auto shut down. This occurs whenever you forget to switch
off a cooking zone. The default shutdown times are shown in the table below:
POWER LEVEL 1 2 3 4 5 6 7 8 9
DEFAULT WORKING TIMER (HOUR) 8 8 8 4 4 4 2 2 2

17
Using the Timer
USING THE TIMER - ALL MODELS
You can set the timer up to 99 minutes and use it in two different ways:
• You can use it as a minute reminder. In this case, the timer will not turn any cooking zone
off when the set time is up.
• You can use it as cut-off timer to turn one or more cooking zones off after time is up.
USING THE TIMER AS A MINUTE REMINDER
Make sure the cooktop is turned on and a zone selection key is not activated (zone indication
"-" is not blinking).
NOTE: You can set the minute reminder before or after a cooking zone power setting finished.
Touch the timer key, “00” will show in the timer display and “00” will
blink.
Set the time from 1 to 99 minutes by touching the “—” “+” control of
the timer (e.g. 5). When the time is set, it will begin to count down
immediately. The display will show the remaining time.
Buzzer will beep for 30 seconds and the timer indicator shows
“- - “ when the setting time finished.
USING THE TIMER TO SWITCH OFF ONE OR MORE COOKING ZONES
Touch the heating zone that you want to set the timer for and
select the power level by touching the “—” “+”.
Touch the timer control; “00” will show in the timer display, and the
“0” flash.
OPERATION
18
Using the Timer
OPERATION
Set the time from 1 to 99 minutes by touching the “—” “+” control of the timer.
When the time is set, it will begin to count down immediately. The display will show the
remaining time.
NOTE: There will be a red dot in the right bottom corner of the power level indicator sowing
which zone is selected.
When the timer expires, the corresponding
cooking zone will be switched off automatically.
NOTE: Other cooking zones will keep operating if they are turned on previously.
IF THE TIMER IS SET ON MORE THAN ONE ZONE
When you set a timer for several cooking zones, red dots of the relevant cooking zones are
indicated. The timer display shows the minute timer. The dot of the corresponding zone blinks.
Set to 15 minutes
Set to 45 minutes
Once the countdown timer expires, the corresponding zone will switch off. Then it will show
the new minute timer and the dot of corresponding zone will flash.
NOTE: Touch the heating zone selection control, and the corresponding timer will be shown
in the timer indicator.

19
Cookware Noises
OPERATION
CANCEL THE TIMER
Touching the “—” “+” control of the heating zone that you
want to cancel the timer.
Touching the timer control, and the indicator will flash.
Touch the “—” “+” at the same time to set the timer
to “00”; the timer is canceled.
COOKWARE NOISES
• Heavier pans such as enameled cast iron will produce less noise than a lighter stainless
steel pan. Lightweight cookware may also vibrate. Heavy weight quality cookware is
recommended.
• Cookware with irregular or warped bottoms can vibrate audibly on the ceramic glass
surface, though again, typically only at high power settings.
• Loose-fitting handles on cookware, typically when rivets are used, can vibrate.
• “Cracking” noise occurs if the cookware base is made of a different material.
• “Low humming” noise occurs when cooking, which is normal particularly at high
power settings.
• A “whistling” noise occurs if two elements are being used at the same time at high
settings, and the cookware base is made of a different material.

20
OPERATION
WARNING
Take care when frying, as oil and fat heat up very quickly, particularly if you’re
using Boost. At extremely high temperatures, oil and fat will ignite spontaneously
and this presents a serious fire risk.
COOKING TIPS
• When food comes to the boil, reduce the power setting.
• Using a lid will reduce cooking times and save energy by retaining heat.
• Minimize the amount of liquid or fat to reduce cooking times.
• Start cooking on a high setting and reduce the setting when the food has heated through.
SEARING STEAK
To cook juicy, flavorful steaks:
1. Stand the meat at room temperature for about 20 minutes before cooking.
2. Heat up a heavy-based frying pan, such as a seasoned cast iron pan.
3. Brush both sides of the steak with oil and season generously. Drizzle a small amount of
oil into the hot pan and then lower the meat onto the hot pan.
4. Turn the steak only once during cooking. The exact cooking time will depend on the
thickness of the steak and how cooked you want it. Times may vary from about 2 to 8
minutes per side. Press the steak to gauge how cooked it is — the firmer it feels the more
"well done" it will be.
5. Leave the steak to rest on a warm plate for a few minutes to allow it to relax and become
tender before serving.
FOR STIR-FRYING
1. Choose a ceramic compatible flat-based wok or a large frying pan.
2. Have all the ingredients and equipment ready. Stir-frying should be quick.
If cooking large quantities, cook the food in several smaller batches.
3. Preheat the pan briefly and add two tablespoons of oil.
4. Cook any meats first and set aside.
5. Stir-fry the vegetables. When they are hot but still crisp, turn the cooking zone to a lower
setting, return the meat to the pan and add your sauce.
6. Stir the ingredients gently to make sure they are heated through.
7. Serve immediately.
Cooking Tips

21
QUICK COOKING TABLE
HEAT SETTING SUITABILITY
1 - 2
• Delicate warming for small amounts of food
• Melting chocolate, butter, and foods that burn quickly
• Gentle simmering
• Slow warming
3 - 4
• Reheating
• Rapid simmering
• Cooking rice
5 - 6 • Pancakes
7 - 8
• Sautéing
• Cooking pasta
9
• Stir-frying
• Searing
• Bringing soup to boil
• Boiling water
Cooking Tips
OPERATION
22
Care and Cleaning
CARE AND CLEANING
WHAT? HOW? IMPORTANT!
Everyday
soiling on glass
(fingerprints,
marks, stains
left by food or
non-sugary
spillovers
on the glass)
1. Switch the power to the
cooktop off.
2. Apply a kitchen-safe cooktop
cleaner while the glass is still warm
(but not hot!)
3. Rinse and wipe dry with a clean
cloth or paper towel.
4. Switch the power to the
cooktop back on.
When the power to the
cooktop is switched off,
there will be no "hot surface"
indication, but the cooking
zone may still be hot! Take
extreme care. Heavy-duty
scourers, some nylon scourers
and harsh/abrasive cleaning
agents may scratch the
glass. Always read the label
to check if your cleaner or
scourer is suitable. Never
leave cleaning residue on
the cooktop: the glass may
become stained.
Boil-overs,
melts, and hot
sugary spills
on the glass
Remove these immediately with a
palette knife or razor blade scrape
suitable for ceramic glasstops, but
beware of hot cooking zone surfaces.
1. Switch the power to the cooktop
off at the wall.
2. Hold the blade at a 30°–45°
angle and scrape the soiling or
spill to a cool area of the cooktop.
3. Clean the soiling or spill up with a
dish cloth or paper towel.
4. Follow steps 2–4 for "Everyday
soiling on glass" above.
Remove stains left by melts
and sugary food or spillovers
as soon as possible. If left to
cool on the glass, they may
be difficult to remove or even
permanently damage the
glass surface. Cut hazard:
when the safety cover is
retracted, the blade in a
scraper is razor-sharp. Use
with extreme care and always
store safely and out of reach
of children.
Spillovers
on the
touch controls
1. Switch the power to the
cooktop off.
2. Soak up the spill.
3. Wipe the touch control area with a
clean damp sponge or cloth.
4. Wipe the area completely dry with
a paper towel.
5. Switch the power to the
cooktop back on.
The cooktop may beep and
turn itself off, and the touch
controls may not function
while liquid is on them. Make
sure you wipe the touch
control area dry before
turning the cooktop back on.

23
Troubleshooting
TROUBLESHOOTING
PROBLEM POSSIBLE CAUSE SOLUTIONS
Cooktop
does not work
Cooktop controls are locked
Make sure the controls lock
button is turned off. See
"Locking the Controls" on page
16. Check the house lights
to confirm power outage.
Power outage
Installation wire is not
plugged in correctly
Circuit breaker tripped or
the fuse blown
Cooktop does not
generate heat
No cookware or improper
cookware placement on the
cooking element
Make sure that the cookware
is centered on the cooking
element, and that cookware
is also the correct type for
induction cooking. The bottom
of the cookware must be large
enough to cover cooking
element completely. Cookware
must be flat and centered on
the cooking element. Make
sure the correct control is
turned ON for the cooking
element being used.
Incorrect cookware size for
the selected cooking element
Cookware is not
properly resting on the
cooking element
Circuit breaker tripped or
the fuse blown
Incorrect cooking
element selected
No power to cooktop
The touch controls are
difficult to operate
There may be a slight film of
water over the controls or
you may be using the tip of
your finger when touching
the controls
Make sure the touch control
area is dry and use the ball
of your finger when touching
the controls.
The glass is
being scratched
Rough-edged cookware
Use cookware with flat and
smooth bases. See "Care and
Cleaning" on page 22.
Unsuitable, abrasive
scourer or cleaning
products being used
• Please review this list for common troubleshooting tips before calling for service, as this
may save you time and money.
• This list contains frequently encountered problems that are not results of faulty workmanship
or material use.
• Your product may not have some of the features described here.
24
TROUBLESHOOTING
Troubleshooting
PROBLEM POSSIBLE CAUSE SOLUTIONS
Some pans make
crackling or
clicking noises
This may be caused by the
construction of your cookware
(layers of different metals
vibrating differently)
This is normal for cookware
and does not indicate a fault.
The induction cooktop
makes a low humming
noise when used on a
high heat setting
This is caused by
the technology of
induction cooking
This is normal, but the
noise should quiet down or
disappear completely when
you decrease the heat setting.
The induction cooktop
or a cooking zone
has turned itself off
unexpectedly, a tone
sounds and an error
code is displayed
(typically alternating
with one or two digits
in the display)
Technical fault
Please note down the error
letters and numbers, switch the
power to the induction cooktop
off at the wall and contact a
qualified technician.
The fans keep running
after the cooking
element has been
switched off
The electronics are shutting
down and cooling off
This is a normal occurrence.
E2/E3 error
Supplied voltage to
cooktop is too low
Please inspect whether
power supply is normal.
Power on after the power
supply is normal.
E4/E5 error Temperature sensor failure
Please contact ZLINE customer
service at 1-614-777-5004.
E6/E9 error
Bad induction cooktop
heat radiation
Please restart after the
induction cooktop cools down.
E7/E8 error
Temperature sensor failure /
IGBT failure
Please contact ZLINE customer
service at 1-614-777-5004.
Please do not disassemble the unit by yourself to avoid danger to yourself and
the induction cooktop.
WARNING

WARRANTY
COVERAGE
ZLINE Kitchen and Bath (“ZLINE”) induction cooktops have a one year parts and
service warranty.
ZLINE warranty periods begin from the original date of product delivery and solely cover the
original purchaser of the product, delivered new and in its original carton. The limited warranty
covers all parts and labor for necessary repairs if any part of the product, or the product itself,
proves to be defective in materials or workmanship. The product must be deemed serviceable
via troubleshooting with the ZLINE Customer Experience team. All service on ZLINE products
under warranty must be performed by ZLINE-approved and ZLINE-certified service providers
unless otherwise specified by ZLINE. Service will be provided during normal business hours.
Products must be unobstructed and accessible to the service provider at the time of service.
ZLINE’s liability is limited to the original purchase price of the product. Additional injuries,
losses, damages, or other inconveniences caused by product malfunction or defects in materials
are not covered under the terms of this warranty.
TERMS
ZLINE warranties apply only to the original purchaser of a ZLINE product installed for normal
residential use. This is defined as a single-family, residential dwelling in a non-commercial
setting. Any warranty claim stemming from installation, operation, or any other use within a
commercial setting is not covered under this limited warranty. Commercial settings include,
but are not limited to: schools, churches, hotels, restaurants, vacation rentals such as Airbnb,
daycare centers, private clubs, fire stations, common areas in multi-family dwellings, nursing
homes, food service locations, and institutional food service locations such as hospitals or
correctional facilities.
This warranty is non-transferable and will not under any circumstance be extended based on
the date of installation — the warranty period takes effect from the date of delivery and only
covers the original purchaser. The warranty applies only to products installed in the contiguous
United States and the District of Columbia. Failure to secure certified warranty service per
these terms will result in a forfeiture of the remaining warranty. Out-of-pocket payments will not
be reimbursed unless prior approval is received from ZLINE and/or ZLINE-certified service
contract partners. Unapproved out-of-pocket payments for service will not be reimbursed. All
warranty procedures must be followed to maintain warranty coverage.

WARRANTY
If a product qualifies within the service window provided under these warranty terms, and ZLINE
is unable to repair the product or a defective part of the product after a reasonable number
of attempts, ZLINE reserves the right to offer to replace the defective part or the product or
provide the original purchaser a full refund of the purchase price of the product (not including
installation, removal, or other charges that were not included in the original purchase price).
The original purchaser of the product must provide the original proof of purchase, including the
purchase date, when filing a claim to obtain replacement parts, service, or refunds. Additionally,
the original purchaser of the product must provide the serial number of the product when filing
a claim to obtain replacement parts, service, or refunds.
This warranty shall not apply to any ZLINE product in which the original factory serial
number has been removed, altered, or cannot be readily determined for any reason. Further,
ZLINE is not responsible for damage resulting from, but not limited to: shipment, delivery, or
improper installation; negligence or improper maintenance, misuse, or abuse of the product;
unauthorized alteration, modification, or tampering with the product; accident, fire, floods,
pest infestations, pandemics, natural disasters, or any other unpreventable or unexplained
acts of nature, commonly referred to as “acts of God”; flare-up fires or damages caused
by improper electric supply, electrical line current, voltage, or power surges; and service
to correct installation not in accordance with the instructions contained in ZLINE’s product
manuals and/or with local government codes.
This warranty does not apply to aesthetic damage, scratches, or natural wear caused by normal
use; second-hand, open box products, or products purchased from an unauthorized retailer;
and damages or issues stemming from alteration or tampering with the cooktop, including, but
not limited to, painting any portion of the product’s interior or exterior and altering or otherwise
manipulating the power cord.
In the event service is dispatched, and it is discovered that the reported issue is not covered
under warranty based on the disclaimers above, the customer will be responsible for all service
fees. Failure to pay these fees will result in the forfeiture of remaining warranty coverage.
Information contained within ZLINE’s installation and user manuals, in addition to product
information included on ZLINE’s website and all related digital listings, do not cover every
possible condition and situation that may occur during the installation or operation of
ZLINE products.

WARRANTY
WARR ANTY
The rating tag shows the model and serial
number of your induction cooktop. The
product label and rating tag is located on
the underside of the product. Do not remove
permanently affixed labels, warnings, or
plates from the product. This will void the
warranty.
SERVICE
For warranty service, please contact our Customer Service team at
1-614-777-5004 or visit www.zlinekitchen.com/contact to utilize our
online Customer Experience Portal.
Scan the QR code to view the most up-to-date version of our Installation
Manual and User Manual.
Need to purchase a part or accessory for your ZLINE product?
Visit www.zlineparts.com, ZLINE's official parts distribution partner.
Induction Cooktop - Installation Manual - English - USA - July 2023 - PRINT.indd 16Induction Cooktop - Installation Manual - English - USA - July 2023 - PRINT.indd 16 7/5/23 2:43 PM7/5/23 2:43 PM
ZLINE reserves the right to make changes at any time to its products when considered safe,
necessary, and useful. Always check the ZLINE website for the most up-to-date version of its
product manuals: www.zlinekitchen.com/pages/manuals.
Do not install or operate any ZLINE product if it has missing or broken parts or if it arrives
damaged due to shipping. If ZLINE products arrive damaged, contact ZLINE Customer
Experience at 1-614-777-5004 for help. Failure to report a damaged appliance prior to
installation or operation may void the warranty.
ZLINE disclaims responsibility for damage or injury caused by improper installation or use of
any of its products. ZLINE is under no obligation, by law or otherwise, to provide concessions,
including repairs, prorates, rebates, discounts, or replacements, once the warranty has expired.
SERIAL NUMBER LOCATION
Please write down the model number and serial number of your appliance. Both numbers are
located on the rating tag located on the underside of the product. Do not remove permanently
affixed labels, warnings, or plates from the product. This will void the warranty. You may also
consider attaching your receipt or proof of purchase to this manual.

WARRANTY
SERVICE
For warranty service, please contact our Customer Service team at
1-614-777-5004 or visit www.zlinekitchen.com/contact to utilize our
online Customer Experience Portal.
Scan the QR code to view the most up-to-date version of our Installation
Manual and User Manual.
Need to purchase a part or accessory for your ZLINE product?
Visit www.zlineparts.com, ZLINE's official parts distribution partner.