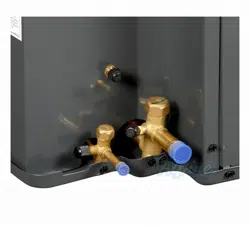
CONDENSING UNIT
Air Conditioning
Installation & Service Reference
is a registered trademark of Maytag Corporation or its related
companies and is used under license. All rights reserved.
© 2025 Daikin Comfort Technologies Manufacturing, Inc.
19001 Kermier Rd. Waller, TX 77484
www.goodmanmfg.com -or- www.amana-hac.com
P/N: IOG-4048D Date: September 2025
IMPORTANT SAFETY INSTRUCTIONS
The following symbols and labels are used throughout this
manual to indicate immediate or potential safety hazards.
It is the owner’s and installer’s responsibility to read
and comply with all safety information and instructions
accompanying these symbols. Failure to heed safety
information increases the risk of personal injury, property
damage, and/or product damage.
WARNING
High Voltage!
Disconnect all power before servicing or
installing this unit. Multiple power sources may
be present. Failure to do so may cause property
damage, personal injury or death.
Only personnel that have been trained to install, adjust,
service, maintenance or repair (hereinafter, “service”)
the equipment specified in this manual should service the
equipment.
This equipment is not intended for use by persons
(including children) with reduced physical, sensory or
mental capacities, or lack of experience and knowledge,
unless they have been given supervision or instruction
concerning use of the appliance by a person responsible
for their safety.
Children should be supervised to ensure that they do not
play with the equipment.
The manufacturer will not be responsible for any injury
or property damage arising from improper supervision,
service or service procedures. If you service this unit, you
assume responsibility for any injury or property damage
which may result. In addition, in jurisdictions that require
one or more licenses to service the equipment specified in
this manual, only licensed personnel should service the
equipment. Improper supervision, installation, adjustment,
servicing, maintenance or repair of the equipment specified
in this manual, or attempting to install, adjust, service
or repair the equipment specified in this manual without
proper supervision or training may result in product
damage, property damage, personal injury or death.
WARNING
Do not bypass safety devices.
WARNING
Scroll equipped units should never be used to evacuate
the air conditioning system. Vacuums this low can cause
internal electrical arcing resulting in a damaged or failed
compressor.
CAUTION
Do not use means to accelerate the defrosting process
or to clean, other than those recommended by the
manufacturer. The appliance shall be stored in a room
without continuously operating ignition sources. For
example: Open flames, an operating gas appliance or an
operating electric heater. Do not pierce or burn. Be aware
that refrigerants may not contain an odor.
WARNING
WARNING
A tripped circuit breaker or blown fuse may indicate that an
electrical problem exists.
do not reset a circuit breaker or replace fuses without
first performing thorough electrical troubleshooting and
testing procedures.
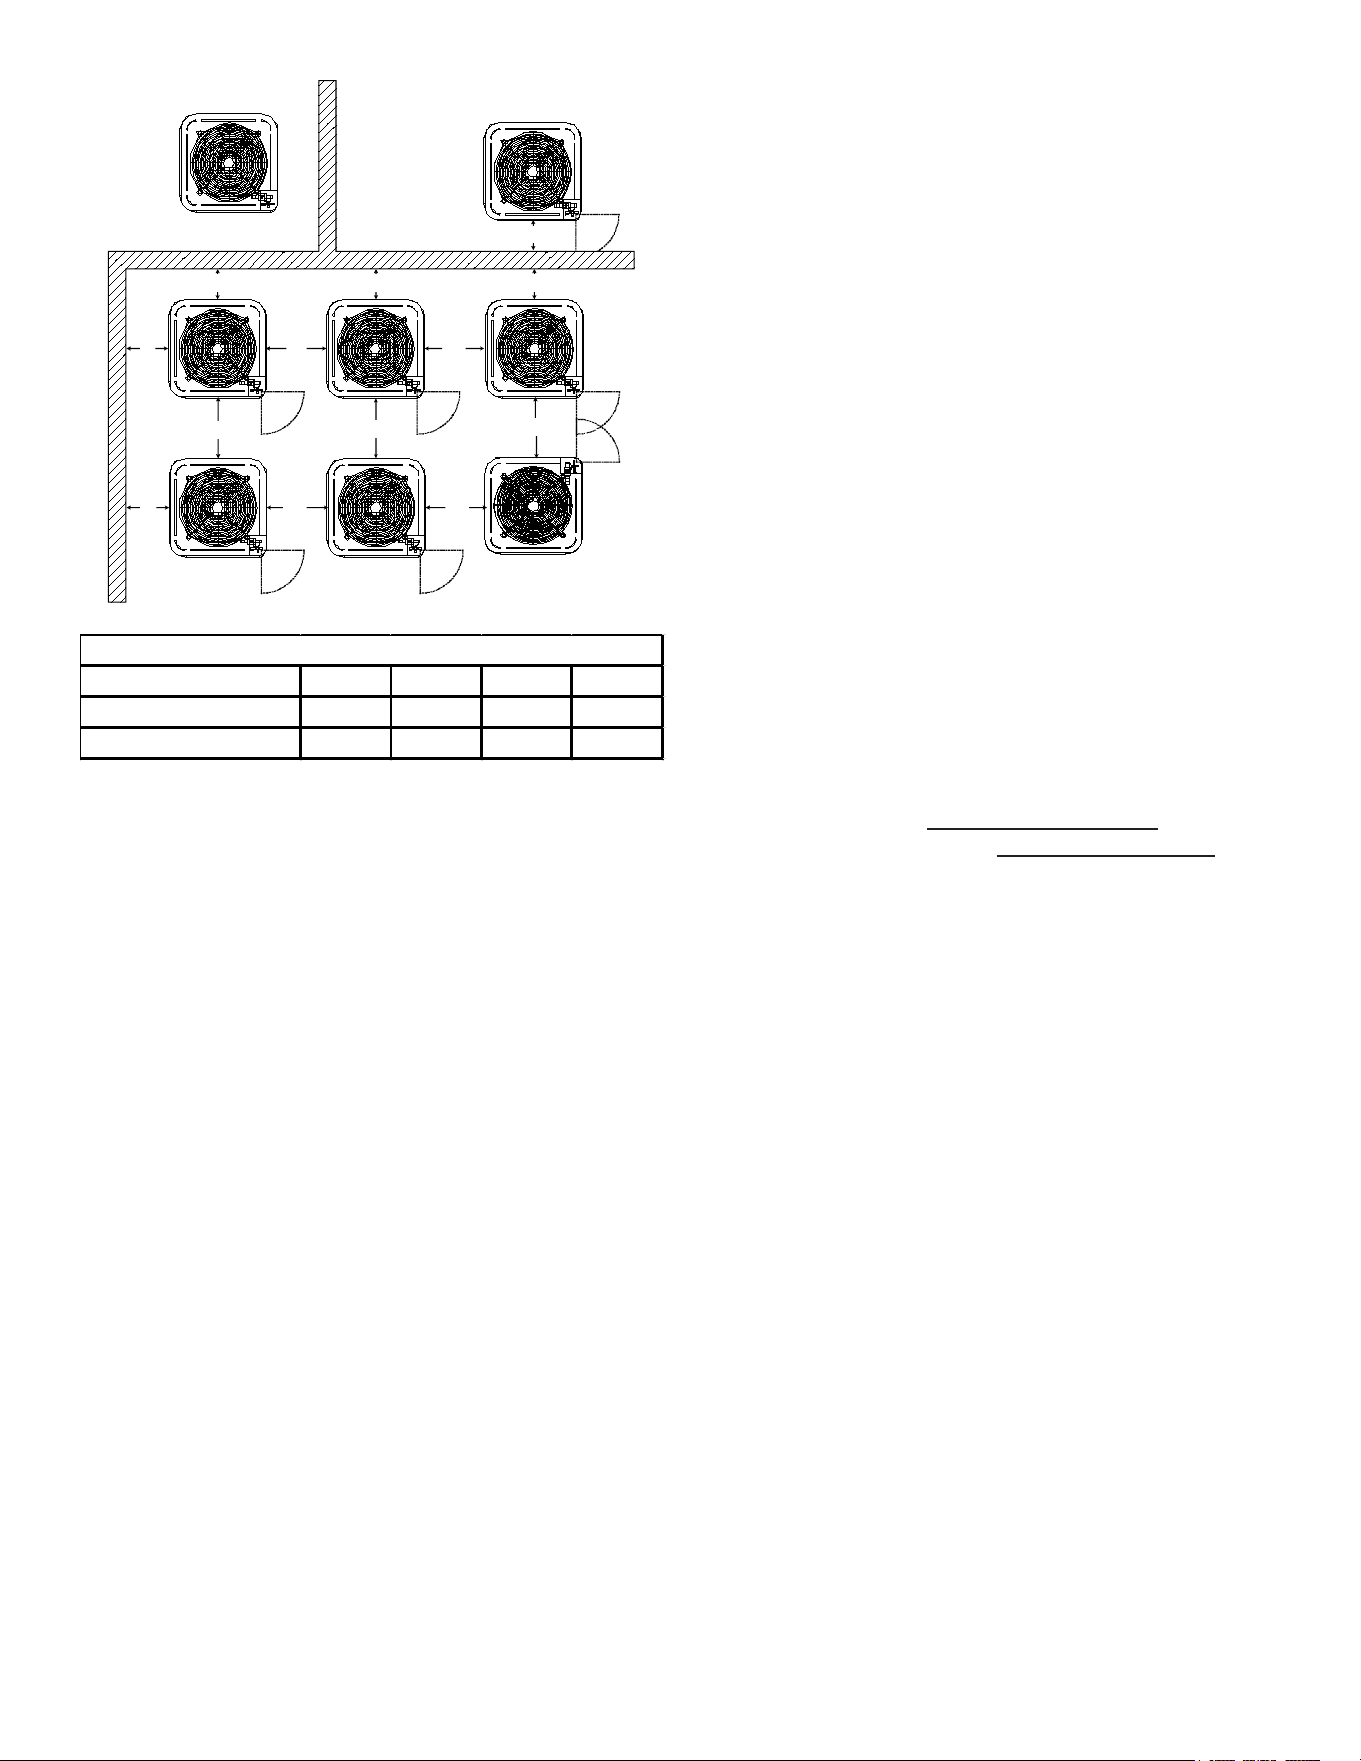
INSTALLATION CLEARANCES
Special consideration must be given to location of the
condensing unit(s) in regard to structures, obstructions,
other units, and any/all other factors that may interfere with
air circulation. Where possible, the top of the unit should
be completely unobstructed; however, if vertical conditions
require placement beneath an obstruction there should
be a minimum of 60 inches between the top of the unit
and the obstruction(s). Ensure there is not a potential
for refrigerant to pool should a leak occur in the unit. The
specied dimensions meet requirements for air circulation
only. Consult all appropriate regulatory codes prior to
determining nal clearances.
Another important consideration in selecting a location for
the unit(s) is the angle to obstructions. Either side adjacent
the valves be placed toward the structure provided the
side away from the structure maintains minimum service
clearance. Corner installations are strongly discouraged.
2
OK!
OK!
AA AAA
A
CC
C
C
OK!
OK!
OK!
OK!
NOT
RECOMMENDED
AA
AA
AA
AA
AA
B B B
B
Model Type A B C AA
Residential 10" 10" 18" 20"
Light Commercial 12" 12" 18" 24"
Minimum Airflow Clearance
This unit can be located at ground oor level or on at
roofs. At ground oor level, the unit must be on a solid,
level foundation that will not shift or settle. To reduce the
possibility of sound transmission, the foundation slab
should not be in contact with or be an integral part of
the building foundation. The dimensions of the space
necessary for correct installation of the appliance including
the minimum permissible distance to adjacent
structures have been covered in this section (per UL
60335-2-40). Ensure the foundation is sucient to support
the unit. A concrete slab raised above ground level
provides a suitable base.
SHIPPING INSPECTION
Always keep the unit upright; laying the unit on its side
or top may cause equipment damage. Shipping damage,
and subsequent investigation is the responsibility of
the carrier. Verify the model number, specications,
electrical characteristics, and accessories are correct
prior to installation. The distributor or manufacturer will not
accept claims from dealers for transportation damage or
installation of incorrectly shipped units.
Overcurrent Protection
The following overcurrent protection devices are approved
for use.
• Time delay fuses
• HACR type circuit breakers
These devices have sucient time delay to permit the
motor-compressor to start and accelerate its load.
Charging Instructions
Additional refrigerant above the amount charged in the
factory must be added during installation based on lineset
length and the compatible indoor model. Carefully follow
the Charge Verication section of this manual to ensure
proper system function.
Storage and Transportation
Units come factory charged with refrigerant. Take care
to store unit in a location that will minimize potential for
damage. The unit should be stored away from continuously
operating sources o ignition. If transporting the unit,
ensure relevant regulations of the geographic area are
followed.
CODES & REGULATIONS
This product is designed and manufactured to comply
with national codes. Installation in accordance with such
codes and/or prevailing local codes/regulations is the
responsibility of the installer. The manufacturer assumes
no responsibility for equipment installed in violation of any
codes or regulations. Rated performance is achieved after
20 hours of operation. Rated performance is delivered at
the specied airow. See outdoor unit specication sheet
for split system models or product specication sheet for
packaged and light commercial models. Specication
sheets can be found at www.goodmanmfg.com for
Goodman® brand products or www.amana-hac.com for
Amana® brand products. Within the website, please select
the residential or commercial products menu and then
select the submenu for the type of product to be installed,
such as air conditioners or heat pumps, to access a list
of product pages that each contain links to that model’s
specication sheet.
The United States Environmental Protection Agency
(EPA) has issued various regulations regarding the
introduction and disposal of refrigerants. Failure to
follow these regulations may harm the environment
and can lead to the imposition of substantial nes.
Should you have any questions please contact the local
oce of the EPA.
If replacing a condensing unit or air handler, the system
must be manufacturer approved and Air Conditioning,
Heating and Refrigeration Institute (AHRI) matched.
NOTE: Installation of unmatched systems is
strongly discouraged.
Outdoor units are approved for operation above 55°F in
cooling mode. Operation below 55°F requires the use of an
approved low ambient kit. Note: LAKT01 Low ambient kit
cannot be used with outdoor units containing ECM motors.
Damage to the unit caused by operating the unit in a
structure that is not complete (either as part of new
construction or renovation) is not covered under the
warranty.
3
ROOFTOP INSTALLATIONS
If it is necessary to install this unit on a roof structure,
ensure the roof structure can support the weight and that
proper consideration is given to the weather-tight integrity
of the roof. Since the unit can vibrate during operation,
sound vibration transmission should be considered when
installing the unit. Vibration absorbing pads or springs can
be installed between the condensing unit legs or frame and
the roof mounting assembly to reduce noise vibration.
WARNING
To avoid possible injury, explosion or death, practice safe
handling of refrigerants.
SAFE REFRIGERANT HANDLING
While these items will not cover every conceivable
situation, they should serve as a useful guide.
WARNING
Refrigerants are heavier than air. They can “push out” the
oxygen in your lungs or in any enclosed space. To avoid
possible difficulty in breathing or death:
• Never purge refrigerant into an enclosed room or
space. By law, all refrigerants must be reclaimed.
• If an indoor leak is suspected, thoroughly ventilate the
area before beginning work.
• Liquid refrigerant can be very cold. To avoid possible
frostbite or blindness, avoid contact and wear gloves
and goggles. If liquid refrigerant does contact your
skin or eyes, seek medical help immediately.
• Always follow EPA regulations. Never burn refrigerant,
as poisonous gas will be produced.
WARNING
To avoid possible explosion:
• Never apply flame or steam to a refrigerant cylinder. If
you must heat a cylinder for faster charging, partially
immerse it in warm water.
• Never fill a cylinder more than 80% full of liquid
refrigerant.
• Never add anything other than R-32 to an R-32 cylinder.
The service equipment used must be listed or certified
for the type of refrigerant used.
• Store cylinders in a cool, dry place. Never use a
cylinder as a platform or a roller.
WARNING
To avoid possible explosion, use only returnable (not
disposable) service cylinders when removing refrigerant
from a system.
• Ensure the cylinder is free of damage which could lead
to a leak or explosion.
• Ensure the hydrostatic test date does not exceed 5
years.
• Ensure the pressure rating meets or exceeds 400 psig.
When in doubt, do not use cylinder.
Prior to beginning work on systems containing ammable
refrigerants, safety checks are necessary to ensure that
the risk of ignition is minimized. Work shall be undertaken
under a controlled procedure as stated in this manual so
as to minimize the risk of a ammable gas or vapor being
present while the work is being performed. All persons
working in the local area shall be instructed on the nature
of work being carried out. Work in conned spaces shall
be avoided. The area shall be checked with an appropriate
refrigerant detector prior to and during work, to ensure the
technician is aware of potentially ammable atmospheres.
Ensure that the leak detection equipment being used is
suitable for use with A2L refrigerants, i.e. non-sparking,
adequately sealed or intrinsically safe.
If any hot work is to be conducted on the refrigerating
equipment or any associated parts, appropriate re
extinguishing equipment shall be available. Have a dry
powder or CO2 re extinguisher adjacent to the hot work
area. No person carrying out work on the refrigeration
system shall use any sources of ignition in such a manner
that it may lead to the risk of re or explosion. All possible
ignition sources, including cigarette smoking, should be
kept suciently far from the site of work, during which
refrigerant can possibly be released to the surrounding
space. Prior to work taking place, the area around the
equipment is to be surveyed to make sure that there are
no ammable hazards or ignition risks. “No Smoking” signs
shall be displayed.
Ensure that the area is in the open or that it is adequately
ventilated before breaking into the system or conducting
any hot work. A degree of ventilation shall continue
during the period that the work is carried out. Ventilation
should be provided such that any leaked refrigerant will
safely disperse, preferably expelled externally into the
atmosphere. The outlet for the vacuum pump shall not be
close to any potential ignition sources and ventilation shall
be available.
Take care to avoid contamination of dierent refrigerants
when using charging equipment. Hoses or lines should
be as short as possible. The refrigerant cylinders should
be kept in an appropriate position according to their
instructions.
4
If a refrigerant leak is suspected, all naked ames shall
be extinguished and the area shall be ventilated. If a leak
is found which requires brazing, all refrigerant shall be
recovered from the system prior to performing hot work.
Ensure the unit is grounded prior to charging the system.
Refrigerant Lines
CAUTION
The compressor POE oil for R-32 units is extremely
susceptible to moisture absorption and could cause
compressor failure. Do not leave system open to atmosphere
any longer than necessary for installation.
WARNING
Partial units shall only be connected to an appliance
suitable for the same refrigerant.
Partial units shall only be connected to an appliance
suitable for the same refrigerant. Review serial plate
on both evaporator and condenser unit to assure the
maximum operating pressure matches before connecting.
For evaporating and condensing units, the instructions
or markings shall include a wording to assure that
the maximum operating pressure is considered when
connecting to any condenser unit or evaporator unit (UL
60335-2-40).
Use only refrigerant grade (dehydrated and sealed) copper
tubing to connect the condensing unit with the indoor
evaporator. Use the minimum amount of copper tubing
where possible. After cutting the tubing, install plugs to
keep refrigerant tubing clean and dry prior to and during
installation. Tubing should always be cut square keeping
ends round and free from burrs. Clean the tubing to
prevent contamination.
To prevent physical damage to refrigerant lines during
operation and service, do NOT let refrigerant lines come
in direct contact with plumbing, ductwork, oor joists, wall
studs, oors, and walls. When running refrigerant lines
through a foundation or wall, openings should allow for
sound and vibration absorbing material to be placed or
installed between tubing and foundation. Any gap between
foundation or wall and refrigerant lines should be lled
with a pliable silicon-based caulk, RTV or a vibration
damping material. Avoid suspending refrigerant tubing
from joists and studs with rigid wire or straps that would
come in contact with the tubing. Use an insulated or
suspension type hanger. Ensure installation of refrigerant
lines is in compliance with nation and local codes and
standards. Compliance with national gas regulations shall
be observed. Keep both lines separate and always insulate
the suction line.
All eld joints created shall be accessible for inspection
prior to being covered or enclosed. When installing
refrigerant lines between evaporating and condensing unit,
ensure there are no connecting joints and no bends with
a centerline radius less than 2.5 times the external pipe
diameter.
This unit is a partial unit air conditioner, complying with
partial unit requirements of this international standard,
and must be only connected to other units that have been
conrmed as complying to corresponding partial unit
requirements of this international standard (UL 60335-2-
40).
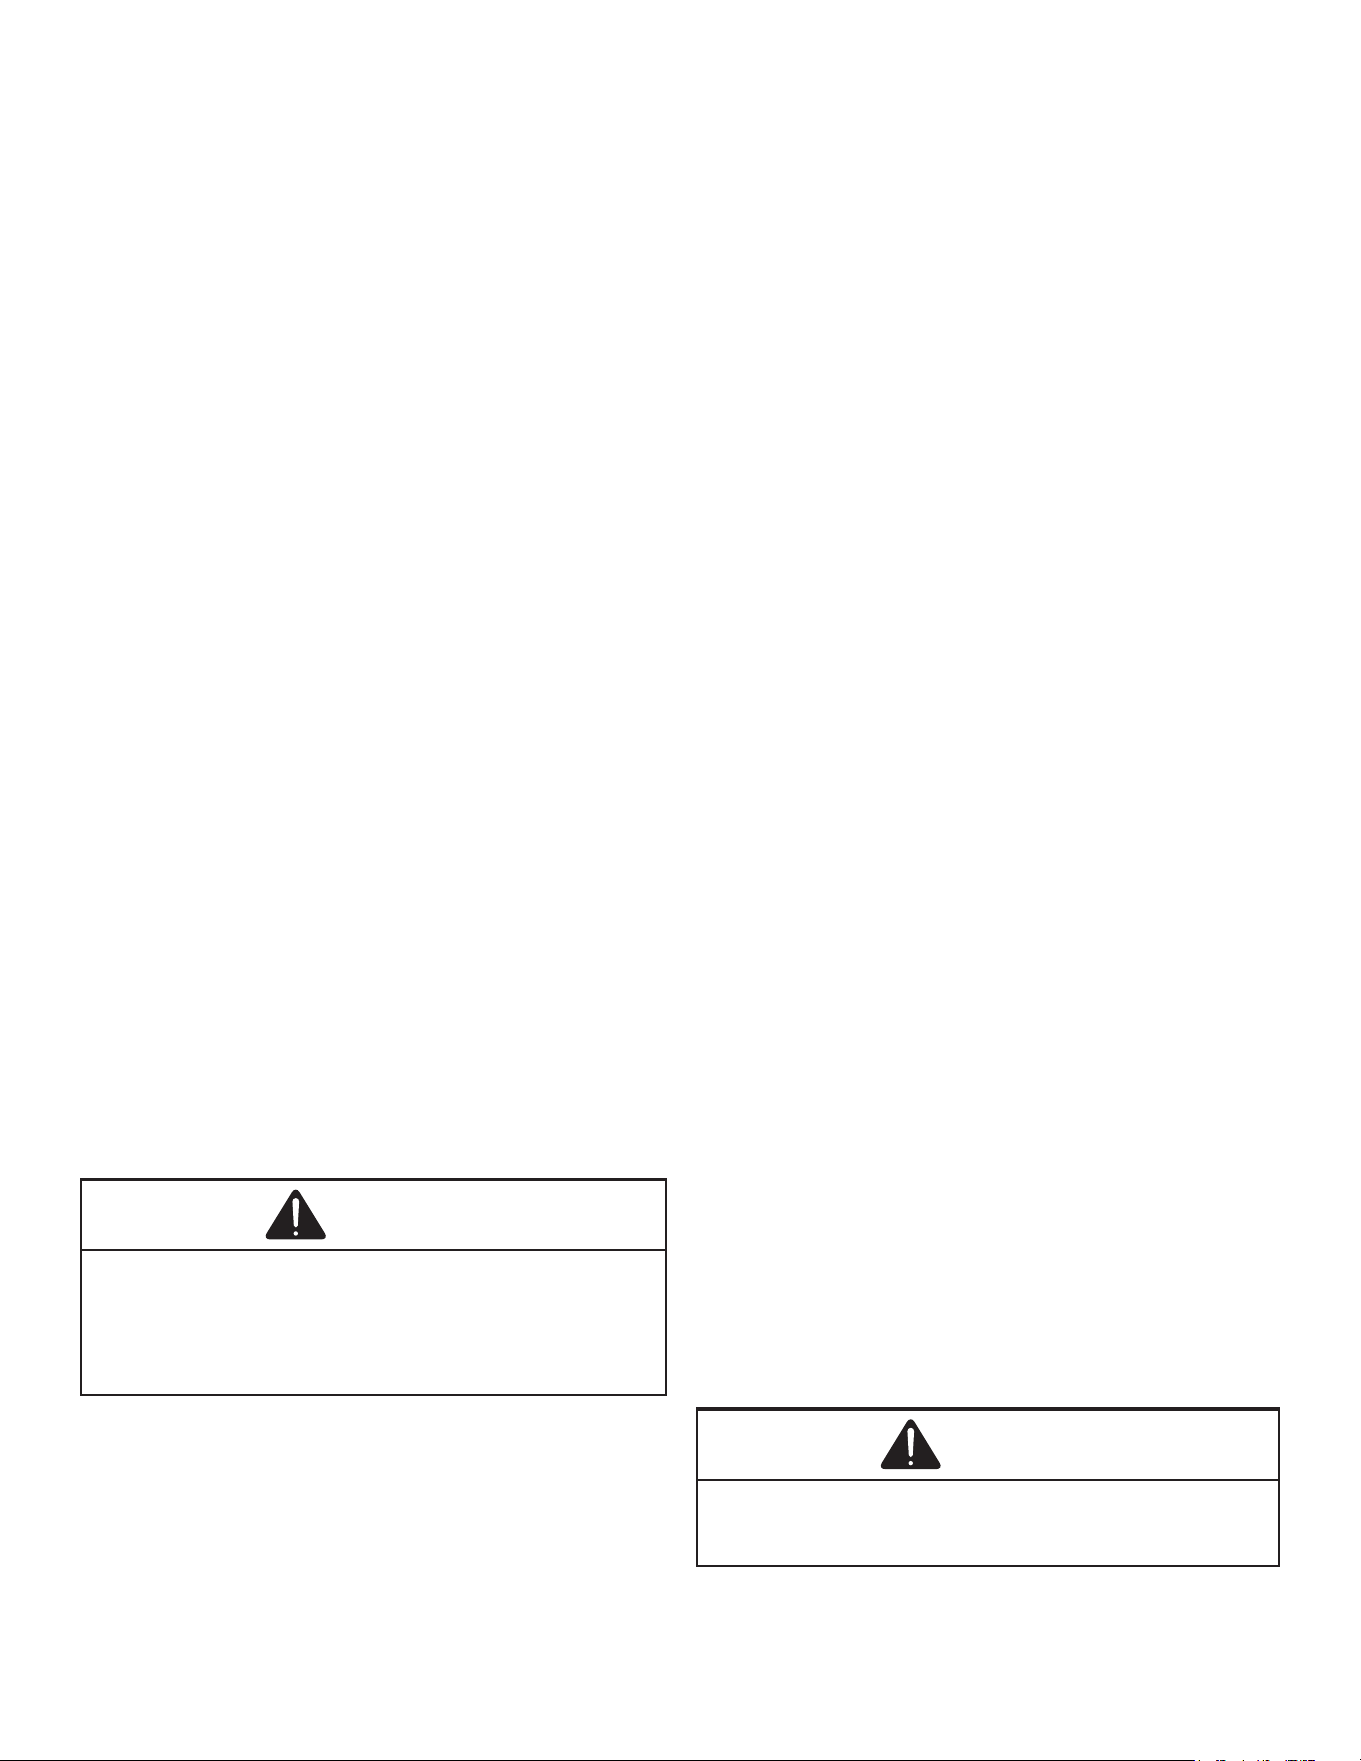
These sizes are recommended for line lengths of 79 feet
or less to obtain optimum performance. For alternate line
sizing options or runs of more than 79 feet, refer to TP-110
R-32 Long Line Set Application Guidelines or contact your
distributor for assistance.
*Lines greater than 79 feet in length or vertical elevation from more than
50 feet refer to the TP-110* R-32 Long Line Set Application Guide lines or
contact your distributor for assistance.
Refer to the latest revision of long line set
guidelines TP-110 Long Line Set
Application R32.
5
Insulation is necessary to prevent condensation from
forming and dropping from the suction line. Armex (or
satisfactory equivalent) with 3/8” min. wall thickness is
recommended. In severe conditions (hot, high humidity
areas) 1/2” insulation may be required. Insulation must be
installed in a manner which protects tubing from damage
and contamination.
Existing Line Sets
Where possible, drain as much residual compressor
oil from existing systems, lines, and traps; pay close
attention to low areas where oil may collect. Use of an
approved ushing agent is recommended followed by a
nitrogen purge to remove any remaining ushing agent
from the lines or indoor coil. Replacement of indoor coil is
recommended.
NOTE: If using existing indoor coil and changing
refrigerant types, ensure the indoor coil and
metering device are compatible with the type
of refrigerant being used. If new indoor coil is
required check spec sheet or AHRI for approved
coil. Refer to the indoor coil installation manual
for instructions and requirements regarding
the installation of the refrigerant detection
system to the existing furnace assembly. If system
is being replaced due to compressor electrical
failure, assume acid is in system. Refer to Service
Procedure Compressor Burnout in service manual
for clean-up procedure.
Burying Refrigerant Lines
If burying refrigerant lines can not be avoided, use the
following checklist.
1. Insulate liquid and suction lines separately.
2. Enclose all underground portions of the refrigerant
lines in waterproof material (conduit or pipe) sealing
the ends where tubing enters/exits the enclosure.
3. If the lines must pass under or through a concrete
slab, ensure lines are adequately protected and
sealed.
Refrigerant Line Connections
IMPORTANT: To avoid overheating the service
valve, TXV valve, or filter drier while brazing,
wrap the component with a wet rag, or use a
thermal heat trap compound. Be sure to follow
the manufacturer’s instruction when using the
heat trap compound. Note: Remove Schrader
valves from service valves before brazing tubes
to the valves. Use a brazing alloy of 5% minimum
silver content. Do not use flux.
Before conducting any hot work, ensure the area is in the
open or has adequate ventilation. The ventilation shall
continue during the period of hot work and should safely
disperse any released refrigerant. Torch heat required to
braze tubes of various sizes is proportional to the size of
the tube. Tubes of smaller size require less heat to bring
the tube to brazing temperature before adding brazing
alloy. Applying too much heat to any tube can melt the
tube. Service personnel must use the appropriate heat
level for the size of the tube being brazed.
NOTE: The use of a heat shield when brazing is
recommended to avoid burning the serial plate or
the finish on the unit.
1. The ends of the refrigerant lines must be cut square,
deburred, cleaned, and be round and free from nicks
or dents. Any other condition increases the chance of
a refrigerant leak.
2. “Sweep” the refrigerant line with nitrogen or inert gas
during brazing to prevent the formation of copper-
oxide inside the refrigerant lines. The POE oils used in
R-32 applications will clean any copper-oxide present
from the inside of the refrigerant lines and spread it
throughout the system. This may cause a blockage or
failure of the metering device.
3. After brazing, quench the joints with water or a wet
cloth to prevent overheating of the service valve.
4. Ensure the lter drier paint nish is intact after
brazing. If the paint of the steel lter drier has
been burned or chipped, repaint or treat with a rust
preventative. This is especially important on suction
line lter driers which are continually wet when the
unit is operating.
NOTE: Be careful not to kink or dent refrigerant
lines. Kinked or dented lines will cause poor
performance or compressor damage.
Ensure connections created during installation are
accessible for maintenance purposes.
Do NOT make nal refrigerant line connection until plugs
are removed from refrigerant tubing.
NOTE: Before brazing, verify indoor piston size by
checking the piston kit chart packaged with indoor
unit.
Standing Pressure Test/ Leak Detection Method
(Recommended before System Evacuation)
WARNING
To avoid the risk of fire or explosion, never use oxygen,
high pressure air or flammable gases for leak testing of a
refrigeration system.
WARNING
Only brazing techniques and approved mechanical joints
should be used to connect refrigerant tubing connections.
non-approved mechanical connectors and other methods
are not permitted in this system containing a2l refrigerant.
approved mechanical joints will be detailed in the product’s
specification sheets.
6
WARNING
To avoid possible explosion, the line from the nitrogen
cylinder must include a pressure regulator and a pressure
relief valve. The pressure relief valve must be set to open at
no more than 450 psig.
Standing Pressure Test/ Leak Method Detection
Using dry nitrogen or dry helium, pressurize the system to
maximum allowable pressure as listed on the serial plate. Al-
low the pressure to stabilize and hold for at least 15 Minutes.
The system is considered leak-free if the pressure does not
drop below above selected maximum allowable pressure. If,
after 15 Minutes, the pressure drops, it implies a leak in the
system. Proceed with identifying and sealing the leak and
repeating the Standing Pressure Test. Leak test the system
using dry nitrogen or dry helium and soapy water to identify
leaks. No refrigerant shall be used for pressure testing
to detect leaks. Proceed to system evacuation using the
Deep Vacuum Method.
System Evacuation
Condensing unit liquid and suction valves are closed to
contain the charge within the unit. The unit is shipped with
the valve stems closed and caps installed. Do not open
valves until the system is evacuated.
WARNING
REFRIGERANT UNDER PRESSURE!
Failure to follow proper procedures may cause property
damage, personal injury or death.
NOTE: Scroll compressors should never be used
to evacuate or pump down a heat pump or air
conditioning system.
CAUTION
Prolonged operation at suction pressures less than 20 psig
for more than 5 seconds will result in overheating of the
scrolls and permanent damage to the scroll tips, drive
bearings and internal seal.
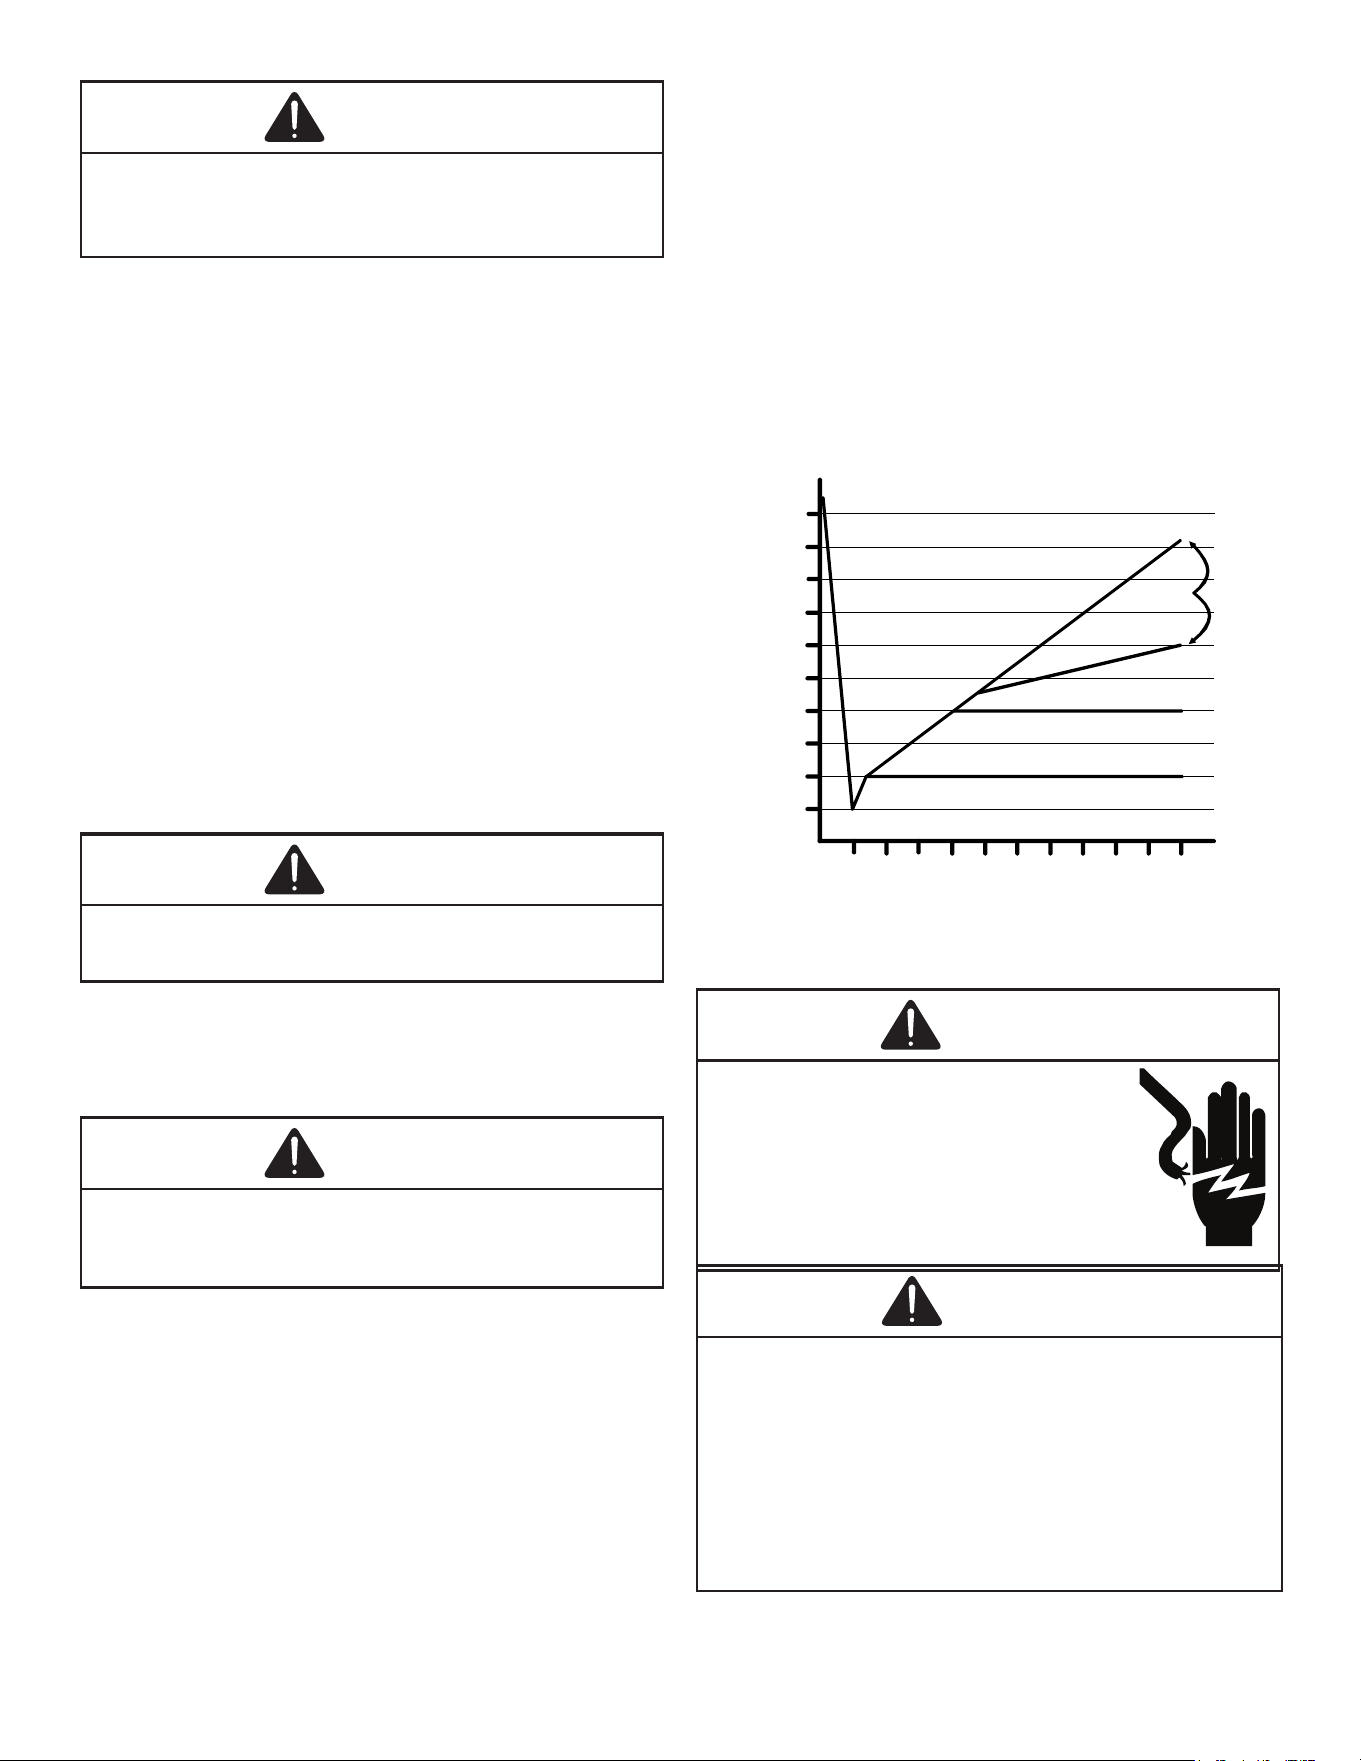
Deep Vacuum Method (Recommended)
The Deep Vacuum Method requires a vacuum pump
rated for 500 microns or less. This method is an eective
and ecient way of assuring the system is free of non-
condensable air and moisture. As an alternative, the Triple
Evacuation Method is detailed in the Service Manual for
this product model.
It is recommended to remove the Schrader Cores from the
service valves using a core-removal tool to expedite the
evacuation procedure.
1. Connect the vacuum pump, micron gauge, and
vacuum rated hoses to both service valves.
Evacuation must use both service valves to eliminate
system mechanical seals.
2. Evacuate the system to less than 500 microns.
3. Isolate the pump from the system and hold vacuum
for 10 minutes (minimum). Typically, pressure will rise
slowly during this period. If the pressure rises to less
than 1000 microns and remains steady, the system is
considered leak-free; proceed to system charging and
startup.
4. If pressure rises above 1000 microns but holds steady
below 2000 microns, non-condensable air or moisture
may remain or a small leak is present. Return to step
2: If the same result is achieved check for leaks and
repair. Repeat the evacuation procedure.
5. If pressure rises above 2000 microns, a leak is
present. Check for leaks and repair. Repeat the
evacuation procedure.
5000
4500
4000
3500
3000
2500
2000
1500
1000
500
0 1 2 3 4 5 6 7 8 9
10
LEAK(S)
PRESENT
MINUTES
V
ACUUM
IN
MICRONS
CONDENSIBLES OR SMALL
LEAK PRESENT
NO LEAKS
NO CONDENSIBLES
ELECTRICAL CONNECTIONS
WARNING
HIGH VOLTAGE!
Disconnect ALL power before servicing.
Multiple power sources may be present.
Failure to do so may cause property damage,
personal injury or death due to electric
shock. Wiring must conform with NEC or CEC
and all local codes. Undersized wires could
cause poor equipment performance, equipment
damage or fire.
WARNING
all accessories that may become a potential ignition source
if installed, such as electronic air cleaners, must only be
powered through our accessory control board kit. if an
electronic air cleaner is already installed in the duct work
and not connected to the accessory control board, it will
have to be disabled or removed. ensure that any additional
wiring from the indoor unit to the accessory control board
is routed and protected from damage and wear, avoiding the
flue pipe and any joints that may need brazed or disconnected
for service. refer to the product specification sheet for the
accessory control board kit part number
7
WARNING
To avoid the risk of fire or equipment damage, use copper
conductors.
NOTICE
Units with rotary or reciprocating compressors and non-
bleed TXV’s require a Hard Start Kit.
The condensing unit rating plate lists pertinent electrical
data necessary for proper electrical service and
overcurrent protection. Wires should be sized to limit
voltage drop to 2% (max.) from the main breaker or fuse
panel to the condensing unit. Consult the NEC, CEC, and
all local codes to determine the correct wire gauge and
length.
Ensure wiring for the unit is in accordance with national
wiring regulations. Check that cabling will not be subject to
wear, corrosion, excessive pressure, vibration, sharp edges
or any other adverse environmental eects. Ensure cabling
will not be subject to any of the above eects as a result of
aging or continual vibration.
Local codes often require a disconnect switch located near
the unit; do not install the switch on the unit. Refer to the
installation instructions supplied with the indoor furnace/
air handler for specic wiring connections and indoor unit
conguration. Likewise, consult the instructions packaged
with the thermostat for mounting and location information.
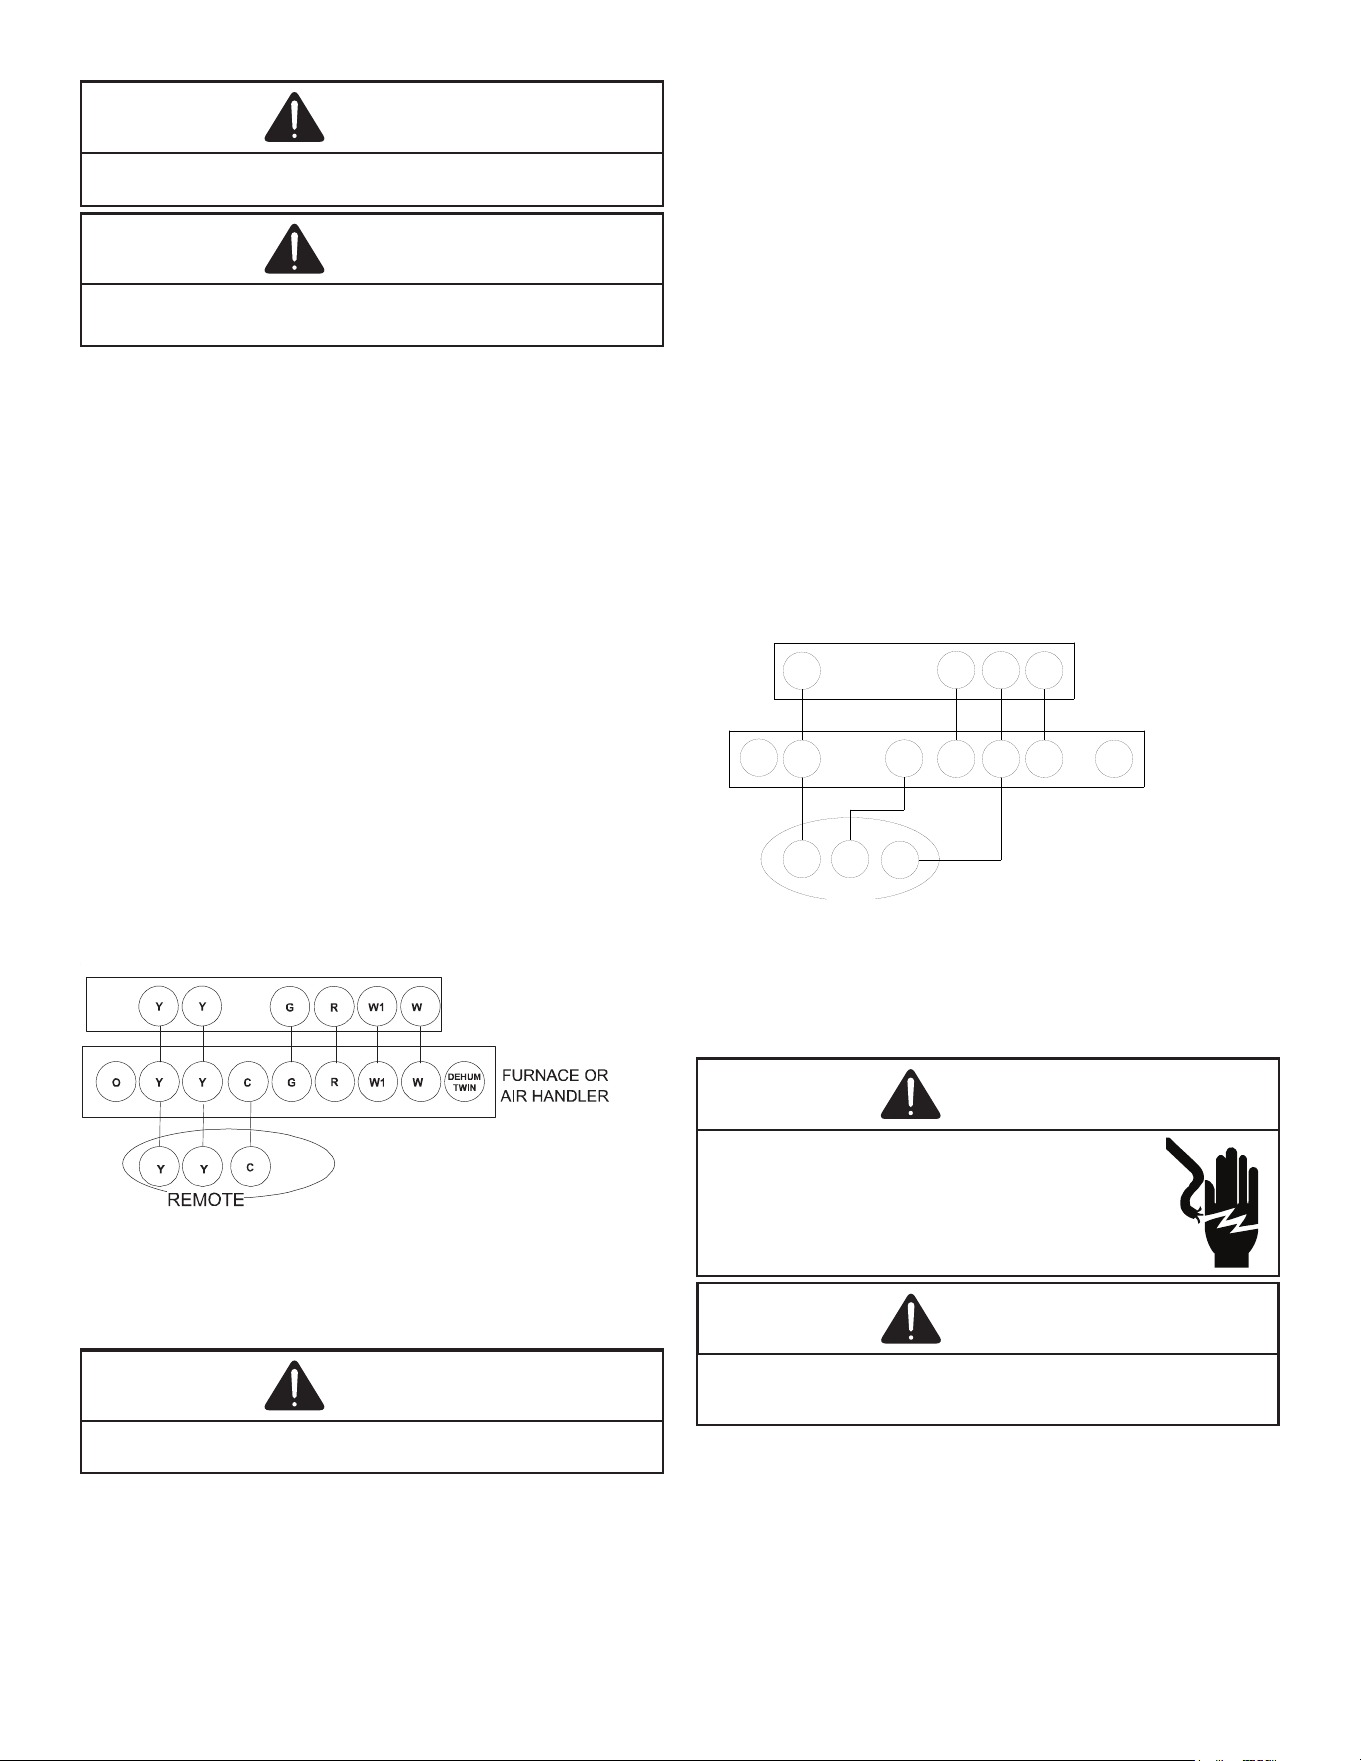
THERMOSTAT
2-STAGE HEATING WITH
2-STAGE COOLING
Two-Stage Thermostat
with Three Low Voltage Wires to
Remote
2
2
2
1
2
1
1
2
Two-Stage Thermostat
with Three Low Voltage Wires to Remote
Three Phase Compressor Rotation
CAUTION
Use care when handling scroll compressors. Dome
temperatures could be hot.
Three phase compressors are power phase dependent
and can rotate in either direction.
Verify proper rotation for three phase compressors by
ensuring the suction pressure drops and discharge
pressure rises when the compressor is energized.
NOTE: When operated in reverse, a three phase
scroll compressors is noisier and its current
draw substantially reduced compared to marked
values.
To correct, disconnect power and switch any two leads at
the unit contactor and re-observe.
High Voltage Connections
Route power supply and ground wires through the high
voltage port and terminate in accordance with the wiring
diagram provided inside the control panel cover.
Low Voltage Connections
Condensing unit control wiring requires 24 Volt minimum,
25VA service from the indoor transformer. Low voltage
wiring for two-stage units depends on the thermostat used
and the number of control wires between the indoor unit
and the condensing unit. Route control wires through the
low voltage port and terminate in accordance with the
wiring diagram provided inside the control panel cover.
Y
G
R
W1
DEHUM
TWIN
FURNACE OR
AIR HANDLER
W1
R
G
B/C
THERMOSTAT
SINGLE-STAGE HEATING
WITH
SINGLE-STAGE COOLING
O
Y
Y
C
R
REMOTE
Single-Stage Thermostat
with Three Low Voltage Wires to Remote
SYSTEM START UP
WARNING
HIGH VOLTAGE!
Disconnect ALL power before servicing or
installing this unit. Multiple power sources
may be present.
Failure to do so may cause property damage,
personal injury or death.
CAUTION
POSSIBLE REFRIGERANT LEAK
To avoid a possible refrigerant leak, open the service valves
until the top of the stem is 1/8” from the retainer.
When opening valves with retainers, open each valve
only until the top of the stem is 1/8” from the retainer. To
avoid loss of refrigerant, DO NOT apply pressure to the
retainer. When opening valves without a retainer remove
service valve cap and insert a hex wrench into the valve
stem and back out the stem by turning the hex wrench
counterclockwise. Open the valve until it contacts the rolled
lip of the valve body.
8
NOTE: These are not back-seating valves. It is not
necessary to force the stem tightly against the
rolled lip.
NOTE: Power must be supplied to the outdoor
units containing ECM motors before the power is
applied to the indoor unit. Sending a low voltage
signal without high voltage power present at
the outdoor unit can cause malfunction of the
control module on the ECM motor.
Adequate refrigerant charge for the matching AHRI rated
designated tested combination (DTC) evaporator coil and
15 feet of lineset is supplied with the condensing unit.
If using evaporator coils other than DTC coil, it may be
necessary to add or remove refrigerant to attain proper
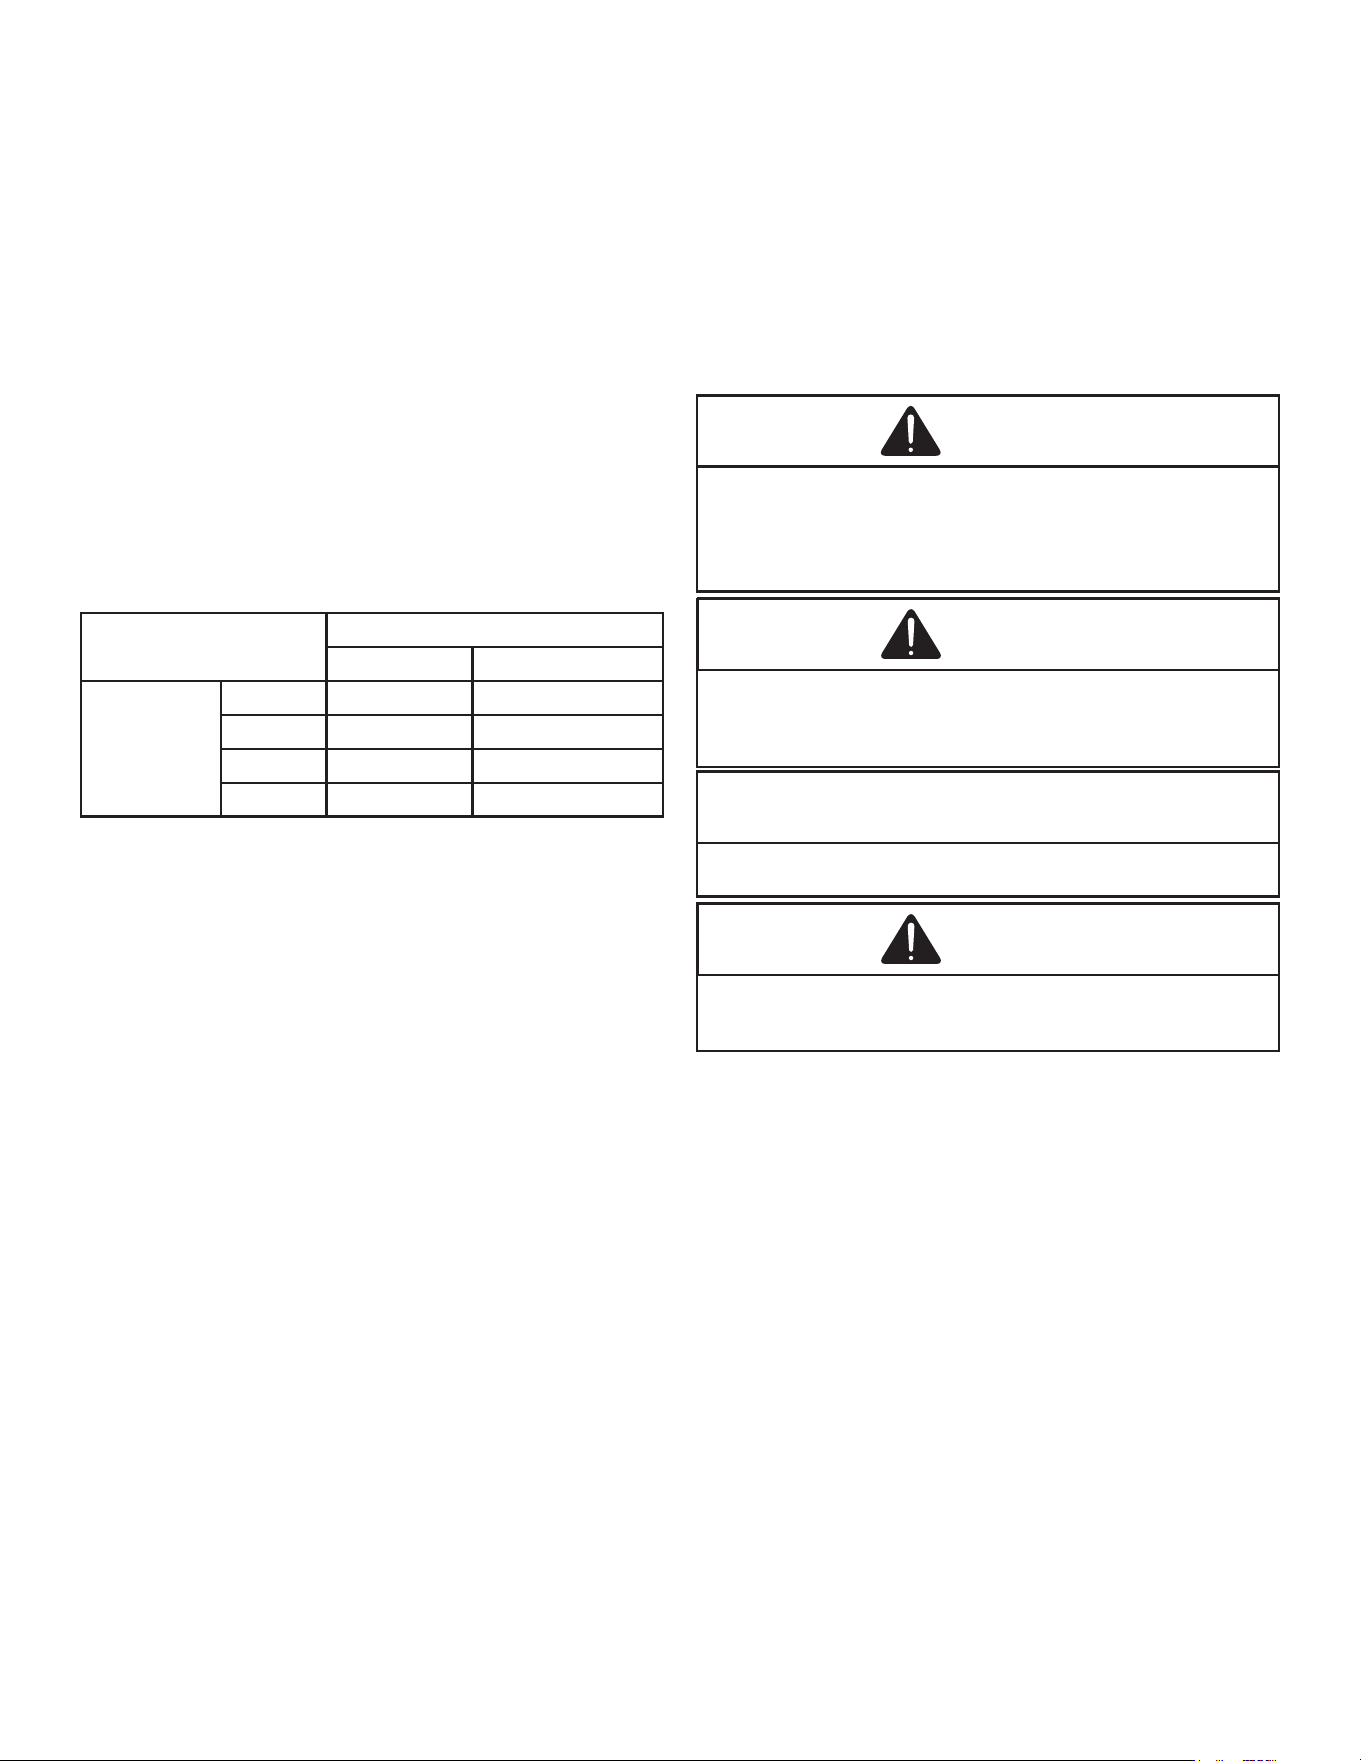
charge. If line set exceeds 15 feet in length, refrigerant
should be added at the amount specied in the below table
based on suction and liquid tube diameters.
Initial Charge Addition
per Foot (oz)
Liquid Line Diameter (in. OD)
1/4 3/8
Suction Line
Diameter
(in. OD)
5/8 0.23 0.53
3/4 - 0.55
7/8 - 0.58
1-1/8 - 0.64
Be sure to ll out the refrigerant charge label on the
lower access panel of the unit. Using a durable marking
instrument, ll in the factory charge found on the serial
plate of the unit in the rst box labeled FACTORY
CHARGE. In the next box labeled FIELD CHARGE ll
in the amount of charge added to the system. NOTE:
The eld charge amount may not be nalized until nal
adjustment. In the third box labeled TOTAL CHARGE add
the two amounts in the boxes above.
NOTE: Charge should always be checked using
superheat when using a piston and subcooling
when using TXV equipped indoor coil to verify
proper charge.
Break vacuum by fully opening liquid service valve.
After the refrigerant charge has bled into the system,
open the suction service valve. The service valve cap is
the secondary seal for the valves and must be properly
tightened to prevent leaks. Make sure cap is clean and
apply refrigerant oil to threads and sealing surface on
inside of cap. Tighten cap nger-tight and then tighten
additional 1/6 of a turn (1 wrench at), or to the following
specication, to properly seat the sealing surfaces.
1. 3/8” valve to 5 - 10 in-lbs
2. 5/8” valve to 5 - 20 in-lbs
3. 3/4” valve to 5 - 20 in-lbs
4. 7/8” valve to 5 - 20 in-lbs
Do not introduce liquid refrigerant from the cylinder into
the crankcase of the compressor as this may damage the
compressor.
1. Break vacuum by fully opening liquid and suction
base valves.
2. Set thermostat to call for cooling. Check indoor and
outdoor fan operation and allow system to stabilize
for 10 minutes for xed orices and 10-15 minutes for
expansion valves.
Charge Verification
WARNING
REFRIGERANT UNDER PRESSURE!
• Do not overcharge system with refrigerant.
• Do not operate unit in a vacuum or at negative pressure.
Failure to follow proper procedures may cause property
damage, personal injury or death.
CAUTION
Use refrigerant certified to AHRI standards. Used
refrigerant may cause compressor damage. Most portable
machines cannot clean used refrigerant to meet AHRI
standards.
NOTICE
Violation of EPA regulations may result in fines or other
penalties.
CAUTION
Damage to the unit caused by operating the compressor with
the suction valve closed is not covered under the warranty
and may cause serious compressor damage.
9
55 57 59 61 63 65 67 69 71
10 13 17 20 23 26 29 30 31
8 11 14 16 19 22 26 27 29
5 8 10 13 15 19 23 24 25
--- --- 6 9 11 15 20 21 23
--- --- --- --- 7 12 17 18 20
--- --- --- --- --- 8 13 15 16
--- --- --- --- --- 7 10 11 13
--- --- --- --- --- --- 7 8 10
--- --- --- --- --- --- --- 7 8
--- --- --- --- --- --- --- --- 7
--- --- --- --- --- --- --- --- ---
--- --- --- --- --- --- --- --- ---
105
110
115
75
80
85
90
95
100
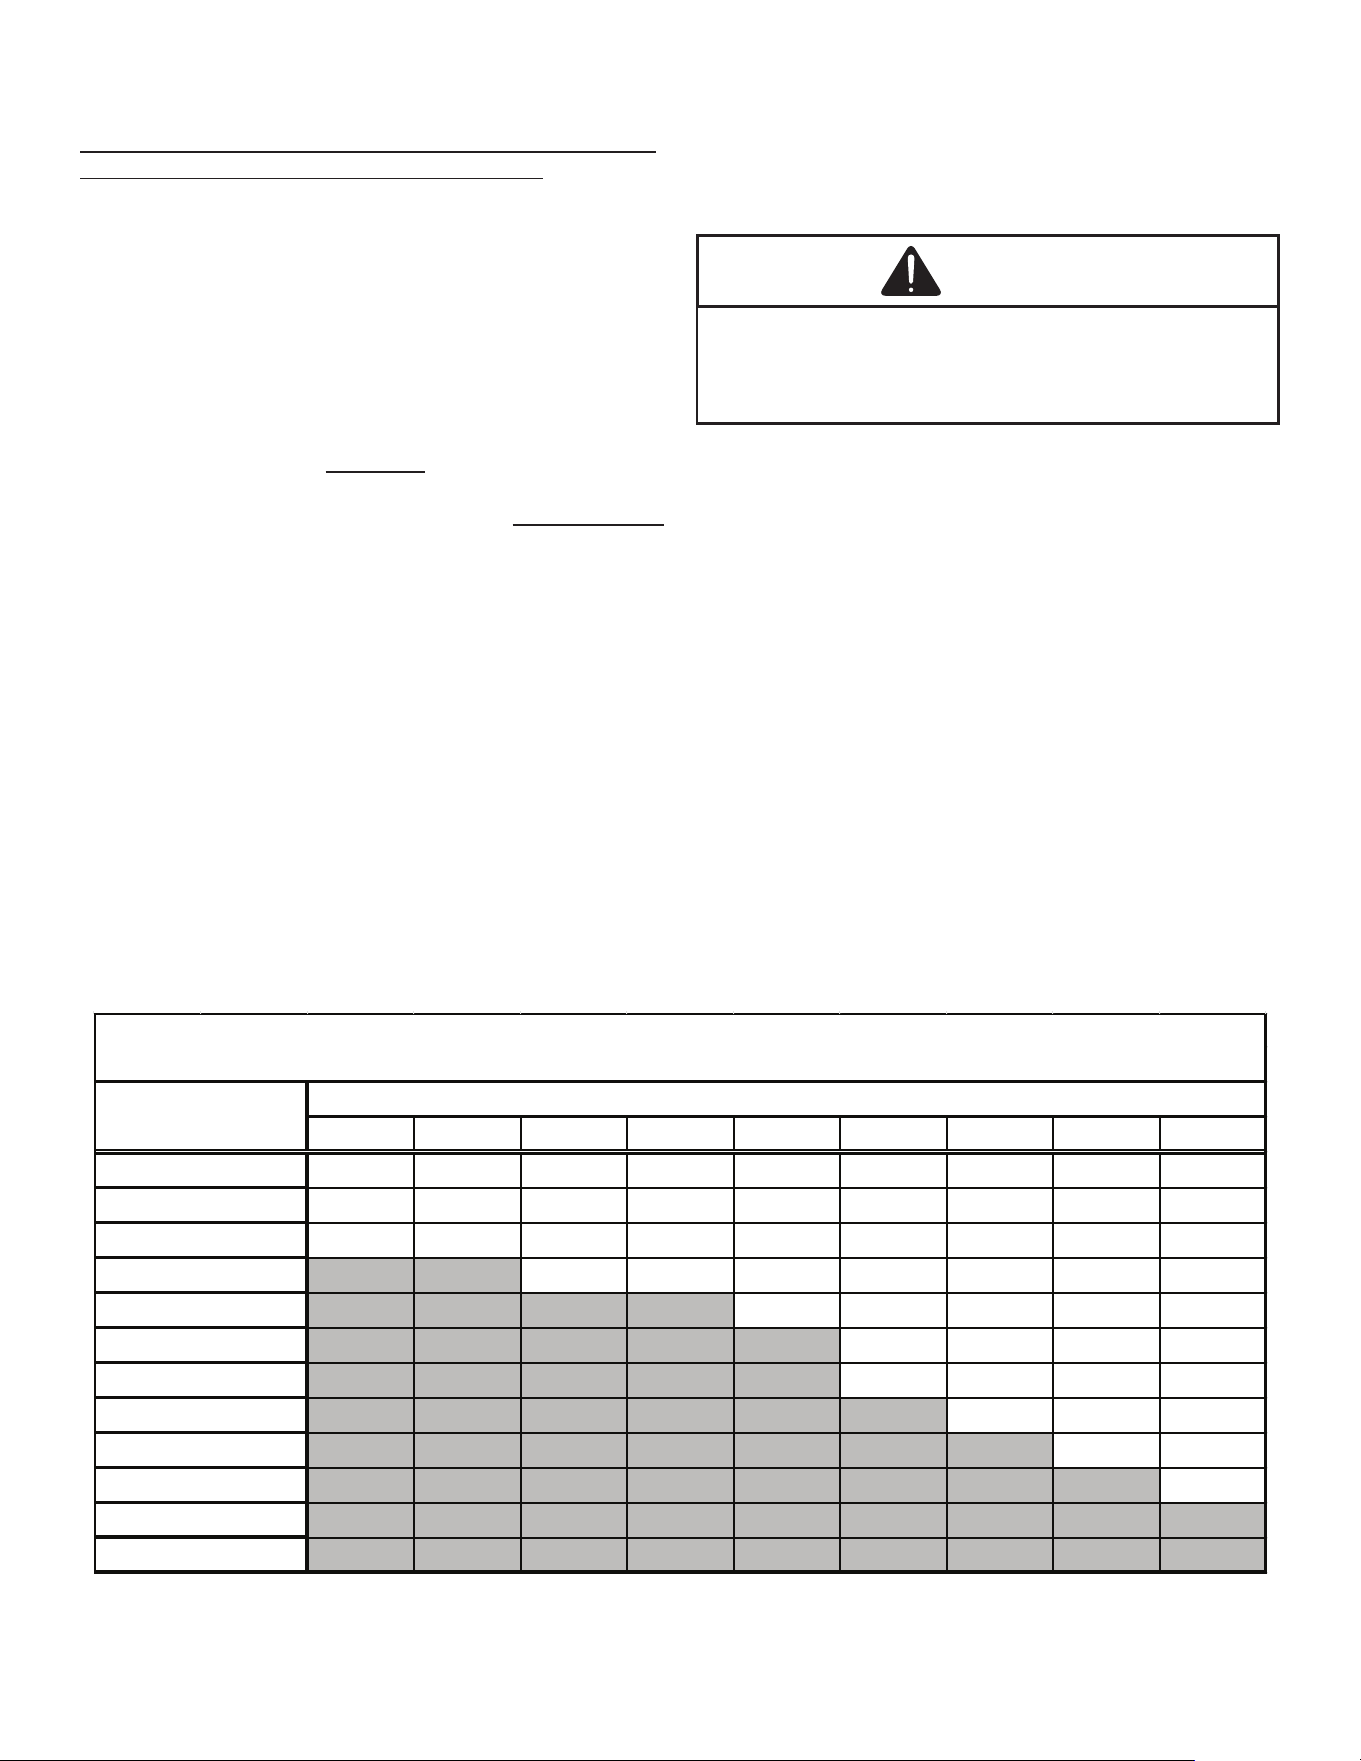
System Superheat Targets for Piston Match-ups (+/- 1.0 °F)
Indoor Wet Bulb Temperature, °F
Outdoor Dry Bulb
Temperature, °F
60
65
70
Superheat Formula = Suct. Line Temp. - Sat. Suct. Temp.
Final Charge Adjustment
Airow and Total Static Pressure for the indoor unit should
be veried before attempting to charge system.
1. Total static pressure is .5” WC or less.
2. Airow is correct for installed unit.
3. Airow tables are in the installation manual and Spec
Sheet for Indoor Unit.
4. Complete charging information is in Service Manual
RS6200006.
NOTE: Superheat adjustments should not be made
until indoor ambient conditions have stabilized.
This could take up to 24 hours depending on
indoor temperature and humidity. Before checking
superheat run the unit in cooling for 10-15 minutes
or until refrigerant pressures stabilize. Use the
following guidelines and methods to check unit
operation and ensure that the refrigerant charge
is within limits.
The outdoor temperature must be 60°F or higher. Set the
room thermostat to COOL, fan switch to AUTO, and set the
temperature control well below room temperature.
Units matched with indoor coils equipped with a non-
adjustable TXV should be charged by Subcooling only.
Superheat on indoor coils with adjustable TXV valves are
factory set and no adjustment is normally required during
startup. Only in unique applications due to refrigerant
line length, dierences in height between the indoor
and outdoor unit and refrigerant tubing sizes or poor
performance should Superheat setting require adjustment.
These adjustments should only be performed by
qualied service personnel. For detailed charge and TXV
adjustments refer to the appropriate Service Manual.
Fixed Orifice
CAUTION
To prevent personal injury, carefully connect and
disconnect manifold gauge hoses. Escaping liquid
refrigerant can cause burns. Do not vent refrigerant into
the atmosphere. Recover all refrigerant during system
repair and before final unit disposal.
1. Purge gauge lines. Connect service gauge manifold
to base-valve service ports. Run system at least 10
minutes to allow pressure to stabilize.
2. Temporarily install a thermometer 4-6” from
the compressor on the suction line. Ensure the
thermometer makes adequate contact and is insulated
for best possible readings. Use vapor temperature to
determine superheat.
3. Refer to the superheat table provided for proper
system superheat. Add charge to lower superheat or
recover charge to raise superheat.
4. Disconnect manifold set, installation is complete.
Superheat Formula = Suct. Line Temp. - Sat. Suct.
Temp.
10
NOTE: Specifications And Performance Data Listed Herein Are Subject To Change Without Notice.
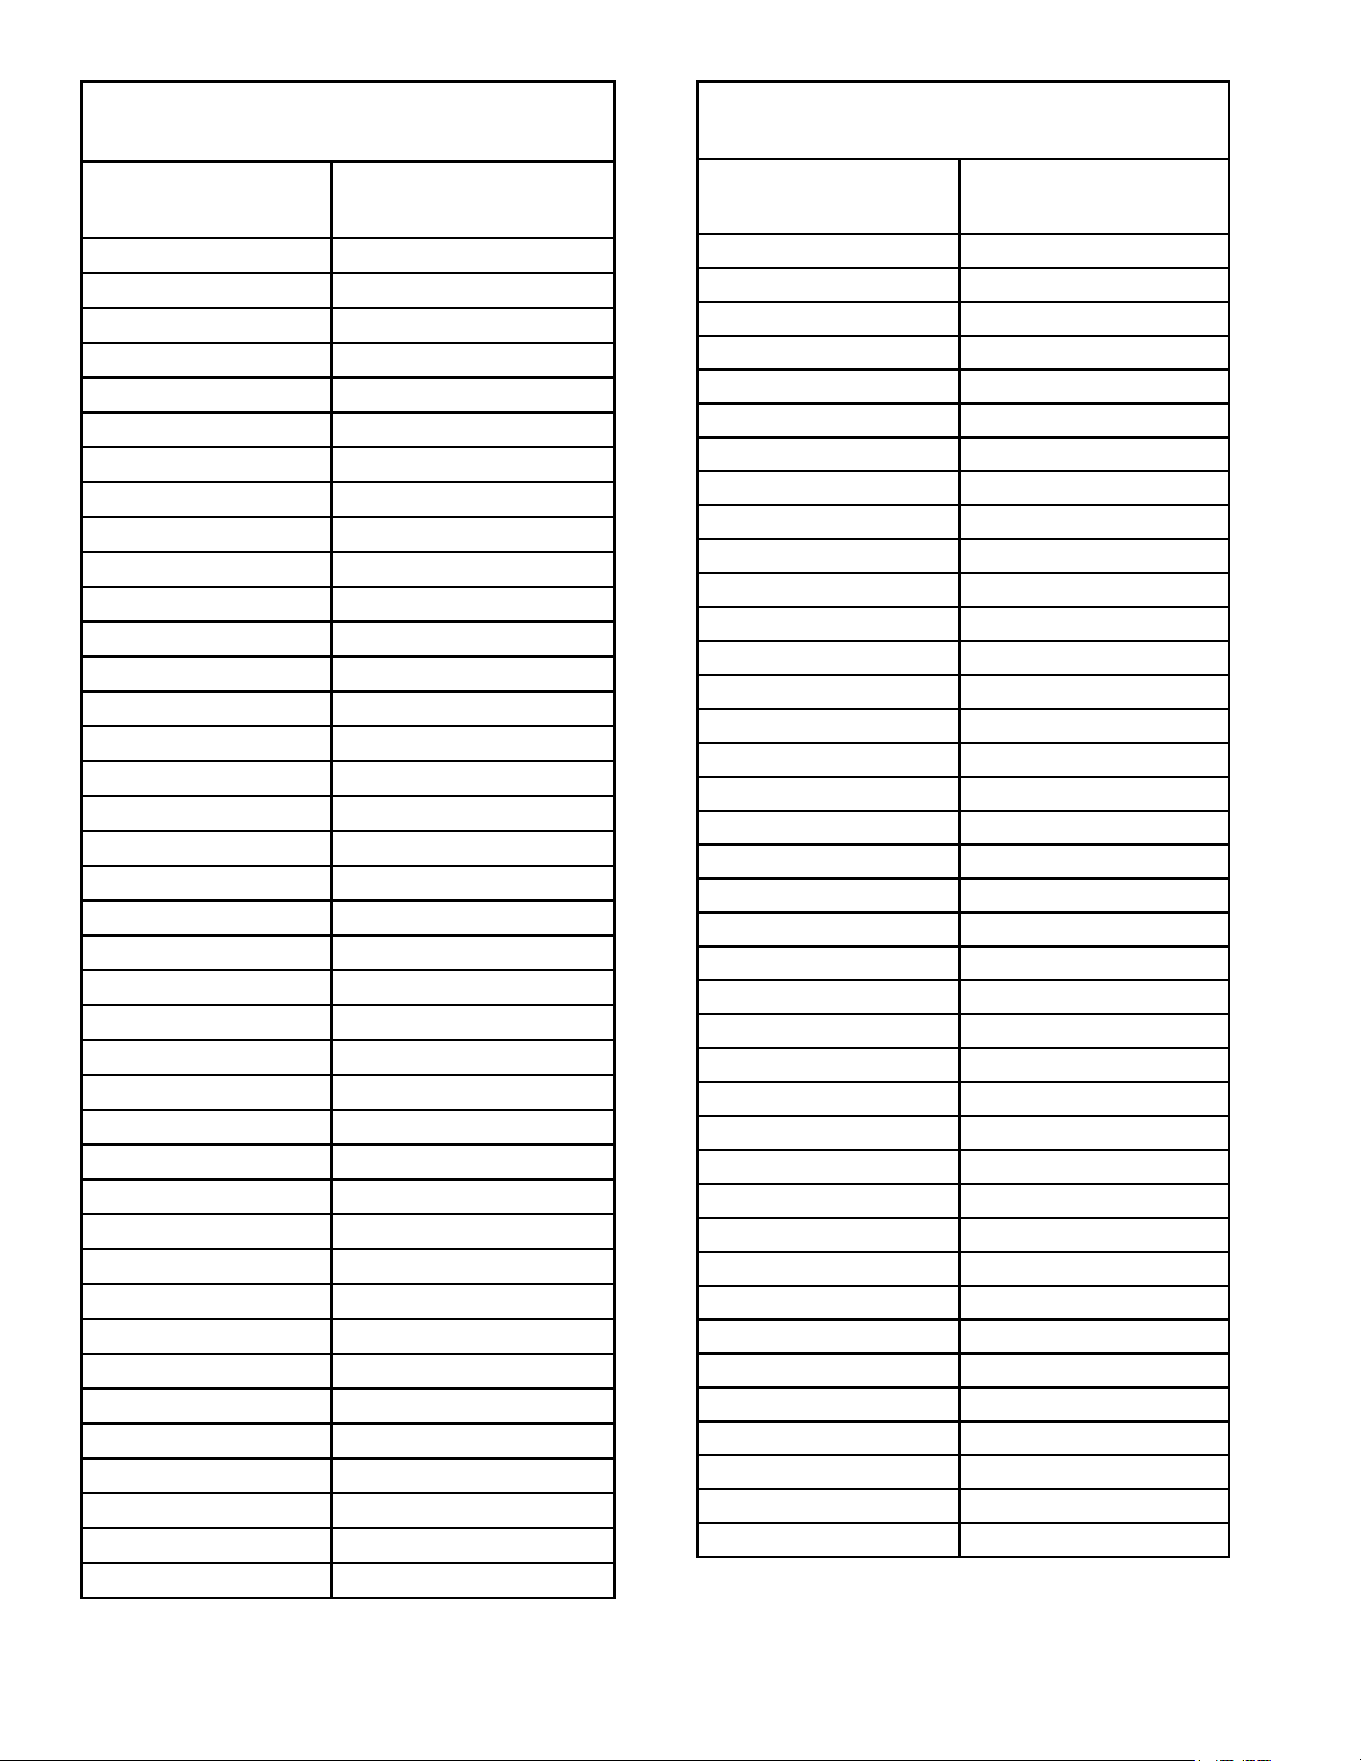
SUCTION
PRESSURE
SATURATED SUCTION
TEMPERATURE ºF
PSIG R-32
40 -7
42 -6
44 -4
48 -1
50 1
52 2
54 4
56 5
58 6
60 8
62 9
64 10
66 12
68 13
70 14
72 15
74 17
76 18
78 19
80 20
85 23
90 25
95 28
100 30
105 33
110 35
115 37
120 40
125 42
130 44
135 46
140 48
145 50
150 52
155 53
160 55
165 57
170 59
SATURATED SUCTION PRESSURE
TEMPERATURE CHART
LIQUID
PRESSURE
SATURATED SUCTION
TEMPERATURE ºF
PSIG R-32
200 68
210 71
220 74
230 77
240 80
250 82
260 85
270 87
280 90
290 92
300 94
310 97
320 99
330 101
340 103
350 105
360 107
370 109
380 111
390 113
400 115
410 117
420 118
430 120
440 122
450 124
460 125
470 127
480 128
490 130
500 132
525 135
550 139
575 143
600 146
625 150
650 153
675 156
SATURATED LIQUID PRESSURE
TEMPERATURE CHART
11
EXPANSION VALVE SYSTEM
NOTE: Units matched with indoor coils equipped
with a TXV should be charged by Subcooling only.
SUBCOOLING FORMULA = SATURATED LIQUID LINE
TEMPERATURE - LIQUID LINE TEMPERATURE
NOTE: for two-stage models, unit will need to be
charged at low stage.
1. Purge gauge lines. Connect service gauge manifold
to base-valve service ports. Run system at least 10
minutes to allow pressure to stabilize.
2. Clamp a pipe clamp thermometer on the liquid line
near the liquid line service valve and 4-6" from the
compressor on the suction line.
a. Ensure the thermometer makes adequate contact
to obtain the best possible readings.
b. The temperature read with the thermometer
should be lower than the saturated condensing
temperature.
3. The dierence between the measured saturated
condensing temperature and the liquid line
temperature is the liquid Subcooling value.
4. TXV-based systems should have a Subcooling value
of 8°F +/- 1°F.
5. Add refrigerant to increase Subcooling and remove
refrigerant to decrease Subcooling.
NOTE: Units matched with indoor coils equipped
with a TXV should be charged by Subcooling only.
Superheat can also be utilized to best verify
charge levels with an adjustable TXV and make
adjustments when needed in unique applications
due to refrigerant line length, differences in
height between the indoor and outdoor unit and
refrigerant tubing sizes. These adjustments
should only be performed by qualified service
personnel.
SUPERHEAT ADJUSTMENT
NOTE: Units matched with indoor coils equipped
with a TXV should be charged by Subcooling only.
SUPERHEAT FORMULA = SUCTION LINE
TEMPERATURE - SATURATED SUCTION
TEMPERATURE
NOTE: for two-stage models, unit will need to be
charged at low stage.
1. Clamp a pipe clamp thermometer near the suction line
4-6” from the compressor on the suction line.
a. Ensure the thermometer makes adequate contact
for the best possible readings.
b. The temperature read with the thermometer
should be higher than the saturated suction
temperature.
2. The dierence between the measured saturated
suction temperature and the suction line temperature
is the Superheat value.
3. TXV-based systems should have a Superheat value
as shown in the table below.
4. Adjust Superheat by turning the TXV valve stem
clockwise to increase and counterclockwise to
decrease.
a. If Subcooling and Superheat are low, adjust the
TXV to the superheat setting specied in the table
below and then check Subcooling.
b. If Subcooling is low and Superheat is high, add
charge to raise Subcooling to 8°F +/- 1°F then
check Superheat.
c. If Subcooling and Superheat are high, adjust the
TXV valve to the superheat specied in the table
below then check the Subcooling value.
d. If Subcooling is high and Superheat is low, adjust
the TXV valve to the superheat specied in the
table below and remove charge to lower the
Subcooling to 8°F +/- 1°F.
NOTE: DO NOT adjust the charge based exclusively
on suction pressure unless for general charging
in the case of a gross undercharge.
NOTE: Check the Schrader ports for leaks and
tighten valve cores if necessary. Install caps
finger-tight.
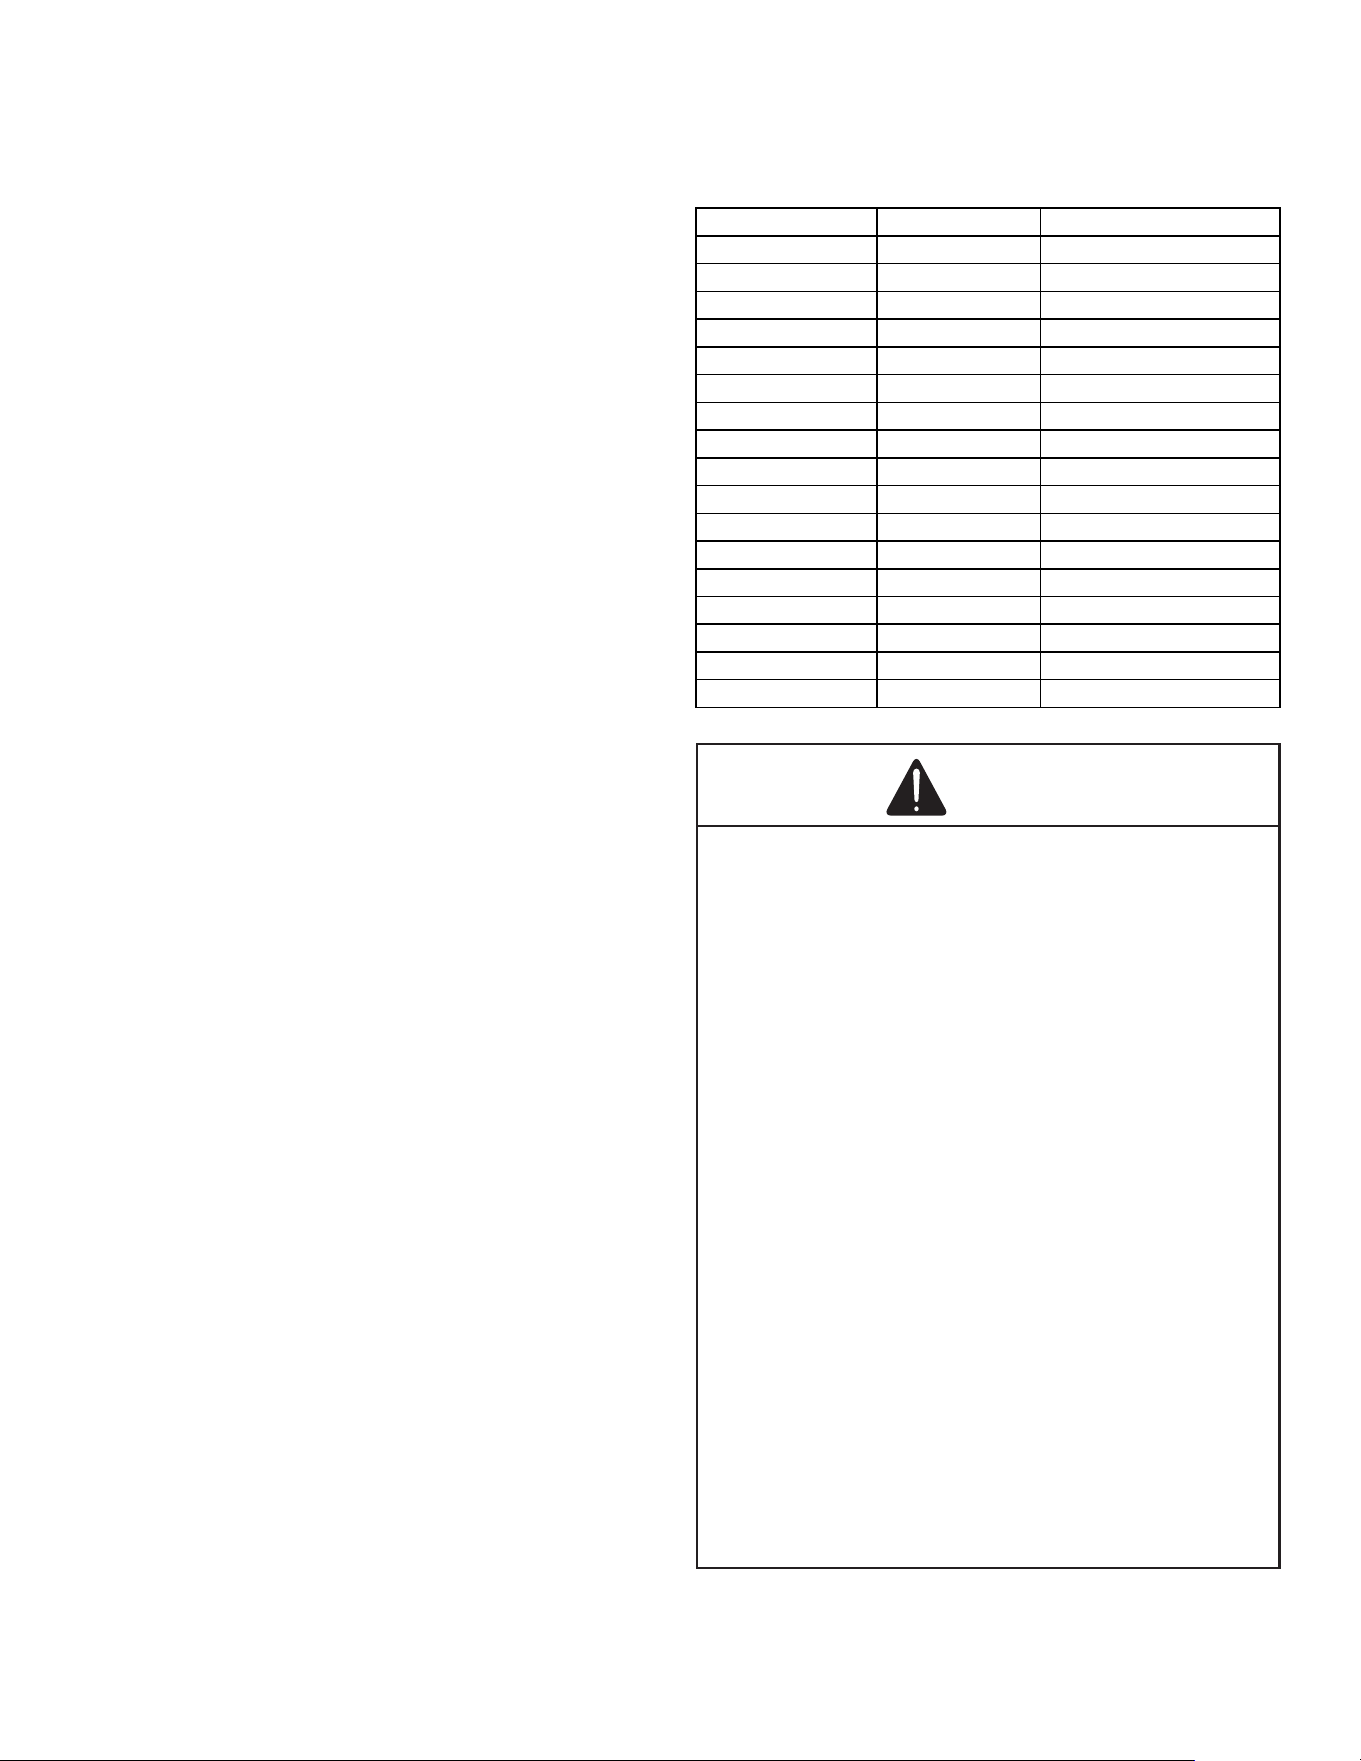
Tonnage SH at Compressor
SC at
OD Liq
1.5-2.5T 10-14°F 7-9°F
3.0-5.0T 9-11°F 7-9°F
Superheat Settings for Expansion Valve Systems
Superheat setting for TXV systems for GLXS4B,
GLXS4M, ALXS4B, and ALXS4N family
Tonnage SH at Compressor
SC at
OD Liq
1.5-2.5T 10-14°F 7-9°F
3.0-5.0T
10-12°F 7-9°F
Superheat Settings for Expansion Valve Systems
Superheat setting for TXV systems for GLXS3B,
ALXS3B, and ALXS3N family
Tonnage SH at Compressor
SC at OD Liquid
1.5T-4.0T 10-12°F 7-9°F
5.0T 10-12°F 5-7°F
Superheat Se�ngs for Expansion Valve Systems
Superheat / Subcool Setting for TXV systems for
GLXS5BA and ALXS5BA
12
SYSTEM SERVICE AND
DECOMMISSIONING
Should repairs requiring recovery of the refrigerant
become necessary, special considerations must be made
when breaking into systems with ammable refrigerants.
These repairs shall only be performed by qualied service
personnel and in compliance with local and national
regulations.
The refrigerant charge shall only be recovered into
a cylinder labeled for use with R-32. Ensure that the
refrigerant cylinder(s) are capable of holding the total
system charge. Cylinders shall be complete with a
pressure-relief valve and associated shut-o valves in good
working order. Empty recovery cylinders are evacuated
and, if possible, cooled before recovery occurs. A set of
calibrated weighing scales shall be available and in good
working order. Hoses shall be complete with leak-free
disconnect couplings and in good condition.
All best practices for refrigerant recovery must be followed,
including use of a recovery machine designated safe for
use with A2L refrigerants. Isolate the system electrically
prior to recovery. Ensure that all personal protective
equipment is being applied correctly. Ensure that the
recovery process is supervised at all times by the qualied
servicer. Situate the R-32 cylinder on the scale before
recovery takes place. Start the recovery machine and
operate in accordance with its instructions. Do not overll
cylinders by more than 80% volume of its allowed liquid
charge.
Should electrical components need to be replaced,
ensure that the original equipment manufacturer’s part or
equivalent is used.
Markings and warnings on the unit shall continue to be
visible and legible after installation and service. Correct
any markings and warnings that are made illegible.
When decommissioning a system, all previously mentioned
precautions regarding safe refrigerant handling must be
followed. Recovered refrigerant shall not be charged into
another refrigerating system unless it has been cleaned
and checked. Equipment must be labeled, dated, and
signed stating that it has been decommissioned and
emptied of refrigerant.
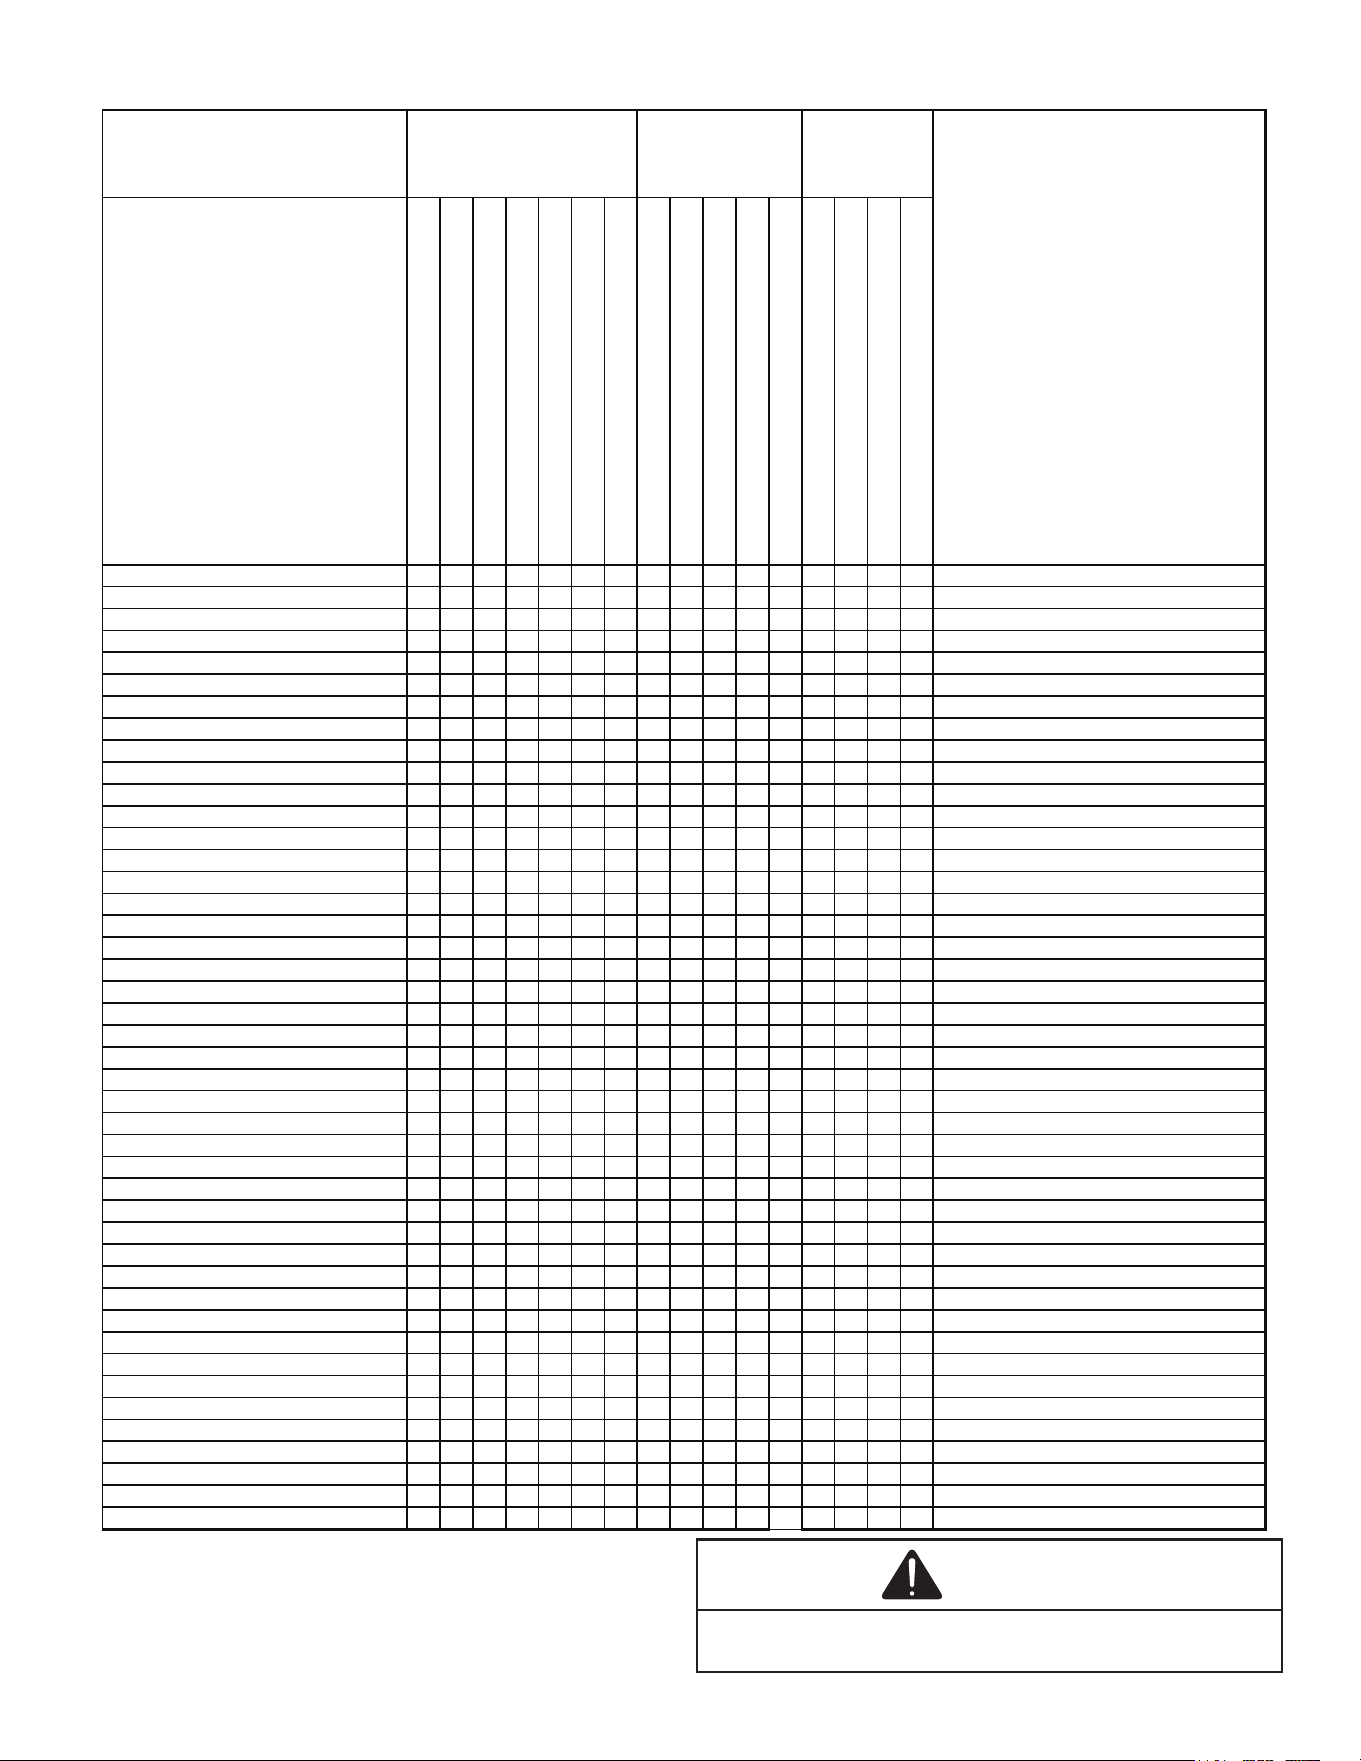
ALTITUDE ADJUSTMENT FACTOR TO
CALCULATE MINIMUM ROOM AREA
The Indoor equipment mitigation requirements are
calculated at sea level. For higher altitudes adjust the
minimum room area specied near the Serial Plate by the
corresponding altitude adjustment factor shown below. This
table is provided as a reference.
Adjusted room area (A
min
adj
) is the product of the minimum
room area specied in the serial plate and the adjustment
factor AF, as shown in below formula A
min adj
= A
min
(serial
plate) * AF
Altitude Adjustment Factor (AF)Height in feetHeight in meters
1.00At sea levelAt sea level
1.021~6601~200
1.03660~1320200~400
1.051320~1970400~600
1.071970~2630600~800
1.092630~3290800~1000
1.113290~39401000~1200
1.133940~46001200~1400
1.154600~52501400~1600
1.175250~59101600~1800
1.195910~65701800~2000
1.216570~72202000~2200
1.247220~78802200~2400
1.267880~85402400~2600
1.298540~91902600~2800
1.319190~98502800~3000
1.349850~105003000~3200
Hermetic compressor electrical terminal venting can be
dangerous. In certain circumstances, the terminal may be
expelled, venting the refrigerant vapor and compressor
oil contained within the compressor housing and system.
Be alert for sounds of arcing (sizzling, sputtering, or
popping) inside the compressor. immediately get away if
you hear these sounds and disconnect electrical power
from the unit. Never operate the compressor without the
terminal cover secured and properly in place or without
the electrical plug fully seated and engaged to the
terminal posts.
If a terminal is damaged, electrically overloaded, or
short circuits to ground, there is a remote possibility that
the terminal can be suddenly expelled from the terminal
housing thereby venting the refrigerant and compressor
oil mixture to atmosphere.
This discharge can be ignited from electrical arcing, or
other open sources of ignition, and can cause potentially
severe or fatal injury. This event is known as “Terminal
Venting.”
To reduce the possibility of external ignition, all open
flames or other heat sources must be extinguished, and
all electrical power must be turned off prior to opening
the terminal cover or removing the electrical plug and
servicing the system.
Proper sealed system evacuation is required during
servicing to maintain adequate internal system cleanliness
while eliminating contaminates. Be alert for sounds
of arcing (sizzling, sputtering, or popping) inside the
compressor. IMMEDIATELY GET AWAY from the unit if you
hear these sounds and disconnect electrical power.
WARNING
NOTE: Never operate the compressor in a vacuum
or in reverse operation.
13
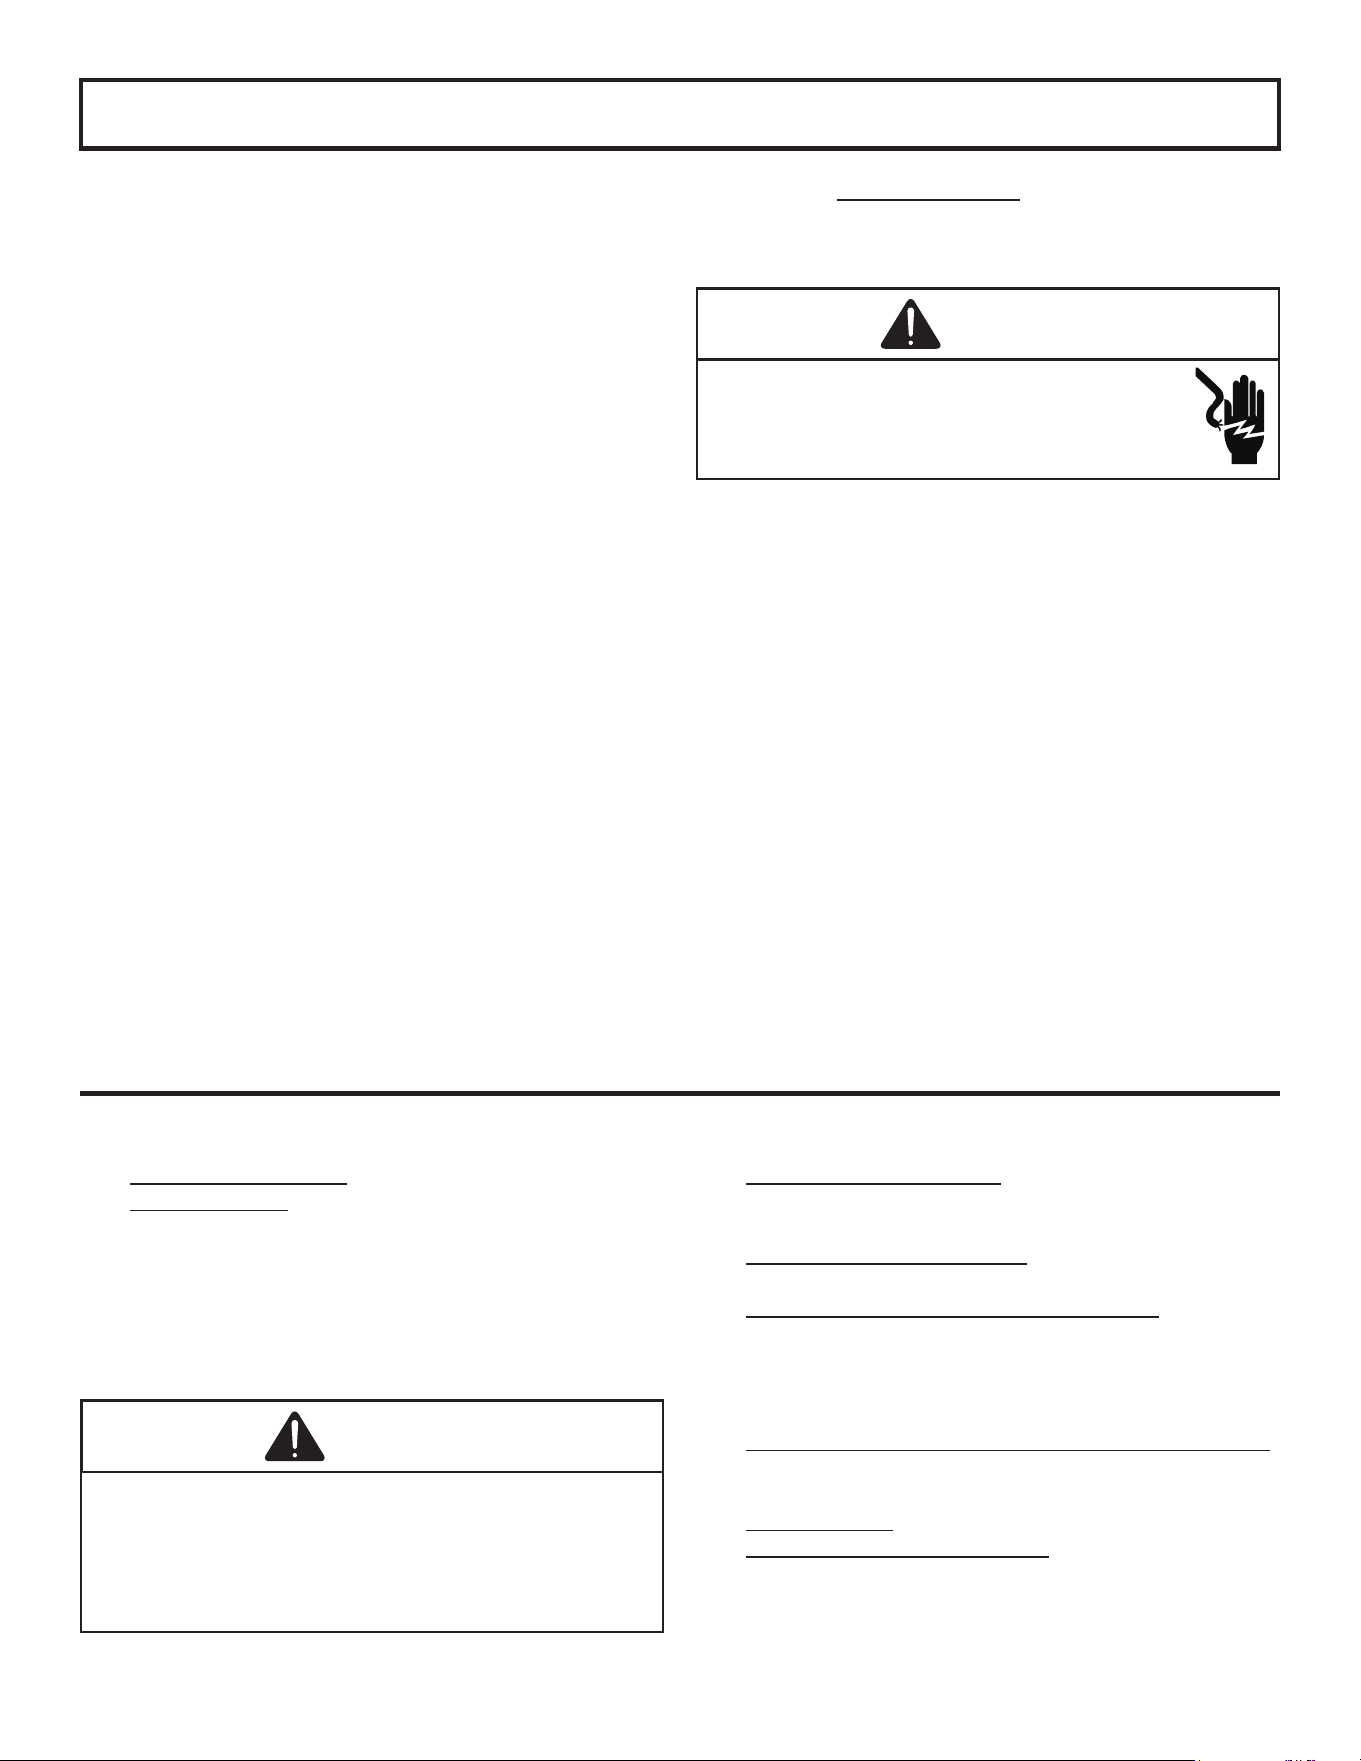
TROUBLESHOOTING INFORMATION
For detailed service information, refer to the
Remote Condensing Unit Service manual.
NOTICE
Units with rotary or reciprocating compressors and non-
bleed TXV’s require a Hard Start Kit.
SYMPTOM
Test Method
Remedy
System
Operating
Pressures
Unsatisfactory
Cooling
No CoolingComplaint
High head pressure
High suction pressure
Low head pressure
Low suction pressure
Compressor is noisy
Certain areas to cool others to warm
Not cool enough on warm days
Too cool and then too warm
System runs continuously - little cooling
Compressor cycles on overload
Compressor runs - goes off on overload
Condenser fan will not start
Evaporator fan will not start
Compressor and
Condenser Fan will not start
Compressor will not start - fan runs
System will not start
POSSIBLE CAUSE
DOTS IN ANALYSIS
GUIDE INDICATE
"POSSIBLE CAUSE"
Test Voltage•Power Failure
Impact Fuse Size & Type•••Blown Fuse
Inspect Connection - Tighten••••Loose Connection
Test Circuits with Ohmmeter••••••Shorted or Broken Wires
Test Continuity of Overloads••Open Overload
Replace Control Board•Faulty Control Board
Test Continuity of Thermostat and Wiring•••
•Faulty Thermostat
Check Control Circuit with Voltmeter••Faulty Transformer
Test Capacitor••••Shorted or Open Capacitor
Test Continuity of Overload•Internal Compressor Overload Open
Test Motor Windings••Shorted or Grounded Compressor
Use Test Cord••Compressor Stuck
Test Continuity of Coil and Contacts••••Faulty Compressor Contactor
Test Continuity of Coil and Contacts•Faulty Fan Relay
Test Control Circuit with VoltmeterOpen Control Circuit
Test Vol
tage•••Low Voltage
Repair or Replace••Faulty Evaporator Fan Motor
Test Motor Windings•••Shorted or Grounded Fan Motor
Check Resistance of Anticipator•Improper Cooling Anticipator
Test For Leaks, Add Refrigerant••••Shortage or Refrigerant
Replace Restricted Part••••Restricted Liquid Line
Replace Line•••Undersized Liquid Line
Replace Line•Undersized Suction Line
Speed Blower, Check Duct Static Pressure••••Not Enough Air across Indoor Coil
Reduce Bl
ower Speed•Too Much Air across Indoor Coil
Recover Part of Charge••·••Overcharge of Refrigerant
Recover Charge, Evacuate, Recharge•••Noncondensibles
Remove Obstruction to Air Flow•••Recirculation of Condensing Air
Check Windows, Doors, Vent Fans, Etc.•••Infiltration of Outdoor Air
Relocate Thermostat•Improperly Located Thermostat
Readjust Air Volume Dampers••Air Flow Unbalanced
Refigure Cooling Load••System Undersized
Replace Compressor•Broken In
ternal Parts
Test Compressor Efficiency•Broken Valves
Test Compressor Efficiency•••Inefficient Compressor
Reset and Test Control•High Pressure Control Open
Test Voltage•••Unbalanced Power, 3PH
Replace Valve•••Wrong Type Expansion Valve
Replace Valve••••••Expansion Valve Restricted
Replace Valve••Oversized Expansion Valve
Replace Valve•••••Undersized Expansion Valve
Tighten Bulb Bracket••Expansion Valve Bulb Loose
Check Valve Operation•••Inope
rative Expansion Valve
Tighten Bolts•Loose Hold-down Bolts
14
SPLIT SYSTEMS
AIR CONDITIONING AND HEAT PUMP homeowner’s Routine Maintenance Recommendations
We strongly recommend a bi-annual maintenance checkup be performed
before the heating and cooling seasons begin by a qualied servicer.
Replace or Clean Filter
IMPORTANT NOTE: Never operate unit without a
filter installed as dust and lint will build up on
internal parts resulting in loss of efficiency,
equipment damage and possible fire.
An indoor air lter must be used with your comfort system.
A properly maintained lter will keep the indoor coil of
your comfort system clean. A dirty coil could cause poor
operation and/or severe equipment damage.
Your air lter or lters could be located in your furnace, in a
blower unit, or in “lter grilles” in your ceiling or walls. The
installer of your air conditioner or heat pump can tell you
where your lter(s) are, and how to clean or replace them.
Check your lter(s) at least once a month. When they are
dirty, replace or clean as required. Disposable type lters
should be replaced. Reusable type lters may be cleaned.
You may want to ask your dealer about high eciency
lters. High eciency lters are available in both electronic
and non-electronic types. These lters can do a better job
of catching small airborne particles.
Compressor
The compressor motor is hermetically sealed and does not
require additional oiling.
Motors
Indoor and outdoor fan motors are permanently lubricated
and do not require additional oiling.
Clean Outside Coil (Qualified Servicer Only)
WARNING
HIGH VOLTAGE!
Disconnect ALL power before servicing or
installing this unit. Multiple power sources may
be present. Failure to do so may cause property
damage, personal injury or death.
Air must be able to ow through the outdoor unit of your
comfort system. Do not construct a fence near the unit or
build a deck or patio over the unit without rst discussing
your plans with your dealer or other qualied servicer.
Restricted airow could lead to poor operation and/or
severe equipment damage.
Likewise, it is important to keep the outdoor coil clean.
Dirt, leaves, or debris could also restrict the airow. If
cleaning of the outdoor coil becomes necessary, hire
a qualied servicer. Inexperienced people could easily
puncture the tubing in the coil. Even a small hole in the
tubing could eventually cause a large loss of refrigerant.
Loss of refrigerant can cause poor operation and/or severe
equipment damage.
Do not use a condensing unit cover to “protect” the outdoor
unit during the winter, unless you rst discuss it with your
dealer. Any cover used must include “breathable” fabric to
avoid moisture buildup.
BEFORE CALLING YOUR SERVICER
• Check the thermostat to conrm that it is properly set.
• Wait 15 minutes. Some devices in the outdoor unit or
in programmable thermostats will prevent compressor
operation for awhile, and then reset automatically.
Also, some power companies will install devices
which shut o air conditioners for several minutes on
hot days. If you wait several minutes, the unit may
begin operation on its own.
CAUTION
To avoid the risk of equipment damage or fire, install the
same amperage breaker or fuse as you are replacing. If the
circuit breaker or fuse should open again within thirty days,
contact a qualified servicer to correct the problem.
If you repeatedly reset the breaker or replace
the fuse without having the problem corrected, you run the
risk of severe equipment damage.
• Check the electrical panel for tripped circuit breakers
or open fuses. Reset the circuit breakers or replace
fuses as necessary.
• Check the disconnect switch near the indoor furnace
or blower to conrm that it is closed.
• Check for obstructions on the outdoor unit. Conrm
that it has not been covered on the sides or the top.
Remove any obstruction that can be safely removed.
If the unit is covered with dirt or debris, call a qualied
servicer to clean it.
• Check for blockage of the indoor air inlets and outlets.
Conrm that they are open and have not been
blocked by objects (rugs, curtains or furniture).
• Check the lter. If it is dirty, clean or replace it.
• Listen for any unusual noise(s), other than normal
operating noise, that might be coming from the
outdoor unit. If you hear unusual noise(s) coming from
the unit, call a qualied servicer.
15
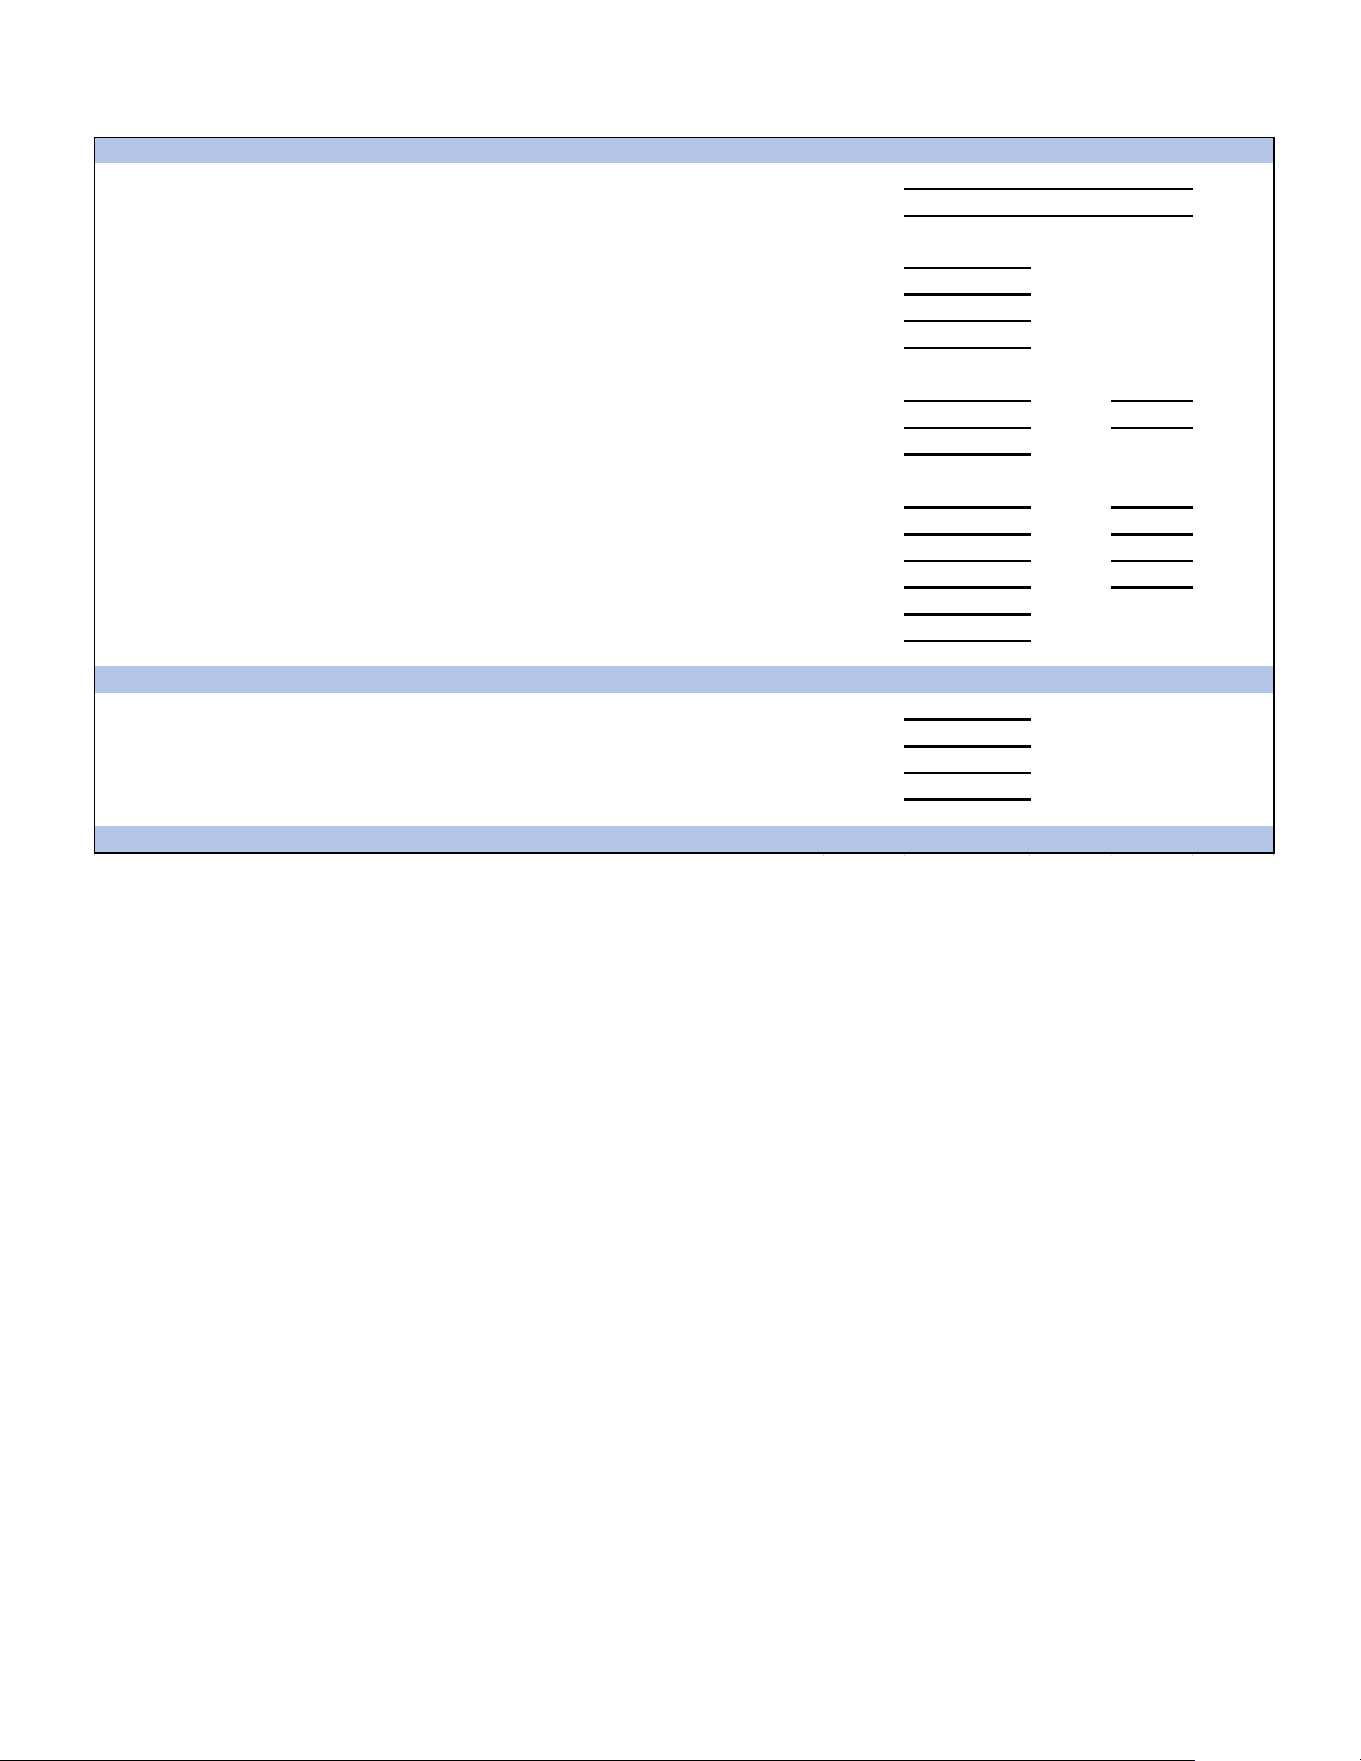
START-UP CHECKLIST
Condenser / Heat Pump (including all Inverter)
ELECTRICAL (Outdoor Unit)
Line Voltage (Measure L1 and L2 Voltage) L1 - L2
Secondary Voltage (Measure Transformer Output Voltage) NOT ALL MODELS R - C
Compressor Amps
Condenser Fan Amps
TEMPERATURES (Indoor Unit)
Return Air Temperature (Dry bulb / Wet bulb) DB °F WB °F
DB °F WB °F
Delta T (Difference between Supply and Return Temperatures) DB °F
PRESSURES / TEMPERATURES (Outdoor Unit)
Suc�on Circuit (Pressure / Suc�on Line Temperature) PSIG TEMP °F
Liquid Circuit (Pressure / Liquid Temperature) PSIG TEMP °F
Outdoor Air Temperature (Dry bulb / Wet bulb) DB °F WB °F
SUPERHEAT / SUBCOOLIN
G SH SC
Line set length in Feet
Addi�onal Refrigerant Charge Added over Factory Charge (Ounces)
Addi�onal Checks
Check wire rou�ngs for any rubbing
Check factory wiring and wire connec�ons.
Check product for proper clearances as noted by installa�on instruc�ons
°F to °C formula: (°F - 32) divided by 1.8 = °C °C to °F formula: (°C mul�plied by 1.8) + 32 = °F
Model Number
Serial Number
Cooling Supply Air Temperature (Dry bulb / Wet bulb)
16
CUSTOMER FEEDBACK
We are very interested in all product comments.
Please ll out the feedback form on one of the following links:
Goodman
®
Brand Products: (http://www.goodmanmfg.com/about/contact-us).
Amana
®
Brand Products: (http://www.amana-hac.com/about-us/contact-us).
You can also scan the QR code on the right for the product brand
you purchased to be directed to the feedback page.
GOODMAN
®
BRAND
AMANA
®
BRAND
NOTE: Specifications and performance data listed herein are subject to change without notice.
Quality Makes the Dierence!
All of our systems are designed and manufactured with the same high quality standards regardless of size or eciency.
We have designed these units to signicantly reduce the most frequent causes of product failure. They are simple to
service and forgiving to operate. We use quality materials and components. Finally, every unit is run tested before it
leaves the factory. That’s why we know. . .There’s No Better Quality.
Visit our website at www.goodmanmfg.com or www.amana-hac.com for information on:
• Products • Customer Services • Contractor Program and Training
• Warranties • Parts • Financing Options
19001 Kermier Rd. Waller, TX 77484
www.goodmanmfg.com -or- www.amana-hac.com
© 2025 Daikin Comfort Technologies Manufacturing, Inc.
is a registered trademark of Maytag Corporation or its related companies and is used under license. All rights reserved.