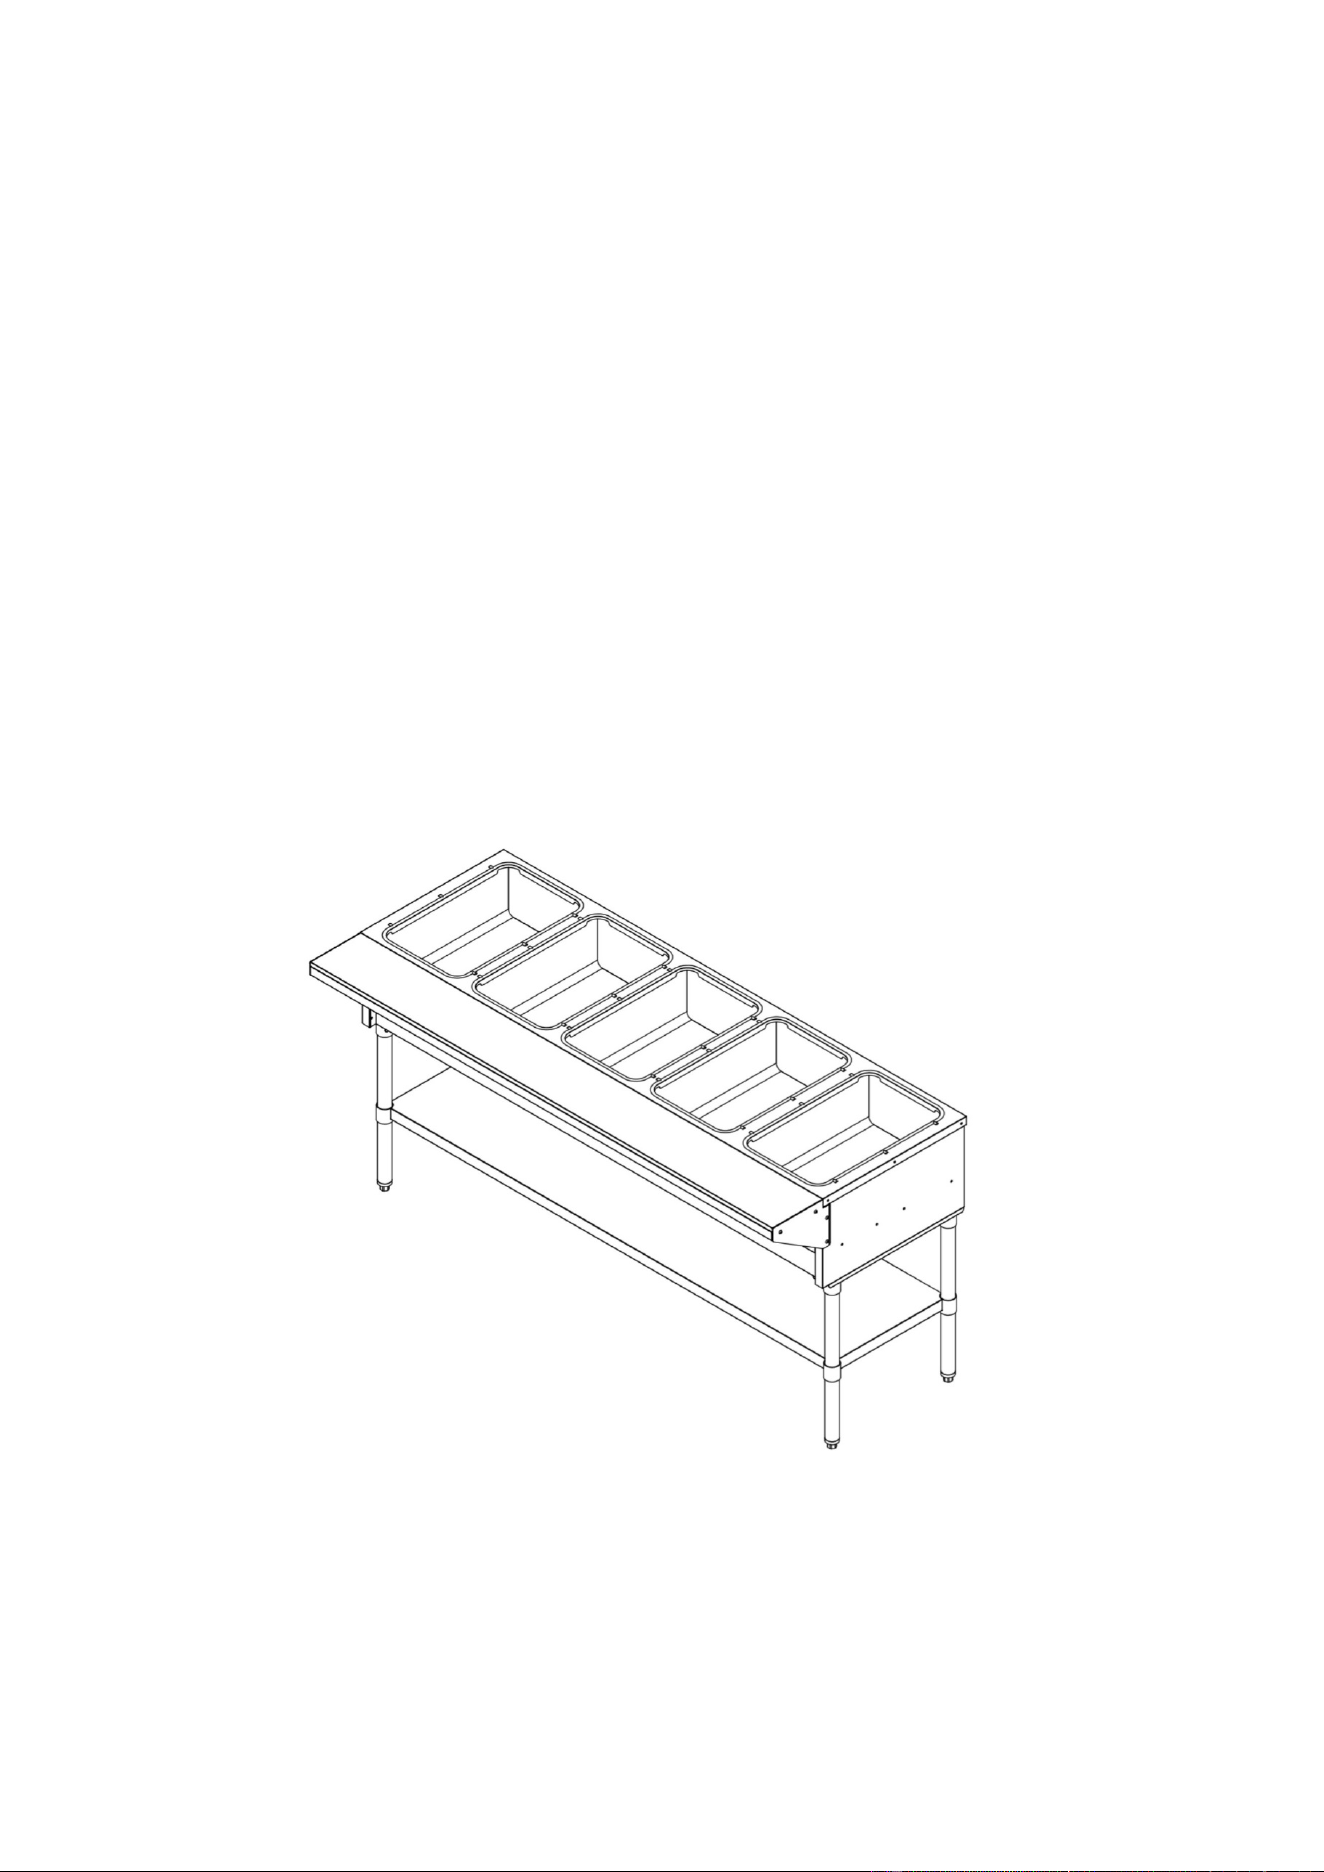
STEAM TABLE MANUAL
Intended for other than household use. Unit must be
kept clear of combustibles at all times.
S ,O, SC,SD series

WARNINGS
Do not touch any hot surfaces
Do not plug or unplug unit with wet hands
Do not immerse unit, cord or plug in liquid at any time
Unplug cord from outlet when not in use and before cleaning
Do not operate unattended
Do not use this unit for anything other than intended use
Do not use outdoors
Operate the unit with legs provided to prevent overheating of surfaces below
Do not use if unit has a damaged cord or plug, in the event the appliance malfunctions, or has
been damaged in any manner
Keep children and animals away from unit
Any incorrect installation, alterations, adjustments and/or improper maintenance can lead to
property loss and injury. All repairs should be done by authorized professionals only
Ensure that the designated power supply is adequate for continual usage and the voltage is
correct
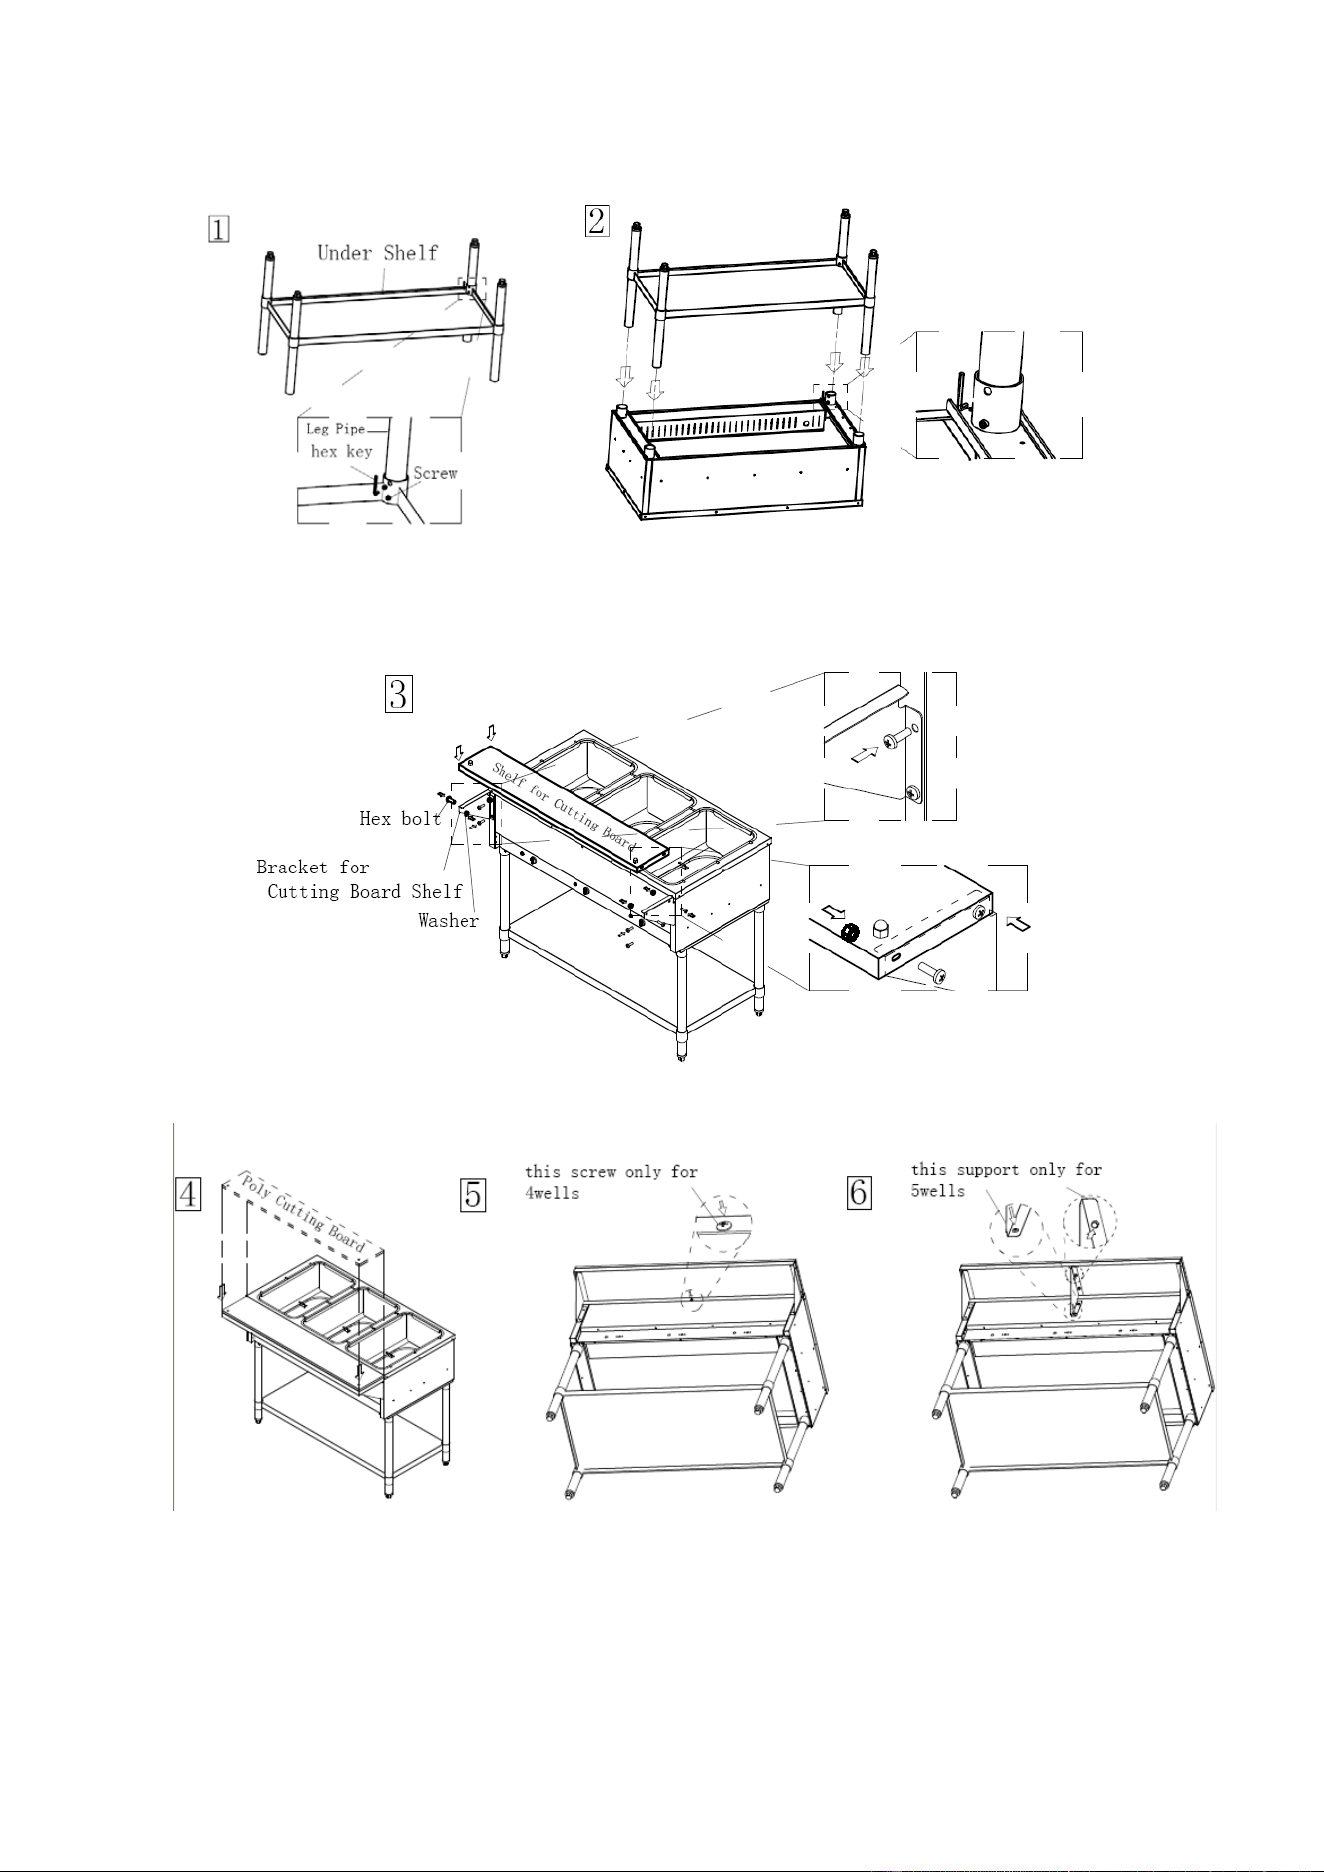
ASSEMBLY ‐NOTE – Legs and under‐shelf must be assembled before securing legs to the
table. Standard Adjustable under‐shelf
1 Remove the unit from the shipping carton and packaging.
2 Inspect the contents to ensure there is no damage to the unit.
3 Rest table on its top with gussets facing up. (use cardboard or other material to prevent
scratching top)
4 Install legs into gussets. Make sure the rivet in leg is closer to gusset than to foot end.
5 Align under‐shelf gussets with legs and slide under‐shelf down legs to desired position. (DO NOT
force or beat corners as damage could occur)
6 Tighten set screws in under‐shelf gussets to secure under‐shelf and install feet into legs using a
rubber mallet.
7 Tighten set screws in gussets to secure legs to table.
8 Place table on back with control knobs up.
9 See below.

O series(open well) Operation
1. Dry Operation with over
1) Plug unit into appropriate electrical power supply receptacle.
2) With openings covered, set dial on highest position for 45 minutes to preheat unit.
3) During initial start‐up, smoke or odor may be detected (a small amount). This will occur
when the coating on the heating element burns off and should stop approximately a half hour
after start up.
4) Place precooked food (minimum 160 F) in food pans, place in openings and cover with lids.
(Indicator light is the set point for the control knob)
5) Adjust to desired setting for proper food temperature. This will vary with the type of food, size
of pans and individual serving temperatures. NSF requires food to be a minimum of 150 F.
6) To increase temperature, turn knob toward highest setting. To decrease, turn toward lowest
setting.
7) Food pans should be covered to maintain temperature when food is not being served and to
prevent food from drying out.
2. Wet Operation with Cover (Spillage pans required)
Note – DO NOT put hot water in heating well or on element
1) With openings covered, set dial at highest setting for 45 minutes.
2) Install spillage pans and spillage pans to bottom of food pans with hot water (minimum of
185°F).
3) Place pre‐cooked food (minimum 160°F) in food pans.
4) Place in spillage pans and cover food pans with lids.
5) Adjust to desired setting for proper food temperature. NSF requires food to be a minimum of
150°F.

S,SO,SD series(sealed well) Operation
1.
Before the unit is used for the first time, turn the temperature knob to “10” and heat the
well for 20- 30 minutes. Do not be alarmed if smoke appears; this preheat should burn off
any residue or dust on the heating element.
WARNING: Steam can cause serious burns. Always wear
some type of protective covering on your hands and arms
when removing lids or pans from the unit. Lift the lid or pan in
a way that will direct escaping steam away from your face
and body.
2.
Never place food directly into the well. Always use pans.
3.
Wet operation is recommended.
4.
Always place covers on pans when not serving to prevent food from drying out and to
reduce your operating costs.
5.
For most efficient operation, keep empty, covered insets in each well during preheating
and when the well is not in use.
6.
Wet Operation
1)
Fill food well with two (2) quarts of water. For quicker pre-heating, use hot
water to till the well.
2)
Turn the control to “HIGH” and pre-heat the warmer for 30 minutes.
3)
After pre-heating, set the control to your desired serving temperature.
4)
Never pour water into a well that has been heated dry. This may cause well to
crack and leak.
5)
Always fill well before preheating or before water level is below 1/2”.
CLEANING – NOTE:
To maintain cleanliness and increase service life, the steam table
should be cleaned daily. Do not immerse the unit in water or any other liquid. If liquid enters
the electrical compartment, it may cause a short circuit or electrical shock.
1 Allow unit to completely cool before cleaning.
2 Disconnect the cord from the outlet.
3 Wipe the inside and outside surfaces of the unit with a damp cloth, then wipe dry.
4 To avoid damage, do not use abrasive cleaners or scouring pads.
5 Avoid using cleaners as the chemical residue could damage or corrode the surfaces of the
unit. Clean the unit with warm soapy water and soft cloth only.
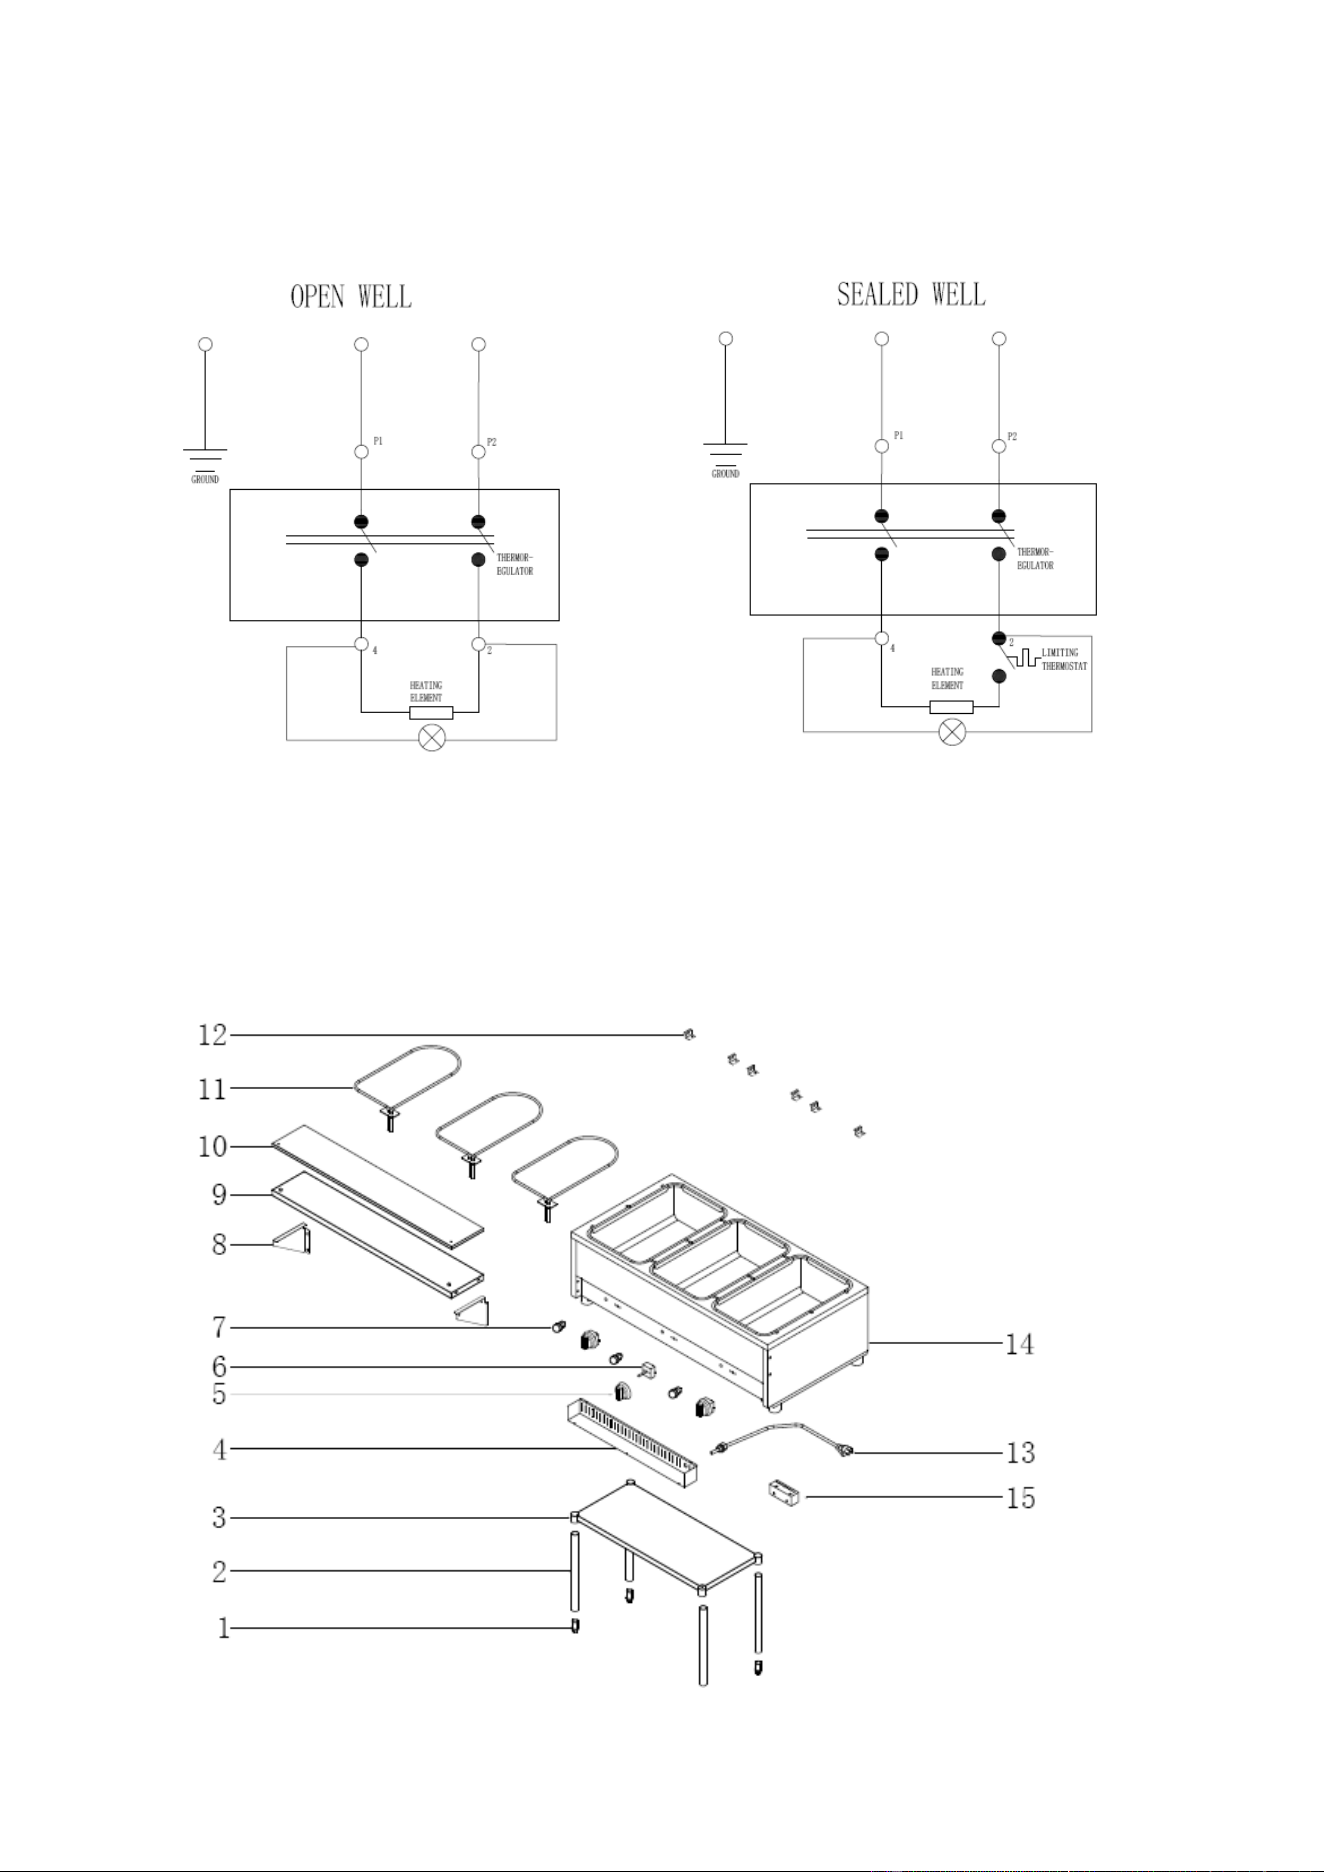
WIRING DIAGRAM
O series(open well)Exploded Views

O series(open well) Spare Part List
ITEM DESCRIPTION
1 ADJUSTABLE FOOT
2 LEG PIPE
3 UNDER SHELF (2) WELL
UNDER SHELF (3) WELL
UNDER SHELF (4) WELL
UNDER SHELF (5) WELL
4 ELECTRICAL BOX (2) WELL
ELECTRICAL BOX (3) WELL
ELECTRICAL BOX (4) WELL
ELECTRICAL BOX (5) WELL
5 THERMOSTAT KNOB
6 THERMOSTAT 120V (Infinite Switch)
THERMOSTAT 240V (Infinite Switch)
7 INDICATOR LIGHT
8 BRACKET FOR CUTTING BOARD LEFT
BRACKET FOR CUTTING BOARD RIGHT
9 SHELF FOR CUTTINNG BOARD (2) WELL
SHELF FOR CUTTING BOARD (3) WELL
SHELF FOR CUTTING BOARD (4) WELL
SHELF FOR CUTTING BOARD (5) WELL
10 POLY CUTTING BOARD (2) WELL
POLY CUTTING BOARD (3) WELL
POLY CUTTING BOARD (4) WELL
POLY CUTTING BOARD (5) WELL
11 HEATING ELEMENT 500W 120v
HEATING ELEMENT 1000W 240
12 HEATING ELEMENT CLIP
13 CORD AND STRAIN RELIEF 5-15P (120v)
CORD AND STRAIN RELIEF 5-20P (120v)
CORD AND STRAIN RELIEF 6-20P (240v)
CORD AND STRAIN RELIEF 6-30P (240V)
14 BODY
15 TERMINAL BLOCK
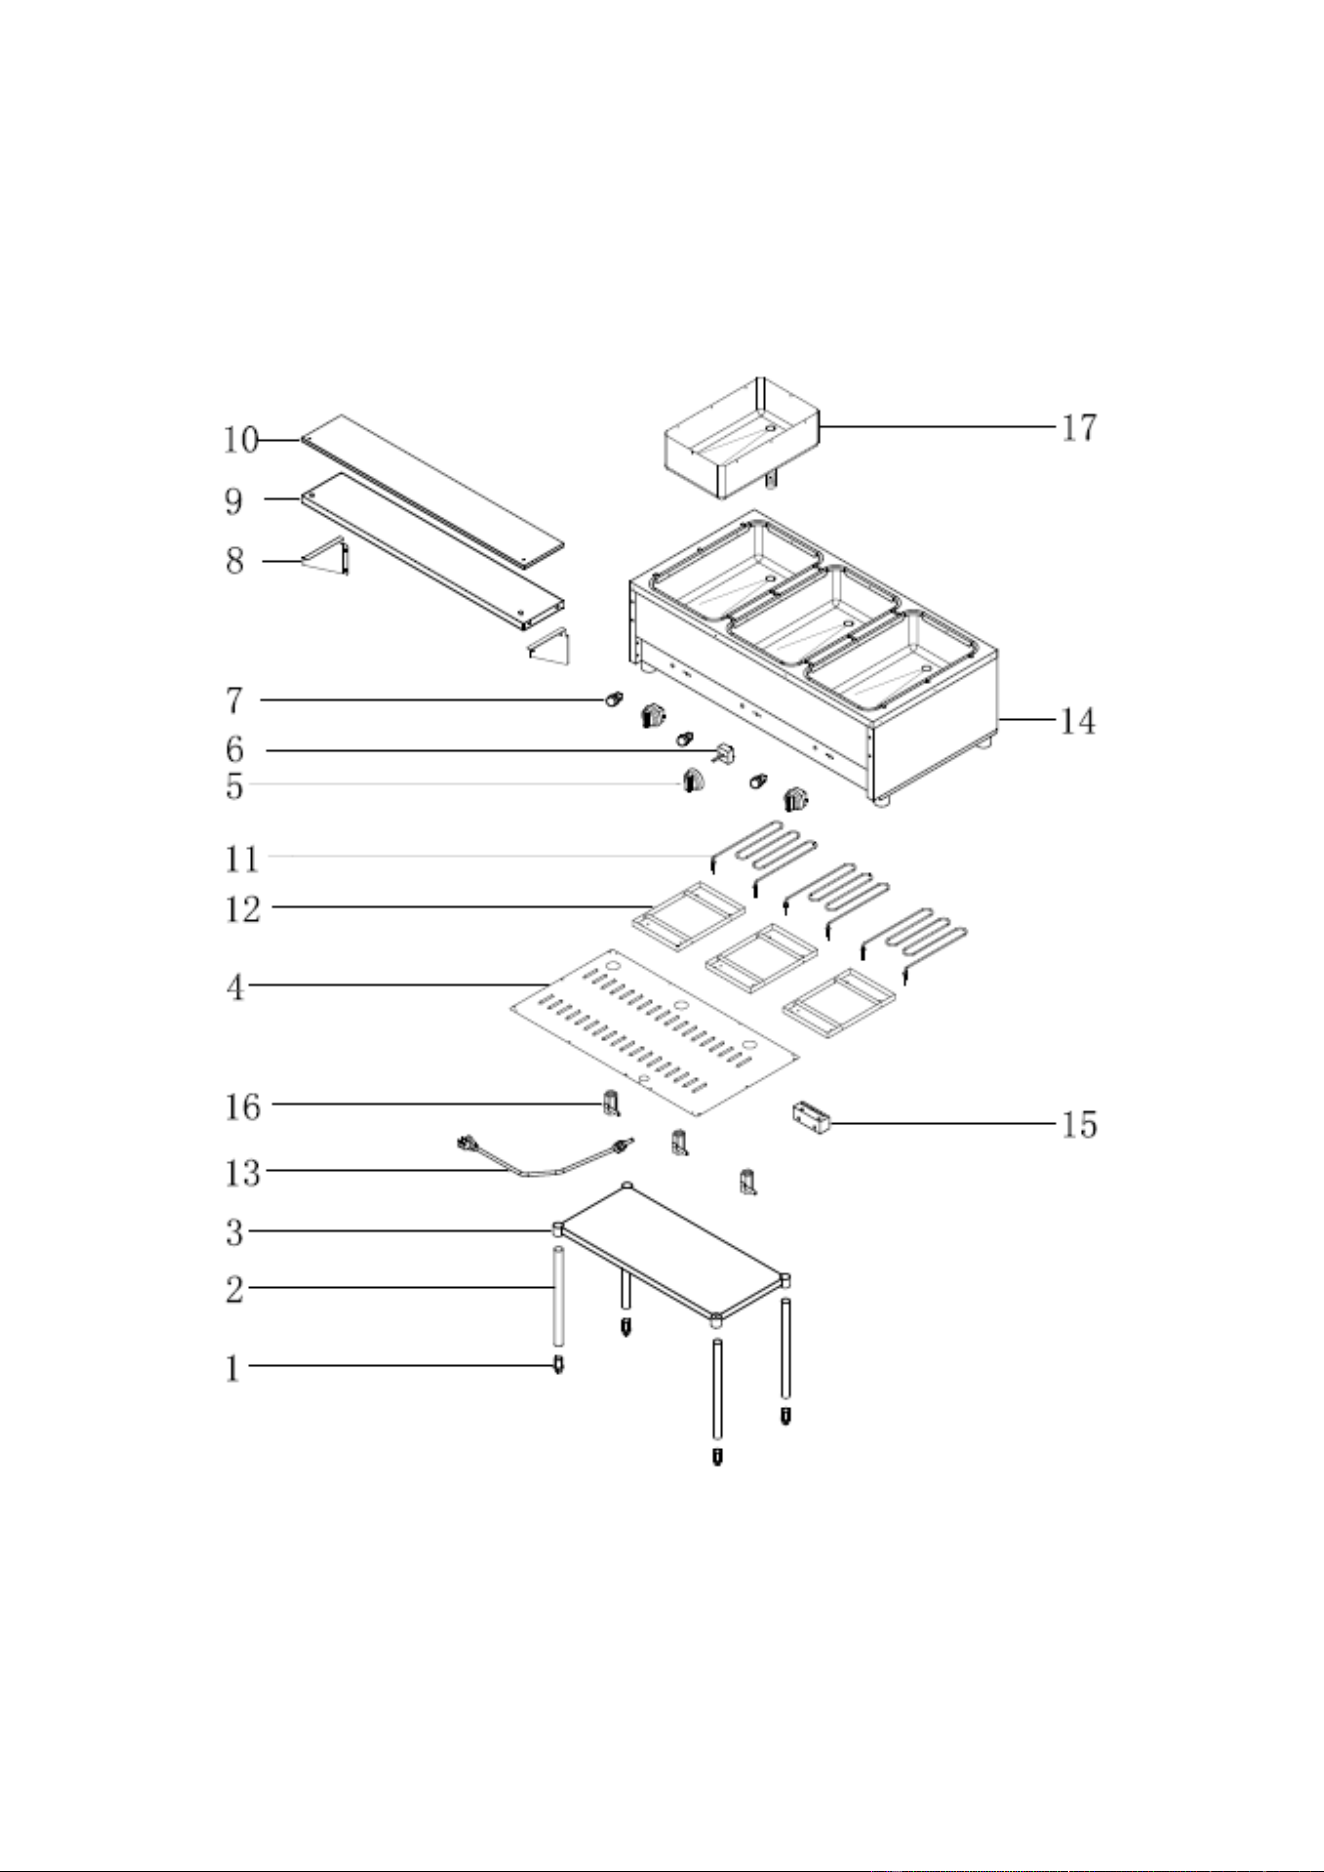
S series(sealed well) Exploded Views

S,SO,SD series(sealed well)
ITEM DESCRIPTION
1 ADJUSTABLE FOOT
2 LEG PIPE
3 UNDER SHELF (2) WELL
UNDER SHELF (3) WELL
UNDER SHELF (4) WELL
UNDER SHELF (5) WELL
4 ELECTRICAL BOX (2) WELL
ELECTRICAL BOX (3) WELL
ELECTRICAL BOX (4) WELL
ELECTRICAL BOX (5) WELL
5 THERMOSTAT KNOB
6 THERMOSTAT 120V (Infinite Switch)
THERMOSTAT 240V (Infinite Switch)
7 INDICATOR LIGHT
8 BRACKET FOR CUTTING BOARD LEFT
BRACKET FOR CUTTING BOARD RIGHT
9 SHELF FOR CUTTINNG BOARD (2) WELL
SHELF FOR CUTTING BOARD (3) WELL
SHELF FOR CUTTING BOARD (4) WELL
SHELF FOR CUTTING BOARD (5) WELL
10 POLY CUTTING BOARD (2) WELL
POLY CUTTING BOARD (3) WELL
POLY CUTTING BOARD (4) WELL
POLY CUTTING BOARD (5) WELL
11 HEATING ELEMENT 640 120v
HEATING ELEMENT 1100W 240
12 HEATING ELEMENT CLIP
13 CORD AND STRAIN RELIEF 5-15P (120v)
CORD AND STRAIN RELIEF 5-20P (120v)
CORD AND STRAIN RELIEF 6-20P (240v)
CORD AND STRAIN RELIEF 6-30P (240V)
14 BODY
15 TERMINAL BLOCK
16 VALVE
17 BOWL