USER MANUAL

CONTENTS
ATTENTION ....................................................................................................... 1
BASIC FUNCTION ............................................................................................ 2
RADIO ..................................................................................................................4
BLUETOOTH..................................................................................................... 5
PHONELINK ...................................................................................................... 6
USB ....................................................................................................................... 8
AUX ...................................................................................................................... 9
EQ SETTINGS .................................................................................................... 9
SYSTEM SETTINGS ....................................................................................... 10
WIRING DIAGRAM ........................................................................................12
INSTALLATION...............................................................................................13

1
ATTENTION
Please try not to watch videos and operate machines while driving for your
safety. When sailing, please adjust the volume to hear outside sounds clearly.
Before starting operation, please read this manual and other manuals of the
system in detail to understand the relevant safety tips and warning signs in this
manual and the machine. After reading, please keep it for reference at any time.
First of all, please pay attention to safety when sailing.
If you encounter difficulties operating this system, please park the boat in a
safe place before operating.
Do not allow children to operate this machine to avoid personal injury or
machine damage.
Please follow the rules of the sailing when using the screen projection
function.
Please do not use it in places where the use of electronic equipment or open
flames is strictly prohibited, such as gas stations, wineries, areas with strong
electromagnetic interference, etc. Otherwise, it may cause danger.
Do not maintain or install this machine by yourself. Do not install or repair
this machine while the power is on. It is extremely dangerous to install and
repair this machine by persons who have not been trained or experienced in
installing electronic equipment or vehicle accessories.
Do not scratch the screen with sharp objects, and do not press the screen
with hard objects, otherwise, the touch screen may be damaged.
2
BASIC FUNCTION
1
.
Power on/off
When the ACC power is on,click the “ ” button on the panel to turn on the
power
;
Insert the USB disk into the USB port, the machine will automatically turn
on and enter the main page.
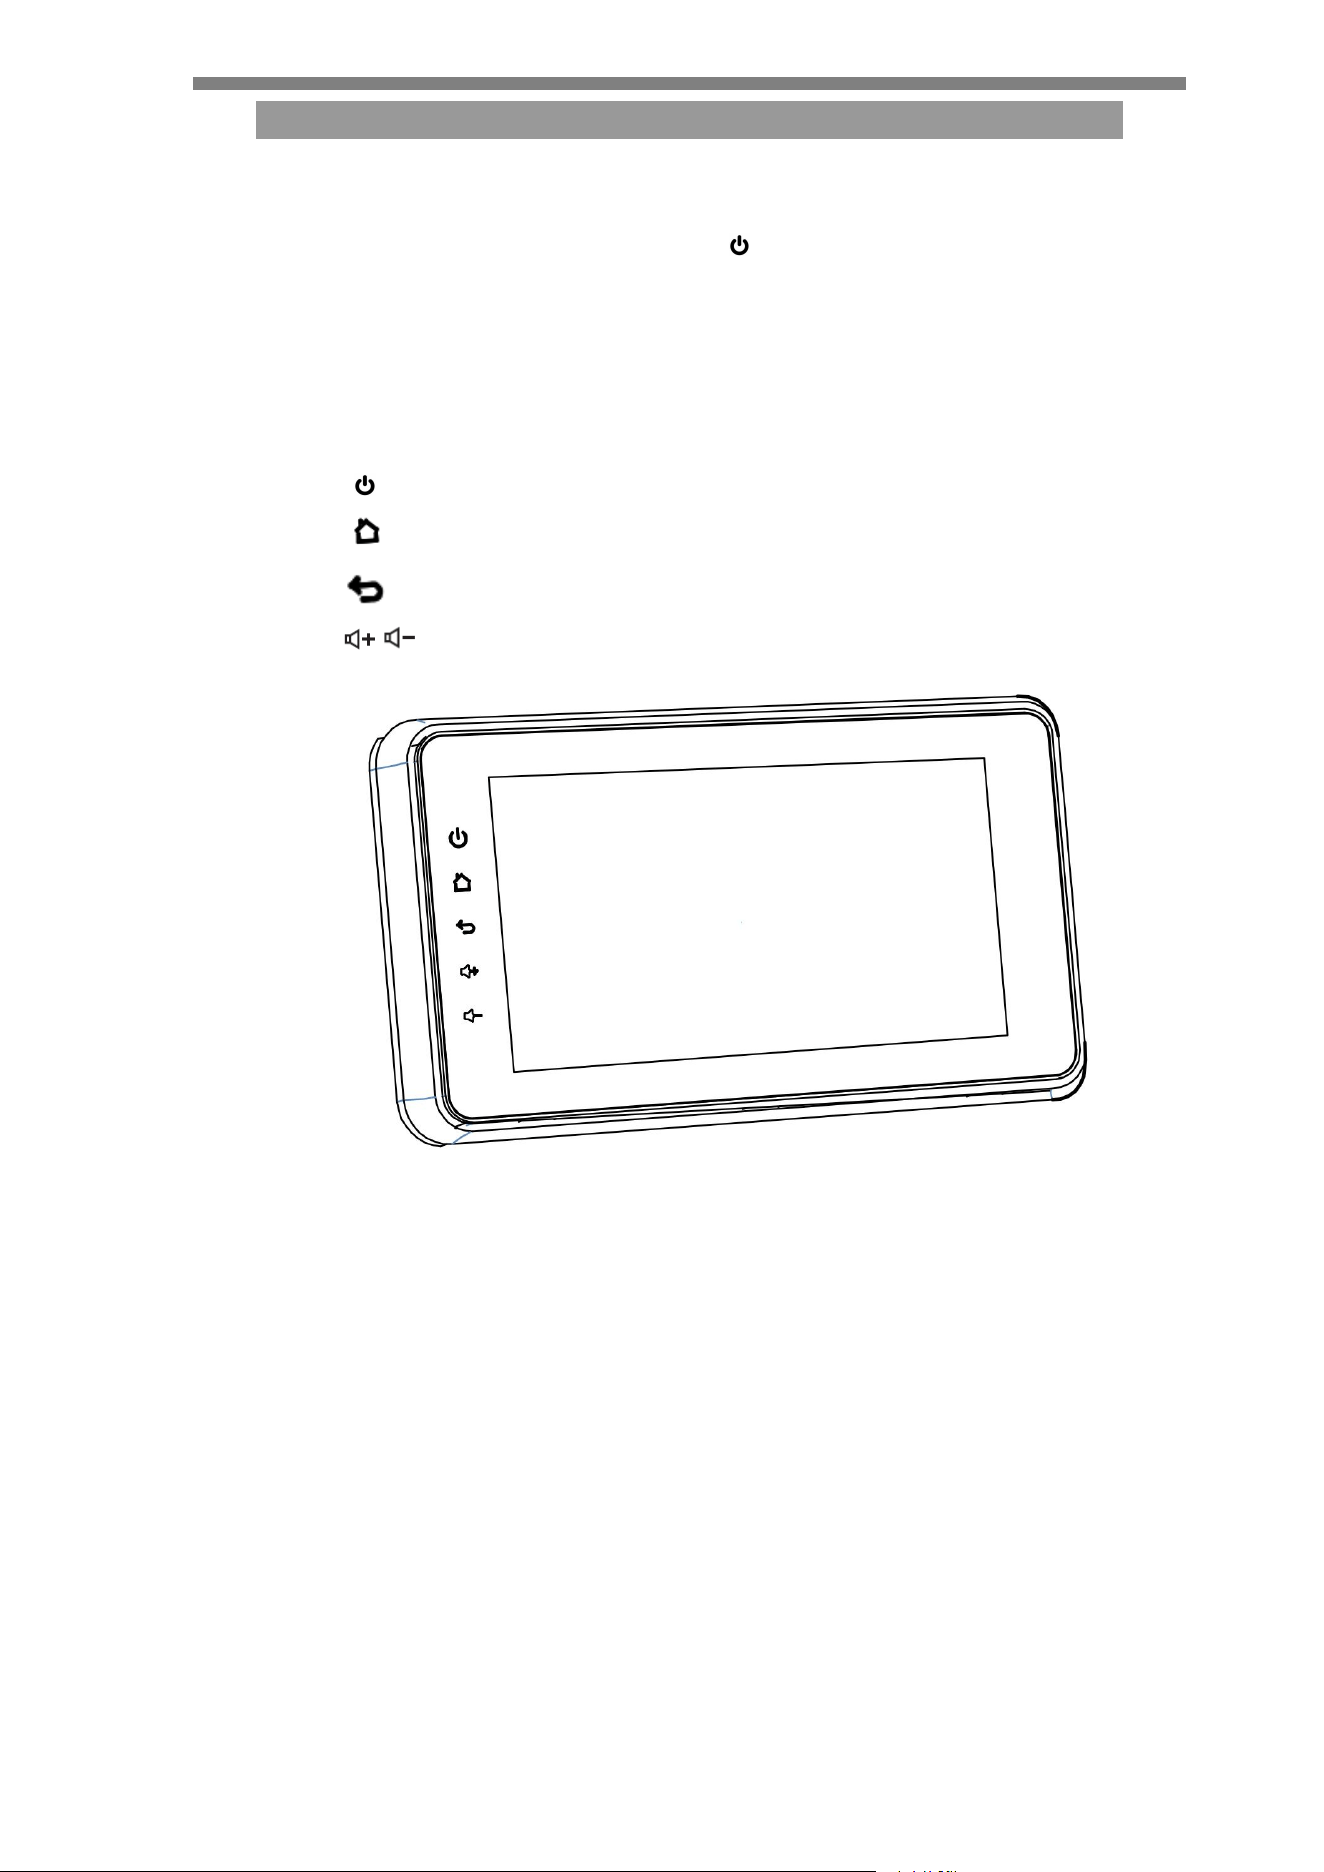
2.Panel function
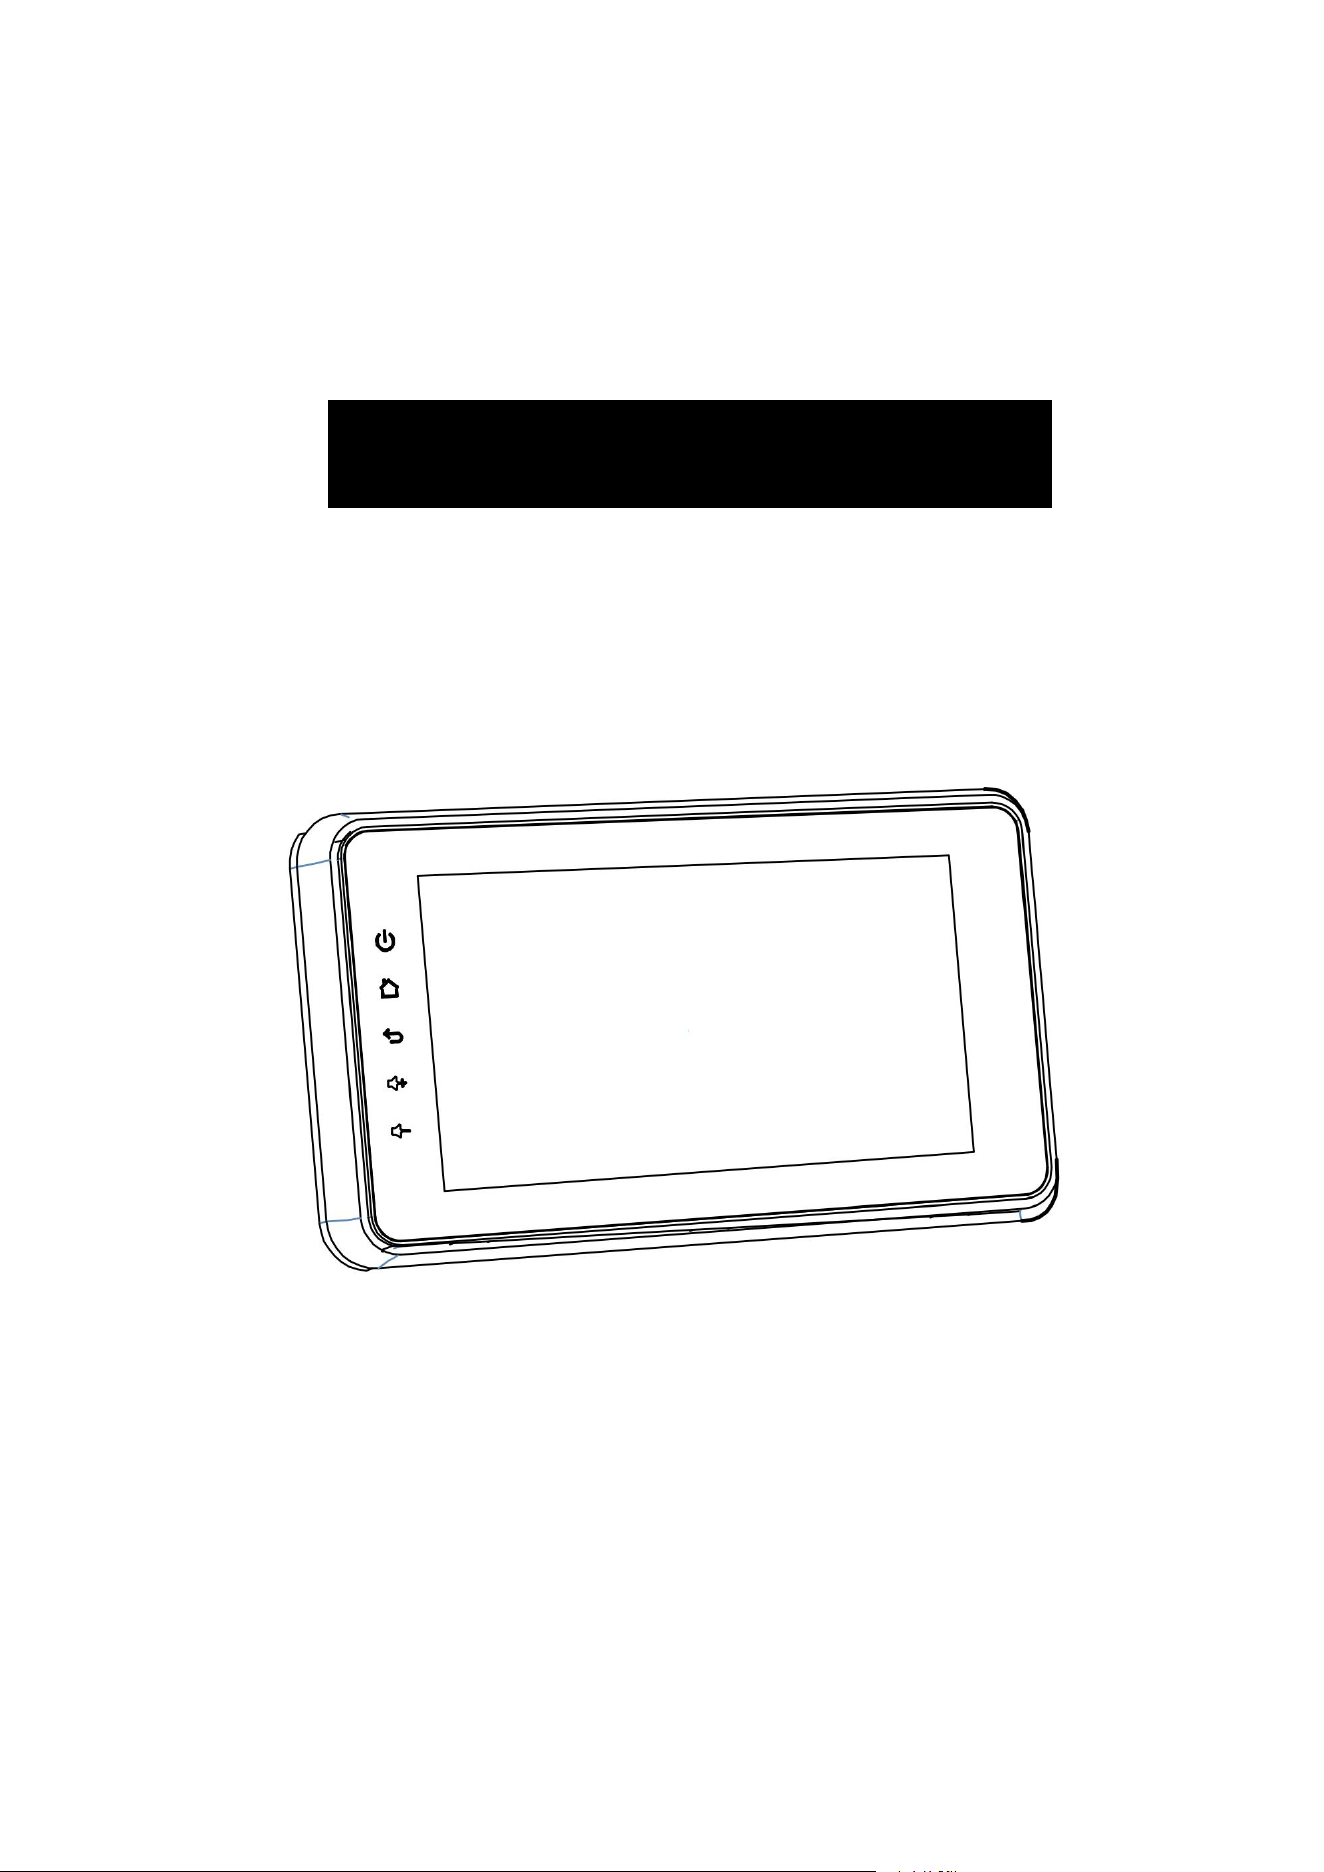
1. “ ” Short press to mute / long press to turn off
2. “ ” Main menu
3. “ ” Back
4. “ ” Volume adjustment
3
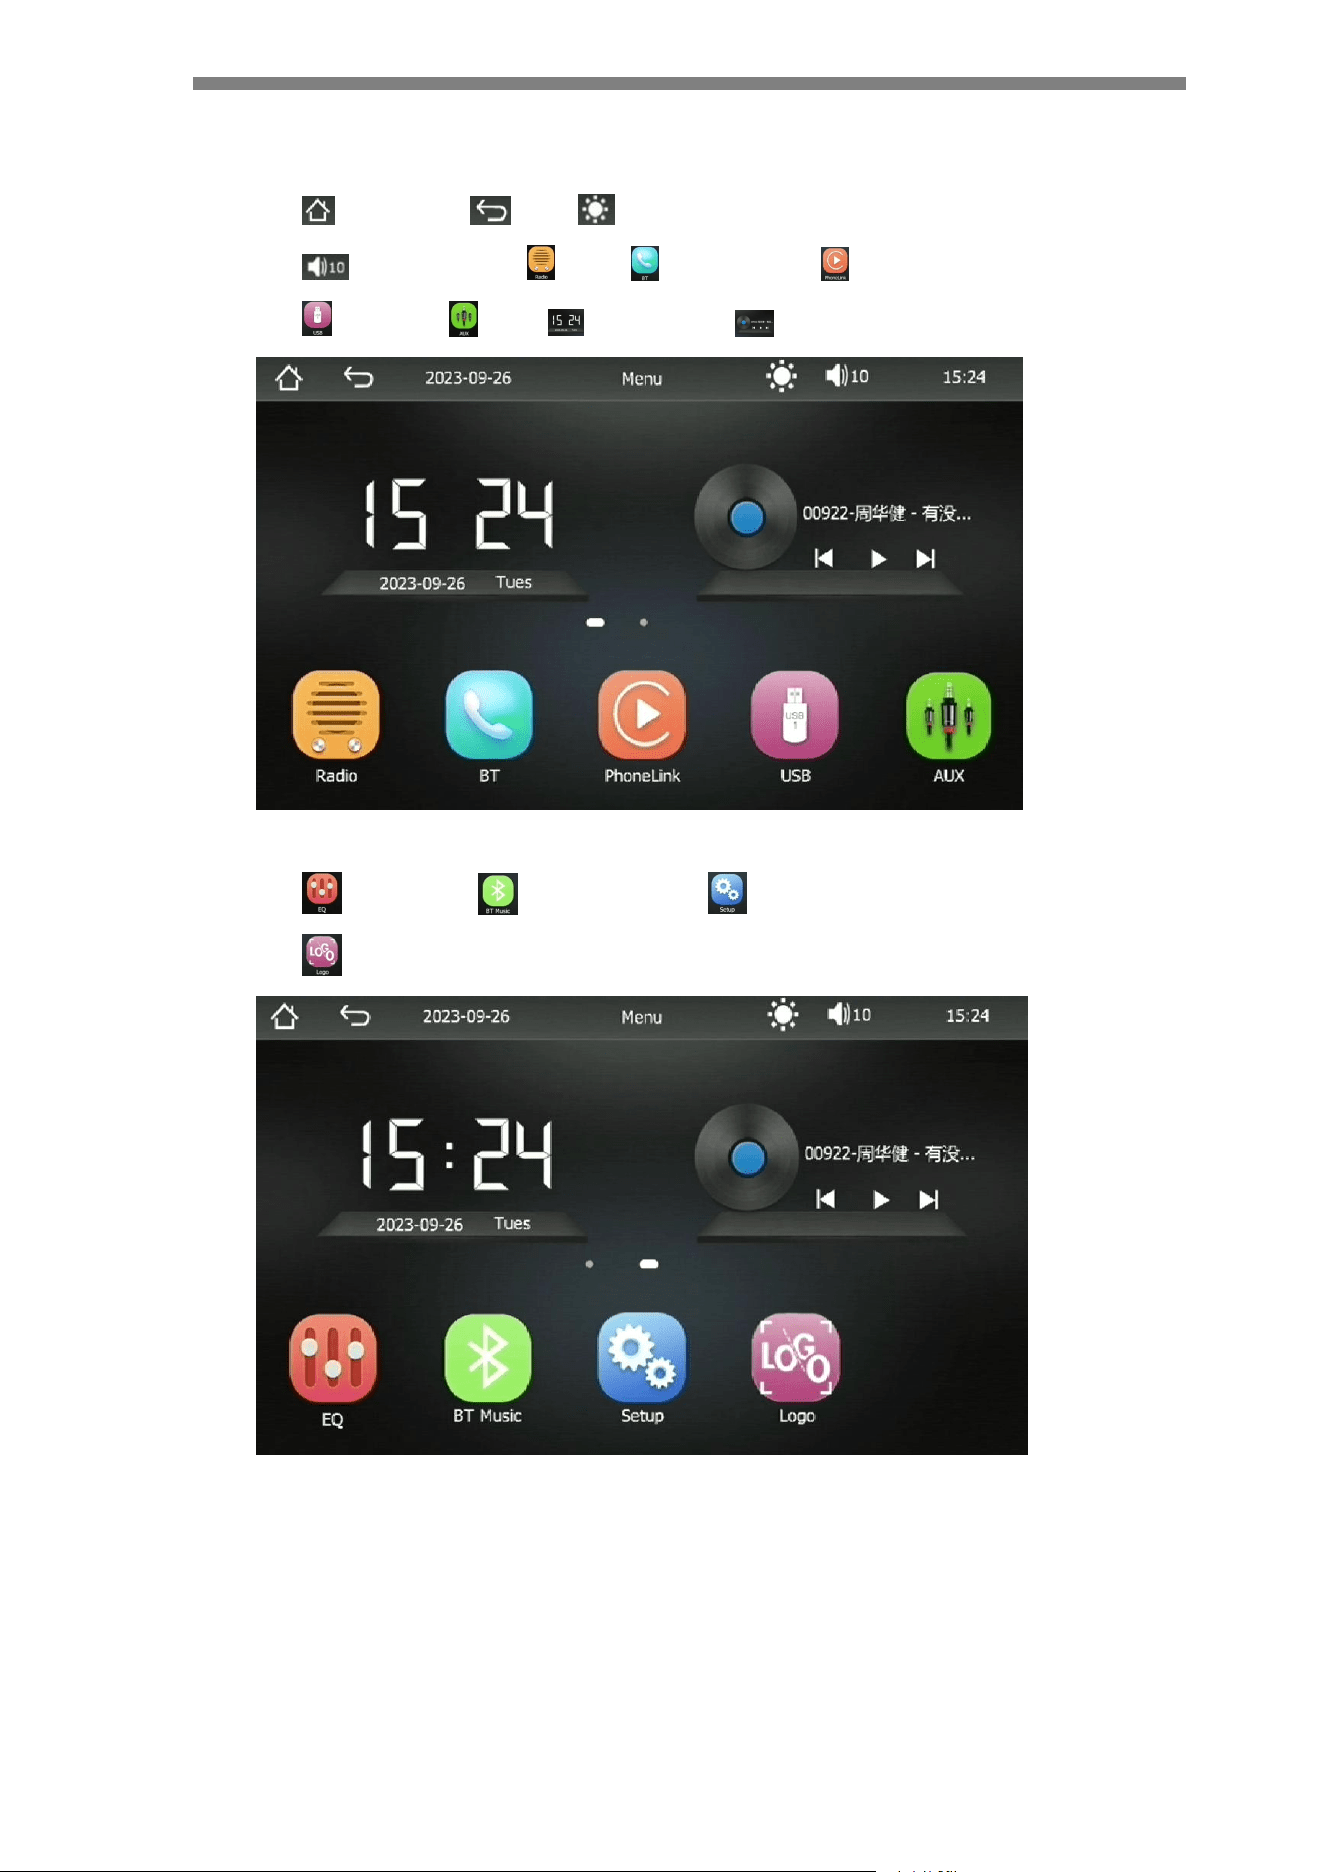
3. Main
menu
Main menu Back Day / night / off screen mode
Volume display Radio Bluetooth call PhoneLink
USB play AUX Time display Playing status
EQ settings Bluetooth Music Setup
Boot LOGO setting
4
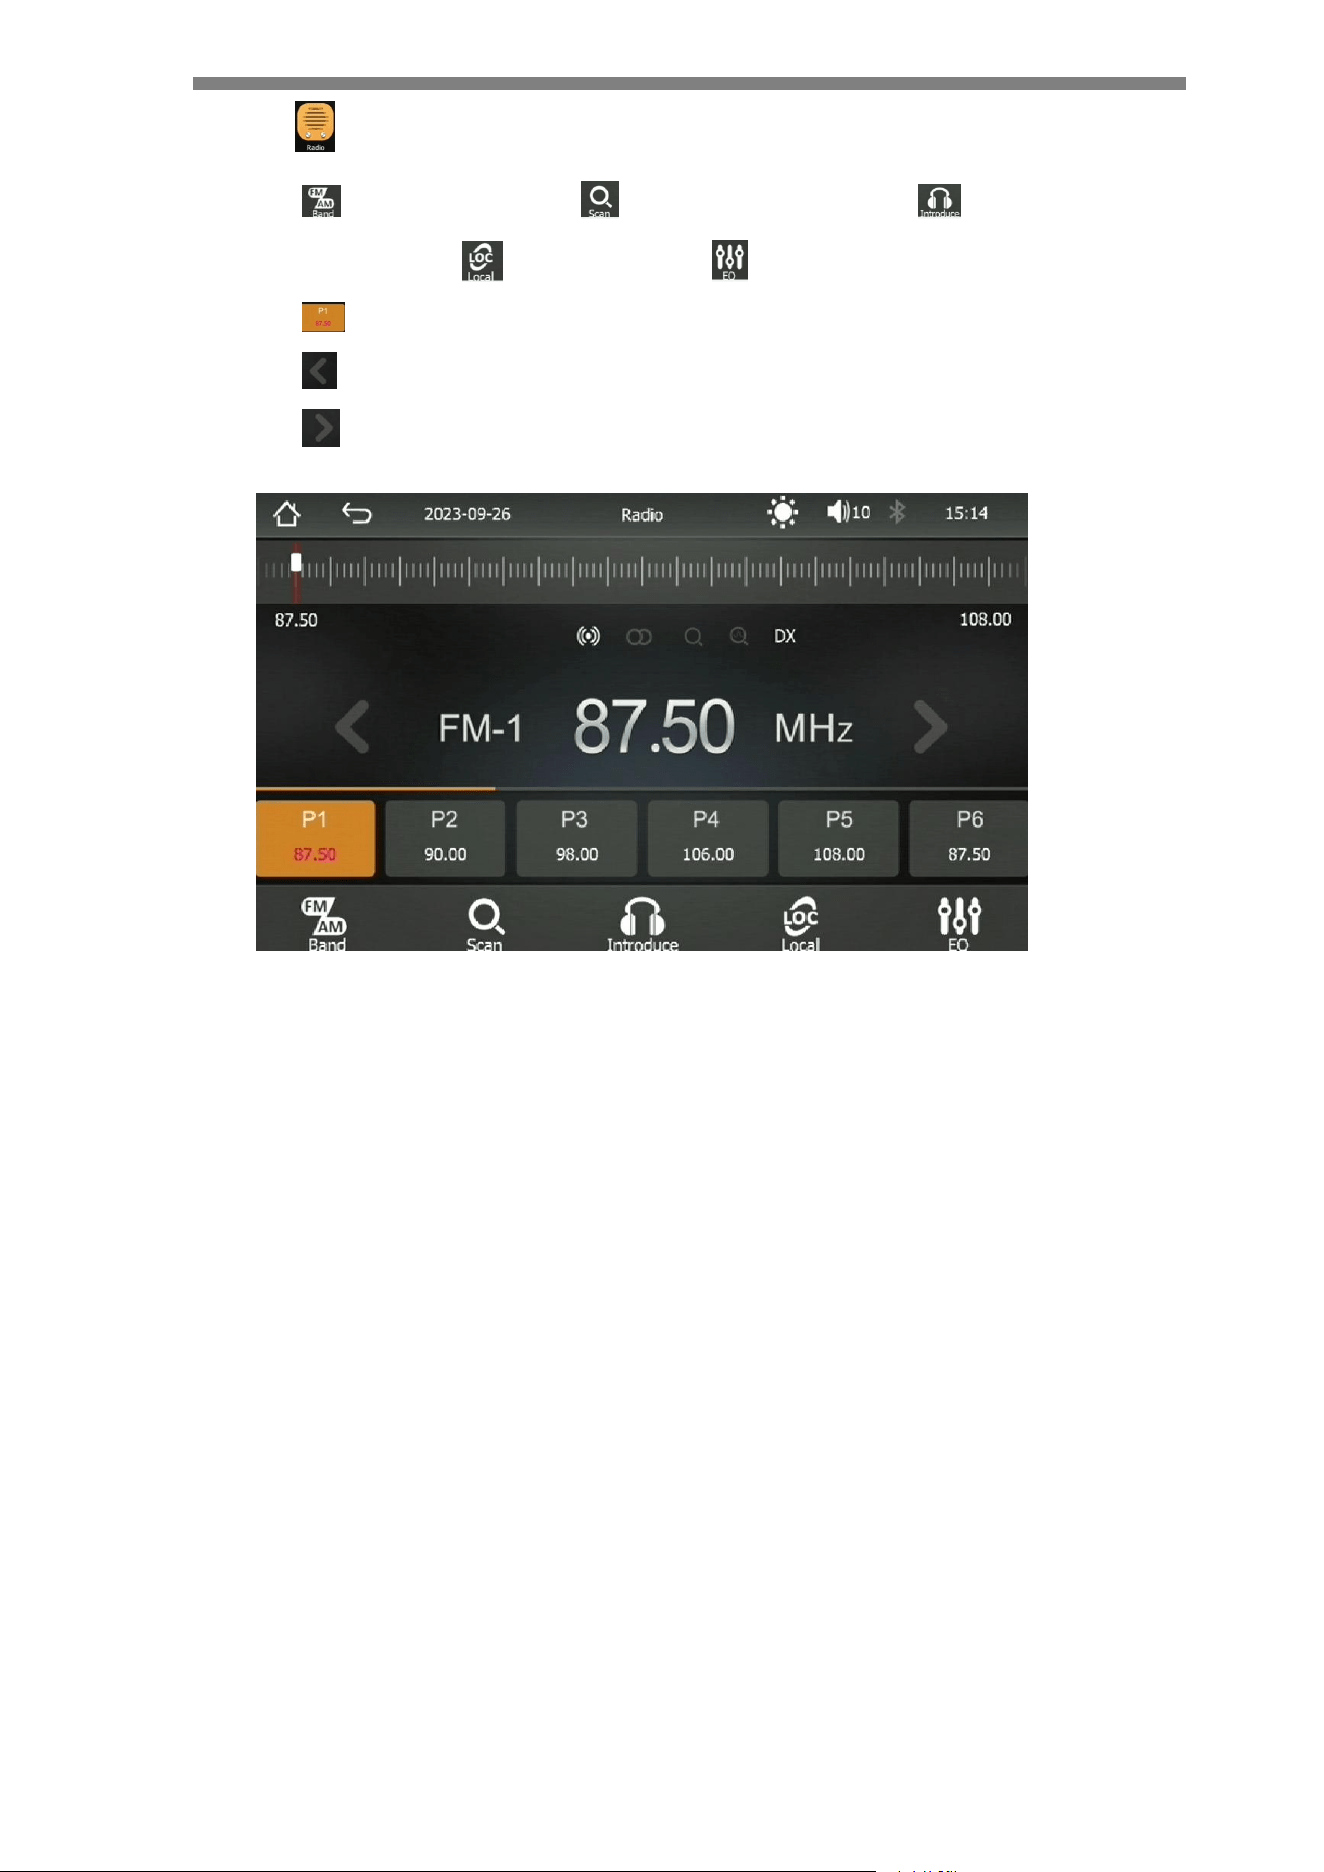
4. Radio
FM band switching Search for radio stations Radio stations
browsing Local / DX switch EQ settings
P1-P6 radio station storage, a total of 18 radio stations can be stored
Press: Single step back; Hold: Up Search
Press: Single step forward; Hold: Down search
5
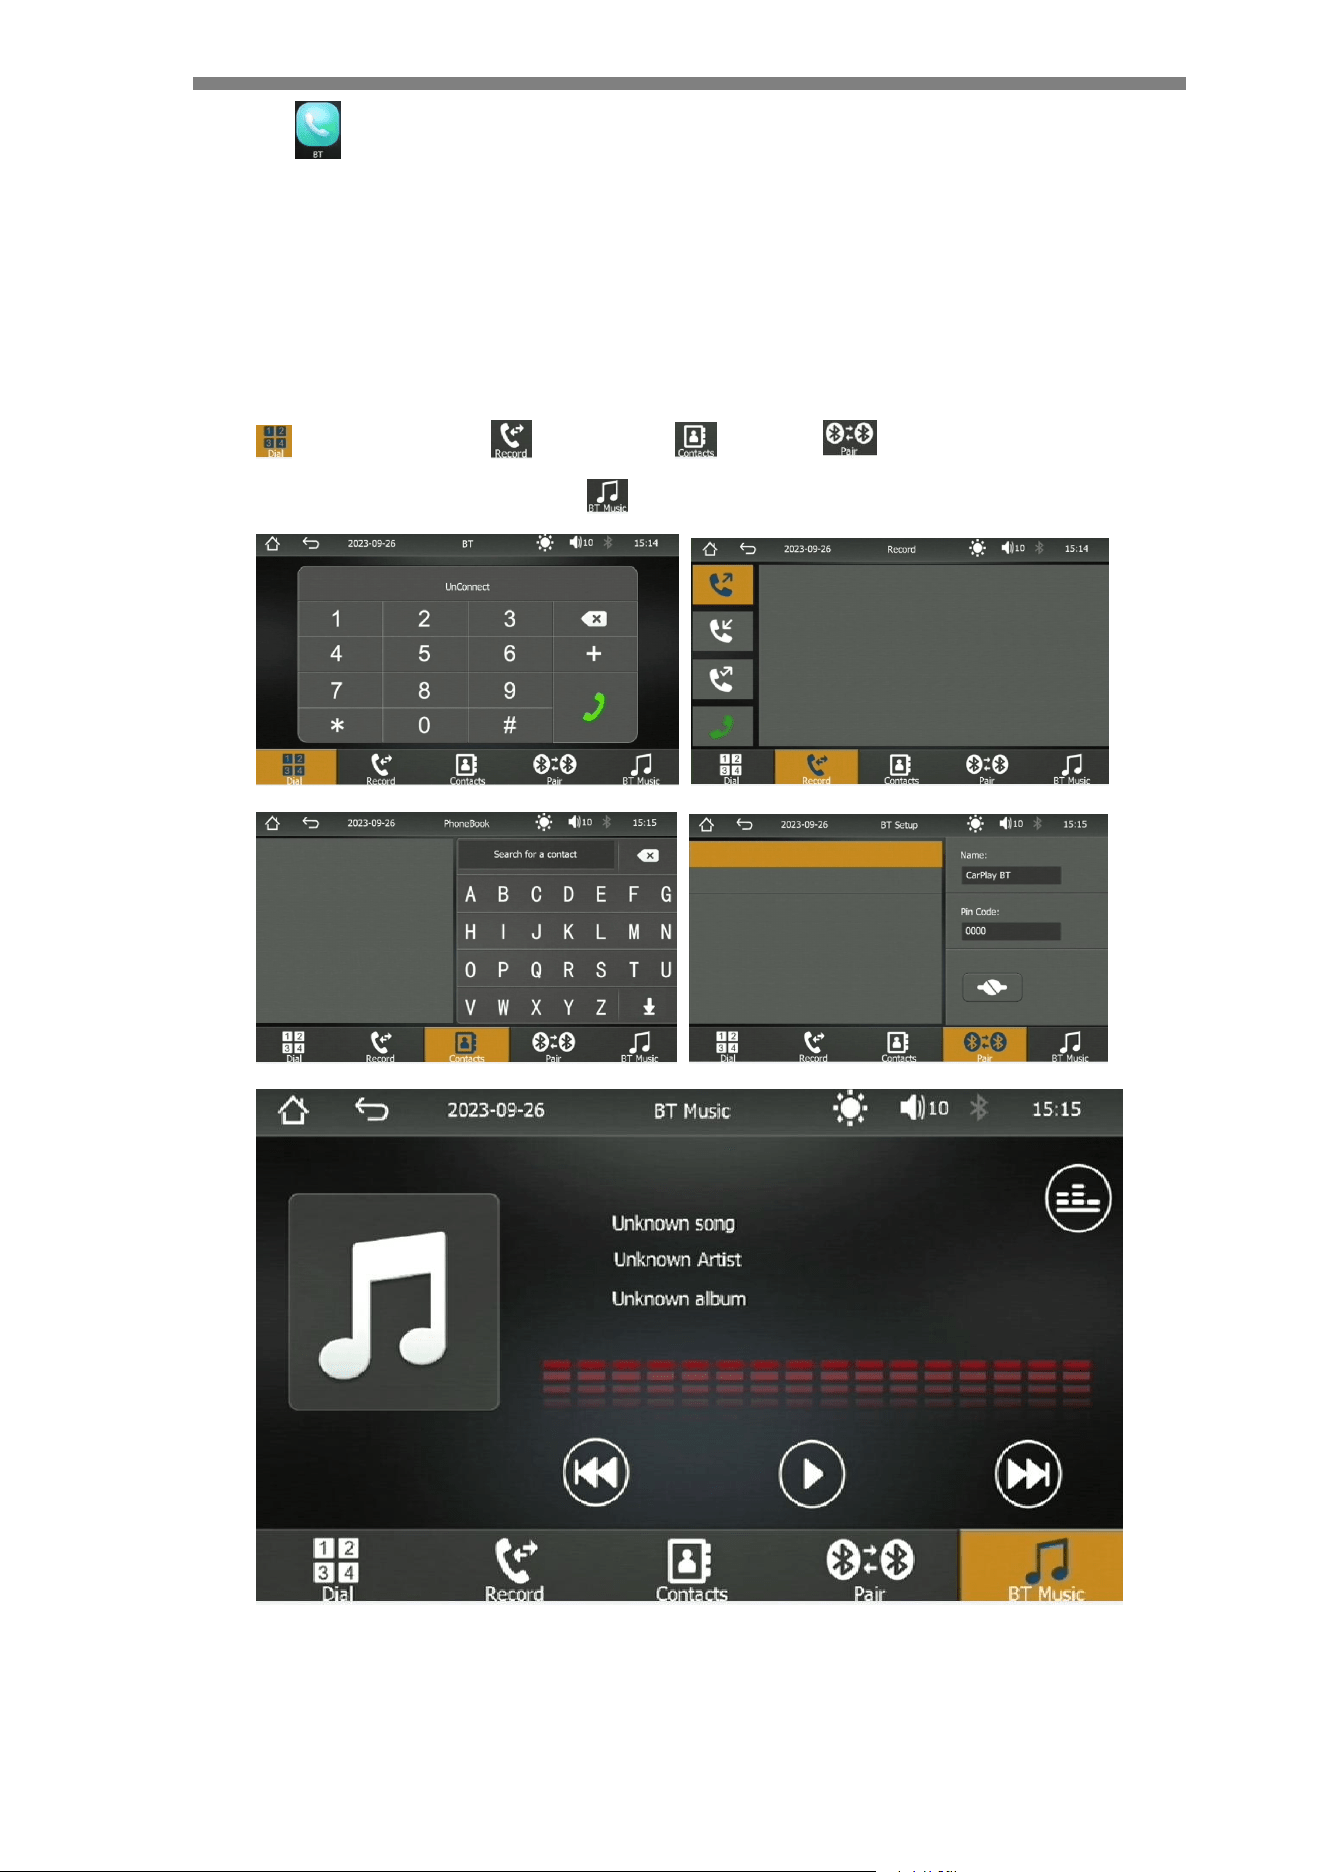
5. Bluetooth Call Menu
Search the Bluetooth device name on your phone: CarPlay BT. When connecting,
the phone will prompt you to enter the PIN code. Enter the corresponding PIN
code, such as "0000". After connecting, the yellow Bluetooth icon displayed in
the upper right corner of the screen will light up.
Bluetooth dialing Call records Contacts Bluetooth device name:
CarPlay BT (PIN code: 0000) Bluetooth music
6
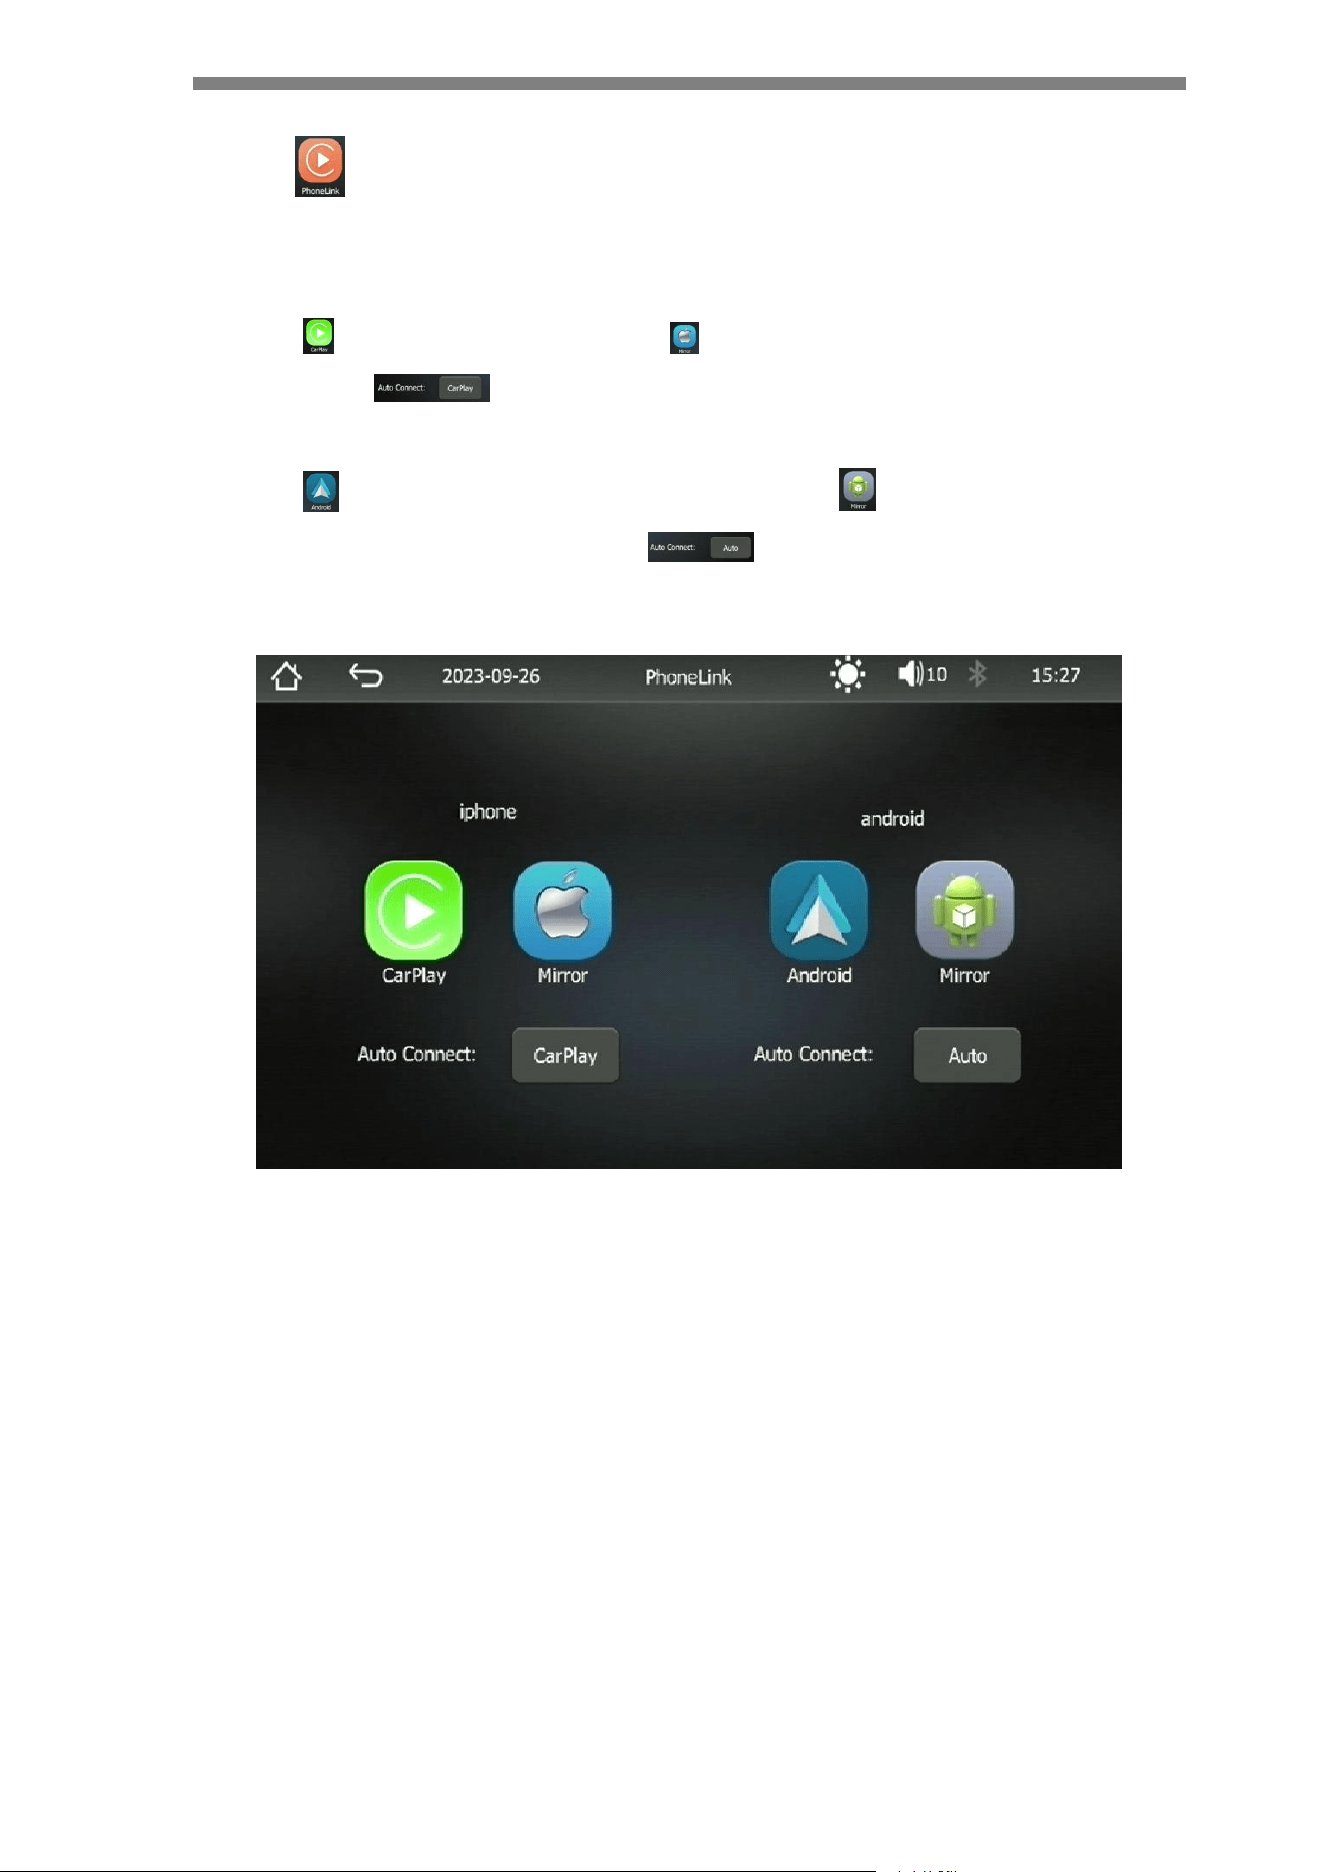
6. Phone Link
When the mobile phone is connected to the machine through the machine's USB
port, the mobile phone screen can be mirrored onto the machine screen.
(1) iPhone enters CarPlay mode iPhone enters MirrorLink mode(wired
only) iPhone default mode selection (CarPlay mode, MirrorLink
mode, OFF)
(2) Android phone enters Android Auto mode Android phone enters
MirrorLink mode (wired only) Android phone connection default
mode selection (Auto mode, MirrorLink mode, OFF)
1. For iPhone:
(1) Mirror iPhone to the unit with wire
Connect your iPhone to the USB port of the unit using the original USB
cable of your iPhone, the unit will automatically enter CarPlay mode.
(2) Mirror iPhone to the unit without wire
Turn on the iPhone's Bluetooth and find the device name (CarPlay BT).
After connecting, the unit will automatically enter CarPlay mode.
7
2. For Android phone:
(1) Mirror Android phone to the unit with wire
Connect your Android Phone to the USB port of the unit using the original
USB cable of your Phone, the unit will automatically enter Android Auto mode.
(2) Mirror Android phone to the unit without wire
Turn on the Android Phone's Bluetooth and find the device name (CarPlay
BT). After connecting, the unit will automatically enter Android Auto mode.
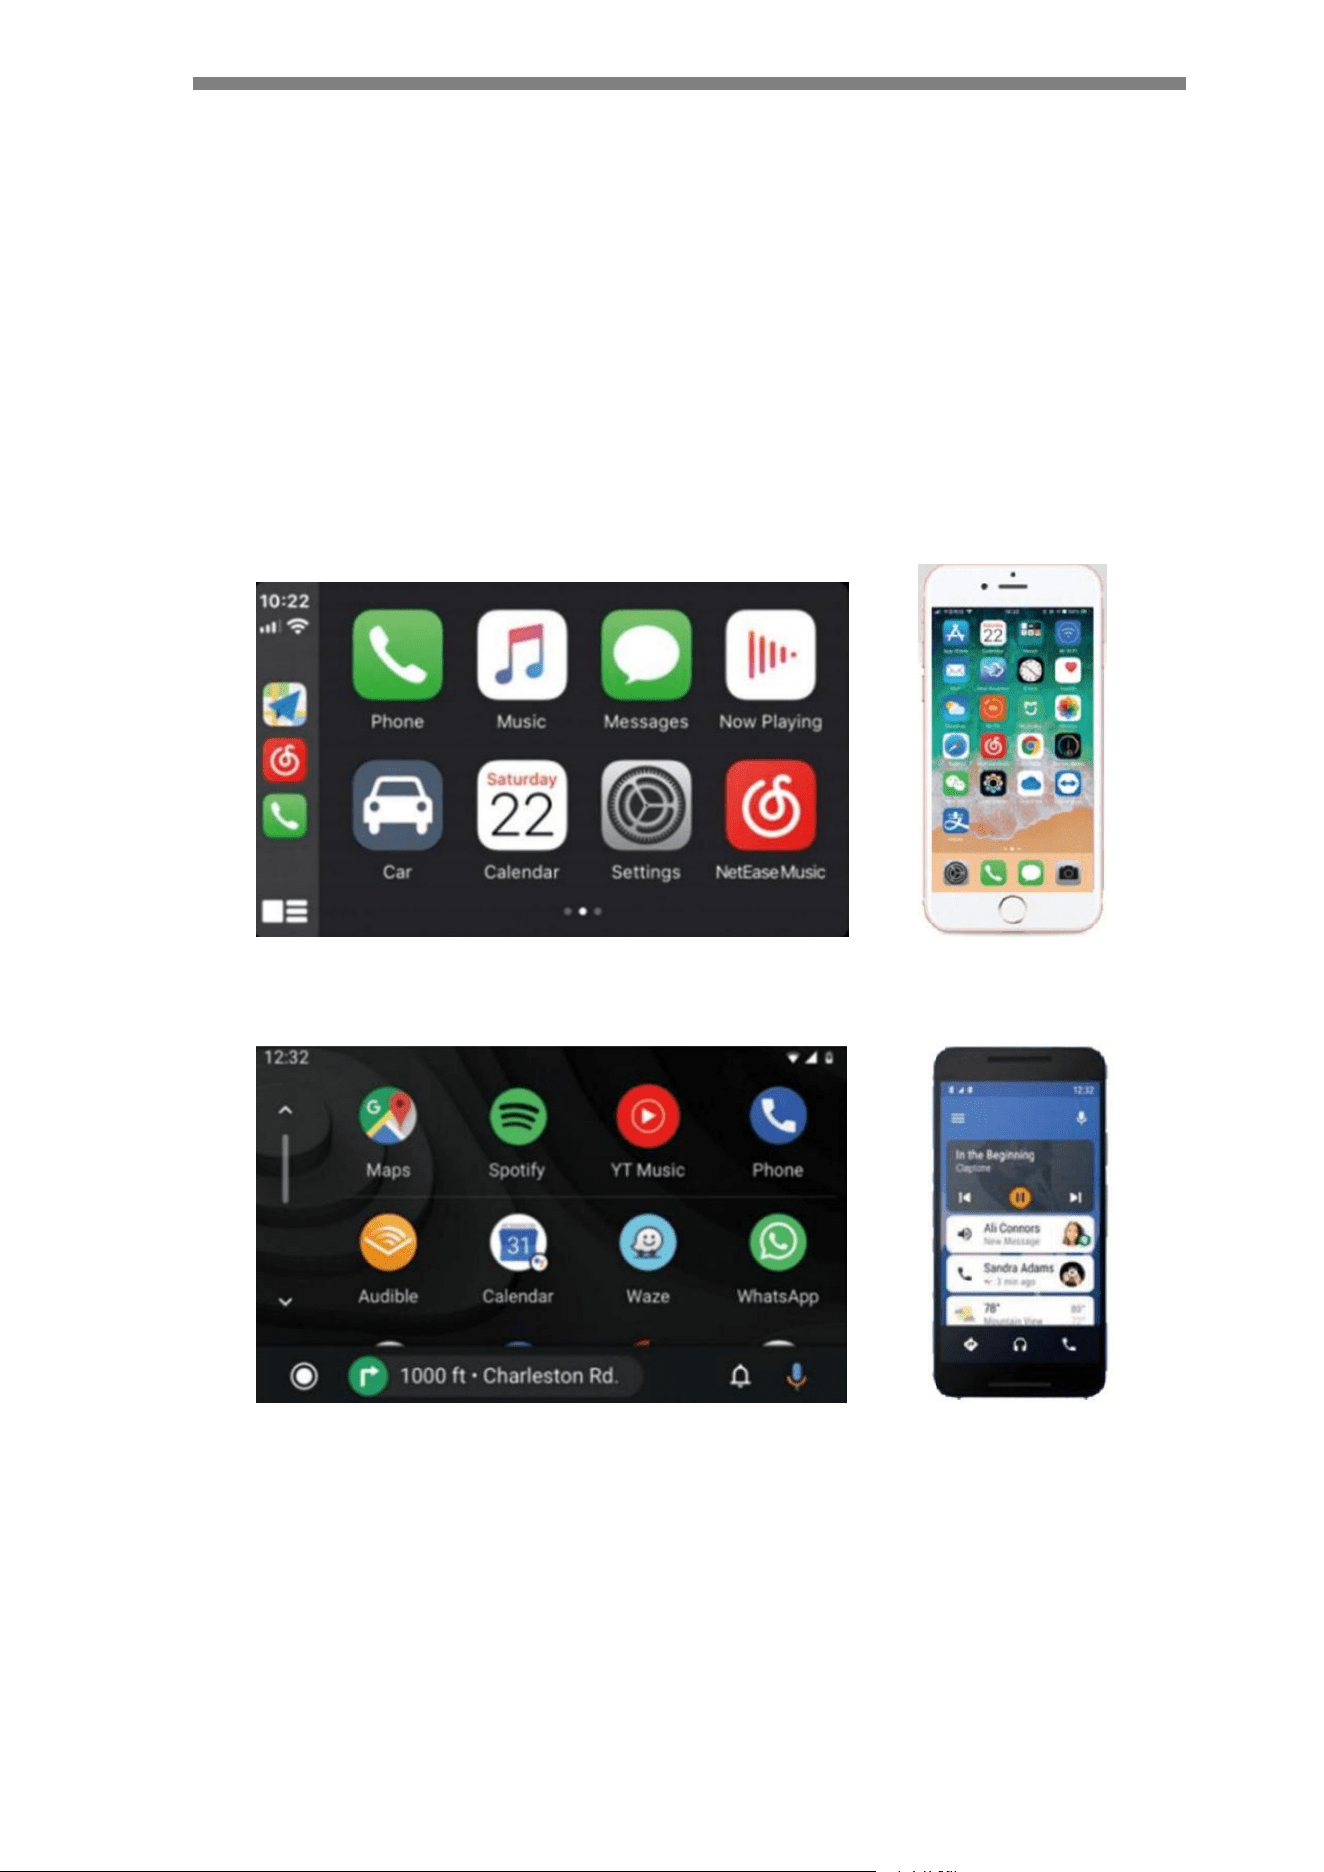
As shown below after mirroring phone
You can control your iPhone on the unit
You can control your Android Phone on the unit
Note: This function requires the Android phone to download and install the
Android Auto APP on Google Play.
8
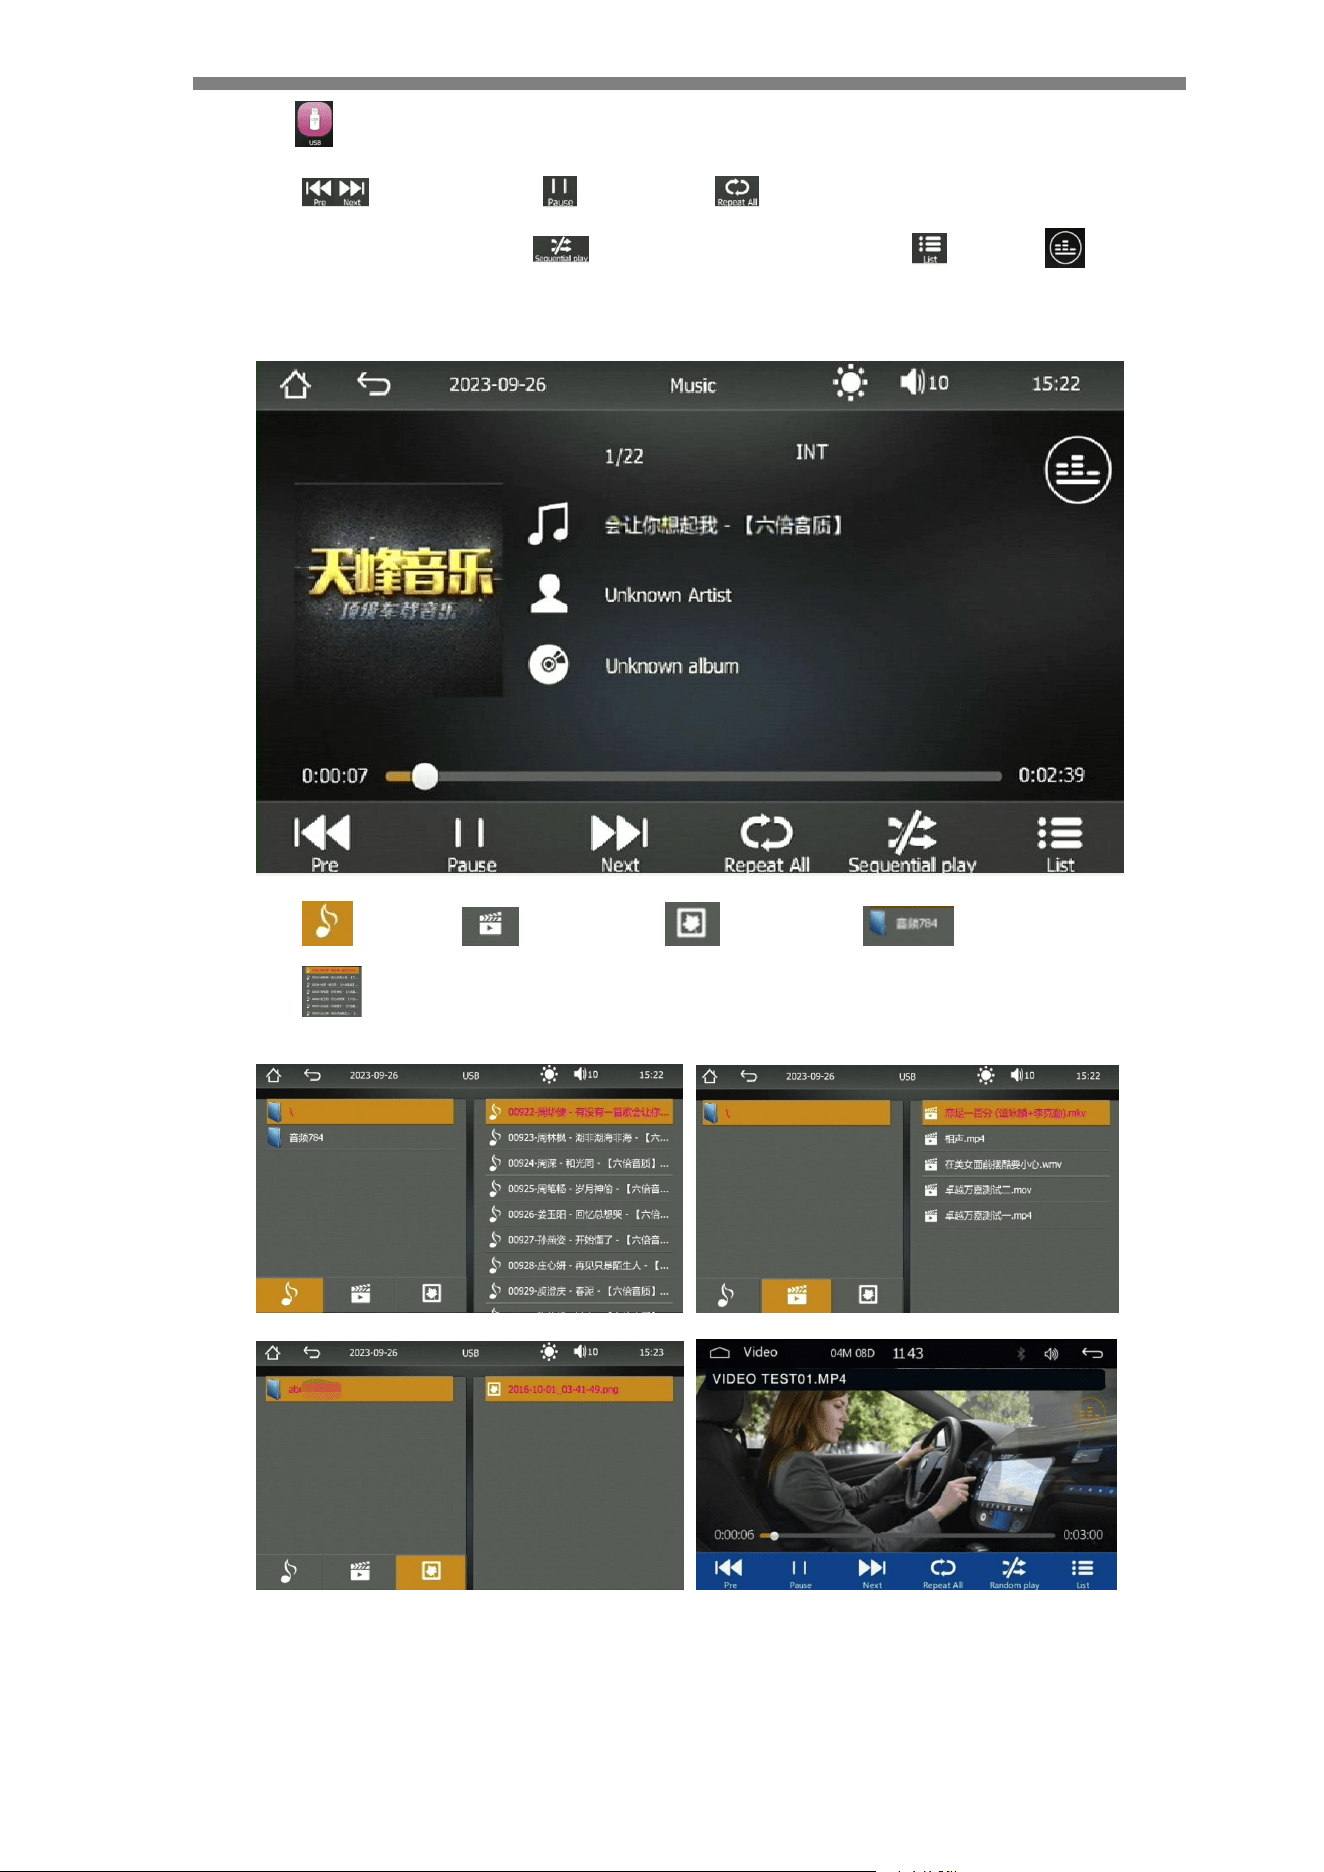
7. USB Play
Previous/ Next Pause/ Play Repeat all/ Close repeat/ Repeat a
song/ Repeat folder Play sequentially/ randomly Playlist EQ
settings
Playlist Movie list Image list Folder display
Play music list status
9
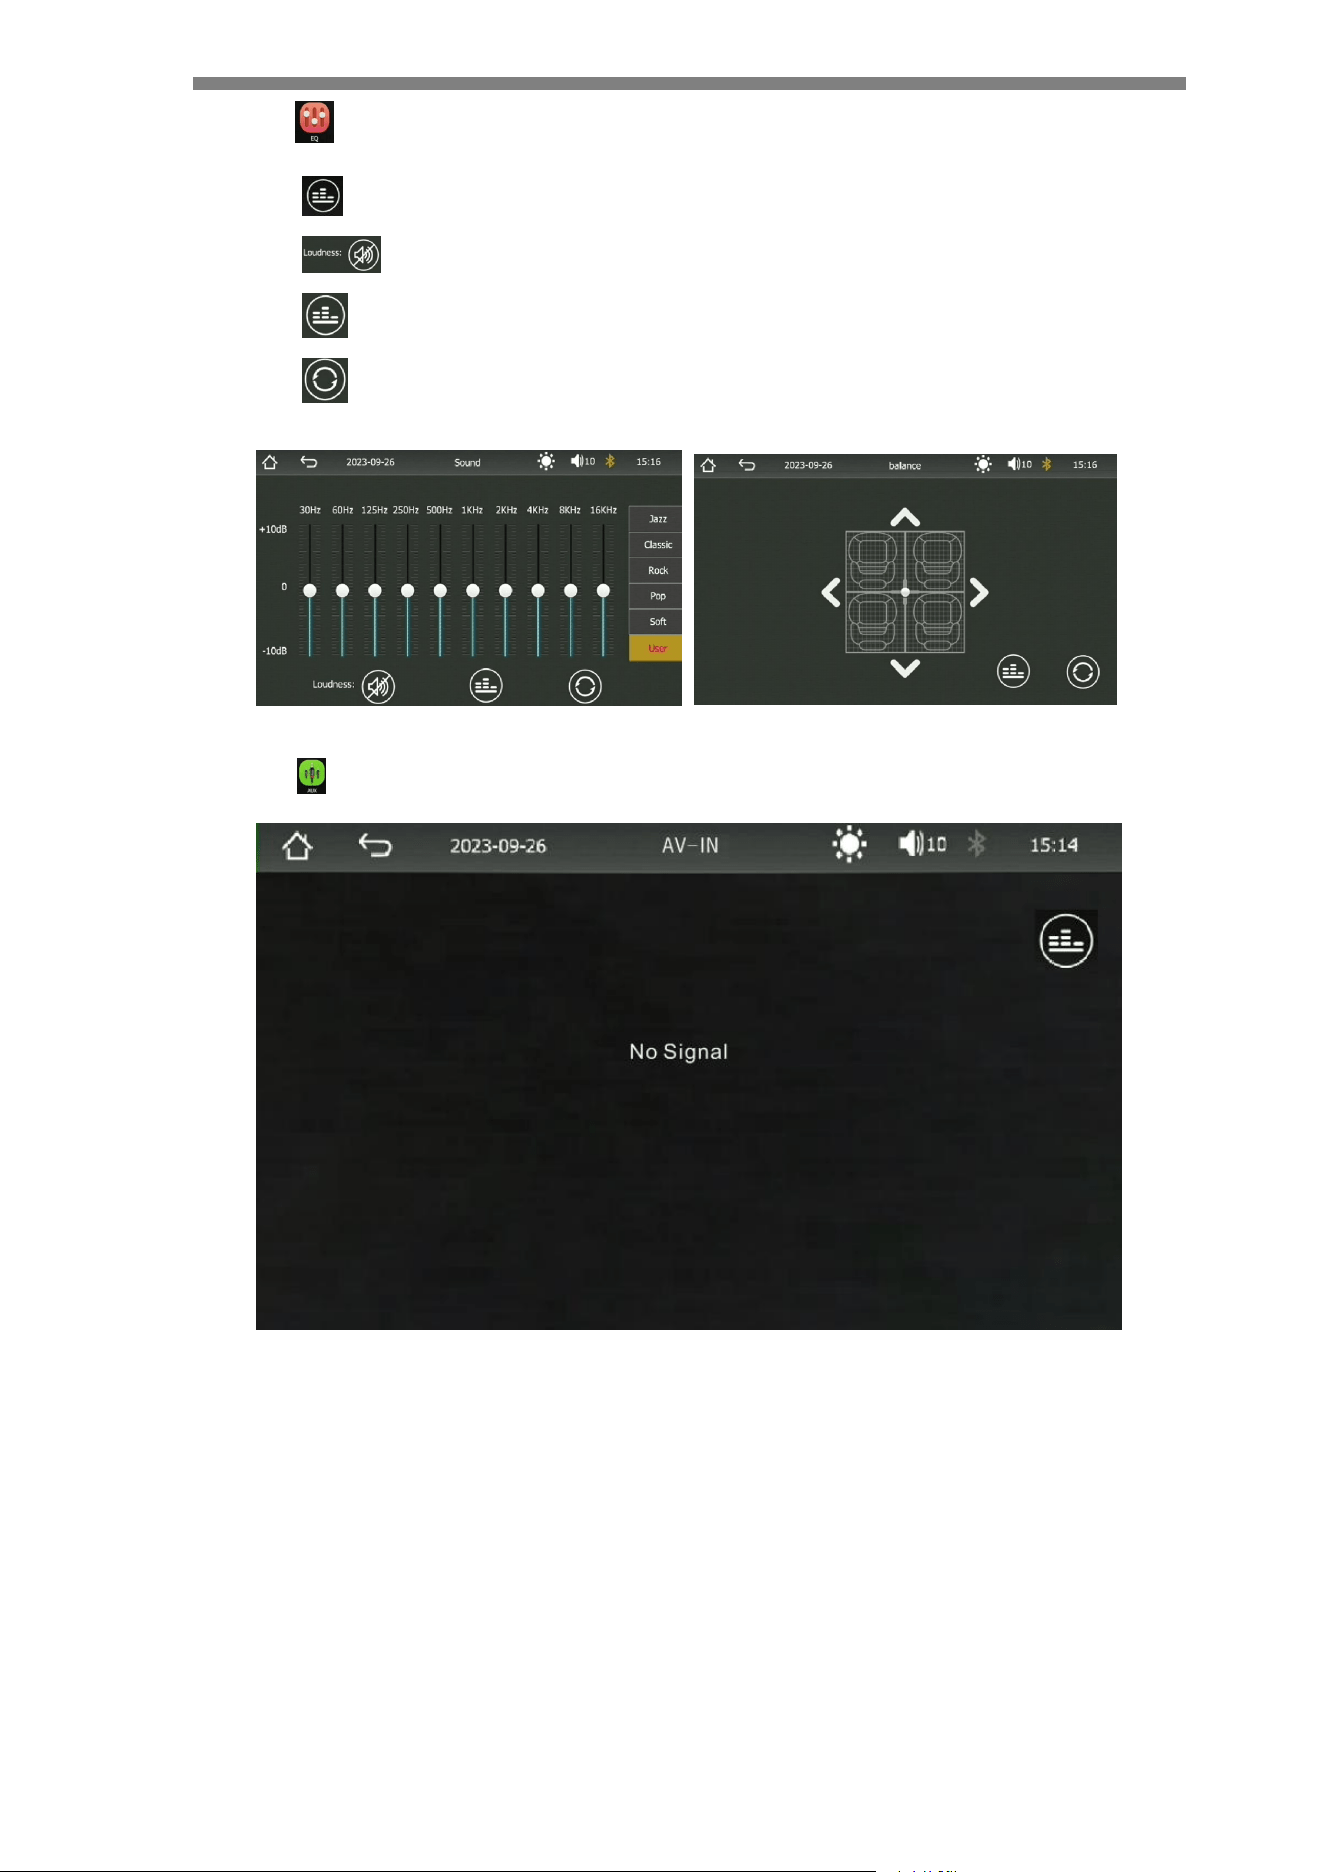
8. EQ Settings
5 Preset EQs :Jazz/Classic/Rock/Pop/Soft
Loudness switch
Front and rear speaker balance settings
Restore settings
9. AUX
10
10. System Settings
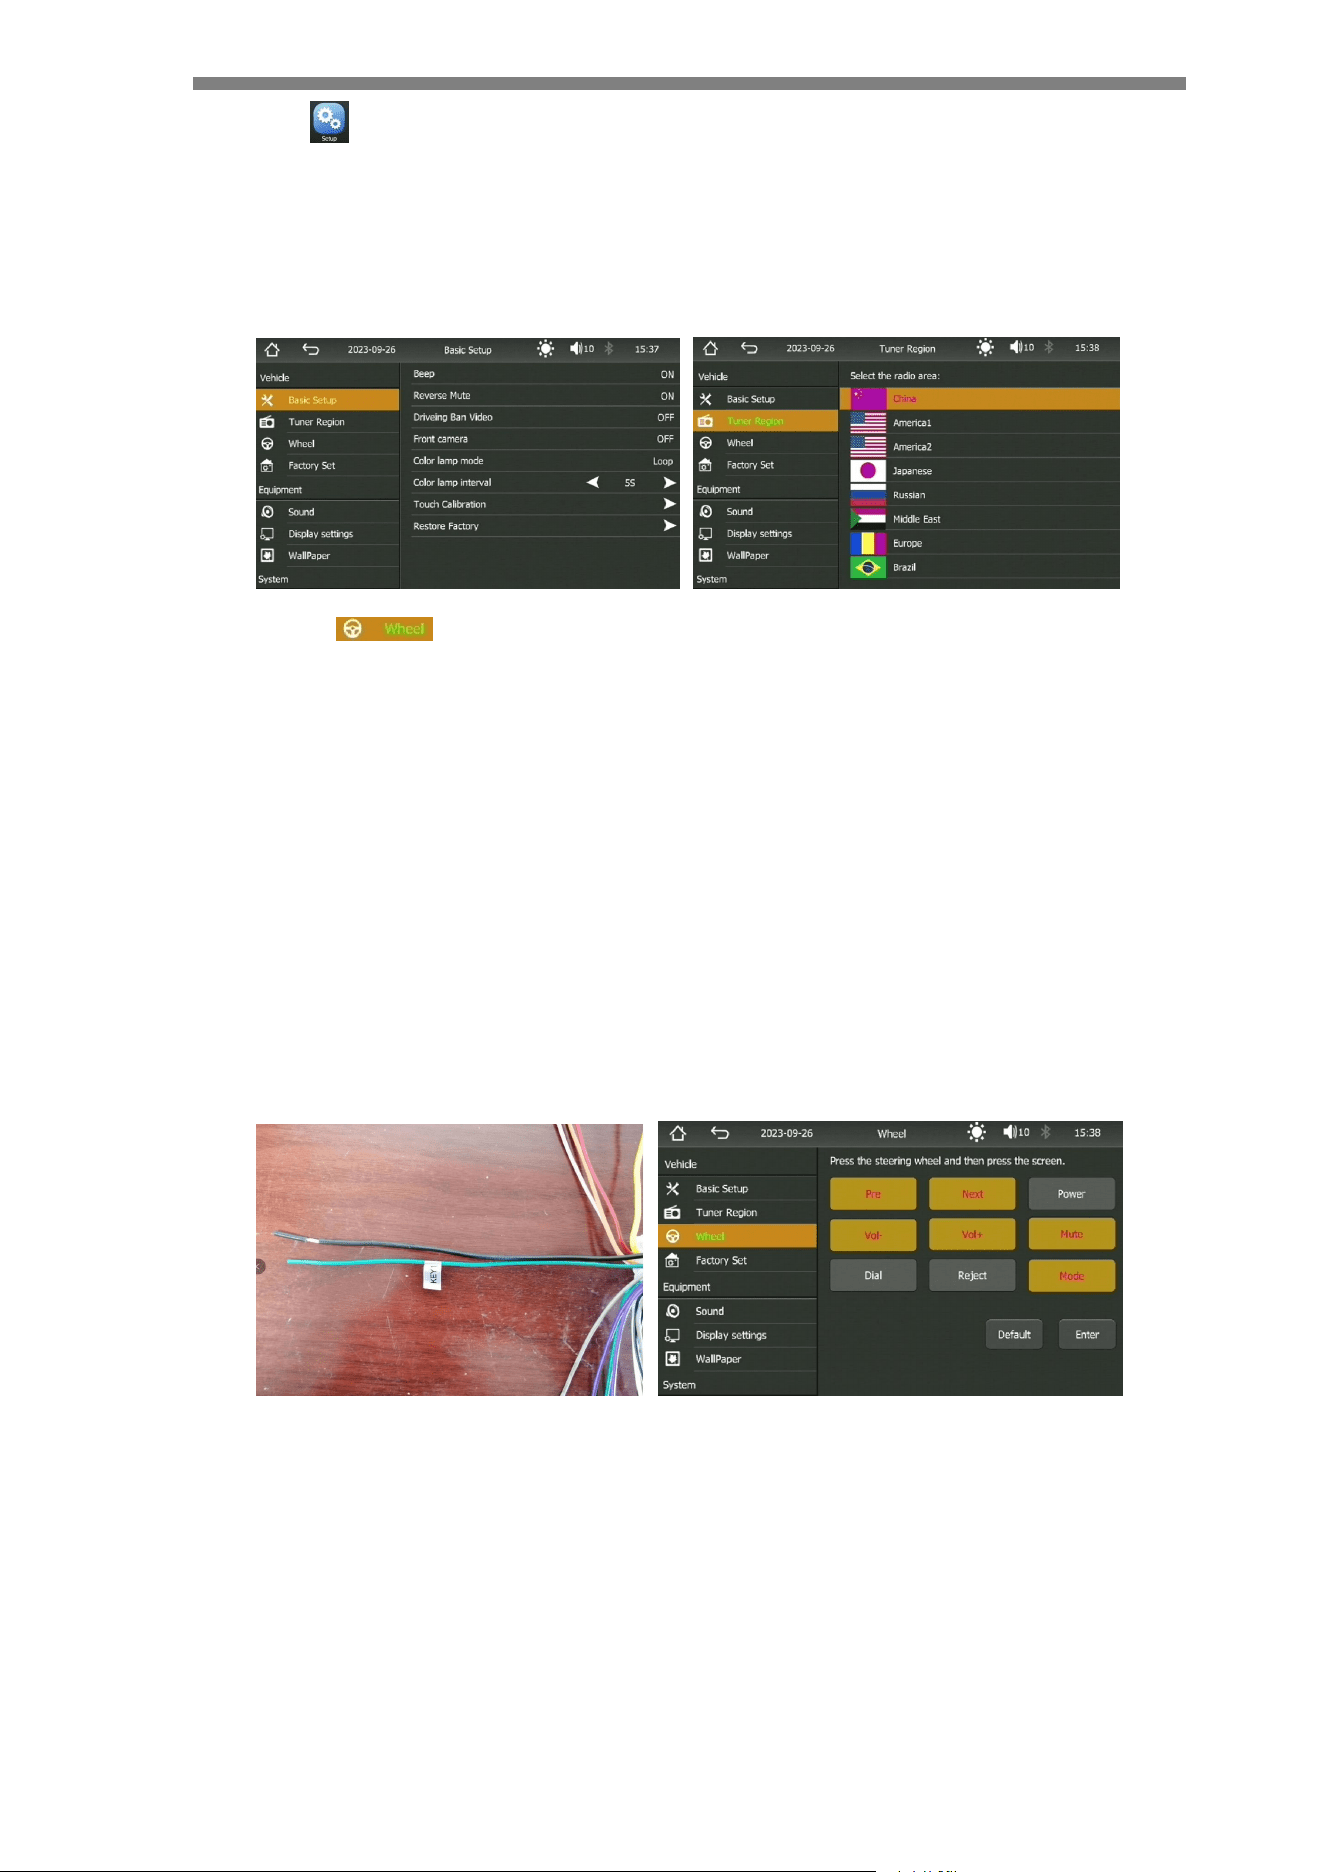
1. Basic Setup
Beep/ Reverse Mute/ Driving Ban Video/ Front Camera/ Color lamp mode/
Color lamp interval/ Touch Calibration/ Restore Factory
2. Steering Wheel Control
(1) Find the positive wire of the boat steering wheel and connect it to the KEY
wire of the unit. Find the negative wire of the steering wheel and connect it
to the black GND wire of the unit.
(2) Click Wheel setting to enter the learning page. For the first time learning,
please click "Reset" to reset all SWC functions. Please follow the steps
below to set the button function: 1. Press and hold the steering wheel button
and corresponding function button on the screen at the same time. 2. When
the button on the screen turns yellow, it means learning is successful.
Release the button and repeat the steps to learn the next button. Click "Save"
after learning all the buttons.
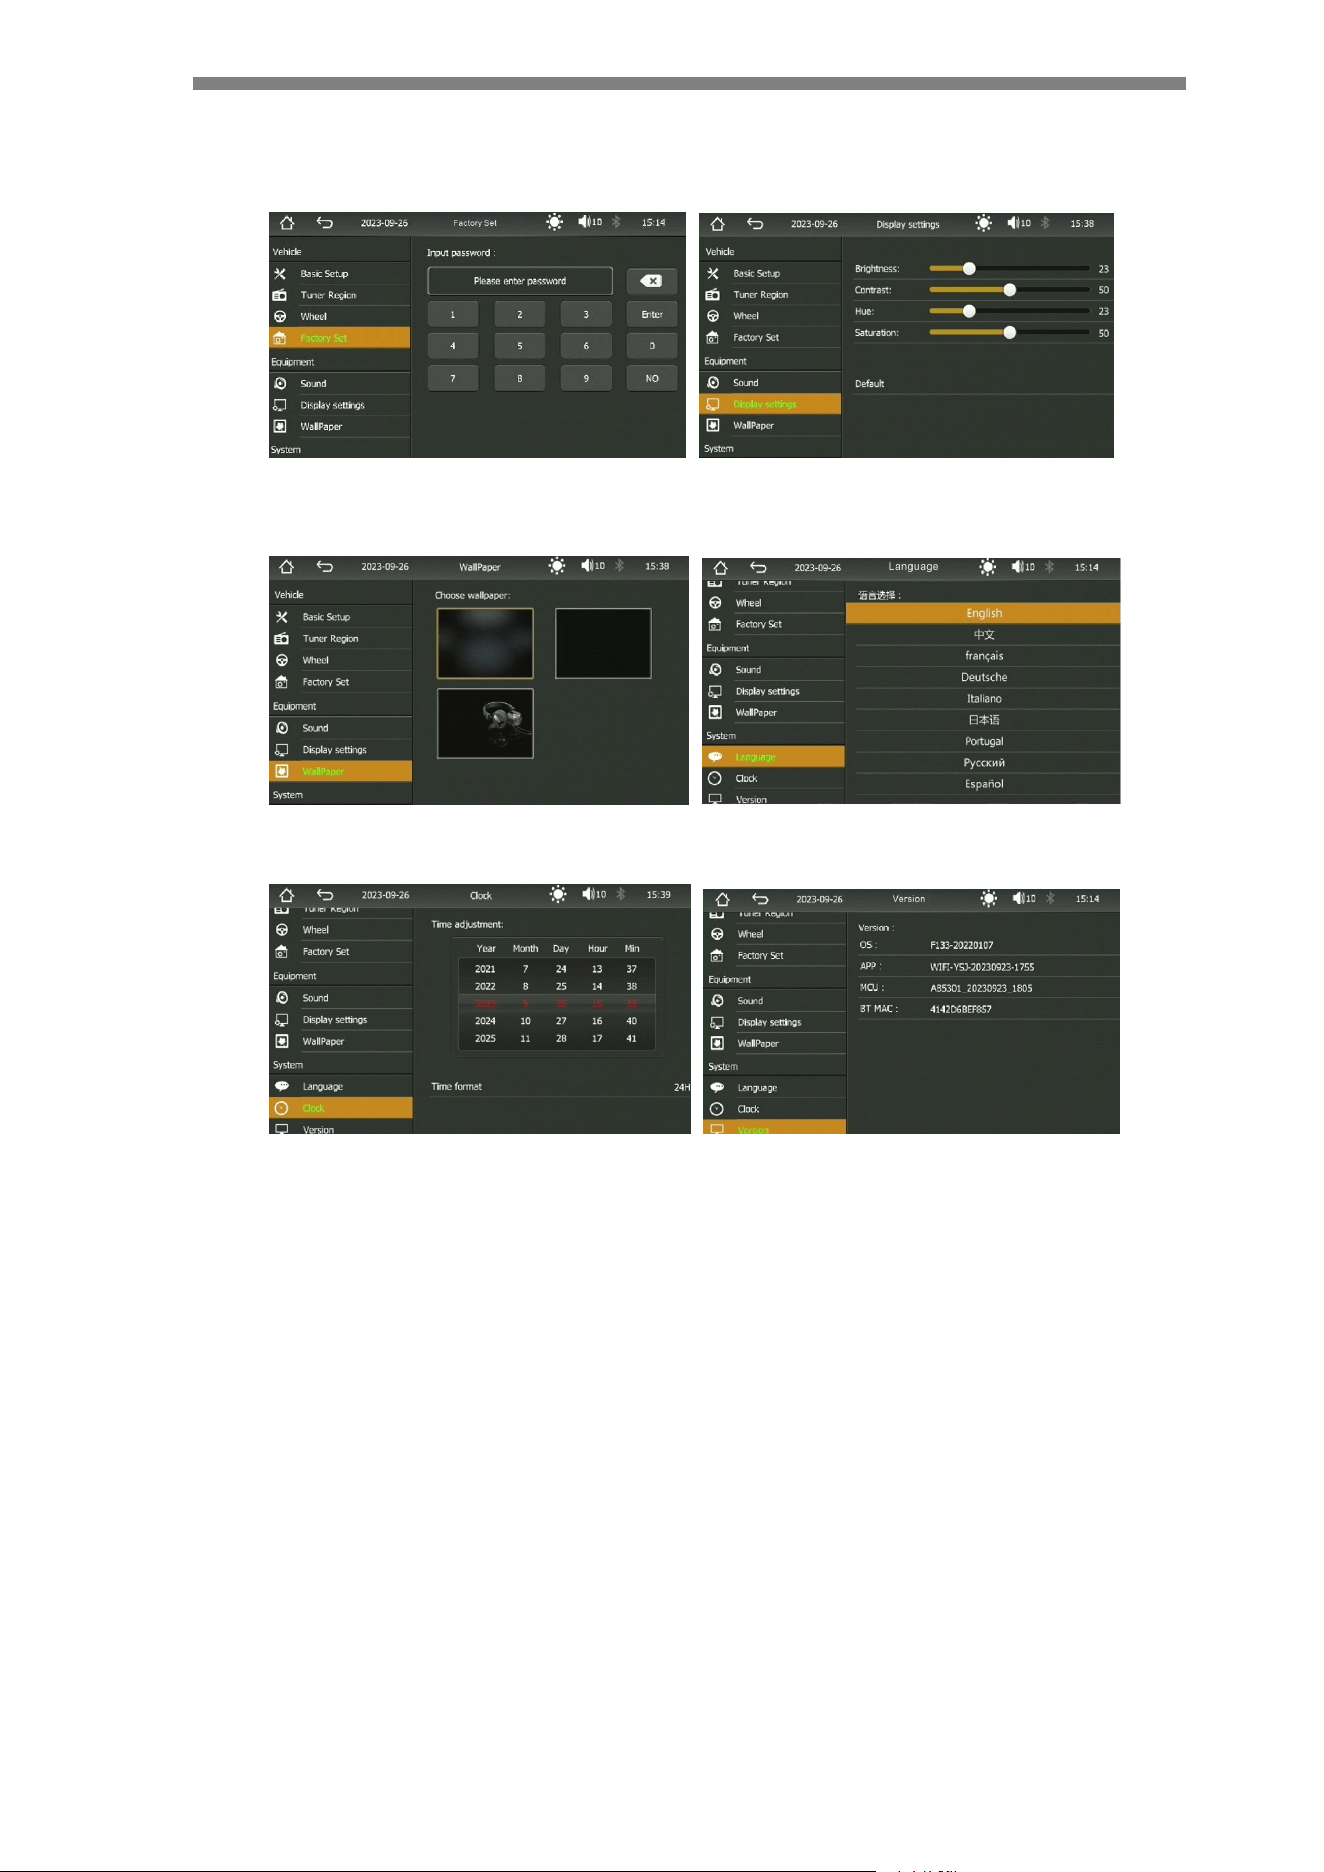
3. Factory Setting
If you need the password of the factory setting, please contact us. (It is not
recommended to change the content in the factory setting, as incorrect changes
may cause the product to become inoperable.)
11
4. Video setting
Brightness, contrast, hue, saturation, reset.
5. Wallpaper settings & Language settings
6. Time setting & Device version display
12
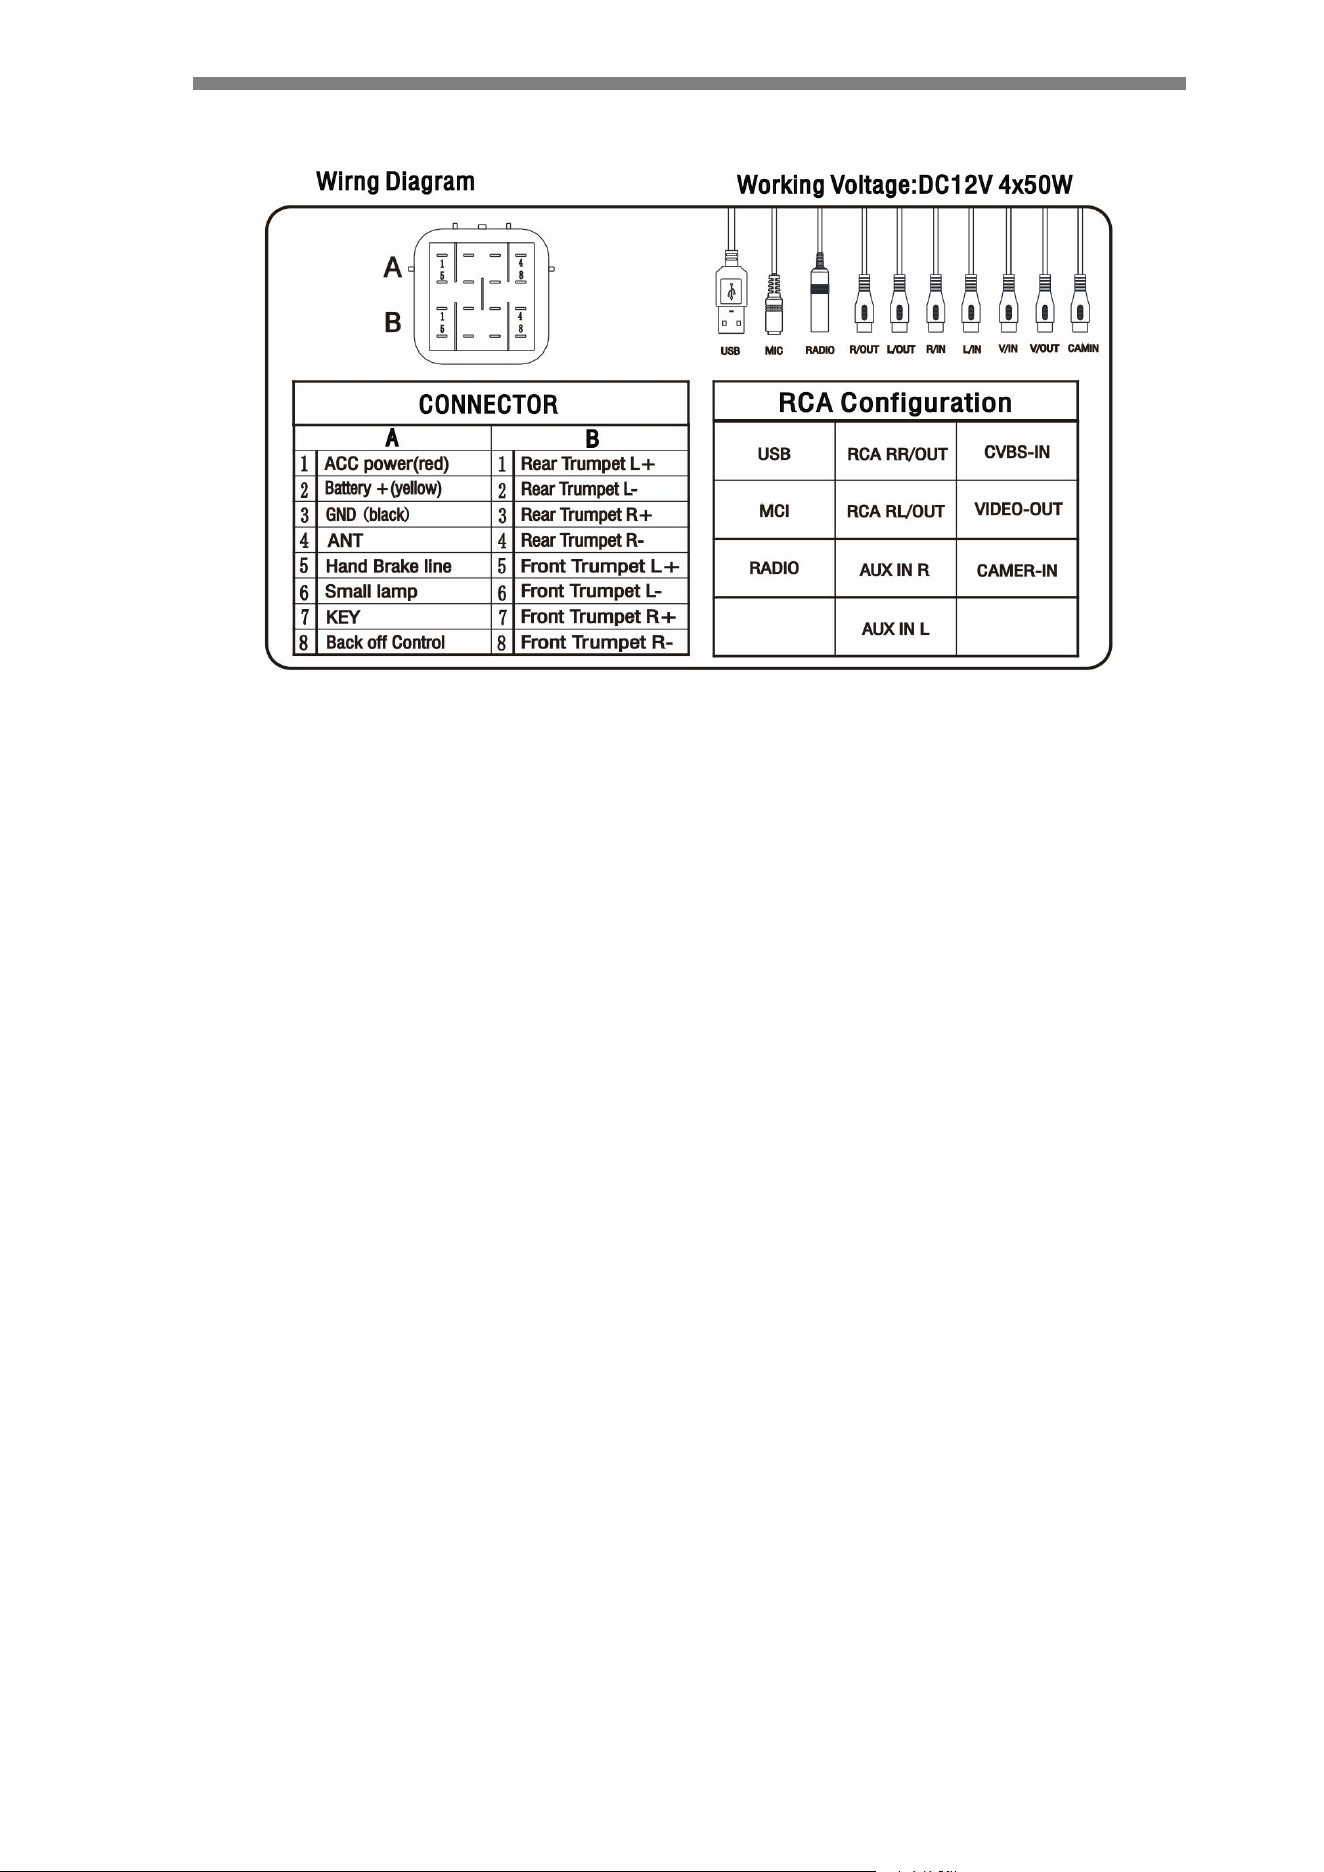
11. Wiring Diagram
FCC Caution:
This device complies with part 15 of the FCC Rules. Operation is subject to the
following two conditions: (1) This device may not cause harmful interference, and (2)
this device must accept any interference received, including interference that may
cause undesired operation.
Any changes or modifications not expressly approved by the party responsible for
compliance could void the user's authority to operate the equipment.
NOTE: This equipment has been tested and found to comply with the limits for a Class
B digital device, pursuant to Part 15 of the FCC Rules. These limits are designed to
provide reasonable protection against harmful interference in a residential installation.
This equipment generates, uses and can radiate radio frequency energy and, if not
installed and used in accordance with the instructions, may cause harmful interference
to radio communications. However, there is no guarantee that interference will not
occur in a particular installation.
If this equipment does cause harmful interference to radio or television reception,
which can be determined by turning the equipment off and on, the user is encouraged
to try to correct the interference by one or more of the following measures:
-- Reorient or relocate the receiving antenna.
-- Increase the separation between the equipment and receiver.
-- Connect the equipment into an outlet on a circuit different
from that to which the receiver is connected.
-- Consult the dealer or an experienced radio/TV technician for help.
The device has been evaluated to meet general RF exposure requirement. The device
can be used in portable exposure condition without restriction.
FCC ID:2BV2G- F8826
13
12. Installation
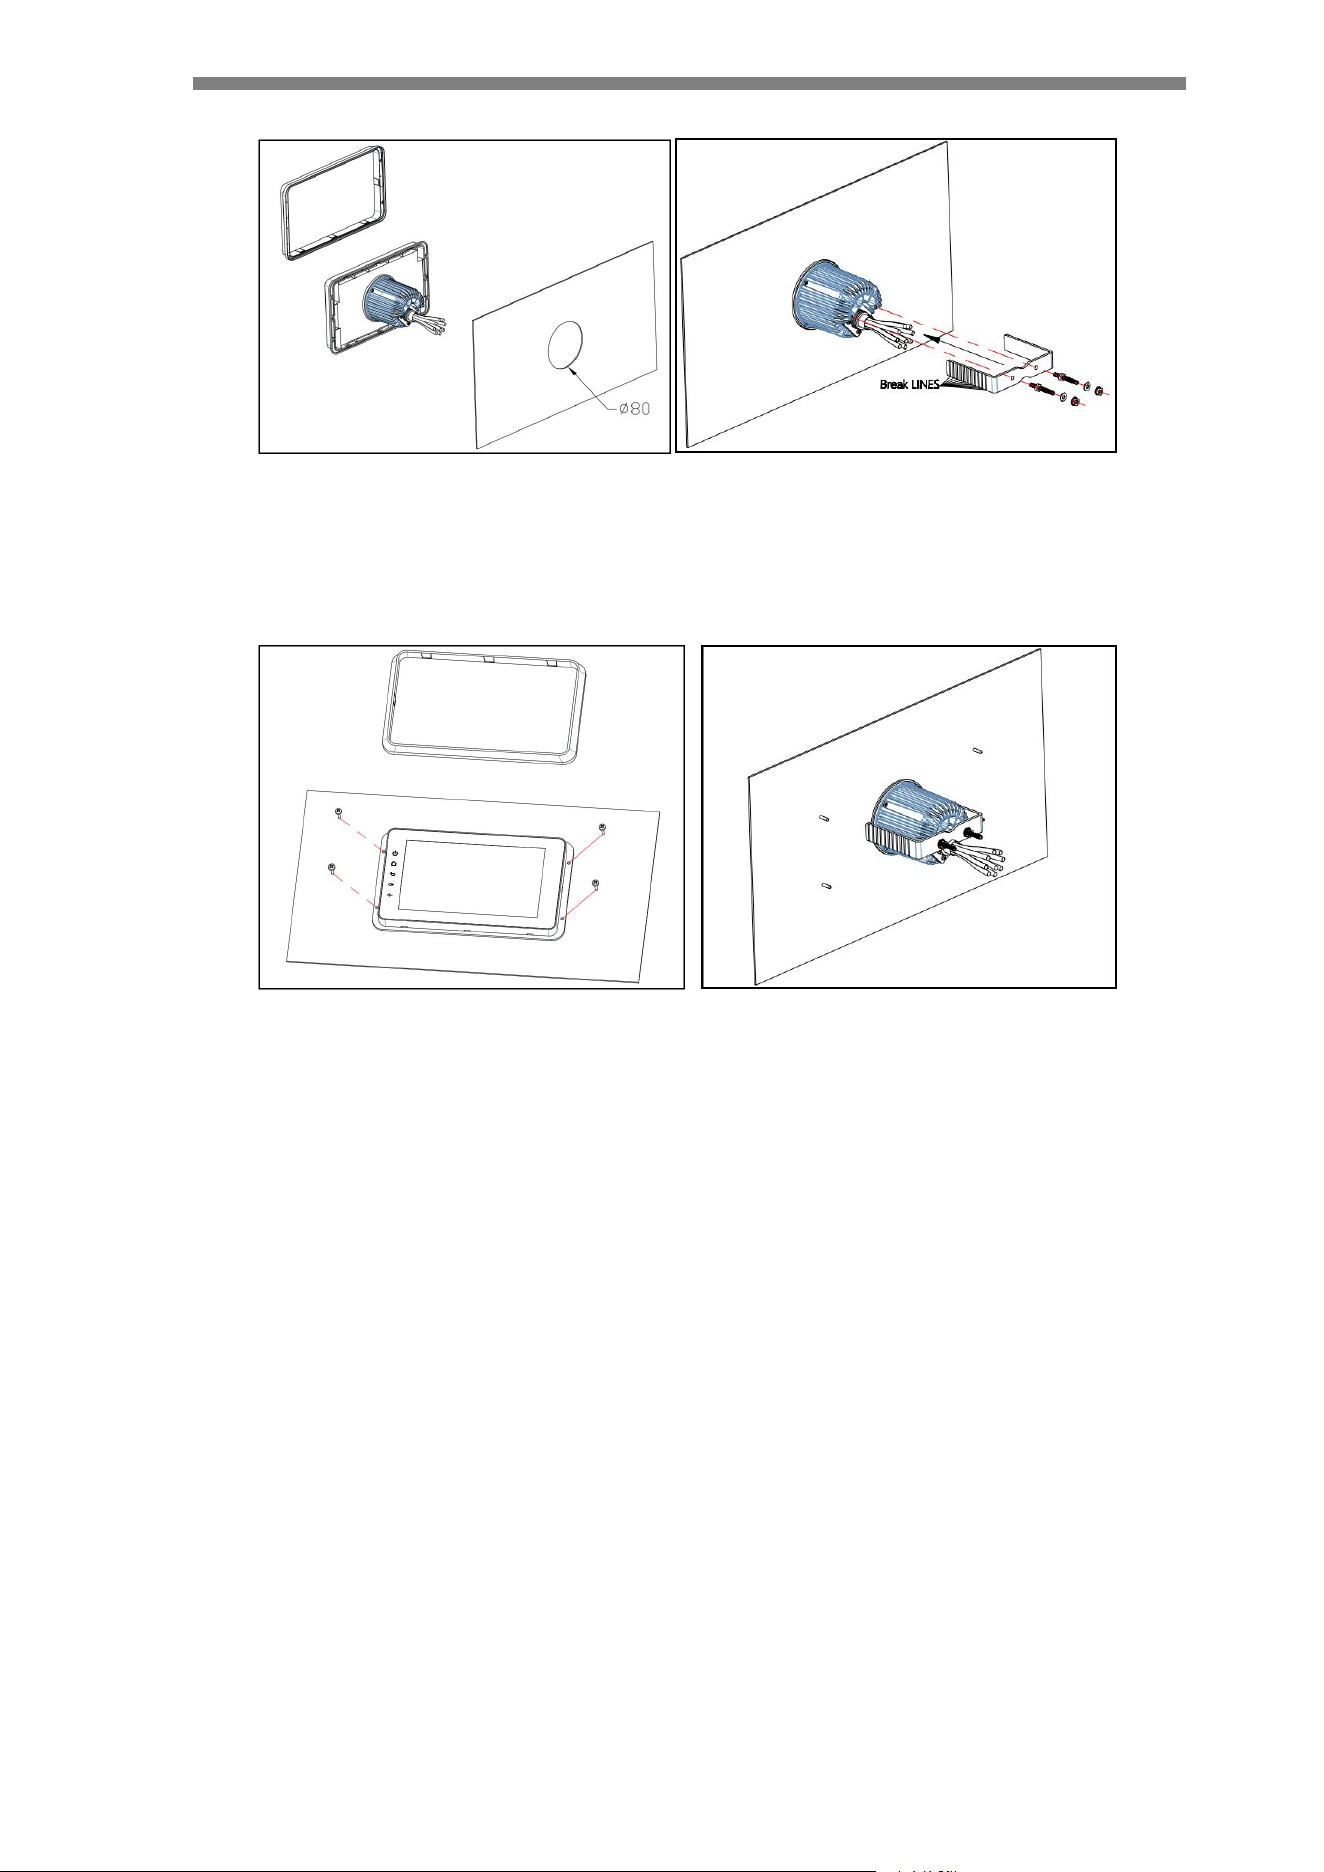
1. Some boats originally have
a hole. If not, an 80mm hole needs
to be drilled.
2.Take out the bracket from the
package and screw on the M4*40
screws, then tighten the nuts.
3. Take out the 4 screws(3*16 )
from the package and screw them
on, then put on the decorative
frame.
4. After installing the bracket and
tightening the screws, as shown in
the picture above.