2.5.13
Repeat Customization
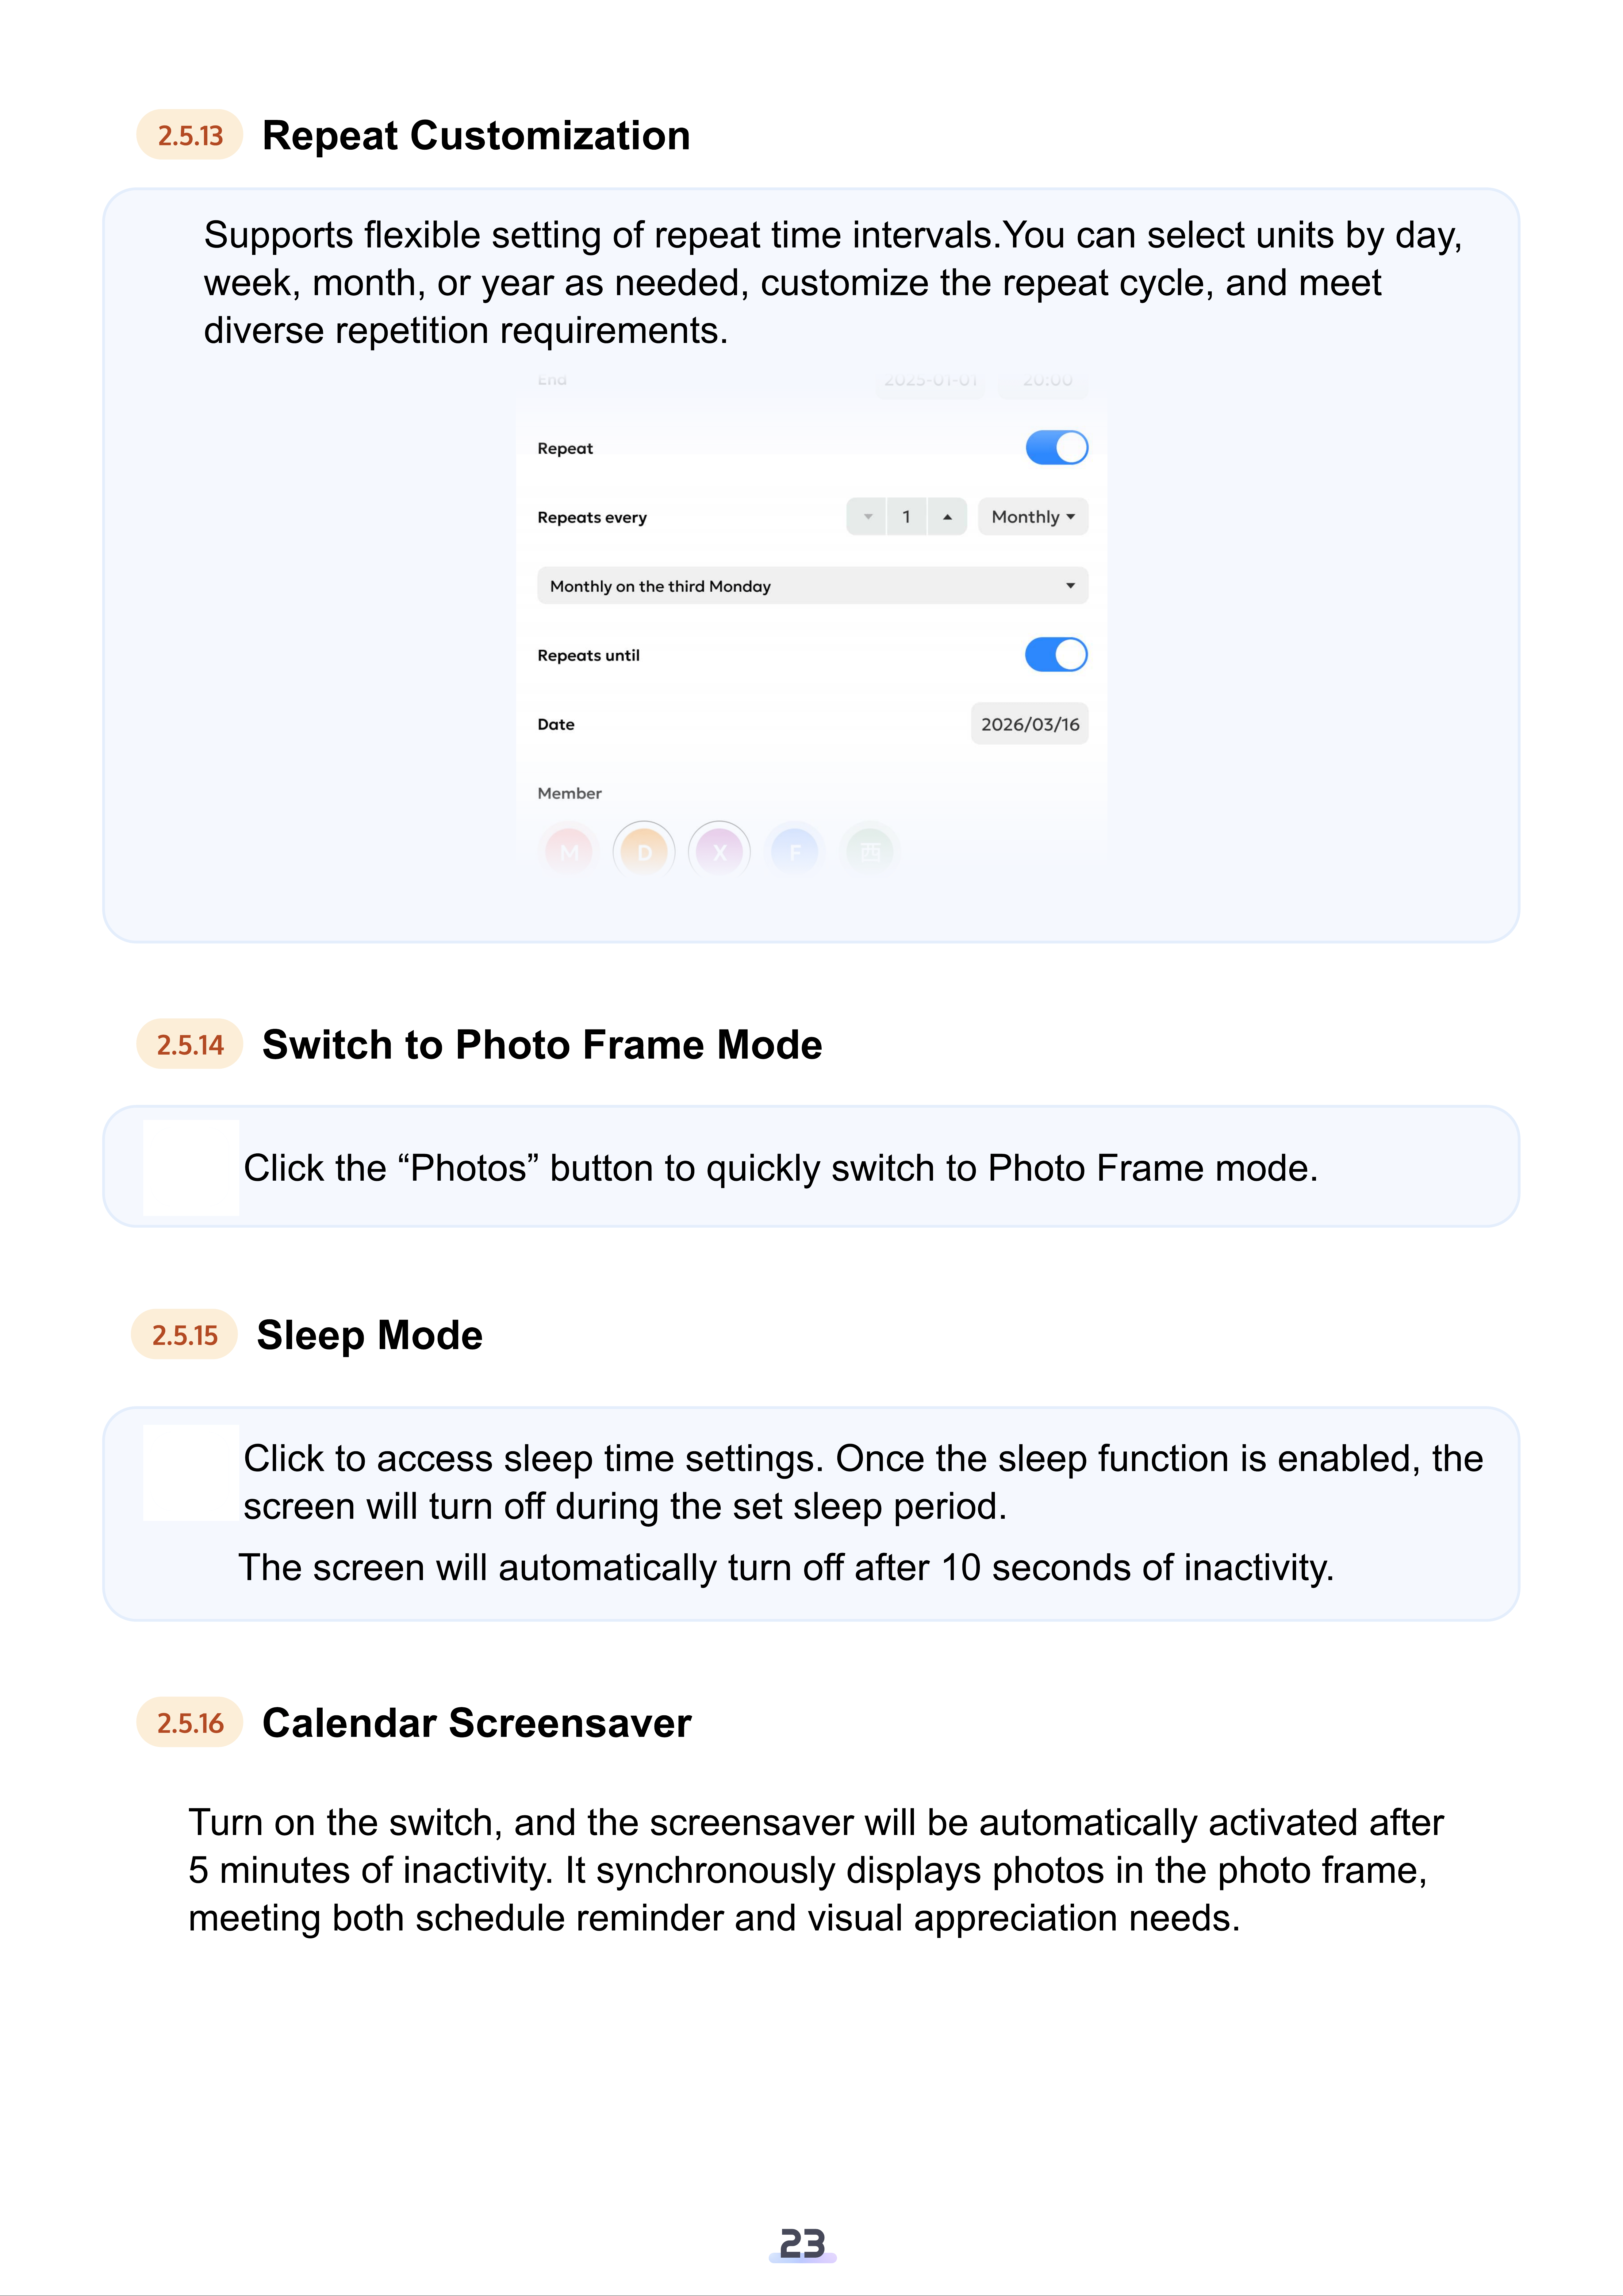
Supports flexible setting of repeat time intervals.You can select units by day,
week, month, or year as needed, customize the repeat cycle, and meet
diverse repetition requirements.
2.5.14
Switch to Photo Frame Mode
Click the “Photos” button to quickly switch to Photo Frame mode.
2.5.15
Sleep Mode
Click to access sleep time settings. Once the sleep function is enabled, the
screen will turn off during the set sleep period.
The screen will automatically turn off after 10 seconds of inactivity.
2.5.16
Calendar Screensaver
Turn on the switch, and the screensaver will be automatically activated after
5 minutes of inactivity. It synchronously displays photos in the photo frame,
meeting both schedule reminder and visual appreciation needs.
23
2.6
Art Gallery
Automatically loops world-class artworks, bringing elegant art into your
living space.
2.6.1
Display of Art Paintings
The name of the painting, the author and the time.
2.6.2
Switch Interval Time
Supports switching of playback intervals of 【5s|10s|60s|5min|1h|
24h】, the actual interval is subject to the smart display.
2.6.3
Select Mode
Support clicking the "Select Mode" button to quickly switch to other
Photo-Frame or Family- Calendar modes.
24
2.7
How to Send Blessings
Open the Gallery view in the FotoCube mobile app and locate the “Greeting”
icon in the top left corner
Write down your wish in words
Choose a festival style
Select the device to which you want to send your blessing.
2.8
System Settings
The name of the painting, the author and the time.
2.8.1
Device Settings
25
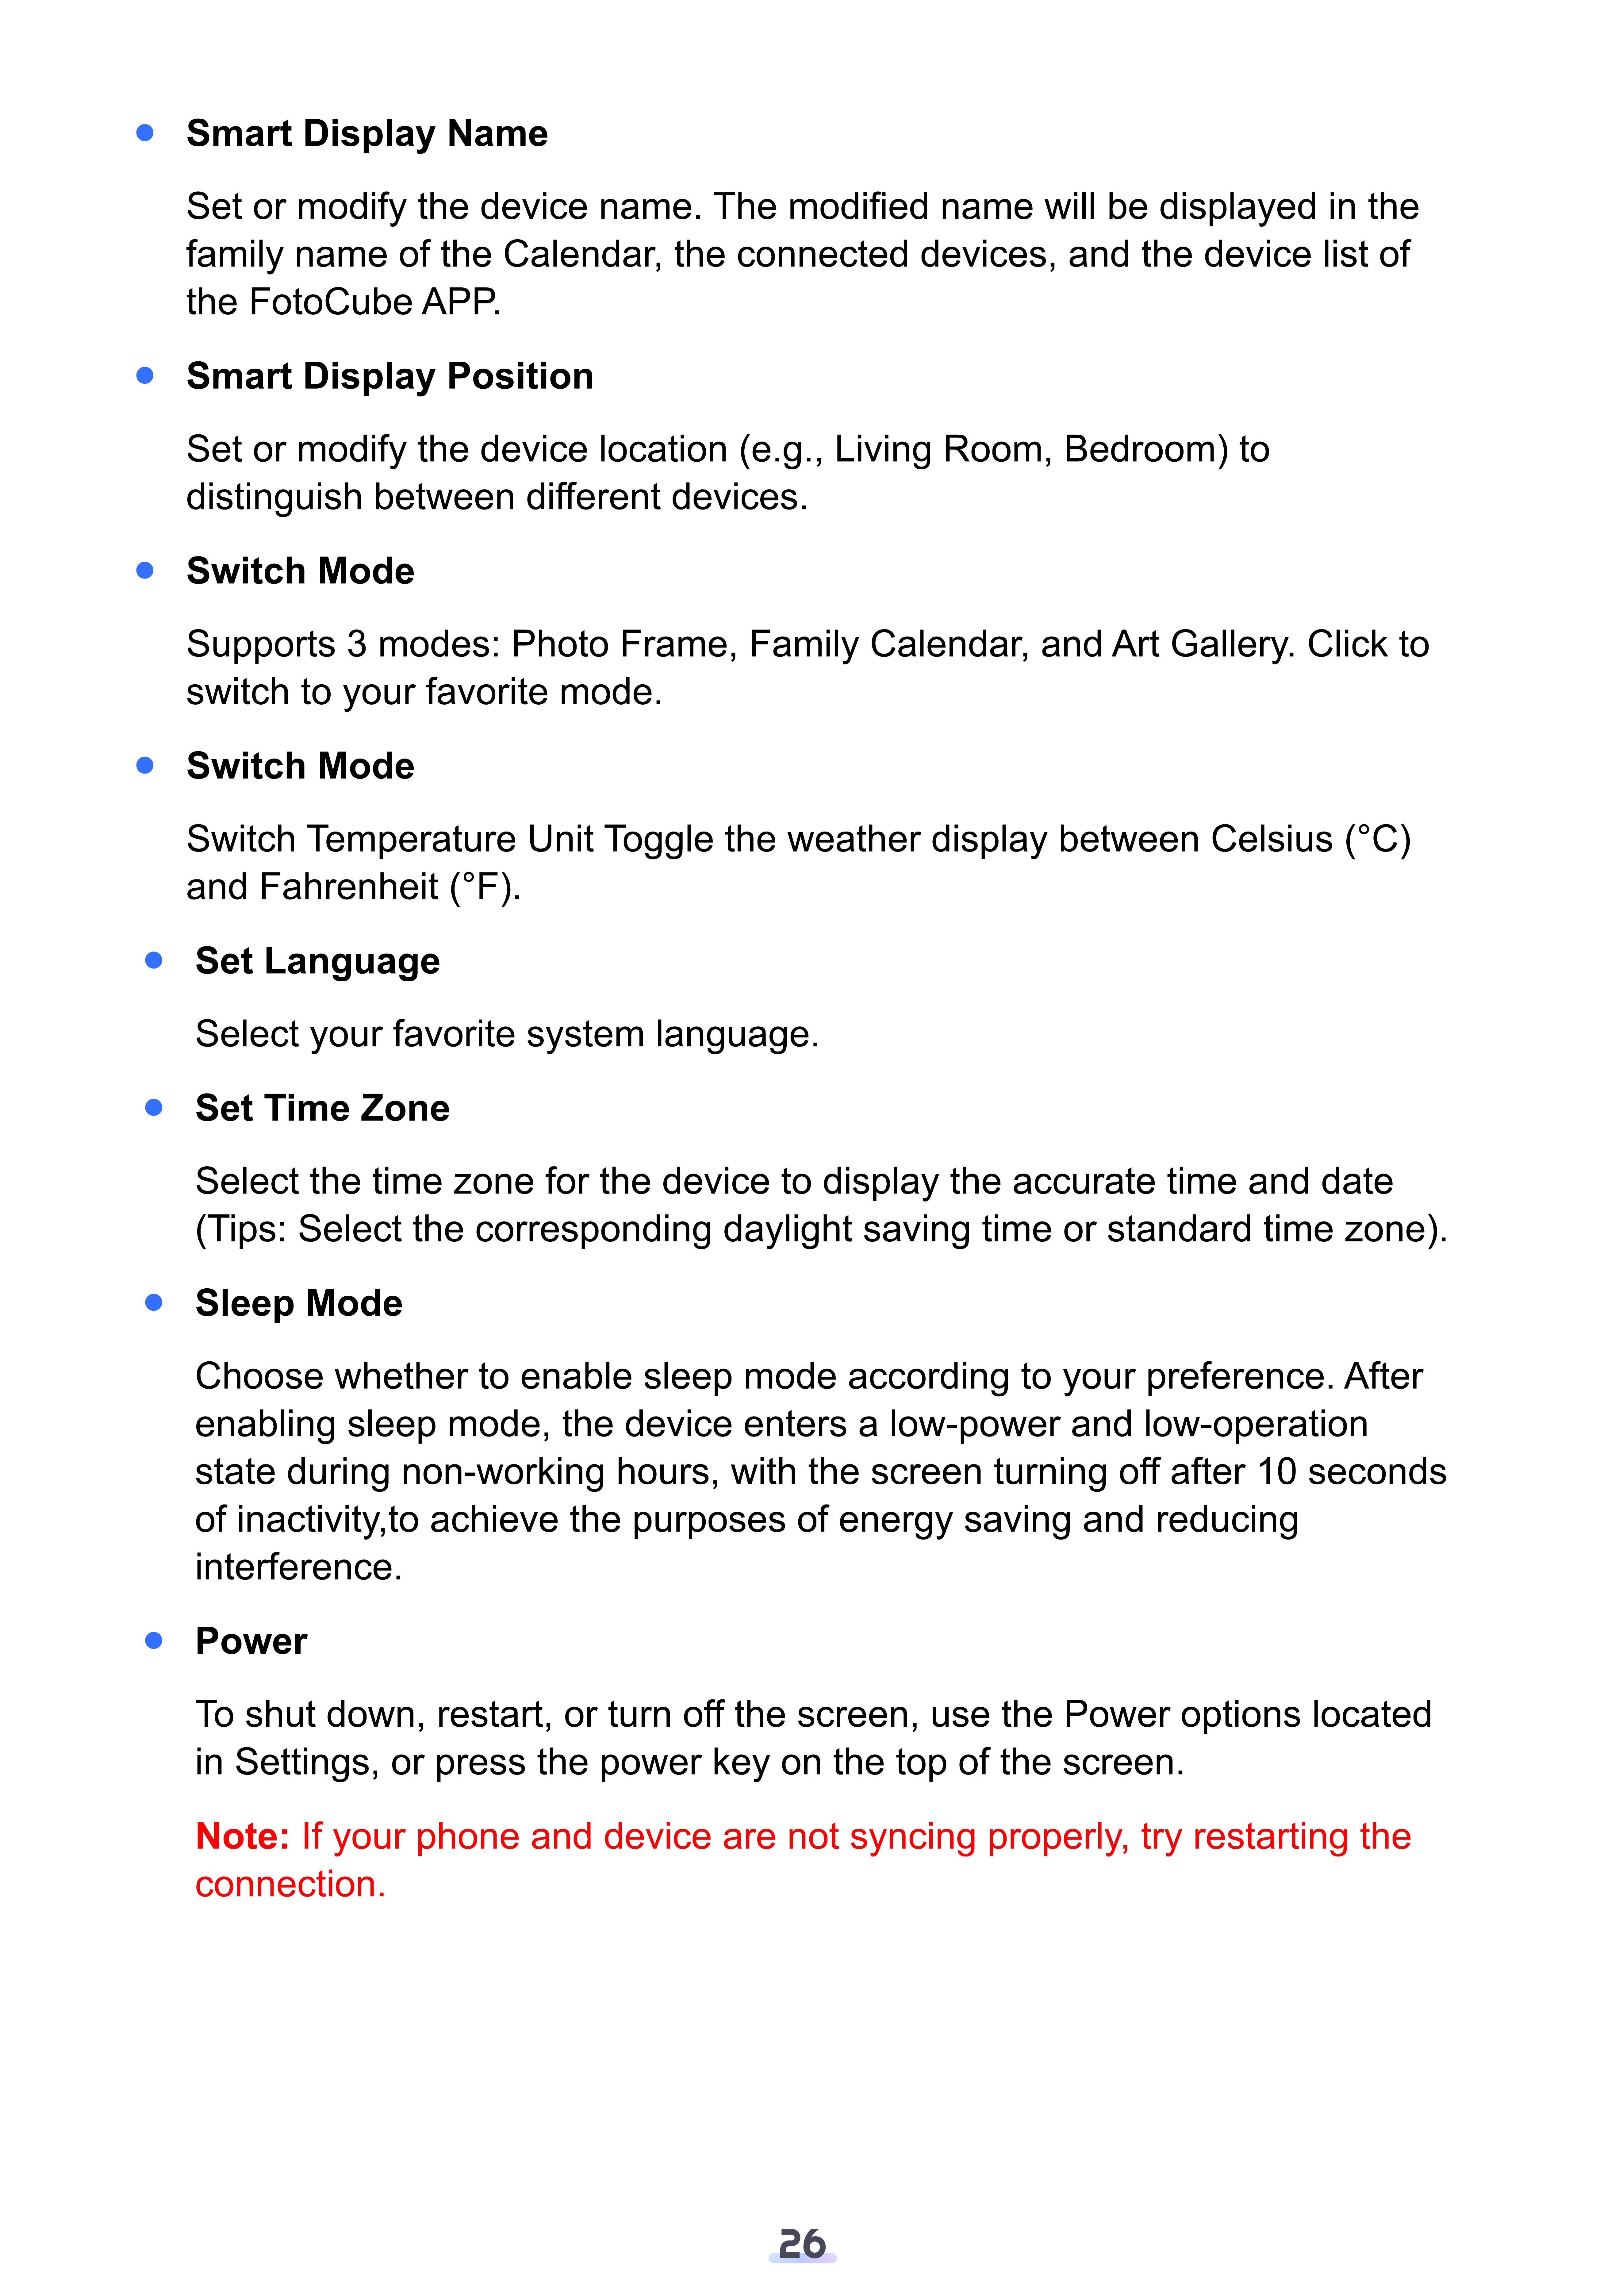
Smart Display Name
Set or modify the device name. The modified name will be displayed in the
family name of the Calendar, the connected devices, and the device list of
the FotoCube APP.
Smart Display Position
Set or modify the device location (e.g., Living Room, Bedroom) to
distinguish between different devices.
Switch Mode
Supports 3 modes: Photo Frame, Family Calendar, and Art Gallery. Click to
switch to your favorite mode.
Switch Mode
Switch Temperature Unit Toggle the weather display between Celsius (°C)
and Fahrenheit (°F).
Set Language
Select your favorite system language.
Set Time Zone
Select the time zone for the device to display the accurate time and date
(Tips: Select the corresponding daylight saving time or standard time zone).
Sleep Mode
Choose whether to enable sleep mode according to your preference. After
enabling sleep mode, the device enters a low-power and low-operation
state during non-working hours, with the screen turning off after 10 seconds
of inactivity,to achieve the purposes of energy saving and reducing
interference.
Power
To shut down, restart, or turn off the screen, use the Power options located
in Settings, or press the power key on the top of the screen.
Note: If your phone and device are not syncing properly, try restarting the
connection.
26
2.8.2
Account Settings
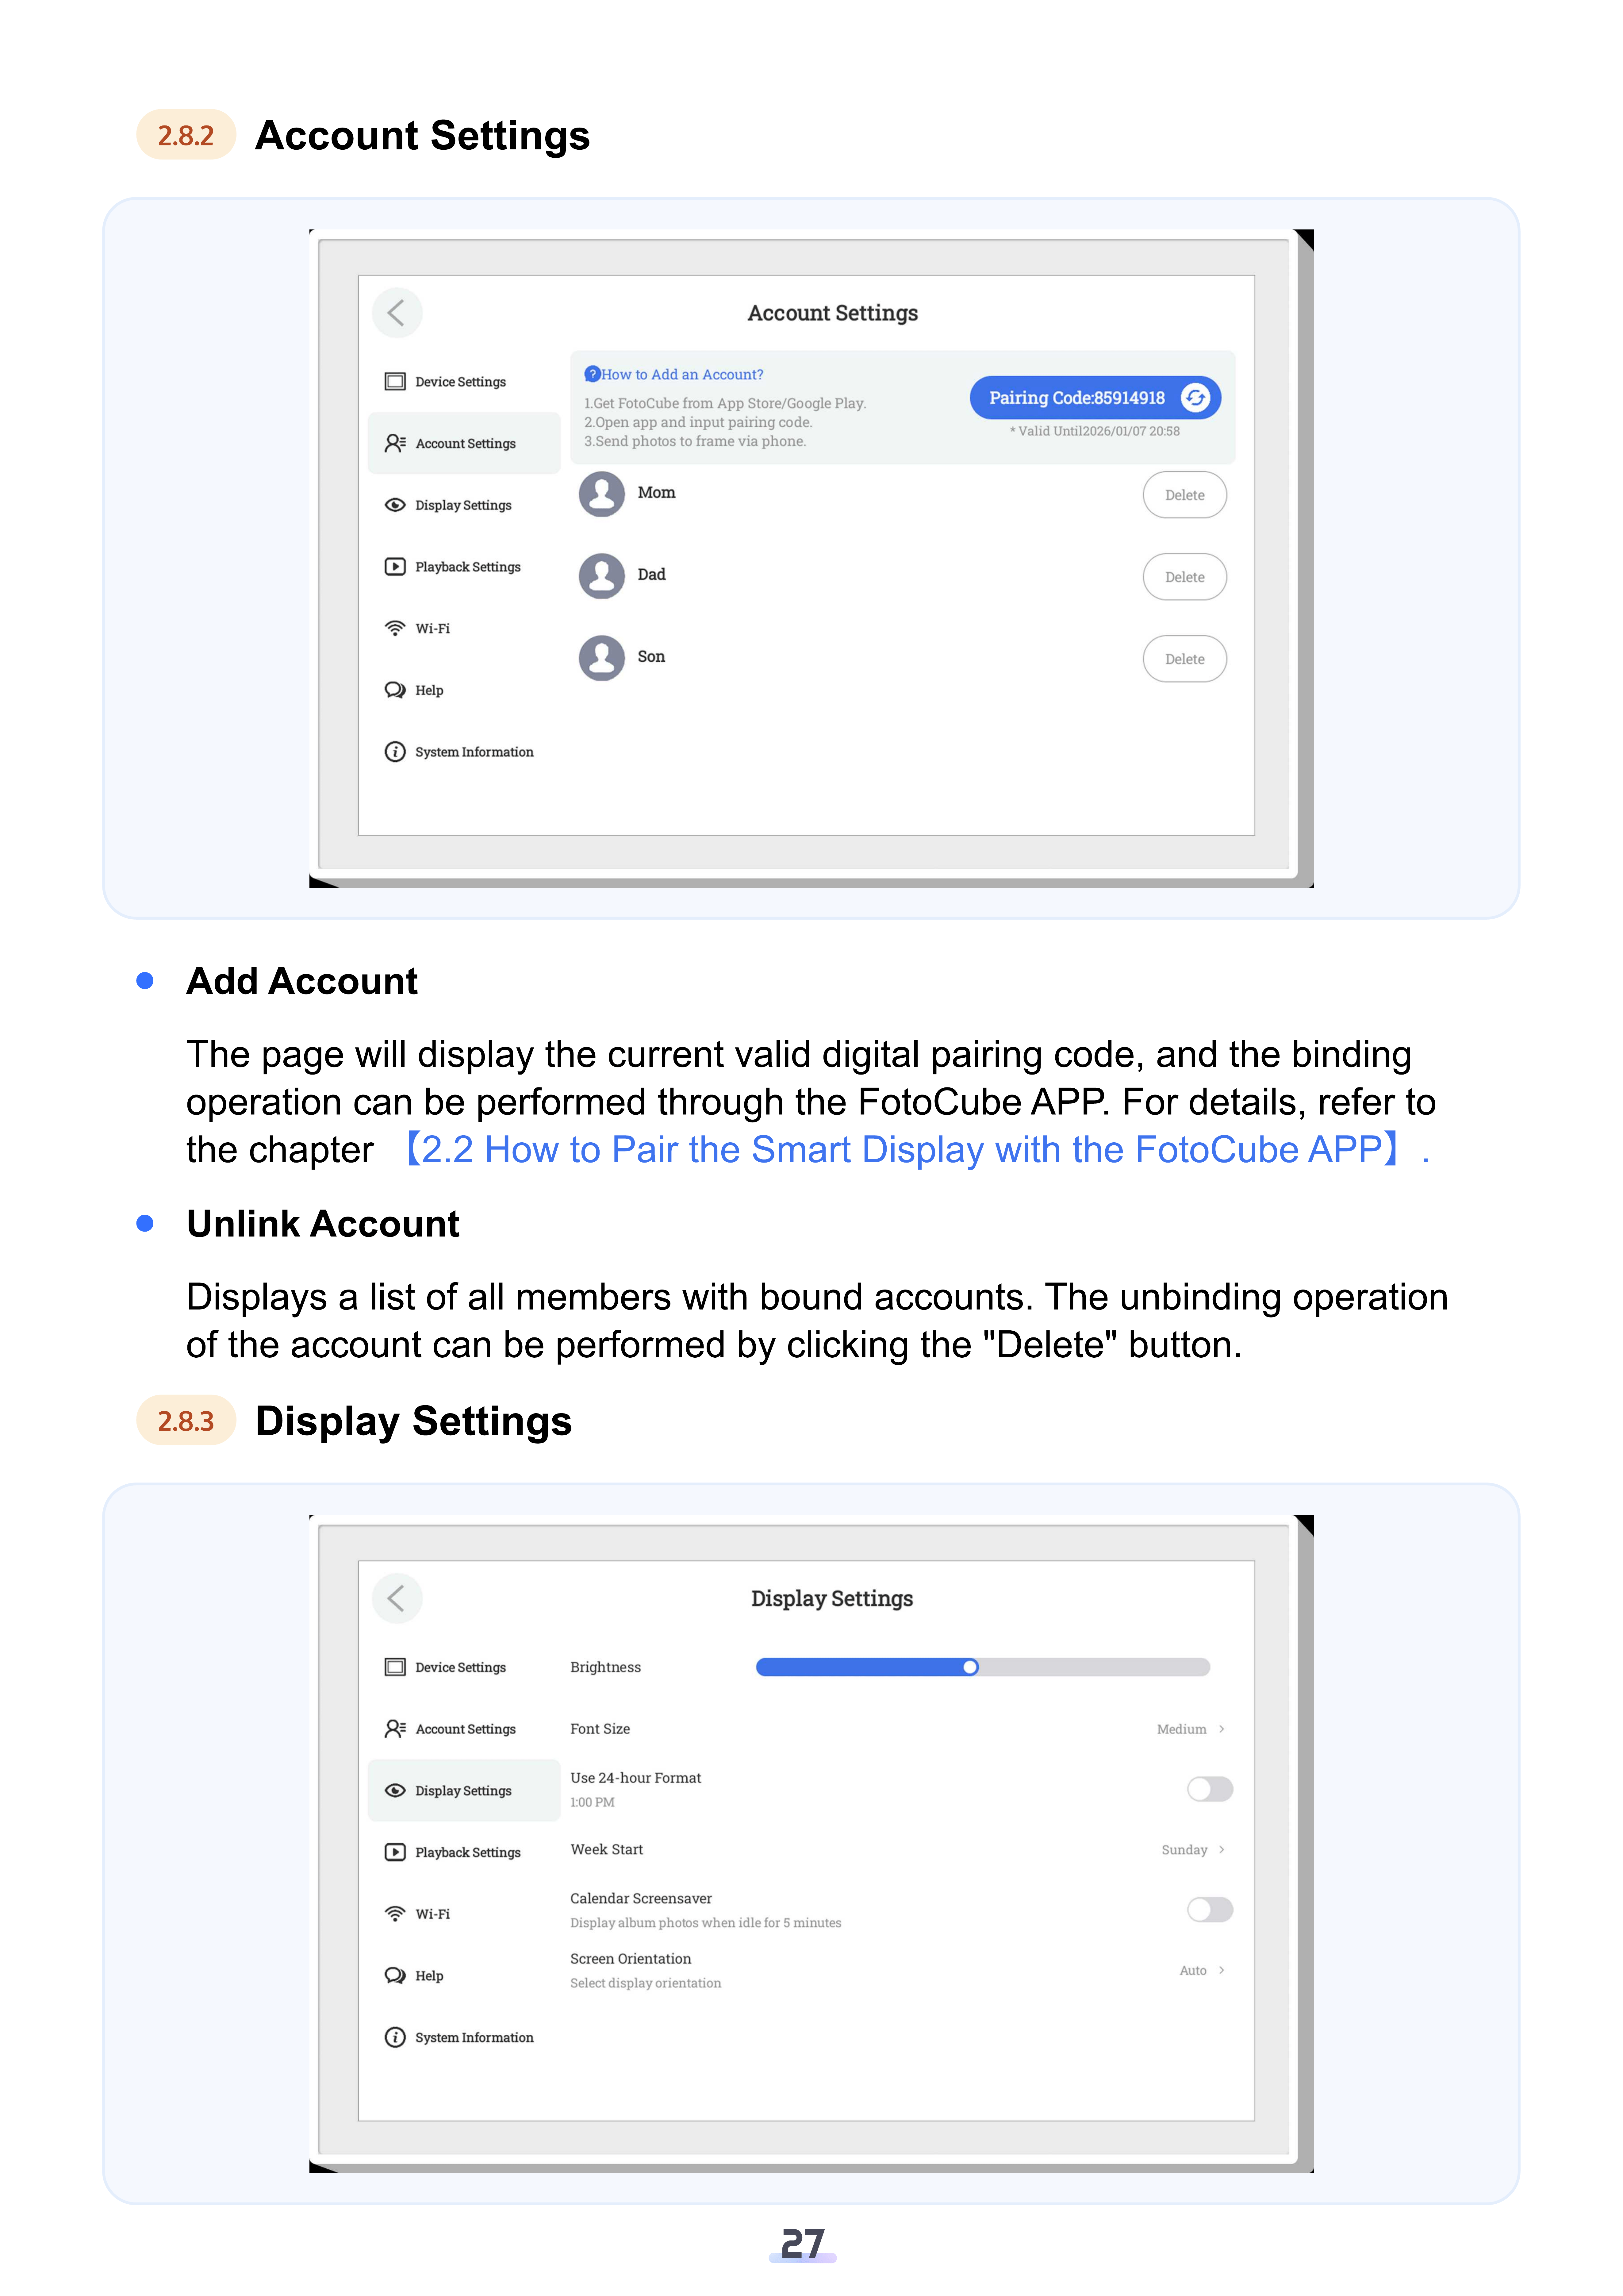
Add Account
The page will display the current valid digital pairing code, and the binding
operation can be performed through the FotoCube APP. For details, refer to
the chapter 【2.2 How to Pair the Smart Display with the FotoCube APP】.
Unlink Account
Displays a list of all members with bound accounts. The unbinding operation
of the account can be performed by clicking the "Delete" button.
2.8.3
Display Settings
27
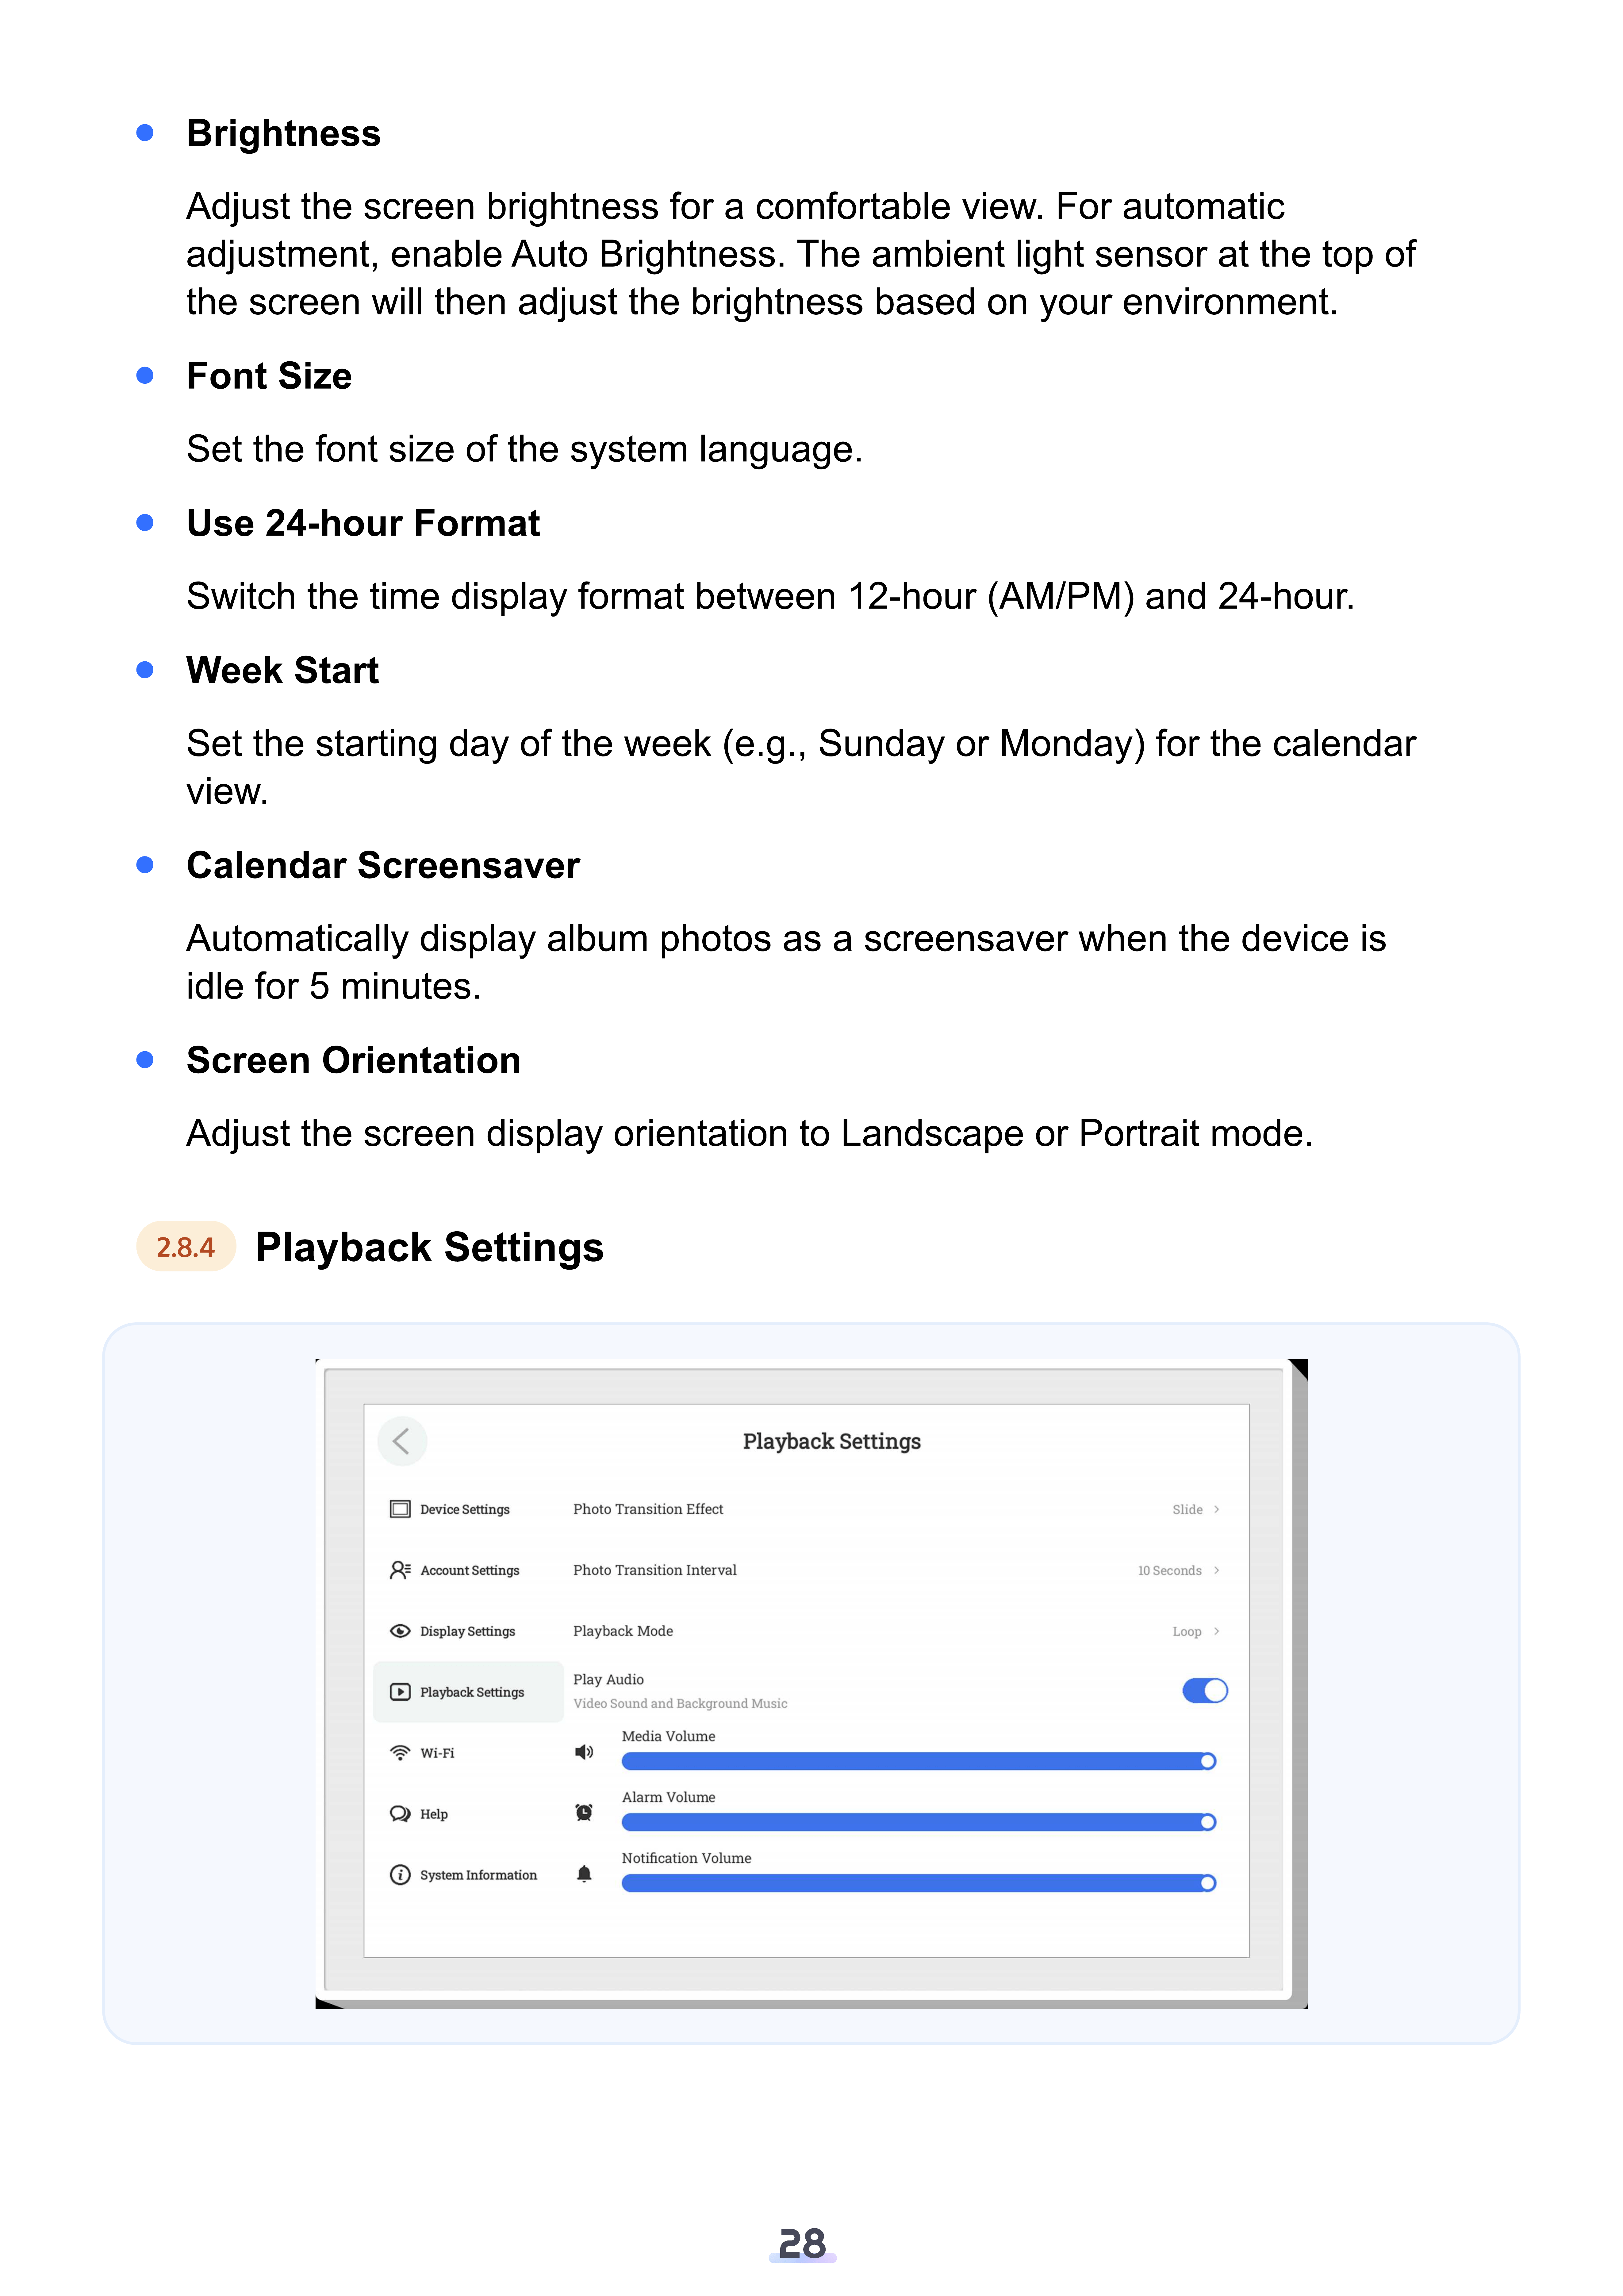
Brightness
Adjust the screen brightness for a comfortable view. For automatic
adjustment, enable Auto Brightness. The ambient light sensor at the top of
the screen will then adjust the brightness based on your environment.
Font Size
Set the font size of the system language.
Use 24-hour Format
Switch the time display format between 12-hour (AM/PM) and 24-hour.
Week Start
Set the starting day of the week (e.g., Sunday or Monday) for the calendar
view.
Calendar Screensaver
Automatically display album photos as a screensaver when the device is
idle for 5 minutes.
Screen Orientation
Adjust the screen display orientation to Landscape or Portrait mode.
2.8.4
Playback Settings
28
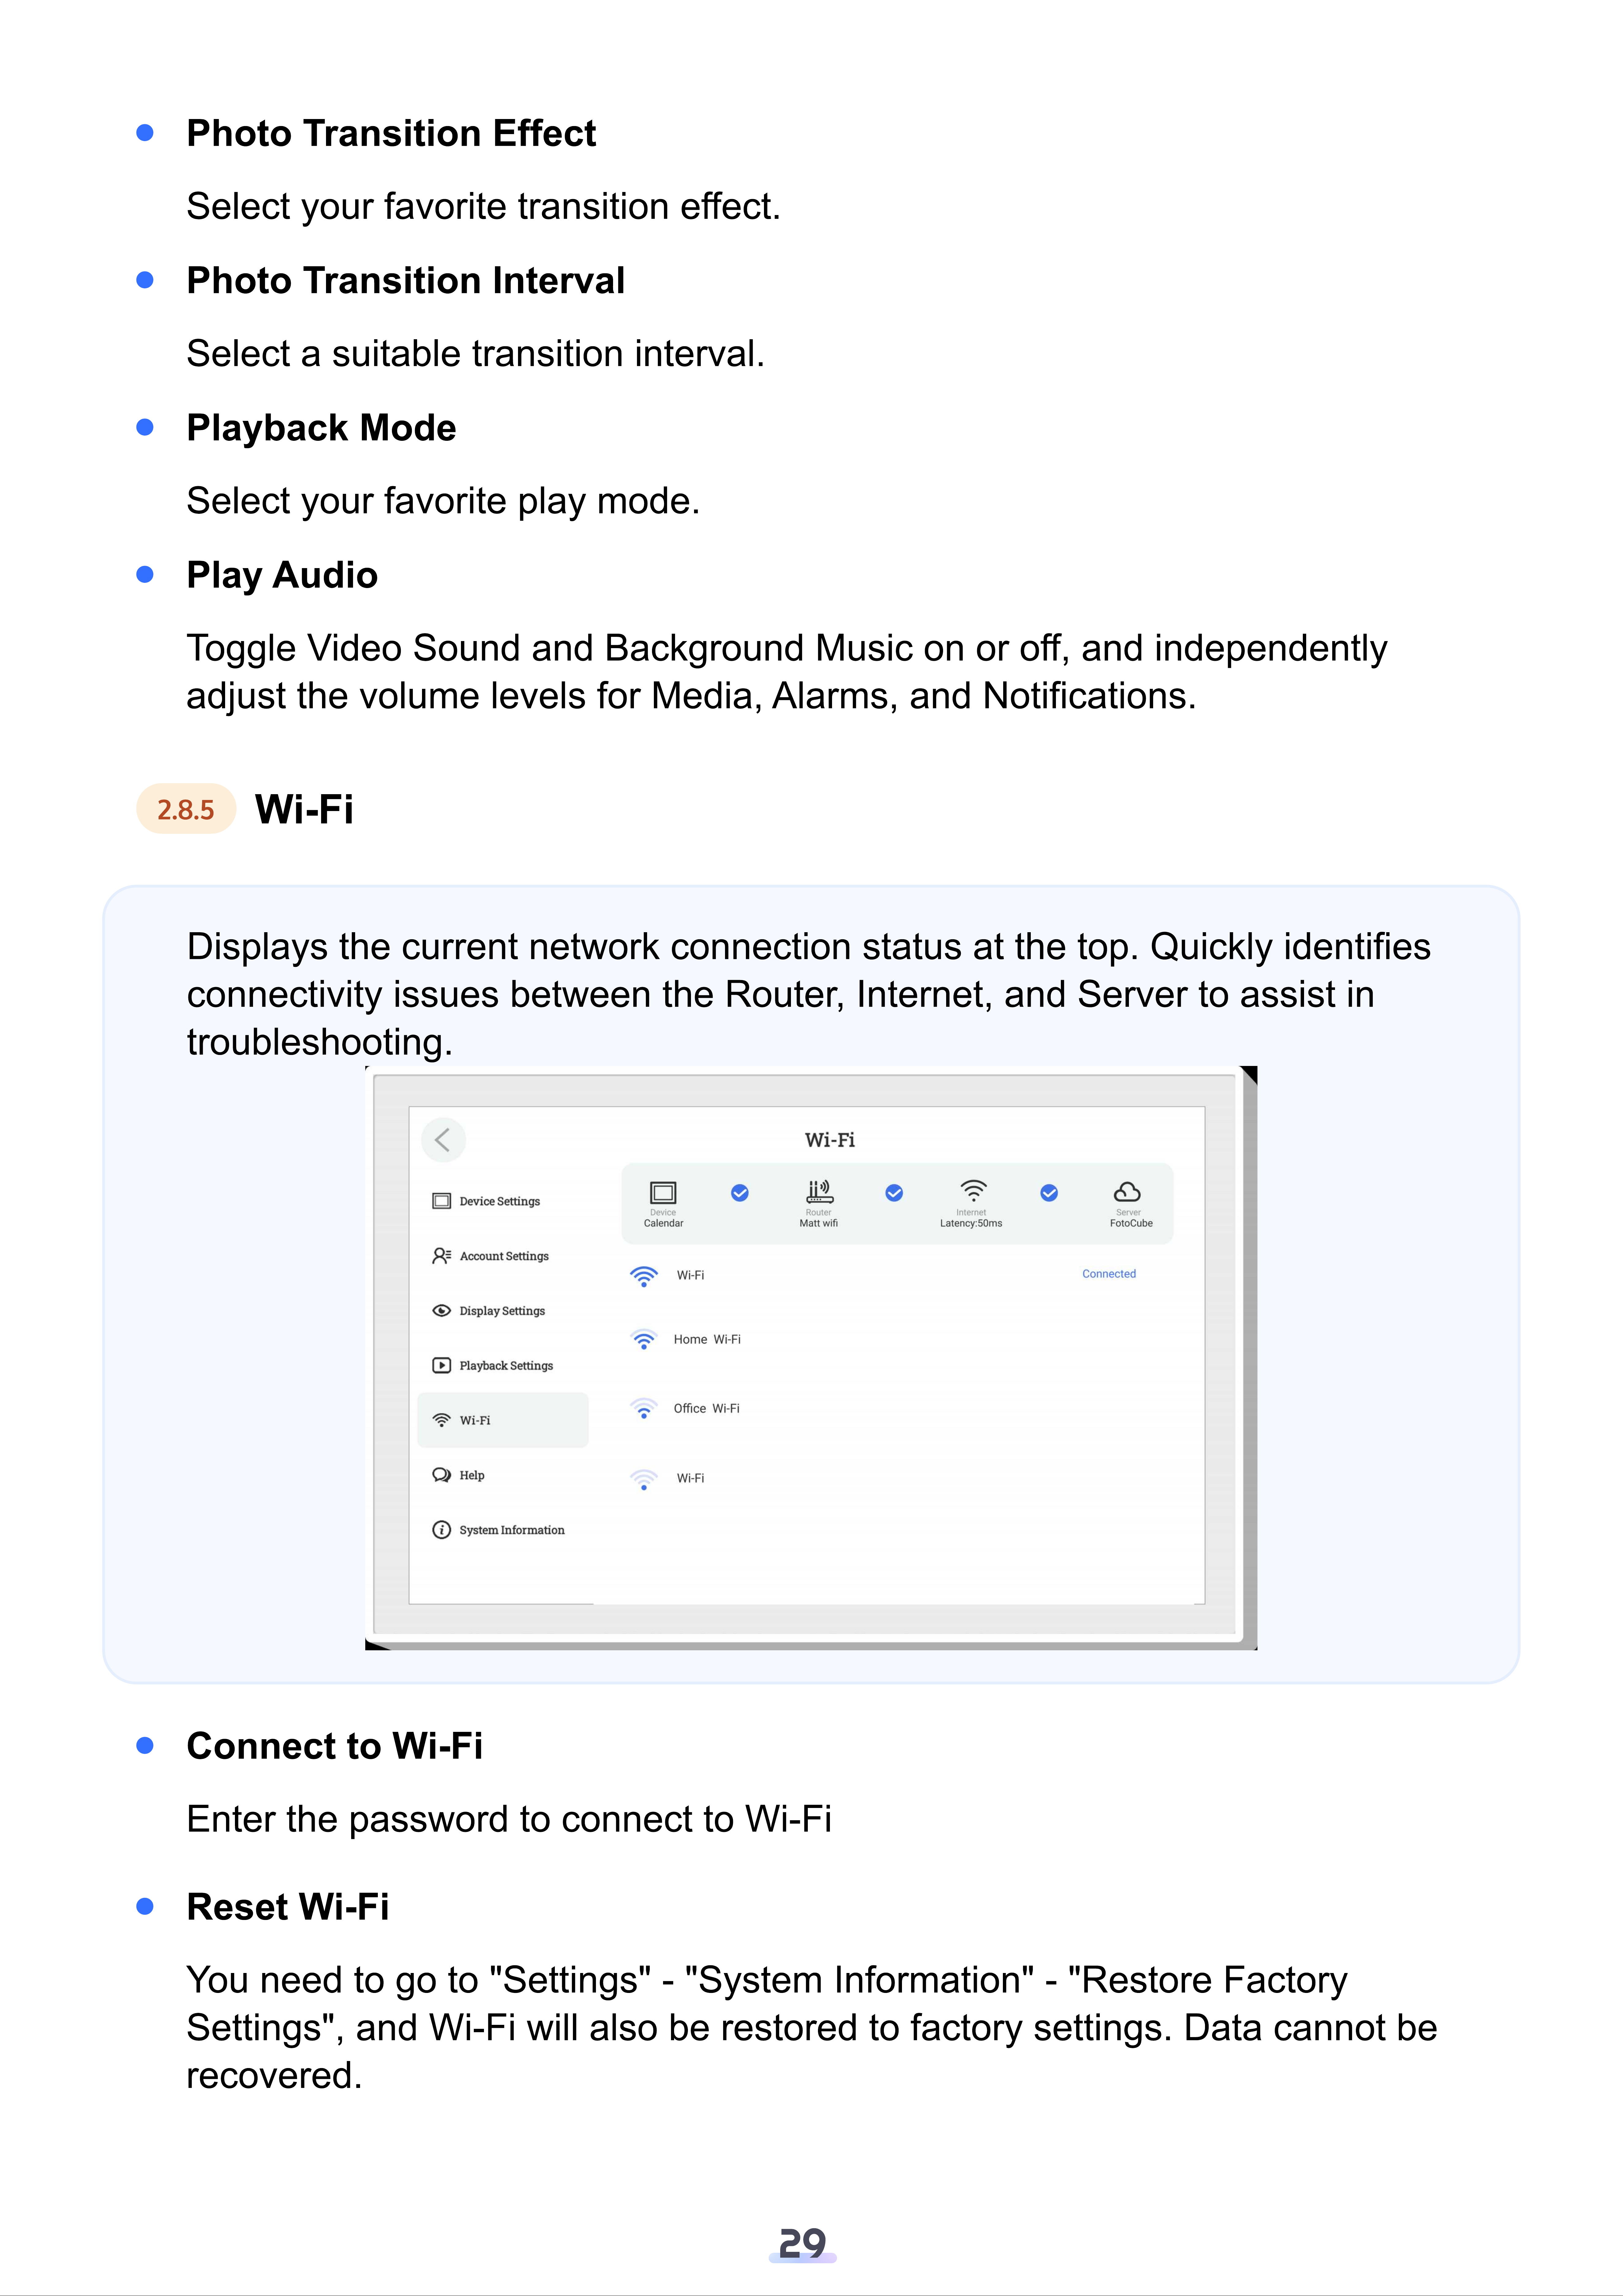
Photo Transition Effect
Select your favorite transition effect.
Photo Transition Interval
Select a suitable transition interval.
Playback Mode
Select your favorite play mode.
Play Audio
Toggle Video Sound and Background Music on or off, and independently
adjust the volume levels for Media, Alarms, and Notifications.
2.8.5
Wi-Fi
Displays the current network connection status at the top. Quickly identifies
connectivity issues between the Router, Internet, and Server to assist in
troubleshooting.
Connect to Wi-Fi
Enter the password to connect to Wi-Fi
Reset Wi-Fi
You need to go to "Settings" - "System Information" - "Restore Factory
Settings", and Wi-Fi will also be restored to factory settings. Data cannot be
recovered.
29
2.8.6
Help
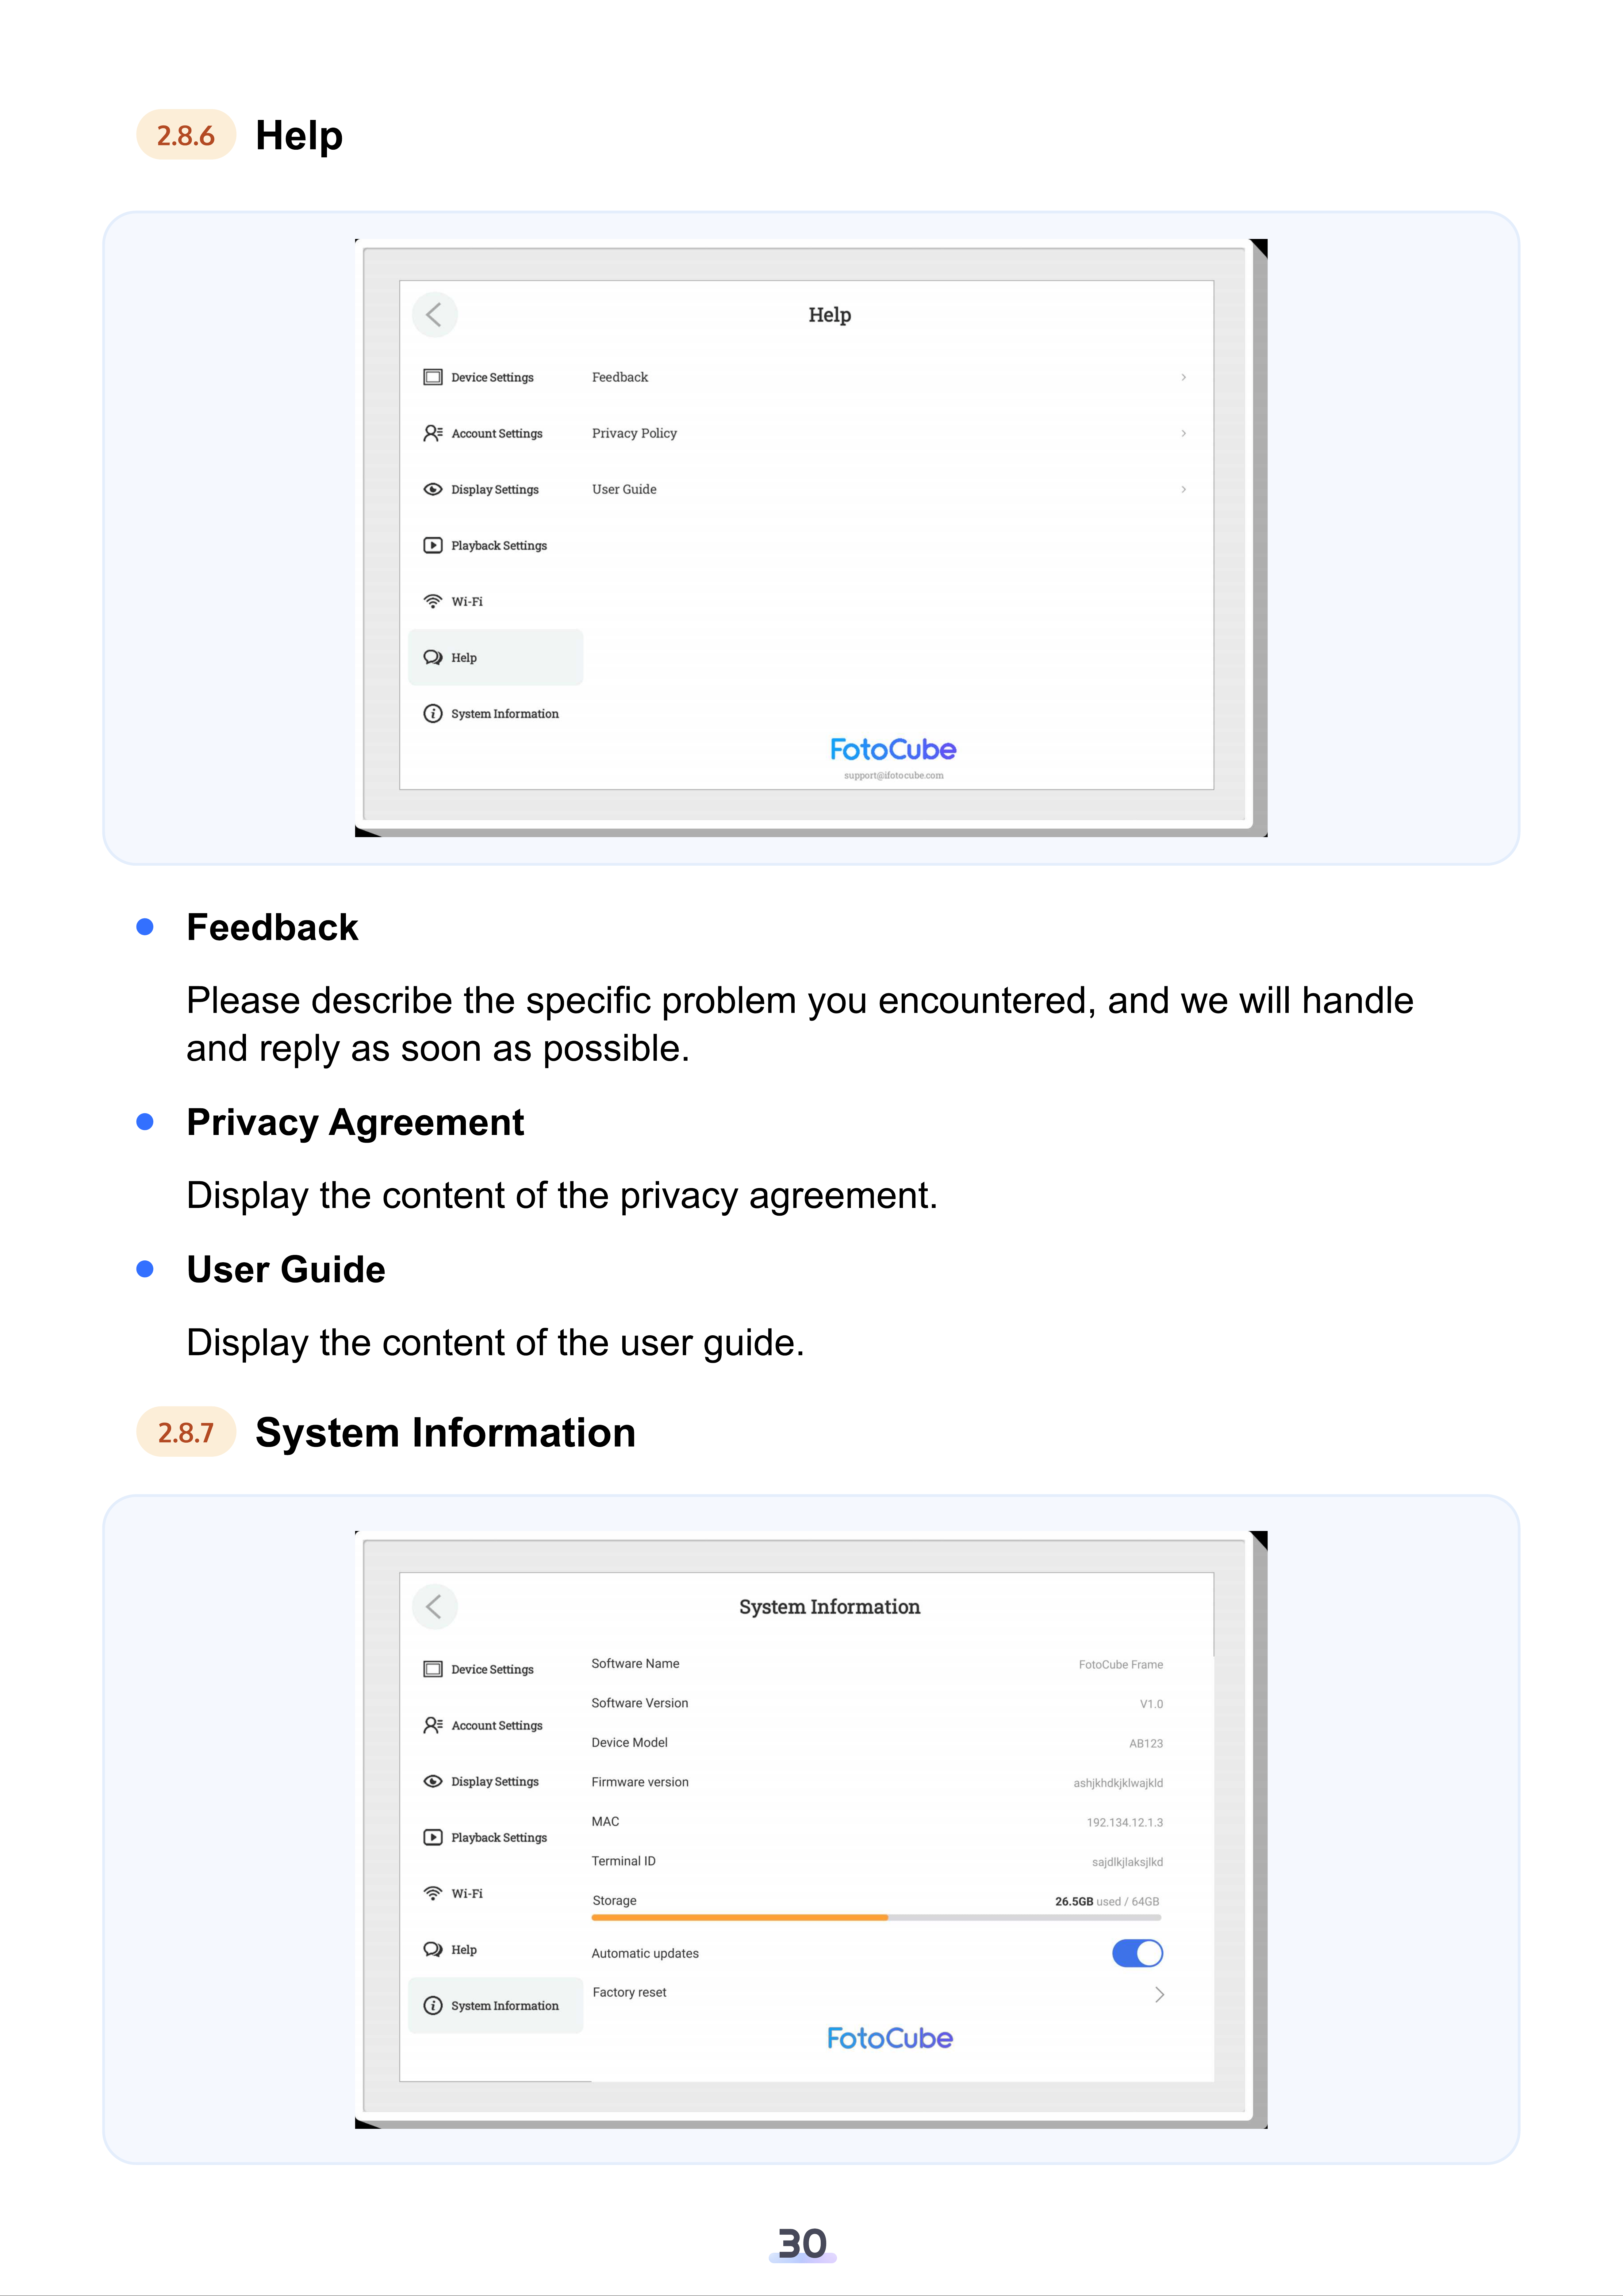
Feedback
Please describe the specific problem you encountered, and we will handle
and reply as soon as possible.
Privacy Agreement
Display the content of the privacy agreement.
User Guide
Display the content of the user guide.
2.8.7
System Information
30
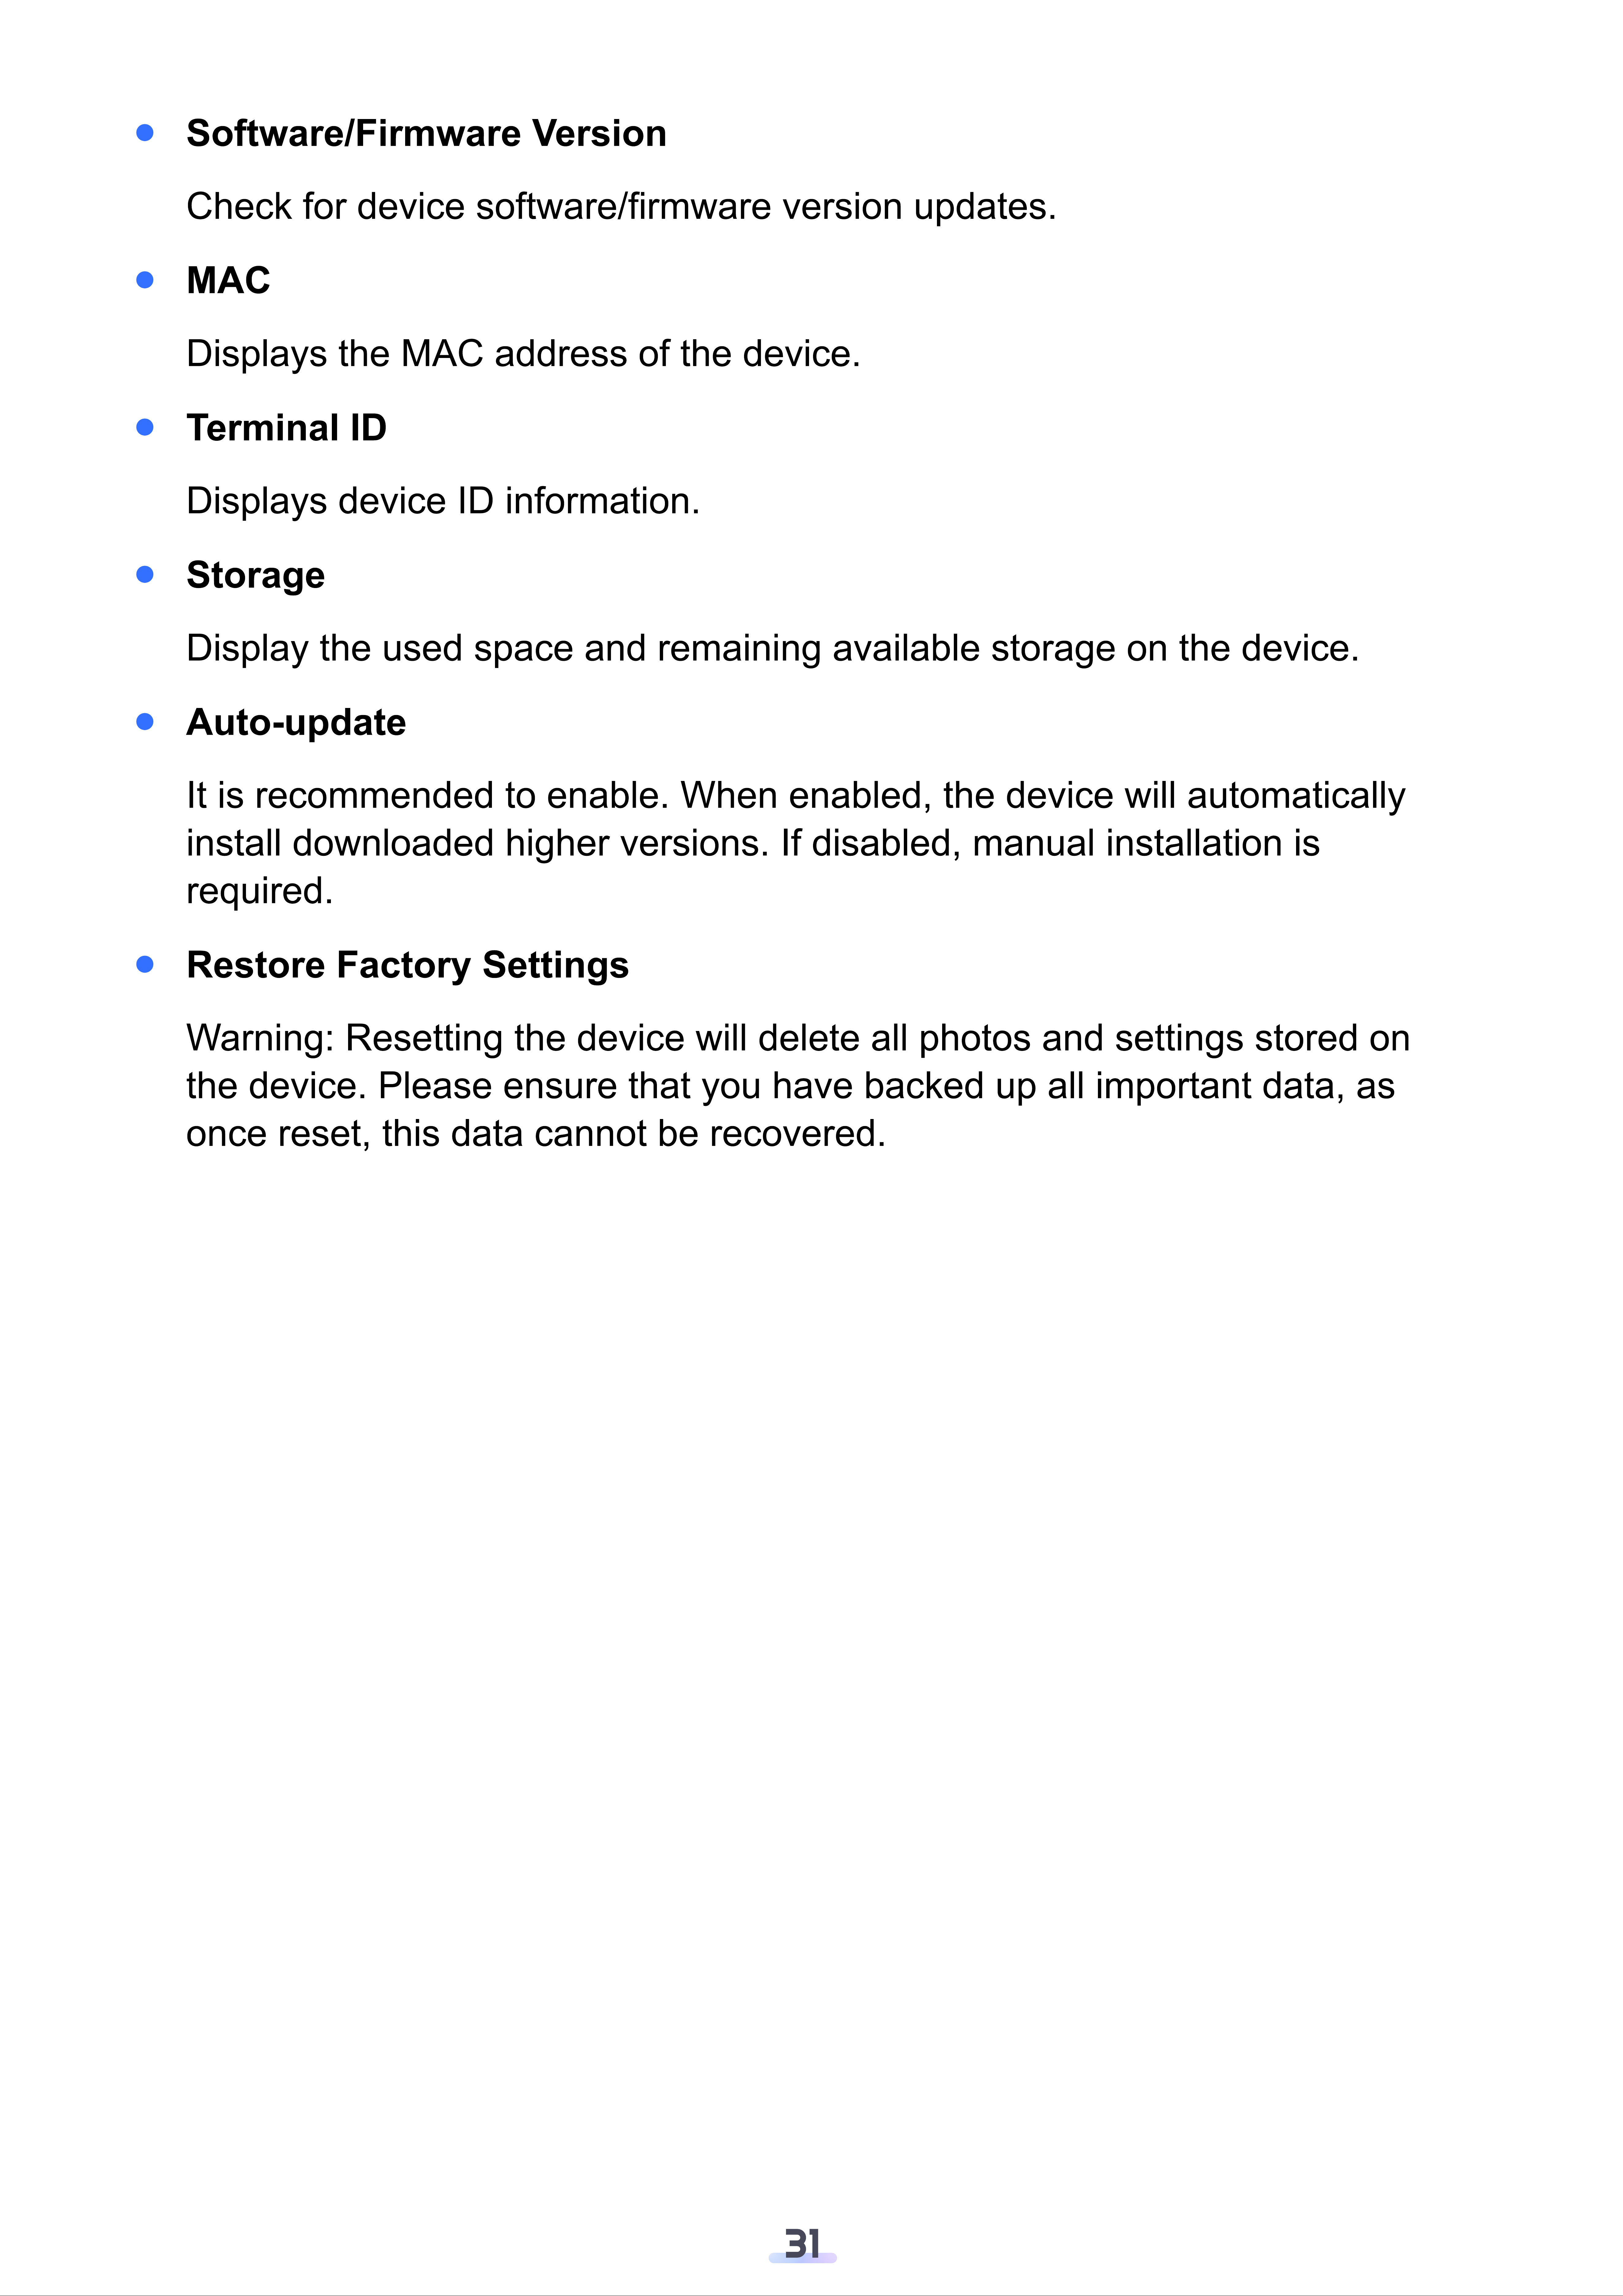
Software/Firmware Version
Check for device software/firmware version updates.
MAC
Displays the MAC address of the device.
Terminal ID
Displays device ID information.
Storage
Display the used space and remaining available storage on the device.
Auto-update
It is recommended to enable. When enabled, the device will automatically
install downloaded higher versions. If disabled, manual installation is
required.
Restore Factory Settings
Warning: Resetting the device will delete all photos and settings stored on
the device. Please ensure that you have backed up all important data, as
once reset, this data cannot be recovered.
31
3
FotoCube APP
3.1
Quick Setup
As an important management and connection device, the APP needs to
be registered via email, and can be used only after login.
3.2
Register an Account
Register an APP account using an email address.
Tips: Please enter a valid registered email address to prevent the code from
failing to be sent. If you cannot find the code, please look for spam email or
contact customer service.
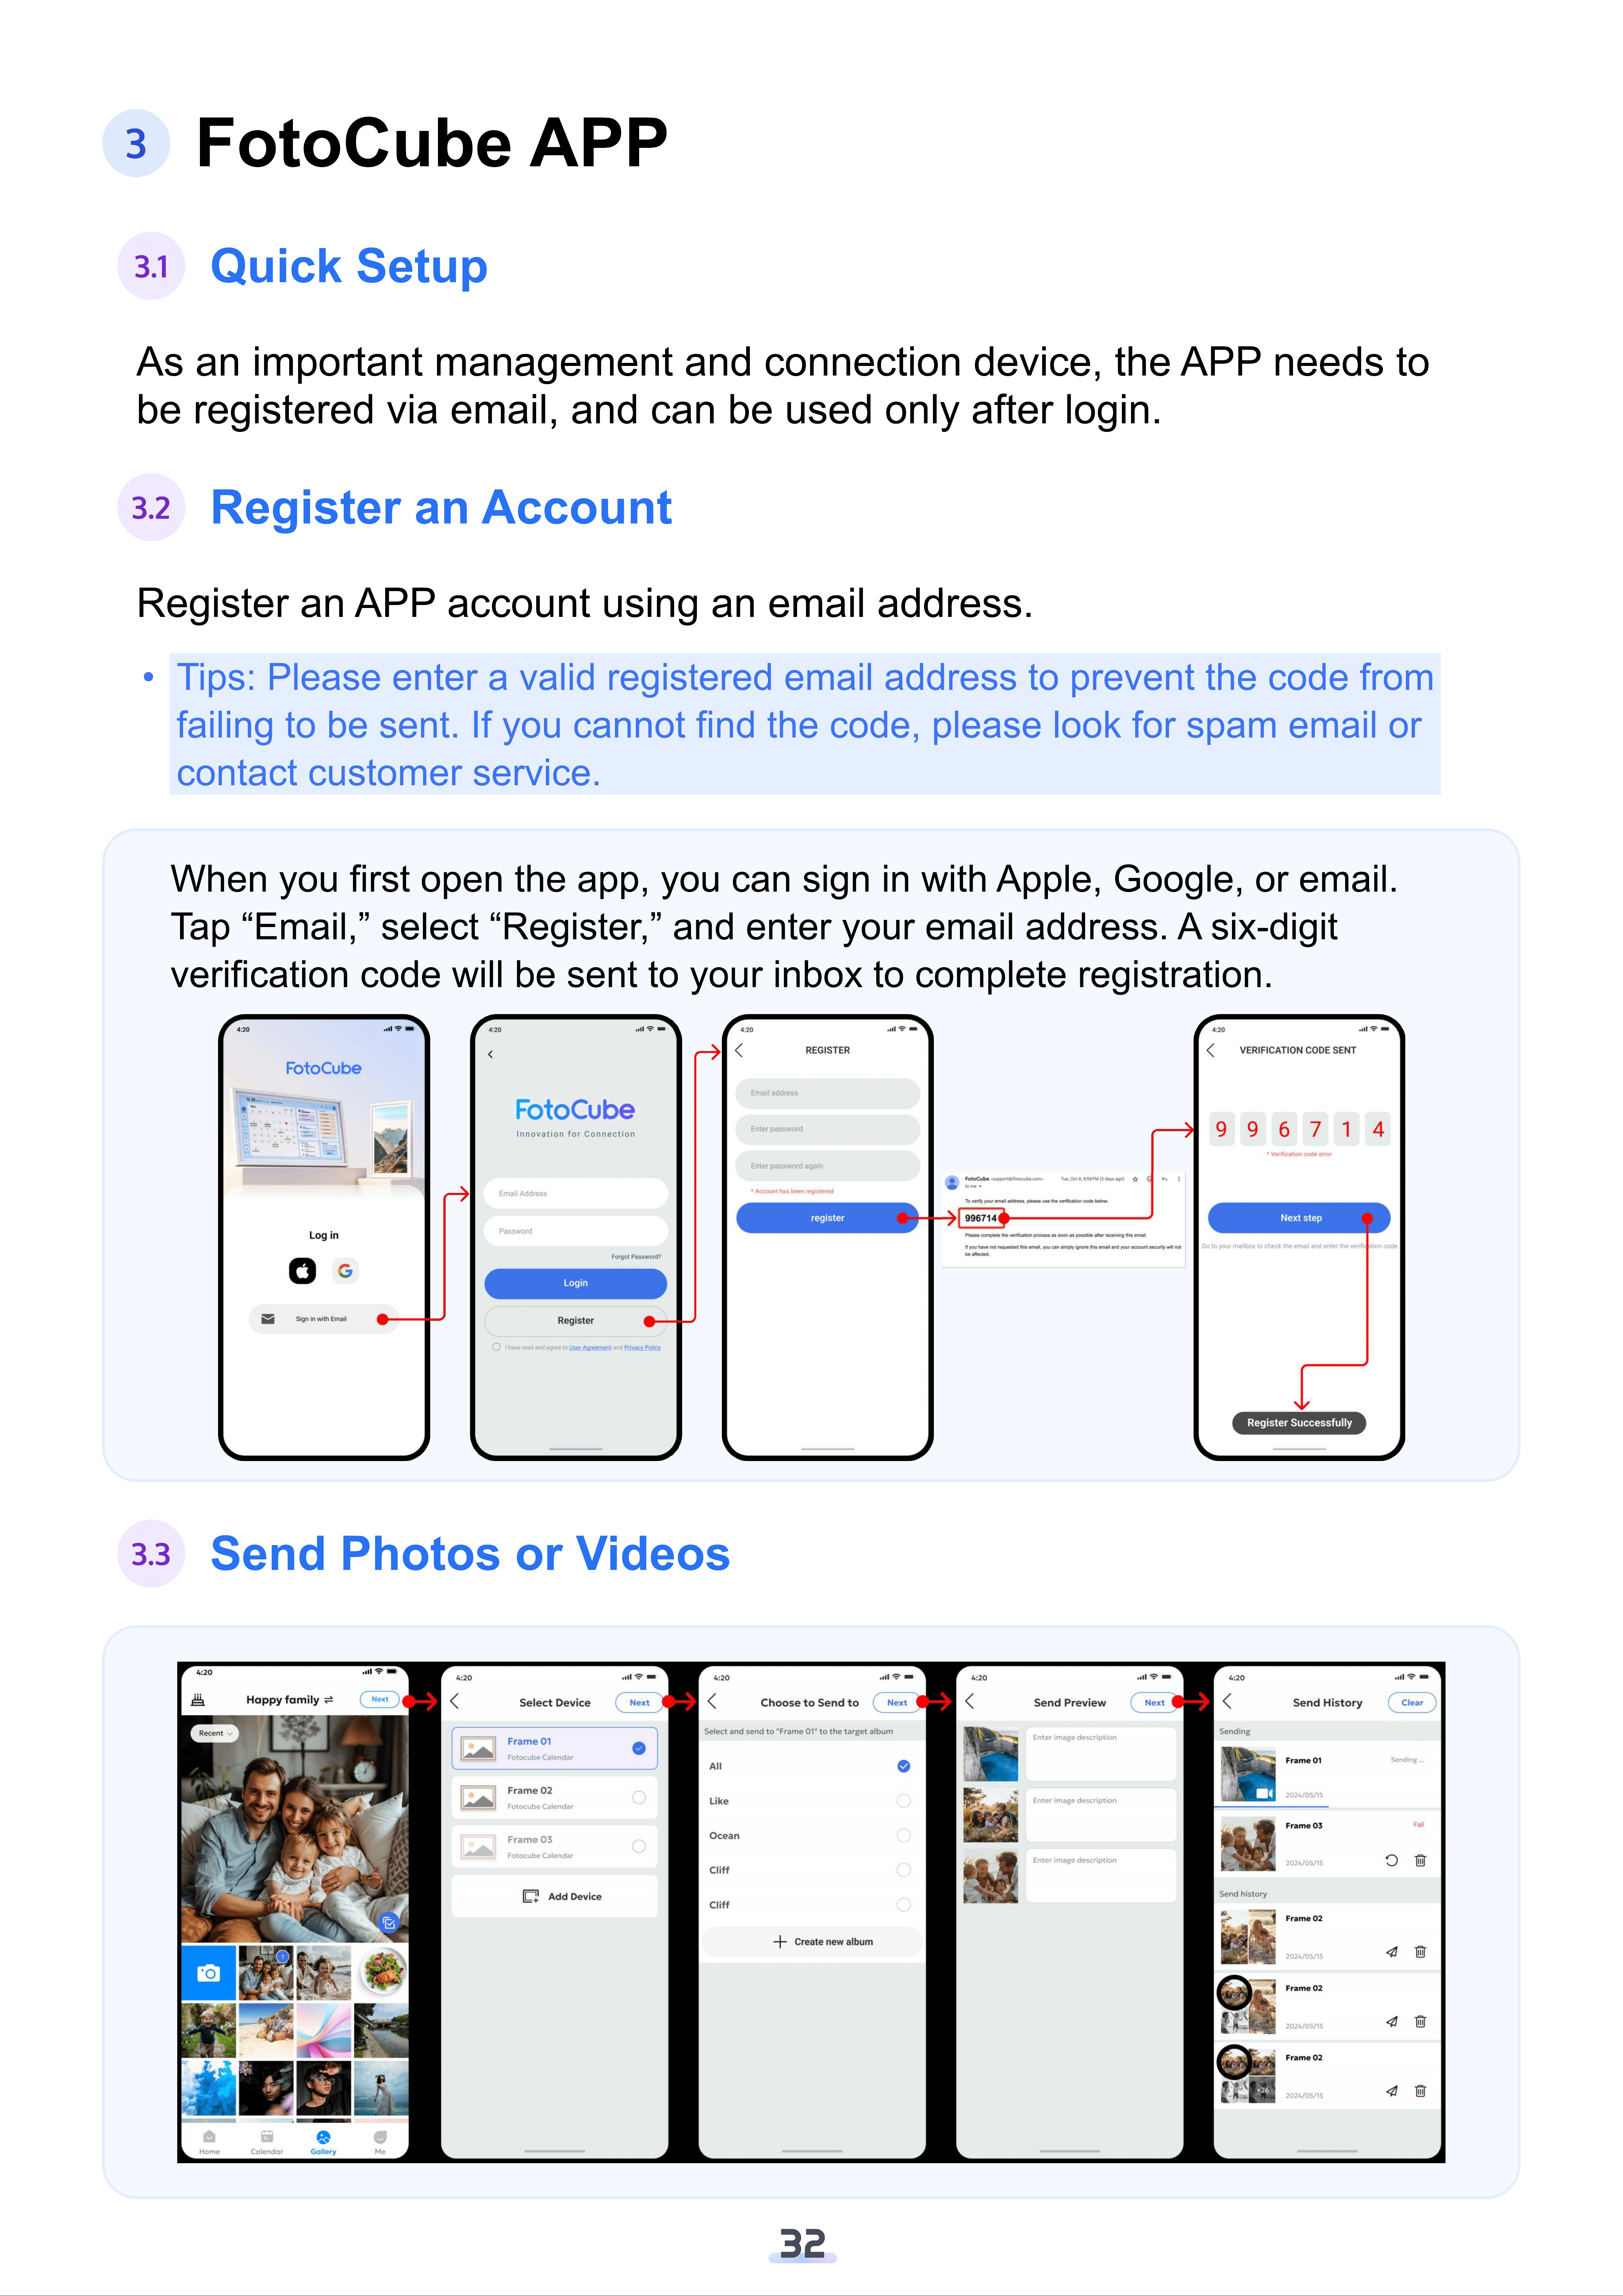
When you first open the app, you can sign in with Apple, Google, or email.
Tap “Email,” select “Register,” and enter your email address. A six-digit
verification code will be sent to your inbox to complete registration.
3.3
Send Photos or Videos
32
Send Photos
(1) Select one or more photos; (2) Select a device; (3) Select the album to send;
(4) Describe the photo; (5) Click "Send".
Note: If you have selected "Keep current selection" and need to add more
photos from your phone's album, you must restart the FotoCube application.
Otherwise, only the option to take a new photo will be available.
Send Videos
(1) Select a video; (2) Select a device; (3) Select the album to send; (4)
Describe the video; (5) Click "Send".
Note: If you have chosen "Keep current selection" and need to add more
videos, you must restart the FotoCube application to start over.
Create a New Album
You can create a new album and send photo or video content to the
specified album. On the smart display, you can let the screen play the
photos and videos of the specified album.
Sending History
You can view the status of the photo sending task and perform re-sending
and deleting record operations in the sending history list.
3.4
M
anage the
F
amily Calendar
3.4.1
Sele
c
t the Smart
D
is
p
lay to
M
anage
The top left corner of the calendar page of the mobile application shows the
currently managed device. If the device is not bound, please bind the device
first before performing calendar management operations. For details, refer to
the 【2.2 How to Pair The Smart Display with The FotoCube APP】chapter.
3.4.2
Create New Calendar
I
tems
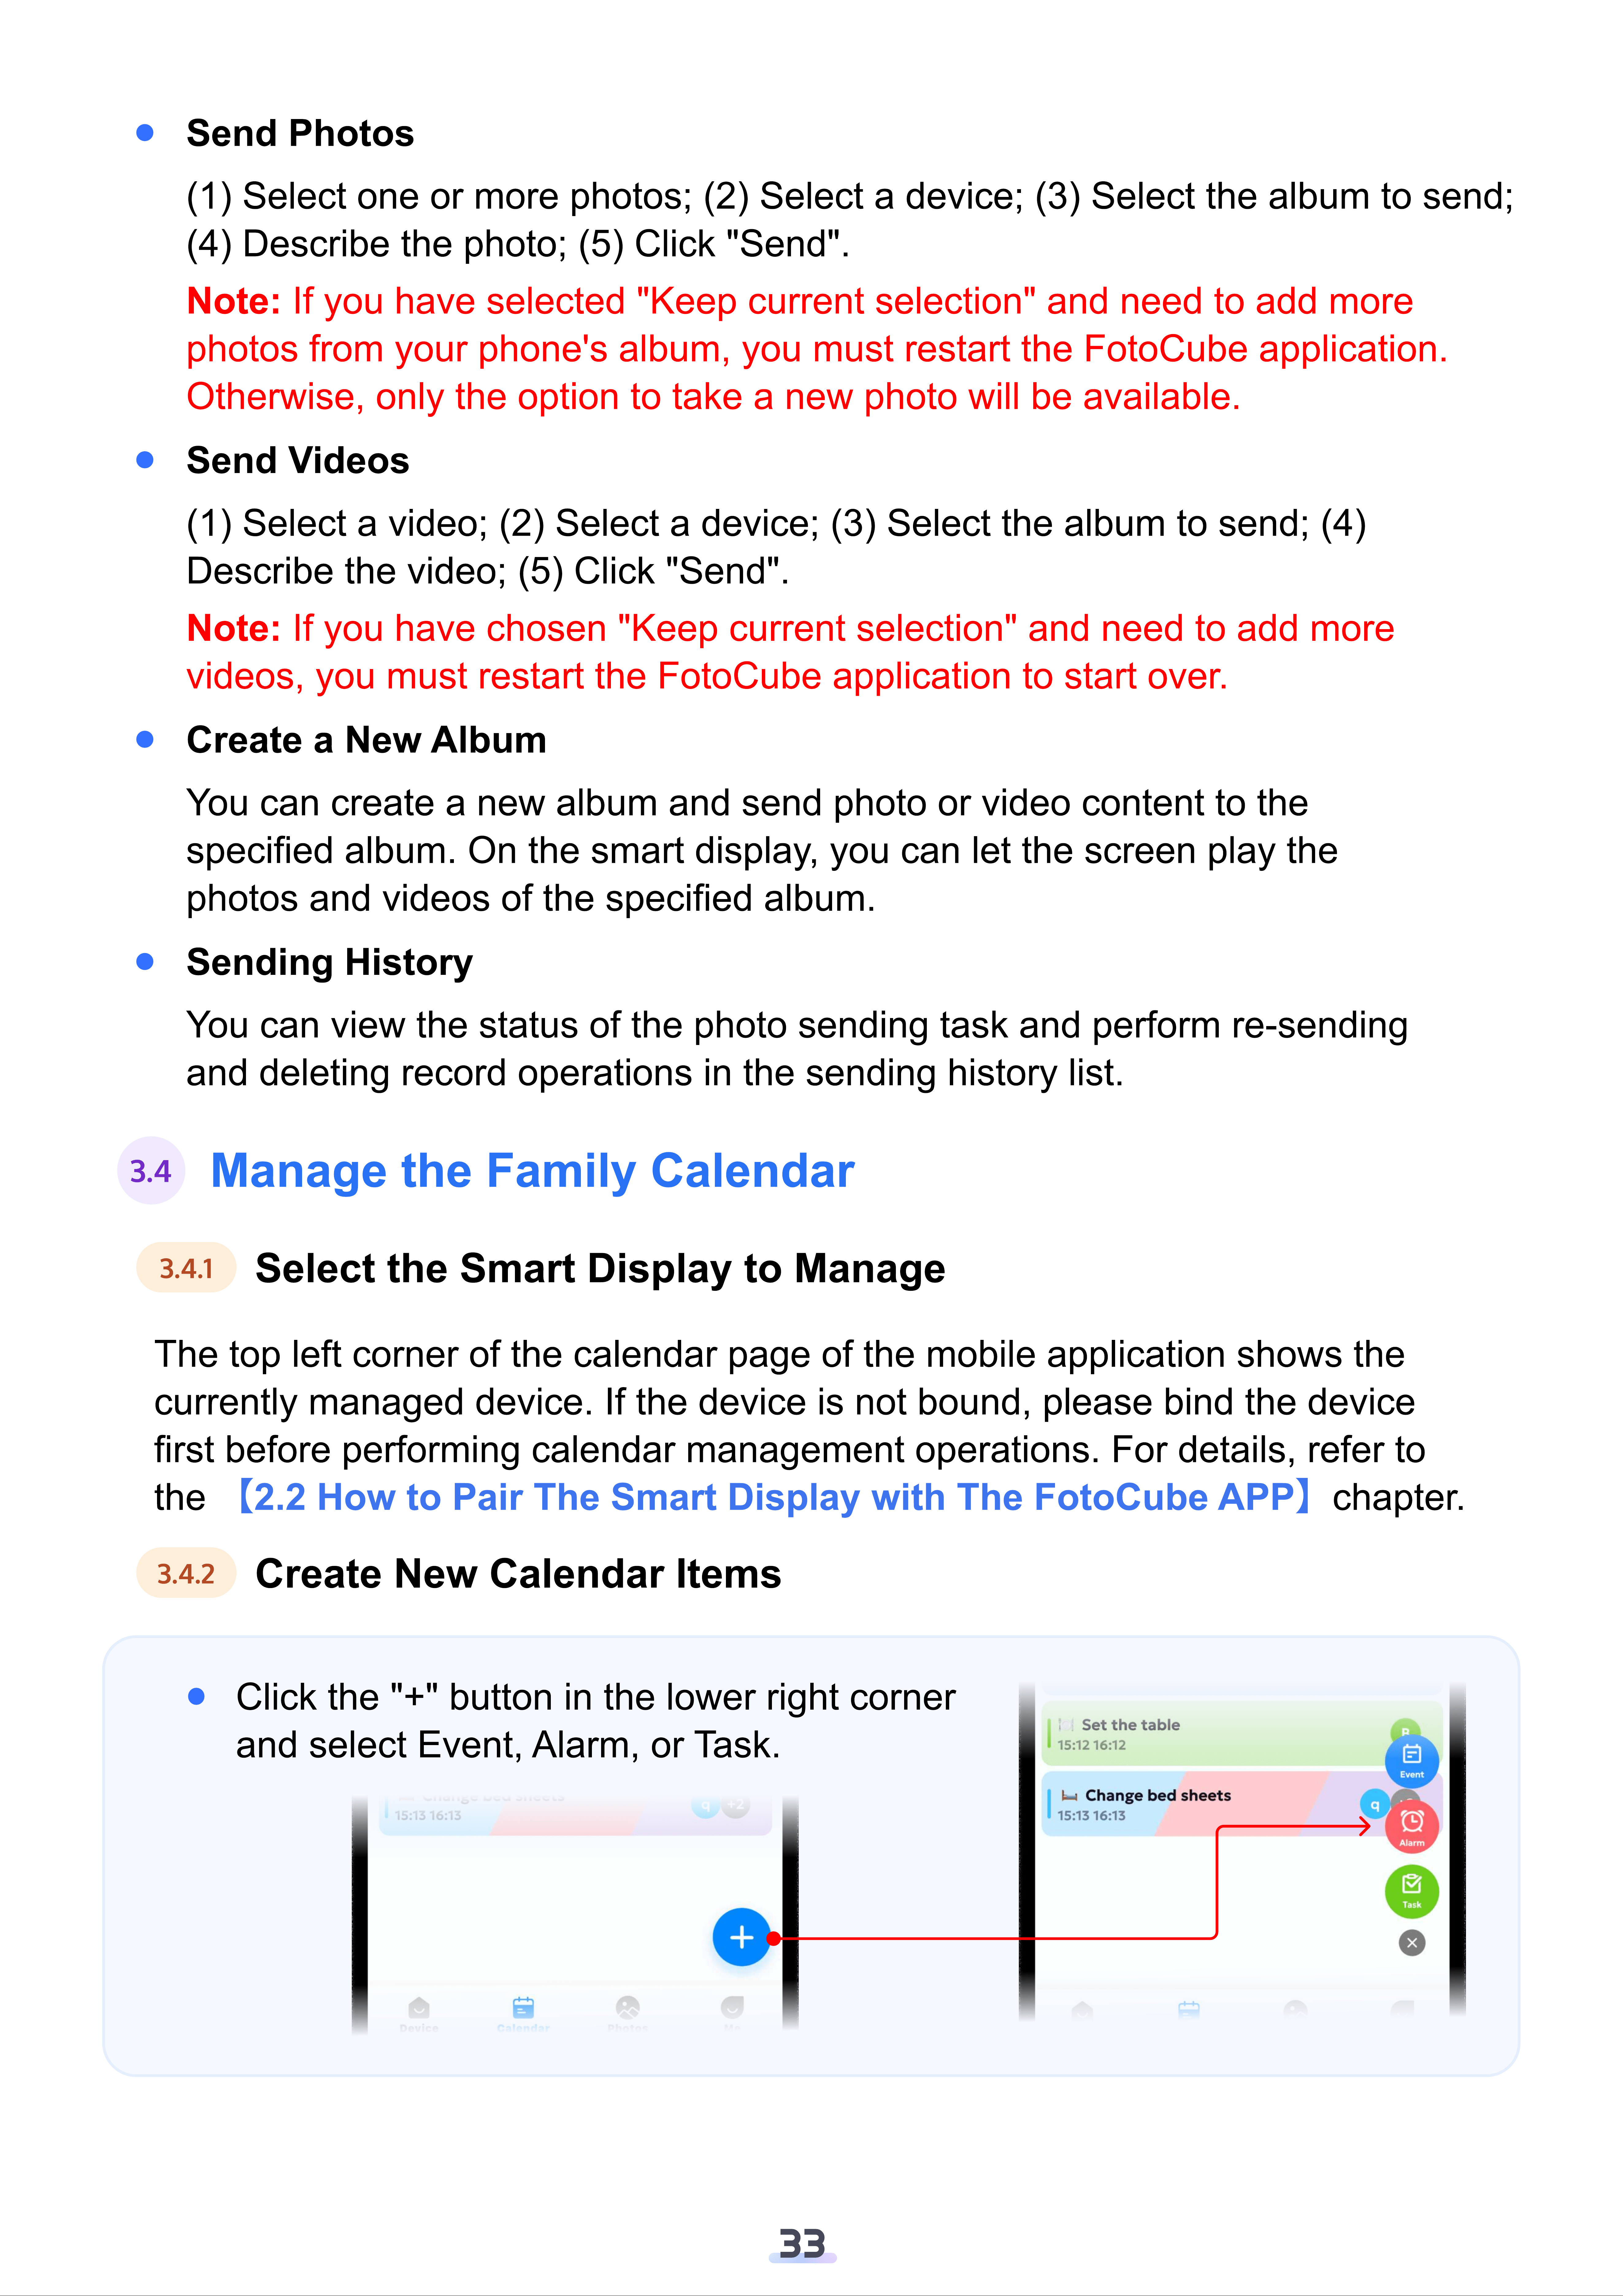
Click the "
+
" button in the lower right corner
and select
E
vent,
A
larm, or Task.
33
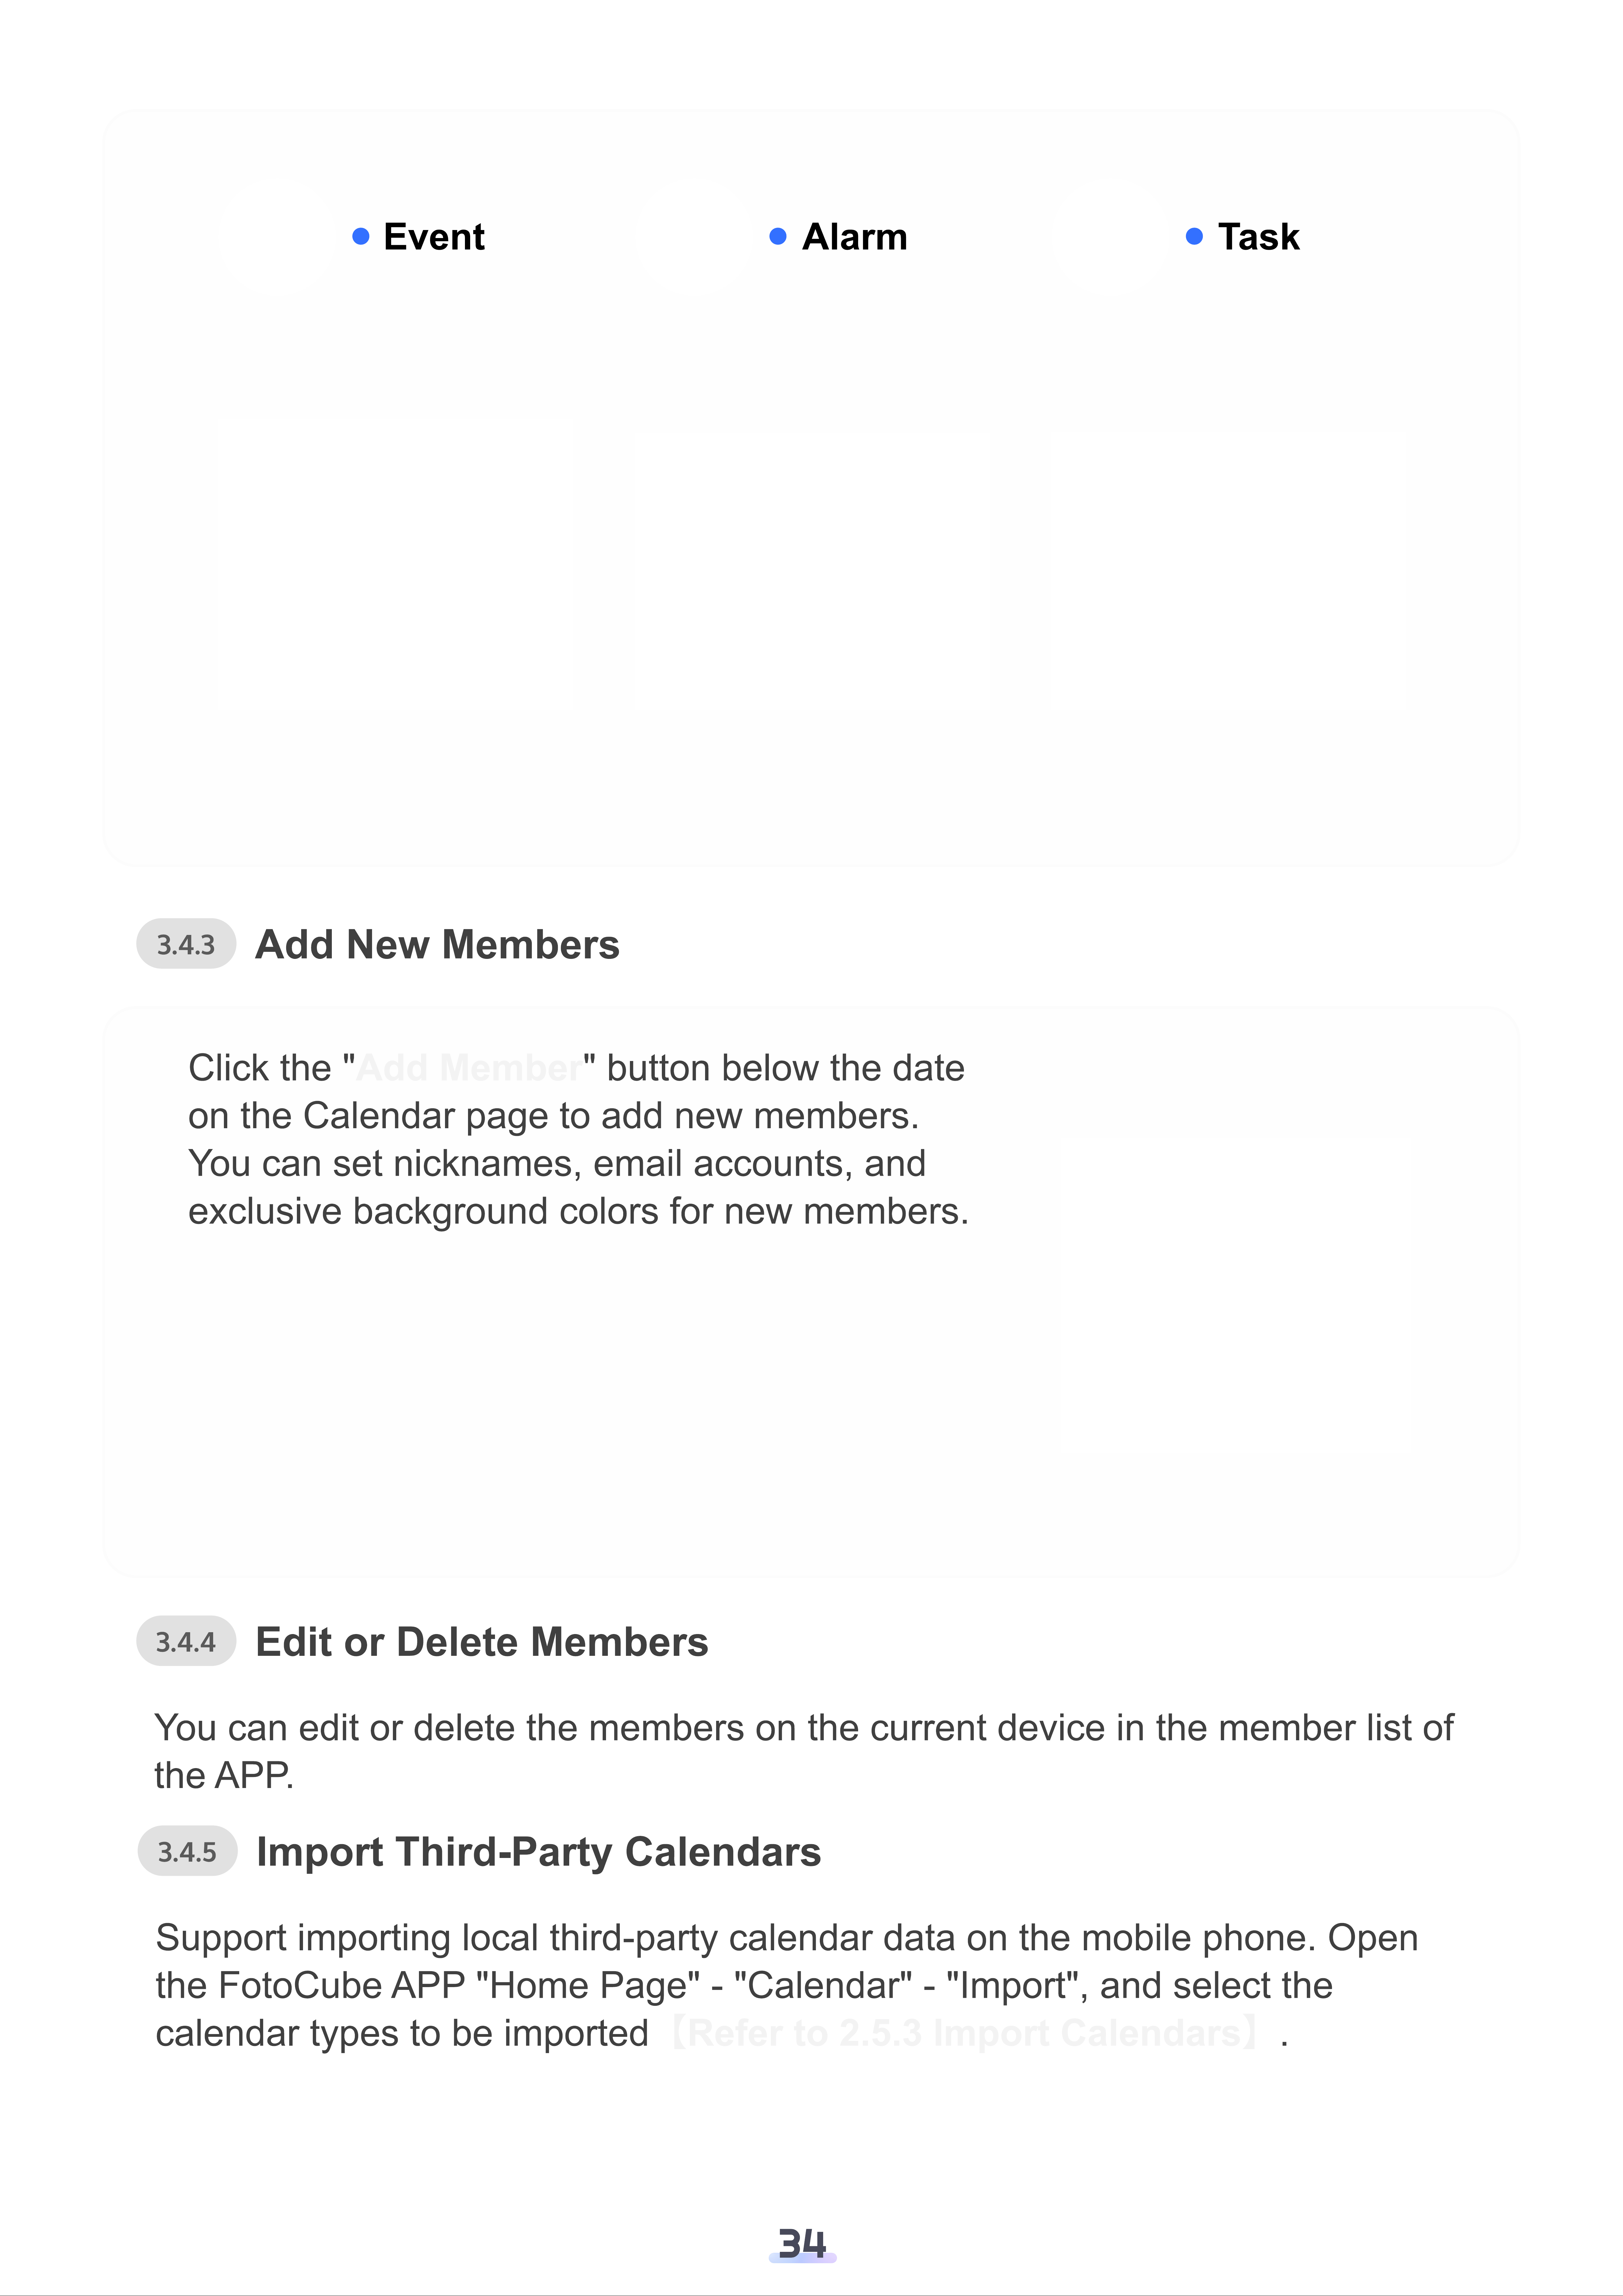
Event Alarm Task
3.4.3
Add New Members
Click the "Add Member" button below the date
on the Calendar page to add new members.
You can set nicknames, email accounts, and
exclusive background colors for new members.
3.4.4
Edit or Delete Members
You can edit or delete the members on the current device in the member list of
the APP.
3.4.5
Import Third-Party Calendars
Support importing local third-party calendar data on the mobile phone. Open
the FotoCube APP "Home Page" - "Calendar" - "Import", and select the
calendar types to be imported【Refer to 2.5.3 Import Calendars】.
34
3.4.6
Meal Plan
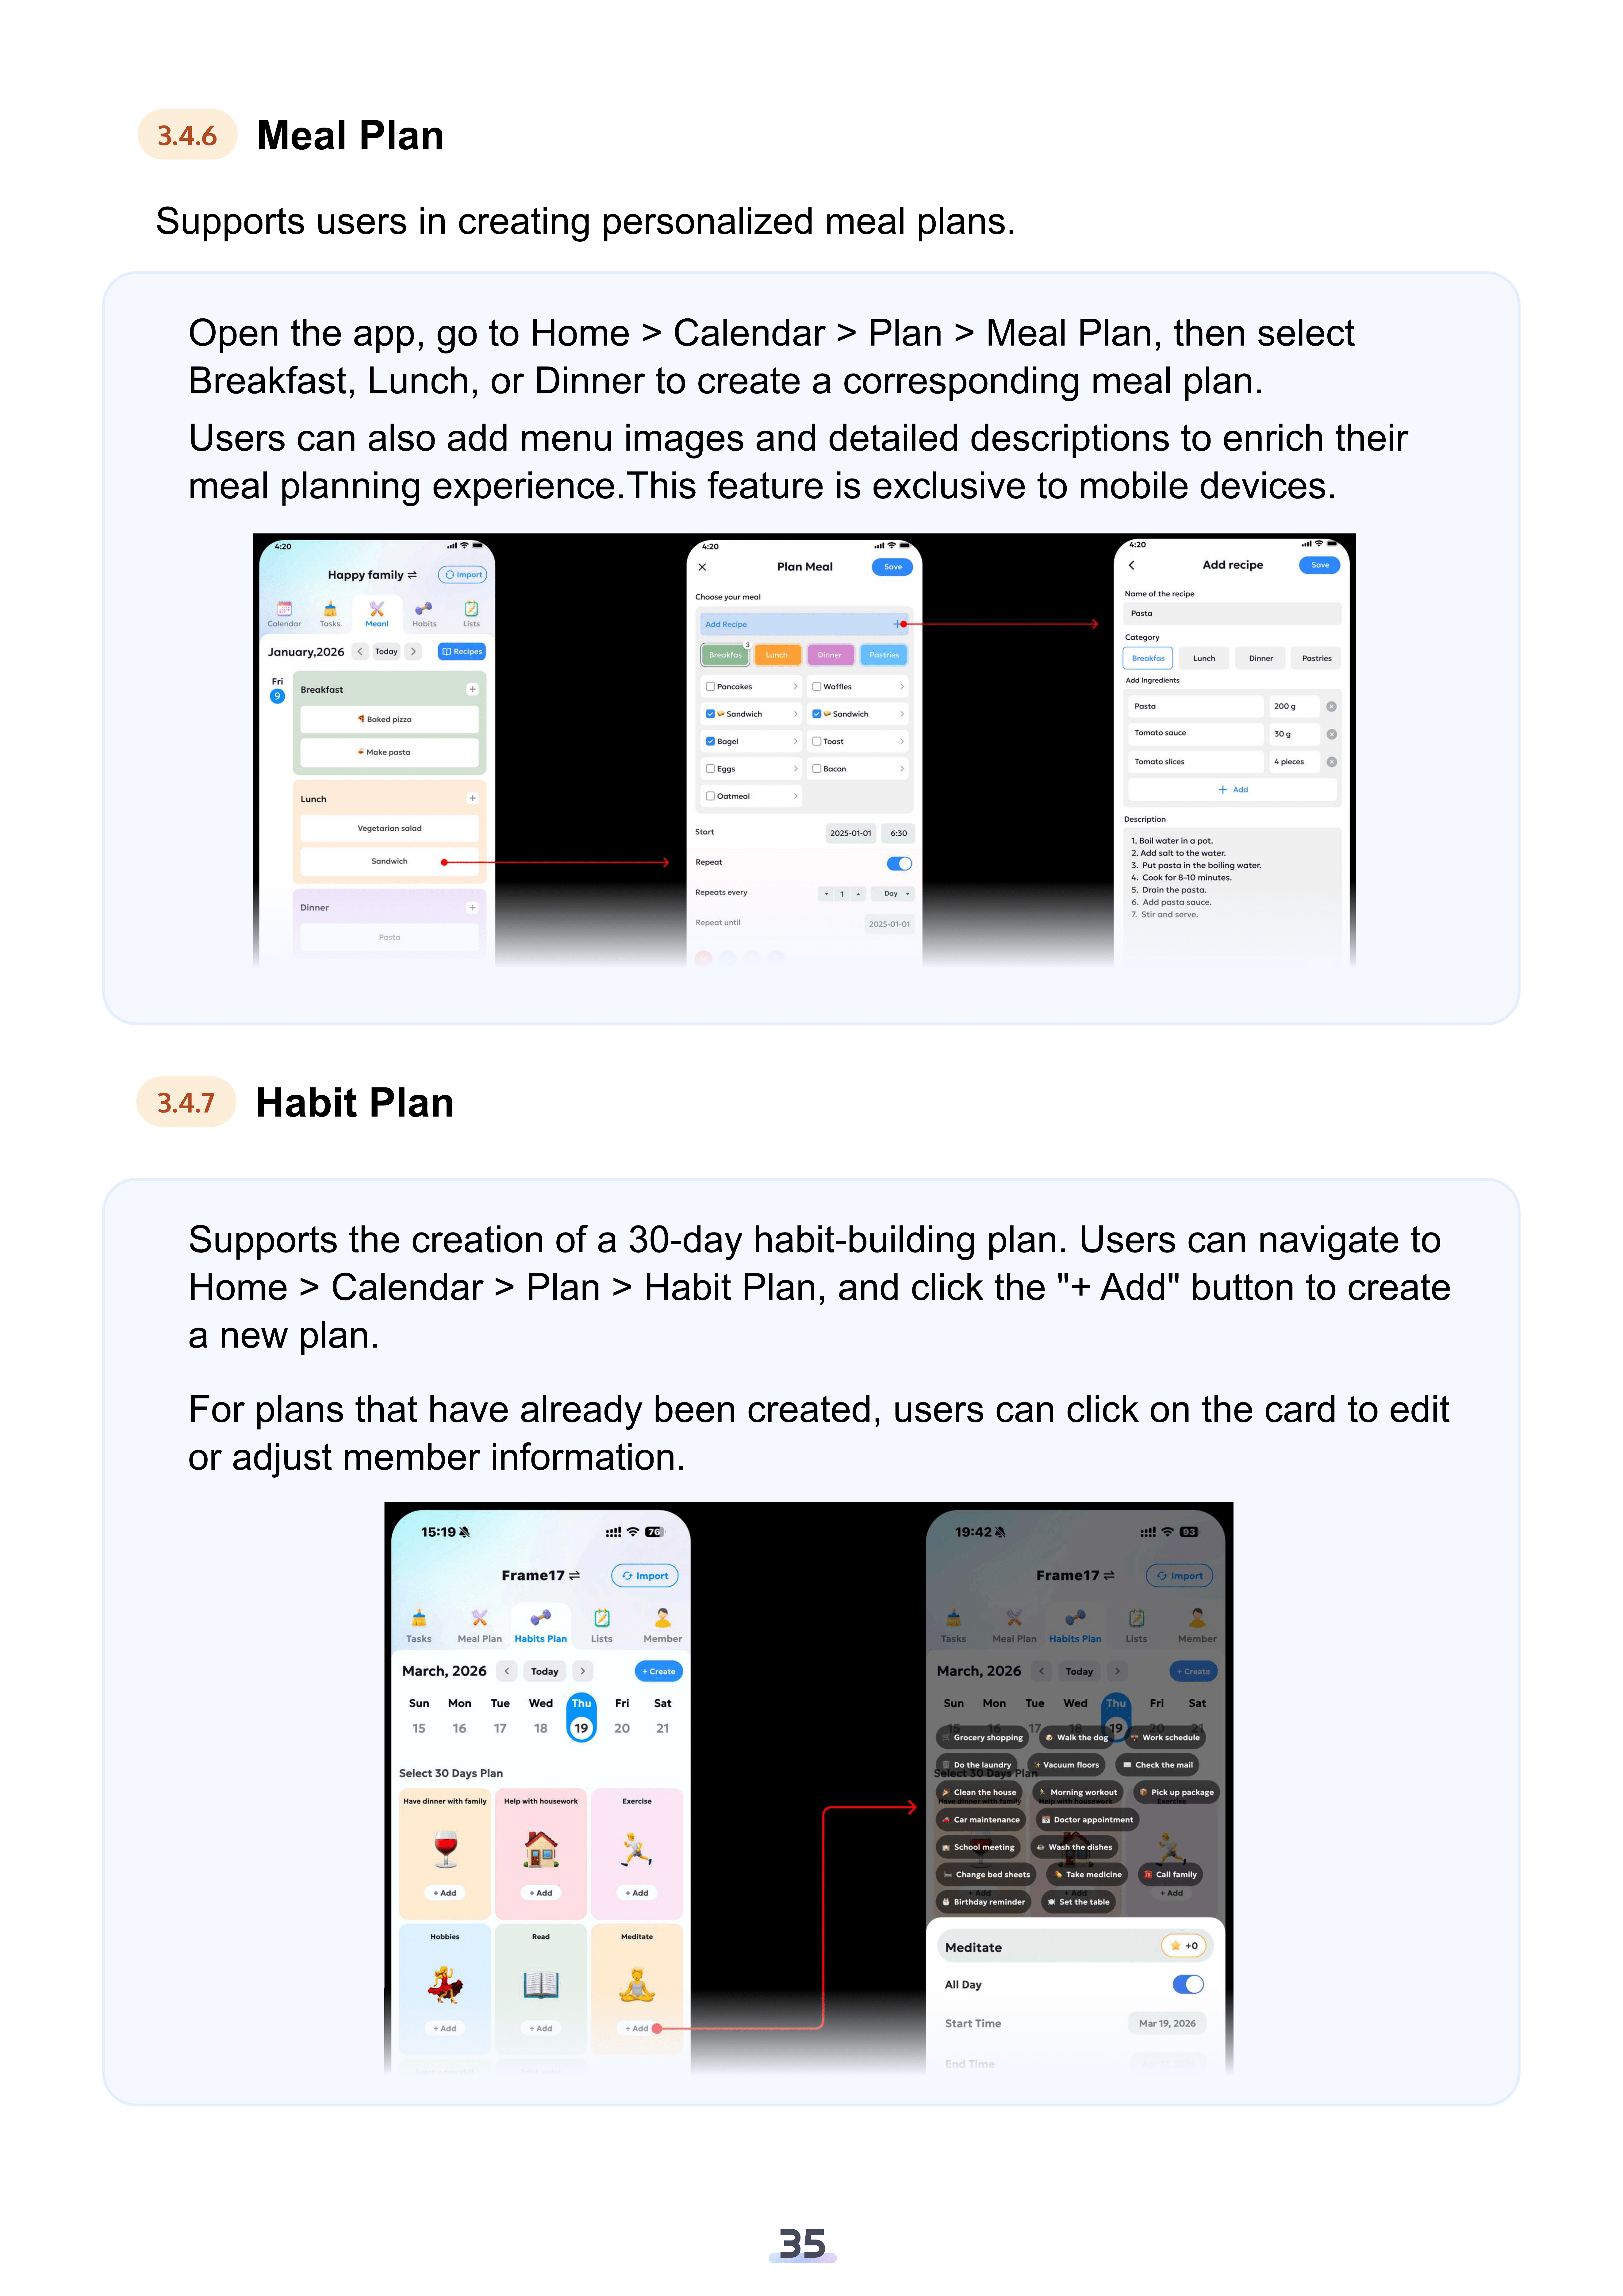
Supports users in creating personalized meal plans.
Open the app, go to Home > Calendar > Plan > Meal Plan, then select
Breakfast, Lunch, or Dinner to create a corresponding meal plan.
Users can also add menu images and detailed descriptions to enrich their
meal planning experience.This feature is exclusive to mobile devices.
3.4.7
Habit Plan
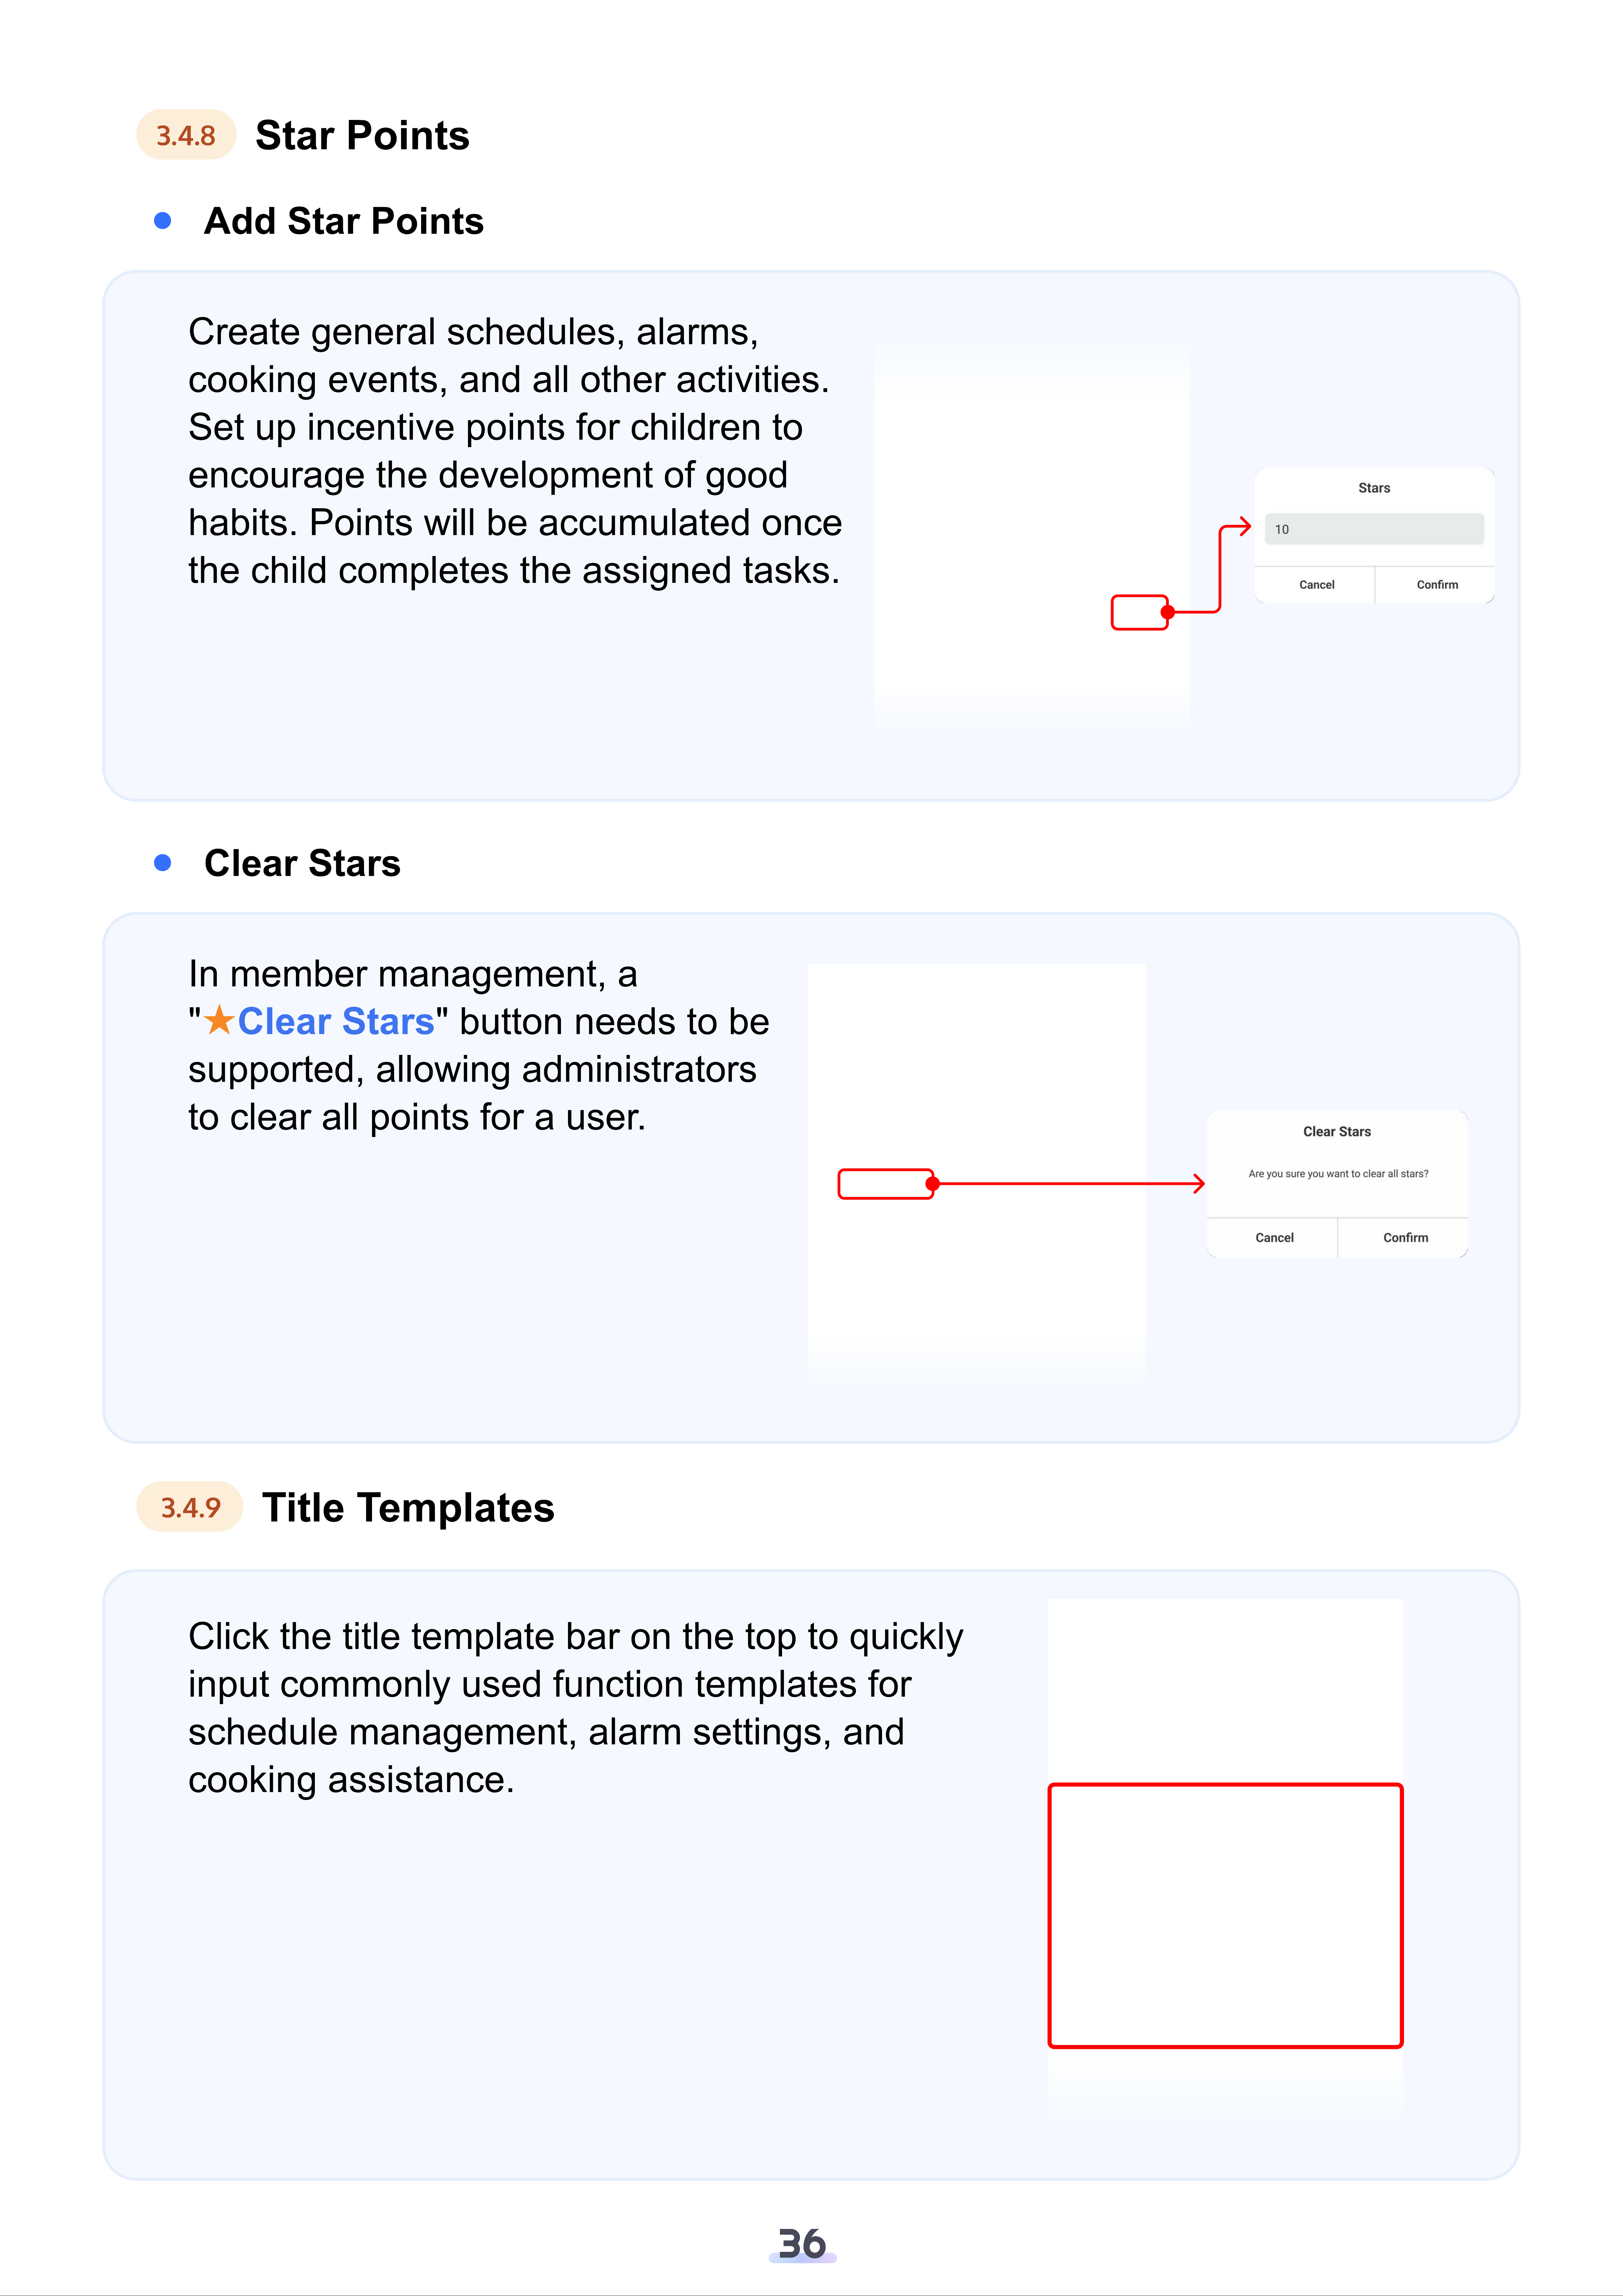
Supports the creation of a 30-day habit-building plan. Users can navigate to
Home > Calendar > Plan > Habit Plan, and click the "+ Add" button to create
a new plan.
For plans that have already been created, users can click on the card to edit
or adjust member information.
35
3.4.8
Star Points
Add Star Points
Create general schedules, alarms,
cooking events, and all other activities.
Set up incentive points for children to
encourage the development of good
habits. Points will be accumulated once
the child completes the assigned tasks.
Clear Stars
In member management, a
"★Clear Stars" button needs to be
supported, allowing administrators
to clear all points for a user.
3.4.9
Title Templates
Click the title template bar on the top to quickly
input commonly used function templates for
schedule management, alarm settings, and
cooking assistance.
36
3.5
Send Blessings
Blessings can be sent to the specified device through the FotoCube APP on the
mobile phone 【Refer to 2.7 How to Send Blessings】.
3.6
Manage Devices
Share the device pairing code
Click to pop up the QR code and pairing code of
the device. You can take a screenshot to share or
copy the digital pairing code for sharing.
Remote switch device mode
Select your favorite mode for the specified device,
such as Photo Frame, Family Calendar, or Art
G
allery.
Remote set device
b
ac
k
gro
u
nd m
u
sic
Send audio content to the specified device as the
background music of the device.
Delete the
b
o
u
nd device
Click to unbind the device.
4
L
ang
u
age S
u
pport
The FotoCube Smart Display supports multiple languages, including English,
French, German, Portuguese, Spanish, Italian, Russian, Japanese,
Chinese, Polish, Romanian, Bulgarian, Hungarian, Czech, Dutch, Danish,
Korean, Finnish, and Estonian.
The language options are regularly updated to enhance the user experience
(availability may vary depending on the device’s software version).
5
W
arrant
y,
C
ompliance
,
T
echnical S
u
pport
,
and Sa
f
et
y
I
n
f
ormation
For detailed information on warranty, hardware compliance, technical support,
and safety, please refer to the information in the packaging.
37
ifotocube.com
youtube.com/@FotoCubeFrame
Download on the
This device complies with part 15 of the FCC Rules. Operation is subject to the following two
conditions: (1) This device may not cause harmful interference, and (2) this device must accept
any interference received, including interference that may cause undesired operation.
NOTE: This equipment has been tested and found to comply with the limits for a Class B digital
device, pursuant to Part 15 of the FCC Rules. These limits are designed to provide reasonable
protection against harmful interference in a residential installation. This equipment generates,
uses and can radiate radio frequency energy and, if not installed and used in accordance with
the instructions, may cause harmful interference to radio communications. However, there is no
guarantee that interference will not occur in a particular installation. If this equipment does
cause harmful interference to radio or television reception, which can be determined by turning
the equipment off and on, the user is encouraged to try to correct the interference by one or
more of the following
measures:
-- Reorient or relocate the receiving antenna.
-- Increase the separation between the equipment and receiver.
-- Connect the equipment into an outlet on a circuit different from that to which the receiver is
connected.
-- Consult the dealer or an experienced radio/TV technician for help.
Changes or modifications not expressly approved by the party responsible for compliance
could void the user's authority to operate the equipment.
This equipment complies with the FCC RF radiation exposure limits set forth for an uncontrolled
environment. This equipment should be installed and operated with a minimum distance of 20cm
between the radiator and any part of your body.